Export Control
EAR Export Classification: Not subject to the EAR per 15 C.F.R. Chapter 1, Part 734.3(b)(3), except for the following Service Bulletins which are currently published as EAR Export Classification 9E991: SBE70-0992, SBE72-0483, SBE72-0580, SBE72-0588, SBE72-0640, SBE73-0209, SBE80-0024 and SBE80-0025.Copyright
© IAE International Aero Engines AG (2001, 2014 - 2021) The information contained in this document is the property of © IAE International Aero Engines AG and may not be copied or used for any purpose other than that for which it is supplied without the express written authority of © IAE International Aero Engines AG. (This does not preclude use by engine and aircraft operators for normal instructional, maintenance or overhaul purposes.).Applicability
All
Common Information
TASK 70-21-04-100-501 General
Preliminary Requirements
Pre-Conditions
NONESupport Equipment
NONEConsumables, Materials and Expendables
NONESpares
NONESafety Requirements
NONEProcedure
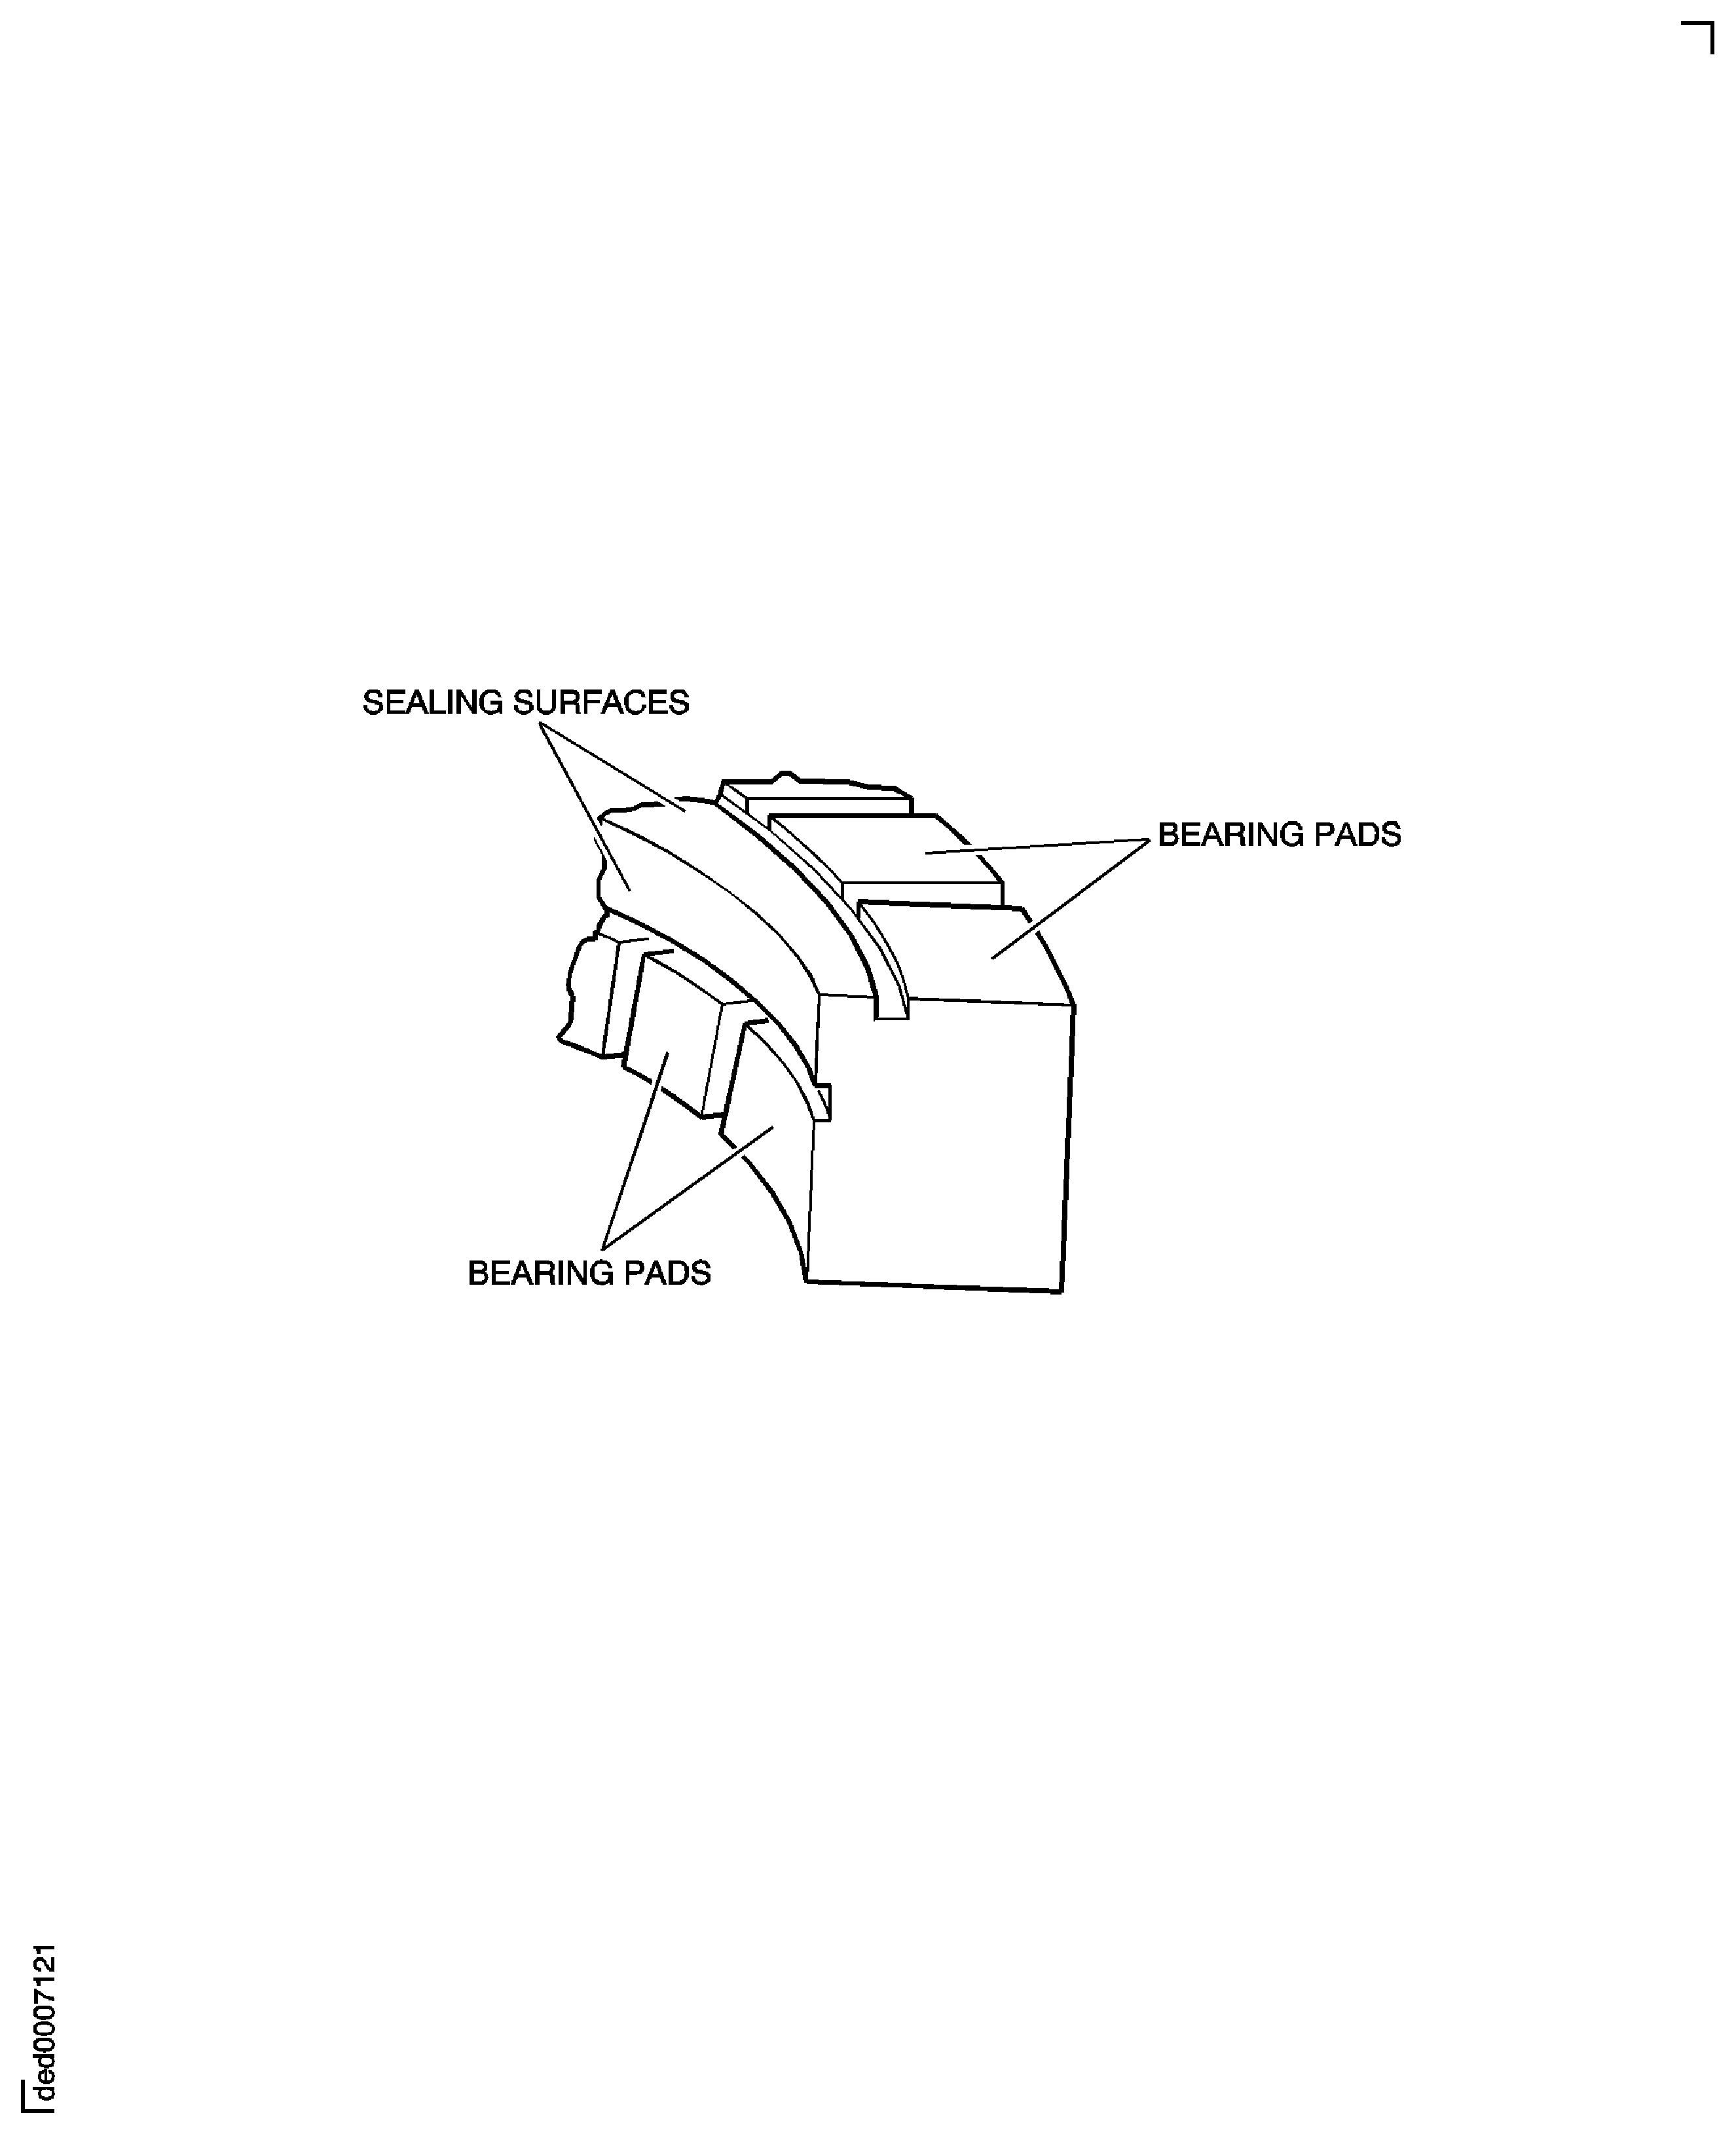
BEARING PADS: On the outer periphery and face of split ring seals, the lands which are interrupted by axial or radial grooves or flutes and by circumferential grooves. See Figure.
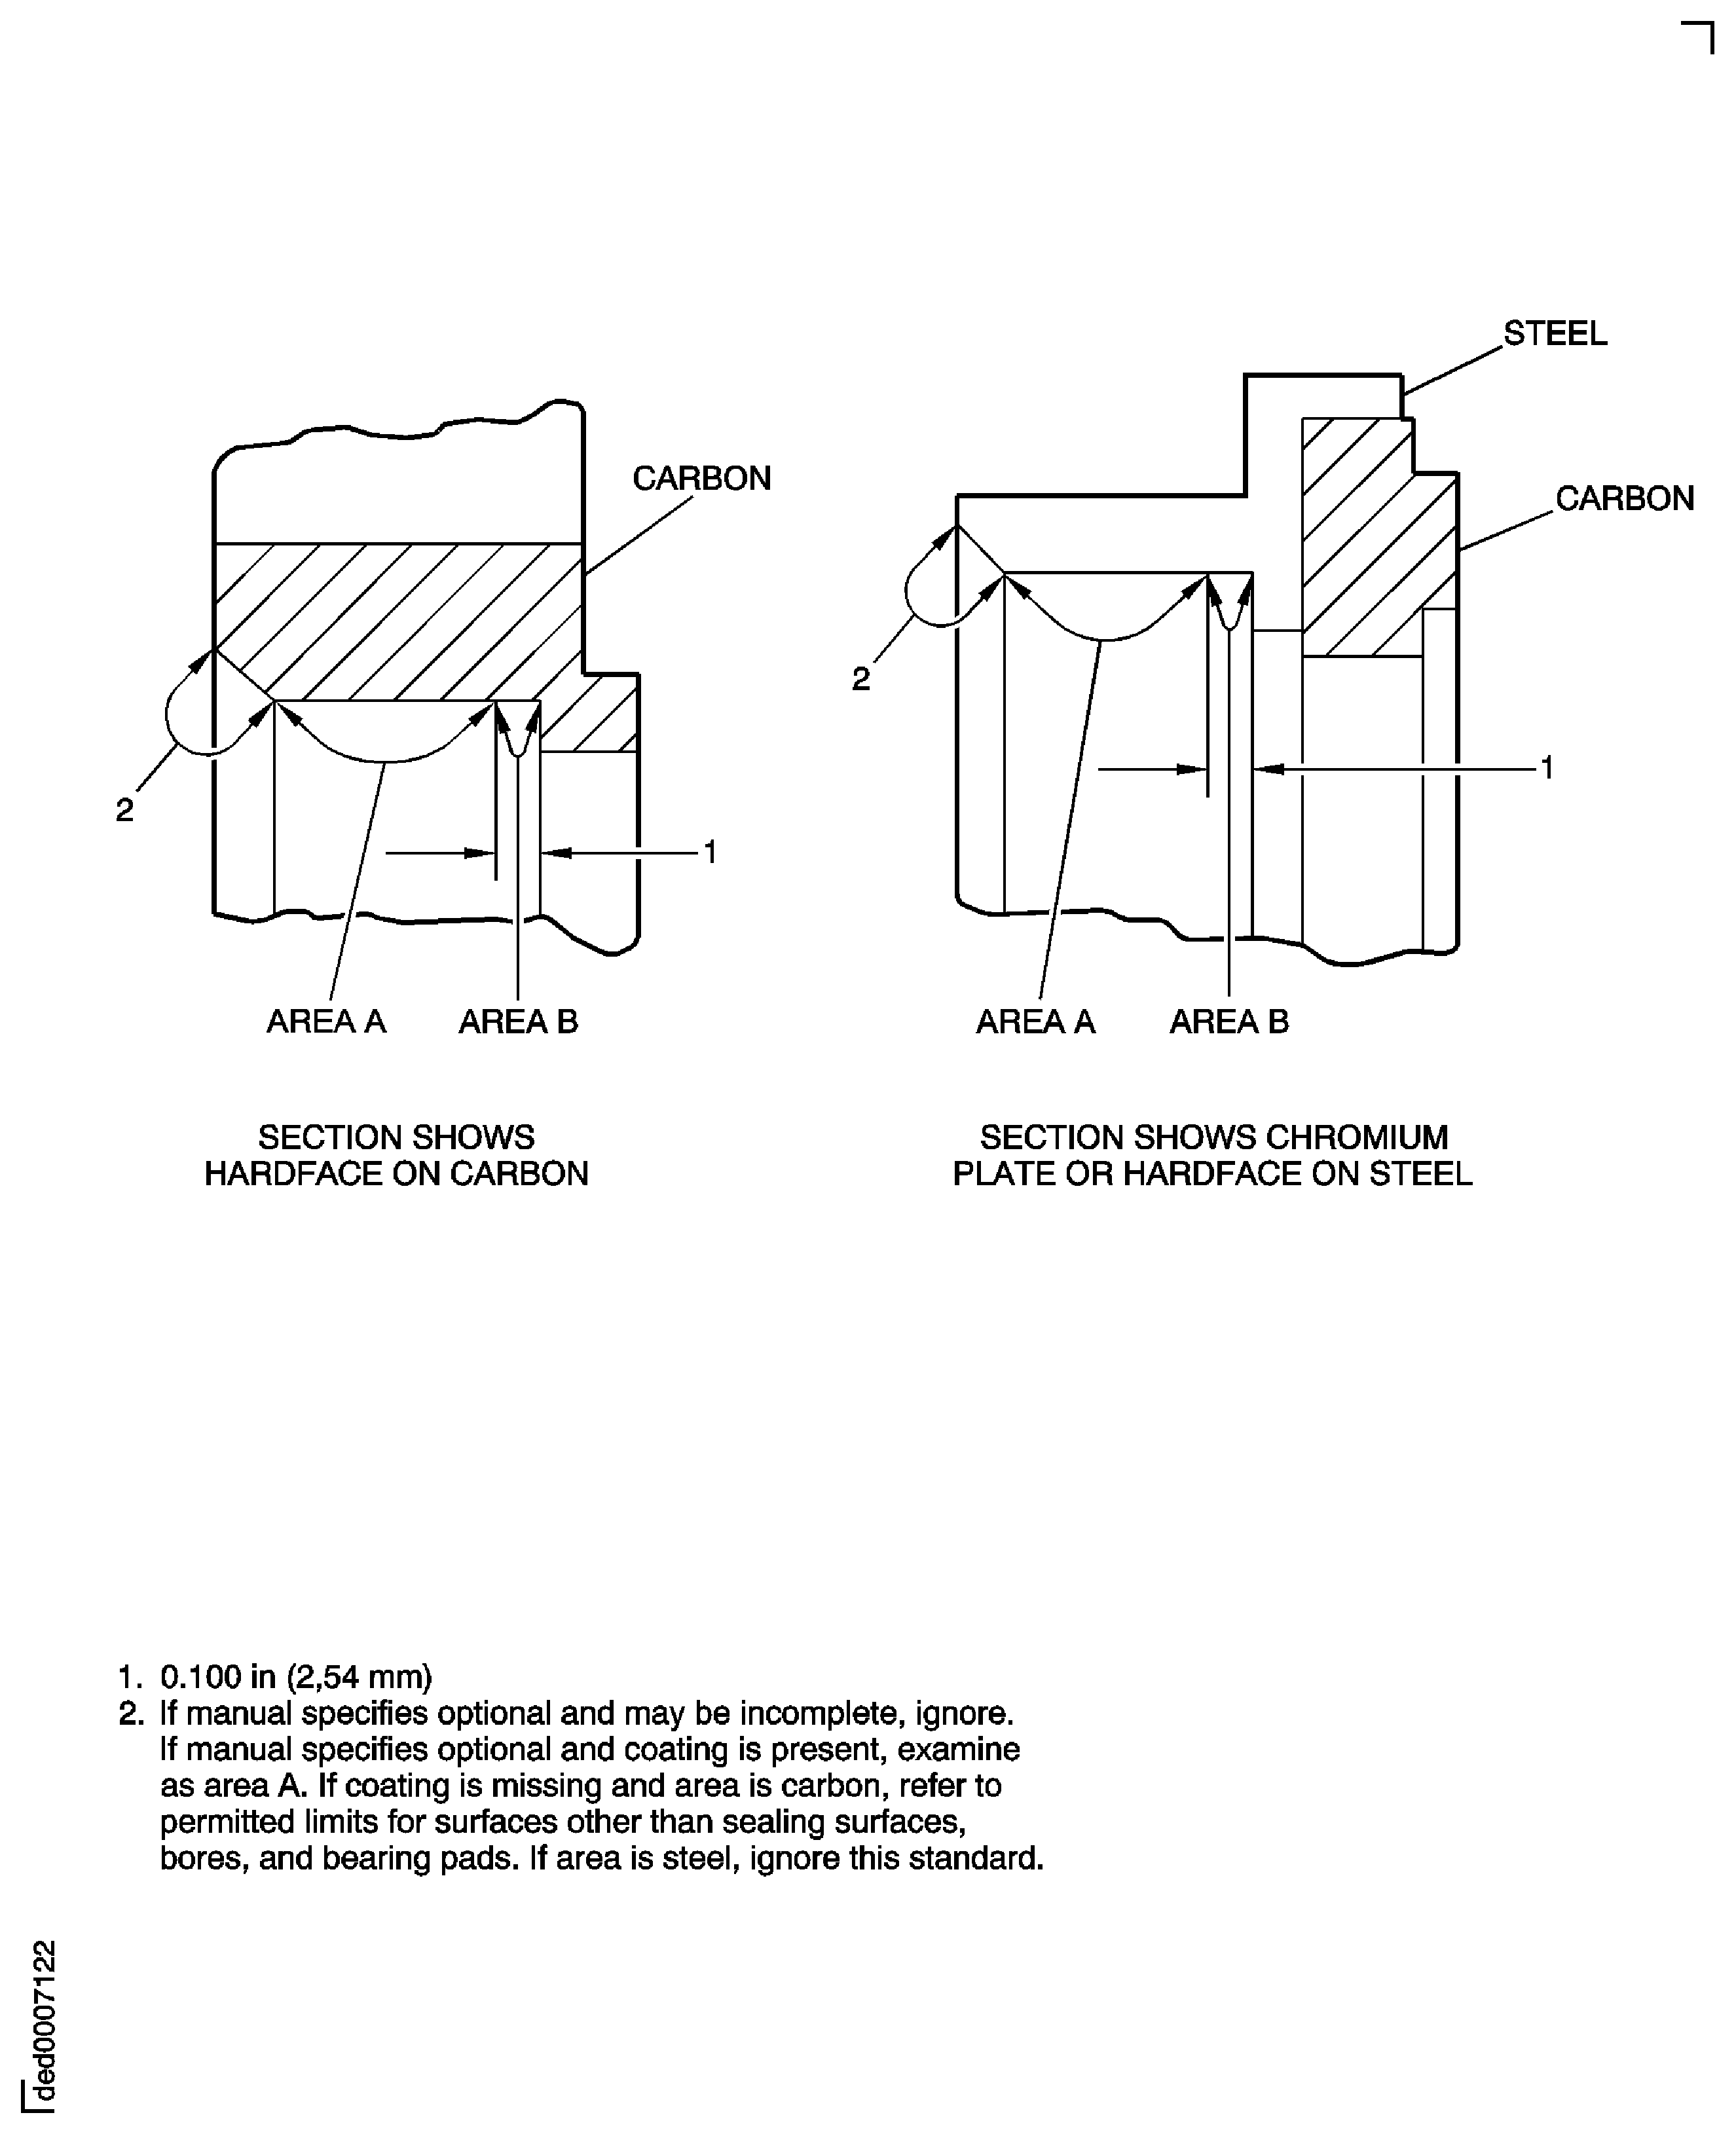
SCRATCH: A mark of minimum depth (or a linear depression), caused by the movement of a sharp object across the surface (this does not include lay marks from manufacture or repair). See Figure, Areas A.
SEALING SURFACE: A surface that moves against another to prevent the flow of fluid. See Figure. A sealing surface always has a surface finish requirement on an illustration.
The subsequent definitions are specifically applicable to the terms used in this task.
SUBTASK 70-21-04-290-002 Definitions
Parts are visually satisfactory when they are within the limits of this task and, as applicable, to those given in the SPM TASK 70-21-01-220-501 and the applicable Engine Manual Inspection sections.
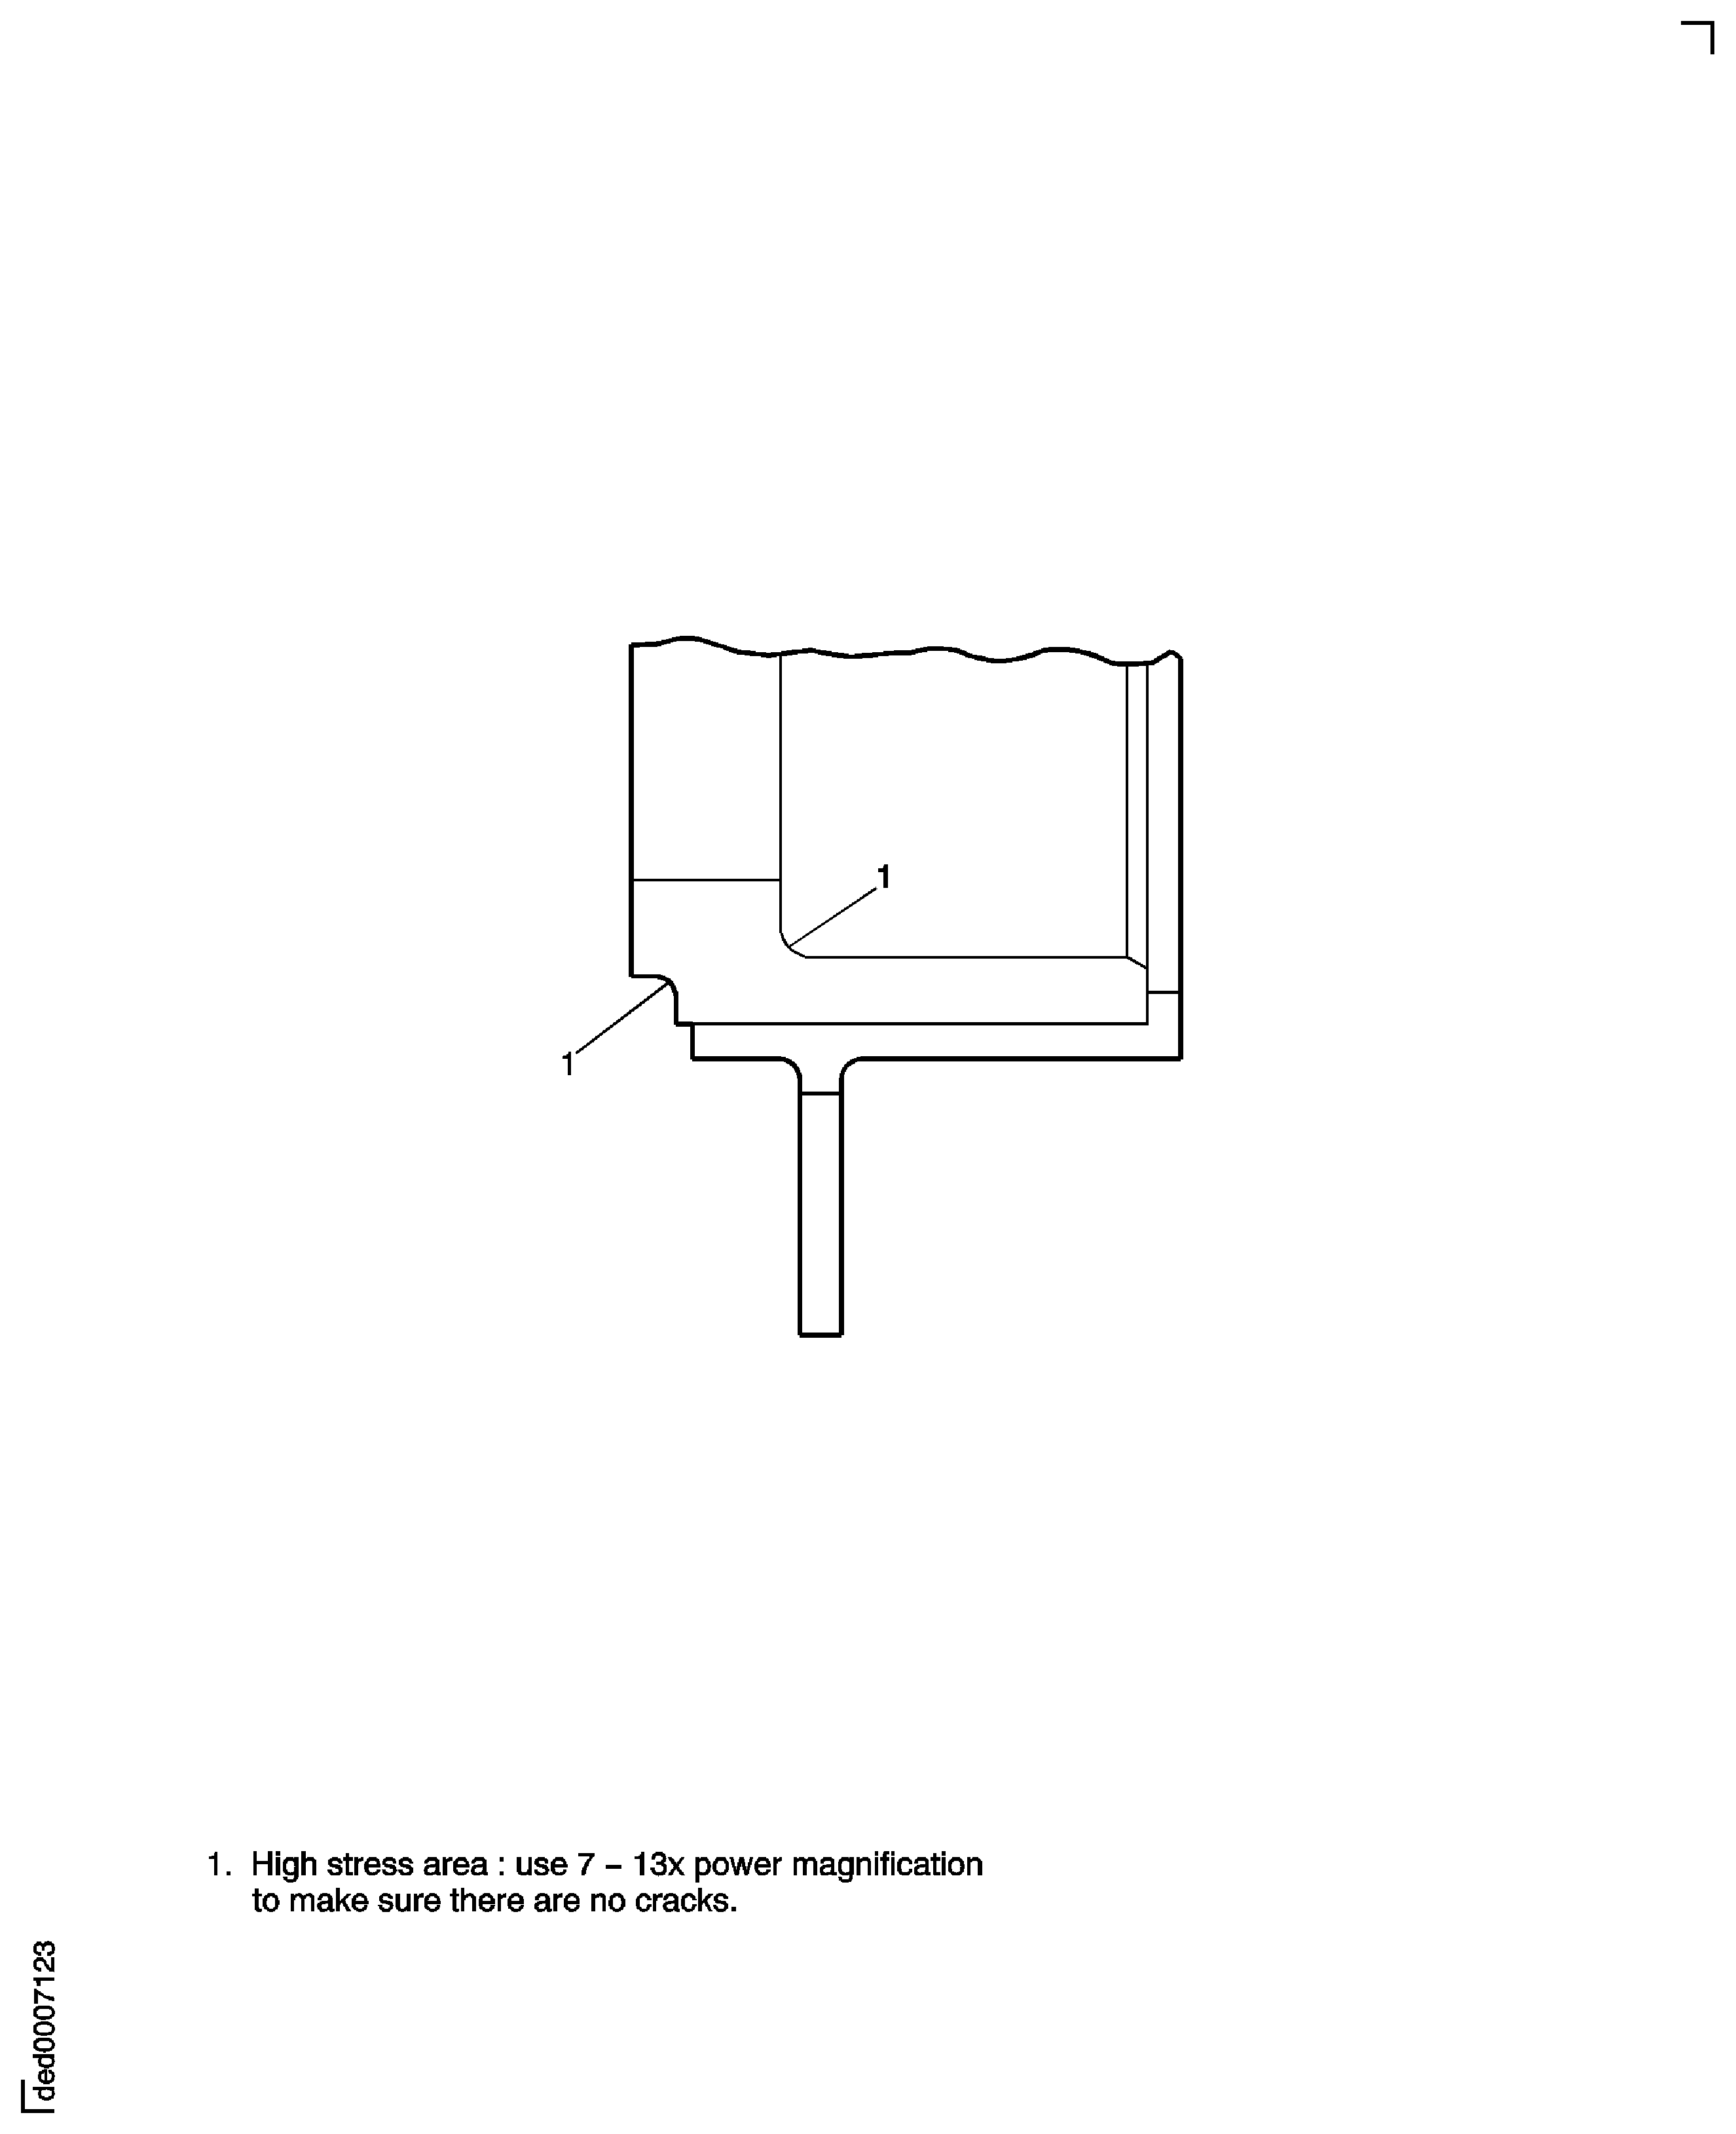
The areas shown in Figure are high stress areas. It is necessary, because of part configuration, to do a visual inspection with 7X to 13X magnification to make sure there are no cracks in the high stress areas.
Imperfections on sealing surfaces and edges (other than bores), which you can feel with a 0.015 - 0.030 inch (0.38 - 0.76 mm) radius stylus, are permitted to the limits of Table 1 and Table 2.
Table 2. Acceptance Limits for Imperfections On Edges Of Seal Surfaces Area
Maximum Extension Into Sealing Surface
Maximum Length, Circumferentially
Maximum Number Of Imperfections For Each Edge
ID and OD Edges
0.005 inch (0.127 mm) or less
No Limit
No Limit
ID and OD Edges
0.020 inch (0.508 mm) or 10 percent of sealing surface, whichever is less
0.500 inch (12.700 mm)
Accumulated length not to exceed 1/4 of total edge length
ID Edges
0.040 inch (1.016 mm) or 25 percent of sealing surface, whichever is less
0.125 inch (3.175 mm)
3 at least 1.000 inch (25.400 mm) apart *
OD Edges
0.060 inch (1.524 mm) or 30 percent of sealing surface, whichever is less
0.188 inch (4.775 mm)
4 at least 0.750 inch (19.050 mm) apart *
* ID and OD edge imperfections must not be radially opposite each other.
Table 3. Acceptance Limits for Imperfections On Sealing Surfaces Maximum Width
Maximum Length
Maximum Distance
Maximum Number Of Imperfections For Each
Up to 0.010 inch (0.254 mm)
0.030 inch (0.762 mm)
Not Applicable
10, but no more than 3 side by side radially across the surface
Up to 0.035 inch (0.889 mm)
0.125 inch (3.175 mm) *
1.000 inch (25.400 mm)
3
* Imperfections must not extend radially across the total face.
The above limits do not include those permitted breaking edges given in Table 1.
Sealing surfaces or edges.
NOTE
When you use the stylus to examine a scratch, the stylus must not cause a scratch.Areas to be coated, before coating, must agree with the requirements for nicks and pits in Table 3A and Table 3B.
NOTE
Areas referred to in Table 3A and Table 3B appear in Figure, in the section that shows hardface on carbon and in the section that shows chromium plate or hardface on steel.Coated areas must agree with all the requirements of Table 3A and Table 3B.
Table 4. Acceptance Limits for Imperfections On Uncoated And Coated Bore Surfaces - Nicks and Pits Area
Maximum Surface Dimension
Maximum Number
Maximum Distance
A
0.020 inch (0.508 mm)
10
1.000 inch (25.400 mm)
B
No limit (ID after final machining must be equal to, or greater than, Area A diameter)
Table 5. Acceptance Limits for Imperfections On Uncoated And Coated Bore Surfaces - Chipped or Flaked Areas Area
Length x Width
Maximum Number
Maximum Distance
A
0.031 inch x 0.15 inch (0.787 x 0.381 mm)
3
1.000 inch (25.400 mm)
B
No limit (ID after final machining must be equal to, or greater than, Area A diameter)
Coated bores.
Bearing pads (See Figure).
Scratches are permitted if you cannot feel them with a 0.030 inch (0.762 mm) radius stylus.
Table 6. Acceptance Limits for Imperfections On All Other Surfaces Maximum Number Of Imperfections
Maximum Surface Dimension
Minimum Distance
10
1/2 the minimum surface dimension or 0.125 inch (3.175 mm), whichever is less
3x the maximum dimension of the imperfection
Surfaces other than sealing surfaces, bores, and bearing pads.
Nicks are permitted to the limits of Table 5.
Table 7. Acceptance Limits of Non-sealing Surfaces Maximum Extension onto Surface
Maximum Number Of Imperfections For Each Edge
Maximum Circumferential Length
0.010 inch (0.254 mm) or less
No Limit
No Limit
Over 0.010 inch (0.254 mm) but less than 0.062 inch (1.575 mm) or 50 percent of non-sealing surface width, whichever is less
5
0.125 inch (3.175 mm)
Edges of non-sealing surfaces.
The maximum limit for the permitted imperfections that follow is 30 on the total part. Minimum separation of different sized imperfections must be the value given for the smaller imperfections.
NOTE
Mainshaft seals are those seals that have a sealing surface radial width greater than 0.105 inch (2.667 mm) nominal or a sealing surface ID greater than 3.5 inches (88.900 mm).
SUBTASK 70-21-04-290-003 Acceptance Limits (All Parts)
Figure: Section Of Carbon Seal Ring To Show Location Of Bearing Pads And Seal Surfaces Fig. 70-21-04-990-001
Section Of Carbon Seal Ring To Show Location Of Bearing Pads And Seal Surfaces Fig. 70-21-04-990-001

Figure: Sections To Show Hardface On Carbon And Chromium Plate And Hardface On Steel Fig. 70-21-04-990-002
Sections To Show Hardface On Carbon And Chromium Plate And Hardface On Steel Fig. 70-21-04-990-002

Figure: Carbon Ring And Bearing Face Seals - Crack Inspection Fig. 70-21-04-990-003
Carbon Ring And Bearing Face Seals - Crack Inspection Fig. 70-21-04-990-003

