Export Control
EAR Export Classification: Not subject to the EAR per 15 C.F.R. Chapter 1, Part 734.3(b)(3), except for the following Service Bulletins which are currently published as EAR Export Classification 9E991: SBE70-0992, SBE72-0483, SBE72-0580, SBE72-0588, SBE72-0640, SBE73-0209, SBE80-0024 and SBE80-0025.Copyright
© IAE International Aero Engines AG (2001, 2014 - 2021) The information contained in this document is the property of © IAE International Aero Engines AG and may not be copied or used for any purpose other than that for which it is supplied without the express written authority of © IAE International Aero Engines AG. (This does not preclude use by engine and aircraft operators for normal instructional, maintenance or overhaul purposes.).Applicability
All
Description
TASK 70-35-09-350-501 Surface Texture
General
This standard practice gives the specified groups for the surface finish of roughness, waviness, lay and flaws. Also included is a set of symbols to be used for illustrations and repair procedures.
Definitions
Surface texture
Changes from the usual surface finish to include roughness, waviness, lay and flaws.
Surface
The limit which divides an object from a different object or substance.
Nominal surface
The theory of an accurate design, the shape and dimensions of which are usually shown on an illustration.
Profile
The correct contour of a surface on a piece or part vertical to that surface unless some other angle is specified.
Hole surface
Internal cylindrical surfaces less than two inches in diameter.
Roughness
Contains the irregular shapes in the surface texture, usually together with those irregular shapes which result from the effects of the production process.
These include traverse feed marks, pores in porous material and other irregular shapes which are in the limits of the roughness width cutoff of the measuring instrument. Refer to Figure.
Tool chatter
Tool marks with small distances between caused by the vibration of the cutting tool.
Tool mismatch
A mark on the surface of the part caused by cutting tool at the intersection of the paths of two tools, cutters or cutting tools. It typically shows as a cusp shape type mark. Examples in different machining processes:
In turning: Where the cutter exits and enters the finish surface of the part.
In broaching: At the intersection of the paths of two cutters on the part finish surface.
In milling or grinding: At the intersection of milling cutter or grinding wheel paths.
Tool line
A mark caused by the cutting tool as it moves across the part:
In turning: Show as feed lines in the direction of the spindle.
In milling: Caused as the milling cutter moves across in the direction of cutting.
In broaching: Fine lines in the direction of broaching. All lines are uniform in size and depth. Surface finish requirements control the size and depth.
Tool mark
An unintended mark caused by a tool. Tool marks usually show as an undercut. Examples of causes:
Caused when cutting tool not ground correctly.
Cutting tools not correctly aligned.
Cutting edge of tool chipped or damaged.
Unintended tool contact.
Stray tool contact - usually goes away from direction of cut..
Superficial imperfection
A light dent in the surface with smooth edges that does not go through the surface roughness texture.
Non-superficial imperfections
Are the scratches, nicks, dents and marks which have been made by hand or by a cutting tool. It can also include, that caused by tool chatter, tool mismatch or tool lines.
Roughness width
The distance parallel to the specified surface between adjacent peaks or ridges which makes the predominant pattern of the roughness. Refer to Figure.
Roughness-width cutoff (Instrument cutoff)
The largest distance or irregular surface shapes which is included in the measured average roughness height and peak density.
Roughness width cutoff is equal to the low frequency cutoff of the instrument and is specified in inches.
Centerline
A line parallel to the direction of the contour along a length, equal to the roughness width cutoff. Such that the sum of the areas contained between it and those parts of the contour which will be on one side or the other of it are equal. Refer to Figure.
Arithmetical Average (AA)
A linear unit of a dimension in microinches (0.000001 inch). AA values are usually read from the meter of a instrument which measures roughness.
Surface roughness can be calculated by two procedures.
Use of the root mean square (RMS).
Use of the arithmetical average (AA) to make an analysis of the surface roughness, or difference from a centerline
The two procedures are measured in microinches. Refer to Figure.
The one used most is the AA, but an AA number will show a rougher surface than the RMS.
The two procedures may be interchangeable so when a value is given as a RMS the AA procedure can be used. This will permit measurement of the surface roughness by the AA or RMS calculated, which must agree with the equipment available. Metric values ar shown in brackets ().
Roughness height
A rate in AA units which shows the average deviation of the roughness irregular differences from the centerline.
Maximum reading
This is the maximum value of a surface roughness as given by the measuring instrument. The roughness value will be the highest value read on the meter.
Average maximum reading
This is the average of the maximum value taken from three traces, when the profile tracing element is positioned vertical to the surface and moved in the direction which gives the highest value.
Minimum reading
This is the minimum value of a surface roughness as given by the measuring instrument. The roughness value will be the lowest value read on the meter.
Average minimum reading
This is the average of the minimum value taken from three traces, when the profile tracing element is positioned vertical to the surface and moved in the direction which gives the highest value.
Minimum and maximum values can be taken from the same traces.
Net peak density
The calculated sum of two or more peak densities each with a different specified threshold height.
Peak density
The number of valleys or peaks for every inch of a contour. These extend from below the lower limit to above the upper limit of the specified threshold height.
Threshold height
An area specified in microinches where the upper (peak) and lower (valley) limits are parallel to and at the same distance from the centerline.
Lay
The direction of the surface finish caused by the procedure when the part is made. Refer to Figure.
Waviness
Changes from the usual surface finish which has a larger peak to peak distance than the roughness width cutoff. Waviness may be caused by machine or work deflections, vibration, chatter, heat treatment or if the part is twisted.
Waviness height
The maximum peak to valley distance measured in inches. Refer to Figure.
Waviness width
The distance between one or more peaks or valleys measured in inches. Refer to Figure.
Chatter marks
Marks caused by the vibration movement of the cutting tool or the machined surface.
Flaws
Unusual defects of any type in a specified area or in different areas on a surface finish. A flaw may be a scratch, nick, crack, hole or seam. Refer to Figure.
Symbols and Notations
The basic symbol used to show the surface texture control is a check mark. Refer to Figure Inset 1.
The symbol can contain a surface texture number to show:
Roughness height rating
Roughness width cutoff rating
Waviness height and width
Lay symbol
Where waviness is controlled or roughness width cutoff value is specified, a horizontal extension will be added to the symbol. Refer to Figure Inset 2.
The roughness height rating number is put in to the V of the symbol. When only one number is shown this will give the average maximum number permitted, and lets any lesser value to be accepted. Refer to Figure Inset 3.
Where a maximum and minimum number is given this will give the average range permitted. Refer to Figure Inset 4.
The roughness width cutoff rating is put below the horizontal extension line. Refer to Figure Inset 5.
The waviness height rating is put above the extension line. This rating unless specified will show the maximum permitted waviness height. Refer to Figure Inset 6.
The waviness width rating is put above the horizontal extension line. It is divided by a hyphen from the waviness height rating. This rating unless specified, will show the maximum permissable waviness width. Refer to Figure Inset 7.
The lay will be identified by the use of symbols as shown in Figure.
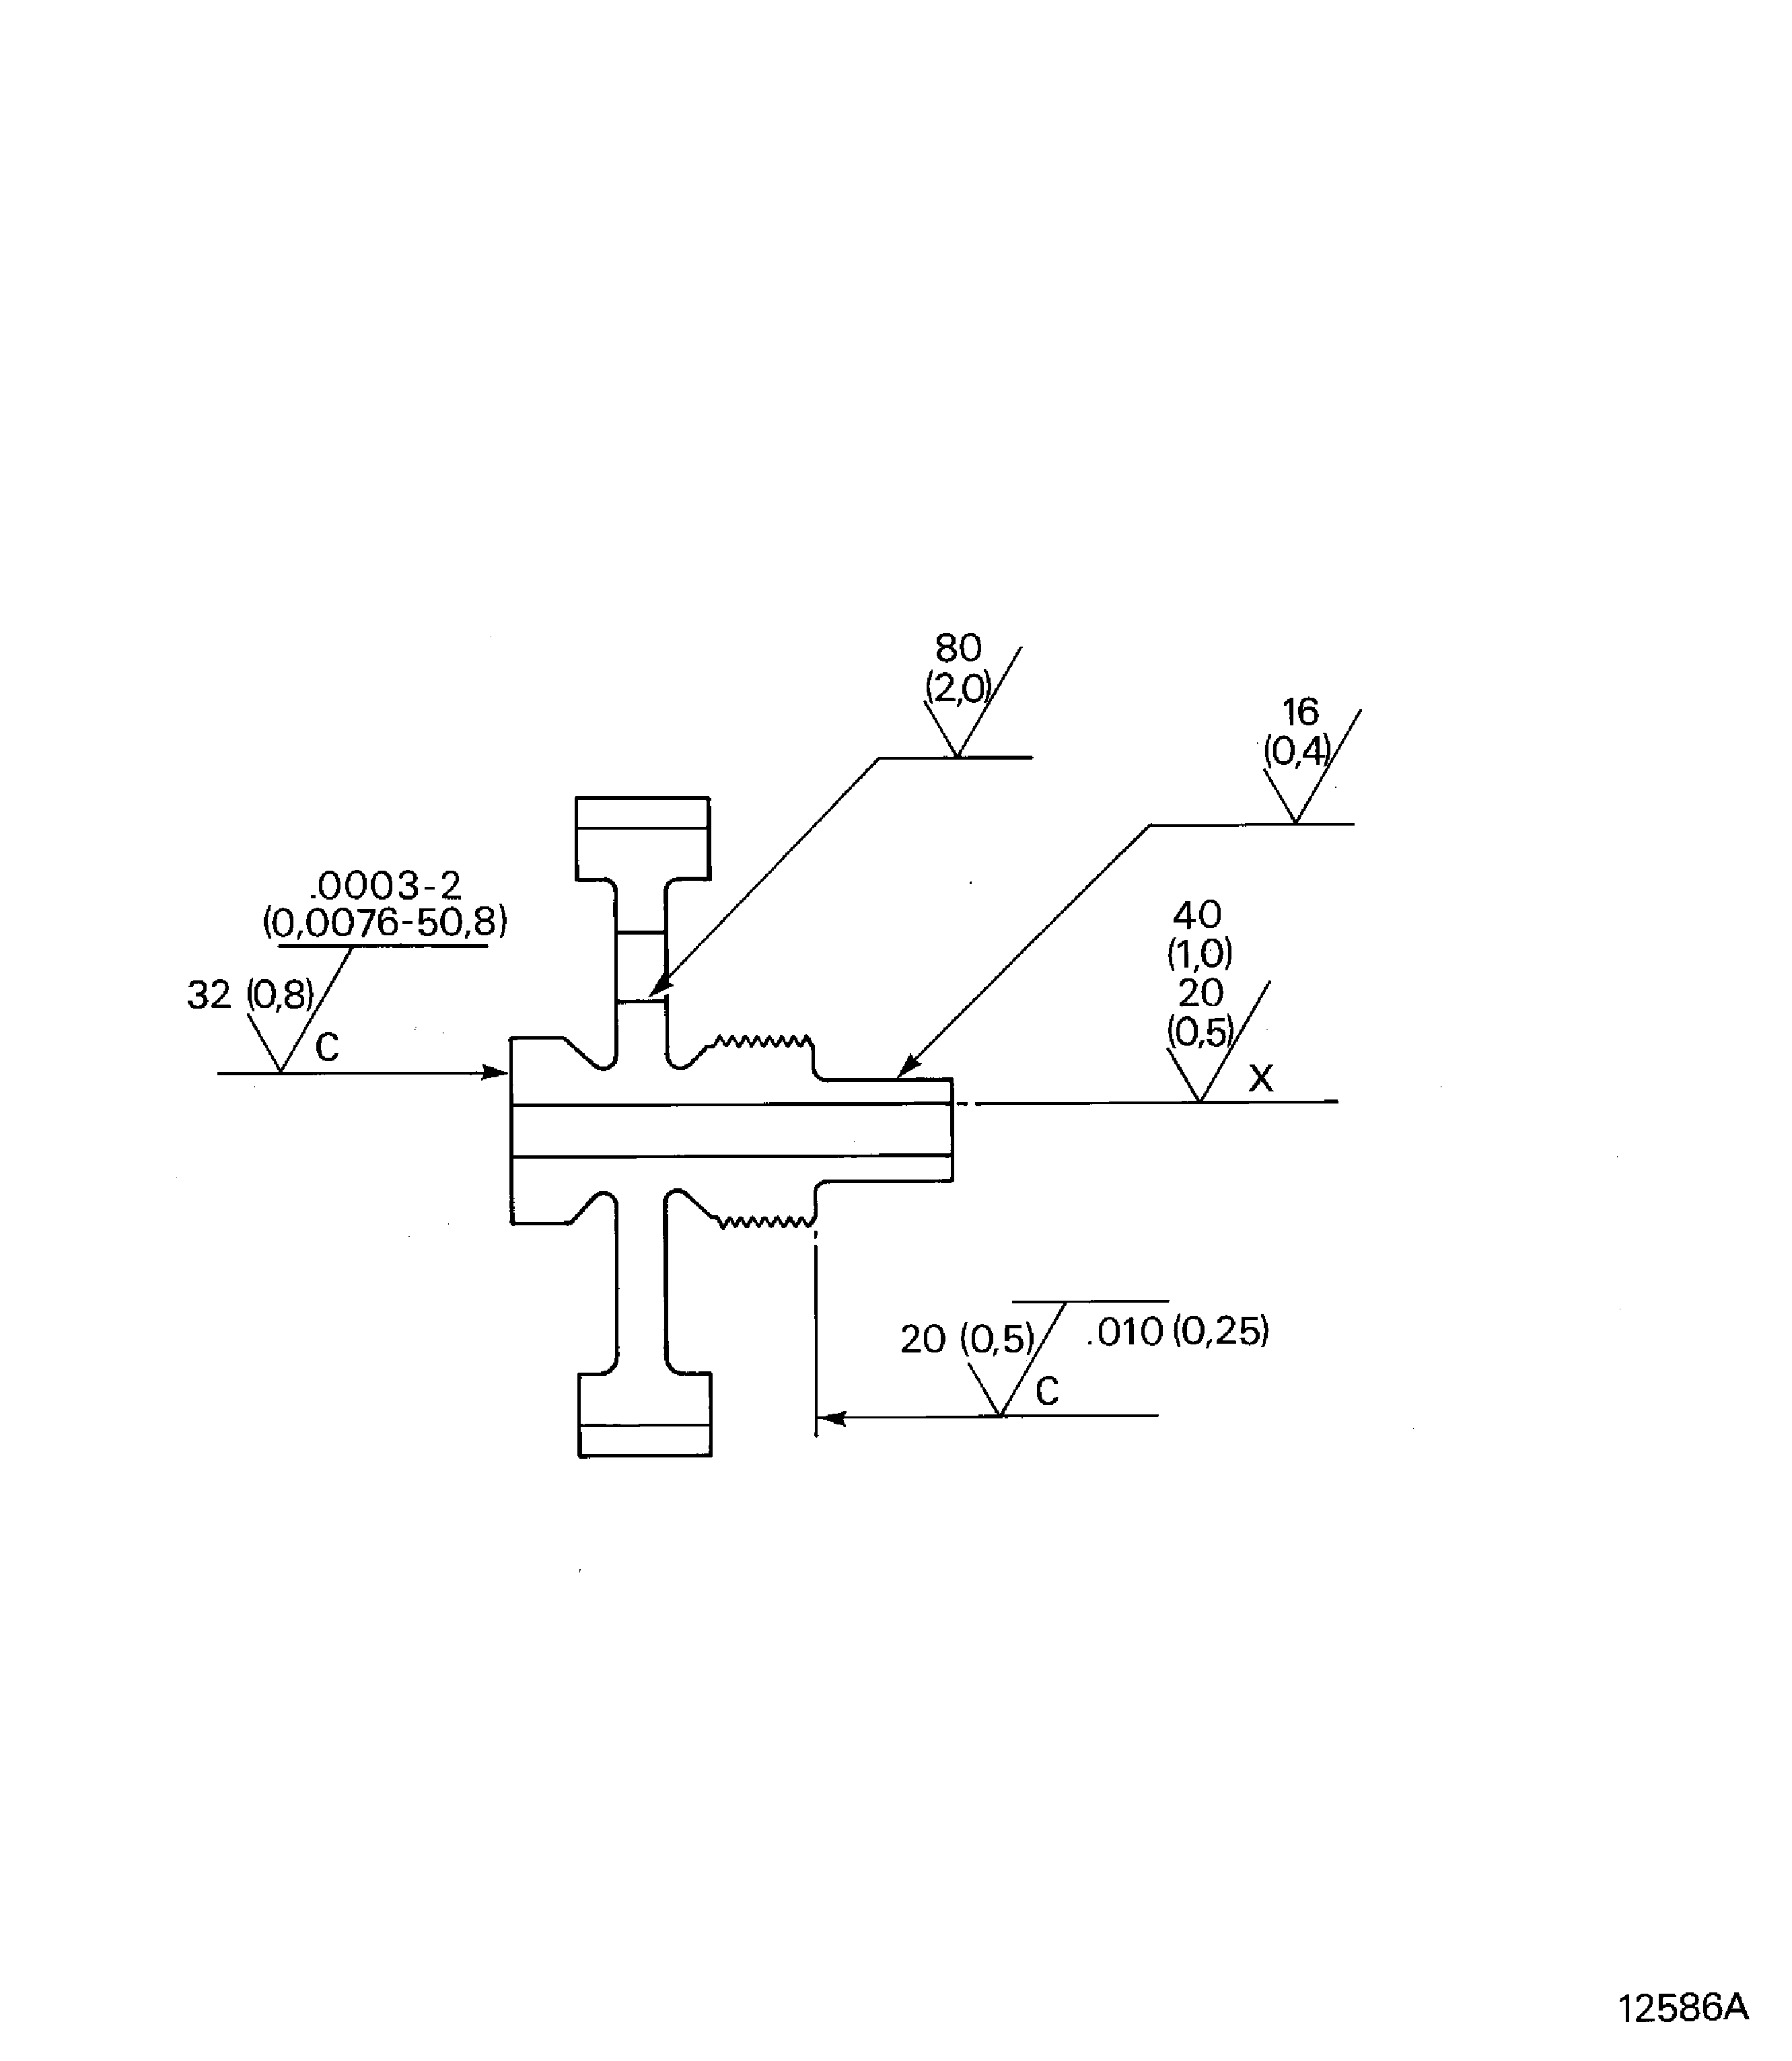
Surface texture symbols must be used in an illustration as shown in Figure.
Deleted
Figure: Surface texture
Surface texture
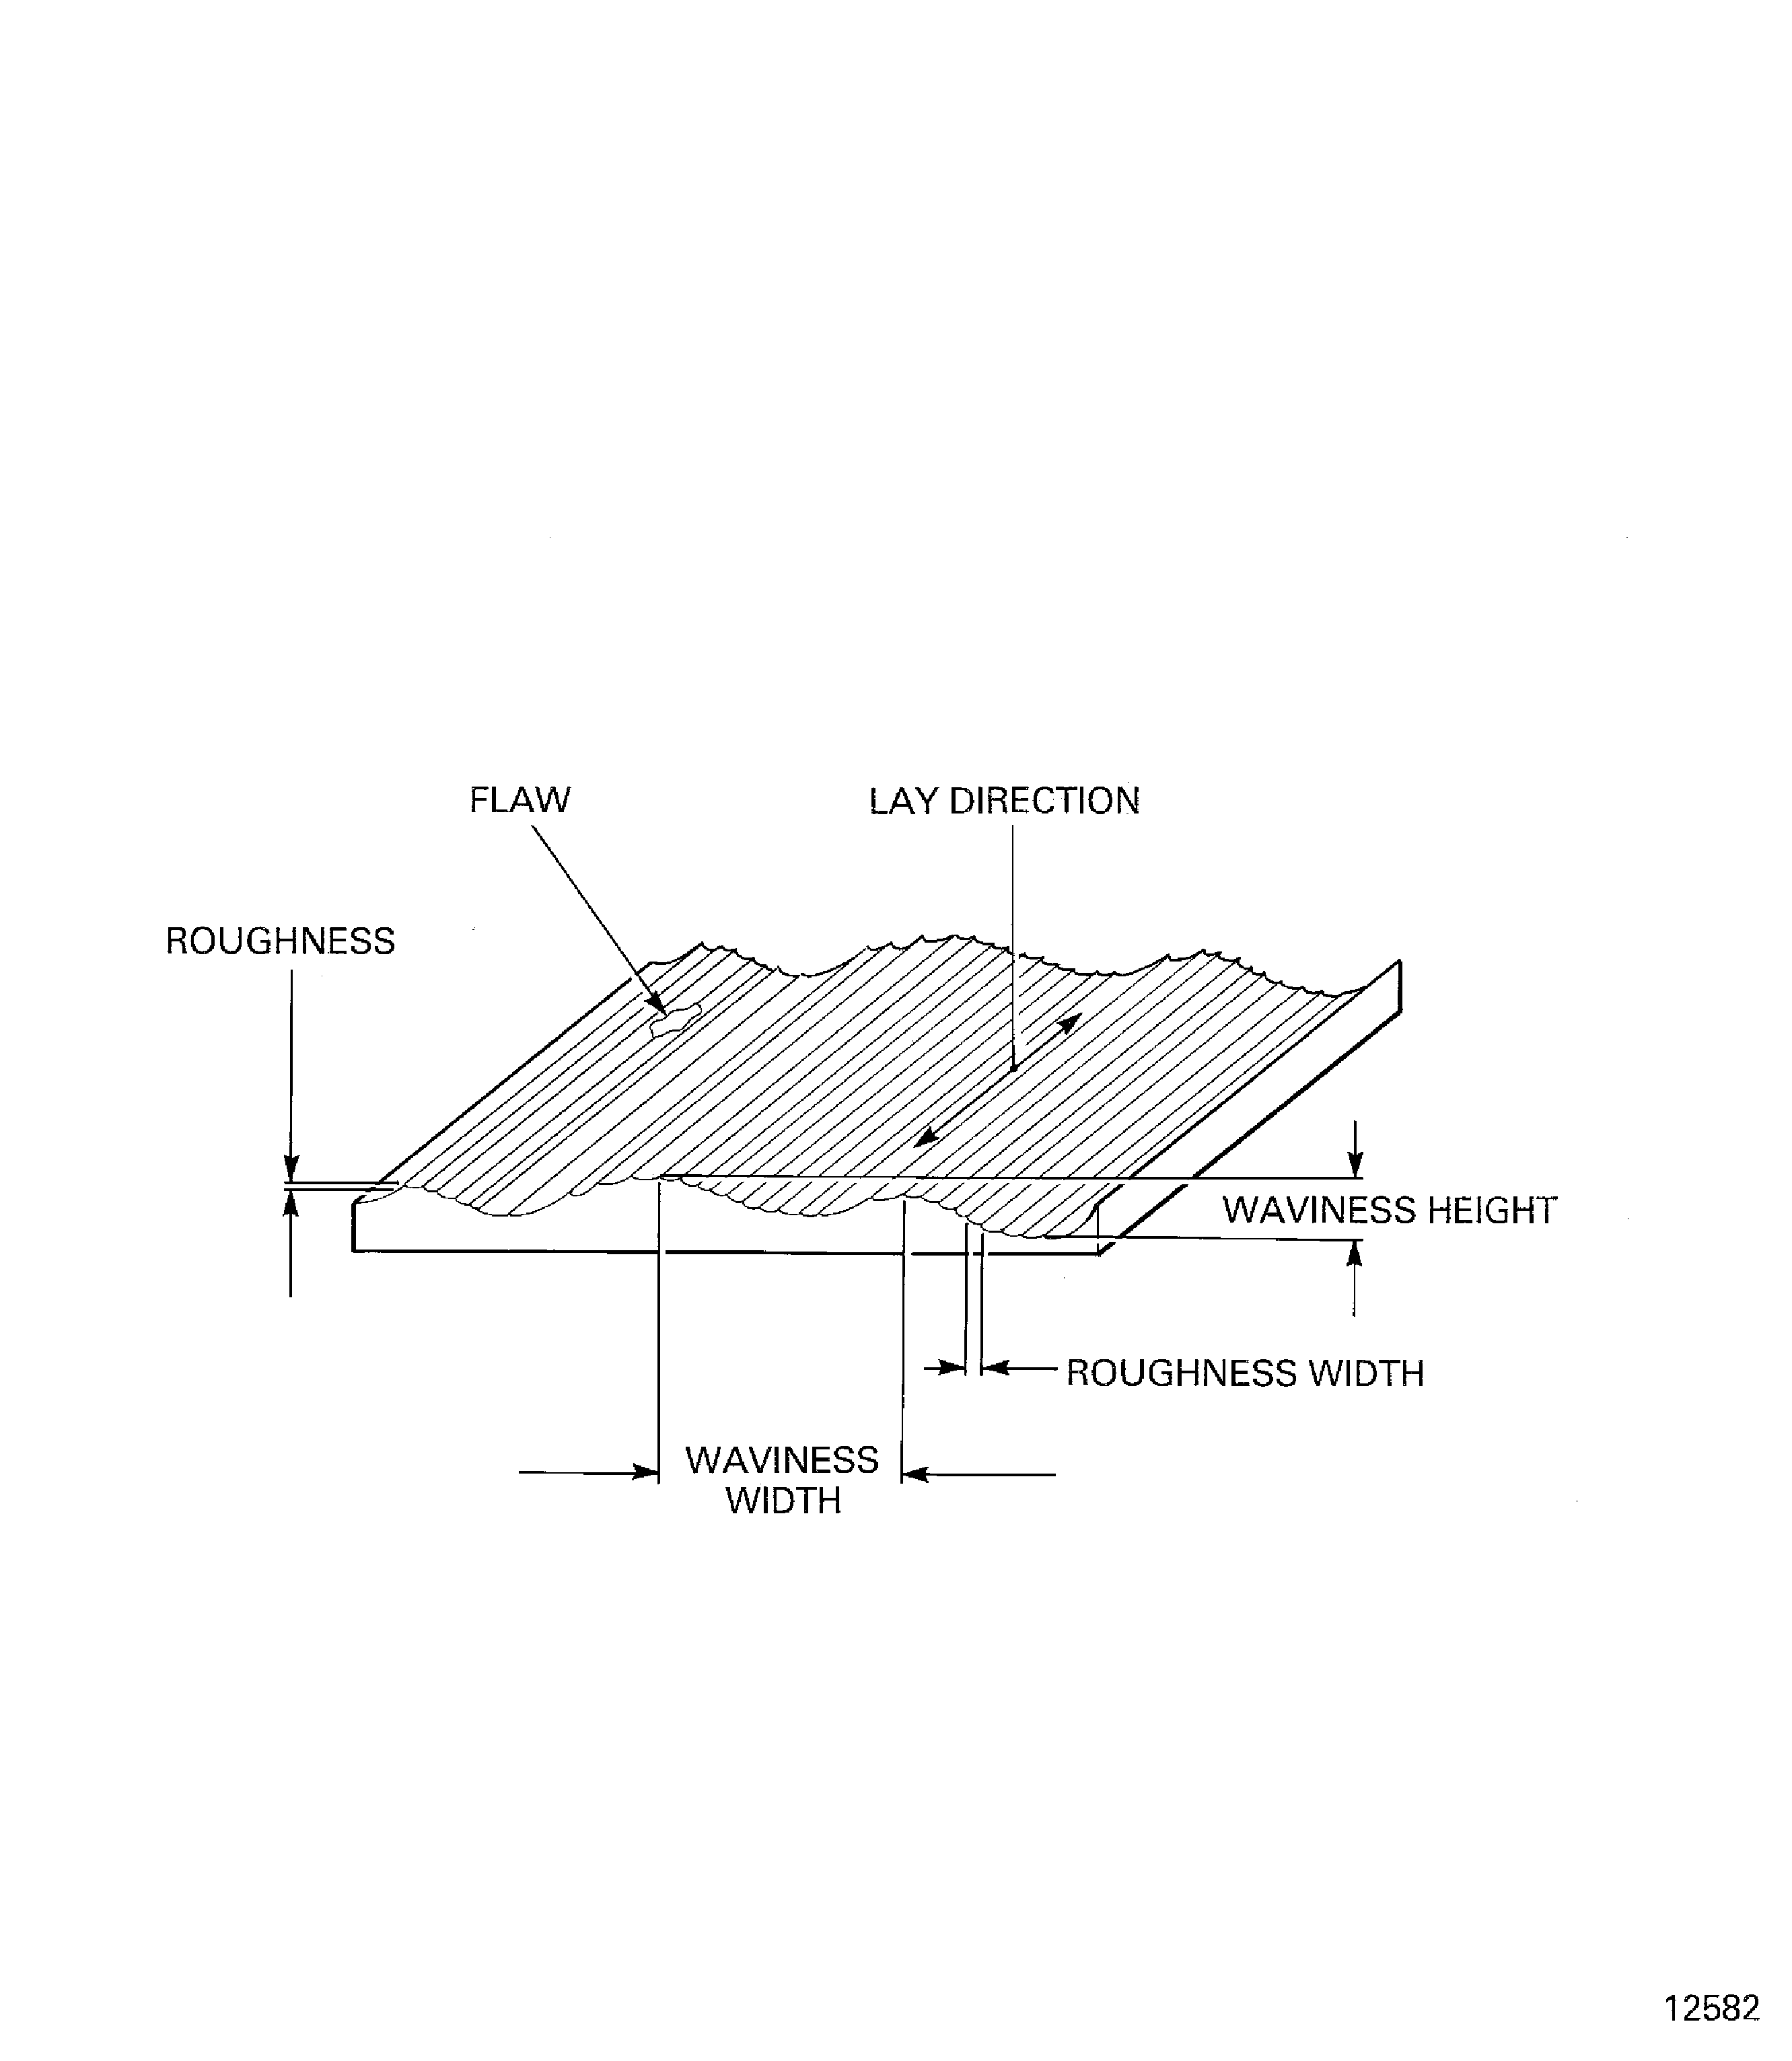
Figure: Procedure to find surface roughness
Procedure to find surface roughness
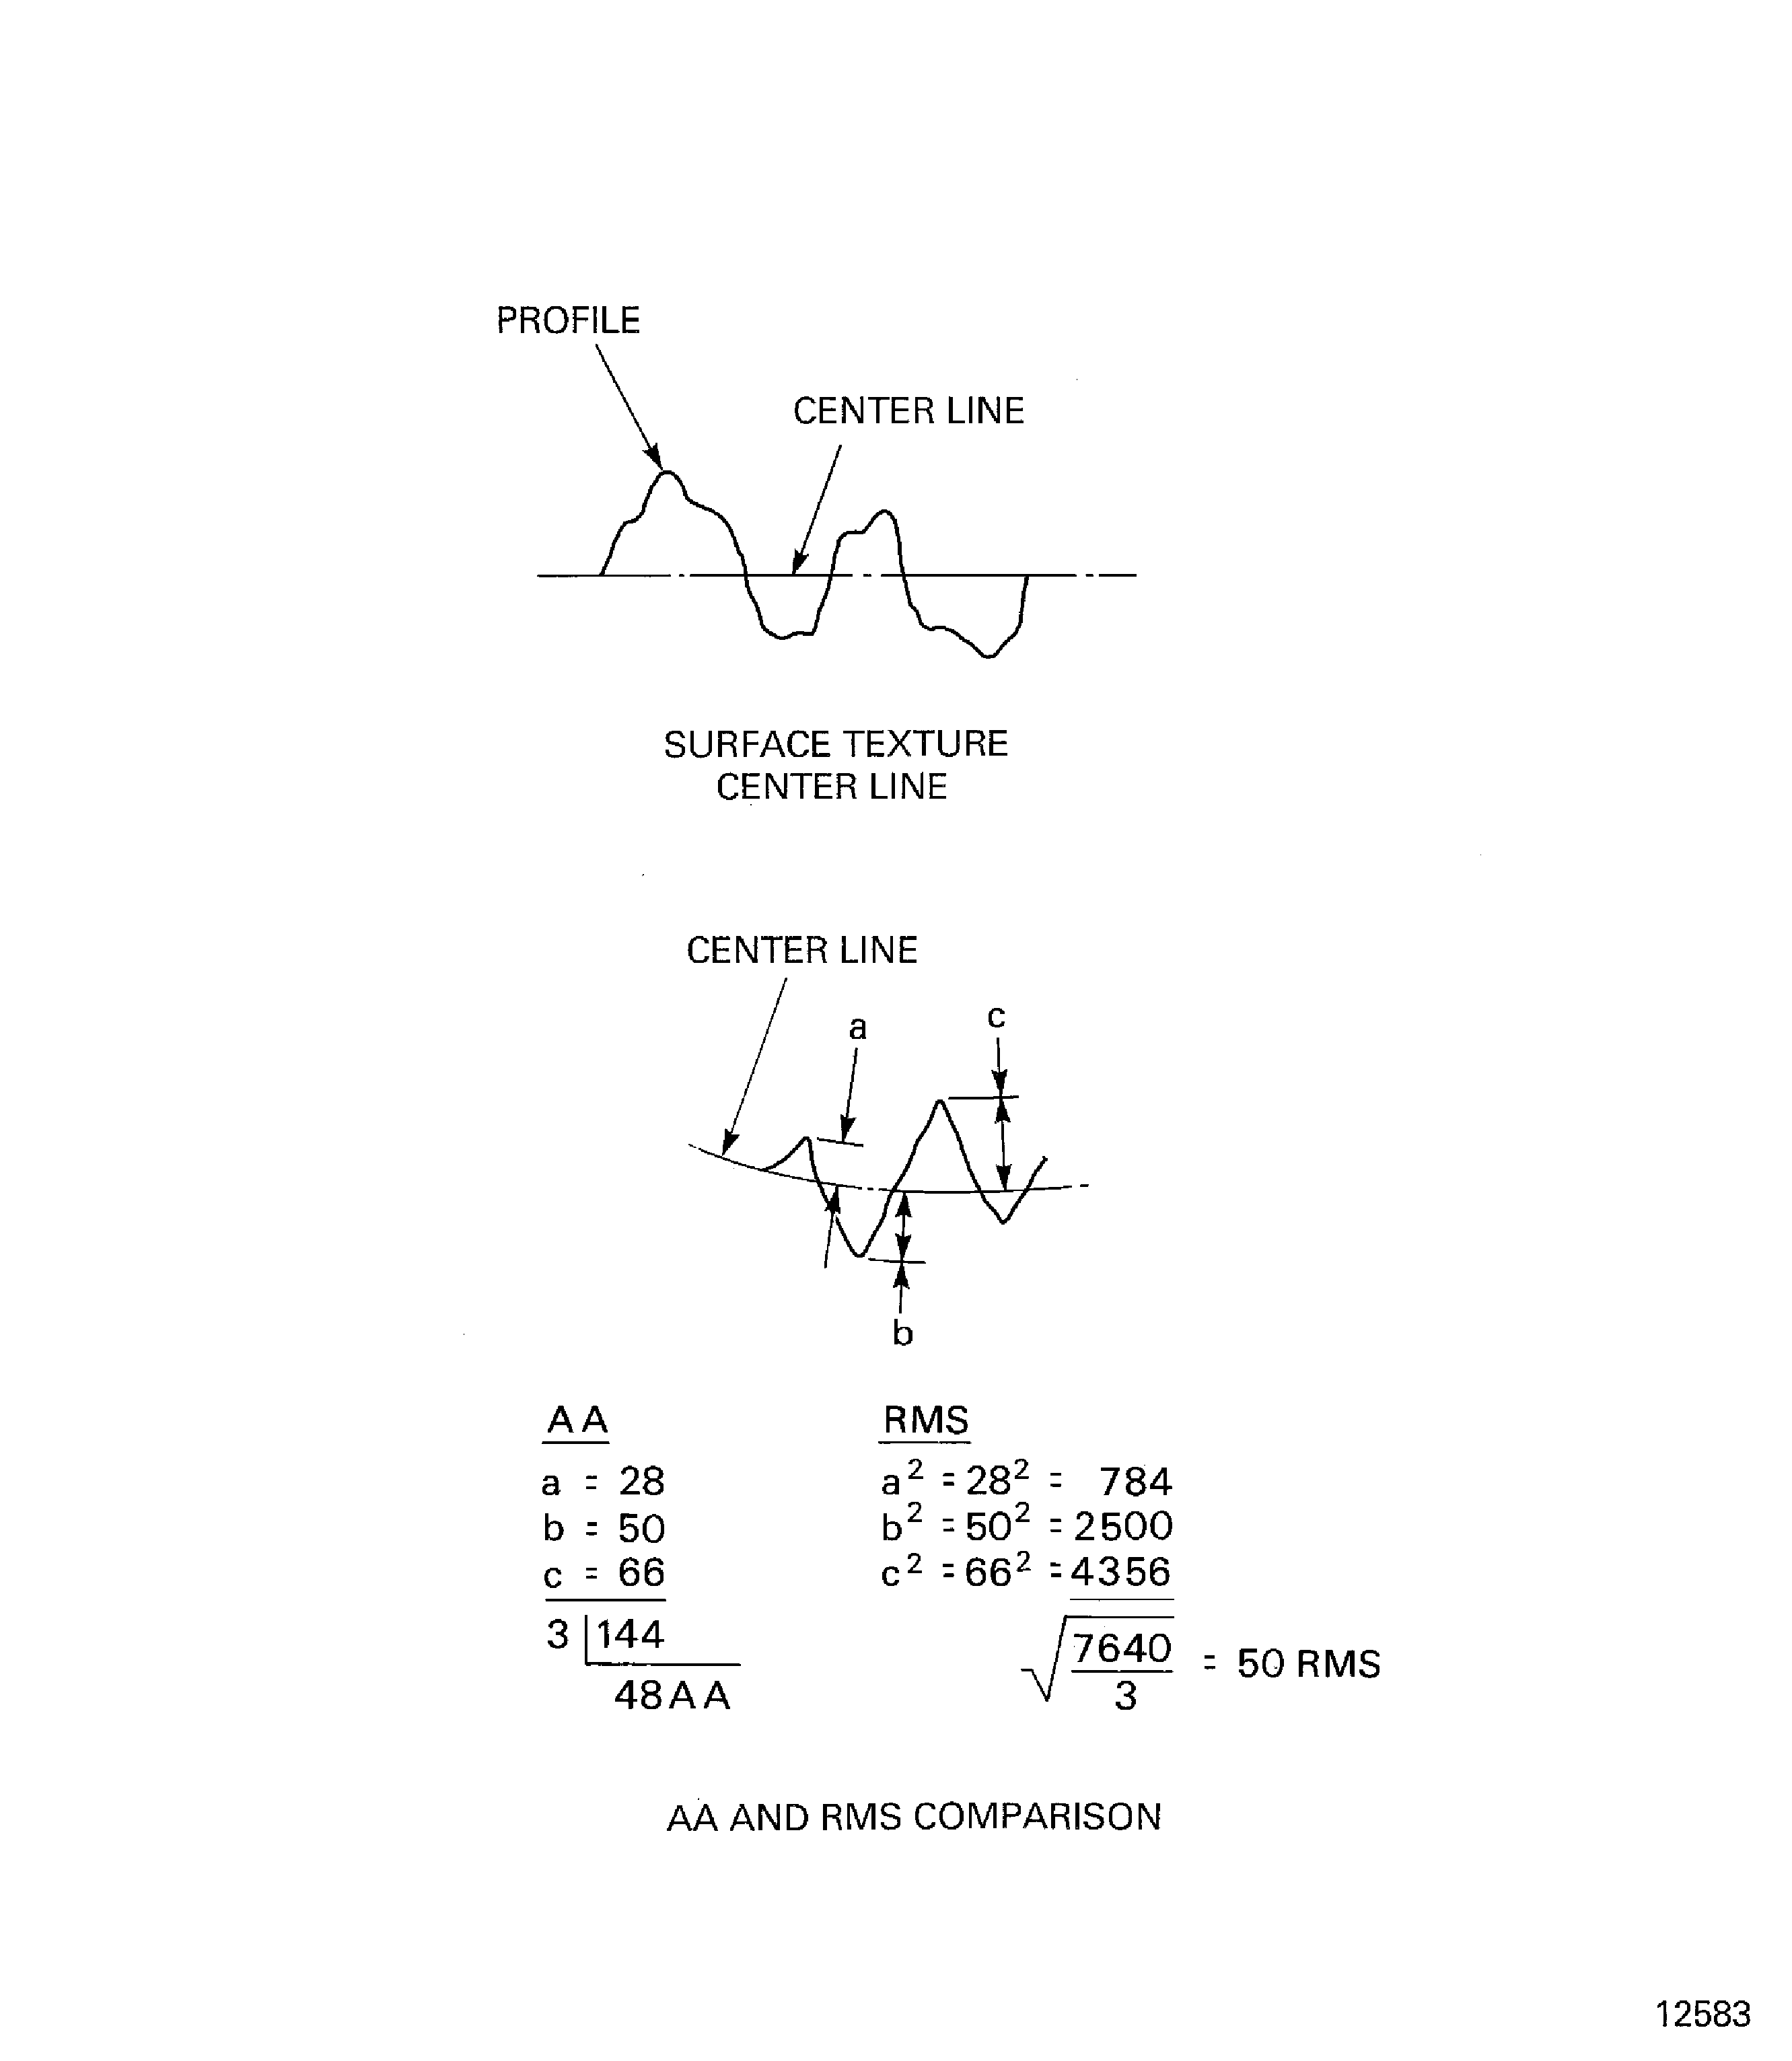
Figure: Symbols and notations
Symbols and notations
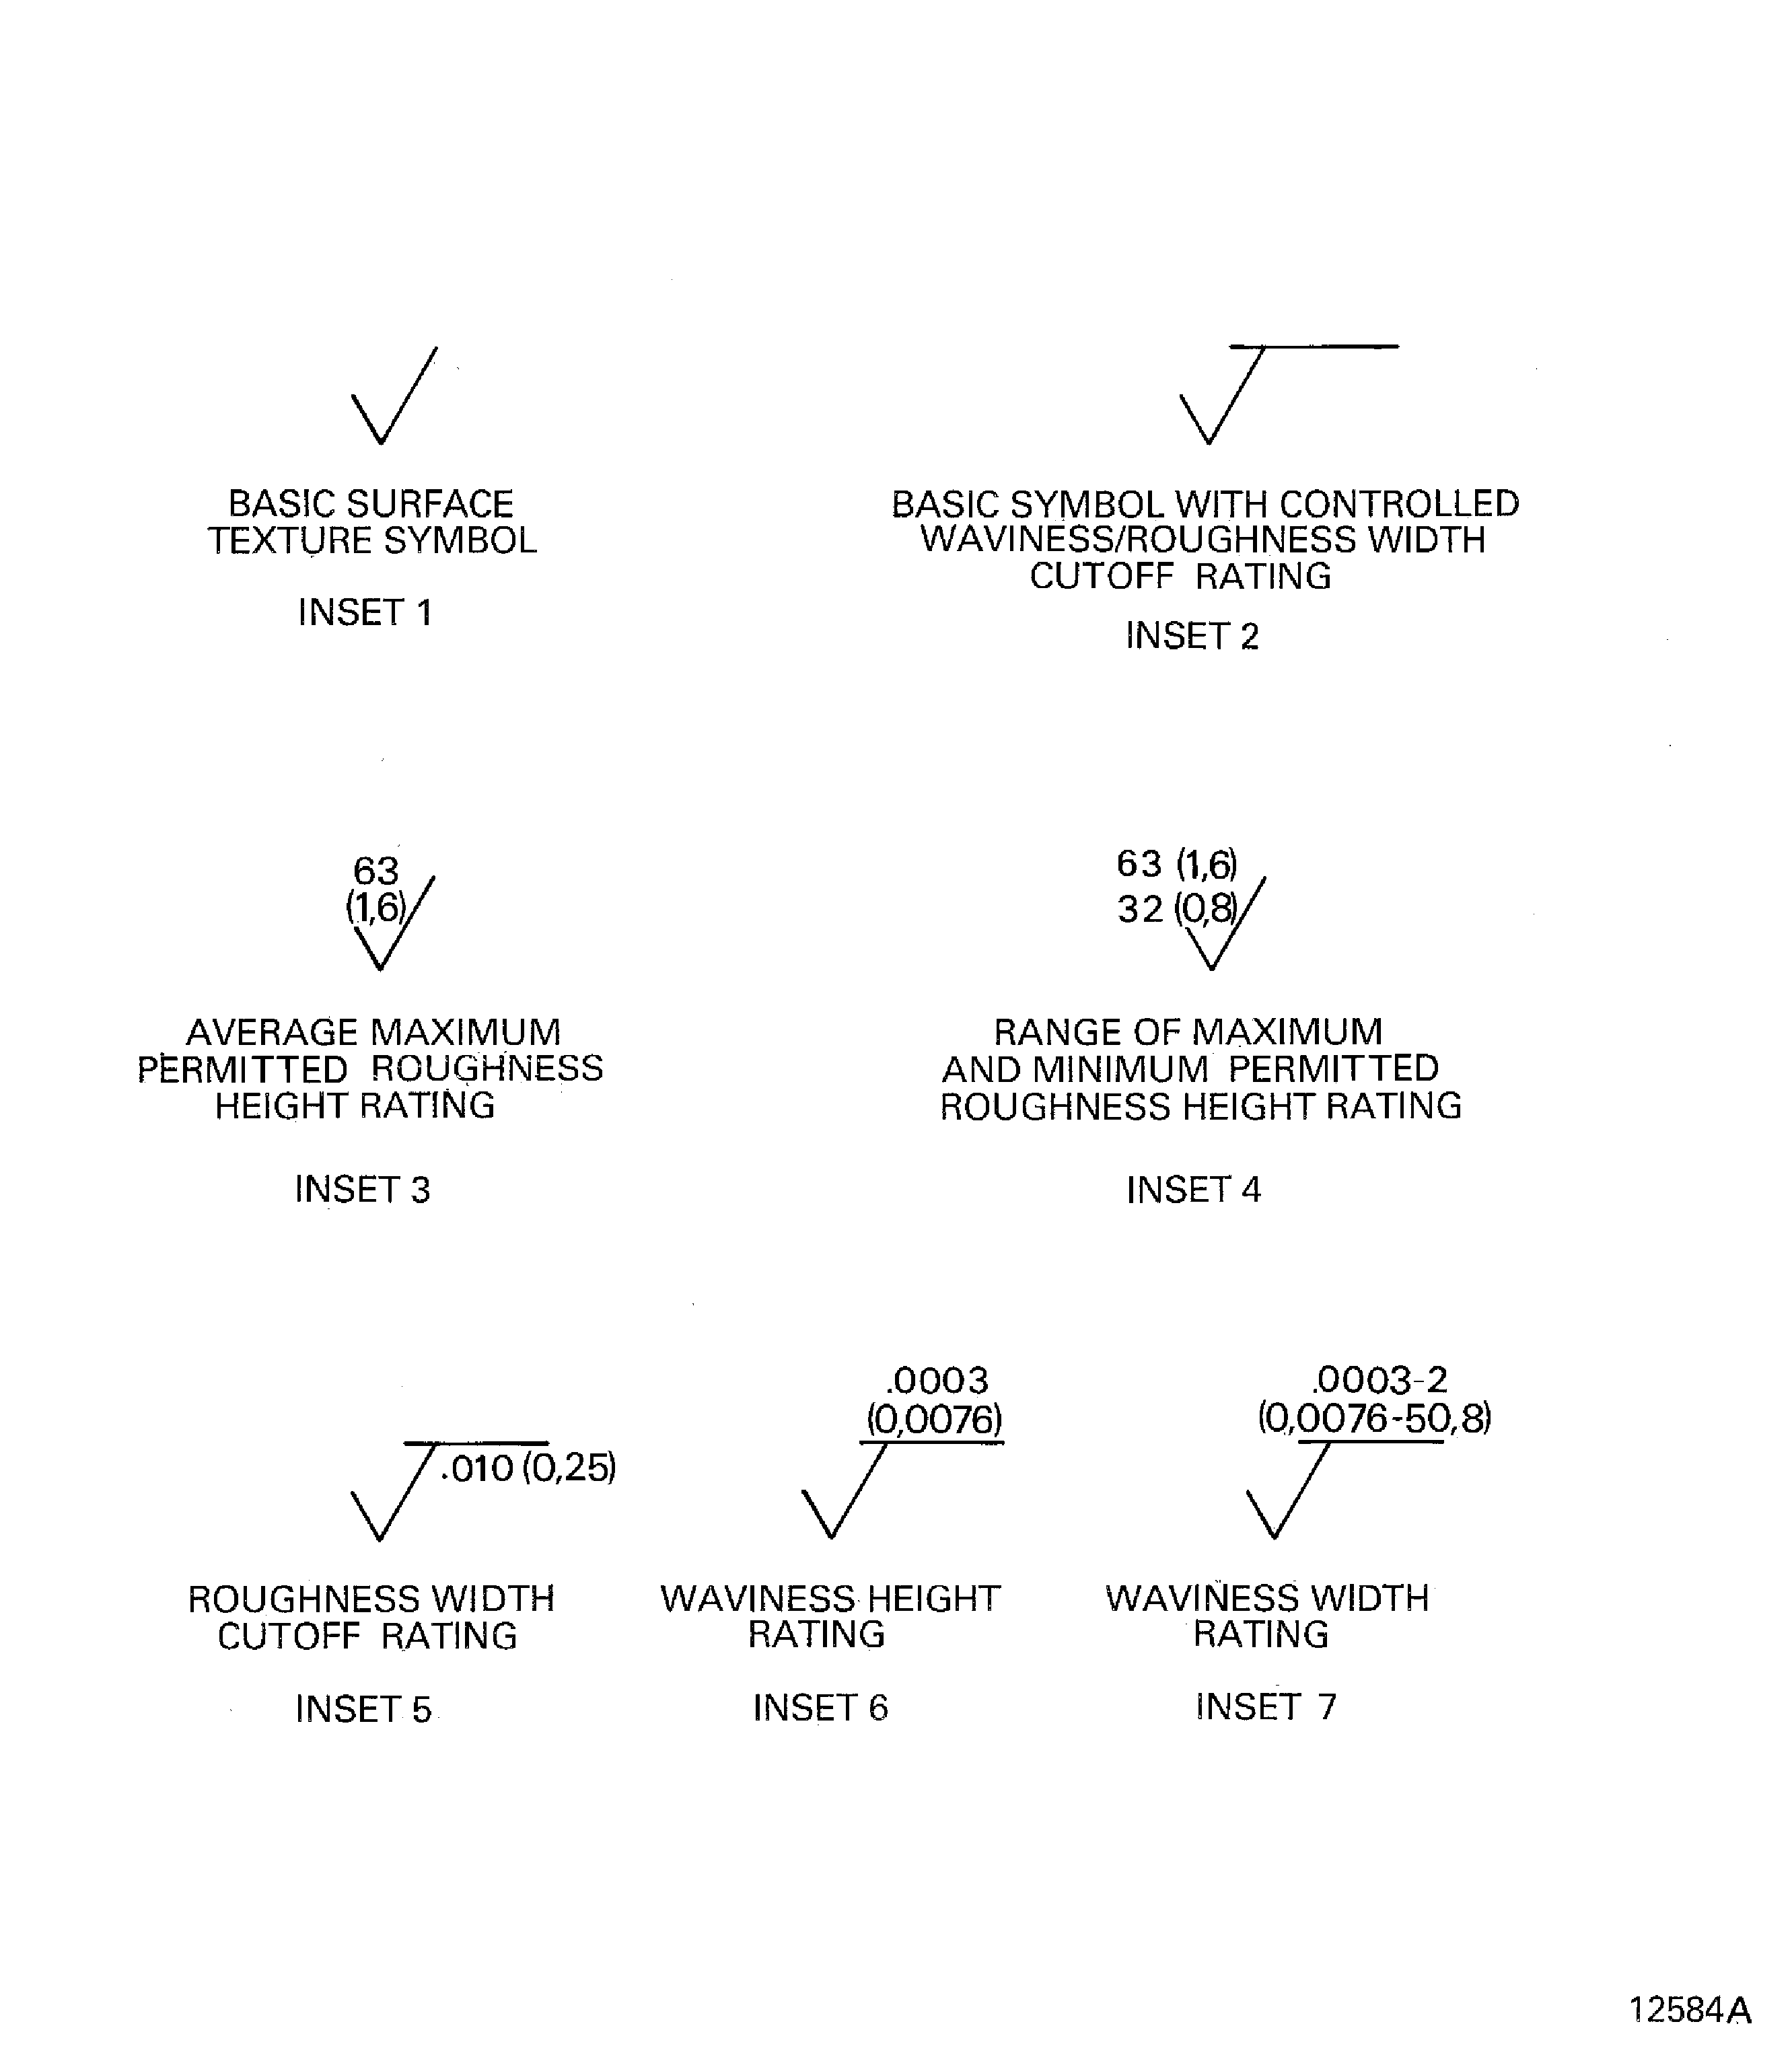
Figure: Surface texture lay symbols
Surface texture lay symbols
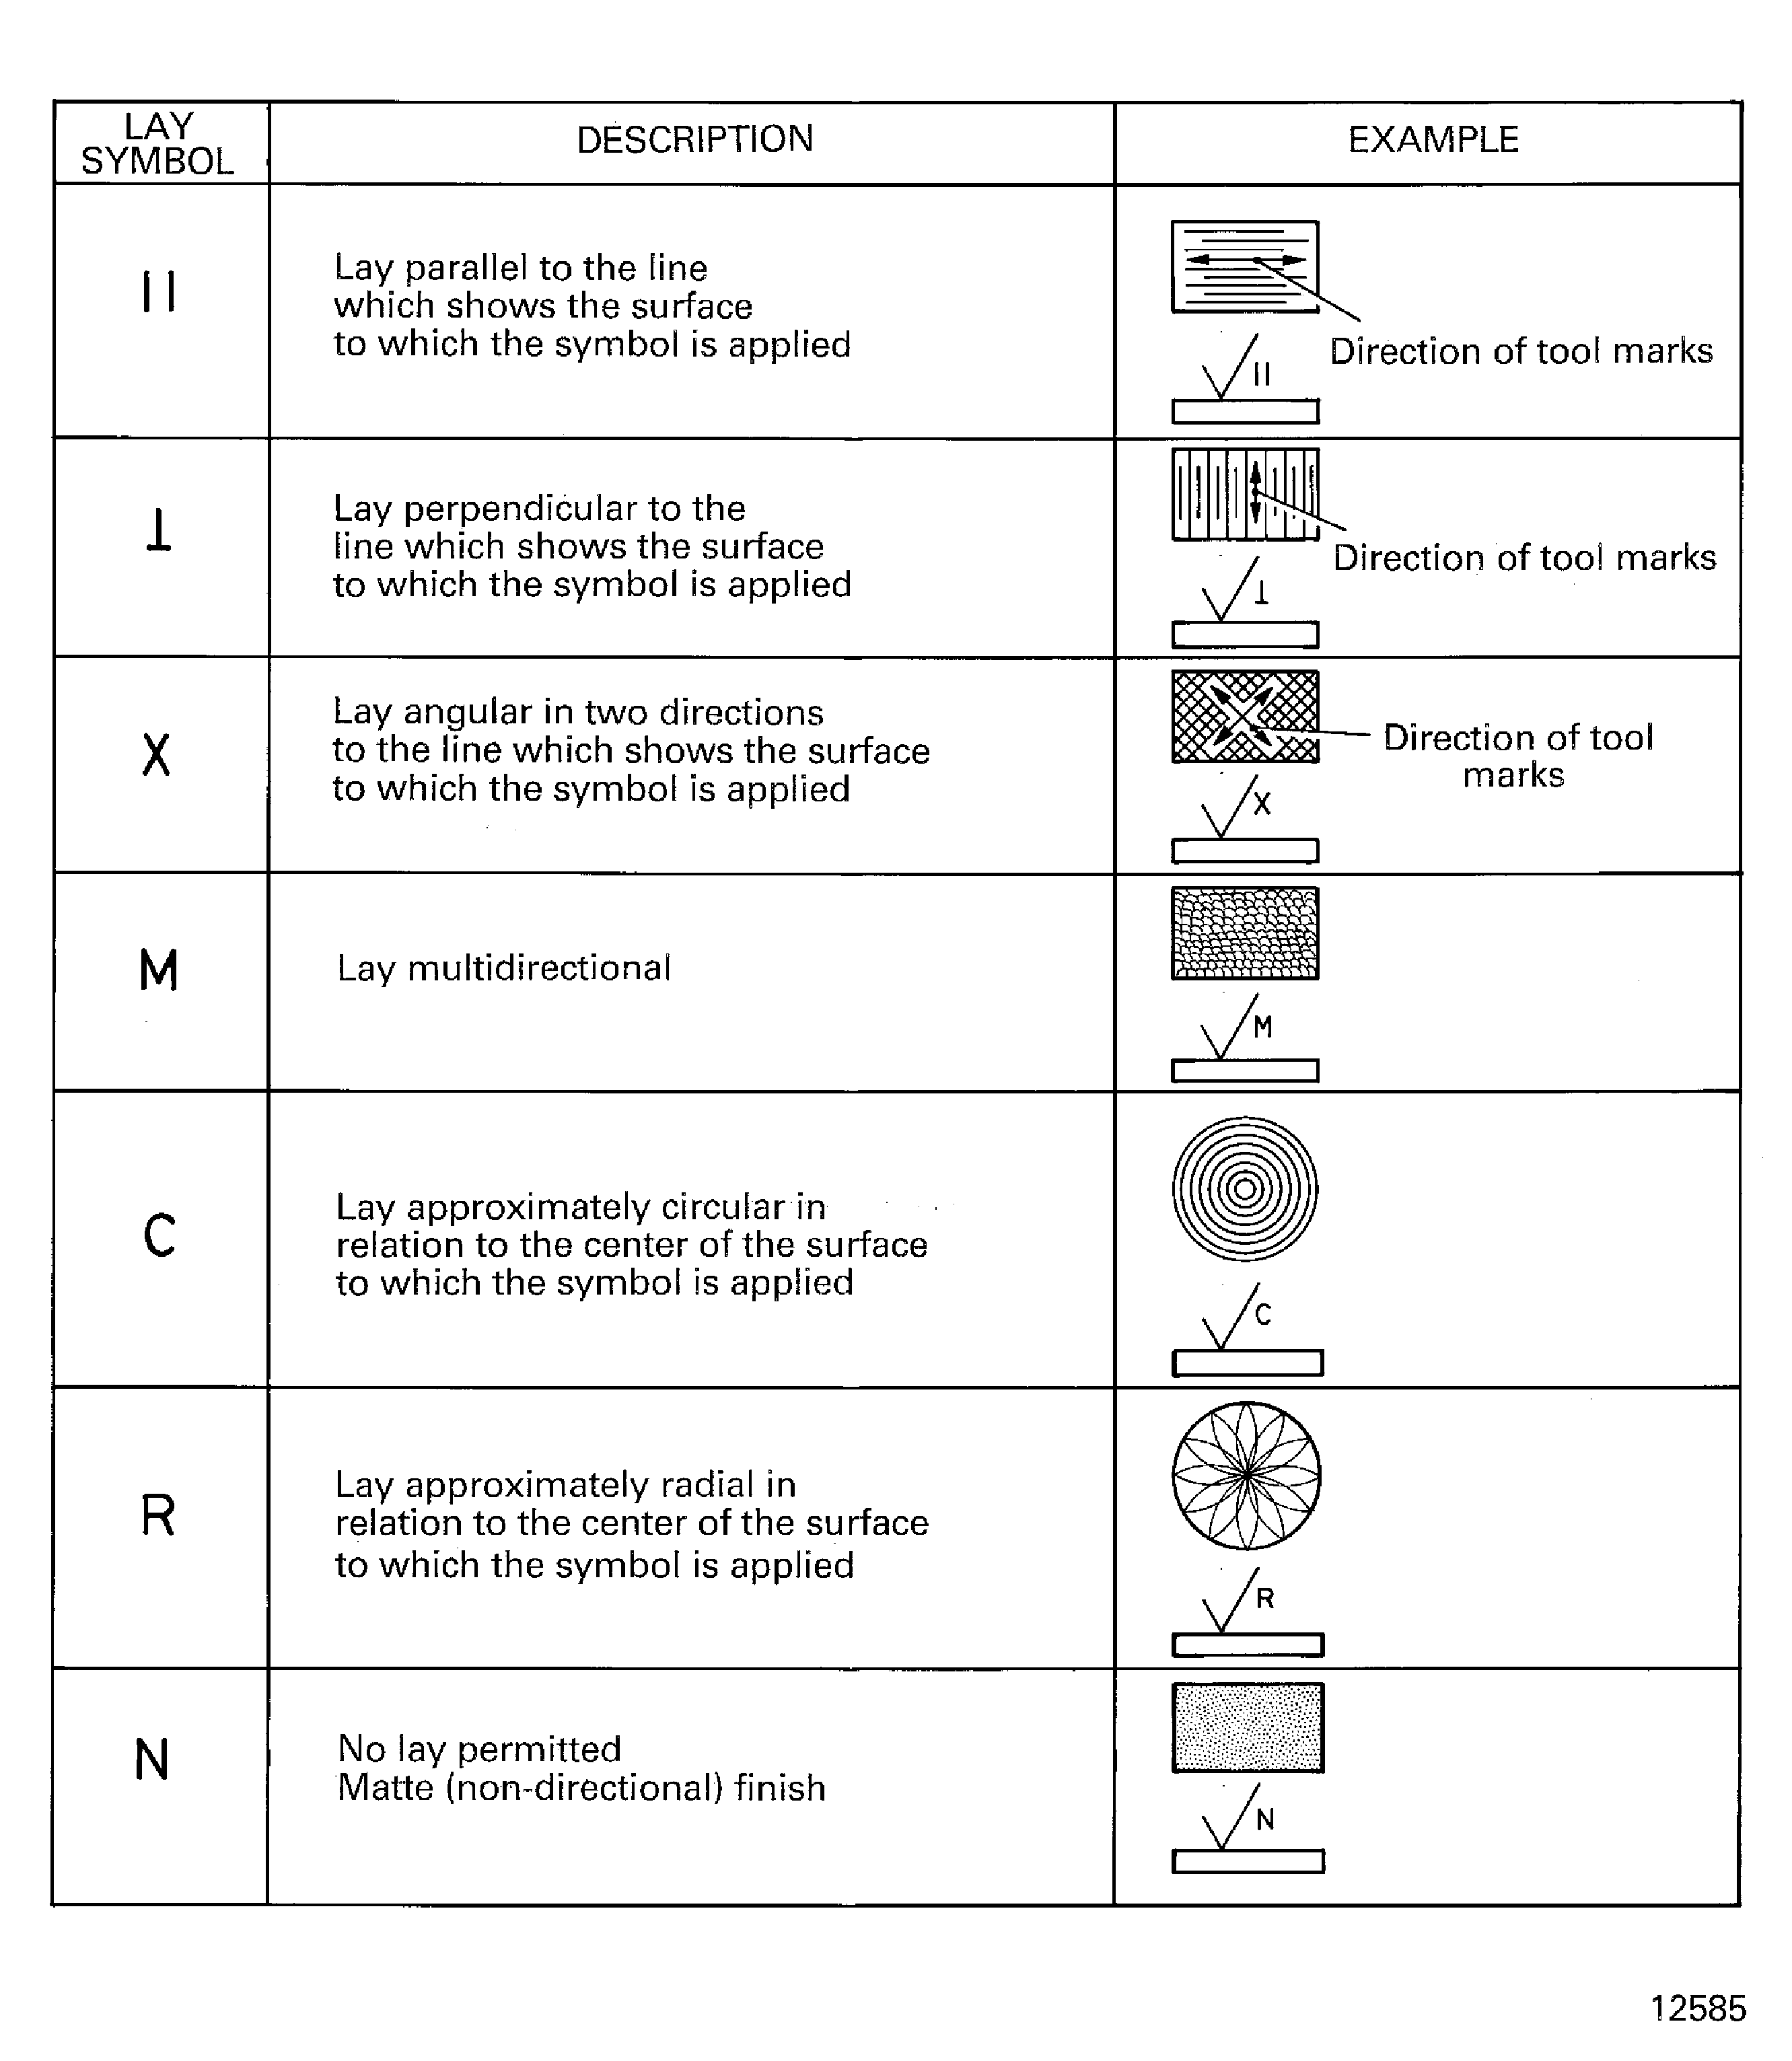
Figure: The use of surface texture symbols
The use of surface texture symbols
