TASK 70-35-23-320-501 Non-Mechanical Metal Removal

DMC:V2500-00-70-35-23-00A-653A-D|Issue No:001.00|Issue Date:2013-03-20

Export Control

EAR Export Classification: Not subject to the EAR per 15 C.F.R. Chapter 1, Part 734.3(b)(3), except for the following Service Bulletins which are currently published as EAR Export Classification 9E991: SBE70-0992, SBE72-0483, SBE72-0580, SBE72-0588, SBE72-0640, SBE73-0209, SBE80-0024 and SBE80-0025.

Copyright

© IAE International Aero Engines AG (2001, 2014 - 2021) The information contained in this document is the property of © IAE International Aero Engines AG and may not be copied or used for any purpose other than that for which it is supplied without the express written authority of © IAE International Aero Engines AG. (This does not preclude use by engine and aircraft operators for normal instructional, maintenance or overhaul purposes.).

Applicability

All

Common Information

TASK 70-35-23-320-501 Non-Mechanical Metal Removal

Safety Precautions

Introduction

Electrochemical Metal Removal (ECMR) and Electrodischarge Metal Removal (EDMR) Processes

Laser Beam Metal (LBMR) Removal Process

Metallurgical Sample Preparation

Acceptance Standards for EDMR

Acceptance Standards for ECMR

Acceptance Standards for EBMR

Acceptance Standards for LBMR

Chemical Milling Acceptance Standards

SUBTASK 70-35-23-290-005

Preliminary Requirements

Pre-Conditions

NONE

Support Equipment

NONE

Consumables, Materials and Expendables

NameManufacturerPart Number / IdentificationQuantityRemark
CoMat 01-007 ETHYL ALCOHOL C2H5OH (DENATURED)LOCALCoMat 01-007
CoMat 01-250 CUPRIC CHLORIDE CuCl2LOCALCoMat 01-250
CoMat 01-320 SULFURIC ACIDLOCALCoMat 01-320
CoMat 01-327 NITRIC ACIDLOCALCoMat 01-327
CoMat 01-346 SULFURIC ACIDLOCALCoMat 01-346
CoMat 01-357 HYDROFLUORIC ACID (HF)LOCALCoMat 01-357
CoMat 01-363 HYDROCHLORIC ACID (HCl),REAGENT GRADELOCALCoMat 01-363
CoMat 01-464 OXALIC ACIDLOCALCoMat 01-464
CoMat 01-465 CUPRIC CHLORIDELOCALCoMat 01-465
CoMat 03-452 THERMOPLASTIC MOUNTINGPOWDER"LUCITE"5U637CoMat 03-452
CoMat 05-082 WATERPROOF SILICON CARBIDE44197CoMat 05-082
CoMat 05-090 DIAMOND PASTE09410CoMat 05-090
CoMat 05-091 DIAMOND PASTE09410CoMat 05-091
CoMat 05-165 WATERPROOF SILIC. CARB.ABRAS. PAPERLOCALCoMat 05-165
CoMat 08-113 EPOXY5U637CoMat 08-113

Spares

NONE

Safety Requirements

WARNING

IT IS THE RESPONSIBILITY OF THE OPERATOR TO OBTAIN AND OBSERVE THE MANUFACTURER'S MATERIAL SAFETY DATA SHEETS FOR CONSUMABLE MATERIALS. THESE CONTAIN INFORMATION SUCH AS HAZARDOUS INGREDIENTS, PHYSICAL/CHEMICAL CHARACTERISTICS, FIRE, EXPLOSION, REACTIVITY, HEALTH HAZARD DATA, PRECAUTIONS FOR SAFE HANDLING, USE AND CONTROL MEASURES. IT IS ALSO THE RESPONSIBILITY OF THE OPERATOR TO TAKE LOCAL REGULATIONS IN TO CONSIDERATION.

WARNING

THE OPERATORS MUST ALWAYS WEAR THE PROTECTIVE CLOTHING SUPPLIED, WHICH INCLUDES RUBBER GLOVES AND EYE PROTECTION.

WARNING

IF ACID SOLUTIONS GET INTO THE EYES FULLY FLUSH, WITH CLEAN WATER, THEN GET MEDICAL TREATMENT IMMEDIATELY.

WARNING

EVERY POSSIBLE CARE MUST BE TAKEN TO AVOID THE SOLUTION COMING INTO CONTACT WITH THE EYES OR BARE SKIN. PROTECTIVE CLOTHING INCLUDING RUBBER GLOVES AND GOGGLES MUST BE PROVIDED FOR THE OPERATORS WHEN PREPARING AND USING THE NITRIC ACID SOLUTION. RUBBER GLOVES MUST BE CHECKED REGULARLY FOR PIN HOLES AND REPLACED IF NECESSARY. IF SKIN BECOMES CONTAMINATED WITH THE SOLUTION IT MUST BE RINSED WITH COPIOUS AMOUNTS OF CLEAN RUNNING WATER.
ALL BURNS, HOWEVER SLIGHT, MUST BE TREATED AT THE NEAREST MEDICAL DEPARTMENT OR FIRST AID POST. THE MEDICAL PERSONNEL MUST BE TOLD WHICH SOLUTION (THE ACIDS INVOLVED) HAS CAUSED THE BURN.

Procedure

    1. SUBTASK 70-35-23-860-001 Safety Precautions

      1. WARNING

        IT IS THE RESPONSIBILITY OF THE OPERATOR TO OBTAIN AND OBSERVE THE MANUFACTURER'S MATERIAL SAFETY DATA SHEETS FOR CONSUMABLE MATERIALS. THESE CONTAIN INFORMATION SUCH AS HAZARDOUS INGREDIENTS, PHYSICAL/CHEMICAL CHARACTERISTICS, FIRE, EXPLOSION, REACTIVITY, HEALTH HAZARD DATA, PRECAUTIONS FOR SAFE HANDLING, USE AND CONTROL MEASURES. IT IS ALSO THE RESPONSIBILITY OF THE OPERATOR TO TAKE LOCAL REGULATIONS IN TO CONSIDERATION.

        WARNING

        THE OPERATORS MUST ALWAYS WEAR THE PROTECTIVE CLOTHING SUPPLIED, WHICH INCLUDES RUBBER GLOVES AND EYE PROTECTION.

        WARNING

        IF ACID SOLUTIONS GET INTO THE EYES FULLY FLUSH, WITH CLEAN WATER, THEN GET MEDICAL TREATMENT IMMEDIATELY.

        General.

        1. Strong acid solutions.

        2. WARNING

          EVERY POSSIBLE CARE MUST BE TAKEN TO AVOID THE SOLUTION COMING INTO CONTACT WITH THE EYES OR BARE SKIN. PROTECTIVE CLOTHING INCLUDING RUBBER GLOVES AND GOGGLES MUST BE PROVIDED FOR THE OPERATORS WHEN PREPARING AND USING THE NITRIC ACID SOLUTION. RUBBER GLOVES MUST BE CHECKED REGULARLY FOR PIN HOLES AND REPLACED IF NECESSARY. IF SKIN BECOMES CONTAMINATED WITH THE SOLUTION IT MUST BE RINSED WITH COPIOUS AMOUNTS OF CLEAN RUNNING WATER.
          ALL BURNS, HOWEVER SLIGHT, MUST BE TREATED AT THE NEAREST MEDICAL DEPARTMENT OR FIRST AID POST. THE MEDICAL PERSONNEL MUST BE TOLD WHICH SOLUTION (THE ACIDS INVOLVED) HAS CAUSED THE BURN.

          Safety notices must be placed in a conspicuous place.

        3. Eye-wash bottles and HF burn jelly must be provided as close as possible to the place of work.

    1. SUBTASK 70-35-23-860-002 Introduction

      1. Types of Processes.

        1. Electrochemical Metal Removal and Electrodischarge Metal Removal - IAE 97.

          1. Electrochemical Metal Removal (ECMR).

          2. During this metal removal procedure, a direct current passes between the part (anode) and the shaped tool(s) (cathode) through a suitable electrolyte without sparks, arcs, or high temperature.

          3. This process is the reverse of electroplating in that anodic dissolution removes metal from the part.

          1. Electrodischarge Metal Removal (EDMR).

          2. During this metal removal process, electrical energy discharges between the tool and the part. The resulting sparks vaporize very small craters and erode the tool shape into the part and cause a thin remelted surface.

          3. EDMR takes place in the presence of a flowing dielectric fluid. When wire EDMR is specified, the electrode must be a continuously moving wire and the dielectric fluid must agree with the EDM (Electrodischarge Machine) equipment manufacturer's recommendations.

        1. Chemical Milling - IAE 108.

          1. Chemical Milling.

          2. This process is a nonmechanical metal removal method that uses a carefully controlled acid etch.

        1. Electron Beam Metal Removal and Laser* Beam Metal Removal - IAE 119.

          1. Electron Beam Metal Removal (EBMR).

          2. This process is primarily used as a hole drilling or cutting method, that applies a concentrated electron beam, in one or more pulses of various millisecond durations, on a part.

          3. There is sufficient heat given off in each pulse to partially vaporize the material at the point of concentration. More than one pulse is permitted to produce a hole.

        2. Laser* Beam Metal Removal (LBMR).

          This process is primarily used as a hole drilling or cutting method, that applies concentrated light energy pulses of 0.3 to 1.0 millisecond duration on a part by optical means.

          There is sufficient heat given off in each pulse to not fully vaporize the material at the point of concentration. More than one pulse is permitted to produce a hole.

          *Light Amplification by Stimulated Emission of Radiation.

      1. The application of ECMR, EDMR and LBMR in a repair operation is extremely attractive from the standpoint of cost and convenience. But, because these processes have their limitations, they must not be unconditionally substituted for the routine mechanical stock removal processes. When you apply ECMR, EDMR or LBMR, it is recommended that you get an IAE review and opinion. They must be used only under the specific conditions given in this section. Do not assume that an acceptable application of ECMR, EDMR, or LBMR on a part for one engine model would be acceptable for similar parts on other engine models. Each application must be treated individually. The application requirements for ECMR and EDMR are to be found in Step, and for LBMR in Step.

      2. ECMR, EDMR and LBMR, when applied to many materials, cause a moderate-to-severe reduction in fatigue properties. This decrease is due, in part, to the absence of work hardening and associated remaining compressive stress in the surface which are a result of mechanical machining operations.

        1. In the ECMR process, degradation of fatigue strength can be further increased by preferential attack of grain boundaries in the machined area and outside this area where the charged electrolyte could flow without the benefit of correct masking.

        2. Arc-burning or direct shorting between the electrode and the workpiece (usually due to contamination of the electrolyte), can result in recast material with cracks up to 0.070 inch (1.778 mm) deep.

        1. The EDMR process is characterized by a remelted surface layer typically 0.001 to 0.003 inch (0.026 to 0.076 mm) thick.

        2. This layer usually contains shrinkage cracks, is very rough, and has limited ductility.

        3. Cracks can be up to 0.012 inch (0.305 mm) deep in the base metal.

        4. Untempered martensite in the remelt layers of hardenable steels, such as Type 410 (for example, AMS 5504 and AMS 5613), increases the crack sensitivity.

        5. Various harmful interstitial elements are absorbed by titanium during EDMR and the result is very hard and brittle surfaces.

        6. Austenitic stainless steels absorb carbon during EDMR which combines with chromium and thus limits high temperature usefulness.

        1. The LBMR process is characterized by a remelted surface layer typically 0.0015 to 0.015 inch (0.04 to 0.38 mm) thick.

        2. This layer may contain shrinkage cracks and has limited ductility.

        3. Cracks can be up to 0.005 inch (0.127 mm) deep in the base metal.

        4. Untempered martensite in the remelt layers of hardenable steels, such as Type 410 (for example, AMS 5504 and AMS 5613), increases the crack sensitivity.

        5. Various harmful interstitial elements are absorbed by titanium during LBMR when cutting is not done with the use of inert assist or cover gas. The result is very hard and brittle surfaces.

    1. SUBTASK 70-35-23-860-003 ECMR and EDMR (IAE 97) Process

    2. The recommendations that follow are for the general application of these processes and help in the selection between mechanical stock removal and ECMR and/or EDMR for the repair of the parts.

    3. Unless the surface layer produced by the process is removed (see Step), ECMR and EDMR must not be used on highly stressed parts and rotating parts.

      1. Unless the surface layer produced by the process is removed (see Step), EDMR must not be used on:

      2. Titanium.

      3. Hardenable (Type 410) material.

        1. Wear or rub surfaces, such as:

        2. Vane slots.

        3. Combustion chamber pin holes.

    4. Unless the surface layer produced by the process is removed (see Step), plating and plasma spraying must not be applied over the surfaces prepared by ECMR and, especially, EDMR.

    5. EDMR must not used indiscriminately as a shop process for the removal of tools, such as broken taps and drills, from a part. The removal of the tool from the wall of the hole could cause the EDMR procedure to degrade the wall and reduce the life and/or function of the part.

      1. The use of ECMR and EDMR is approved if the resulting surface layer is essentially removed by one of the methods that follow:

      2. At least 0.010 inch (0.254 mm) is removed by subsequent mechanical machining from any surface so processed, except for wire EDM where 0.004 inch (0.102 mm) must be removed.

      3. Any surface so processed is later consumed by welding.

      1. EDMR Procedure.

      2. Schedules, set up for each part, should be signed and dated by the approved person to prepare the procedure and should be kept at the source for use by the operators who process the parts.

        1. The schedules should contain, as a minimum, a description of and the limits for the procedure parameters that follow:

        2. Power pack.

        3. Frequency.

        4. Current (amperage).

        5. Capacitance.

        6. Dielectric pressure.

        7. Sensitivity.

        8. Gap voltage.

        9. Dielectric type.

        10. Electrode polarity.

        11. Electrode material.

        12. Fixturing.

        1. EDMR procedure must be controlled and meet the conditions of Step Quality Standards, so that there is a limit to the depth of the transformed surface layer and that it will be removed to the amount necessary.

        2. Metallurgical verification of quality should be made before processing actual parts.

        3. Thereafter, testing should be done from time to time, at a frequency sufficient to keep quality continuous. These intervals should be short at first; when satisfactory results are demonstrated on a continuous basis, the test intervals can be made longer.

    1. SUBTASK 70-35-23-860-004 LBMR (IAE 119) Process

      1. The recommendations that follow are for:

      2. General application of this process.

      3. Help in the selection between mechanical stock removal and laser beam metal removal (LBMR) for the repair of parts.

    2. LBMR must not used on rotating parts except for certain blade applications as shown below and on other parts only when the surface layer produced is removed, see Step.

    3. Unless the surface layer produced is removed, see Step, plating and plasma spraying must not be applied over surface prepared by LBMR.

      1. The use of LBMR is approved if the surface layer that results is essentially removed by one the methods that follow:

      2. At least one and one-half times the thickness of the remelt layer and all base material indications are removed mechanically from all surfaces processed by LBMR.

        1. Removal of remelt from the surfaces is not necessary for any of the materials that follow if that cutting was done with the assistance of inert cover gas and the remelt will be fully consumed by a subsequent weld:

        2. 300 Series stainless steel.

        3. Inconel 600.

        4. Inconel 625.

        5. Hastelloy X.

      1. LBMR Procedure.

      2. Schedules, set up for each part, should be signed and dated by the approved person to prepare the procedure and should be kept at the source for use by the operators who process the parts.

        1. The schedules should contain, as a minimum, a description of and the limits for the procedure parameters that follow:

        2. Power pack.

        3. Frequency.

        4. Current (amperage).

        5. Capacitance.

        6. Dielectric pressure.

        7. Sensitivity.

        8. Gap voltage.

        9. Dielectric type.

        10. Electrode polarity.

        11. Electrode material.

        12. Fixturing.

        1. LBMR procedure must be controlled and meet the conditions of Step Quality Standards, so that there is a limit to the depth of the transformed surface layer and that it will be removed to the amount necessary.

        2. Metallurgical verification of the quality procedure should be made before processing the actual parts.

        3. Thereafter, testing should be done from time to time, at a frequency sufficient to keep quality continuous. These intervals should be short at first; when satisfactory results are demonstrated on a continuous basis, the test intervals can be made longer.

    1. SUBTASK 70-35-23-860-006 Metallurgical Sample Preparation - Metal Removal

      1. Sectioning of Specimen.

      2. Section the specimen for testing into a suitable sized piece for mounting. Use a coolant to prevent any change of microstructure due to the specimen becoming hot.

      1. Mounting of Metallographic Specimen.

      2. Mount the metallographic specimen with CoMat 08-113 EPOXY, CoMat 03-452 THERMOPLASTIC MOUNTINGPOWDER"LUCITE" or equivalent mounting compound.

      1. Preparation of Specimen.

      2. Wet grind the specimen manually; go step-by-step from 120 thru 600 grit silicon carbide paper; use CoMat 05-082 WATERPROOF SILICON CARBIDE thru CoMat 05-165 WATERPROOF SILIC. CARB.ABRAS. PAPER.

      3. Final polish first CoMat 05-091 DIAMOND PASTE (6 micron) and then with CoMat 05-090 DIAMOND PASTE (1 micron).

      1. Etching of Specimen.

      2. Etch the polished specimen in any suitable etchant to reveal the structure of the base metal. Electrolytically etch austenitic stainless steels and cobalt base alloys for 10 seconds with 10 percent oxalic acid, or equivalent; see below for make-up of etchants.

        1. Etchant composition used on the specimens illustrated in this procedure (see figures at end of document) are as follows:

        2. NOTE

          Application time for electrolytic etching must not be more than 10 seconds; too much etching of the specimen could result in the masking of defects.

          Oxalic acid, 10 percent (electrolytic):

          100 ml water plus 10 g CoMat 01-464 OXALIC ACID.

        3. Kroll's reagent:

      1. Illustration of Metallographic Features.

      2. Micrographs representative of the metallographic features to be found on samples are to be found at the end of this document. If viewing electronically, the magnification of the image will change if you enlarge or reduce the image size; adjust the magnification accordingly. Take care not view the micrographs and samples at different magnifications.

    1. SUBTASK 70-35-23-290-001 Acceptance Standards for Electrodischarge Metal Removal (EDMR)

      1. For Disks, Gearshafts, Hubs, Rotor Seals, Rotor Spacers, Shafts, Blade Baffles/Tubes, and Blade Retaining Plates.

        1. Surface Irregularity.

          Refer to Figure.

        2. Surface irregularity amplitude up thru 0.0015 inch (0.038 mm) is permitted.

        3. Surface irregularity amplitude greater than 0.0015 inch (0.038 mm) must be examined again.

        1. NOTE

          Remelt depth includes any heat affected area adjacent to recast material.

          Remelt Layer.

          Refer to Figure.

        2. Remelt layer thickness up thru 0.0010 inch (0.025 mm) is permitted.

        3. Remelt layer thickness greater than 0.0010 inch (0.025 mm) up thru 0.0015 inch (0.038 mm) must be examined again.

        4. Remelt layer thickness greater than 0.0015 inch (0.038 mm) must be rejected.

        1. Spark Out.

          Refer to Figure.

        2. Spark out is not permitted.

        3. Spark out depth up thru 0.0008 inch (0.020 mm) must be examined again.

        4. Spark out depth greater than 0.0008 inch (0.020 mm) must be rejected.

        1. Remelt Layer Cracks.

          Refer to Figure.

        2. All cracks in remelt layer must be examined again.

        1. Base Metal and Remelt Cracks.

          Refer to Figure (Base Metal Cracks and Cracked Carbides), and Figure (Cracked Borides).

        2. All base metal cracks must be rejected except on IAE 658 blade baffles where cracks only in carbides or borides (TLP-bonded airfoils) in the base metal are permitted. Remelt separation associated with the cracks in the carbides and borides as permitted.

      1. For the Swirl Guides and Nickel Base Vane Baffles.

        1. Surface Irregularity.

          Refer to Figure.

        2. Surface irregularity amplitude up thru 0.0020 inch (0.051 mm) is permitted.

        3. Surface irregularity amplitude greater than 0.0020 inch (0.051 mm) must be examined again.

          NOTE

          Remelt depth includes any heat affected area adjacent to recast material.
        1. Remelt Layer.

          Refer to Figure.

        2. Remelt layer thickness up thru 0.0015 inch (0.038 mm) is permitted.

        3. Remelt layer thickness greater than 0.0015 inch (0.038 mm) up thru 0.0025 inch (0.064 mm) must be examined again.

        4. Remelt layer thickness greater than 0.0025 inch (0.064 mm) must be rejected.

        1. Spark Out.

          Refer to Figure.

        2. Spark out is not permitted.

        3. Spark out up thru 0.0010 inch (0.025 mm) must be examined again.

        4. Spark out depth greater than 0.0010 inch (0.025 mm) must be rejected.

        1. Remelt Layer Cracks.

          Refer to Figure.

        2. Cracks in the remelt layer are permitted.

        1. Base Metal Cracks.

          Refer to Figure.

        2. All base metal cracks must be rejected.

      1. For the Parts and the Assemblies of Bolts, Nozzle Nuts, Probes, Tierods, and Cobalt Base Vane Baffles.

        1. Surface Irregularity.

          Refer to Figure.

        2. Surface irregularity amplitude up thru 0.0020 inch (0.051 mm) is permitted.

        3. Surface irregularity amplitude greater than 0.0020 inch (0.051 mm) must be examined again.

        1. NOTE

          Remelt depth includes any heat affected area adjacent to recast material.

          Remelt Layer.

          Refer to Figure.

        2. Remelt layer thickness up thru 0.0015 inch (0.038 mm) is permitted.

        3. Remelt layer thickness greater than 0.0015 inch (0.038 mm) up thru 0.0025 inch (0.064 mm) must be examined again.

        4. Remelt layer thickness greater than 0.0025 inch (0.064 mm) must be rejected.

        1. Spark Out.

          Refer to Figure.

        2. Spark out is not permitted.

        3. Spark out up thru 0.0010 inch (0.025 mm) must be examined again.

        4. Spark out depth greater than 0.0010 inch (0.025 mm) must be rejected.

        1. Remelt Layer Cracks.

          Refer to Figure.

        2. Cracks in the remelt layer are permitted.

        1. Base Metal and Remelt Cracks.

          Refer to Figure (Base Metal Cracks and Cracked Carbides), and Figure (Cracked Borides).

        2. Cracks with total length up thru 0.0030 inch (0.076 mm) are permitted.

        3. For vane baffles, cracks only in carbides or borides (TLP bonded airfoils) in the base metal are permitted. Remelt separation associated with these cracked carbides is permitted.

        4. Cracks with total length greater than 0.0030 inch (0.076 mm) up thru 0.0050 inch (0.127 mm) must be examined again.

        5. Cracks with total length greater than 0.0050 inch (0.127 mm) must be rejected.

      1. For All Other Parts and Assemblies.

        This includes Bosses, Braces, Brackets, Bushings, Cases, Case Segments, Clamps, Combustion Chambers, Cones, Covers, Ducts, Duct Segments, Elbows, Flame Holders, Guides, Housing, Liners, Nipples, Nuts, Plates, Pins, Rings, Metal Seal Rings, Nonrotor Seals, Heat Shields, Sleeves Nonrotor Spacers, Bearing Stops, Air Bleed Straps, Struts, Support, Tees, and Tubes.

        1. Surface Irregularity.

          Refer to Figure.

        2. Surface irregularity amplitude up thru 0.0030 inch (0.076 mm) is permitted.

        3. Surface irregularity amplitude greater than 0.0030 inch (0.076 mm) must be examined again.

        1. NOTE

          Remelt depth includes any heat affected area adjacent to recast material.

          Remelt Layer.

          Refer to Figure and Figure.

        2. Remelt layer thickness up thru 0.0015 inch (0.038 mm) is permitted. See Figure.

        3. Remelt layer thickness greater than 0.0015 inch (0.038 mm) up thru 0.0025 inch (0.064 mm) must be examined again.

          Read and report remelt layer as predominant and maximum conditions that permit isolated indications up thru 0.0025 inch (0.064 mm) as an acceptable condition.

          For vane cluster honeycombs, any indication of redeposited remelt must be examined again. Refer to Figure.

        4. Remelt layer thickness greater than 0.0025 inch. (0.064 mm) must be rejected.

        1. Spark Out.

          Refer to Figure.

        2. Spark out is not permitted.

        3. Any spark out must be examined again.

        1. Remelt Layer Cracks.

          Refer to Figure.

        2. Cracks in the remelt layer are permitted.

        1. Base Metal and Remelt Cracks.

          Refer to Figure (Base Metal Crack and Cracked Carbides), and Figure (Cracked Borides).

        2. Cracks in the base metal are not permitted.

        3. All cracks in the base metal must be examined again.

      1. For Stator Shroud Section Edges (OD and ID).

        1. Surface Irregularity.

          Refer to Figure.

        2. All surface irregularity is permitted.

        1. NOTE

          Remelt depth includes any heat affected area adjacent to recast material.

          Remelt Layer.

          Refer to Figure.

        2. Remelt layer thickness up thru 0.0040 inch (0.0102 mm) is acceptable.

        3. Remelt layer thickness greater than 0.0040 inch (0.0102 mm) must be examined again.

        1. Spark Out.

          Refer to Figure.

        2. Spark out is permitted.

        1. Remelt Layer Cracks.

          Refer to Figure.

        2. All remelt layer cracks are permitted.

        1. Base Metal and Remelt Cracks.

          Refer to Figure (Base Metal Cracks and Cracked Carbides), and Figure (Cracked Borides).

        2. Cracks with a total length up thru 0.0015 inch (0.038 mm) are permitted.

        3. Cracks with a total length greater than 0.0015 inch (0.038 mm) must be examined again.

      1. NOTE

        For holes where LBMR is specifically identified as an acceptable alternative to EDMR, it is permitted to evaluate EDMR holes to the LBMR Quality Standards (refer to LMBR Acceptance Standards for holes in Single Crystal and Directionally Solidified Turbine Blades) as an alternative to the EDMR Quality Standards.

        NOTE

        Surface irregularity measurement is applicable only to the attached remelt layer and is to include redeposited remelt particles securely bonded to the attached remelt layer. See Figure Figure 8A. Surface irregularity is not applicable to turbine airfoil and platform cooling holes.

        For Blades.

        1. Surface Irregularity.

          Refer to Figure and Figure.

        2. Surface irregularity amplitude up thru 0.0050 inch (0.127 mm) is permitted.

        3. Surface irregularity amplitude greater than 0.0050 inch (0.127 mm) must be examined again.

        1. Spark Out.

          Refer to Figure.

        2. Spark out depth up thru 0.0008 inch (0.020 mm) is permitted.

        3. Spark out depth greater than 0.0008 inch (0.020 mm) must be rejected.

        1. Remelt Layer Cracks.

          Refer to Figure.

        2. All remelt layer cracks must be rejected. Cracks in re-deposited remelt particles, which include those that are securely bonded to the attached remelt layer, are permitted.

        1. Base Metal and Remelt Cracks.

          Refer to Figure (Base Metal Cracks and Cracked Carbides), and Figure (Cracked Borides) and Figure 7A (Crack in eutectic gamma prime).

        2. All base metal cracks must be rejected.xcept isolated cracks in attached remelt layer of holes in first stage HPT blades are permitted. For turbine blades, occasional cracks only in carbides and/or associated with eutectic gamma prime in IAE 1480, IAE 1440, and IAE 1499 and commercial blade applications of IAE 1484 are also permitted. (See Figures 6, 7, and 7A).

        1. NOTE

          Remelt depth includes any heat affected area adjacent to recast material.

          Remelt Layer plus Re-deposited Remelt Particles.

          Refer to Figure (Surface Irregularity) and Figure (Remelt Layer).

          1. A depth up thru 0.0055 inch (0.140 mm) of the remelt layer plus re-deposited remelt particles is permitted.

            1. For unalloyed brass (Cu-Zn) or tungsten electrode material, acceptable dimensions of remelt particles are as follows:

            2. When the ratio of particle length to thickness (that is, the aspect ratio) is less than 2:1, particles must be less than or equal to 0.003 inch (0.076 mm) maximum diameter.

            3. When the ratio of particle length to thickness (that is, the aspect ratio) is greater than 2:1, particles must be less than or equal to 0.003 inch (0.076 mm) thickness.

          2. For alloyed brass (Cu-Zn) or copper electrode material, any shape or size particle is permitted.

        2. A depth greater than 0.0055 inch (0.140 mm) of the remelt layer plus re-deposited remelt particles must be rejected.

      1. NOTE

        Surface irregularity measurement is applicable only to the attached remelt layer and is to include redeposited remelt particles securely bonded to the attached remelt layer. See Figure Figure 8A. Surface irregularity is not applicable to turbine airfoil and platform cooling holes.

        For Nickel Base Vanes (Other than IAE 655).

        1. Surface Irregularity.

          Refer to Figure and Figure.

        2. Surface irregularity amplitude up thru 0.0050 inch (0.127 mm) is permitted.

        3. Surface irregularity amplitude greater than 0.0050 inch (0.127 mm) must be rejected.

        1. Spark Out.

          Refer to Figure.

        2. Spark out depth up thru 0.0010 inch (0.025 mm) is permitted.

        3. Spark out depth greater than 0.0010 inch (0.025 mm) must be rejected.

        1. Remelt Layer Cracks.

          See Figure.

        2. Cracks in remelt layer are permitted.

        1. Base Metal and Remelt Cracks.

          Refer to Figure (Remelt Cracks and Cracked Carbides), and Figure (Cracked Borides) and 7A (Crack in eutectic gamma prime).

        2. All base metal cracks must be rejected except on IAE 1447 vanes where cracks in carbides or borides (TLP-bonded airfoils) in the base metal are permitted. Occasional cracks in carbides and/or associated with eutectic gamma prime in IAE 1480 and IAE 1440, and commercial vane applications of IAE 1484 and IAE 1426 are also acceptable. See Figures 6, 7, and 7A.

        3. Remelt separation associated with the cracks in the carbides are permitted.

        1. NOTE

          Remelt depth includes any heat affected area adjacent to recast material.

          Remelt Layer plus Re-deposited Remelt Particles.

          Refer to Figure and Figure.

          1. A depth up thru 0.0070 inch (0.178 mm) of the remelt layer plus re-deposited remelt particles is permitted.

            1. For unalloyed brass (Cu-Zn) or tungsten electrode material, acceptable dimensions of remelt particles are as follows:

            2. When the ratio of particle length to thickness (that is, the aspect ratio) is less than 2:1, particles must be less than or equal to 0.003 inch (0.076 mm) maximum diameter.

            3. When the ratio of particle length to thickness (that is, the aspect ratio) is greater than 2:1, particles must be less than or equal to 0.003 inch (0.076 mm) thickness.

          2. For alloyed brass (Cu-Zn) or copper electrode material, any shape or size particle is permitted.

        2. A depth greater than 0.0070 inch (0.178 mm) of the remelt layer plus re-deposited remelt particles must be rejected.

      1. For IAE 655 Vanes, Cobalt Base Castings.

        1. NOTE

          Surface irregularity measurement is applicable only to the attached remelt layer and is to include redeposited remelt particles securely bonded to the attached remelt layer. See Figure Figure 8A. Surface irregularity is not applicable to turbine airfoil and platform cooling holes.

          Surface Irregularity.

          Refer to Figure and Figure.

        2. Surface irregularity amplitude up thru 0.0050 inch (0.127 mm) are permitted.

        3. Surface irregularity amplitude greater than 0.0050 inch (0.127 mm) must be rejected.

        1. Spark Out.

          Refer to Figure.

        2. Spark out depth up thru 0.0010 inch (0.025 mm) is permitted.

        3. Spark out depth greater than 0.0010 inch (0.025 mm) must be rejected.

        1. Remelt Layer Cracks.

          Refer to Figure.

        2. Cracks in remelt layer are permitted.

        1. Base Metal and Remelt Cracks.

          Refer to Figure (Remelt Cracks and Cracked Carbides), and Figure (Cracked Borides and Crack in eutectic gamma prime).

        2. Cracks up thru 0.0030 inch (0.076 mm) in length are permitted.

        3. Cracks greater than 0.0030 inch (0.076 mm) in length must be rejected.

        1. NOTE

          Remelt depth includes any heat affected area adjacent to recast material.

          Remelt Layer plus Re-deposited Remelt Particles.

          Refer to Figure and Figure.

        2. A depth up thru 0.0070 inch (0.178 mm) of the remelt layer plus re-deposited remelt particles is permitted.

        3. A depth greater than 0.0070 inch (0.178 mm) of the remelt layer plus re-deposited remelt particles must be rejected.

    1. SUBTASK 70-35-23-290-002 Acceptance Standards for Electrochemical Metal Removal (ECMR)

      1. For Disks, Gearshafts, Hubs, Rotor Seals, Rotor Spacers and Shafts.

        1. Surface Irregularity.

          Refer to Figure and Figure .

        2. Surface irregularity amplitude (see Figure) up thru 0.0008 inch (0.020 mm) is permitted. Ignore a smut level as shown in Figure.

        3. Surface irregularity amplitude (see Figure) greater than 0.0008 inch (0.020 mm) must be examined again.

        1. Intergranular Attack.

          Refer to Figure.

        2. Intergranular attack up thru 0.0004 inch (0.0102 mm) in depth is permitted.

        3. Intergranular attack greater than 0.0004 inch. (0.0102 mm) up thru 0.0008 inch (0.020 mm) in depth must be examined again.

        4. Intergranular attack greater than 0.0008 inch (0.020 mm) in depth must be rejected.

        1. Selective Attack.

          Refer to Figure.

        2. Selective attack up thru 0.0004 inch (0.010 mm) in depth is permitted.

        3. Selective attack greater than 0.0004 inch (0.010 mm) up thru 0.0008 inch (0.020 mm) in depth must be examined again.

        4. Selective attack greater than 0.0008 inch (0.020 mm) in depth must be rejected.

        1. Phased Protrusion (Applicable to Castings Only).

          Refer to Figure.

        2. Phased protrusion up thru 0.0004 inch (0.010 mm) in depth is permitted.

        3. Phased protrusion greater than 0.0004 inch (0.010 mm) in depth up thru 0.0008 inch (0.020 mm) must be examined again.

        4. Phased protrusion greater than 0.0008 inch (0.020 mm) must be rejected.

        1. Spark Out.

          Refer to Figure.

        2. All spark out must be examined again.

      1. For Blades, Blade Baffles, Clevises, Swirl Guides, Root Wedges and Blade Retaining Plates.

        1. Surface Irregularity.

          Refer to Figure and Figure.

        2. NOTE

          The presence of smut on or in the vicinity of any ECMR surface of the blade to be subsequently coated must be re-evaluated.

          Surface irregularity amplitude (see Figure) up thru 0.0015 inch (0.038 mm) is permitted. Ignore a smut level as shown in Figure.

        3. Surface irregularity amplitude (see Figure) greater than 0.0015 inch (0.038 mm) must be examined again.

        1. Intergranular Attack.

          Refer to Figure.

        2. Intergranular attack up thru 0.0004 inch (0.010 mm) in depth is permitted.

        3. Intergranular attack greater than 0.0004 inch (0.010 mm) up thru 0.0008 inch (0.020 mm) in depth must be examined again.

        4. Intergranular attack greater than 0.0008 inch (0.020 mm) in depth must be rejected.

        1. Selective Attack.

          Refer to Figure.

        2. Selective attack up thru 0.0004 inch (0.010 mm) in depth or up thru 0.0010 inch (0.025 mm) in the case of IAE 1422 blades is permitted.

        3. Selective attack greater than 0.0004 inch (0.010 mm) up thru 0.0008 inch (0.020 mm) in depth or greater than 0.0010 inch (0.025 mm) in depth in the case of IAE 1422 blades must be examined again.

        4. Selective attack greater than 0.0008 inch (0.020 mm) in depth or greater than 0.0030 inch (0.076 mm) in depth in the case of IAE 1422 blades must be rejected.

        1. Phased Protrusion (Applicable to Castings Only).

          Refer to Figure.

        2. Phased protrusion up thru 0.0015 inch (0.038 mm) in depth is permitted.

        3. Phased protrusion greater than 0.0015 inch (0.038 mm) in depth up thru 0.0020 inch (0.051 mm) must be examined again.

        4. Phased protrusion greater than 0.0020 inch (0.051 mm) must be rejected.

        1. Spark Out.

          Refer to Figure.

        2. All spark out must be examined again.

      1. For Parts and Assemblies of Bolts, Nozzle Nuts, Probes, Tierods, Vanes, and Vane Baffles.

        1. Surface Irregularity.

          Refer to Figure and Figure.

        2. Surface irregularity amplitude (see Figure) up thru 0.0015 inch (0.038 mm) is permitted. Ignore smut on or in the vicinity of any surface of a vane to be subsequently coated, see Figure.

        3. Surface irregularity amplitude (see Figure) greater than 0.0015 inch (0.038 mm) must be examined again.

        1. Intergranular Attack.

          Refer to Figure.

        2. Intergranular attack up thru 0.0010 inch (0.025 mm) in depth is permitted.

        3. Intergranular attack greater than 0.0010 inch (0.025 mm) up thru 0.0030 inch (0.076 mm) in depth must be examined again.

        4. Intergranular damage greater than 0.0030 inch (0.076 mm) in depth must be rejected.

        1. Selective Attack.

          Refer to Figure.

        2. Selective attack up thru 0.0010 inch (0.025 mm) in depth are permitted.

        3. Selective attack greater than 0.0010 inch (0.025 mm) up thru 0.0030 inch (0.076 mm) in depth must be examined again.

        4. Selective attack greater than 0.0030 inch (0.076 mm) in depth must be rejected.

        1. Phased Protrusion (Applicable to Castings Only).

          Refer to Figure.

        2. Phased protrusion up thru 0.0015 inch (0.038 mm) in depth are permitted.

        3. Phased protrusion greater than 0.0015 inch (0.038 mm) in depth up thru 0.0020 inch. (0.051 mm) must be examined again.

        4. Phased protrusion greater than 0.0020 inch (0.051 mm) must be rejected.

        1. Spark Out.

          Refer to Figure.

        2. All spark out must be examined again.

      1. For All Other Parts and Assemblies.

        This includes Bosses, Braces, Brackets, Bushings, Cases, Case Segments, Clamps, Combustion Chambers, Cones, Covers, Ducts, Duct Segments, Elbows, Flame Holders, Guides, Housings, Liners, Nipples, Nuts, Plates, Pins, Rings, Metal Seal Rings, Nonrotor Seals, Heat Shields, Sleeves, Nonrotor Spacers, Bearing Stops, Air Bleed Straps, Struts, Supports, Tees, and Tubes.

        1. Surface Irregularity.

          Refer to Figure and Figure.

        2. Surface irregularity amplitude (see Figure) up thru 0.0030 inch (0.076 mm) is permitted. Ignore a smut layer similar to Figure.

        3. Surface irregularity amplitude (see Figure) greater than 0.0030 inch (0.076 mm) up thru 0.0060 inch (0.152 mm) must be examined again.

        4. Surface irregularity amplitude (see Figure) greater than 0.0060 inch (0.152 mm) must be rejected.

        1. Intergranular Attack.

          Refer to Figure.

        2. Intergranular attack up thru 0.0015 inch. (0.038 mm) in depth is permitted.

        3. Intergranular attack greater than 0.0015 inch (0.038 mm) up thru 0.0030 inch (0.076 mm) in depth must be examined again.

        4. Intergranular attack up thru 0.0030 inch (0.076 mm) in depth must be rejected.

        1. Selective Attack.

          Refer to Figure.

        2. Selective attack up thru 0.0015 inch (0.038 mm) in depth is permitted.

        3. Selective attack greater than 0.0015 inch (0.038 mm) up thru 0.0030 inch (0.076 mm) in depth must be examined again.

        4. Selective attack greater than 0.0030 inch (0.076 mm) in depth must be rejected.

        1. Phased Protrusion (Applicable to Castings Only).

          Refer to Figure.

        2. Phased protrusion up thru 0.0020 inch (0.051 mm) is permitted.

        3. Phased protrusion greater than 0.0020 inch (0.051 mm) in depth up thru 0.0030 inch (0.076 mm) must be examined again.

        4. Phased protrusion greater than 0.0030 inch (0.076 mm) must be rejected.

        1. Spark Out.

          Refer to Figure.

        2. All spark out must be examined again.

    1. SUBTASK 70-35-23-290-003 Acceptance Standards for Electron Beam Metal Removal (EBMR)

      1. For All Parts.

        1. Surface Irregularity.

          Refer to Figure.

        2. Surface irregularity amplitude up thru 0.0015 inch (0.038 mm) is permitted.

        3. Surface irregularity amplitude greater than 0.0015 inch (0.038 mm) must be examined again.

        1. Remelt Layer.

          Refer to Figure.

        2. Remelt layer thickness up thru 0.0010 inch (0.025 mm) is permitted.

        3. Remelt layer thickness greater than 0.0010 inch (0.025 mm) up thru 0.0015 inch (0.038 mm) must be examined again.

        4. Remelt layer thickness greater than 0.0015 inch. (0.038 mm) must be rejected.

        1. Spark Out.

          Refer to Figure.

        2. Spark out depth up thru 0.0008 inch (0.020 mm) must be examined again.

        3. Spark out greater than 0.0008 inch (0.020 mm) must be rejected.

        1. Remelt Layer Cracks.

          Refer to Figure.

        2. All remelt layer cracks must be examined again.

        1. Base Metal Cracks.

          Refer to Figure.

        2. All cracks in the base metal must be rejected.

      2. NOTE

        This step is not applicable.

        Cracked Carbides.

      3. NOTE

        This step is not applicable.

        Cracked Borides.

    1. SUBTASK 70-35-23-290-004 Acceptance Standards for Laser Beam Metal Removal (LBMR)

      1. For IAE 647 Vane Platform Holes and Cooling Holes in Cobalt Based Alloys.

        1. Surface Irregularity.

          Refer to Figure.

        2. Surface irregularity of any amplitude is permitted.

        1. NOTE

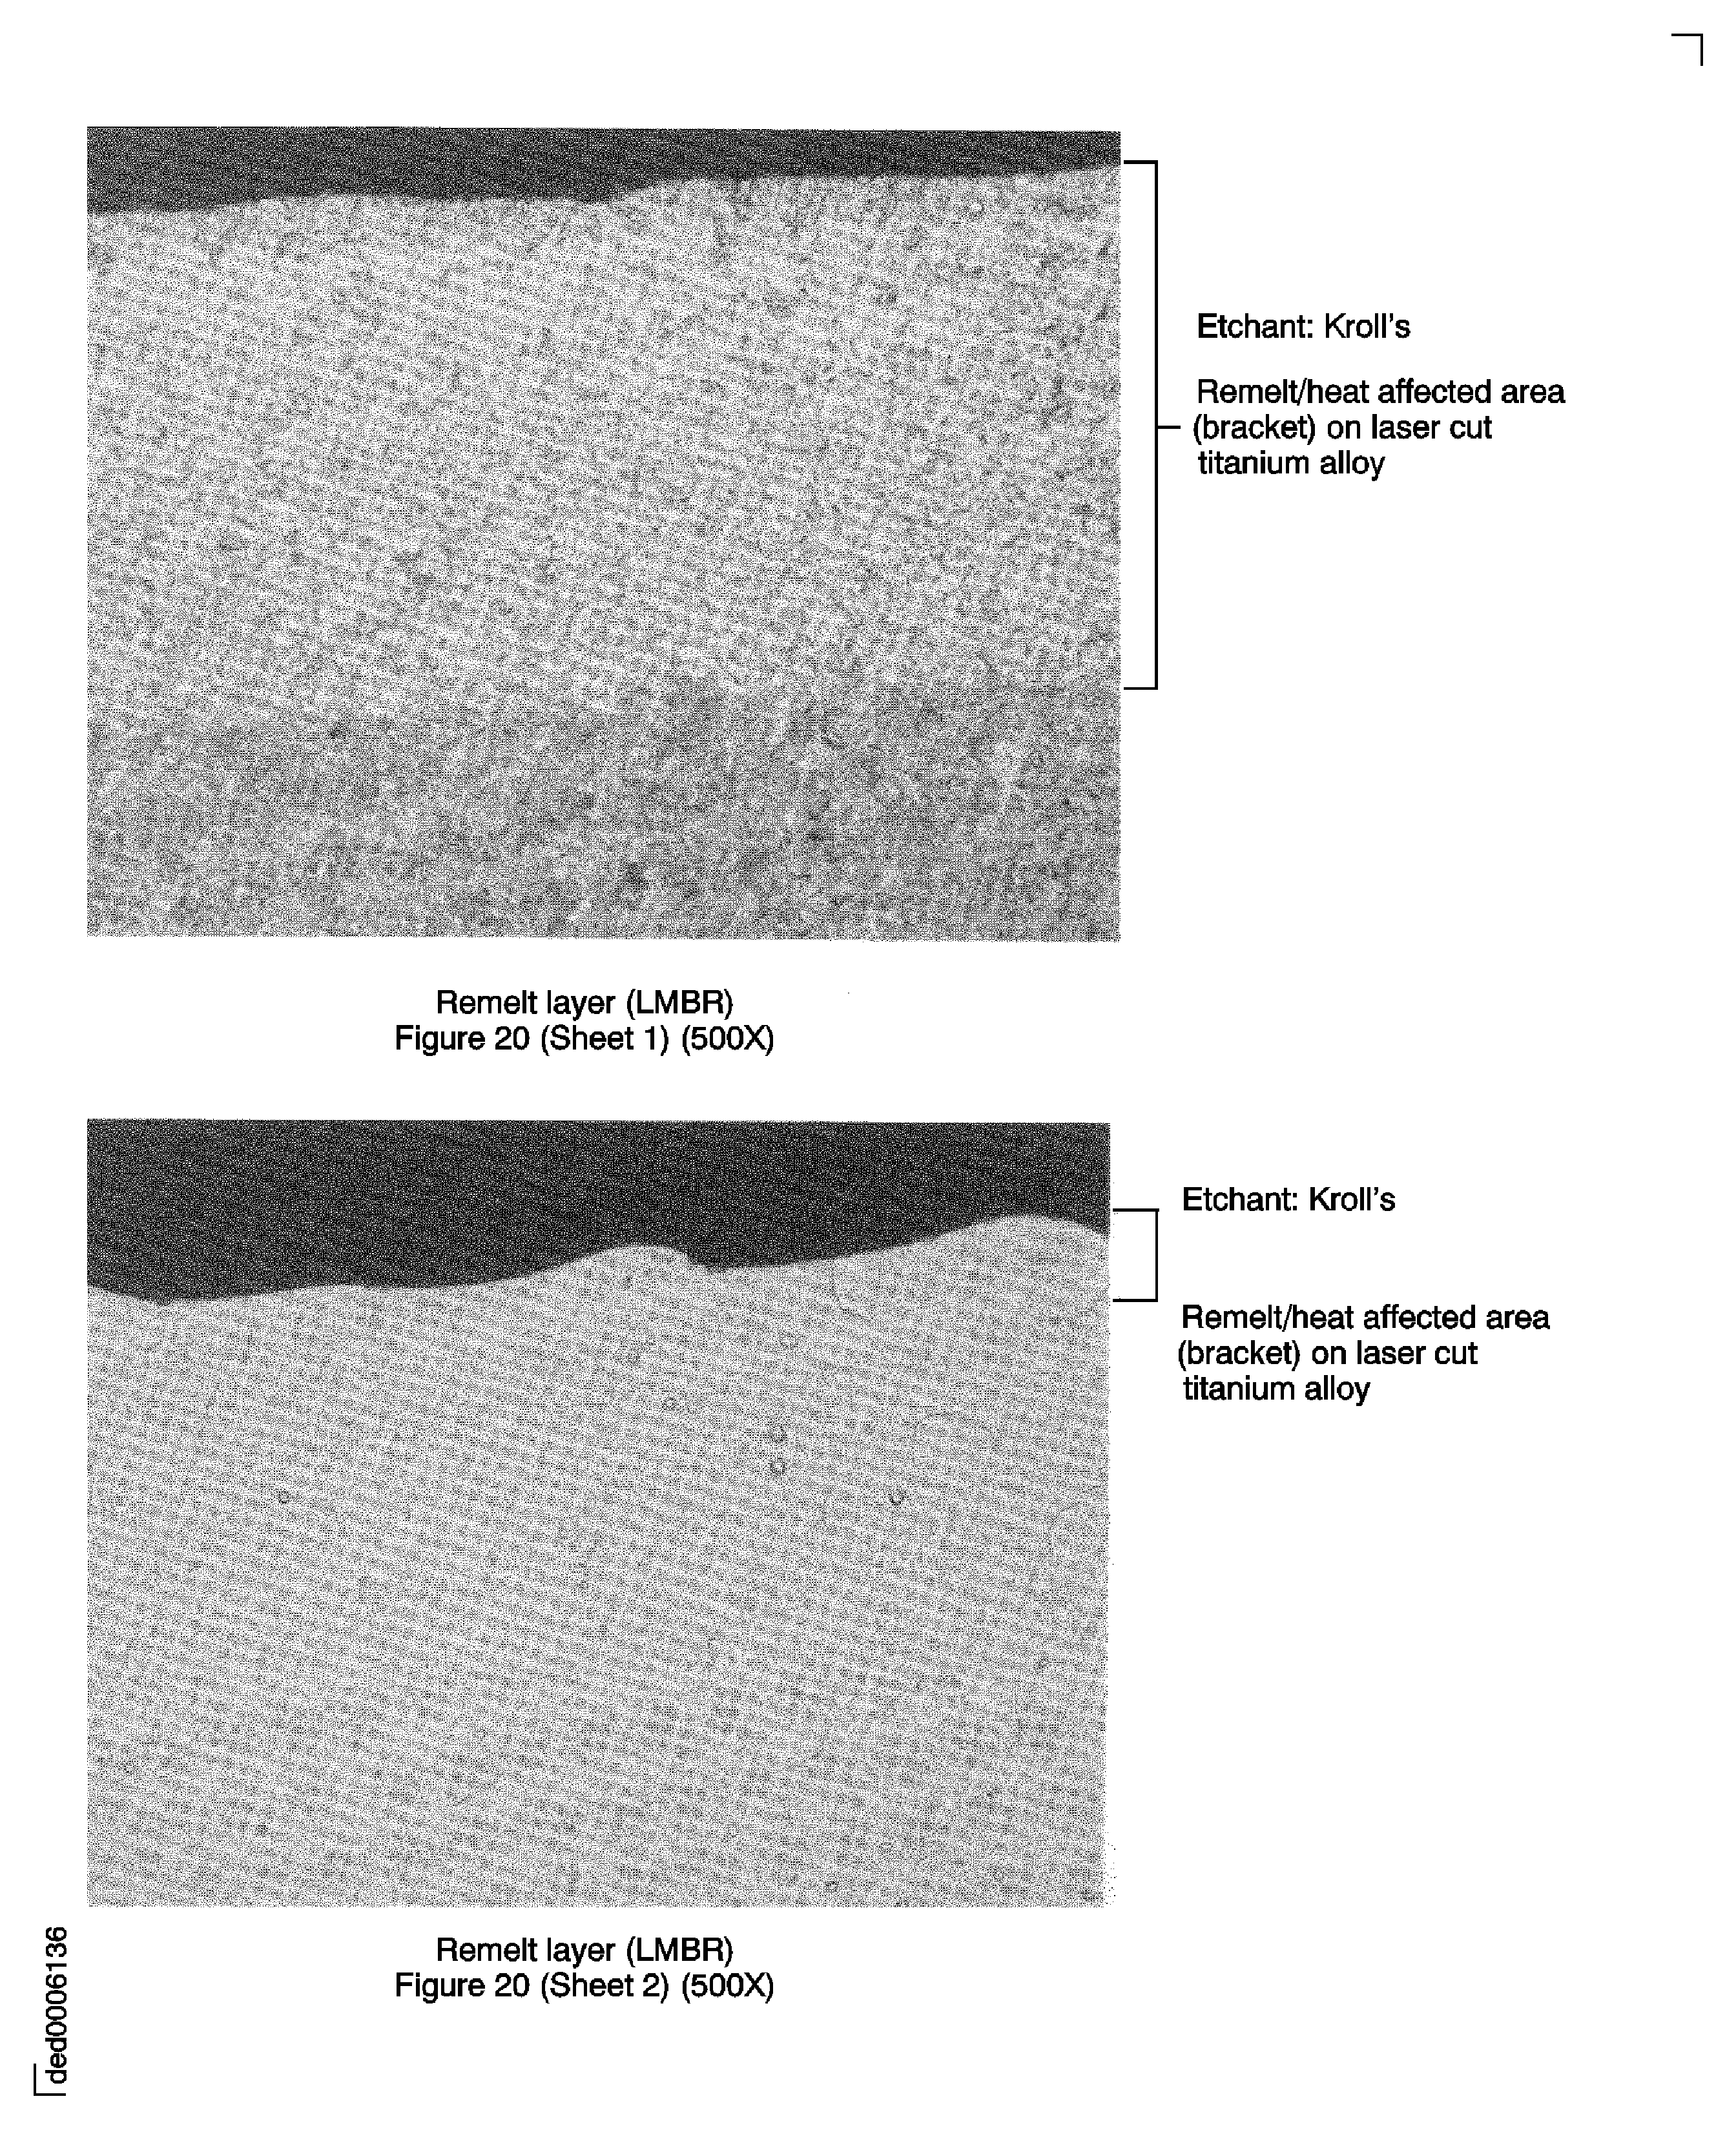
          Remelt layer depth includes any heat affected area adjacent to recast material.

          Remelt Layer.

          Refer to Fig. 70-35-23-990-010 and Figure.

          1. Remelt layers which are permitted as a function of hole length, in inches (mm), are as follows:

          2. For holes less than or equal to 0.200 inch (5.080 mm) in length, a remelt layer thickness up thru 0.010 inch (0.254 mm) is permitted.

          3. For holes less than or equal to 0.400 inch (10.160 mm) in length, a remelt layer thickness up thru 0.020 inch (0.508 mm) is permitted.

          4. For holes greater than 0.400 inch (10.160 mm) in length, a remelt layer thickness up thru 0.030 inch (0.762 mm) is permitted.

          1. Remelt layers which must be examined again as a function of hole length, in inches (mm), are as follows:

          2. Holes less than or equal to 0.200 inch (5.080 mm) in length, with a remelt layer thickness greater than 0.010 inch. (0.254 mm).

          3. Holes less than or equal to 0.400 inch (10.160 mm) in length with a remelt layer thickness greater than 0.020 inch (0.508 mm).

          4. Holes greater than 0.400 inch (10.160 mm) in length with a remelt layer thickness greater than 0.030 inch (0.762 mm).

        1. Cracks in Base Metal.

          Refer to Figure.

        2. Cracks in the base metal are not applicable to this category of parts.

        1. NOTE

          Cracks in the base metal which do not extend into or fully through a firmly attached remelt layer will be considered to be as deep as their visible length plus the thickness of the attached remelt layer above the crack.

          Cracks in Base Metal plus Attached Remelt Layer.

          Refer to Figure.

        2. Cracks up thru 0.012 inch (0.305 mm) deep are permitted.

        3. Cracks greater than 0.012 inch (0.305 mm) up thru 0.015 inch (0.381 mm) deep must be examined again.

        4. Cracks greater than 0.015 inch (0.381 mm) deep must be rejected.

        1. Cracks in Attached Remelt Layer.

          Refer to Figure.

        2. Cracks in the attached remelt layer are not applicable to this category of the parts.

        1. Remelt Layer Surface Oxide.

          Refer to Figure.

        2. Remelt layer surface oxide is not applicable to this category of parts.

        3. Attached oxide layer is permitted on laser cut holes and surfaces that are not subsequently welded.

      1. For IAE 647 Vane Airfoil Holes.

        1. Surface Irregularity.

          Refer to Figure.

        2. Surface irregularity of any amplitude is permitted.

        1. NOTE

          Remelt layer depth includes any heat affected area adjacent to recast material.

          Remelt Layer.

          Refer to Figure, and Figure.

        2. Remelt layers up thru 0.011 inch (0.279 mm) are permitted.

        3. Remelt layers greater than 0.011 inch (0.279 mm) must be examined again.

        1. Cracks in Base Metal.

          Refer to Figure.

        2. Cracks in the base metal are not applicable to this category of parts.

        1. NOTE

          Cracks in the base metal which do not extend into or fully through a firmly attached remelt layer will be considered to be as deep as their visible length plus the thickness of the attached remelt layer above the crack.

          Cracks in Base Metal plus Attached Remelt Layer.

          Refer to Figure.

        2. Cracks up thru 0.008 inch (0.203 mm) deep are permitted.

        3. Cracks greater than 0.008 inch (0.203 mm) deep must be examined again.

        1. Cracks in Attached Remelt Layer.

          Refer to Figure.

        2. Cracks in the remelt layer are not applicable to this category of parts.

        1. Remelt Layer Surface Oxides.

          Refer to Figure.

        2. Remelt layer surface oxides are not applicable to this category of parts.

      1. For Holes in Single Crystal and Directionally Solidified Turbine Blades.

        1. Surface Irregularity.

          Refer to Figure.

        2. Surface irregularity of any amplitude is permitted.

        1. NOTE

          Remelt layer depth includes any heat affected area adjacent to recast material.

          Remelt Layer.

          Refer to Figure, and Figure.

        2. Remelt layers up thru 0.0055 inch (0.140 mm) are permitted.

        3. Remelt layers greater than 0.0055 inch. (0.140 mm) up thru 0.007 inch (0.178 mm) must be examined again.

        4. Remelt layers greater than 0.007 inch (0.178 mm) must be rejected.

        1. NOTE

          Base metal cracks in directionally solidified alloys, when limited to carbides, borides, and/or associated with eutectic gamma prime, are acceptable at all levels. See Figure and Figure.

          Cracks in Base Metal.

          Refer to Figure.

        2. Cracks in the base metal up thru 0.001 inch (0.025 mm) deep are permitted.

        3. Cracks in the base metal greater than 0.001 inch. (0.025 mm) deep must be rejected.

        1. Cracks in Base Metal plus Attached Remelt Layer.

          Refer to Figure.

        2. Cracks in the base metal plus attached remelt layer are not applicable to this category of parts.

        1. NOTE

          Cracks in the base metal which do not extend into or fully through a firmly attached remelt layer will be considered to be as deep as their visible length plus the thickness of the attached remelt layer above the crack.

          Cracks in Attached Remelt Layer.

          Refer to Figure.

        2. Cracks up thru 0.0025 inch (0.064 mm) deep are permitted.

        3. Cracks greater than 0.0025 inch (0.064 mm) up to 0.0035 inch (0.089 mm) deep must be examined again.

        4. Cracks greater than 0.0035 inch (0.089 mm) deep must be rejected.

        1. Remelt Layer Surface Oxides.

          Refer to Figure.

        2. Remelt layer surface oxides are not applicable to this category of parts.

      1. For IAE 264 Coated Platform and Airfoil Holes and Conical Holes in Outer Airseals.

        1. Surface Irregularity.

        2. Refer to Figure.

        3. Surface irregularity of any amplitude is permitted.

        1. Remelt Layer.

          Refer to Figure, and Figure.

          1. Remelt layers which are permitted as a function of hole length, in inches (mm), are as follows:

          2. For holes less than or equal to 0.200 inch (5.080 mm) in length, a remelt layer thickness up thru 0.015 inch (0.381 mm) is permitted.

          3. For holes less than or equal to 0.400 inch (10.060 mm) in length, a remelt layer thickness up thru 0.020 inch (0.508 mm) is permitted.

          4. For holes greater than 0.400 inch (10.160 mm) in length, a remelt layer thickness up thru 0.030 inch (0.762 mm) is permitted.

          1. Remelt layers which must examined again as a function of hole length, in inches (mm), are as follows:

          2. Holes less than or equal to 0.200 inch (5.080 mm) in length with a remelt layer thickness greater than 0.015 inch (0.381 mm).

          3. Holes less than or equal to 0.400 inch (10.160 mm) in length with a remelt layer thickness greater than 0.020 inch (0.508 mm).

          4. Holes greater than 0.400 inch (10.160 mm) in length with a remelt layer thickness greater than 0.030 inch (0.762 mm).

        1. Cracks in Base Metal.

        2. Refer to Figure.

        3. Cracks in the base metal are not applicable to this category of parts.

        1. Cracks in Base Metal plus Attached Remelt Layer.

        2. Refer to Figure.

        3. Cracks up thru 0.015 inch (0.381 mm) deep are permitted.

        4. Cracks greater than 0.015 inch (0.381 mm) thru 0.020 inch (0.508 mm) deep must be examined again.

        5. Cracks greater than 0.020 inch (0.508 mm) deep must be rejected.

        1. Cracks in Attached Remelt Layer.

        2. Refer to Figure.

        3. Cracks in the base metal are not applicable to this category of parts.

      1. For 1st HPT Blade Platform Holes.

        1. Surface Irregularity.

        2. Refer to Figure.

        3. Surface attack of any amplitude is permitted.

        1. NOTE

          Remelt layer depth includes any heat affected area adjacent to recast material.

          Remelt Layer.

        2. Refer to Figure, and Figure.

        3. Remelt layers up thru 0.018 inch (0.457 mm) are permitted.

        4. Remelt layers greater than 0.018 inch (0.457 mm) must be examined again.

        1. NOTE

          Base metal cracks in directionally solidified alloys, when limited to carbides, borides, and/or associated with eutectic gamma prime, are acceptable at all levels. See Figure and Figure.

          Cracks in Base Metal.

        2. Refer to Figure.

        3. Cracks up thru 0.002 inch (0.051 mm) deep with isolated instances up to 0.003 inch (0.076 mm) are permitted.

        4. Cracks greater than 0.002 inch (0.051 mm) deep with isolated instances greater than 0.003 inch (0.076 mm) must be examined again.

        5. Cracks greater than 0.003 inch (0.076 mm) deep must be rejected.

        1. Cracks in Base Metal plus Attached Remelt Layer.

        2. Refer to Figure.

        3. Cracks in the base metal plus attached remelt layer are not applicable to this category of the parts, other than isolated cracks greater than 0.003 inch (0.076 mm) deep must be examined again.

        1. NOTE

          Cracks in the base metal which do not extend into or fully through a firmly attached remelt layer will be considered to be as deep as their visible length plus the thickness of the attached remelt layer above the crack.

          Cracks in Attached Remelt Layer.

        2. Refer to Figure.

        3. All cracks in the attached remelt layer are permitted.

      1. For HPT Blades.

        1. Surface Irregularity.

        2. Refer to Figure.

        3. Surface irregularity of any amplitude is permitted.

        1. NOTE

          Remelt layer depth includes any heat affected area adjacent to recast material.

          Remelt Layer.

        2. Refer to Figure, and Figure.

        3. Remelt layers up thru 0.007 inch (0.178 mm) are permitted.

        4. Remelt layers greater than 0.007 inch (0.178 mm) up thru 0.008 inch (0.203 mm) must be examined again.

        5. Remelt layers greater than 0.008 inch (0.203 mm) must be rejected.

        1. Cracks in Base Metal.

        2. Refer to Figure.

        3. Cracks in the base metal up thru 0.001 inch (0.025 mm) deep are permitted.

        4. Cracks in the base metal greater than 0.001 inch (0.025 mm) deep must be rejected.

        1. Cracks in Base Metal plus Attached Remelt Layer.

        2. Refer to Figure.

        3. Cracks in the base metal are not applicable to this category of the part.

        1. Cracks in Attached Remelt Layer.

        2. Refer to Figure.

        3. Cracks up thru 0.004 inch (0.102 mm) deep are permitted.

        4. Cracks greater than 0.004 inch (0.102 mm) up to 0.0045 inch (0.114 mm) deep must be examined again.

        5. Cracks greater than 0.0045 inch (0.114 mm) deep must be rejected.

      1. For Cast and Wrought Combustion Chambers Domes (Bulkheads).

        1. Surface Irregularity.

        2. Refer to Figure.

        3. Surface irregularity of any amplitude is permitted.

        1. NOTE

          Remelt layer depth includes any heat affected area adjacent to recast material.

          Remelt Layer.

          Refer to Figure and Figure.

        2. Remelt layers up thru 0.008 inch (0.203 mm) are permitted.

        3. Remelt layers greater than 0.008 inch (0.203 mm) must be rejected.

        1. Cracks in Base Metal.

        2. Refer to Figure.

        3. Cracks in the base metal are not applicable to this category of parts.

        1. NOTE

          Cracks in the base metal which do not extend into or fully through a firmly attached remelt layer will be considered to be as deep as their visible length plus the thickness of the attached remelt layer above the crack.

          Cracks in Base Metal plus Attached Remelt Layer.

          Refer to Figure.

        2. Cracks in the base metal plus attached remelt layer up thru 0.008 inch (0.203 mm) are permitted.

        3. Cracks in the base metal plus attached remelt layer greater than 0.008 inch (0.203 mm) must be rejected.

        1. Cracks in Attached Remelt Layer.

        2. Refer to Figure.

        3. Cracks in the attached remelt layer up thru 0.008 inch (0.203 mm) are permitted.

        4. Cracks in the attached remelt layer greater than 0.008 inch (0.203 mm) must be rejected.

        1. Remelt Layer Surface Oxides.

          Refer to FigFigure.

        2. No surface oxides are permitted in the remelt layer.

        3. Attached oxide layer is permitted on laser cut holes and surfaces that are not subsequently welded.

    1. SUBTASK 70-35-23-290-006 Chemical Milling Acceptance Standards

      1. Intergranular Attack.

      2. Intergranular attack up thru 0.0003 inch (0.0076 mm) in depth is permitted.

      3. Intergranular damage greater than 0.0003 inch (0.0076 mm) in depth must be examined again.

      1. Selective Etching.

      2. Selective etching up thru 0.001 inch (0.025 mm) in depth is permitted.

      3. Selective etching greater than 0.001 inch (0.025 mm) in depth must be examined again.

  1. Figure: Nonmechanical metal removal

    Nonmechanical metal removal
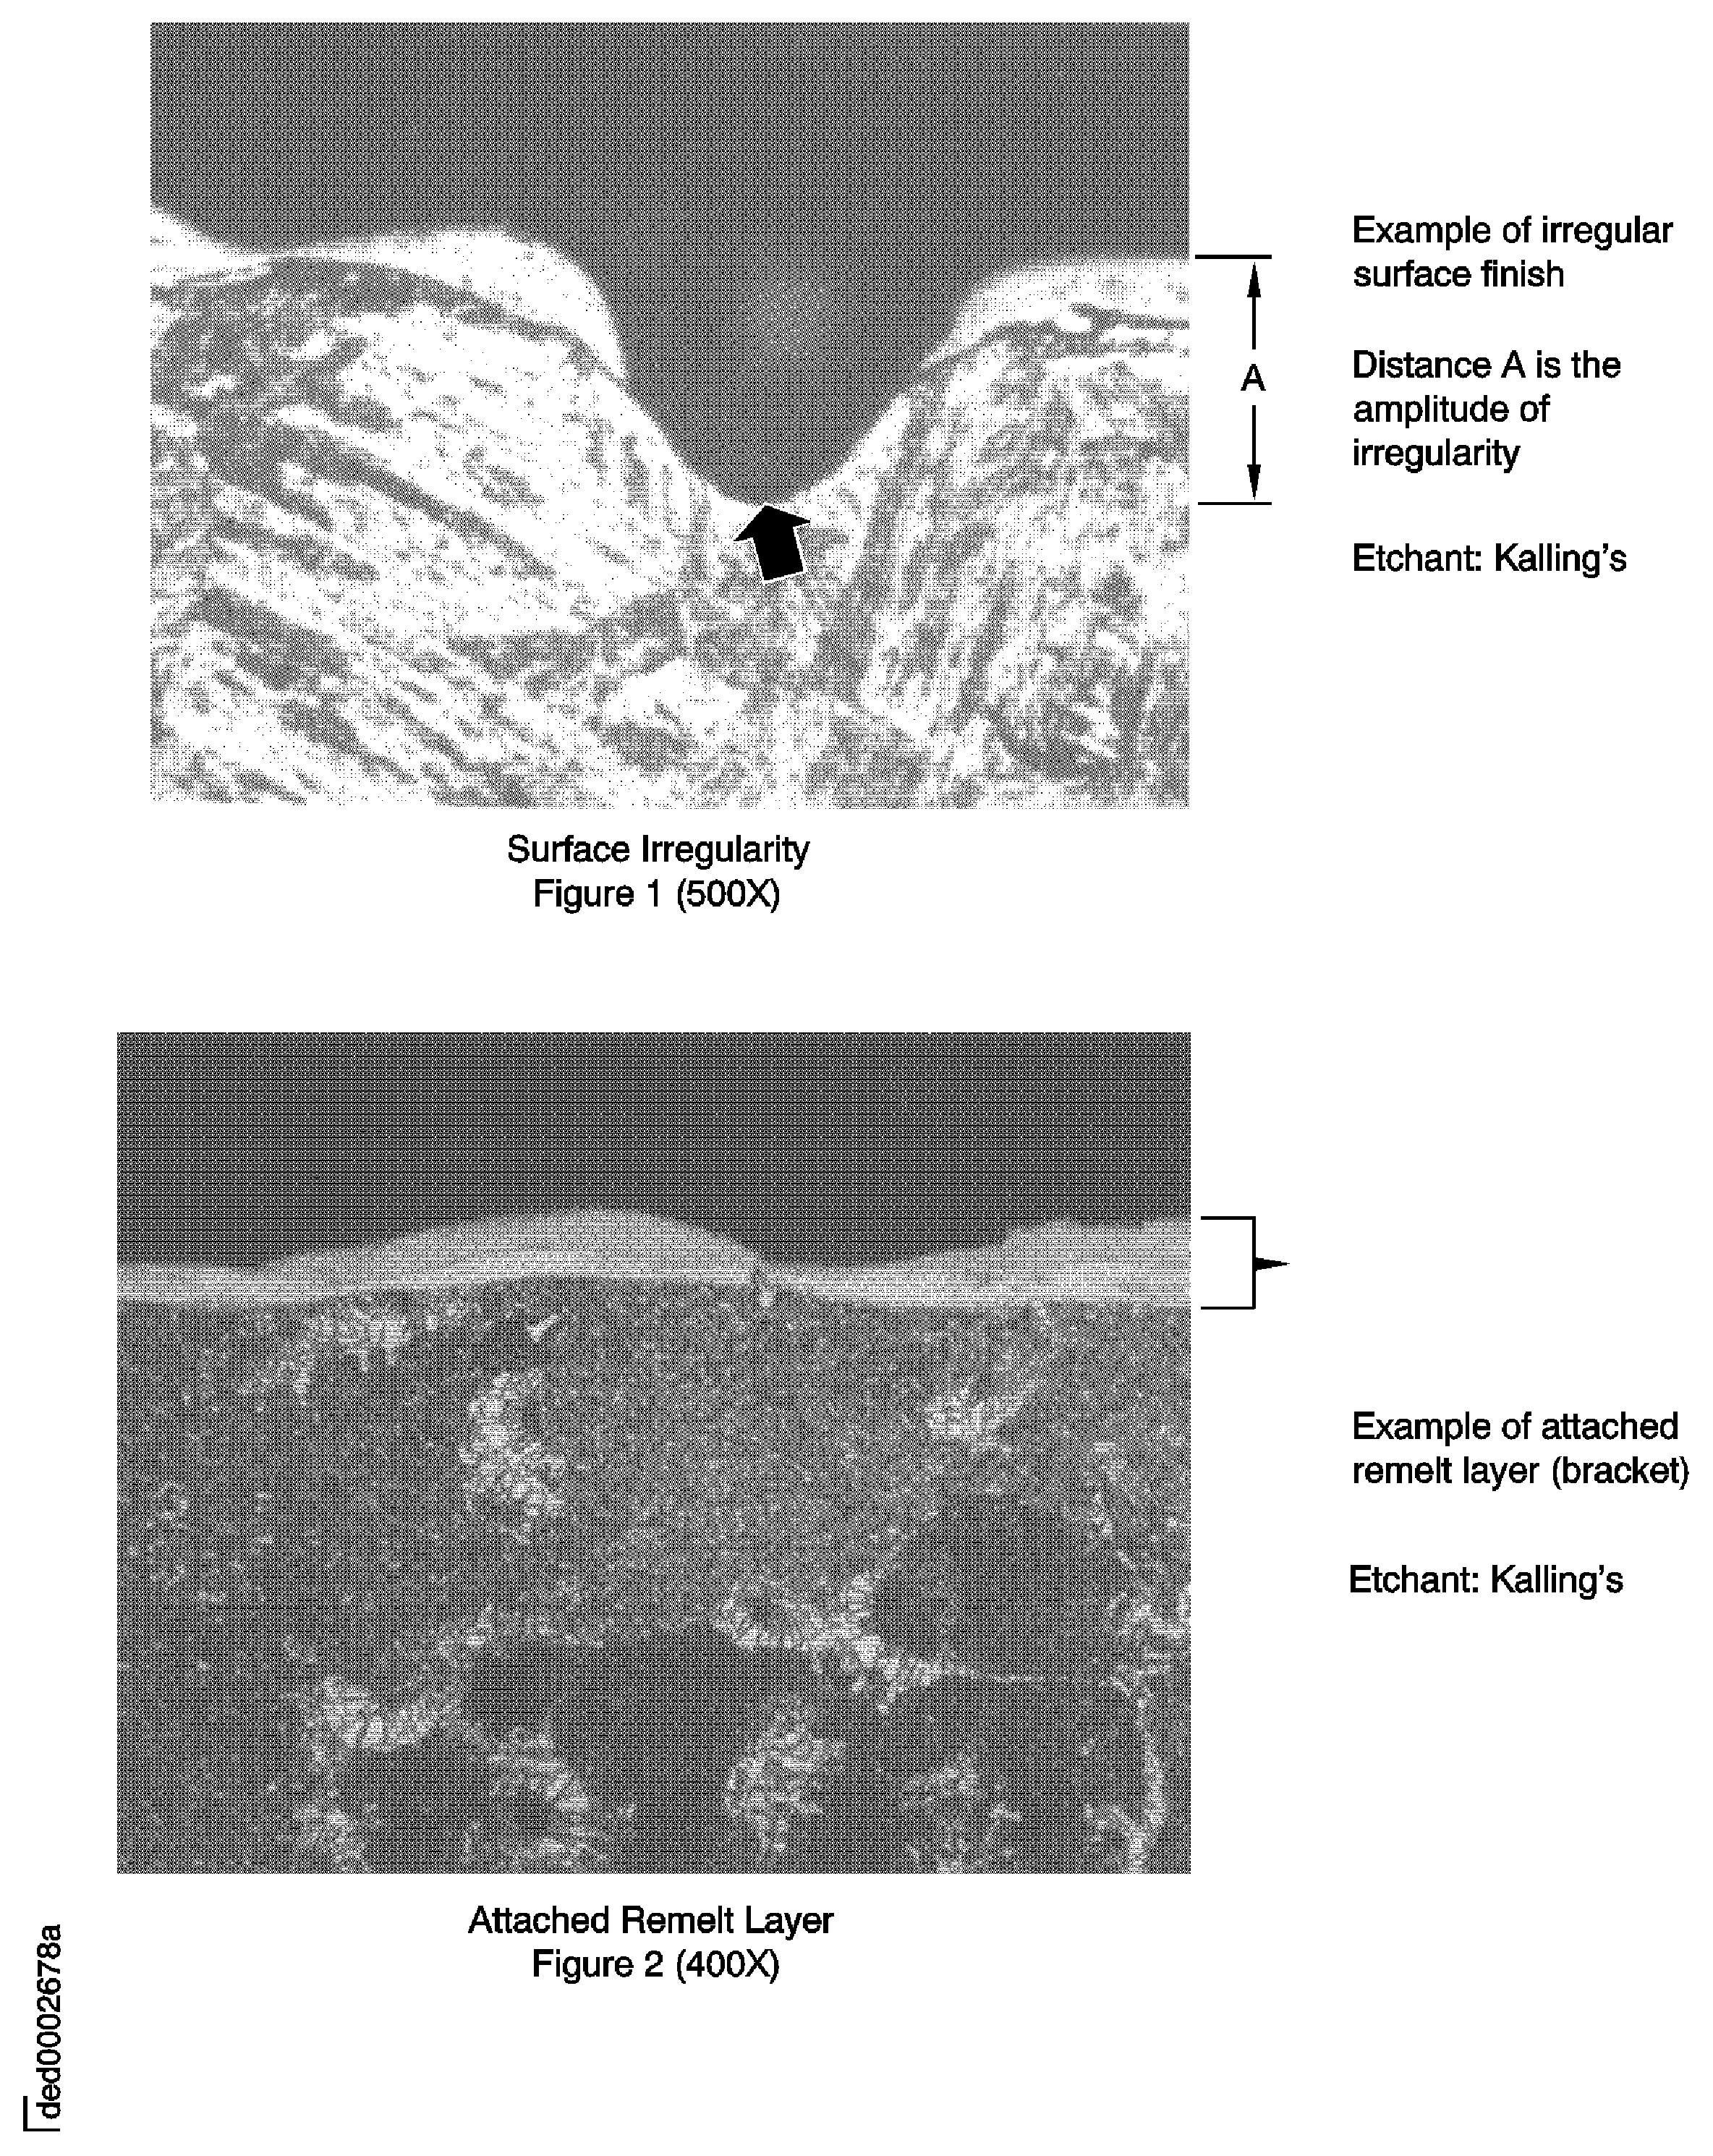
    Figure: Nonmechanical metal removal

    Nonmechanical metal removal
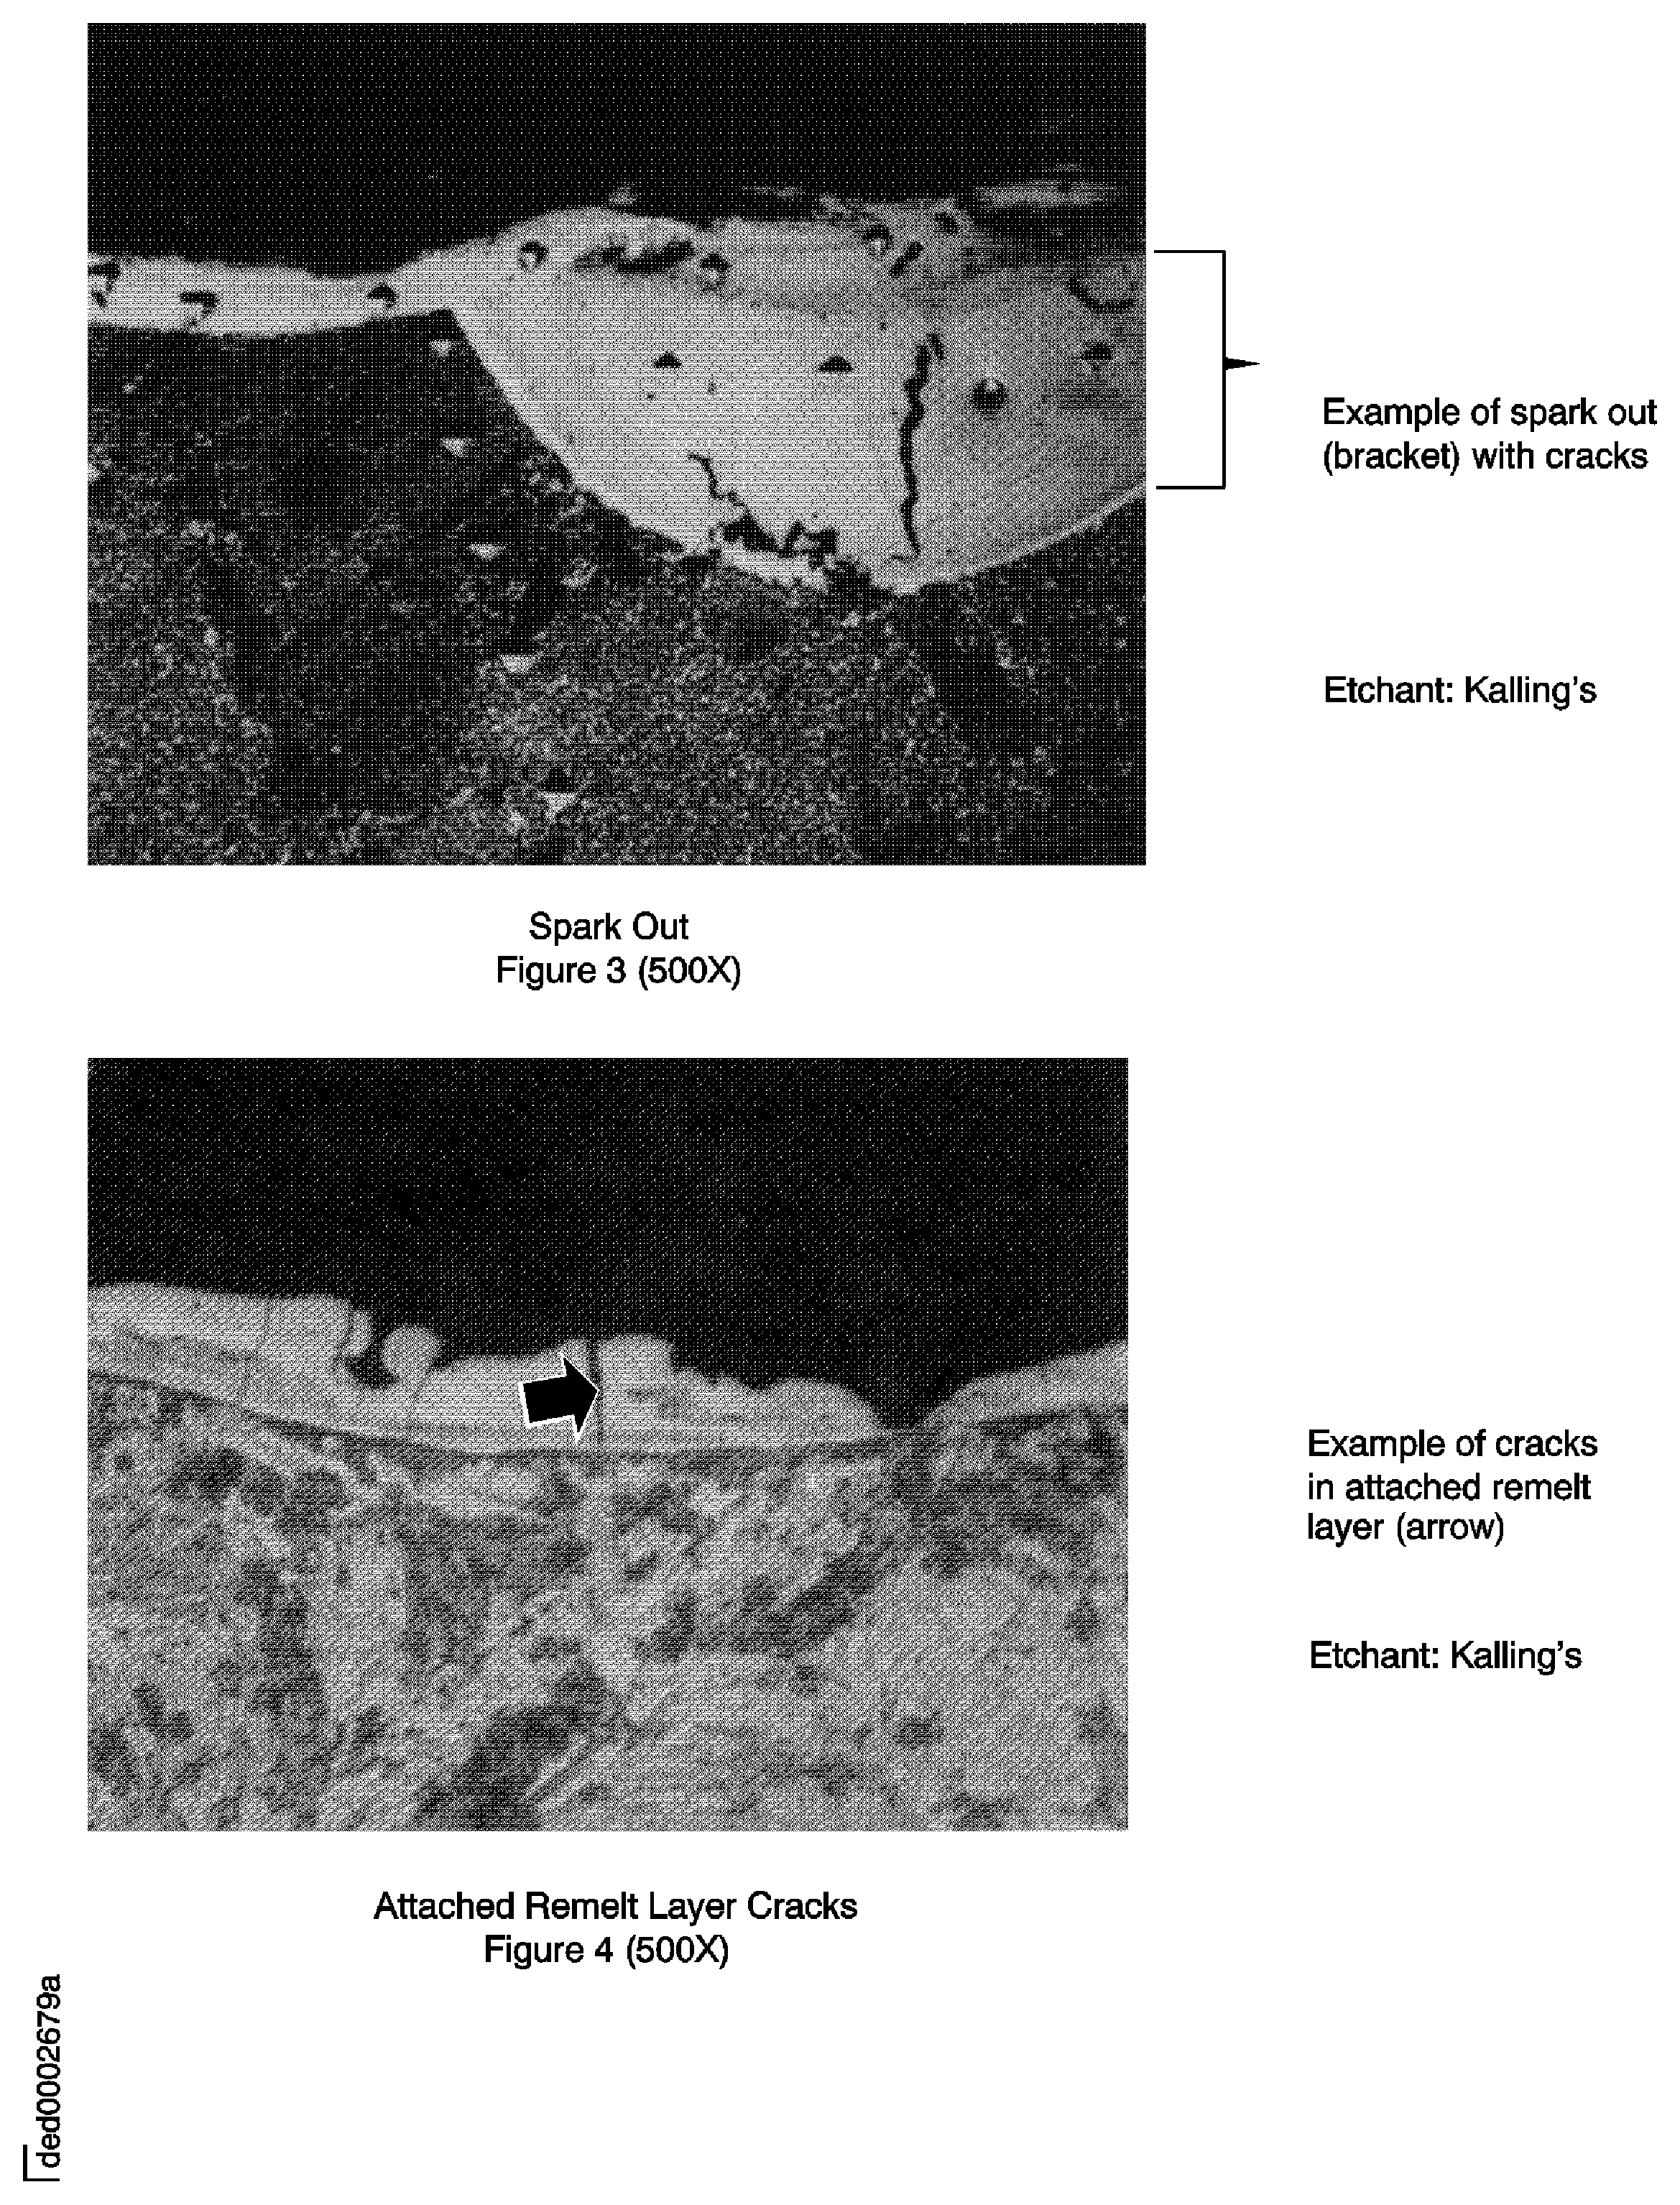
    Figure: Nonmechanical metal removal

    Nonmechanical metal removal
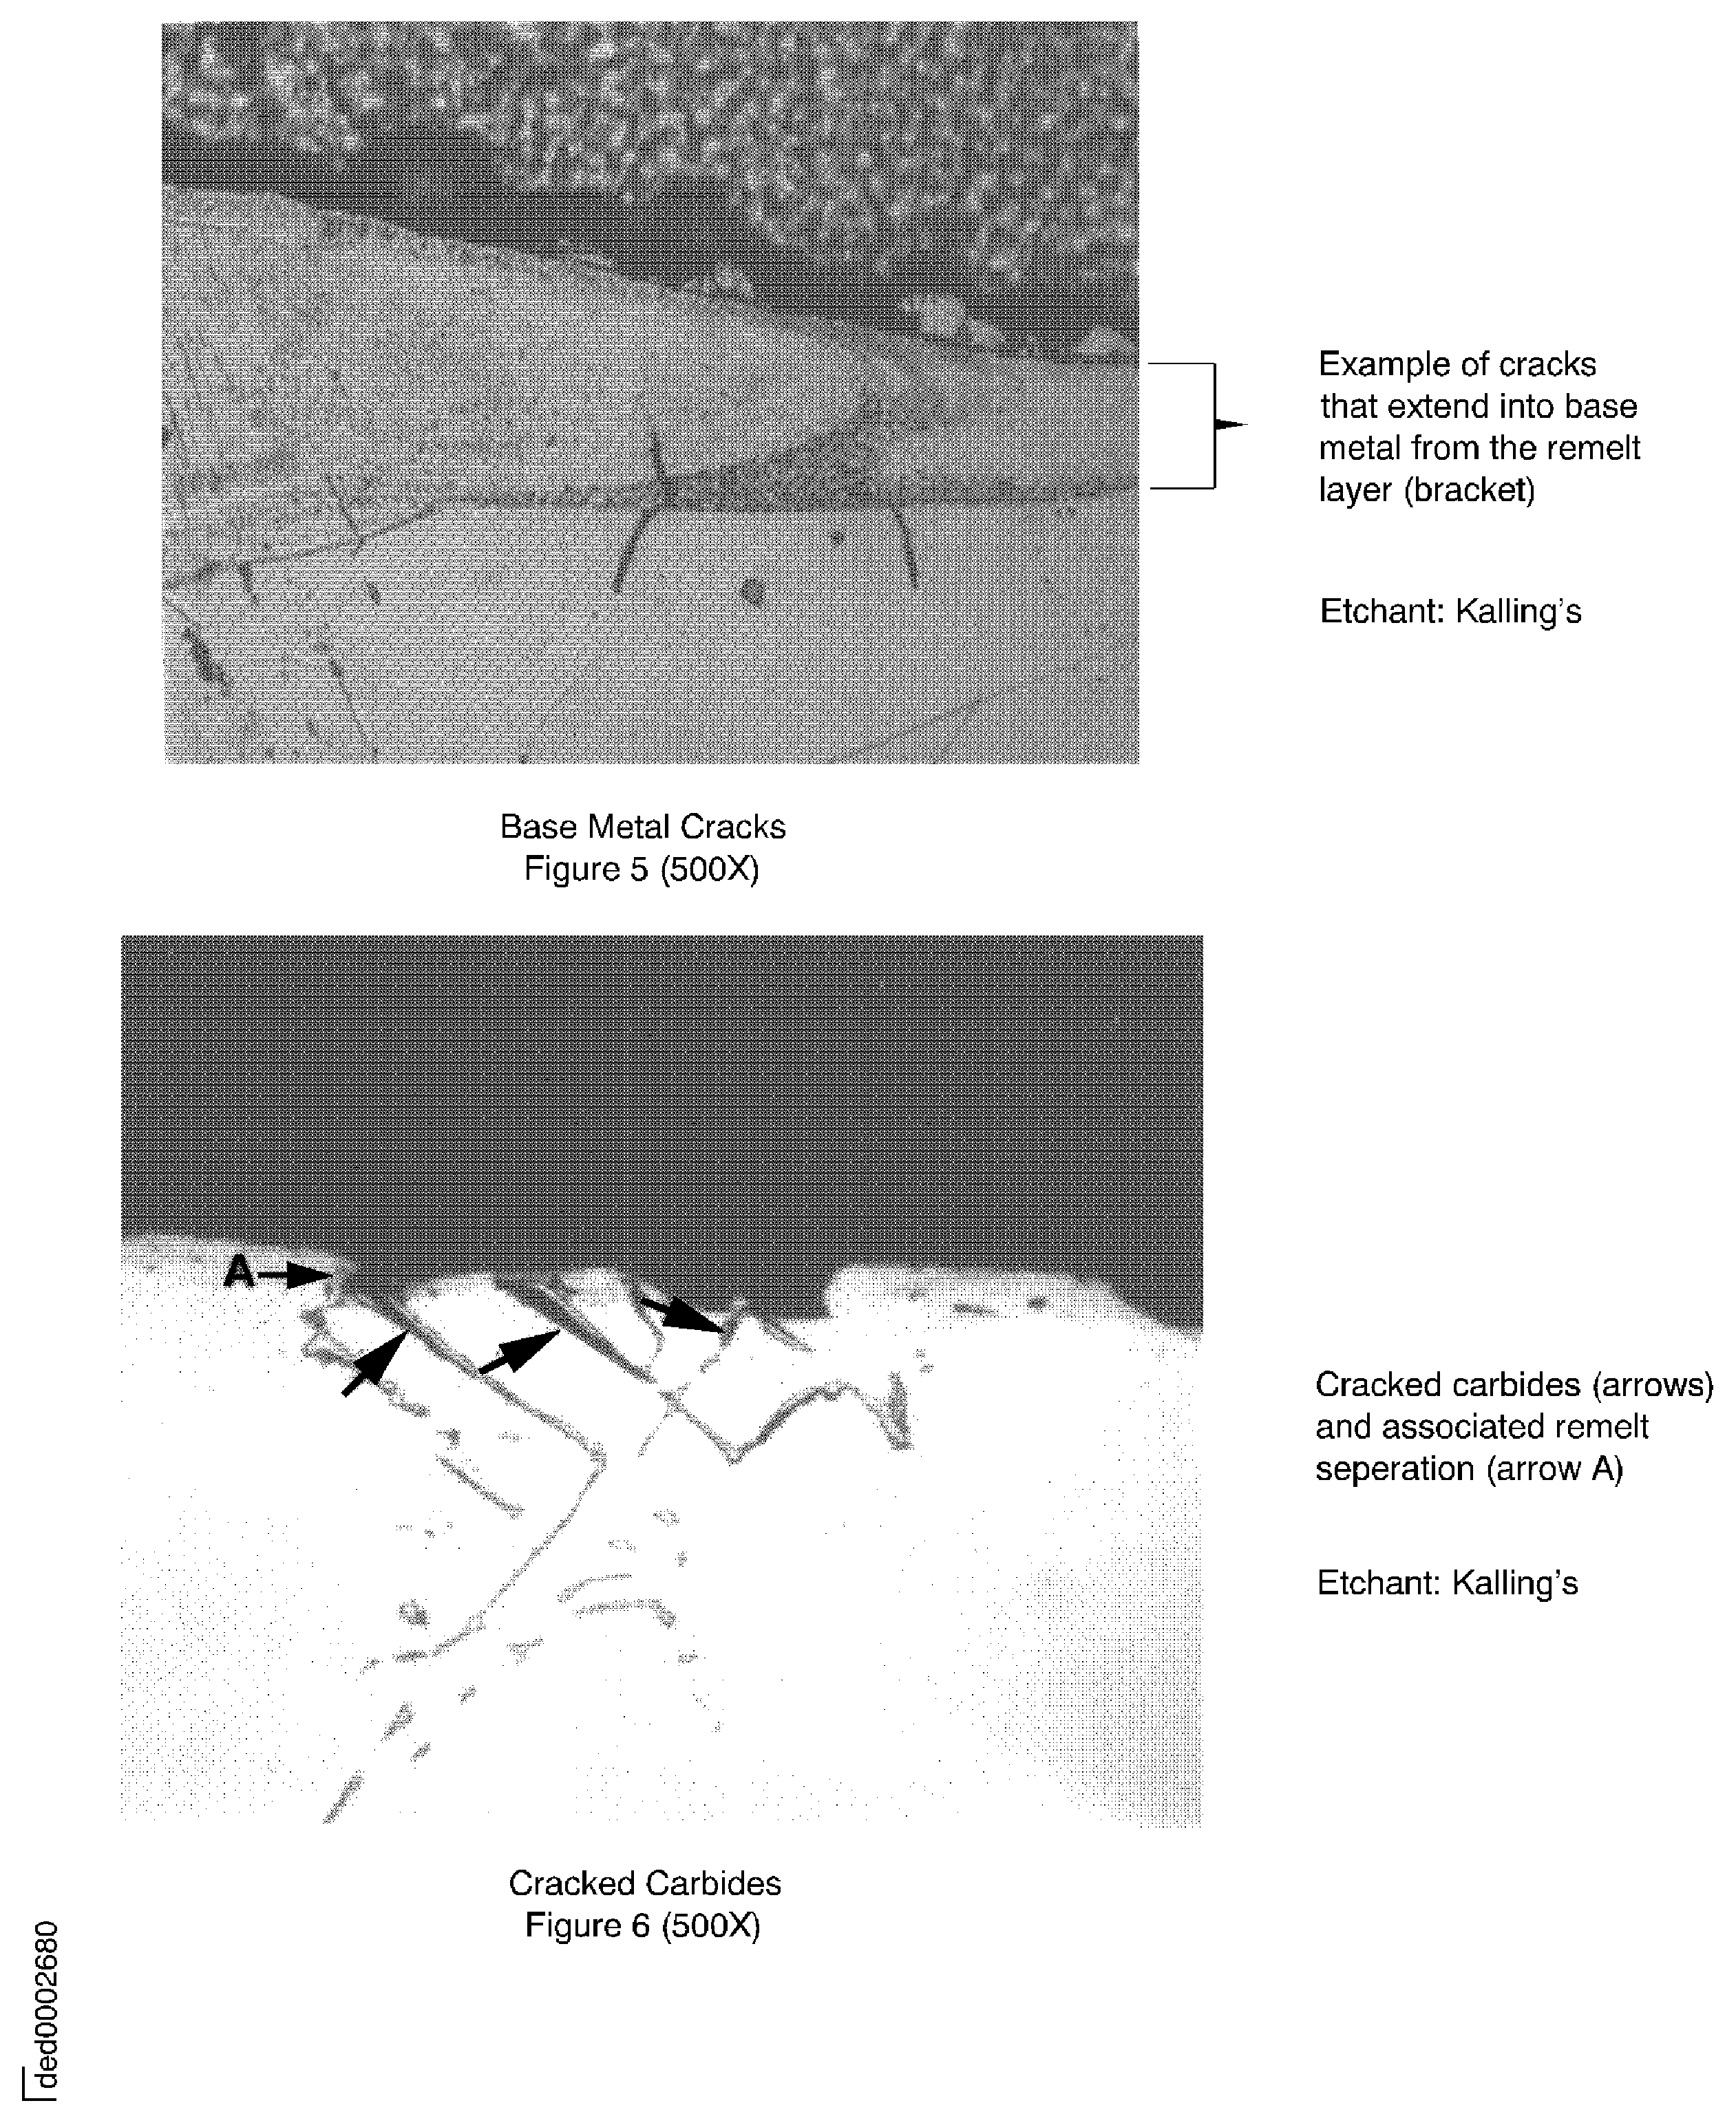
    Figure: Nonmechanical metal removal

    Nonmechanical metal removal
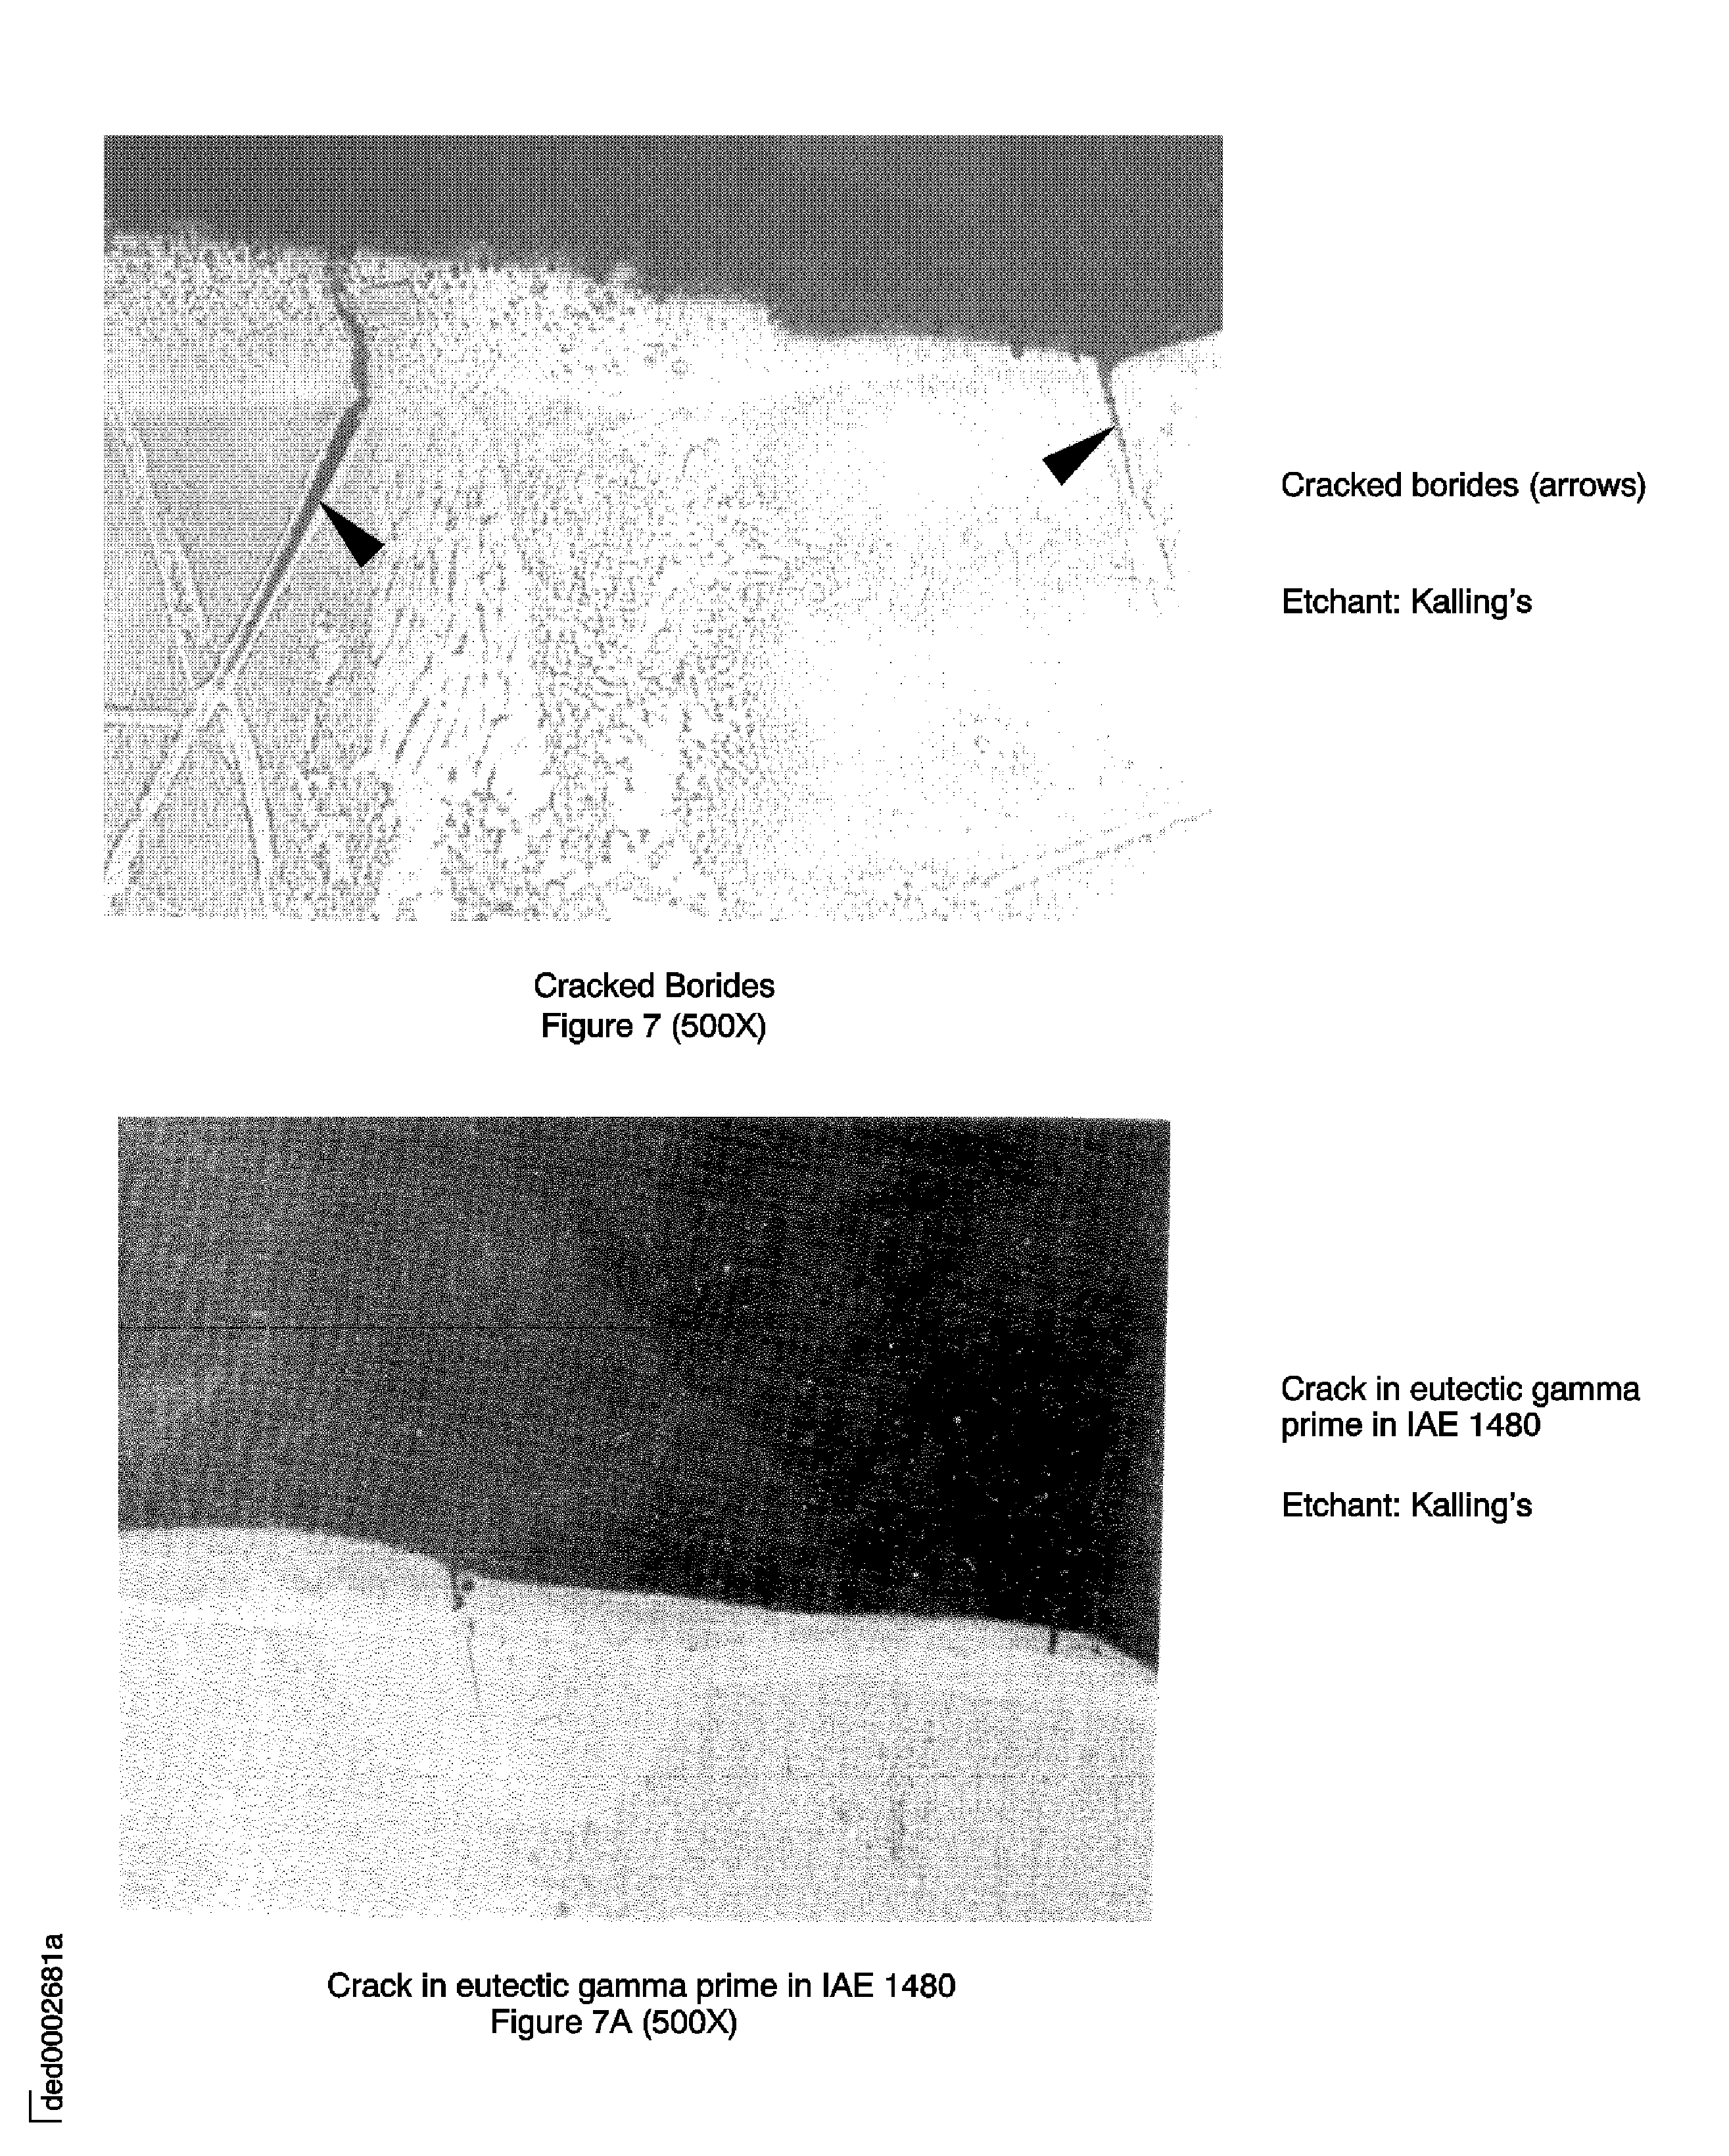
    Figure: Nonmechanical metal removal

    Nonmechanical metal removal
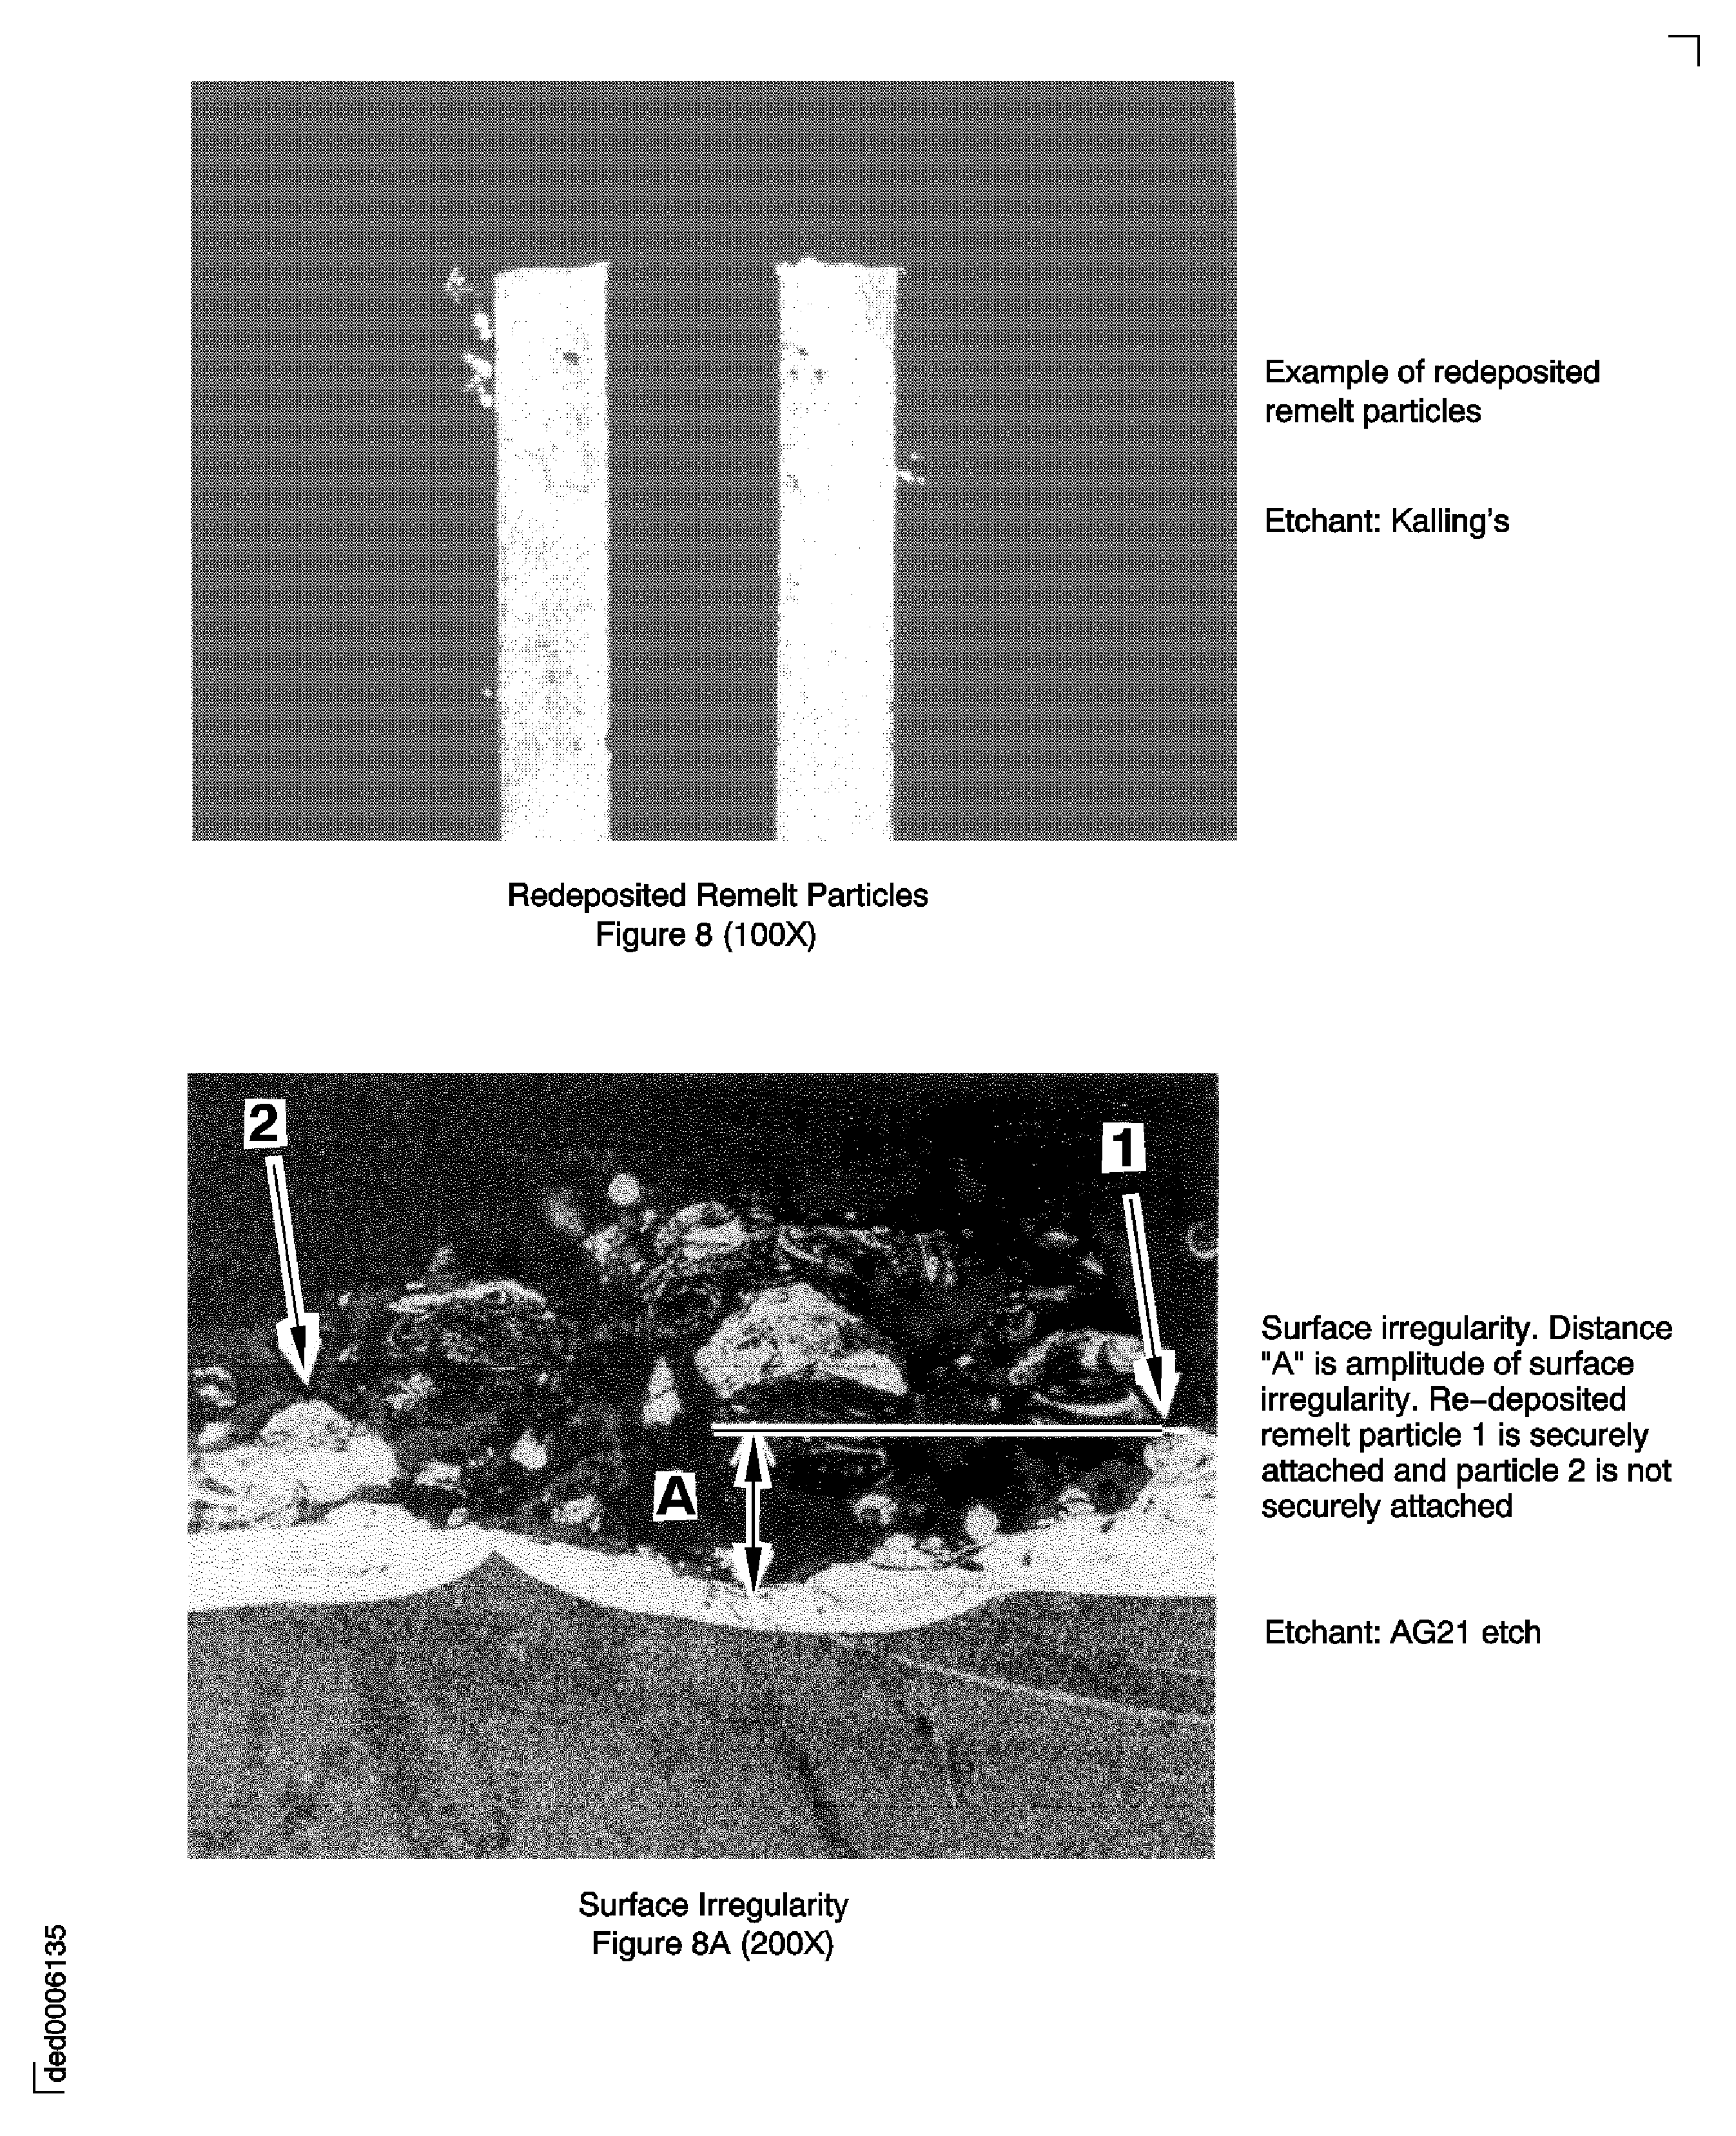
    Figure: Nonmechanical metal removal

    Nonmechanical metal removal
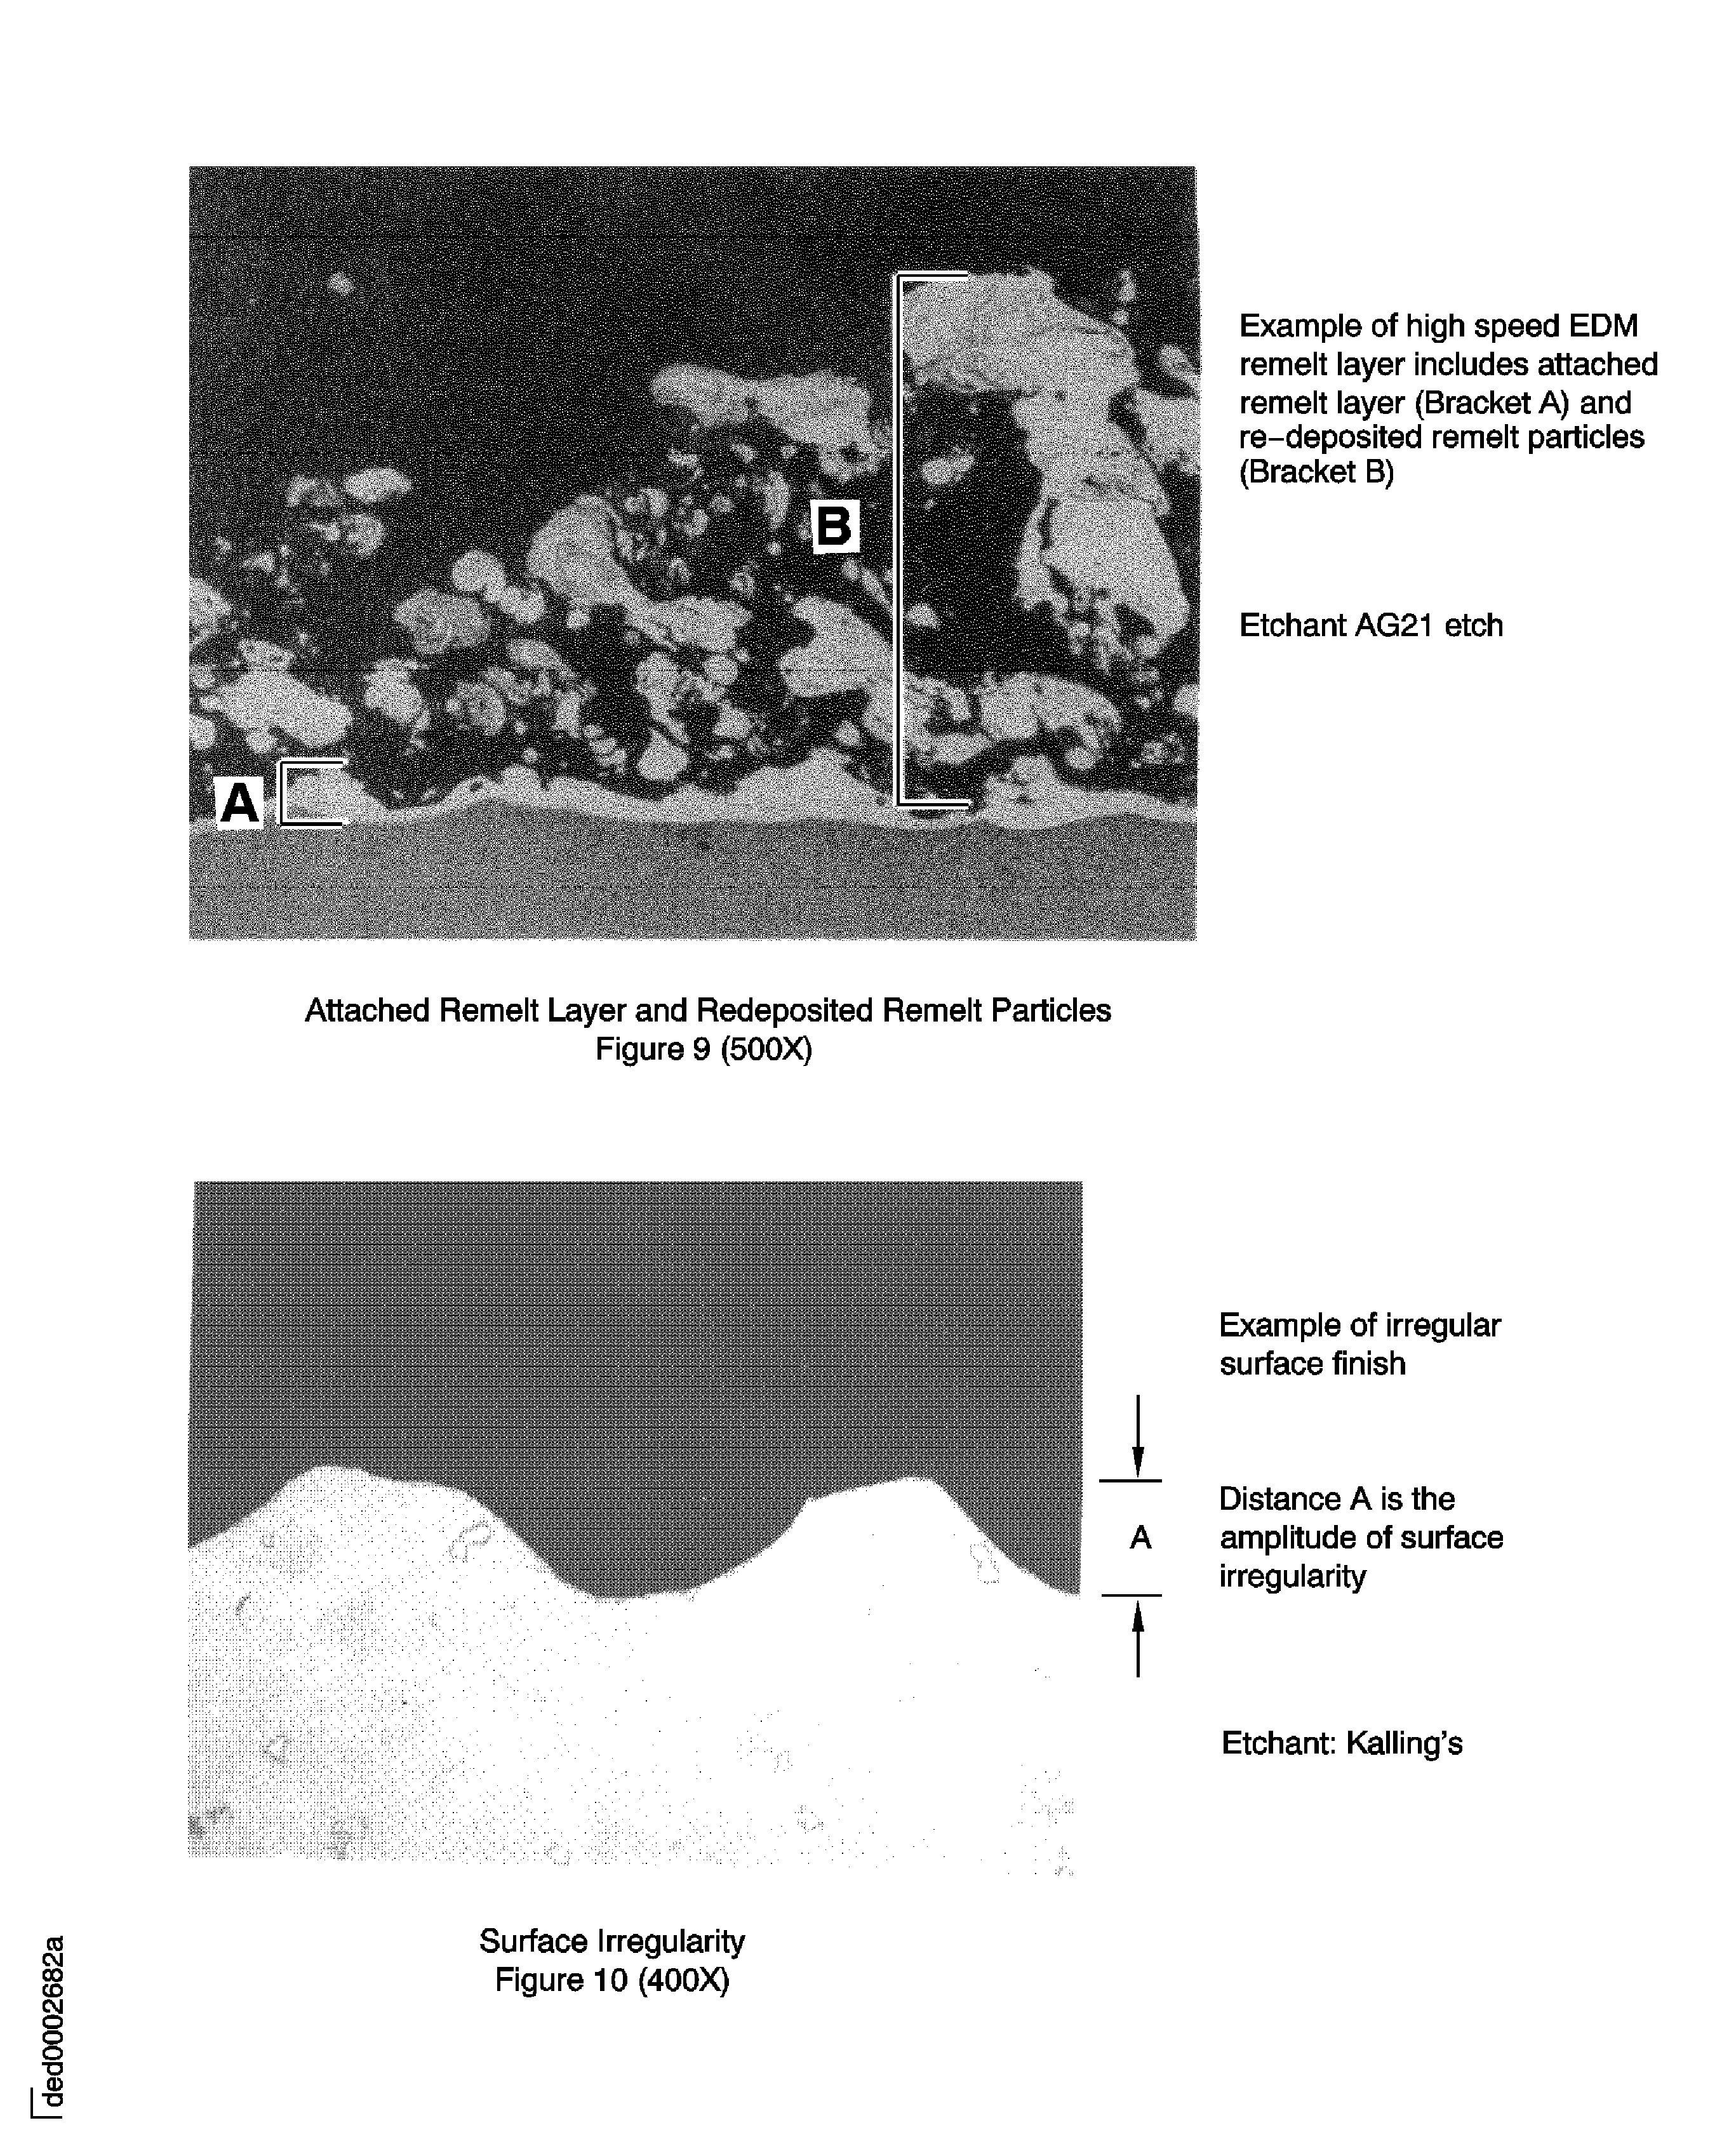
    Figure: Nonmechanical metal removal

    Nonmechanical metal removal
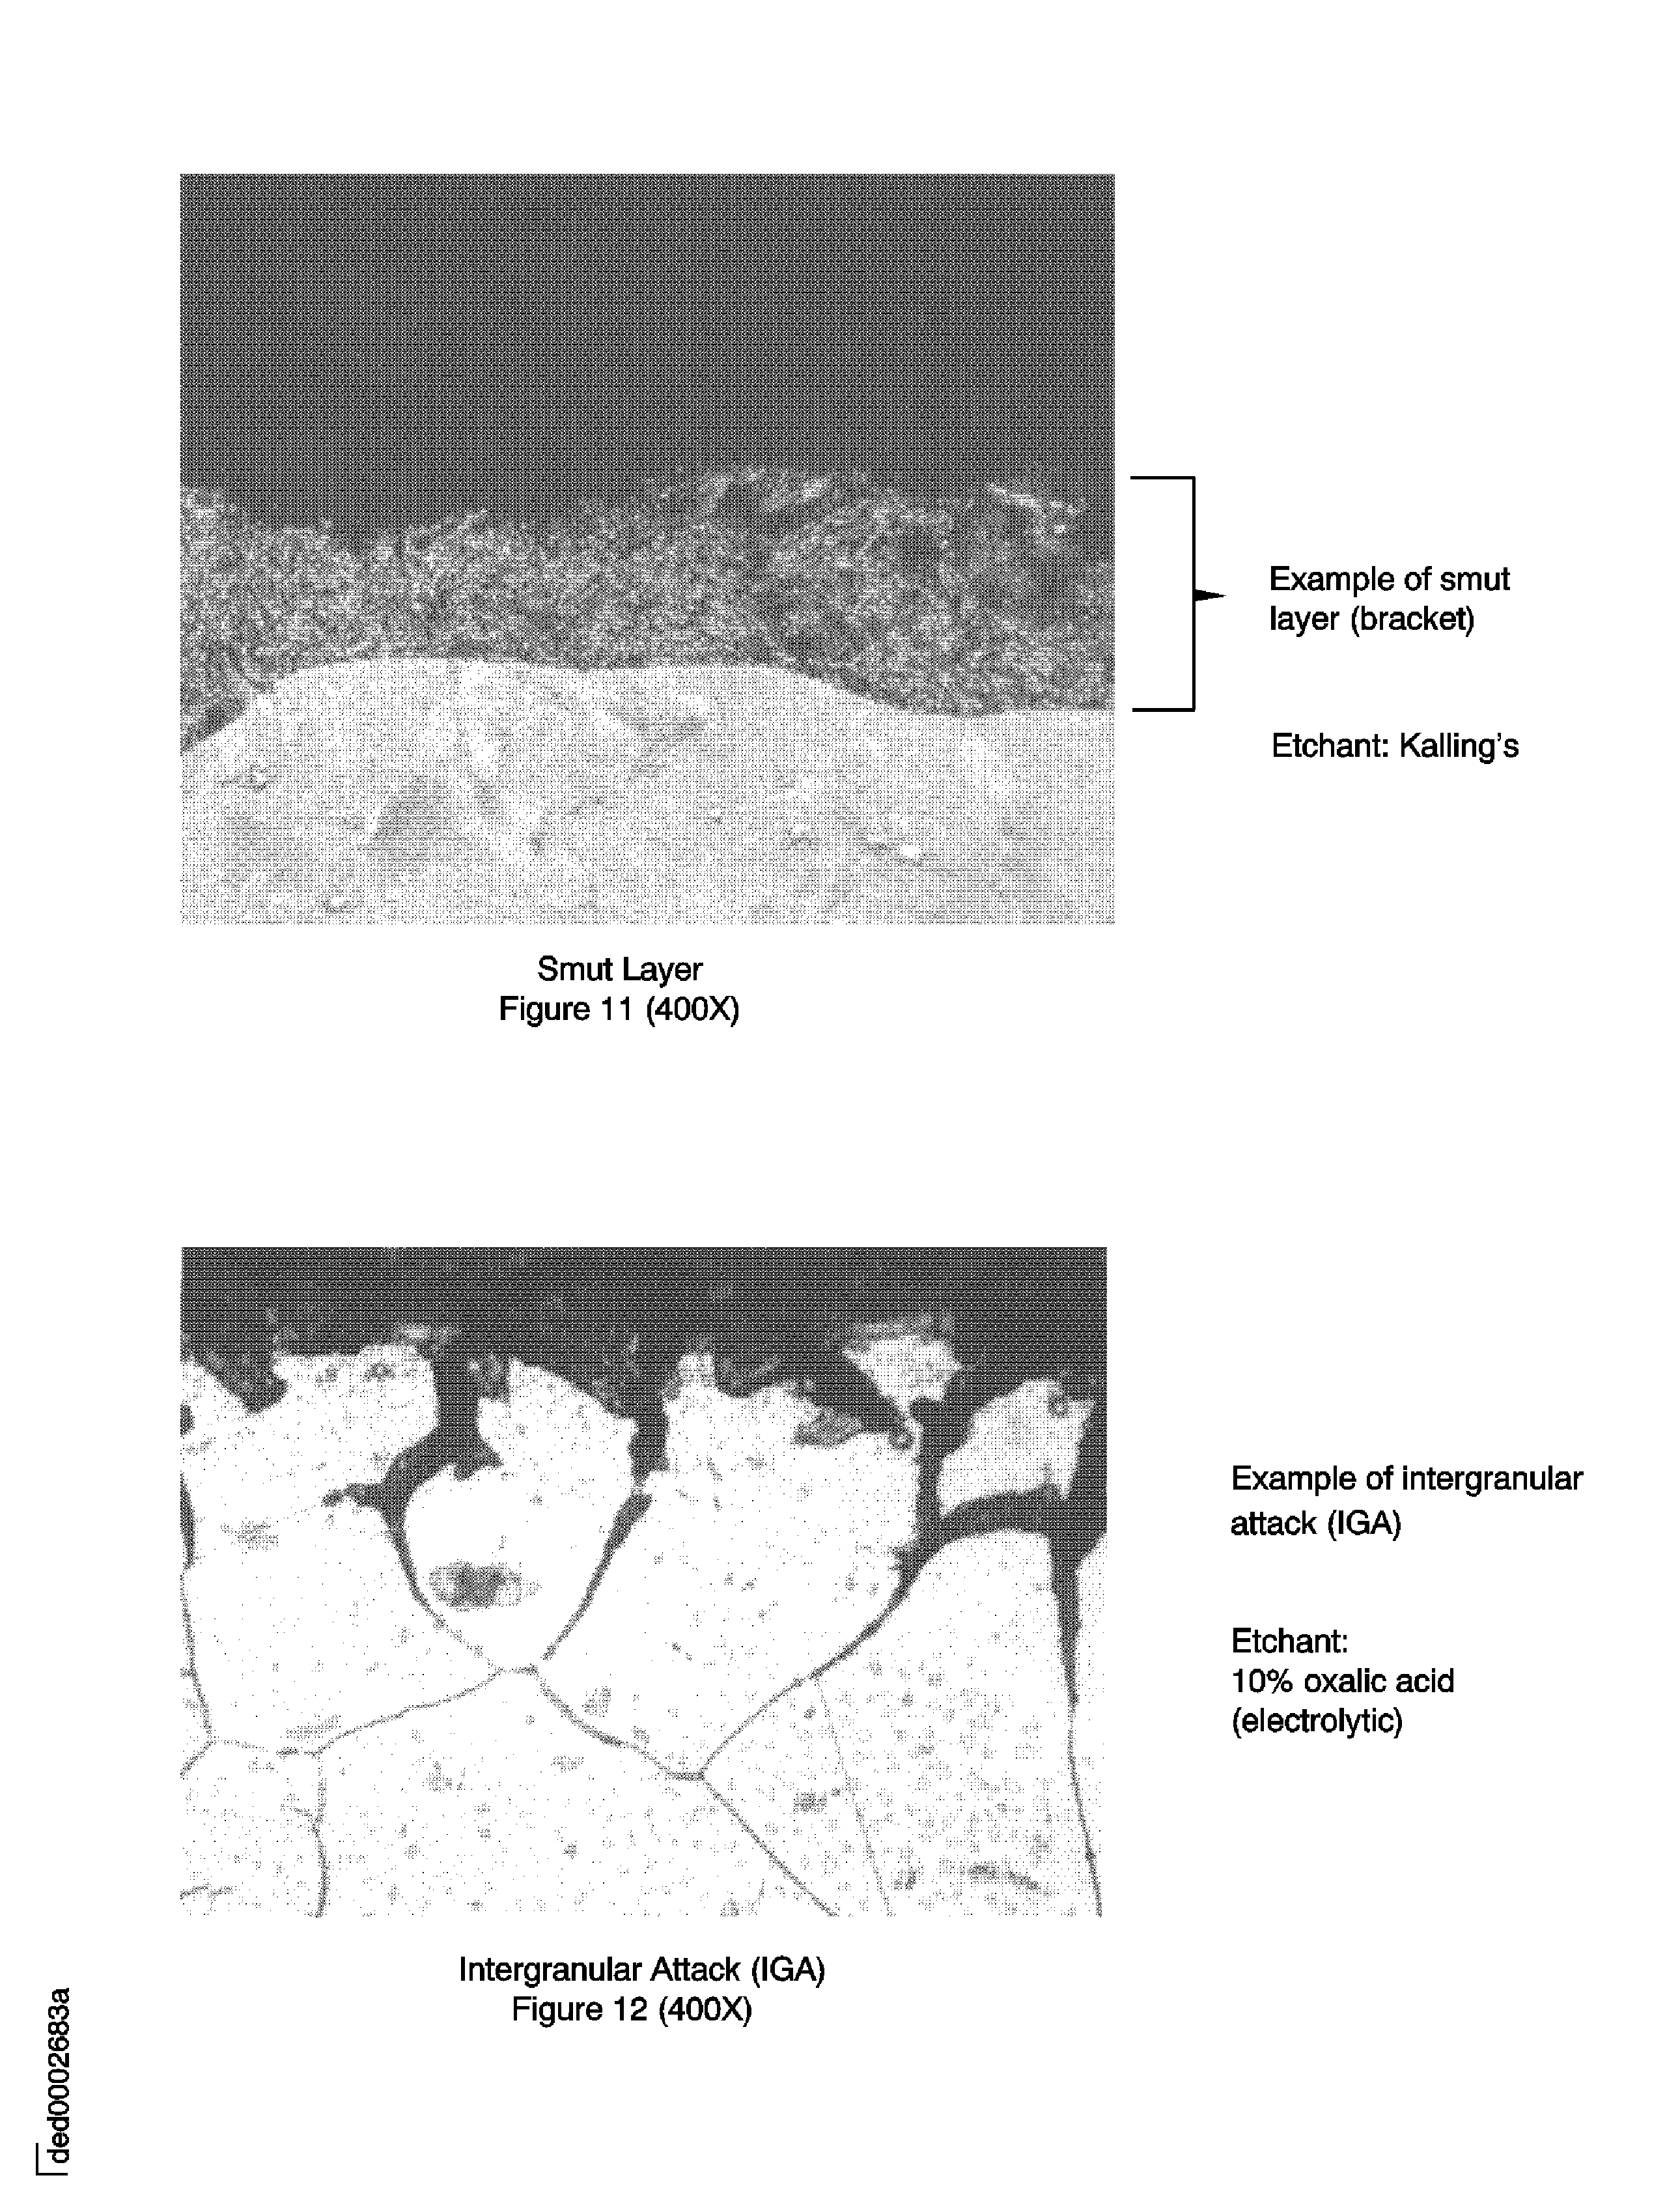
    Figure: Nonmechanical metal removal

    Nonmechanical metal removal
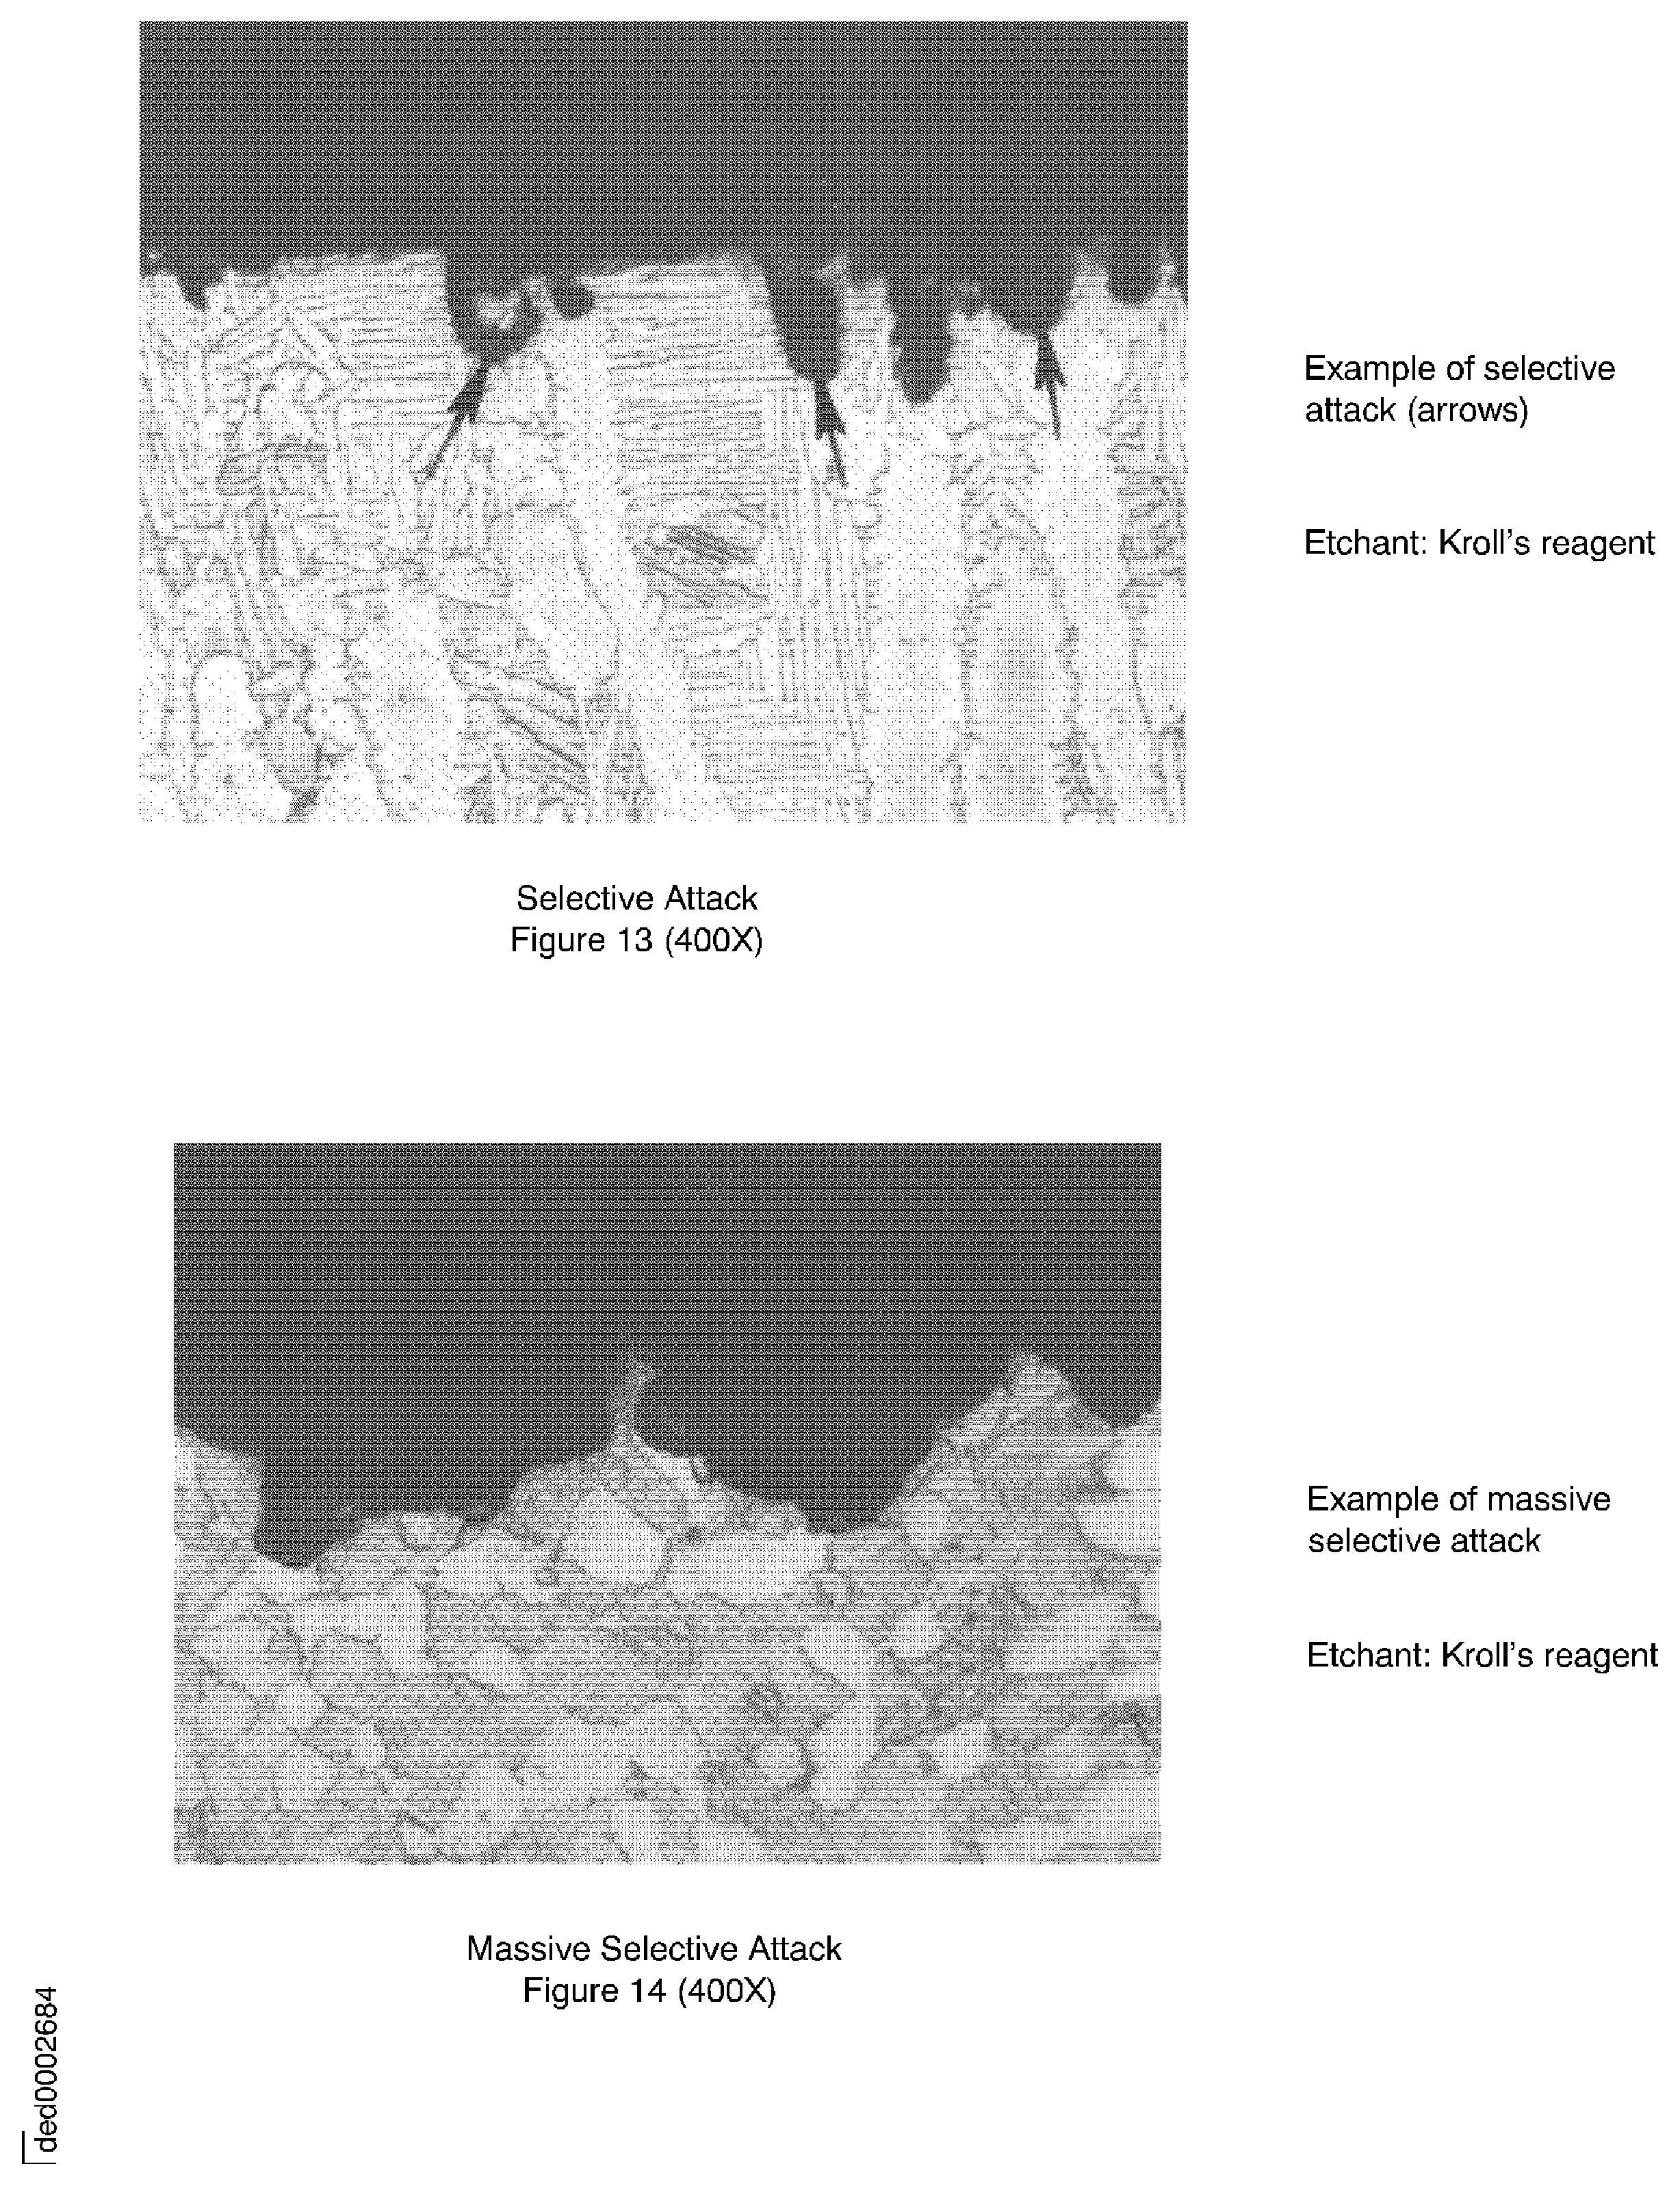
    Figure: Nonmechanical metal removal

    Nonmechanical metal removal
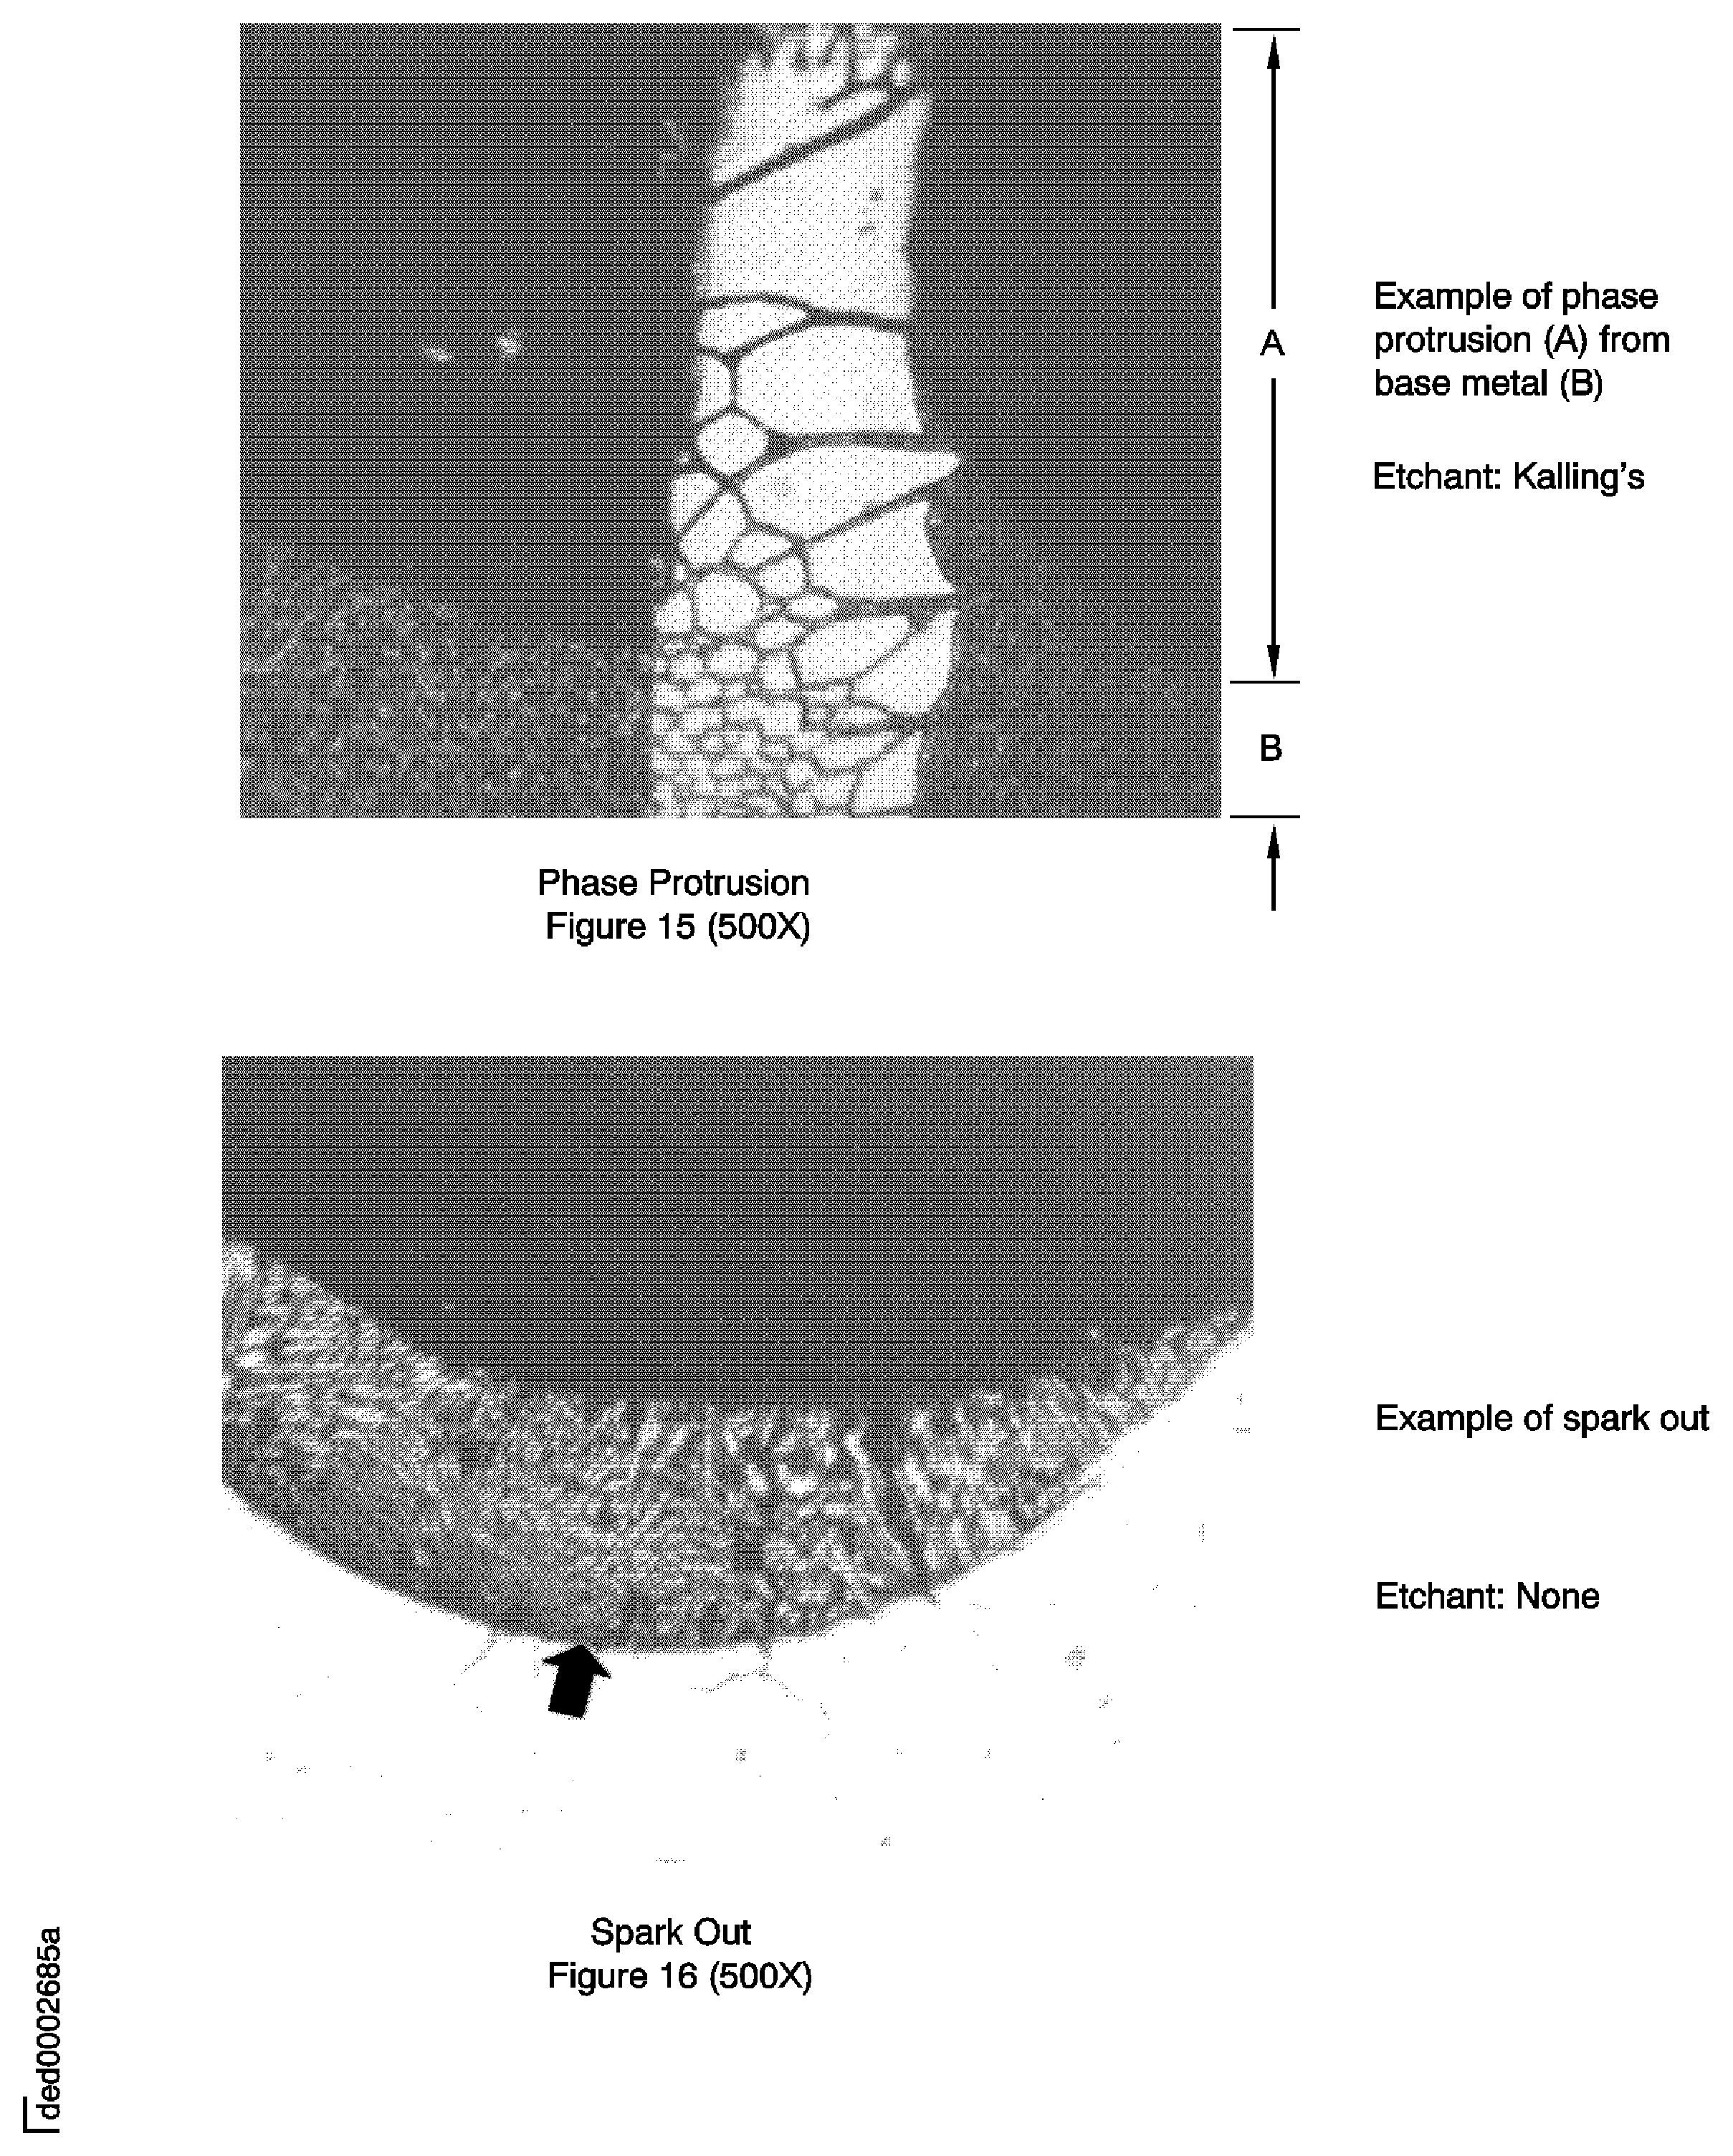
    Figure: Nonmechanical metal removal

    Nonmechanical metal removal
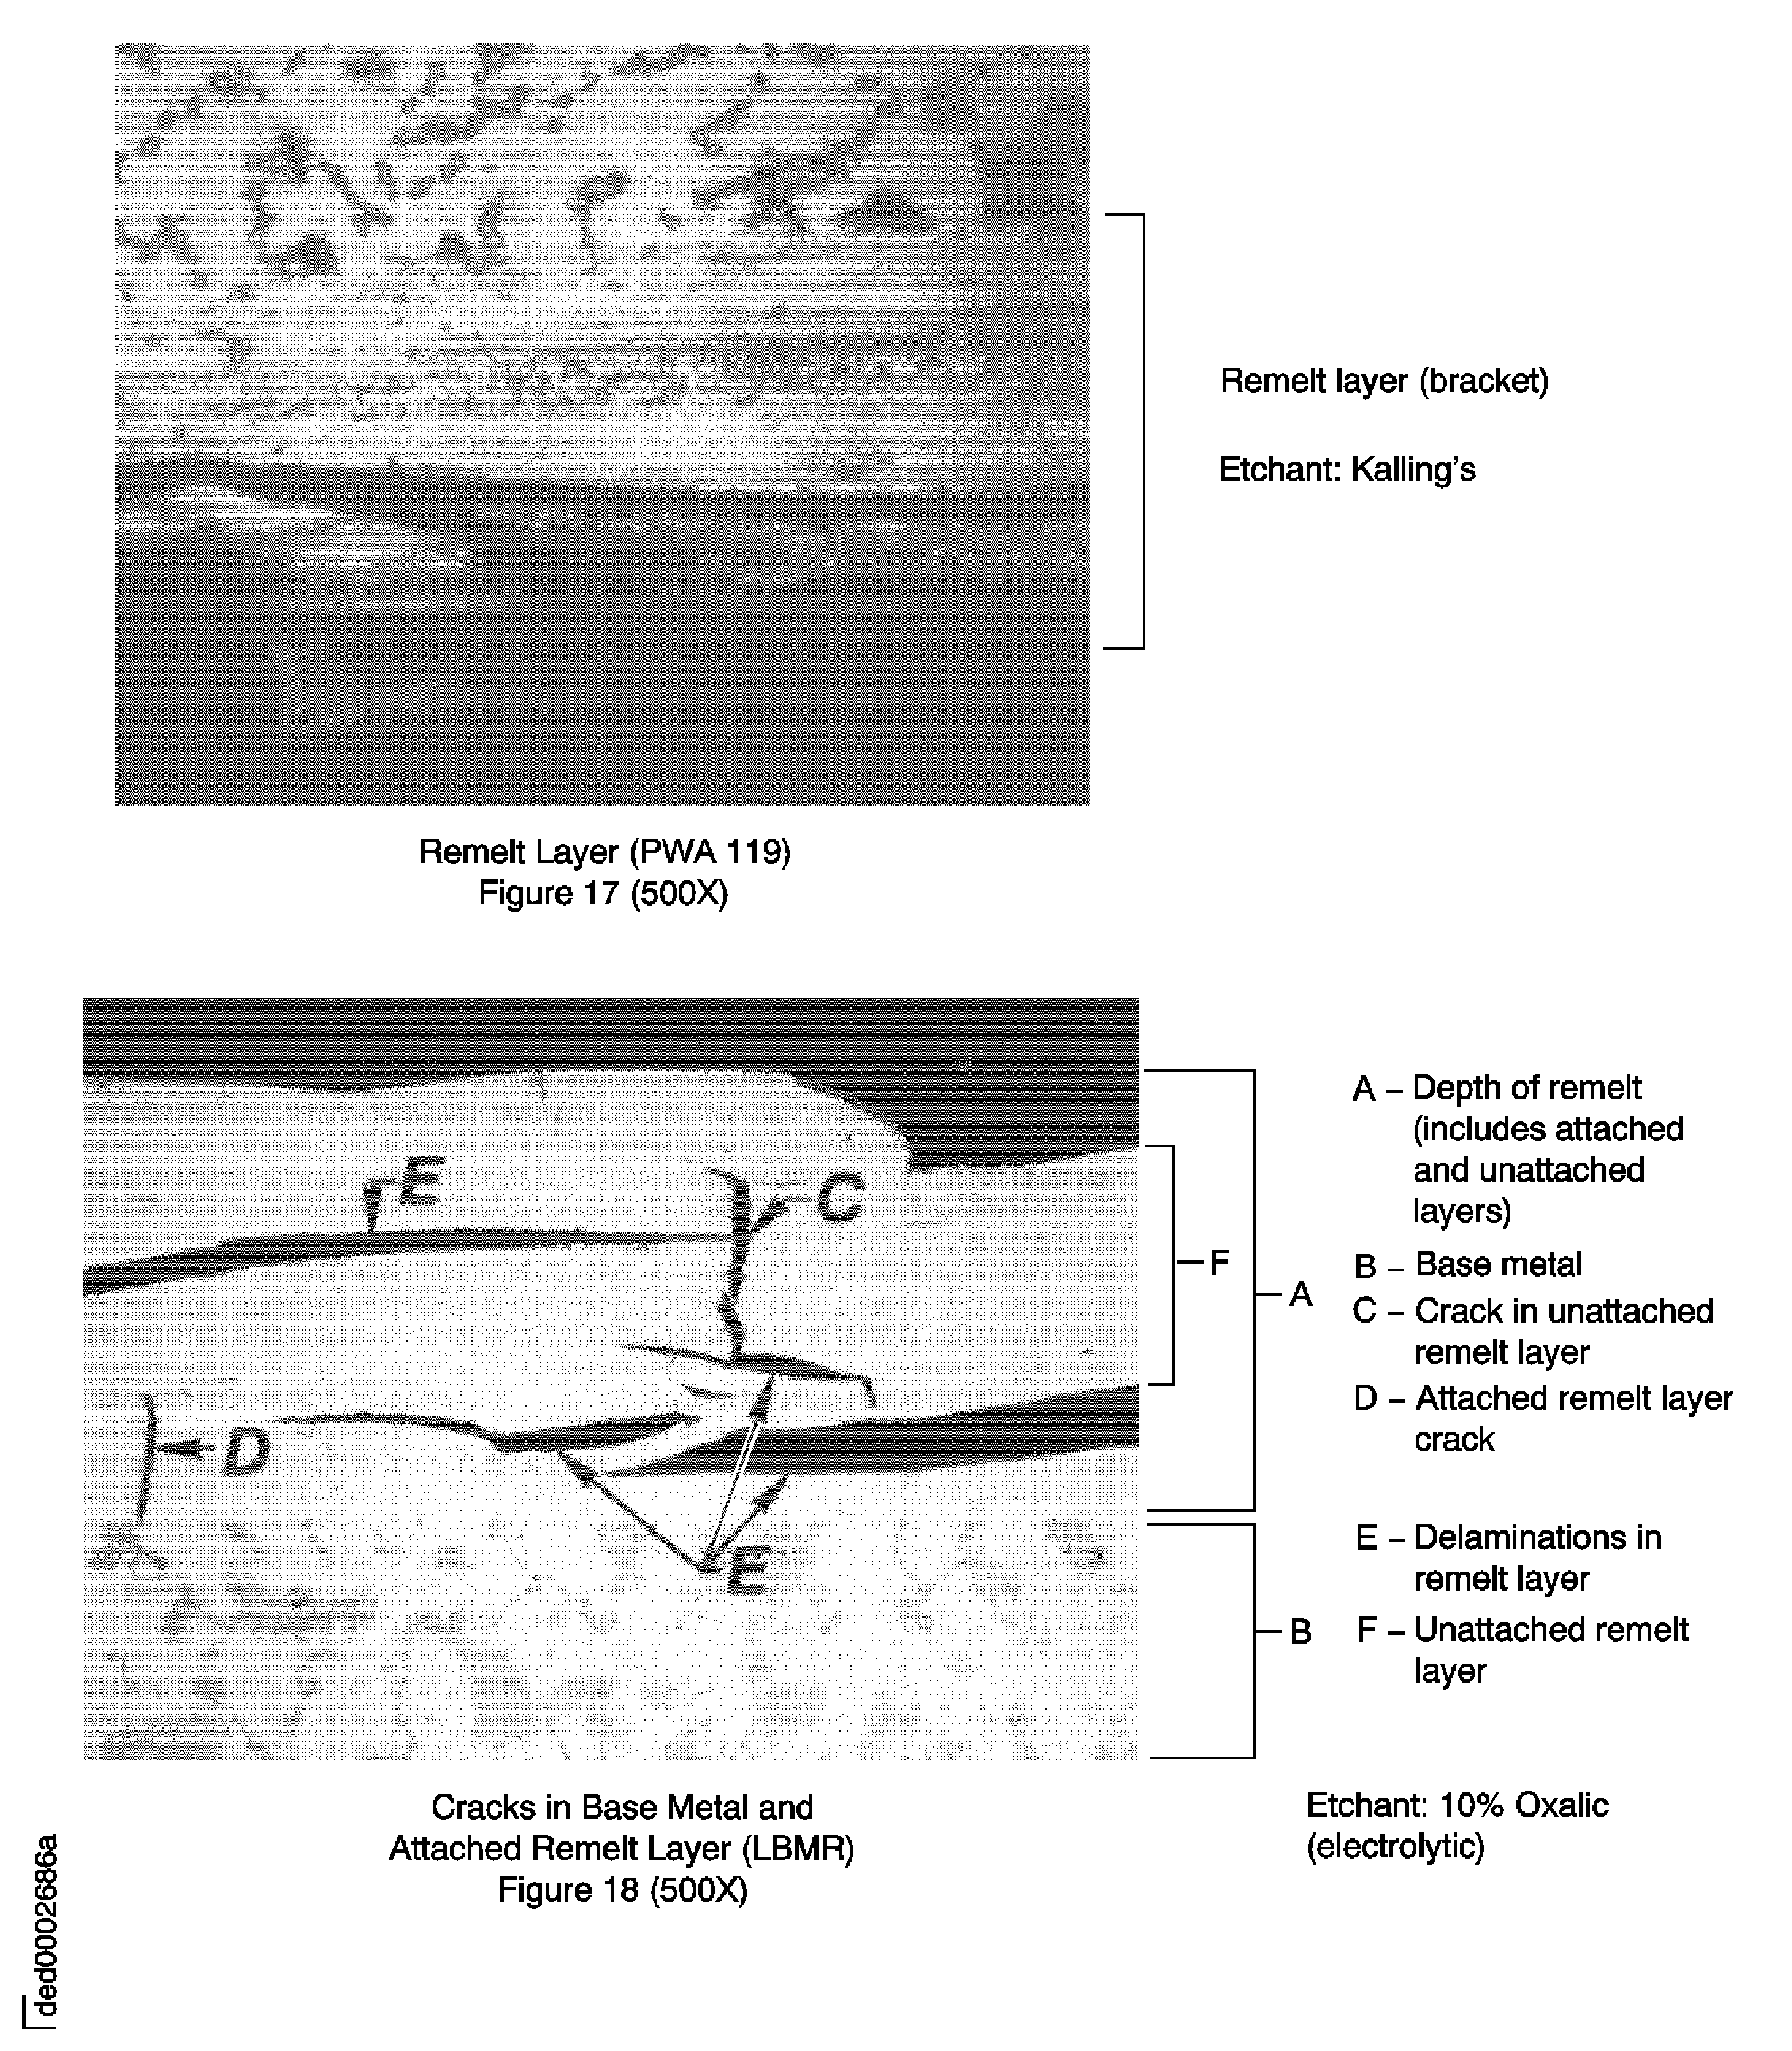
    Figure: Nonmechanical metal removal

    Nonmechanical metal removal
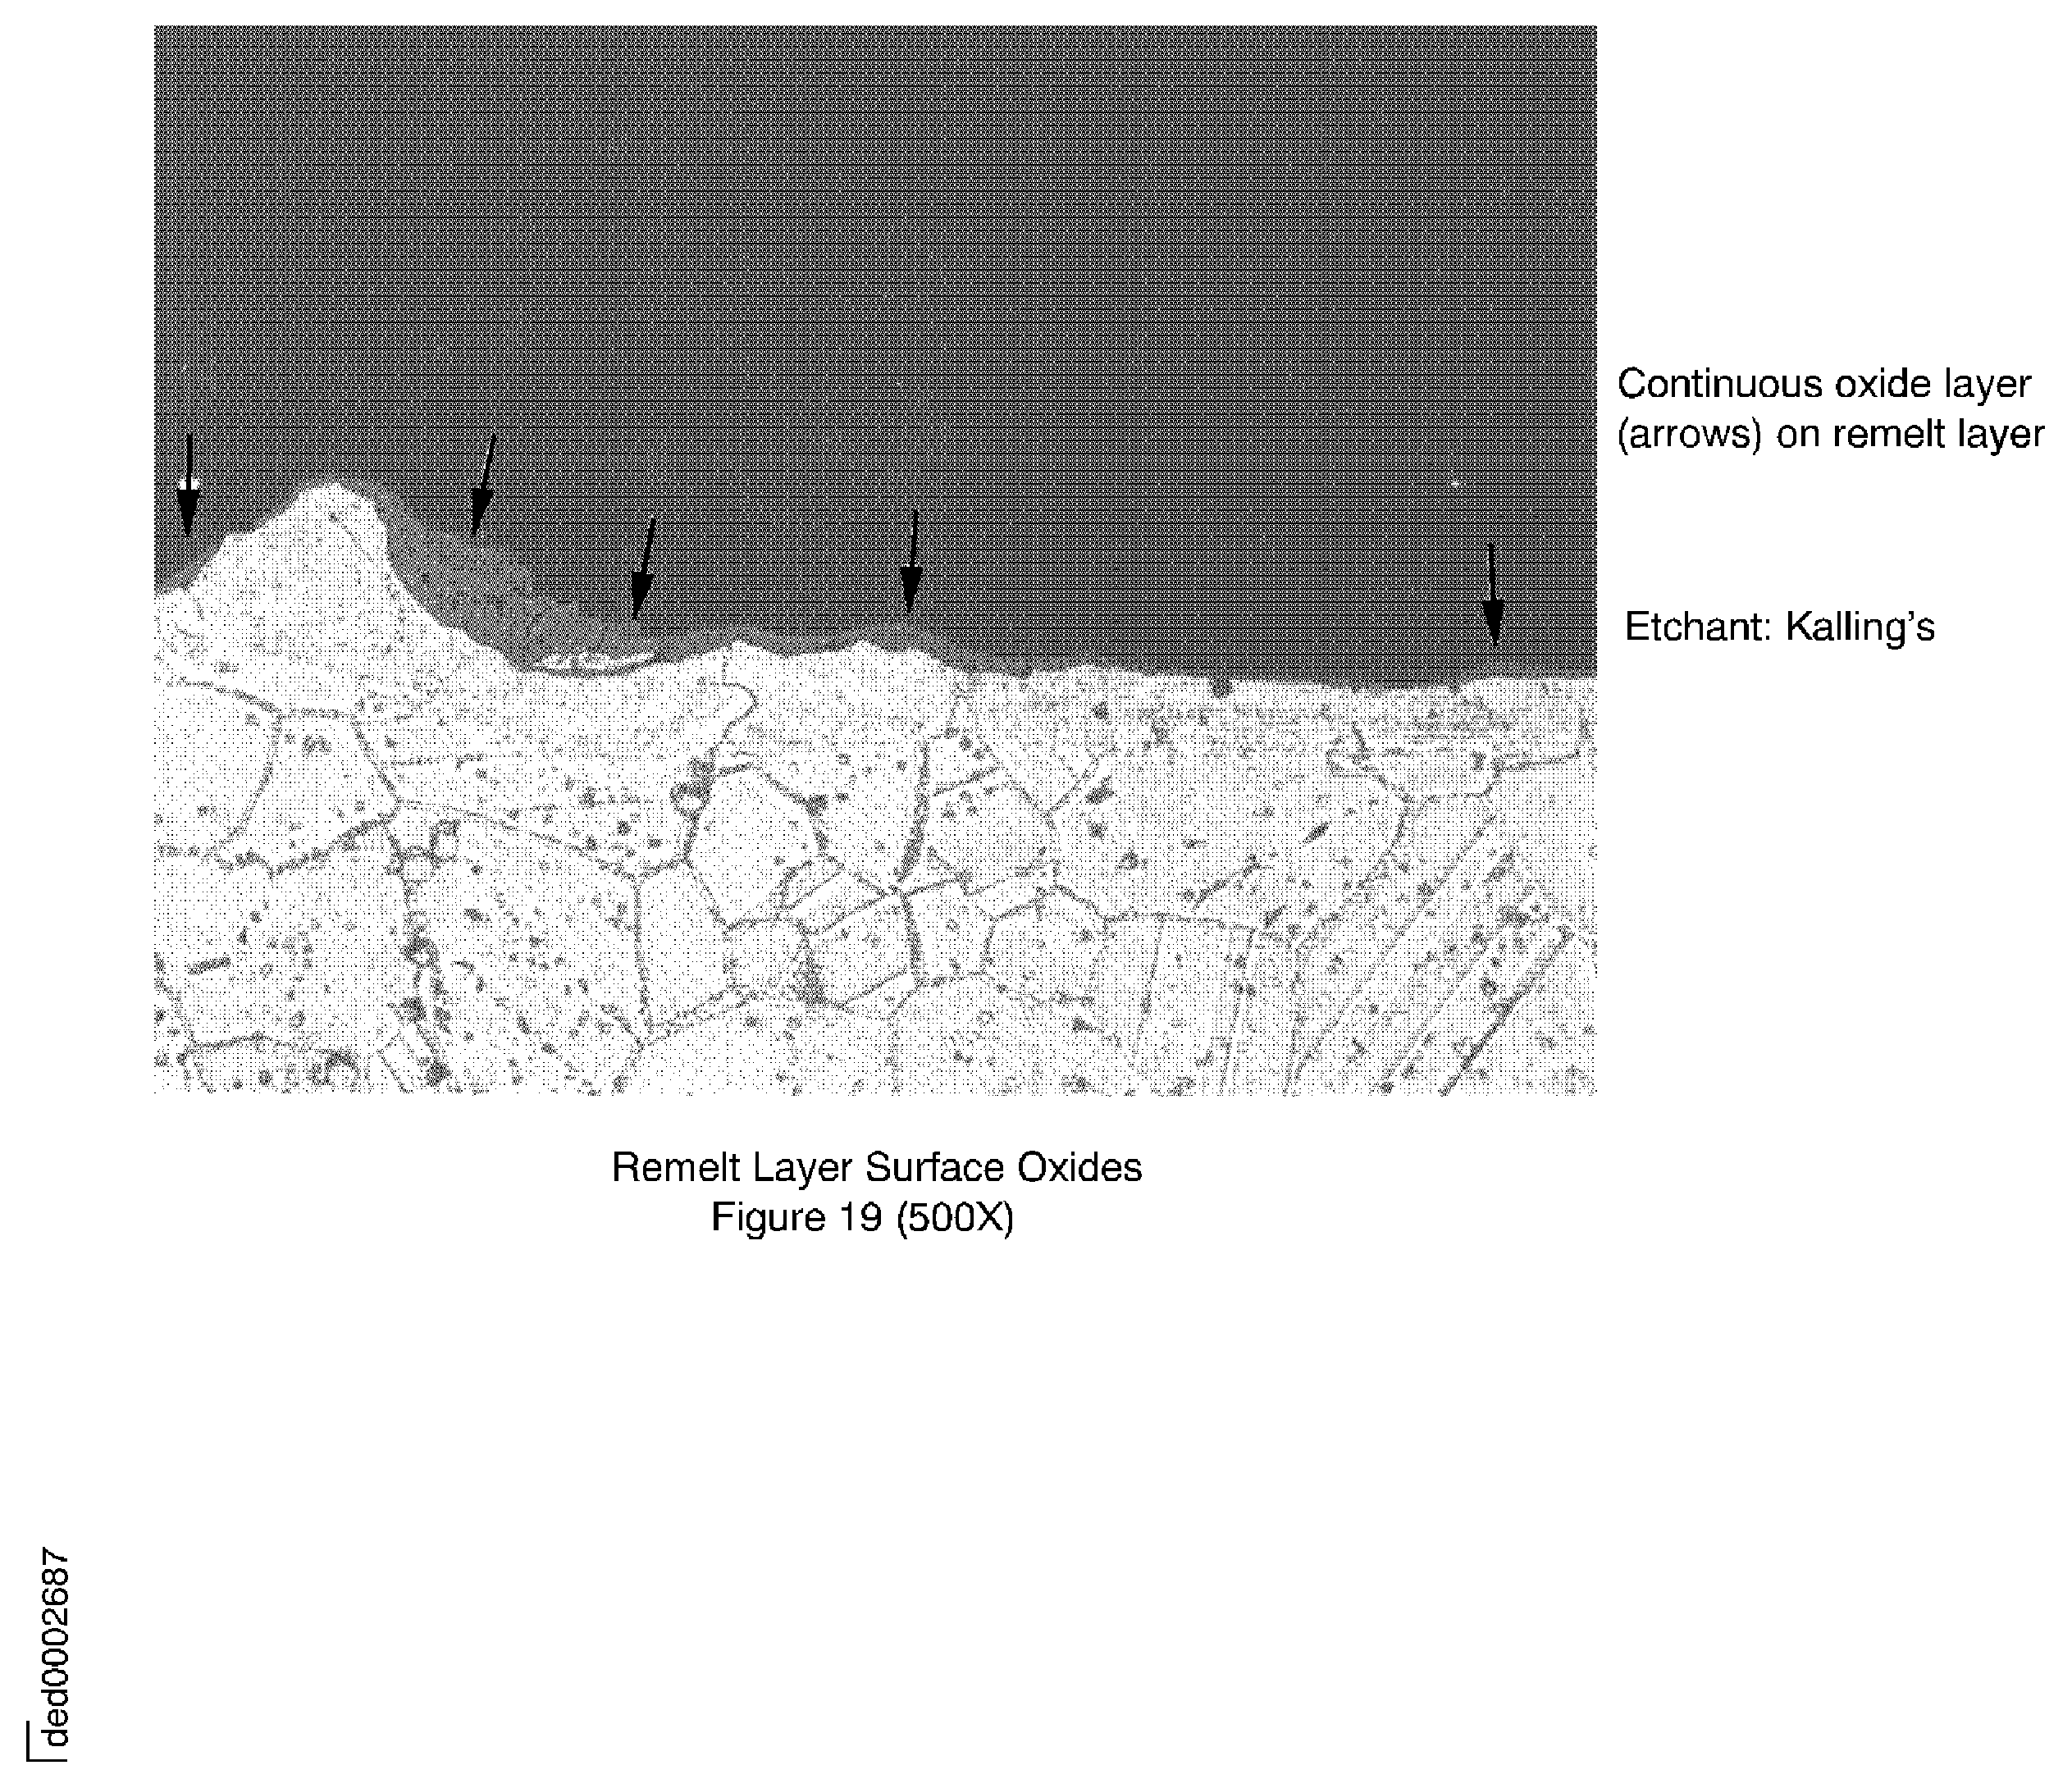
    Figure: Nonmechanical metal removal

    Nonmechanical metal removal
Requirements After Job Completion

Follow-On Conditions

NONE
Manufacturer Code:09410
Enterprise Name:BUEHLER LTD
BU Name:BUEHLER LTD
Street:41 WAUKEGAN RD
P.O. Box:1
City:LAKE BLUFF
State:IL
Zip Code:60044-1699
Country:USA
Phone Number:1-847-295-6500
Fax Number:1-847-295-7979
Internet:www.buehler.com
Manufacturer Code:44197
Enterprise Name:SAINT-GOBAIN INDUSTRIAL CERAMICS INC.
BU Name:SAINT-GOBAIN ABRASIVES, INC
Street:ONE NEW BOND STREET
P.O. Box:PO BOX 15008
City:WORCESTER
State:MA
Zip Code:01615-0008
Country:USA
Phone Number:1-508-795-5000
Fax Number:1-508-795-2828
Internet:www.saint-gobain-northamerica.com
Manufacturer Code:5U637
Enterprise Name:EXCEL TECHNOLOGIES INC
BU Name:EXCEL TECHNOLOGIES INC
Street:99 PHOENIX AVE
City:ENFIELD
State:CT
Zip Code:06082-4439
Country:USA
Phone Number:1-860-741-3435
Fax Number:1-860-745-7212
Manufacturer Code:LOCAL
Enterprise Name:LOCALLY SUPPLIED
Manufacturer Code:LOCAL
Supply Number:CoMat 01-007
Type:sp01
Supply Short Name:CoMat 01-007 ETHYL ALCOHOL C2H5OH (DENATURED)
Supply Name:CoMat 01-007 ETHYL ALCOHOL C2H5OH (DENATURED)
Specification Groups:
Doc NumberType
PMC 9009 (PW REF)Reagent grade
MTH 133 (94%) (MTU REF)Reagent grade
Suppliers:
ManufacturerRemarks
LOCAL
K6835
IE441
24853
Manufacturer Code:LOCAL
Supply Number:CoMat 01-250
Type:sp01
Supply Short Name:CoMat 01-250 CUPRIC CHLORIDE CuCl2
Supply Name:CoMat 01-250 CUPRIC CHLORIDE CuCl2
Specification Groups:
Doc NumberType
OMAT:1/193ANALAR GRADE
Suppliers:
ManufacturerRemarks
LOCAL
24853
K6835
U1185
Manufacturer Code:LOCAL
Supply Number:CoMat 01-320
Type:sp01
Supply Short Name:CoMat 01-320 SULFURIC ACID
Supply Name:CoMat 01-320 SULFURIC ACID
Specification Groups:
Doc NumberType
PMC 1025REAGENT GRADE S.G 1.84
Suppliers:
ManufacturerRemarks
LOCAL
Manufacturer Code:LOCAL
Supply Number:CoMat 01-327
Type:sp01
Supply Short Name:CoMat 01-327 NITRIC ACID
Supply Name:CoMat 01-327 NITRIC ACID
Specification Groups:
Doc NumberType
PMC 1019REAGENT GRADE (68 - 70% BY WEIGHT)
Suppliers:
ManufacturerRemarks
LOCAL
Manufacturer Code:LOCAL
Supply Number:CoMat 01-346
Type:sp01
Supply Short Name:CoMat 01-346 SULFURIC ACID
Supply Name:CoMat 01-346 SULFURIC ACID
Specification Groups:
Doc NumberType
REAGENT GRADE
Suppliers:
ManufacturerRemarks
LOCAL
Manufacturer Code:LOCAL
Supply Number:CoMat 01-357
Type:sp01
Supply Short Name:CoMat 01-357 HYDROFLUORIC ACID (HF)
Supply Name:CoMat 01-357 HYDROFLUORIC ACID (HF)
Specification Groups:
Doc NumberType
PMC 1024REAGENT GRADE (49%)
Suppliers:
ManufacturerRemarks
LOCAL
Manufacturer Code:LOCAL
Supply Number:CoMat 01-363
Type:sp01
Supply Short Name:CoMat 01-363 HYDROCHLORIC ACID (HCl),REAGENT GRADE
Supply Name:CoMat 01-363 HYDROCHLORIC ACID (HCl),REAGENT GRADE
Specification Groups:
Doc NumberType
PMC 1020REAGENT GRADE (36 - 38% BY WEIGHT)
Suppliers:
ManufacturerRemarks
LOCAL
Manufacturer Code:LOCAL
Supply Number:CoMat 01-464
Type:sp01
Supply Short Name:CoMat 01-464 OXALIC ACID
Supply Name:CoMat 01-464 OXALIC ACID
Specification Groups:
Doc NumberType
REAGENT GRADE
Suppliers:
ManufacturerRemarks
LOCAL
22527
94480
Manufacturer Code:LOCAL
Supply Number:CoMat 01-465
Type:sp01
Supply Short Name:CoMat 01-465 CUPRIC CHLORIDE
Supply Name:CoMat 01-465 CUPRIC CHLORIDE
Specification Groups:
Doc NumberType
REAGENT GRADE
Suppliers:
ManufacturerRemarks
LOCAL
22527
94480
Manufacturer Code:5U637
Supply Number:CoMat 03-452
Type:sp01
Supply Short Name:CoMat 03-452 THERMOPLASTIC MOUNTINGPOWDER"LUCITE"
Supply Name:CoMat 03-452 THERMOPLASTIC MOUNTINGPOWDER"LUCITE"
Specification Groups:
Doc NumberType
XL 14515
Suppliers:
ManufacturerRemarks
5U637
Manufacturer Code:1E1X8
Supply Number:CoMat 05-082
Type:sp01
Supply Short Name:CoMat 05-082 WATERPROOF SILICON CARBIDE
Supply Name:CoMat 05-082 WATERPROOF SILICON CARBIDE
Specification Groups:
Doc NumberType
OMAT: 5/39 (RR REF)WATERPROOF SILICON CARBIDE ABRASIVE PAPER, CAMI GRIT DESIGNATION 120 (ANSI B74.18)
JCR-192 (JAEC REF)
Suppliers:
ManufacturerRemarks
1E1X8
K6835
LOCAL
Manufacturer Code:09410
Supply Number:CoMat 05-090
Type:sp01
Supply Short Name:CoMat 05-090 DIAMOND PASTE
Supply Name:CoMat 05-090 DIAMOND PASTE
Specification Groups:
Doc NumberType
PASTE DIAMOND (1 MICRON)
Suppliers:
ManufacturerRemarks
09410
Manufacturer Code:09410
Supply Number:CoMat 05-091
Type:sp01
Supply Short Name:CoMat 05-091 DIAMOND PASTE
Supply Name:CoMat 05-091 DIAMOND PASTE
Specification Groups:
Doc NumberType
PASTE DIAMOND (6 MICRON)
Suppliers:
ManufacturerRemarks
09410
IE398
Manufacturer Code:LOCAL
Supply Number:CoMat 05-165
Type:sp01
Supply Short Name:CoMat 05-165 WATERPROOF SILIC. CARB.ABRAS. PAPER
Supply Name:CoMat 05-165 WATERPROOF SILIC. CARB.ABRAS. PAPER
Specification Groups:
Doc NumberType
GRIT SIZE 600
Suppliers:
ManufacturerRemarks
LOCAL
42736
A2549
IE302
K3895
Manufacturer Code:5U637
Supply Number:CoMat 08-113
Type:sp01
Supply Short Name:CoMat 08-113 EPOXY
Supply Name:CoMat 08-113 EPOXY
Specification Groups:
Doc NumberType
XL 14707
Suppliers:
ManufacturerRemarks
5U637