Export Control
EAR Export Classification: Not subject to the EAR per 15 C.F.R. Chapter 1, Part 734.3(b)(3), except for the following Service Bulletins which are currently published as EAR Export Classification 9E991: SBE70-0992, SBE72-0483, SBE72-0580, SBE72-0588, SBE72-0640, SBE73-0209, SBE80-0024 and SBE80-0025.Copyright
© IAE International Aero Engines AG (2001, 2014 - 2021) The information contained in this document is the property of © IAE International Aero Engines AG and may not be copied or used for any purpose other than that for which it is supplied without the express written authority of © IAE International Aero Engines AG. (This does not preclude use by engine and aircraft operators for normal instructional, maintenance or overhaul purposes.).Applicability
All
Common Information
TASK 70-35-26-300-501 Replace Damaged Unified Thinwall Self Lock Inserts
General
This repair gives the procedure for the removal/installation of thinwall self-lock inserts.
Install thinwall self-lock inserts when specified in the inspection check and or repair scheme.
Insert and tapped hole data
For data on the tapped hole refer to the engineering detail drawings.
For data on the thinwall insert (part number and dimensions) refer to Step Table 1.
Preliminary Requirements
Pre-Conditions
NONESupport Equipment
| Name | Manufacturer | Part Number / Identification | Quantity | Remark |
|---|---|---|---|---|
| Standard workshop tools | LOCAL | Standard workshop tools | ||
| Thinwall self-lock insert removal/installation tools | LOCAL | Thinwall self-lock insert removal/installation tools |
Consumables, Materials and Expendables
| Name | Manufacturer | Part Number / Identification | Quantity | Remark |
|---|---|---|---|---|
| CoMat 04-004 JOINTING COMPOUND, LIGHT GRADE | LOCAL | CoMat 04-004 |
Spares
NONESafety Requirements
NONEProcedure
Apply a thin layer of CoMat 04-004 JOINTING COMPOUND, LIGHT GRADE externally on to the insert if it is to be installed in aluminium or magnesium components (this prevents electrolytic corrosion).
Installation data.
Ensure that the tool is held firmly down on the insert. Stop turning the tool when the tool face touches the surface of the component.
If you continue turning the installation tool the insert will be too far down the threaded hole. Use hand pressure only to turn the tool.
If hand pressure is not sufficient to install the insert to depth, discard it and use a new insert.
Screw the insert into the tapped hole in a clockwise direction with the applicable tool (refer to Step Table 3 and Figure). The insert must be installed 0.40 mm to 0.65 mm (0.0157 in. to 0.0256 in.) below the surface of the component (Refer to Figure).
Installation procedure.
Where a serrated counterbore is used (this is optional) you must ensure that the serrations line up at the 0.40 mm to 0.65 mm (0.0157 in. to 0.0256 in.) installation depth (Refer to Figure).
To lock the insert, sufficient force must be applied to the approved swage tool (Refer to Step Table 4 and Figure) with a pneumatic gun or if this is not available a mechanical press (Fly press) or manual method (Hammer). This must be done until the nylon stop washer of the tool touches the surface of the component. The insert must now be examined to make sure it is correctly swaged and locked (refer to Figure).
Swage the insert.
As an alternative to the applicable after swage check gage in Step Table 5, it is permitted to use the after swage check gauge that the insert manufacturer specifies for the installed insert.

CAUTION
YOU MUST NOT CLEAN THE INTERNAL THREAD OF THE INSERT WITH A TAP. IF YOU DO DAMAGE TO THE INSERT WILL OCCUR.The insert thread must be examined for damage from the swaging procedure. The thread must be examined with the correct thread gauge or bolt (See Table 1 for nominal bolt size). This gauge or bolt must be screwed into the insert with the hand until it gets to the lock thread. Then remove the gauge or bolt. If the thread gauge or bolt does not go into the insert easily, then the insert must be removed. A new insert must then be installed.
Inspection.
SUBTASK 70-35-26-350-001 Replacement of Thinwall Self-Lock Inserts
SUBTASK 70-35-26-300-002 Table 1 (Bolt sizes, thinwall insert part numbers and dimensions)
Bolt thread diameter
Short inserts
Length +/- 0.25mm (0.0098in.)
Long inserts
Length +/- 0.30 mm (0.0118in.)
Tapped hole diameter
0.1900-32 UNJF
AS52760
7.37
(0.290)
AS52790
12.07 (0.475)
0.2500-28 UNJF
0.2500-28 UNJF
AS52761
9.65
(0.380)
AS52791
15.11 (0.595)
0.3125-24 UNJF
0.3125-24 UNJF
AS52762
11.94 (0.470)
AS52792
18.29 (0.720)
0.3750-24 UNJF
0.3750-24 UNJF
AS52763
14.22 (0.560)
AS52793
22.22 (0.875)
0.4375-20 UNJF
0.4375-20 UNJF
U760329
25.40 (1.000)
0.5000-20 UNJF
0.5000-20 UNJF
U760330
28.57 (1.124)
0.5625-24 UNJEF
SUBTASK 70-35-26-300-003 Table 2 (Thinwall insert part numbers and bolt thread diameter in relation to the serration contour)
BOLT THREAD DIAMETER
SHORT INSERT
AA mm (in.)
DIA AB mm (in.)
DIA AC mm (in.)
AD mm (in.)
ANGLE AE
0.1900-32 UNJF
AS52760
0.305 (0.012)
6.77 (0.266)
6.57 (0.258)
0.08 (0.003)
80.3
0.2500-28 UNJF
AS52761
0.300 (0.0118)
8.55 (0.337)
8.32 (0.327)
0.09 (0.0035)
82.0
0.3125-24 UNJF
AS52762
0.360 (0.014)
10.22 (0.402)
9.90 (0.389)
0.10 (0.0039)
83.5
0.3750-24 UNJF
AS52763
0.383 (0.015)
11.67 (0.459)
11.39 (0.448)
0.10 (0.0039)
84.5
SUBTASK 70-35-26-300-004 Table 3 (Thinwall insert part numbers and tool dimensions)
Short insert
Long insert
A mm (in.)+/-
0.125 mm (0.0049)
B max
mm (in.)
AS52760
AS52790
3.775 (0.147)
4.52 (0.178)
AS52761
AS52791
5.175 (0.204)
5.77 (0.227)
AS52762
AS52792
6.575 (0.259)
6.76 (0.266)
AS52763
AS52793
8.075 (0.318)
8.41 (0.331)
U760329
9.375 (0.369)
8.94 (0.352)
U760330
10.975 (0.432)
10.67 (0.420)
SUBTASK 70-35-26-300-005 Table 4 (Thinwall insert part numbers and tool dimensions)
Short insert
Long insert
DIA B mm (in.) +/-0.015 mm (0.0006 in.)
C mm (in.) +/-0.127mm (0.005 in.)
DIA D mm (in.) +/-0.25 mm (0.0098 in.)
AS52760
AS52790
5.375 (0.212)
1.829 (0.072)
0.65 (0.0256)
AS52761
AS52791
7.125 (0.281)
1.778 (0.070)
0.80 (0.0315)
AS52762
AS52792
8.775 (0.345)
1.702 (0.067)
1.00 (0.0394)
AS52763
AS52793
10.375 (0.408)
2.311 (0.091)
1.10 (0.043)
U760329
11.955 (0.471)
2.413 (0.095)
1.10 (0.043)
U760330
13.625 (0.536)
2.413 (0.095)
1.10 (0.043)
SUBTASK 70-35-26-300-006 Table 5 (Thinwall insert part numbers and specified dimensions)
Short insert
Long insert
DIA A min mm (in.)
B depth min mm (in.)
After swage check gauge
AS52760
AS52790
5.36 (0.211)
1.702 (0.067)
726016*
AS52761
AS52791
7.11 (0.279)
1.651 (0.065)
726588*
AS52762
AS52792
8.76 (0.344)
1.575 (0.062)
726009*
AS52763
AS52793
10.36 (0.407)
2.185 (0.086)
726592*
U760329
11.94 (0.471)
2.286 (0.09)
726030*
U760330
13.61 (0.535)
2.286 (0.09)
726033*
*As an alternative, it is permitted to use the after swage check gauge that the insert manufacturer specifies for the installed insert.
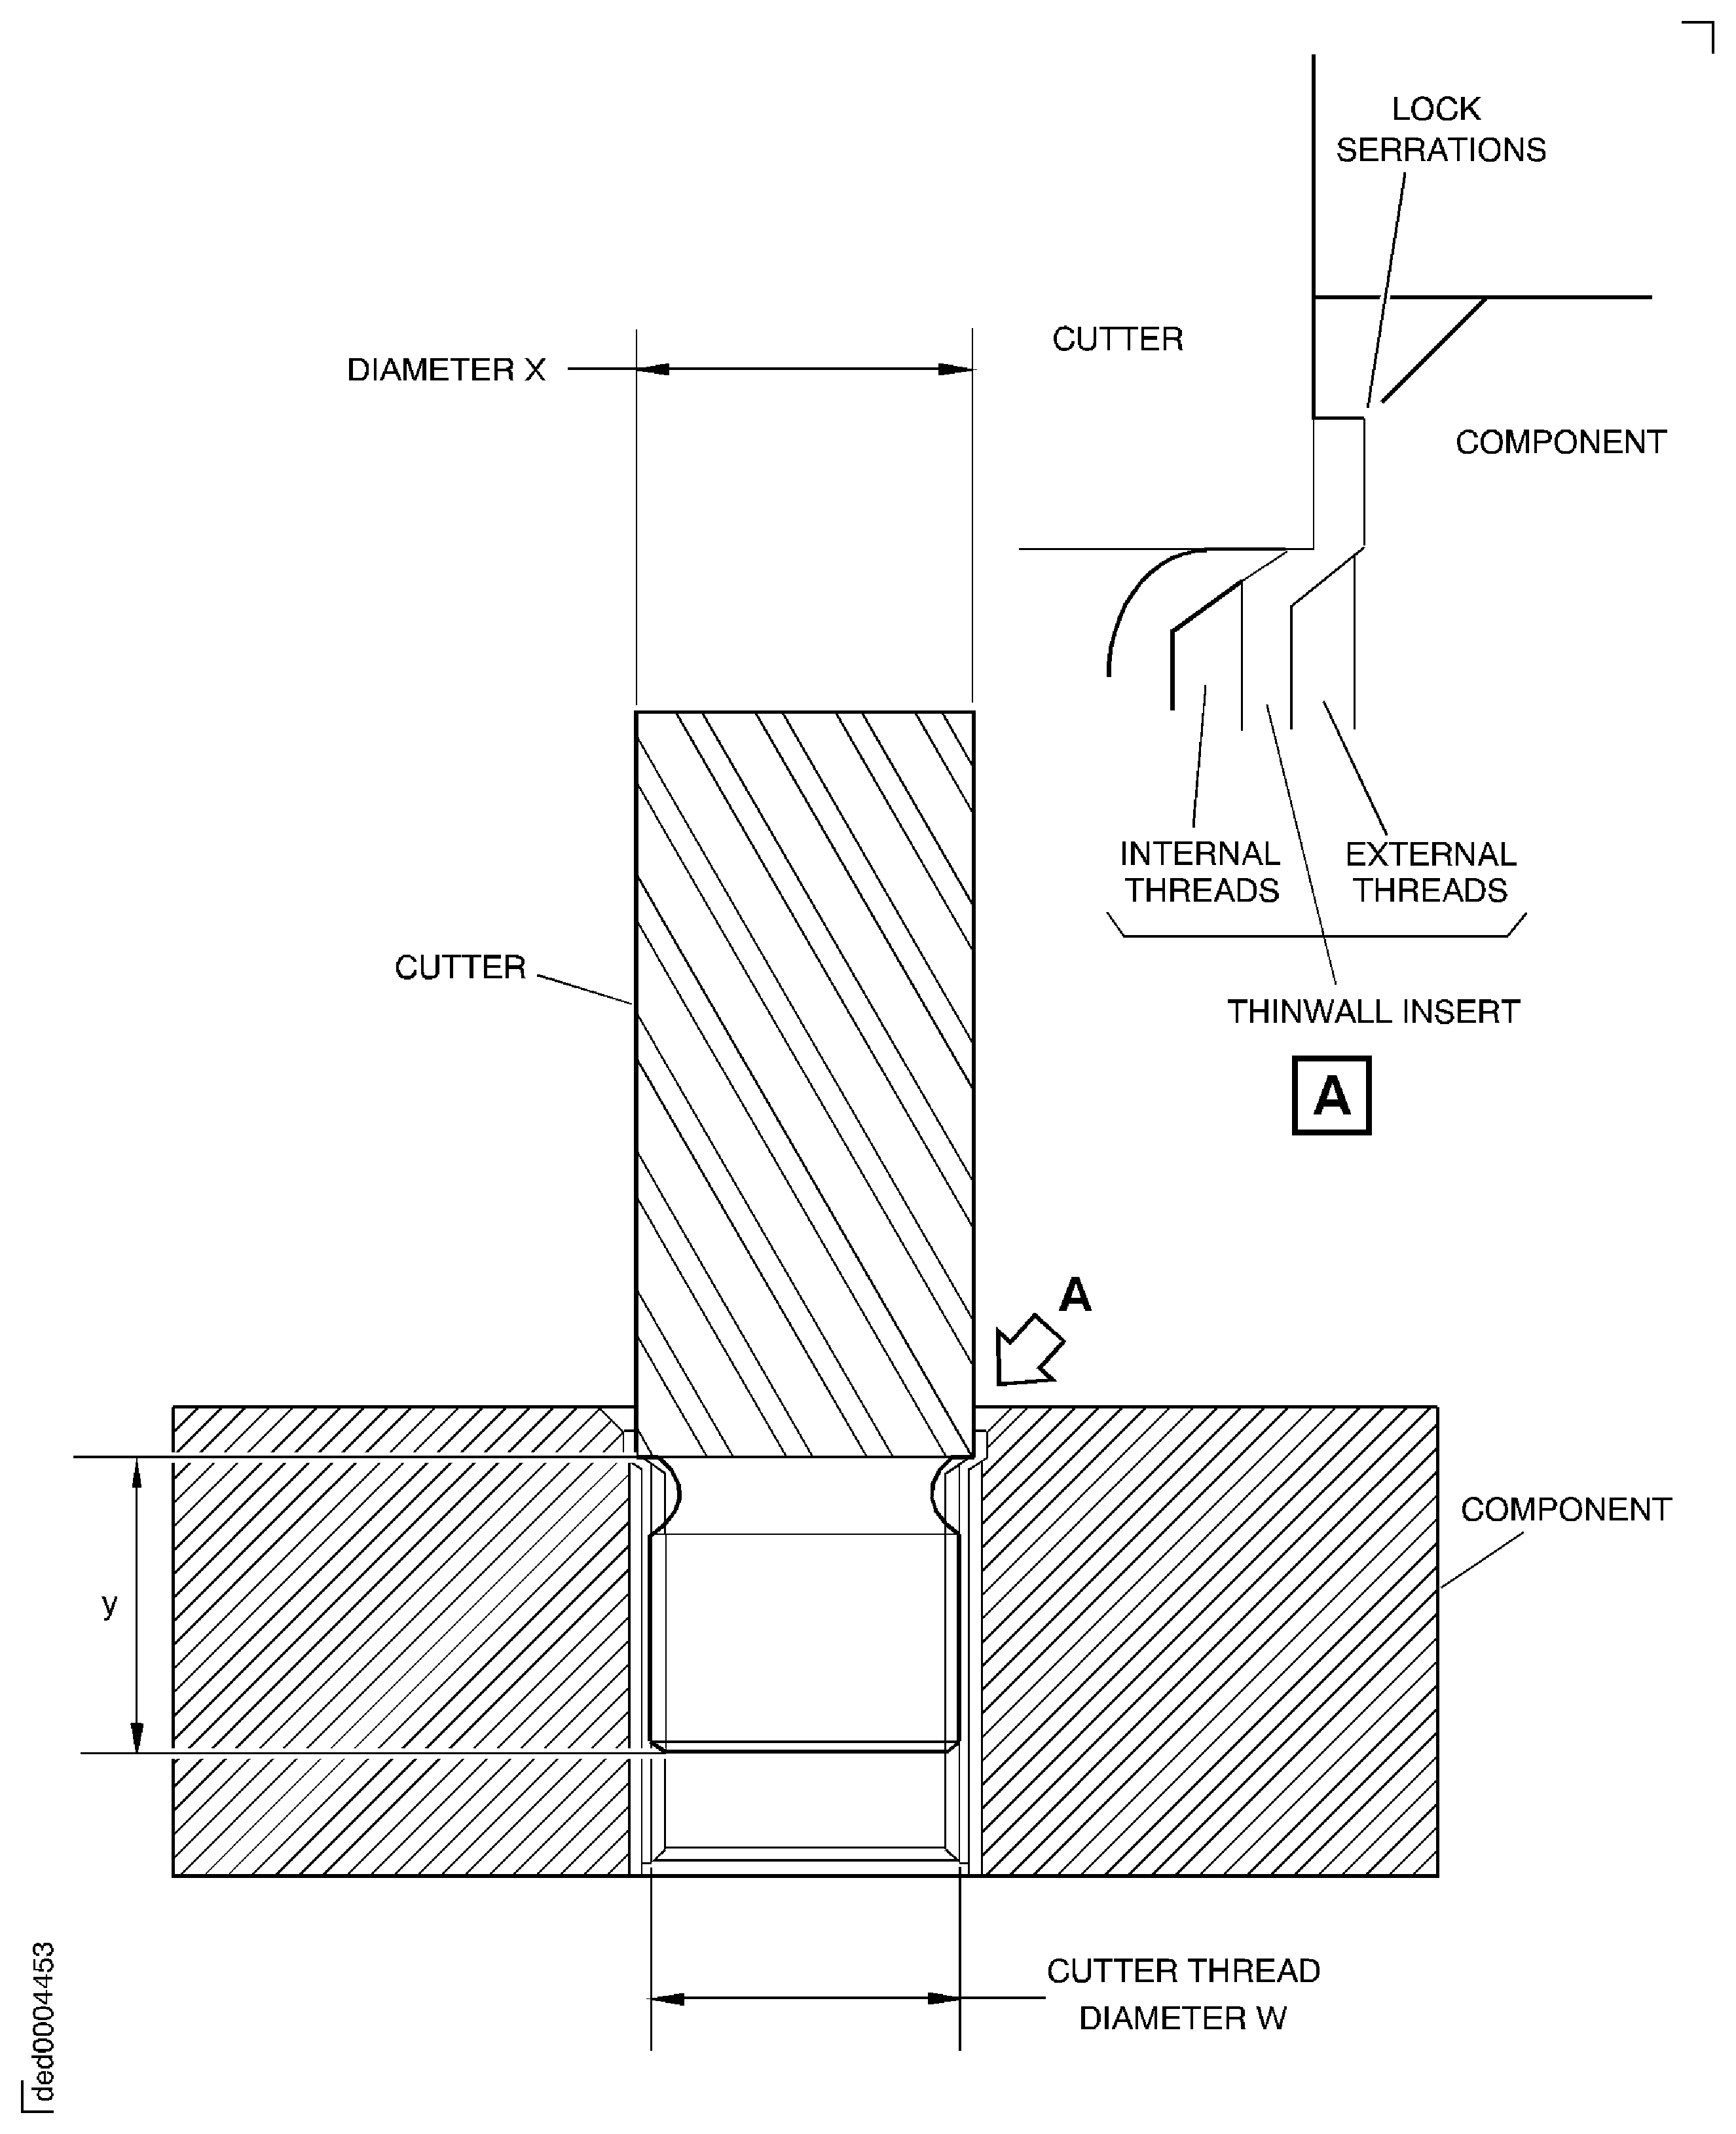
SUBTASK 70-35-26-300-007 Table 6 (Cutter dimensions for thinwall insert removal)
Short insert
Long insert
Cutter thread diameter W (BS1580)
Major dia. inches
Pitch dia. inches
Dia X mm(in.)
Tol m6
Y mm(in.) Tol +/- 0.3 mm
AS52760
AS52790
0.1870-32 UNS-3A
0.1870 0.1810
0.1667 0.1644
6.37
(0.25)
8.00 (0.315)
AS52761
AS52791
0.2470-28 UNS-3A
0.2470 0.2405
0.2238 0.2212
7.96
(0.313)
9.50 (0.374)
AS52762
AS52792
0.3095-24 UNS-3A
0.3095 0.3023
0.2824 0.2796
9.53
(0.375)
12.50 (0.492)
AS52763
AS52793
0.3720-24 UNS-3A
0.3720 0.3648
0.3449 0.3420
11.00 (0.433)
14.50 (0.570)
U760329
0.4345-20 UNS-3A
0.4345 0.4264
0.4020 0.3989
12.73 (0.501)
16.00 (0.629)
U760330
0.490-20 UNS-3A
0.4970 0.4889
0.4645 0.4613
14.25 (0.561)
18.50 (0.728)
Figure: Bolt Thread diameter in relation to serration contour (Refer also to table 2)
Bolt Thread diameter in relation to serration contour (Refer also to table 2)
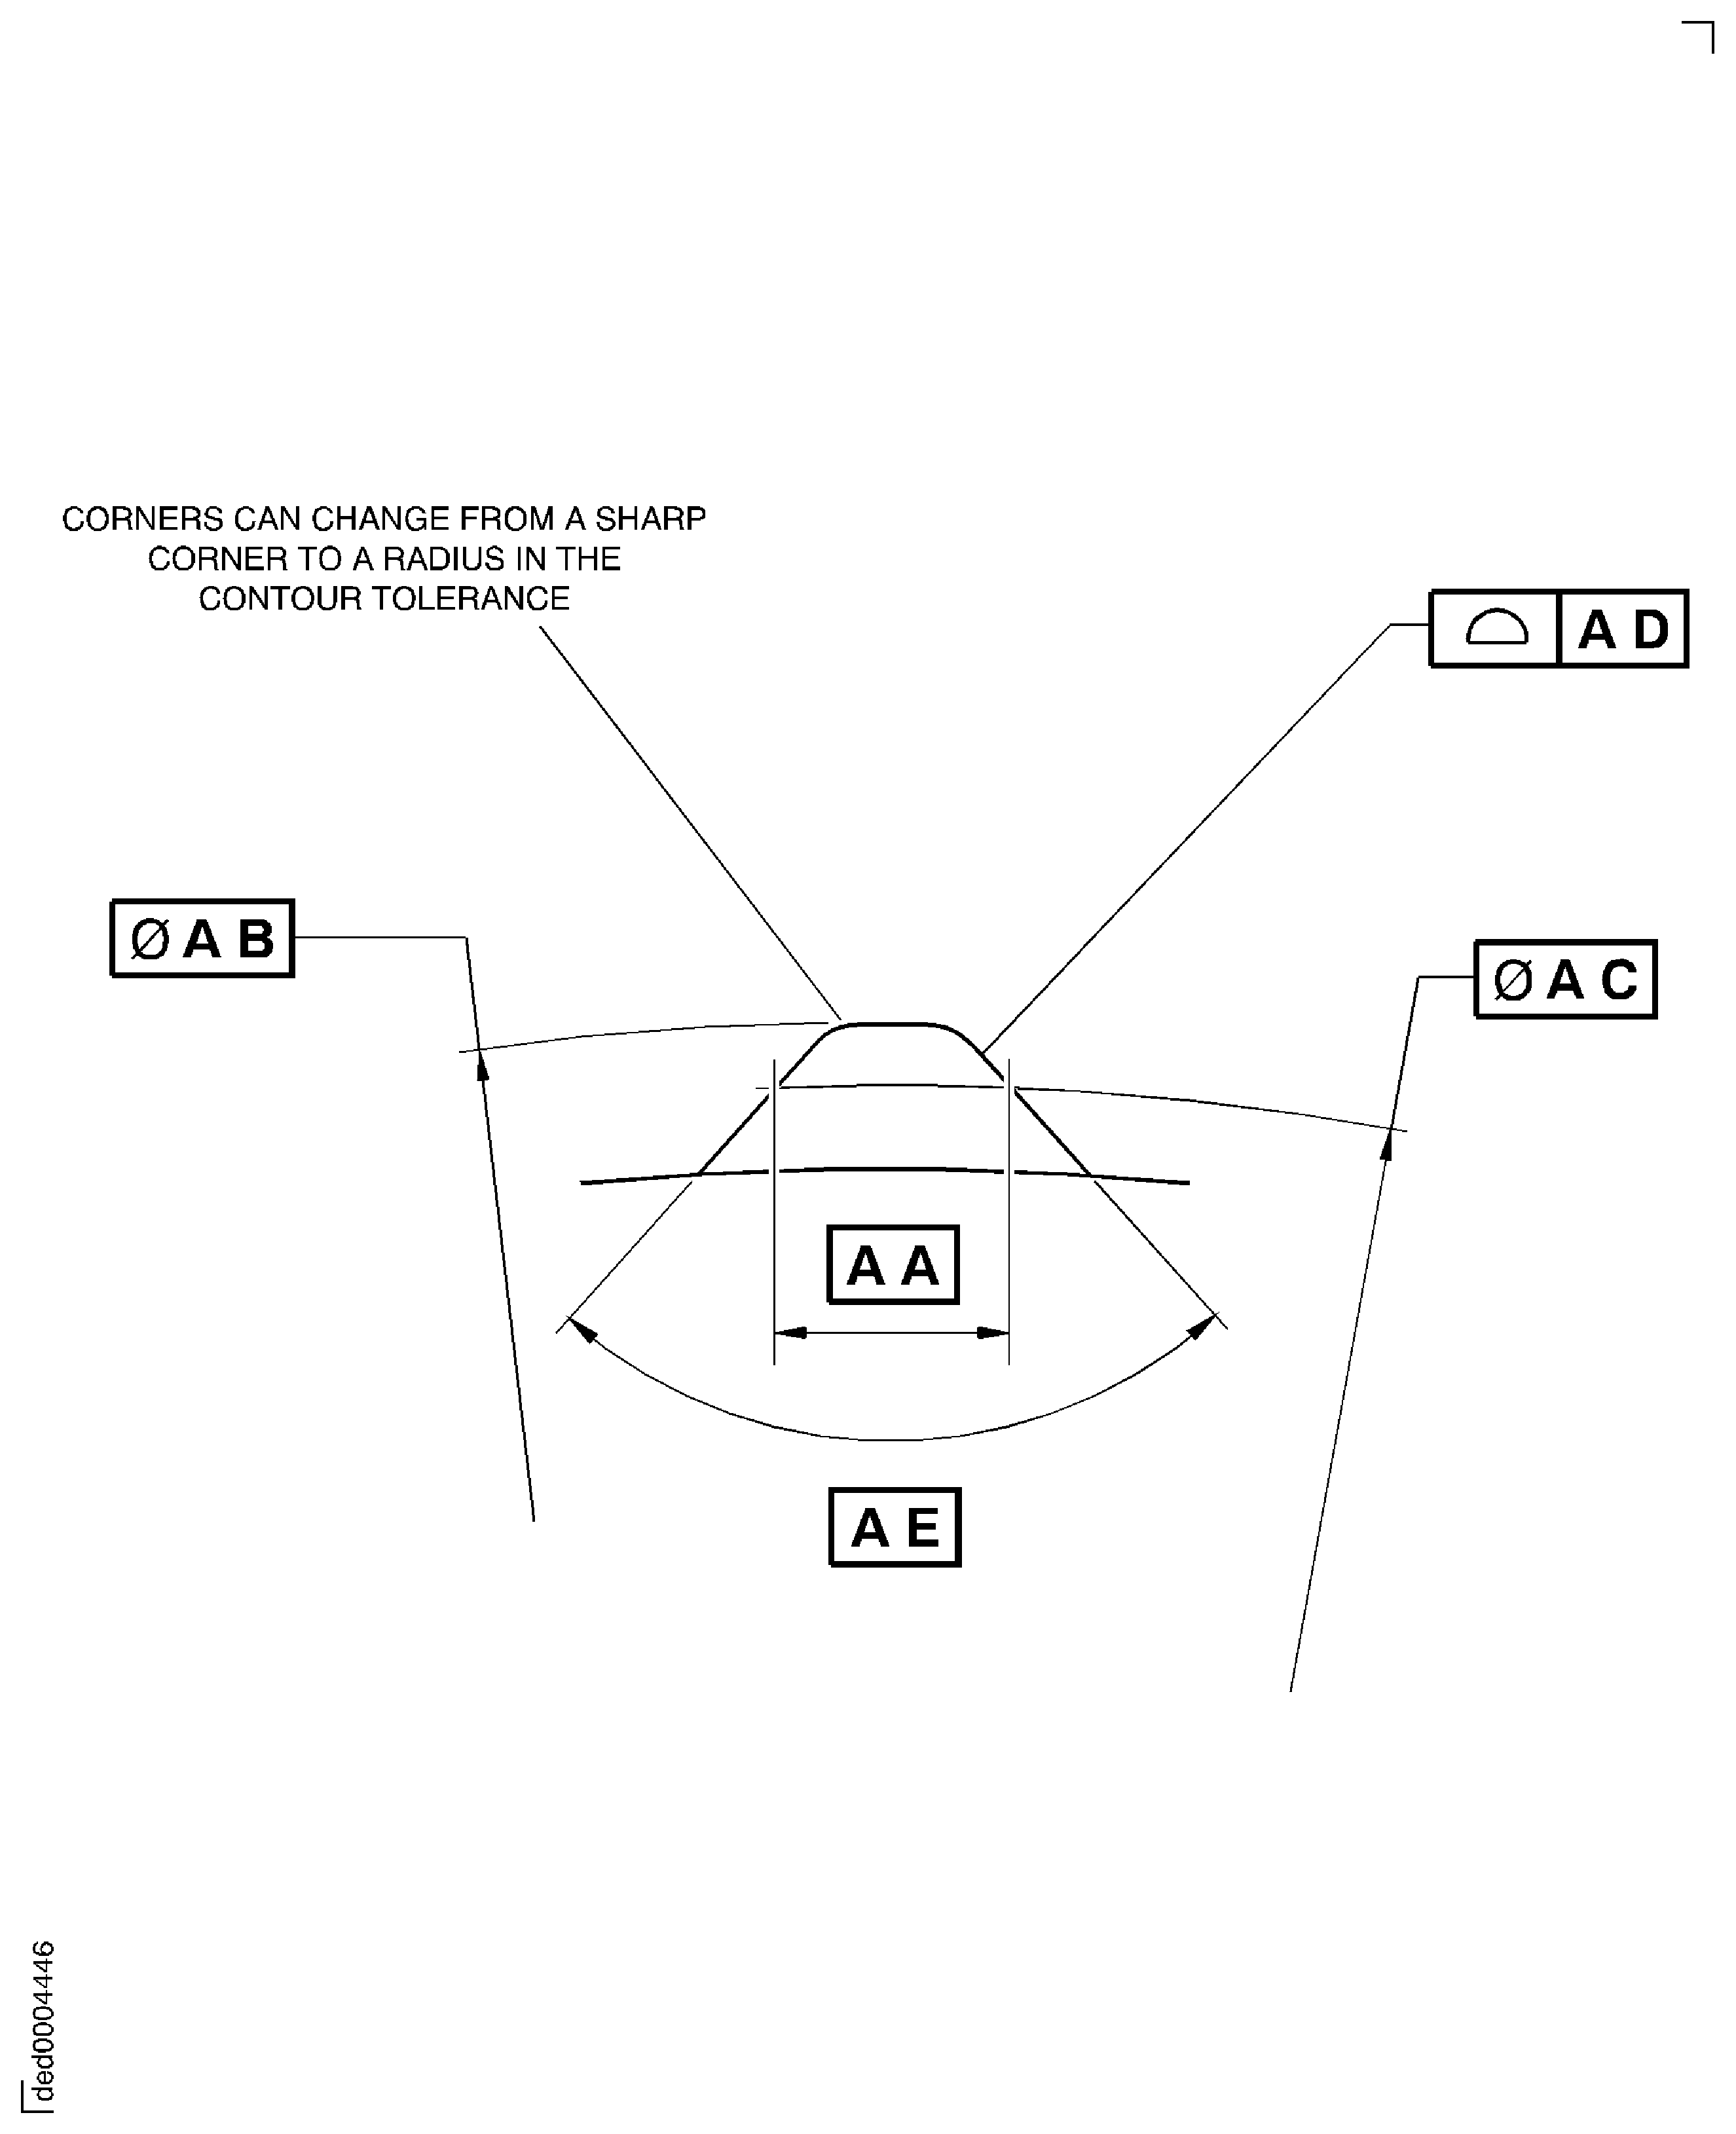
Figure: Installation Tool Data (Refer also to Table 3)
Installation Tool Data (Refer also to Table 3)
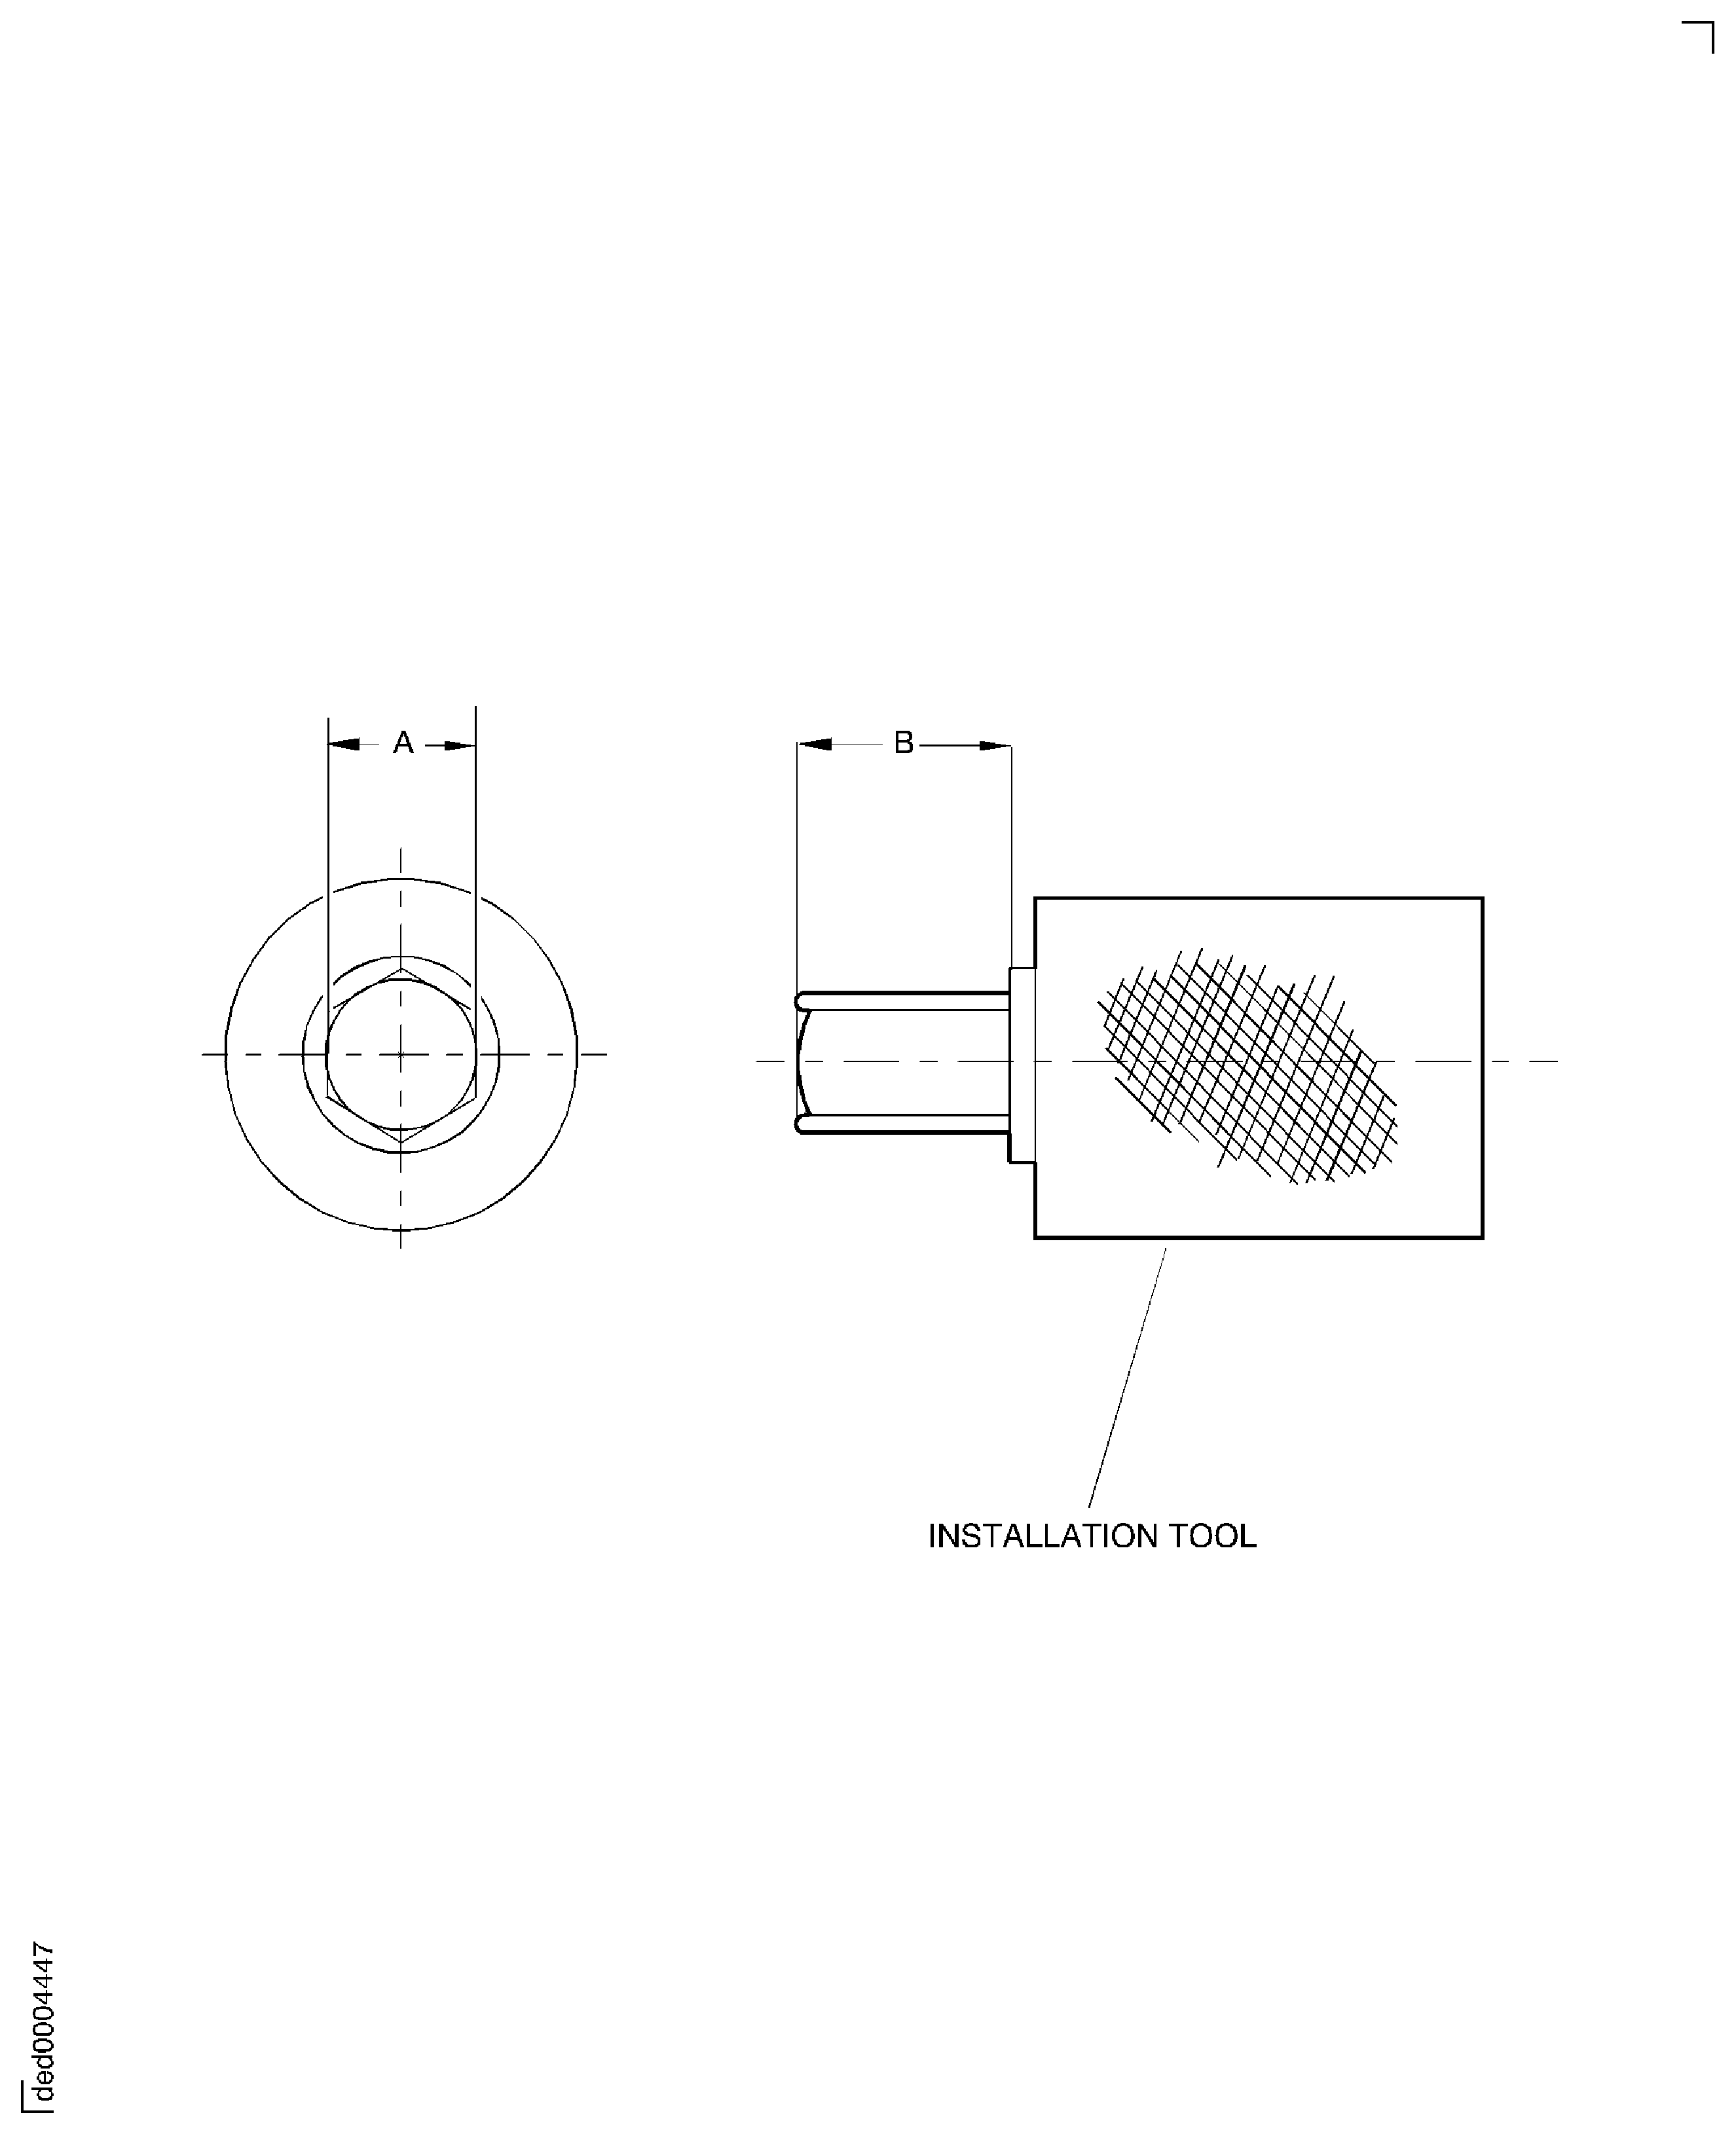
Figure: Installation Depth
Installation Depth
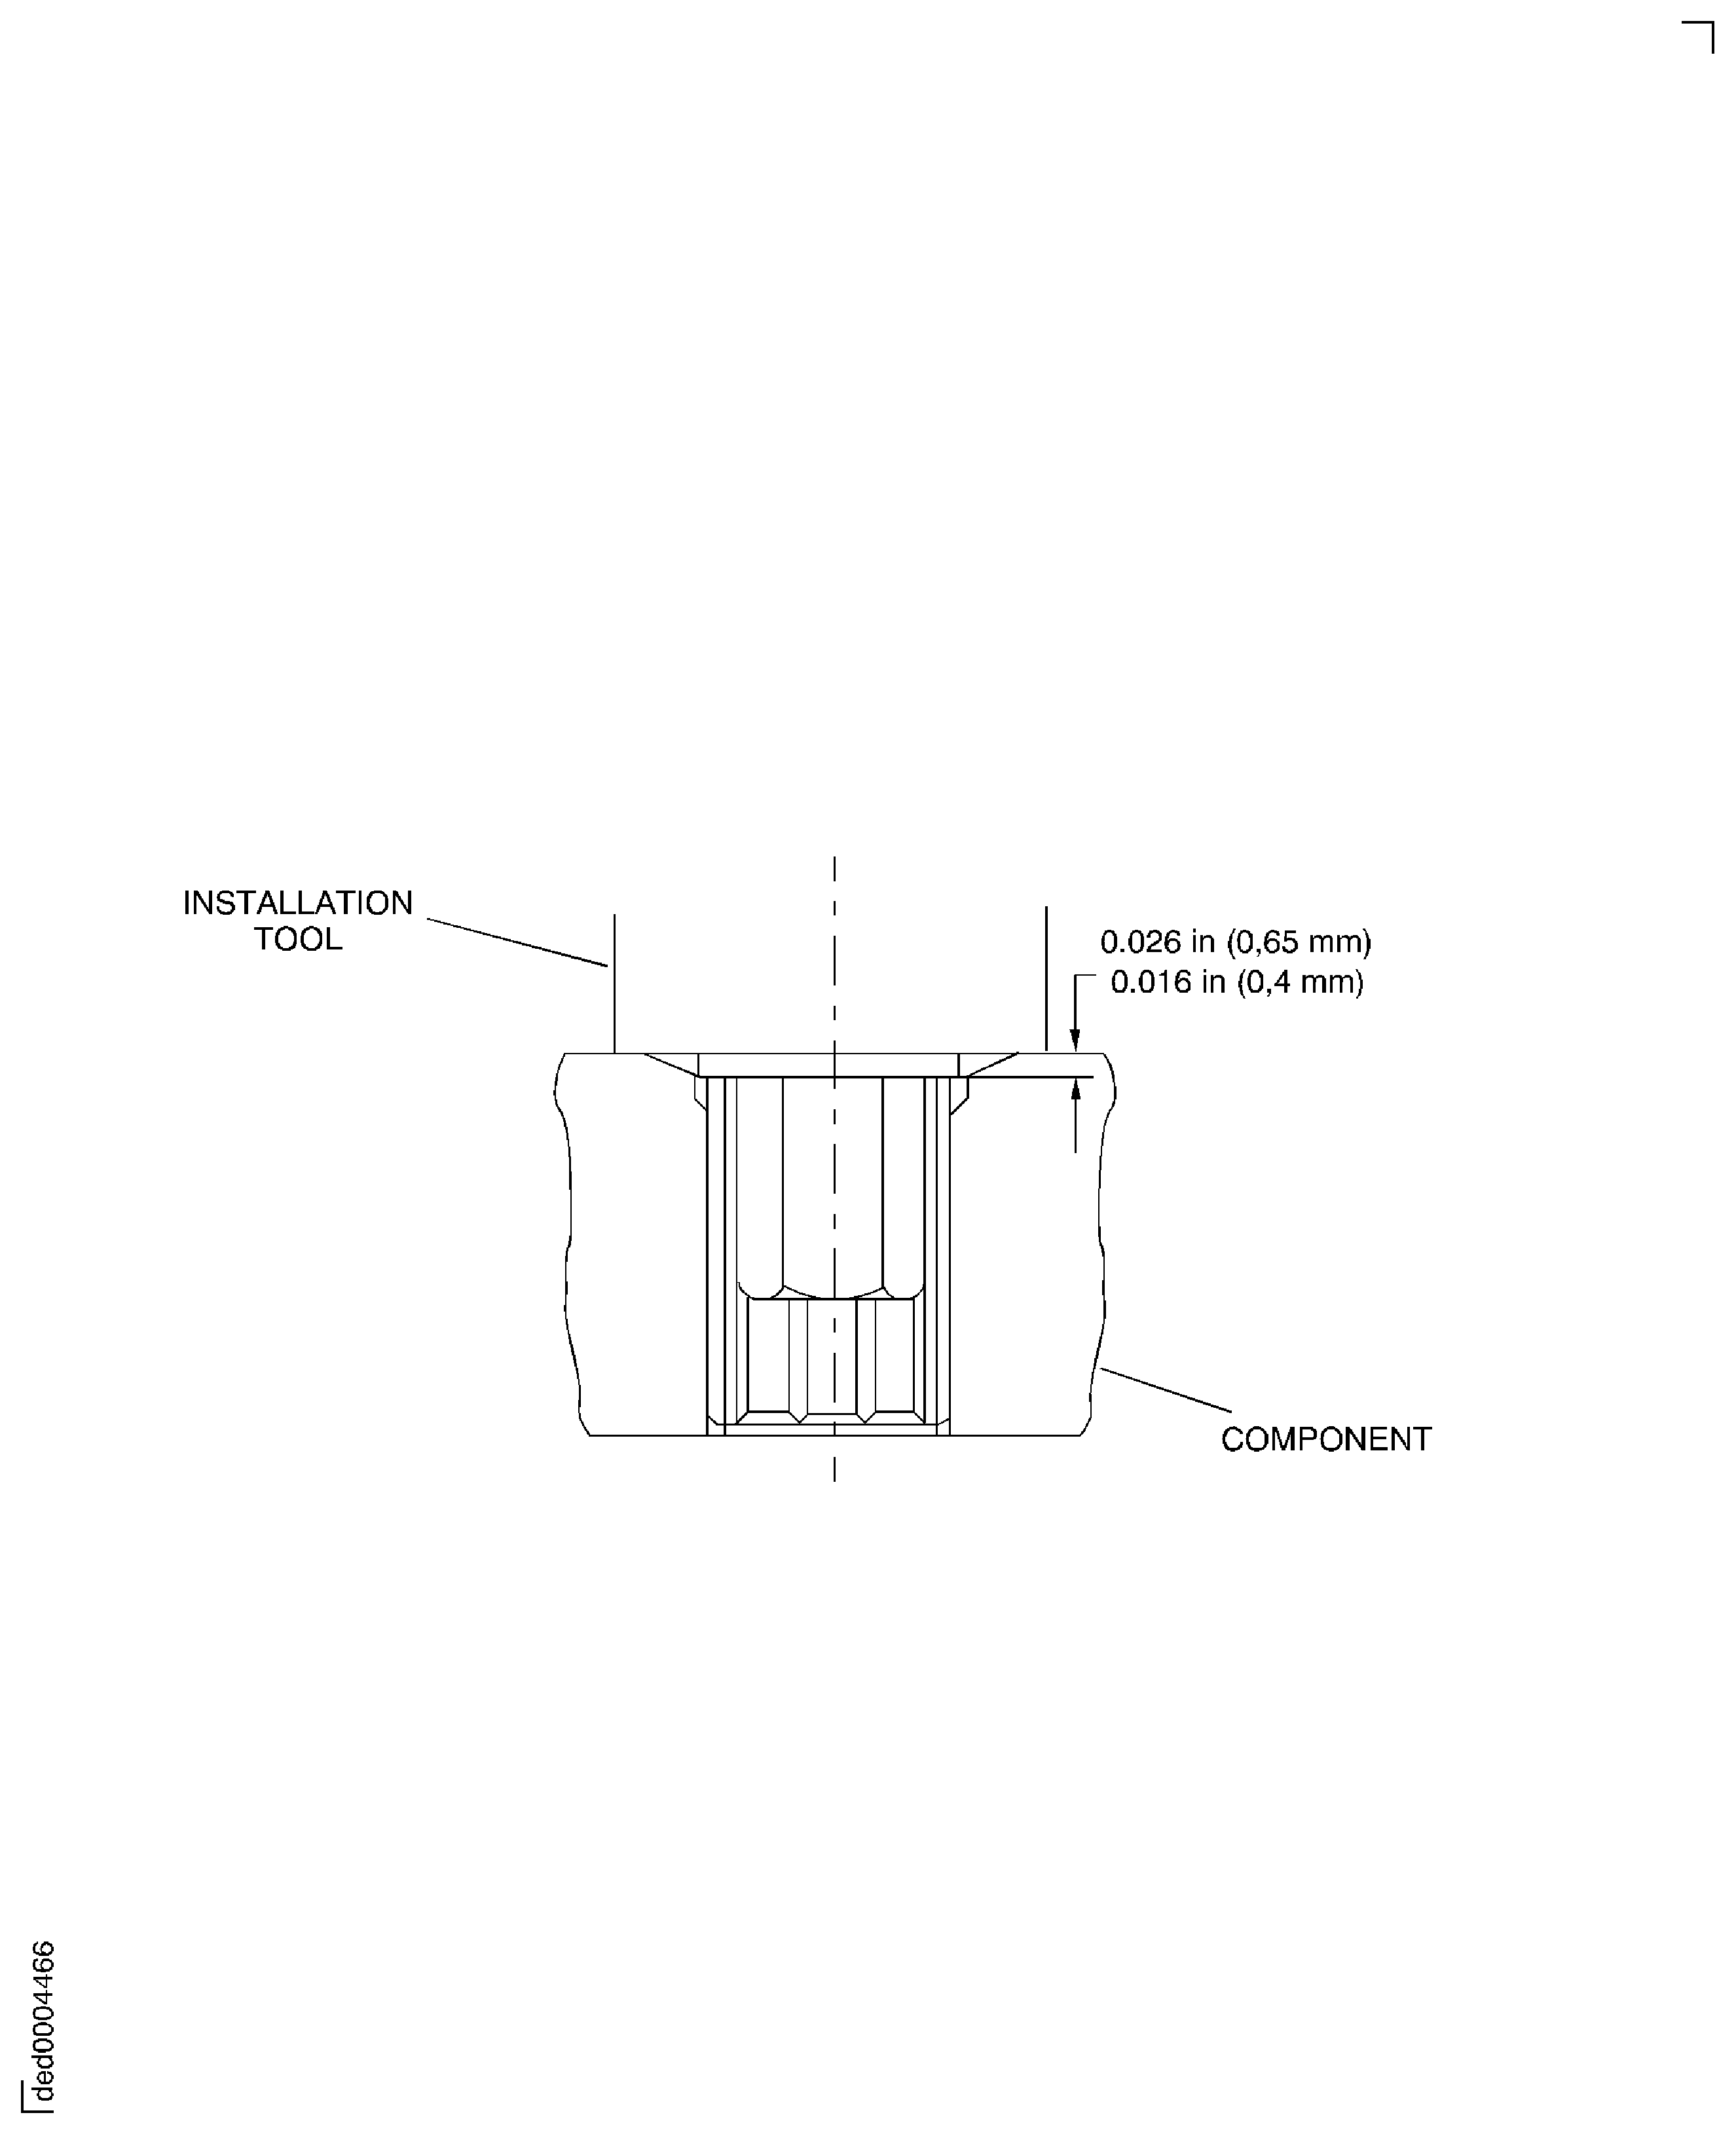
Figure: Aligned Serrations
Aligned Serrations
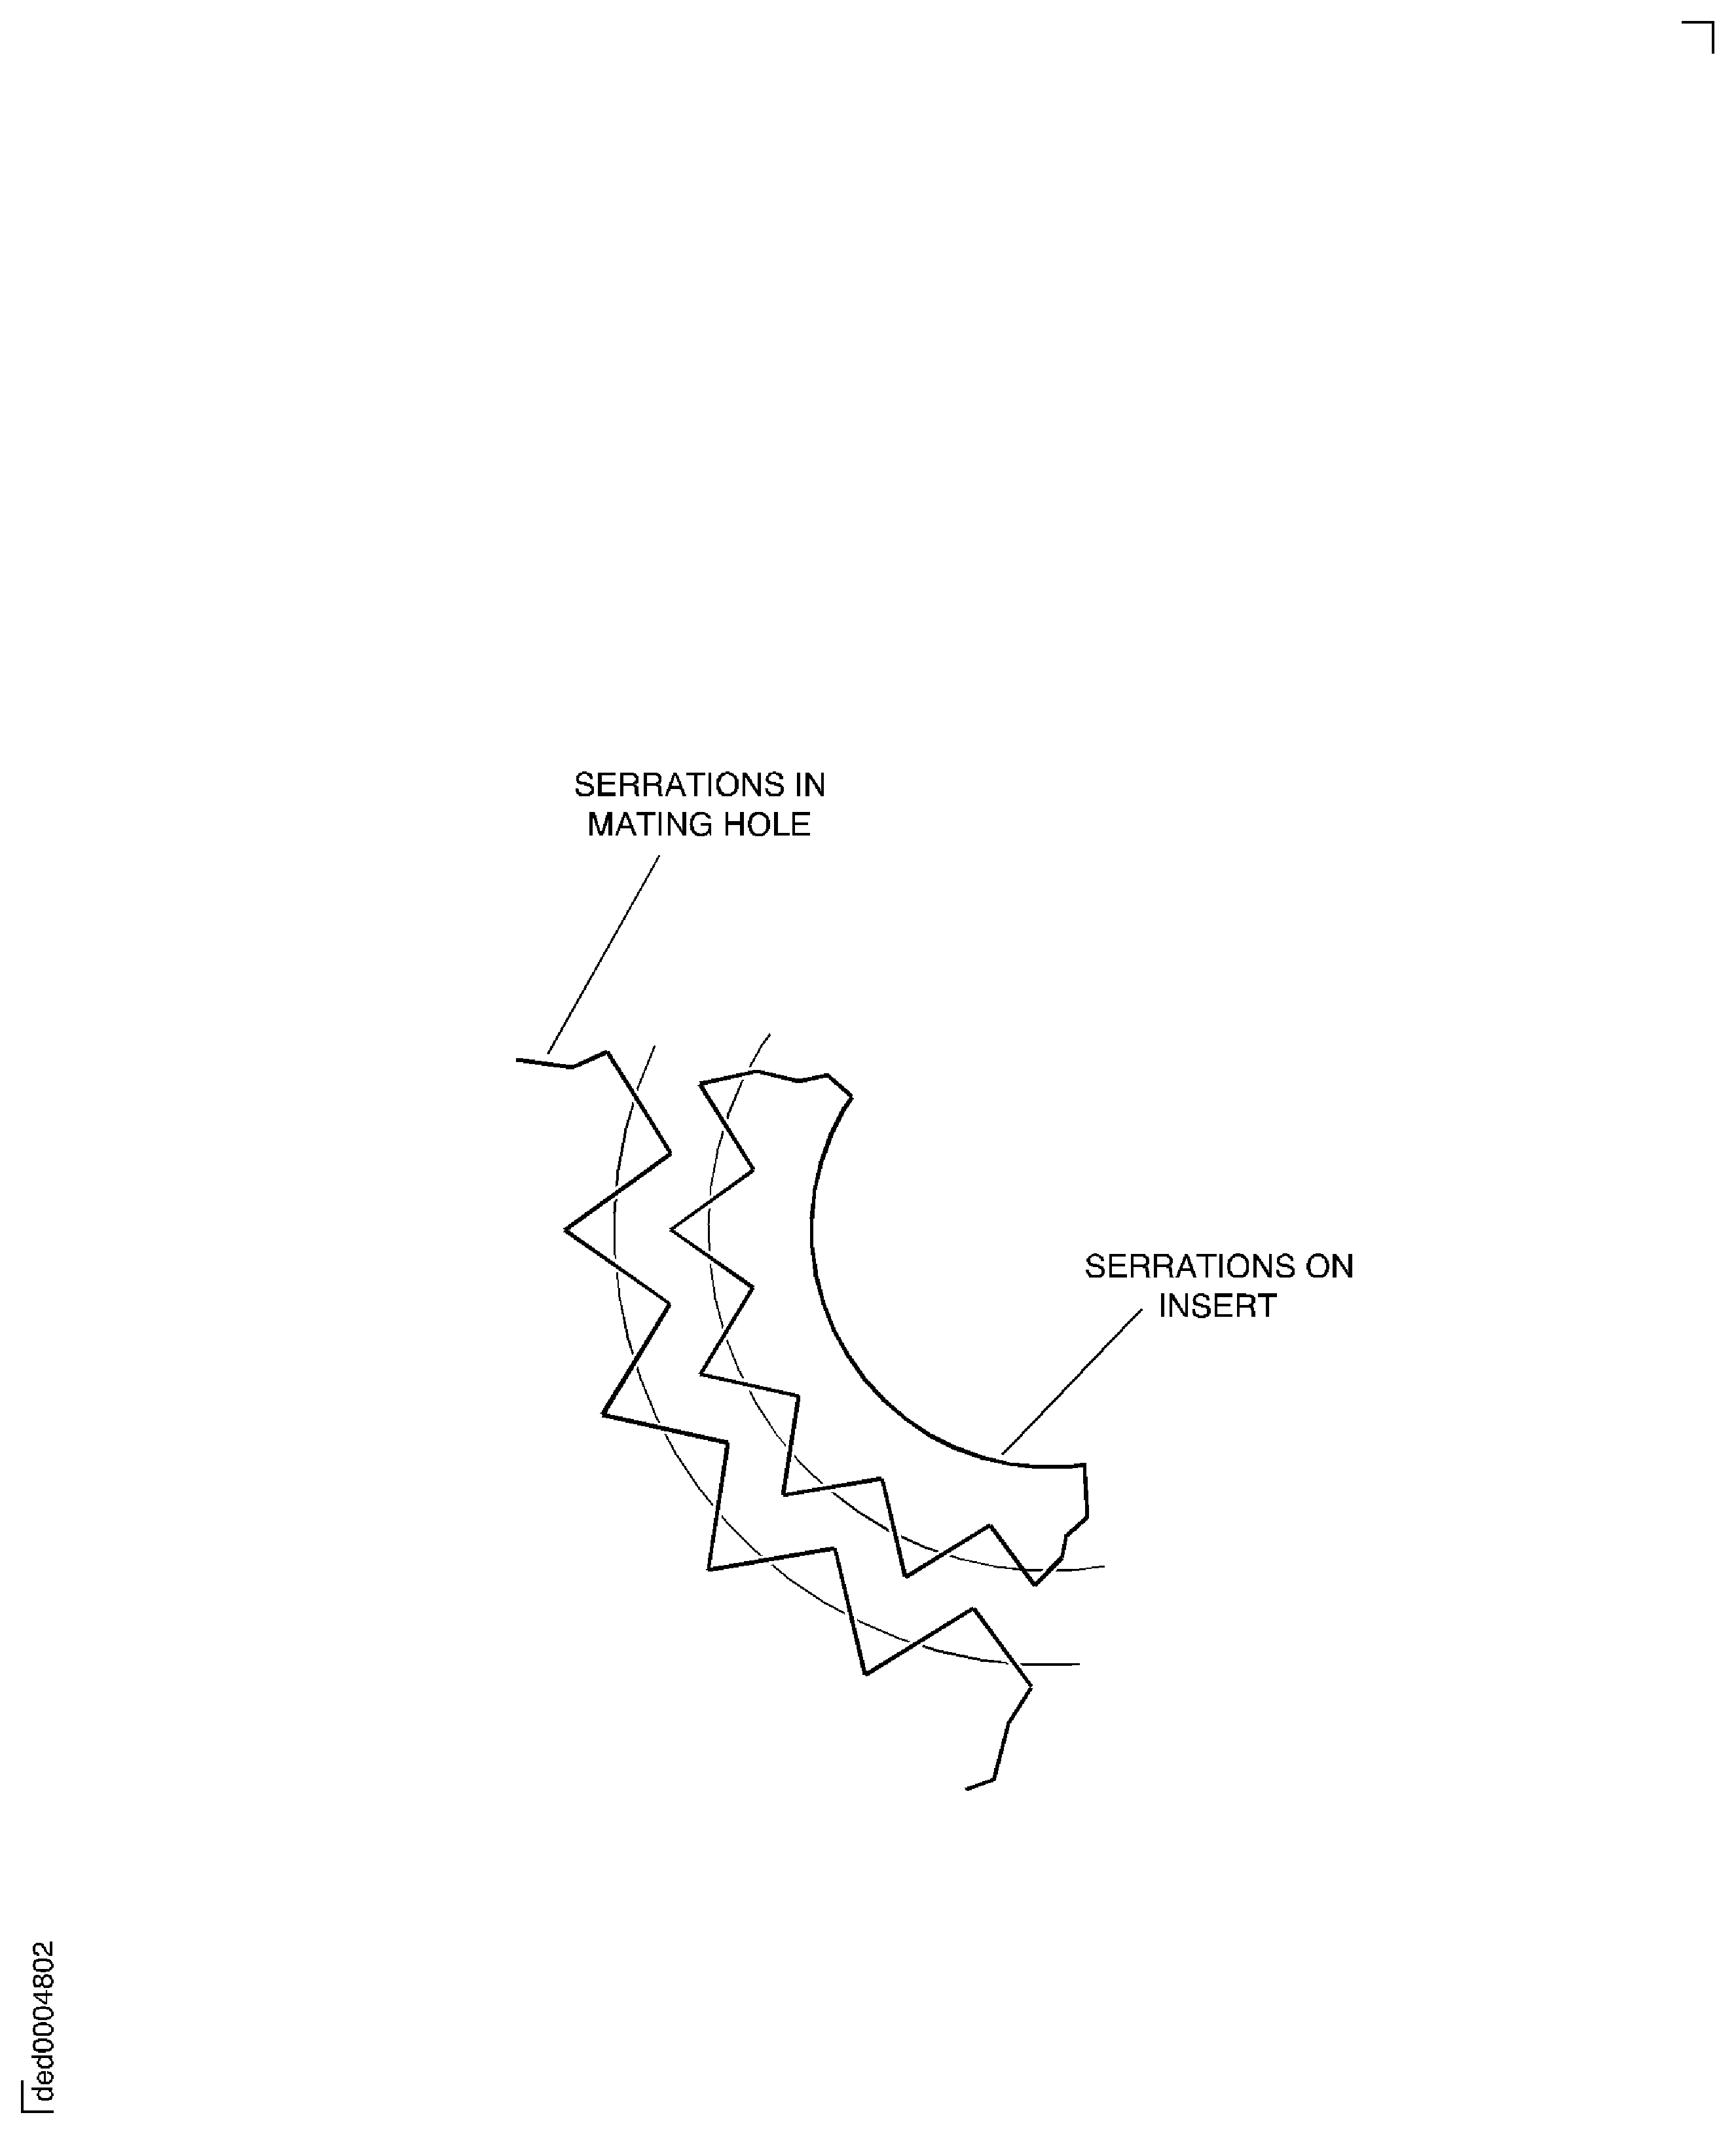
Figure: Swage Tool Data (Refer also to Table 4)
Swage Tool Data (Refer also to Table 4)
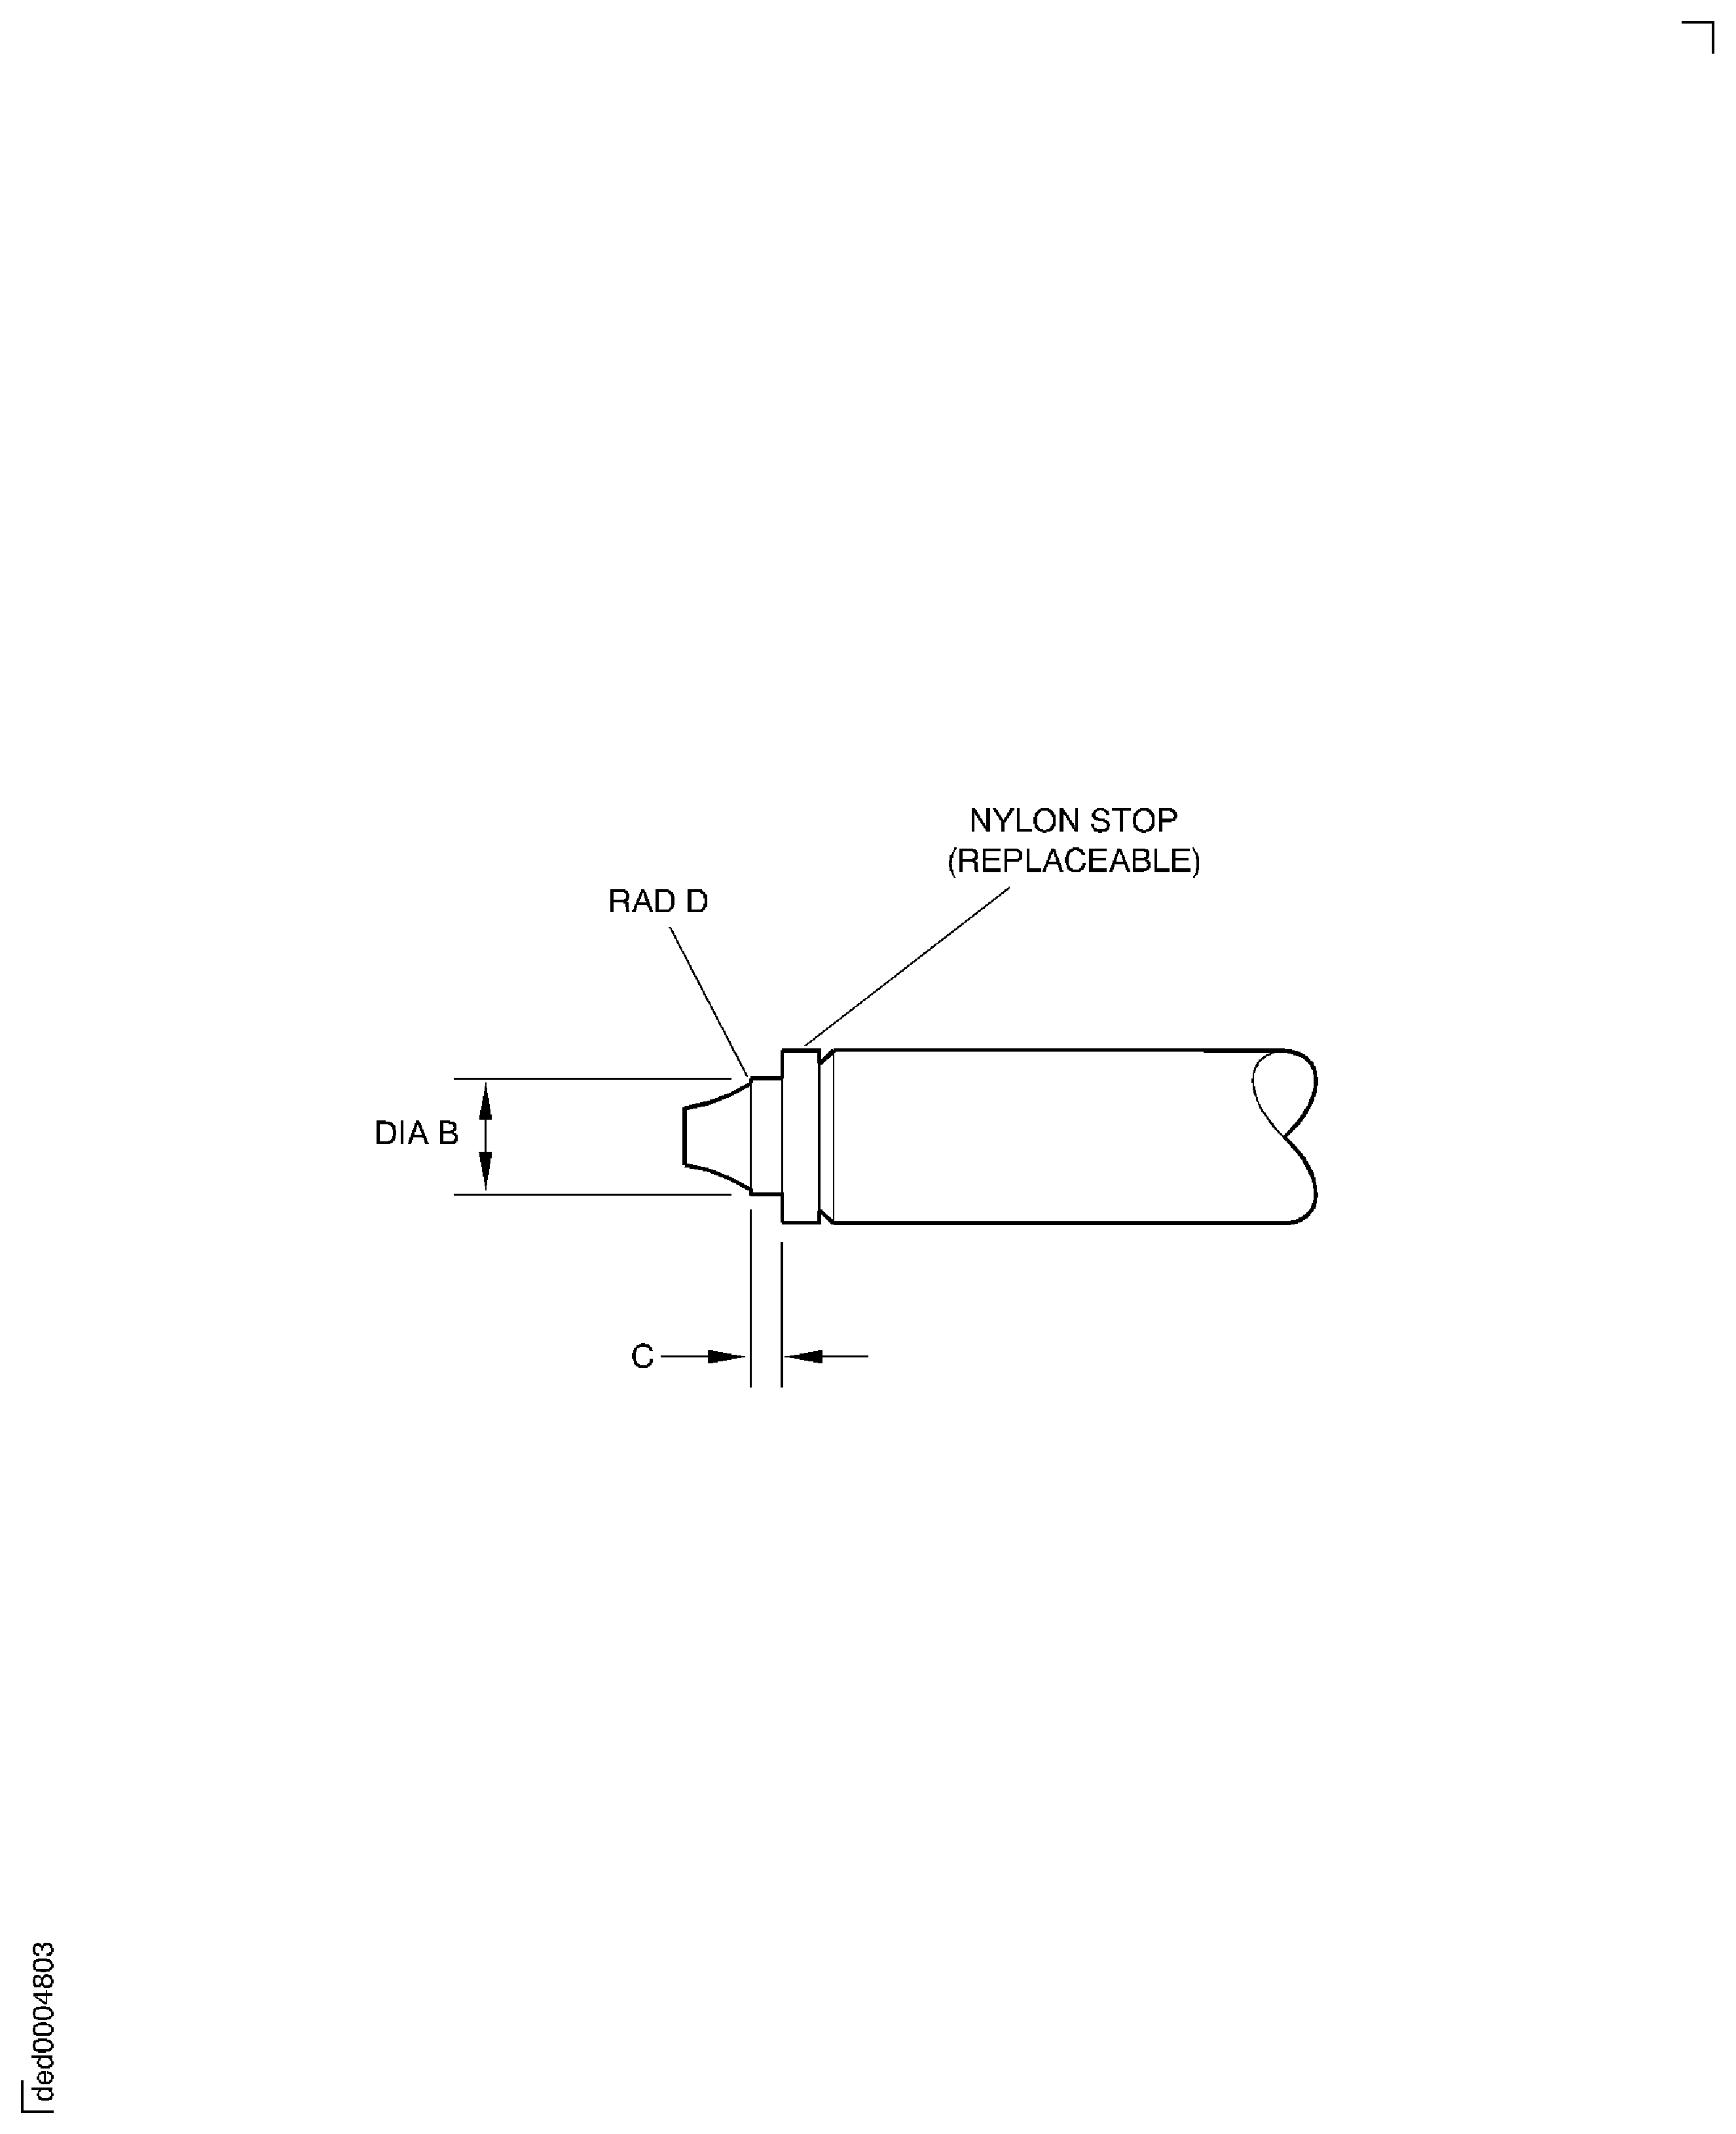
Figure: Swaged Thinwall Insert and Tool
Swaged Thinwall Insert and Tool
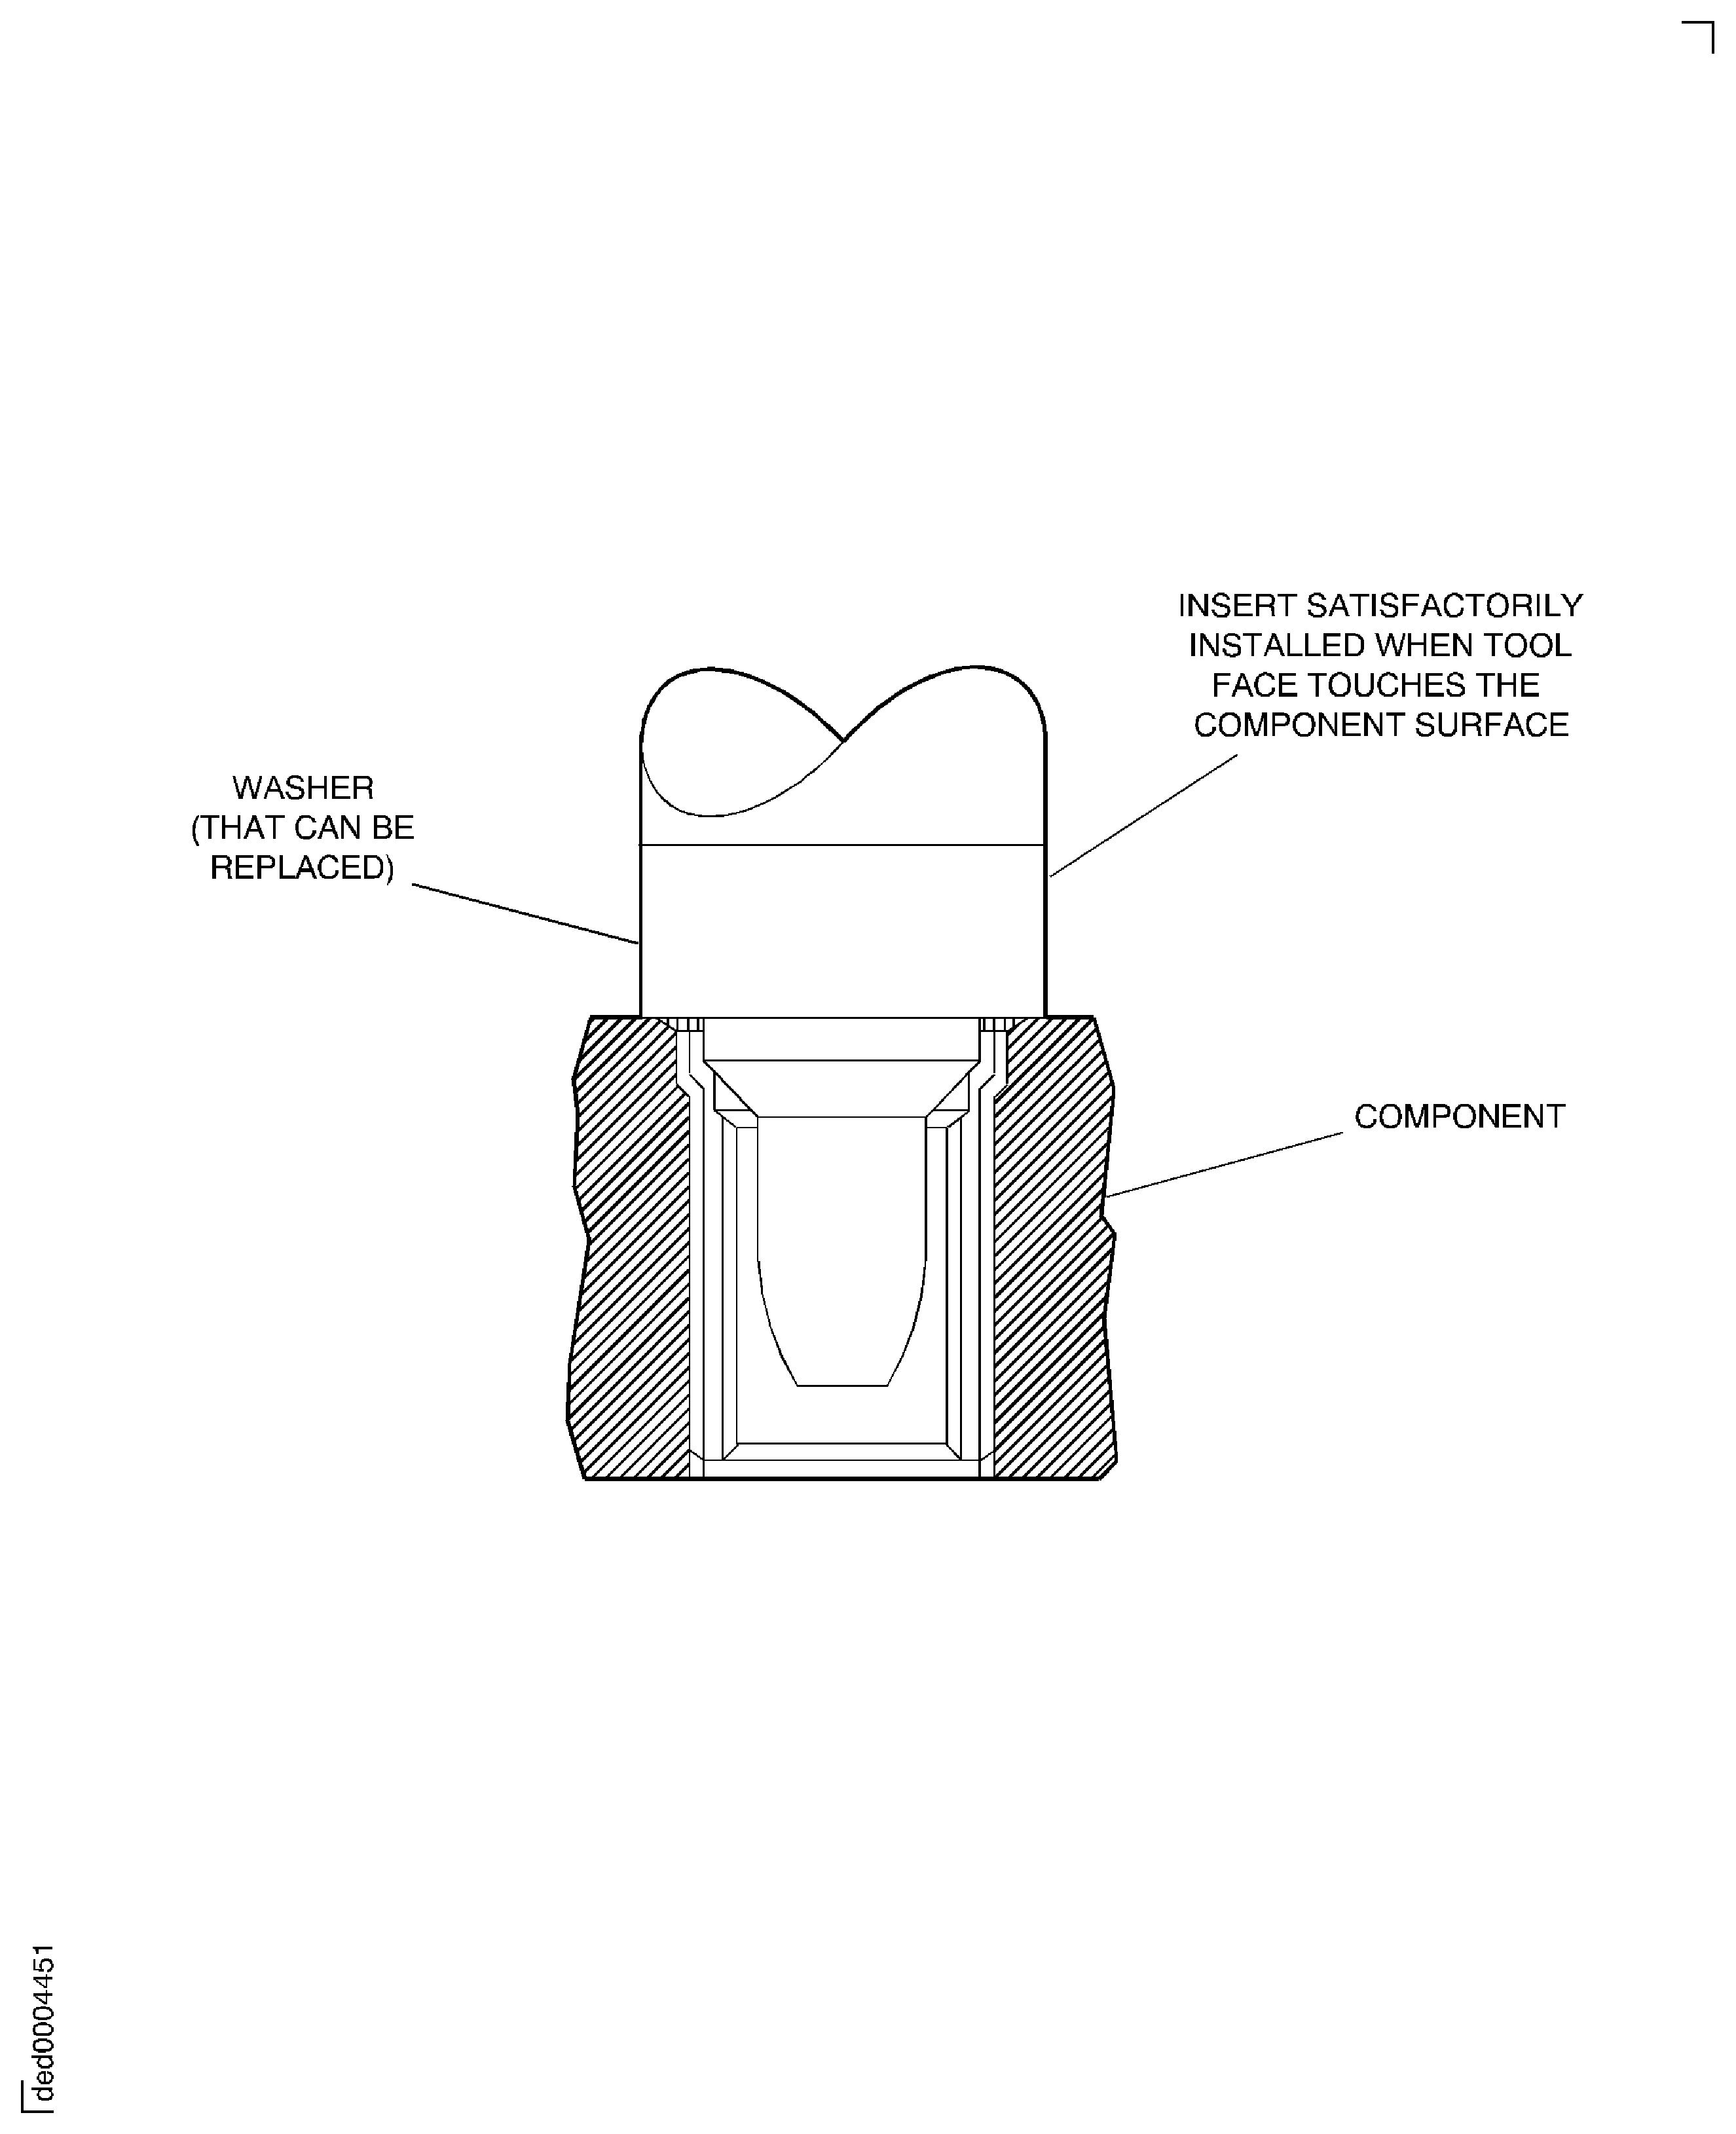
Figure: Dimensions Required (Refer also to Table 5)
Dimensions Required (Refer also to Table 5)
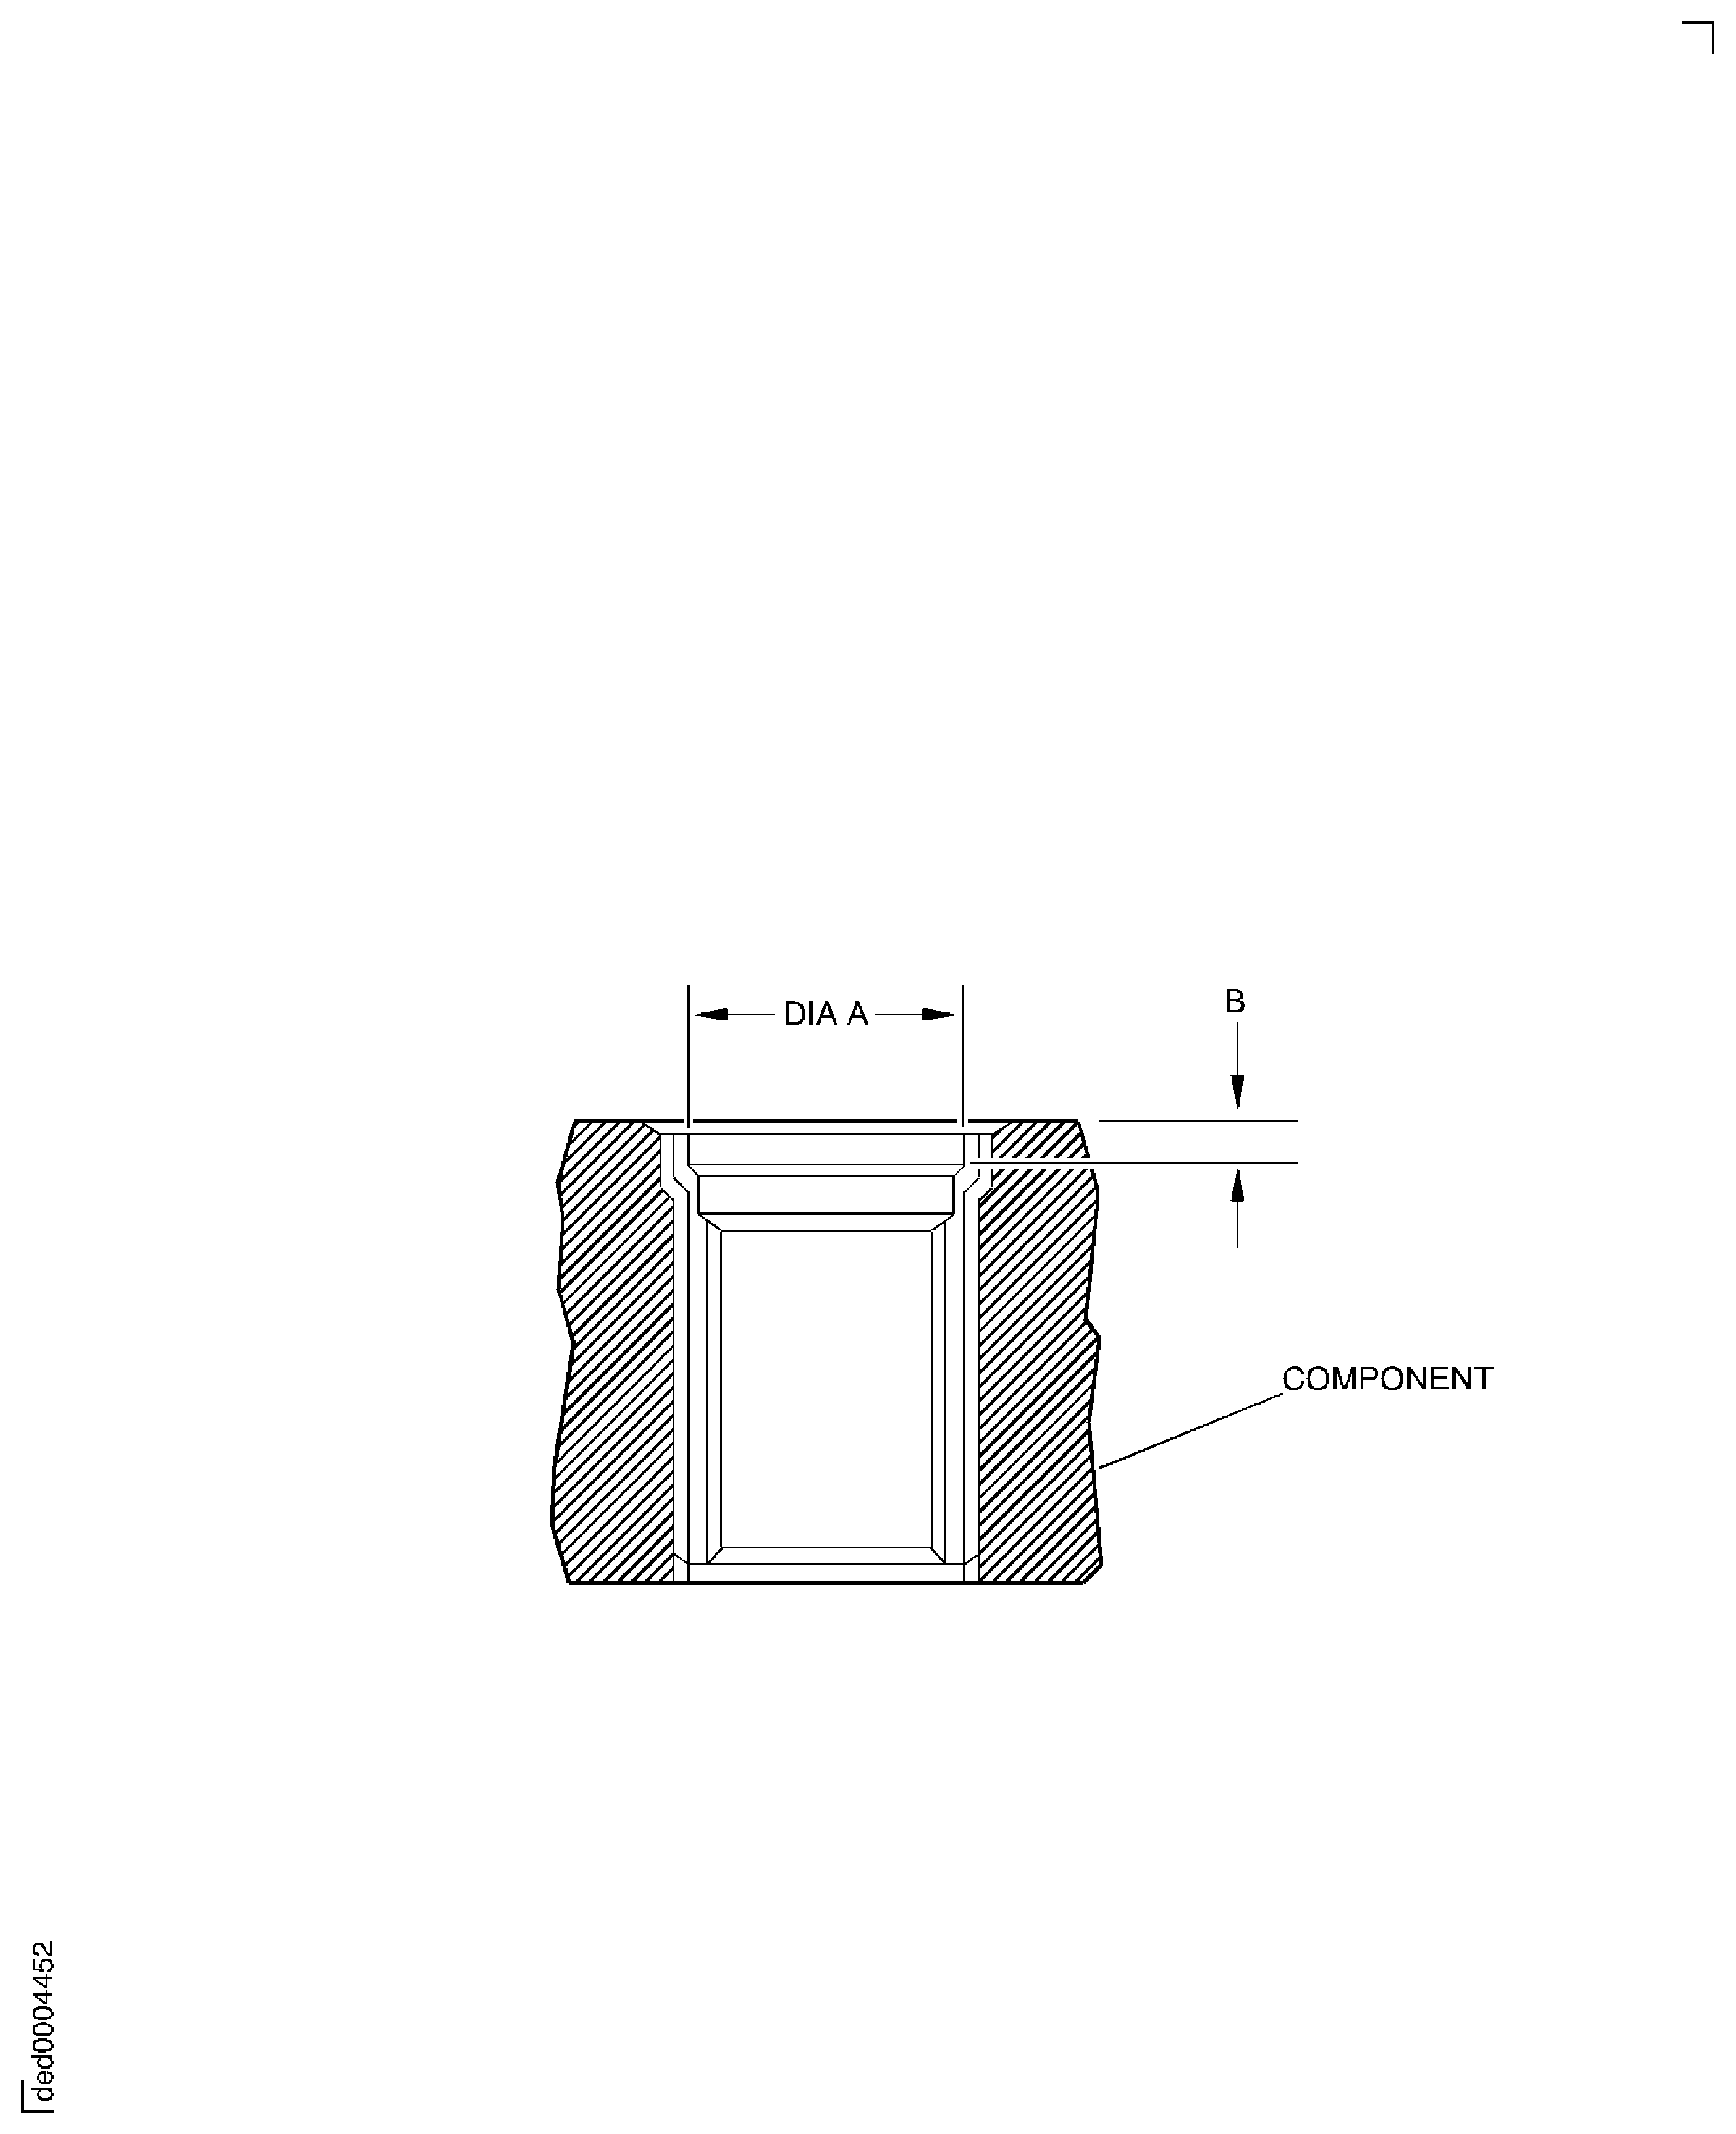
Figure: Removal of a Thinwall Insert (Refer also to Table 6)
Removal of a Thinwall Insert (Refer also to Table 6)
