Export Control
EAR Export Classification: Not subject to the EAR per 15 C.F.R. Chapter 1, Part 734.3(b)(3), except for the following Service Bulletins which are currently published as EAR Export Classification 9E991: SBE70-0992, SBE72-0483, SBE72-0580, SBE72-0588, SBE72-0640, SBE73-0209, SBE80-0024 and SBE80-0025.Copyright
© IAE International Aero Engines AG (2001, 2014 - 2021) The information contained in this document is the property of © IAE International Aero Engines AG and may not be copied or used for any purpose other than that for which it is supplied without the express written authority of © IAE International Aero Engines AG. (This does not preclude use by engine and aircraft operators for normal instructional, maintenance or overhaul purposes.).Applicability
All
Common Information
TASK 70-38-04-200-502 Control Of The Materials Used For Abrasive Blasting And Shot/Glass Bead Peening For Fatigue Strength Improvement
Preliminary Requirements
Pre-Conditions
NONESupport Equipment
NONEConsumables, Materials and Expendables
NONESpares
NONESafety Requirements
WARNING
Procedure
Full control is essential, during all parts of the peening procedure, to make sure that the amount and uniformity of stress, together with the depth of layer are consistently maintained. Automatic peening procedures must always be used, when possible, to make sure that uniform and constant results are obtained. The equipment must therefore be mechanically controlled and capable of moving either the parts to be peened, or the shot stream. The areas to be peened are specified in the Engine Manual, together with the type and size of peening medium to be used and the peening intensity (that is, the Almen 'arc height' and coverage required).
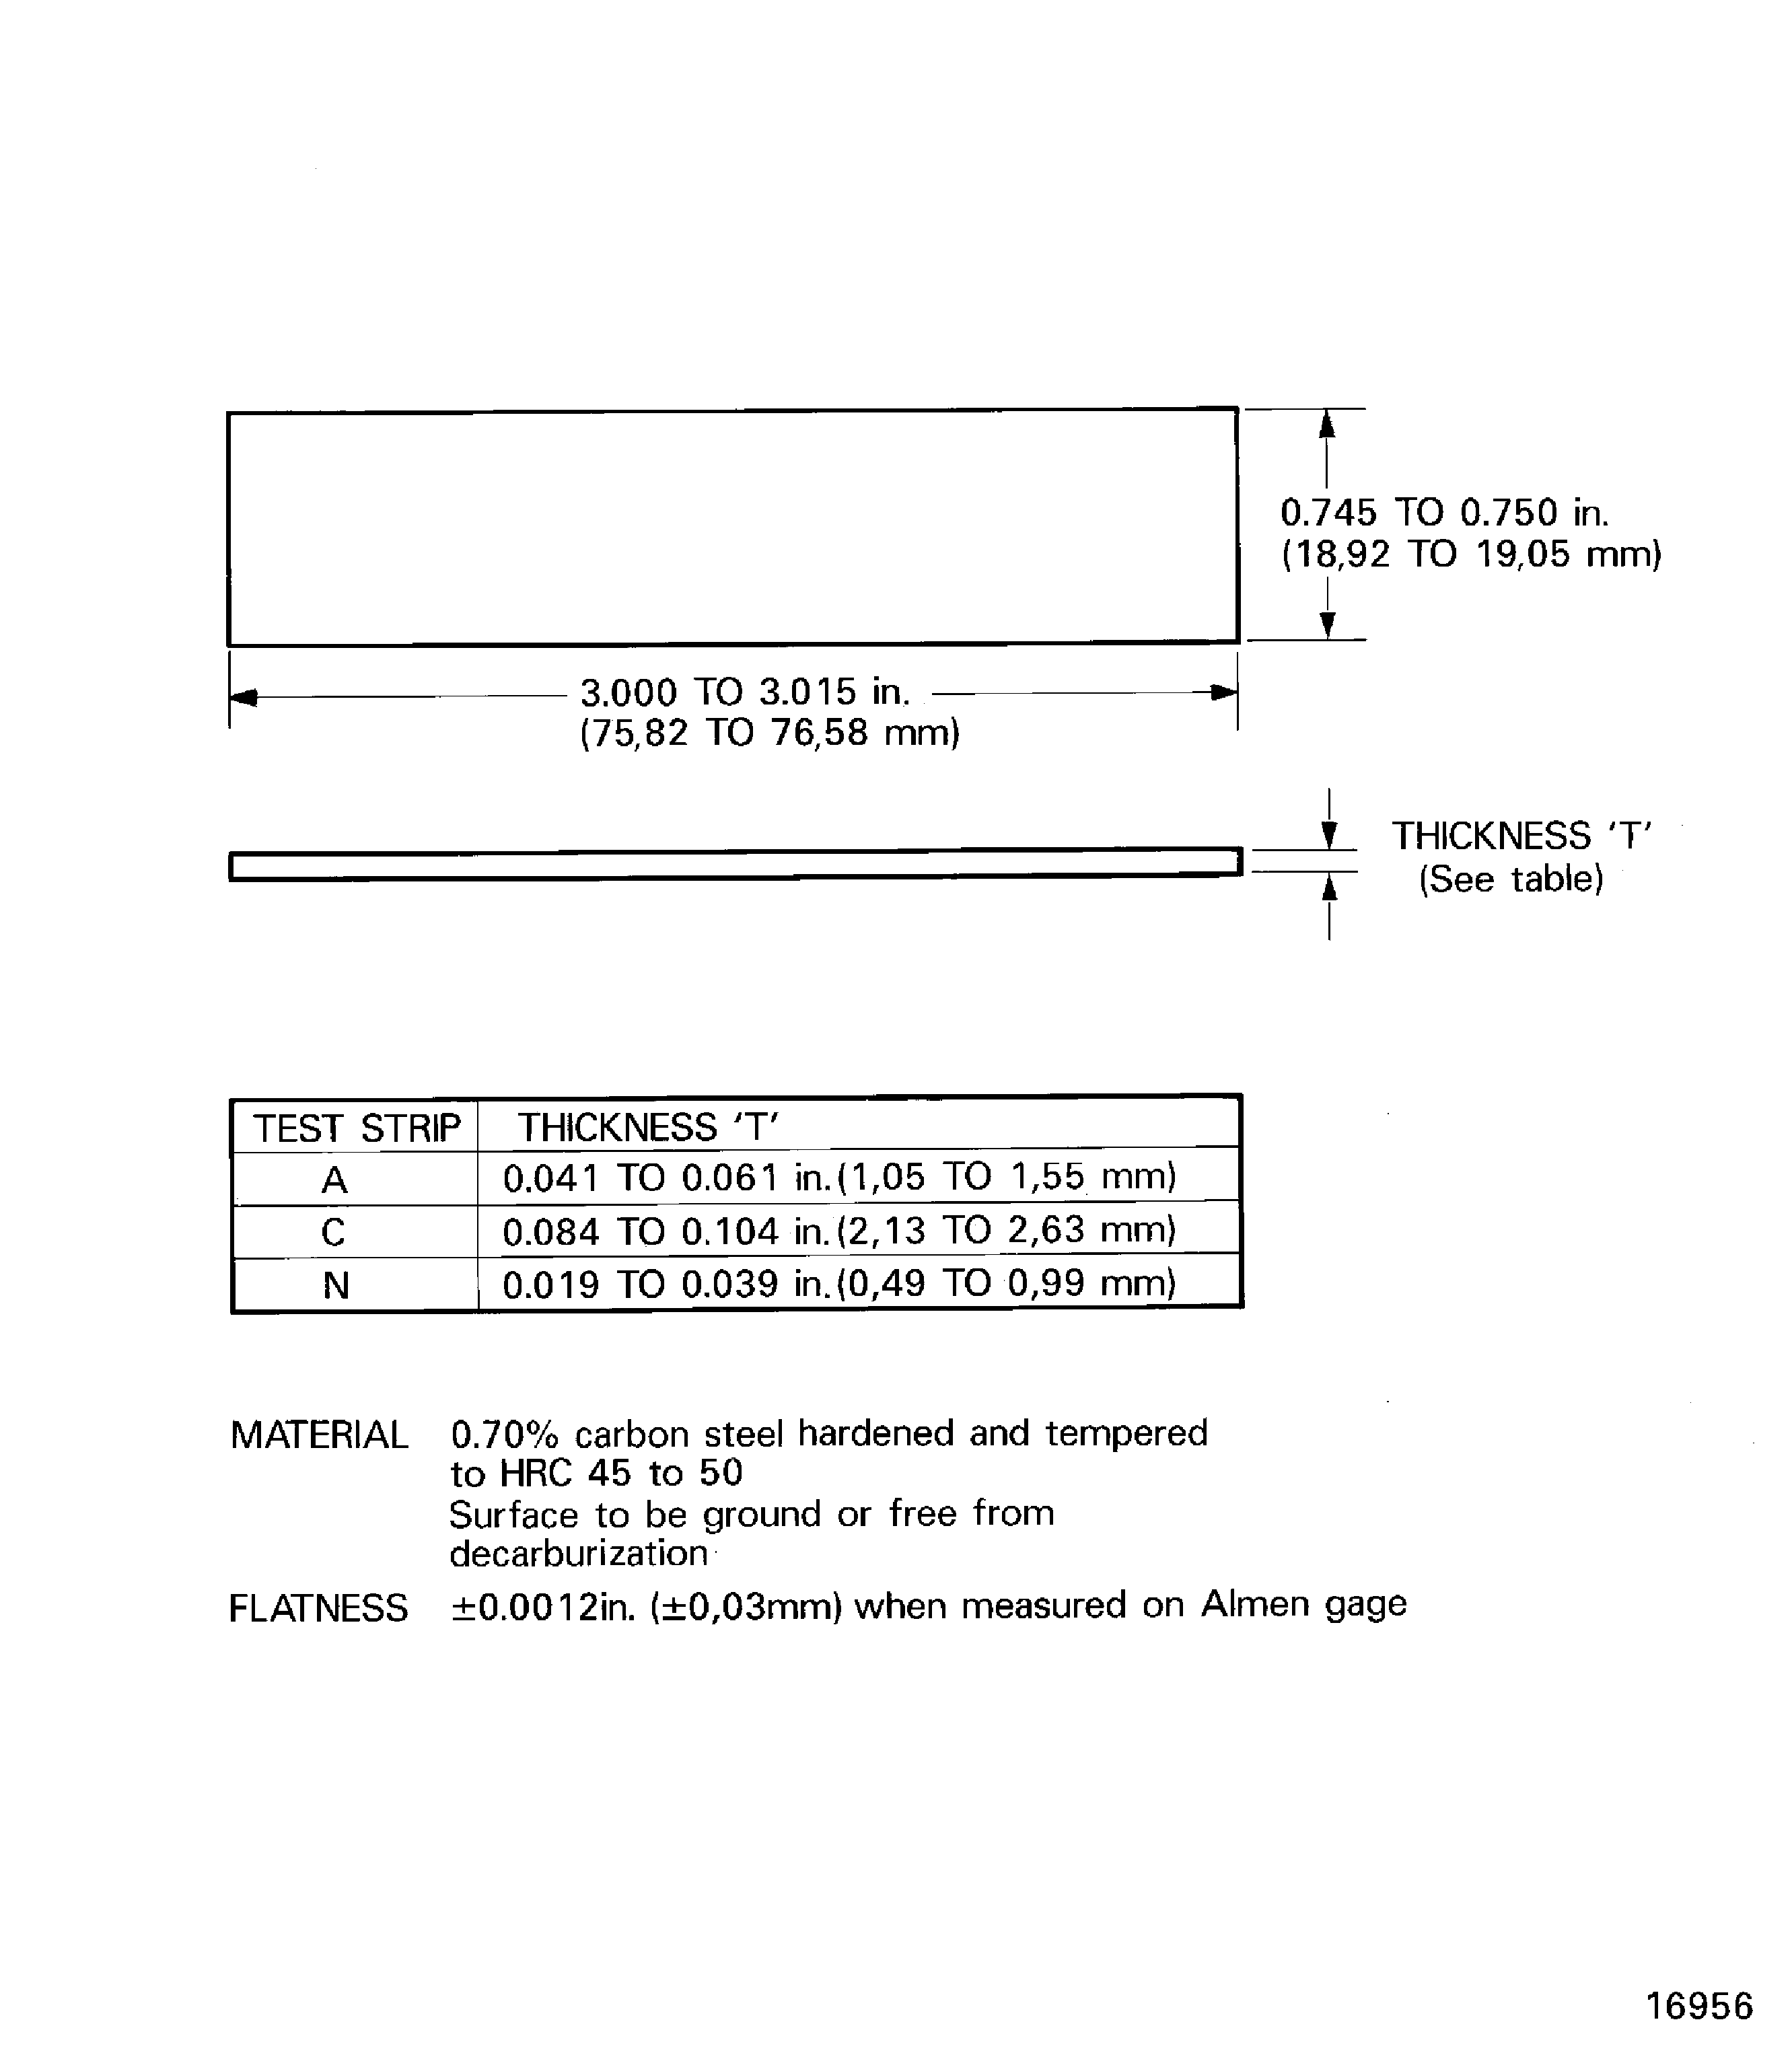
Peening control means that the depth of the compressive stress is held constant; which is achieved with Almen strips, made from cold rolled spring steel (SAE 1070) heat-treated to 45 to 50 HRC. These strips are identified as N, A and C; which are 0.031in. (0.74 mm), 0.051in. (1.30 mm) and 0.094in. (2.38 mm), thick respectively (refer to Figure).
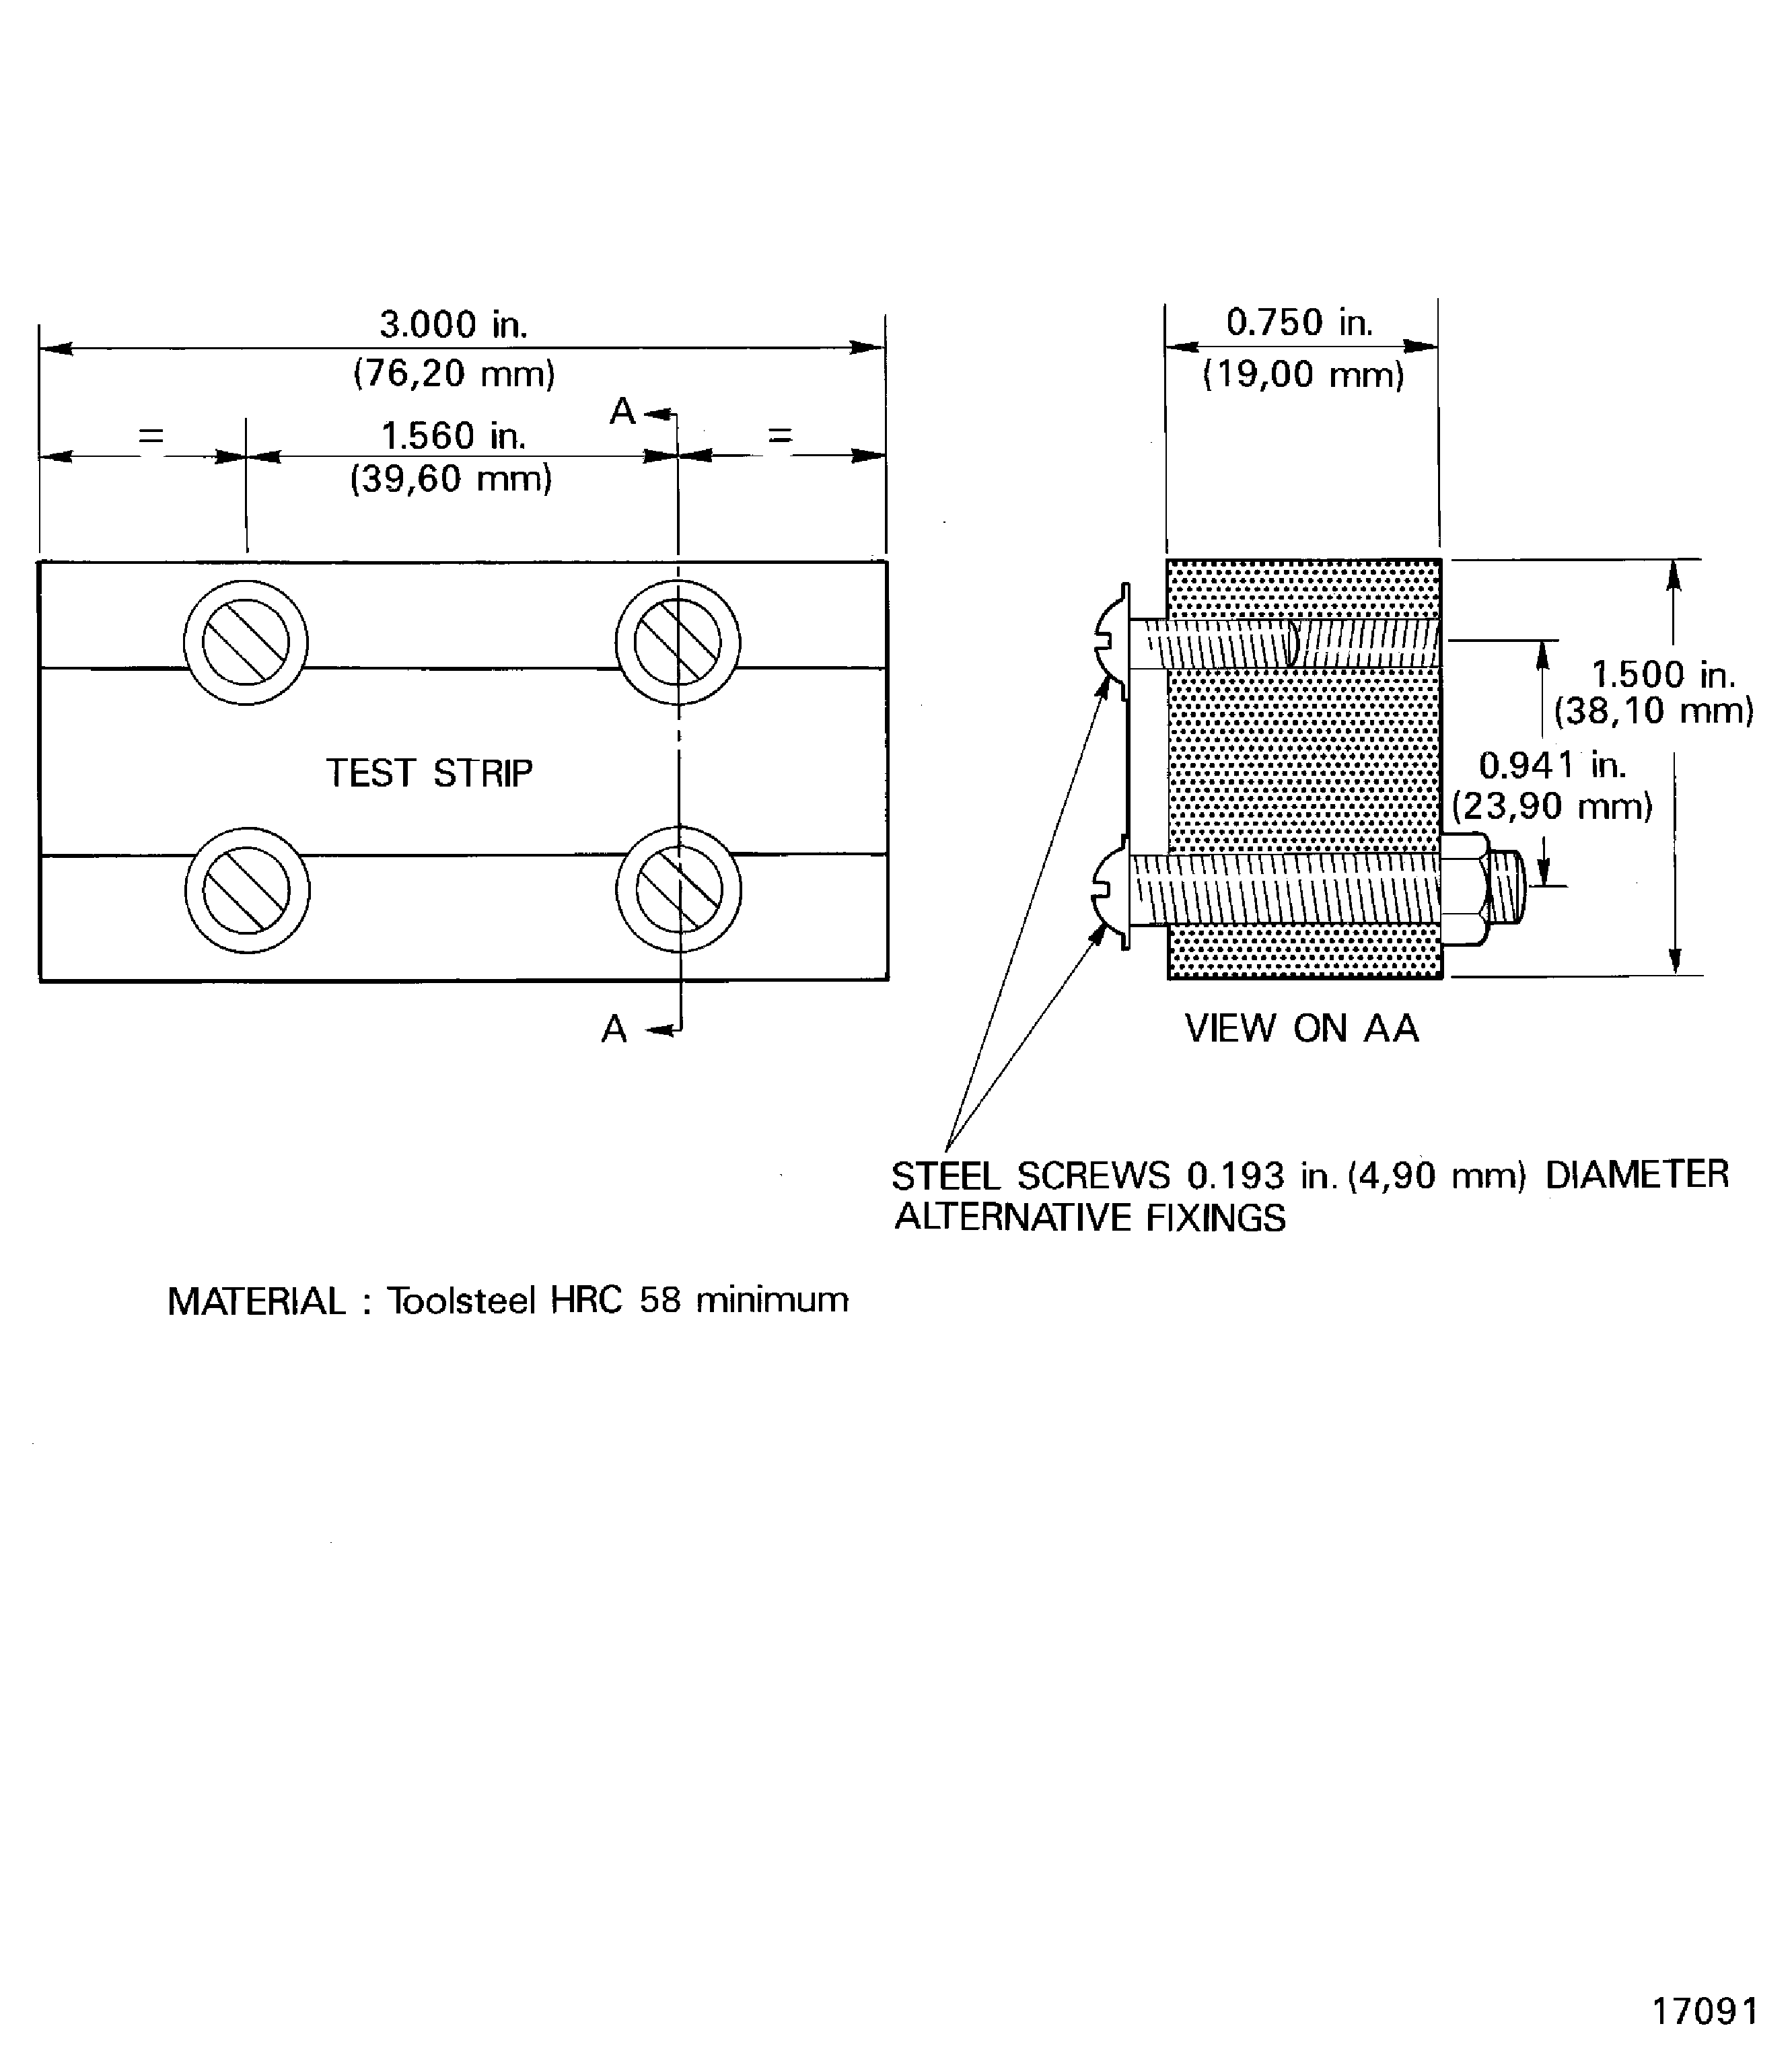
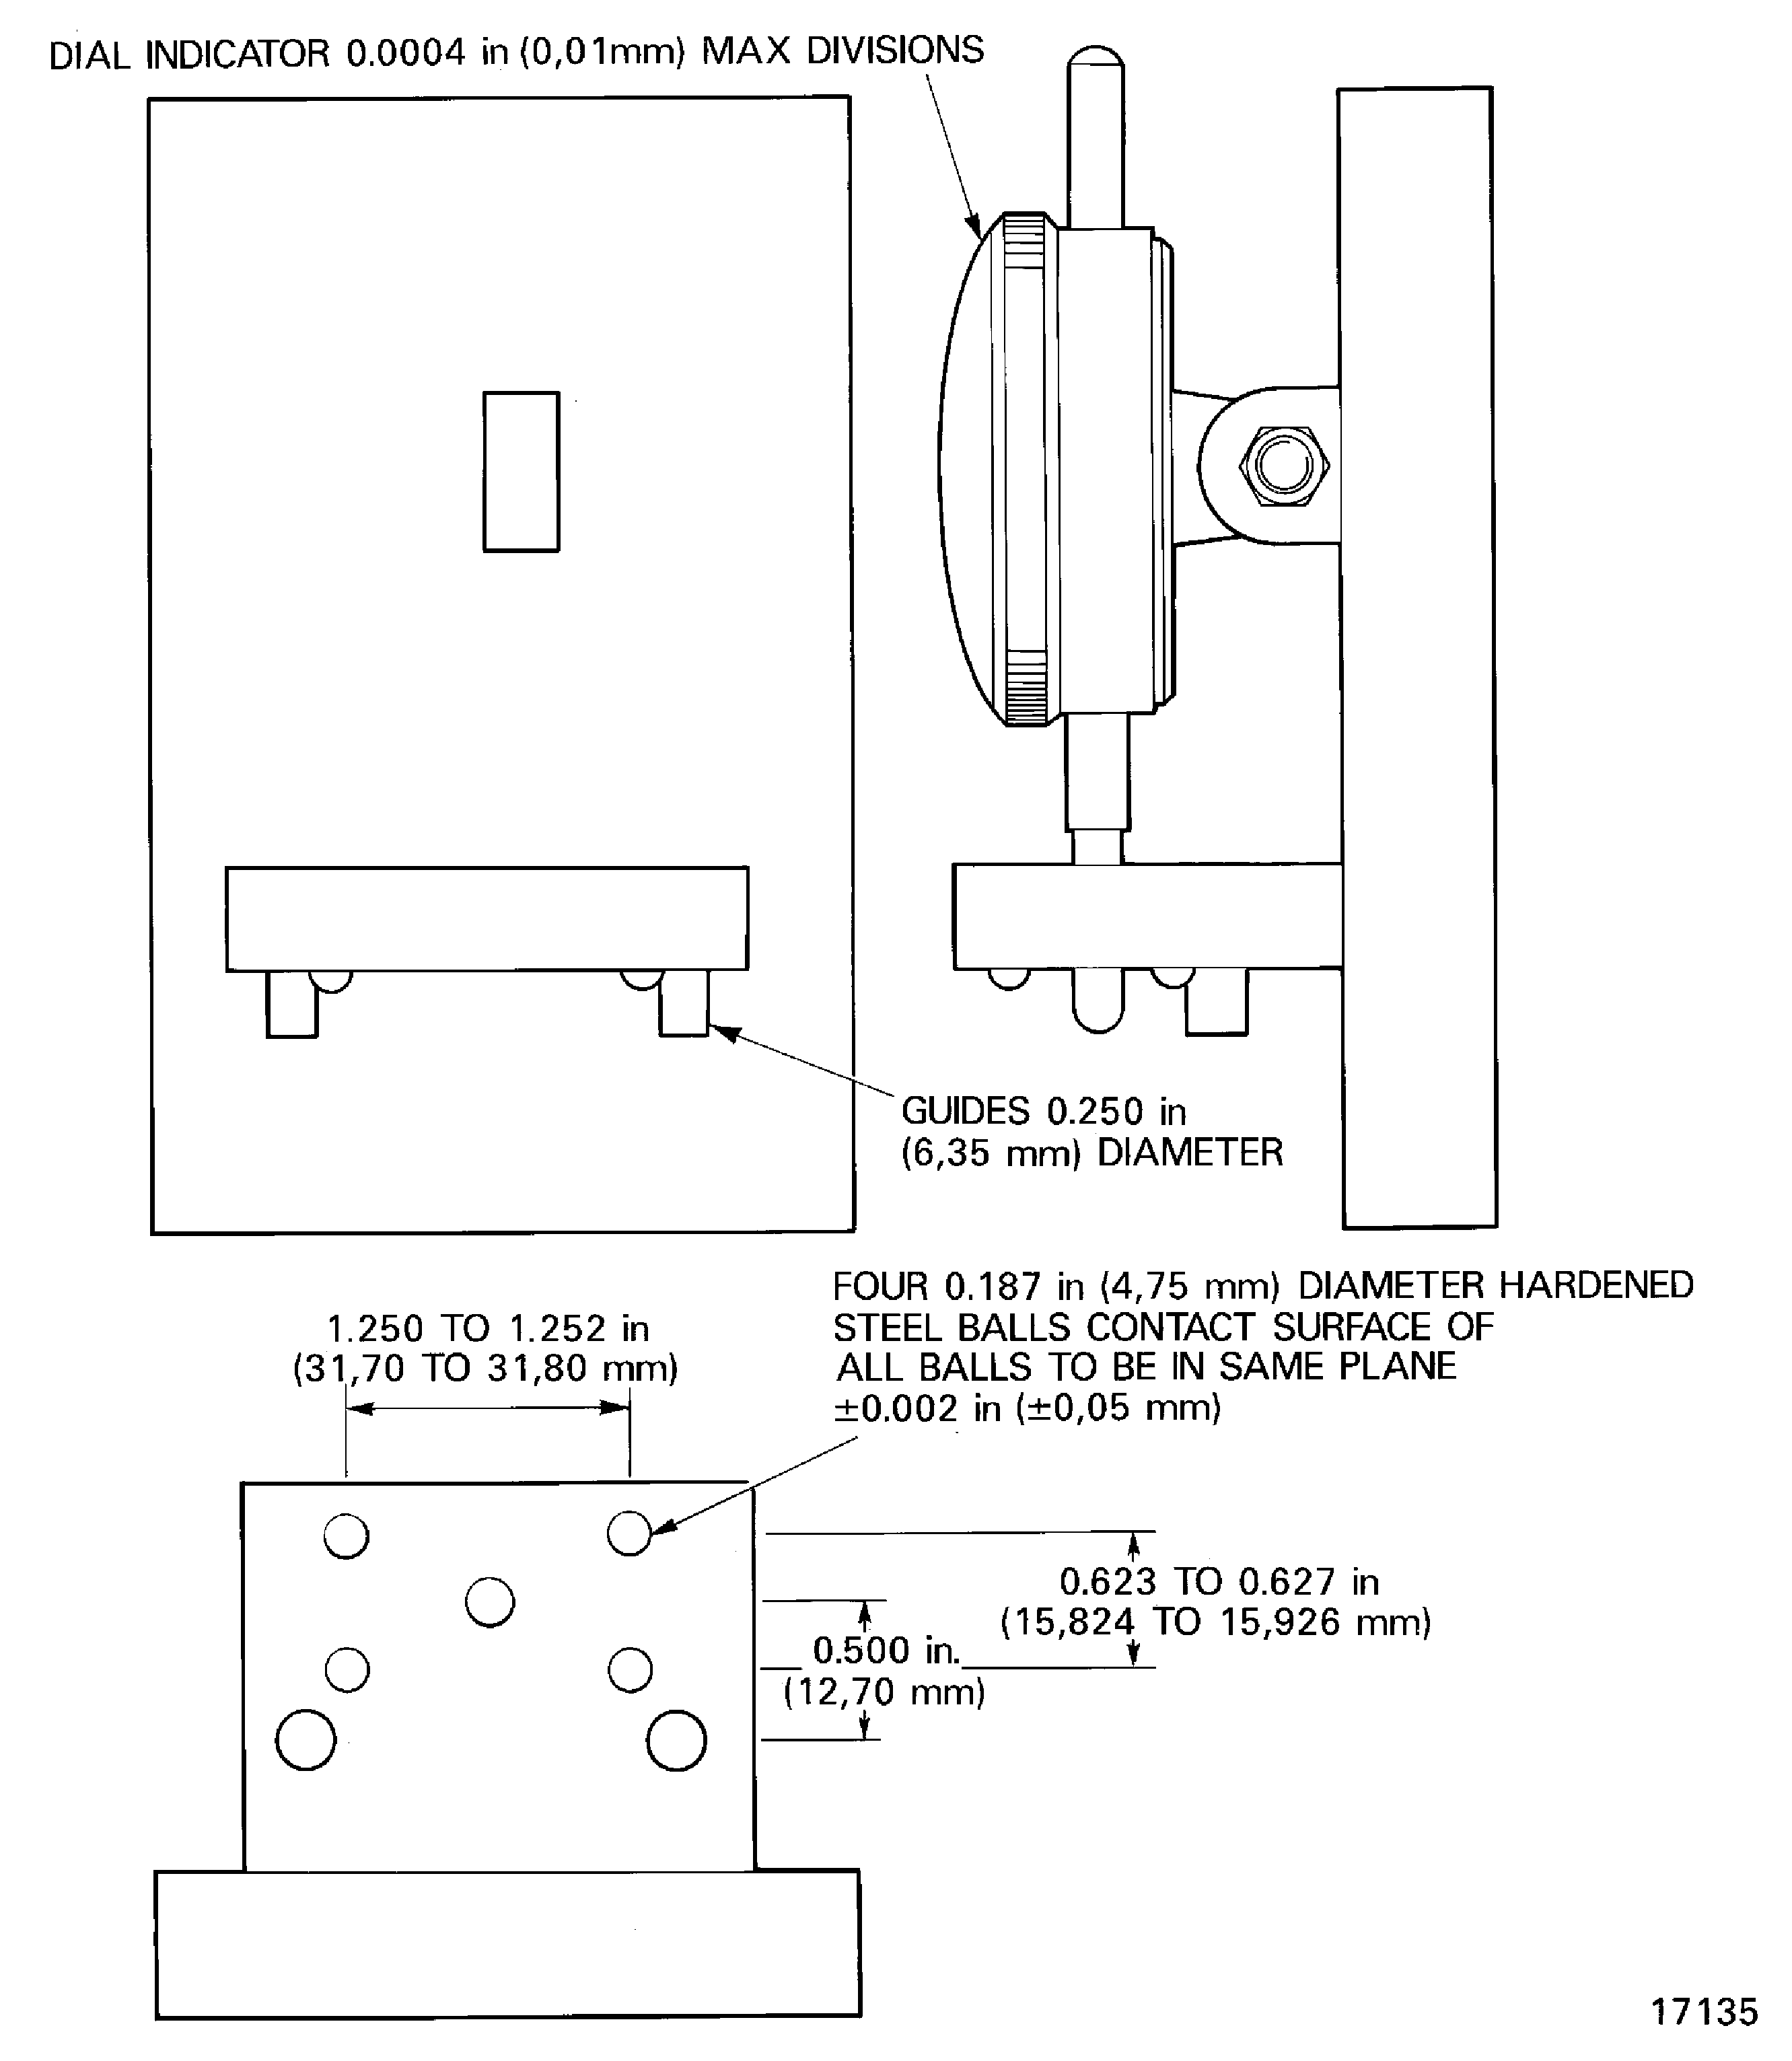
The measurement of the peening intensity is made, by inserting an Almen strip into the fixture (refer to Figure) where one side of the strip is saturated with a specified particle size of shot or glass bead, at a specified air pressure. This then causes the strip to bend or arc, according to the amount of peening (that is, the compressive stress applied). The peening intensity is thus expressed in terms of 'arc height' of the curvature of the Almen strips, as measured on a standard Almen gage (refer to Figure). The intensity is expressed as, for example, 6-10A (that is, an 'arc height' of 0.006 to 0.010in. (0.15 to 0.25 mm)). The use of Almen strip measurements allow the peening intensity to be repeated (that is, at different times, with different equipment and operators) but always with the same results.
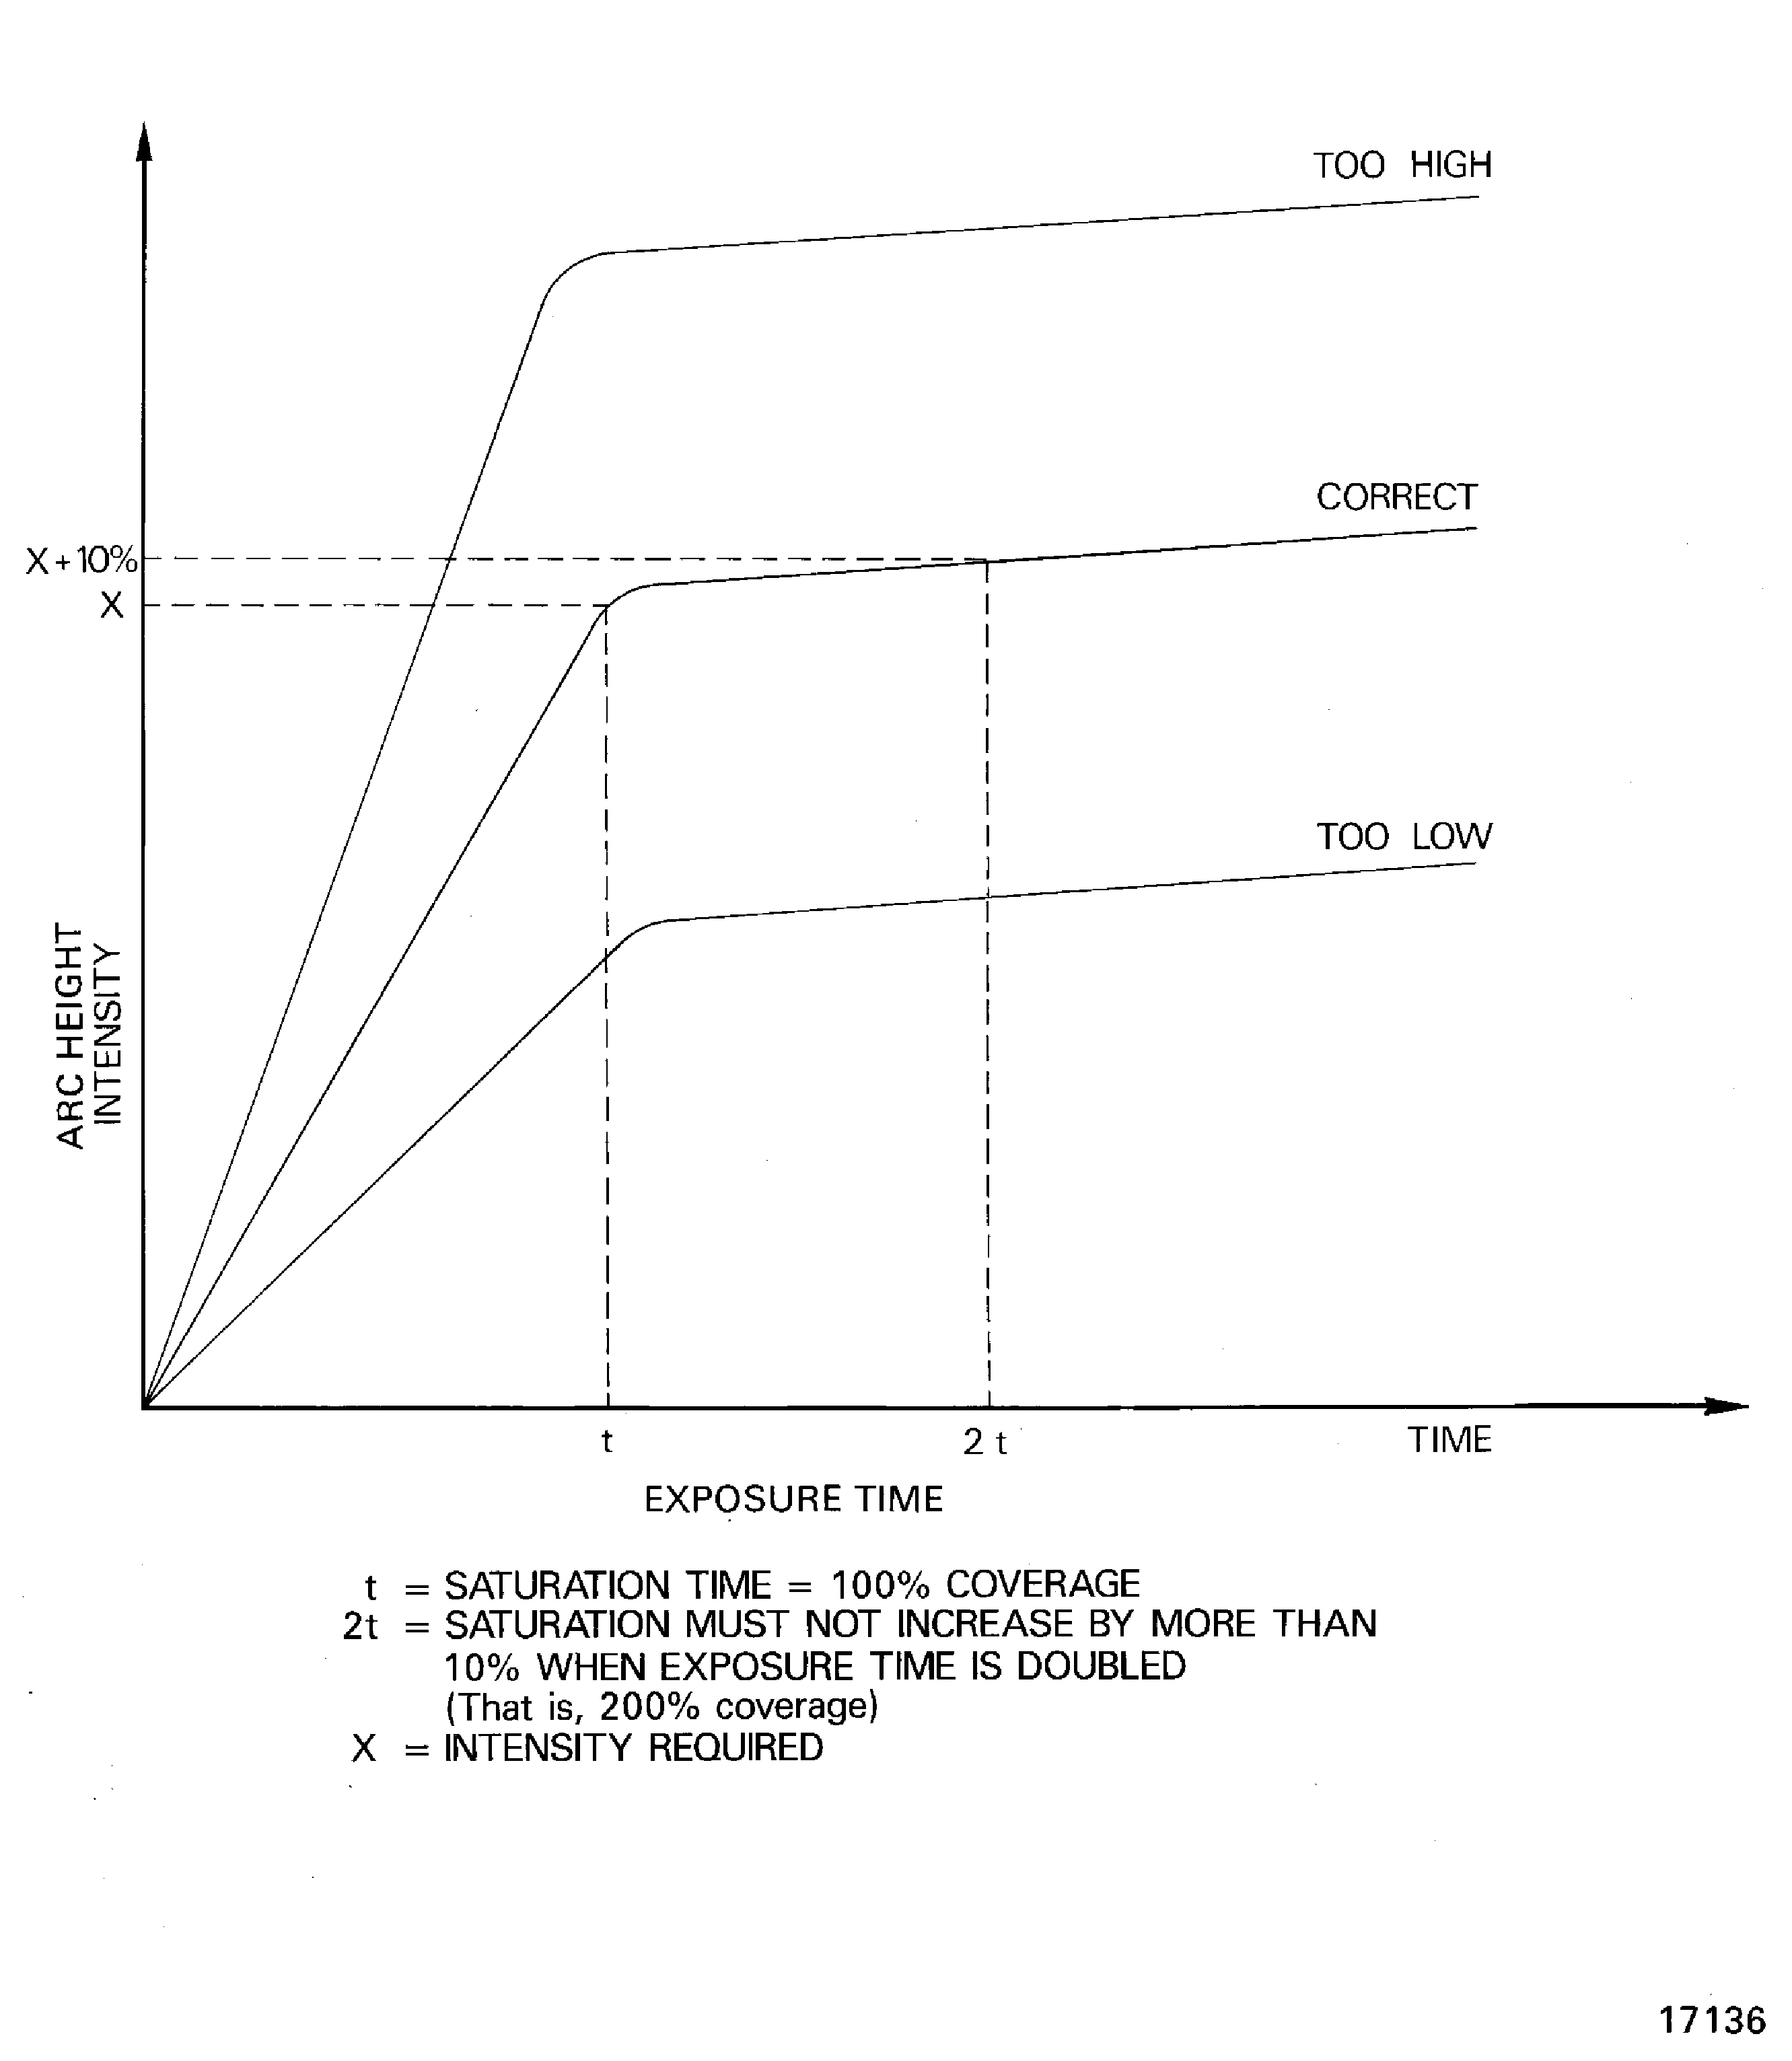
The tests must be repeated for different air pressures or impeller speeds and the results plotted to give an intensity curve (refer to Figure) from which the optimum air pressure or impeller speed and exposure time can be determined.
Control sheets must be kept to record the following parameters as a minimum for each peened part.
Details of equipment and set-up.
Details of peening medium.
Working pressure.
Nozzle-to-work distance.
Nozzle diameter.
Air jet diameter.
Impingement angle of blast.
100 or 200 percent saturation.
Duration.
Almen 'arc height'.
Area treated.
Other important information.
Control procedure:
Vapor degrease the strips (refer to the SPM TASK 70-11-01-300-503).
Secure the strip in the fixture (refer to Figure), before applying the same procedure as for the parts.
After peening, remove the strip from the fixture. Measure the curvature of the unpeened surface using the Almen gage (refer to Figure).
Plot the results to give an intensity curve (refer to Figure).
When the machine is calibrated, periodic checks must be made during the peening procedure:
Glass beads - one determination after every 2 hours of operation.
Cast steel - one determination after every 8 hours of operation.
At least one determination at the beginning and end of each batch.
At least one determination after any control setting change or shot replacement.
.
Test procedure:
Control and testing of shot and glass bead peening procedures.
SUBTASK 70-38-04-200-001 Control Procedures
Figure: Almen test strip
Almen test strip

Figure: Test strip fixture
Test strip fixture

Figure: Almen gage
Almen gage

Figure: Intensity determination curve
Intensity determination curve

