Export Control
EAR Export Classification: Not subject to the EAR per 15 C.F.R. Chapter 1, Part 734.3(b)(3), except for the following Service Bulletins which are currently published as EAR Export Classification 9E991: SBE70-0992, SBE72-0483, SBE72-0580, SBE72-0588, SBE72-0640, SBE73-0209, SBE80-0024 and SBE80-0025.Copyright
© IAE International Aero Engines AG (2001, 2014 - 2021) The information contained in this document is the property of © IAE International Aero Engines AG and may not be copied or used for any purpose other than that for which it is supplied without the express written authority of © IAE International Aero Engines AG. (This does not preclude use by engine and aircraft operators for normal instructional, maintenance or overhaul purposes.).Applicability
All
Common Information
TASK 70-39-03-390-501 Riveting
General
Most rivets are formed by a cold continuous squeeze procedure. With this procedure hand tools, hydraulic or pneumatic machines, are used to form the rivet heads with a continuous squeezing operation. Special tools, anvils and rivet sets, are also supplied when necessary. The hydraulic cold riveter is usually recommended, more than the pneumatic riveter, because it can apply higher pressures which are frequently necessary. For special uses (for example, swaging, bucking, hot forming of rivets, the use of dimpled sheets or explosive rivets), special instructions are given in the related assembly instructions.
In most cases, the correct replacement rivet for an assembly, is specified in the related Engine Illustrated Parts Catalog (EIPC) and/or the assembly instructions. Use the instructions given in this section for the correct replacement of oversized rivets when EIPC and assembly instructions are not given.
The specifications that follow, give the conditions that are applicable to the removal and replacement of rivets in riveted assemblies. Some assembly conditions specify modifications to these specifications. Where there are differences, between these specifications and the assembly data given in the related engine instructions, the engine instructions must be obeyed.
NOTE
Preliminary Requirements
Pre-Conditions
NONESupport Equipment
NONEConsumables, Materials and Expendables
NONESpares
NONESafety Requirements
WARNING
Procedure

CAUTION
BLIND RIVETS MUST NOT BE DEGREASED OR SOLVENT WASHED AS THIS WILL REMOVE THE LUBRICANT.Blind bolt: A blind bolt is a three-piece assembly (that is, a sleeve, a nut-type of expander and a core bolt). This assembly is installed and set (that is, when the sleeve is expanded by the nut) with special tools that are from the side of the sheet on which the manufactured head of the sleeve is installed. The core bolt is installed after installation of the sleeve.
Blind rivet: A blind rivet is a rivet installed and set (with the upset head formed) from the same side of the sheet, on which the manufactured head is installed. The rivets are made of different parts, which are set when integral pins or stems are pulled with a special tool. Different types of blind rivets are available in which the pins are broken-off above, below or flush with, the manufactured head. While with other types of blind rivets, the pins are pulled fully through and away from the shells of the rivets.
Machine countersunk: This shows that the holes were drilled through all sheets in one operation; also that the countersink depressions were made by a machine operation, that cut the metal - (Refer to Figure). Machine countersinks are usually contained in one sheet and do not go through to the faying surfaces.
Protruding head rivet: A protruding head rivet is a rivet with the bearing surface of its head flat against the sheet; where its full head is above the surface of the sheet. Protruding head is a general name. This includes button, brazier, cone, fillister, flat, mushroom, oval, pan, round, steeple, tinners, truss, universal or washer head shapes.
SUBTASK 70-39-03-390-001 Riveting Terms
Unless specified differently, as in Step, the rivet holes must be made during assembly although pilot or rigging holes are permitted. All unwanted materials, between the sheets which can cause separation of the sheets, must be removed before riveting. If it is found that the riveting procedure (that is, manual or automatic) causes a clamping effect, that does not let unwanted materials become caught between the sheets, separation of the sheets for cleaning will not be necessary. The perpendicularity must not be more than 5 degrees (for diameters up to 0.250 in. (6.35 mm)), or 3 degrees (for diameters more than 0.250 in. (6.35 mm)).
For static parts, unless specified differently, a burr collar is permitted; if the instructions given in step 3.F. and Step, step 6.B. are obeyed. If deburring is necessary, the edges can be broken a maximum of 0.005 in. (0.13 mm).
Hole preparation.
The counter surface for rivets must be such that a good fit is made with the manufactured rivet head; also that the manufactured head is flush to high before driving. Unless specified differently, the manufactured rivet head must be minus 0.000 in. (0.00 mm) to plus 0.005 in. (0.13 mm) high after driving. If the upset head is set into a countersunk or chamfered hole, the upset head must be flush to 0.020 in. (0.51 mm) above the surface. The manufactured heads of driven rivets, that are plus 0.005 in. to 0.010 in. (0.13 mm to 0.26 mm) high, must be shaved to minus 0.000 in. (0.00 mm) to plus 0.005 in. (0.13 mm) high. Where flush is specified on the assembly instructions, manufactured (or upset) heads must be shaved to minus 0.000 in. (0.00 mm) to plus 0.0005 in. (0.01 mm) high. (See Figure). Rivets that are plated (cadmium, etc) for corrosion protection must not be shaved to obtain flushness requirements. The inspection is usually done before shaving. The limits specified in Figure and Step, step 6.H., must be used. This is to find if too much material has been shaved from the rivet head. If flushness is produced by grinding, no burns are permitted.
The manufactured heads of blind rivets, blind bolts and rivet pins, must be minus 0.005 in. (0.13 mm) to plus 0.010 in. (0.26 mm) high after driving. The manufactured head must not be damaged, to get the correct flushness. Where flush is specified on the assembly illustration, the manufactured head must be shaved to plus 0.0005 in. (0.01 mm) high. Figure must be used, to find if too much material is shaved from the rivet head. For alternative instructions, refer to Step, step 6.J.(2).
Flush blind rivets, blind bolts and rivet pins:
Counter surface for flush rivets.
The nominal distances between the rivets, and from the edges, must be as specified on the assembly illustration. The rivet holes must be in the correct position; with a radius of 0.030 in. (0.76 mm) and/or a run of 0.060 in. (1.52 mm). Mismatch between corresponding holes must not be more than 0.001 in. (0.025 mm).
When the length of a rivet run, with equal distances, is controlled by the end holes the part length will be different; for each assembly. When this occurs, it will be necessary to change the distance at the end of the run; so that most of the holes can be found, with templates of the drill jigs. The distance can be increased or decreased, by a maximum of 0.060 in. (1.52 mm.) for as many distances as necessary, to make the end holes into an equal shape; when the minimum dimensions given in Figure are obeyed.
Rivet and edge distances.
Unless specified differently, as in steps (2) thru (4) that follow, the maximum clearance between all faying surfaces in a riveted assembly (where a clearance is not specifically permitted), in a diameter equal to two times the manufactured head diameter, will be 0.001 in. (0.02 mm). For sheet metal components the maximum gap of 0.001 in. (0.02 mm) must apply within one manufactured head diameter. The maximum clearance (sheet separation) between the rivets, more than the distance given above, will be as follows:
Nominal faying surfaces - (Refer to Figure):
For a diameter equal to two times that of the manufactured rivet head, a maximum clearance (sheet separation) of 0.010 in. (0.25 mm) is permitted; when the line contact specified in Step, step 6.B.(5)(b)(ii) is kept. After this point, the clearance will decrease; until there is no clearance at the center point between rivets.
Parts with anchor nut plates riveted to convex surfaces - (Refer to Figure - Detail A):
For a diameter equal to two times that of the manufactured rivet head, a maximum clearance (sheet separation) of 0.003 in. (0.08 mm) is permitted; when the line contact specified in Step, step 6.B.(6)(b)(ii) is kept. The maximum permitted clearance, at a center point between the rivets, is 0.010 in. (0.25 mm).
Parts with anchor nut plates riveted to concave surfaces - (Refer to Figure - Detail B):
For a diameter equal to two times that of the manufactured rivet head, a maximum clearance of 0.005 in. (0.13 mm) is permitted, when there is a line contact between the sheet surface and the rivet head; for the full head diameter, in at least one plane, that contains the rivet axis. If the manufactured rivet head touches a convex plastic sheet, a minimum of two contact points - (Between the head and the sheet) must be kept.
Parts with plastic details (which include reinforced plastics):
Faying surfaces clearance.
SUBTASK 70-39-03-390-002 Technical Data
The holes necessary for such rivets must be as specified in the assembly instructions. The counter surface, when necessary, will be as specified in Figure.
Blind rivets.
SUBTASK 70-39-03-390-003 Special Types of Rivets and Pins
On the rivet assembly illustrations the type of rivet, head position, type of hole and necessary counter surface are specified by the use of standard symbols. The symbol includes a single cross, which shows the location of the fastener - (Refer to Figure - Detail A).
General.
The letter gives the position of the manufactured head.
NOTE
No letter is included in the code, when the location of the manufactured head is optional; or when it is specified differently, on the assembly illustration.If not specified, the direction of assembly is optional. In general, the upset head is on the side of the thicker sheet or harder material.
The rivet diameter and location of the manufactured head are shown in this quadrant by an alpha-numeric code that follows.
Upper right quadrant - (Refer to Figure):
Rivets that are flush on each side are shown with the number-letter code on two different lines. The first line shows the countersink operation for the manufactured head; while the second line shows the countersink operation for the upset head. If the angle is different, from the manufactured head, the included angle will be shown as in Figure - Detail B; but without the degree symbol.
The sheets to be countersunk are shown in the lower left quadrant; by the number-letter code that follows:
Lower left quadrant - (Refer to Figure - Detail D):
Quadrant identification.
SUBTASK 70-39-03-390-004 Rivet Symbols
The manufactured heads of protruding head rivets can be flat, because of a flat driver or bucking bar - (Refer to Figure - Detail B), if the head is not thinner than the minimum head height for upset heads - (Refer to Figure); for all materials. Rivets with manufactured head heights of less than these values, before driving, must not be flat.
Flat manufactured heads:
The manufactured heads of all protruding head rivets must be such that a 0.002 in. (0.05 mm) shim can not touch the rivet shank; when examined as shown in Figure - Details A and B. A contact with the rivet shank is found, when the shim does not touch and can move freely; below the rivet head - (Refer to Figure - Detail B).
The manufactured heads of all flush head rivets must be such that a 0.002 in. (0.05 mm) shim can not be put between the rivet head and the countersink; for more than 145 degrees of the circumference of the head - (Refer to Figure - Detail A). Also, that a 0.002 in. (0.05 mm) shim - (Almost the same as the type shown on Figure) does not touch the rivet shank; when examined, as shown on Figure - Details A and B.
Rivets with clearances 0.002 in. (0.05 mm) or less below the upset head, must be hit again. Rivets with clearances of more than 0.002 in. (0.05 mm) must be replaced. Rivets with clearances between the manufactured head and the sheet, more than the limits specified in Step and Step, must also be replaced. At least 50 percent of the manufactured head must have a zero clearance with the sheet.
Solid rivets: The clearances between the rivet manufactured and upset heads, of installed shank rivets and the surface of that part being riveted, will be found as follows:
Flat surfaces: For protruding head rivets, bolts and pins, a 0.005 in. (0.13 mm) maximum clearance is permitted - (Between the manufactured head and the flat sheet surface); when at least 40 percent of the head circumference touches the sheet surface. For countersunk manufactured heads a 0.003 in. (0.08 mm) maximum clearance is permitted - (Between the rivet head and the countersink); when there is no clearance, for at least 50 percent of the rivet head circumference - (Refer to Figure).
Blind and hollow rivets, bolts and rivet pins:
The instructions given in Step above apply to solid rivets, in assemblies that contain plastic or reinforced plastic sheets.
Plastic sheets:
Open heads on flush and protruding head rivets - (Refer to Figure - Detail D):
Some cracks are permitted, in the upset heads, when they are not more than the limits given on Figure. Cracks are not permitted in more than 10 percent of a rivet pattern. Cracks are not permitted in rivets made of AMS 7223 material.
Rivets with cracks around the edge of the upset head, that run in an approximate radial direction, can be accepted; if they do not go into diameter A, or are not longer than length B - (Refer to Figure).
The width of a crack must not be more than 0.062 times the shank diameter - (Refer to Figure).
Cracks in locations of the upset head, other than those shown on Figure, can not be accepted.
Rivets with cracks around the edge of the upset head, in the shape of a wedge - (Such that a chip can fall out), can not be accepted - (Refer to Figure - Detail A).
Upset heads:
Cracks:
Protruding head rivets with a ring around the manufactured head, caused during the rivet set, can be accepted; if less than 10 percent of the rivets have rings and the depth of cut is less than 25 percent of the driven head height. Rivets with head rings off-set, by more than one eighth of the head diameter, can not be accepted - (Refer to Figure - Detail B).
Protruding head rivets:
Manufactured head set damage:
Hand peening of shanks to upset rivet heads - (For rivets made of the materials specified in Figure) is not permitted; because fast cold working of such materials does not let the shank become sufficiently large to fill the hole.
Necessary hole fill:
NOTE
This does not apply to rivets that are spun set.
Solid rivets.
The sheet hole sizes, for all such rivets, is specified in Figure. Cracks in the swaged or flared ends can not be accepted. The rivet end must be swaged to a minimum diameter; equal to the shank diameter, plus 15 percent of that diameter.
General:
To make sure the flare bend is not too thin, the flare angle must be approximately the same as the chamfer; into which the flare is set. Unless specified differently, the maximum chamfer angle must be the minimum angle of the approved setting tool - (Refer to Figure - Detail C). The flare angle of hollow rivets, not set to a chamfer, must be approximately 60 degrees - (Refer to Figure - Detail D).
Flare angle:
Hollow rivets.
Damaged sheets - (For example, sheets with bulged edges) or open seams that let a 0.001 in. (0.02 mm) feeler gage touch the rivet shank, or other unwanted sheet damage - (Refer to Figure - Detail E), can not be accepted.
Bulged sheets, caused when rivet shanks become expanded between the sheets - (Or when chips become caught between the sheets), can not be accepted - (Refer to Figure - Detail F).
Sheet differences.
A rivet that is the same size as the loose rivet can replace the loose rivet if the hole diameter is not more than the limits given in Figure.
Loose rivets.
A minimum clearance of 0.002 in. (0.05 mm) must be kept between adjacent sheets, before they are riveted - (Refer to Figure - Detail G).
Clearance between adjacent sheets.
The maximum permitted clearance, between the edge of the upset rivet head and the sheets, is given on Figure - Detail H.
Clearance between edge of upset rivet head and sheet.
For cold upset heads, a hardness check must be made; in the areas shown on Figure. The hardness value must not be more than Rockwell-C40; or its equivalent.
Hardness:
Control of the upset rivet head properties.
For those rivets (other than CherryMAX) where the stem snaps off flush with the manufactured head of the rivet: The stem and locking collar flushness must be within the limits given in Figure. The collar must be flush or below the land of the stem.
For CherryMAX rivets:
The locking collar must be flush within plus 0.005 in. (0.127 mm) with the top surface of the rivet head. Stem flushness must be within the limits shown in Figure. Where the locking collar is flush with the top of the rivet head, it can be safely concluded that the stem is within flushness tolerance limits.
For either type of rivet, a slight collar flash caused by the pressures necessary to drive the collar, is acceptable with the limit shown in Figure.
Stem and lock collar flushness:
The stem can be milled or trimmed, flush with the head, when the head is open; or when injury to persons, or damage to materials, can be caused by stems that are not trimmed. Refer to Step, step 3.C.(5),(a), for the limits. Rivets that use lock collars, to keep the stems, must not have the heads or collars trimmed or shaved. Stems that are loose, or do not have the necessary axial push-out load given in Figure, must be rejected; the rivet must then be replaced. The installed and locked stem must meet or exceed the push-out limits given in Figure. The stem push-out tool must be 0.007 in. (0.18 mm) smaller than the minimum rivet stem.
Trim the stems:
General instructions for blind rivets.
Where the trim material is cut from the collar, at the edge of the pin, a thin sharp fin, not more than 0.010 in. (0.25 mm) thick, can be accepted - (Refer to Figure - Detail B). Also, the trim edge of the collar can be none symmetrical; because of the trim procedure.
Trim material:
The collar must be in the shape of a smooth cone, symmetrical with the rounded end of the pin. There can be a shoulder at the base of the collar, or a ring up to 0.030 in. (0.76 mm) high at the top of the collar, if all the other instructions are obeyed - (Refer to Figure).
Shoulder and/or ring:
General instructions for high-shear stump pins and collars.
SUBTASK 70-39-03-390-005 Quality Standards
Make sure that you remove and install protection covers as necessary to prevent damage to the adjacent surfaces, and to make sure that rivet parts and pieces do not go into open areas, cavities, holes, or ports.
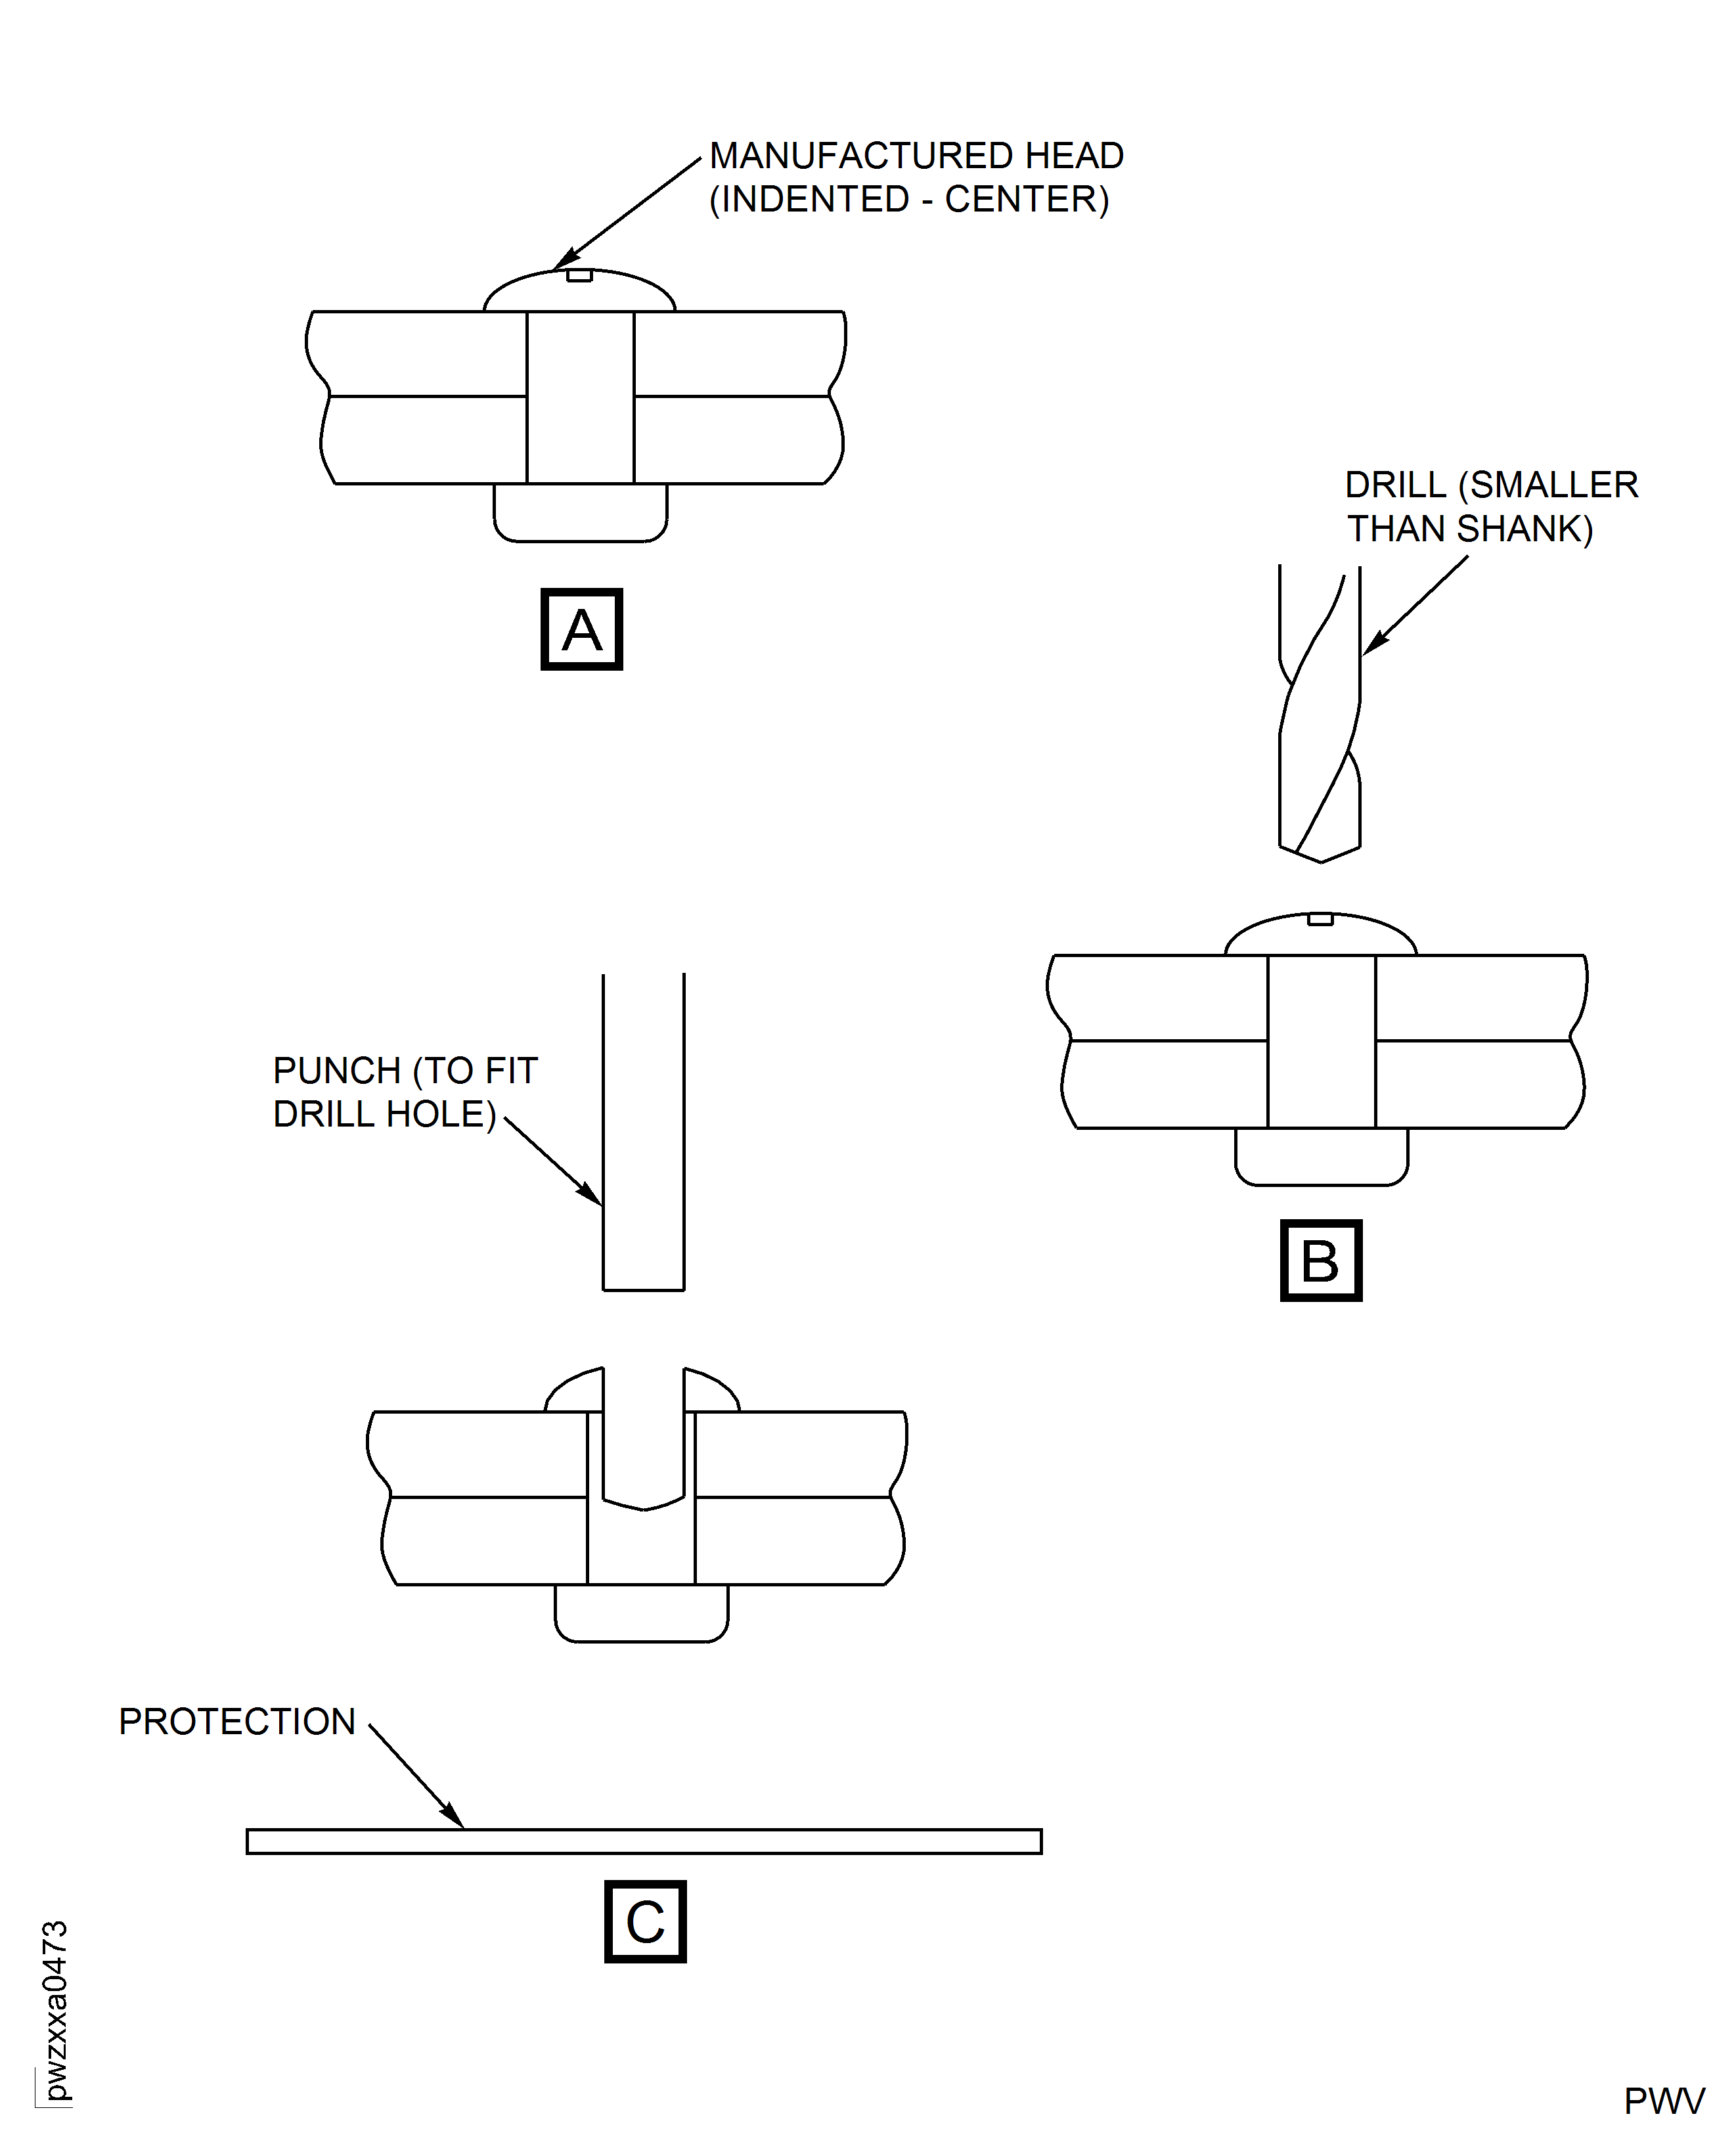
Carefully remove rivets to prevent damage to the detail parts. See Figure.
Use the blind rivet removal tool and the tool manufacturers instructions.
Blind rivet removal tool procedure.
Center-punch the rivet for the start of drilling in the manufactured head. See Figure, View A.
Use a drill size smaller than the rivet shank diameter. Keep the drill perpendicular to the surface and drill through the head and a small distance into the rivet shank. Do not drill into the rivet base structure. Do not oversize the rivet hole. See Figure, View B.
Put a protection pad under the rivet to collect the rivet head. Use a punch, the same size as the drill (or smaller), to punch out the upset head. See Figure, View C.
Remove the rivet heads and all remaining unwanted material.
Center-punch and drill procedure.
If there is no center indentation, do one of the subsequent procedures:

CAUTION
DO NOT GRIND. IF YOU GRIND TO REMOVE A RIVET, YOU CAN CAUSE DAMAGE TO THE DETAIL PARTS.Unless specified differently in the repair, you must carefully drill out rivets. Do not grind. Typical tools include center-punch, drill, and blind rivet removal tool available from Grainger and Starrett. These tools are available from the sources that follow by source code. Refer to the V2500 IETP Vendor List for the source names/addresses identified by these numbers:
25795
57163
SUBTASK 70-39-03-390-006 Rivet Removal Procedure
Figure: Examples of machine countersinks
Examples of machine countersinks
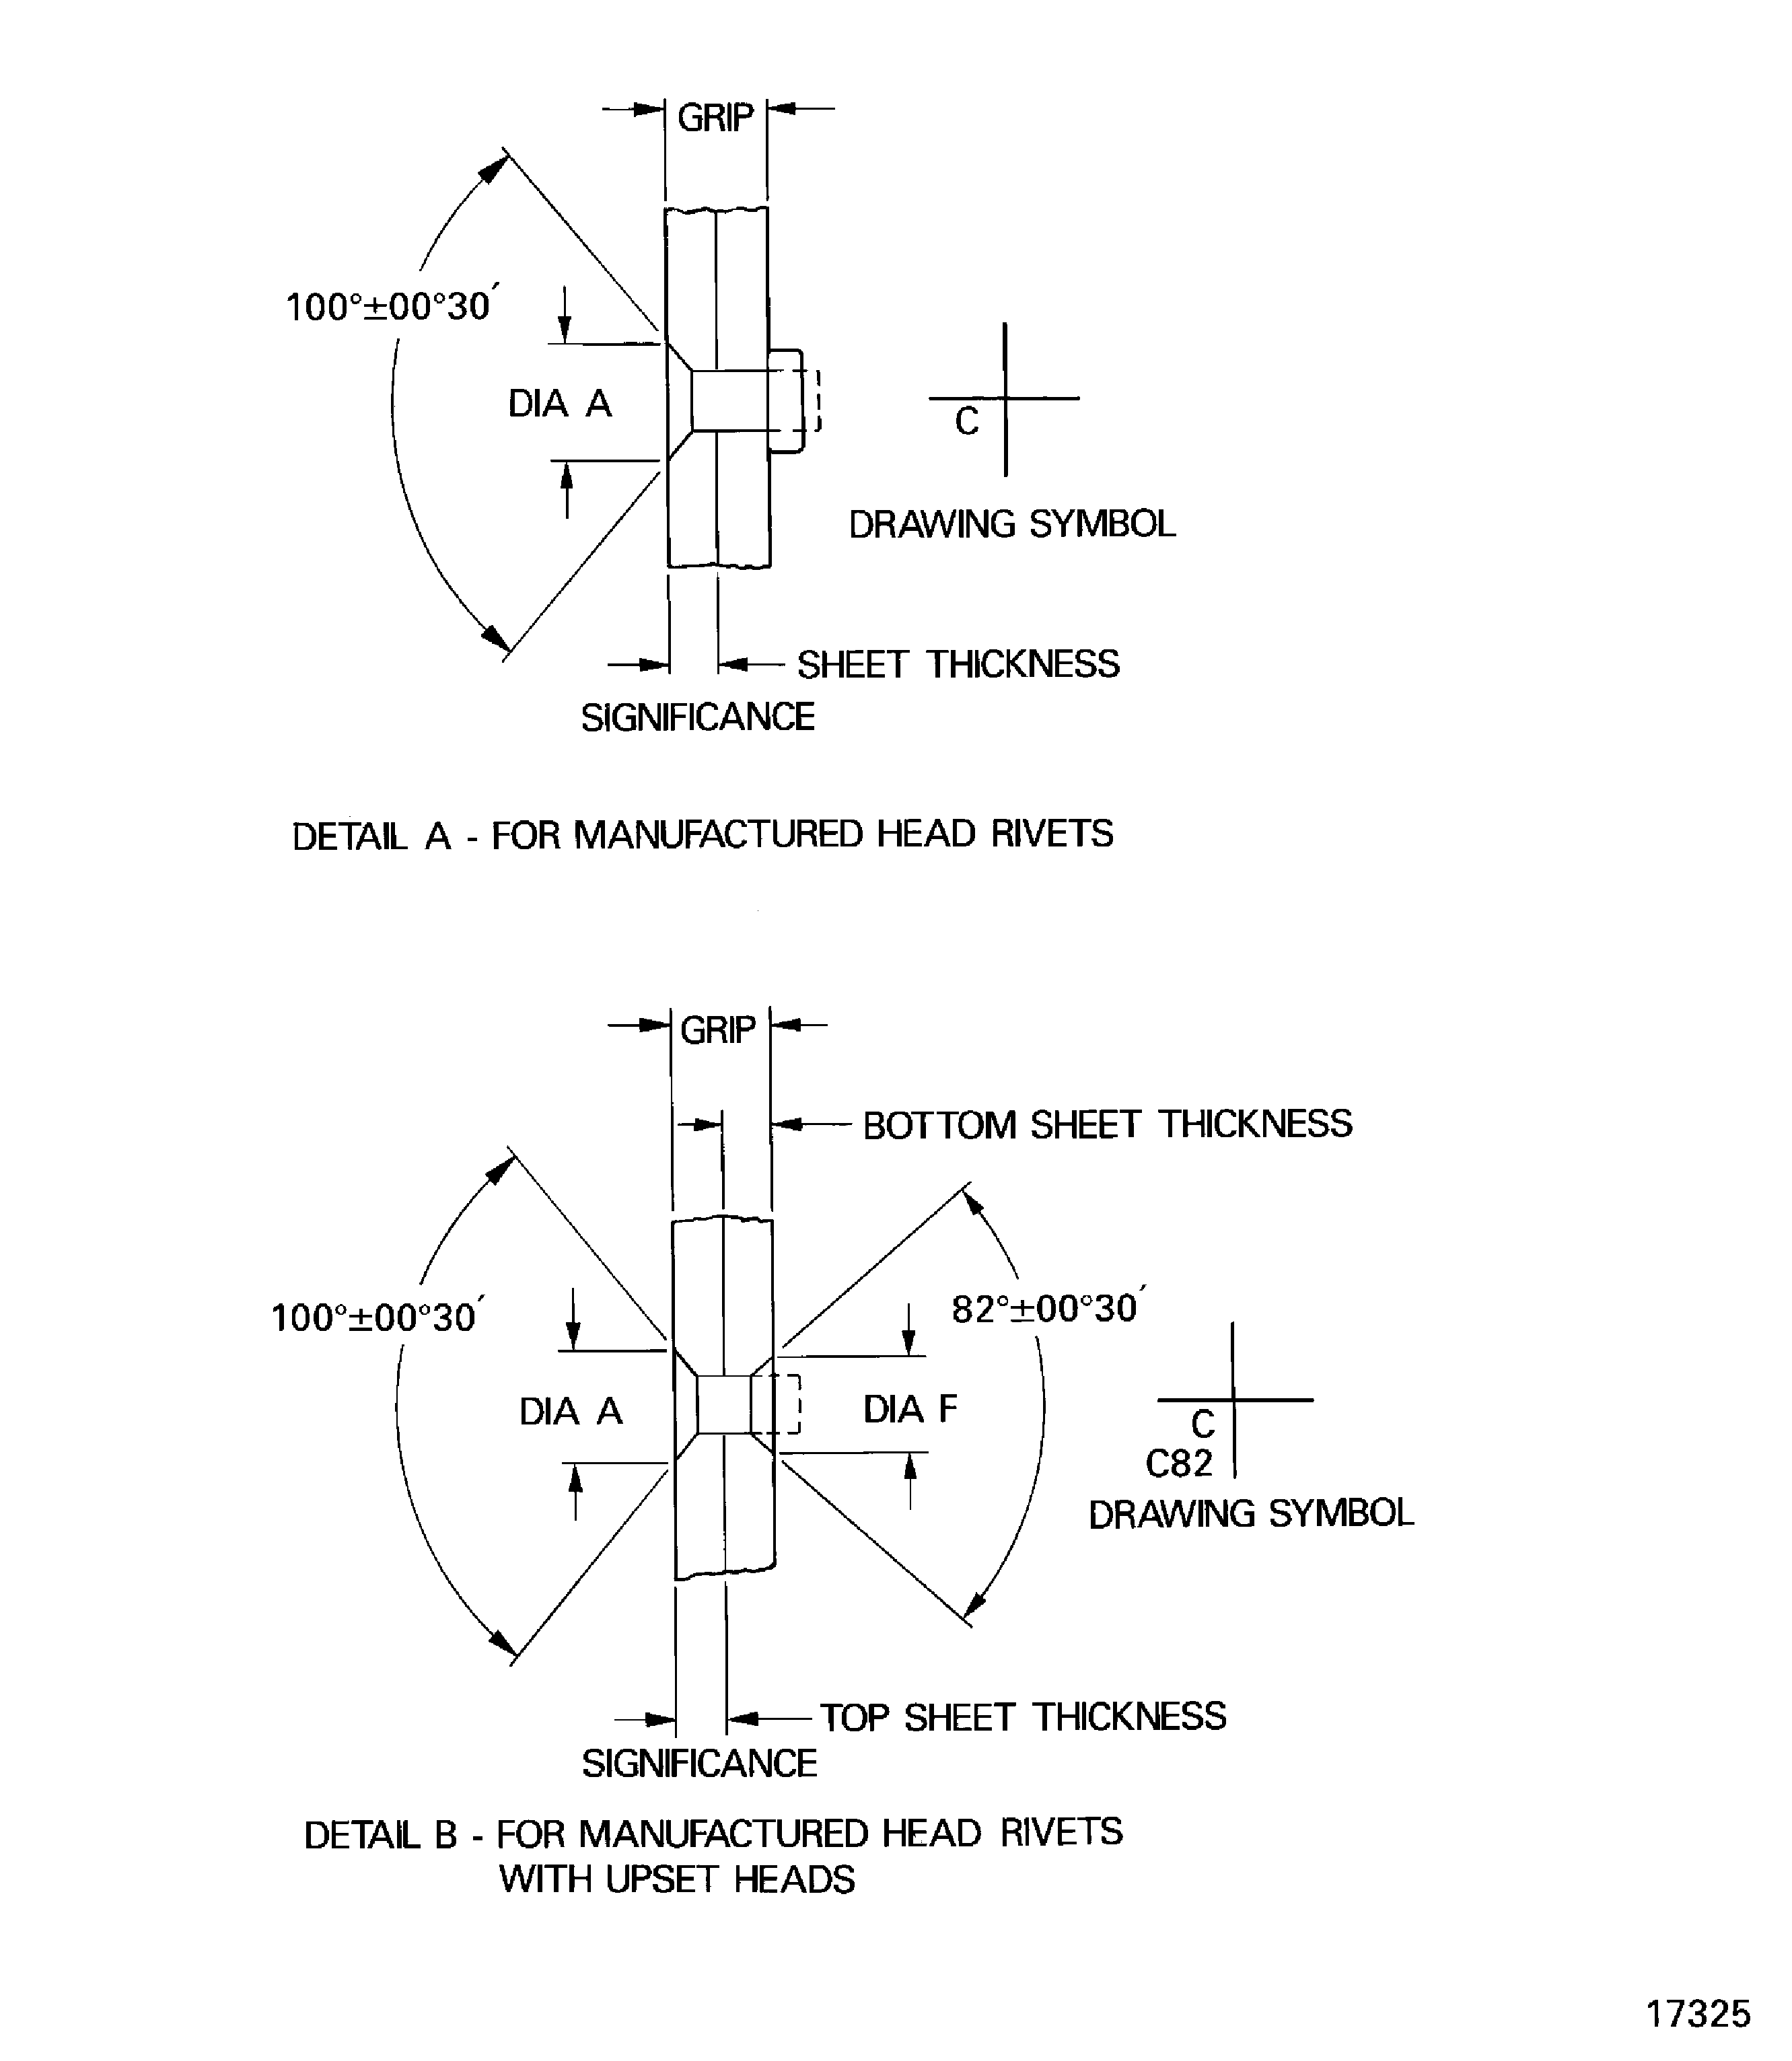
Figure: Shaved manufactured or upset heads
Shaved manufactured or upset heads
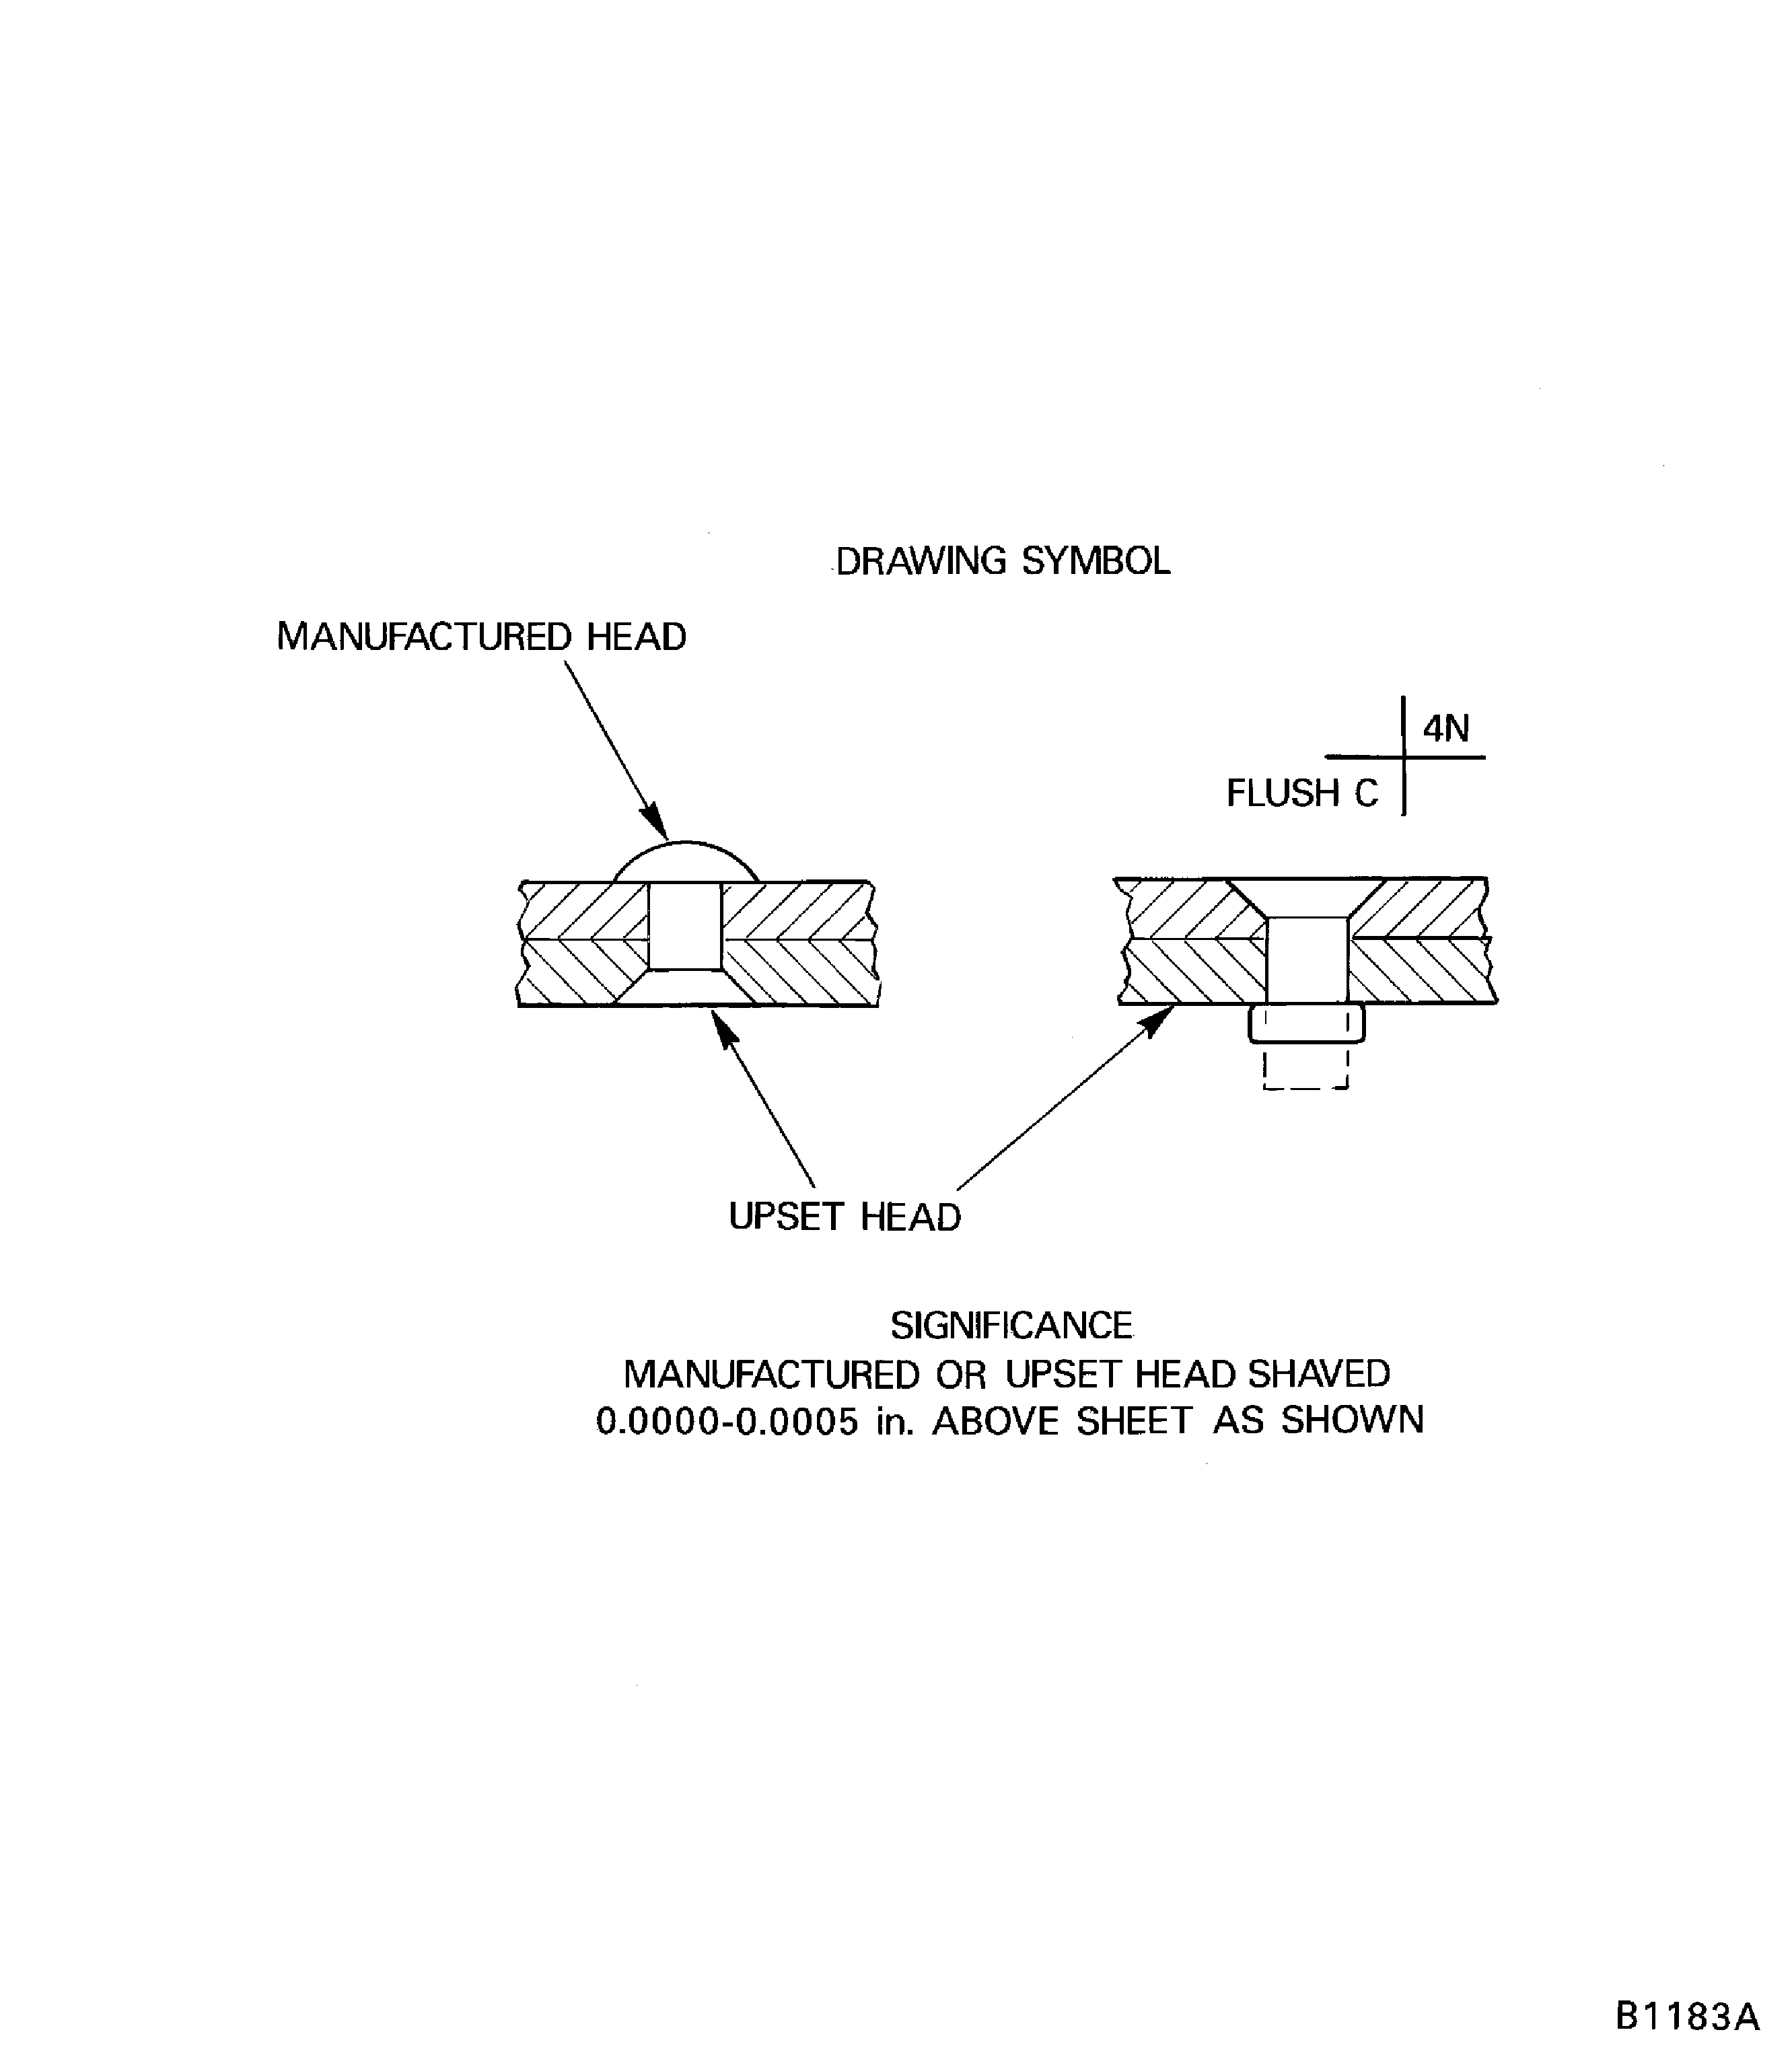
Figure: Rivet hole data
Rivet hole data
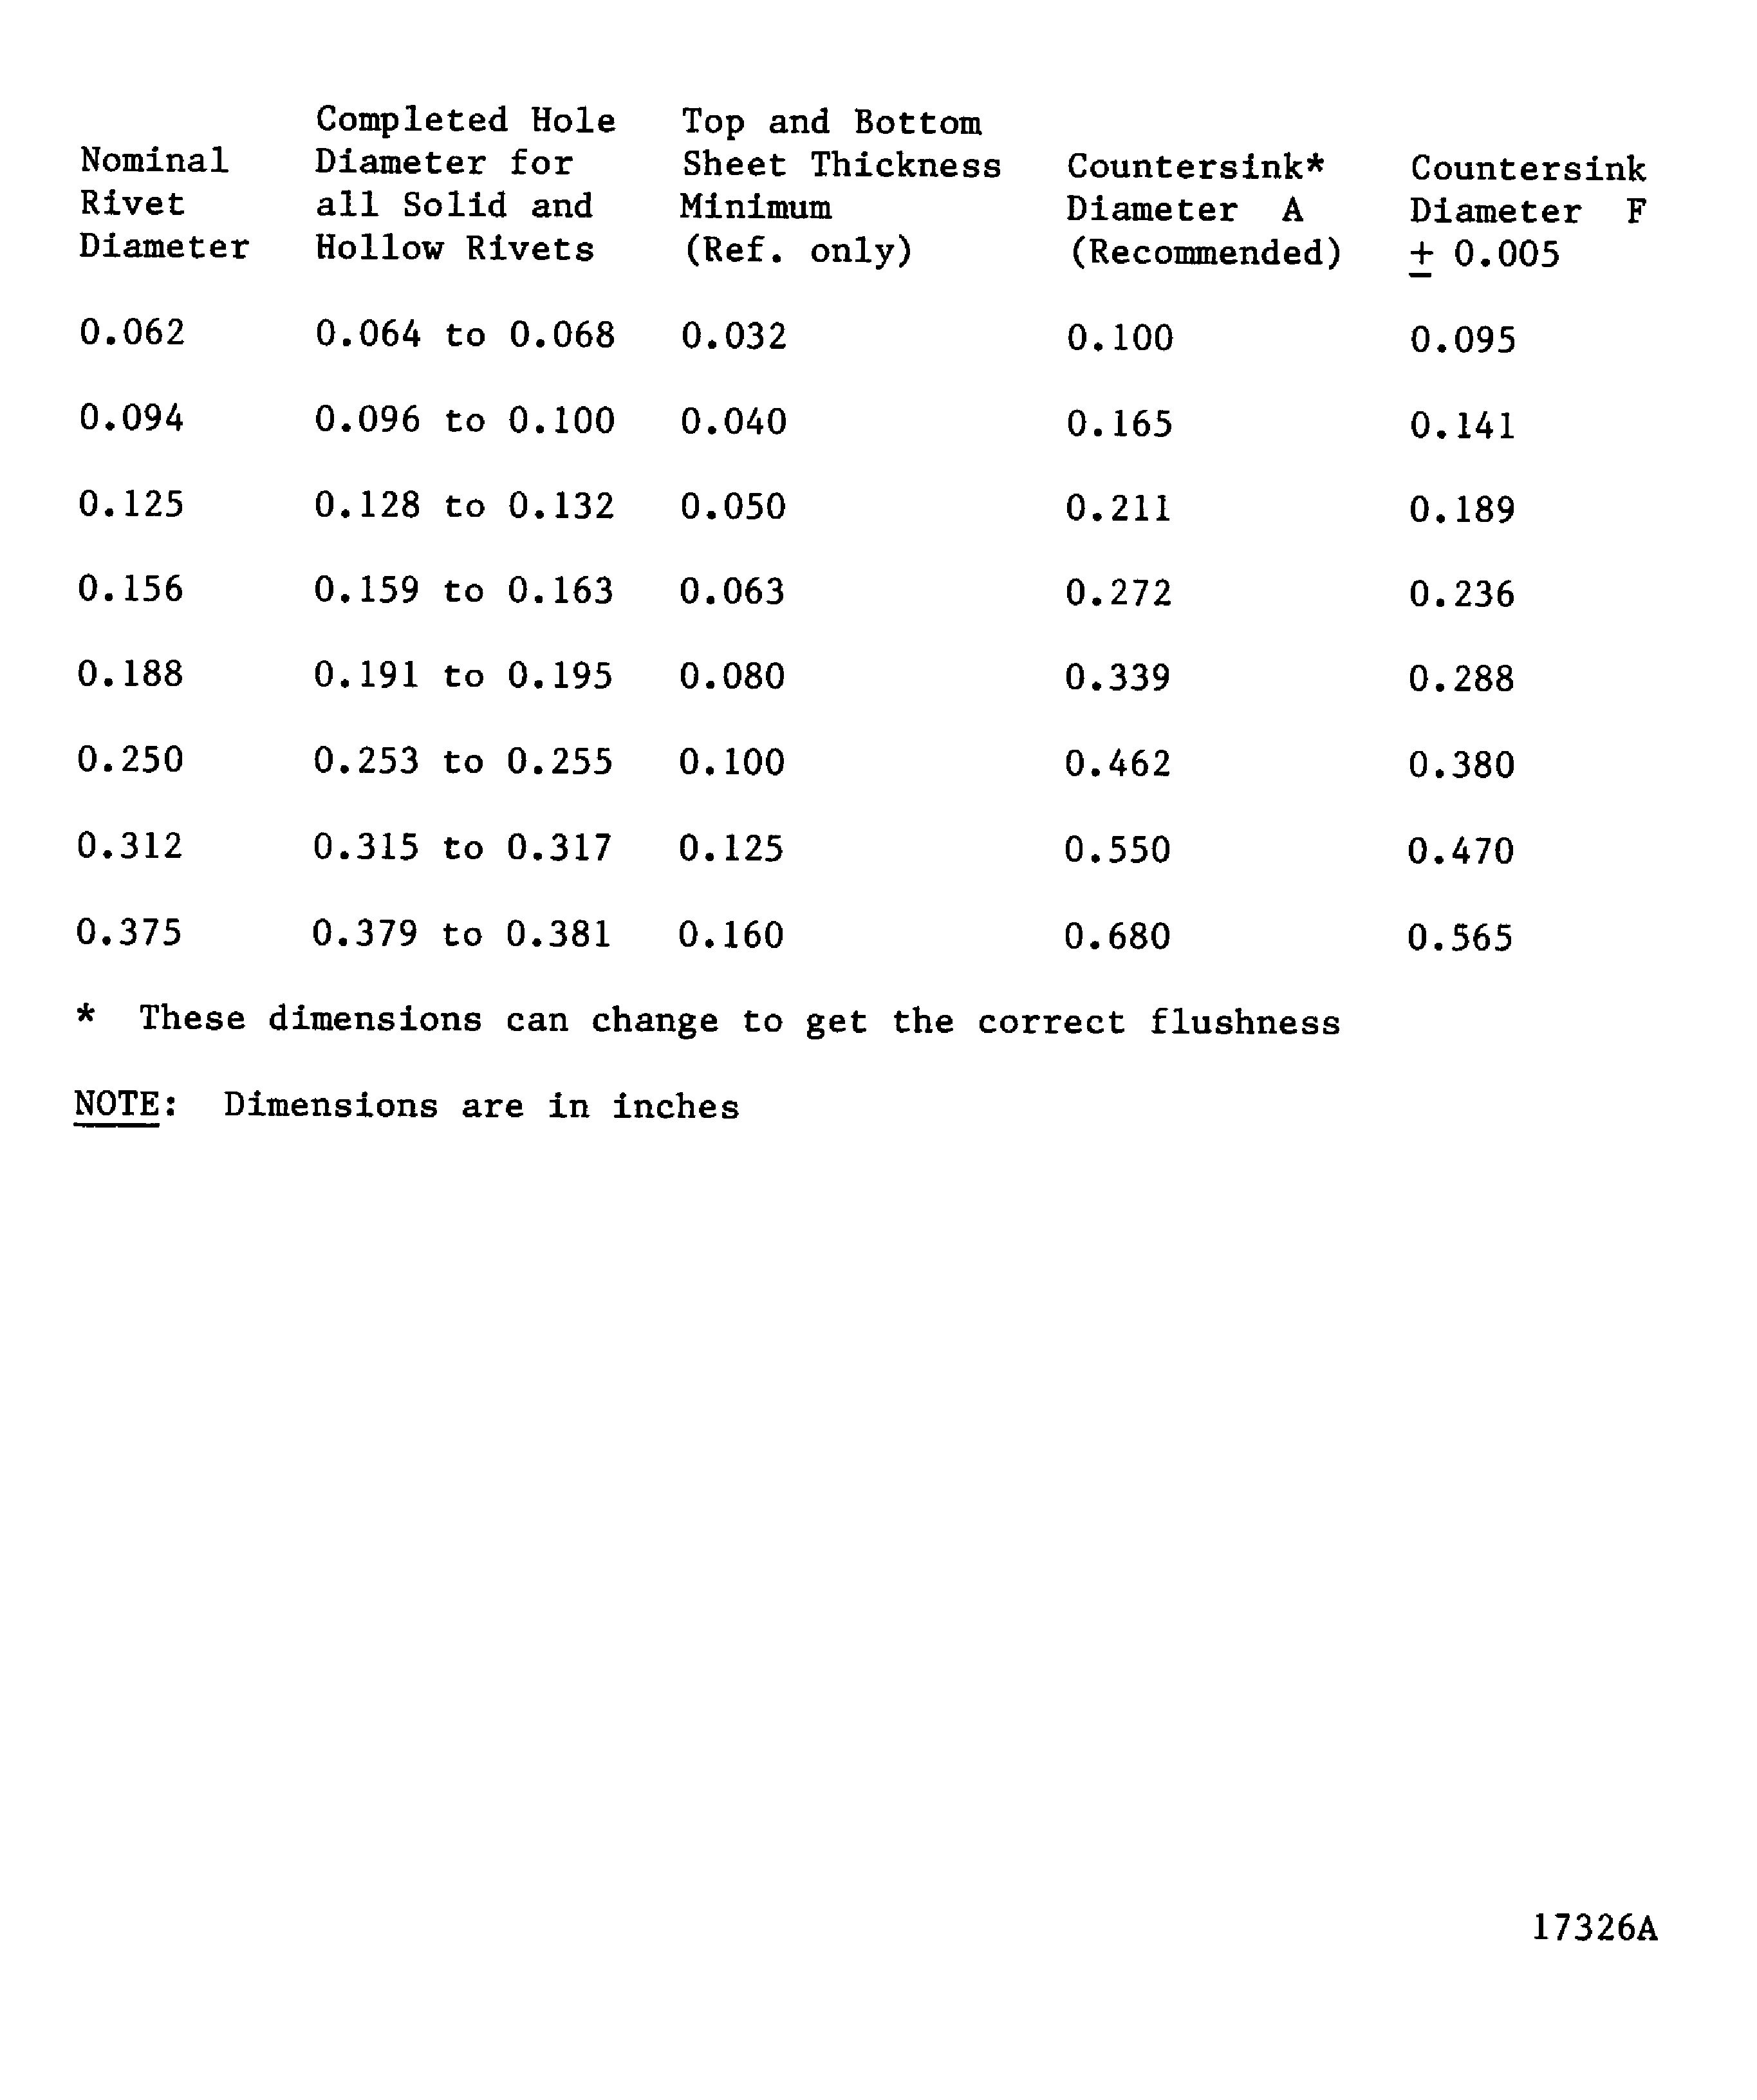
Figure: Minimum head diameter when manufactured rivet head is shaved
Minimum head diameter when manufactured rivet head is shaved
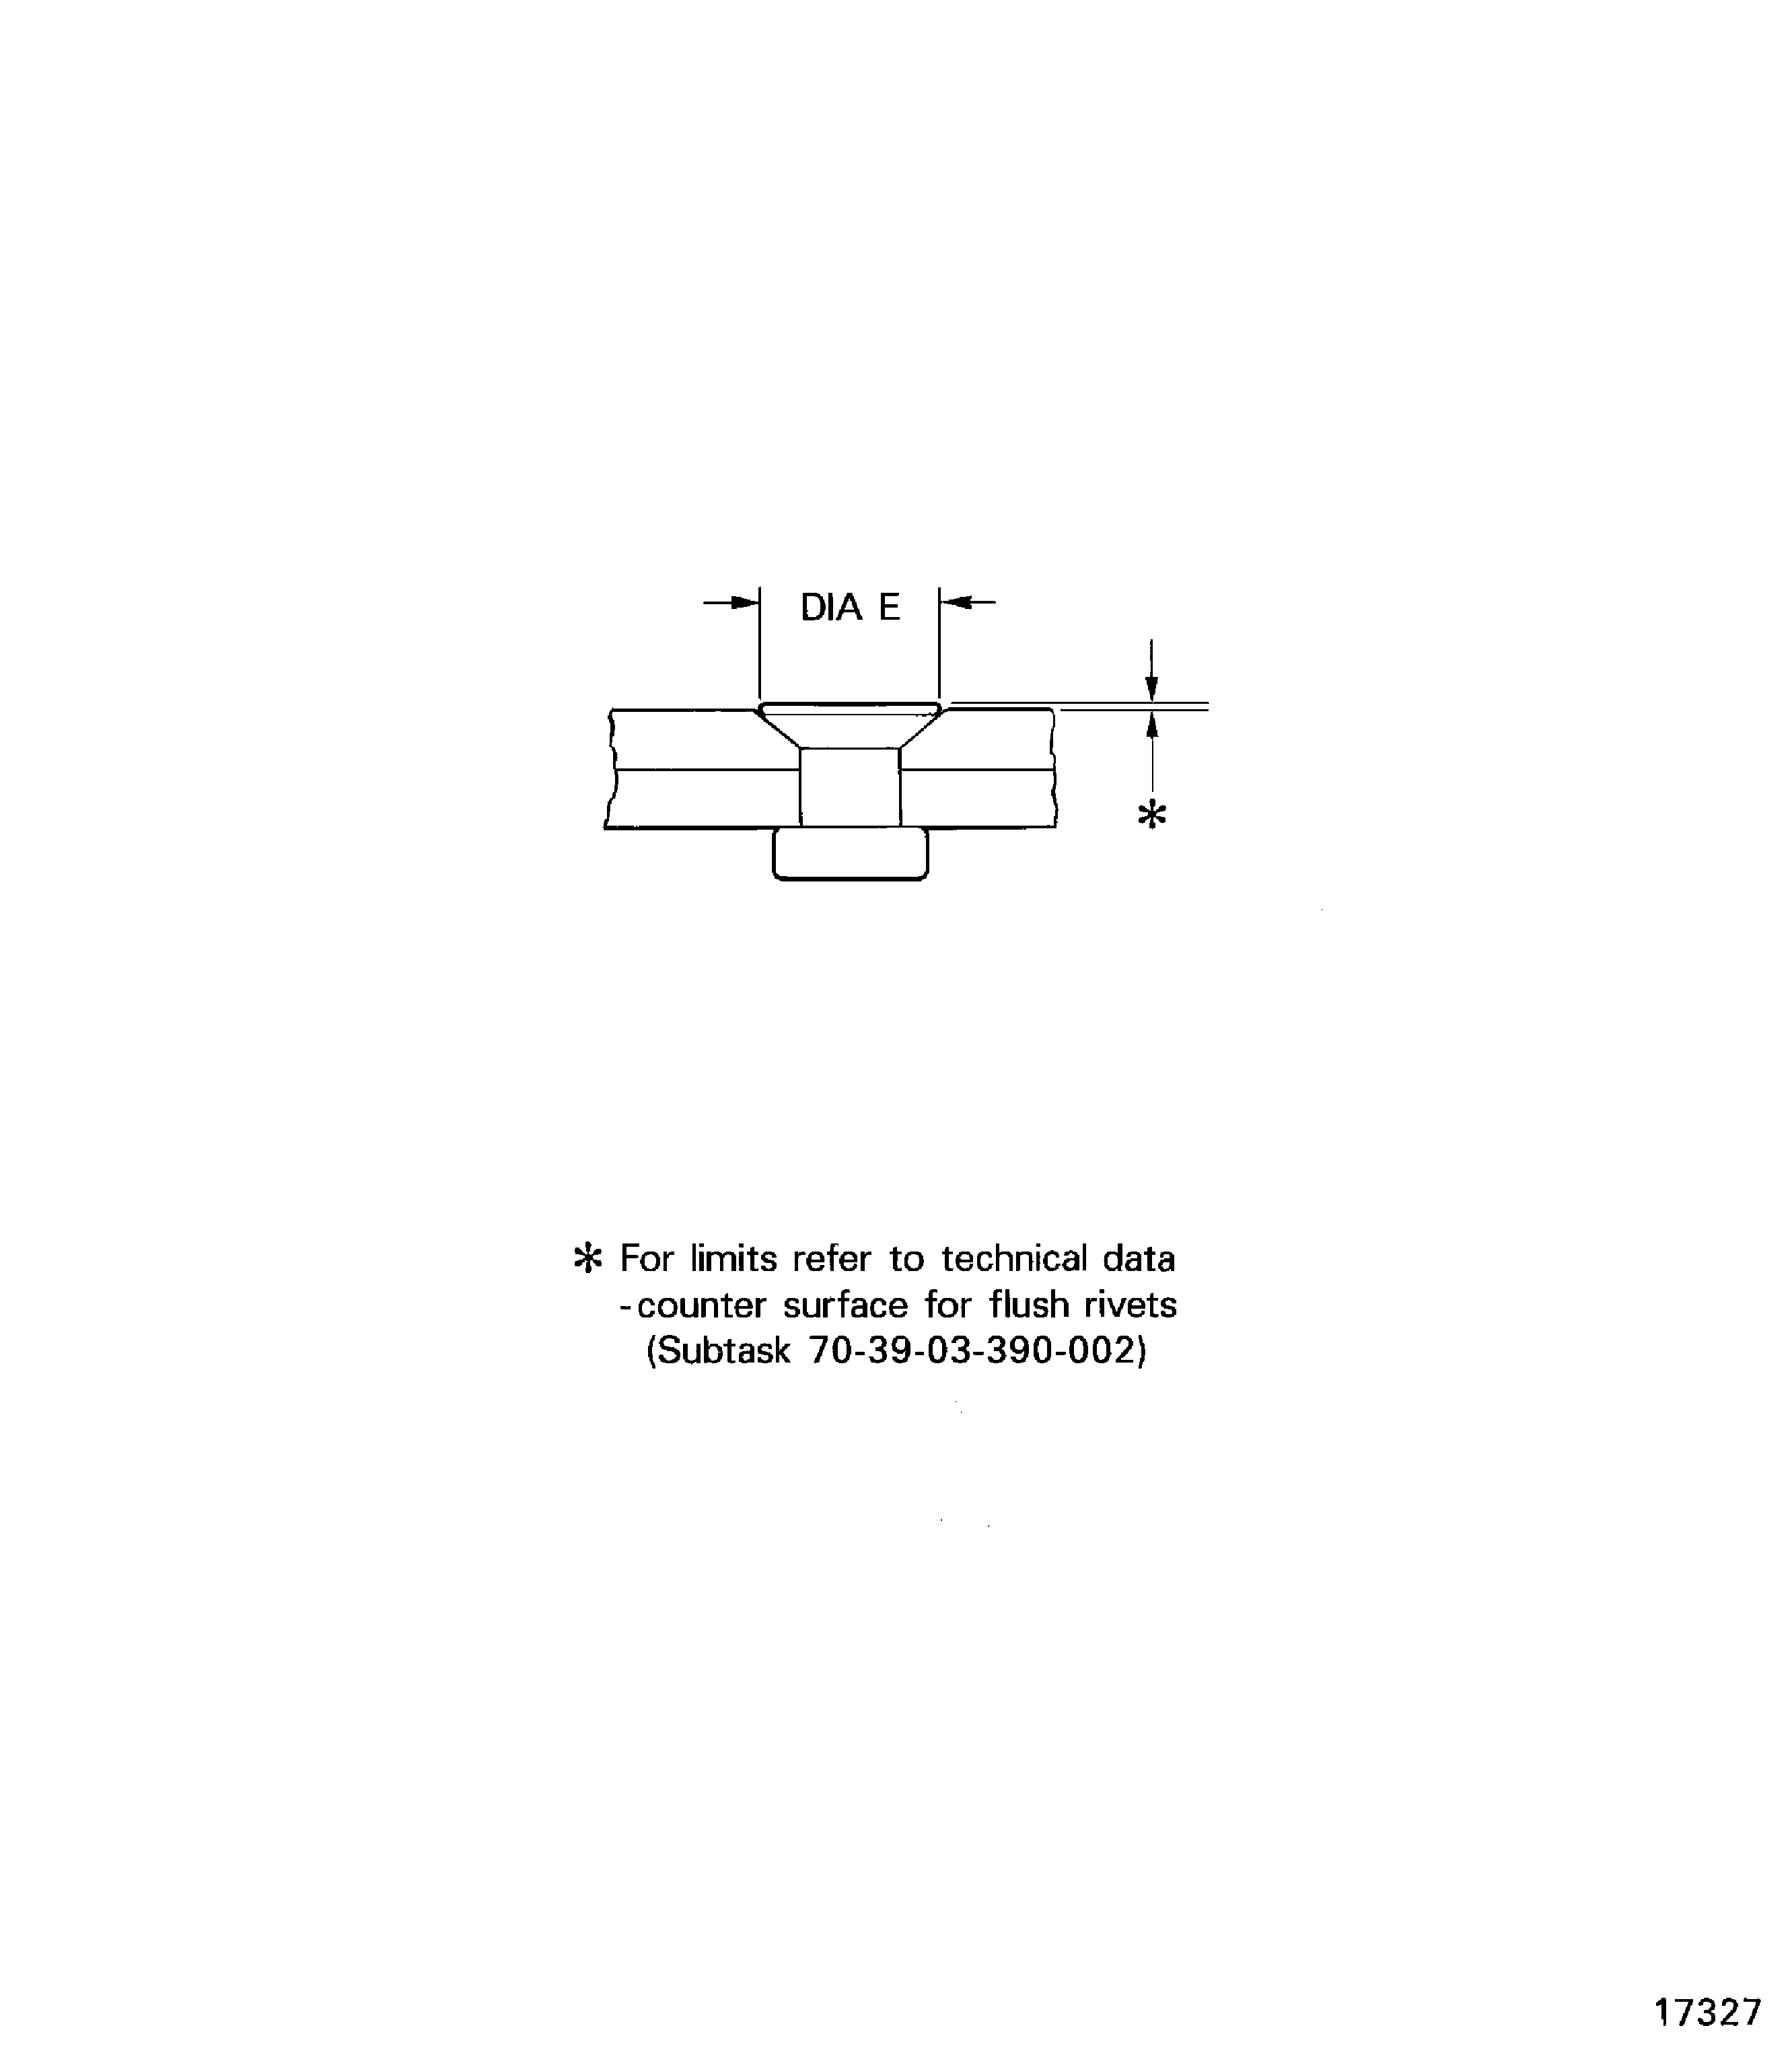
Figure: Minimum head diameter when manufactured rivet head is shaved
Minimum head diameter when manufactured rivet head is shaved
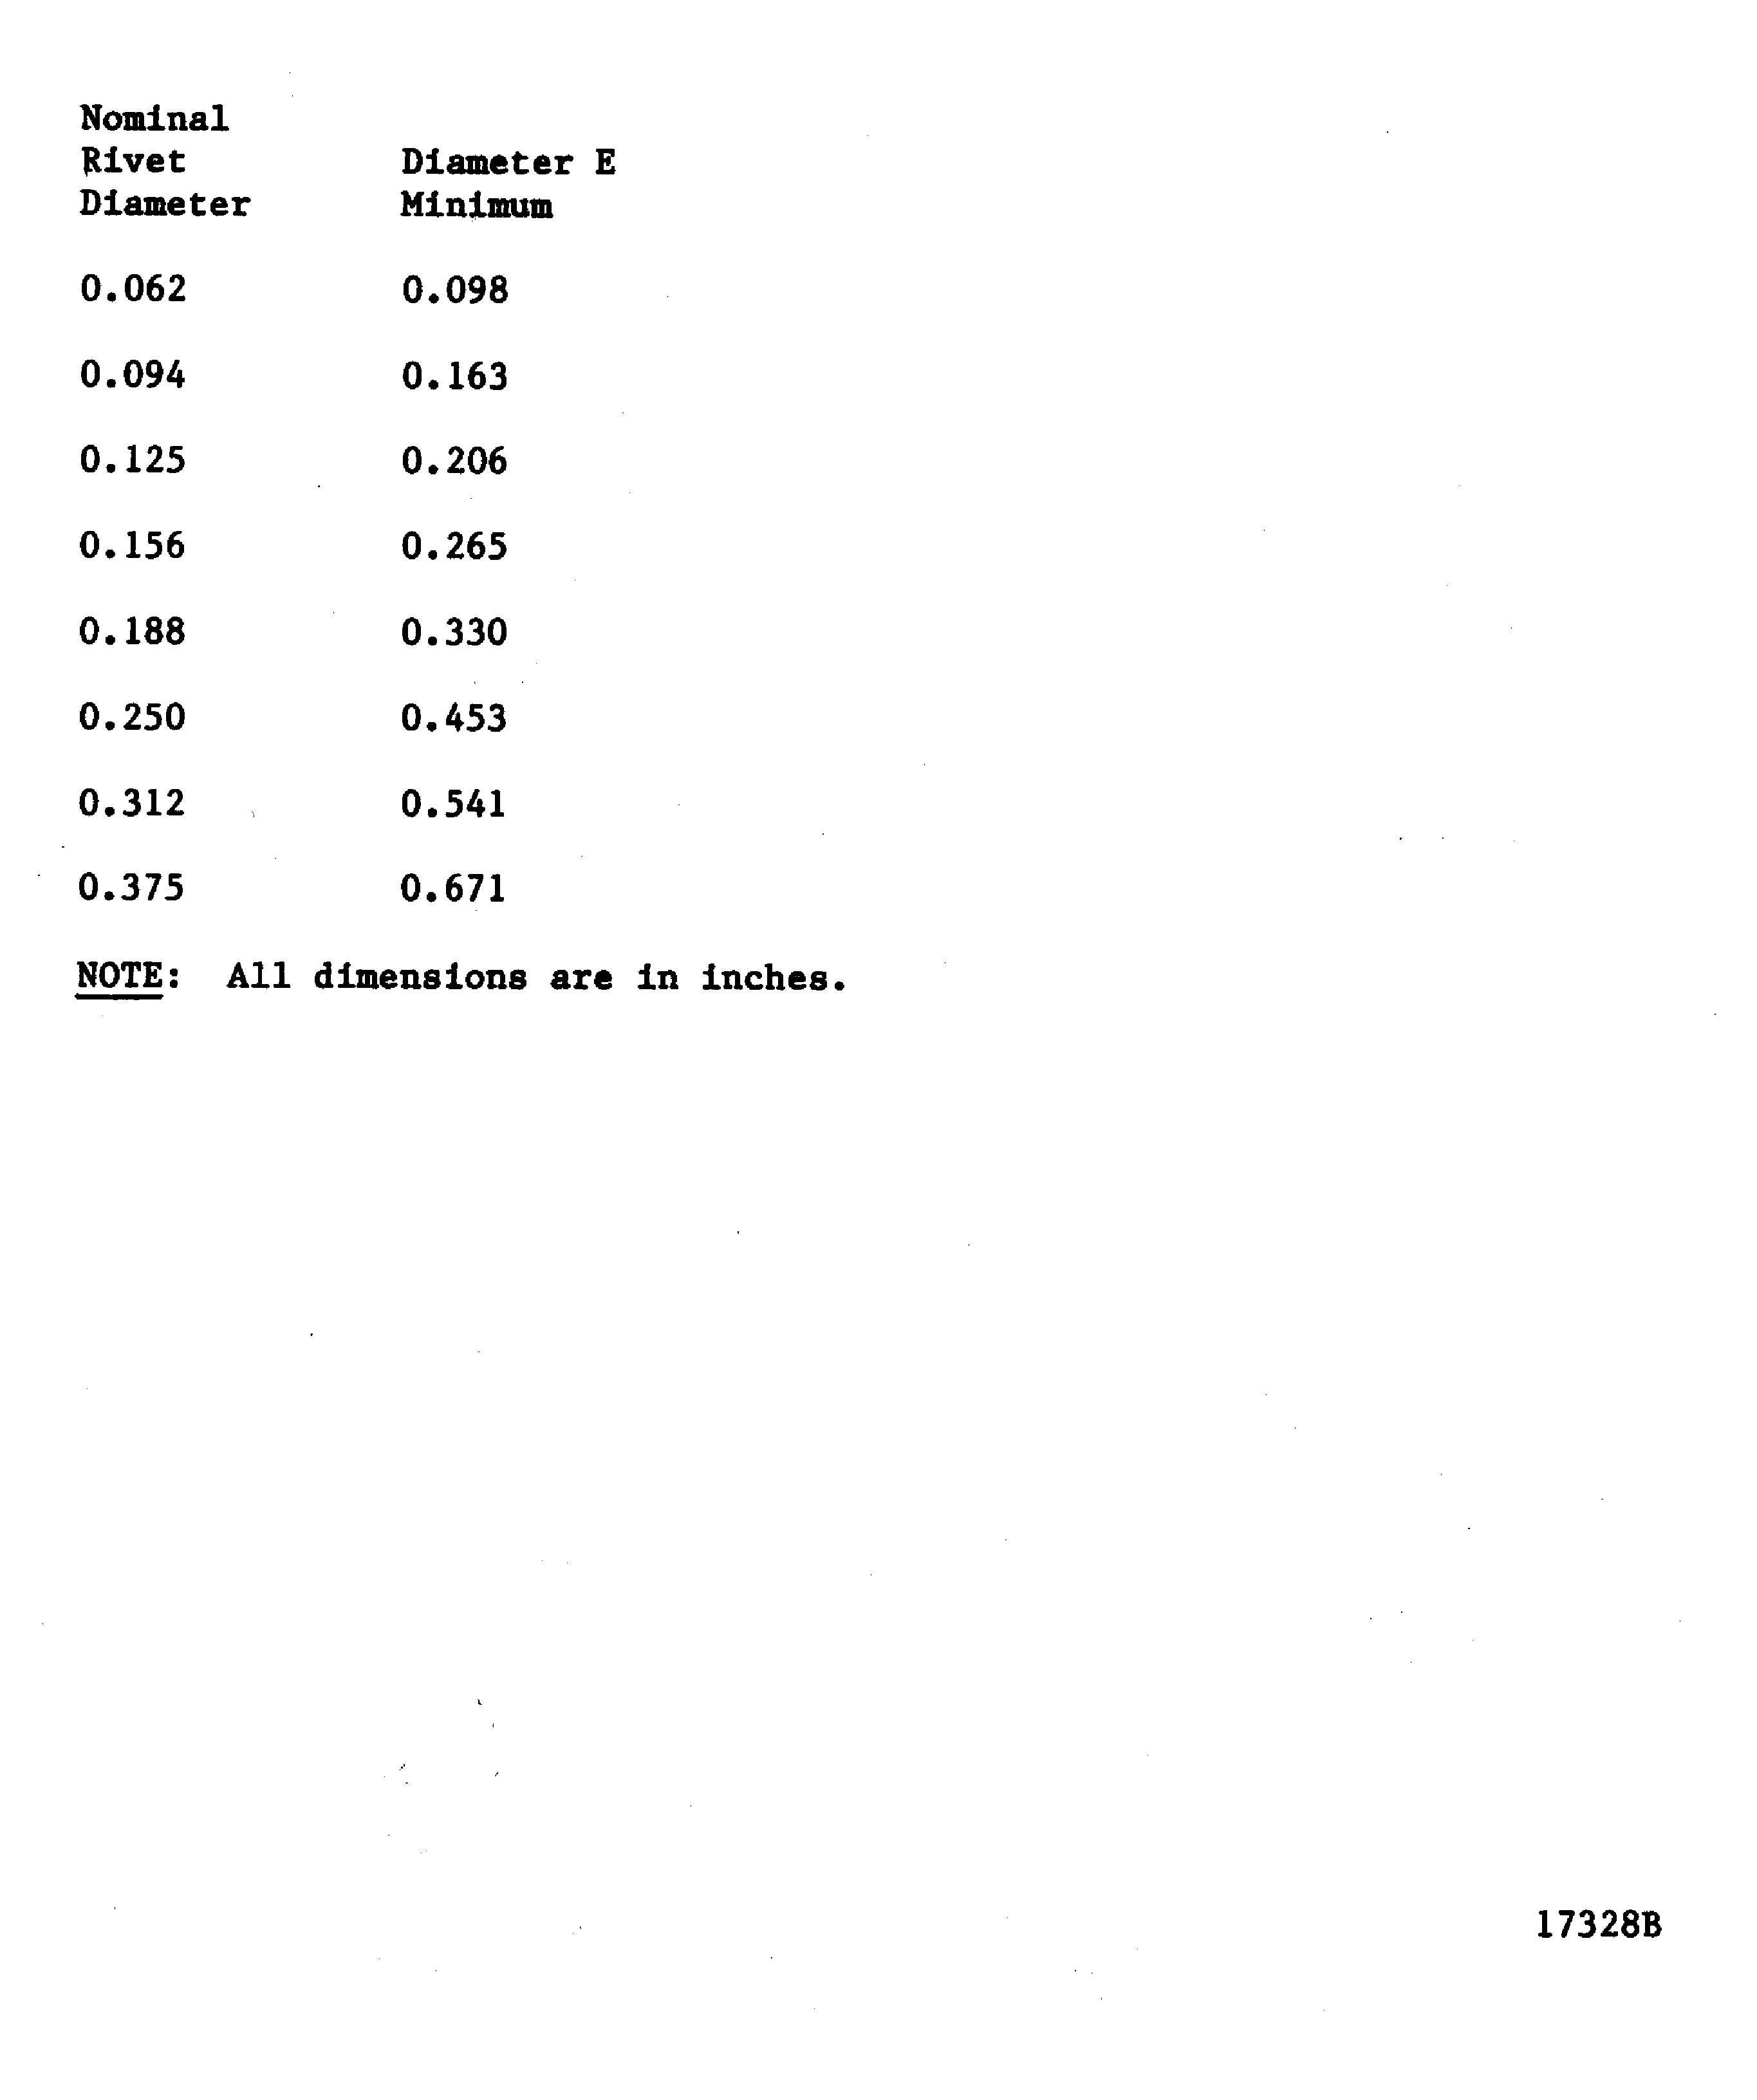
Figure: Protruding head rivet
Protruding head rivet
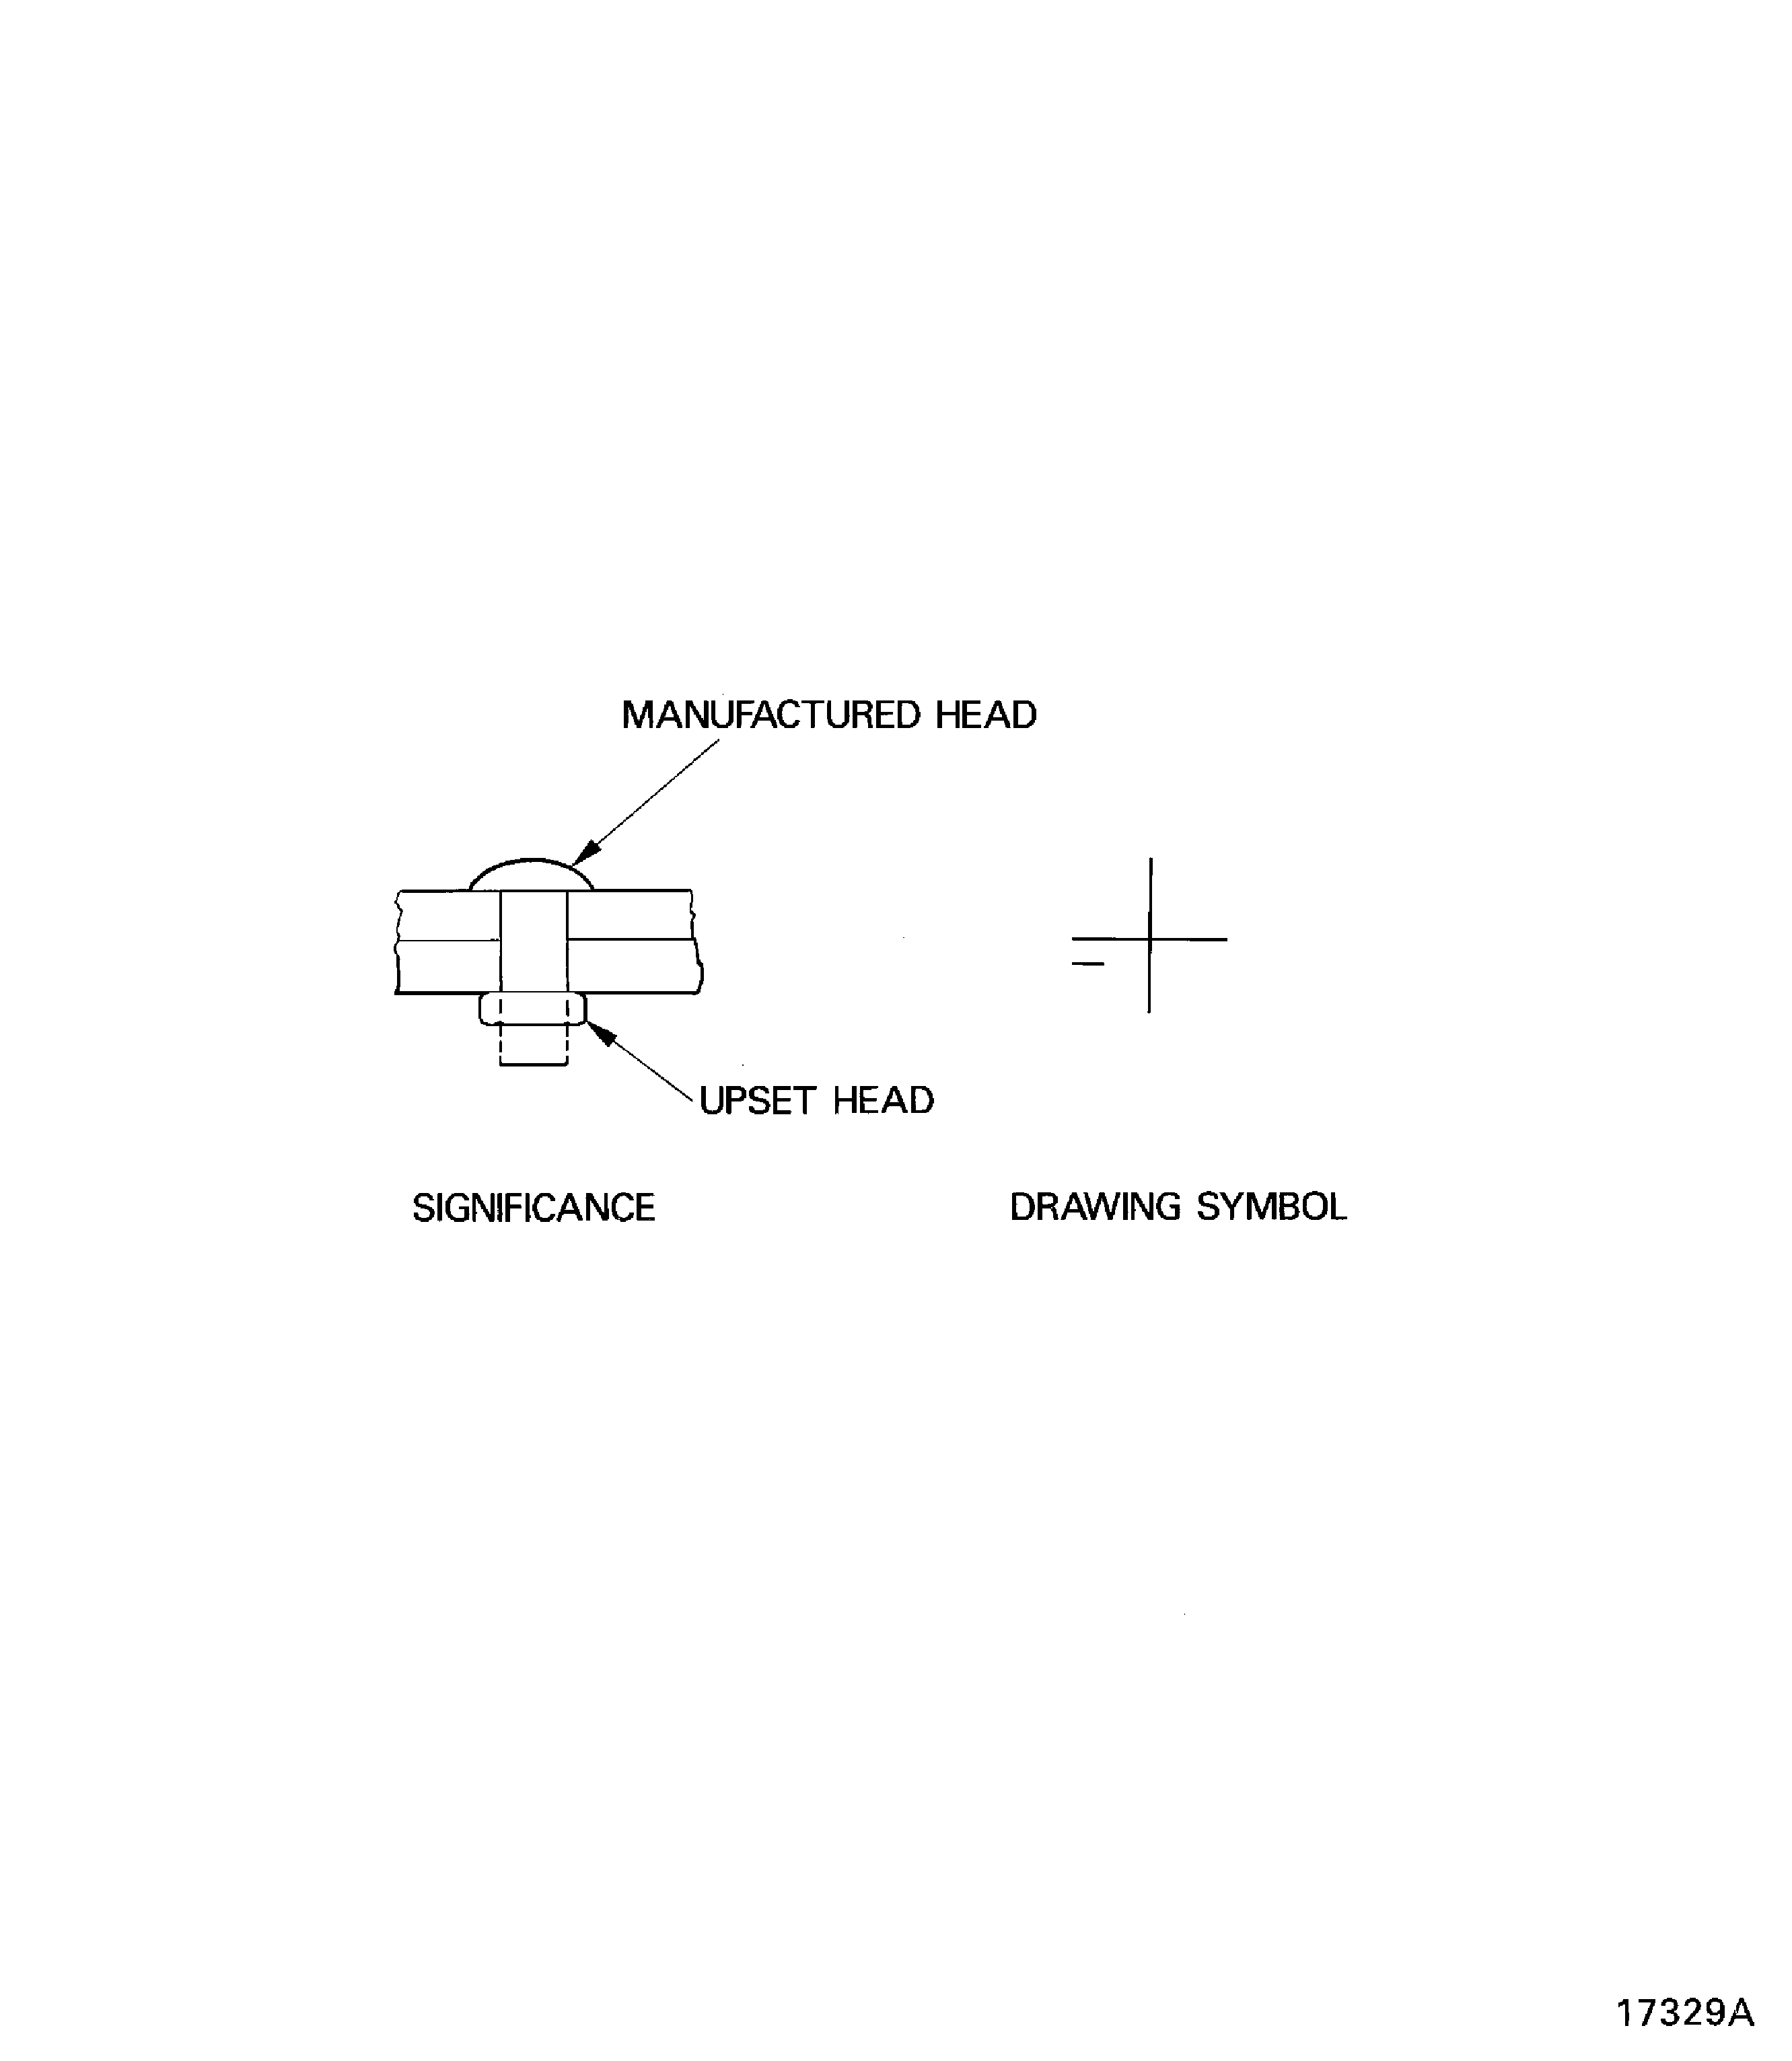
Figure: Minimum edge distances and distance between rivets for the inspection of drilled assemblies
Minimum edge distances and distance between rivets for the inspection of drilled assemblies
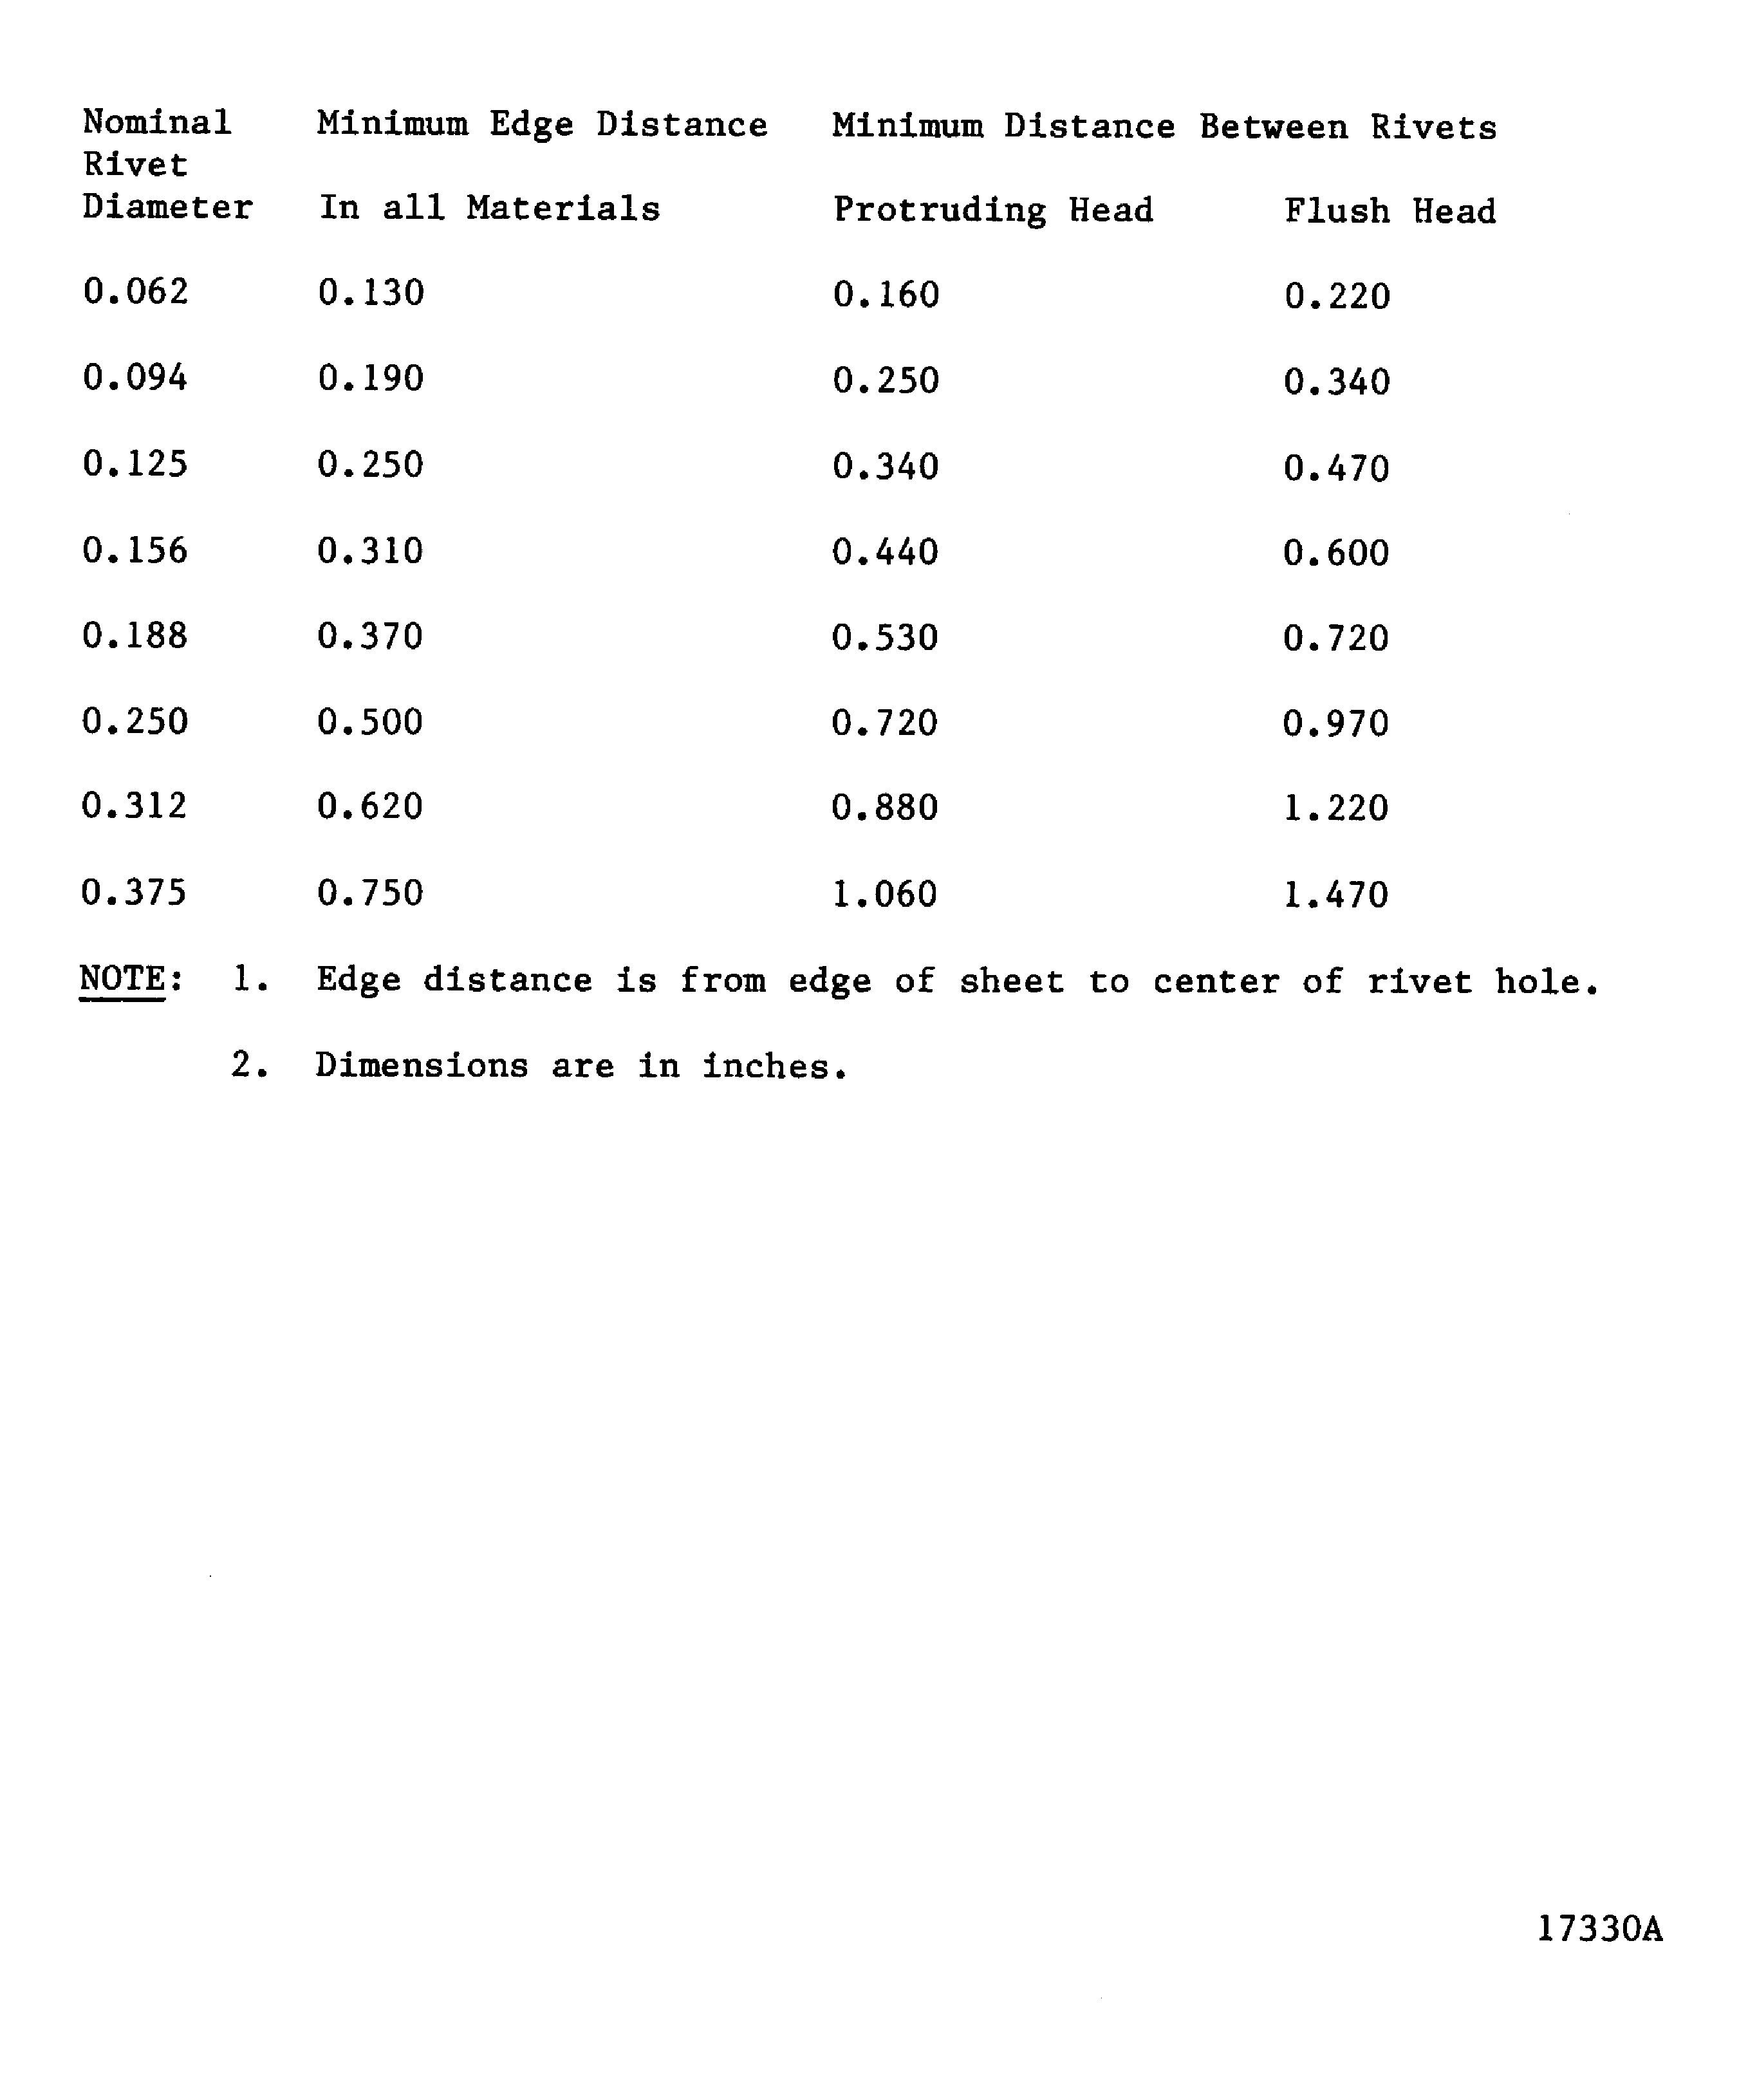
Figure: Nominal faying surface clearance
Nominal faying surface clearance
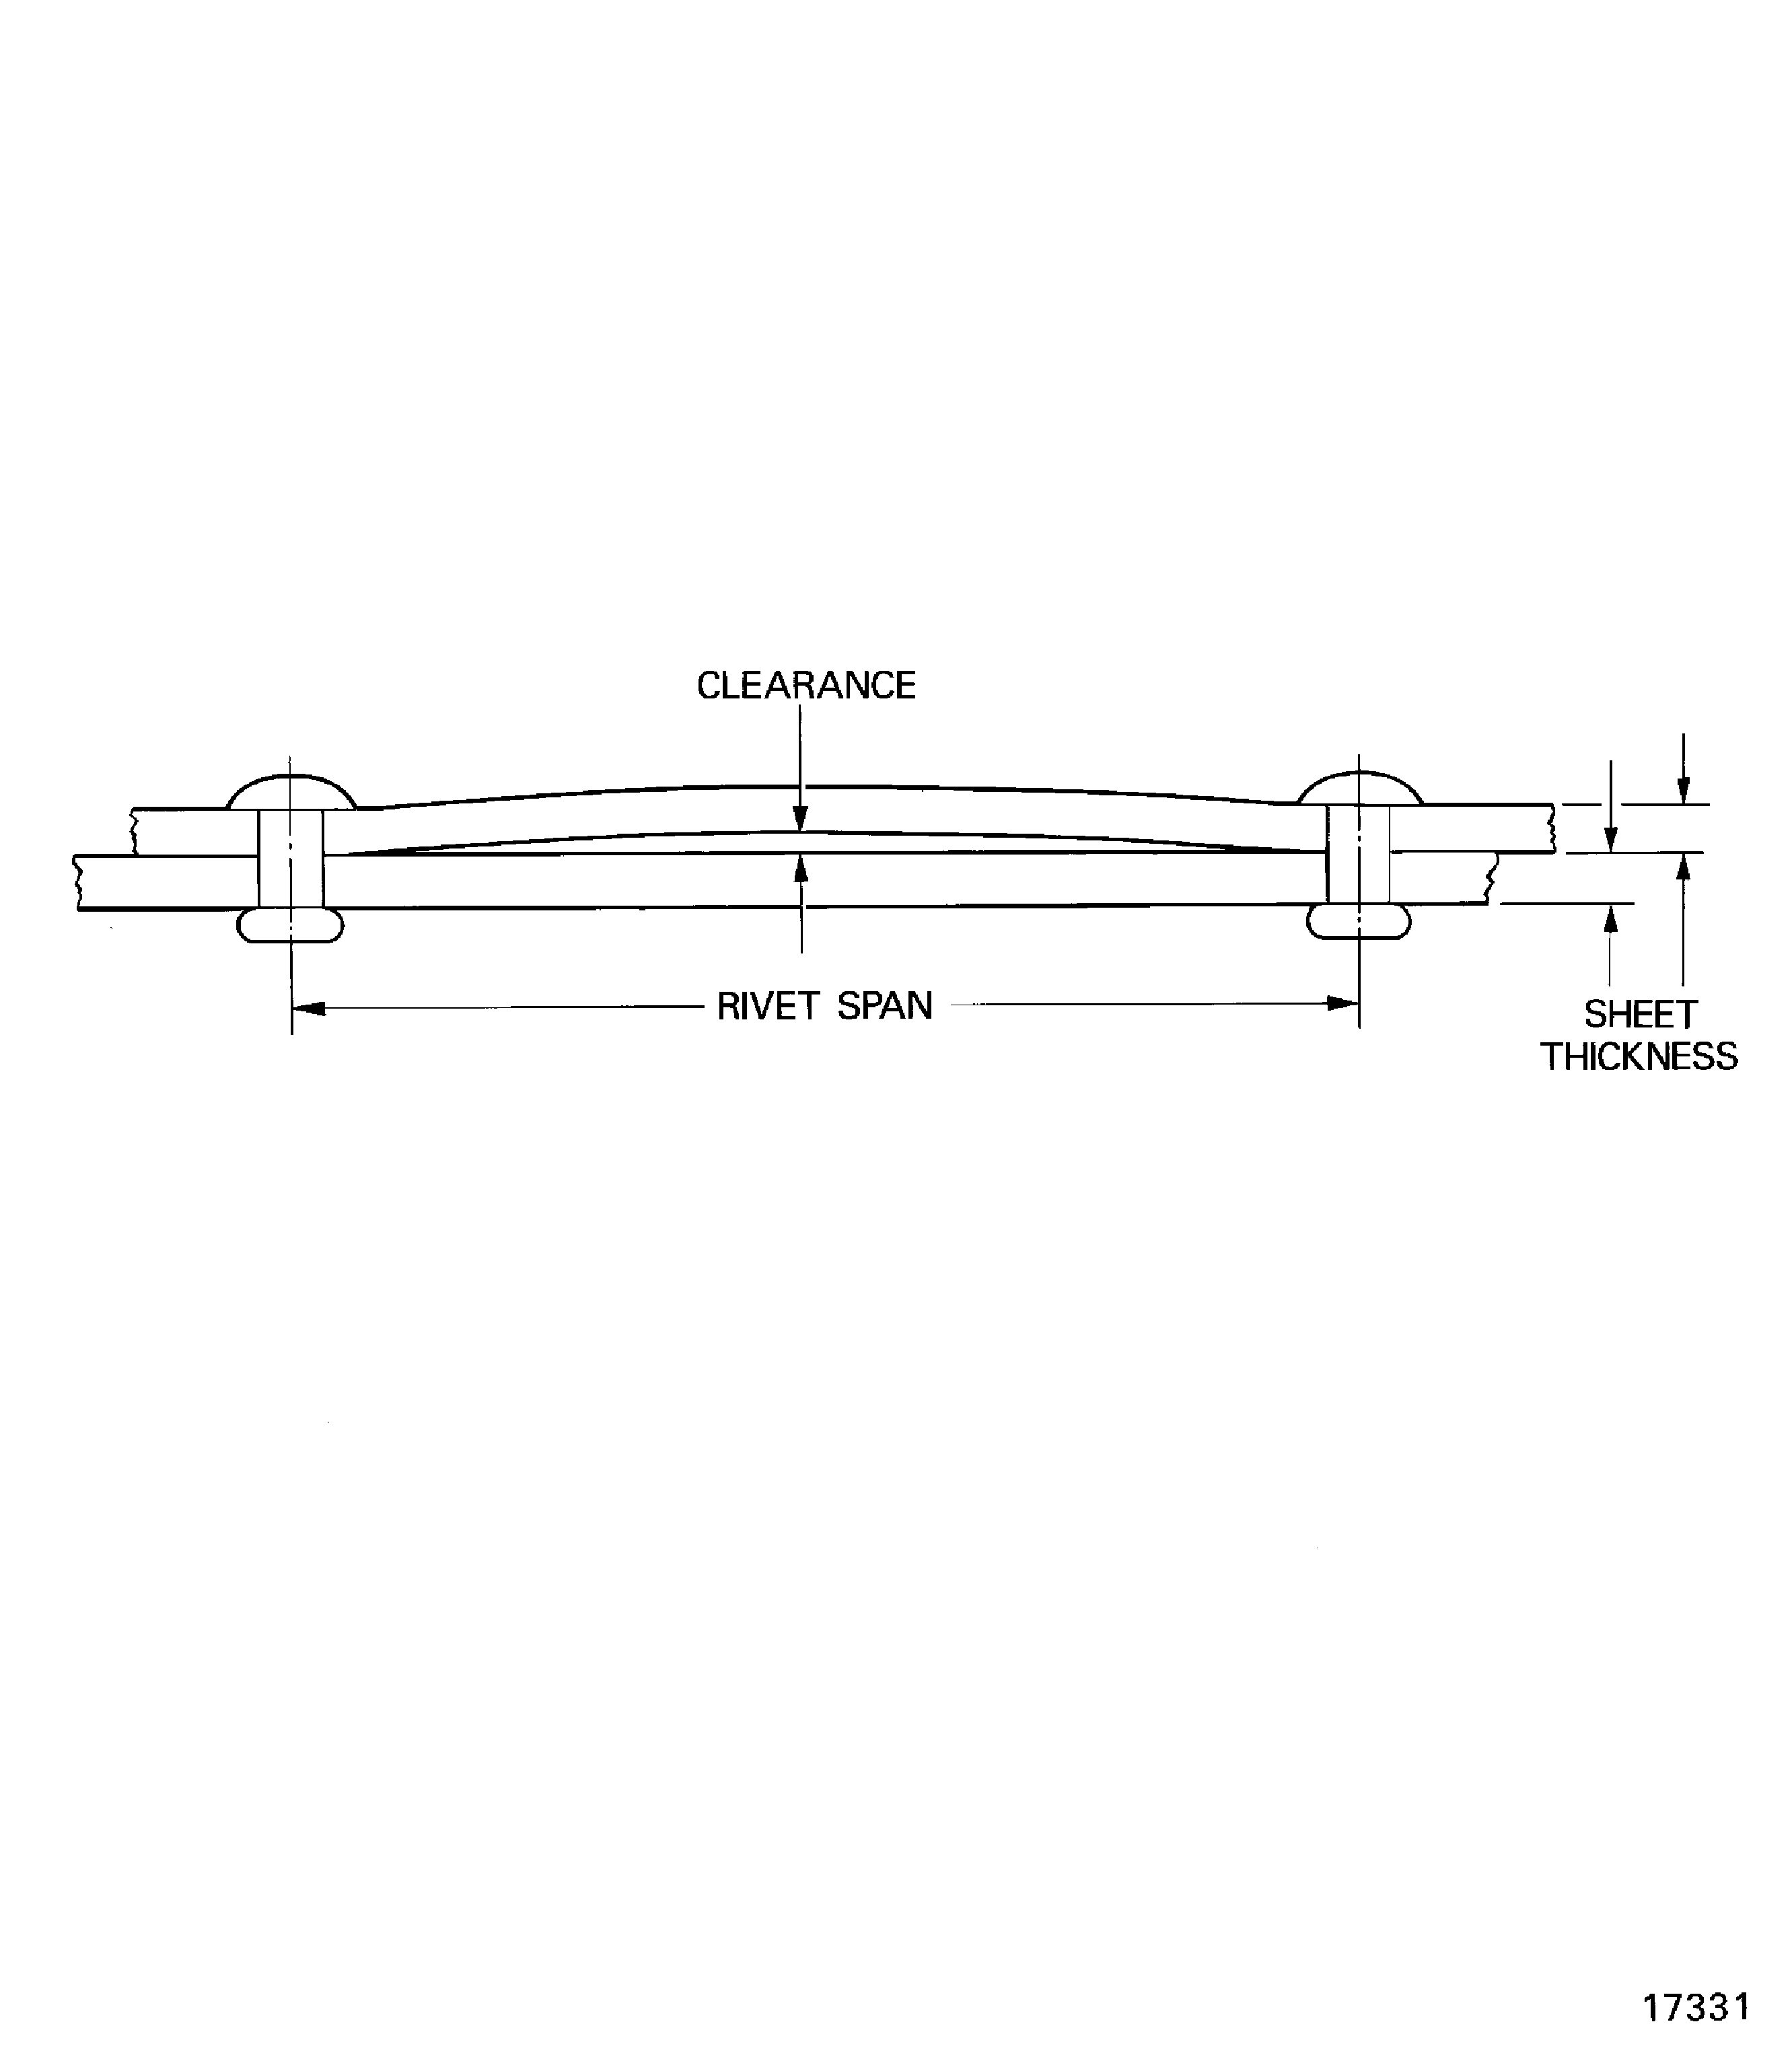
Figure: Examples of riveted anchor nut plates
Examples of riveted anchor nut plates
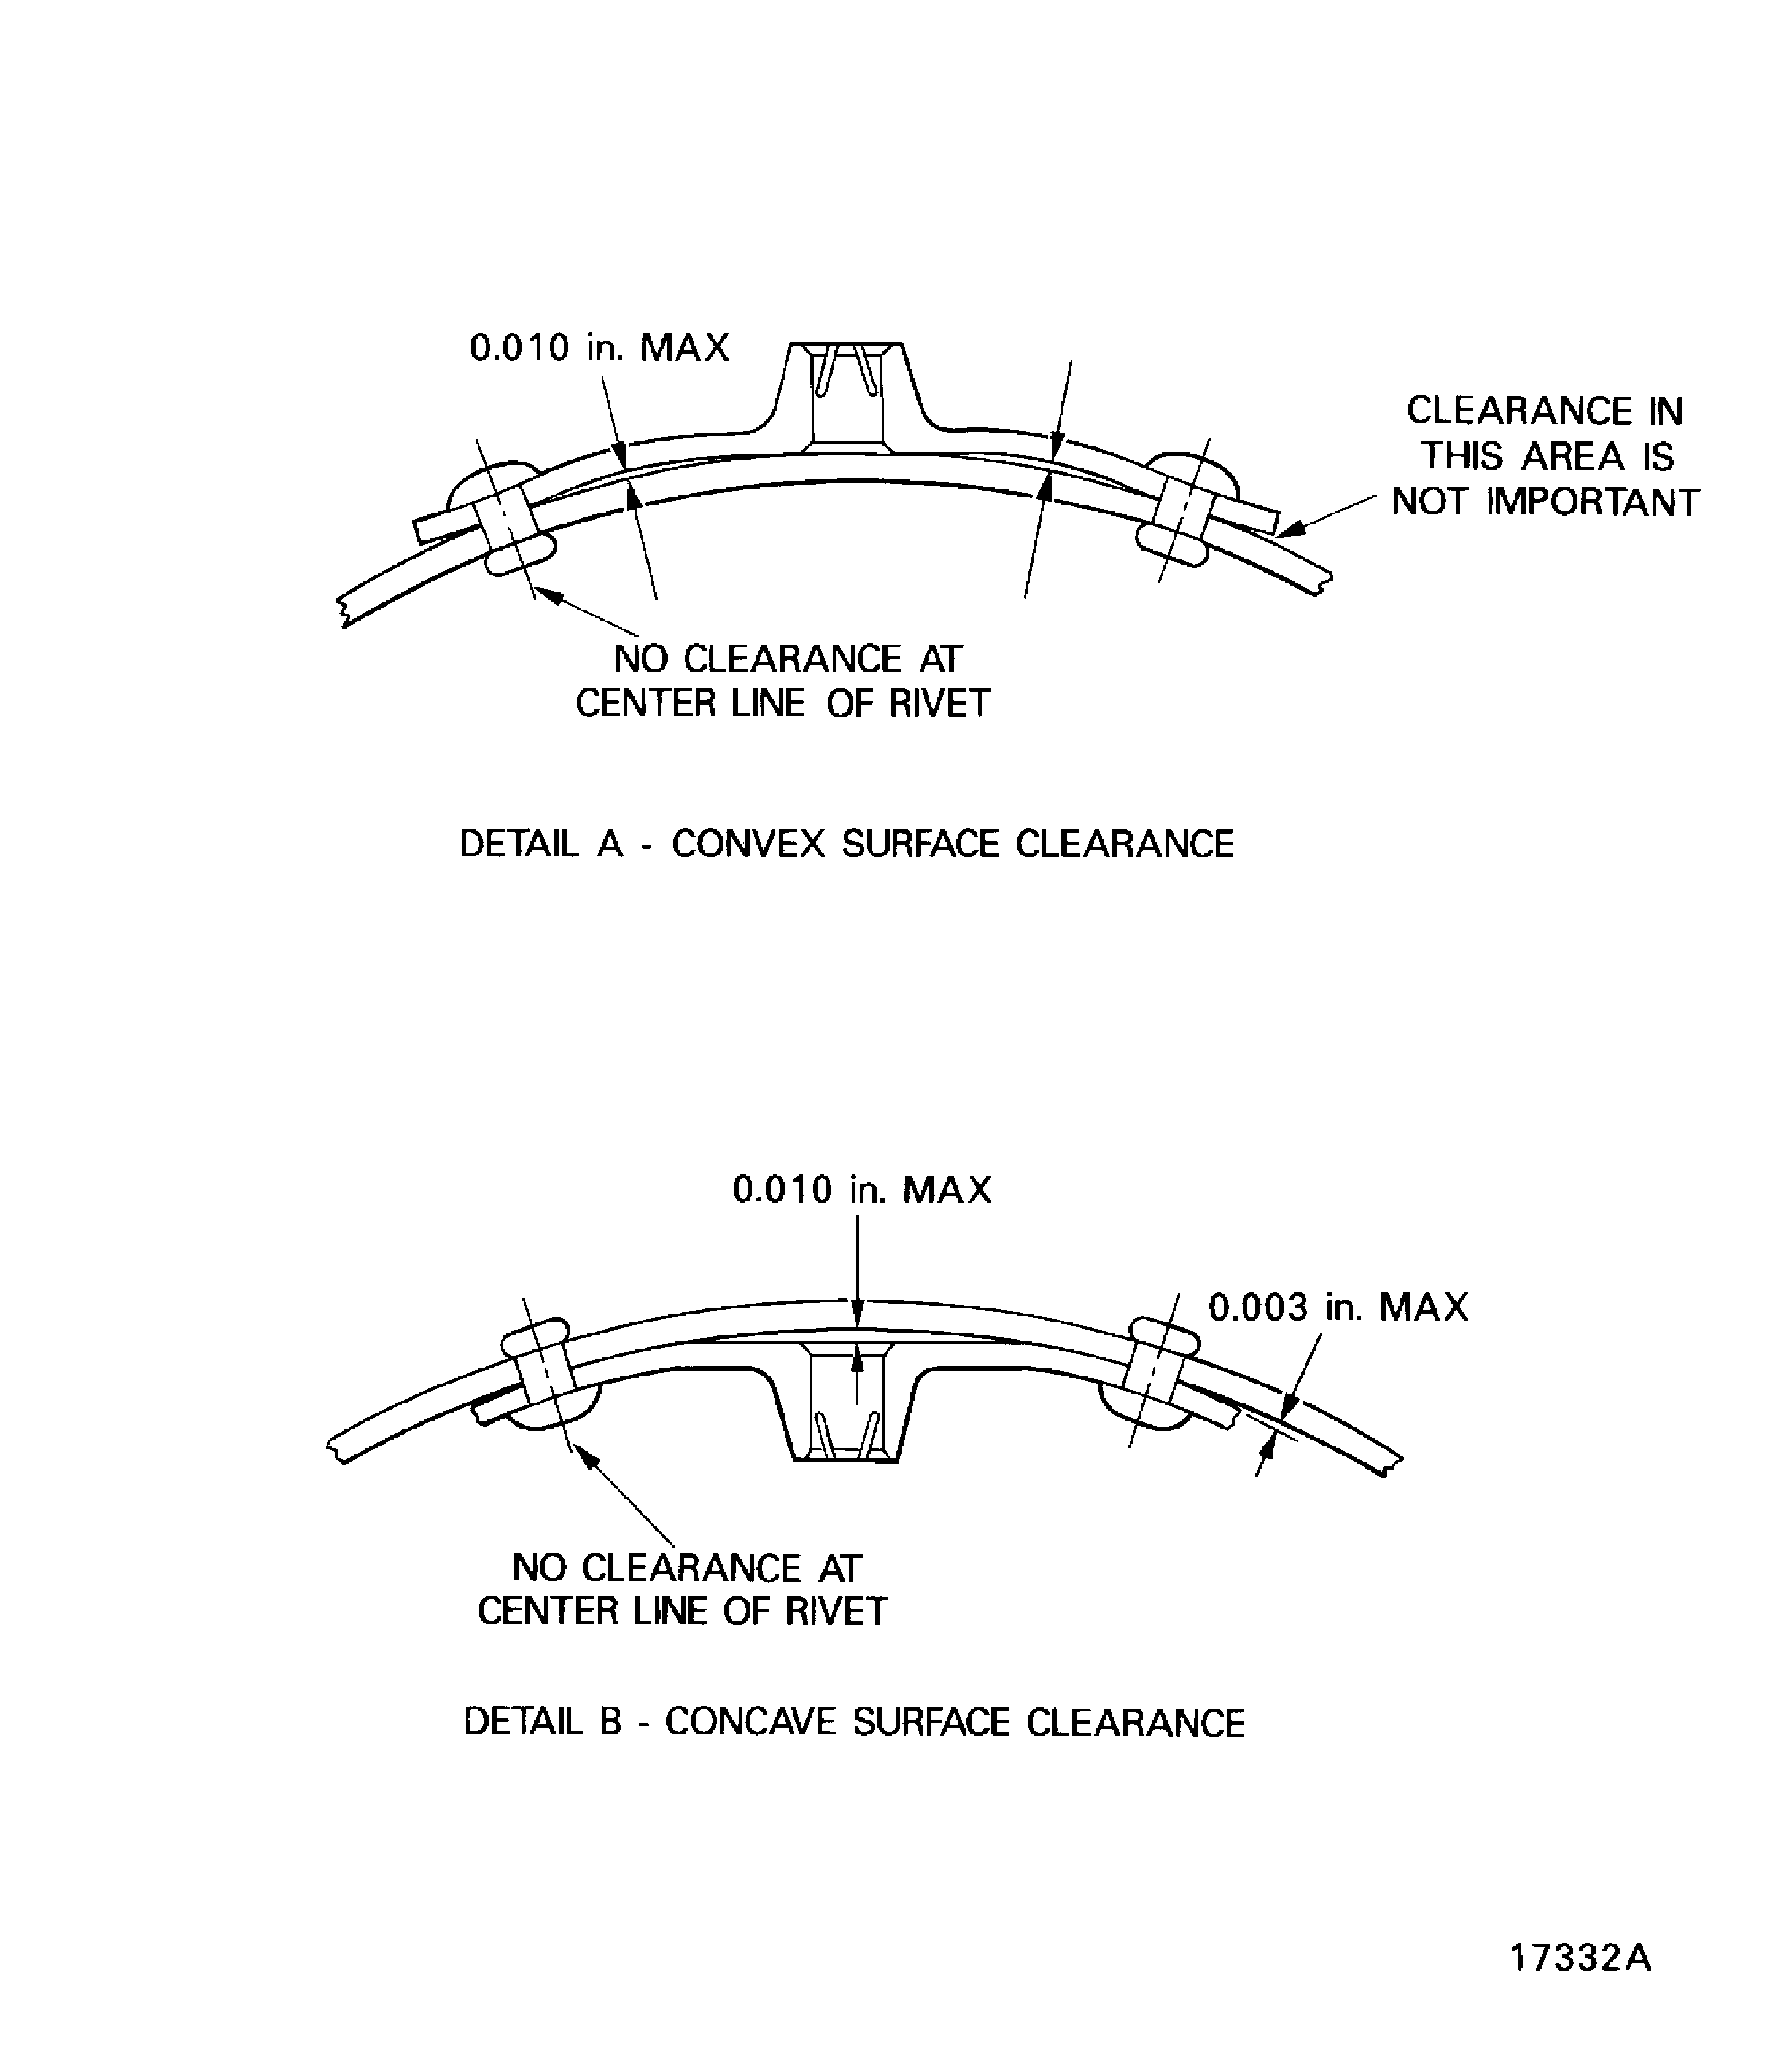
Figure: Bend-to-rivet distance
Bend-to-rivet distance
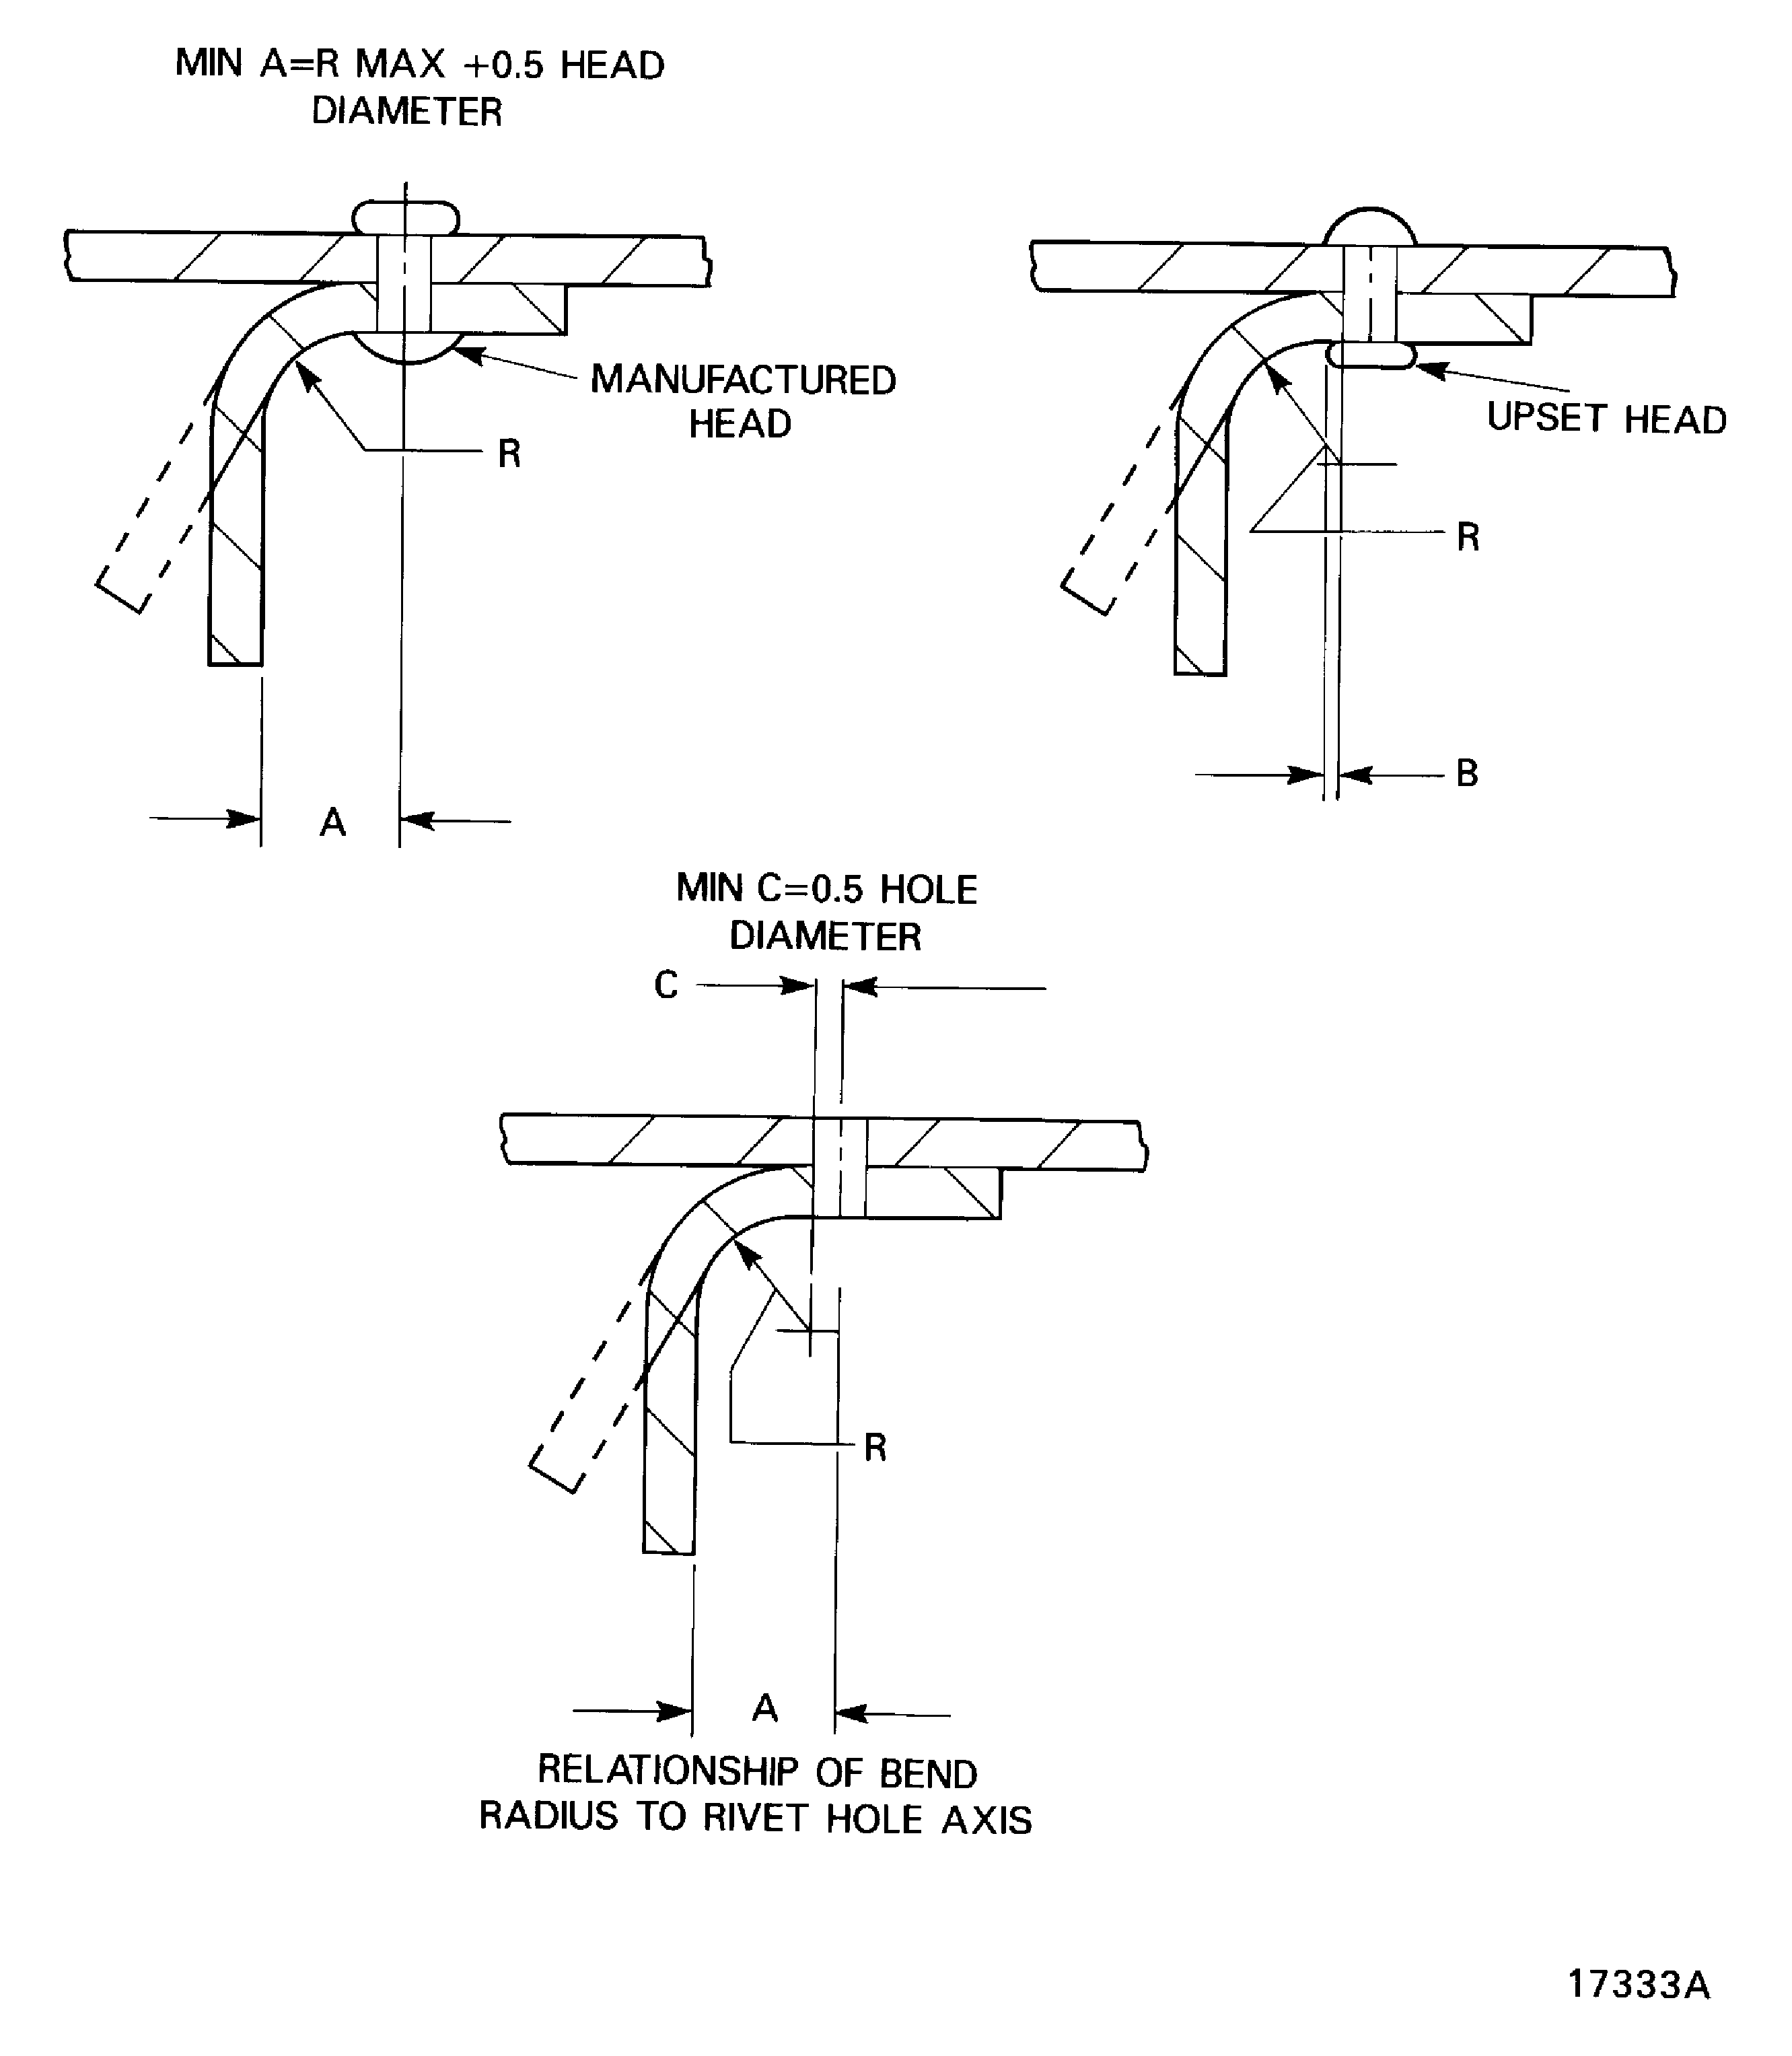
Figure: Examples of rivet symbols
Examples of rivet symbols
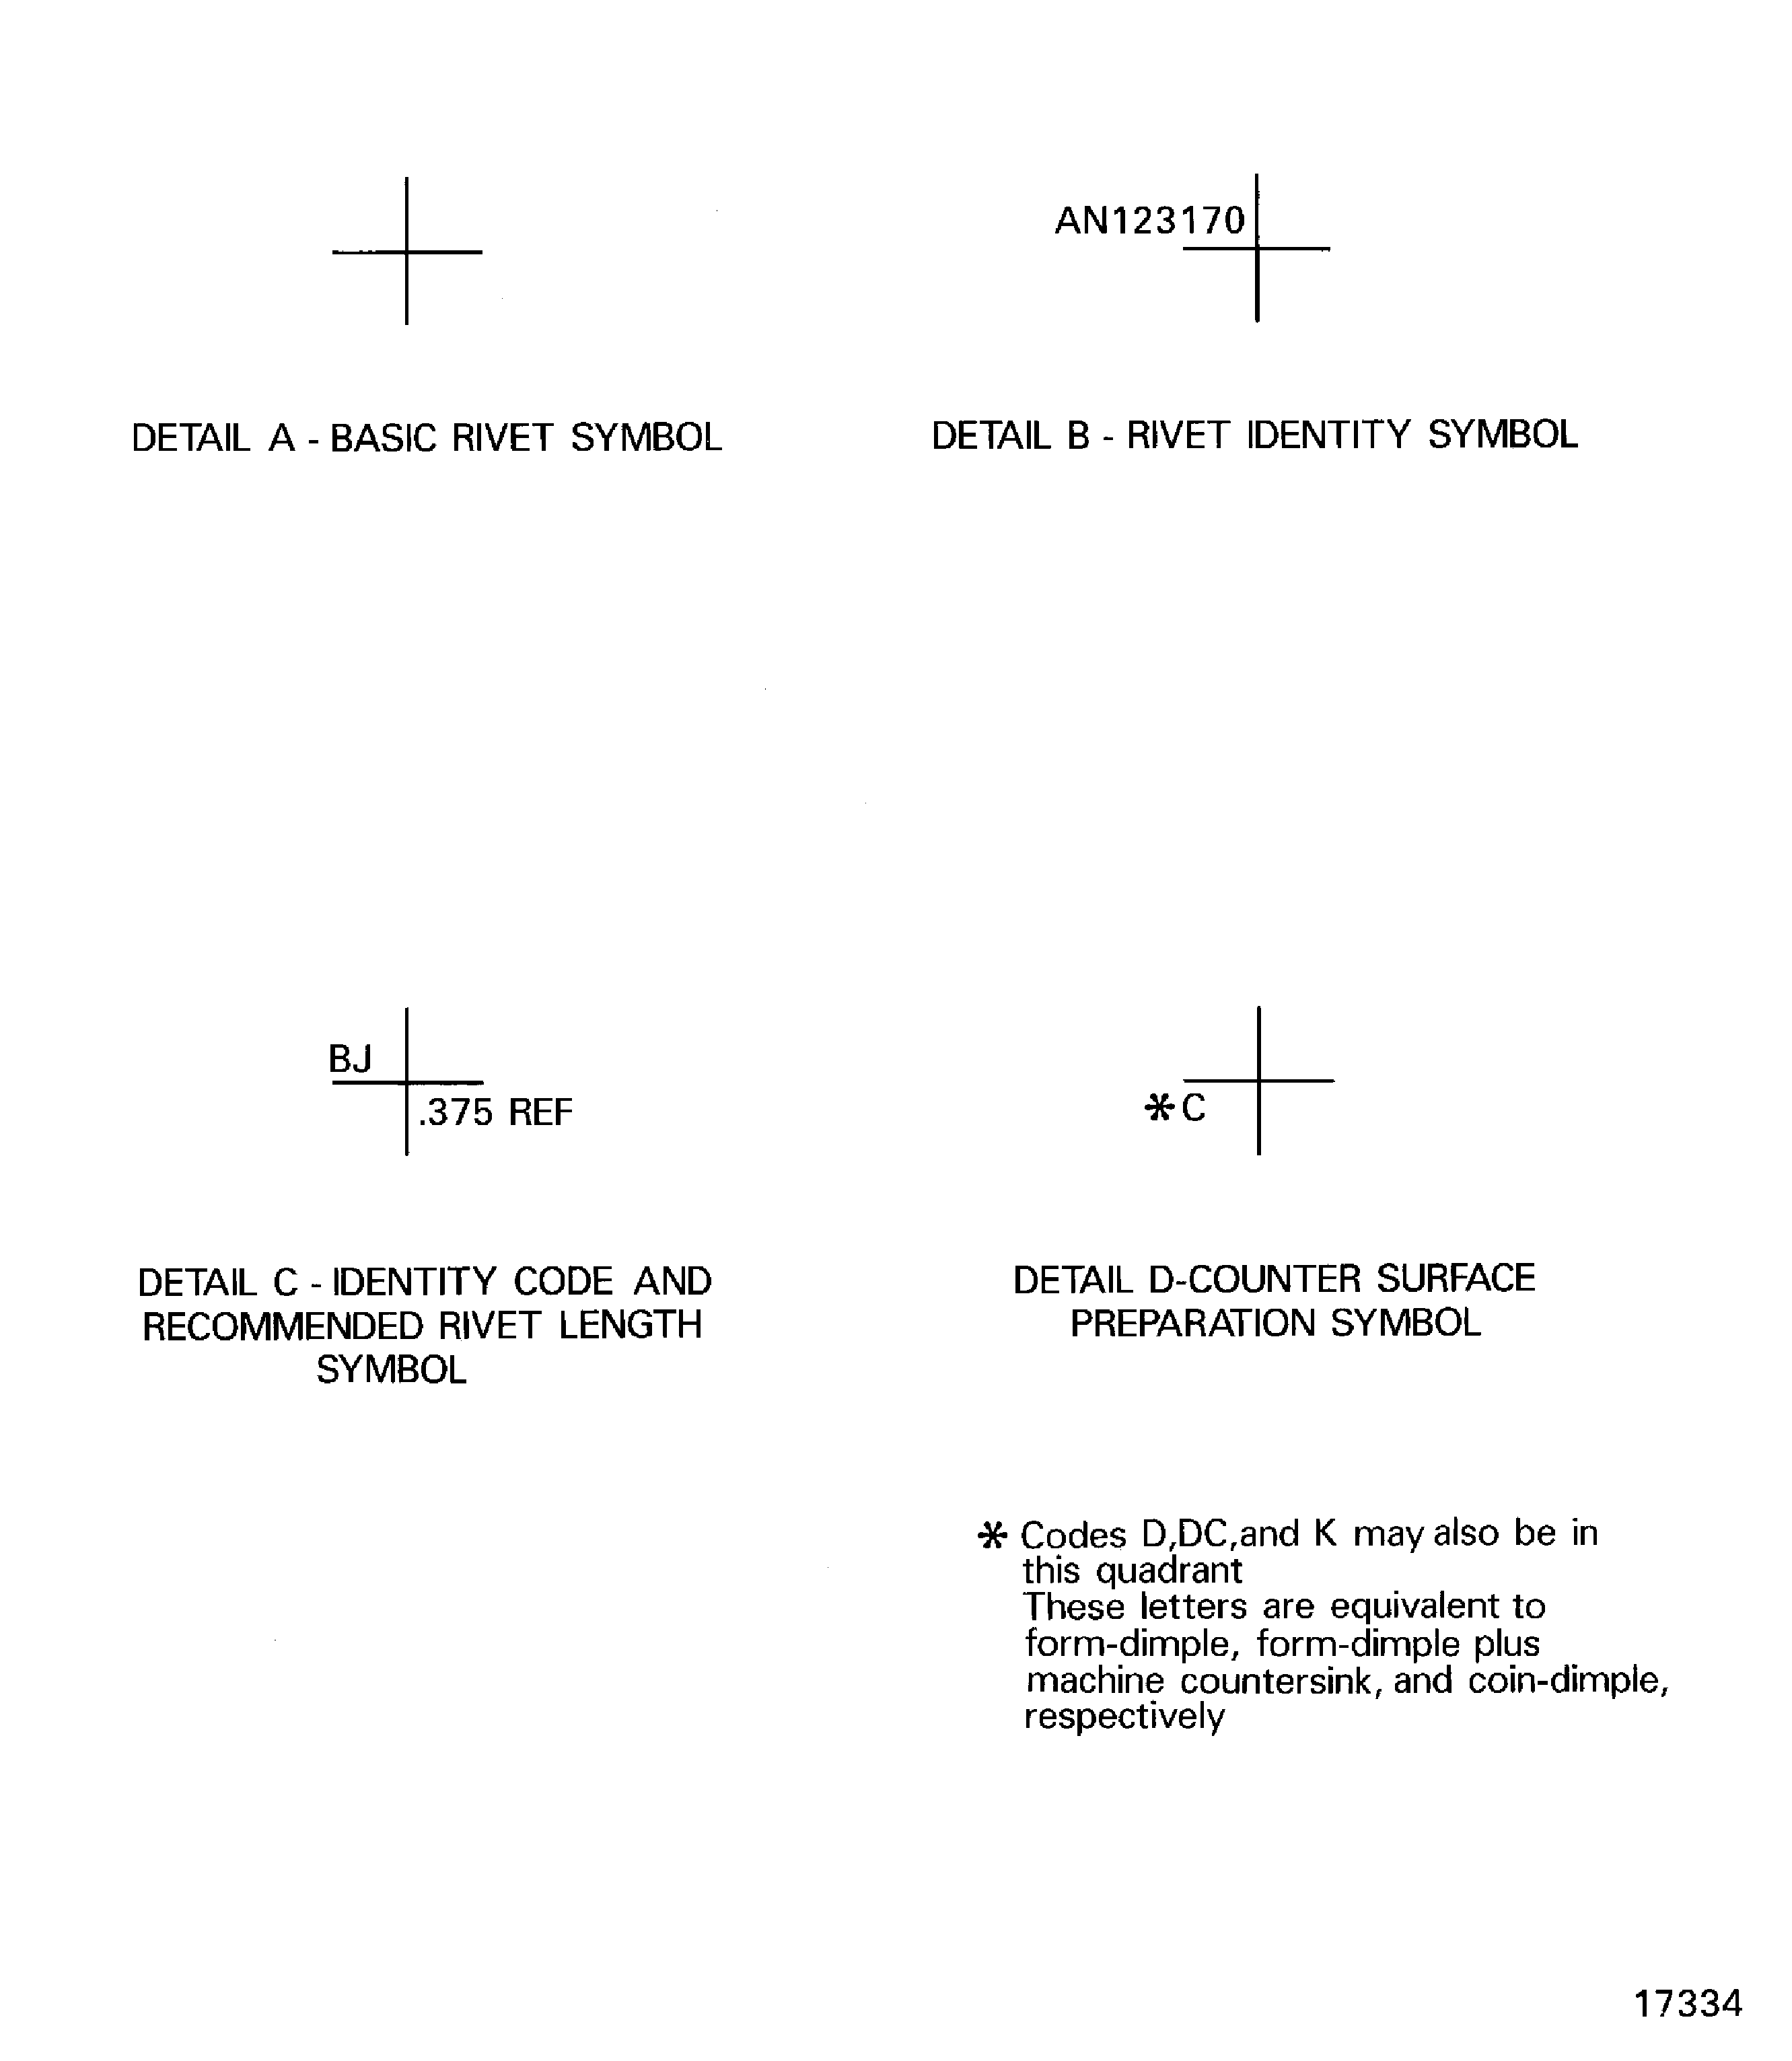
Figure: Examples of rivet symbols
Examples of rivet symbols
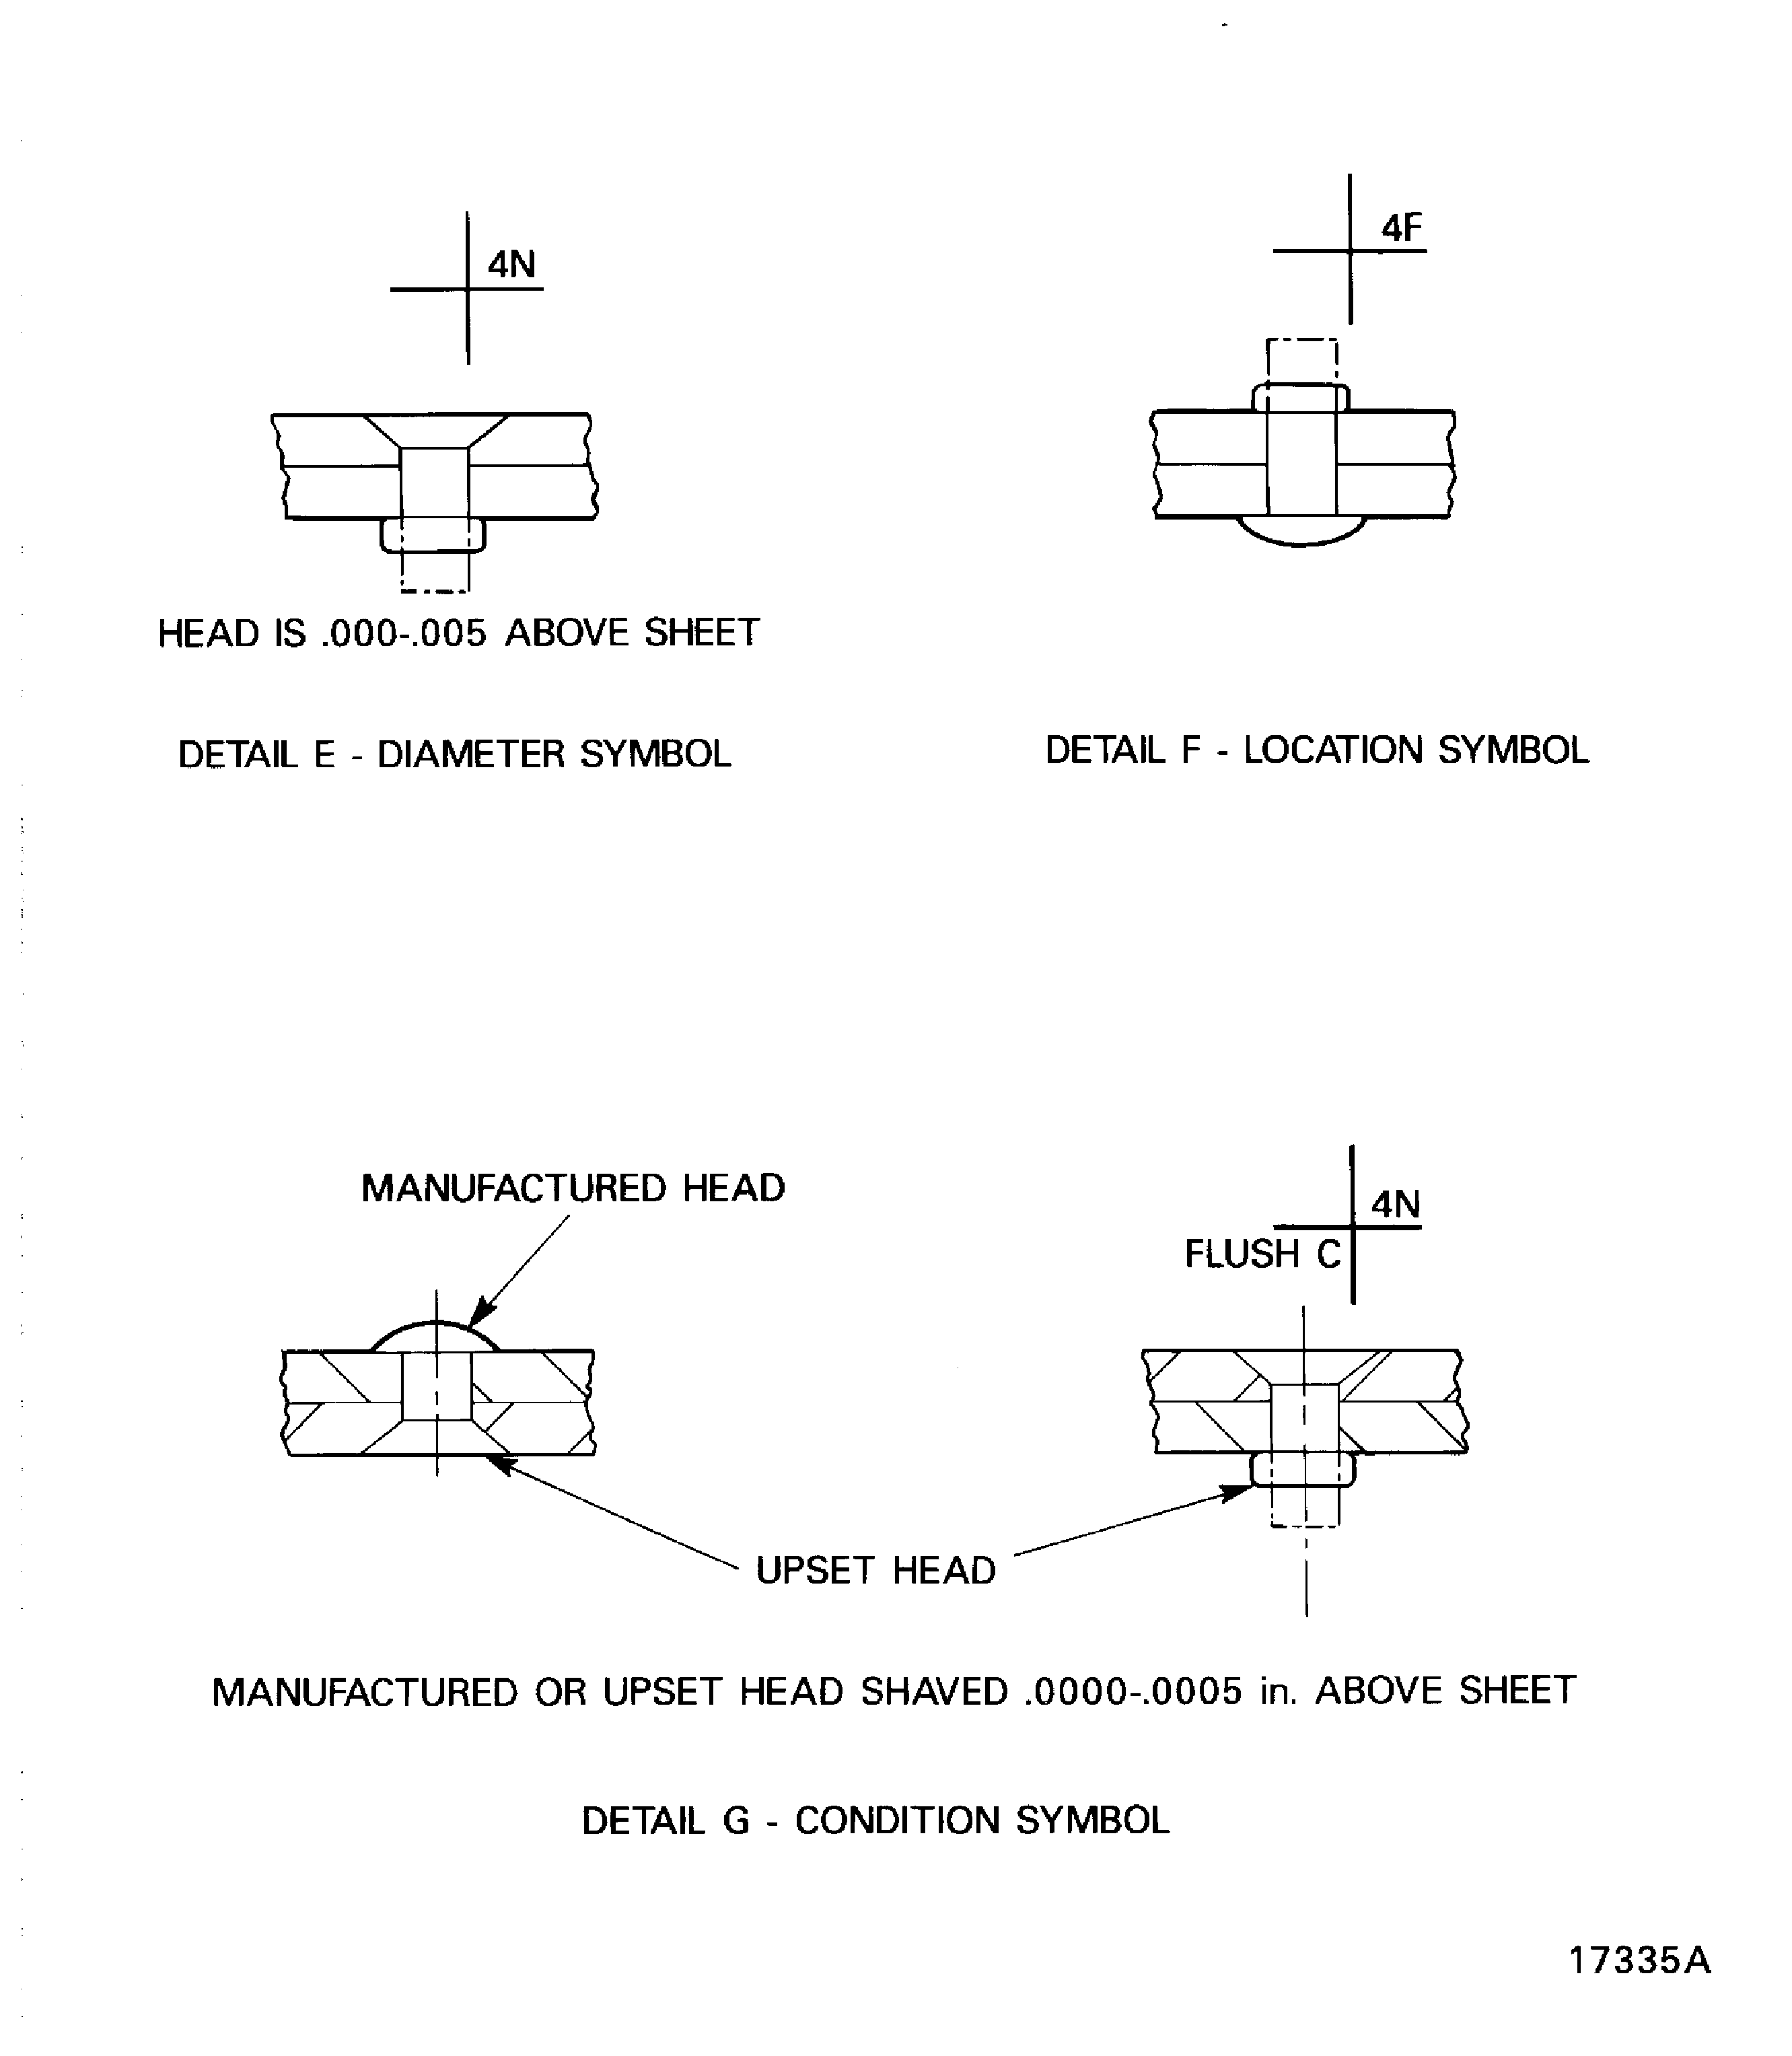
Figure: Examples of rivet symbols
Examples of rivet symbols
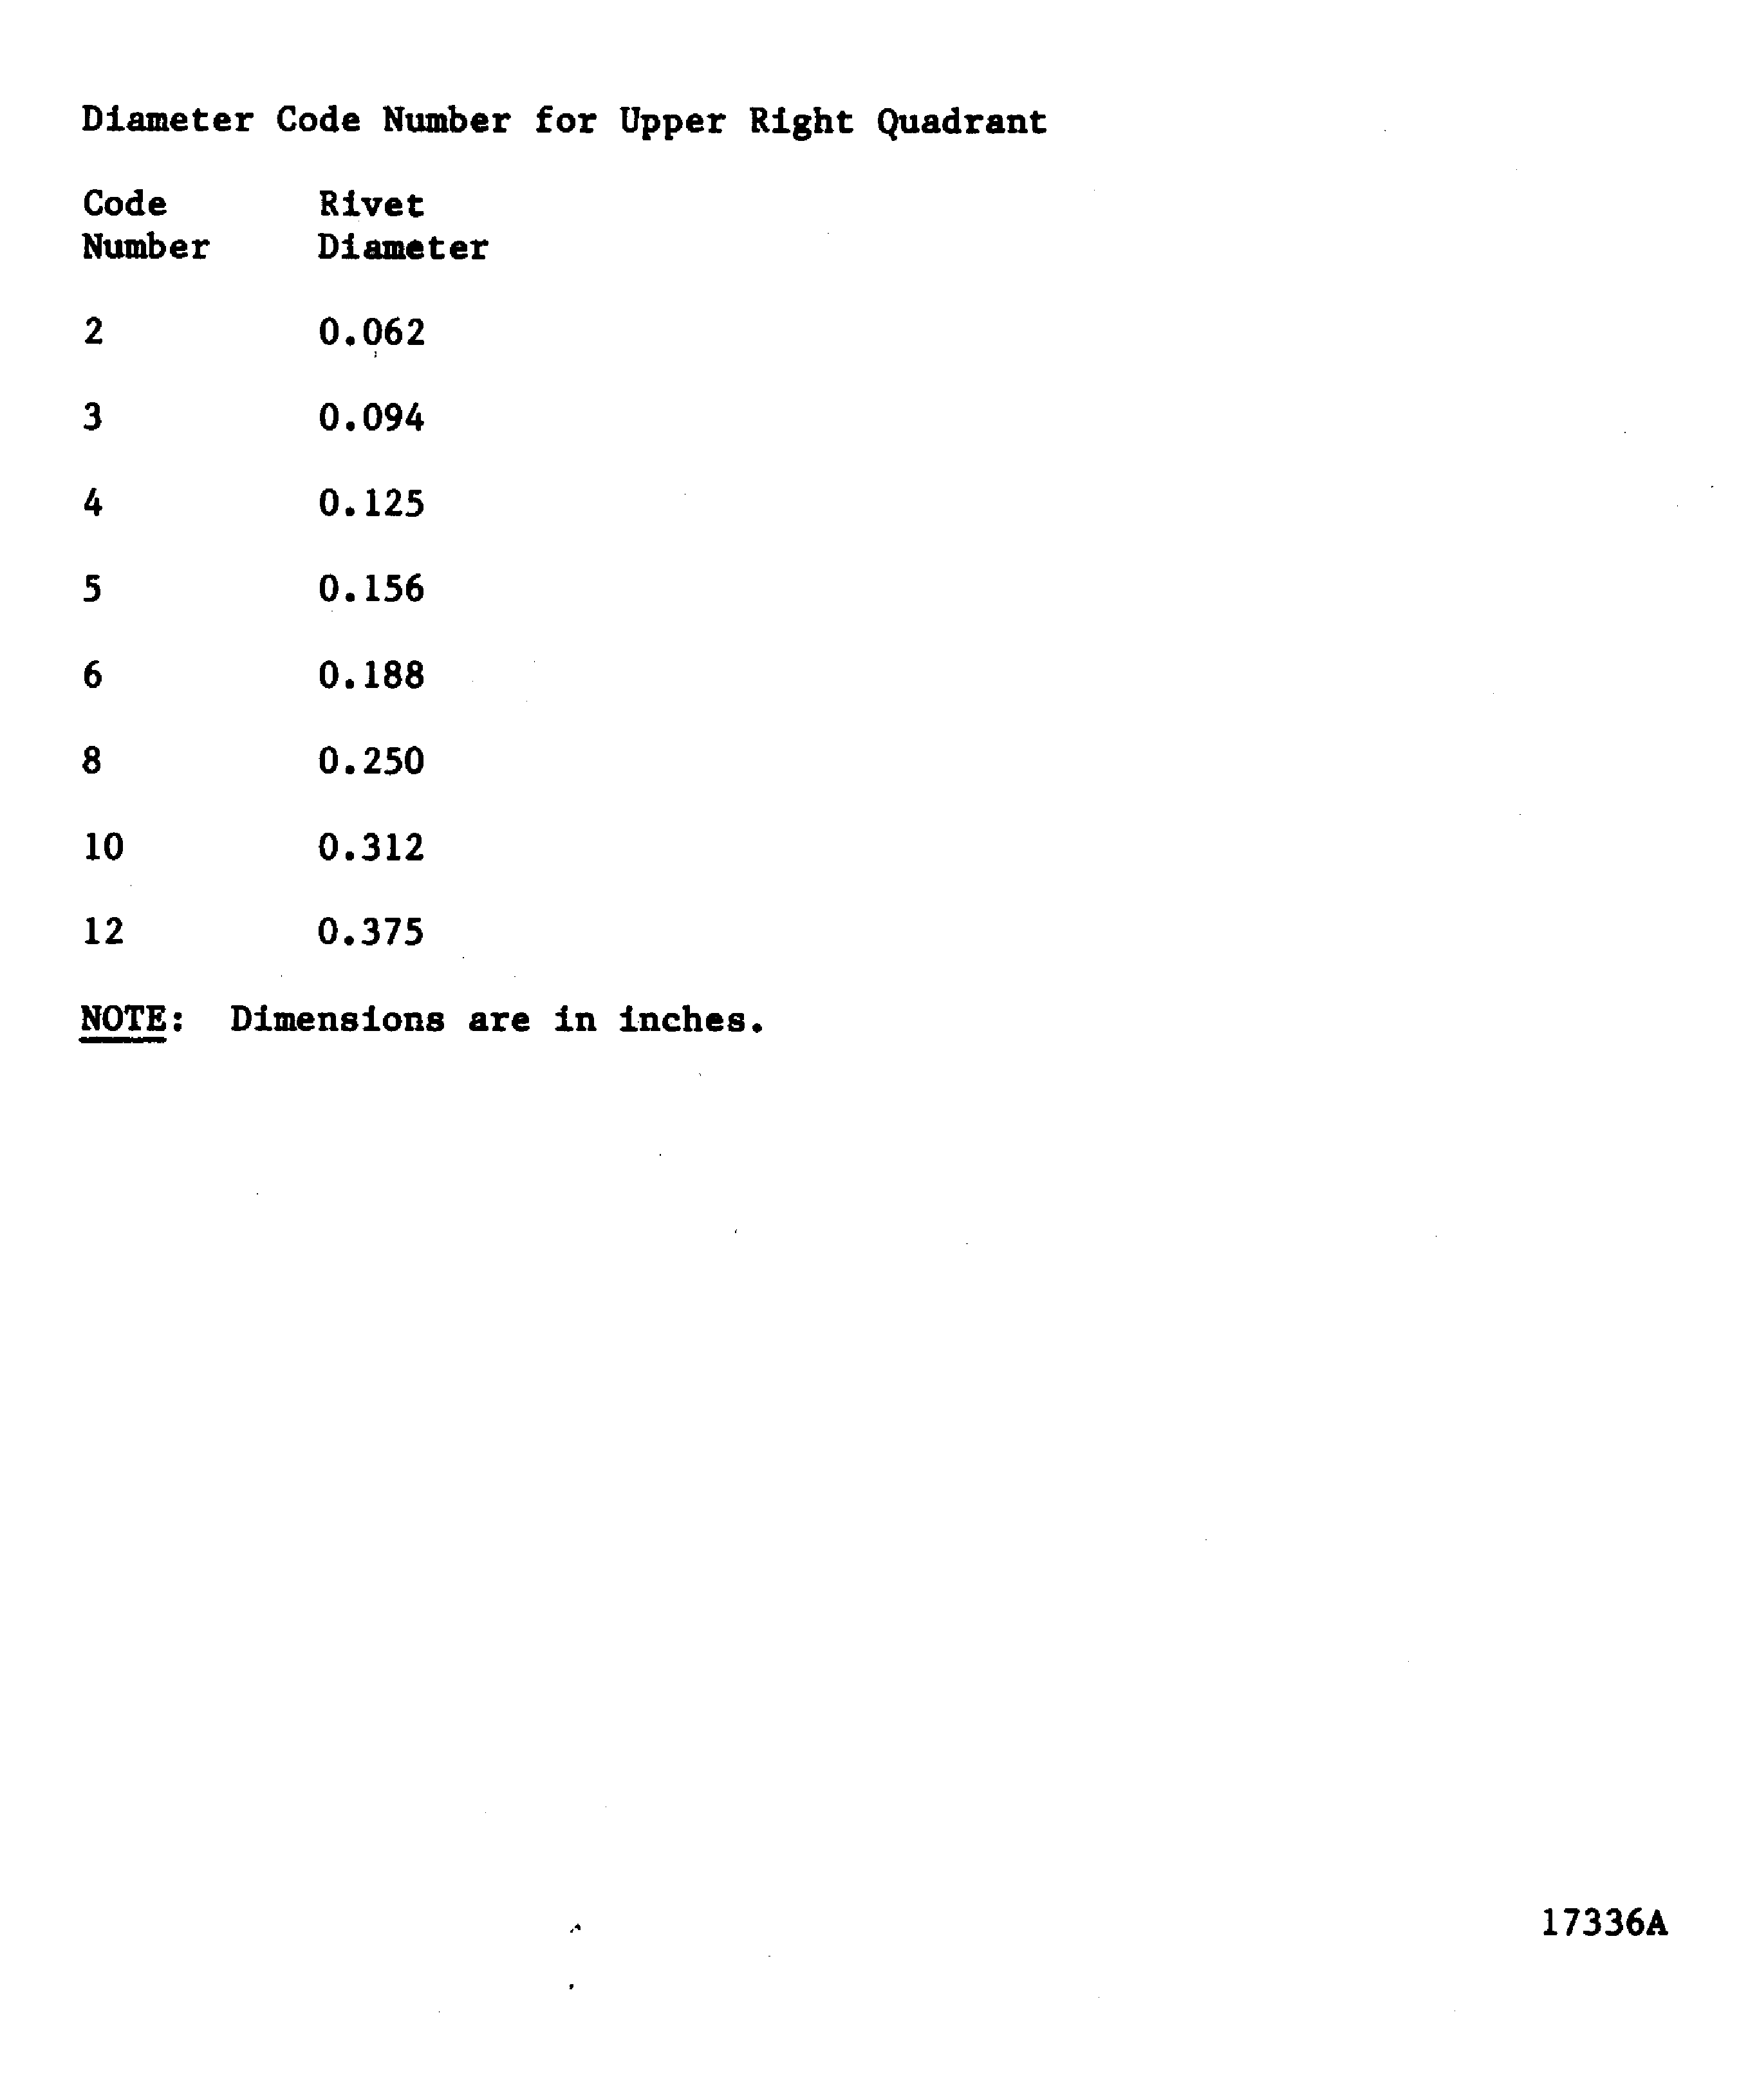
Figure: Rivet part number code index for protruding head conventional rivets
Rivet part number code index for protruding head conventional rivets
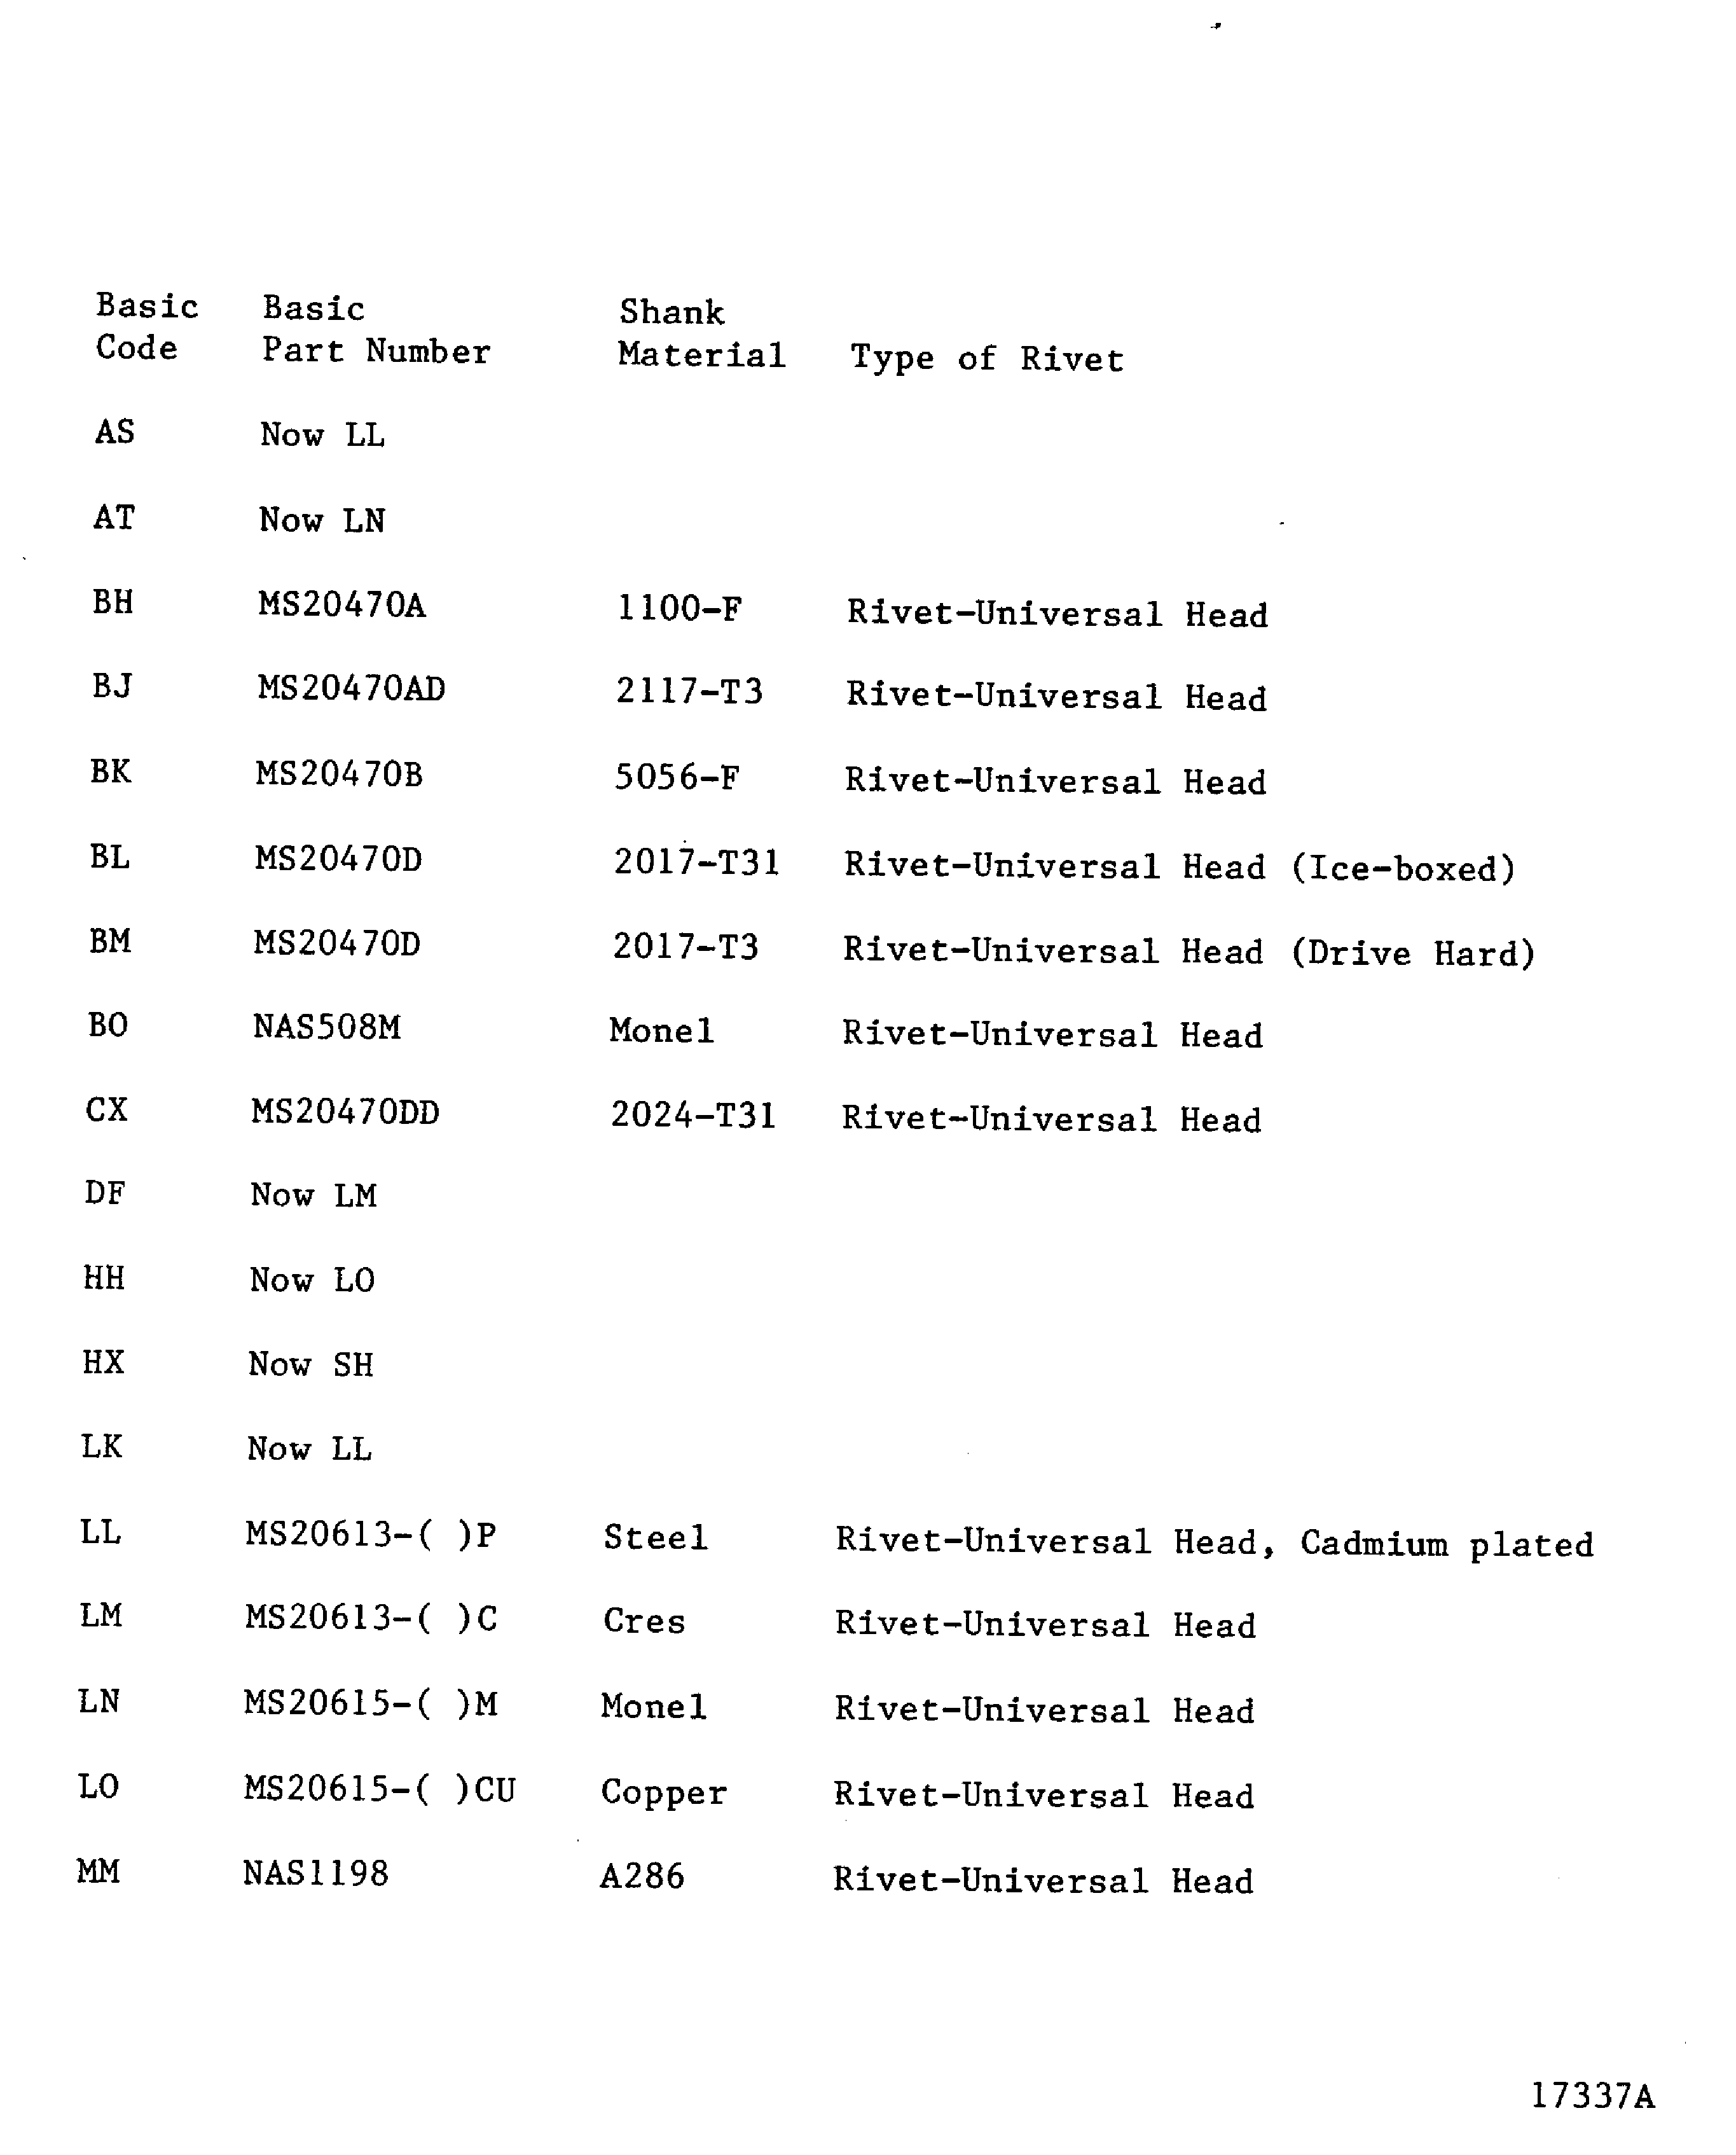
Figure: Rivet part number code index for protruding head conventional rivets
Rivet part number code index for protruding head conventional rivets
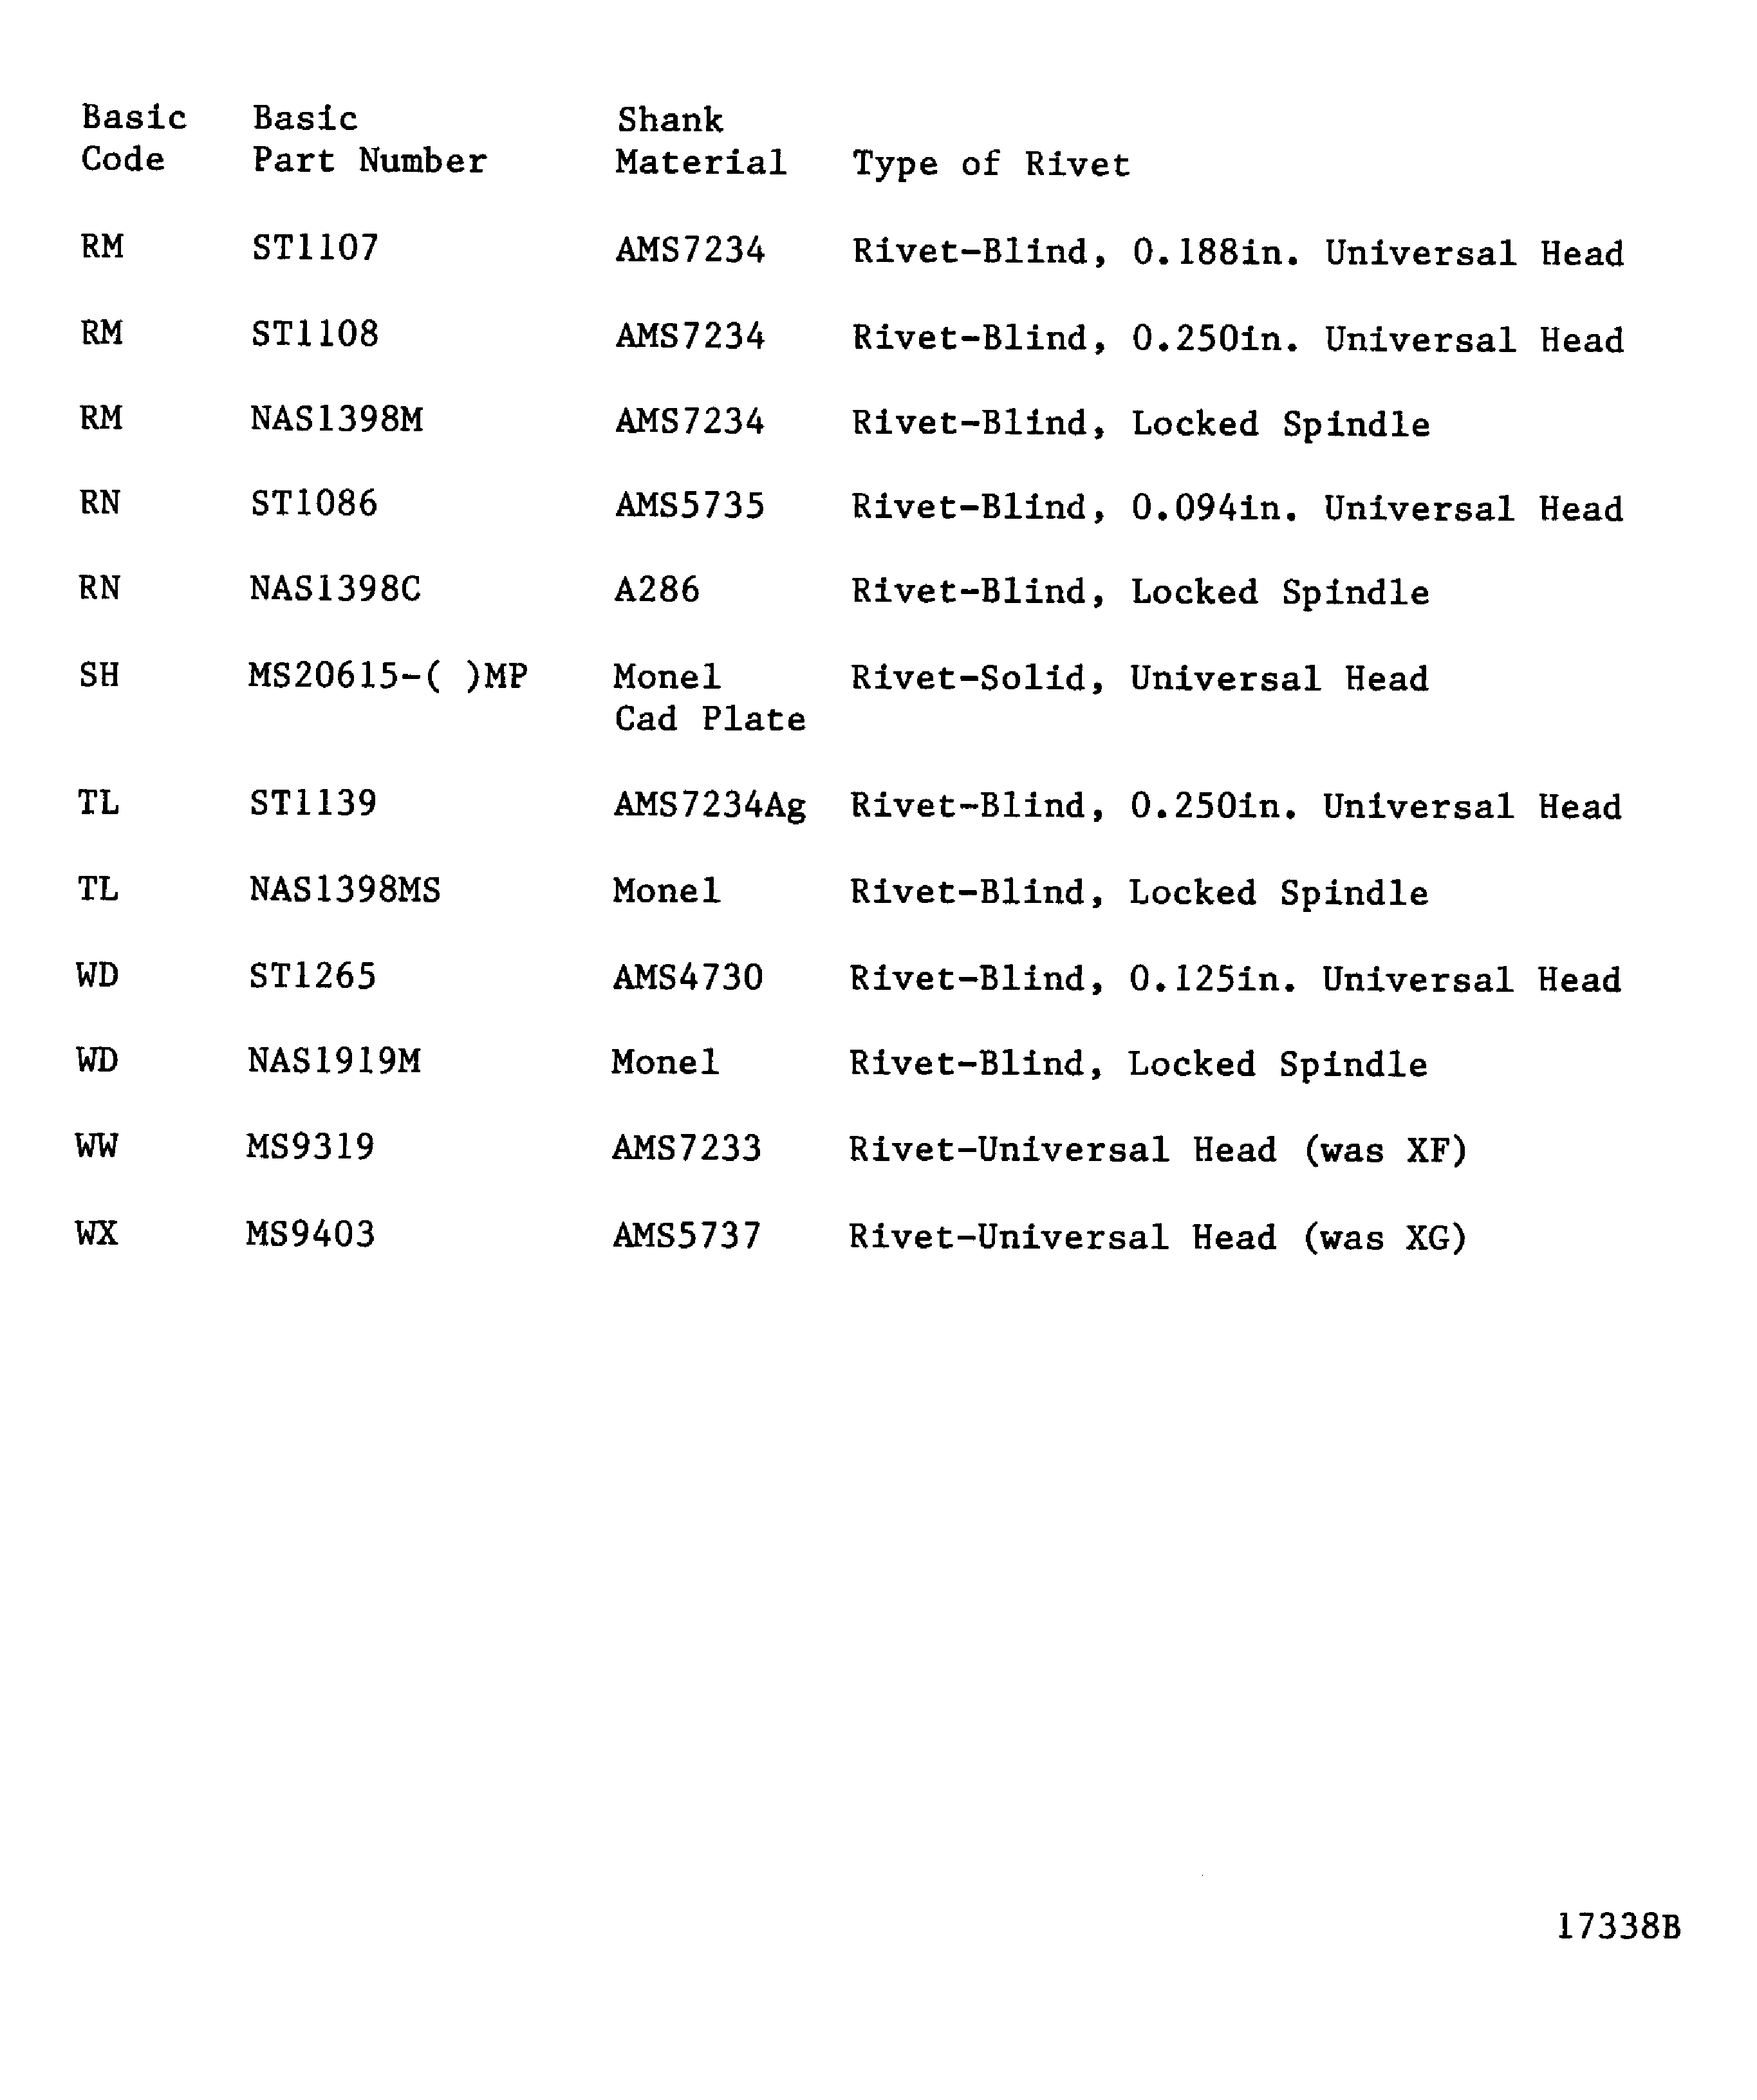
Figure: Rivet part number code index for protruding head conventional rivets
Rivet part number code index for protruding head conventional rivets
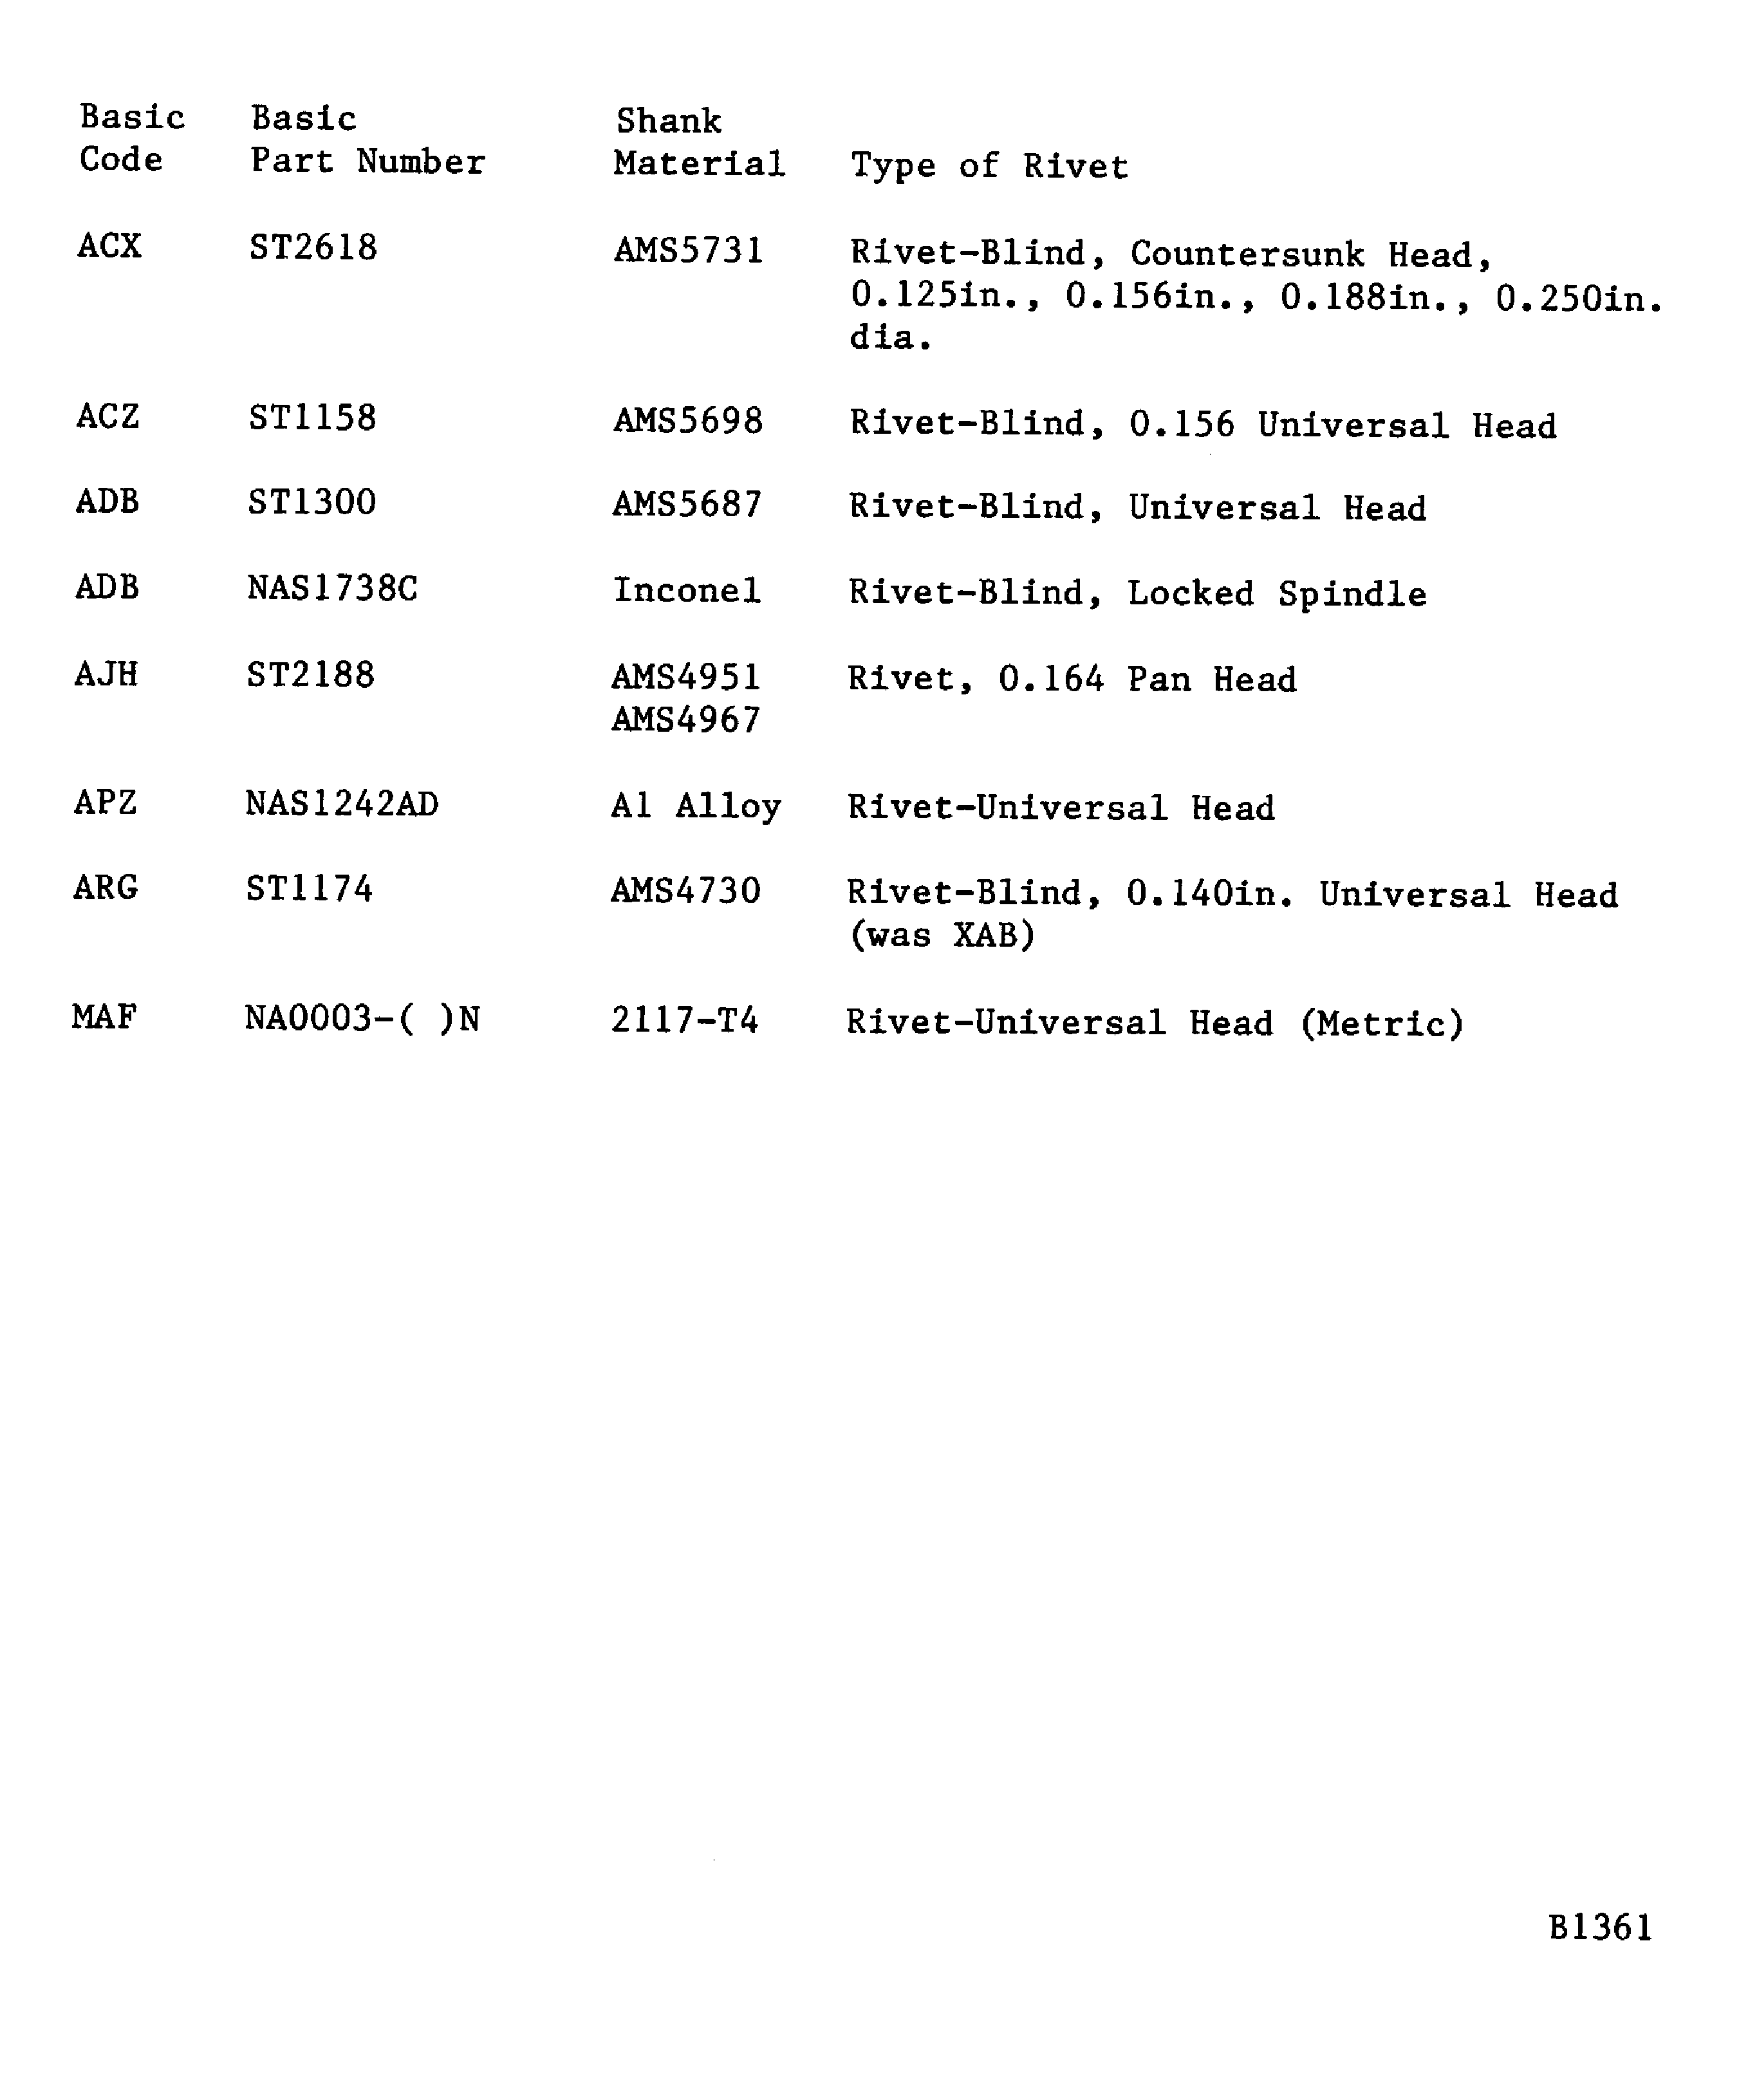
Figure: Rivet part number code index for protruding head conventional rivets
Rivet part number code index for protruding head conventional rivets
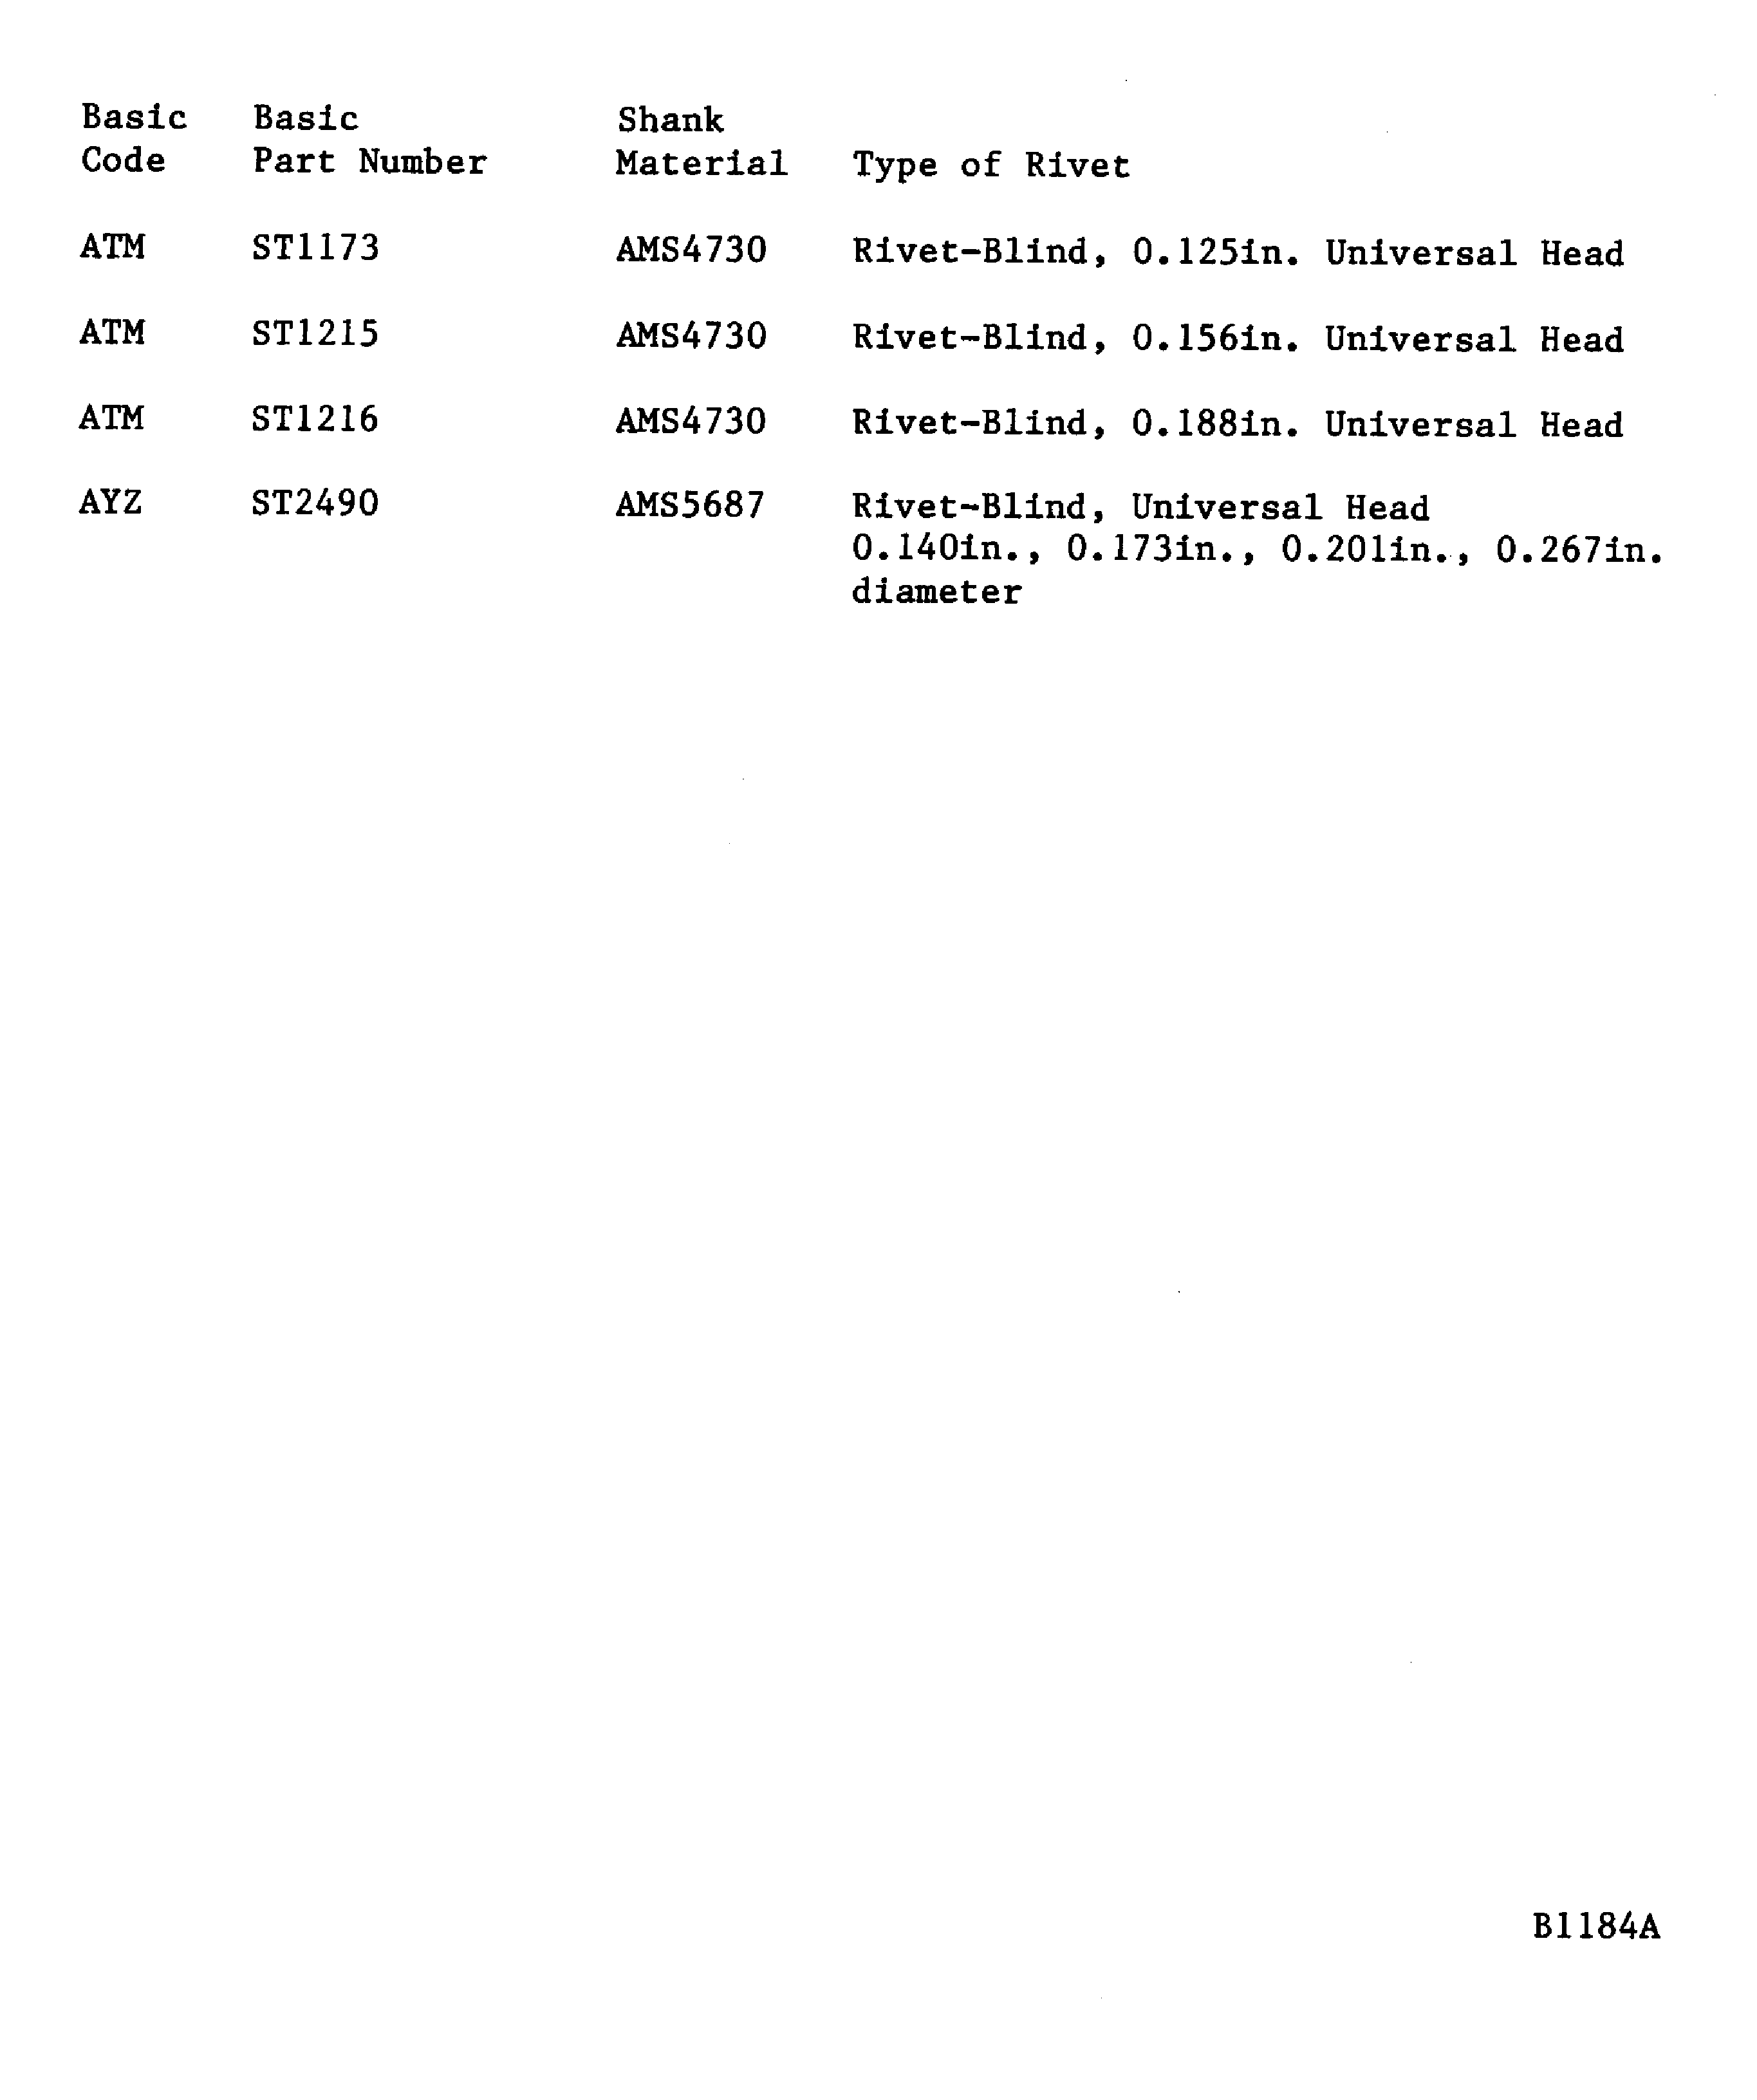
Figure: Rivet part number code index for countersunk head conventional rivets
Rivet part number code index for countersunk head conventional rivets
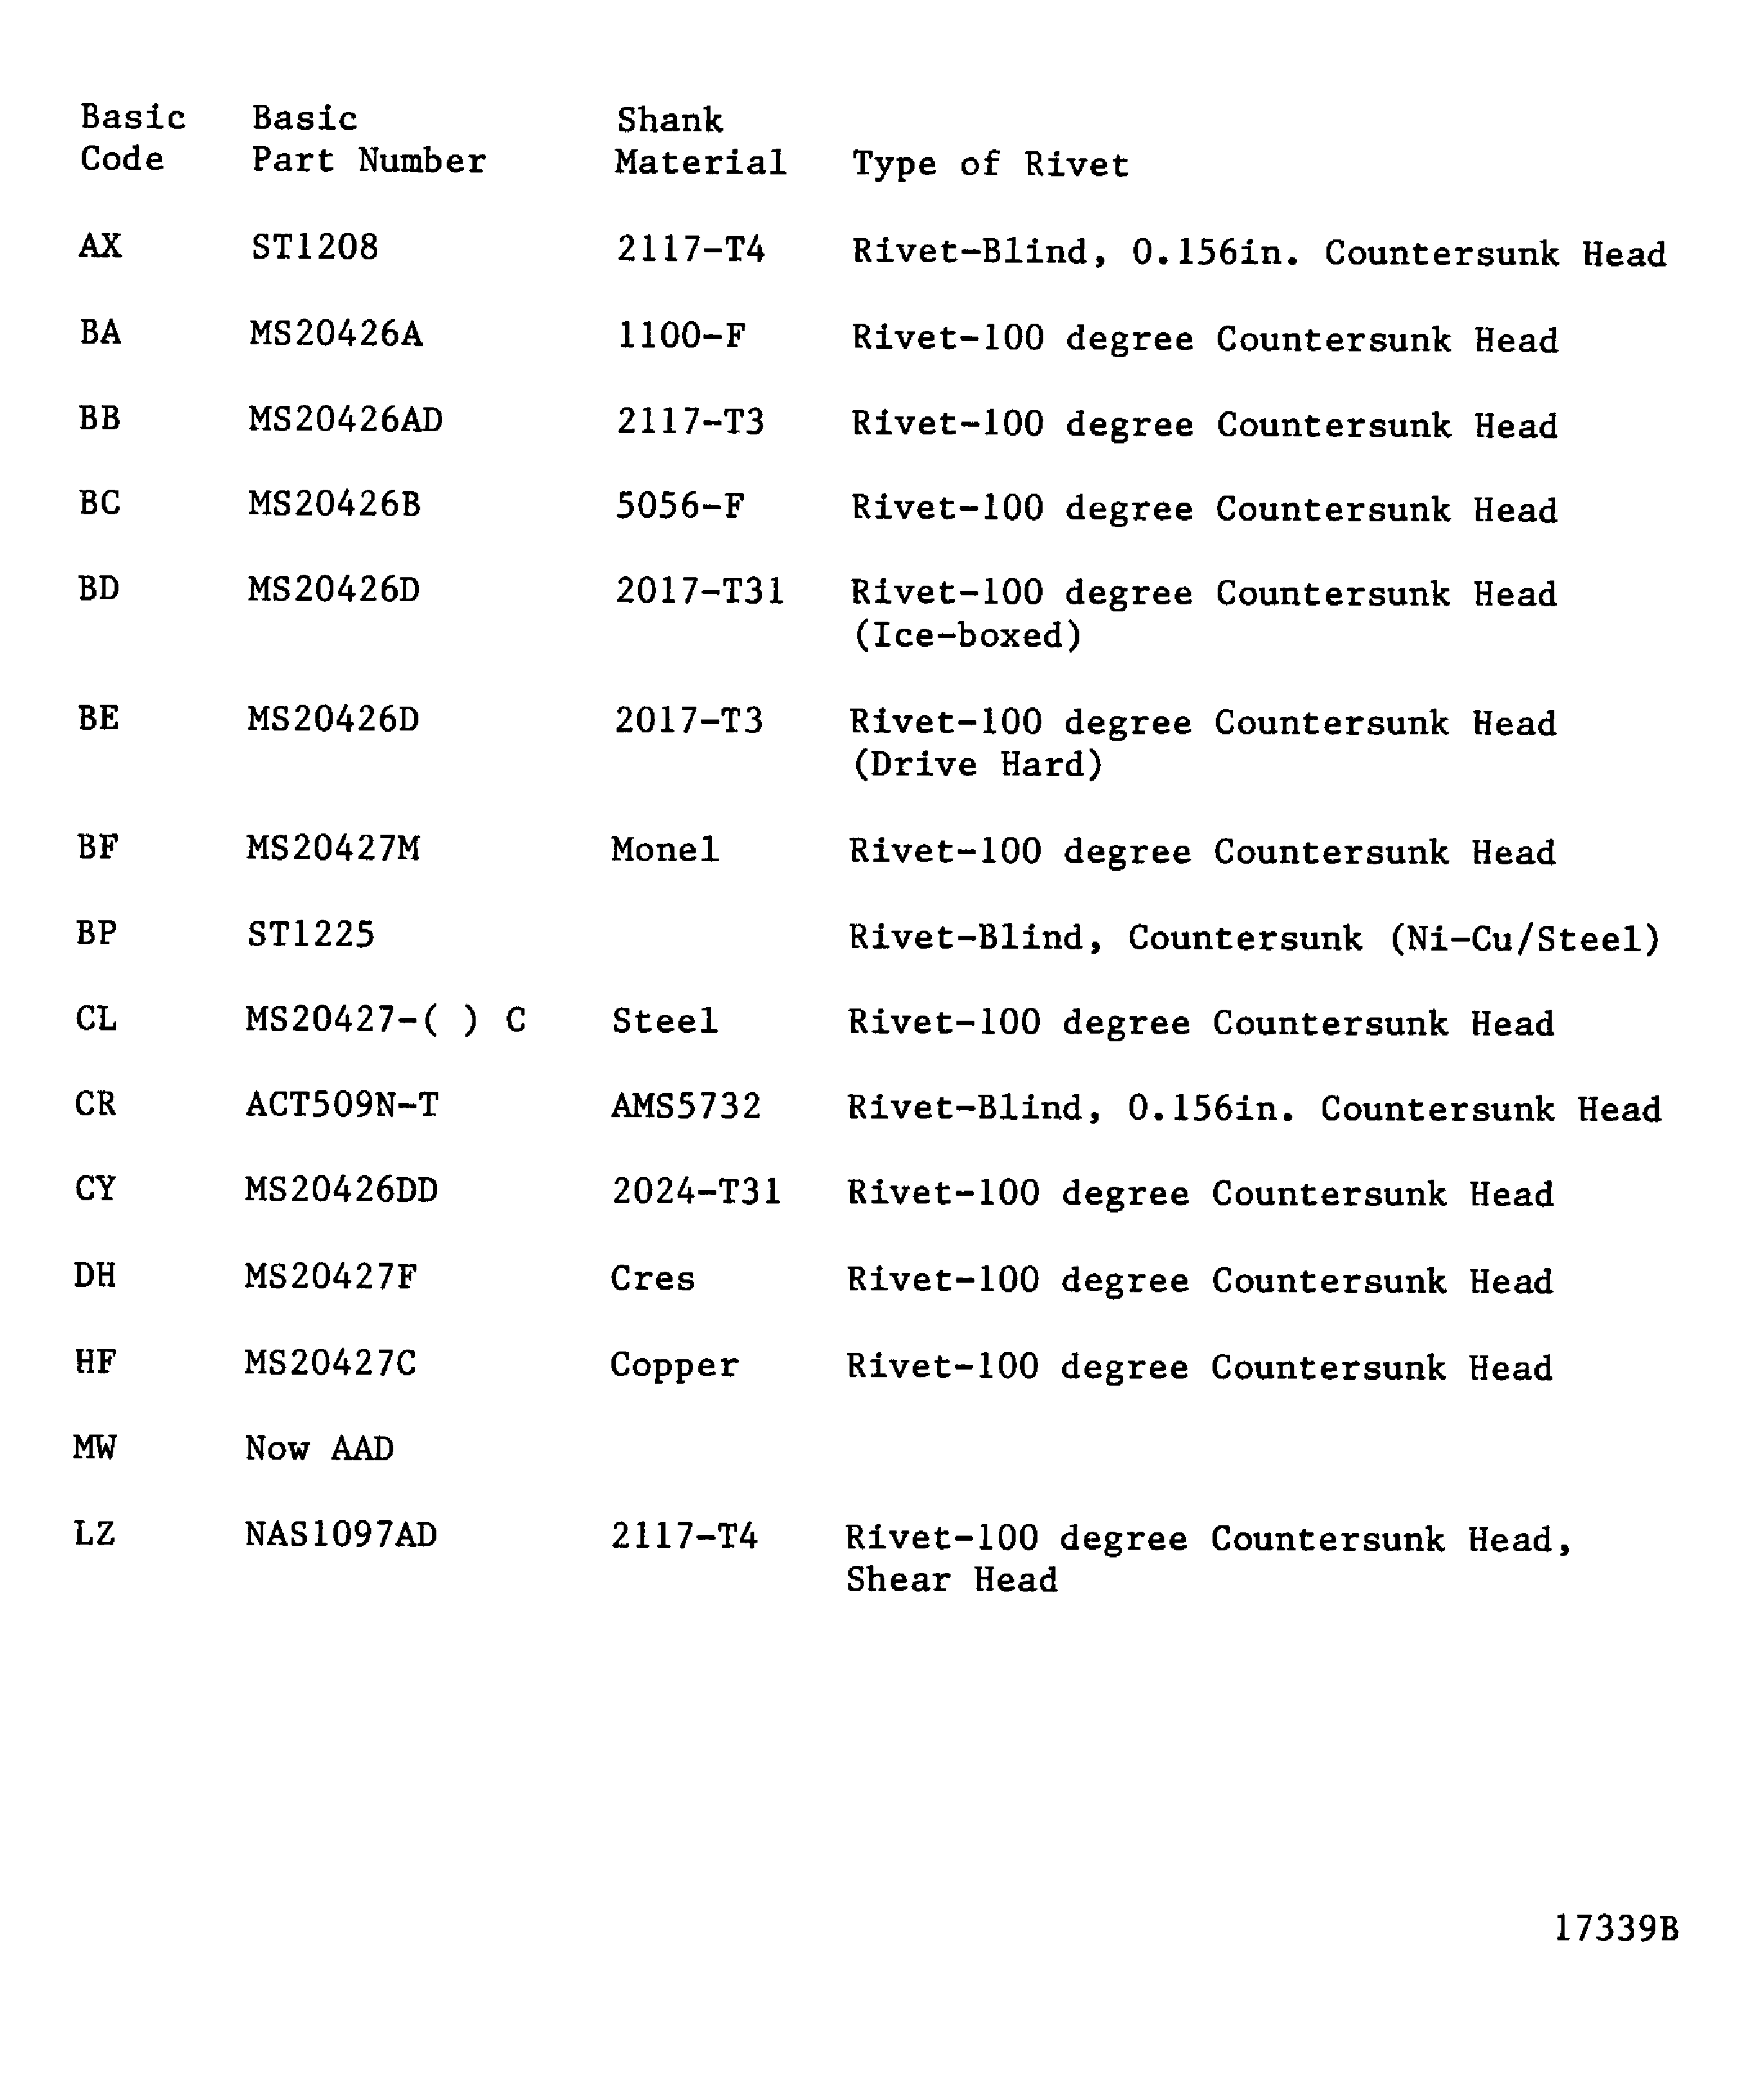
Figure: Rivet part number code index for countersunk head conventional rivets
Rivet part number code index for countersunk head conventional rivets
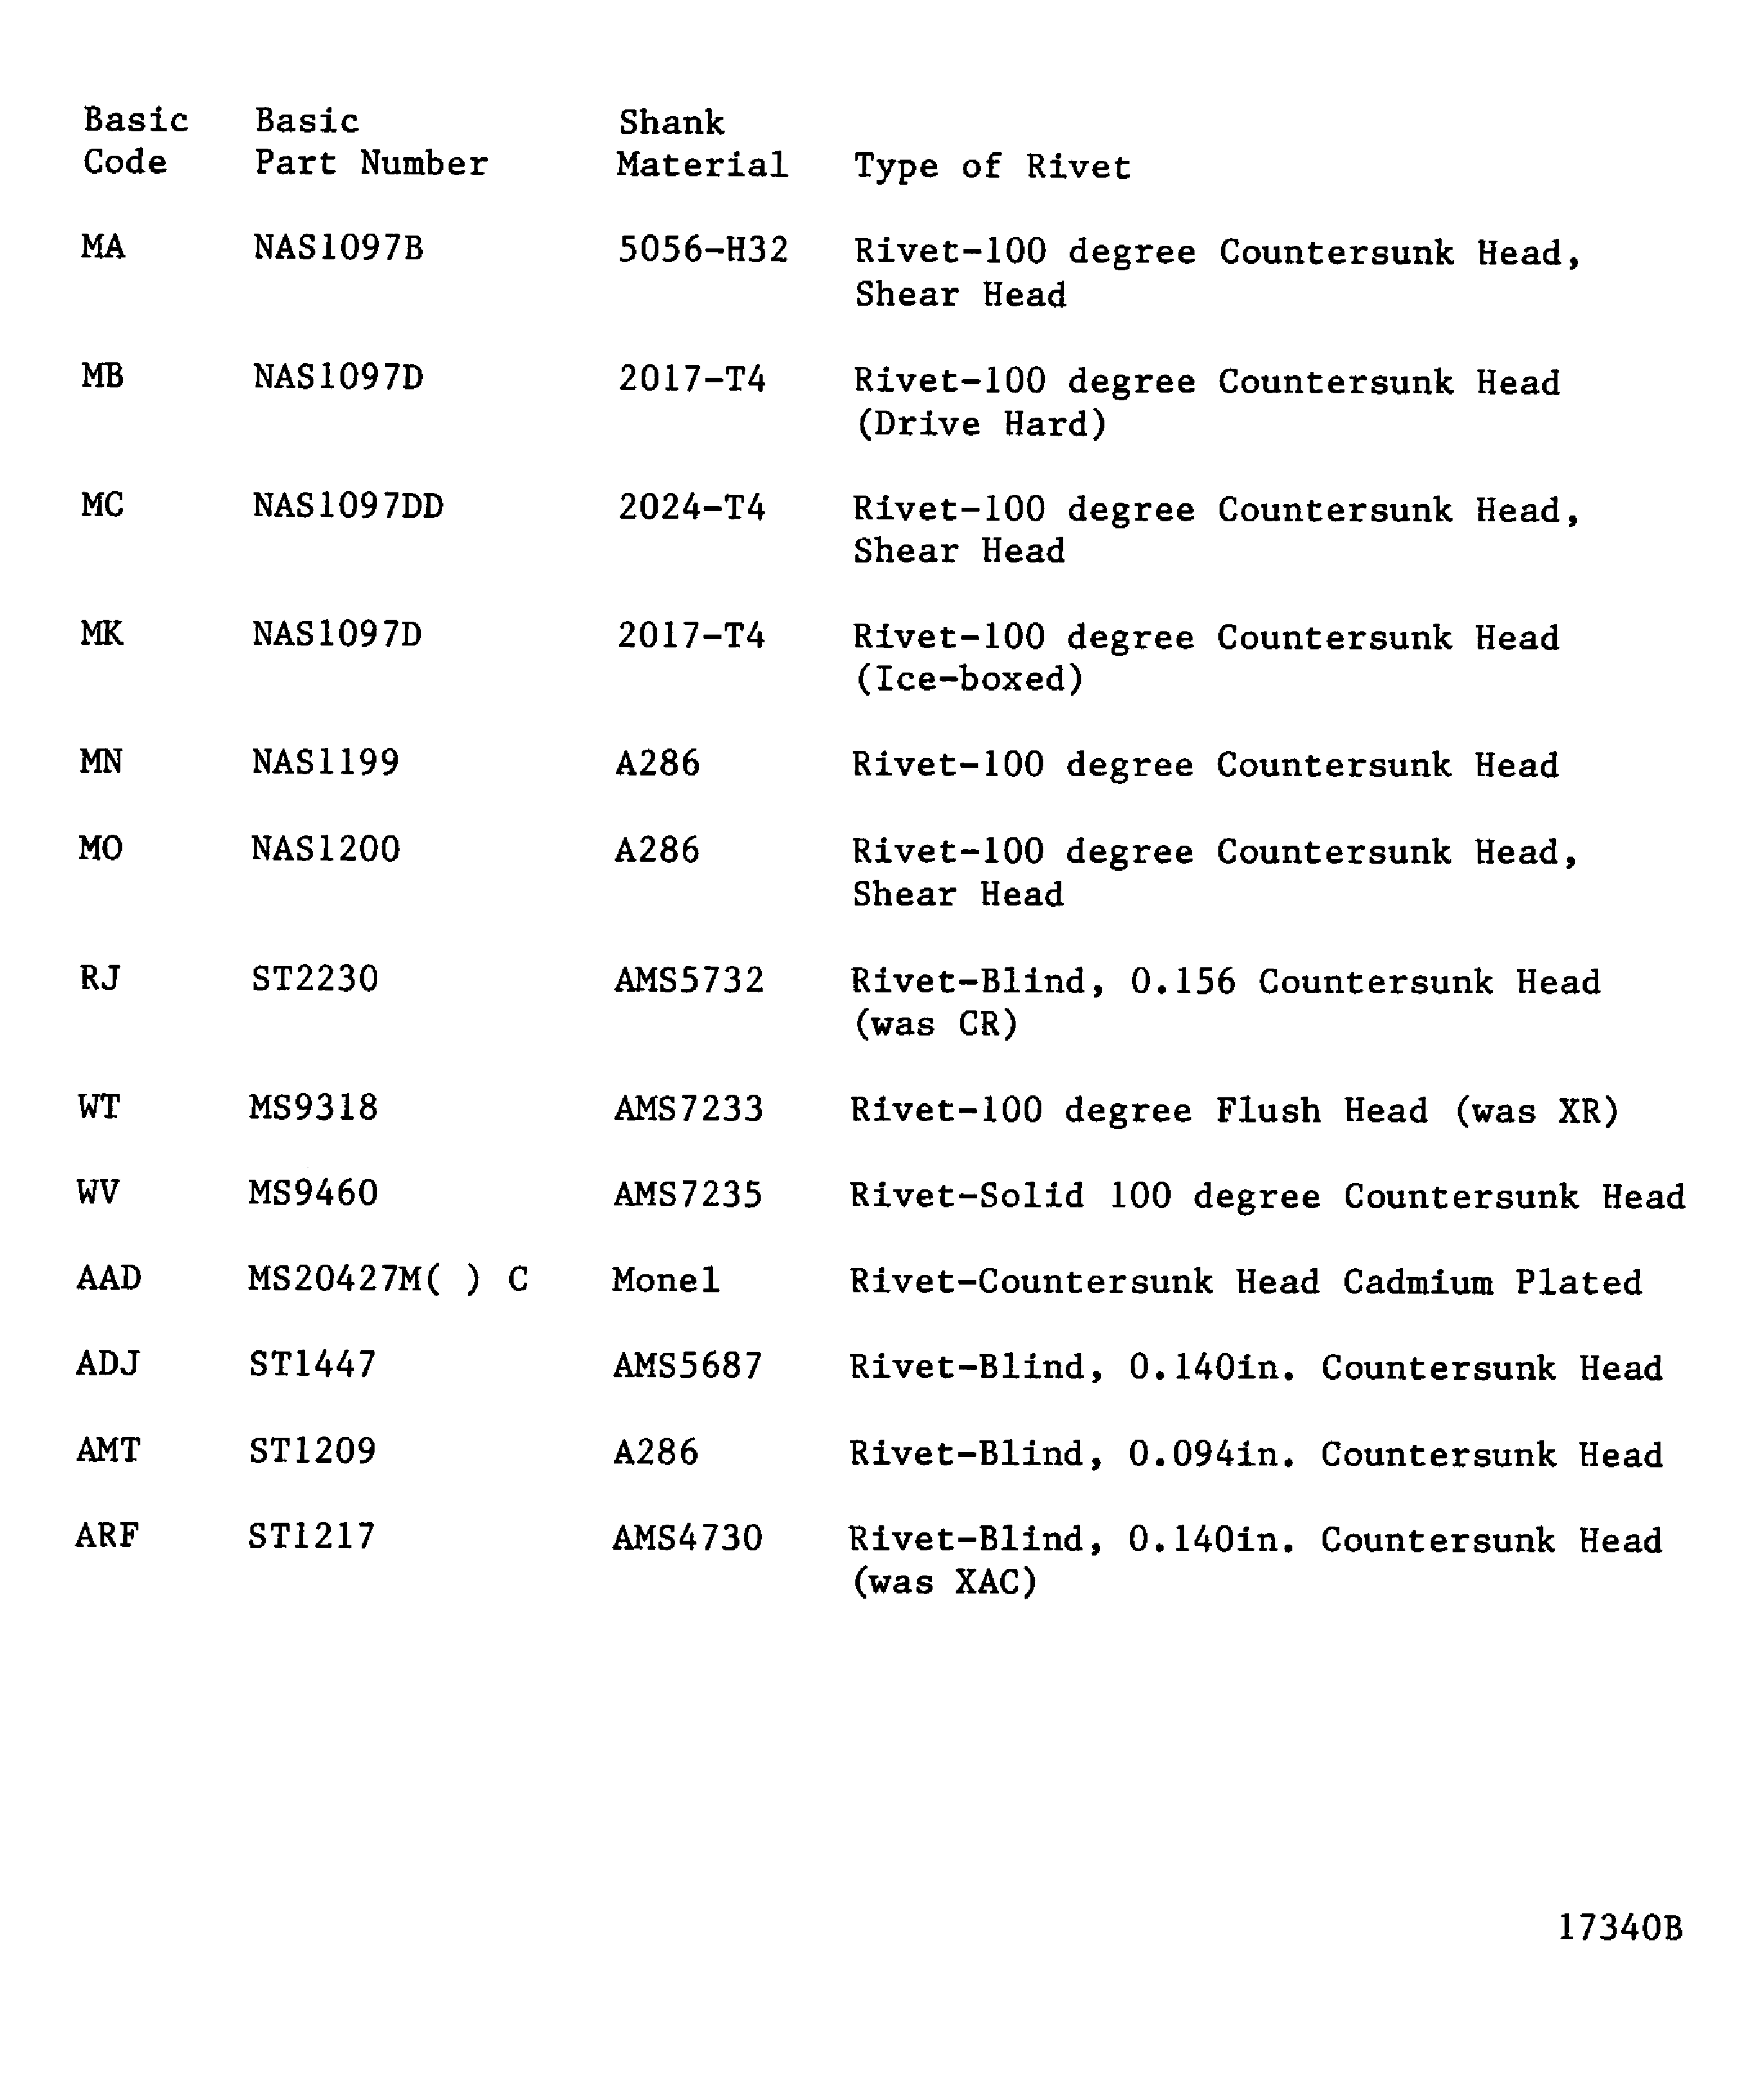
Figure: Rivet part number code index for protruding head propulsion industry rivets
Rivet part number code index for protruding head propulsion industry rivets
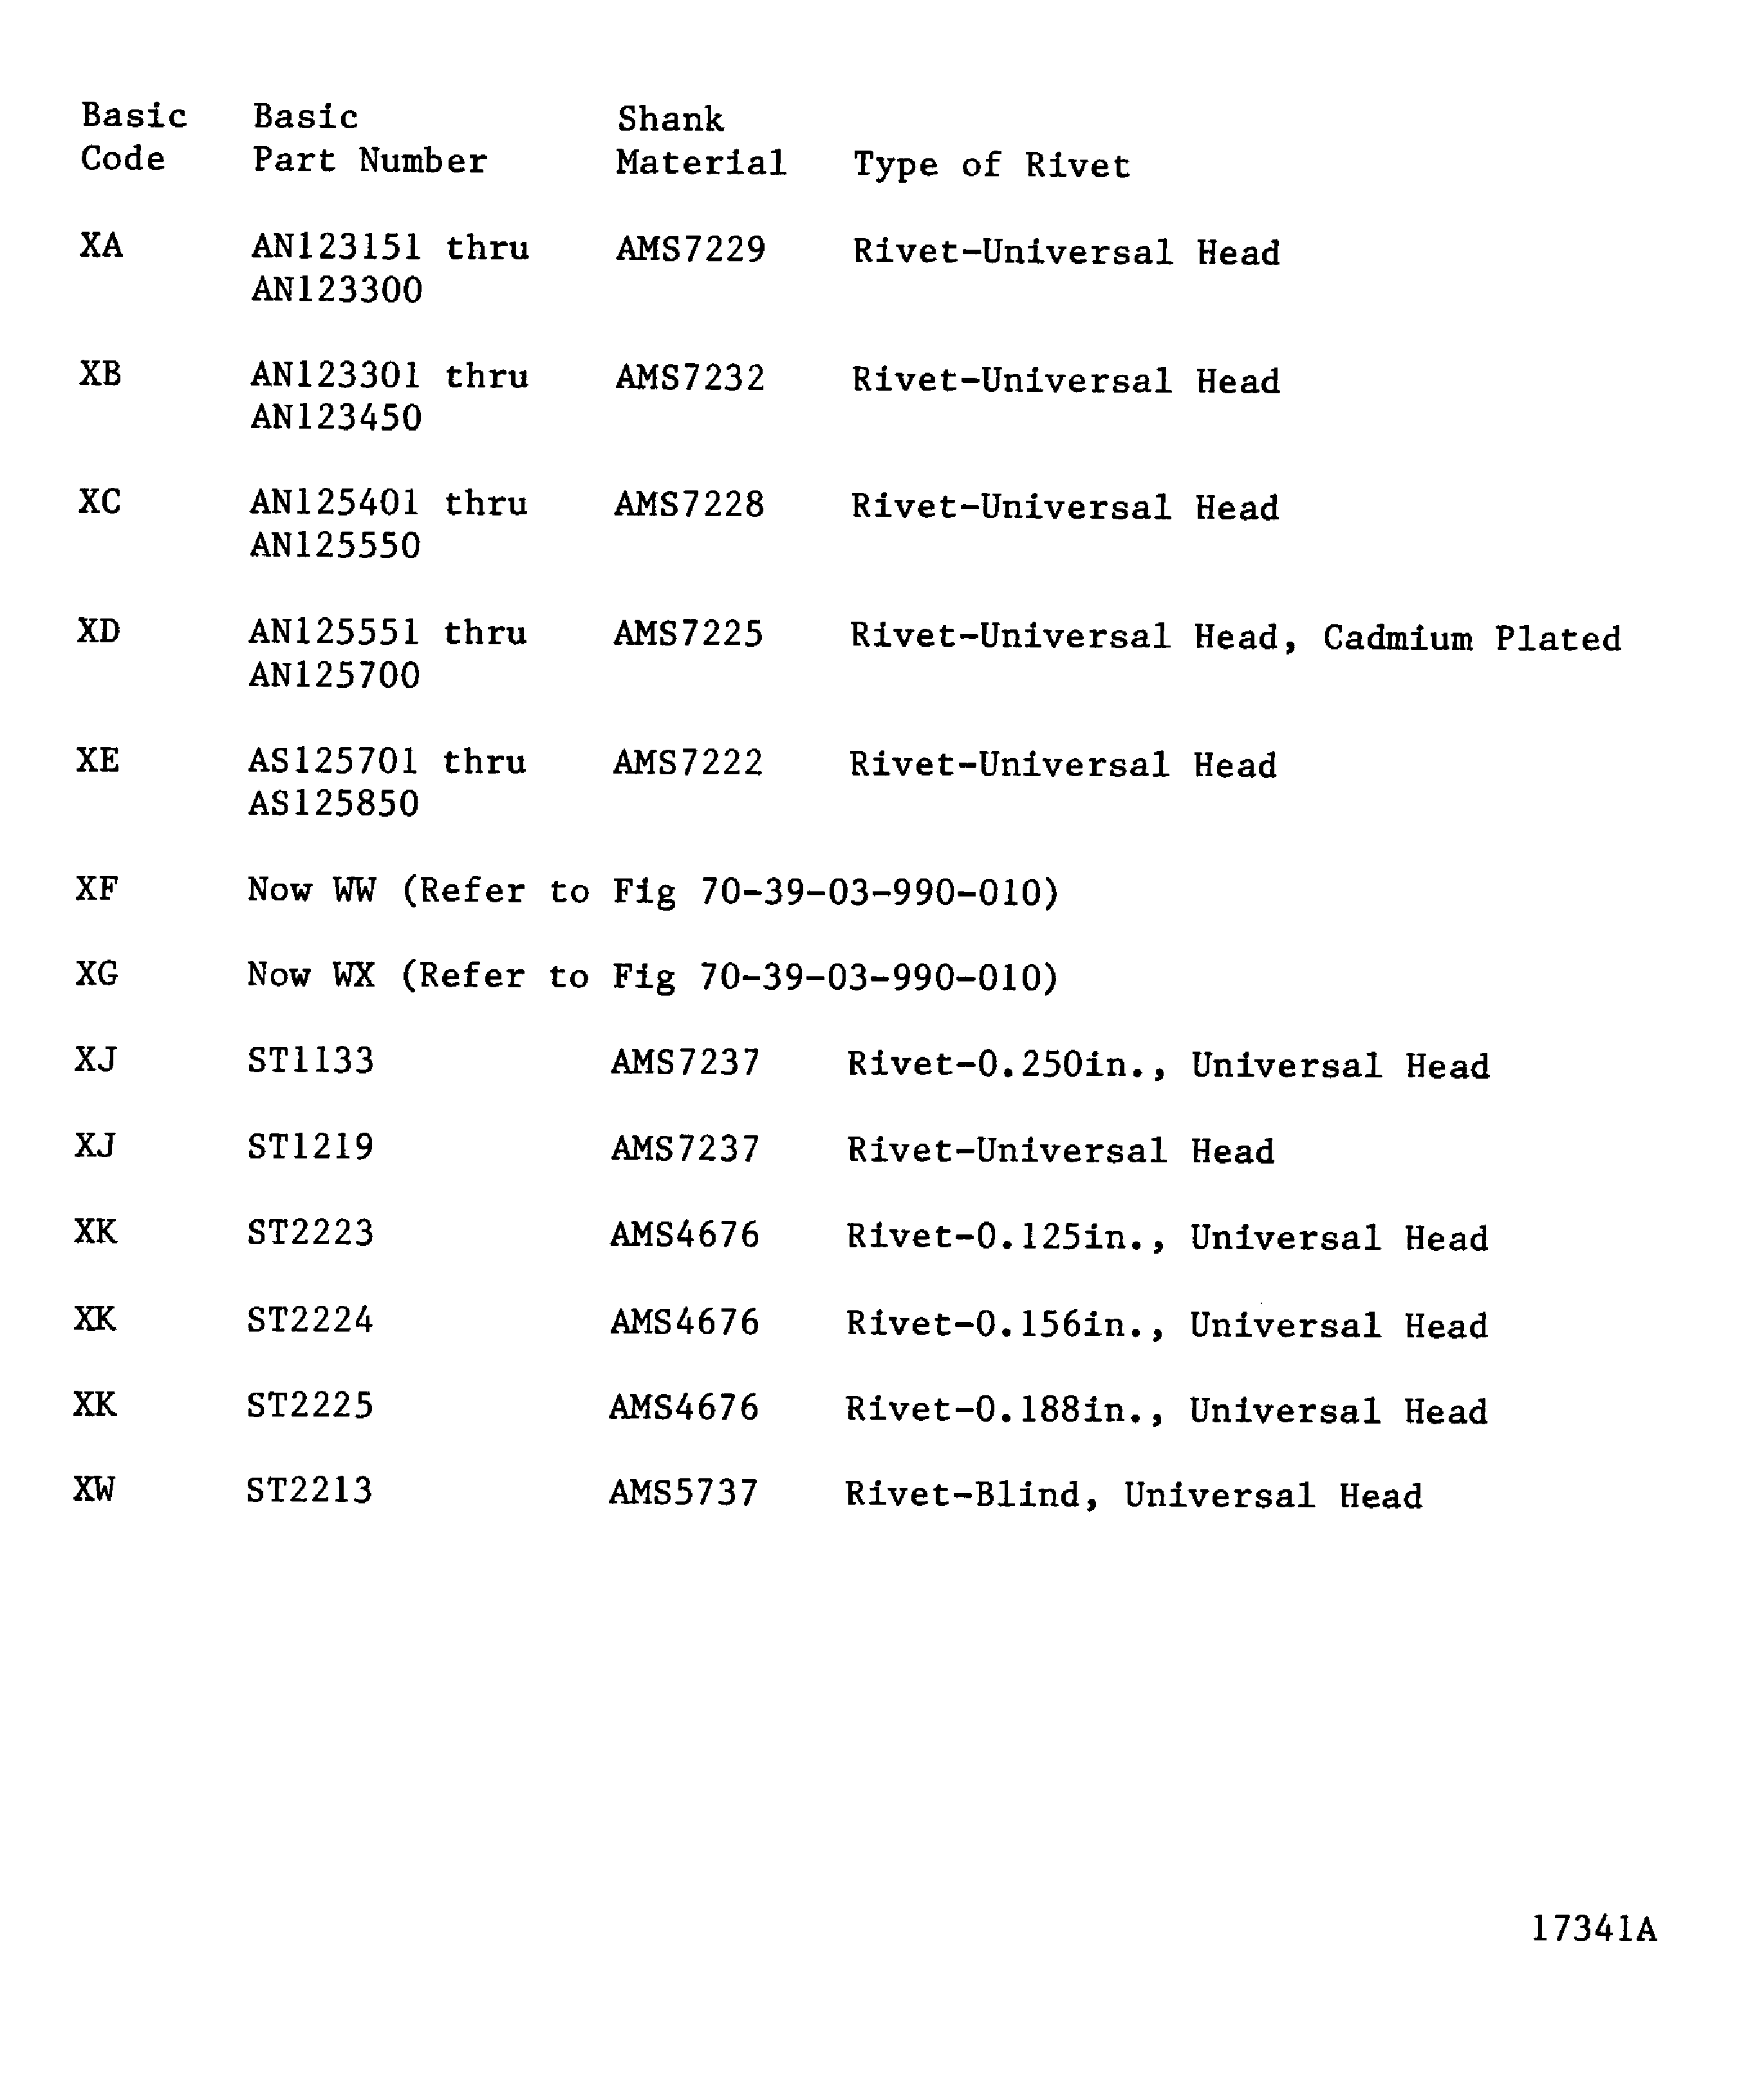
Figure: Rivet part number code index for protruding head propulsion industry rivets
Rivet part number code index for protruding head propulsion industry rivets
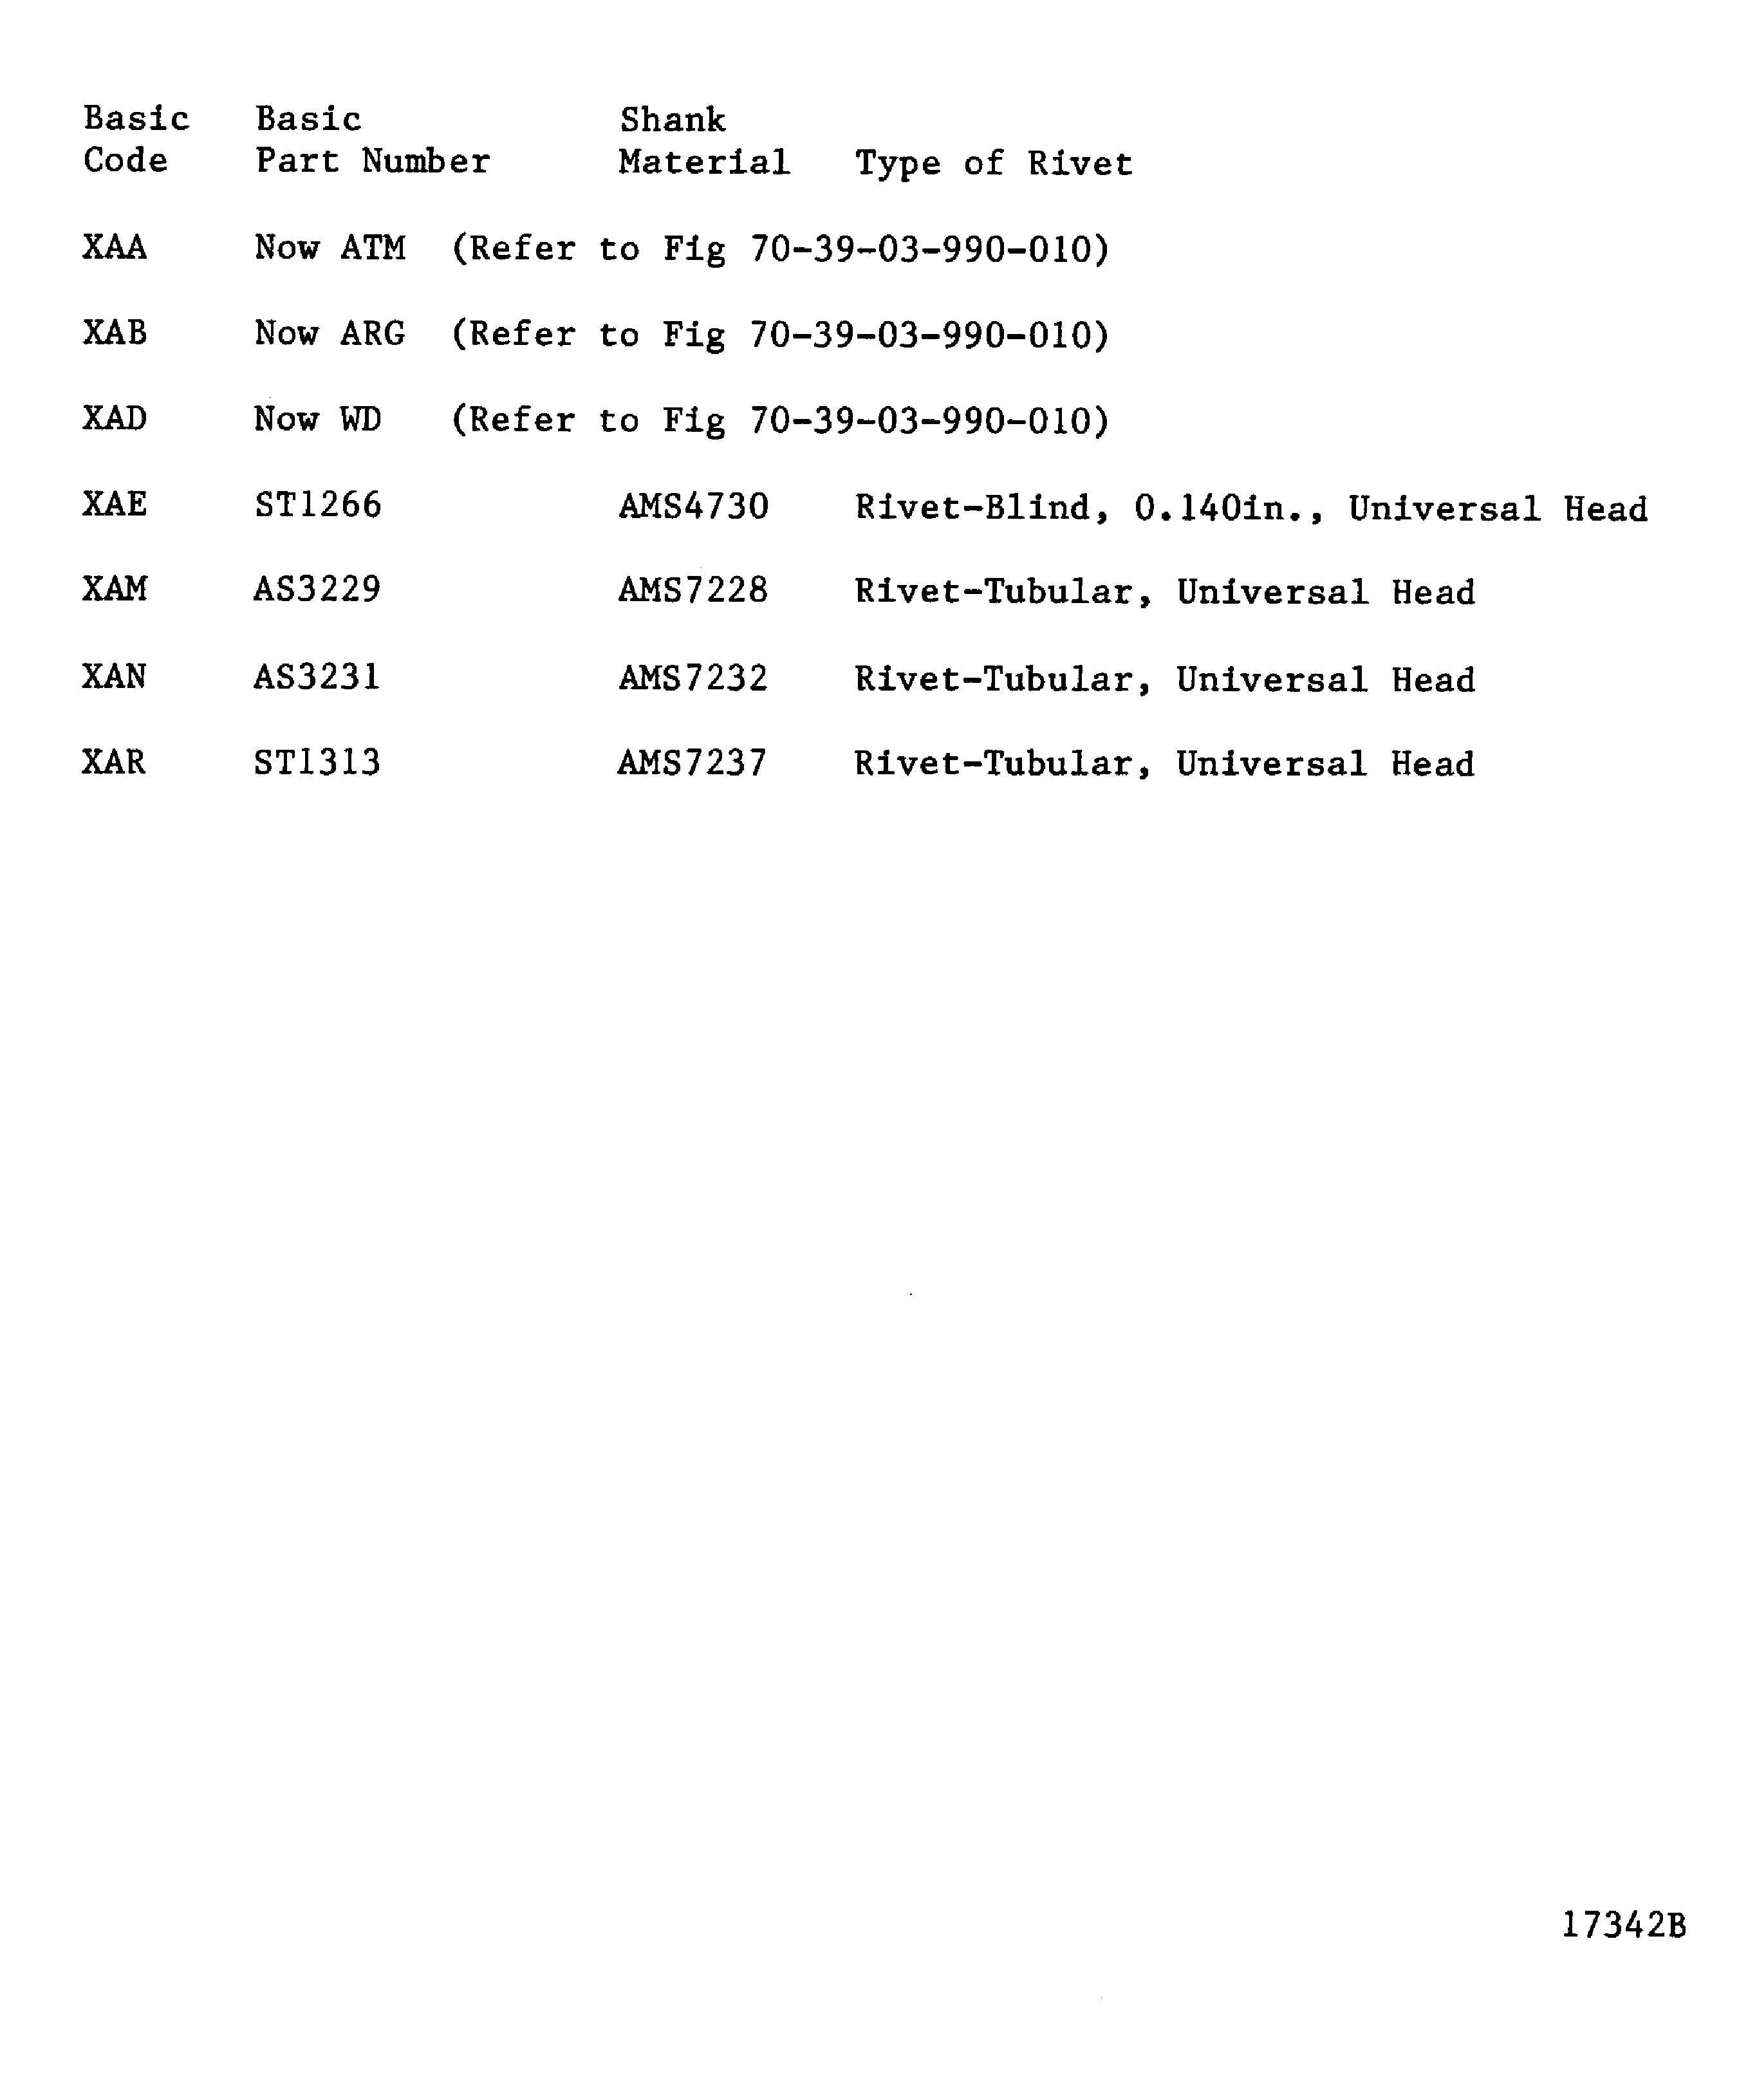
Figure: Rivet part number code index for countersunk head propulsion industry rivets
Rivet part number code index for countersunk head propulsion industry rivets
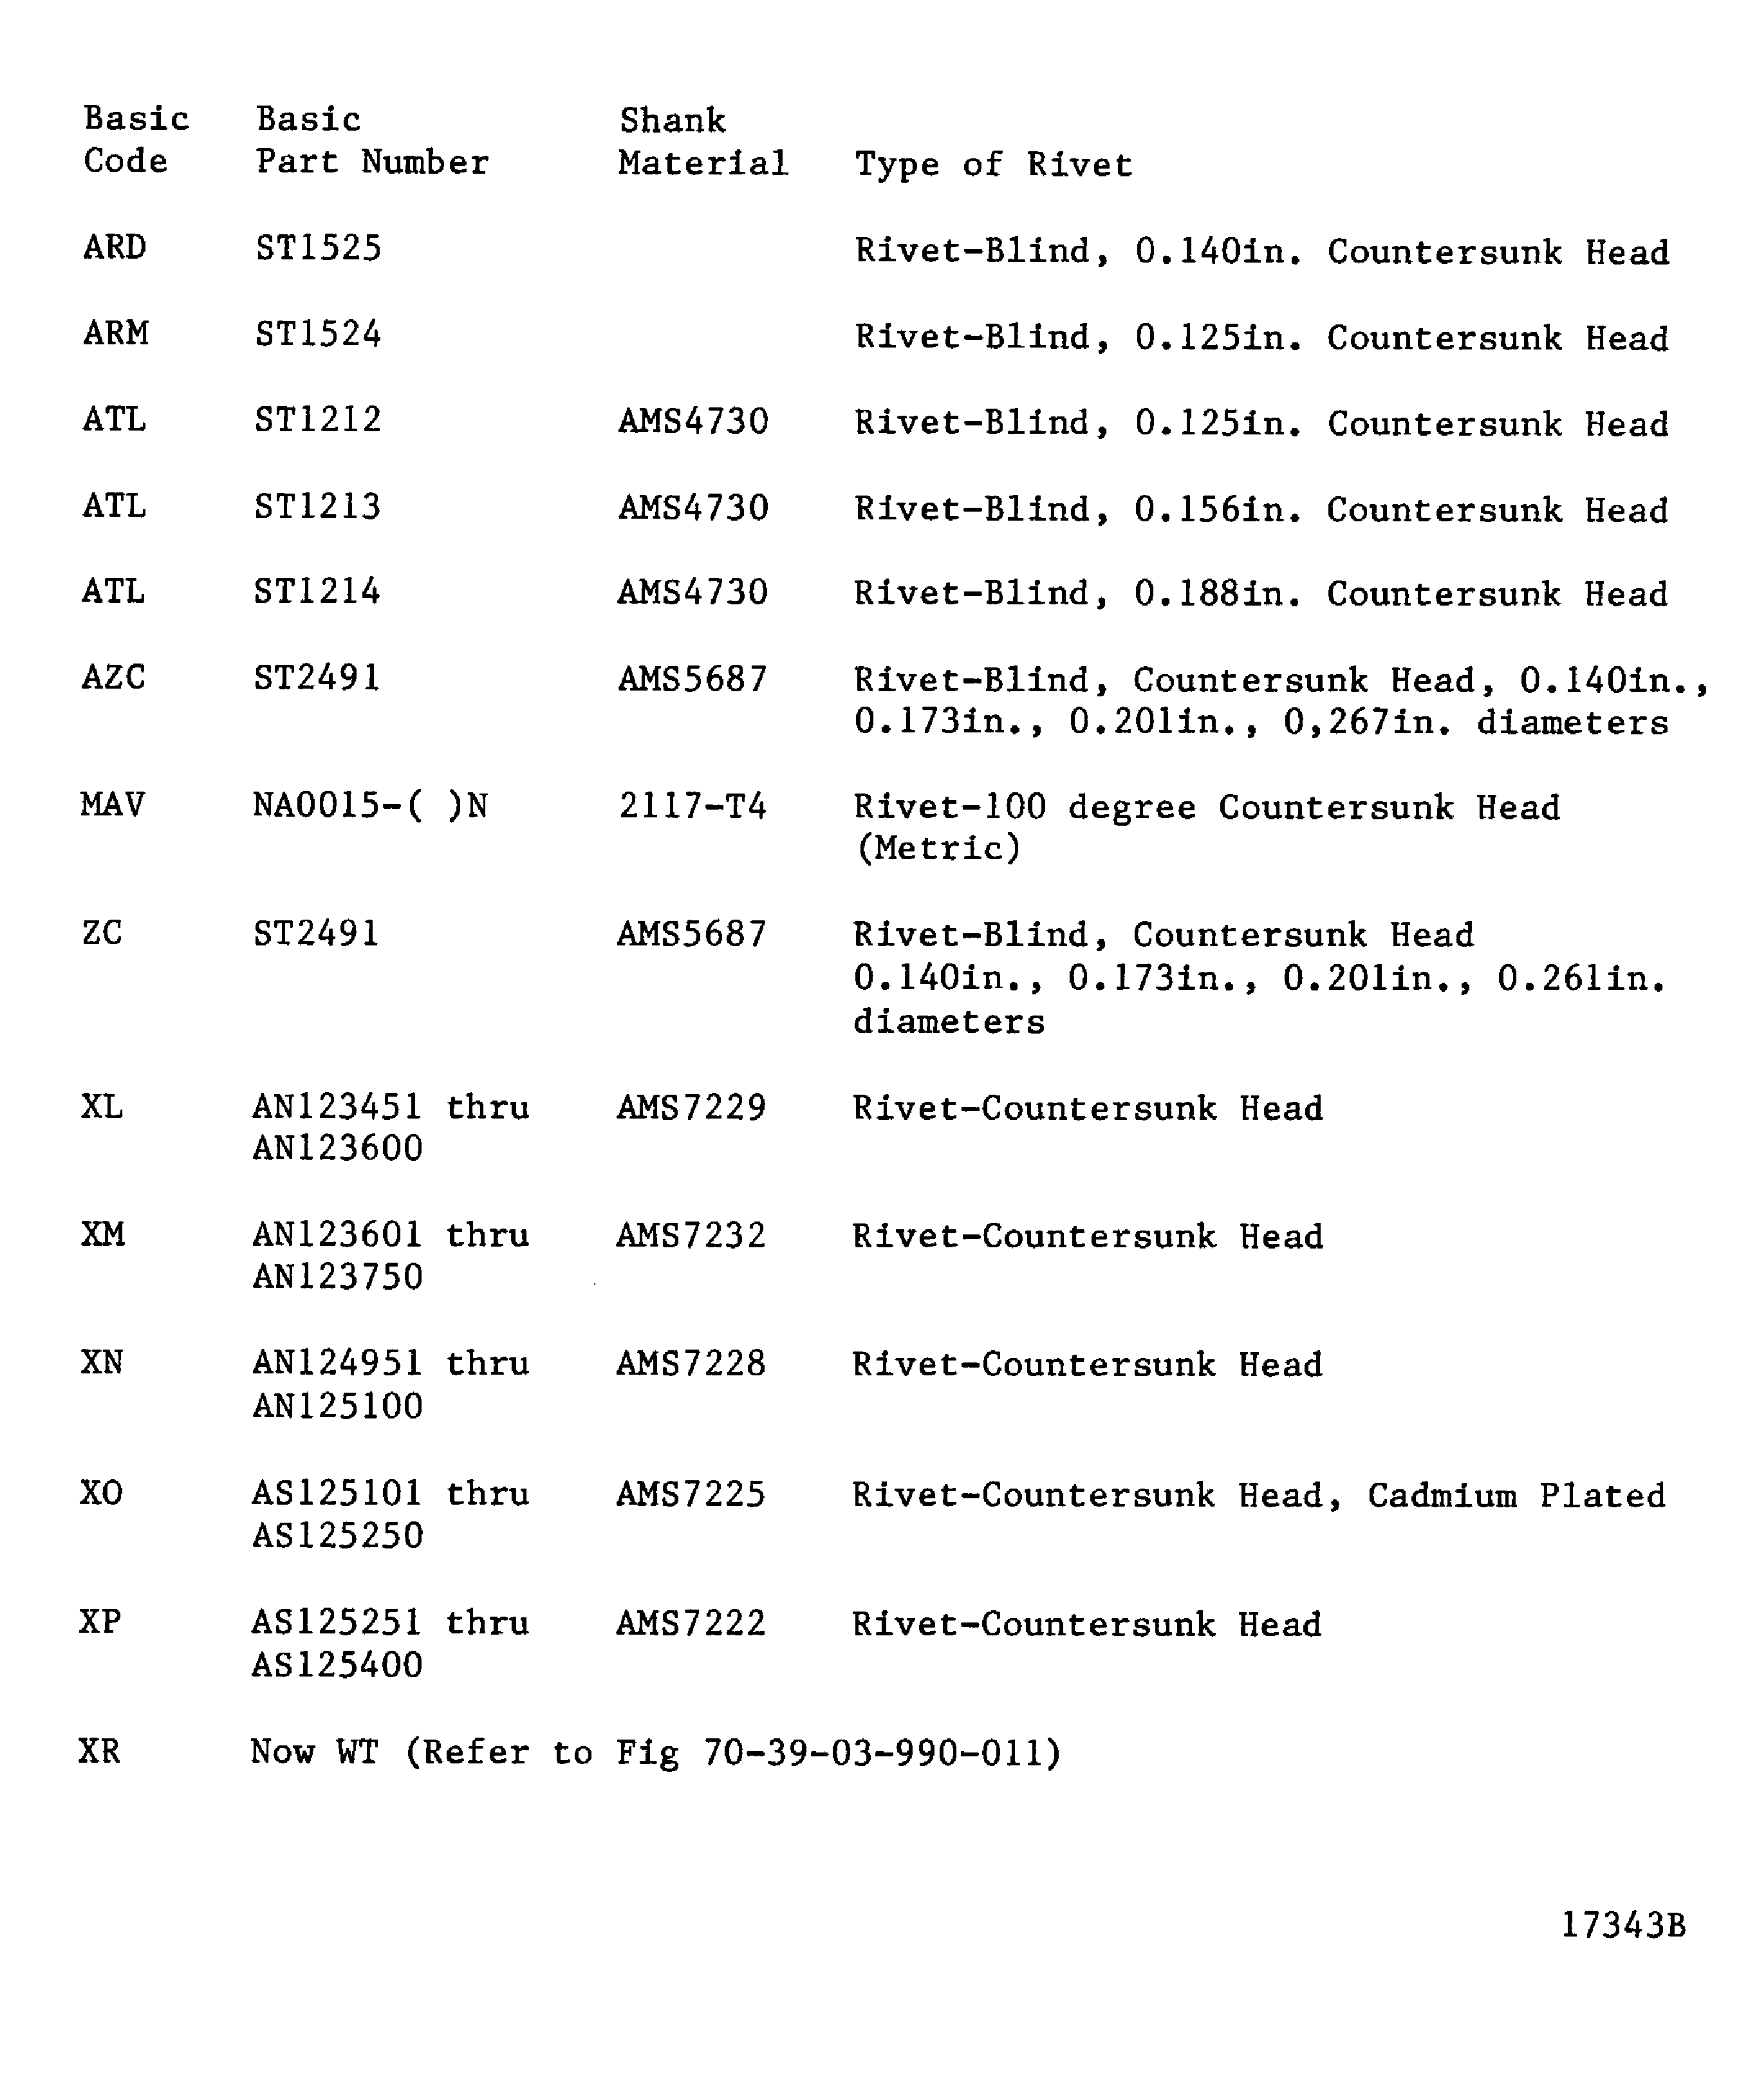
Figure: Rivet part number code index for countersunk head propulsion industry rivets
Rivet part number code index for countersunk head propulsion industry rivets
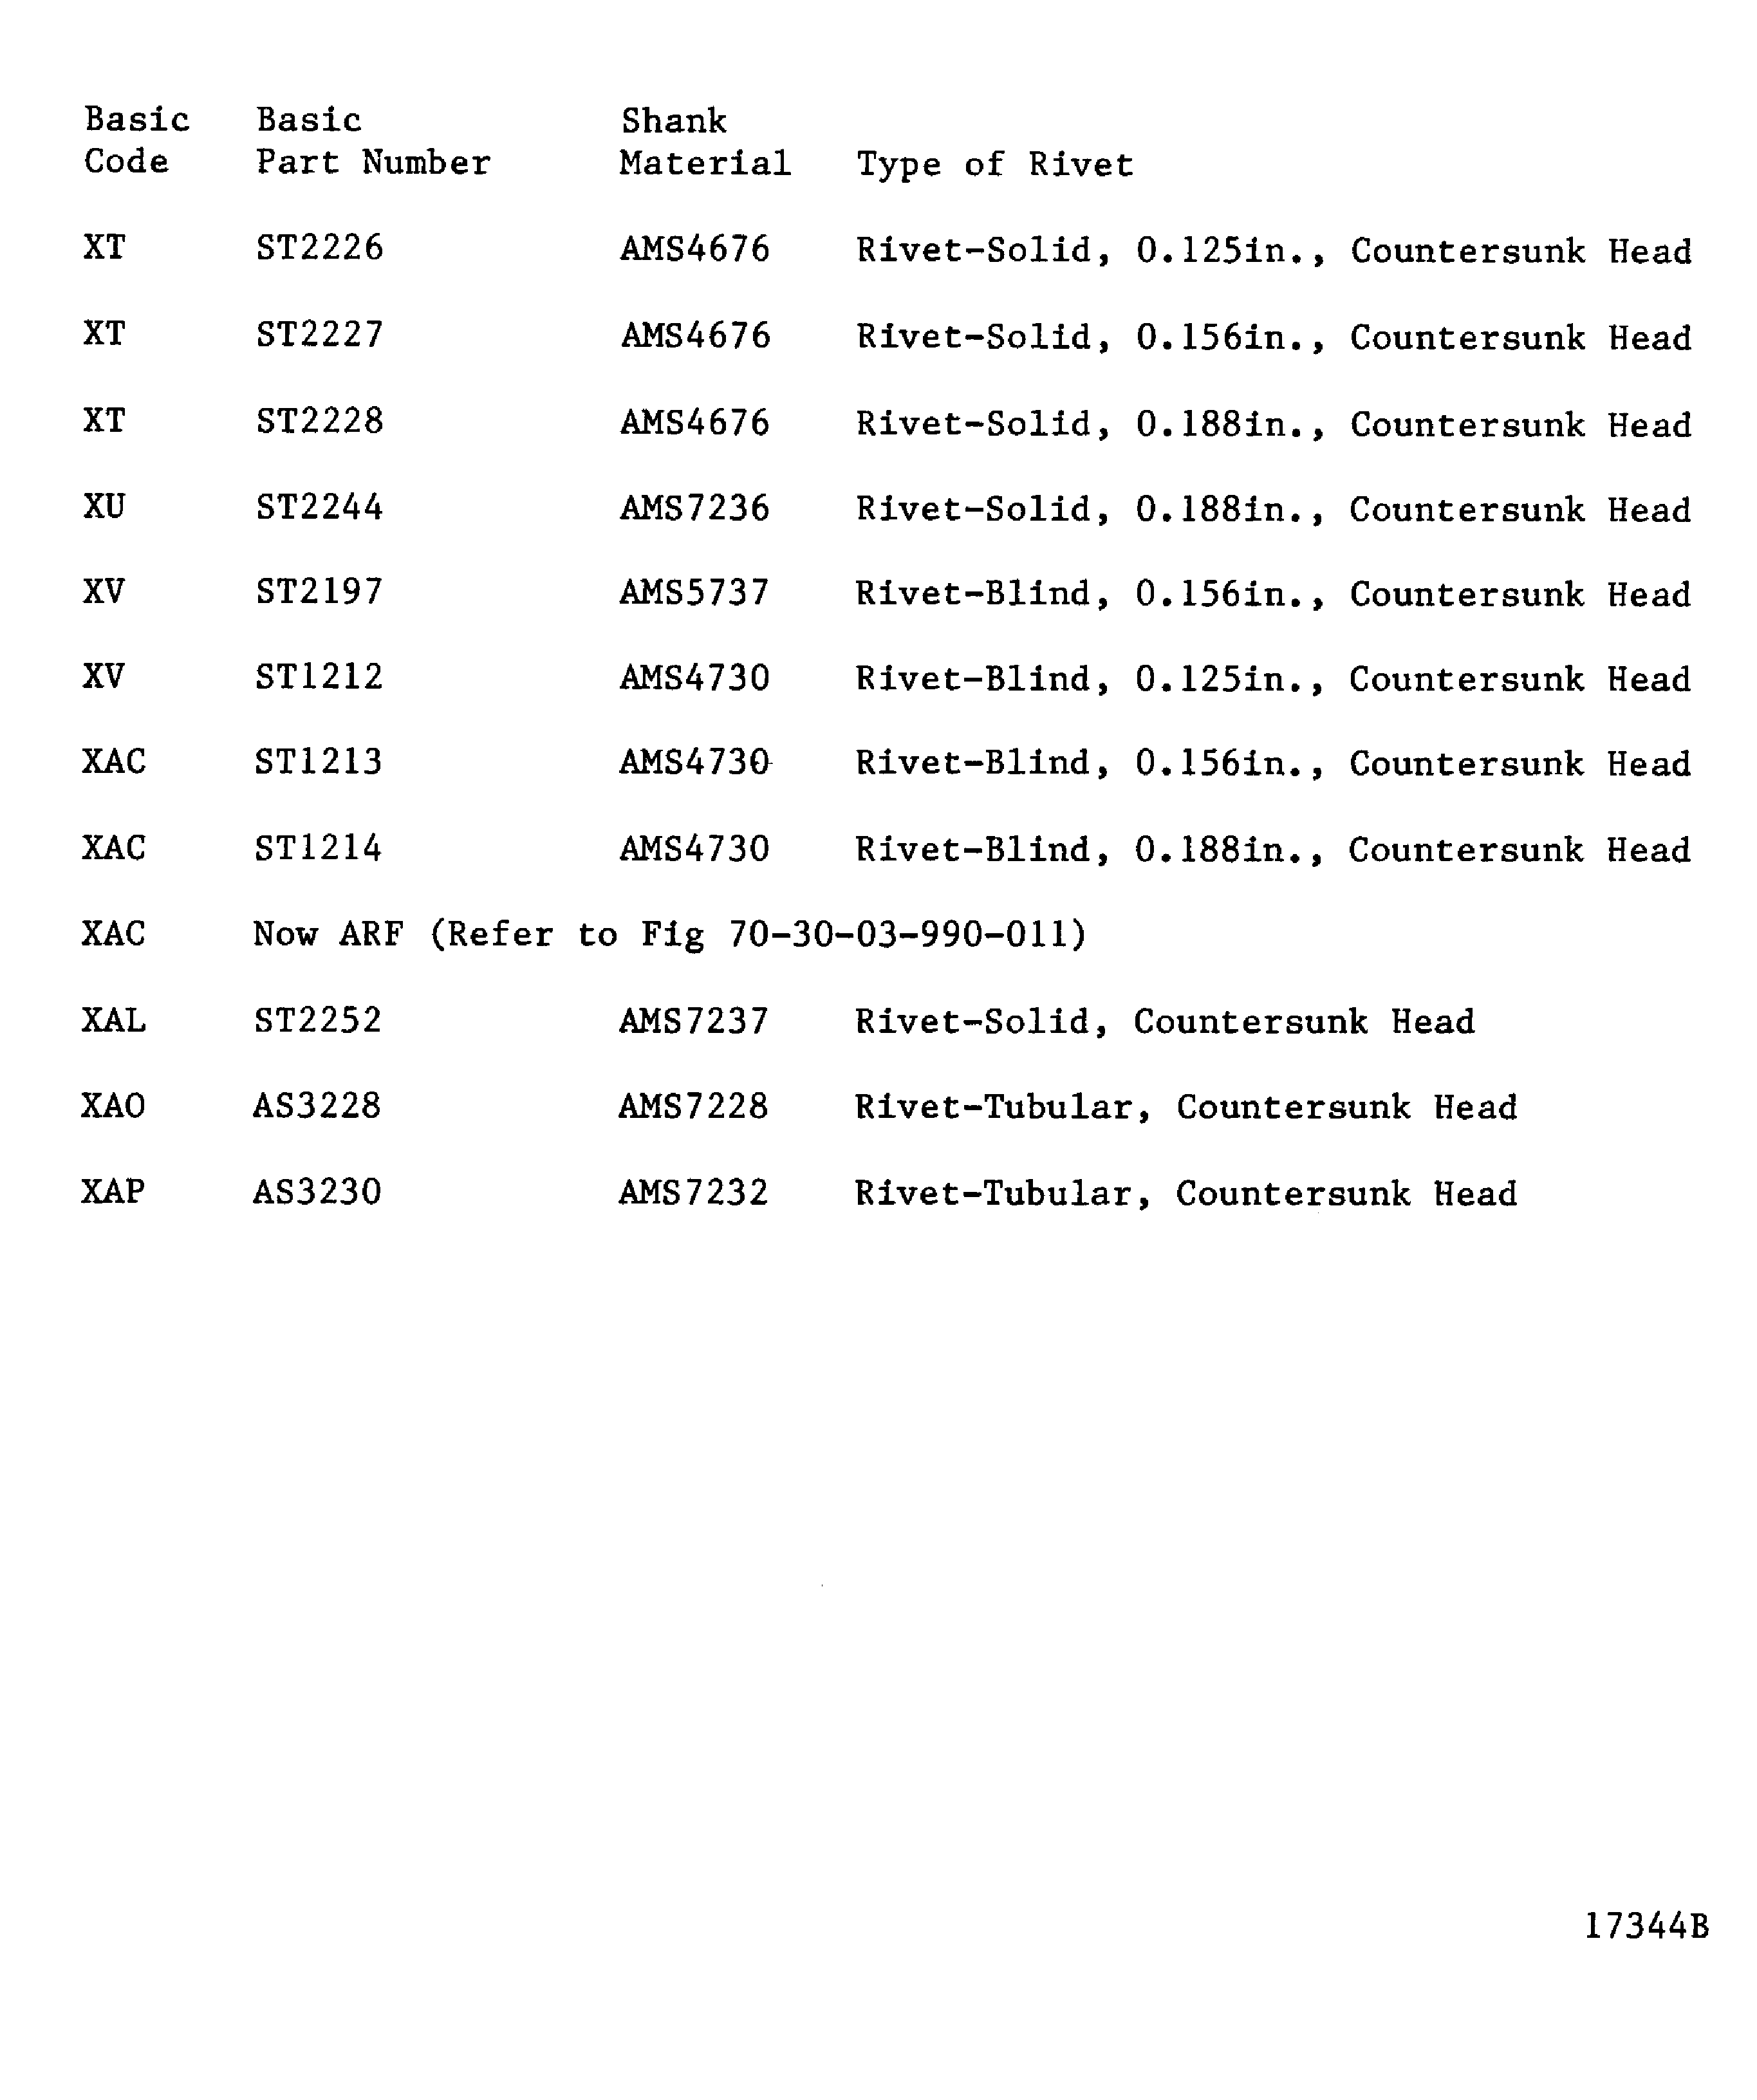
Figure: Upset head dimensions for solid rivets
Upset head dimensions for solid rivets
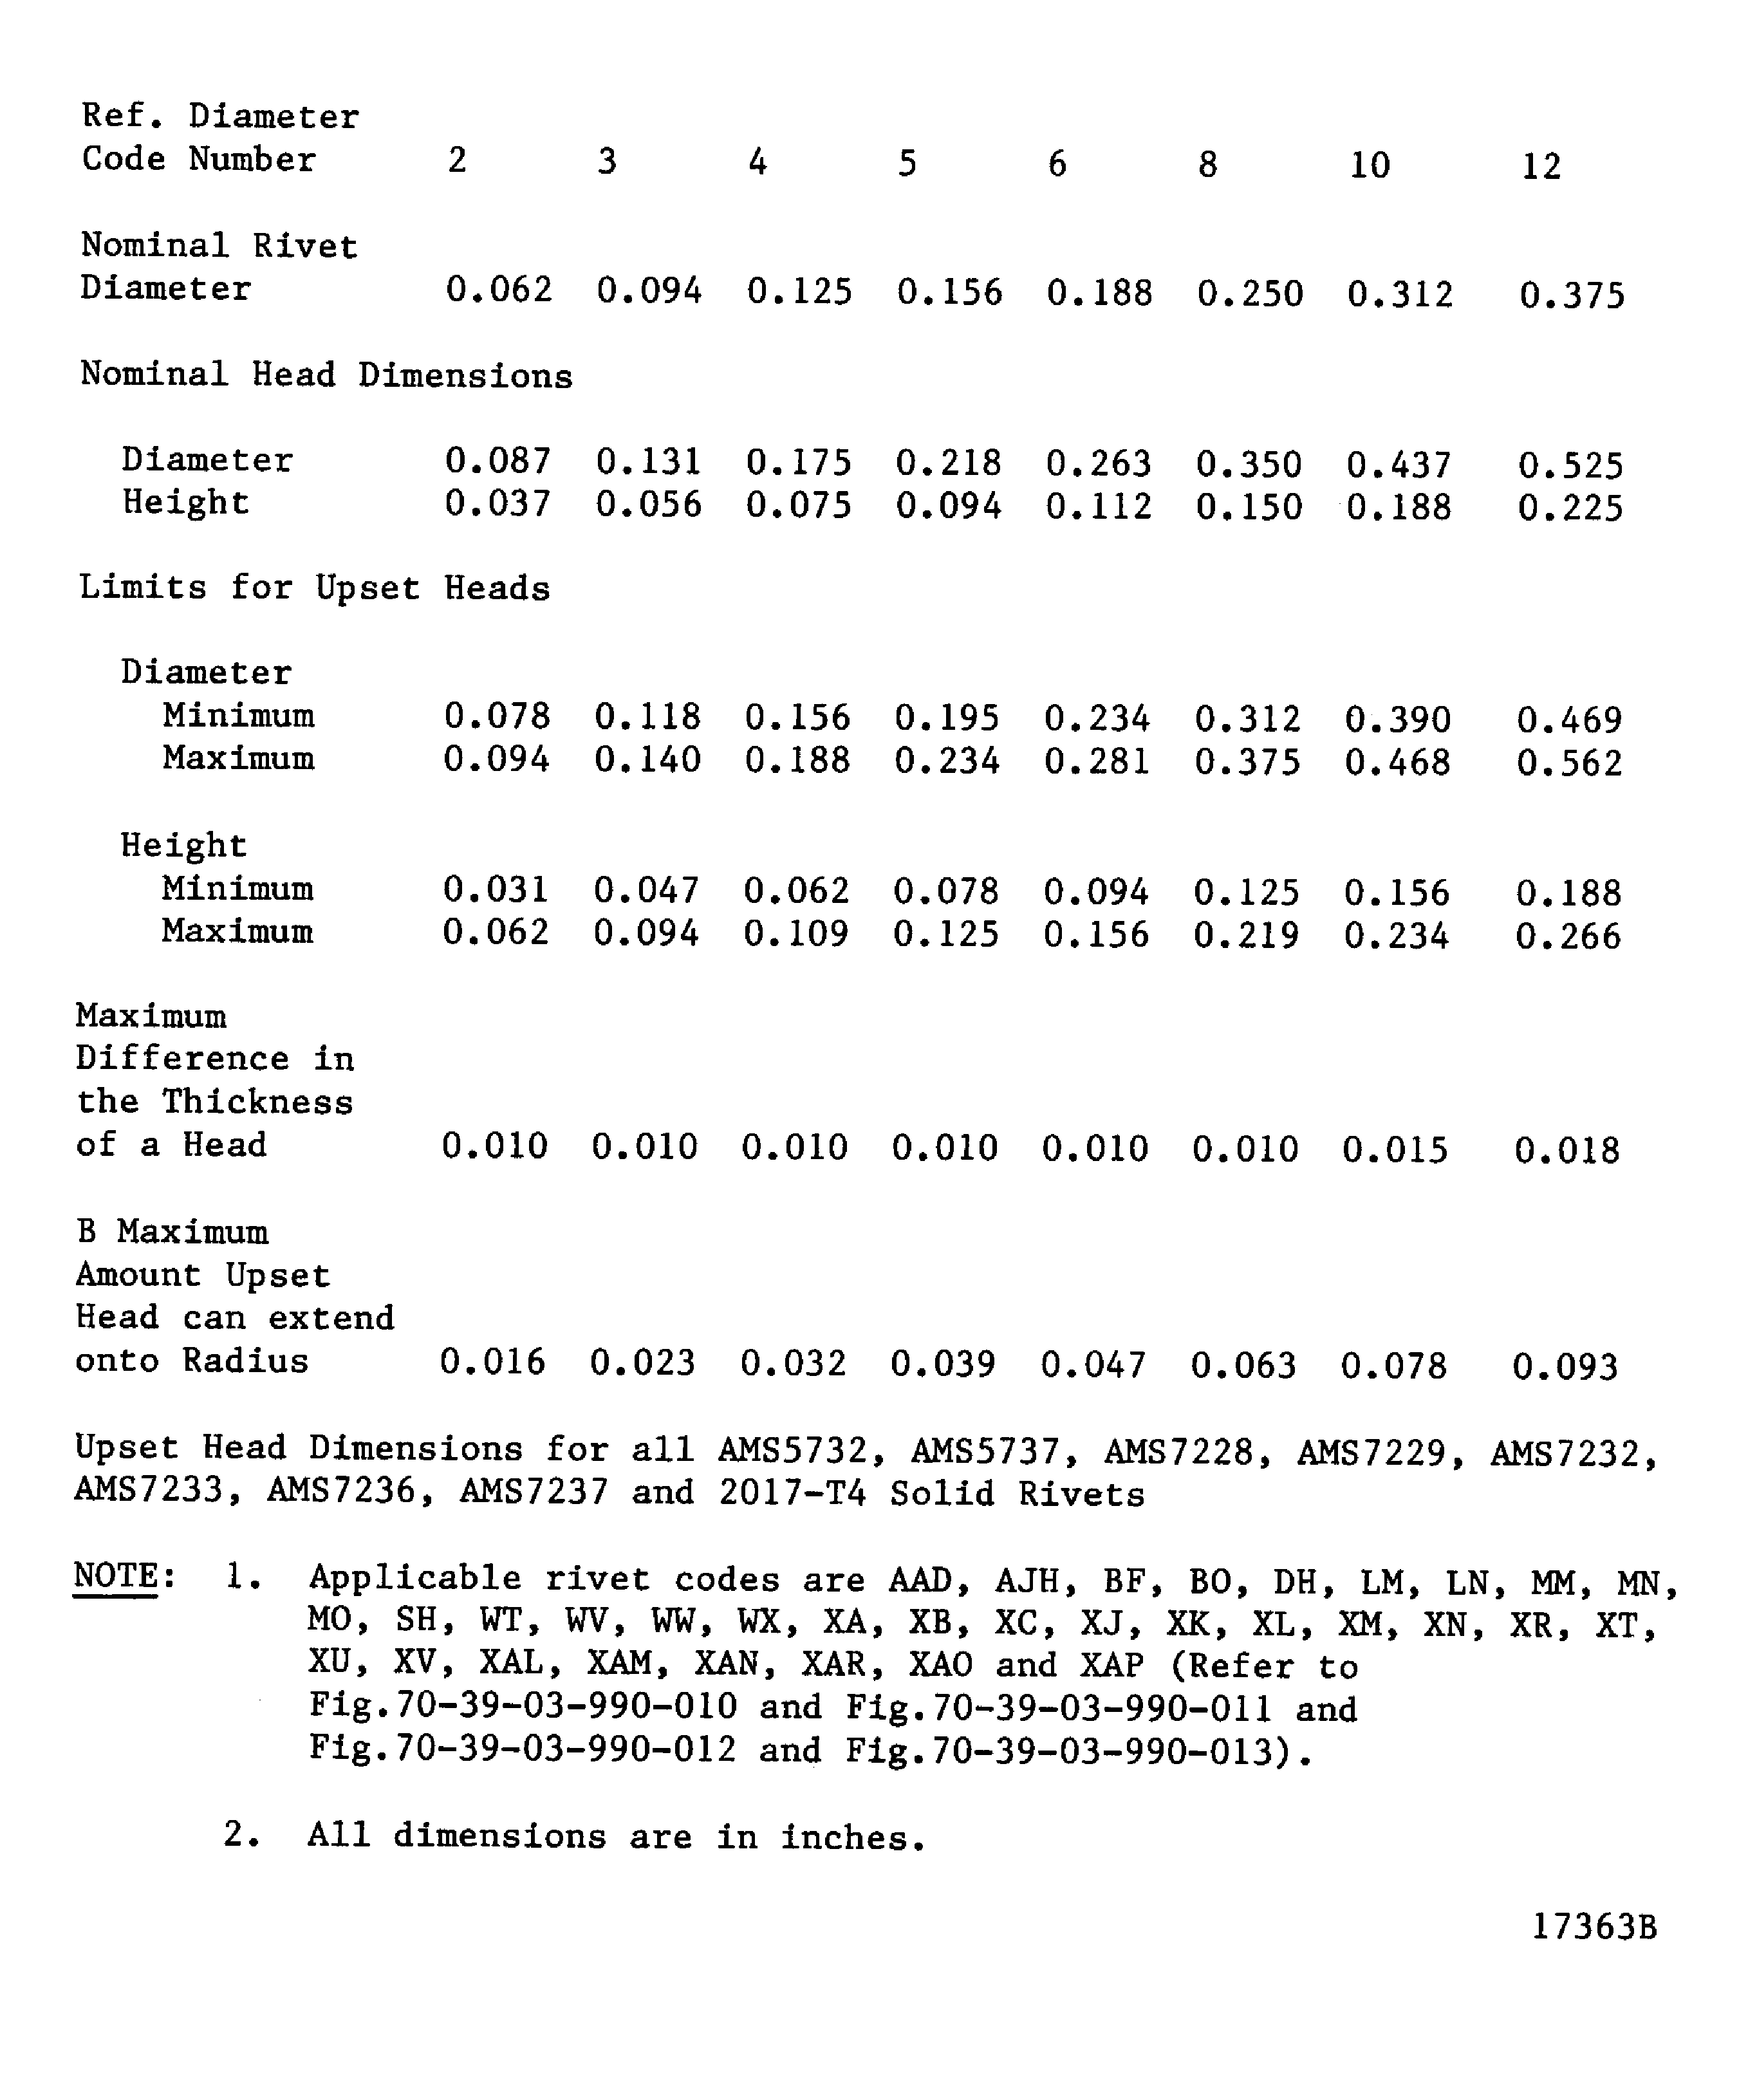
Figure: Upset head dimensions for solid rivets
Upset head dimensions for solid rivets
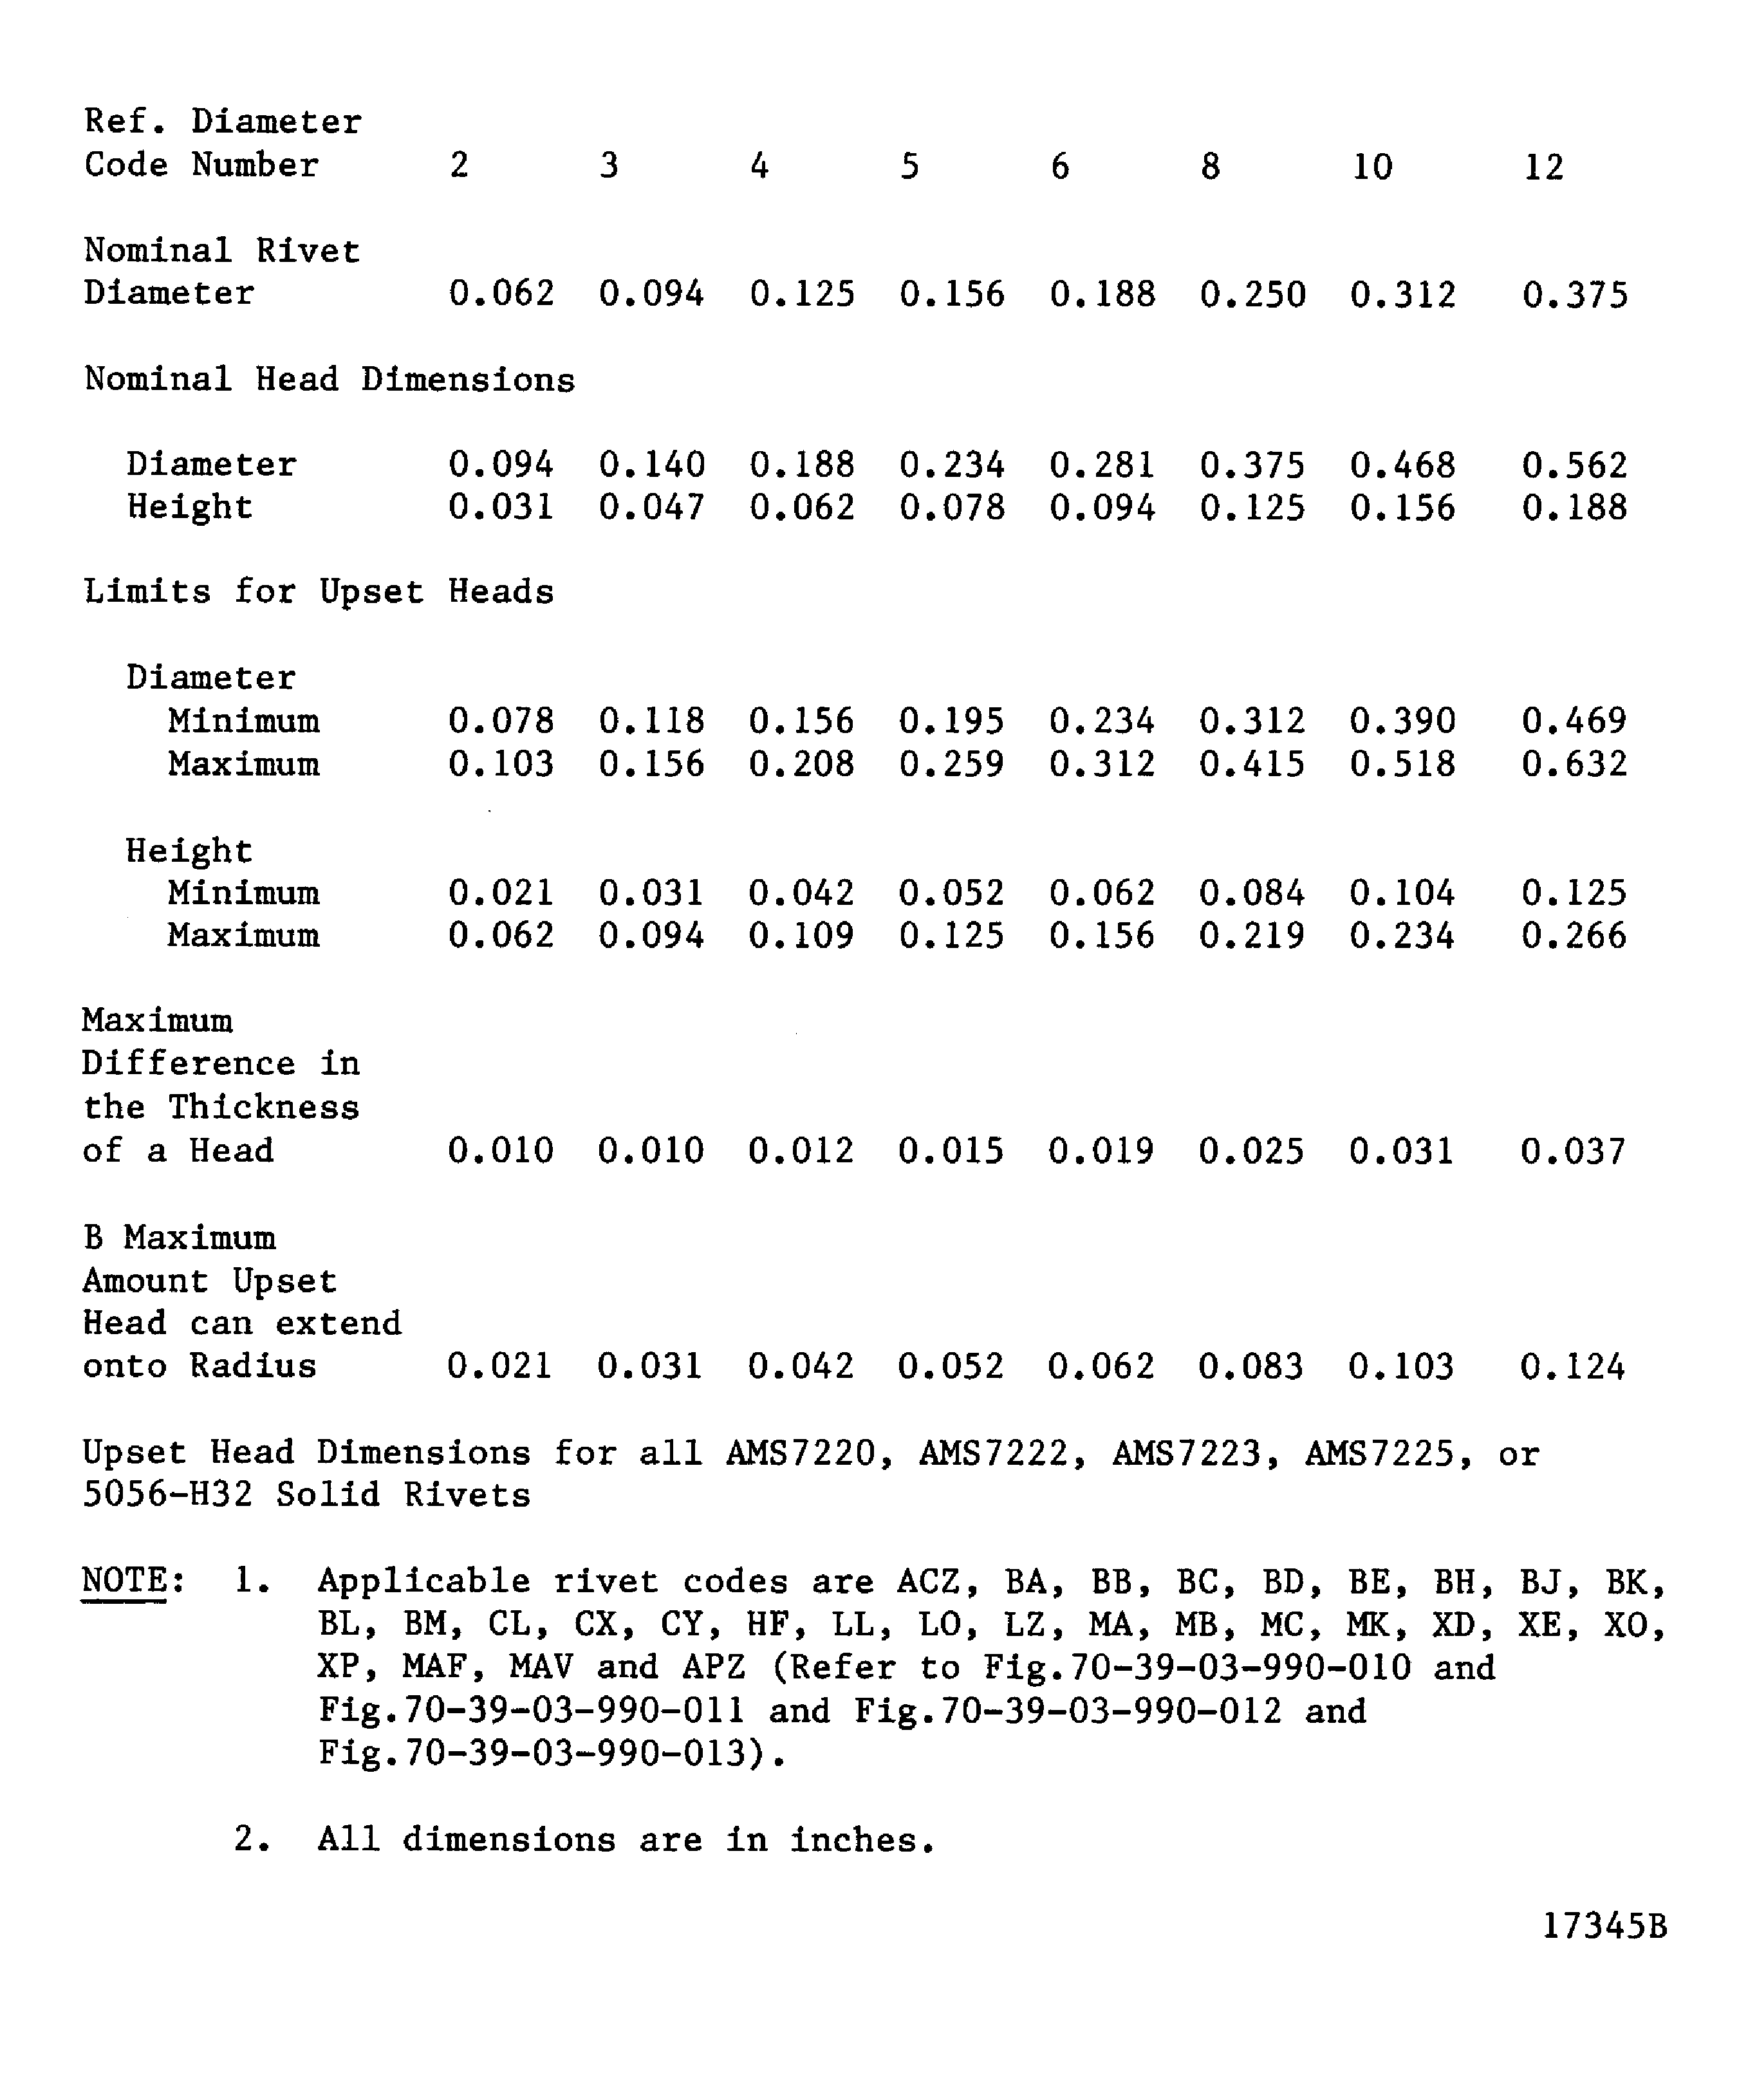
Figure: Examples of damaged rivets
Examples of damaged rivets
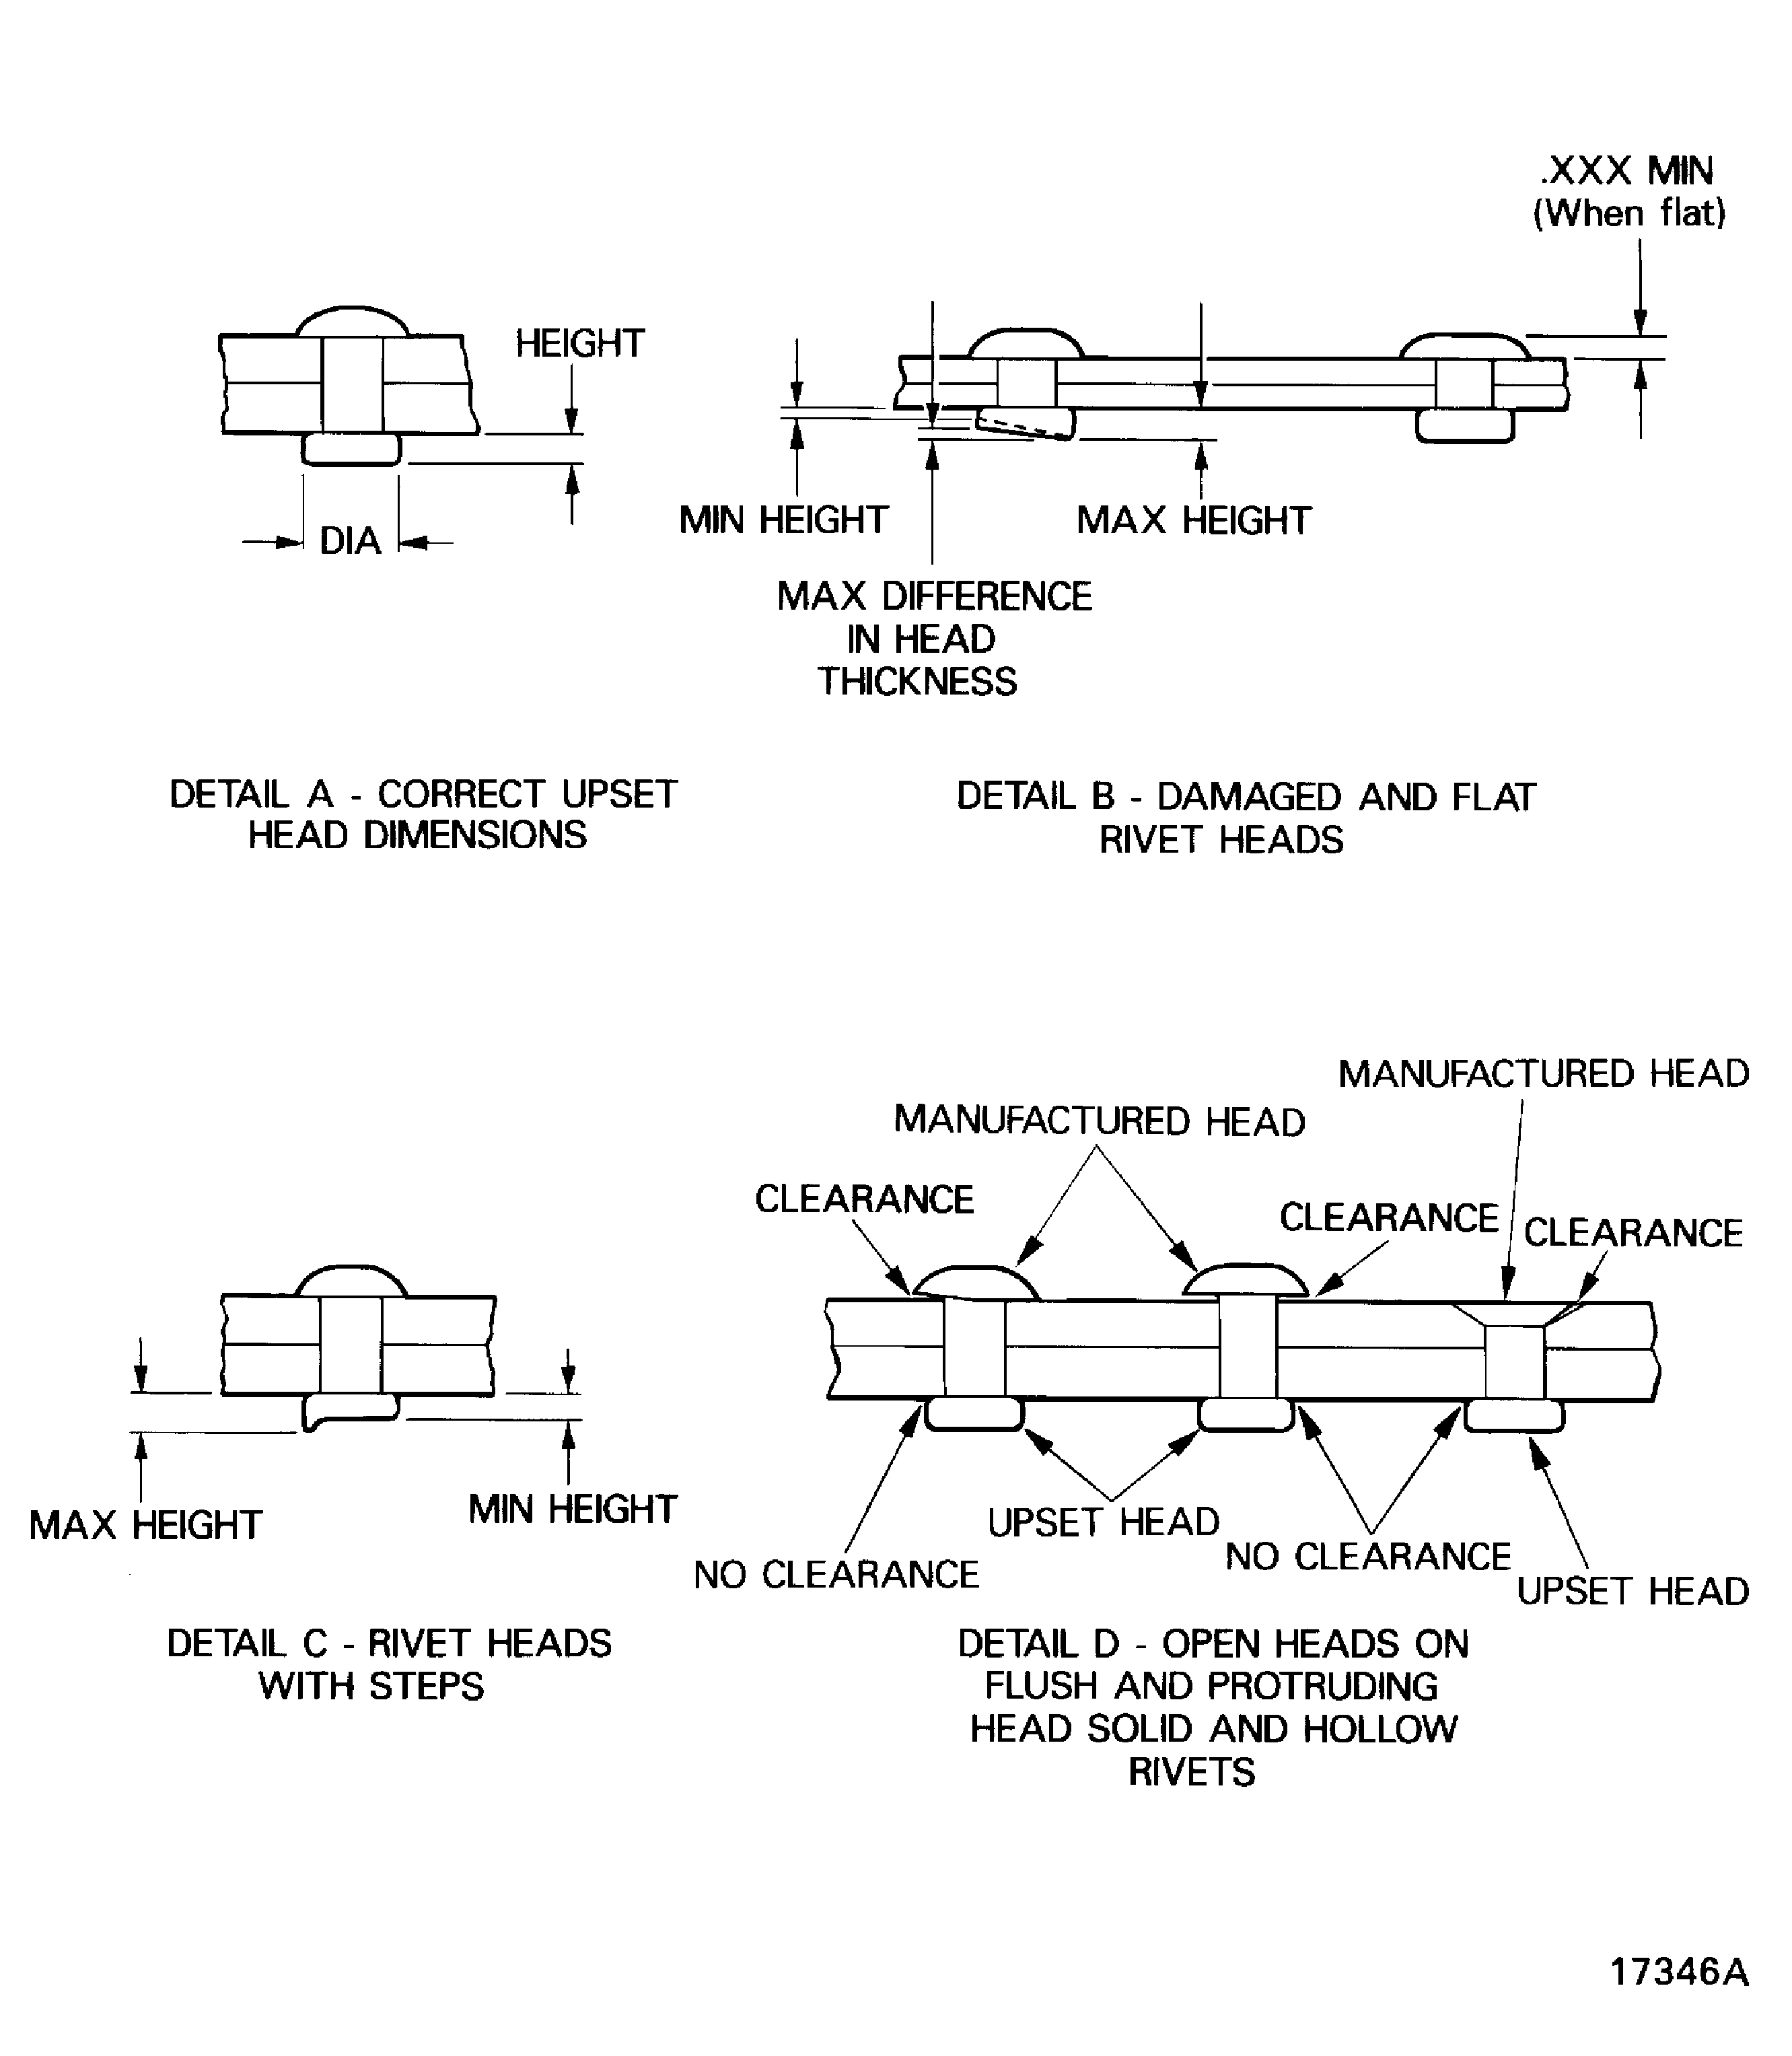
Figure: Inspection of manufactured protruding head rivet clearances
Inspection of manufactured protruding head rivet clearances
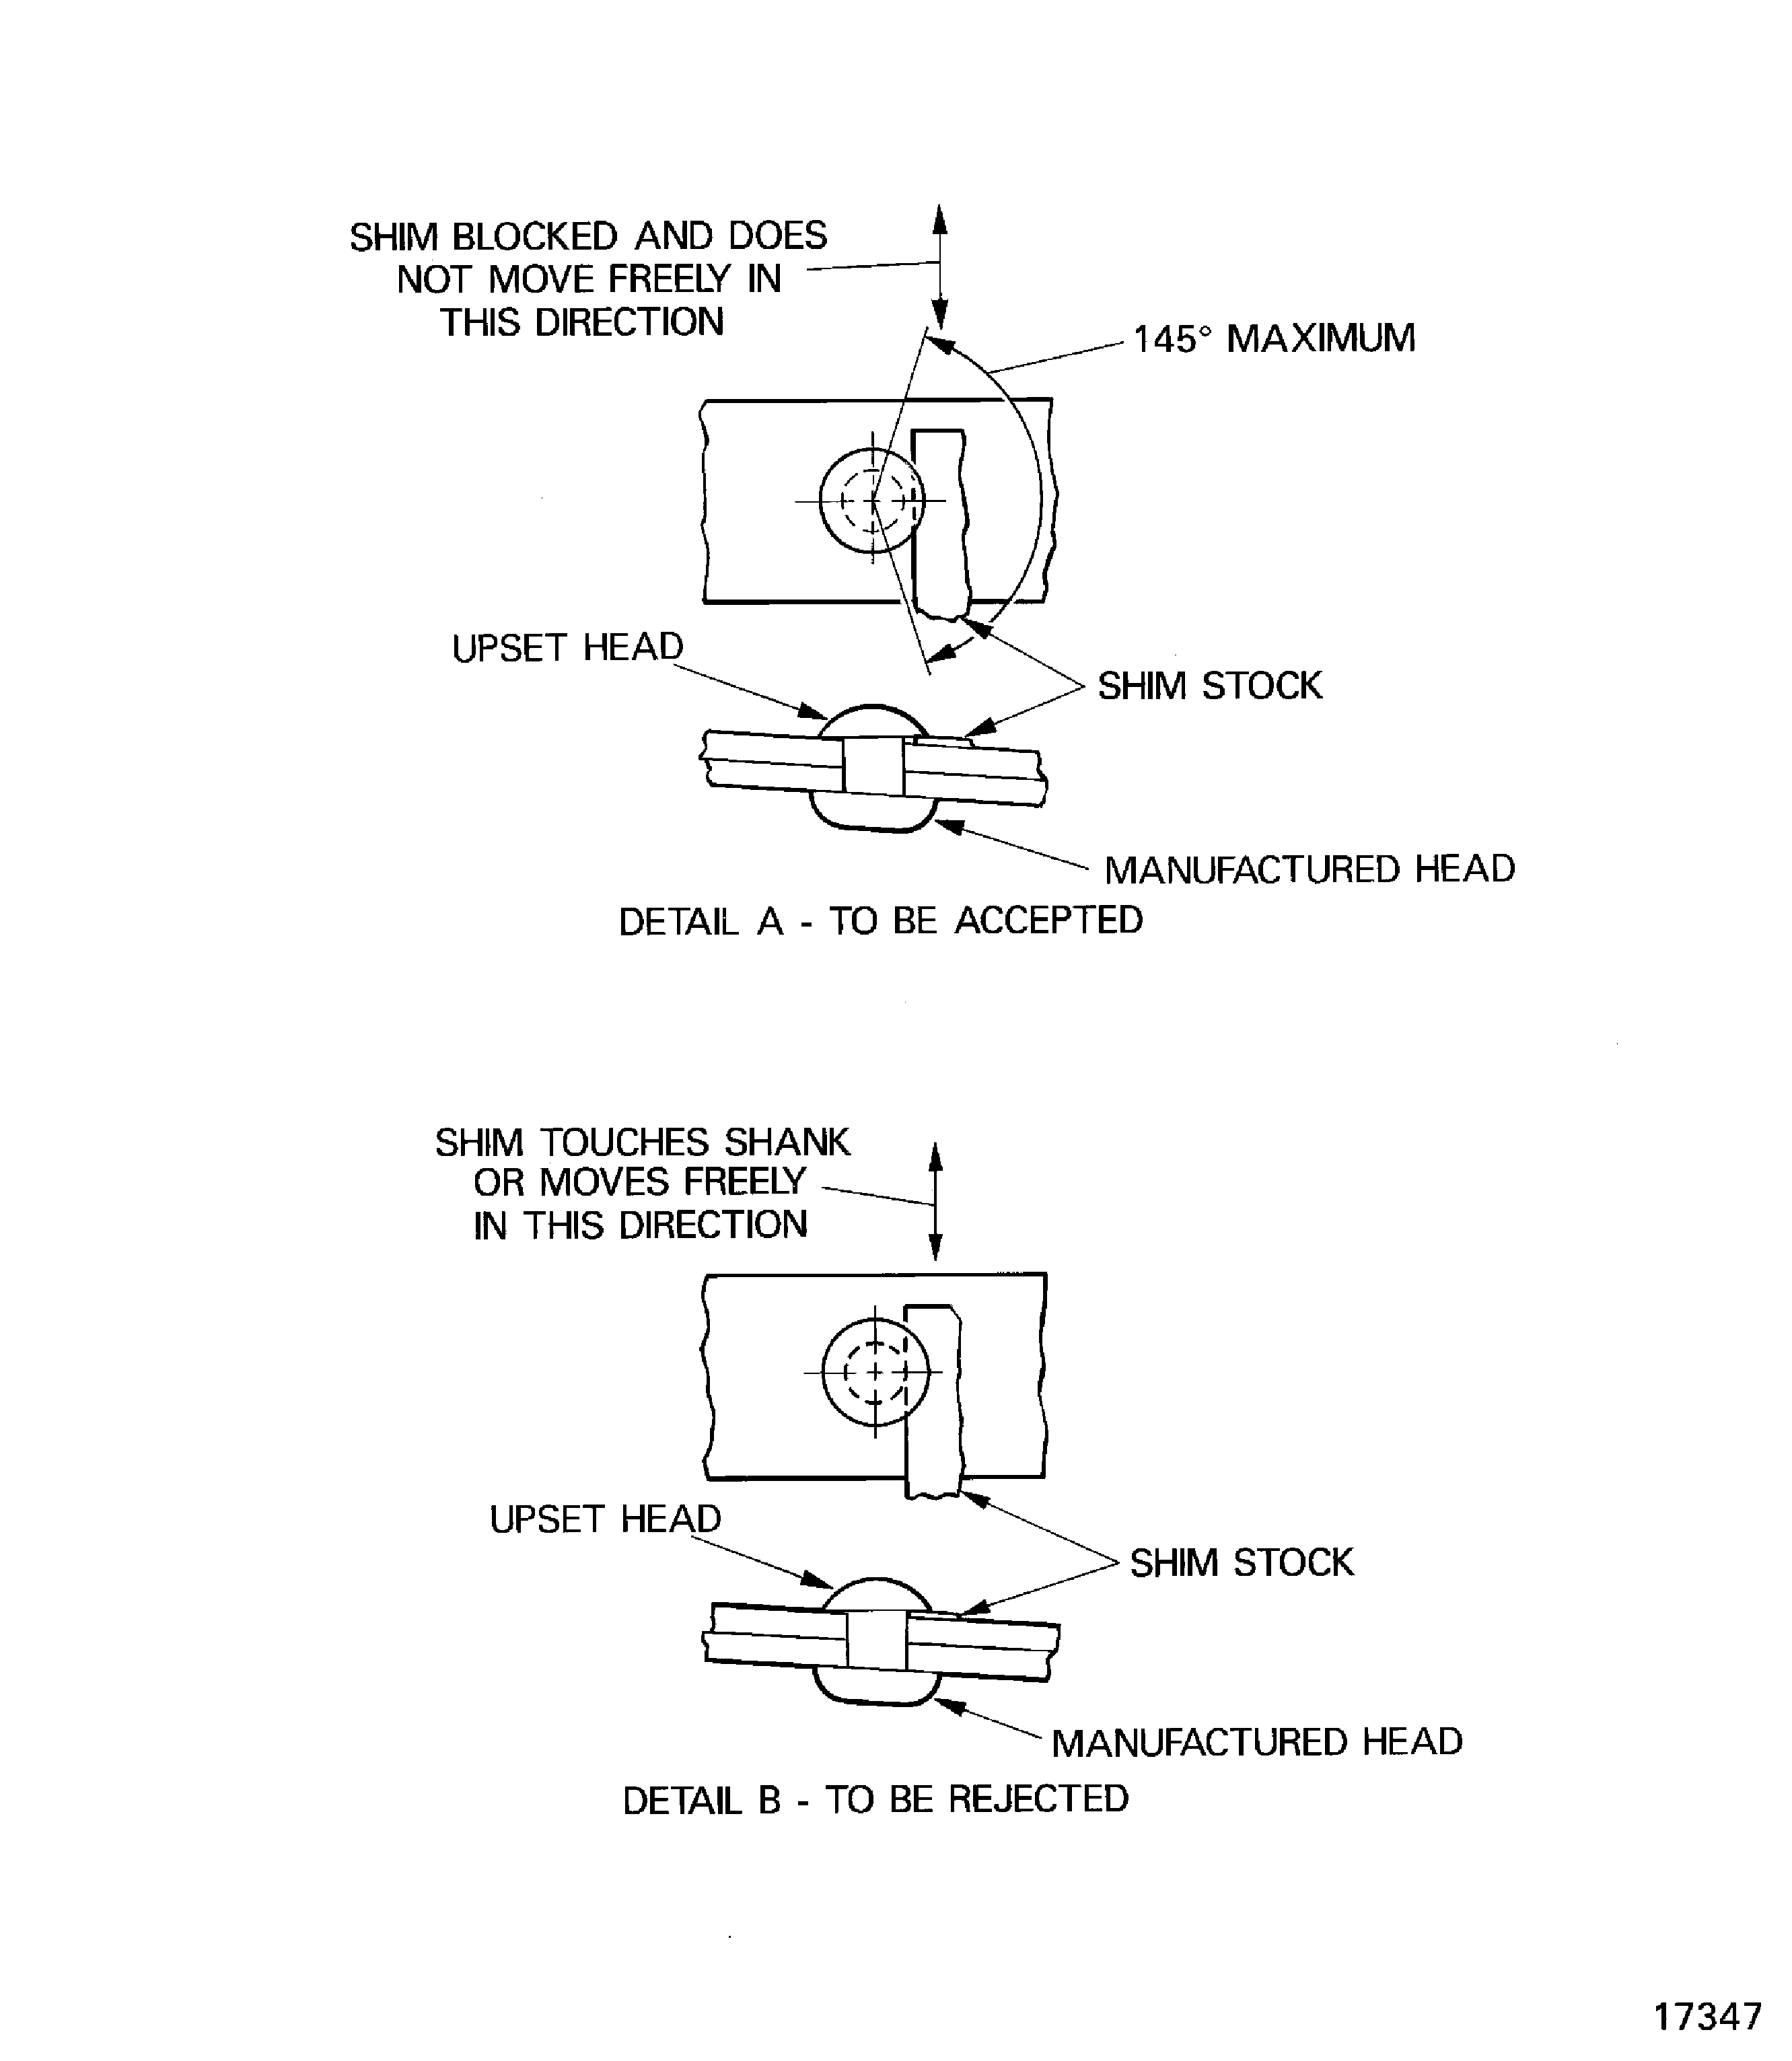
Figure: Inspection of manufactured flush head rivet clearances
Inspection of manufactured flush head rivet clearances
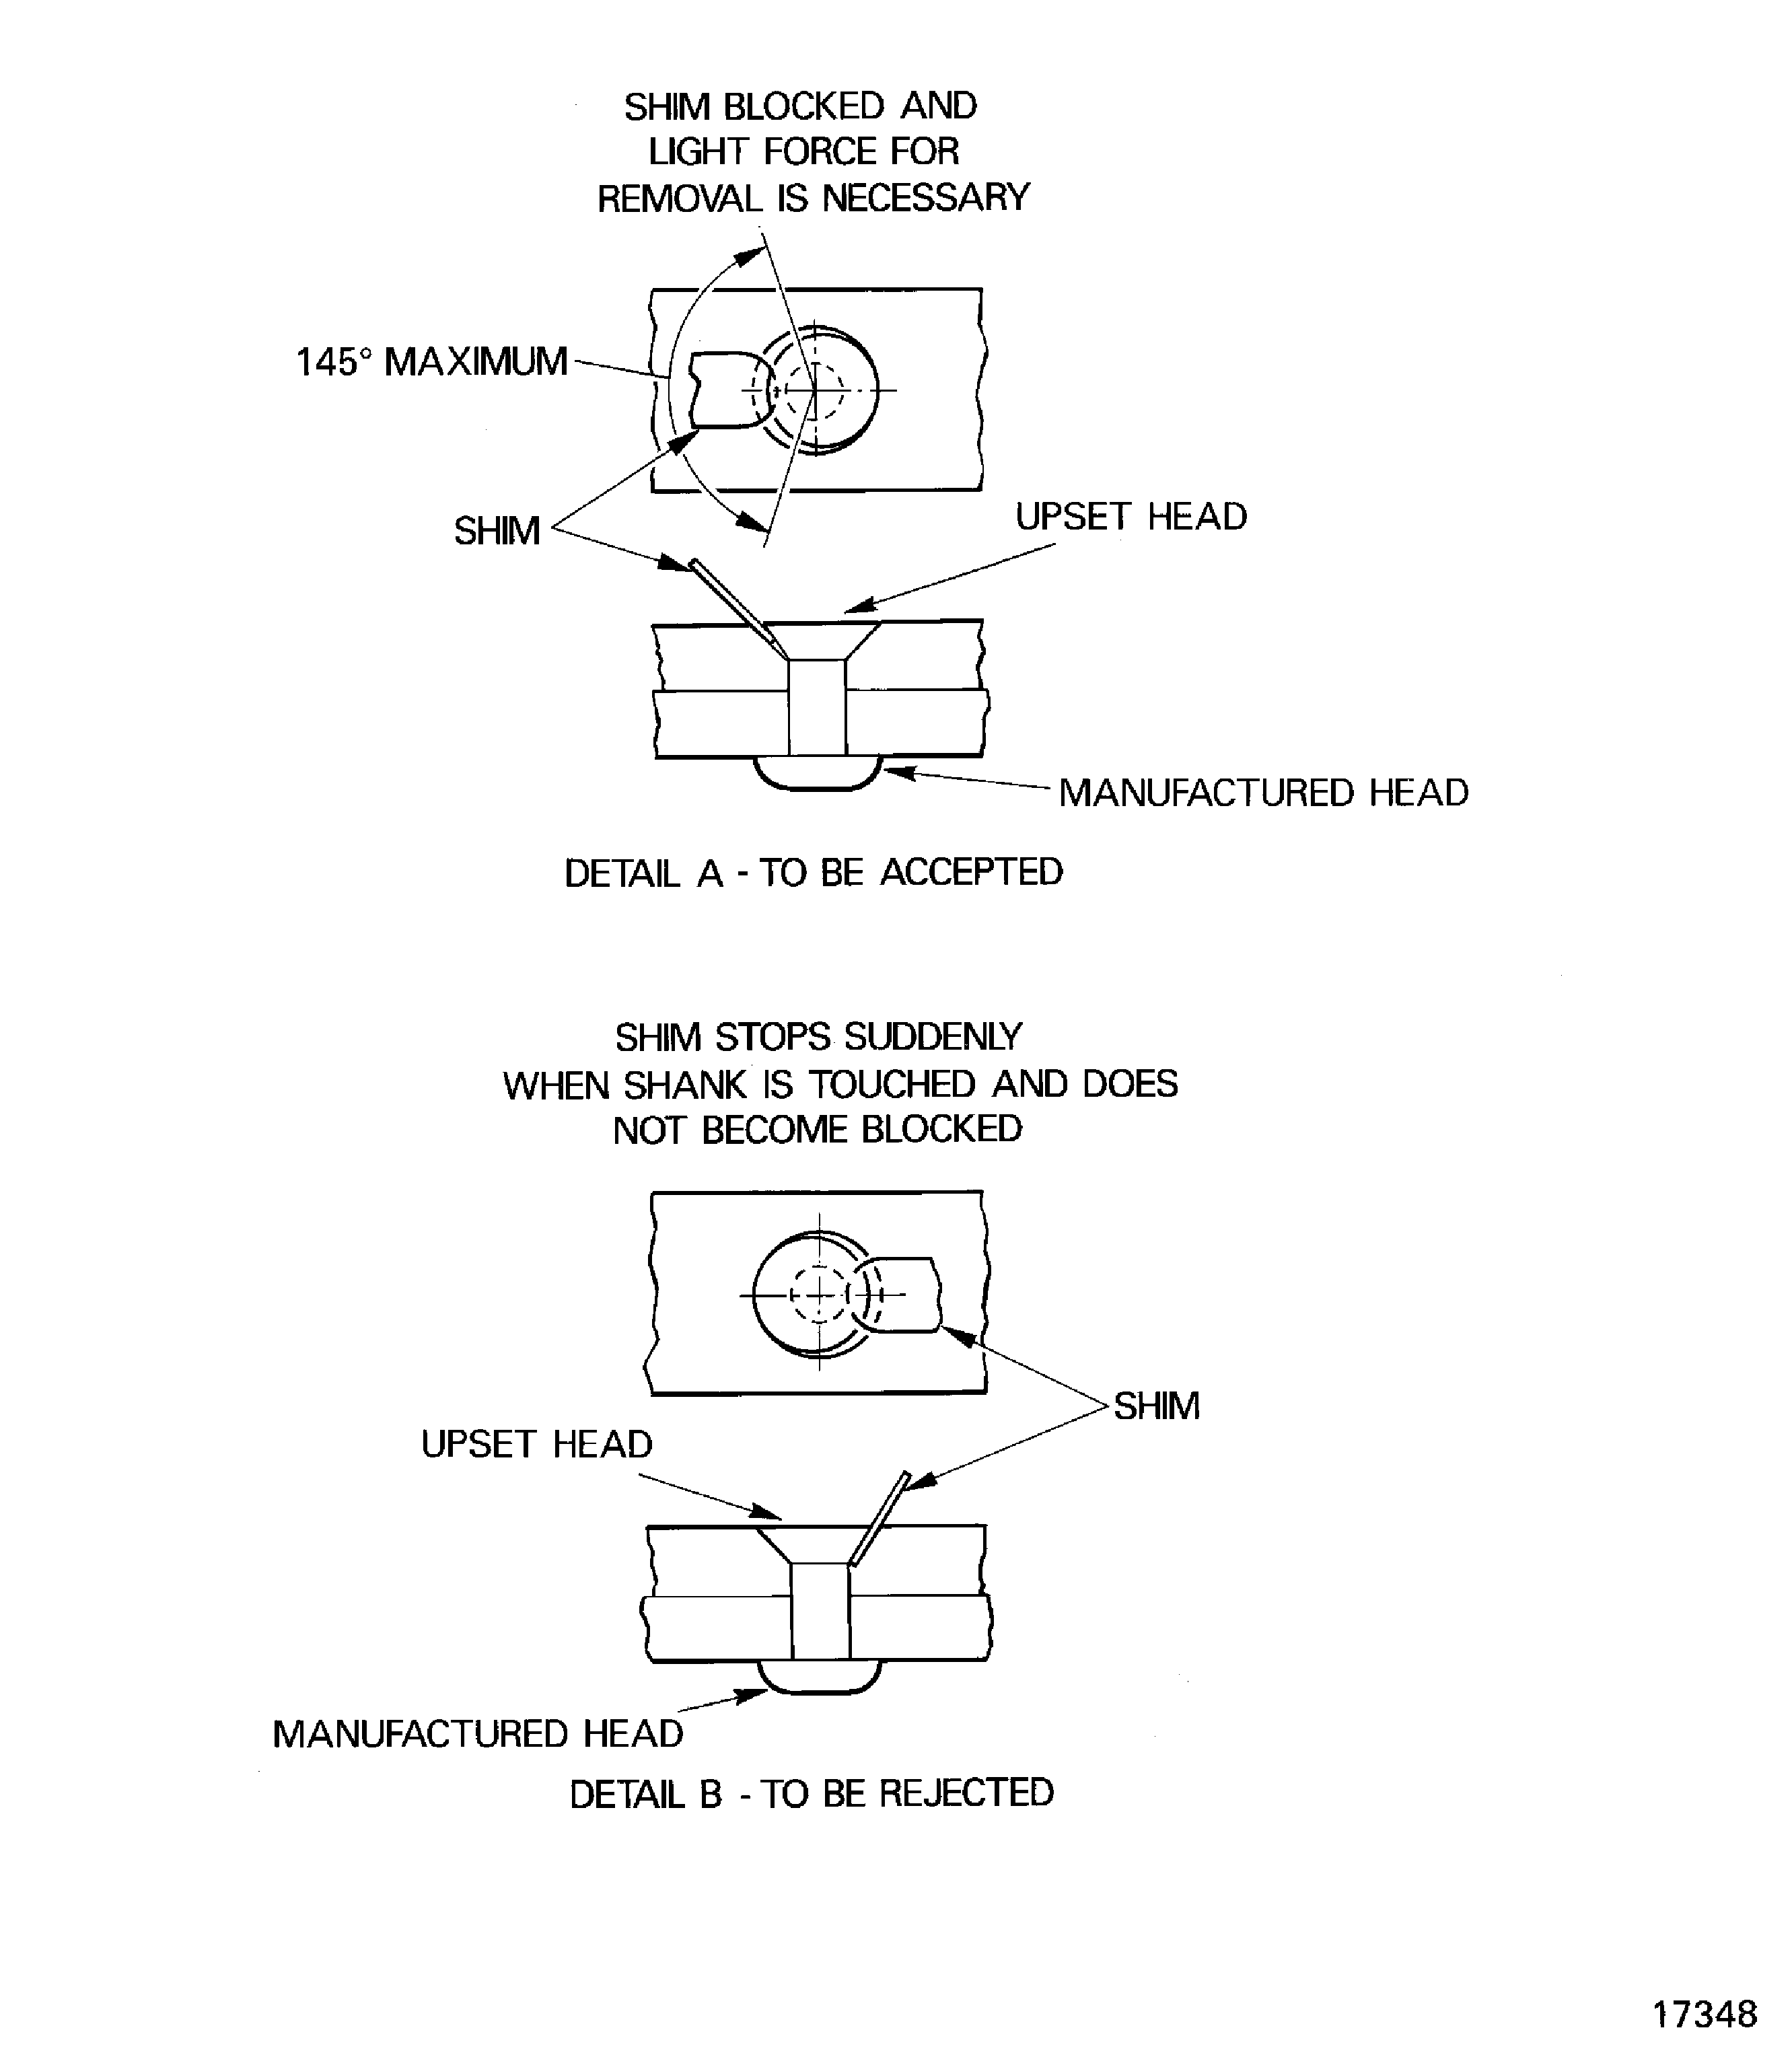
Figure: Detail of rivet clearance inspection shim
Detail of rivet clearance inspection shim
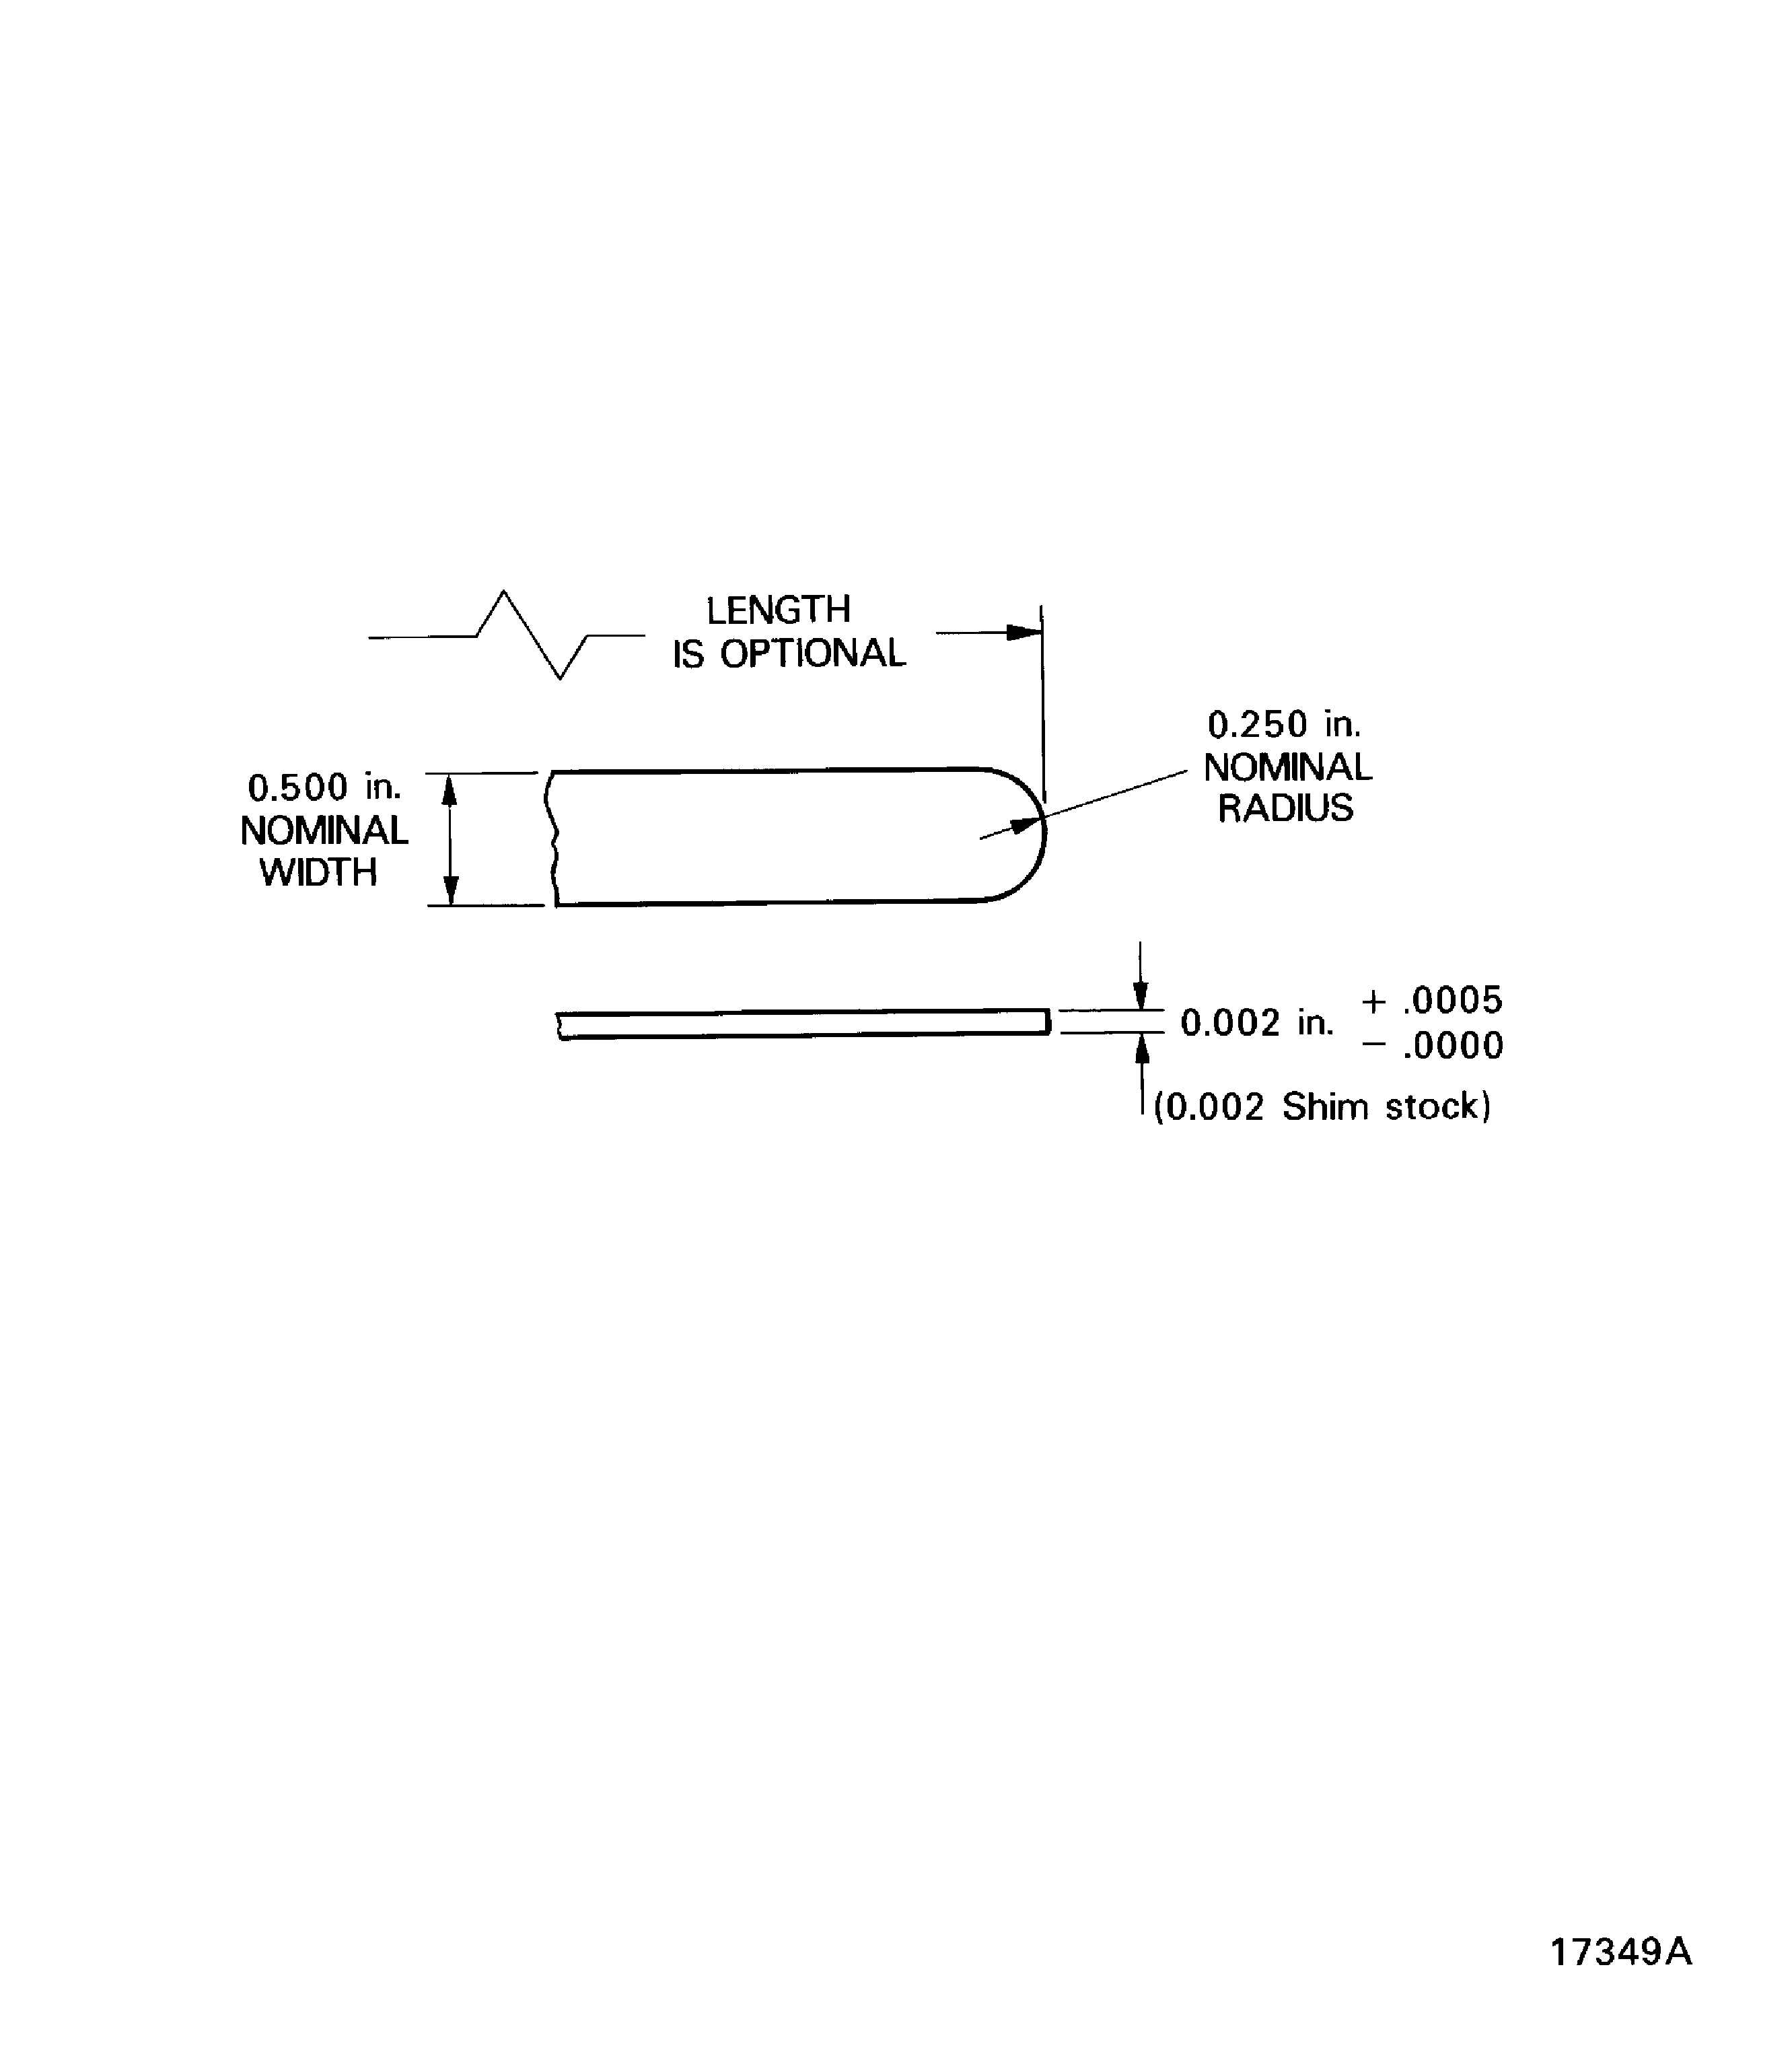
Figure: Open heads on flush and protruding head blind rivets, bolts and rivet pins, against flat surfaces
Open heads on flush and protruding head blind rivets, bolts and rivet pins, against flat surfaces
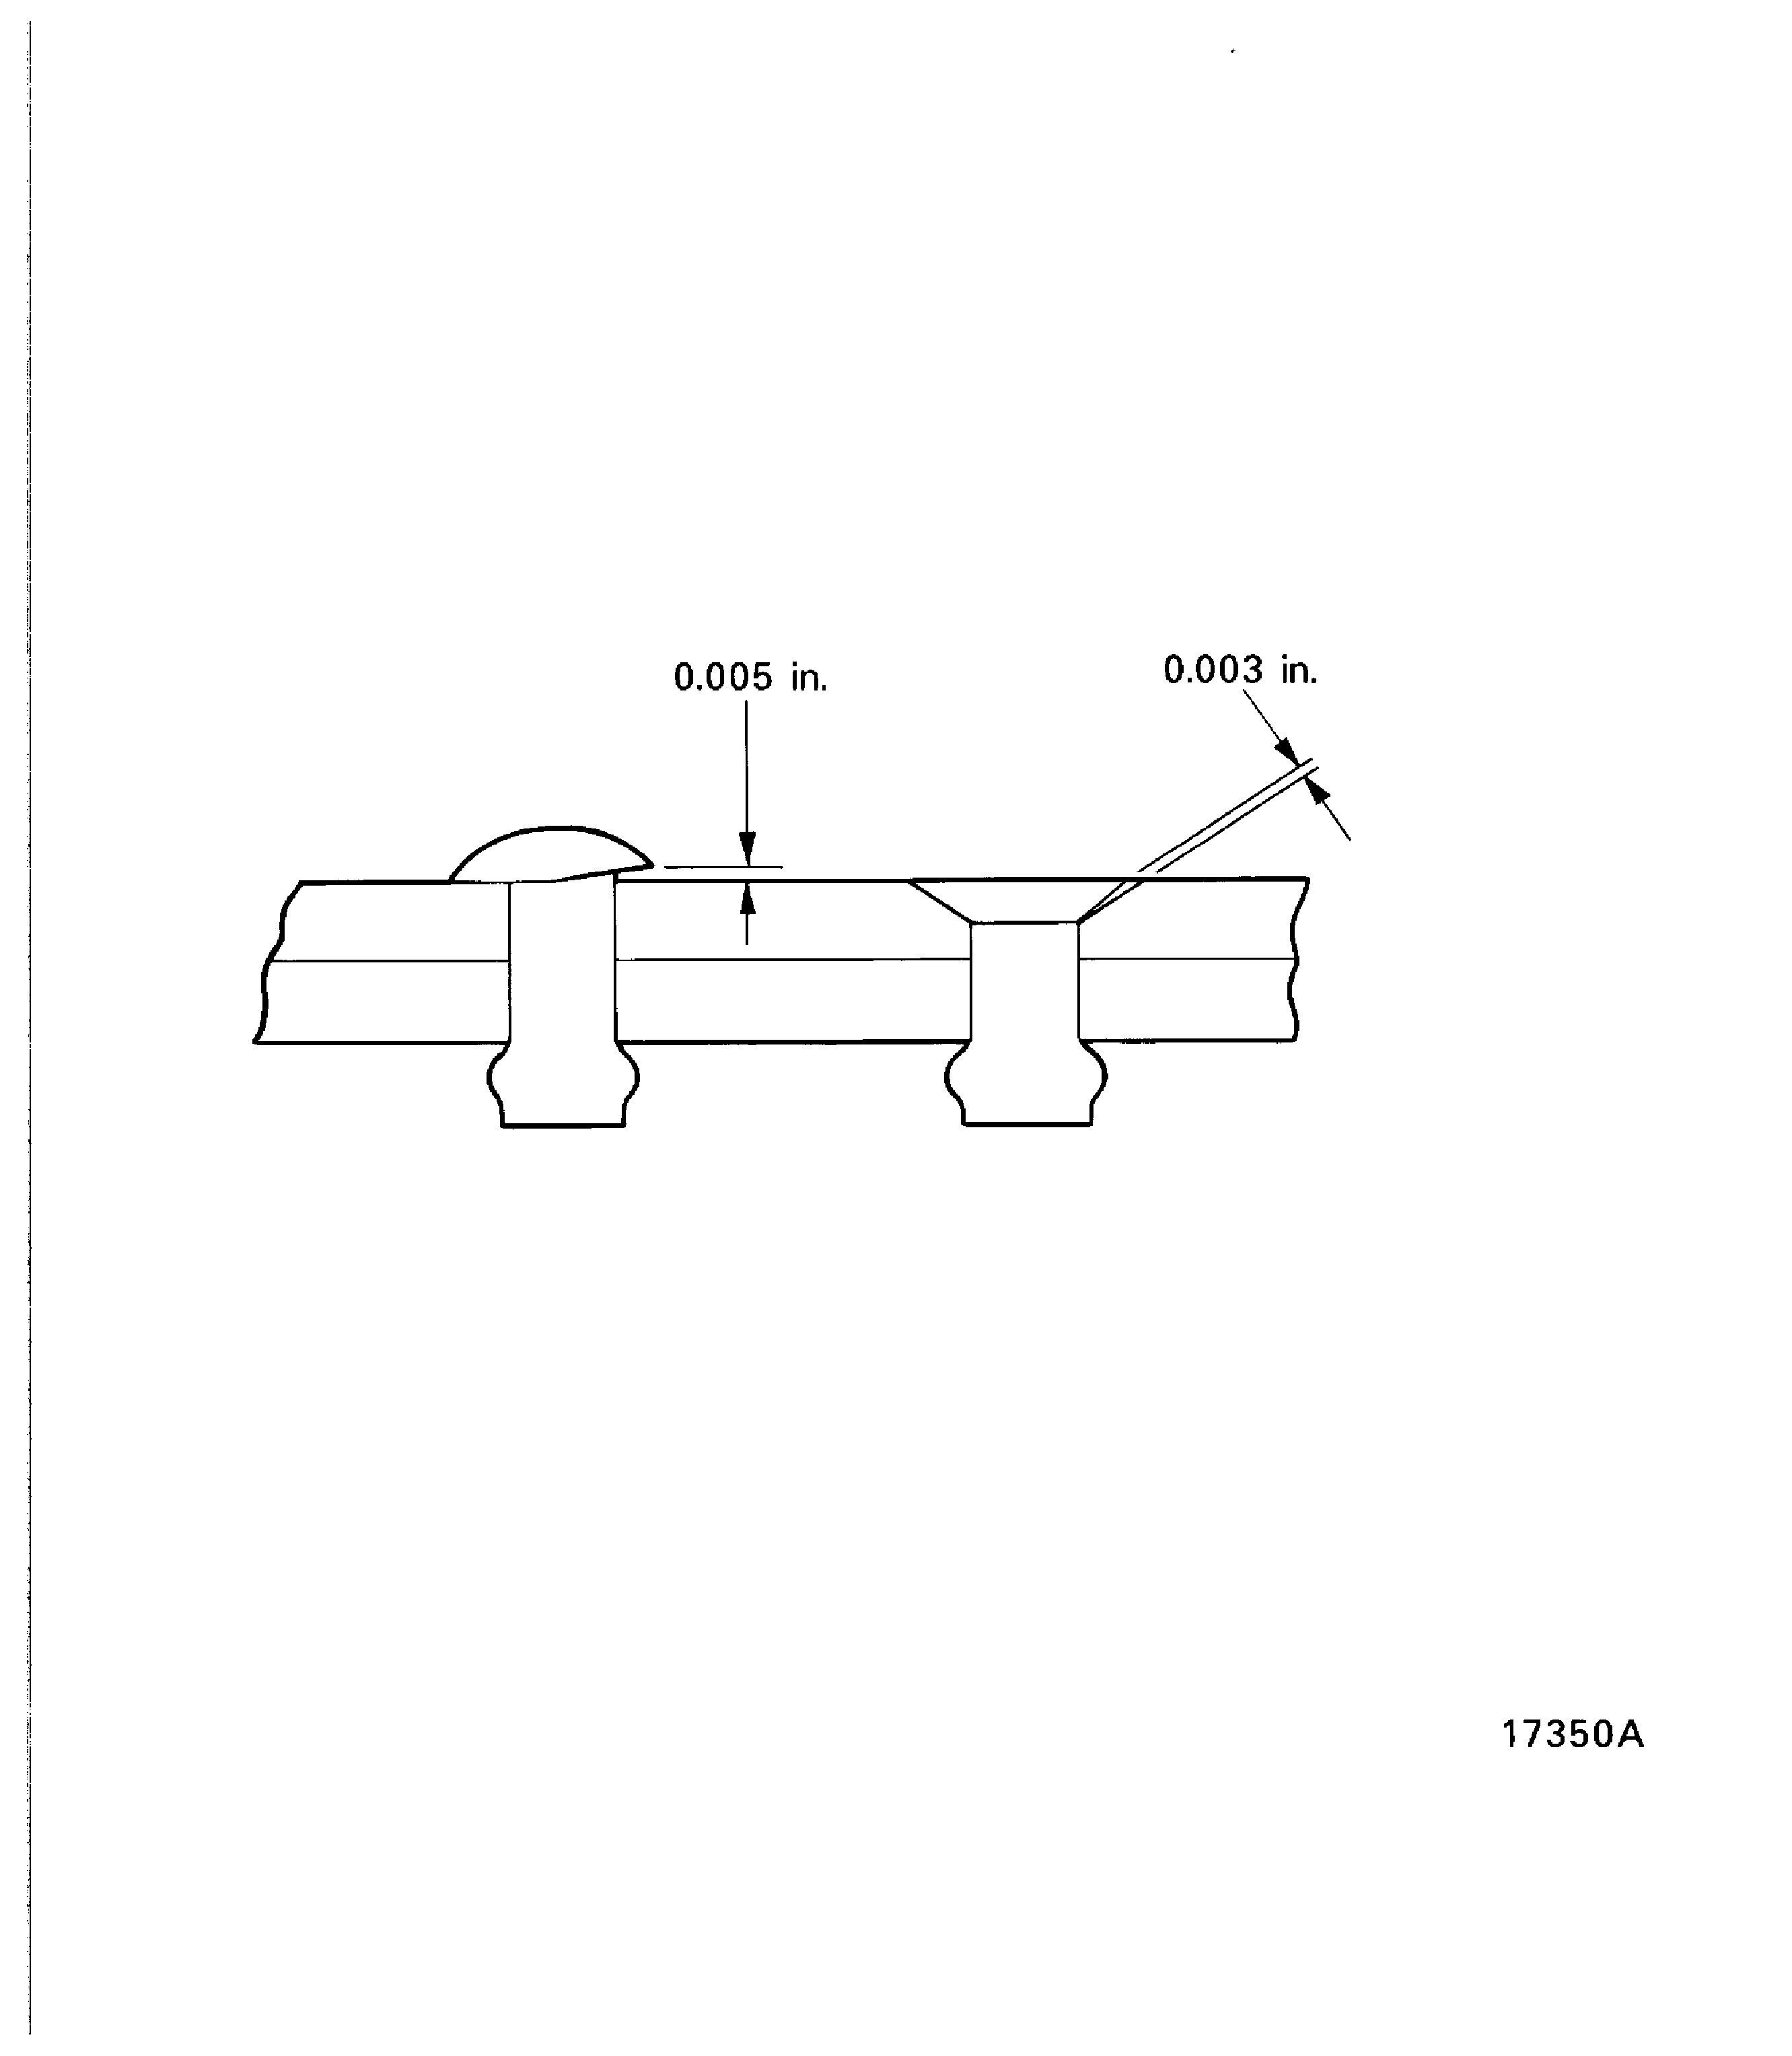
Figure: Crack limits for upset heads
Crack limits for upset heads
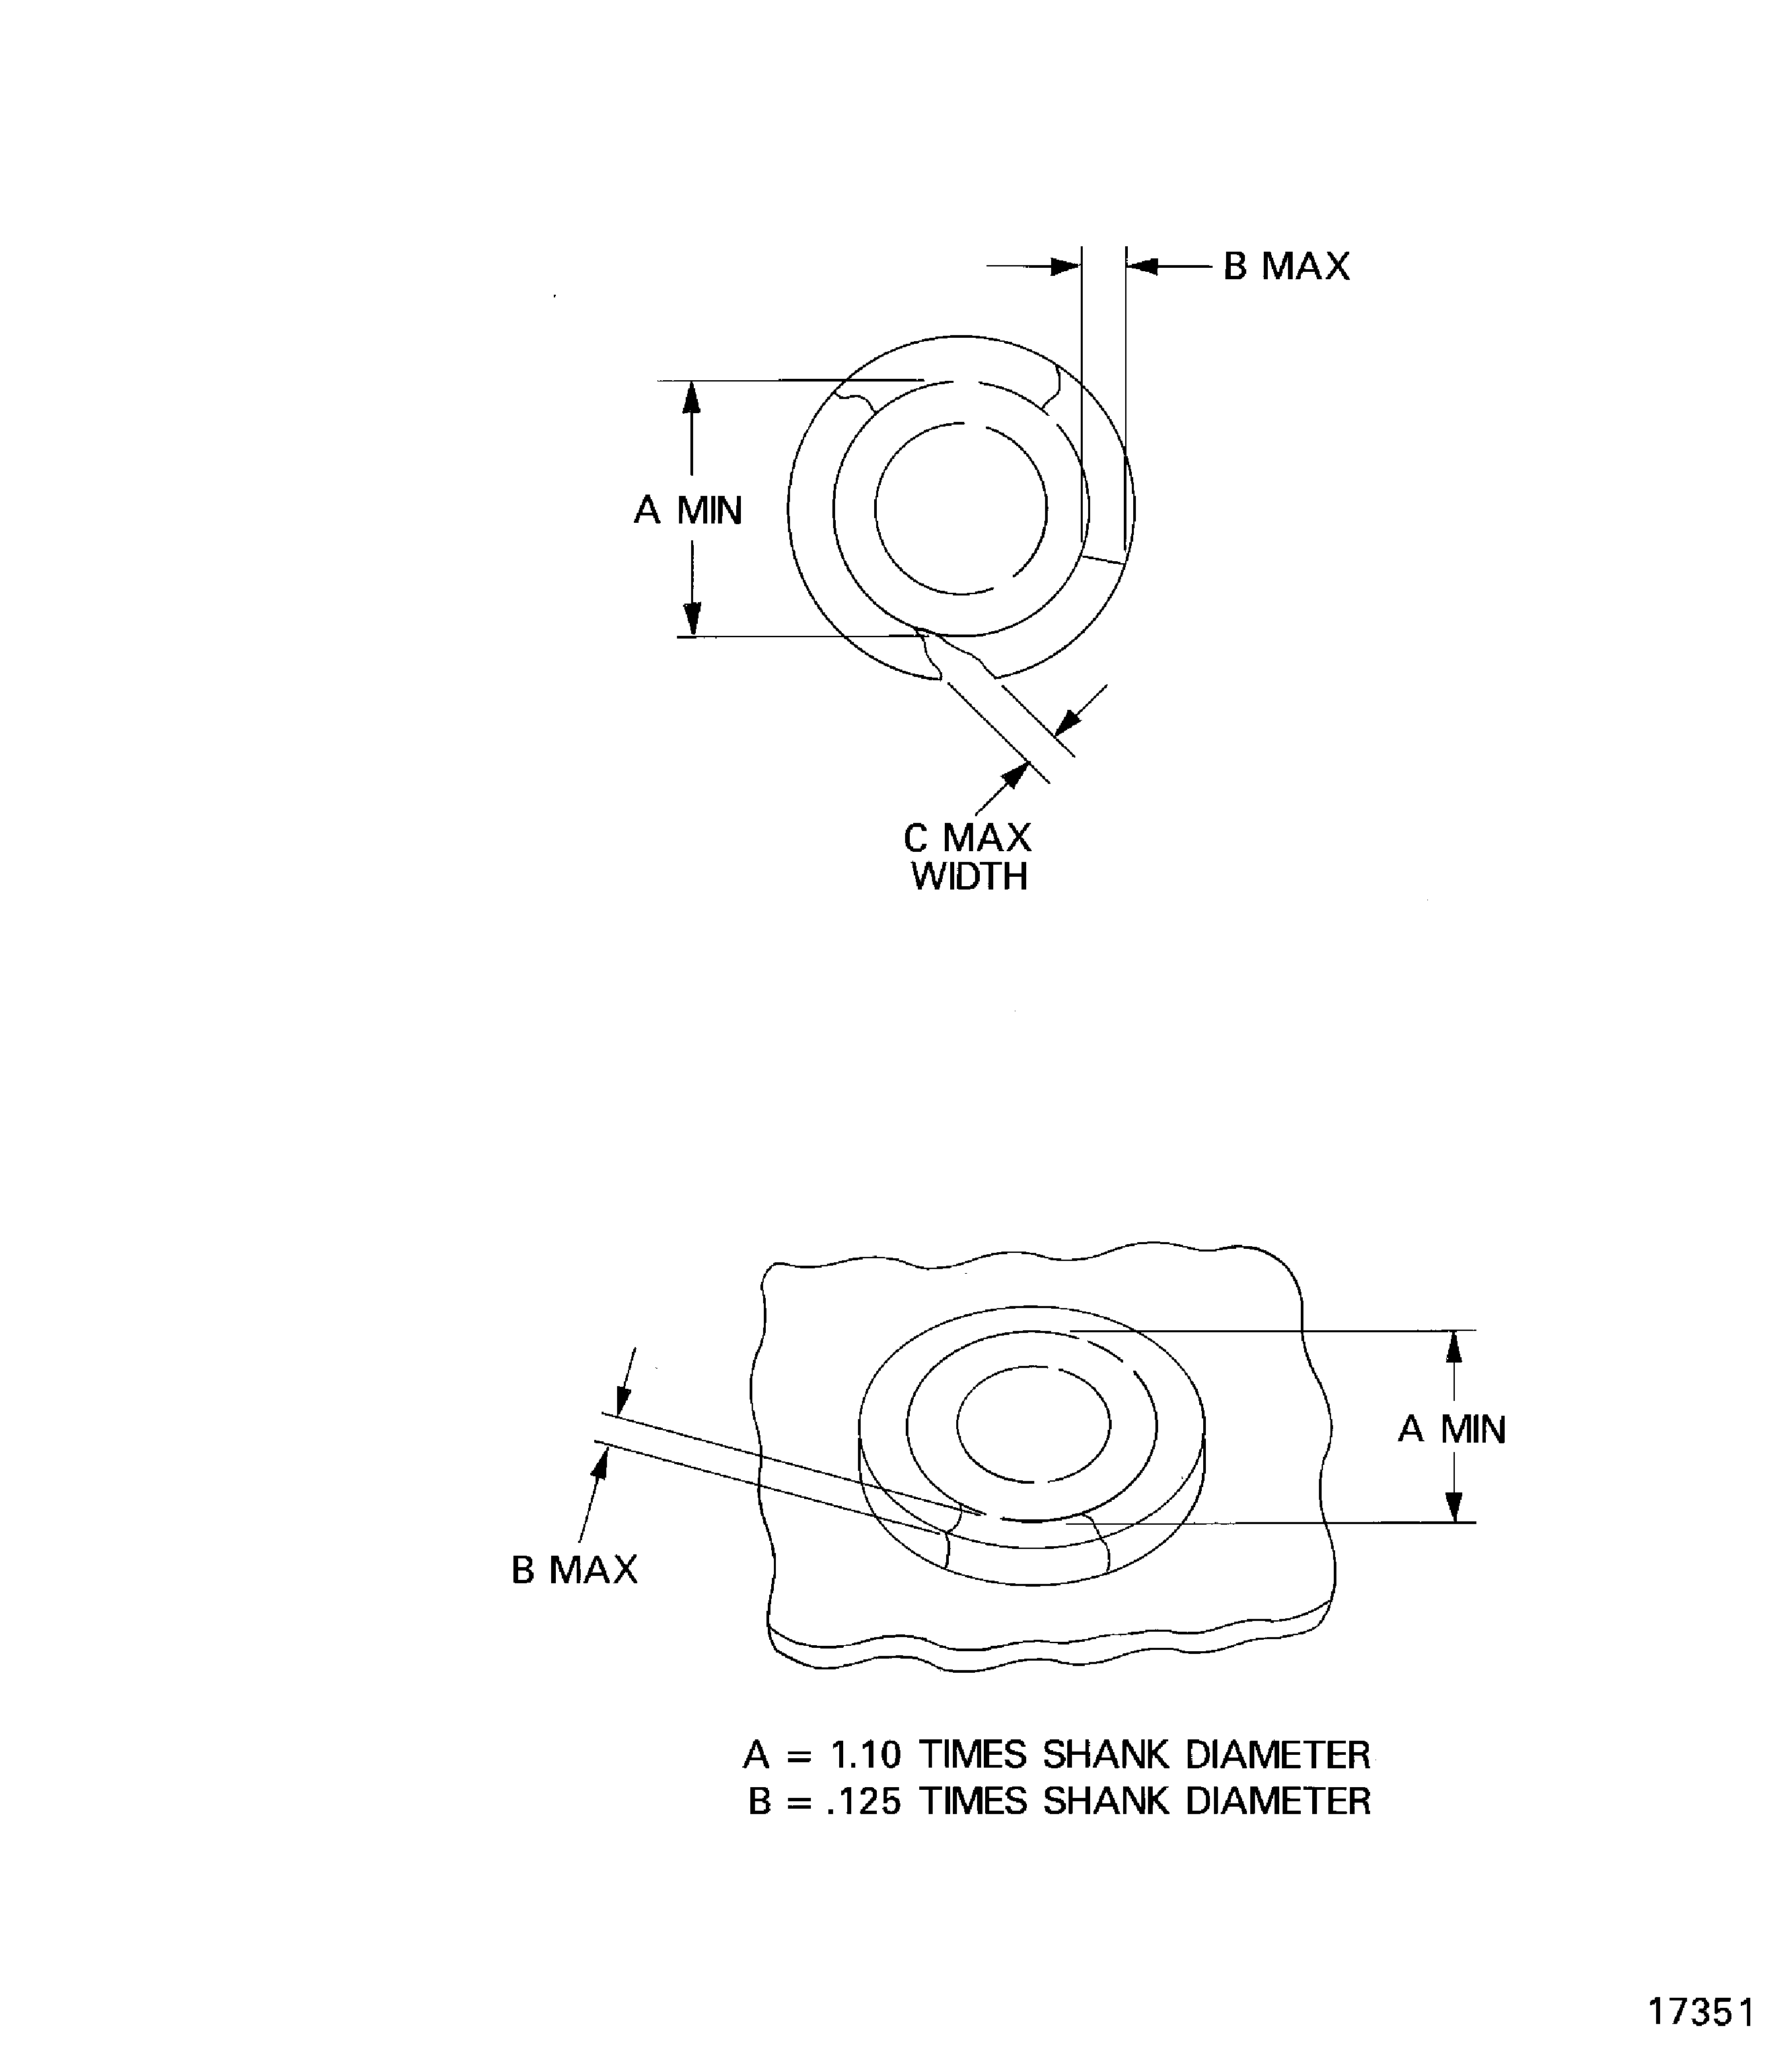
Figure: Crack limits for upset heads
Crack limits for upset heads
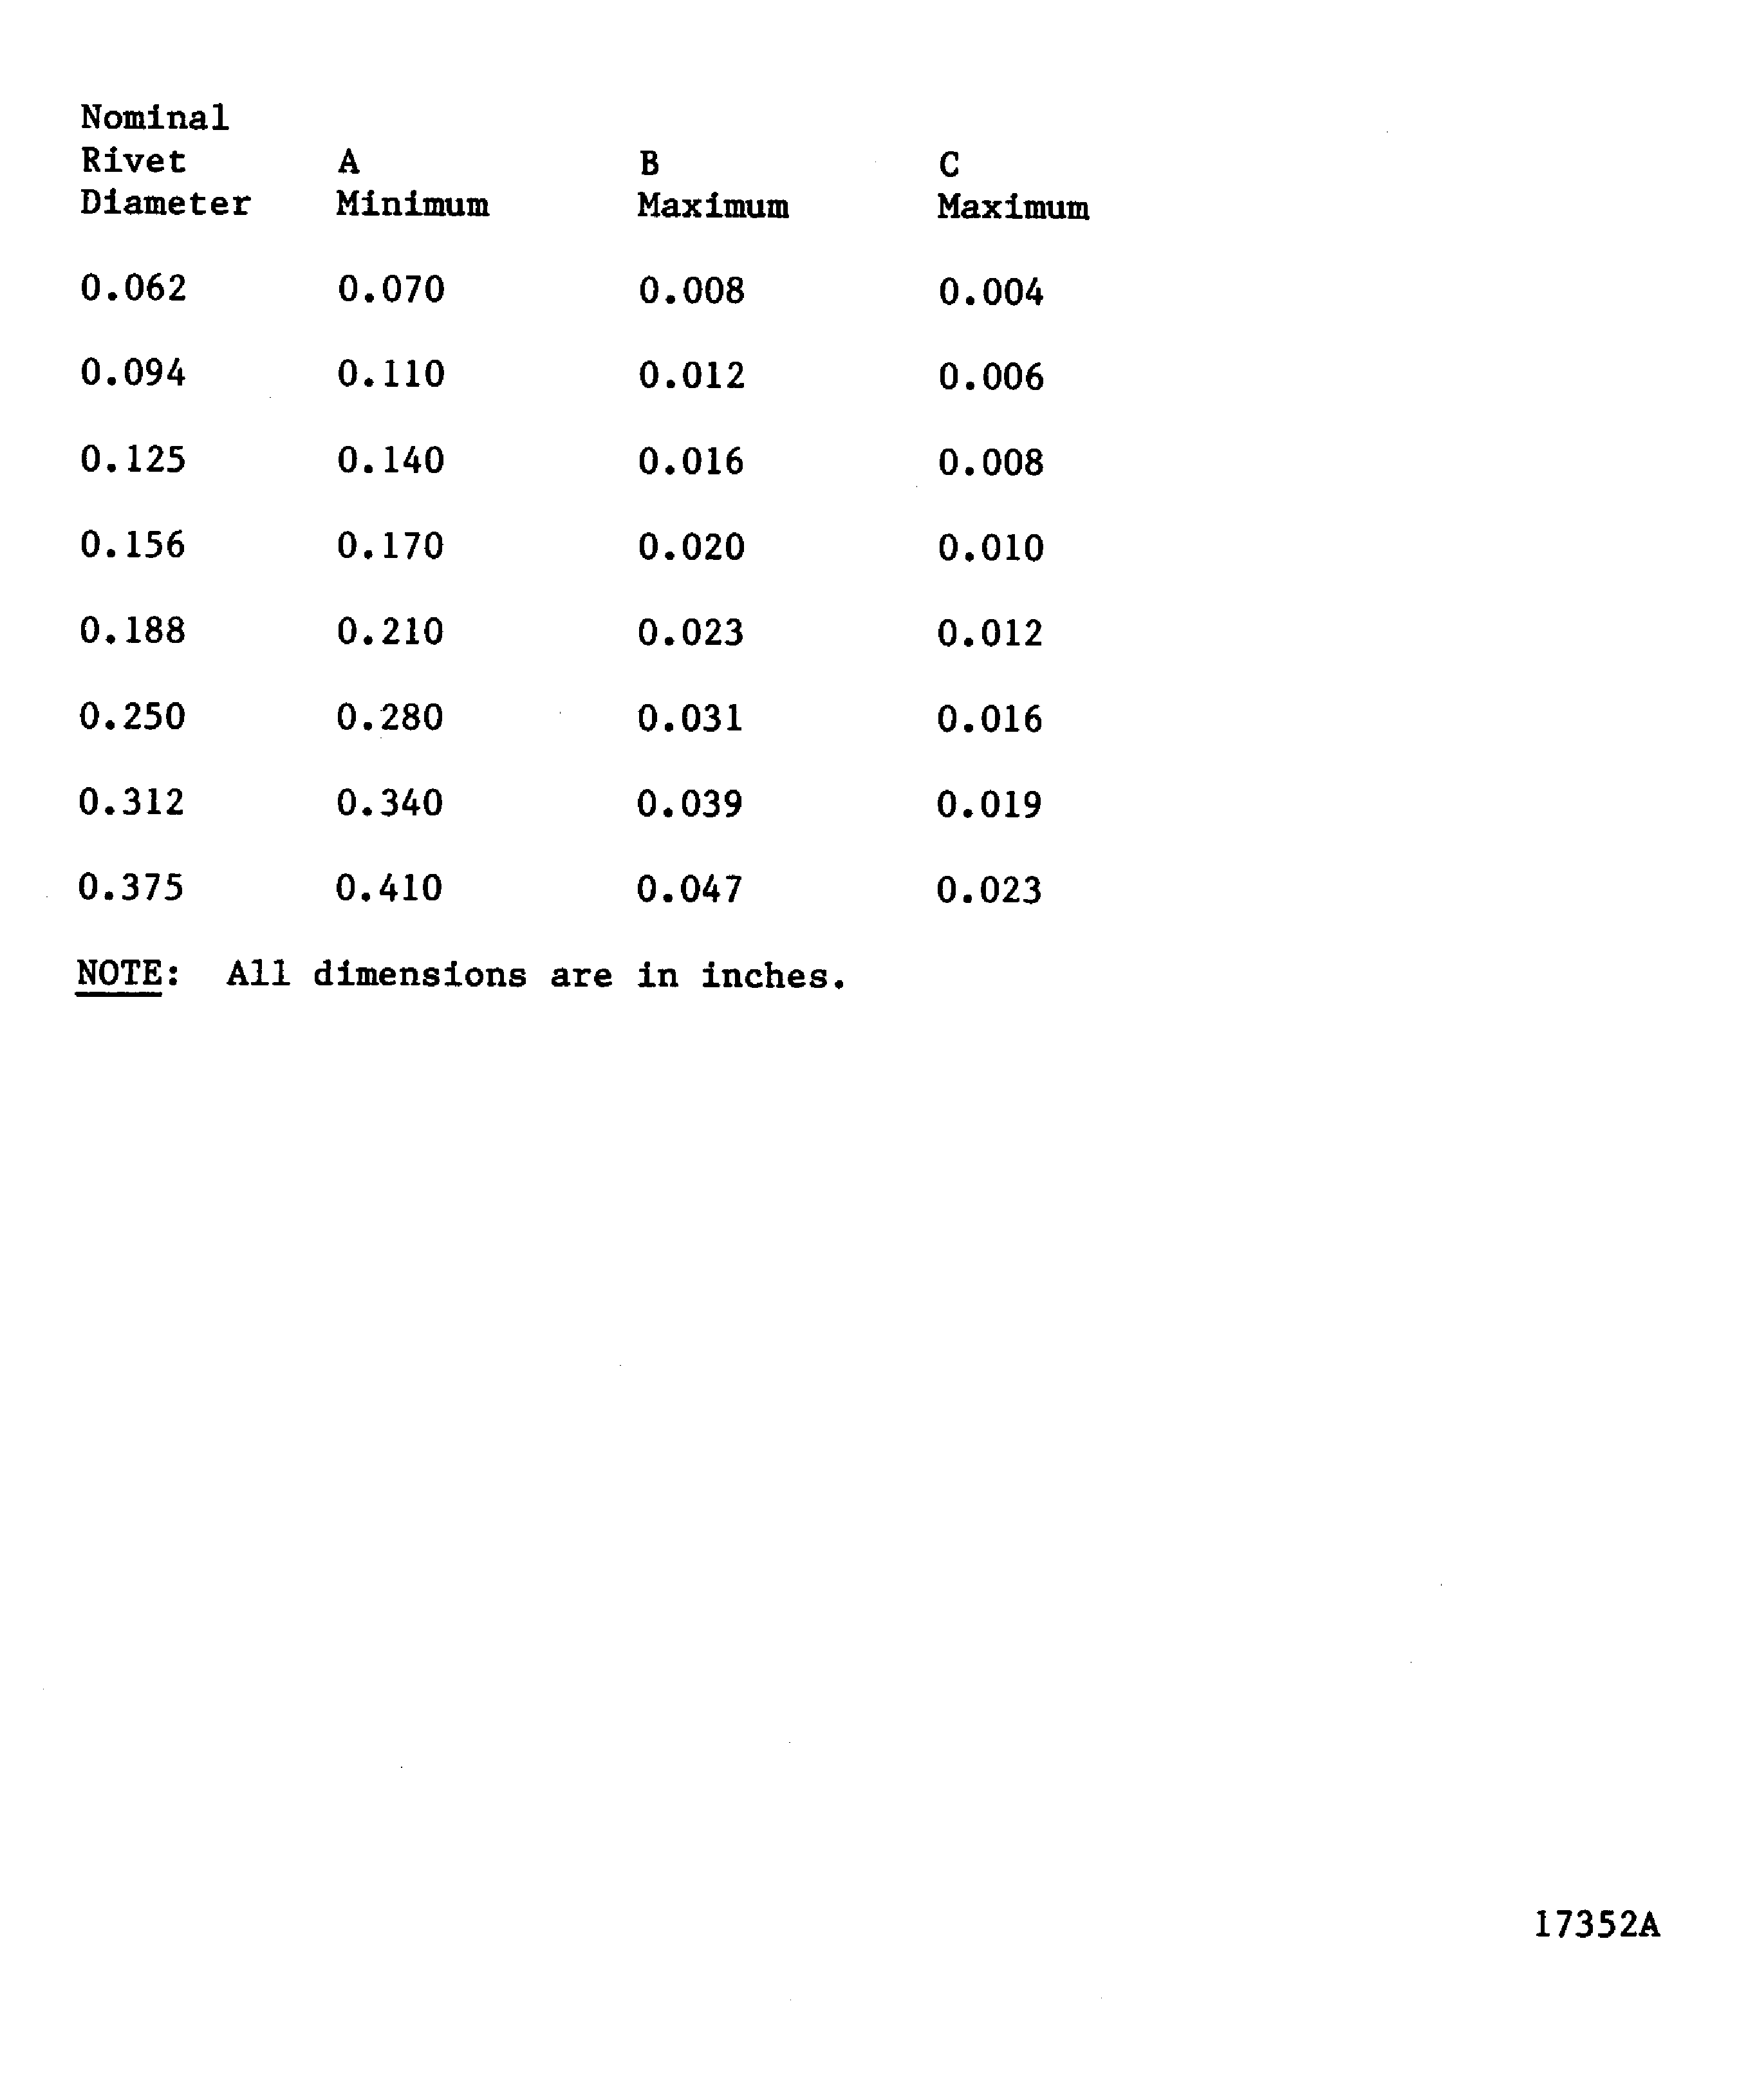
Figure: Examples of defective rivets
Examples of defective rivets
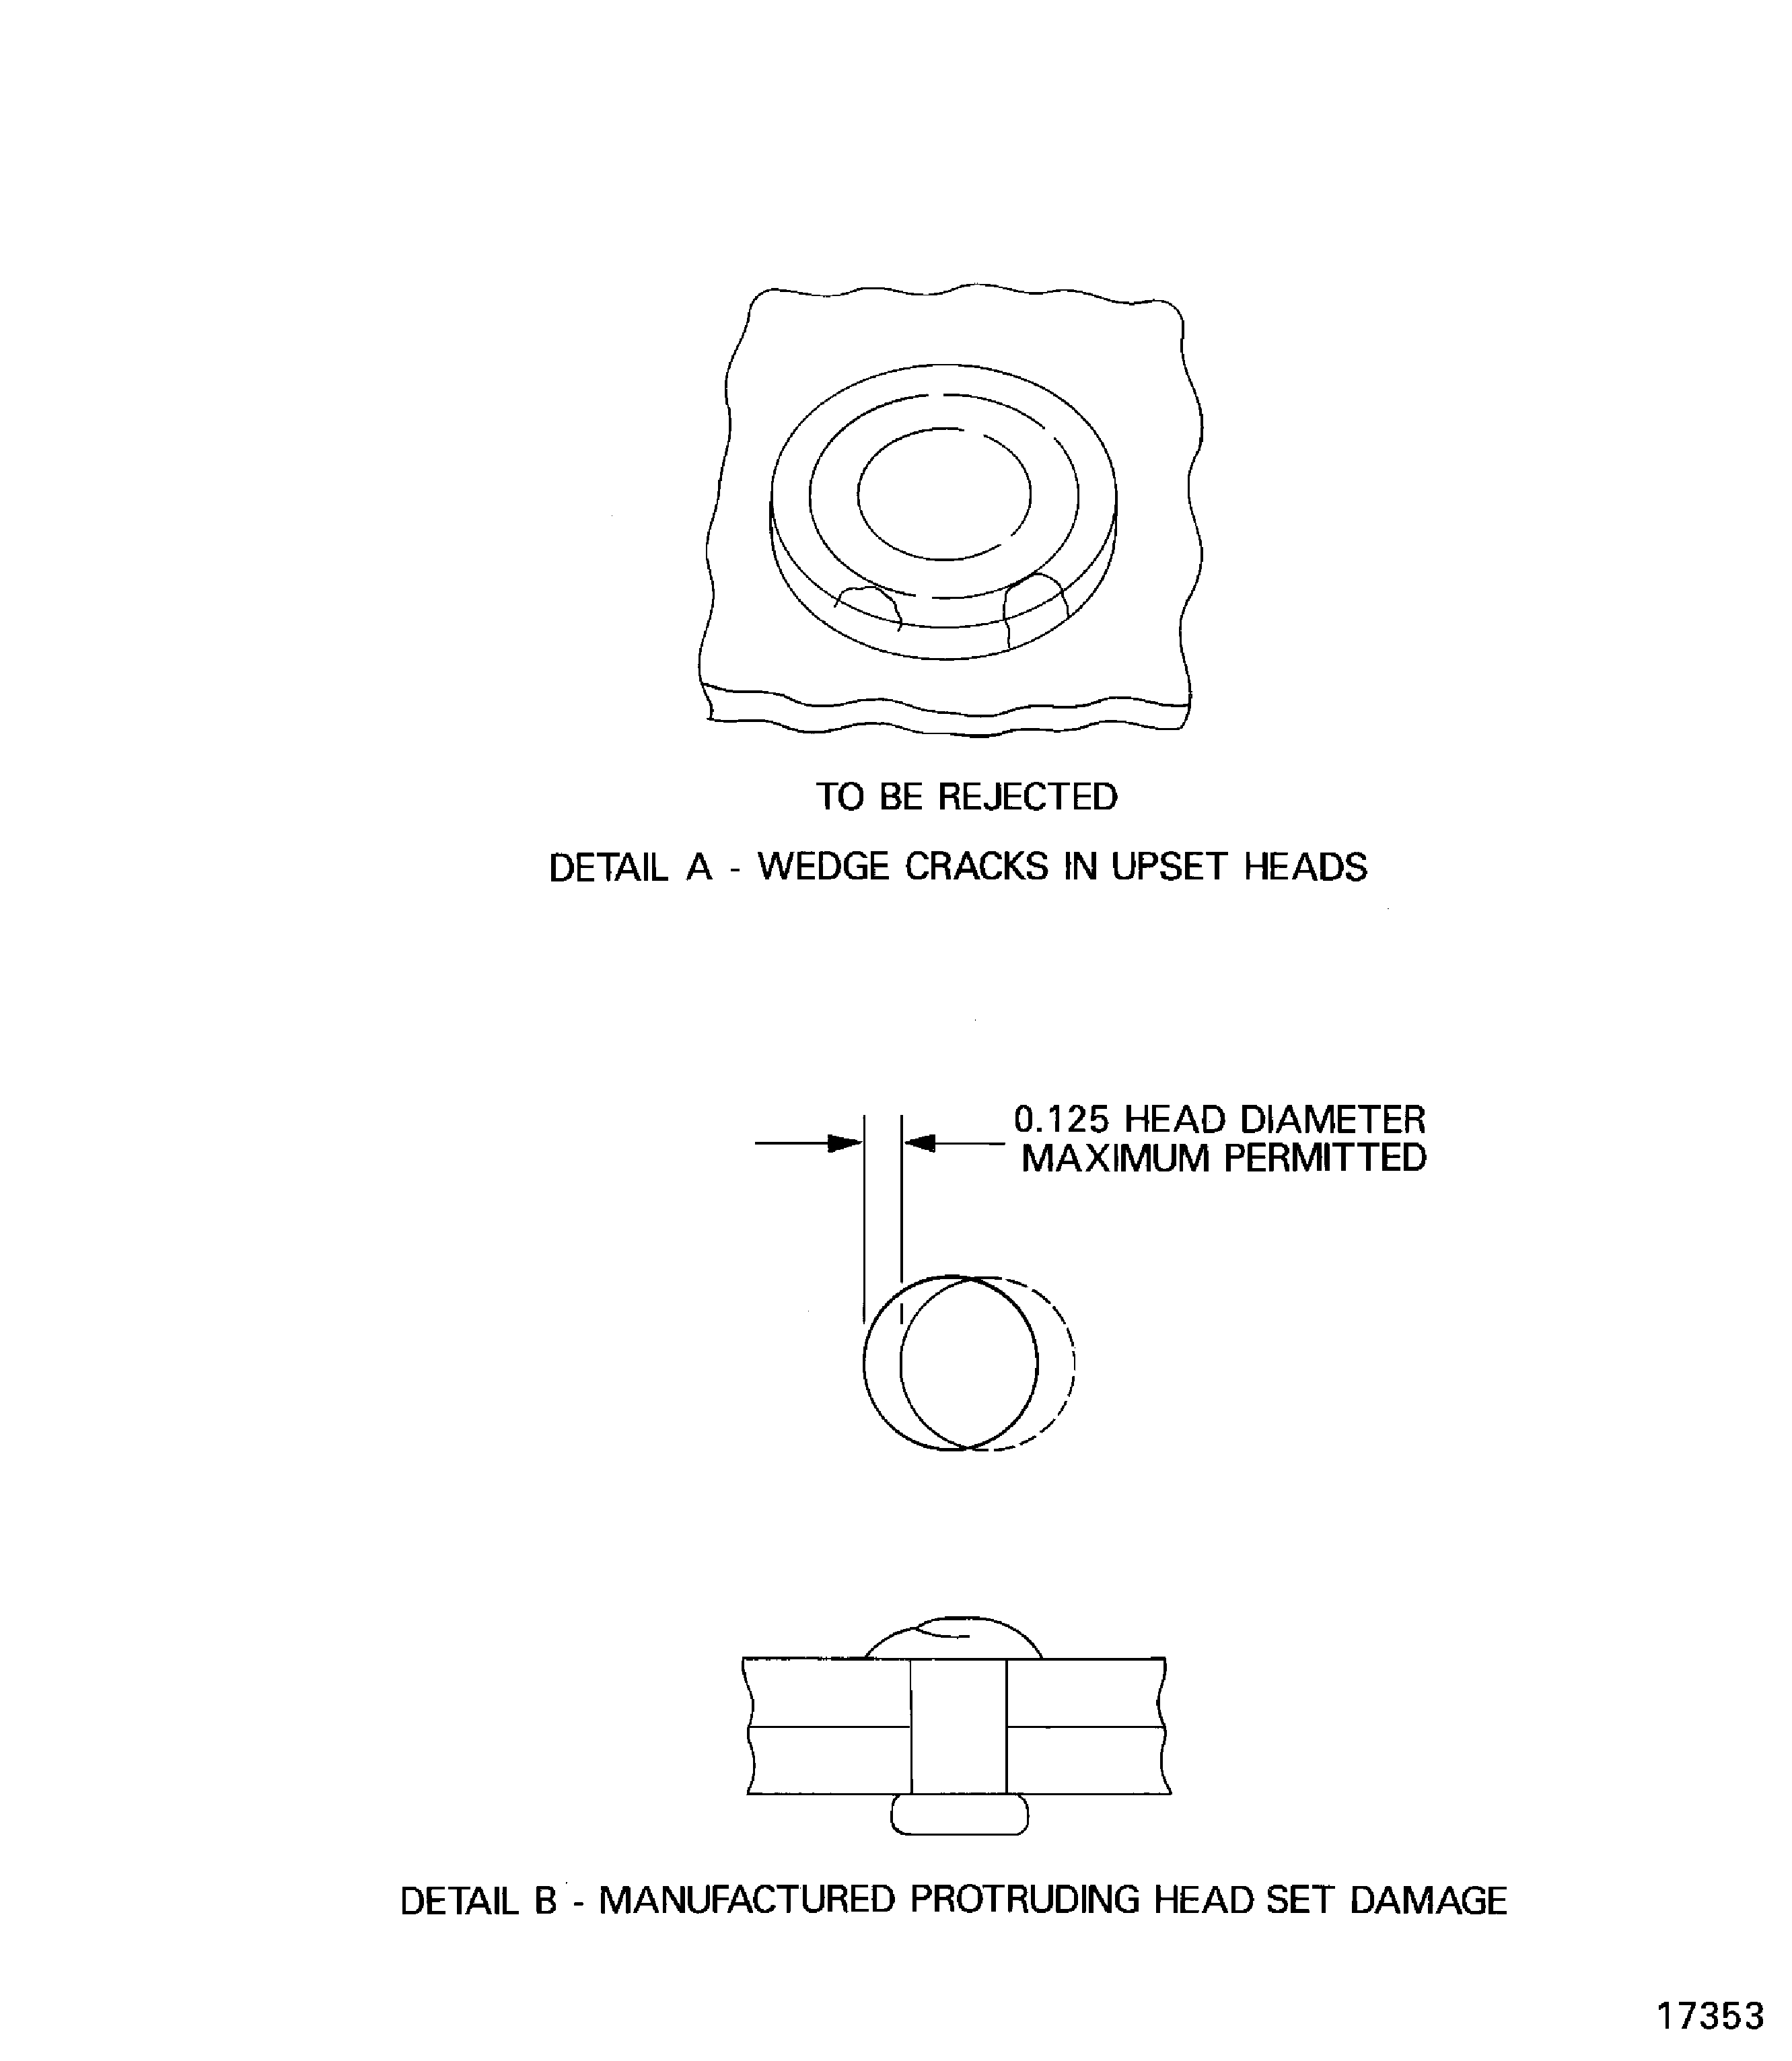
Figure: Examples of defective rivets
Examples of defective rivets
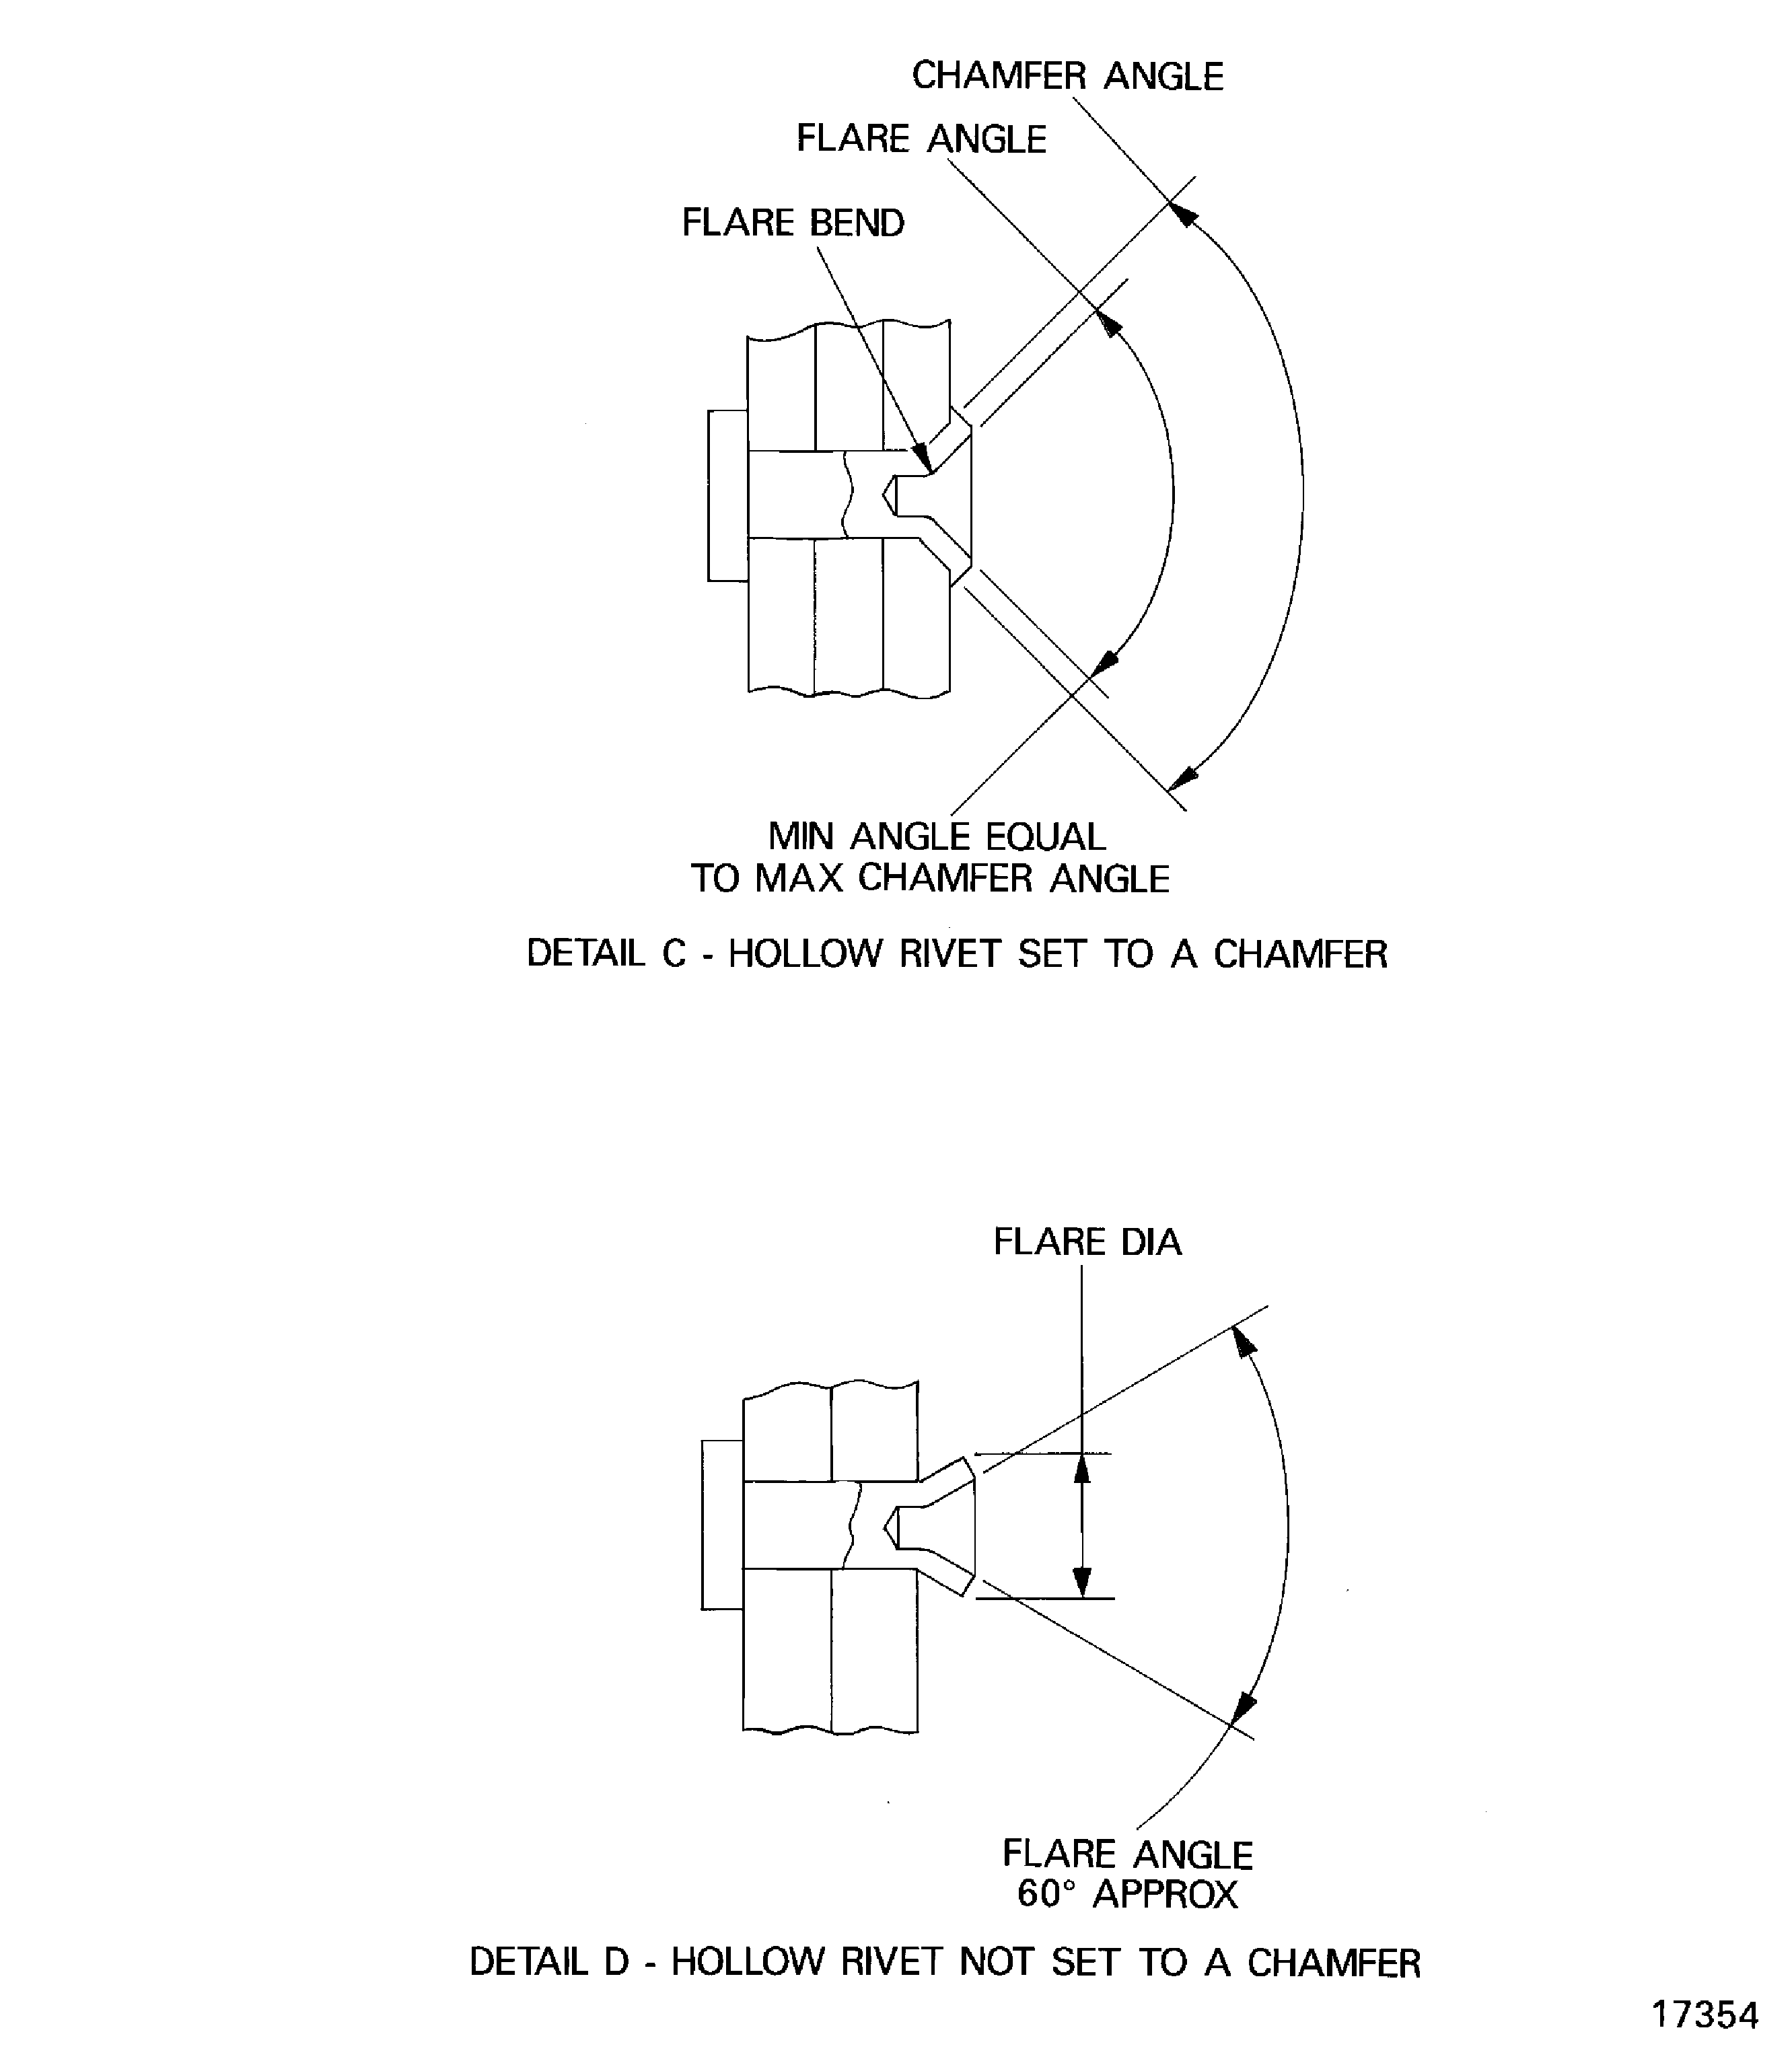
Figure: Examples of defective rivets
Examples of defective rivets
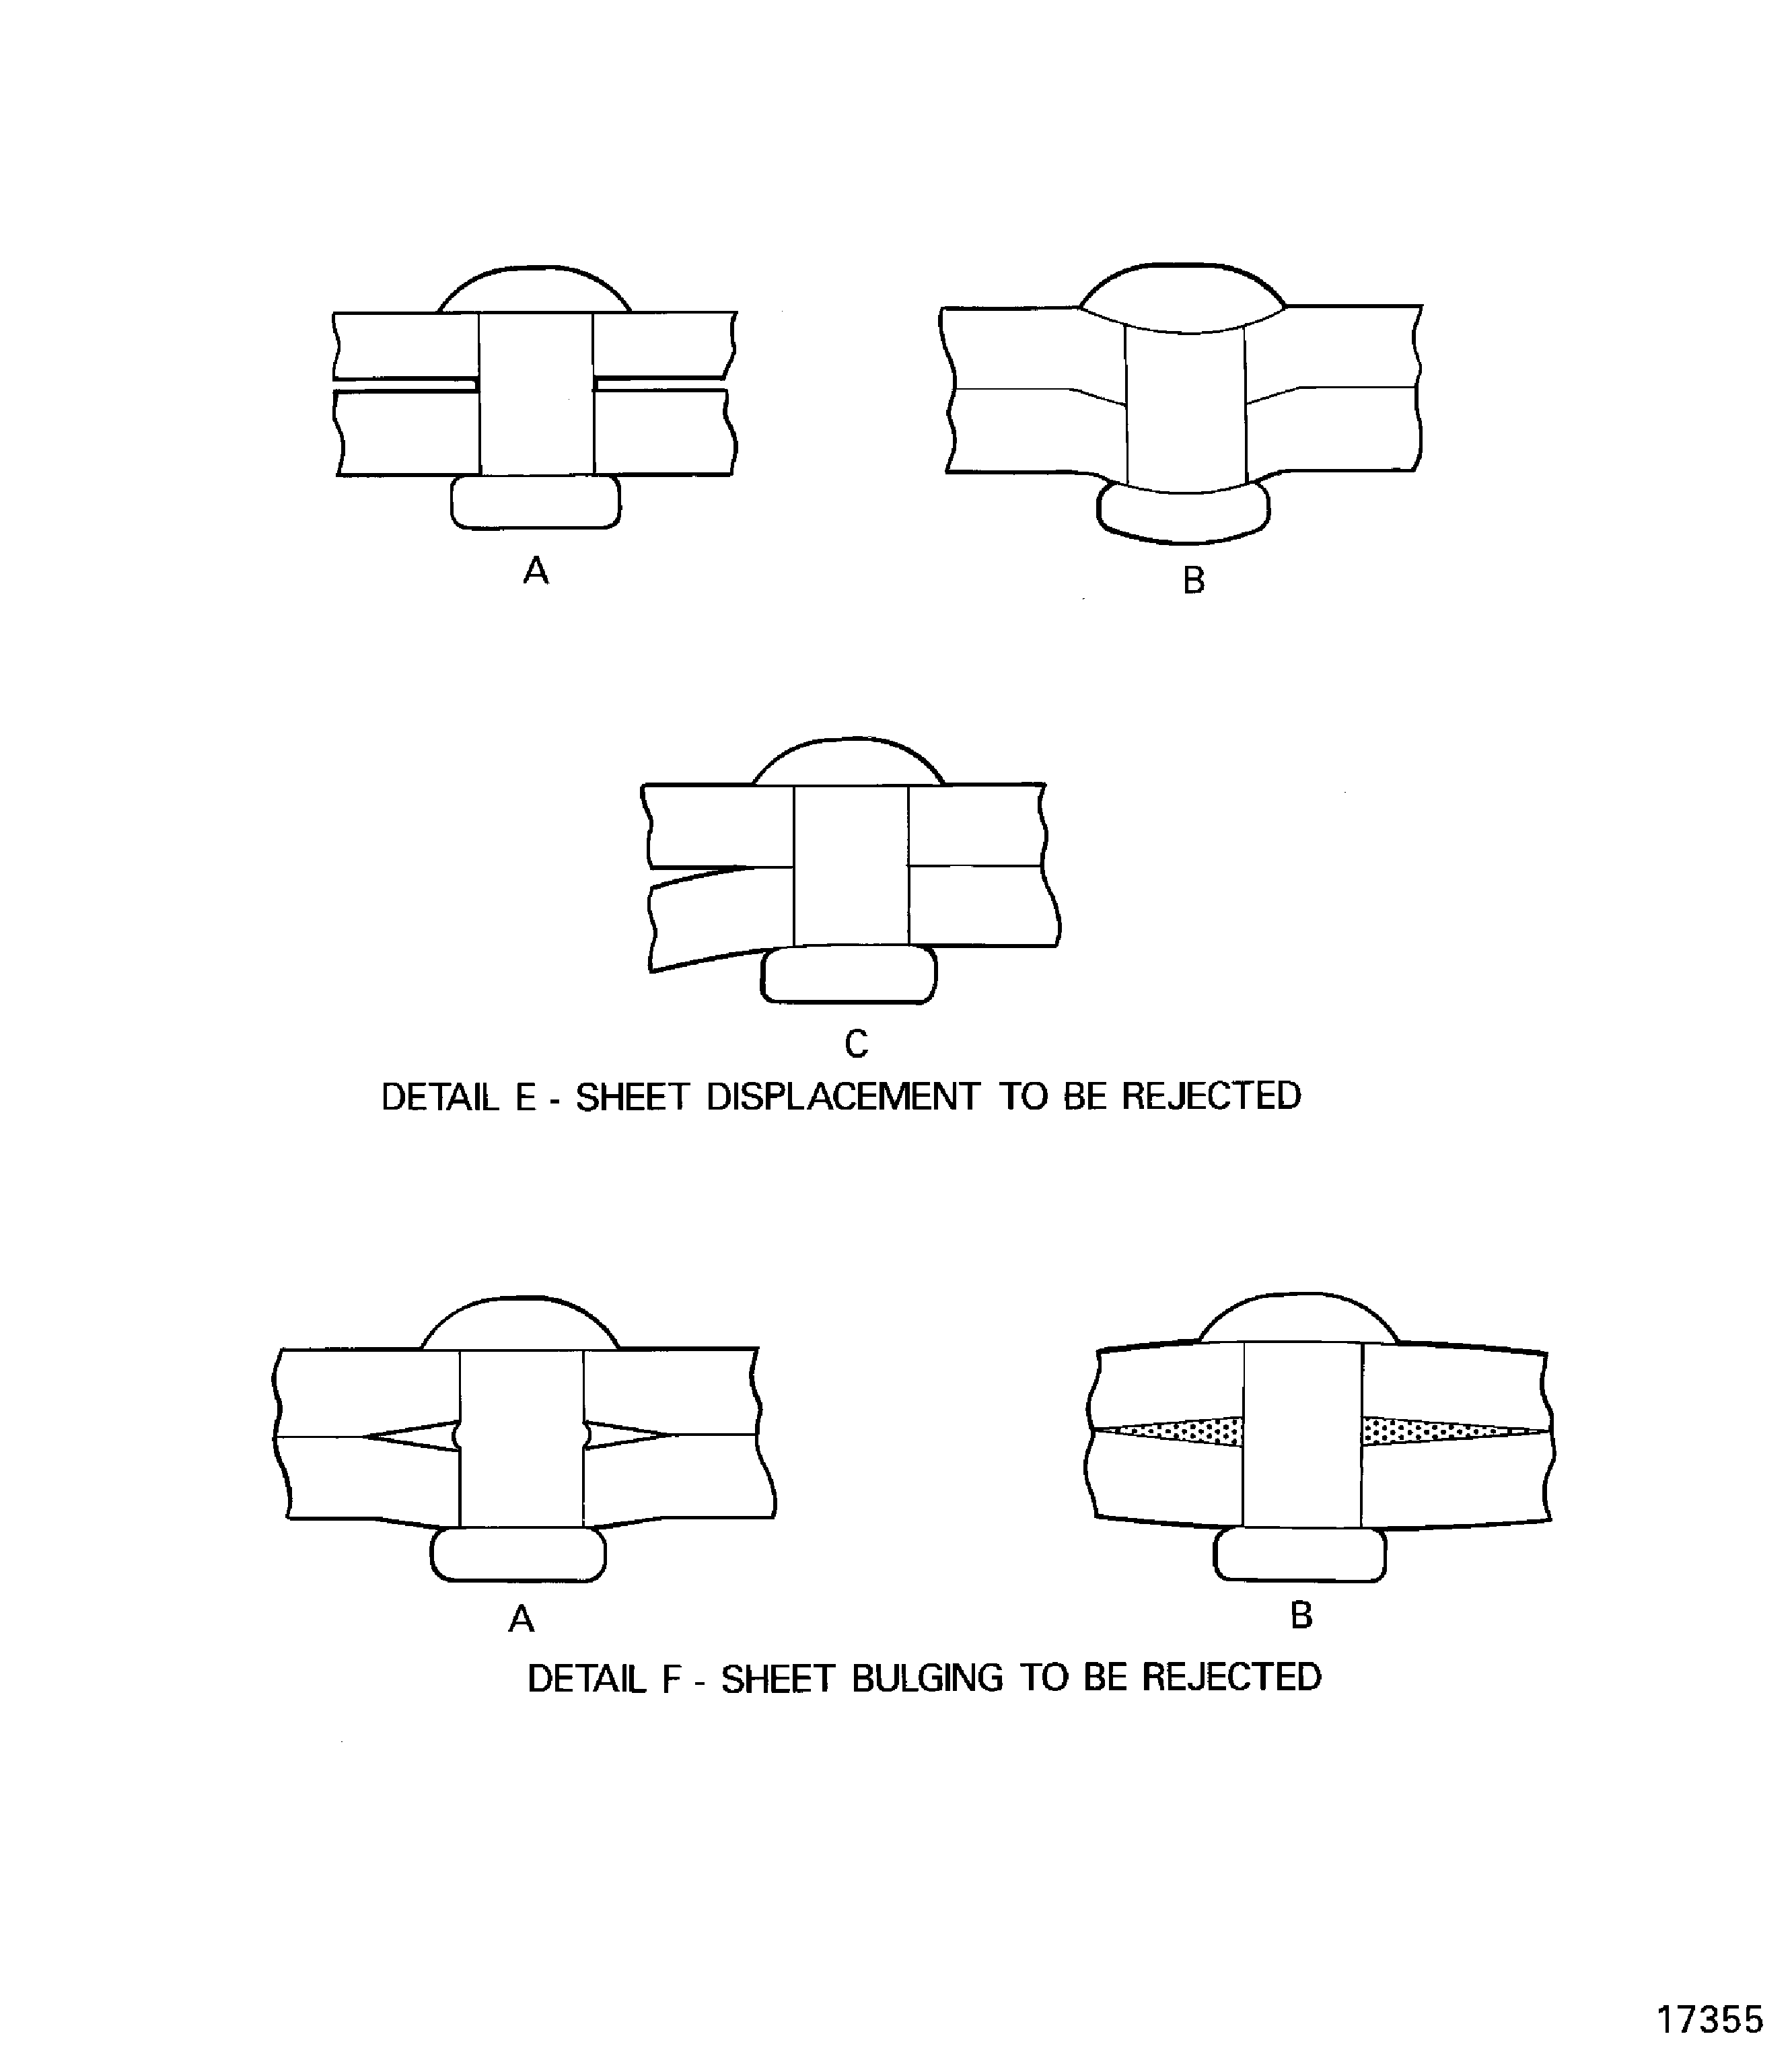
Figure: Examples of defective rivets
Examples of defective rivets
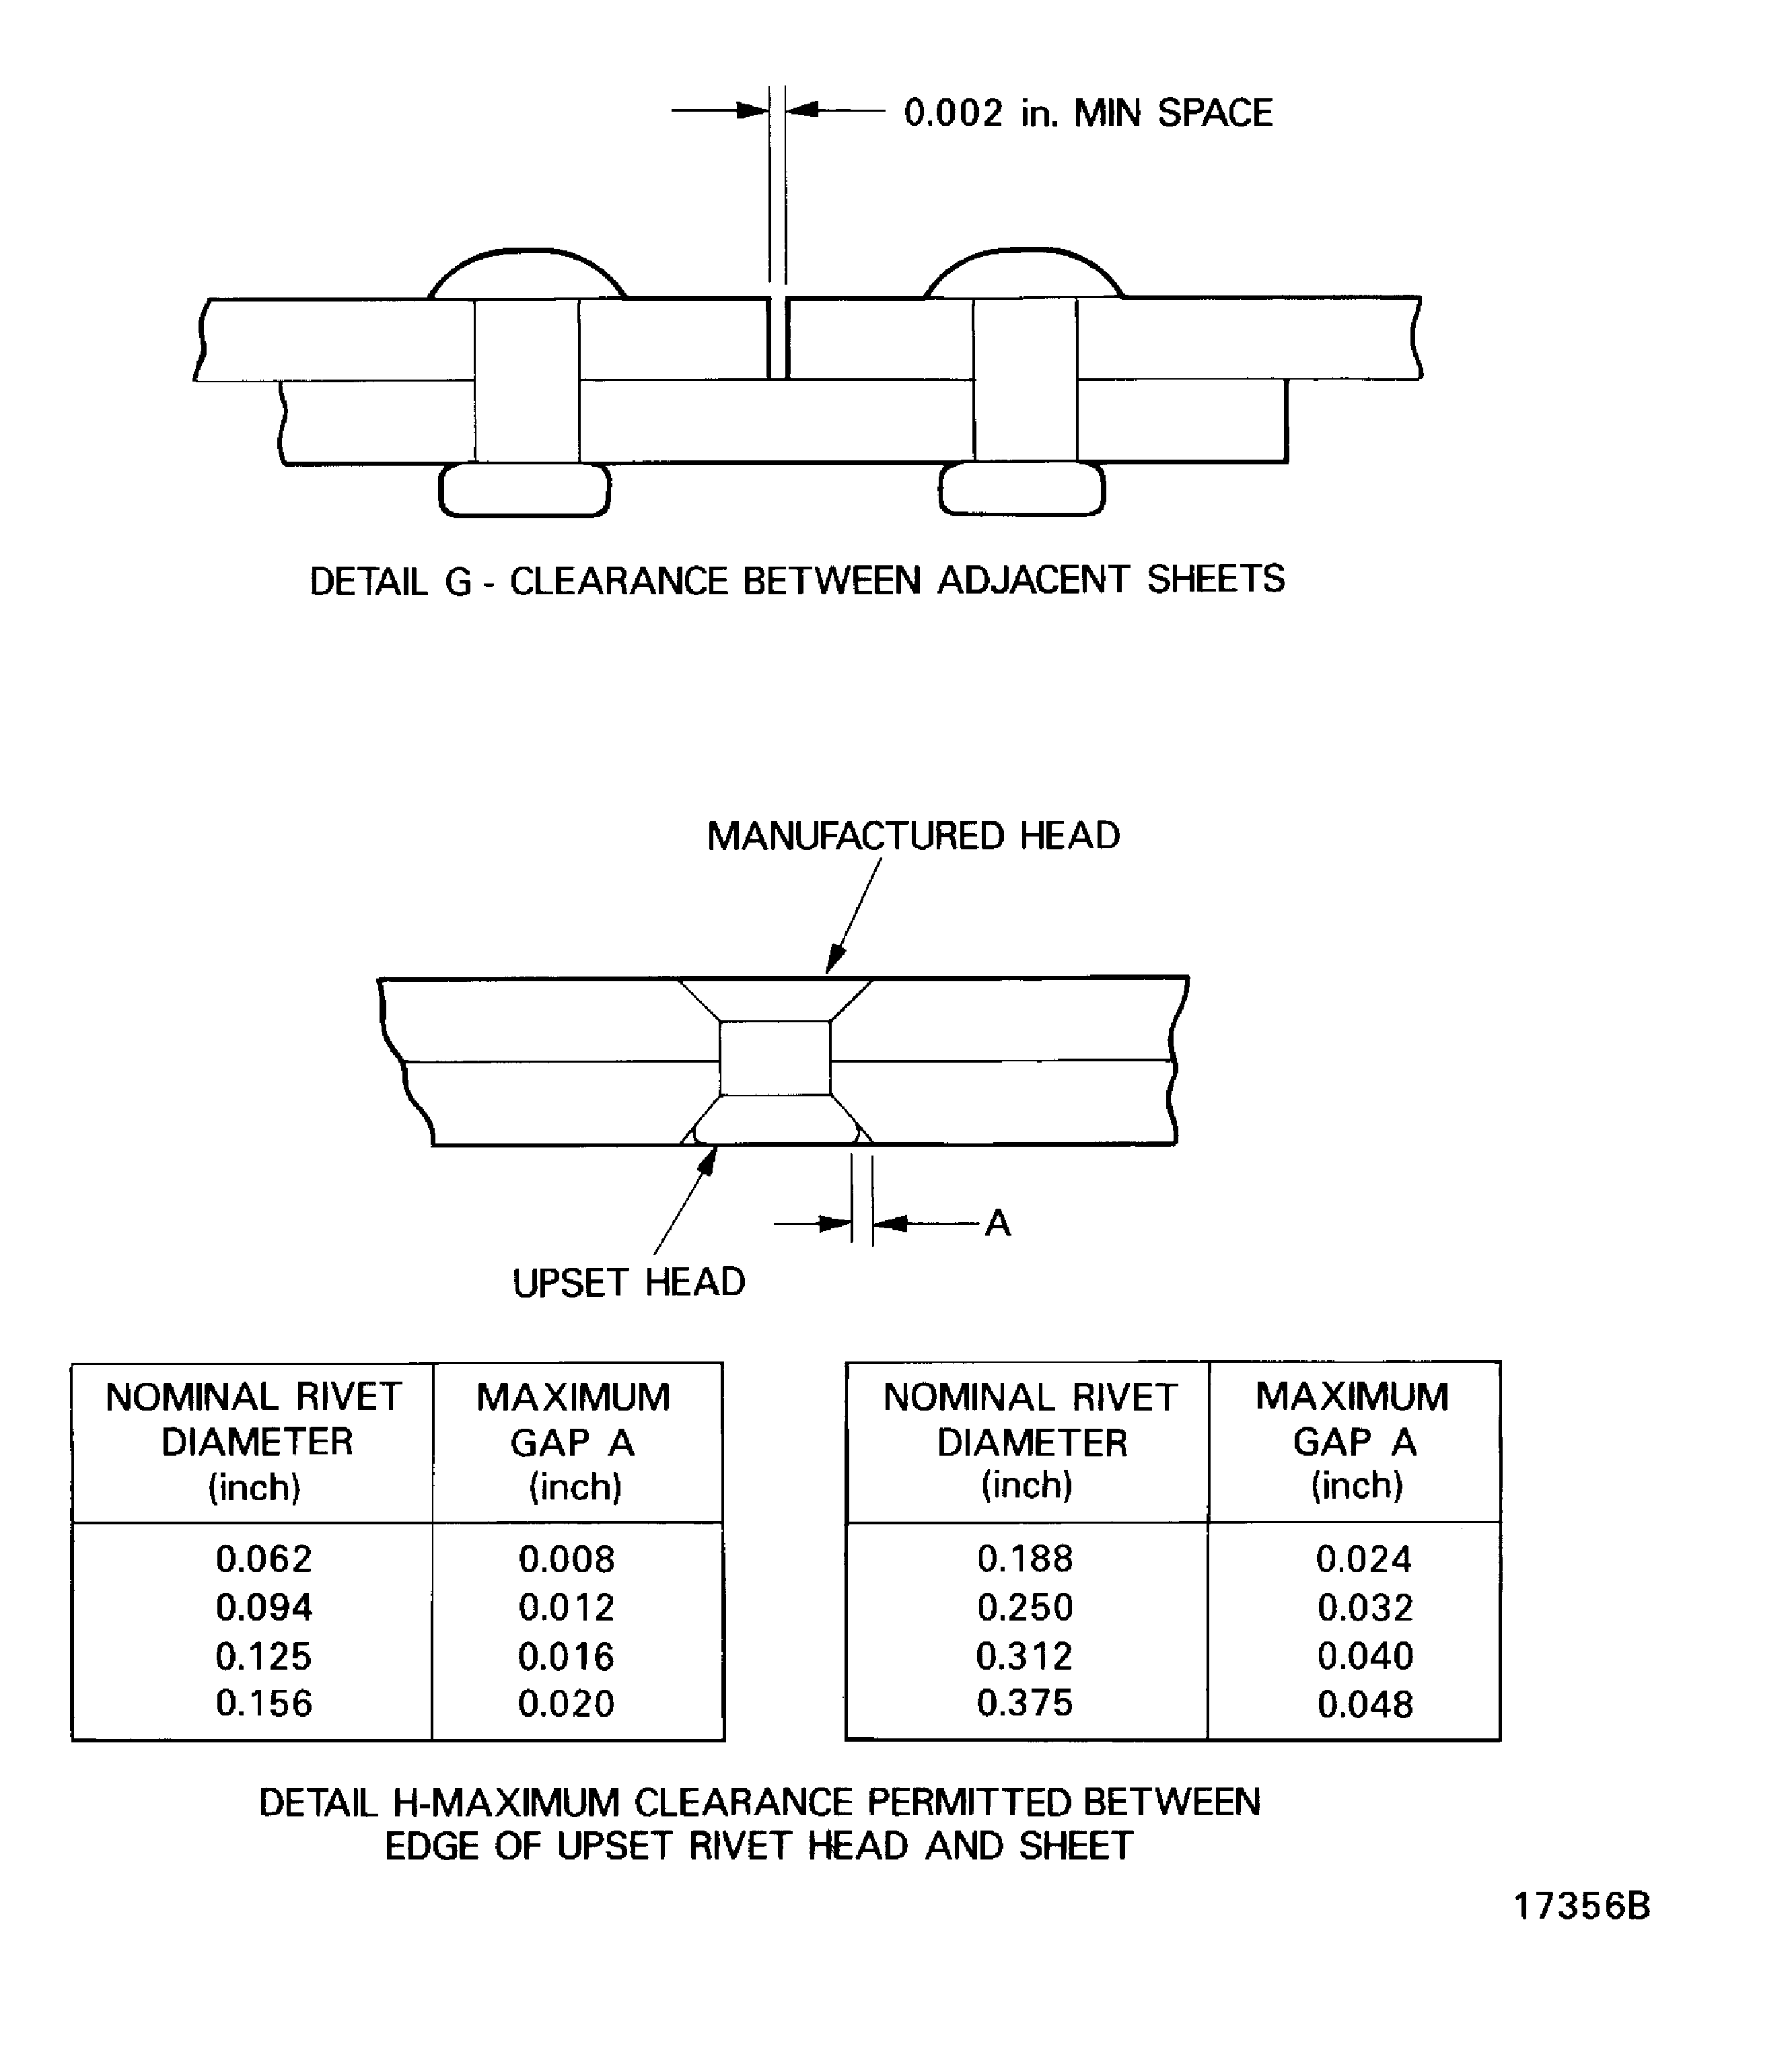
Figure: Hardness check locations on cold upset rivet heads
Hardness check locations on cold upset rivet heads
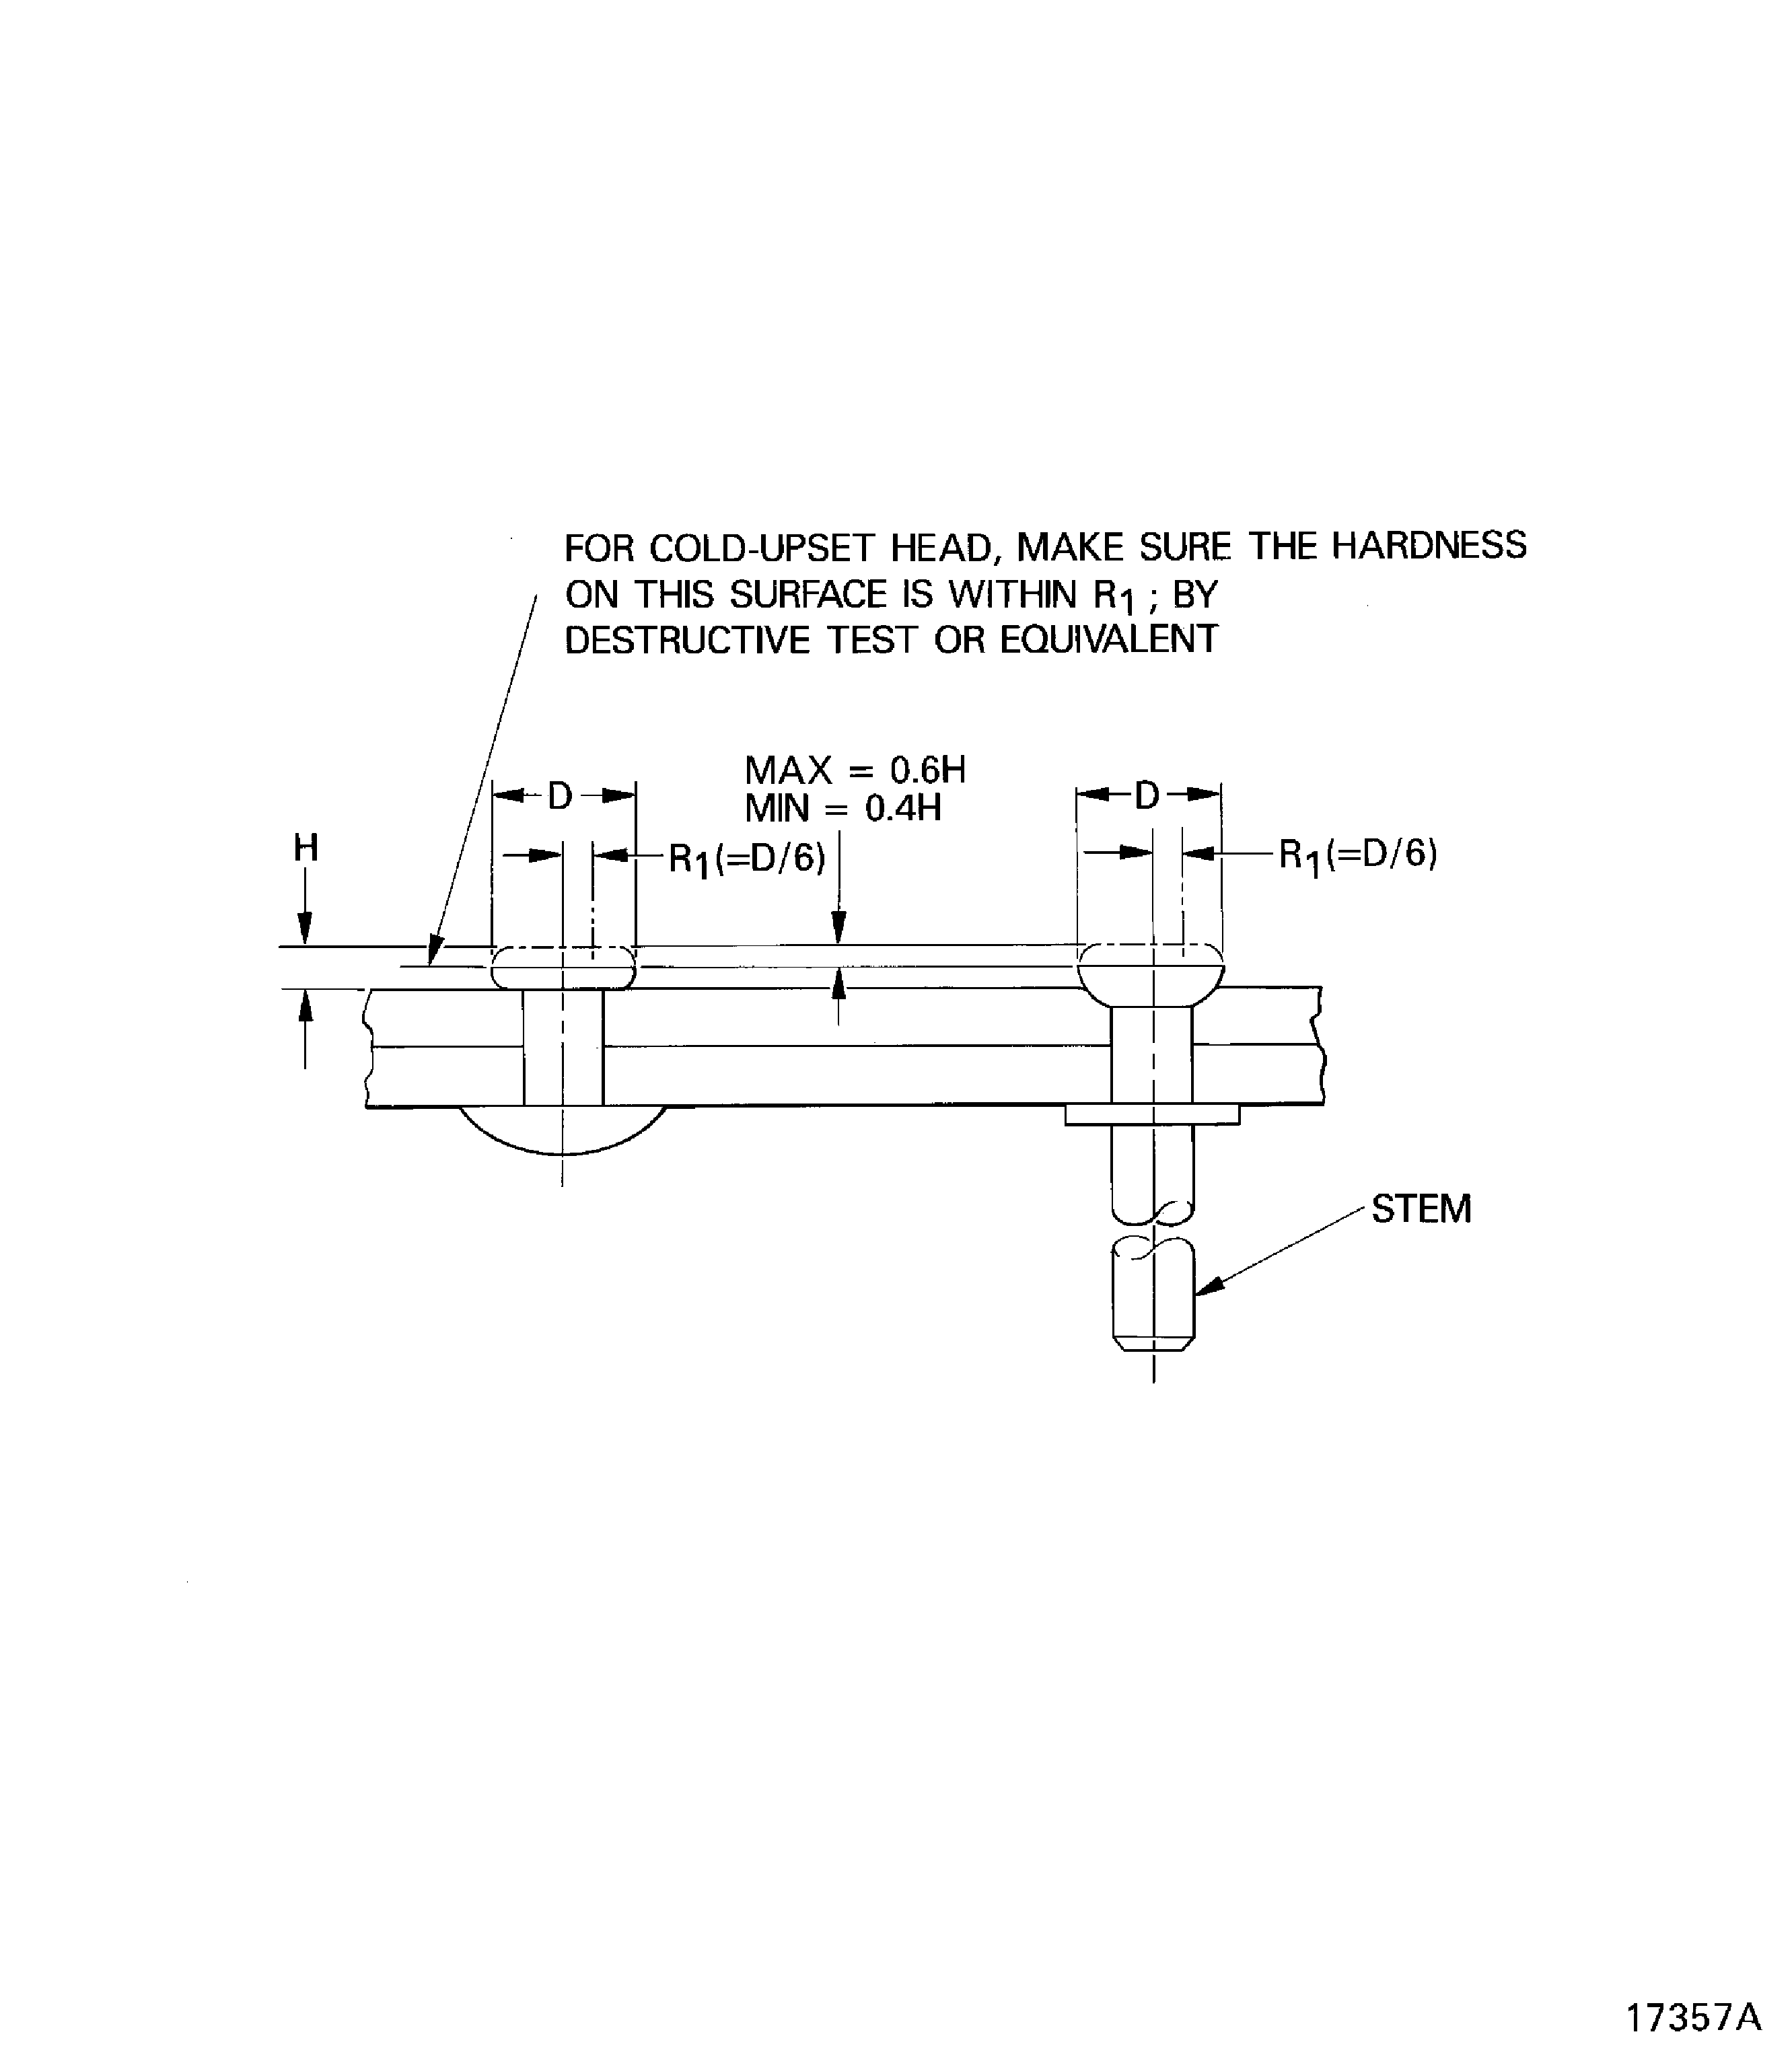
Figure: Stem and lock collar flushness, necessary for blind rivets
Stem and lock collar flushness, necessary for blind rivets
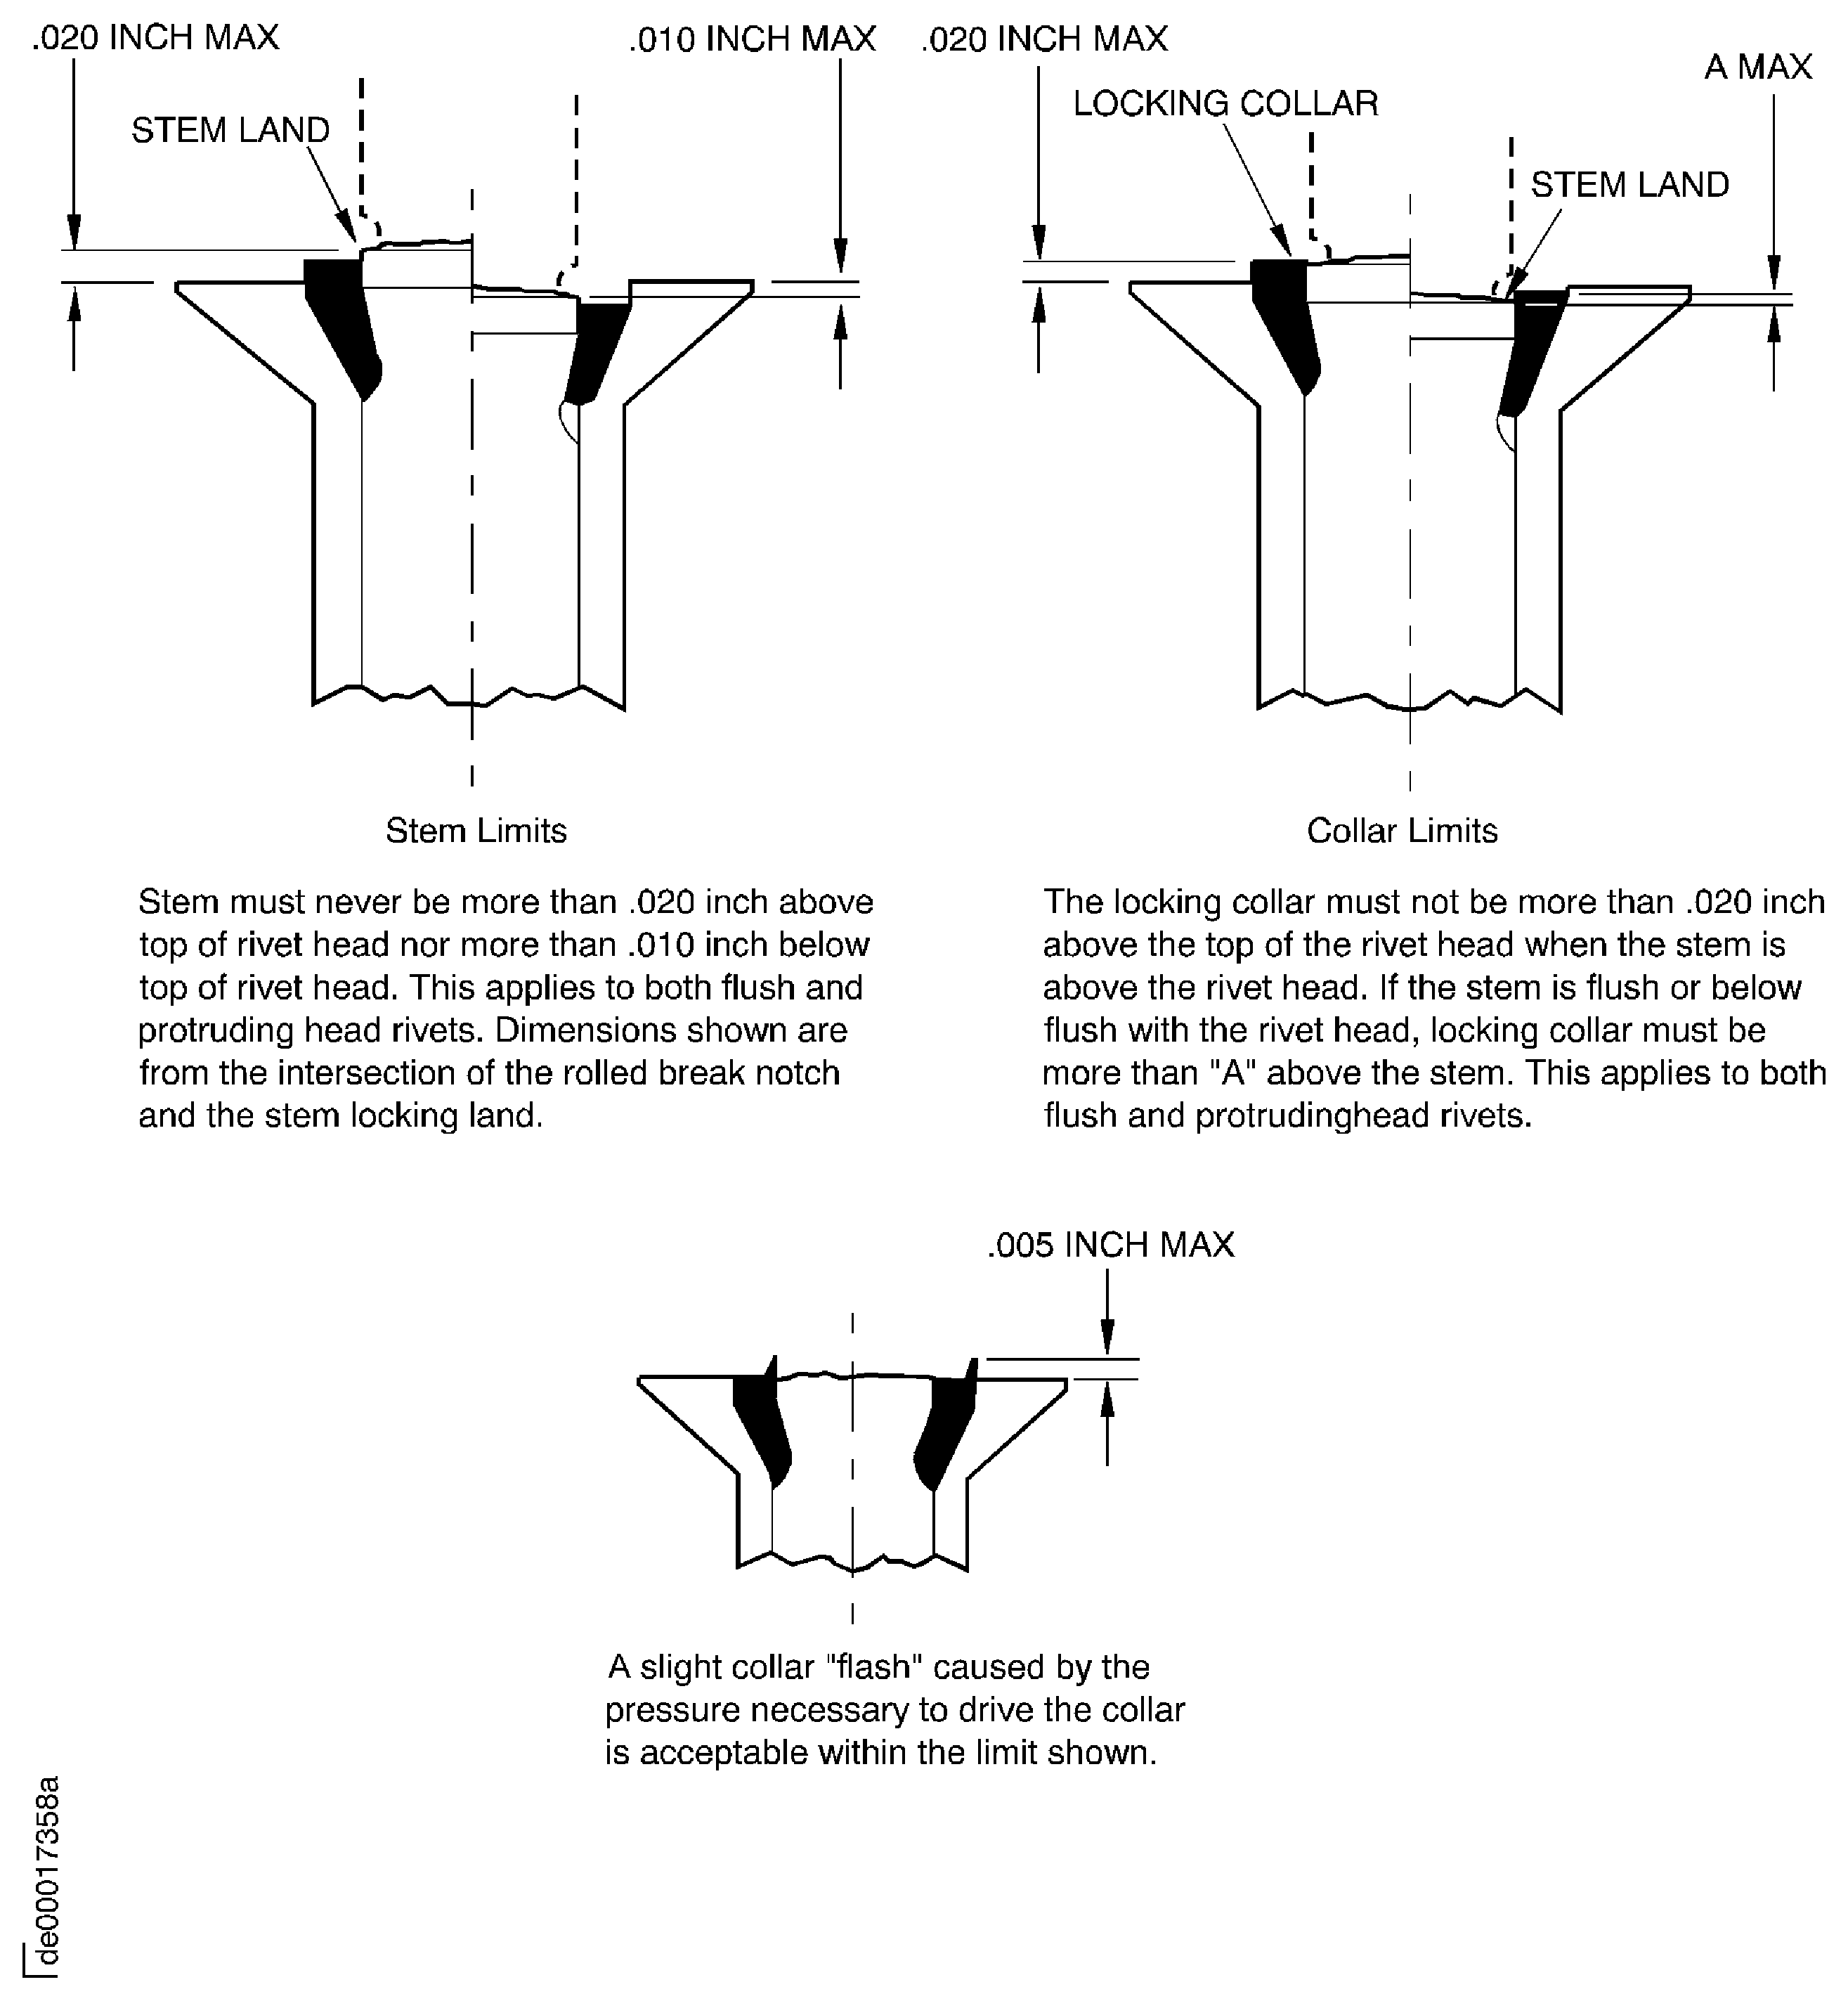
Figure: Stem and lock collar flushness, necessary for blind rivets
Stem and lock collar flushness, necessary for blind rivets
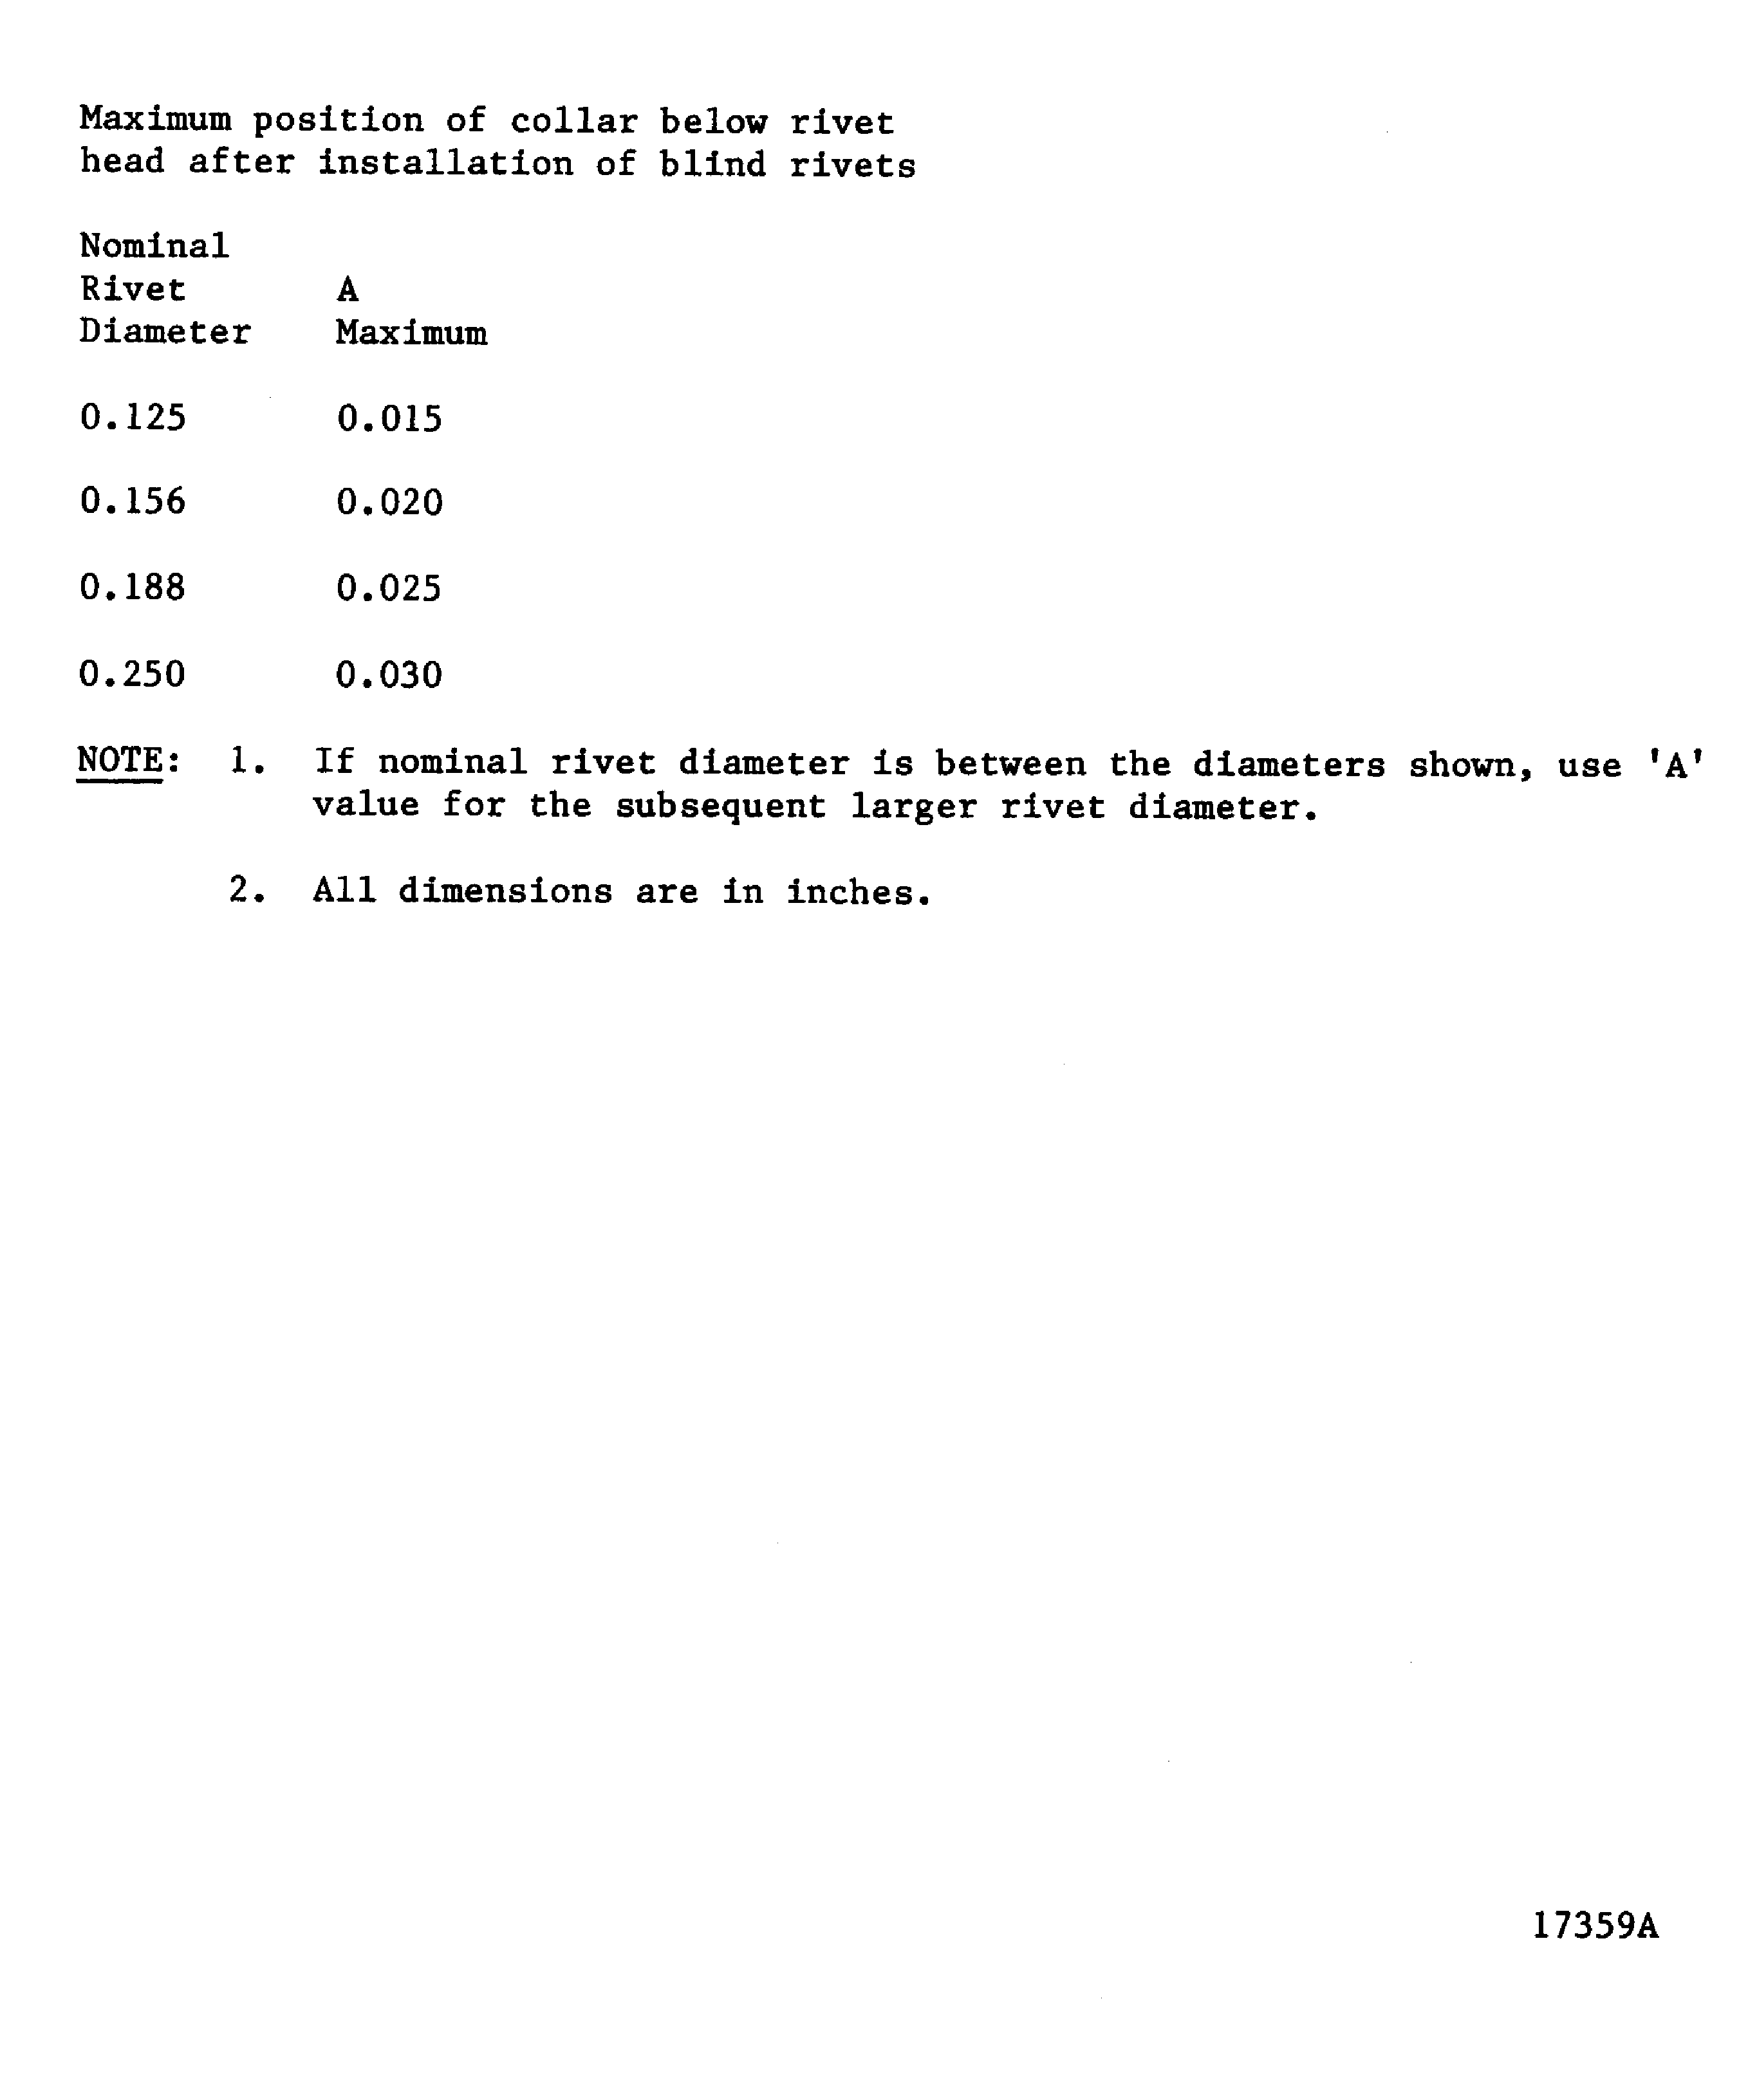
Figure: CherryMAX stem flushness
CherryMAX stem flushness
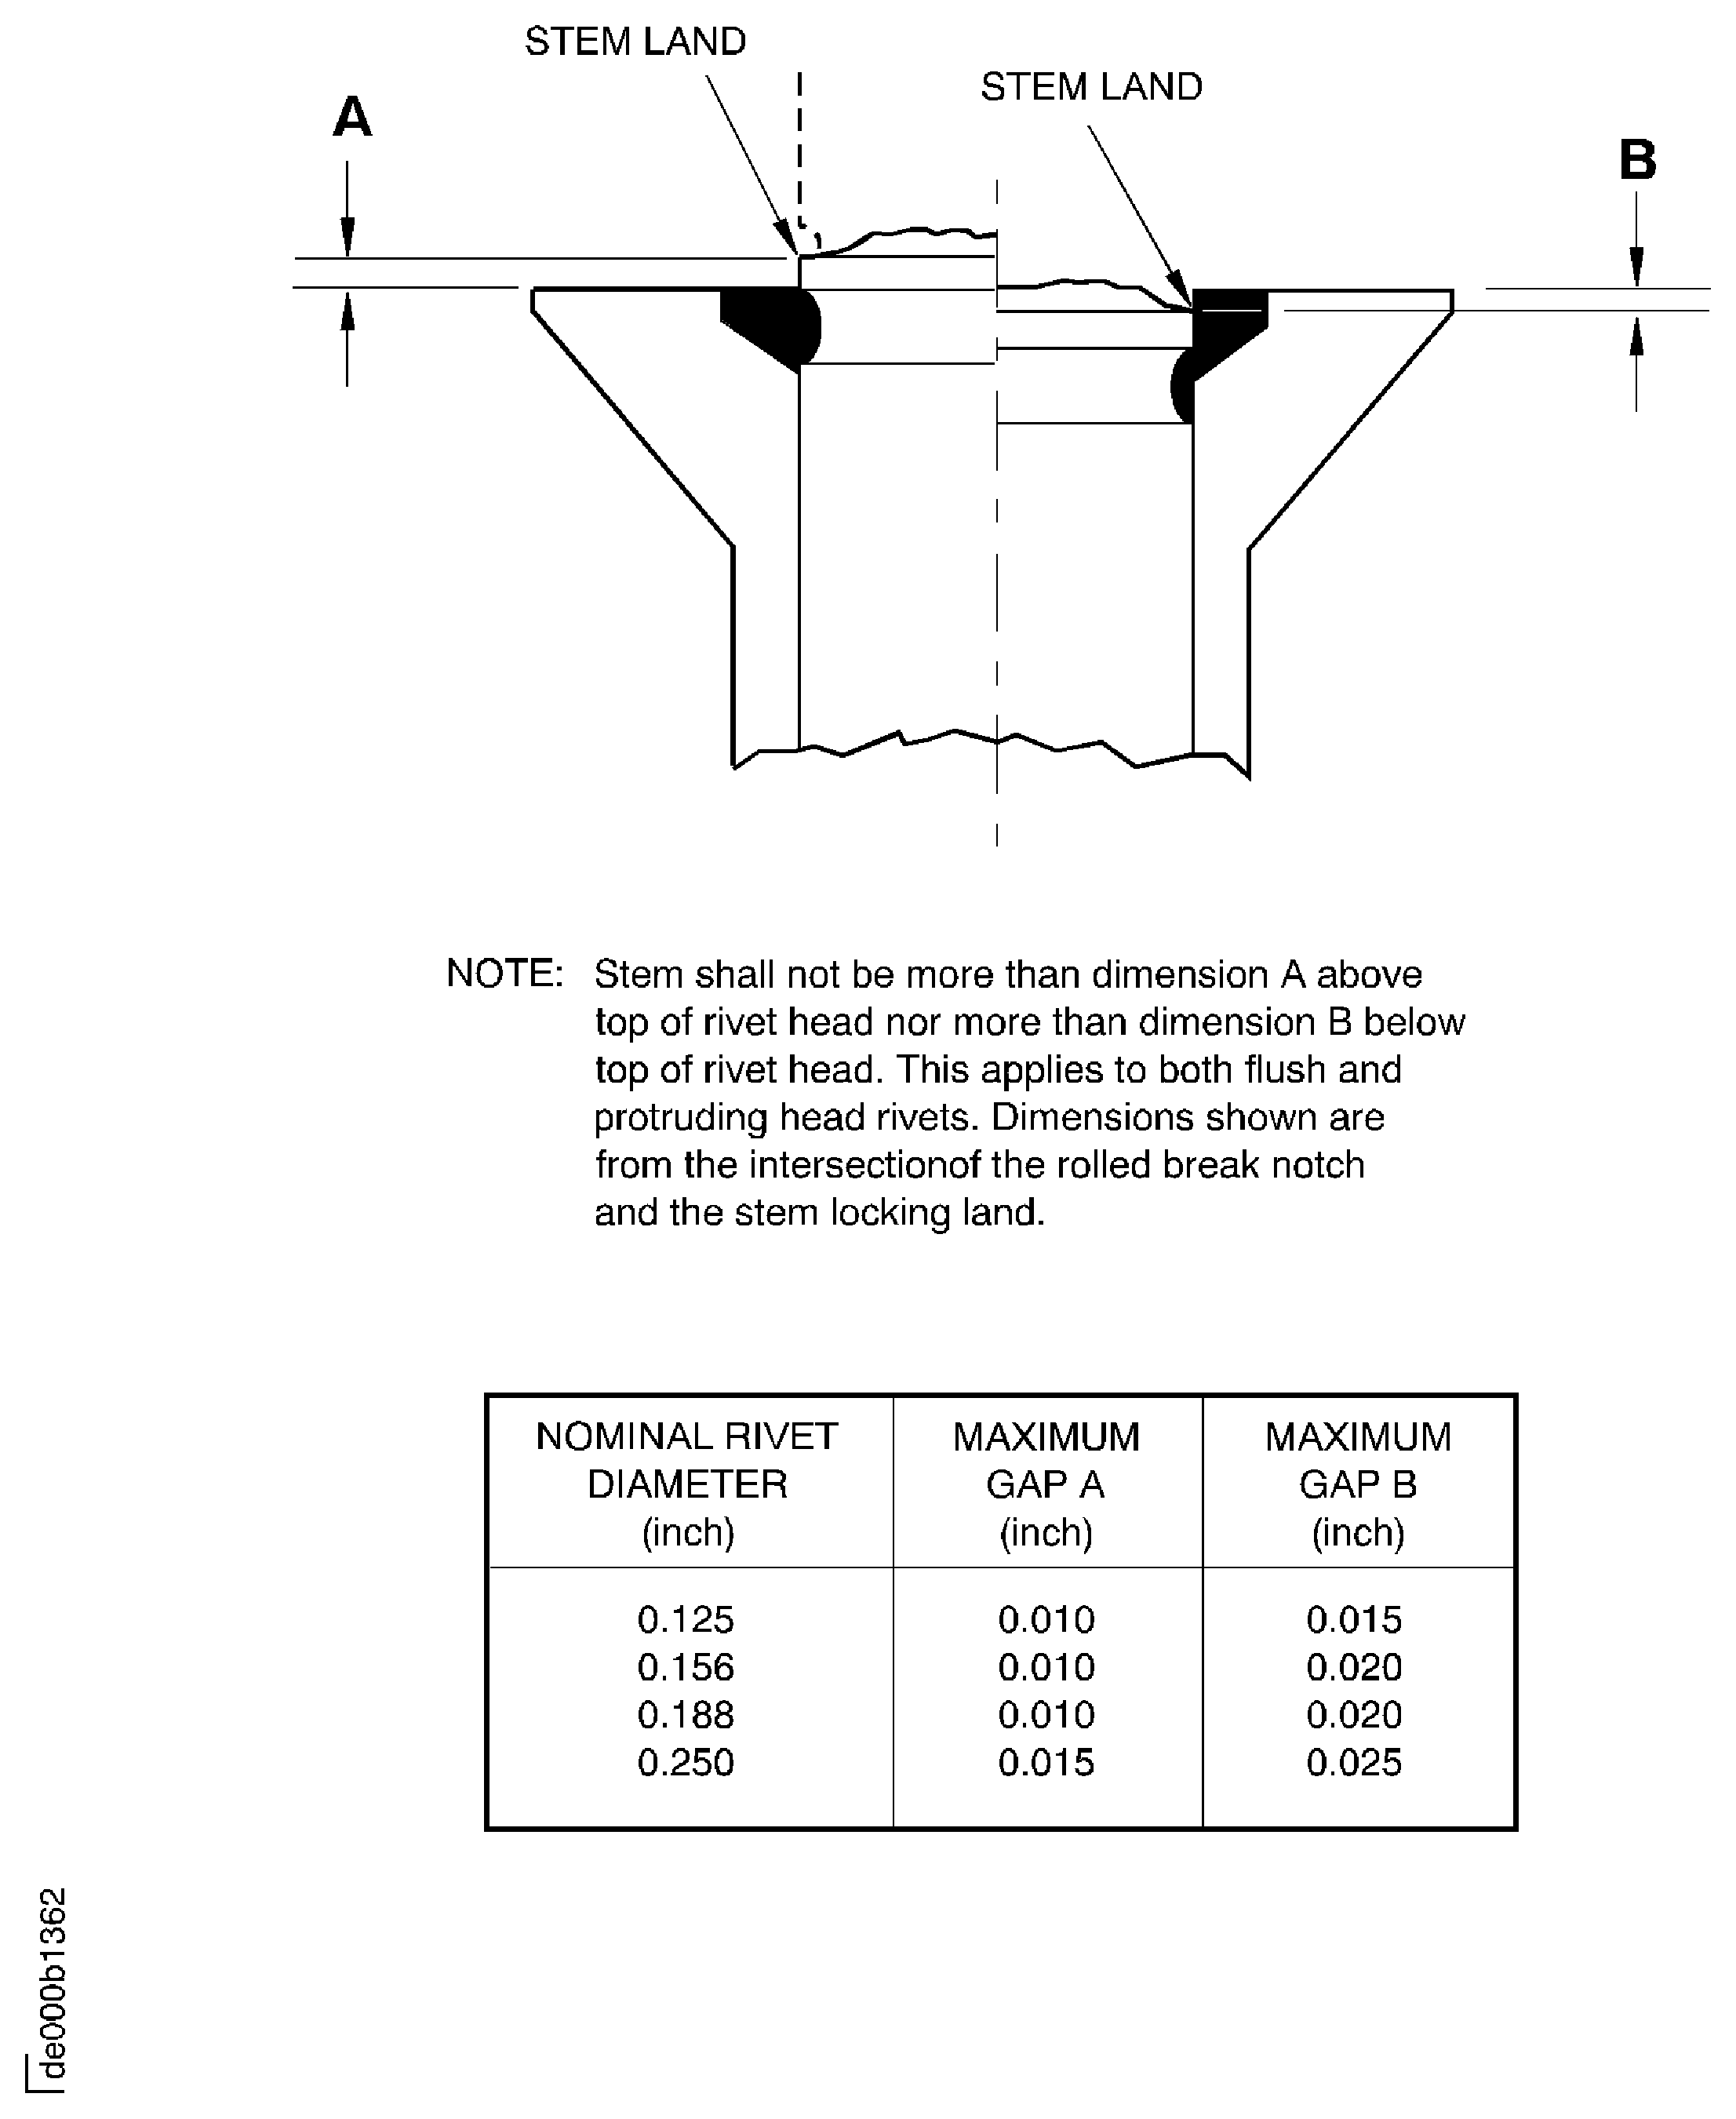
Figure: Total load necessary to push-out the installed and locked stem
Total load necessary to push-out the installed and locked stem
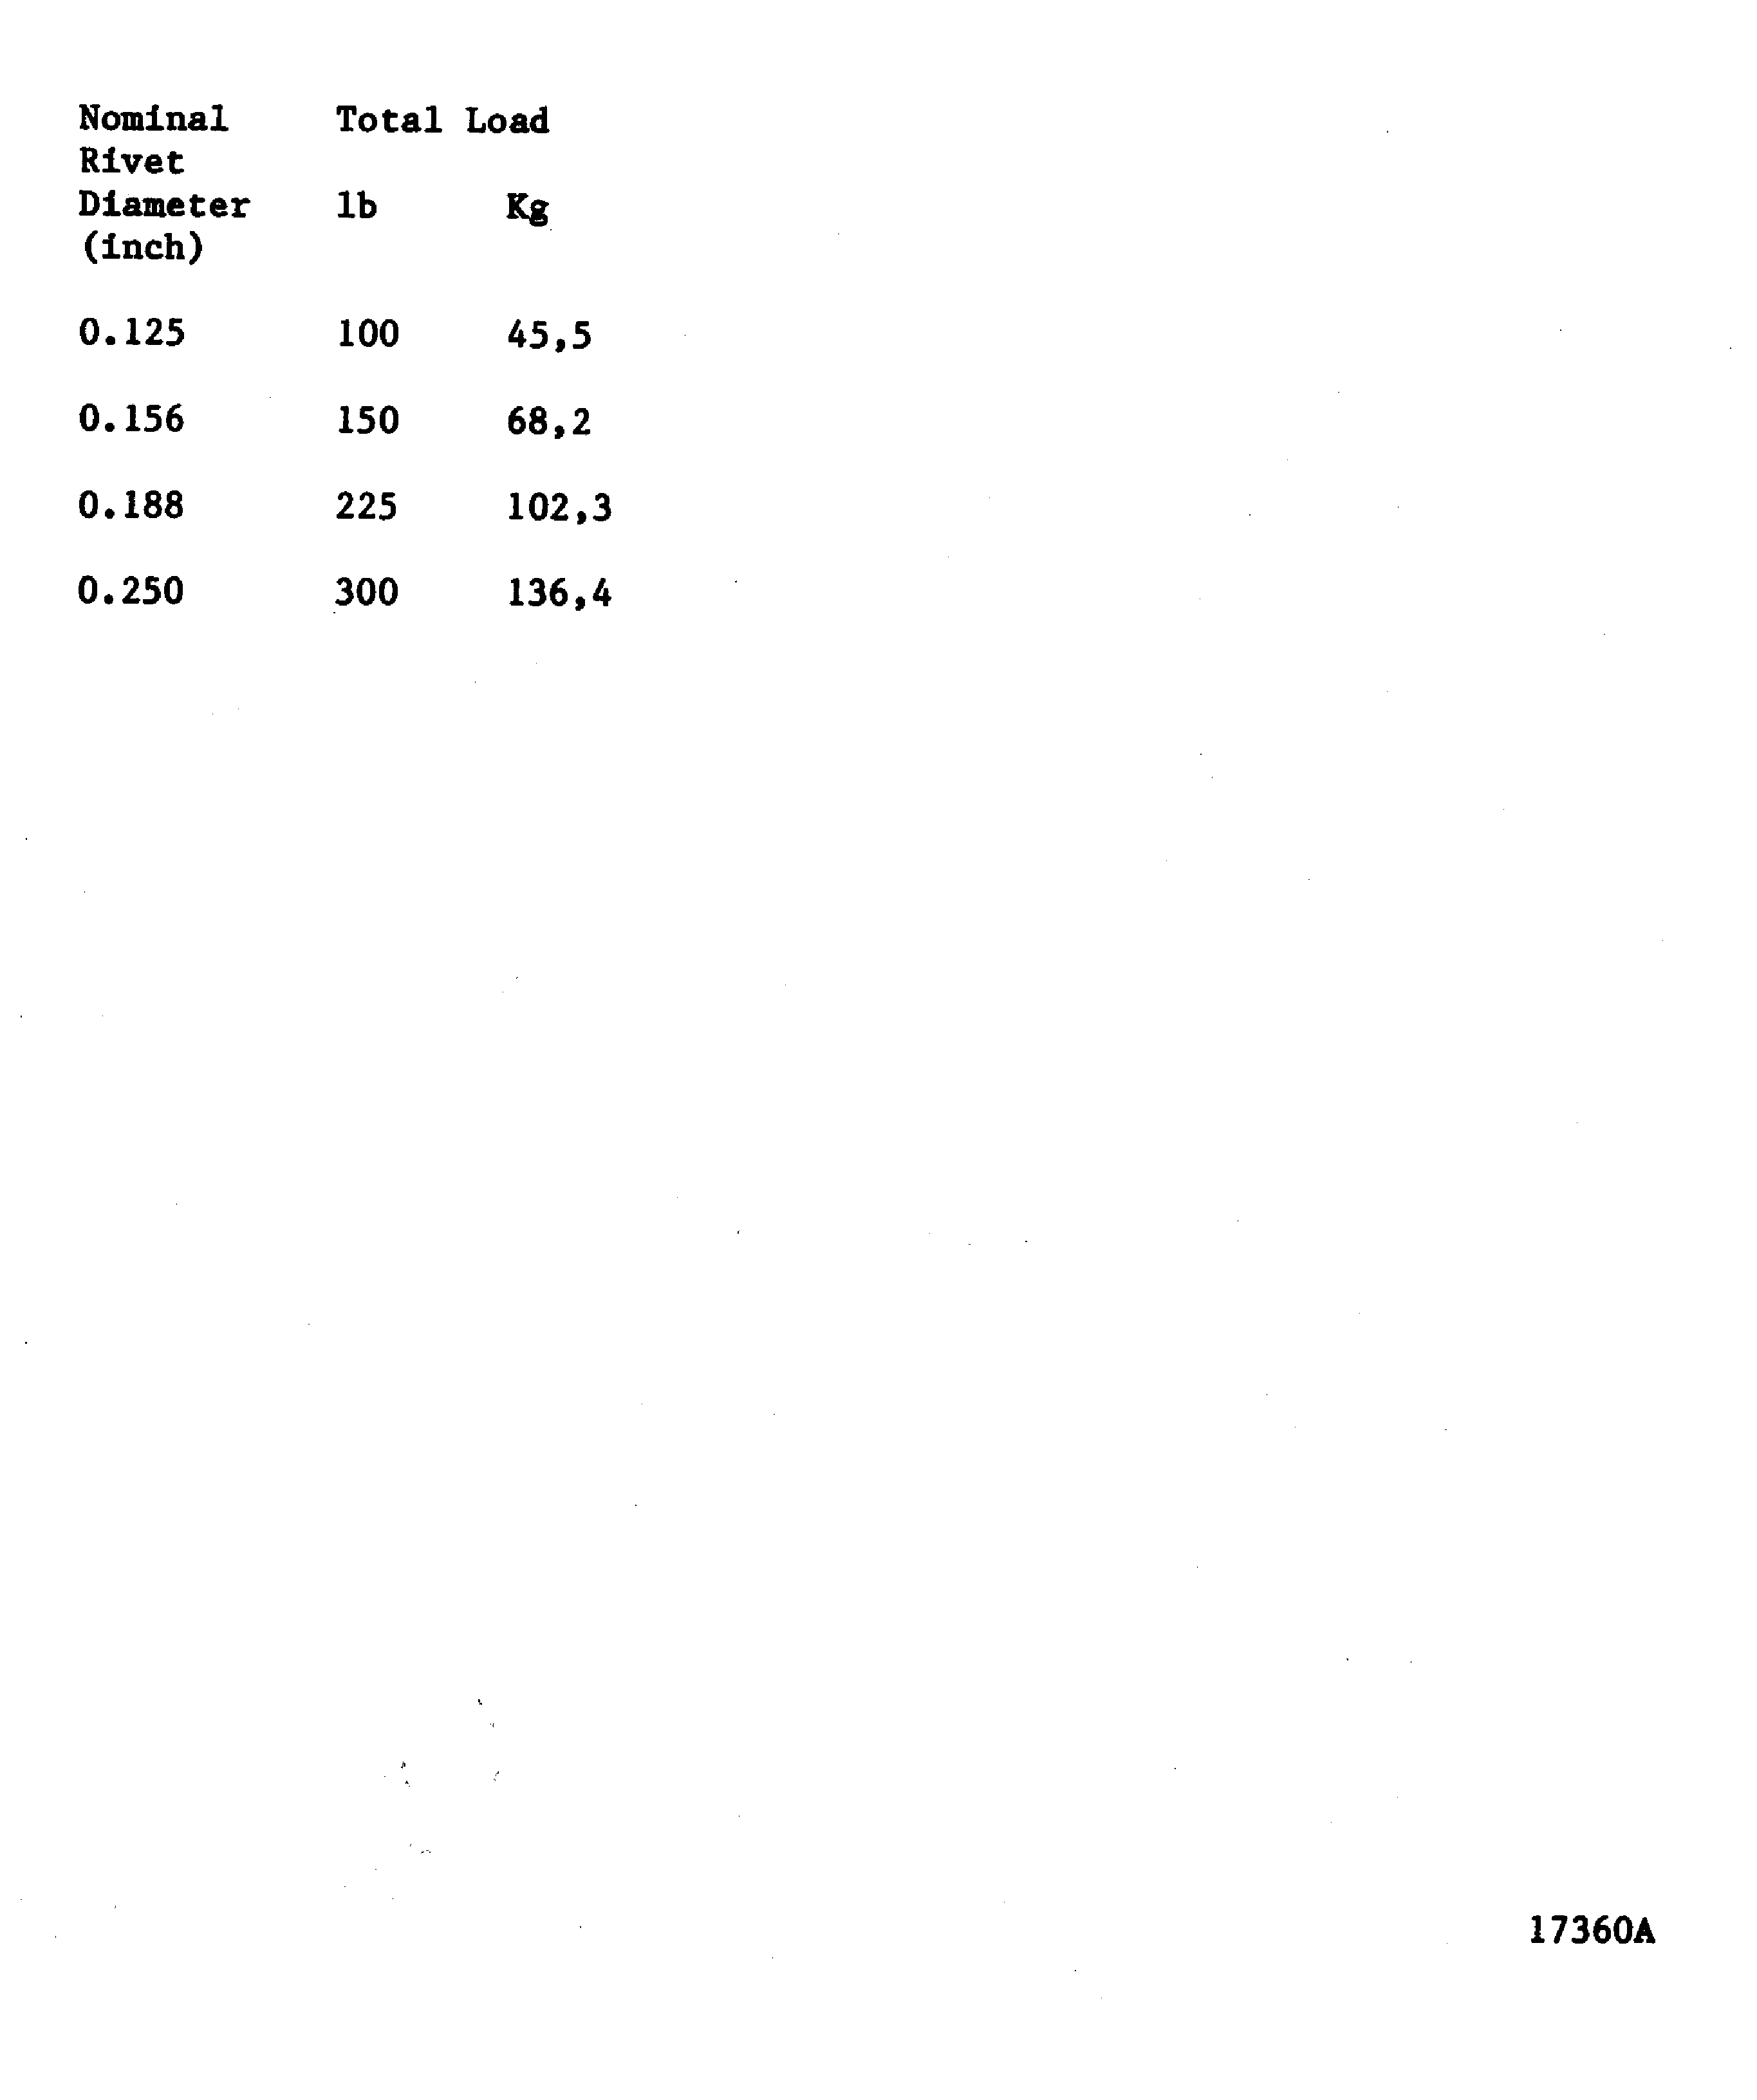
Figure: Clearance and material removal limits, for high-shear stump pins and collars
Clearance and material removal limits, for high-shear stump pins and collars
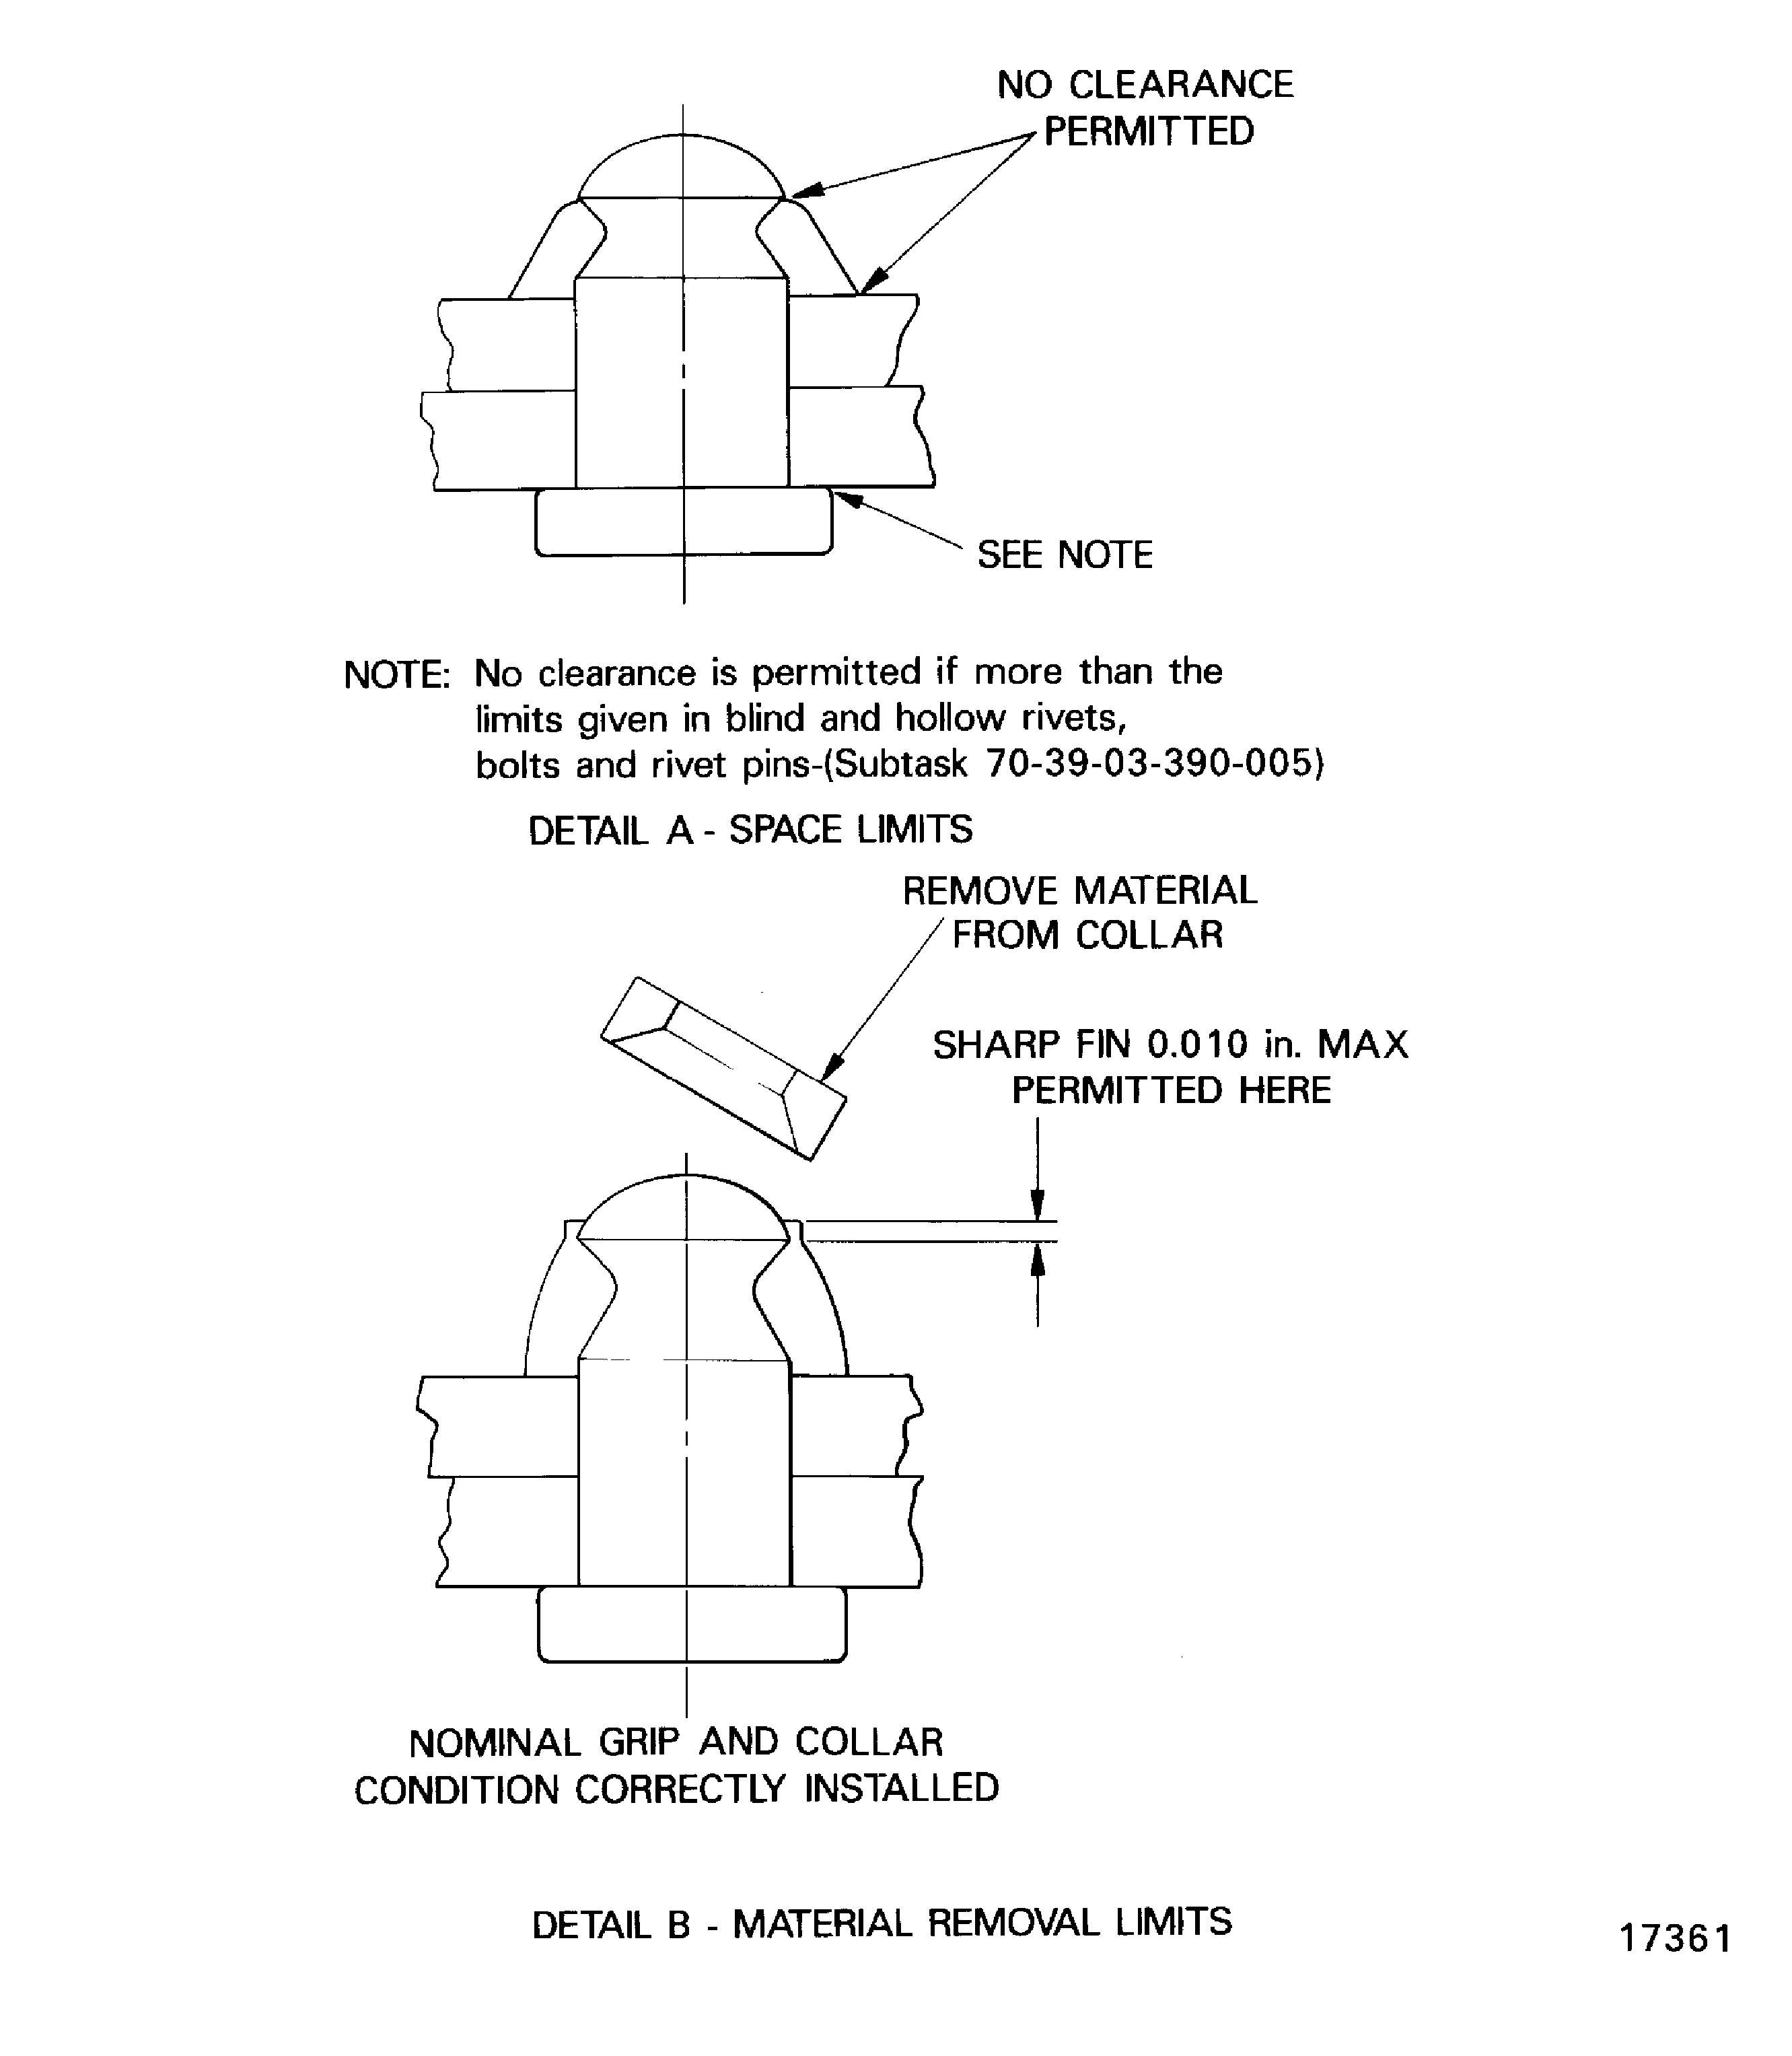
Figure: Shoulder and/or ring limits for high-shear collars
Shoulder and/or ring limits for high-shear collars
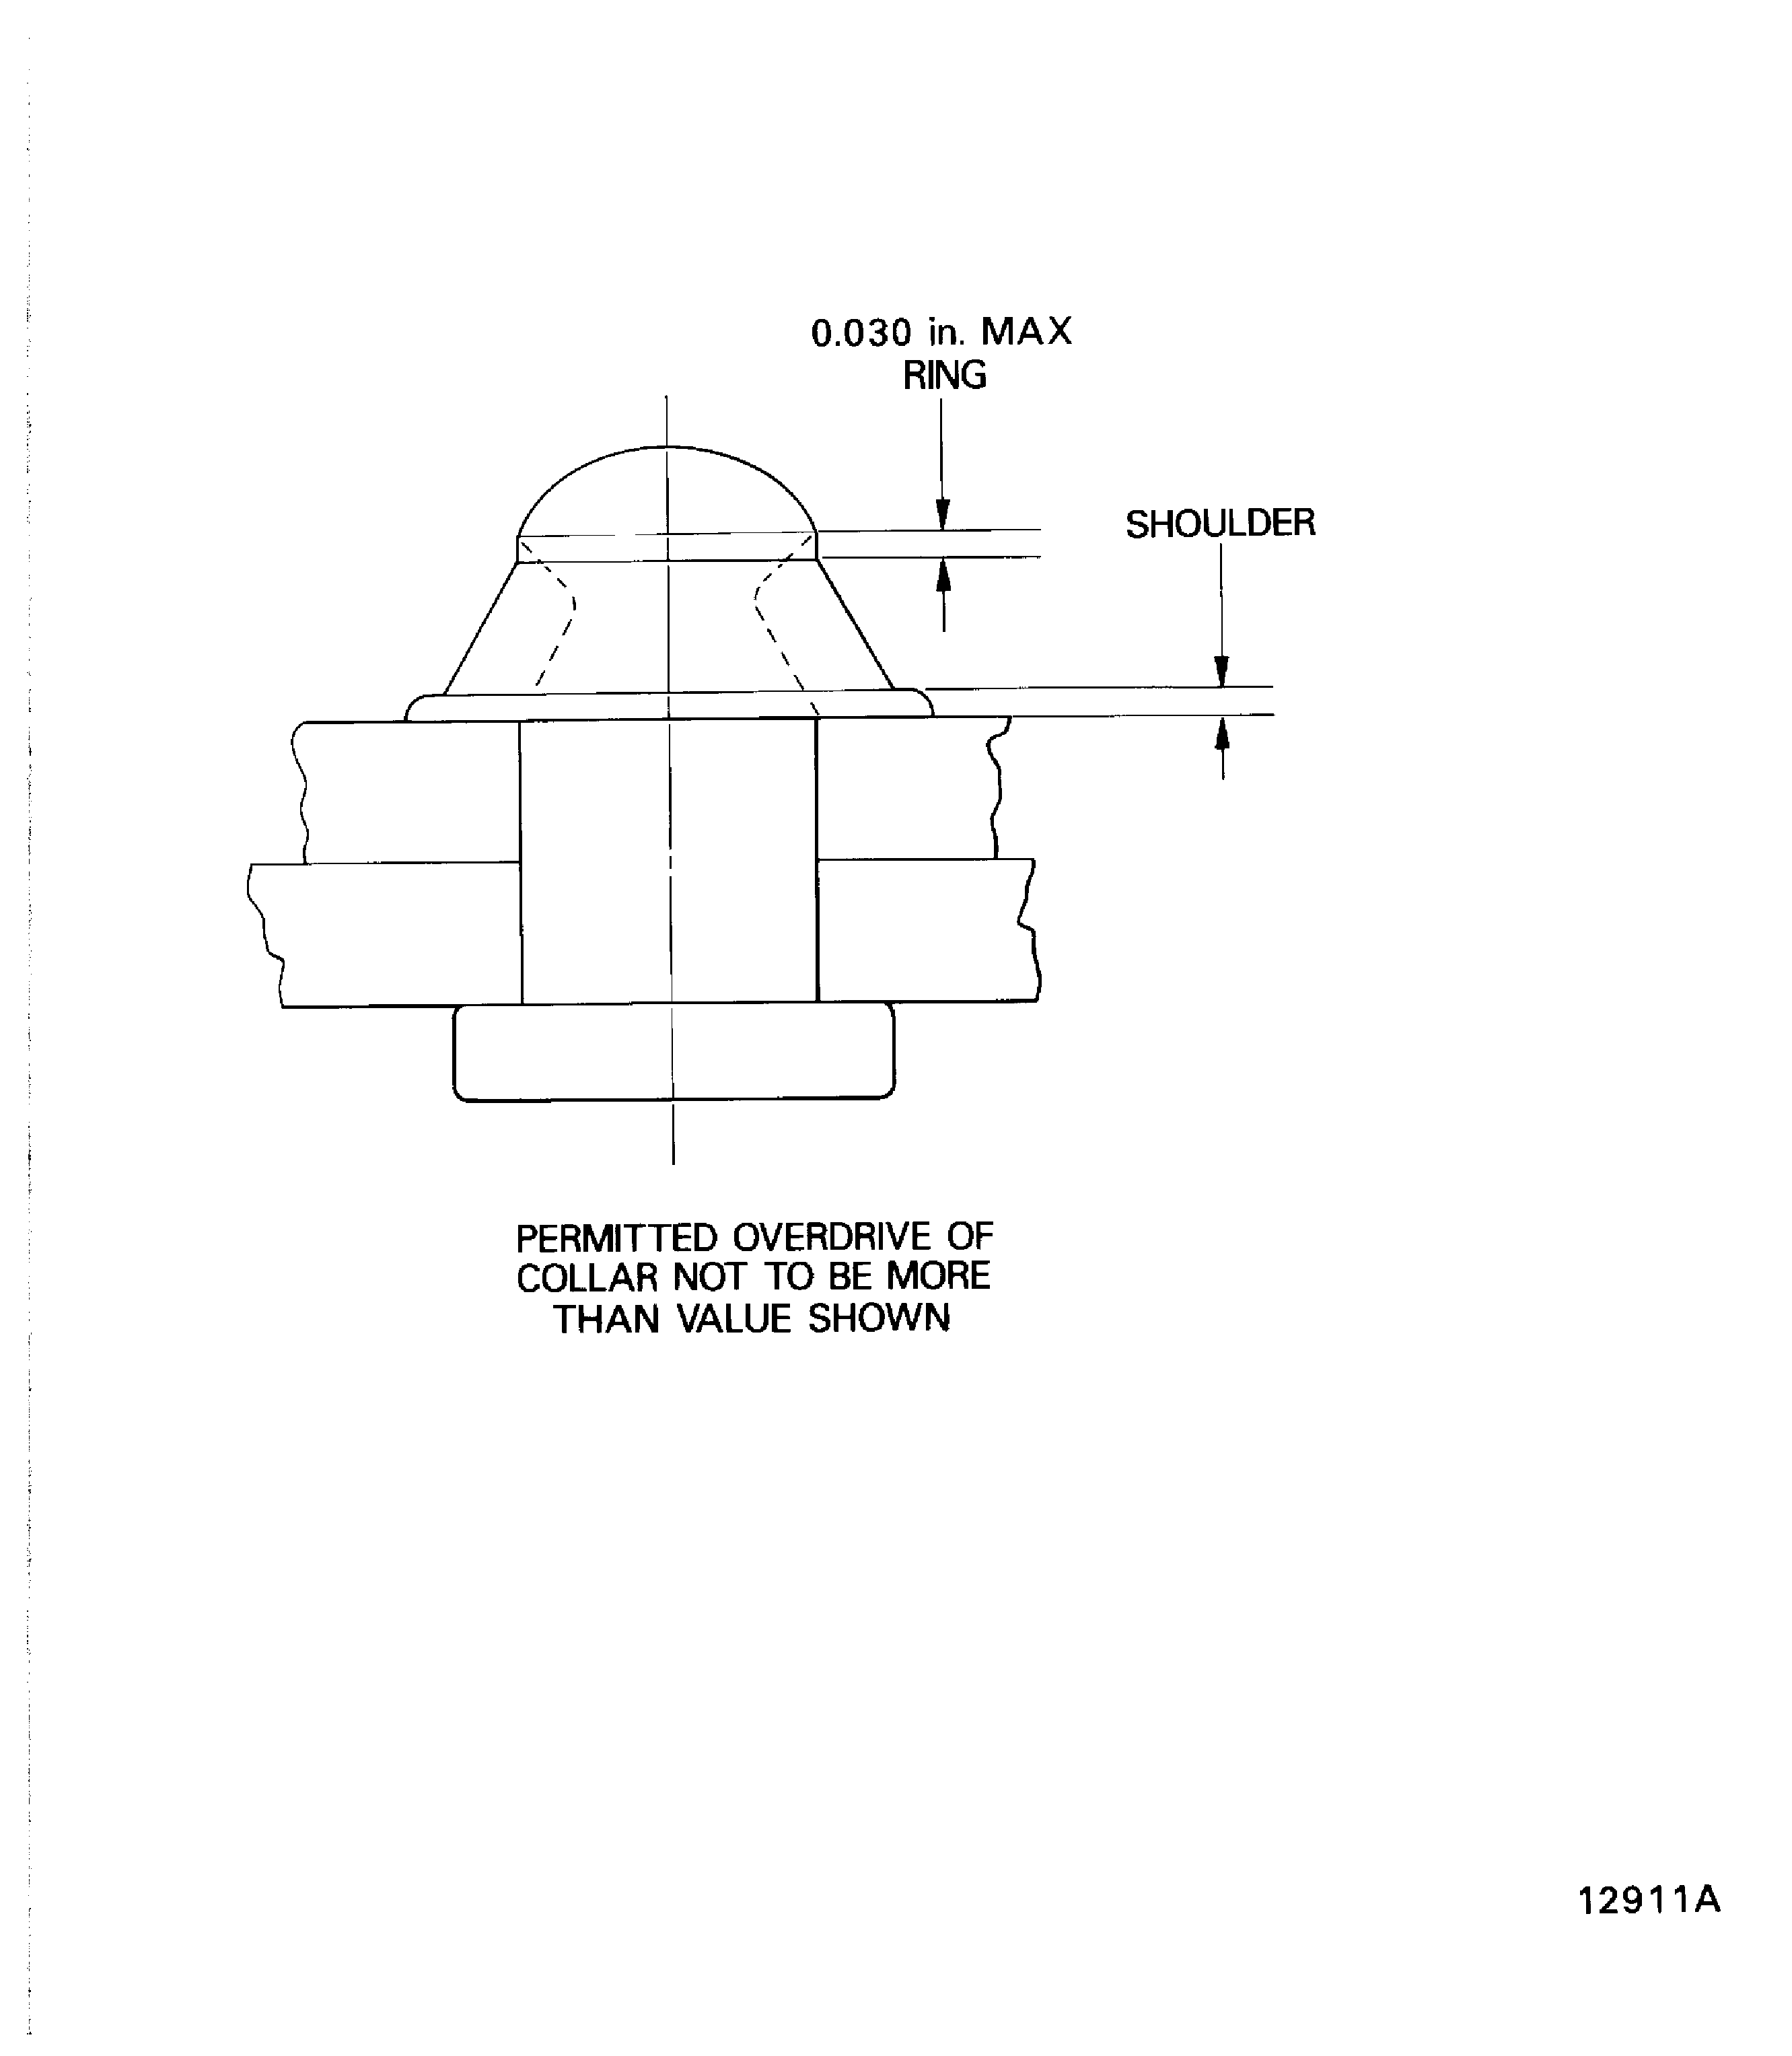
Figure: General quality necessary for huck-tension stump-type rivet pins and collars
General quality necessary for huck-tension stump-type rivet pins and collars
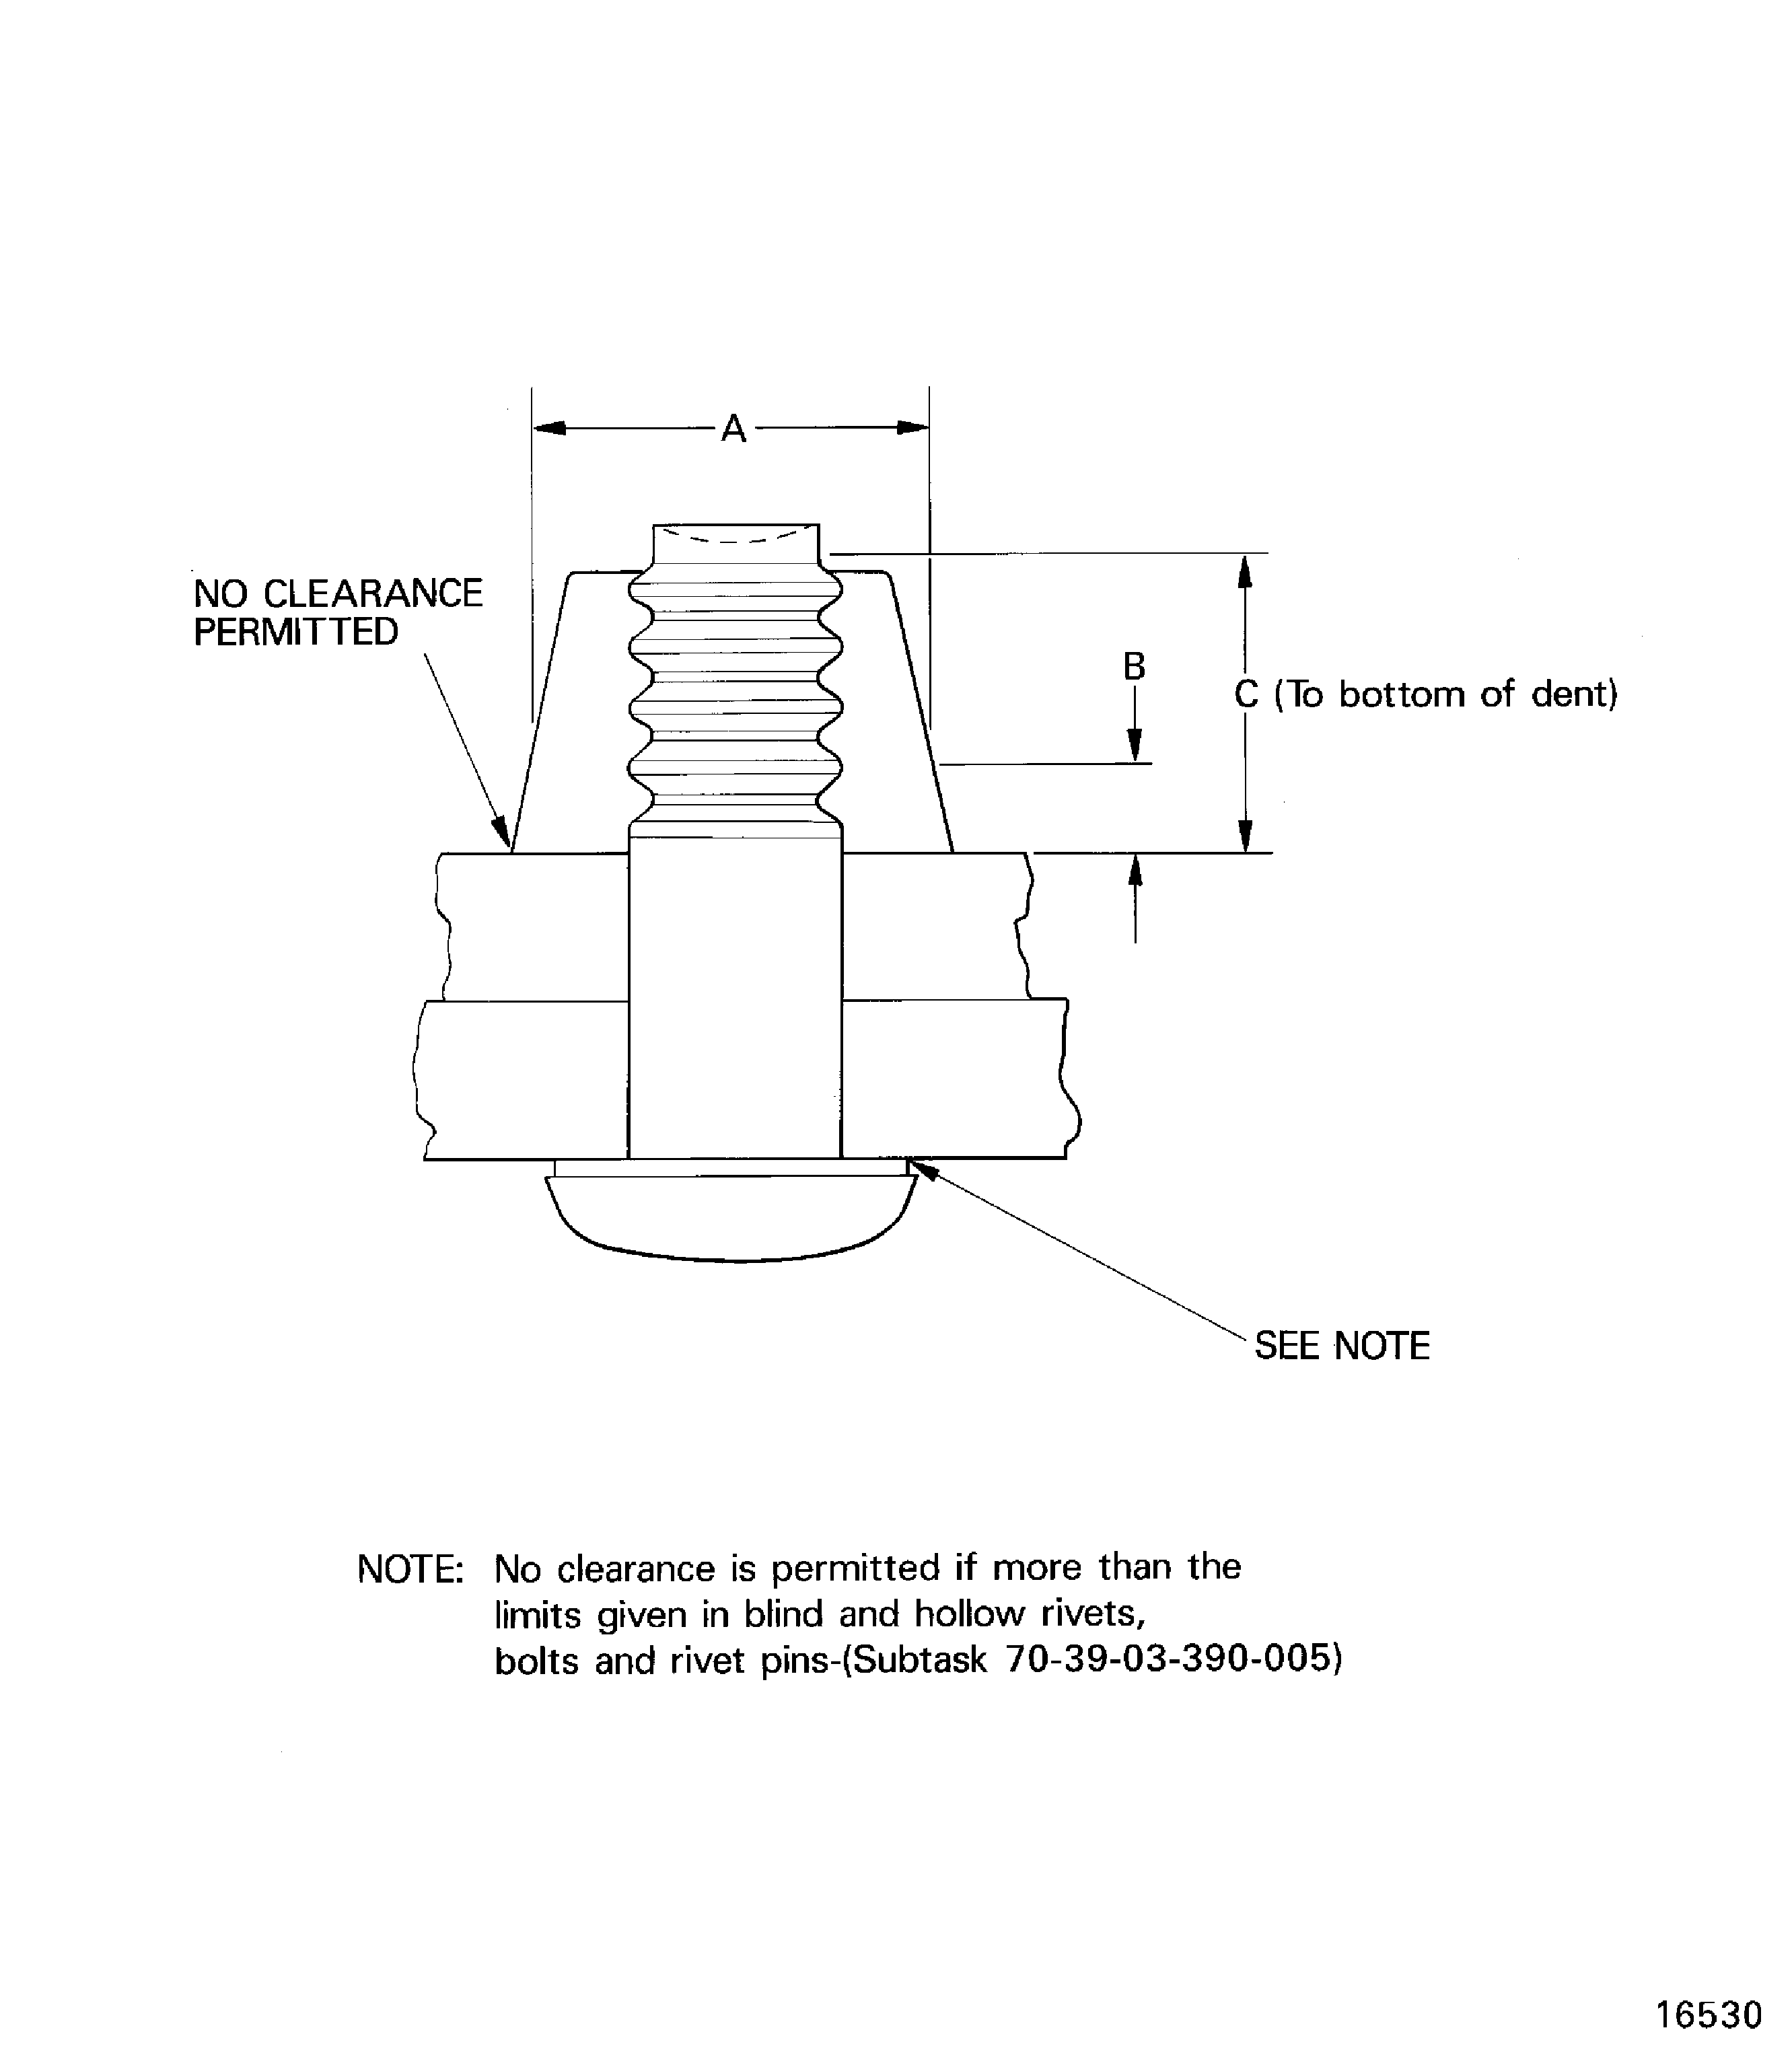
Figure: General quality necessary for huck-tension stump-type rivet pins and collars
General quality necessary for huck-tension stump-type rivet pins and collars
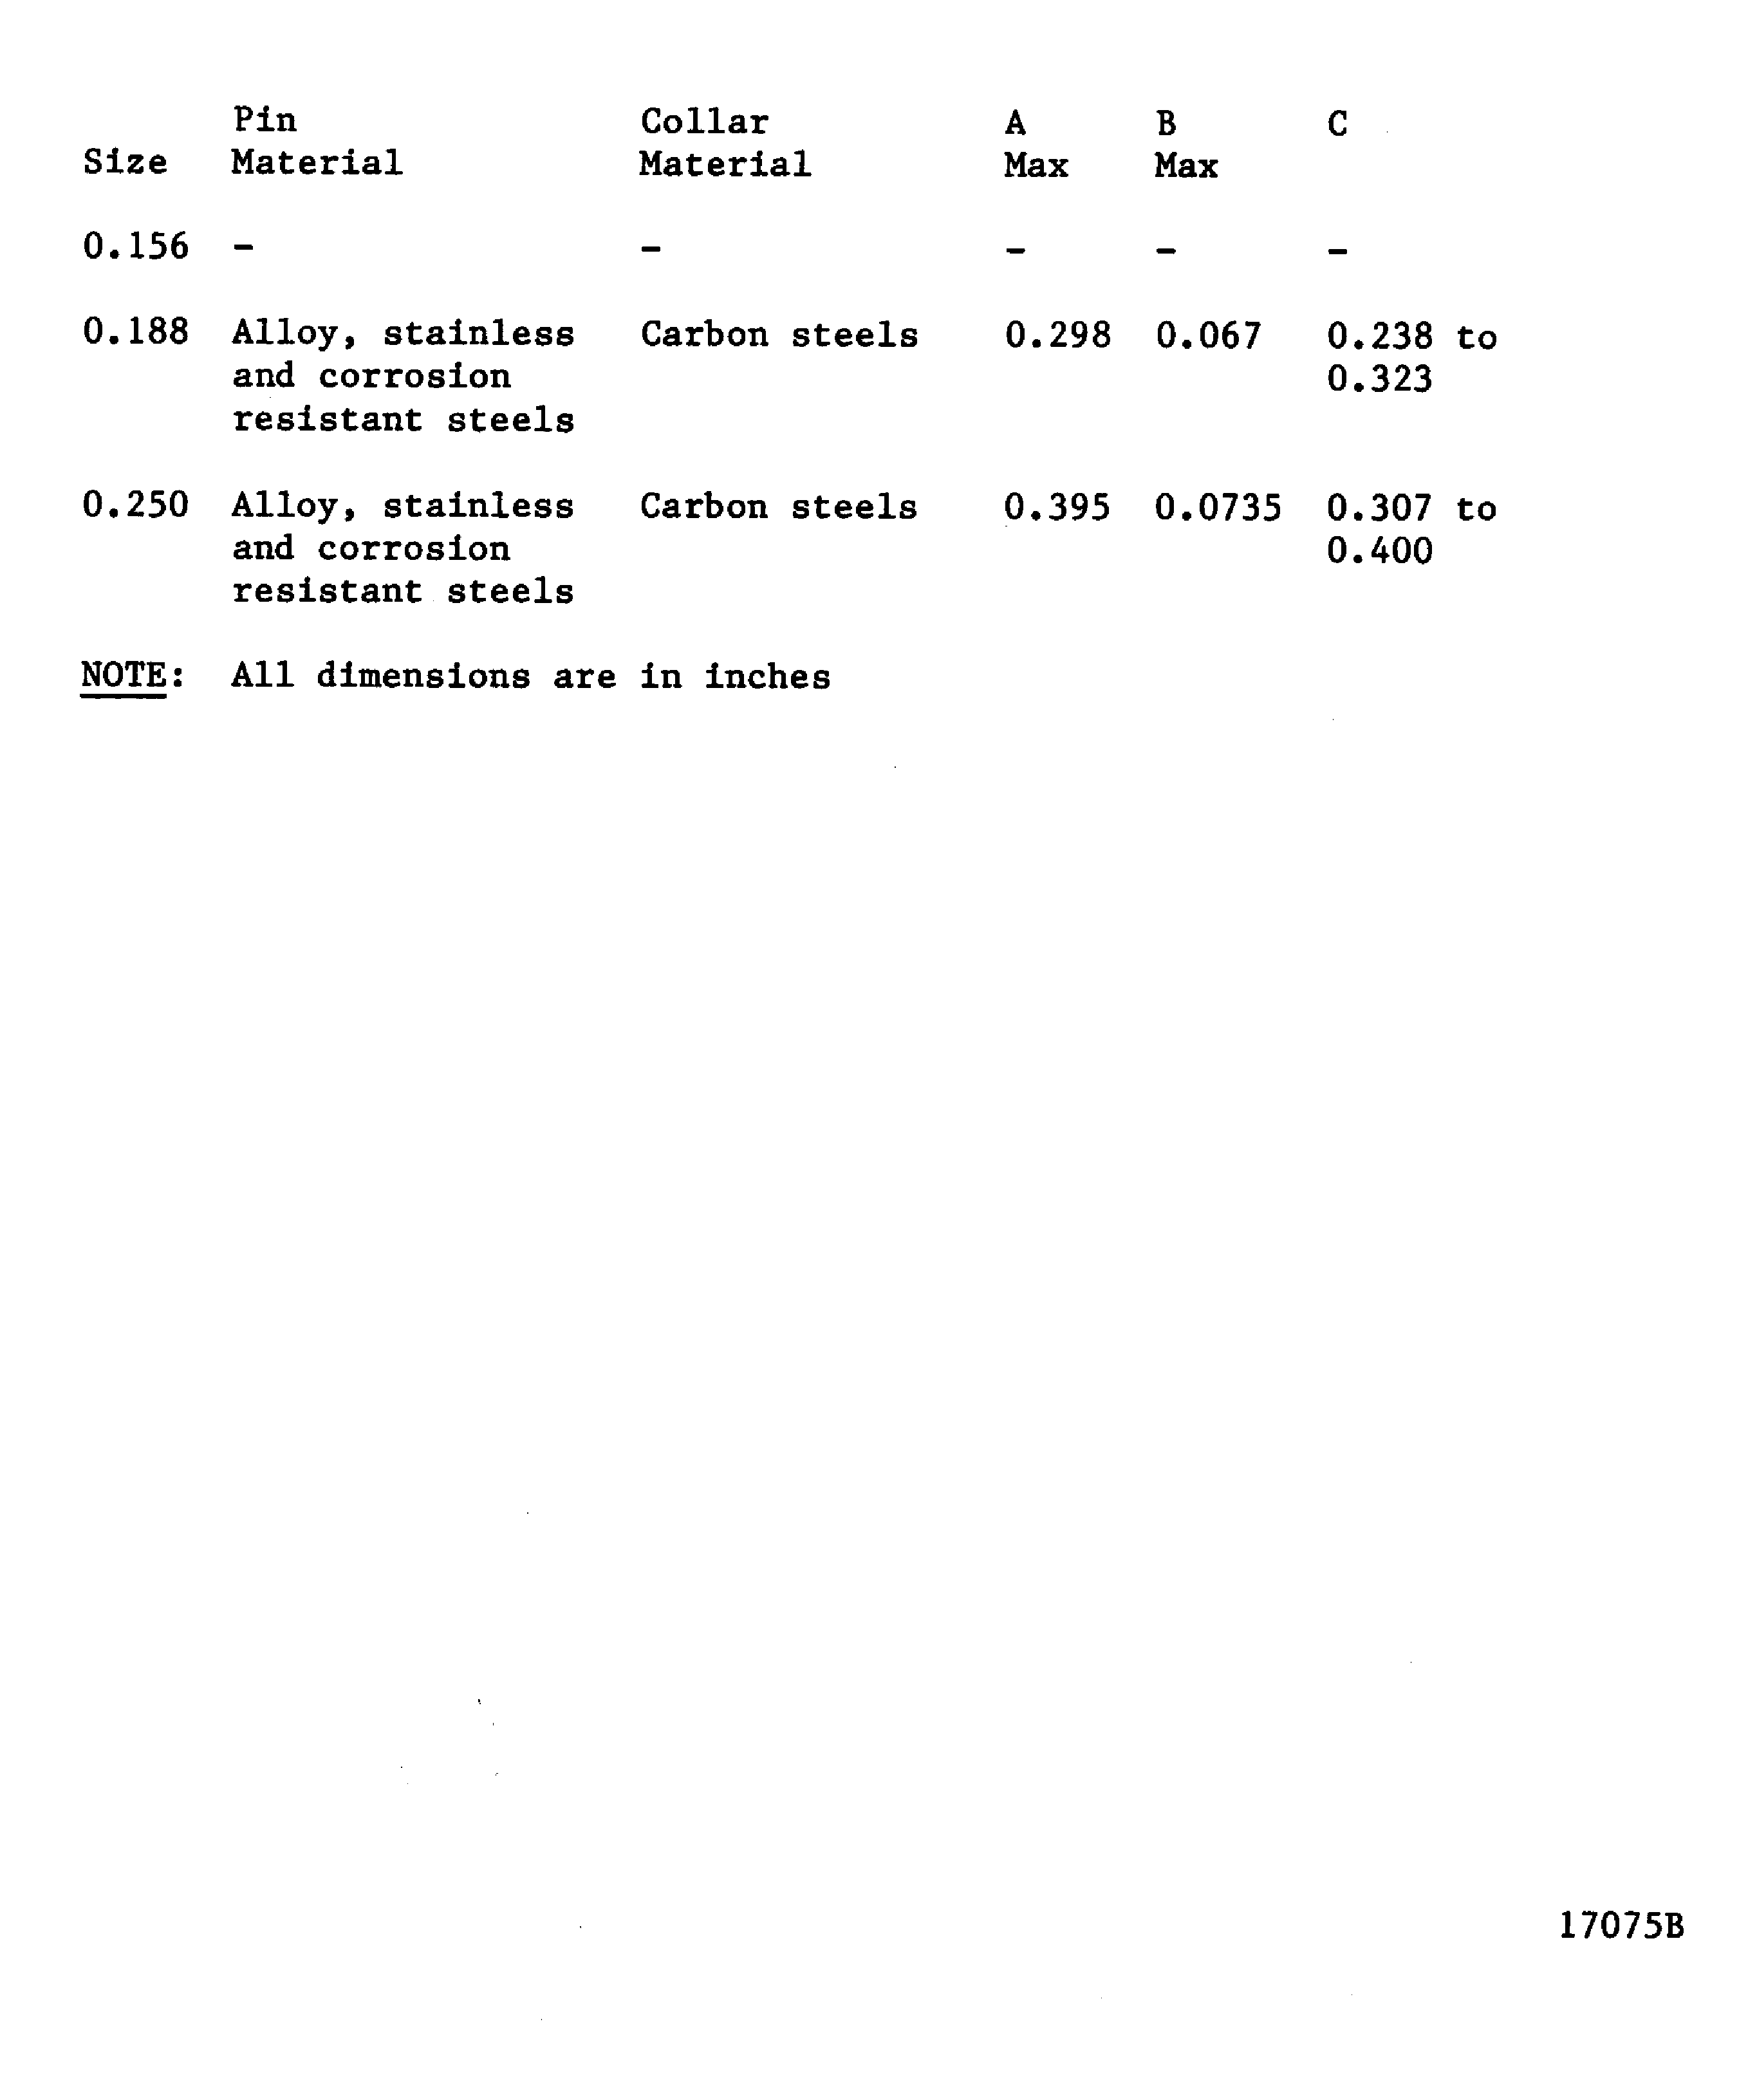
Figure: General quality necessary for huck-tension pull-type rivet pins and collars
General quality necessary for huck-tension pull-type rivet pins and collars
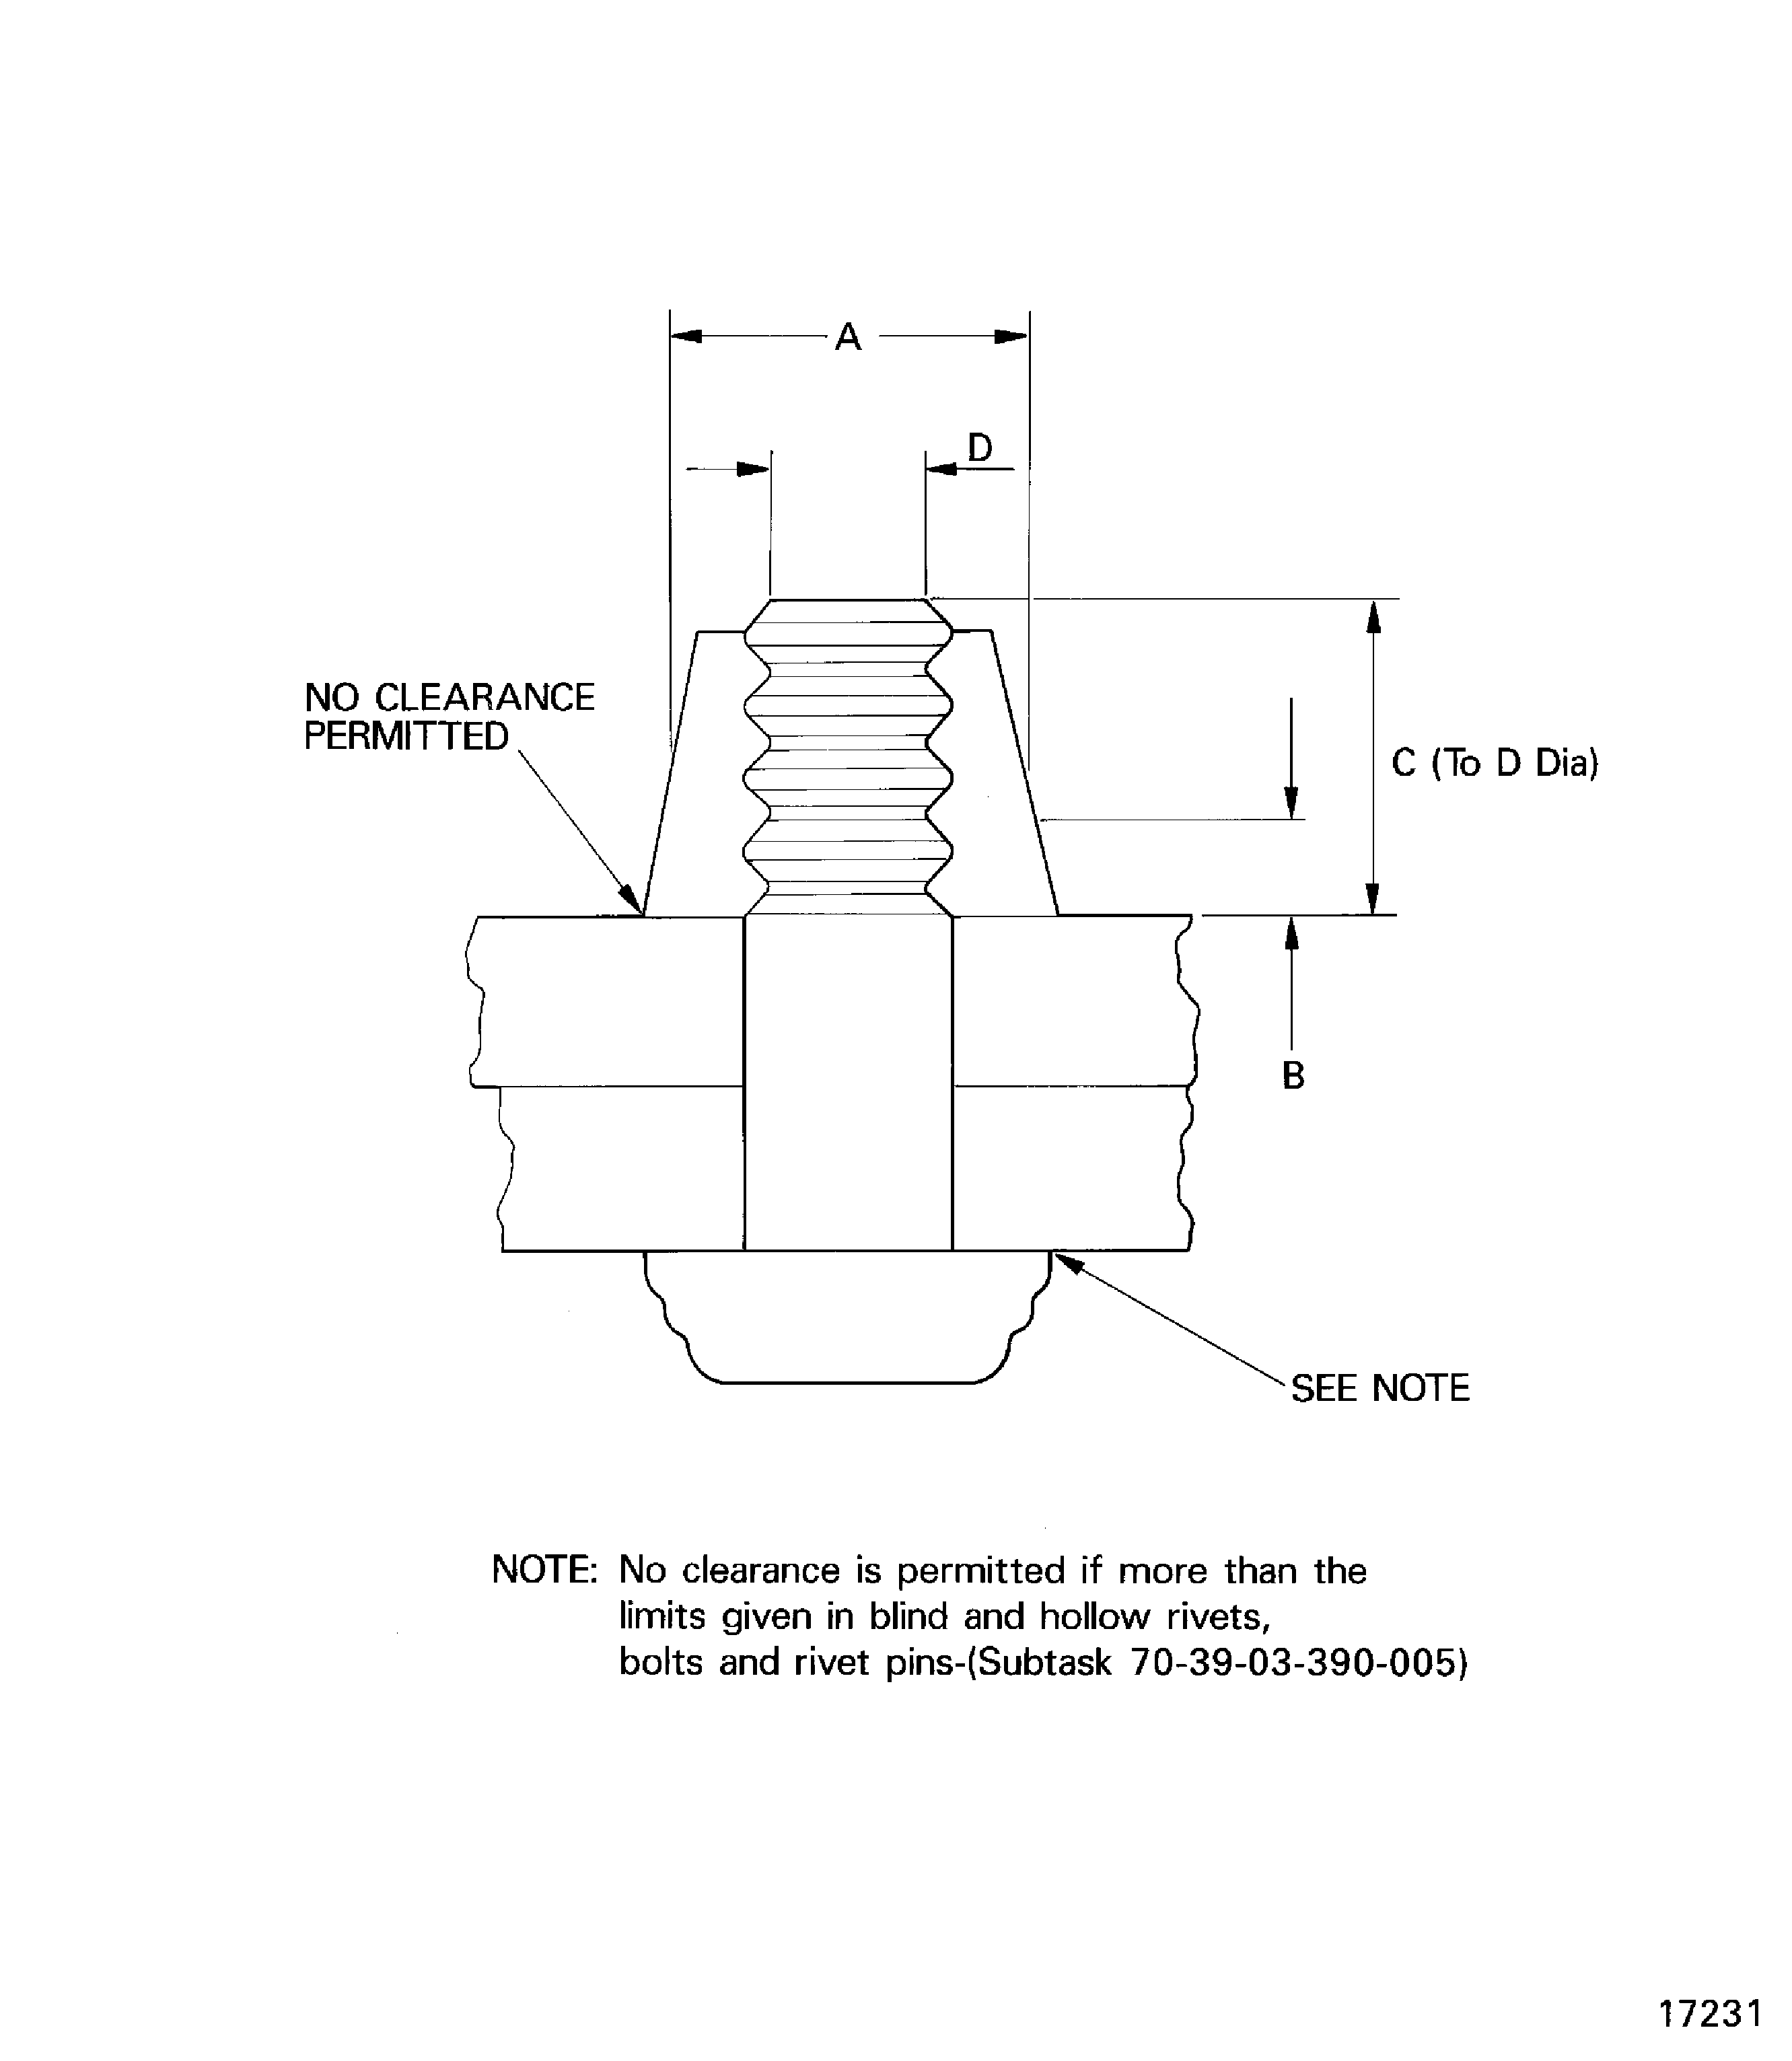
Figure: General quality necessary for huck-tension pull-type rivet pins and collars
General quality necessary for huck-tension pull-type rivet pins and collars
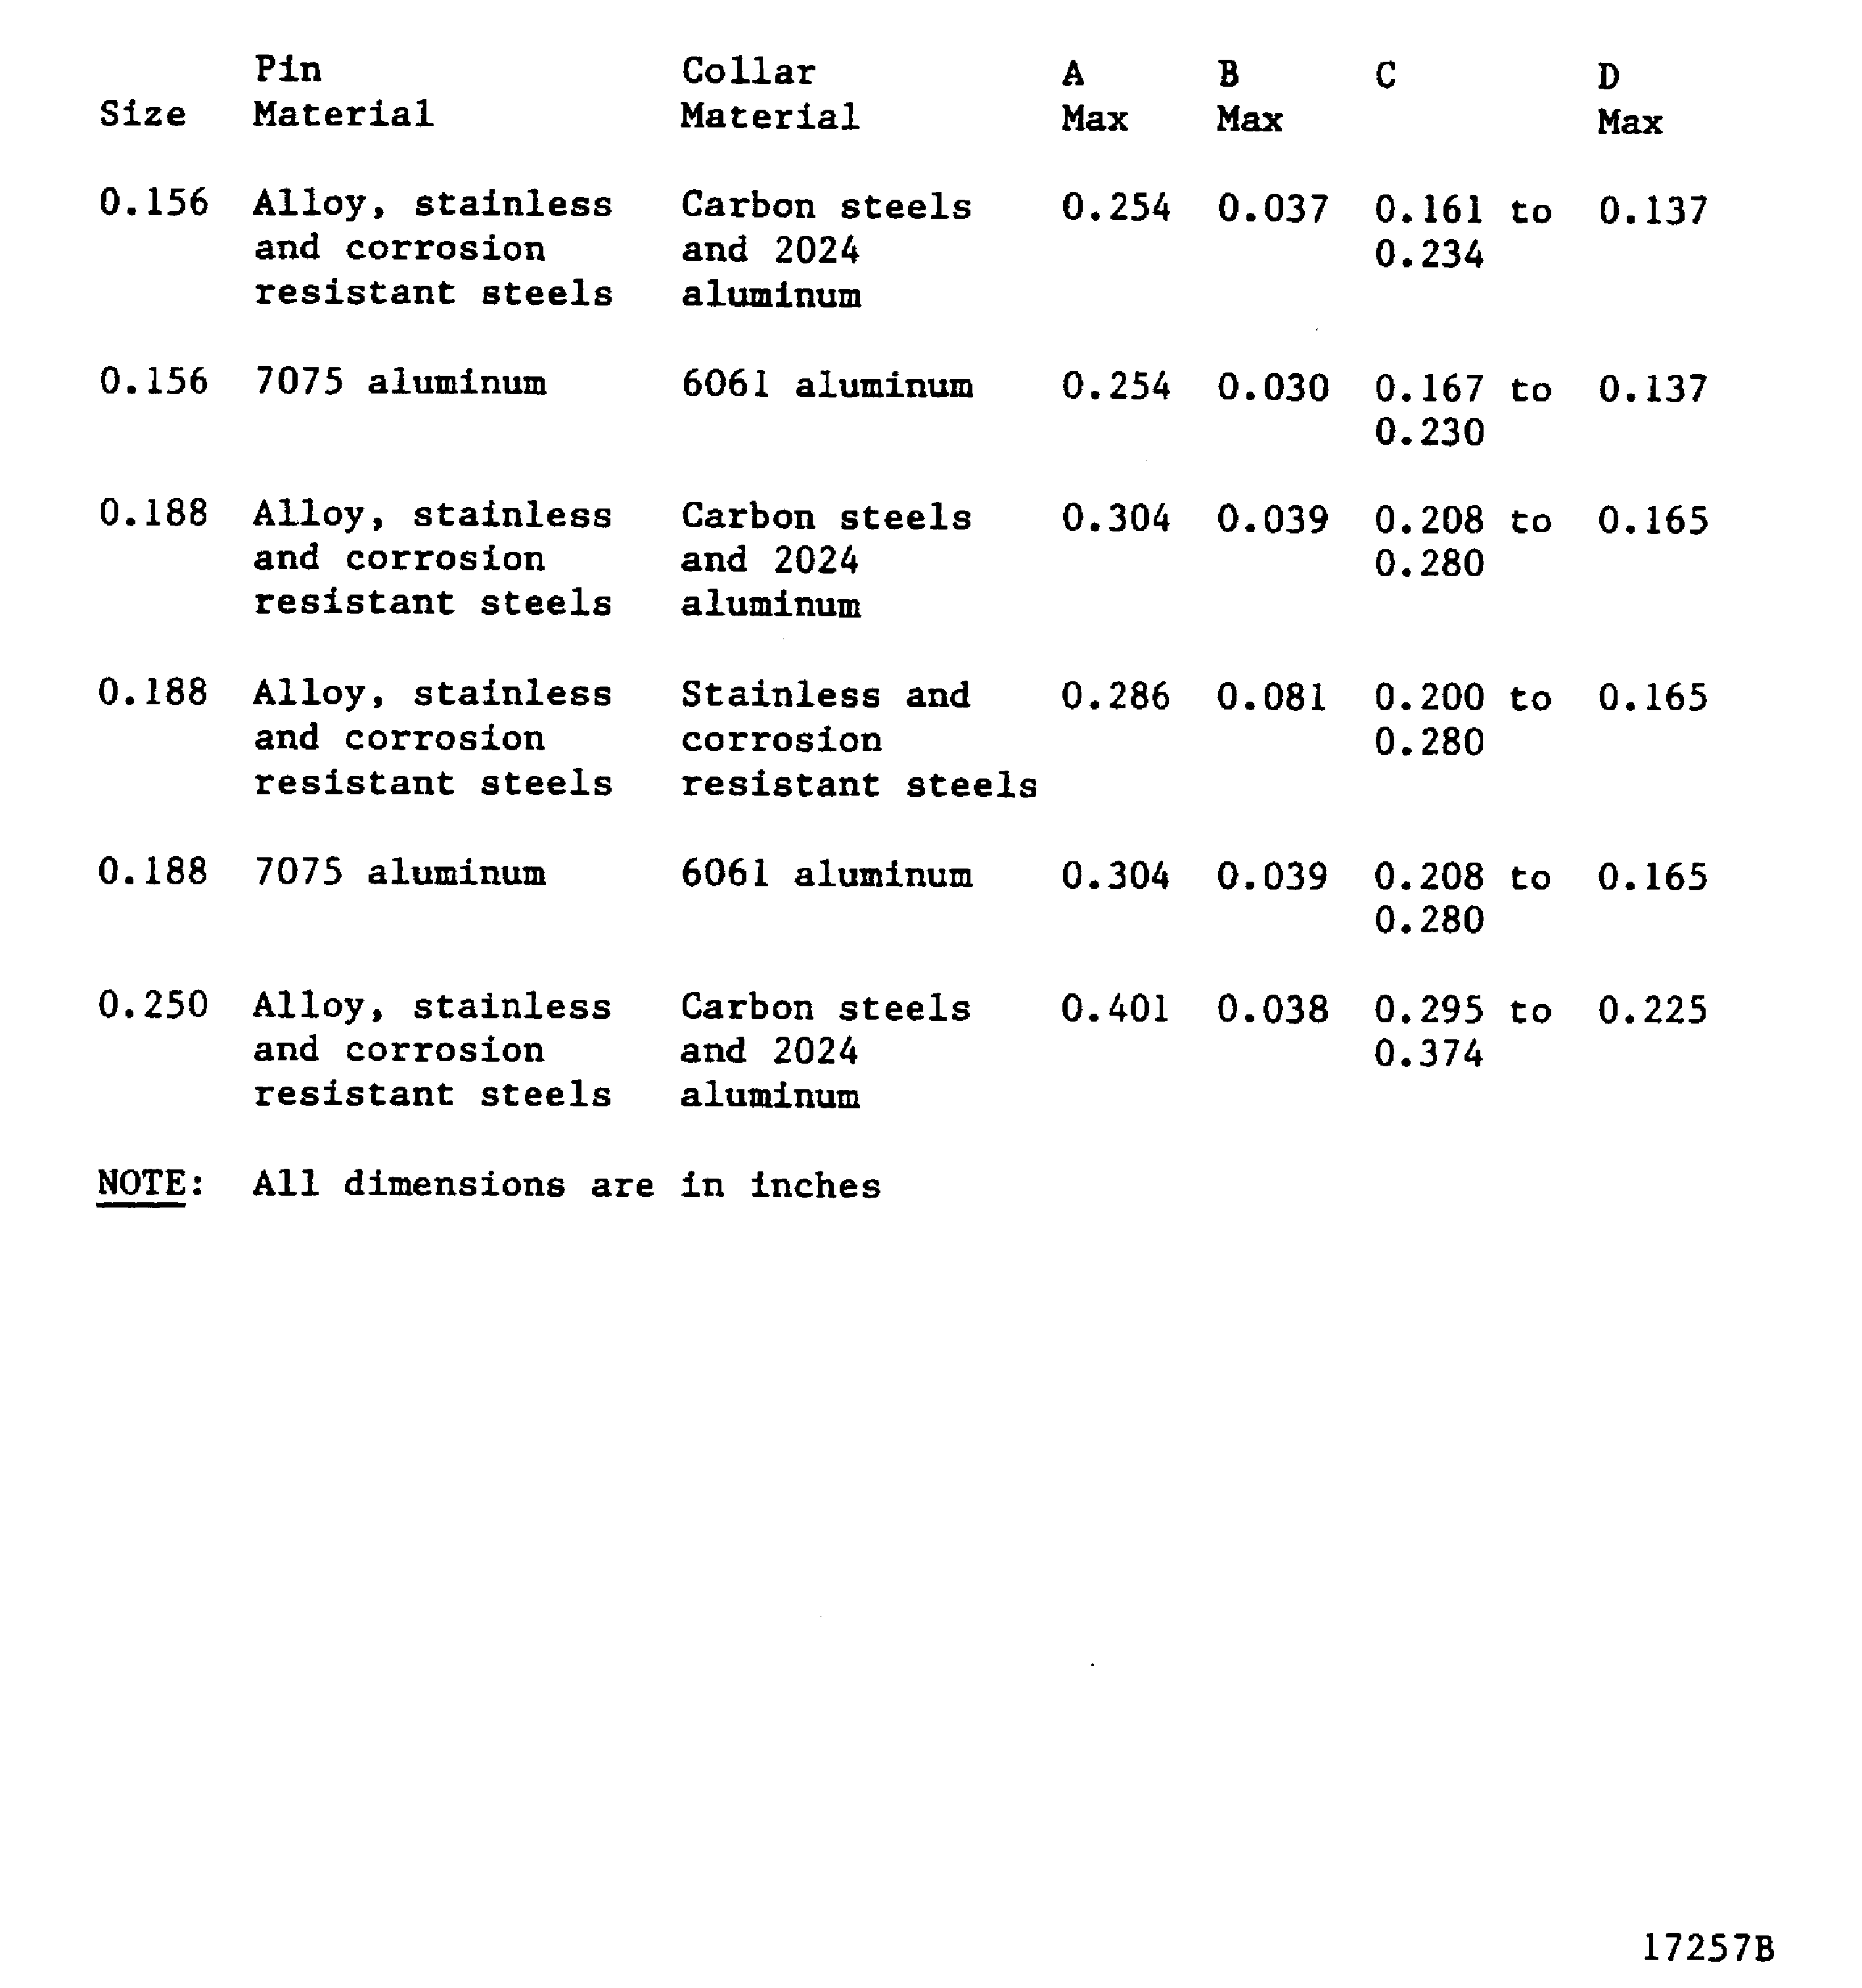
Figure: Rivet Removal Procedure
Rivet Removal Procedure
