DMC:V2500-00-70-42-06-00A-712A-D|Issue No:001.00|Issue Date:2013-03-20
Export Control
EAR Export Classification: Not subject to the EAR per 15 C.F.R. Chapter 1, Part 734.3(b)(3), except for the following Service Bulletins which are currently published as EAR Export Classification 9E991:
SBE70-0992, SBE72-0483, SBE72-0580, SBE72-0588, SBE72-0640, SBE73-0209, SBE80-0024 and SBE80-0025.
Copyright
© IAE International Aero Engines AG (2001, 2014 - 2021)
The information contained in this document is the property of © IAE International Aero Engines AG and may not be copied or used for any purpose other than that for which it is supplied without the express written authority of © IAE International Aero Engines AG. (This does not preclude use by engine and aircraft operators for normal instructional, maintenance or overhaul purposes.).
Common Information
TASK 70-42-06-400-501 The Staking Of Components
Definition and Purpose
Staking is the procedure used to keep an installed part held in position.
A staking punch causes the movement of material on a housing to keep an installed part in position.
A threaded installed part can be stake punched to cause an interference in the thread of the housing.
Quality Requirements
The staking operation must be done very carefully so that the parts are not damaged. The movement of material must be kept to a limit, this limit must only be the movement done by the staking operation.
After a staking operation on a part, the material must not show signs of separation. A crack in the material or the material adjacent to the staking will cause the part to be rejected.
The mark made by the pressure of staking must have equally lifted edges of moved material with no burrs.
Staking which causes incorrect material movement (not cracks) must be removed or made smooth.
Preliminary Requirements
Pre-Conditions
NONESupport Equipment
NONEConsumables, Materials and Expendables
NONESpares
NONESafety Requirements
CAUTION
DO NOT USE PARALLEL-SIDED, SHARP-EDGED OR SHARP POINTED TOOLS FOR STAKING.
Procedure
SUBTASK 70-42-06-400-001 Staking of Nonthreaded Parts
The number of staking dents necessary are:
For components which are less than 0.126 in. (3.2 mm) in diameter, there must be at least one staking dent.
For components which are more than 0.126 in. (3.2 mm) in diameter, there must be at least two staking dents.
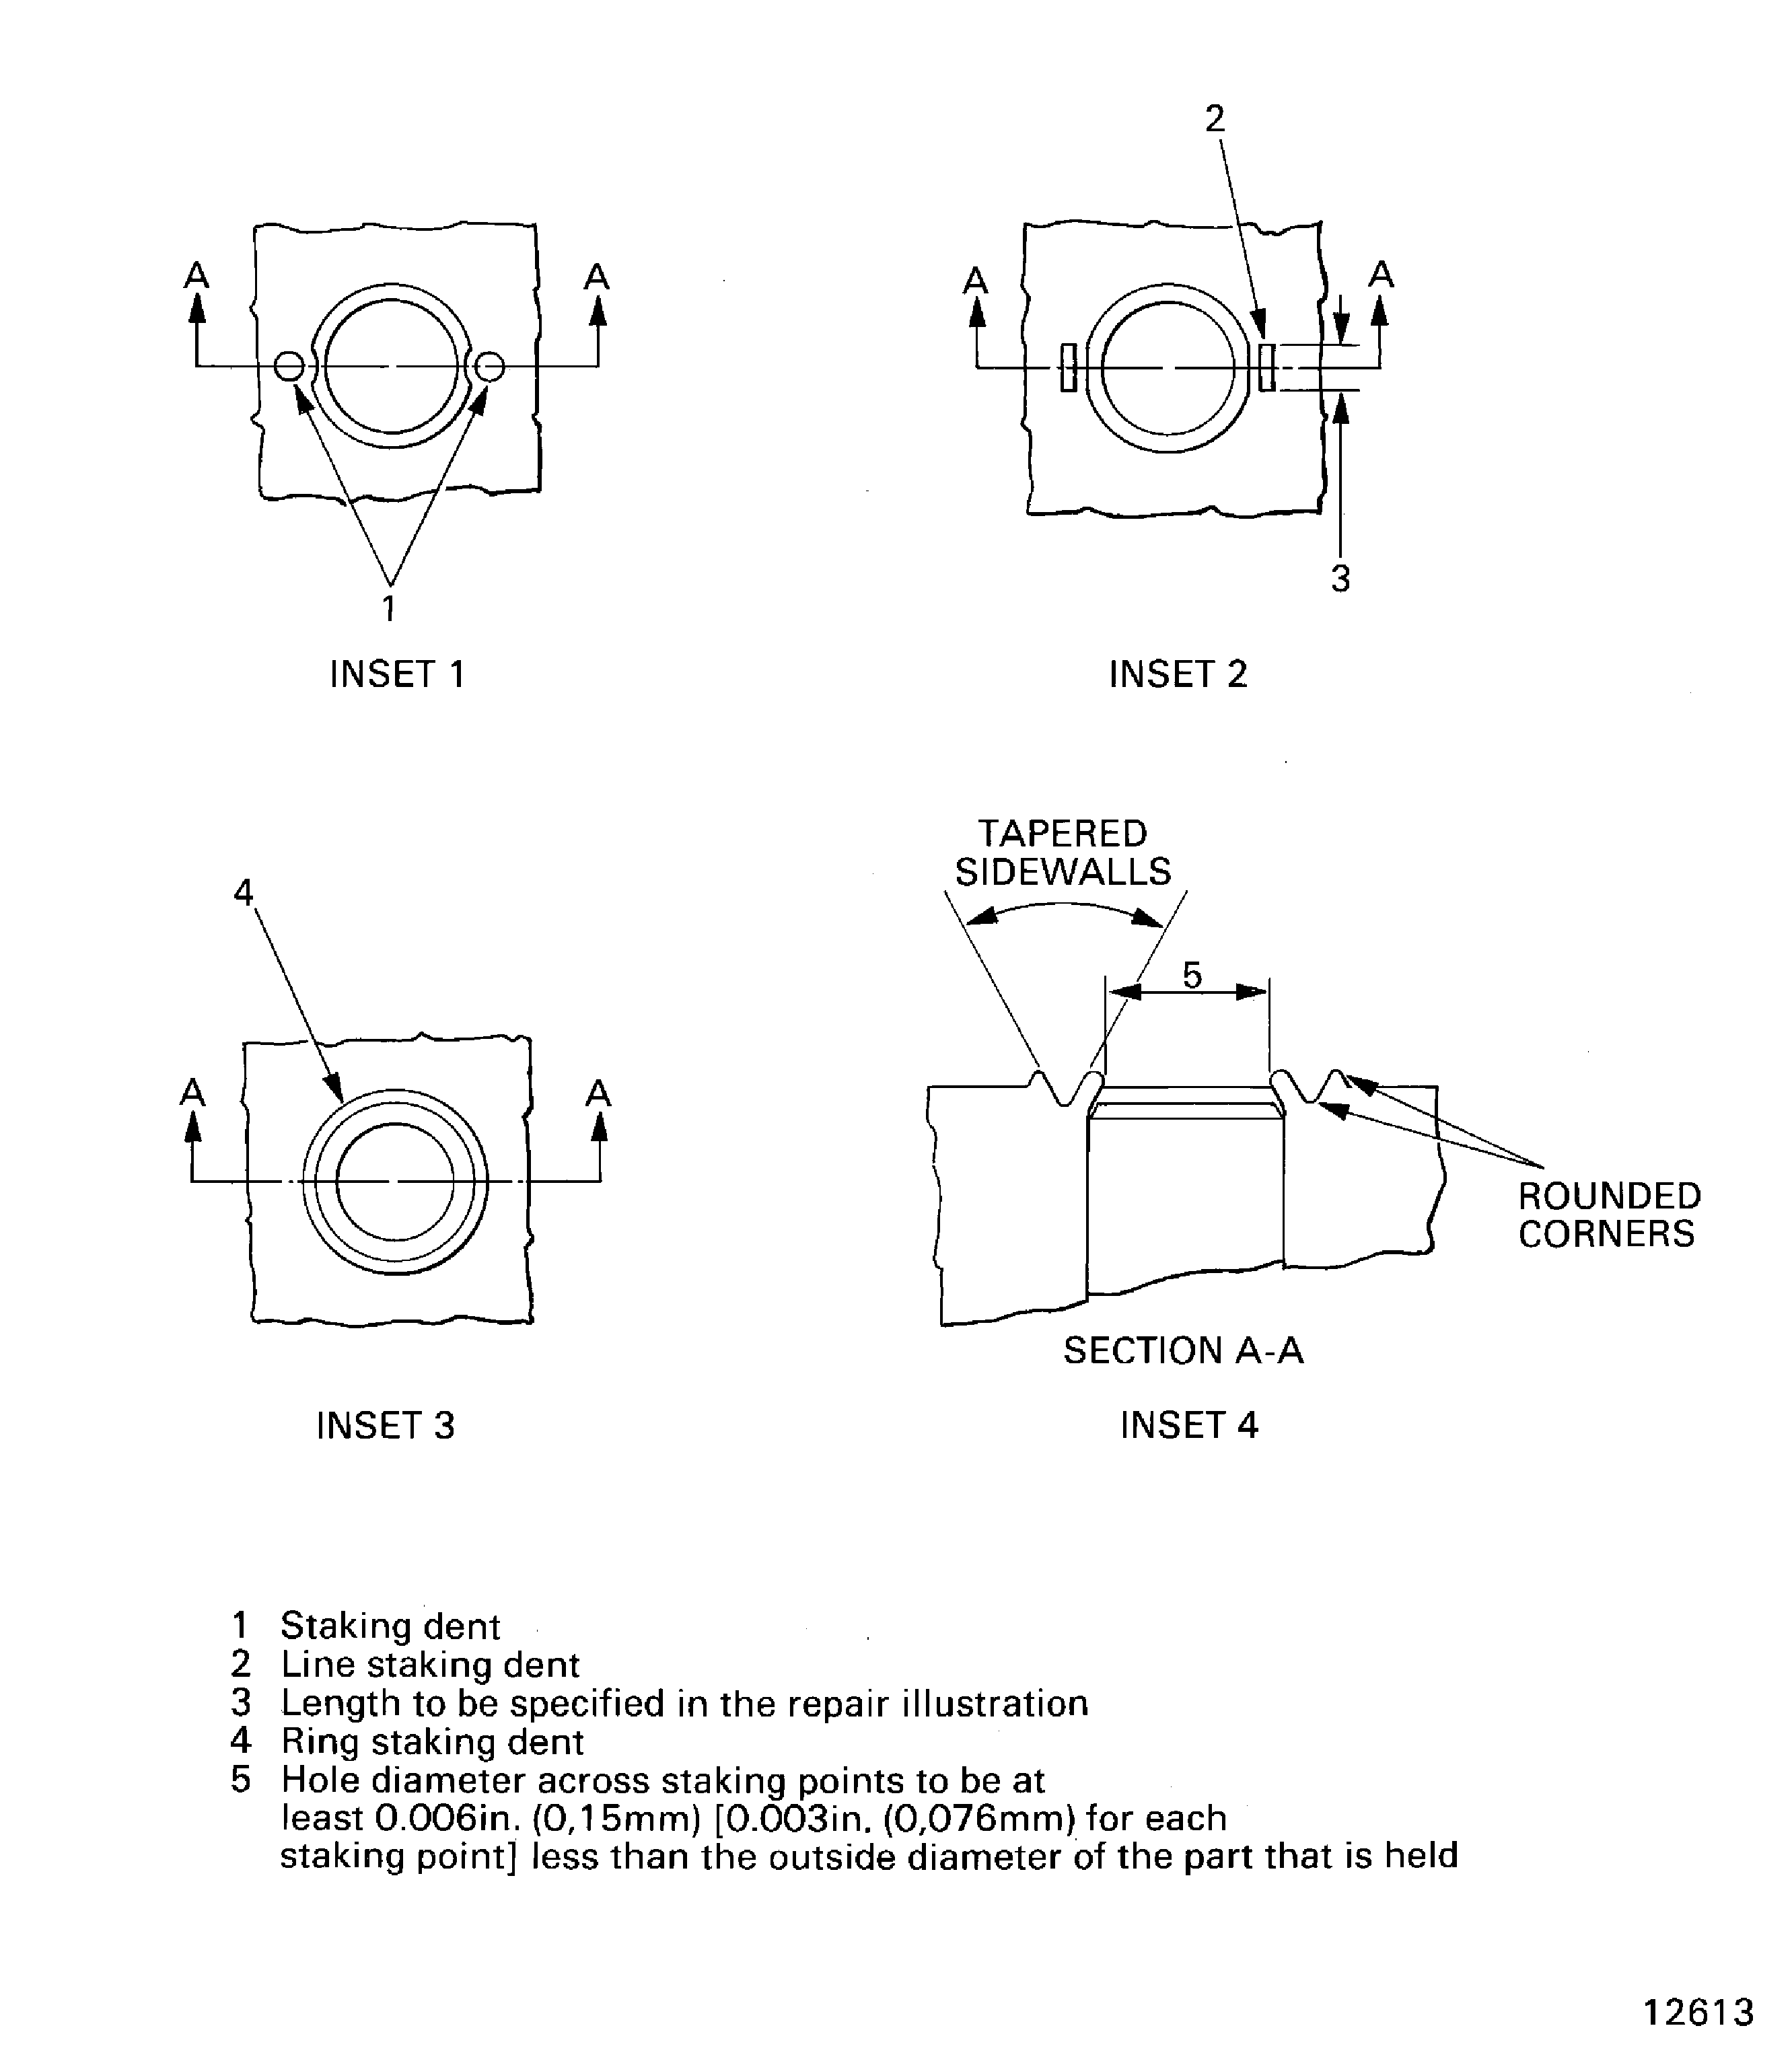
The location of the staking dent (Figure INSET 1).
All staking dents must be in 0.030 in. (0.76 mm) or less of correct position.
For holes which are less than 0.375 in. (9.52 mm) in diameter, the staking dent must be on a diameter 0.060 in. (1.5 mm) larger than the hole diameter.
For holes which are 0.375 in. (9.52 mm) and above, the staking dent must be on a diameter 0.100 in. (2.50 mm.) larger than the hole diameter.
Staking dents must be equally spaced around the edge of the hole if the wall thickness is a minimum of 0.090 in. (2.29 mm).
If the wall thickness is less than 0.090 in. (2.29 mm) in some areas, the staking must be done only in the areas larger than 0.090 in. (2.29 mm). The maximum space between staking must be kept. No staking is permitted in areas where the wall thickness is less than 0.090 in. (2.29 mm).
NOTE
The type of staking dent used is optional, but the side walls of dents must be tapered and have rounded corners (
Figure INSET 4).
The shape of the staking dents.
Line staking (Figure INSET 2).
When this procedure of staking is necessary, the length of the dents must be specified in the repair illustration.
Ring staking (Figure INSERT 3).
When this procedure of staking is necessary, the dent must be fully around the hole.
The dimensions and depth of staking dents.
The dimensions and depth necessary for staking dents to sufficiently keep the installed parts in position is given in operation E. and in the limits given in paragraph 2. (Quality Requirements).
Parts are sufficiently held, after staking if:
The housing material is moved over the installed part.
The hole diameter at each staking position is at least 0.003 in. (0.076 mm) less than the outside diameter of the part held. (Figure INSET 4).
SUBTASK 70-42-06-400-002 Staking of Headless Threaded Plugs
The number of staking dents necessary.
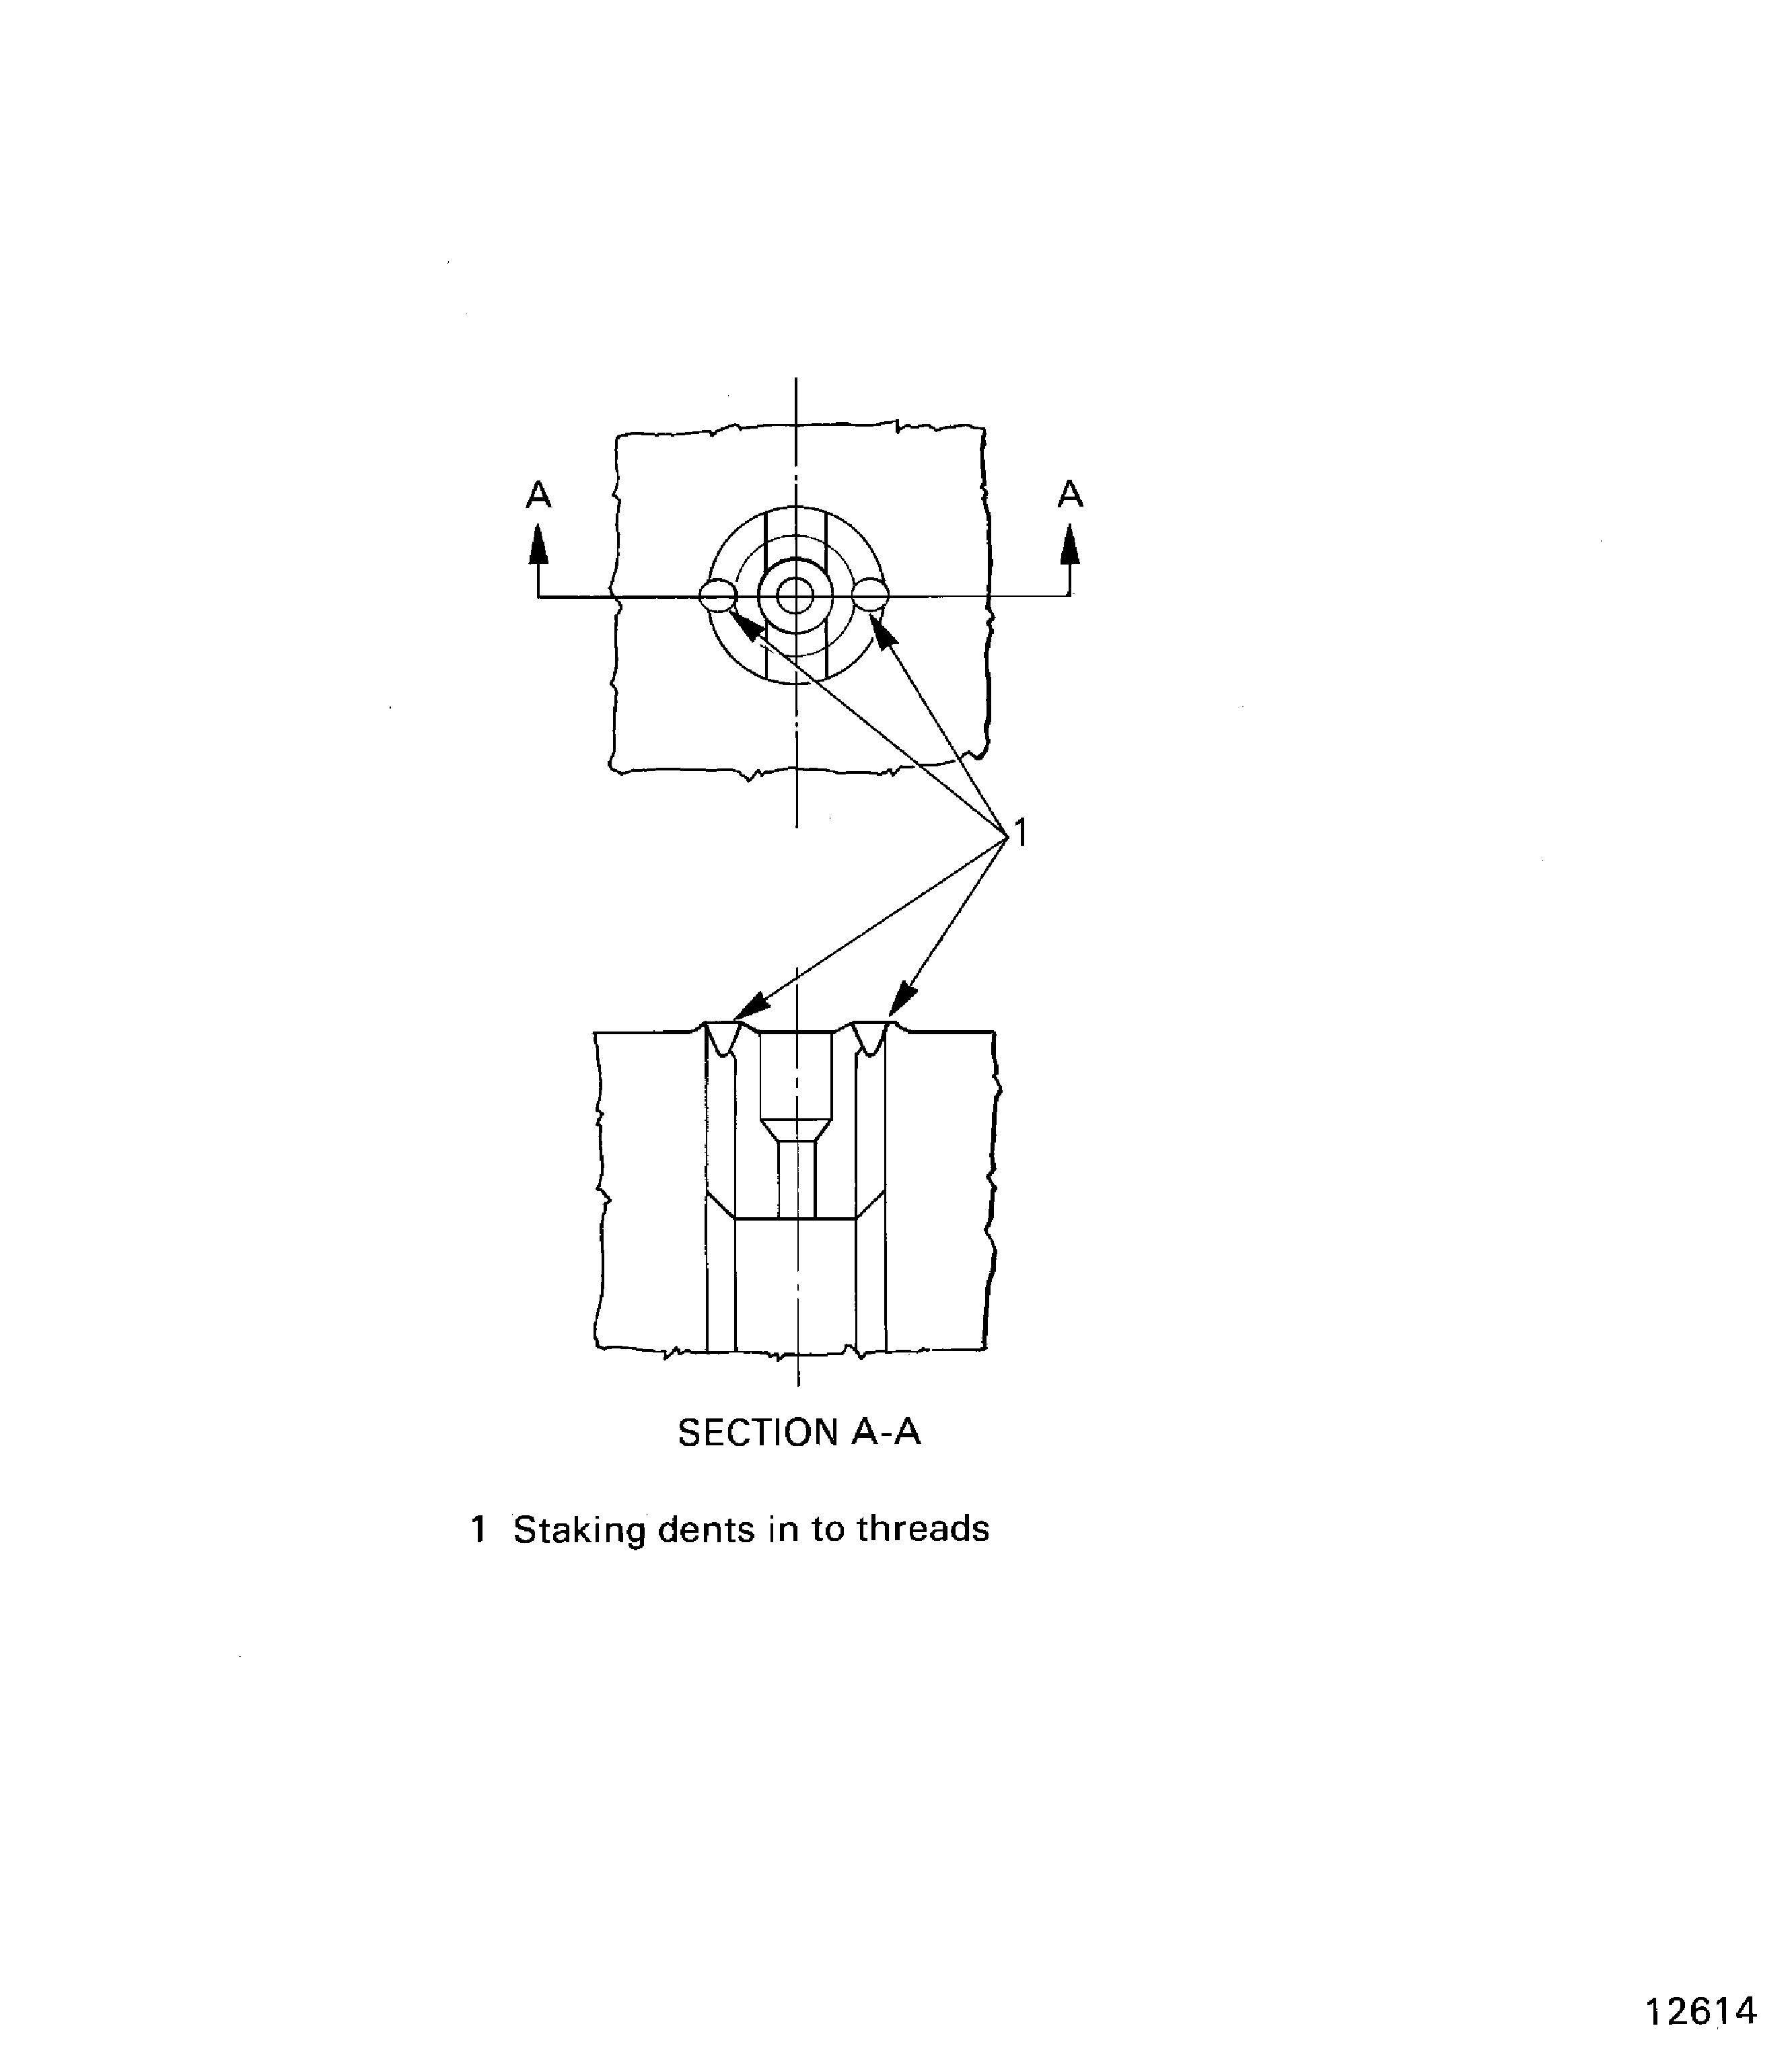
For headless threaded plugs, there must be at least two staking dents.
The location of the staking dent.
Staking dents must be in to the threads and be equally divided to the nearest 15 degrees.
The shape of staking dents.
Staking dents must be circular in shape with rounded bottoms.
The dimensions and depth of staking dents.
The dimensions and depth necessary for staking dents to sufficiently keep the installed parts in position is given in operation E. and in the limits given in paragraph 2. (Quality Requirements).
All staked plugs must be resistant to a loosen torque of ten pound-inches minimum, to be sufficiently held.
SUBTASK 70-42-06-400-003 Staking of Flat Head Screws
The number of staking dents necessary.
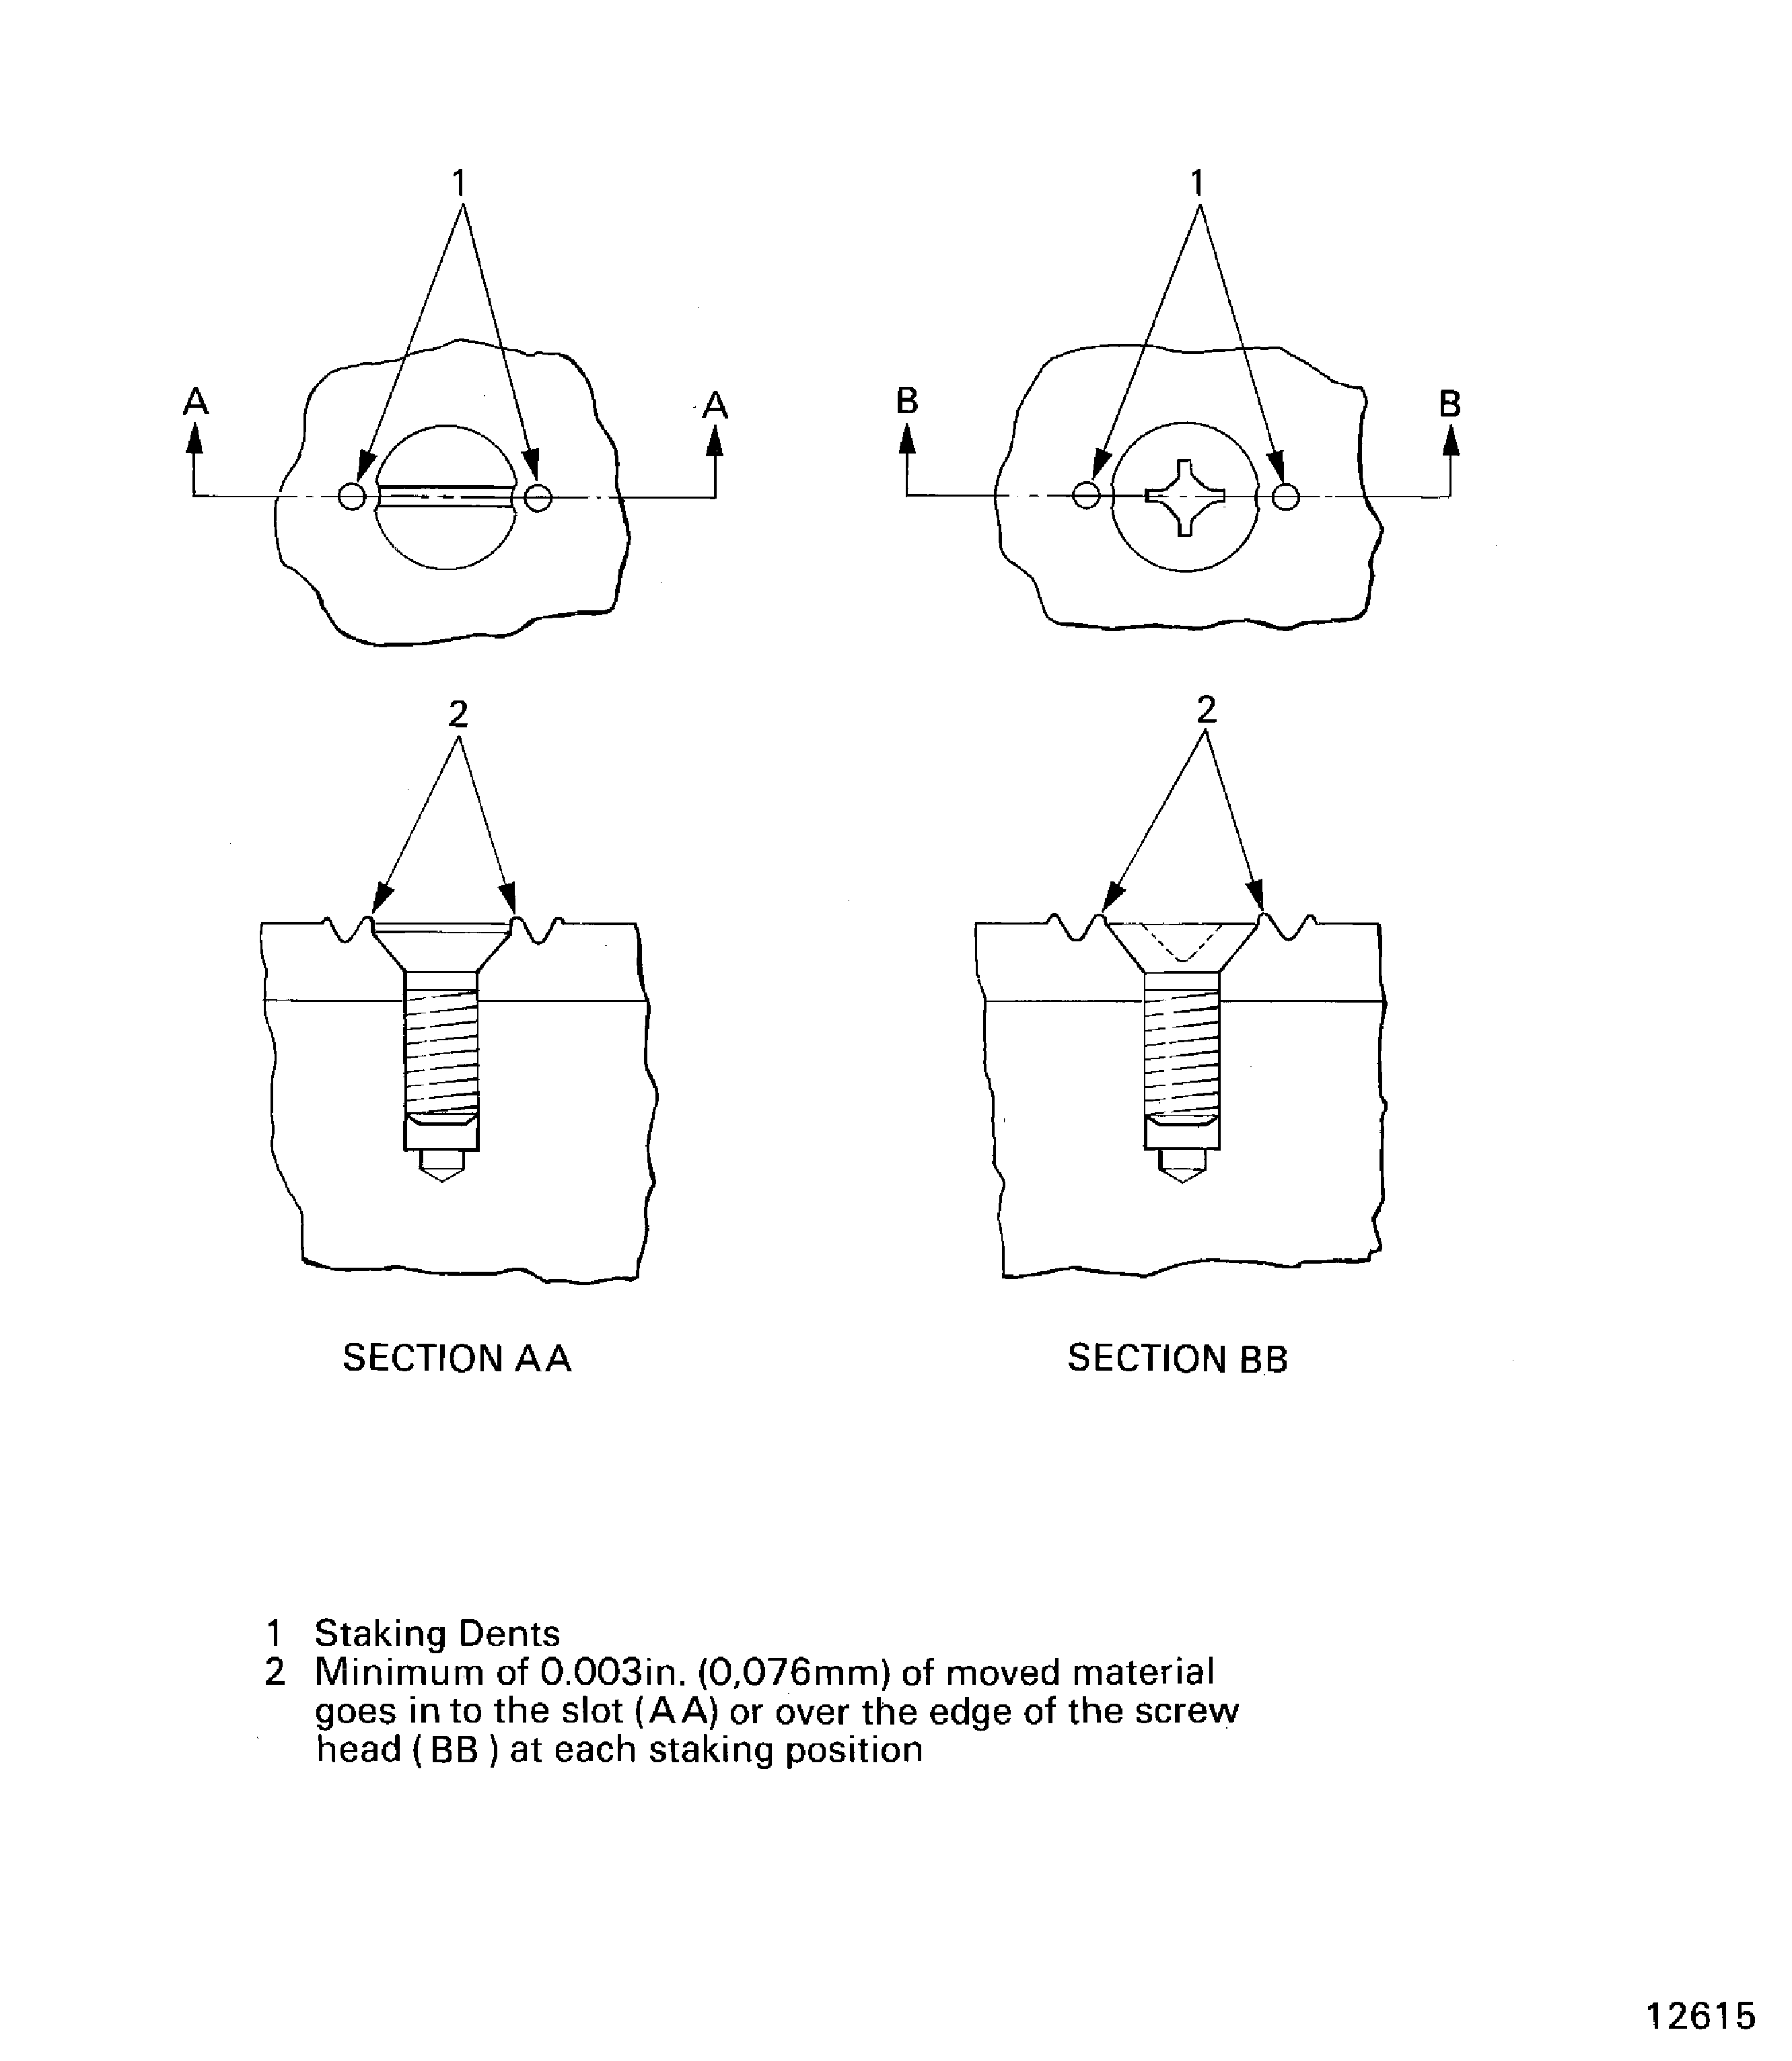
For flat head screws, there must be at least two staking dents.
The location of the staking dents.
The staking dents must be on the edge of the screw head and equally divided to the nearest 15 degrees. The material moved by the staking dent must be over the edge of the screw head.
Screws with slots or notches must have the staking dent positioned at the slot or notch. This will move the metal in to the slot or notch.
The shape of staking dents.
The shape of staking dents used is optional, but the side walls of dents must be tapered and have rounded corners.
The dimensions and depth of staking dents.
The dimensions and depth necessary for staking dents to sufficiently keep the installed parts in position is given in operation E. and in the limits given in paragraph 2. (Quality Requirements).
Screws without slots or notches are sufficiently held when a minimum of 0.003 in. (0.076 mm) of moved material is above the edge of the screw head at each staking position.
Screws with slots or notches are sufficiently held when a minimum of 0.003 in. (0.076 mm) of moved material goes in to the slot or notch at each staking position.
SUBTASK 70-42-06-400-004 Groove Staking
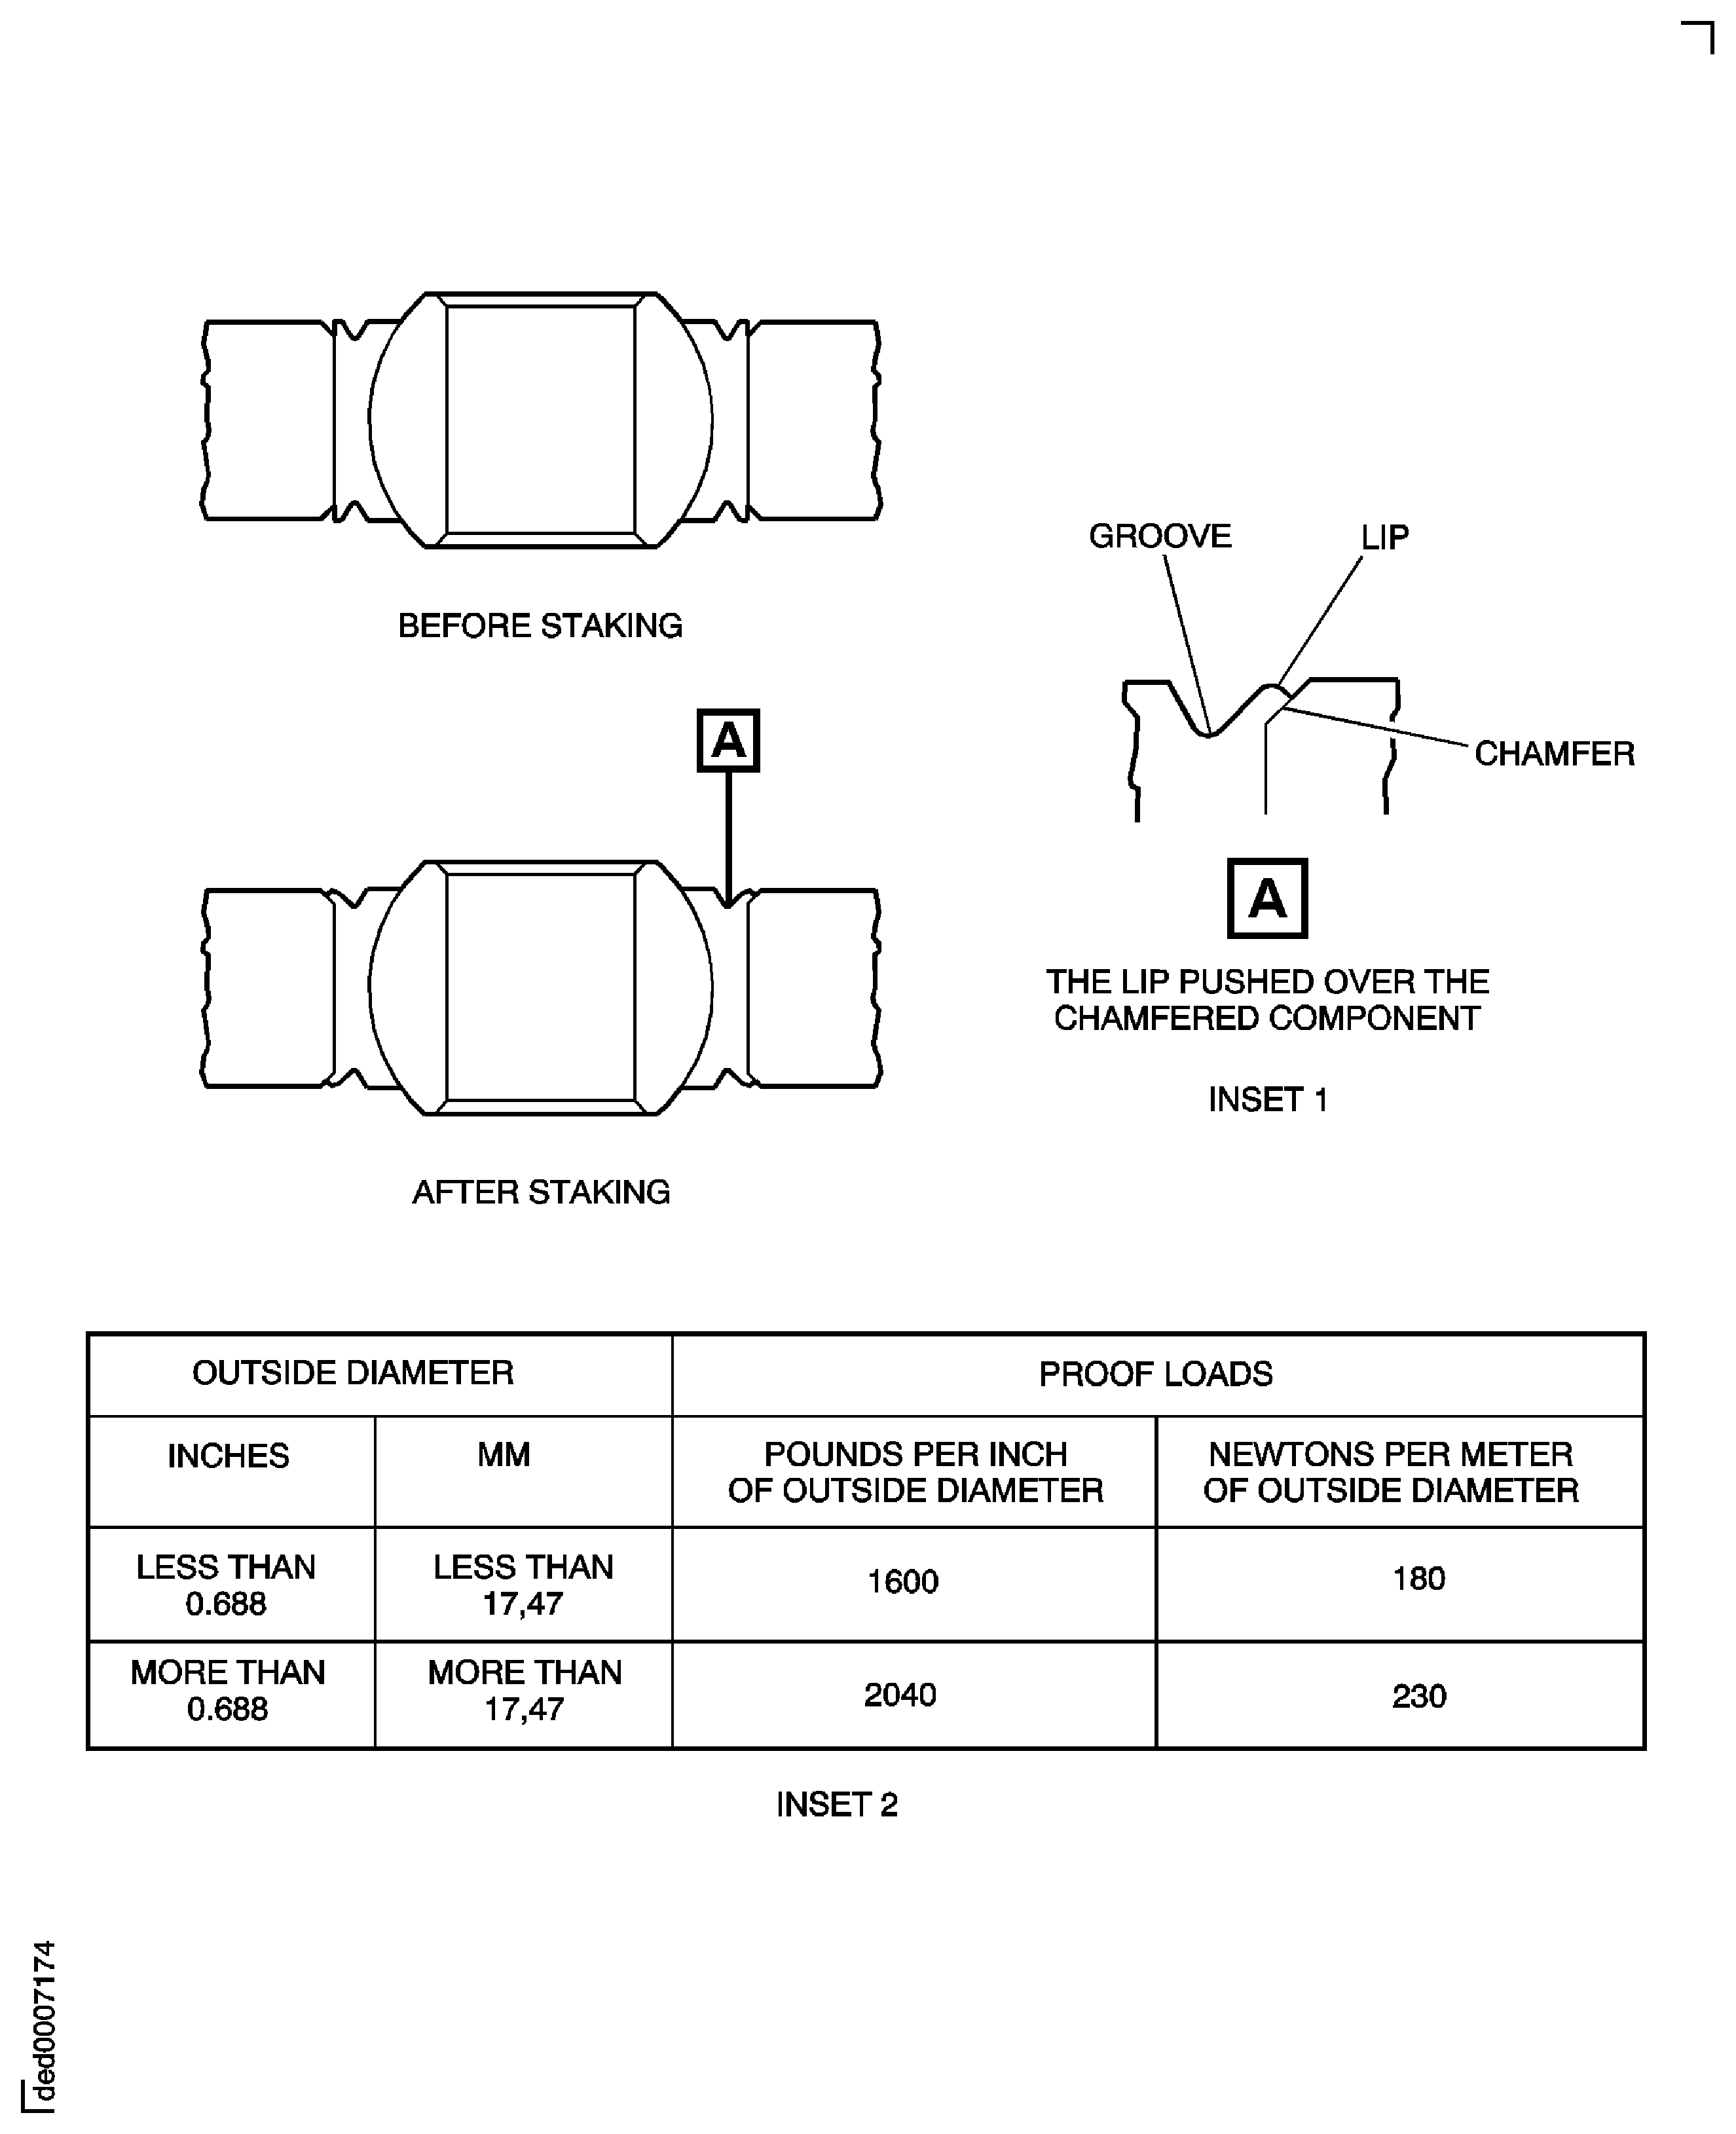
Use the correct tool to push the lip of the grooved component over the chamfered component. Make sure that the material moved is equal around the groove. (Figure INSET 2).
A 0.005 in. (0.13 mm) maximum clearance is permitted between the lip and the chamfer. This clearance can be more than 0.005 in. (0.13 mm) for a maximum of 90 degrees around the chamfer. If the clearance is more, it can be accepted but it must agree with the proof loads given in C. Axial change because of proof load is not permitted.
Proof loads when used are the value given in Figure INSET 1, multiplied by the outside diameter of the component that is held.
The moved material on the lip must be free from cracks and gouges.
Tool marks and gouges caused by the staking tool in the groove opposite the moved lip is cause for reject.
Requirements After Job Completion
Follow-On Conditions
NONE


