TASK 72-00-50-220-004 LPT Module - Examine The LPT Module Rear Face At Interface E-50/50, Inspection-004

DMC:V2500-A0-72-00-5000-03A-300A-B|Issue No:001.00|Issue Date:2013-11-01

Export Control

EAR Export Classification: Not subject to the EAR per 15 C.F.R. Chapter 1, Part 734.3(b)(3), except for the following Service Bulletins which are currently published as EAR Export Classification 9E991: SBE70-0992, SBE72-0483, SBE72-0580, SBE72-0588, SBE72-0640, SBE73-0209, SBE80-0024 and SBE80-0025.

Copyright

© IAE International Aero Engines AG (2001, 2014 - 2021) The information contained in this document is the property of © IAE International Aero Engines AG and may not be copied or used for any purpose other than that for which it is supplied without the express written authority of © IAE International Aero Engines AG. (This does not preclude use by engine and aircraft operators for normal instructional, maintenance or overhaul purposes.).

Applicability

All

Common Information

TASK 72-00-50-220-004 LPT Module - Examine The LPT Module Rear Face At Interface E-50/50, Inspection-004

General

The word reject is used after an interface inspection statement to show that higher level inspection and possible repair to the damaged part is necessary. Do the higher level inspection procedure as found in the applicable Chapter/Section/Subject of this manual on the damaged part(s). It is not necessary to do the higher level inspection on parts that are serviceable to the interface inspection standard.

Refer to TASK 72-00-00-220-000 (INSPECTION/CHECK-001) (Examine the modular/non-modular interfaces), before you do this TASK.

The policy that is necessary for inspection is given in the SPM TASK 70-20-00-200-501.

NOTE

Special tools are identified in the procedure by the tool primary number.

NOTE

Unless specified differently, there is no limitation in the number of acceptable or repairable damages on the airfoils. But there is an effect on the performance of the LP turbine, if excessive usage of the limits on a high number of airfoils.

Preliminary Requirements

Pre-Conditions

NONE

Support Equipment

NameManufacturerPart Number / IdentificationQuantityRemark
10x illuminated magnifierLOCAL10x illuminated magnifier
IAE 6F10408 Borescope0AM53IAE 6F104081

Consumables, Materials and Expendables

NONE

Spares

NONE

Safety Requirements

NONE

Procedure

    1. SUBTASK 72-00-50-220-094 Visually Examine the Stage 7 Turbine Blades at Location 1 for Cracks

    2. Refer to Figure and Figure.

      1. Examine the shrouds and airfoils for cracks. Use 10x illuminated magnifier or IAE 6F10408 Borescope 1 off.

        1. Cracked

        2. Reject

    1. SUBTASK 72-00-50-220-095 Visually Examine the Stage 7 Turbine Blades at Location 1 for Surface Damage

    2. Refer to Figure and Figure.

      1. Examine the surface in area A1.

        1. Nicked, dented, pitted.

          1. Round bottom dents up to 0.005 in. (0.13 mm) maximum depth

          2. Accept

          1. Nicked or pitted up to 0.005 in. (0.13 mm) maximum depth

          2. Accept

          1. More than in Step or Step

          2. Reject

      1. Examine the surface in area A2.

        1. Nicked, dented, pitted.

          1. Round bottom dents up to 0.005 in. (0.13 mm) maximum depth

          2. Accept

          1. More than in Step

          2. Reject

        1. Rubbed against stage 7 rotating airseal

        2. Reject

      1. Examine the surface in area A3.

        1. Nicked, dented, pitted.

          1. Round bottom dents if the maximum depth is less than 0.014 in. (0.35 mm) and the diameter or the length is less than 0.040 in. (1.0 mm)

          2. Accept

          1. Nicked or pitted up to 0.005 in. (0.13 mm) maximum depth

          2. Accept

          1. More than in Step or Step

          2. Reject

      1. Examine the surface in area A4.

        1. Nicked, dented, pitted.

          1. Round bottom dents up to 0.005 in. (0.13 mm) maximum depth

          2. Accept

          1. More than in Step

          2. Reject

      1. Examine the surface in area A5.

        1. Nicked, dented, pitted.

          1. Round bottom dents up to 0.020 in. (0.51 mm) maximum depth, not visible from other side, up to 10 per cent of surface of area A5

          2. Accept

          1. Nicked or pitted up to 0.010 in. (0.25 mm) maximum depth

          2. Accept

          1. More than in Step or Step

          2. Reject

      1. Examine the surface in area A6.

        1. Nicked, dented, pitted.

          1. Round bottom dents up to 0.010 in. (0.25 mm) maximum depth

          2. Accept

          1. More than in Step

          2. Reject

      1. Examine the surface in area A7.

        1. Nicked, dented, pitted.

          1. Round bottom dents if the maximum depth is less than 0.010 in. (0.25 mm) and the diameter or the length is less than 0.040 in. (1.0 mm)

          2. Accept

          1. Nicked or pitted up to 0.005 in. (0.13 mm) maximum depth

          2. Accept

          1. More than in Step or Step

          2. Reject

      1. Examine the surface in area A8.

        1. Nicked, dented, pitted.

          1. Round bottom dents up to 0.005 in. (0.13 mm) maximum depth

          2. Accept

          1. More than in Step

          2. Reject

      1. Examine the surface in area A9.

        1. Nicked, dented, pitted.

          1. Round bottom dents up to 0.005 in. (0.13 mm) maximum depth

          2. Accept

          1. Nicked or pitted up to 0.005 in. (0.13 mm) maximum depth

          2. Accept

          1. More than in Step or Step

          2. Reject

      1. Examine the surface in area A10.

        1. Nicked, dented, pitted.

          1. Round bottom dents up to 0.005 in. (0.13 mm) maximum depth

          2. Accept

          1. More than in Step

          2. Reject

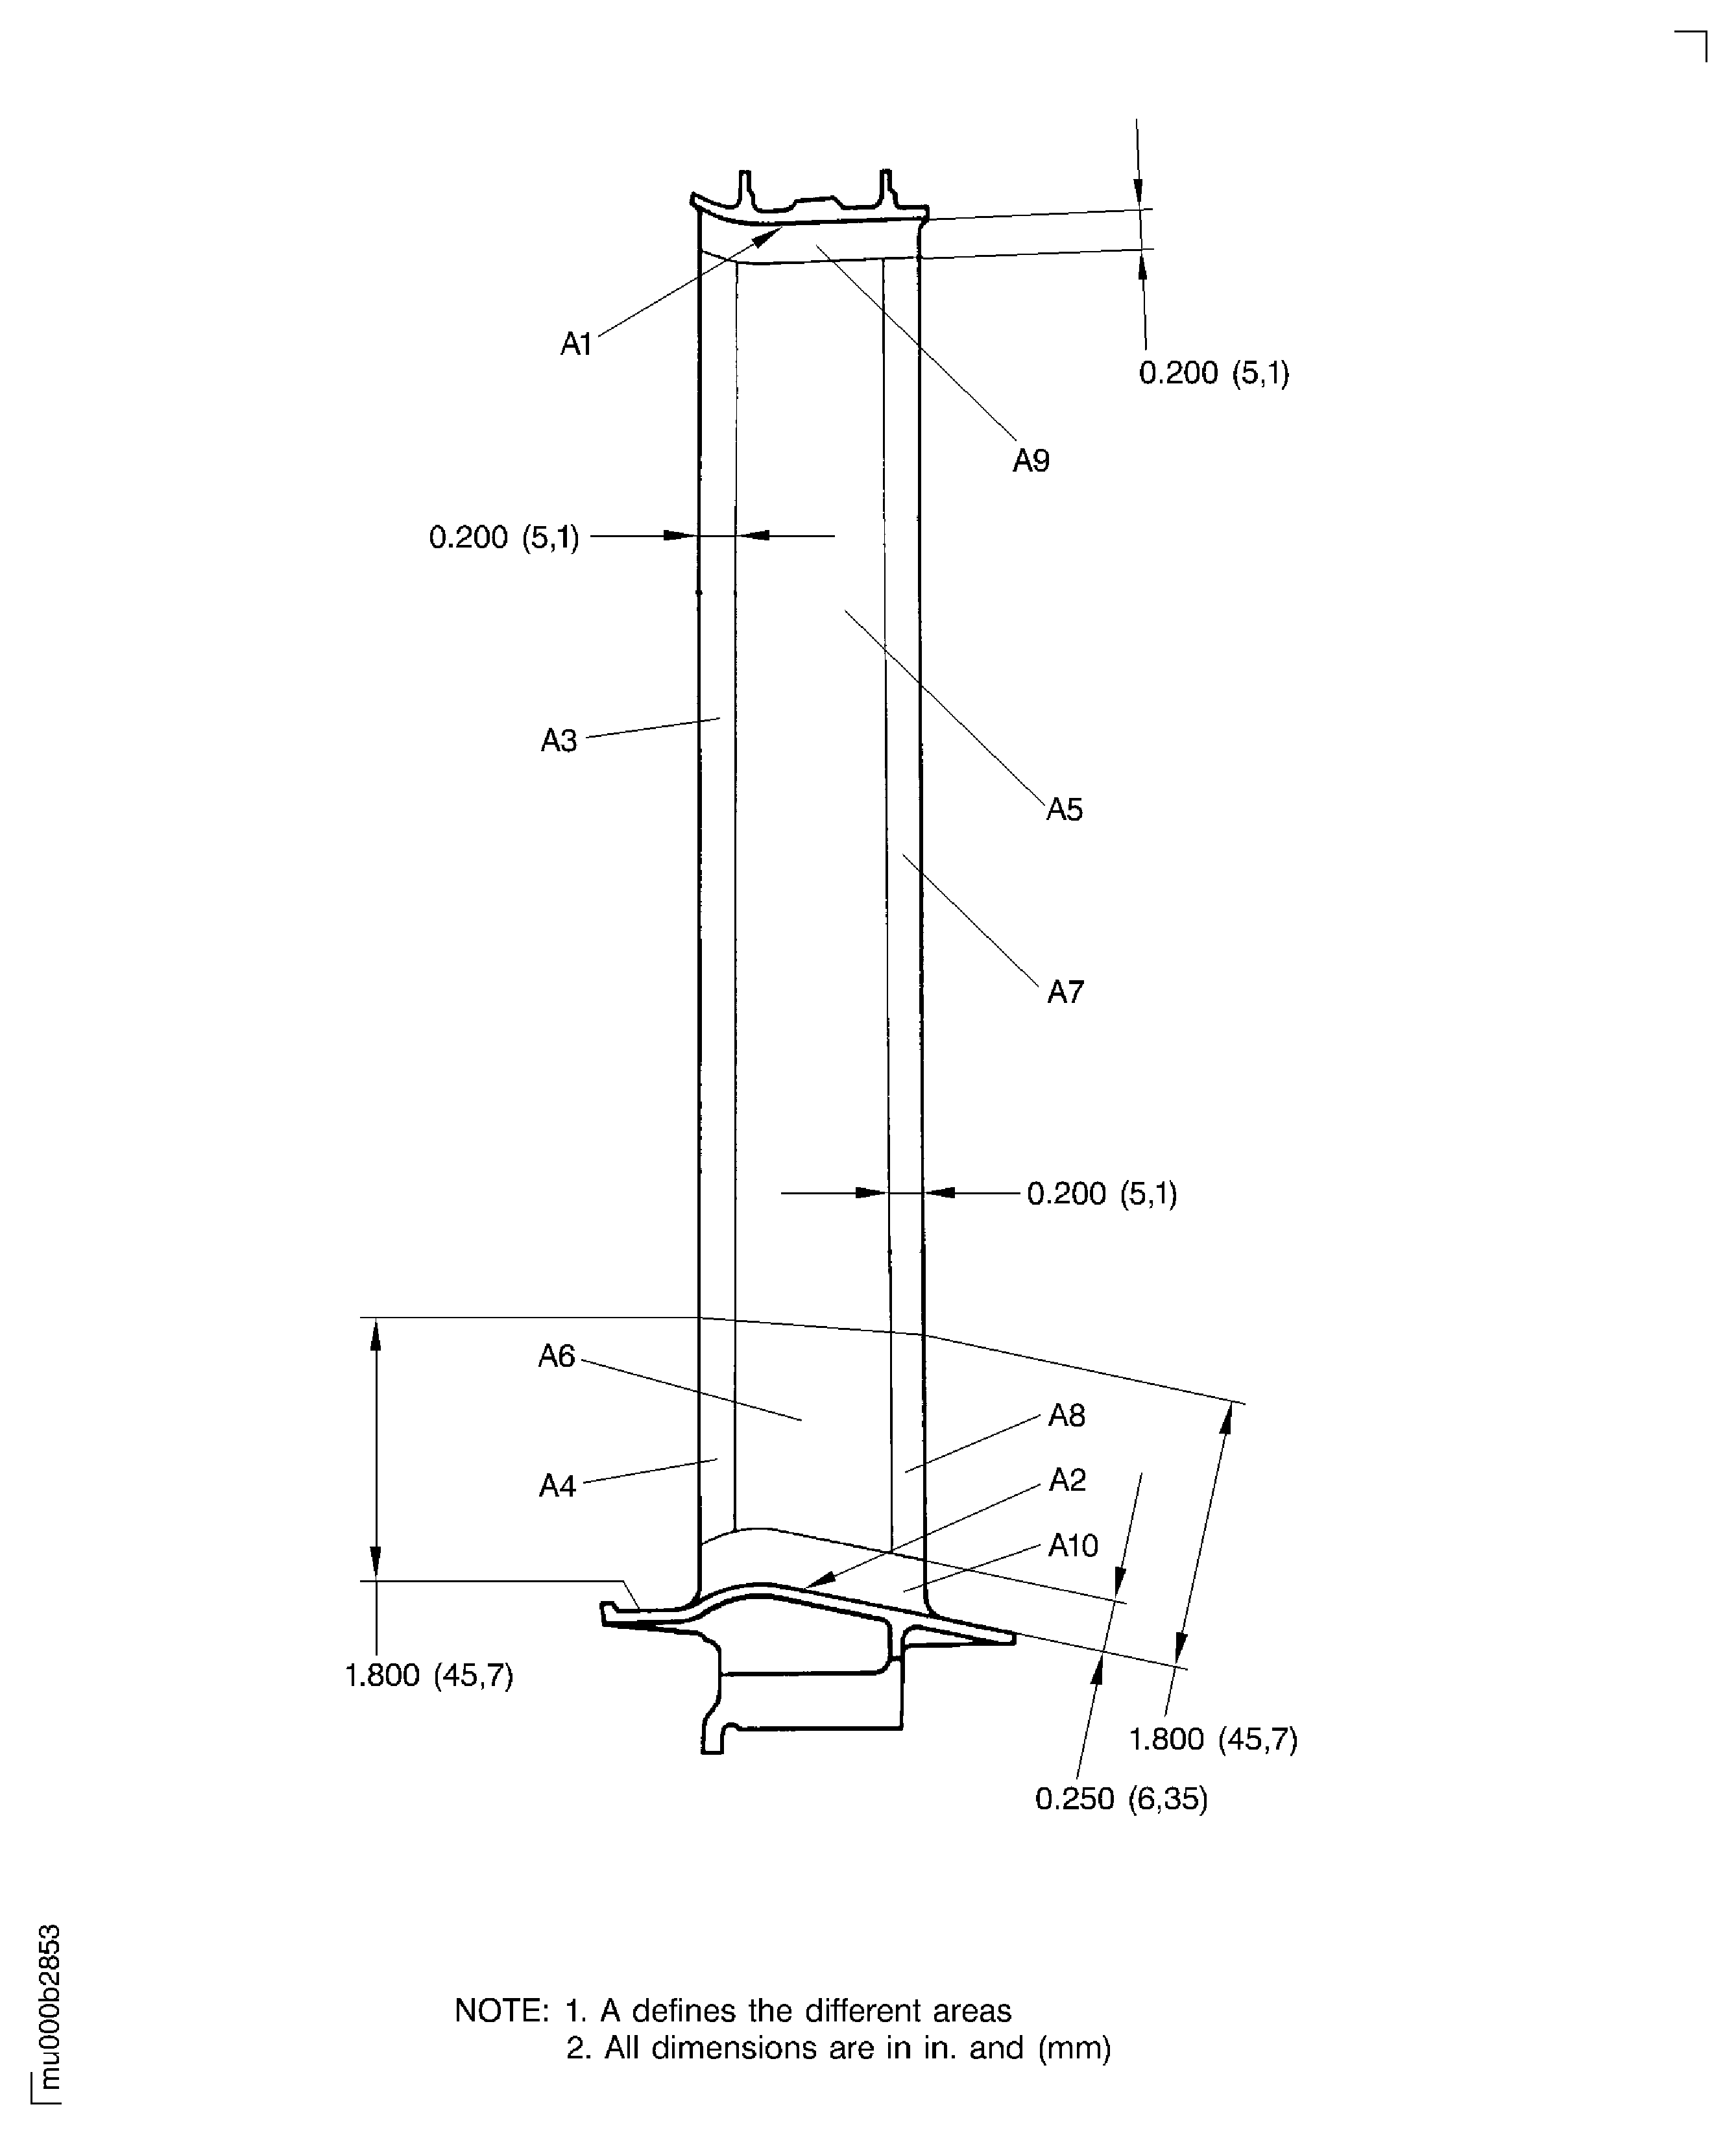
  1. Figure: Locations at interface E-50/50

    Locations at interface E-50/50

    Figure: Examine the stage 7 turbine blades

    Examine the stage 7 turbine blades
Requirements After Job Completion

Follow-On Conditions

NONE
Manufacturer Code:0AM53
Enterprise Name:IAE INTERNATIONAL AERO ENGINES AG
BU Name:NULL
Building:SUITE 400
Street:628 HEBRON AVENUE
City:GLASTONBURY
State:CT
Zip Code:06033
Country:USA
Manufacturer Code:LOCAL
Enterprise Name:LOCALLY SUPPLIED
Manufacturer Code:LOCAL
Tool Number:10x illuminated magnifier
Tool Name:10x illuminated magnifier
Manufacturer Code:0AM53
Tool Number:IAE 6F10408
Tool Name:IAE 6F10408 Borescope