Export Control
EAR Export Classification: Not subject to the EAR per 15 C.F.R. Chapter 1, Part 734.3(b)(3), except for the following Service Bulletins which are currently published as EAR Export Classification 9E991: SBE70-0992, SBE72-0483, SBE72-0580, SBE72-0588, SBE72-0640, SBE73-0209, SBE80-0024 and SBE80-0025.Copyright
© IAE International Aero Engines AG (2001, 2014 - 2021) The information contained in this document is the property of © IAE International Aero Engines AG and may not be copied or used for any purpose other than that for which it is supplied without the express written authority of © IAE International Aero Engines AG. (This does not preclude use by engine and aircraft operators for normal instructional, maintenance or overhaul purposes.).Applicability
All
Common Information
TASK 72-41-13-300-002 HPC Rear Shaft - Blend Repair, Repair-002 (VRS3461)
Material of component
RR | ||
|---|---|---|
DESCRIPTION | SYMBOL | MATERIAL |
HPC Compressor Shaft | Wrought precipitation | |
hardenable nickel base | ||
alloy |
General
This repair must only be done when the instruction to do so is given in 72-41-13 Inspection.
The practices and processes referred to in the procedure by TASK number are in the SPM.
Price and availability - none
Preliminary Requirements
Pre-Conditions
NONESupport Equipment
| Name | Manufacturer | Part Number / Identification | Quantity | Remark |
|---|---|---|---|---|
| Workshop inspection equipment | LOCAL | Workshop inspection equipment |
Consumables, Materials and Expendables
| Name | Manufacturer | Part Number / Identification | Quantity | Remark |
|---|---|---|---|---|
| CoMat 05-107 ABRASIVE STONE | K6835 | CoMat 05-107 |
Spares
NONESafety Requirements
NONEProcedure
Use a CoMat 05-107 ABRASIVE STONE.
Remove the minimum amount of material to smooth out the defect.
The depth of the blend must not be more than 0.010 in. (0.25 mm).
The ratio of circumferential length to depth must be 10 or more.
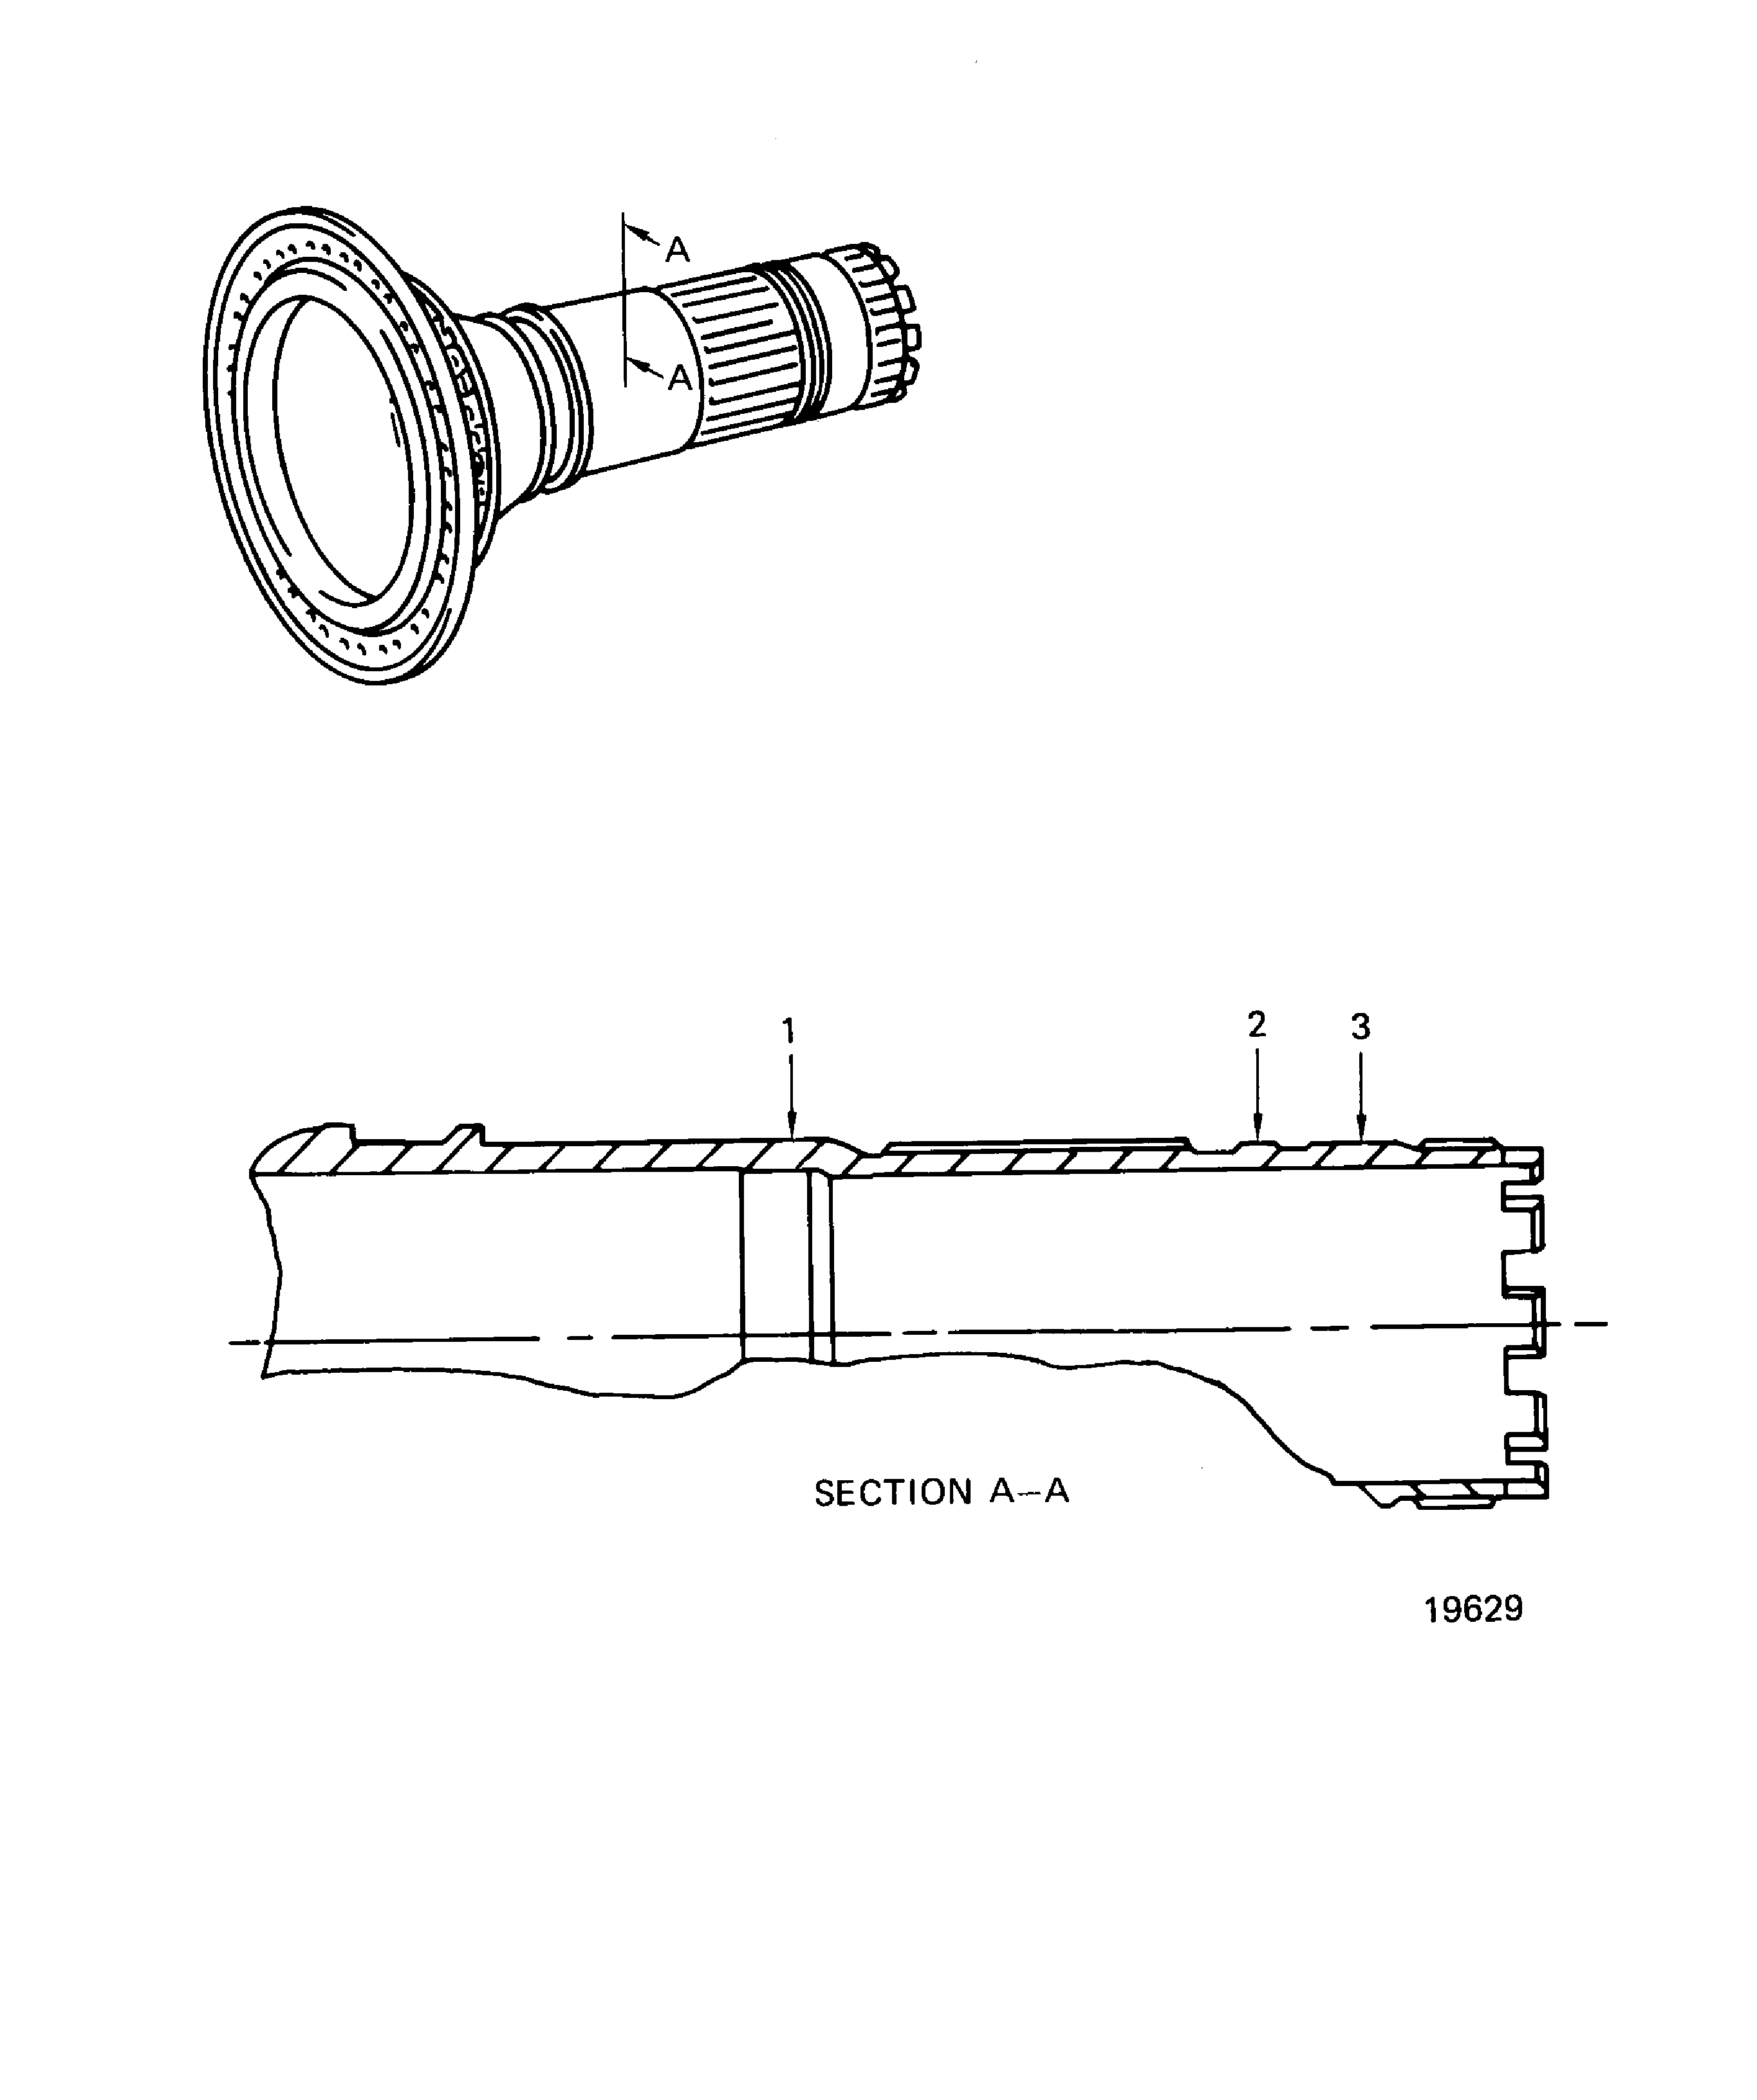
The diameter at location 1 can be less than 5.107 in. (129.72 mm) if the blends are not more than 0.500 in. (12.70 mm) in circumferential length and are not less than 0.500 in. (12.70 mm) circumferentially from another blend.
Only 20 percent of the total surface area can be blended below the diameter limits given above.
Refer to Figure.
Hand stone to remove high metal, scoring and scratches at location 1. Move the stone in a circumferential direction.
Use a CoMat 05-107 ABRASIVE STONE.
Remove the minimum amount of material to smooth out the defect.
The depth of the blend must not be more than 0.010 in. (0.25 mm).
The ratio of circumferential length to depth must be 10 or more.
The diameter at location 2 can be less than 4.841 in. (122.96 mm) if the blends are not more than 0.500 in. (12.70 mm) in circumferential length and are not less than 0.500 in. (12.70 mm) circumferentially from another blend.
Only 20 percent of the total surface area can be blended below the diameter limits given above.
Refer to Figure.
Hand stone to remove high metal, scoring and scratches at location 2. Move the stone in a circumferential direction.
Use a CoMat 05-107 ABRASIVE STONE.
Remove the minimum amount of material to smooth out the defect.
The depth of the blend must not be more than 0.010 in. (0.25 mm).
The ratio of circumferential length to depth must be 10 or more.
The diameter at location 3 can be less than 4.819 in. (122.40 mm) if the blends are not more than 0.500 in. (12.70 mm) in circumferential length and are not less than 0.500 in. (12.70 mm) circumferentially from another blend.
Only 20 percent of the total surface area can be blended below the diameter limits given above.
Refer to Figure.
Hand stone to remove high metal, scoring and scratches at location 3. Move the stone in a circumferential direction.
SUBTASK 72-41-13-350-053 Remove the Damage from the Outer Diameter of the Shaft
The diameter at location 1 must be between 5.107 and 5.108 in. (129.72 and 129.74 mm).
Refer to Figure.
Measure the diameter at location 1. Measure the diameter at three equally spaced locations (where you did not blend, if possible). Add the three measurements together then divide by three to get the average diameter at location 1.
The diameter at location 2 must be between 4.841 and 4.842 in. (122.96 and 122.99 mm).
Refer to Figure.
Measure the diameter at location 2. Measure the diameter at three equally spaced locations (where you did not blend, if possible). Add the three measurements together then divide by three to get the average diameter at location 2.
The diameter at location 3 must be between 4.819 and 4.821 in. (122.40 and 122.45 mm).
Refer to Figure.
Measure the diameter at location 3. Measure the diameter at three equally spaced locations (where you did not blend, if possible). Add the three measurements together then divide by three to get the average diameter at location 3.
SUBTASK 72-41-13-220-079 Inspect the HPC Shaft Diameters after Blending
Figure: HPC Shaft Assembly Blend Repair
HPC Shaft Assembly Blend Repair

