TASK 72-50-33-300-038 LPT Stage 7 Rotating Airseal - Rebalance, Repair-038 (VRS4057)

DMC:V2500-A0-72-50-3307-01A-709A-C|Issue No:002.00|Issue Date:2013-11-01

Export Control

EAR Export Classification: Not subject to the EAR per 15 C.F.R. Chapter 1, Part 734.3(b)(3), except for the following Service Bulletins which are currently published as EAR Export Classification 9E991: SBE70-0992, SBE72-0483, SBE72-0580, SBE72-0588, SBE72-0640, SBE73-0209, SBE80-0024 and SBE80-0025.

Copyright

© IAE International Aero Engines AG (2001, 2014 - 2021) The information contained in this document is the property of © IAE International Aero Engines AG and may not be copied or used for any purpose other than that for which it is supplied without the express written authority of © IAE International Aero Engines AG. (This does not preclude use by engine and aircraft operators for normal instructional, maintenance or overhaul purposes.).

Applicability

All

Common Information

TASK 72-50-33-300-038 LPT Stage 7 Rotating Airseal - Rebalance, Repair-038 (VRS4057)

Effectivity

FIG/ITEM

PART NO.

01-010

3A1741

01-010

3A2522

Material of component

DESCRIPTION

SYMBOL

MATERIAL

Stage 7 turbine air seal

Waspaloy

General

Price and availability - none

The practices and processes referred to in the procedure by the TASK numbers are in the SPM.

NOTE

Equivalent materials or equipment may be used.

NOTE

Special tools are identified in the procedure by the tool primary number.

Preliminary Requirements

Pre-Conditions

NONE

Support Equipment

NameManufacturerPart Number / IdentificationQuantityRemark
Grinding machineLOCALGrinding machine
Horizontal rotating tableLOCALHorizontal rotating table
Vertical balancing machineLOCALVertical balancing machine
Radius gage setLOCALRadius gage set
Roughness microtesterLOCALRoughness microtester
Vernier caliperLOCALVernier caliper
IAE 1M14150 Balancing fixture0AM53IAE 1M141501

Consumables, Materials and Expendables

NONE

Spares

NONE

Safety Requirements

NONE

Procedure

    1. SUBTASK 72-50-33-350-108 General Instructions for the Rebalancing of the Turbine Air Seal after Repair

      1. Remove material to get balance within limits.

      2. Machine grind turbine air seal in circumferential direction.

        For small quantities of material use files.

      1. Polish the machined areas.

      2. Use fine stones to make the worked surface as smooth as the adjacent surface.

    1. SUBTASK 72-50-33-350-109 Prepare the Turbine Air Seal for Rebalancing Procedure

      1. Install the balancing fixture on to the vertical balancing machine.

      2. Align TOP marks.

      1. Install the turbine air seal on to the balancing fixture and safety.

      2. Align TOP marks.

    1. SUBTASK 72-50-33-350-110 Rebalance the Turbine Air Seal

      NOTE

      1. Keep material removal to the minimum to get balance within limits.

      2. Do not remove material from a small number of areas. Remove material over a larger number, with less removal, to permit more rebalancing procedures.

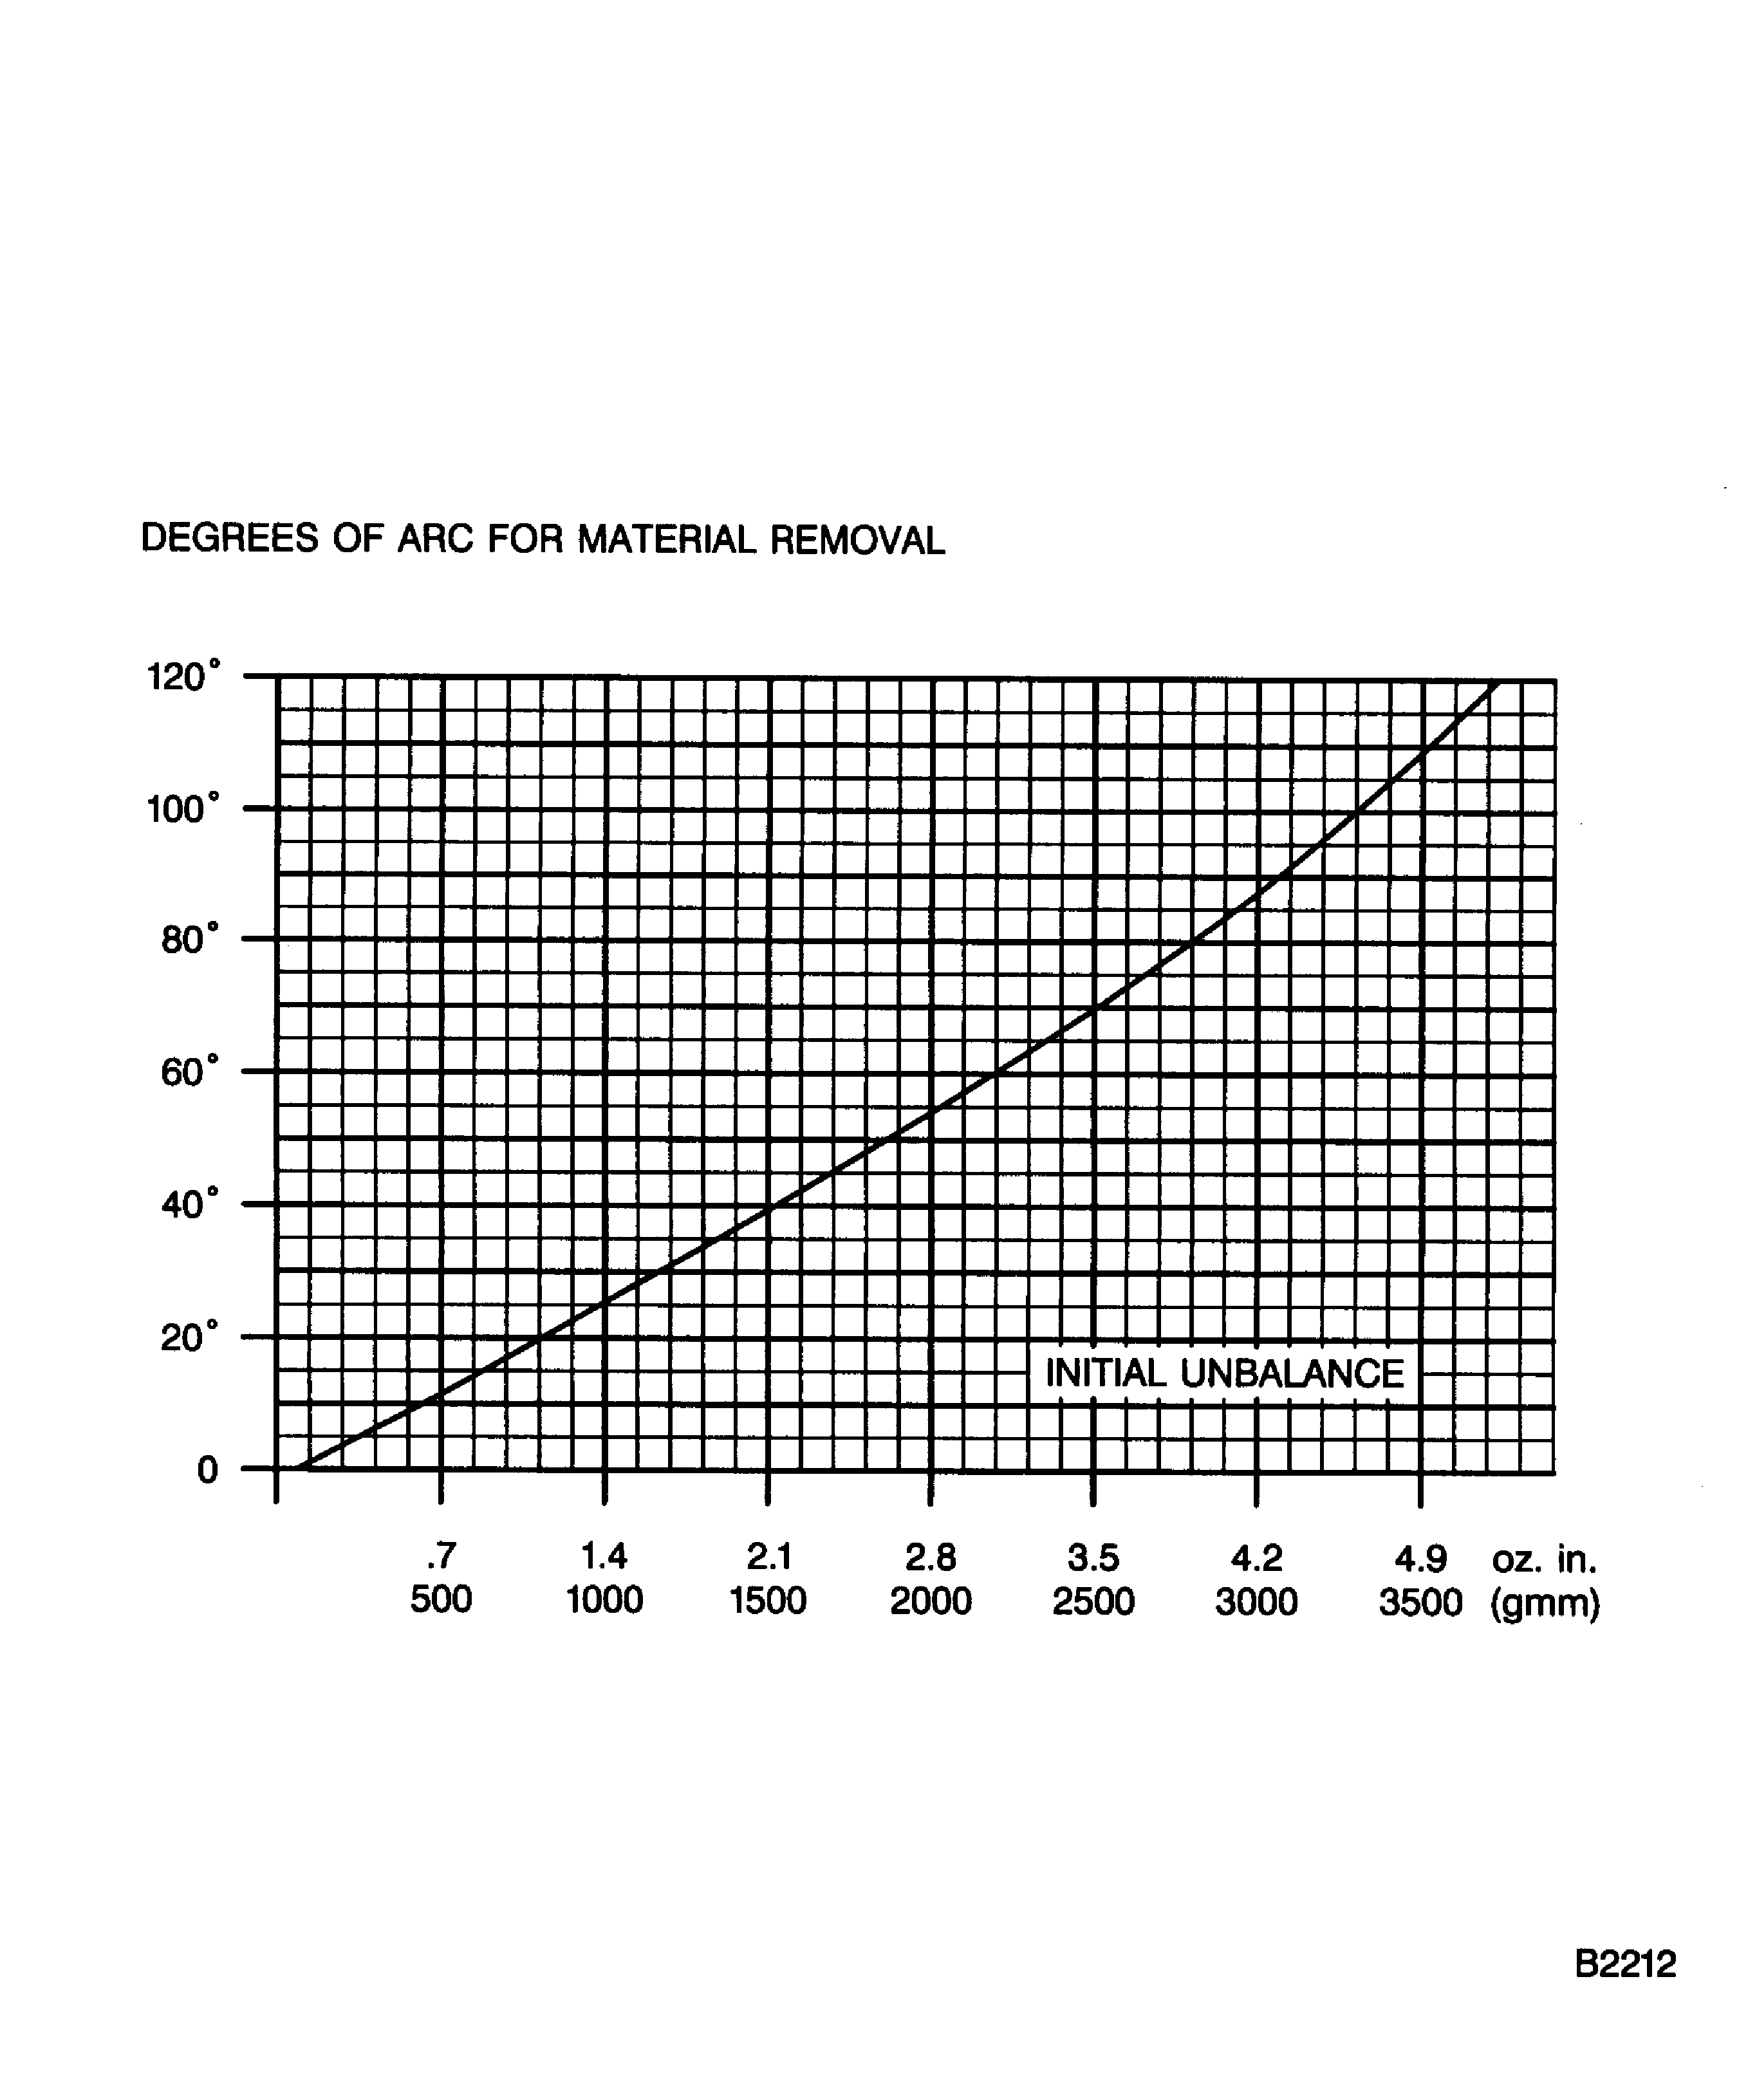
    2. Refer to: Figure

      1. Do the first check for static unbalance of the turbine air seal at 900 RPM minimum.

      2. The direction of turn on the vertical balancing machine must be in a clockwise direction.

        The unbalance value includes the unbalance of the tools.

    3. Remove the turbine air seal from the balancing tool assembly.

      1. Install the turbine air seal again to the balancing tool assembly and safety.

      2. Installation of the turbine air seal must be in a 180 degree position opposite to the first rebalance position.

      1. Do the check for actual static unbalance of the turbine air seal at 900 RPM minimum.

      2. Initial unbalance must not be more than maximum 5 ozin (3600 gmm) when attached on diameter B and Plane A.

        Remaining unbalance must not be more than maximum 0.50 0zin (360 gmm).

        The direction of turn on the vertical balancing must be in a clockwise direction.

      1. Correct the unbalance.

      2. Install the air seal on grinding machine.

        Remove material to bring the unbalance in the limits, refer to step D.

        Remove material as shown in Figure and in Figure.

        Edges must be rounded 0.004 to 0.020in. (0.10 to 0.50 mm).

    1. SUBTASK 72-50-33-220-149 Do the Post Repair Inspection of the Turbine Air Seal

      1. Examine the surface finish.

      2. The surface finish of all grinded areas must be as good as adjacent areas.

        Use horizontal rotating table and roughness microtester.

      1. Dimensionally examine the grinded areas.

      2. Make sure that dimensions are within the limits given in Figure.

        Use horizontal rotating table, vernier caliper and radius gage set.

  1. Figure: Repair Details and Dimensions

    Repair Details and Dimensions
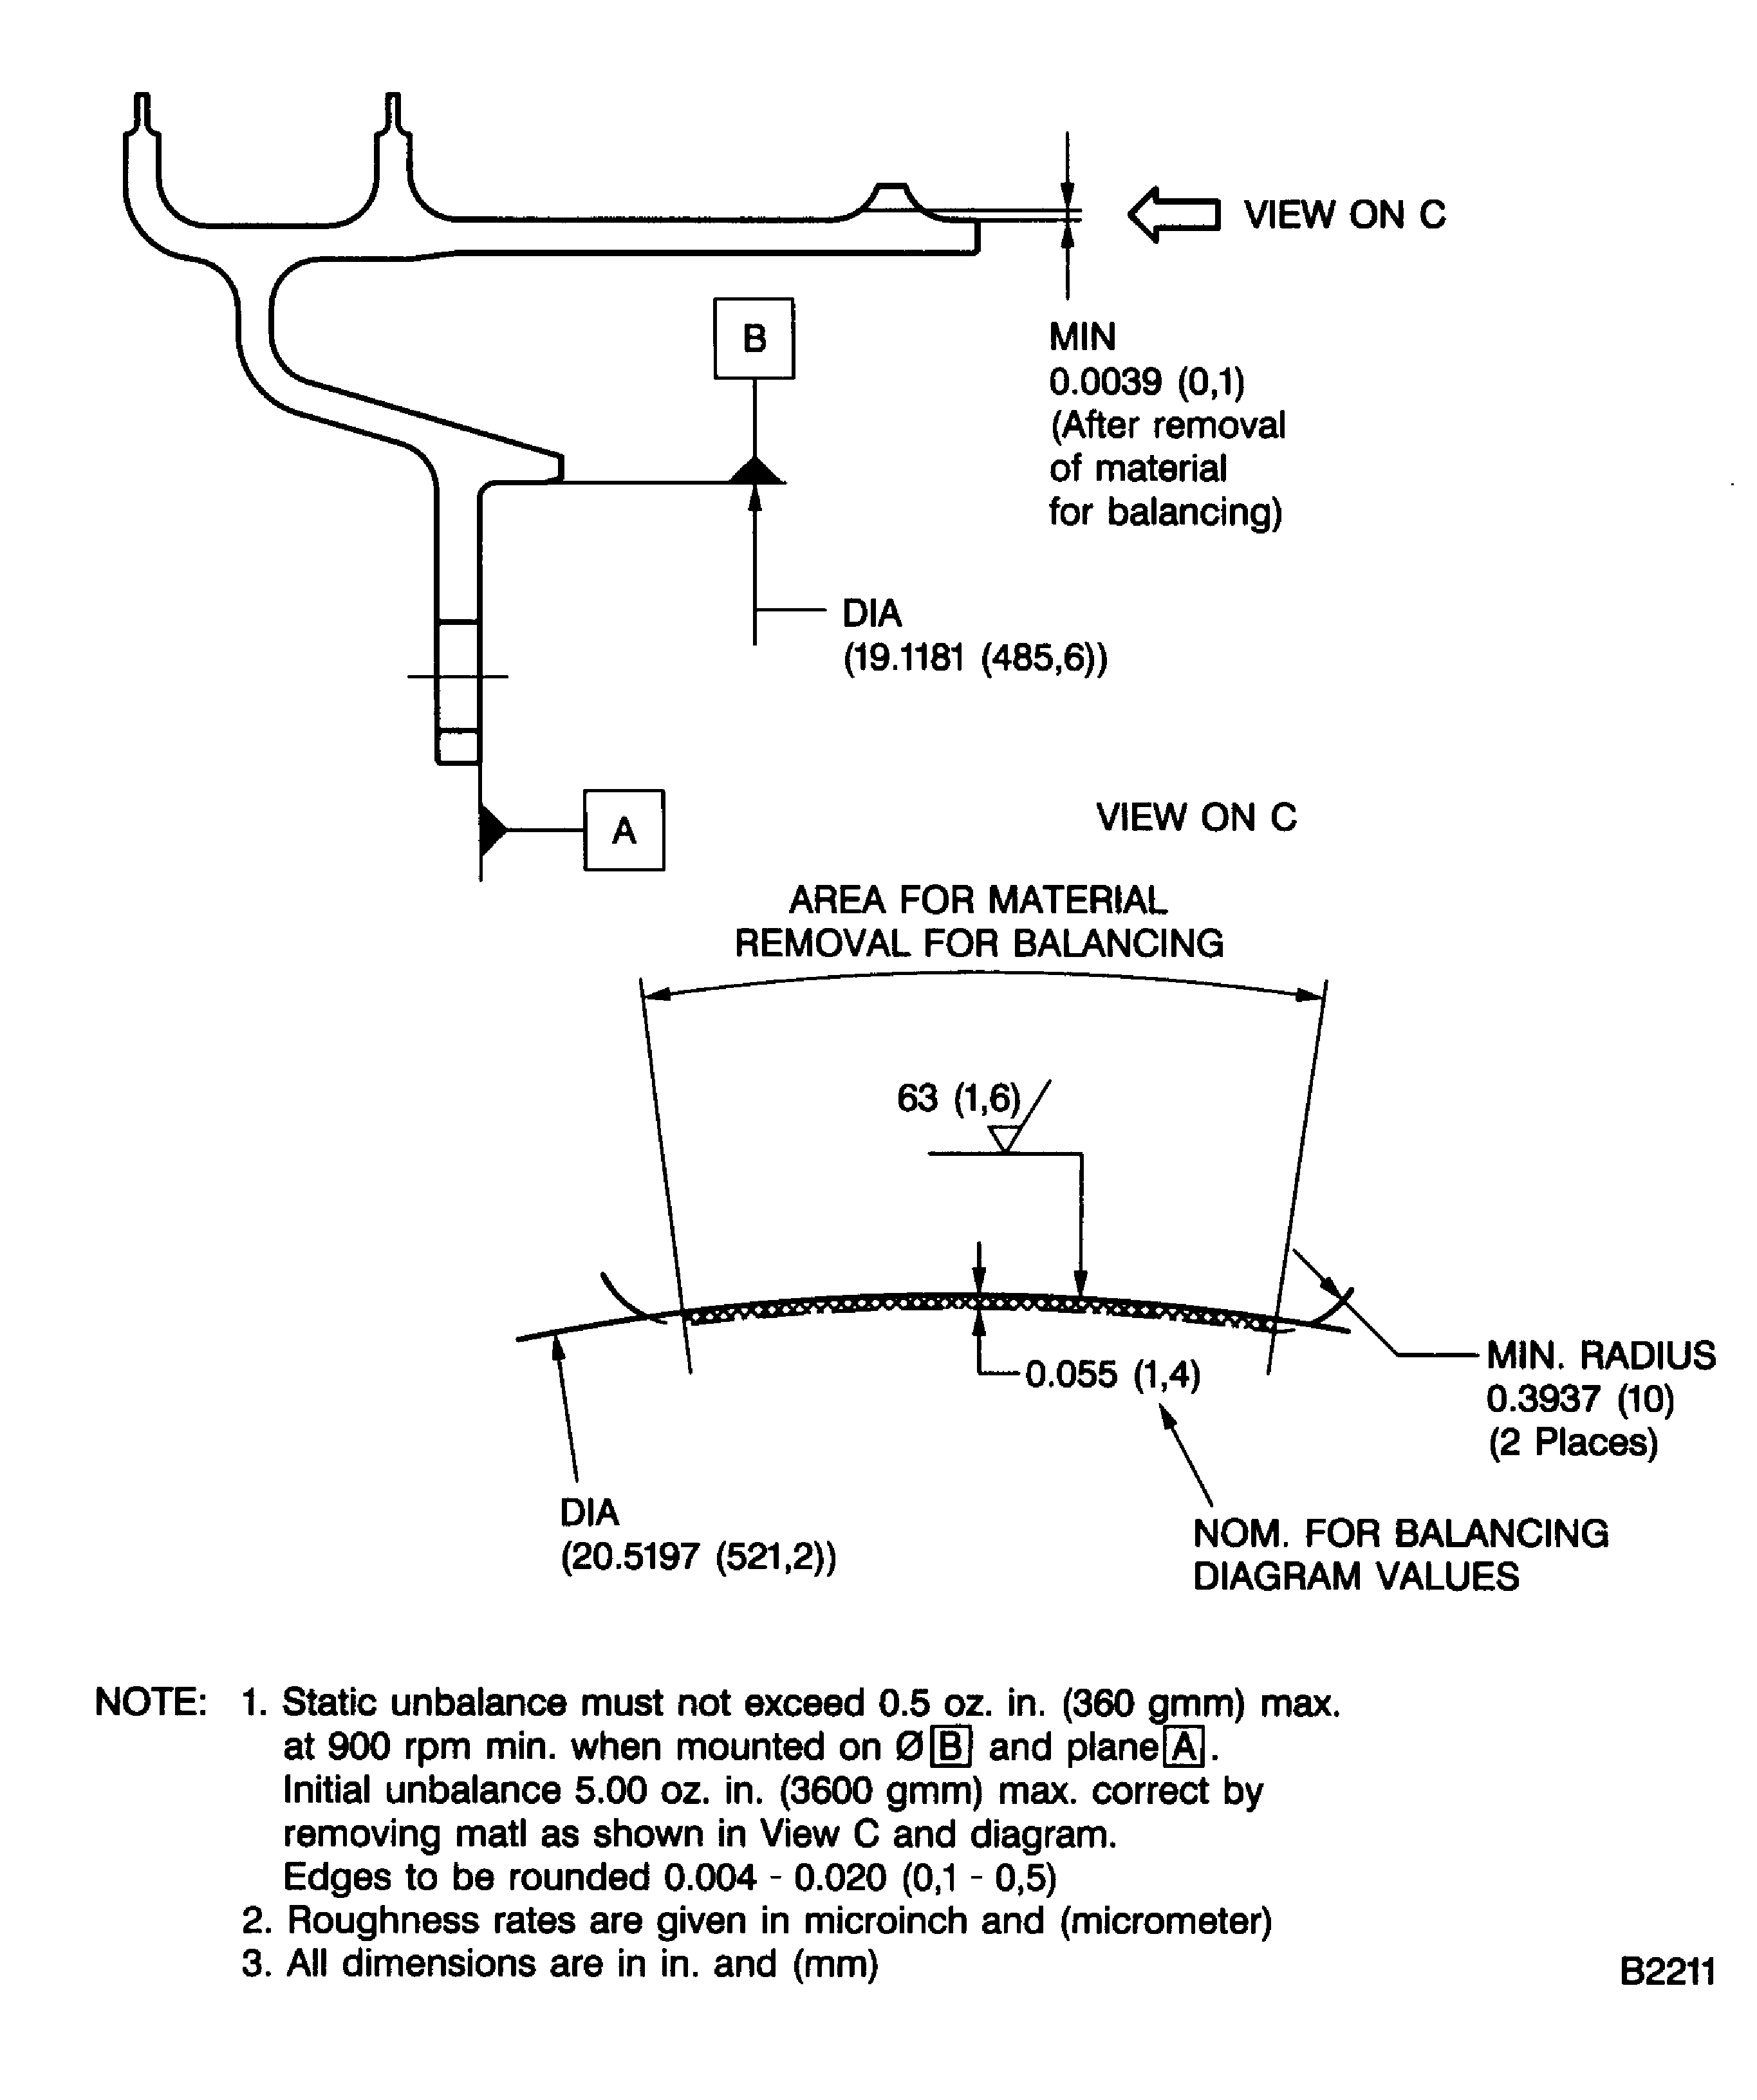
    Figure: Repair Details and Dimensions

    Repair Details and Dimensions
Requirements After Job Completion

Follow-On Conditions

NONE
Change Type:

Editorial correction due to conversion

Manufacturer Code:0AM53
Enterprise Name:IAE INTERNATIONAL AERO ENGINES AG
BU Name:NULL
Building:SUITE 400
Street:628 HEBRON AVENUE
City:GLASTONBURY
State:CT
Zip Code:06033
Country:USA
Manufacturer Code:LOCAL
Enterprise Name:LOCALLY SUPPLIED
Link not Found
Manufacturer Code:LOCAL
Tool Number:Horizontal rotating table
Tool Name:Horizontal rotating table
Manufacturer Code:0AM53
Tool Number:IAE 1M14150
Tool Name:IAE 1M14150 Balancing fixture
Manufacturer Code:LOCAL
Tool Number:Radius gage set
Tool Name:Radius gage set
Manufacturer Code:LOCAL
Tool Number:Roughness microtester
Tool Name:Roughness microtester
Manufacturer Code:LOCAL
Tool Number:Vernier caliper
Tool Name:Vernier caliper
Manufacturer Code:LOCAL
Tool Number:Vertical balancing machine
Tool Name:Vertical balancing machine