Export Control
EAR Export Classification: Not subject to the EAR per 15 C.F.R. Chapter 1, Part 734.3(b)(3), except for the following Service Bulletins which are currently published as EAR Export Classification 9E991: SBE70-0992, SBE72-0483, SBE72-0580, SBE72-0588, SBE72-0640, SBE73-0209, SBE80-0024 and SBE80-0025.Copyright
© IAE International Aero Engines AG (2001, 2014 - 2021) The information contained in this document is the property of © IAE International Aero Engines AG and may not be copied or used for any purpose other than that for which it is supplied without the express written authority of © IAE International Aero Engines AG. (This does not preclude use by engine and aircraft operators for normal instructional, maintenance or overhaul purposes.).Applicability
All
Common Information
TASK 75-24-48-300-013 HPT ACC Air Tubes - Weld Repair Cracks, Repair-013 (VRS1548)
Effectivity
FIG/ITEM | PART NO. |
02-200 | 2A1545 |
02-210 | 2A1549 |
02-220 | 2A1553 |
02-230 | 2A1557 |
02-400 | 2A1547 |
02-410 | 2A1551 |
02-420 | 2A1555 |
02-430 | 2A1559 |
General
Price and availability - none
The practices and processes referred to in the procedure by the TASK number are in the SPM.
For the method to clean the parts, refer to Cleaning-000 TASK 75-24-48-100-100.
NOTE
NOTE
Preliminary Requirements
Pre-Conditions
NONESupport Equipment
| Name | Manufacturer | Part Number / Identification | Quantity | Remark |
|---|---|---|---|---|
| TIG welding equipment | LOCAL | TIG welding equipment | ||
| Grinder, Hand held pneumatic | LOCAL | Grinder, Hand held pneumatic | ||
| Fluorescent Penetrant Inspection Equipment | LOCAL | Fluorescent penetrant inspection equipment | ||
| Fluorescent Penetrant Inspection Equipment | LOCAL | Fluorescent Penetrant Inspection Equipment | ||
| Magnifying glass | LOCAL | Magnifying glass | 8x |
Consumables, Materials and Expendables
| Name | Manufacturer | Part Number / Identification | Quantity | Remark |
|---|---|---|---|---|
| CoMat 01-031 ACETONE (CH3)2CO | LOCAL | CoMat 01-031 | ||
| CoMat 02-099 LINT-FREE CLOTH | LOCAL | CoMat 02-099 | ||
| CoMat 03-204 WELDING FILLER WIRE | LOCAL | CoMat 03-204 |
Spares
NONESafety Requirements
NONEProcedure
Refer to SPM TASK 70-23-02-230-501.
Fluorescent penetrant examine the TCC tube assemblies for crack indications.
SUBTASK 75-24-48-230-059 Examine the TCC Tube Assemblies
Refer to Figure.
Use a Grinder, Hand held pneumatic.
Dress-out the crack.
Make sure that the crack is completely removed from the TCC tube assemblies.
SUBTASK 75-24-48-350-093 Dress-Out the Crack to Weld Without Patches
Refer to Cleaning-000 TASK 75-24-48-100-100.
Remove all the oxides, hydrocarbon, grit and scale from the surface to be welded and the adjacent area by local cleaning.
SUBTASK 75-24-48-110-064 Remove All the Dirt from the Surface
Refer to Figure.
Refer to SPM TASK 70-31-02-310-501.
Weld the dressed cracks manually by tungsten inert gas (TIG) weld.
Use a Grinder, Hand held pneumatic.
Remove the excess weld and dress flush with the adjacent area.
SUBTASK 75-24-48-310-060 Weld the Dressed Cracks on the TCC Tube Assemblies
Make again the air-hole pattern to the same size and spacing as the other holes, in the same hole system, where the welds affect the holes.
Make air-holes in the repaired area of the TCC tube assemblies (if applicable).
SUBTASK 75-24-48-350-094 Make Air-Holes in the TCC Tube Assemblies
Stress relieve at 1200 deg F plus or minus 25 deg F (649 deg C plus or minus 14 deg C) for one hour.
Heat treat the TCC tube assemblies.
SUBTASK 75-24-48-310-061 Heat Treat the TCC Tube Assemblies
Refer to SPM TASK 70-23-05-230-501.
Penetrant examine the repaired area.
Use an 8x Magnifying glass.
Refer to Inspection-000 TASK 75-24-48-200-100.
Visually examine the repaired area.
Refer to Figure.
Do a dimensional check of the TCC tube assemblies for distortion. (This does not include the patch welding repaired area.)
SUBTASK 75-24-48-350-095 Examine the Repaired Area for Cracks
Use a Grinder, Hand held pneumatic.
Use a patch as a template to cut out the damaged area. Bevel the repair edges.
SUBTASK 75-24-48-350-097 Cut Out the Damaged Area
Refer to Cleaning-000 TASK 75-24-48-100-100.
Remove all the oxides, hydrocarbon, grit and scale from the surface to be welded and the adjacent area by local cleaning.
SUBTASK 75-24-48-110-065 Remove All the Dirt from the Surface
Refer to SPM TASK 70-31-02-310-501.
Weld the Patch.
Use a Grinder, Hand held pneumatic.
Avoid undercutting the parent metal.
In the contact area, remove the excess weld and dress flush with the adjacent area.
SUBTASK 75-24-48-350-098 Weld the Patch to the TCC Tube Assemblies
NOTE
Patch weld repair of tubes is not allowed if the total patch weld areas are greater than 20 percent of the surface.Make again the air-hole pattern to the same size and spacing of the other holes, in the same hole system, where the welds or patches affect the holes.
Make air-holes through the patch (if applicable).
SUBTASK 75-24-48-350-099 Make Air-Holes in the TCC Tube Assemblies
Stress relieve at 1200 deg F plus or minus 25 deg F (649 deg C plus or minus 14 deg C) for one hour.
Heat treat the TCC tube assembly.
SUBTASK 75-24-48-310-076 Heat Treat the TCC Tube Assemblies
Refer to SPM TASK 70-23-05-230-501.
Penetrant examine the repaired area.
Use an 8x Magnifying glass.
Refer to Inspection-000 TASK 75-24-48-200-100.
Visually examine the edge of the patch.
Refer to Figure.
Do a dimensional check of the TCC tube assemblies for distortion (except the patch welding repaired area).
SUBTASK 75-24-48-350-100 Examine the Repaired Area for Cracks
Figure: Weld of the TCC Tube Assemblies
Weld of the TCC Tube Assemblies
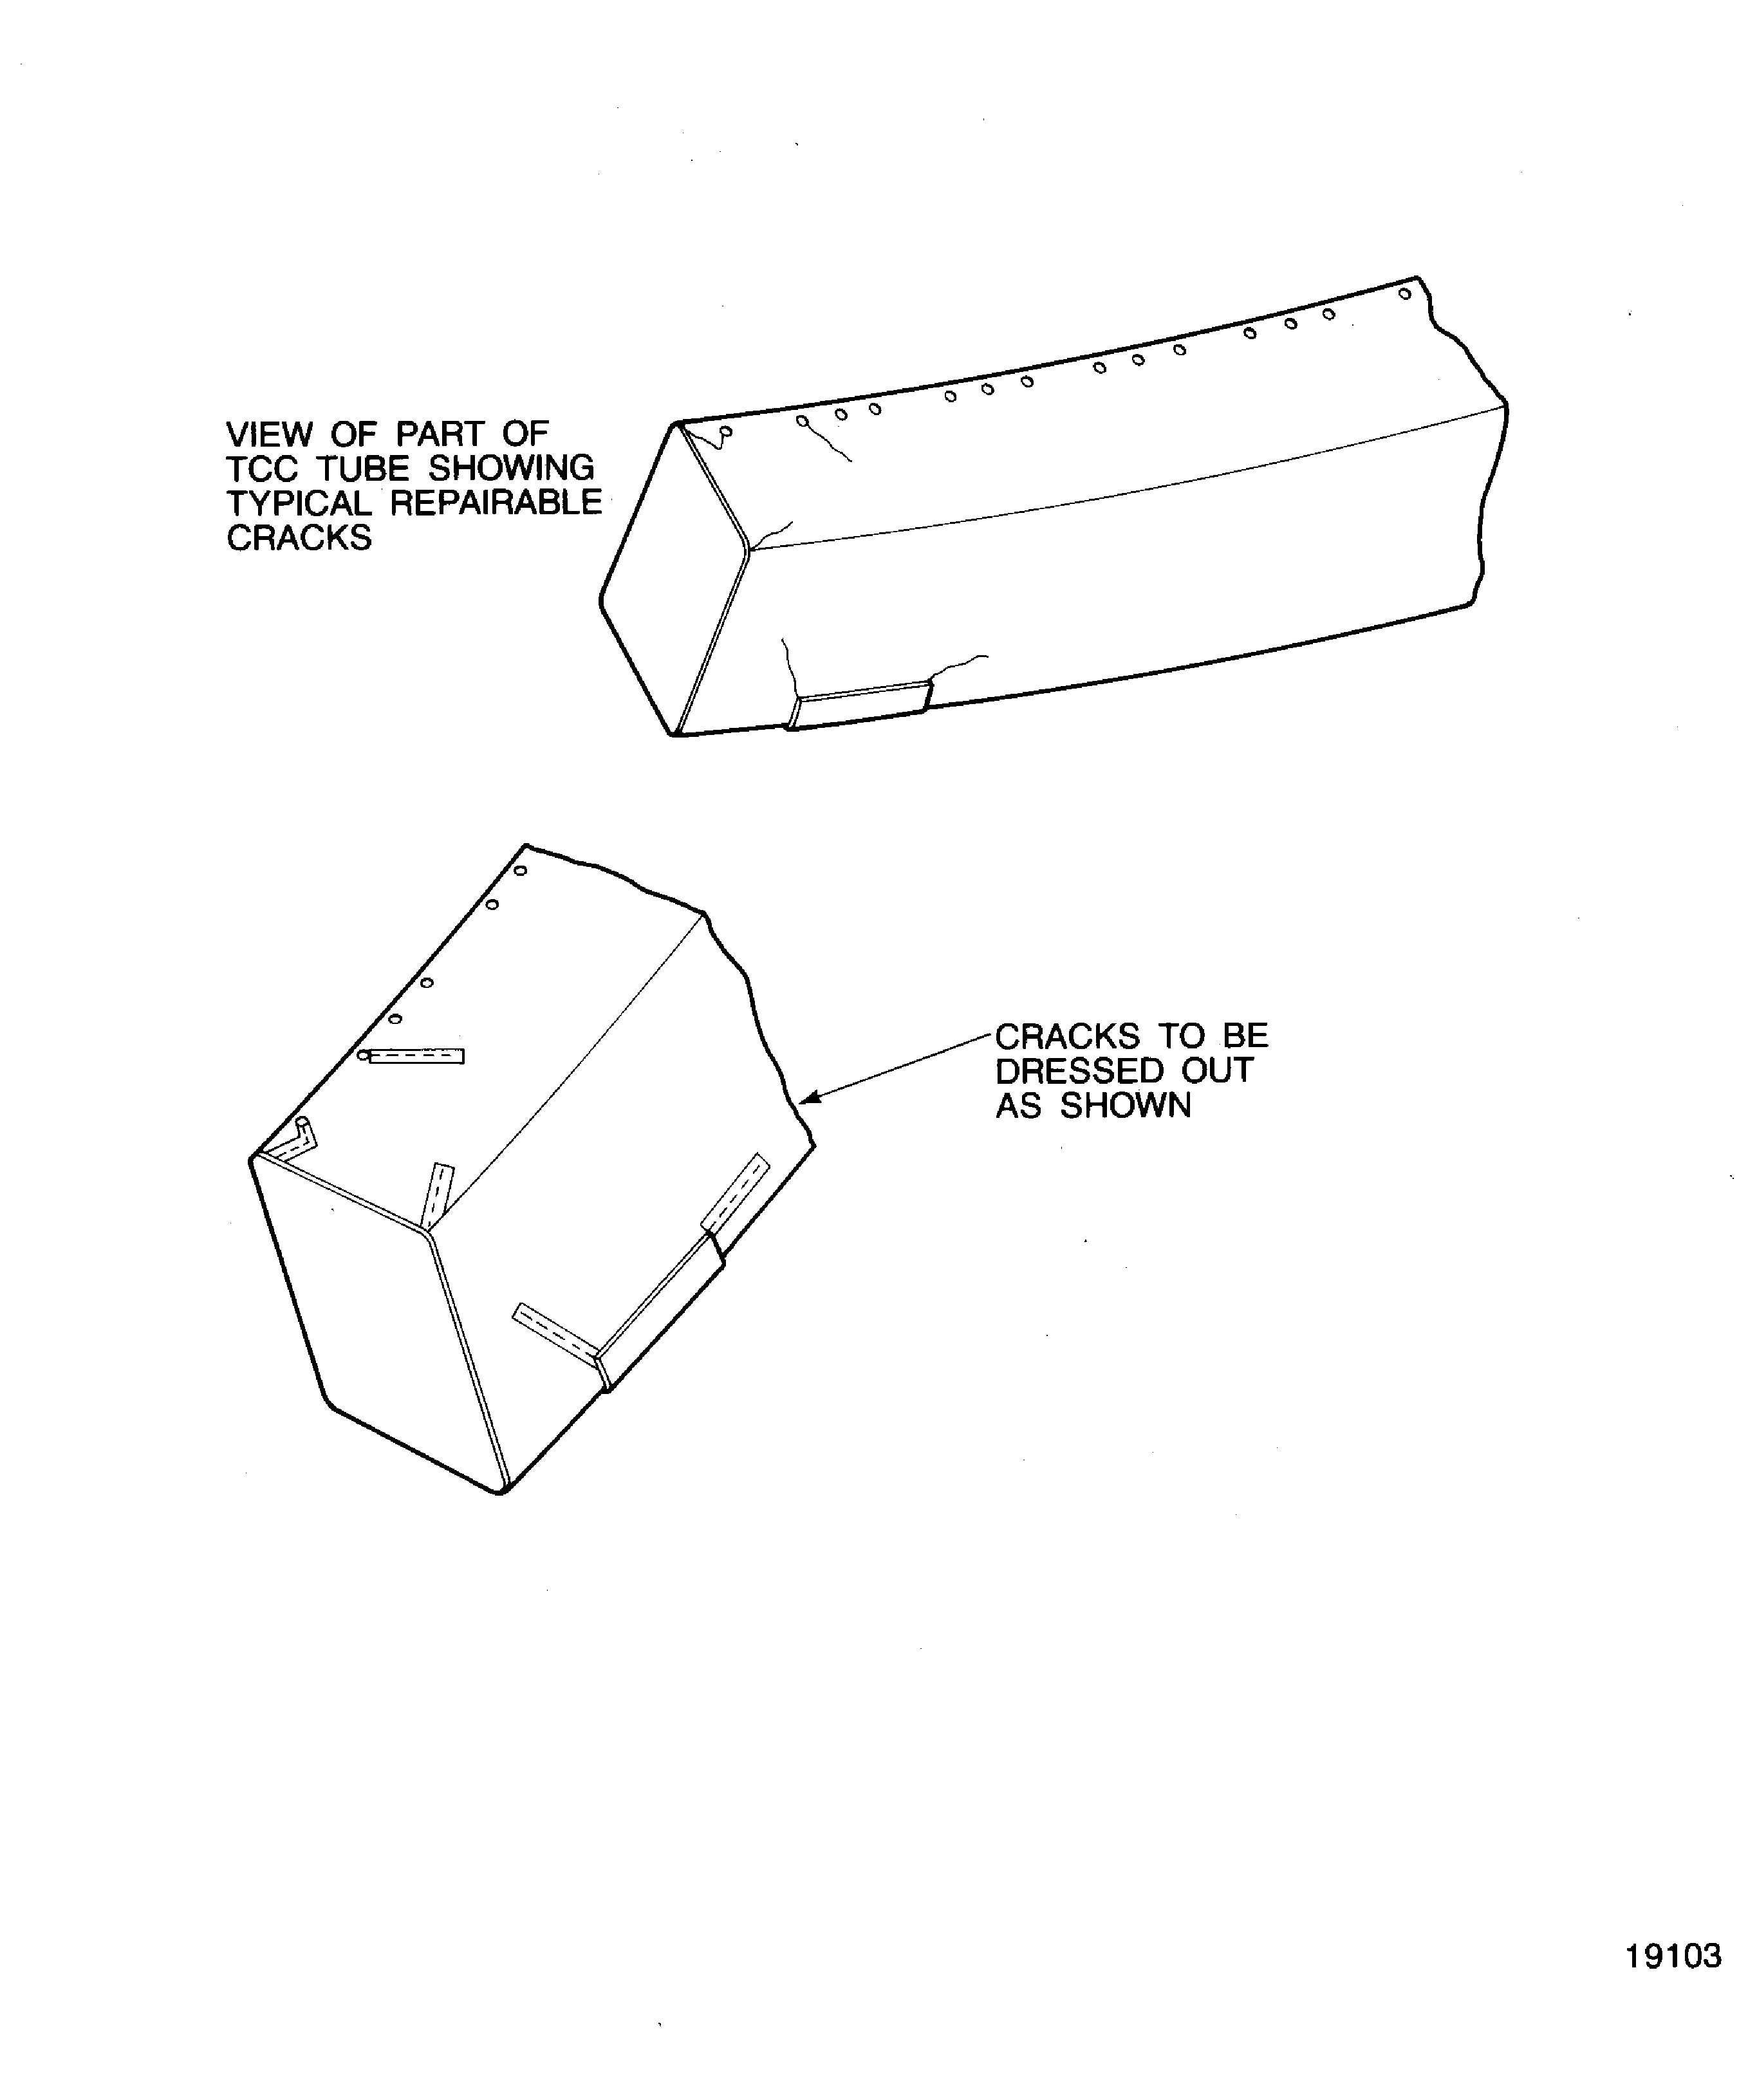
Weld of the TCC Tube Assemblies

Figure: Dimension of the TCC tube assemblies
Dimension of the TCC tube assemblies
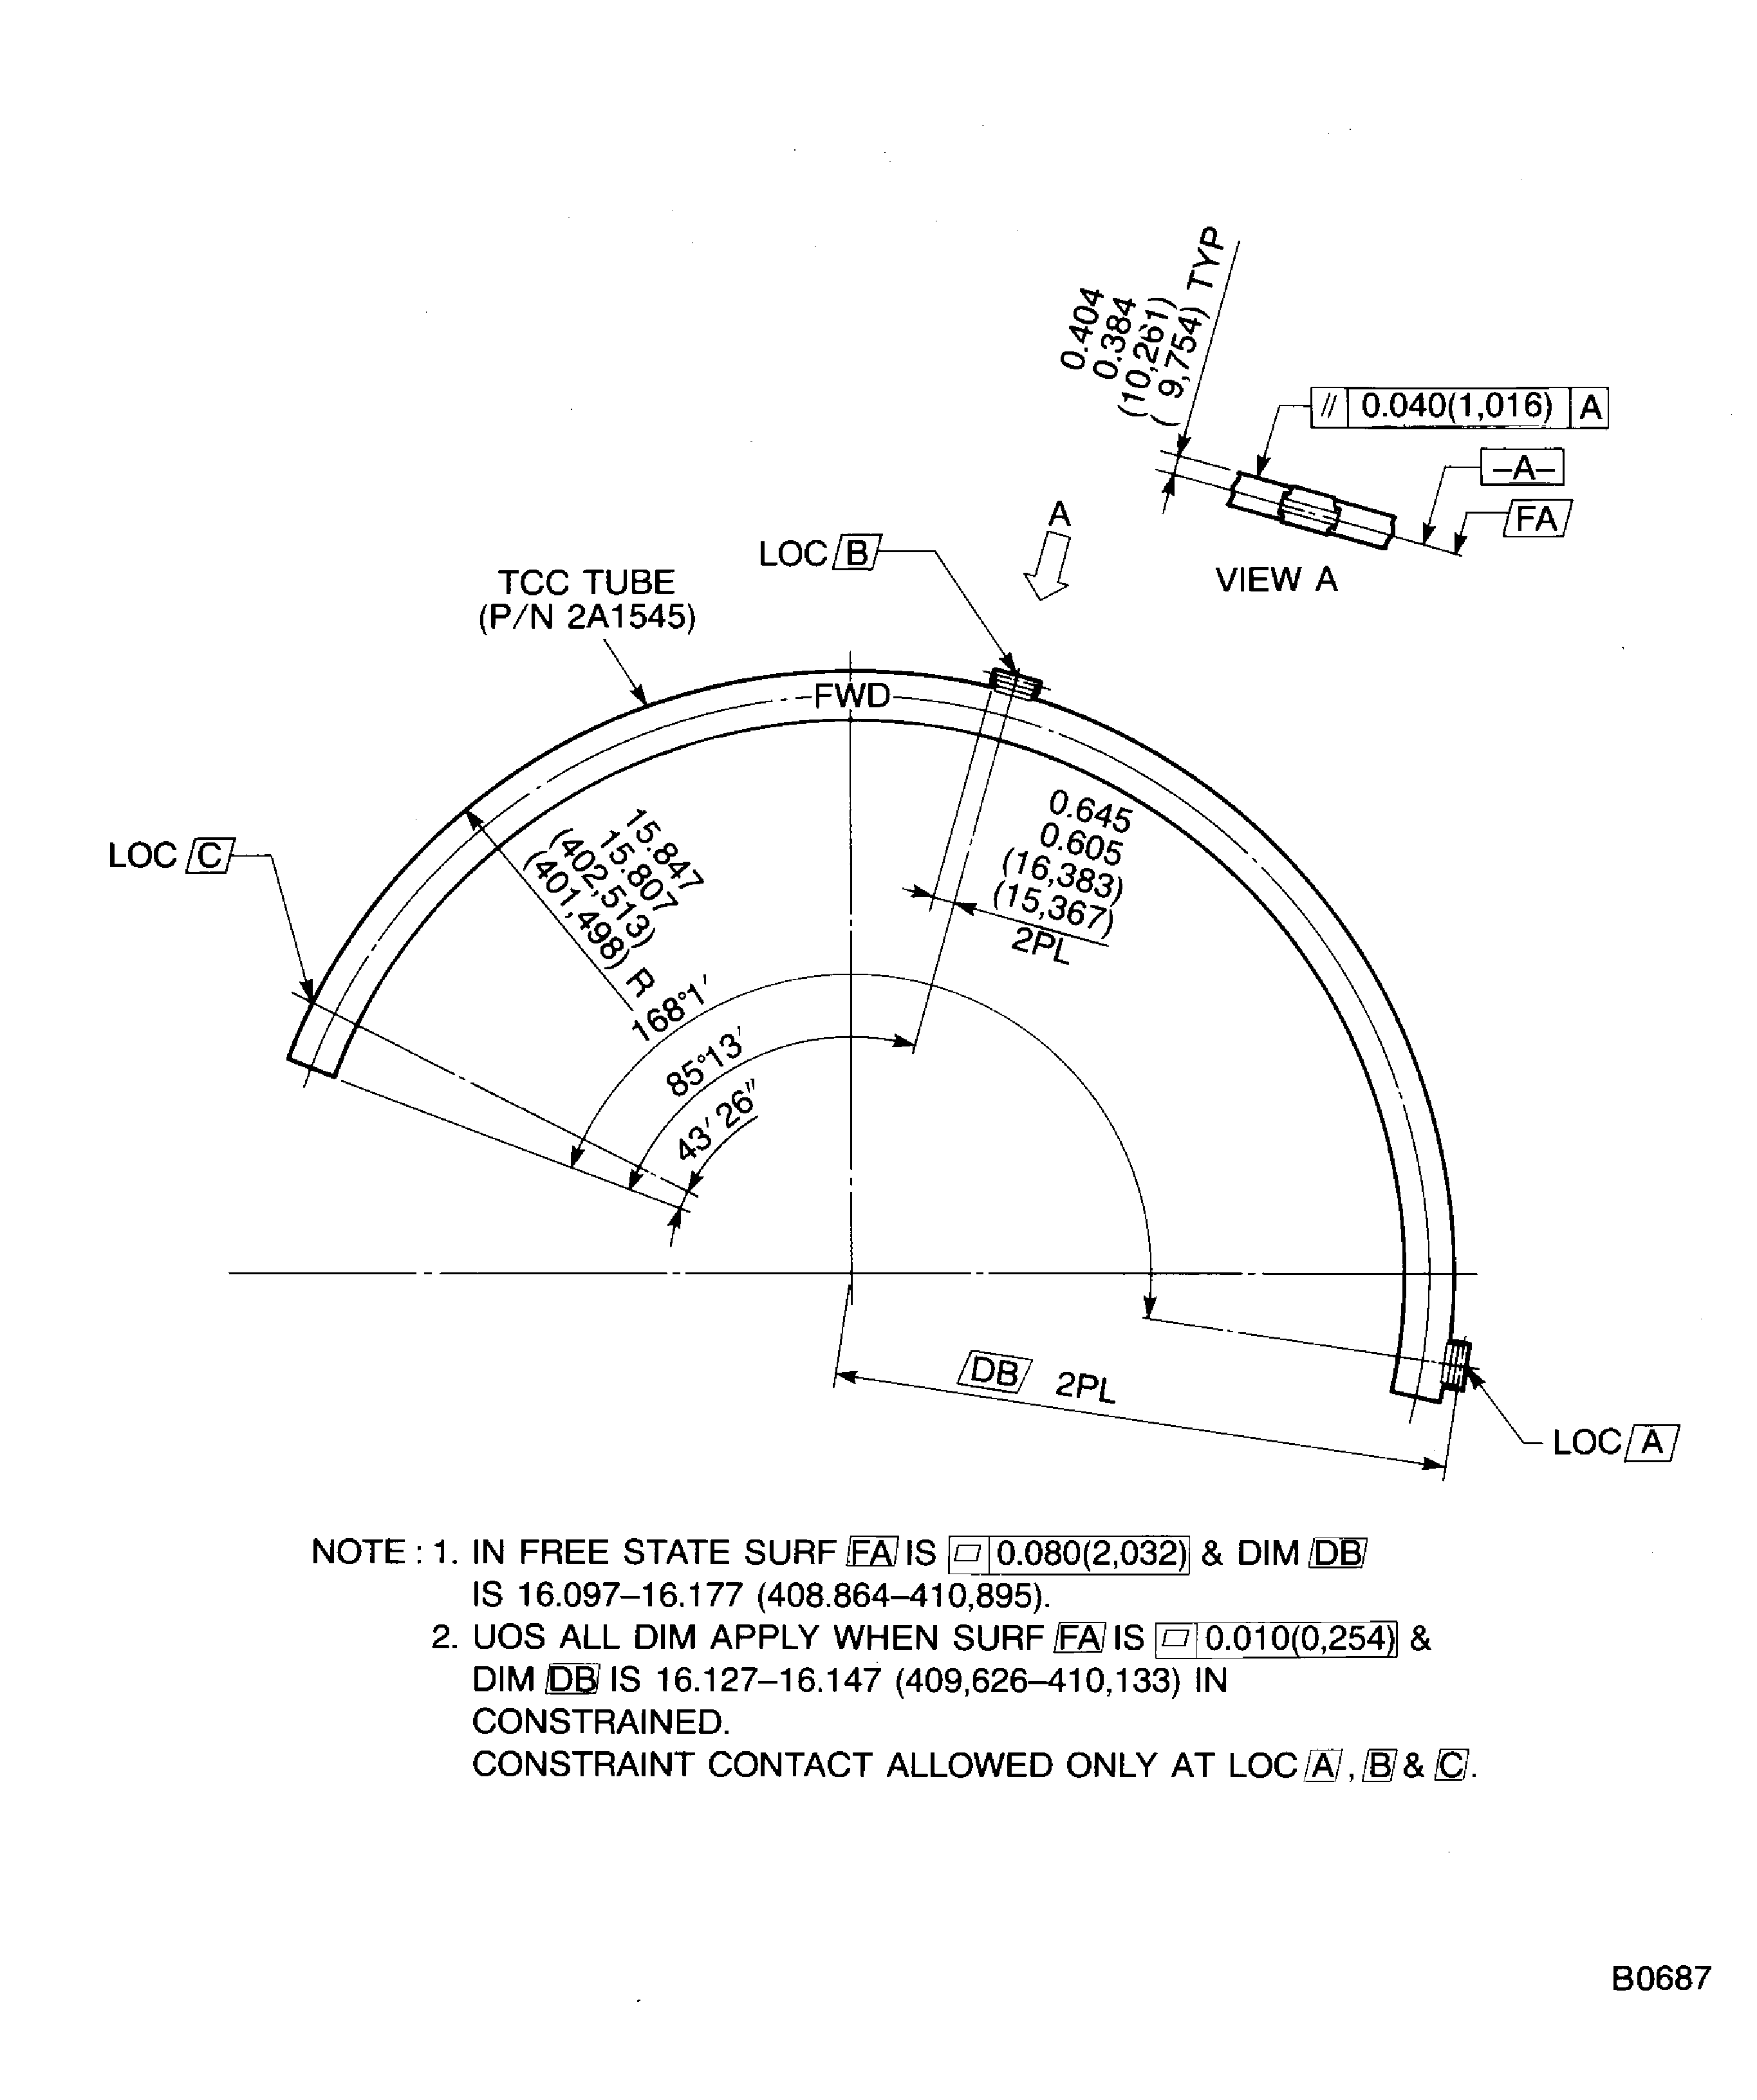
Dimension of the TCC tube assemblies
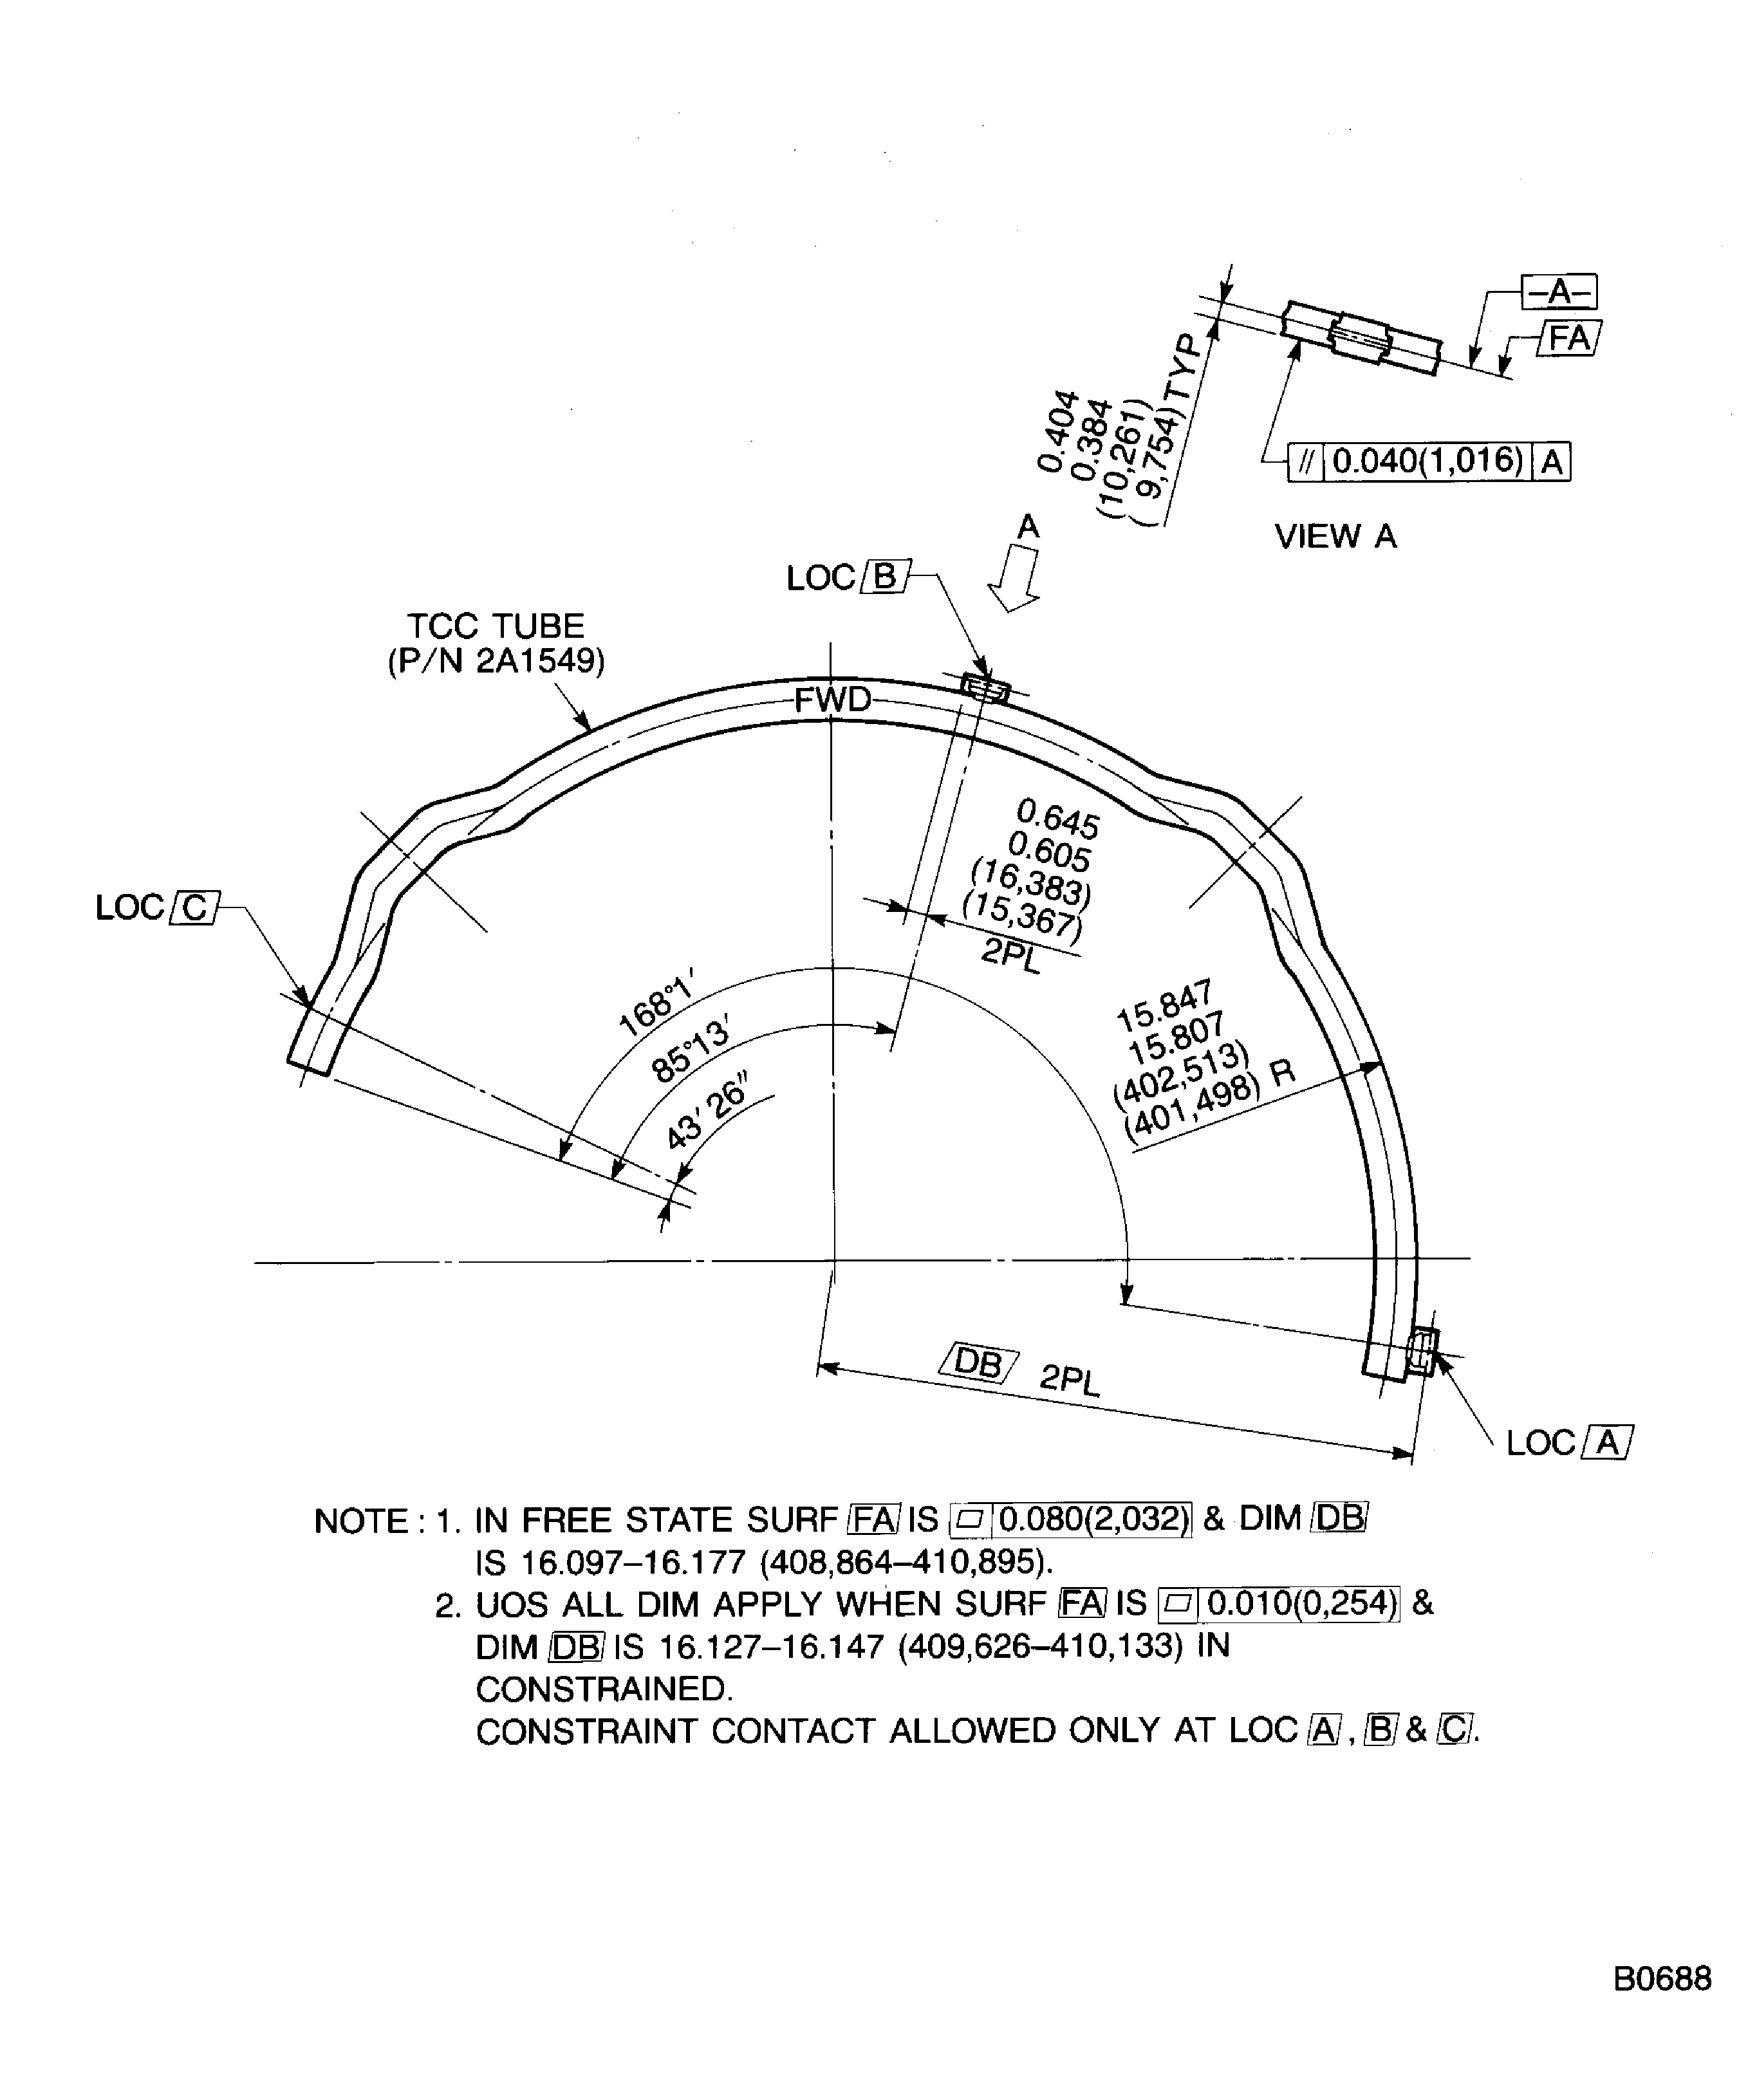
Dimension of the TCC tube assemblies
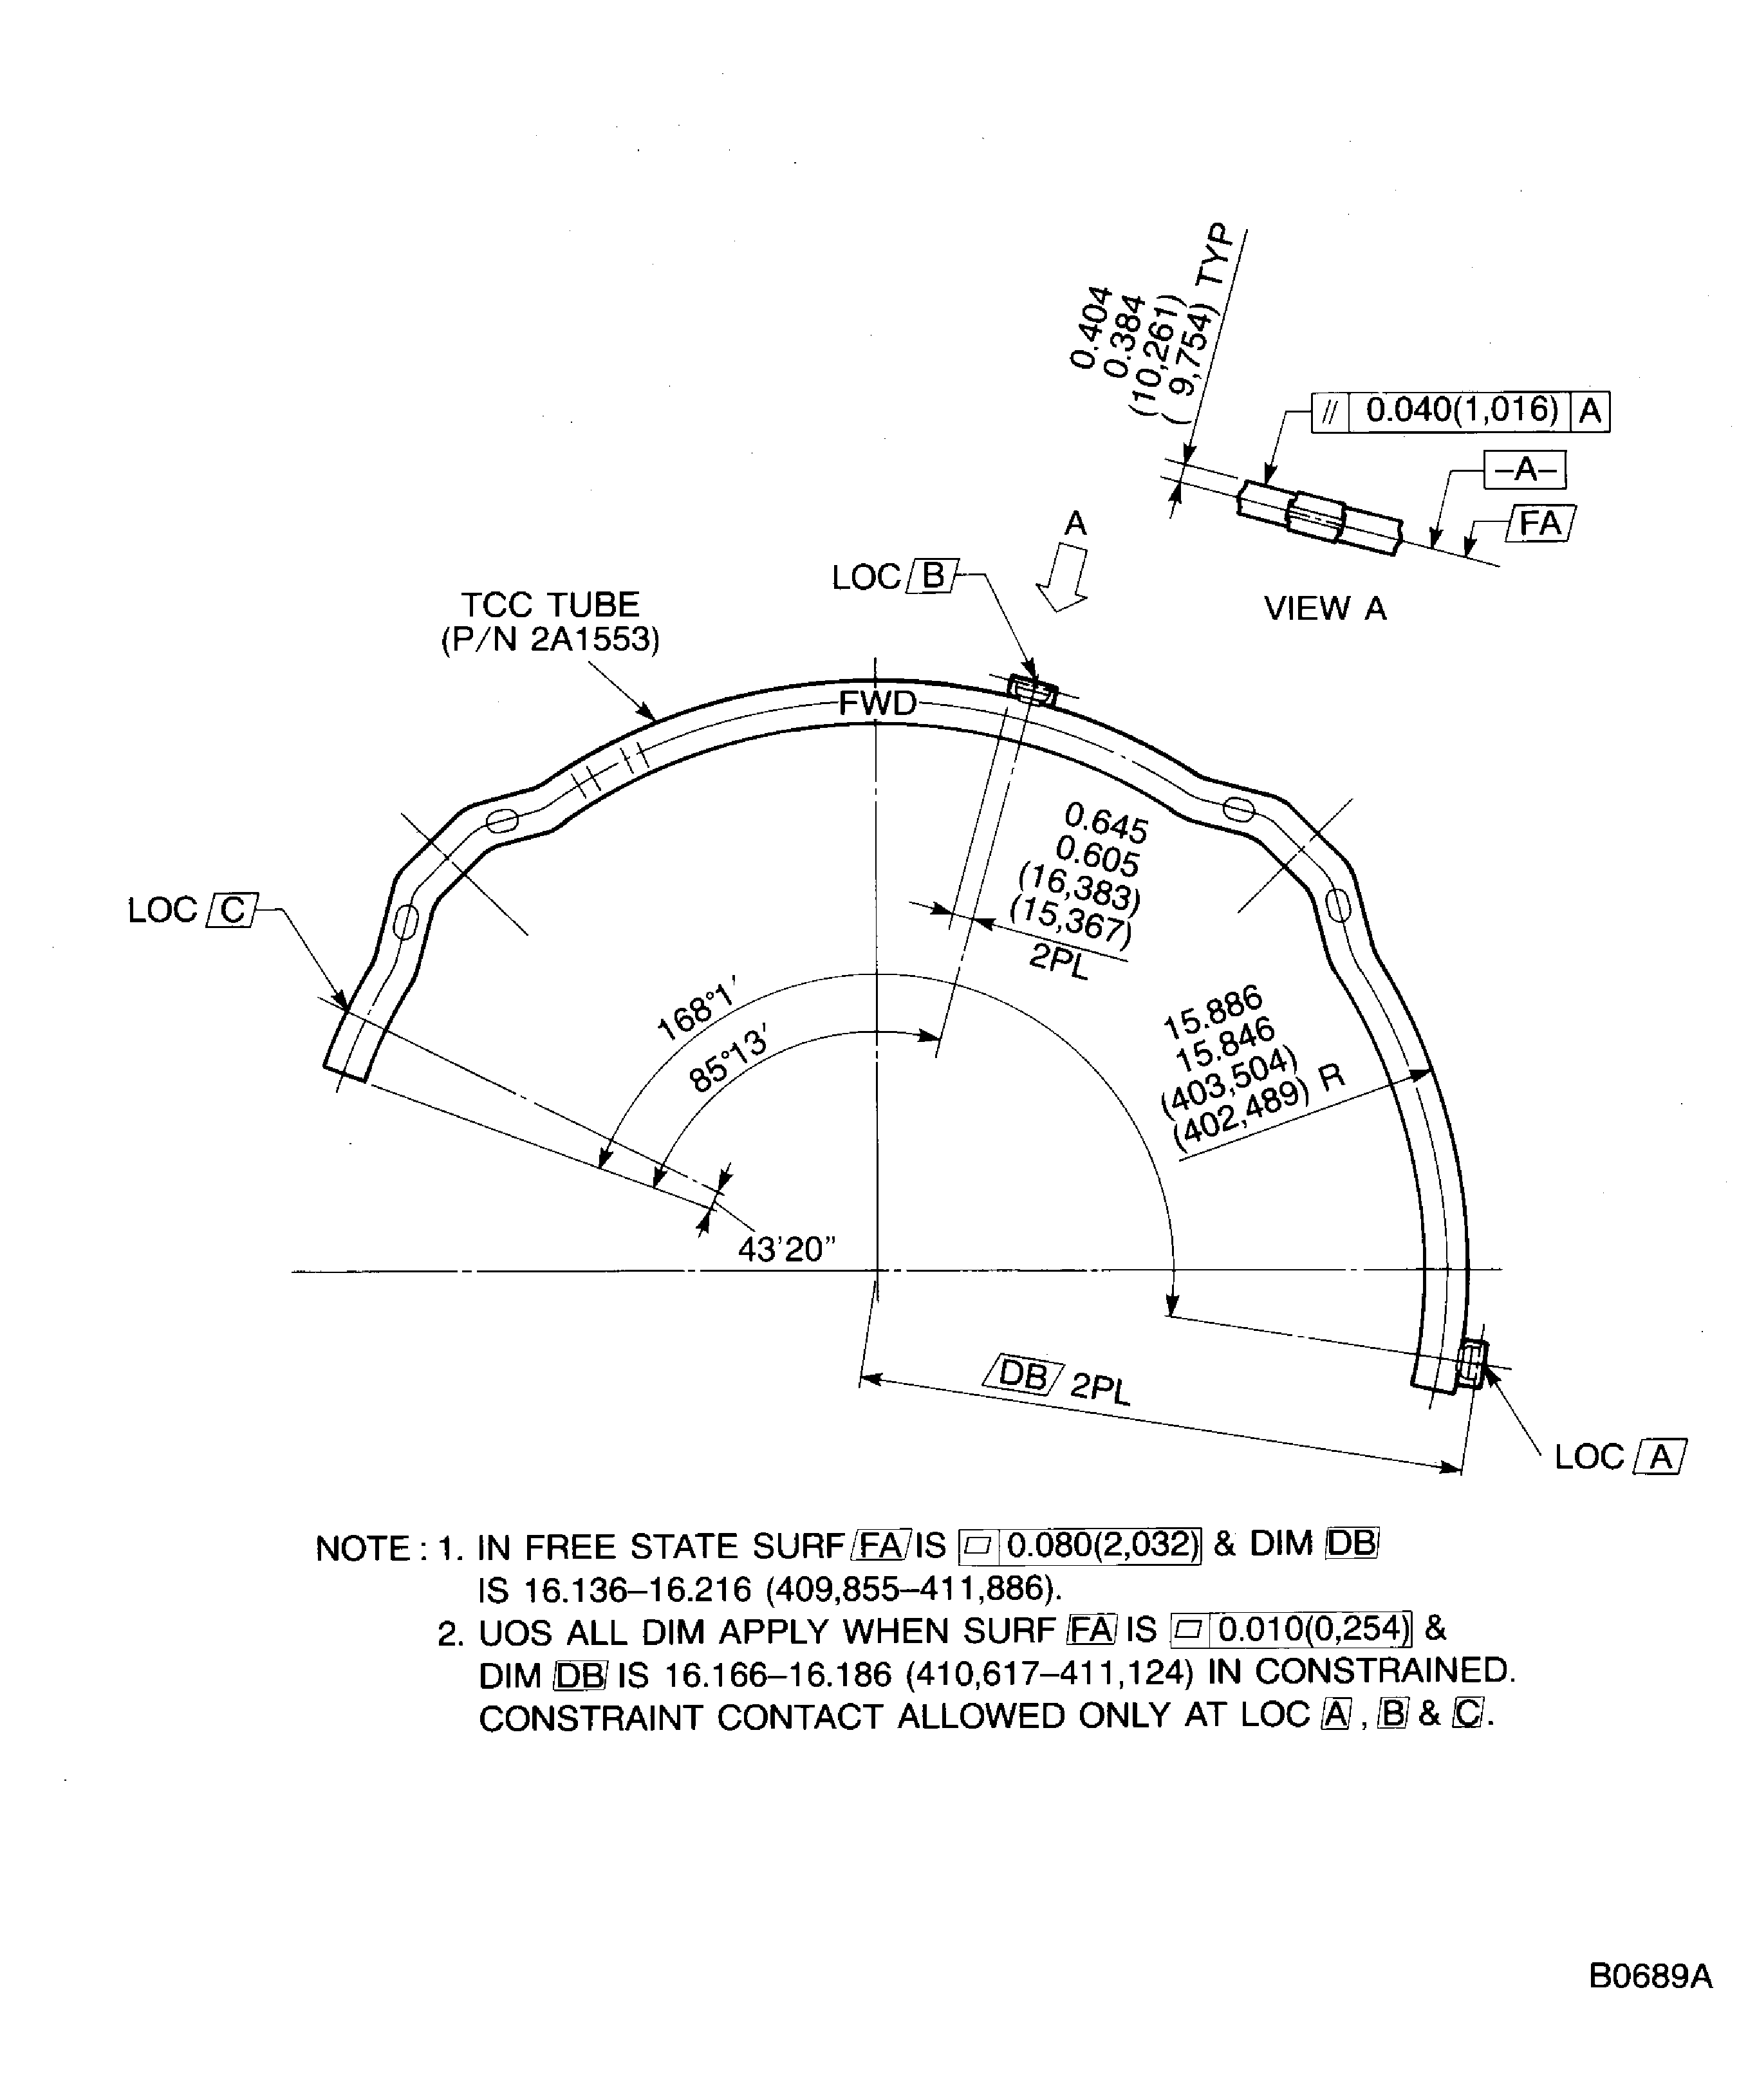
Dimension of the TCC tube assemblies

Dimension of the TCC tube assemblies

Dimension of the TCC tube assemblies
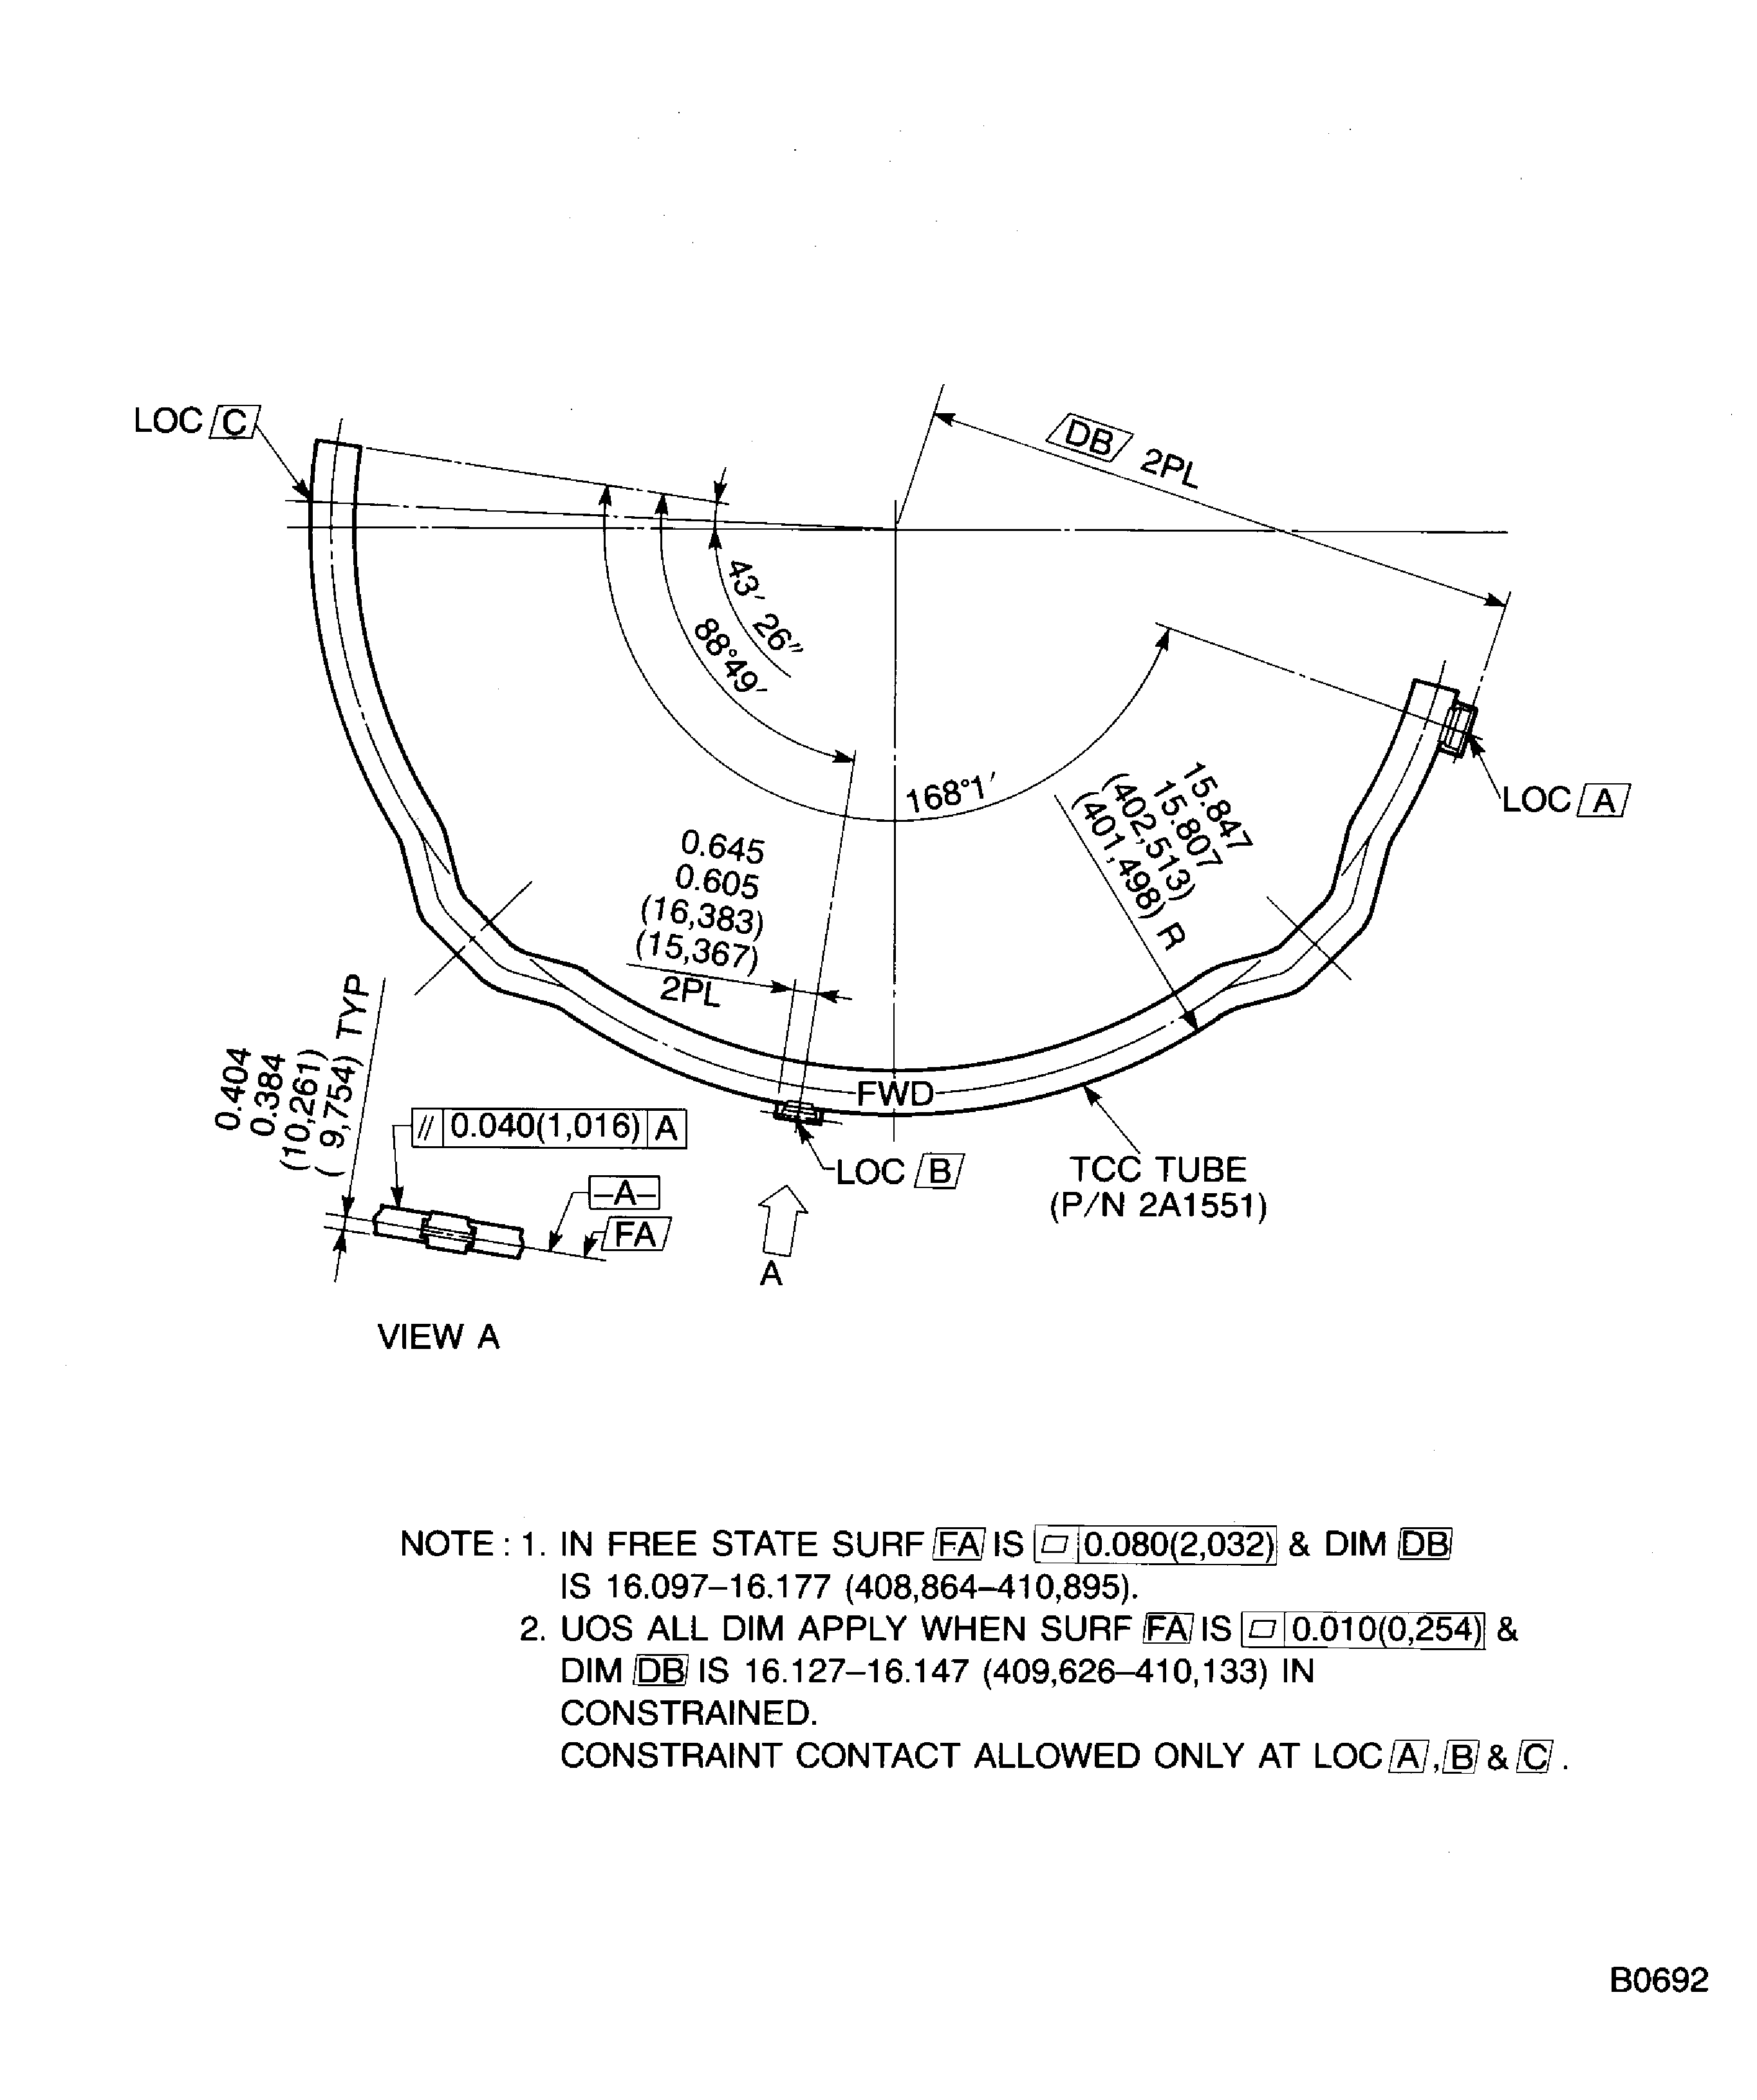
Dimension of the TCC tube assemblies
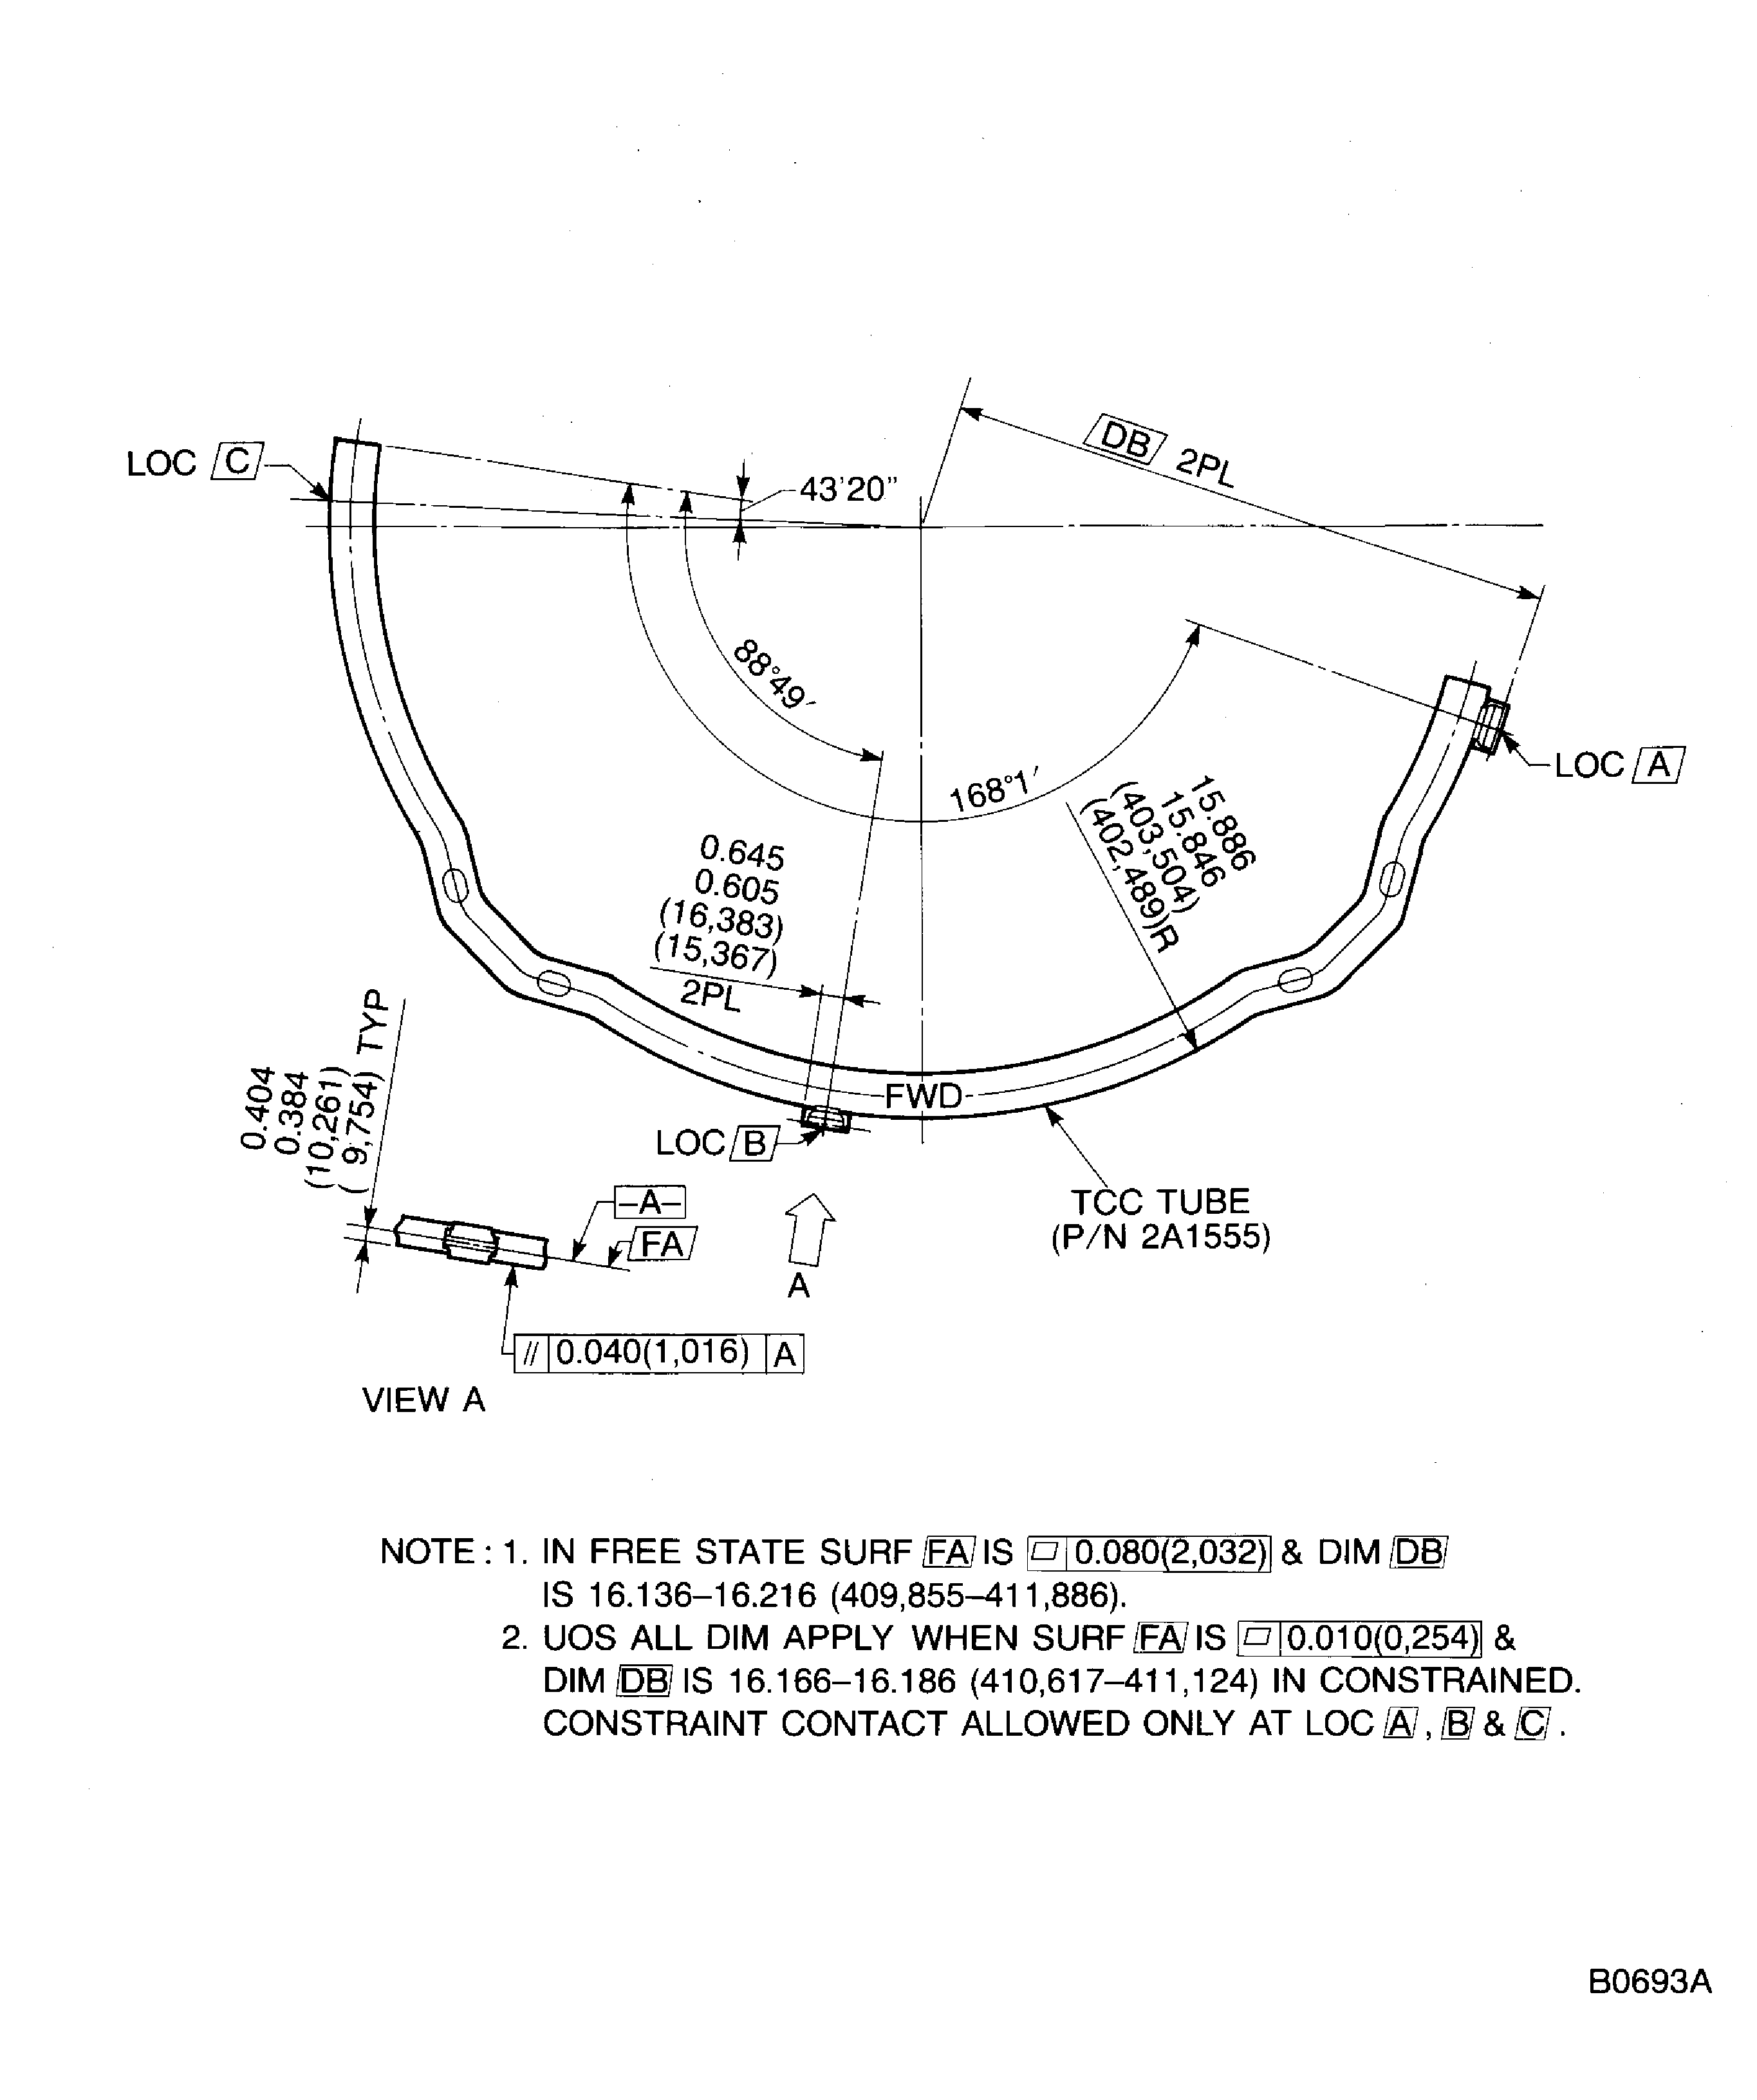
Dimension of the TCC tube assemblies

