Export Control
EAR Export Classification: Not subject to the EAR per 15 C.F.R. Chapter 1, Part 734.3(b)(3), except for the following Service Bulletins which are currently published as EAR Export Classification 9E991: SBE70-0992, SBE72-0483, SBE72-0580, SBE72-0588, SBE72-0640, SBE73-0209, SBE80-0024 and SBE80-0025.Copyright
© IAE International Aero Engines AG (2001, 2014 - 2021) The information contained in this document is the property of © IAE International Aero Engines AG and may not be copied or used for any purpose other than that for which it is supplied without the express written authority of © IAE International Aero Engines AG. (This does not preclude use by engine and aircraft operators for normal instructional, maintenance or overhaul purposes.).Applicability
V2500-A5
Common Information
TASK 72-45-20-200-001-B00 HPT Case And Vane Assembly - Examine, Inspection-001
General
The word "reject" is used after an interface inspection statement to show that a higher level inspection and possible repair to the damaged part is necessary.
Do the higher level inspection procedure as found in the applicable Chapter/Section/Subject of this manual on the damaged part(s). It is not necessary to do the higher level inspection on parts that are serviceable to the interface inspection standard.
All parts must be visually examined for damage, corrosion and wear. All defects (distress, missing hardware etc.) that are not identified in the procedure must be documented and referred to IAE Technical Services.
Preliminary Requirements
Pre-Conditions
NONESupport Equipment
NONEConsumables, Materials and Expendables
NONESpares
NONESafety Requirements
NONEProcedure
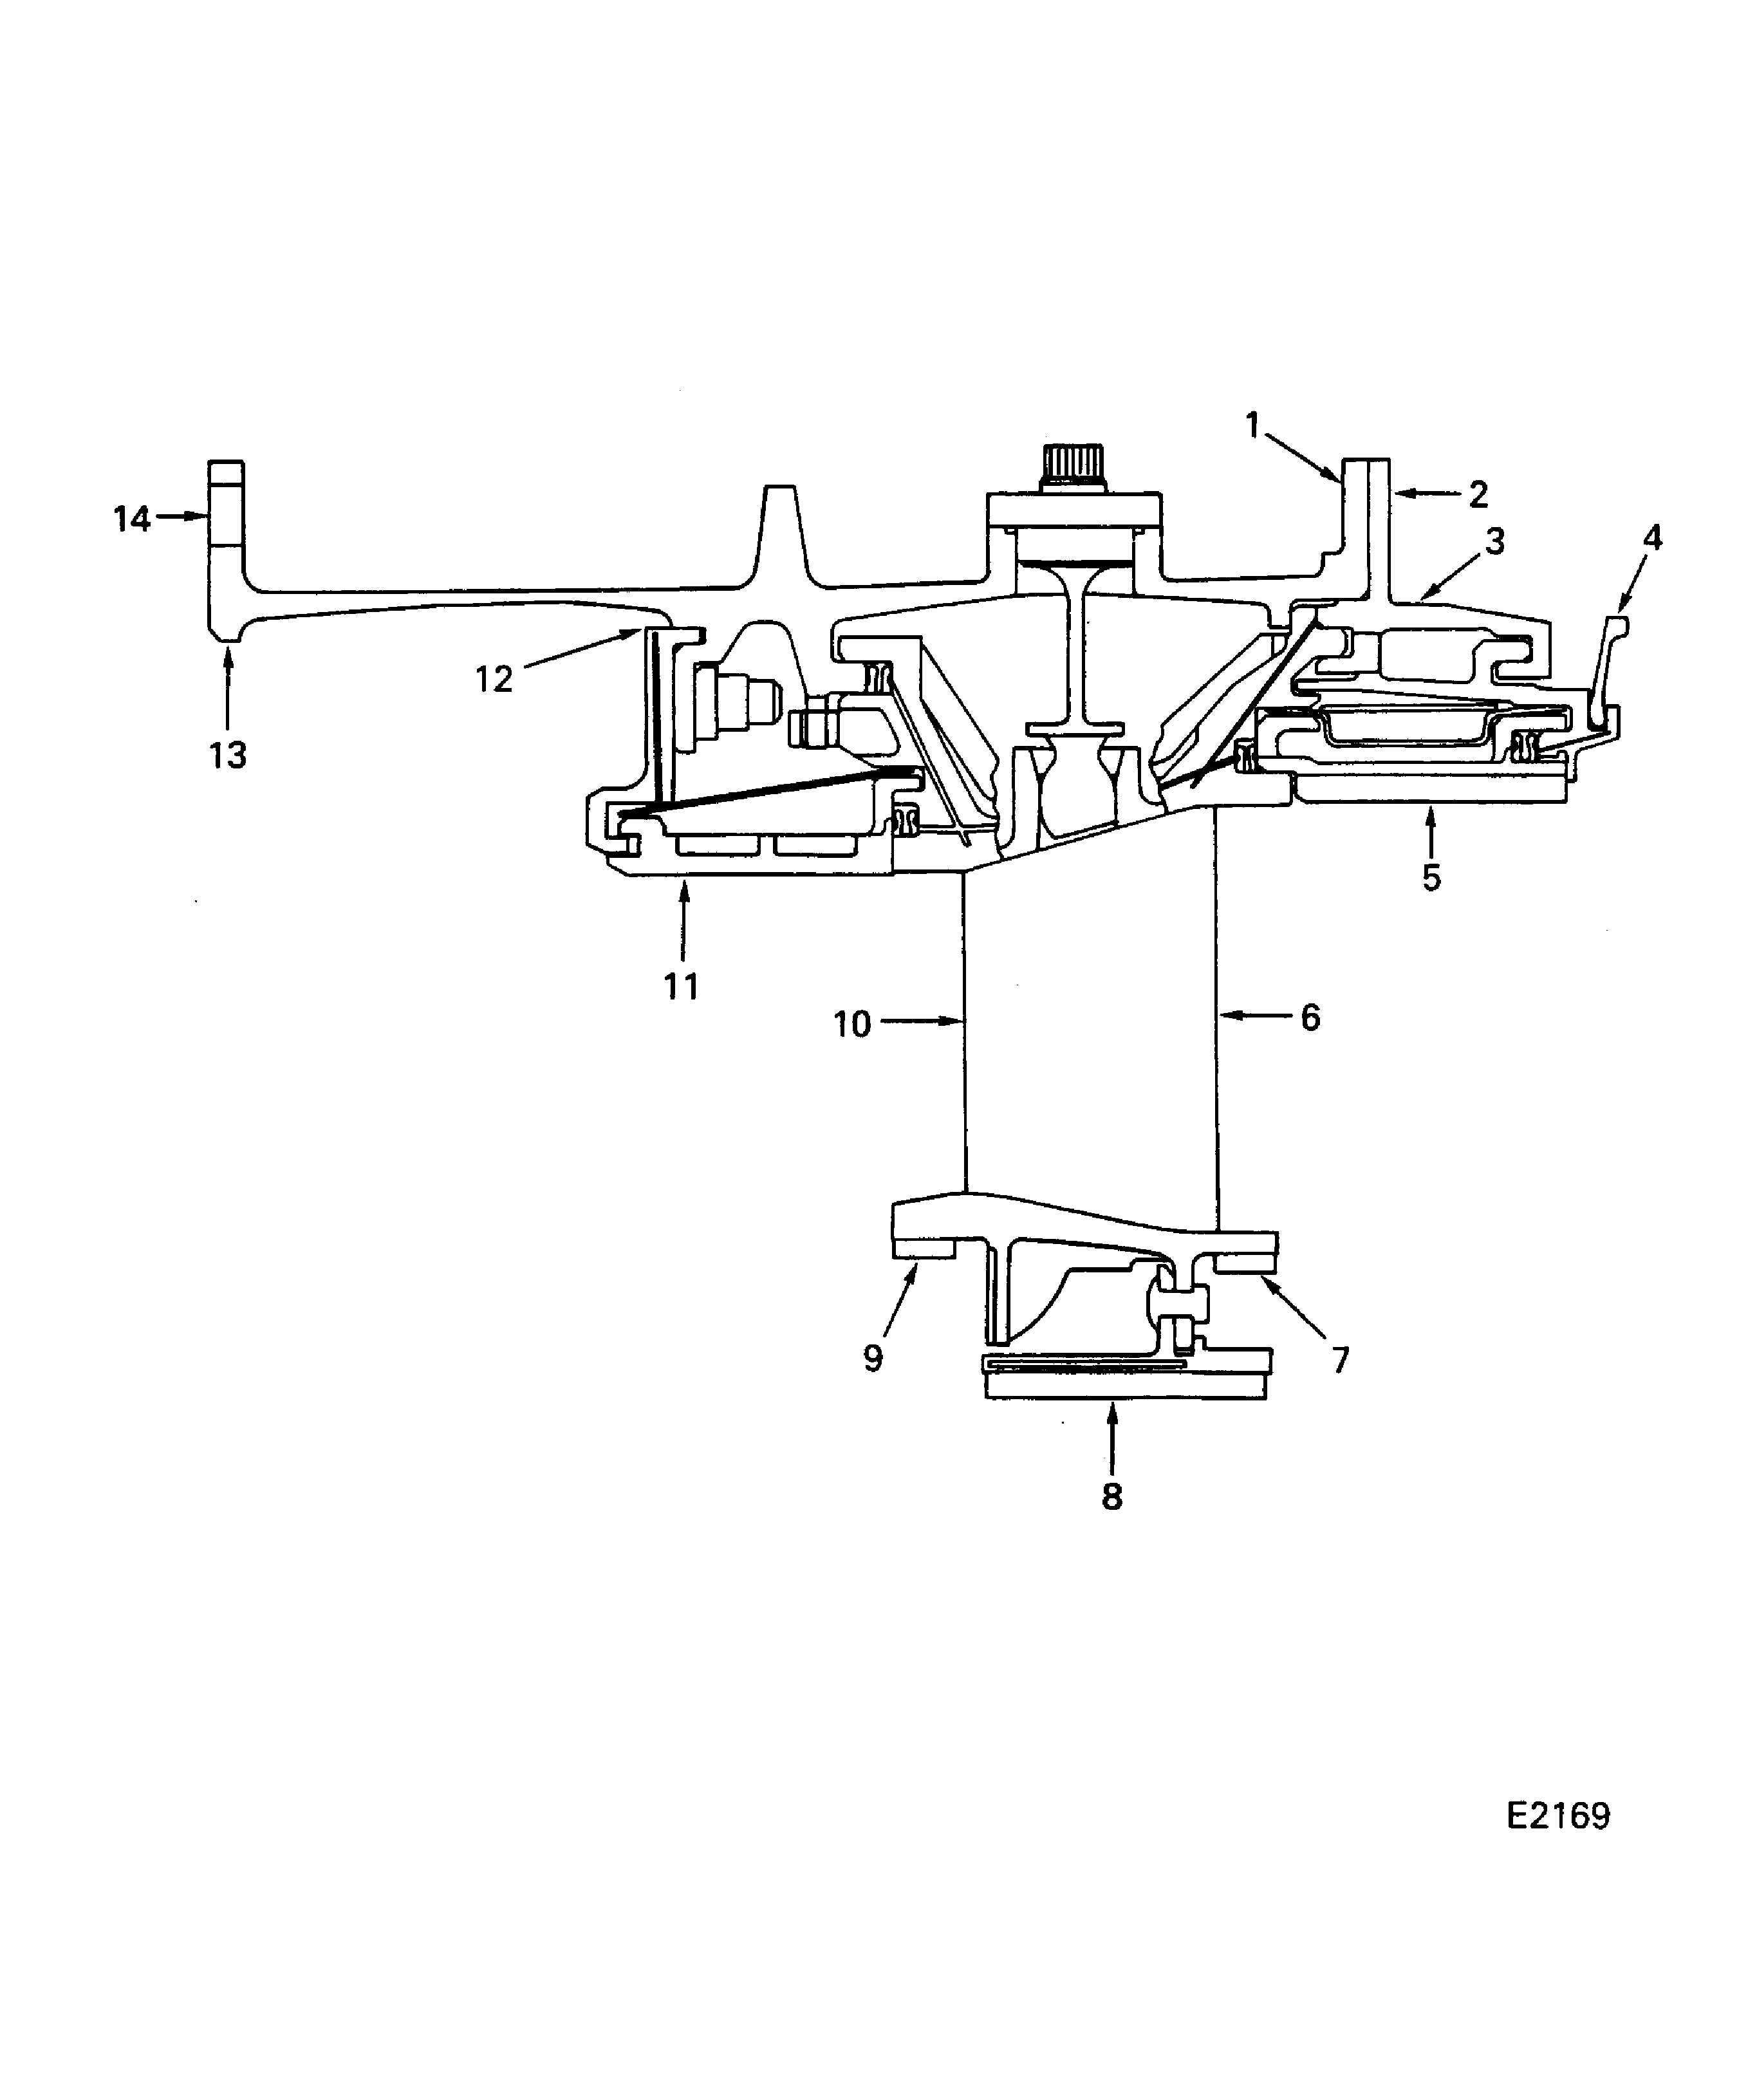
Refer to: Figure
SUBTASK 72-45-20-220-070 Visually Examine the Outer Flange at Location 1
Refer to: Figure
SUBTASK 72-45-20-220-071 Visually Examine the Support Assembly Outer Flange Bolt Holes at Location 2
Refer to: Figure
SUBTASK 72-45-20-220-072 Visually Examine the Support Assembly Outer Flange at Location 3
Refer to: Figure
SUBTASK 72-45-20-220-073 Visually Examine the Rear Turbine Seal of the Stage 2 Turbine Nozzle Assembly at Location 4
Refer to Figure.
SUBTASK 72-45-20-220-074-A00 Visually Examine the Stage 2 Ceramic Outer Airseals at Location 5 (Pre SBE 72-0364)
SBE 72-0364: Provide New Stage 2 High Pressure Turbine Duct Segments
Refer to Figure.
SUBTASK 72-45-20-220-074-B00 Visually Examine the Stage 2 Ceramic Outer Airseals at Location 5 (SBE 72-0364 and Pre SBE 72-0522)
Refer to: Figure
SUBTASK 72-45-20-220-075 Measure the Diameter of the Stage 2 Ceramic Outer Airseals at Location 5
Refer to: Figure
One or more cracks up to 0.500 in. (12.7 mm) in length on the airfoil and platforms. Cracks up to 0.750 in. (19.050 mm) in length are permitted on vanes that are not adjacent. Cracks on the airfoil must be less than 0.050 in. (1.27 mm) wide. Platform cracks must be tight with no burning. The cracks do not make a closed loop and do not look like they will make closed loop.
SUBTASK 72-45-20-220-076 Visually Examine the Stage 2 Turbine Vane at Locations 6 and 10
NOTE
Location 10 includes the ID and OD platforms.Refer to: Figure
SUBTASK 72-45-20-220-086 Visually Examine the Honeycomb Seal Land at Location 7
Refer to: Figure
SUBTASK 72-45-20-220-077 Visually Examine the Honeycomb Seal Lands at Location 9
Refer to: Figure
SUBTASK 72-45-20-220-078 Visually Examine the Honeycomb Seal Lands at Location 8
Refer to Figure.
SUBTASK 72-45-20-220-079 Visually Examine the Stage 1 Ceramic Outer Airseals at Location 11
Refer to: Figure
SUBTASK 72-45-20-220-080 Measure the Diameter of the Stage 1 Ceramic Outer Airseals at Location 11
Refer to: Figure
SUBTASK 72-45-20-220-081 Visually Examine the Hardface on the Outer Airseal Supports at Location 12
Refer to: Figure
SUBTASK 72-45-20-220-082 Visually Examine the Surface of the Case at Location 13
Refer to: Figure
SUBTASK 72-45-20-220-083 Visually Examine the Case Outer Flange and the Flange Bolt Holes at Location 14
Figure: HP Turbine Case and Vane Assembly Inspection Locations
HP Turbine Case and Vane Assembly Inspection Locations

