TASK 70-09-00-400-501 Procedures To Make Permanent Identification And Location Marks

DMC:V2500-00-70-09-00-00A-691A-D|Issue No:006.00|Issue Date:2020-05-01

Export Control

EAR Export Classification: Not subject to the EAR per 15 C.F.R. Chapter 1, Part 734.3(b)(3), except for the following Service Bulletins which are currently published as EAR Export Classification 9E991: SBE70-0992, SBE72-0483, SBE72-0580, SBE72-0588, SBE72-0640, SBE73-0209, SBE80-0024 and SBE80-0025.

Copyright

© IAE International Aero Engines AG (2001, 2014 - 2021) The information contained in this document is the property of © IAE International Aero Engines AG and may not be copied or used for any purpose other than that for which it is supplied without the express written authority of © IAE International Aero Engines AG. (This does not preclude use by engine and aircraft operators for normal instructional, maintenance or overhaul purposes.).

Applicability

All

Common Information

TASK 70-09-00-400-501 Procedures To Make Permanent Identification And Location Marks

Table of Contents

General

Procedures to Make Permanent Marks

Beehive Symbols

Scope

To specify the procedure to make permanent marks on parts.

Preliminary Requirements

Pre-Conditions

NONE

Support Equipment

NONE

Consumables, Materials and Expendables

NameManufacturerPart Number / IdentificationQuantityRemark
CoMat 07-050 VARNISH - PHENOLIC RESIN,CORROSION PREVENTIVELOCALCoMat 07-050
CoMat 07-125 LACQUER0W199CoMat 07-125

Spares

NONE

Safety Requirements

WARNING

IT IS THE RESPONSIBILITY OF THE OPERATOR TO OBTAIN AND OBSERVE THE MANUFACTURER'S MATERIAL SAFETY DATA SHEETS FOR CONSUMABLE MATERIALS INFORMATION AND ALSO TO TAKE LOCAL REGULATIONS INTO CONSIDERATION. THE SAFETY DATA SHEETS CONTAIN MATERIAL SAFETY INFORMATION SUCH AS HAZARDOUS INGREDIENTS; PHYSICAL/CHEMICAL CHARACTERISTICS; FIRE, EXPLOSION, REACTIVITY, AND HEALTH HAZARD DATA; PRECAUTIONS FOR SAFE HANDLING; AND USE AND CONTROL MEASURES.

CAUTION

THE MARK MUST NOT CHANGE THE CONDITION OR THE OPERATION OF THE PART. ONLY THE APPLICABLE IAE PROCEDURE IS TO BE USED TO MAKE MARKS.

Procedure

    1. SUBTASK 70-09-00-300-001 General

      1. Marks made on engine parts, assemblies, or weldments must be easily read and must not be easily removed.

      2. Marks must be easily and accurately read with no aid to the eye.

      3. Where there are unusual area or surface limitations, a maximum of 3.5X magnification is permitted to get the necessary readability.

    2. The location of a mark must be where specified in the Service Bulletin or Engine Manual instructions.

      1. If not specified in the Engine Manual or Service Bulletin, reidentification of parts, reapplication and/or relocation of part markings must be made adjacent to, or in a location almost the same as the initial mark.

      2. Where reidentification or corrective marking is specified, removal of all or part of the old marking can be necessary. Use an approved marking method to put a wavy line, loop, flat oval, or X's through the initial mark to be removed.

    3. Each character in a mark, unless specified differently, must be 0.050 in. to 0.160 in. (1.27 mm to 4.06 mm) in height. If necessary because of the dimensions or the shape of the part, characters not less than 0.028 in. (0.71 mm) in height and not more than 0.500 in. (12.7 mm) in height are permitted.

      1. If the surface specified for a mark will get a plating, paint, hardcoat, anodized coating, or other surface treatment coating, it is necessary to apply the mark before you apply the coating. Use an approved permanent marking method that will show through the final surface treatment coating.

        1. If none of the specified marking methods will show through the final surface treatment coating, then it is permitted to use the applicable procedure in the subsequent list to make the mark after you apply the surface treatment coating:

          1. On external surfaces, do the subsequent procedure:

          2. On external surfaces, apply the mark with ink and a stamp, then apply a full layer of CoMat 07-125 LACQUER on the mark. Refer to SPM TASK 70-09-01-400-501 for applicable inks.

          1. On internal surfaces, do the applicable procedure in the subsequent list:

          2. If permitted by the repair instructions, use the vibration peen method to apply the mark.

          3. Apply the mark with ink and a stamp, then apply a full layer of transparent CoMat 07-050 VARNISH - PHENOLIC RESIN,CORROSION PREVENTIVE on the mark. Refer to SPM TASK 70-09-01-400-501 for applicable inks.

    4. Electric arc scribing, especially hand arc scribing, in which characters are made by the action of an electric arc between the surface and an electrode (scriber), is unsatisfactory for jet engine parts and must not be used.

    5. Acid etching, in which characters are formed by the action of an acid on the surface of a part, is not recommended. Acid etching can possibly cause corrosion.

    6. Soapstone must not be used to mark engine parts.

    7. Offset holes in mating parts can be identified with an X vibration peened adjacent to the offset hole (unless a different procedure is specified); but make sure that the condition or operation of the part does not change.

    1. SUBTASK 70-09-00-400-001 Procedures to Make Permanent Marks

      1. General.

      2. Permanent marks are those that can easily be read during the full life of the part.

      3. Permanent marks must not be nearer than 0.032 inch (0.8 mm) to corners, fillets or edges unless instructed in the engine manual. Permanent marks must not extend to beads adjacent to a specified marking surface unless specified differently in the engine manual.

      1. Methods used to make permanent marks.

        NOTE

        Electrolytic etch is sometimes used as a temporary method. It is not the same as electric arc scribing.
        1. Electrolytic etch.

        2. CAUTION

          DO NOT ELECTROLYTICALLY ETCH ANODIZED SURFACES.

          Refer to the procedure to electrolytically make identification and location marks in the SPM TASK 70-09-02-400-501.

        1. Metal stamp.

          1. Symbols are made by the displacement of material by force.

          2. Hammer: symbols are made one at a time or in groups with a force applied mechanically or manually.

          3. Press: symbols are made one at a time or in groups by force with a controlled pressure that steadily increases.

          4. Roll: symbols are made with the circular movement of either the part or the tool, or both, while a controlled force pushes them together.

        2. Stamps used to make marks must make fillets and radii at all intersecting surfaces of the symbols.

        3. Put a support behind the surface to be marked to prevent immediate damage, and harmful stresses, to parts marked by a metal stamp.

        4. Do not use a metal stamp to make a mark on parts with a hardness higher than Rockwell C45 (or equivalent).

          NOTE

          It is necessary to remove all lifted metal around the symbols on the surfaces of bearings that touch.
        5. Carefully remove all metal lifted more than 0.001 in. (0.03 mm) by this method of marking.

        1. Vibration peen.

          1. Symbols are made with the vibration of a radius-tipped conical tool as follows:

          2. Manual: the tool is hand-operated. It has one tip.

          3. Mechanical: the tool is mechanically operated. It has one or more tips which make one or more symbols at the same time.

            NOTE

            The vibration peen method can be used as an alternative to roll stamping or the drag impression procedure. This method can also be an alternative to the deep dot peen method used on turbine airfoils.
        2. Unless specified, do not make a mark on a part if the hardness of the part is higher than Rockwell C45 (or equivalent). Vibration peen can be used on parts harder than Rockwell C45 when specifically permitted only.

        1. Engrave.

        2. The symbols are made with the circular movement of a cutter or grinder. The cutter or grinder can be the hand-operated or the mechanically operated type.

        1. Brand.

        2. The symbols are burned in to the surface of a part, that is not metal, with a hot tool.

        1. Drag impression.

        2. The symbols are made when material is moved by force by a conical tool that is drawn (dragged) across the surface of the part. The tool is mechanically guided and turns freely.

        1. Blast.

        2. The symbols are made when an abrasive material hits the characters in the stencil area.

        1. Dot Peen.

          1. Definitions.

          2. Dot Peen Marking: Characters are made as a series of dot-like impressions, marked on the parts by a controlled compressive force. This force is applied by a microprocessor-controlled stylus.

          3. Stylus: A metal shaft with a defined radius on a conical tip that is driven into the part marking surface.

          4. Drop Distance (Gap): The distance from the tip of the stylus to the part marking surface.

          5. Force: The energy exerted by the machine to drive the stylus into the material.

          6. OCR: Optical Character Recognition.

          7. OCR Reader: A video imaging device that automatically deciphers alphanumeric characters and electronically reports the characters to another device (for example, a computer).

          1. Character Description.

          2. The dot peen character set is a set of alphanumeric characters and symbols.

            1. If it is necessary that the characters be readable by an automated Optical Character Reader, the characters must agree with the subsequent requirements:

              1. The characters are made by a pattern of dots laid out in a 5 x 7 (width x height) matrix. See Figure.

              2. The dot shape is a smooth spherical depression or dimple with conical walls. The configuration of the dot impression is determined by the depth of penetration (that is, shallow, intermediate, or deep).

              3. The character height must be 0.035 in. to 0.250 in. (0.89 mm to 6.35 mm).

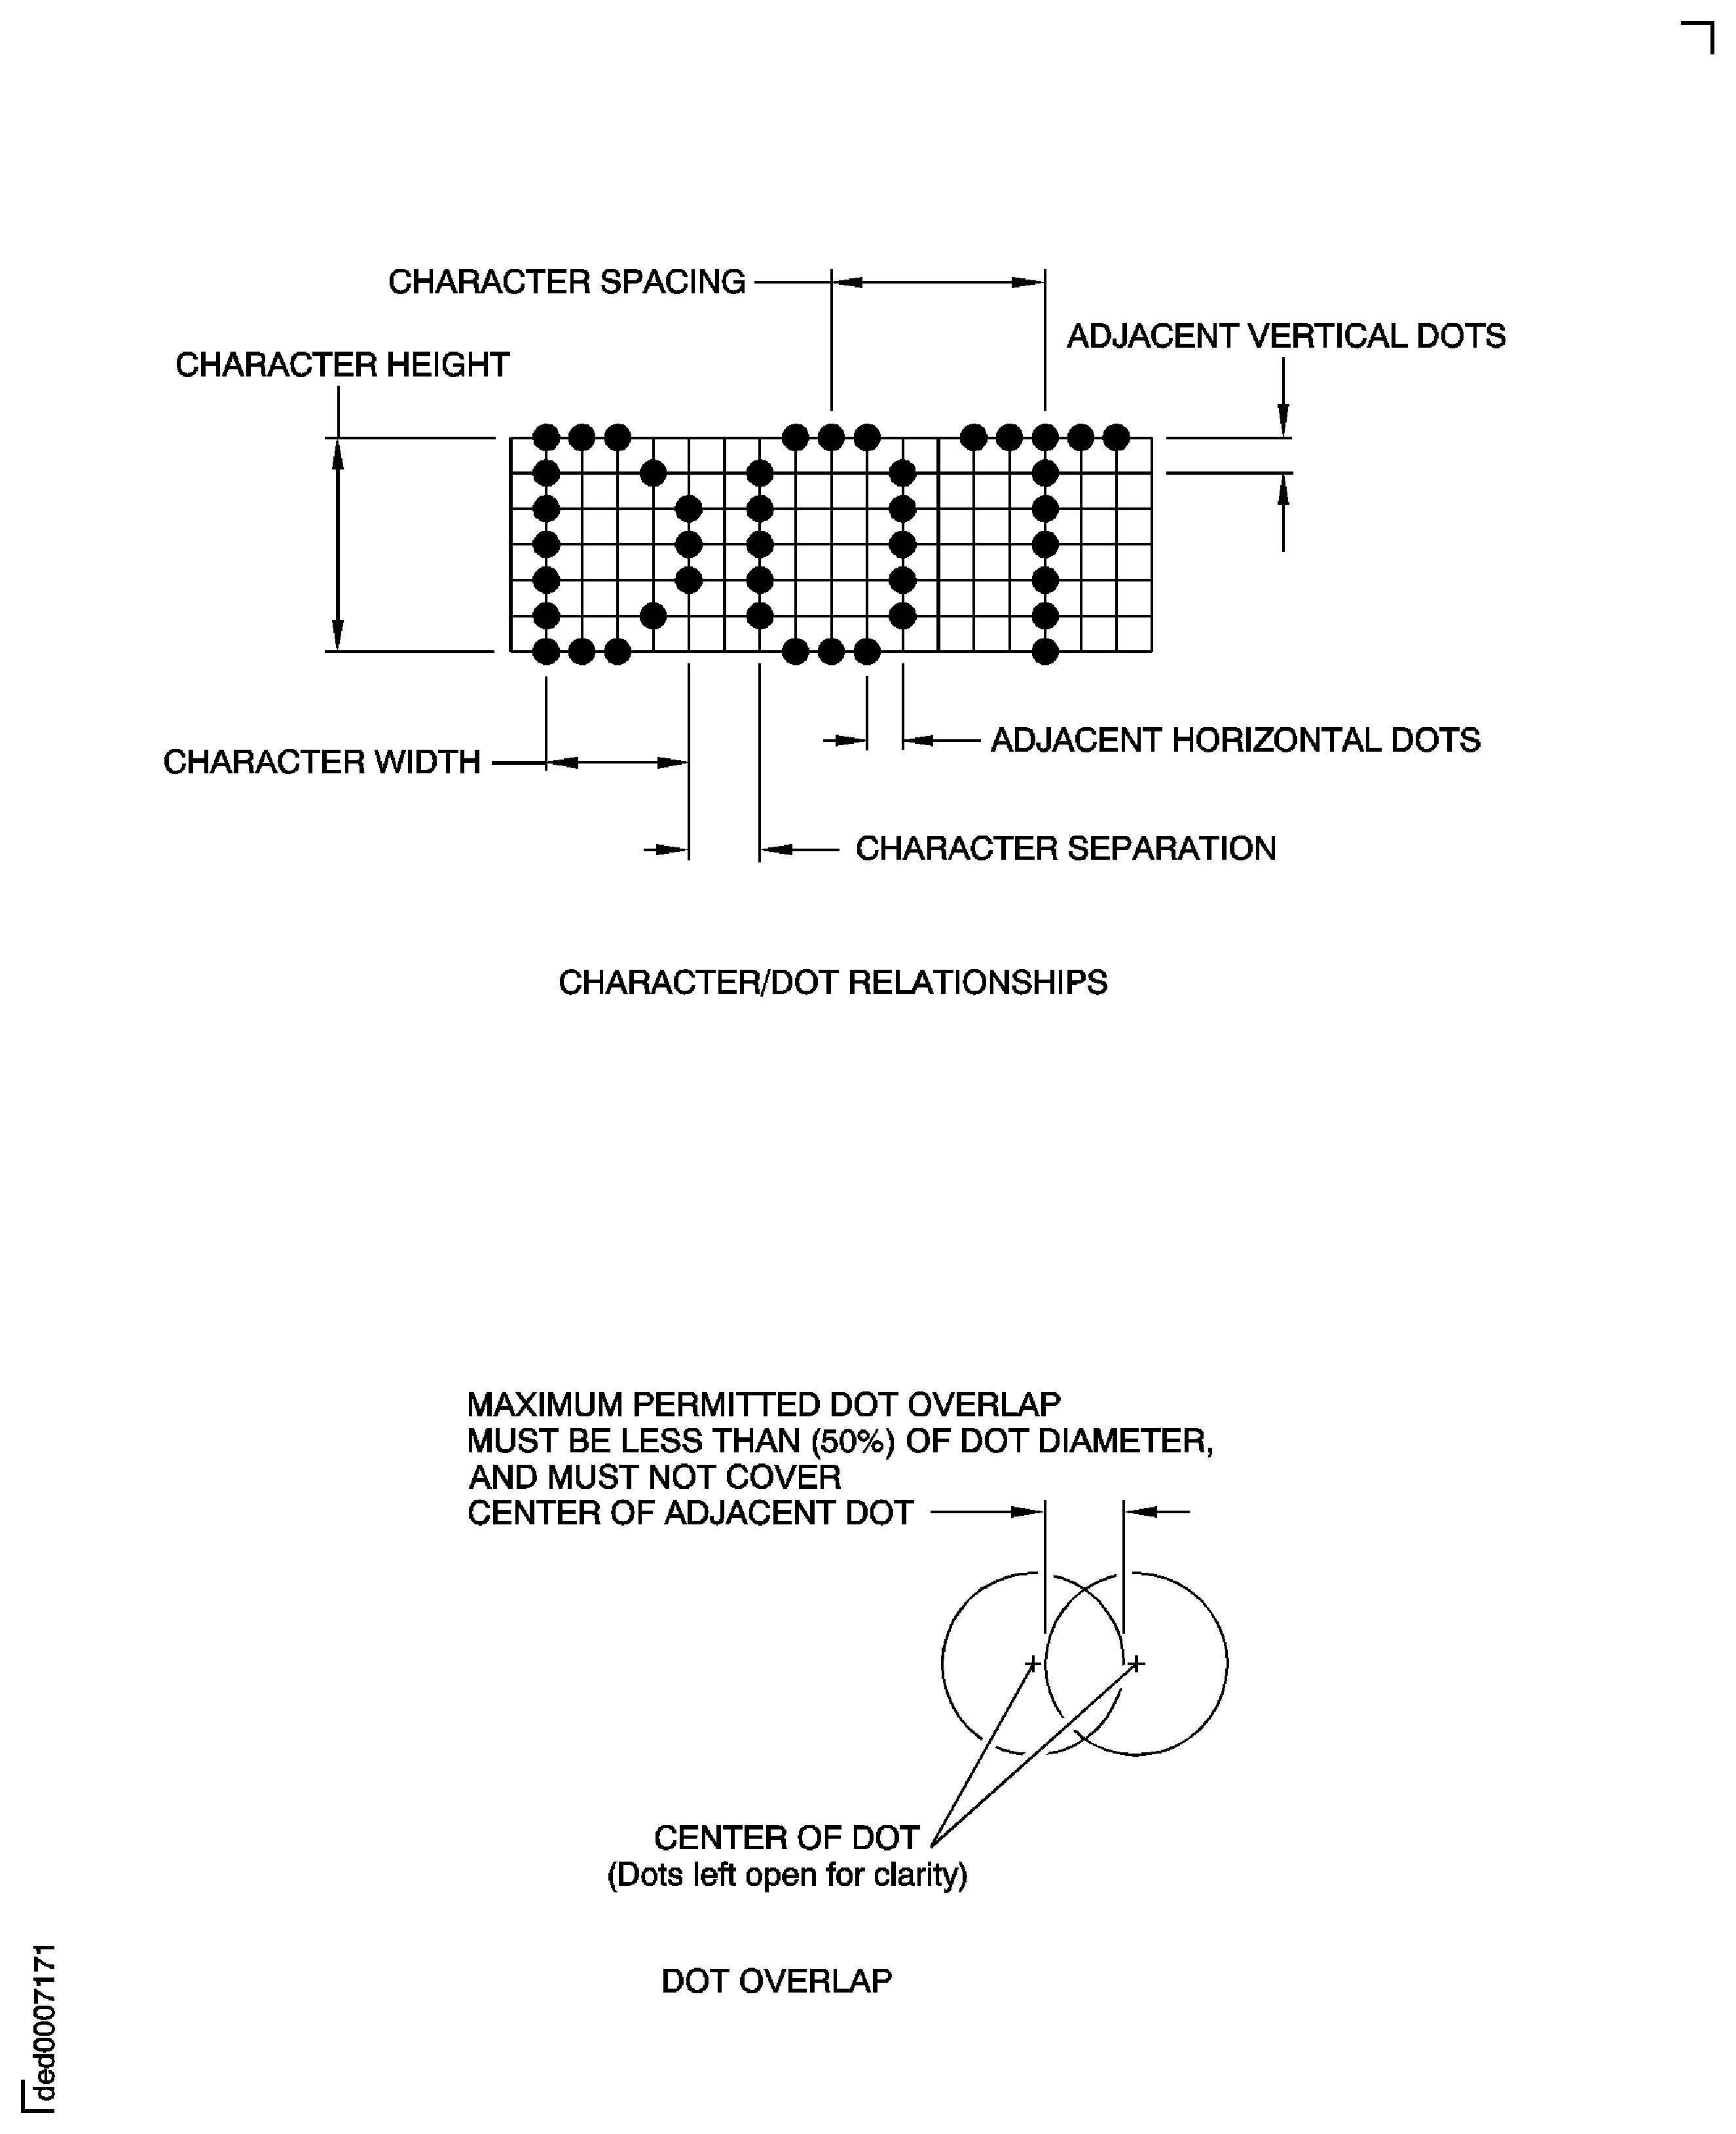
                1. Character height/width relationship:

                2. The character height must be the specified height plus or minus 8 percent.

                3. The character width must be equal to (4 x Height/6) plus or minus 8 percent.

                4. See Character/Dot Relationships in Figure.

              4. The dot placement distance between two adjacent dots in the vertical direction must be equal to (Height/6) plus or minus 5 percent and in the horizontal direction equal to (Width/4) plus or minus 5 percent. See Character/Dot Relationships in Figure.

              5. Character spacing is the distance between the center lines of two adjacent characters and must be equal to the character height plus or minus 8 percent. See Character/Dot Relationships in Fig. 70-09-00-002-002.

              6. Character separation must be a minimum of one dot between adjacent characters. See Character/Dot Relationships in Figure.

              7. The adjacent dot overlap must be less than 50 percent, so the center of the adjacent dot is visible. See Dot Overlap in Figure.

          1. Readability of Characters.

            1. Dot peened characters can be automatically read only if they are correctly marked. Parts are correctly marked when:

            2. The part does not move during the marking procedure.

            3. The correct depth has been reached.

            4. The dots are well formed depressions.

            5. There are not too many pits on the surface to be marked.

            1. Reasons for Problems with Character Readability.

            2. Part Movement: When the part moves during the marking process, the characters are deformed because of dot misplacement. This condition makes interpretation of the characters difficult.

            3. Depth: Marking must be of sufficient depth to be visible after subsequent surface treatments. Refer to the specific dot peen marking depth limits in the Depth of Marks paragraph below.

              1. Stylus Control: Various problems with the stylus can reduce the readability of the dot pattern and cause the conditions that follow.

              2. Extended Stylus: If the stylus extends too far beyond the stylus nut, the stylus will bow. This condition causes misplacement of the dots, especially on rough surfaces where the stylus point can be pulled into a surface imperfection.

              3. Broken Stylus: A broken stylus tip causes irregular depressions. This condition reduces the light reflection for reading and produces shallower dots.

              4. Flattened Stylus: A stylus tip that has been flattened because of wear will produce shallow dots.

            4. Surface Condition: Surfaces with random buffing or grinding cause light to scatter when imaging the marking for automatic read. Overmarks cause readability problems because of modified light reflections.

          1. Marking Requirements.

            1. Stylus Drop Distance.

            2. For the initial setup for a part, set the drop distance to the lowest possible distance as recommended by the machine manufacturer.

            3. Increase the force, as necessary, to get the applicable marking depth.

            4. Only increase the gap when the force is at the maximum machine setting or is no longer effective.

            1. Fixturing.

            2. The holding device must prevent bounce, vibration, or movement of the part during the marking process.

            3. For sheet metal parts, give sufficient back support to the surface to be marked.

            1. Stylus Direction.

            2. Set the stylus at a 90 degree angle plus or minus 5 degrees to the surface to be marked.

          1. Quality.

          2. It can be difficult to measure the marked dot depth on parts where the geometry will not permit an accurate result. Make sure you measure correctly.

            1. A systematic check is necessary to control and prevent the deterioration of the markings over time during the marking procedure. Use the applicable aids that follows:

            2. A magnifying glass.

            3. A vision system: TV camera, lighting, and a monitor.

      1. Depth of marks.

        NOTE

        For detailed information on shallow and deep electrolytic etch, refer to SPM TASK 70-09-02-400-501.
      2. Unless specified differently, the depth of the marks must agree with the specified limits in Table:

        Table 2.

        Marking Method

        Minimum Depth

        Maximum Depth

        Electrolytic Etch, Shallow

        (See Note 1)

        0.0003 in. (0.008 mm)

        Electrolytic Etch, Deep

        0.0005 in. (0.013 mm)

        0.002 in. (0.05 mm)

        Metal Stamp, Hammer

        (See Note 1)

        0.010 in. (0.25 mm)

        Metal Stamp, Press and Roll

        (See Note 1)

        0.006 in. (0.2 mm) (See Note 2)

        Metal Stamp, Roll

        (See Note 1)

        0.006 in. (0.2 mm) (See Note 3)

        Vibration Peen, Manual or Mechanical

        (See Note 1)

        0.006 in. (0.2 mm)

        Engrave, Manual or Mechanical

        (See Note 1)

        0.006 in. (0.2 mm) (See Note 4)

        Brand

        (See Note 1)

        0.010 in. (0.25 mm)

        Drag Impression

        (See Note 1)

        0.006 in. (0.2 mm) (See Note 4)

        Blast

        (See Note 1)

        0.0003 in. (0.008 mm)

        Laser Engrave, Shallow

        (See Note 1)

        0.0004 in. (0.01 mm) (See Note 5)

        Laser Engrave, Intermediate

        (See Note 1)

        0.003 in. (0.08 mm)

        Laser Engrave, Deep

        (See Note 1)

        0.005 in. (0.1 mm) (See Note 4)

        Dot Peen, Shallow

        0.0002 in. (0.005 mm)

        0.0007 in. (0.02 mm)

        Dot Peen, Intermediate

        (See Note 1)

        0.0015 in. (0.038 mm)

        Dot Peen, Deep

        (See Note 1)

        0.003 in. (0.08 mm) (See Note 6)

        NOTE

        1: The minimum permitted marking depth is the minimum depth that is sufficient for the marking to be easily and accurately readable with no magnification during the usual service life of the part.

        NOTE

        2: Maximum depth of 0.015 in. (0.38 mm) is permitted on the sides of main shaft bearing rings.

        NOTE

        3: Maximum depth of 0.010 in. (0.25 mm) is permitted if metal stamp hammer is also an approved marking method.

        NOTE

        4: Unless specified differently, maximum permitted marking depth on titanium or titanium alloy parts in locations other than the bottom surface of blade roots is 0.003 in. (0.08 mm).

        NOTE

        5: Maximum depth of 0.003 in. (0.08 mm) is permitted for anti-friction roller bearings and cages.

        NOTE

        6: Unless specified differently, maximum depth of 0.005 in. (0.1 mm) is permitted on static parts where the marked surface will subsequently get a coating layer, the cross-sectional material thickness is more than 0.030 in. (0.76 mm), and the material hardness is not more than HRC 45.
    1. SUBTASK 70-09-00-400-005 Beehive Symbols

    2. A beehive symbol on a part shows that the part had a repair for plating, plasma spray, epoxy adhesion, or flame spraying at manufacture. Application of a beehive symbol on components after repair is not necessary. The beehive symbol and equivalent procedures are shown on Figure. When it is possible, you will find the symbol adjacent to the part number and the repaired area on the part.

    1. SUBTASK 70-09-00-400-002 Procedures to Make a Temporary Mark

    2. This SUBTASK is deleted. Refer to the SPM TASK 70-09-01-400-501.

    1. SUBTASK 70-09-00-400-003 Equipment Used to Make a Mark Electrochemically

    2. This SUBTASK is deleted. Refer to the SPM TASK 70-09-02-400-501.

    1. SUBTASK 70-09-00-400-004 Procedure to Make a Mark Electrochemically

    2. This SUBTASK is deleted. Refer to the SPM TASK 70-09-02-400-501.

    1. SUBTASK 70-09-00-400-006 Specification Table for Electrolytic Marking.

    2. This SUBTASK is deleted. Refer to the SPM TASK 70-09-02-400-501, SUBTASK 70-09-02-400-002.

  1. Figure: Beehive Symbols

    Beehive Symbols
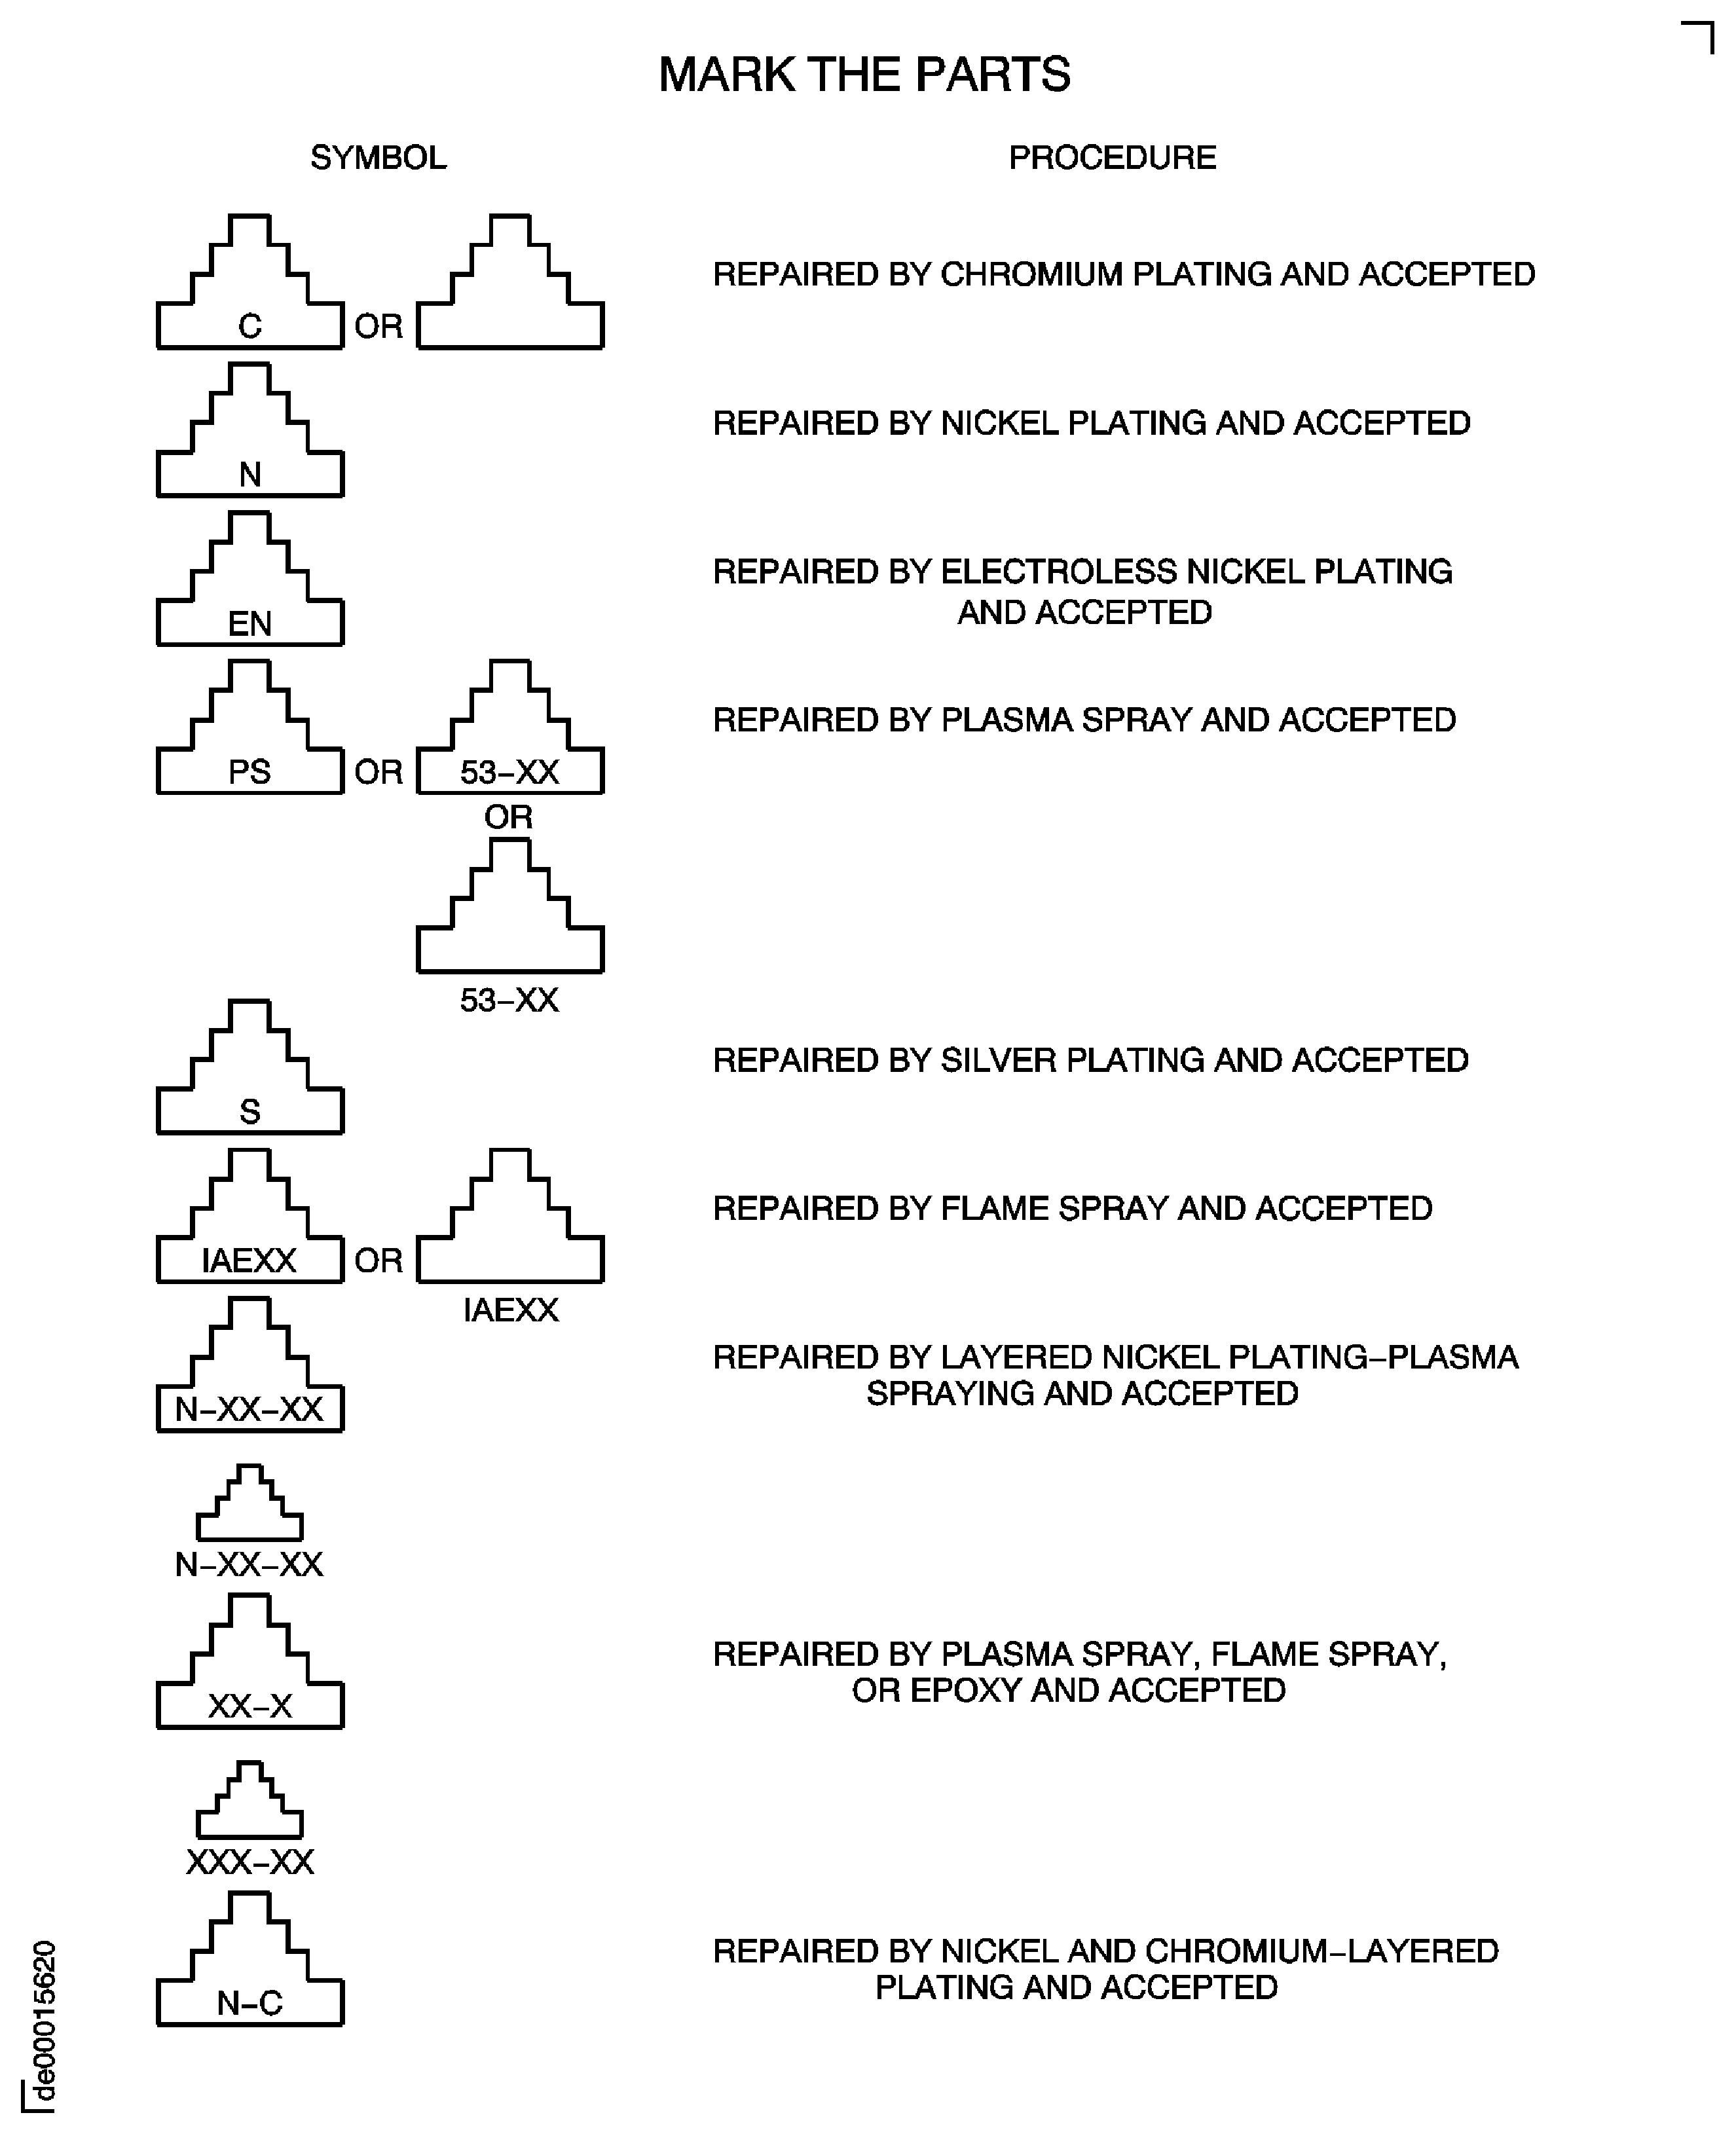
    Figure: Dot Peen Character Height/Width Relationships

    Dot Peen Character Height/Width Relationships
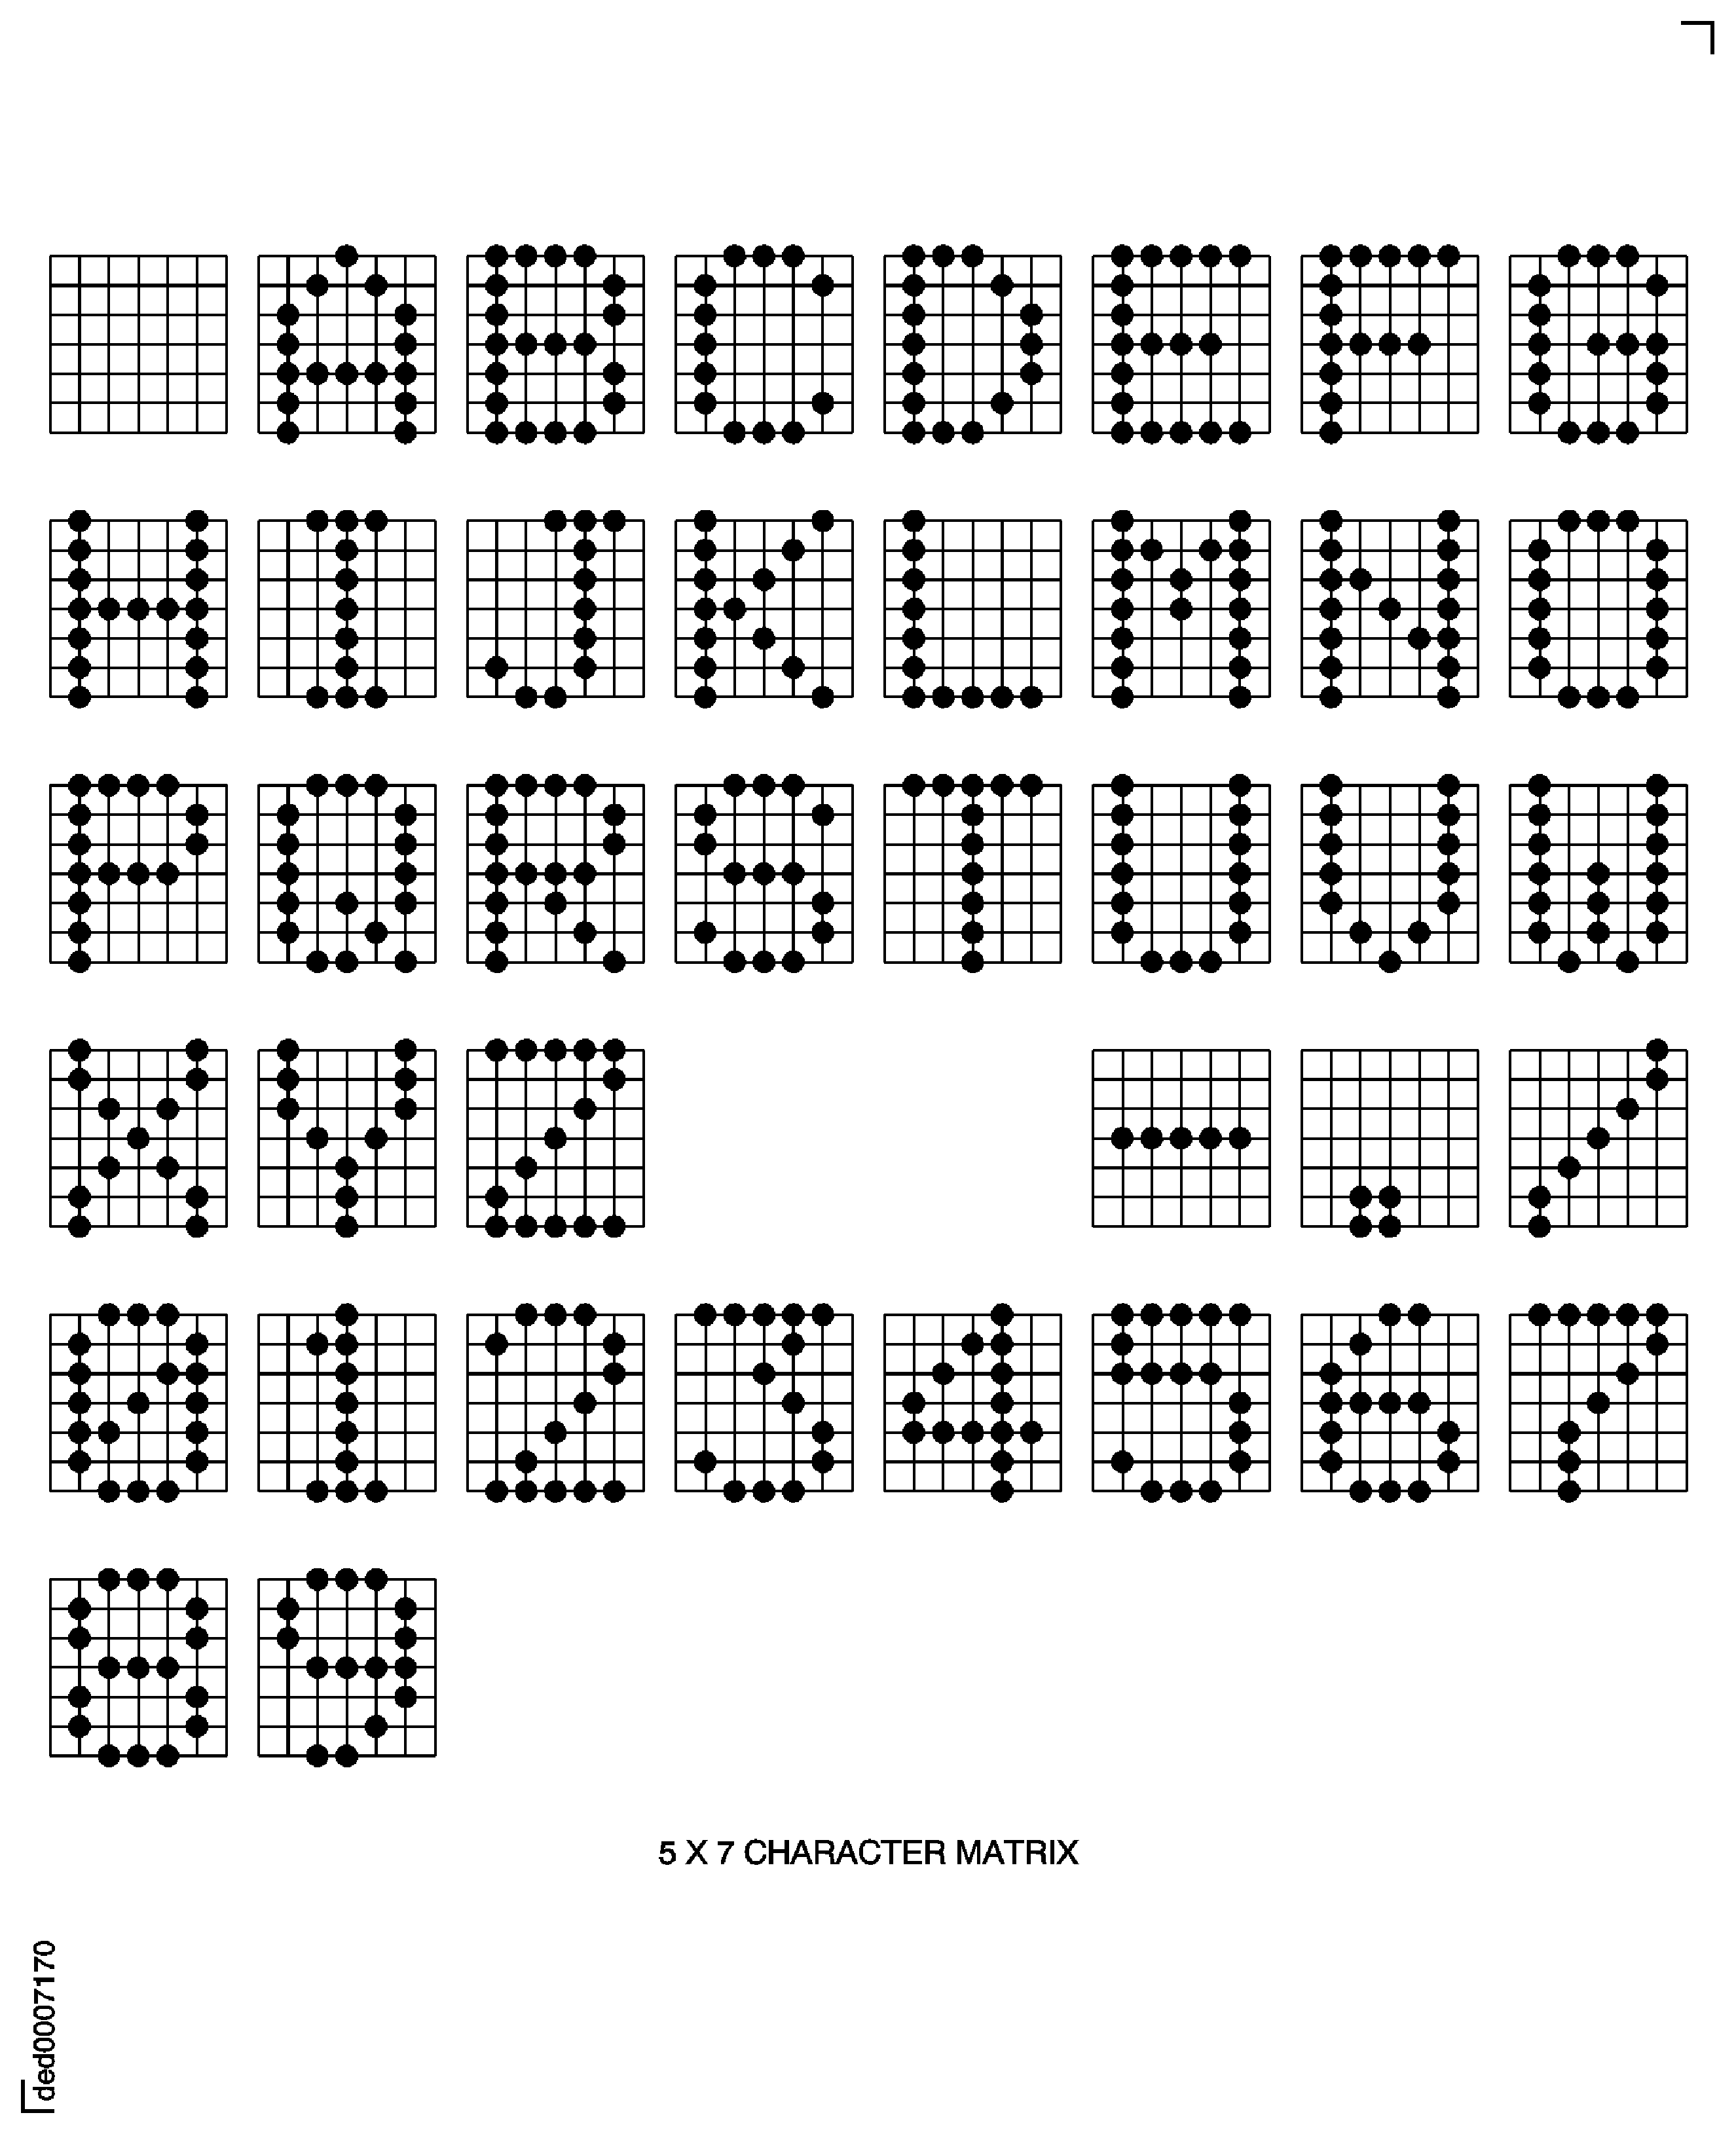
    Figure: Dot Peen Character Height/Width Relationships

    Dot Peen Character Height/Width Relationships
Requirements After Job Completion

Follow-On Conditions

NONE
Change Type:

Correct SPM reference (REA20VC027)

Manufacturer Code:0W199
Enterprise Name:THE SHERWIN-WILLIAMS CO
BU Name:THE SHERWIN-WILLIAMS CO
Street:2390 ARBOR BOULEVARD
City:DAYTON
State:OH
Zip Code:45439
Country:USA
Phone Number:1-937-298-8691
Fax Number:1-937-298-3820
Internet:www.sherwin-williams.com, www.sherwin.com
Manufacturer Code:LOCAL
Enterprise Name:LOCALLY SUPPLIED
Manufacturer Code:LOCAL
Supply Number:CoMat 07-050
Type:sp01
Supply Short Name:CoMat 07-050 VARNISH - PHENOLICRESIN, CORROSION PREVENTIVE
Supply Name:CoMat 07-050 VARNISH - PHENOLIC RESIN,CORROSION PREVENTIVE
Specification Groups:
Doc NumberType
OMAT:7/103450-A-2101D AMS 3132
JCR-204450-A-2101D AMS 3132
Suppliers:
ManufacturerRemarks
LOCAL
08483
72818
Manufacturer Code:0W199
Supply Number:CoMat 07-125
Type:sp01
Supply Short Name:CoMat 07-125 LACQUER
Supply Name:CoMat 07-125 LACQUER
Specification Groups:
Doc NumberType
PMC 1641CRYSTAL CLEAR ACRYLIC SPRAY 1303
Suppliers:
ManufacturerRemarks
0W199