TASK 70-24-01-240-501 Magnetic Particle Inspection Procedures

DMC:V2500-00-70-24-01-00A-352A-D|Issue No:004.00|Issue Date:2020-08-01

Export Control

EAR Export Classification: Not subject to the EAR per 15 C.F.R. Chapter 1, Part 734.3(b)(3), except for the following Service Bulletins which are currently published as EAR Export Classification 9E991: SBE70-0992, SBE72-0483, SBE72-0580, SBE72-0588, SBE72-0640, SBE73-0209, SBE80-0024 and SBE80-0025.

Copyright

© IAE International Aero Engines AG (2001, 2014 - 2021) The information contained in this document is the property of © IAE International Aero Engines AG and may not be copied or used for any purpose other than that for which it is supplied without the express written authority of © IAE International Aero Engines AG. (This does not preclude use by engine and aircraft operators for normal instructional, maintenance or overhaul purposes.).

Applicability

All

Common Information

TASK 70-24-01-240-501 Magnetic Particle Inspection Procedures

General

Magnetic particle inspection is a Non-Destructive Inspection (NDI) procedure. It is used to find cracks and inclusions, on or near the surface of ferro-magnetic parts. It cannot be used on alloys that are not magnetic, which include Austenitic steels.

This procedure gives the data on how to find defects with magnetic ink, which is a fluid that contains ferro-magnetic particles. The procedure is used only when specified in the Engine Manual. Data is also included on alternative procedures that can be used with different equipment.

All persons who do these inspection procedures must be fully approved by the applicable authority.

The procedure to be used is controlled by the dimensions and shape of the part to be examined; also, the direction in which the magnetic field is applied. The Engine Manual gives the procedures to find the possible defects, the necessary amperages, the inspection procedures and other related instructions.

The abbreviations that follow are those used in the Engine Manual:

R

-

Radial

C

-

Circumferential

TB

-

Threading bar

MF

-

Magnetic flow

CI

-

Current induction

L

-

Longitudinal

T

-

Transverse

CF

-

Current flow

A/T

-

Ampere turns

FMI

-

Fluorescent magnetic ink

Magnetic Inks and Procedures

The magnetic inks contain small ferro-magnetic particles, held in suspension in a fluid such as kerosene. Particles with a color are used to add contrast to the surface of the part when the inspection is made in white light. Alternatively, fluorescent particles are used for inspection in ultra-violet light.

The inks must be kept fully shaken during use to make sure that the particles are held in suspension in the fluid.

The inks can be applied by 'flowing-on, spraying or immersion'. When the inks are applied during magnetization the procedure is known as the 'simultaneous inking' or the 'wet continuous technique'. When the inks are applied after magnetization the procedure is known as the 'residual technique'.

When the 'simultaneous inking' or the 'wet continuous technique' is used you start to apply the ink before you turn the current on; then stop before you turn the current off. When the 'residual technique' is used you apply the ink after the part is magnetized.

NOTE

To identify the consumable materials, refer to the Consumable Materials Index.

Preliminary Requirements

Pre-Conditions

NONE

Support Equipment

NONE

Consumables, Materials and Expendables

NameManufacturerPart Number / IdentificationQuantityRemark
CoMat 06-011 MAGNETIC PARTICLES, FLUORESCENT, DRY POWDERX222XCoMat 06-011
CoMat 06-058 FLUX INDICATOR2R128CoMat 06-058
CoMat 06-176 MAGNETIC PARTICLE SUSPENSION FLUID, HIGH FLASH POINT37676CoMat 06-176
CoMat 06-180 MAGNETIC, INK FLUORESCENTX222XCoMat 06-180

Spares

NONE

Safety Requirements

WARNING

IT IS THE RESPONSIBILITY OF THE OPERATOR TO OBTAIN AND OBSERVE THE MANUFACTURERS MATERIAL SAFETY DATA SHEETS FOR CONSUMABLE MATERIALS INFORMATION (SUCH AS HAZARDOUS INGREDIENTS; PHYSICAL/CHEMICAL CHARACTERISTICS; FIRE, EXPLOSION, REACTIVITY, AND HEALTH HAZARD DATA; PRECAUTIONS FOR SAFE HANDLING; AND USE AND CONTROL MEASURES), AND ALSO TO TAKE LOCAL REGULATIONS INTO CONSIDERATION.

Procedure

    1. SUBTASK 70-24-01-240-001 Make-up of the Magnetic Inks

      1. NOTE

        To get a satisfactory inspection, it can be necessary to use a narrower range that is between the limits of the specified magnetic oxide concentration range (such as 0.1 to 0.2 volume percent or 0.3 to 0.4 volume percent).

        NOTE

        Dry powder fluorescent magnetic particles that agree with the requirements of the latest revision of SAE AMS3044 are permitted as an alternative to CoMat 06-011 MAGNETIC PARTICLES, FLUORESCENT, DRY POWDER.

        Use the manufacturer's instructions to mix CoMat 06-011 MAGNETIC PARTICLES, FLUORESCENT, DRY POWDER or CoMat 06-180 MAGNETIC, INK FLUORESCENT with applicable carrier/suspension vehicle to get a magnetic oxide concentration of 0.1 to 0.4 volume percent, or use a magnetic ink that agrees with the requirements of the latest revision of SAE AMS3045.

        1. Water-base suspension vehicles:

          1. It is permitted to use water as a carrier for the particles if the magnetic particle or ink manufacturer's instructions specify that water is a permitted carrier, and the water agrees with these conditions:

          2. The water must be in the correct condition to give sufficient wetting, particle dispersion, and corrosion protection. Refer to The "Water Break" test of water-based vehicles below to see if the wetting is sufficient.

            NOTE

            Usually, the percentage of wetting agent in the suspension must be higher for smooth part surfaces than for rough surfaces.
          3. When you add the wetting agent, monitor the pH of the suspension to make sure that the quantity of wetting agent that you add does not cause the pH of the suspension to increase to more than 10.0 or decrease to less than 6.0.

          4. The water-based suspension must have the same concentration of iron particles that you use in petroleum-based suspensions.

        1. The "Water Break" test of water-based vehicles:

        2. Use a clean part that has a surface finish that is approximately the same as the surface finish on the parts that will have an inspection.

        3. Flood the part with the conditioned water (suspension) (that is, flow the suspension on the part to put a film/layer of suspension on the full part surface).

        4. Examine the film/layer of suspension on the part surface. Compare the film/layer on the part with the conditions in the chart below:

          Appearance Of The Part

          Result

          Part has a continuous film/layer of suspension on the full/total surface.

          The suspension has sufficient wetting agent.

          The film/layer of suspension has breaks that show the bare surface of the part.

          The suspension does not have sufficient wetting agent, or the part is not sufficiently clean.

    1. SUBTASK 70-24-01-240-002 Control of the Magnetic Inks

      1. Examine the magnetic inks regularly for signs of contamination and particle content:

      2. When a quantity of new ink is mixed.

      3. At the start of each work time.

      4. After each correction, or if new ink is added.

      1. Examine the magnetic inks:

      2. With the ink fully mixed, put a 100 ml sample into a flask with graduations.

      3. Make sure that the sample is not moved for at least one hour.

      4. Examine the solid particle concentration range of the sample, which must be as specified by the manufacturer.

      5. Examine the sample for signs of contamination. Clean ink will always show a clear separation line between the solids and the fluids. If the separation line is not clear, the tank must be drained, fully cleaned and filled with new ink.

      6. To keep the solid particle concentration range at the correct level, add more fluids or solids as necessary.

    1. SUBTASK 70-24-01-240-003 Ammeter Check

    2. Each six months, the ammeter must be compared with a calibrated reference instrument when a maximum difference of plus or minus 10 percent is permitted.

    1. SUBTASK 70-24-01-240-004 Ultraviolet Lamp Check (UV Light)

    2. Refer to SPM TASK 70-23-01-230-001.

    1. SUBTASK 70-24-01-240-006 Performance Checks

    2. The performance of the equipment, the materials and the procedures, must be regularly monitored with test pieces that have known defects.

    3. For the test piece data, refer to Figure, and Figure. For circumferential magnetization, it is permitted to use an SAE AS5282 tool steel ring for magnetic particle inspection as an alternative test piece.

    4. The use of CoMat 06-058 FLUX INDICATOR is recommended to find the direction and minimum strength of the applied magnetic field during magnetization of the parts. It is also used to find the magnetic procedures and values to be used when the solenoid coil and magnetic flux flow inspection procedures are used.

    1. SUBTASK 70-24-01-240-007 Record of Performance Checks and Test Pieces

      1. Keep a record of each performance check and test piece, after it is completed and approved. For example:

        1. Check daily:

        2. Tank level.

        3. Magnetic ink contamination and particle content.

        4. Test pieces.

        1. Check each month:

        2. Ultra-violet lamp (satisfactory use).

        3. General equipment check.

        1. Check each six months:

        2. Ammeter.

    1. SUBTASK 70-24-01-240-008 Magnetization Procedures

    2. The different types of magnetic particle inspection machines have different electrical current outputs. The amperages shown can be different to those recommended by I.A.E.

      1. The machines can have one or more different types of current output:

      2. Alternating current (AC).

      3. Half-wave rectified AC; direct current (DC) output.

      4. Full-wave rectified AC; DC output.

      5. Smooth full-wave rectified AC; with a wave shape almost the same as that from a battery.

      1. The different types of wave shape outputs are caused by the different machine inputs:

      2. Single-phase.

      3. Two wires of a three-phase system.

      4. Three-phase.

      1. The different scales used on output ammeters are:

      2. Root mean square (RMS) is usual for AC outputs. Refer to Figure.

      3. 0.7 peak current (or two times the average current) is usual for half-wave rectified AC outputs.

      4. Peak current (which has an effect on the magnetic force) is usual for DC outputs from a battery or a DC generator.

    3. When AC magnetization or rectified AC is recommended, the necessary amperage will be specified in the Engine Manual. They will use AC outputs, with single-phase inputs and an ammeter scale in RMS values, unless specified differently. If machines with a different specification to these conditions are used, change the RMS values to peak current values. To change a meter indication to peak current, use the correction value of the machine. The necessary meter indication of the machine will be acceptable when the peak current is the same as that recommended.

    4. When the 'residual technique' with a spiral coil or a multiple threading bar is recommended, use the maximum current available. The current must not be less than 1000 amp for half-wave, or 1400 amp for full-wave, unless specified differently.

    5. It is not necessary to correct the current values specified in the Standard Practices Manual or the Engine Manual; if the ammeters are calibrated for 0.7I maximum (When I maximum is the same as the peak current). This is usual for commercial equipment.

    6. When the solenoid coil inspection procedure is used as the magnetization force, use the values specified in the Engine Manual. These values are for a 16in. (406 mm) diameter, multi-wound (five-turn), coil. If different diameter coils are used, apply the formula given in Step.

    1. SUBTASK 70-24-01-240-009 Demagnetization Procedures

    2. Demagnetization must always be done before and after a magnetic particle inspection.

    3. Demagnetization is also necessary between two magnetizations of the same part; if the second, which is usually at 90 degrees to the first, is weaker than the residual field.

    4. A demagnetized part must not be nearer than 5 ft (1.5 m) to an energized demagnetizer coil or the magnetization equipment.

    5. A single layer of small parts can be demagnetized on a tray, or in a basket, that is not magnetic.

    6. The satisfactory strength of a demagnetization field, at the position where a part is demagnetized, is 85 oersteds (6.67 kA/m) or more. The minimum field strength must not be less than 70 oersteds (5.57 kA/m).

    7. After completion of all magnetising operations, all components shall be demagnetised and then checked for residual magnetism which shall not be greater than 0.25 KA/m (3 oersteds). This check is normally carried out using a certified, calibrated pocket field strength indicator.

      1. Procedure To Demagnetize Parts:

      2. Put the part into the demagnetization coil.

      3. Turn on the coil current.

      4. Move the part through the coil.

      5. Remove the part from the coil, to a minimum distance of 5 ft (1.5 m).

      6. Turn off the coil current.

      7. Make sure that the part is fully demagnetized.

    1. SUBTASK 70-24-01-240-010 Current Flow Inspection Procedures

      1. Application:

      2. This procedure is used to find defects which are parallel to the direction of current flow (That is longitudinal in long parts and circumferential in circular parts). Refer to Figure.

      3. Alternating current (AC) or direct current (DC) can be used with the 'simultaneous inking' or the 'wet continuous technique'.

      1. Procedure:

      2. Remove the grease from the part, as specified in SPM TASK 70-11-03-300-503.

      3. Demagnetize the part. Use the procedure to demagnetize parts in Step.

      4. CAUTION

        MAKE SURE THAT THERE IS A GOOD CONTACT BETWEEN THE TERMINAL PADS ON THE MACHINE AND THE PARTS SO THAT THE PARTS CANNOT ARC AND BECOME DAMAGED.

        Install the part on to the magnetic particle inspection machine.

      5. Make sure that the magnetic ink is fully shaken, then apply it to the part. Apply the necessary current through the part for a minimum total time of two seconds. The two seconds minimum magnetizing time can be the total of a fast-succession series of shorter times (such as a fast succession of four 0.5 second magnetization times).

      6. NOTE

        For a general inspection use a low power magnification of 2X. For an accurate inspection use a magnification power of 5X to 10X; then, if you are not sure, examine the part again with a high power magnification of 15X.

        When possible, make the inspection with the part installed on the machine.

      7. If necessary, turn the part on the machine to make an inspection of the other side; then do step (4) again.

      8. If the diameter of the part is attached to the machine with a clamp, turn the part through 90 degrees; then do steps (4) and (5) again.

      9. NOTE

        When an inked part is to be moved before inspection, it is necessary to be very careful when you touch the part. This is to make sure that distortion of the magnetic indications does not occur.

        Remove the part from the machine and let it drain.

      10. Examine the part.

      11. Demagnetize the part. Use the procedure to demagnetize parts in Step.

      12. Clean the part as specified in SPM TASK 70-11-03-300-503.

      13. Apply temporary rust protection to the part, as specified in SPM TASK 70-38-05-380-501.

    1. SUBTASK 70-24-01-240-011 Threading Bar Inspection Procedures

      1. Application:

      2. This procedure is used to find longitudinal defects in long parts and radial defects in circular parts; that can be put on to a single conductor, through which the necessary current flows. The magnetic field is at 90 degrees to the threading bar. When the part is magnetized, all defects in the magnetic field will be shown. Refer to Figure.

      3. When the 'offset threading bar technique' is used, different magnetizations will be necessary at equal distances around the circumference. This will make sure that magnetic cover is complete. The magnetic ink is then applied to each magnetic point. Refer to Figure.

      4. A threading cable, energized by the magnetic particle inspection machines, can also be used to examine the areas around holes. Refer to Figure.

      1. Procedure:

      2. Remove the grease from the part, as specified in SPM TASK 70-11-03-300-503.

      3. Demagnetize the part. Use the procedure to demagnetize Parts in Step.

      4. CAUTION

        WHEN PARTS WITH A SMALL INTERNAL DIAMETER ARE MAGNETIZED, INSULATION MATERIAL MUST FIRST BE APPLIED TO THE THREADING BAR. THIS IS TO MAKE SURE THAT THE PARTS CANNOT TOUCH THE BAR, ARC AND BECOME DAMAGED.

        Put the threading bar into the internal diameter, then install the assembly on to the magnetic particle inspection machine.

      5. NOTE

        When the residual technique is specified, step (5) does not apply. Apply the recommended current, then put the part fully into the magnetic ink after magnetization.

        If necessary, put the part on to some insulation material to align the threading bar with the center of the internal diameter.

      6. NOTE

        When an inked part is to be moved before inspection, it is necessary to be very careful when you touch the part. This is to make sure that distortion of the magnetic indications does not occur.

        Apply the magnetic ink by the 'simultaneous inking' or the 'wet continuous technique'. Apply the recommended current through the threading bar to magnetize the part. This must be done in different steps during a maximum time of five seconds. Turn the part during this step to make sure that the ink is applied to all surfaces.

      7. Let the part drain.

      8. NOTE

        For a general inspection use a low power magnification of 2X. For an accurate inspection use a magnification power of 5X to 10X; then, if you are not sure, examine the part again with a high power magnification of 15X.

        Examine the part.

      9. Demagnetize the part. Use the procedure to demagnetize parts in Step.

      10. Clean the part as specified in SPM TASK 70-11-03-300-503.

      11. Apply temporary rust protection to the part, as specified in SPM TASK 70-38-05-380-501.

    1. SUBTASK 70-24-01-240-012 Multiple Threading Bar/Split Coil Inspection Procedures

      1. Application:

      2. This procedure is used to find longitudinal and radial defects in tubular and circular parts. It can only be used with direct current (DC) (half or full-wave rectified alternating current (AC)).

      3. The equipment used for this procedure (which is also known as the 'knife method' or 'split coil method'), is shown on Figure.

      1. Procedure:

      2. Remove the grease from the part, as specified in SPM TASK 70-11-03-300-503.

      3. Demagnetize the part. Use the procedure to demagnetize parts in Step.

      4. Install the part on to the magnetic particle inspection machine. Make sure that the part is in the center of the machine.

      5. Turn the part, and at the same time apply the recommended current in a single step of two or three seconds.

      6. NOTE

        Simultaneous inking or the wet continuous technique can be applied to steps (4) and (5); when recommended in the Engine Manual.

        Remove the part from the machine, then put it fully into the magnetic ink for a minimum of 10 seconds.

      7. NOTE

        When an inked part is to be moved before inspection, it is necessary to be very careful when you touch the part. This is to make sure that distortion of the magnetic indications does not occur.

        Let the part drain.

      8. NOTE

        For a general inspection use a low power magnification of 2X. For an accurate inspection use a magnification power of 5X to 10X; then, if you are not sure, examine the part again with a high power magnification of 15X.

        Examine the part.

      9. Demagnetize the part. Use the procedure to demagnetize parts in Step.

      10. Clean the part as specified in SPM TASK 70-11-03-300-503.

      11. Apply temporary rust protection to the part, as specified in SPM TASK 70-38-05-380-501.

    1. SUBTASK 70-24-01-240-013 Flat Spiral Coil Inspection Procedure

      1. Application:

      2. This procedure is used to find circumferential defects in disks or in parts with almost the same shape.

      3. The equipment used is a close-wound flat coil. The coil diameter must be 4 in. (100 mm) or more larger than that of the part to be magnetized. Refer to Figure.

      4. The coil is energized with direct current (DC) (half or full-wave rectified alternating current (AC)).

      1. Procedure:

      2. Remove the grease from the part, as specified in SPM TASK 70-11-03-300-503.

      3. Demagnetize the part. Use the procedure to demagnetize parts in Step.

        1. Magnetization And Inspection Procedure

        2. NOTE

          Parts with stub-shafts can be magnetized with the shaft pieces installed in the inner surface of the coil.

          Install the part on to the coil. Make sure that the part is in the center of the coil.

        3. Apply the recommended current in a single step of two or three seconds, to magnetize the part.

        4. NOTE

          Simultaneous inking or the wet continuous technique can be applied to Step and Step when recommended in the Engine Manual.

          Put the part fully into the magnetic ink for a minimum of 10 seconds.

        5. Install the part on to a fixture for inspection.

        6. NOTE

          For a general inspection use a low power magnification of 2X. For an accurate inspection use a magnification power of 5X to 10X; then, if you are not sure, examine the part again with a high power magnification of 15X.

          Examine the part.

        7. Demagnetize the part. Use the procedure to demagnetize parts in Step.

      4. Do the above magnetization and inspection procedure again with the opposite face of the part nearest to the coil during magnetization.

      5. Clean the part as specified in SPM TASK 70-11-03-300-503.

      6. Apply temporary rust protection to the part, as specified in SPM TASK 70-38-05-380-501.

    1. SUBTASK 70-24-01-240-014 Solenoid Coil Inspection Procedures

      1. Application:

      2. This procedure is used to find circumferential, and transverse, defects as shown on Figure. The procedure also gives sufficient longitudinal magnetization for parts with a length to diameter ratio of more than three to one.

      3. The magnetization force is calculated from the formula as follows:

        NI = 430r in. or 170r cm

        When: N = Number of turns in the coil

        I = Amperes AC (RMS)

        r = Radius of the coil

      4. NOTE

        The magnetization forces necessary for a solenoid coil inspection procedure (as specified in the Engine Manual), are for a 16 in. (406 mm) multi-wound (five-turn) coil.

        When the length to diameter ratio is less than three to one, the magnetization force must be two times that calculated from the formula. Also, for such parts, the magnetic flux flow inspection procedure is better than coil inspection procedures. The strength of the magnetic field is measured with a magnetic flux indicator. Only that piece of the part, which is in the coil at the time, will be magnetized. Different magnetization steps along the length of the part will then be necessary when long parts are examined.

      5. The coil can be a permanent unit (refer to Figure, Detail A) through which the part can be moved. Alternatively, it can be made when three or more turns of cable (of the correct dimensions and sufficient for the necessary current) are wound around the part (refer to Figure, Details B and C).

      6. The coil turns must be as near as possible to each other and to the parts to be magnetized. Also, they must not stop the flow of magnetic ink when the 'simultaneous inking' or the 'wet continuous technique' is used.

      7. Distance pieces, or a jig with sufficient insulation, must be used to make sure that the coil cannot touch the part.

      8. With short parts the necessary current becomes very high because of the small length to diameter ratio. To decrease the high current, extenders are used (refer to Figure). The defects shown are those transverse to the magnetic lines of force and at least two checks will be necessary on each part.

      1. Procedure:

      2. Remove the grease from the part, as specified in SPM TASK 70-11-03-300-503.

      3. Demagnetize the part. Use the procedure to demagnetize parts in Step.

      4. Install the part on to the coil. Make sure that the part is in the center of the coil.

      5. NOTE

        The necessary current is usually specified in the Engine Manual. For example, 2000 A/T (that is five turns at 400 amp).

        Magnetize the part with alternating current (AC) or direct current (DC) with the 'simultaneous inking' or the 'wet continuous technique'.

      6. NOTE

        When magnetization by the simultaneous inking or the wet continuous technique, is done again, examine the part as specified in step (7).

        If necessary, do step (4) again along the full length of the part.

      7. NOTE

        When an inked part is to be moved before inspection, it is necessary to be very careful when you touch the part. This is to make sure that distortion of the magnetic indications does not occur.

        Remove the part from the coil, or the coil from the part, as applicable.

      8. NOTE

        For a general inspection use a low power magnification of 2X. For an accurate inspection use a magnification power of 5X to 10X; then, if you are not sure, examine the part again with a high power magnification of 15X.

        Examine the part.

      9. Demagnetize the part. Use the procedure to demagnetize parts in Step.

      10. Clean the part as specified in SPM TASK 70-11-03-300-503.

      11. Apply temporary rust protection to the part, as specified in SPM TASK 70-38-05-380-501.

    1. SUBTASK 70-24-01-240-015 Magnetic Flow Inspection Procedure

      1. Application:

      2. This procedure is used to find defects that are transverse to the flux path of a part.

      3. During the magnetic flux flow inspection procedure, direct current (DC) flows through a coil that contains an iron core. The core is then magnetized to become an electro-magnet. When a part touches the poles, it becomes a keeper for the magnetic field (refer to Figure).

      4. Because there is no current flow through the part, the contacts cannot arc and cause damage.

      1. Procedure:

      2. Remove the grease from the part, as specified in SPM TASK 70-11-03-300-503.

      3. Demagnetize the part. Use the procedure to demagnetize parts in Step.

      4. Install the part longitudinally, between the pads of the magnetic particle inspection machine.

      5. NOTE

        If there are too many particles adjacent to the magnetic poles, they must be removed. The magnetic ink must then be applied again.

        Apply the magnetic ink and at the same time adjust the machine to give the maximum magnetic flow available with the minimum of background. Then turn off the current.

      6. NOTE

        For a general inspection use a low power magnification of 2X. For an accurate inspection use a magnification power of 5X to 10X; then, if you are not sure, examine the part again with a high power magnification of 15X.

        Examine the part.

      7. Demagnetize the part. Use the procedure to demagnetize parts in Step.

      8. Clean the part as specified in SPM TASK 70-11-03-300-503.

      9. Apply temporary rust protection to the part, as specified in SPM TASK 70-38-05-380-501.

    1. SUBTASK 70-24-01-240-016 Current Induction Inspection Procedure

      1. Application:

      2. This procedure is used to find circumferential defects in annular parts that are not too rigid and where other procedures are not satisfactory. This procedure is not recommended for parts such as compressor disks where the radial dimensions are more than the thickness.

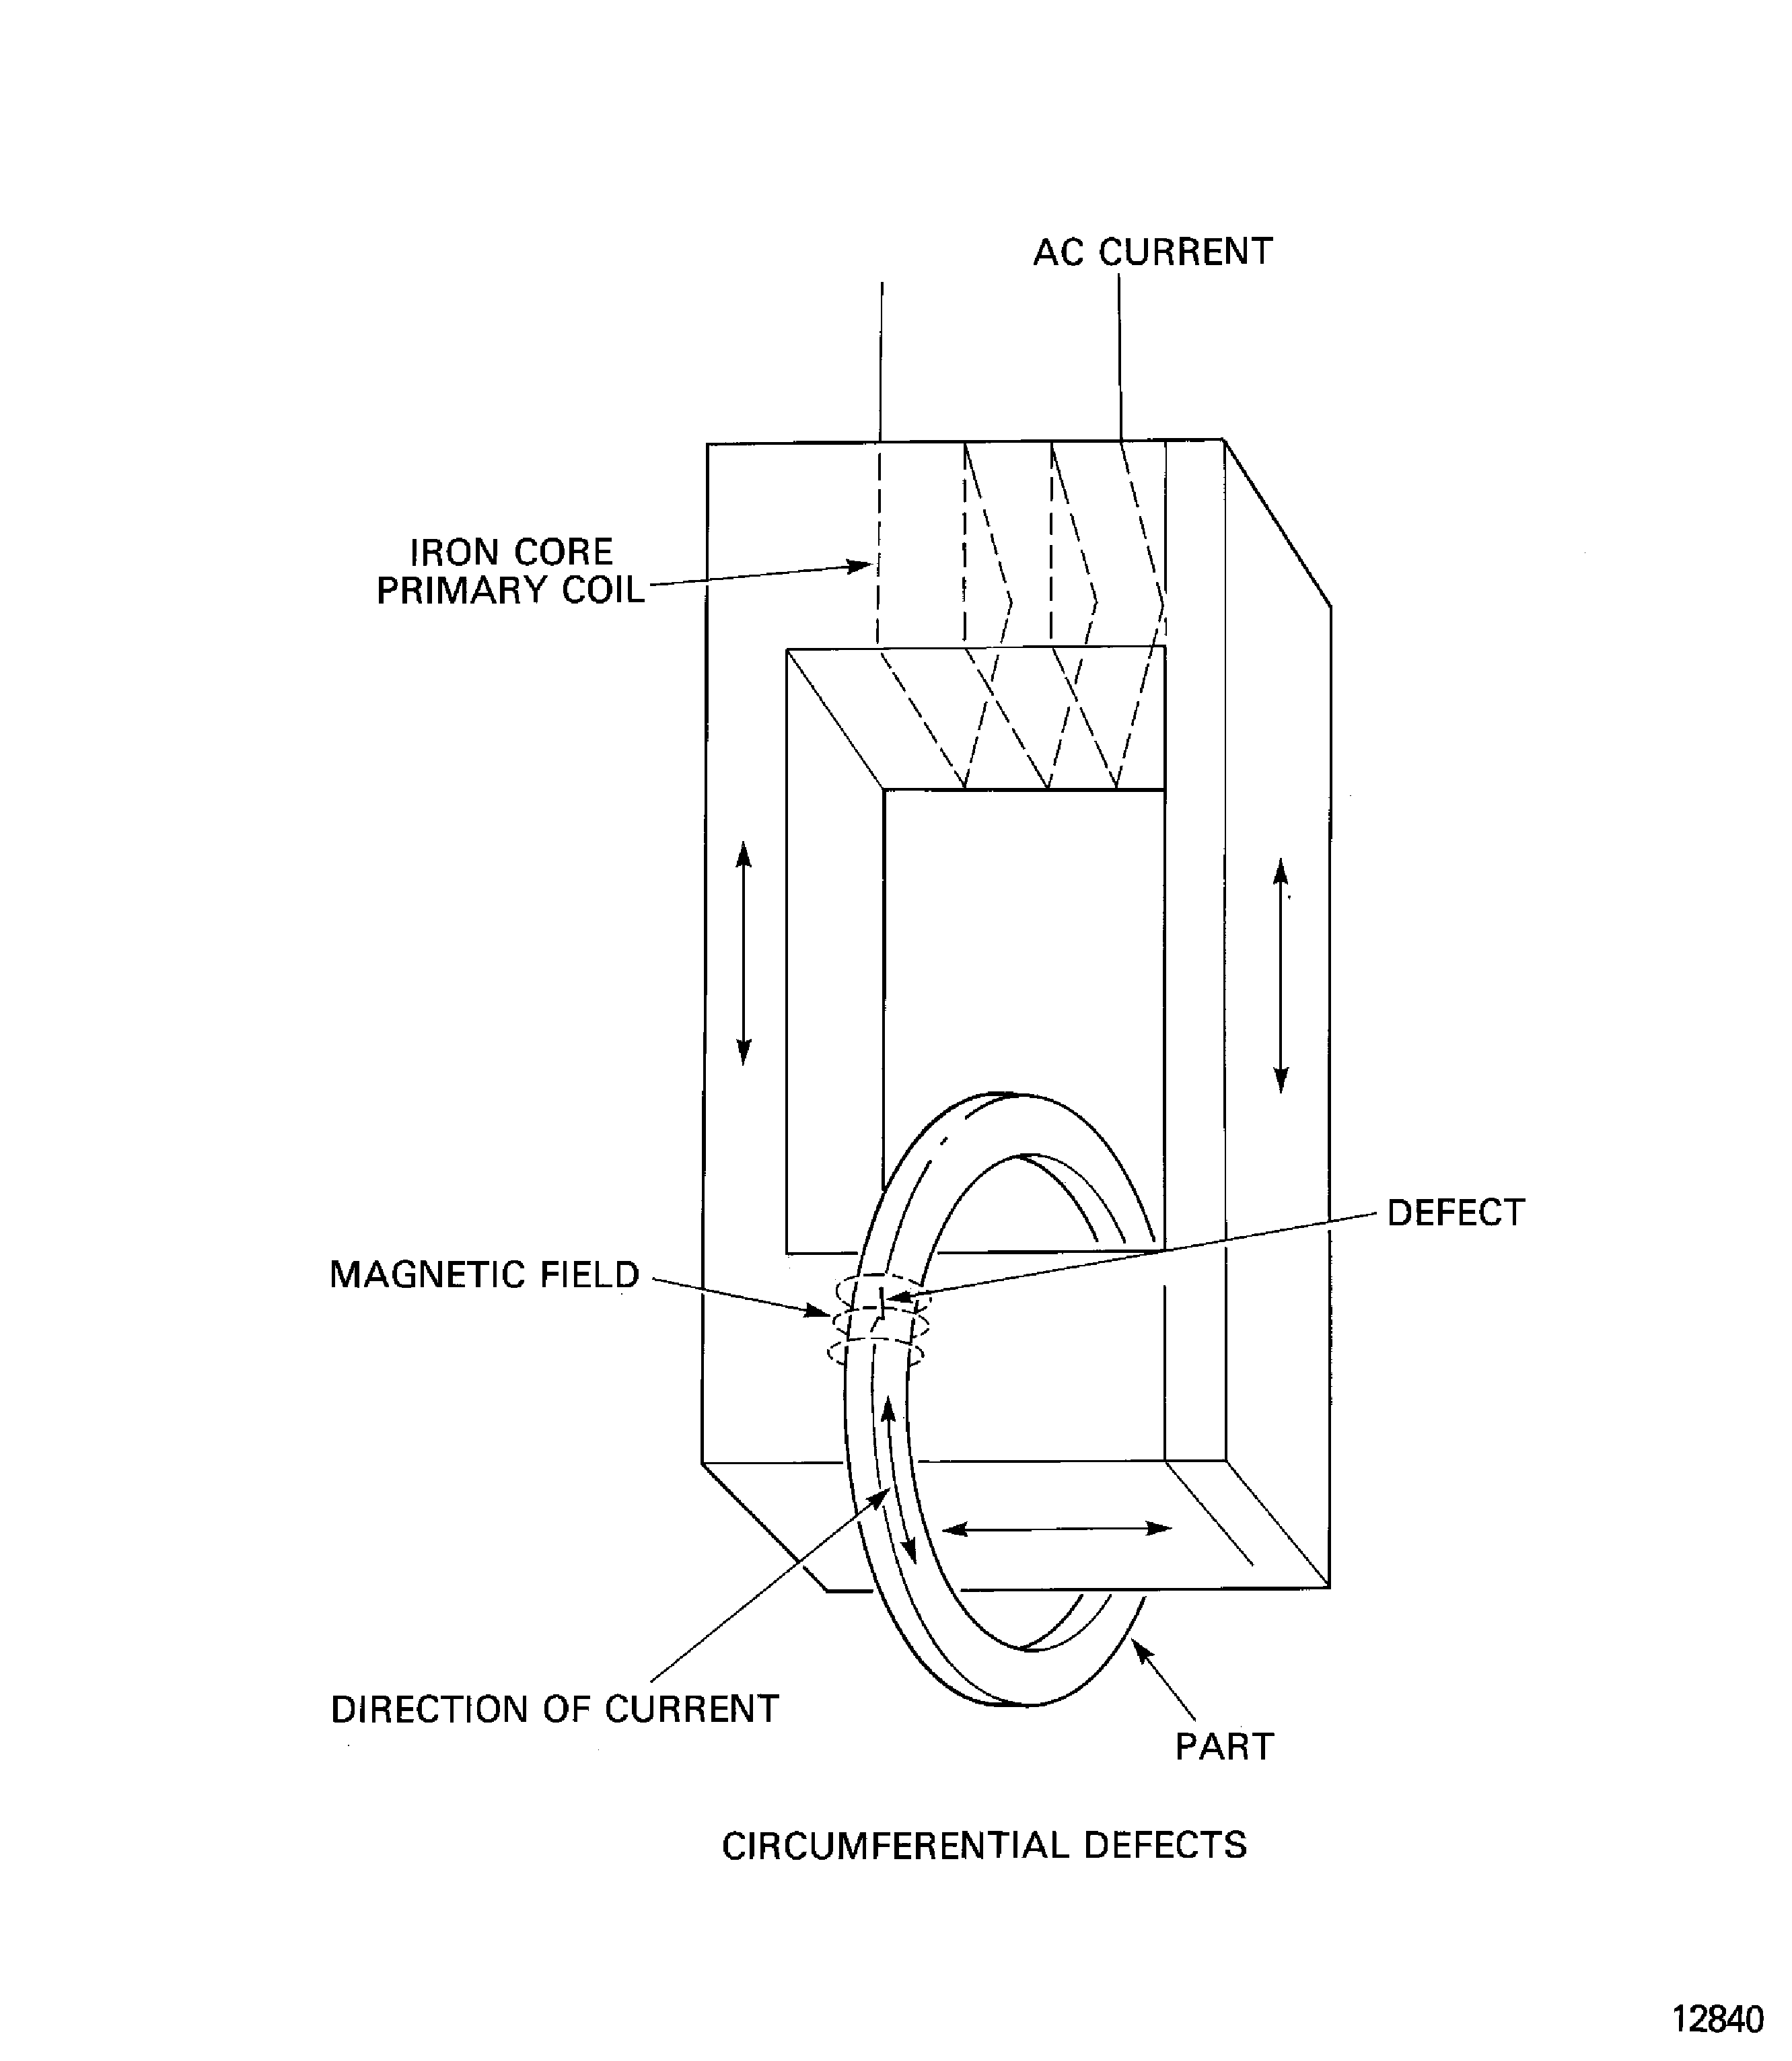
      3. The equipment used is almost the same as a transformer. The primary coils are wound on to a laminated iron core which is divided when installed into the part to be examined (refer to Figure). When the current is applied to the primary coils, the core becomes energized, which then causes a current in the ring. It is this current that causes the magnetic field in the part.

      1. Procedure:

      2. Remove the grease from the part, as specified in SPM TASK 70-11-03-300-503.

      3. Demagnetize the part. Use the procedure to demagnetize parts in Step.

      4. Install the part on to the magnetic particle inspection machine.

      5. Apply the magnetic ink and magnetize the part with an alternating current (AC). Use the 'simultaneous inking' or the 'wet continuous technique', with the recommended current.

      6. NOTE

        When an inked part is to be moved before inspection, it is necessary to be very careful when you touch the part. This is to make sure that distortion of the magnetic indications does not occur.

        Remove the part from the machine and let it drain.

      7. NOTE

        For a general inspection use a low power magnification of 2X. For an accurate inspection use a magnification power of 5X to 10X; then, if you are not sure, examine the part again with a high power magnification of 15X.

        Examine the part.

      8. Demagnetize the part. Use the procedure to demagnetize parts in Step.

      9. Clean the part as specified in SPM TASK 70-11-03-300-503.

      10. Apply temporary rust protection to the part, as specified in SPM TASK 70-38-05-380-501.

  1. Figure: Test pieces for circumferential magnetization

    Test pieces for circumferential magnetization
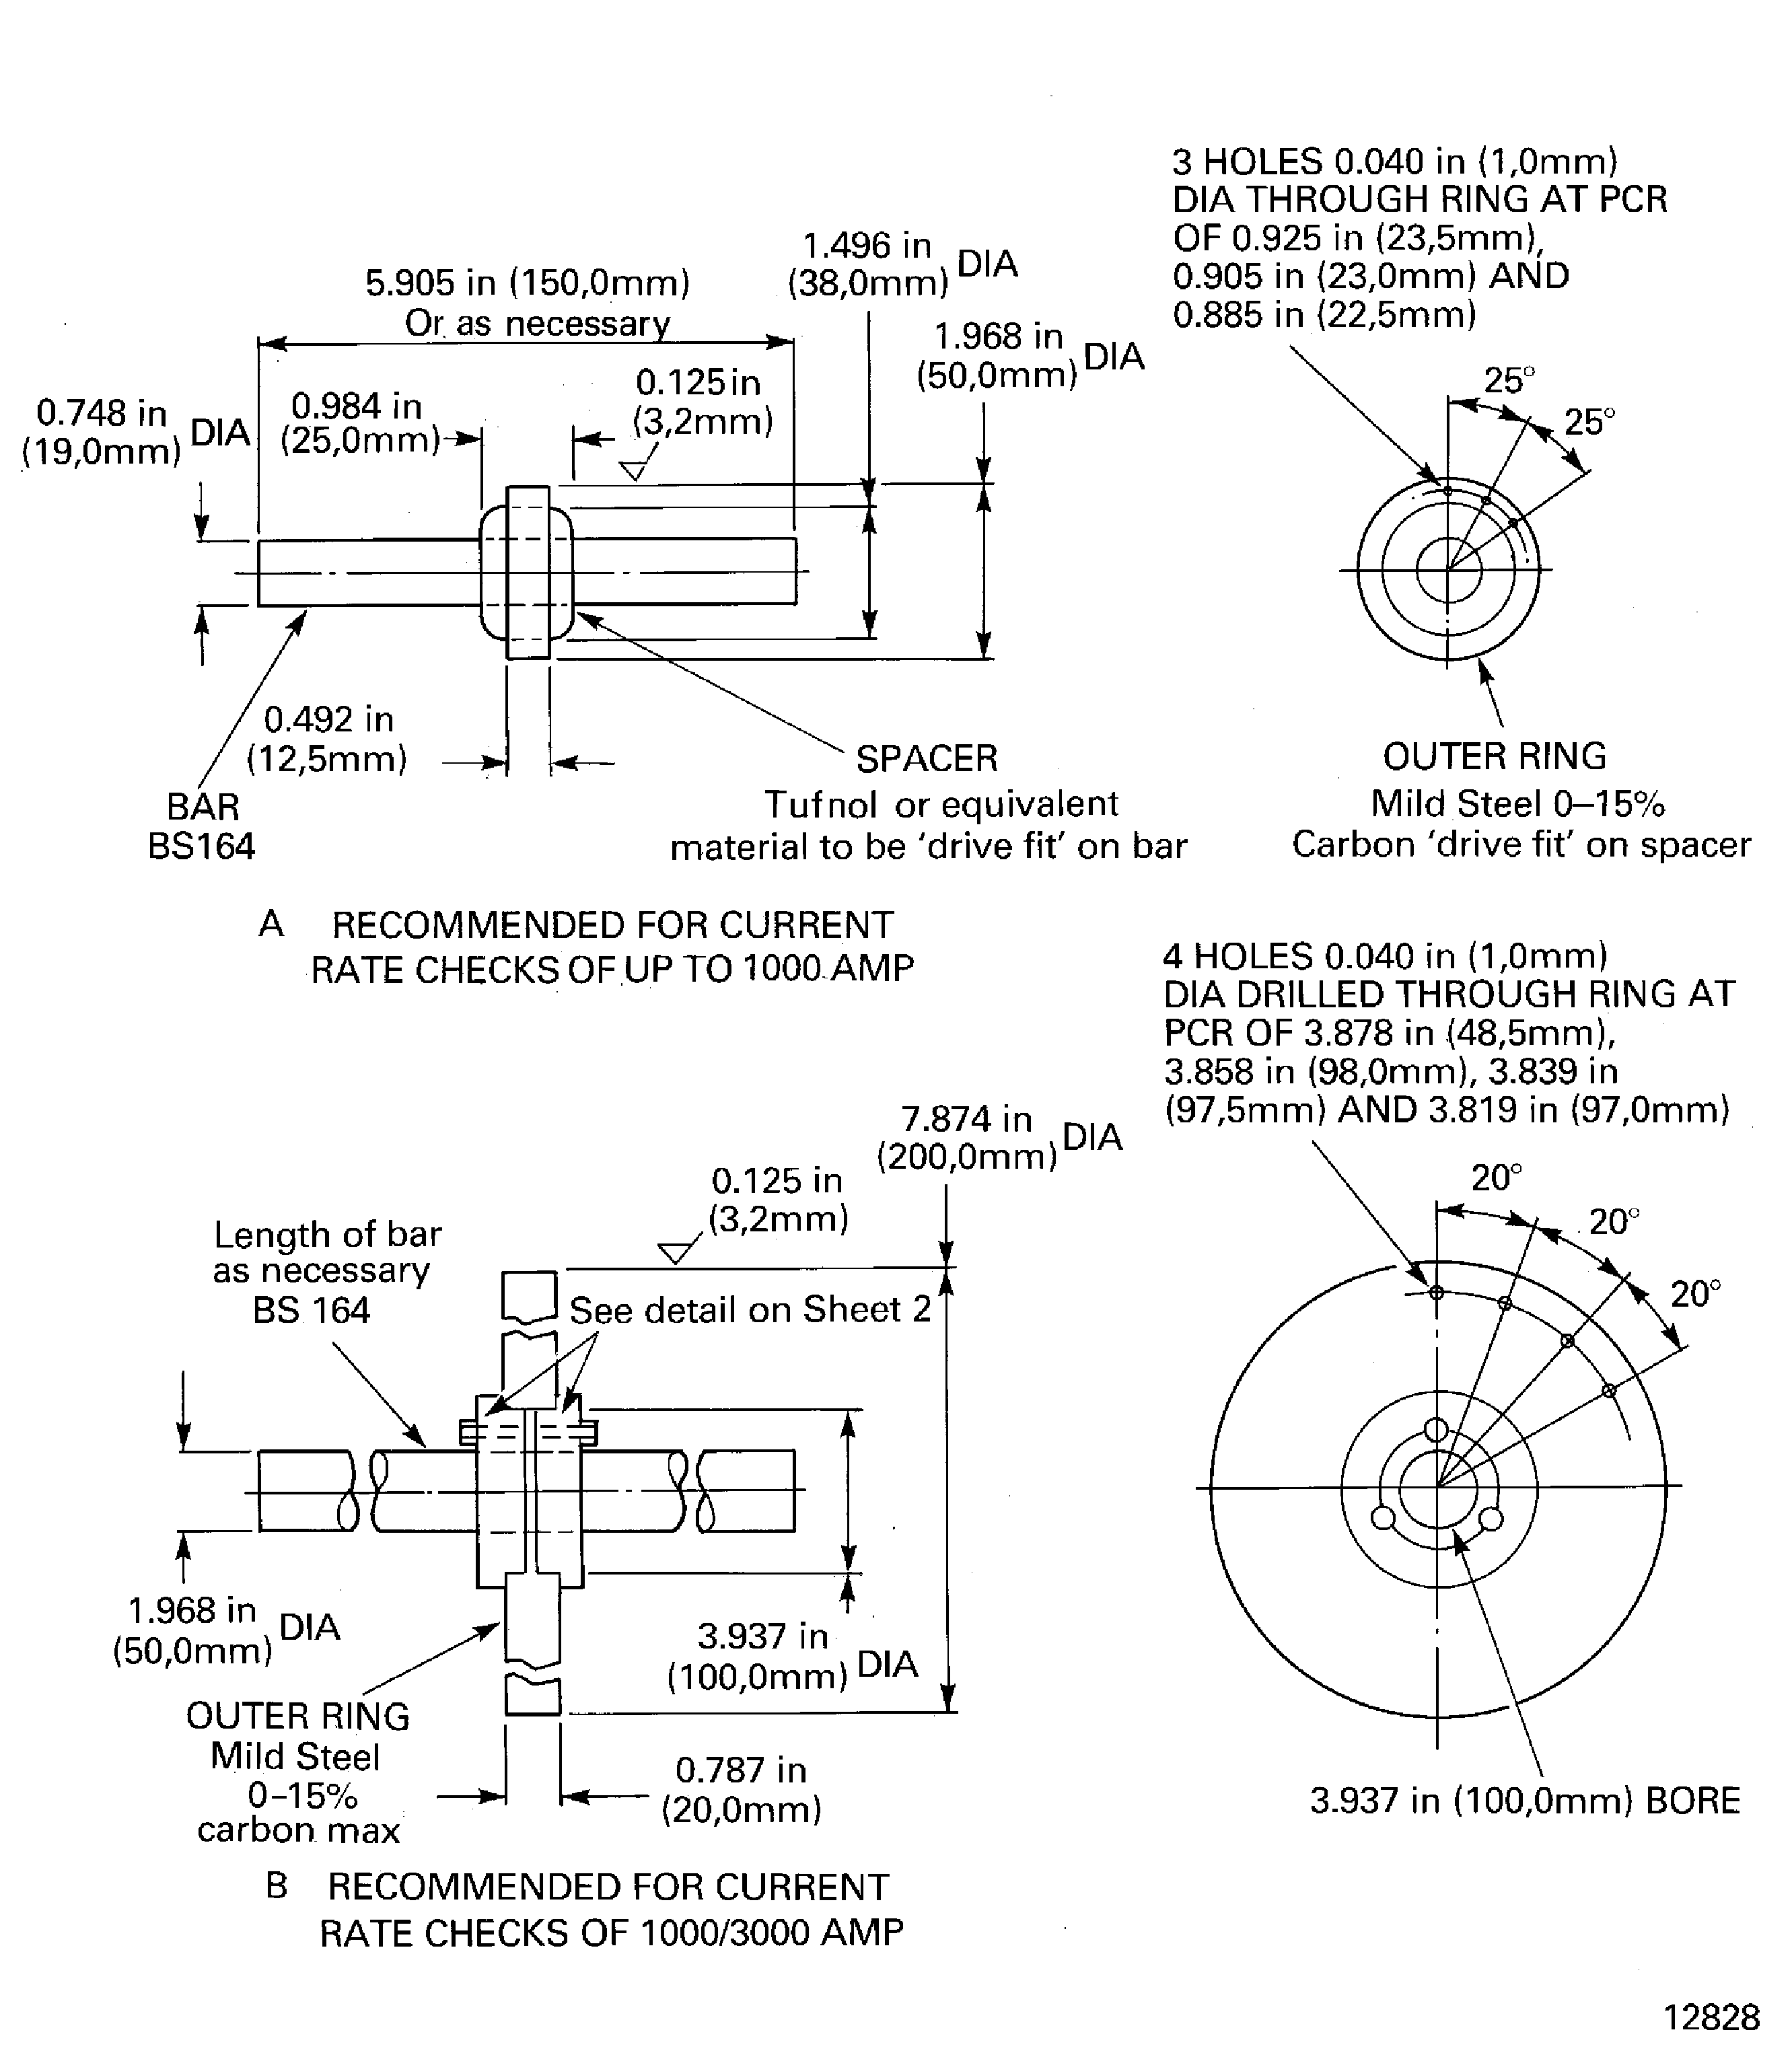
    Figure: Test pieces for circumferential magnetization

    Test pieces for circumferential magnetization
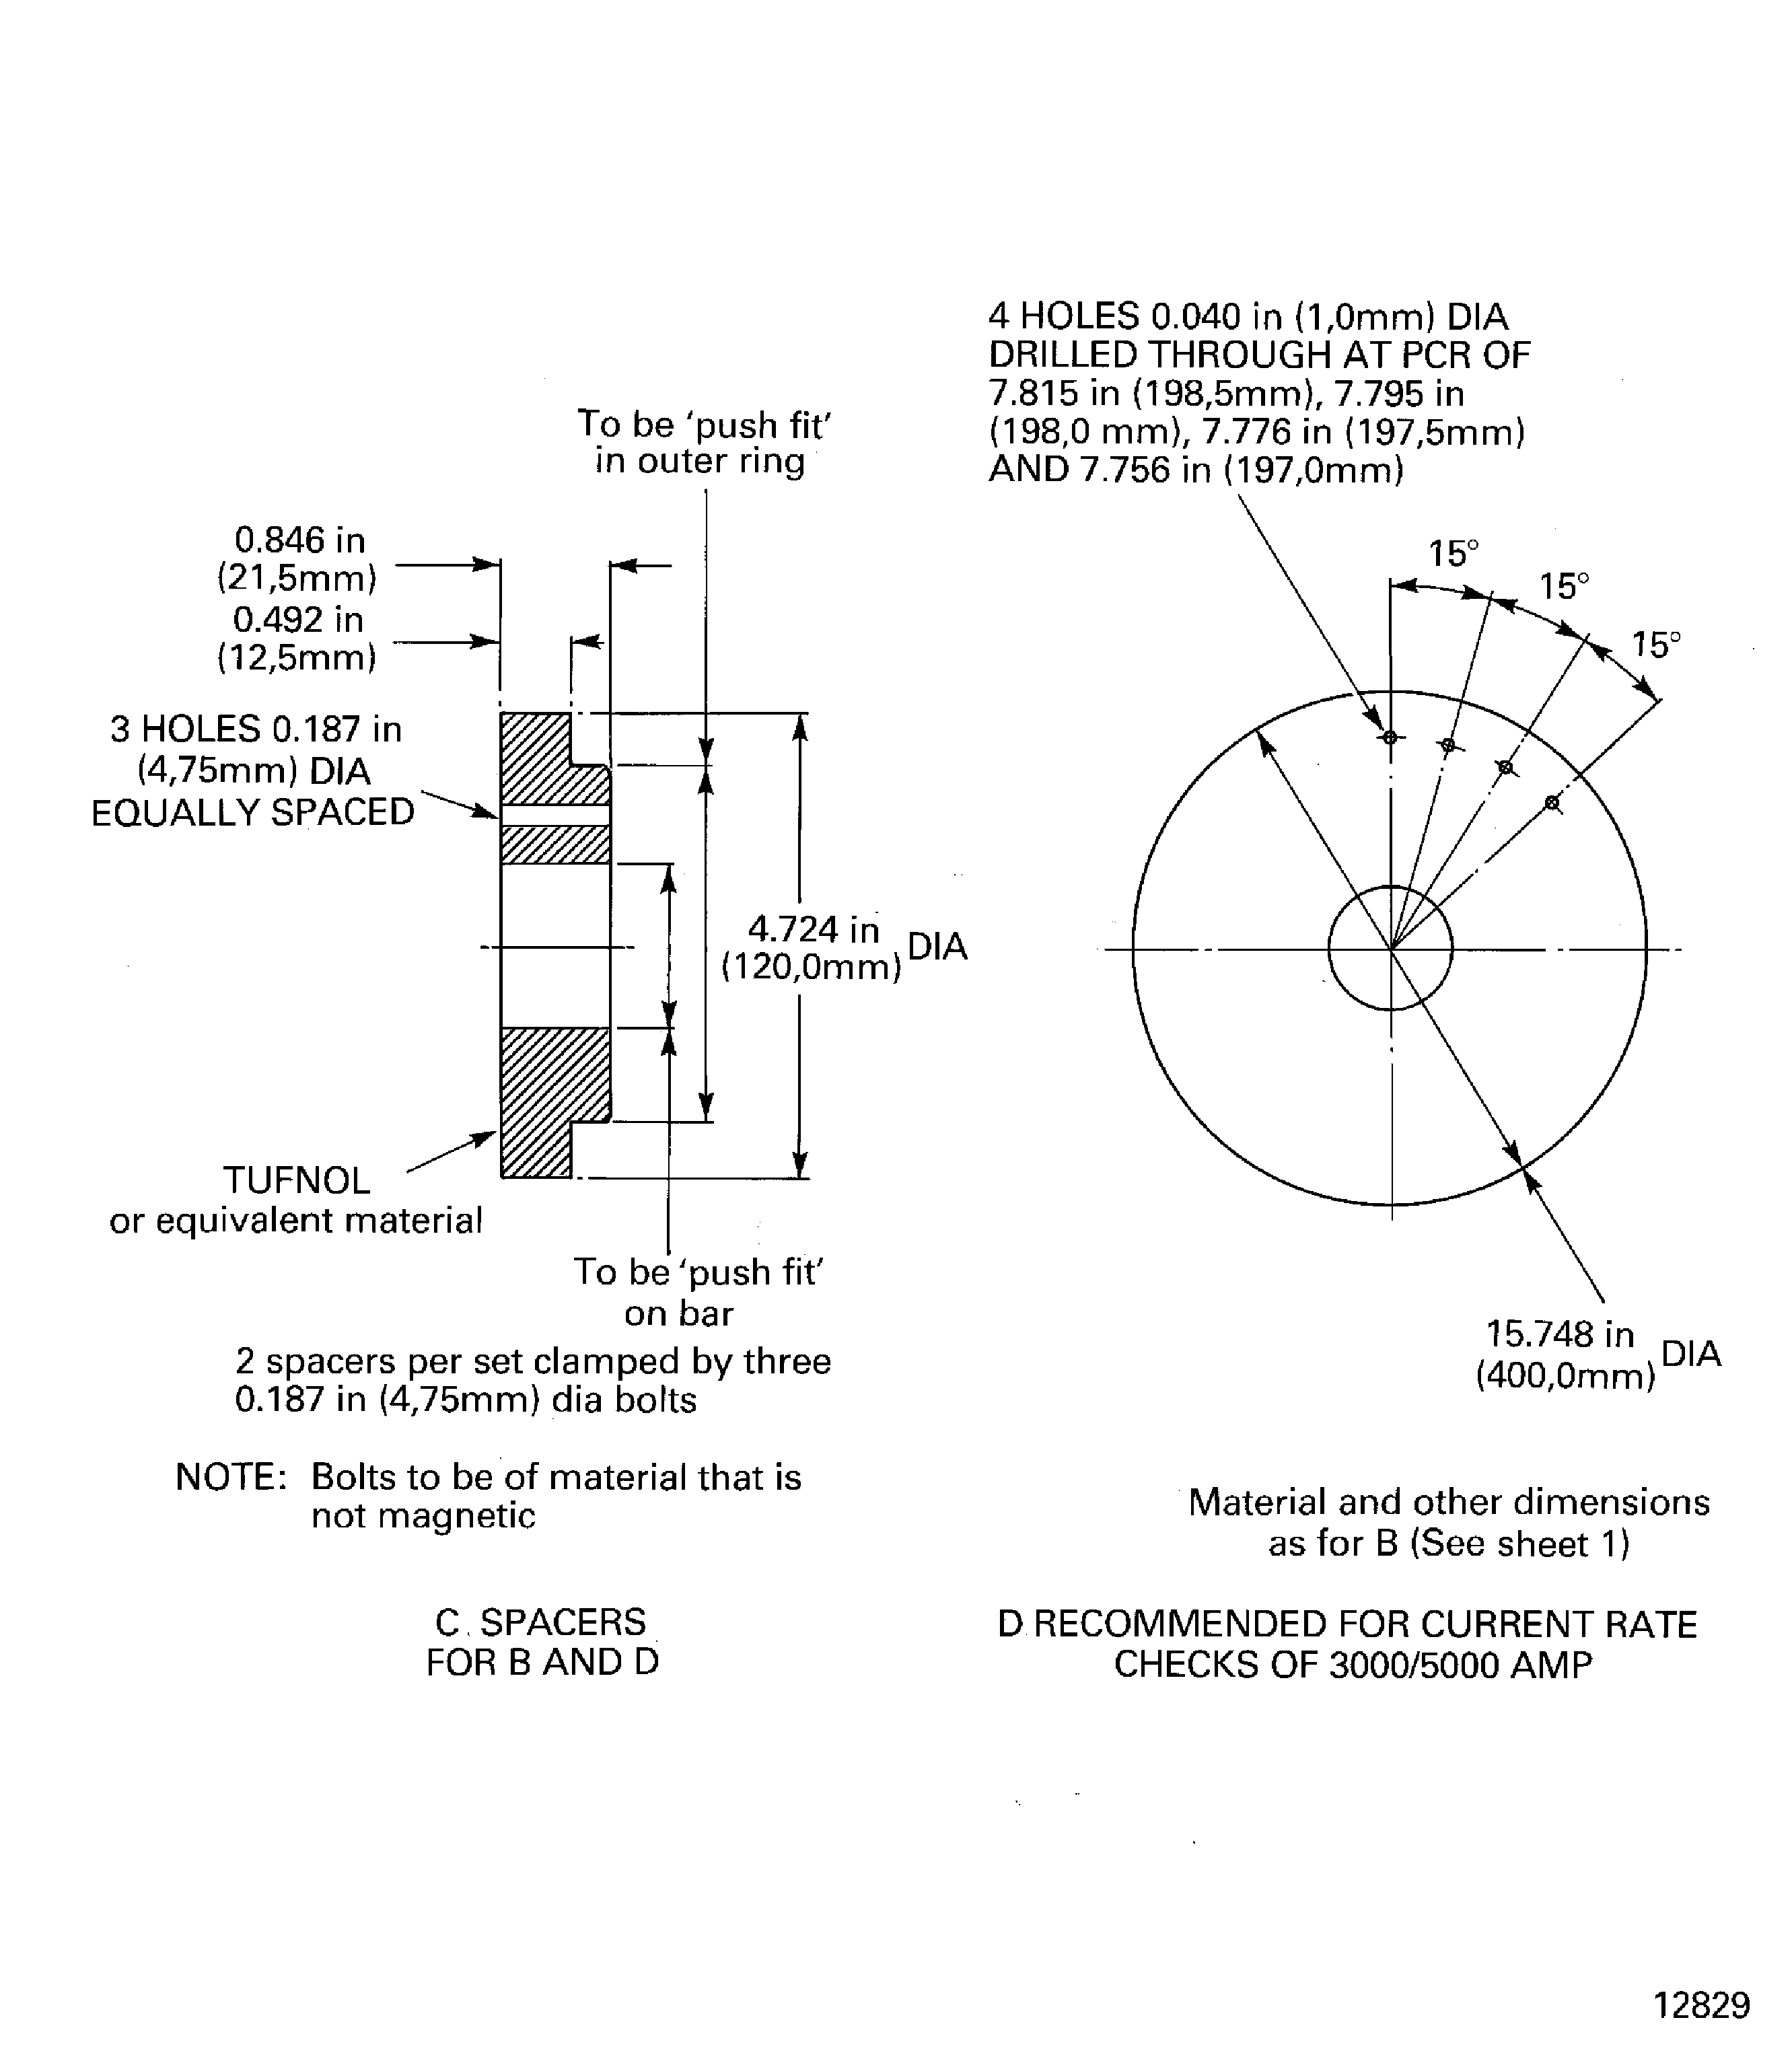
    Figure: Test piece for longitudinal magnetization

    Test piece for longitudinal magnetization
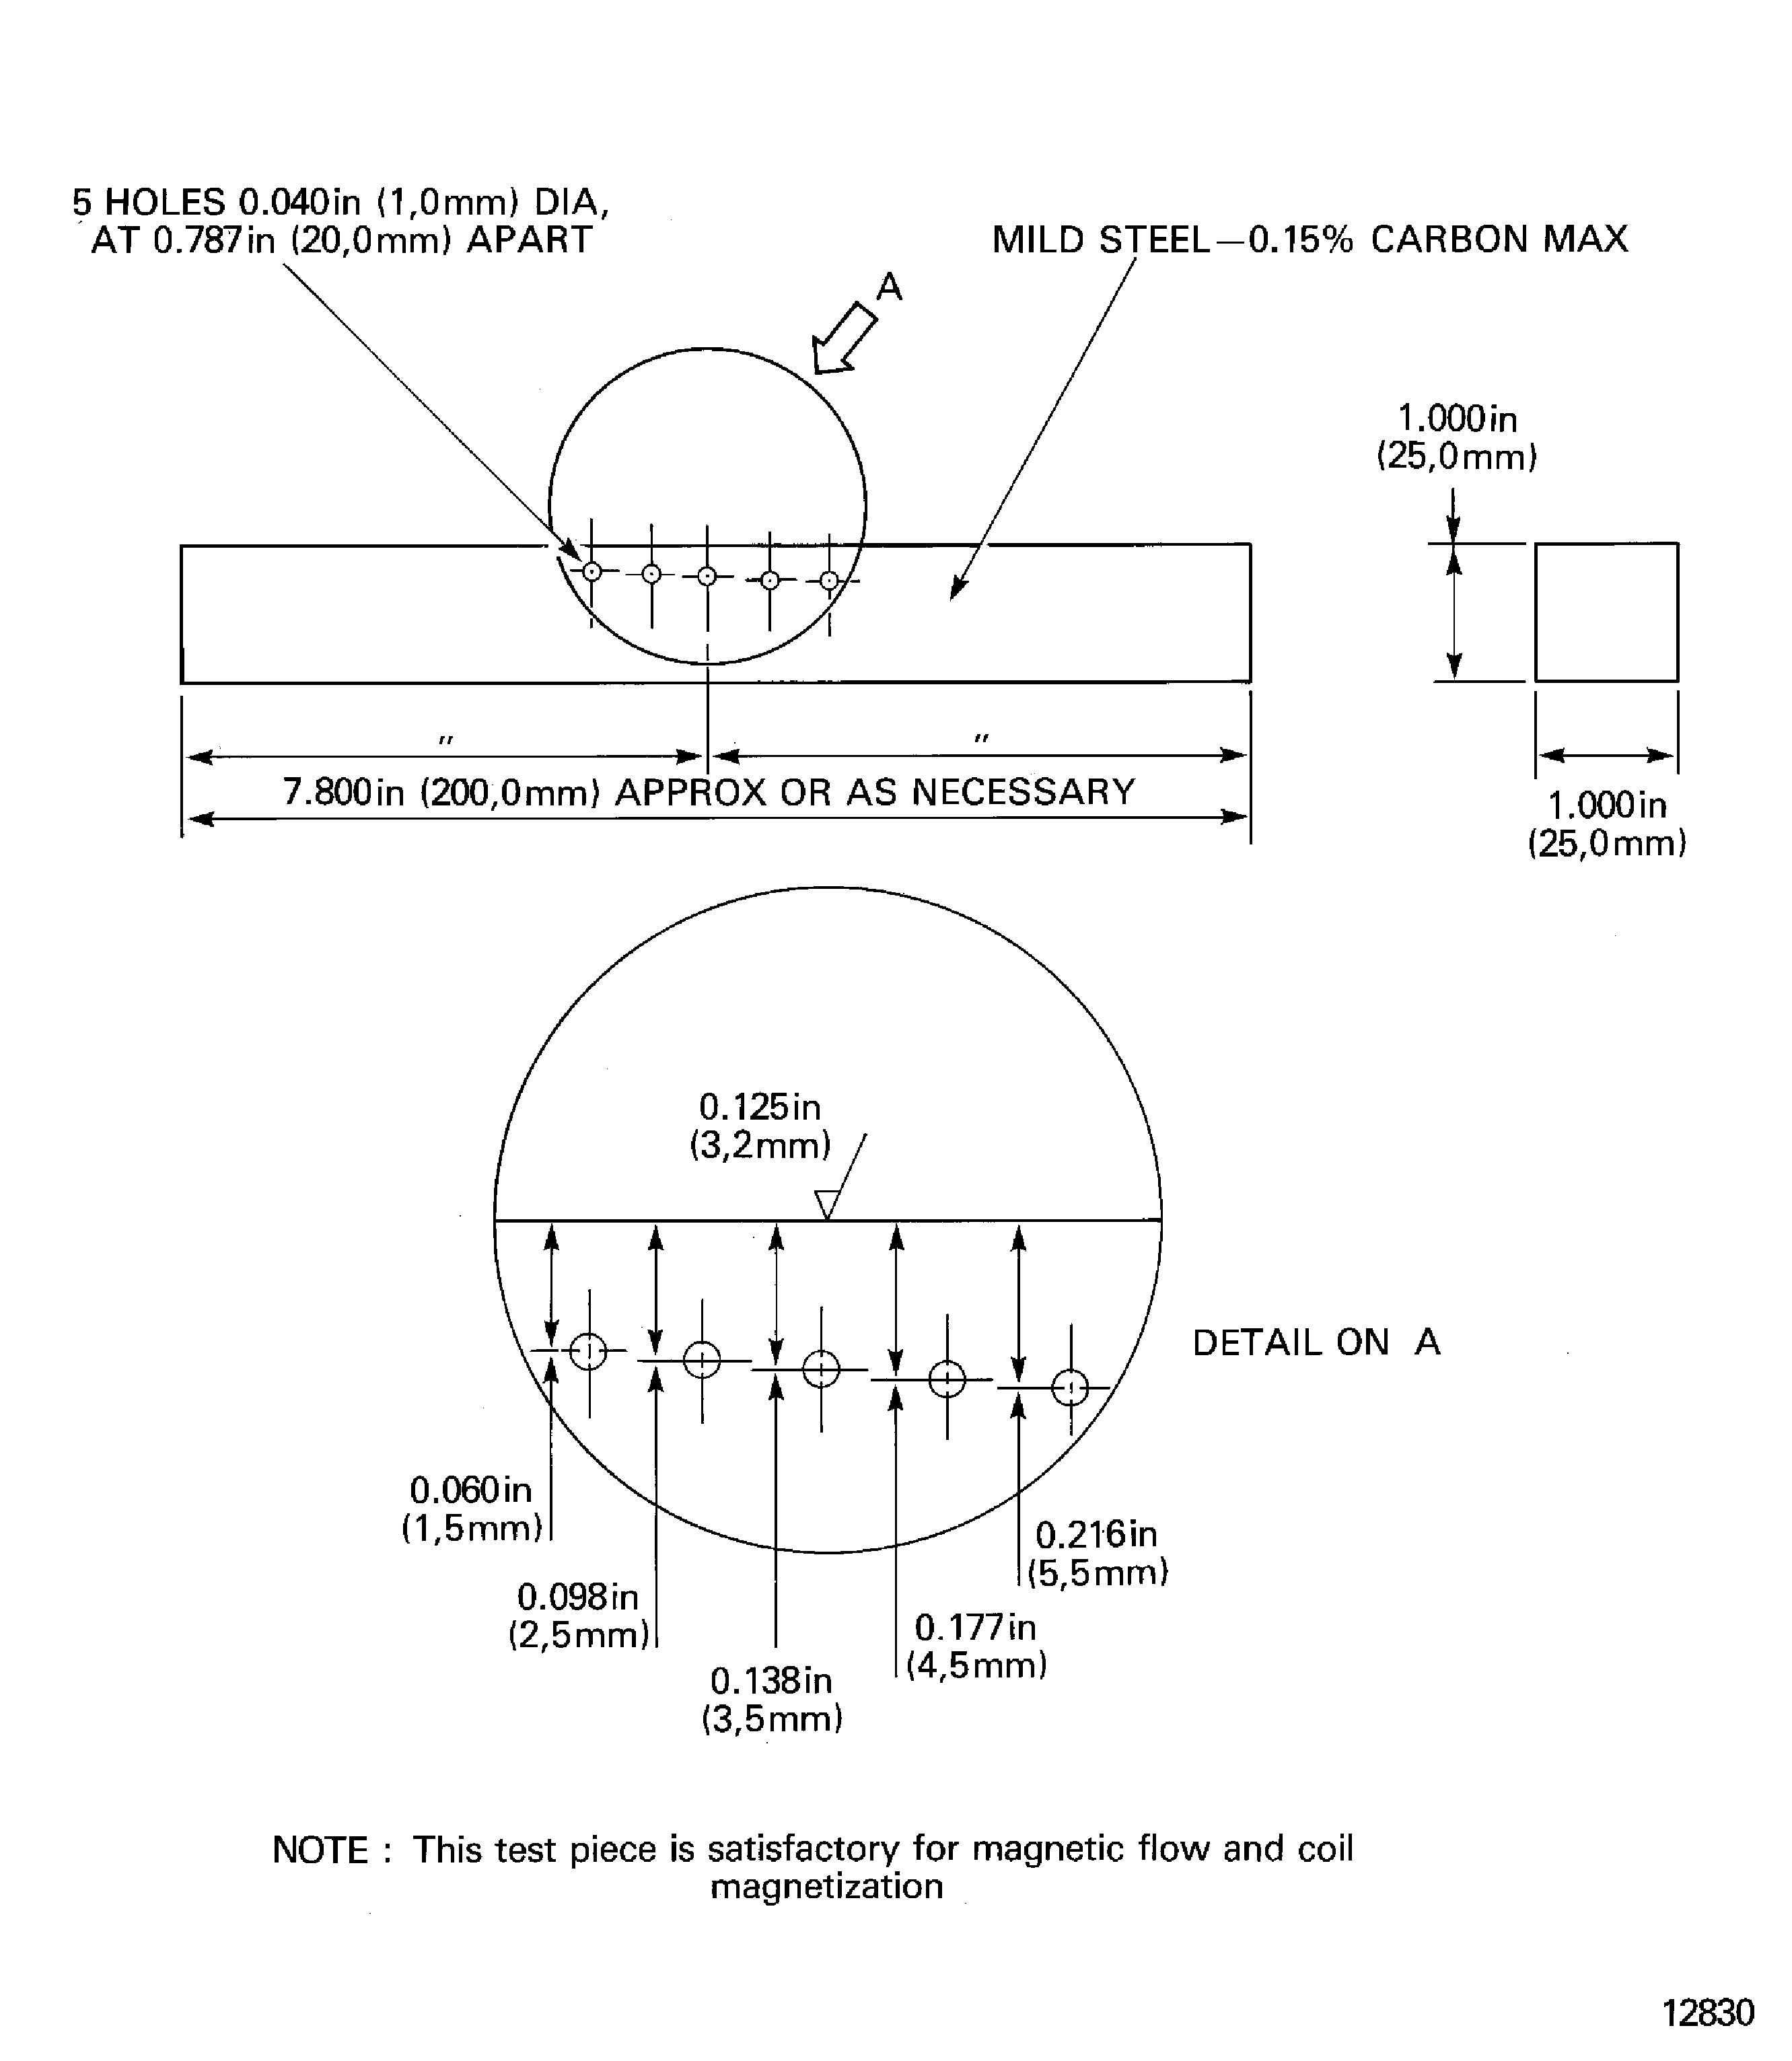
    Figure: Relation between peak and indicated amperages

    Relation between peak and indicated amperages
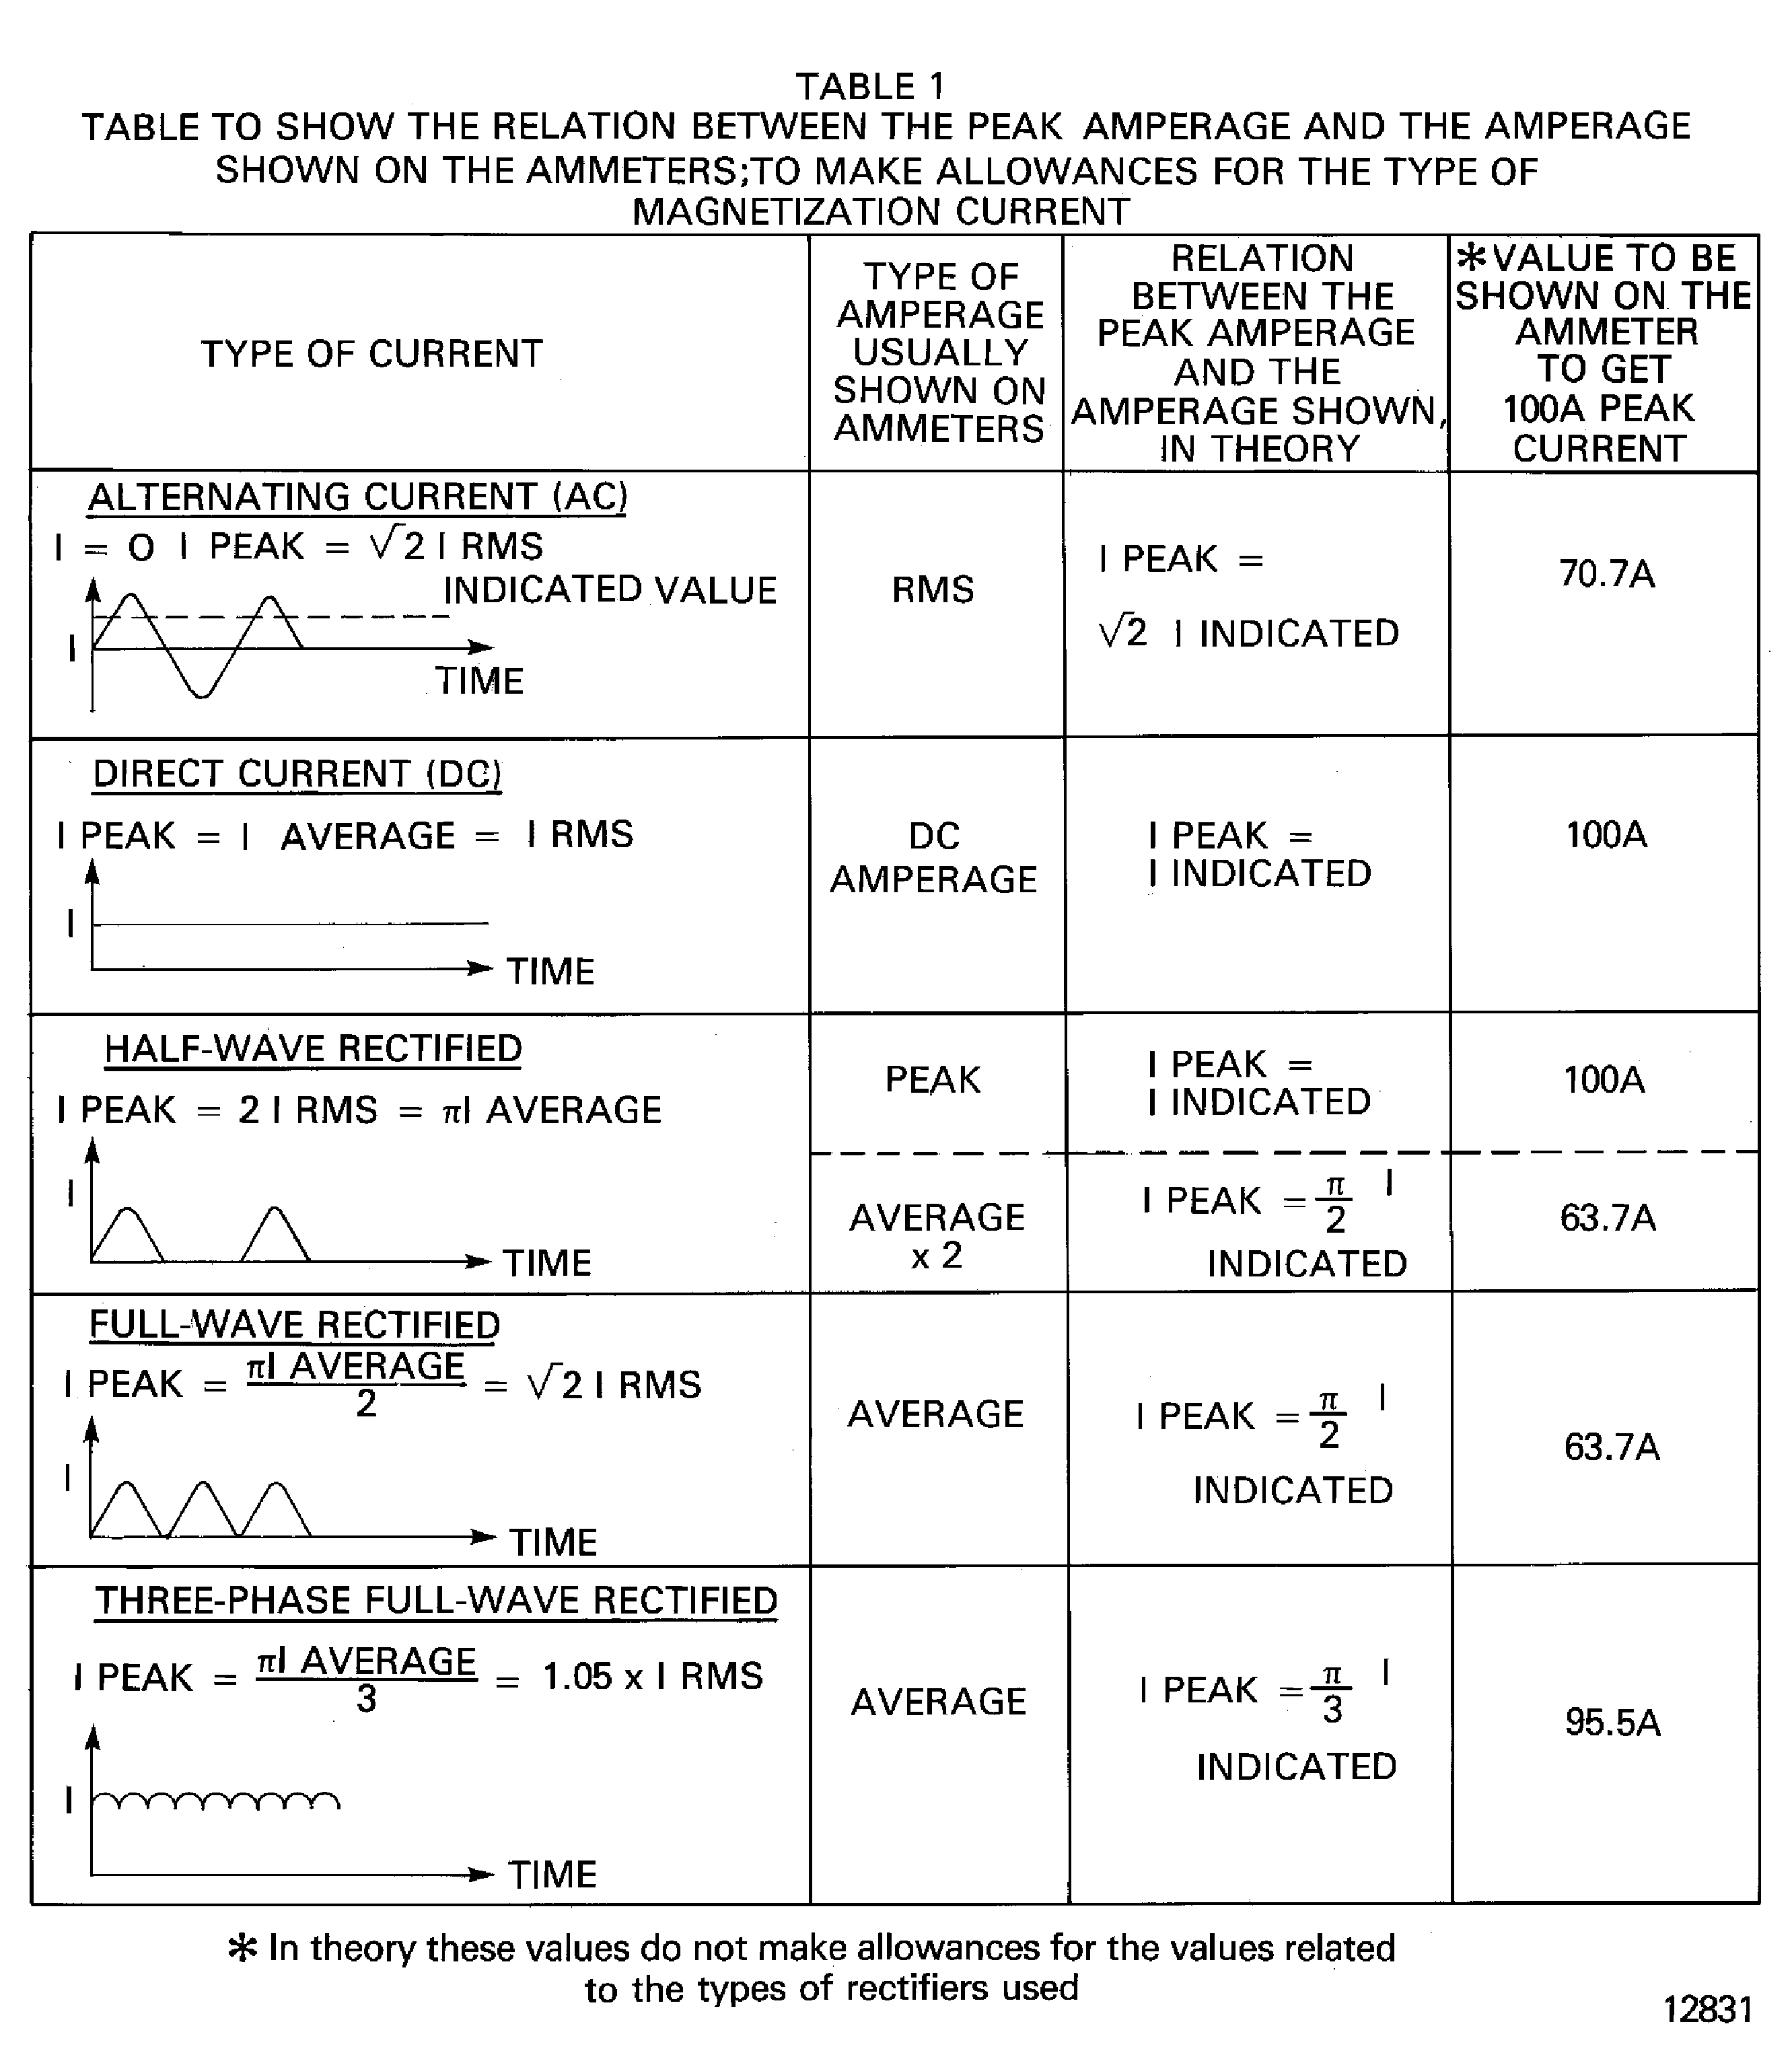
    Figure: Current flow inspection procedures

    Current flow inspection procedures
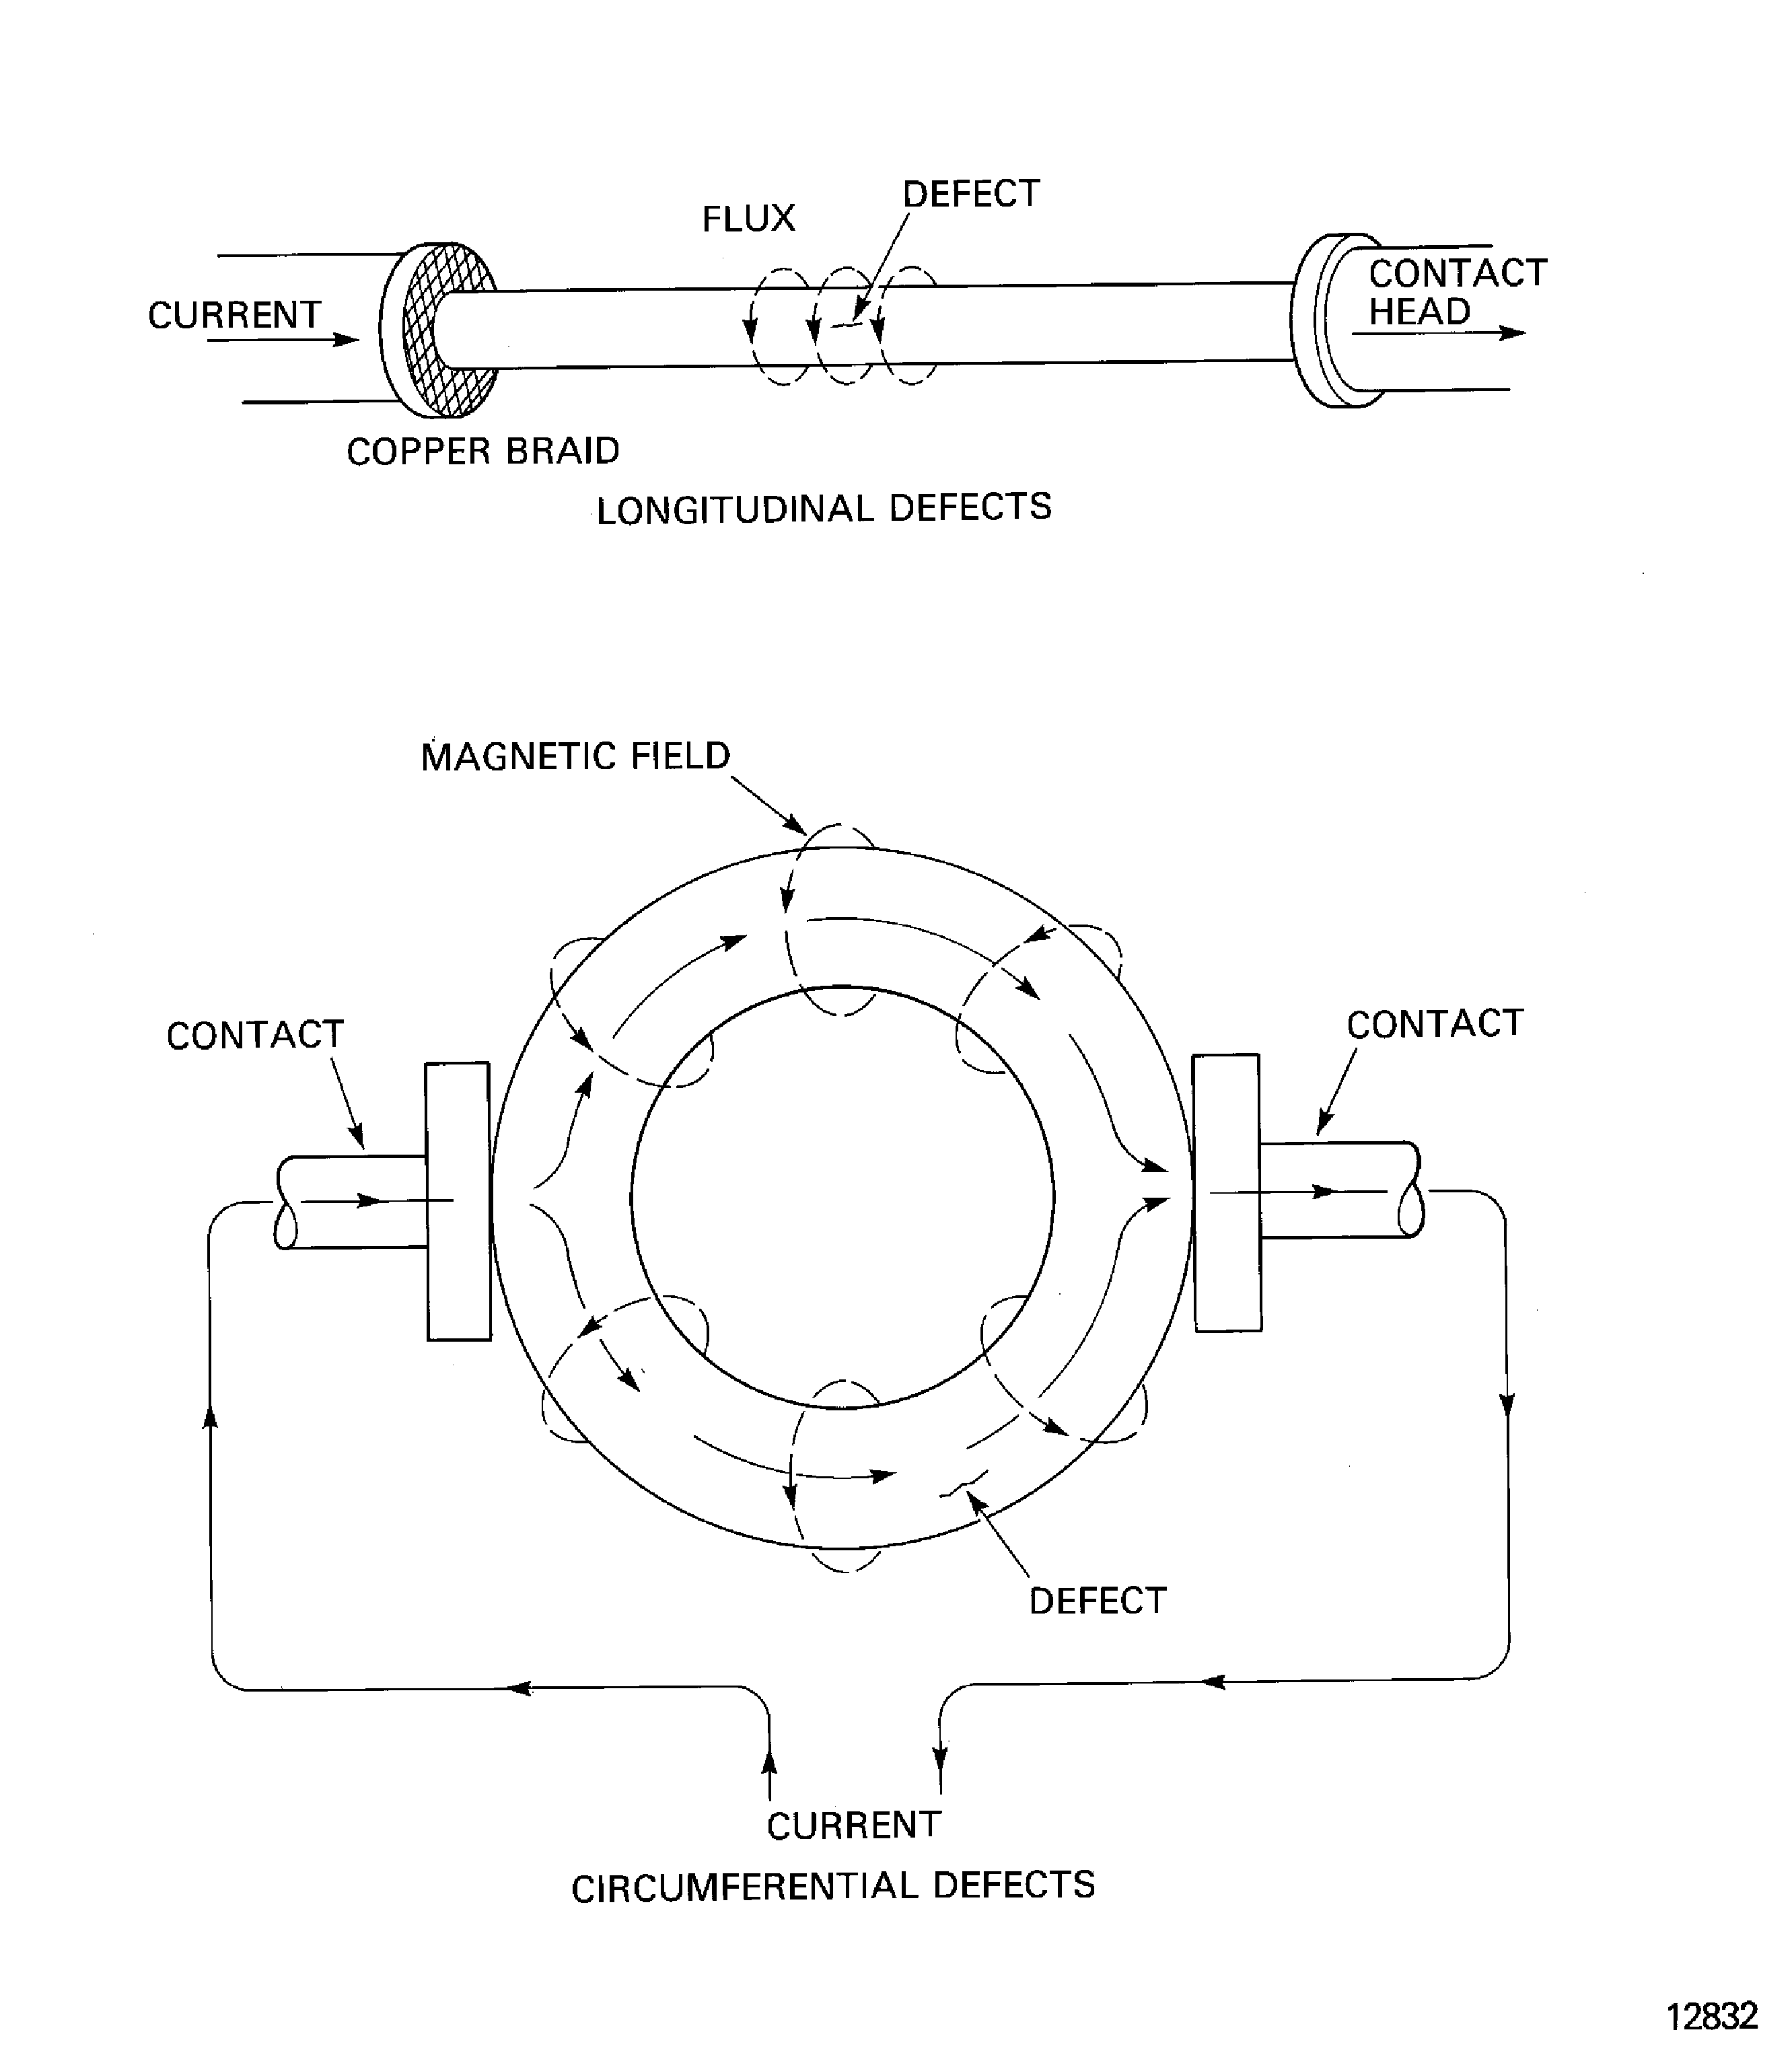
    Figure: Threading bar inspection procedures

    Threading bar inspection procedures
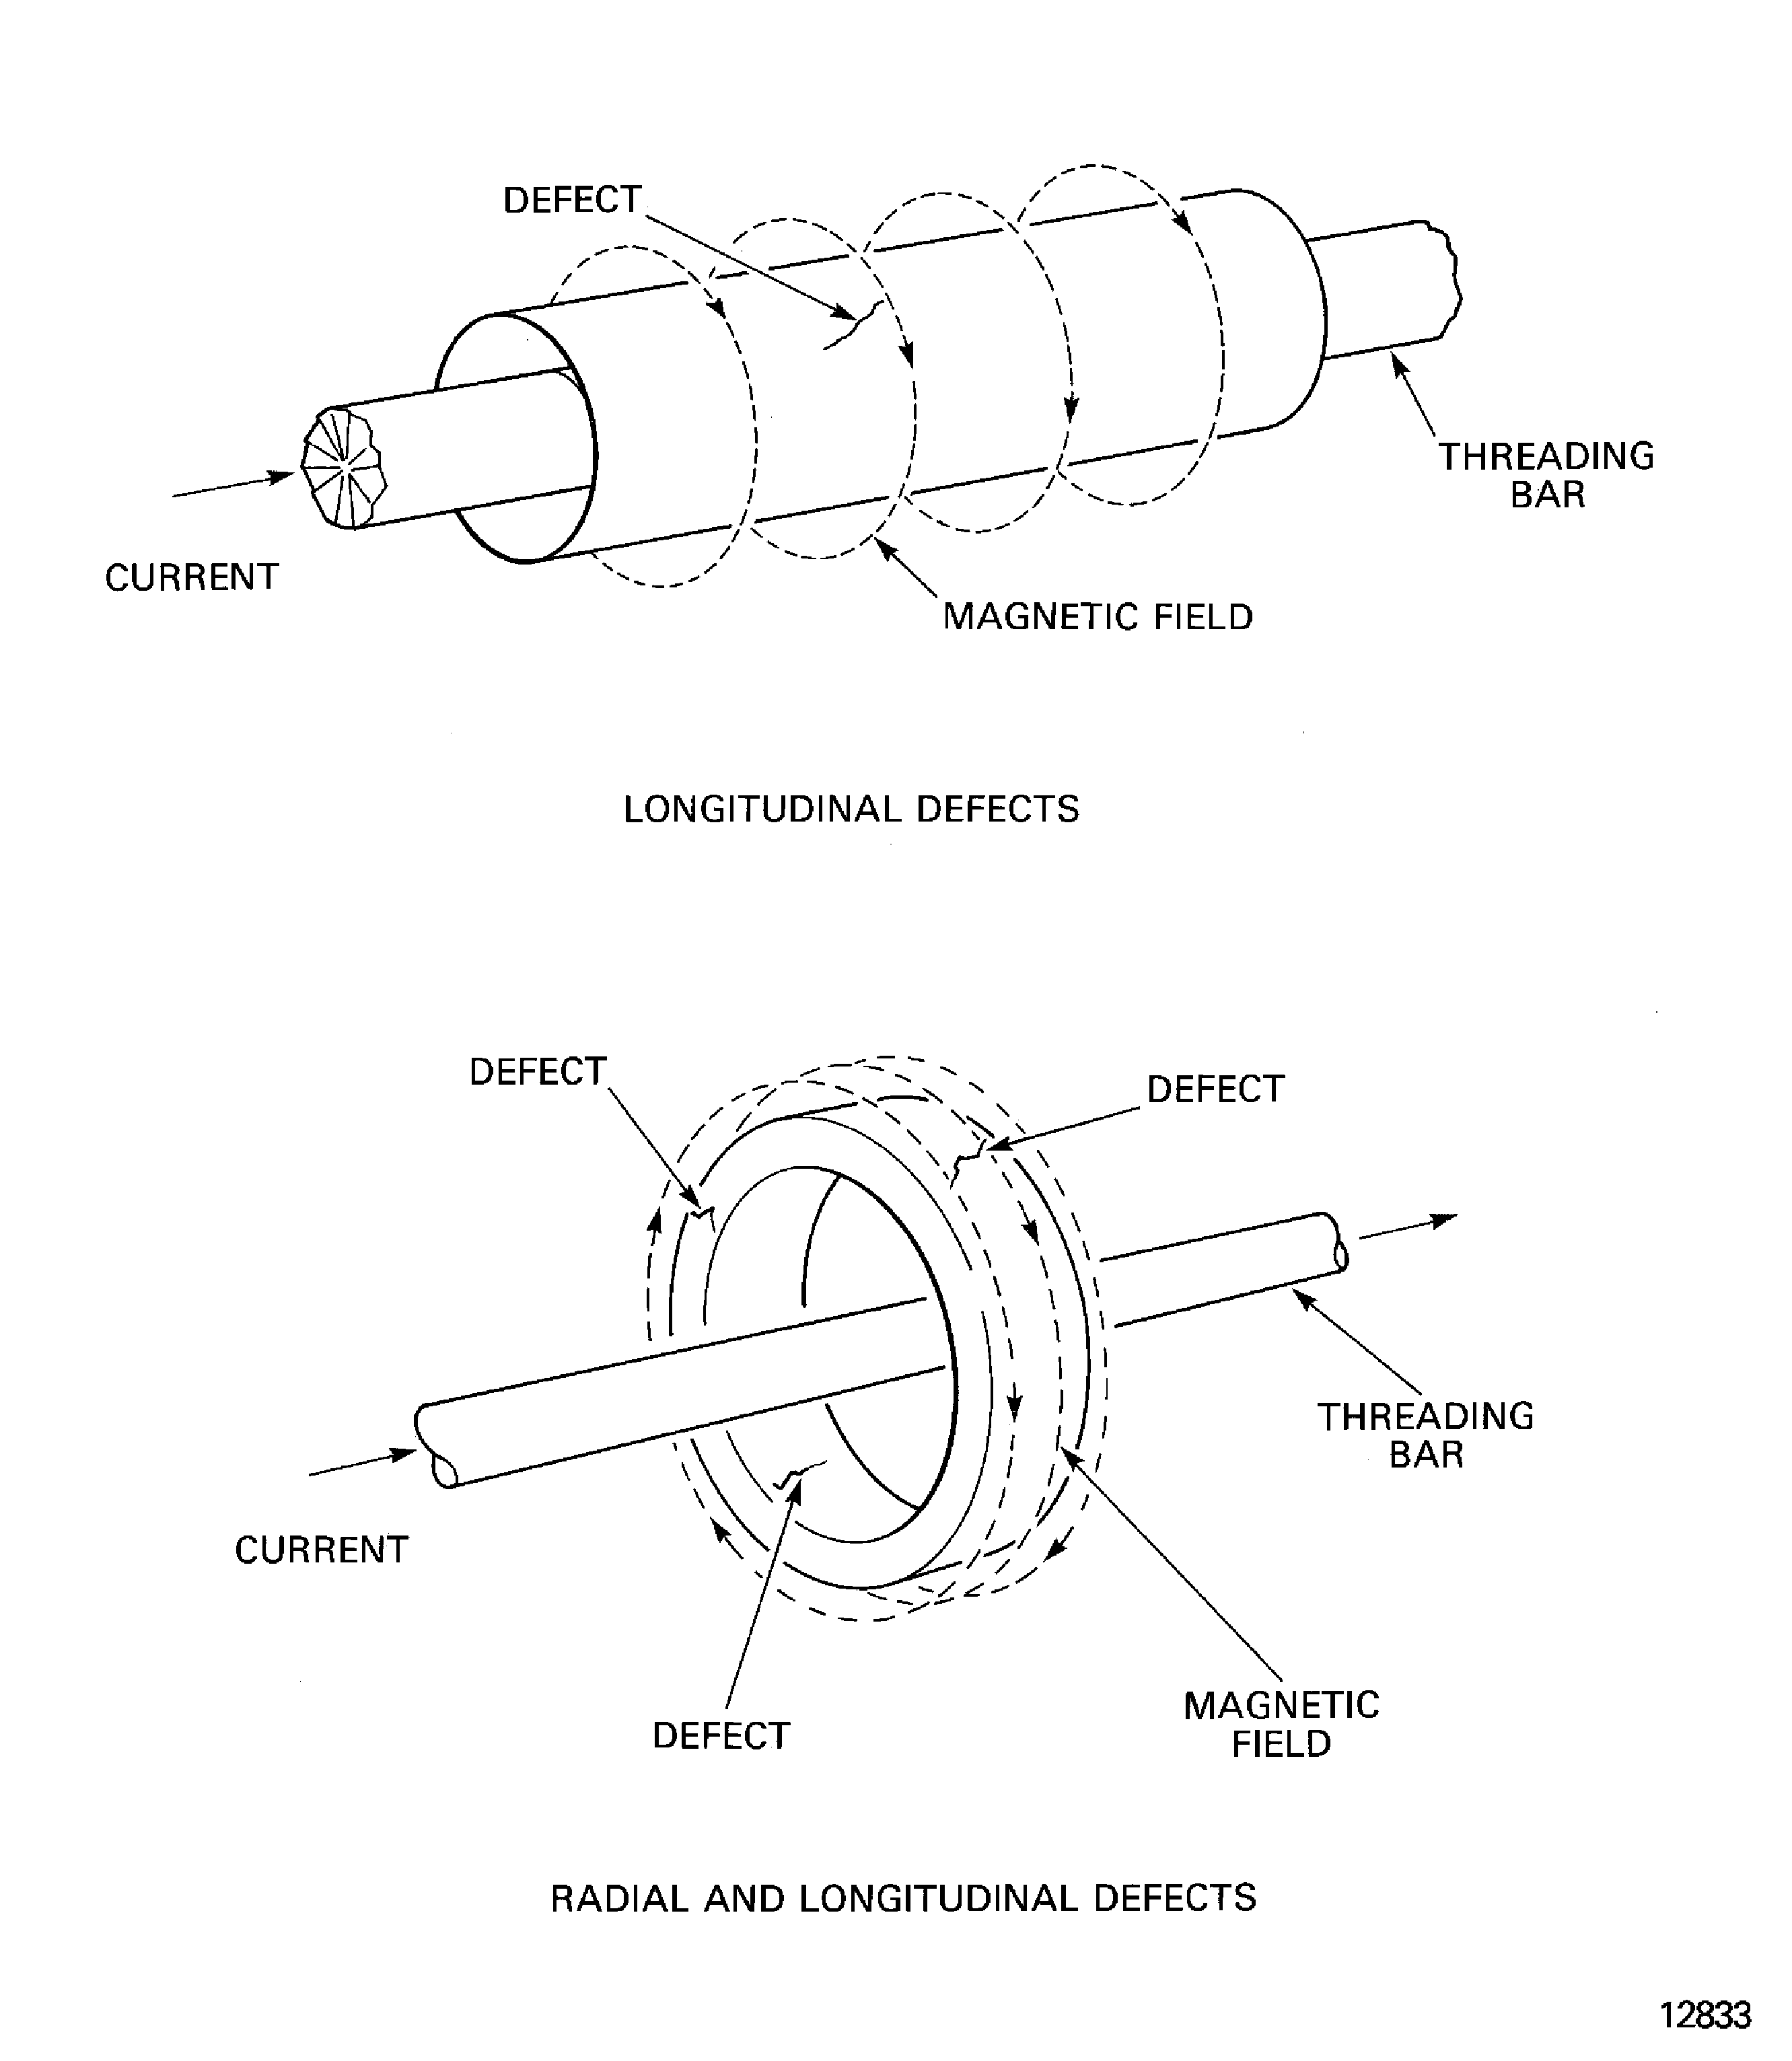
    Figure: Threading bar inspection procedures

    Threading bar inspection procedures
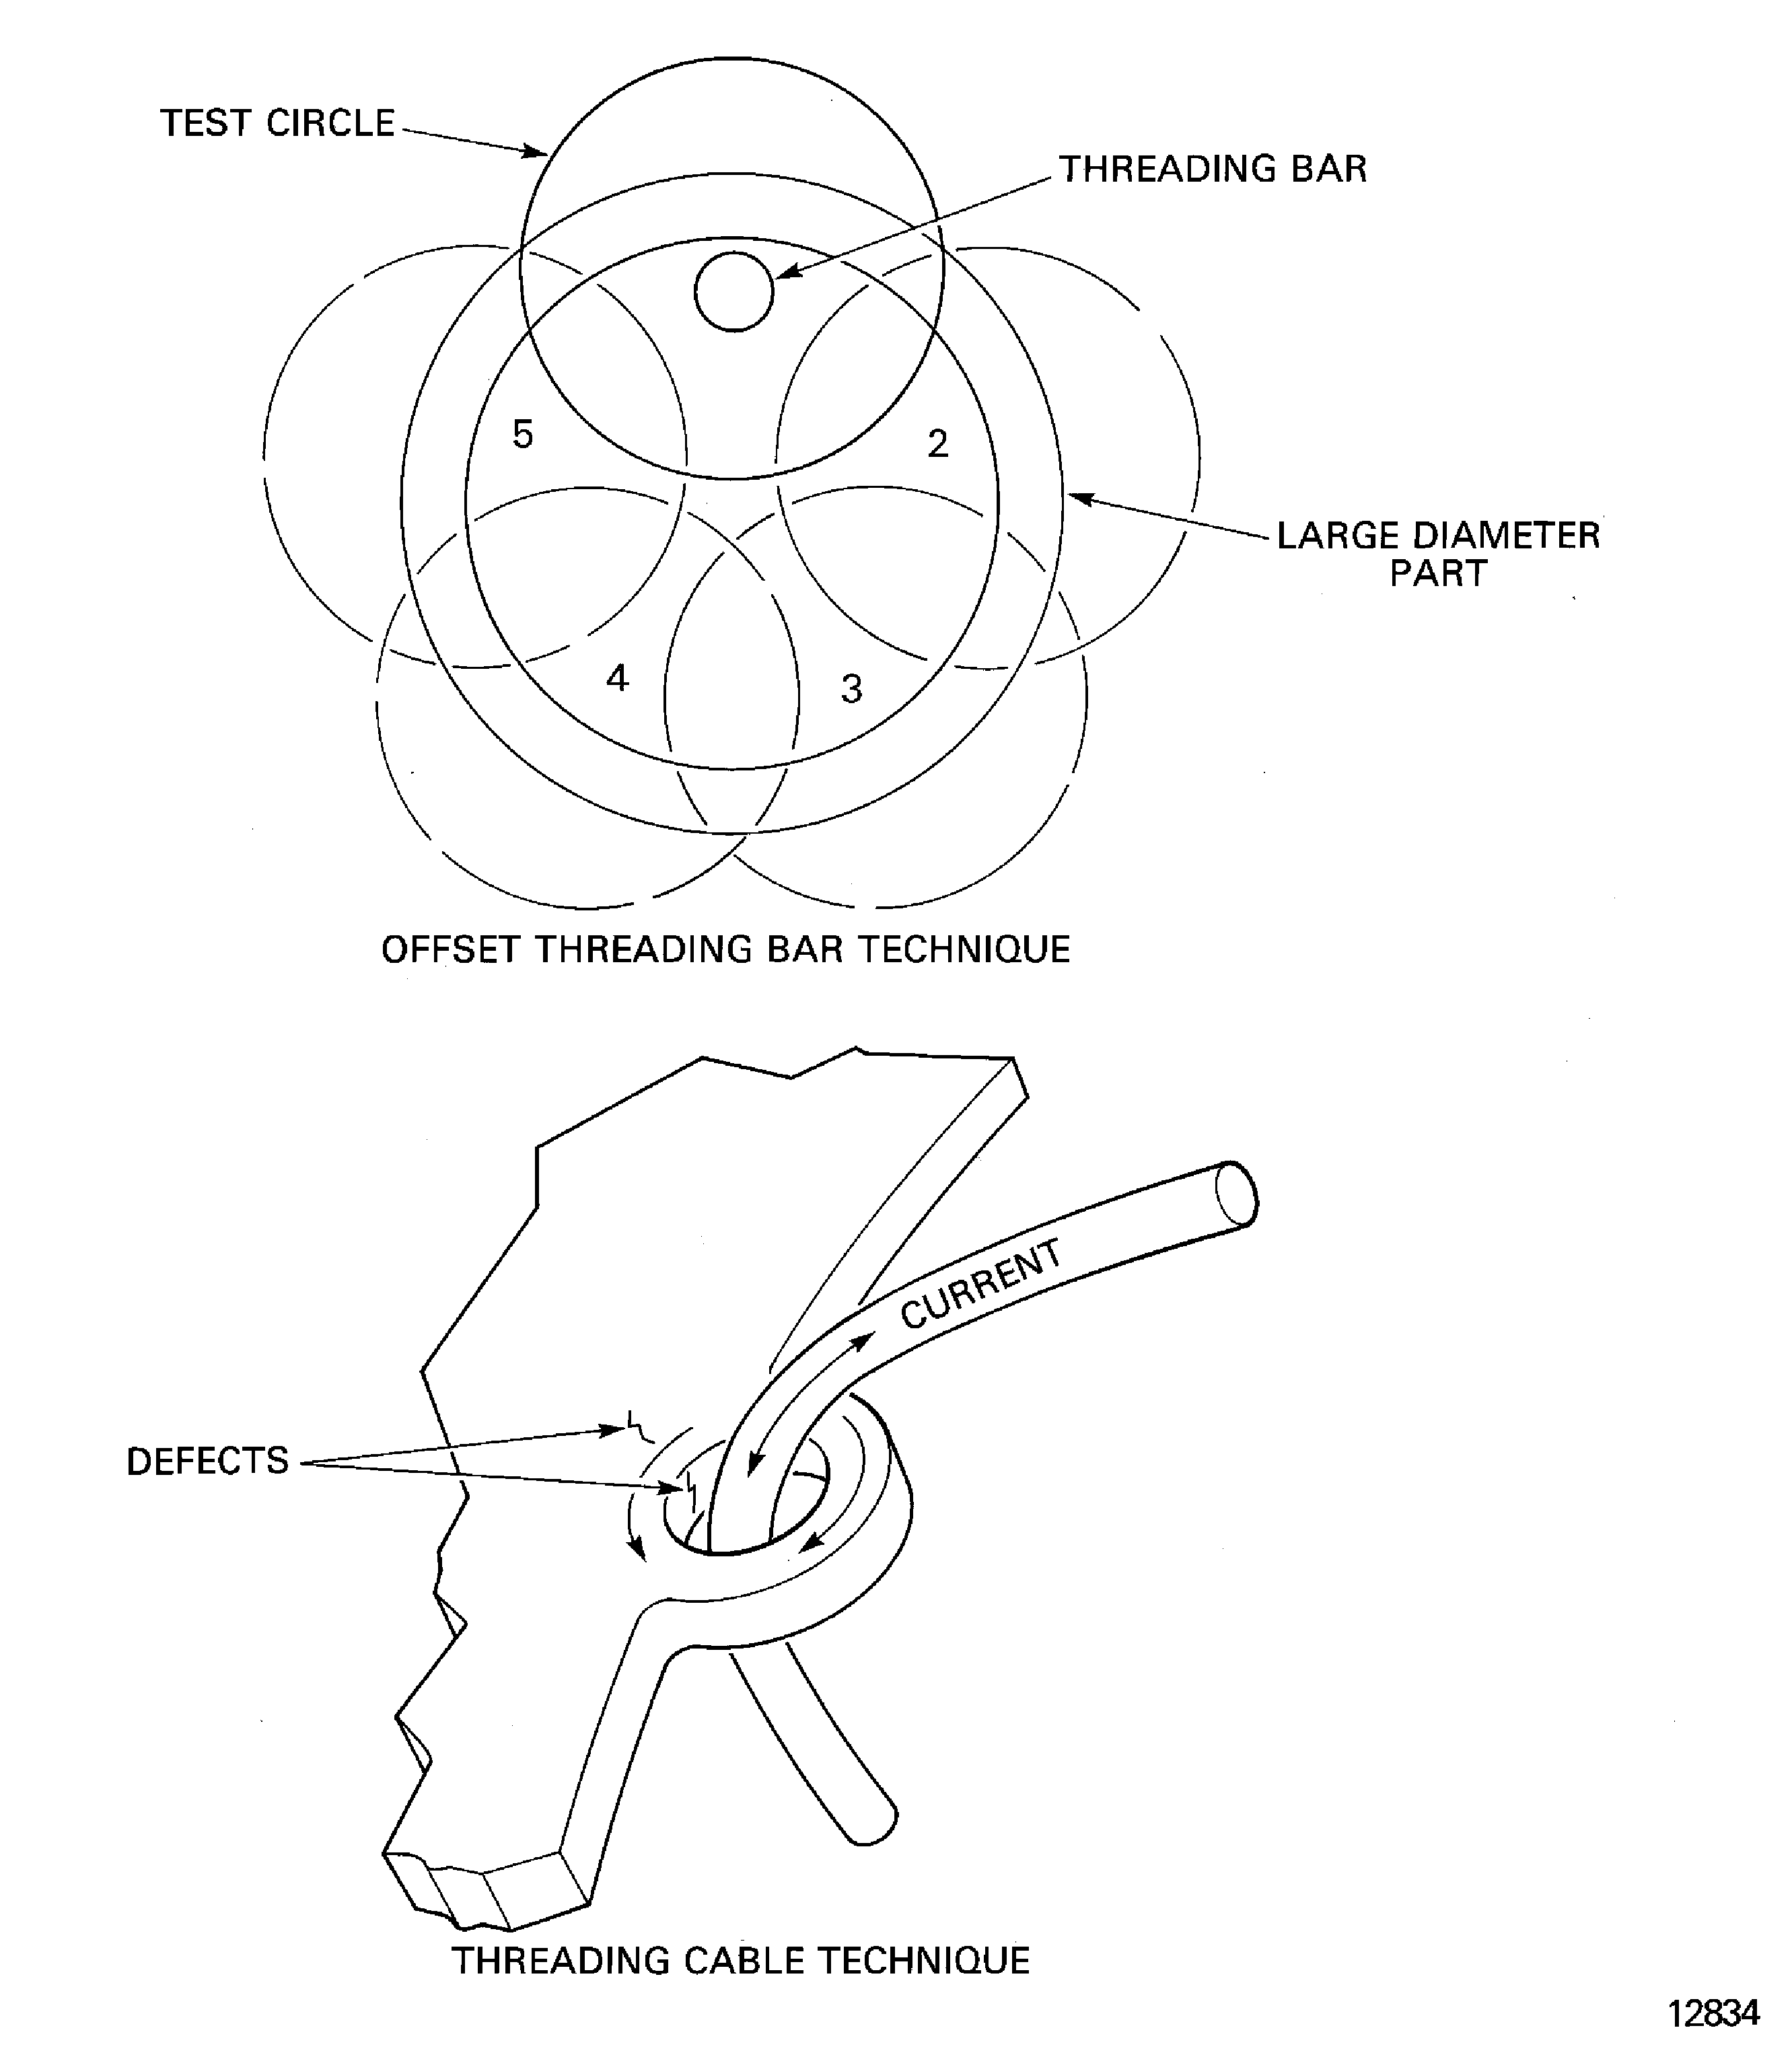
    Figure: Multiple threading bar/split coil inspection procedures

    Multiple threading bar/split coil inspection procedures
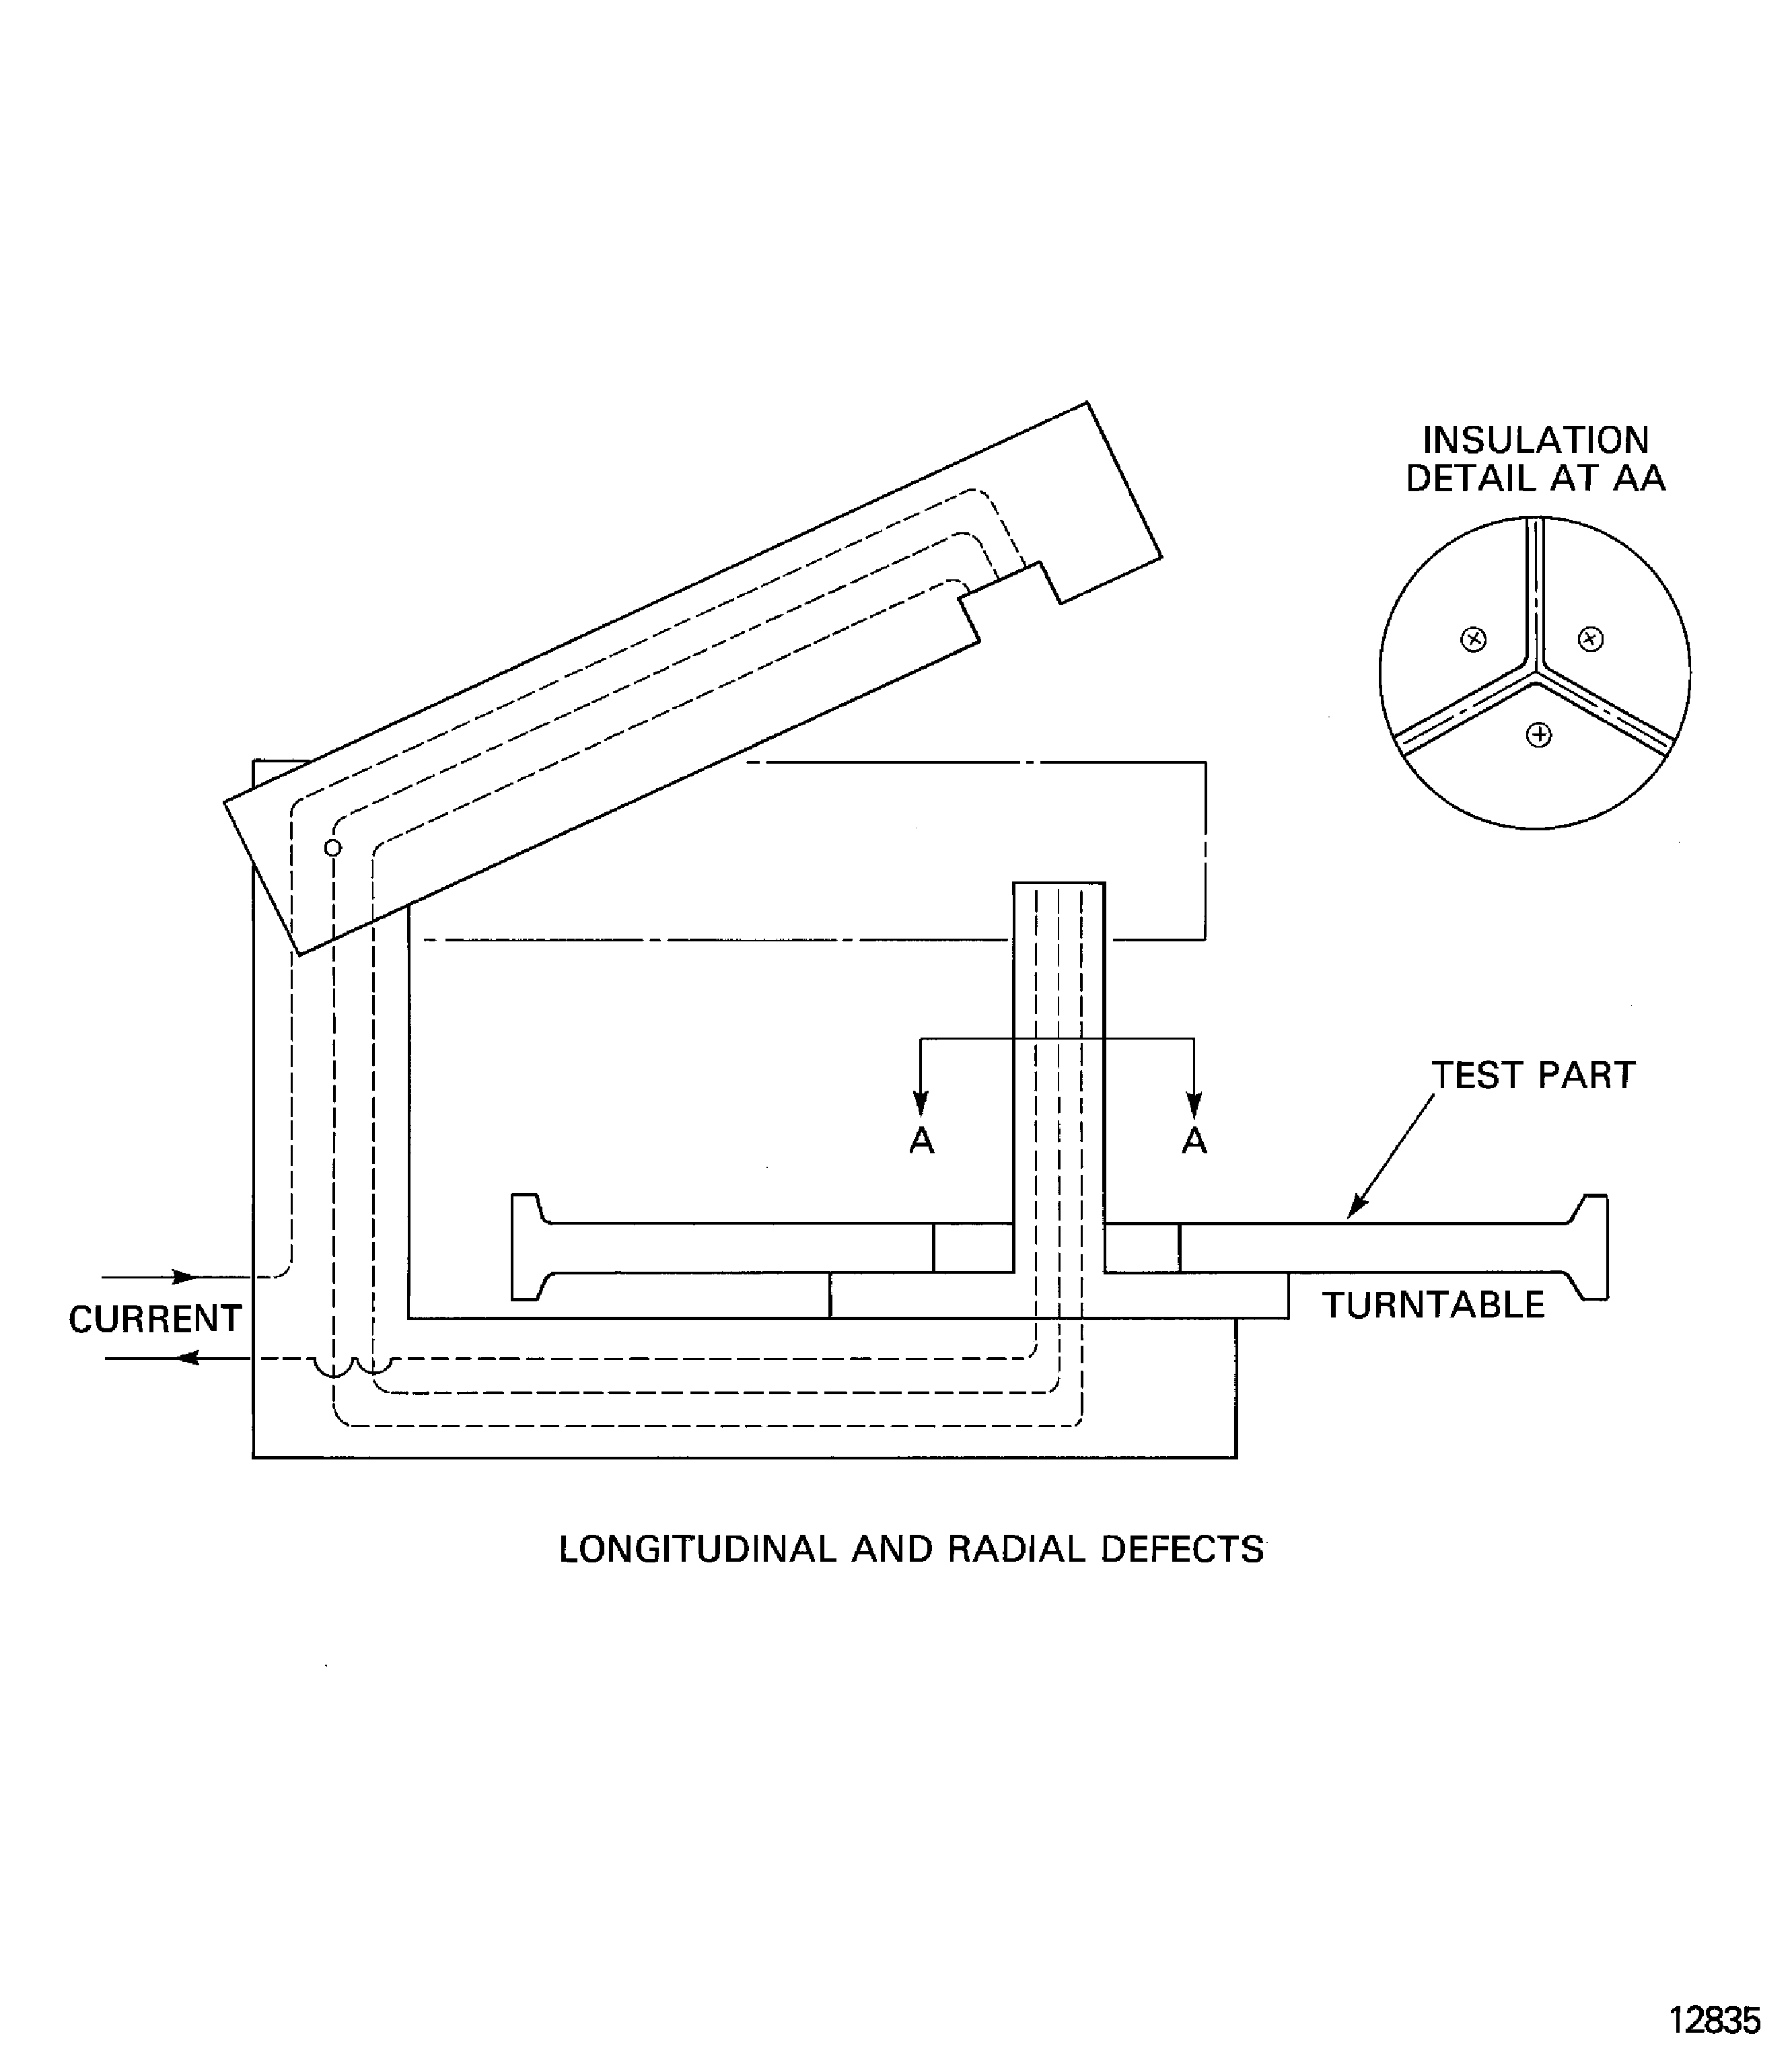
    Figure: Flat spiral coil inspection procedure

    Flat spiral coil inspection procedure
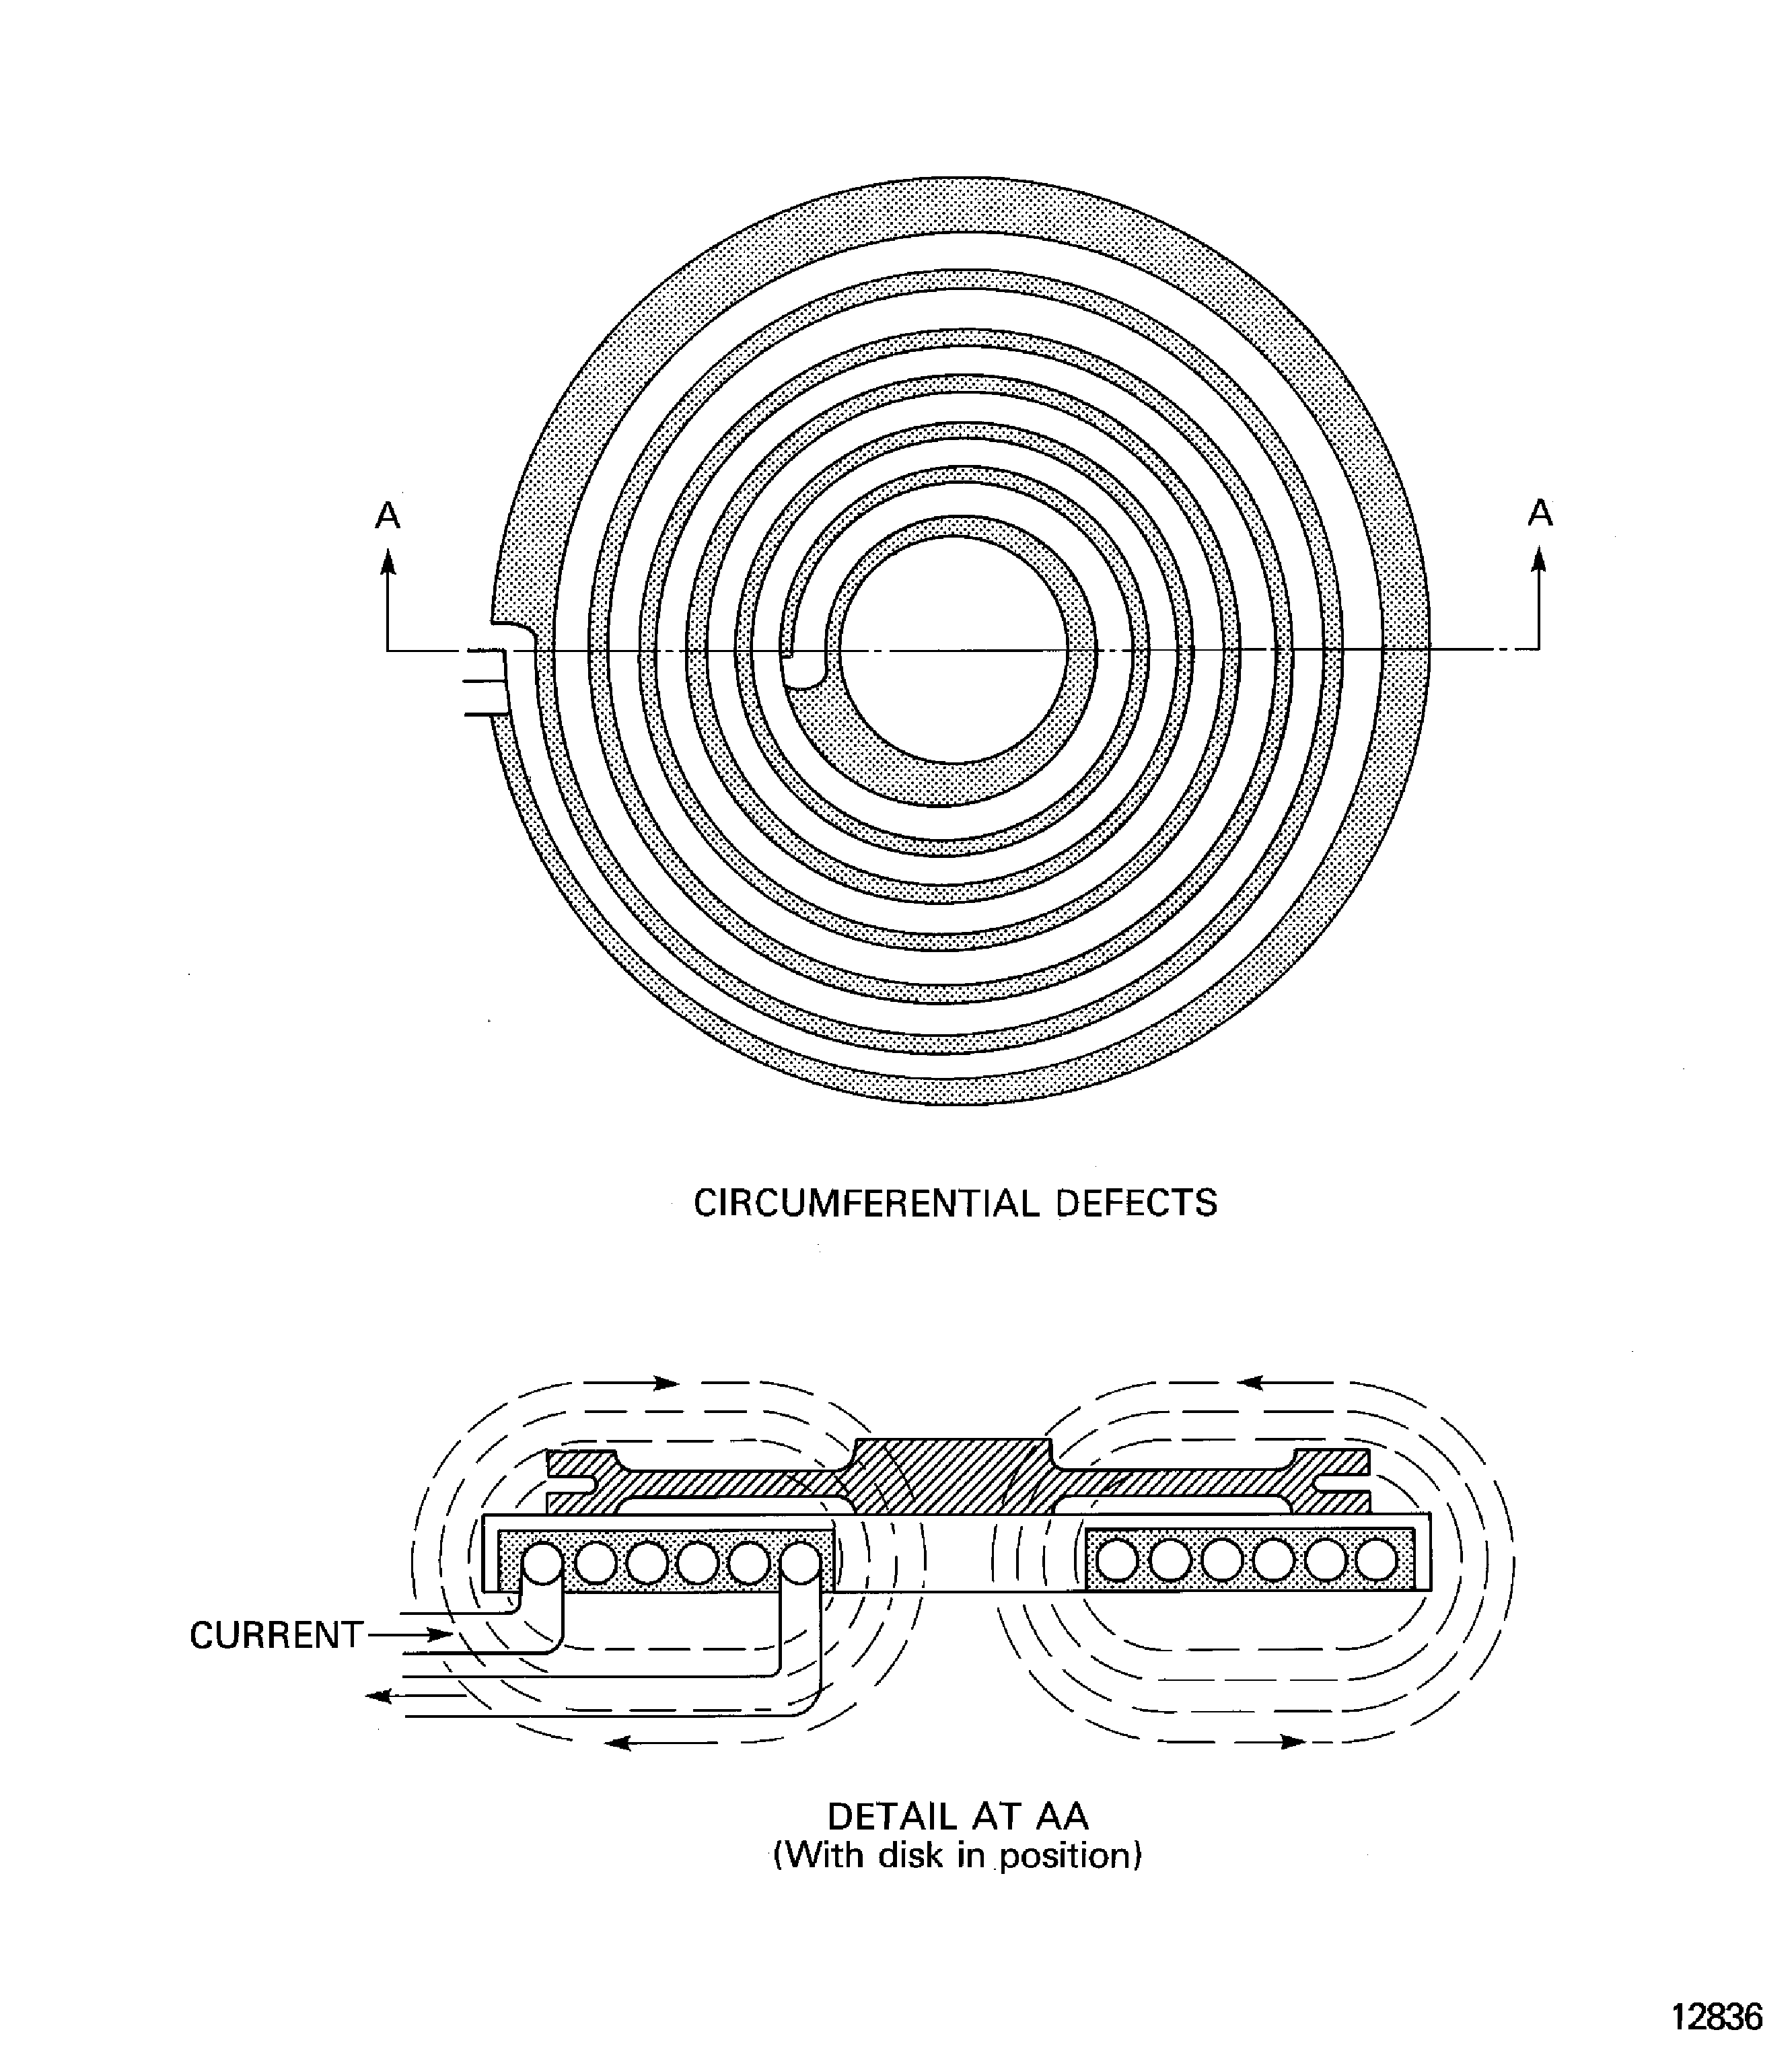
    Figure: Solenoid coil inspection procedures

    Solenoid coil inspection procedures
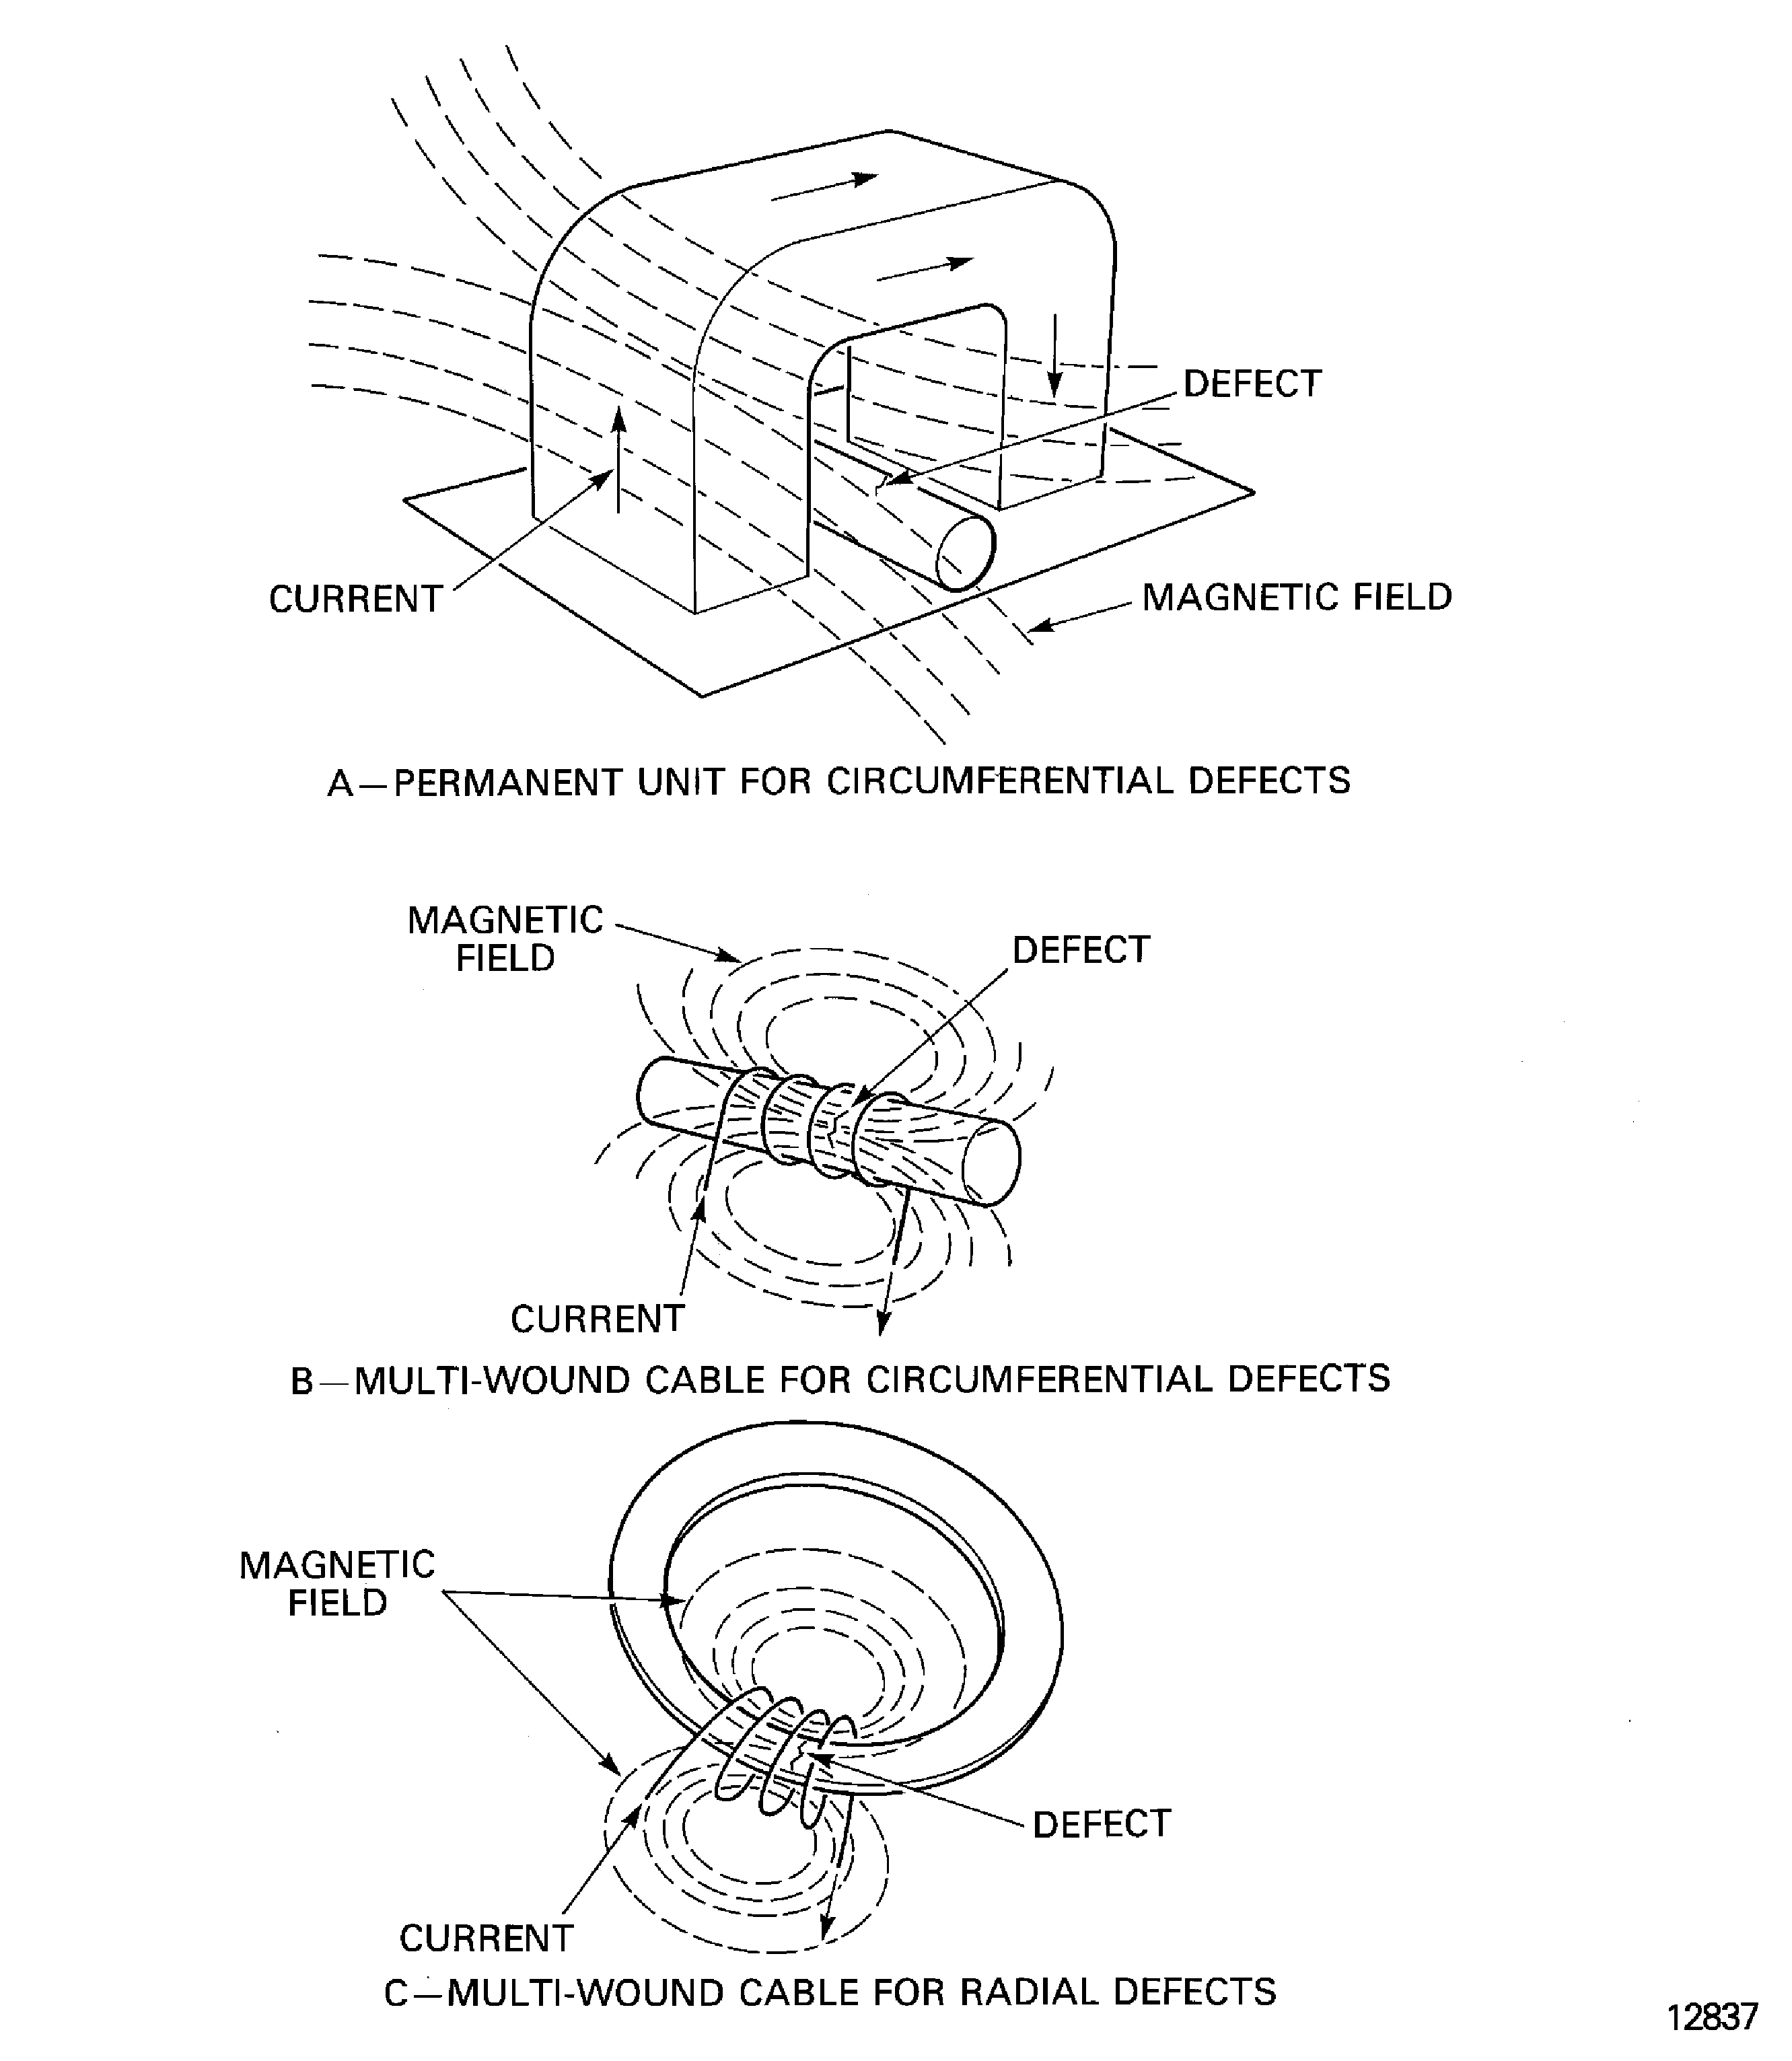
    Figure: Solenoid coil with built-in extenders for transverse defects

    Solenoid coil with built-in extenders for transverse defects
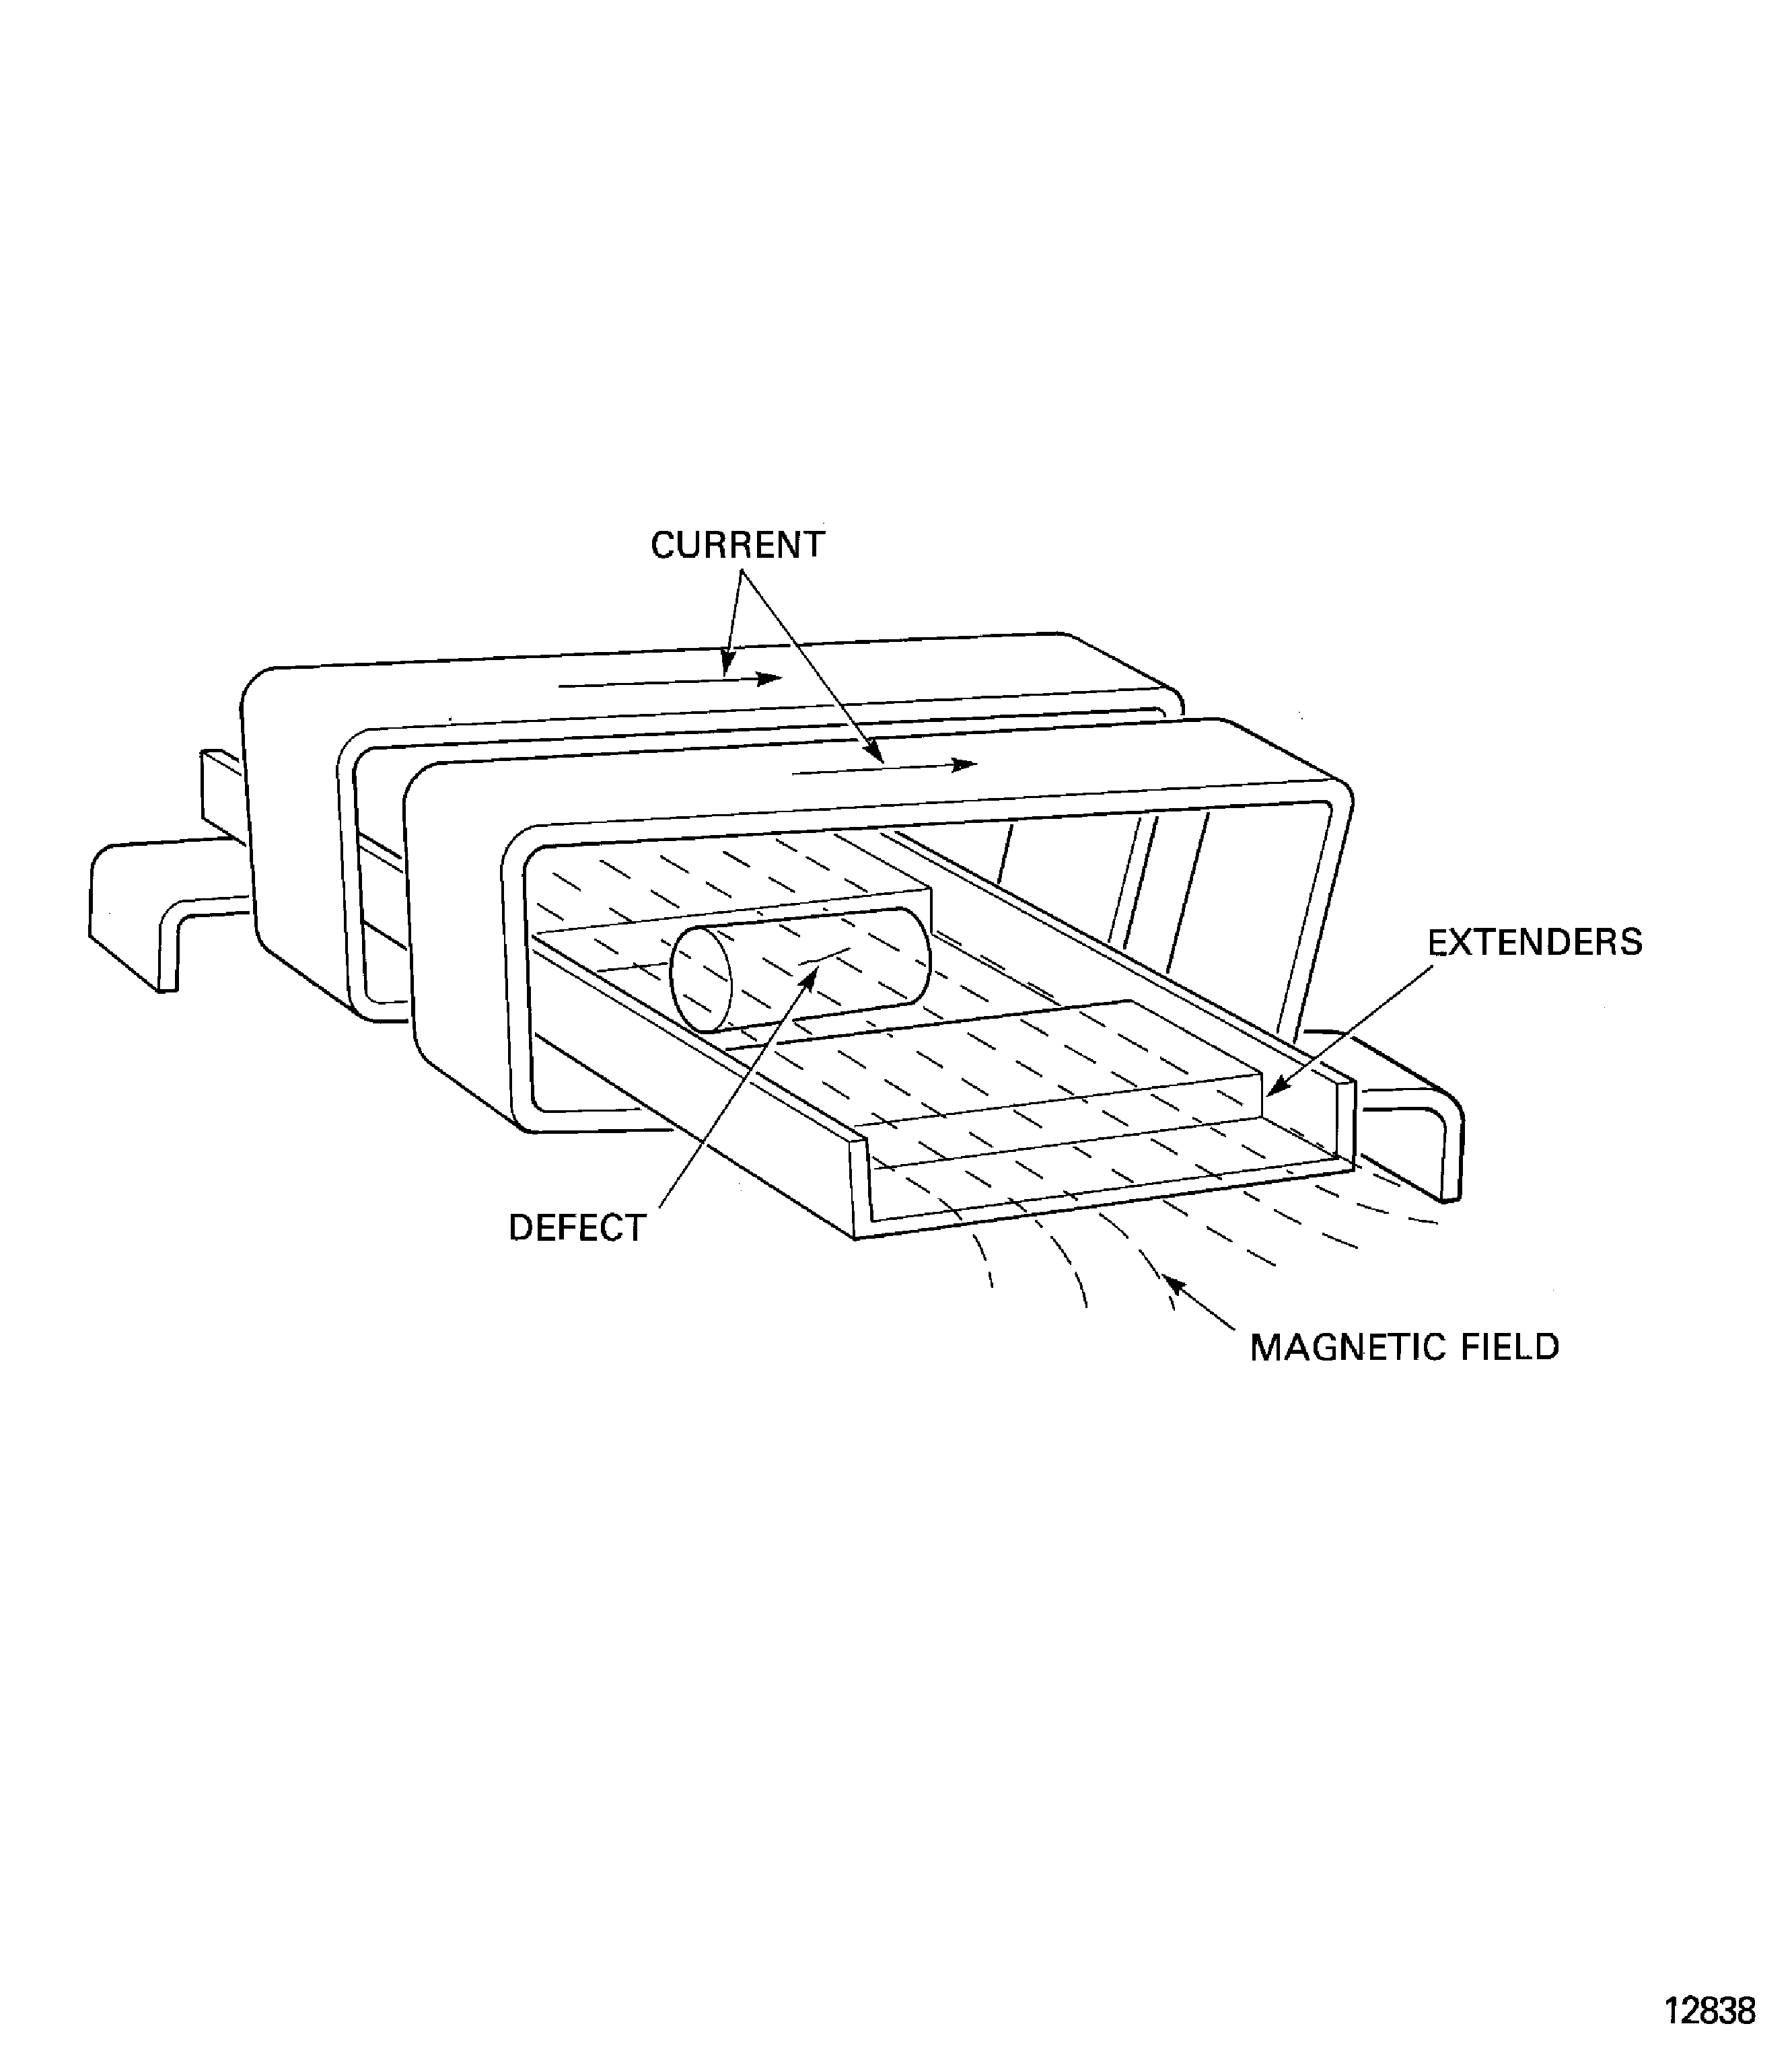
    Figure: Magnetic flow inspection procedure

    Magnetic flow inspection procedure
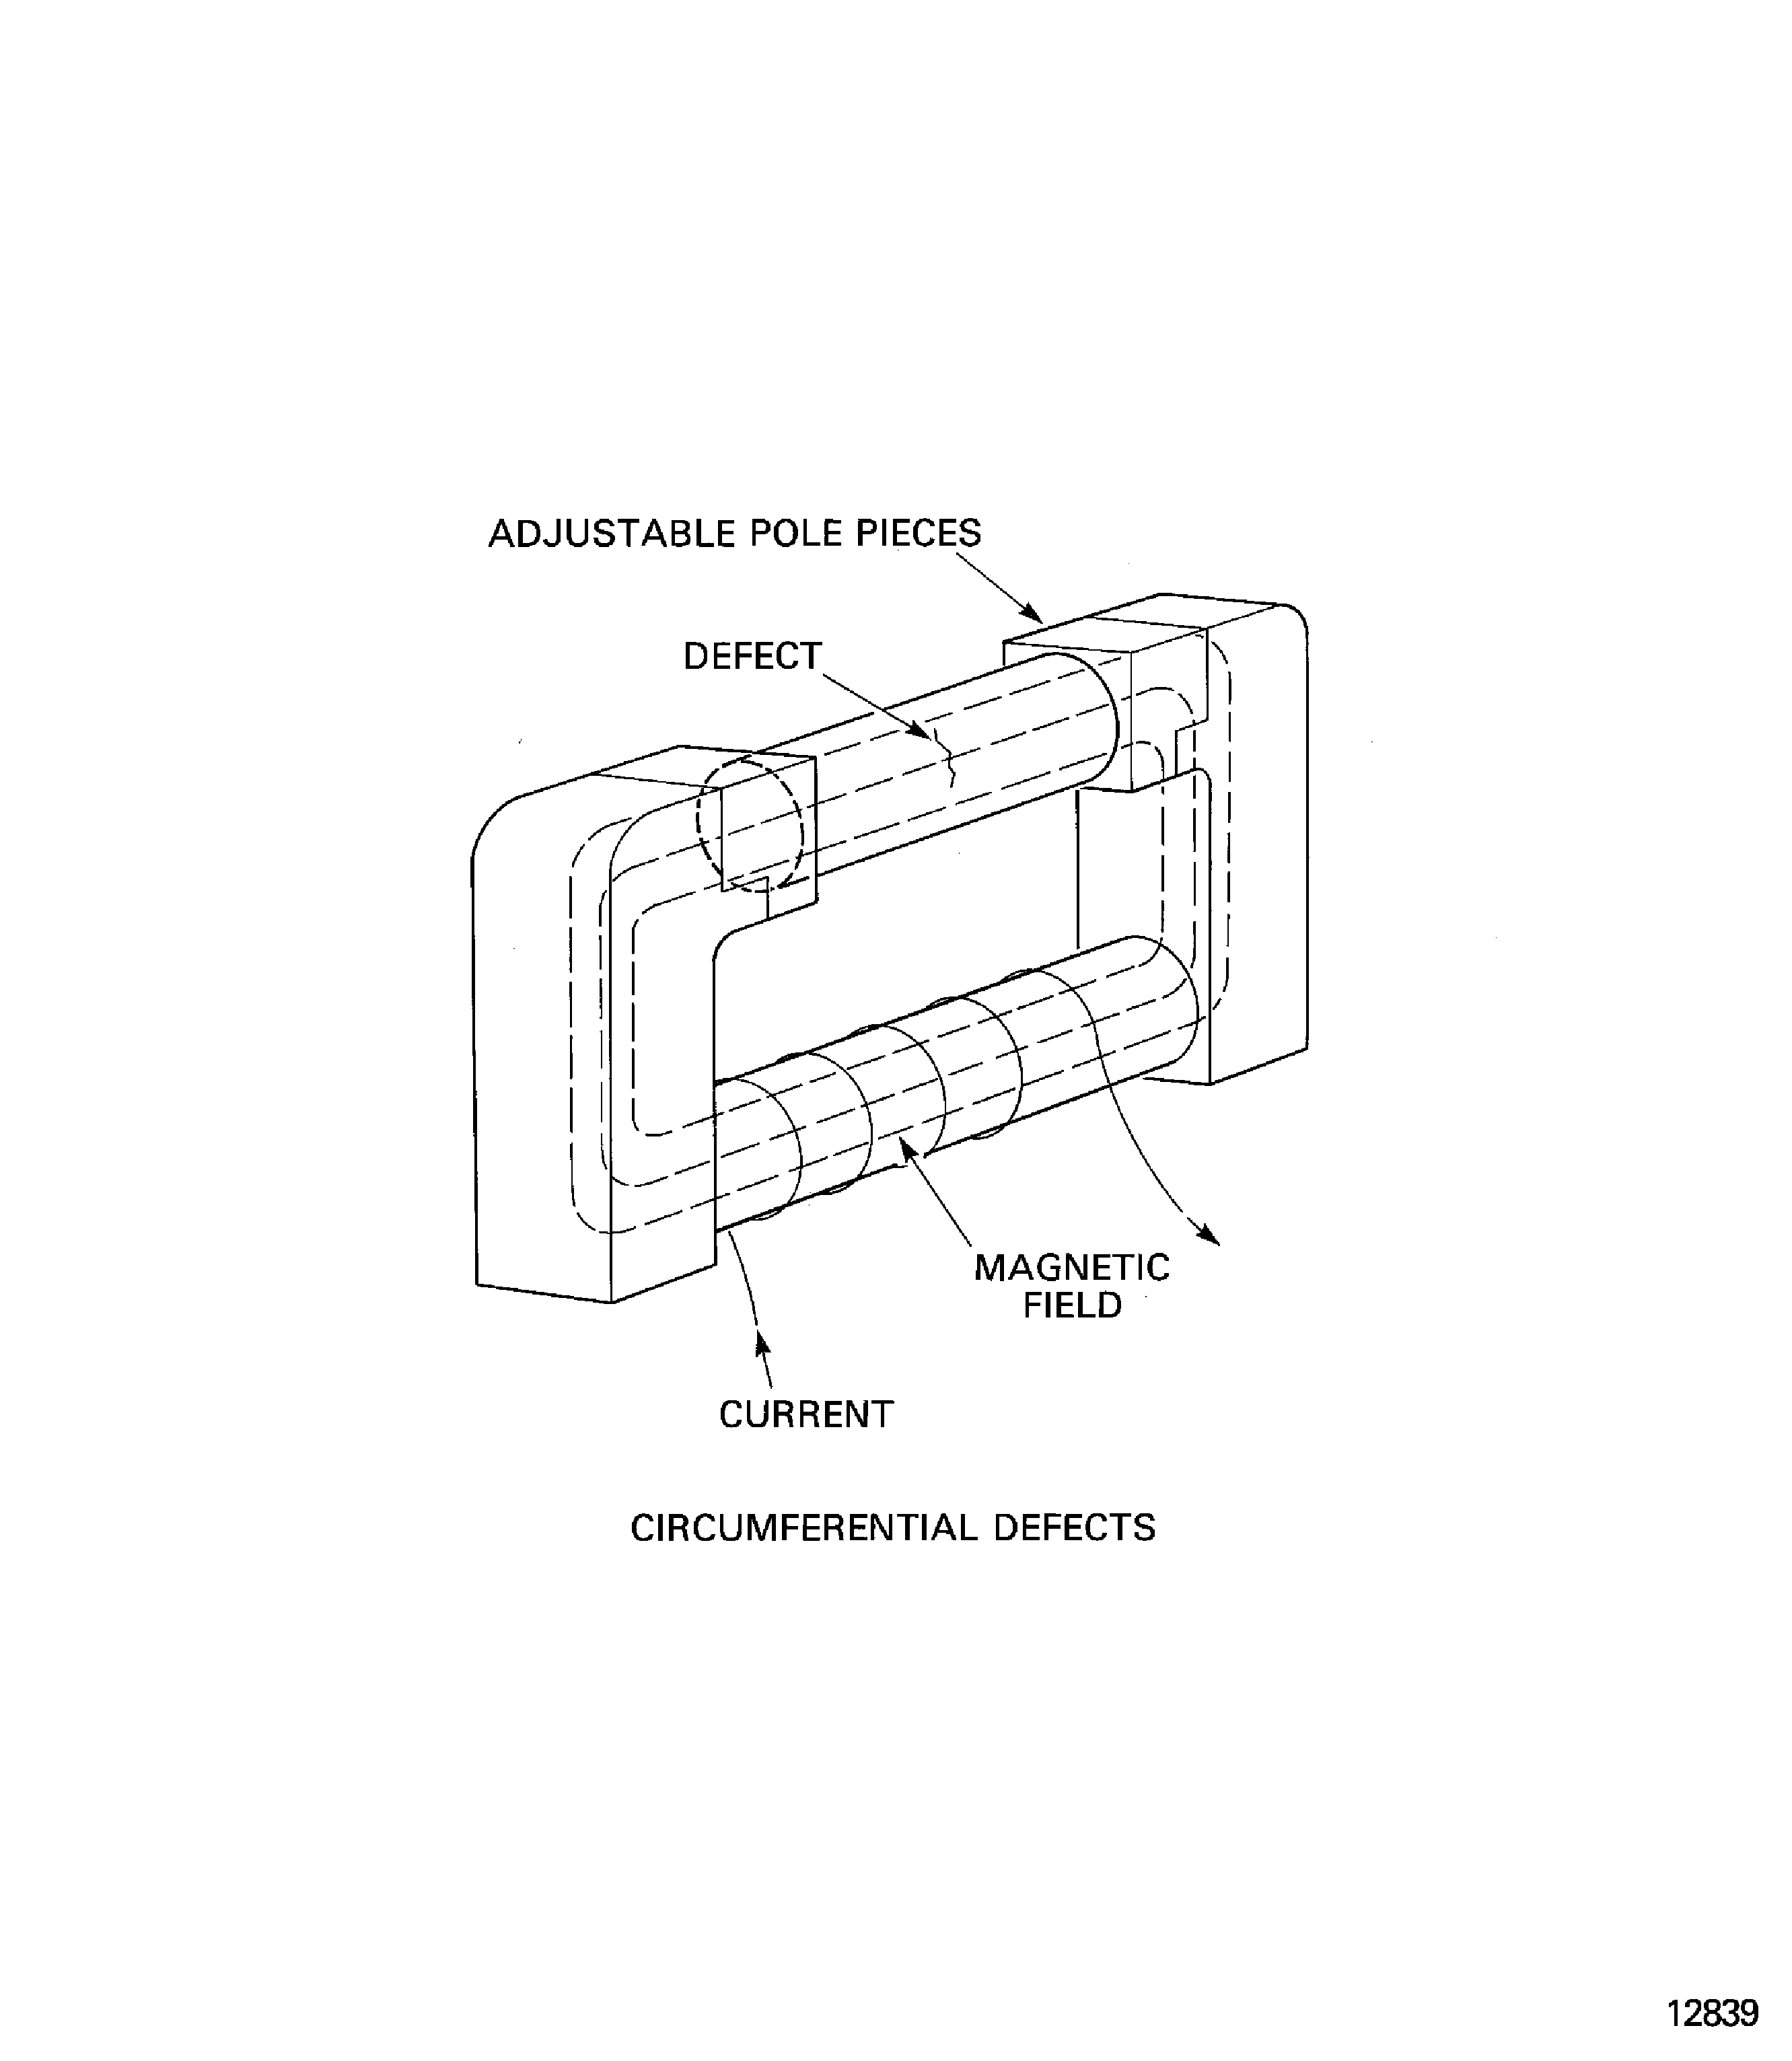
    Figure: Current induction inspection procedure

    Current induction inspection procedure
Requirements After Job Completion

Follow-On Conditions

NONE
Change Type:

Revised to add alternative materials and parameters. (20VC104)

Manufacturer Code:2R128
Enterprise Name:CASTROL INDUSTRIAL AMERICAS
BU Name:CASTROL INDUSTRIAL AMERICAS
Department:MAIL CODE 605-3E
Street:150 WEST WARRENVILLE ROAD
City:NAPERVILLE
State:IL
Zip Code:60563
Country:USA
Phone Number:1-877-641-1600, 1-630-420-4826
Fax Number:1-877-648-9801, 1-630-961-6244
Internet:www.castrol.com, www.castrolindustrial.com
Manufacturer Code:37676
Enterprise Name:ITW MAGNAFLUX
BU Name:MAGNAFLUX CORPORATION
Street:155 HARLEM AVE
City:GLENVIEW
State:IL
Zip Code:60025
Country:USA
Phone Number:1-847-657-5300
Fax Number:1-847-867-5388
Internet:www.magnaflux.com
Manufacturer Code:X222X
Enterprise Name:N/A – REFER TO APPLICABLE COMAT SUFFIX
Manufacturer Code:X222X
Supply Number:CoMat 06-011
Type:sp01
Supply Short Name:CoMat 06-011 MAGNETIC PARTICLES, FLUORESCENT, DRY POWDER
Supply Name:CoMat 06-011 MAGNETIC PARTICLES, FLUORESCENT, DRY POWDER
Specification Groups:
Doc NumberType
Where CoMat 06-011 is specified with no suffix, use one of the CoMat 06-011 letter suffix alternative materials.
Suppliers:
ManufacturerRemarks
X222X
Manufacturer Code:2R128
Supply Number:CoMat 06-058
Type:sp01
Supply Short Name:CoMat 06-058 FLUX INDICATOR
Supply Name:CoMat 06-058 FLUX INDICATOR
Specification Groups:
Doc NumberType
SURCHECK INDICATOR TYPE 2
OMAT: 612
Suppliers:
ManufacturerRemarks
2R128
IE280
IE478
37995
K6835
IE281
K0132
Manufacturer Code:37676
Supply Number:CoMat 06-176
Type:sp01
Supply Short Name:CoMat 06-176 MAGNETIC PARTICLE SUSPENSION FLUID, HIGH FLASH POINT
Supply Name:CoMat 06-176 MAGNETIC PARTICLE SUSPENSION FLUID, HIGH FLASH POINT
Specification Groups:
Doc NumberType
PMC 1887-1 (PW REF)CARRIER II
OMAT 1/260D (RR REF)
Suppliers:
ManufacturerRemarks
37676
Manufacturer Code:X222X
Supply Number:CoMat 06-180
Type:sp01
Supply Short Name:CoMat 06-180 MAGNETIC, INK FLUORESCENT
Supply Name:CoMat 06-180 MAGNETIC, INK FLUORESCENT
Specification Groups:
Doc NumberType
Where CoMat 06-180 is specified with no suffix, use one of the CoMat 06-180 letter suffix alternative materials.
Suppliers:
ManufacturerRemarks
X222X