Export Control
EAR Export Classification: Not subject to the EAR per 15 C.F.R. Chapter 1, Part 734.3(b)(3), except for the following Service Bulletins which are currently published as EAR Export Classification 9E991: SBE70-0992, SBE72-0483, SBE72-0580, SBE72-0588, SBE72-0640, SBE73-0209, SBE80-0024 and SBE80-0025.Copyright
© IAE International Aero Engines AG (2001, 2014 - 2021) The information contained in this document is the property of © IAE International Aero Engines AG and may not be copied or used for any purpose other than that for which it is supplied without the express written authority of © IAE International Aero Engines AG. (This does not preclude use by engine and aircraft operators for normal instructional, maintenance or overhaul purposes.).Applicability
All
Common Information
TASK 70-31-03-310-501 The Procedure For Electron Beam Welding
General
This TASK gives the necessary basic procedure, to do electron beam weld repairs to the engine components, as follows:
The theory of electron beam welding
The types of machine
The control of the machine functions
The types of joint
Weld geometry and metallurgy
Test pieces
Tooling
The general procedures to clean and prepare for welding
The general procedures to demagnetize the component
The welding procedure
Quality control
NOTE
Preliminary Requirements
Pre-Conditions
NONEConsumables, Materials and Expendables
| Name | Manufacturer | Part Number / Identification | Quantity | Remark |
|---|---|---|---|---|
| CoMat 01-025 NITRIC ACID HNO3, TECHNICAL GRADE | LOCAL | CoMat 01-025 | ||
| CoMat 01-027 HYDROFLUORIC ACID | LOCAL | CoMat 01-027 | ||
| CoMat 01-031 ACETONE (CH3)2CO | LOCAL | CoMat 01-031 | ||
| CoMat 01-099 HYDROCHLORIC ACID | K6835 | CoMat 01-099 | ||
| CoMat 01-124 ISOPROPYL ALCOHOL | LOCAL | CoMat 01-124 | ||
| CoMat 03-012 OXALIC ACID (COOH)2 | LOCAL | CoMat 03-012 | ||
| CoMat 03-013 METHYLATED SPIRIT | LOCAL | CoMat 03-013 | ||
| CoMat 03-014 PICRIC ACID (NO2)3C6H2OH | LOCAL | CoMat 03-014 | ||
| CoMat 03-015 ALCOHOL | LOCAL | CoMat 03-015 | ||
| CoMat 03-026 LIQUID NITROGEN | LOCAL | CoMat 03-026 | ||
| CoMat 04-001 BERKATEKT | K6835 | CoMat 04-001 |
Spares
NONESafety Requirements
WARNING
Procedure
The vacuum helps the free movement of the electrons, they can not hit gas or air particles (in a vacuum). Thus, deterioration (of the flow of electrons) does not occur in the device (gun) which gives off the electrons. Also, weld contamination is prevented.
This is a type of fusion welding done in a vacuum. Heat is made because a high speed electron beam is focused on the material work surface. The beams kinetic energy changes into thermal energy when it hits this surface. Fusion occurs in the direction of and around the beam. This area solidifies and the weld joint is made.
SUBTASK 70-31-03-310-001 The Theory of Electron Beam Welding
Special low or high voltage machines are made to get a fast operation, when many components are welded at one time. The machine chamber is operated at 'soft' vacuum conditions (a vacuum pressure of 0.01 mm/Hg) or 'hard' vacuum conditions (a vacuum pressure of 0.0001 mm/Hg or lower). The unit used to measure vacuum pressure is 'torr'.
The welds made with the different machines are very similar. The TASKS given in the applicable Engine Manual will not specify a particular type of machine to use. Each machine must operate to get the correct geometry and metallurgy. The applicable TASK gives the necessary data to help you to set the particular machine in use.
If a special procedure is necessary the TASK will tell you the type of machine to use to get the best results.
The high voltage machines operate up to 150 kilovolts (approximately).
SUBTASK 70-31-03-310-002 The Types of Machine
The beam power, this is beam current and accelerating voltage.
The heat supply through the complete weld.
The dimension of the beam focus spot on the material work surface.
The material work surface 'traverse' speed.
If a special material is to be welded (and could be difficult to weld) the applicable TASK will tell you if more controls are necessary.
To control the weld geometry and quality you can make an adjustment to:
The supply of heat through the complete weld can be changed with the induction of low amplitude movement of variable high frequency in the beam. This is done with a programmed magnetic coil system. You can make the different movements with the beam; such as circular, elliptical or linear. Thus the heat supply is changed and this can cause a change in the solidification rate of the weld metal. This also gives a method to make the weld wider and more parallel.
SUBTASK 70-31-03-310-003 The Control of the Machine Functions
Heavy porosity and cavitation in high vapor pressure materials is caused if the gas becomes caught. This gas is contaminated material and chemicals (these are both as ionized vapors) given off from the fusion zone. If a large quantity is made (because of the material) and it stays too near the weld, it becomes caught during solidification.
The properties of the material of the component can change the best joint design you could use, as follows:
Before you make a decision on the type of joint to use for a particular repair, think about these things:
Some different joint configurations can be used in repair. Refer to Figure, to see the given weld geometry. Joints can be put into groups, as follows:
Refer to Figure (joints A, B, D, F, G and H are full penetration joints). When you weld these joints you must set the equipment correctly to get the specified geometry. This is important in the condition and the shape of the crown and underbead. Some materials can only be welded at low speeds, then it is very important to keep the correct equipment adjustment. This can be difficult. The difference between penetration which does not go through the joint and penetration which does, can be as small as 0.5 mA of beam current.
In joint G you can not see the joint. To help you during welding use the spigot end face to accurately keep the 'tracking' correct (and the component is moved the necessary distance) this is the dimension X. This is done so that the beam will align with the joint line. Alternatively, machine a mark on the top surface of the spigot; in line with the joint face.
The last joint of the full penetration type is joint H. This is used if there is a limit in the selection of joint position. Also, if the machined shape will include some of the fusion zone. Refer to Figure and Figure. The depth of penetration is not in proportion to the thickness of the joint sides (where they come against each other). This depth of penetration can cause distortion. The necessary tools/fixtures must be used to let the heat go out of the material and to limit movement.
Full penetration joints.
Refer to Figure. Joints C and E give good results if there is no problem of distortion, or if the vapor can go out of the fusion zone (also if these unsatisfactory properties can be prevented). It must be possible to machine off the backing part of welded joints. This is to make an inspection of the weld. The primary properties of these joints are as follows:
All joints which use backing pieces (this includes the full penetration joints D and F) must be prepared correctly. All air must come from a small space at the bottom of joint (if it is there) during machine pump down. The space is made because of chamfers or radii. To let the air come out, make a groove 0.010in. (0.25 mm) deep axially across the mating diameter of the backing piece. Use a small rotary tool in a hand grinder or a hand scraper (prepared to make the groove) and a straight edge.
Partial penetration joints.
If a solid disk is installed into a material work piece (and the disk does not become smaller when its temperature is increased) you must use the highest interference you can correctly use. The high interface pressure will make allowance for some of the weld shrinkage. It will decrease the joint 'gapping'.
Procedure 1: Make the tooling hold the rings correctly and soak up the conductive heat.
Procedure 2: Make the rings large and heavy so the heat goes out and makes them rigid, to stop the distortion.
If an internal or external ring is to be welded into or over a component it can be difficult to calculate the necessary interference. if a light internal ring of 15 inches (381.00 mm) is installed, and there is a high interference fit, distortion will occur (and 'gap' away from the component). This is caused because of the expansion stresses during welding. Also, with an external thin ring, a slow and continuous movement from the component could occur (if the "interference" used was too low). The control of the expansion defects are as follows:
Planetary joints, refer to Figure.
The configuration of the different joints.
SUBTASK 70-31-03-310-004 The Types of Joint
Use care when you set the machine, this can help to keep the correct weld geometry and metallurgy. But the adjustment should be kept and good quality control used, to do this.
When you do a weld, it is usual to make the weld of sufficient width for complete joint fusion. The joint can be aligned (in its tolerance limit) but can have small errors in it. Some distortion could have occurred during its use in the engine. An allowance could have to be made for small errors of the 'joint tracking', or when you 'spot center' the machine.
Try to keep the width of weld between 0.030 to 0.040in. (0.76 to 1.02 mm) (measure this at its smallest width). You must make sure that the width of the weld root is correct. If this is not done the weld root will not be in line with the joint. If you can, use the 'hourglass' shape weld; refer to Figure.
The geometry of an electron beam weld is unusually special because of its larger depth to width ratio; also because of the small width of the heat affected zone. Refer to Figure, this gives an example of the geometry.
When you weld at a low speed, the beam power levels must be kept at the specified value to get the necessary geometry. At higher speeds it is possible to increase the beam power more than the specified value. This will also give good results. This is because the molten metal has no time to 'drop' before it becomes solid behind the beam.
With this procedure it is possible to weld a joint of different thickness (for example, between 0.075 to 0.750in. (1.91 to 19.05 mm)) at a constant power and speed. This will also give good geometry during welding. One more example is when you weld a double layer joint, such as a hollow airfoil, with one 'pass'.
The effects of the beam power controls.
Weld width - a higher speed will make a weld which is not as wide (as usual).
Weld solidification properties - the higher the speed, the faster the molten metal will become solid behind the beam.
Distortion - the higher the speed, the less the heat distortion. Also the shrinkage distortion is less. This is because of the decreased volume of metal of the fusion zone.
The primary effects of welding speed are:
An important thing to think about is the effect of the welding speed on the metallurgy of the weld (the effect on the weld solidification properties). Low volume welds that become solid quickly can have 'grain boundary separation' and cracks in them. This can usually occur in 'air-hardening steels' and coarse grain structure materials. Refer also to step (8)(f).
The shape and surface condition of the weld crown and underbead is also related to the welding speed, the effects change with different materials. For example, weld spatter (which is a quantity of small 'globules' of weld metal) immediately in the weld area. This is usually because a higher welding speed is used; while it is less usual to get undercuts (at the side of the weld) with an increase in speed.
Welding speed.
There are different devices (which are not available at this time) to focus the electron beam at a point you can calculate. In the machines used at this time, it is usual to focus the beam visually. This is done with a tungsten or copper target adjusted at the focus height. The beam is adjusted for the smallest apparent 'spot size'; or for the color intensity in the 'target melt pool' (when the equipment is used at high powers).
Both these procedures (used in step (a)) are not very accurate. It is also difficult to set the same adjustment again and again. Some new types of beam welding machines will be available subsequently. These will have an automatic device which will focus the beam and will be used for all regular work.
The dimension of the focus spot on the material to be welded, will directly effect the weld geometry. If you focus the beam above or below the top joint surface, the weld is made wider (and is the same distance apart at all points). In some materials one more 'nail head' is made at the bottom of a full penetration weld. This gives an 'hourglass' geometry and a good shaped underbead. The shape and surface condition of the weld crown and underbead are usually made better with this procedure.
The applicable Repair TASK gives the adjustments and type of machine which you can use as an aid (as used by IAE during the preparation of the applicable TASK).
Use test pieces to find the necessary quantity the focus spot will be out of focus. Also to find the position of the focus point (if it is to be above or below) in relation to the joint top surface.
The size of the focus spot.
Beam deflection procedures can be used to set the weld geometry and the thermal conditions (it is almost the same procedure as in step (4)). Although it is not as satisfactory to make better surface conditions or to make the 'hourglass' shape of weld. On some materials you can make the surface conditions worse, for example porosity can occur. But, the procedure has the value of control of the heat given across the weld. This is because of the different 'tracking patterns' and cycle frequencies that can be put into the machine to control the beam. For some welding problems the beam deflection procedures can be the only solution.
Beam deflection is usually not used unless it is necessary. This is because of problems when you try to get the same adjustments each time. At this time there is no sure procedure to measure and keep the amplitude of a deflection pattern constant, again and again (to find the solution to this problem, is the cause of some research).
The procedure at this time is to set the amplitude visually with a scale graticule. It is not easy to find 'the spot boundary' accurately. You can not always get an adjustment, calculated with a theory, each time this is necessary (this usually occurs if the machine is used by different persons). This can also occur during the spot focus procedure, although you can get more accuracy with the visual spot focus procedure (if you try to find a minimum spot dimension than when you try to measure a spot shape made by a deflection amplitude).
The problems given in step (c) do not occur if you use linear deflection (the deflection is at the same distance apart at each point to the joint, with no effect on the width of the weld). You can use this to adjust the weld solidification properties without a decrease in the welding speed. This does give better geometry than you will get with only a decrease in speed. The accuracy of the amplitude when you do this is less important. Also, the visual adjustment when done carefully is satisfactory.
Beam deflection procedures.
For continuous welds the welding machine lets the beam power be automatically decreased to zero when the weld 'start' is 'overlapped'. This time is known as the 'slope-out' time. It is usual for the beam current to decrease at a controlled mA/sec rate. Although it can sometimes help if you 'slope-out' with a decrease of the accelerating voltage.
Beam slope-out.
The most important defect of this type (and difficult to find) is the 'missed joint' condition. Refer to joints A and B. The primary causes of 'missed joint' conditions are:
An unsatisfactory view of the joint during the welding procedure.
The beam spot not adjusted correctly to find the specified position it has to go to, with the machine scale graticule.
The movement of the beam spot with a change in beam power.
The beam comes on the joint at an angle to the joint surface (beam 'impingement').
The beam moves away from the joint because of expansion of the component.
For the geometric defects, refer to Figure and as follows:
The underbead conditions of joint G are caused because the weld root metal has come away from the joint (this is 'jettisoning') and a slot is made. Usually this occurs when you try to weld an open joint in some 'difficult' materials. Use a 'backed' joint (as given in Figure, joint C or E) if the defect can not be corrected with the weld adjustments set differently. The root defects are machined away with the backing.
If the underbead conditions of step (f) are found in the test pieces do as follows. Take a longitudinal piece and measure the vertical quantity of the 'jettisoning'. The result of this procedure is then used to make the 'backing' (this is the dimension of the fault, with a specified allowance added to it).
Geometric defects.
The metallurgical defects are given in Figure and as follows.
Internal cavitation is shown in joint B. This is a much more important defect. It is caused because of high vapor pressure in the weld before it becomes a solid (the vapors can not come out of the weld, at a sufficiently fast rate). In very bad examples this cavitation makes long 'tunnels' along the weld.
A structure which can be usually made in the air-hardening steels is joint D. As the weld becomes solid behind the beam the columnar crystal structure is made in the material. This structure goes inwards from the edges of the fusion zone. When it comes against the opposite crystals, a plane of weaker structure is made down the center line of the weld. If in this center plane, a good structure of equiaxed crystals is made, then the weld has the satisfactory metallurgical qualities necessary. The usual defect found (with this structure) is that shrinkage stresses make this center plane weaker. Also grain boundary separation and cracks occur (as in joint E).
Shrinkage stresses cause the defect in joint F. The structure of the fusion zone can be much better than the coarser grain of the initial material. Although there is failure in the edges of the grain structure in the weld heat changed zone. The structure becomes weak. This is 'inter-granular breakdown' or 'separation'. It can have a very bad effect and can change into cracks which can go in to the weld fusion zone.
In some joints the 'traverse' weld shrinkage can be stopped because of the type of joint (for example in planetary welding of a solid disk piece). Separation and cracks occur usually along the edge of the weld.
With low volume welds, which become solid quickly. This can make cracks, these go across in the weld surfaces. These are usually seen as a number of very small cracks. These can usually be machined away.
Most separation and crack defects in welds can be prevented if there is a decrease in the weld thermal cycle. Although, in some materials it can be made better with an increase in welding speed. The applicable Repair TASK will give the necessary procedure to weld the materials where these defects can occur.
More shrinkage effects are:
The metallurgical defects.
The Repair TASK will give the type of machine and adjustments to use, to help you complete the TASK satisfactorily. If an equivalent machine is to be used, use test pieces for the initial welds (before you repair the component). This gives you the correct adjustments to use and makes sure the machine is correct for the TASK.
The applicable Repair TASK will give the necessary figures to show the weld geometry and the tolerance of the dimensions (at the applicable reference points). Refer to Figure. If necessary, photomicrographs of the metallurgical structure will be given.
The data necessary in the Repair TASK.
The effects of the control functions on weld geometry and quality.
SUBTASK 70-31-03-310-005 Weld Geometry and Metallurgy
The test pieces given in the Repair TASK will be materials usually kept in the welding facility (as 'stock items'). If low value components are to be used, the Repair TASK will give the necessary instructions.
The initial work is done on flat test pieces to find the basic conditions for the geometry and metallurgical qualities. Usually this will let you continue the Repair TASK. This is not always possible if, for example, more important components are to be welded (primary components of the engine which turn or large components). More work is to be done on test pieces, which are equivalent to the applicable component.
This is necessary because the temperature of the components with long weld 'runs' will increase continuously, as the low welding speeds are used. If you get distortion, which is difficult to stop, a component 'simulator' must also be welded. This is to measure the levels of distortion.
There are two types of test pieces, flat test pieces and component 'simulator' test pieces.
To get the correct geometrical and metallurgical repair weld, test pieces must be used. Pieces of the test piece are cut, from across the weld. These are polished, etched and examined. This is done as the procedure continues.
The welding speed.
The focus point.
The approximate power levels.
The correct geometry and metallurgy.
Plain flats machined to the thickness of the thicker joint piece on open butt joints; also to the total thickness of both the joints together on backed joints and those with external spigots. Refer to joint A. These test pieces are applicable to get the basic procedures, such as:
Shaped flats machined to the correct mechanical joint condition, refer to joint C. These are necessary when you make an analysis of the metallurgical qualities, if different metals are joined. Also these are necessary if backed or external spigot joints are used. Refer to Step, for the metallurgical defects with these joints.
It is recommended to let the test piece become cool between each weld (while you find the adjustments). You can, subsequently in the procedure, make the equivalent length of component weld with continuous welds next to each other. This is done to make an analysis, about the effect of the increase of the components temperature on the weld geometry (and other related things). You can not directly compare this with the conditions in the component. It can give you an indication of the weld conditions.
Flat test pieces, refer to Figure.
Much of the work done on test pieces will be 'melt run' welding. This is fusion of the metal, where a mechanical joint is not necessary. This type of procedure is usually used if 'simulators' are to be welded at a subsequent time. There are three types of test pieces, as follows:
This type of test piece is made to give the equivalent conditions found in component repair conditions. This is to help you make and analysis on the effects of an interference fit, expansion, shrinkage (and other related things).
The mass and shape of the component and replacement part can effect the thermal conditions and geometry of the weld. These conditions are difficult to make again (with precision) on flat test pieces. If there are Repair TASKS where such conditions are important, the use of 'simulator' test pieces will be of value. They will help you find the best final weld adjustments to use. Also they help when you make an analysis related to the distortion levels.
For large components the 'simulators' are usually made smaller in size (that is, 'scaled down') but this does not include the joint configuration.
You can use the 'simulators' to prepare most of the necessary procedures for welding (after the basic procedures are completed on 'plain flats'). This is done with short weld 'runs' on a 'simulator' joint. This is then followed with a full weld on a different 'simulator'.
Component 'simulator' test pieces.
Obey the same necessary instructions when you prepare and weld the test pieces, as when you weld the component.
The test pieces must be in the correct heat treatment condition for welding. For a metallurgical examination they must be given the post-weld heat treatment (given in the applicable Repair TASK). You can make an immediate analysis of the weld geometry after welding, because the heat treatment does not effect it.
On materials where weld embrittlement can occur, make a hardness inspection across the weld heat-affected and fusion zones. This is done after the post-weld heat treatment, as given in the applicable Repair TASK.
When you prepare for welding hold the flat test pieces away from the backing plate. The joint surface is to be at the same height, in the chamber, as the component joint will be (set) for the repair. The backing plate material must agree with the material to be welded. This is to prevent weld contamination with vapors pushed out from the backing plate, refer to paragraph A.(4). Also, prepare and clean the test pieces correctly, as given in Step to Step.
The preparation and welding of the test pieces.
SUBTASK 70-31-03-310-006 Test Pieces
Use 10 percent CoMat 03-012 OXALIC ACID (COOH)2 (Electrolytic) to etch nickel-based alloys, stainless steel (S/CNT, 18/8), 12 percent chrome steel (S/SJ2, S/ST) and Inco 901.
Use the electrolytic procedure with a 4 volts DC supply. Attach the piece to be etched to the anode. The cathode must be made of platinum.
As an alternative to the electrolytic procedure, etch the 12 percent chrome steel with a solution made-up of one gram of CoMat 03-014 PICRIC ACID (NO2)3C6H2OH with five milliliters of CoMat 01-099 HYDROCHLORIC ACID and 100 milliliters of CoMat 03-015 ALCOHOL.
Clean the nickel-base alloys to remove the oxalic acid (this is seen as a brown stain), lightly apply water to the specified surface with a quantity of cotton wool. Dry the piece with CoMat 03-013 METHYLATED SPIRIT and hot air.
For other materials use the CoMat materials as follows:
Magnesium S/MOB: 2 percent Nital (2 percent CoMat 01-025 NITRIC ACID HNO3, TECHNICAL GRADE in CoMat 03-015 ALCOHOL).
Aluminum: 2 percent CoMat 01-027 HYDROFLUORIC ACID (2 percent HF in water).
Titanium: 2 percent CoMat 01-027 HYDROFLUORIC ACID HF-10 percent CoMat 01-025 NITRIC ACID HNO3, TECHNICAL GRADE.

CAUTION
DO NOT USE GLASS CONTAINERS WHEN YOU ETCH WITH HYDROFLUORIC ACID. PLASTIC CONTAINERS MUST BE USED.Use these specified CoMat materials and procedures to etch the piece as follows:
Clean the etched piece fully in water to remove the etchant. Dry the piece with CoMat 03-013 METHYLATED SPIRIT and hot air.
NOTE
It is satisfactory to use alternative procedures if these are available.Etch the surfaces as follows:
SUBTASK 70-31-03-310-007 Prepare and Etch the Welded Test Piece
Do the procedure in Step, if the geometry and metallurgy is satisfactory.
SUBTASK 70-31-03-220-002 Examine the Etched Test Piece Surfaces
Prepare and etch the welded test pieces for metallurgical inspection. Refer to Step. Make sure the etchant shows the grain structure of the material.
SUBTASK 70-31-03-310-008 Make a New Test Piece
There must be no closed spaces made when the component is assembled in the fixture. This is because the welding is done in a vacuum. These spaces could fail to become empty during the time the chamber is emptied ('chamber pump-down'). Holes or slots must be made in the tooling.
This must be done to let the spaces become empty, if they are near the weld or not.
The gas which comes out during the welding cycle will cause chamber contamination. Possibly this could cause the current to come out of the beam gun or 'flash over'. Make sure the holes go completely through the tooling and the gas can come out easily. The gas could become caught behind a setscrew and only come out slowly, around the threads.
When full penetration joints are welded the beam-energy is not completely used up in the weld. The beam will come out from the bottom of the joint. In relation to the power level used and joint thickness, this remaining beam could have sufficient energy to cause damage. The beam could go on the component or tooling in the beams direction. It is necessary to give the tooling 'impingement shields' to catch the remaining beam. You can have shields which are not part of the tooling; an item you can replace, or part of the tooling.
When the remaining beam goes on the shield, ionized gas material is given off. This will move up the beam to the negative source. This can cause contamination in the weld (if the gas material does not agree with the weld conditions).
Many alloys used in the components in the V2500 engine can be open to contamination with unwanted vapors during welding. It is most important that the materials used to make the shield agree with the materials to be welded. They must be of the same material group. This is very important on components which turn in the engine and work in hot, highly stressed conditions.
Position the shield as far as possible below the joint surface. This is to decrease 'spatter' (these are the small round particles of metal which are pushed from the shield and can go on different surfaces). This 'spatter' must be removed after welding. Alternatively, use CoMat 04-001 BERKATEKT, apply this compound on the bottom face, with a brush. This prevents the bond of the 'spatter' on the surface. After welding you must fully clean the component to remove this compound.
Use a good quality stainless steel shield when you weld all steels. The use of copper is possible, but it must be plated with chromium. This is to prevent copper contamination of the weld.
When you make the tooling you must think about the access of the beam to the joint. Also you must clearly see the joint line in the machine view system. If it is necessary for the tooling to be installed near to the joint line it must not be nearer than 0.125in. (3.18 mm). If the tooling must be near to the joint (and the part of the fixture which prevents movement is of a thick dimension) you must have an open angle of view. The tooling will have a chamfer, as given in Figure.
All joints must have some interface pressure, to prevent the part of the joint not welded 'gapping' as you weld. This does not include closed 'interference fit' joints. This pressure is applied with the tooling, the name of this is 'end load'.
Usually to keep a quantity of 'end load' springs are used, refer to Figure. The 'end load' is not applied with only the springs. The tool surfaces touch along their length. The spring effect occurs after the weld cycle and subsequent shrinkage has started.
Alternatively, a hydraulic load can be used.
In Figure, if the springs are not there (and a sufficient torque load is put on the nut) the arbor will give the 'spring' effect. This is caused because of the compression loads on the flexible vertical end of the arbor. If the springs are necessary or not, will be related to the particular type of the repair.
When you weld large diameter components for which an 'end load' is necessary do as follows, where possible. Apply the 'end load' with divided segments, refer to Figure.
One end plate is cut in segments with sawcuts, this is done to let isolated loads be applied. These loads are applied to parts of the joint through the bolts. This lets the end plate be flexible, as the weld shrinkage occurs around the joint.
The tools and fixtures used in electron beam welding are almost the same as those used in other welding procedures (as an example, as those tools used in argonarc welding). The tools and fixtures hold the mating components in the necessary relation to each other. They give the necessary force to hold the component and are used to take the heat away from the component. There is usually less of a distortion problem in electron beam welding. The tooling can then be of lighter construction, it is not necessary to make it to hold the argon gas (for the gas shield).
Before you make the selection of the materials (to make the tooling from) think about these things:
The type of 'impingement shield', it could be part of the tooling or could not be part.
The removal of the remaining magnetism.
Chamber contamination.
The total weight of the component/tooling.
Use materials which are not magnetic or can be easily de-magnetized, with the usual procedures. As an example, do not use high tensile steel bolts. It is very difficult to remove the remaining magnetism from these materials. It is better to use stainless or mild steel bolts. Use brass nuts in the tooling/fixture, this will make it easier when the time comes to disassemble it.
For the larger tools necessary, there is a limit in the selection of materials that are not magnetic, which you can use (because of the high monetary value). It is usually satisfactory to use 'commercial' quality mild steel, for example, for tooling/fixtures which are symmetrical. If the tooling/fixture is not symmetrical (for example, if there is a large, isolated part of it near a weld joint) you could have to make this part from a material which is not magnetic. Alternatively, a 'shield tube' could be used, refer to Step.
Do not use cadmium plating to give the corrosion protection on parts of the tools/fixture.
The removal of the remaining magnetism.
When you make the selection of the materials for a large tool/fixture, you must think about the weight. This is important if it is to be turned about a horizontal axis in relation to the light weight gearbox of the welding machine. Use holes or slots in the material to make the tooling lighter. The careful use of light materials, for example aluminum, will result in the easier use of the tooling.
When a large heavy assembly is operated at low speed on a horizontal axis (one half rpm is not unusual) a low friction bearing will give better operation. This could be a ball bearing assembly installed on a 'vee block'. Although this is not necessary if the machine tailstock has a satisfactory 'center' on which it turns.
'Tack welds' can be used in electron beam welding (as in argonarc welding) this results in easier to use tooling. These could be argonarc 'tack welds' (if the material agrees with this type of welding). Alternatively, they could be electron beam 'tack welds', used before the full power weld. The argonarc 'tack welds' could decrease 'set-up' time on quantities of small components. This lets you use easier to use tooling ('lash-up' tooling). Electron beam 'tack welds' includes the use of full 'sealing runs' with little depth welded at low power, to prevent joint 'gapping'. If this procedure is not used, much more tooling will have to be used.
The total weight of the component/tooling.
Tool materials.
SUBTASK 70-31-03-310-009 Tooling
If electron beam welding is necessary during the components overhaul, clean them to remove the oil and carbon deposits (with the specified procedures).
If specified in the Repair TASK, both sides of the joint to be welded must be abrasive cleaned; or 'scurf mopped'. Remove all the unwanted abrasive material with a specified detergent cleaner. It is most important no abrasive material becomes caught in the component. The abrasive blasted joint area will not be shiny compared with the shiny surface of the replacement part. This can help you to see the joint more easily in the welding machine.
The primary components which turn in the engine (for example rotor and turbine disks and shafts) must only be abrasive cleaned if the applicable Repair TASK tells you to.
It is most important to correctly clean and prepare the component parts for electron beam welding. This is to get the necessary good quality welds.
SUBTASK 70-31-03-120-001 The Procedure to Clean for Welding
Before you assemble the components parts, make an inspection of the surface finish. Make sure also, no damage has occurred because of the movement of the parts from one procedure to a different procedure. A surface finish of 32 microinches (0.8 micrometers) is satisfactory for electron beam welding. Although a surface finish of 80 microinches (2.0 micrometers) has given good results.
Make an assembly measurement to make sure the clearance between the joint faces is not more than 0.0015in. (0.038 mm). This is not necessary for those components which have a diametral interference fit with replacement parts. An assembly measurement is very important when the backing is part of the joint. This is done to make sure there is no 'binding' in the corner radius at the bottom of the joint.
SUBTASK 70-31-03-220-004 Make an Inspection to Prepare for Welding
Before you final assemble the component do as follows. Clean the joint faces with a cloth, that has not lint, made moist with CoMat 01-124 ISOPROPYL ALCOHOL or CoMat 01-031 ACETONE (CH3)2CO.
Clean the components surfaces.
SUBTASK 70-31-03-160-001 Clean the Surfaces of the Components Before Final Assembly

CAUTION
YOU MUST USE CLEAN LINEN GLOVES BEFORE YOU TOUCH THE CLEANED PARTS/COMPONENTS. DO NOT TOUCH THE JOINT FACES WITHOUT THE PROTECTION OF GLOVES ON THE HANDS, BETWEEN THE PROCEDURE TO CLEAN AND THE ASSEMBLY PROCEDURE.Freeze the internal component in liquid air or CoMat 03-026 LIQUID NITROGEN. Put the component fully in to the liquid until the bubbles stop. Immediately before assembly clean the joint face with a cloth made moist with alcohol, refer to Step. Do not let the face 're-frost'.
Alternatively, use the procedure which follows:
SUBTASK 70-31-03-310-010 The General Procedure to Assemble the Components
Unless the welding machine includes special components to correct the beam, the remaining magnetism will control and deflect it. These special components could be of a high monetary value and difficult to make. The remaining magnetism could be in the parts (to be welded) or the tooling. Subsequently, this could give decreased tracking precision.
It is necessary then, to demagnetize the parts to a specified level (until the remaining magnetism does not cause the beam to be out of control). This level is usually one gauss or less. A gaussmeter must be used to measure this.
The electron beam is a flow of negatively charged particles. These operate with the control of the electromagnetic fields. These are made with the focusing and deflection coil systems in the electron beam gun assembly.
Demagnetize the parts to be welded in a strong alternating magnetic field. Then you must let the field close, slowly, at the specified constant rate as follows:
NOTE
On a screen which is completely neutral the black dot will not let you set the spot. The earth's magnetic field will give a small change in the position of the spot. An allowance is made for this 'offset', when you measure the deflection.Set and operate the CRT at maximum sensitivity. Focus the spot carefully and make sure it is correctly focused.
The cathode-ray tube (CRT).
Make the inspection which follows outside the machine chamber. Do this with the component and tooling assembly set for welding.
Set the part in the machine and 'pump down' the chamber, as for welding. Adjust the beam current to a sufficiently low level (so you can use it focused on the parts surface with no 'impingement' damage). Move the part, as for welding, look for magnetic effects through the view system of the machine.
An effect which can cause you problems (although the assembly could be demagnetized to the specified level) is from the electron beam. The beam could cause magnetism in an assembly. This is possible if the assembly is not symmetrical. Use the tube (refer to paragraph A.(6)) to seal the beam, to prevent the effect.
Low power tracking.
Some machines have a beam pulsing system installed in them. With these, the beam can be used at full welding power to examine for 'drift'. This can be done without component damage.
Set the pulse so that the 'beam on' time is very short in relation to the 'beam off' time, and the joint 'welded'.
The beam will make a mark on the parts surface with a number of 'melt spots'. These 'spots' will not have a large depth (because of the short 'beam on' time). You can then see if the beam has moved from the joint line.
The conditions for this procedure must be done with test pieces, before it is done on the component.
Beam pulsing.
Beam tracking.
To examine the effects of magnetism in the component and tooling, the beam can be used as follows:
A gaussmeter has a limit in its use to show the magnetic effects on the beam. More procedures are available to calculate the remaining magnetism of the assembly. These also show the effect on the beam.
SUBTASK 70-31-03-310-011 The General Procedures to Demagnetize the Component
Examine the component for its remaining magnetism. Refer to Step.
Set the beam current so no 'impingement' damage can occur.
Do the 'tracking run'.
Make sure the beam spot is center to the graticule before each weld.
With the target block make the beam spot center to the graticule. Focus the beam. If a low power 'tracking run' is to be done on the joint, to make sure of the accuracy, do as follows:
The procedure to use before you weld the component.
Continuous welds must be 'overlapped' on the full power 'run' before the 'slope out' starts. On joints up to six inches (152.4 mm) diameter, the 'overlap' must be between five and ten percent of the joint circumference. On larger diameter joints the 'overlap' must be between one and one half inches (38.10 mm) and two and one half inches (63.50 mm). The 'slope out' must be made with the beam current set at the rate of six mA/second. This rate must be used unless the Repair TASK gives a different rate.
When you weld large diameter joints 'beam steering' could be necessary. This is used to keep the joint travel in the specified limits. It is also used during welding, when the joint moves away from the beam (because of heat expansion).
NOTE
To get the correct results with this procedure it is related to the traverse speed of the joint. This procedure can be used if the differences in the joint position are not too large, in relation to the beam. You must do this procedure satisfactorily on test pieces and be approved in its use.There are different joint 'tracking' devices you can use. When the accurately made stylus 'tracks' near the joint position it gives a signal to a servo mechanism. This corrects the differences in the joint position, in relation to the beam.When welding, do not use 'tack' weld procedures unless it is given in the Repair TASK; or make an analysis with component simulators, refer to Step. During welding, if defects occur (for example, if the beam does not go on to the joint or the joint clearance has become larger) do not continue to weld. Remove the component from the machine and find the correct procedure to complete the weld.
Welding the component.
If a weld is not satisfactory (because of not sufficient penetration, or low quality surface conditions) it is possible to correct the defects, with more welding procedures. This can be one more full power 'run' or a low power 'dressing run'. Although, it is necessary to make sure there is no remaining magnetism in the component. This could have occurred because of the welding procedure.
Make the 'dressing' beam go on to the top step, to melt more metal on the crown. This is the 'offset'. Do not use a larger 'offset' than 0.010 in. (0.25 mm). If it is necessary to use a larger 'offset' than this, make sure you get the specified geometry with test pieces. Do not use a beam power level for these 'dressing runs' of more than 30 percent of the initial welding power.
If the heat treatment has not removed the embrittlement, do as follows:
Make more 'dressing runs' on a test piece. Use different weld adjustments to make the condition of the weld better. It is possible you could have to make a decrease in the welding speed, with an adjustment of the beam power (so it agrees with it).
If the replacement part has a large allowance, to machine it to the final dimensions (for example, a top 'step', refer to Figure, joint B), you can get better crown conditions as follows:
Full power welds to correct the defect of decreased penetration are permitted. Before you do this procedure, to correct 'missed joint' conditions (refer to Figure, joints A and B), make an analysis with test pieces. Make sure the conditions you get (with the test pieces) have satisfactory geometric and metallurgical properties.
You can repair some defects with argonarc welding. Examples of these are: surface cavitation, surface cracks and undercuts. The material must agree with the use of argonarc welding. Also, to use this type of welding, the distortion levels must not be so important. Refer to the SPM TASK 70-31-02-310-501-001 to SPM TASK 70-31-02-310-501-017; or the applicable Repair TASK could give the necessary instructions for the procedure to use. Do not repair primary components which turn (refer to step (7)) with argonarc welding, unless given in the applicable Repair TASK.
The welding procedure to correct the defects.
SUBTASK 70-31-03-310-012 The Welding Procedure
The authority must make sure the procedures and equipment used are satisfactory. Examples of these procedures follow:
When you find the weld procedures for new welds.
When you examine and make sure the usual welds are satisfactory.
That all the necessary procedures are done before welding (this includes demagnetization).
After the weld adjustments are found with the test pieces (the authority must give its approval of these).
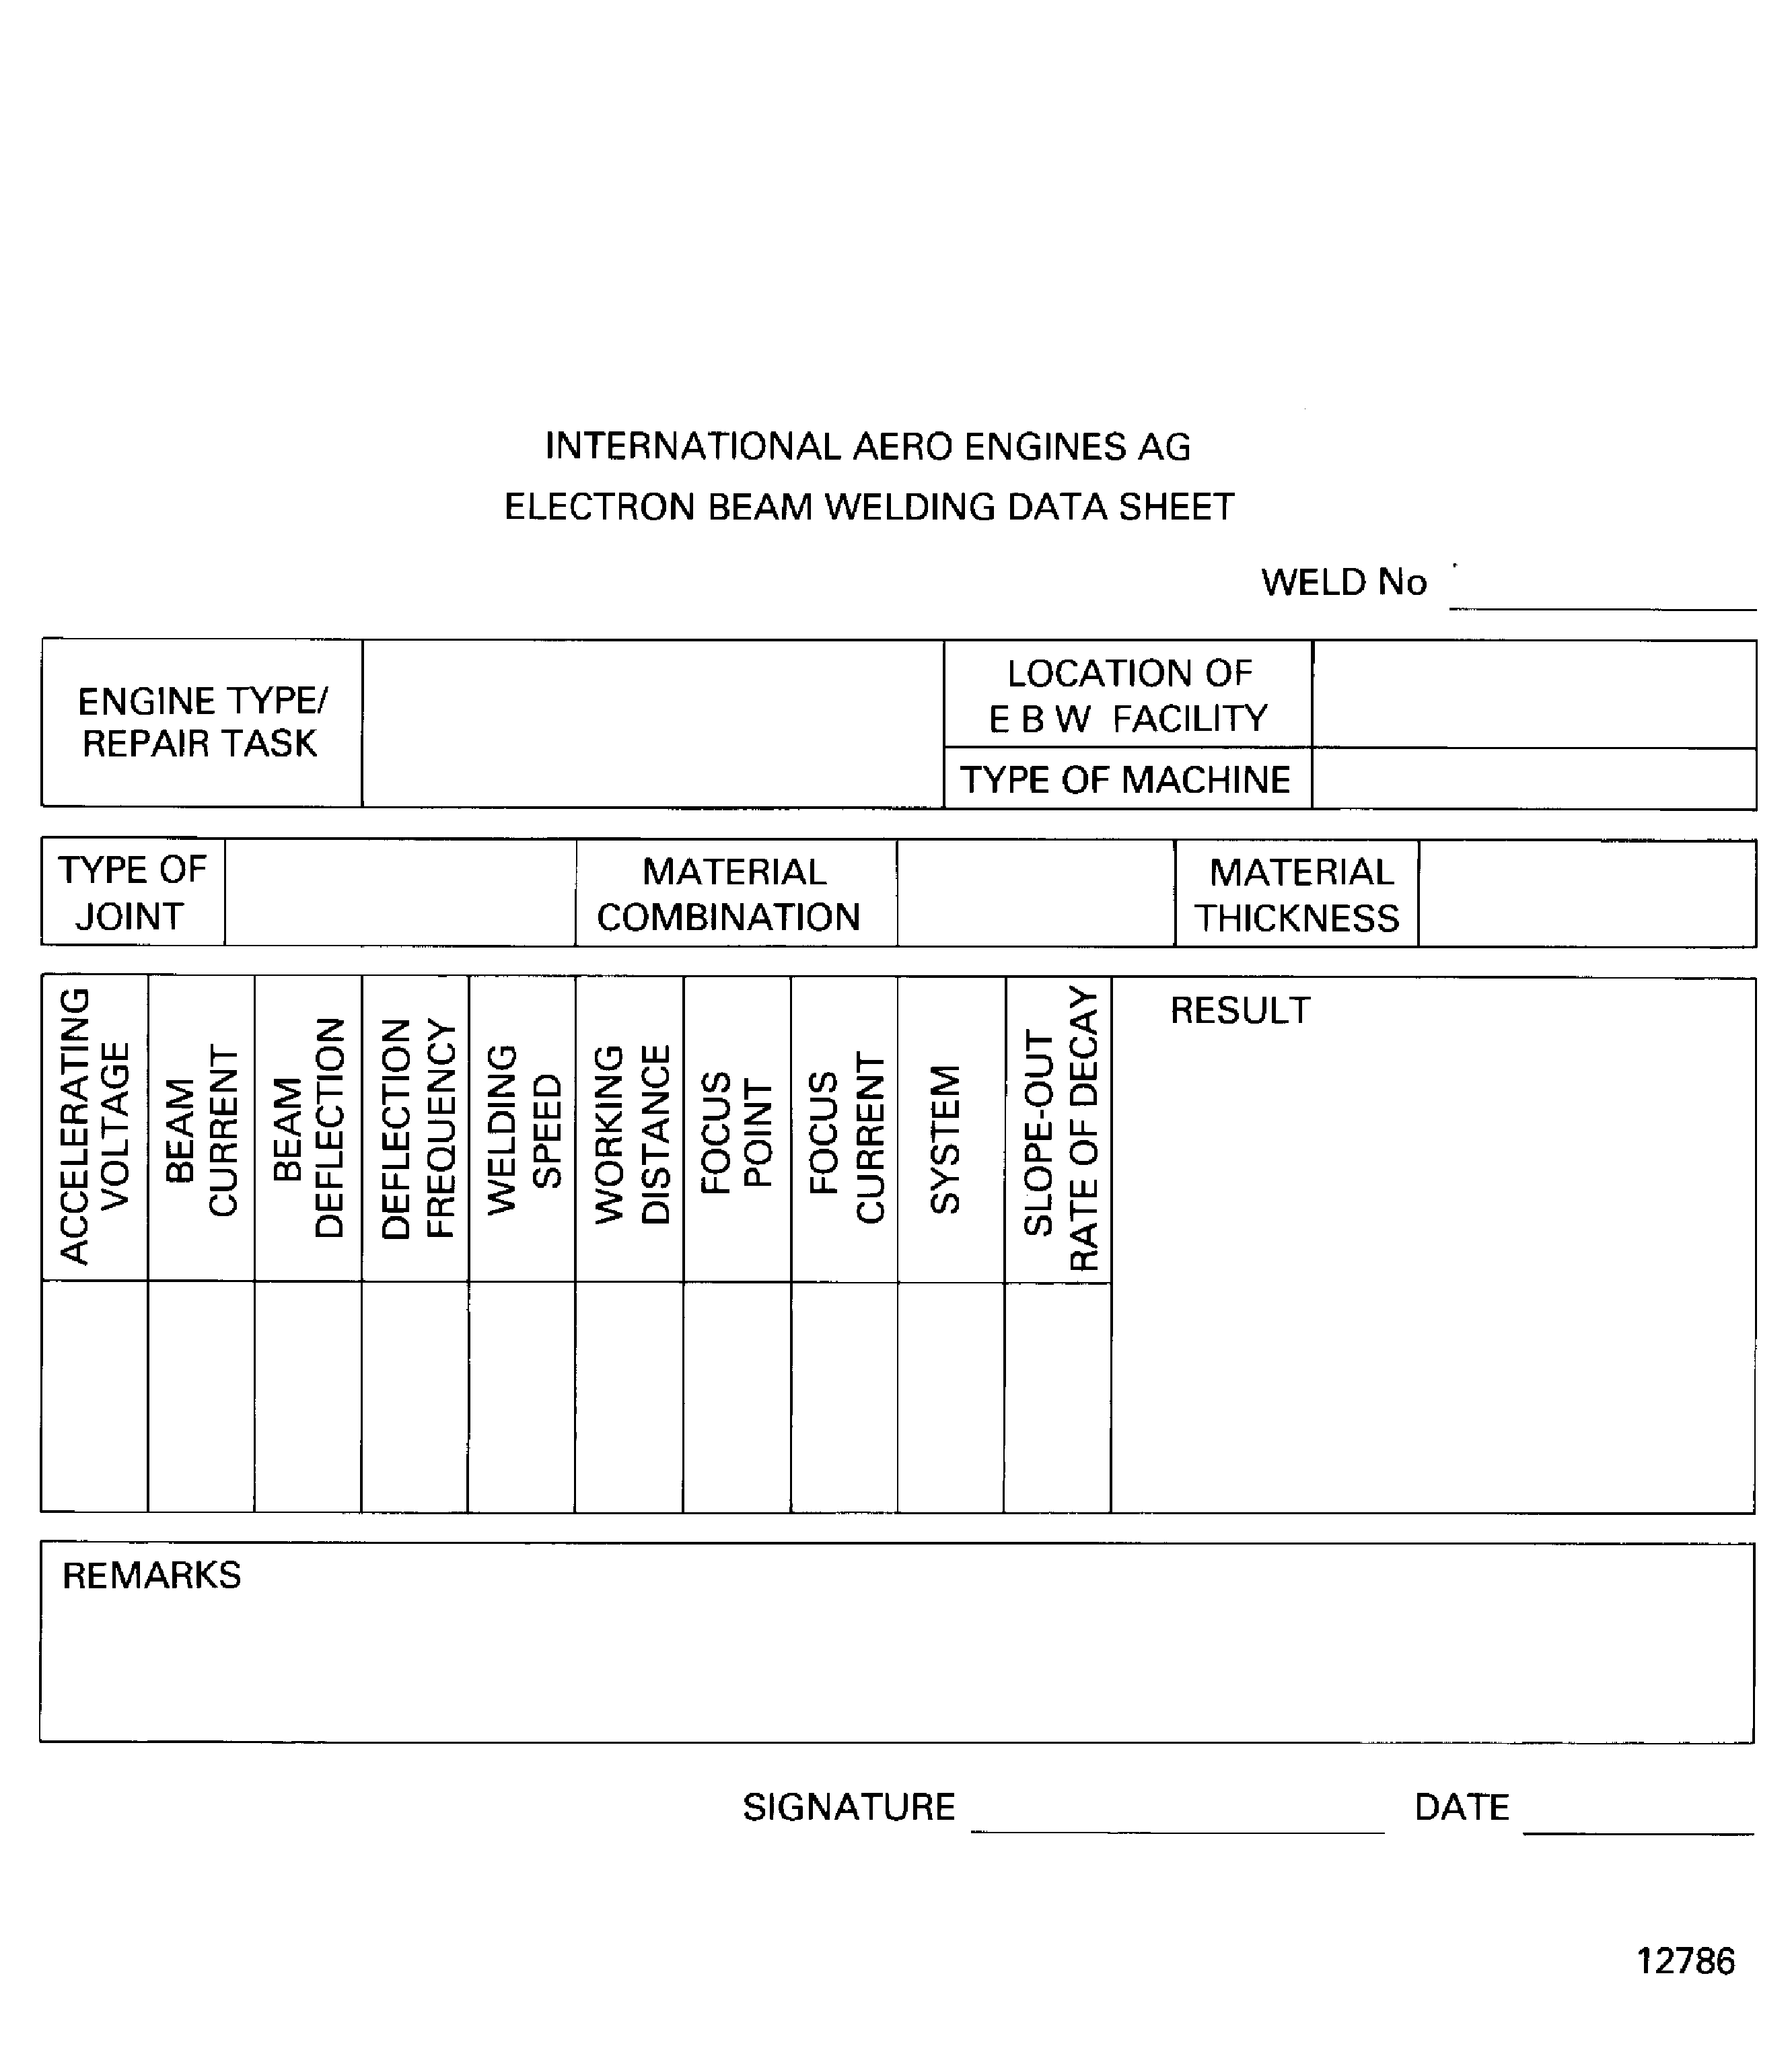
A record must be kept of the weld adjustments used for the test pieces and components. Refer to Figure, for a data sheet you can use for this procedure.
It is not permitted to change or use different adjustments from those approved by the authority. All the welding done to make a correction to the defects, must be approved by the authority.
Record all the limits and conditions used, during the welding, to make the corrections.
The quality control function makes it necessary to make 'proving runs' on flat test pieces. This is done before welding a primary component.
A visual analysis must be made on the test pieces, to make sure the weld can be done again and again (and to keep the necessary weld conditions).
On primary components which turn or for components of a high monetary value a 'proving run' must also be made, as follows:
After a filament is replaced.
After a current discharge or 'flashover'.
After a different person continues the welding procedure.
After machine servicing, or if a failure of the machine occurs.
Make a record of all the hours the filament is in use. Make sure there is sufficient filament life available before you start a weld on a primary component. If you are not sure of the remaining life of a filament, replace it with a new filament.
The authority must make sure the necessary machine servicing procedures and the routine maintenance work is done (to the maker's instructions).
Each overhaul facility, which does electron beam welding for component repair, must use the necessary quality control procedures. An authority will control the preparation, the welding and the inspection of the electron beam welds, during repair.
SUBTASK 70-31-03-280-001 Quality Control
Figure: The types of joint
The types of joint
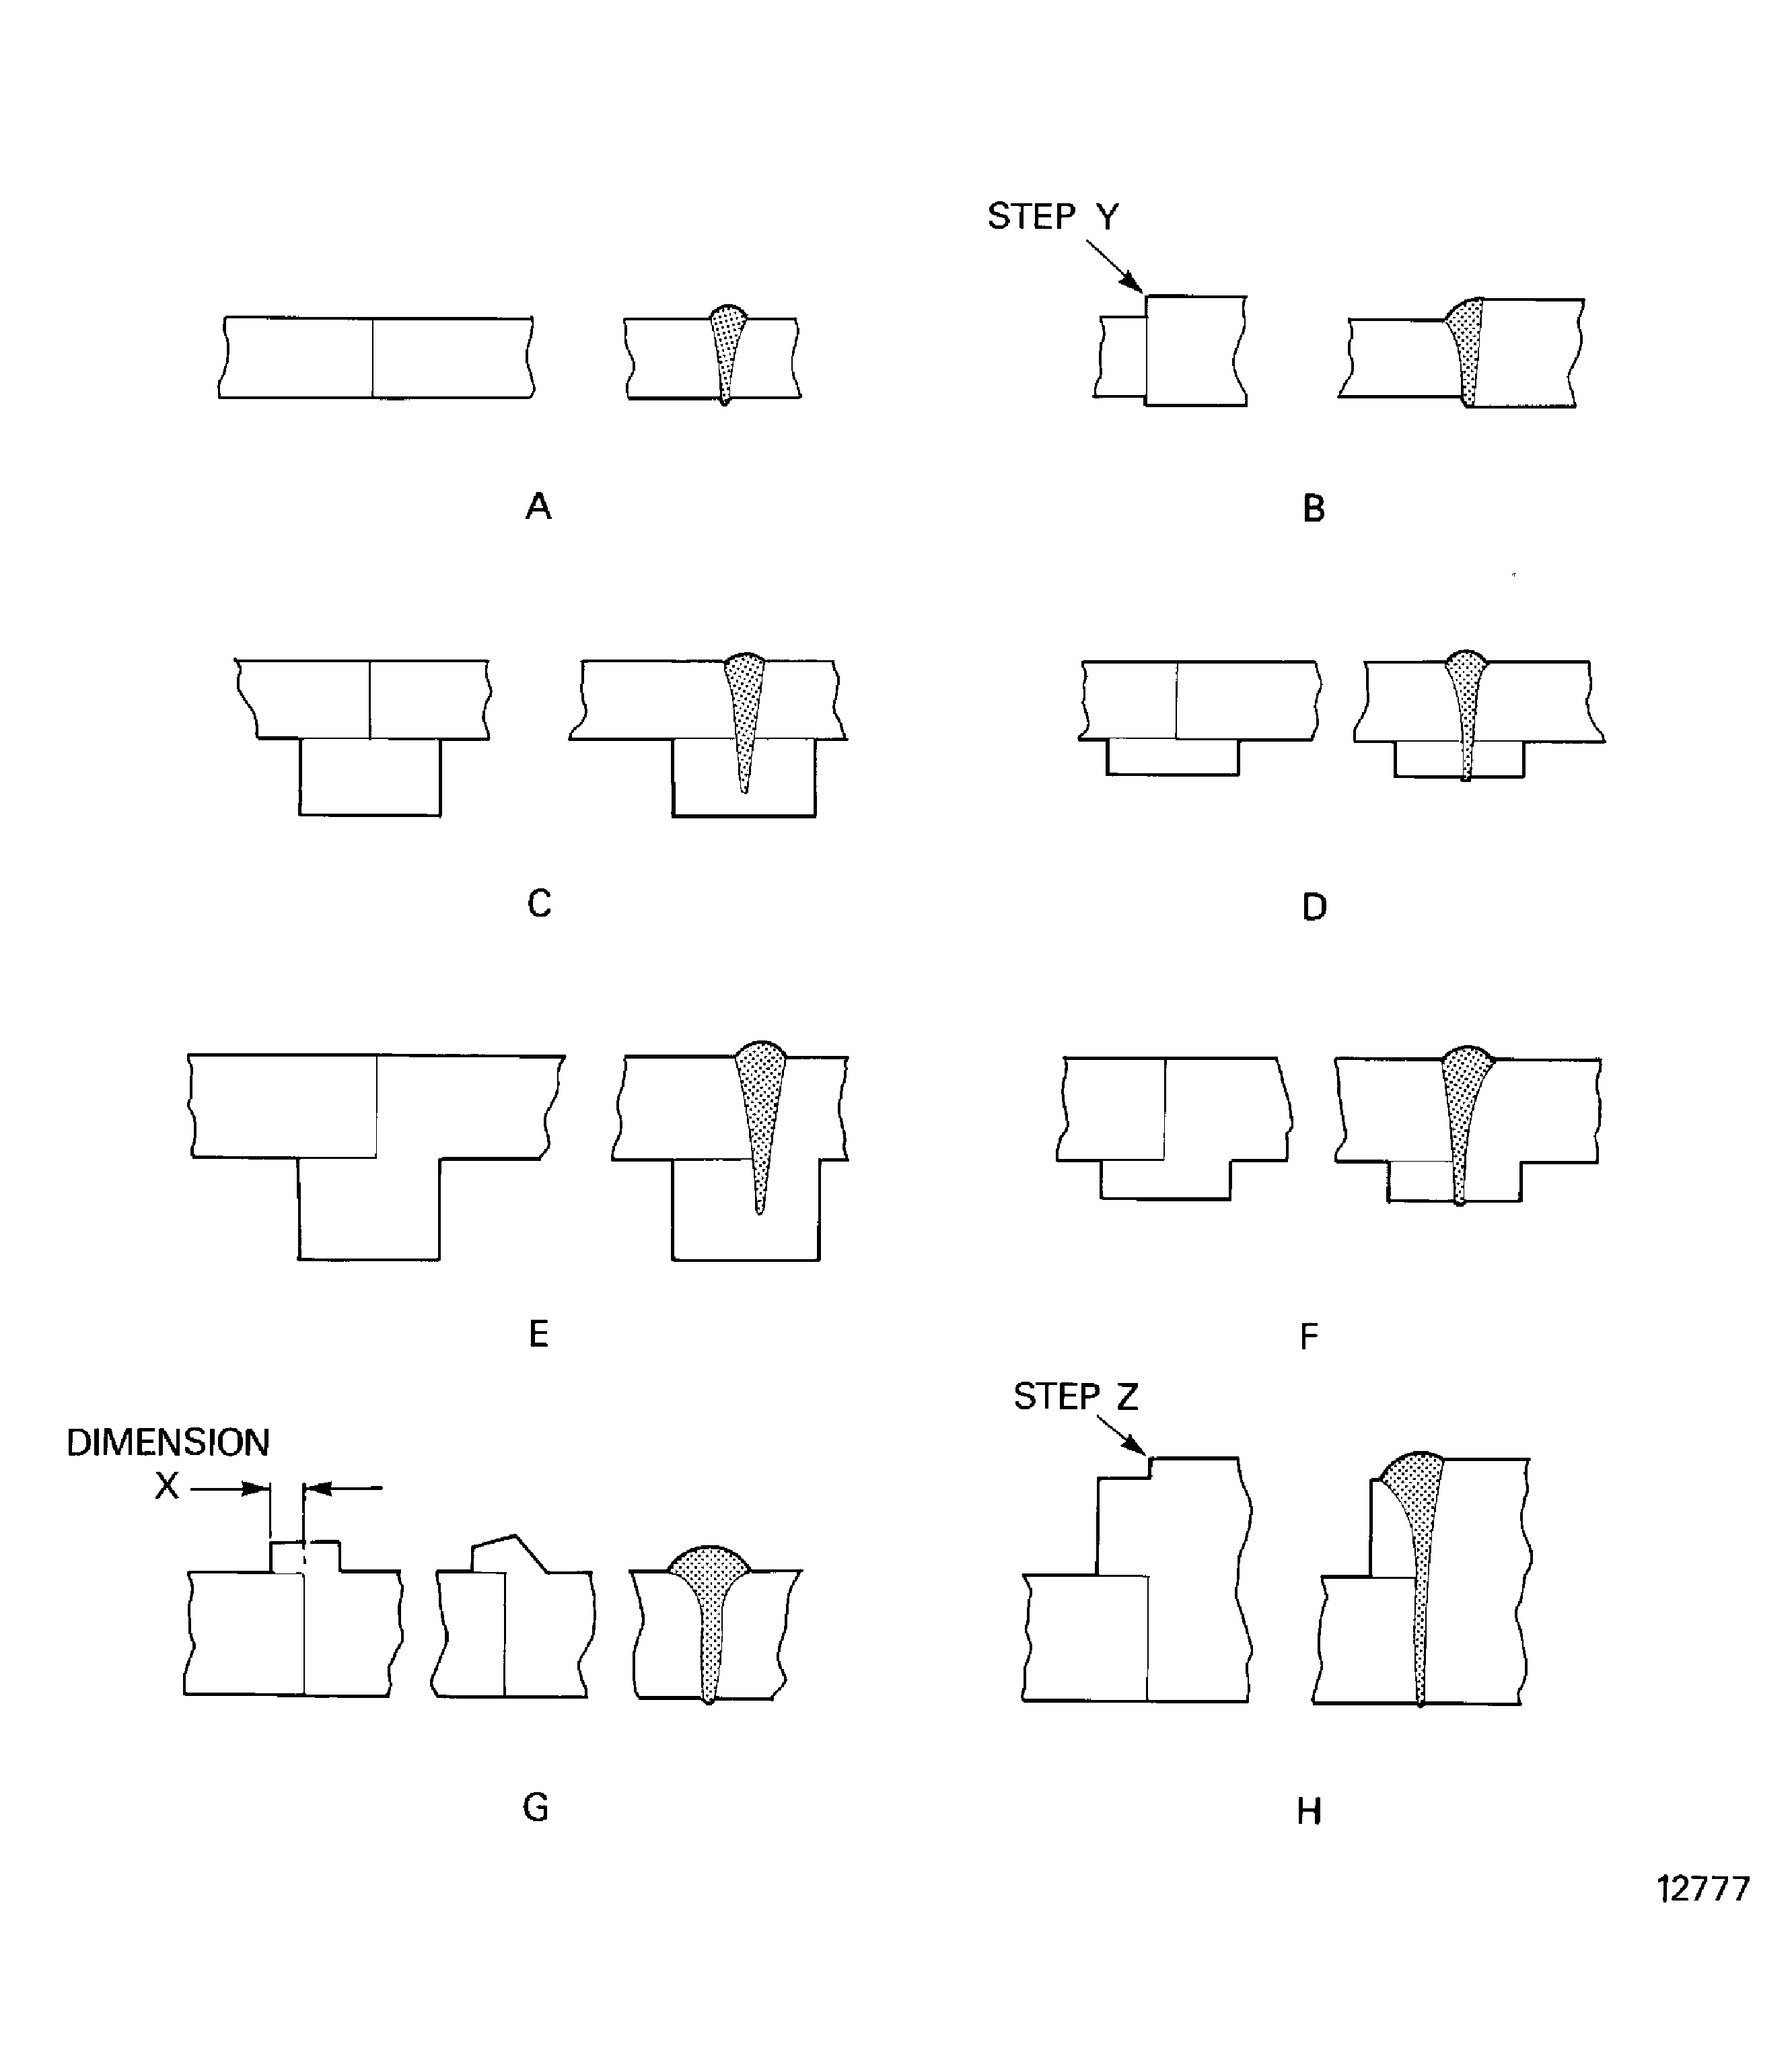
Figure: The machined shape of joint H and an example of a planetary joint
The machined shape of joint H and an example of a planetary joint
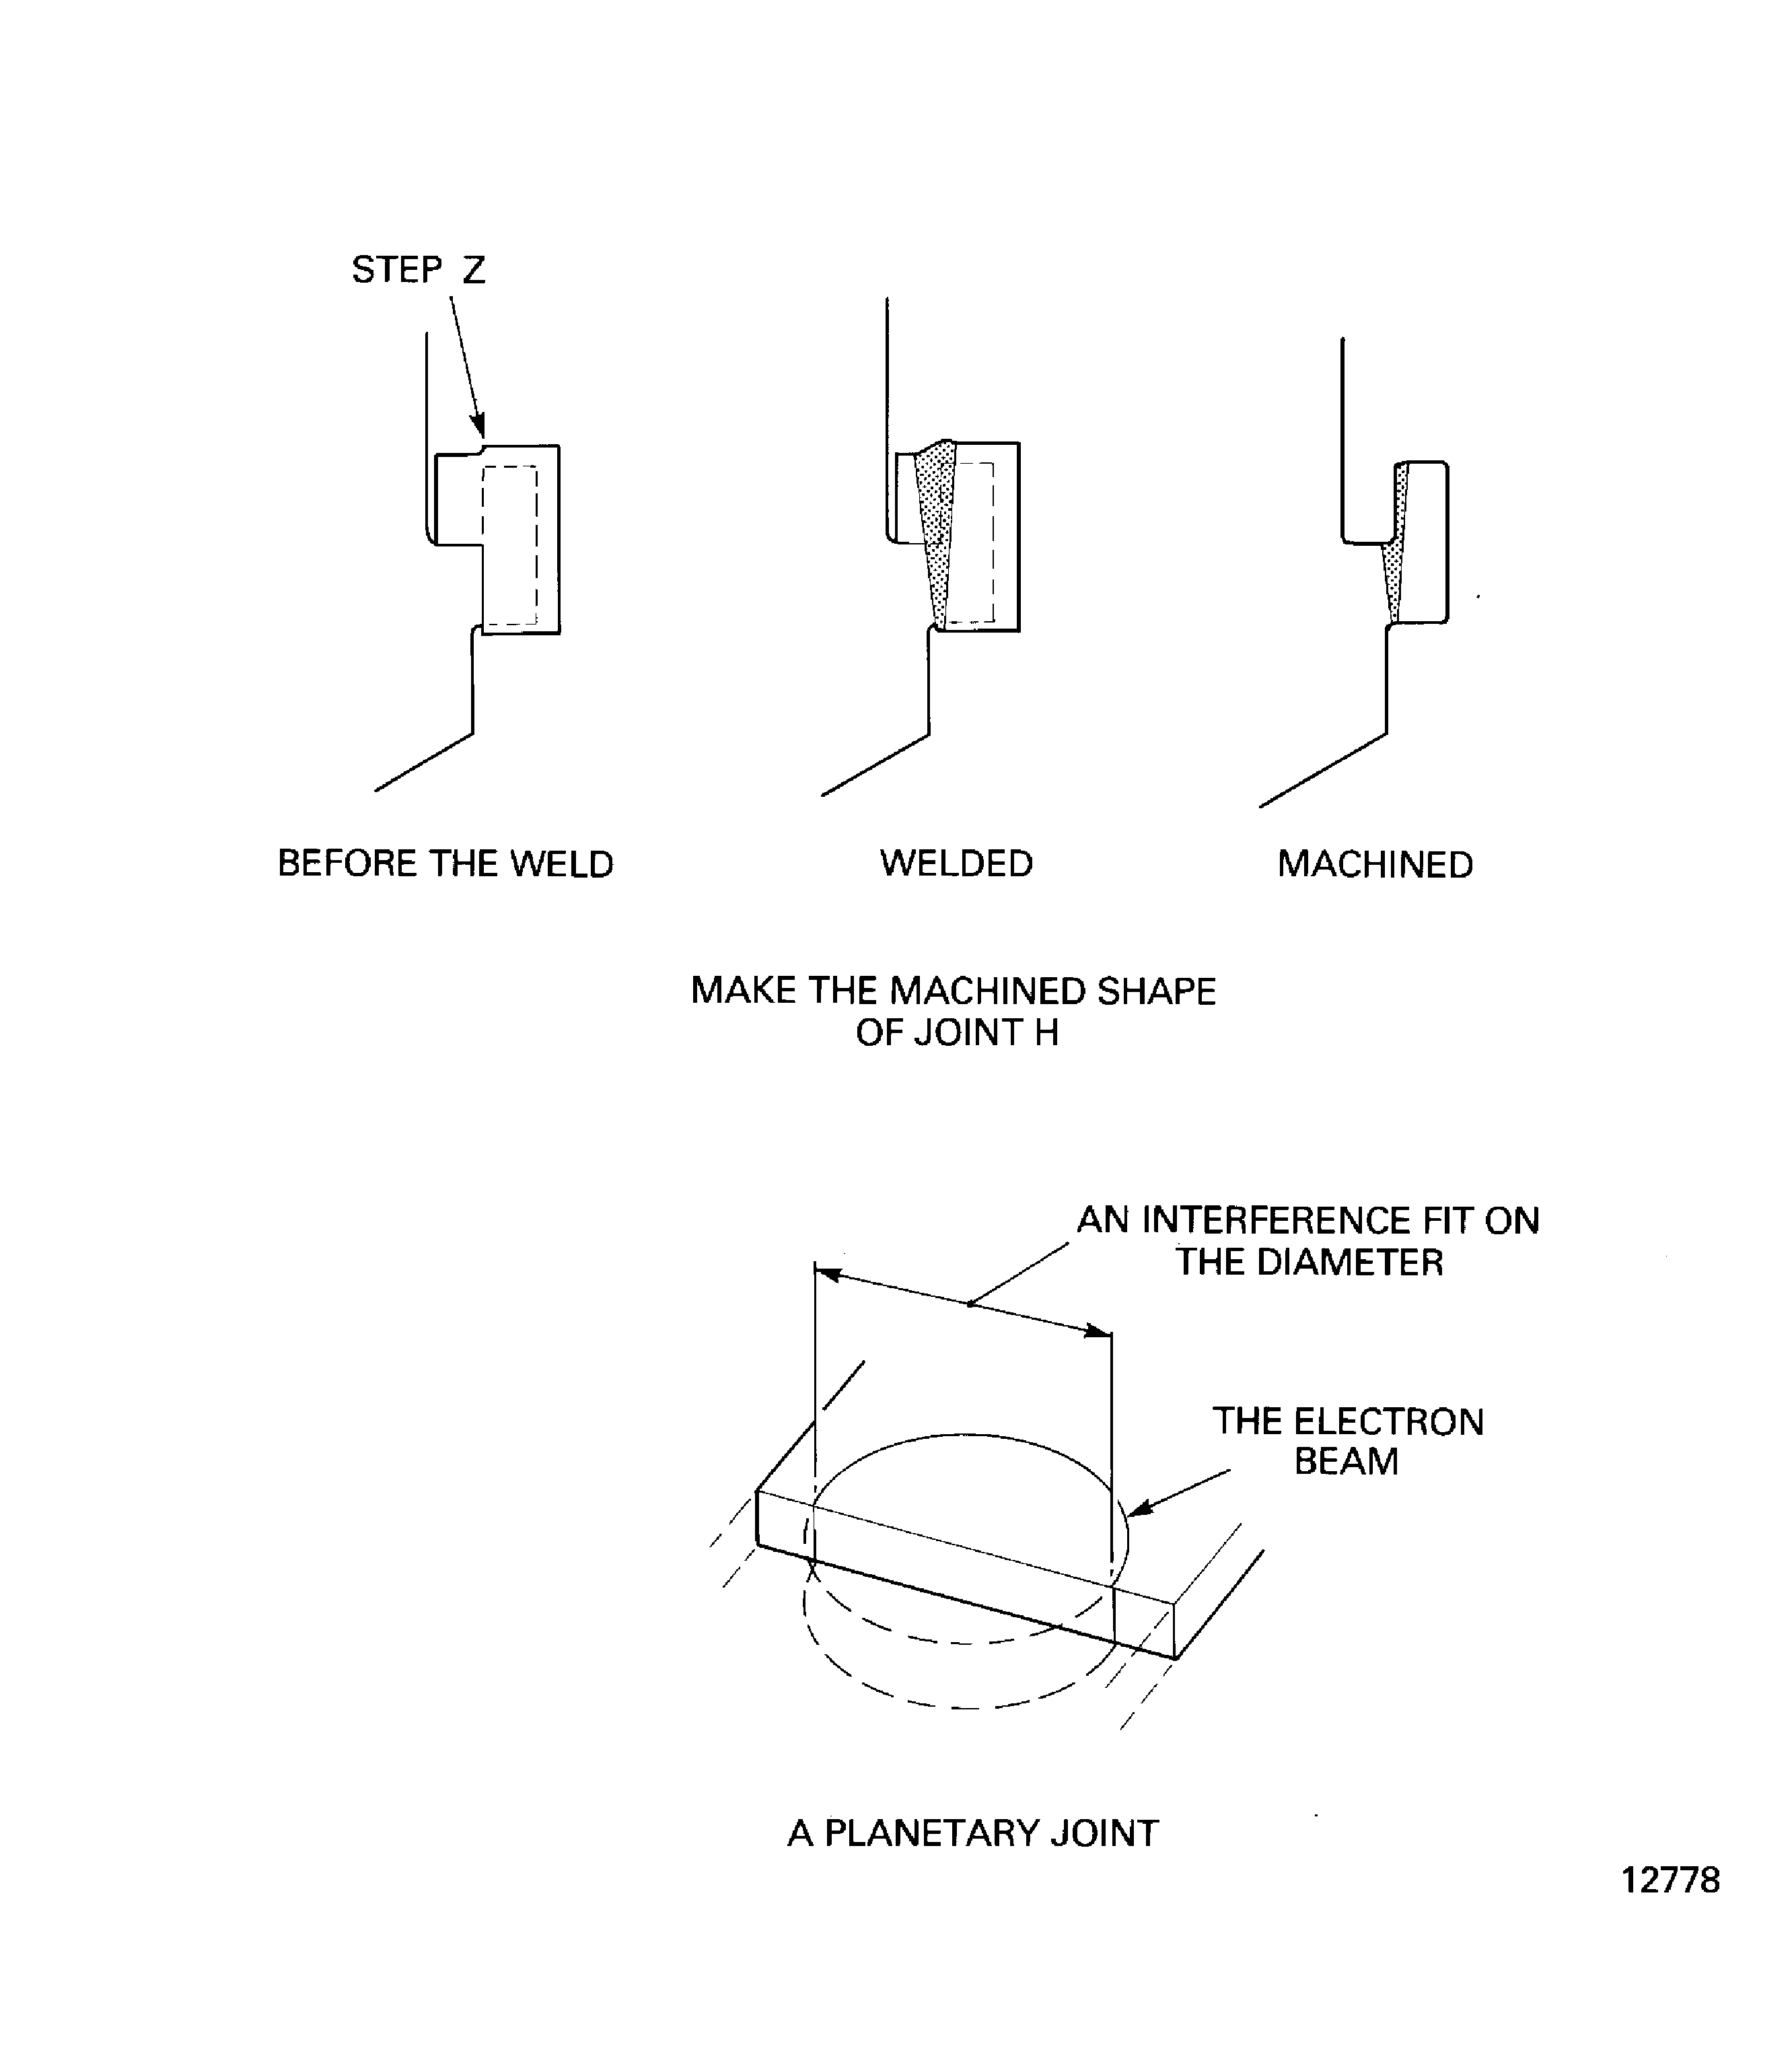
Figure: Electron beam weld geometry
Electron beam weld geometry
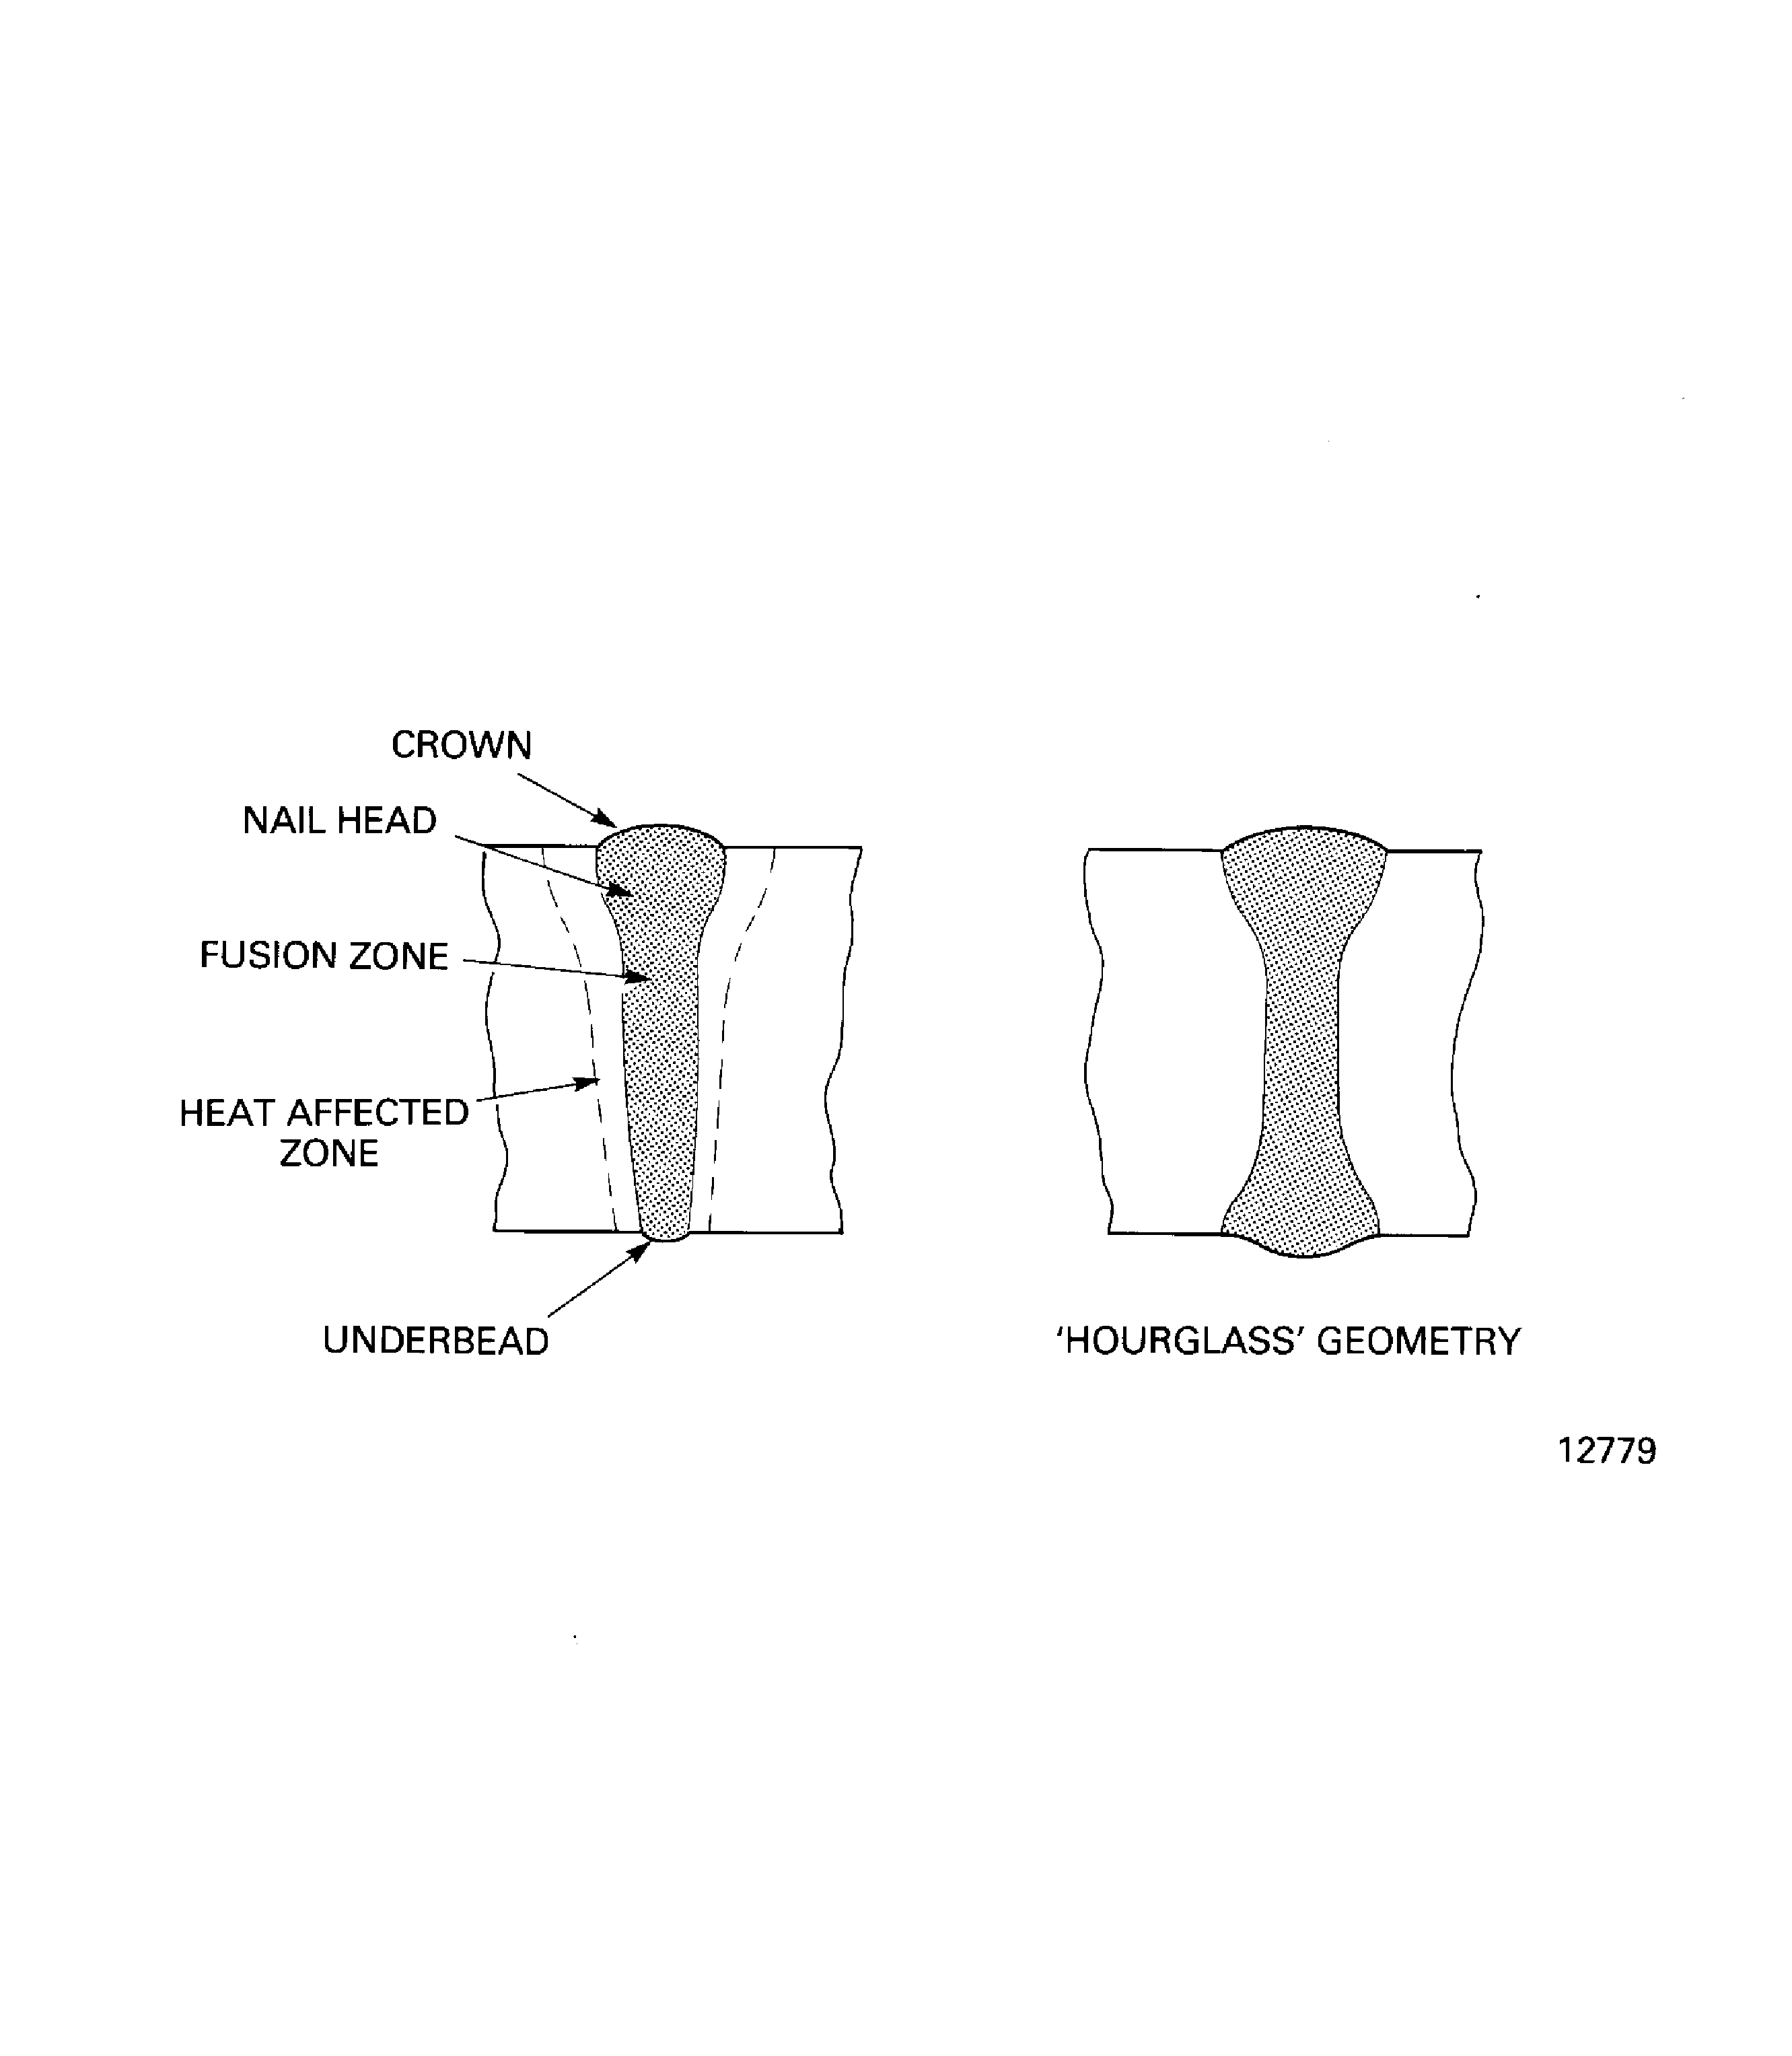
Figure: Geometric defects
Geometric defects
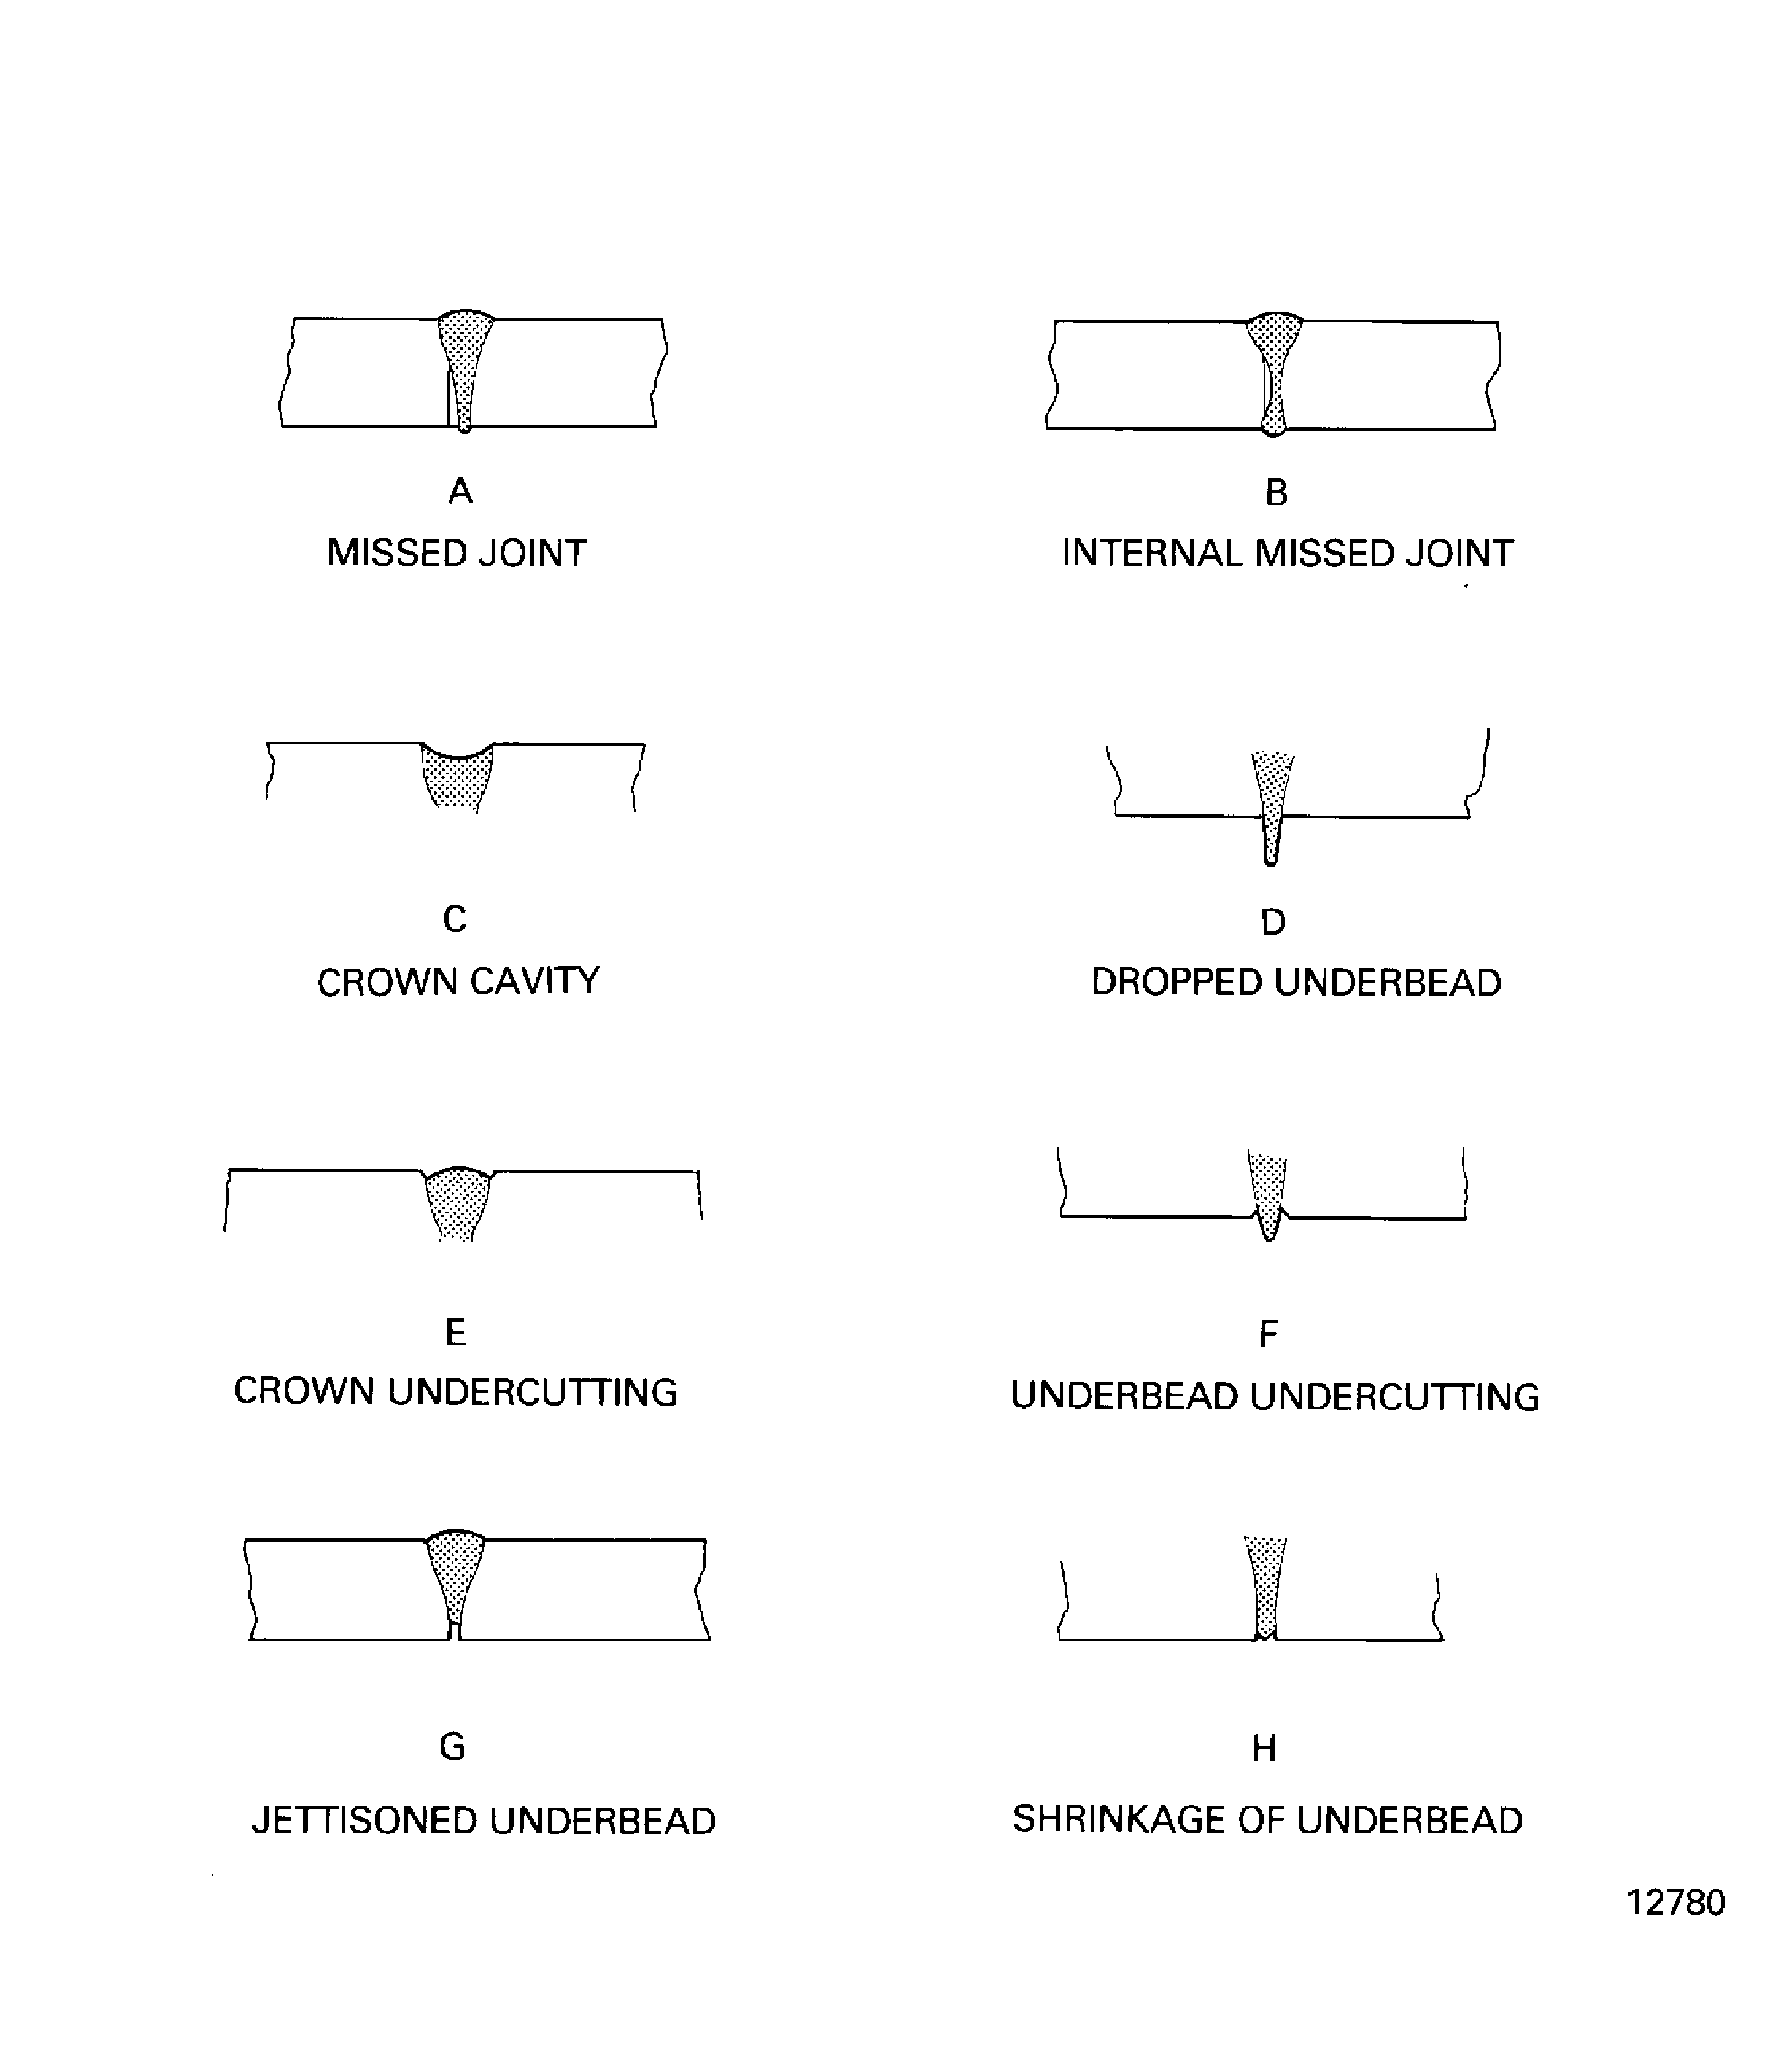
Figure: Metallurgical defects
Metallurgical defects
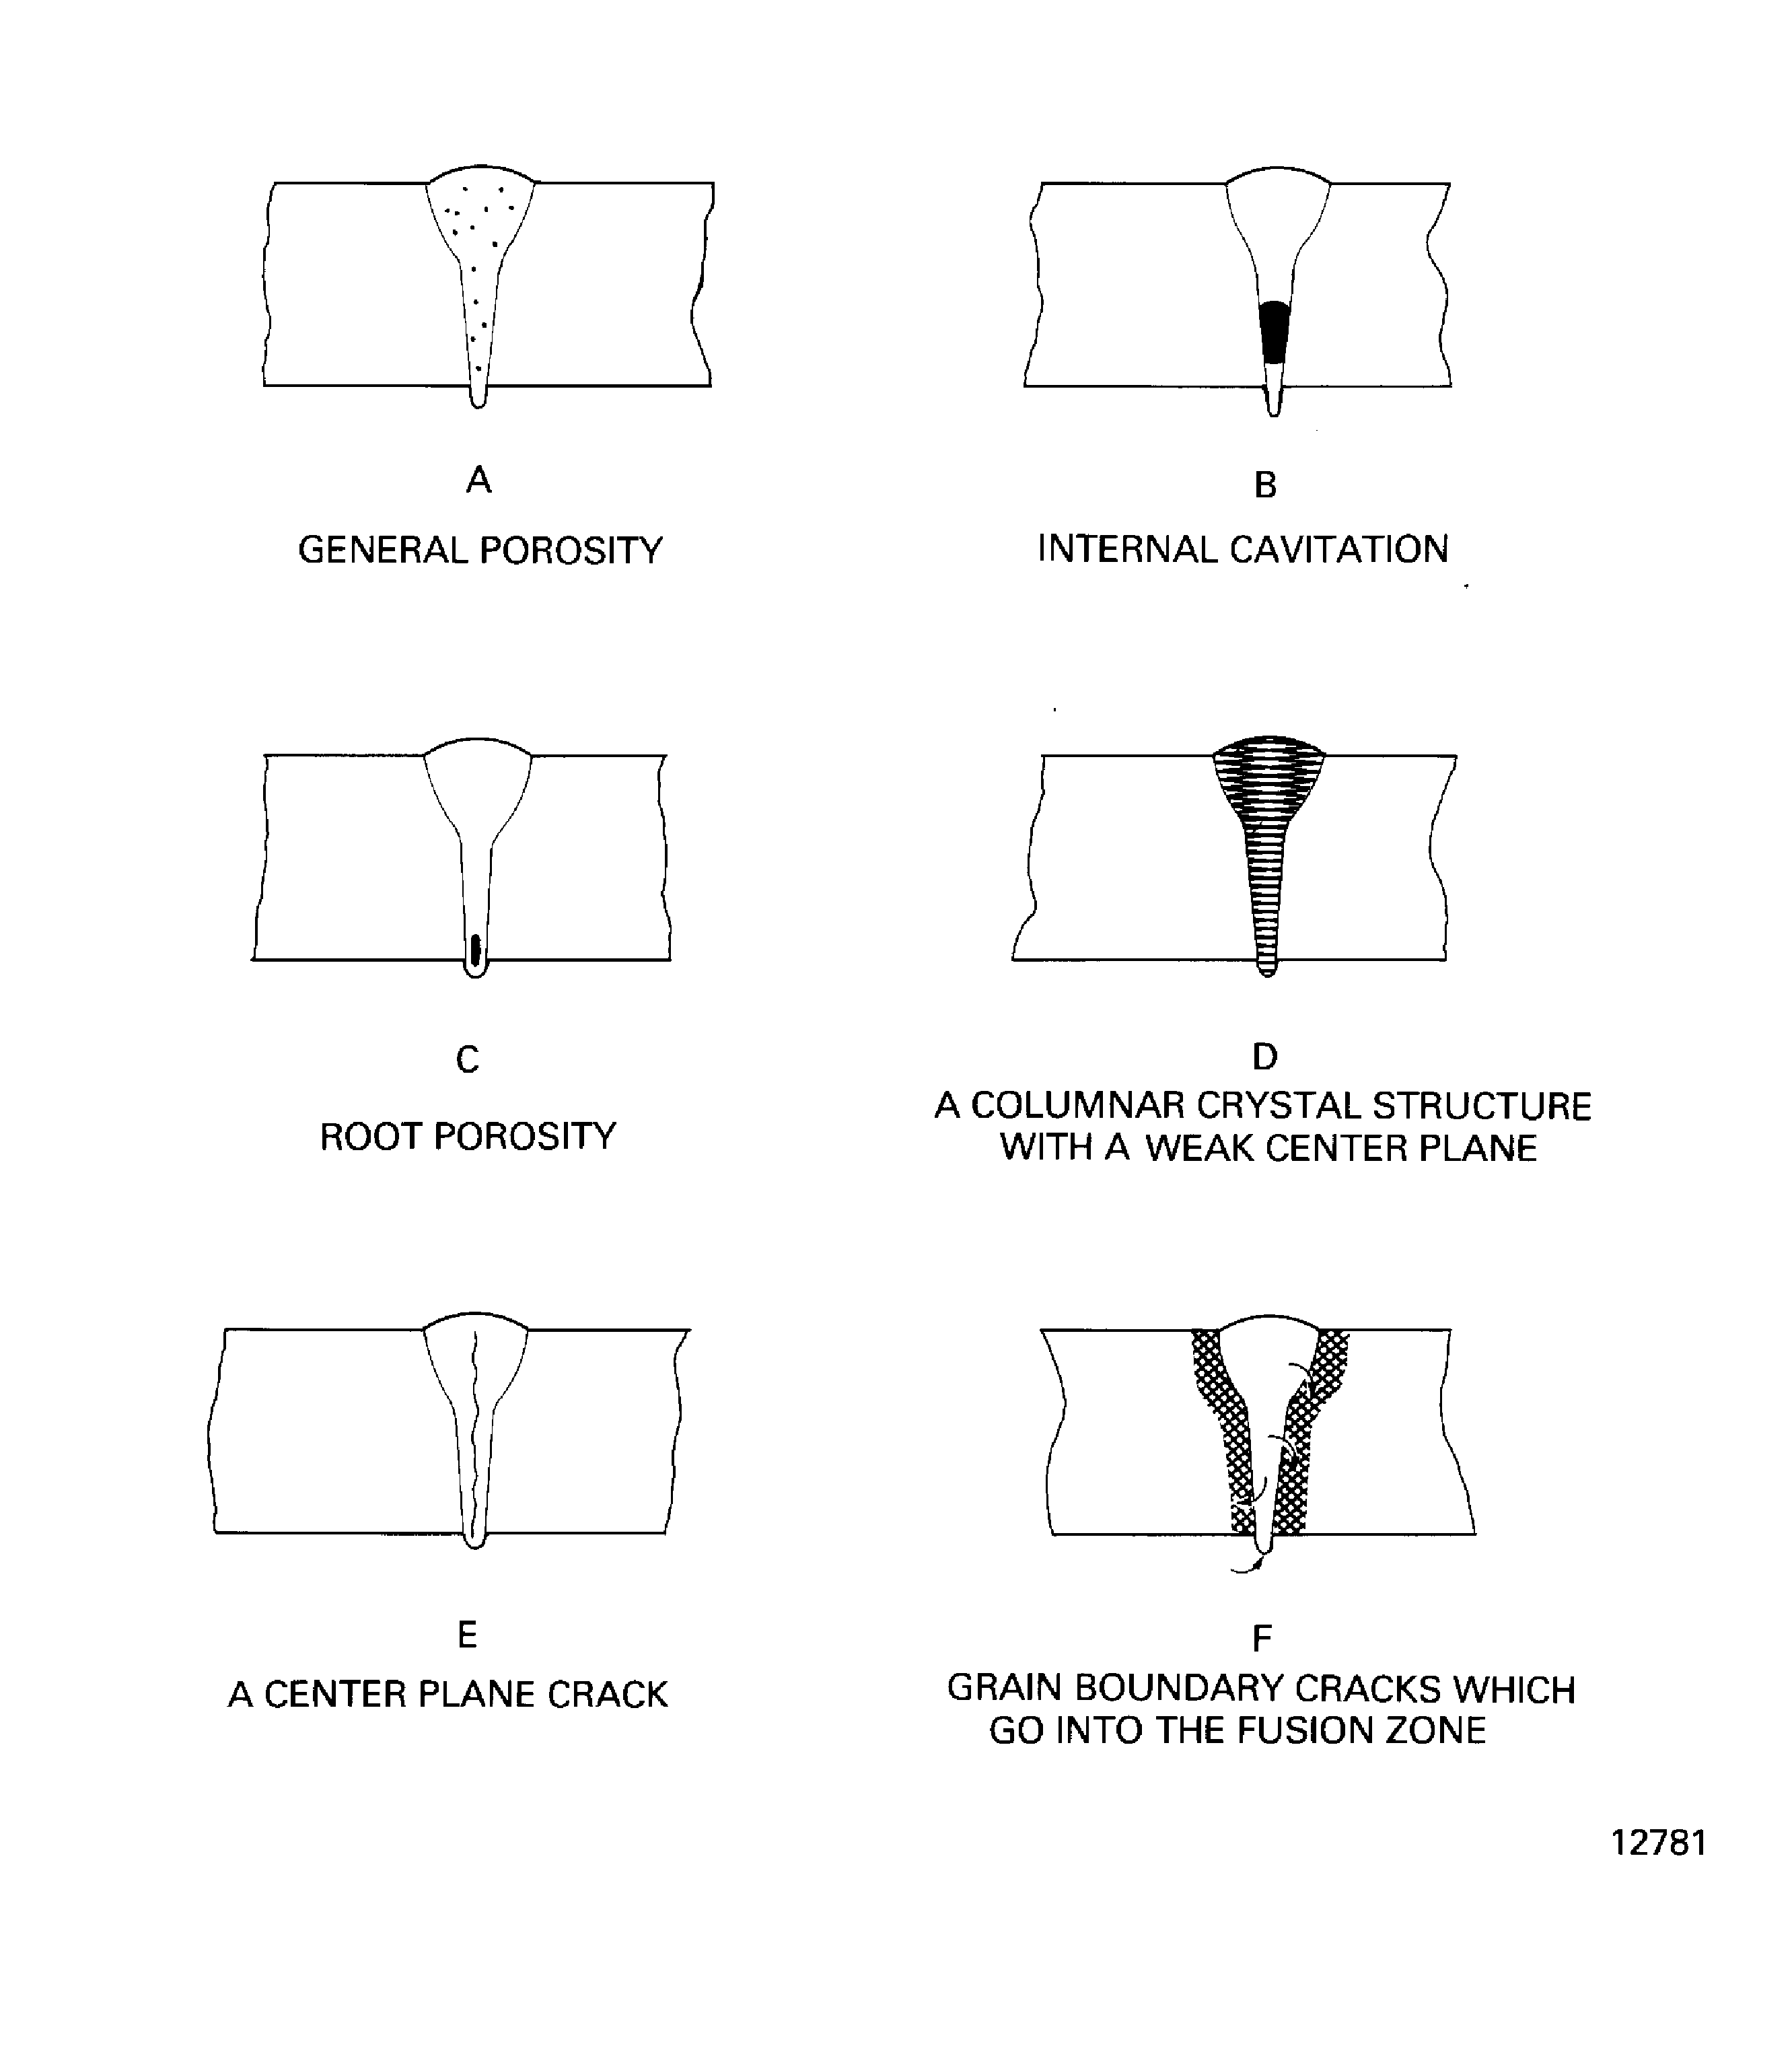
Figure: Weld dimension reference points
Weld dimension reference points
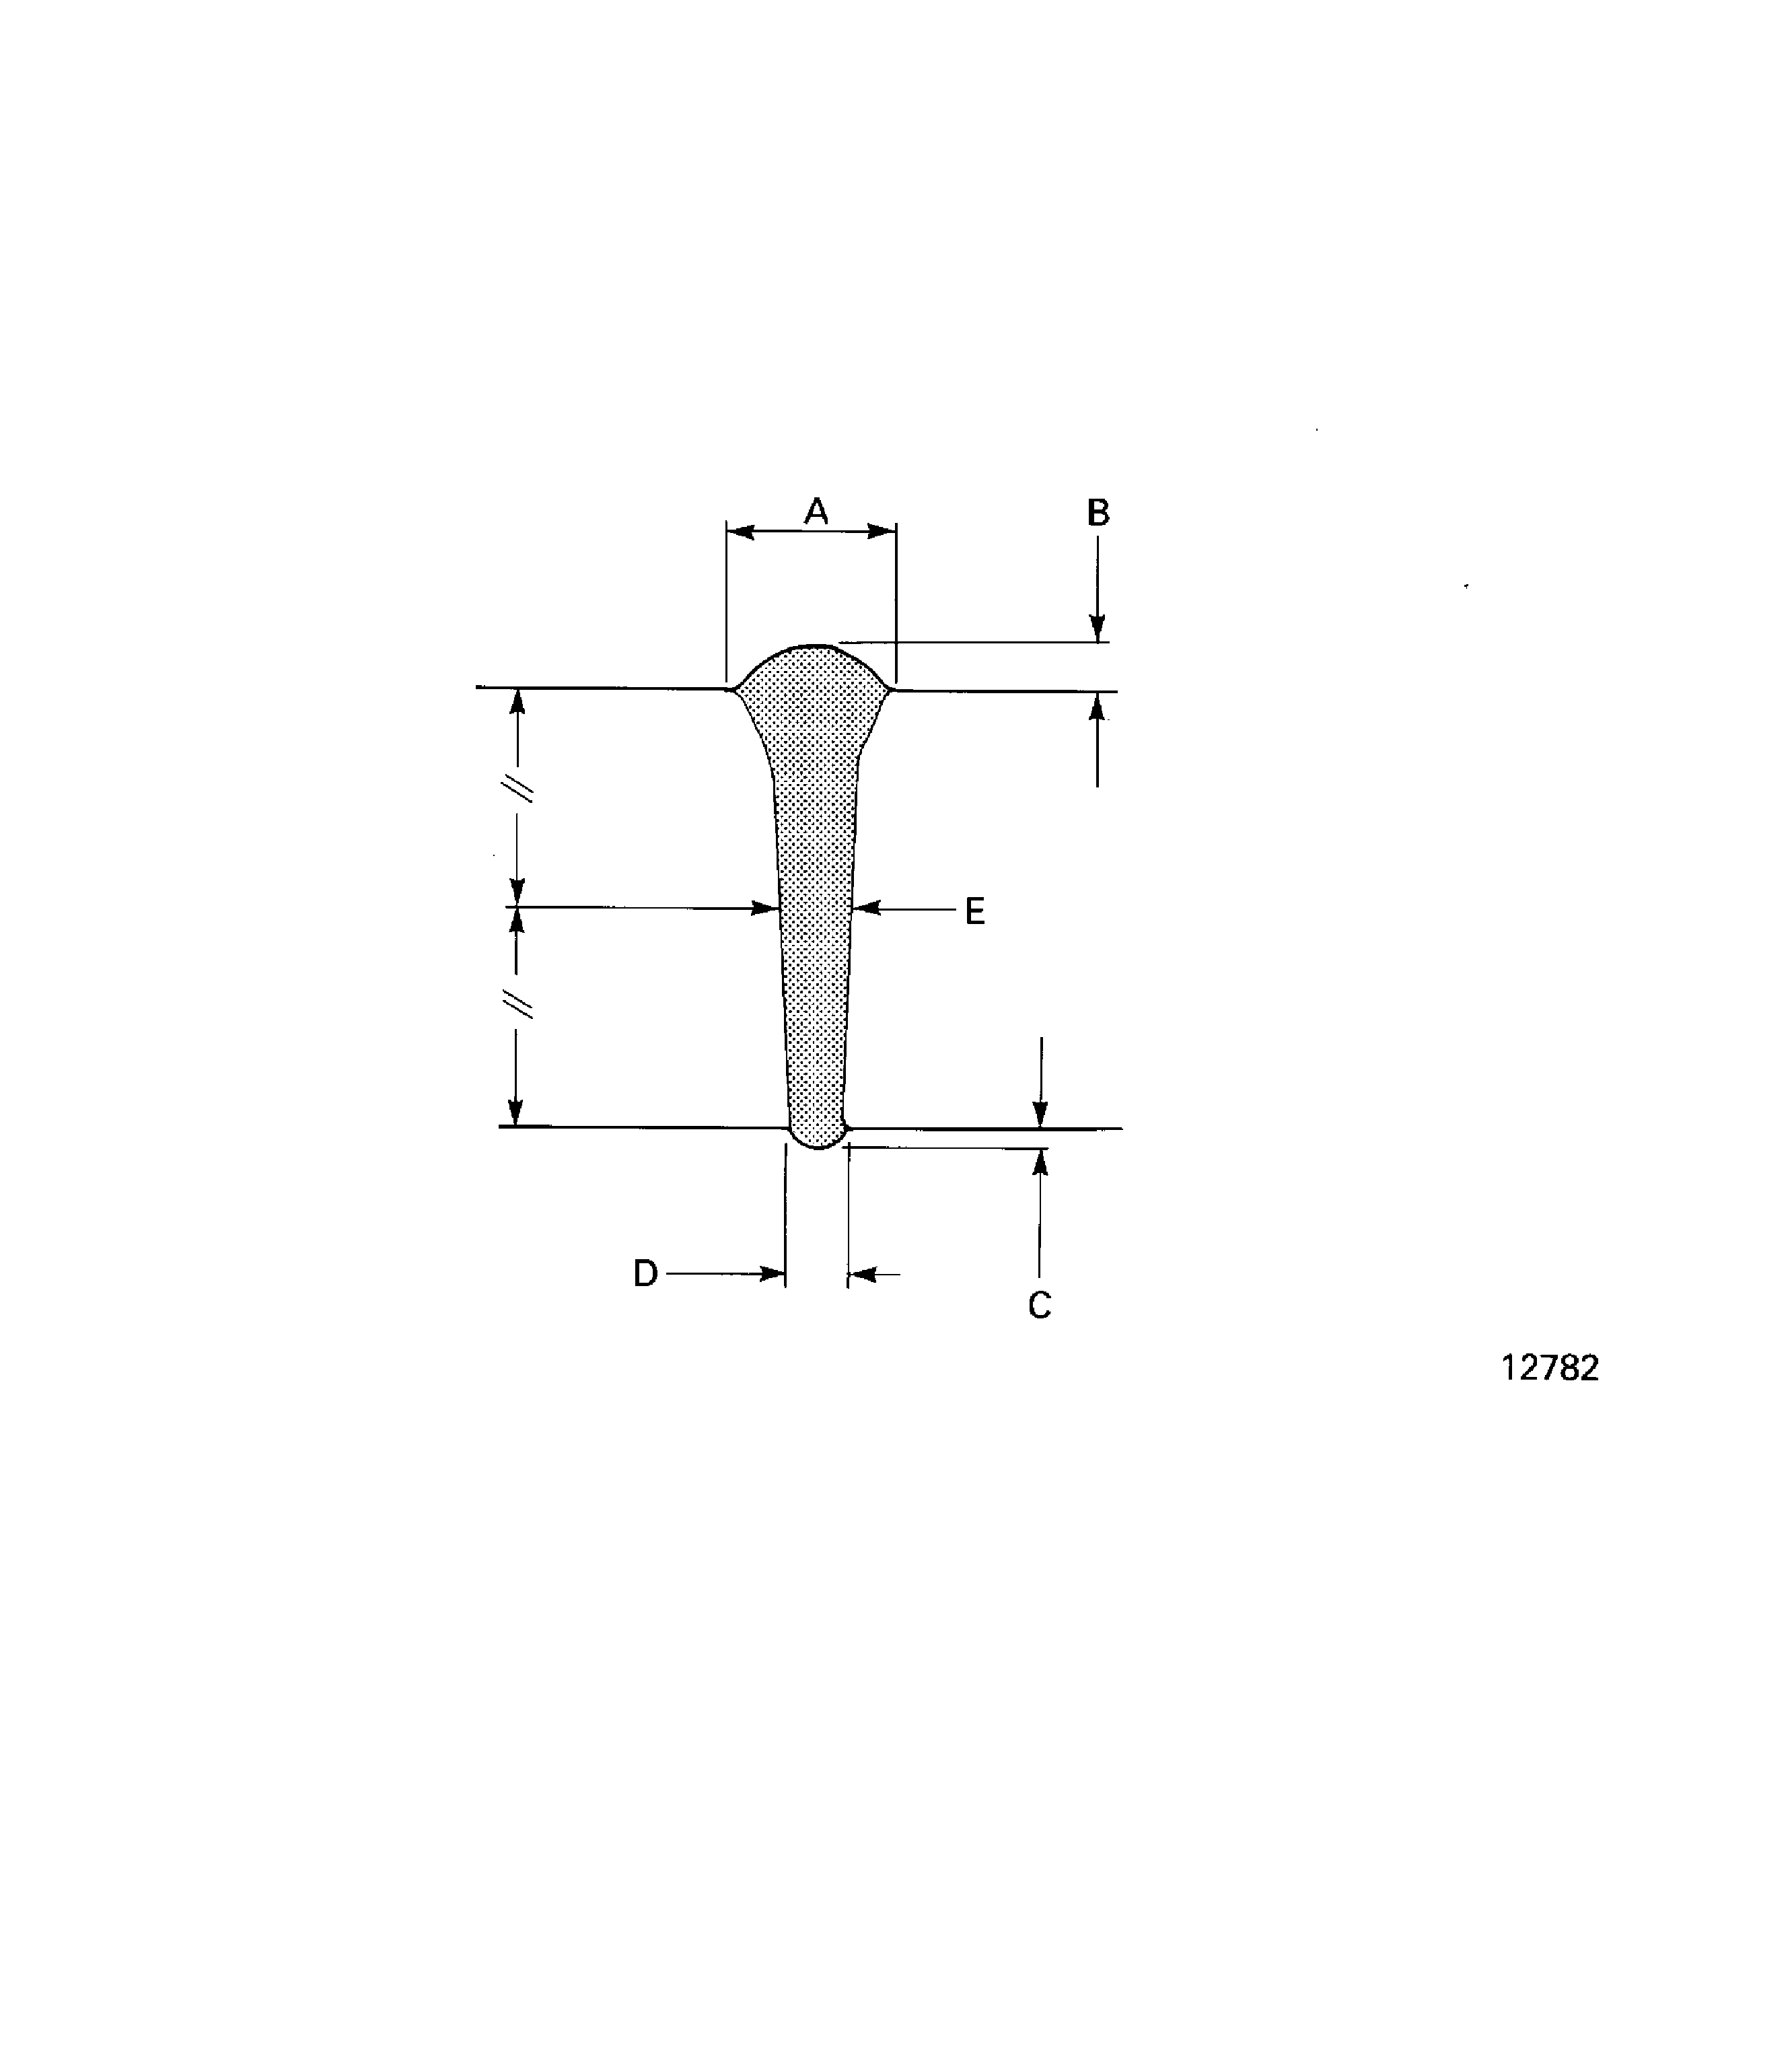
Figure: Flat test pieces
Flat test pieces
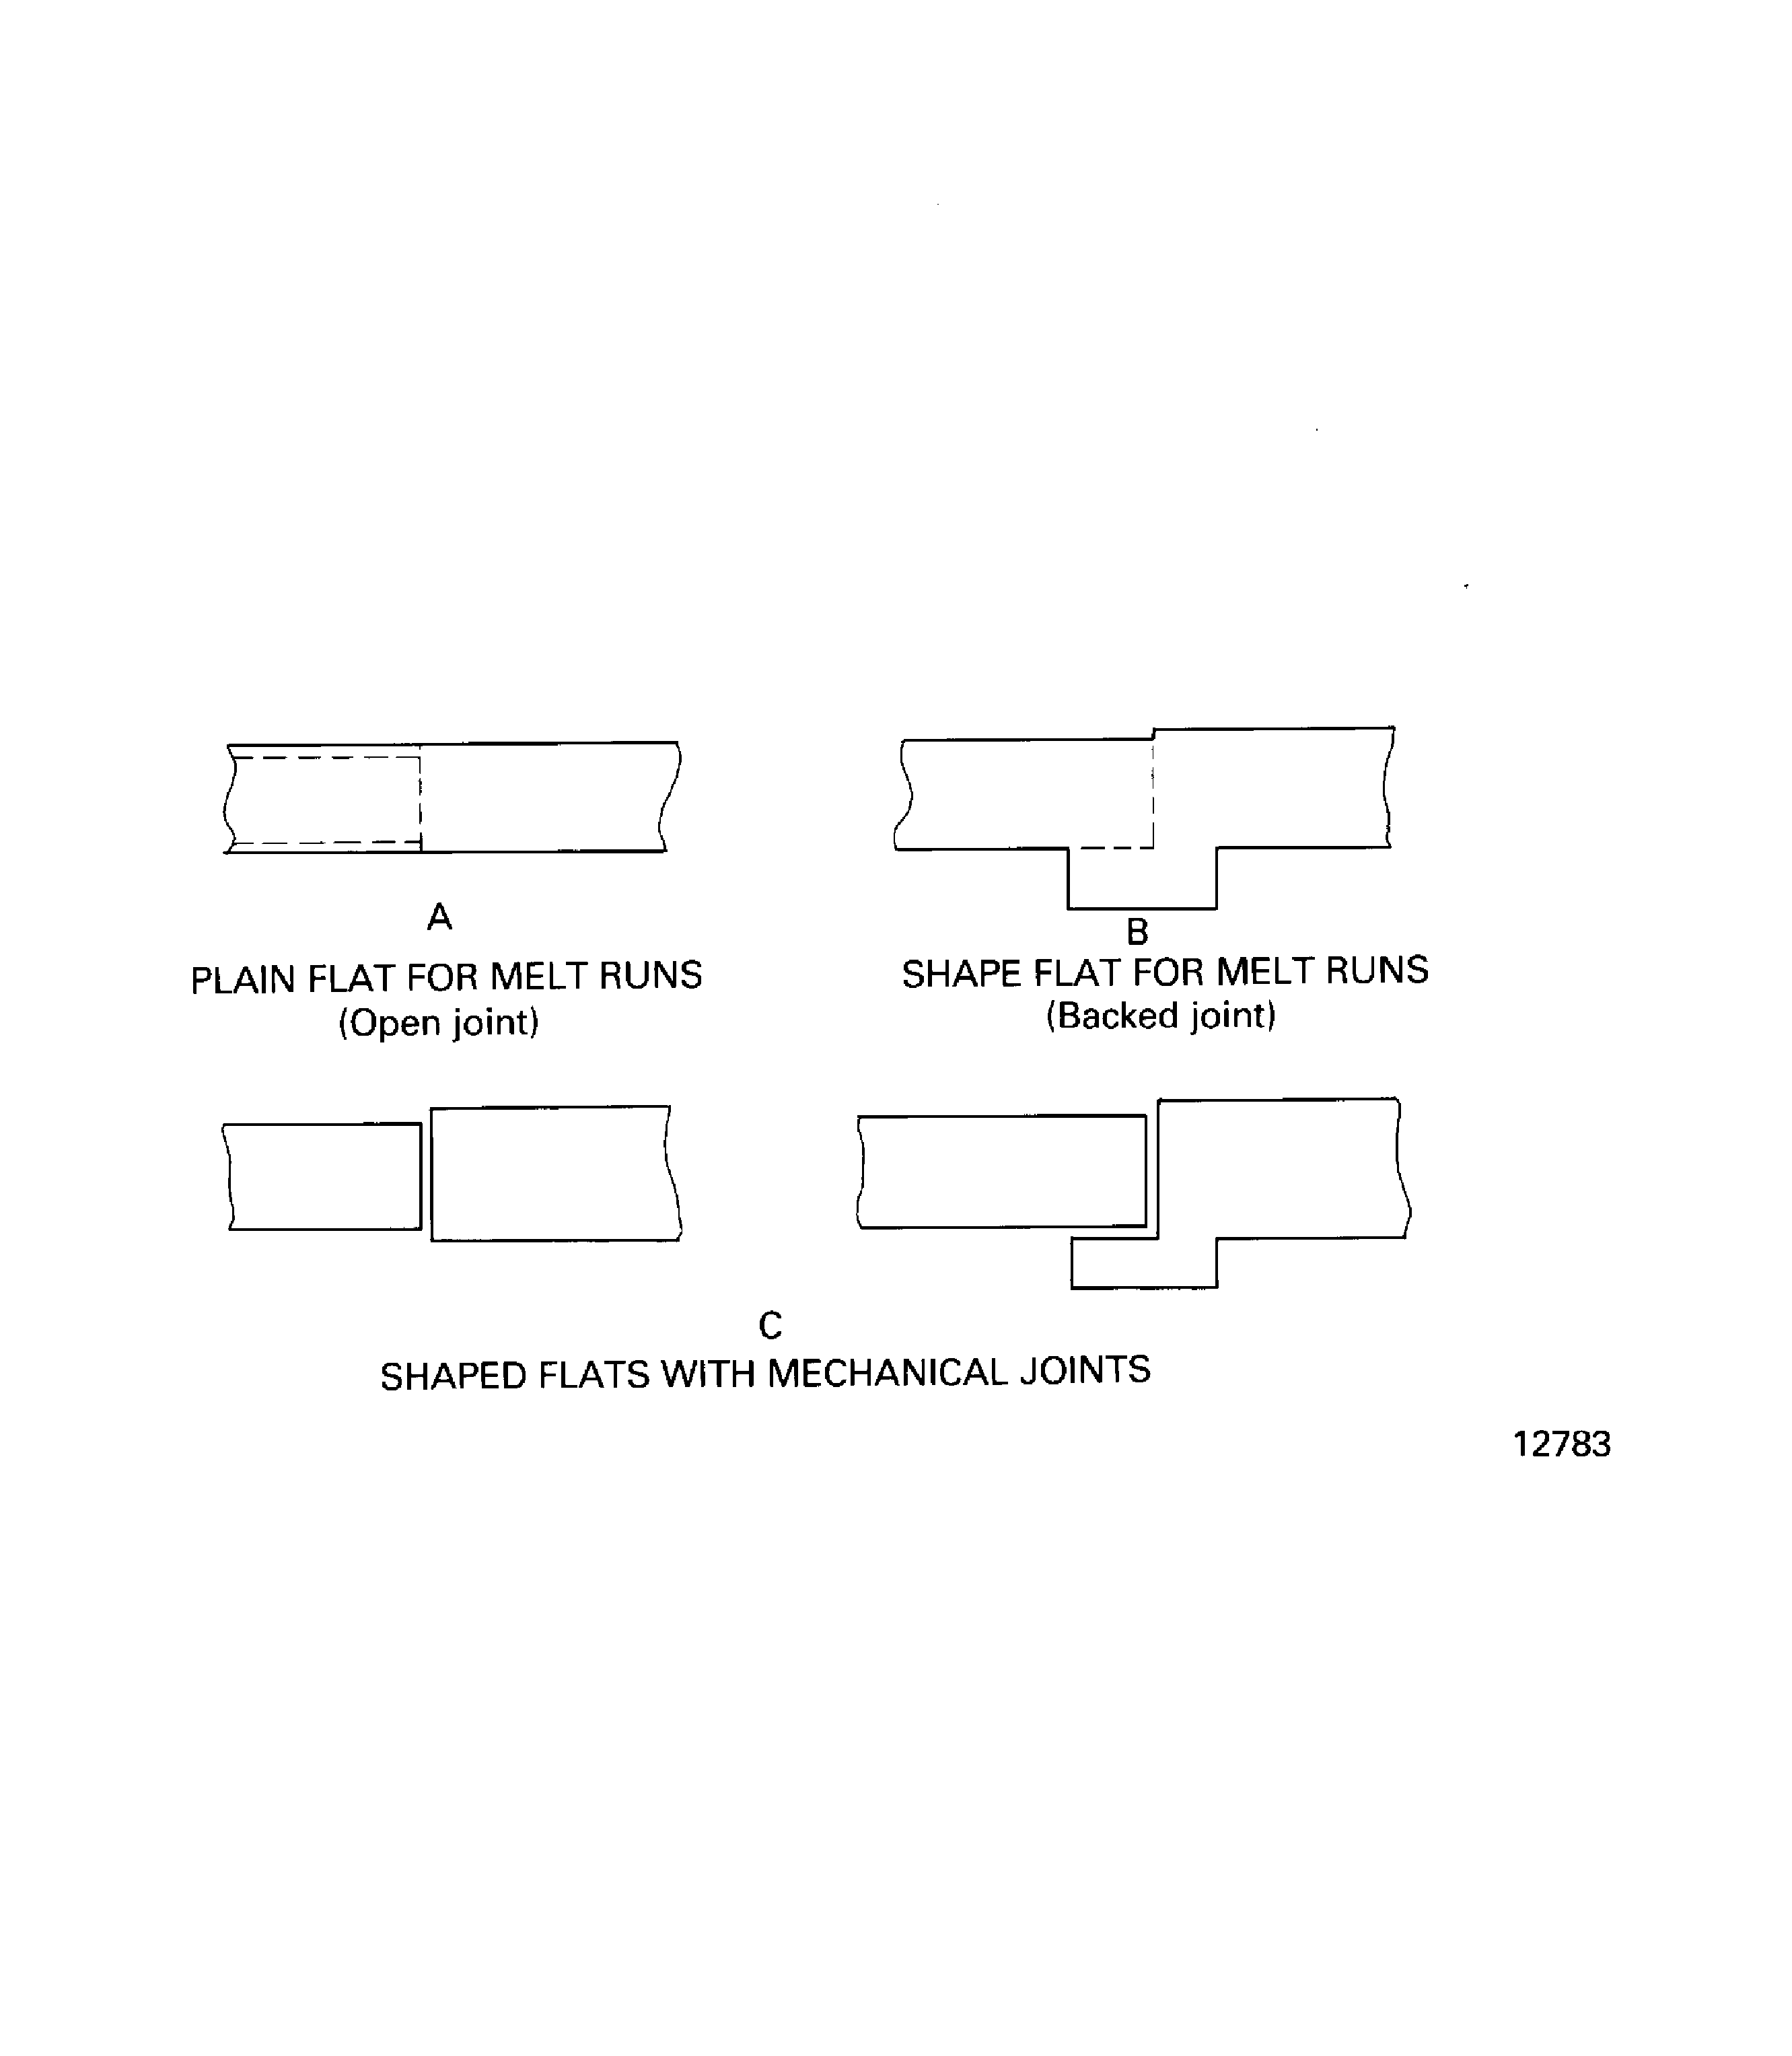
Figure: Examples of tooling as welding aids
Examples of tooling as welding aids
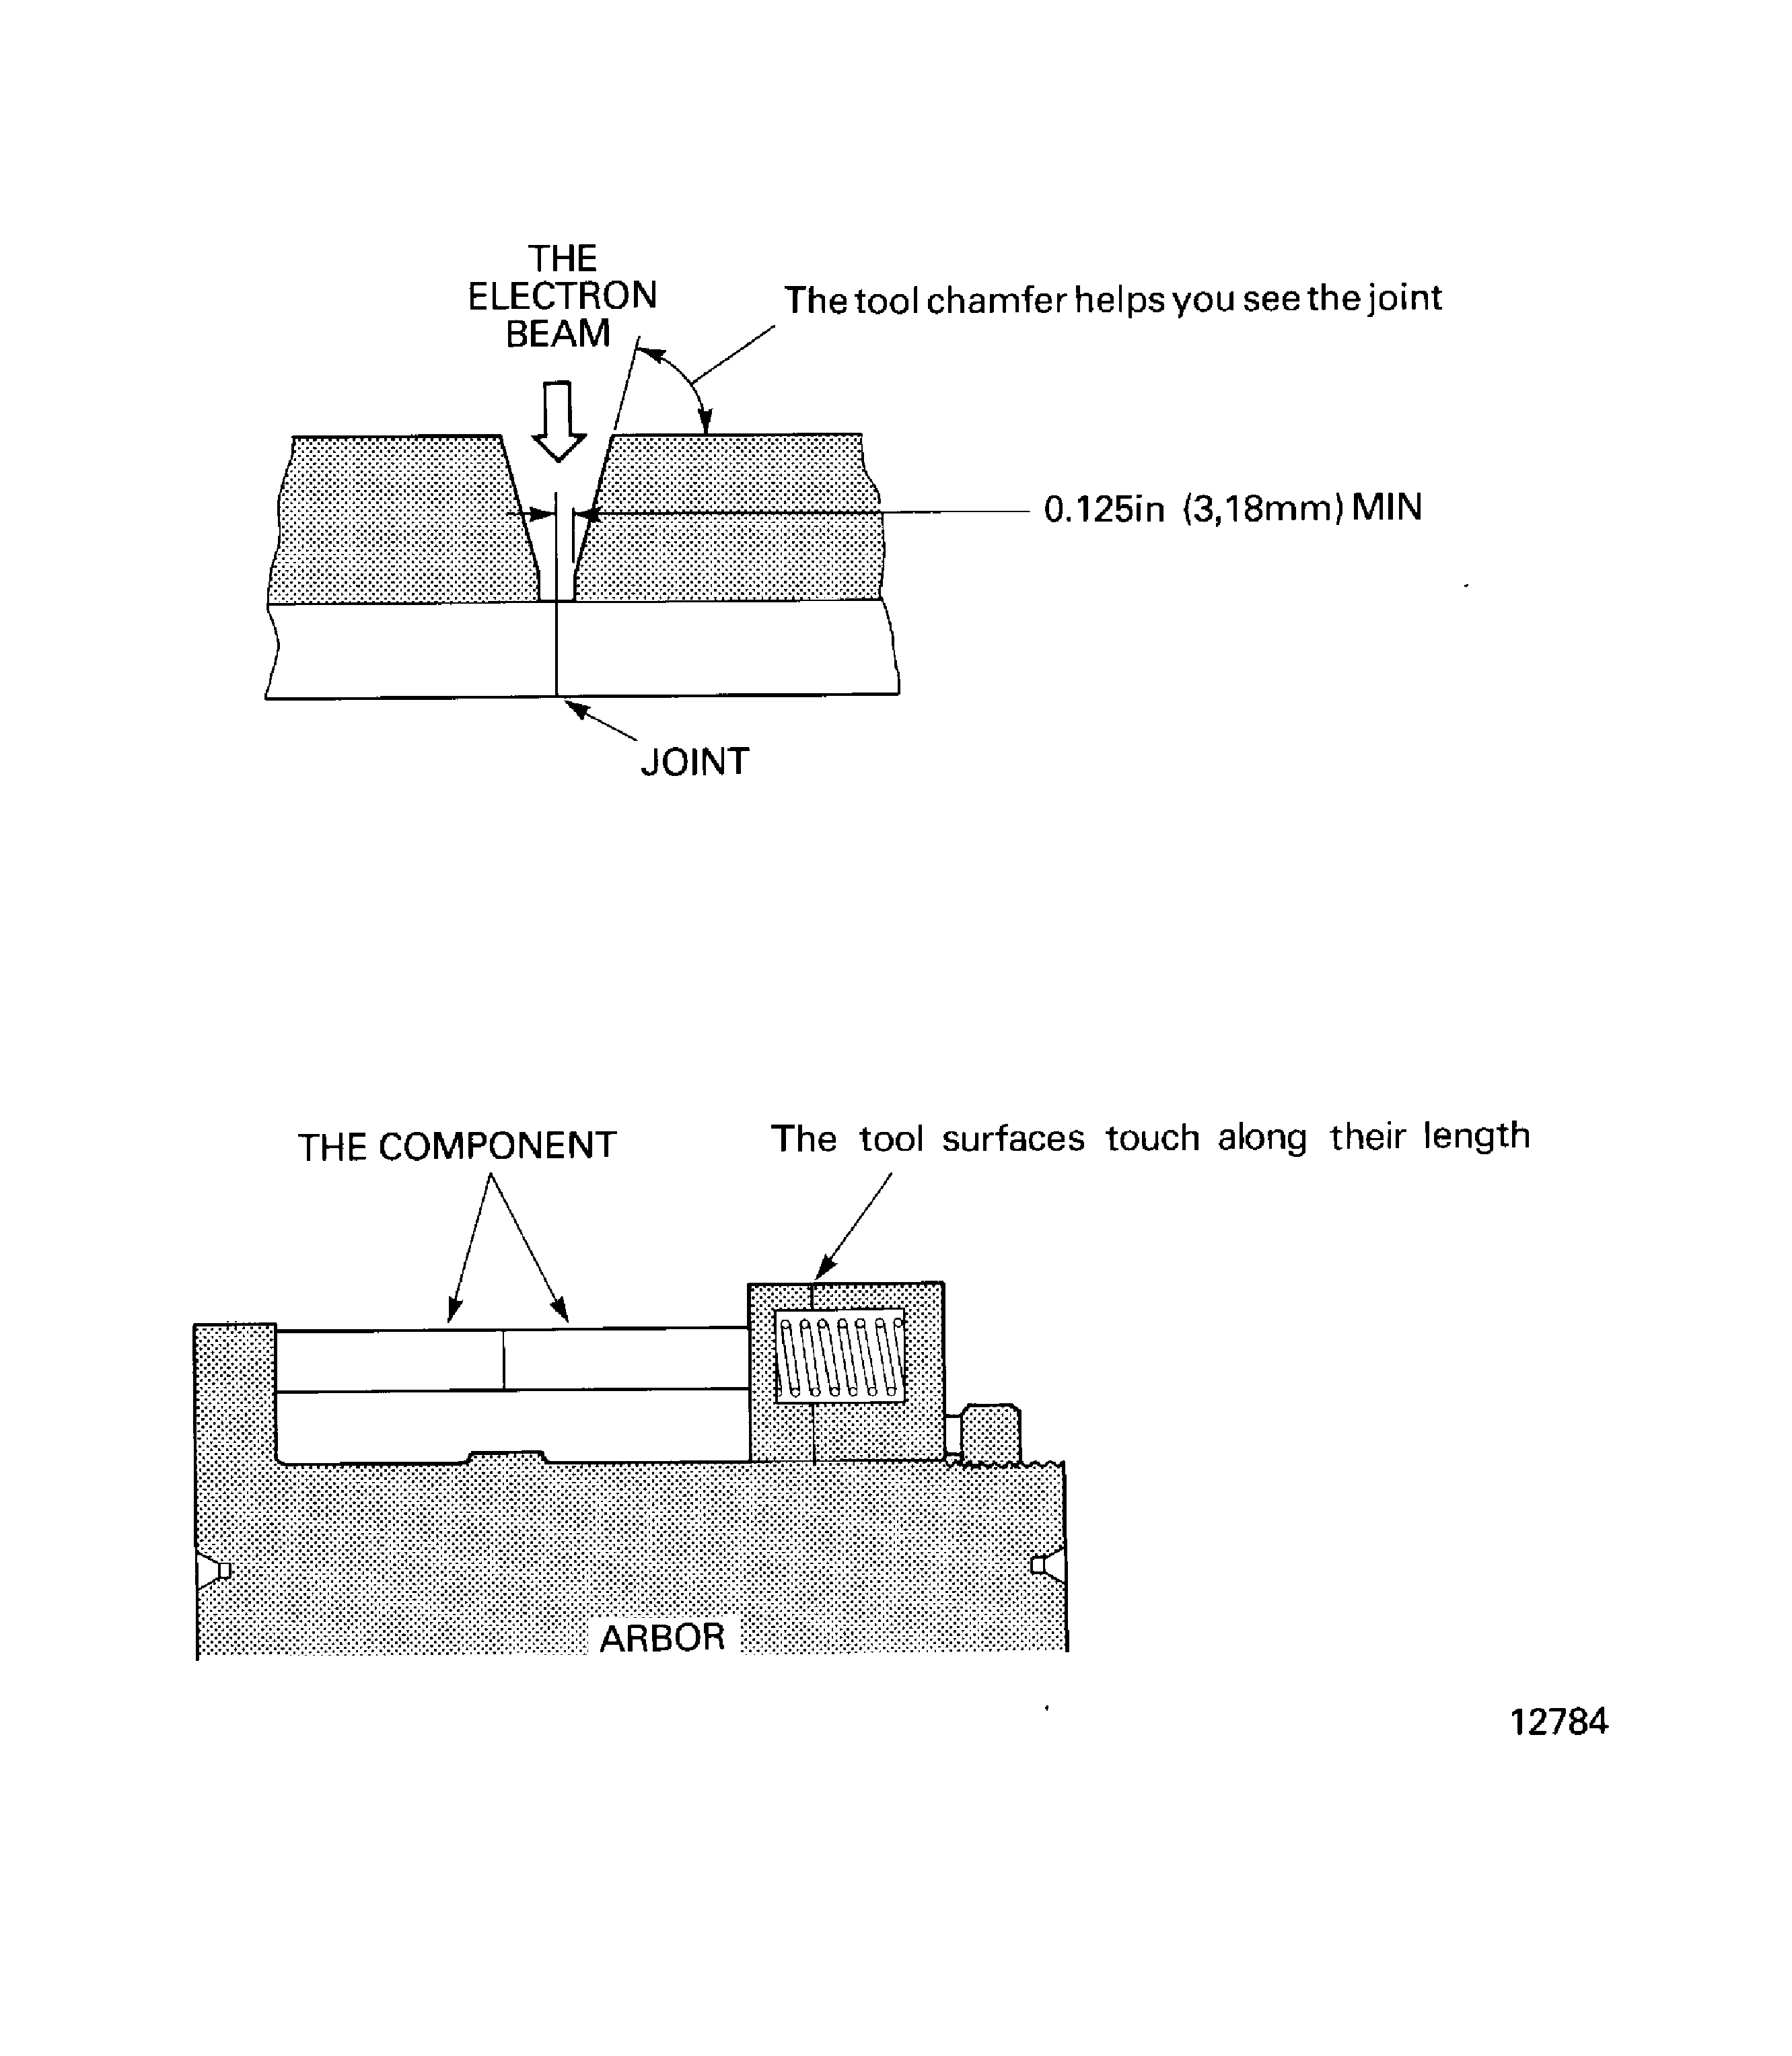
Figure: Examples of tooling as welding aids
Examples of tooling as welding aids
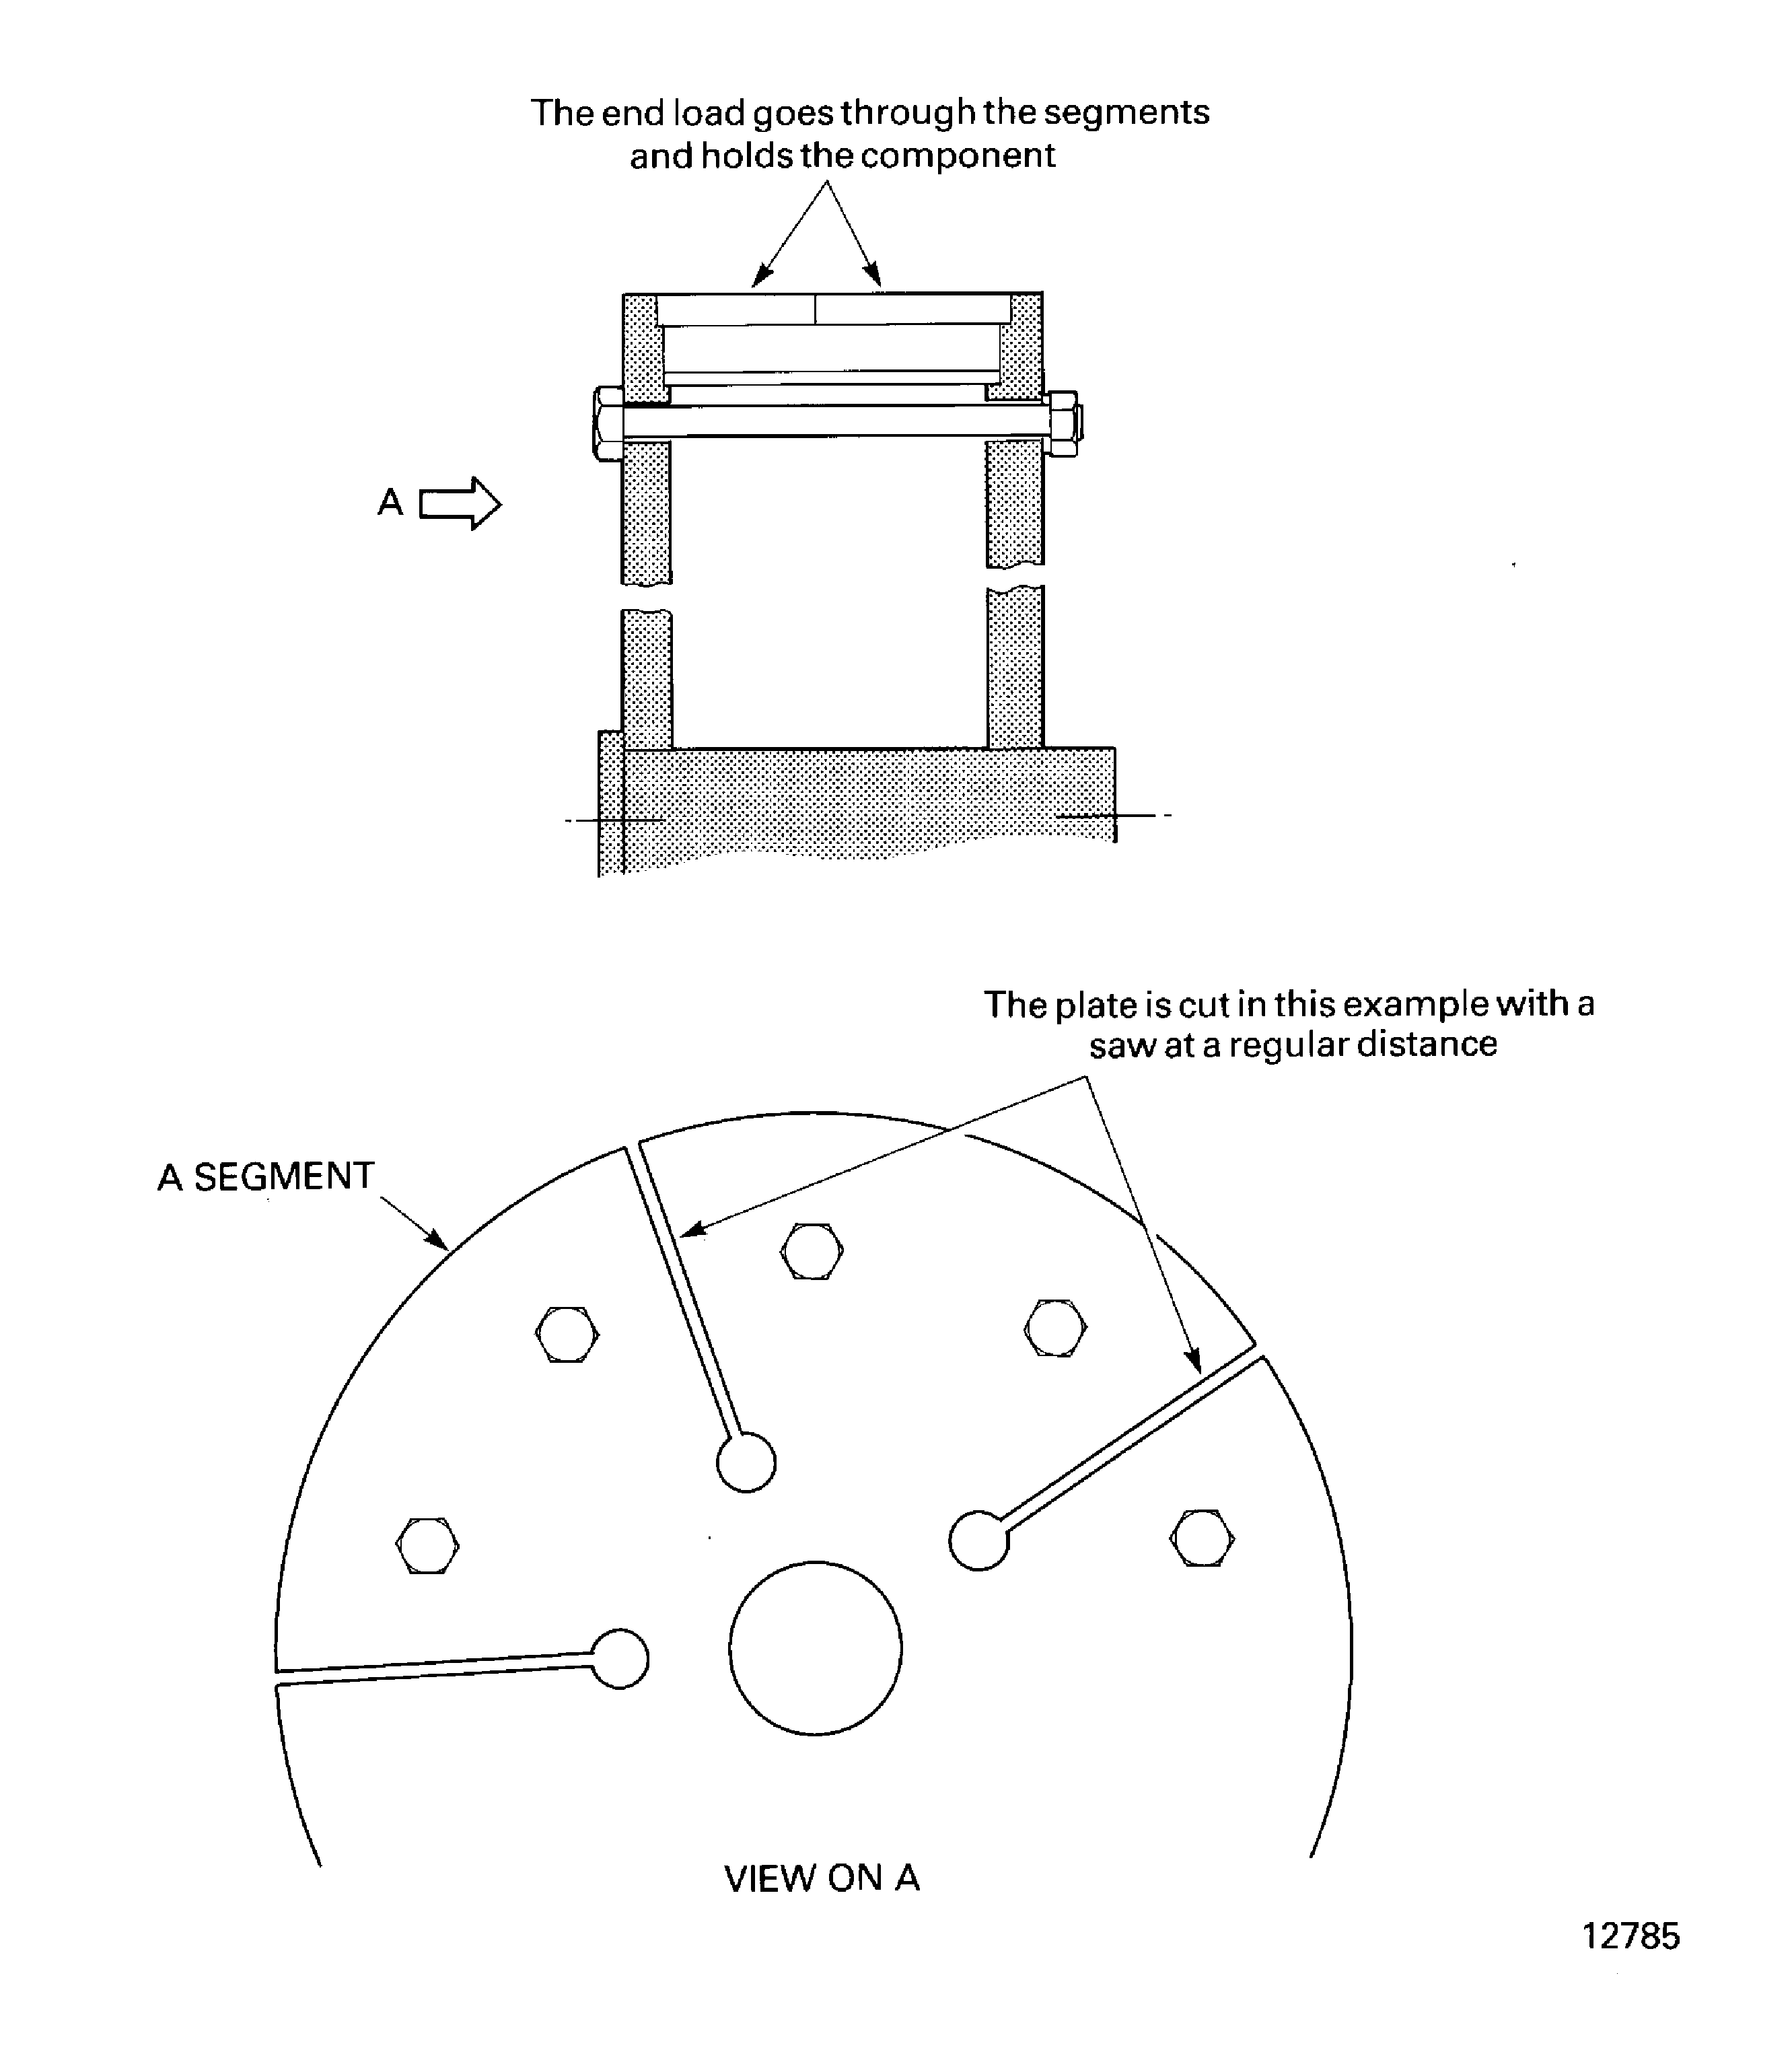
Figure: The electron beam welding data sheet
The electron beam welding data sheet
