Export Control
EAR Export Classification: Not subject to the EAR per 15 C.F.R. Chapter 1, Part 734.3(b)(3), except for the following Service Bulletins which are currently published as EAR Export Classification 9E991: SBE70-0992, SBE72-0483, SBE72-0580, SBE72-0588, SBE72-0640, SBE73-0209, SBE80-0024 and SBE80-0025.Copyright
© IAE International Aero Engines AG (2001, 2014 - 2021) The information contained in this document is the property of © IAE International Aero Engines AG and may not be copied or used for any purpose other than that for which it is supplied without the express written authority of © IAE International Aero Engines AG. (This does not preclude use by engine and aircraft operators for normal instructional, maintenance or overhaul purposes.).Applicability
All
Common Information
TASK 70-31-02-310-501-001 Argonarc Welding Repairs - Welding Procedures
Table of Contents
General | |||
Safety Precautions | |||
Clean | |||
Shielding Gas | |||
Distortion | |||
Equipment | |||
Preheating | |||
Heat Treatment | |||
Local Heat Treatment | |||
Process control and validation | |||
Welder Approval | |||
Inspection and quality standards | |||
Inspection of Welds | |||
Weld Classification | |||
Bend Test on the Titanium Welds | |||
Surface Flaw Inspection Requirements | |||
Radiographic Inspection | |||
Radiographic Inspection of Welds in Light Alloy Castings | |||
Visible Inspection of Titanium Welds | |||
Rewelding | |||
Filler material selection | |||
Orbital torch welding. | |||
Post weld heat treatment. | |||
Aluminum alloys | |||
Corrosion and creep resistant steels | |||
Nimonic 80 alloy | |||
Nimonic 90 alloy | |||
Nickel base alloy C.263 | |||
Titanium alloys | |||
Preliminary Requirements
Pre-Conditions
NONESupport Equipment
NONEConsumables, Materials and Expendables
| Name | Manufacturer | Part Number / Identification | Quantity | Remark |
|---|---|---|---|---|
| CoMat 05-003 ABRASIVE MEDIUM ALUMINUM OXIDE, 120/220 GRADE | X222X | CoMat 05-003 | ||
| CoMat 03-010 ARGON GAS | 0B434 | CoMat 03-010 |
Spares
NONESafety Requirements
NONEProcedure
This task provides general data for the weld repair of cracks and the replacement of material to metal parts with argonarc welding. In some cases changes to this general data or the use of special procedures is necessary. These changes will be given in detail in the Engine Manual. The Engine Manual is the primary authority. The weld group will be given in the applicable repair. Weld classification is given in Step.

CAUTION
WELDING MUST BE DONE IN A CLEAN AREA WHICH HAS PROTECTION FROM DRAFTS THAT CAN MOVE THE ARGON GAS.Introduction.
SUBTASK 70-31-02-860-003 General
SUBTASK 70-31-02-860-001 Safety Precautions

WARNING
IT IS THE RESPONSIBILITY OF THE OPERATOR TO OBTAIN AND OBSERVE THE MANUFACTURER'S MATERIAL SAFETY DATA SHEETS FOR CONSUMABLE MATERIALS. THESE CONTAIN INFORMATION SUCH AS, HAZARDOUS INGREDIENTS, PHYSICAL/CHEMICAL CHARACTERISTICS, FIRE, EXPLOSION, REACTIVITY, HEALTH HAZARD DATA, PRECAUTIONS FOR SAFE HANDLING, USE AND CONTROL MEASURES AND ALSO TO TAKE LOCAL REGULATIONS INTO CONSIDERATION.
WARNING
ULTRAVIOLET LIGHT PRODUCED DURING ARC WELDING CAN BE HAZARDOUS. WEAR APPROPRIATE PERSONAL PROTECTIVE EQUIPMENT.
WARNING
FUMES PRODUCED DURING WELDING CAN BE HAZARDOUS. MAKE SURE VENTILATION IS ADEQUATE OR WEAR APPROPRIATE PERSONAL PROTECTION.Clean the parts to be welded by one of the methods in the SPM TASK 70-11-01-300-503 (vapour degreasing), or SPM TASK 70-11-03-300-503 (aqueous cleaning), or SPM TASK 70-11-26-300-503 (local degreasing with solvent), or SPM TASK 70-11-34-300-503 (aqueous degreasing). Then, if necessary, clean the surface to be welded by a suitable abrasive method. Examples of suitable methods are: abrasive mop, or rotary file, or abrasive blasting with CoMat 05-003 ABRASIVE MEDIUM ALUMINUM OXIDE, 120/220 GRADE. After abrasive blasting, it may be necessary to scurf mop the edges with carbide paper. Titanium alloys may need to be etched if weld porosity is a problem.
Before welding, it is essential to remove all dirt, oxide, paints and coatings from the weld edges and the surrounding surfaces on both sides of the material.
SUBTASK 70-31-02-120-001 Clean the Part Before you Weld

CAUTION
ABRASIVE MEDIA, STAINLESS STEEL WIRE BRUSHES, ABRASIVE MOPS, AND ROTARY FILES, USED TO PREPARE WELDS MUST BE CLEAN AND FREE FROM GREASE. DIRTY TOOLS CAN TRANSFER CONTAMINATION TO THE WELD PREPARATION WHICH CAUSES WELD DEFECTS.The shielding gas is needed to protect the molten weld pool from atmospheric contamination. The top of the weld is shielded by the gas from the welding torch; for automatic welds a trailing shroud may also be required. The back of the weld also needs to be protected. This shielding can be provided by:
The usual shielding gas for repair welding is CoMat 03-010 ARGON GAS.
SUBTASK 70-31-02-310-001 Shielding Gas used in Welding Repair Methods
To decrease the risk of distortion on large casings, attach them with a clamp to a rigid baseplate. This will hold them when they are welded or during subsequent heat treatment.
NOTE
Chill plates must have a groove to clear the weld line. The groove can also be used to supply the argon to the back of the weld.
SUBTASK 70-31-02-310-002 Precautions to Decrease the Risk of Distortion
The equipment must give sufficient argon coverage before the arc is made and after the weld run is completed. The equipment must permit the supply of argon to the opposite side of the weld. When argon is fed to the underside of the weld a separate flow meter shall be used. The argon supply to the torch and fixture shall be free from leaks.
For argon backing lines use Polychloroprene (Neoprene).
NOTE
A rectifier with an output range of 10 to 150 amperes will be sufficient for most applications, but one with a range of 5 to 300 amperes recommended. The current range shall be adjustable in small increments or linearly over the range of the power source. The meter scale shall enable small current increments to be readily seen.
Tubing For The Supply Of The Argon
NOTE
It is permitted to use alternative tube material if the alternative tube material has no negative effect on the quality of the argon gas, the welding equipment, or the welds.The arc must be initiated by a high frequency (HF) or impulse generated spark. Touch starting of the arc is not permitted. Automatic control to increase the weld current from the minimum necessary for arc initiation to the pre-set weld current over the first few seconds of the weld sequence is permitted.

CAUTION
POOR EARTH CONTACT CAN CAUSE ARC DAMAGE ON THE PART AWAY FROM THE AREA BEING WELDED.To prevent arc damage a good earth connection shall be made either directly onto the component, or to the fixture in which the component is secured. Do not rely on the connection of the earth lead to the electrical contact on the bench.

WARNING
DO NOT BREATH DUST PARTICLES WHEN SHARPENING THORIATED TUNGSTEN ELECTRODES. THORIUM EMITS ALPHA RADIATION, OBEY LOCAL HEALTH AND SAFETY PROCEDURES FOR SAFE WORK PRACTICES.Electrodes
NOTE
The different types of electrode have different emissivity, if the electrode type is changed then automatic welds must be revalidated.NOTE
If the repair documentation calls for Thoriated elctrodes for manual welds then the alternatives quoted below can be used.
SUBTASK 70-31-02-310-003 The Equipment Necessary to make a Weld
For a details of specific heat treatment requirements, refer to the Engine Manual and the SPM TASK 70-31-02-310-501-004.
Where the weld distortion is local and acceptable, particularly on large fabricated parts, the use of thermal blanket heating elements may be accepted.
SUBTASK 70-31-02-370-001 Heat Treatment After you Weld
General.
This subtask is for the local heat treatment of repair welds on engine parts with Flexible beaded heating elements, blanket elements and heating tape used as an alternative to a furnace. The use of this type of equipment is specified in the applicable Repair. This type of heat treatment removes the problems of putting large components in furnaces and with the distortion of parts.
SUBTASK 70-31-02-370-002 The Local Heat Treatment of Repair Welds

CAUTION
WELDS ON PARTS THAT ROTATE MUST NOT BE GIVEN LOCAL HEAT TREATMENT UNLESS SPECIFIED IN THE APPLICABLE REPAIR.
CAUTION
LOCAL HEAT TREATMENT SHALL ONLY BE USED WHERE THE GEOMETRY OF THE COMPONENT ALLOWS ADEQUATE ACCESS FOR HEATING ELEMENTS. INCORRECT PLACEMENT OF HEATER ELEMENTS, THERMOCOUPLES OR INSULATION CAN CAUSE OVERHEATING OF COMPONENTS OR UNDER HEATING OF REPAIR WELDS.Figure shows acceptable step conditions in butt weld joints at the pre-weld inspection.
Pre-weld inspection:
Post weld inspection.
Table 2. Butt Welds Feature
Requirement
Concavity
Permitted up to 10%t provided it blends smoothly with the parent metal, see Figure.
Weld bead
Weld beads must blend smoothly into the parent metal.
Maximum weld crown height
50%t for manual welds (Aluminum 100%t maximum)
30%t for mechanical welds (Aluminum 50%t maximum)
See Figure.
Maximum bead penetration
50t for manual or mechanical welds (Aluminum 100%t)
See Figure.
Excessive penetration seen as large particles of weld metal on the opposite side of the weld is not permitted.
Lack of penetration and fusion
Not permitted.
See Figure.
Lack of fusion is not permitted.
Parent metal thinning
Maximum 10%t.
See Figure.
Undercutting
Less than 10%t is permitted provided there is no sharp change of section.
See Figure.
Cracks
Not permitted in the weld or adjacent heat affected zone (HAZ).
Porosity
Isolated pores are permitted provided that:
They have a minimum separation of 1.00 inch (25.4 mm).
The depth is not more than half the diameter of the pore.
The depth does not exceed:
30%t in Group 1 welds
40%t in Group 2 welds
50%t in Group 3 welds.
Stop and start craters
Not permitted in Group 1 and Group 2 welds.
In Group 3 welds, maximum permitted diameter is 0.030 inch (0.75 mm)
Weld width
Maximum
Welds shall be consistent with full penetration of the weld.
The weld bead shall have uniform width; local variations are permitted up to 1.5 W
Changes in the weld path direction
Changes in the weld path must be smooth and uniform. The maximum permitted deviation is 25 percent W in a distance of 3W.
See Figure.
Arc damage
Arc damage to the part at the earthing contact or fixture is not permitted.
Heavy oxidation
Not permitted.
Titanium discolouration
Refer to Step.
Table 3. Fillet welds Feature
Requirement
Weld beads
Must be blend smoothly with the parent metal but can range in shape from lightly convex to lightly concave.
Bridging
Not permitted
See Figure
Undercutting
10%t is permitted provided there is no sharp change in the section.
Overlap and blunt toes
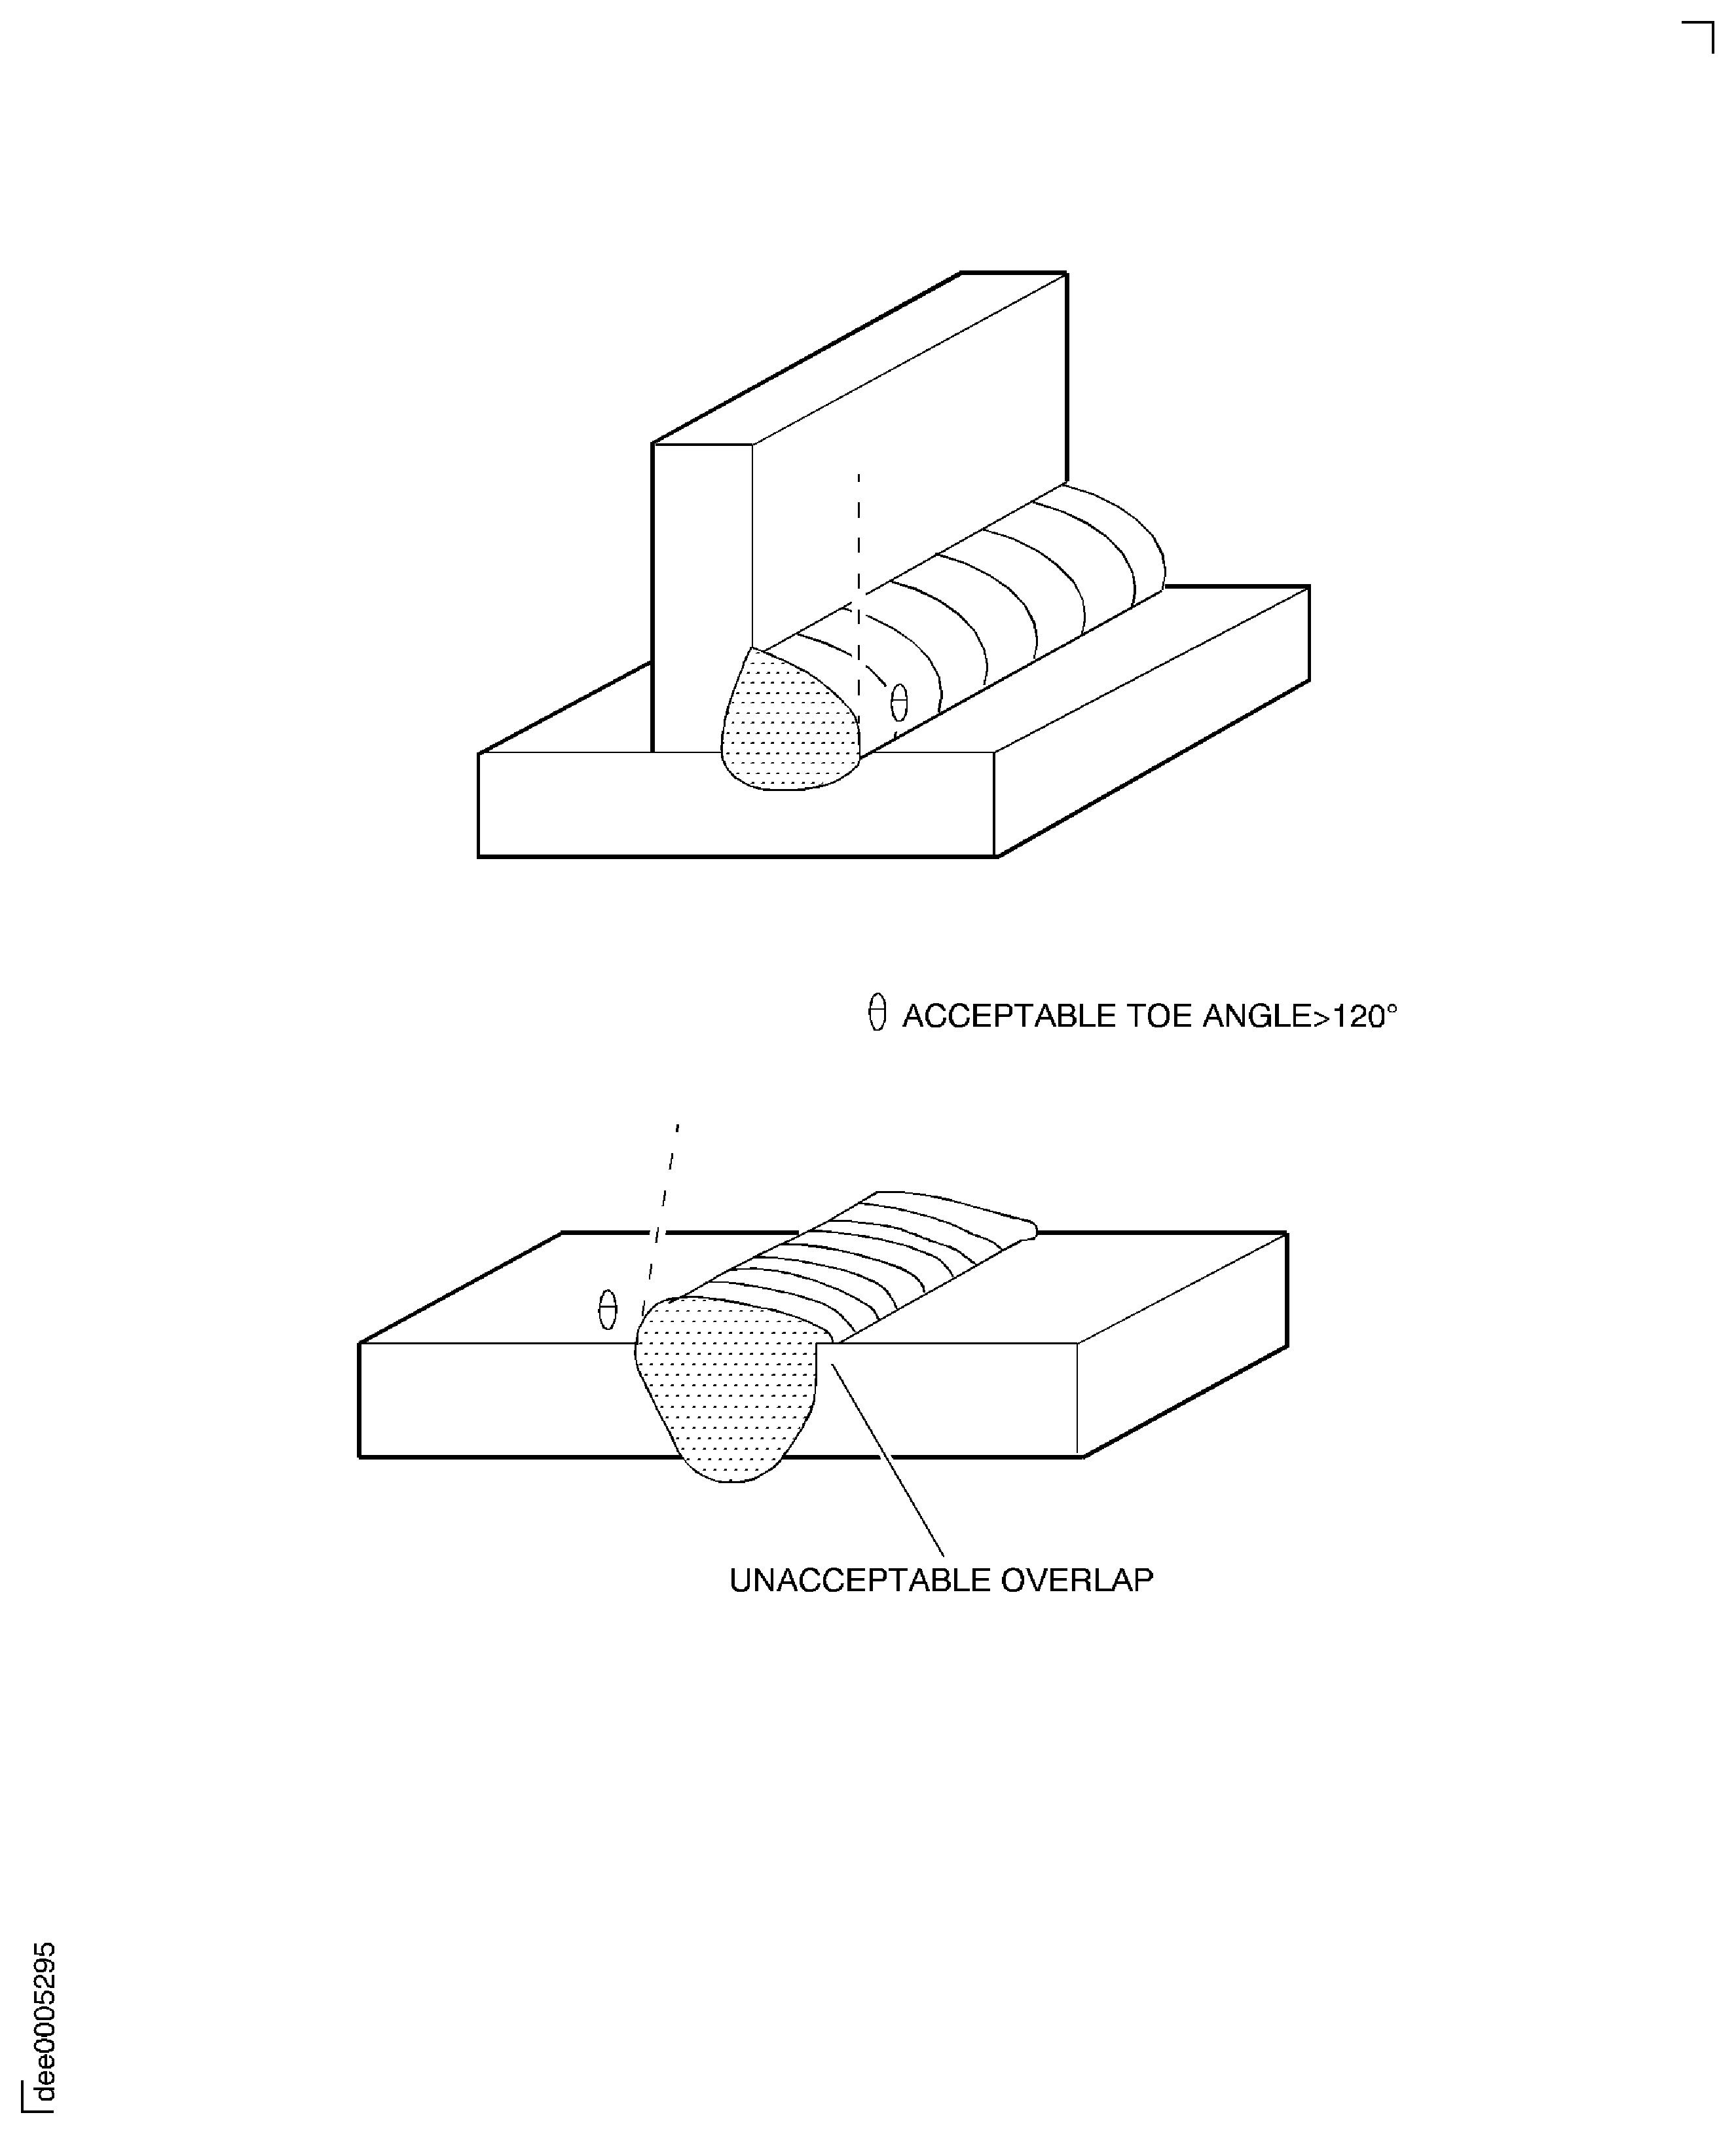
Not permitted
See Figure
Complete penetration of the material
Not permitted unless suitable argon backing has been used.
Arc damage
Arc damage to the part at the earthing contact or fixture is not permitted.
Heavy oxidation
Not permitted
Titanium discolouration
Refer to Step.
SUBTASK 70-31-02-220-001 Inspection of Welds
There are three groups of welded joint as follows:
Group 1
Highly or lightly stressed weld - failure or leakage will have an effect on the safety of the aircraft - basic inspection procedures together with radiographic and penetrant or radiographic and magnetic inspection must be done on these welds.
Group 2
Highly stressed weld - failure or leakage will not have an effect on the safety of the aircraft - basic inspection procedures together with radiographic or penetrant or magnetic inspection must be done on these welds.
Group 3
All other welds, basic inspection procedures must be done.
SUBTASK 70-31-02-860-004 Weld Classification
Refer to the SPM TASK 70-23-00-230-501 Fluorescent Penetrant Inspection - General Information for information on fluorescent penetrant inspection methods and control.
Refer to the SPM TASK 70-24-00-240-501 Magnetic Particle Inspection - General Information, and SPM TASK 70-24-01-240-501 Magnetic Particle Inspection Procedures, for the information on magnetic particle inspection method and control.
Defects must be contained within the weld and separated by defect free weld to be permitted as specified in Step.
SUBTASK 70-31-02-230-001 Penetrant and Magnetic Particle Inspection Procedure of Welds
Refer to the SPM TASK 70-26-01-260-501 for methods and control of radiographic inspection.
Radiological inspection acceptance standard.
The repair scheme may override the requirements of this specification.
Table 5. Butt welds DEFECT
GROUP 1
GROUP 2
GROUP 3
Cracks
None
None
None
Re-entrant effect
None
None
None
Heavy oxidation (coking).
None
None
None
Lack of penetration
None
None
None
Lack of fusion
None
None
0.25 inch (6.35 mm) long, below the surface and 2.00 inches (50.8 mm) apart
Cavities
Spherical, below the surface, 50%t and 1.00 inch (25.4 mm) apart
Non-metallic inclusions
0.075 inch (1.91 mm) major dimension and 2.00 inches (50.8 mm) apart, no sharp corners.
Tungsten inclusions
0.025 inch (0.64 mm) major dimension or 50%t maximum and 50 mm apart
Porosity, see Figure
1-A,B,C,D
2-B,C,D,E
3-C,D
7
1-A,B,C,D
2-B,C,D,E
3-C,D
7
1-A,B,C,D
2-B,C,D,E
3-C,D
4-D
7
8
Interdendritic shrinkage (IDS)
0.075 inch (1.91 mm) long
0.100 inch (2.54 mm) long
0.150 inch (3.80 mm) long
Undercut
10%t if there is no sharp change in section
Thinning
10%t if there is no sharp change in section
Table 6. Fillet welds DEFECT
GROUP 1
GROUP 2
GROUP 3
Cracks
None
None
0.100 inch (2.54 mm) long 2.00 inches (50.8 mm) apart
Re-entrant effect
None
None
None
Heavy oxidation (coking)
None
None
None
Lack of root penetration
A total of 0.25 inch (6.35 mm ) or 30% of length. Use the lower value.
A total of 0.25 inch (6.35 mm) or 30% of length. Use the lower value.
A total of 0.50 inch (12.7 mm) or 30% of length. Use the lower value.
Cavities
Spherical, below the surface 80%t and 1.00 inch (25.4 mm) apart
Non-metallic inclusions
0.125 inch (3.17 mm) major dimension and 2.00 inches (50.8 mm) apart, no sharp corners.
Tungsten inclusions
0.025 inch (0.65 mm) major dimension
0.050 inch (1.27 mm) major dimension
0.050 inch (1.27 mm) major dimension
Porosity, see Figure
1-A,B,C,D
2-B,C,D,E
3-C,D
7
8
1-A,B,C,D
2-B,C,D,E
3-B,C,D
7
8
1-A,B,C,D
2-A,B,C,D,E
3-A,B,C,D,E
4-D
7
8
9-A,B,C
Thinning
10%t. If there is no sharp change in section.
Undercut
None
None
None
SUBTASK 70-31-02-260-001 Radiographic Inspection Procedure of Welds
For approved examples of materials to be welded and the recommended filler wire, refer to the SPM TASK 70-31-02-310-501-002.
SUBTASK 70-31-02-310-008 Materials to be Welded and Filler Wire
This subtask is deleted. Refer to the SPM TASK 70-31-02-310-501-003.
SUBTASK 70-31-02-310-009 Orbital Torch Welding
Figure: Permitted butt joint step conditions
Permitted butt joint step conditions
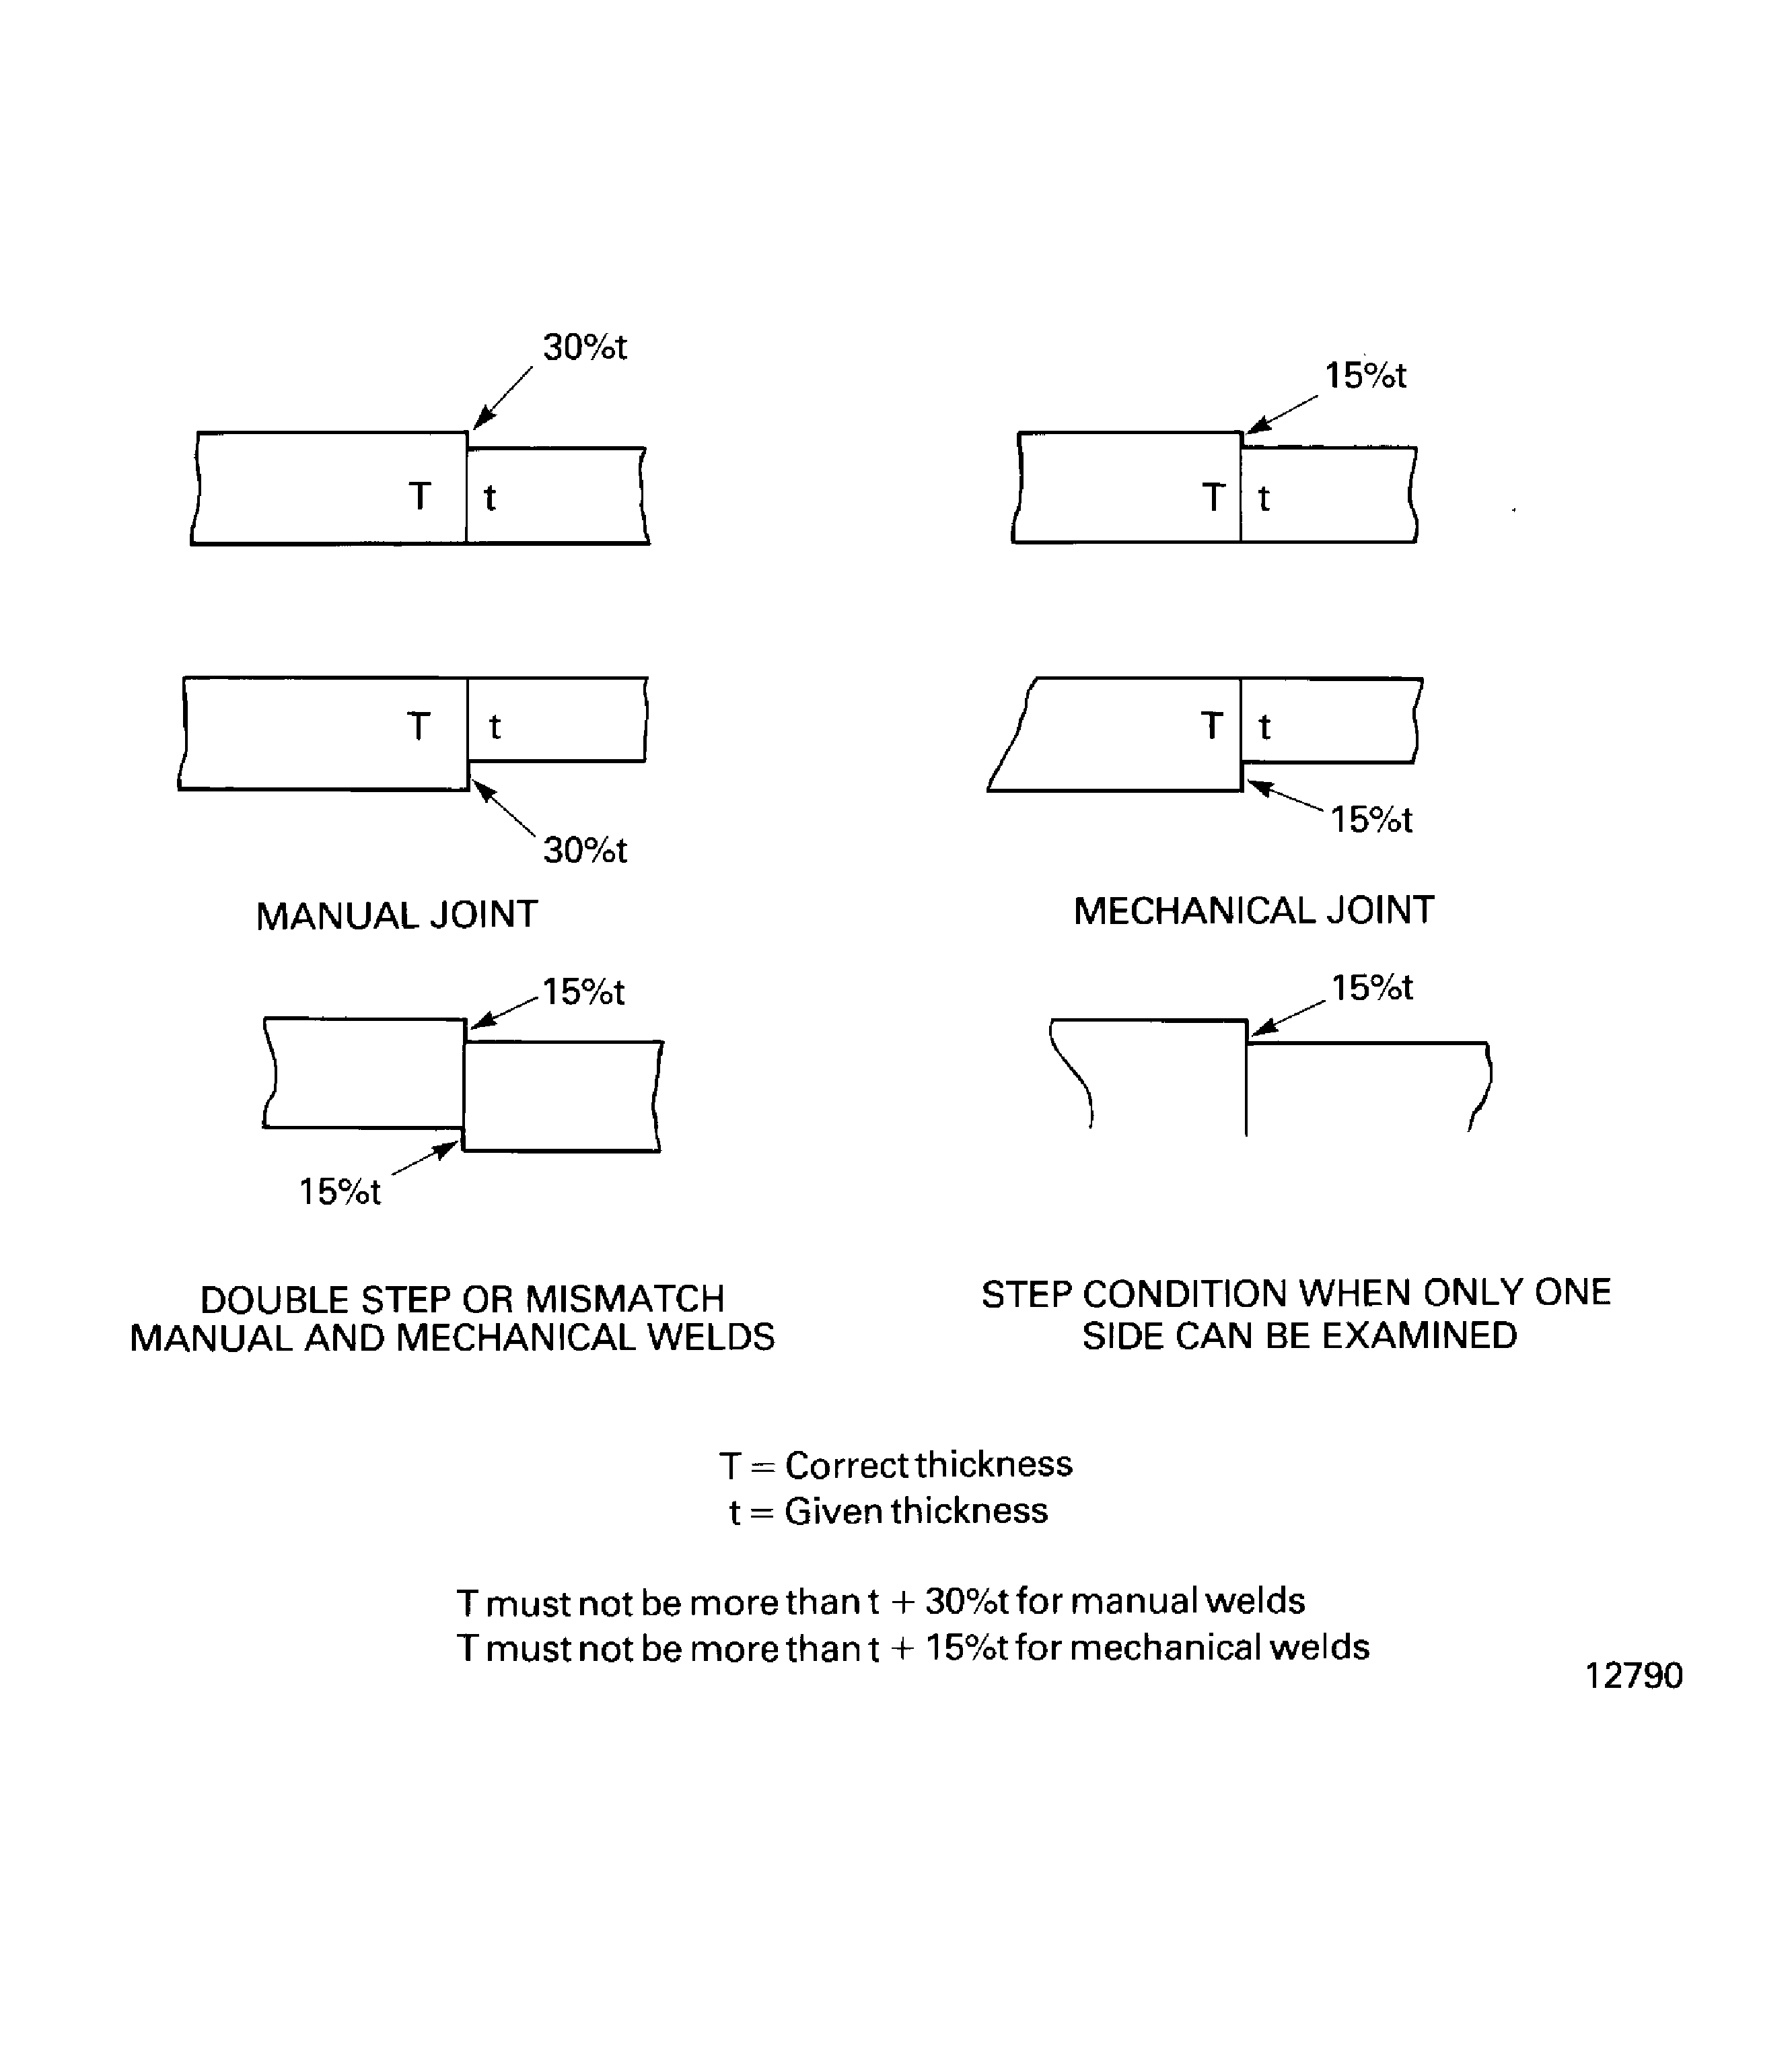
Figure: Butt weld
Butt weld
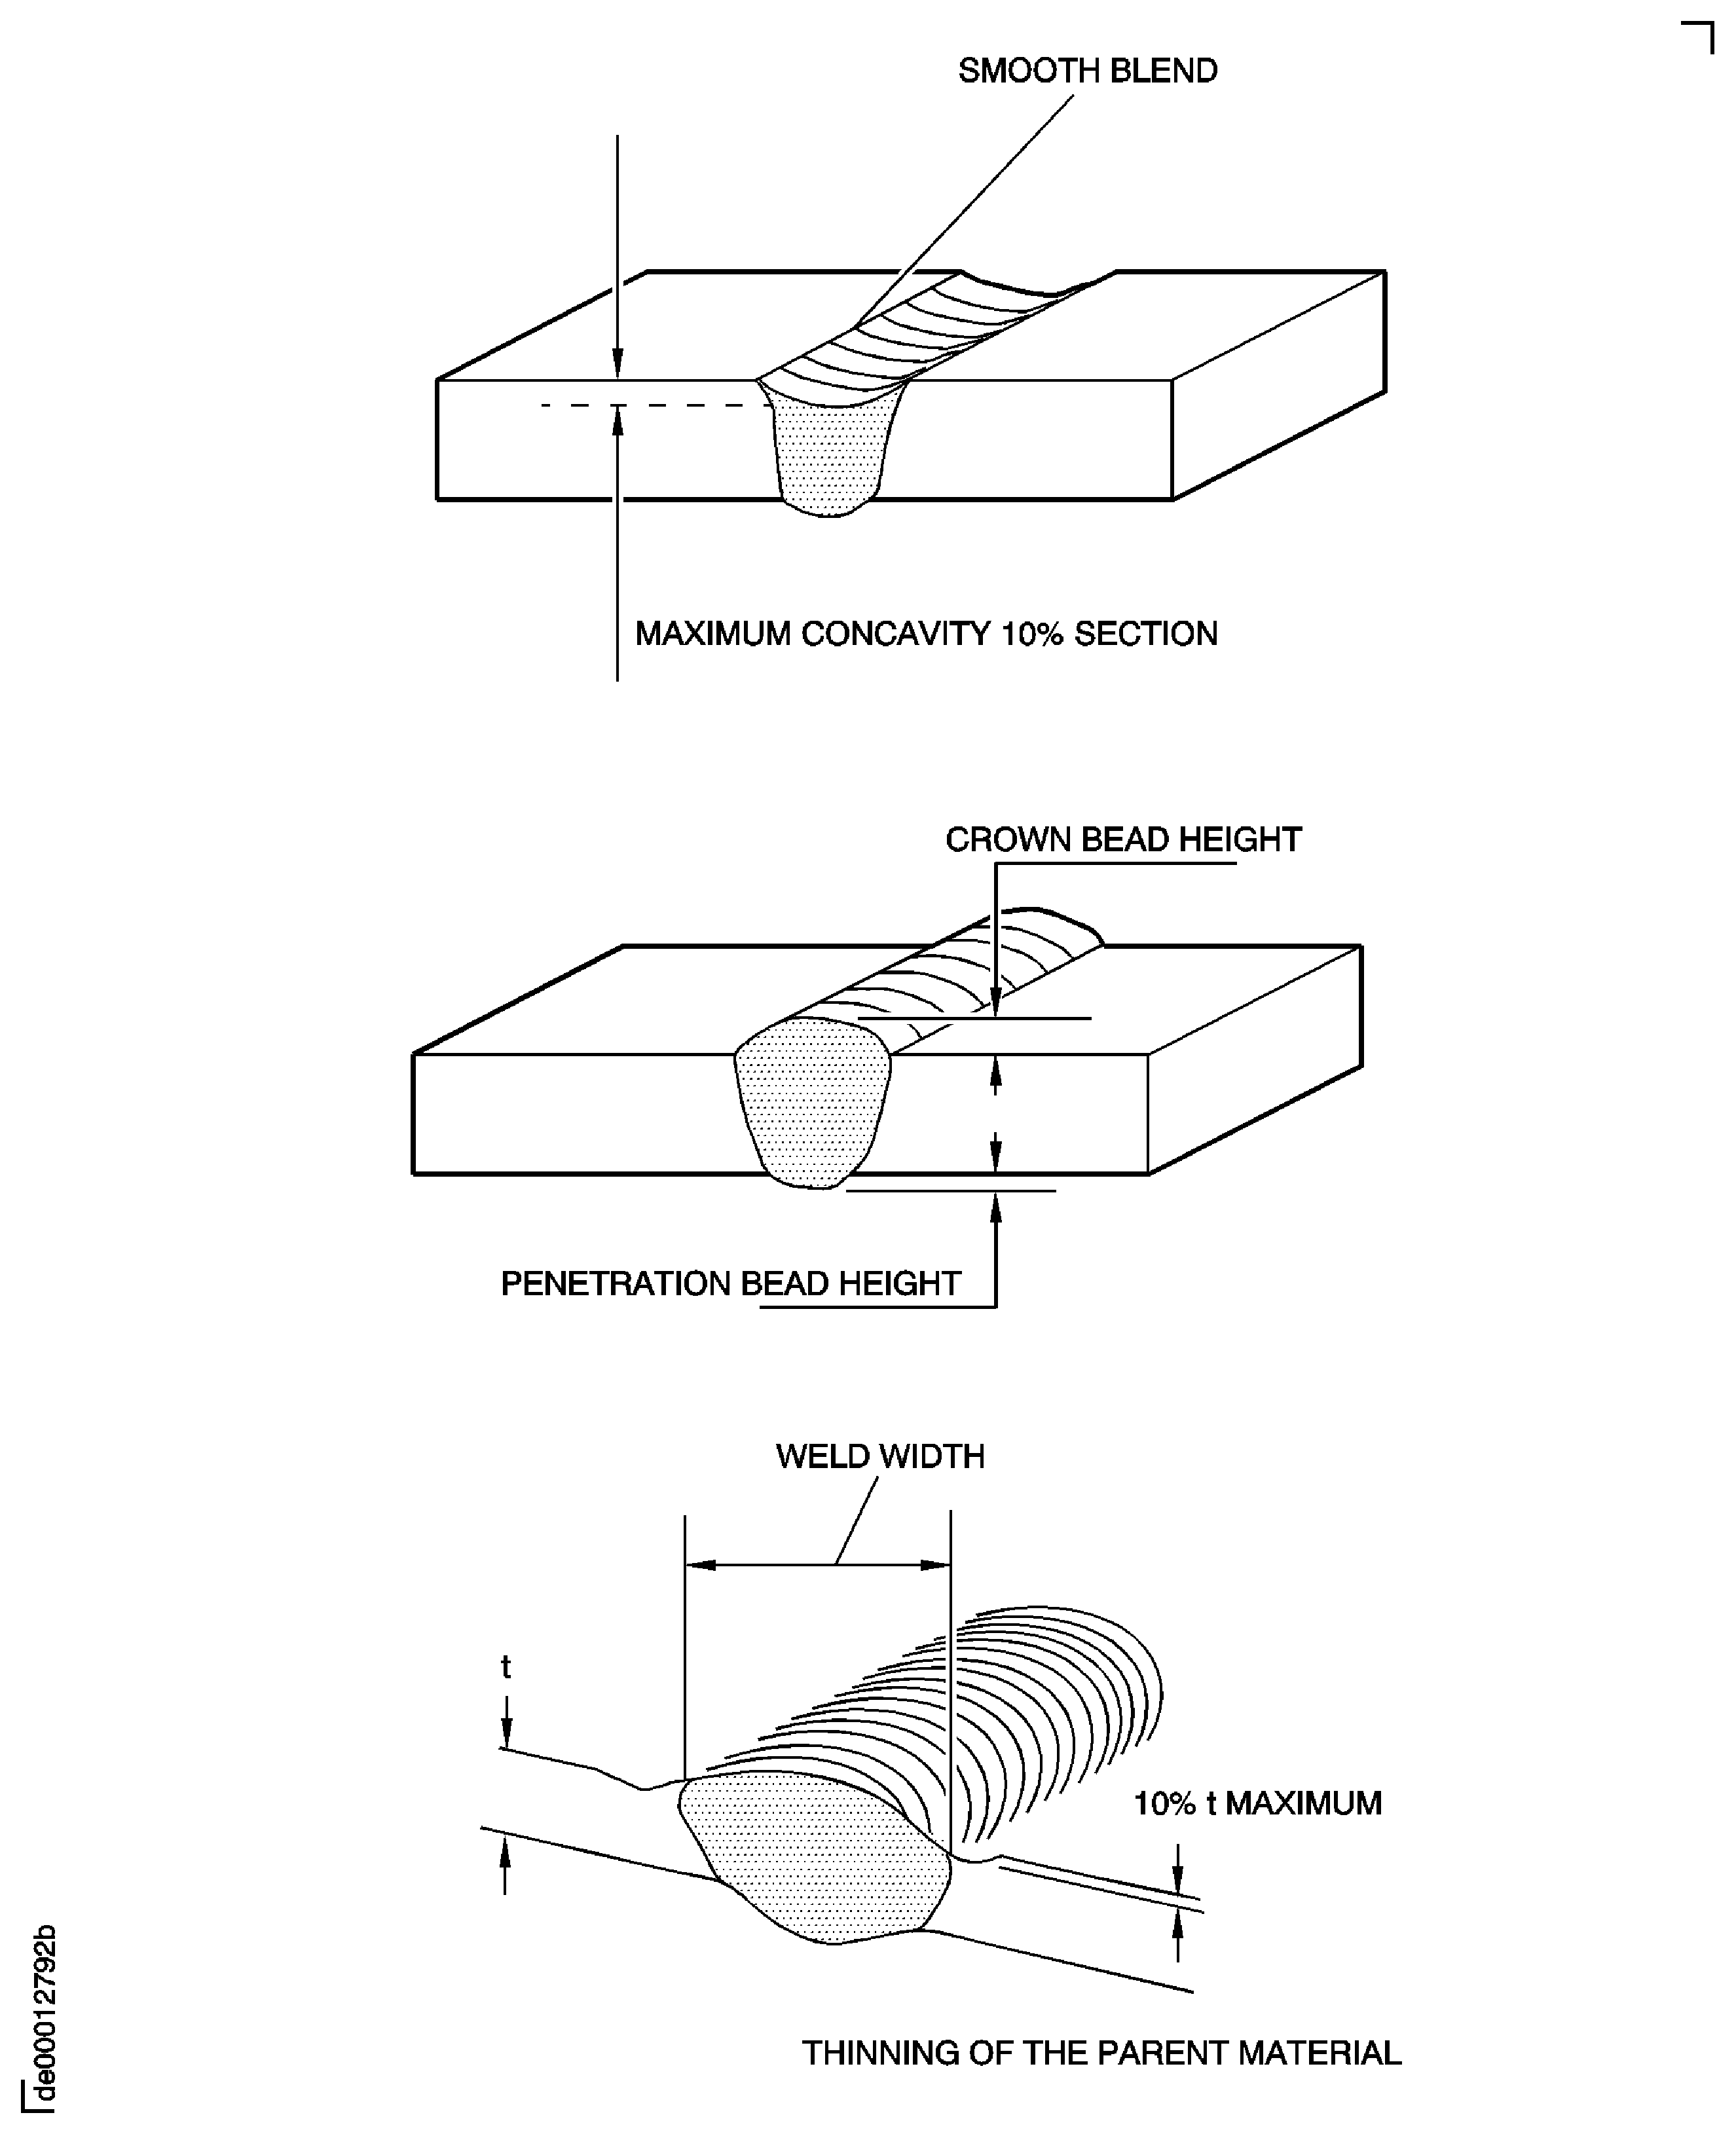
Figure: Butt weld
Butt weld
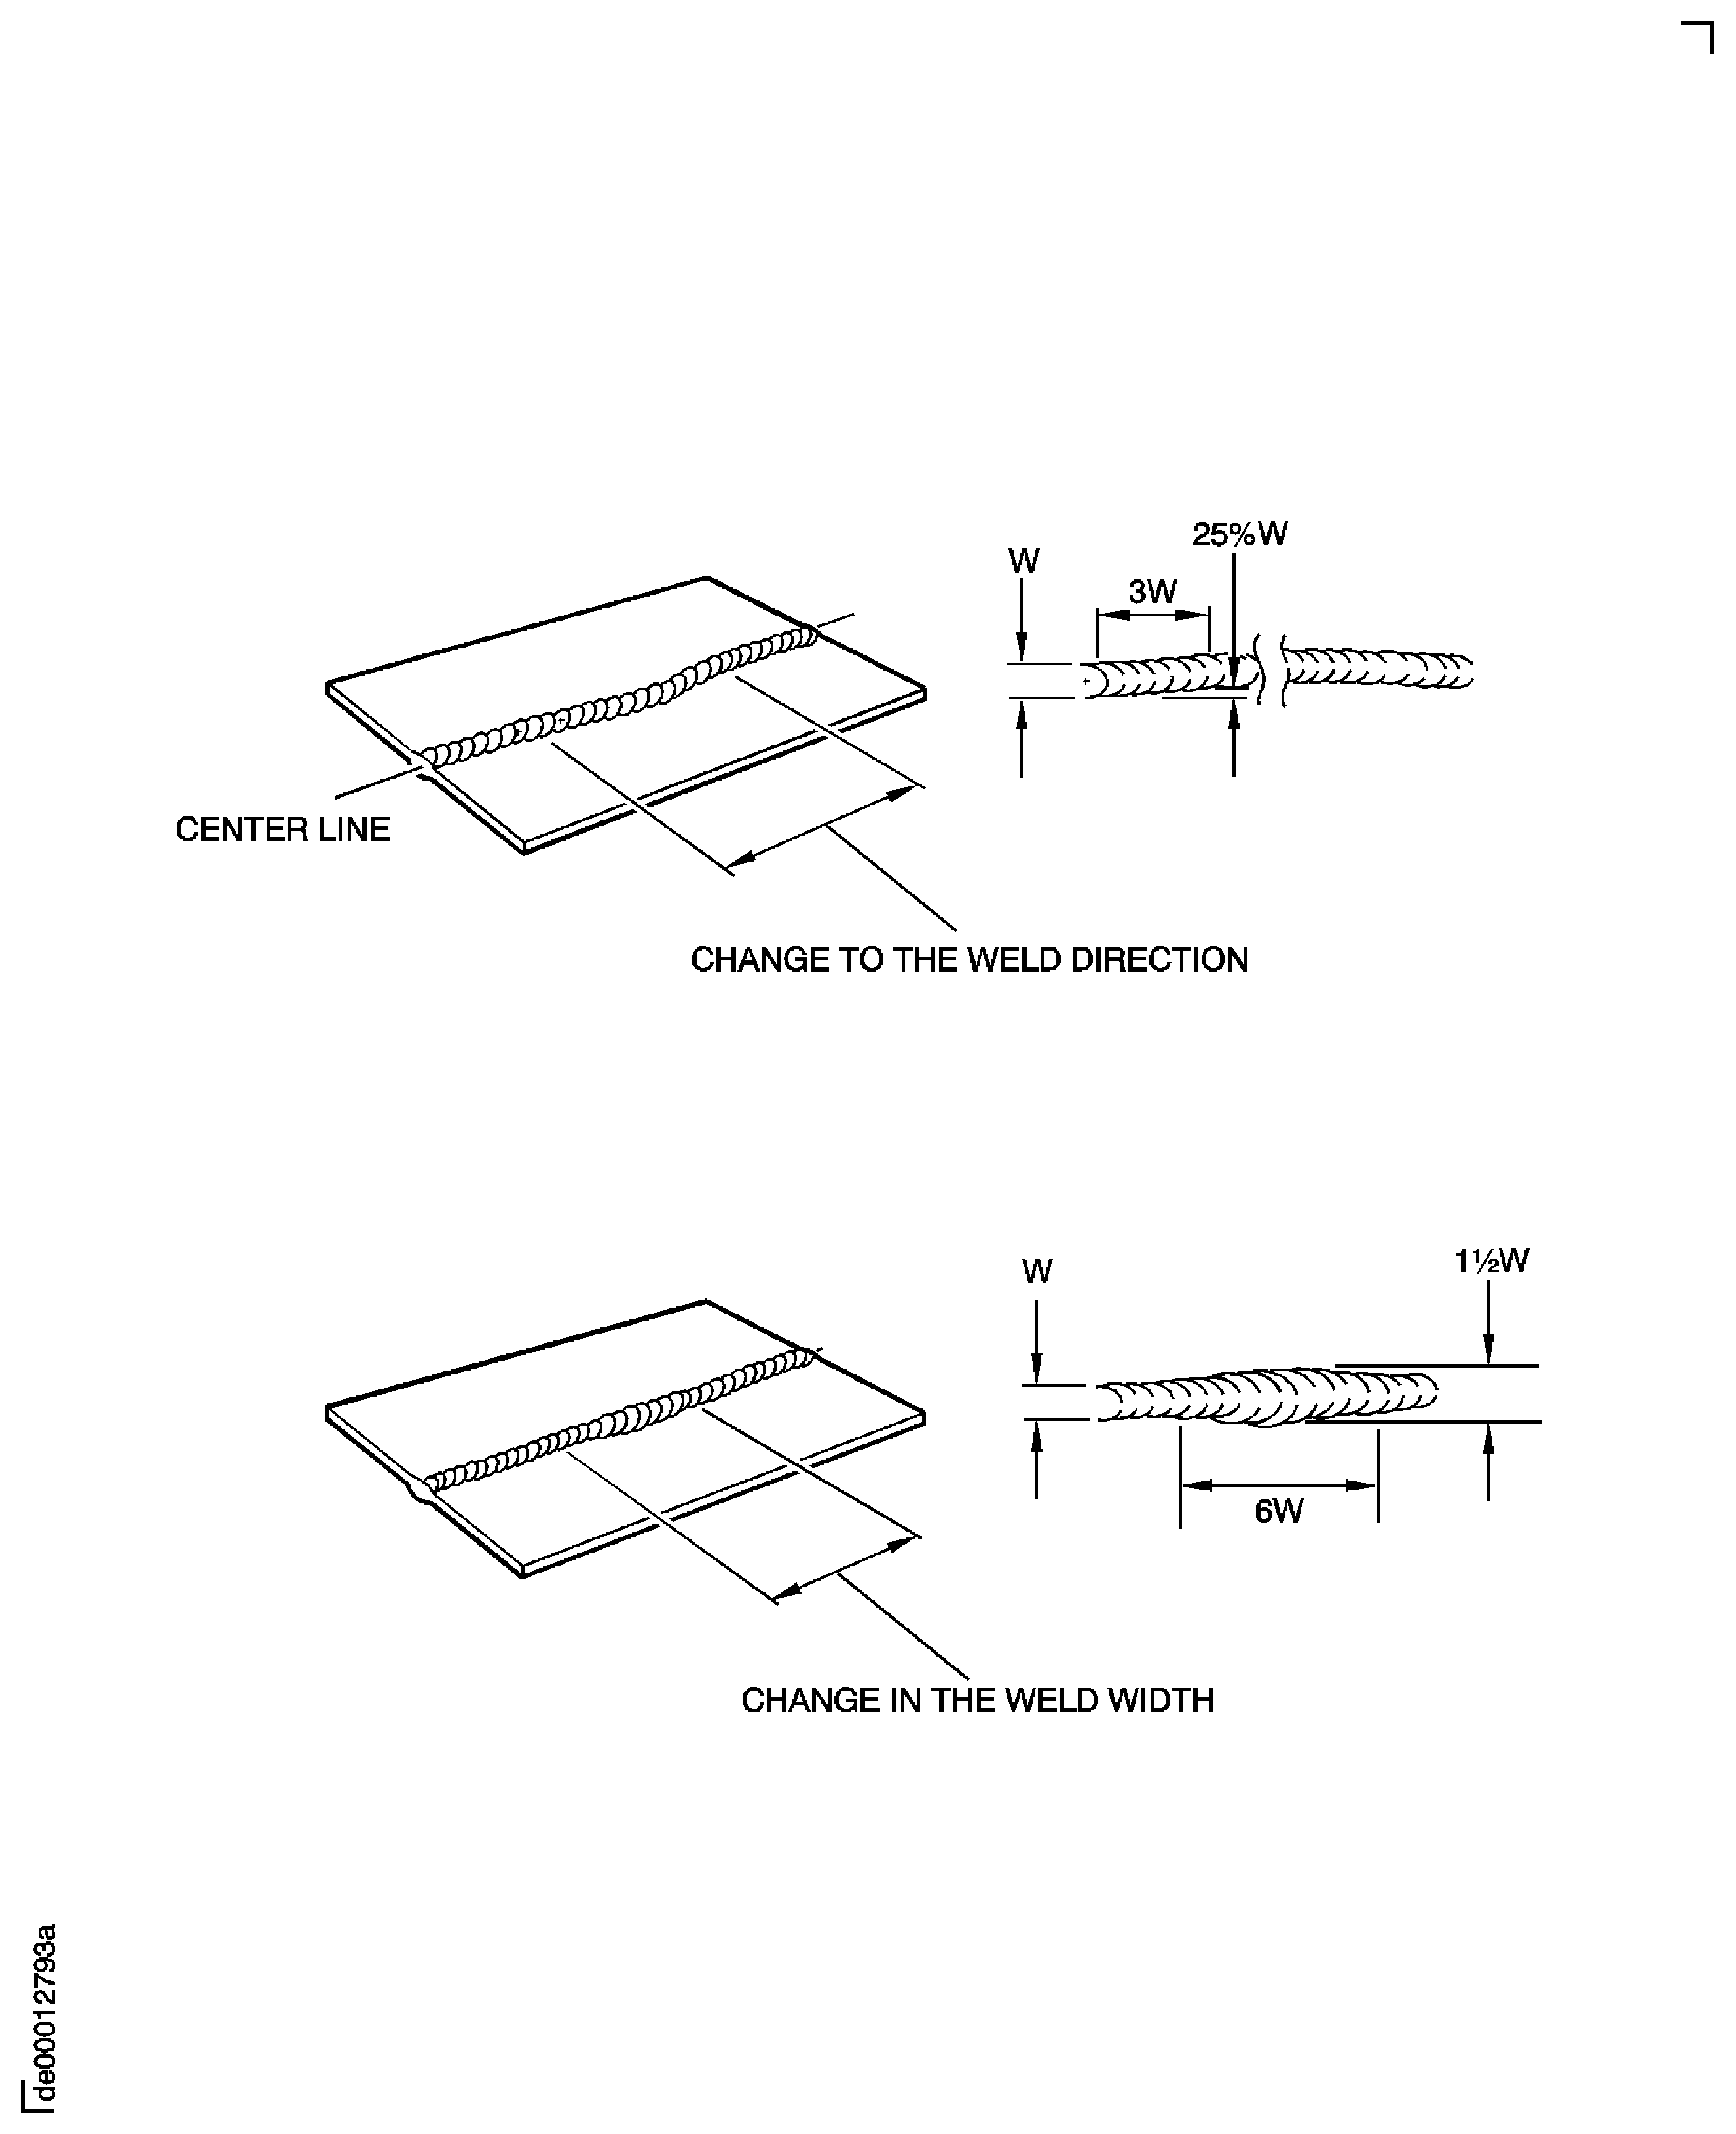
Figure: Butt weld
Butt weld
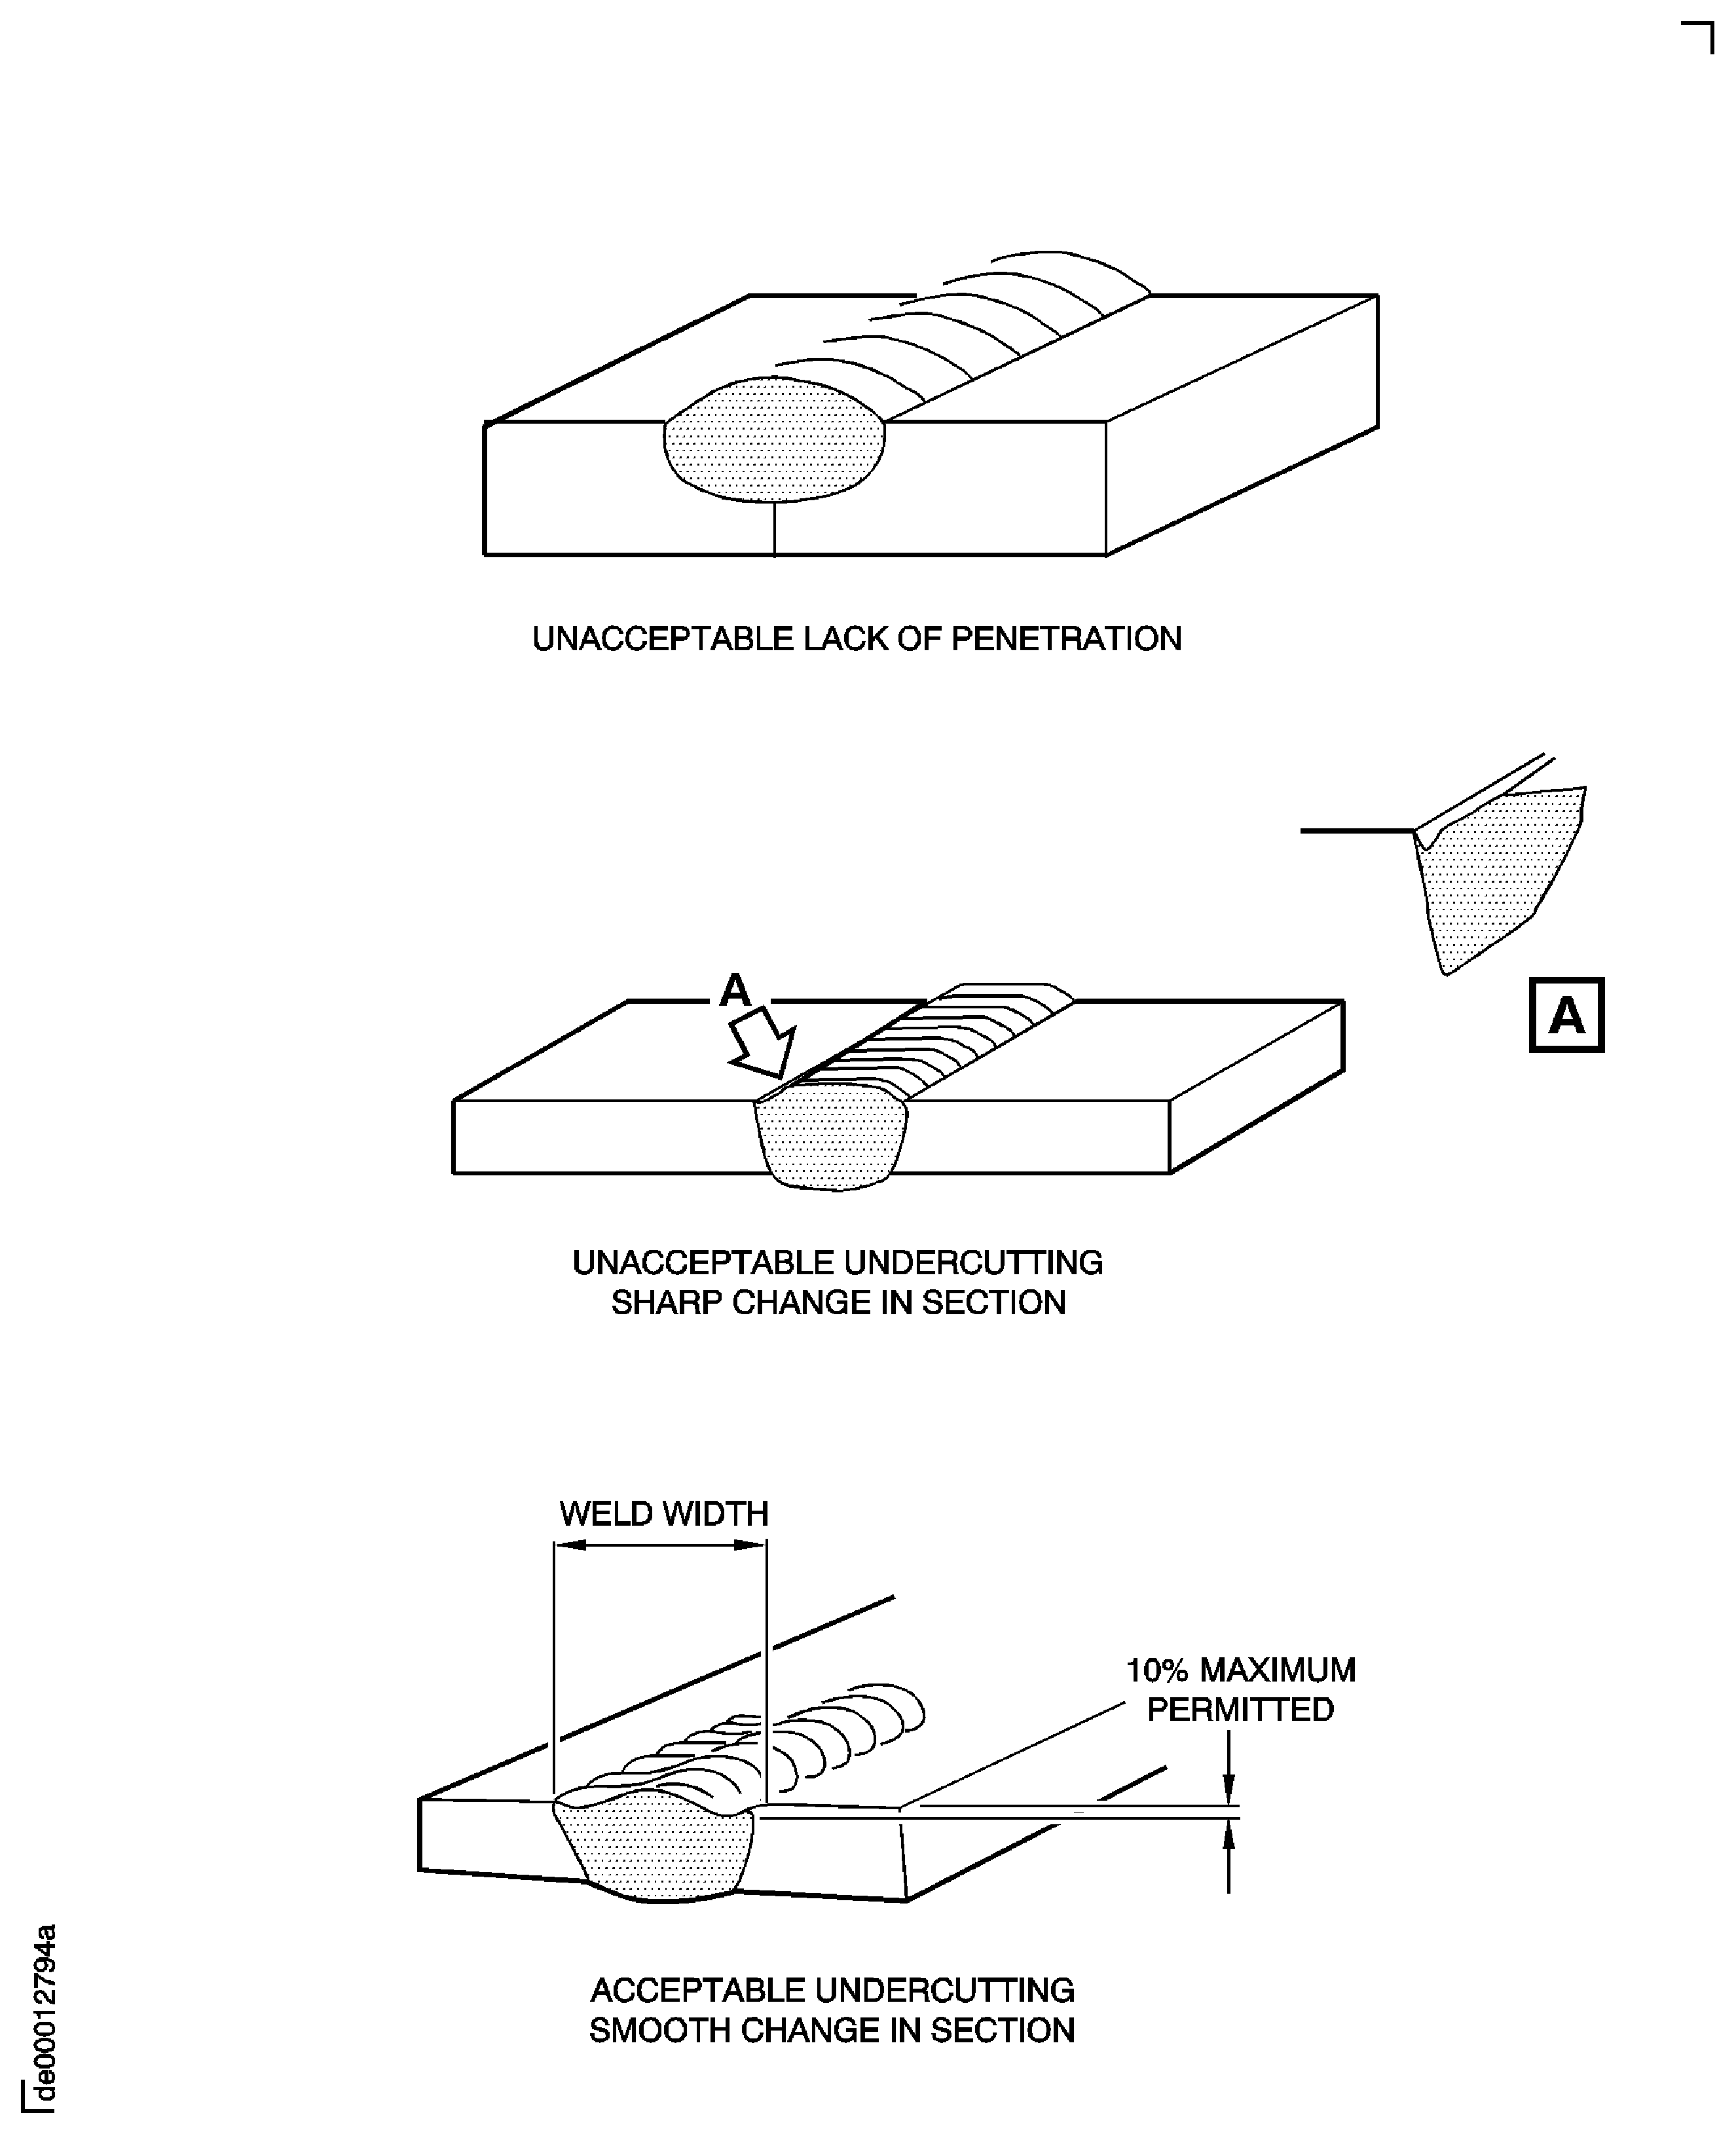
Figure: Fillet weld
Fillet weld
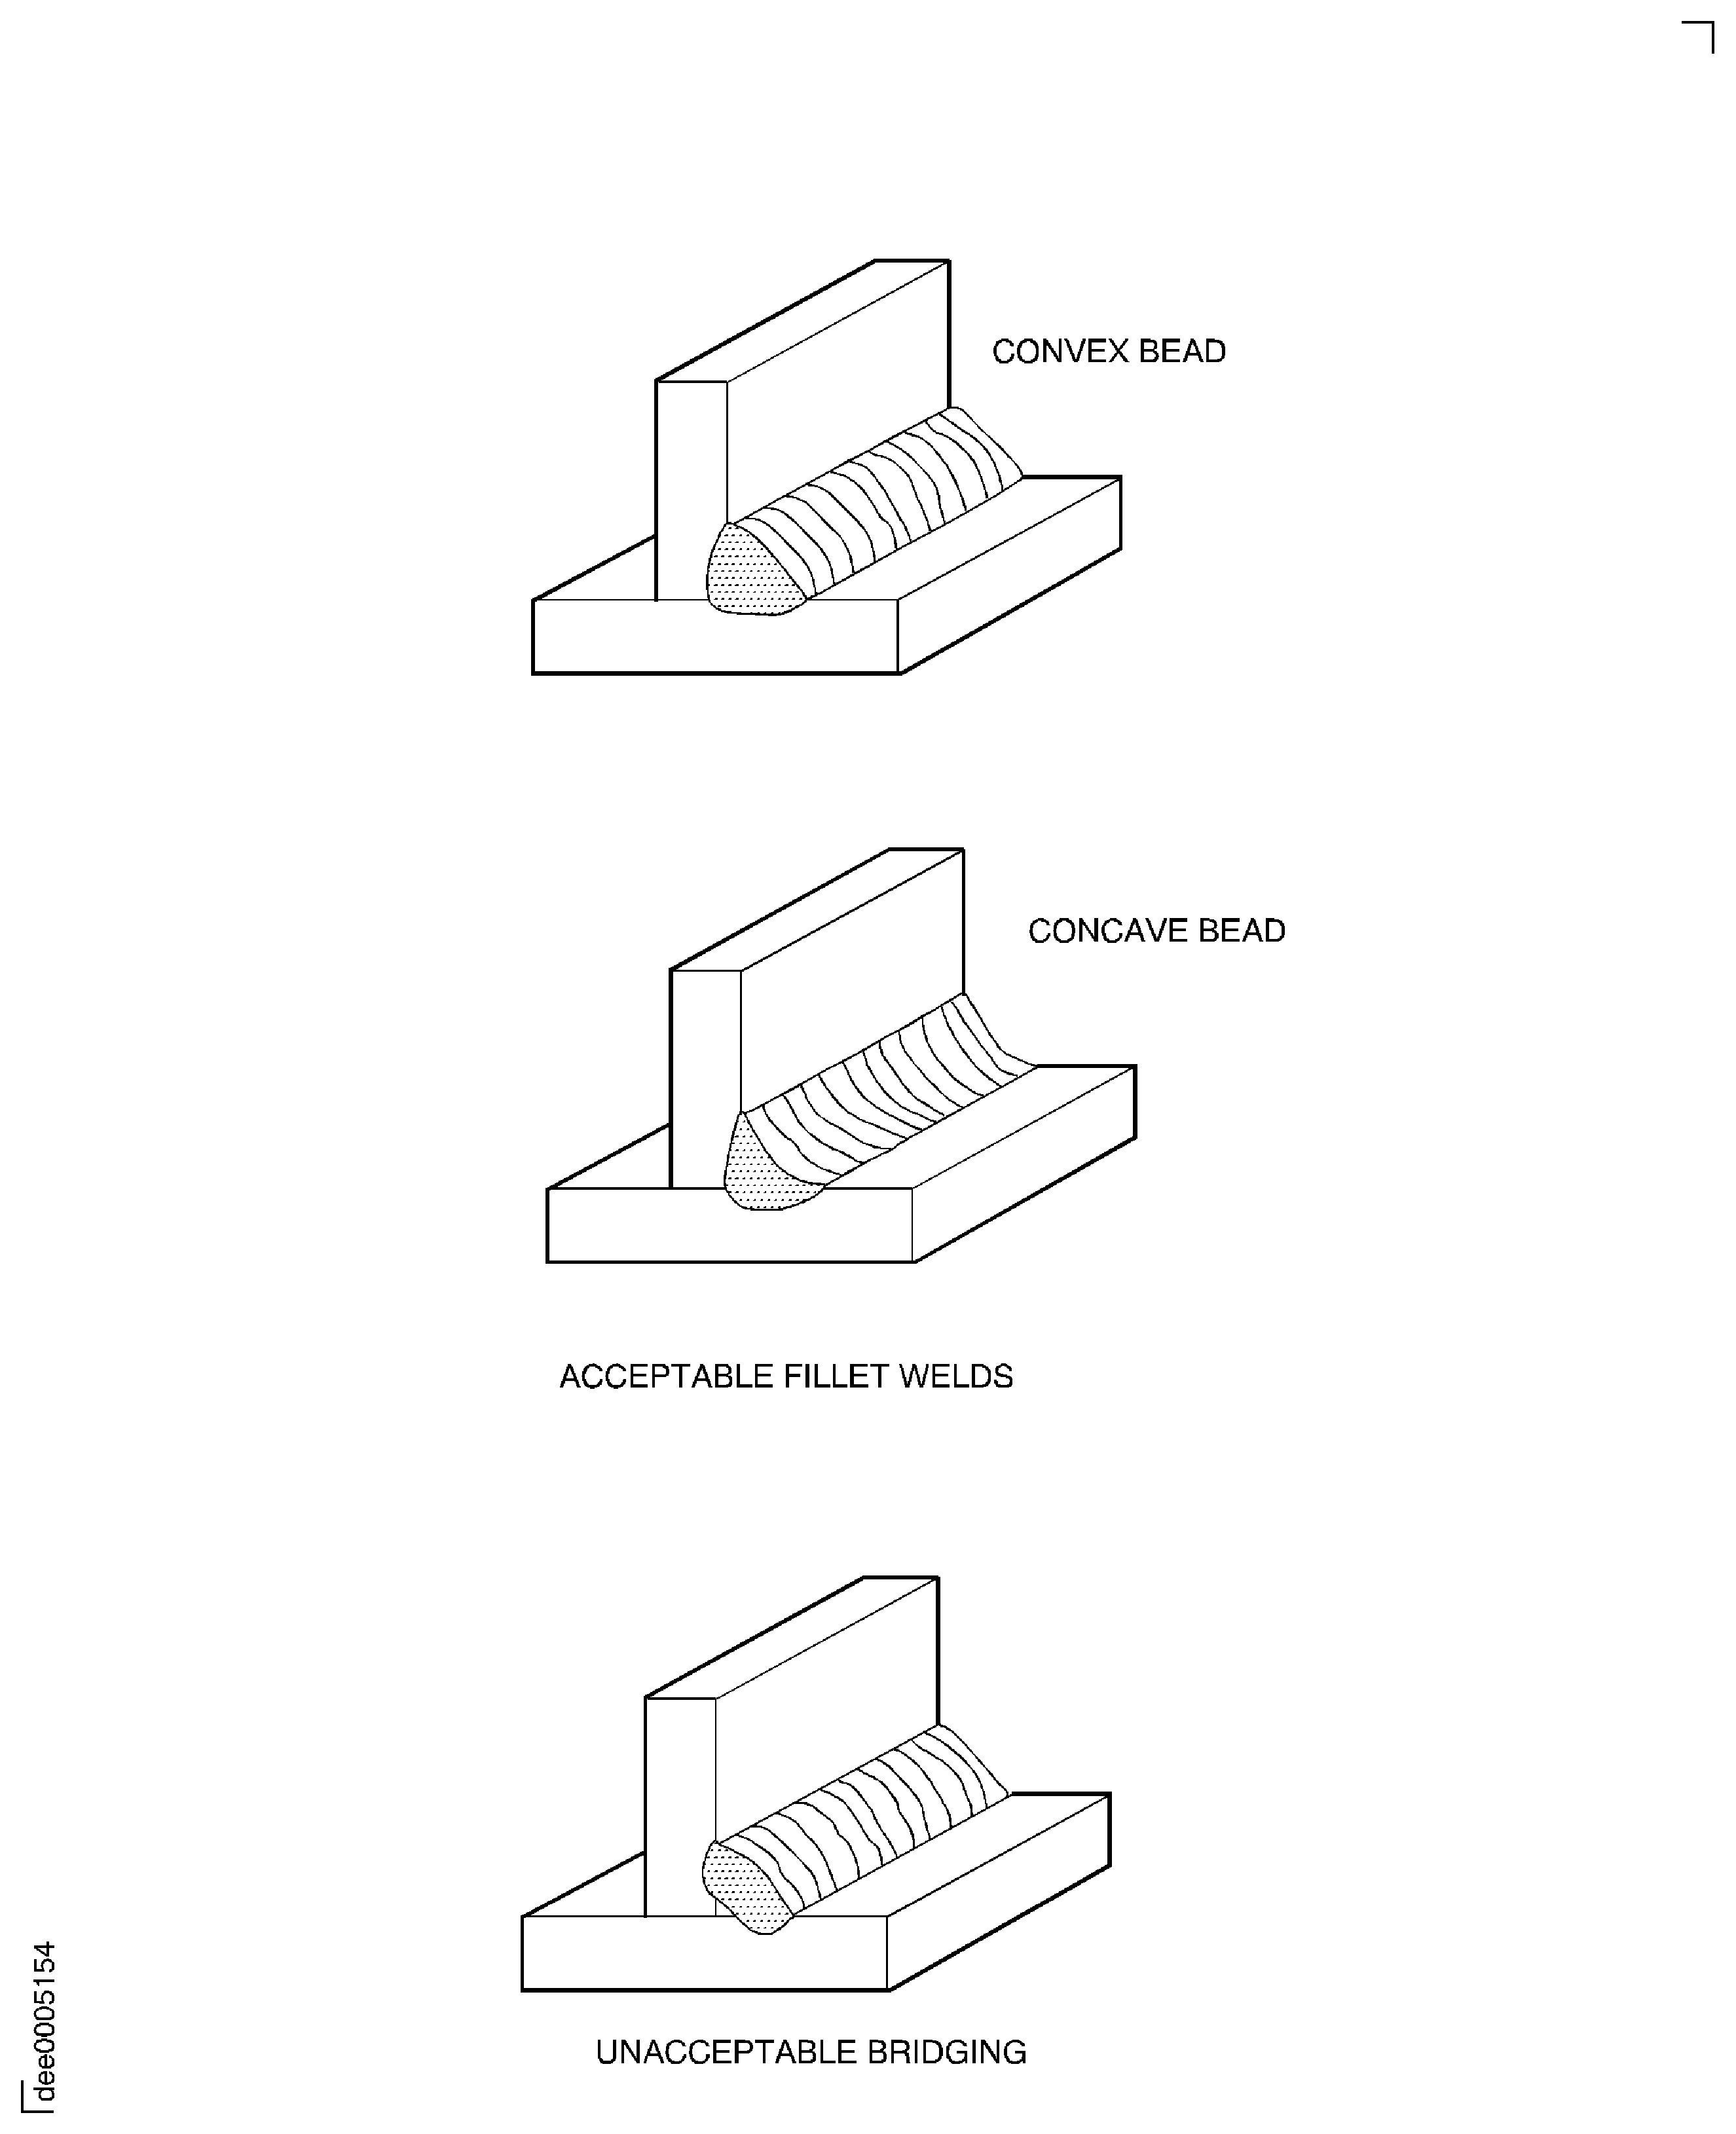
Figure: Porosity limits
Porosity limits
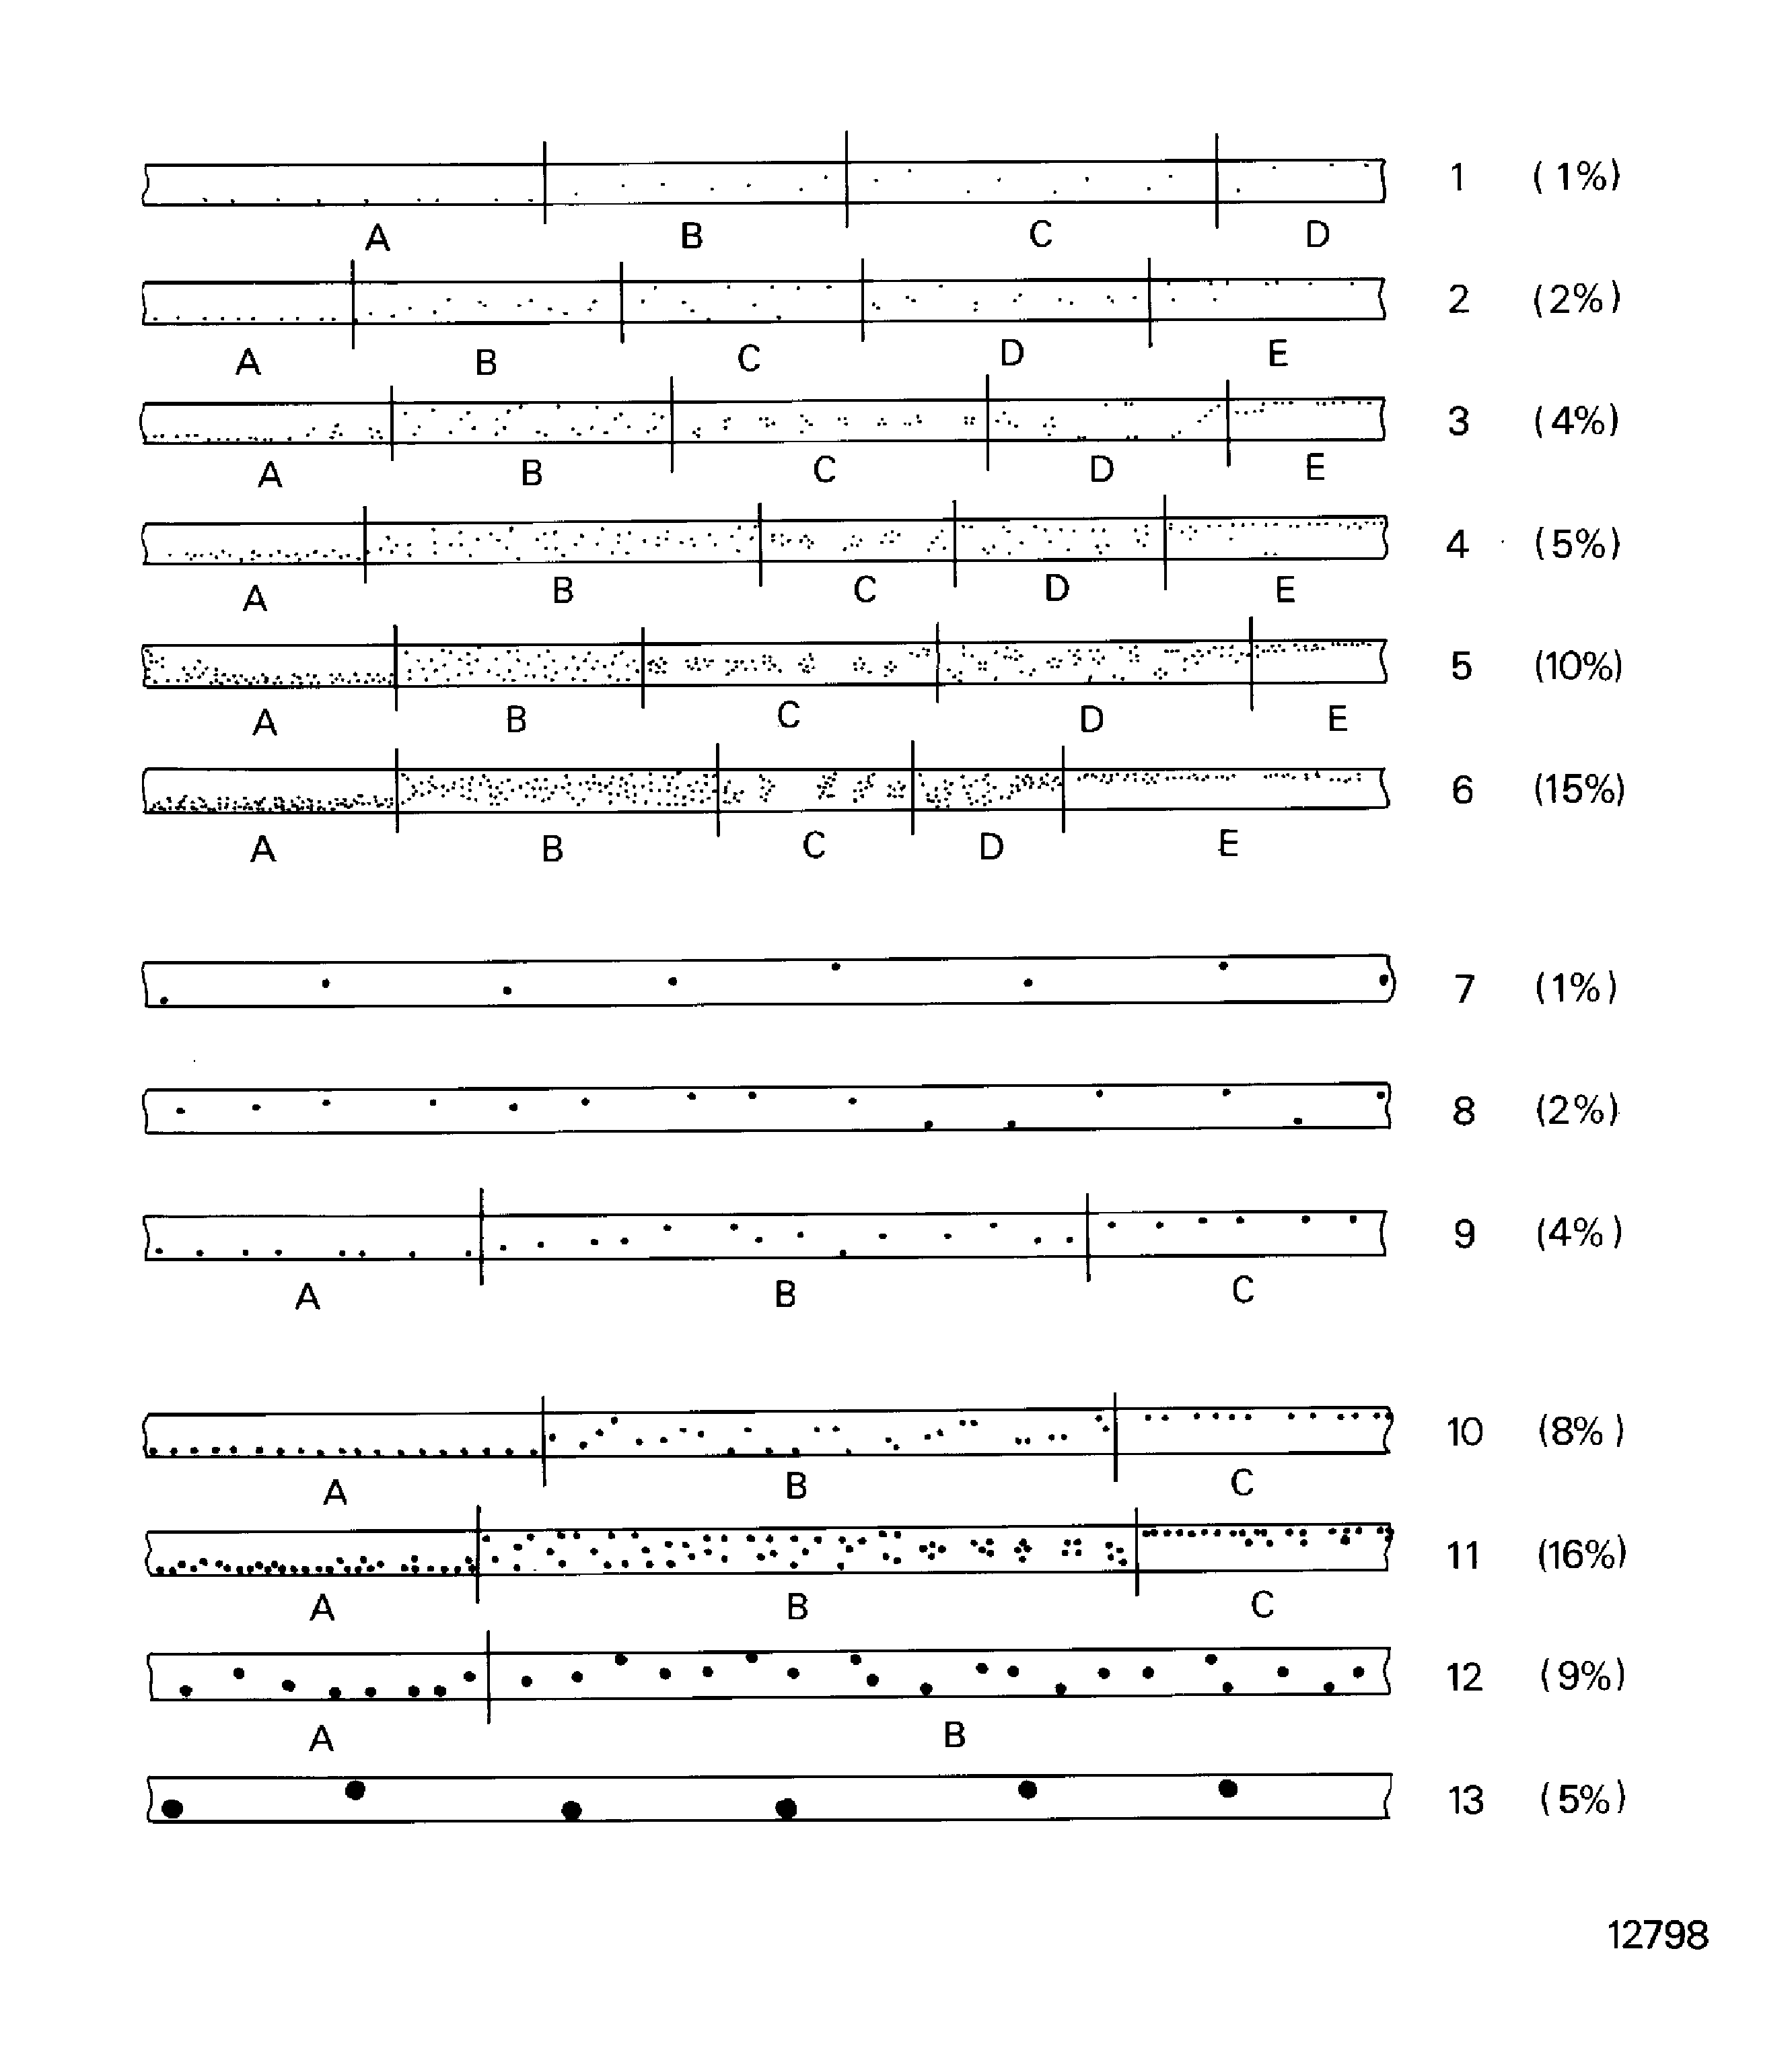
Figure: Visual inspection limits
Visual inspection limits
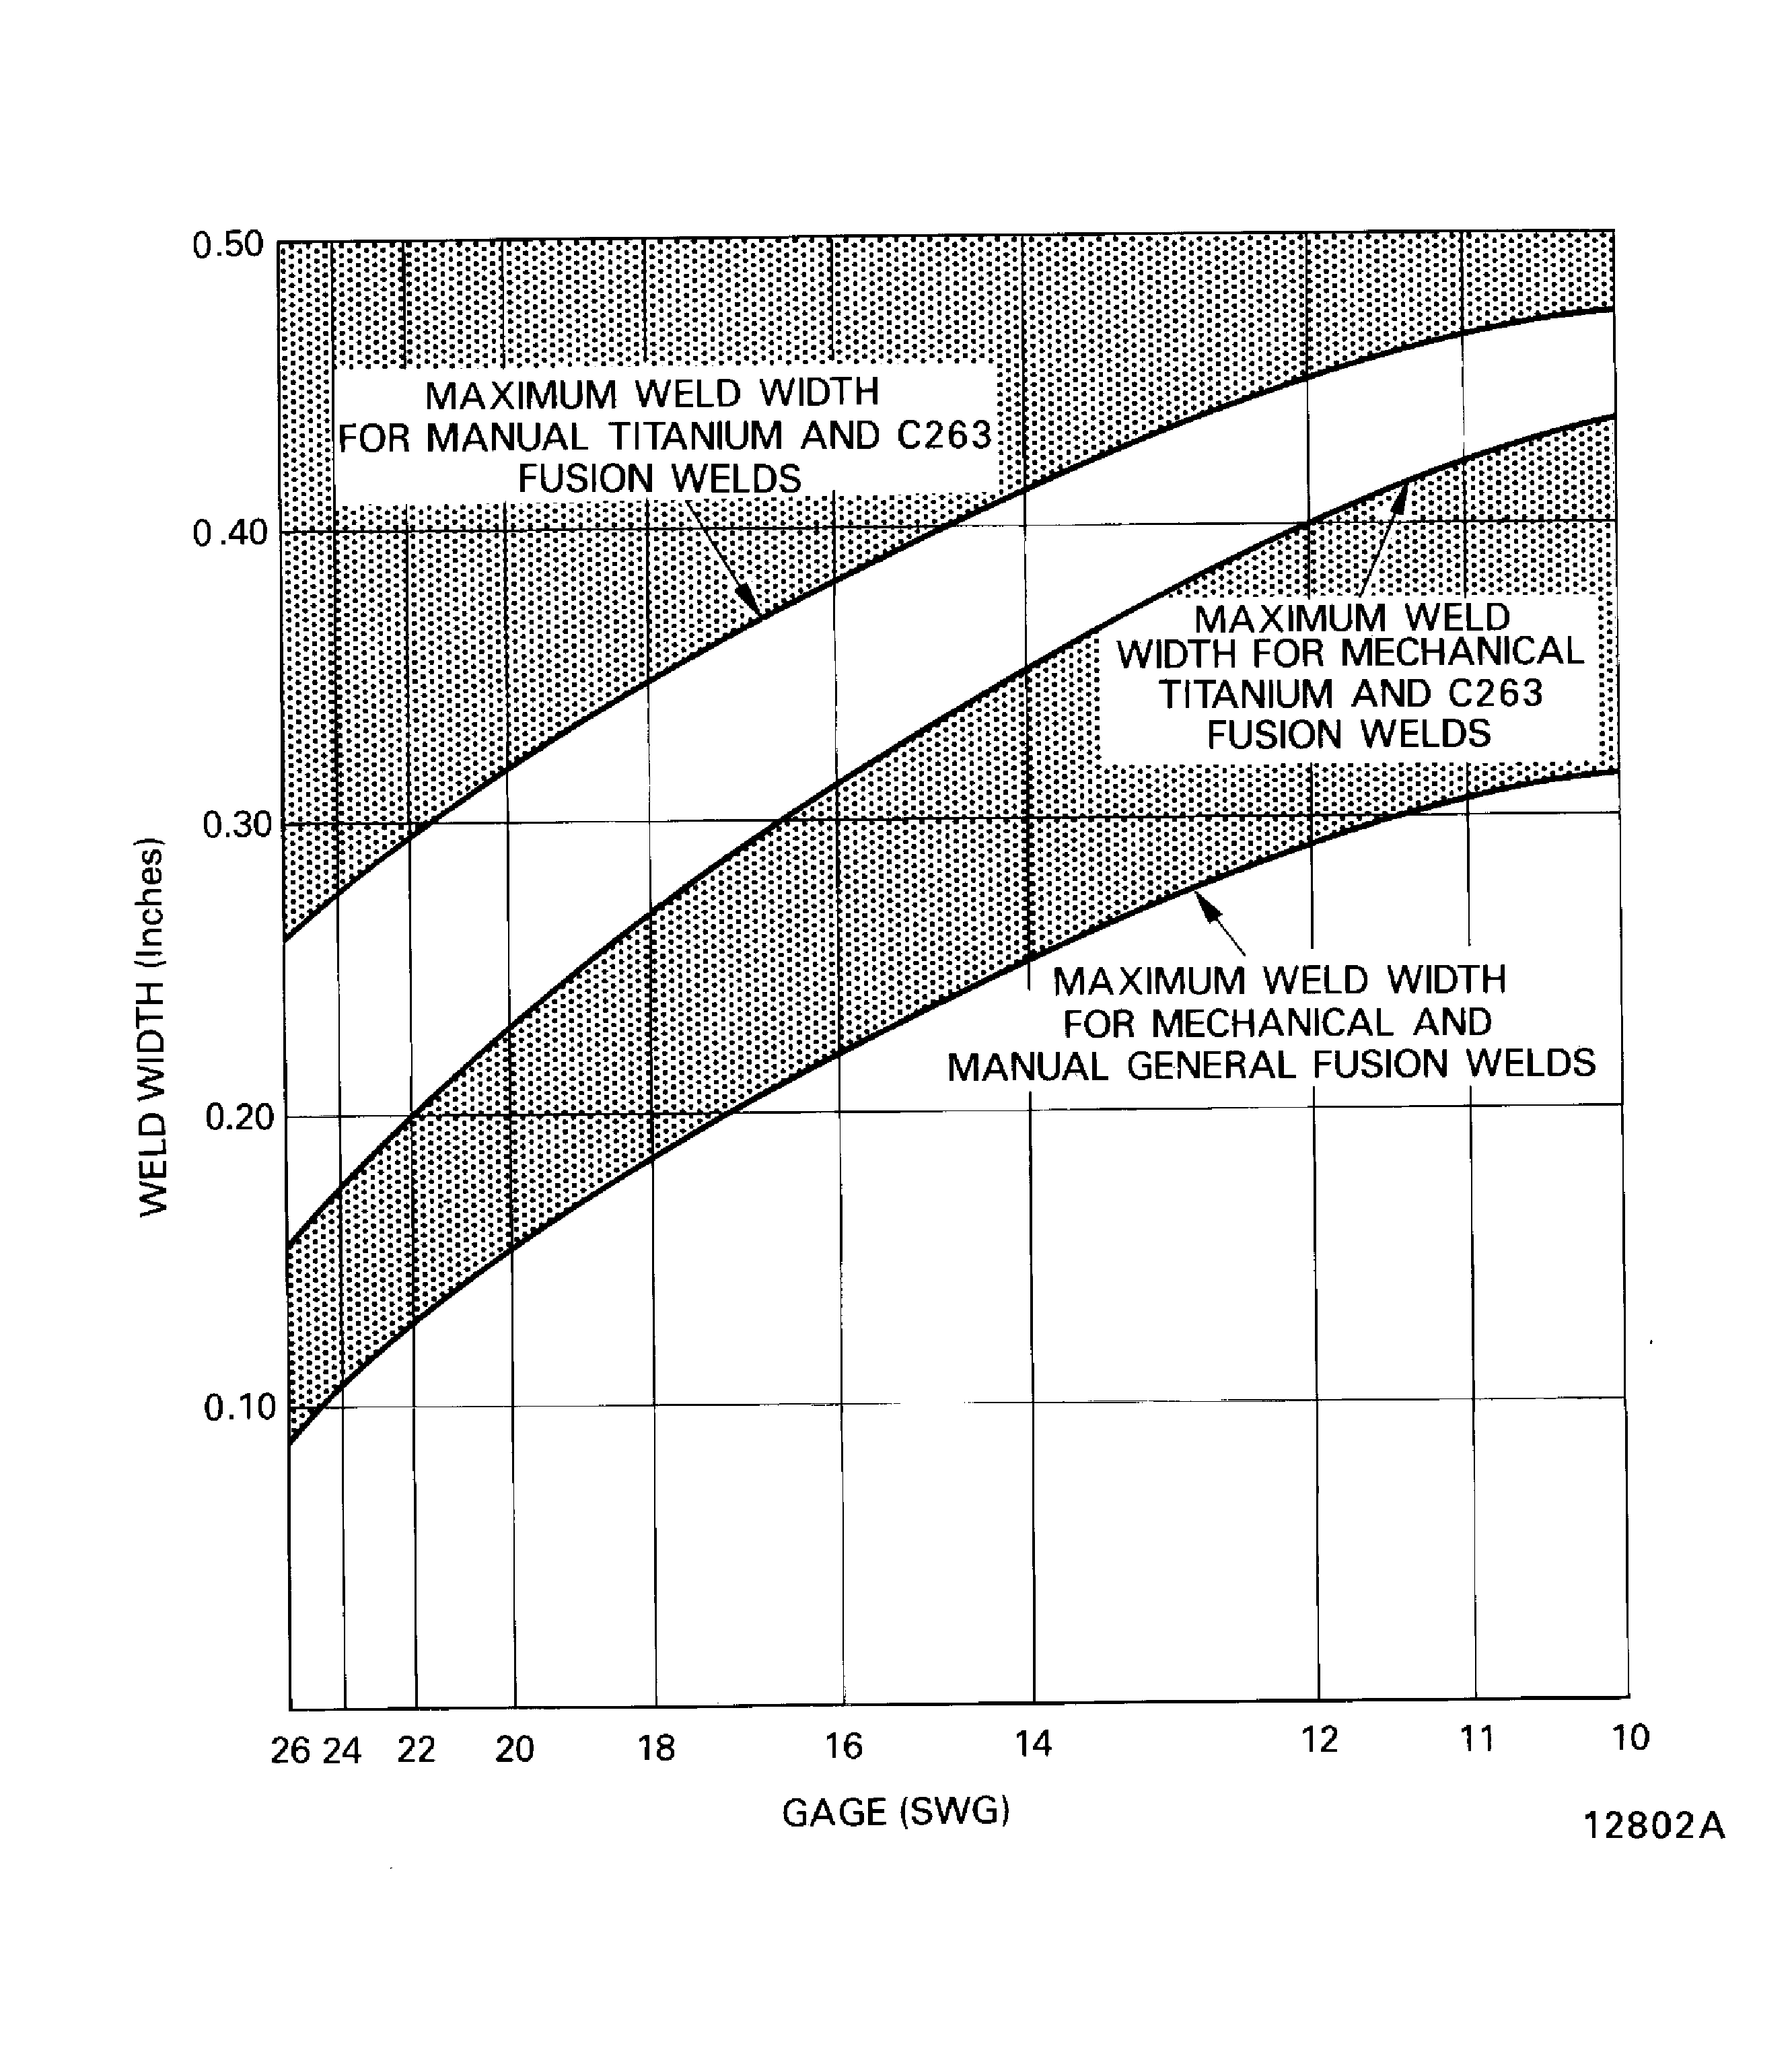
Figure: Overlap and Blunt toe
Overlap and Blunt toe
