Export Control
EAR Export Classification: Not subject to the EAR per 15 C.F.R. Chapter 1, Part 734.3(b)(3), except for the following Service Bulletins which are currently published as EAR Export Classification 9E991: SBE70-0992, SBE72-0483, SBE72-0580, SBE72-0588, SBE72-0640, SBE73-0209, SBE80-0024 and SBE80-0025.Copyright
© IAE International Aero Engines AG (2001, 2014 - 2021) The information contained in this document is the property of © IAE International Aero Engines AG and may not be copied or used for any purpose other than that for which it is supplied without the express written authority of © IAE International Aero Engines AG. (This does not preclude use by engine and aircraft operators for normal instructional, maintenance or overhaul purposes.).Applicability
All
Common Information
TASK 70-41-01-400-501 The Procedure To Use Torque Wrenches And Power Tools
Preliminary Requirements
Pre-Conditions
NONESupport Equipment
NONEConsumables, Materials and Expendables
| Name | Manufacturer | Part Number / Identification | Quantity | Remark |
|---|---|---|---|---|
| CoMat 01-124 ISOPROPYL ALCOHOL | LOCAL | CoMat 01-124 | ||
| CoMat 04-004 JOINTING COMPOUND, LIGHT GRADE | LOCAL | CoMat 04-004 | ||
| CoMat 04-005 JOINTING COMPOUND, MEDIUM GRADE | LOCAL | CoMat 04-005 | ||
| CoMat 04-006 JOINTING COMPOUND, HEAVY GRADE | LOCAL | CoMat 04-006 | ||
| CoMat 10-039 ENGINE OIL | LOCAL | CoMat 10-039 | ||
| CoMat 10-040 LUBRICANT (ENGINE OIL) | 0AM53 | CoMat 10-040 | ||
| CoMat 10-077 APPROVED ENGINE OILS | LOCAL | CoMat 10-077 |
Spares
NONESafety Requirements
NONEProcedure
SUBTASK 70-41-01-400-001 Table of Contents
Safety Precautions
Introduction
Equipment and Material
Use of Torque Wrenches
Use of Power Wrenches
Application of Torque
Lubrication
Cleaning
Sealing Compounds
Tightening Sequence
Self-locking Fasteners
Torque Loading of Fluid Fittings and Blanking Plugs
Assembly of Face Tooth Joints
Minimum Thread Projection Requirements

WARNING
IT IS THE RESPONSIBILITY OF THE OPERATOR TO OBTAIN AND OBSERVE THE MANUFACTURER'S MATERIAL SAFETY DATA SHEETS FOR CONSUMABLE MATERIALS, THESE CONTAIN INFORMATION SUCH AS, HAZARDOUS INGREDIENTS, PHYSICAL/CHEMICAL CHARACTERISTICS, FIRE, EXPLOSION, REACTIVITY, HEALTH HAZARD DATA, PRECAUTIONS FOR SAFE HANDLING, USE AND CONTROL MEASURES AND ALSO TO TAKE LOCAL REGULATIONS INTO CONSIDERATION.The operator shall provide adequate procedures and training to ensure manual manipulation and handling comply with local regulations.
SUBTASK 70-41-01-860-002 Safety Precautions

CAUTION
UNIVERSAL JOINTS MUST NOT BE USED WITH TORQUE WRENCHES BECAUSE INCORRECT TORQUE VALUES CAN BE SHOWN.
CAUTION
HANDLE EXTENSIONS MUST NOT BE USED ON TORQUE WRENCHES.This specification gives torque tightening procedures and standardized torque loads for use on V2500 engines in order to ensure consistent assembly of bolted joints.
The torque limits given in this specification apply to threaded assemblies when the specification is referenced on the drawing or in a document referenced on the drawing. Torque limits specially shown on the drawing or in a document referenced on the drawing shall take priority over the torque limits listed in this specification.
For a small number of bolts at moderate torque loads (for example, 3 or 4 bolts at up to 125 lbf/inch), use a suitable manual wrench; the use of a power tool is not appropriate.
SUBTASK 70-41-01-860-003 Introduction
Generally good quality commercial tooling; some specific type-approved power wrenches are given in Table 1, (Step).
Standard equipment.
SUBTASK 70-41-01-860-008 Equipment and Material
To get the correct torque indication, the handle must be held lightly with one hand. The wrench must be pulled at right angles (90 degrees) to the center line of the wrench. The handle must be free to move on the pivot-point. This will make sure that the concentration of the force or load is at the correct position (refer to Figure. The position of the hand must not be changed to a position that will change the concentration of the force from the pivot-point to a different position on the handle. Interchangeable sockets, adapters and extension bars are supplied with all wrenches to suit a variety applications.
Use a torque wrench which will show the necessary torque value in the higher range of the scale; this will make sure of an accurate torque indication. The first and last quarter of the scale must not be used for mandatory loads. This is because the torque value shown for small loads can not be read accurately in the first and last quarter. Some flexible beam type wrenches do not show the first and last quarter of the scale. Wrenches must be set to zero before they are used.
Flexible Beam Type.
Hold the tool the same as a screwdriver handle; this will make sure of an accurate torque indication. The handle must be turned smoothly until the necessary torque value is shown (refer to Figure.
Screwdriver Type.
The torque multiplier is a mechanical gearbox or hydraulic unit and must be used with a torque wrench. Higher torque values are possible with a torque multiplier than are possible with the usual range of torque wrenches. The torque wrench must have the correct scale for the ratio of the unit that is used. The torque multiplier must be calibrated at regular times and kept serviceable as specified in the applicable instructions.
Torque Multiplier.
When an extension is used with a torque wrench, it will change the length that has an effect on the load. The corrected torque value that is necessary to give a specified torque value for a part must be calculated when extensions are used (refer to Figure. The procedure to calculate the corrected torque value that is necessary on the torque wrench is as follows:
T = Specified torque for a part.
E = Length of extension or adapter.
L = Length of torque wrench.
A = Distance through which force is given to a part.
R = Corrected torque value.
R =
L x T
=
L x T
A
L + E
Example:
A specified torque of 1440 pound-inches (163 Nm) is necessary on a part. An extension of 3 inches (76 mm) from center to center of its holes is used. The torque wrench used has a length of 15 inches (381 mm) from center of handle or handle swivel pin to center of its square adapter. The extension or adapter and torque wrench are used in a straight line.
Then:
R =
L x T
=
15 x 1440
= 1200
L + E
15+3
To get the specified torque (T) of 1440 pound-inches (163 Nm) the corrected torque value (R) that is necessary is 1200 pound-inches (136 Nm).
NOTE
The length of extensions, adapters, and wrenches must be shown on the tools, or measured correctly before they are used.Torque Wrenches and Extensions.
SUBTASK 70-41-01-860-005 Use of Hand Torque Wrenches

CAUTION
DUE TO THE SPEED OF POWER TORQUE WRENCHES, HEAT CAN BE GENERATED, THIS HEAT CAN AFFECT THE TORQUE VALUE. IF YOU DO NOT ALLOW THE FASTENERS TO COOL BEFORE APPLYING THE FINAL TORQUE YOU CAN DAMAGE THE FASTENERS.
CAUTION
DO NOT USE POWER TOOLS TO TIGHTEN FASTENINGS ON JOINTS THAT CONTAIN "CRUSH GASKETS" BECAUSE THE GASKET CAN BE DAMAGED BY INAPPROPRIATE TIGHTENING TECHNIQUE.Air-driven power wrenches must give a constant load irrespective of the airline pressure.
NOTE
* These tools are complex and not appropriate for general use. Facilities introducing these tools with no previous experience must seek manufacturer's recommendations for their appropriate application.All power tools approved for final torque tightening must have demonstrated calibrated accuracy of +/- 5% of the tightening torque. Table 1 contains a sample list of tools that have been assessed and approved.Other torque wrenches can be used provided it can be demonstrated that they meet the calibration requirements of this specification.
Tool Manufacturer and Tool Part Number
Torque Range
Power Source
Atlas Copco ETB6
9 to 53 lbf/in
(1 to 6 Nm)
Battery
Atlas Copco ETB10
26 to 90 lbf/in
(3 to 10 Nm)
Battery
Atlas Copco BTB12
95 to 105 lbf/in
(10 to 12 Nm)
Battery
Atlas Copco LTV008 R07-6
31 to 62 lbf/in
(3.5 to 7 Nm)
Pneumatic
Atlas Copco LTV18 R15-6
53 to 132 lbf/in
(6 to 15 Nm)
Pneumatic
Atlas Copco LTV28 N22-10
96 to 192 lbf/in
(11 to 22 Nm)
Pneumatic
Atlas Copco LTV28 R28-10
120 to 252 lbf/in
(14 to 28 Nm)
Pneumatic
Atlas Copco LTV38 N31-10
156 to 276 lbf/in
(18 to 31 Nm)
Pneumatic
Atlas Copco LTV37 SR005
180 to 372 lbf/in
(20 to 42 Nm)
Pneumatic
Atlas Copco LTV38 N55-10
265 to 486 lbf/in
(30 to 55 Nm)
Pneumatic
Atlas Copco Tensor S7*
45 to 1770 lbf/in
(5 to 200 Nm)
Electric
Atlas Copco Tensor ST*
Atlas Copco Tensor SL*
Desoutter CVI 11 with ERP 10L
26 to 90 lbf.in
(3 to 10 Nm
Electric
Desoutter CVIS with ERP 10L
26 to 90 lbf.in
(3 to 10 Nm
Electric
Desoutter CVI 11 with ERP 20L
45 to 177 lbf.in
(5 to 20 Nm
Electric
Desoutter CVIS with ERP 20L
45 to 177 lbf.in
(5 to 10 Nm
Electric
Power Wrenches.
Power torque tools with accuracy of at least +/-10% of the required setting can be used to aid faster assenbly but not for applying final tightening torques. These tools must be set to approximately 50% of the final tightening torque value. The full final torque being applied with an approved torque tool having the +/-5% calibration accuracy.
Other Power Wrenches.
SUBTASK 70-41-01-860-006 Use of Power Wrenches
SUBTASK 70-41-01-400-010 Application of Torque
The lubricant must be clean CoMat 10-077 APPROVED ENGINE OILS unless an alternative antigalling compound is approved either on the fastener drawing, or on some other Engineering Document.
Torque limits given in this specification for parts coated with antigalling compound, apply specially to the compounds given in CoMat 10-077 APPROVED ENGINE OILS. If other compounds are used, the torque must be as specified on the drawing or on other applicable documentation.
SUBTASK 70-41-01-400-002 Lubrication
When CoMat 04-004 JOINTING COMPOUND, LIGHT GRADE or CoMat 04-005 JOINTING COMPOUND, MEDIUM GRADE or CoMat 04-006 JOINTING COMPOUND, HEAVY GRADE is specified, the oil lubrication must be ignored, and a minimum of 10 minutes air drying time must be allowed before assembling components. Torque values must be as those specified in Figure for oil-lubricated fasteners.
SUBTASK 70-41-01-400-004 Sealing Compounds
When using non type-approved power wrenches, the torque setting must not exceed 50 percent of the final torque (refer to Step).
Do not immediately tighten adjacent fasteners on flanges to the necessary torque load. Lightly tighten (nip) two fasteners approximately opposite to each and then another pair approximately at 90 degrees to the first pair. This process is repeated by selecting the next pair of fasteners by bisecting the resulting angular spaces until all fasteners in the flange are lightly loaded (nipped) and the joint faces are in light contact. When the faces are in light contact with all the positions lightly loaded (nipped up), apply the specified torque in a similar sequence. No special requirements apply for horizontal build except face tooth joints (curvics) (refer to Step).
An illustration of the numbered sequence of tightening bolts in a circular pattern is shown in Figure.
On half-casing split lines, use the same method but tighten the mid-section positions first and then work outwards from the center.
For rectangular-shaped flanges, and joints at half casing split lines, a similar procedure must be followed, but the bolts at the central positions must be tightened first as illustrated in Figure.
Sequence tightening of flanges with 50 or more fastenings.
SUBTASK 70-41-01-400-005 Tightening Sequence for Circular and Split Casing Flanges
This section gives torque loads and build requirements for bolts assembled with standard self-locking nuts, self-locking helical coil inserts and miscellaneous self-locking fasteners such as riveted anchor nuts (plate nuts), clip-on nuts, and flange-restrained nuts (shank nuts). For torque limits on wiring harness temperature probe nuts and junction box terminal nuts, see below.
If oil lubricant is applied to the part, use the torque values of Figure.
If one of the antigalling compounds given in SUBTASK 70-41-02-410-002, is applied, either by engineering drawing instruction or specified by another engineering document, use the torque values of Figure.
If the fastener is for either the wiring harness temperature probe terminal or junction box terminal and is oil-lubricated, use the torque value of Figure.
Torque loads.
SUBTASK 70-41-01-400-006 Self-Locking Fasteners
In order to reduce the union turning, during tightening of the union nut, a lower torque load for the union nut must be applied as given in Figure. These values are based on the practice of tightening the union to a value of 20 percent higher than that for the union nut.
The nut must be tightened to the value given in Figure, unless specified differently on the Engineering Drawing.
The nut must be tightened finally to the specified tightening torque, refer to Figure, without a pause being made before reaching the applicable torque value.
When fitting tube assemblies, a 'bedding-in' procedure is necessary to give a good seal as follows:
Torque loading of thrust wire union nuts.
The torque values in Figure are applicable to coupling nuts for double seal (performed packing and 37 degree cone, dual seal) fluid fittings.
Torque loading of double seal fluid connections.
SUBTASK 70-41-01-400-007 Torque Loading of Fluid Fittings and Blanking Plugs
Immediately before bringing together the face-toothed joint, examine the teeth to be sure that they are free from burrs or damage and fully clean by brushing with a soft brush (nylon for example), with CoMat 01-124 ISOPROPYL ALCOHOL or by swab degreasing to the SPM TASK 70-11-26-300-503.
Start with the nut/bolt combination in hole 1 and continue in numerical sequence to tighten to the initial torque value specified in Figure.
Follow the same sequence (without loosening) and tighten each nut/bolt combination to the intermediate torque values specified in Figure.
Without loosening, follow the sequence again, and tighten each nut/bolt combination to the final tightening torque values specified in Figure, unless other values are specified on the related Engineering Drawing or Torque Tightening Schedule.
Start with the nut/bolt combination in hole 1 and continue in a clockwise direction, checking each nut/bolt combination in turn to the torque value specified in Figure, unless other values are specified on the related Engineering Drawing or Torque Tightening Schedule.
Tightening sequence.
Assembly procedure.
SUBTASK 70-41-01-400-008 Assembly of Face Tooth Joints
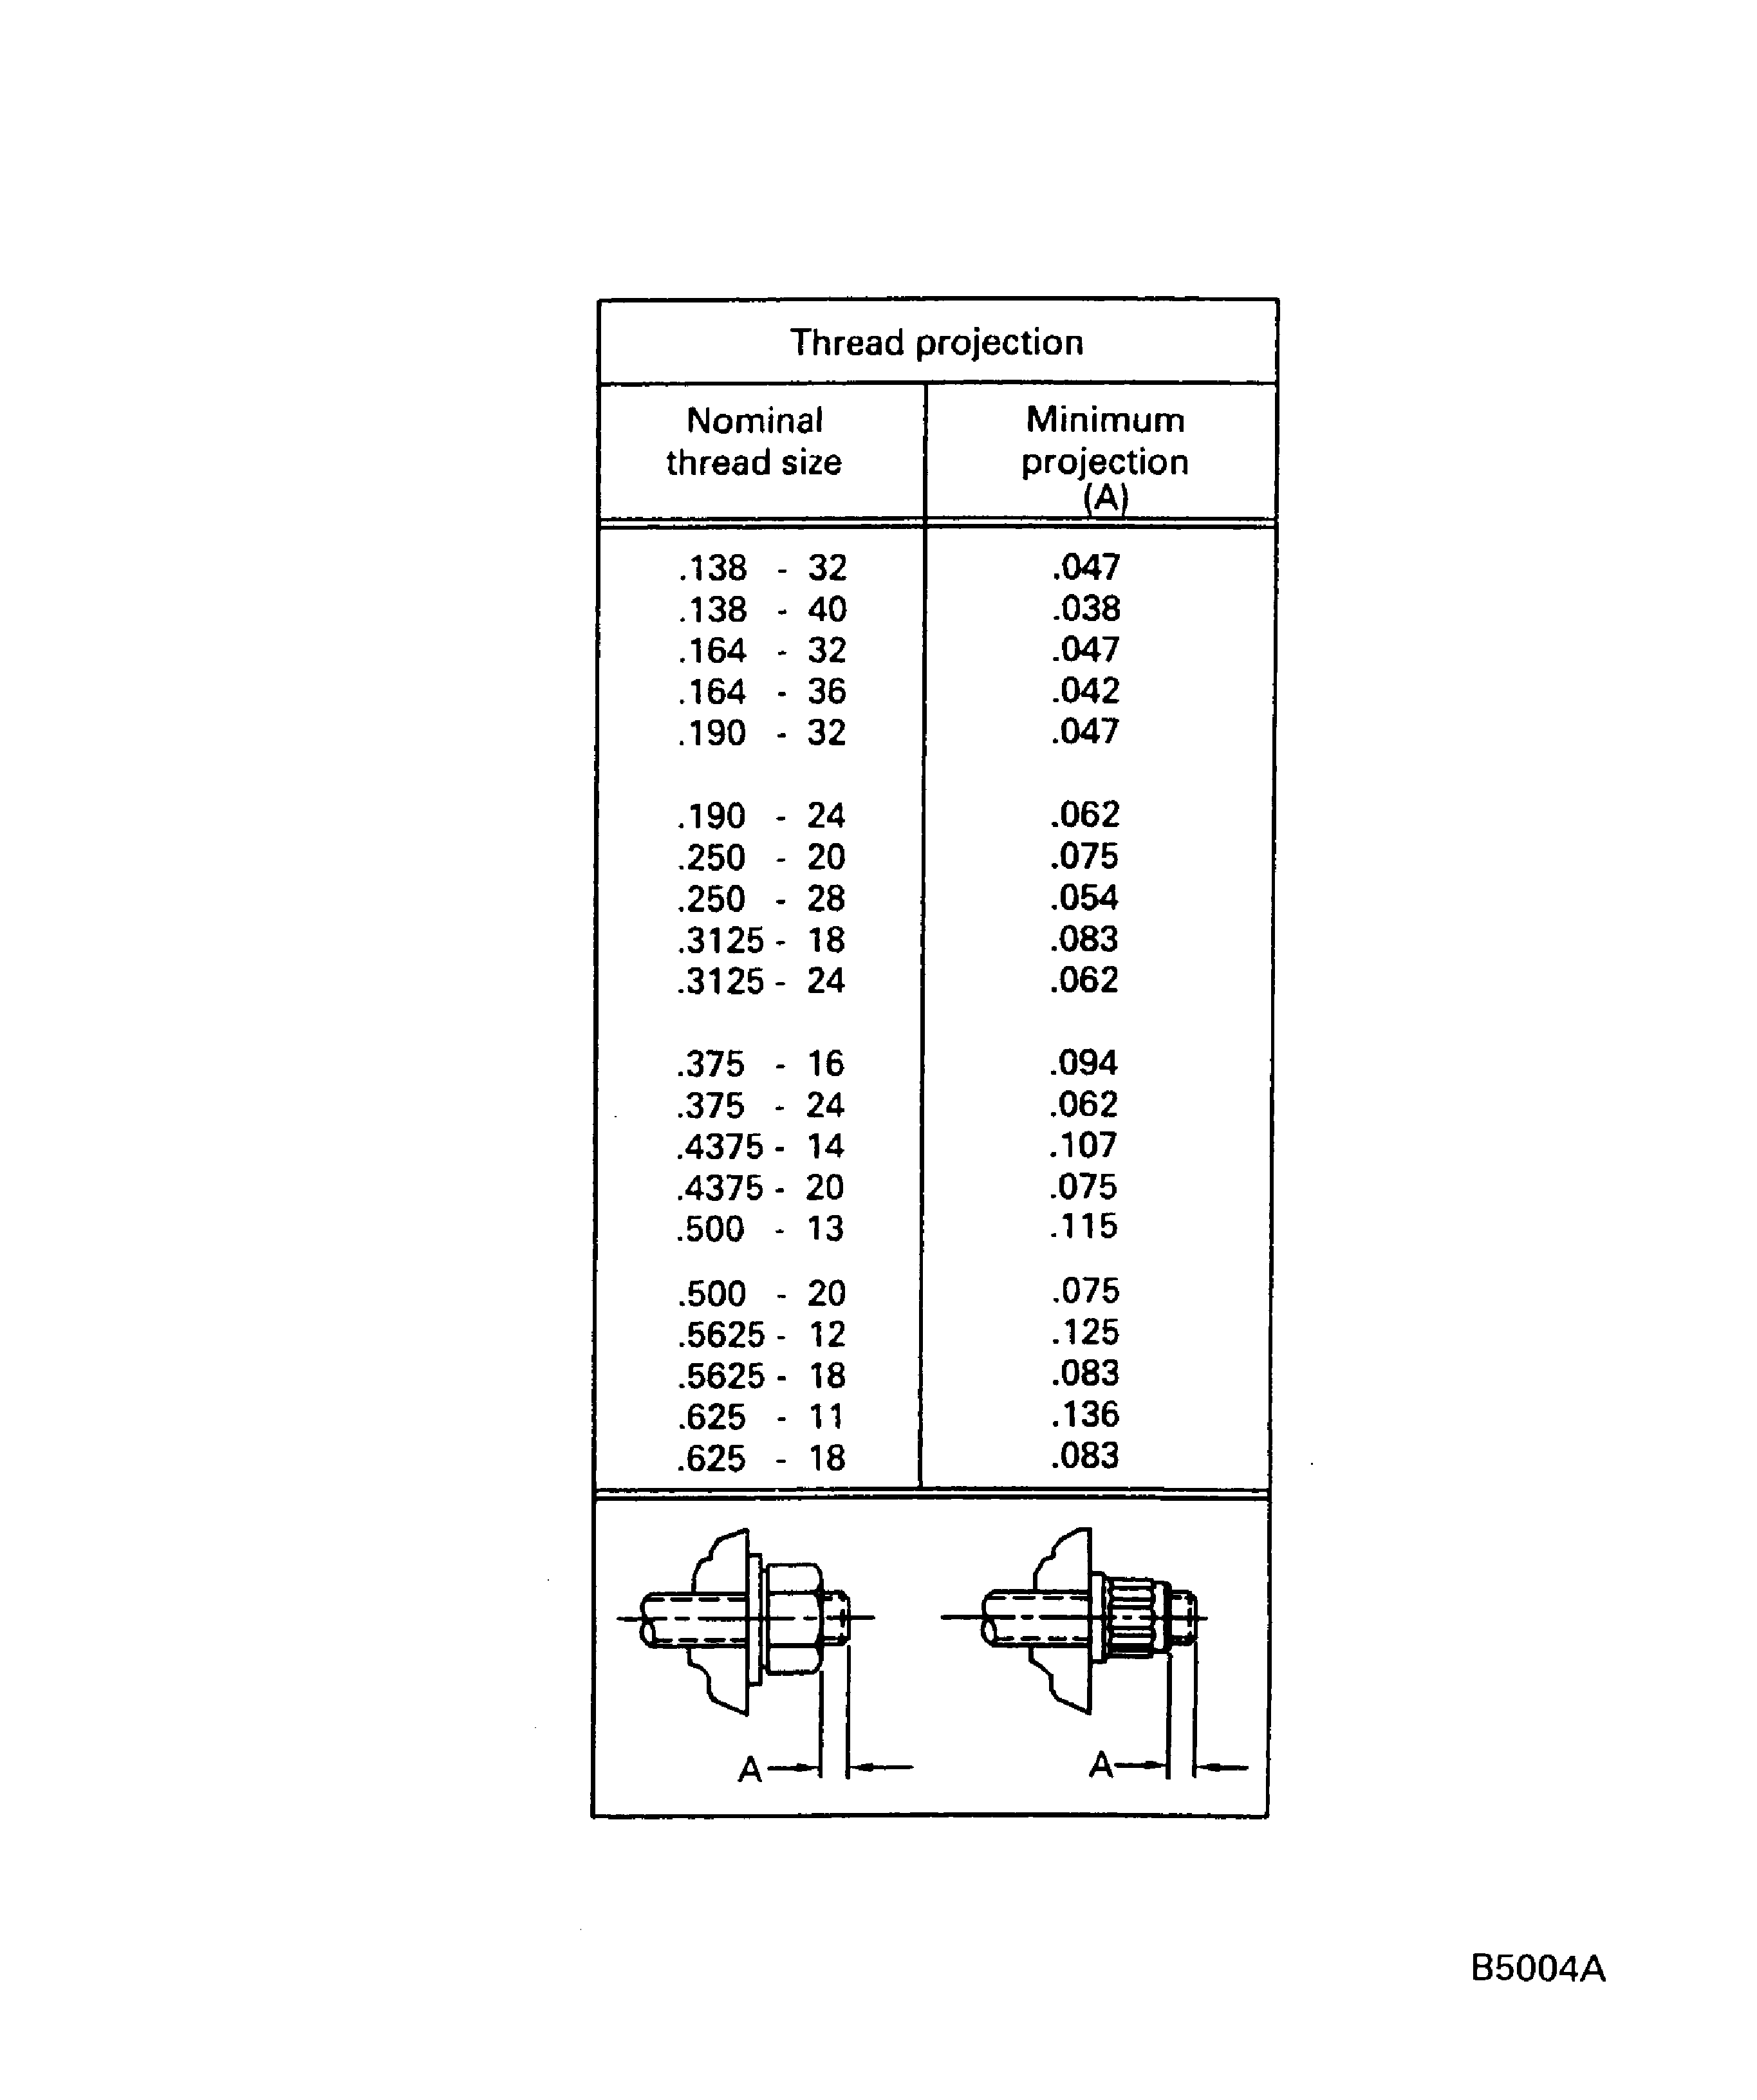
Thread projection must meet the minimum requirements as shown in Figure.
SUBTASK 70-41-01-400-009 Minimum Thread Projection Requirement
Figure: Flexible beam torque wrench
Flexible beam torque wrench
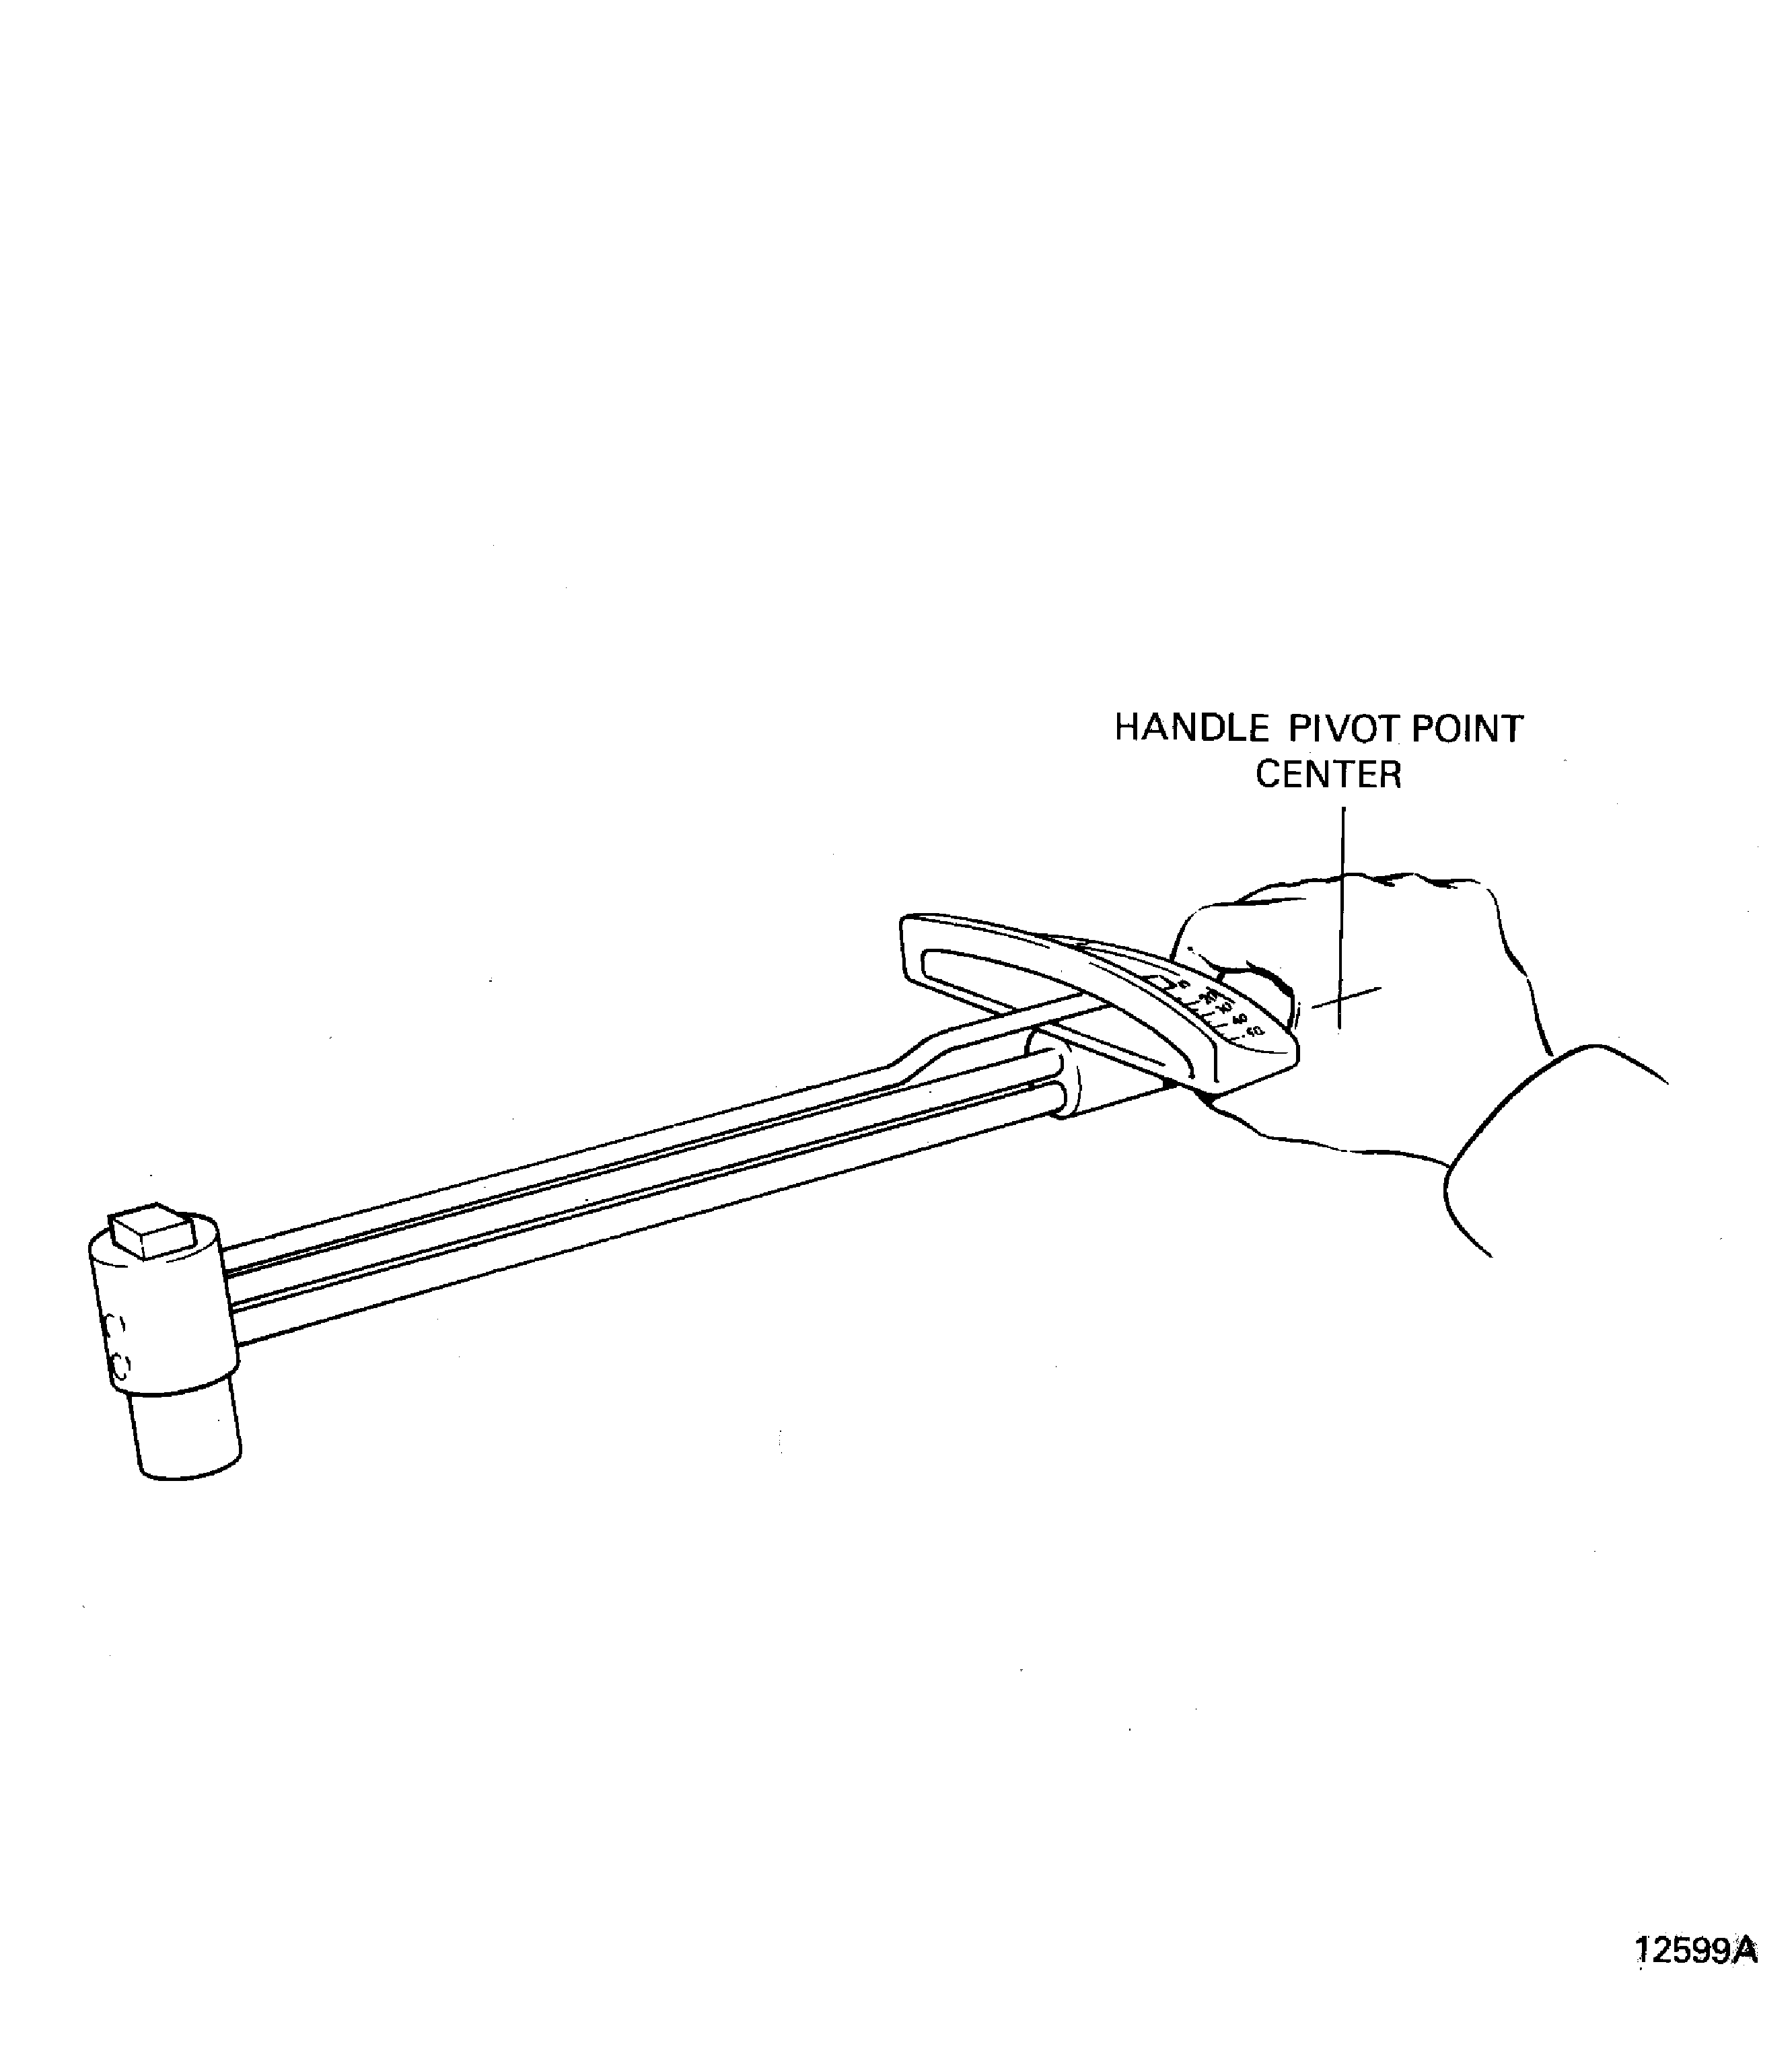
Figure: Screwdriver torque wrench
Screwdriver torque wrench
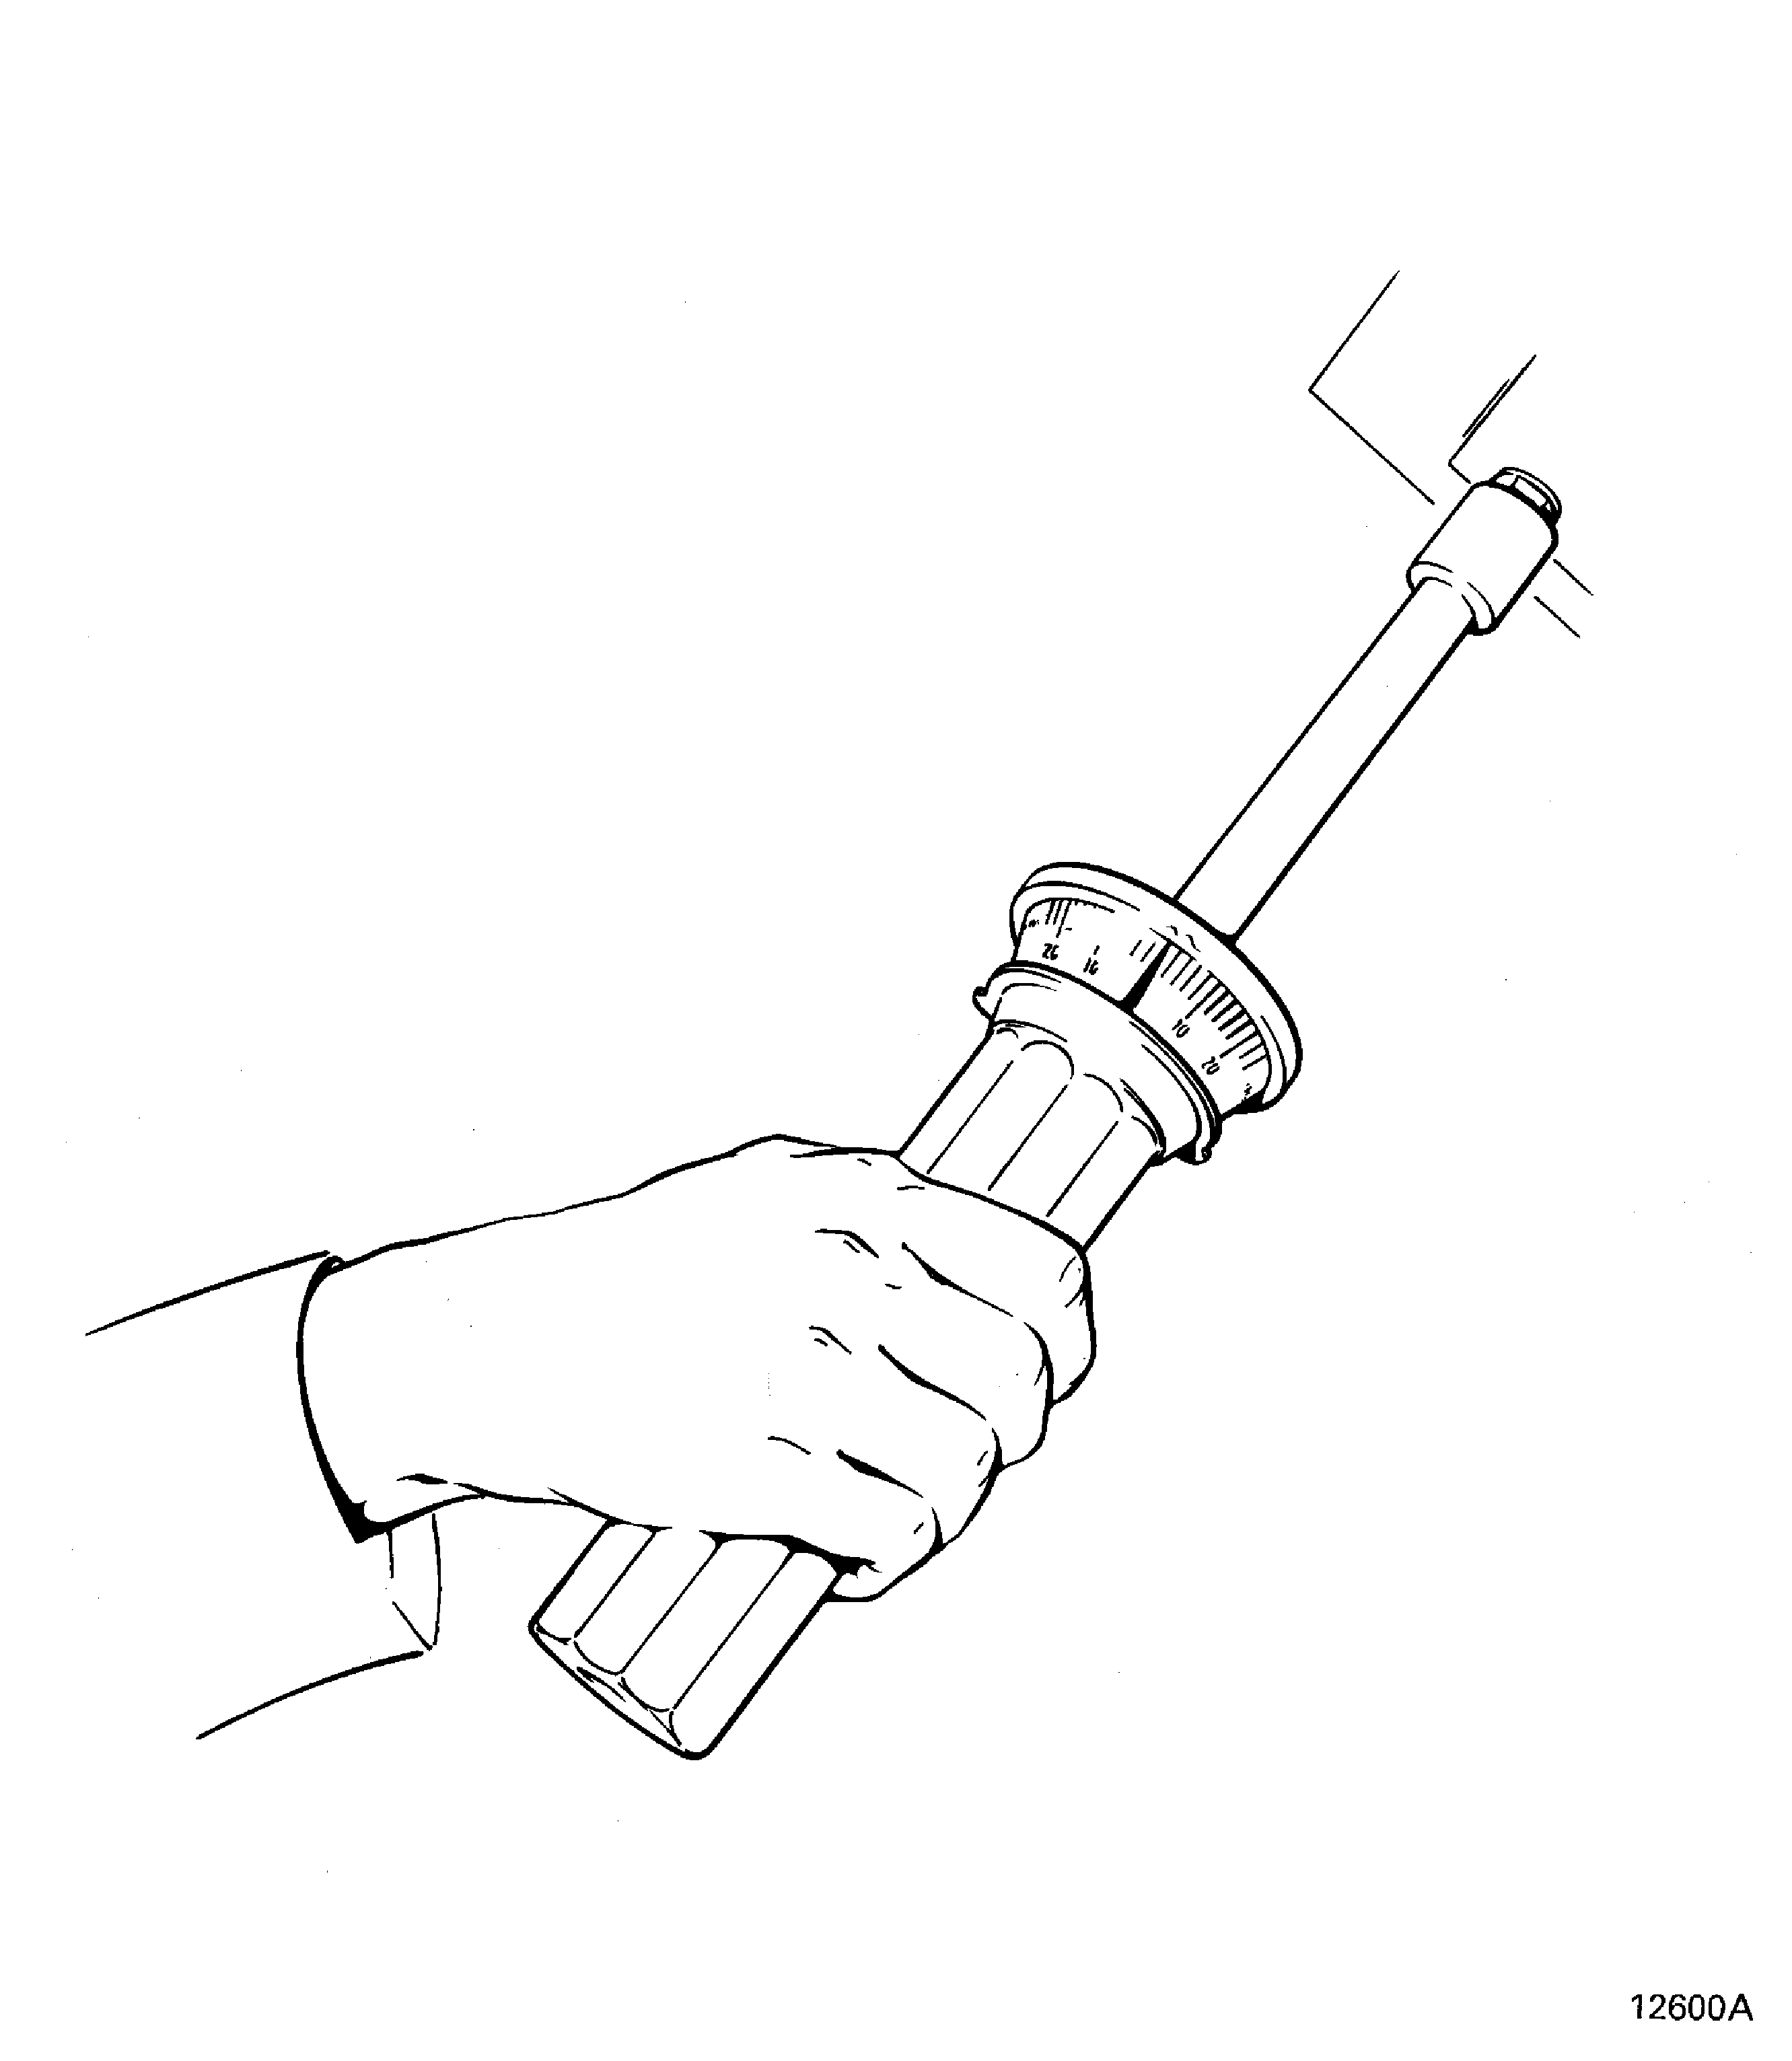
Figure: Calculate corrected torque value
Calculate corrected torque value
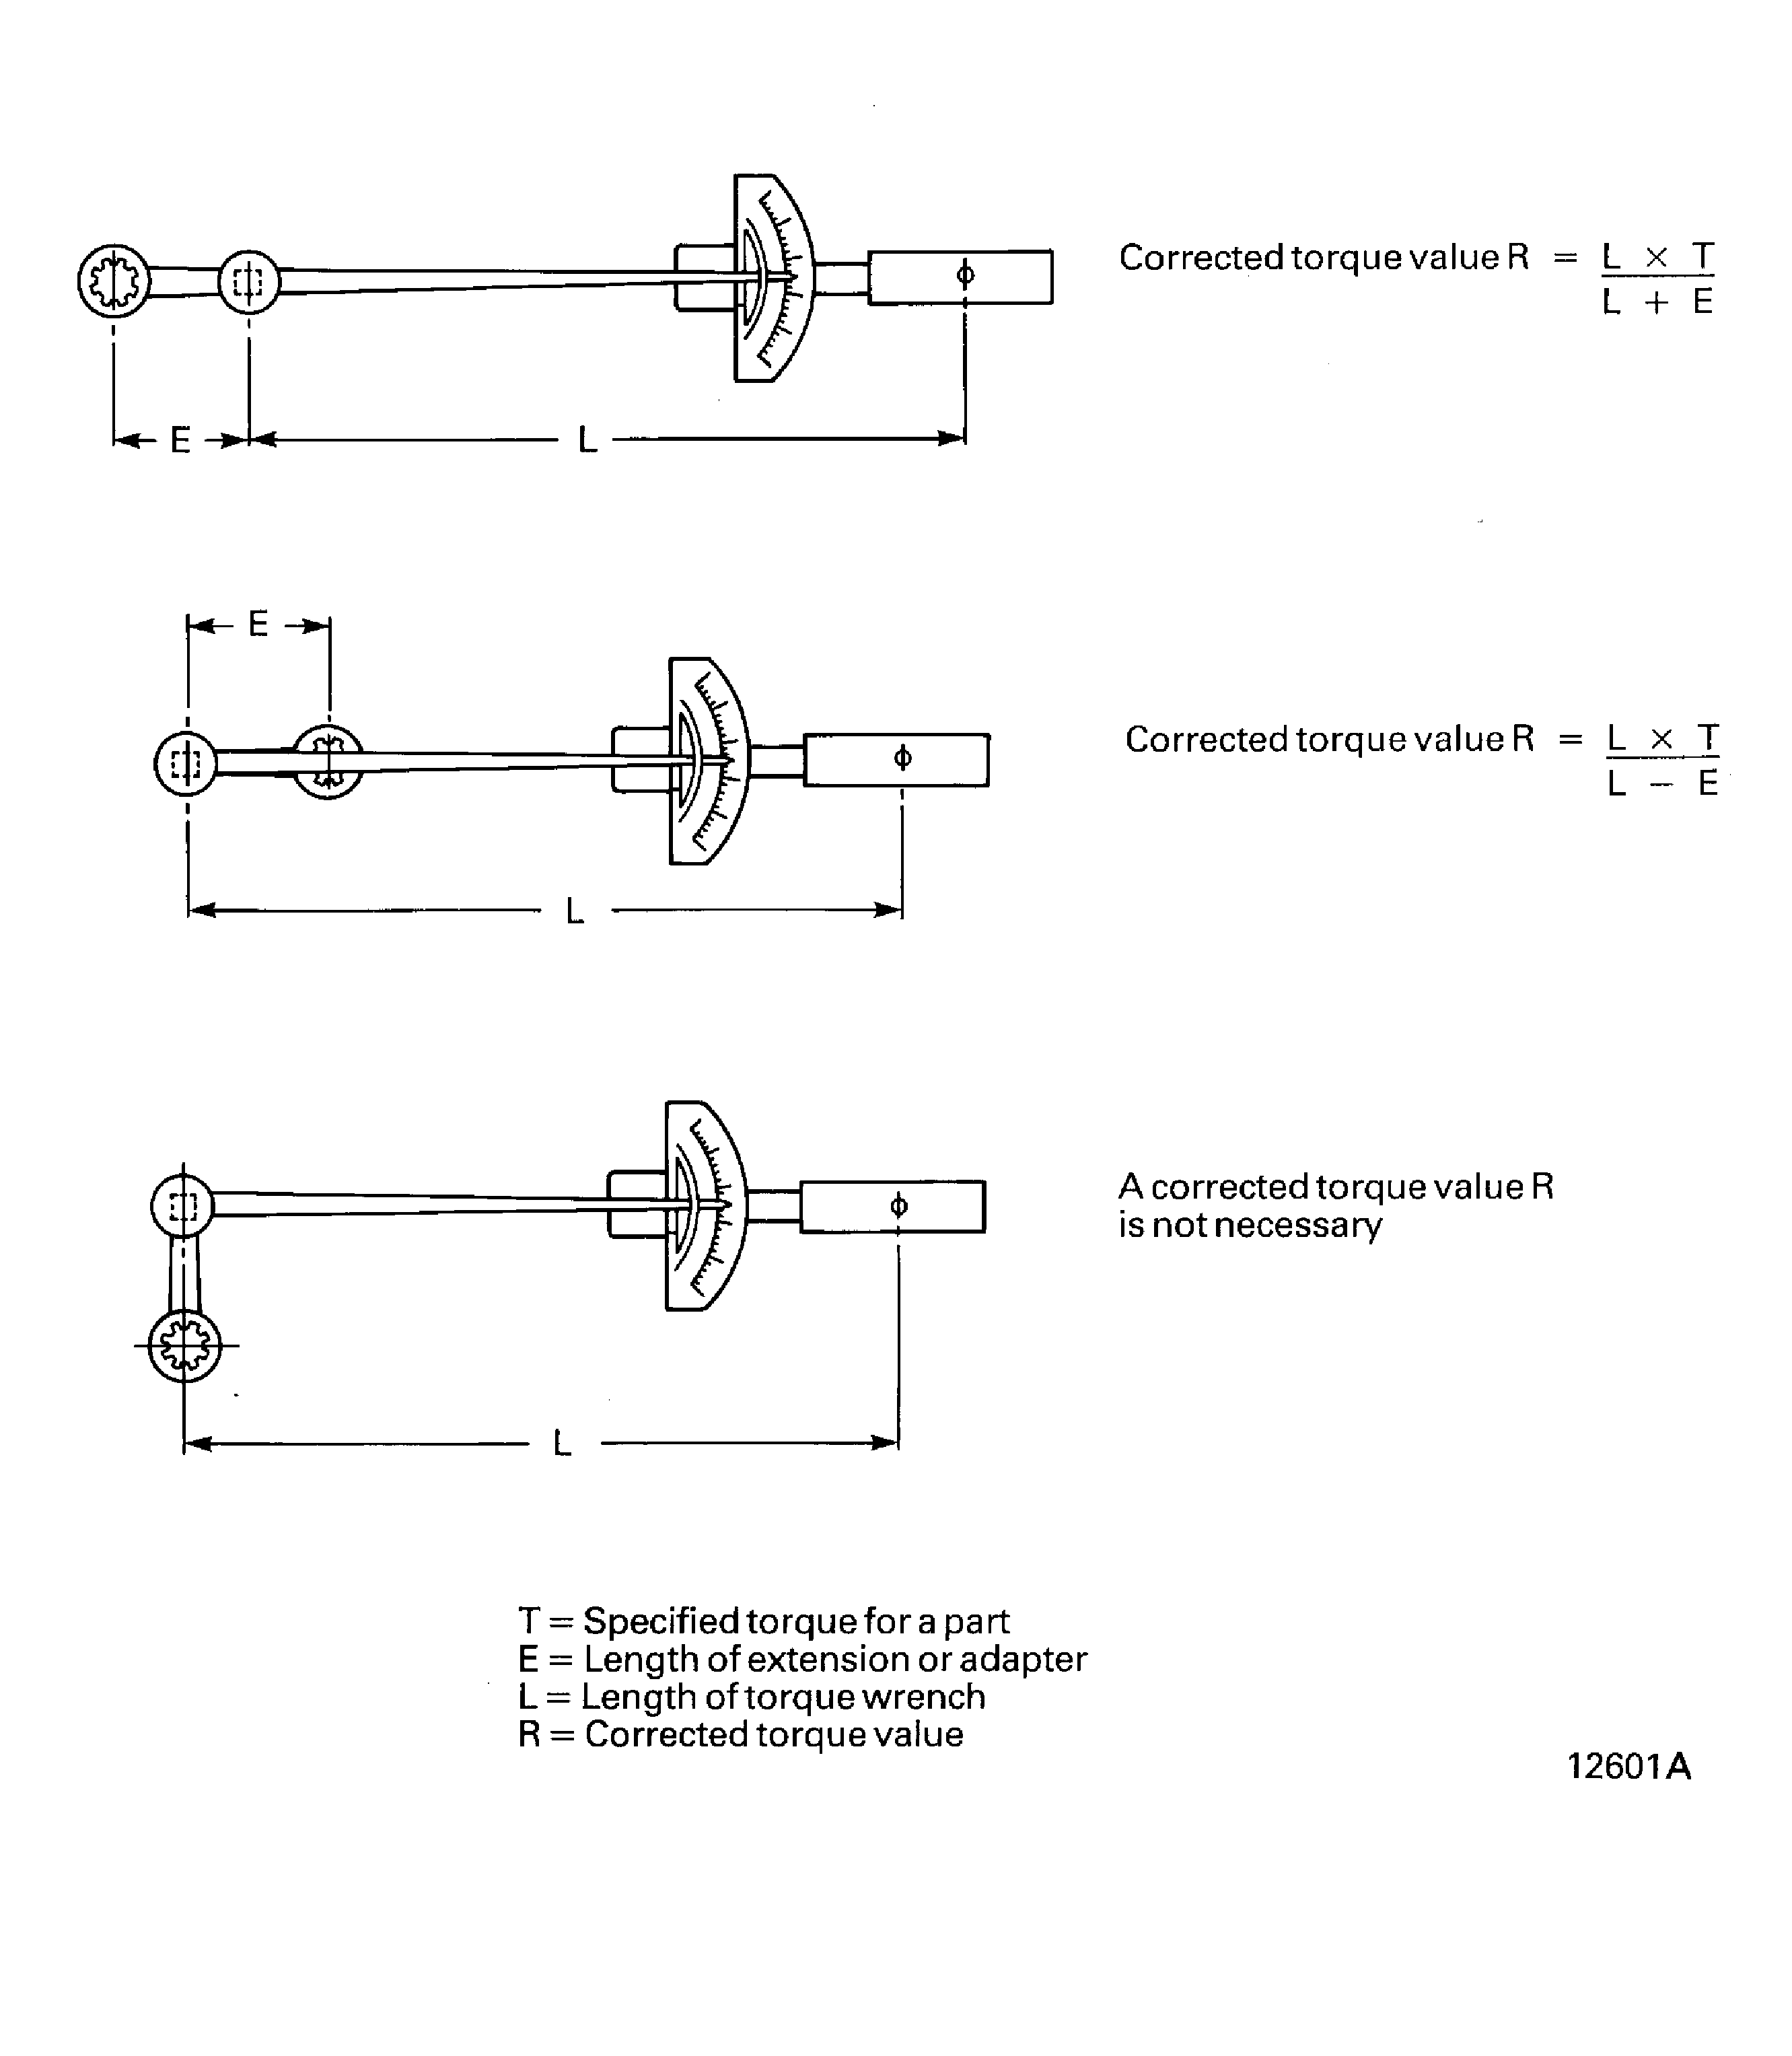
Figure: Torque limits for oil-lubricated fasteners
Torque limits for oil-lubricated fasteners
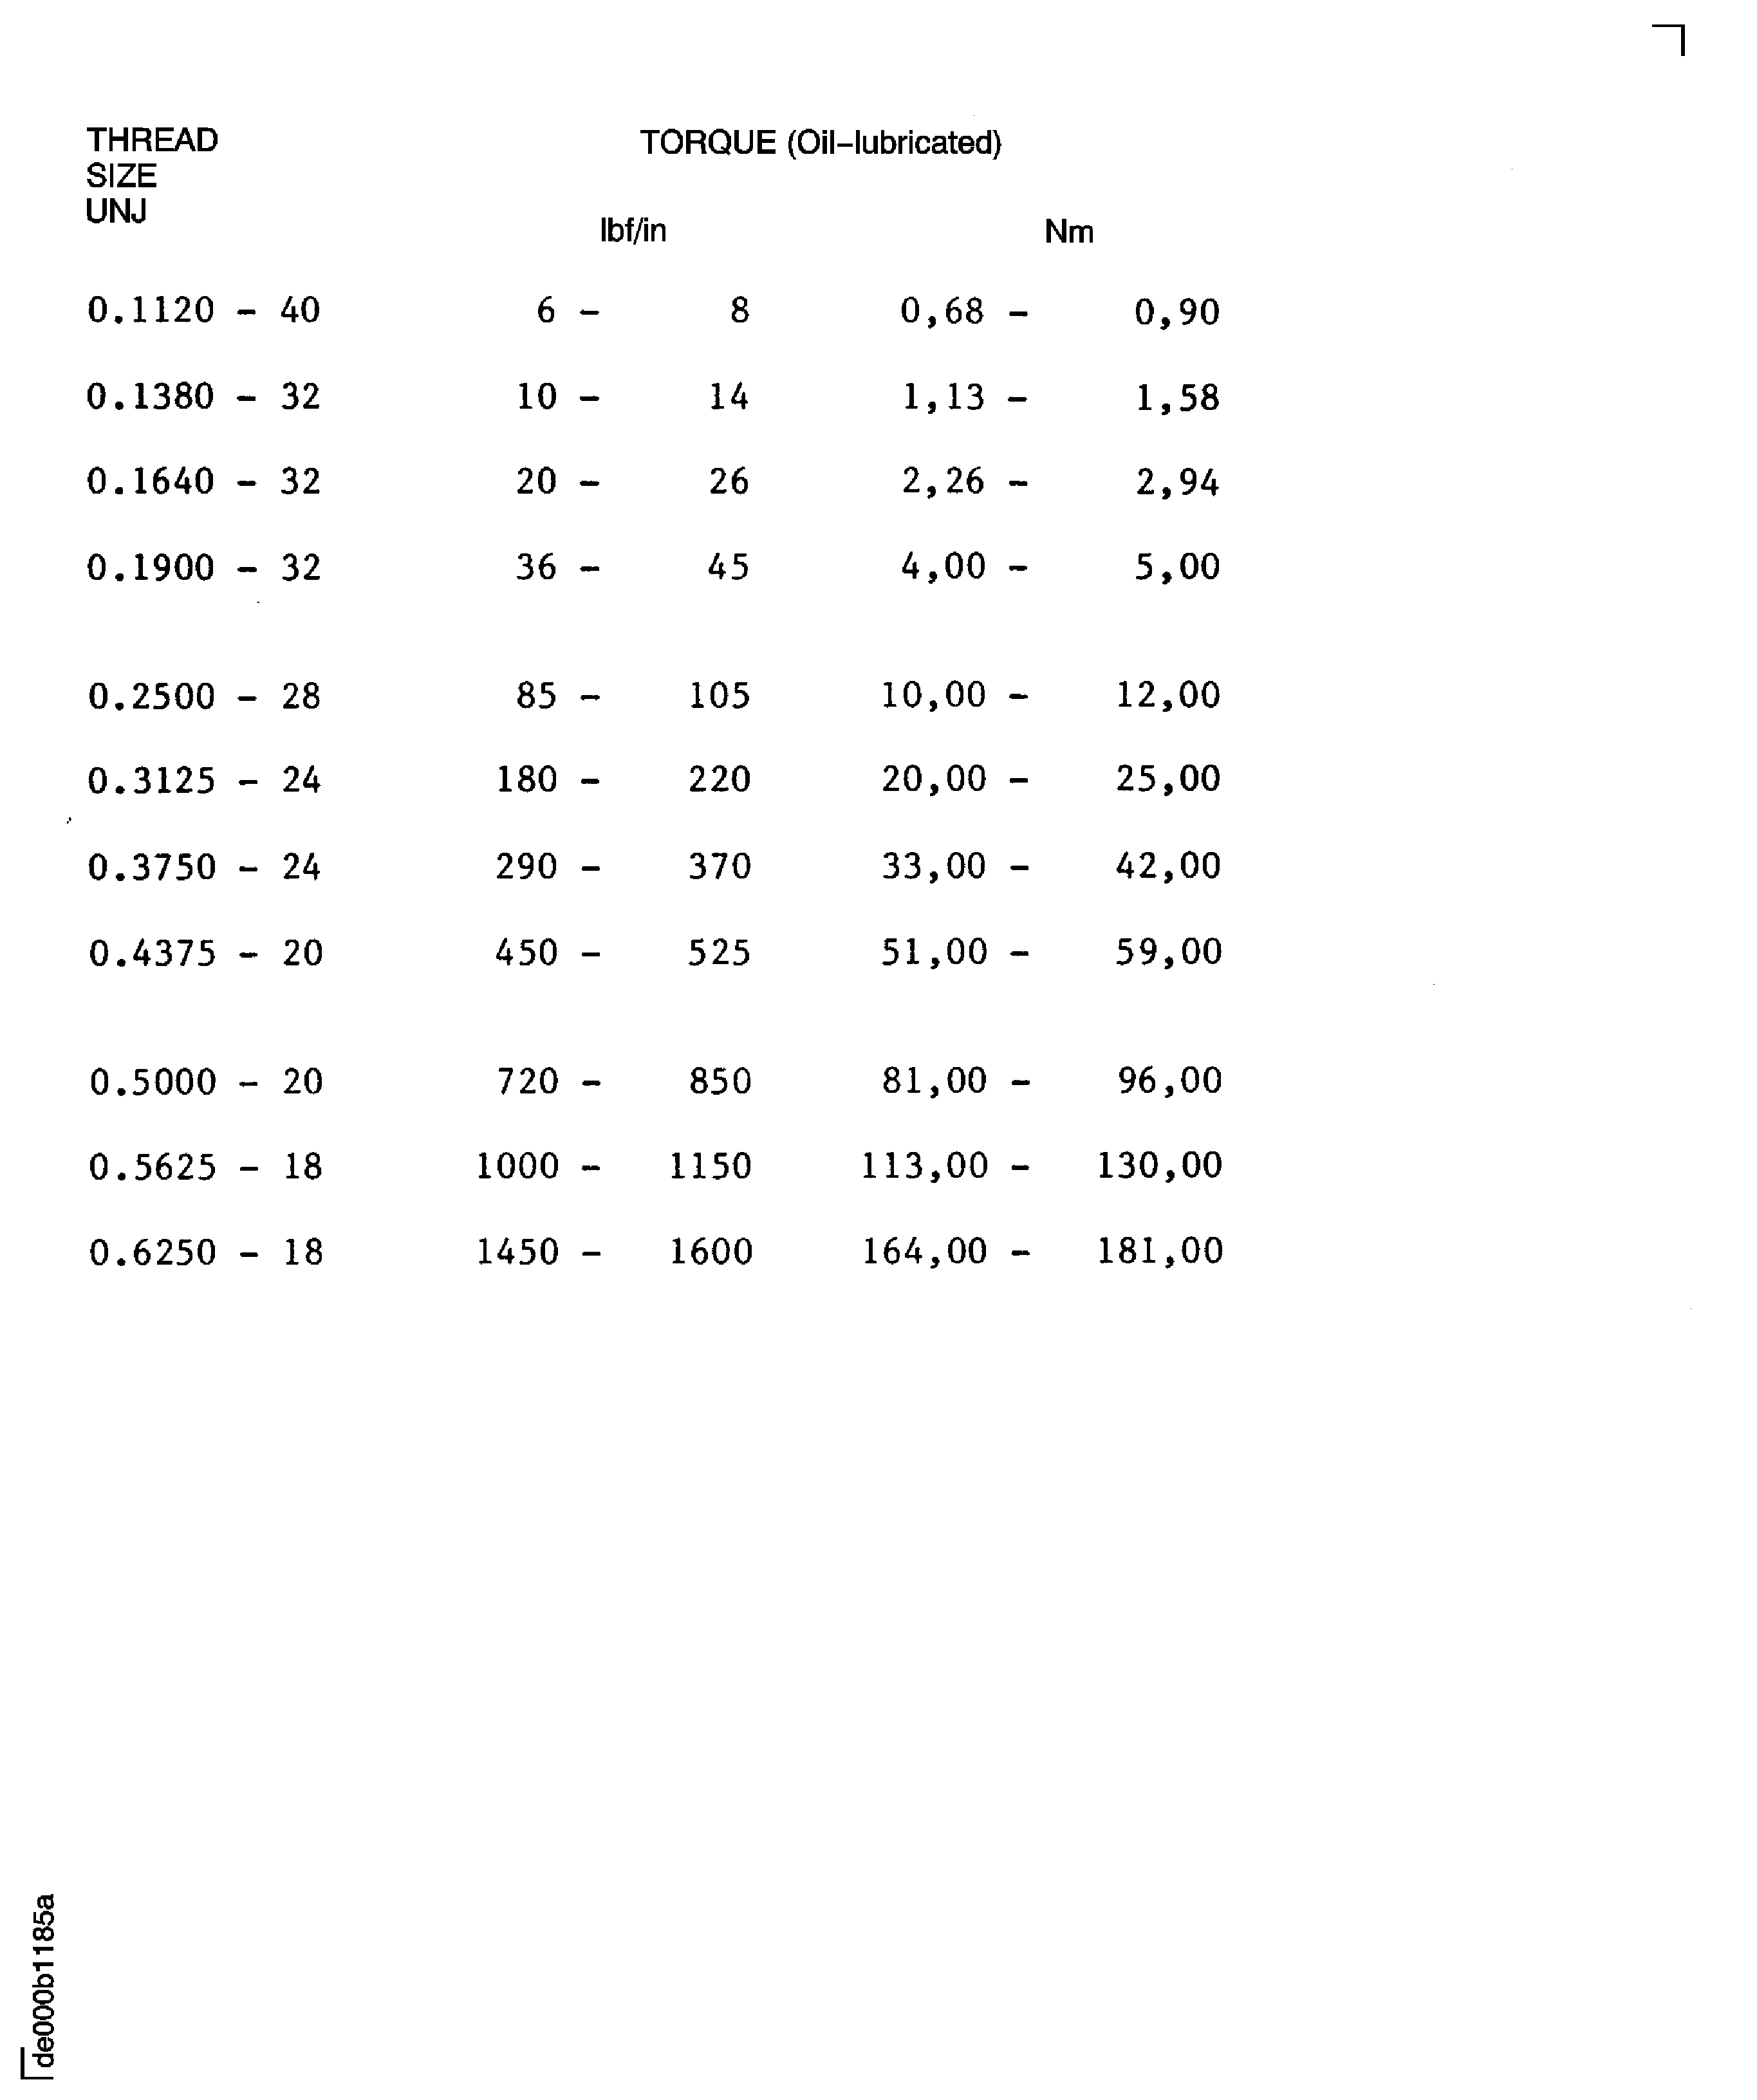
Figure: Example of tightening sequence for circular flanges and split casing flanges
Example of tightening sequence for circular flanges and split casing flanges
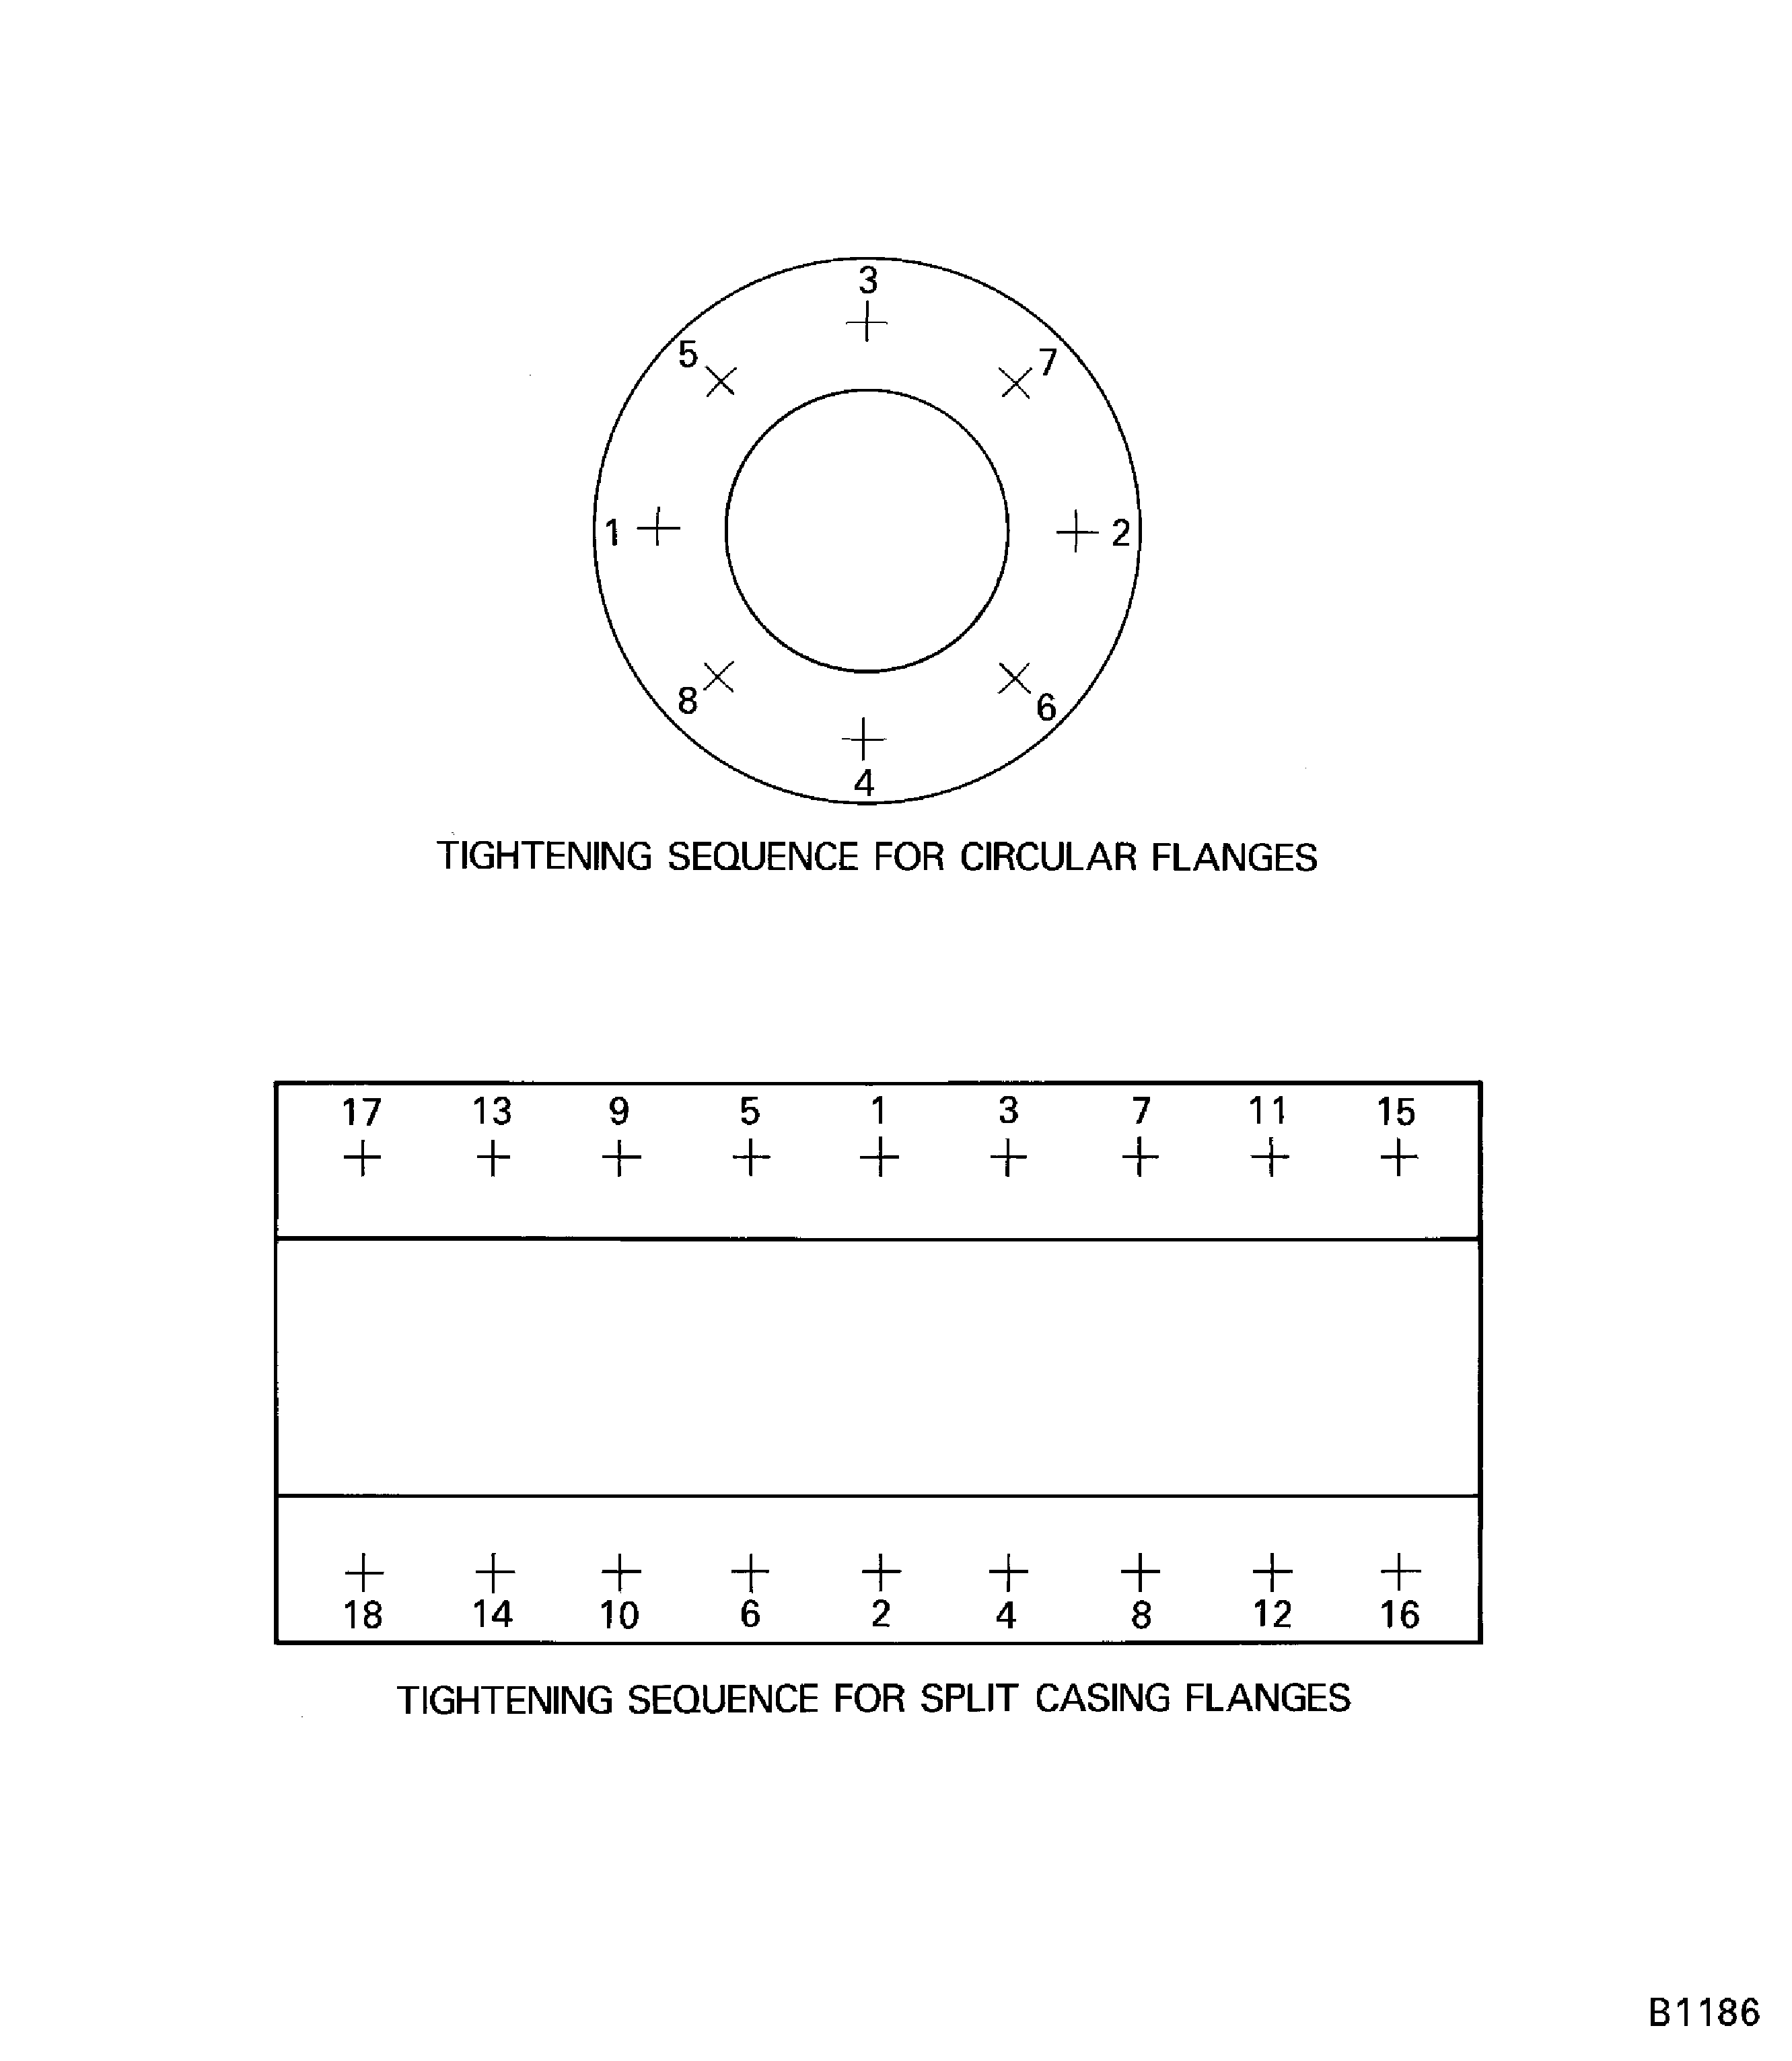
Figure: Torque limits for fasteners coated with antigalling compound
Torque limits for fasteners coated with antigalling compound
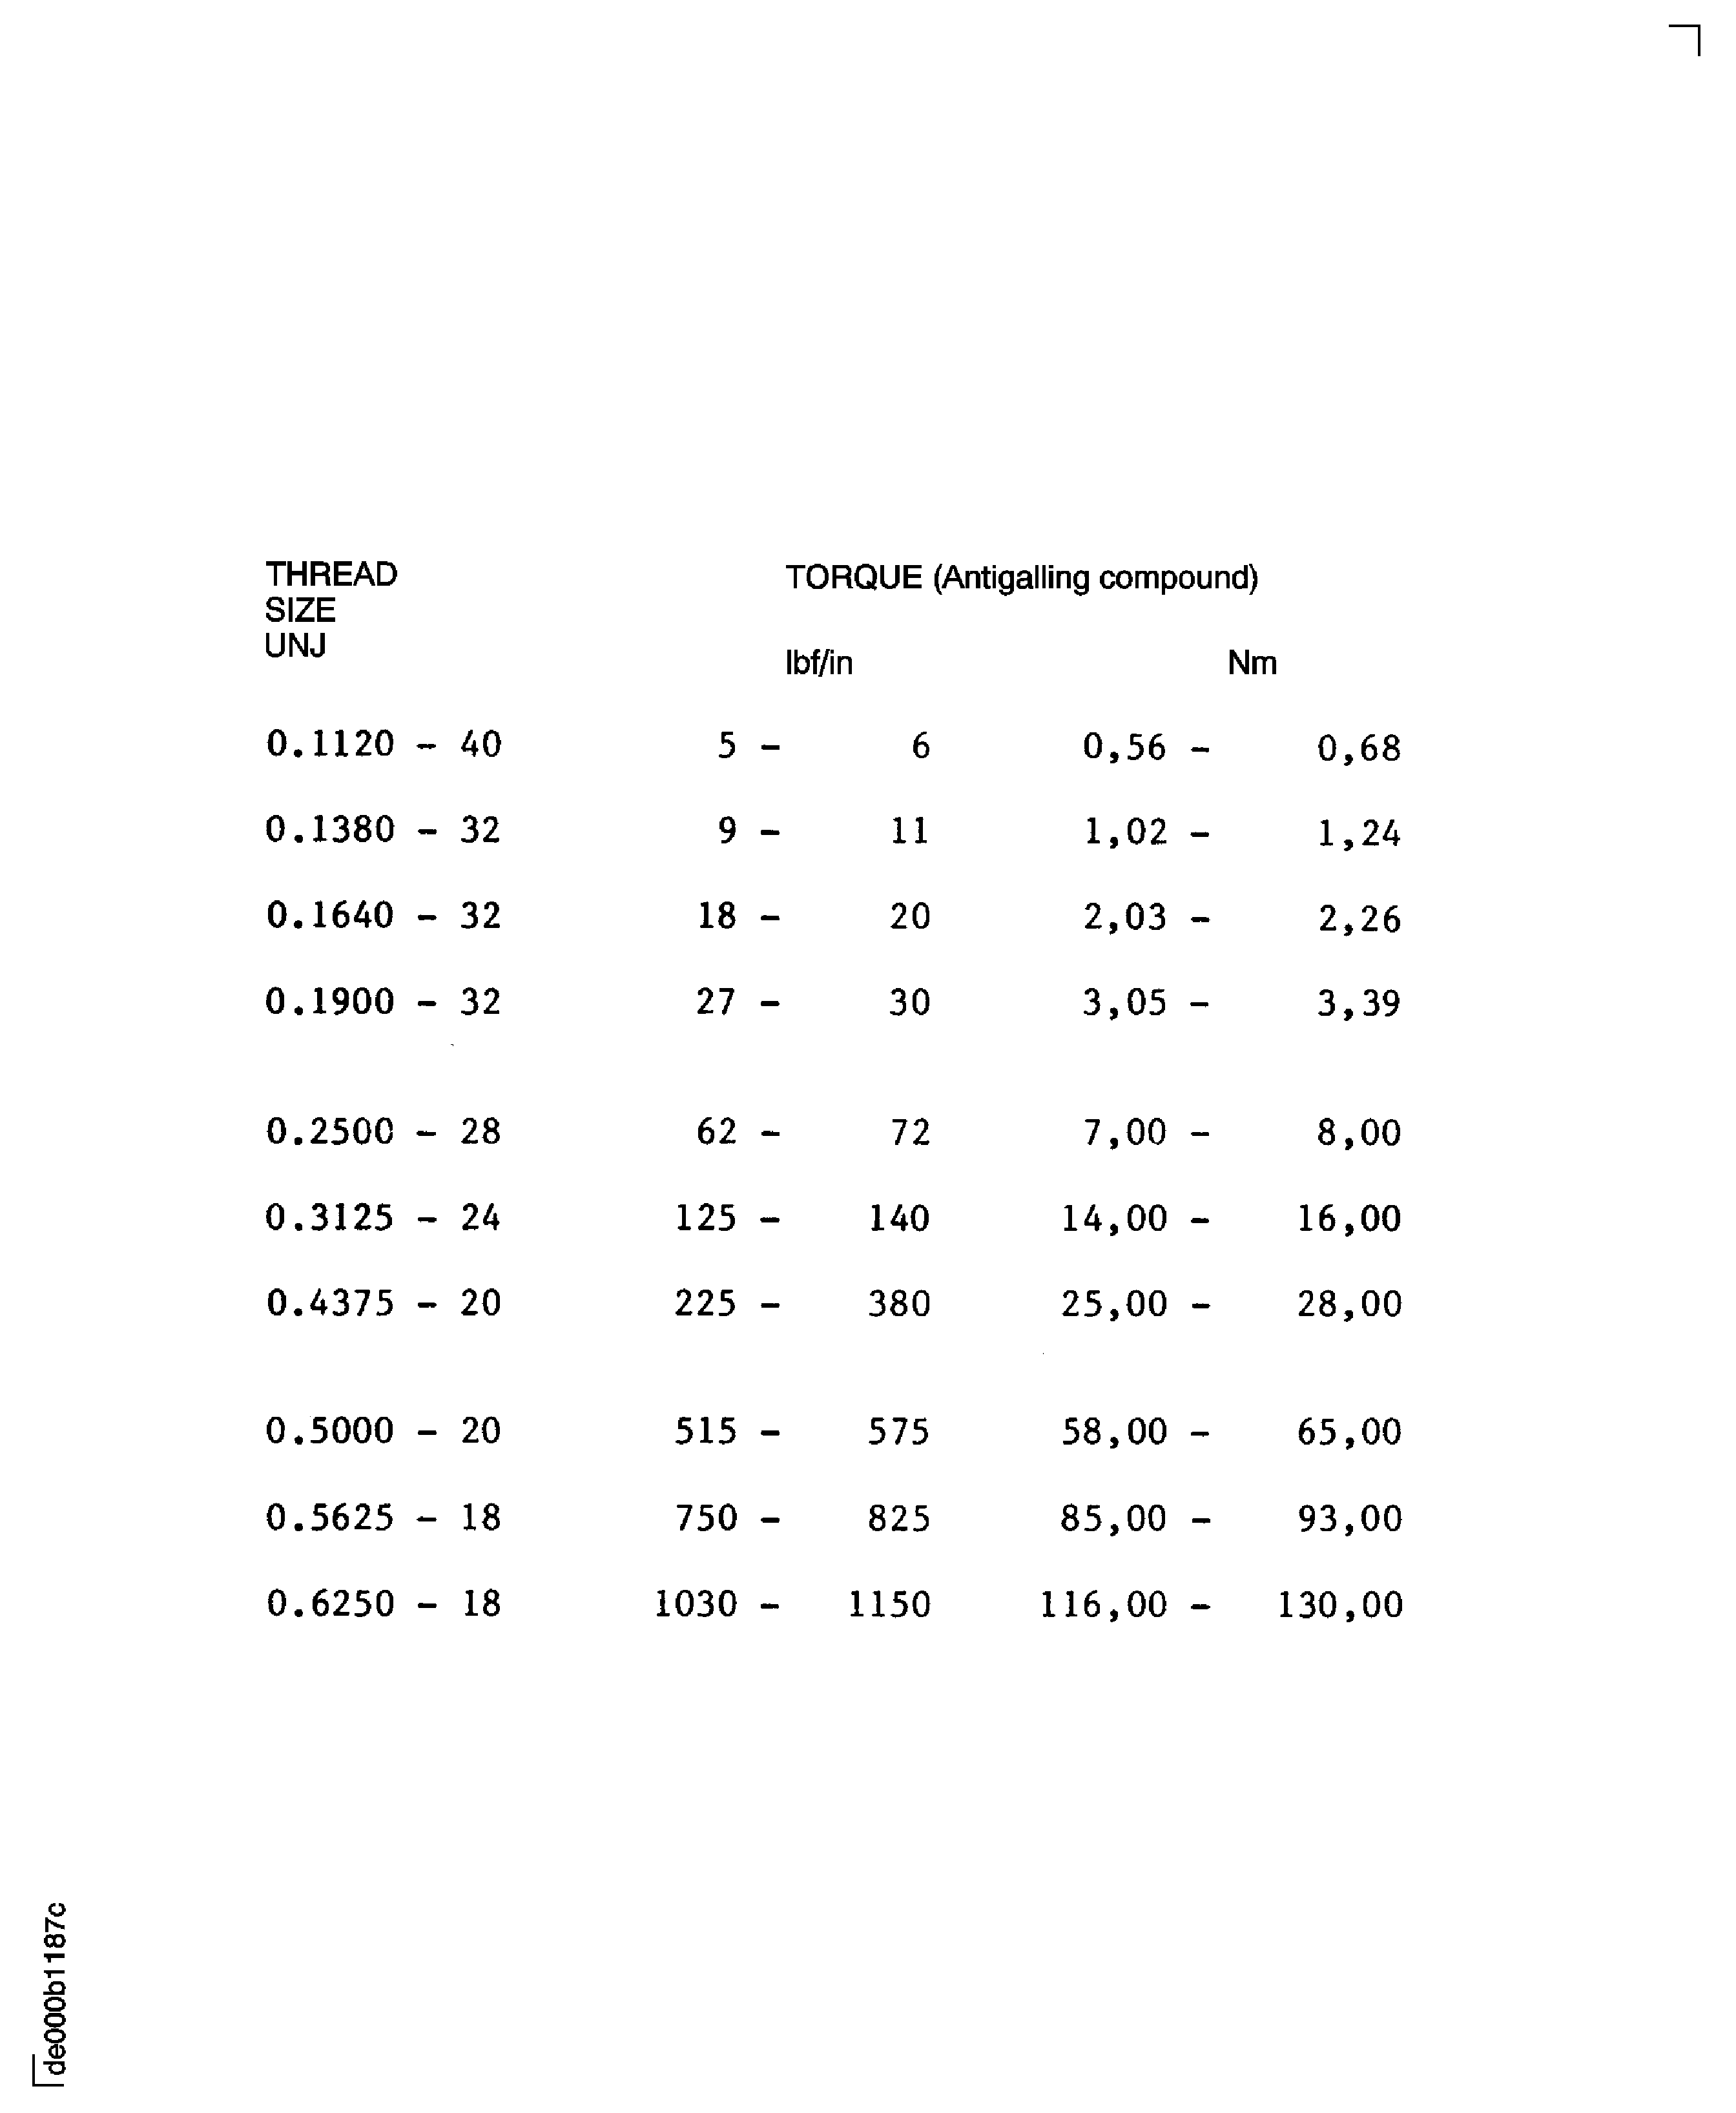
Figure: Torque limits for temperature probe and junction box terminal fasteners
Torque limits for temperature probe and junction box terminal fasteners
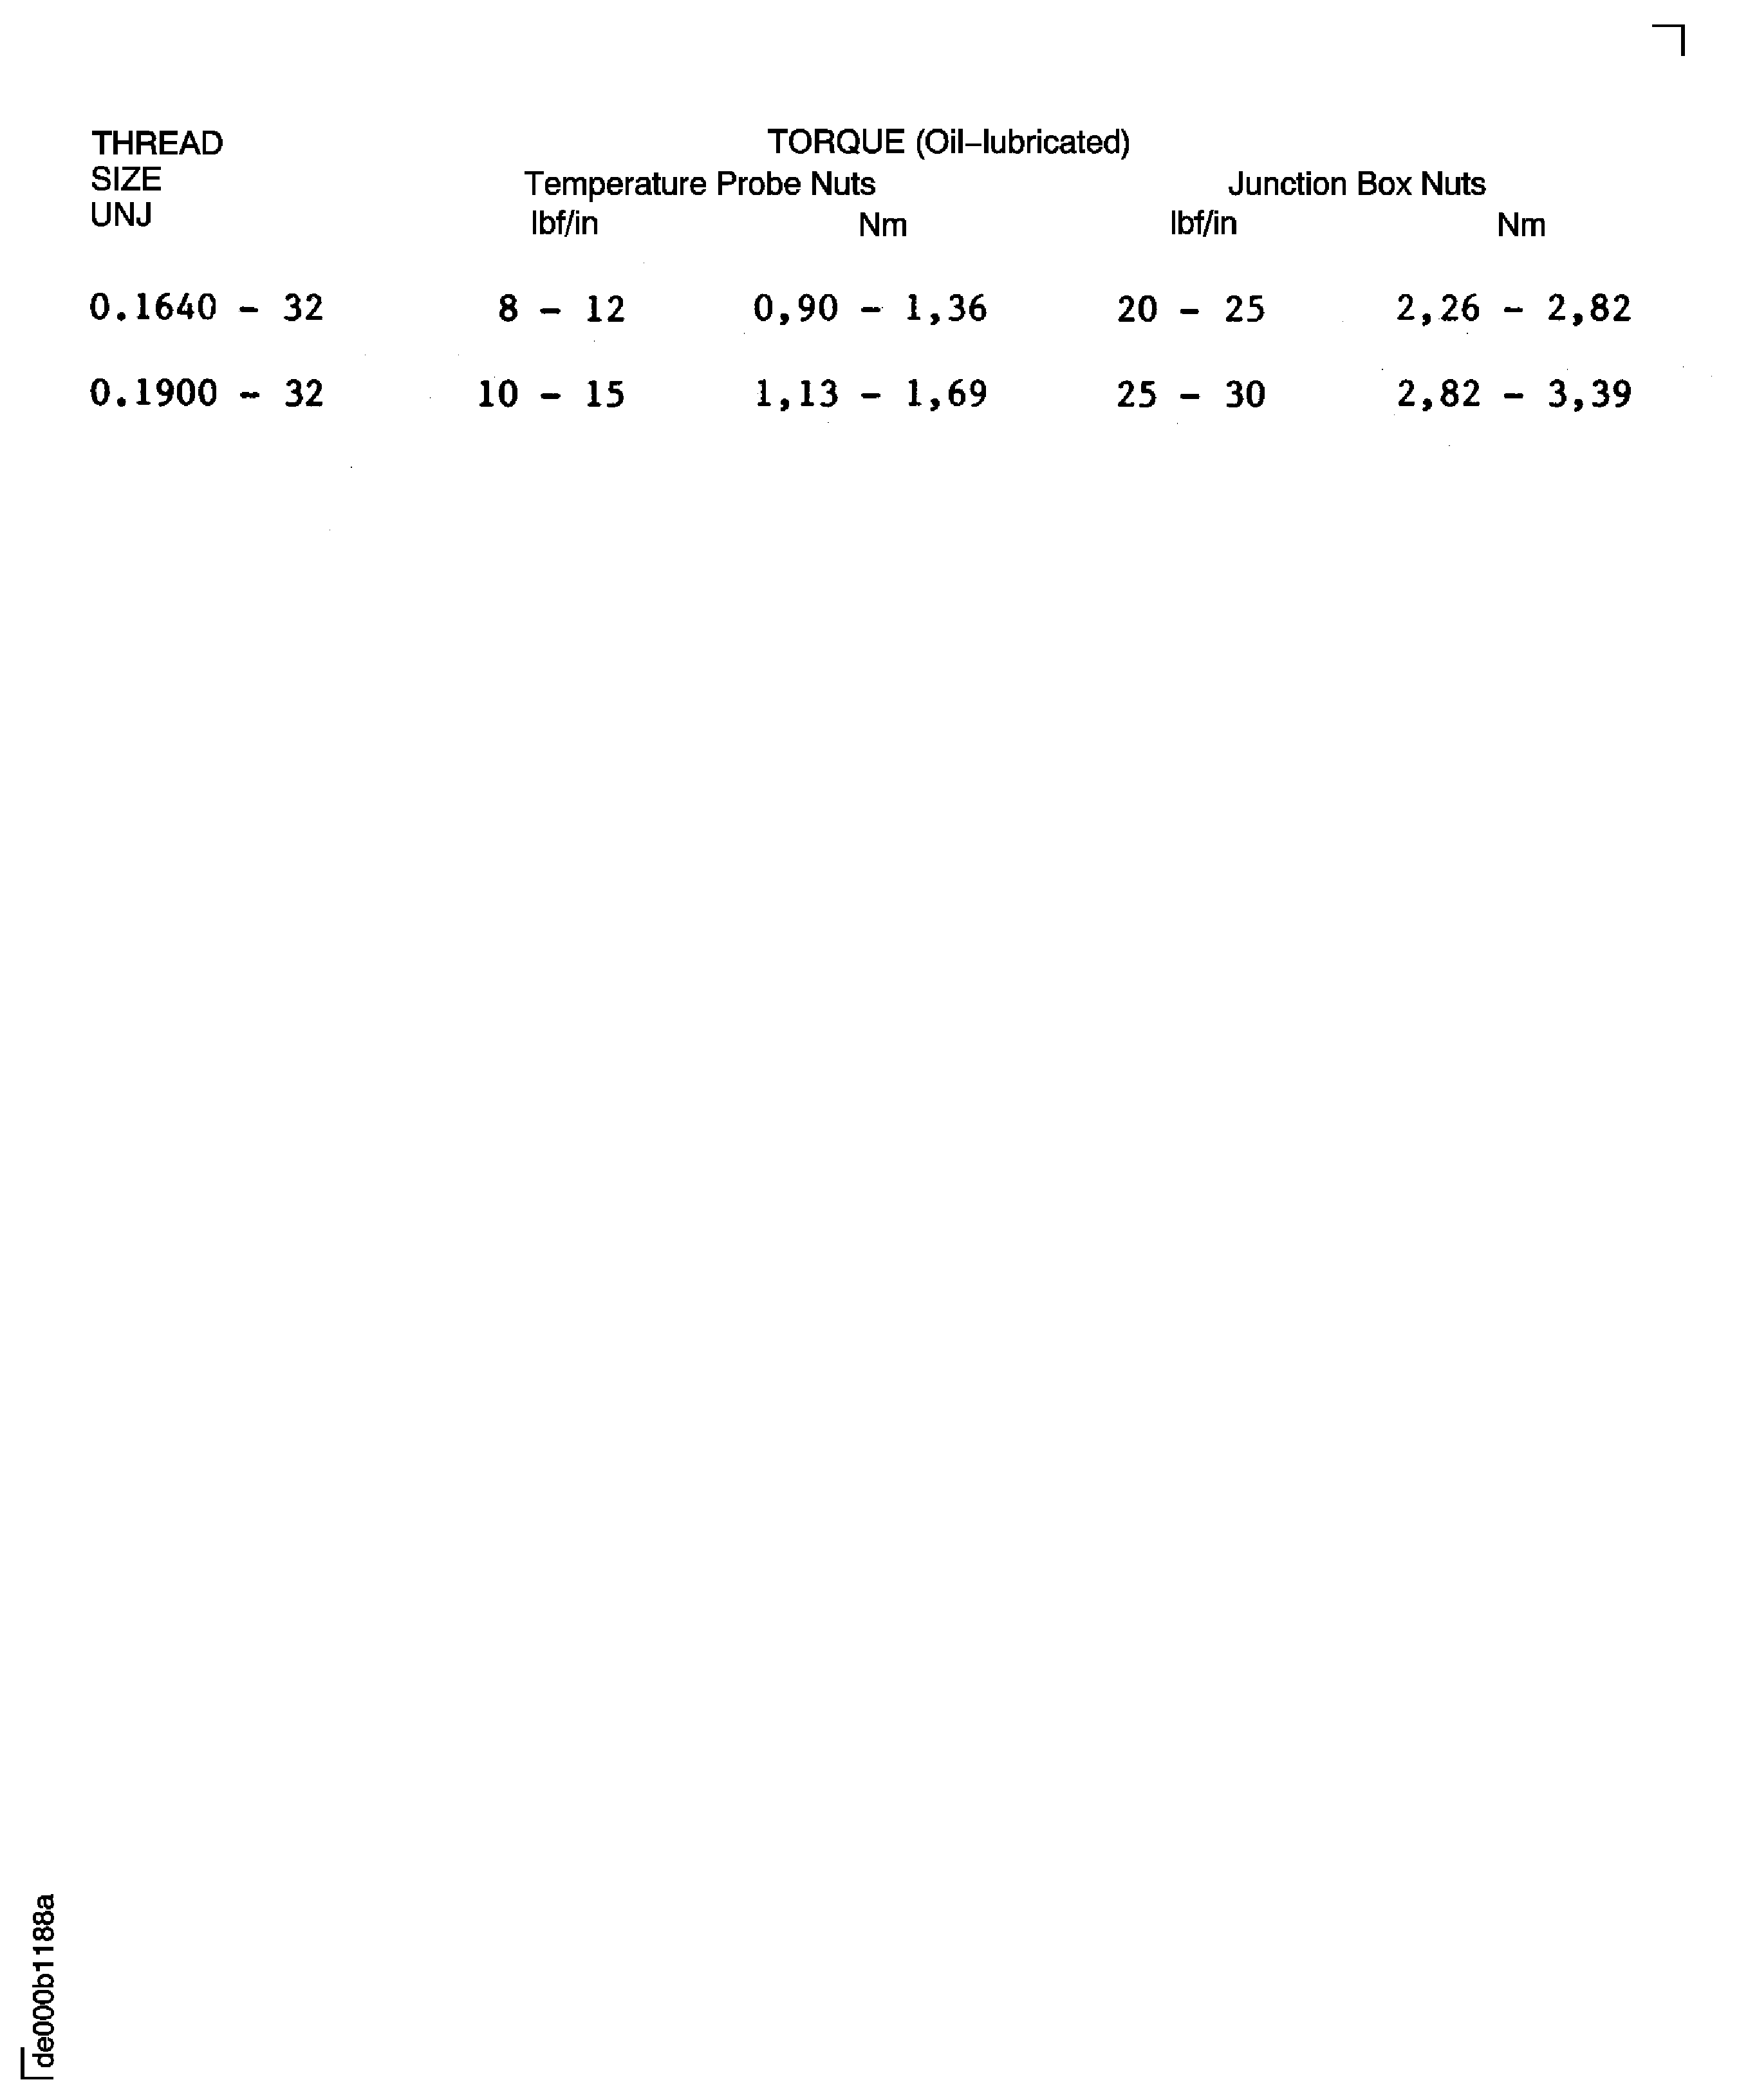
Figure: Self-locking torque limits for re-use of fasteners
Self-locking torque limits for re-use of fasteners
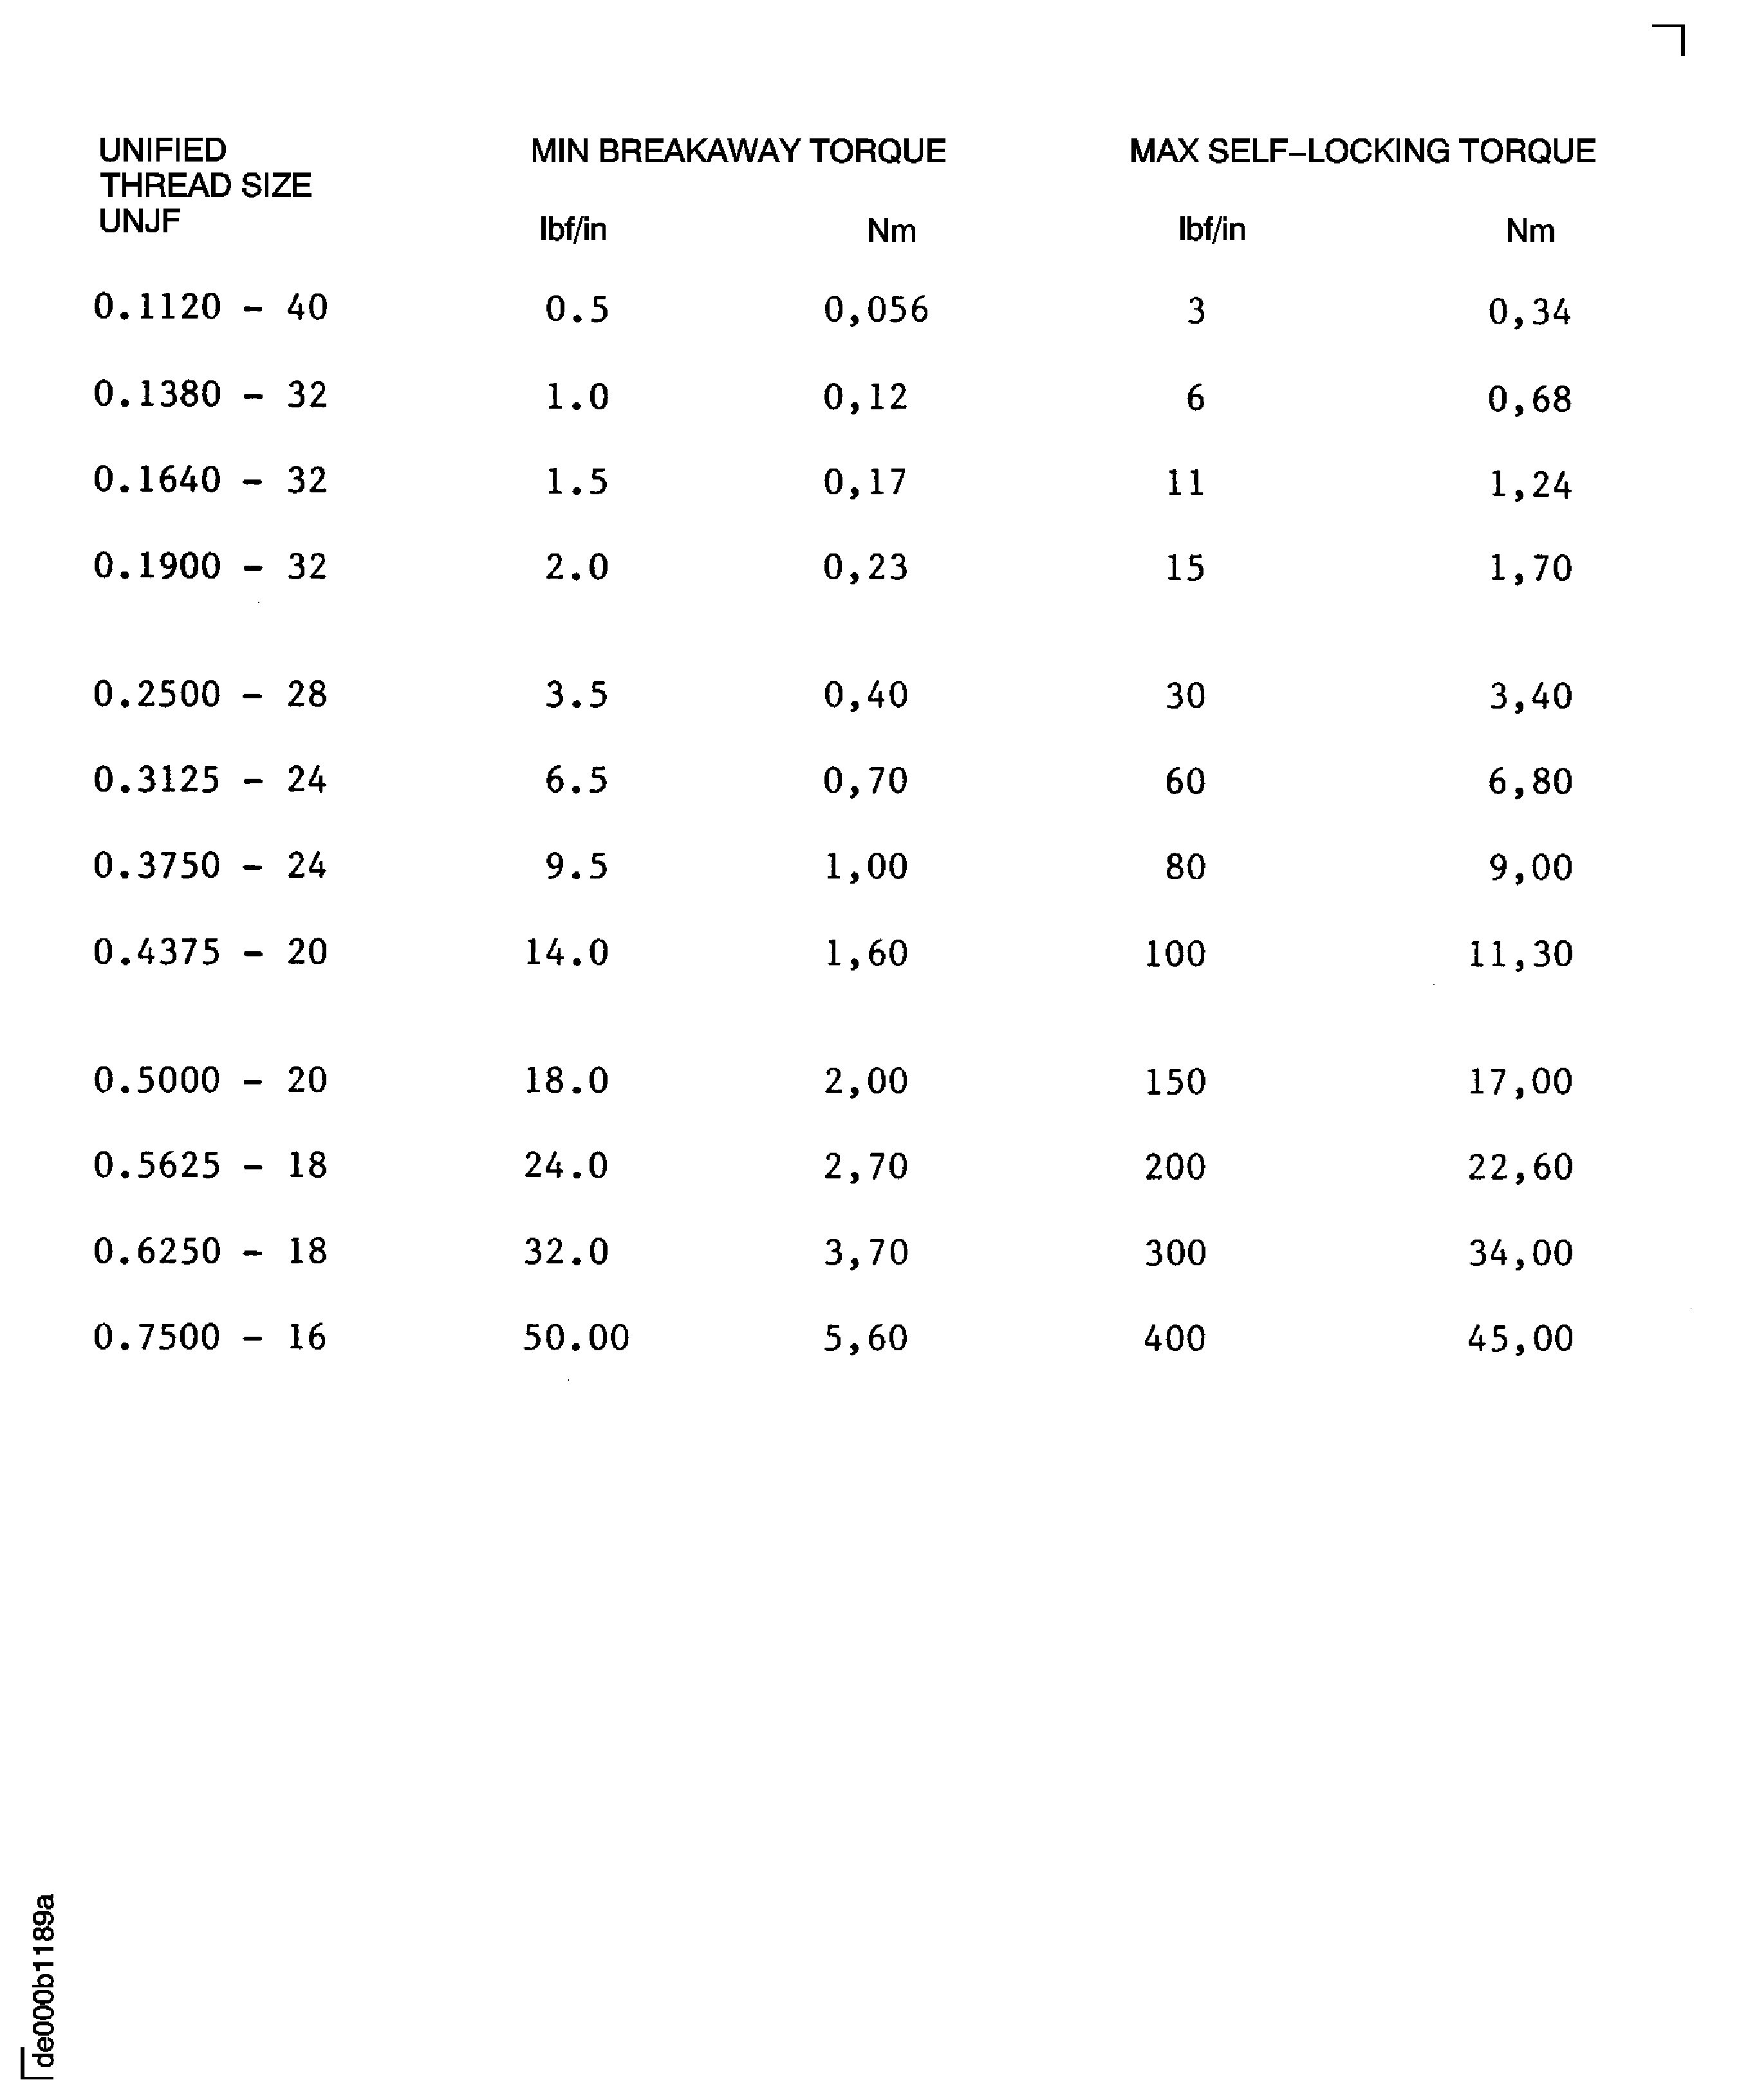
Figure: Torque loads for thrust wire union nuts
Torque loads for thrust wire union nuts
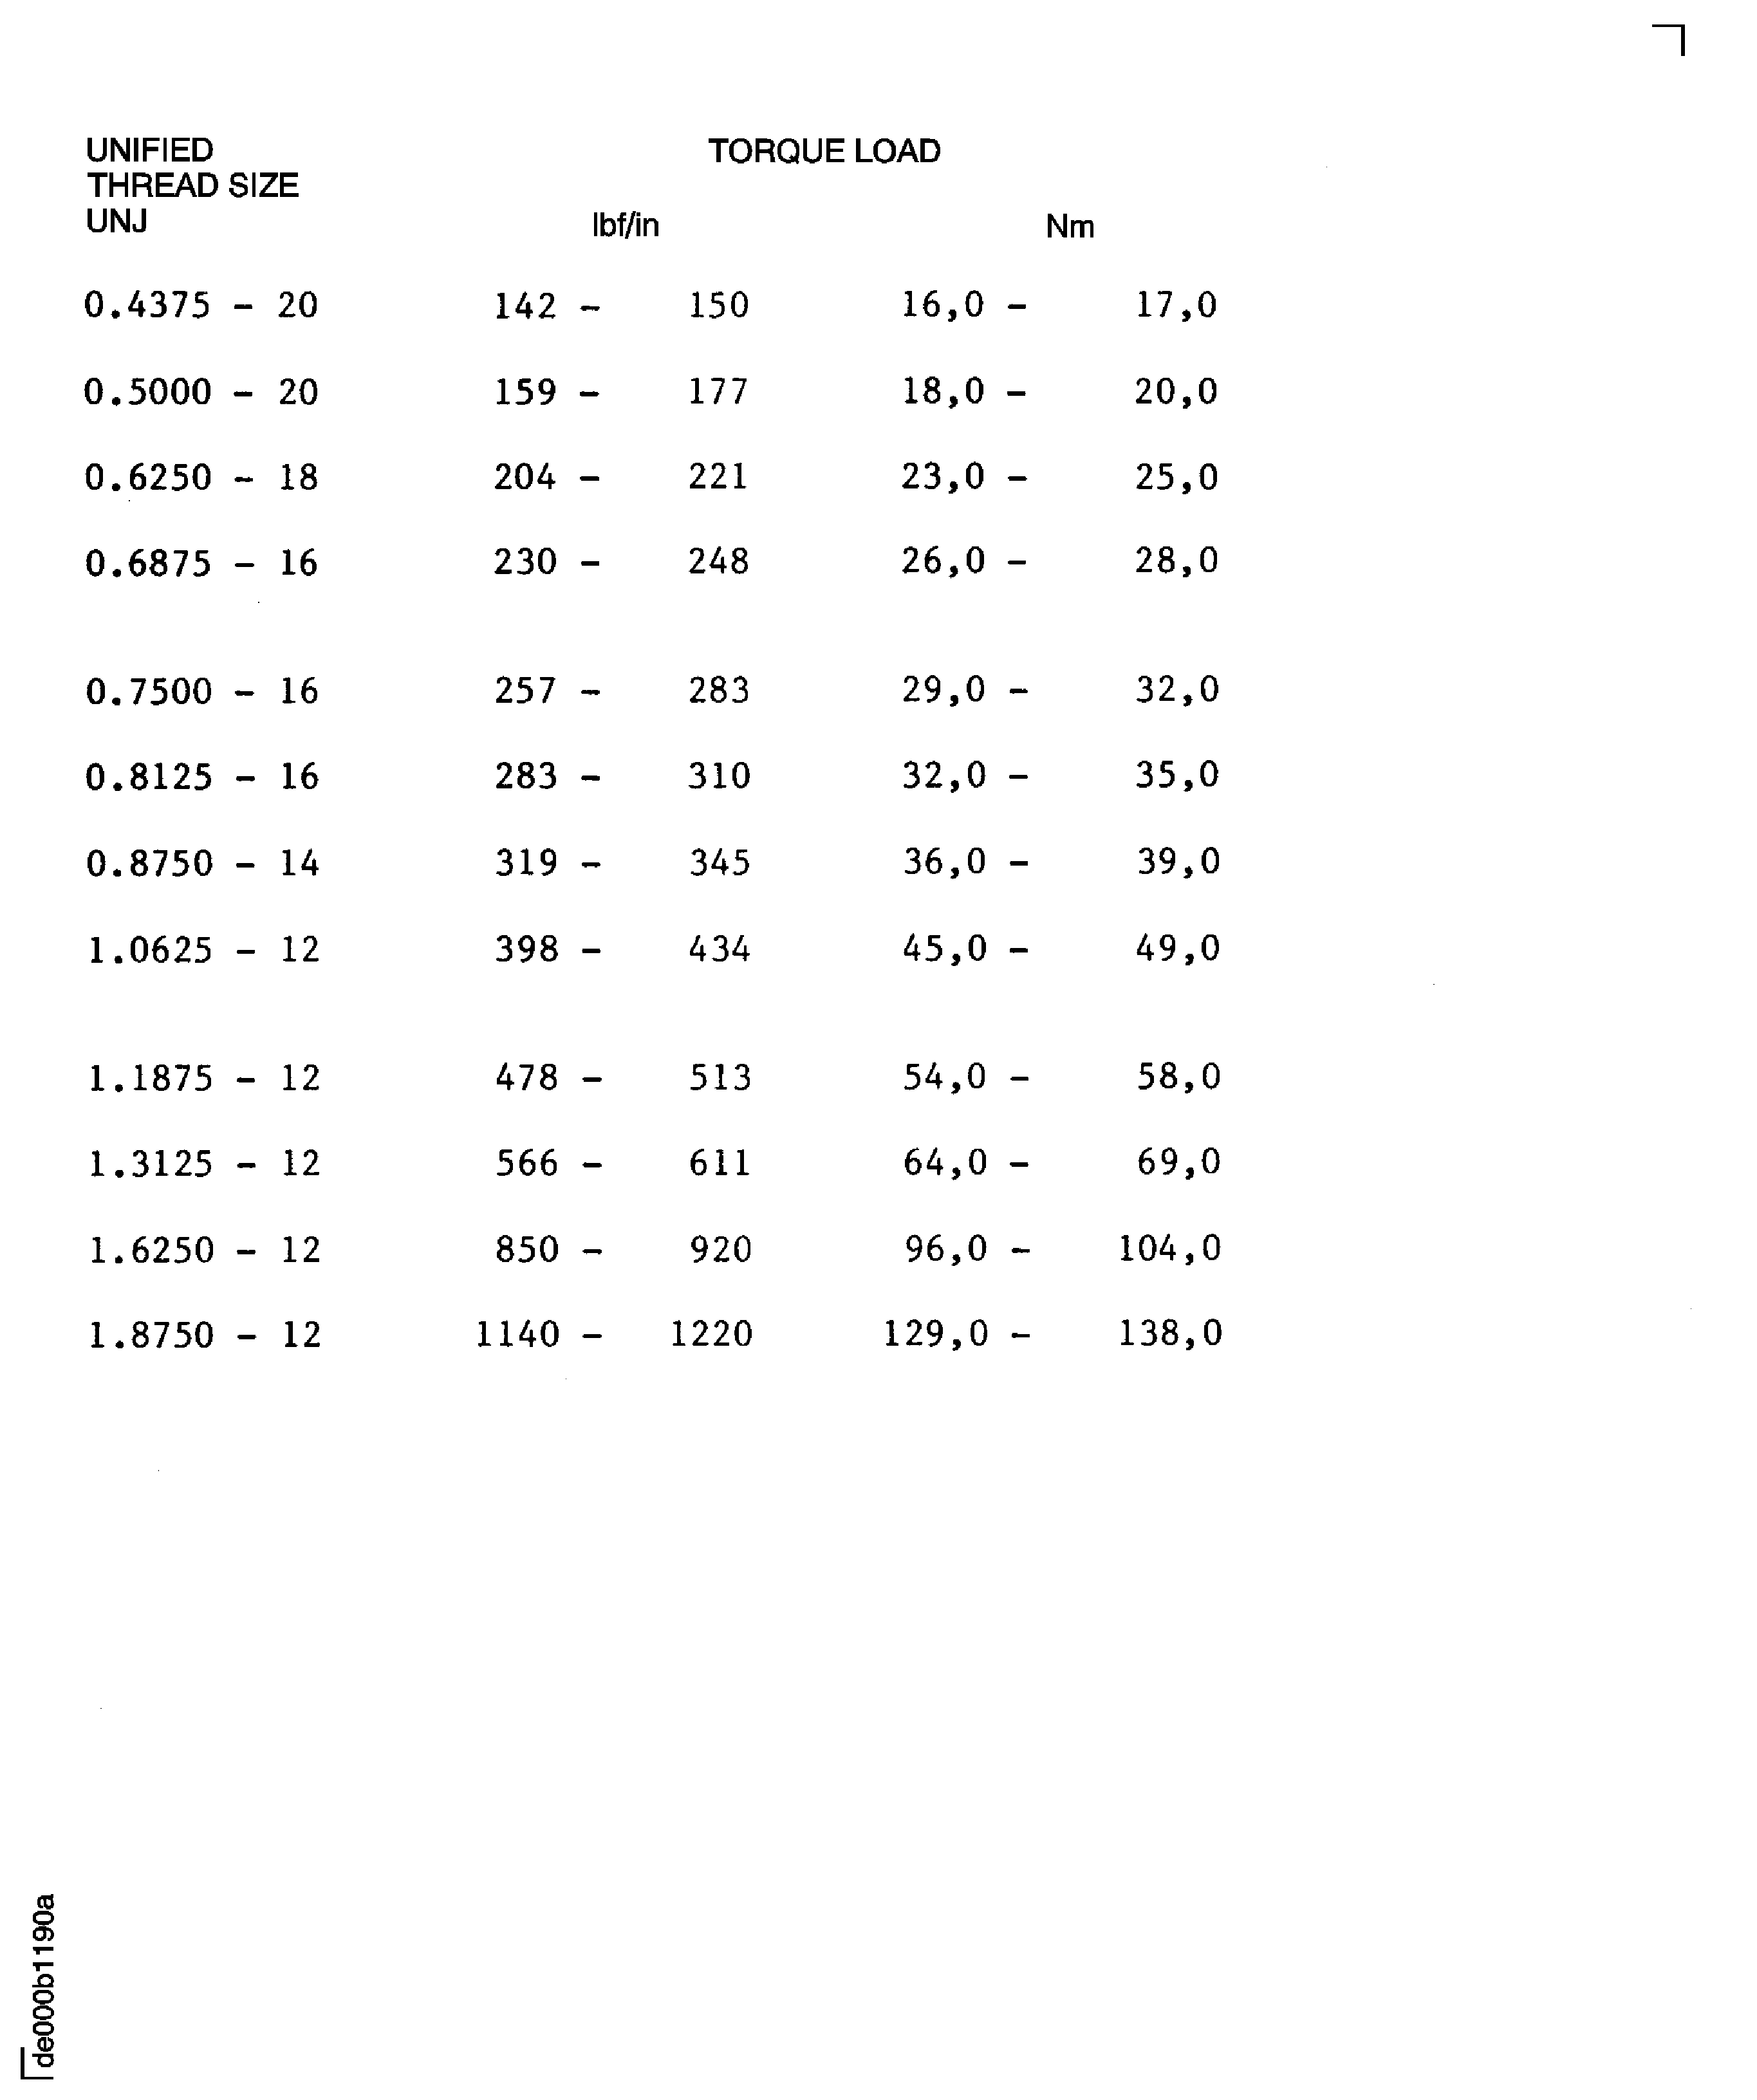
Figure: Standard unions and blanking plugs
Standard unions and blanking plugs
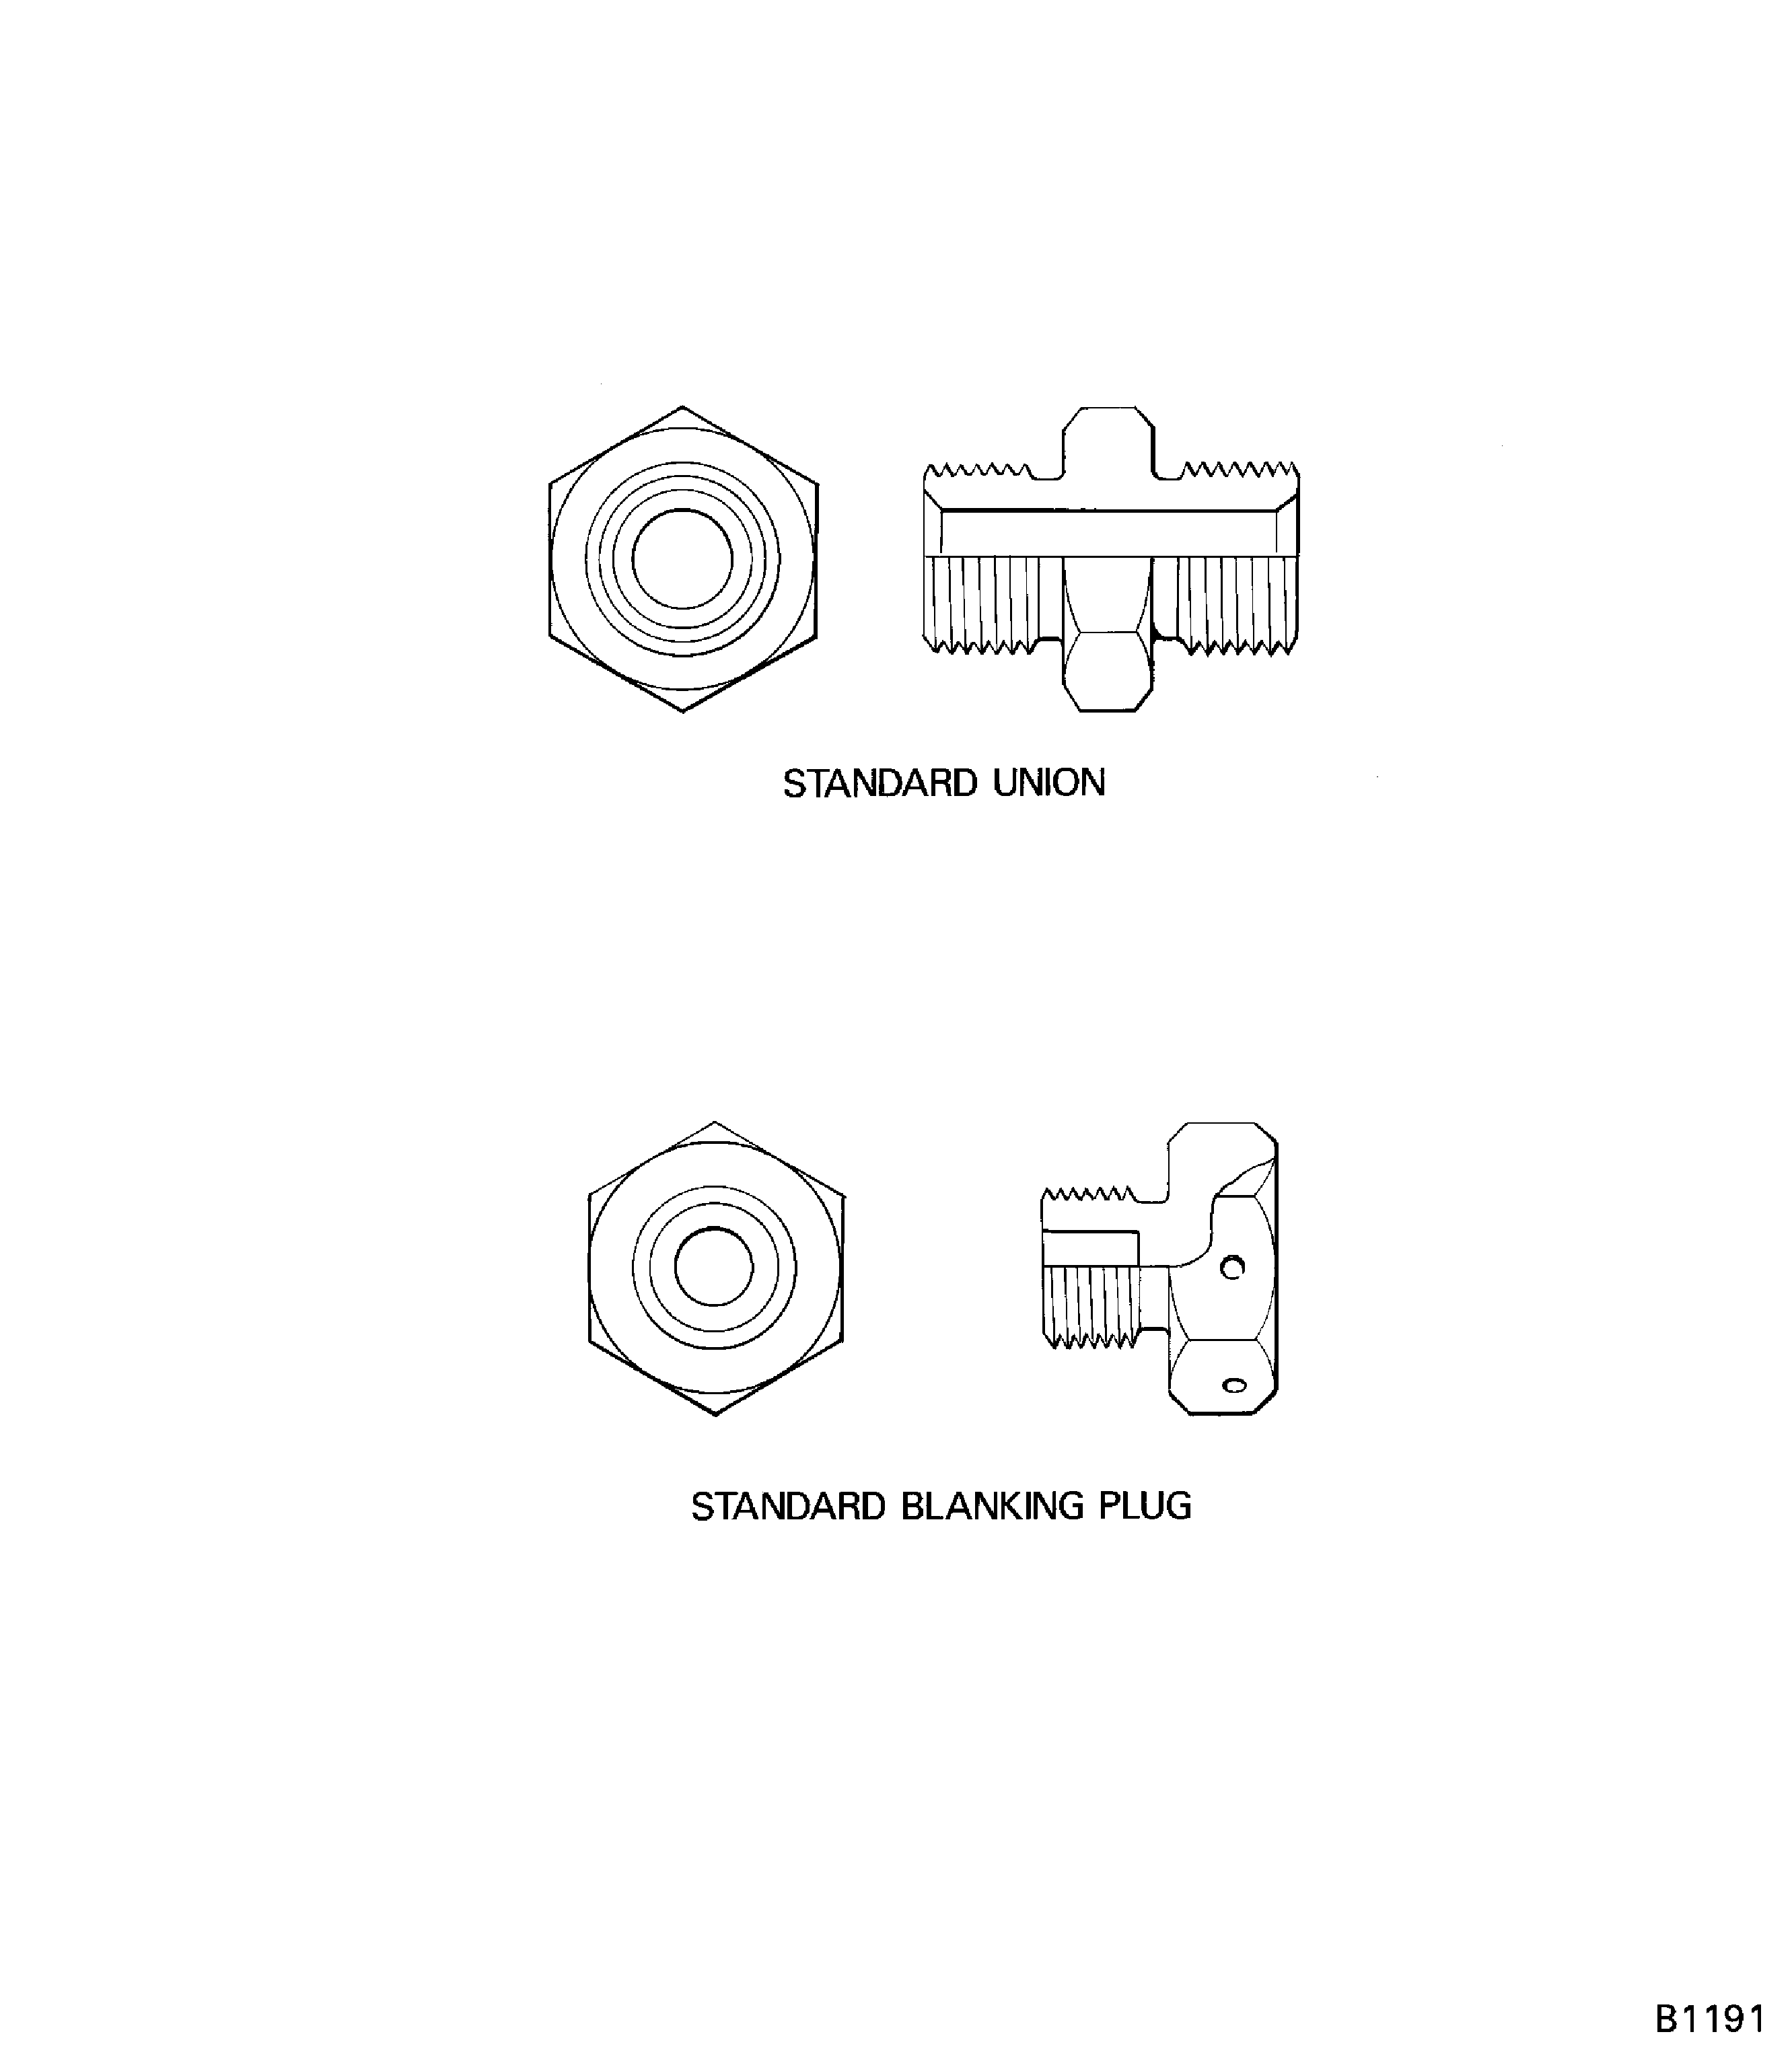
Figure: Torque loads for unions and blanking plugs
Torque loads for unions and blanking plugs
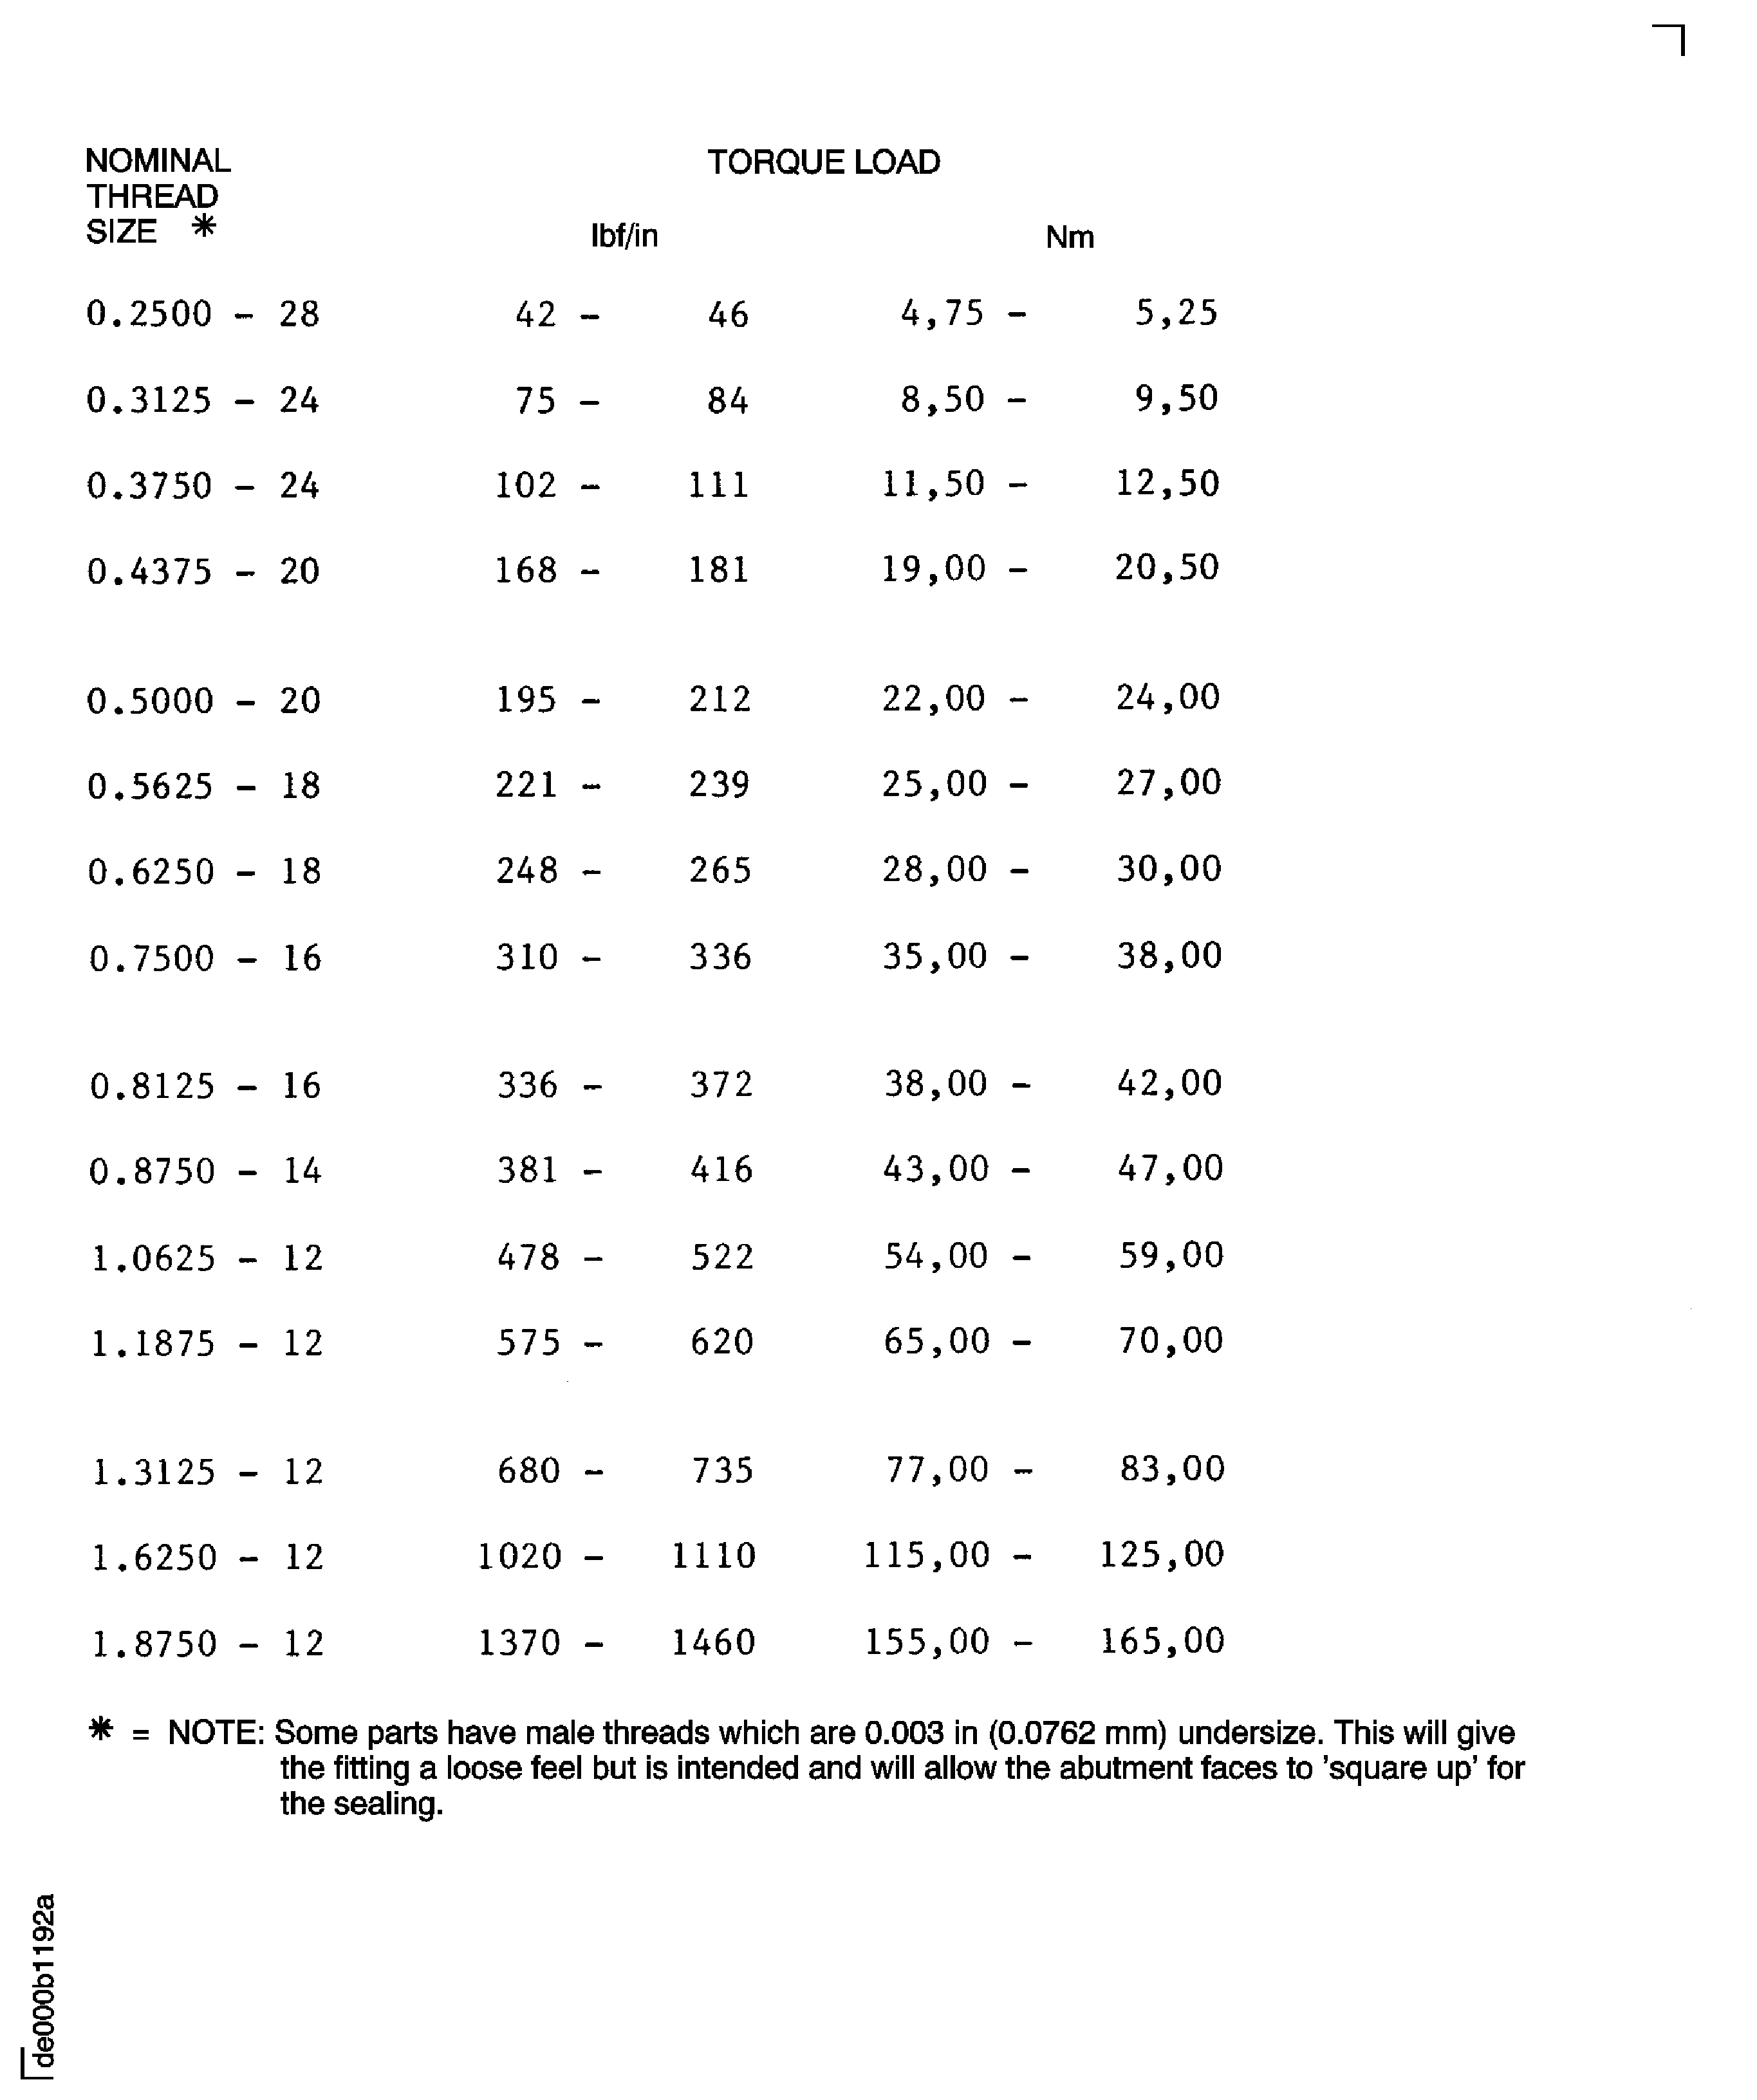
Figure: Torque limits for oil-lubricated double seal fluid connections
Torque limits for oil-lubricated double seal fluid connections
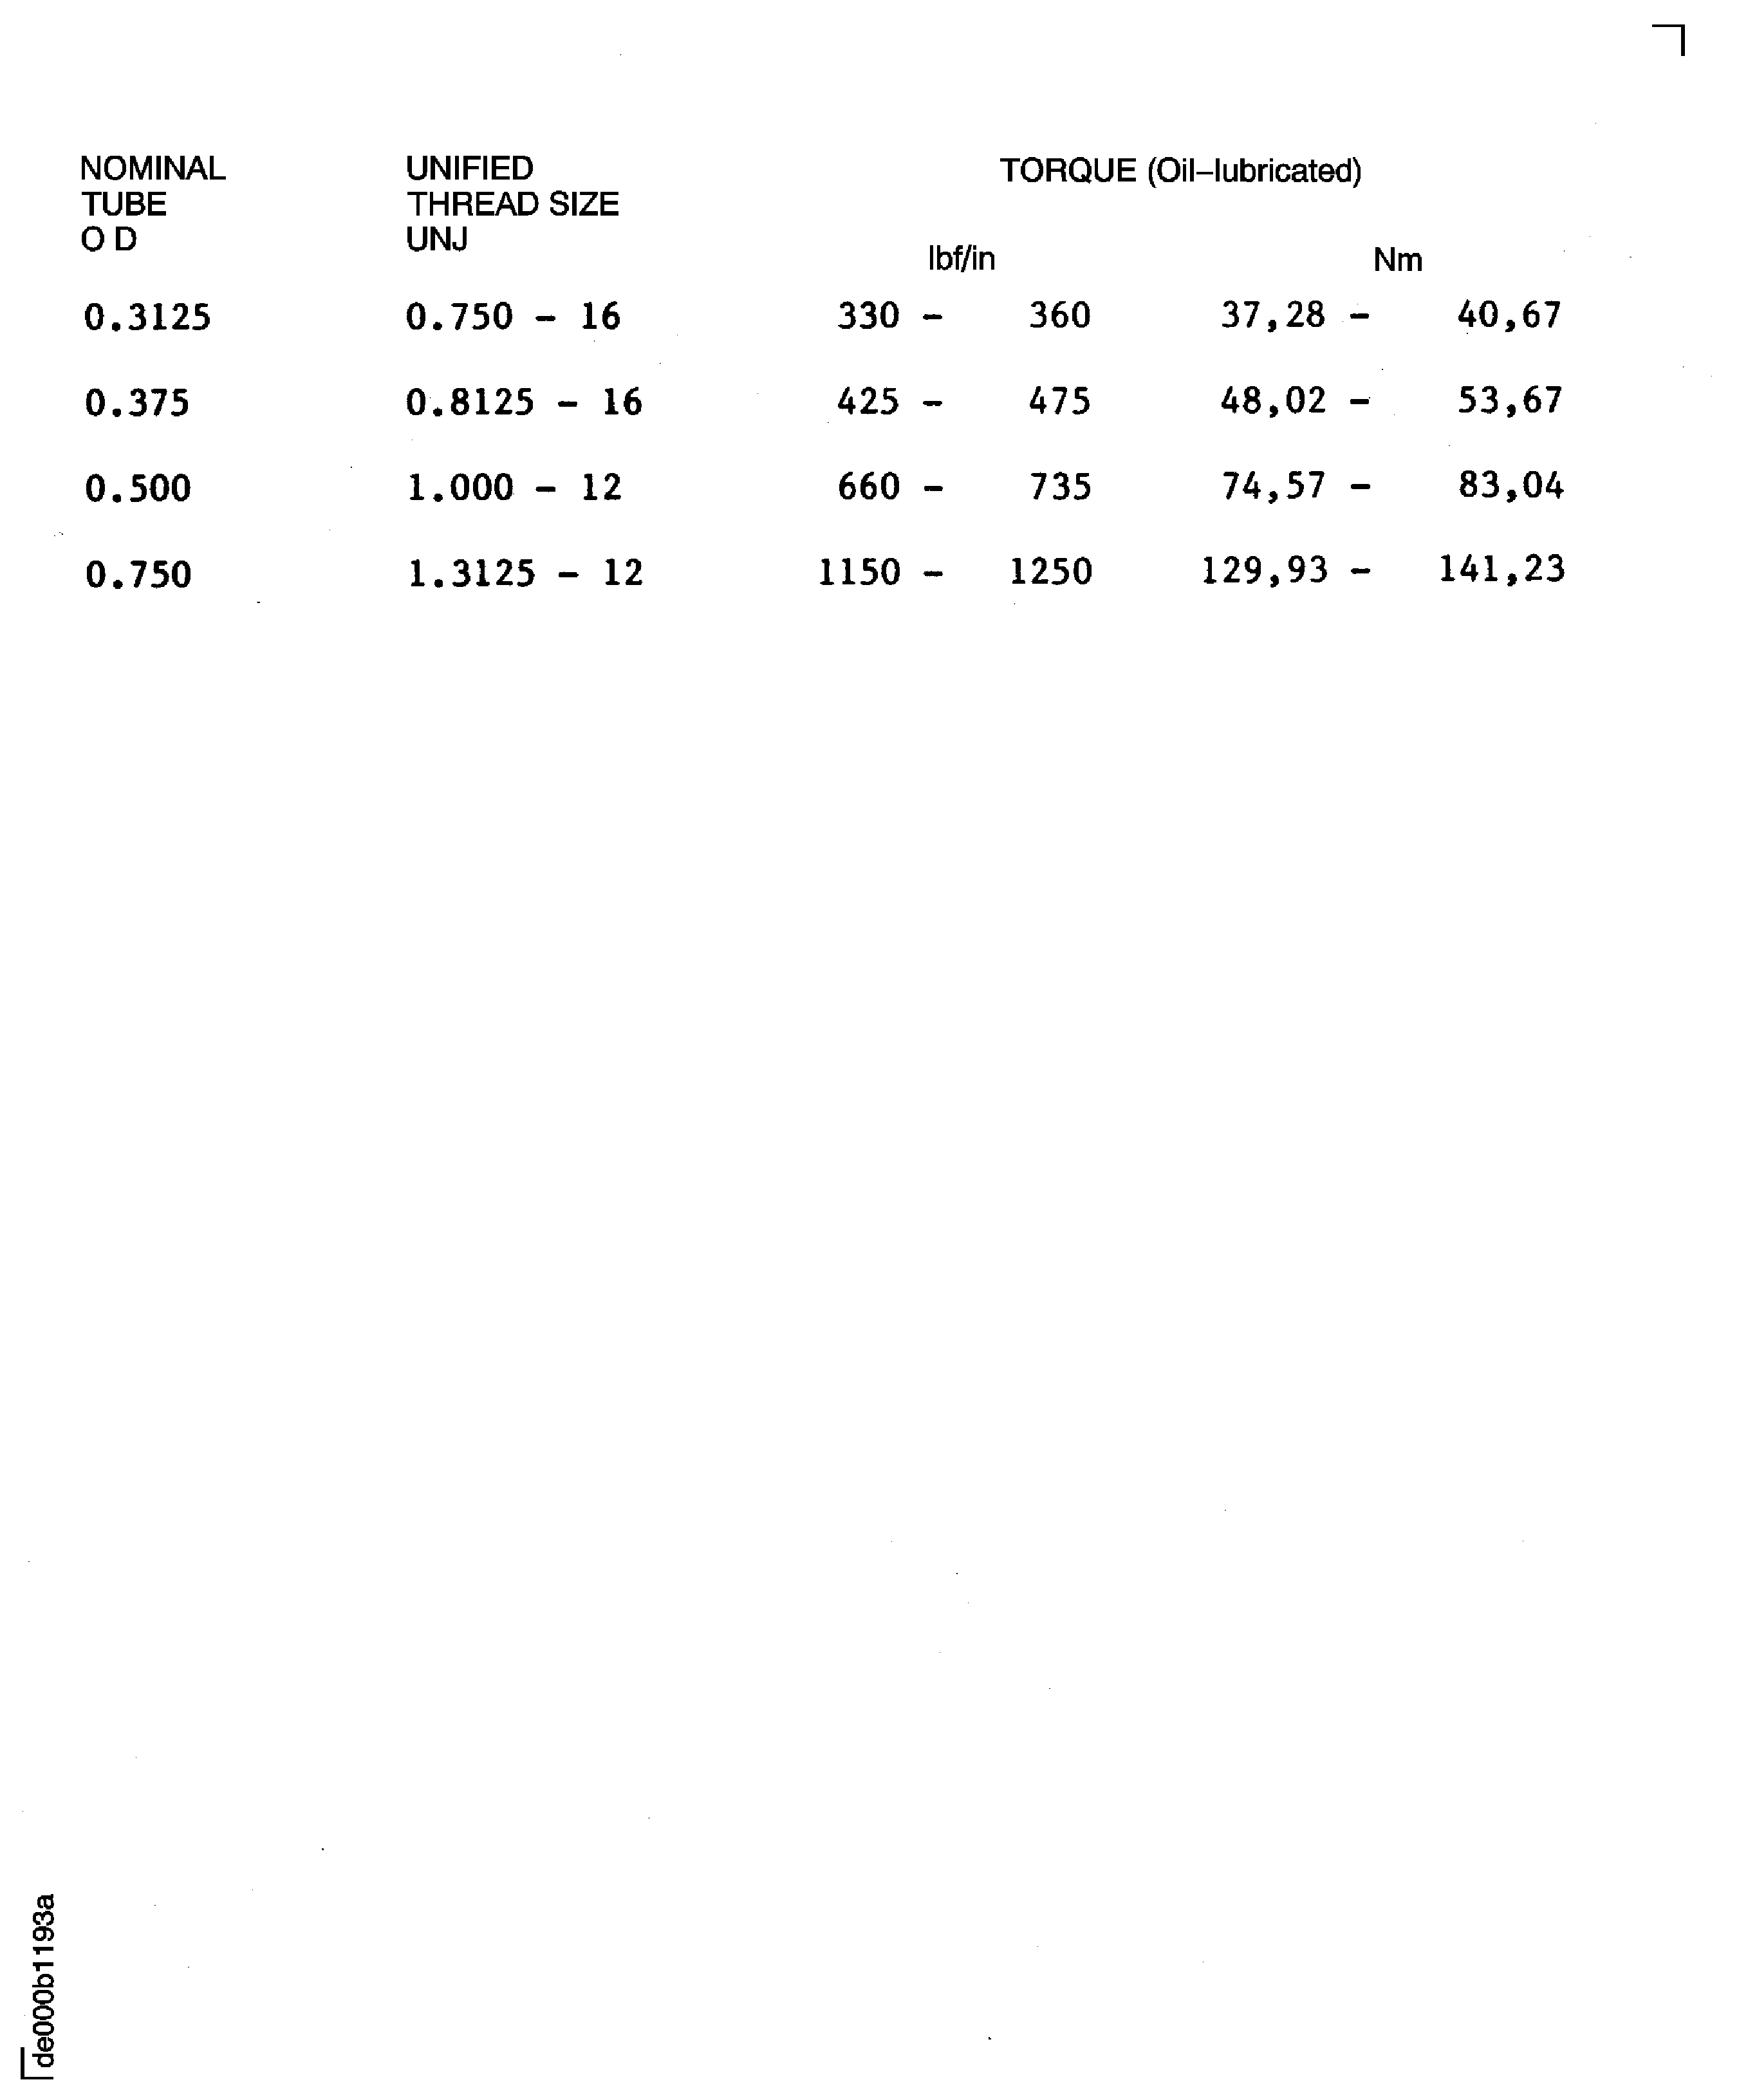
Figure: Initial, intermediate, and final torque values
Initial, intermediate, and final torque values
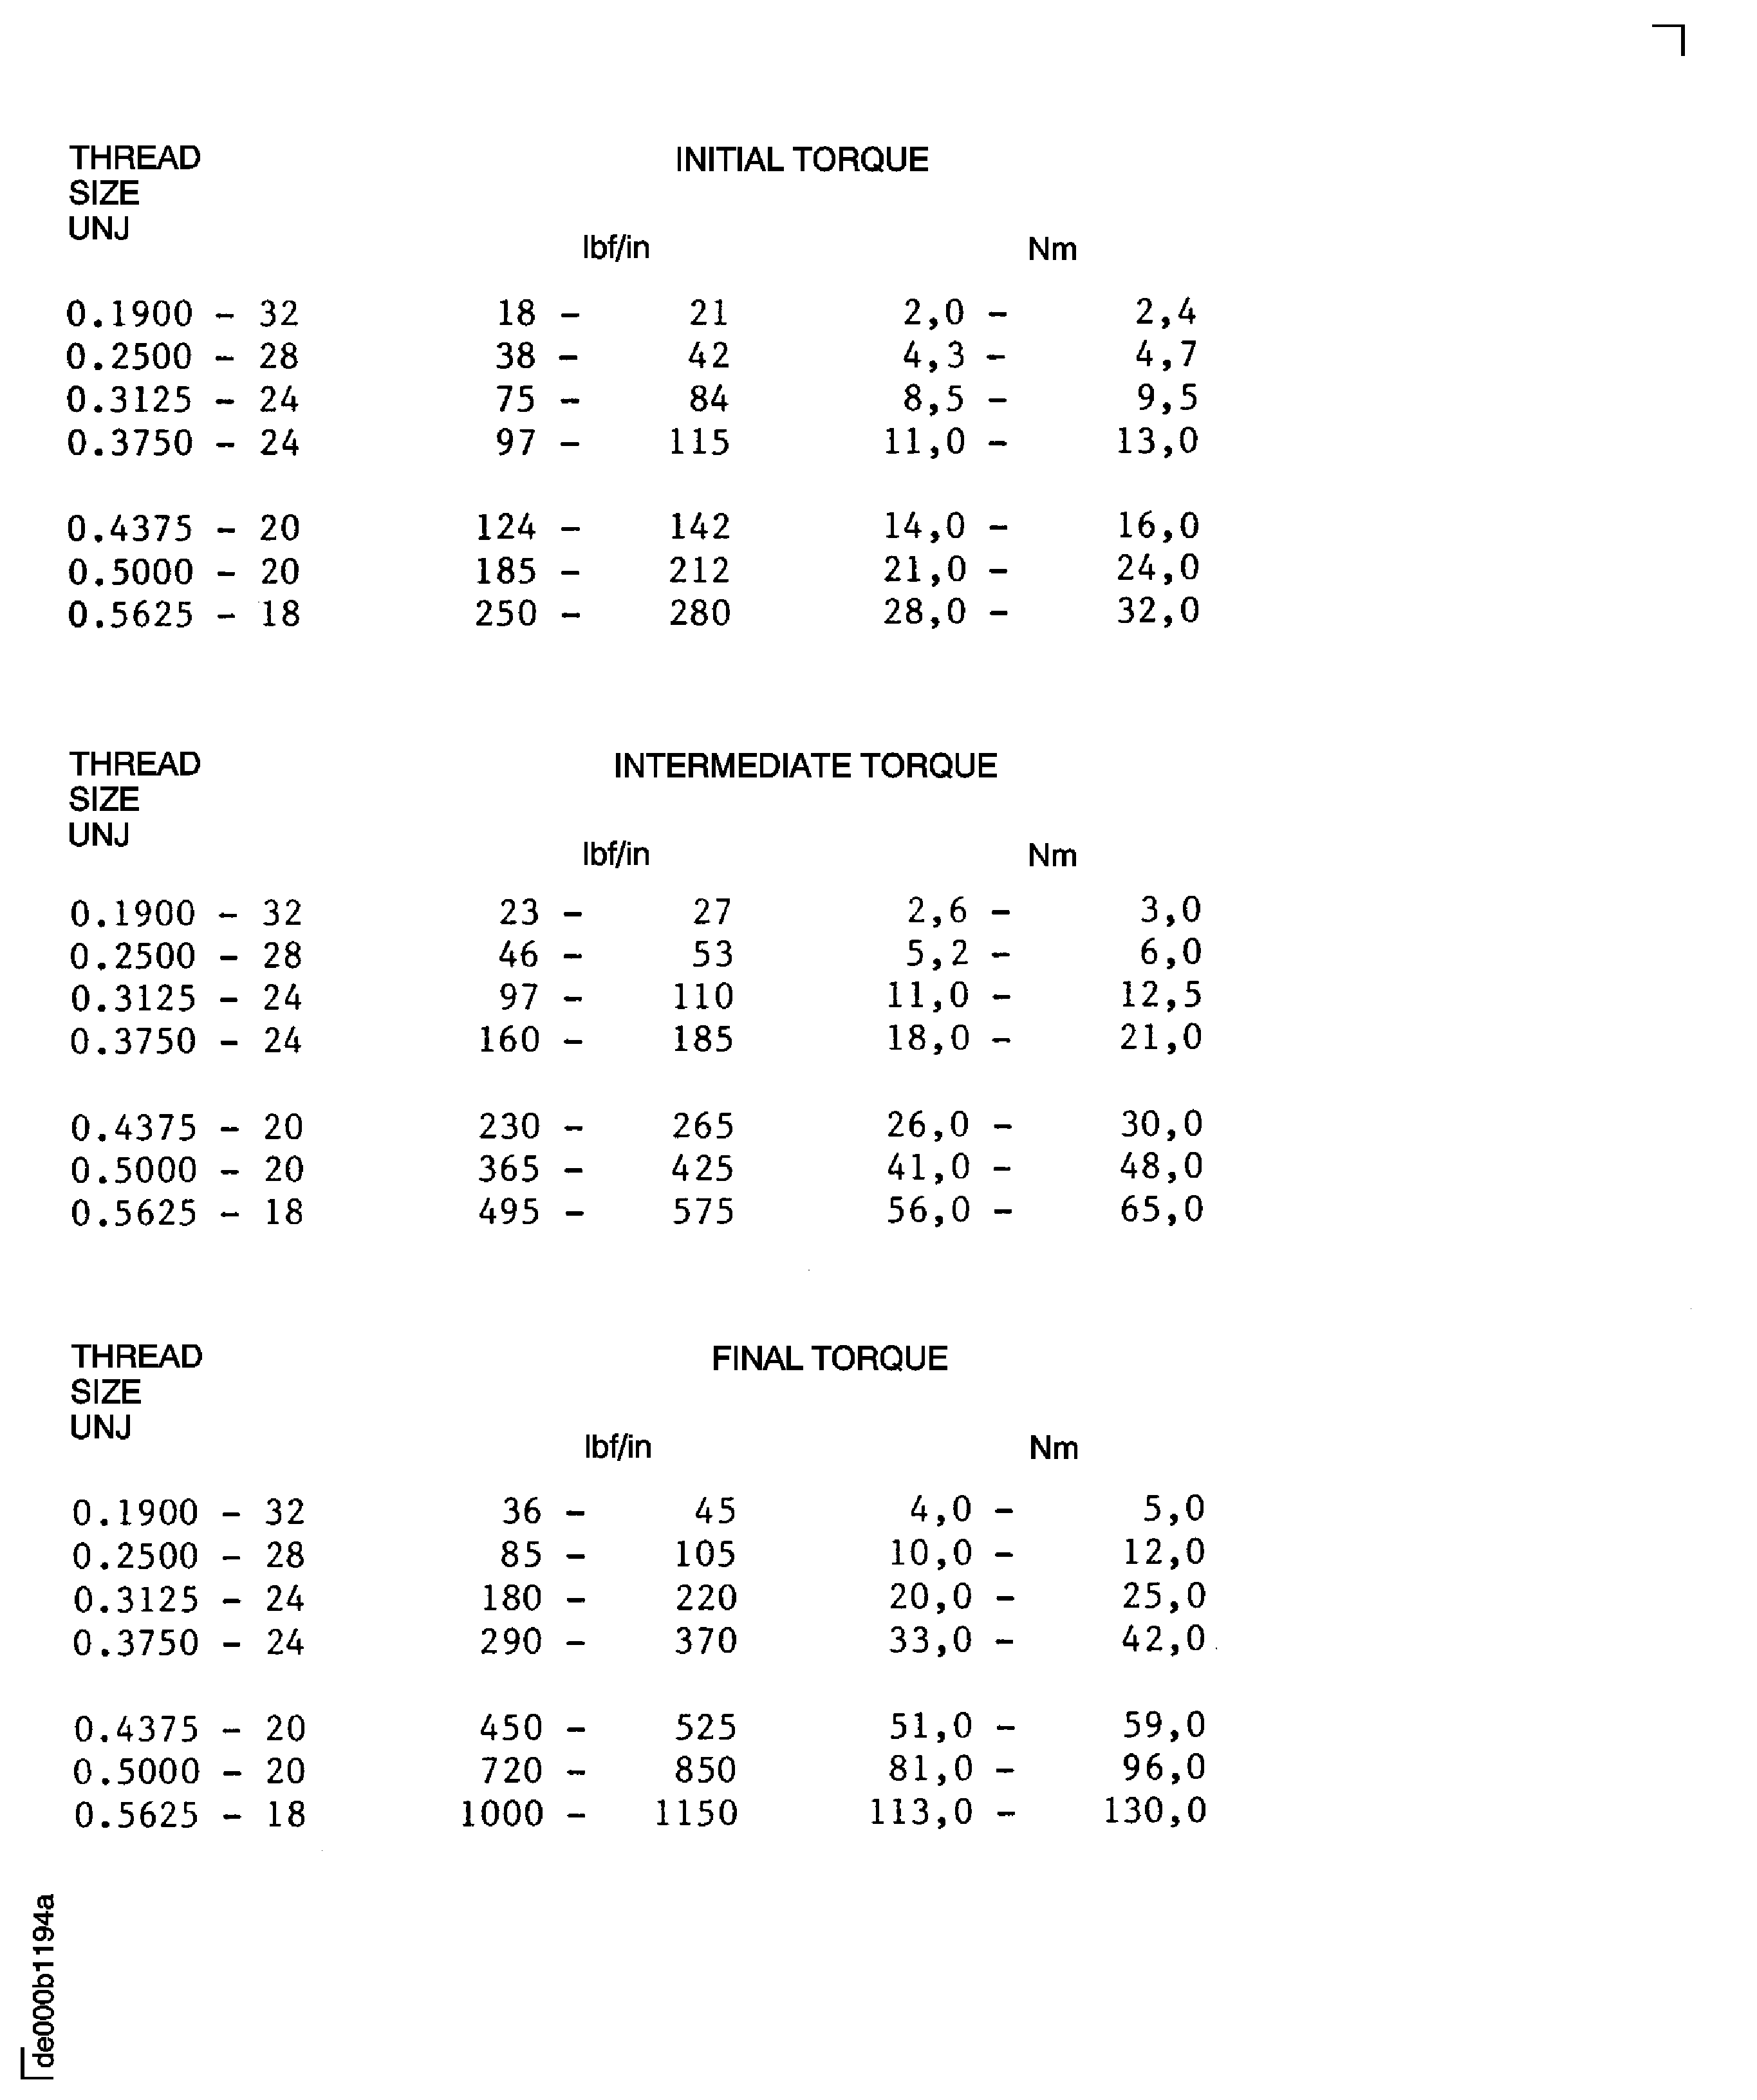
Figure: Minimum thread projection requirements
Minimum thread projection requirements
