TASK 70-72-02-720-501 Equipment And Material

DMC:V2500-00-70-72-02-00A-363A-D|Issue No:002.00|Issue Date:2019-08-01

Export Control

EAR Export Classification: Not subject to the EAR per 15 C.F.R. Chapter 1, Part 734.3(b)(3), except for the following Service Bulletins which are currently published as EAR Export Classification 9E991: SBE70-0992, SBE72-0483, SBE72-0580, SBE72-0588, SBE72-0640, SBE73-0209, SBE80-0024 and SBE80-0025.

Copyright

© IAE International Aero Engines AG (2001, 2014 - 2021) The information contained in this document is the property of © IAE International Aero Engines AG and may not be copied or used for any purpose other than that for which it is supplied without the express written authority of © IAE International Aero Engines AG. (This does not preclude use by engine and aircraft operators for normal instructional, maintenance or overhaul purposes.).

Applicability

All

Common Information

TASK 70-72-02-720-501 Equipment And Material

General

The function of this section is to supply information about the equipment necessary to airflow test engine parts. The equipment necessary is:

A sonic nozzle test bench.

Correlation Master Tools to calibrate the test bench.

Aiflow test fixtures to adapt engine parts to the test bench.

Leak test tools to check for air leakage before you airflow test engine parts.

NOTE

To identify consumable materials, refer to the Consumable Materials Index.

Preliminary Requirements

Pre-Conditions

NONE

Support Equipment

NameManufacturerPart Number / IdentificationQuantityRemark
IAE 6P16080 Test bench0AM53IAE 6P160801

Consumables, Materials and Expendables

NameManufacturerPart Number / IdentificationQuantityRemark
CoMat 01-124 ISOPROPYL ALCOHOLLOCALCoMat 01-124
CoMat 02-120 APPLICATOR, COTTON-TIPPED0AM53CoMat 02-120

Spares

NONE

Safety Requirements

WARNING

IT IS THE RESPONSIBILITY OF THE OPERATOR TO OBTAIN AND OBSERVE THE MANUFACTURERS MATERIAL SAFETY DATA SHEETS FOR CONSUMABLE MATERIALS SAFETY INFORMATION (SUCH AS HAZARDOUS INGREDIENTS; PHYSICAL/CHEMICAL CHARACTERISTICS; FIRE, EXPLOSION, REACTIVITY, AND HEALTH HAZARD DATA; PRECAUTIONS FOR SAFE HANDLING; AND USE AND CONTROL MEASURES), AND ALSO TO TAKE LOCAL REGULATIONS INTO CONSIDERATION.

Procedure

    1. SUBTASK 70-72-02-720-001 Sonic Nozzle Test Bench

      1. The sonic nozzle test bench is shown in schematic form in Figure and is fully specified in specifications published by IAE.

      2. The IAE 6P16080 Test bench 1 off is used to check the airflow in the turbine blades, vanes and cooling air duct assemblies.

      3. The test bench equipment is put in a position with controls which are easy to access and displays which can be seen from one position.

    2. The operator can get copies of the current test bench specifications and a current list of vendors who can make a full test bench from International Aero Engines, supplier code IAE00.

    1. SUBTASK 70-72-02-720-002 Master Tools Used for Test Bench Calibration

    2. Because of the precision necessary in airflow testing, it is necessary that the persons test bench be calibrated to find how accurate it measures compared to the IAE 6P16080 Test bench 1 off. The calibration is done with the correlation master tools.

    3. Correlation master tools are special tools made to function as engine parts. These tools are used to calibrate the IAE 6P16080 Test bench 1 off. The correlation master tools are kept with the IAE master test bench and are not available to the operators. The airflow properties have been written down on a calibration curve and support data.

    4. Work master tools are special tools made to function as an engine part. These tools are calibrated by IAE on the master test bench, that use the correlation master tools as the standard.

      1. The work master tools are used by the operator for the airflow necessary on the stage 1 turbine cooling air duct, and the stages 1 and 2 HPT blades and vanes.

      2. The tool number is supplied in the applicable section of the Engine Manual where the airflow test intructions are supplied.

      3. Each tool is usually calibrated in more than one way. This is to copy the airflow specifications on the IAE master test bench.

      4. The dual system of master tools is recommended because it permits the correlation master tools to be kept for controlled uses and prevents them to come into touch with dangers of daily use, such as handling damage or contamination. These would make there value unserviceable as the master to calibrate the master test bench and the work master tools.

      5. To calibrate the work master tools, the operators must get into touch with International Aero Engines AG, supplier code IAE00.

    1. SUBTASK 70-72-02-720-003 Fixtures to Adapt Engine Parts to Test Bench

    2. Specific tool numbers of airflow test fixtures that adapt engine parts to the test bench are in the Engine Manual airflow testing section.

    3. Descriptions of airflow test fixture installations are in SPM TASK 70-72-01-720-501.

    1. SUBTASK 70-72-02-720-004 Leak Test Tools

    2. CAUTION

      ALL LEAK TEST TOOLS MUST BE CLEARLY MARKED (COLOR CODED) TO PREVENT THEM FROM BEING ACCIDENTALLY INCLUDED IN A SET OF ENGINE PARTS.

      The primary function of leak test tools is to check for air leakage at the rubber gasket or grommet which seals the interface between engine part air inlet and airflow test fixture. During the leak check, leakage at other locations can also be found.

      1. Leak test tools are engine parts with the air exit holes permanently sealed.

      2. For some procedures, tool numbers have been given to leak test tools and tool blueprints are available to calculate the modification needed to change an engine part into a tool.

      3. For other procedures the operator must change the engine parts to seal the air exit holes.

    1. SUBTASK 70-72-02-720-005 Maintenance of Sonic Nozzle Test Stand

      1. Sonic nozzle - Recalibration.

      2. Recalibrate the sonic nozzle after each five years of use.

        1. Recalibrate the nozzles used to test turbine blades and vanes, as follows.

        2. Remove from the test bench the nozzles and the inlet flow straighteners which control the nozzles.

        3. If assembly of the test bench makes it possible to do so, remove the outlet flow straighteners which control the nozzles.

        4. Permanently mark on each flow straightener the serial number of the nozzle which is controls.

        5. Keep together as a set the nozzle, the inlet flow straightener, and where applicable the outlet flow straightener.

        1. Recalibrate the nozzles used to test turbine cooling air ducts as follows.

          1. Remove the parts from the test bench by the applicable procedure as follows.

          2. NOTE

            If the pressure measurement system is to be changed for the use of total pressure probes, after the nozzles and flow straighteners have been removed from the test bench but before they go for recalibration, install and position the probes in the inlet flow straighteners.

            Procedure 1. For the test benches without a total pressure pole, remove the nozzle, the inlet flow straightener, and the outlet flow straightener.

          3. CAUTION

            THE RADIAL POSITION AND THE ALIGNMENT OF THE TOTAL PRESSURE PROBE WITH RELATION TO THE AIRSTREAM ARE VERY IMPORTANT TO THE ACCURACY OF THE PRESSURE MEASUREMENT.

            Procedure 2. For test benches with a total pressure probe, remove the nozzle, the inlet flow straightener with the total probe installed, and the outlet flow straightener.

        2. Permanently mark on both flow straighteners the serial number of the nozzle which they control.

        3. Keep the parts together as a set.

      3. For recalibration, return the nozzle(s) and their related parts to the nozzle manufacturer or to supplier code IAE00.

        1. The purchase order which approves the nozzle recalibration must show:

        2. That the parts returned are to be operated together as a set during nozzle recalibration.

          1. The type of nozzle inlet pressure measurement system (static or total) to be used during the nozzle recalibration.

          2. If the total pressure system is specified, the total pressure probe must be returned, installed in its boss on the inlet flow straightener.

        3. The minimum and maximum nozzle inlet pressure, in PSIA, which must be closed during the recalibration. The pressures specified must range from the minimum found for the parts tested to a maximum which is 20 PSIA above the maximum pressure usually found when testing engine parts.

        4. The number of test points to be run (usually a minimum of five) during the recalibration.

          1. That the agency that does the recalibration will supply.

          2. A positive statement which identifies the systems used to measure nozzle inlet pressure during the recalibration.

          3. As a table, for each test point, the nozzle inlet pressure in PSIA, the airflow through the nozzle in pounds/second, the calculated airflow coefficient (K-factor), the air temperature at the nozzle inlet, the ambient atmospheric pressure in PSIA at the time the test point was run, and the ambient air (room) temperature at the time the test point was run.

          4. As a graph or curve form, a plot of flow coefficients (K-factor) against nozzle inlet pressures in PSIA. These must show all test points and specify the average K-factor for the nozzle.

      1. Sonic nozzle - cleaning.

        1. At intervals of approximately six months, sonic nozzles must be removed from the test bench and cleaned.

        2. CAUTION

          DO NOT USE METAL OR ABRASIVES IN SONIC NOZZLES. DO NOT FORCE COTTON SWABS THROUGH NOZZLE THROATS. REMOVAL OF MATERIALS FROM A NOZZLE OR EVEN VERY SMALL SCRATCHES WITHIN A NOZZLE WILL CHANGE THE AIRFLOW PROPERTIES OF THE NOZZLE.

          Remove all signs of oil or contaminant from each nozzle with CoMat 02-120 APPLICATOR, COTTON-TIPPED made moist with CoMat 01-124 ISOPROPYL ALCOHOL.

        3. While nozzles are removed, examine the inside of the flow straighteners for oil film or contamination. If necessary, clean the flow straighteners. Refer to step (a).

      1. Gages and Barometer - recalibration.

      2. Gages and aneroid barometer must be recalibrated at intervals of approximately six months or as given by the policy applicable to all such items used in the shop.

      3. It is not necessary to calibrate these items in place.

      1. Ball valves and shut-off valves - internal leakage.

        1. Ball valves and shut-off valves must be checked for internal leakage at least once a year.

        2. Internal leakage past these items will change the rate of pressure drop which is used to measure the quantity of external leakage during leak checks made before the testing of the engine parts.

      1. Dryer and Ten Micron filter.

      2. Frequency of maintenance on these items depends on how clean the shop air system is. The frequency must be found by the operator given by his specific conditions.

    1. SUBTASK 70-72-02-720-006 Measuring Sonic Nozzle Inlet (P1) Pressure

    2. NOTE

      This SUBTASK applies only to a sonic nozzle which has a large throat diameter, where nozzle inlet pressure is measured from a boss or port welded to the OD of the inlet flow straightener.

      NOTE

      This SUBTASK does not apply where the nozzle inlet pressure is measured from a boss or part on a large diameter manifold.

      Refer to Figure.

      1. The two basic pressure measurement systems, static and total, are shown in Figure. The identity of the numbered arrows are given below.

      2. Arrow number 1 identifies the inlet flow straightener.

      3. Arrow number 2 identifies the boss or part welded on the OD of the inlet flow straightener.

      4. Arrow number 3 identifies the direction of airflow.

      5. Arrow number 4 identifies the standard AN or MS adaptor. The standard configuration for the fitting is drilled through.

      6. Arrow number 5 identifies the standard Kiel head probe.

      7. Arrow number 6 identifies the standard compression fitting.

      8. Arrow number 7 identifies the standard compression fitting.

      9. Arrow number 8 identifies the installation of the probe head on the centerline of the flow straightener.

      10. Arrow number 9 identifies the position of the probe head with the centerline of the flow straightener. Lock compression fitting to secure the probe in position.

      11. Arrow number 10 identifies the 0.050 to 0.070in. (1.27 to 1.78 mm) diameter hole, static pressure part.

      1. During sonic nozzle calibration, measurements of airflow, air temperature, made at several different nozzle inlet pressures, are used to calculate a K-factor for the nozzle.

      2. The K-Factor is a constant which airflow through the nozzle in PPS is a relation to nozzle inlet pressure in PSIA.

    3. The K-factor got during the sonic nozzle calibration is correct for use during testing of engine parts, only if both the inlet flow straightener and the pressure measurement system, which were used at the time of the nozzle calibration are also used in the operators test bench.

      1. The steps that follow give a short description of the relation between inlet flow straightener ID and nozzle inlet pressure measurement system.

        1. Take it that a test bench with a 1in. (25.40 mm) diameter nozzle is being used to test turbine cooling air ducts by the flow parameter procedure.

        2. In this system, pressure in the shop air system is adjusted by the flow control valve to drive a weight of air through the system which will make a specific pressure in the engine part, P3 pressure.

      2. At the nozzle throat, where the diameter is 1in. (25.40 mm), the velocity of air is Mach 1.0 (sonic, nozzle chocked).

      3. NOTE

        The inlet flow straightener used in the IAE master test bench was purchased from a nozzle manufacturer and has approximately a 1.76in. (44.70 mm) ID.

        The ID of the inlet flow straightener gives the velocity (Mach Number) of air in the inlet flow straightener. This is shown below.

        Inlet ID (Inches)

        Flow Straightener Area (Sq in)

        Mach Number

        1.16

        1.0568

        0.50

        1.76

        2.4328

        0.19

        3.30

        8.5530

        0.05

      4. When a total pressure measurement system (probe) is used, both velocity (dynamic pressure) and static pressure are measured and the veolcity through the flow straightener has no effect on the accuracy of the pressure measurement.

        1. When a static pressure measurement system (tap) is used, only the static component of total pressure is measured.

        2. Static pressure is the same as the total pressure only when the velocity of air (Mach number) is zero. This condition cannot occur when the nozzle operates.

        3. The chart below relates the velocity (Mach number) of air that moves past the pressure measurement port to the percentage of total pressure which would be shown or read by a static pressure measurement system.

          Inlet Flow Straightener ID (Inches)

          Mach Number

          Total Pressure (Percentage)

          1.16

          0.50

          84.0

          1.76

          0.19

          97.5

          3.30

          0.05

          99.8

    1. SUBTASK 70-72-02-720-007 Selecting Sonic Nozzles

      1. General.

      2. Nozzle diameters and the number of nozzle positions recommended in the IAE 6P16080 Test bench 1 off specifications are general. Before the operator purchases or builds a new test bench, he must examine the airflow test needs of his fleet of engines to find the nozzle diameters applicable to his needs. An examination must also be done when a new engine model is added to the fleet.

      3. A mathematical procedure is just one of the ways used to set or find the nozzle throat diameter/diameters necessary to airflow test engine parts.

      1. Mathematical procedure of nozzle selection.

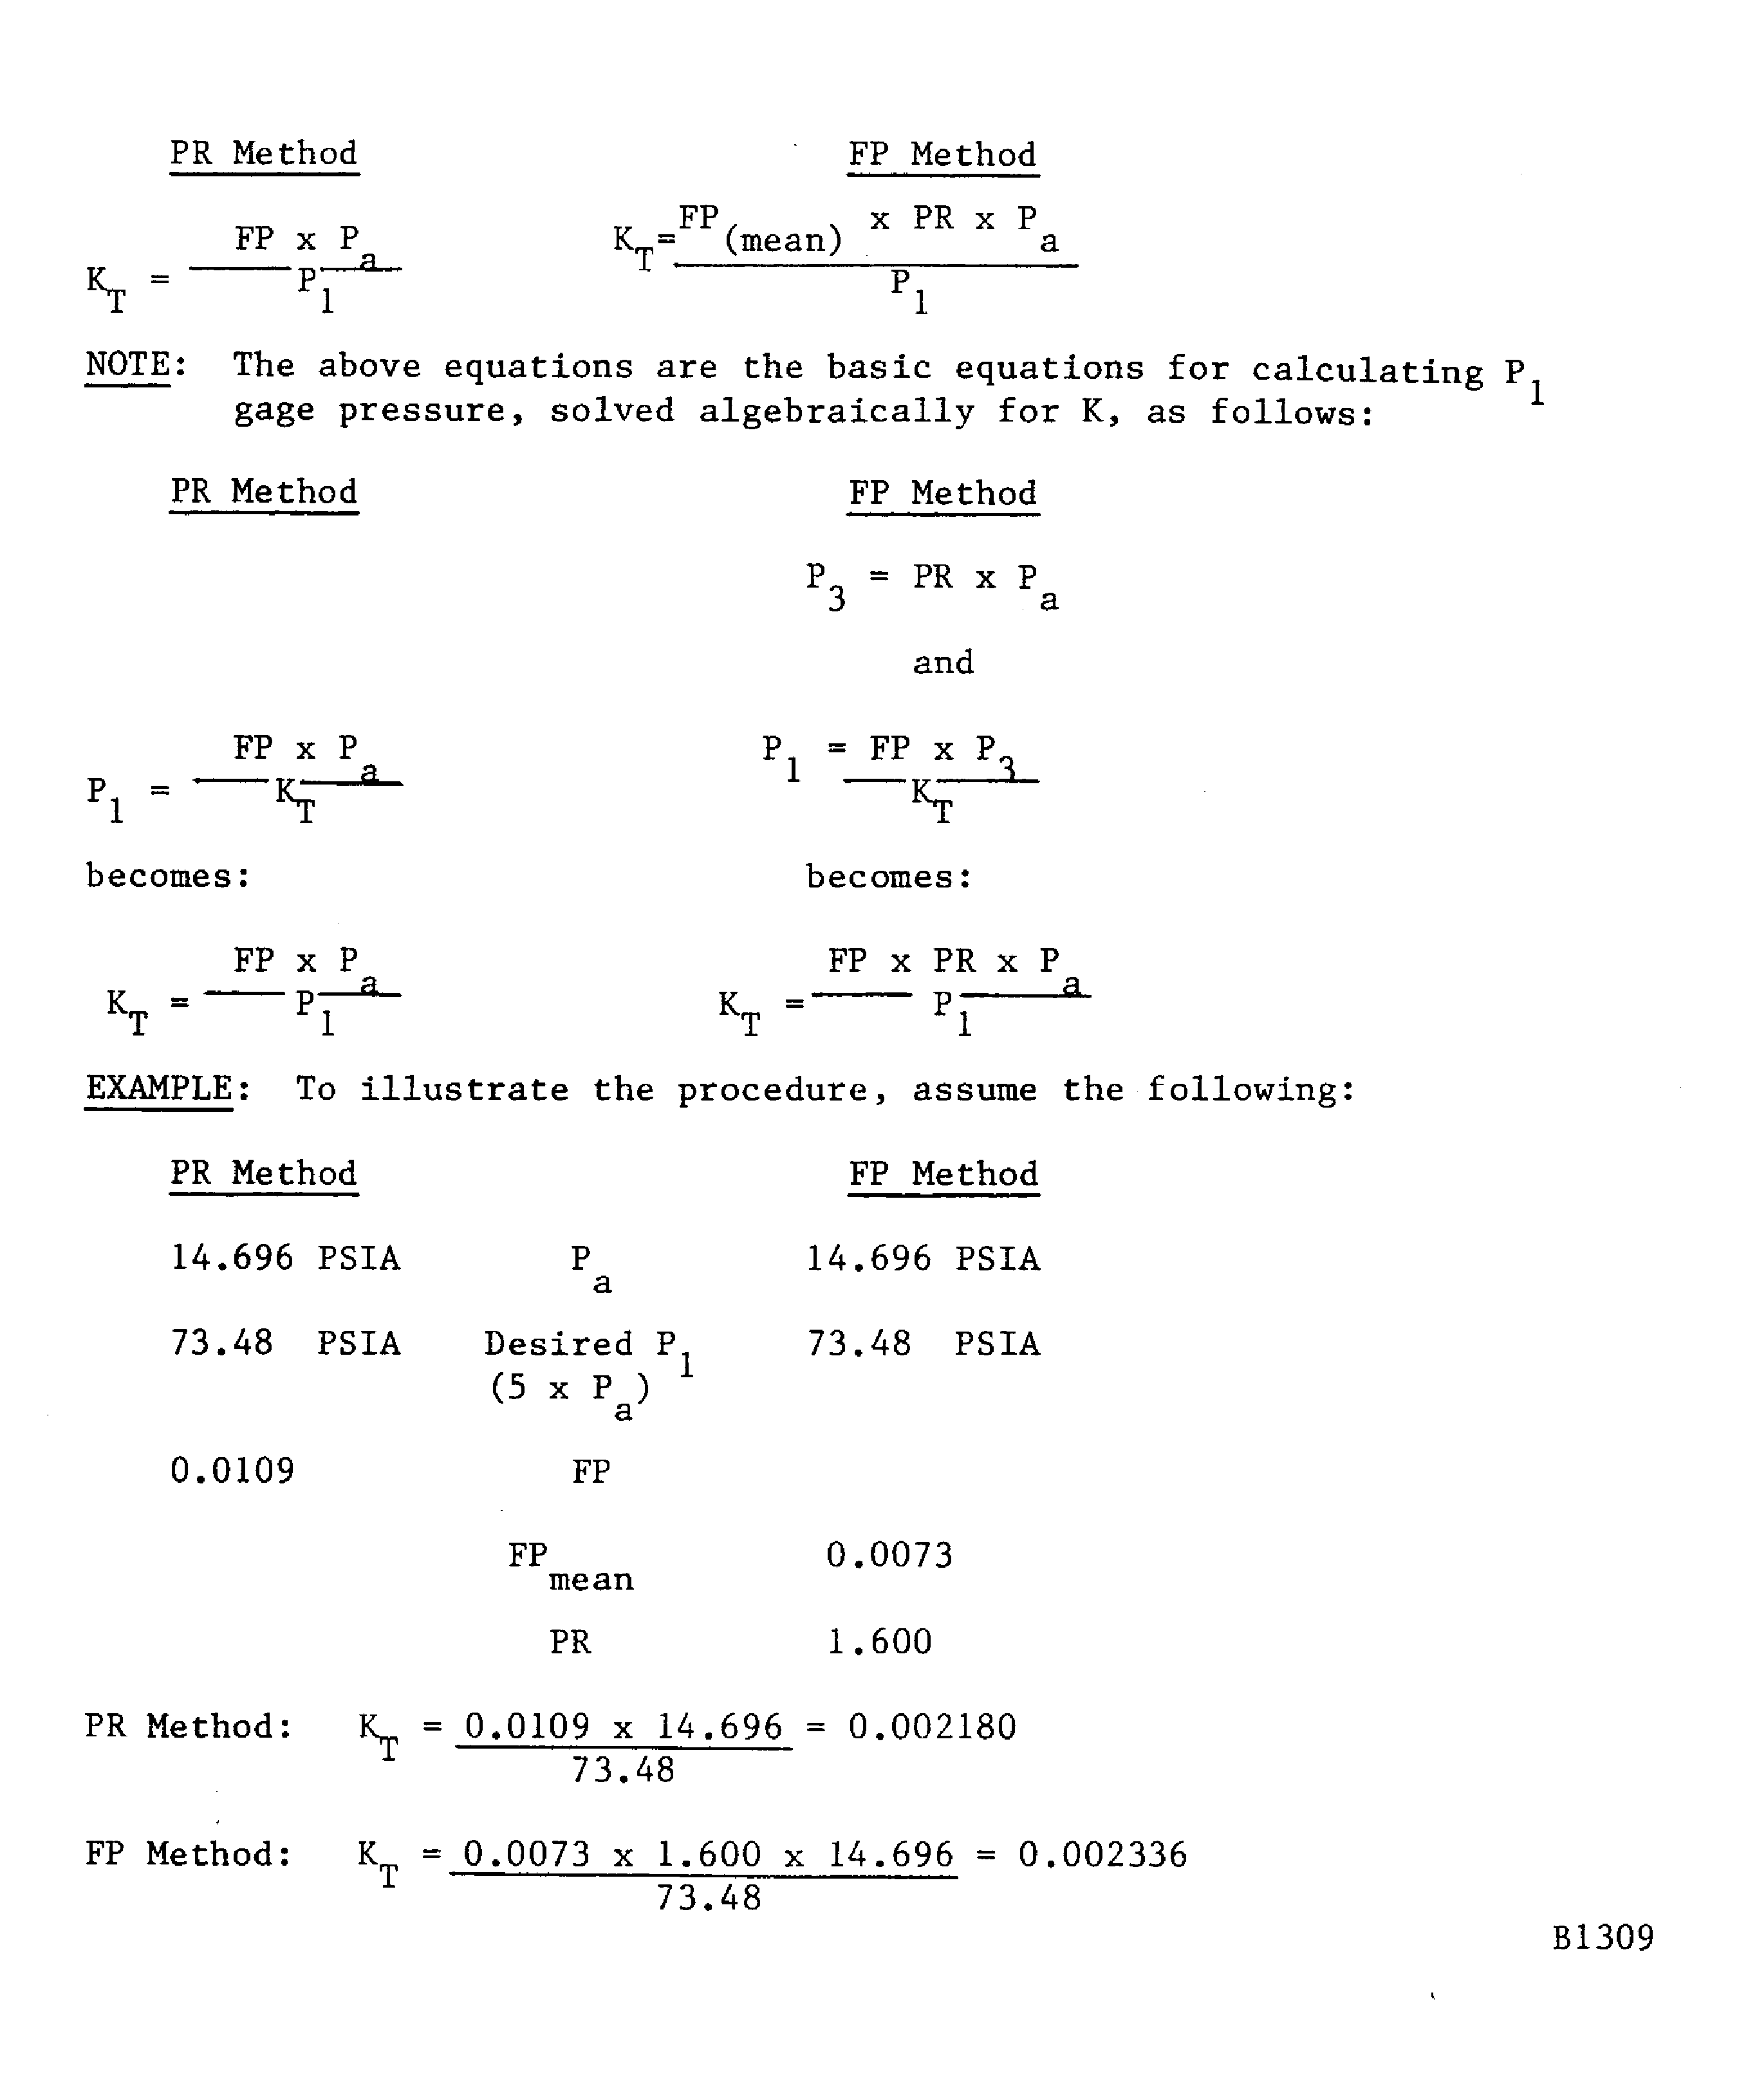
      2. Find the total K-factor for the nozzle/nozzles necessary to test a specific engine part. Replace into the equations, refer to Figure, the values of FP or FP mean and PR from the engine part airflow test limits, the value of Pa in PSIA and a value of P1 equal to 5 x Pa. Refer to the Inspection/Check section of the Engine Manual for engine parts airflow test limits.

        1. From a list of the actual K-factors of nozzles installed in the customers test bench, or from the list of K-factors given below, select the K-factor (nozzle diameter, or a mixture (sum) of two K-factors (two nozzle diameters)), which most carefully align the K-factor calculated in step (1).

        2. NOTE

          Nozzle design changes nozzle discharge coefficient (nozzle efficiency). Some nozzles usually have discharge coefficiency of 0.98 or better.

          Sonic nozzle K-factor.

          K (theoretical) = 0.532 x Throat area (sq in.).

          Nozzle diameter Inches

          K at CD = 0.99

          1.250

          0.64633

          1.125

          0.52353

          1.000

          0.41365

          0.250

          0.025853

          0.177

          0.012954

          0.125

          0.006463

          0.088

          0.003203

          0.063

          0.001642

          0.052

          0.001119

          0.042

          0.000730

          0.021

          0.000182

        3. Example: Take it that the nozzles and K-factors available in the test bench are those listed in step (a). The nearest match is shown in step (c).

        4. A mixture of 0.063 and 0.042 nozzles, operated in parallel, will test the part by either testing procedure. This will need approximately 5 atmospheres nozzle inlet pressure.

          K=0.001642 for a 0.063 nozzle.

          K=0.000730 for a 0.042 nozzle.

          kt=0.002372 for a 0.063 and 0.042 nozzles.

  1. Figure: Schematic of IAE 6P16080 test bench and identification

    Schematic of IAE 6P16080 test bench and identification
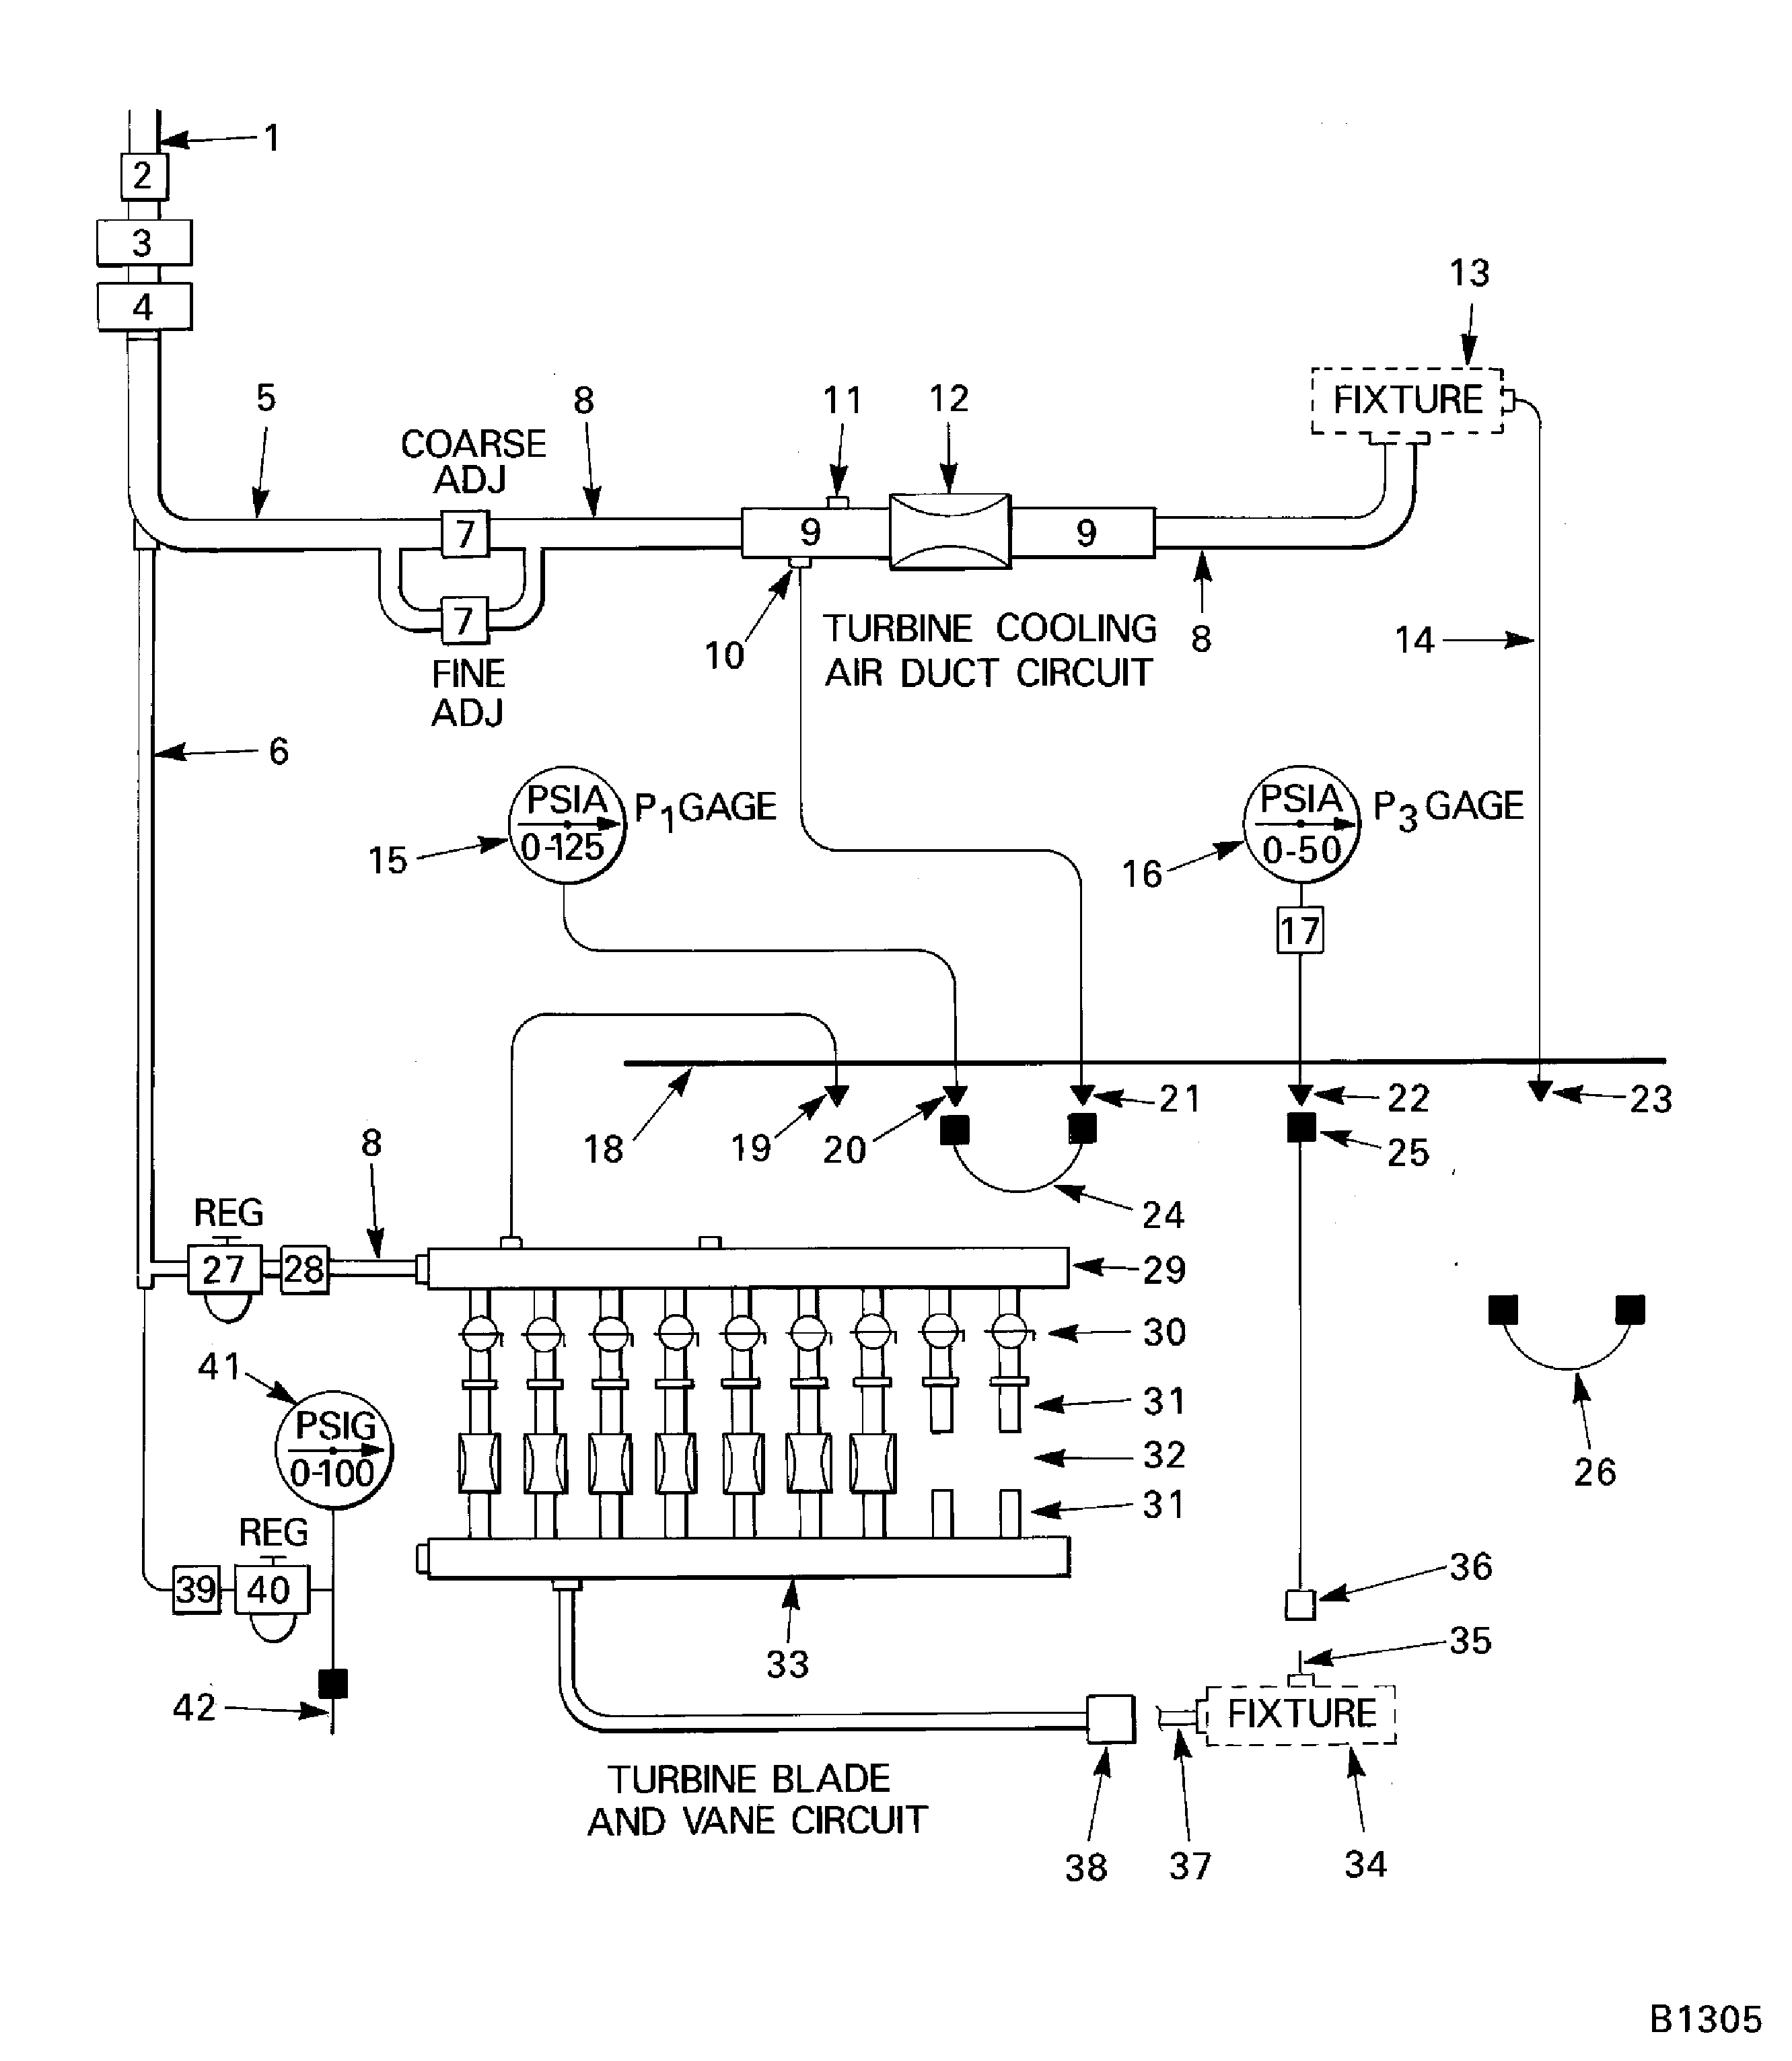
    Figure: Schematic of IAE 6P16080 test bench and identification

    Schematic of IAE 6P16080 test bench and identification
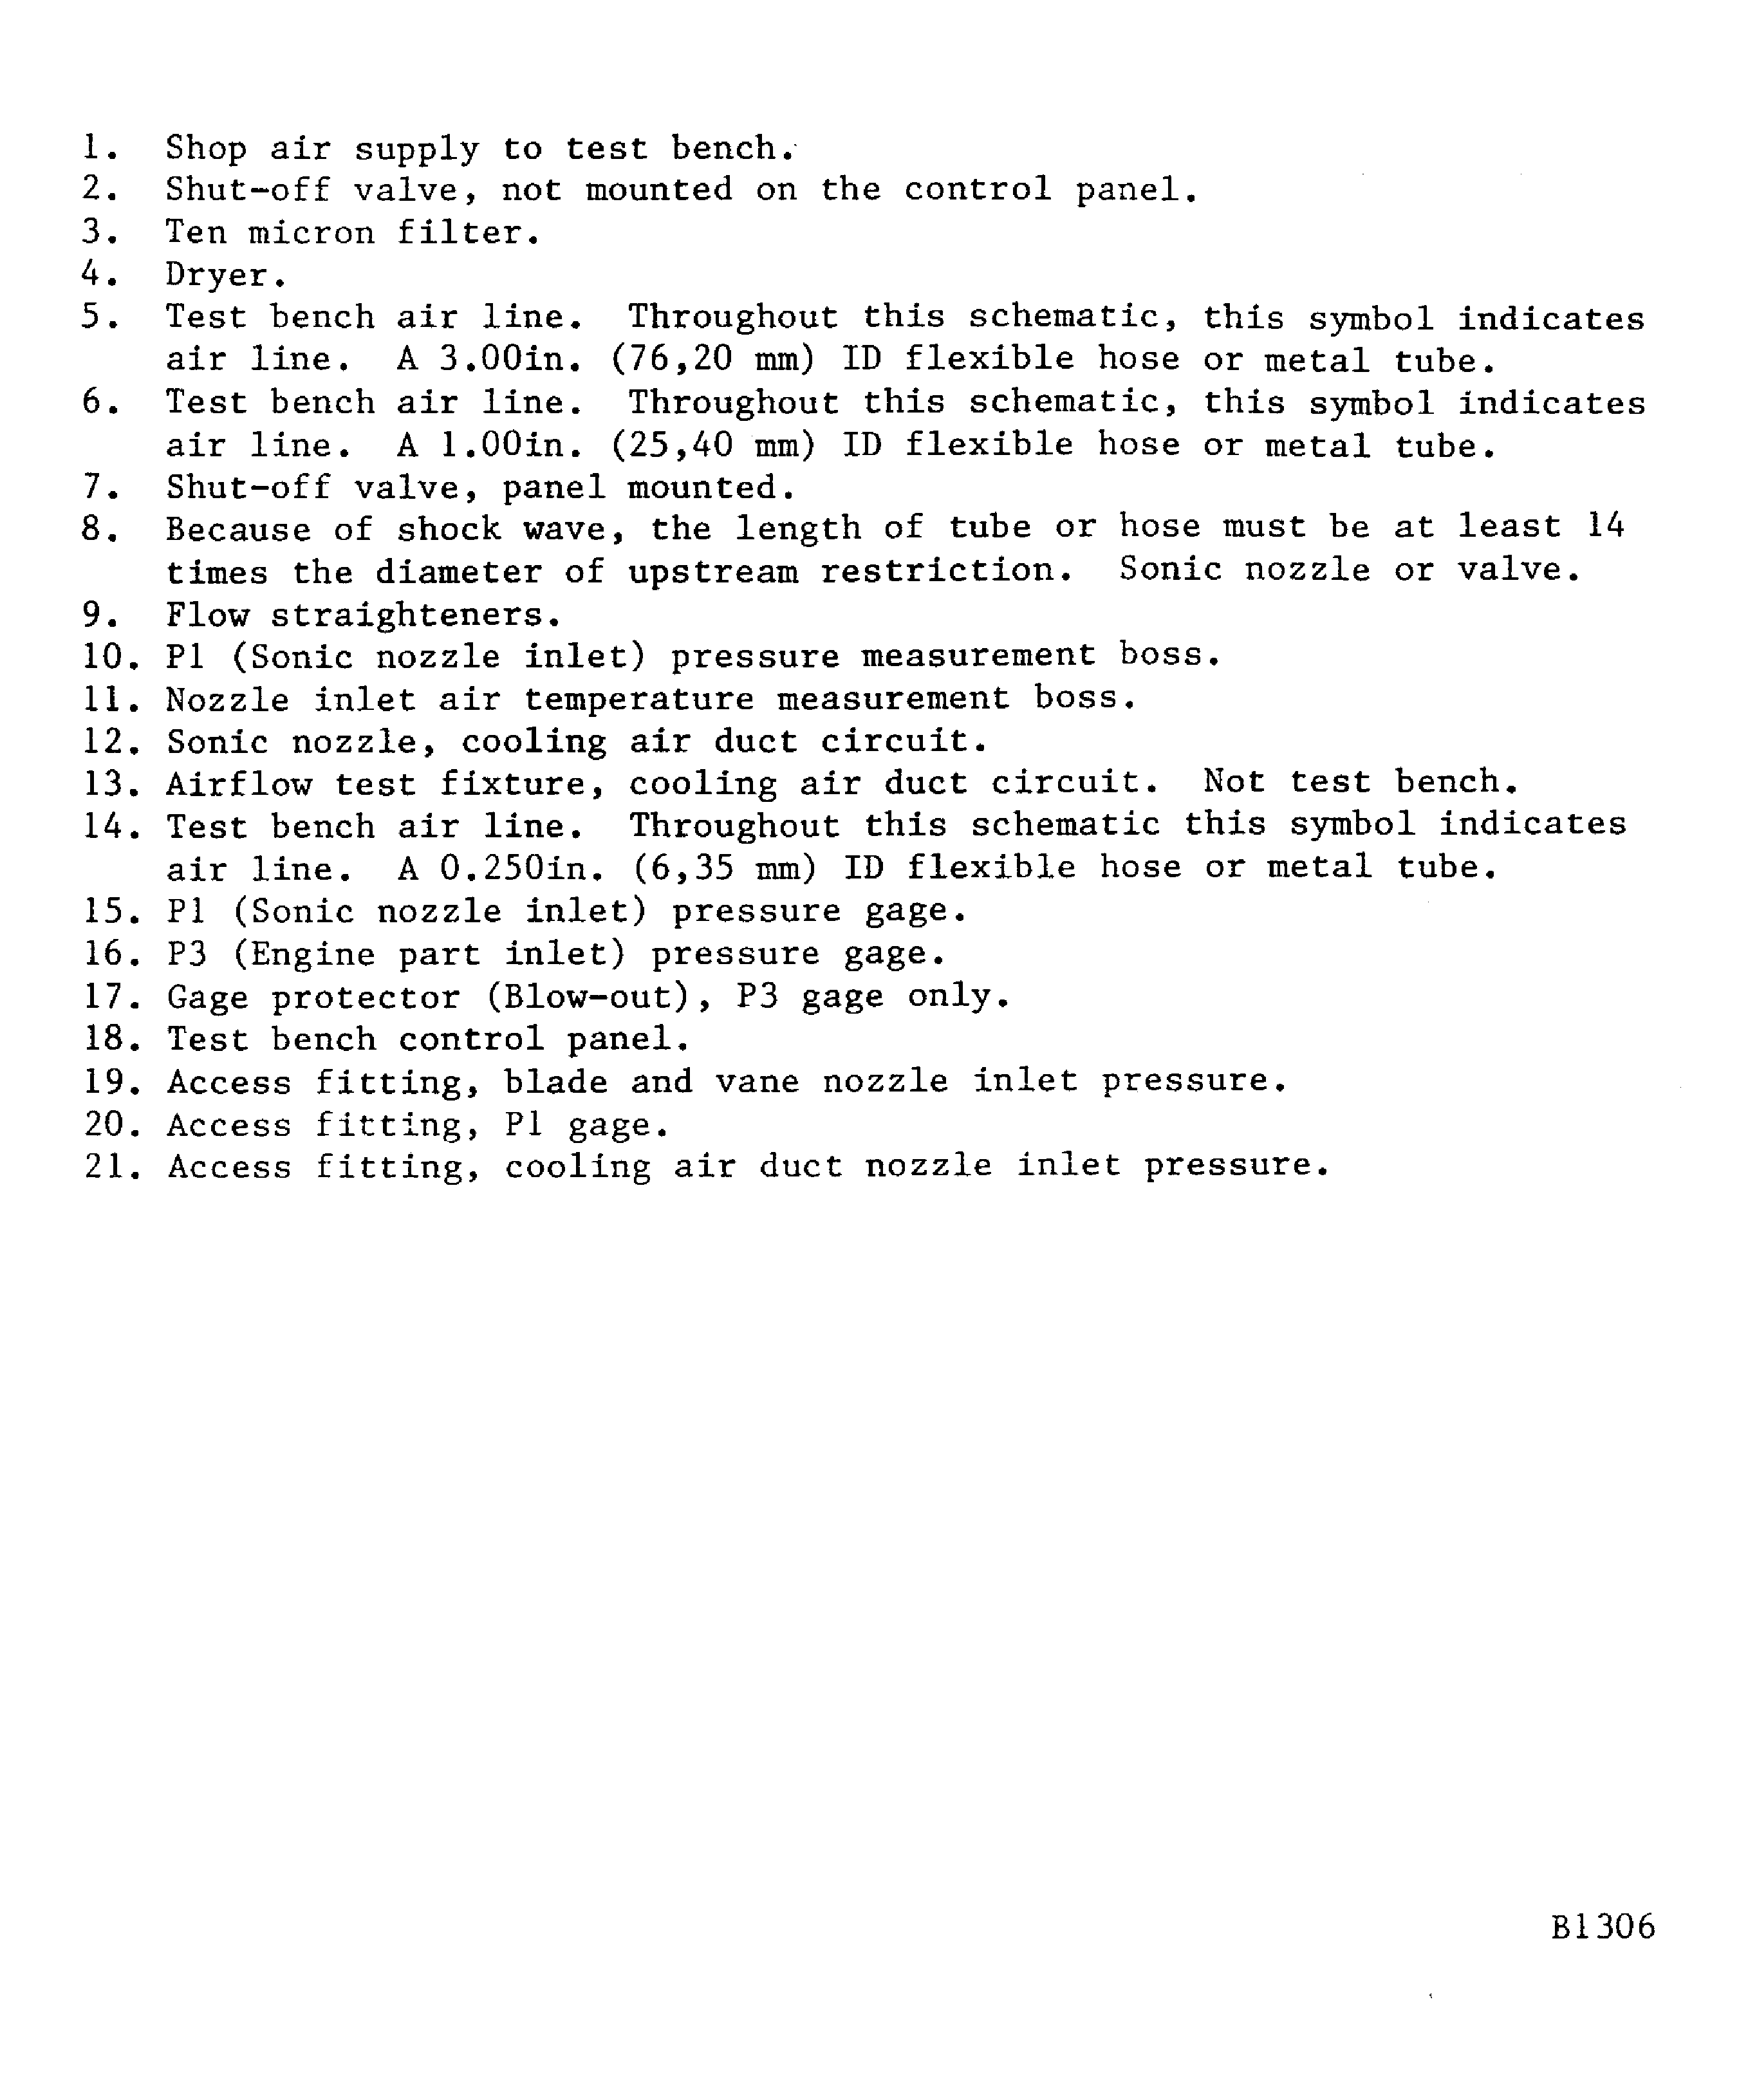
    Figure: Schematic of IAE 6P16080 test bench and identification

    Schematic of IAE 6P16080 test bench and identification
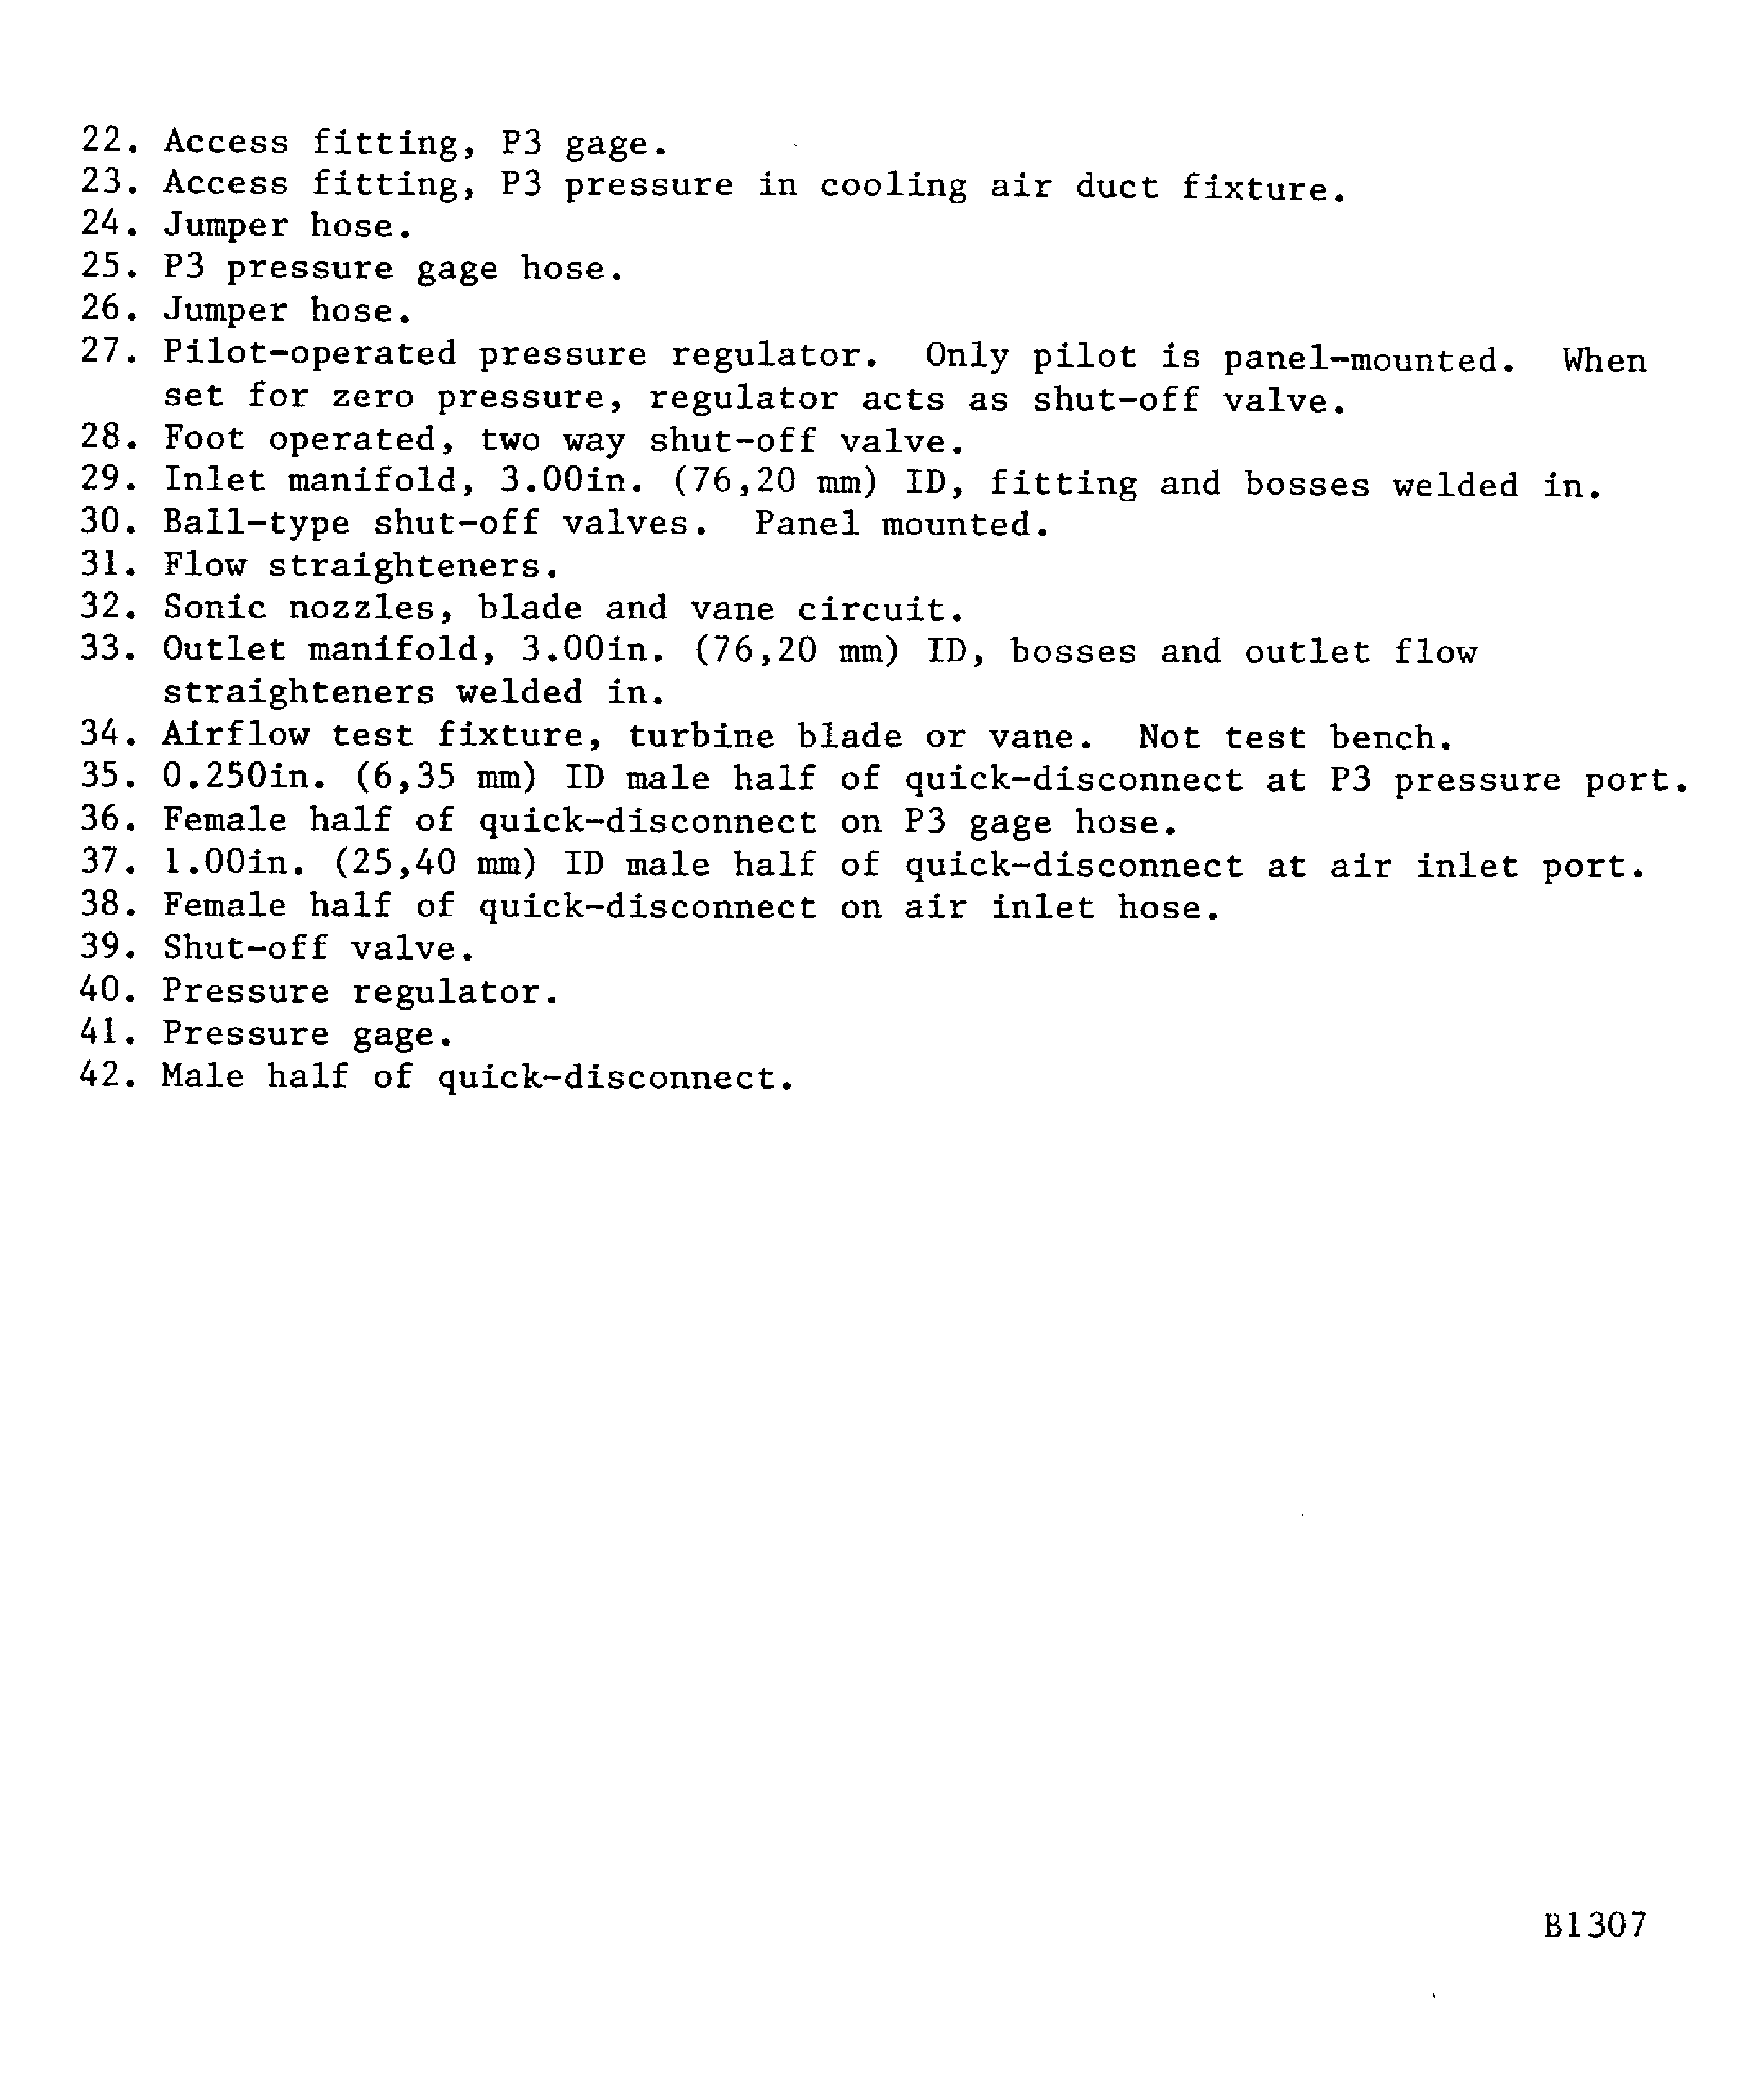
    Figure: Pressure measurement system static against total

    Pressure measurement system static against total
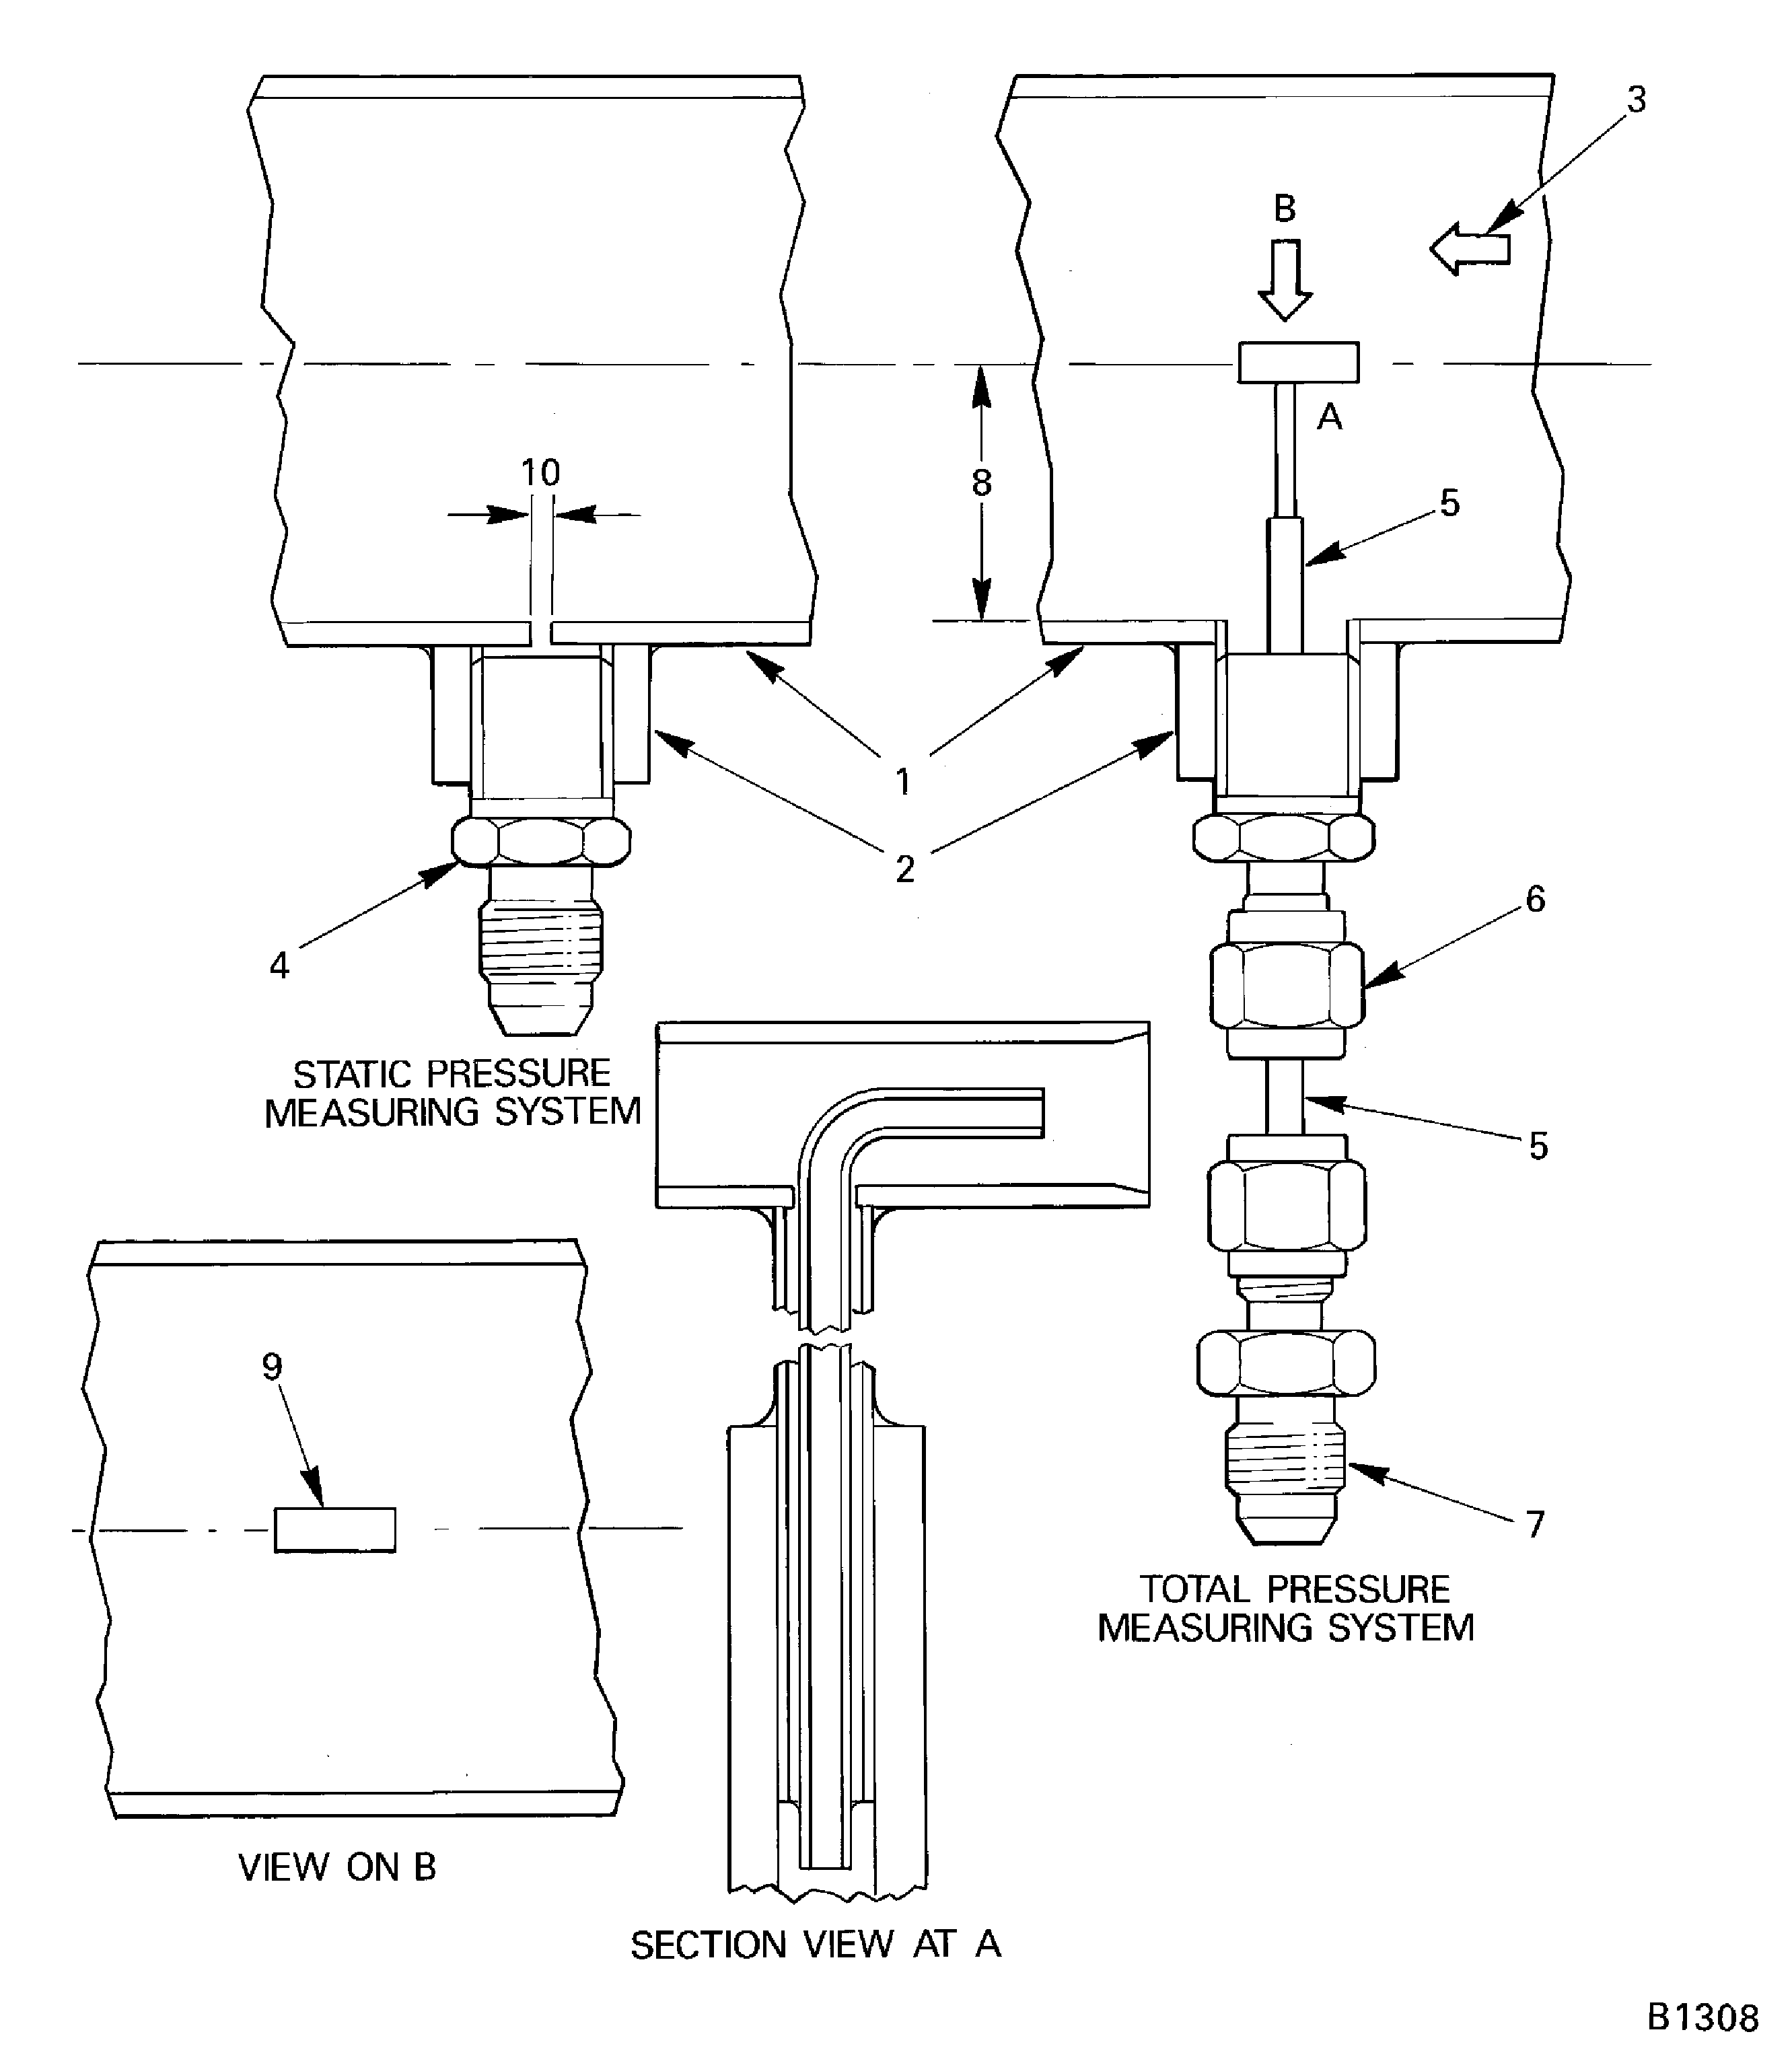
    Figure: Calculation of total K-factor PR and FP procedures

    Calculation of total K-factor PR and FP procedures
Requirements After Job Completion

Follow-On Conditions

NONE
Change Type:

Revised the procedure to update IETP format structure. (19VC091)

Manufacturer Code:0AM53
Enterprise Name:IAE INTERNATIONAL AERO ENGINES AG
BU Name:NULL
Building:SUITE 400
Street:628 HEBRON AVENUE
City:GLASTONBURY
State:CT
Zip Code:06033
Country:USA
Manufacturer Code:LOCAL
Enterprise Name:LOCALLY SUPPLIED
Manufacturer Code:LOCAL
Supply Number:CoMat 01-124
Type:sp01
Supply Short Name:CoMat 01-124 ISOPROPYL ALCOHOL
Supply Name:CoMat 01-124 ISOPROPYL ALCOHOL
Specification Groups:
Doc NumberType
OMAT:1/40GPR TECHNICAL GRADE
PMC 9094GPR TECHNICAL GRADE
JCR-011GPR TECHNICAL GRADE
Suppliers:
ManufacturerRemarks
LOCAL
U1185
24853
K6835
Manufacturer Code:0AM53
Supply Number:CoMat 02-120
Type:sp01
Supply Short Name:CoMat 02-120 APPLICATOR, COTTON-TIPPED
Supply Name:CoMat 02-120 APPLICATOR, COTTON-TIPPED
Specification Groups:
Doc NumberType
DELETED
Suppliers:
ManufacturerRemarks
0AM53
Manufacturer Code:0AM53
Tool Number:IAE 6P16080
Tool Name:IAE 6P16080 Test bench