Export Control
EAR Export Classification: Not subject to the EAR per 15 C.F.R. Chapter 1, Part 734.3(b)(3), except for the following Service Bulletins which are currently published as EAR Export Classification 9E991: SBE70-0992, SBE72-0483, SBE72-0580, SBE72-0588, SBE72-0640, SBE73-0209, SBE80-0024 and SBE80-0025.Copyright
© IAE International Aero Engines AG (2001, 2014 - 2021) The information contained in this document is the property of © IAE International Aero Engines AG and may not be copied or used for any purpose other than that for which it is supplied without the express written authority of © IAE International Aero Engines AG. (This does not preclude use by engine and aircraft operators for normal instructional, maintenance or overhaul purposes.).Applicability
All
Common Information
TASK 70-72-01-720-501 Airflow Testing - Turbine Blades And Vanes
Table of Contents
Introduction Safety Precautions Consumables | ||
Standard Conversion and Definitions of Terms | ||
Procedure for Leak Check of Test Bench | ||
Pressure Caused by Acoustic Damper or Enclosure | ||
One-Point Test Bench Calibration | ||
Five-Point Test Bench Calibration | ||
Airflow Testing Engine Parts - General | ||
Airflow Testing the Stage 1 HPT Vane Cluster Assembly or the Vane Assembly | ||
Airflow Testing the Stage 1 HPT Blade Assembly | ||
Airflow Testing the Stage 2 HPT Ring Segment and Vane Clusters | ||
Testing the Stage 2 HPT Blade Assembly | ||
Trouble shooting |
Introduction
This TASK gives the procedures to prepare the sonic nozzle test bench for use in airflow testing the engine parts and make an analysis of the problems related with airflow testing.
The procedures applicable to a glass tube flowmeter and a sharp-edged orifice-type test bench are not given. Portions of some of these procedures can be adapted to these types of test benches.
General
NOTE
Preliminary Requirements
Pre-Conditions
NONESupport Equipment
| Name | Manufacturer | Part Number / Identification | Quantity | Remark |
|---|---|---|---|---|
| Artist's soft bristle brush | LOCAL | |||
| IAE 6P16080 Test bench | 0AM53 | IAE 6P16080 |
Consumables, Materials and Expendables
| Name | Manufacturer | Part Number / Identification | Quantity | Remark |
|---|---|---|---|---|
| CoMat 02-021 MASKING WAX COMPOUND | 59460 | CoMat 02-021 | ||
| CoMat 02-030 MASKING TAPE (CLOTH BACKING) | IE479 | CoMat 02-030 | ||
| CoMat 02-047 TAPE, HEAT REFLECTIVE | 52152 | CoMat 02-047 | ||
| CoMat 10-045 LEAK CHECK FLUID, BUBBLES-TYPE | 03530 | CoMat 10-045 |
Spares
NONESafety Requirements
WARNING
Procedure
The terms and symbols shown below are used many times in equations and calculations for airflow testing. The definitions are applicable during this TASK.
FP = Flow Parameter, usually written as F/P or F.P. Used as an alternative of.
W x the square root of T3 all divided by Pa.
or
W x the square root of T3 all divided by P3.
FPcp = Calibration Point Flow Parameter, the flow parameter displayed by a master tool when it is operating at PRdes.
FPdes = Design Flow Parameter, the flow parameter at which an engine part or correlation master tool is designed to operate.
K = A constant for sonic nozzle flow parameter, got at the time of nozzle calibration, which is the relation between the nozzle inlet pressure in psia and weight of the air in PPS which flows through the nozzle when air velocity at the nozzle throat is Mach 1.0 (sonic, nozzle choked).
KT = Sum of K for two or more sonic nozzles operated in parallel at the same inlet pressure.
Pa = Atmospheric pressure in psia.
Pd = Pressure, in psia, in the acoustic damper or contained during airflow test.
P1 = Sonic nozzle inlet pressure, in psia, measured by the P1 pressure gage.
P3 = Engine part inlet pressure, in psia, is measured by the P3 pressure gage from a part in the airflow test fixture. P3 pressure is also accepted as sonic nozzle discharge or outlet pressure.
PPS = Pounds per second (that is, pounds/second).
PR = Pressure Ratio, usually written as P/R or P.R. Used as an alternative of P3/Pa.
PRcp = Calibration Point Pressure Ratio, the pressure ratio displayed by a master tool when it is operating at FPdes.
PRdes = Design Pressure Ratio, the pressure ratio at which an engine part or correlation master tool is designed to operate.
T3 = Temperature in degrees Rankine, usually written without the subscript 3.
W = Airflow in pounds per second (that is, in pounds/second).
To change gage pressure to absolute pressure and absolute pressure to gage pressure:
psia = psia + Pa (psia).
psig = psia - Pa (psia).
NOTE
The factor 800.75 (800.7473) is got from 60 seconds per minute (that is, seconds/minute) divided by 0.07493 which is the density of air at standard pressure (29.92in. Hg) and temperature (70 deg F).
The standard conversions used during airflow testing are shown below.
SUBTASK 70-72-01-720-001 Standard Conversion and Definitions of Terms
This airflow testing section provides full, step-by-step procedures for doing each airflow test that is necessary. In each of the airflow test procedures, one of the steps needs an air leakage test done, in which a leak test tool (engine part with the air exit holes sealed) replaces the engine part or in which rubber stoppers are used to seal the air exit holes in the engine part or master tool. These air leakage tests are used to detect leakage which is related to or caused by constant use of the airflow test fixtures. Leakage at the quick-disconnects which attach the fixture to the test bench or leakage at the rubber gasket or grommet which seals the interface between the engine part and the airflow test fixture are examples of this type of leakage.
A leak check of the entire test bench to detect external leakage is only extending the daily leak check procedure provided in Step thru Step to cover not only quick-disconnects and gasket or grommet at the engine part-to-fixture interface, but also all other joints, fittings and couplings in the entire test bench.
A leak check to detect internal leakage is important only at the ball valves which are used to select sonic nozzles. (Refer to the SPM TASK 70-72-02-720-501 for the schematics for IAE 6P16080 Test bench 1 off). Air leaks which pass the closed ball valves would affect the P3 gage pressure but would not be measured by the active nozzle/nozzles. Thus, an error would be introduced into the airflow test results.
During the leak check of the full test bench, the limit is zero for both internal and external leakage at all joints, fittings, valves, connections, etc, which includes the quick-disconnect fittings used to attach blade and vane airflow test fixtures to the test bench and gaskets or grommets which seal the interface between the engine part and the airflow test fixture.
Air leakage limits.

CAUTION
DO NOT USE THE RATE OF PRESSURE DROP AS AN INSPECTION CONDITION.At the place in the daily leak test procedure where the system has been pressurized to 9 psia (62.1 kPa) and isolated, use CoMat 10-045 LEAK CHECK FLUID, BUBBLES-TYPE to inspect for air leakage at all the joints, fittings, couplings, valves, etc, in the full test bench, where a possible external leakage can occur. Repair as necessary to stop external leakage.
With external leakage stopped, pressurize the IAE 6P16080 Test bench to 9 psia (62.1 kPa).
Check for internal leakage at the ball valves. (Refer to the SPM TASK 70-72-02-720-501 for the schematics for IAE 6P16080 Test bench).
Procedure.
SUBTASK 70-72-01-720-002 Procedure for Leak Check of Test Bench
Some test benches have an acoustic chamber, in with the test bench, which fully contains both the engine part and airflow test fixture. Air flows from the engine part into the acoustic chamber and then out of the chamber through the muffler, which exhausts into the room in which the test bench is located, or through the duct work to the outside of the building.
NOTE
IAE recommends that the test benches be manufactured without an acoustic chamber which is a part of the test bench and, that an isolated cylindrical acoustic damper be used that is not a part of a test bench.For test benches without an acoustic chamber, which is a part of the test bench, an acoustic damper is supplied which is isolated from the test bench. The acoustic damper is a cylinder, open at both ends and lined with acoustic material, which is placed around the engine part and airflow test fixture before the start of the airflow test. Air flows from the engine part into the inside diameter of the damper and then out the open top into the room in which the test bench is located.
For engine parts, such as turbine cooling air ducts and turbine vane ring assemblies, which must have high airflow, an acoustic device is supplied to decrease the noise hazard.
Arrow number 3 identifies the locally made acoustic damper. The approximate dimensions are, outside dimension (OD) 40.00 inches (1016 mm), height 36 inches (914.40 mm) open at both ends and lined with acoustic material 2 inches (50.80 mm) thick. It also has three equally spaced lifting eyes attached to one end.
One method to do the pressure measurement for a cylindrical acoustic damper can be seen in Figure. The identity of the numbered arrows are given below.
A pressure tap, which can be put through the wall of an acoustic chamber, can be seen in Figure. The identity of the numbered arrows are given below.
To measure the pressure caused by an acoustic device, an aneroid barometer must be adjusted to measure pressure inside the acoustic device while air is flowing.
SUBTASK 70-72-01-720-003 Pressure Caused by Acoustic Damper or Enclosure
The cause of the one-point test bench calibration is to temporarily adjust out of the test bench as much of the remaining 3 percent difference as possible so that, when engine parts are airflow tested, the test bench will function as close as possible to the way the IAE master test bench would function.
For correlation master tools calibration by the flow parameter procedure, the specific point is the point through which the design pressure ratio (PRdes) line and the calibration curve meet each other. The flow parameter at this specific point (FPcp) is also given and the values of PRdes and FPcp are marked on the master tool.
NOTE
Refer to the SPM TASK 70-72-02-720-501 for an analysis of the correlation master against work master tools.For correlation master tools calibrated by the pressure ratio procedure, the specific point is the point through which the design flow parameter (FPdes) line and the calibration curve meet each other. The pressure ratio at this specific point (PRcp) is also given and the values of FPdes and PRcp are marked on the master tool.
Correlation master tools are calibrated on the IAE master test bench by either the flow parameter or the pressure ratio procedure of testing, as specified by the operator. It does not matter which procedure was used, after the calibration data was plotted and a curve was drawn, one specific point on the curve was defined.
The general health or condition of the test bench is checked by finding if the flow parameter displayed by the master tool is still between plus or minus 3 percent of the flow parameter which was displayed by the tool when it was calibrated on the IAE master test bench.
NOTE
The reason for supplying the test bench with P1 and P3 gages, which have dials which turn, is to make possible the step of adjusting minor deviations out of the operator's test bench so that, at this one specific point, the correct relation is between the P1 and P3 gage pressures. Without dials which turn, it would be necessary to calculate a correction factor and to apply this factor as each engine part is tested. This is a time-consuming process which could give an error.
Two things shown during the one-point test bench calibration are:
General.
Leakage limit before the one-point test bench calibration is zero.
NOTE
Refer to the SPM TASK 70-72-02-720-501 for an analysis of the correlation master against the work master tools.NOTE
Use the work master tool in regular testing of engine parts and regular test bench calibration.
Do the air leakage check as given in the applicable paragraphs that follow. Refer to the Engine Manual for test limits:
Use sheet 1 of the worksheet, (Refer to Figure) which agrees with the method of testing used to calibrate the master tool.
In step 8, when the airflow is adjusted to the P3 gage, permit some time for the pressure to become stable and then re-set the P3 gage pressure before you continue to step 9. The smaller the sonic nozzle diameter, the more time will be necessary to reach a stable condition.
NOTE
If the P1 gage pressure is higher than the value of 103 percent of FP, the possible cause is air leakage. If the P1 gage pressure is lower than the value of 97 percent of FP, the possible cause is contamination of the work master tool, such as clips or rubber seal shavings blown into the work master tool. If one of the two or both occurs, clean the fixture and use the correlation master tool to trouble shoot the system.In step 9, a satisfactory general condition of the test bench is indicated if the result of P1 gage pressure, before the gage adjustment, falls between the range of the P1 calculated for 97 percent and 103 percent of flow parameter. If the result of the P1 gage pressure is not between the limits, use of the test bench must be stopped until the problem is found and corrected.
In step 10, to make easy the task of keeping track of the change in atmospheric pressure, a locally made marker can be temporarily attached to, or adjacent to, the barometer. The device should have a mark to show the current position of the barometer needle or mercury column and also have a mark at the equivalent of plus 0.1 psia (0.7 kPa) and one at the equivalent of minus 0.1 psia.
Sample worksheets 1, (Refer to Figure) and 2, (Refer to Figure) give a step-by-step procedure to complete the one-point test bench calibration. The subsequent items give the use of the worksheets:
NOTE
In order to correctly compare between the function of the master tool on the IAE master test bench and the function of the master tool on the person's test bench, the one-point test bench calibration must always be tested by the same procedure as was used when the master tool was calibrated.NOTE
After the one-point test bench calibration has been completed, the engine parts can be airflow tested by two procedures for which airflow test limits are available in the Engine Manual.Example 1, worksheet 1 (Sheet 2), Figure.
Master tool calibrated by : PR procedure.
Design FP : 0.0676.
Cal. Pt. PR : 1.380.
Sonic Nozzles - Throat diameter : 0.125 plus 0.177.
(K Factor) : (0.00647 plus 0.01300).
Total "K" : 0.01947.
Atmospheric pressure : 29.860 inches Hg.
Example 2, worksheet 2 (Sheet 2), Figure.
Master tool calibrated by : FP procedure.
Design PR : 1.300.
Cal. Pt. FP : 0.00971.
Sonic nozzles - Throat diameter : 0.088.
(K Factor) : 0.00323.
Total "K" : 0.00323.
Atmospheric pressure : 792.5 mm Hg.
To show the use of worksheets, sample worksheets 1 (Refer to Figure) and 2 (Refer to Figure) have been completed on the basis of these figures:
Procedure.
SUBTASK 70-72-01-720-004 One-Point Test Bench Calibration
NOTE
The engine part inspection TASK in the Engine Manual gives specific airflow test limits; Step thru Step give full, step-by-step procedures to do each airflow test necessary. In each airflow test procedure, one of the steps needs a one-point test bench calibration. This SUBTASK gives the general procedure for the one-point test bench calibration.The operator can operate the master tool on his test bench at a series of check points (minimum of five) and compare the performance of the master tool on his test bench against the performance of the master tool on the IAE master test bench. The operator can find the quantity of the master tool performance difference. Because the airflow properties of the master tool are thought to stay constant, all master tool performance difference is really a test bench performance difference.
The five-point (basic) test bench calibration is a copy on the operator's test bench, or the procedure by which all of the operator's correlation master tools were calibrated on the IAE master test bench.
General.
During the five-point or basic calibration, the operator's test bench must agree to the IAE master test bench to between plus or minus 3 percent of the flow parameter. The flow parameter shown by the correlation master tool on the operator's test bench must be between plus or minus 3 percent of the flow parameter shown by the master tool at the time it was calibrated or the IAE master test bench.
Correlation limits.
When the test bench is new, before its first use for airflow testing engine parts.
NOTE
It is not necessary to do the five-point test bench calibration after small maintenance. Small maintenance includes: calibration of gages, disassembly for cleaning of the inside of the nozzles or flow straighteners, or the replacement of items with new items which are the same as the ones removed.
The five-point test bench calibration must be done.
Frequency of five-point calibration.
Refer to Step to select the airflow test instructions for an engine part which will use the selected nozzle on nozzle combination.
For the IAE IAE 6P16080 Test bench 1 off, use a jumper hose to connect the P1 and P3 gages to the applicable circuit.
Set up the test bench to do the airflow test selected in step (2).
Do the air leakage check specified in the selected airflow test. Then do an air leakage check on all the test bench that is specified in Step. Before the five-point test bench calibration, both external and internal air leakage must be zero.
Continue the five-point test bench calibration which uses the procedure which is the same as the procedure used to calibrate the master tool. Refer to Step, paragraph F or paragraph G.
NOTE
This continues from SUBTASK 70-72-01-720-005 paragraph E, calibration procedure.
To illustrate this procedure, two examples will be carried through the procedure, both done on the understanding that the test bench is being calibrated with a typical correlation master tool A, applicable to the turbine cooling air duct.
Procedure - General.
Convert the atmospheric pressure into psia. Refer to the standard conversions in Step.
Example 1 : 30.00 x 0.4912 = 14.736 psia.
Example 2 : 29.75 x 0.4912 = 14.613 psia.
Select a minimum of four more values of P3 pressure, in 0.5 psi increments, which bracket the master tool inlet pressure, after rounding off in step (4).
Table 2. Example: 22.0
21.5
21.0 From step (4)
20.5
20.0
NOTE
To accurately calculate the curve, a minimum of five-points must be used, this gives the name of the procedure. More points (7 or 9) can be used.If calibration includes a correlation master tool and airflow test where an acoustic devise is usually used, adjust the acoustic device for measurement of the pressure in the device. Refer to Step. Close the doors of the acoustic chamber or place a cylindrical type damper around the engine part.
If the pressure in the acoustic device, while the air flows, is higher than the limit, stop the test bench calibration until the acoustic device has been changed so that it is in the limit. Refer to Step.
If the pressure in the acoustic device, while the air flows, is in the limit, continue to the steps that follow:
NOTE
Accept that the subsequent P1 gage pressures occur when P3 is set at values selected in step (5). Note that, although the selected P3 gage pressures are the same in both examples, the different atmospheric pressures selected in step (2) will cause different resulting P1 gage pressures.
If an acoustic device is being used, with P3 set at the highest value, check that the pressure caused by the acoustic device is in the limit. Refer to Step.
At a selected P3 of:
22.0 - Example 1, Resulting P1 = 72.50 : Example 2, Resulting P1 = 68.55.
21.5 - Example 1, Resulting P1 = 70.03 : Example 2, Resulting P1 = 66.57.
21.0 - Example 1, Resulting P1 = 67.49 : Example 2, Resulting P1 = 64.11.
20.5 - Example 1, Resulting P1 = 64.70 : Example 2, Resulting P1 = 61.50.
20.0 - Example 1, Resulting P1 = 61.83 : Example 2, Resulting P1 = 58.71.
At each value of P3, record the resulting P1 gage pressure. Turn off the air.
Change the five resulting P1 gage pressures, recorded in step (10), to the flow parameter; use the equation: FP = (KT x P1)/P3.
NOTE
Airflow test equipment documents can refer to a square root temperature factor to be used if the difference in temperature between the air at the sonic nozzle inlet and air at the master tool inlet is more than 3 degrees Rankine. If has been shown that, in test benches built with IAE instructions, the temperature difference is never more than 3 degrees Rankine. Although temperature measurement ports or bosses are included in the test bench, they are not being used and no temperature correction is necessary.With the use of the pressure ratio calculated in step (11) and the flow parameters calculated in step (12) as coordinates, plot the test points which specified the function of the master tool and draw a curve through the point. To make it easy to compare, plot the data on a copy of the master tool calibration curve. Refer to Figure.
If the curve which shows the master tool performance on the operator's test bench falls between the plus 3 percent of FP and minus 3 percent of FP curves, the test bench is acceptable.
NOTE
On Figure, the curve shown by the points in Example No. 2 is not in the plus or minus 3 percent of the FP band (about 0.9 percent below minus 3 percent of the FP curve). Corrective action is necessary.NOTE
Do not do corrective action until the calibration procedure in Step paragraphs E and F, has been done a sufficient number of times to use all the nozzles applicable to blades and vanes, so that results of all calibration curves can be compared.NOTE
The flow properties of the test bench must be the same. For example, if the test bench flows low when using the 0.250 inch (6.35 mm) nozzle, it would be expected to flow low also when using the 0.117 inch (2.97 mm) nozzle or some other combination of nozzles.
Make an analysis on the condition of the operator's test bench.
NOTE
On Figure, the curve shown by the points in Example No. 1 falls approximately 1.5 percent above the calibration curve, well in the plus 3 percent of the FP limit. The test bench is acceptable.Do the calibration procedure again. Refer to Step paragraphs E and F, as necessary, to use all the sonic nozzles installed in the test bench.
Keep the correlation master tools and work master tools in applicable protective containers.
NOTE
This continues from Step paragraph E, calibration procedure.NOTE
To illustrate this procedure, an example will be carried through the procedure on the understanding that the test bench is being calibrated with a typical correlation master tool B, applicable to the first stage turbine vane.
Correlation master tool that is calibrated by the flow parameter procedure of testing.
From the calibration curve or supporting data, find the master tool calibration point pressure ratio (PRcp).
Example: Accept that, for this master tool, the PRcp is 1.380.
NOTE
The rounding-off process is to make the calculations and plotting of points on the graph easy. If PRcp occurs to fall in the middle position between tenths, for example, 1.350, it can be rounded-off to the higher or lower tenth (1.300 or 1.400).Change atmospheric pressure into psia, refer to Step.
Example: Take the barometer reading of 30.00 inches Hg.
30.00 x 0.4912 = 14.736 psia
If the calibration includes a correlation master tool and airflow test where an acoustic device is normally used, adjust the acoustic device for measurement of the pressure in the device as in Step. Close the doors of the acoustic chamber or place a cylindrical acoustic damper around the engine part.
If the pressure in the acoustic device, while air flows, is higher than the limit, stop the test bench calibration until the acoustic device has been changed so that it is in the limit. Refer to Step.
If the acoustic device is being used, with P3 set at the highest value, check that the pressure caused by the acoustic device is between the limits, refer to Step.
At a P3 of:
17.68 : Resulting P1 = 38.08.
19.16 : Resulting P1 = 45.41.
20.63 : Resulting P1 = 52.35.
22.10 : Resulting P1 = 59.14.
23.58 : Resulting P1 = 65.55.
25.05 : Resulting P1 = 71.28.
NOTE
Airflow test equipment documents can refer to a square root temperature factor to be used if the difference in temperature between the air at the sonic nozzle inlet and air at the master tool inlet is more than 3 degrees Rankine. If has been shown that, in test benches built with IAE instructions, the temperature difference is never more than 3 degrees Rankine. Although temperature measurement ports or bosses are included in the test bench, they are not being used and no temperature correction is necessary.
At each value of P3, record the resulting P1 gage pressure. Turn the air off.
Example: Accept that the P1 gage pressures that follow result when P3 is set at each of the values calculated in step (5).
Convert the resulting P1 gage pressures to a flow parameter by the use of the equation: FP = (KT x P1)/Pa.
Let the sonic nozzles have a total or effective K factor of 0.01931. Then.
FP = (0.01931 x 38.08)/14.736 = 0.0499.
FP = (0.01931 x 45.41)/14.736 = 0.0595.
FP = (0.01931 x 52.35)/14.736 = 0.0686.
FP = (0.01931 x 59.14)/14.736 = 0.0775.
FP = (0.01931 x 65.55)/14.736 = 0.0859.
FP = (0.01931 x 71.28)/14.736 = 0.0934.
With the use of the pressure ratios selected in step (3) and the flow parameters calculated in step (11) as coordinates, plot the test points which specified the function of the master tool and draw a curve through the points. Plot the data on a copy of the master tool calibration curve. Refer to Figure.
If the curve which shows the master tool performance is between plus and minus 3 percent of the FP curves, the test bench is acceptable.
Example: In Figure, the curve shown by the points in the example is approximately 1.5 percent below the calibration curve, well in plus or minus 3 percent of the FP band. The test bench is acceptable in this calibration.
NOTE
Do not do corrective action until the calibration procedure in Step paragraphs E and F, has been done a sufficient number of times to use all the nozzles applicable to blades and vanes, so that results of all calibration curves can be compared.NOTE
The flow properties of the test bench must be the same. For example, if the test bench flows low with the 0.250 inch (6.35 mm) nozzle, it would be expected to flow low also with the 0.177 inch (2.97 mm) nozzle or some other combination of nozzles.
Make an analysis on the condition of the test bench.
Do the calibration procedure again. Refer to Step paragraphs E and G, as necessary to use all sonic nozzles installed in the test bench.
Correlation master tool calibrated by the pressure ratio method of testing.
SUBTASK 70-72-01-720-005 Five-Point Test Bench Calibration
For some engine parts, special air holes are removed from some airflow tests. For example, air holes in the leading edge of some turbine vanes are airflow tested apart. The applicable paragraphs that follow in this section will give which holes or sets of holes must be sealed off for a specified airflow test and how to do it. This can be done by a special tool or by plater's wax, tape, etc.
Do the one-point test bench calibration, given in Step.
NOTE
These procedures are correct only if the acoustic device causes a pressure at the engine part outlet of less than 0.1 psia (0.2 inch Hg or 5.2 mm Hg) above ambient atmospheric, or if no acoustic device is used during the airflow test.
The procedure can be broken up into basic steps which apply to airflow testing all engine parts by one of the two procedures of testing. These steps are:
In Step, use the nozzle throat diameter and K factor applicable to the actual nozzle in the test bench that will be used to test the engine parts.
In step 5, spaces are supplied for you to write the airflow test limits so that calculated gage pressures agree with the limits.
NOTE
When you test turbine blades and vanes by the flow parameter procedure, in sequence to set the P3 gage to the pre-calculated value, it will be necessary to adjust the flow control pressure regulator for almost every part.
When you test turbine blades and vanes by the pressure ratio procedure, after the flow control pressure regulator has been set to give the pre-calculated P1 gage pressure, the pressurization will be done again automatically, part after part. This is the why IAE recommends the pressure ratio procedure to test blades and vanes.
If using a manual or non-automated flow bench, Sample Worksheet 3 (refer to Figure) and Sample Worksheet 4 (refer to Figure) give a step-by-step procedure to complete the airflow test of the engine parts. These worksheets are general in type and can be adapted to any engine part. The subsequent items show the use of the worksheets.
If no leakage is there, start to test the engine parts.
NOTE
The continuous 15-minute cycle, when you check the change in the atmospheric pressure, must be done to make sure that the gage pressures used as limits are sufficiently accurate. An atmospheric pressure change without a change in pre-calculated gage pressure causes an error into the airflow test results. For example, if the engine part PR is 2.470 in the equation P3 = PR x Pa, then a 0.1 psia change in atmospheric pressure becomes a 0.247 psia error in P3 gage pressure or approximately a 0.7 percent error. The continuous 15-minute check cycle of the installation of the leak test tool is necessary to monitor the condition of the rubber seal or the grommet on the airflow test fixture. If three or four engine parts are rejected one after another for high flow, do not wait the full 15 minutes before you use the leak test tool.
Install the leak test tool in the airflow test fixture and do a check for air leakage.
Fifteen minutes after you start the procedure to test the engine parts, do these checks:
SUBTASK 70-72-01-720-006 Airflow Testing Engine Parts - General
NOTE
Refer to the SPM TASK 70-72-00-720-501 for an analysis of the two procedures used to airflow test the engine parts. These two procedures are called the pressure ratio (PR) procedure and the flow parameter (FP) procedure.Do all the inspections and repairs on the vane cluster assembly or vane assembly before you do the airflow check.
Do the procedure in the sequences given for accurate airflow data. Make sure you do all the steps.
This procedure is for the A1/A5/D5 models.
NOTE
To get accurate results, you must leak check and calibrate the test bench. The vane performance and engine efficiency are directly related to the correct airflow procedure.
If the test bench has absolute pressure gages, add the psig value given in the procedure to the ambient atmospheric pressure to get the psia value.
Select the sonic nozzle with the correct throat diameter. Use the mathematical method of nozzle selection given in TASK 70-72-02-720-501, SUBTASK 70-72-02-720-007.
Set up the IAE IAE 6P16080 Test bench 1 off. Refer to Figure.
Calculate the values for the pressure ration method of airflow check; use an applicable airflow test limit table. Refer to the Engine Manual TASK 72-44-20-200-000 (INSPECTION-000). Use the pressure ratio method worksheet procedure in Figure.
If the rate of pressure decrease is more than 0.5 psig (3.4 kPa) for one minute, use CoMat 10-045 LEAK CHECK FLUID, BUBBLES-TYPE to find the source of the leak. The leaks must be repaired to get accurate vane airflow results.
Do a leak check on the airflow fixture.
Set the P1 equal to the pressure related with the one largest individual vane flow parameter (refer to the applicable airflow test limit table in the Engine Manual TASK 72-44-20-200-006 (INSPECTION-006) and Figure for the calculations of the P1 pressure) without the vane cluster assembly or vane assembly in the fixture.
Do the check again.
NOTE
The two primary errors caused when you do the airflow check are:The air will leak at the interface between the engine part that is tested and the rubber grommets or the gaskets that seal the engine part to the air flow fixture.
The allowance for atmospheric pressure changes that are not made in the calculated gage pressure.
Do an airflow restriction check on the airflow fixture each time the fixture is installed.
Set up and leak check the vane airflow fixture and the test bench.
Set up the test bench to do the airflow check by the applicable limits. Refer to the Engine Manual TASK 72-44-20-200-000 (INSPECTION-000) and Figure.
Do a one-point test bench calibration by the procedure given in Step. Refer to the Engine Manual TASK 72-44-20-200-000 (INSPECTION-000) and Figure.
Do the airflow check by the applicable limits. Refer to the Engine Manual TASK 72-44-20-200-000 (INSPECTION-000) and Figure.
Accept the airflow on the vane front air passage(s) if the flow is within the limits given in step 9. of Figure.
NOTE
Go to step (3) if you have done the airflow operation for 15 minutes.
Do the airflow check on the vane cluster assembly or vane assembly front air passage(s). Refer to Figure.
Set up the test bench to do the airflow check by the applicable limits. Refer to the Engine Manual TASK 72-44-20-200-000 (INSPECTION-000) and Figure.
Do a one-point test bench calibration by the procedure given in Step. Refer to the Engine Manual TASK 72-44-20-200-000 (INSPECTION-000) and Figure.
Do the airflow check by the applicable limits. Refer to the Engine Manual TASK 72-44-20-200-000 (INSPECTION-000) and Figure.
Accept the airflow on the vane front air passage(s) if the flow is within the limits given in step 9, of Figure.
Do the airflow check on the vane cluster assembly or the vane assembly rear air passage(s). Refer to Figure.
If the atmospheric pressure changed more than 0.1 psia (0.7 kPa) or more than 0.2 inch Hg (5.2 mm Hg), stop the test on the vanes. Do a one-point test bench calibration and calculate the new gage pressure by the procedure given in Step. Use the new limits when you check the vanes.
If there is leakage, repair or replace the insert set or repair the test bench as necessary and do Step (d) again.
NOTE
The continuous 15-minute cycle, when you check the change in the atmospheric pressure, must be done to make sure that the gage pressures that are used as limits are accurate. An atmospheric pressure change without a change in the pre-calculated gage pressure causes an error in the airflow test results. For example, in the equation PR x Pa = P3; if the vane PR is 2.470 psia (17.0 kPa) then a 0.1 psia (0.7 kPa) or 0.2 inch Hg (5.2 mm Hg) change in the atmospheric pressure becomes a 0.247 psia (1.7 kPa) error in the P3 pressure. This is approximately a 0.7 percent error. The continuous 15-minute cycle, when you install the locally made plug, is necessary to monitor the condition of the airflow insert on the airflow fixture. If three or four vanes, one after the other, are rejected for high flow, do not wait the full 15 minutes to do the checks.
Fifteen minutes after you start the vane airflow operation do the checks that follow:
Ultrasonic clean the vanes by the procedure given in the SPM TASK 70-13-01-100-501 but flush the inside of the vanes with hot water. Flush and air dry fully. If necessary, use 0.017 inch (0.432 mm) diameter wire or equivalent to put into the trailing edge cooling air slot to clean the air passage.
Reject all the vanes that have less airflow than the limits given on the worksheet Step 9. Refer to Figure.
Do the procedure that follows on the vane cluster assembly or the vane assembly that has less airflow than the limits. Refer to the worksheet Step 9. for the vanes marked minus (-). Refer to Figure.
Two hours after you start the airflow operation, do a one-point test bench calibration for each airflow parameter by the procedure given in Step. Refer to the airflow test limit table in the Engine Manual TASK 72-44-20-200-000 (INSPECTION-000) and Figure.
Do the airflow check on the vane cluster assembly or the vane assembly.
SUBTASK 70-72-01-720-007 Airflow Testing the Stage 1 HPT Vane Cluster Assembly or the Vane Assembly
NOTE
Do all the inspections and repairs on the vane cluster assembly or vane assembly before you do the airflow check.
Do the procedure in the sequences given for accurate airflow data. Make sure you do all the steps.
This procedure is for the A1/A5/D5 models.
NOTE
To get accurate results, you must leak check and calibrate the test bench. The blade performance and engine efficiency are directly related to the correct airflow procedure.If the test bench has absolute pressure gages, add the psig value given in the procedure to the ambient atmospheric pressure to get the psia value.Select the sonic nozzle with the correct throat diameter. Use the mathematical method of nozzle selection given in the SPM TASK 70-72-02-720-501, SUBTASK 70-72-02-720-007.
Install the fixture on the base and align the two open holes in the base with the two holes on the fixture. Move the horizontal clamp block on the fixture until the two holes in the block align with the two holes in the base. Install and tighten the four bolts. Connect and tighten the test bench pressure sense line to the small boss on the side of the base.
NOTE
The airflow path must be from the shop air supply, through the sonic nozzle on the test bench, into the airflow fixture and out through the blade.
Set up the IAE 6P16080 Test bench 1 off (Refer to Figure):
Calculate the values for the pressure ratio method of airflow check. Refer to the airflow limits tables in the Engine Manual TASK 72-45-14-200-000 (INSPECTION-000). Use the pressure ratio method worksheet procedure in Figure.
If the test bench has absolute P1 and P3 pressure gages with adjustable dials, adjust the dials to indicate ambient atmospheric pressure or zero the gages if the gages indicate psig (at zero air pressure).
NOTE
If the test bench has absolute pressure gages, add 9 psig (62.1 kPa) to the atmospheric pressure (in psia) to find the leak check pressure.If the rate of pressure decrease is more than 0.5 psig (3.4 kPa) for 40 seconds use CoMat 10-045 LEAK CHECK FLUID, BUBBLES-TYPE to find the source of the leak. The leaks must be repaired to get accurate blade airflow results.
Do a leak check on the airflow fixture.
Set the P1 equal to the pressure related with the one largest individual blade flow parameter (Refer to Figure for the calculations of the P1 pressure) without the blade assembly in the fixture.
Correct the cause of the restriction and do the check again.
NOTE
The two primary errors caused when you do the airflow check are:The air will leak at the interface between the engine part that is tested and the rubber grommets or the gaskets that seal the engine part to the airflow fixture.
The allowance for atmospheric pressure changes that are not made in the calculated gage pressure.
Do an airflow restriction test on the airflow fixture each time the fixture is installed:
Set up and leak check the blade airflow fixture and the test bench.
Set up the test bench to do the airflow check. Refer to limits and locations given in the Engine Manual TASK 72-45-14-200-000 (INSPECTION-000) and Figure.
Use melted CoMat 02-021 MASKING WAX COMPOUND, applied with an artist's soft bristle brush.
NOTE
The blade assembly can be sealed at room temperature. If the blade is lightly warmed, the wax seal will be better.
Block and seal the applicable airflow passages and cooling air holes, refer to Figure and the Engine Manual TASK 72-45-14-200-000 (INSPECTION-000), for each test by one of these methods:
Do the airflow check. Refer to the limits given in the Engine Manual TASK 72-45-14-200-000 (INSPECTION-000). No leakage is permitted at the sealed airflow passages or cooling air holes.
Accept the airflow on each test of the blade airflow passage if the flow is within the limits given in Step 9. of Figure.
Do the procedure again on the blade assembly for each of the airflow tests given in the Engine Manual TASK 72-45-14-200-000 (INSPECTION-000) and Figure.
Do this procedure for each of the tests given in the figure. Use the applicable airflow master for each test.
If the atmospheric pressure has changed more than 0.1 psia (0.7 kPa) or more than 0.2 inch Hg (5.2 mm Hg), stop the test on the blades. Do a one-point test bench calibration and calculate the new gage pressure by the procedure given in Step. Use the new limits when you check the blade assembly.
If there is leakage, repair the leaks as necessary and do Step (e) again.
NOTE
The continuous 15-minute cycle, when you check the change in the atmospheric pressure, must be done to make sure that the gage pressures that are used as limits, are accurate. An atmospheric pressure change, without a change in the pre-calculated gage pressure, makes an error in the airflow test results. For example, in the equation PR x Pa = P3, if the blade assembly PR is 2.470 psia (17.0 kPa), then a 0.1 psia (0.7 kPa) or 0.2 inch Hg (5.2 mm Hg) change in the atmospheric pressure becomes a 0.247 psia (1.7 kPa) error in the P3 pressure. This is approximately a 0.7 percent error. The continuous 15-minute cycle, when you install the locally made plug, is necessary to monitor the condition of the airflow insert on the airflow fixture. If three of four blades, one after the other, are rejected for high flow, do not wait the full 15 minutes to do the checks.
Fifteen minutes after you start the blade assembly airflow operation, do the checks that follow:
Airflow the blade assembly that shows more airflow than the limits. Refer to the worksheet Step 9. for the blades marked plus (+). (Refer to Figure).
Ultrasonic clean the blade assembly by the procedure given in the SPM TASK 70-13-01-100-501 but flush the inside of the blades with hot water. Flush and air dry fully. If necessary, use 0.009 inch (0.229 mm) diameter wire or equivalent to put into the trailing edge cooling air slots to clean the air passage.
Do the subsequent procedure on the blade assembly that has less airflow than the limits. Refer to the worksheet Step 9. for the blades marked minus (-). (Refer to Figure).
Clean the blade assembly by the procedure given in the Engine Manual TASK 72-45-14-100-003-A00 (CLEANING-003).
Two hours after you start the airflow operation, do a one-point test bench calibration for each airflow parameter by the procedure given in Step. Refer to Figure and the Engine Manual TASK 72-45-14-200-000 (INSPECTION-000).
Do the airflow check on the blade assembly. Refer to the four sets of airflow limits and tests in the Engine Manual TASK 72-45-14-200-000 (INSPECTION-000) and Figure.
SUBTASK 70-72-01-720-008 Airflow Testing the Stage 1 HPT Blade Assembly
NOTE
Do all the inspections and repairs on the vane cluster assembly or vane assembly before you do the airflow check.
Do the procedure in the sequences given for accurate airflow data. Make sure you do all the steps.
This procedure is for the A1/A5/D5 models.
NOTE
To get accurate airflow results, you must leak check and calibrate the test bench. The vane performance and engine efficiency are directly related to the correct airflow procedure.If the test bench has absolute pressure gages, add the psig value given in the procedure to the ambient atmospheric pressure to get the psia value.Select the sonic nozzle with the correct throat diameter. Use the mathematical method of nozzle selection given in the SPM TASK 70-72-02-720-501, SUBTASK 70-72-02-720-007.
Set up the IAE 6P16080 Test bench 1 off (Refer to Figure).
Calculate the values for the pressure ratio method of airflow check. Use the applicable airflow test limit table in the Engine Manual TASK 72-45-24-200-000 (INSPECTION-000) and Figure.
If the rate of pressure decrease is more than 0.5 psig (3.4 kPa) for one minute, use CoMat 10-045 LEAK CHECK FLUID, BUBBLES-TYPE to find the source of the leak. The leaks must be repaired to get an accurate vane airflow result.
Do a leak check on the airflow fixture.
Set the P1 equal to the pressure related with the one largest individual vane flow parameter (Refer to the applicable airflow limits table in the Engine Manual TASK 72-45-24-200-000 (INSPECTION-000) and Figure for the calculations of the P1 pressure) without the vane cluster in the fixture.
Do the check again.
NOTE
The vane cluster or an individual vane with or without the borescope hole can be airflow tested in the airflow fixture. Only one passage in one vane of the cluster can be airflow tested at a time.NOTE
The two primary errors caused when you do the airflow check are:The air will leak at the interface between the engine part that is tested and the rubber grommets or the gaskets that seal the engine part to the airflow fixture.
The allowance for atmospheric pressure changes that are not made in the calculated gage pressure.
Do an airflow restriction check on the airflow fixture.
Set up and leak check the vane airflow fixture and the test bench.
Set up the test bench to do the airflow check by the applicable limits and locations. (Refer to the Engine Manual TASK 72-45-24-200-000 (INSPECTION/CHECK-000) and Figure).
Do a one-point test bench calibration by the procedure given in Step. (Refer to the Engine Manual TASK 72-45-24-200-000 (INSPECTION-000) and Figure).
If applicable, when you have air leakage from the vane assembly cannon hole, remove the vane assembly from the insert and seal the front passage and install a locally made plug in the cannon hole. Use masking wax compound or heat reflective tape. Install the vane assembly in the insert and do step (h) again. (Refer to Figure).
Do the airflow check by the limits given. Refer to the Engine Manual TASK 72-45-24-200-000 (INSPECTION-000) and Figure.
Accept the airflow on the vane rear air passage if the flow is within the limits given in Step 9. of Figure.
Do the airflow check on the vane rear air passage. (Refer to Figure).
Set up the test bench to do the airflow check by the applicable limits and locations given. Refer to the Engine Manual TASK 72-45-24-200-000 (INSPECTION-000) and Figure.
Do a one-point test bench calibration by the procedure given in Step. Refer to Engine Manual TASK 72-45-24-200-000 (INSPECTION-000) and Figure.
Block the front flange cooling holes with CoMat 02-021 MASKING WAX COMPOUND or CoMat 02-047 TAPE, HEAT REFLECTIVE.
If applicable, when you have air leakage from the vane assembly trailing edge cooling air slots, remove the vane assembly from the insert. Seal the vane passage D and the trailing edge cooling air slots. Use masking wax compound or heat reflective tape. Install the vane assembly in the insert and do step (h) again. (Refer to Figure).
Do the airflow check by the limits given. Refer to the Engine Manual TASK 72-45-24-200-000 (INSPECTION-000) and Figure.
Accept the airflow on the vane rear air passage if the flow is within the limits given in Step 9. of Figure.
Do the airflow check on the vane front air passage - leading edge cooling hole. (Refer to Figure).
Set up the test bench to do the air flow check by the applicable limits and locations given. Refer to Engine Manual TASK 72-45-24-200-000 (INSPECTION/CHECK-000) and Figure.
Do a one-point test bench calibration by the procedure given in Step. Refer to Engine Manual TASK 72-45-24-200-000 (INSPECTION-000) and Figure.
Block the leading edge cooling holes with CoMat 02-021 MASKING WAX COMPOUND or CoMat 02-047 TAPE, HEAT REFLECTIVE.
If applicable, when you have air leakage from the vane assembly trailing edge cooling air slots, remove the vane assembly from the insert. Seal the vane passage D and the trailing edge cooling air slots. Use CoMat 02-021 MASKING WAX COMPOUND or CoMat 02-047 TAPE, HEAT REFLECTIVE. Install the vane assembly in the insert and do step (h) again. (Refer to Figure).
Do the airflow check by the limits given. Refer to the Engine Manual TASK 72-45-24-200-000 (INSPECTION-000) and Figure.
Accept the airflow on the vane rear air passage if the flow is within the limits given in Step 9. of Figure.
Do the airflow check on the vane front air passage - inner flange cooling hole(s). (Refer to Figure).
If the atmospheric pressure has changed more than 0.1 psia (0.7 kPa) or more than 0.2 inch Hg (5.2 mm Hg or 0.7 kPa), stop the test on the vanes. Do a one-point test bench calibration and calculate the new gage pressure by the procedure given in Step. Use the new limits when you check the vanes.
If there is leakage, repair or replace the insert or repair the test bench as necessary and do Step (e) again.
NOTE
The continuous 15-minute cycle, when you check the change in the atmospheric pressure, must be done to make sure that the gage pressures that are used as limits are accurate. An atmospheric pressure change, without a change in the pre-calculated gage pressure, makes an error in the airflow test results. For example, in the equation PR x Pa = P3, if the vane PR is 2.470 psia (17.0 kPa) then a 0.1 psia (0.7 kPa) or 0.2 inch Hg (5.2 mm Hg) change in the atmospheric pressure becomes a 0.247 psia (1.7 kPa) error in the P3 pressure. This is approximately a 0.7 percent error. The continuous 15-minute cycle, when you install the locally made plug, is necessary to monitor the condition of the airflow insert on the airflow fixture. If three or four vanes, one after the other, are rejected for high flow, do not wait the full 15 minutes to do the checks.
Fifteen minutes after you start the vane airflow operation do the checks that follow:
Ultrasonic clean the vanes by the procedure given in the SPM TASK 70-13-01-100-501 but flush fully the inside of the vanes with hot water. Flush and air dry fully. If necessary, use 0.017 inch (0.43 mm) diameter wire or equivalent to put into the trailing edge cooling air slots to clean the air passage.
Reject all the vanes that have less airflow than the limits given on the worksheet Step 9. of Figure.
Do the procedure that follows on the vane or the vane cluster that has less airflow than the limits. Refer to the worksheet Step 9. for the vanes marked minus (-). (Refer to Figure.).
Remove the CoMat 02-021 MASKING WAX COMPOUND and the CoMat 02-047 TAPE, HEAT REFLECTIVE from the vane assembly airflow passages and cooling air holes.
Two hours after you start the airflow operation, do a one-point test bench calibration for each airflow parameter by the procedure given in Step. Refer to Figure and the Engine Manual TASK 72-45-24-200-000 (INSPECTION-000).
Clean the vane assembly by the procedure given in TASK 72-45-24-100-002 (CLEANING-002).
Do the airflow check on the vane cluster assembly and if applicable on an individual vane.
SUBTASK 70-72-01-720-009 Airflow Testing the Stage 2 HPT Ring Segment and Vane Clusters
NOTE
Do all the inspections and repairs on the vane cluster assembly or vane assembly before you do the airflow check.
Do the procedure in the sequences given for accurate airflow data. Make sure you do all the steps.
This procedure is for the A1/A5/D5 models.
NOTE
To get accurate results, you must leak check and calibrate the test bench. The blade performance and engine efficiency are directly related to the correct airflow procedure.If the test bench has absolute pressure gages, add the psig value given in the procedure to the ambient atmospheric pressure to get the psia value.Select the sonic nozzle with the correct throat diameter. Use the mathematical method of nozzle selection given in the SPM TASK 70-72-02-720-501, SUBTASK 70-72-02-720-007.
Set up the IAE 6P16080 Test bench 1 off. Refer to Figure.
Calculate the values for the pressure ratio method of airflow check. Refer to the airflow limits table in the Engine Manual TASK 72-45-32-200-000 (INSPECTION-000) and use the pressure ratio method worksheet procedure in Figure.
If the test bench has absolute P1 and P3 pressure gages with adjustable dials, adjust the dials to indicate atmospheric pressure or zero the gages if the gages indicate psig (at zero air pressure).
NOTE
If the test bench has absolute pressure gages, add 9 psig (62.1 kPa) to the atmospheric pressure (in psia) to find the leak check pressure.If the rate of pressure decrease is more than 0.5 psig (3.4 kPa) for 40 seconds, use CoMat 10-045 LEAK CHECK FLUID, BUBBLES-TYPE to find the source of the leak. The leaks must be repaired to get accurate blade airflow results.
Do a leak check on the airflow fixture.
Set the P1 equal to the pressure related with the one largest individual blade flow parameter (refer to Figure) for the calculations of the P1 pressure) without the blade assembly in the fixture.
Correct the cause of the restriction and do the check again.
NOTE
The two primary errors caused when you do the airflow check are:The air will leak at the interface between the engine part that is tested and the rubber grommets or the gaskets that seal the engine part to the airflow fixture.
The allowance for atmospheric pressure changes that are not made in the calculated gage pressure.
Do an airflow restriction check on the airflow fixture each time the fixture is installed.
Set up and leak check the blade airflow fixture and the test bench.
Set up the test bench to do the airflow check by the application limits and locations given. Refer to the Engine Manual TASK 72-45-32-200-000 (INSPECTION-000), Figure and Figure.
Do a one-point test bench calibration by the procedure given in Step.
Do the airflow check by the limits given. Refer to the Engine Manual TASK 72-45-32-200-000 (INSPECTION-000) and Figure.
Accept the airflow on each test of the blade airflow passage if the flow is within the limits given in Step 9. of Figure.
NOTE
Go to Step (2) if you have done the airflow operation for 15 minutes.
Do this procedure for each one of the tests given. Refer to the Engine Manual TASK 72-45-32-200-000 (INSPECTION-000). Use the applicable airflow master for each test.
If the atmospheric pressure changed more than 0.1 psia (0.7 kPa) or more than 0.2 inch Hg (5.2 mm Hg or 0.7 kPa), stop the test on the blades. Do a one-point test bench calibration and calculate the new gage pressure by the procedure given in Step. Use the new limits when you check the blade assembly.
If there is leakage, repair the leaks as necessary and do Step (f) again.
NOTE
The continuous 15-minute cycle, when you check the change in the atmospheric pressure, must be done to make sure that the gage pressures that are used as limits are accurate. An atmospheric pressure change, without a change in the pre-calculated gage pressure, makes an error in the airflow test results. For example, in the equation PR x Pa = P3, if the blade assembly PR is 2.470 psia (17.0 kPa), then a 0.1 psia (0.7 kPa) or 0.2 inch Hg (5.2 mm Hg) change in the atmospheric pressure becomes a 0.247 psia (1.7 kPa) error in the P3 pressure. This is approximately a 0.7 percent error. The continuous 15-minutes cycle, when you install the locally made plug, is necessary to monitor the condition of the airflow insert on the airflow fixture. If three or four blades, one after the other, are rejected for high flow, do not wait the full 15 minutes to do the checks.
Fifteen minutes after you start the blade assembly airflow operation, do these checks:
Ultrasonic clean the blade assembly by the procedure given in the SPM TASK 70-13-01-100-501 but flush the inside of the blades with hot water. Flush and air dry fully. If necessary, use 0.010 inch (0.254 mm) diameter wire or equivalent to put into the trailing edge cooling air slots to clean the air passage.
Reject the blade assembly that has less airflow than the limits given on the worksheet Step 9. of Figure.
Do the procedure that follows on the blade assembly that has less airflow than the limits. Refer to the worksheet Step 9. for the blades marked minus (-). (Refer to Figure).
Two hours after you start the airflow operation, do a one-point test bench calibration for each airflow parameter by the procedure given in Step. Refer to the Engine Manual TASK 72-45-32-200-000 (INSPECTION-000) and Figure.
Do the airflow check on the blade assembly. Refer to the airflow limits given in the Engine Manual TASK 72-45-32-200-000 (INSPECTION-000).
SUBTASK 70-72-01-720-010 Testing the Stage 2 HPT Blade Assembly
NOTE
The subsequent paragraphs give procedures to make an analysis of the airflow test problem plus steps for its solution.
NOTE
Measurements to calculate the shop air system operation are important only after you bleed down the shop air system for the period of time necessary to test a high airflow part. The subsequent check is an equivalent to test an engine part.
General.
Record the temperature and atmospheric pressures. Change the temperature to Rankine and the atmospheric pressure to psia. Refer to Step.
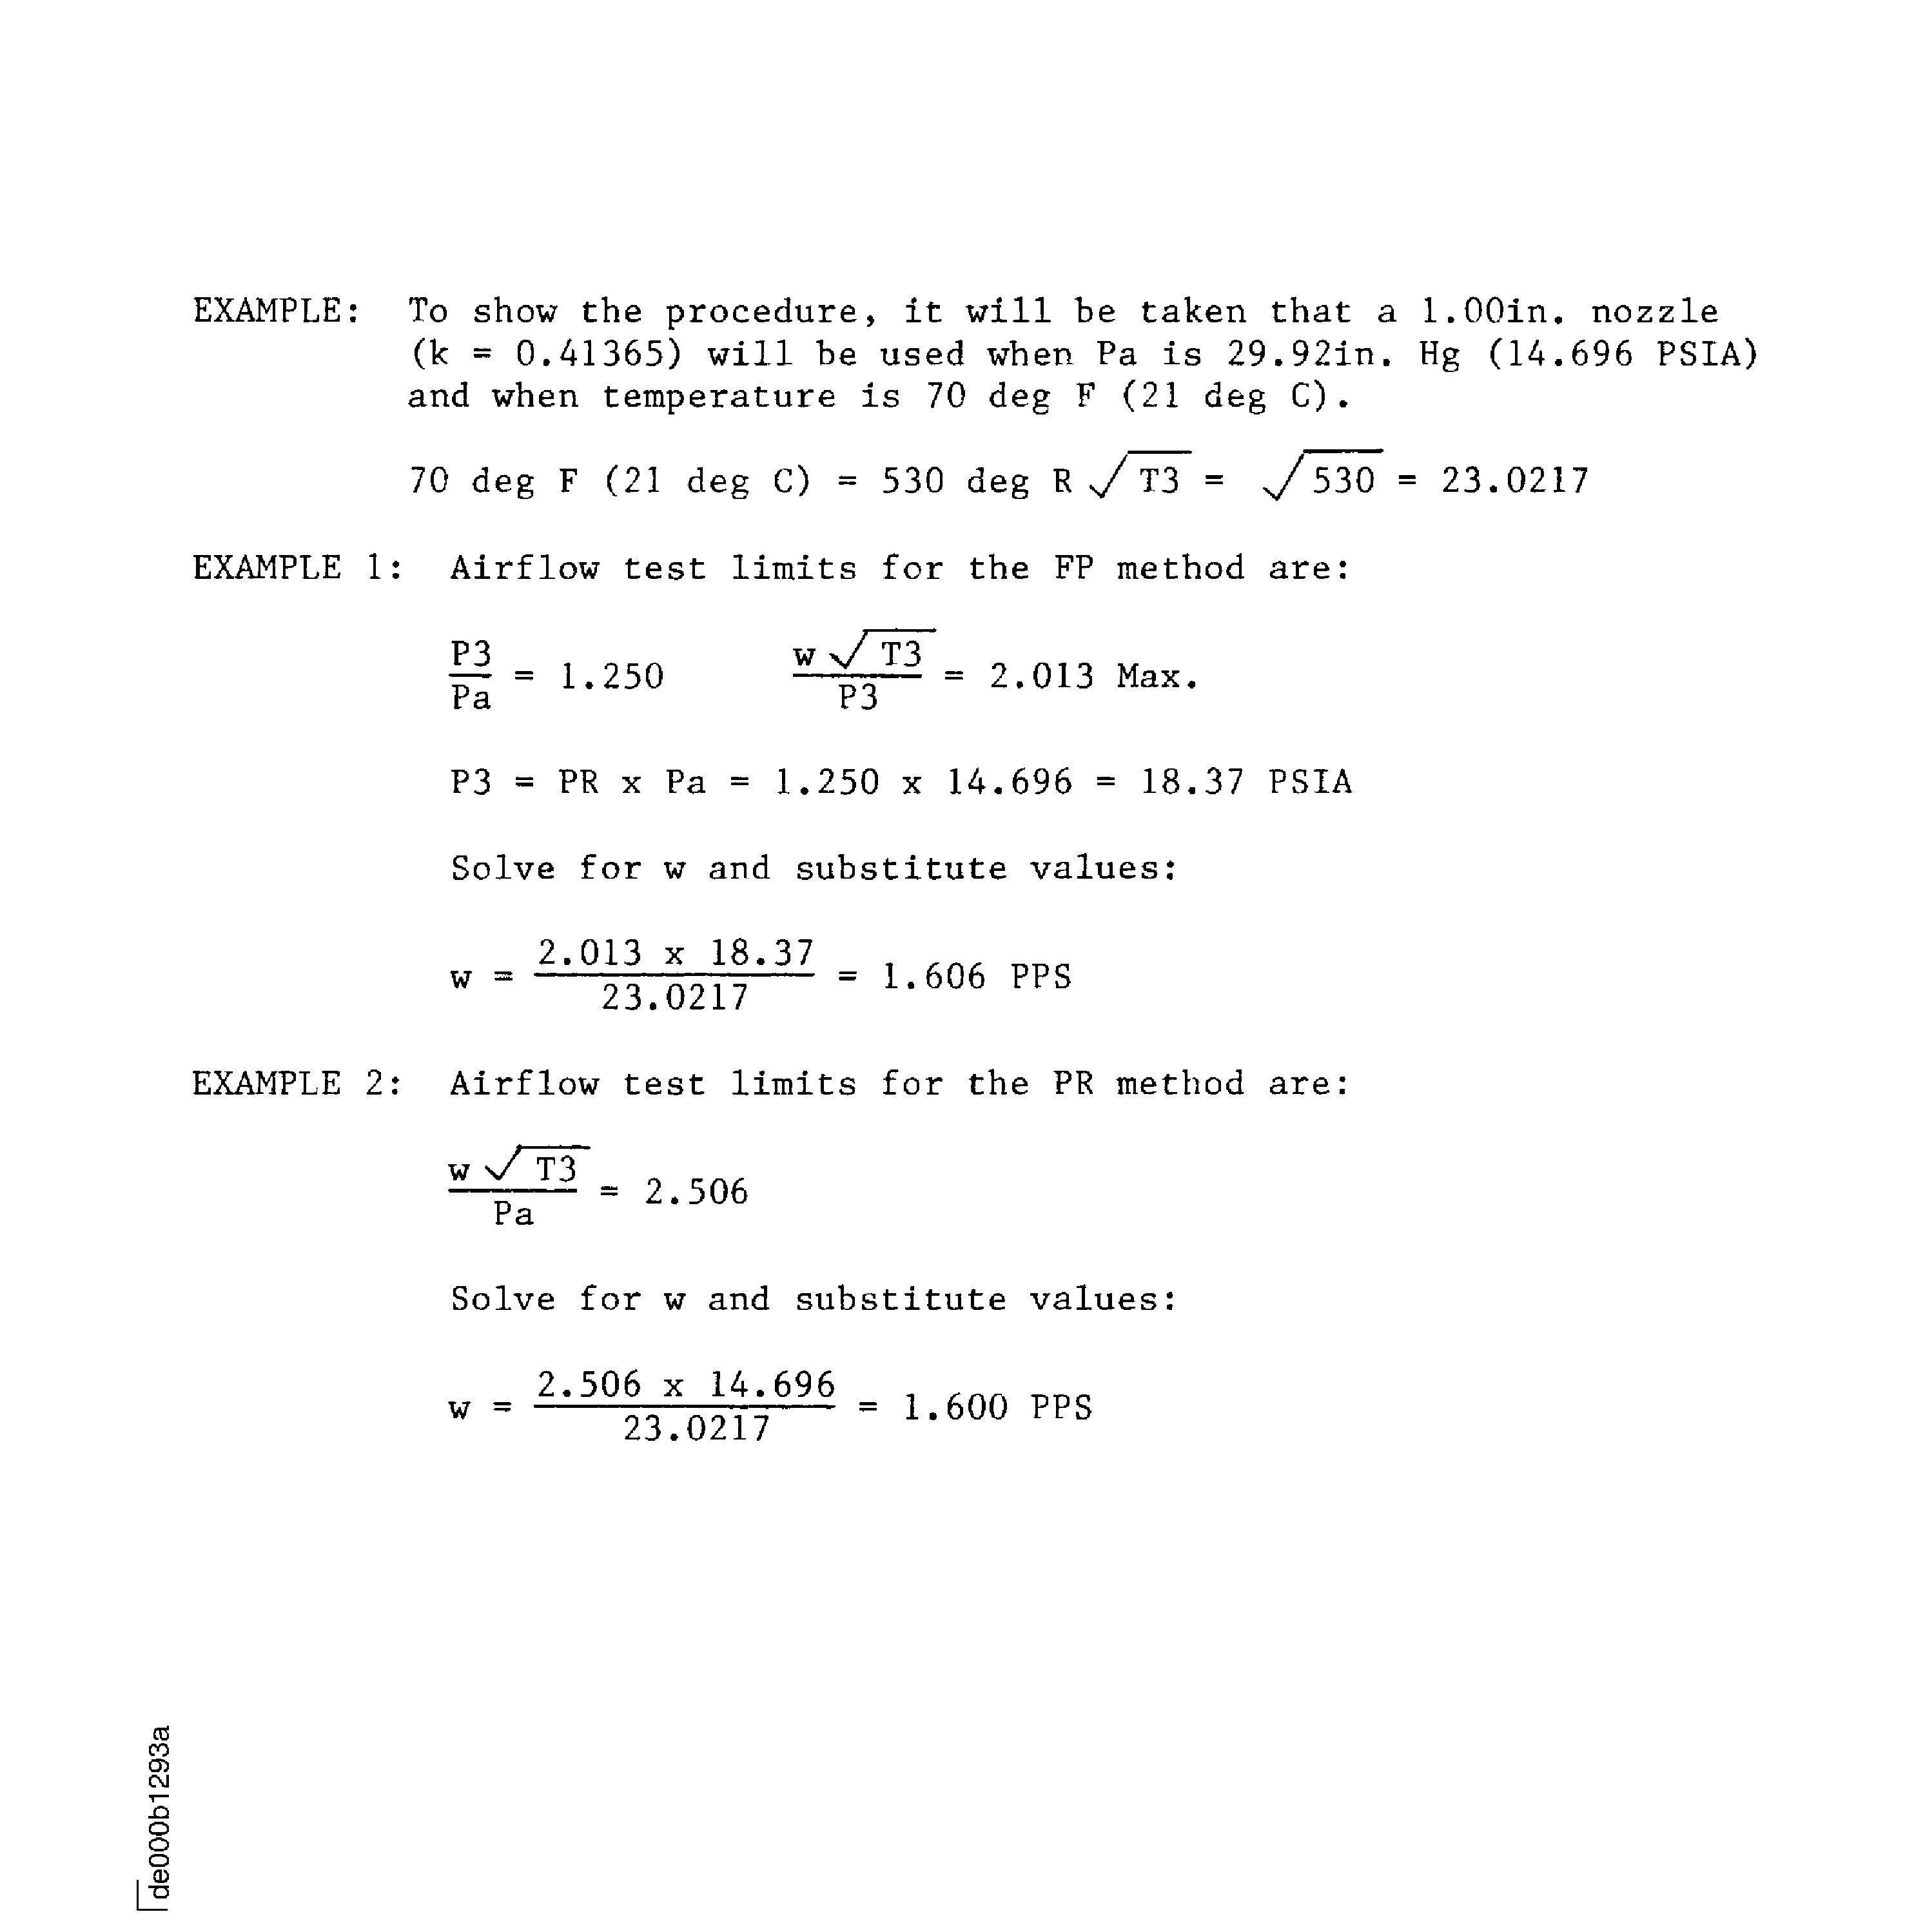
Example: 70 deg F (530 deg R) and 29.92 inches Hg (14.696 psia) will be used during the example.
Calculate the airflow in PPS and P1 (nozzle inlet) pressure necessary to test the highest flow engine part. Refer to Figure.
NOTE
If the time necessary to test the part is not known from other tests, use 20 seconds. During the time air flows continuously, increase the flow control valve opening to keep pressure on the P1 gage as constant as possible as the shop air system bleeds down. If the shop air system is defective, at some point in this procedure the flow control valve will be fully open. After which, more adjustment is not possible and pressure on the P1 gage will start to drop. The P1 pressure, which is important to this check, is that supplied by the shop air system at the end of the time period.Change the P1 gage pressure recorded at the end of the time period into airflow in PPS. Refer to Figure.
Calculate the volume of air available at the test bench.
Install a sonic nozzle whose throat diameter is as large as it is possible to use, when testing the lowest flow of the high flow parts. Refer to the SPM TASK 70-72-02-720-501.
The available air can be used satisfactorily with the use of steps (1) thru (4). If these steps are not sufficient to stop the problem, then a reservoir (accumulator) or more air compressors must be added to the shop air system.
NOTE
To add a reservoir is an alternative to air compressors, in that an increased volume of air is made available which can be expanded during the airflow test of an engine part.
A reservoir must be added only in relation with, or subsequent to, a pilot-operated pressure regulator.
A reservoir does not make pressure; it just extends the period of time during which the shop air system can supply a specified pressure.
To stop a problem in the shop air system operation, these steps are recommended:
Change the airflow test limits for the highest flow part to airflow in PSS. Refer to Figure.
NOTE
The factor 800.75 is from 60 seconds for each minute divided by 0.07493 which is the density of air at standard pressure (29.92in. Hg) and standard temperature 70 deg F (21 deg C).Change PPS to a standard cubic feet per minute or standard cubic feet/minute (SCFM) with the equation that follows:
SCFM = PSS x 800.75.
Example 1: 1.606 PPS x 800.75 = 1286.0 SCFM.
Example 2: 1.600 PPS x 800.75 = 1281.2 SCFM.
NOTE
The time necessary to test the engines part is the time to adjust the airflow, to set the pressure on one gage, check the pressure setting is stable and then read the other gage.Use the percentage calculated in Step paragraph B. Give the volume of air as the P1 pressure which must come from the reservoir.
Example: In the example used with Step paragraph B.(7), the shop air system was calculated to be 16 percent defective.
NOTE
With a pressure regulator installed to control the airflow, it would be possible, in theory, to dimension the reservoir to the volume calculated in step D.(6). In practice, the factor of five is used to take into consideration:Engine growth.Inaccuracies in the evaluation of the shop air system capability.Increased operation of the shop air system by other functions in the shop.16 percent of 70.5 cu ft = 11.28 cu ft from reservoir.
Calculate the size of a reservoir or accumulator.
SUBTASK 70-72-01-720-011 Troubleshooting
Figure: Acoustic damper
Acoustic damper
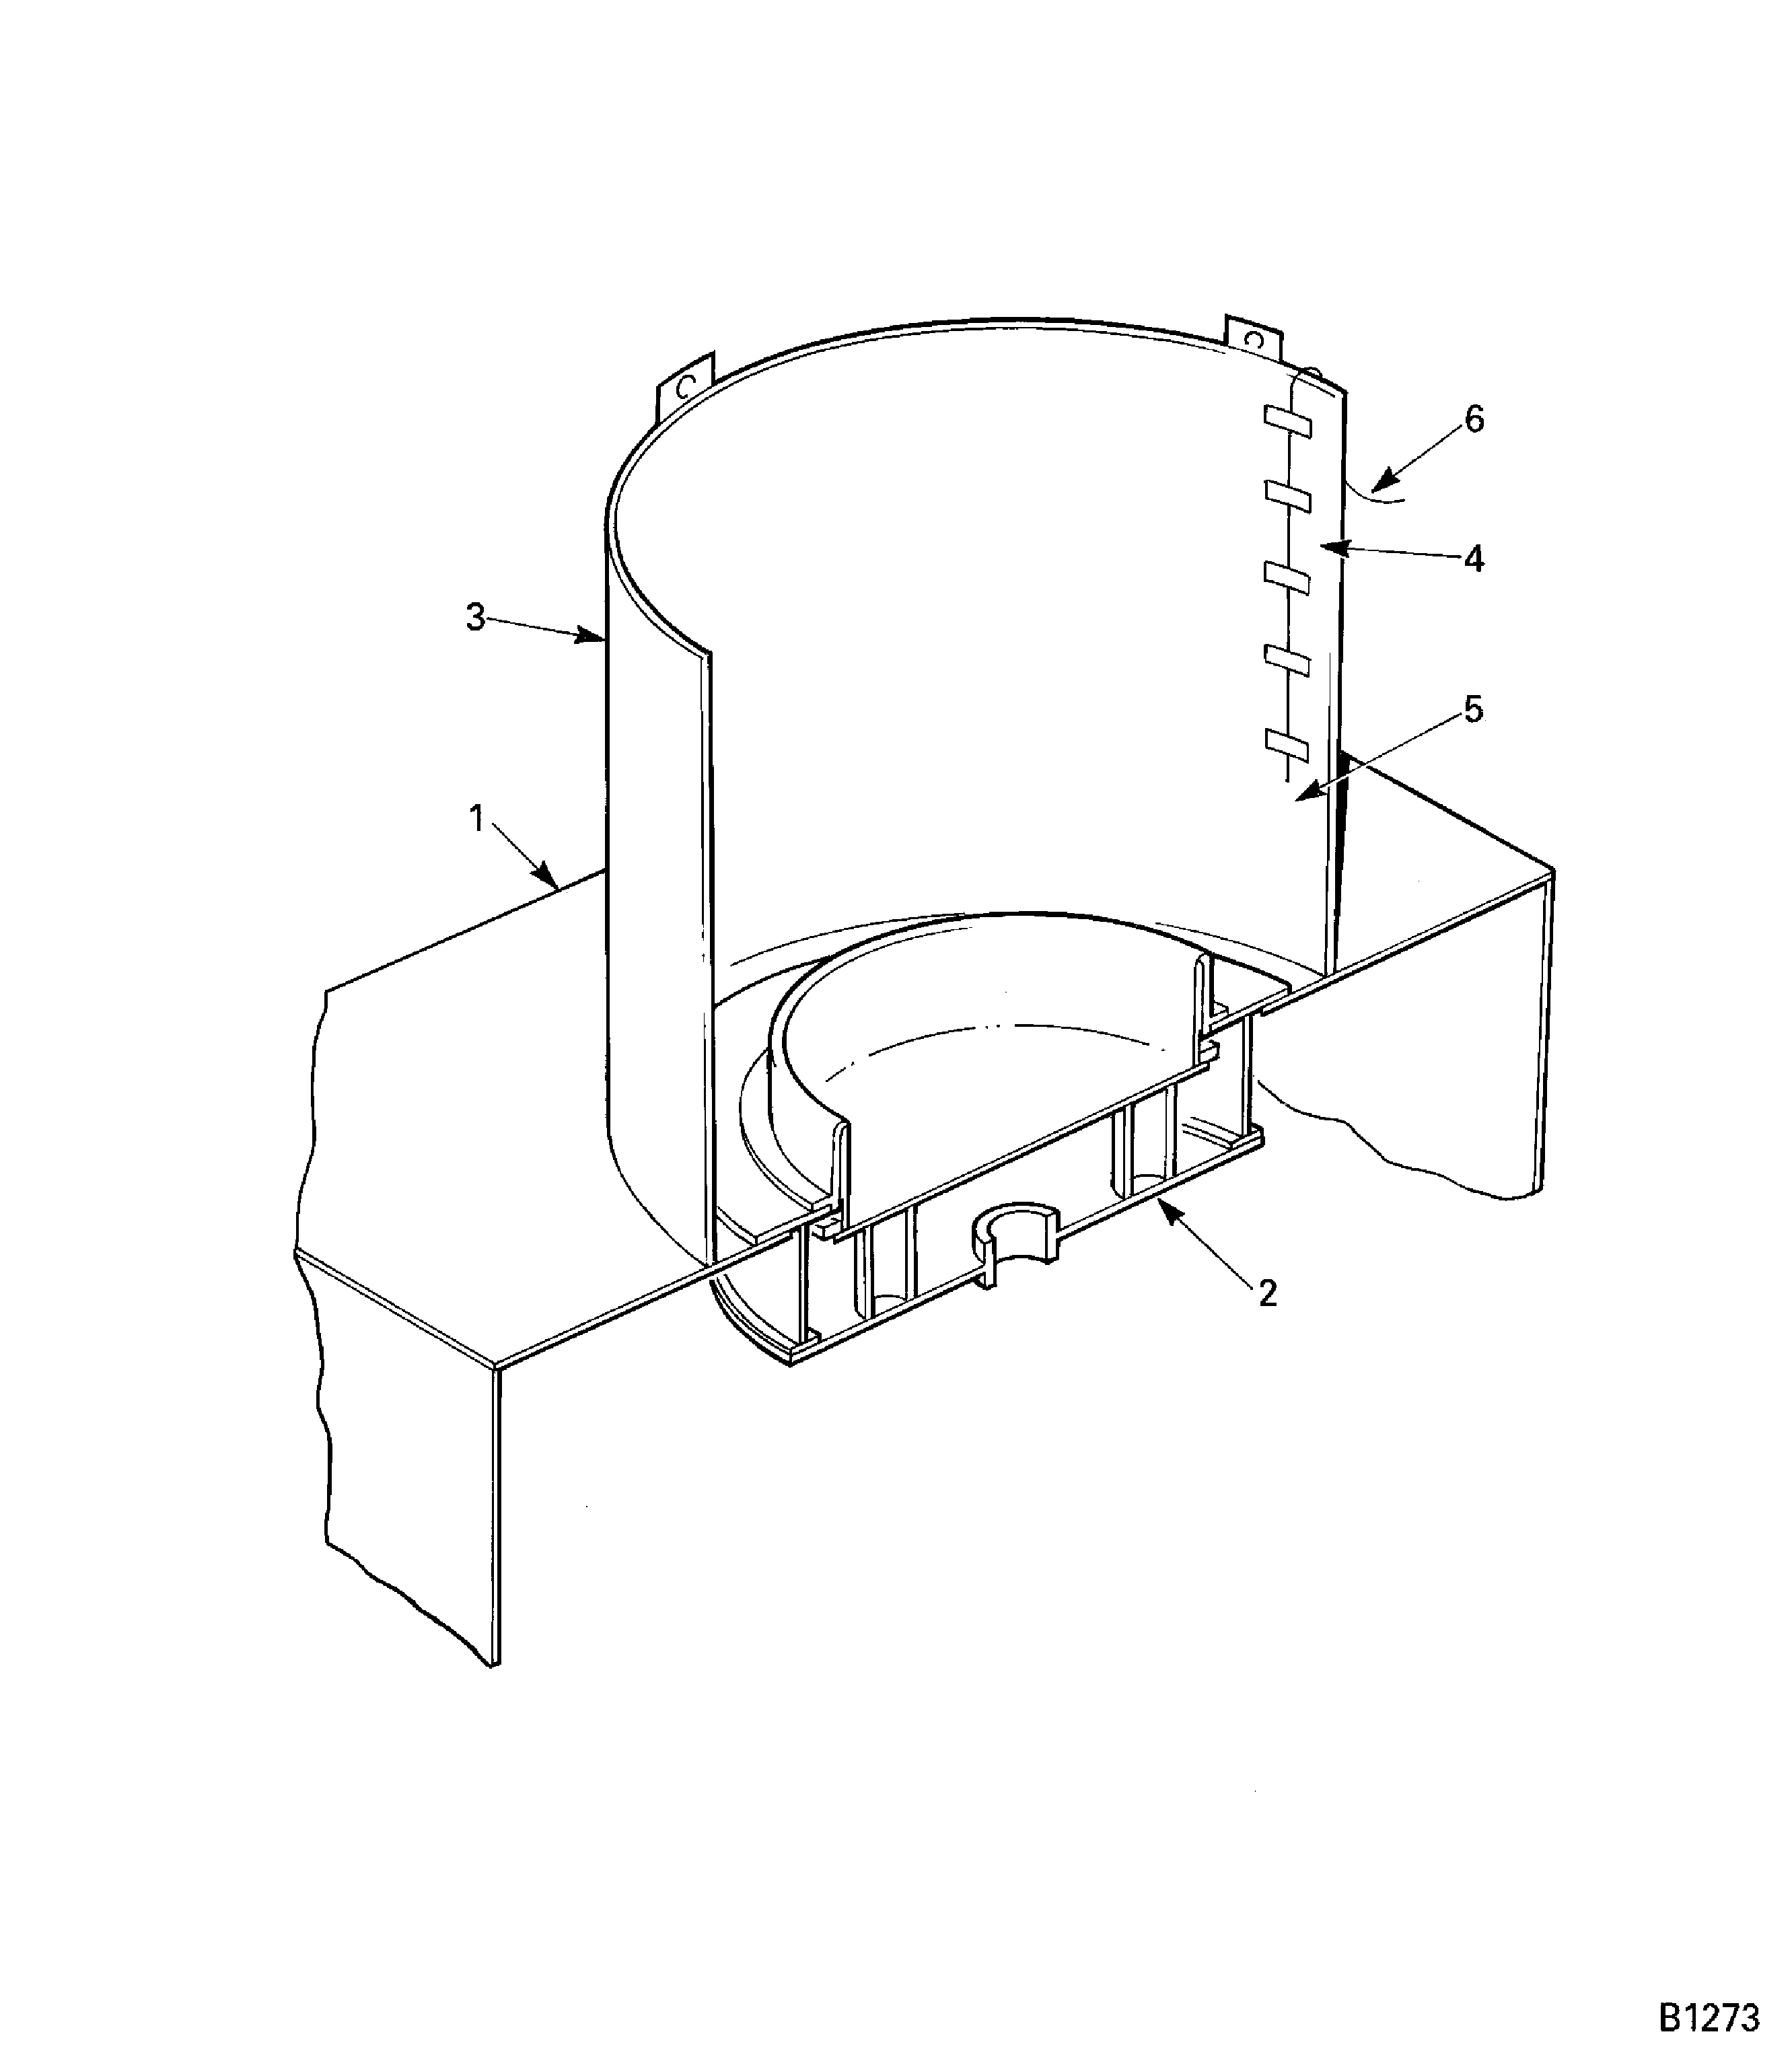
Figure: Pressure tap in chamber wall
Pressure tap in chamber wall
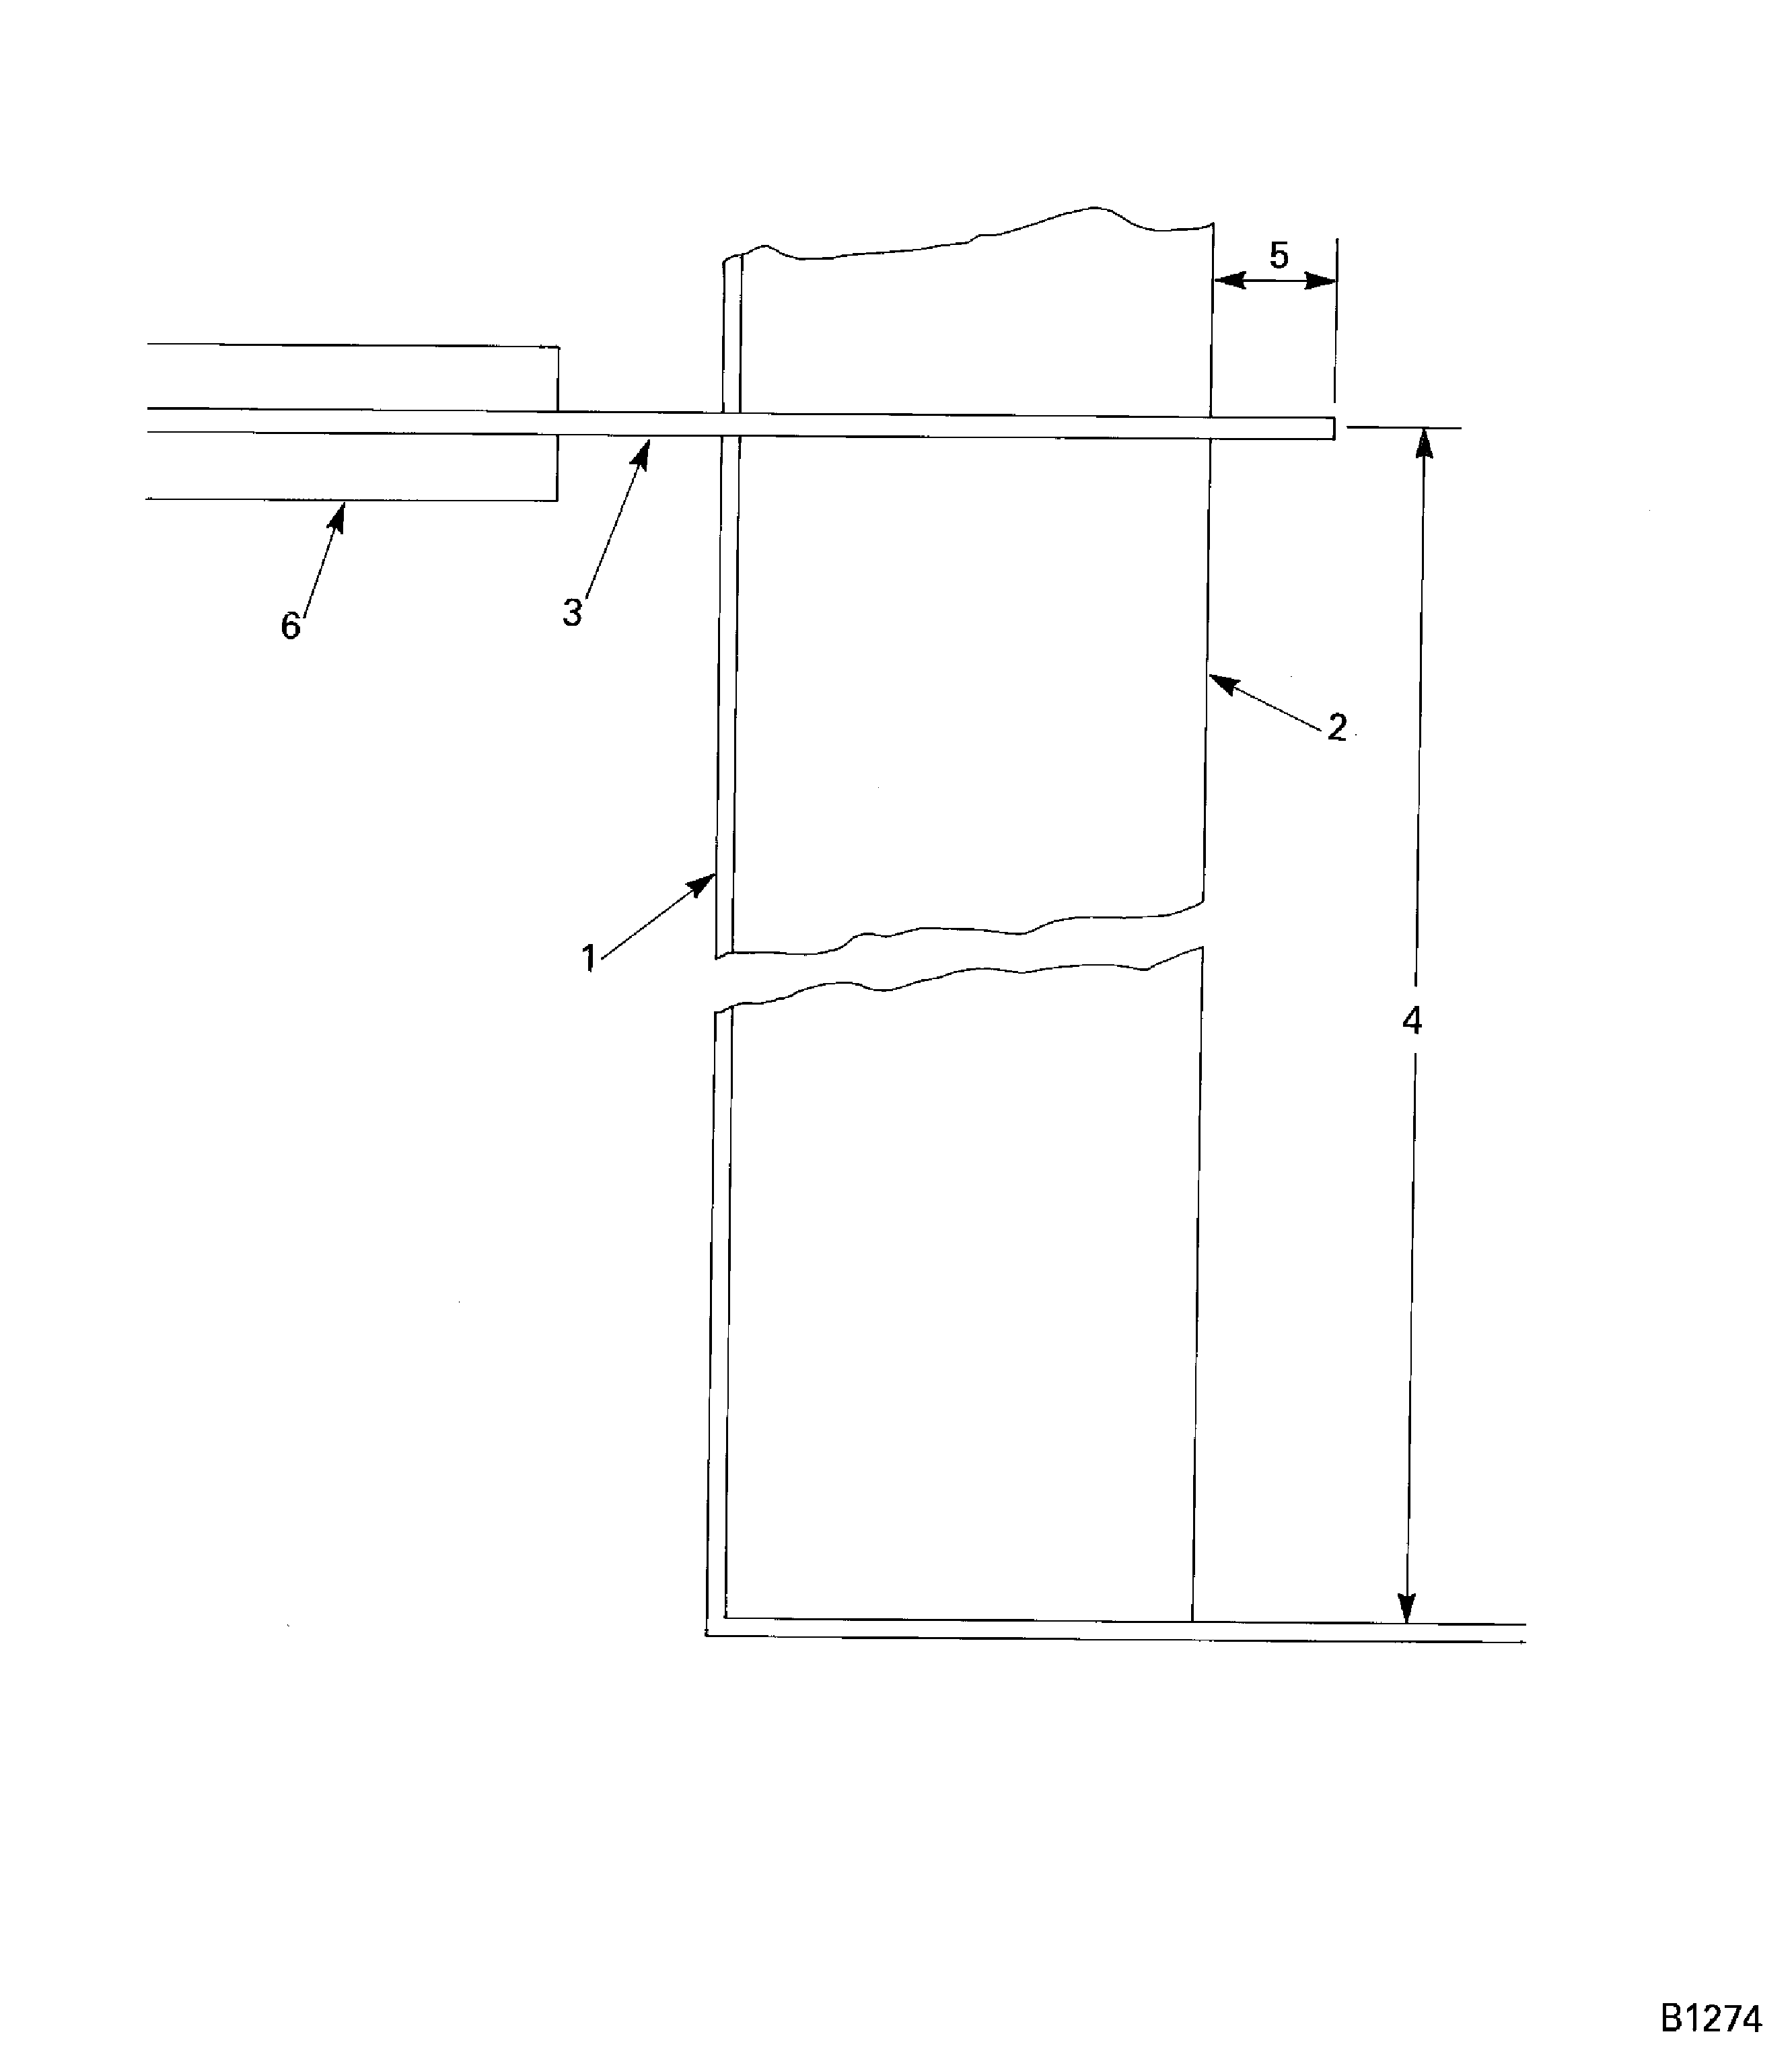
Figure: One-point test bench calibration. Master tool calibration by pressure ratio procedure. Sample worksheet 1 (Sheet 1)
One-point test bench calibration. Master tool calibration by pressure ratio procedure. Sample worksheet 1 (Sheet 1)
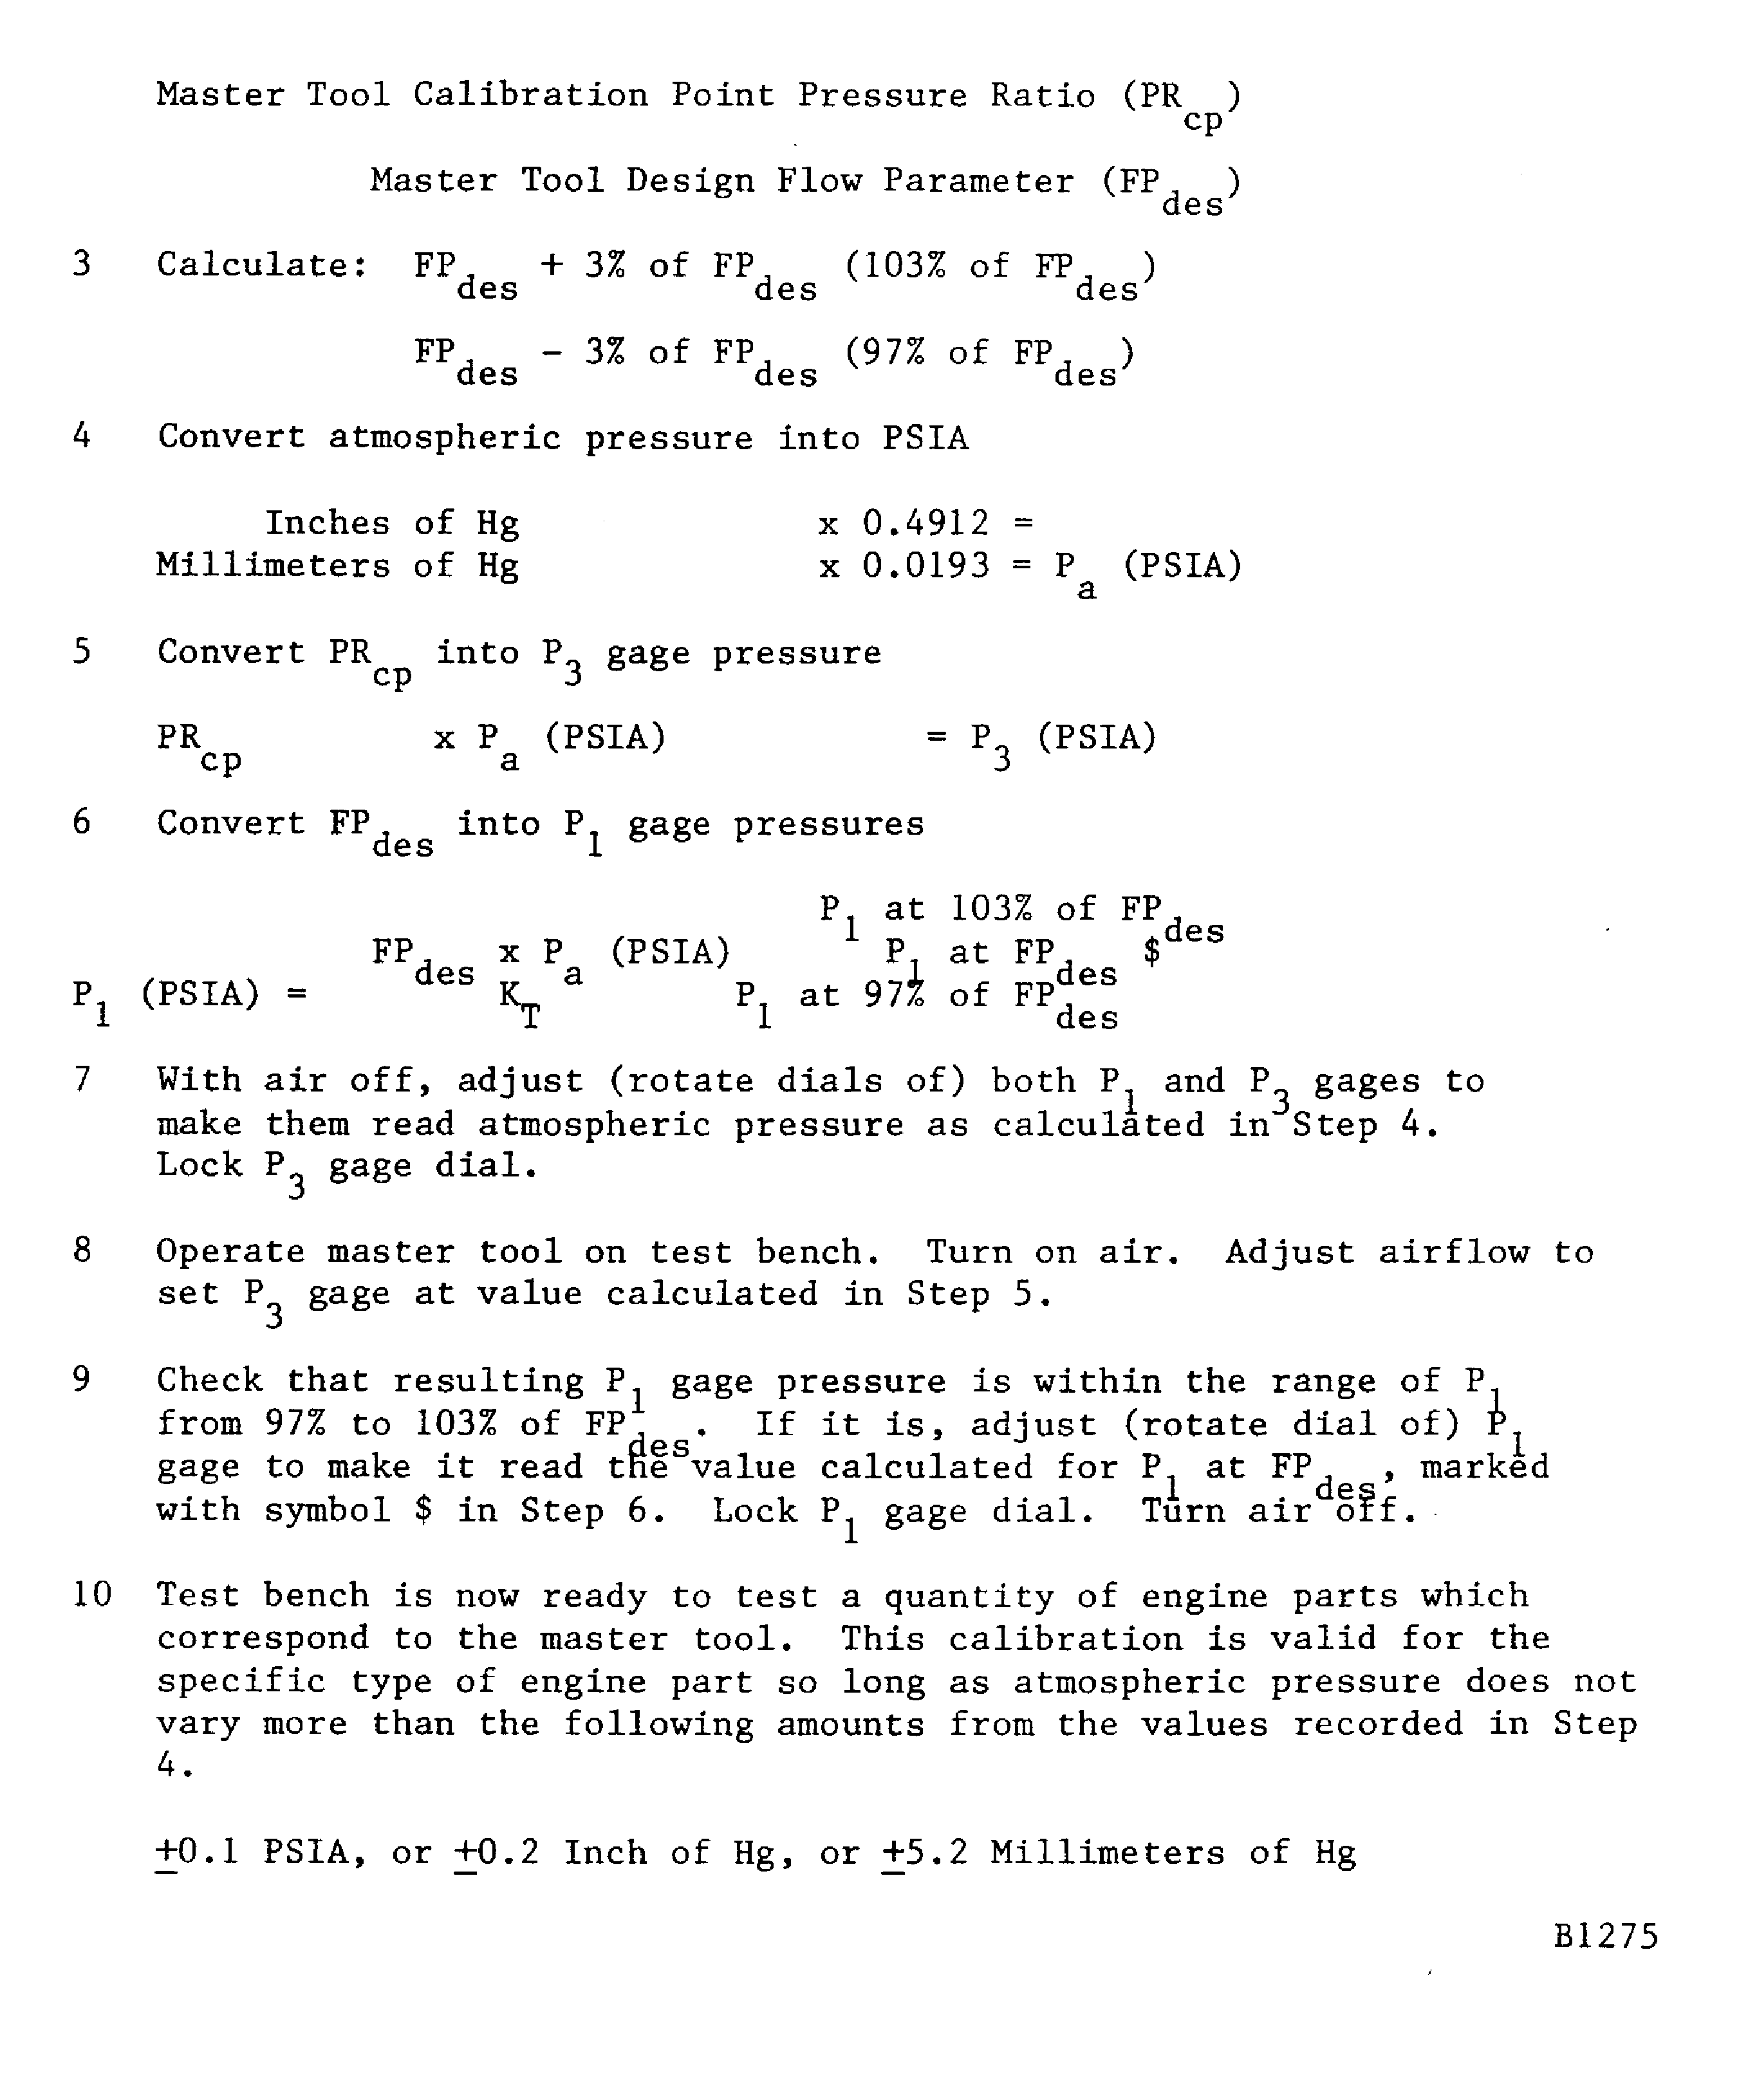
Figure: One-point test bench calibration. Master tool calibration by pressure ratio procedure. Sample worksheet 1 (Sheet 2)
One-point test bench calibration. Master tool calibration by pressure ratio procedure. Sample worksheet 1 (Sheet 2)
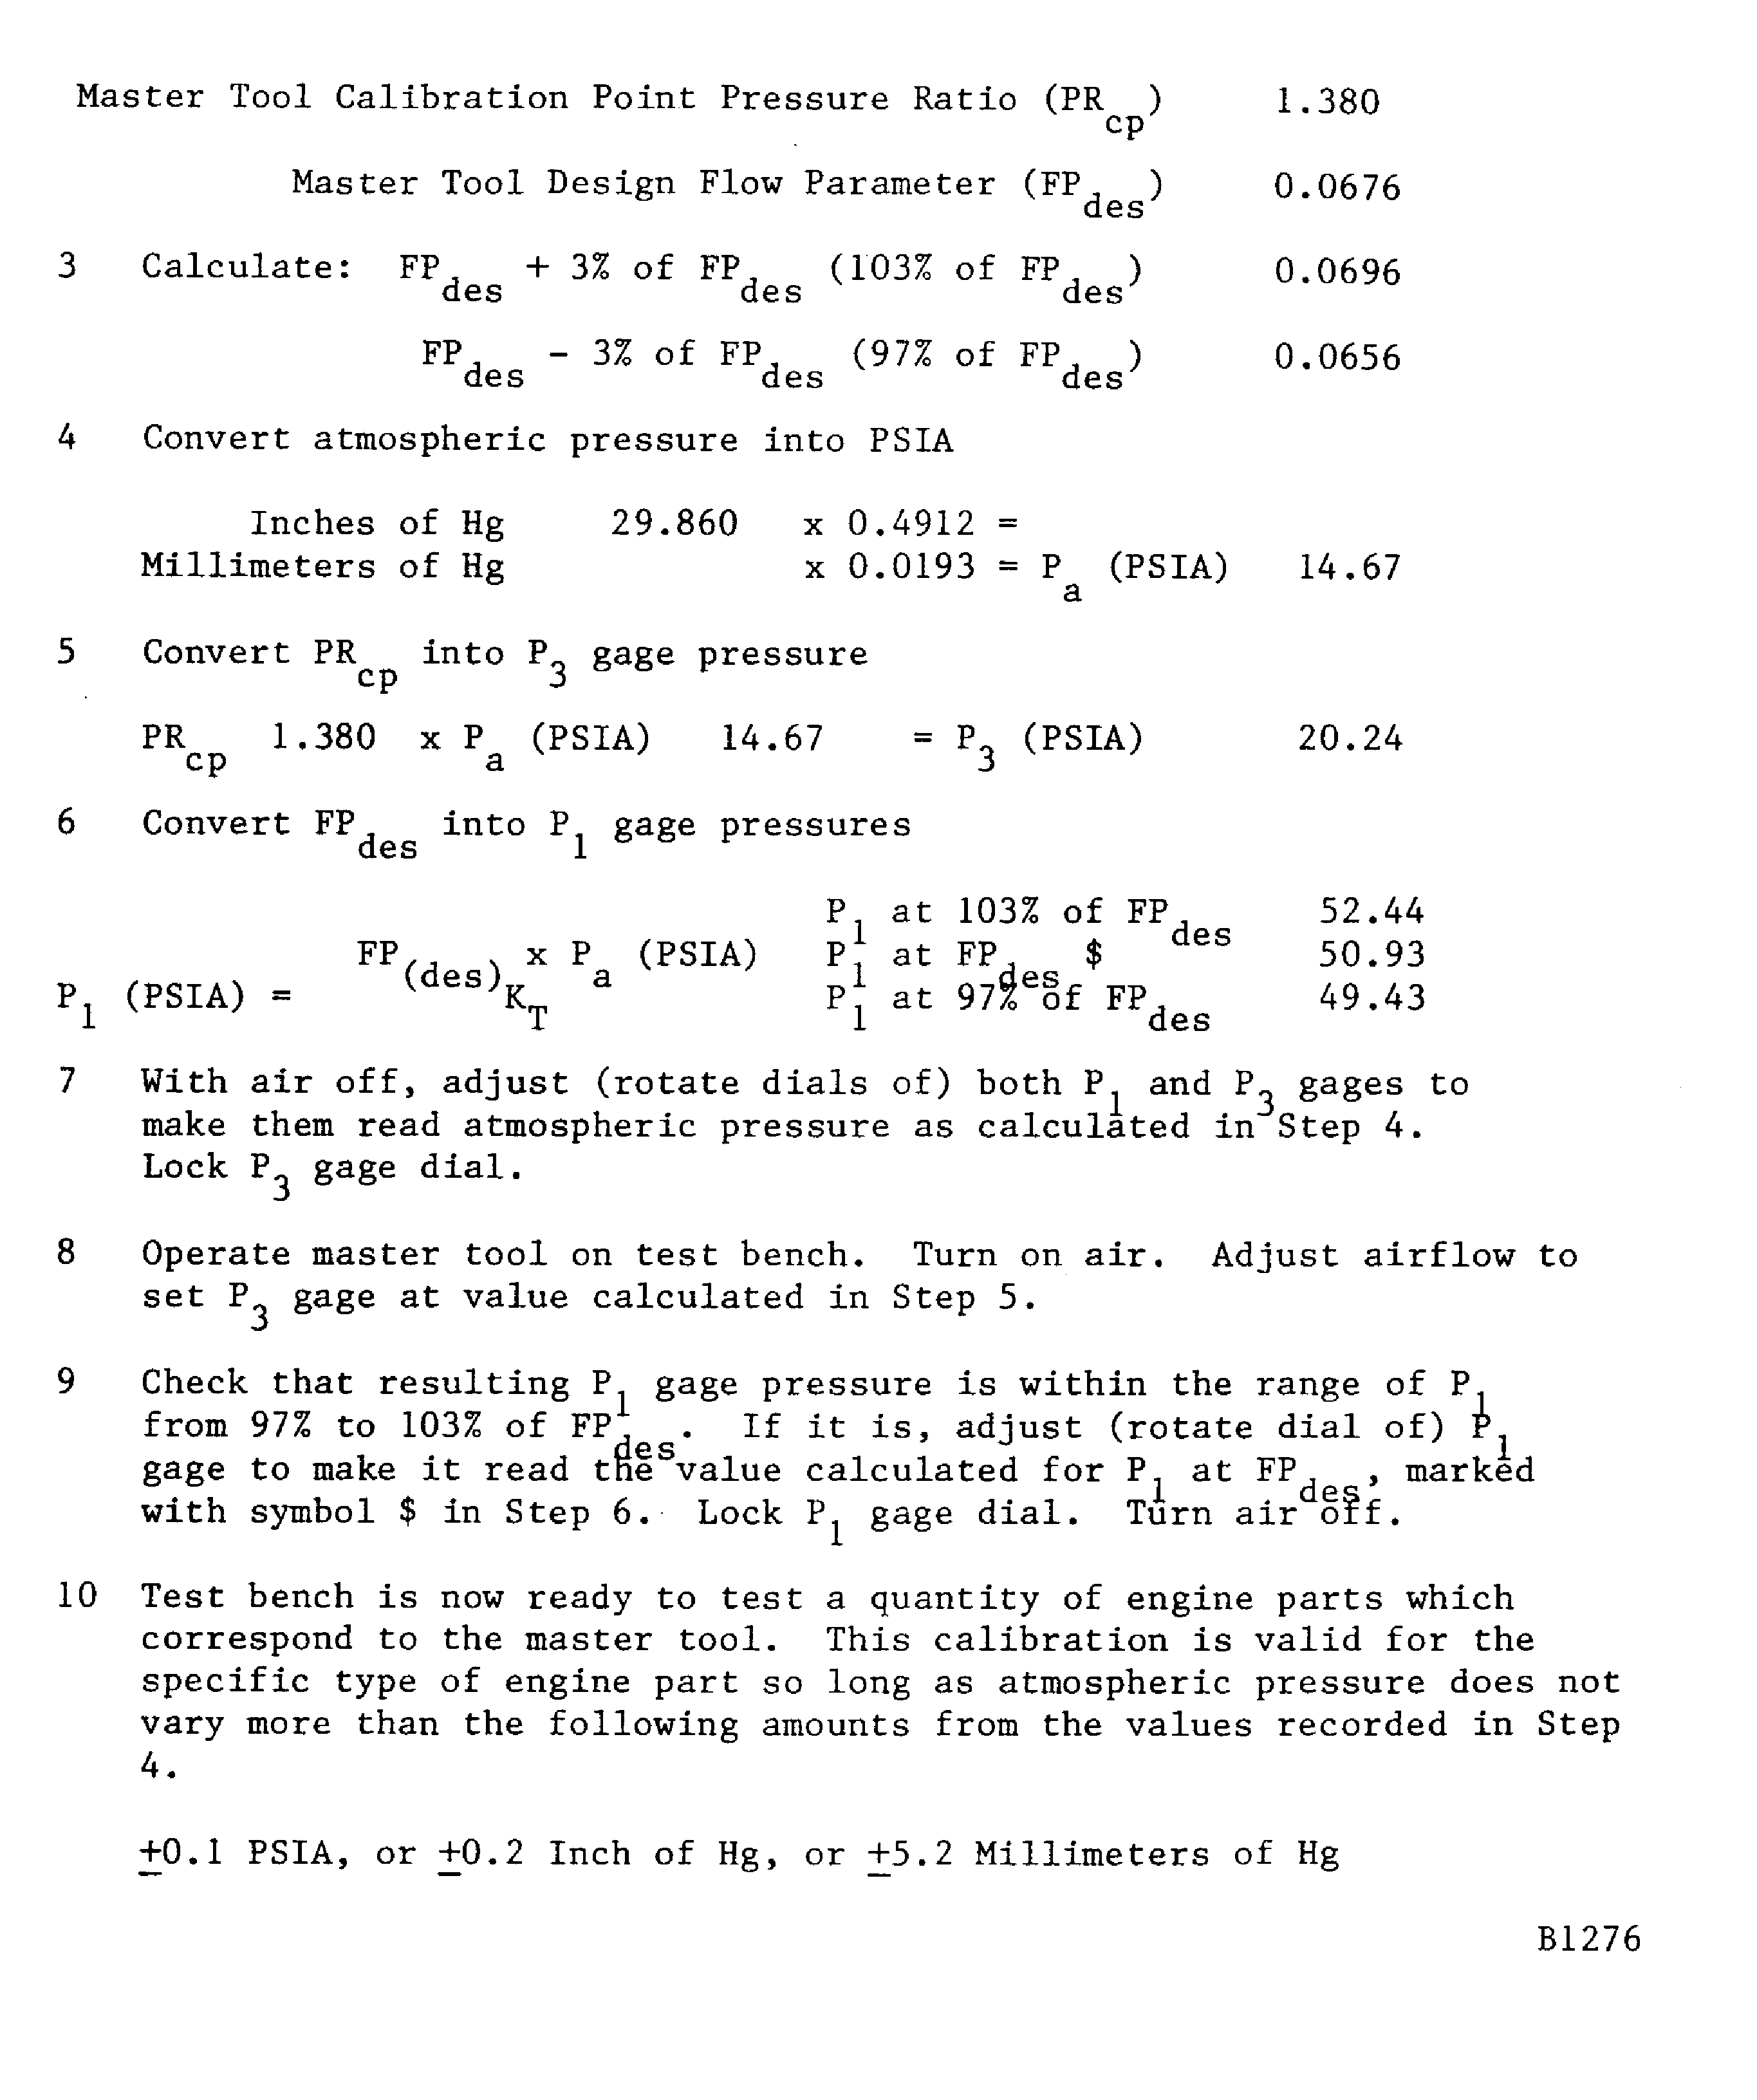
Figure: One-point test bench calibration. Master tool calibration by flow parameter procedure. Sample worksheet 2 (Sheet 1)
One-point test bench calibration. Master tool calibration by flow parameter procedure. Sample worksheet 2 (Sheet 1)
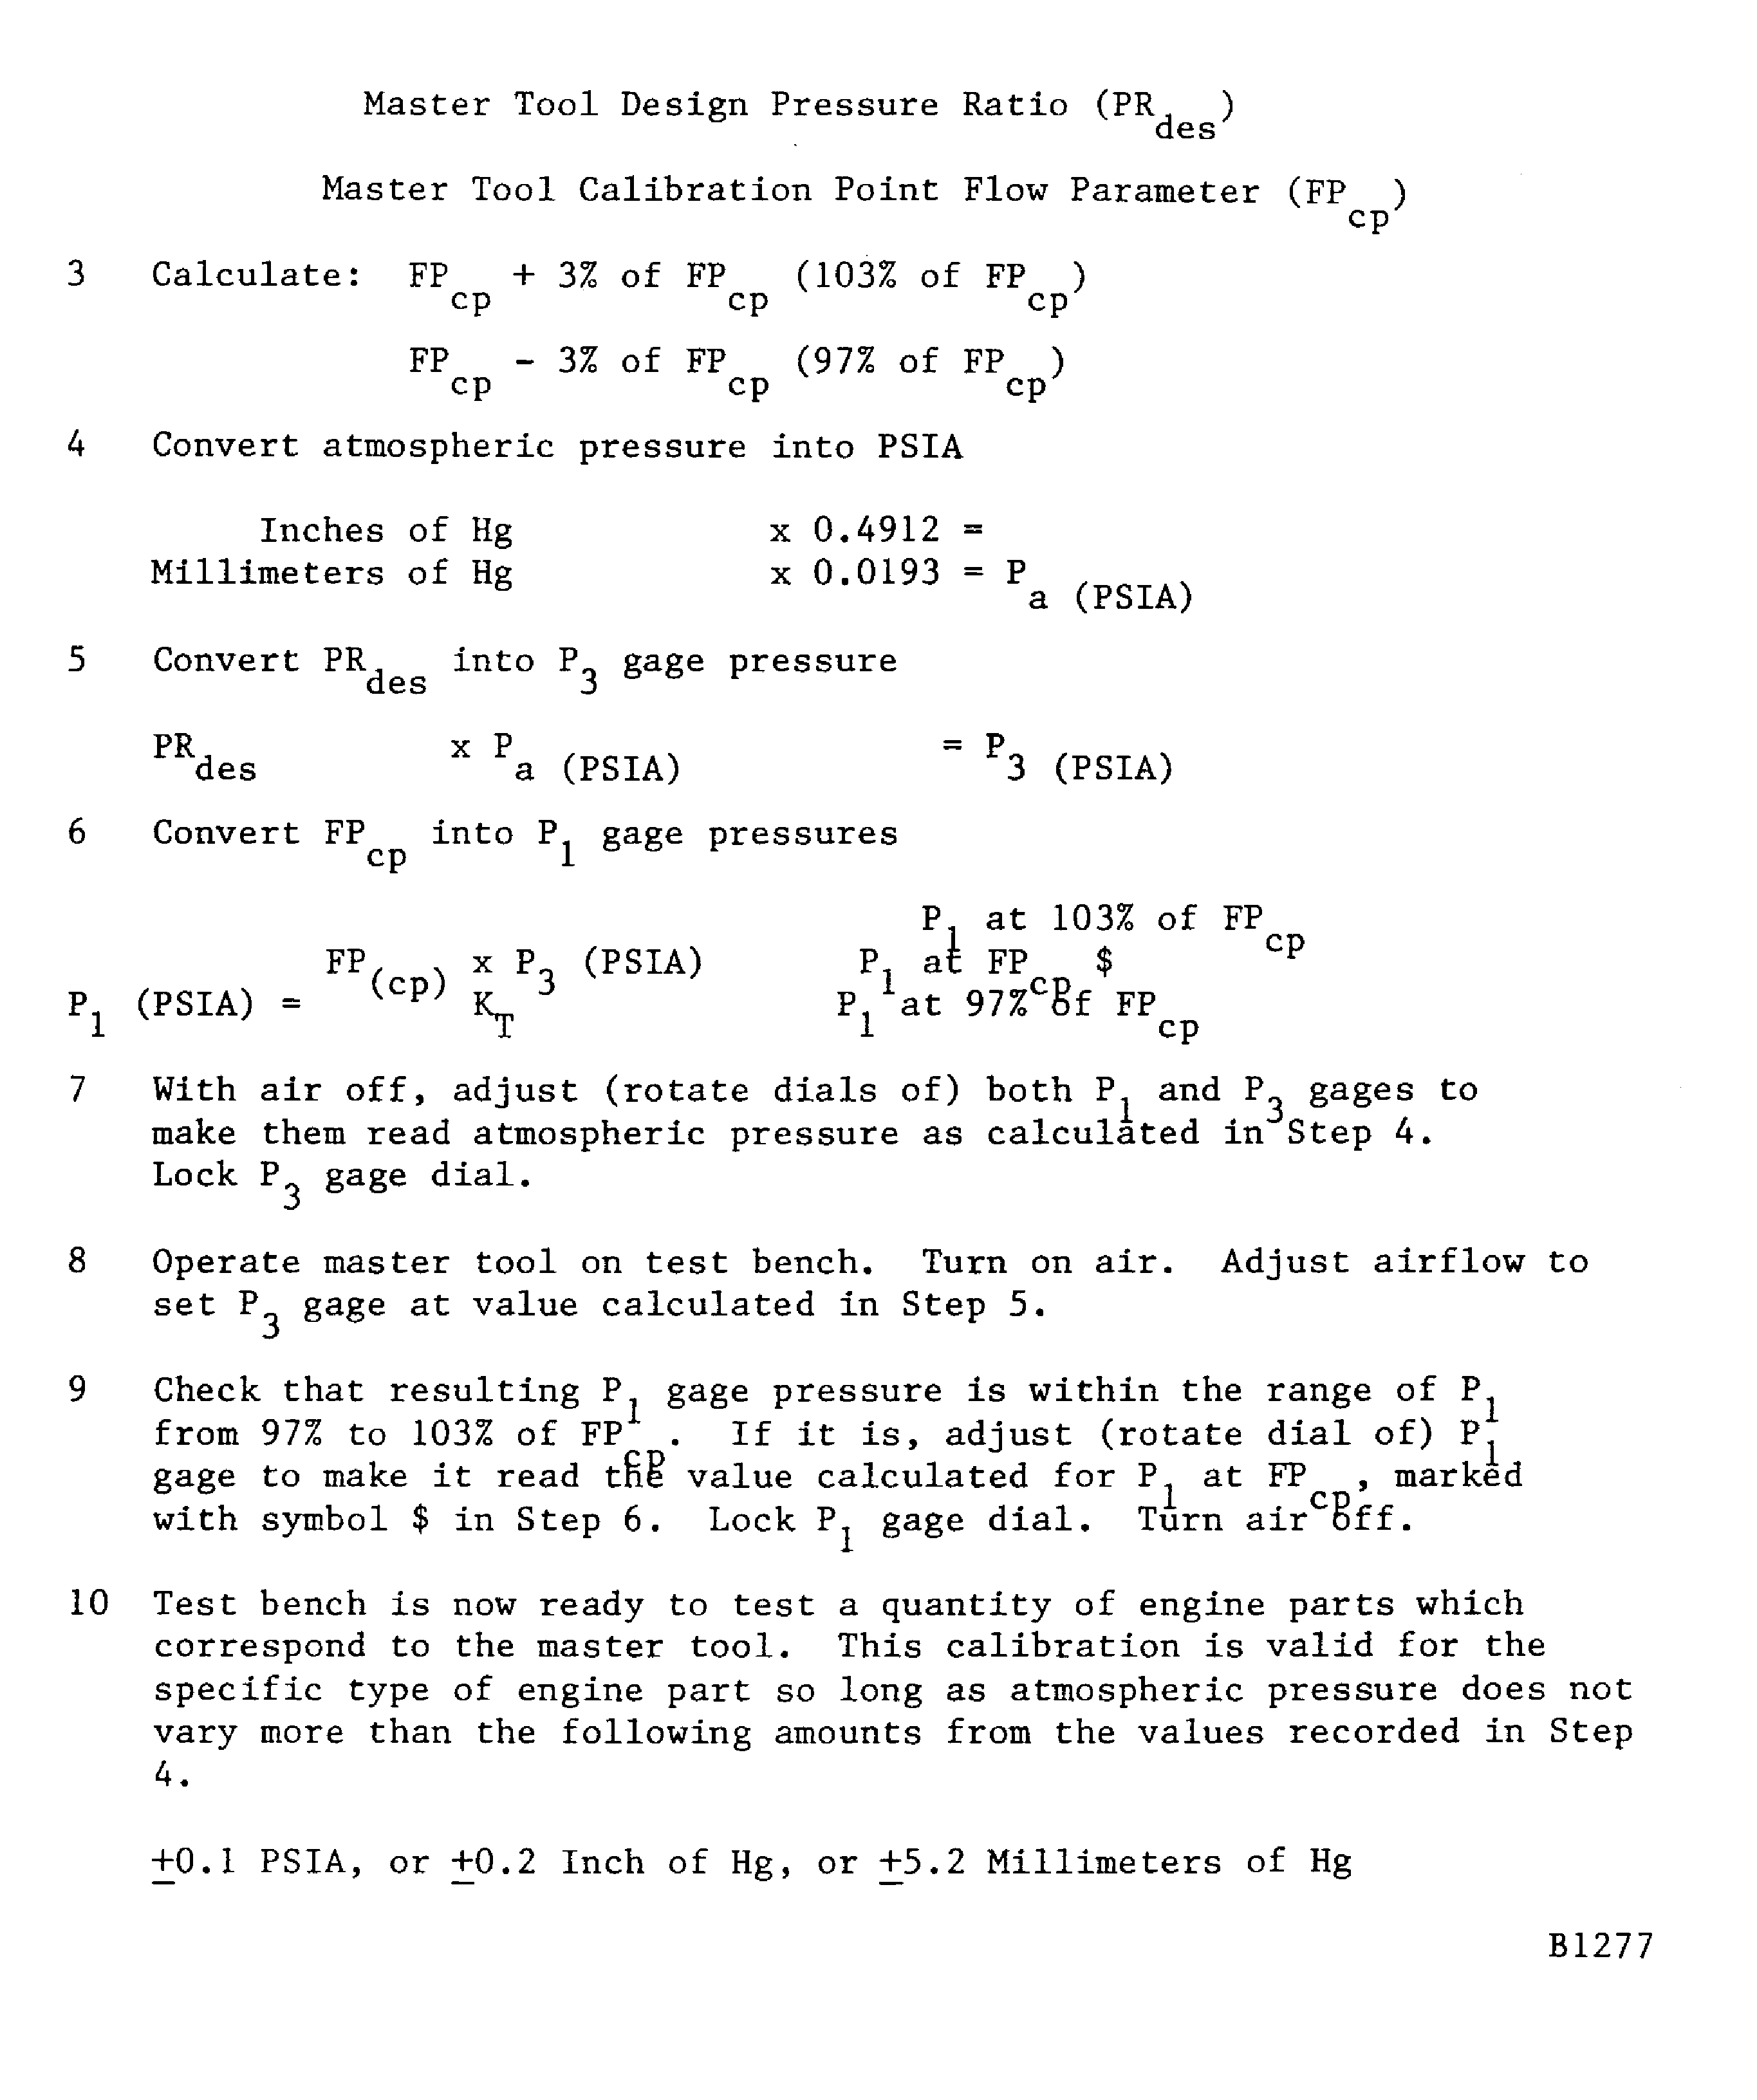
Figure: One-point test bench calibration. Master tool calibration by flow parameter procedure. Sample worksheet 2 (Sheet 2)
One-point test bench calibration. Master tool calibration by flow parameter procedure. Sample worksheet 2 (Sheet 2)
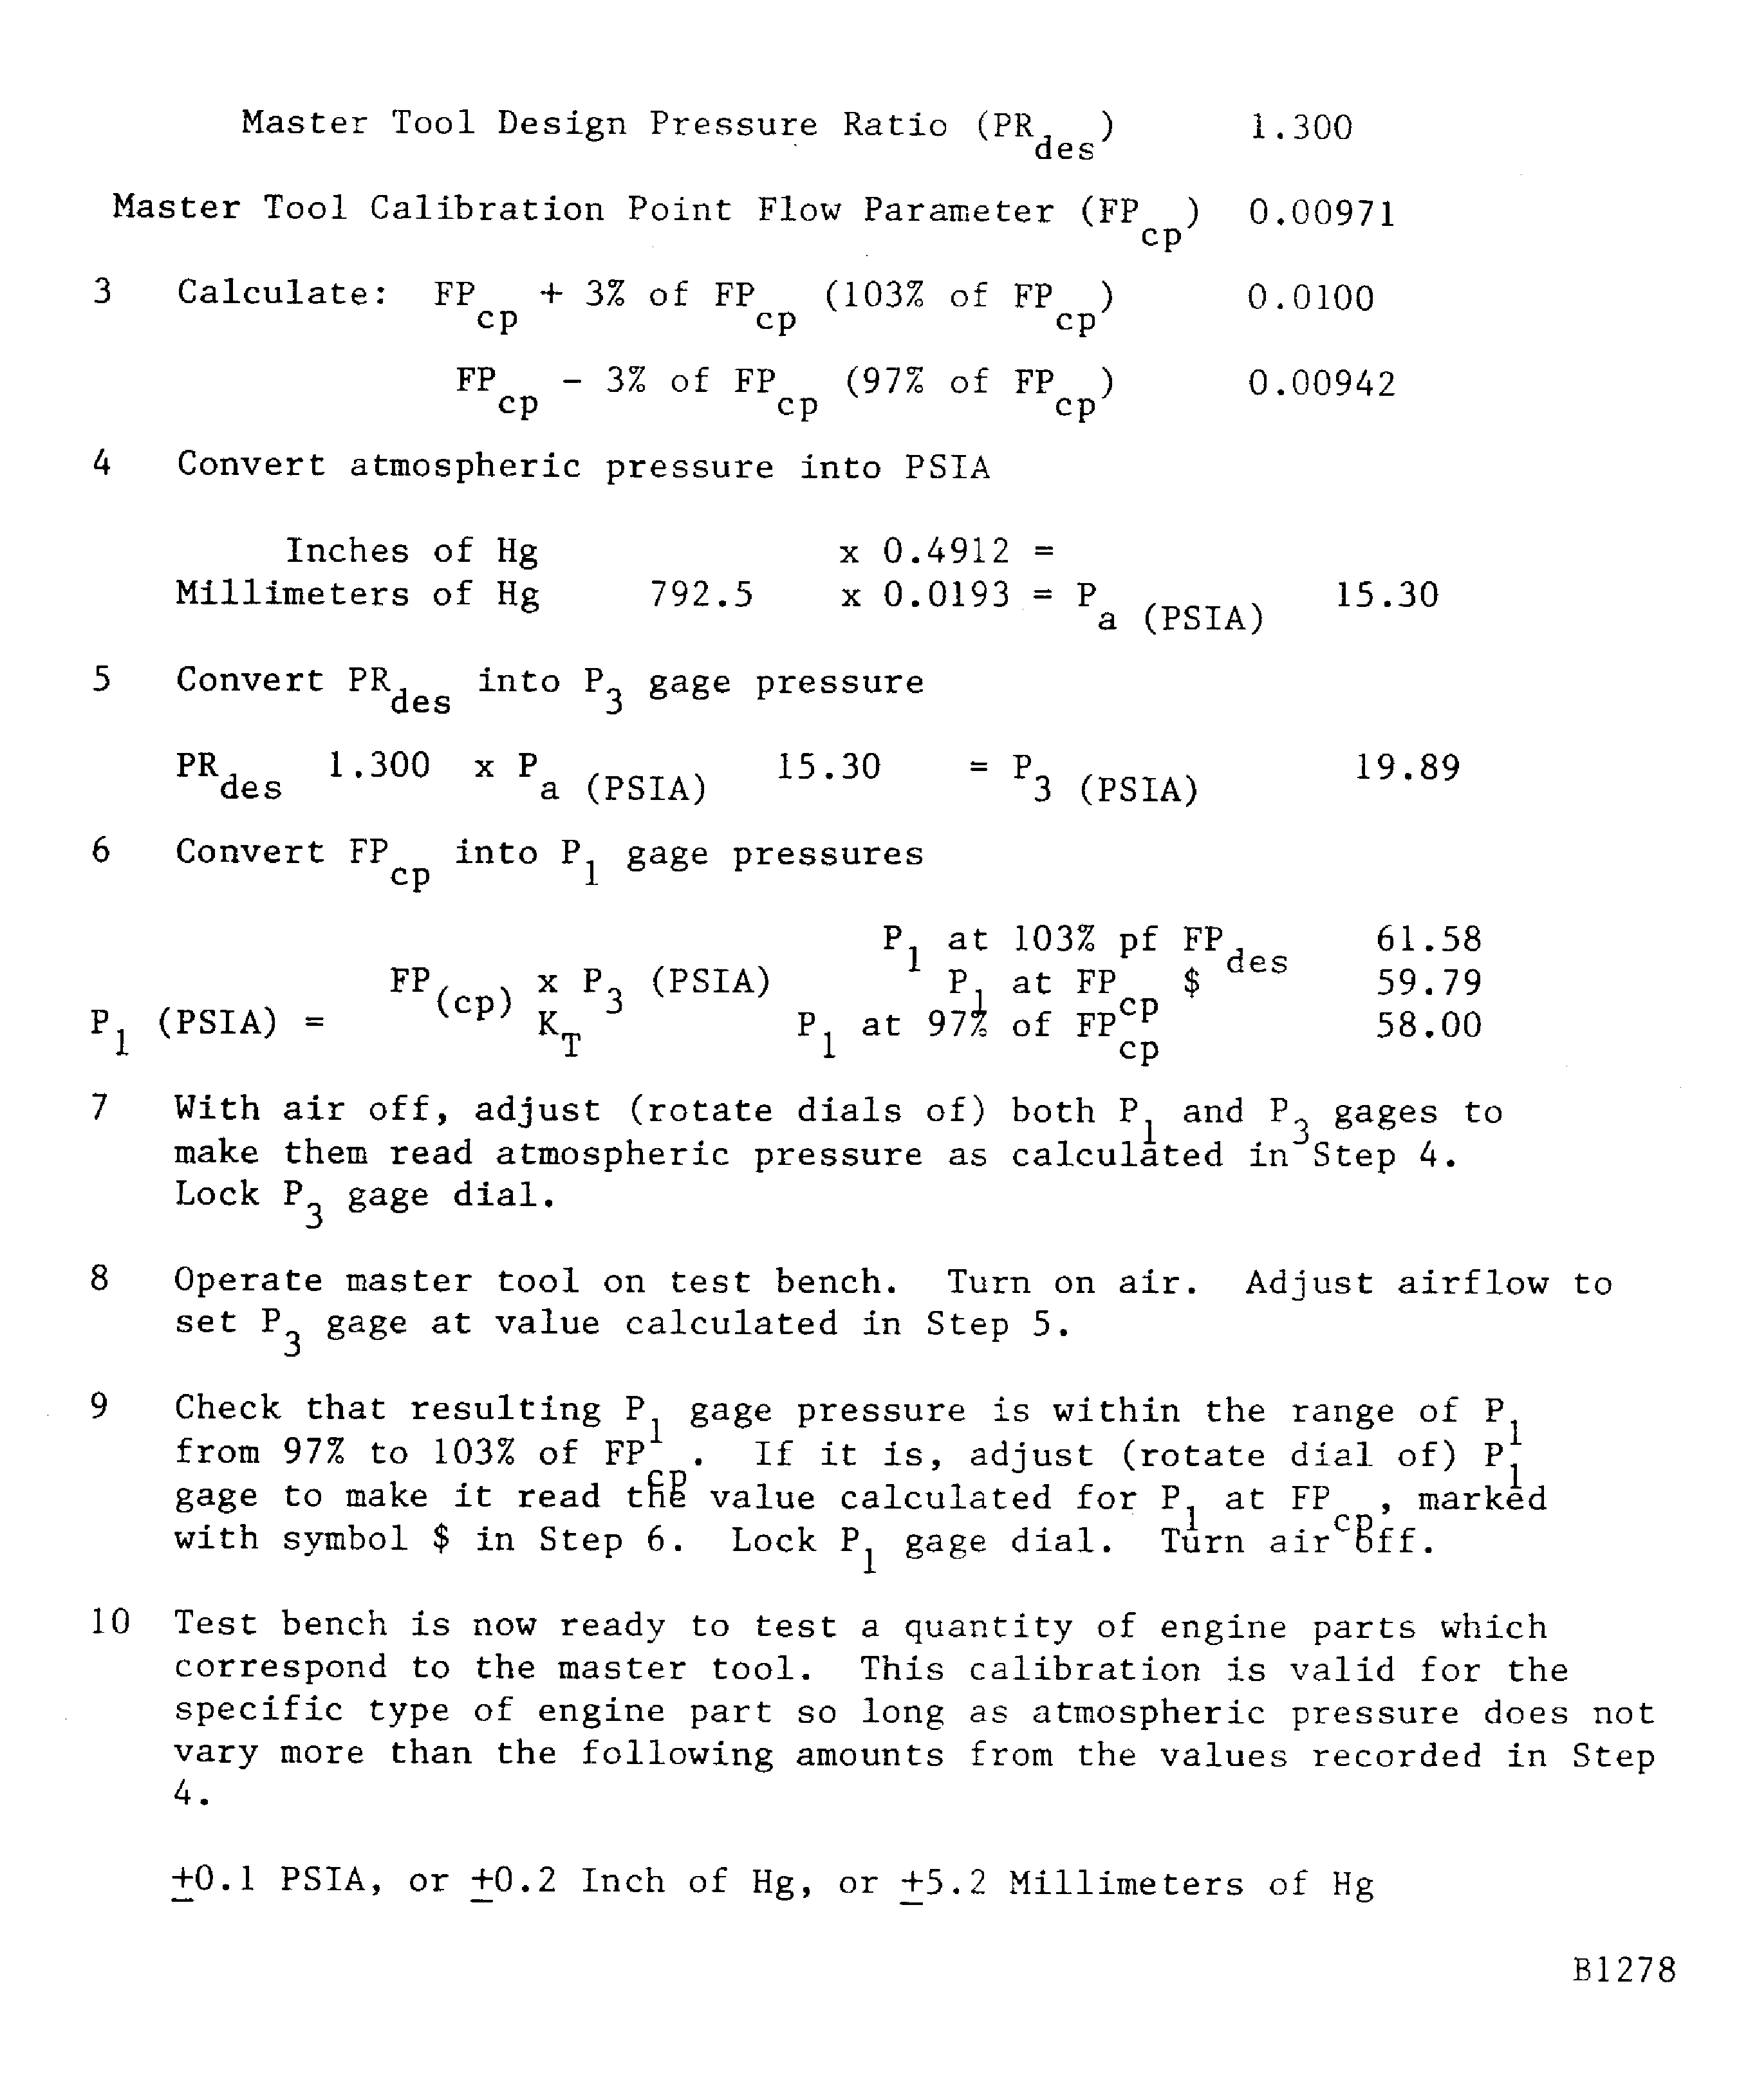
Figure: Coordinates used for the sample five-point calibration curve flow parameter procedure
Coordinates used for the sample five-point calibration curve flow parameter procedure
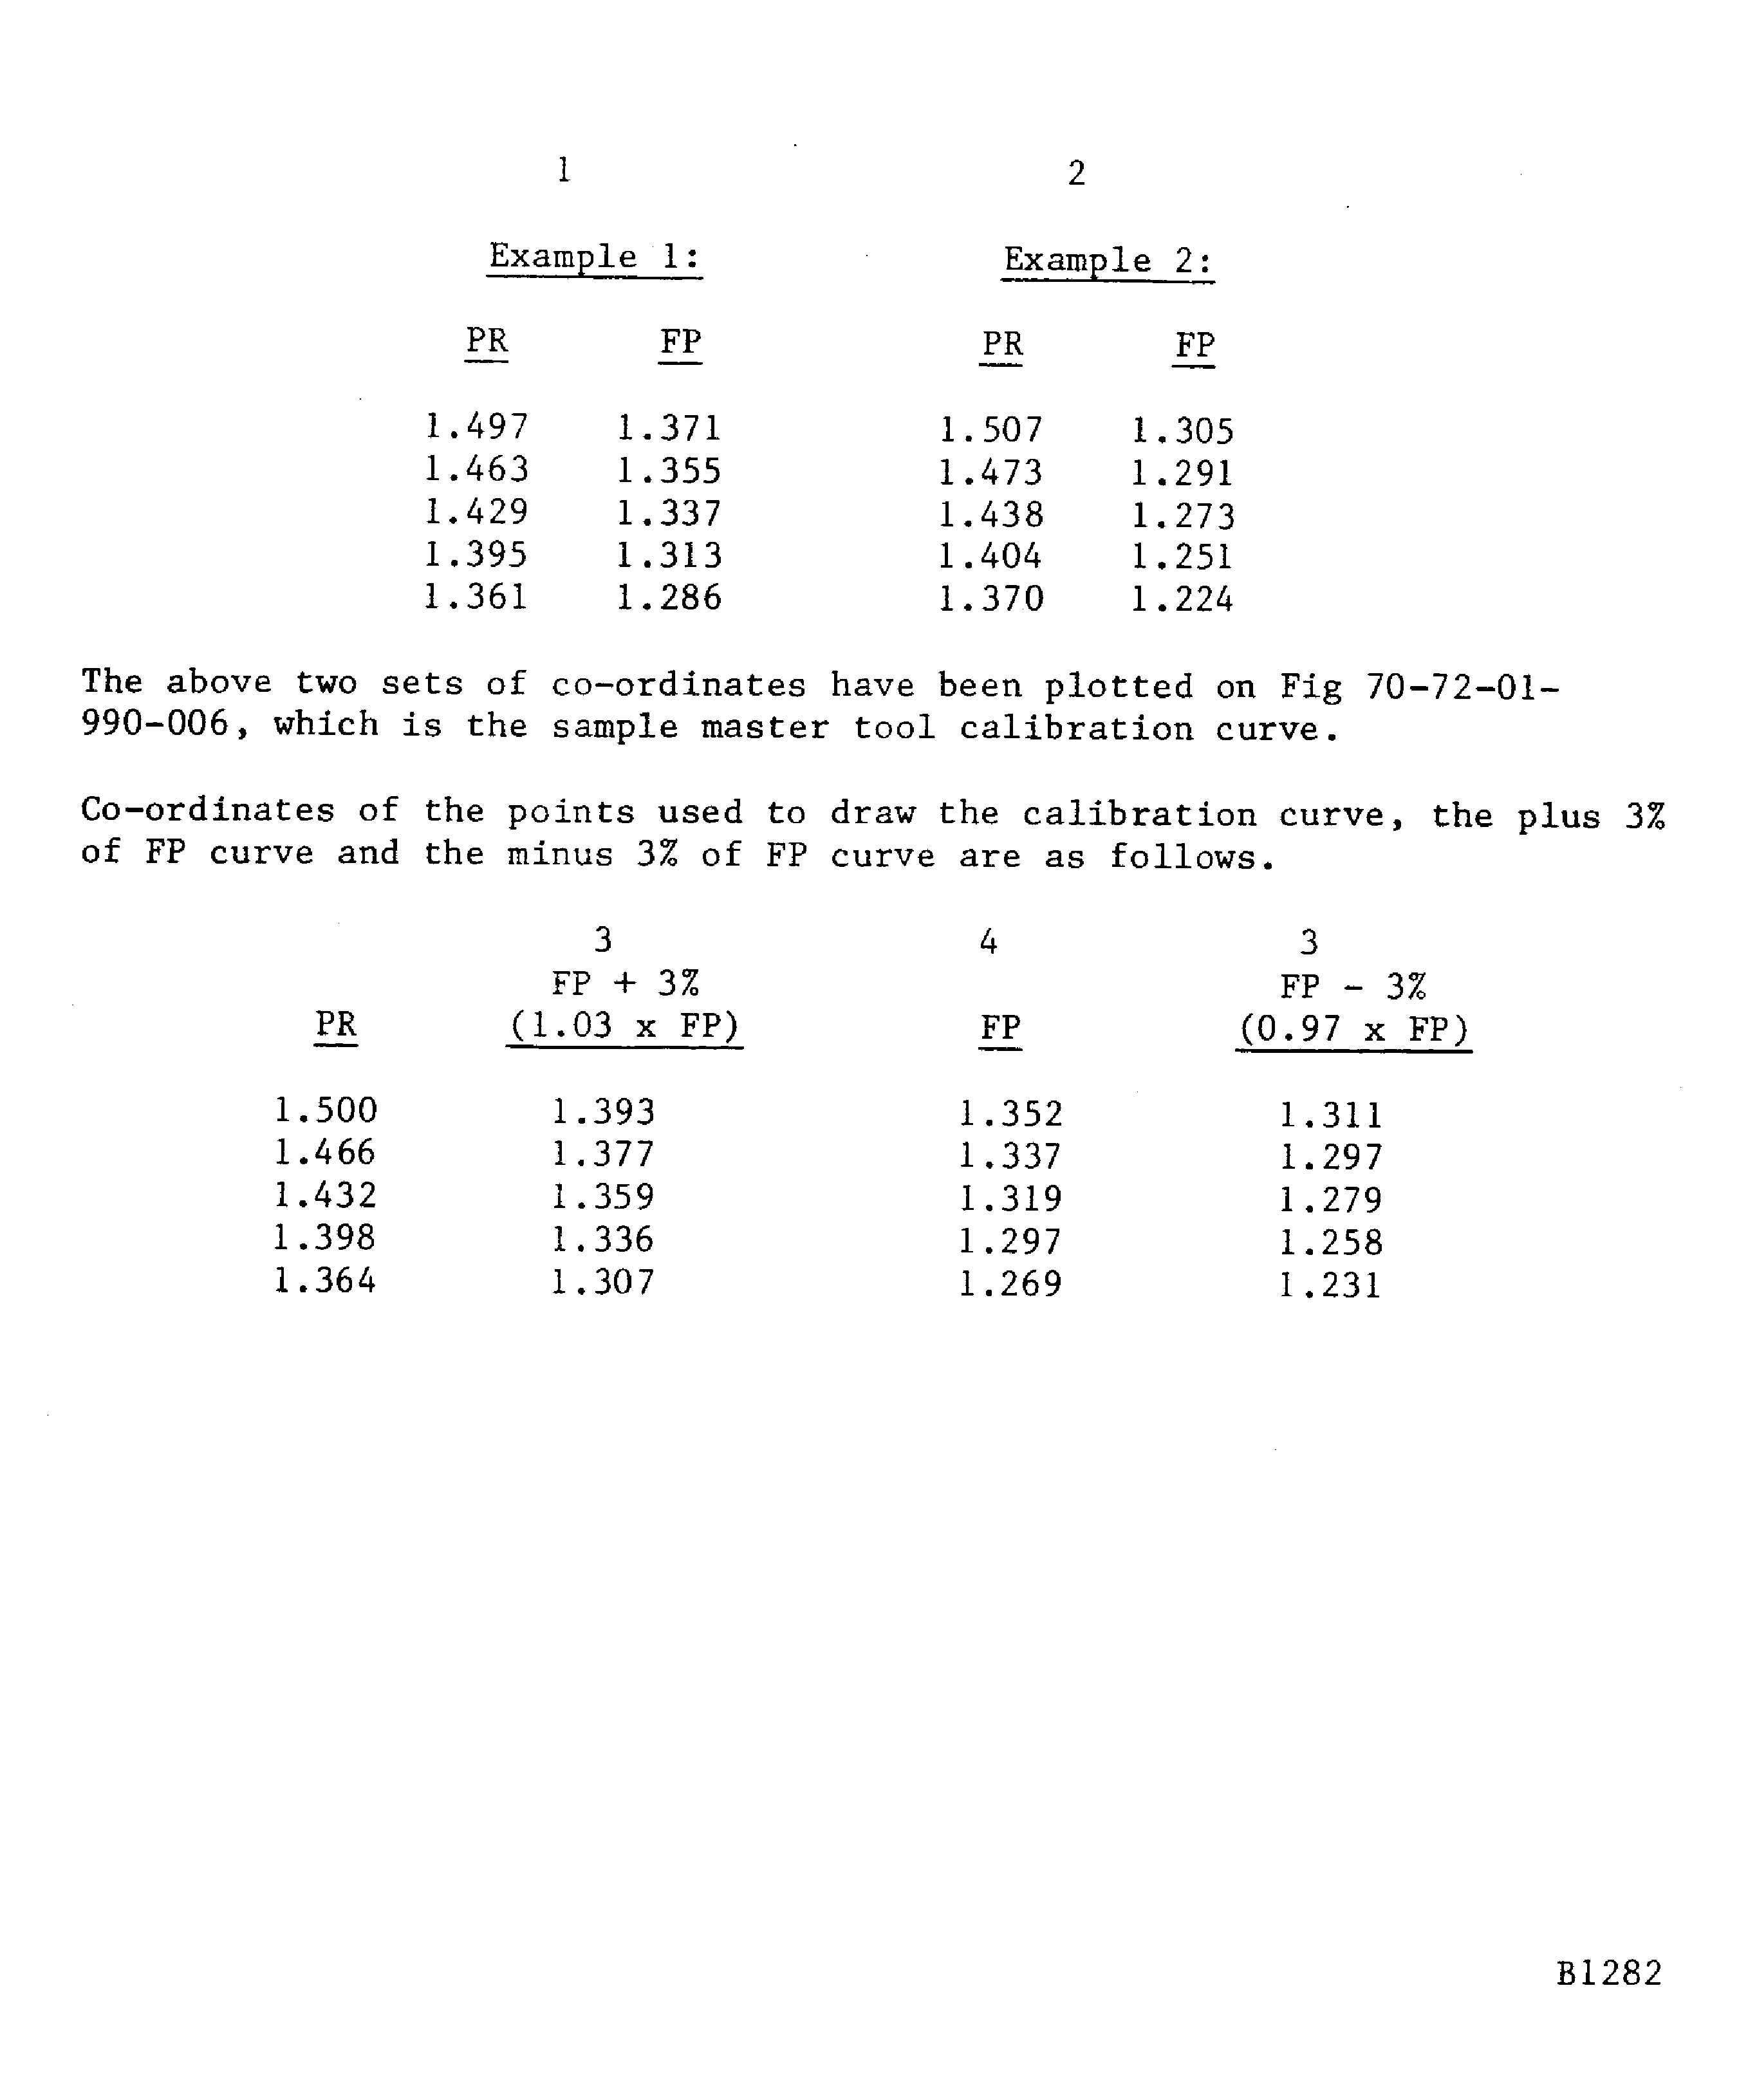
Figure: Sample five-point calibration curve flow parameter procedure
Sample five-point calibration curve flow parameter procedure
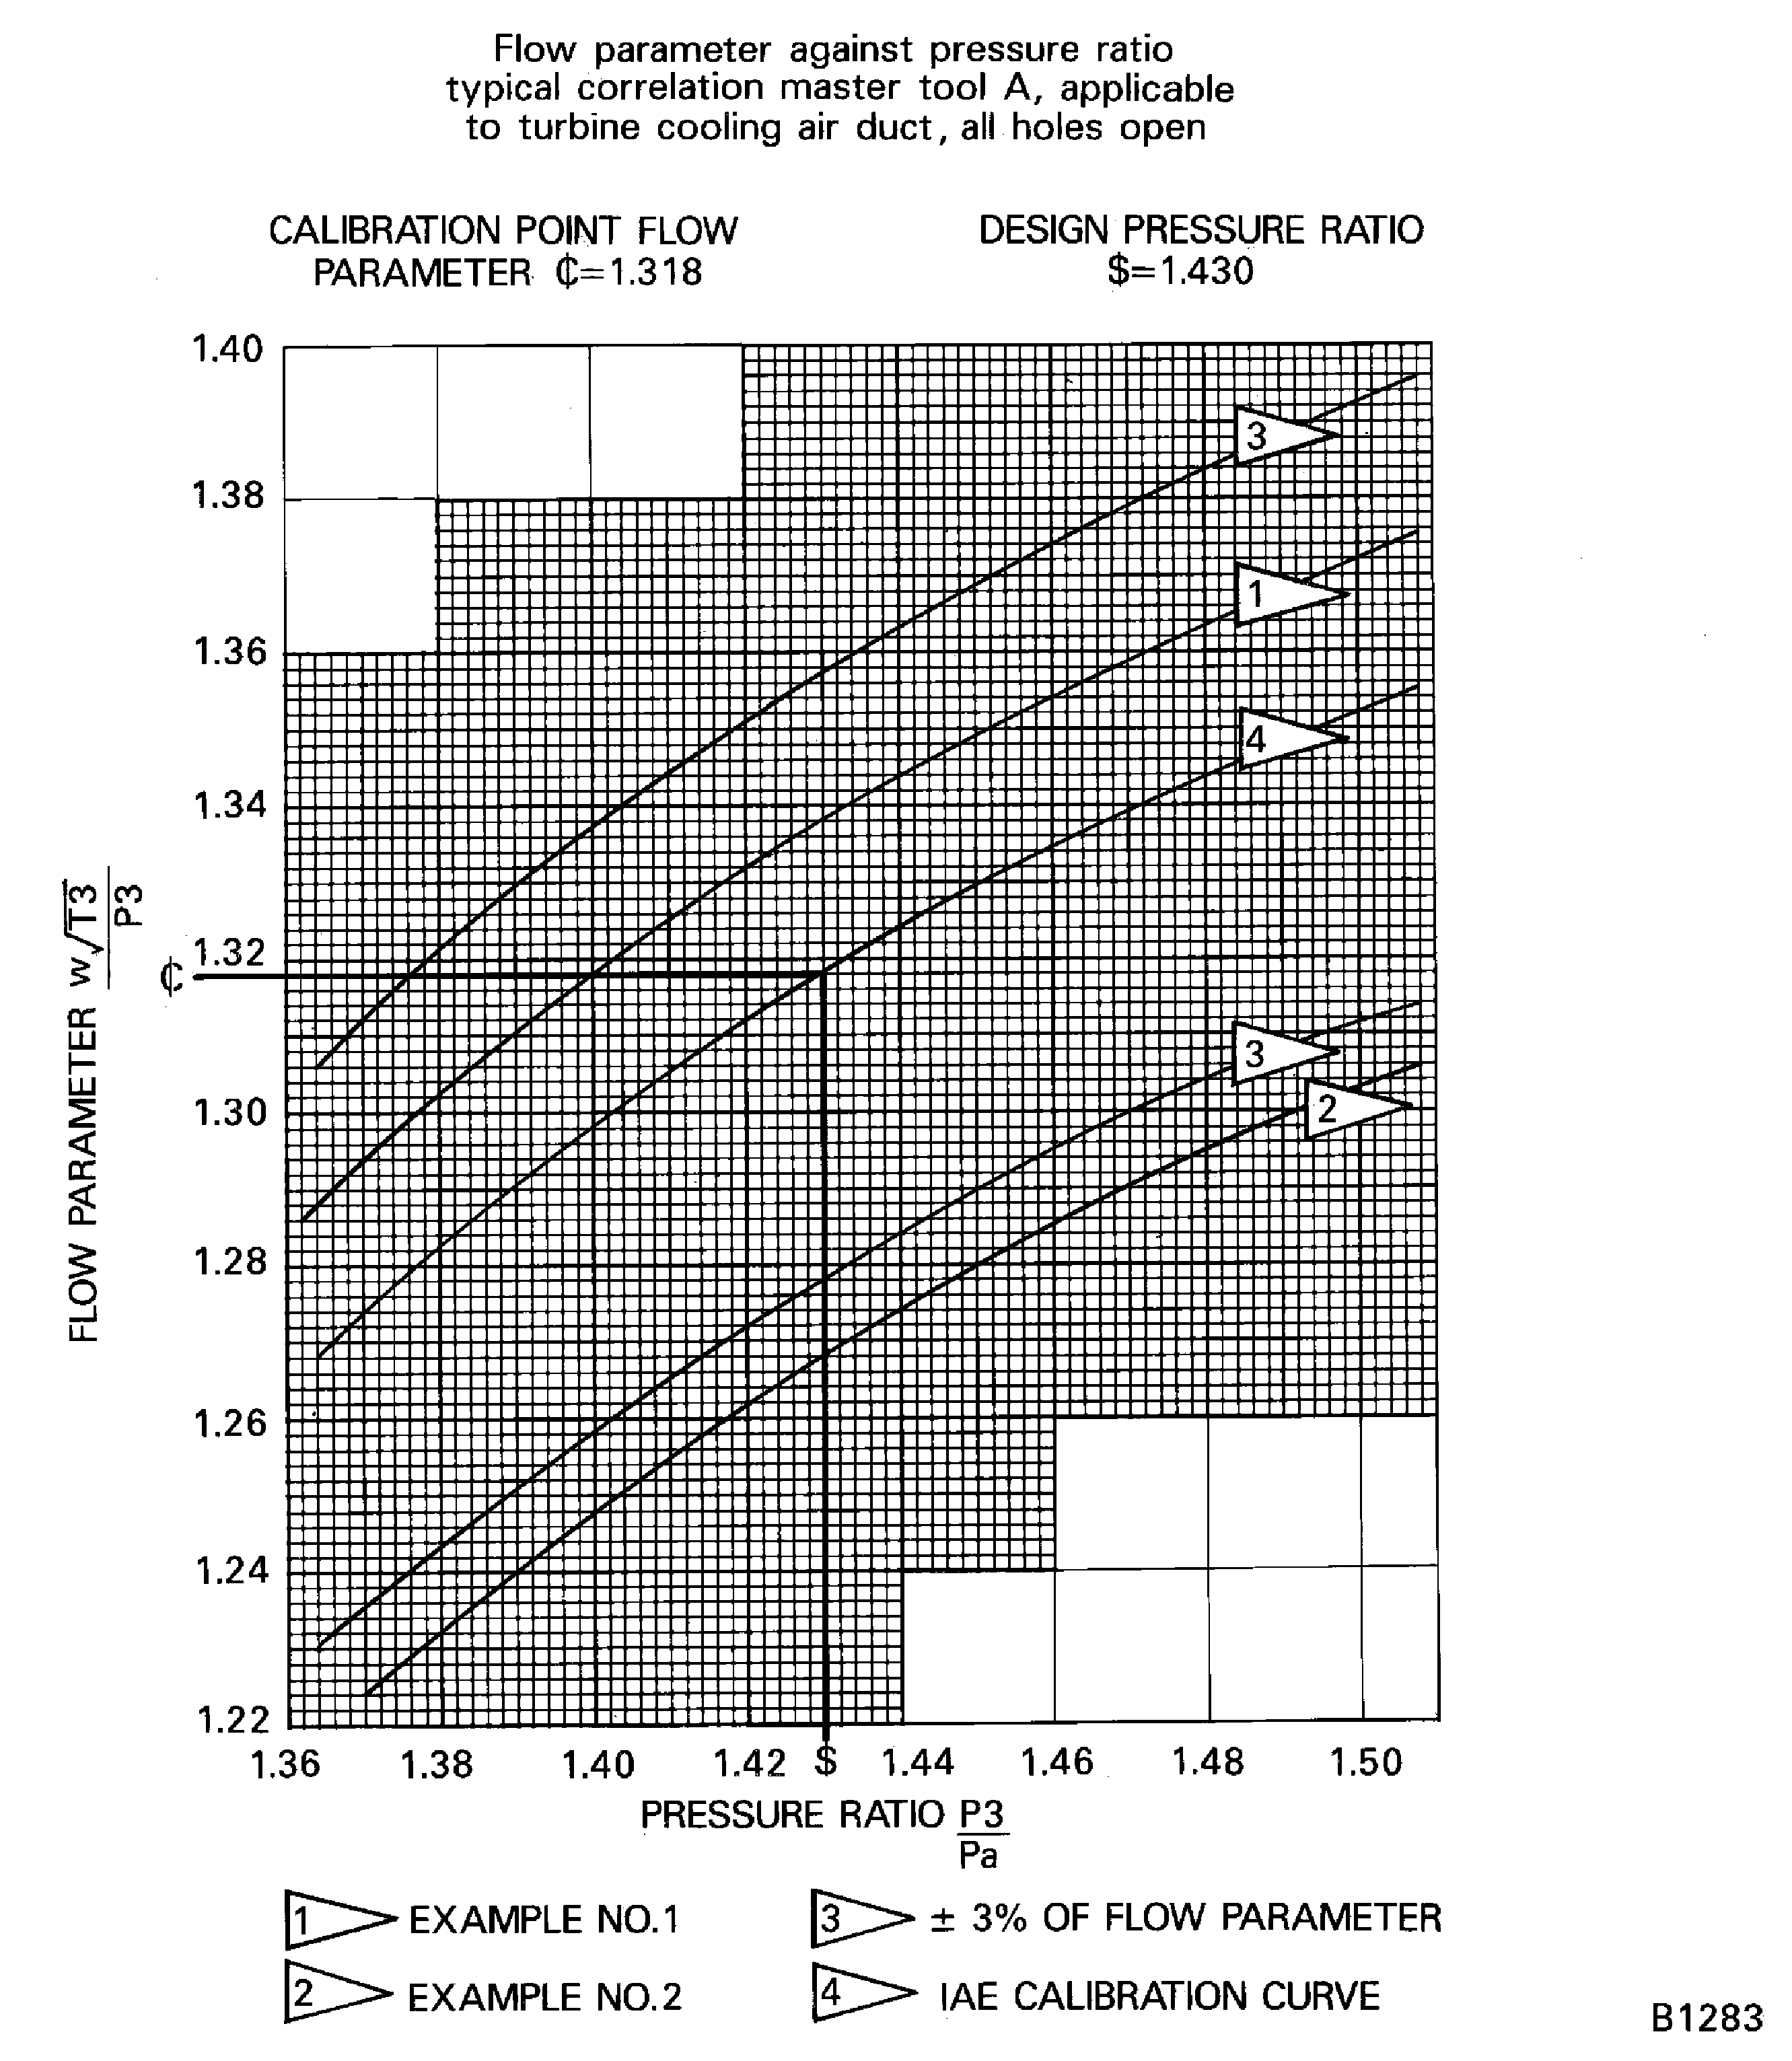
Figure: Coordinates used for the five-point calibration curve pressure ratio procedure
Coordinates used for the five-point calibration curve pressure ratio procedure
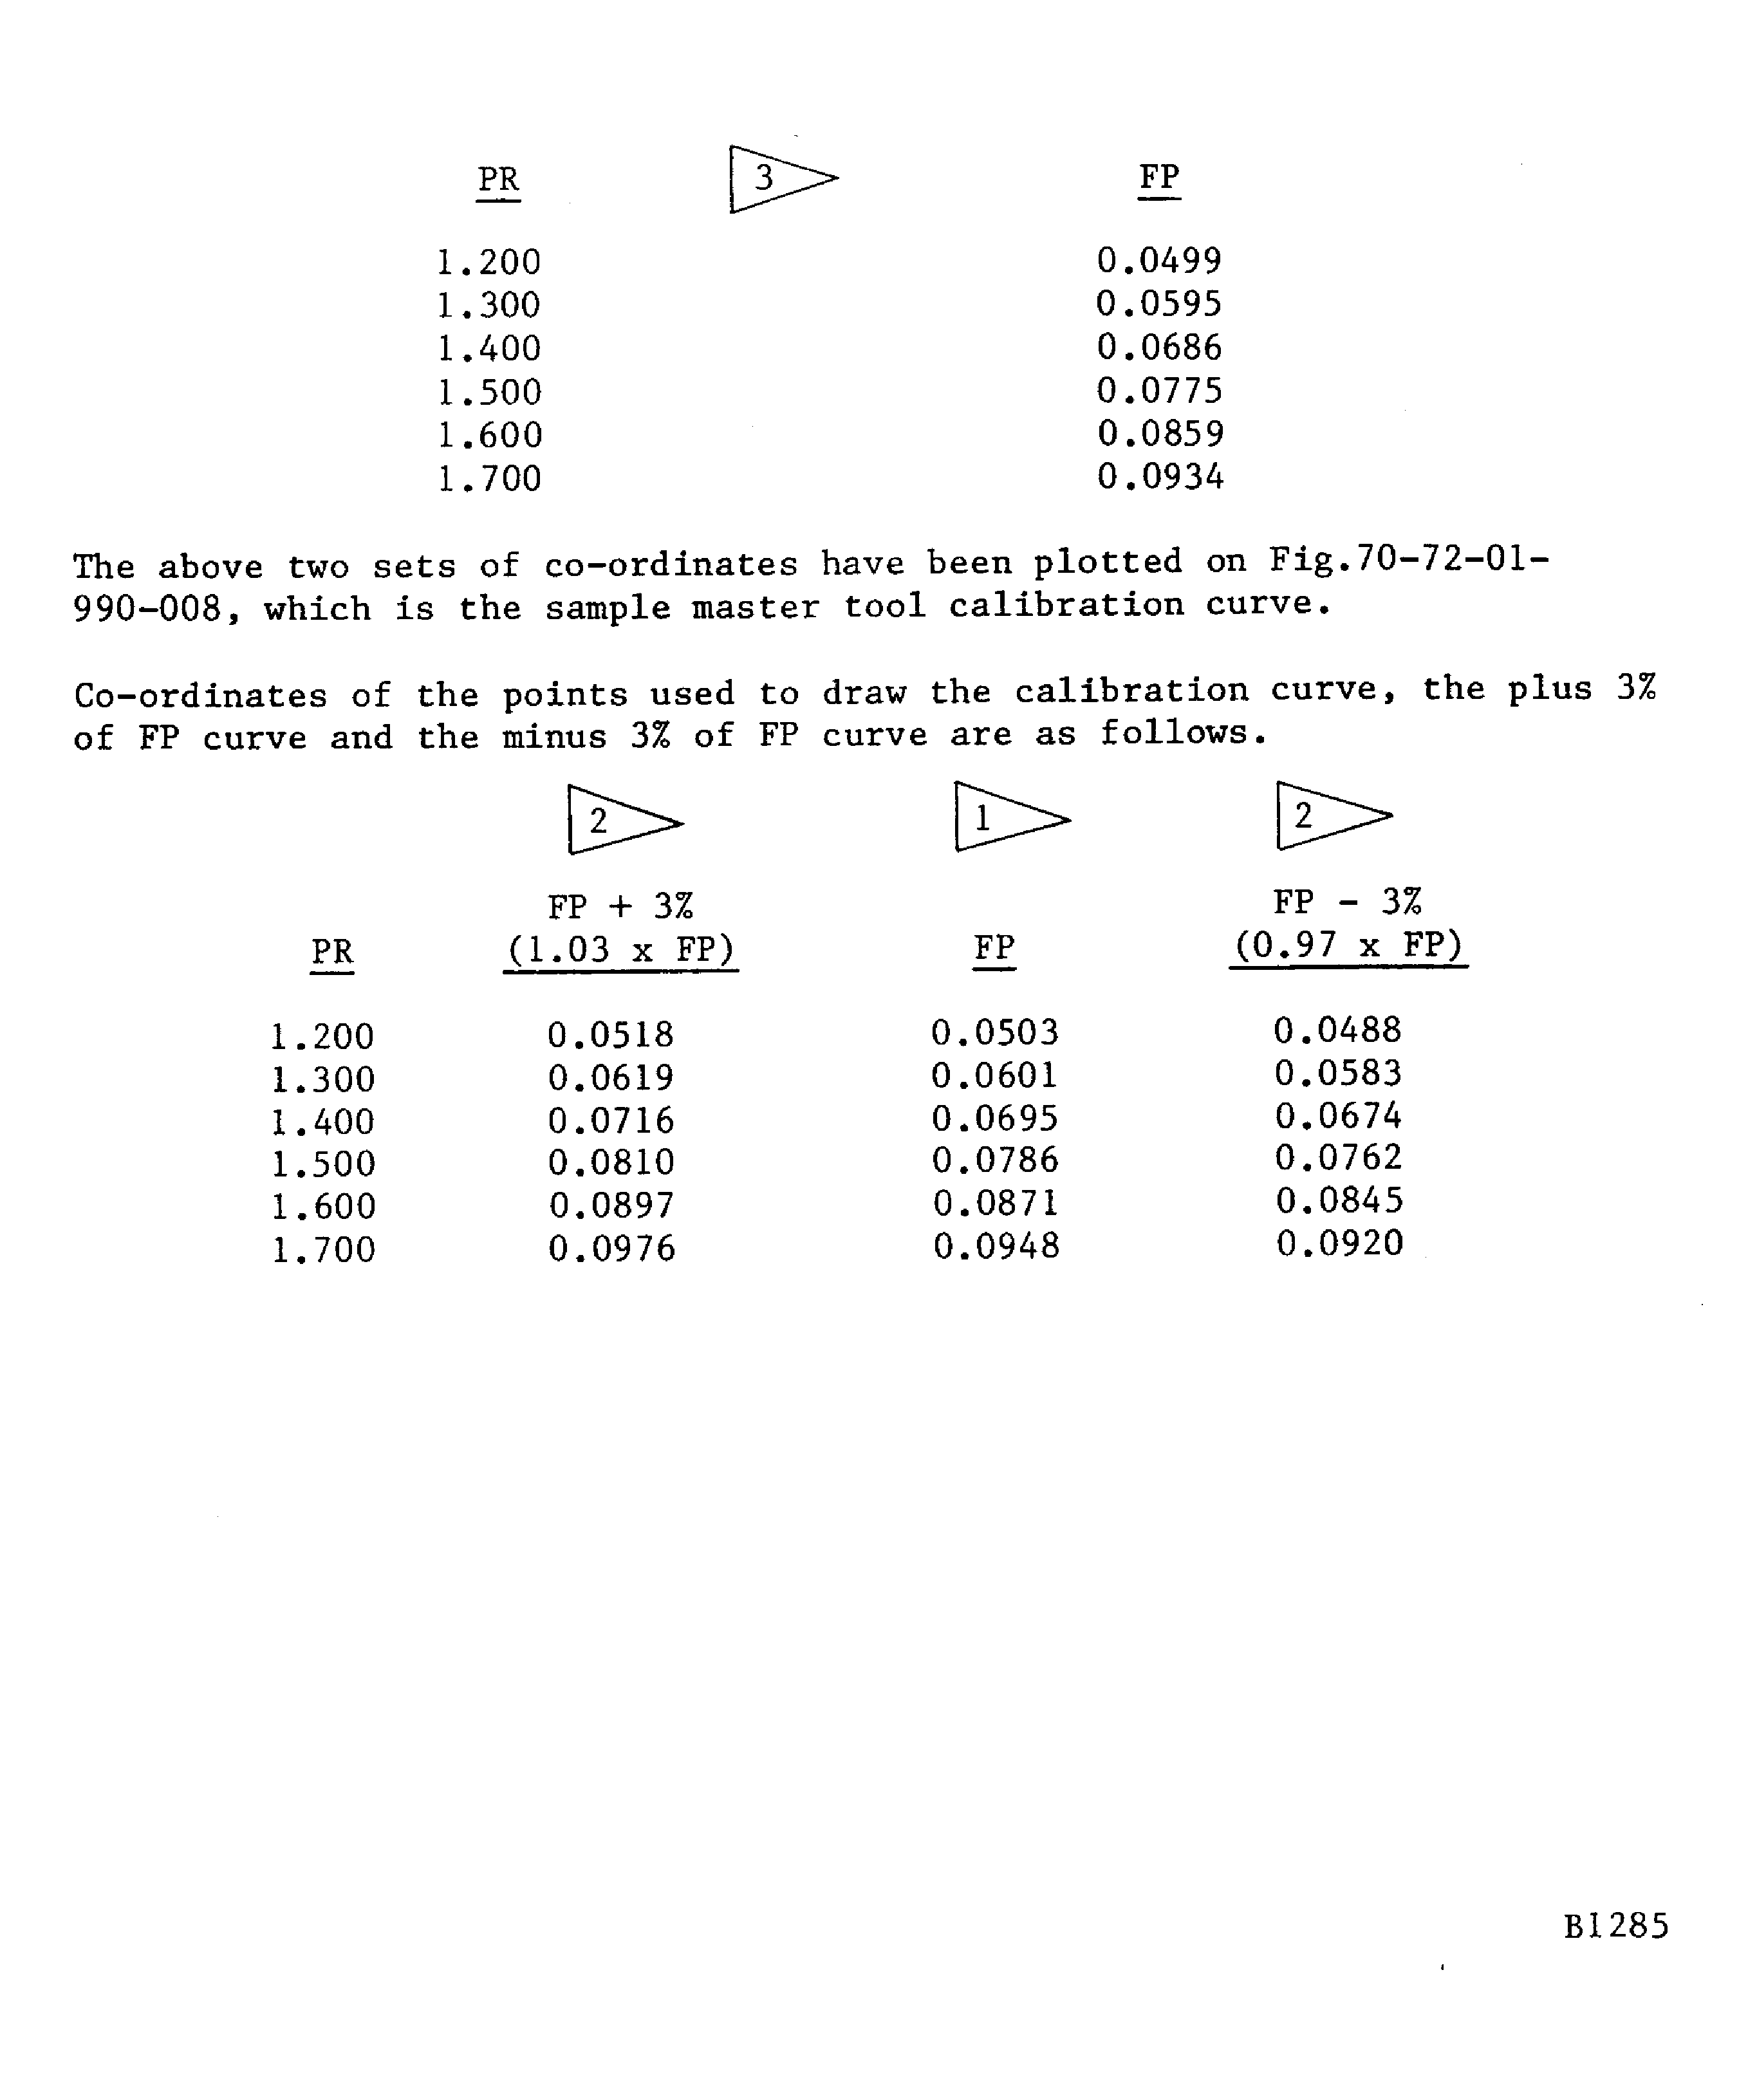
Figure: Sample five-point calibration curve pressure ratio procedure
Sample five-point calibration curve pressure ratio procedure
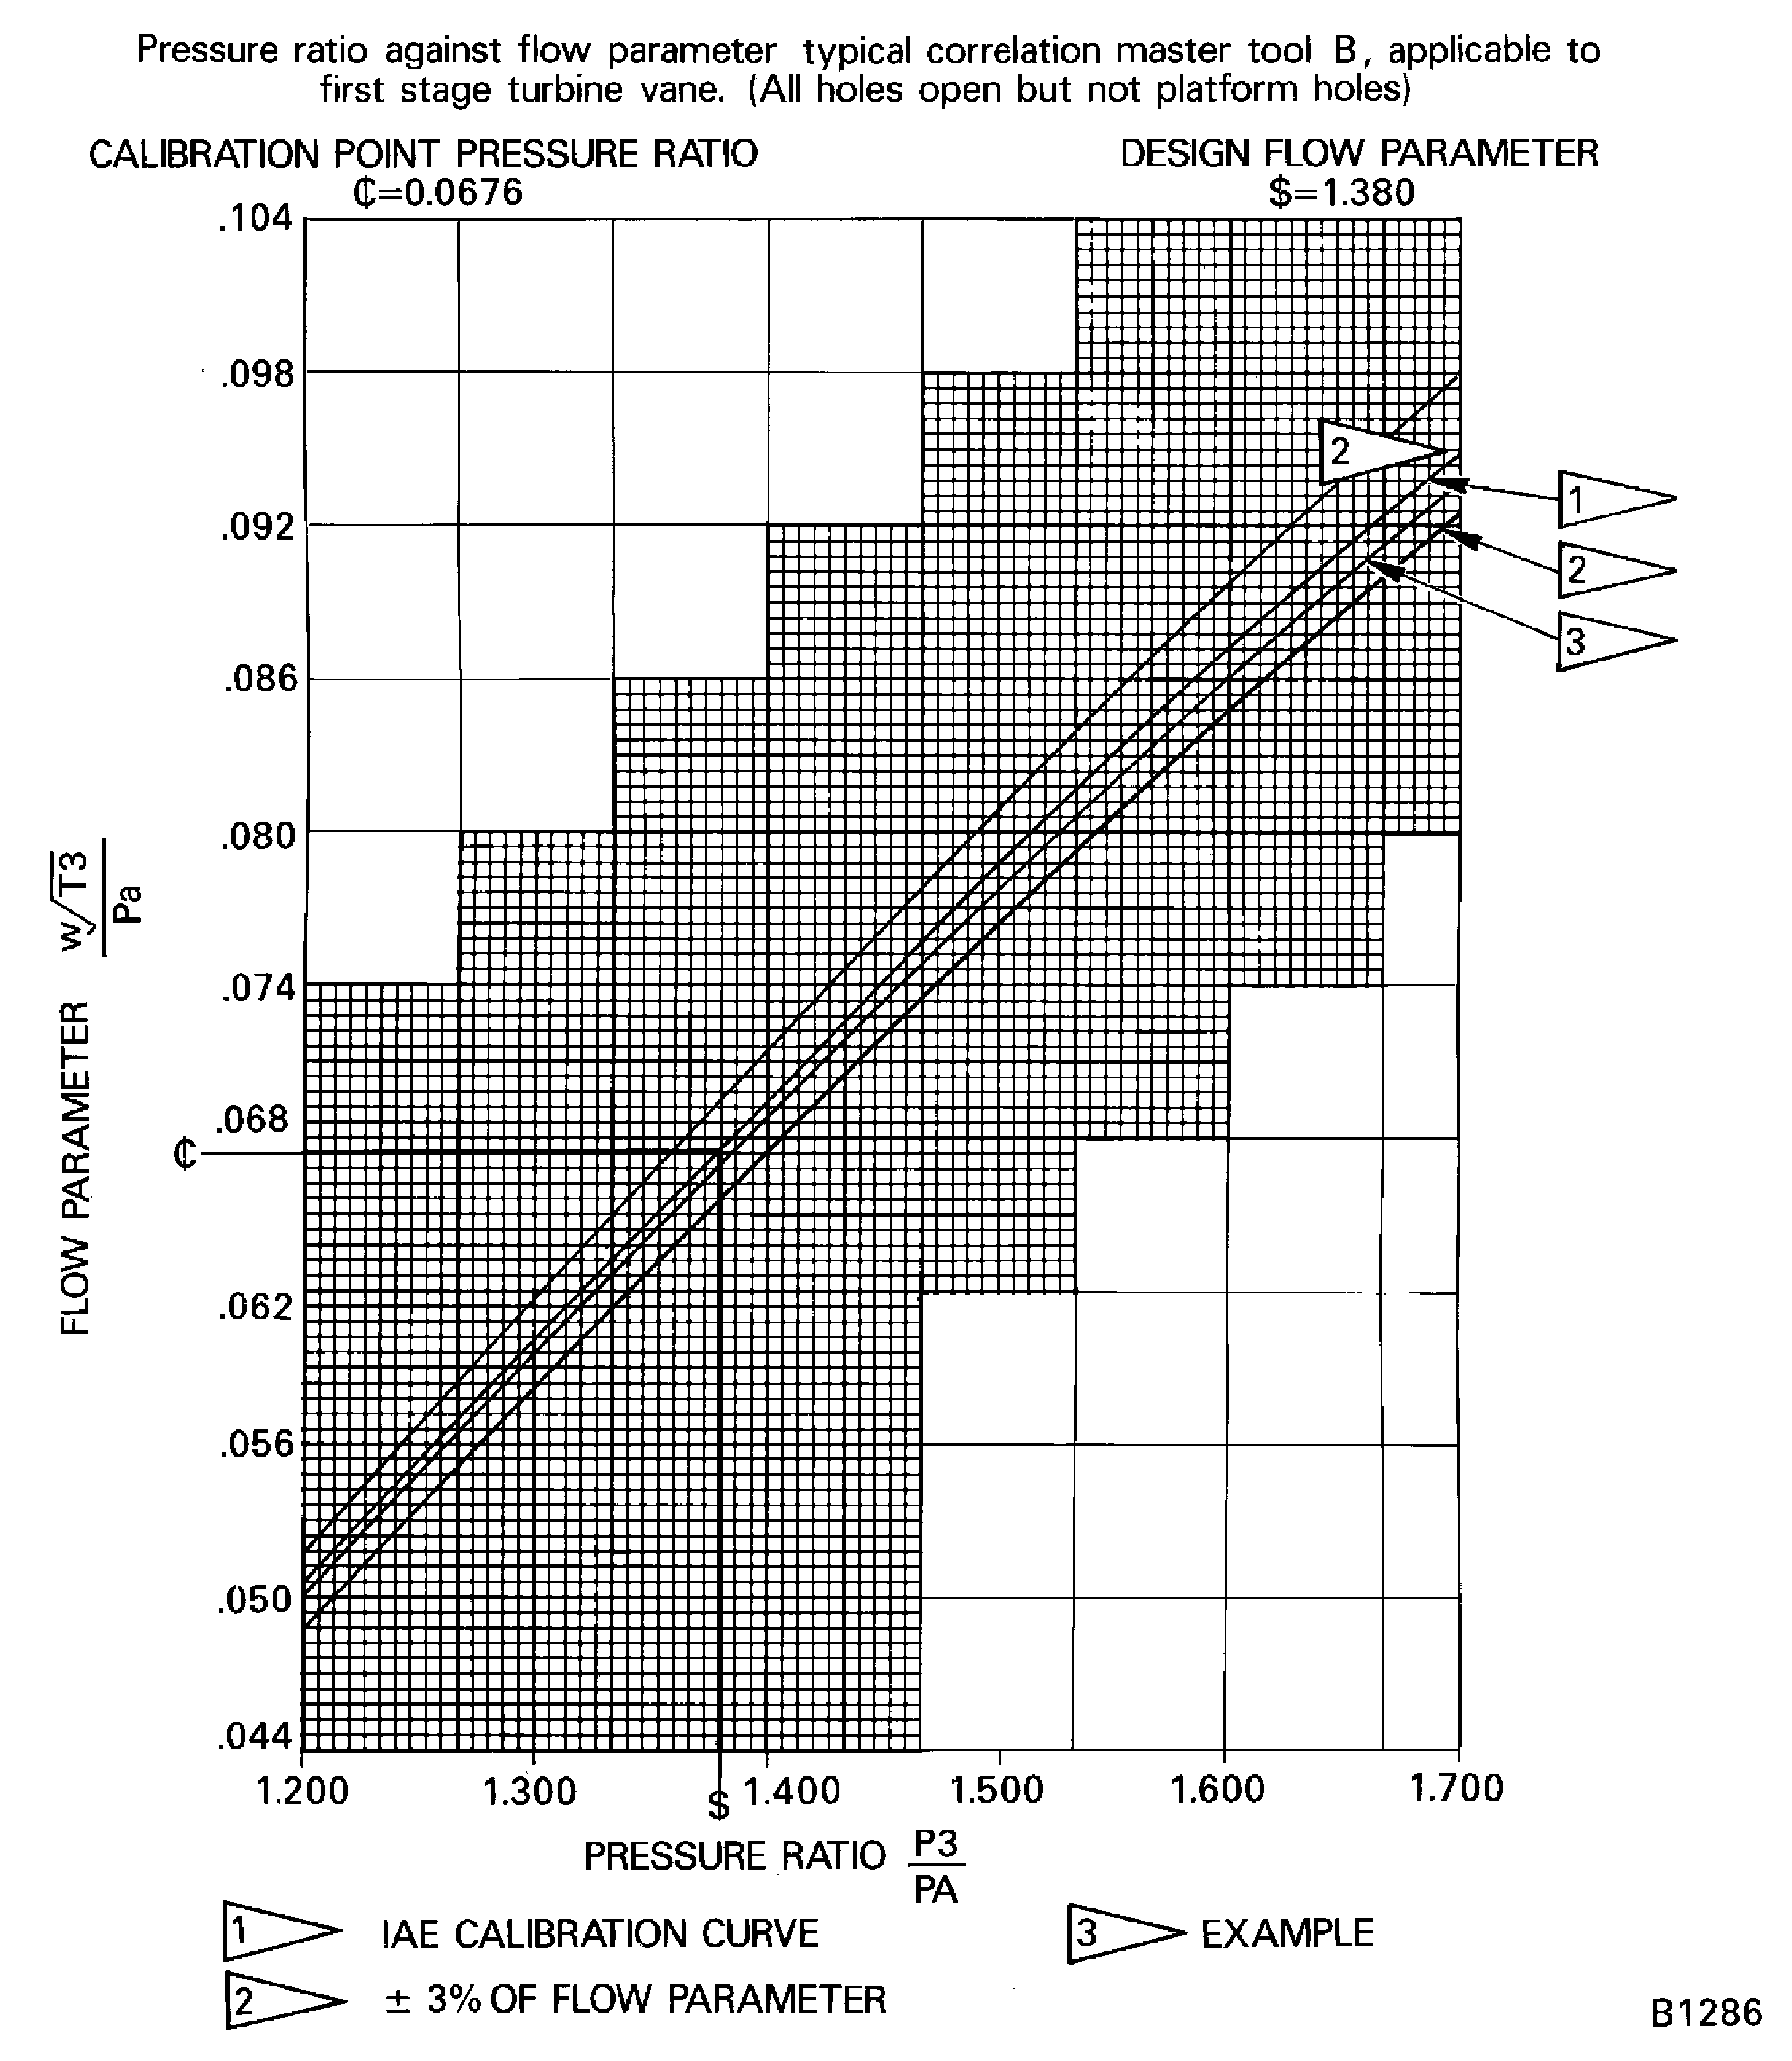
Figure: Pressure ratio procedure of testing. Sample worksheet 3 (Sheet 1)
Pressure ratio procedure of testing. Sample worksheet 3 (Sheet 1)
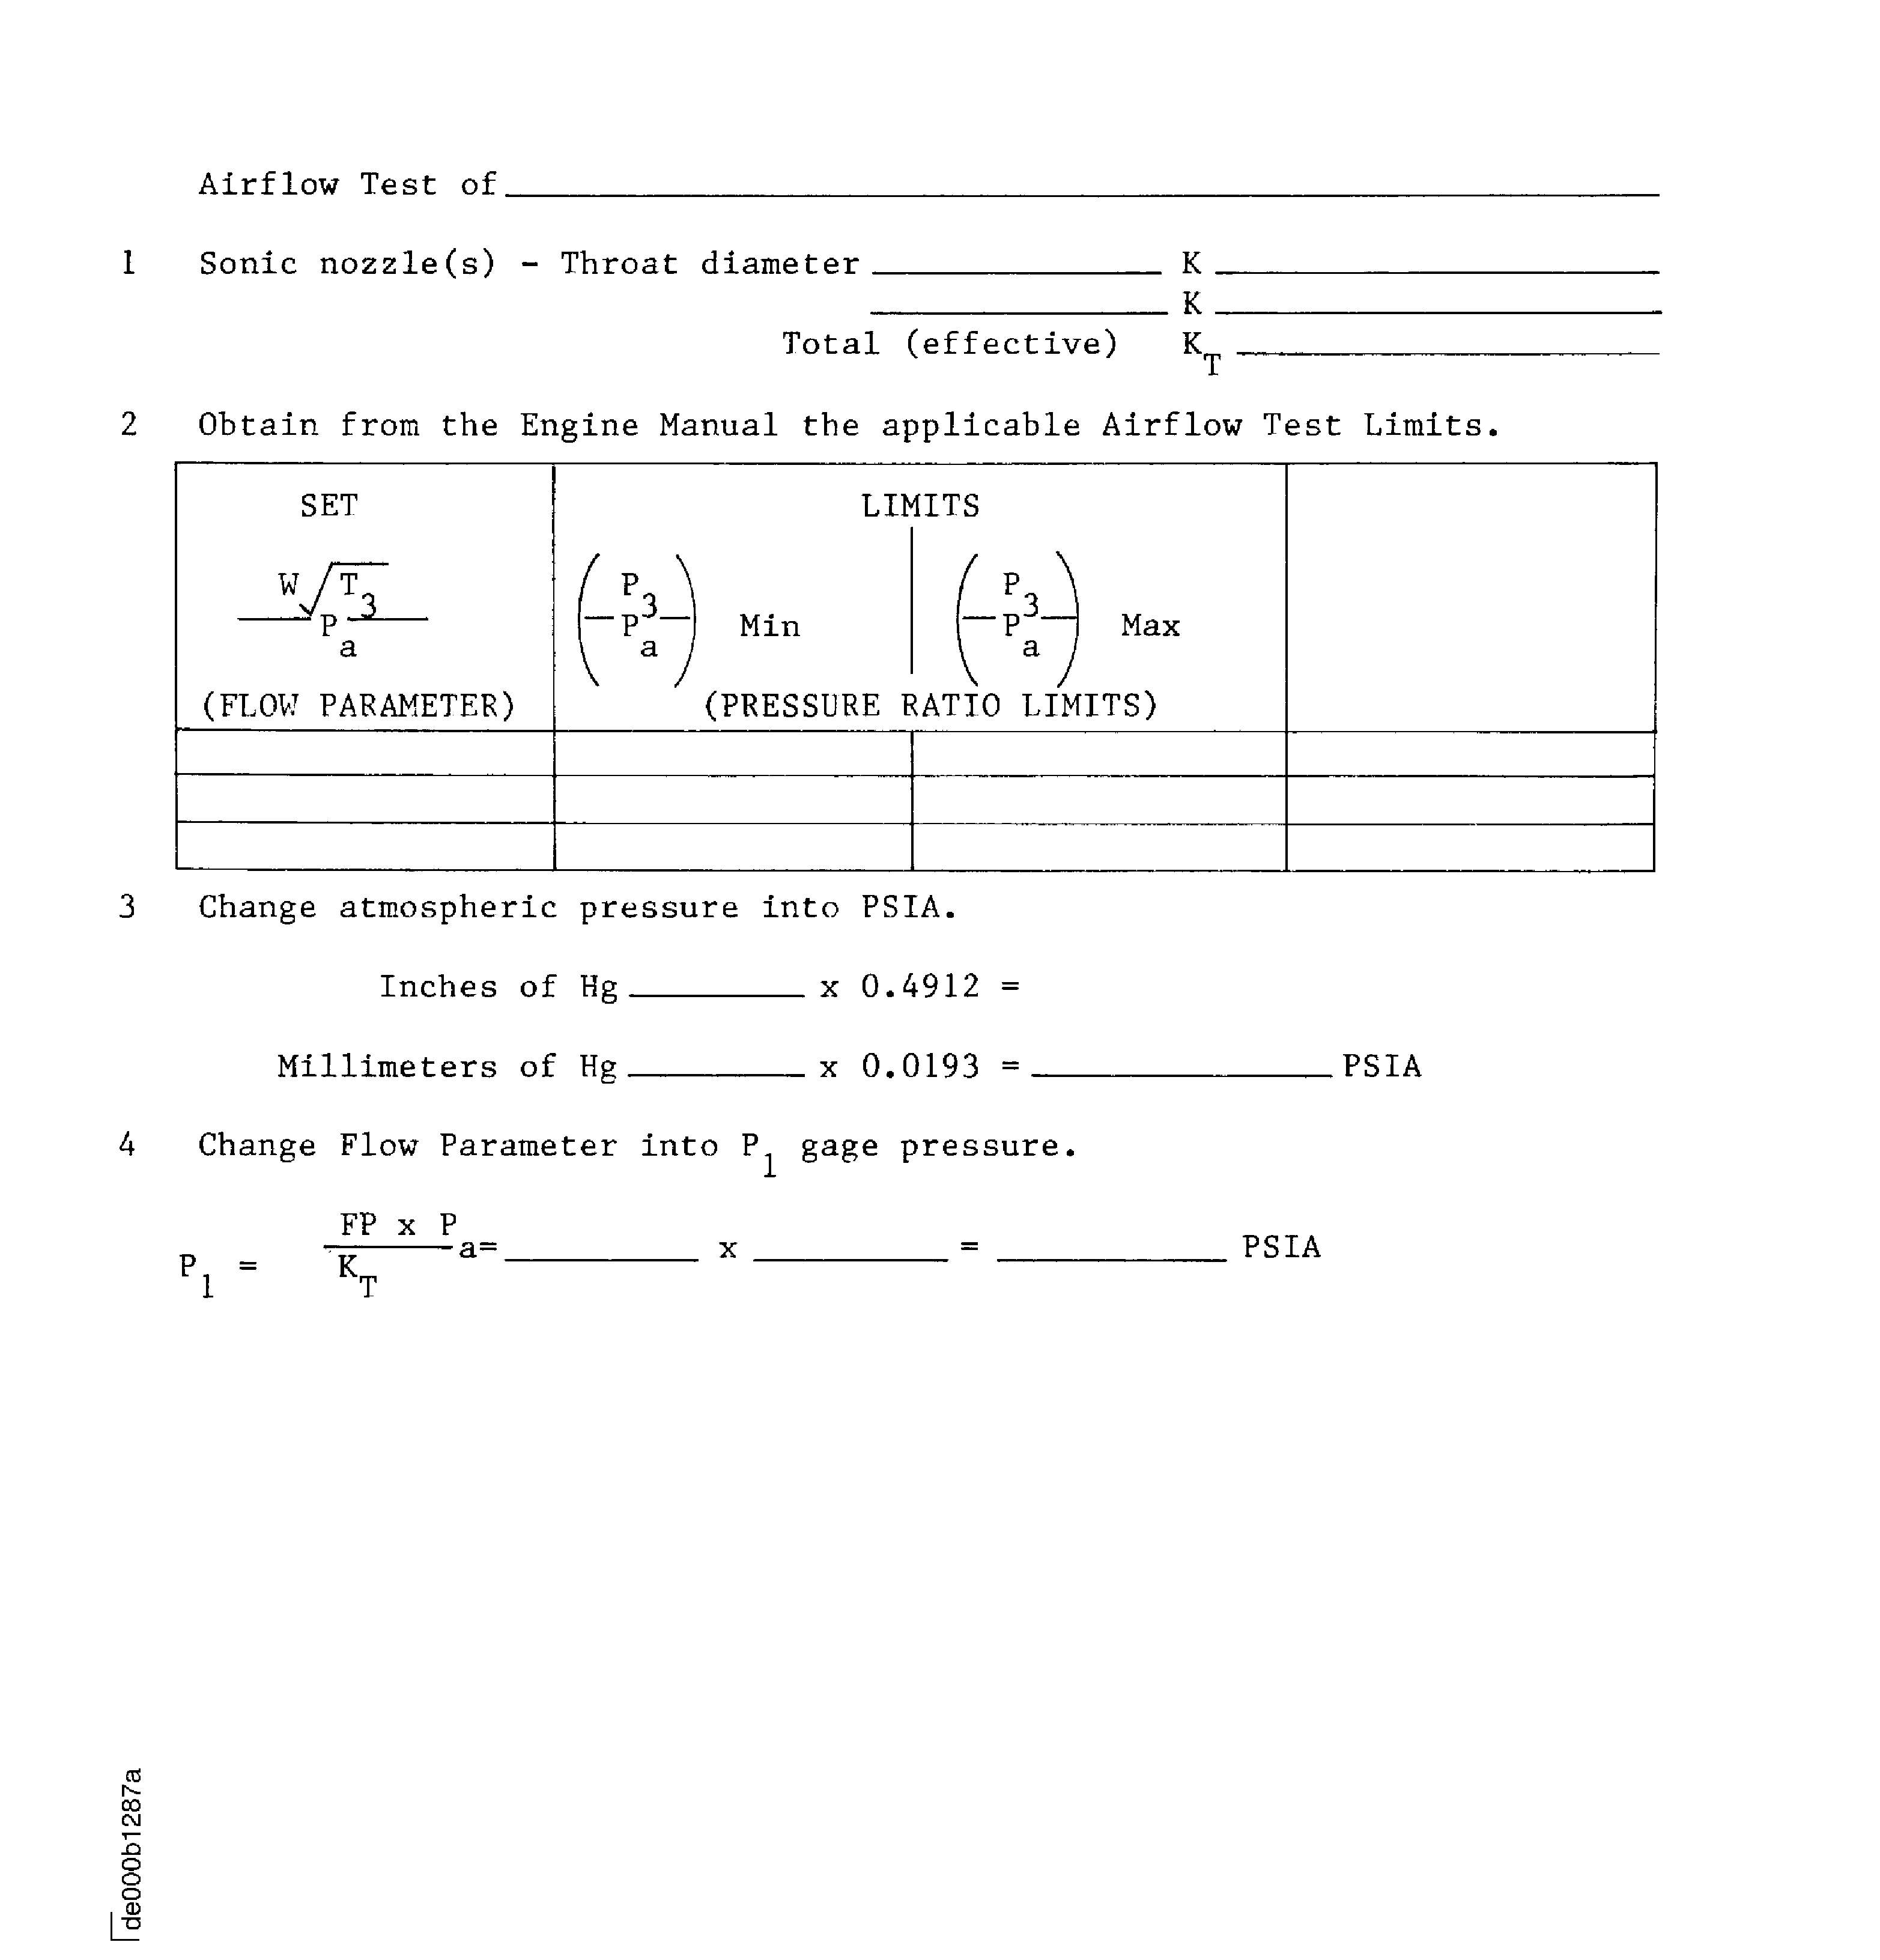
Figure: Pressure ratio procedure of testing. Sample worksheet 3 (Sheet 2)
Pressure ratio procedure of testing. Sample worksheet 3 (Sheet 2)
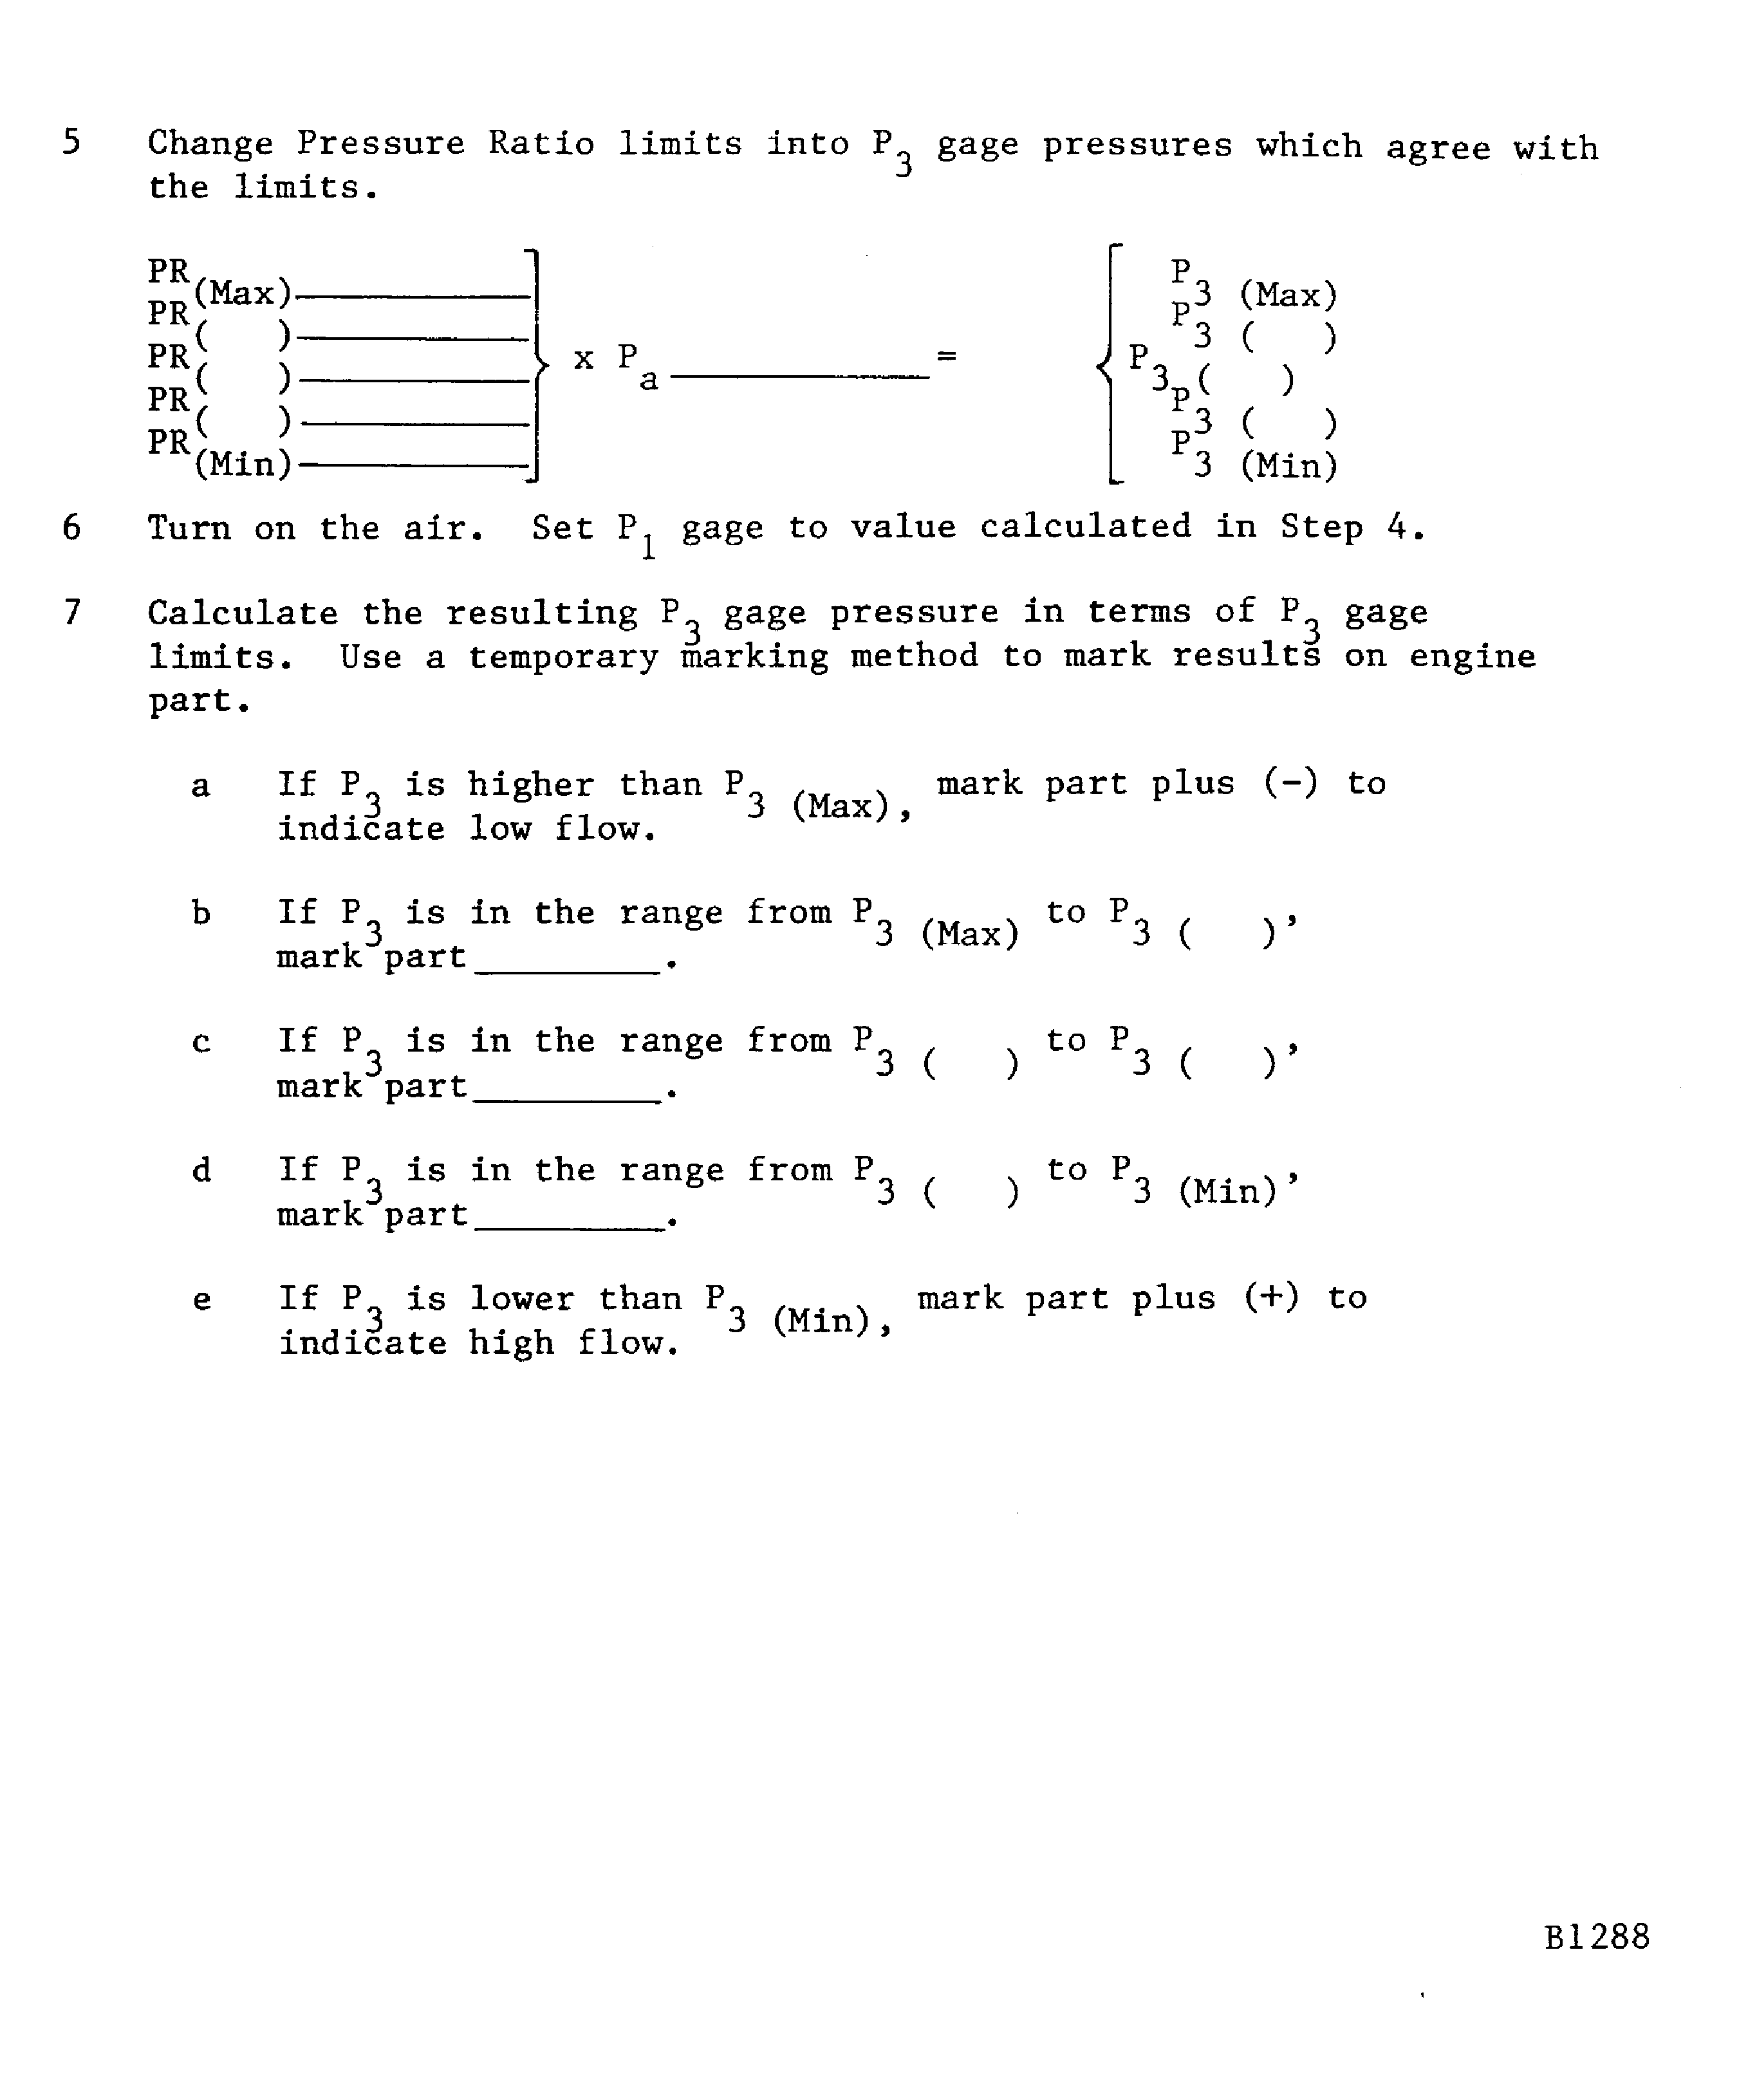
Figure: Flow parameter procedure of testing. Sample worksheet 4 (Sheet 1)
Flow parameter procedure of testing. Sample worksheet 4 (Sheet 1)
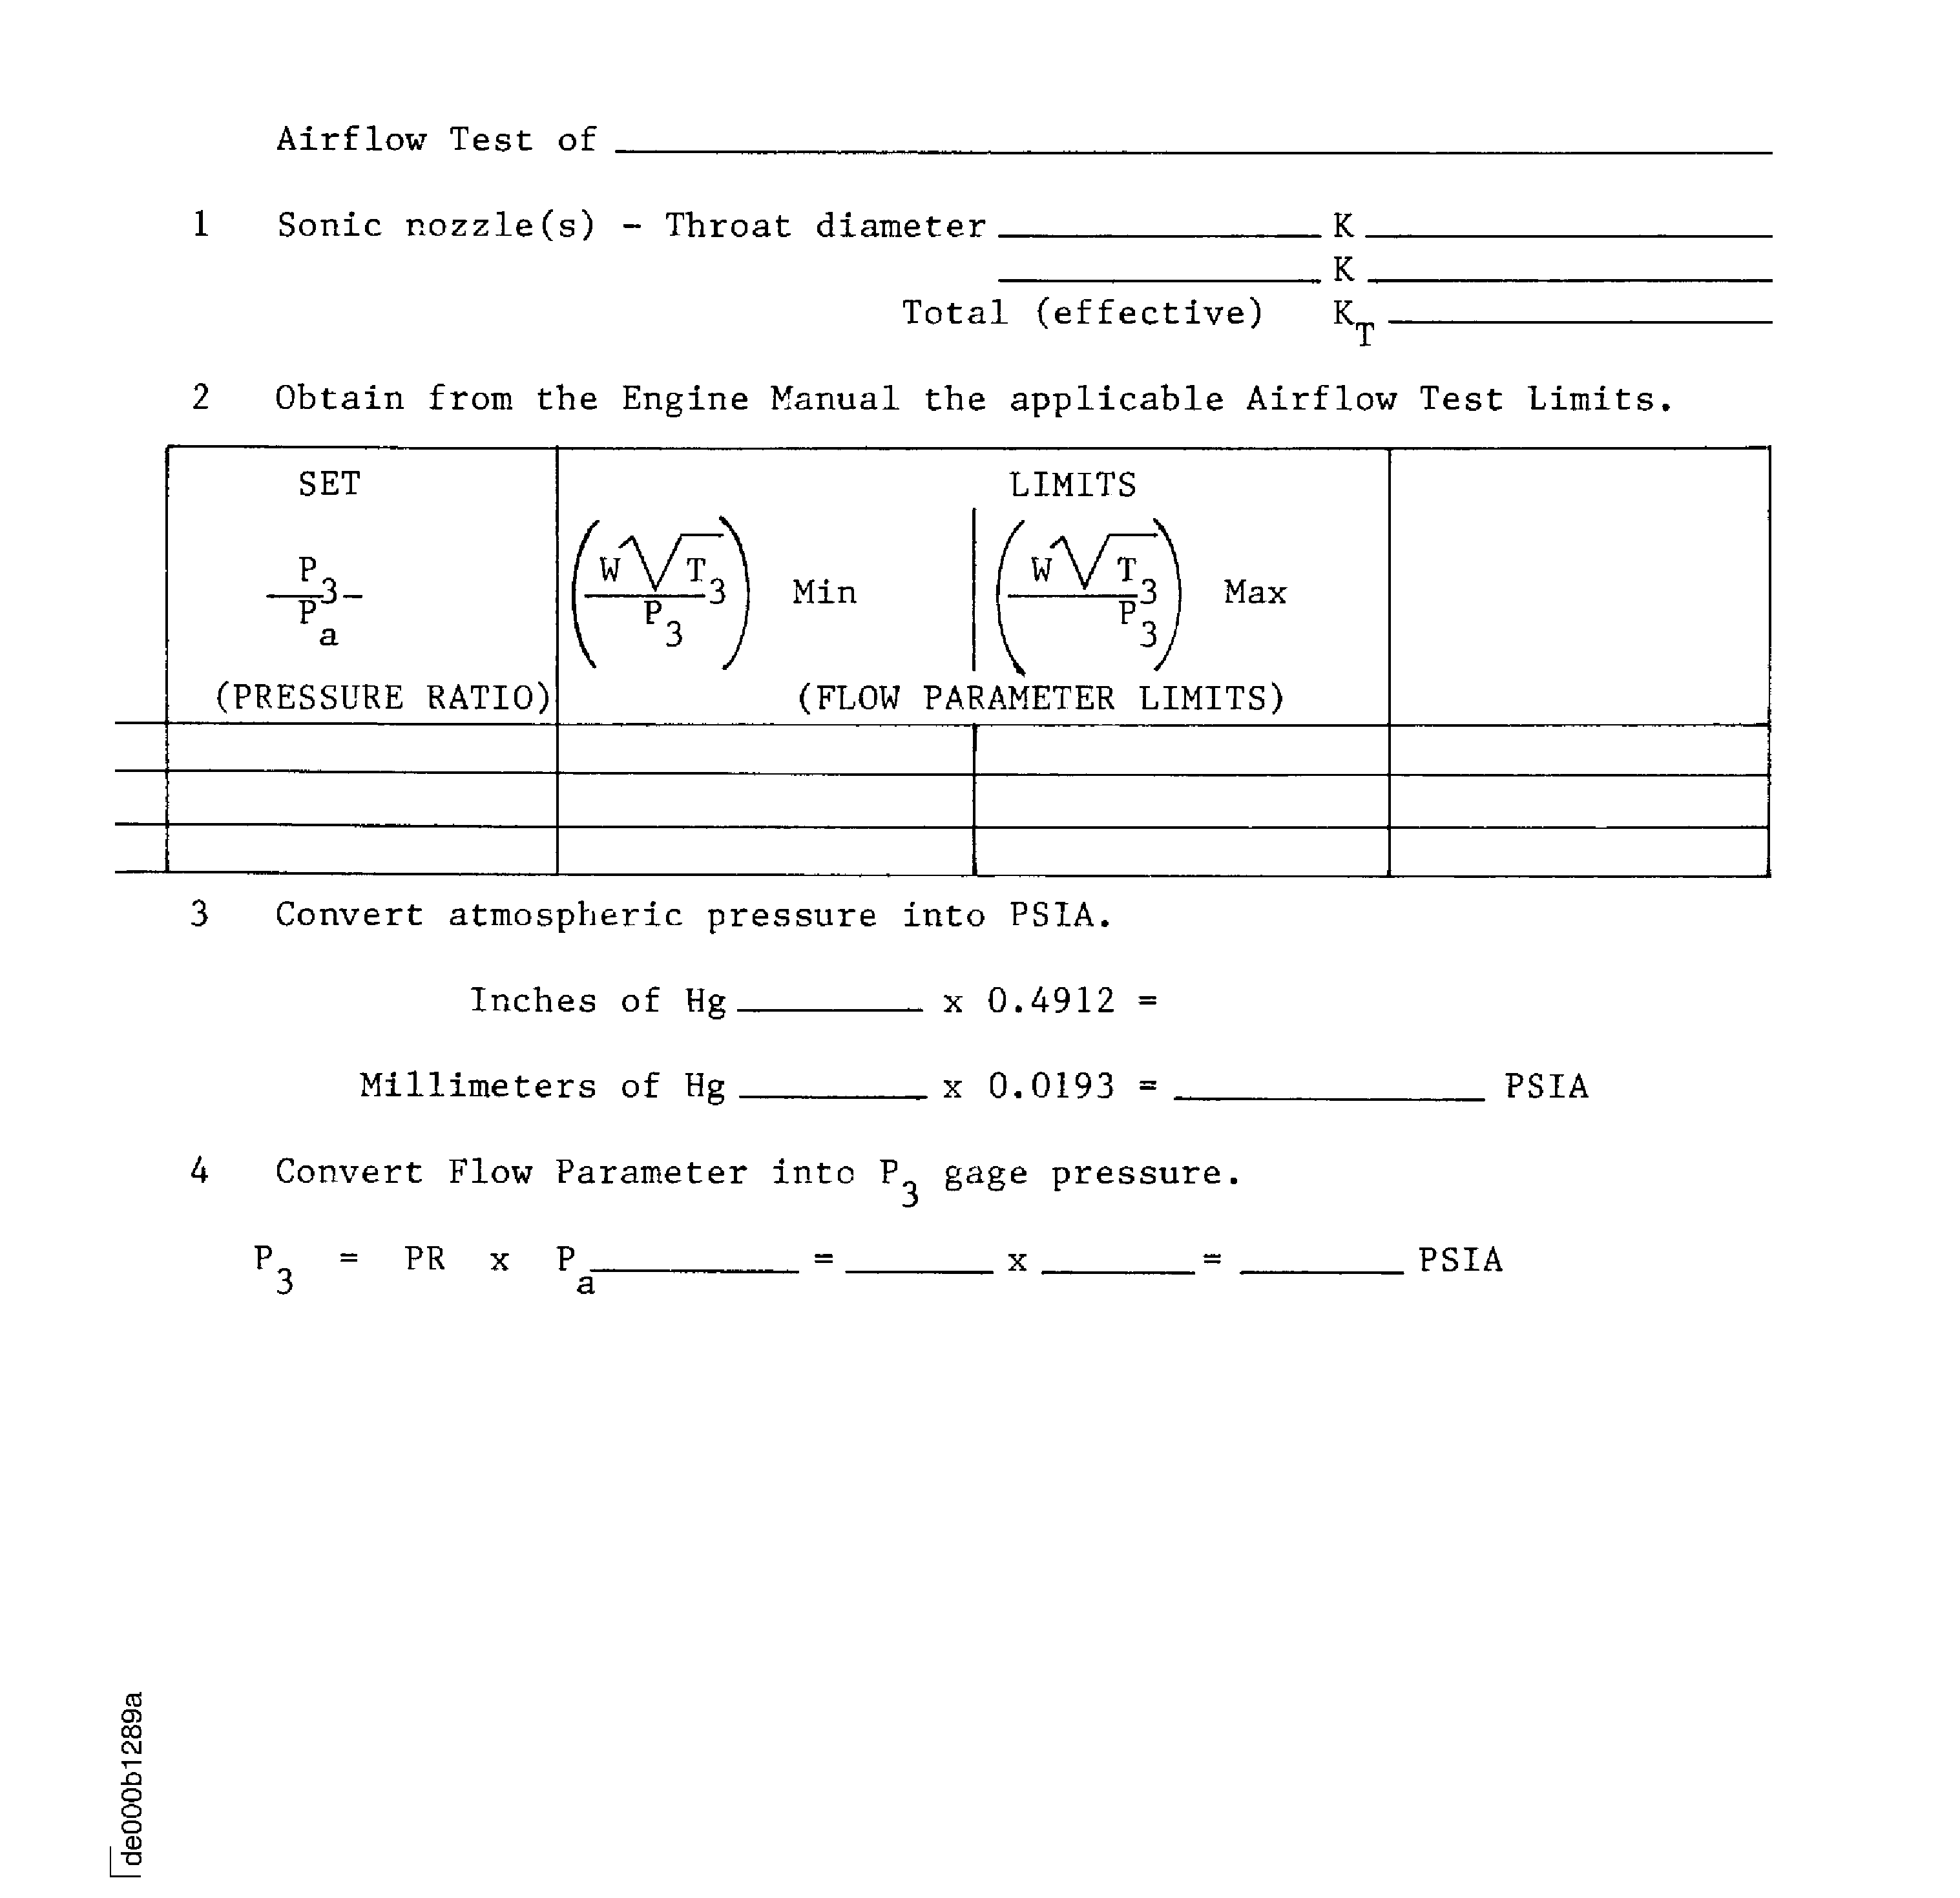
Figure: Flow parameter procedure of testing. Sample worksheet 4 (Sheet 2)
Flow parameter procedure of testing. Sample worksheet 4 (Sheet 2)
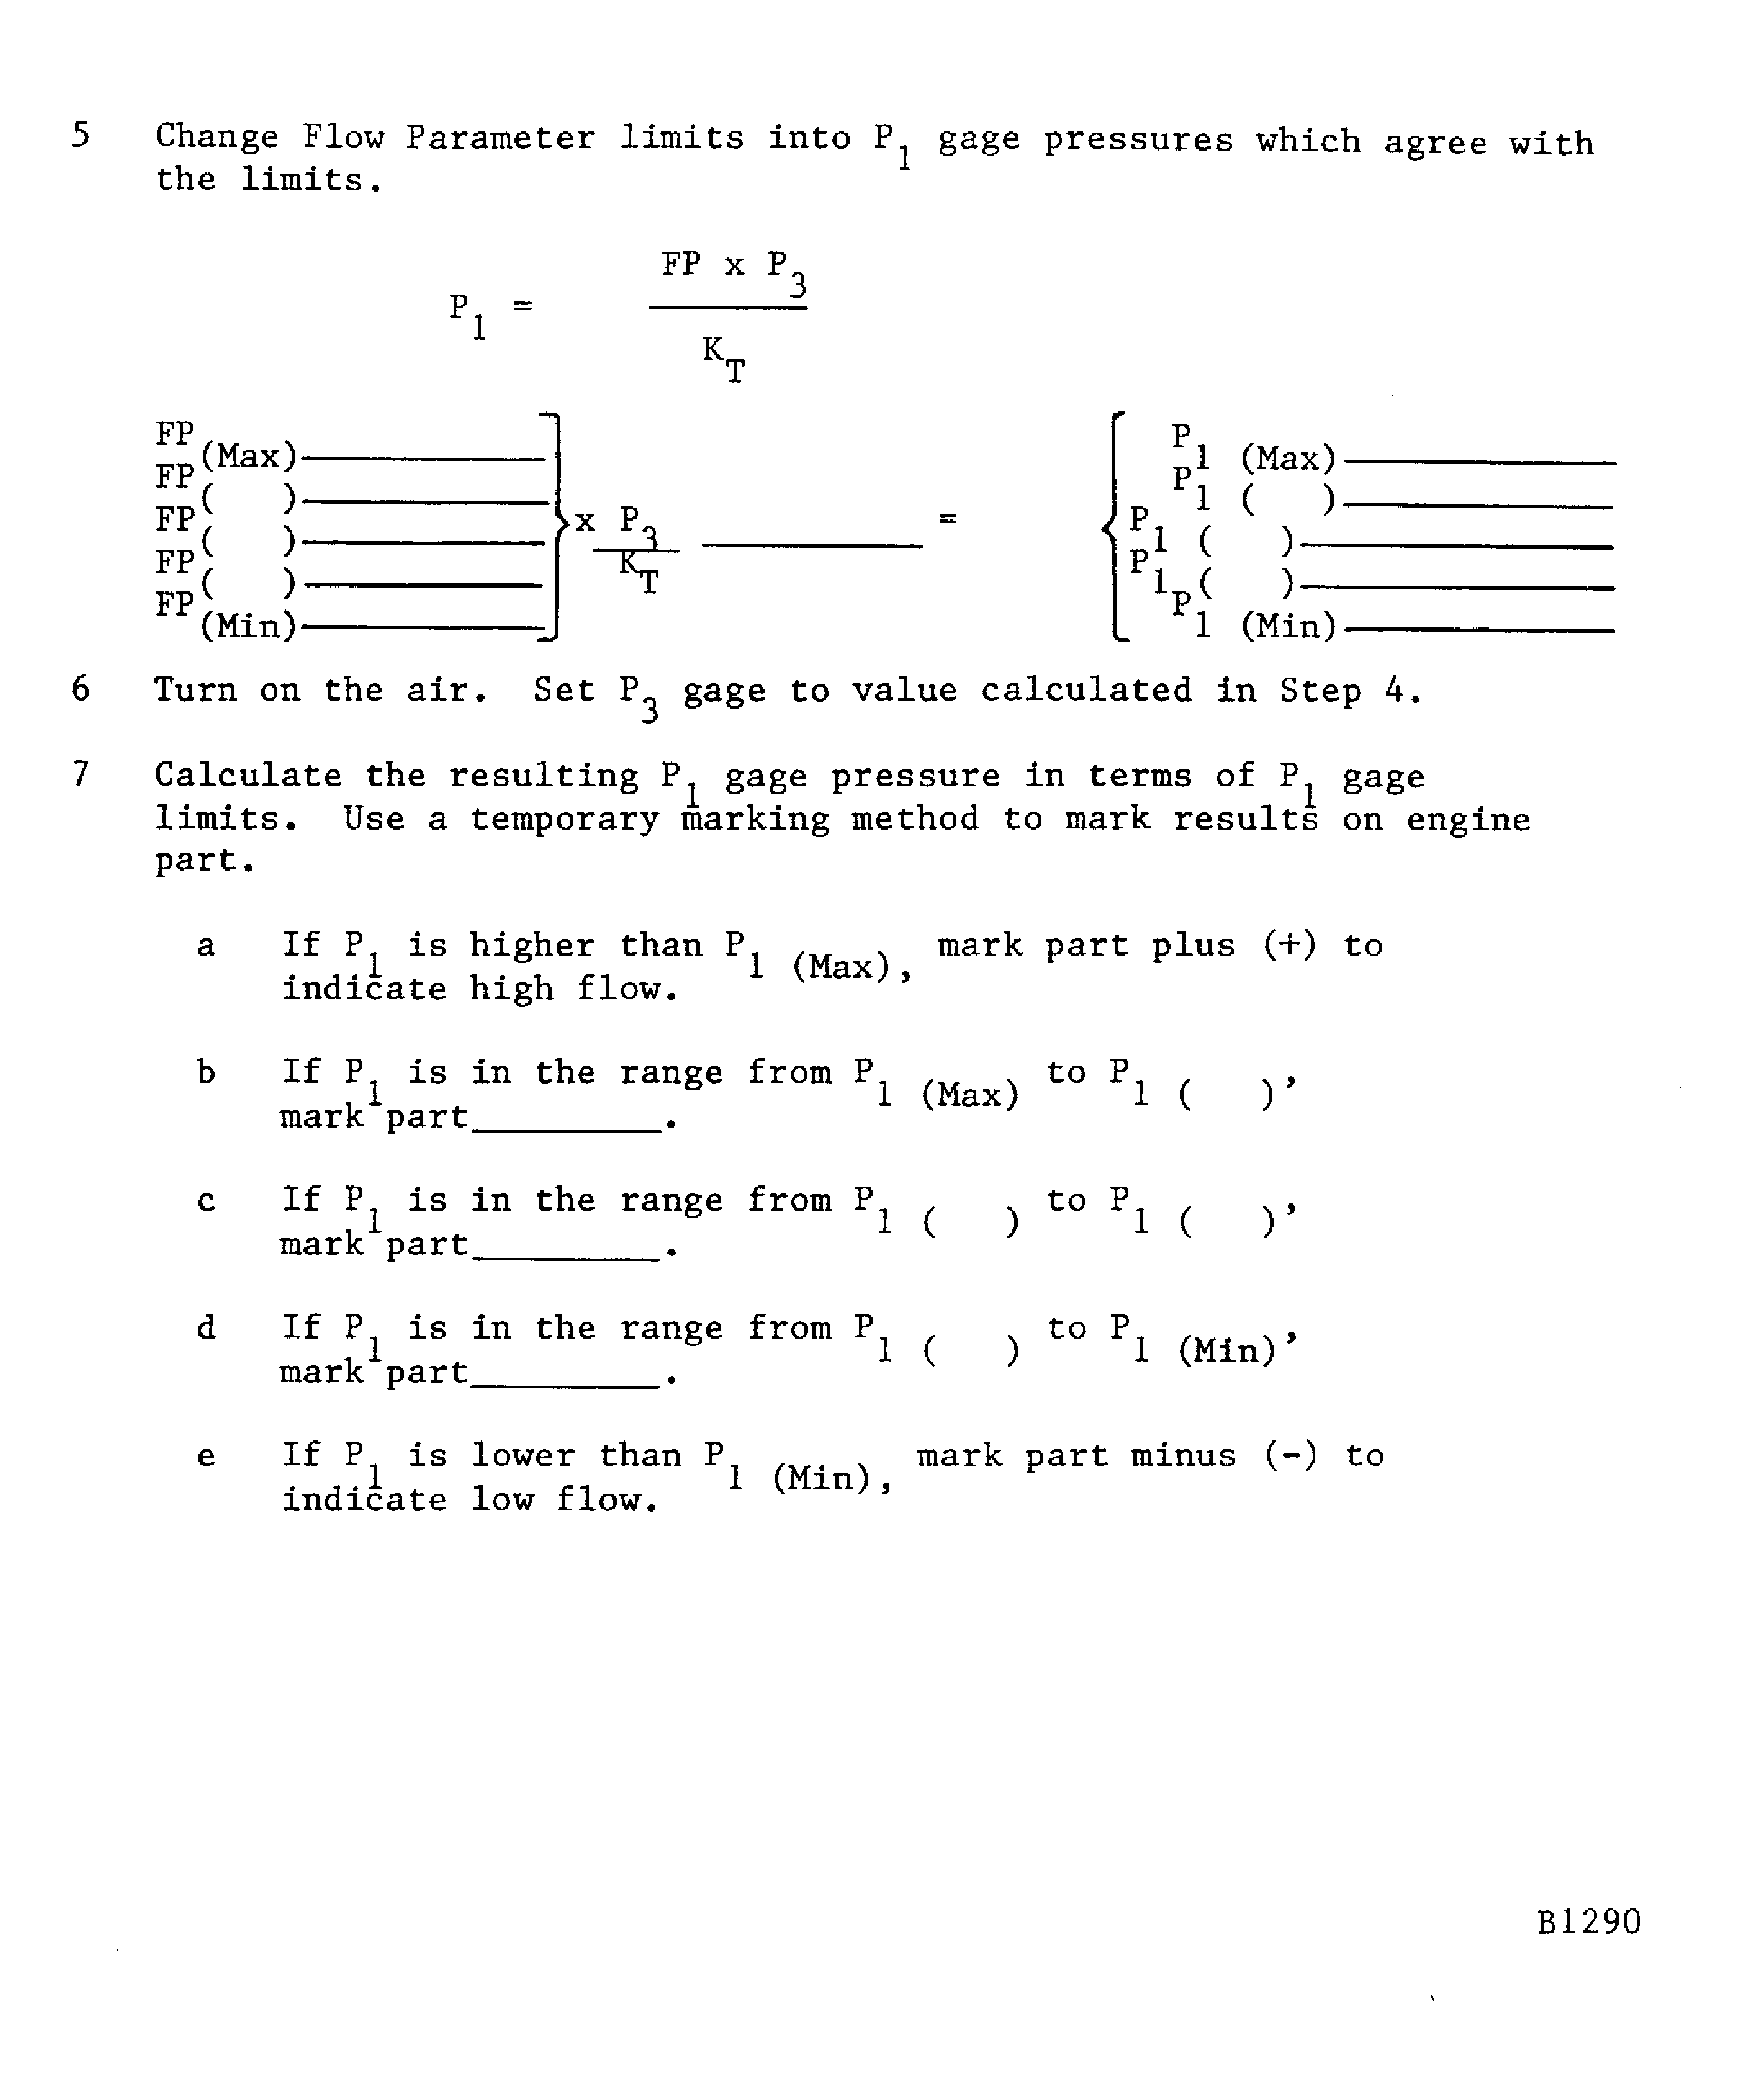
Figure: Stage 1 HPT vane cluster assembly or vane assembly airflow check tools (typical)
Stage 1 HPT vane cluster assembly or vane assembly airflow check tools (typical)
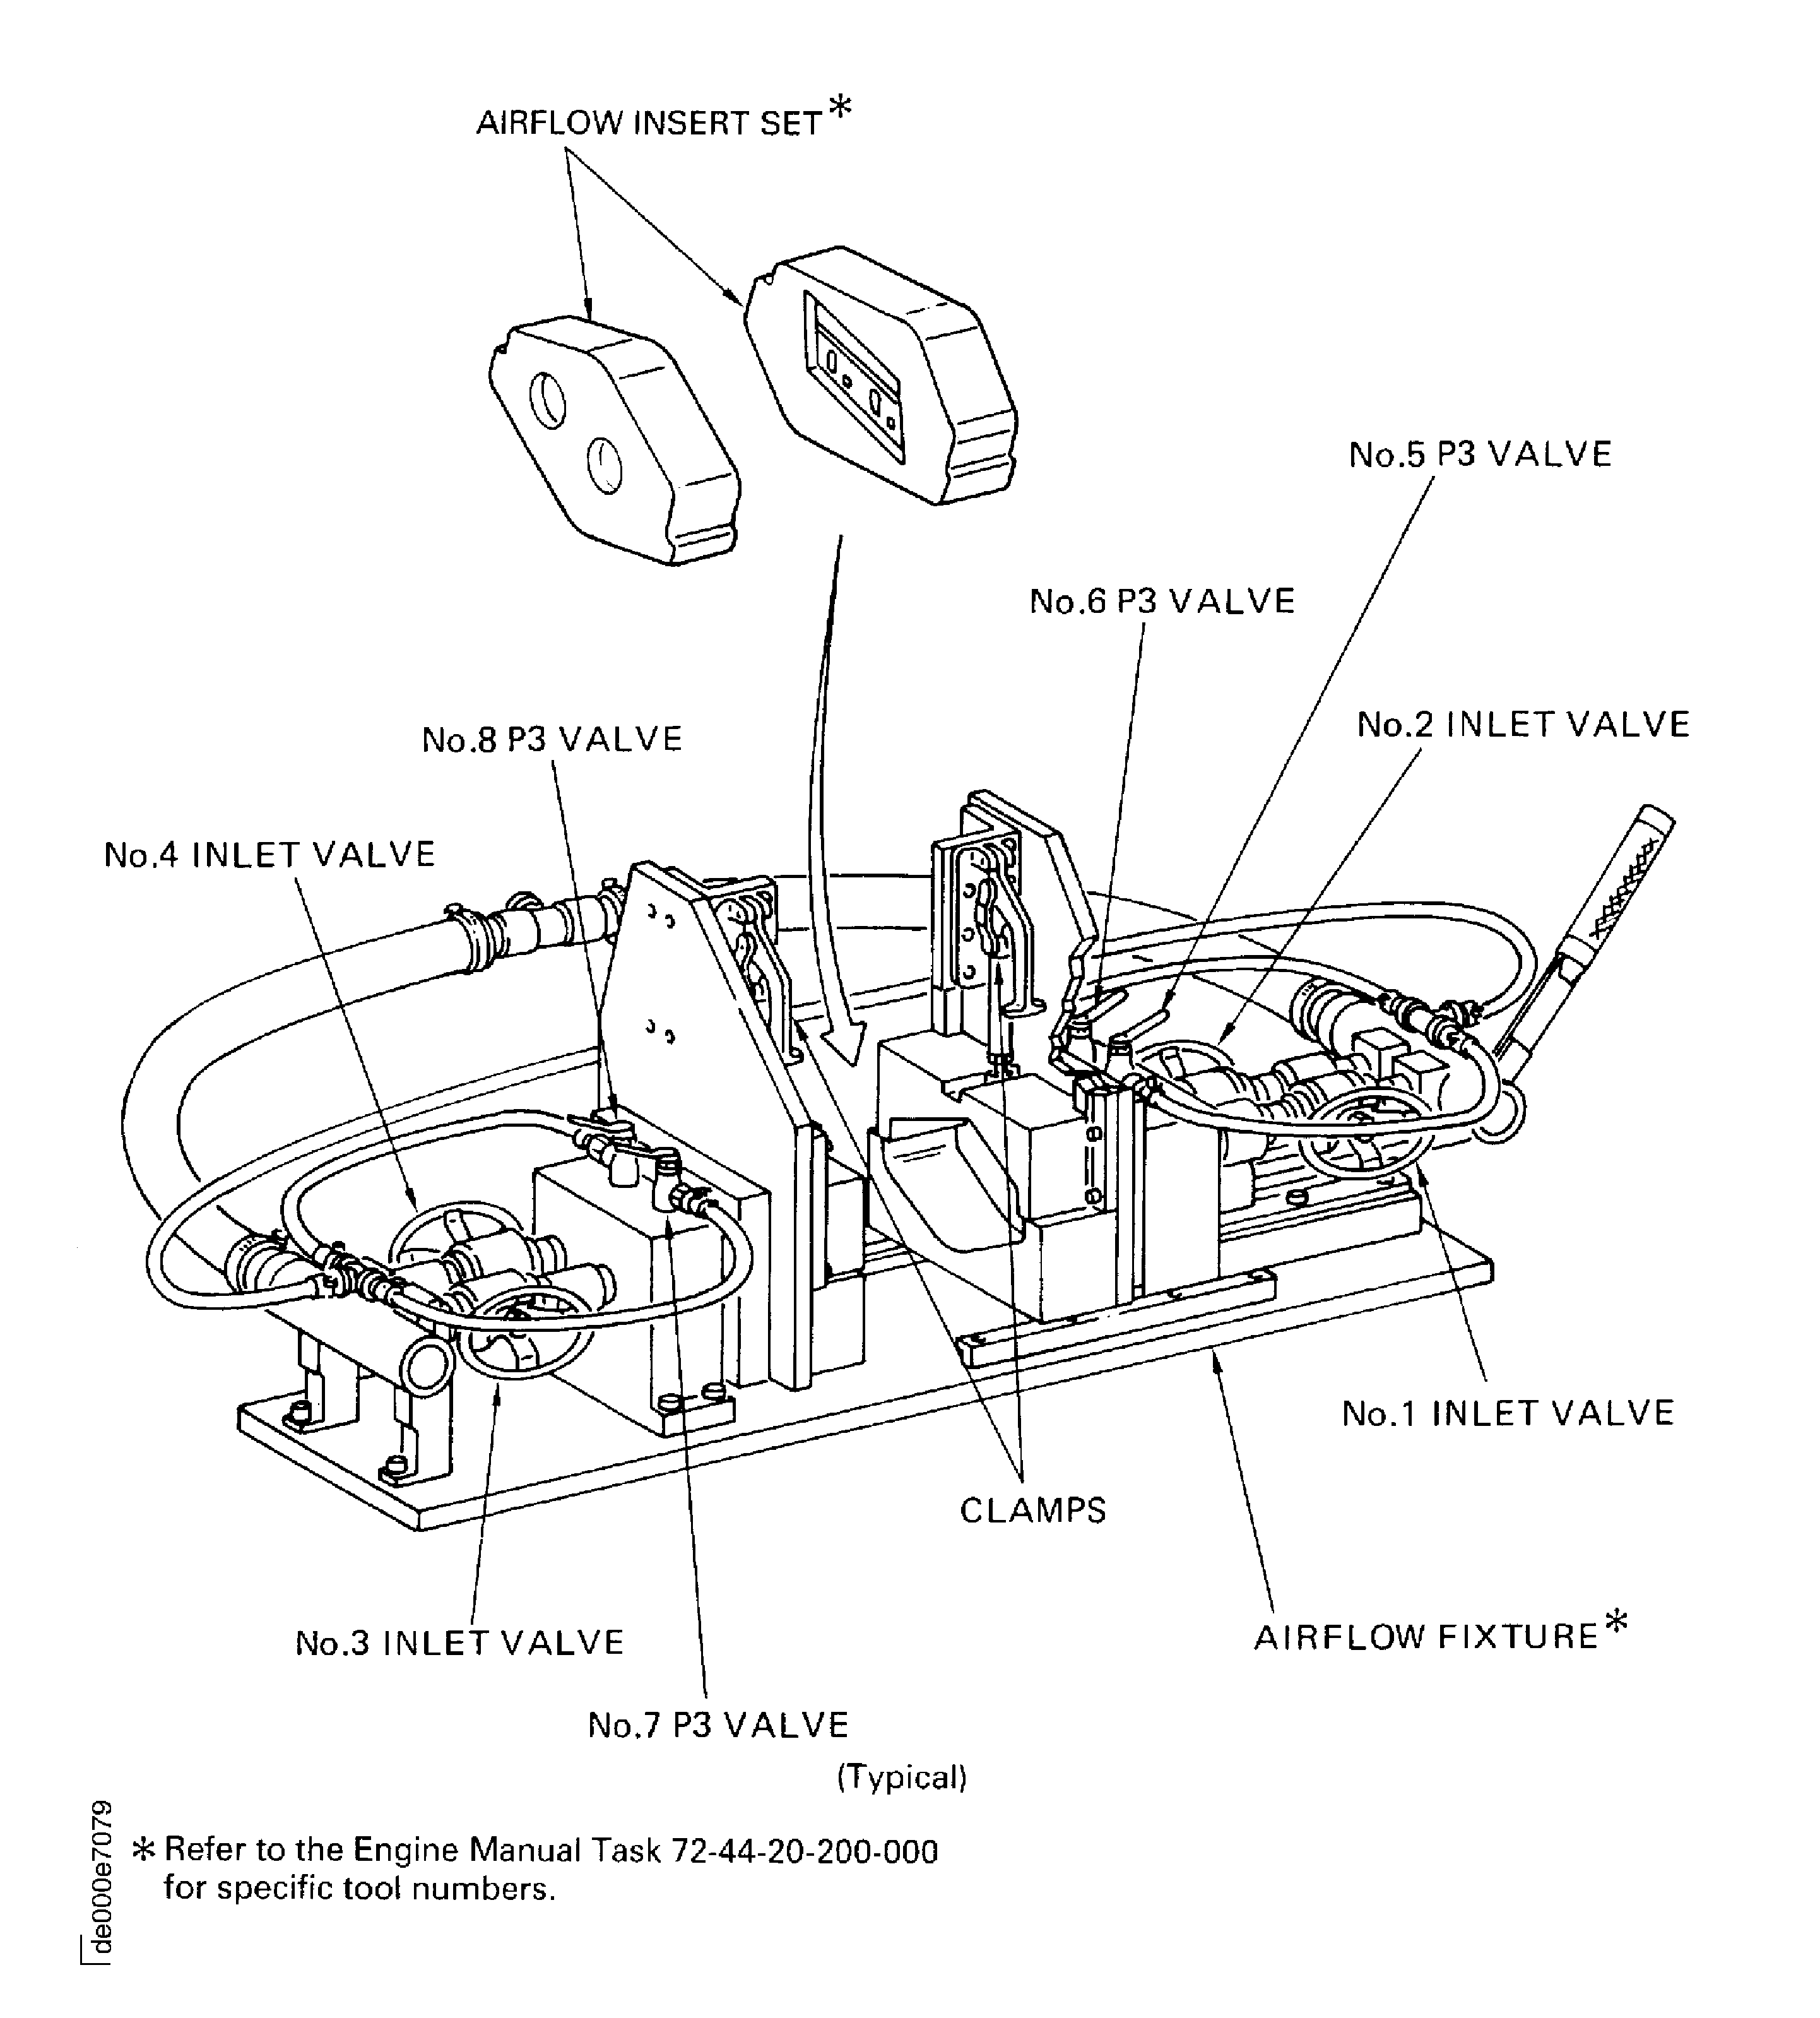
Figure: Airflow check - pressure ratio method worksheet (typical)
Airflow check - pressure ratio method worksheet (typical)
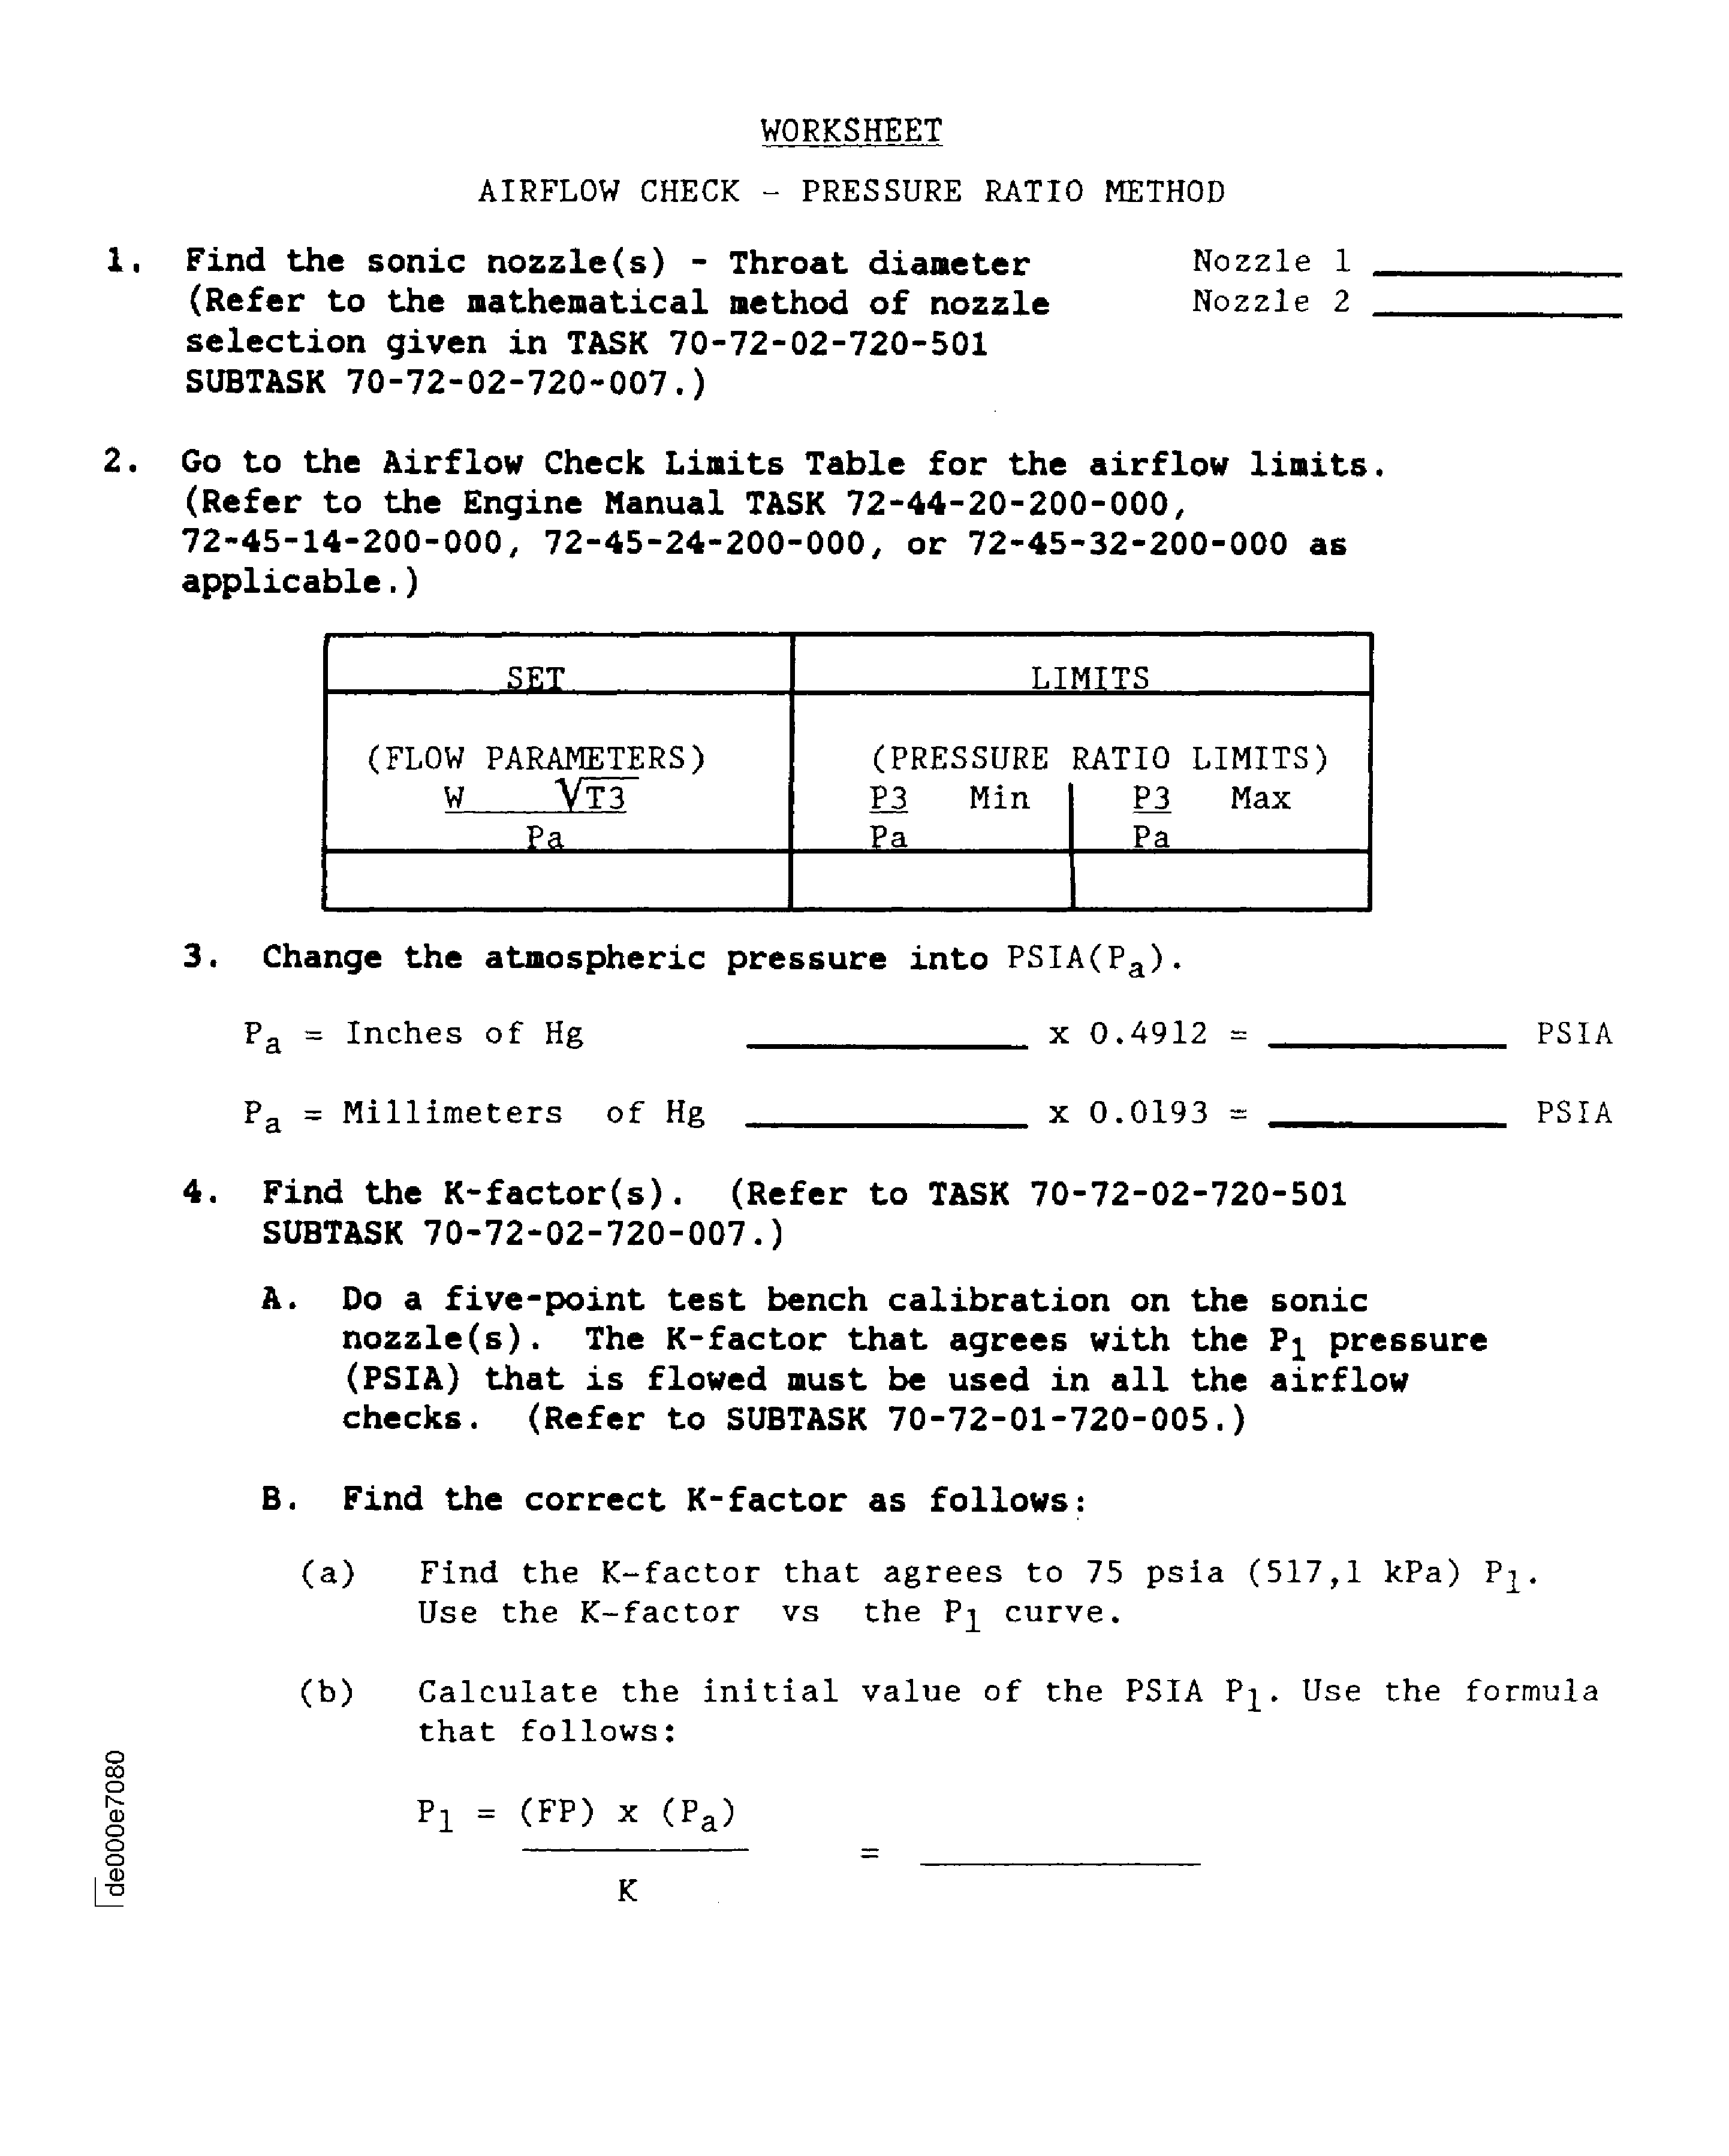
Figure: Airflow check - pressure ratio method worksheet (typical)
Airflow check - pressure ratio method worksheet (typical)
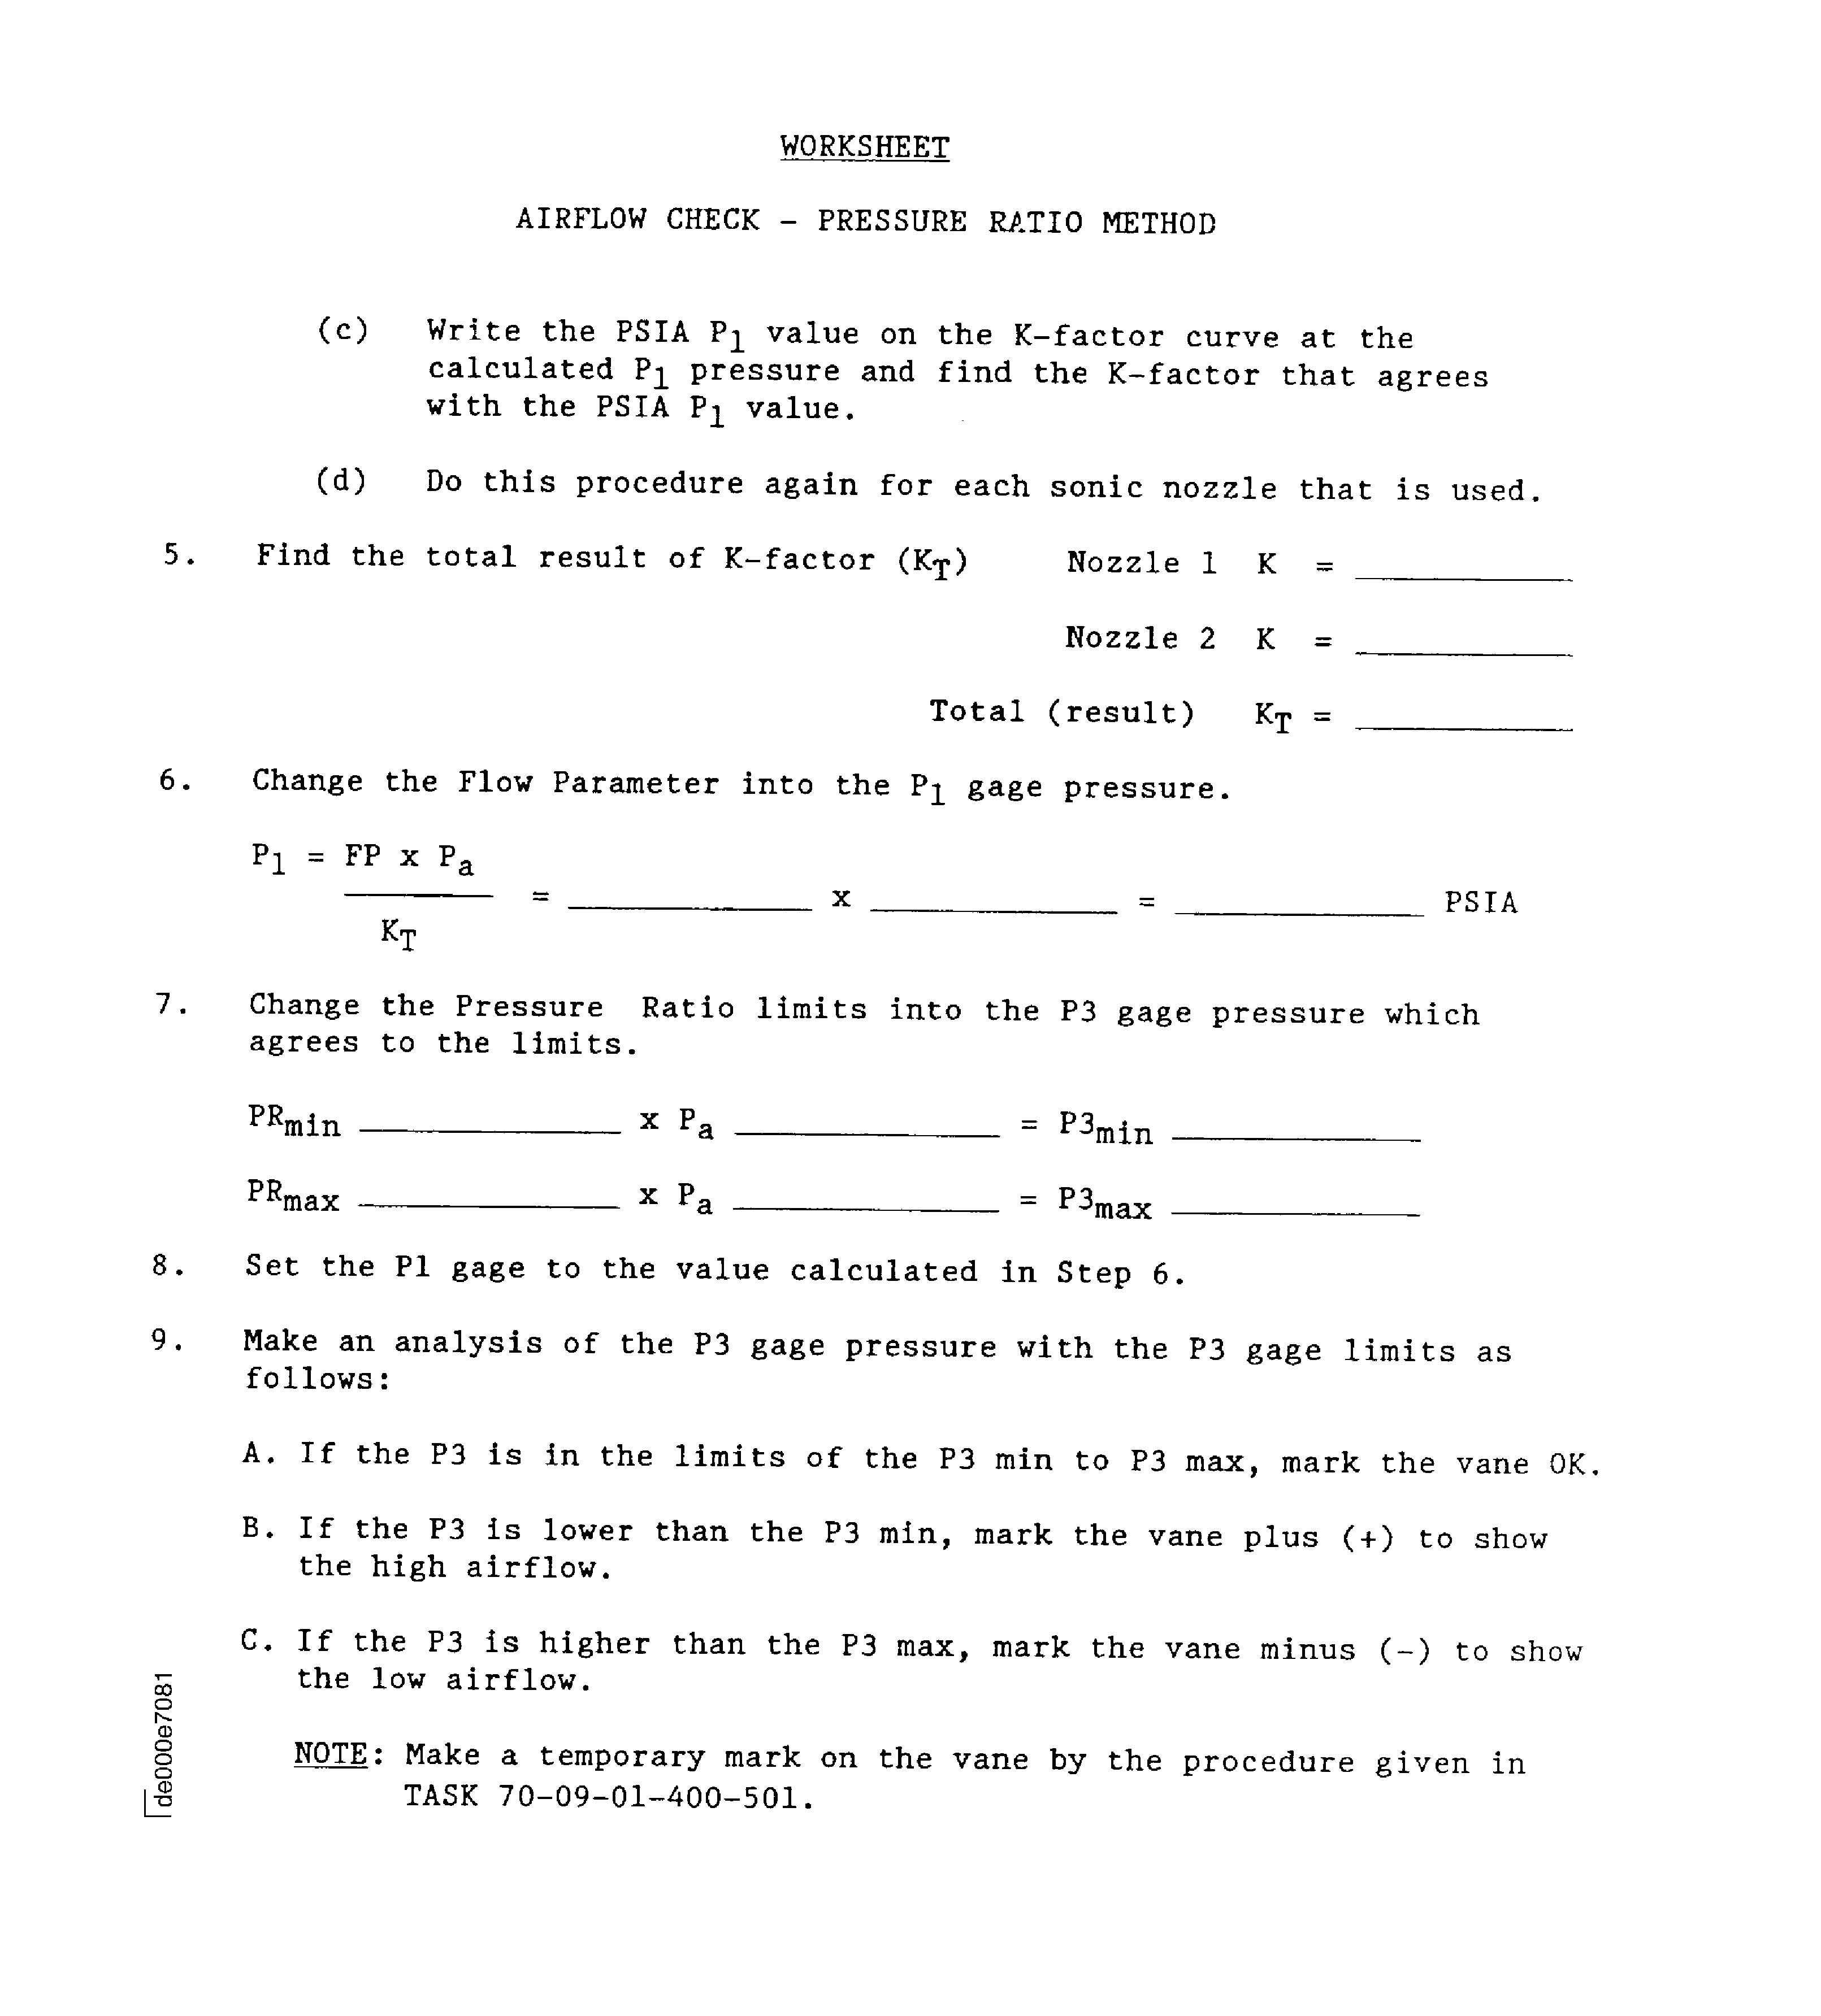
Figure: Stage 1 HPT vane cluster assembly and vane assembly airflow passages
Stage 1 HPT vane cluster assembly and vane assembly airflow passages
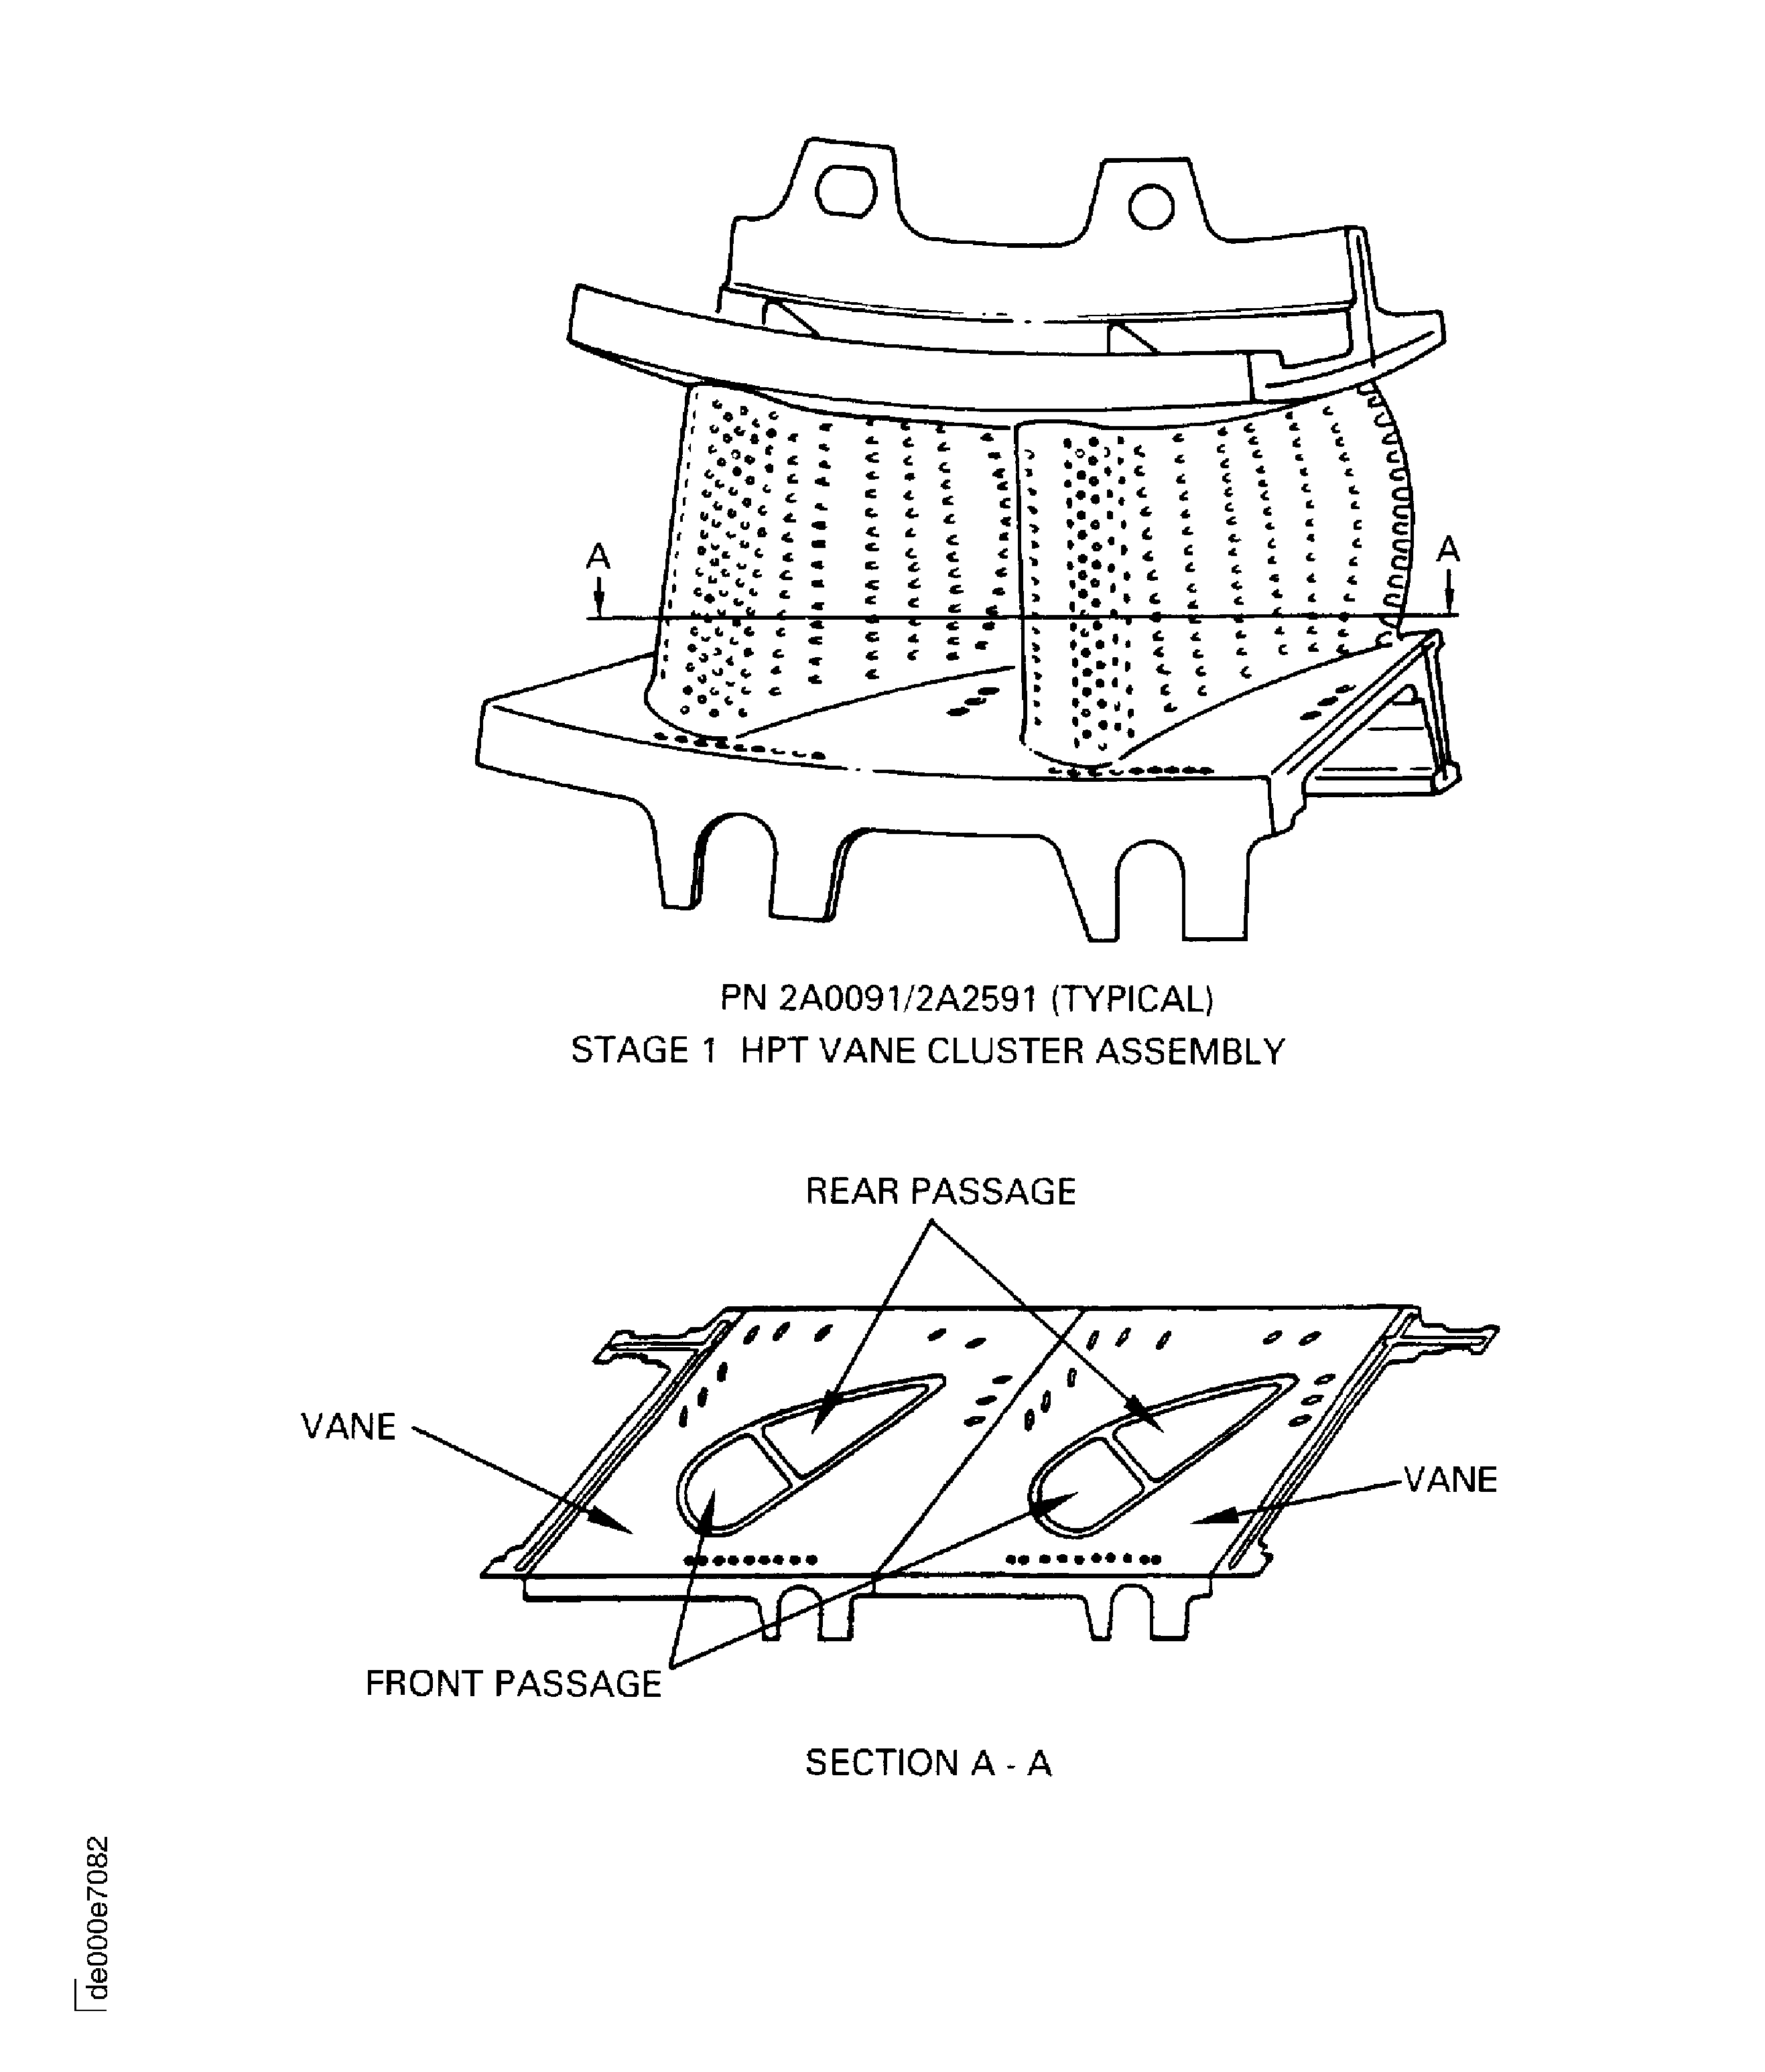
Figure: Stage 1 HPT vane cluster assembly and vane assembly airflow passages
Stage 1 HPT vane cluster assembly and vane assembly airflow passages
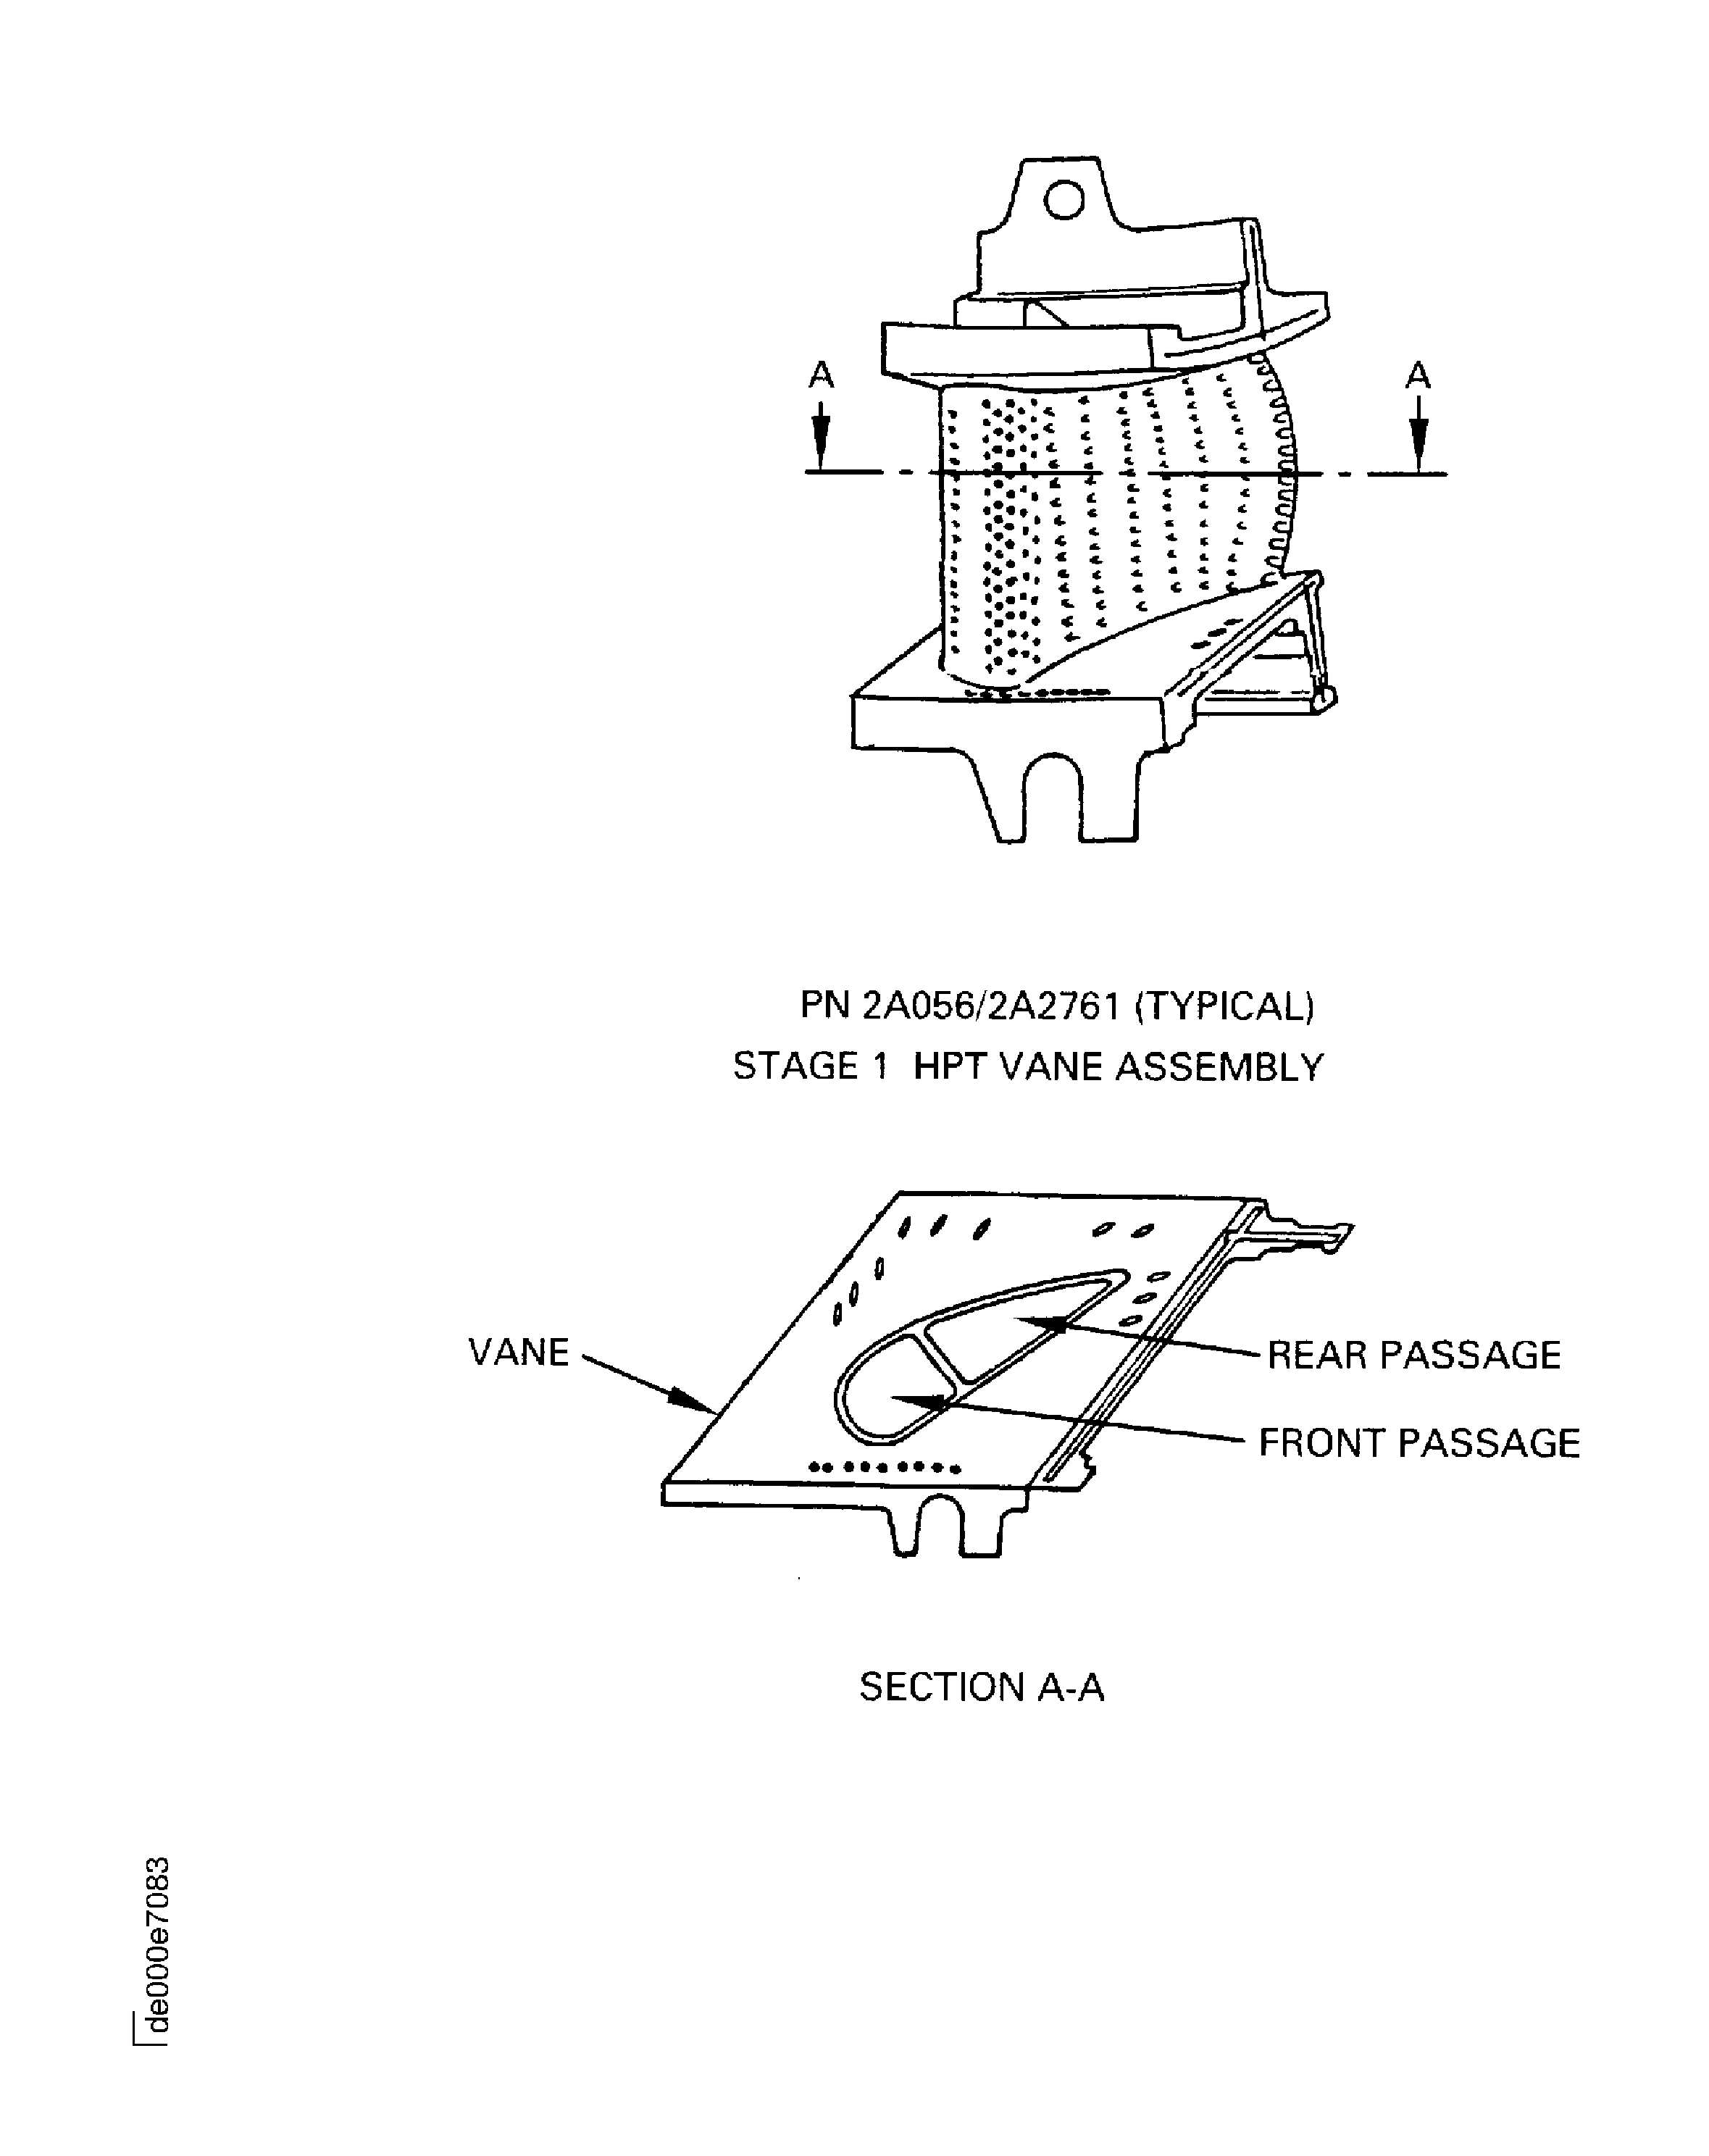
Figure: Stage 1 or 2 HPT blade assembly airflow check tools (typical)
Stage 1 or 2 HPT blade assembly airflow check tools (typical)
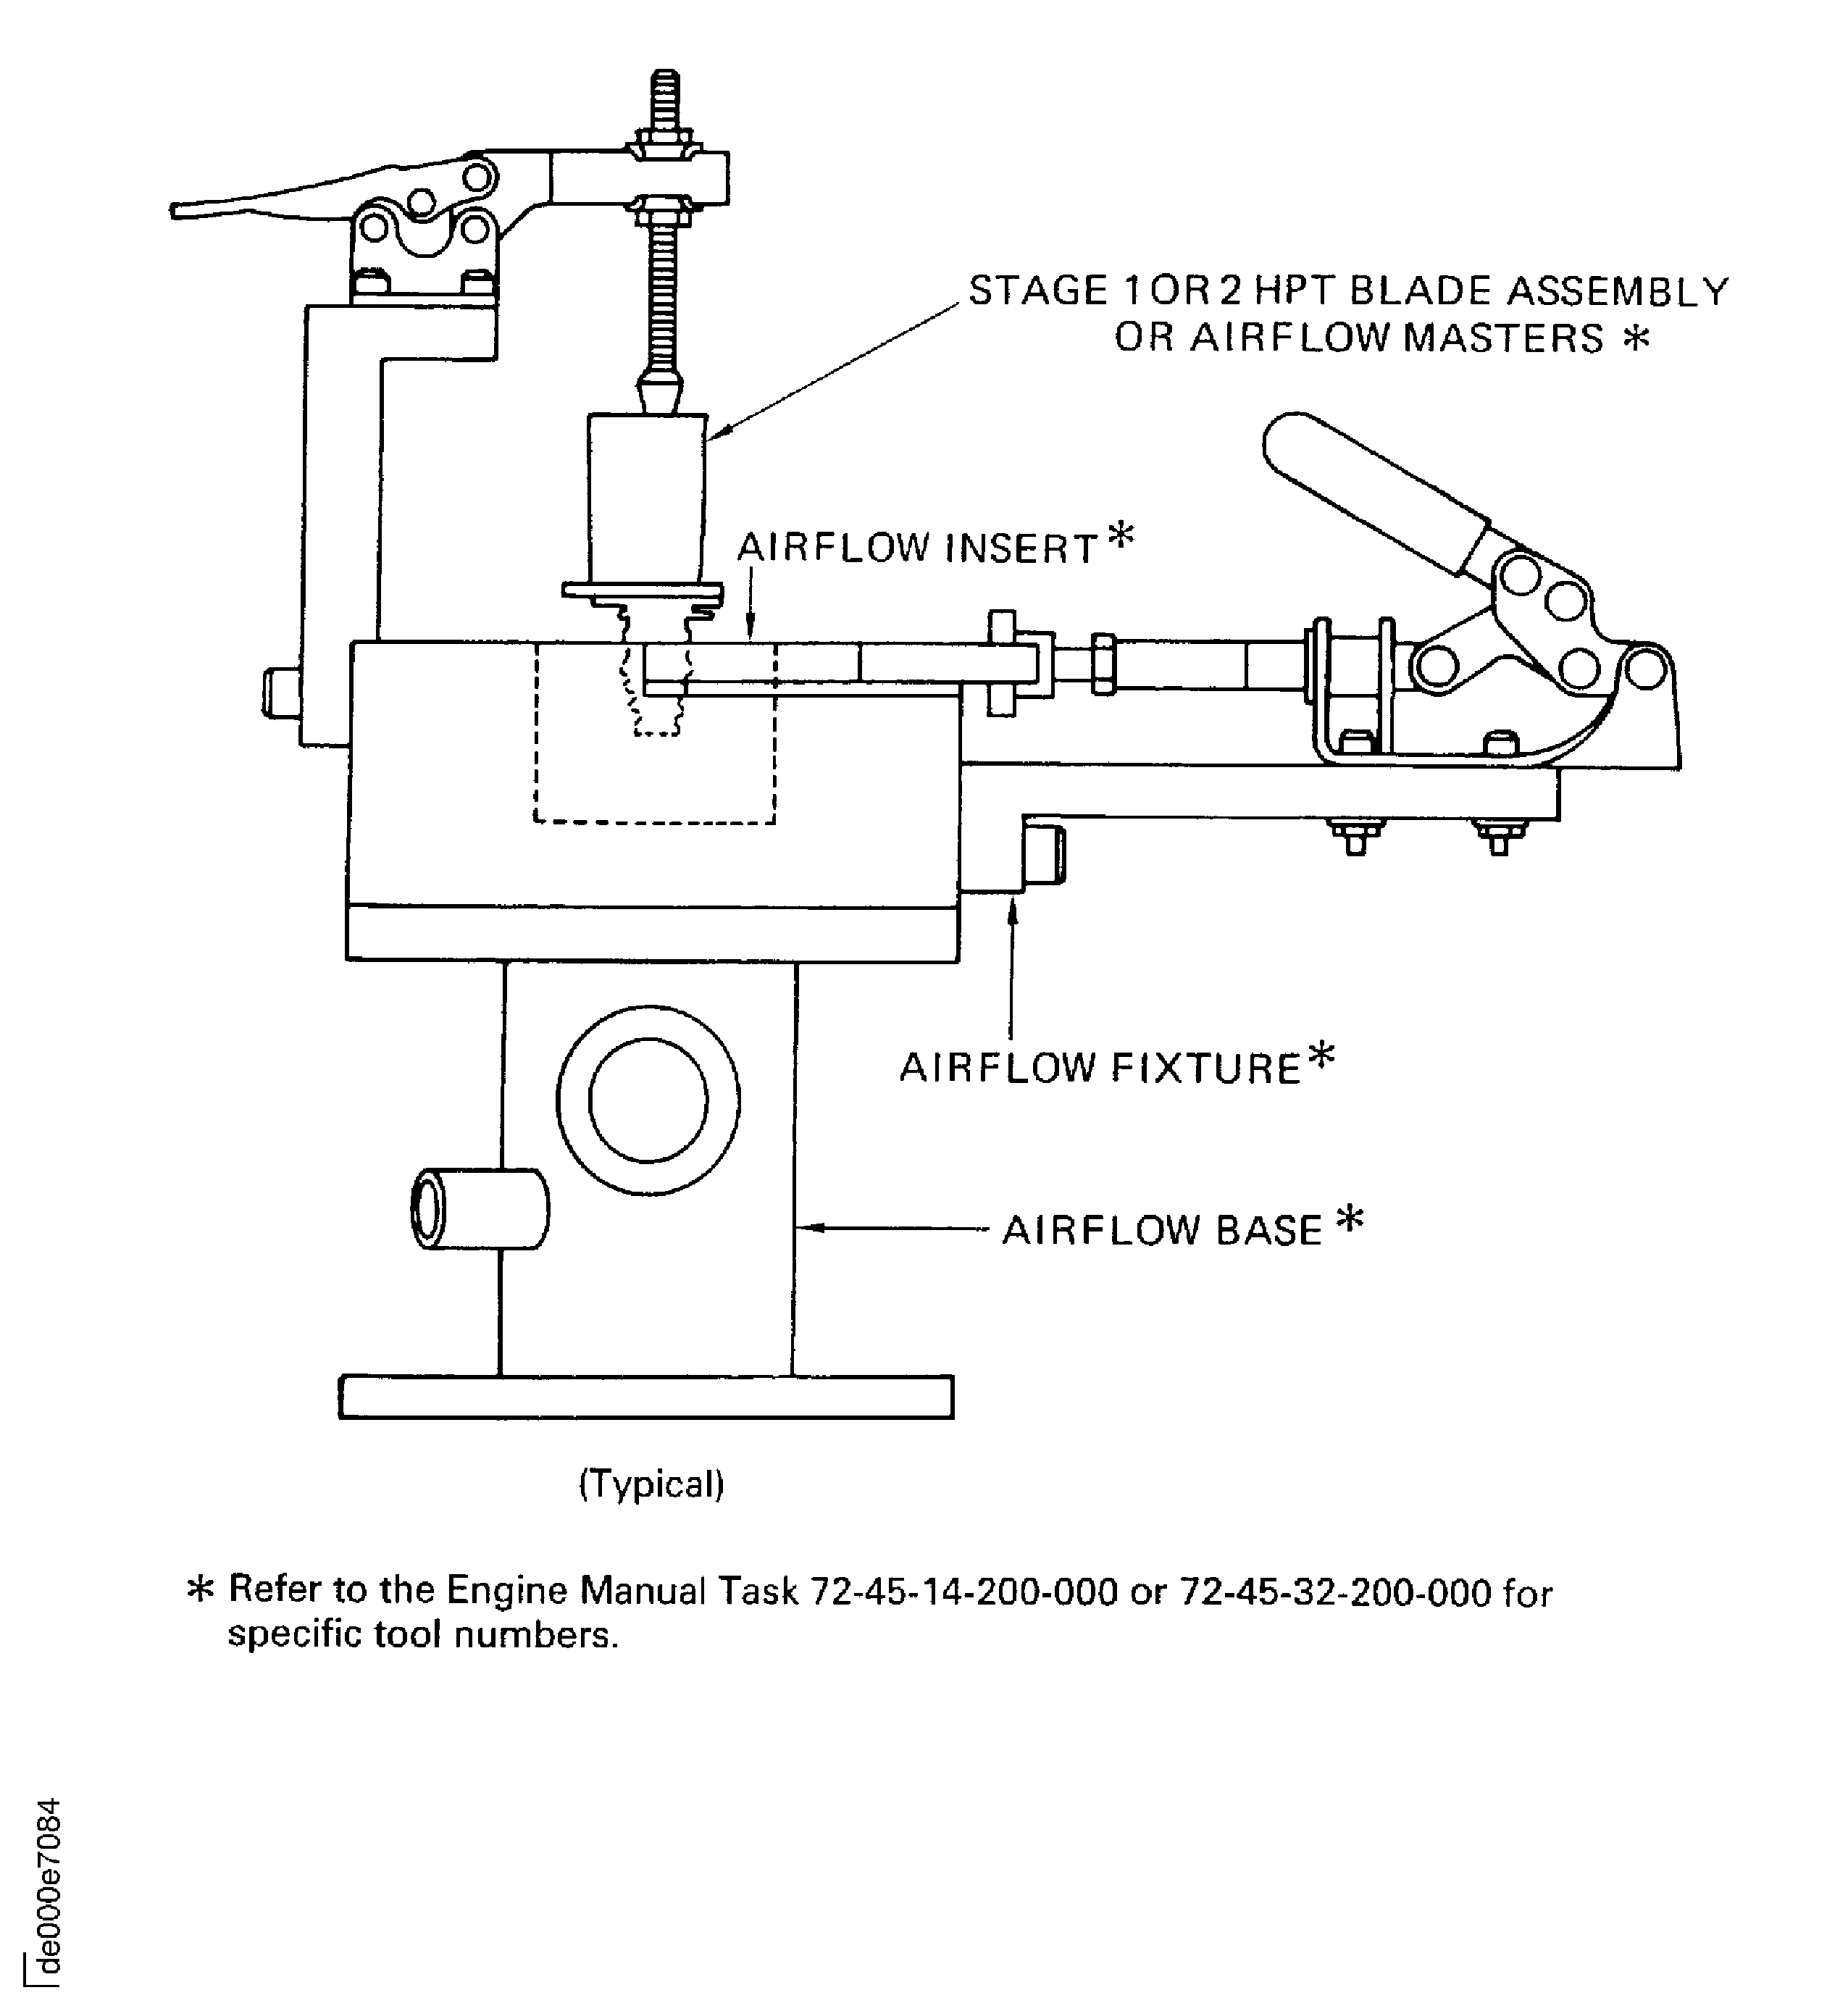
Figure: Stage 1 HPT blade assembly airflow passages and cooling holes
Stage 1 HPT blade assembly airflow passages and cooling holes
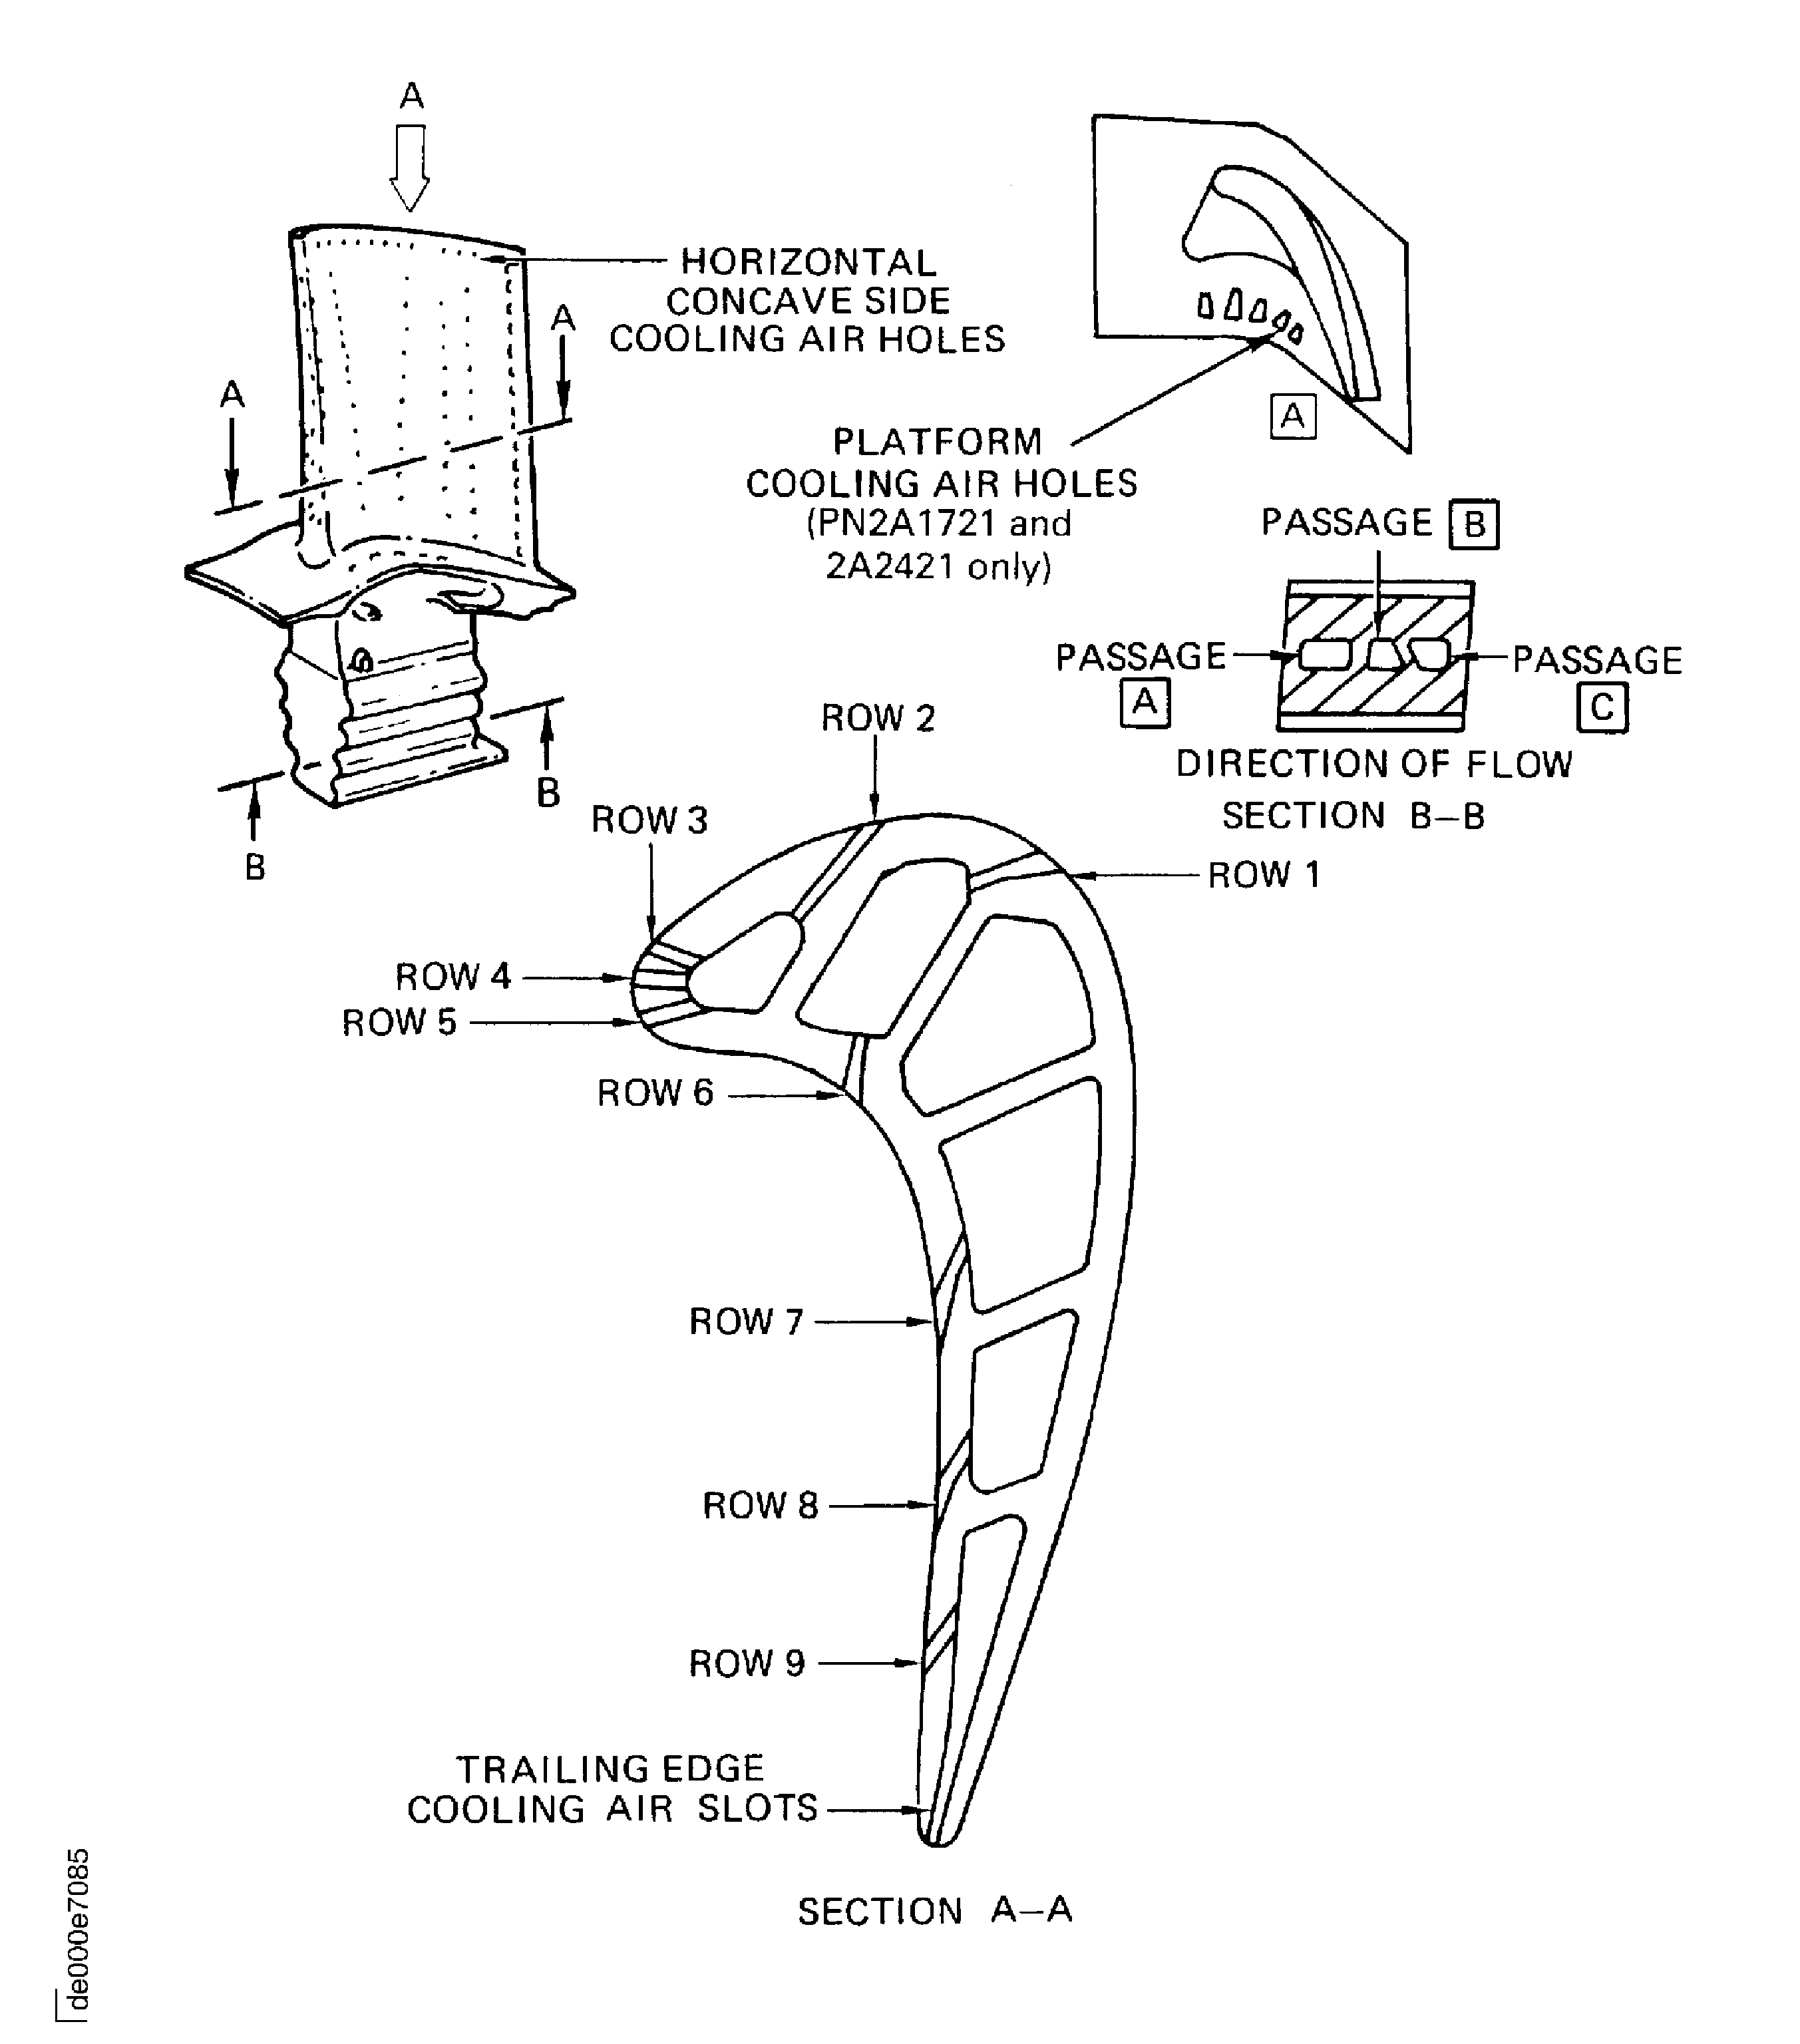
Figure: Stage 2 HPT ring segment and vane cluster airflow check tools (typical)
Stage 2 HPT ring segment and vane cluster airflow check tools (typical)
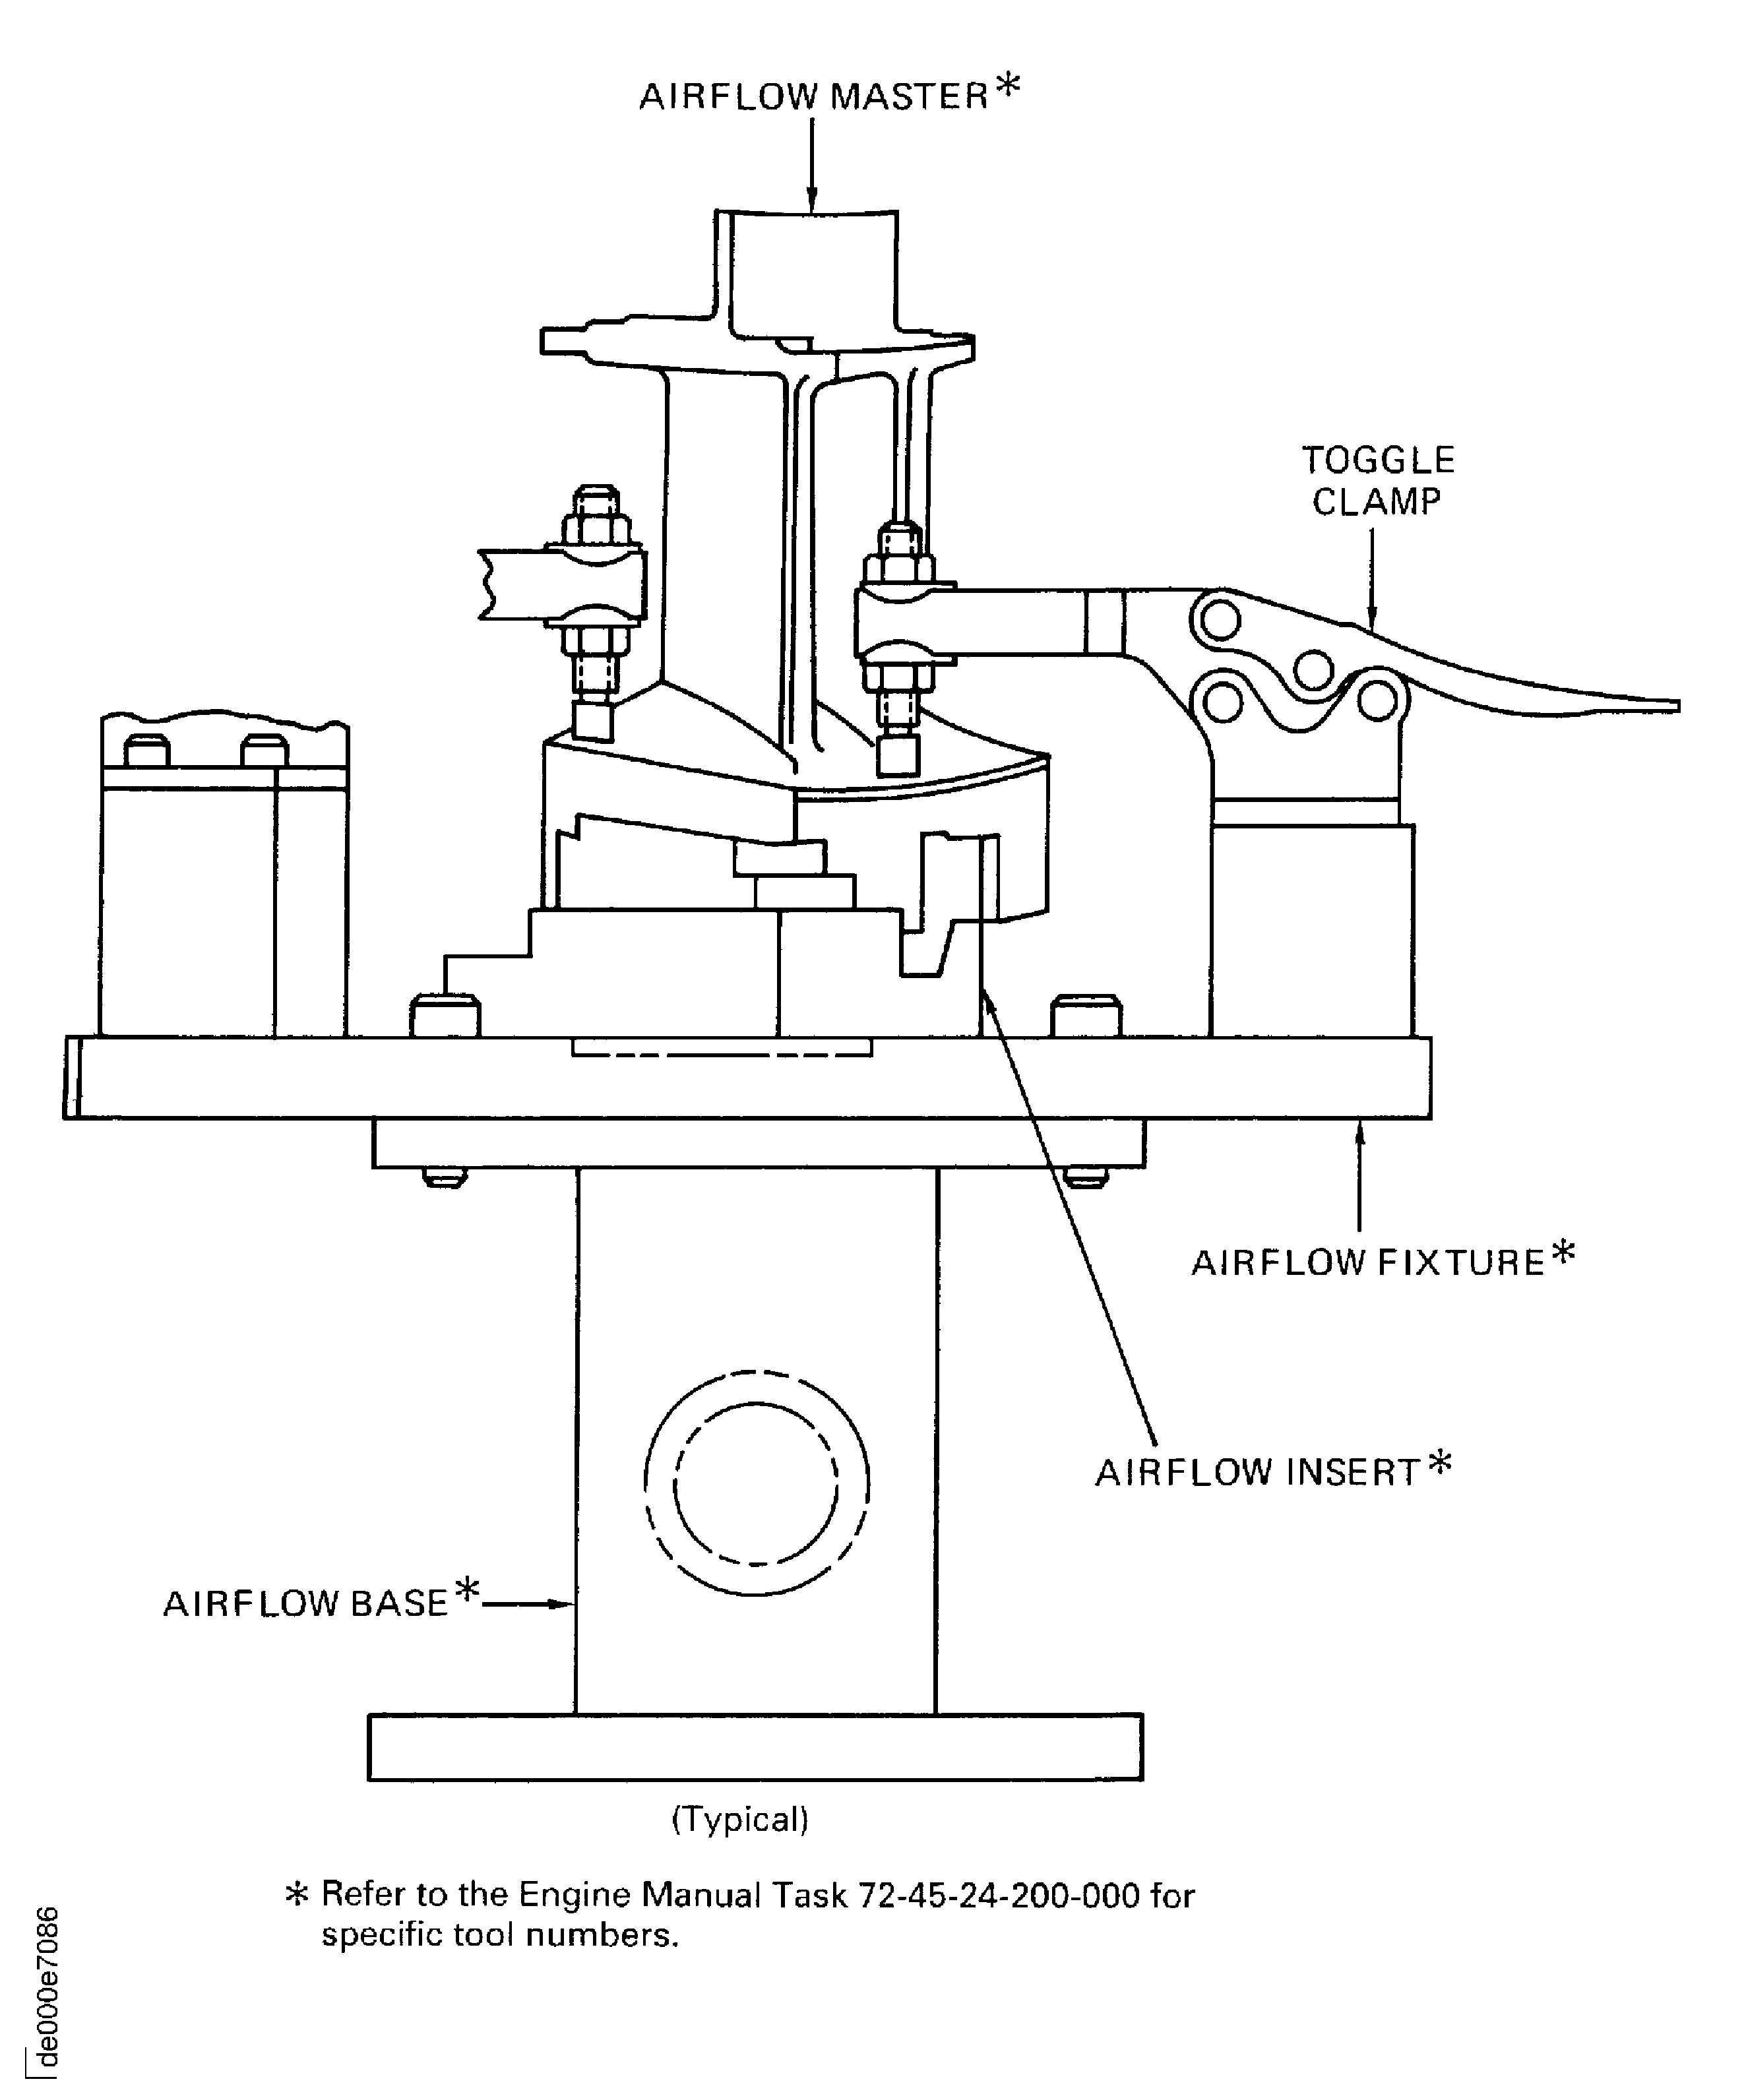
Figure: Stage 2 HPT ring segment and vane cluster airflow passages
Stage 2 HPT ring segment and vane cluster airflow passages
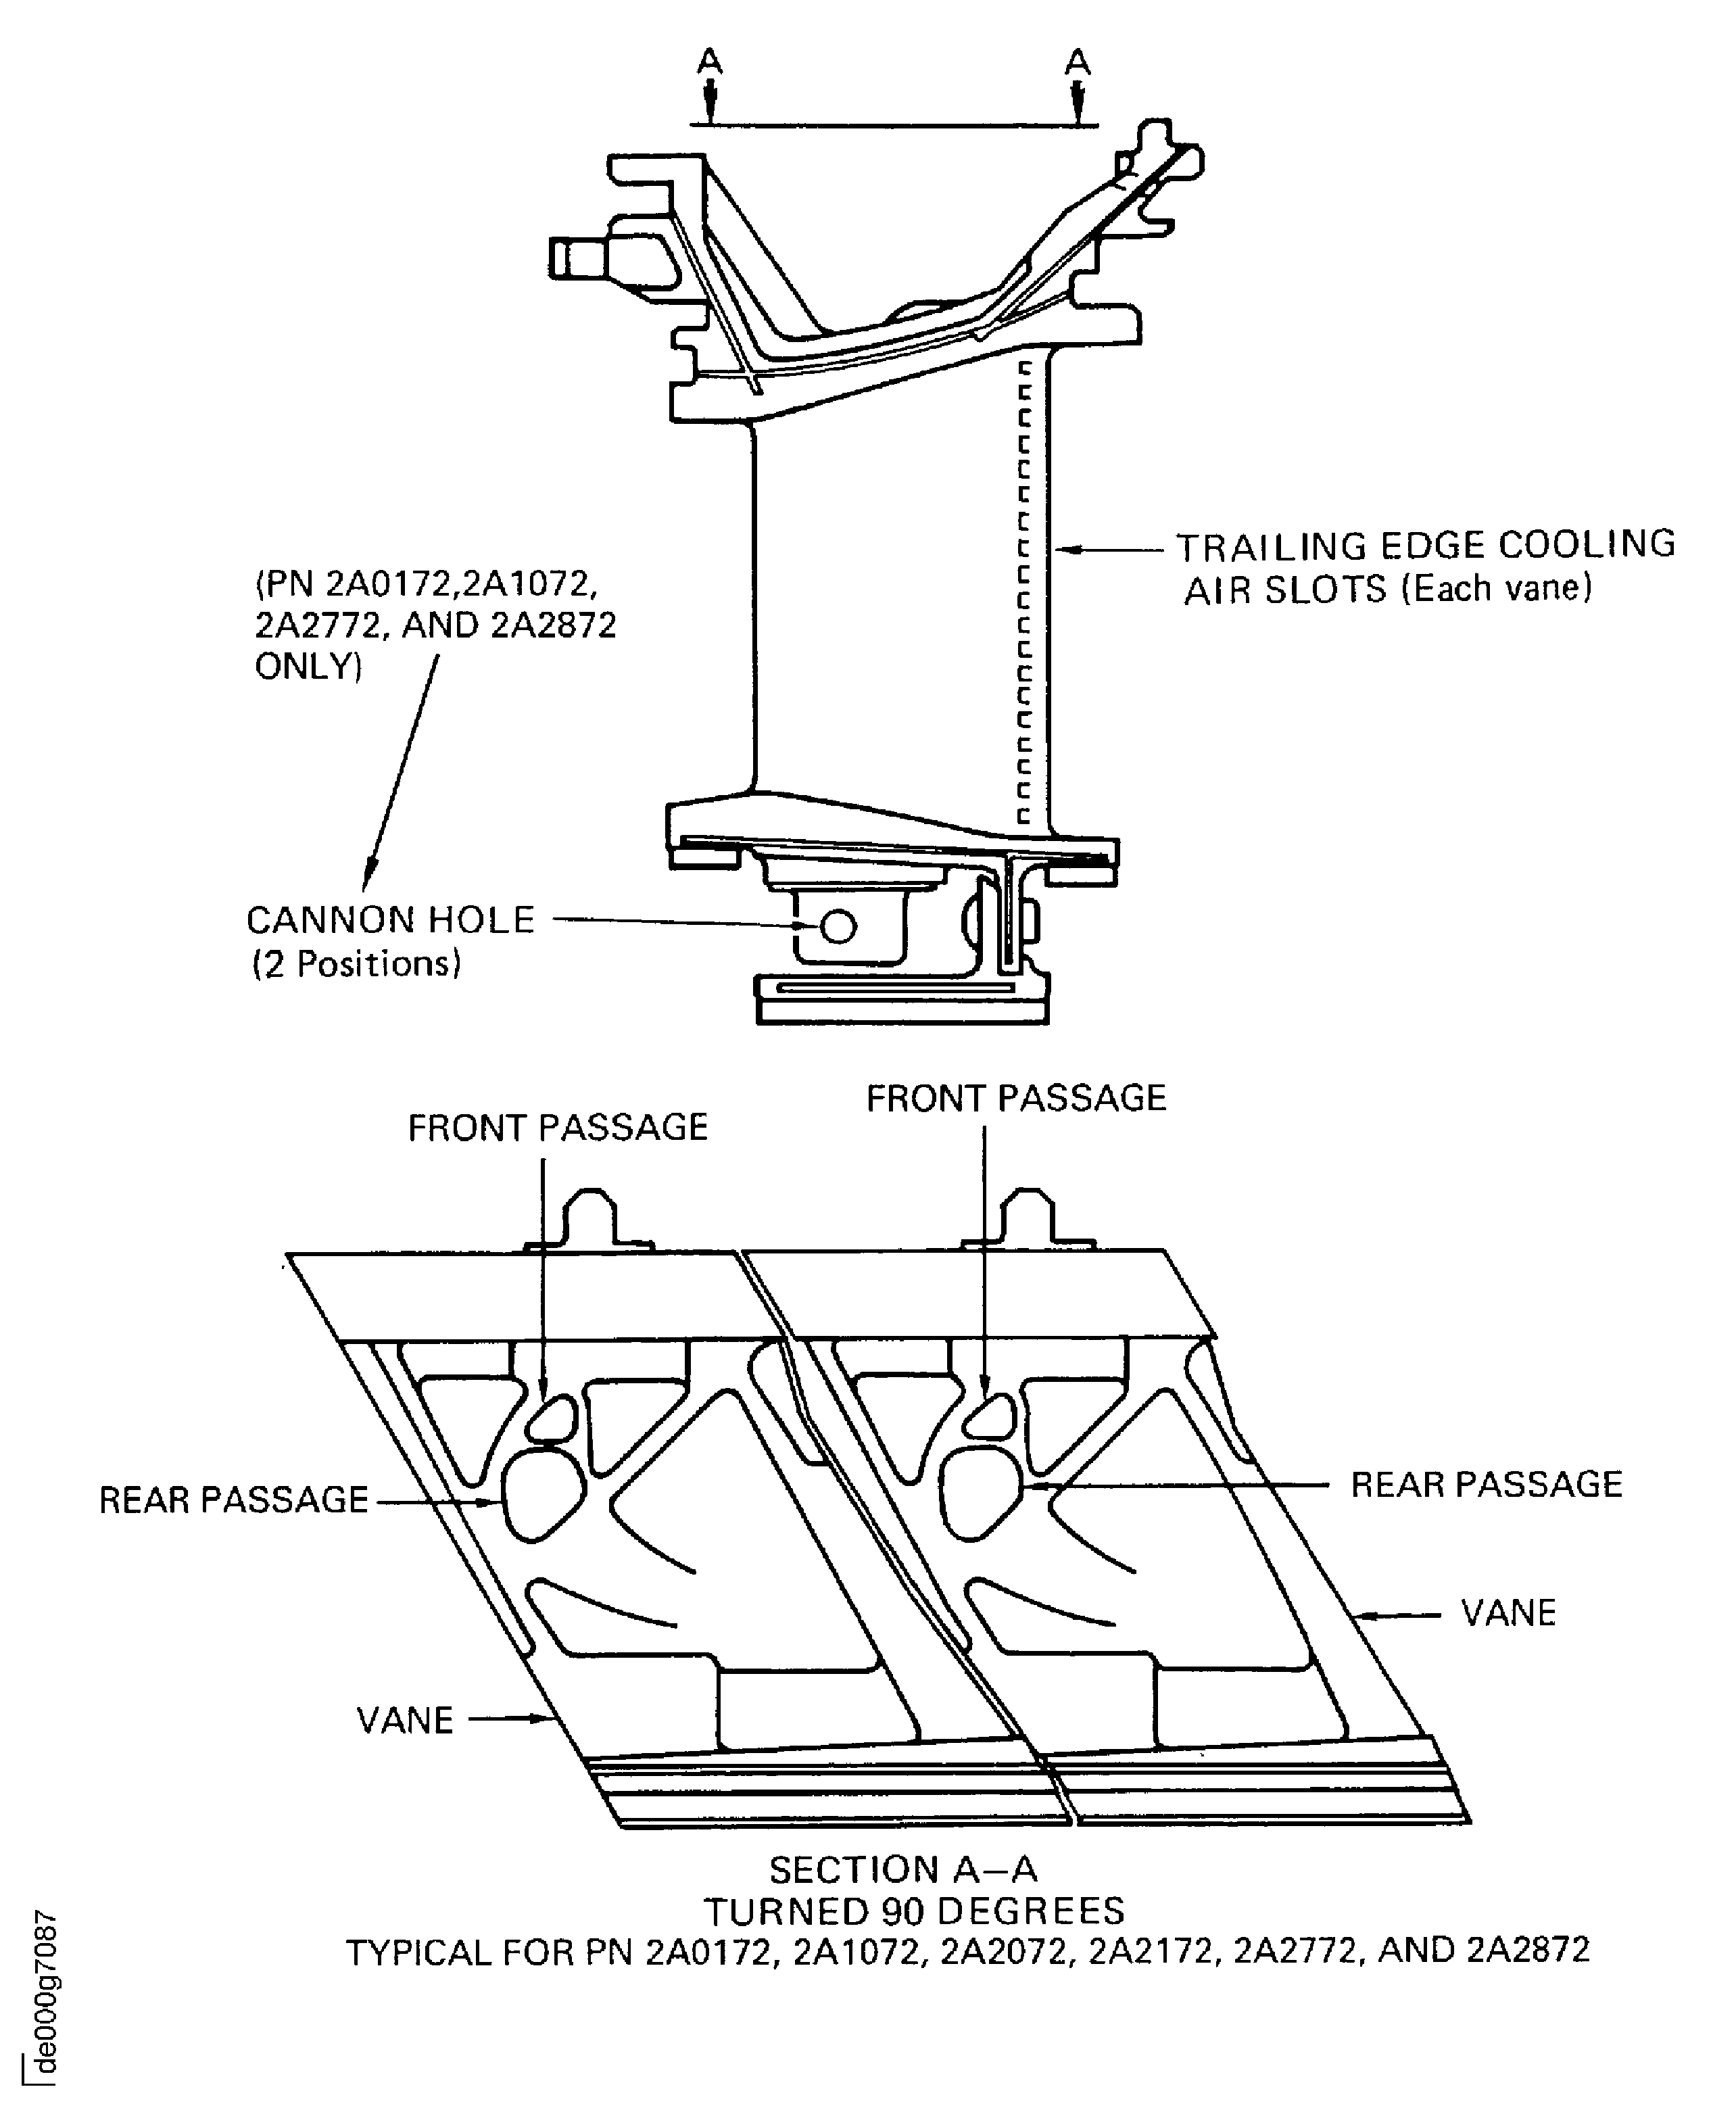
Figure: Stage 2 HPT ring segment and vane cluster airflow passages
Stage 2 HPT ring segment and vane cluster airflow passages
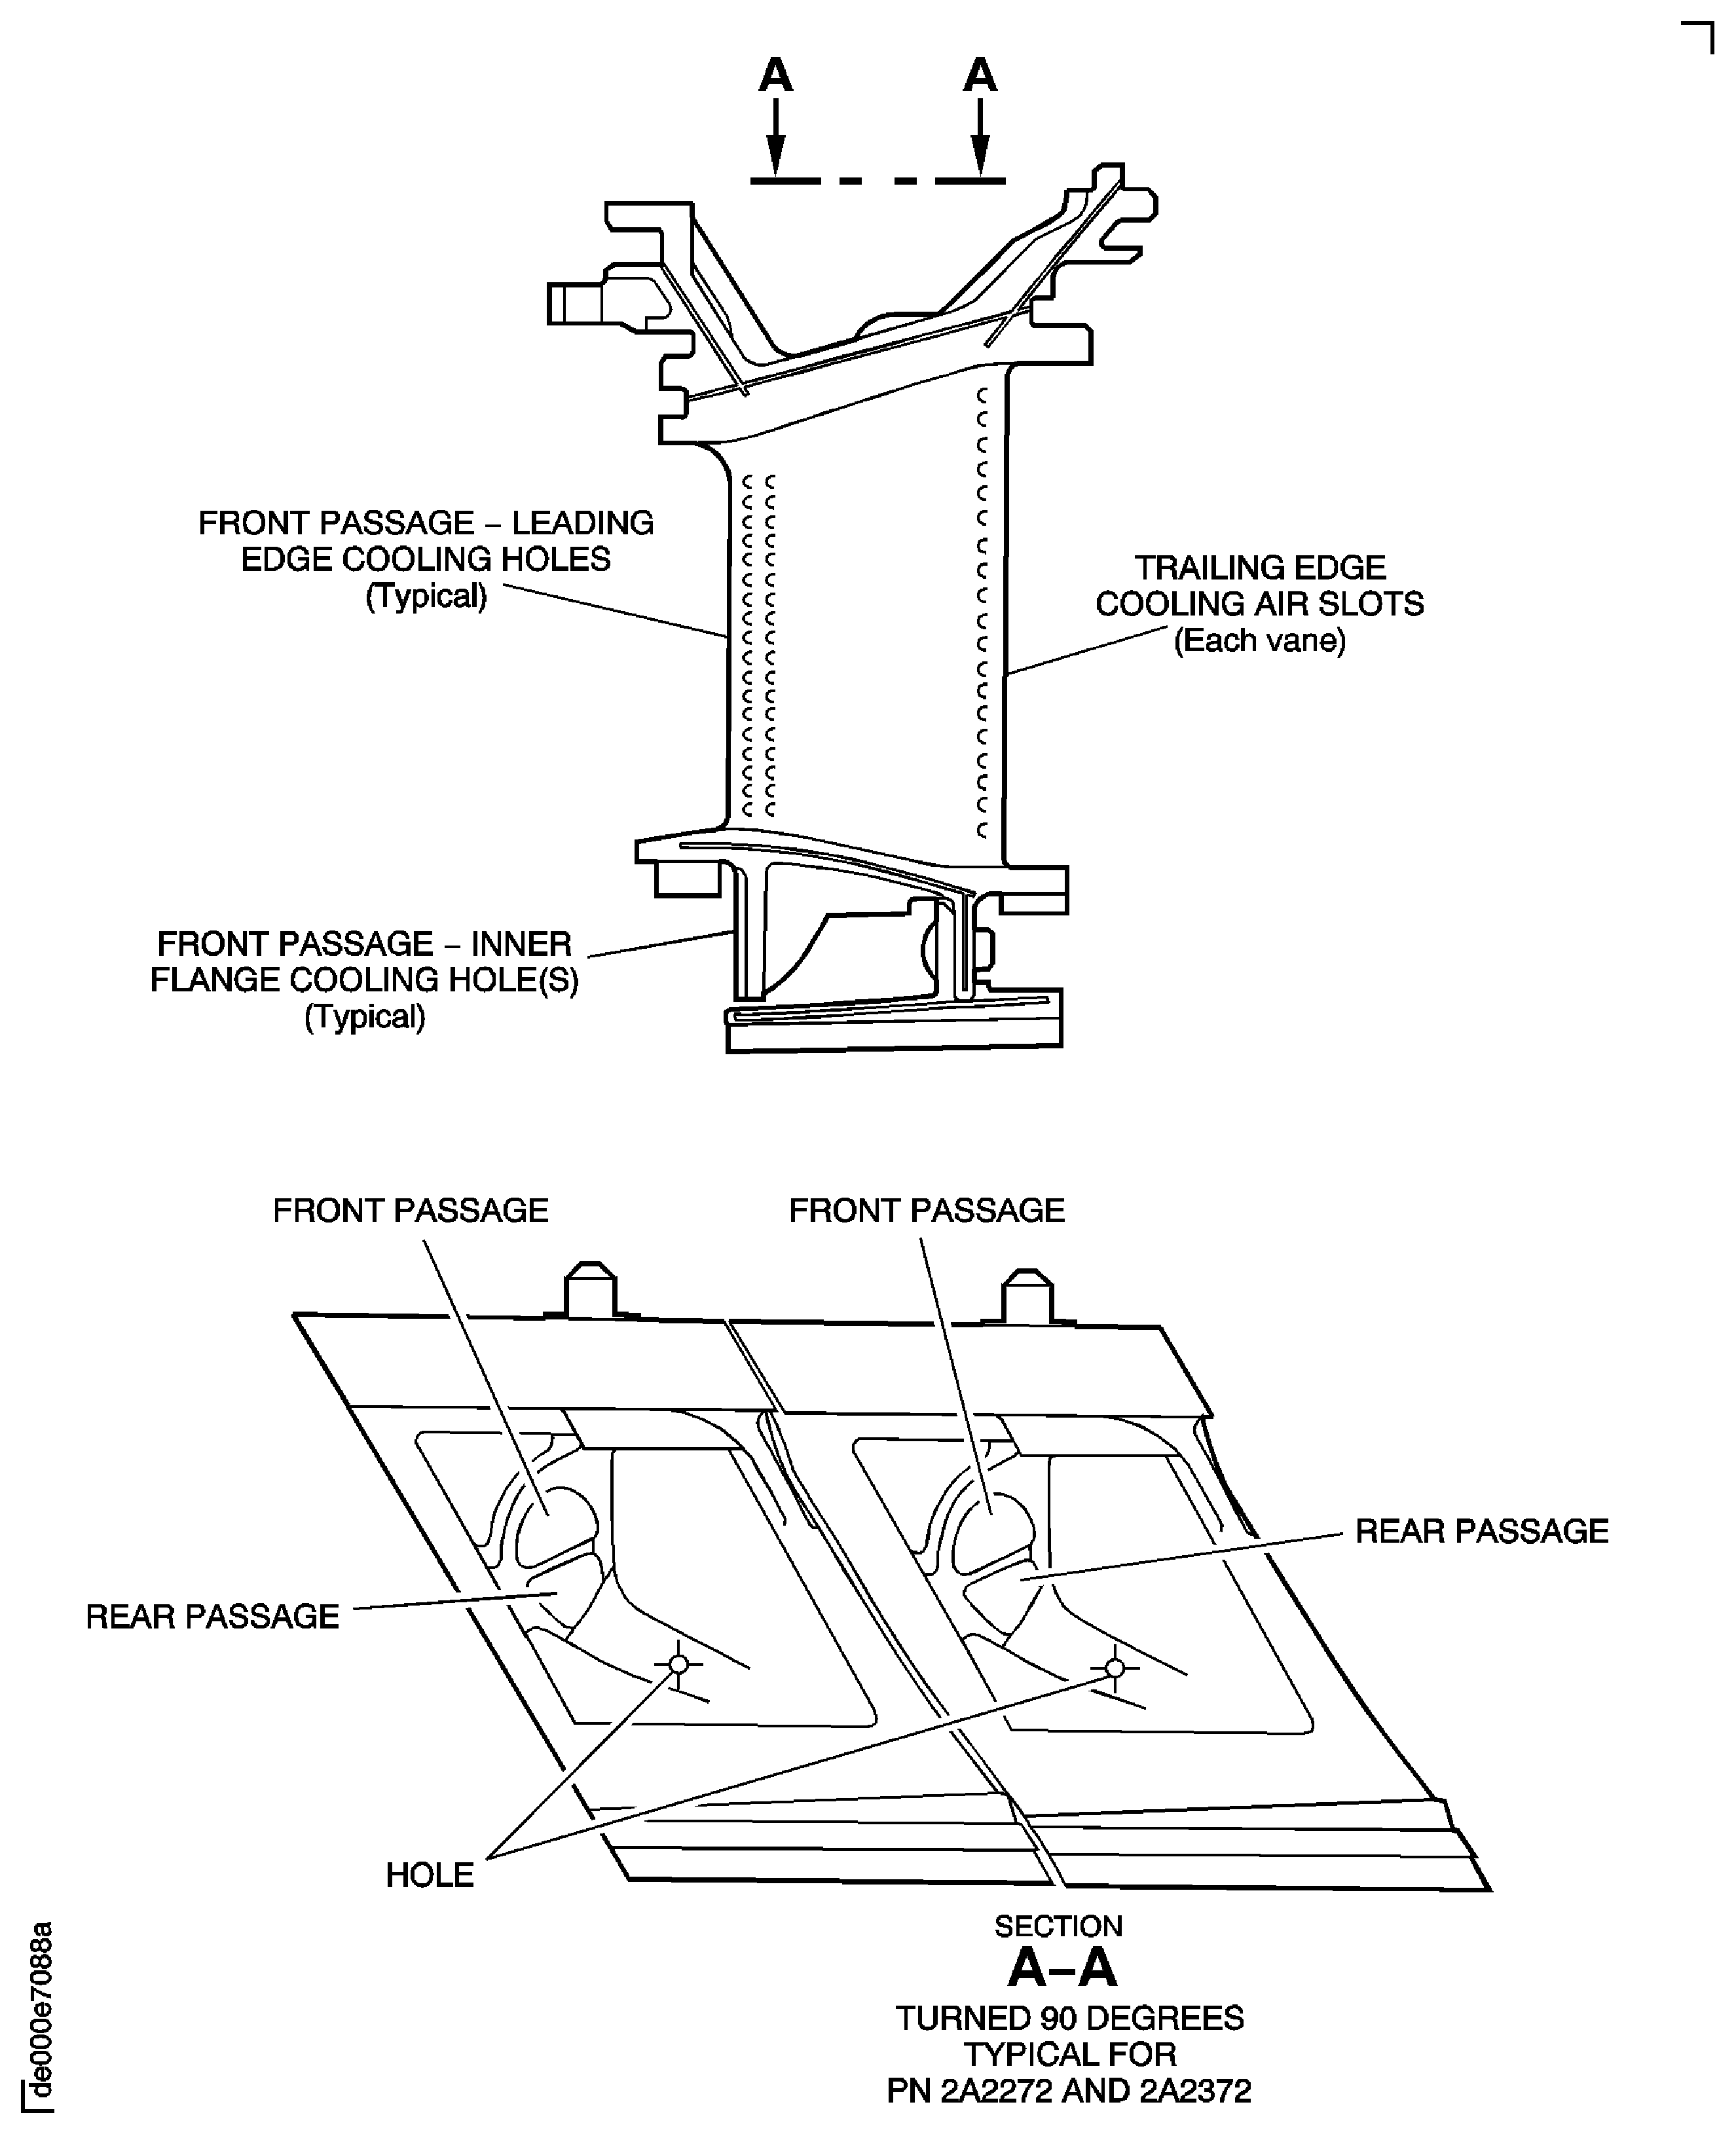
Figure: Stage 2 HPT blade assembly airflow passages and cooling hole
Stage 2 HPT blade assembly airflow passages and cooling hole
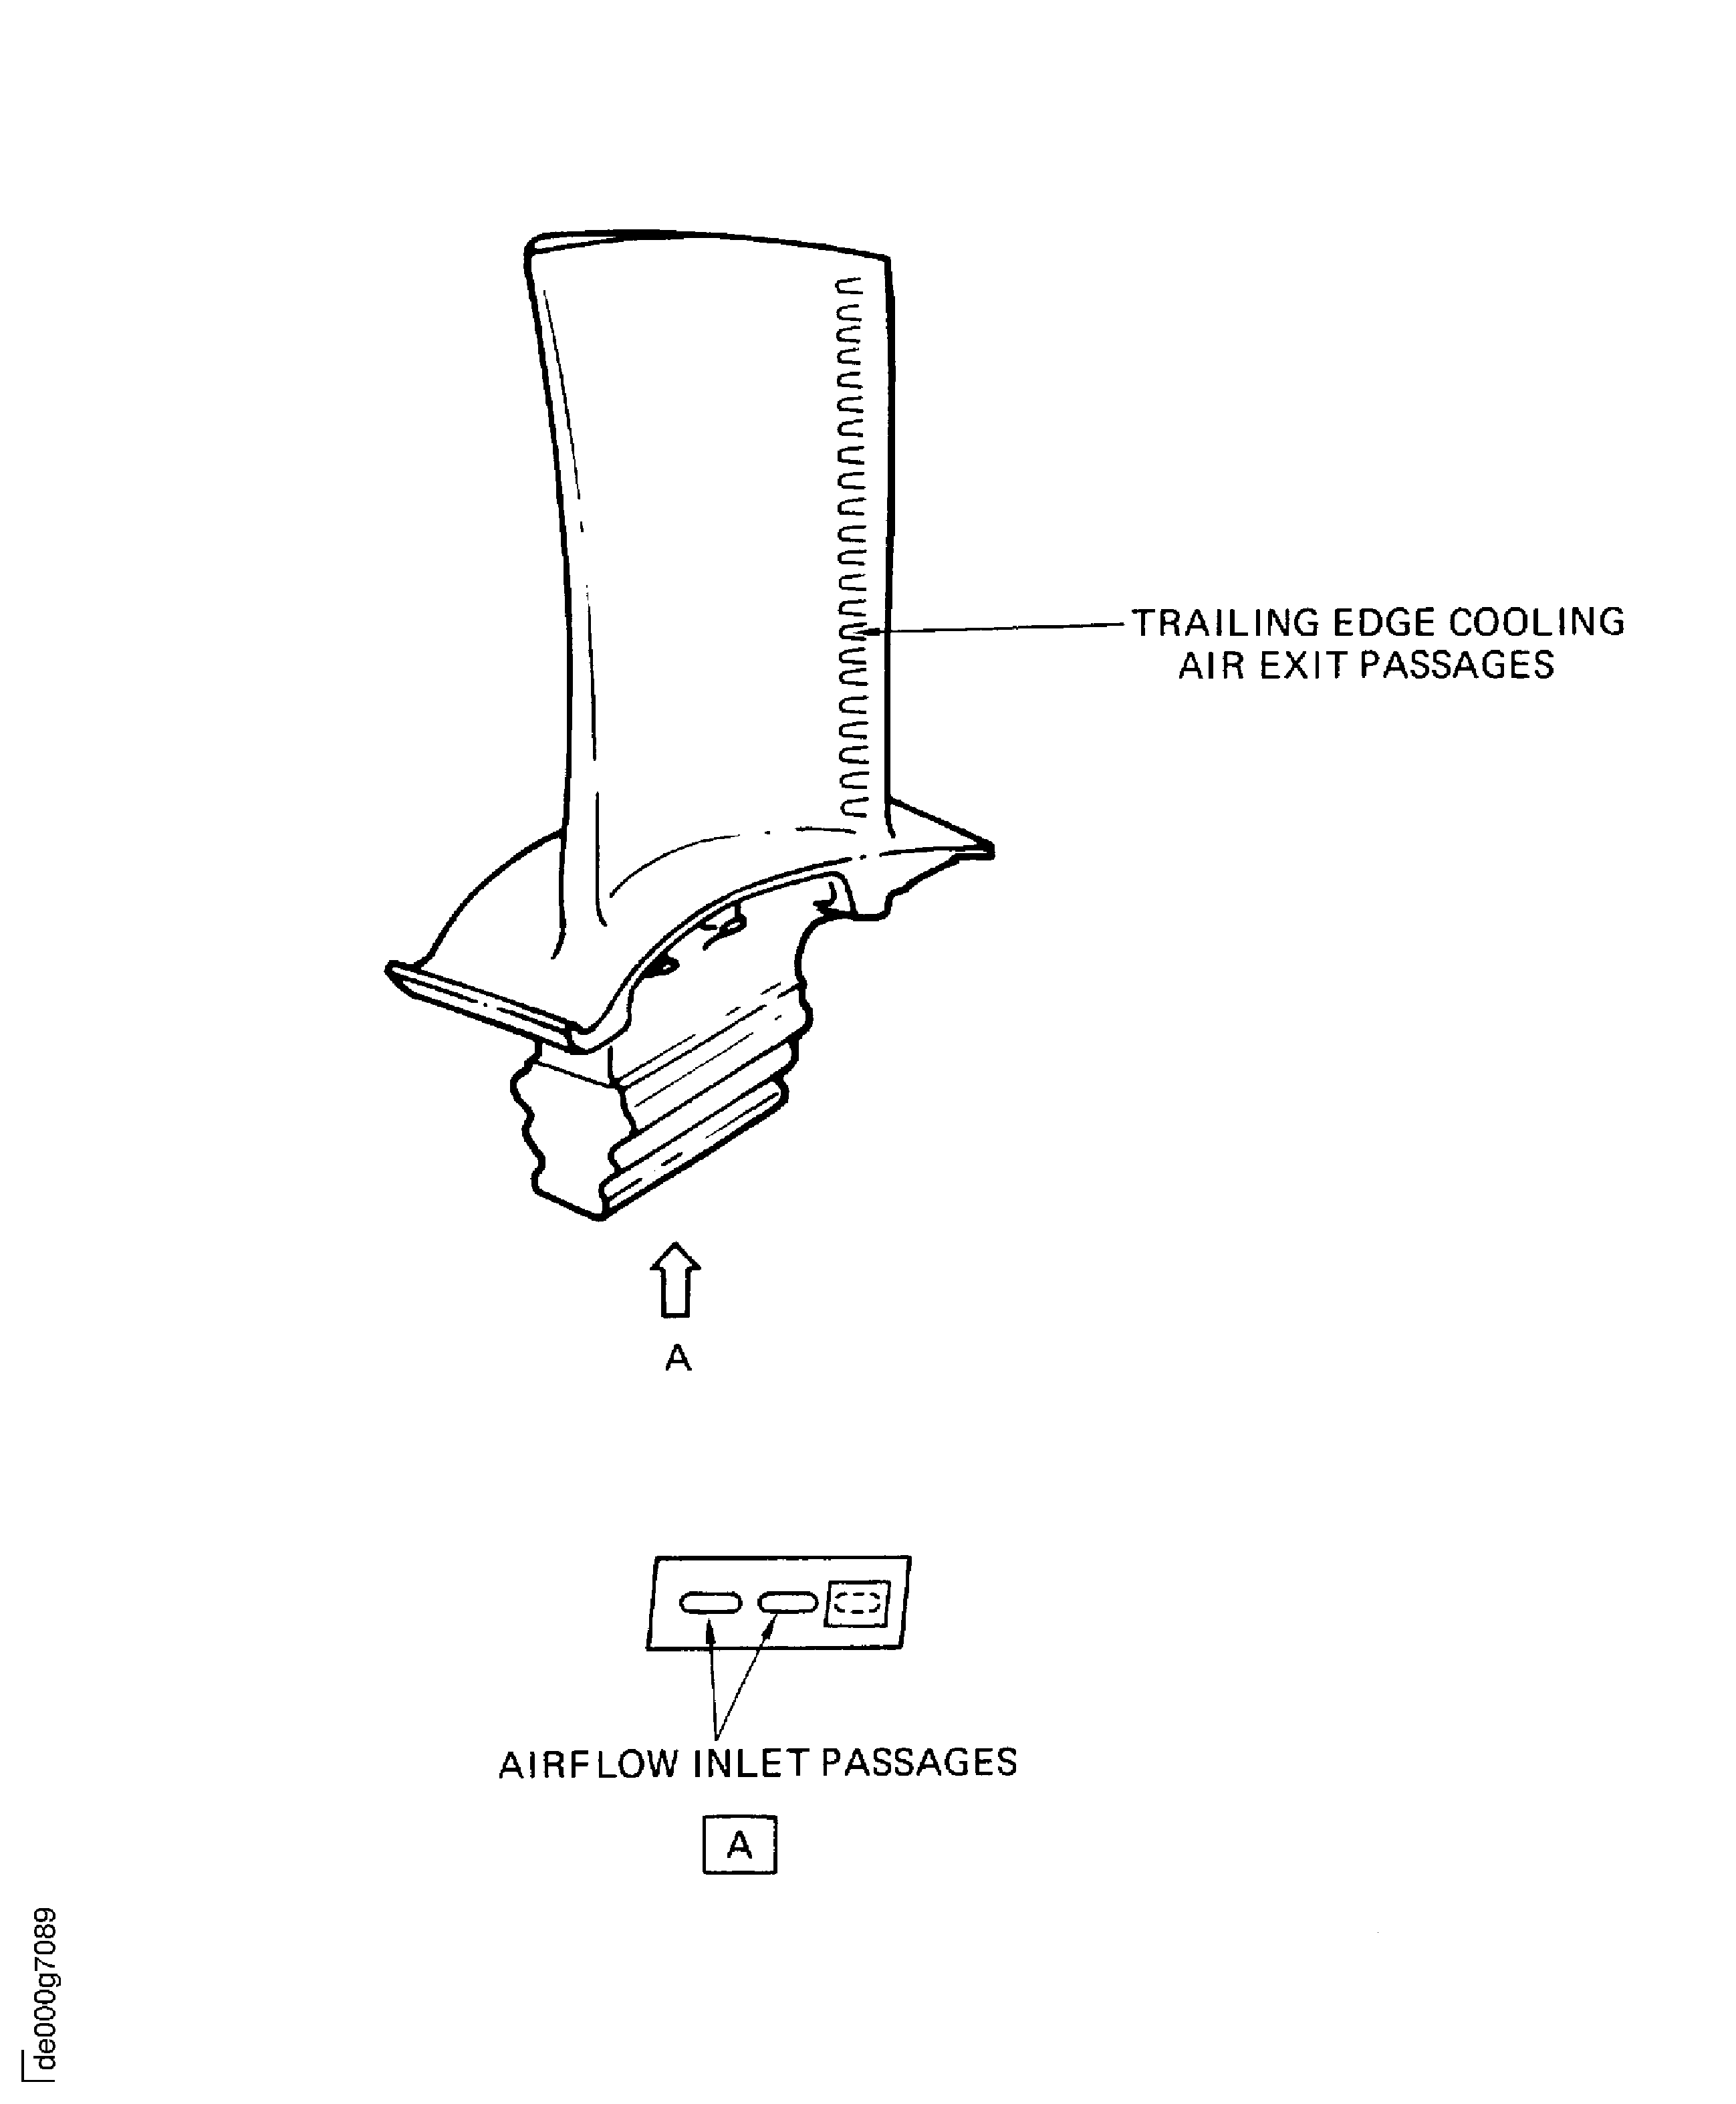
Figure: Calculation necessary to test the highest flow engine part
Calculation necessary to test the highest flow engine part
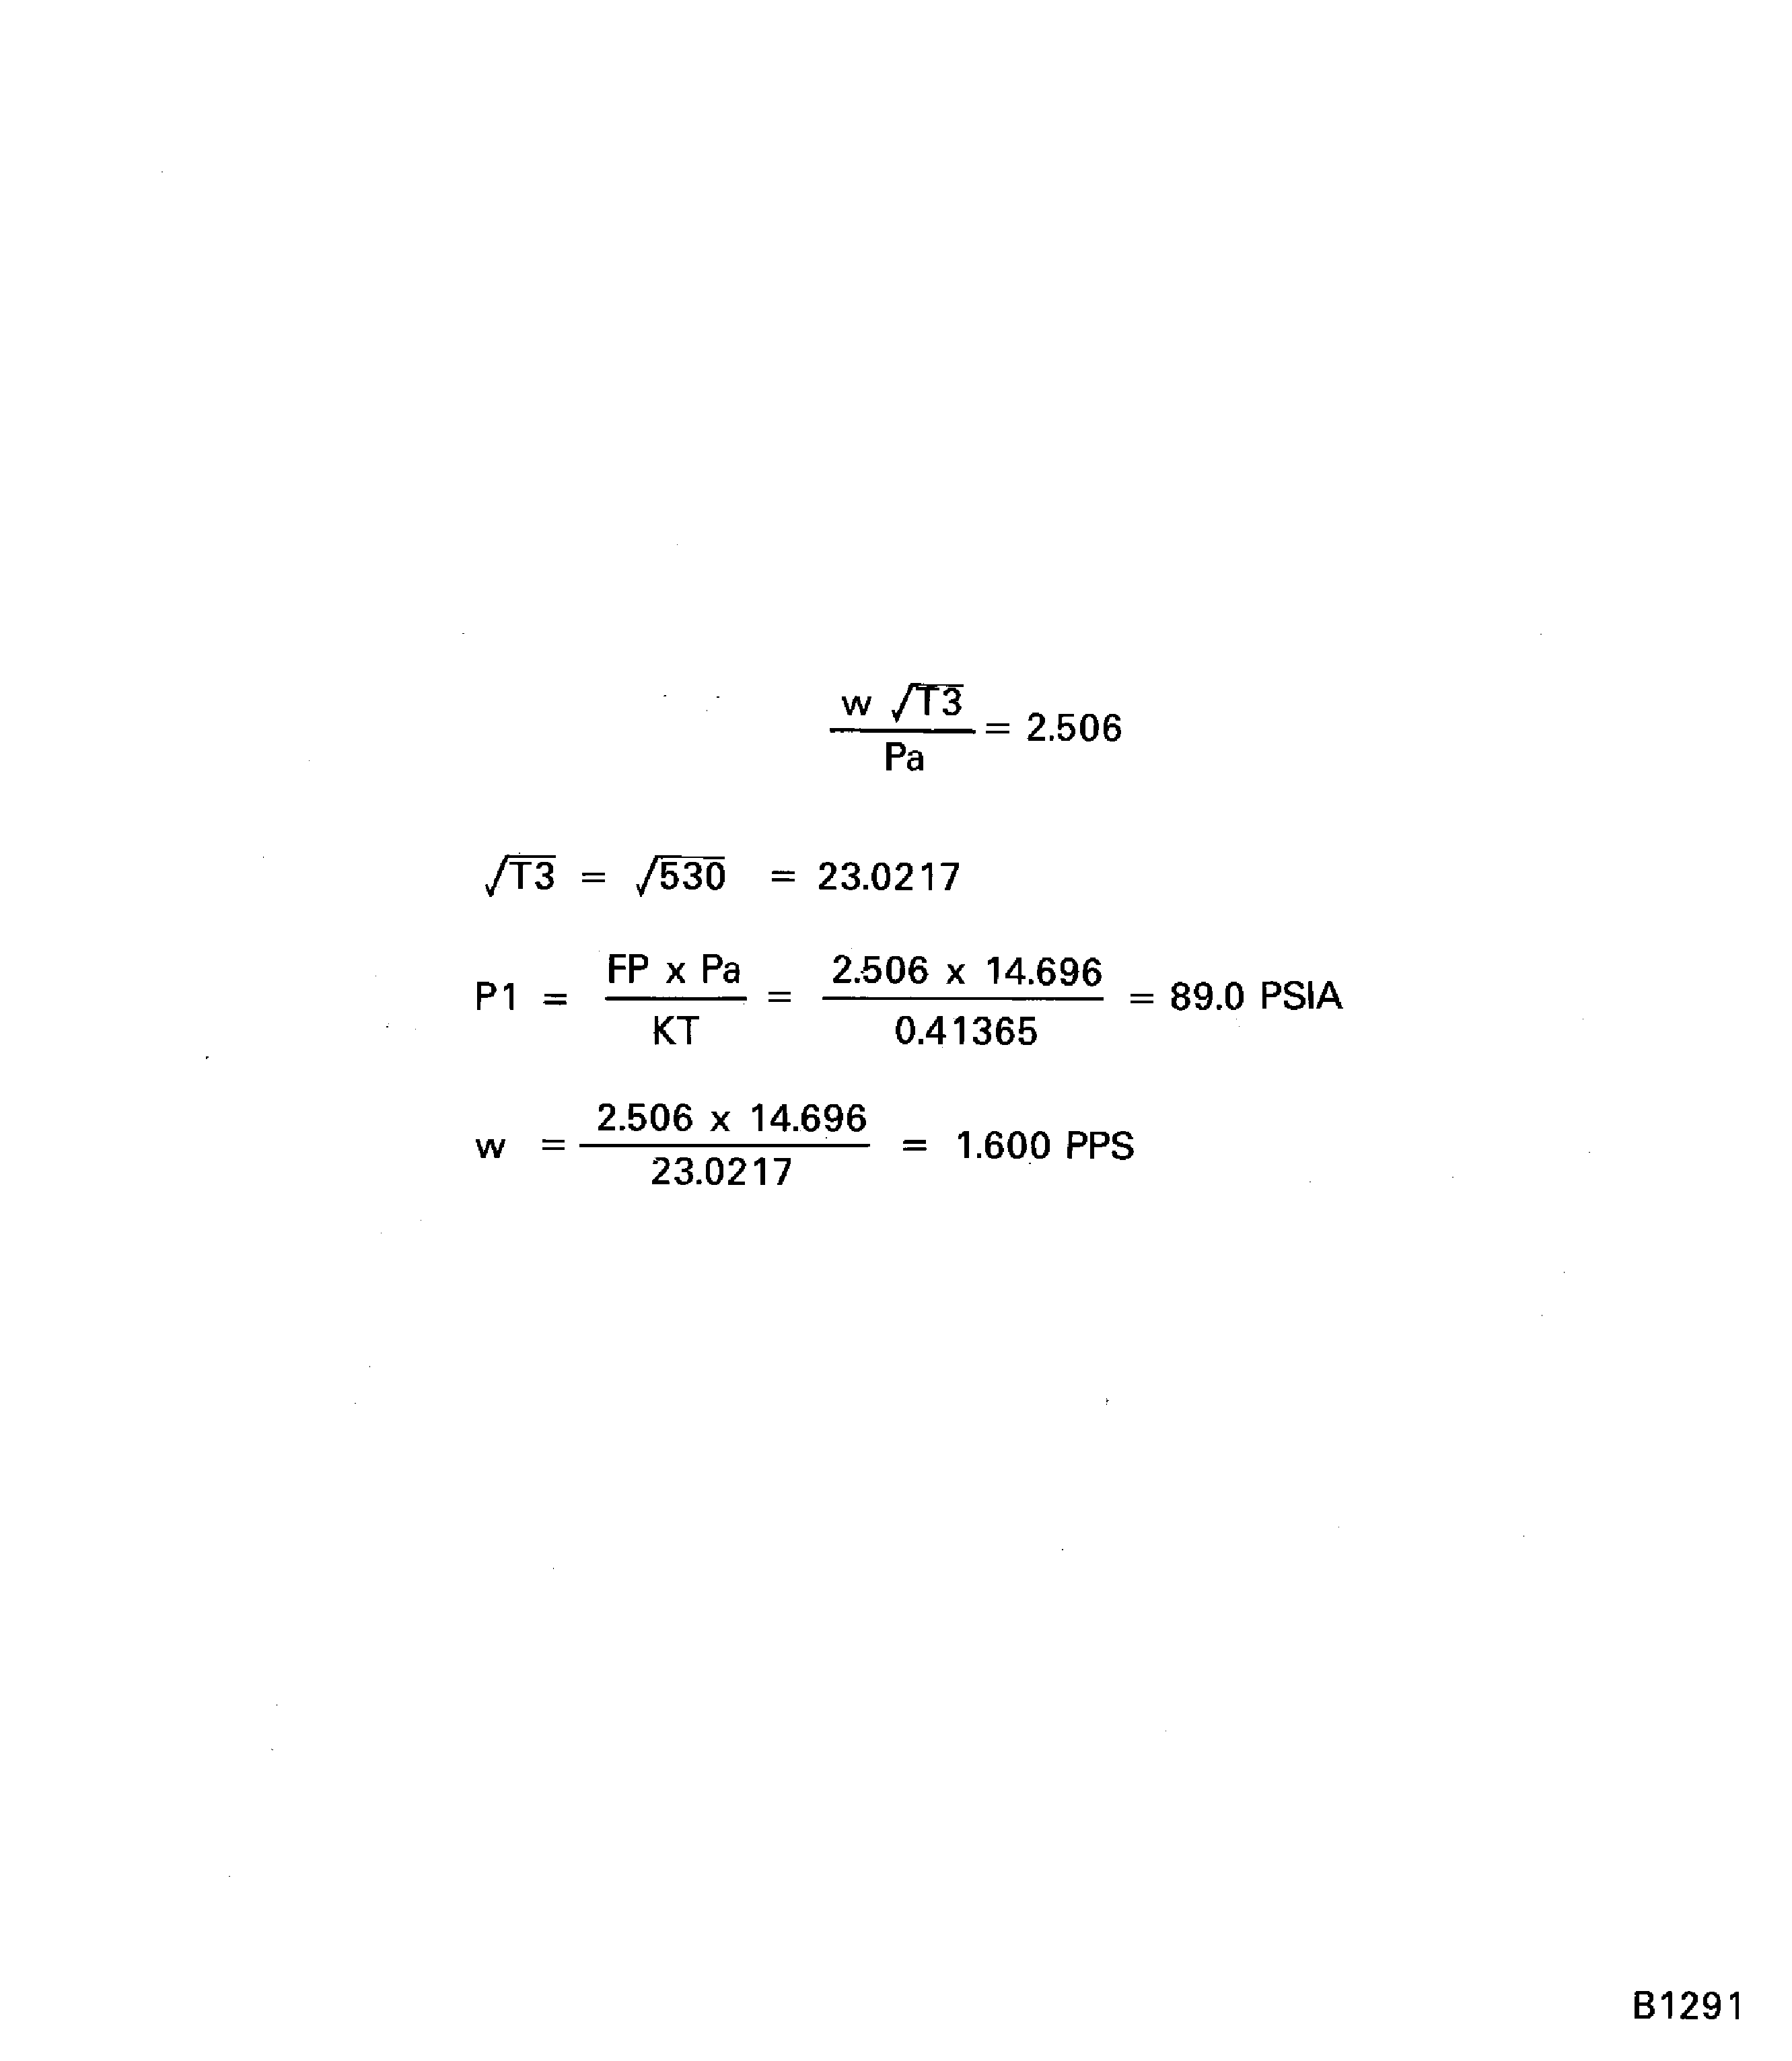
Figure: Conversion of P1 gage pressure into airflow in PPS
Conversion of P1 gage pressure into airflow in PPS
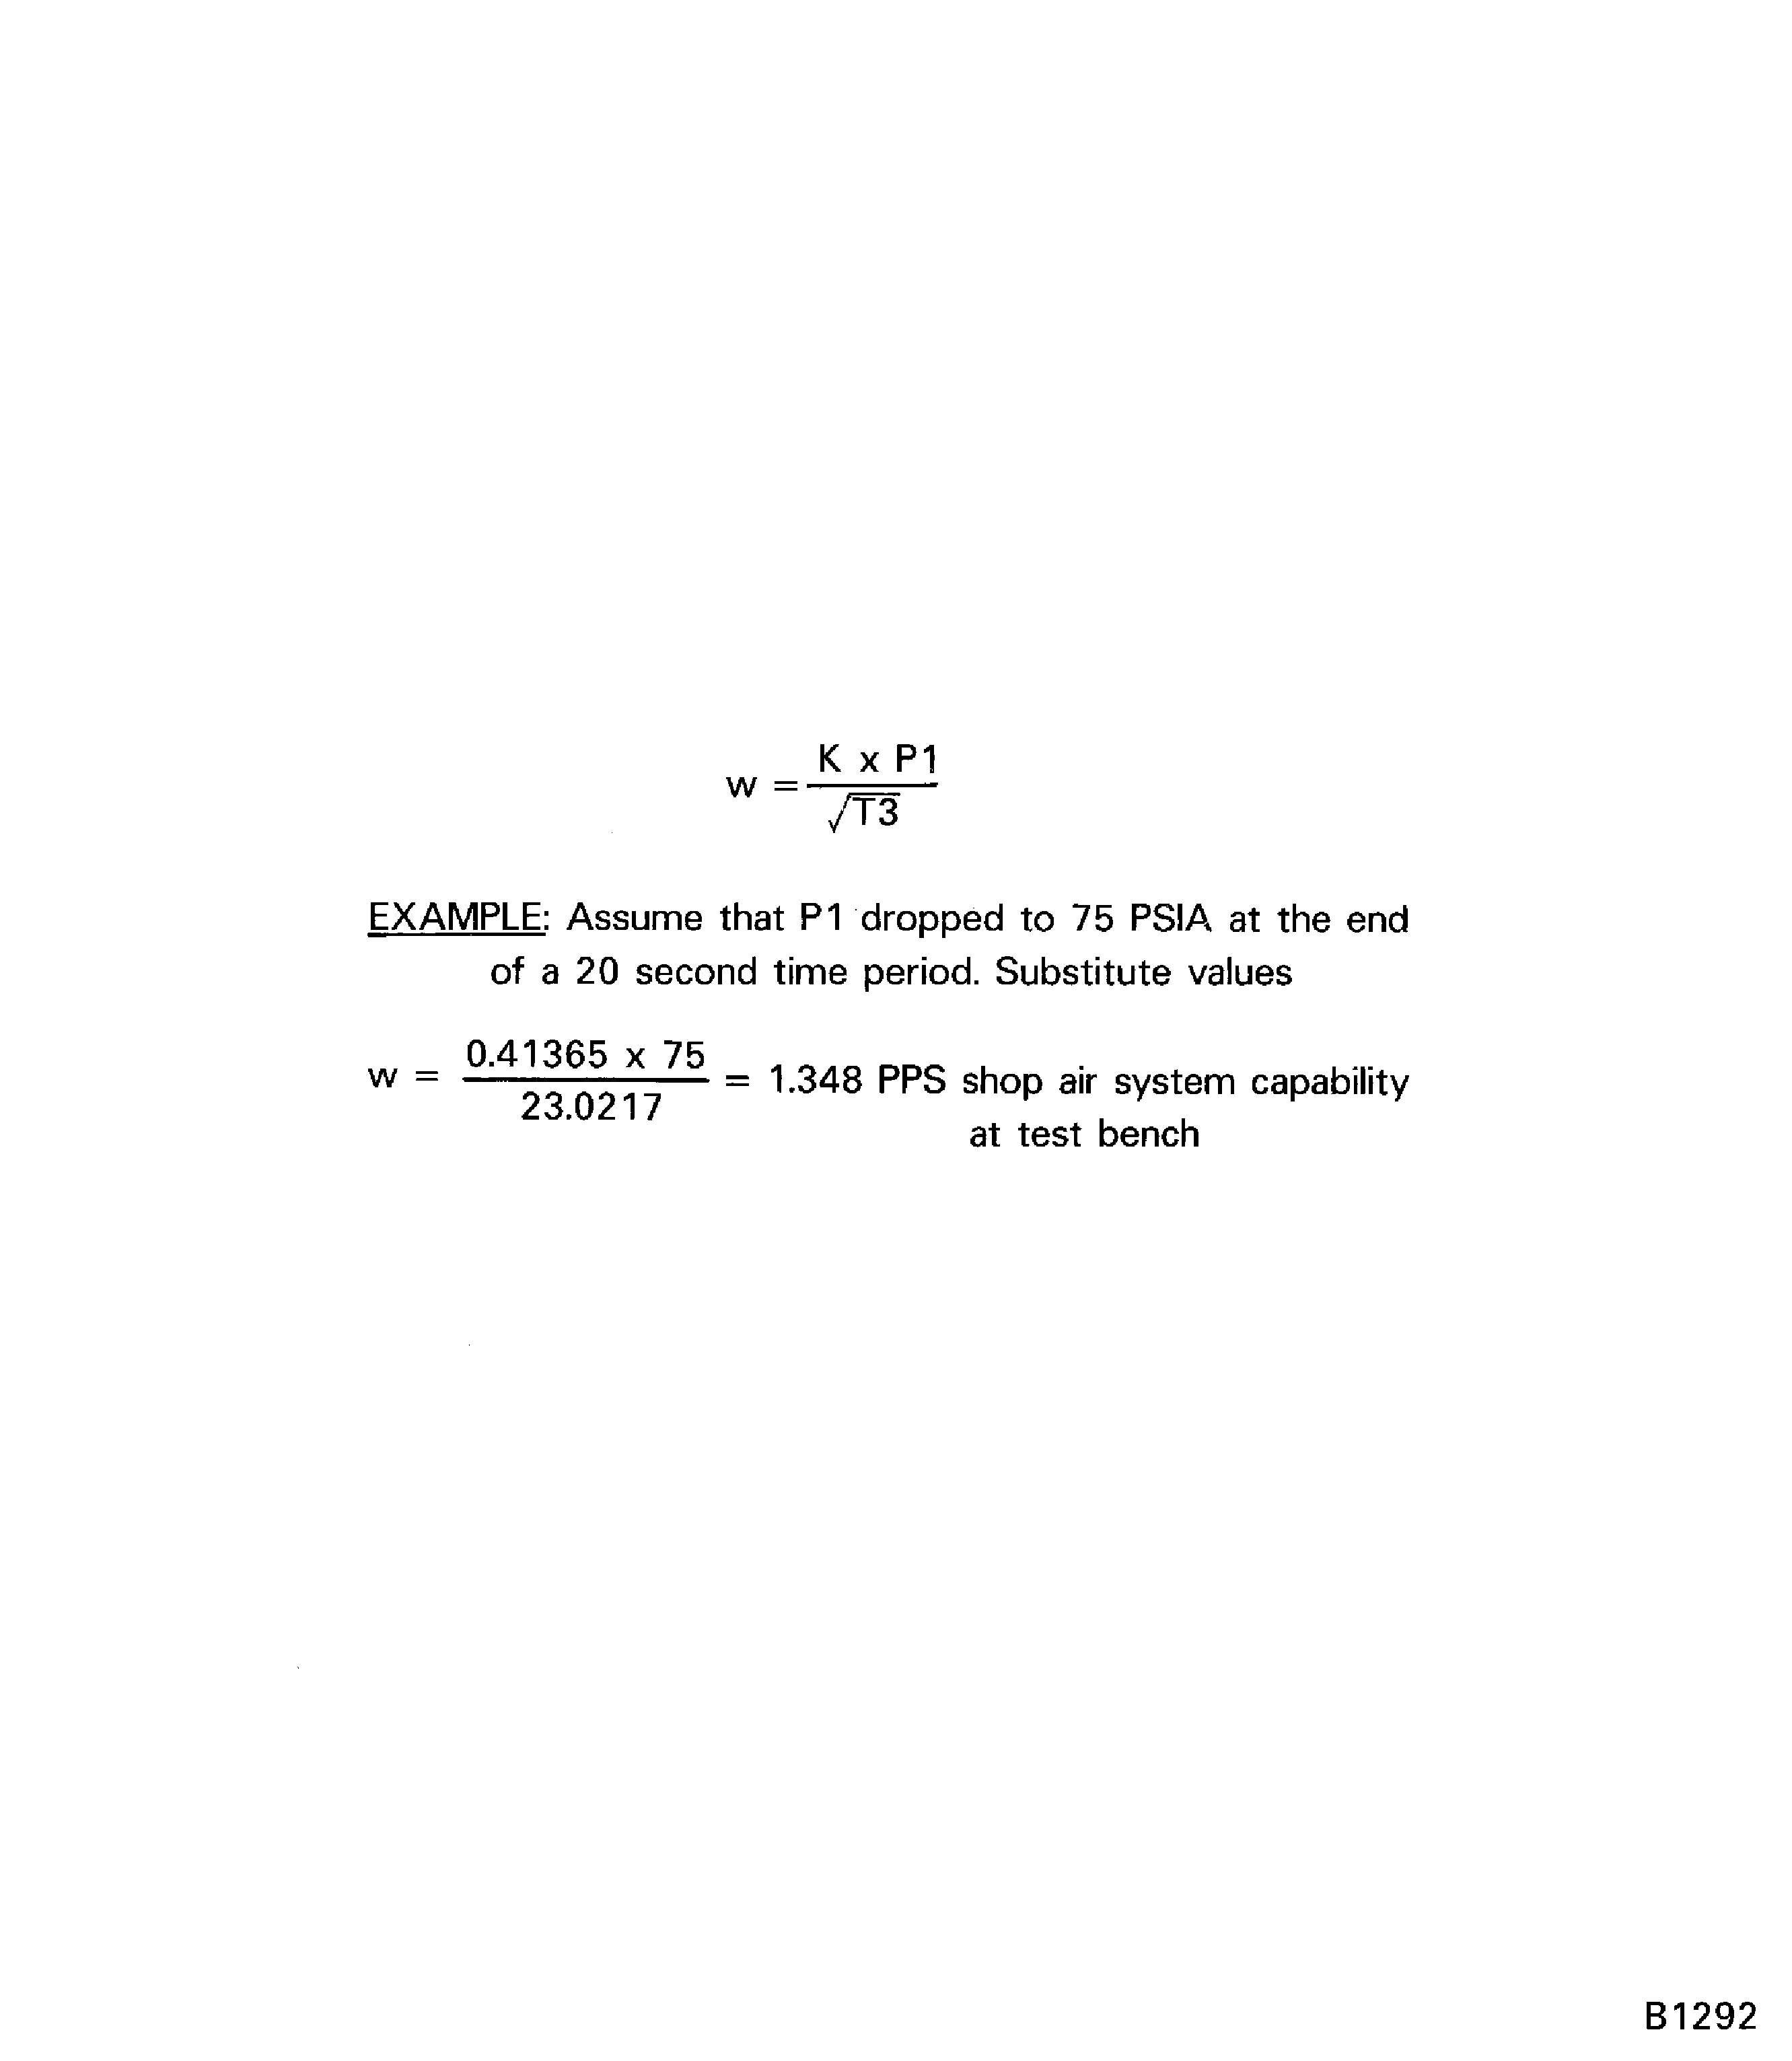
Figure: Conversion of airflow test limits to airflow in PPS
Conversion of airflow test limits to airflow in PPS
