TASK 72-00-42-220-001 Combustion System - Examine The Diffuser Case Assembly Front Face at Interface H-42, Inspection-001

DMC:V2500-A0-72-00-4200-00A-300A-B|Issue No:001.00|Issue Date:2013-11-01

Export Control

EAR Export Classification: Not subject to the EAR per 15 C.F.R. Chapter 1, Part 734.3(b)(3), except for the following Service Bulletins which are currently published as EAR Export Classification 9E991: SBE70-0992, SBE72-0483, SBE72-0580, SBE72-0588, SBE72-0640, SBE73-0209, SBE80-0024 and SBE80-0025.

Copyright

© IAE International Aero Engines AG (2001, 2014 - 2021) The information contained in this document is the property of © IAE International Aero Engines AG and may not be copied or used for any purpose other than that for which it is supplied without the express written authority of © IAE International Aero Engines AG. (This does not preclude use by engine and aircraft operators for normal instructional, maintenance or overhaul purposes.).

Applicability

All

Common Information

TASK 72-00-42-220-001 Combustion System - Examine The Diffuser Case Assembly Front Face at Interface H-42, Inspection-001

General

The word 'reject' after an interface inspection statement requires that further detailed inspection or repair as applicable, of the affected area be accomplished using data in the applicable ATA section of the part in question. Contact IAE for FAA approved data if the referenced TASK is not in the manual.

Refer to TASK 72-00-00-200-001 (examine the modular/non-modular interfaces) before you do this TASK.

The policy that is necessary for inspection is given in the SPM TASK 70-20-01-200-501.

Interface limit definitions

Nick

-

A small area of local displacement of metal usually caused by contact with another object. There is no distortion to the adjacent metal.

Dent

-

A surface depression made by contact with another object and can possibly have local distortion of the adjacent metal.

Warp

-

A local area of metal twisted or damaged from it's original shape. For this applicable function, warps cause metal movement of less than 0.050in. (0.270 mm).

Distortion

-

An area (larger than a warp) of metal damaged from it's original shape. For this applicable function, distortion can cause metal movement more than 0.050in. (0.270 mm).

Preliminary Requirements

Pre-Conditions

NONE

Support Equipment

NONE

Consumables, Materials and Expendables

NONE

Spares

NONE

Safety Requirements

NONE

Procedure

    1. SUBTASK 72-00-42-220-052 Measure the Outer Flange Diameter of the Diffuser Case Assembly at Location 1

    2. Refer to Figure.

      1. Diameter more than 25.200 in. (640.080 mm)

      2. Accept

      1. Other than Step

      2. Reject

    1. SUBTASK 72-00-42-220-053 Visually Examine the Flange of the Diffuser Case Assembly at Location 2

    2. Refer to Figure.

      1. Smooth, warps or dents with no cracks not more than 0.050 in. (1.27 mm) in depth

      2. Accept

      1. Round bottom nicks not more than 0.025 in. (0.64 mm) in depth

      2. Accept

      1. Scratches not more than 0.010 in. (0.25 mm) in depth

      2. Accept

      1. Surface damage more than Step, Step, or Step

      2. Reject

      1. Distortion and/or cracks

      2. Reject

    1. SUBTASK 72-00-42-220-054 Visually Examine the Flange Dowel Pin and the Bolt Holes on the Diffuser Case Assembly at Location 3

    2. Refer to Figure.

      1. Bolt holes with less than 0.010 in. (0.254 mm) wear. Worn surface must be smooth and continuous. No sharp edges, grooves or high metal permitted

      2. Accept

      1. Loose dowel pin

      2. Reject

      1. Cracked bolt holes

      2. Reject

    1. SUBTASK 72-00-42-220-055 Visually Examine the Inner Surface of the Diffuser Case Assembly at Location 4

    2. Refer to Figure.

      1. Smooth, warps or dents with no cracks not more than 0.050 in. (1.27 mm) in depth

      2. Accept

      1. Round bottom nicks not more than 0.025 in. (0.64 mm) in depth

      2. Accept

      1. Scratches not more than 0.010 in. (0.25 mm) in depth

      2. Accept

      1. Surface damage more than Step, Step, or Step

      2. Reject

      1. Distortion and/or cracks

      2. Reject

    1. SUBTASK 72-00-42-220-056 Visually Examine the Outer Surface of the Diffuser Case Assembly at Location 5

    2. Refer to Figure.

      1. Smooth, warps or dents with no cracks not more than 0.050 in. (1.27 mm) in depth

      2. Accept

      1. Round bottom nicks not more than 0.025 in. (0.64 mm) in depth

      2. Accept

      1. Scratches not more than 0.010 in. (0.25 mm) in depth

      2. Accept

      1. Surface damage more than Step, Step, or Step

      2. Reject

      1. Distortion and/or cracks

      2. Reject

    1. SUBTASK 72-00-42-220-057 Visually Examine the Front Inner Flange Flare Nuts of the Diffuser Case Assembly at Location 6

    2. Refer to Figure.

      1. Loose

      2. Reject

      1. Damaged threads

      2. Reject

    1. SUBTASK 72-00-42-220-058 Visually Examine the Inner Front Flange Face of the HPC Outlet Guide Vanes at Location 7

    2. Refer to Figure.

      1. Smooth, warps or dents with no cracks not more than 0.050 in. (1.27 mm) in depth

      2. Accept

      1. Round bottom nicks not more than 0.025 in. (0.64 mm) in depth

      2. Accept

      1. Scratches not more than 0.010 in. (0.25 mm) in depth

      2. Accept

      1. Surface damage more than Step, Step, or Step

      2. Reject

      1. Distortion and/or cracks

      2. Reject

    1. SUBTASK 72-00-42-220-059 Visually Examine the HPC Outlet Guide Vanes at Location 8

    2. Refer to Figure.

      1. Cracks

      2. Reject

      1. Round bottom nicks up to 0.010 in. (0.254 mm) and no nicks or dents in the fillet radius

      2. Accept

      1. Nicks, dents or scratches more than Step

      2. Reject

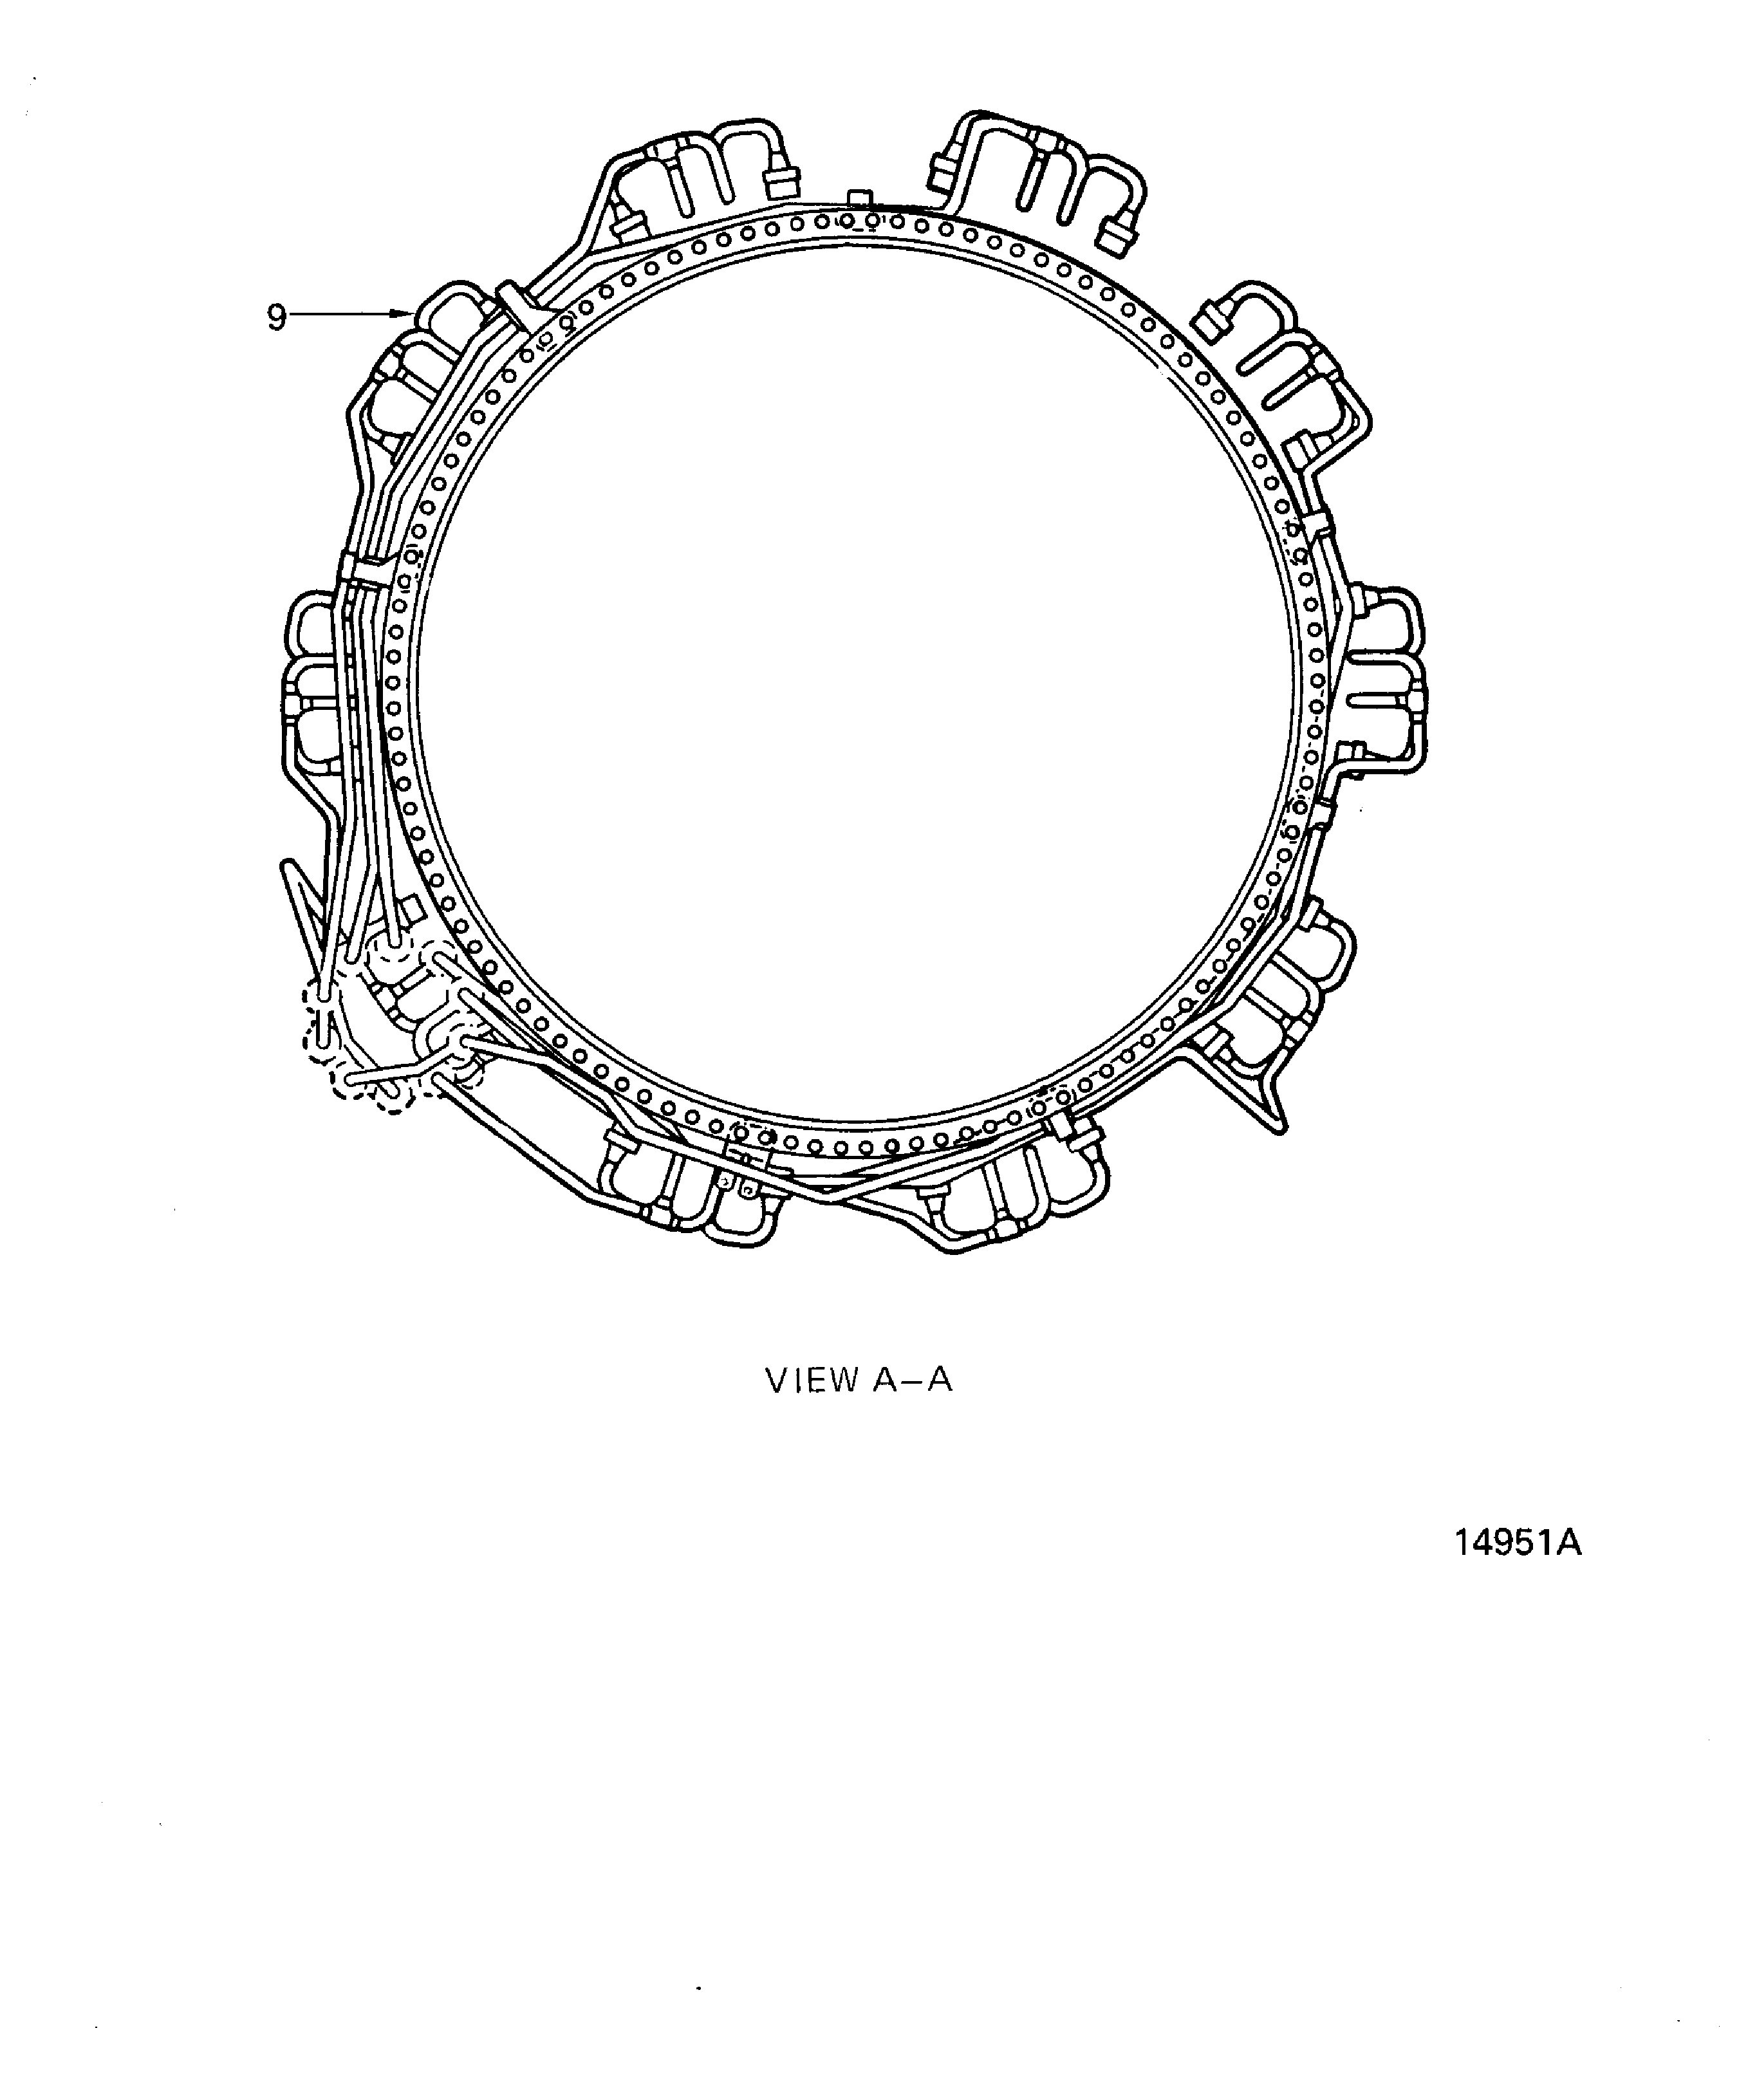
    1. SUBTASK 72-00-42-220-061 Visually Examine the Fuel Manifolds at Location 9

    2. Refer to Figure.

      1. Dents.

        1. Up to five percent of the nominal outside diameter and the surface measurement is no less than three times the depth

        2. Accept

        1. Other than Step

        2. Reject

      1. Kinks or looseness at the clips

      2. Reject

    1. SUBTASK 72-00-42-220-095 Examine the Inner Surface of the Diffuser Case Assembly for Signs of Soot or Oil at Location 10

    2. Refer to Figure and Figure.

    3. If signs of soot and oil are found, examine the High Pressure Turbine (HPT) for possible oil ignition event. Refer to TASK 72-45-00-200-801.

    4. Report all findings to IAE Technical Service.

    1. SUBTASK 72-00-42-220-096 Examine the Rear Surface Static Seal for Signs of Soot or Oil at Location 11

    2. Refer to Figure and Figure.

    3. If signs of soot and oil are found, examine the High Pressure Turbine (HPT) for possible oil ignition event. Refer to TASK 72-45-00-200-801.

    4. Report all findings to IAE Technical Service.

  1. Figure: Locations at Interface H-42

    Locations at Interface H-42
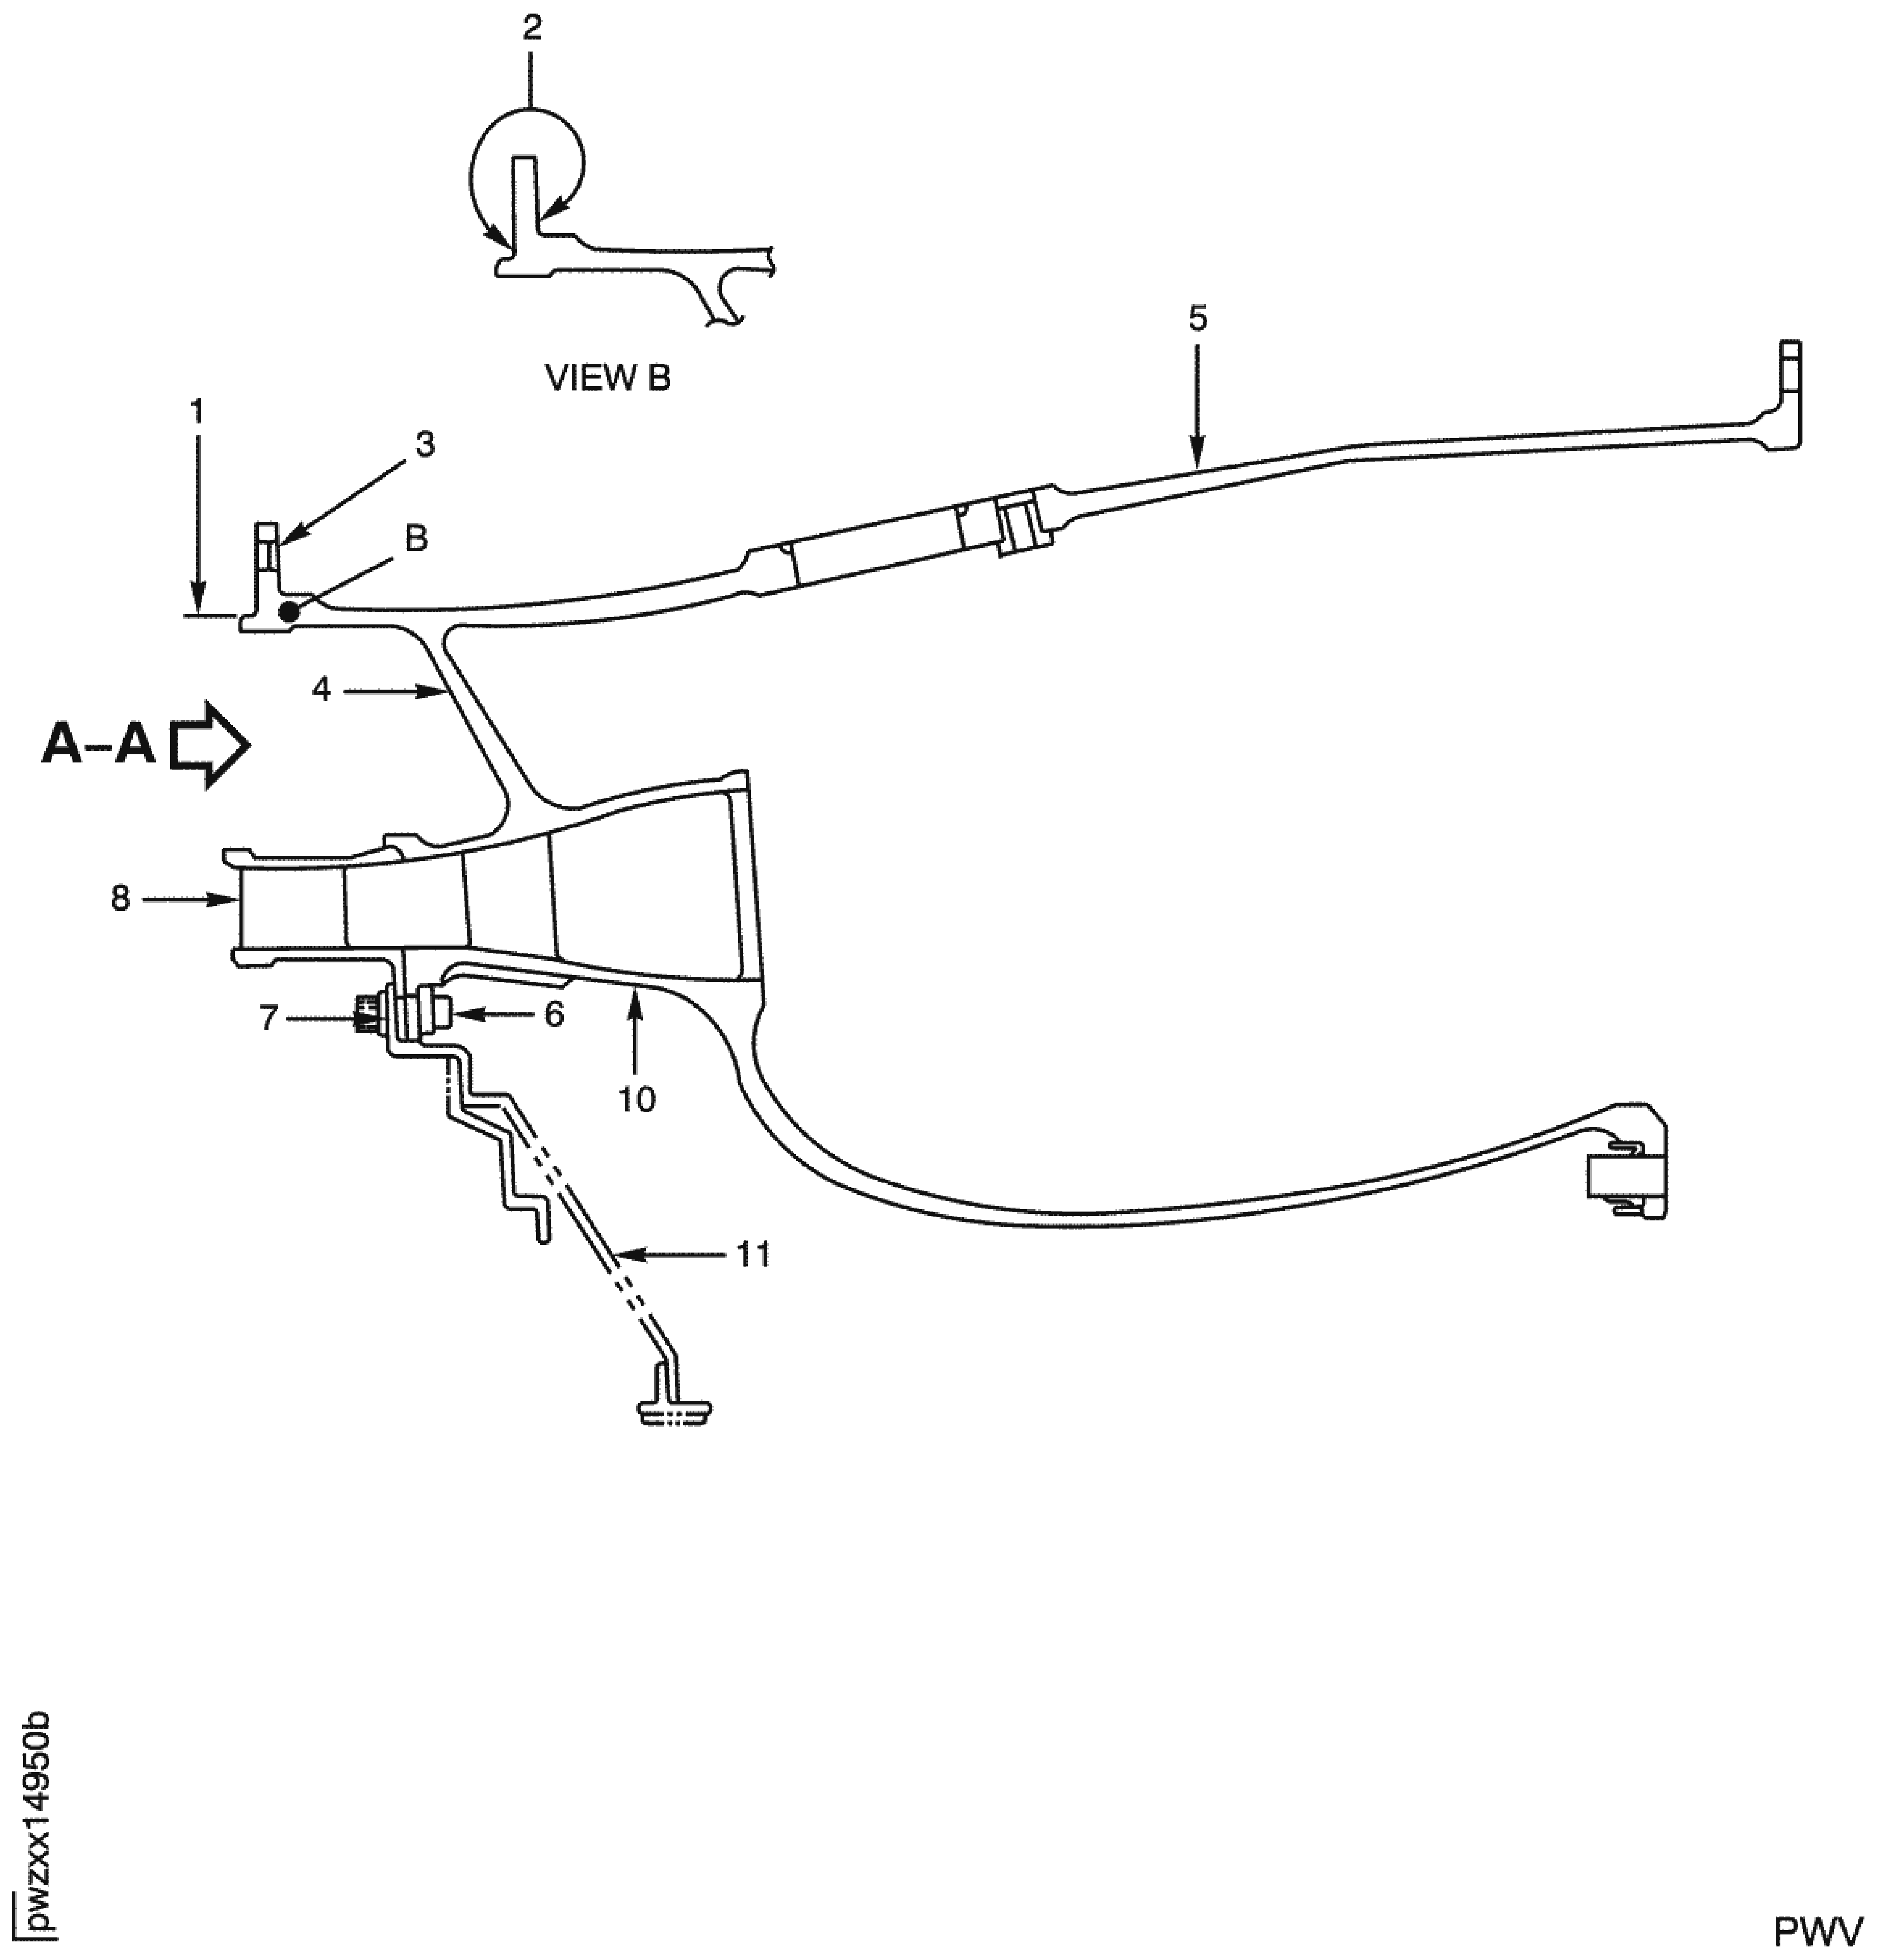
    Figure: Locations at Interface H-42

    Locations at Interface H-42
Requirements After Job Completion

Follow-On Conditions

NONE