DMC:V2500-A0-72-00-6000-00A-310A-B|Issue No:001.00|Issue Date:2013-11-01
Export Control
EAR Export Classification: Not subject to the EAR per 15 C.F.R. Chapter 1, Part 734.3(b)(3), except for the following Service Bulletins which are currently published as EAR Export Classification 9E991:
SBE70-0992, SBE72-0483, SBE72-0580, SBE72-0588, SBE72-0640, SBE73-0209, SBE80-0024 and SBE80-0025.
Copyright
© IAE International Aero Engines AG (2001, 2014 - 2021)
The information contained in this document is the property of © IAE International Aero Engines AG and may not be copied or used for any purpose other than that for which it is supplied without the express written authority of © IAE International Aero Engines AG. (This does not preclude use by engine and aircraft operators for normal instructional, maintenance or overhaul purposes.).
Common Information
TASK 72-00-60-220-001 External Gearbox Module - Visually Examine The External Gearbox Module At Interface G-60, Inspection-001
General
Refer to TASK 72-00-00-200-001 (INSPECTION/CHECK-001) (Examine the modular/non-modular interfaces), before you do this TASK.
All parts must be visually examined for damage, corrosion and wear. Any defects that are not identified in the procedure must be referred to IAE.
Do not discard any part until you are sure there are no repairs available. Refer to instructions in the repair before a discarded part is used again or oversized parts are installed.
Preliminary Requirements
Pre-Conditions
NONESupport Equipment
NONEConsumables, Materials and Expendables
NONESpares
NONESafety Requirements
NONEProcedure
SUBTASK 72-00-60-220-080 Visually Examine the Mounting Features on the External Gearbox
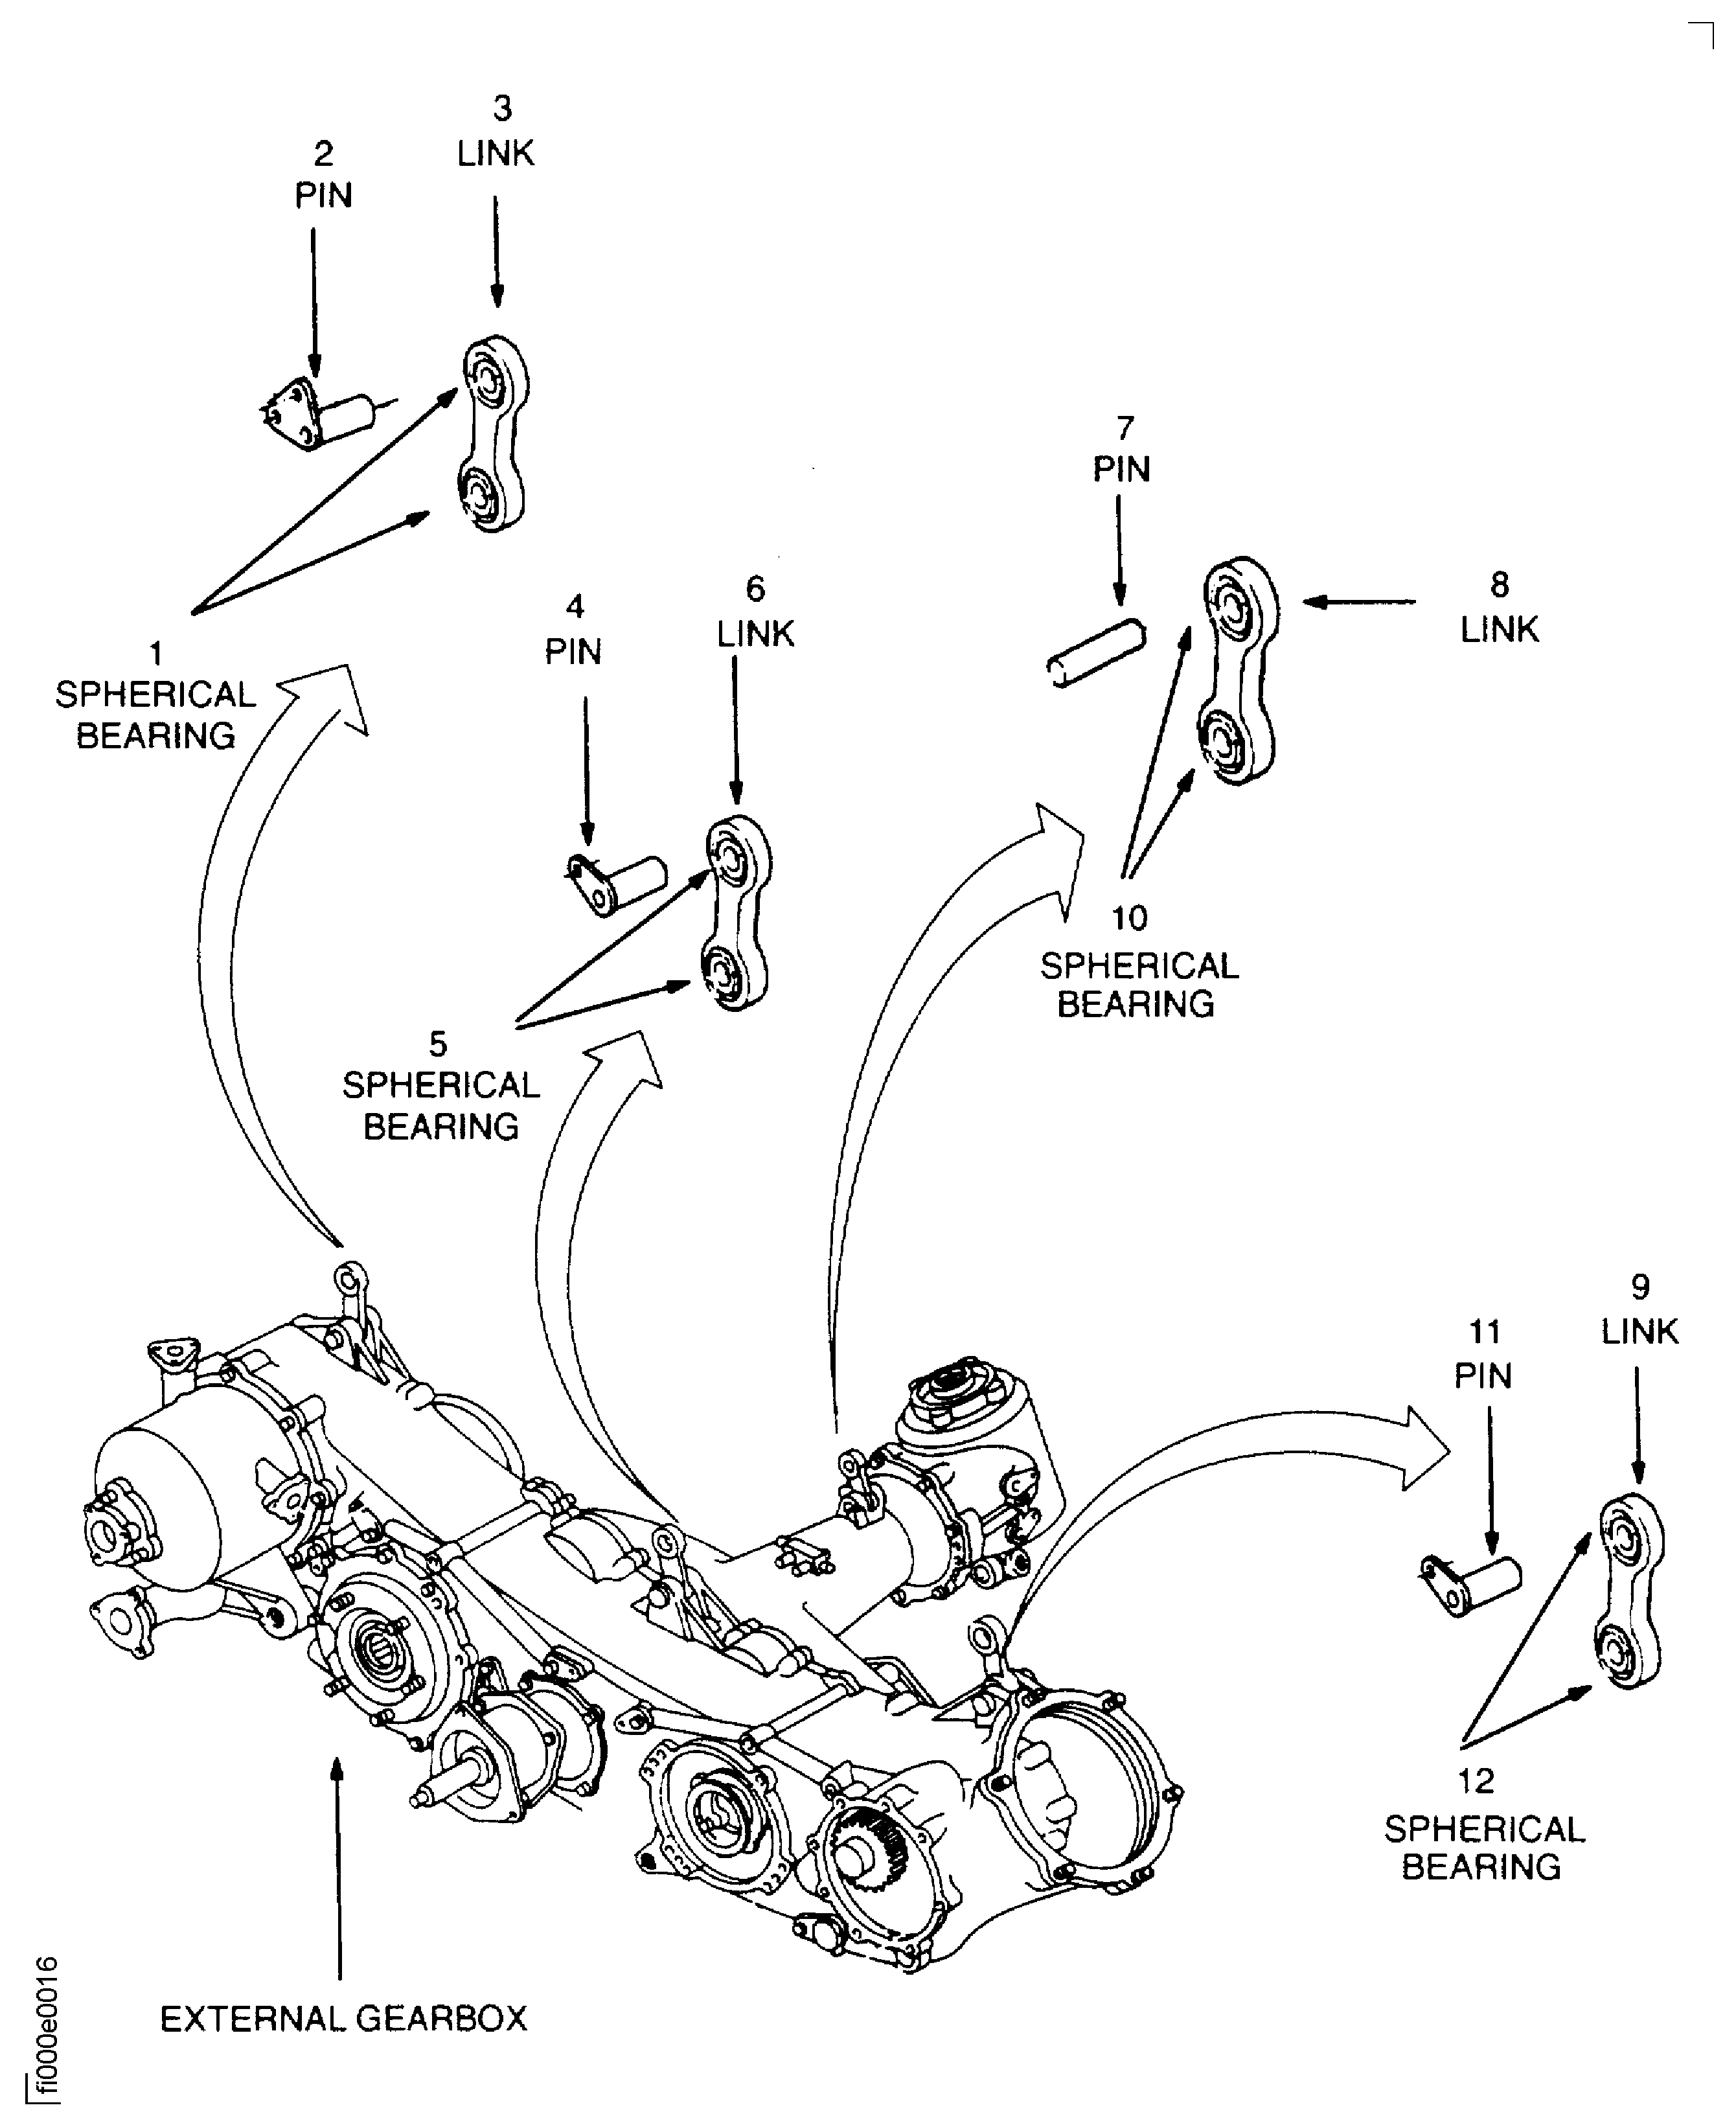
Pins at location 2, 4, 11.
Not more than 0.004 in. (0.10 mm) in depth
Between 0.6254 and 0.6251 in. (15.885 and 15.877 mm) in diameter
Less than 0.6251 in. (15.877 mm)
Links at location 3, 6, 9.
Spherical bearing at location 1, 5, 12.
Between 0.6250 and 0.6254 in. (15.862 and 15.875 mm)
More than 0.6254 in. (15.875 mm)
Put the support link on a suitable inspection table. Make sure the end faces of the spherical bearing are flat on the table.
Hold one spherical bearing end and at the same time, push and pull the link in line parallel with the two bearings.
Use a dial indicator on the end of the link to measure play.
Do Step and Step again for the other spherical bearing.
The total diametrical play must be within 0.005 in. (0.127 mm)
Frettage on the inner surface.
Rotate the spherical bearing to inspect the inner surface.
Steps caused by fret wear and close to end faces
Steps caused by fret corrosion deeper than 0.002 in (0.050 mm)
SUBTASK 72-00-60-220-081 Visually Examine the Mounting Features on the External Gearbox
Not more than 0.004 in. (0.10 mm) in depth
Between 0.3748 and 0.3750 in. (9.519 and 9.525 mm) in diameter
Less than 0.3748 in. (9.519 mm)
Spherical bearing at location 10.
Between 0.3745 and 0.3750 in. (9.512 and 9.525 mm)
More than 0.3750 in. (9.525 mm)
Put the support link flat on a suitable inspection table. Make sure the end faces of the spherical bearing are flat on the table.
Hold one spherical bearing end and at the same time push and pull the link in a line parallel with the two bearing.
Use a dial indicator on the end of the link to measure the play.
Do Step and Step again for the other spherical bearings.
The total diametrical play must be within 0.005 in. (0.127 mm)
Frettage on the inner surface.
Rotate the spherical bearing to inspect the inner surface.
Steps caused by fret wear and close to end faces
Steps caused by fret corrosion deeper than 0.002 in. (0.050 mm)
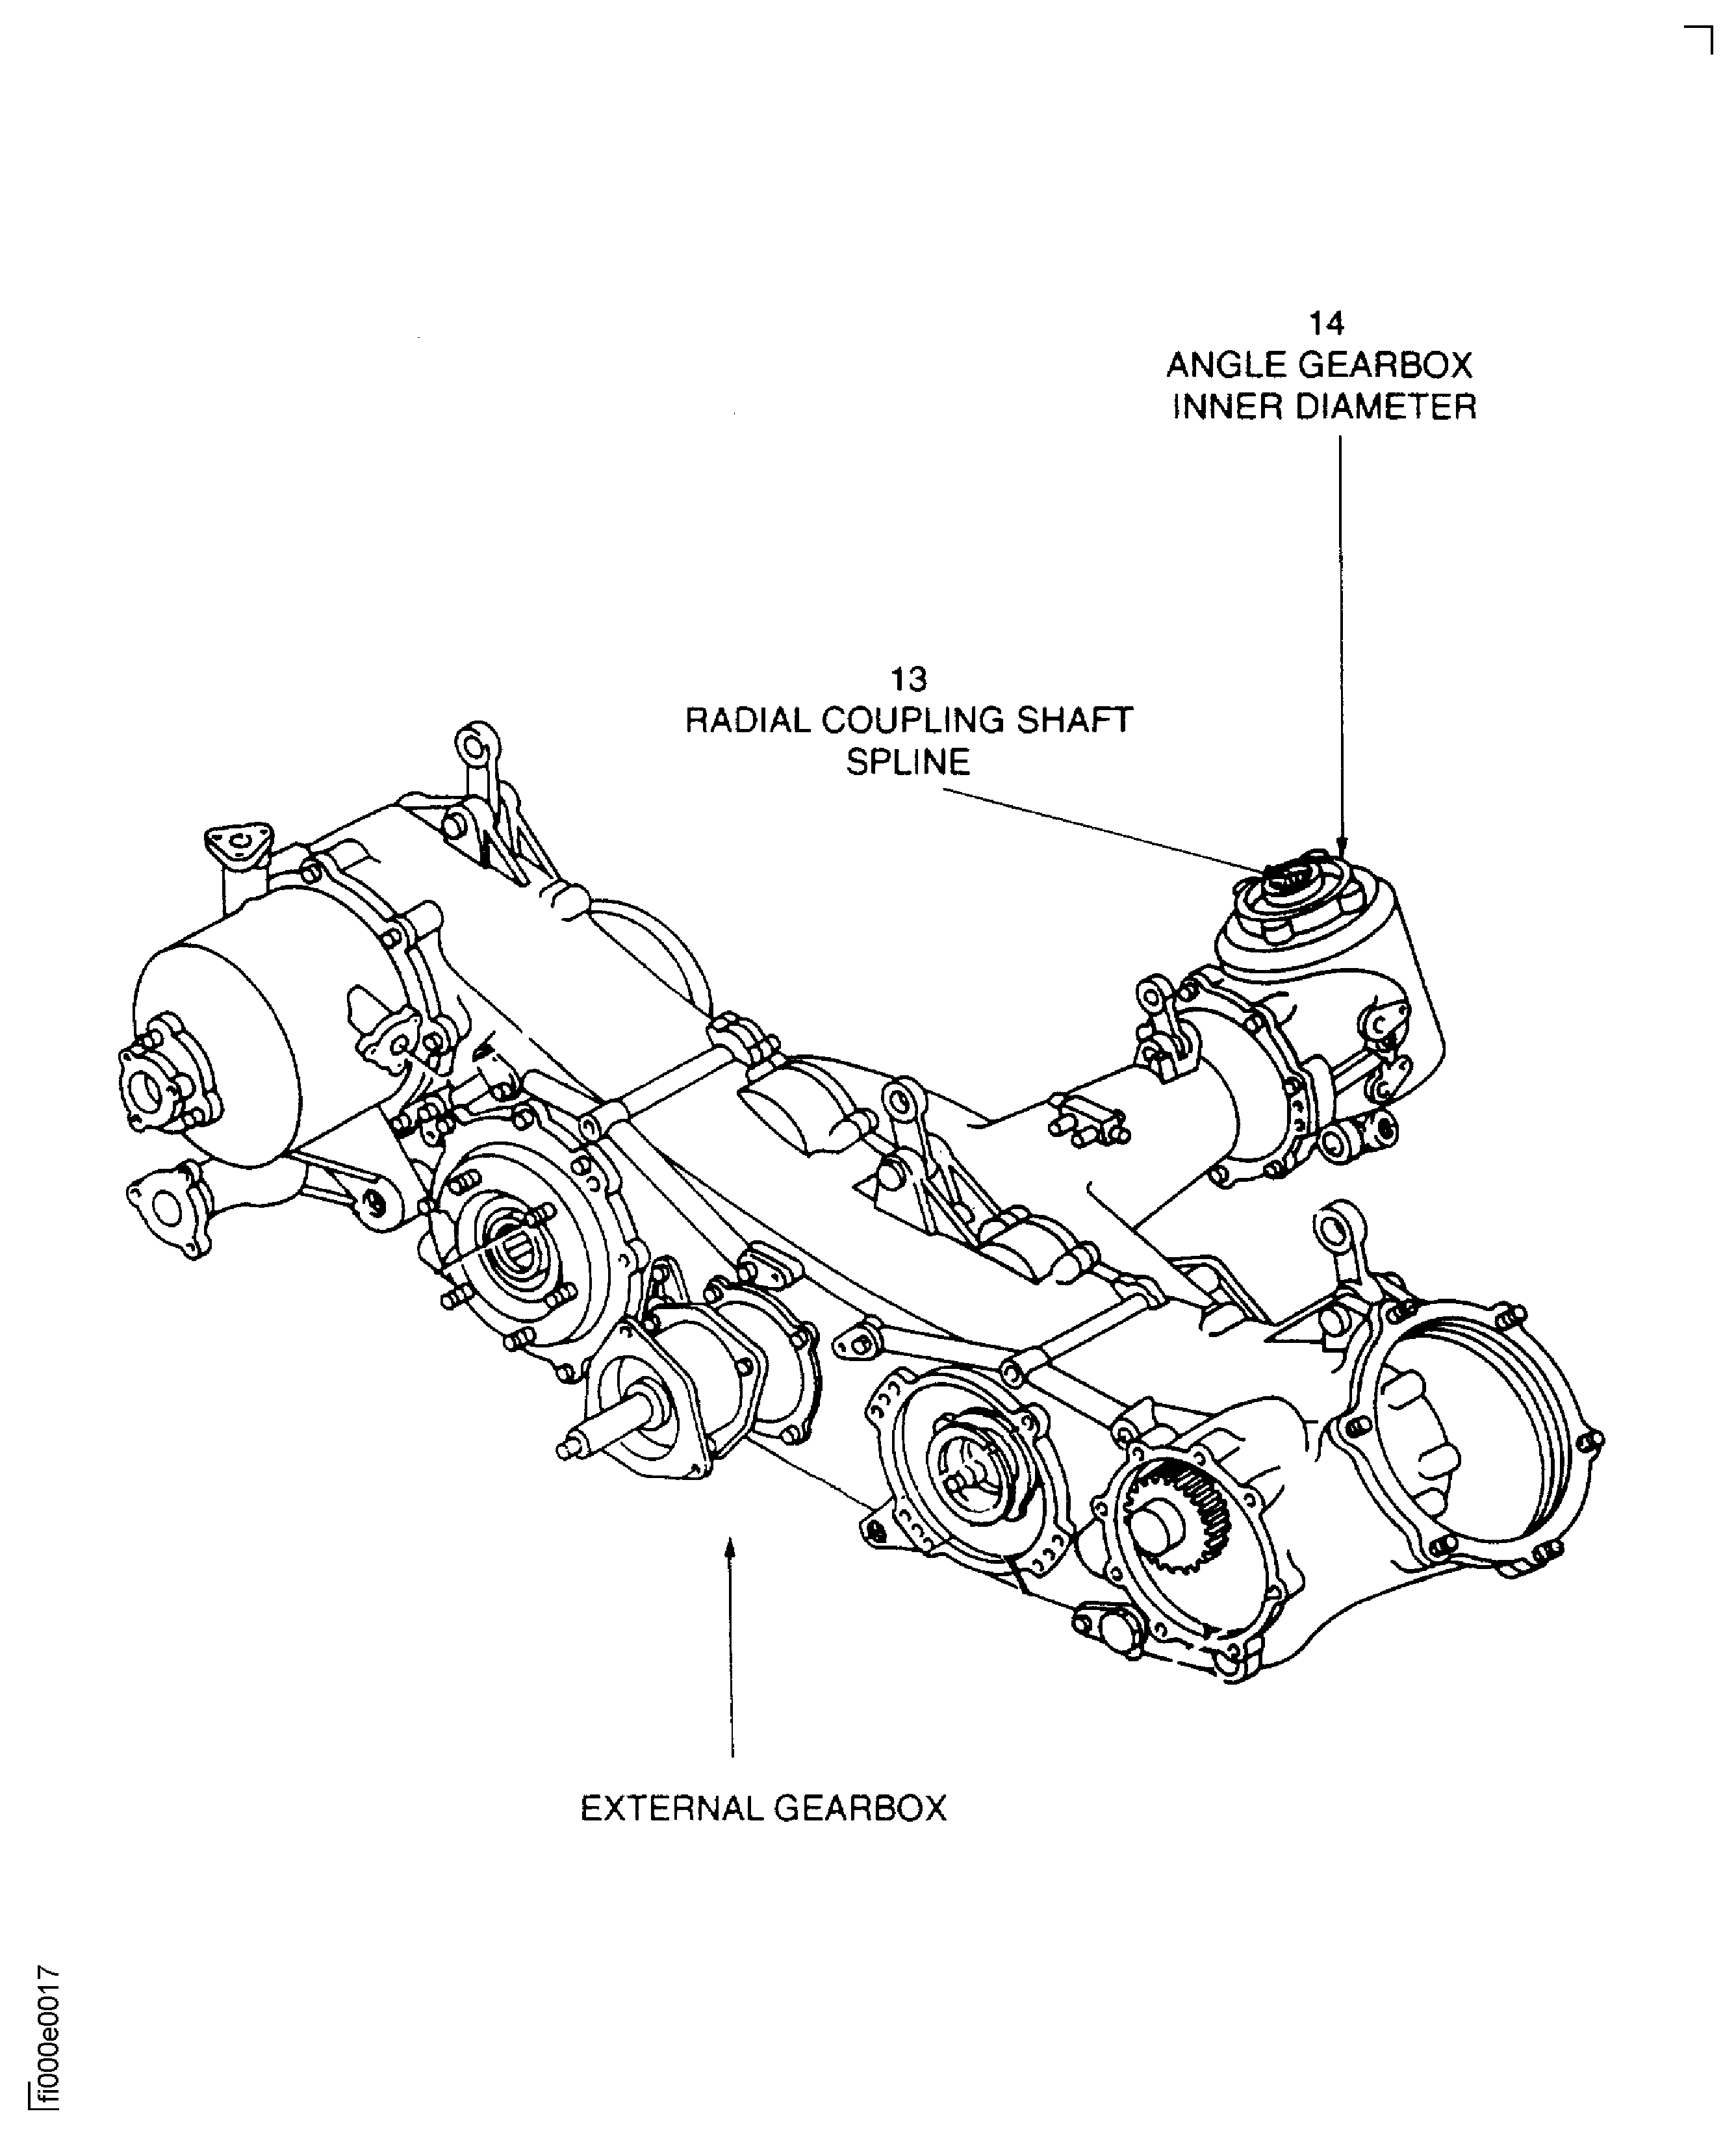
SUBTASK 72-00-60-220-082 Visually Examine the Radial Shaft Coupling
Not more than 0.003 in. (0.080 mm.) in depth
SUBTASK 72-00-60-220-083 Visually Examine the Angle Gearbox Casing
Inner diameter at location 14.
Not more than 0.004 in. (0.10 mm) in depth
Between 3.5039 and 3.5053 in. (89.000 and 89.035 mm) in diameter
More than 3.5053 in. (89.035 mm) and less than 3.5100 in. (89.154 mm) in diameter
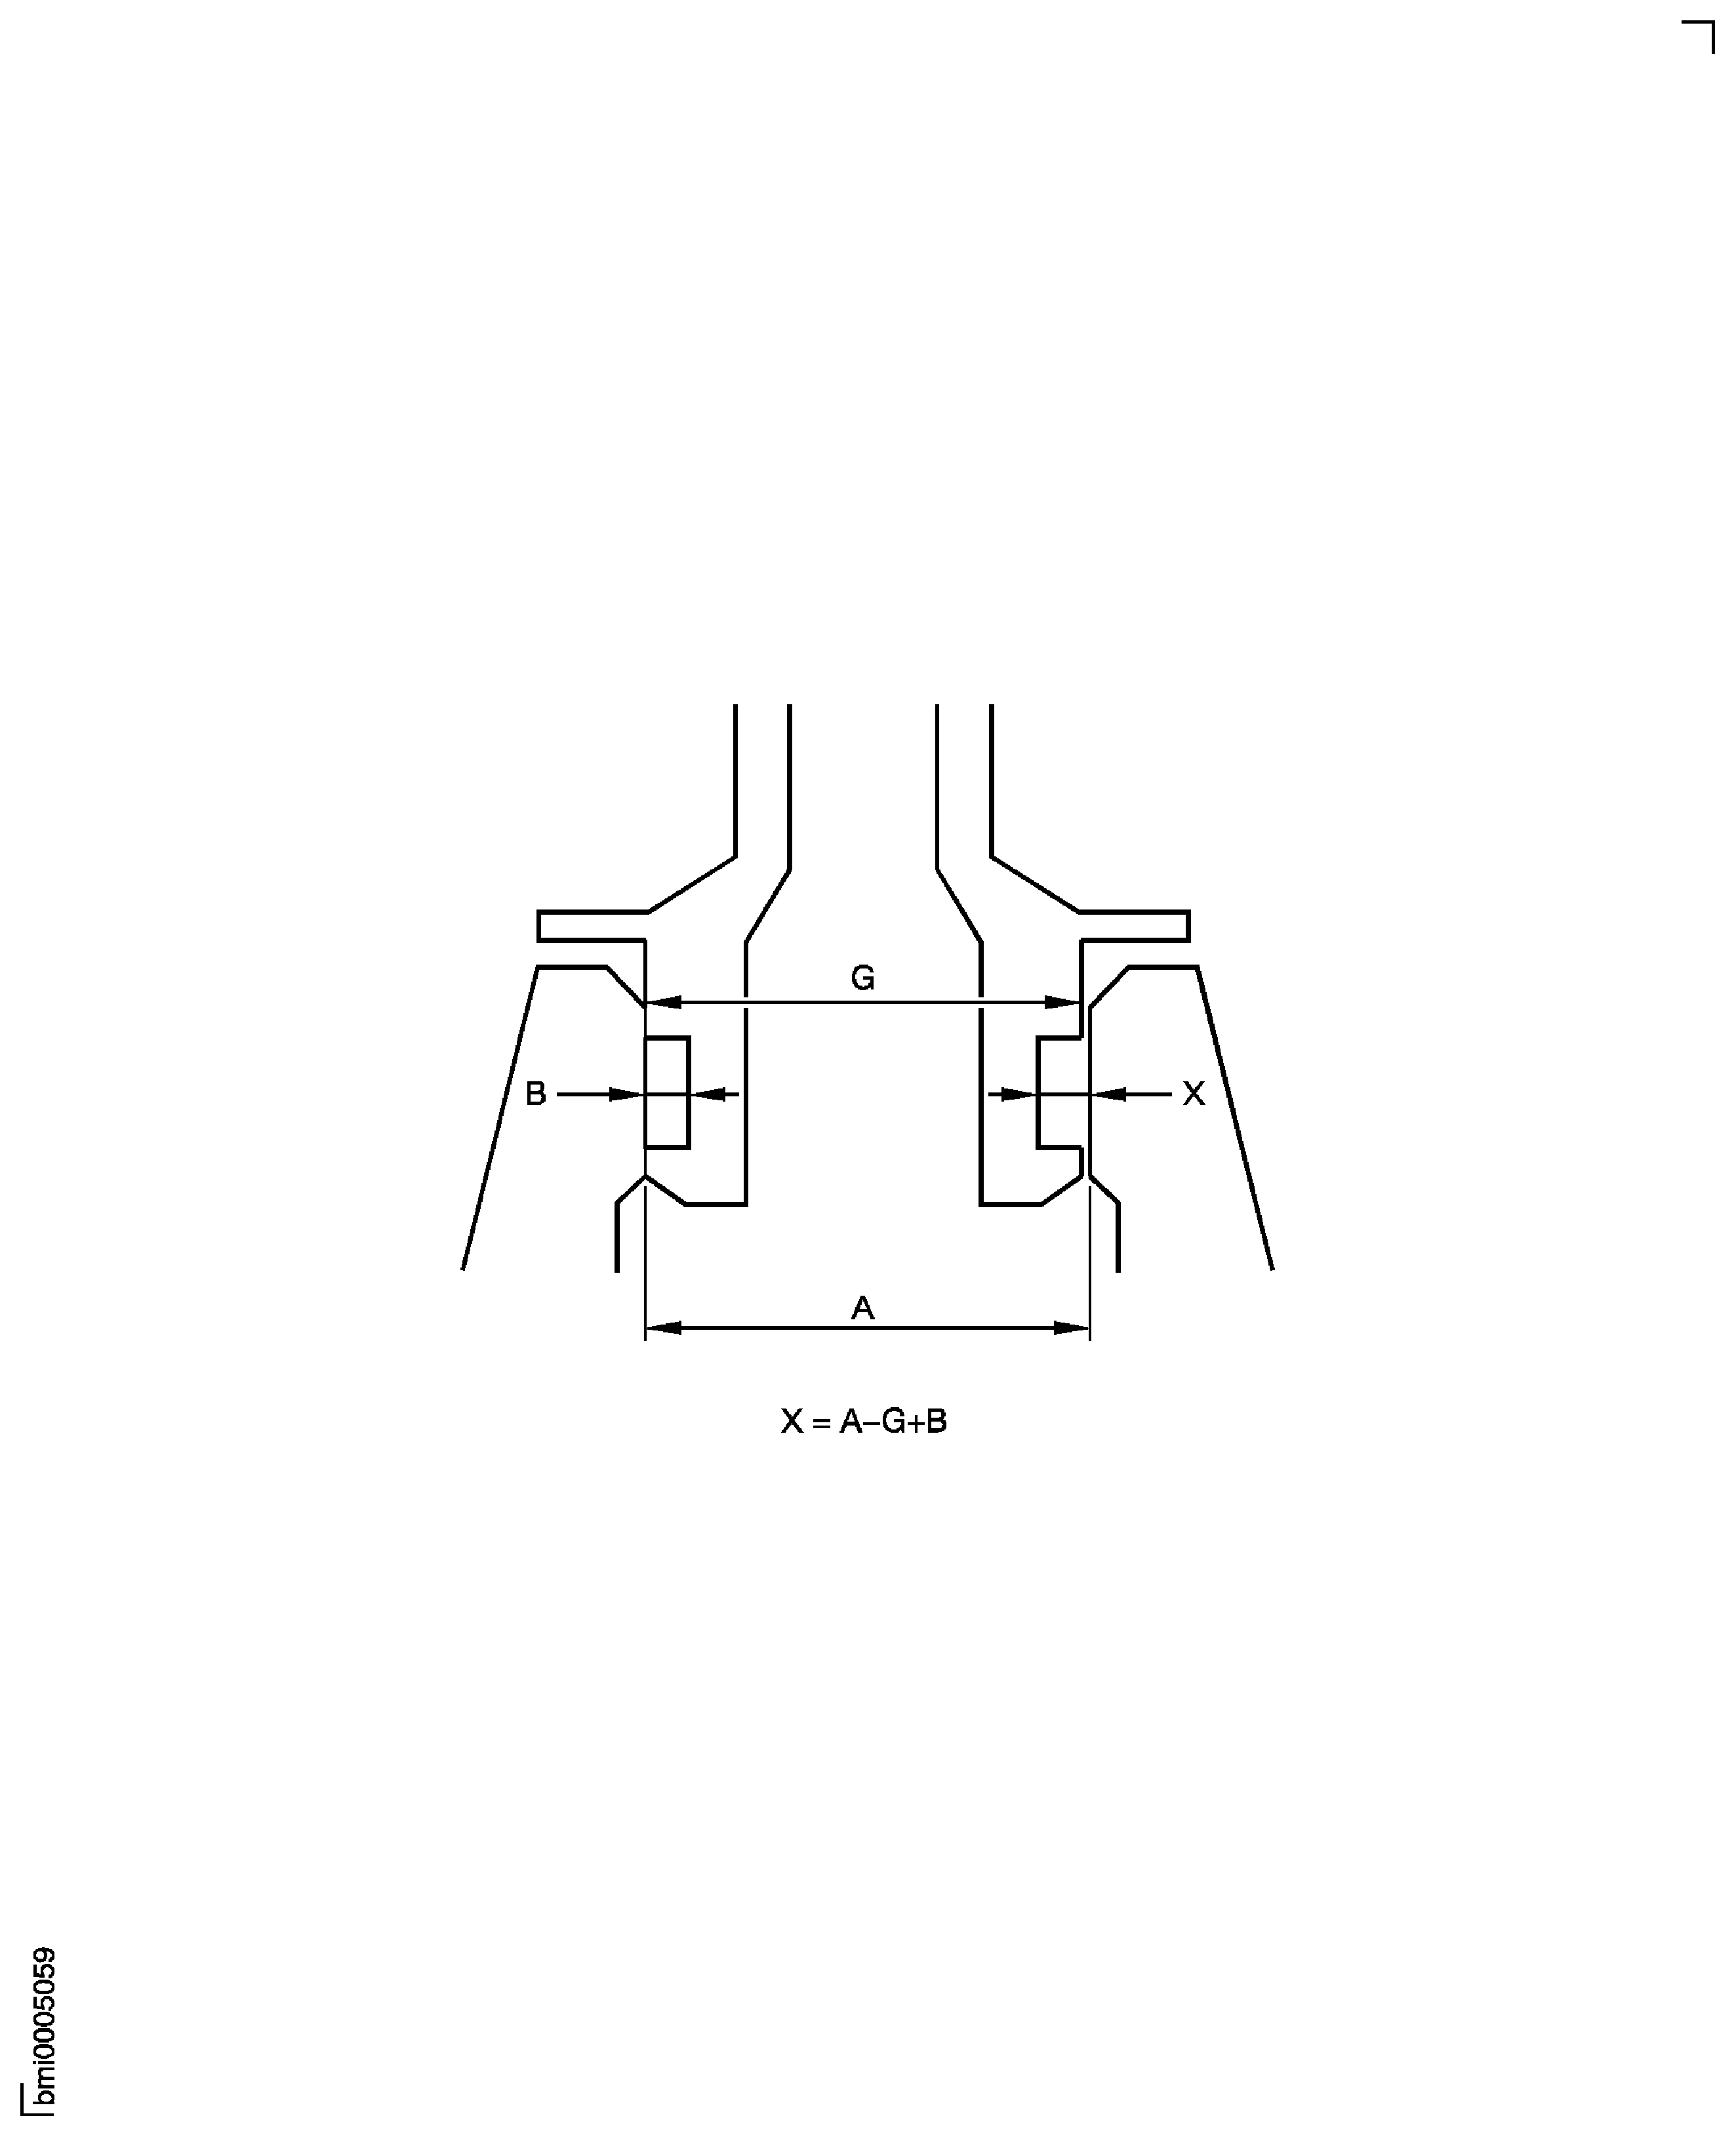
Accept, if dimension X is less than 0.1266 in. (3.216 mm). Refer to Figure. Reject, if dimension X is more than 0.1266 in. (3.216 mm)
More than 3.5100 in. (89.154 mm) in diameter
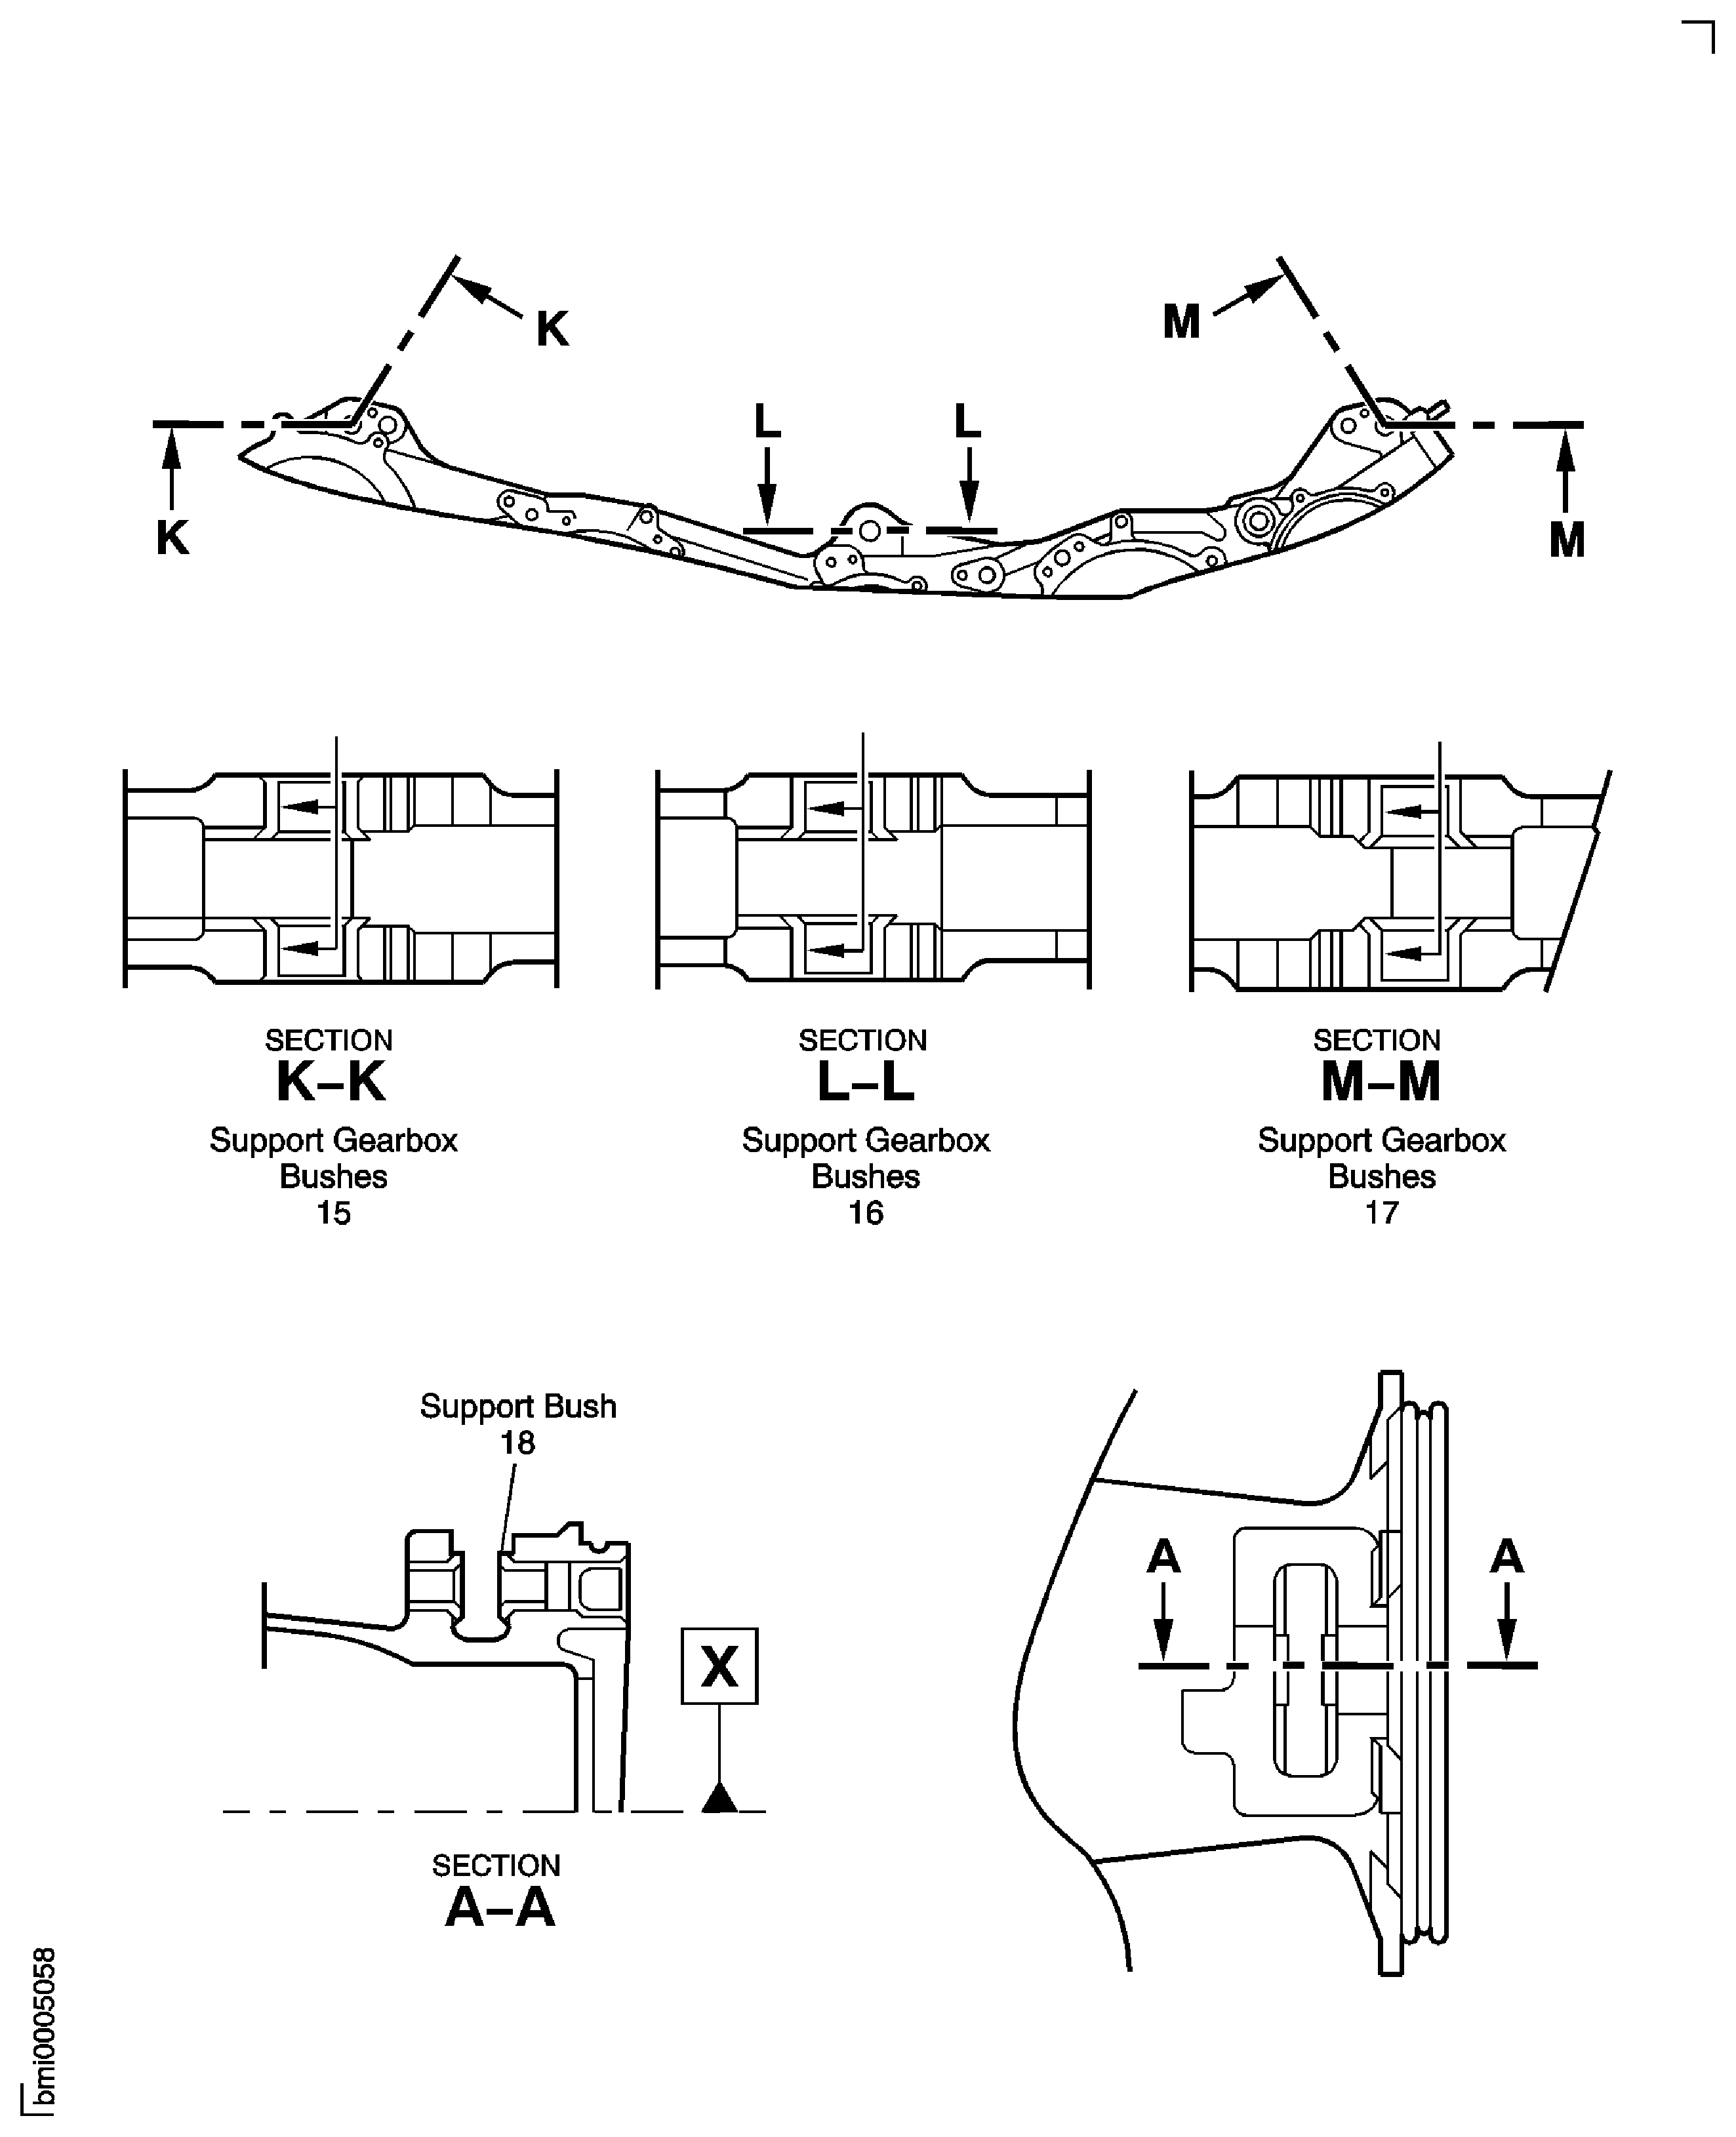
SUBTASK 72-00-60-220-099 Examine the support Gearbox Bushes at Location 15, Location 16 and Location 17
Between 0.6256 and 0.6263 in. (15.890 and 15.908 mm)
More than 0.6263 in. (15.908 mm)
SUBTASK 72-00-60-220-100 Examine the Angle Support Gearbox Bushes at Location 18
Between 0.3752 and 0.3756 in. (9.530 and 9.540 mm)
More than 0.3756 in. (9.540 mm)
Between 0.4154 and 0.4271 in. (10.550 and 10.850 mm)
More than 0.4271 in. (10.850 mm)
Requirements After Job Completion
Follow-On Conditions
NONE


