Export Control
EAR Export Classification: Not subject to the EAR per 15 C.F.R. Chapter 1, Part 734.3(b)(3), except for the following Service Bulletins which are currently published as EAR Export Classification 9E991: SBE70-0992, SBE72-0483, SBE72-0580, SBE72-0588, SBE72-0640, SBE73-0209, SBE80-0024 and SBE80-0025.Copyright
© IAE International Aero Engines AG (2001, 2014 - 2021) The information contained in this document is the property of © IAE International Aero Engines AG and may not be copied or used for any purpose other than that for which it is supplied without the express written authority of © IAE International Aero Engines AG. (This does not preclude use by engine and aircraft operators for normal instructional, maintenance or overhaul purposes.).Applicability
All
Common Information
TASK 72-32-19-300-005 Hydraulic Seal - Repair Damage On The Front And Rear Flange Face By Chromium Plate, Repair-005 (VRS1232)
General
Price and availability - none
The practices and processes referred to in the procedure by the TASK numbers are in the SPM.
NOTE
Preliminary Requirements
Pre-Conditions
NONESupport Equipment
| Name | Manufacturer | Part Number / Identification | Quantity | Remark |
|---|---|---|---|---|
| Chromium plate equipment | LOCAL | Chromium plate equipment | ||
| Grinding machine | LOCAL | Grinding machine | ||
| Magnetic particle inspection equipment | LOCAL | Magnetic particle inspection equipment | ||
| Vernier caliper | LOCAL | Vernier caliper | ||
| Depth gage micrometer | LOCAL | Depth gage micrometer | ||
| Oven | LOCAL | Oven | ||
| Vibrating marking pencil | LOCAL | Vibrating marking pencil | ||
| Dial set indicator | LOCAL | Dial set indicator | ||
| IAE 3J12845 Plate hanger | 0AM53 | IAE 3J12845 | 1 | |
| IAE 3J12846 Grinding fixture | 0AM53 | IAE 3J12846 | 1 | |
| IAE 3J12847 Grinding fixture | 0AM53 | IAE 3J12847 | 1 |
Consumables, Materials and Expendables
NONESpares
NONESafety Requirements
NONEProcedure
Refer to Figure.
Use IAE 3J12847 Grinding fixture 1 off.
Use Grinding machine.
Locally manufactured tool and another machining facility can be used instead of IAE 3J12847 Grinding fixture and grinding machine if all the requirements in Figure are satisfied after the machining.
Install the fixture into the grinding machine for machining front flange face.
Use a Dial set indicator.
Install the hydraulic ring on to the fixture and set to turn correctly.
Use Depth gage micrometer and vernier caliper.
Machine the front flange face to remove all damage.
SUBTASK 72-32-19-320-051 Machine the Damaged Front Flange Face

CAUTION
DO NOT REMOVE MORE MATERIAL THAN IS NECESSARY.Refer to Figure.
Use IAE 3J12846 Grinding fixture 1 off.
Use Grinding machine.
Locally manufactured tool and another machining facility can be used instead of IAE 3J12846 Grinding fixture and grinding machine if all the requirements in Figure are satisfied after the machining.
Install the fixture into the grinding machine for machining rear flange face.
Use a Dial set indicator.
Install the hydraulic ring on to the fixture and set to turn correctly.
Use Depth gage micrometer and Vernier caliper.
Machine the rear flange face to remove all damage.
SUBTASK 72-32-19-320-060 Machine the Damaged Rear Flange Face

CAUTION
DO NOT REMOVE MORE MATERIAL THAN IS NECESSARY.Use an Oven.
Heat treat the part for one hour at a temperature of 374 to 410 deg F (190 to 210 deg C).
SUBTASK 72-32-19-370-051 Heat Treat the Hydraulic Ring
Refer to TASK 72-32-19-200-003 (INSPECTION/CHECK-003, CONFIG-001).
No cracks permitted.
Magnetic particle examine the machined area.
SUBTASK 72-32-19-240-054 Examine the Machined Flange Face of the Hydraulic Ring for Cracks
Refer to the SPM TASK 70-38-24-300-503.
NOTE
When both front and rear flange faces are machined in step 4. and step 5., application of chromium plate by step 9. and step 10. can be done at the same time.When both front and rear flange faces are machined in step 4. and step 5. you can apply the plating to only one side in accordance with step 9. or step 10. if you can get the dimension L2 and W2 referred to Figure and Figure with plating thickness 0.0020 to 0.0059 in. (0.05 to 0.15 mm).You must apply the plate to only the machined flange face in accordance with step 9. or step 10. if one flange face is machined in step 4. or step 5.Apply a mask to the areas where the plate is not applied.
Locally manufactured tool can be used instead of IAE 3J12845 Plate hanger if all the requirements in Figure are satisfied after the plating.
The electrical connection for plating is located on the fixture.
Use IAE 3J12845 Plate hanger 1 off.
Install the hydraulic ring on to the fixture.
Refer to the SPM TASK 70-38-24-300-503.
If the mask is not applied on the correct area, apply the mask on the correct area.
Refer to the SPM TASK 70-33-02-100-501.
Electrical contact is permitted only in the area given in the figure.
Use chromium plate equipment.
Chromium plate the front flange face of the hydraulic ring to the dimension given in the figure.
SUBTASK 72-32-19-330-051 Chromium Plate the Hydraulic Ring, Front Flange Face
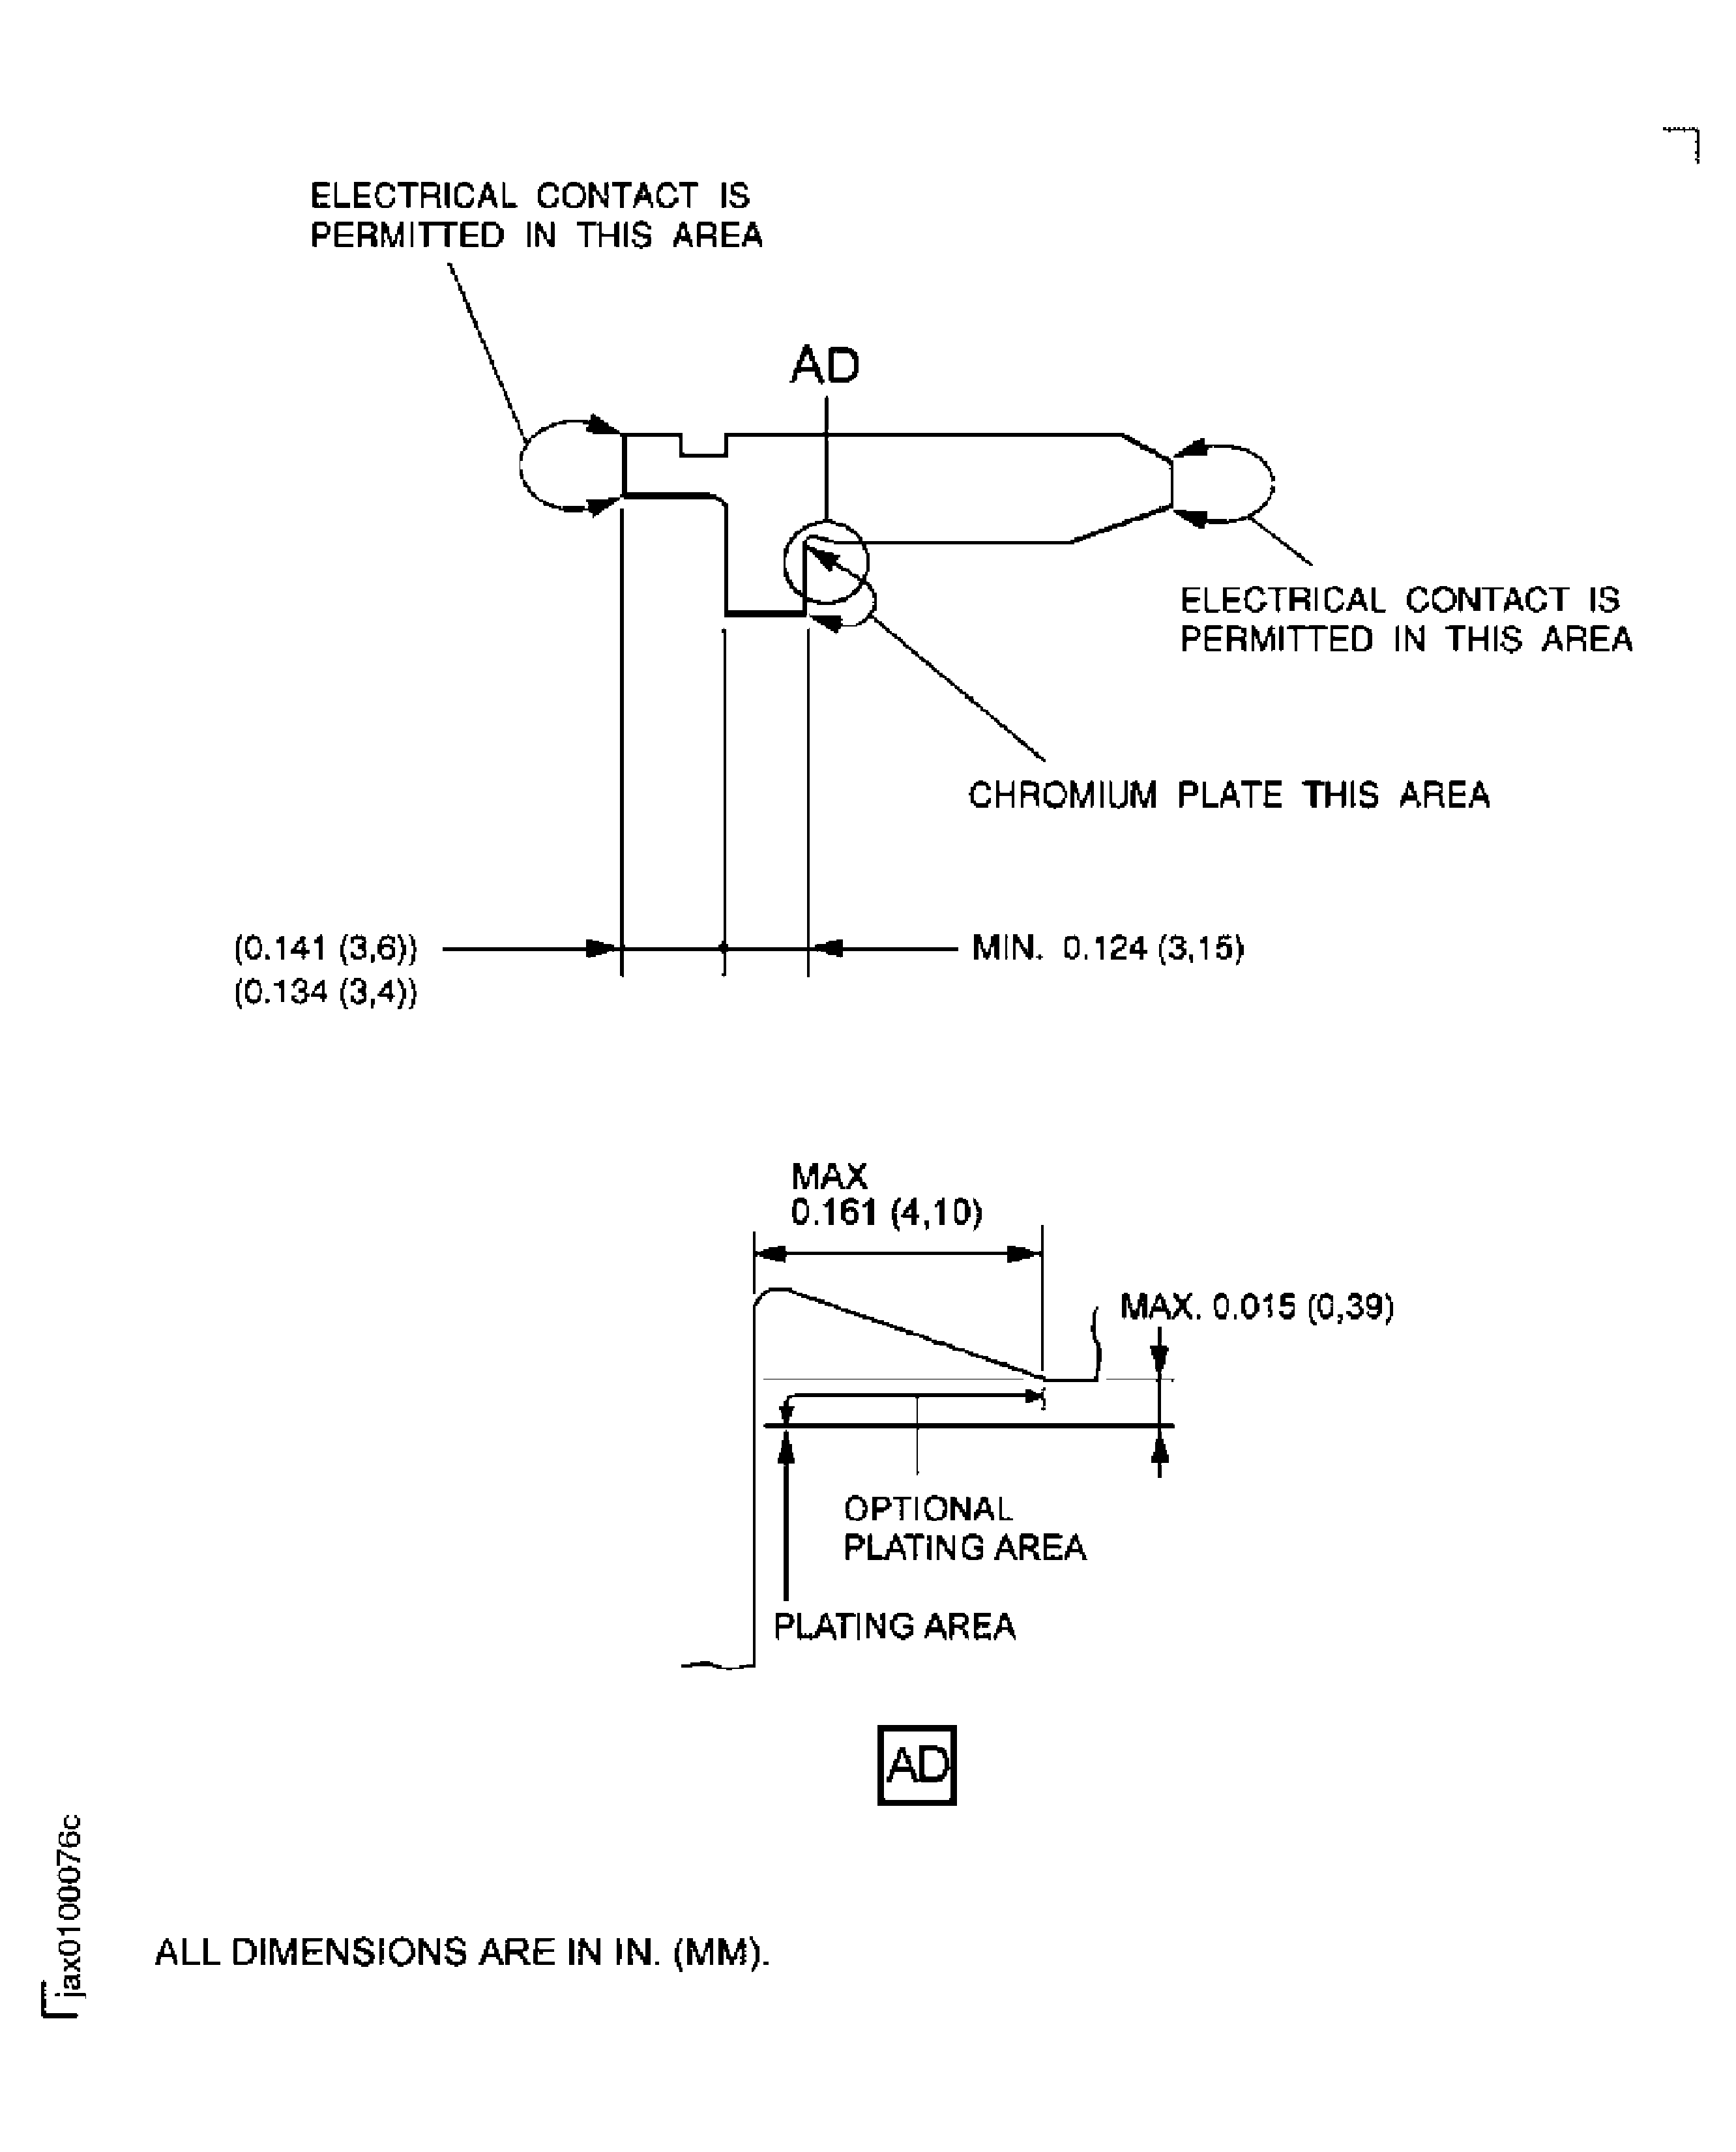
Refer to Figure.
NOTE
When both front and rear flange faces are machined in step 4. and step 5., application of chromium plate by step 9. and step 10. can be done at the same time.When both front and rear flange faces are machined in step 4. and step 5. you can apply the plating to only one side in accordance with step 9. or step 10. if you can get the dimension L2 and W2 referred to Figure and Figure with plating thickness 0.0020 to 0.0059 in. (0.05 to 0.15 mm).You must apply the plate to only the machined flange face in accordance with step 9. or step 10. if one flange face is machined in step 4. or step 5.Refer to the SPM TASK 70-38-24-380-501.
Apply a mask to the areas where the plate is not applied for rear flange face.
Use IAE 3J12845 Plate hanger 1 off. Locally manufactured tool can be used instead of IAE 3J12845 Plate hanger if all the requirements in Figure are satisfied after the plating.
Install the hydraulic ring on to the fixture.
Refer to the SPM TASK 70-38-24-380-501.
If the mask is not applied on the correct area, apply the mask on the correct area.
Refer to the SPM TASK 70-38-24-380-501.
Electrical contact is permitted only in the figure.
Use chromium plate equipment.
Chromium plate the rear flange face of the hydraulic ring to the minimum dimension given in the figure.
SUBTASK 72-32-19-330-055 Chromium Plate the Hydraulic Ring, Rear Flange Face
Refer to Figure.
Use IAE 3J12847 Grinding fixture 1 off.
Use grinding machine.
Locally manufactured tool and another machining facility can be used instead of IAE 3J12847 Grinding fixture and grinding machine if all the requirements in Figure are satisfied after the machining.
Install the fixture into grinding machine for machining front flange face.
SUBTASK 72-32-19-320-052 Machine the Hydraulic Ring, Front Flange Face after Plating

CAUTION
BE CAREFUL TO MACHINE THE FRONT FLANGE FACE, SO AS TO SATISFY DIMENSION L2 IN Figure AND COATING THICKNESS 0.0020 TO 0.0059 IN. (0.05 TO 0.15 MM).Refer to Figure.
Use IAE 3J12846 Grinding fixture 1 off.
Use grinding machine.
Locally manufactured tool and another machining facility can be used instead of IAE 3J12846 Grinding fixture and grinding machine if all the requirements in Figure are satisfied after the machining.
Install the fixture into grinding machine for machining rear flange face.
SUBTASK 72-32-19-320-061 Machine the Hydraulic Ring, Rear Flange Face after Plating

CAUTION
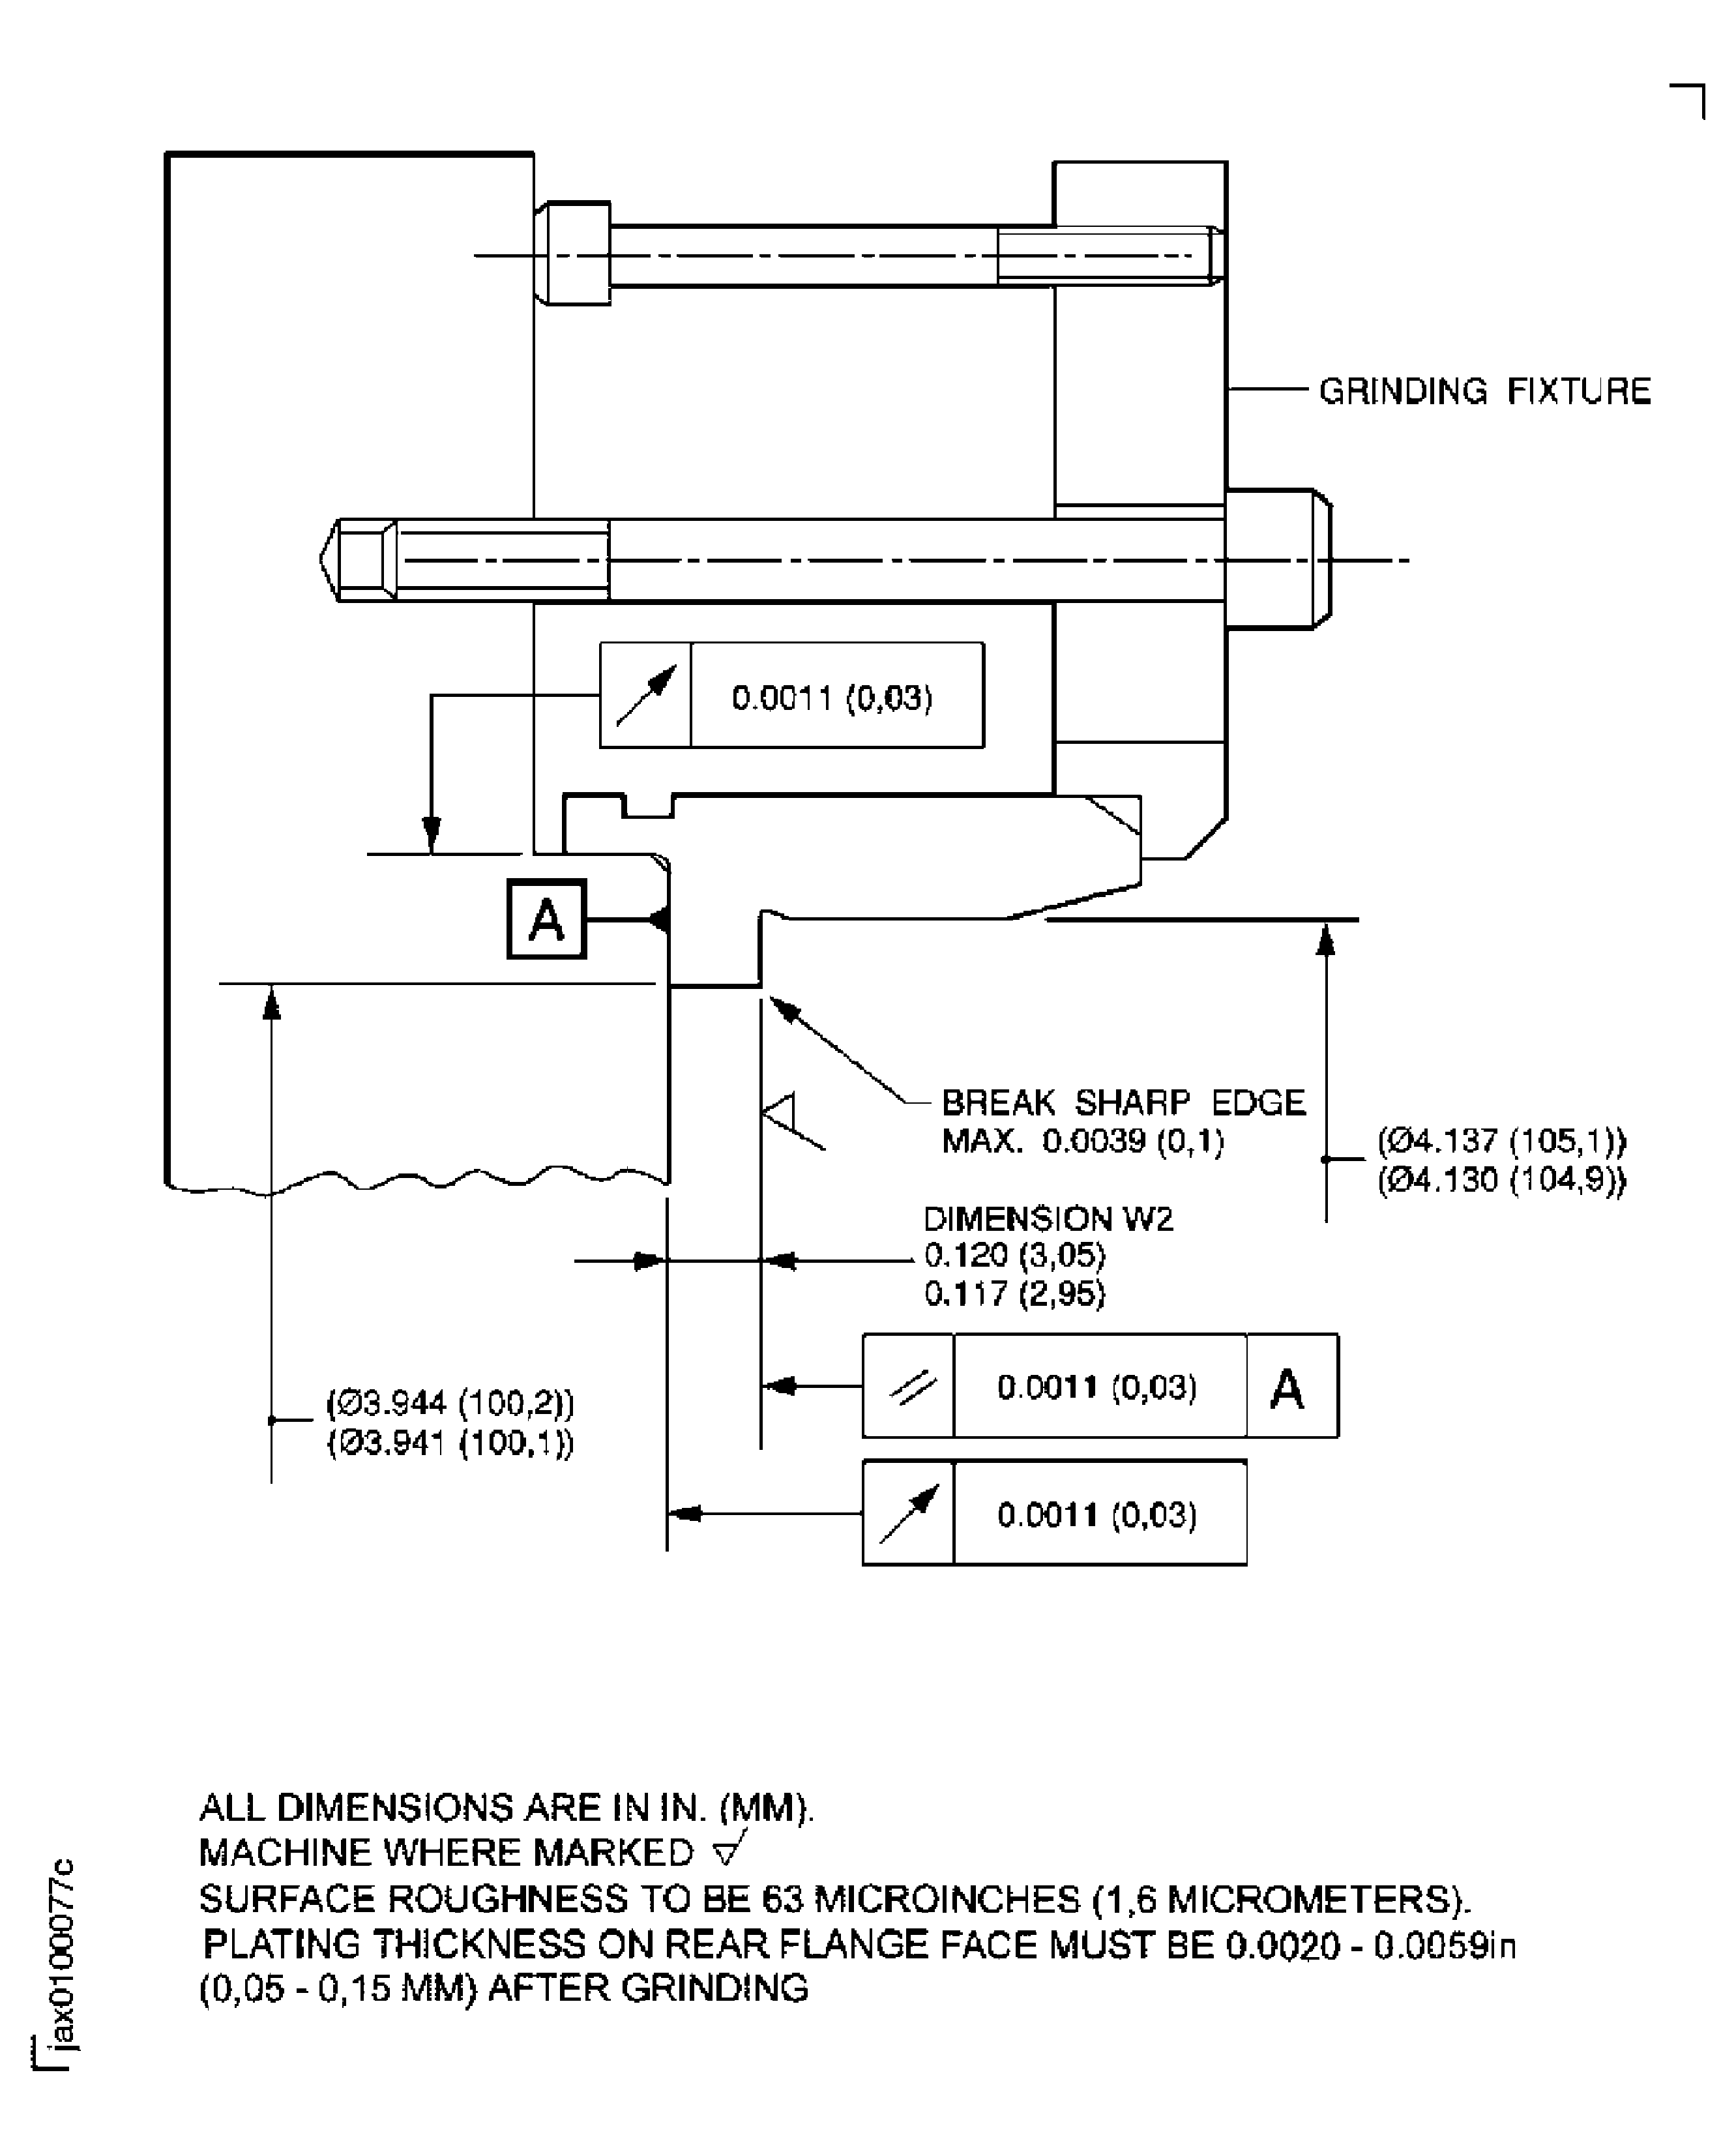
BE CAREFUL TO MACHINE THE REAR FLANGE FACE, SO AS TO SATISFY DIMENSION W2 IN FIG. 906 AND COATING THICKNESS 0.0020 TO 0.0059 IN. (0.05 TO 0.15 MM).Refer to TASK 72-32-19-200-000 (INSPECTION-000, CONFIG-001).
Visually examine and measure the dimensions of the flange face.
SUBTASK 72-32-19-220-072 Examine the Hydraulic Ring
Refer to the SPM TASK 70-09-00-400-501.
Use vibro-engraving equipment.
Mark VRS1232 adjacent to the part number.
SUBTASK 72-32-19-350-051 Identify the Repair
Figure: Repair Details and Dimensions (Before Plating - Front Flange Face)
Repair Details and Dimensions (Before Plating - Front Flange Face)

Figure: Repair Details and Dimensions (Before Plating - Rear Flange Face)
Repair Details and Dimensions (Before Plating - Rear Flange Face)

Figure: Repair Details and Dimensions (Chromium Plate - Front Flange Face)
Repair Details and Dimensions (Chromium Plate - Front Flange Face)

Figure: Repair Details and Dimensions (Chromium Plate - Rear Flange Face)
Repair Details and Dimensions (Chromium Plate - Rear Flange Face)

Figure: Repair Details and Dimensions (After Plating - Front Flange Face)
Repair Details and Dimensions (After Plating - Front Flange Face)

Figure: Repair Details and Dimensions (After Plating - Rear Flange Face)
Repair Details and Dimensions (After Plating - Rear Flange Face)

