Export Control
EAR Export Classification: Not subject to the EAR per 15 C.F.R. Chapter 1, Part 734.3(b)(3), except for the following Service Bulletins which are currently published as EAR Export Classification 9E991: SBE70-0992, SBE72-0483, SBE72-0580, SBE72-0588, SBE72-0640, SBE73-0209, SBE80-0024 and SBE80-0025.Copyright
© IAE International Aero Engines AG (2001, 2014 - 2021) The information contained in this document is the property of © IAE International Aero Engines AG and may not be copied or used for any purpose other than that for which it is supplied without the express written authority of © IAE International Aero Engines AG. (This does not preclude use by engine and aircraft operators for normal instructional, maintenance or overhaul purposes.).Applicability
All
Common Information
TASK 72-32-83-300-013 LPC Rear Case - Replace The Abradable Rubber, Repair-013 (VRS1397)
Material of component
PART IDENT | SYMBOL | MATERIAL |
|---|---|---|
LPC rear case assembly | - | 2.2Al-1.5Mg-1.1Ni-1.1Fe Aluminum |
General
Price and availability - none
The practices and processes referred to in the procedure by the TASK number are in the SPM.
For the method to clean the parts, refer to TASK 72-32-83-100-000 (CLEANING-000).
NOTE
NOTE
Preliminary Requirements
Pre-Conditions
NONESupport Equipment
| Name | Manufacturer | Part Number / Identification | Quantity | Remark |
|---|---|---|---|---|
| Oven | LOCAL | Oven | ||
| Hardness tester (durometer) | LOCAL | Hardness tester (durometer) | ||
| IAE 3J12775 Bond test fixture | 0AM53 | IAE 3J12775 | 1 | |
| IAE 3J12785 Inspection stand | 0AM53 | IAE 3J12785 | 1 | |
| IAE 3J13513 Fixture, rubber moulding | 0AM53 | IAE 3J13513 | 1 | |
| IAE 3J13155 Filler injector | 0AM53 | IAE 3J13155 | 1 | |
| IAE 3J12791 Inspection stand | 0AM53 | IAE 3J12791 | 1 |
Consumables, Materials and Expendables
| Name | Manufacturer | Part Number / Identification | Quantity | Remark |
|---|---|---|---|---|
| CoMat 01-076 METHYL ETHYL KETONE | LOCAL | CoMat 01-076 | ||
| CoMat 02-005 ADHESIVE TAPE (MASKING) | LOCAL | CoMat 02-005 | ||
| CoMat 02-099 LINT-FREE CLOTH | LOCAL | CoMat 02-099 | ||
| CoMat 05-050 SILICON CARBIDE GRIT | 1E1X8 | CoMat 05-050 | ||
| CoMat 07-028 CHROMATE CONVERSION COATING FOR ALUMINUM | LOCAL | CoMat 07-028 | ||
| CoMat 08-032 PRIMER | LOCAL | CoMat 08-032 | ||
| CoMat 08-037 DELETED | LOCAL | CoMat 08-037 | ||
| CoMat 08-038 SILICONE RUBBER COMPOUND | 64101 | CoMat 08-038 | ||
| CoMat 06-064 FLUORESCENT PENETRANT (WATER WASHABLE MEDIUM SENSITIVITY) | LOCAL | CoMat 06-064 |
Spares
NONESafety Requirements
NONEProcedure
Refer to the SPM TASK 70-23-05-230-501. Use CoMat 06-064 FLUORESCENT PENETRANT (WATER WASHABLE MEDIUM SENSITIVITY).
Fluorescent penetrant examine the repair area.
SUBTASK 72-32-83-220-240 Examine the Repaired Area
Refer to the SPM TASK 70-11-03-300-503. Use CoMat 02-099 LINT-FREE CLOTH.
Clean the repaired area.
Use CoMat 07-028 CHROMATE CONVERSION COATING FOR ALUMINUM chemical conversion coating.
Do a chemical touch up to the surface by a brush (if required).
Refer to the SPM TASK 70-36-06-360-501.
Clean the repair area.
SUBTASK 72-32-83-380-070 Surface Treat the Repair Area
Refer to Figure.
SUBTASK 72-32-83-110-091 Clean the Repair Area
Refer to Figure.
Use CoMat 08-032 PRIMER.
Refer to the SPM TASK 70-36-06-360-501.
NOTE
Store the primer in small containers for single usage only. The remaining primer in the glass bottle after coating must not be used.Within 30 minutes of cleaning, apply a 0.0001 in. (0.003 mm) coat of primer to the mold surface using unsized cheese cloth.
Refer to the SPM TASK 70-36-06-360-501.
Cure at 77 deg F (25 deg C) minimum and a relative humidity of 50 percent minimum for 2 hours minimum.
SUBTASK 72-32-83-380-054 Apply Primer to the Surface after Cleaning
Refer to the SPM TASK 70-36-06-360-501.

CAUTION
THIS COMPOUND HAS A GUARANTEED SHELF LIFE OF NOT LESS THAN SIX MONTHS FROM DATE OF SHIPMENT. A SHELF LIFE EXTENSION OF ONE MONTH MAY BE PERMITTED ON COMPOUND PROVIDED VISCOSITY CHECK IS WITHIN LIMITS SUCH AS BELOW.VISCOSITY AT 70 TO 80 DEG F (22.7 TO 25.3 DEG C).COMPOUND AS RECEIVED: 3000 - 5000 POISES.COMPOUND MIXED WITH CURING AGENT: 1300 - 3500 POISES.COMPOUND AS RECEIVED HAS BEEN STORED AT TEMPERATURE NOT HIGHER THAN 90 DEG F (32 DEG C). COMPOUND WHICH HAS BEEN STORED UNDER THE ABOVE CONDITIONS FOR MORE THAN 6 MONTHS SHALL BE DISCARDED.Mix silicone rubber compound at 70 to 80 deg F (21 to 27 deg C) for 30 to 40 minutes.
Refer to the SPM TASK 70-36-06-360-501.
Degas from mixture by applying a vacuum of 25 to 50 mmHg for 30 minutes minimum.
SUBTASK 72-32-83-360-051 Mix the Silicone Rubber Compound
Use IAE 3J13513 Fixture, rubber moulding 1 off.
Attach the component to the molding fixture.
Use IAE 3J13155 Filler injector 1 off.
Put the degased silicone rubber compound into the injector.
SUBTASK 72-32-83-360-052 Mold the Silicone Rubber Compound
Refer to the SPM TASK 70-36-06-360-501.
Cure at 290 to 310 deg F (143 to 154 deg C) for one hour.
Refer to the SPM TASK 70-36-06-360-501.
Cure the component removed at 390 to 410 deg F (199 to 210 deg C) for one hour out of the molding fixture.
SUBTASK 72-32-83-360-053 Cure the Silicone Rubber Compound
Bubbles are not permitted.
Foreign inclusions are not permitted.
Peelings are not permitted.
Refer to Figure.
Refer to the SPM TASK 70-36-06-360-501.
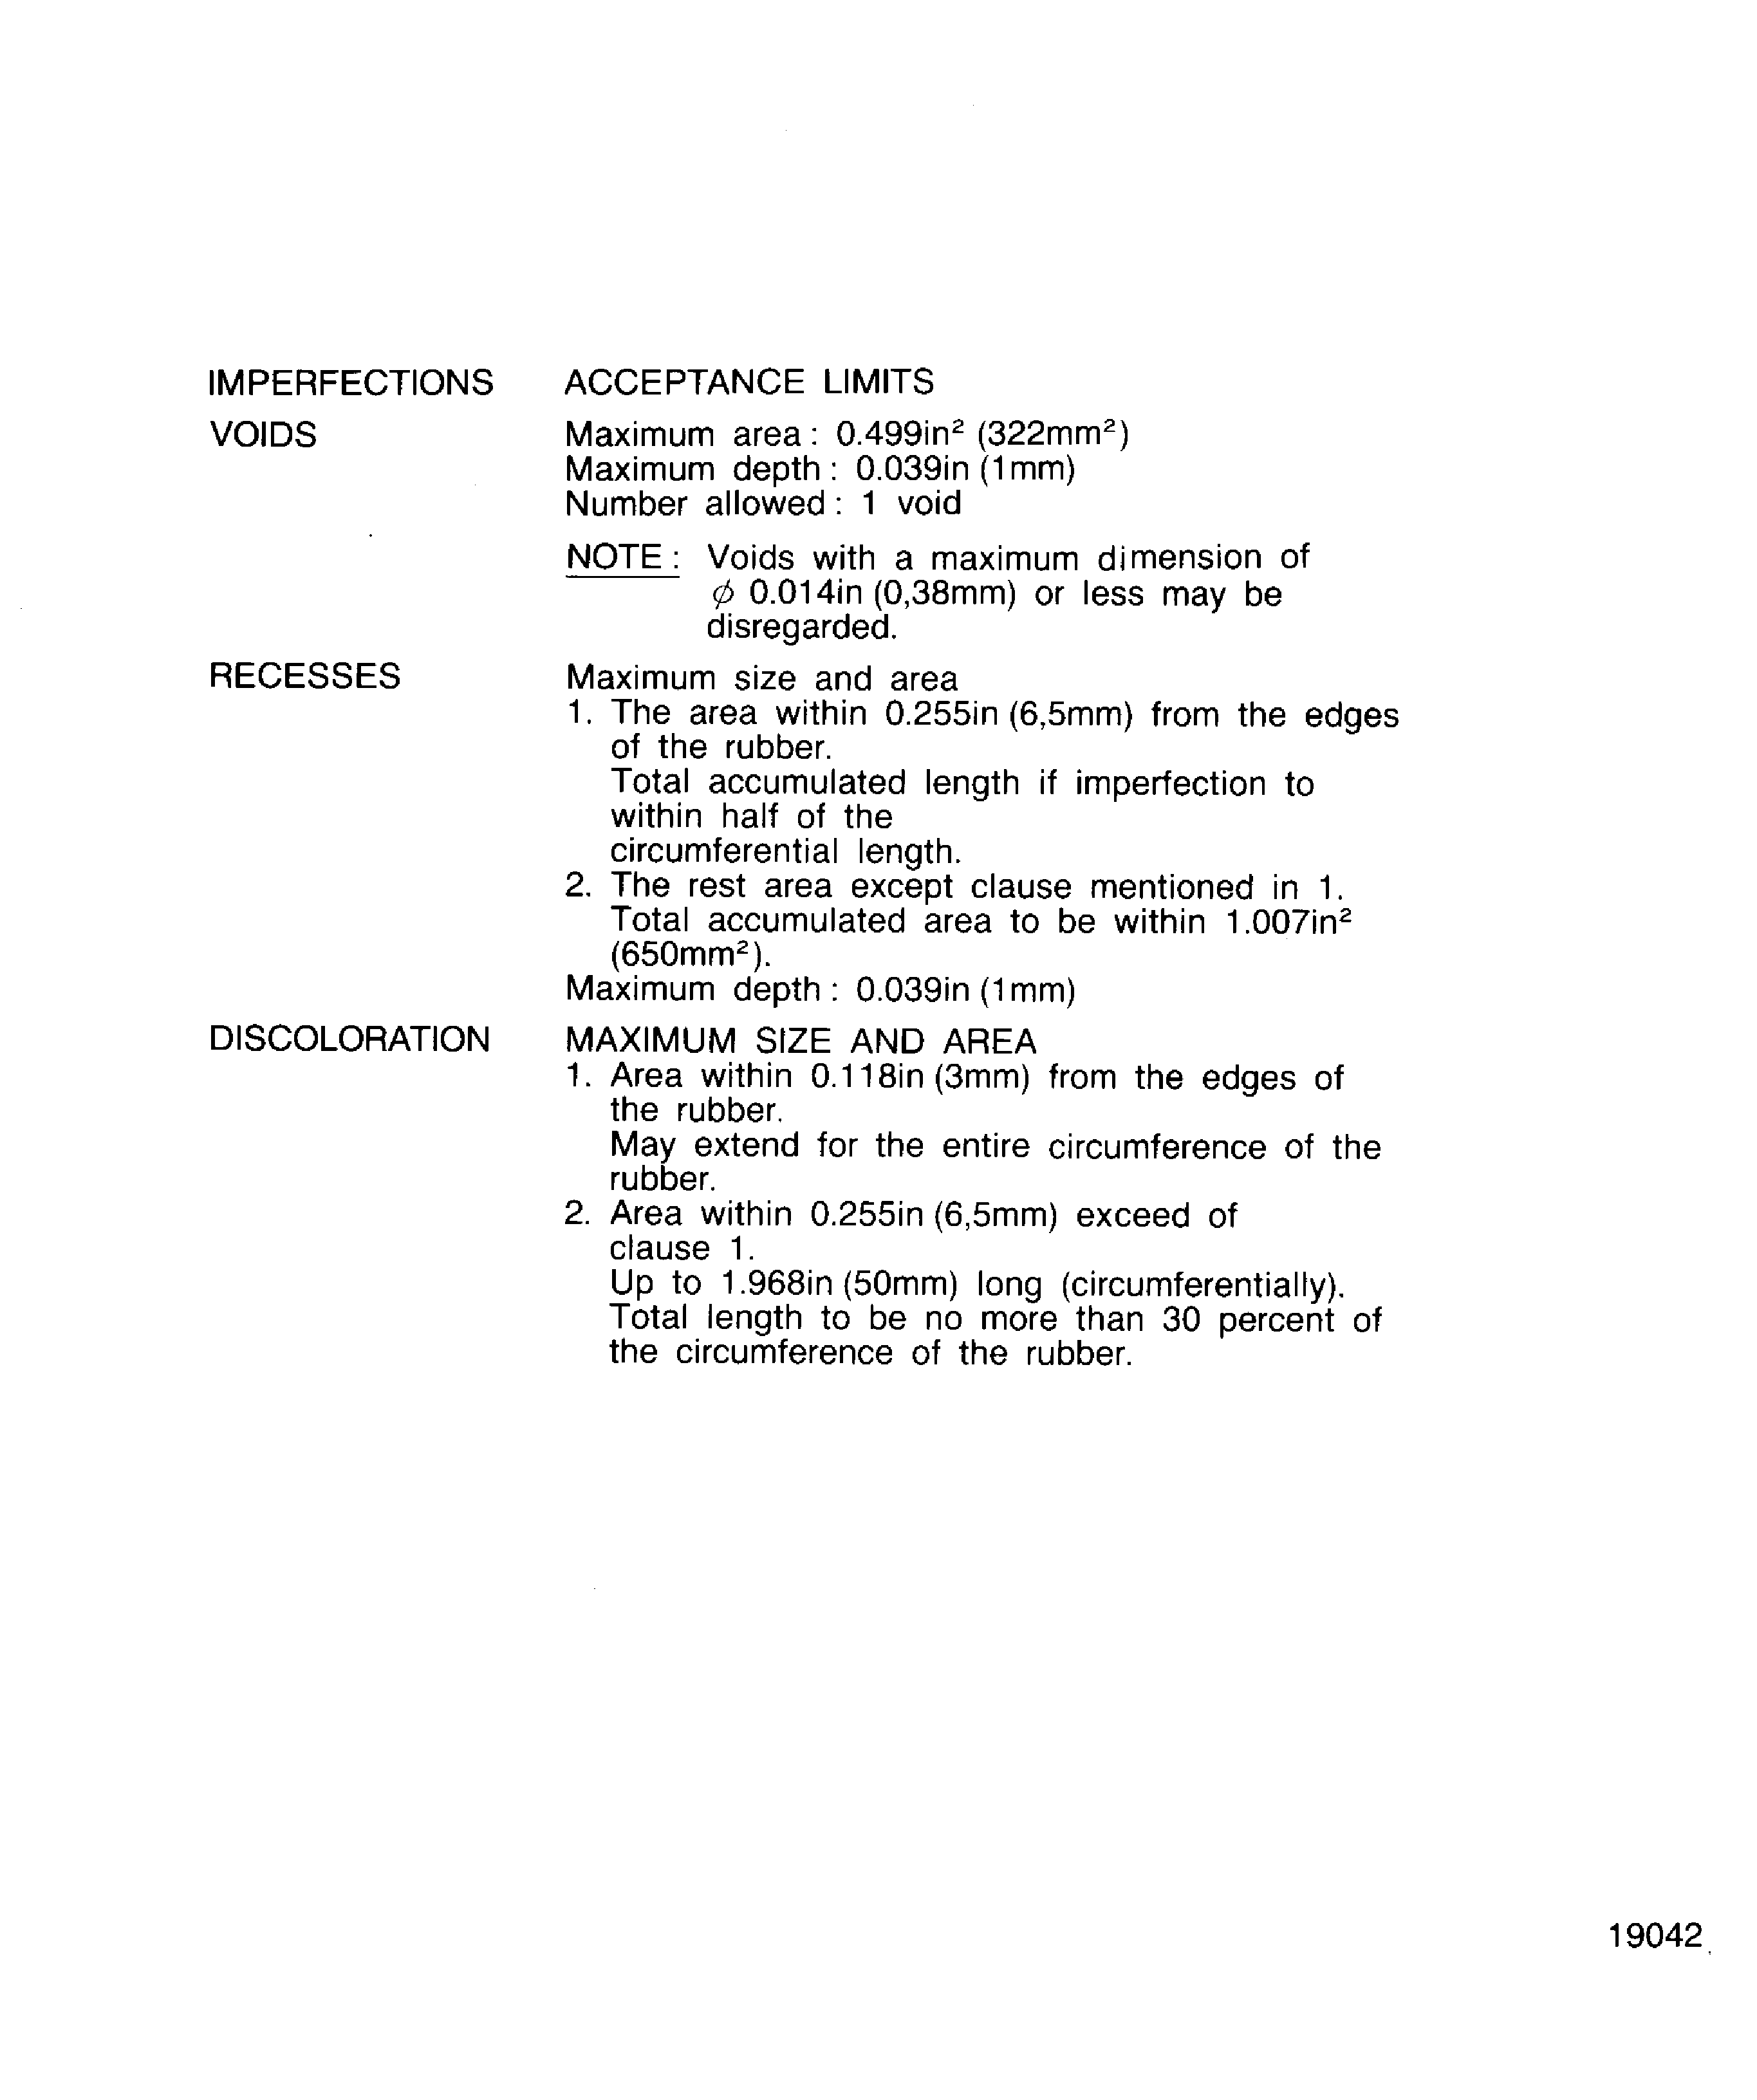
Visually examine the repaired area.
Refer to TASK 72-32-83-200-000 (INSPECTION-000) for the applicable Inspection/Check TASK.
Refer to Figure.
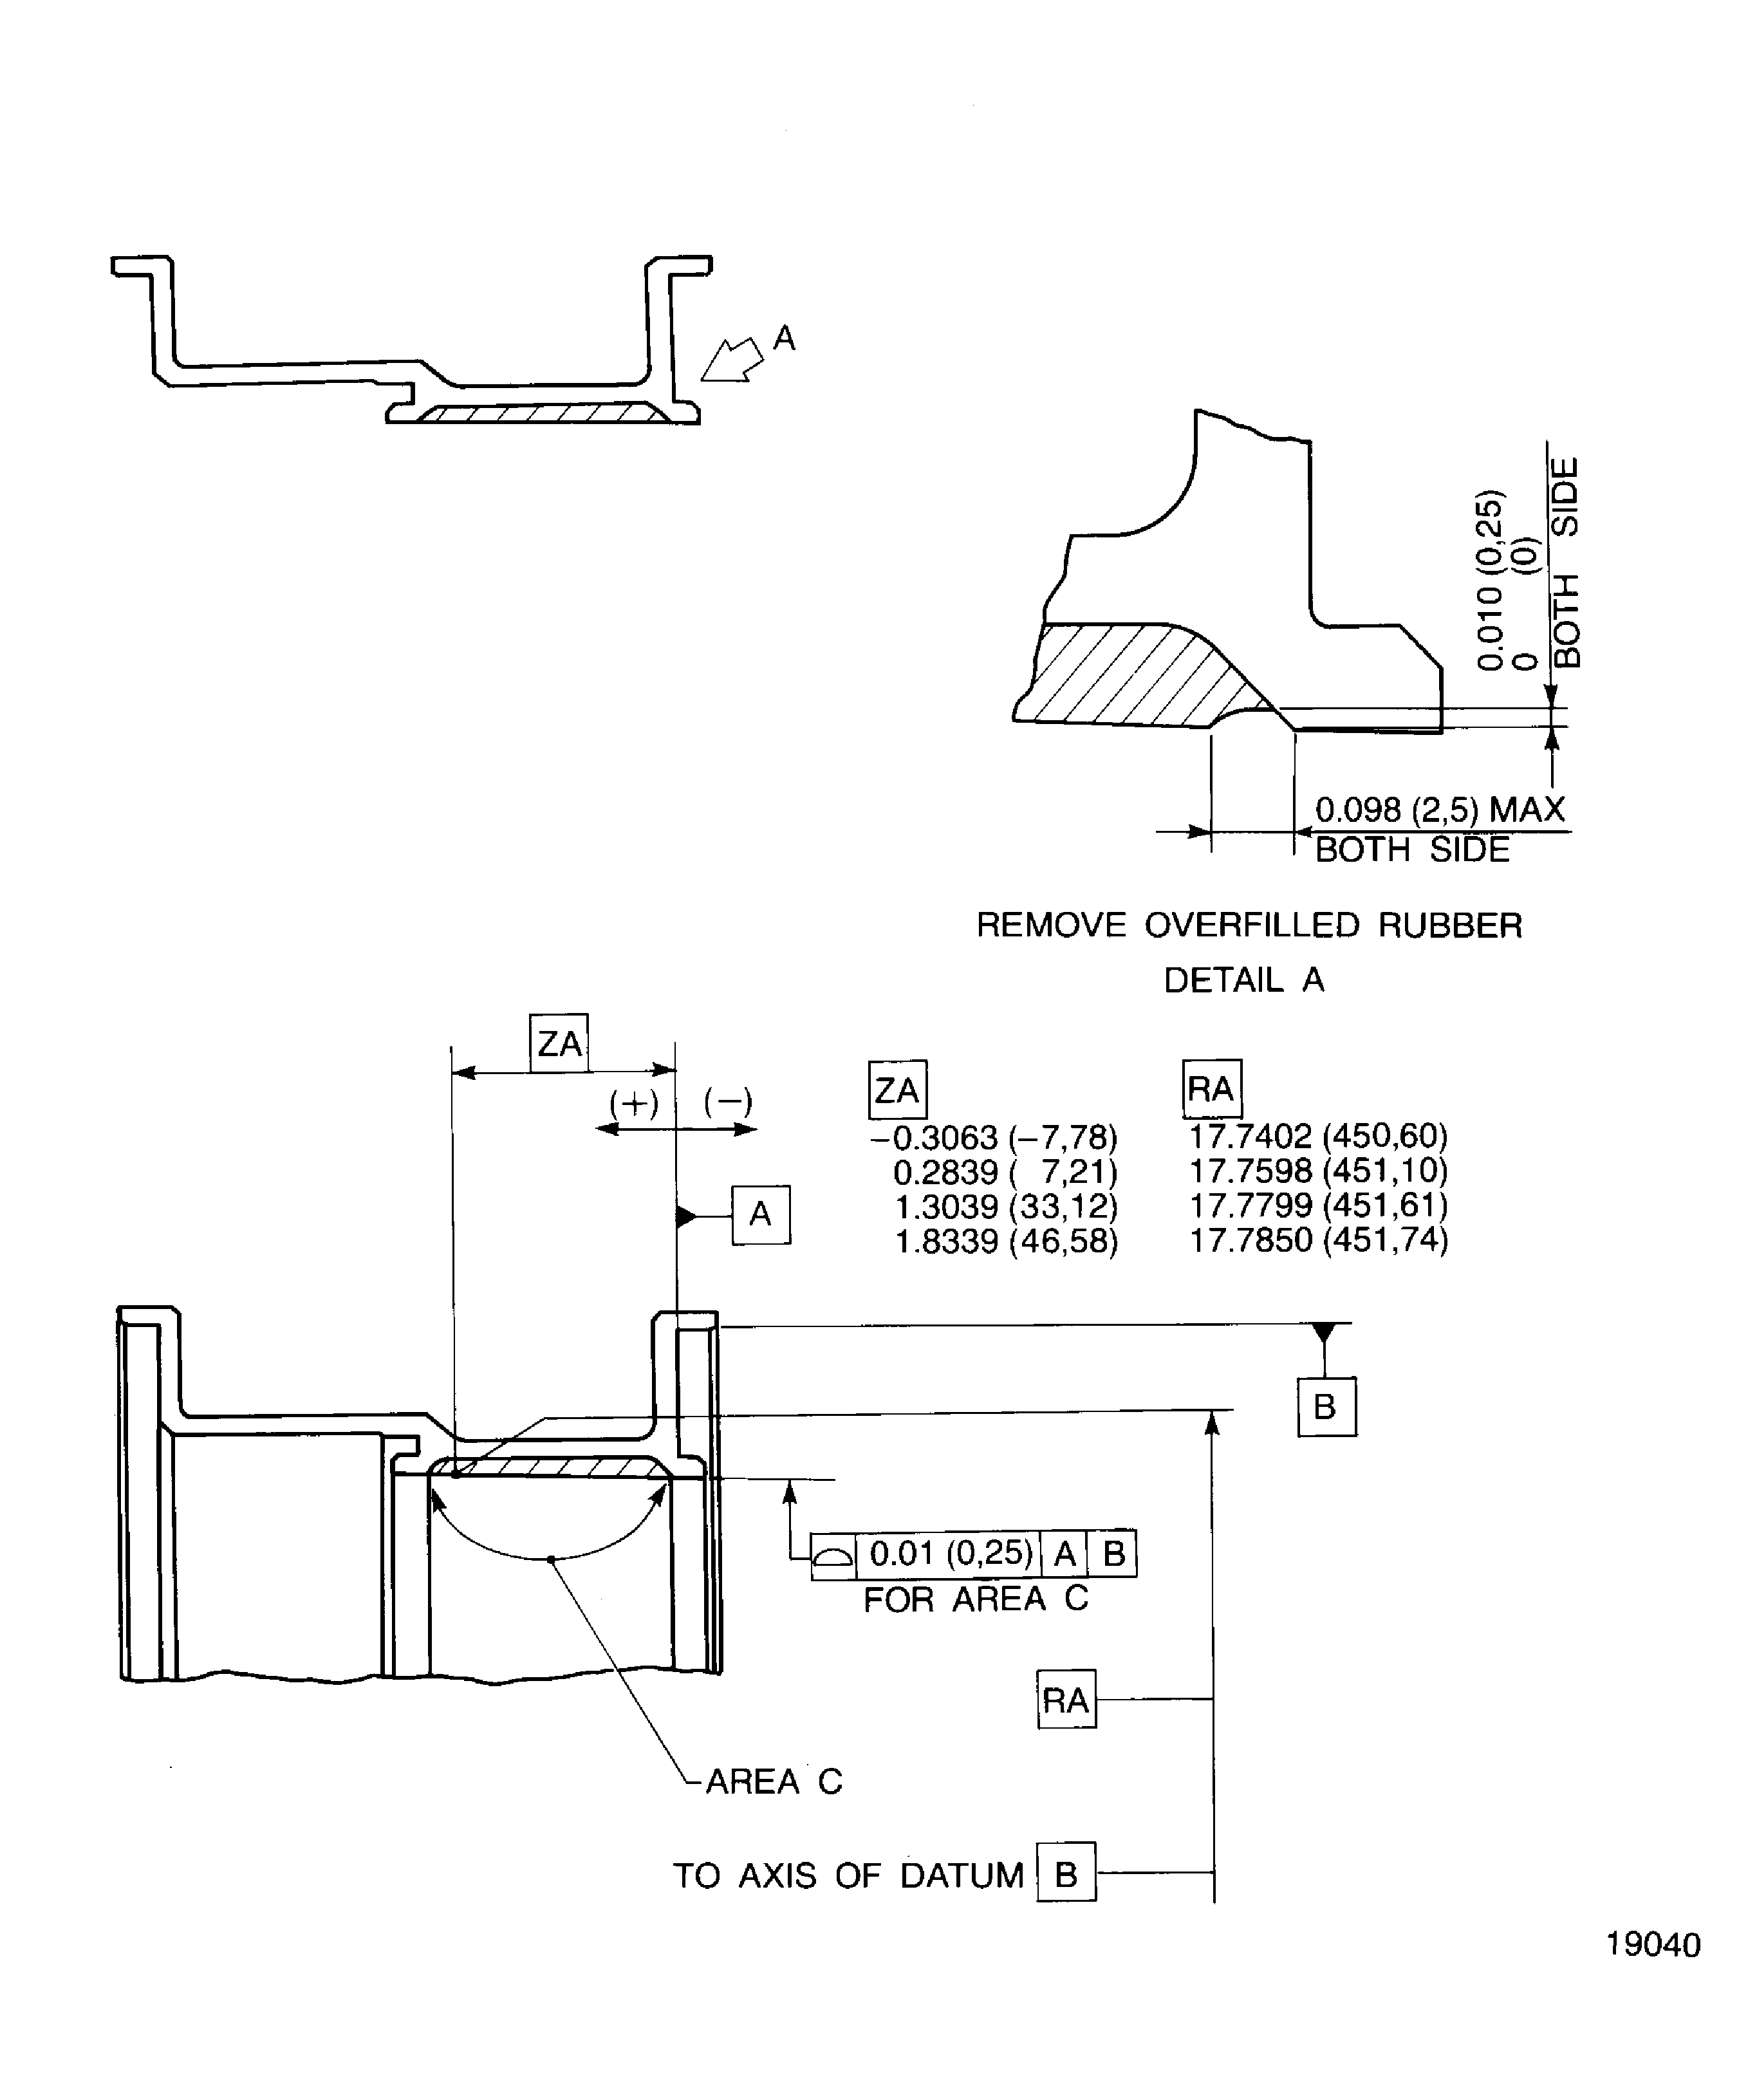
Dimensional check the diameter of the repaired area. If necessary, grind the diameter of the repaired area.
Refer to the SPM TASK 70-36-06-360-501.
Hardness: ASTM D2240 (Durometer 'A') 52 - 65.
Hardness check the repaired area at four positions equally spaced on the circumference.
SUBTASK 72-32-83-220-085 Examine the Repaired Area
Refer to Figure.
Use the IAE 3J12775 Bond test fixture 1 off, IAE 3J12791 Inspection stand 1 off and the IAE 3J12785 Inspection stand 1 off.
Signs of bulging or air leakage are not permitted.
NOTE
Bond test shall be done after curing (bake) of rubber on the following conditions.Do a bond test to the repaired area.
Vary the pattern as necessary to inspect partial repaired areas.
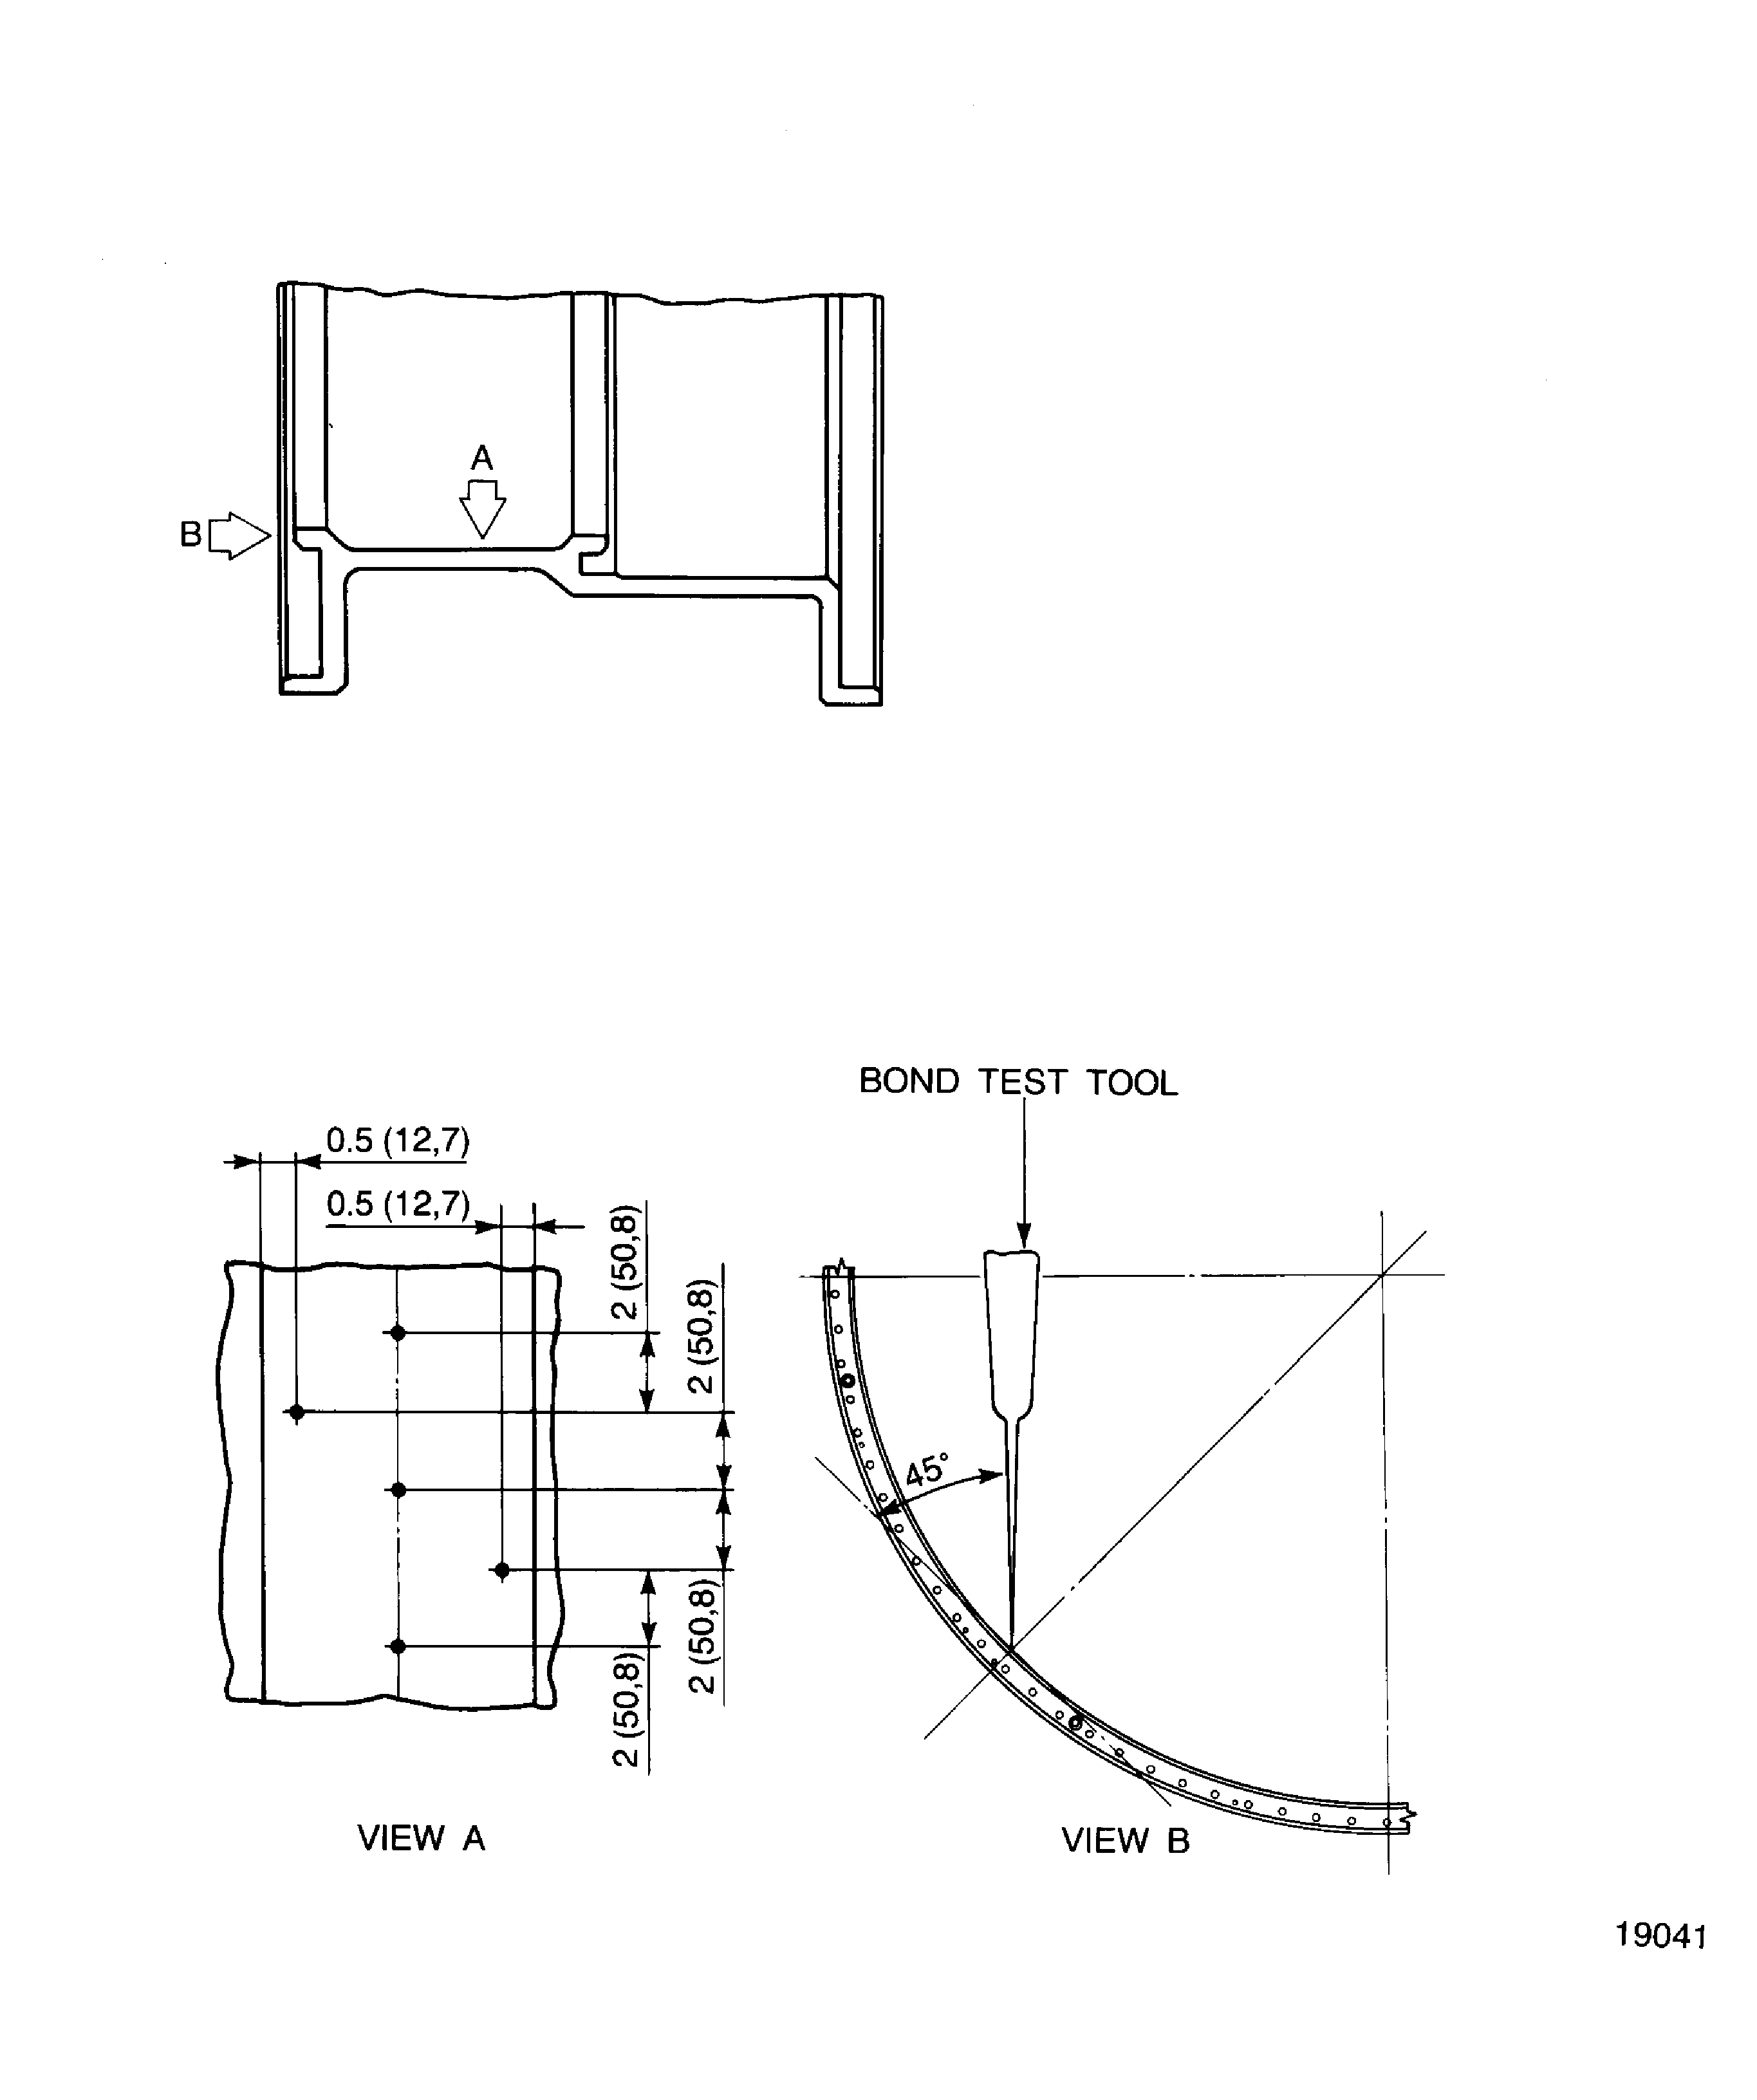
Inspection position: Refer to Figure.
SUBTASK 72-32-83-220-086 Do a Bond Test to the Repaired Area
Figure: Repair Details and Dimensions
Repair Details and Dimensions

Figure: Repair Details and Dimensions
Repair Details and Dimensions

Figure: Repair Details and Dimensions
Repair Details and Dimensions

