Export Control
EAR Export Classification: Not subject to the EAR per 15 C.F.R. Chapter 1, Part 734.3(b)(3), except for the following Service Bulletins which are currently published as EAR Export Classification 9E991: SBE70-0992, SBE72-0483, SBE72-0580, SBE72-0588, SBE72-0640, SBE73-0209, SBE80-0024 and SBE80-0025.Copyright
© IAE International Aero Engines AG (2001, 2014 - 2021) The information contained in this document is the property of © IAE International Aero Engines AG and may not be copied or used for any purpose other than that for which it is supplied without the express written authority of © IAE International Aero Engines AG. (This does not preclude use by engine and aircraft operators for normal instructional, maintenance or overhaul purposes.).Applicability
All
Common Information
TASK 72-41-21-300-020 HPC Stage 11 Case And Stage 12 Rotor Path Case - Blend Repair, Repair-020 (VRS6101)
Material of component
PART IDENT | SYMBOL | MATERIAL |
|---|---|---|
HP compressor stage 11 case | QRK or QTX | Nickel, cobolt steel |
General
This repair must only be done when the instruction to do so is given in 72-41-21 Inspection.
NOTE
NOTE
Preliminary Requirements
Pre-Conditions
| Action/Condition | Data Module/Technical Publication |
|---|---|
| Make sure that all the necessary cleaning and inspection procedures are done before this repair. |
Support Equipment
NONEConsumables, Materials and Expendables
NONESpares
NONESafety Requirements
NONEProcedure
Refer to the SPM TASK 70-35-03-300-501.
The diameter of the repaired area(s) is to be 50 times the depth.
Remove the damage completely.
SUBTASK 72-41-21-350-075 Remove the Damaged Area(s)
Refer to the SPM TASK 70-23-05-230-501, use a high sensitivity penetrant.
Cracks or indications are not permitted.
Do a fluorescent penetrant inspection of the repaired area(s).
SUBTASK 72-41-21-230-091 Do a Crack Test
Refer to the SPM TASK 70-09-00-400-501, SUBTASK 70-09-00-400-001.
Vibration peen “VRS6101” adjacent to the part number.
SUBTASK 72-41-21-350-196 Identify the Repair
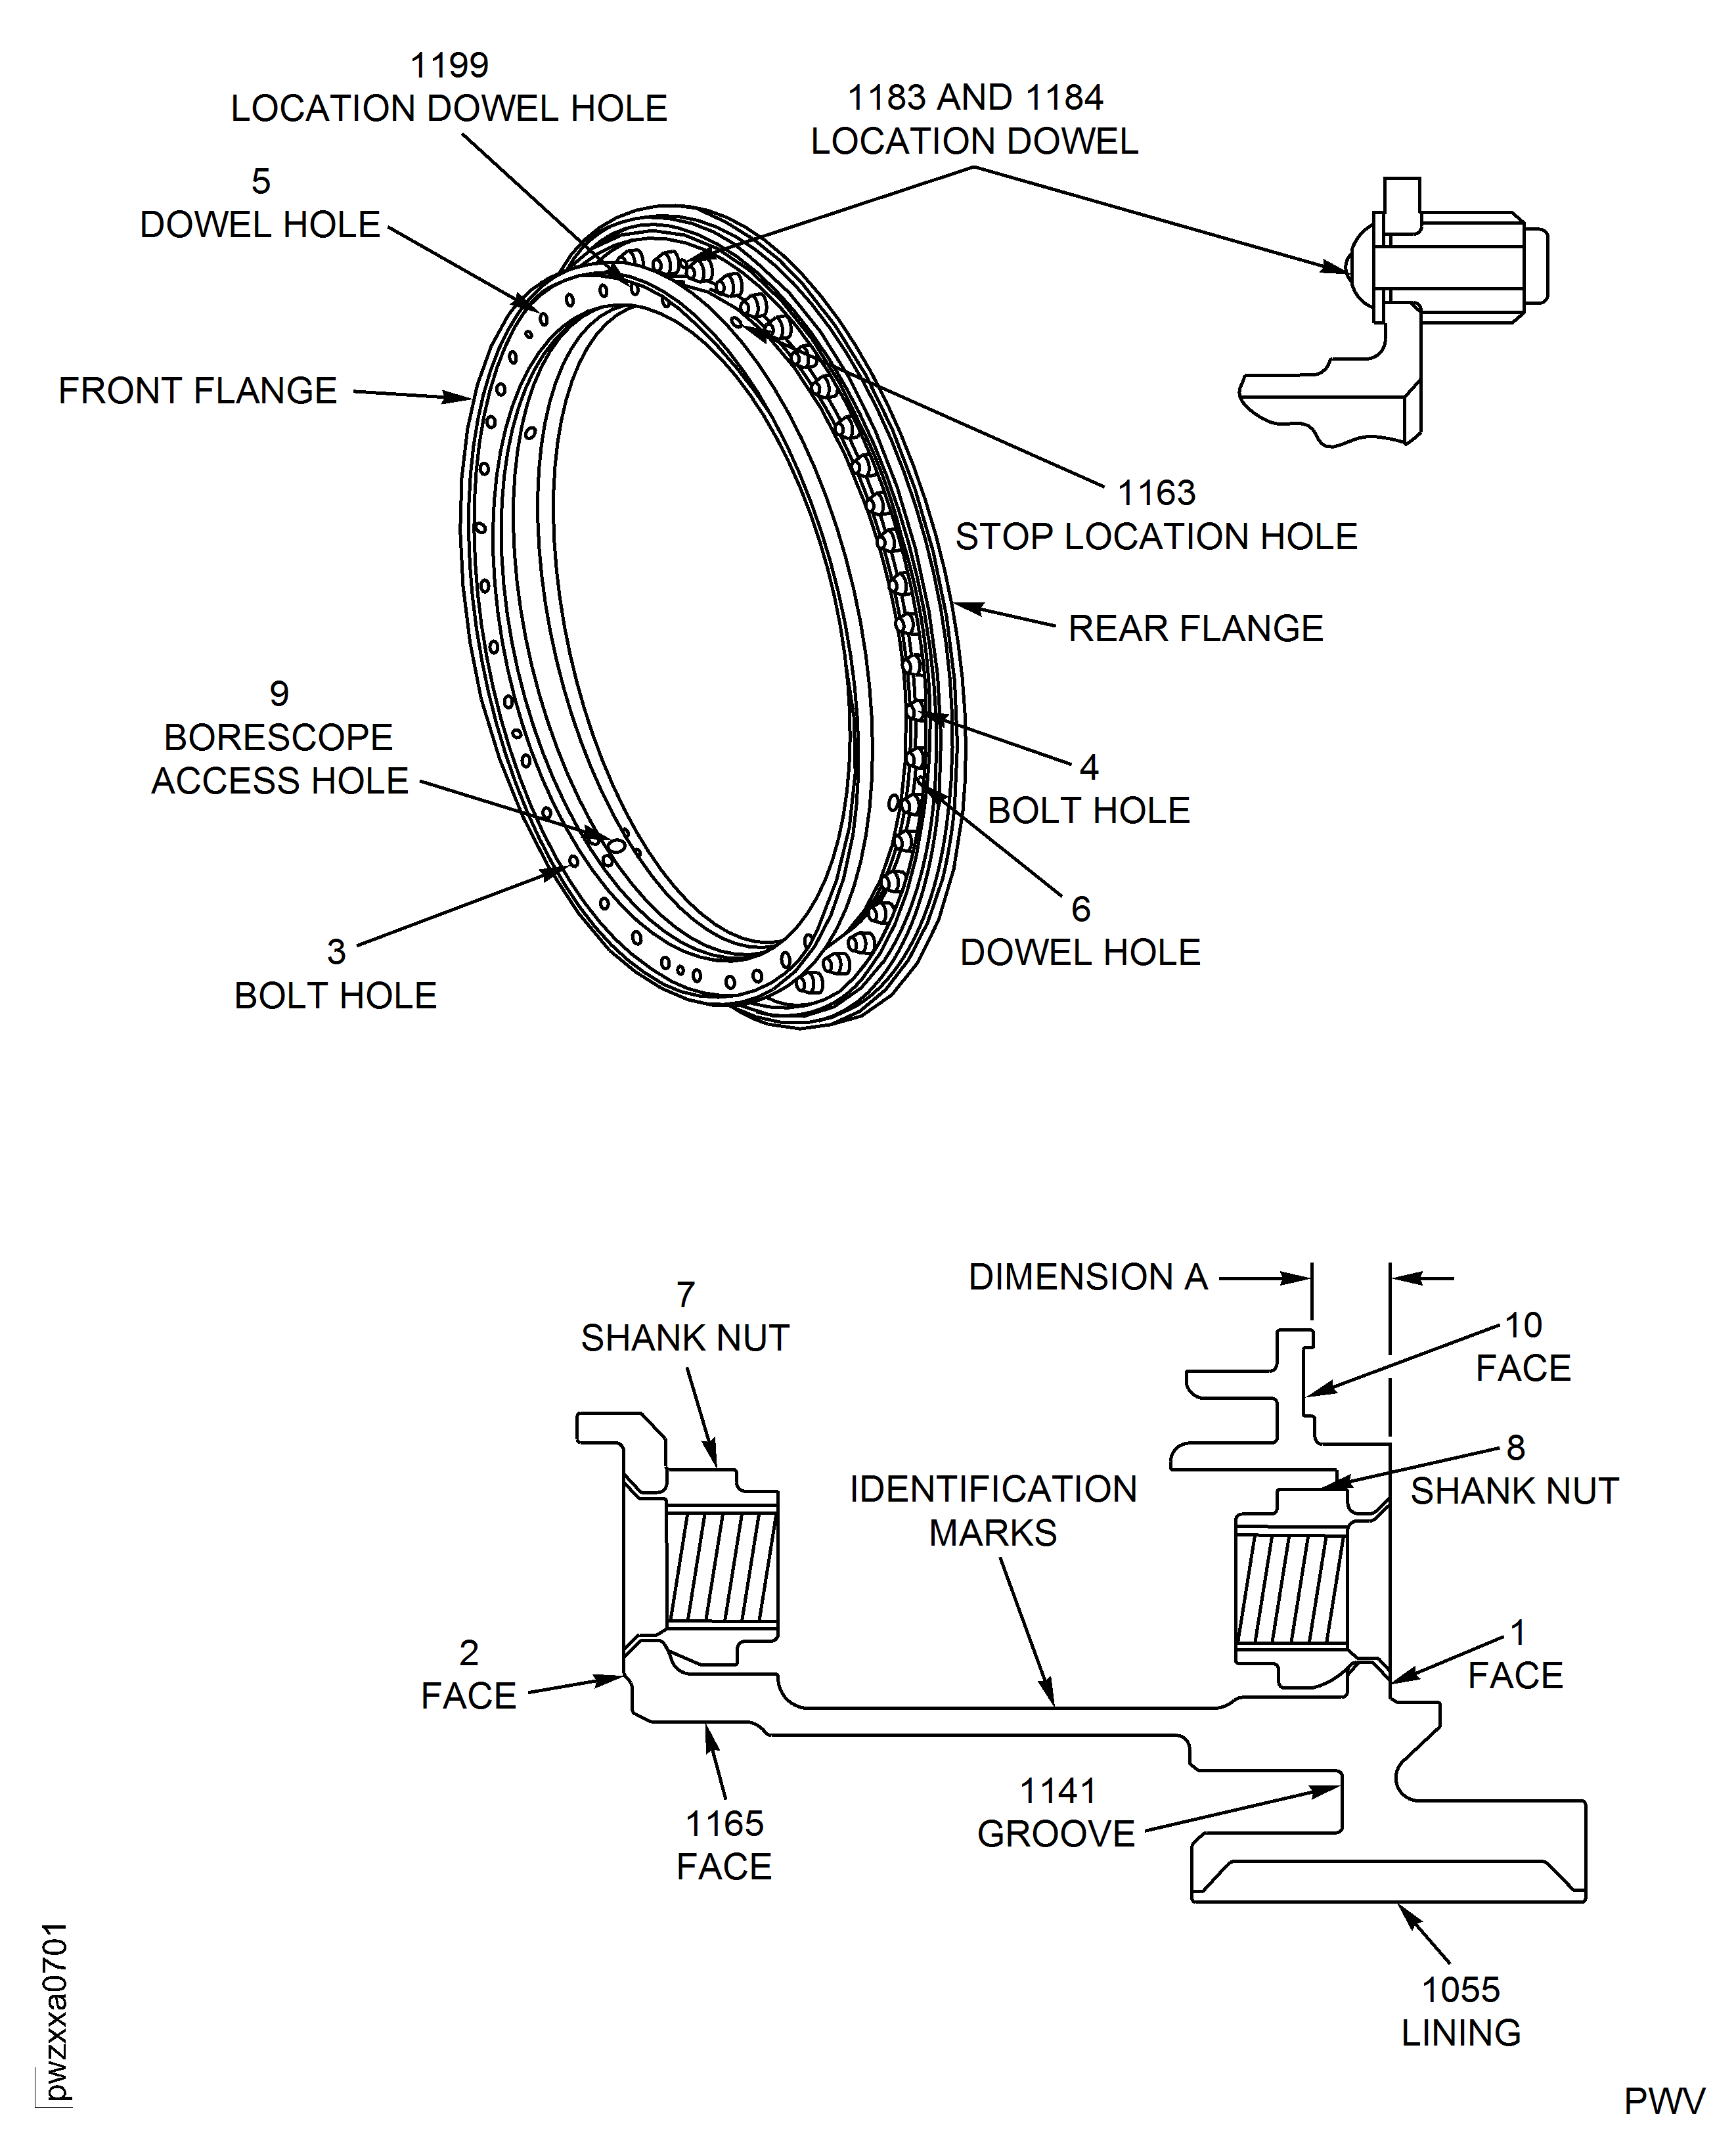
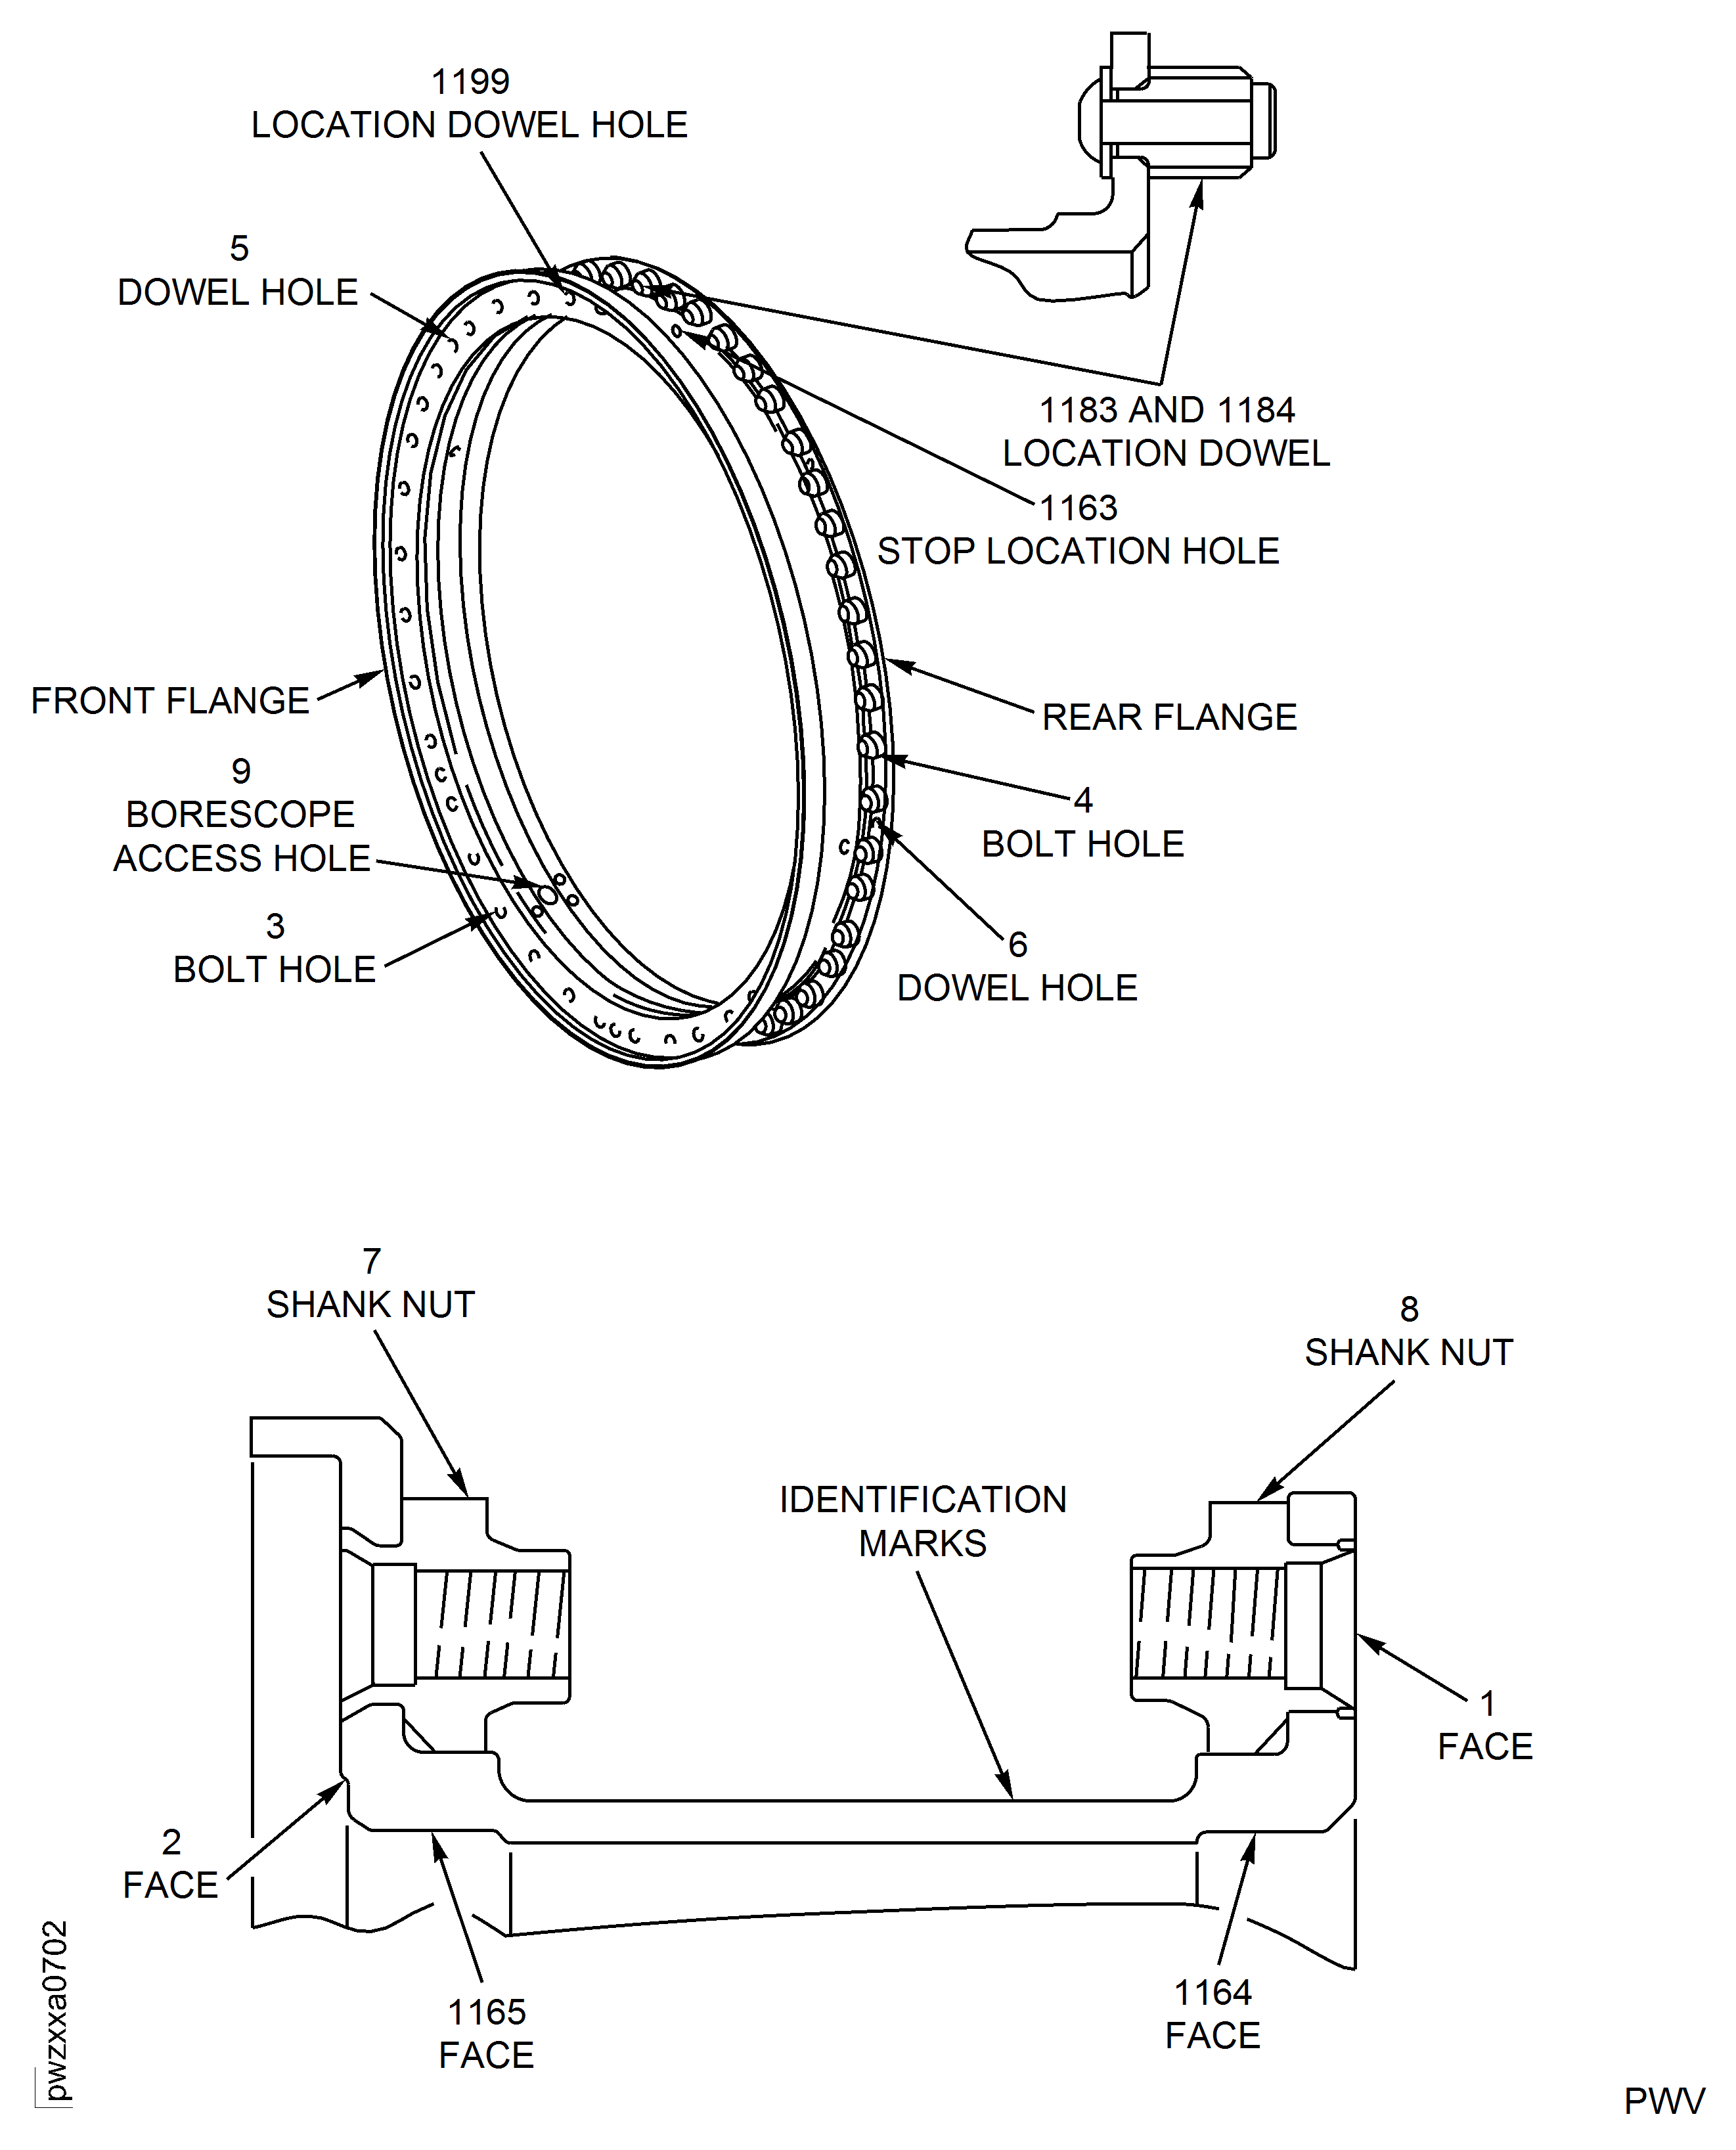
Location | Maximum Blend Depth |
|---|---|
1 (Rear Flange Faces) | 0.005 in. (0.13 mm) |
2 (Front Flange Faces) | 0.005 in. (0.13 mm) |
3 and 4 (Boltholes) | Burring: Make smooth to adjacent areas. Scoring: 0.005 in. (0.13 mm) |
5 and 6 (Dowel Holes) | Burring: 0.005 in. (0.13 mm) |
7 and 8 (Shank Nut) | Not repairable by blending |
9 (Borescope Access Hole) | Burring: Make smooth to adjacent areas. Scratches: 0.005 in. (0.13 mm) |
10 (Figure, for PN 6A6552 only) (Ring Face/Seal Mating Face) | Not repairable by blending |
1055 (Figure, for PN 6A6552 only) (Lining) | Not repairable by blending |
1141 (Figure, for PN 6A6552 only) (Groove) | Not repairable by blending |
1163 (Stop Location Hole) | Burring: 0.005 in. (0.13 mm) |
Face 1165 (Front Snap Diameter) | Not repairable by blending |
1183 and 1184 (Location Dowel) | Not repairable by blending |
1199 (Location Dowel Hole) | Burring: 0.005 in. (0.13 mm) |
Dimension A (Figure, for PN 6A6552 only) | Not repairable by blending |
Remaining surfaces | 0.005 in. (0.13 mm) |
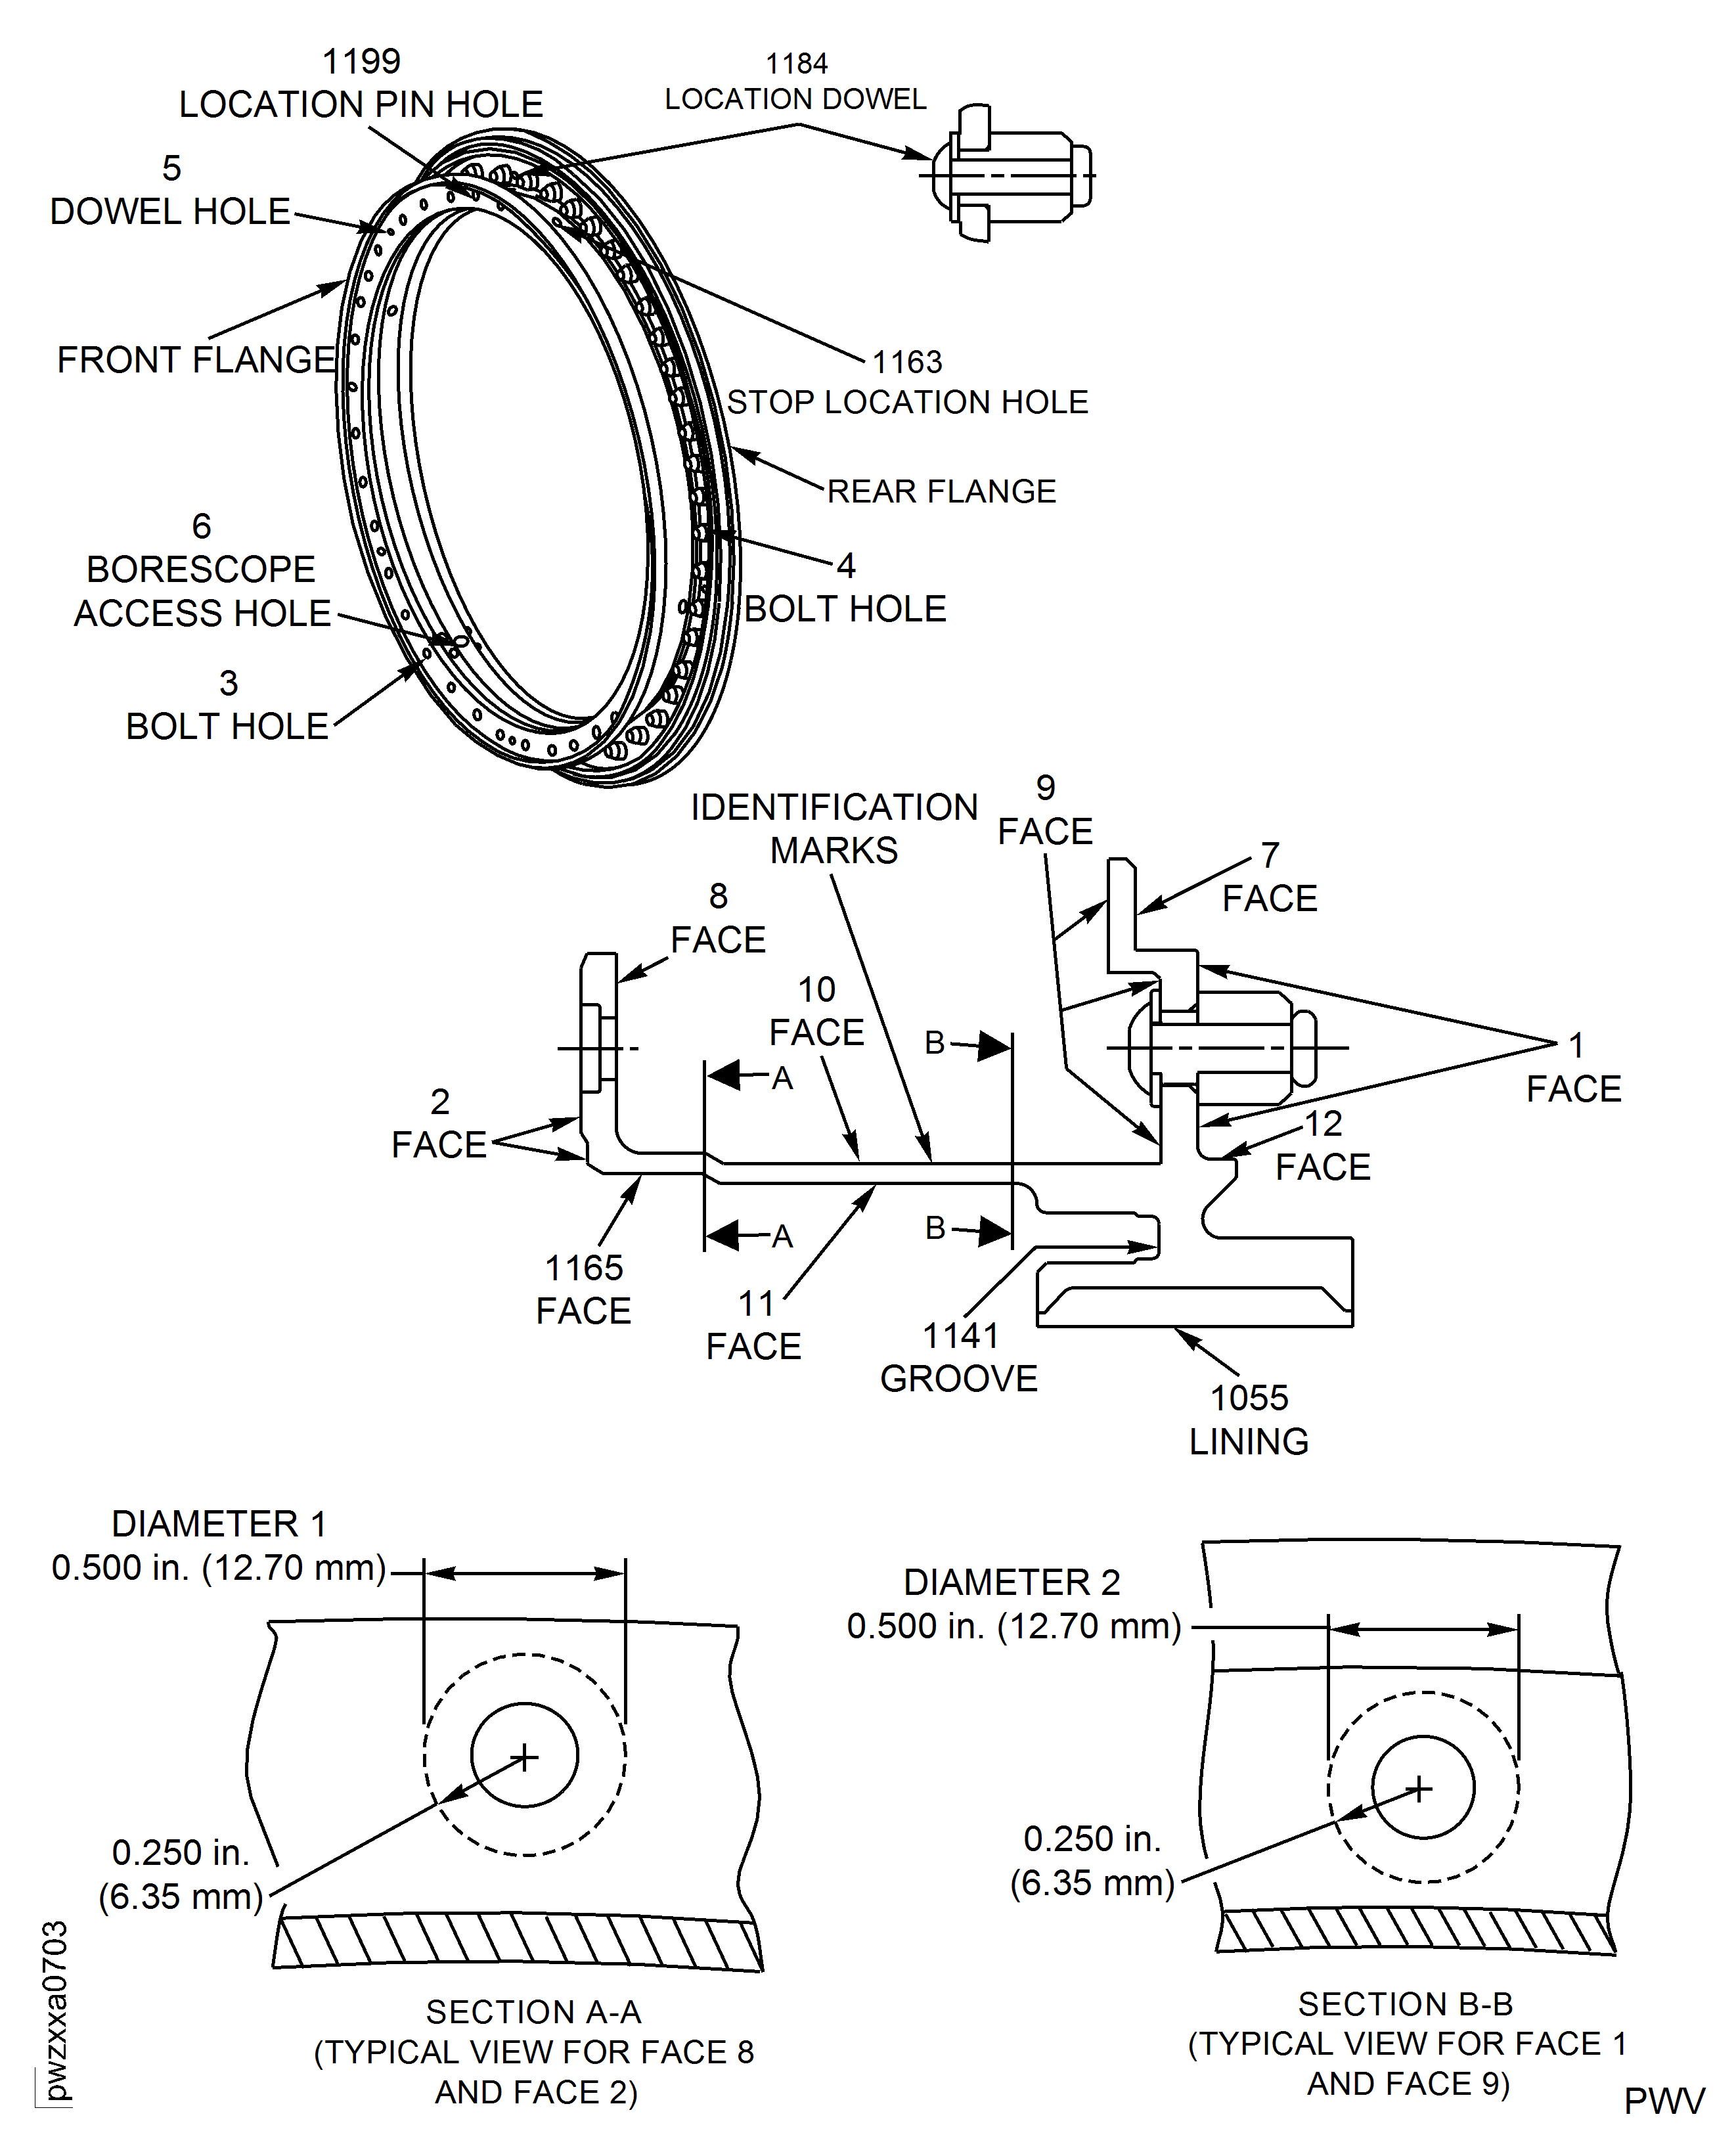
Location | Maximum Blend Depth |
|---|---|
1 (Rear Flange Rear Face) | 0.005 in. (0.13 mm) except for within Diameter 2. Minimum post-blend wall thickness: 0.086 in. (2.18 mm). Cumulative blend area cannot exceed 10 percent of surface. Individual blend area cannot exceed 0.250 sq in. (161.29 sq mm). Blends must be separated by a minimum of one blend width. |
2 (Front Flange Front Face) | 0.005 in. (0.13 mm) except for within Diameter 1. Minimum post-blend wall thickness: 0.086 in. (2.18 mm). Cumulative blend area cannot exceed 10 percent of surface. Individual blend area cannot exceed 0.250 sq in. (161.29 sq mm). Blends must be separated by a minimum of one blend width. |
3 and 4 (Boltholes) | Scoring: 0.005 in. (0.13 mm) Burring: Make smooth to adjacent areas. |
5 (Dowel Hole) | Not repairable by blending |
6 (Borescope Access Hole) | Not repairable by blending |
7 (Ring Face/Seal Mating Face) | Not repairable by blending |
8 (Front Flange Rear Face) | 0.005 in. (0.13 mm) except for within Diameter 1. Minimum post-blend wall thickness: 0.086 in. (2.18 mm). |
9 (Rear Flange Front Face) | 0.005 in. (0.13 mm) except for within Diameter 2. Minimum post-blend wall thickness: 0.086 in. (2.18 mm). |
10 (Case Wall Inner Surface) | 0.005 in. (0.13 mm) Minimum post-blend wall thickness: 0.044 in. (1.12 mm). |
11 (Case Wall Outer Surface) | 0.005 in. (0.13 mm) Minimum post-blend wall thickness: 0.044 in. (1.12 mm). |
12 (Aft snap diameter to cross key location ring) | Not repairable by blending |
1055 (Lining) | Not repairable by blending |
1141 (Groove) | Not repairable by blending |
1163 (Stop Location Hole) | Not repairable by blending |
1165 (Front Snap Diameter) | Not repairable by blending |
1184 (Location Dowel) | Not repairable by blending |
1199 (Location Pin Hole) | Not repairable by blending |
Remaining surfaces | 0.005 in. (0.13 mm) |
Figure: Repair Details And Dimensions
Repair Details And Dimensions

Figure: Stage 12 Rotor Path Case Assembly (PN 6A6552) - Blend Repair Limit Areas
Stage 12 Rotor Path Case Assembly (PN 6A6552) - Blend Repair Limit Areas

Figure: Stage 11 Case Assembly (PNs 6A3390 And 6A4328) - Blend Repair Limit Areas
Stage 11 Case Assembly (PNs 6A3390 And 6A4328) - Blend Repair Limit Areas

Figure: Stage 12 Rotor Path Case Assembly (PN 6B1436) - Blend Repair Limit Areas
Stage 12 Rotor Path Case Assembly (PN 6B1436) - Blend Repair Limit Areas

