Export Control
EAR Export Classification: Not subject to the EAR per 15 C.F.R. Chapter 1, Part 734.3(b)(3), except for the following Service Bulletins which are currently published as EAR Export Classification 9E991: SBE70-0992, SBE72-0483, SBE72-0580, SBE72-0588, SBE72-0640, SBE73-0209, SBE80-0024 and SBE80-0025.Copyright
© IAE International Aero Engines AG (2001, 2014 - 2021) The information contained in this document is the property of © IAE International Aero Engines AG and may not be copied or used for any purpose other than that for which it is supplied without the express written authority of © IAE International Aero Engines AG. (This does not preclude use by engine and aircraft operators for normal instructional, maintenance or overhaul purposes.).Applicability
All
Common Information
TASK 72-42-31-300-001 No. 4 Bearing Support - Nickel Plate The Intermediate Flange, Repair-001 (VRS3072)
General
Price and availability - Refer to IAE
The practices and processes referred to the procedure by the TASK numbers are in the SPM.
NOTE
Preliminary Requirements
Pre-Conditions
NONESupport Equipment
| Name | Manufacturer | Part Number / Identification | Quantity | Remark |
|---|---|---|---|---|
| Workshop inspection equipment | LOCAL | Workshop inspection equipment | ||
| Grinding machine | LOCAL | Grinding machine | ||
| Magnifying glass, 4x | LOCAL | Magnifying glass, 4x | or greater |
Consumables, Materials and Expendables
| Name | Manufacturer | Part Number / Identification | Quantity | Remark |
|---|---|---|---|---|
| CoMat 02-067 STRIPPABLE COATING | 71410 | CoMat 02-067 | ||
| CoMat 05-106 ABRASIVE STONE | K6835 | CoMat 05-106 | ||
| CoMat 05-110 EMERY POLISHING PAPER | 0AM53 | CoMat 05-110 | ||
| CoMat 05-120 POLISHING CLOTH | 06565 | CoMat 05-120 |
Spares
NONESafety Requirements
NONEProcedure
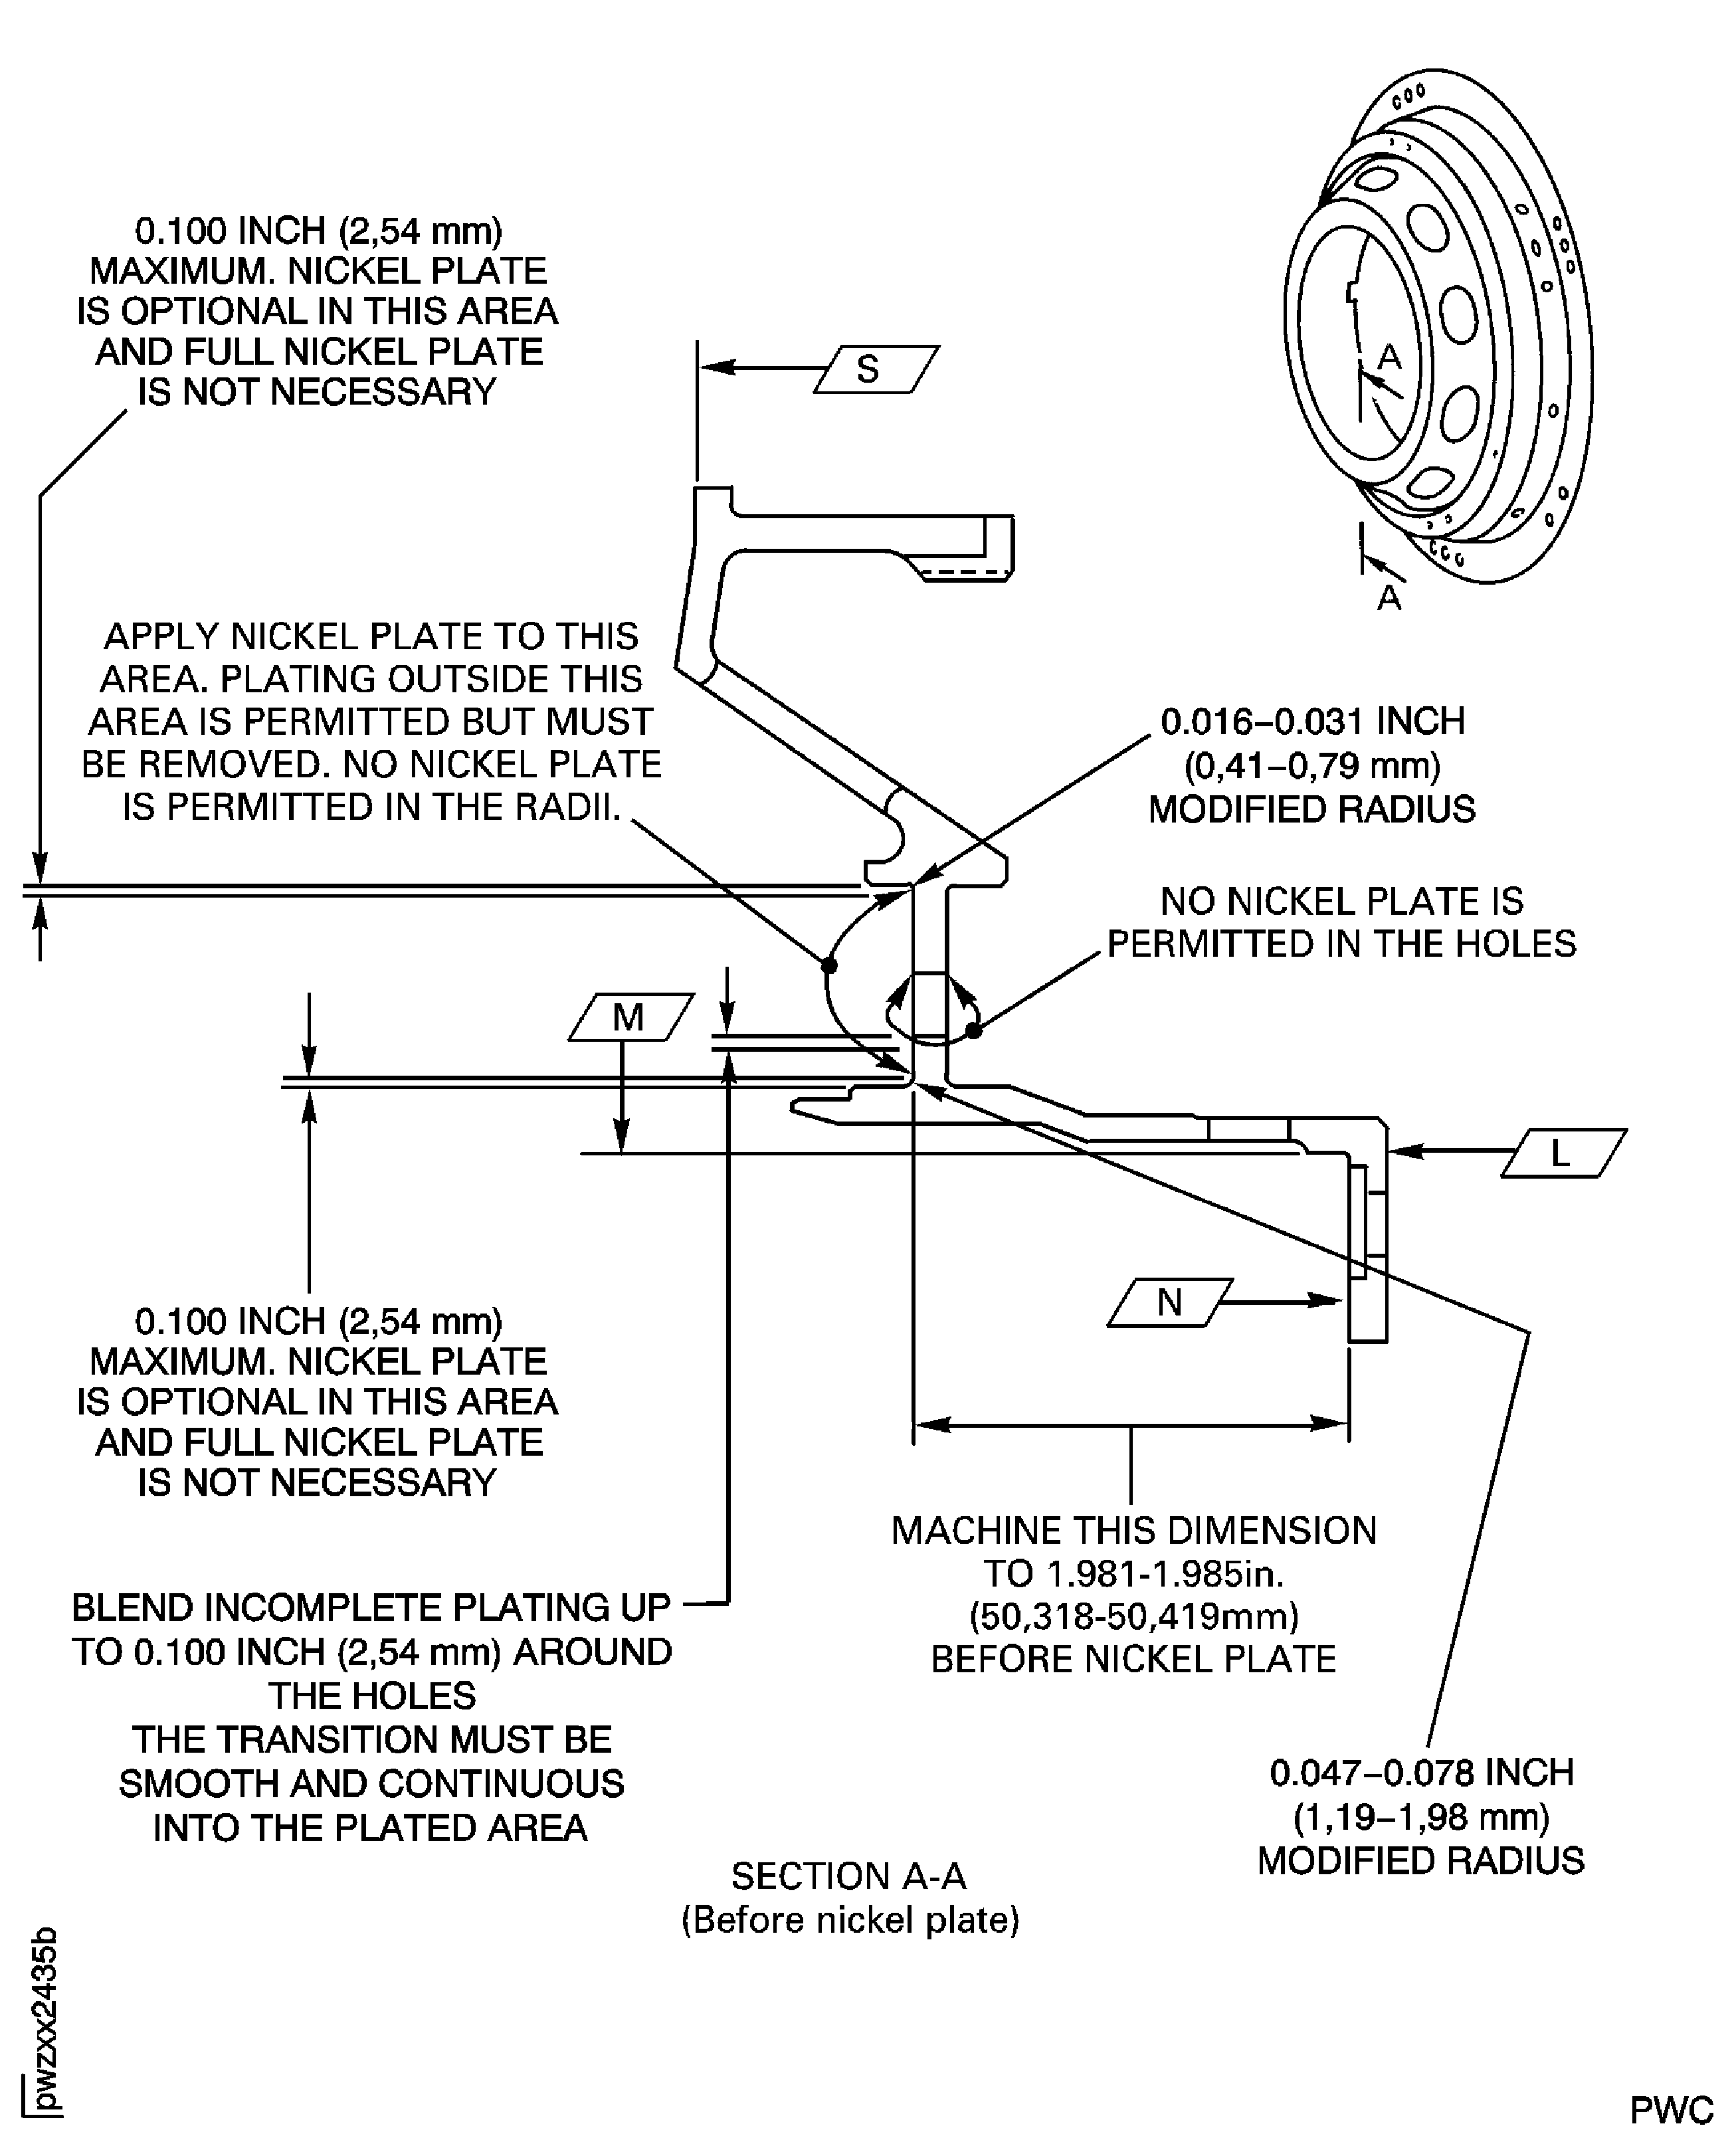
Refer to Figure.
Hold to the maximum value.
The part must be in a held condition.
All dimensions apply when Surface N is flat by 0.001 in. (0.025 mm) and Diameter M maintains a clearance envelope of 13.350 in. (339.09 mm) in a free or held condition.
Hold the support only on Surfaces N, L and S and Diameter M.
If the flange surface(s) were plated before, you can strip them.
Refer to the SPM TASK 70-33-06-300-503.
Machine the flange surface(s) of the support.
SUBTASK 72-42-31-320-051 Machine the Intermediate Flange Surface(s) of the No. 4 Bearing Support before Nickel Plate
Refer to Figure.
Refer to the SPM TASK 70-33-06-300-503.
Apply nickel plate to a sufficient thickness to permit finish machining.
Plating outside the repair area is permitted but must be removed. Nickel plate is optional in the radii and full nickel plate is not necessary as shown in the figure.
Nickel plate the flange surface(s) of the support.
SUBTASK 72-42-31-330-051 Nickel Plate the Intermediate Flange of the No. 4 Bearing Support
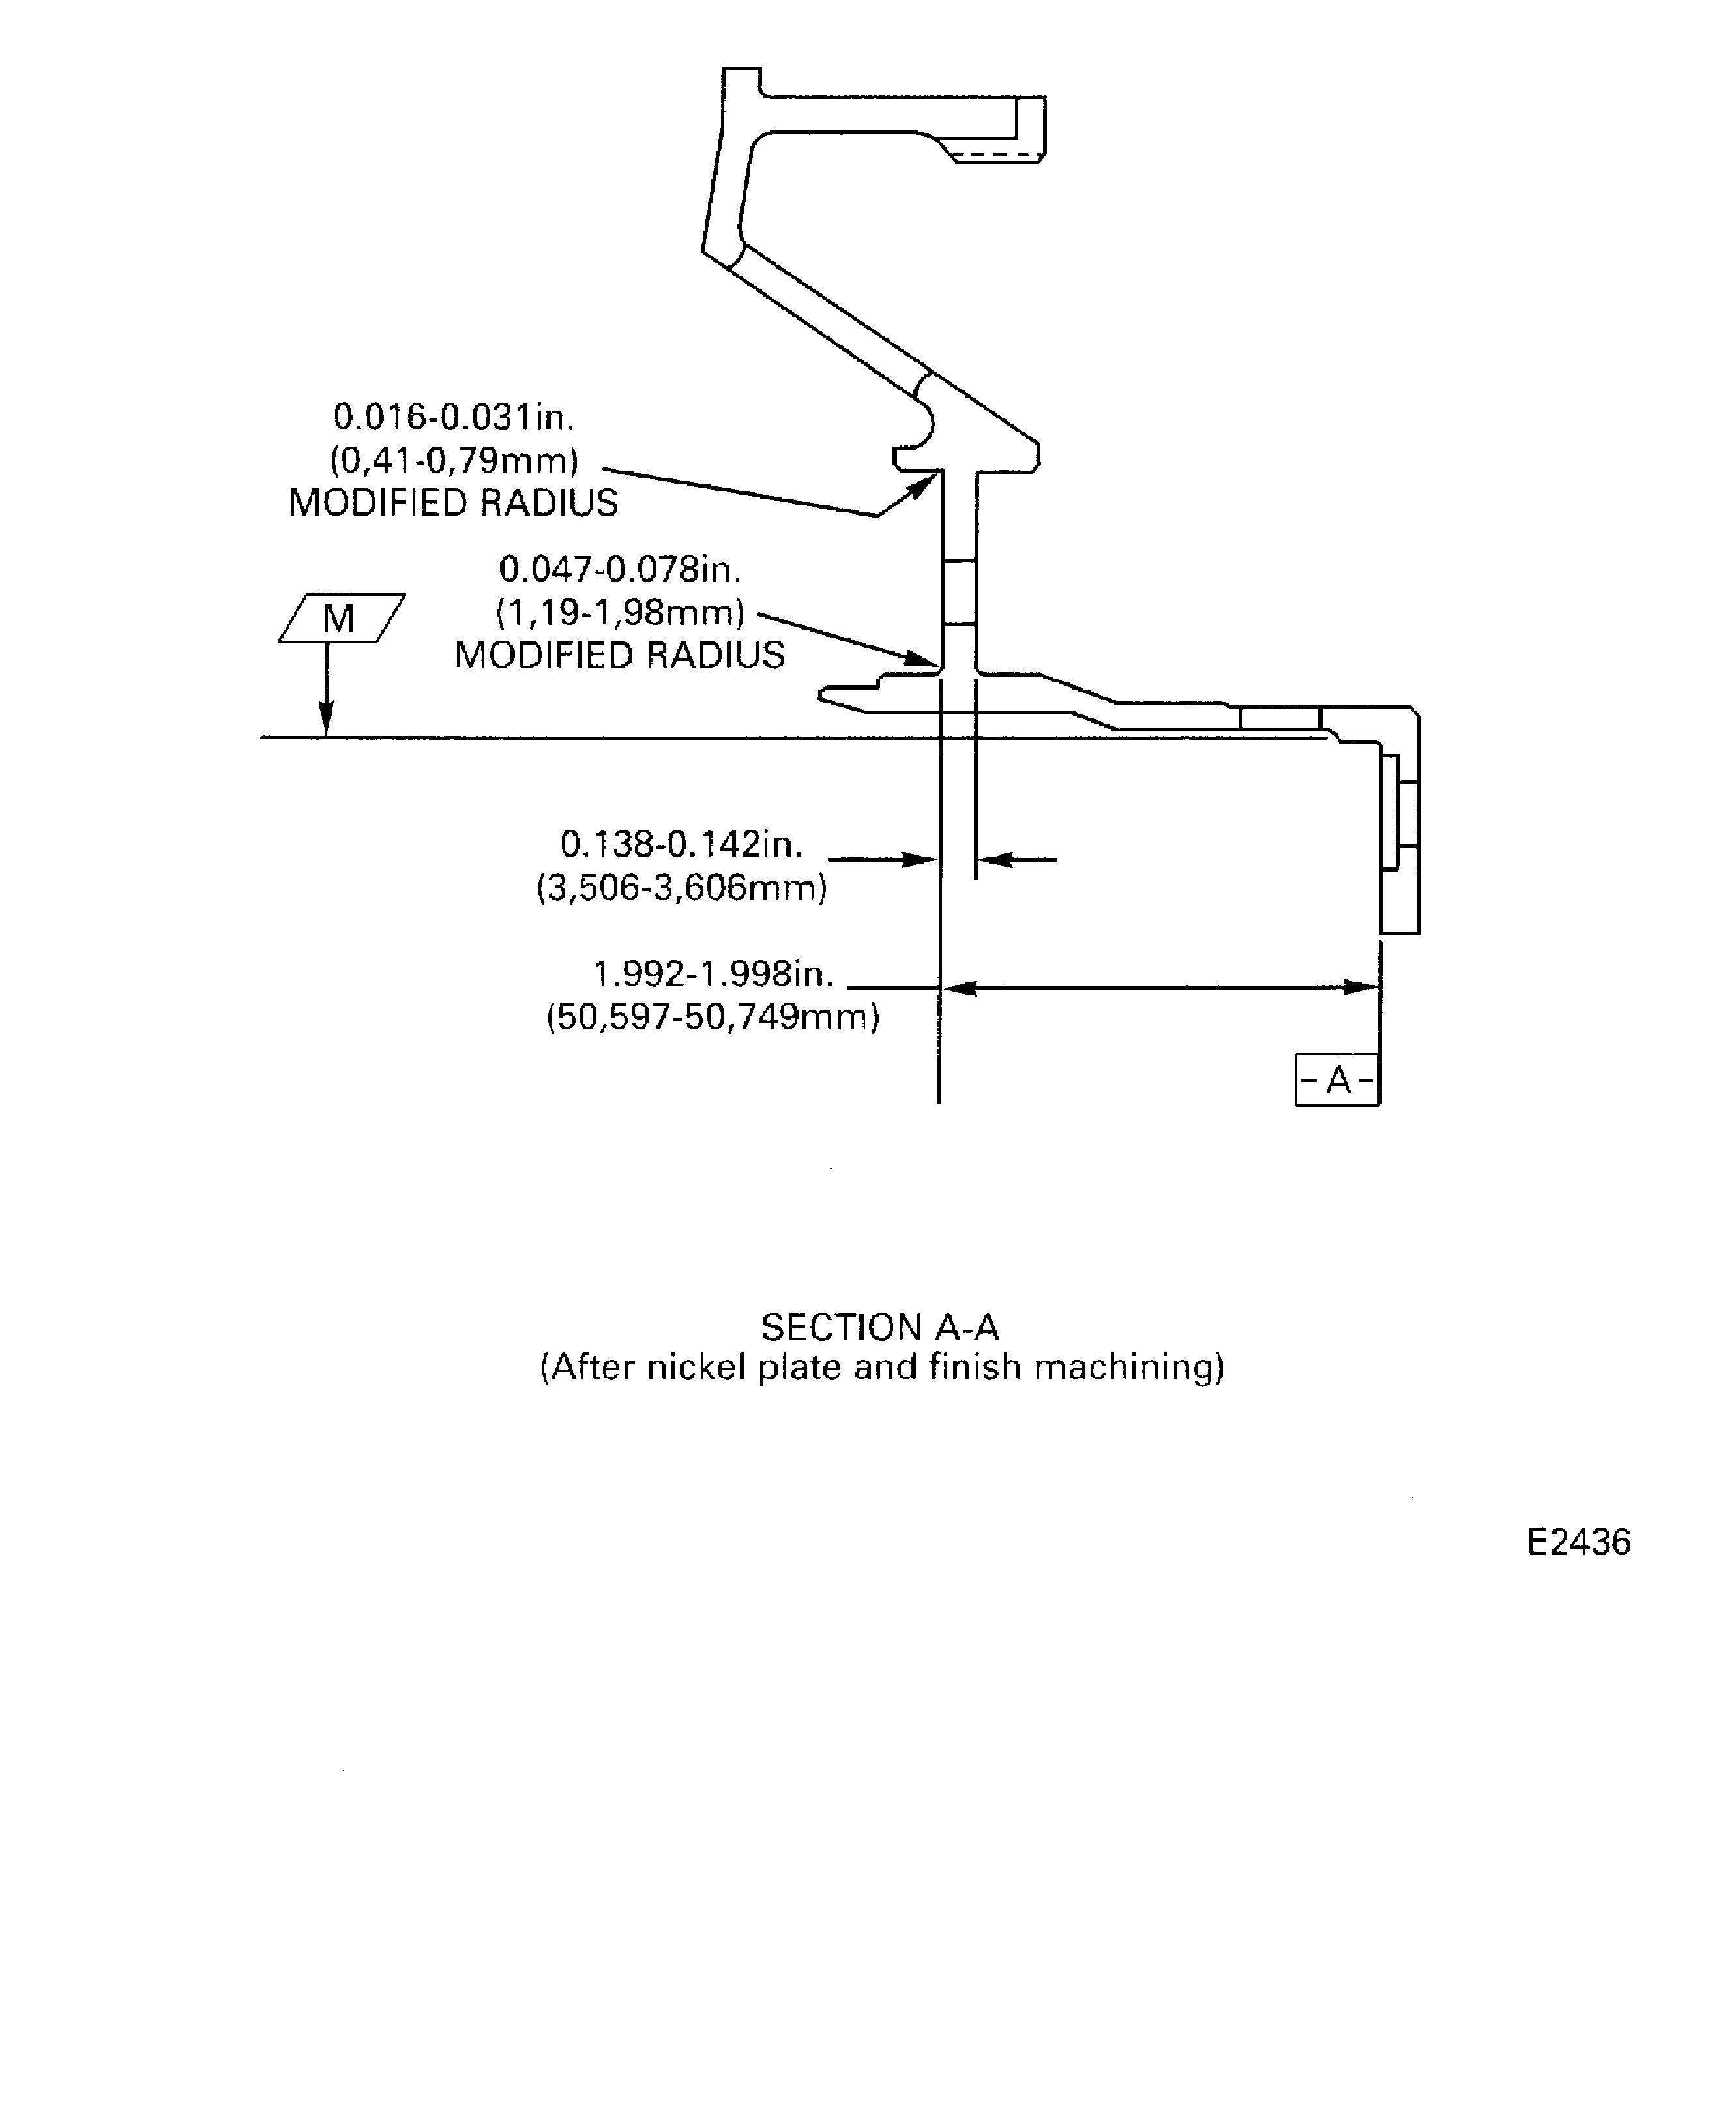
Refer to Figure.
The minimum plating thickness is 0.002 in. (0.05 mm) after machining.
The part must be in a held condtion.
All dimensions apply when surface N is flat by 0.001 in. (0.03 mm) and Diameter M maintains a clearance envelope of 13.350 in. (339.09 mm) in a free or held condition.
Hold the support only on Surfaces N, L and S and Diameter M.
Maintain the radii.
Steps are not permitted.
Machine the flange support surface(s) of the support after nickel plate.
SUBTASK 72-42-31-320-052 Machine the Intermediate Flange of the No. 4 Bearing Support after Nickel Plate
Refer to Figure and TASK 72-42-31-200-000 (INSPECTION-000).
Use a Magnifying glass, 4x to do a visual inspection of the plated area to examine for cracks and adhesion.
Examine the support after nickel plate and finish machining.
SUBTASK 72-42-31-220-063 Examine the Repair
Make a permanent mark by the procedure given in the SPM TASK 70-09-00-400-501.
Use the vibration peen method.
Remove high metal caused by marking the number.
Mark VRS3072 on the repaired No. 4 bearing support adjacent to the part number.
SUBTASK 72-42-31-350-058 Identify the Repair
Figure: Repair Details and Dimensions
Sheet 1

Figure: Repair Details and Dimensions
Sheet 2

