Export Control
EAR Export Classification: Not subject to the EAR per 15 C.F.R. Chapter 1, Part 734.3(b)(3), except for the following Service Bulletins which are currently published as EAR Export Classification 9E991: SBE70-0992, SBE72-0483, SBE72-0580, SBE72-0588, SBE72-0640, SBE73-0209, SBE80-0024 and SBE80-0025.Copyright
© IAE International Aero Engines AG (2001, 2014 - 2021) The information contained in this document is the property of © IAE International Aero Engines AG and may not be copied or used for any purpose other than that for which it is supplied without the express written authority of © IAE International Aero Engines AG. (This does not preclude use by engine and aircraft operators for normal instructional, maintenance or overhaul purposes.).Applicability
All
Common Information
TASK 72-43-30-300-008 No. 4 Bearing Heatshield - Restore The Front Flange OD By Nickel Plate Or Plasma Spray, Repair-008 (VRS3125)
General
Price and availability - refer to IAE
The practices and processes referred to in the procedure by the TASK numbers are in the SPM.
Preliminary Requirements
Pre-Conditions
NONESupport Equipment
NONEConsumables, Materials and Expendables
| Name | Manufacturer | Part Number / Identification | Quantity | Remark |
|---|---|---|---|---|
| CoMat 03-089 METAL SPRAYING POWDER Ni/Al (95/5) | 00741 | CoMat 03-089 |
Spares
NONESafety Requirements
NONEProcedure
NOTE
The diameter can be measured in a free or held condition. All dimensions apply when Surface D is flat by 0.004in. (0.102 mm), Diameter E maintains a clearance envelope of 13.009in. (330.429 mm) diameter, and Diameter F maintains a clearance envelope of 6.196in. (157.378 mm) diameter in a free or held condition. Hold the heat shield only on Surfaces D and G, and Diameters E and F.Refer to Figure. Hold the diameter to maximum value.
Machine the outside diameter before nickel plate.
SUBTASK 72-43-30-320-051-A00 Machine the Outside Diameter of the No. 4 Bearing Heat Shield (PN 2A0890-01) before Nickel Plate
NOTE
The diameter can be measured in a free or held condition. All dimensions apply when Surface D is flat by 0.004in. (0.102 mm), Diameter E maintains a clearance envelope of 13.009in. (330.429 mm) diameter, and Diameter F maintains a clearance envelope of 6.515in. (165.481 mm) diameter in a free or held condition. Hold the heat shield only on Surfaces D and G, and Diameters E and F.Refer to Figure. Hold the diameter to maximum value.
Machine the outside diameter before nickel plate.
SUBTASK 72-43-30-320-051-B00 Machine the Outside Diameter of the No. 4 Bearing Heat Shield (PN 2A1204-01) before Nickel Plate
NOTE
The diameter can be measured in a free or held condition. All dimensions apply when Surface D is flat by 0.004in. (0.102 mm), Diameter E maintains a clearance envelope of 13.009in. (330.429 mm) diameter, and Diameter F maintains a clearance envelope of 6.196in. (157.378 mm) diameter in a free or held condition. Hold the heat shield only on Surfaces D and G, and Diameters E and F.Refer to Figure.
Machine the outside diameter after nickel plate.
SUBTASK 72-43-30-320-052-A00 Machine the Outside Diameter of the No. 4 Bearing Heat Shield (PN 2A0890-01) after Nickel Plate
NOTE
The diameter can be measured in a free or held condition. All dimensions apply when Surface D is flat by 0.004in. (0.102 mm), Diameter E maintains a clearance envelope of 13.009in. (330.429 mm) diameter, and Diameter F maintains a clearance envelope of 6.515in. (165.481 mm) diameter in a free or held condition. Hold the heat shield only on Surfaces D and G, and Diameters E and F.Refer to Figure.
Machine the outside diameter after nickel plate.
SUBTASK 72-43-30-320-052-B00 Machine the Outside Diameter of the No. 4 Bearing Heat Shield (PN 2A1204-01) after Nickel Plate
Refer to Figure or Figure and TASK 72-43-30-200-000 (INSPECTION-000).
Examine the heat shield after nickel plate repair.
SUBTASK 72-43-30-220-062 Examine the Repair
Refer to Figure or Figure and TASK 70-38-24-300-503.
Apply a mask to the areas not to be coated.
SUBTASK 72-43-30-380-051 Apply a Mask to the Areas not to be Plasma Sprayed
NOTE
The diameter can be measured in a free or held condition. All dimensions apply when Surface D is flat by 0.004in. (0.102 mm), Diameter E maintains a clearance envelope of 13.009in. (330.429 mm) diameter, and Diameter F maintains a clearance envelope of 6.196in. (157.378 mm) diameter in a free or held condition. Hold the heat shield only on Surfaces D and G, and Diameters E and F.Refer to Figure. Hold the diameter to maximum value.
Machine the outside diameter before plasma spray.
SUBTASK 72-43-30-320-053-A00 Machine the Outside Diameter of the No. 4 Bearing Heat Shield (PN 2A0890-01) before Plasma Spray
NOTE
The diameter can be measured in a free or held condition. All dimensions apply when Surface D is flat by 0.004in. (0.102 mm), Diameter E maintains a clearance envelope of 13.009in. (330.429 mm) diameter, and Diameter F maintains a clearance envelope of 6.515in. (165.481 mm) diameter in a free or held condition. Hold the heat shield only on Surfaces D and G, and Diameters E and F.Refer to Figure. Hold the diameter to maximum value.
Machine the outside diameter before plasma spray.
SUBTASK 72-43-30-320-053-B00 Machine the Outside Diameter of the No. 4 Bearing Heat Shield (PN 2A1204-01) before Plasma Spray
Refer to Figure or Figure and TASK 70-34-03-340-501. Use CoMat 03-089 METAL SPRAYING POWDER Ni/Al (95/5). Make sure you use a sufficient amount to permit finish machining.
Plasma spray the front flange OD.
SUBTASK 72-43-30-340-051 Plasma Spray the Front Flange Outside Diameter of the No. 4 Bearing Heat Shield
NOTE
The diameter can be measured in a free or held condition. All dimensions apply when Surface D is flat by 0.004in. (0.102 mm), Diameter E maintains a clearance envelope of 13.009in. (330.429 mm) diameter, and Diameter F maintains a clearance envelope of 6.196in. (157.378 mm) diameter in a free or held condition. Hold the heat shield only on Surfaces D and G, and Diameters E and F.Refer to Figure.
Machine the outside diameter after plasma spray.
SUBTASK 72-43-30-320-054-A00 Machine the Outside Diameter of the No. 4 Bearing Heat Shield (PN 2A0890-01) after Plasma Spray
NOTE
The diameter can be measured in a free or held condition. All dimensions apply when Surface D is flat by 0.004in. (0.102 mm), Diameter E maintains a clearance envelope of 13.009in. (330.429 mm) diameter, and Diameter F maintains a clearance envelope of 6.515in. (165.481 mm) diameter in a free or held condition. Hold the heat shield only on Surfaces D and G, and Diameters E and F.Refer to Figure.
Machine the outside diameter after plasma spray.
SUBTASK 72-43-30-320-054-B00 Machine the Outside Diameter of the No. 4 Bearing Heat Shield (PN 2A1204-01) after Plasma Spray
Refer to Figure or Figure and TASK 72-43-30-200-000 (INSPECTION-000).
Examine the heat shield after repair.
SUBTASK 72-43-30-220-063 Examine the Repair
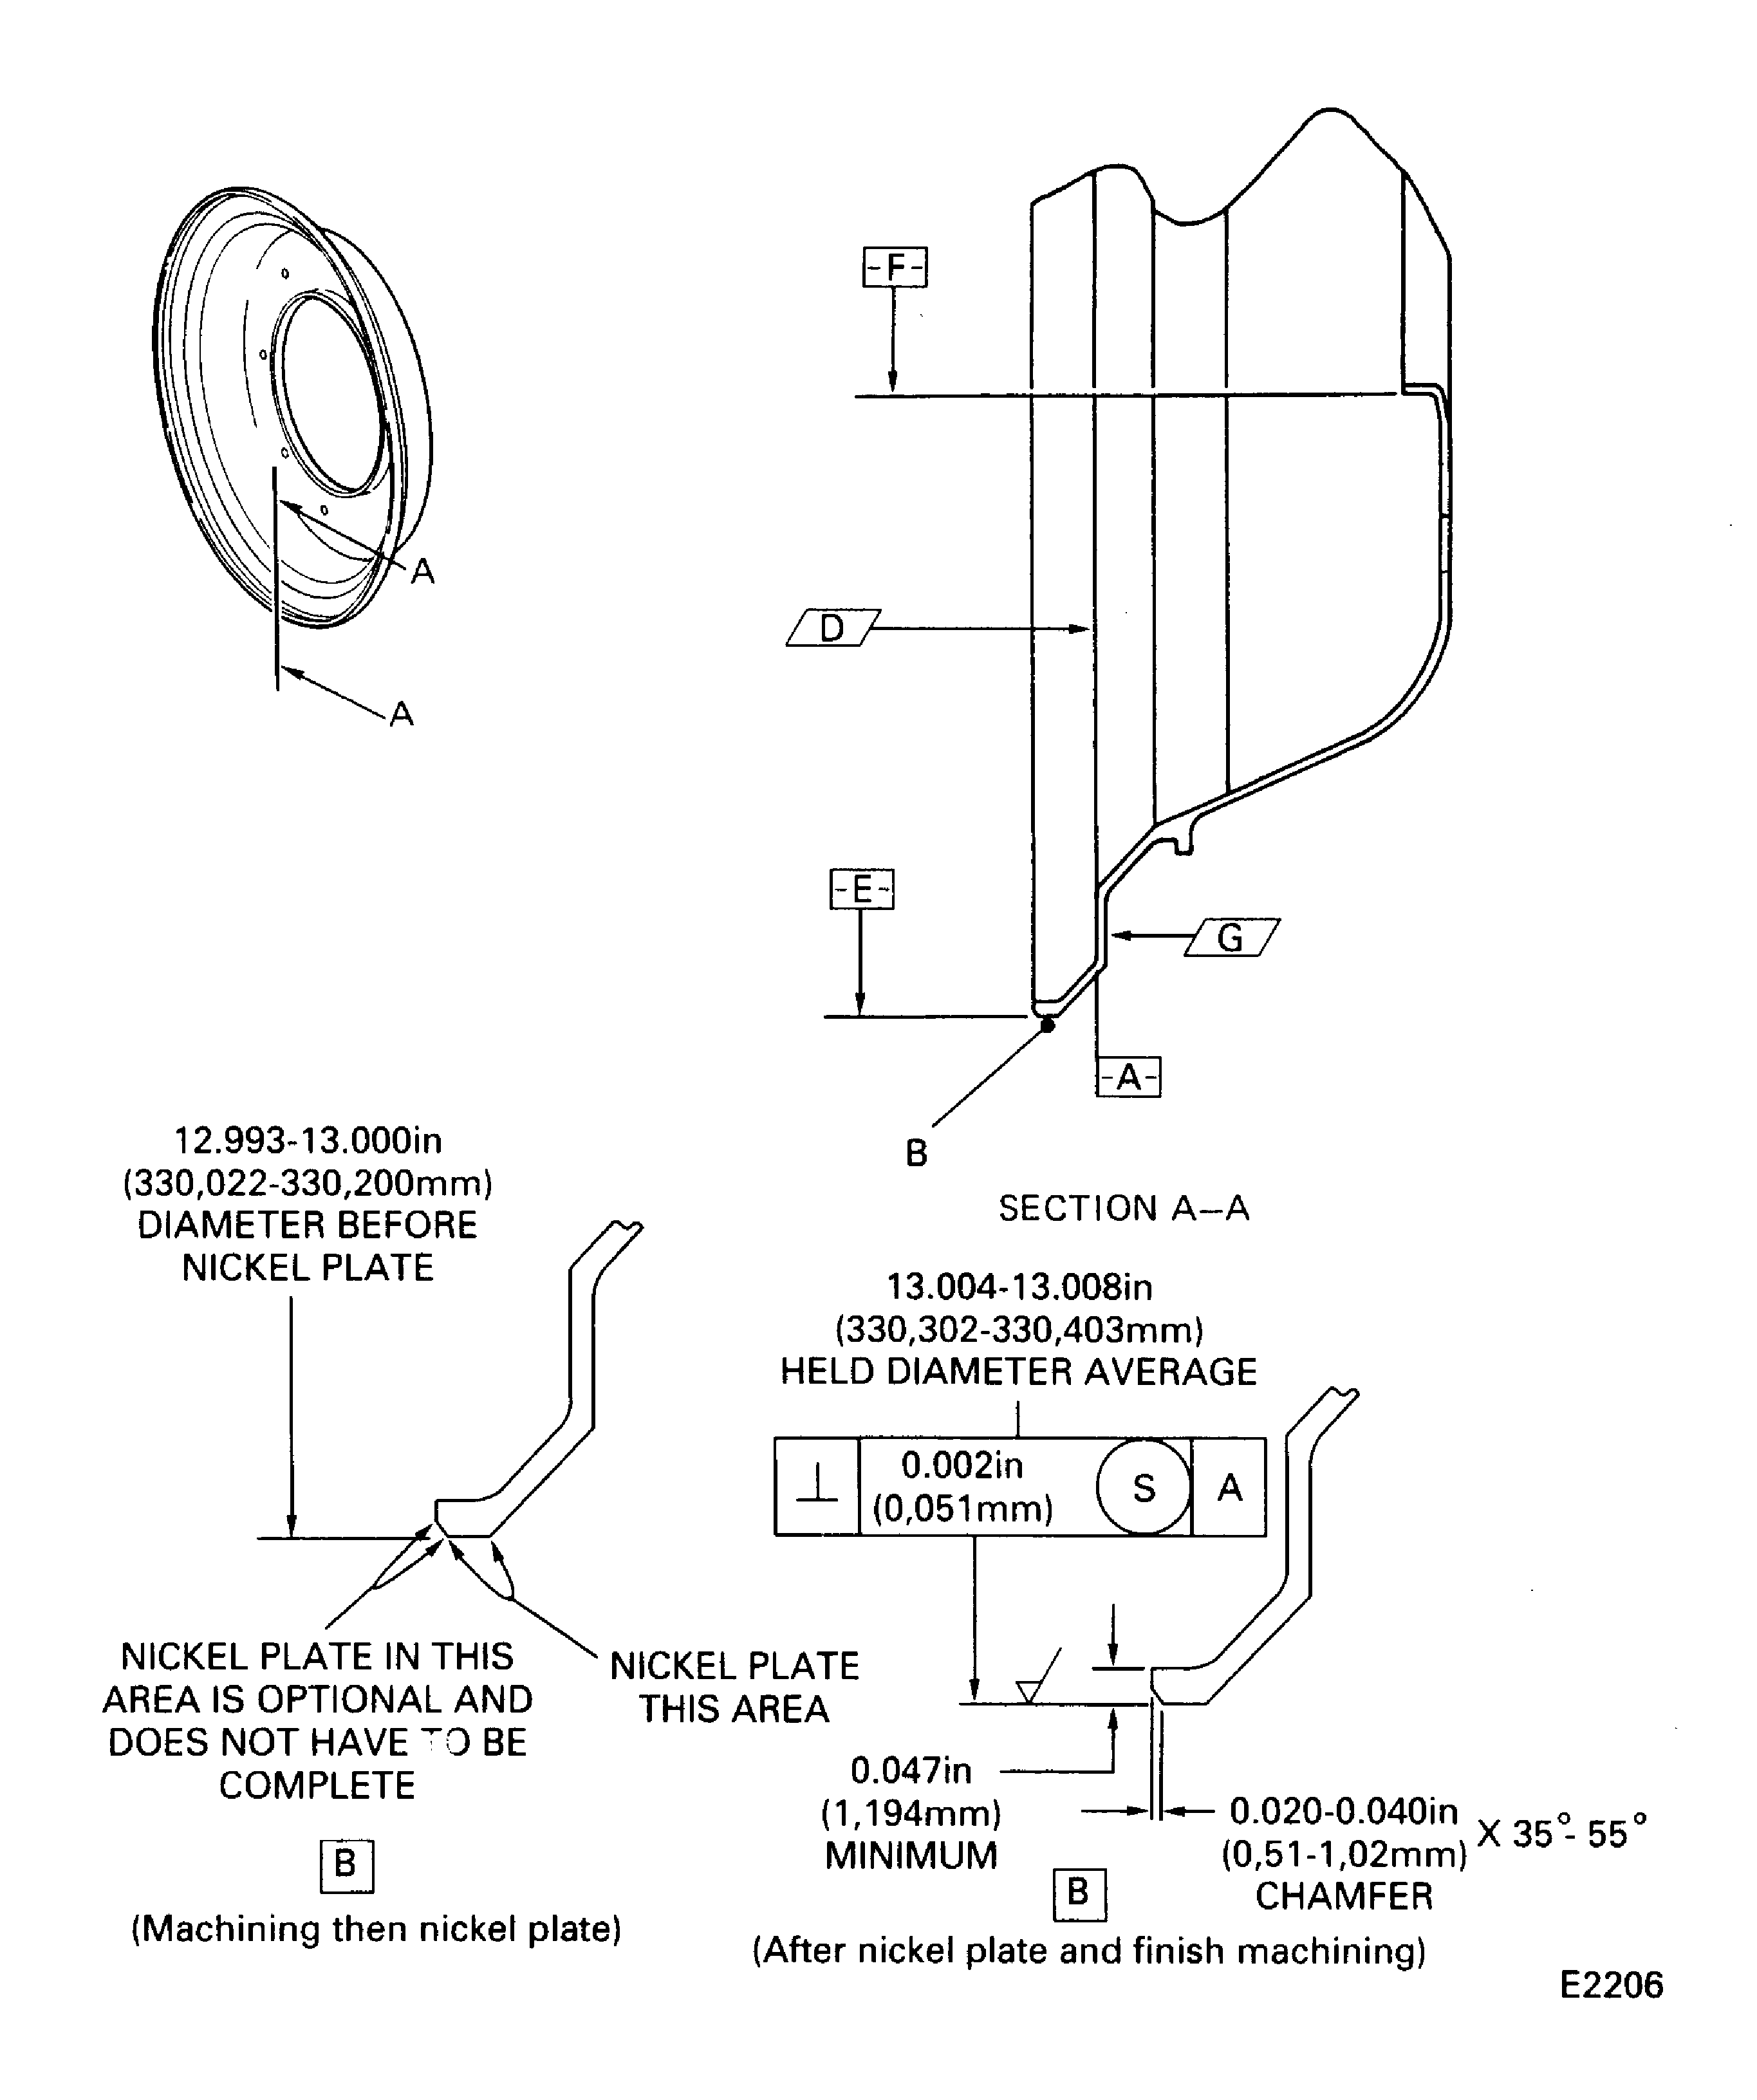
Figure: Repair Details and Dimensions
Repair Details and Dimensions

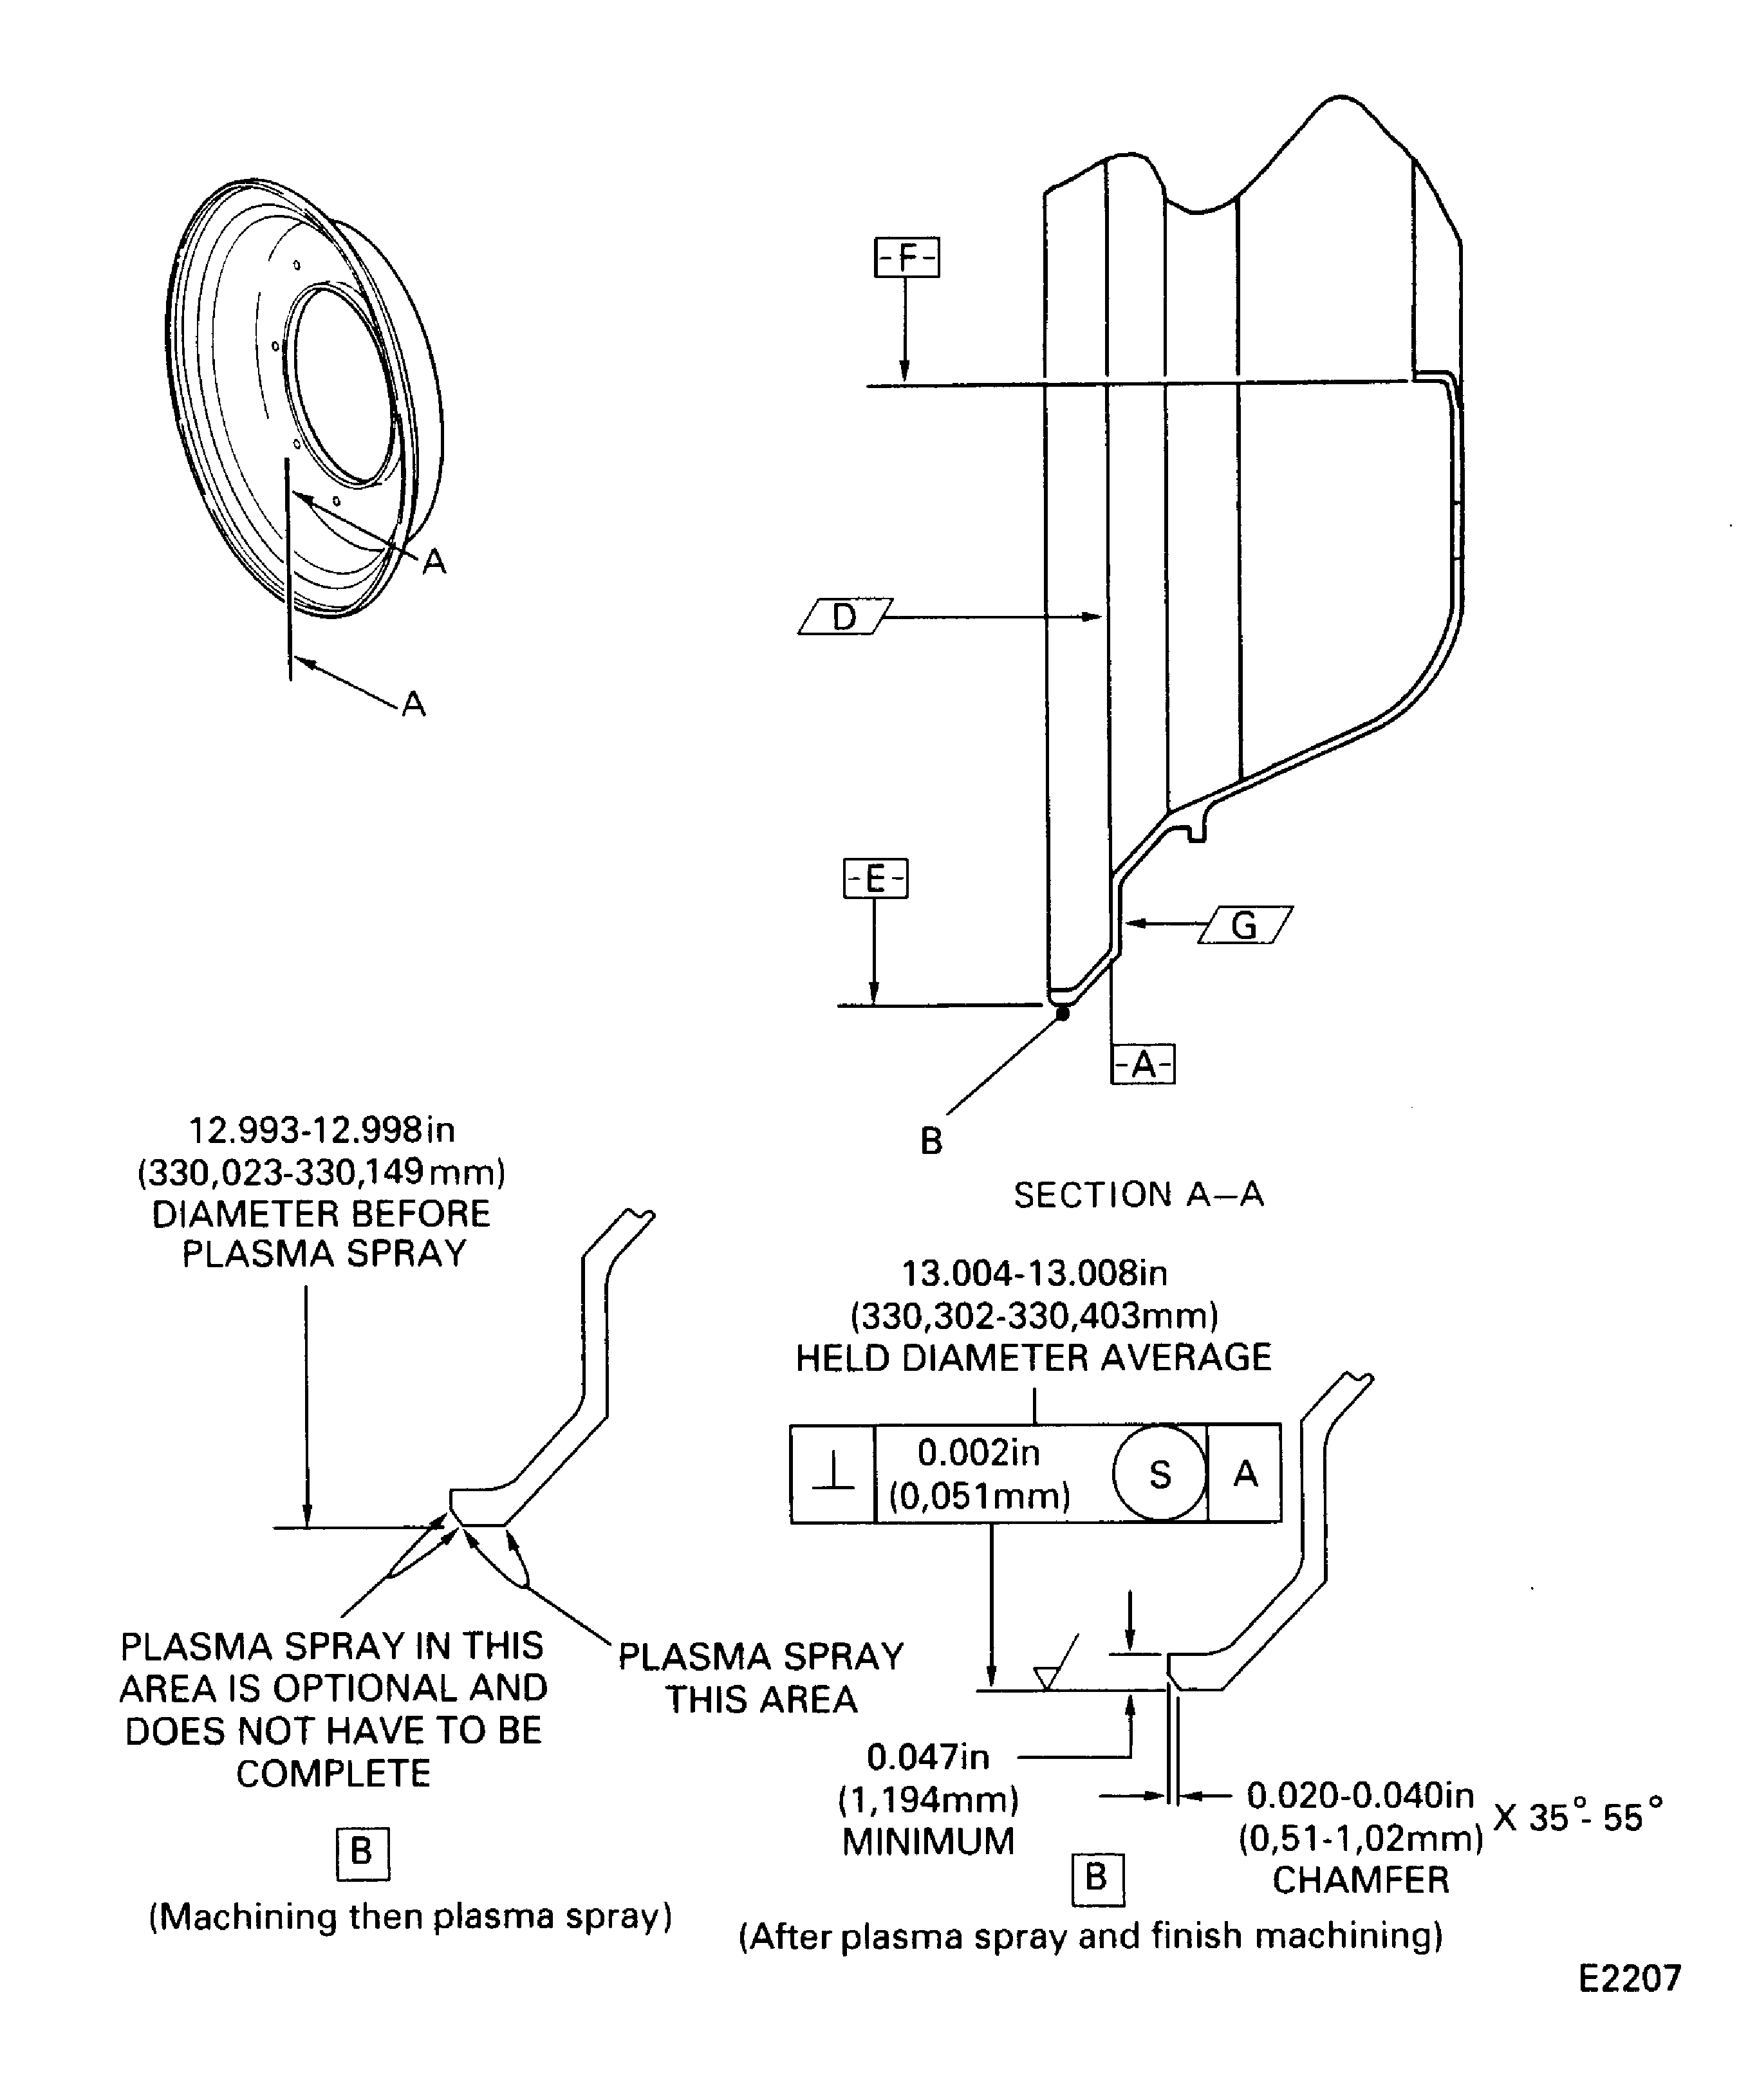
Figure: Repair Details and Dimensions
Repair Details and Dimensions

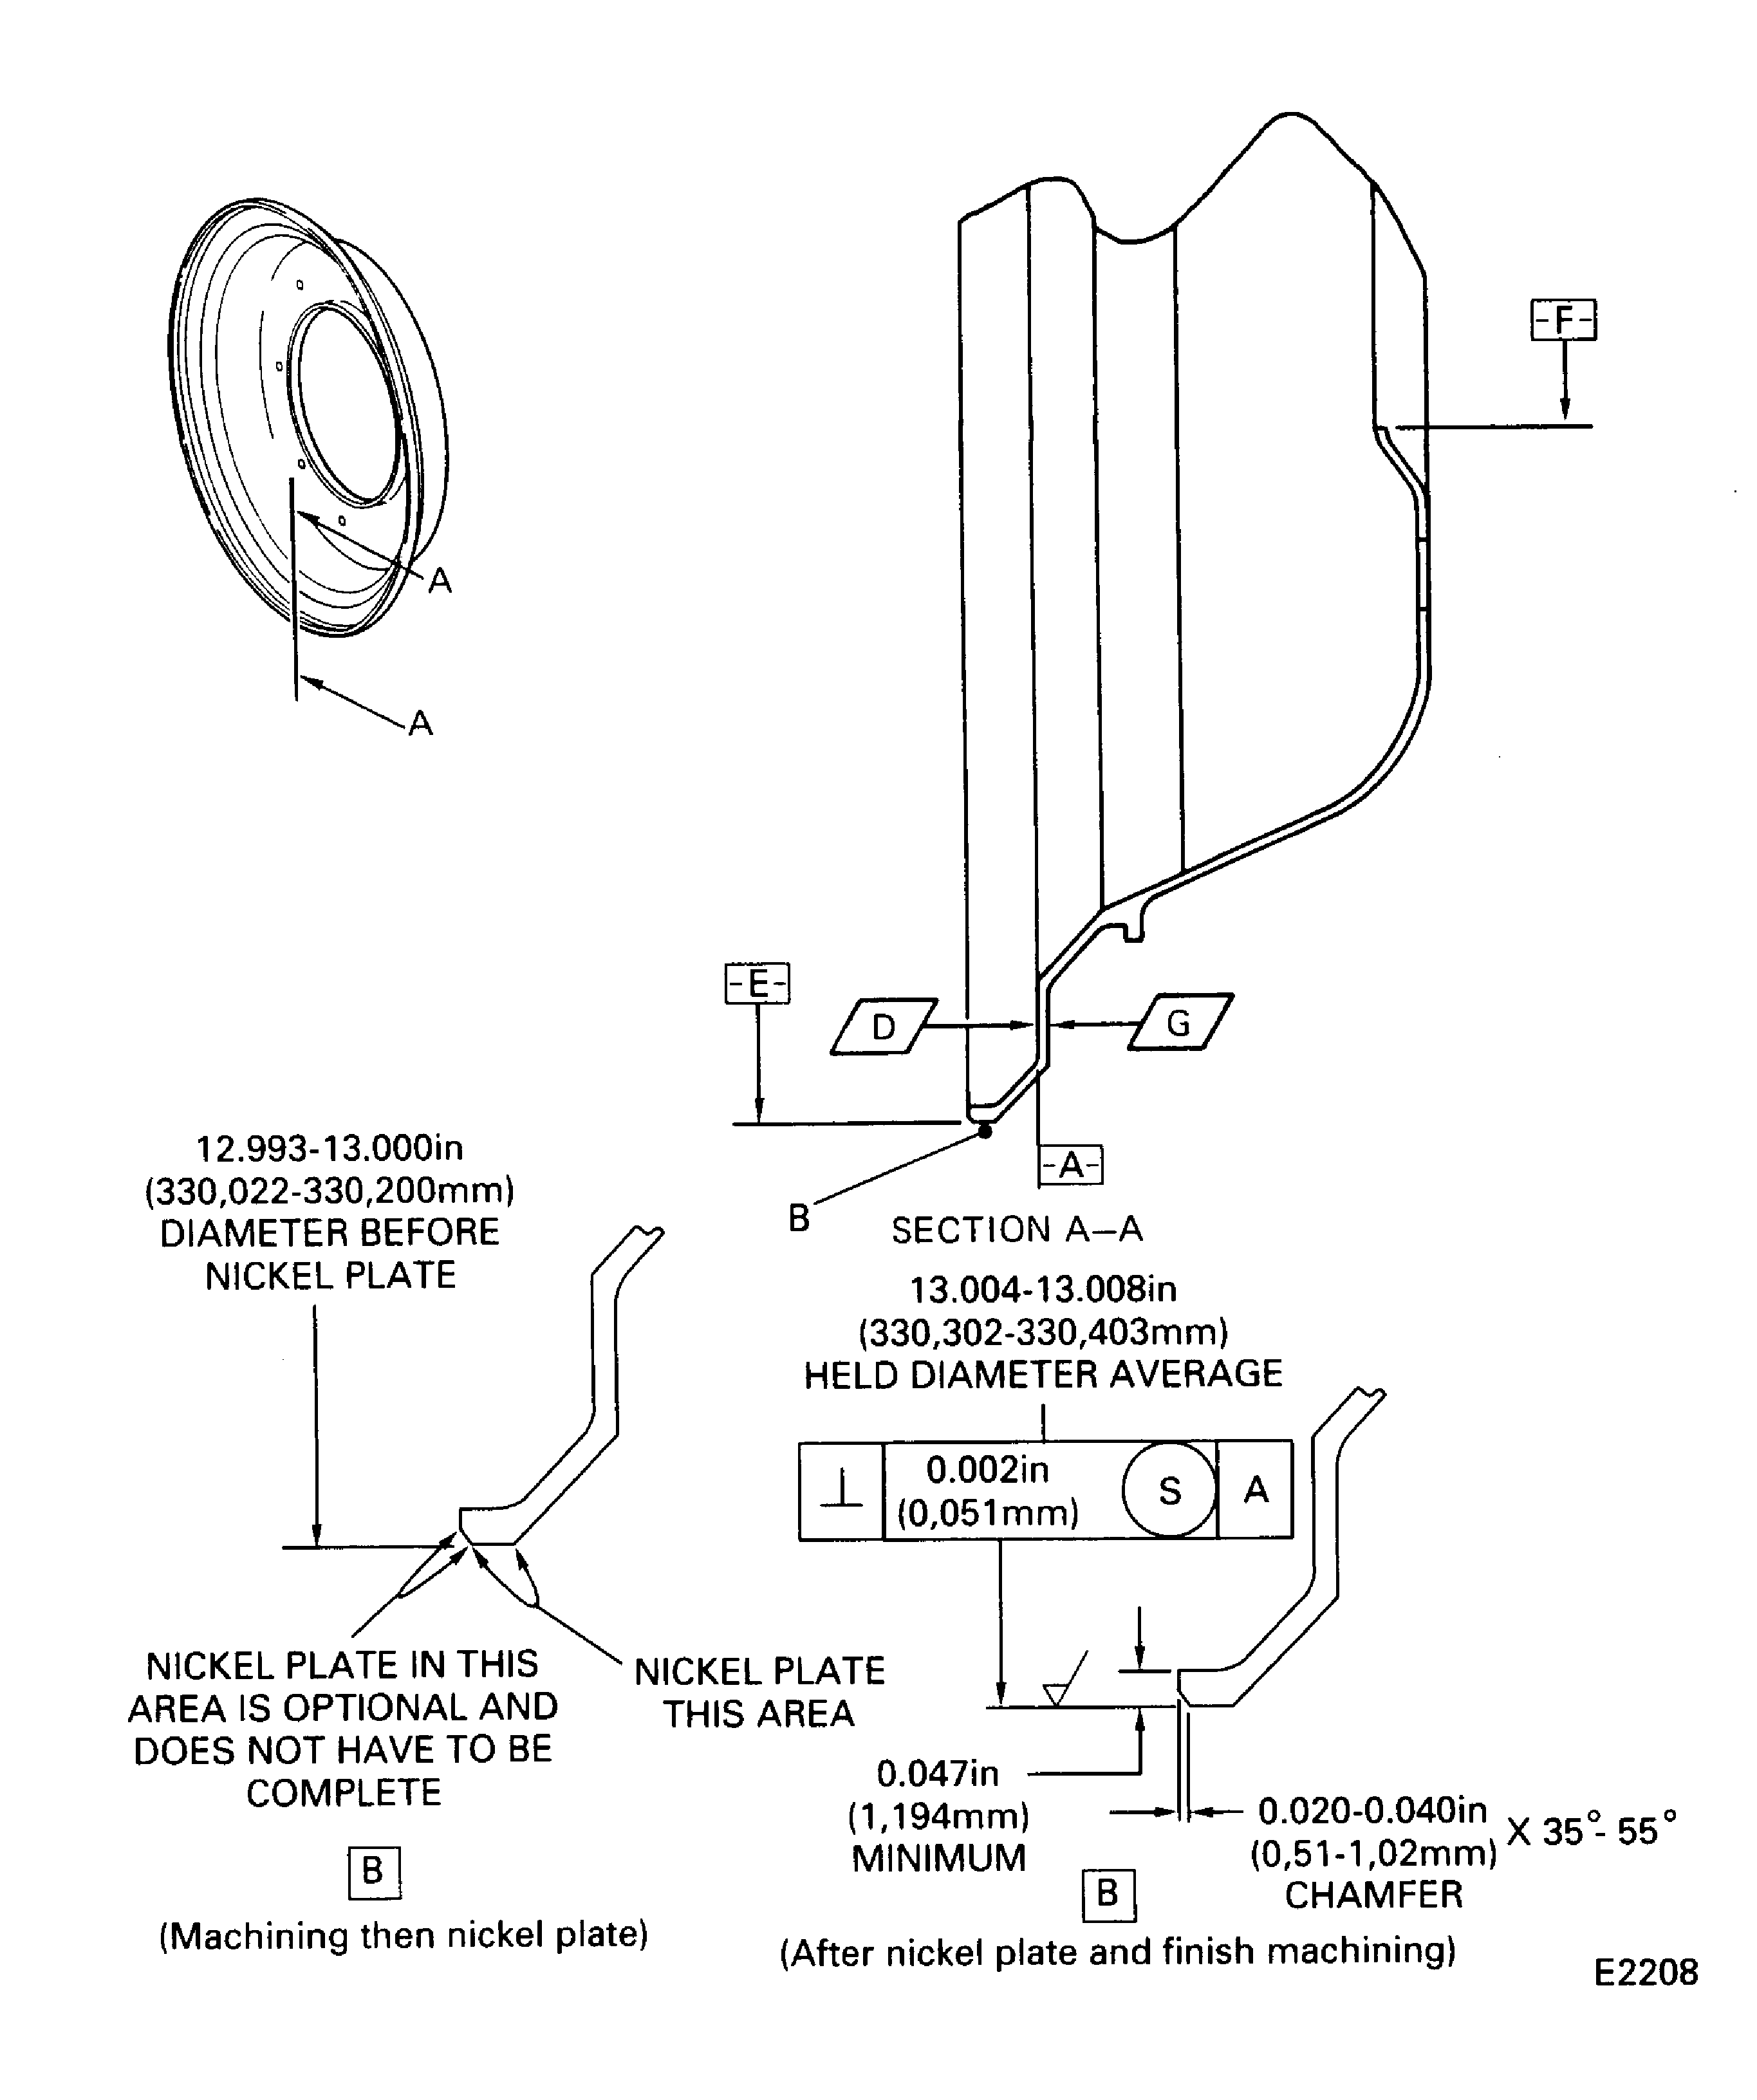
Figure: Repair Details and Dimensions
Repair Details and Dimensions

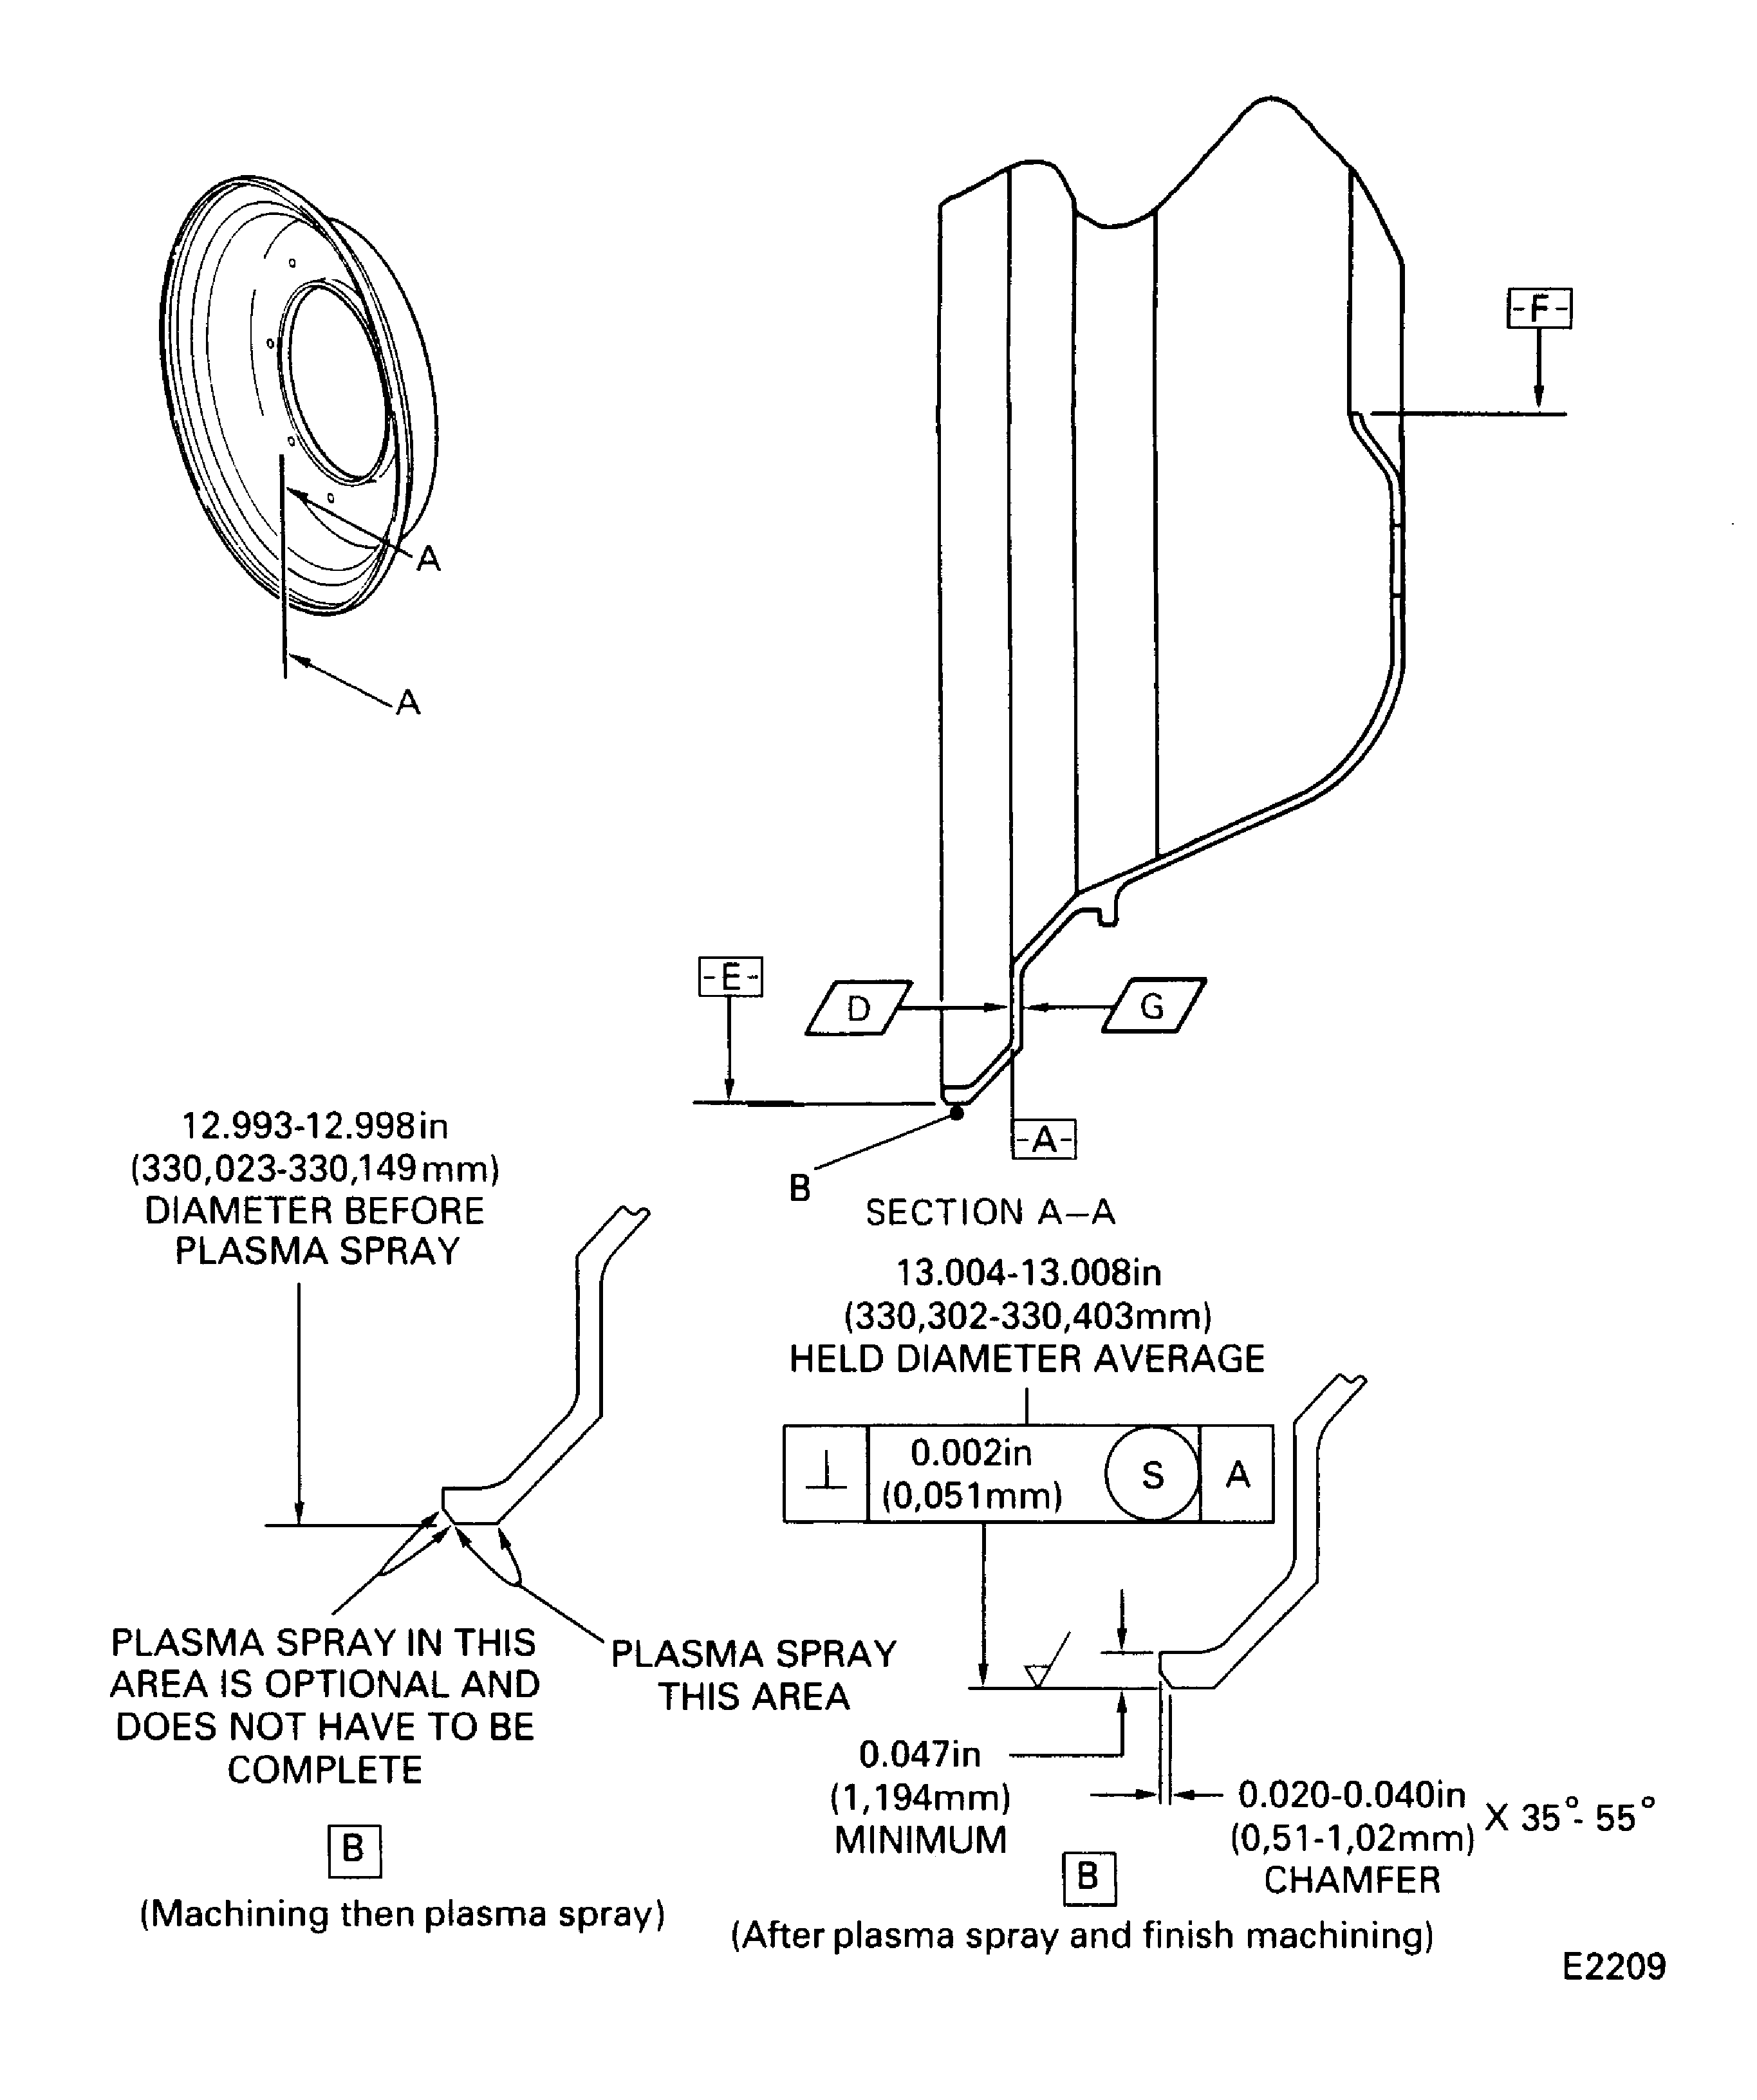
Figure: Repair Details and Dimensions
Repair Details and Dimensions

