Export Control
EAR Export Classification: Not subject to the EAR per 15 C.F.R. Chapter 1, Part 734.3(b)(3), except for the following Service Bulletins which are currently published as EAR Export Classification 9E991: SBE70-0992, SBE72-0483, SBE72-0580, SBE72-0588, SBE72-0640, SBE73-0209, SBE80-0024 and SBE80-0025.Copyright
© IAE International Aero Engines AG (2001, 2014 - 2021) The information contained in this document is the property of © IAE International Aero Engines AG and may not be copied or used for any purpose other than that for which it is supplied without the express written authority of © IAE International Aero Engines AG. (This does not preclude use by engine and aircraft operators for normal instructional, maintenance or overhaul purposes.).Applicability
All
Common Information
TASK 70-34-03-340-501 Thermal Spray Coating Application - General Data
Introduction | ||
Health Precautions | ||
Methods Used to Apply Plasma Spray Coatings | ||
General | ||
Standard Equipment | ||
Prepare the Surface of the Parts for Plasma and Other Thermal Spray Coatings (Titanium and Non-Titanium Parts) | Relocated to the SPM TASK 70-34-18-380-501, SUBTASK 70-34-18-340-001 | |
Selection of the Coating | ||
Comparative Standards for Analysis of Coating Microstructures | ||
Corners, Grooves, or Slots Where Higher Amounts of Porosity or Oxides Are Permitted | ||
Apply IAE 53-XX Plasma Coating | ||
Apply IAE 271-XX Dual Wire Electric Arc Coating | ||
Apply IAE 36206-XX HVOF Coating | ||
Removal of Masking Tape | ||
Finish the Surface of the Parts | ||
Microplasma Spray Chip Repair | ||
Evaluation of Ground and Lapped Plasma and Flame Deposited Coatings |
Introduction
This procedure give details of the method and control of thermal spray coatings. Step gives a description of the different application methods.
IAE 53 suffix numbers refer to coatings applied by plasma spray.
IAE 271 suffix numbers refer to coatings applied by the dual wire arc process.
IAE 36206 Suffix numbers refers to coatings applied by HVOF spray process.
Preliminary Requirements
Pre-Conditions
NONESupport Equipment
NONEConsumables, Materials and Expendables
| Name | Manufacturer | Part Number / Identification | Quantity | Remark |
|---|---|---|---|---|
| CoMat 03-037 METAL SPRAYING POWDER,Ni Al | 08662 | CoMat 03-037 | ||
| CoMat 03-064 PLASMA SPRAY POWDER | DK026 | CoMat 03-064 | ||
| CoMat 03-065 PLASMA SPRAY POWDER | LOCAL | CoMat 03-065 | ||
| CoMat 03-066 METAL SPRAYING POWDER, 75 CHROMIUM CARBIDE/25 (80 NICKEL - 20 CHROMIUM ALLOY), FINE | DK026 | CoMat 03-066 | ||
| CoMat 03-067 PLASMA SPRAY POWDER | LOCAL | CoMat 03-067 | ||
| CoMat 03-068 PLASMA SPRAY POWDER | IE426 | CoMat 03-068 | ||
| CoMat 03-069 PLASMA SPRAY POWDER | 08662 | CoMat 03-069 | ||
| CoMat 03-074 PLASMA SPRAY POWDER | LOCAL | CoMat 03-074 | ||
| CoMat 03-076 PLASMA SPRAY POWDER | 0AM53 | CoMat 03-076 | ||
| CoMat 03-077 METAL SPRAYING POWDERNI-CR ALLOY | IE426 | CoMat 03-077 | ||
| CoMat 03-078 METAL SPRAYING POWDER,Co-BASE ALLOY | IE426 | CoMat 03-078 | ||
| CoMat 03-079 PLASMA SPRAY POWDER | IE426 | CoMat 03-079 | ||
| CoMat 03-080 METAL SPRAYING POWDER,Co BASE ALLOY | IE426 | CoMat 03-080 | ||
| CoMat 03-081PLASMA SPRAY POWDER | 33870 | CoMat 03-081 | ||
| CoMat 03-083 PLASMA SPRAY POWDER | 39918 | CoMat 03-083 | ||
| CoMat 03-084 PLASMA SPRAY POWDER | 06565 | CoMat 03-084 | ||
| CoMat 03-086 PLASMA SPRAY POWDER | 67027 | CoMat 03-086 | ||
| CoMat 03-089 METAL SPRAYING POWDER Ni/Al (95/5) | 33870 | CoMat 03-089 | ||
| CoMat 03-091 PLASMA SPRAY POWDER | 60097 | CoMat 03-091 | ||
| CoMat 03-096 PLASMA SPRAY POWDER | LOCAL | CoMat 03-096 | ||
| CoMat 03-100 PLASMA SPRAY POWDER | 33870 | CoMat 03-100 | ||
| CoMat 03-101 PLASMA SPRAY NICKEL ALUMINIUMALLOY | 72271 | CoMat 03-101 | ||
| CoMat 03-124 FLAME SPRAY NICKEL-ALUMINUM(78 Ni-22 Al) | 39918 | CoMat 03-124 | ||
| CoMat 03-340 PLASMA SPRAY POWDER | 33870 | CoMat 03-340 | ||
| CoMat 03-396 PLASMA/FLAME SPRAY POWDER | 0FGH2 | CoMat 03-396 | ||
| CoMat 03-478 WIRE, DUAL ELECTRIC ARC, MOLYBDENUM | 26057 | CoMat 03-478 | ||
| CoMat 03-479 WIRE, DUAL ELECTRIC ARC, NICKEL ALLOY | 26057 | CoMat 03-479 | ||
| CoMat 03-480 WIRE, DUAL ELECTRIC ARC, ALUMINUM ALLOY | 26057 | CoMat 03-480 | ||
| CoMat 03-481 WIRE, DUAL ELECTRIC ARC, NICKEL-CHROMIUM/ ALUMINUM ALLOY | 26057 | CoMat 03-481 | ||
| CoMat 03-482 WIRE, DUAL ELECTRIC ARC, NICKEL ALLOY | 39918 | CoMat 03-482 | ||
| CoMat 03-486 POWDER, HIGH VELOCITYOXY-FUEL (HVOF) | 01FK3 | CoMat 03-486 | ||
| CoMat 03-487 POWDER, HIGH VELOCITYOXY-FUEL (HVOF) | 01FK3 | CoMat 03-487 | ||
| CoMat 03-488 POWDER, HIGH VELOCITYOXY-FUEL (HVOF) | 01FK3 | CoMat 03-488 | ||
| CoMat 03-489 POWDER, HIGH VELOCITYOXY-FUEL (HVOF) | 01FK3 | CoMat 03-489 | ||
| CoMat 03-490 POWDER, HIGH VELOCITYOXY-FUEL (HVOF) | 01FK3 | CoMat 03-490 |
Spares
NONESafety Requirements
WARNING
Procedure
The noise from a plasma gun in operation is sufficiently high to be considered dangerous to the operator and other personnel in the area. Noise is given off in frequencies which can and cannot be heard. Sample decibel measurements are 119 dB at the gun and 95 to 105 dB in the area up to 30 ft. (10 m) from the gun. Correct sound-proofing of the spray area, use of portable baffles at the booth entrance, and ear protection for both operator and other personnel in the area are recommended.
Ear protection.
The need to use respirators will depend on the degree of air pollution control that you get from the exhaust ventilation, water-wash curtain, plus the general air circulation in the spray booth or work area. Good ventilation and the circulation of air away from the operator will minimize the need for respirators.
Respiration protection.
SUBTASK 70-34-03-860-001 Health Precautions
Gaseous fuel and oxygen flame.
Terms such as flame spray, powder spray, and wire spray, generally refer to a procedure which uses gaseous fuel and oxygen flame to melt and propel molten metal on to the surface of parts. The metal can be supplied to the gun in wire or powder form. There are different types of this equipment but the basic principle is the same and the heat available is the limiting factor. Metals with relatively low melting points can be applied in this manner. The gun can be held by hand or supported in position. This type of equipment is relatively inexpensive but is not able to apply coatings that require heat greater than 5000 deg F (2760 deg C).
Detonation.
This process is known as Praxair's D-Gun Process. The process uses a cannon-like device inside a concrete room with an outside control area. An explosive mixture of gas and oxygen is ignited in the combustion chamber which erupts from the open barrel end. As the gases pass out of the barrel, the metallic powder is melted by a shock wave and propelled by the pressure wave which follows. This process is used to apply hard coatings with relatively high density which is obtained by the very high speed at impact. This is a proprietary process which requires shipment of parts outside the overhaul shop.
Plasma spray.
Plasma coatings use a high intensity electric arc which heats an inert (or relatively inert) gas or gaseous mixture to an ionized state. This causes expansion of the gas which results in a high velocity. Powdered metal is injected in to the hot flame, melted, and propelled on to the surface of the part. The advantage of plasma is the higher temperatures which can be used, up to 20,000 to 30,000 deg F (11.093 to 16.649 deg C) and the inert atmosphere which permits control of oxides in the coating. Plasma equipment is easily available at reasonable cost, and the work area can be located in an overhaul shop. It gives a selection of coatings and only an average level of skill is necessary.
HVOF Spray.
The High - Velocity-Oxy-Fuel (HVOF) process uses an oxygen-fuel (propylene,propane,hydrogen,natural gas or kerosene) mixture, high kenetic energy, and combustion thermal output to propel axially or radially-fed powder feed stock. High inlet process gas pressures and system and gun components designs cause high particle velocities. These coatings usually have low residual internal stresses, low oxide levels, and high bond strengths and densities. Thus, the operator can usually spray HVOF coatings to higher thicknesses than other thermally sprayed coatings.
Microplasma.
The Compact Plasma Spray (CPS or Microplasma) process is technically the same as the standard plasma spray process but the gun and its components cause a much narrower spray pattern. CPS coatings are applied either manually or with automated equipment. The CPS process makes it easier to apply the coating to a small area and to repair local coating chips with only minimal masking necessary.
NOTE
All of the coatings are mechanically bonded to the surface and should not be confused with fusion weld type hardfacing. The temperature of the part can usually be kept below 400 deg F (204 deg C) to keep distortion to a minimum. Each coating mixture has distinct characteristics which are used on different parts to best advantage. Plasma coatings are used regularly for the repair of jet engine parts to return them to a serviceable condition.
SUBTASK 70-34-03-860-002 Methods Used to Apply Thermal Spray Coatings
It is necessary to get IAE Repair Source Approval before application of IAE 53-XX coatings on any knife-edge seals, brush seals, seal plates, bearing seal faces, or blade tips. Prospective sources must request qualification through IAE Engineering. Plasma spray repairs on disks, hubs, rotor shafts, and rotor spacers are not recommended except where permitted in the applicable engine repair instructions. Conditions to be observed at these repairs are as follows:
Dual wire electric arc spray coatings (that is, the IAE 271-XX coatings) can be used in place of IAE 53-XX coatings in many applications. They can usually be applied to greater thicknesses than equivalent composition plasma spray coatings. Refer to Step.
SUBTASK 70-34-03-860-003 General
Sufficient work area and many items of support equipment are necessary for the plasma coating procedure. The correct equipment, space, and lay-out for the plasma coating procedure will help with the quality of the coating and make shorter the time necessary to get and keep the sufficient level of plasma coating skills.
A suggestion for a typical set of plasma spray equipment is contained in the Facilities Equipment Manual (FEM) under section 12.
The main items are:
RT 001 Acoustic Room, Modularized.
RT 002 Power Supply.
RT 004 Turntable.
RT 005 Control Assembly, Turntable.
RT 006 Transverse Unit, Horizontal and Vertical.
RT 007 Control Assembly, Transverse Unit.
RT 008 Collector, Airborne Particle.
RT 010 Heat exchanger.
RT 012 Gun, Plasma Spray.
RT 018 Computer, Control Unit.
RT 019 Distribution Unit.
RT 020 Powder Feed Unit.
RT 021 Main Unit.
Equivalent equipment which leads to achievement of process requirements can be used also.
The plasma coating acceptance standards given in the SPM TASK 70-34-03-340-501-001 were developed with argon or helium gas or mixtures of argon and helium gas with up to a maximum of 25% hydrogen gas by volume.
Arc gas.
Give special attention to:
For large engine parts, such as cases, a variable speed turntable, which can have its angle changed, is necessary. Locally made adapters to hold the workpiece to the turntable are also necessary. For a supplier of turntables, refer to supplier code 95226 in the PCI Supplier List; however, other suppliers can be used, if equally competent, to make the necessary item.
Fixtures must be available to support the workpieces and (if necessary) spray gun in such a way that the gun-to-workpiece distance and angle can be controlled and repeated. Fixtures and supports are the responsibility of the operator.
Fixtures/Supports.
Parts must be clean and free of any oil or contamination. Degreasing equipment used in the SPM TASK 70-11-03-300-503 is recommended. The same degreasing equipment used in the usual cleaning of parts in the engine overhaul can be used for parts which are to be plasma coated.
Degreasing Equipment.

CAUTION
AIR WITH OIL VAPOR, GRINDING DUST, OR OTHER CONTAMINATION MUST NOT GET PULLED INTO THE BOOTH BECAUSE IT COULD CAUSE AN UNSATISFACTORY BOND IF IT TOUCHES THE PART DURING THE PLASMA COATING PROCEDURE.To permit large and heavy workpieces, such as engine cases, to be handled in the spray booth, a walk-in type is recommended. A satisfactory booth can be made by the conversion of a walk-in size spray-painting booth, with a water-washed rear wall and the addition of the necessary sound-proof material. For the address of a supplier of spray booths, refer to supplier code 3GX14 in the Supplier List in the PCI; however, other suppliers can be used.
Plasma spray booth.
SUBTASK 70-34-03-860-004 Standard Equipment
This subtask has been relocated to the SPM TASK 70-34-18-380-501, SUBTASK 70-34-18-380-001.
SUBTASK 70-34-03-380-001 Prepare the Surface of the Parts for Thermal Spray Coatings (Titanium and Non-Titanium Parts) (Deleted)
IAE 53-XX group.
Table 2. Table 1 Coating Process/ Powder Item Number
Powder Composition and Maximum Service Temperature
Recommended Thickness
Use
IAE 53-1/
Plasma spray powder
88 WC - 12 Co (Fine)
1000 deg F (538 deg C)
0.003 to 0.008 inch (0.08 to 0.203 mm) (See Note 1);
0.002 to 0.008 inch (0.051 to 0.203 mm) (See Note 2)
Hardcoat
IAE 53-2/
Plasma spray powder
88 WC - 12 Co
1000 deg F (538 deg C)
0.003 to 0.010 inch (0.08 to 0.254 mm) (See Note 1);
0.003 to 0.013 inch (0.08 to 0.330 mm) (See Note 2)
Hardcoat
IAE 53-5/
Plasma spray powder
75 CrC + 25(80 Ni - 20 Cr alloy) (Fine)
1600 deg F (871 deg C)
0.003 to 0.008 inch (0.08 to 0.203 mm) (See Note 1);
0.002 to 0.006 inch (0.051 to 0.152 mm) (See Note 2)
Hardcoat
IAE 53-7/
Plasma spray powder
75 CrC + 25(80 Ni - 20 Cr alloy)
1500 deg F (816 deg C)
0.003 to 0.010 inch (0.08 to 0.254 mm) (See Note 1);
0.003 to 0.008 inch (0.08 to 0.203 mm) (See Note 2)
Hardcoat
IAE 53-10/
Plasma spray powder
Aluminum oxide
2000 deg F (1093 deg C)
0.003 to 0.010 inch (0.08 to 0.254 mm)
Hardcoat
IAE 53-11/
Plasma spray powder
93 Aluminum oxide - 3 Titanium oxide
1300 deg F (704 deg C)
0.003 to 0.011 inch (0.008 to 0.28 mm) See Notes 1 and 11)
Hardcoat
IAE 53-12/
Plasma spray powder
Zirconium oxide (See Note 4)
2000 deg F (1093 deg C)
0.003 to 0.020 inch (0.08 to 0.51 mm) (See Note 4)
Thermal barrier
IAE 53-13/
Plasma spray powder
Molybdenum commercially pure
800 deg F (427 deg C)
0.003 to 0.020 inch (0.08 to 0.51 mm) (See Note 3)
Build-up and undercoat
IAE53-14/
Plasma spray powder
Cobalt alloy - 28 Cr - 19.5 W - 5 Ni - 1 V
1600 deg F (871 deg C)
0.003 to 0.008 inch (0.08 to 0.203 mm) (See Note 2)
Hardcoat
IAE 53-15/
Plasma spray powder
80 Ni - 20 Cr alloy
1500 deg F (816 deg C)
0.003 to 0.020 inch (0.08 to 0.51 mm) (See Note 3).
Build-up
0.002 to 0.005 inch (0.051 to 0.127 mm).
Undercoat
IAE 53-16
(See Note 10)/
Plasma spray powder
Cobalt alloy - 25.5 Cr - 10.5 Ni - 7.5 W (Fine)
1800 deg F (982 deg C)
0.003 to 0.006 inch (0.08 to 0.152 mm) (See Note 1);
0.002 to 0.006 inch (0.051 to 0.152 mm) (See Note 2).
Hardcoat
IAE 53-17/
Plasma spray powder
80 Ni - 20 Cr alloy (Fine)
1500 deg F (816 deg C)
0.003 to 0.010 inch (0.08 to 0.254 mm).
Build-up
0.003 to 0.005 inch (0.08 to 0.127 mm)
Undercoat
IAE53-18/
Plasma spray powder
Cobalt alloy - 25.5 Cr - 10.5 Ni - 7.5 W
1800 deg F (982 deg C)
0.003 to 0.030 inch (0.08 to 0.762 mm) (See Note 1);
0.003 to 0.028 inch (0.08 to 0.711 mm) (See Note 2).
Hardcoat
0.003 to 0.030 inch (0.08 to 0.76 mm) (See Note 3)
Build-up
IAE 53-20/
Plasma spray powder
Aluminum, commercially pure
500 deg F (260 deg C)
0.003 to 0.020 inch (0.08 to 0.51 mm)
Rub strip and build-up
IAE 53-21
(See Note 8)/
Metal spraying powder
80 Ni - 20 Al (Nickel coated aluminum particles)
1600 deg F (871 deg C)
0.003 to 0.015 inch (0.08 to 0.38 mm) (See Note 3).
Build-up
0.002 to 0.005 inch (0.051 to 0.127 mm)
Undercoat
IAE 53-22/
Plasma spray powder
50 (80 WC - 12 Co) + 35 (70 Ni - 16.5 Cr - 4 Fe - 4 Si - 3.8 B) + 15 (80 Ni - 20 Al)
800 deg F (427 deg C)
0.003 to 0.010 inch (0.08 to 0.254 mm) (See Note 2)
Hardcoat
IAE 53-33/
Plasma spray powder
Magnesium Zirconate (See Note 5)
2000 deg F (1093 deg C)
0.003 to 0.020 inch (0.08 to 0.51 mm) (See Note 5)
Thermal barrier
IAE 53-35/
Plasma spray powder
Aluminum - 12 silicon alloy (See Note 6)
500 deg F (260 deg C)
0.003 to 0.025 inch (0.08 to 0.64 mm) (See Note 6)
Build-up
IAE 53-37
(See Note 9)/
Plasma spray powder
95 Ni - 5 Al (Nickel-aluminum composite particles)
1300 deg F (704 deg C)
0.003 to 0.025 inch (0.08 to 0.64 mm) (See Note 3).
Build-up
0.002 to 0.007 inch (0.051 to 0.177 mm) (See Note 13)
Undercoat
IAE 53-38/
Plasma spray powder
Molybdenum, commercially pure (Fine)
800 deg F (427 deg C)
0.003 to 0.020 inch (0.08 to 0.51 mm) (See Note 3)
Build-up
IAE 53-47/
Plasma spray powder
94 (69.5 Ni + 18.5 Cr) - 6 Al (Nickel-chromium/aluminum composite particles)
1600 deg F (871 deg C)
0.003 to 0.025 inch (0.08 to 0.64 mm) (See Note 3).
Build-up
0.002 to 0.015 inch (0.051 to 0.38 mm)
Undercoat
IAE 53-69/
Plasma spray powder
62 Cu - 38 Ni alloy
1000 deg F (538 deg C)
As necessary
Blade root antigallant
IAE 53-78/
Plasma/Flame spray powder
90 Cu - 10 Al
1200 deg F (649 deg C)
As necessary
Provides fretting and wear resistance
IAE 53-80
(See Note 9)/
Plasma spray nickel aluminum alloy
95 Ni - 5 Al
1300 deg F (704 deg C)
As necessary
Build-up
An undercoat of 0.001 to 0.005 inch (0.026 to 0.127 mm) ofCoMat 03-124 FLAME SPRAY NICKEL-ALUMINUM(78 Ni-22 Al) Flame spray nickel-aluminum, or 0.003 to 0.005 inch (0.08 to 0.127 mm) of IAE 53-17, or IAE 53-37 is necessary. (Refer to Note 8).
IAE 271-XX Group.
Coating Process/ Wire Item Number (See Note 1)
Wire Composition (See Note 2) and Maximum Service Temperature
Recommended Thickness (See Note 4)
Use
IAE 271-13/
Wire
Molybdenum, commercially pure
800 deg F (427 deg C)
0.003 to 0.035 inch (0.08 to 0.89 mm)
Build-up
IAE 271-35/
Wire
Aluminum - 12 Si alloy
500 deg F (260 deg C)
0.003 to 0.040 inch (0.08 to 1.02 mm)
(See Note 3)
IAE 271-37/
Wire
95 Ni - 5 Al
1300 deg F (704 deg C)
0.003 to 0.040 inch (0.08 to 1.02 mm).
(See Note 5)
Build-up
0.003 to 0.005 inch (0.08 to 0.13 mm)
Undercoat
IAE 271-47/
Wire
94 (69.5 Ni - 18.5 Cr) - 6 Al
1500 deg F (815 deg C)
0.003 to 0.050 inch (0.08 to 1.27 mm).
Build-up
0.003 to 0.005 inch (0.08 to 0.13 mm)
Undercoat
IAE 271-48/
Wire
Nickel - 25 Fe - 15 Cr - 1.1 Si
1300 deg F (704 deg C)
0.003 to 0.030 inch (0.08 to 0.76 mm)
Build-up
Recommended thicknesses are for static, non-rotating parts only. Refer to Step on Rotating Components for rotating part coating thickness information.
IAE 36206-XX Group-.
Coating Process/Powder Item Number
Powder Composition and Maximum Service Temperature
Recommended Thickness
Use
IAE 36206-4/ CoMat 03-486 POWDER, HIGH VELOCITYOXY-FUEL (HVOF)
Powder-High Velocity Oxy-Fuel (HVOF), Nickel Aluminium
0.008 to 0.010 inch (0.204 to 0.254 mm)
Hardcoat
IAE 36206-5/ CoMat 03-487 POWDER, HIGH VELOCITYOXY-FUEL (HVOF)
Powder-High Velocity Oxy -Fuel (HVOF), Nickel-Chromium- Iron (Inconel 718)
0.008 to 0.010 inch (0.204 to 0.254 mm)
Hardcoat
IAE 36206-6/ CoMat 03-488 POWDER, HIGH VELOCITYOXY-FUEL (HVOF)
Powder- High Velocity Oxy -Fuel (HVOF) (Inconel 625)
0.008 to 0.010 inch (0.204 to 0.254 mm)
Hardcoat
IAE 36206-7/ CoMat 03-489 POWDER, HIGH VELOCITYOXY-FUEL (HVOF)
Powder- High Velocity Oxy - Fuel (HVOF), Cobalt-Molybdenum- Chromium ( Triballoy T-400)
0.008 to 0.010 inch (0.204 to 0.254 mm)
Hardcoat
IAE 36206-8/ CoMat 03-490 POWDER, HIGH VELOCITYOXY-FUEL (HVOF)
Powder- High Velocity Oxy-Fuel (HVOF), Cobalt-Molybdenum- Chromium (Triballoy T-800)
0.008 to 0.010 inch (0.204 to 0.254 mm)
Hardcoat
The coatings which are used regularly are identified by an IAE code number. The coatings are identified as one of the IAE 53-XX group or the IAE 36206-XX group. The CoMat numbers which can be used for the different coatings are given in the Tables as follows:
Engine parts will be coated with material specified by the instructions for each part. Use no other material unless an option is permitted; this information will be included in instructions in the Engine Manual Repair section. Permitted options are as follows:
NOTE
IAE 53-13 is usually used on surface finishes of 64AA or rougher.IAE 53-38 is usually used on surface finishes of 32AA or finer.
SUBTASK 70-34-03-340-001 Selection of the Coating
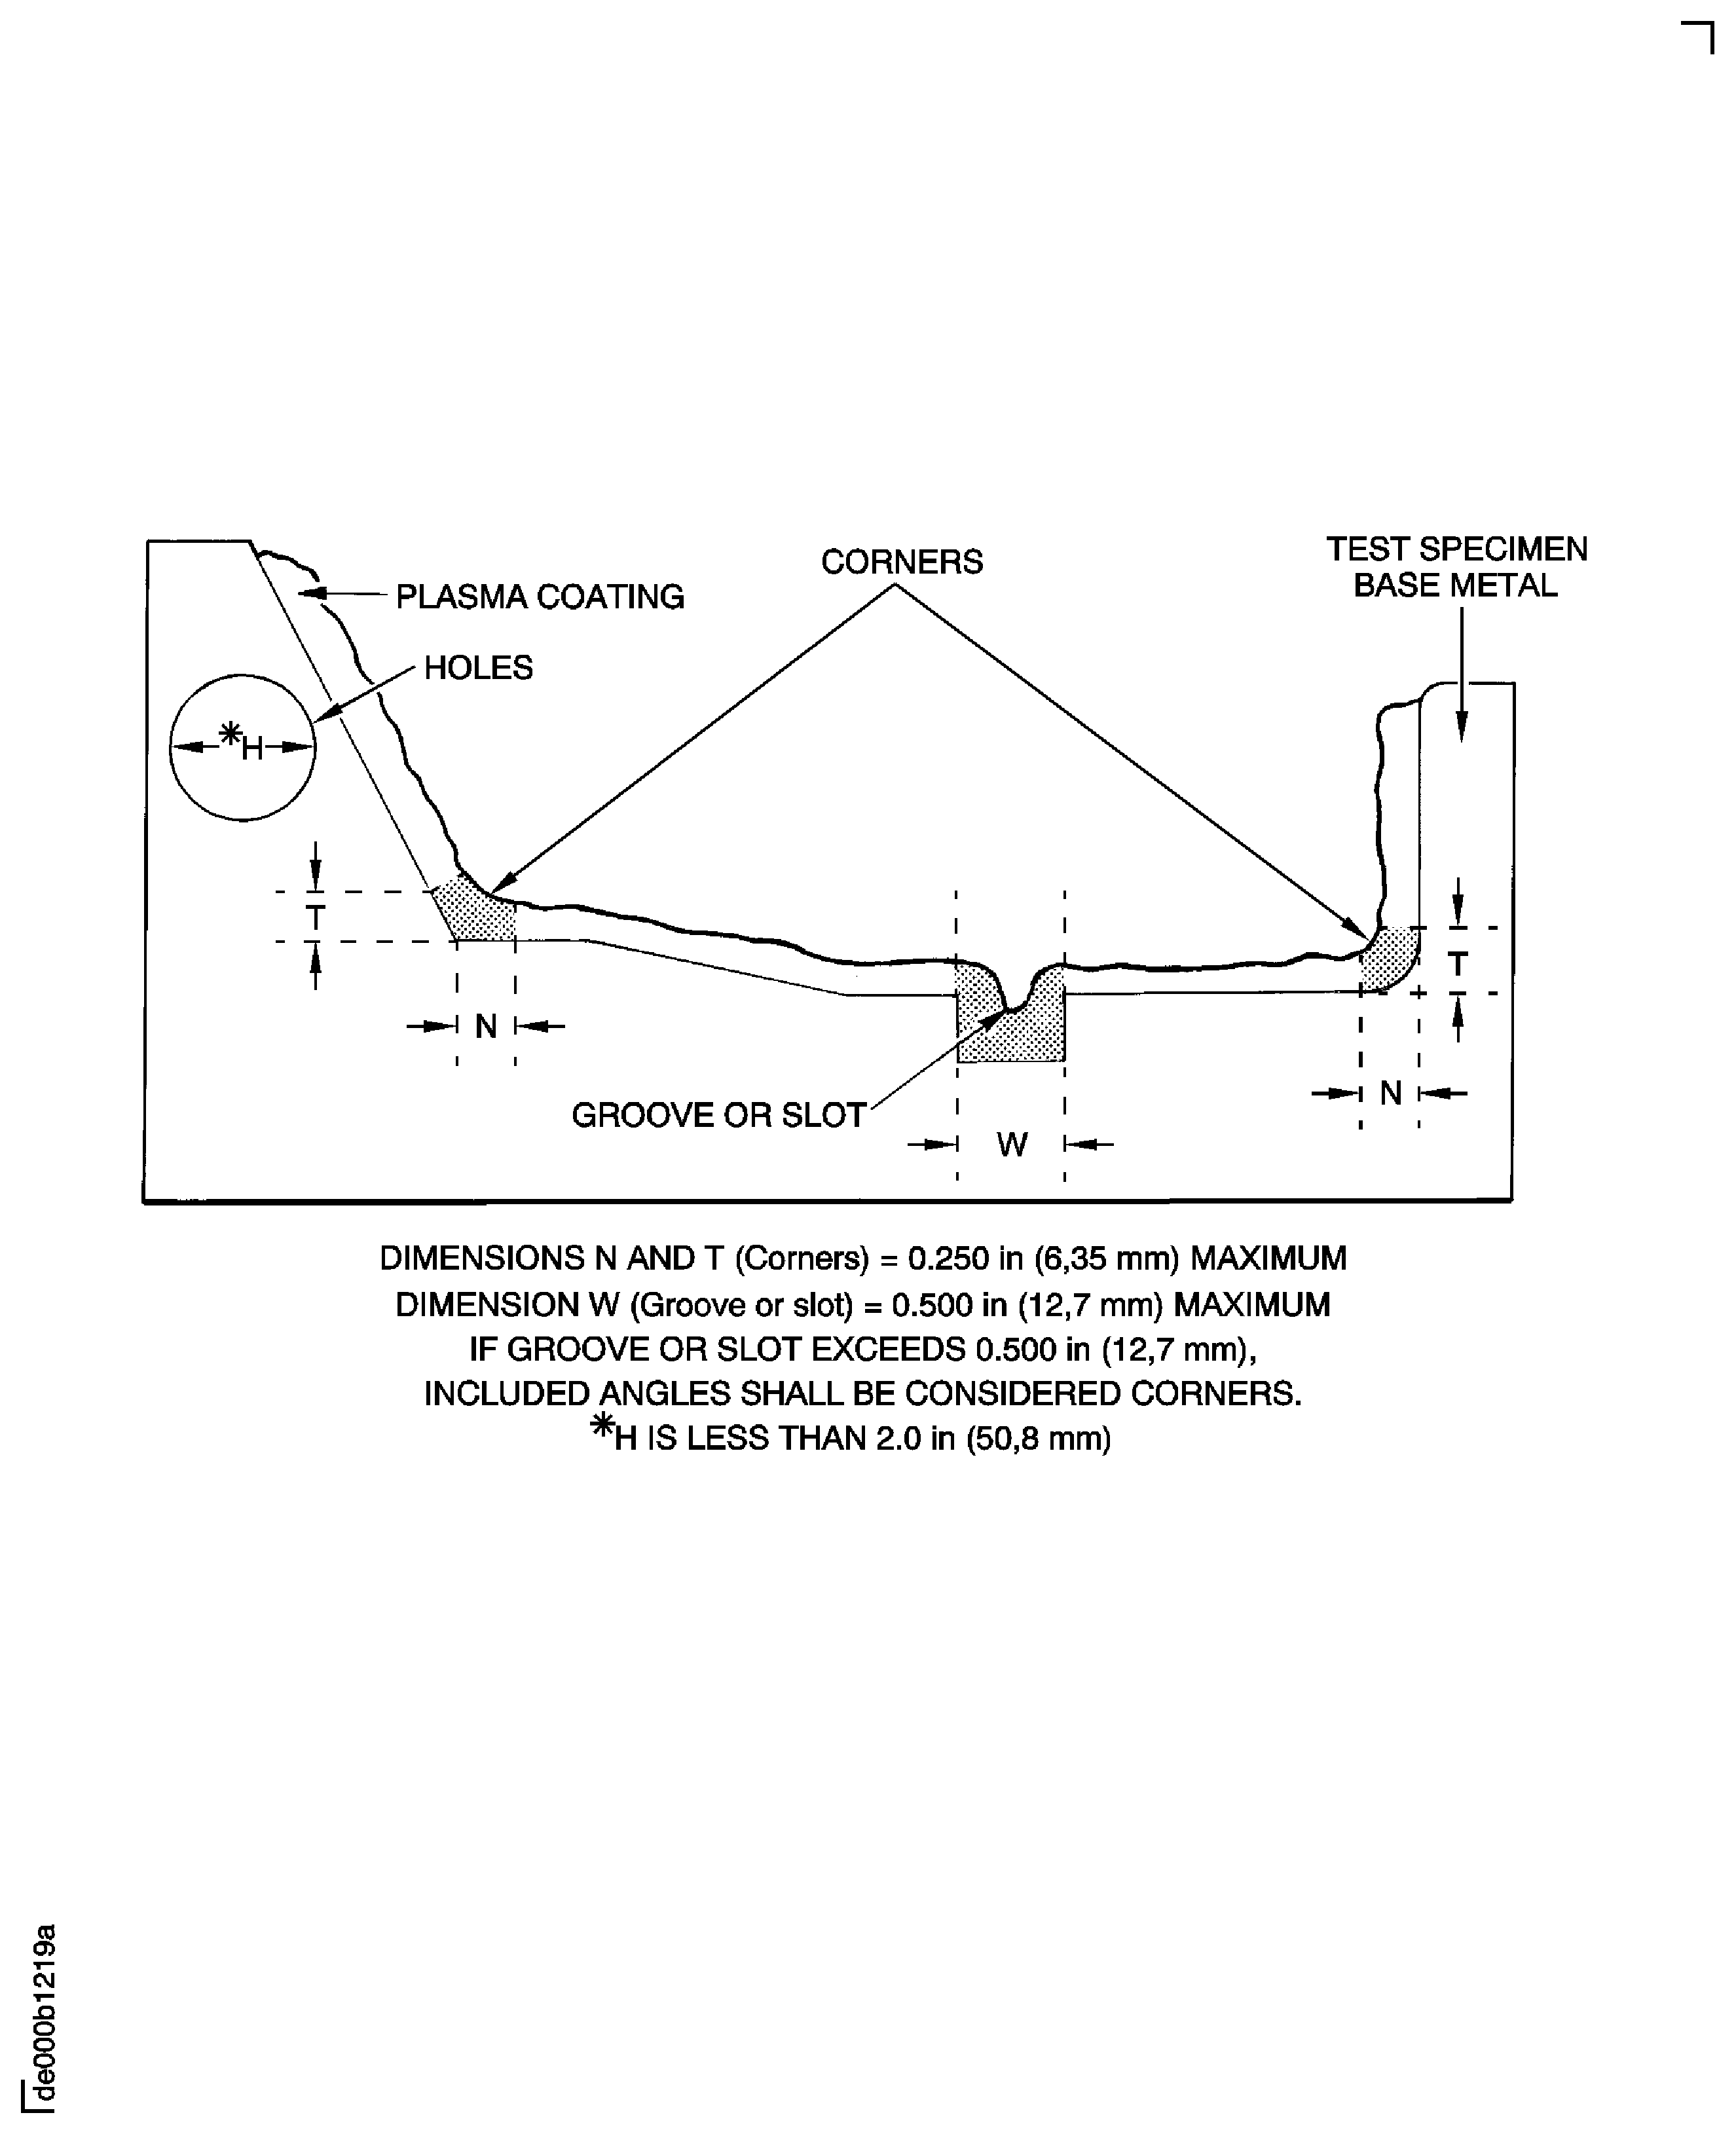
For an illustration of typical corners, grooves, or slots where greater amounts of porosity or oxides are permitted, see Figure.
General.
SUBTASK 70-34-03-860-007 Corners, Grooves, or Slots Where Higher Amounts of Porosity or Oxides Are Permitted
Refer to: Figure
Each spray schedule must be initially qualified by metallography, bond strength, and hardness (where applicable). Refer to the SPM TASK 70-34-03-340-501-001, Step.
Disks, hubs, blades, rotor shafts, rotor spacers, drum rotors or knife-edge seals, brush seals, seal plates, and bearing seal faces must be held in a fixture, and mechanized equipment must be used in such a manner that the gun-to-work distance and spray angle stay fixed during grit blast preparation and coating. Mechanized or manual equipment can be used to prepare and plasma spray all other parts.
Before application of plasma coating.

CAUTION
DO NOT EXCEED THE APPROVED LIMITS (PARAMETER RANGES) BECAUSE THIS COULD HAVE A HARMFUL EFFECT ON THE COATING QUALITY. DETERMINE THE CAUSE OF THE OUT-OF-LIMITS CONDITION (OR, PARAMETER DRIFT) AND CORRECT THE CONDITION.Continuously monitor equipment settings and adjust to make allowance for drift caused by erosion of the gun electrode and nozzle.
During the application of a plasma coating.
Parts to be coated with IAE 53-33 must have the surface prepared after grit blasting and before the IAE 53-33 plasma coating is applied. These parts must be coated with CoMat 03-124 FLAME SPRAY NICKEL-ALUMINUM(78 Ni-22 Al) to a thickness of 0.001 to 0.005 inch (0.026 to 0.127 mm) applied by an oxy-acetylene flame spray torch, or a 0.003 to 0.005 inch (0.077 to 0.127 mm) thick of IAE 53-17 or 53-37 undercoat must be applied. Uncoated areas are not permitted.
Surfaces to be coated must be heated to remove moisture and, when necessary, to control thermal expansion of the part in relation to the coating. The part can be heated by control of the torch dwell time immediately before spraying. The temperature of the part when heating and spraying must be kept sufficiently low to stop discoloration, oxidation, distortion, and other conditions which can have a bad effect on the coating or base metal.
When repair illustrations or instructions specify one or more IAE 53 coatings to be applied one after the other, they must be applied as soon as possible. If possible, the coatings should be applied within two hours of completion of the coating applied before. The surfaces must not be prepared between each coating.
Aluminum parts with surfaces or edges that are bare from when the surface was prepared before spraying or when it was finished after spraying, must have these areas protected as given in the SPM TASK 70-38-02-300-503 before assembly.
As plasma coating equipment is used, IAE recommends that you record the settings to minimize the set-up time necessary to copy a specific coating on to a part. Figure shows a plasma coating process operation sheet. Such records will help when setting up equipment.
SUBTASK 70-34-03-340-002 Apply the IAE 53-XX Plasma Coating
In the IAE 271 dual wire electric arc coating, the coating material is specified by various suffixes. Refer to Step, TABLE 2.
For rotating components, the IAE 271-XX coatings can be used as alternatives to the equivalent suffix IAE 53-XX plasma spray coatings ONLY UP TO A RECOMMENDED MAXIMUM THICKNESS of 0.020 inch (0.508 mm) (see NOTE below).
Example:
IAE 271-37 can be used as an alternative to IAE 53-37, on a rotating part up to a maximum recommended thickness of 0.020 inch (0.508 mm).
Each spray schedule must be initially qualified by metallography, bond strength, and hardness (where applicable). Refer to the SPM TASK 70-34-03-340-501-001.
All requirements associated with plasma spray of rotating parts are also applicable to dual wire electric arc coatings. Some of these requirements are:
Rotating Components.
NOTE
If a specific repair permits IAE 53-XX plasma spray of a rotating component to a thickness greater than 0.020 inch (0.508 mm), the equivalent suffix IAE 271-XX dual wire electric arc coating can also be used to that thickness.
SUBTASK 70-34-03-340-003 Apply the IAE 271-XX Dual Wire Electric Arc Coating
Refer to: Figure
Each spray schedule must be initially qualified by metallography, bond strength, and hardness (where applicable).
Refer to the SPM TASK 70-34-03-340-501-001, Step.

CAUTION
EACH EQUIPMENT SET-UP MUST BE QUALIFIED BY METALLOGRAPHIC EXAMINATION.Surfaces to be coated may be heated to remove moisture and, when necessary, to control thermal expansion of the part in relation to the coating. The part can be heated by control of the torch dwell time immediately before spraying. The temperature of the part when heating and spraying must be kept sufficiently low to stop discolouration, oxidation distortion, and other conditions which can have a bad effect on the coating or base metal.
Unless specified differently, tolerance of -0 and + 0.125 inch ( 3.175 mm) will be permitted on the edges of areas to be coated. Optional coating areas, if coated, must be prepared, handled and coated the same as the other areas.
NOTE
When possible, adjacent areas, which are not necessary to coat, should be specified as optional coating areas.
SUBTASK 70-34-03-340-004 Apply the IAE 36206-XX HVOF Coating
After you plasma coat and decrease the temperature of the part, remove all masking materials and wipe clean all remaining masking adhesive from the part. Refer to the SPM TASK 70-11-26-300-503.
SUBTASK 70-34-03-110-001 Removal of Masking Tape
NOTE
When machining or finishing is necessary, it is permitted to remove masking after these operations.On some parts it will be necessary to finish the coating, either because of part fit or surface finish requirements. For harder coatings, it will be necessary to grind excess material to the finished dimensions. Single point machining and grinding are effective mechanical methods (procedures) for the removal or finishing of thermal spray coatings. Refer to the SPM TASK 70-32-07-100-501, SUBTASK 70-32-07-320-001.
Dress and true each grinding wheel with a brake dresser to zero runout and balance on a wheel balancer until the wheel does not turn. If each grinding wheel has its own wheel mount, it should not be necessary to true the wheel again unless it becomes glazed or clogged. Regular dressing with a clean silicon carbide (37C400-HV) stick will keep it clean and satisfactorily cutting. Unless a diamond wheel is abused or misused, it is not necessary to retrue unless it becomes glazed or loaded.
Grooves and other irregular-shaped surfaces (such as, radii and spherical surfaces) can be more economically finished with silicon carbide wheels (such as Jowitt and Rodgers X80J, or equivalent), which are dressed to the shape of the surface. This will stop the need for dressing an expensive diamond wheel.
Use Solution Code 177 as the coolant. Refer to SPM TASK 70-32-08-320-501. Spray the mist of the coolant on to the grinding wheel.

CAUTION
DO NOT TRY TO GET A BETTER FINISH ON THE PART THAN THE GRIT SIZE OF THE WHEEL IS MANUFACTURED TO GIVE. A DULL OR GLAZED WHEEL CAN GIVE A SHINY, SMOOTH SURFACE COMPARED WITH A CLEAN FREE-CUTTING WHEEL. THE SURFACE, HOWEVER, WILL BE SMEARED AND UNWANTED HEAT CRACKS WILL APPEAR UNDER HIGH MAGNIFICATION. THIS IS NOT PERMITTED.Finishes of approximately 20 microinches can be had with size 100 grit, approximately 10 microinches with 220 grit, and approximately 6 microinches with 400 grit when a diamond wheel is used.
For internal and external grinding, an infeed on cylindrical surfaces must not be more than a maximum of 0.0003 inch (0.0076 mm) for 100 grit, 0.0002 inch (0.0051 mm) for 220 grit, or 0.0001 inch (0.0025 mm) for 400 grit for each pass. The traverse feed must be at the slowest available setting on the machine.
For surface or flat grinding, the down feed must not be more than a maximum of 0.0003 inch (0.0076 mm) for 100 grit, 0.0002 inch (0.0051 mm) for 220 grit, or 0.0001 inch (0.0025 mm) for 400 grit for each pass. Cross feed must be between 0.040 to 0.080 inch (1.02 to 2.03 mm)/pass. Traverse speed will be determined by the size of the part.
NOTE
The difference in different coatings will have an effect on the cutting rate. Thus, infeeds, cross feeds, work speed, and grinding speeds will be different as experience shows in order to get the best results.
IAE 53-1, -2, -5 and -7 coatings.
Grinding fluid - Solution Code 177. Refer to SPM TASK 70-32-08-320-501. Spray the mist of the coolant on to the grinding wheel.
IAE 53-10 coating.
Grinding fluid - Solution Code 177. Refer to SPM TASK 70-32-08-320-501.
IAE 53-13, -16 and -18 coatings.
Grinding fluid - Solution Code 177. Refer to SPM TASK 70-32-08-320-501.
IAE 53-21, -35, -37, and -80 coatings.
These coatings should usually be finished by conventional milling procedures. But, if grinding is used to get a better surface finish, the subsequent data must be used.
Cutting fluid - Solution Code 177. Refer to SPM TASK 70-32-08-320-501.
IAE 271-37 coating.
Grinding.
NOTE
When grinding coatings, soft wheels do a better job than hard wheels. If problems, like cracking or burnishing, occur during the grinding operation, it is recommended that you try a softer wheel. Softer wheels break down faster and the result is sharp, fresh, new grit.
SUBTASK 70-34-03-350-001 Finish the Surface of the Parts
Equipment and operator qualification is necessary before you do this repair. Refer to the SPM TASK 70-34-03-340-501-001.
If the chipped coating (IAE 53-37 IAE 271-37, IAE 53-47 or IAE 271-47) only was not in engine service, you can repair it with the microplasma spray equipment available from Supplier Code 01FK3. Refer to the supplier List in the PCI. Be sure to obey these requirements:
General.
Clean the repair area(s). Refer to the SPM TASK 70-11-26-300-503.
Mask the repair area(s). Refer to the SPM TASK 70-34-18-380-501.
Grit blast the repair area(s). Refer to the SPM TASK 70-34-18-380-501.
For area(s) with no coating at the interface.
Clean the repair area(s). Refer to the SPM TASK 70-11-26-300-503.
Mask the repair area(s). Refer to the SPM TASK 70-34-18-380-501.
For area(s) with coating at the interface.
Use CoMat 03-089 METAL SPRAYING POWDER Ni/Al (95/5) for IAE 53-37.
Use CoMat 03-096 PLASMA SPRAY POWDER for IAE 53-47.
Use only compact plasma spray equipment.
Apply IAE 53-37 or IAE 53-47 plasma coating.
Clean the part. Refer to the SPM TASK 70-11-03-300-503.
Prepare the repair area for plasma spray by one of these methods:
NOTE
All metallographic requirements applicable to IAE 53-37 and IAE 53-47 must be met, except up to 20 percent lack of bond is permitted for PWA 53-47, applied with Compact Plasma Spray equipment only.Apply IAE 53-57 plasma coating. Use CoMat 03-089 METAL SPRAYING POWDER Ni/Al (95/5) powder and only microplasma spray equipment.
Clean the part. Refer to the SPM TASK 70-11-26-300-503.
Procedure.
SUBTASK 70-34-03-860-008 Microplasma Spray Chip Repair
Clean areas to be examined by the SPM TASK 70-11-26-300-503. Be sure to remove all oil and other unwanted materials before you examine the cleaned areas.
The surface of the coating must be continuous and equal in thickness.
NOTE
For IAE 53-37 or IAE 271-37 coating only, refer to Step micro plasma spray chip repair.
Examine the coating without magnification.
SUBTASK 70-34-03-220-001 Evaluation of Ground and Lapped Thermal Spray Coatings
Figure: Example of a plasma coating schedule form
Example of a plasma coating schedule form
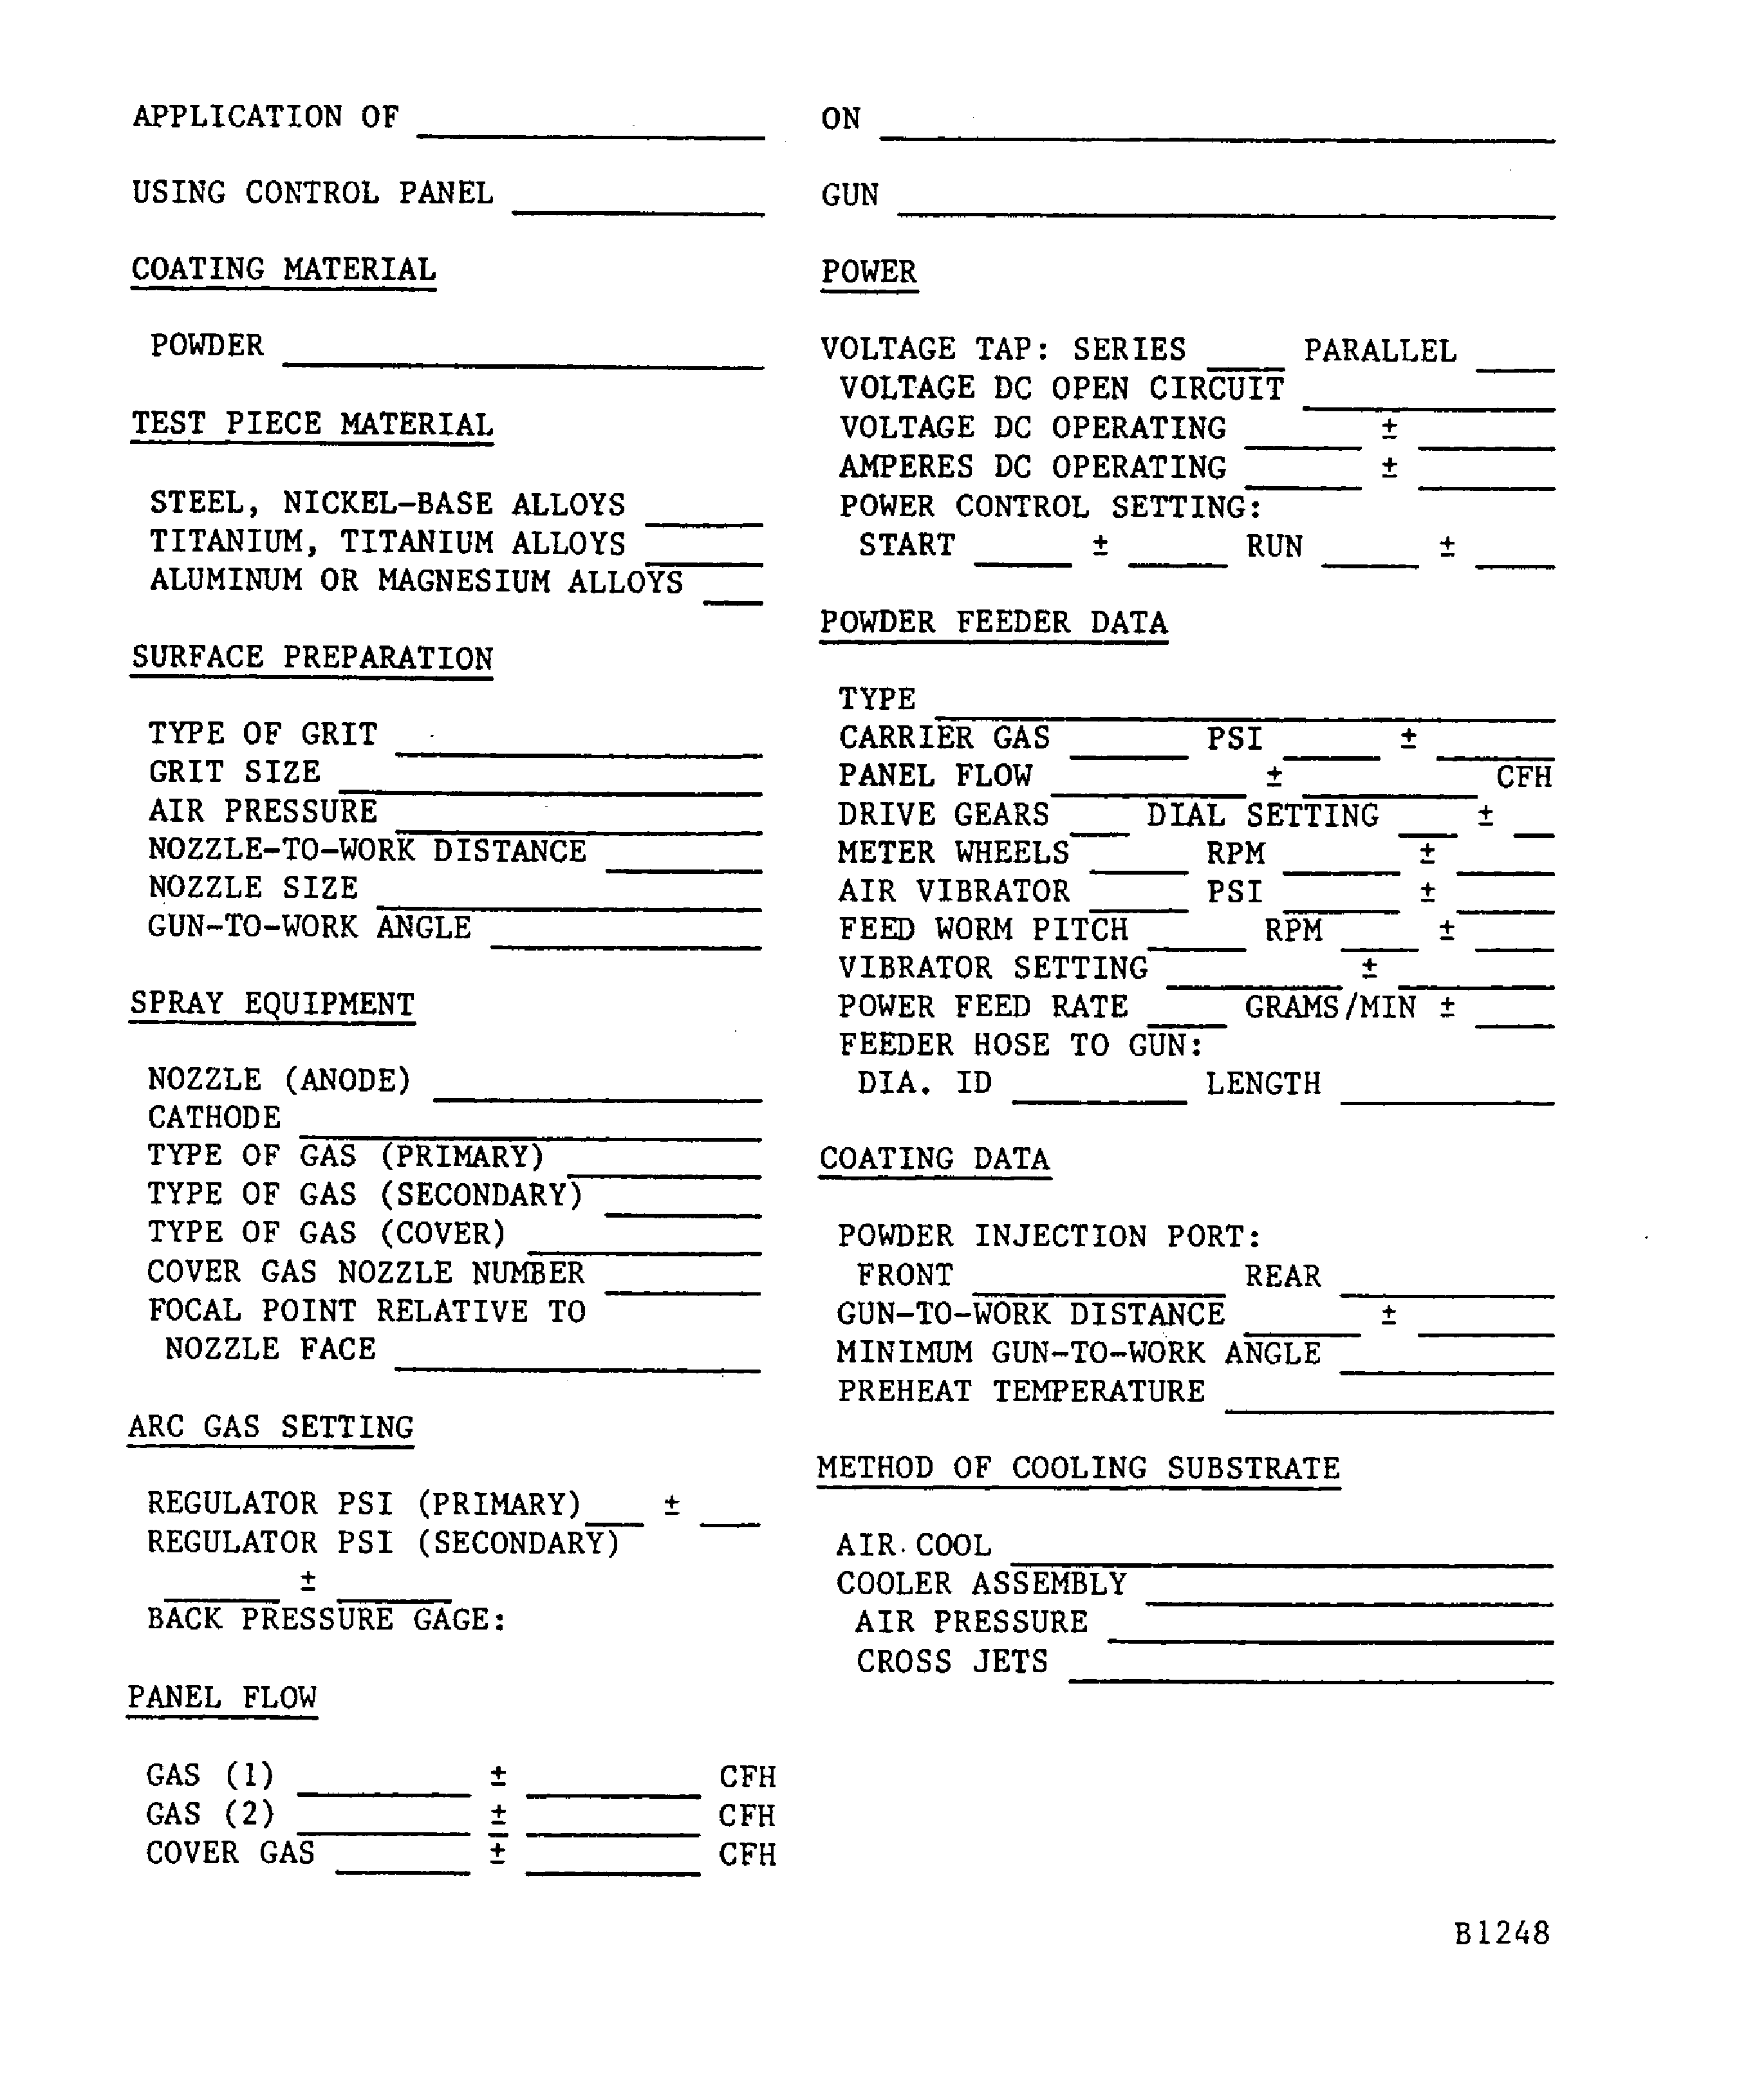
Figure: Example of permitted machine marks
Example of permitted machine marks
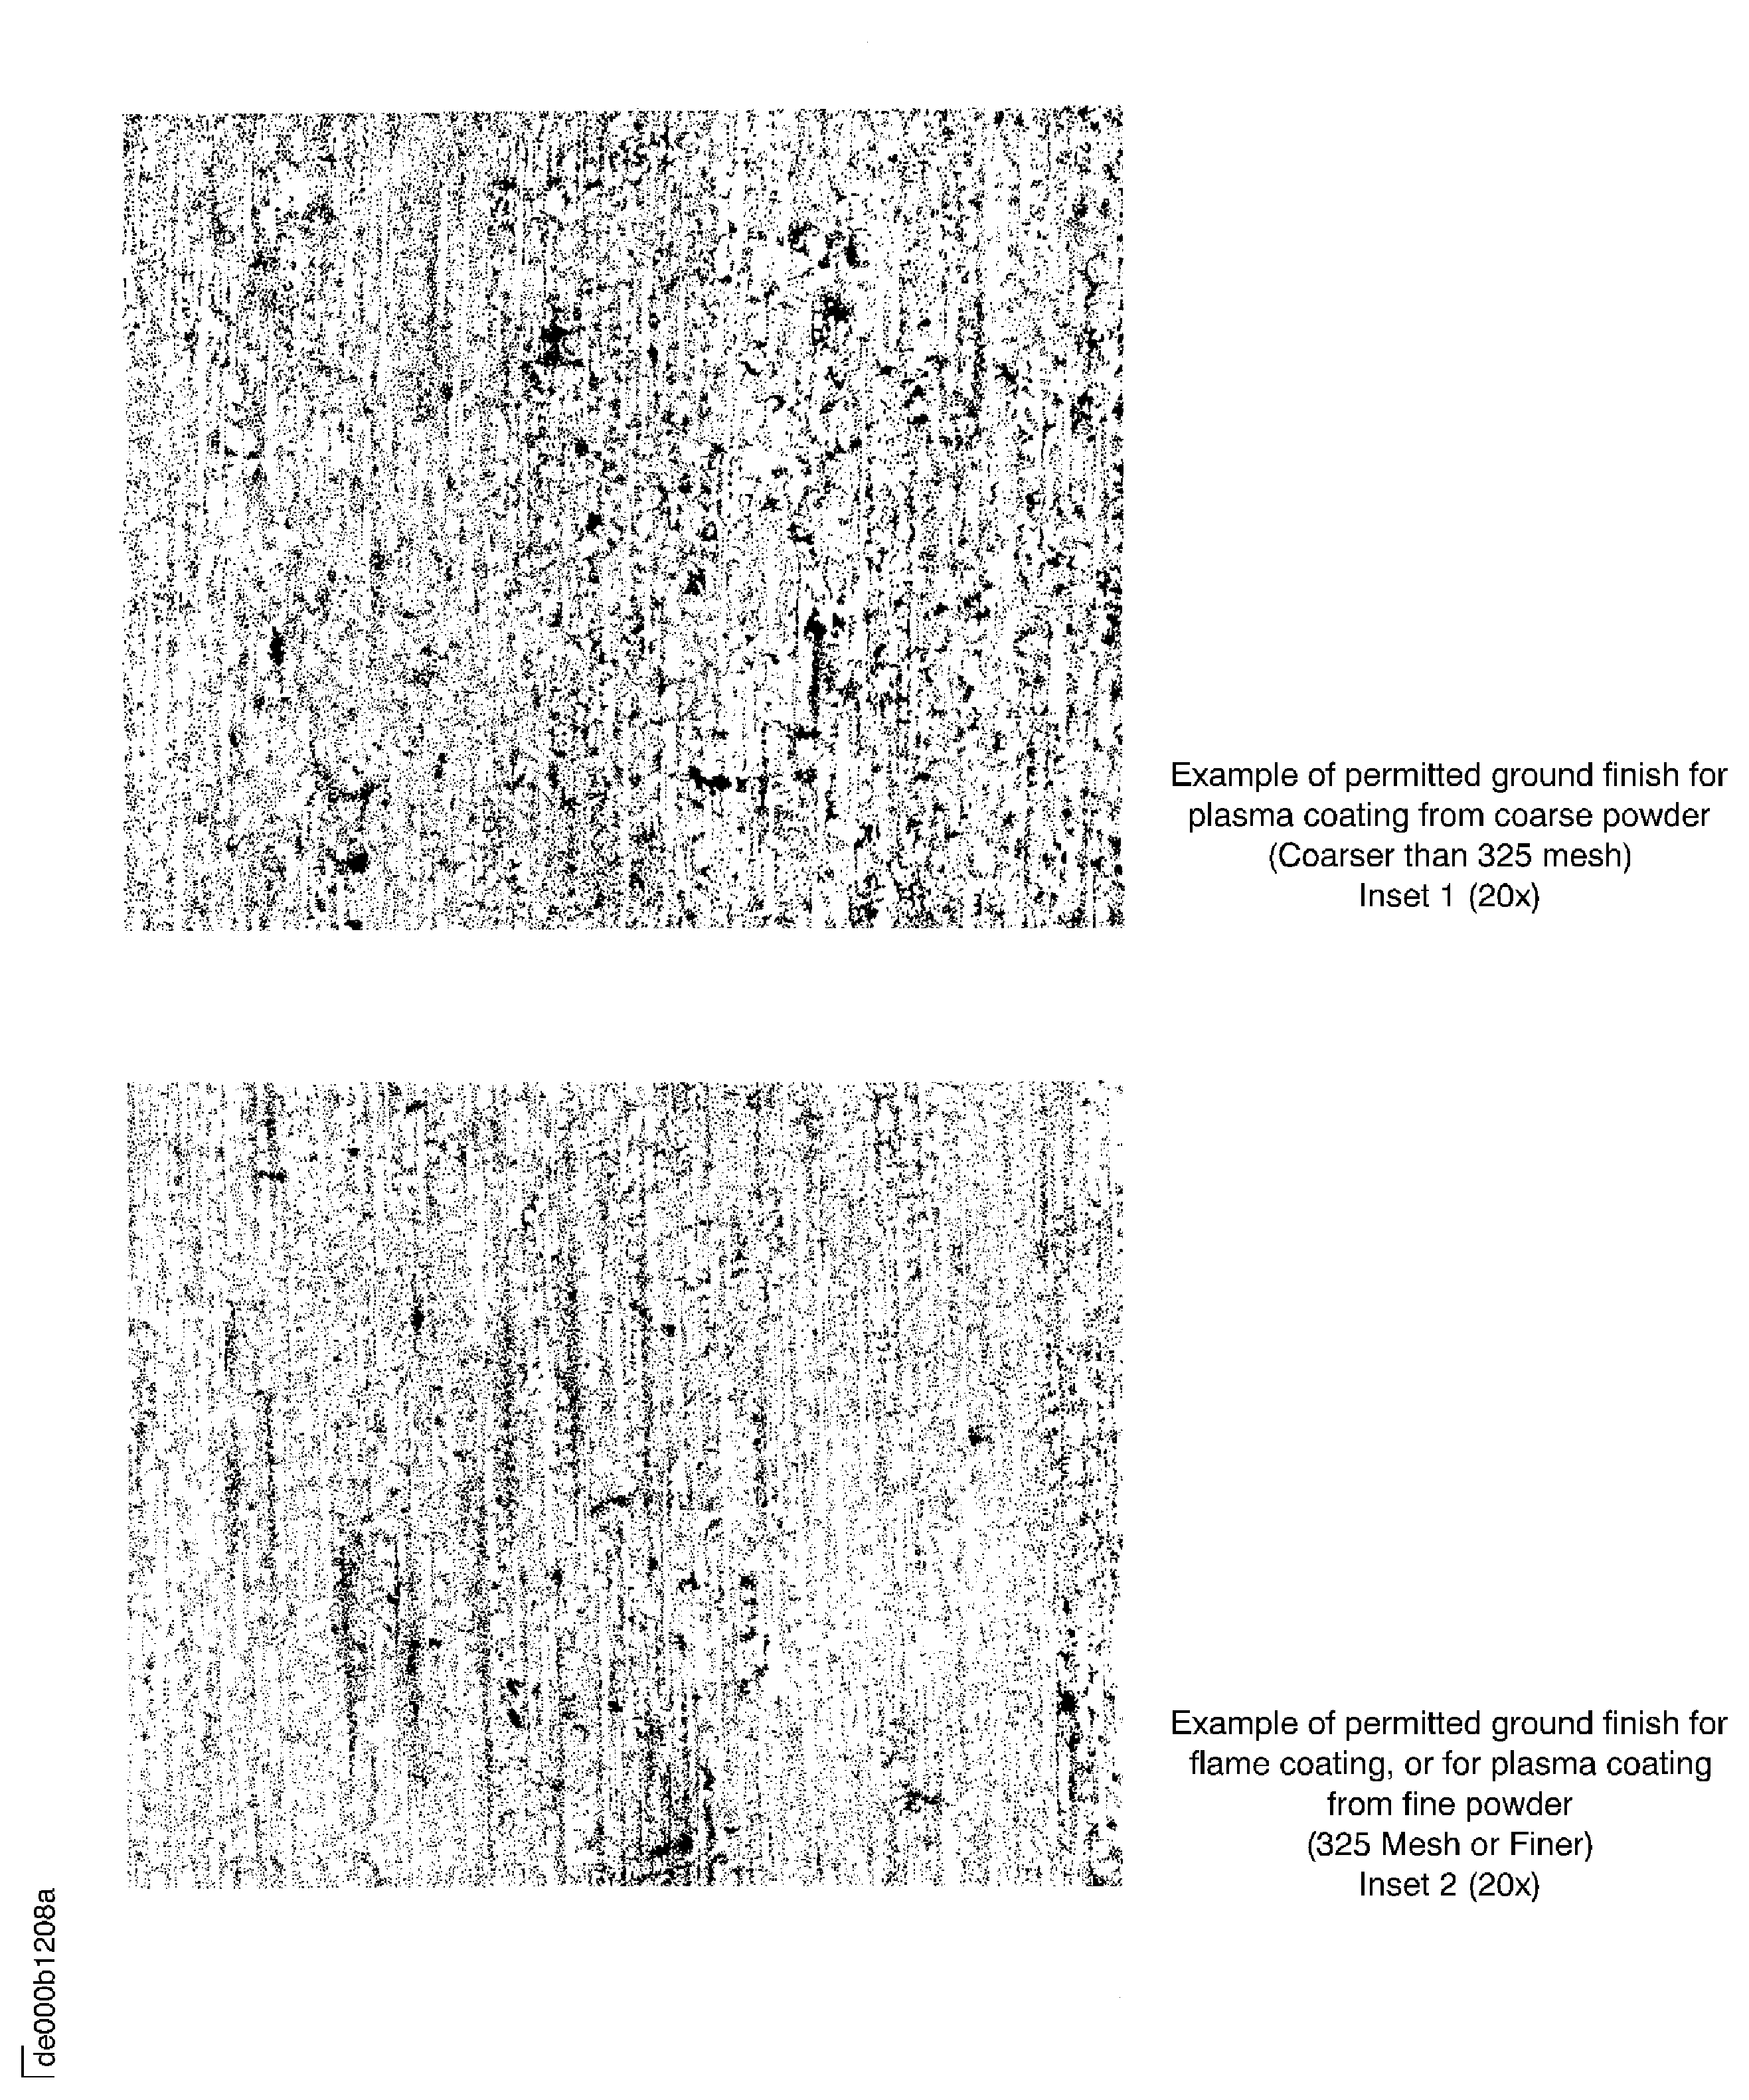
Figure: Example of permitted machine marks
Example of permitted machine marks
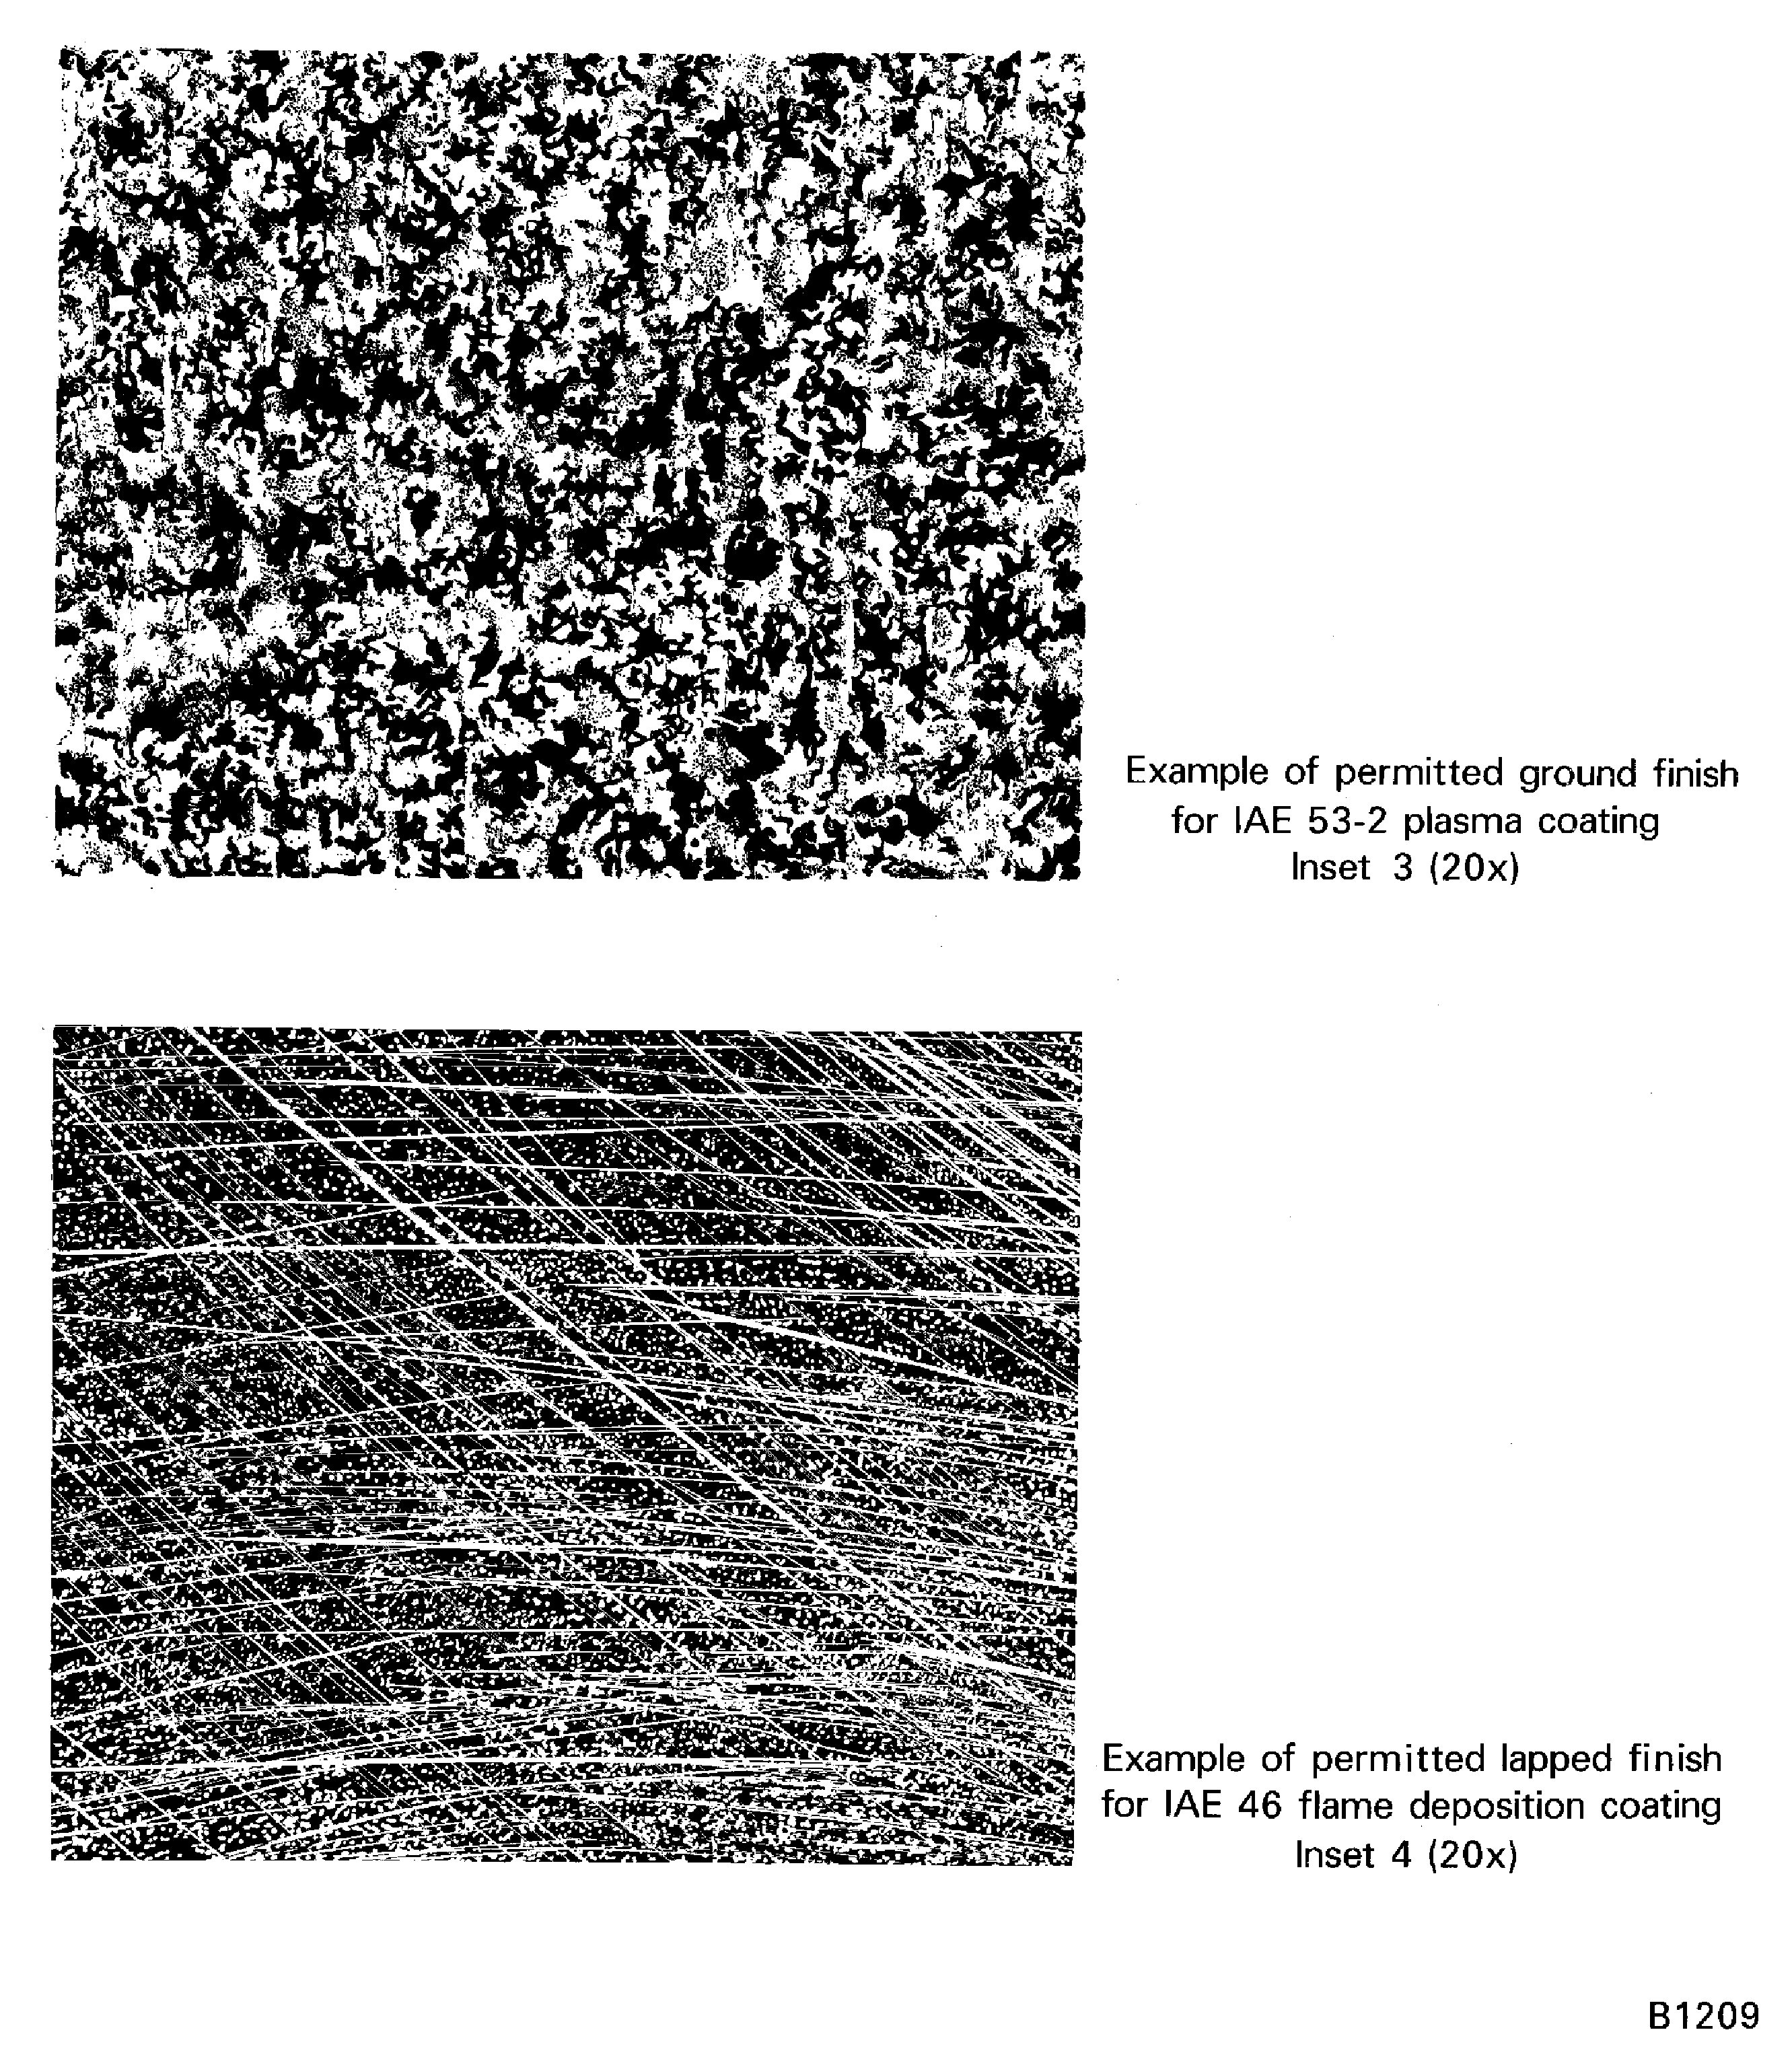
Figure: Example of usual grinding defects
Example of usual grinding defects
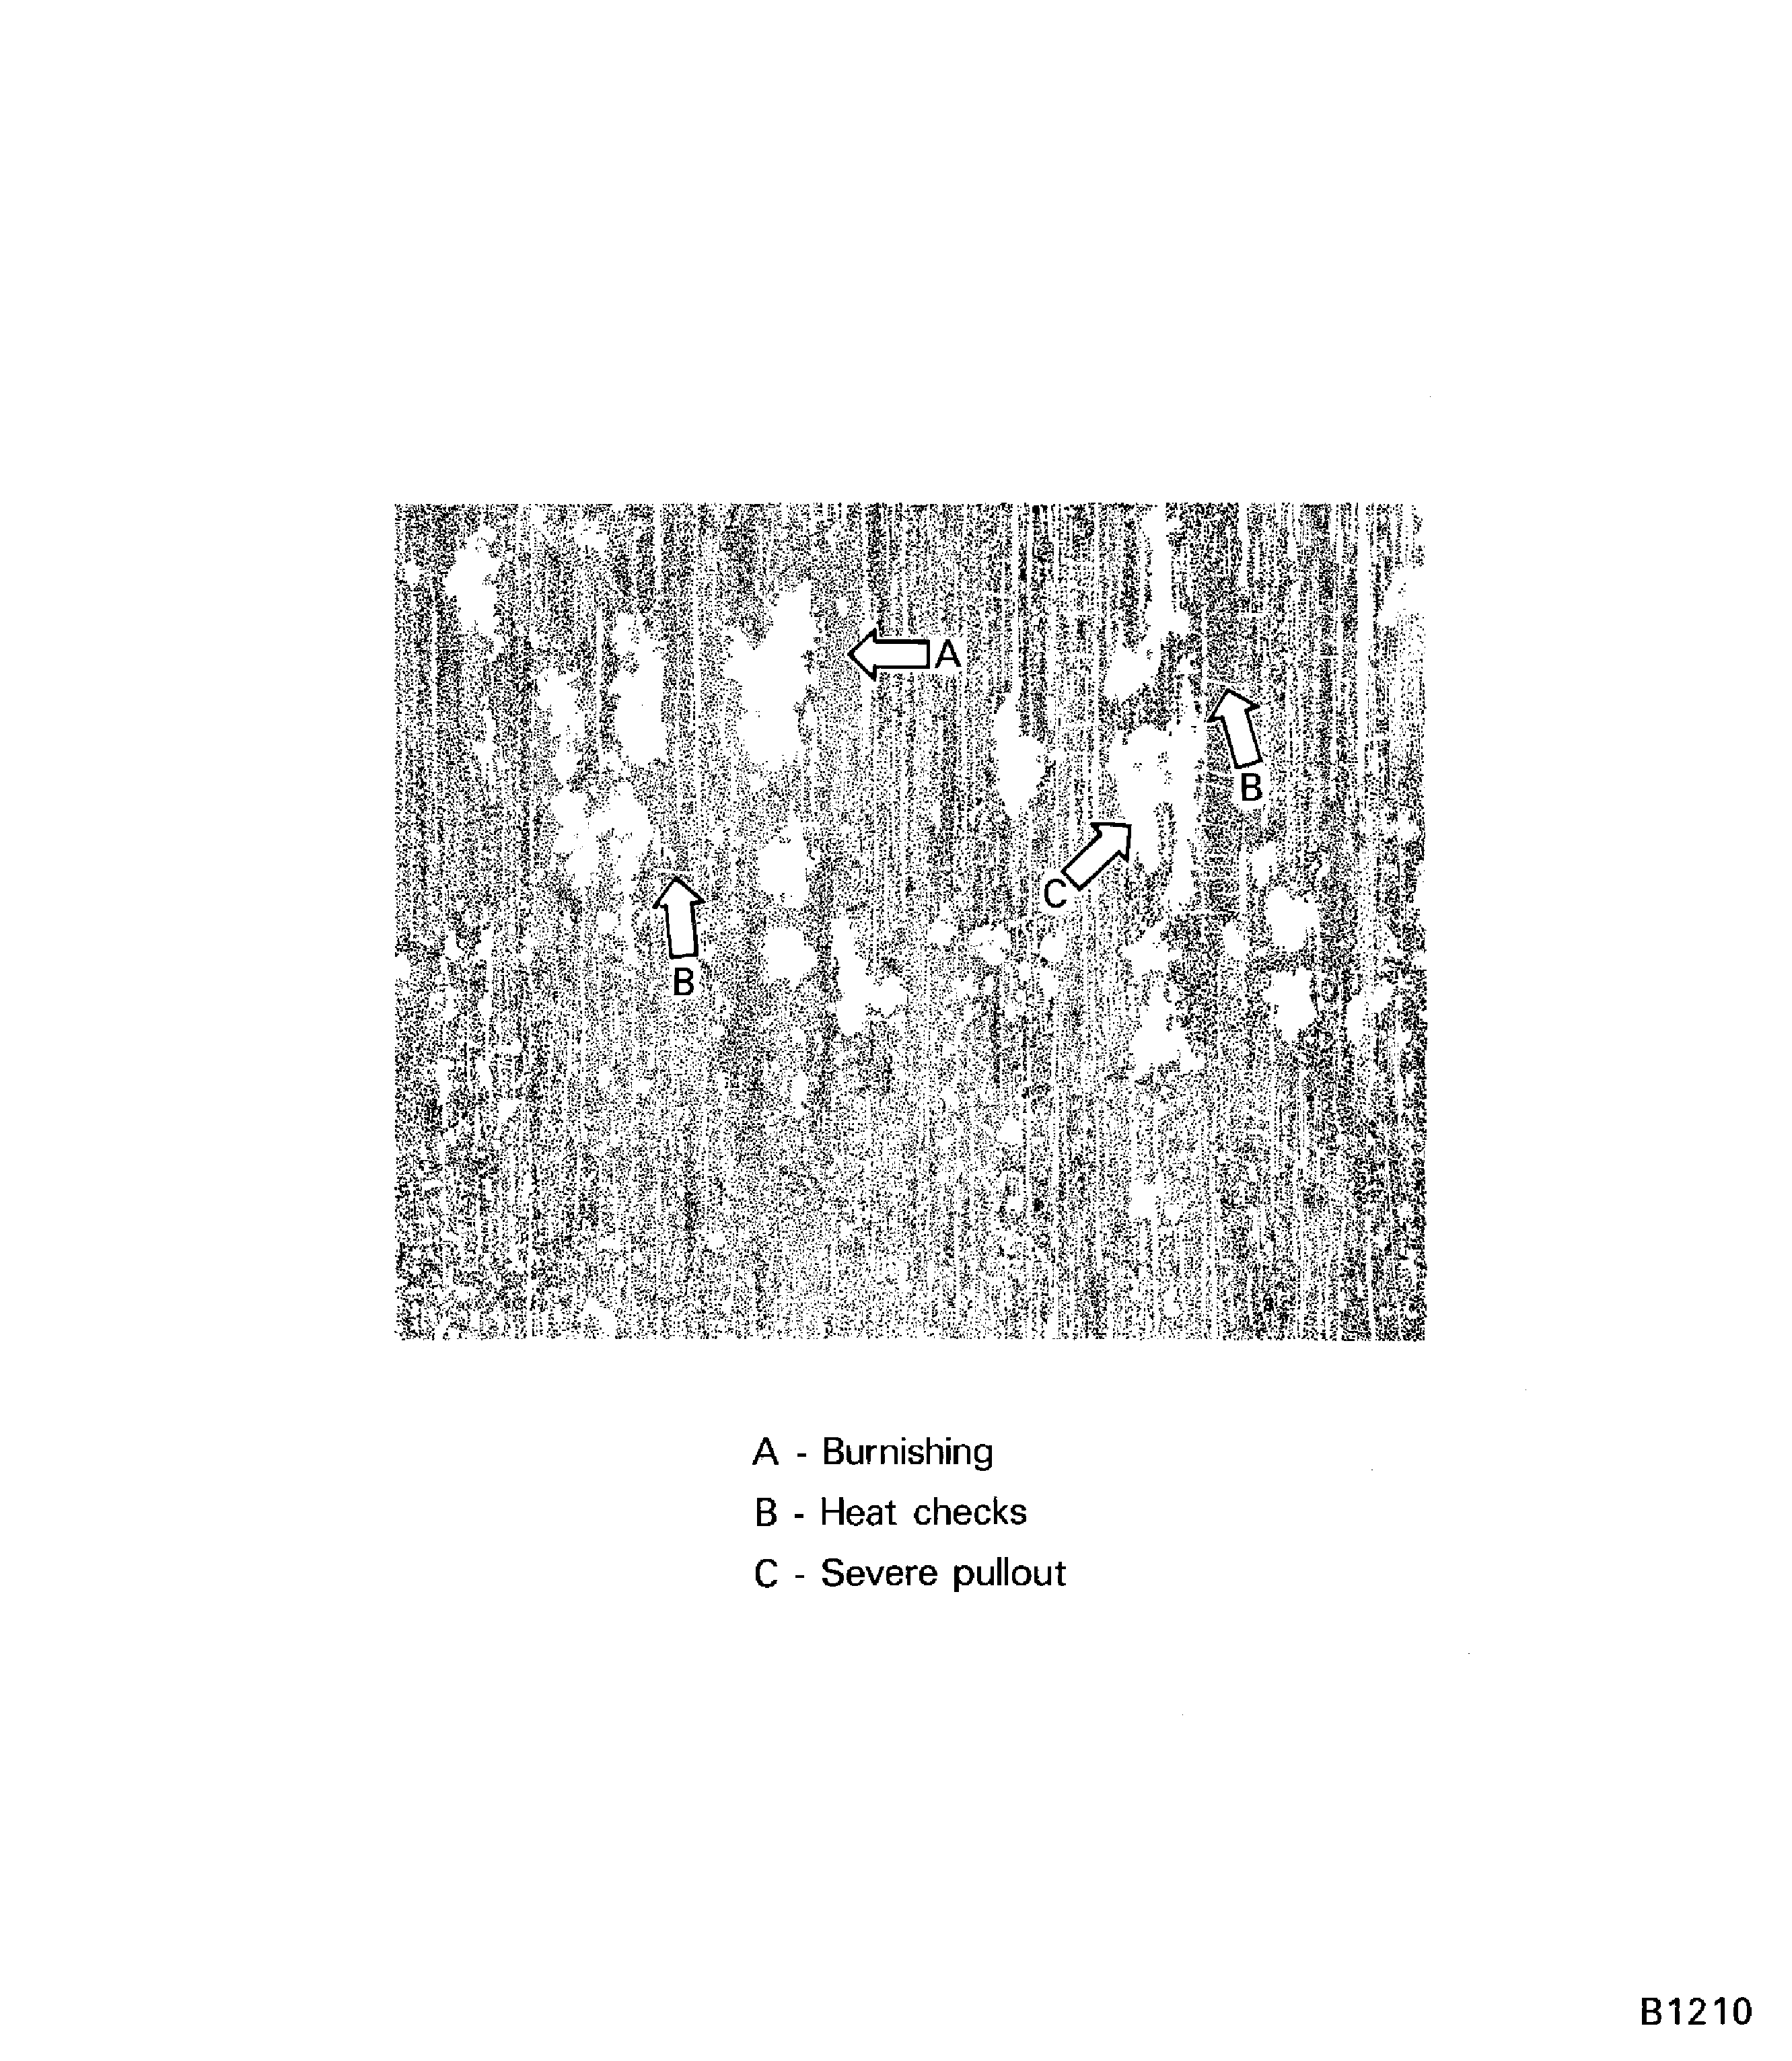
Figure: Examples of interface contamination: The amount of contamination in the top picture is 10 percent and in the bottom picture 20 percent.
Examples of interface contamination: The amount of contamination in the top picture is 10 percent and in the bottom picture 20 percent.
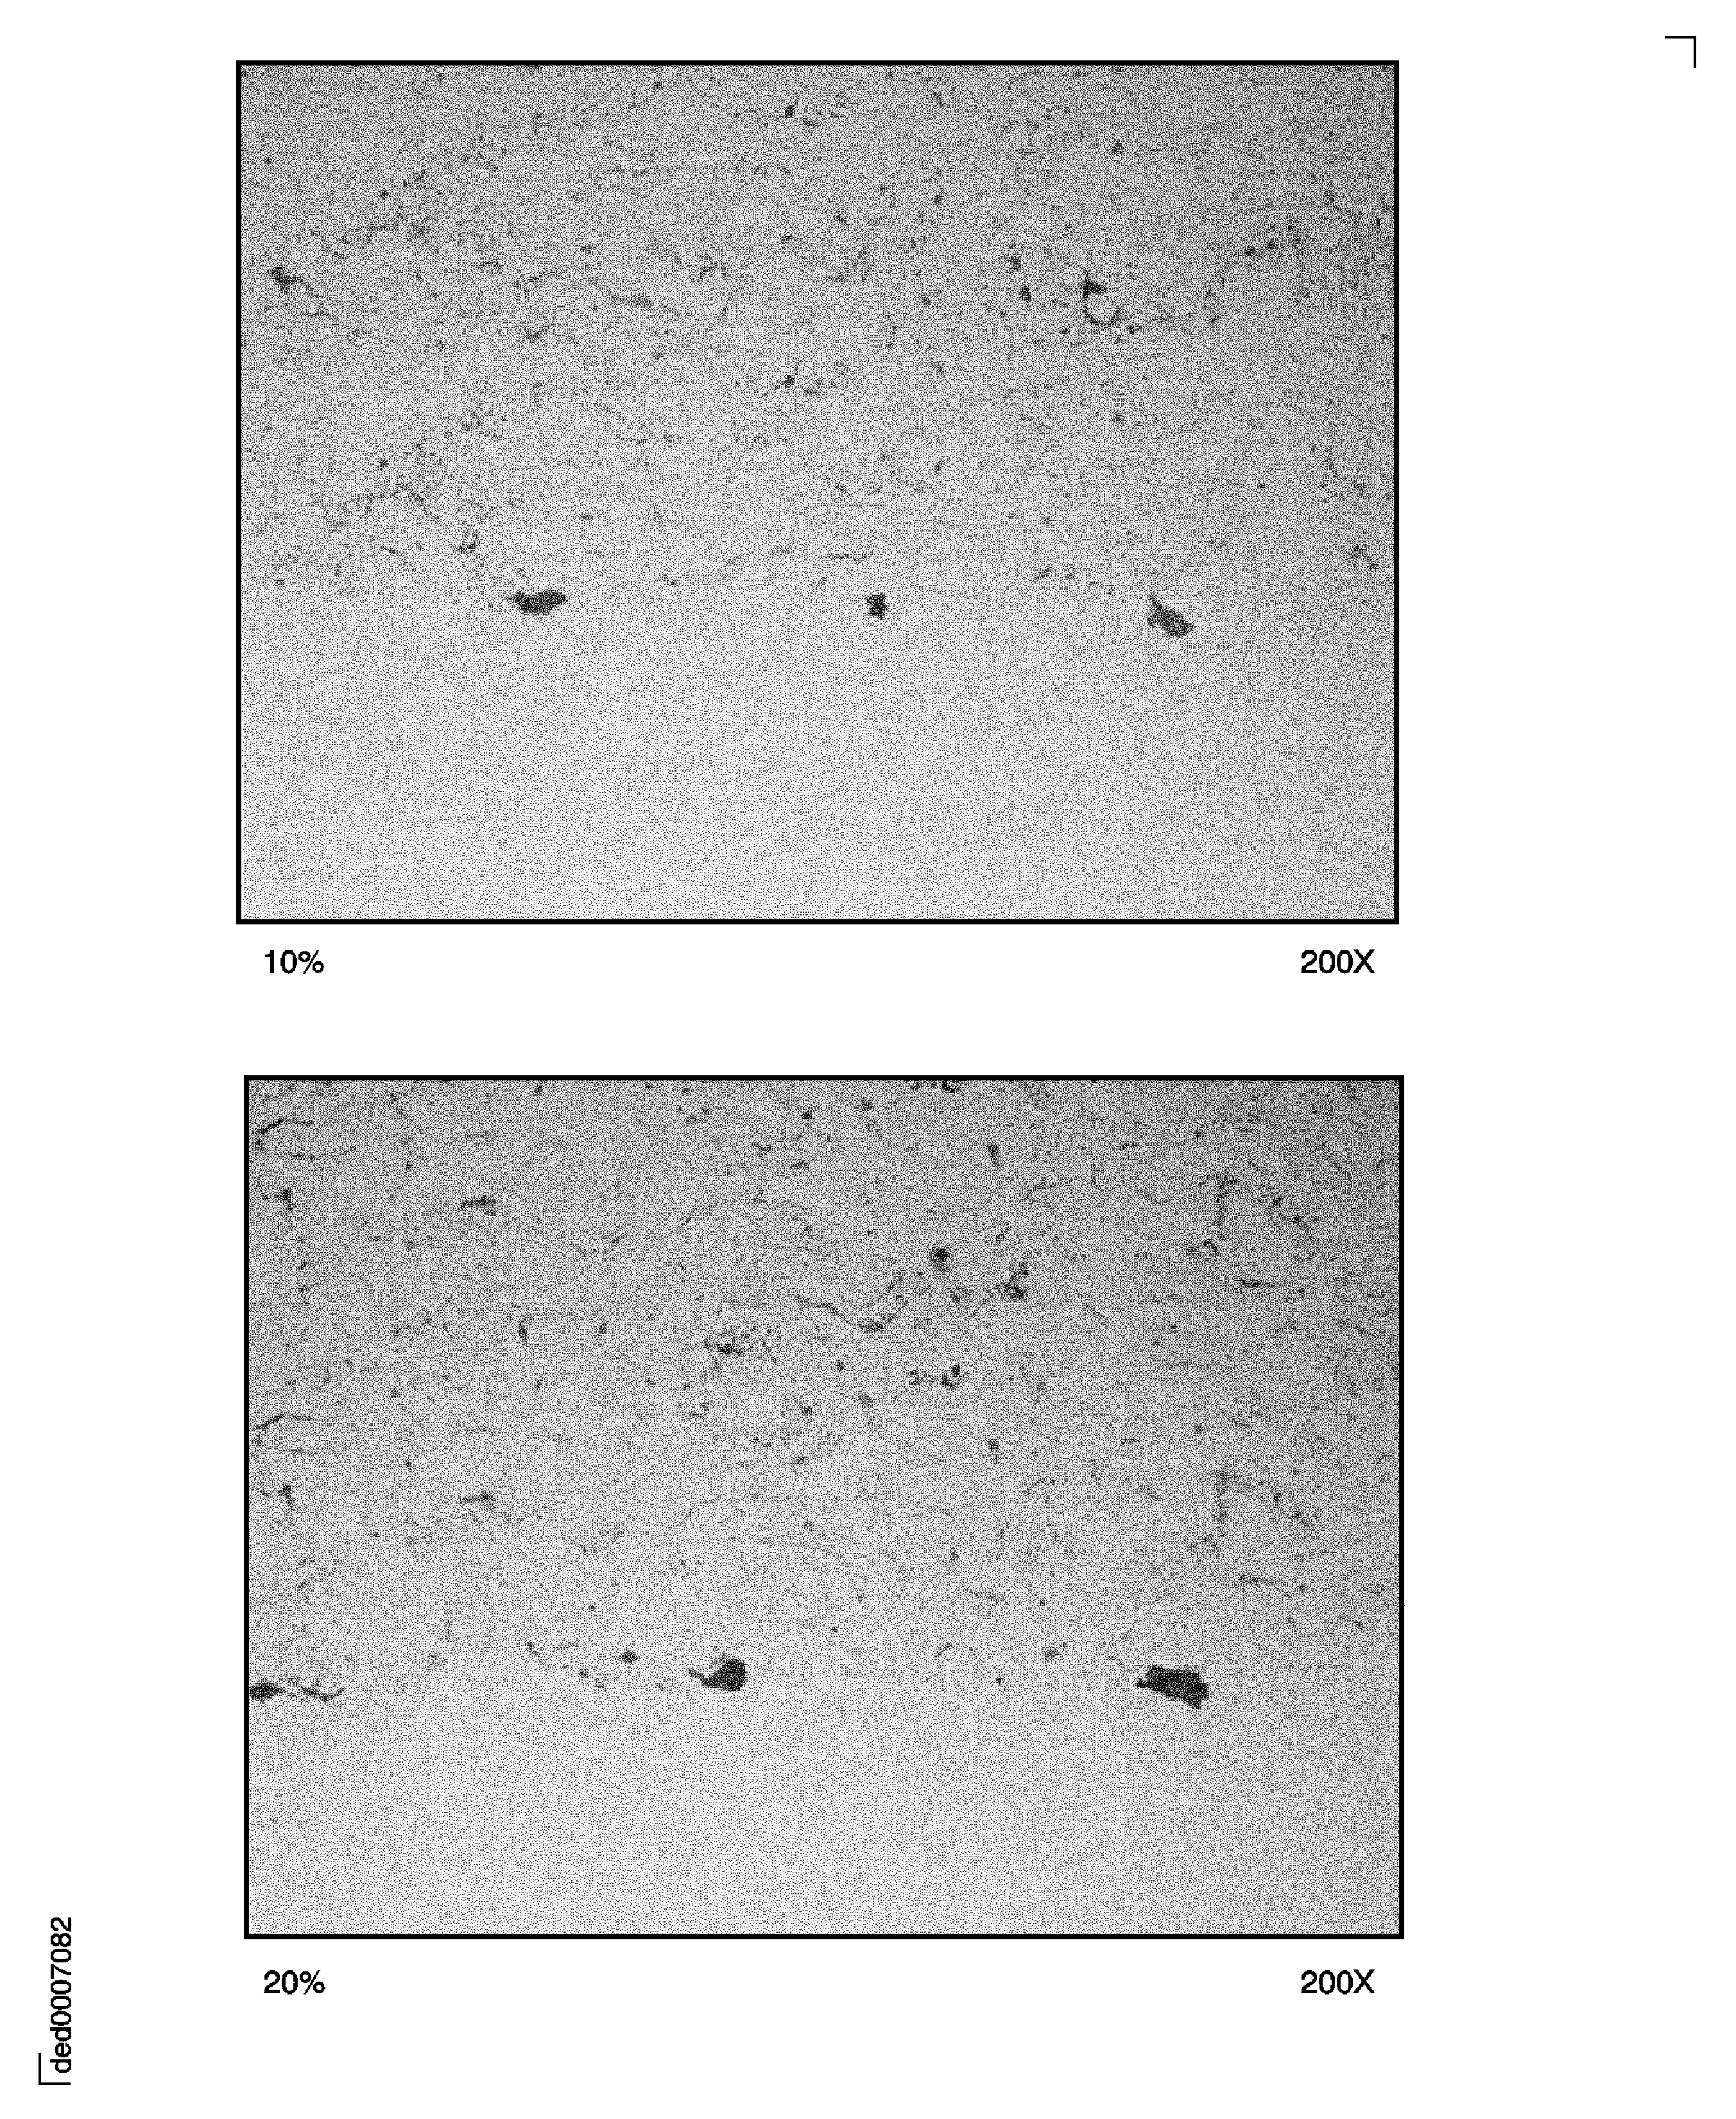
Figure: Examples of interface contamination: The amount of contamination in the top picture is 25 percent and in the bottom picture 30 percent.
Examples of interface contamination: The amount of contamination in the top picture is 25 percent and in the bottom picture 30 percent.
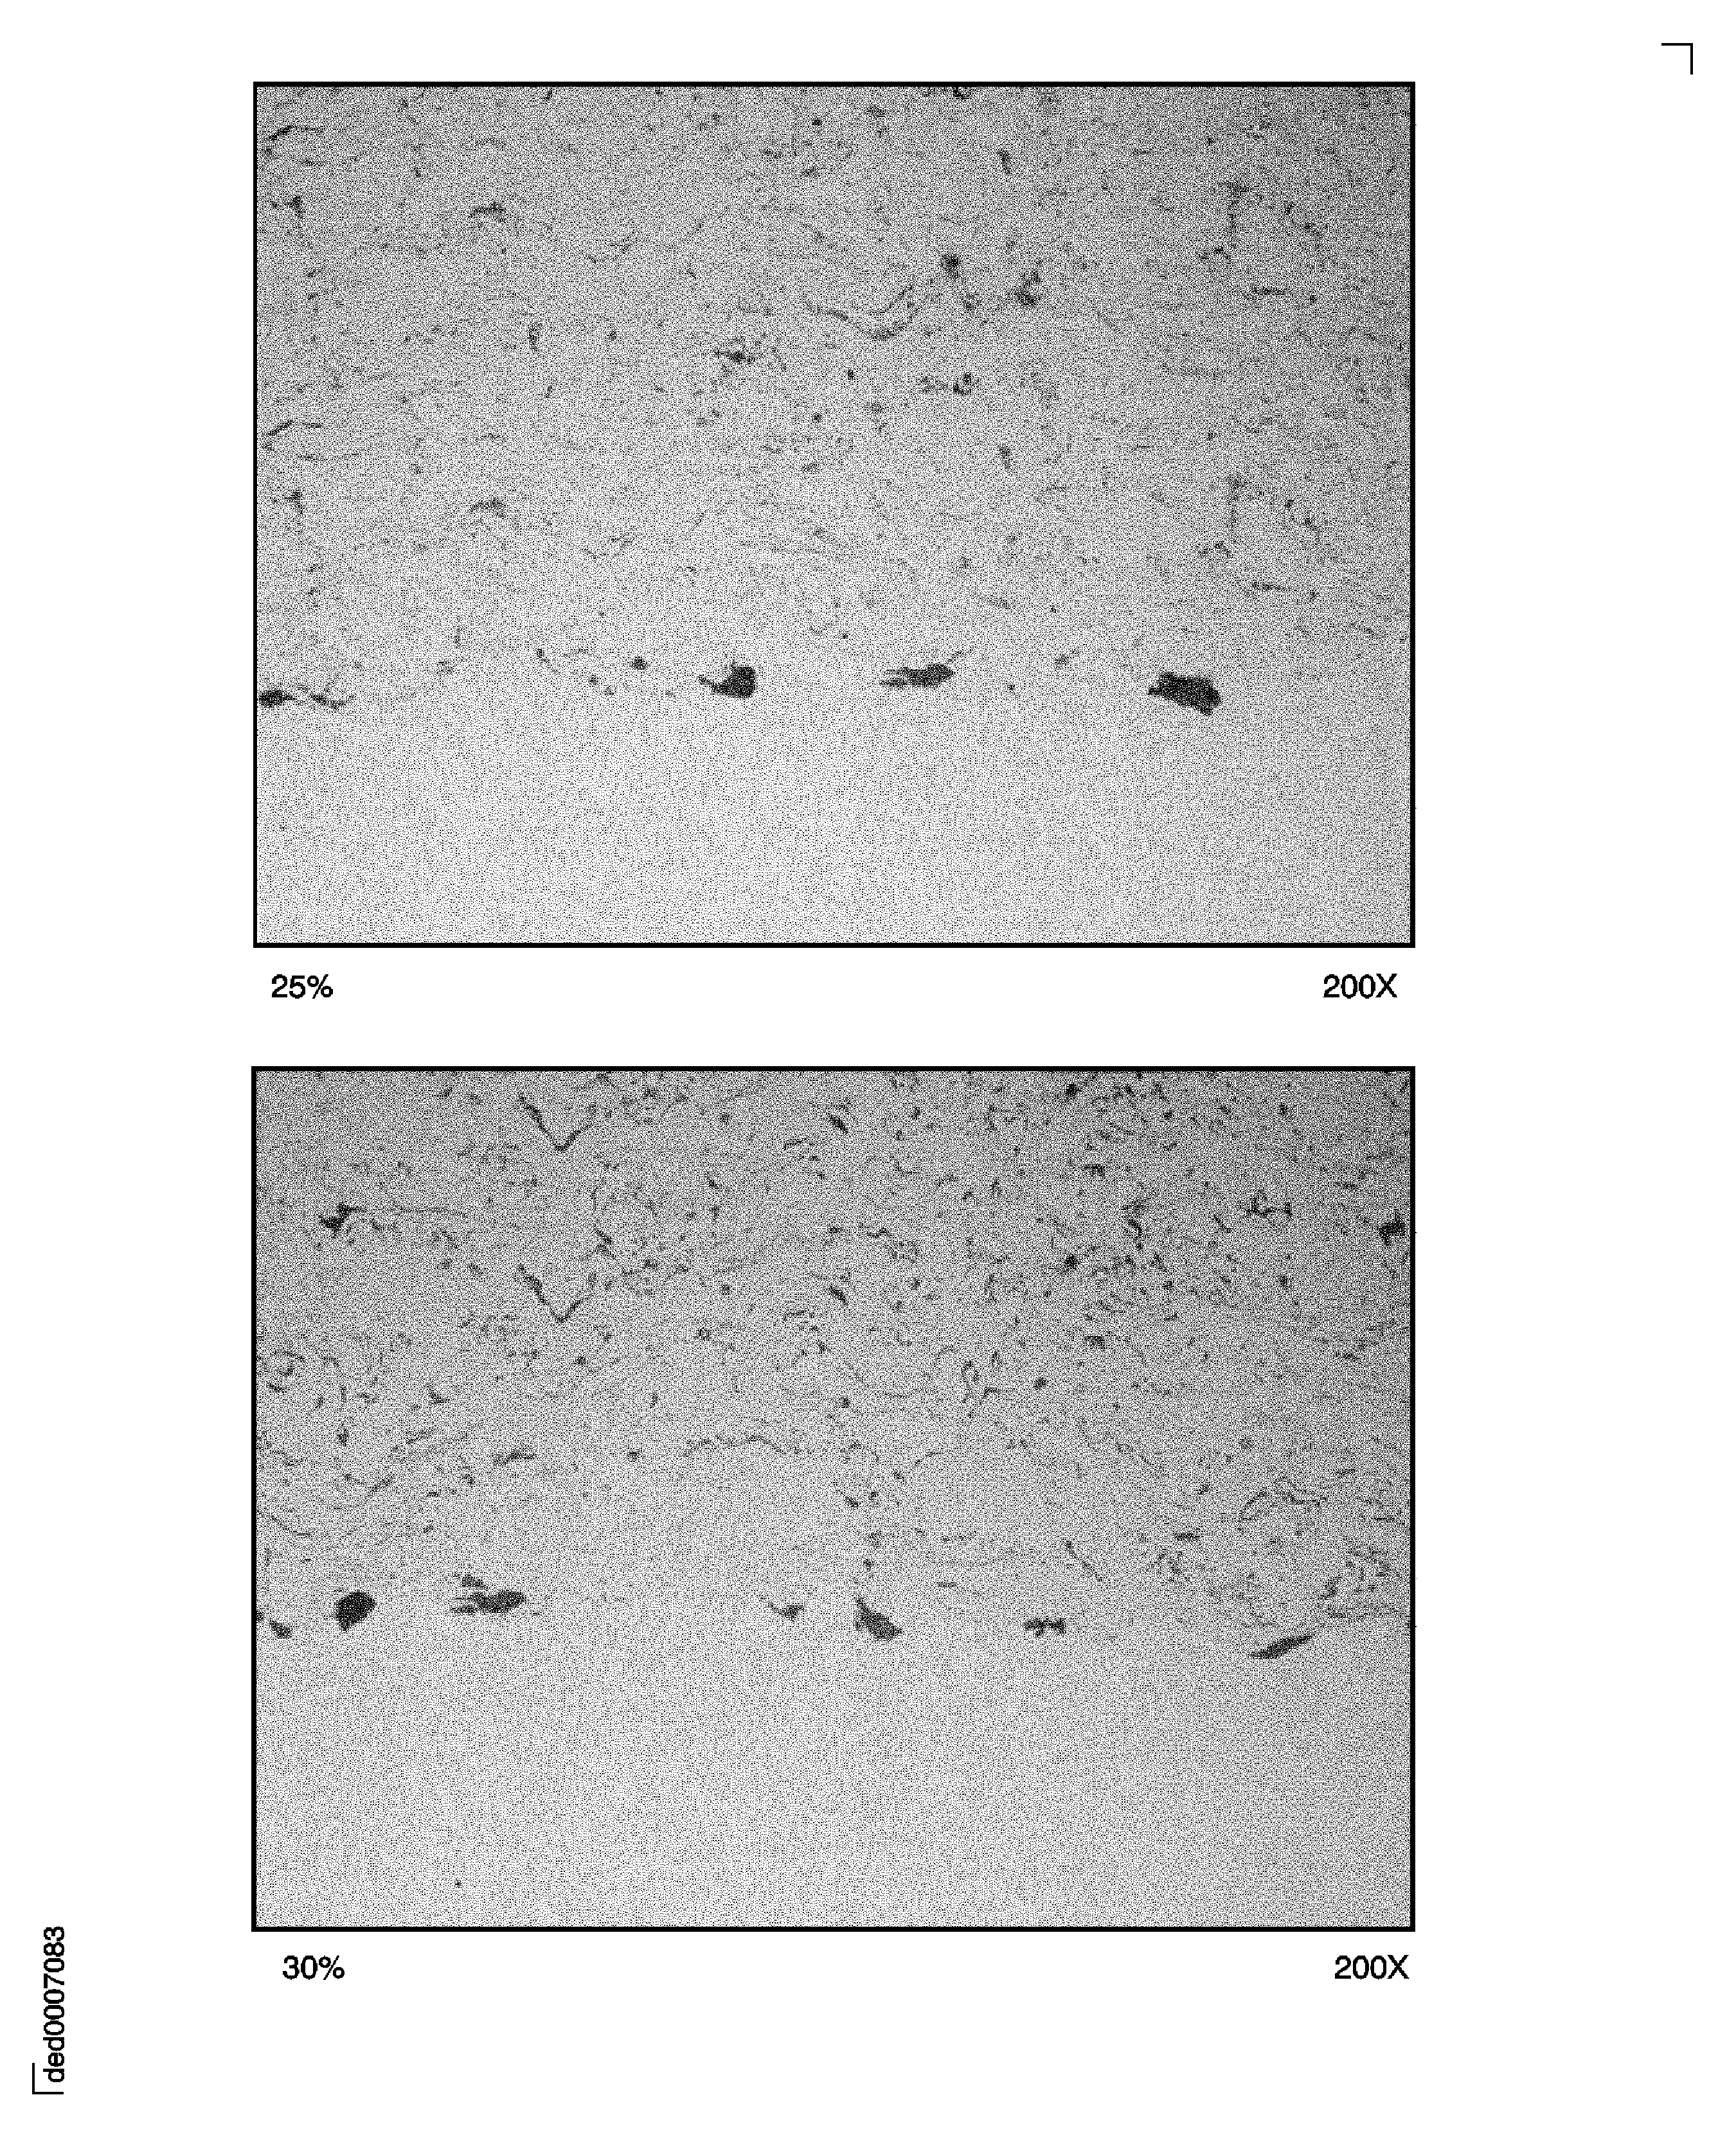
Figure: Examples of interface contamination: The amount of contamination is 35 percent.
Examples of interface contamination: The amount of contamination is 35 percent.
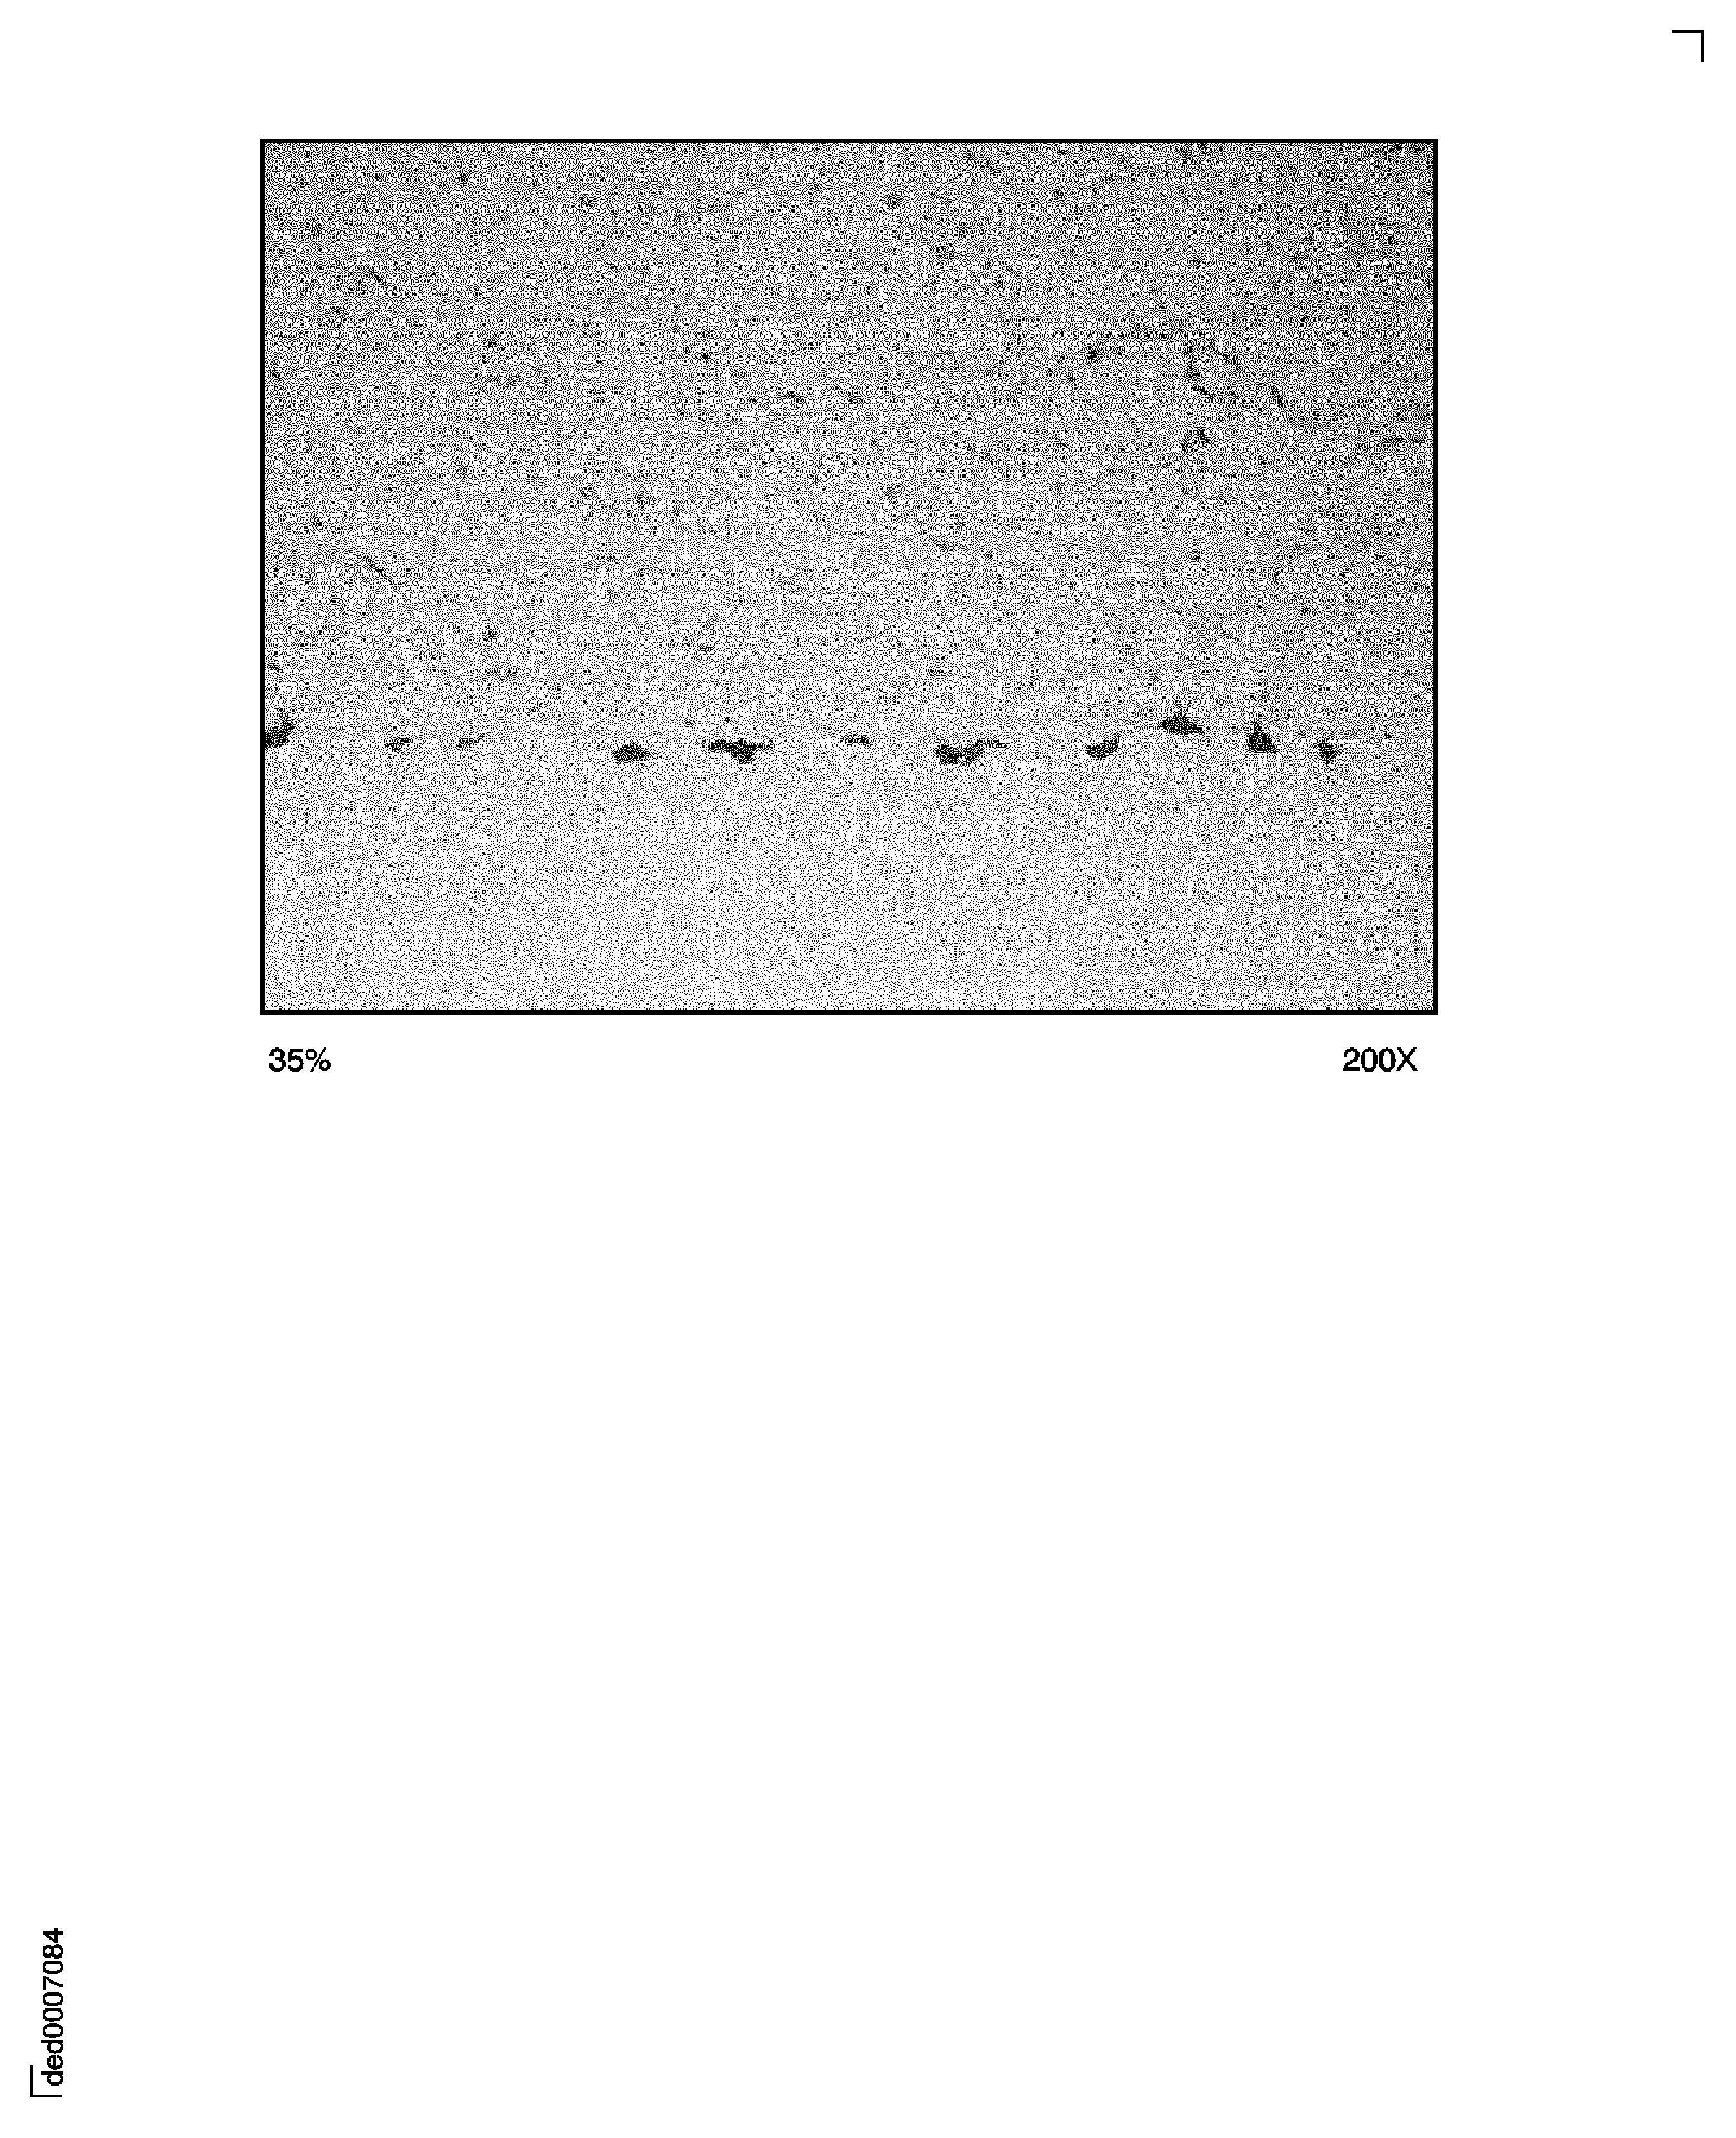
Figure: Porosity: Pore size 10 micron; the amount of porosity in the top picture is 1 percent and in the bottom picture 3 percent.
Porosity: Pore size 10 micron; the amount of porosity in the top picture is 1 percent and in the bottom picture 3 percent.
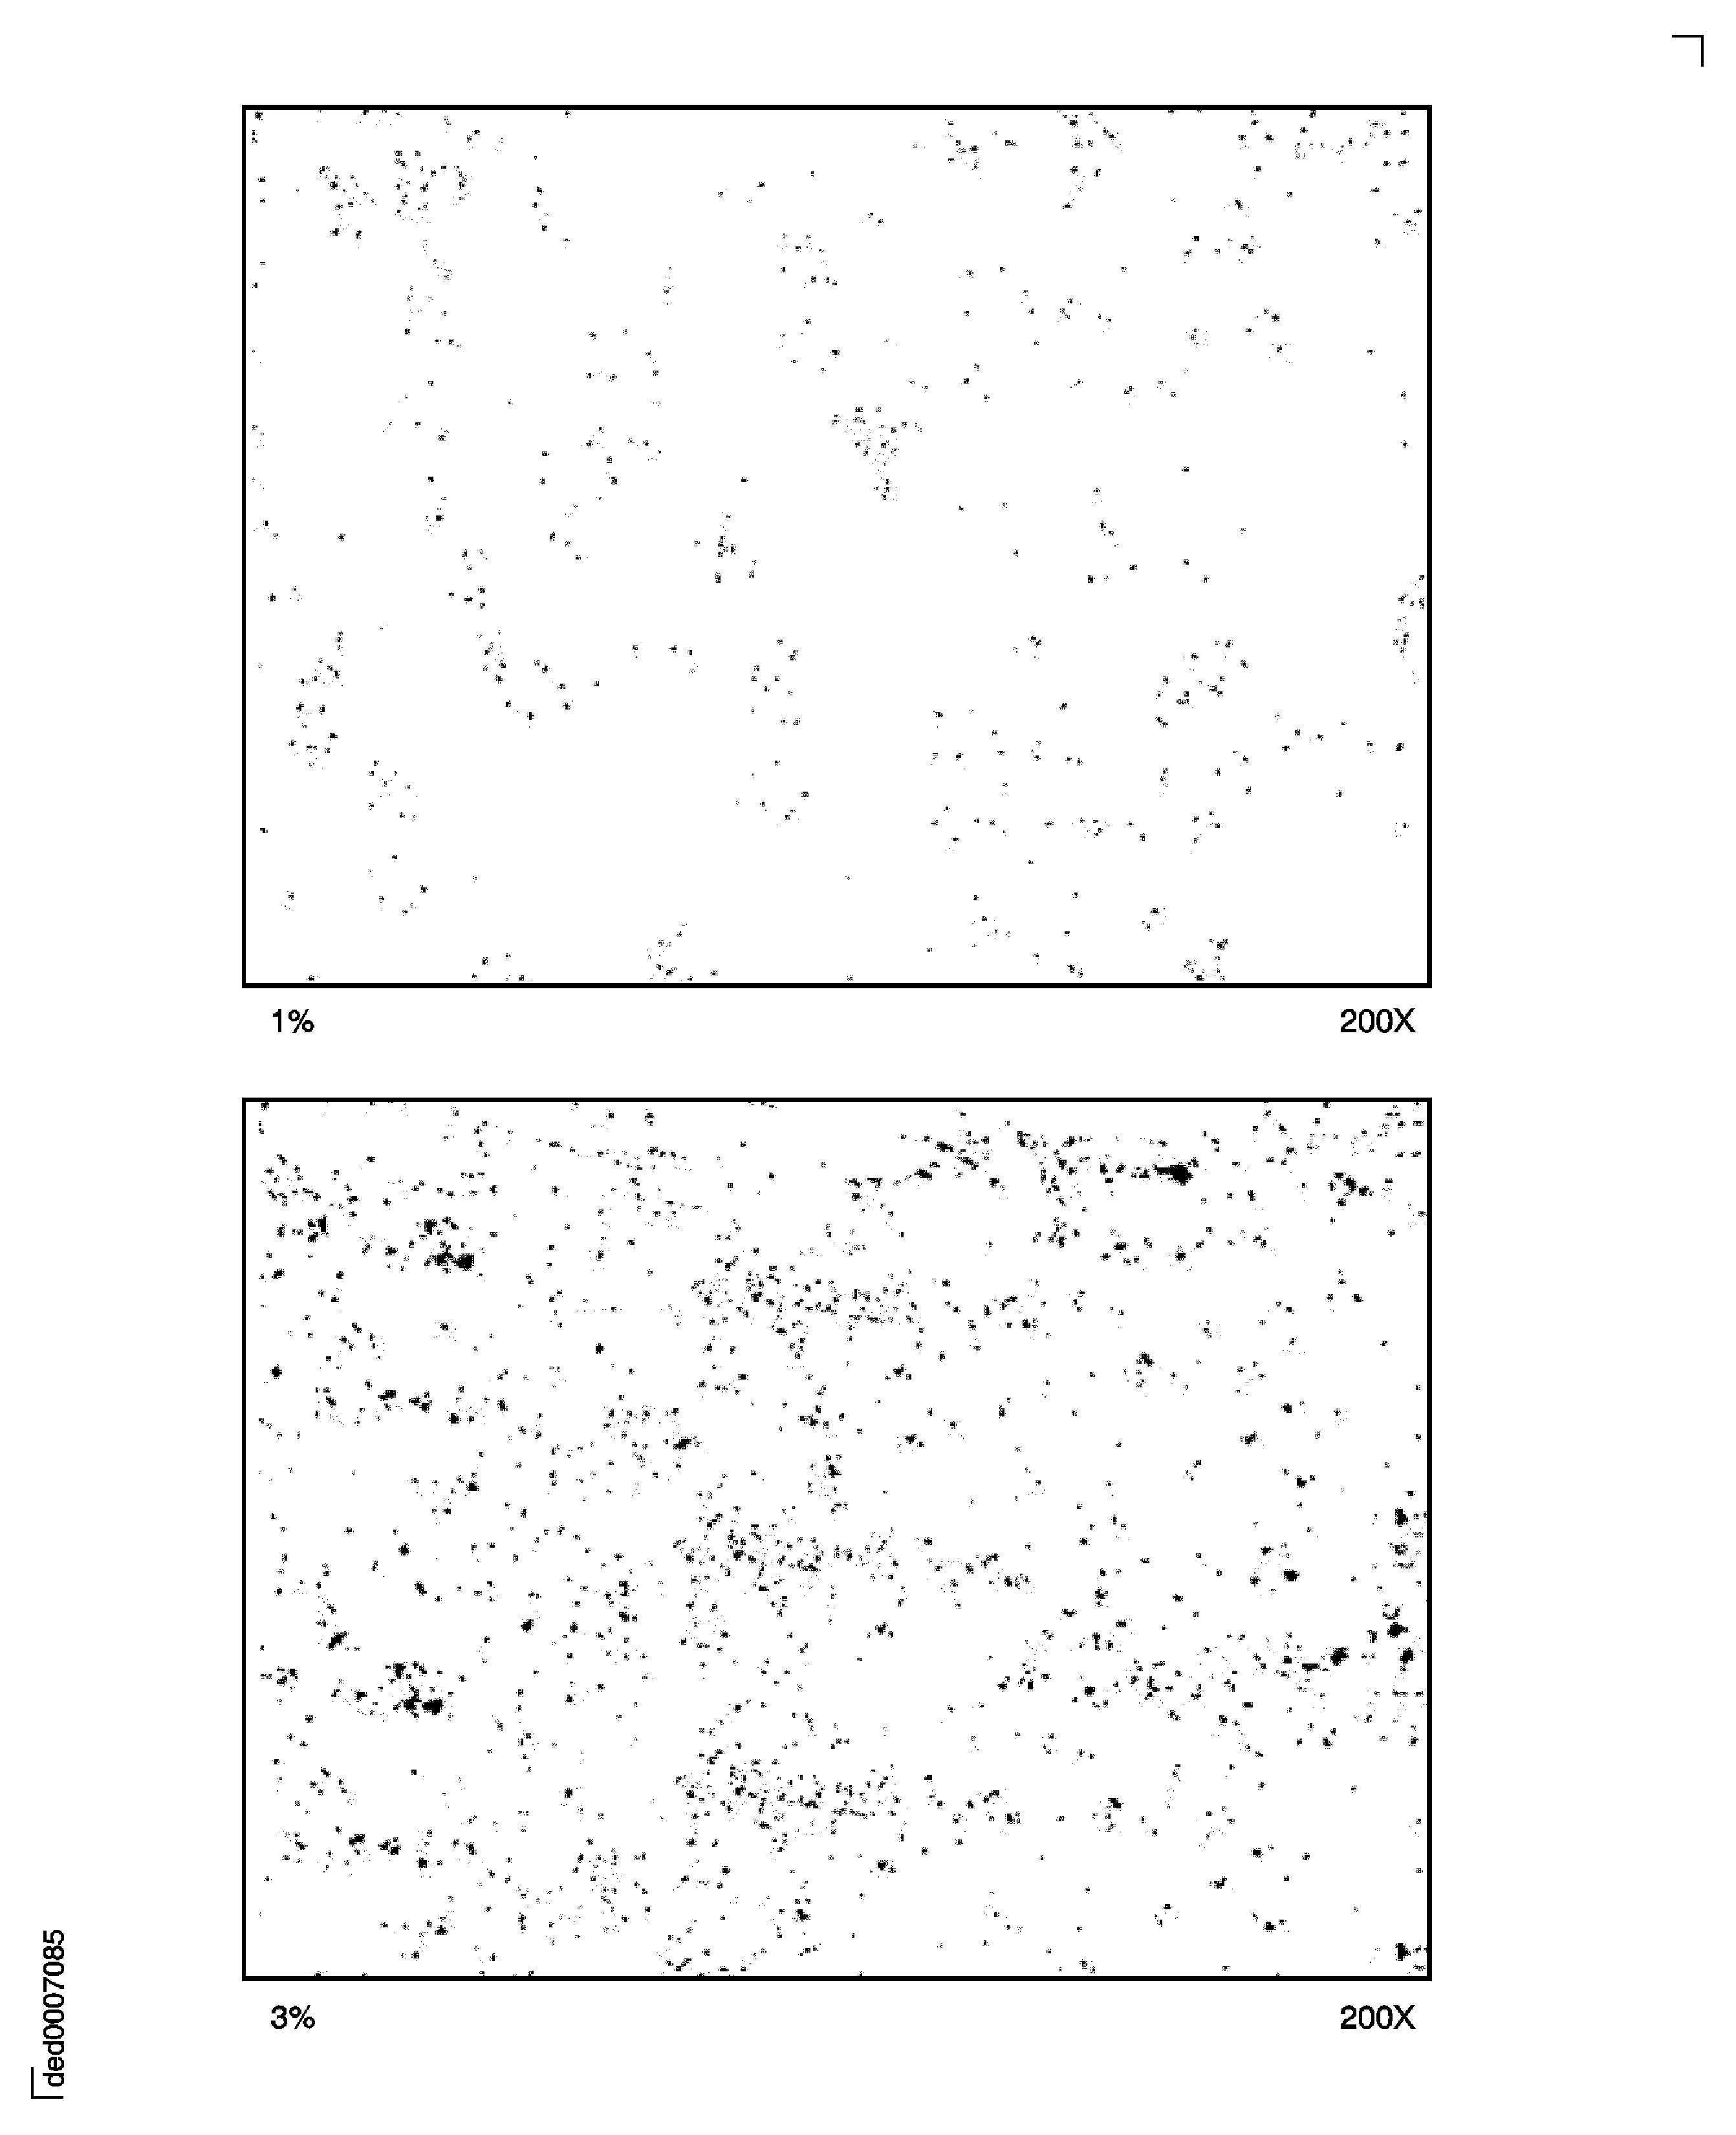
Figure: Porosity: Pore size 10 microns; the amount of porosity in the top picture is 5 percent and in the bottom picture 8 percent.
Porosity: Pore size 10 microns; the amount of porosity in the top picture is 5 percent and in the bottom picture 8 percent.
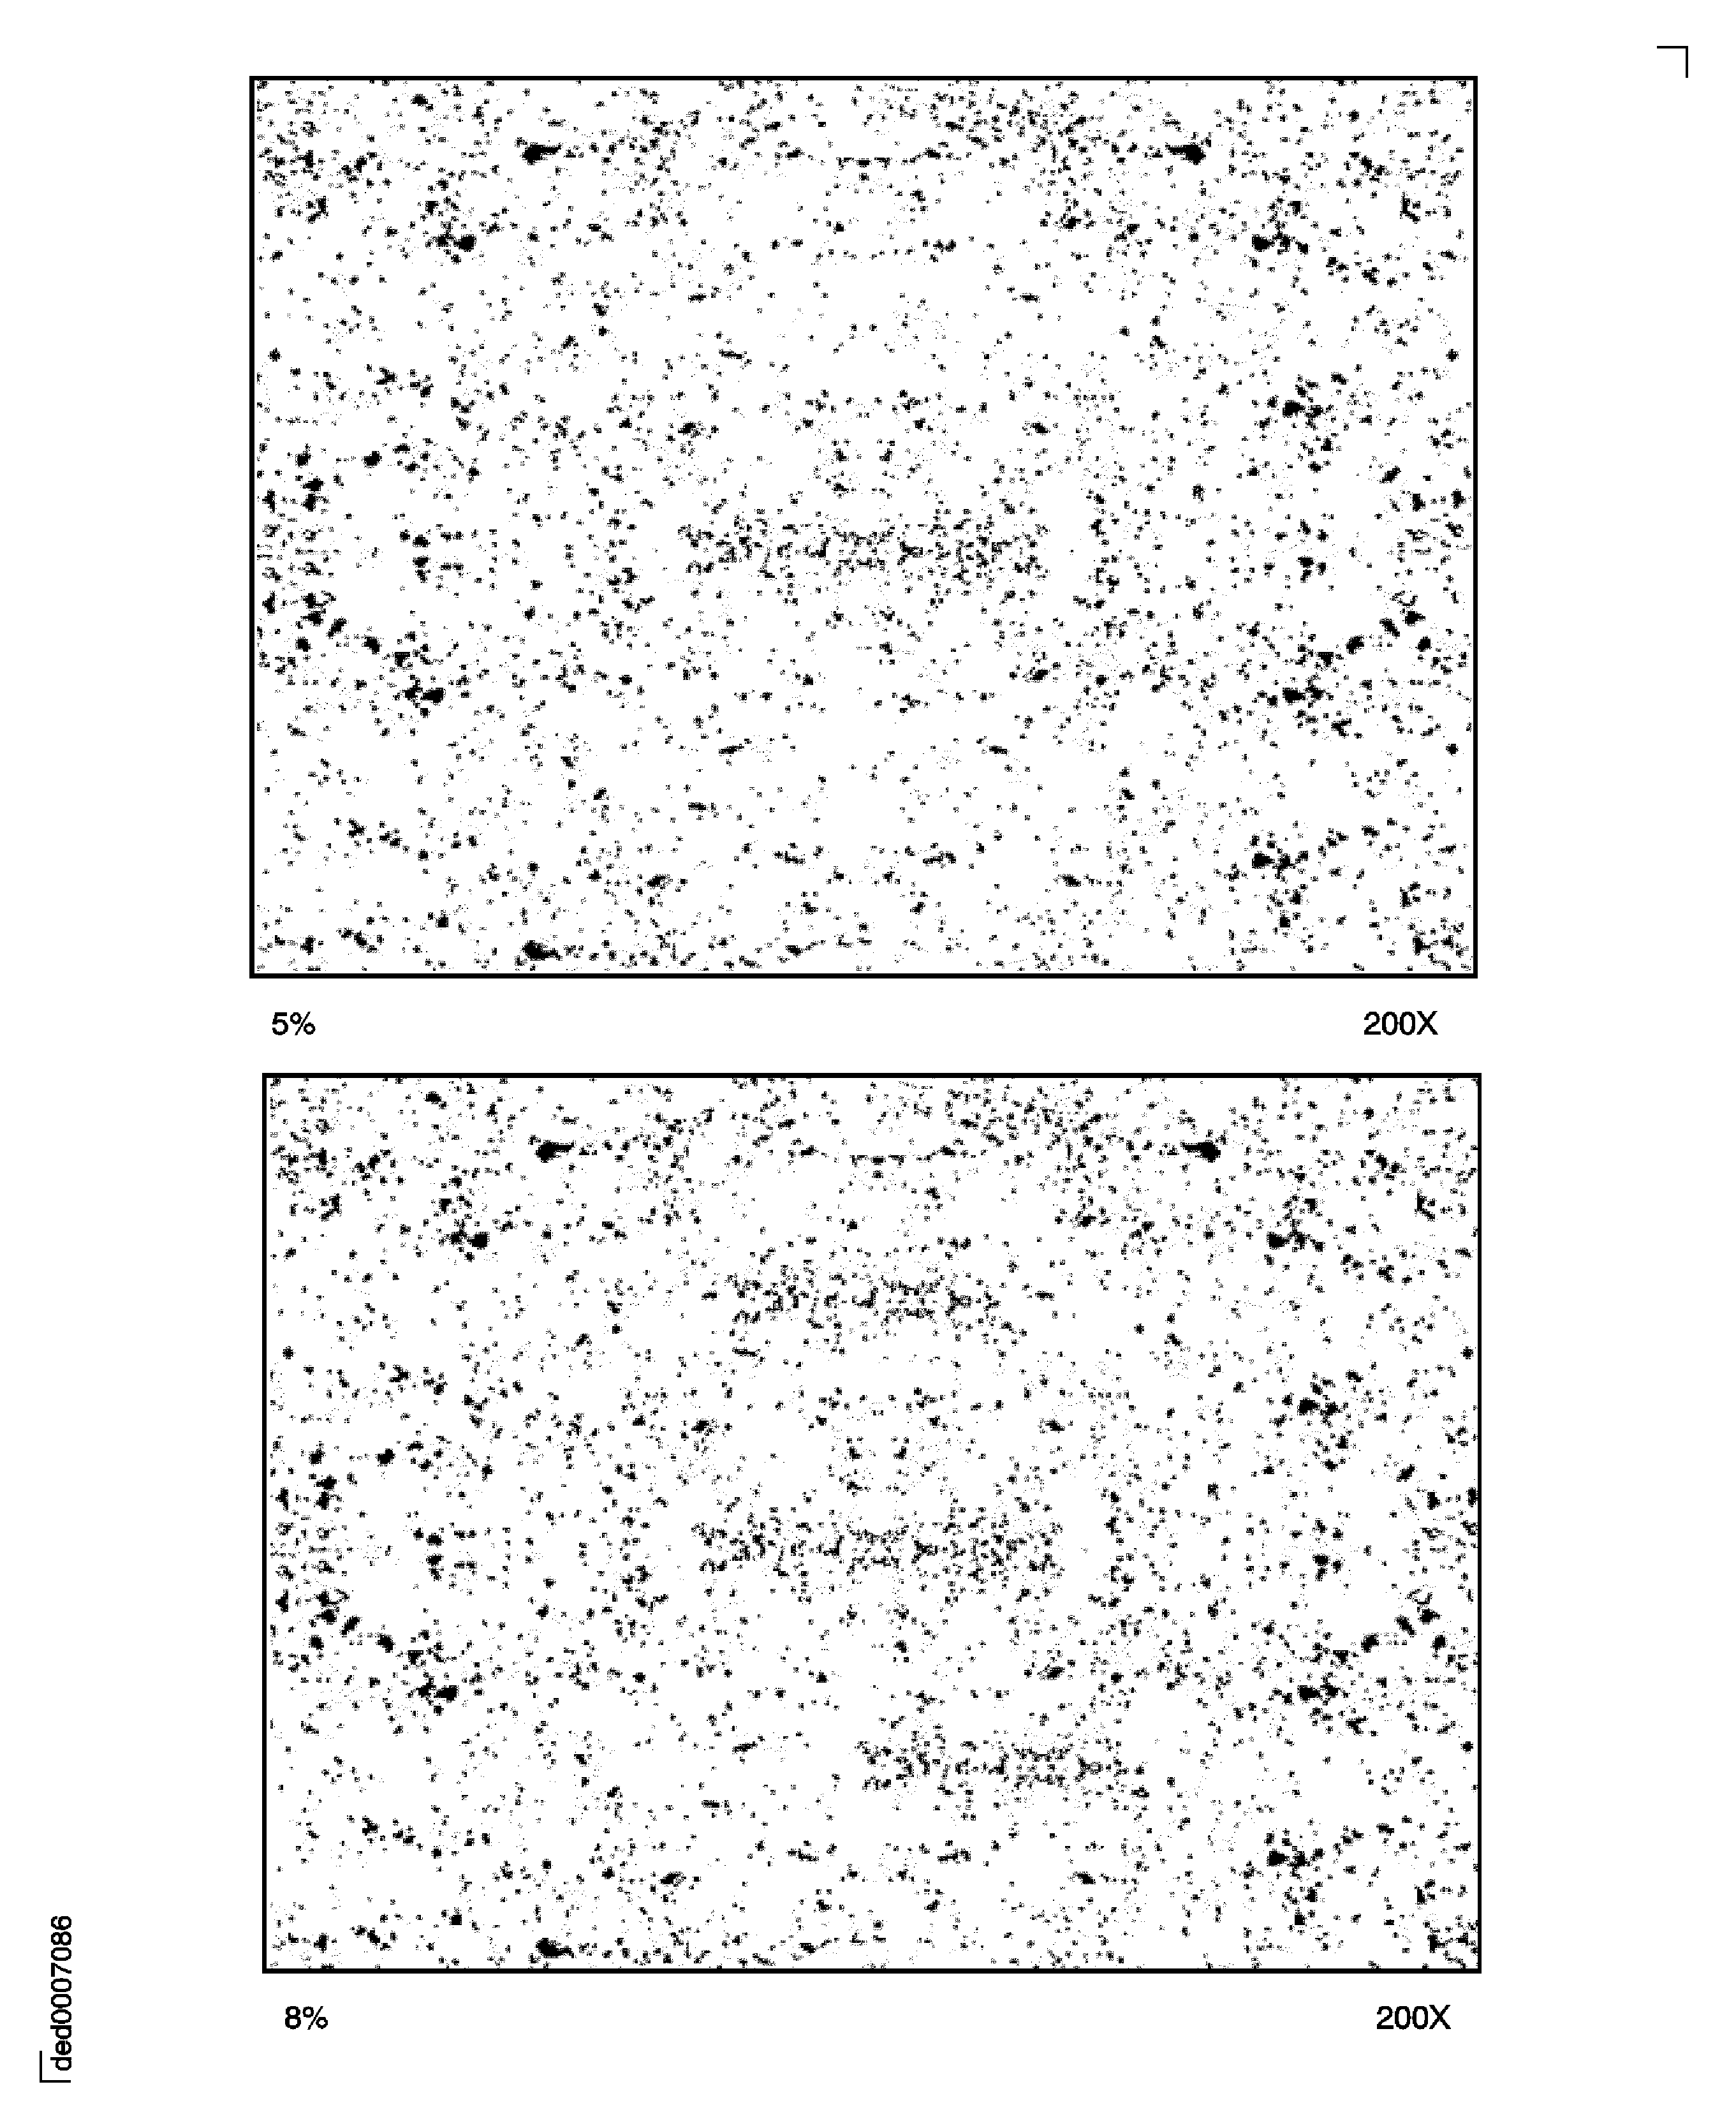
Figure: Porosity: Pore size 20 microns; the amount of porosity in the top picture is 2 percent and in the bottom picture 5 percent.
Porosity: Pore size 20 microns; the amount of porosity in the top picture is 2 percent and in the bottom picture 5 percent.
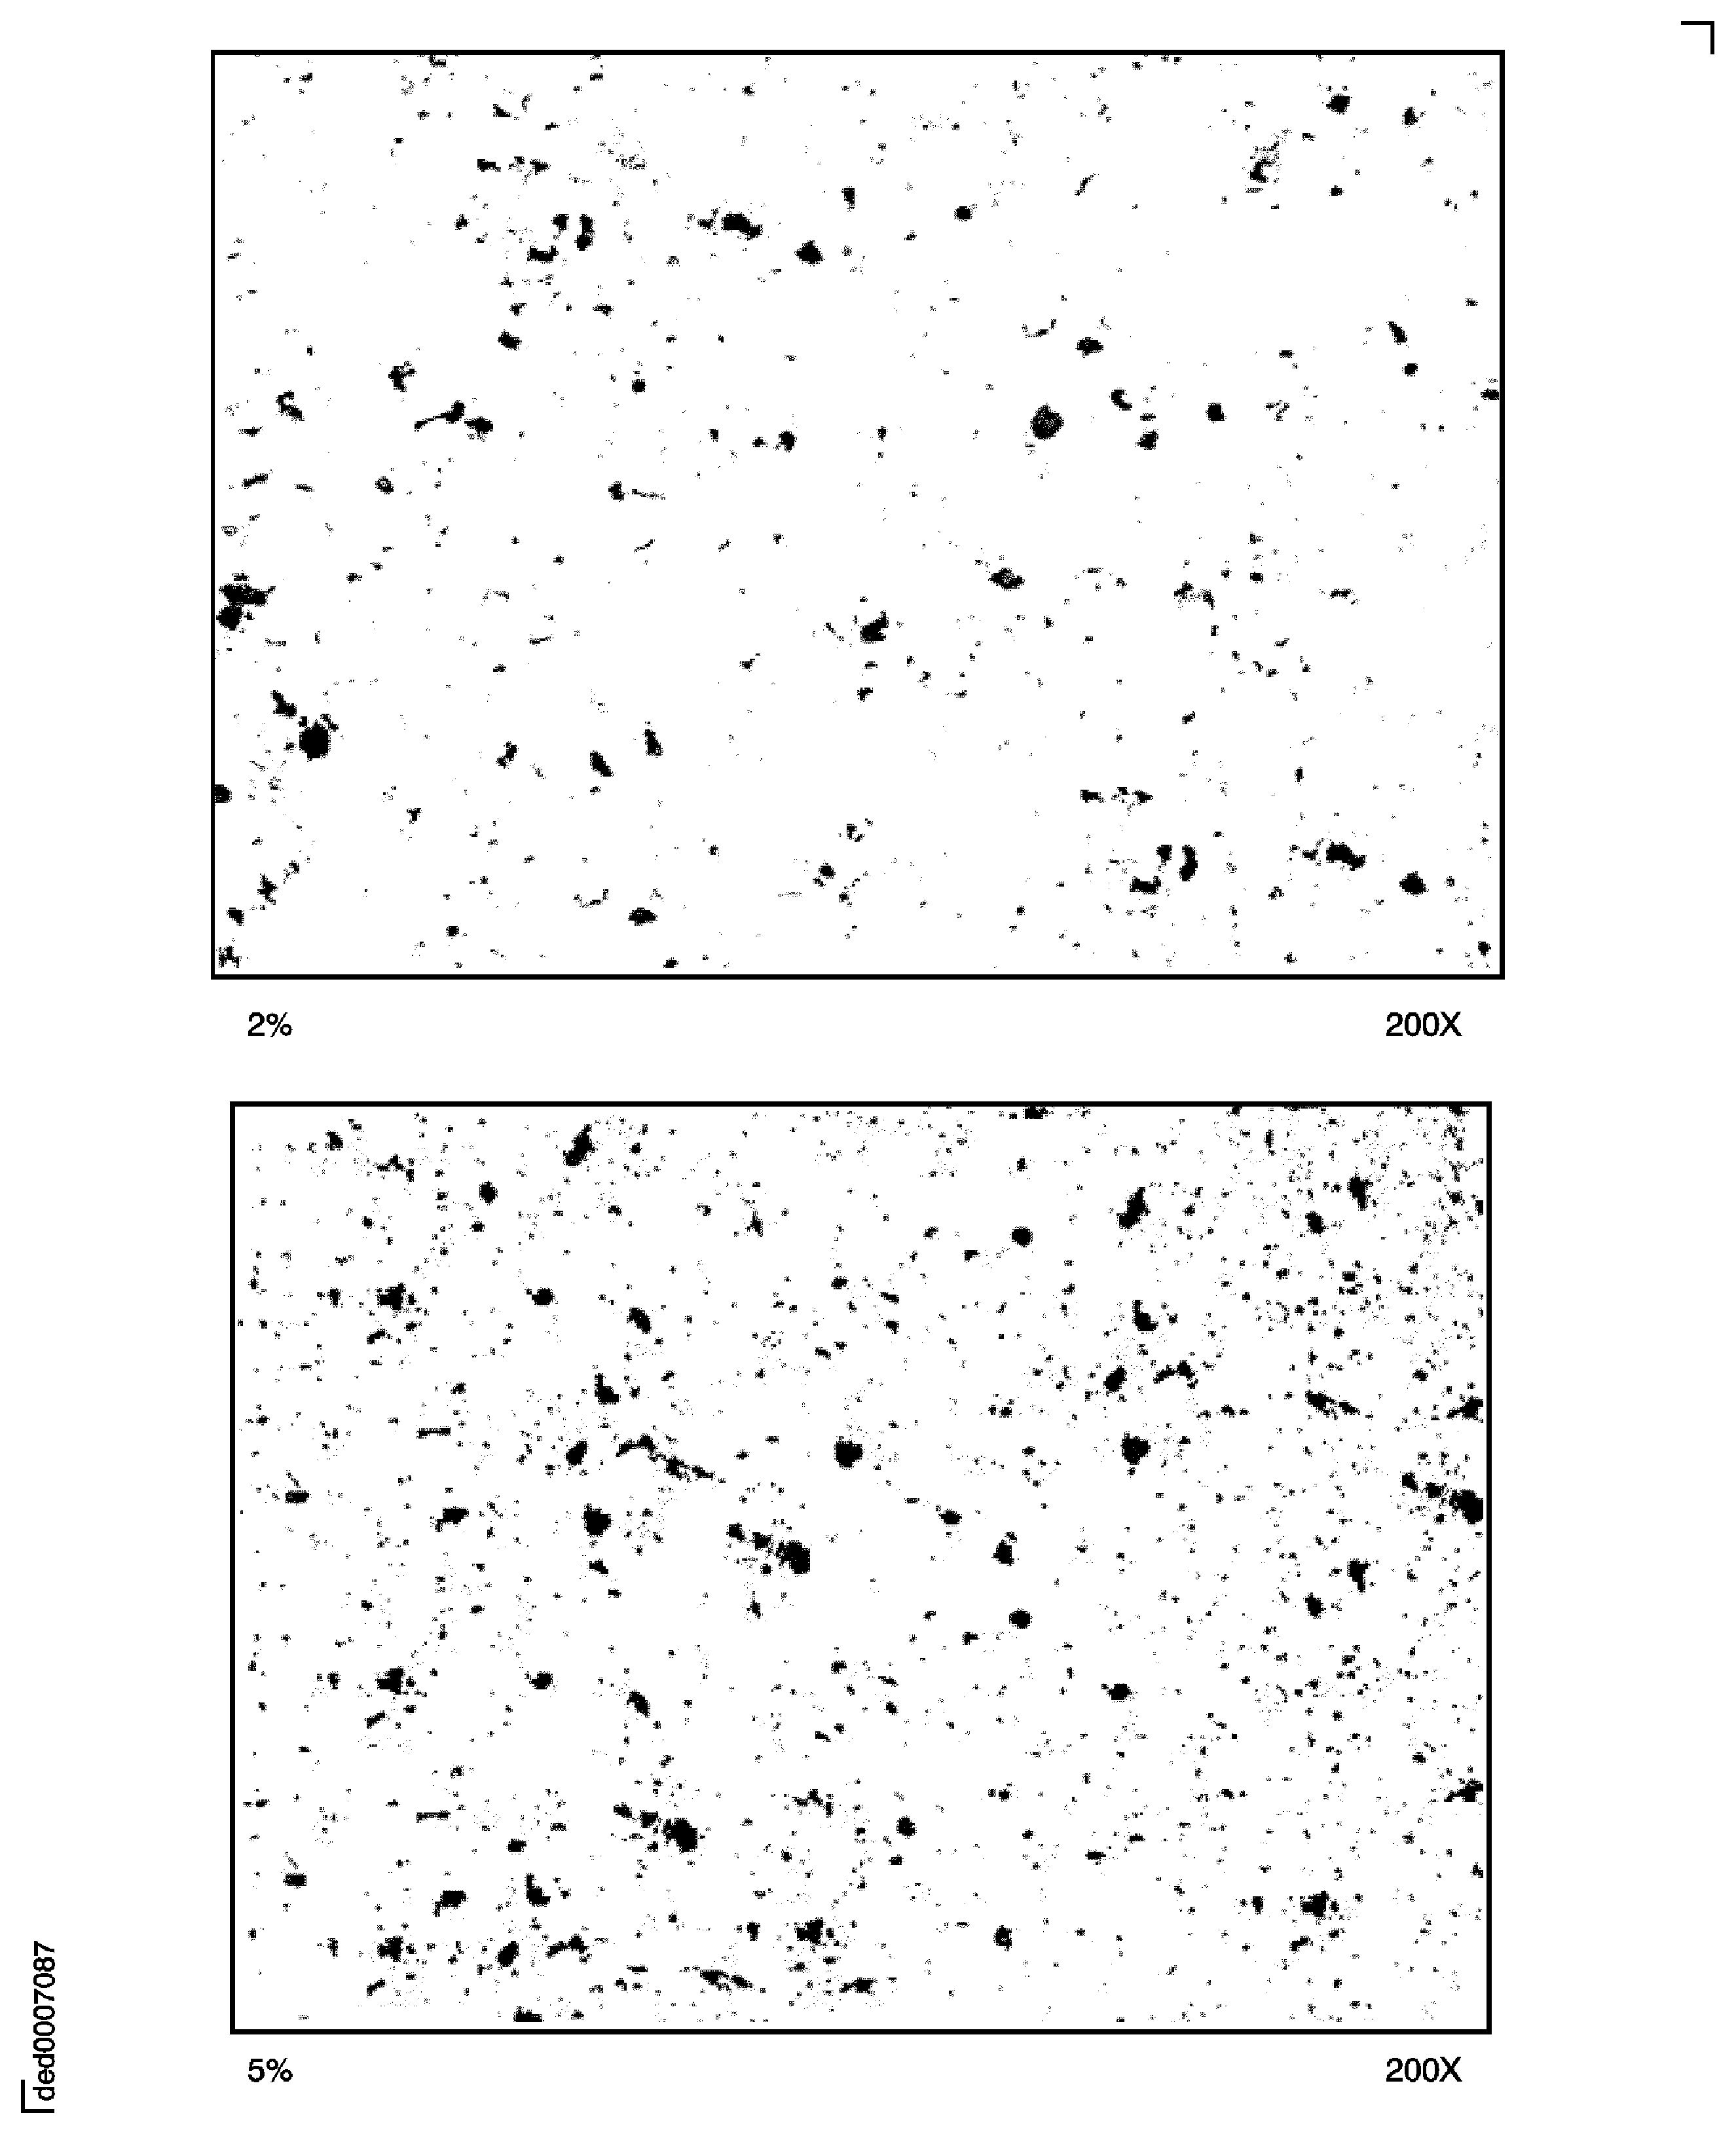
Figure: Porosity: Pore size 20 microns; the amount of porosity in the top picture is 7.5 percent and in the bottom picture 10 percent.
Porosity: Pore size 20 microns; the amount of porosity in the top picture is 7.5 percent and in the bottom picture 10 percent.
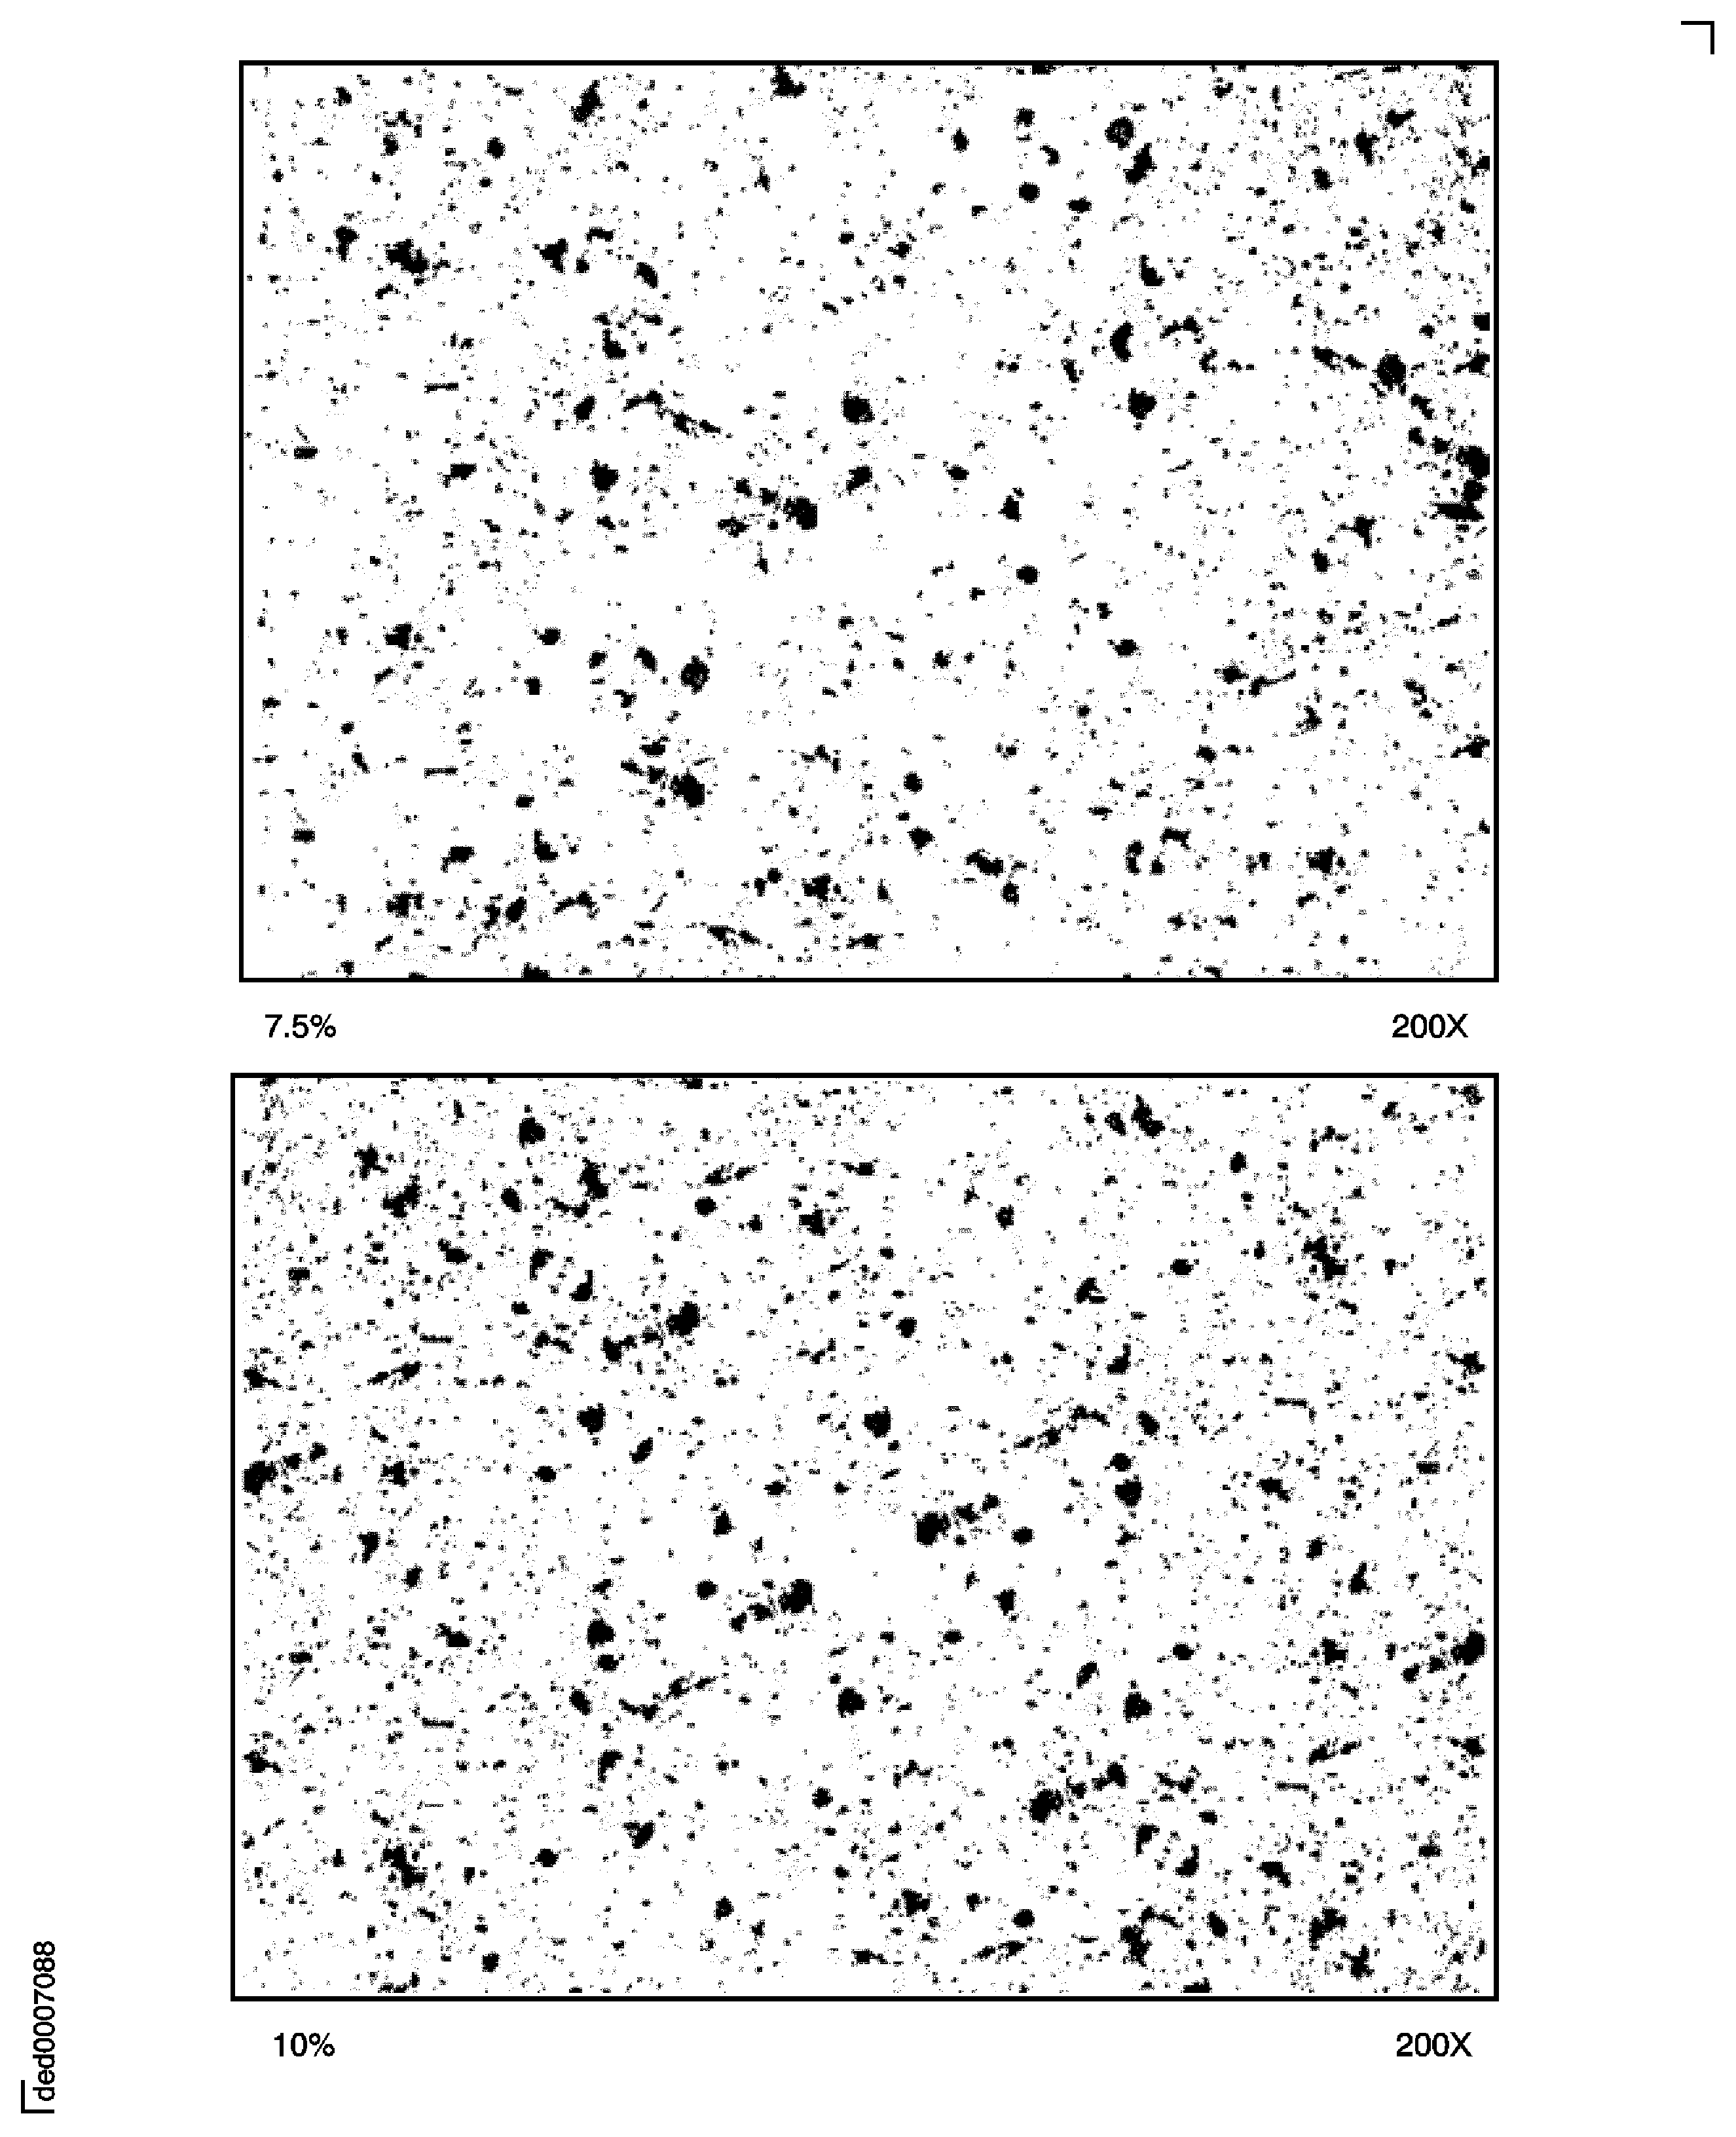
Figure: Porosity: Pore size 20 microns; the amount of porosity in the top picture is 12.5 percent and in the bottom picture 15 percent.
Porosity: Pore size 20 microns; the amount of porosity in the top picture is 12.5 percent and in the bottom picture 15 percent.
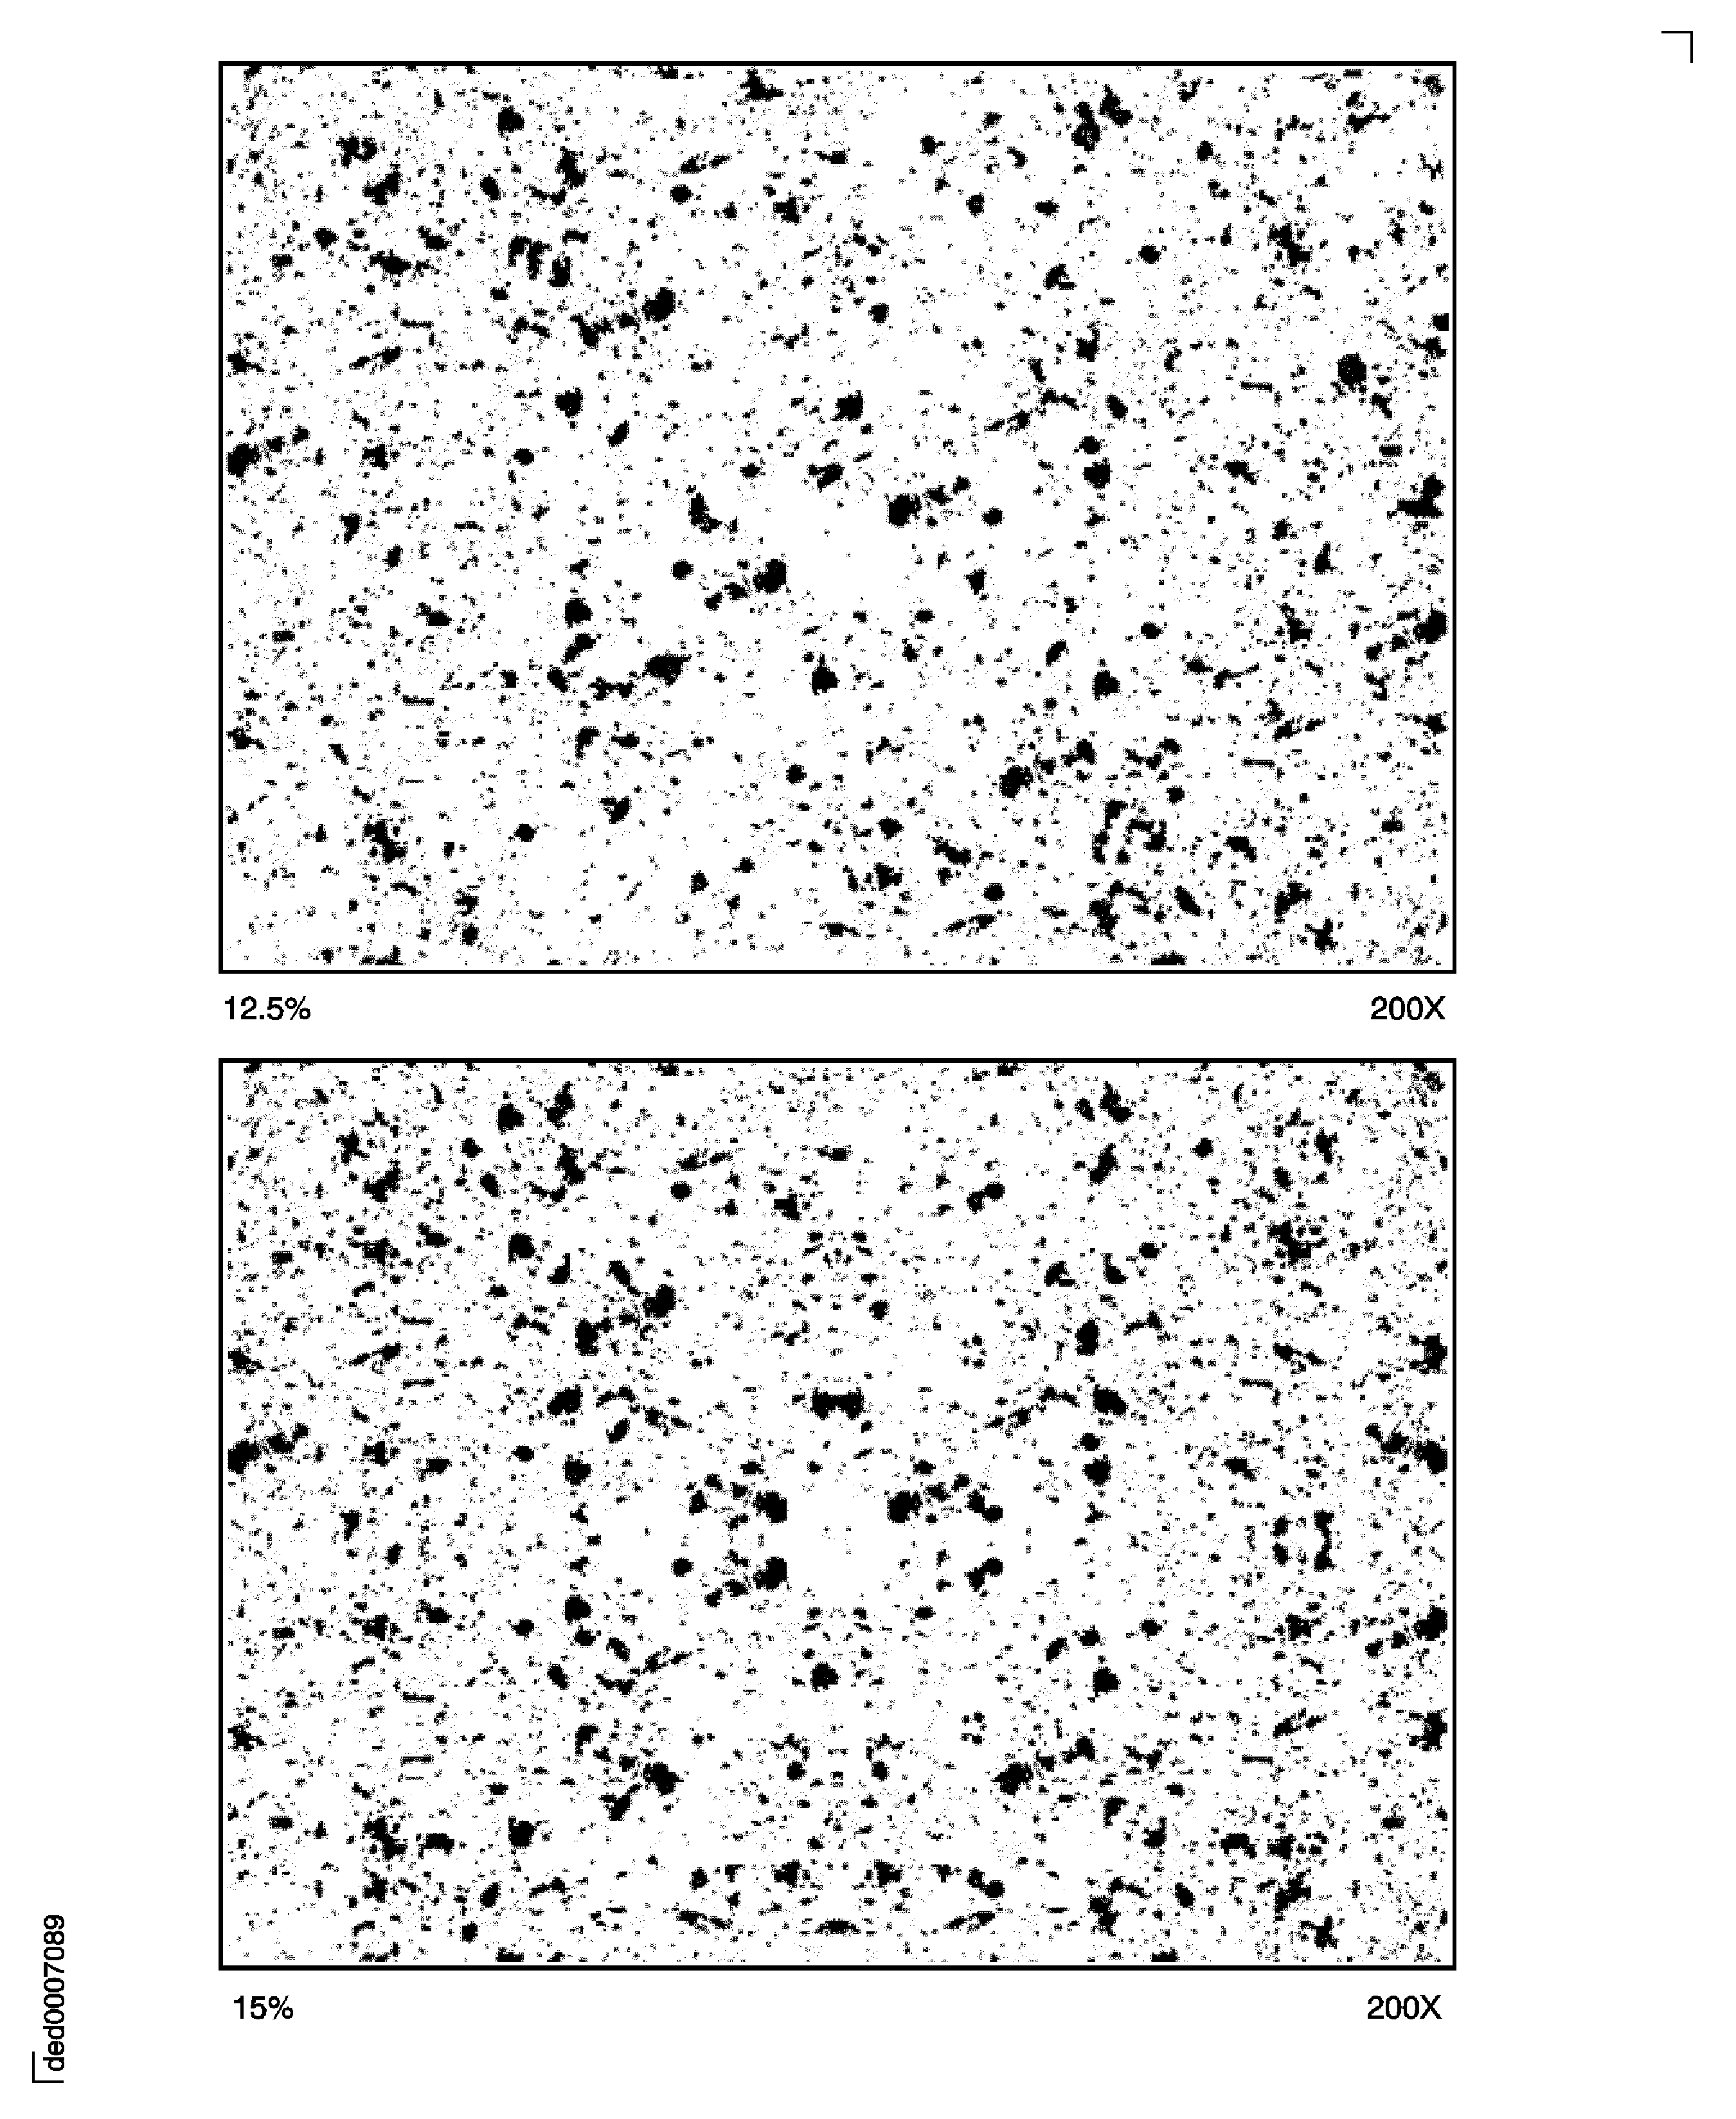
Figure: Porosity: Pore size 20 microns; the amount of porosity in the top picture is 20 percent and in the bottom picture 25 percent.
Porosity: Pore size 20 microns; the amount of porosity in the top picture is 20 percent and in the bottom picture 25 percent.
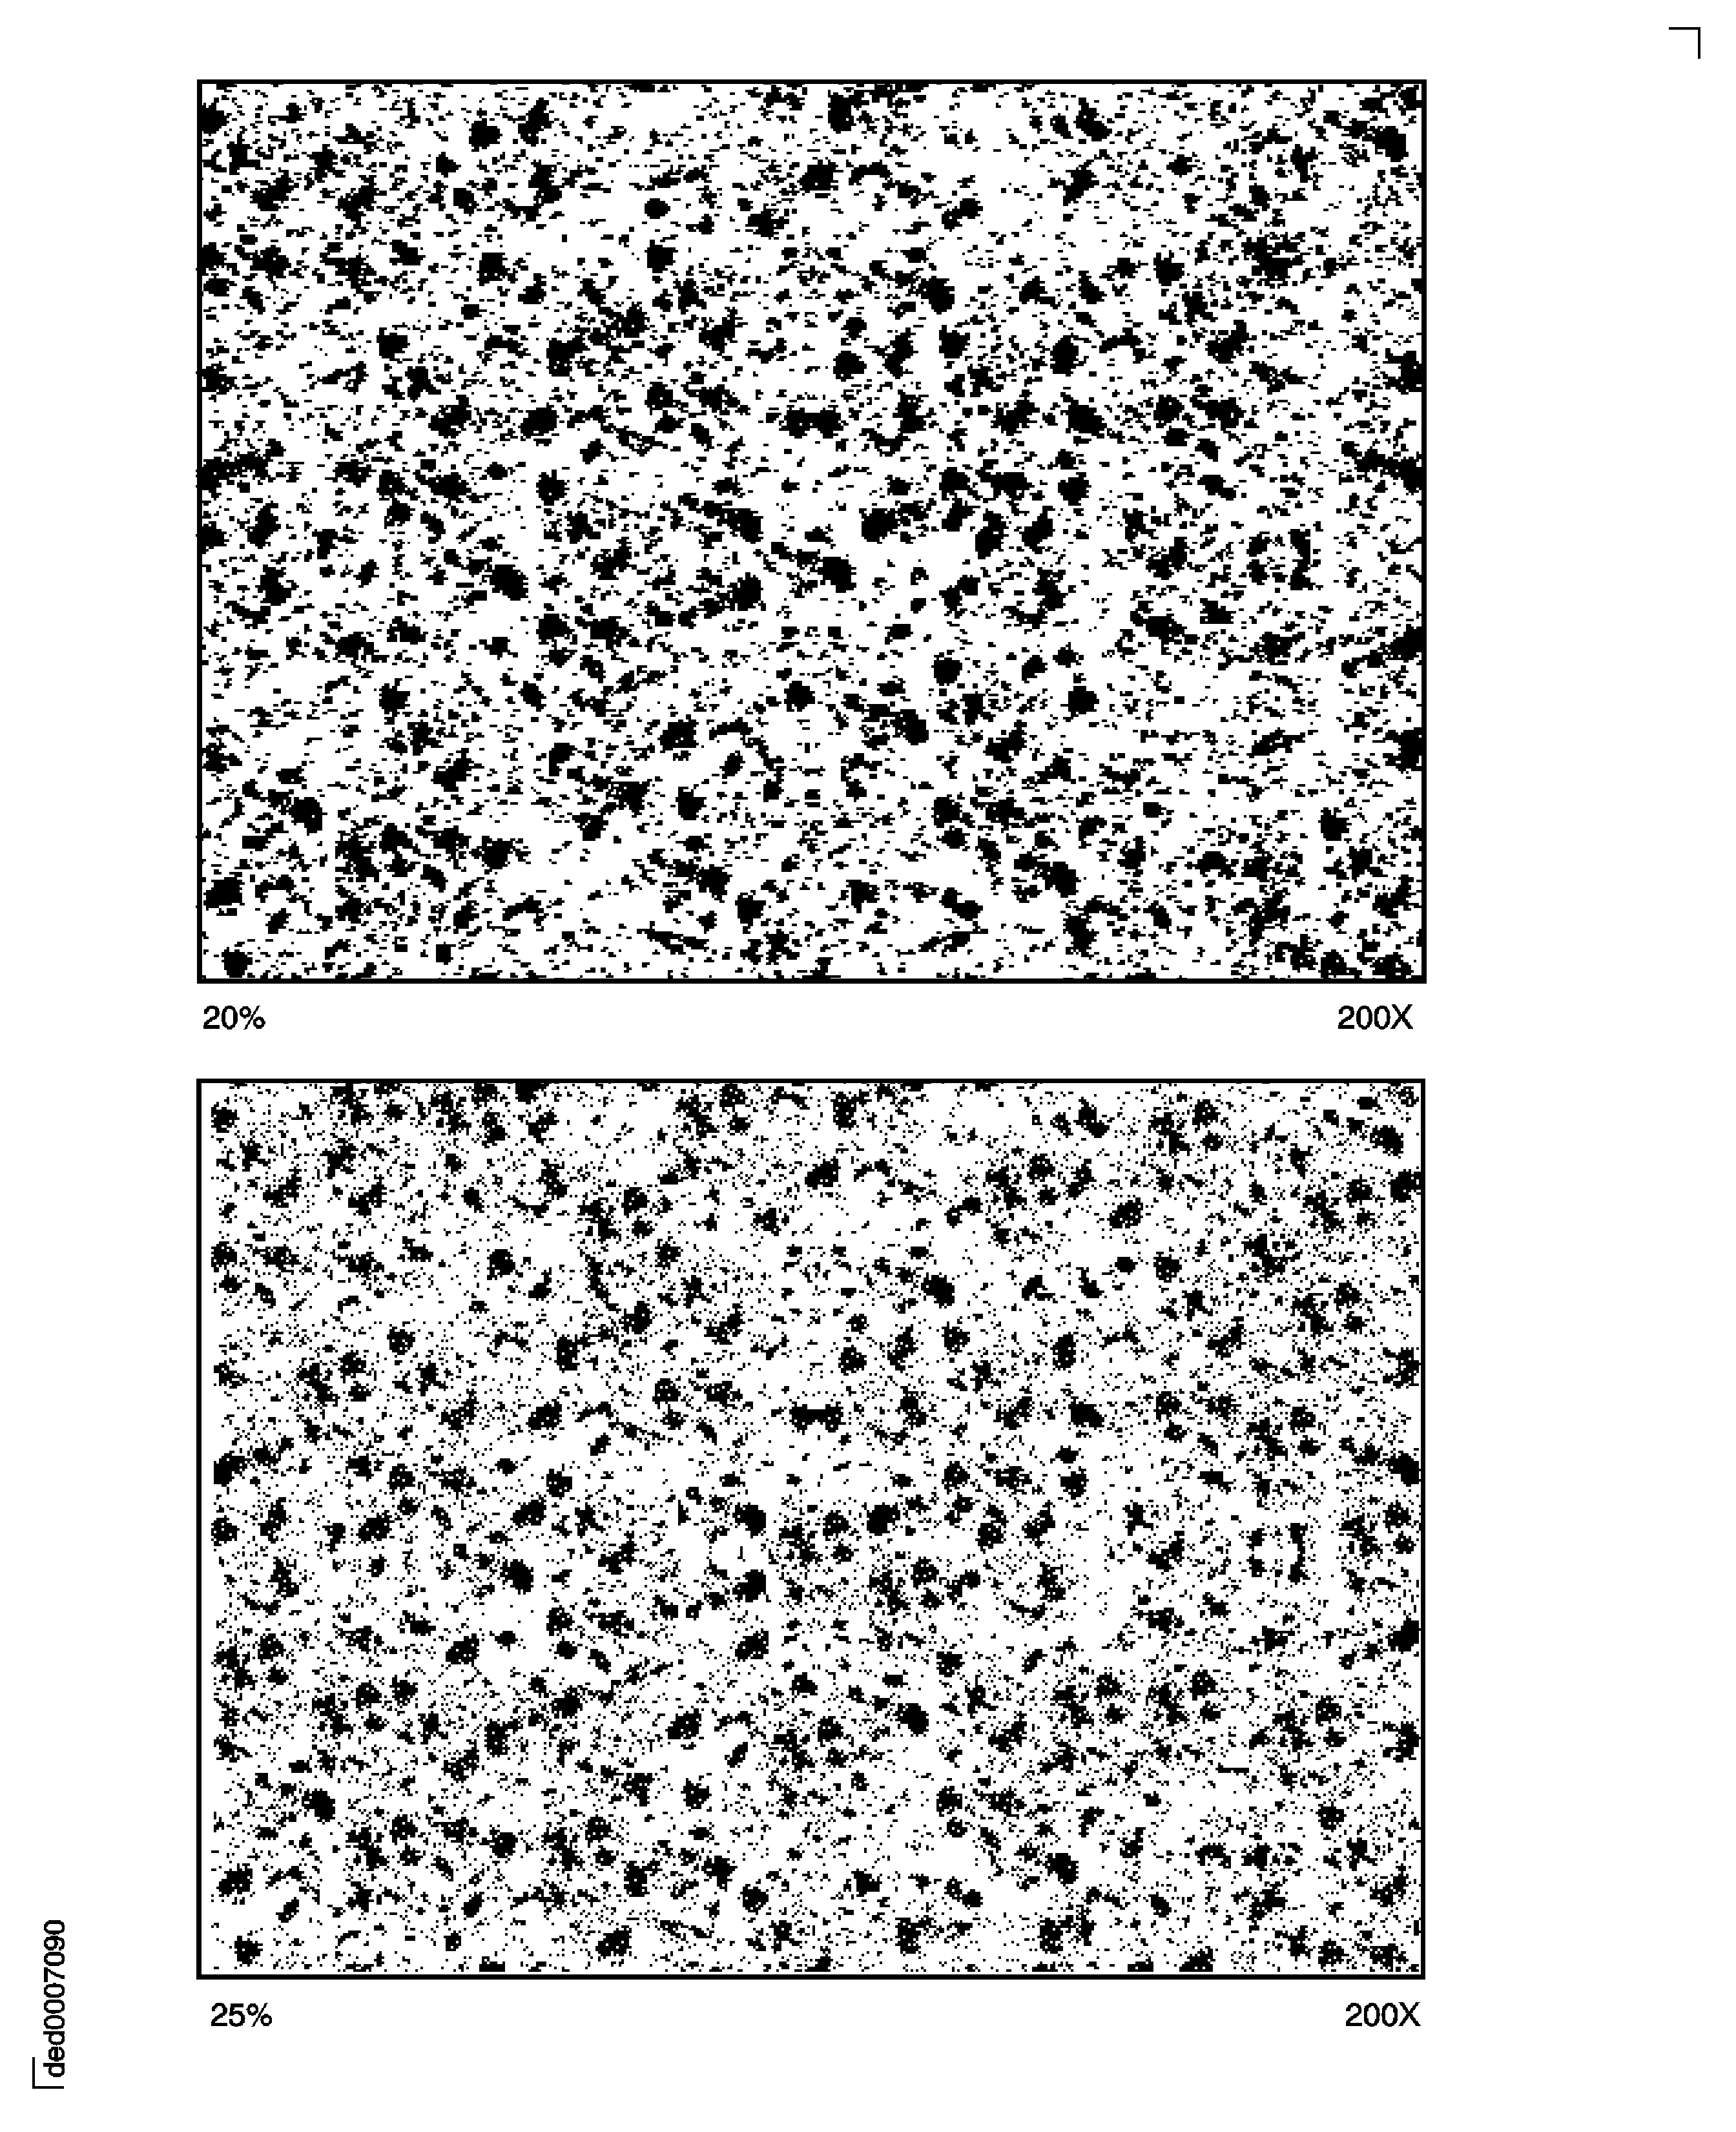
Figure: Example of unmelted particles: the amount of unmelted particles in the top picture is 3 percent and in the bottom picture 5 percent.
Example of unmelted particles: the amount of unmelted particles in the top picture is 3 percent and in the bottom picture 5 percent.

Figure: Example of unmelted particles: the amount of unmelted particles in the top picture is 8 percent and in the bottom picture 10 percent.
Example of unmelted particles: the amount of unmelted particles in the top picture is 8 percent and in the bottom picture 10 percent.
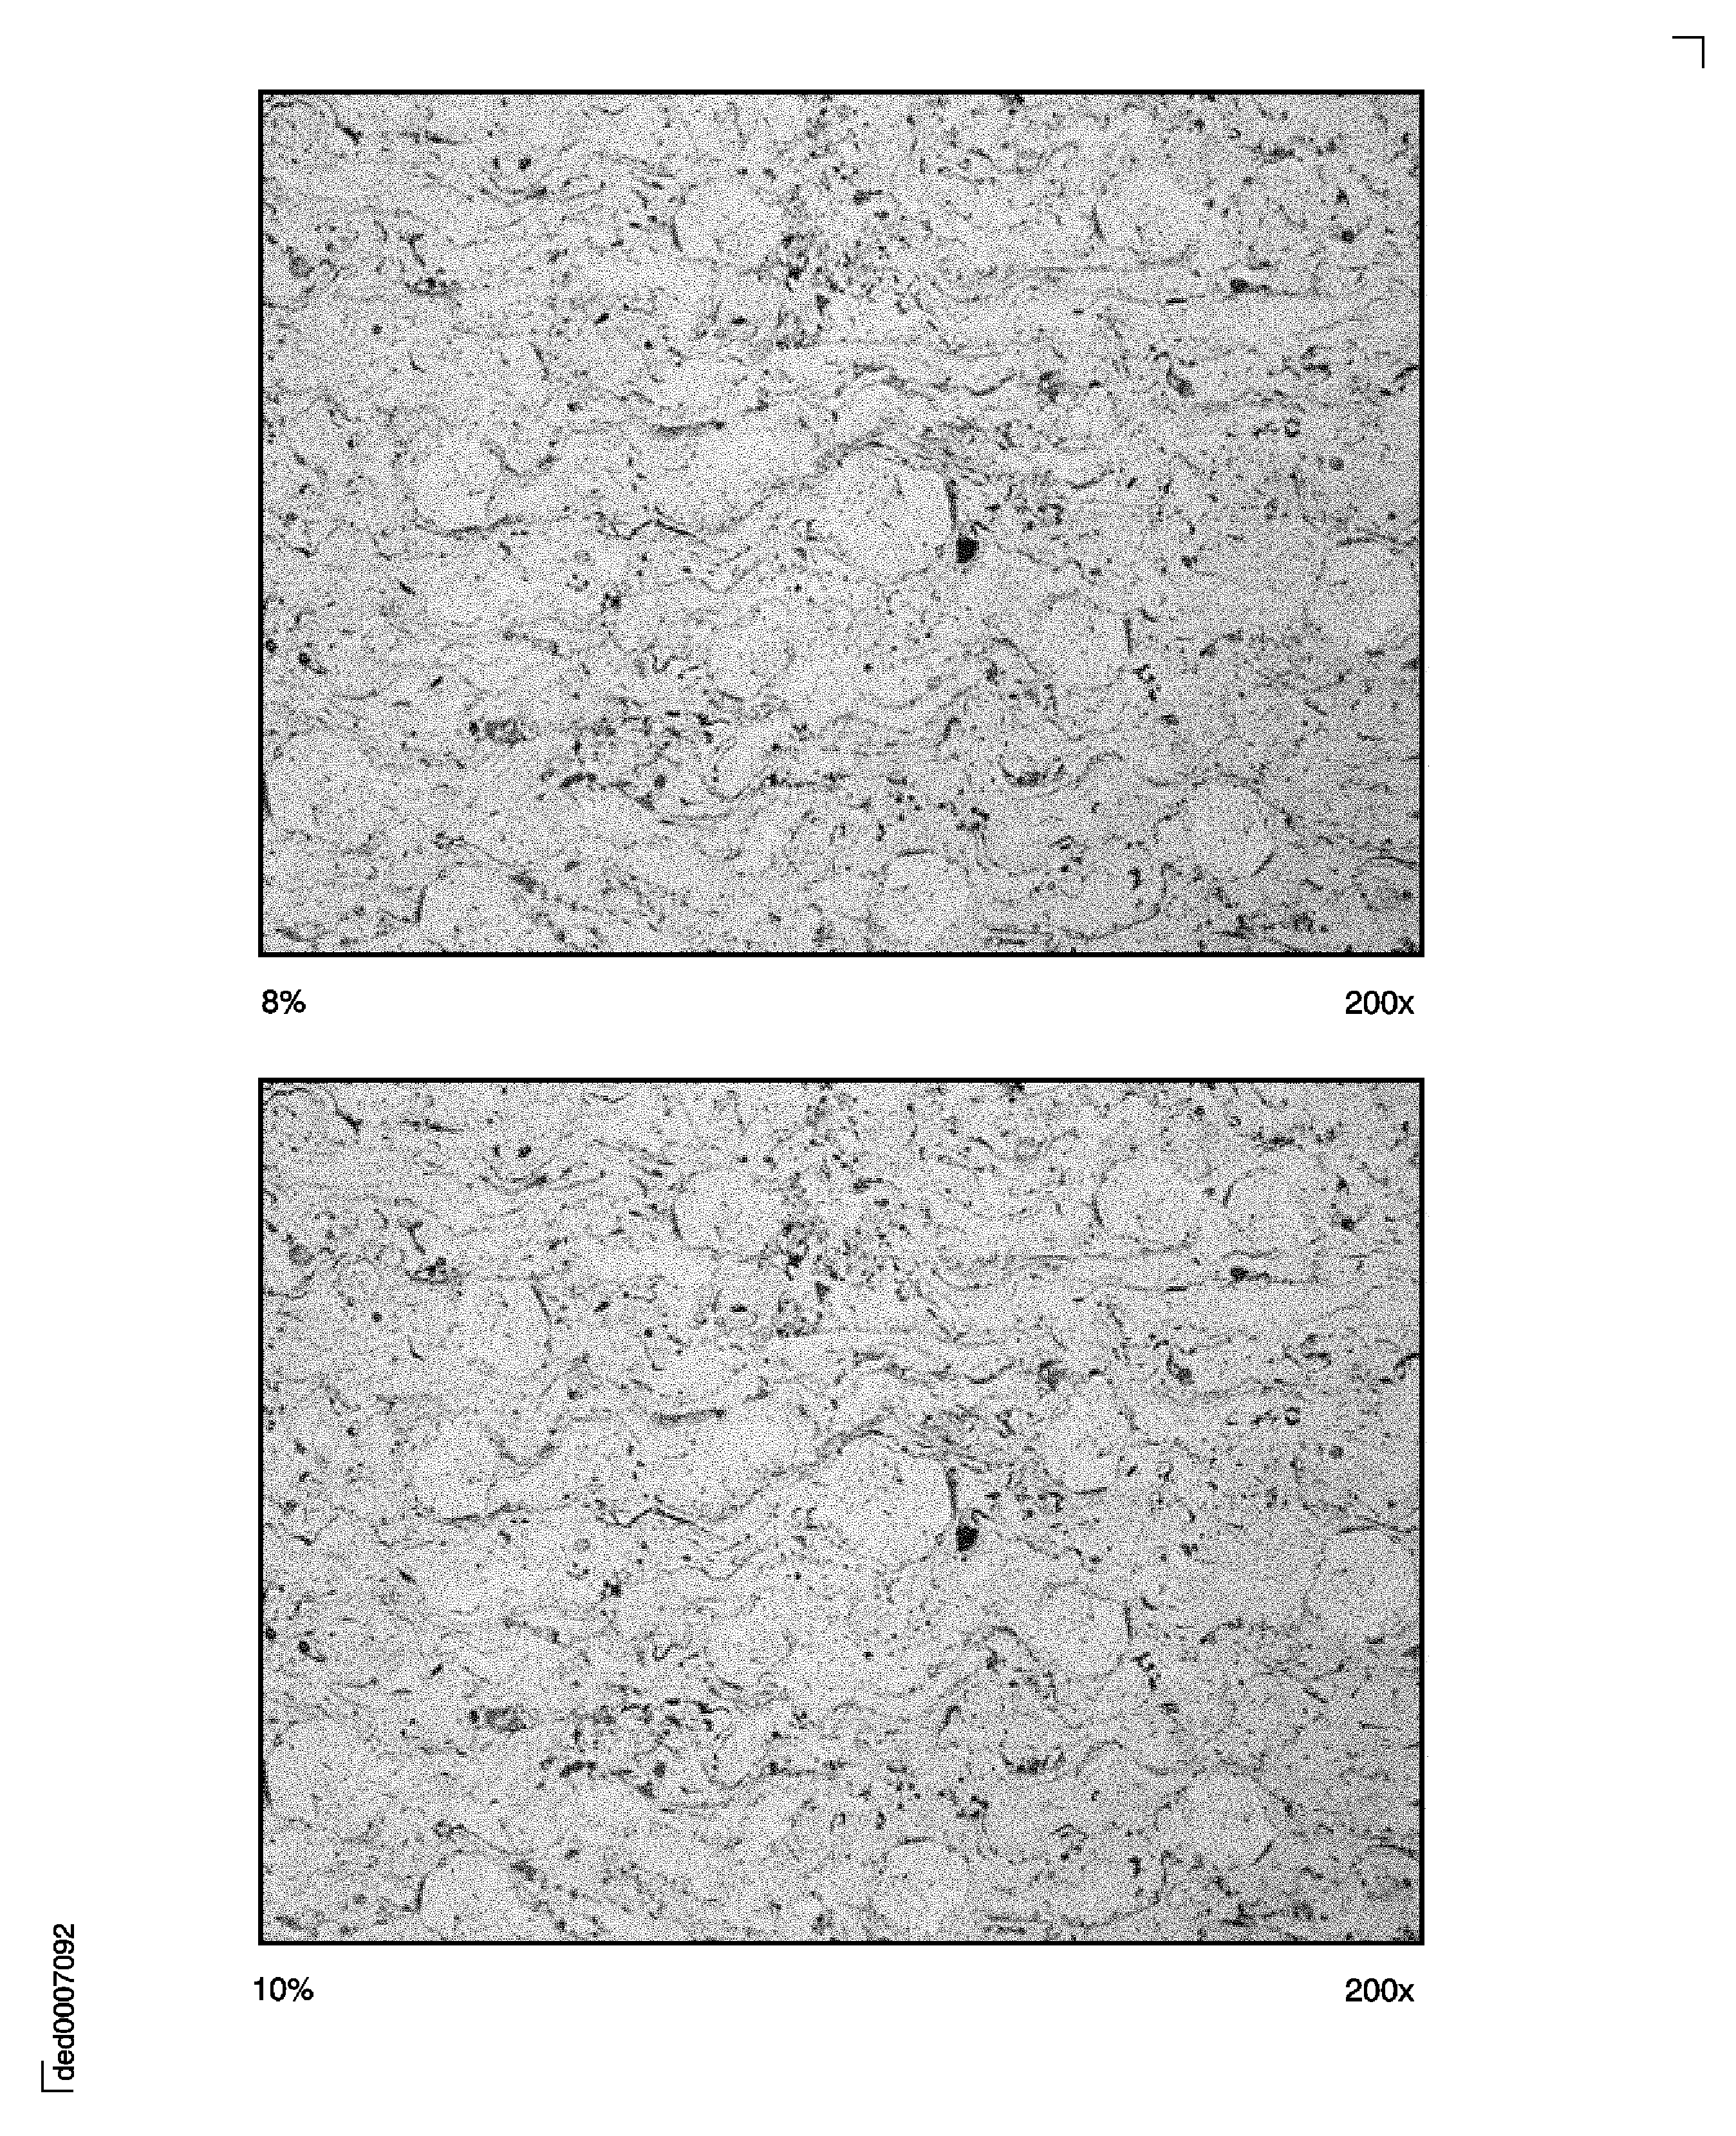
Figure: Example of unmelted particles: the amount of unmelted particles is 15 percent.
Example of unmelted particles: the amount of unmelted particles is 15 percent.
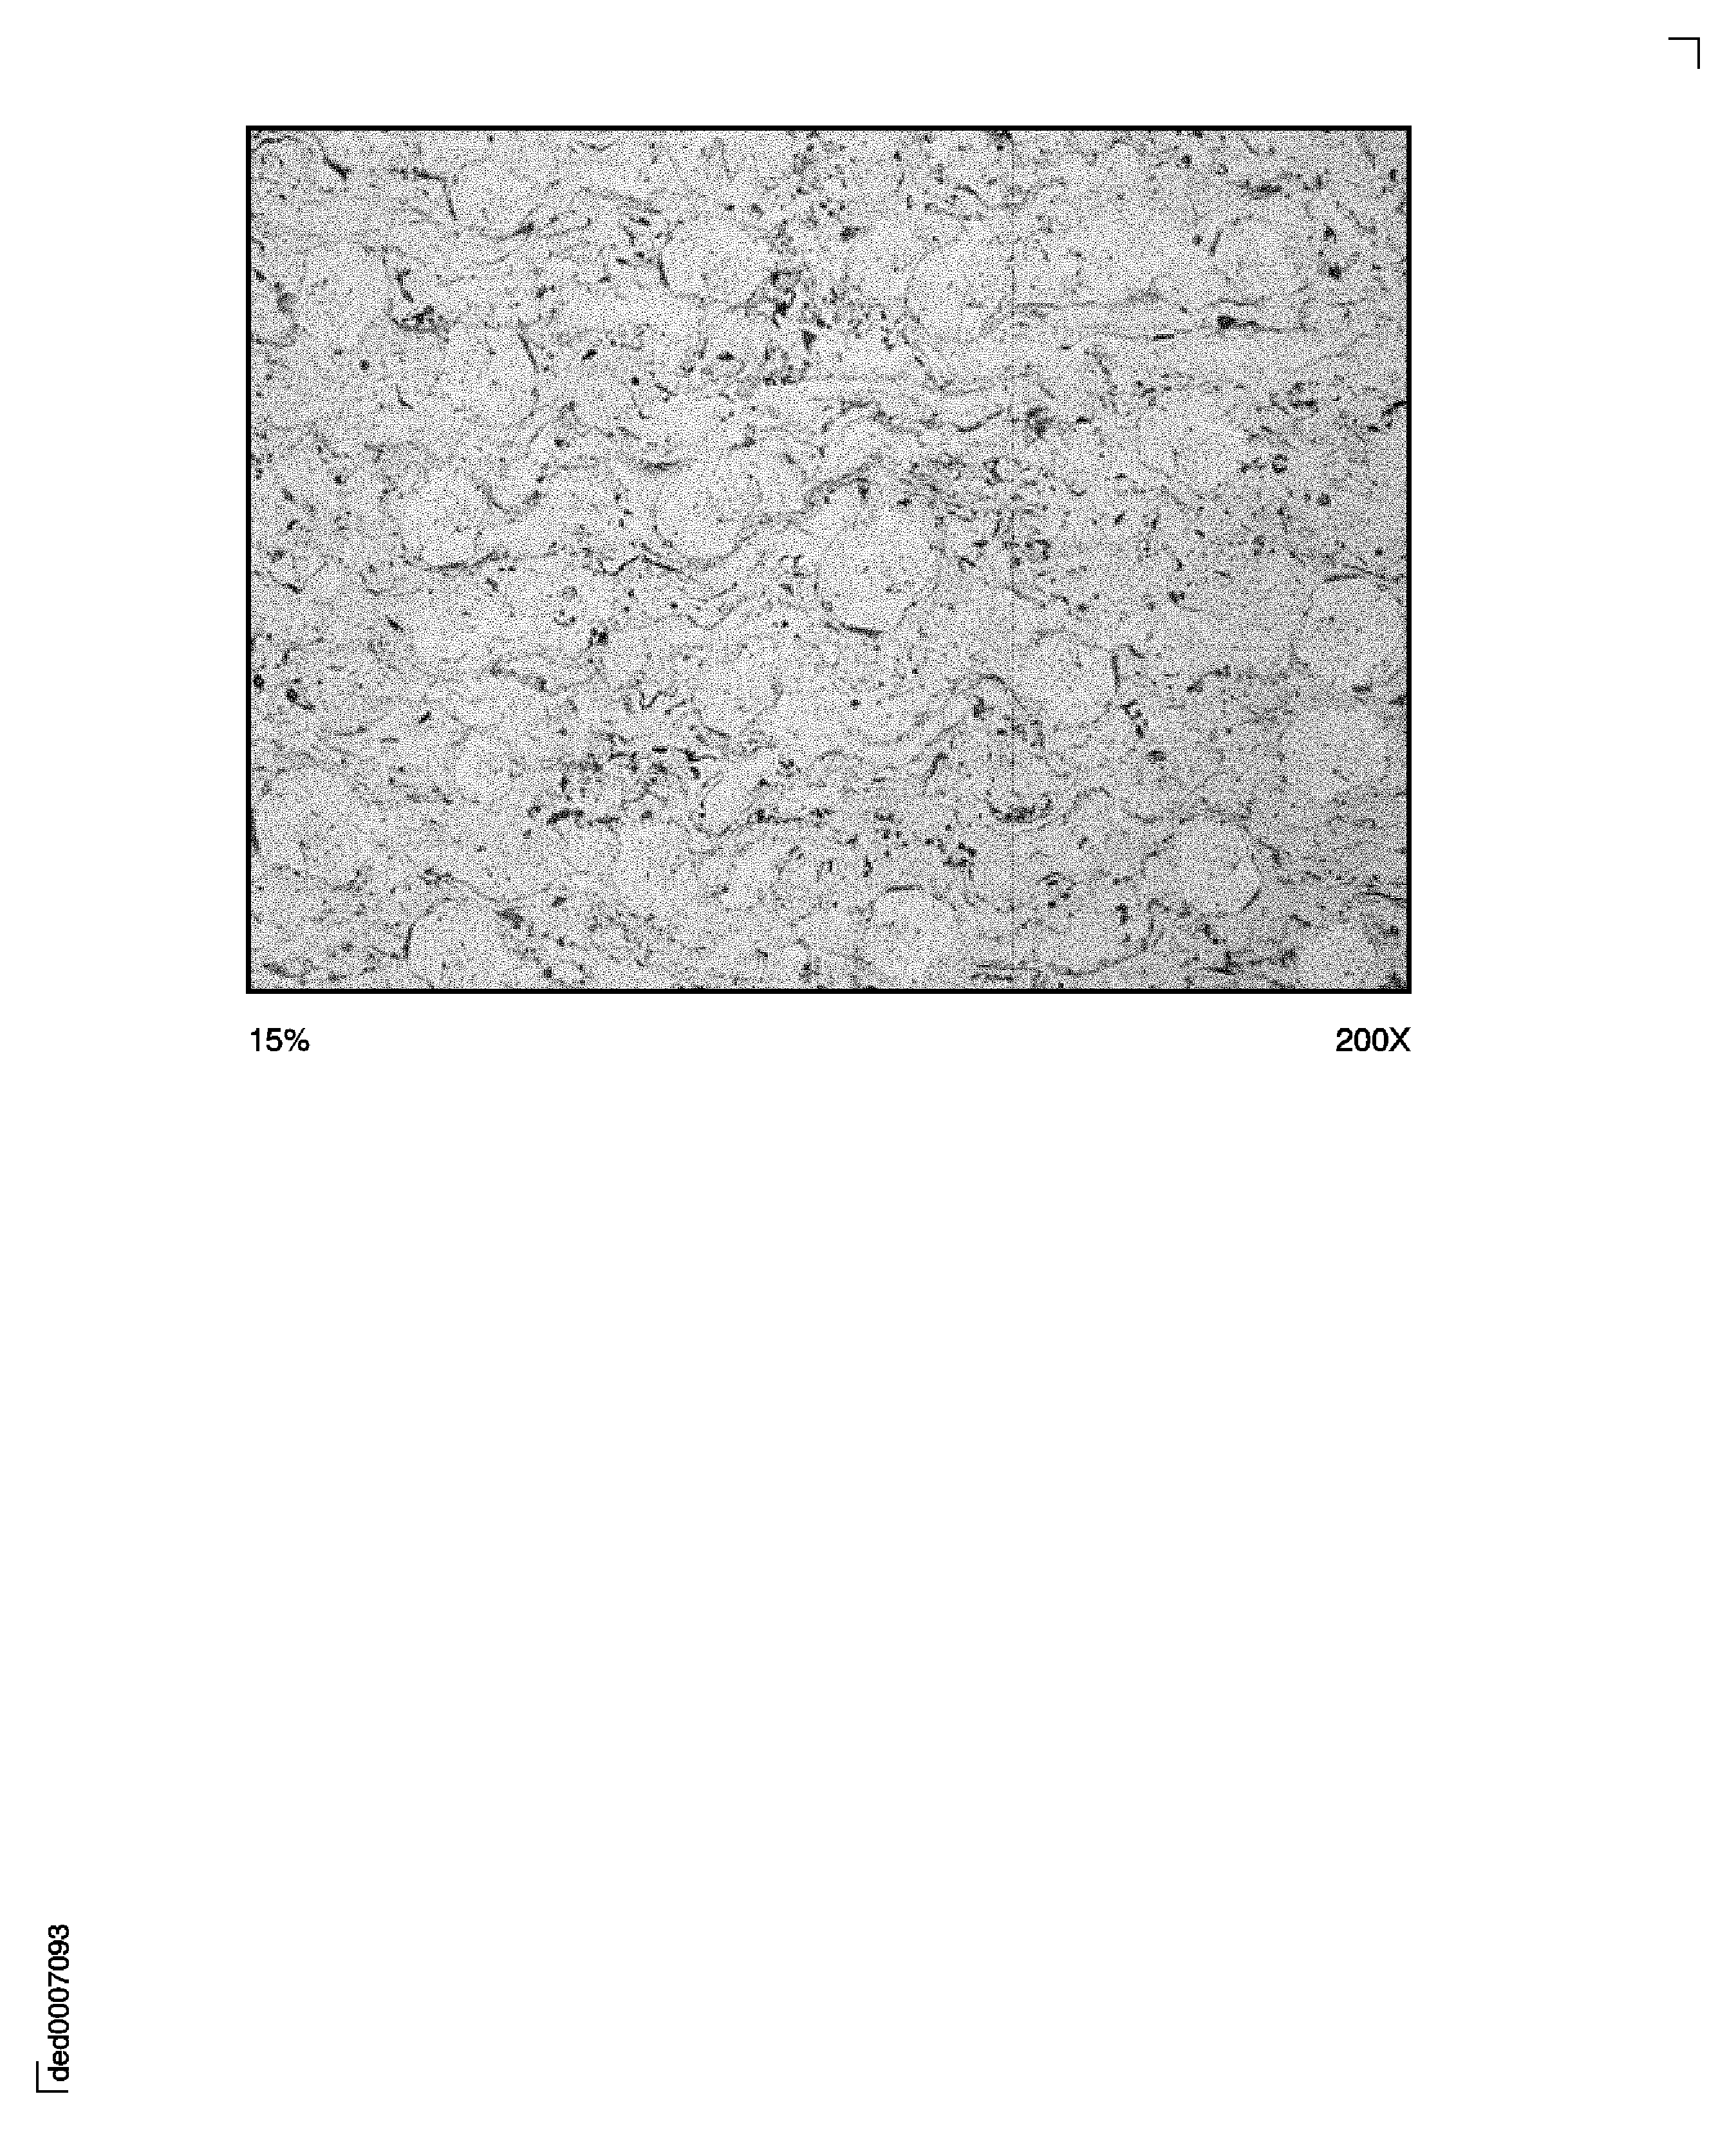
Figure: Typical corners, grooves, or slots where greater amounts of porosity or oxides are permitted.
Typical corners, grooves, or slots where greater amounts of porosity or oxides are permitted.
