Export Control
EAR Export Classification: Not subject to the EAR per 15 C.F.R. Chapter 1, Part 734.3(b)(3), except for the following Service Bulletins which are currently published as EAR Export Classification 9E991: SBE70-0992, SBE72-0483, SBE72-0580, SBE72-0588, SBE72-0640, SBE73-0209, SBE80-0024 and SBE80-0025.Copyright
© IAE International Aero Engines AG (2001, 2014 - 2021) The information contained in this document is the property of © IAE International Aero Engines AG and may not be copied or used for any purpose other than that for which it is supplied without the express written authority of © IAE International Aero Engines AG. (This does not preclude use by engine and aircraft operators for normal instructional, maintenance or overhaul purposes.).Applicability
All
Common Information
TASK 70-34-03-340-501-001 Plasma Spray Coating Application- Quality Control
Table of Contents
Introduction
Quality Control Procedure - Step
Initial Qualification - Step
Re-qualification - Step
Periodic or Routine Qualification Tests - Step
Quality Control Tests - Step
Rules for Metallographic Examination - Step
Tables - Step
Introduction
In most repair operations, the quality of the finished repair is closely related to the experience and skill of the person who does the work. Due to the number of variables involved, the experience and skill of the plasma equipment operator plays a great part in the quality of plasma coatings. This section on plasma coating quality control gives, in addition to coating quality tests, recommendations as to how this capability should be developed so that plasma equipment operators can get the necessary fundamental skill level and experience.
To get the same results every time is very important in any repair procedure. Do not rely on plasma coating as a repair tool or procedure until the equipment operator can apply different types of plasma coatings to many different types of part shapes and materials, with satisfactory results each time. To do this it will be necessary for the operator to use the plasma equipment carefully and frequently for satisfactory results.
Refer to SPM TASK 70-34-03-340-501, SUBTASK 70-34-03-340-001 and related figure for the CoMat numbers which are applicable to the IAE coating numbers.
Preliminary Requirements
Pre-Conditions
NONESupport Equipment
NONEConsumables, Materials and Expendables
| Name | Manufacturer | Part Number / Identification | Quantity | Remark |
|---|---|---|---|---|
| CoMat 08-156 ADHESIVE | DQ004 | CoMat 08-156 | ||
| CoMat 08-157 ADHESIVE | 11684 | CoMat 08-157 | ||
| CoMat 08-158 ADHESIVE FILM - EPOXY,SCRIM SUPPORTED | 33564 | CoMat 08-158 | ||
| CoMat 08-159 ADHESIVE | 04963 | CoMat 08-159 | ||
| CoMat 08-160 ADHESIVE | 04963 | CoMat 08-160 | ||
| CoMat 08-161 ADHESIVE | 04963 | CoMat 08-161 |
Spares
NONESafety Requirements
WARNING
Procedure
Record all parameters on a process operation sheet so that parameters can be related to coating defects. Refer to general data and the example of a plasma coating schedule form illustrated in SPM TASK 70-34-03-340-501.
Data Records.
Of special interest is the rate of deterioration of the nozzle. The number of parts which can be grouped together and sprayed between sets of test panels is controlled by this rate of deterioration. This deterioration rate will help to identify a nozzle life that will deliver consistent, satisfactory performance.
Nozzle Life.
SUBTASK 70-34-03-860-102 Quality Control Procedure
The programmer/operator (that is, the coating process programmer for robots, CNC machines) must take extensive training course(s) to the manual sprayer qualification requirements with additional training in spray equipment programming.
NOTE
Commercially available courses/training are:European Welding Federation (EWF) - European Thermal Spray Course.
American Welding Society (AWS) - Performance Qualification Testing.
For a new operator or new operator skill level, the qualification requirements are as follows:
Operator.
A representative alloy. See Table 1 (in Step) for representative materials/alloys for test panels and bond strength specimens).
A simulated part with these features:
For a representative engine part for metallurgical evaluation, use one of these types of parts:
Evaluate the coating on the engine part to the repair requirements and establish the correlation with process test coupons.
Part (Engine Component Being Repaired) - Qualification Of A Coating On A New Part.
SUBTASK 70-34-03-860-103 Initial Qualification
Test panel and bond test specimen materials are given in Table 1 (refer to Step) for the three general types of engine part materials.
Test Materials.
Test by the Quality Control Program in SPM TASK 70-34-03-340-501-001, Plasma Coating Quality Control Tests.
Frequency of Testing.
Test Evaluation And Disposition Criteria.
Bond Strength Test.
The correct interpretation of the specimen is of greatest importance. The personnel who do these procedures and compare the results to standards, must have training to do these functions correctly. Thus, the supplier's quality system should include equipment maintenance and calibration as well as training for all metallographic personnel to correctly do all the necessary functions and analyses.
Qualification/Certification of the Metallurgist/Metallographer/Equipment/Laboratory.
Metallographic preparation of thermal spray samples includes the preparation of a composite specimen composed of the coating and substrate material. Coating types can vary from soft porous abradables to dimensional restoration metal build-ups to hardface materials. Many coatings with similar properties can be prepared by a universal standard method; but, there can be special considerations for materials at the soft or hard end of the spectrum. It is permitted to use methods developed for cast or wrought metallic samples for coatings with these two considerations:
General.
Typical mounting materials for coatings (see Figure).
For porous coatings (such as, abradables, thermal barrier coatings (TBC), and other materials), cold mounting with vacuum impregnation alone and/or pressure impregnation is recommended. The viscosity of the cold mount epoxy will be important if the porosity in the coating is small and is not easy to impregnate.
Mounting.
The critical parameters that must be considered /controlled in preparation are given in Table 3 in Step.
Grinding and Polishing.
Typical procedures that include both grinding paper and disc formats are shown in Tables 4 and 5 in Step. These procedures will require modification for different coating types and equipment available in the specific laboratories.
Metallographic Preparation.
A relatively new concept is the use of metallographic standards to understand the reliability of metallographic equipment and consumables. These standards can be used in the same way calibration blocks are used to test the repeatability of hardness machines. The microstructure of these standards must be fully documented before their use in this exercise. By polishing a sample of known quality, a comparison can be made between the new metallographic process and the old and accepted process. If there are little or no differences in the old and new processes, it is permitted to use the new metallographic process. Typical situations where this new procedure is used are:
Use of Physical Metallographic Standards.
If the coating thickness specified is less than that which will make it possible to do a satisfactory microhardness inspection, apply the coating to a sample to a thickness sufficient for the hardness test. (See RULE 3 in Rules for Metallographic Examination in Step).
Use the subsequent steps to make sure that the hardness values represent the coating's true properties. (Refer to RULE 14 in Rules for Metallographic Examination in Step.).
Microhardness.
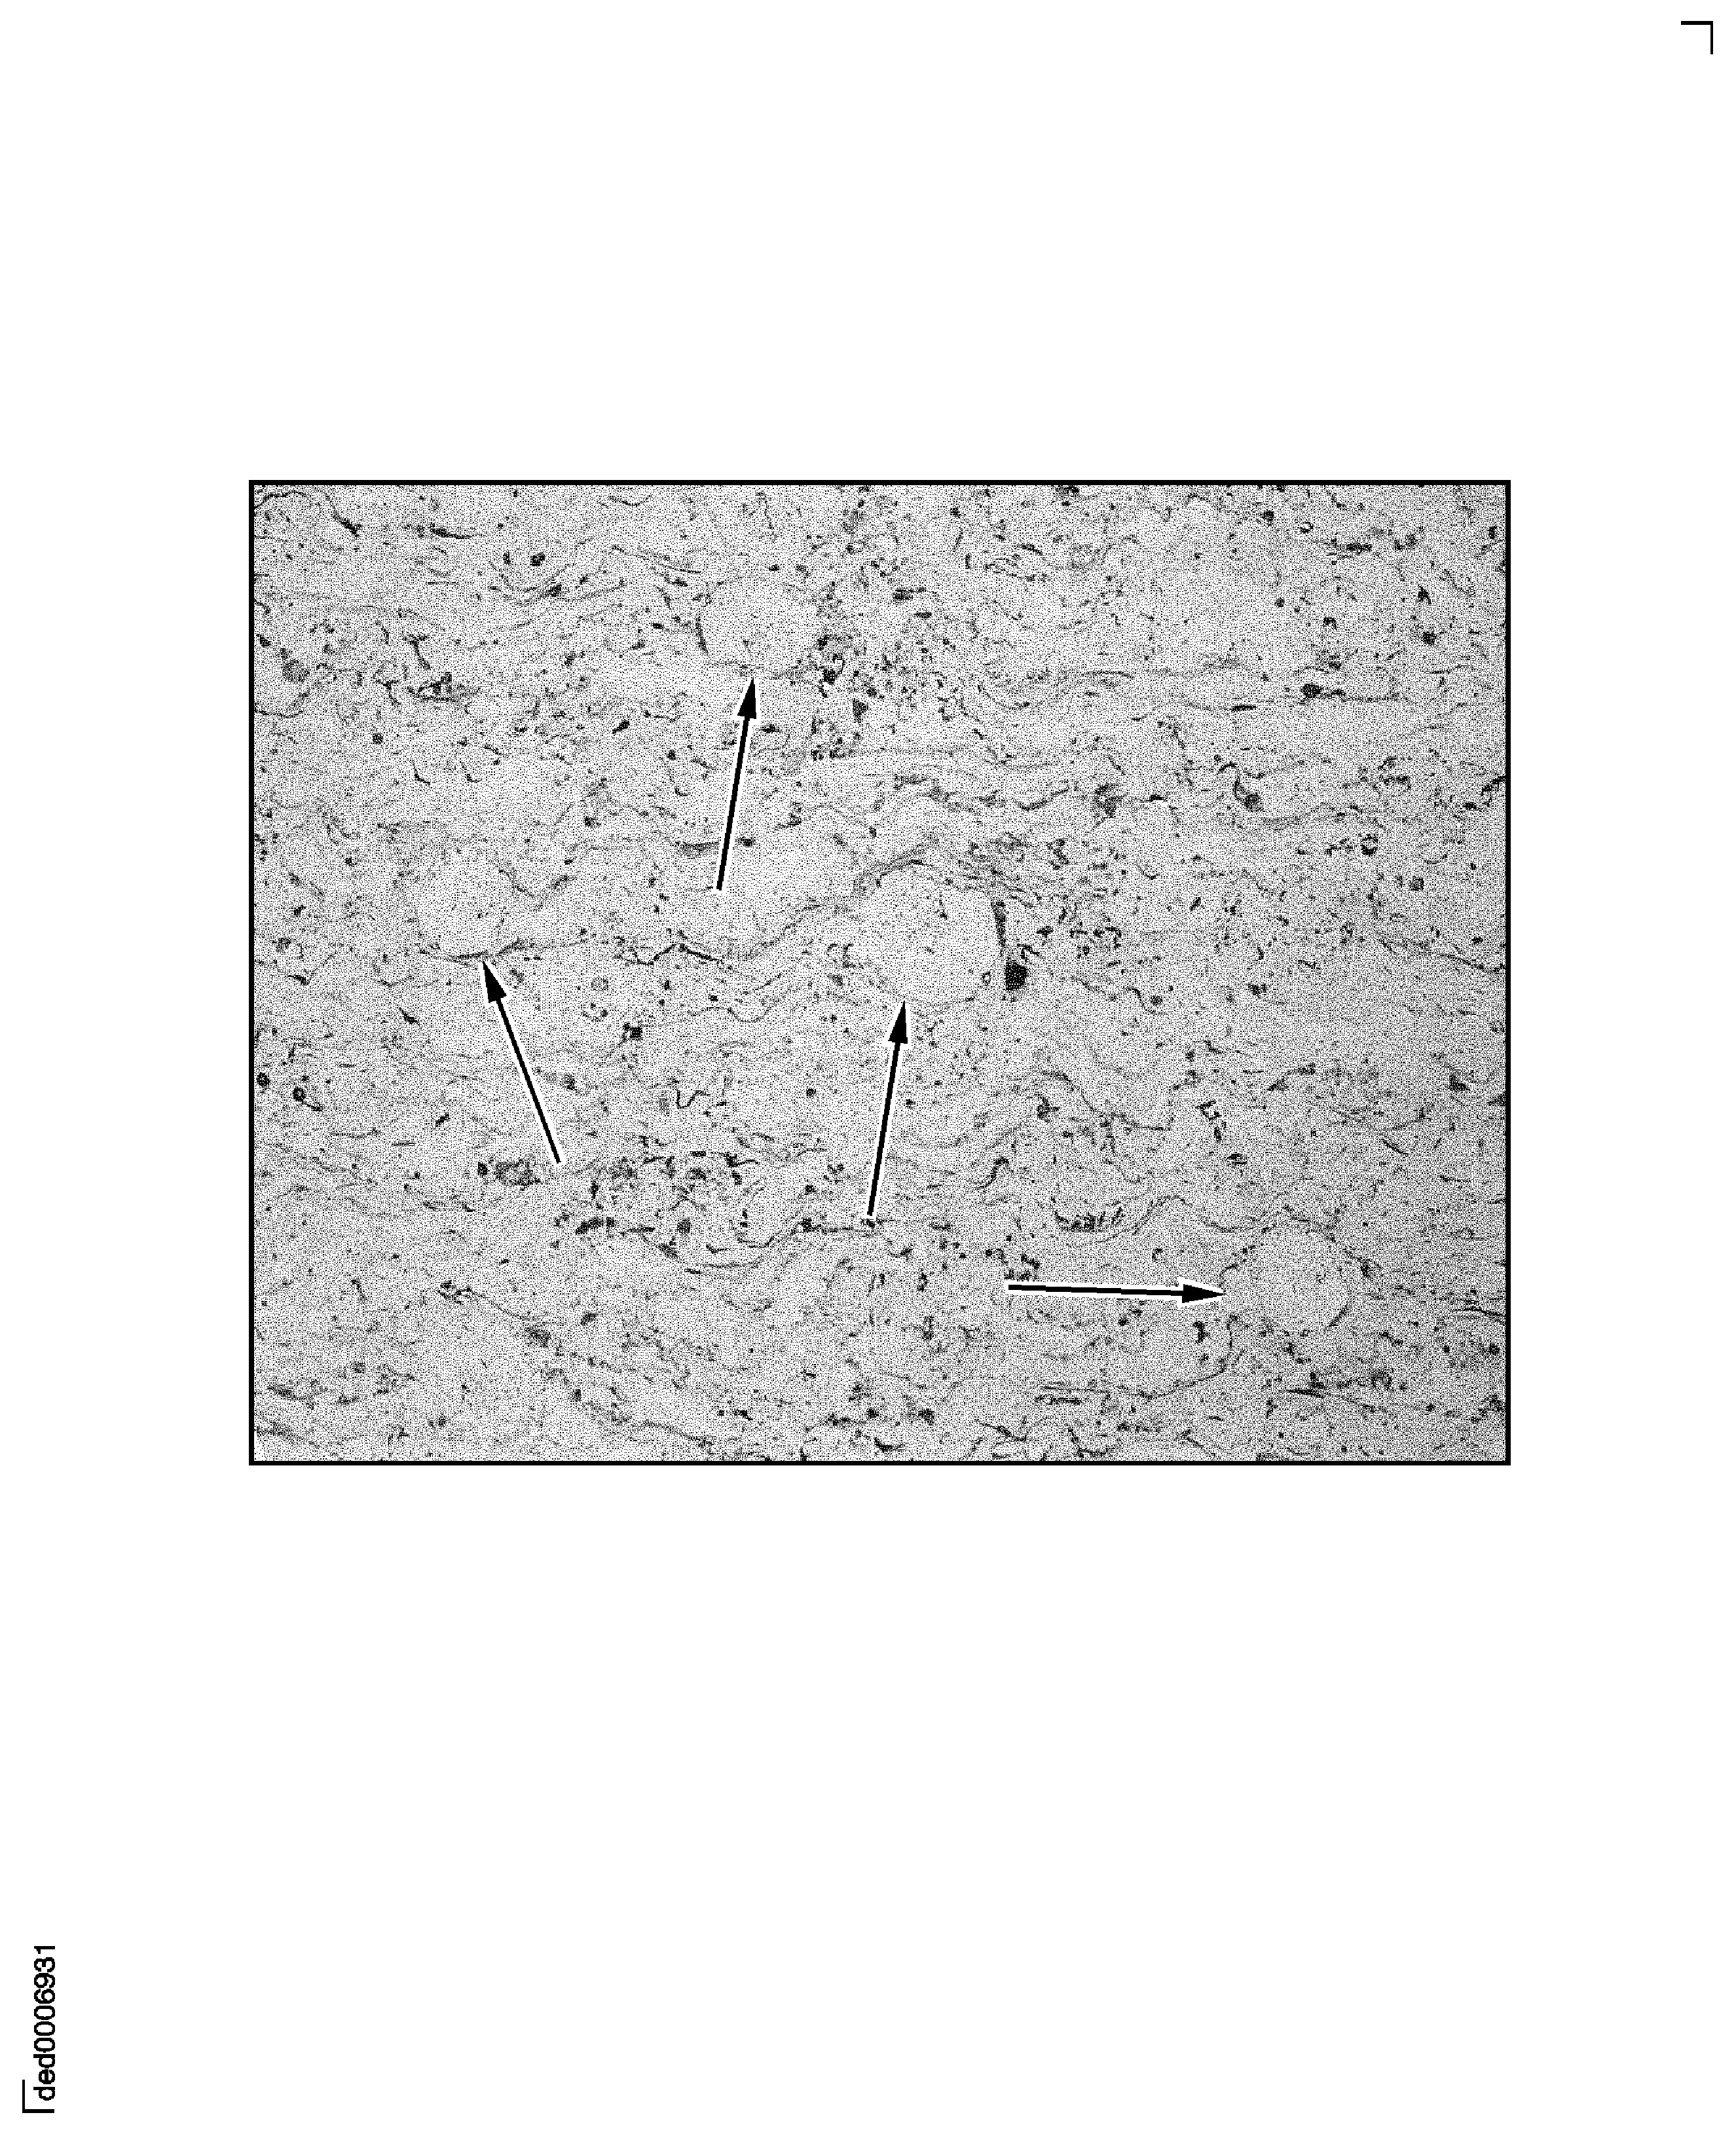
This contamination can be in the form of metallic or ceramic particles. These particles can come from sources such as nozzle hardware and contaminated power feed systems. See Figure.
Coating Contamination: Unwanted (foreign) material present in the coating.
Crack: A linear or branched separation with a general perpendicular direction within the coating. See Figure.
Delamination: A separation or horizontal defect that follows, or is associated with, the contour of the laminar build-up of the coating layers. See Figure.
Integrity: The overall quality and soundness of the coating. The integrity of a coating with only one defect (for example, oxide clusters, massive porosity, or unmelted particles) can be considered acceptable (satisfactory) but integrity can become considered rejectable (unsatisfactory) if there are more than one of these defects. Coatings are also considered rejectable (unsatisfactory) that have excessive segregation or an uneven distribution of defects, phases, or coating components. Individually, these features could be within their metallographic limits, but, when concentrated in a localized area, could become a possible problem. See Figure.
Interface Contamination: Embedded unwanted (foreign) particles or contamination between the base metal and the coating. This contamination can be in the form of oxides, grit, or coating remaining from previous stripping operations. See Figure.
NOTE
It is very important for all personnel to know that there can be size differences between the photographic field of view and the microscopic field of view.Field of View (FOV): A unit area as viewed or photographed with normal light microscopy. Used as a unit of measure to help determine the percent that a particular feature or condition occurs. To examine specific rejectable (unsatisfactory) conditions, count the affected number of fields of view. Fields of view must not overlap and must be of random selection.
Layering: Stratification of coating components or features. See Figure.
Massive Porosity: A large pore (hole) or a cluster of small pores (holes) in a specific area. See Figure.
Oxide Clusters: Concentration of oxides. See Figure.
Oxide Stringers: Wavy oxide striations that run parallel through the coating. See Figure.
Separation: A defect that follows or is associated with the contour of the interface. See Figure. For linear intra-coating defects, refer to Delamination.
Uniformity: Distribution of constituents (such as, phases, porosity, oxides). See Figure.
Unmelted Particles: Unreacted powder particles contained within the coating matrix. These particles have a globular or angular appearance, are not adhered to the adjacent coating matrix, and are not part of a cohesive microstructure. See Figure.
Metallographic Definitions For Coated Test Samples.
View the polished surface at either 500X or 200X magnification, as necessary, and evaluate by the acceptance standards in SPM TASK 70-34-03-340-501-002.
Magnification for Metallographic Examination.
Equipment, applicable for this operation and that gives up to 500X magnification, is available from the subsequent Supplier Code. Refer to V2500-00-00-00-00-00A-00KA-D for the company name/address identified by this number:
1KGE8.
Equipment for Metallographic Examination.
Mount the test specimen in the microhardness tester. A list of test equipment is available from the subsequent Supplier Code. Refer to V2500-00-00-00-00-00A-00KA-D for the company name/address identified by this number:
80140.
Record the data: minimum, maximum, and average hardness. Refer to SPM TASK 70-34-03-340-501-002.
Hardness Test (IAE 53-1, -5, -10, -16, -38, and -69 Coatings).
Metallographic Preparation.
SUBTASK 70-34-03-860-106 Quality Control Tests
NOTE
Test panel and bond strength specimens are to be representative of the process being qualified except it is necessary to use No. 60 alumina grit for bond specimen preparation.RULE 2 - Coating Contamination (Refer to the applicable quality standard in SPM TASK 70-34-03-340-501-002 for Acceptance Standards.).
RULE 15 - Oxide Clusters: Ratable if the longest dimension is greater than 0.003 inch (0.076 mm) or 75 percent of the coating thickness, or the number of unratable clusters is greater than five (5) in one standard field of evaluation (see RULE 6). Any ratable condition is rejectable (unsatisfactory).
RULE 19 - Unmelted Particles (Unmelts): Must be greater than 75 percent unbonded. Ratable if size aspect ratio is less than 3:2 (longest:shortest) or if the longest measured dimension is greater than 0.002 inch (0.051 mm) for coarse powder coatings or greater than 0.001 inch (0.025 mm) for fine powder coatings.
SUBTASK 70-34-03-860-107 Rules for Metallographic Examination
NOTE
Coating-specific acceptance standards must supersede the Rules.Table 2. Coating Thickness Requirements for Bond Strength Test Coating
Thickness, Inches (mm)
IAE 53-11, -69
0.003 - 0.005 (0.077 - 0.127)
IAE 53-1, -5, -16, -17, -38
0.006 - 0.008 (0.153 - 0.203)
All Others
0.008 - 0.010 (0.204 - 0.254)
IAE 53-33 (Includes Undercoat)
0.013 - 0.020 (0.330 - 0.508)
NOTE
When a bond strength test is specified for IAE 53-35 coating applied over an undercoat of IAE 53-21 or IAE 53-37, apply the undercoat to a thickness of 0.002 to 0.004 inch (0.051 to 0.101 mm); then add a top coat of IAE 53-35 for a total coating thickness of 0.008 to 0.010 inch (0.024 to 0.254 mm).Table 3. Critical Parameters for Grinding and Polishing Parameter
Description
Pressure
Applied/specified for each mount
Speed
Both table and specimen holder
Rotation Direction
Relative rotation of head in relation to the table
Format
Grinding: Disc compared to grinding papers
Polishing: No nap compared to high nap cloths
Type of Abrasive
Diamond, silicon carbide, colloidal silica, aluminum oxide
Quantity of Abrasive
ml/min.
Orientation
How samples are put in holder in relation to wheel rotation
Frequency
How often lubricant/abrasive is applied
Type of Lubricant
Oil, water, alcohol
Quantity of Lubricant
ml/min.
Time
Total for individual steps
Table 4. Typical Preparation Procedure for Abrasive Papers Surface
Abrasive,
Grit Size
Lubricant
Load/ Specimen
Speed (RPM)
Time
Rotation
Grinding Papers or Grinding Stone
SiC
120 or 180
Water
5 lbs. (2.27 kg)
300
Enough papers to flatten specimen and remove damage/edge effects; 30 seconds
Complimentary
Grinding Papers
SiC
240 thru 800/1200
Water
5 lbs. (2.27 kg)
300
Usually two papers/grit size; 30 seconds
Complimentary
No Nap Cloth
Polycrystalline or monocrystalline diamond
Can be in the range 1 to 6 micron diamond
Water or Alcohol
5 lbs. (2.27 kg)
300
Can be in the range of 1 to 4 minutes
Complimentary
Higher Nap Cloth
Colloidal silica, aluminum oxide (used to prevent overpolishing)
Usually 0.05 micron
Water or Alcohol
5 lbs. (2.27 kg)
300
Usually 15 to 30 seconds
Complimentary
Table 5. Typical Preparation Procedure for Abrasive Discs Surface
Abrasive,
Grit Size
Lubricant
Load/ Specimen
Speed (RPM)
Time
Rotation
Grinding Stone
SiC
120 or 180
Water
5 lbs. (2.27 kg)
300
Enough to flatten specimen and remove damage/edge effects; 30 seconds
Complimentary
Fixed Diamond or Composite Disc
Polycrystalline or monocrystalline diamond
40 to 60 micron
Water
5 lbs. (2.27 kg)
300
Enough to flatten specimen and remove damage/edge effects; 2 to 4 minutes
Complimentary
Fixed Diamond or Composite Disc
Polycrystalline or monocrystalline diamond
6 to 9 micron
Water
5 lbs. (2.27 kg)
300
3 to 5 minutes
Complimentary
No Nap
Cloth
Polycrystalline or monocrystalline diamond
Can be in the range 1 to 6 micron diamond
Water or Alcohol
5 lbs. (2.27 kg)
300
Can be in the range 1 to 4 minutes
Complimentary
Higher Nap Cloth
Colloidal silica, aluminum oxide (used to prevent overpolishing)
Usually 0.05 micron
Water or Alcohol
5 lbs. (2.27 kg)
300
Usually 15 to 30 seconds
Complimentary
Table 6. Key to Figure IAE Bond Strength Specimen 1
0.88 Inch (2.235 mm) diameter maximum. (No. 2 center drill ref)
Depth 0.110 inch (2.794 mm) maximum.
Chamfer 60 deg +/- 6 deg included to 0.120 Inch (3.048 mm) diameter maximum (optional).
2
Chamfer to 0.050 to 0.080 inch (1.27 to 2.03 mm) X 45 deg approximately.
3
1.500 to 2.250 inches (38.1 to 57.2 mm)
4
1.000-12 UNF-3A, Pitch diameter 0.9415 to 0.9459 inch (23.915 to 24.025 mm).
Major diameter 0.9886 to 0.9905 inch (25.111 to 25.158 mm).
Minor diameter 0.8978 inch (22.804 mm) maximum.
5
Vibration peen identification in shaded area.
6
Coat this end. Surface "A" must be square with centerline within 0.001 inch (0.025 mm) FIR before coating. This is a critical requirement.
7
0.960 to 0.990 inch (24.38 to 25.15 mm) diameter.
8
No overspray is permitted. Mask outside diameter of specimen.
9
1.00 inch (25.400 mm) maximum. Full or imperfect thread.
10
0.834 Inch (21.184 mm) minimum full thread.
Table 7. Key to Figure IAE Universal Adaptor To Attach Bond Test Specimen To Tensile Test Equipment 1
1.000-12 UNF-3B to fit bond test specimen
2
0.005 inch (0.127 mm) clearance
3
To fit tensile test machine
Table 8. Key to Figure Other Bond Strength Specimen Configurations 1
0.39 - 0.40 inch (9.91 - 10.16 mm) diameter
2
0.16 - 0.24 inch (4.06 - 6.10 mm) radius
3
0.386 - 0.402 inch (9.80 - 10.21 mm)
4
1.96 - 1.98 inches (49.78 - 50.29 mm)
5
1.33 - 1.35 inches (33.78 - 34.29 mm)
6
0.66 - 0.68 inch (16.76 - 17.27 mm)
7
0.98 - 0.99 inch (24.89 - 25.15 mm) diameter
8
90 +/- 2 deg
Table 9. Key to Figure Other Bond Strength Specimen Configurations (2) 1
0.99 - 1.00 inch (25.15 - 25.40 mm) diameter
2
1.90 - 2.10 inches (48.3 - 53.3 mm)
3
1.125 inches (28.575 mm) maximum
4
1.00 inch (25.40 mm) - 8NC - 2A diameter
5
0.50 inch (12.70 mm) - 20 UNF - 2B (minimum) diameter;
0.625 inch (15.875 mm) - 18 UNF - 2B diameter;
0.75 inch (19.05 mm) - 16 UNF - 2B (maximum) diameter
Table 10. Key to Figure Other Bond Strength Specimen Configurations (3) 1
0.39 - 0.40 inch (9.91 - 10.16 mm) diameter
2
0.16 - 0.24 inch (4.06 - 6.10 mm) radius
3
0.386 - 0.402 inch (9.80 - 10.21 mm)
4
0.12 - 0.28 inch (3.0 - 7.1 mm)
5
1.96 - 1.98 inches (49.78 - 50.29 mm)
6
1.33 - 1.35 inches (33.78 - 34.29 mm)
7
0.66 - 0.68 inch (16.76 - 17.27 mm)
8
0.98 - 0.99 inch (24.89 - 25.15 mm) diameter
9
90 +/- 2 deg
Table 11. Key to Figure Other Bond Strength Specimen Configurations (4) 1
0.99 - 1.00 inch (25.15 - 25.40 mm) diameter
2
1.90 - 2.10 inches (48.3 - 53.3 mm)
3
1.00 inch (25.40 mm) diameter - 8NC - 2A diameter
4
0.50 inch (12.70 mm) - 20 UNF - 2B (minimum) diameter;
0.625 inch (15.875 mm) - 18 UNF - 2B diameter;
0.75 inch (19.05 mm) - 16 UNF - 2B (maximum) diameter
5
1.125 inches (28.575 mm) - maximum
6
0.245 - 0.255 inch (6.22 - 6.48 mm)
SUBTASK 70-34-03-860-108 Tables
Figure: Specimen Configuration - IAE Bond Strength Specimen. For Key, Refer to Table 6.
Specimen Configuration - IAE Bond Strength Specimen. For Key, Refer to Table 6.
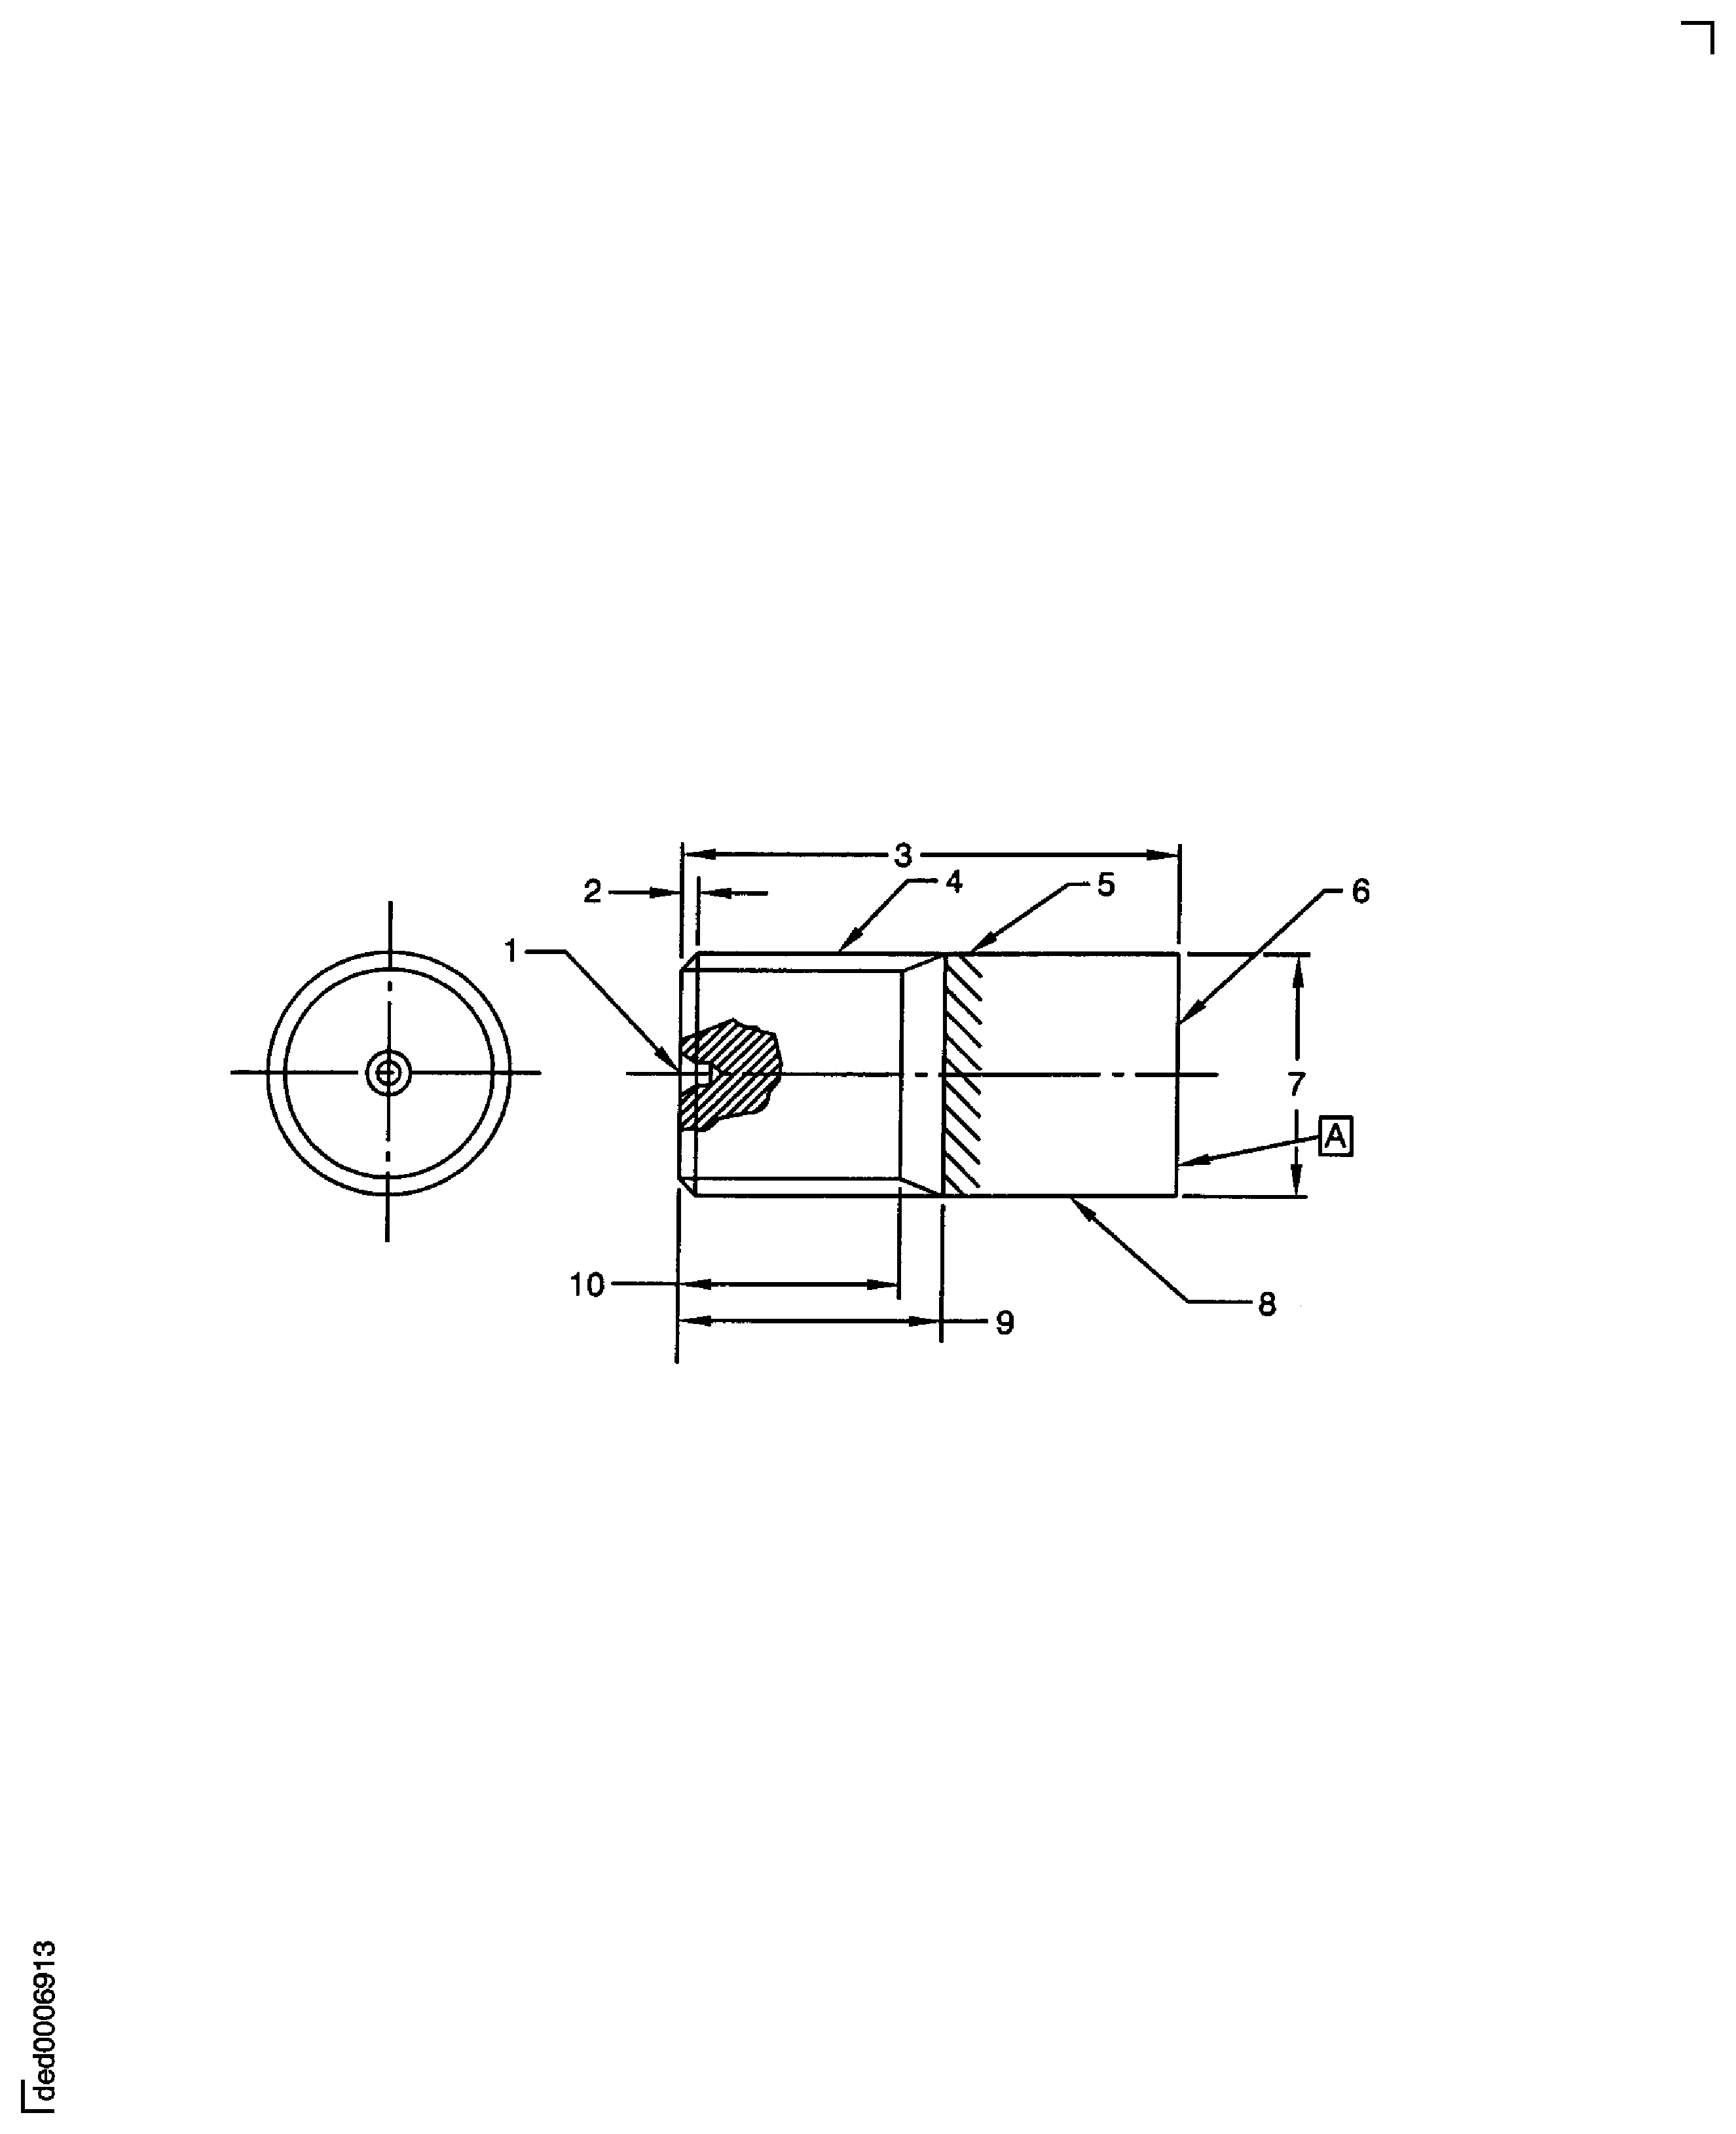
Figure: IAE Universal Adaptor To Attach Bond Test Specimen to Tensile Test Equipment. For Key, Refer to Table 7.
IAE Universal Adaptor To Attach Bond Test Specimen to Tensile Test Equipment. For Key, Refer to Table 7.
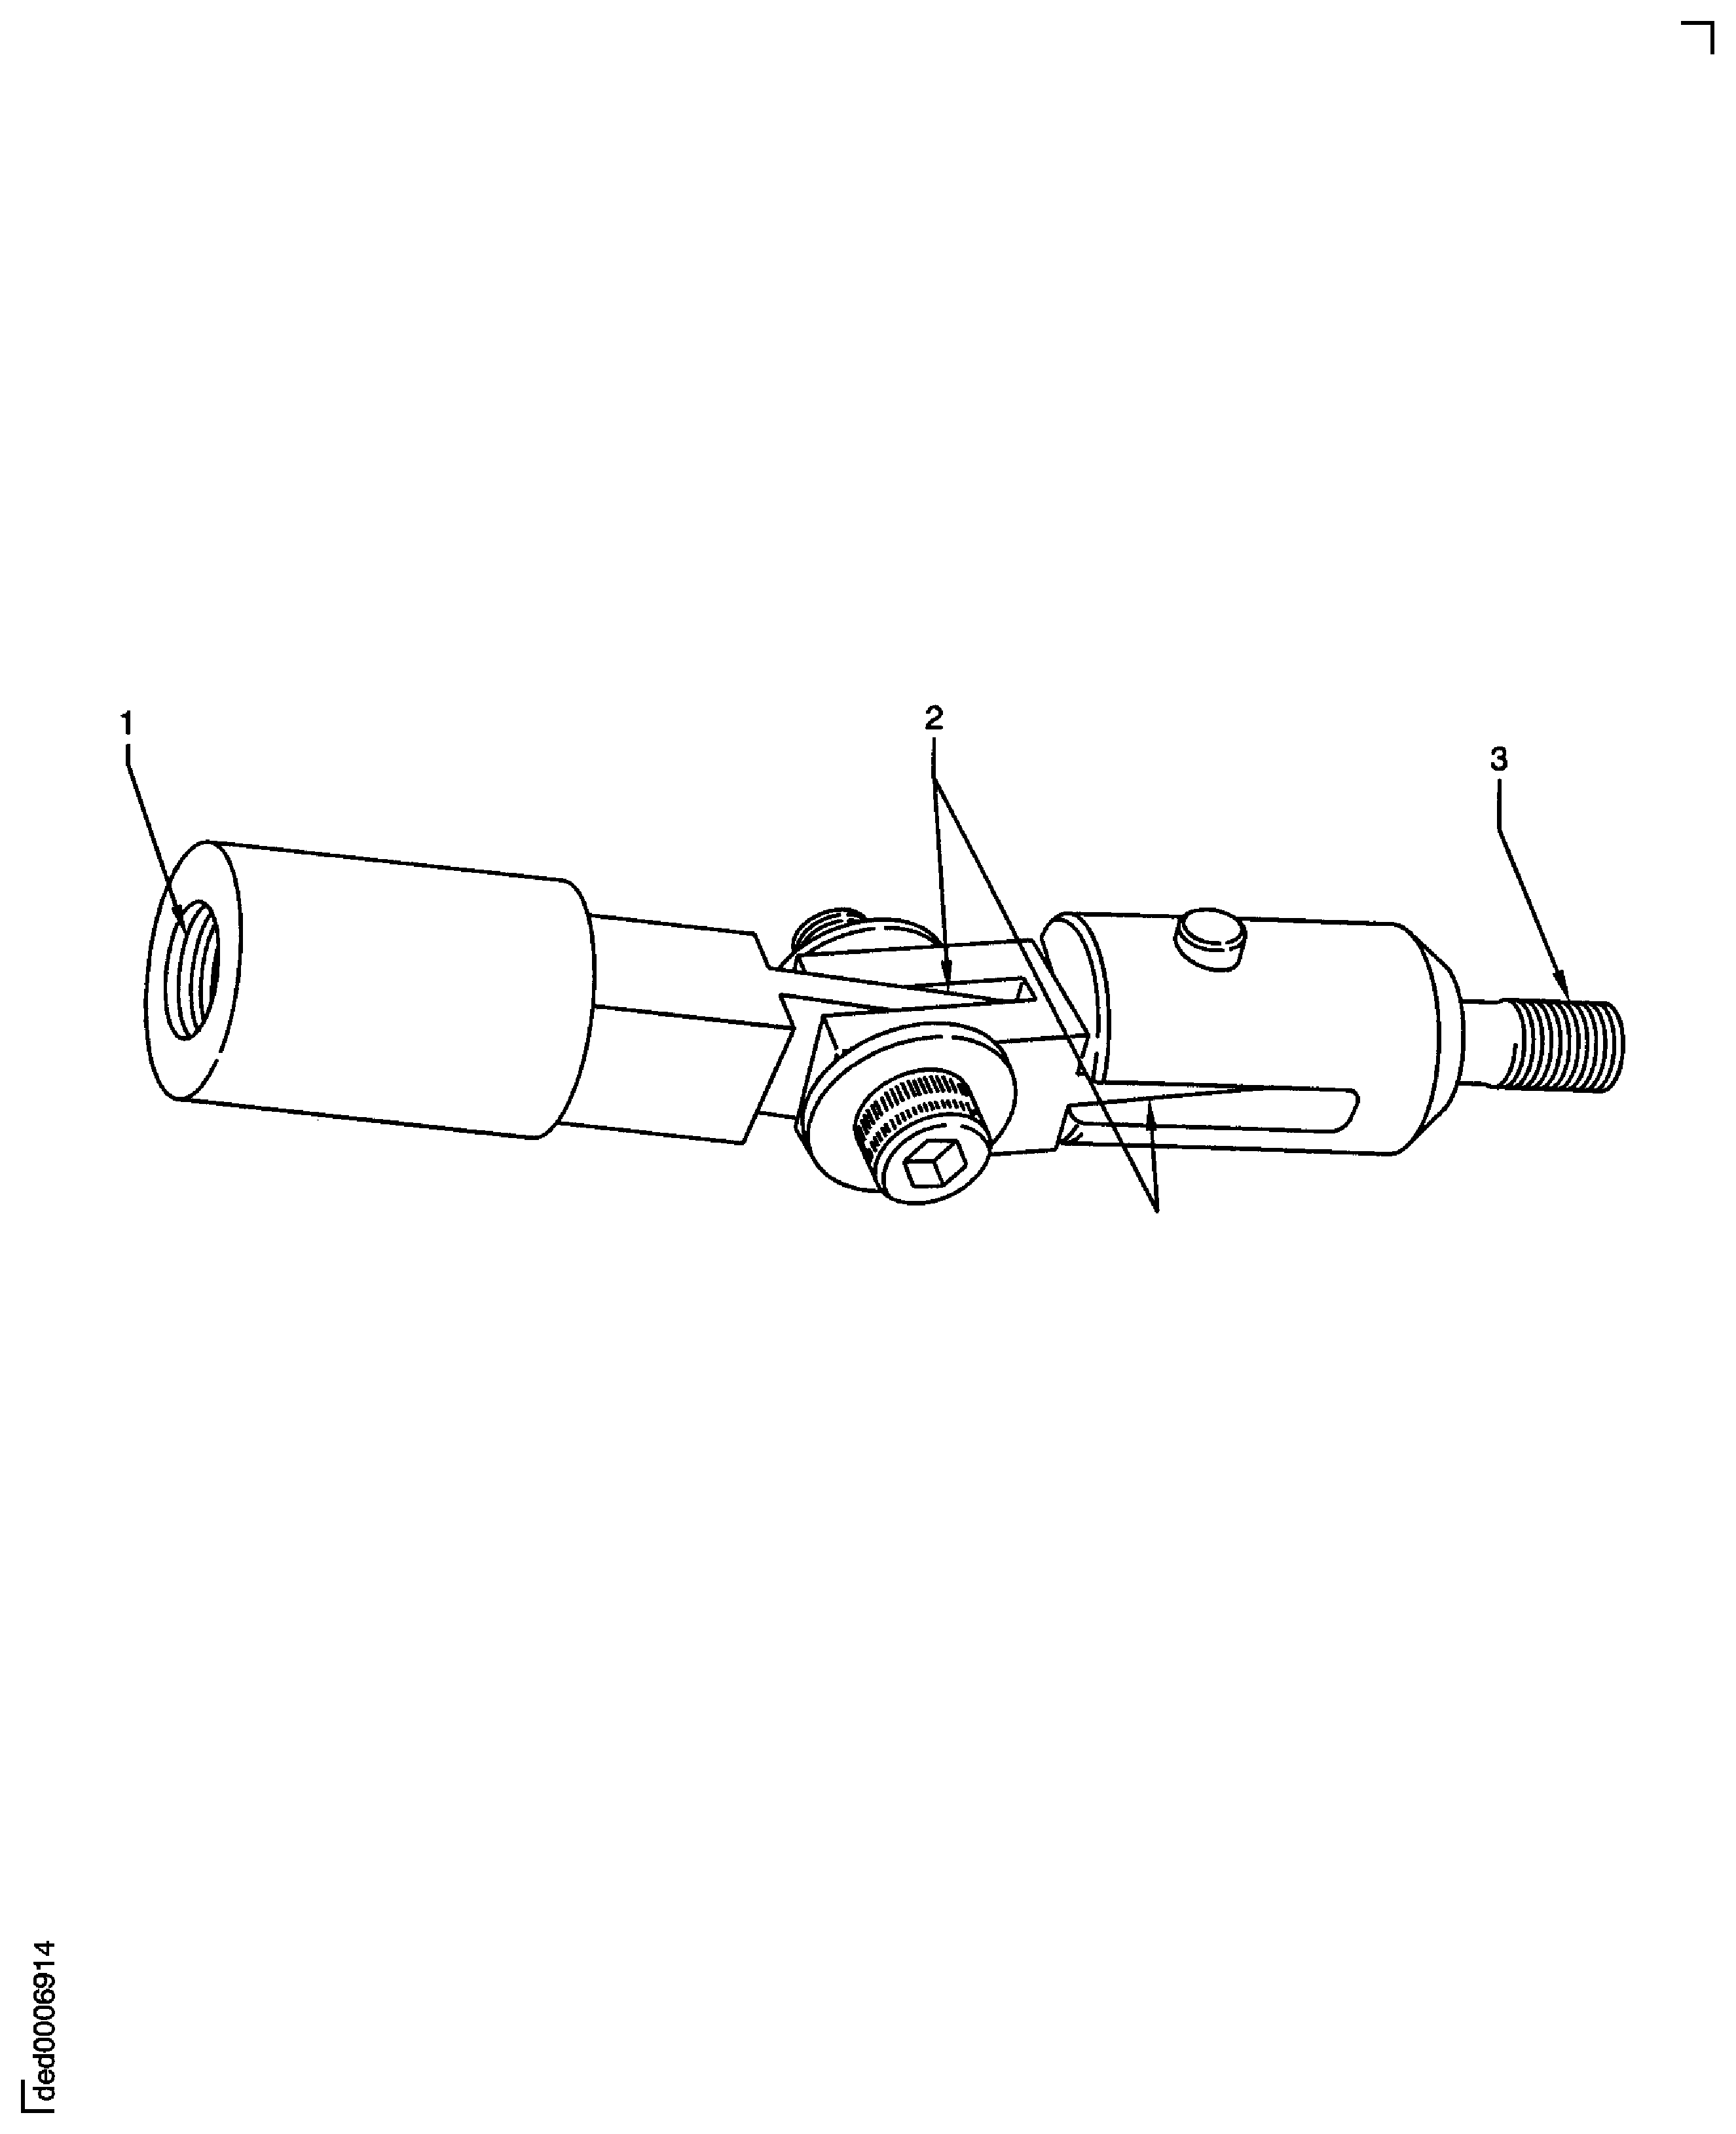
Figure: Other Bond Strength Specimen Configurations. For Key, Refer to Table 8.
Other Bond Strength Specimen Configurations. For Key, Refer to Table 8.
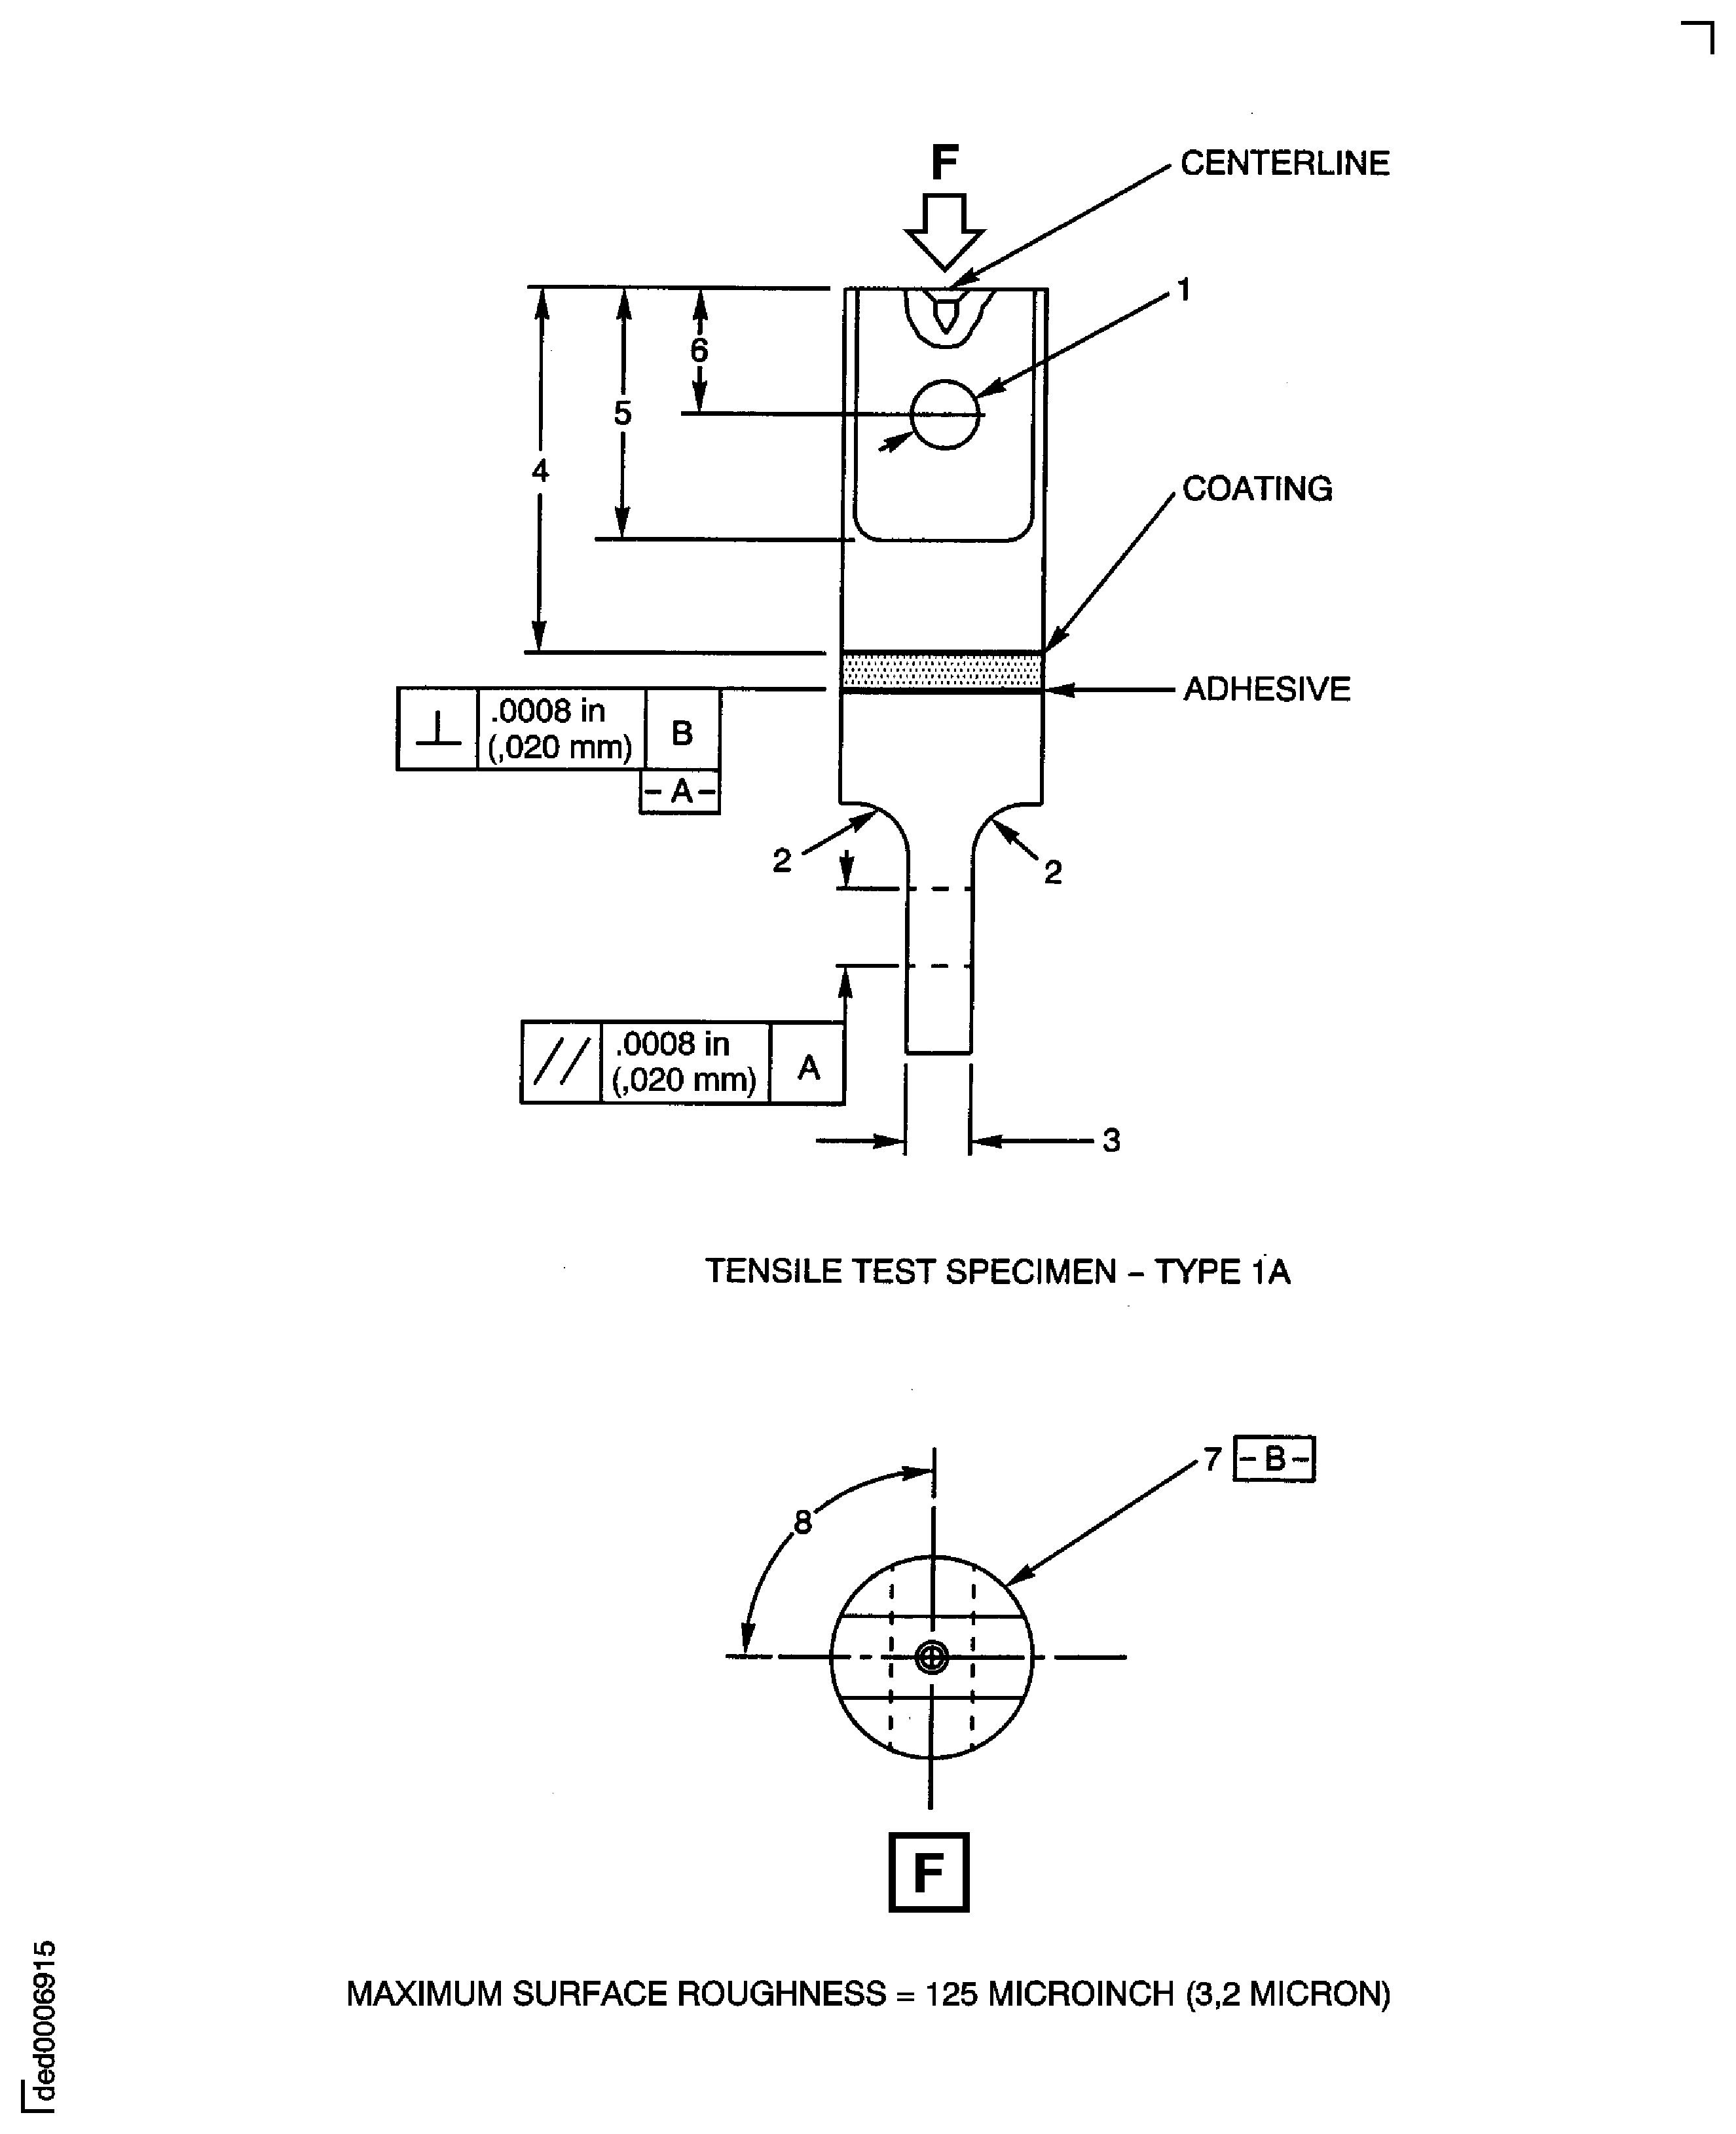
Figure: Other Bond Strength Specimen Configurations. For Key, Refer to Table 9.
Other Bond Strength Specimen Configurations. For Key, Refer to Table 9.
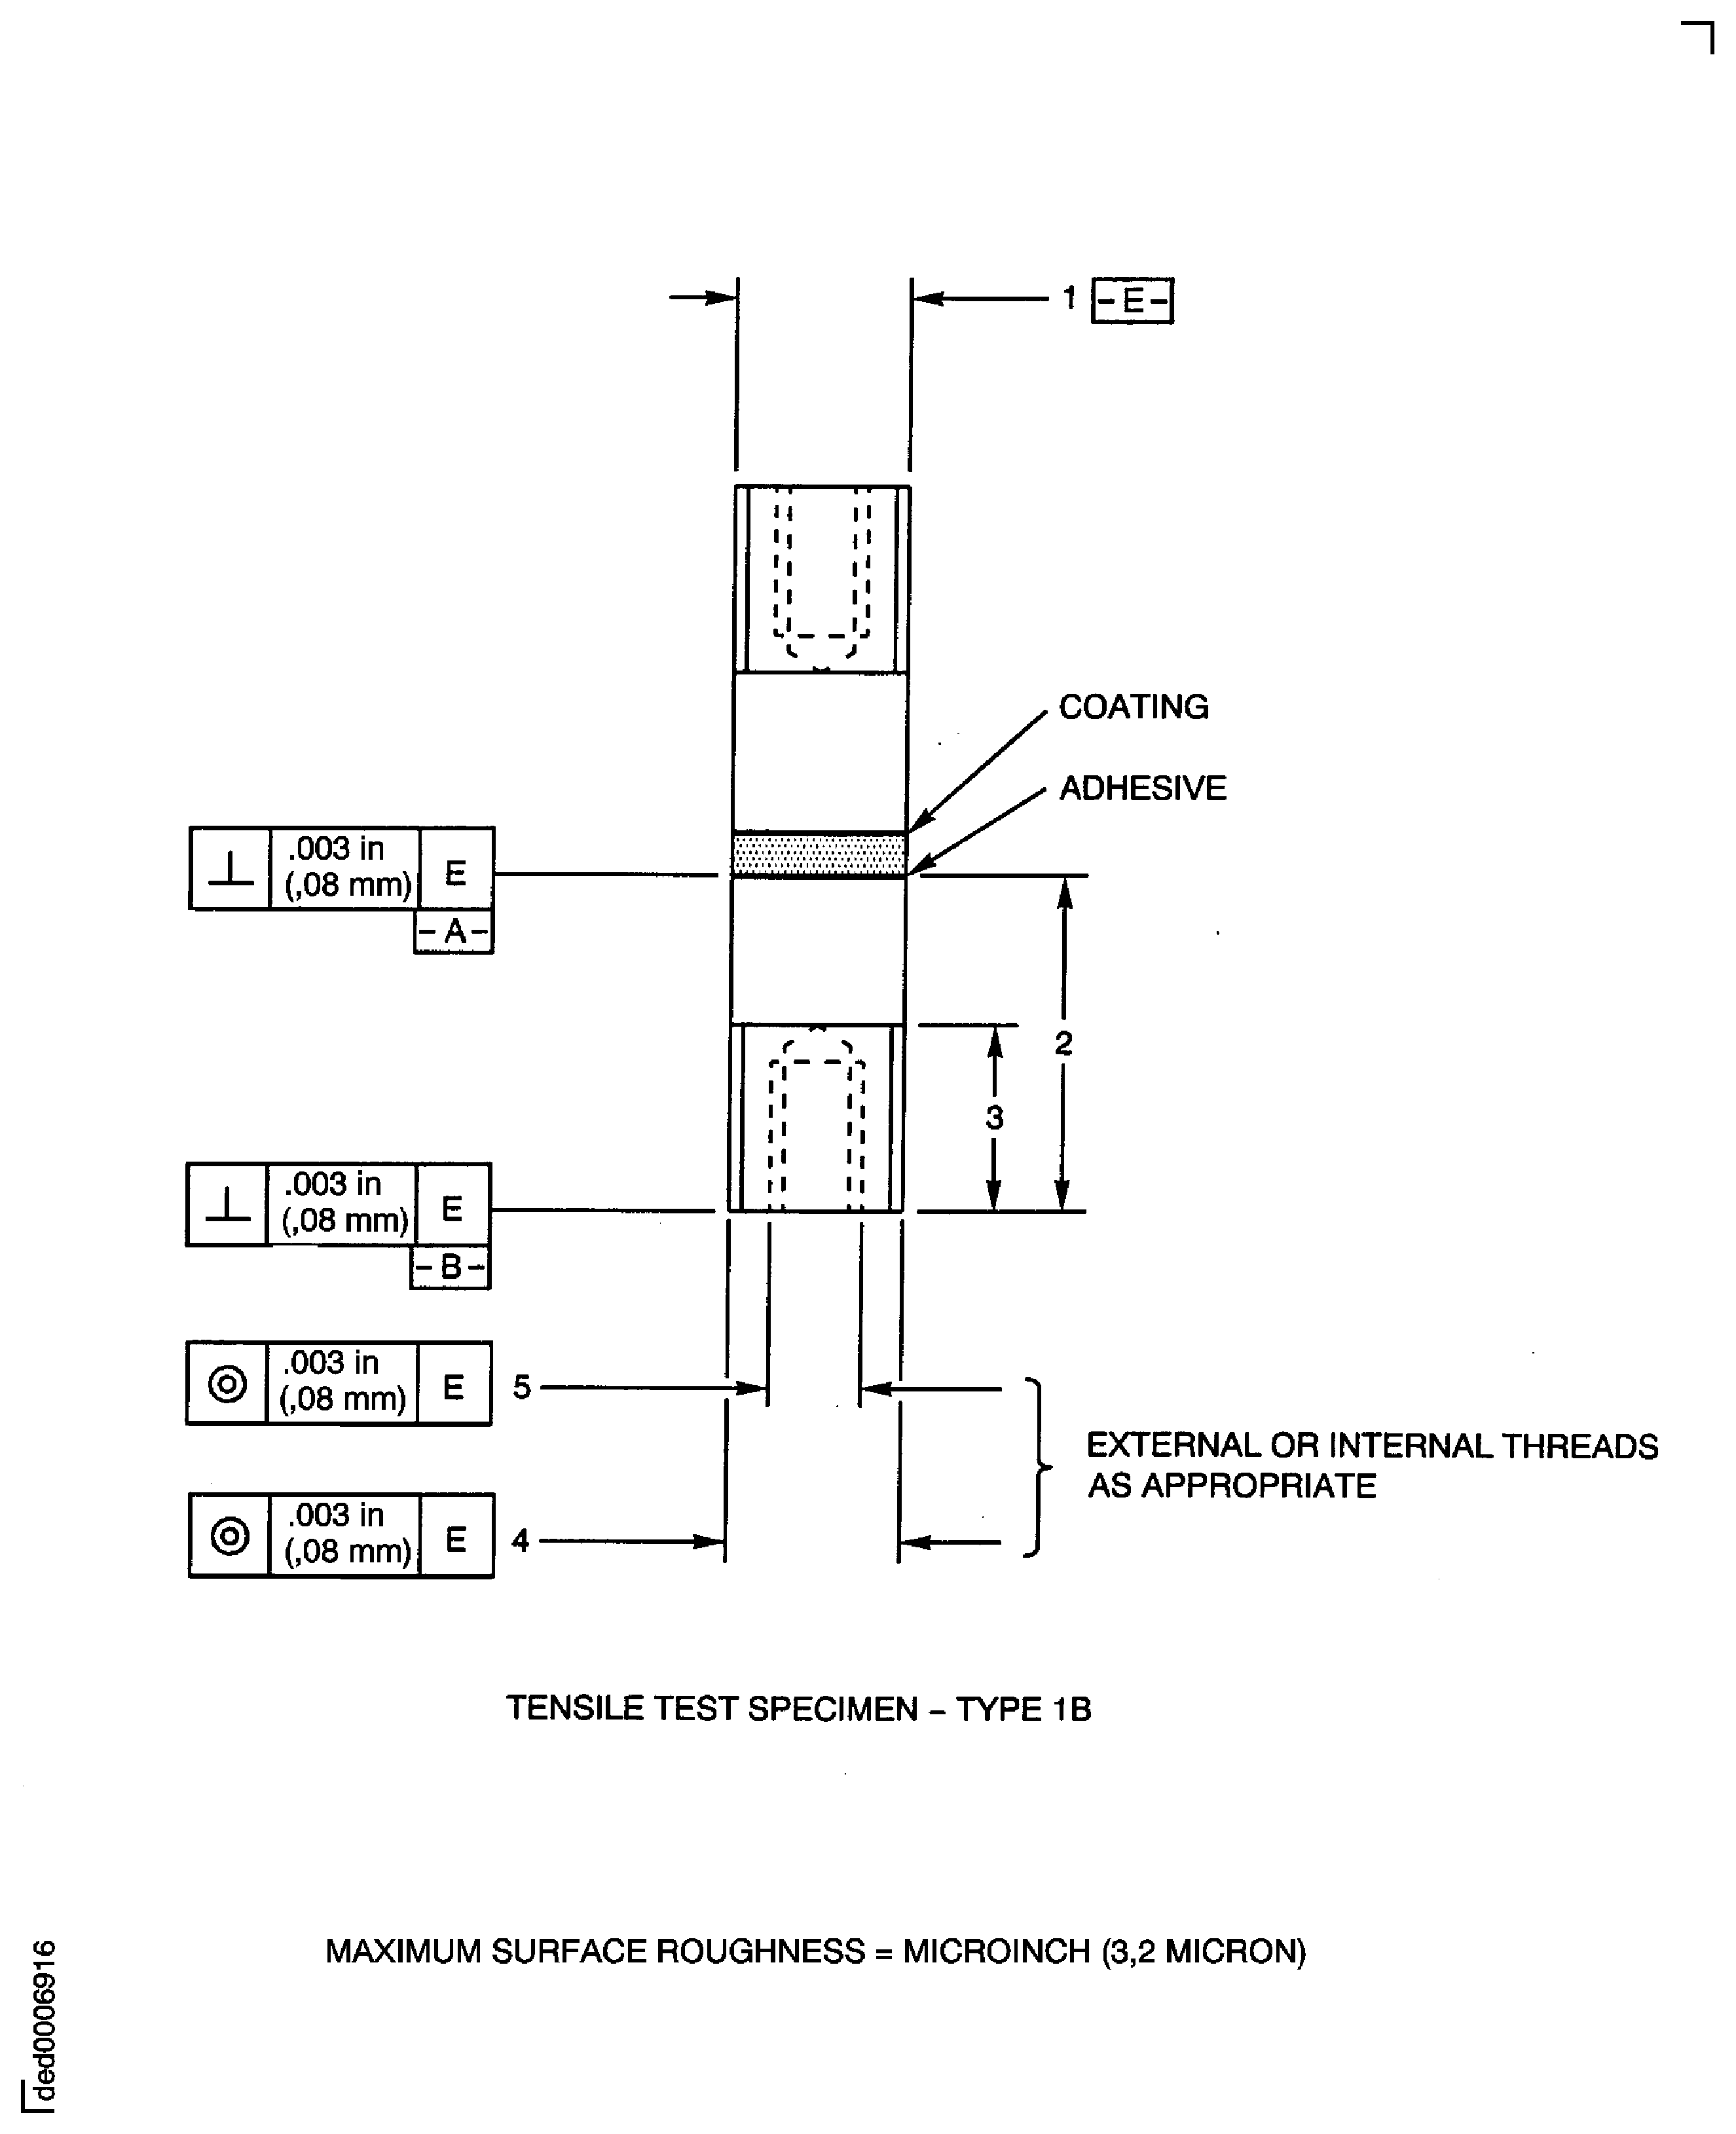
Figure: Other Bond Strength Specimen Configurations. For Key, Refer to Table 10.
Other Bond Strength Specimen Configurations. For Key, Refer to Table 10.
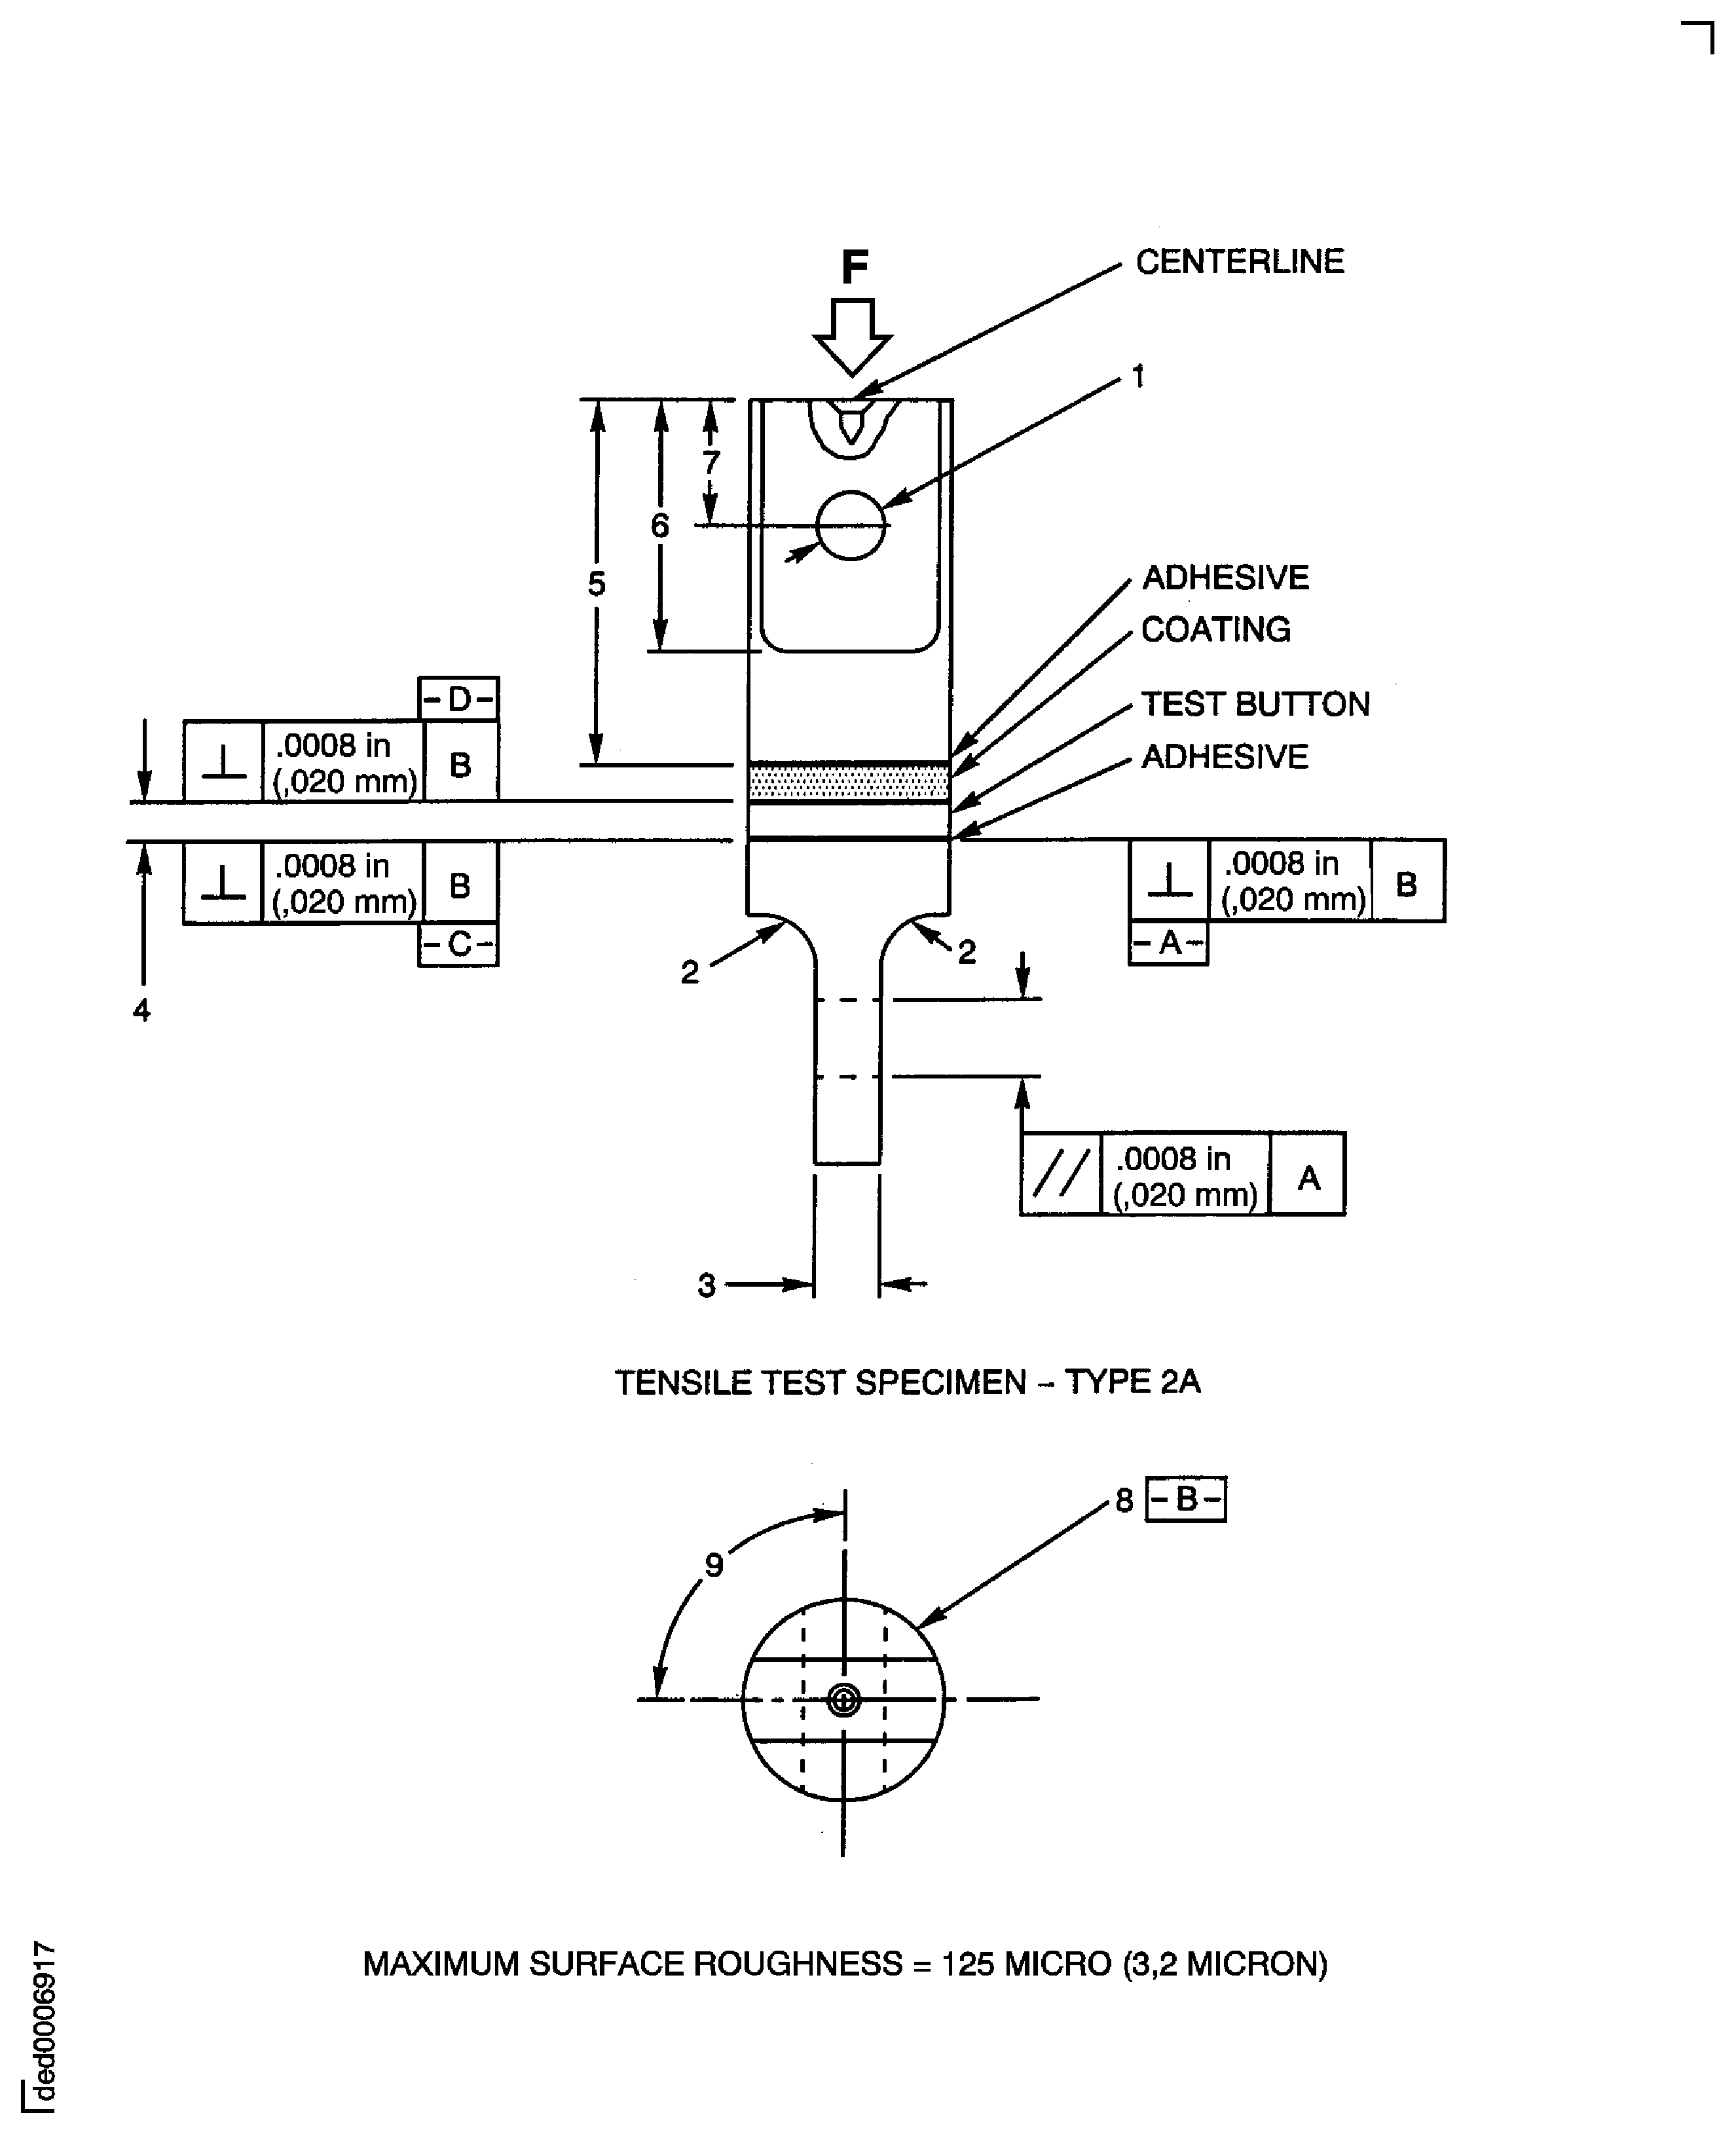
Figure: Other Bond Strength Specimen Configurations (4). For Key Refer to Table 11.
Other Bond Strength Specimen Configurations (4). For Key Refer to Table 11.
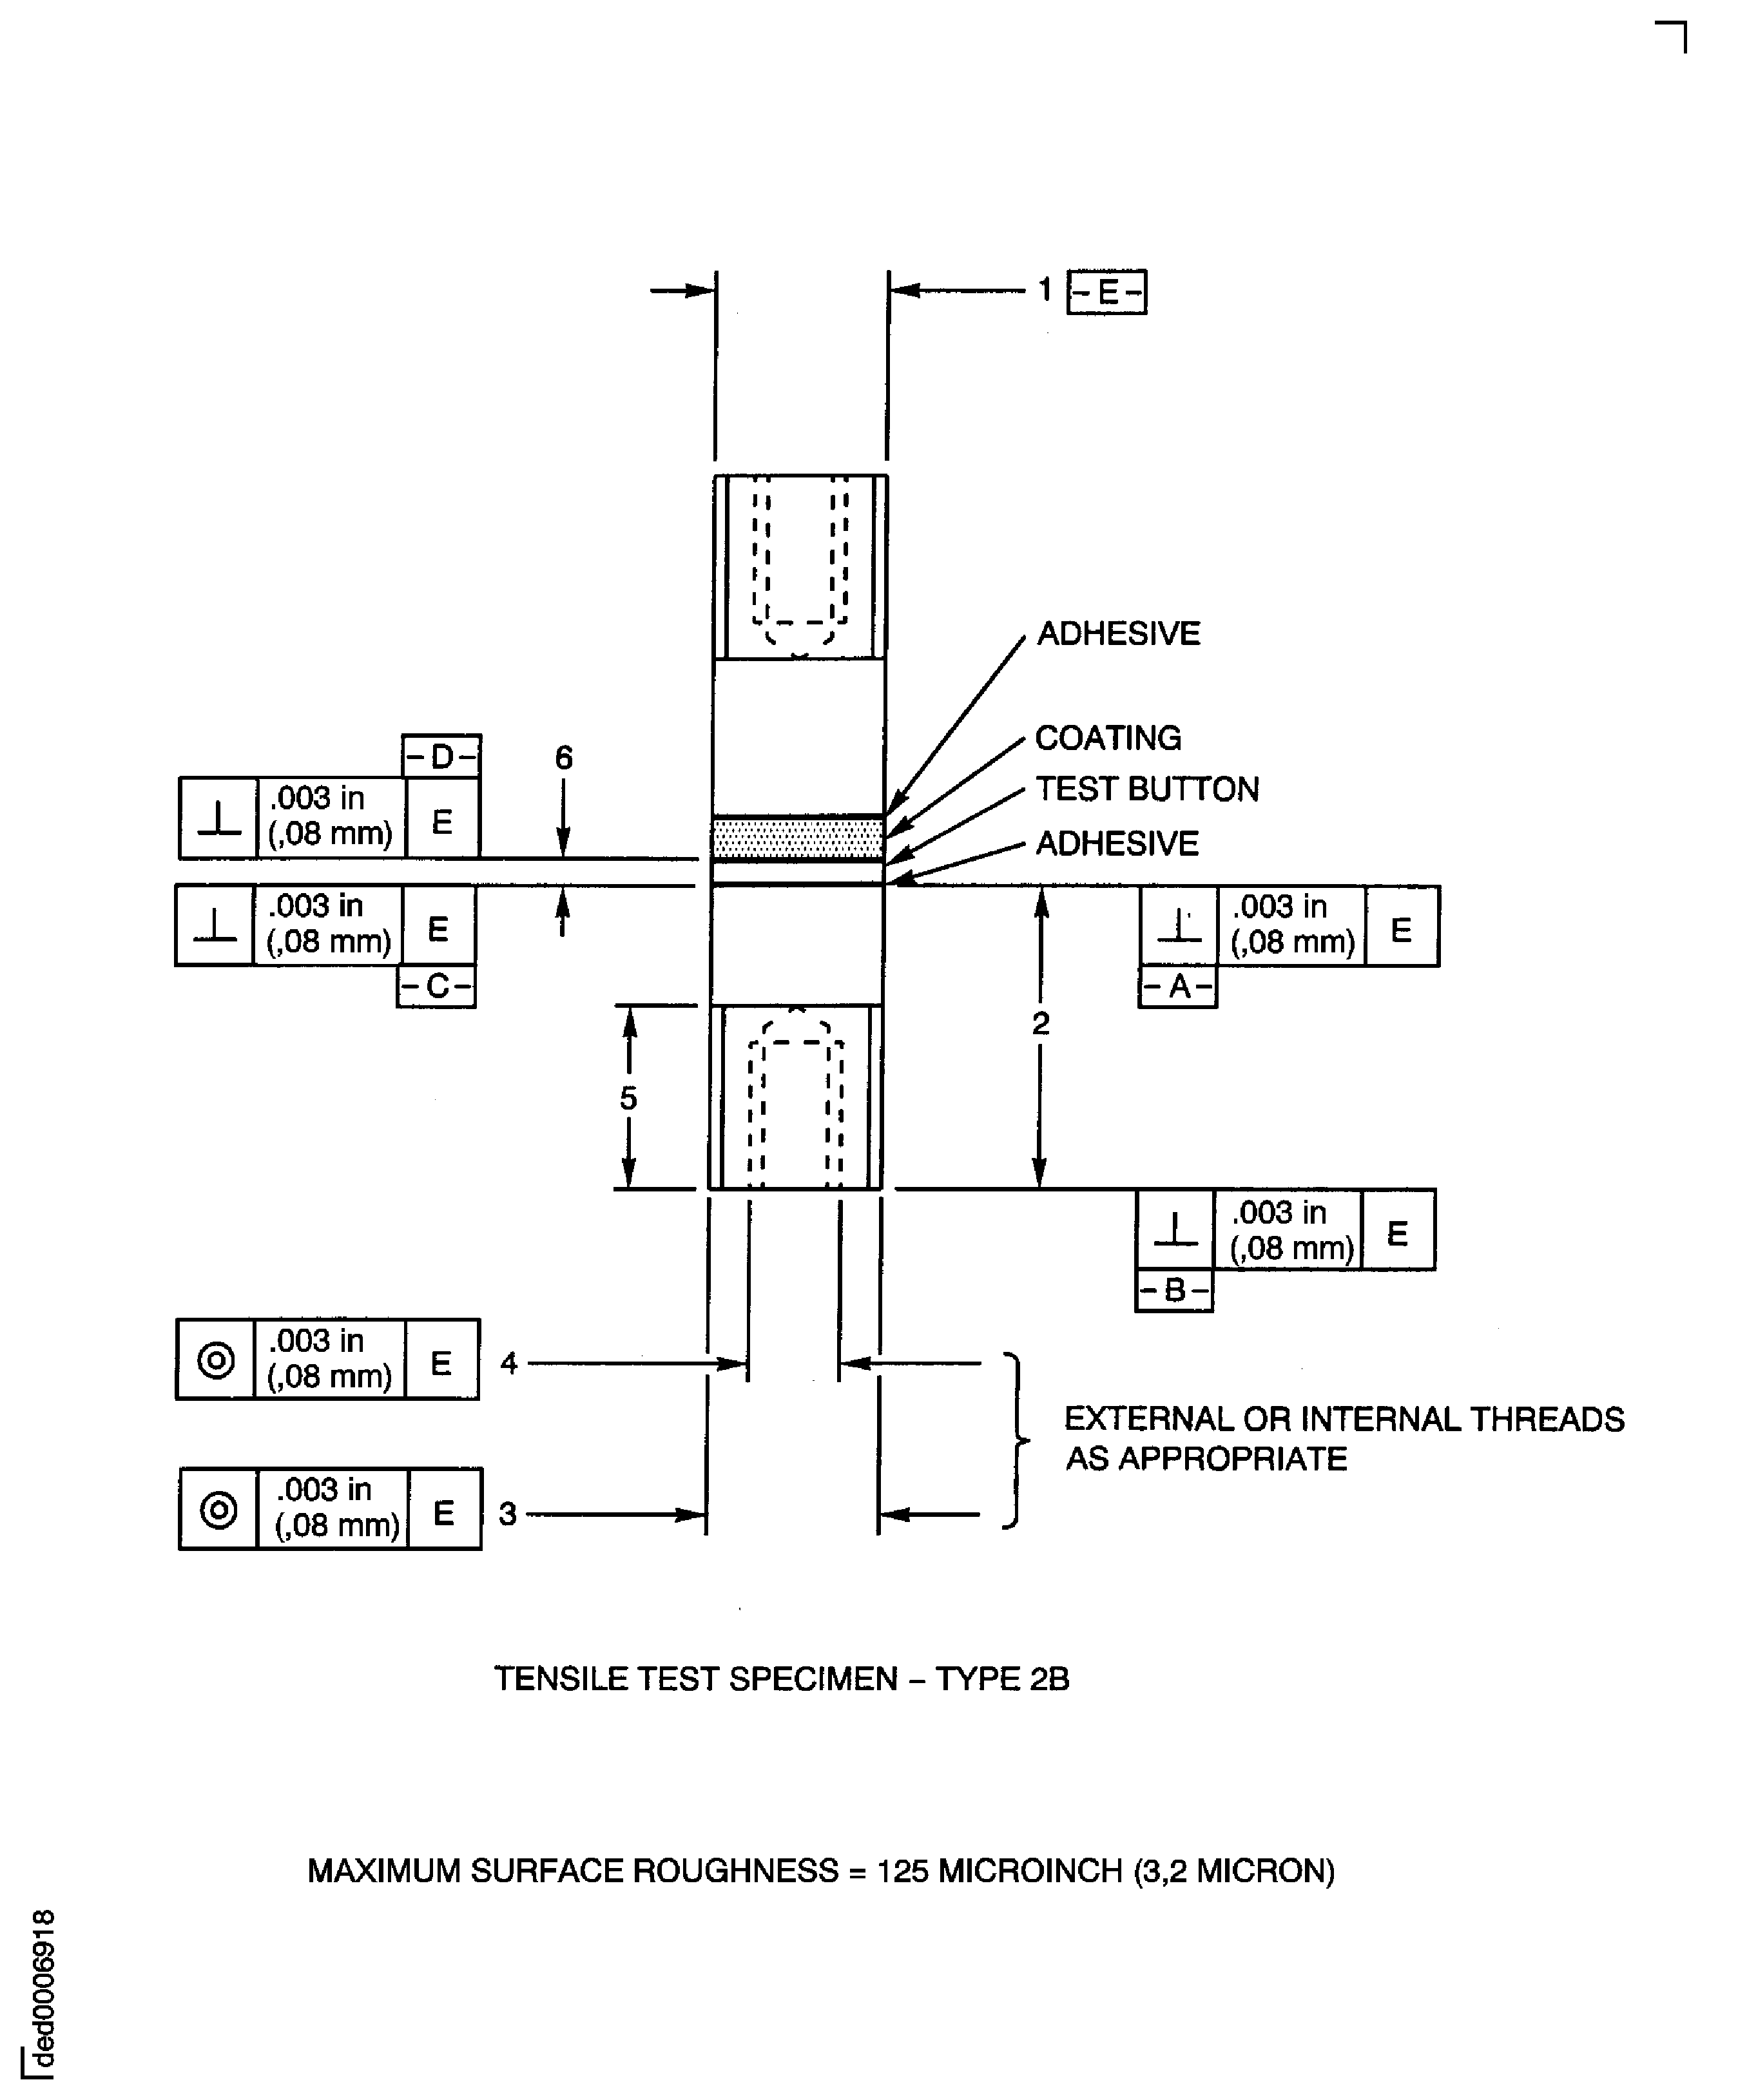
Figure: Examples of Hot and Cold Mounting Techniques on Smearing
Examples of Hot and Cold Mounting Techniques on Smearing
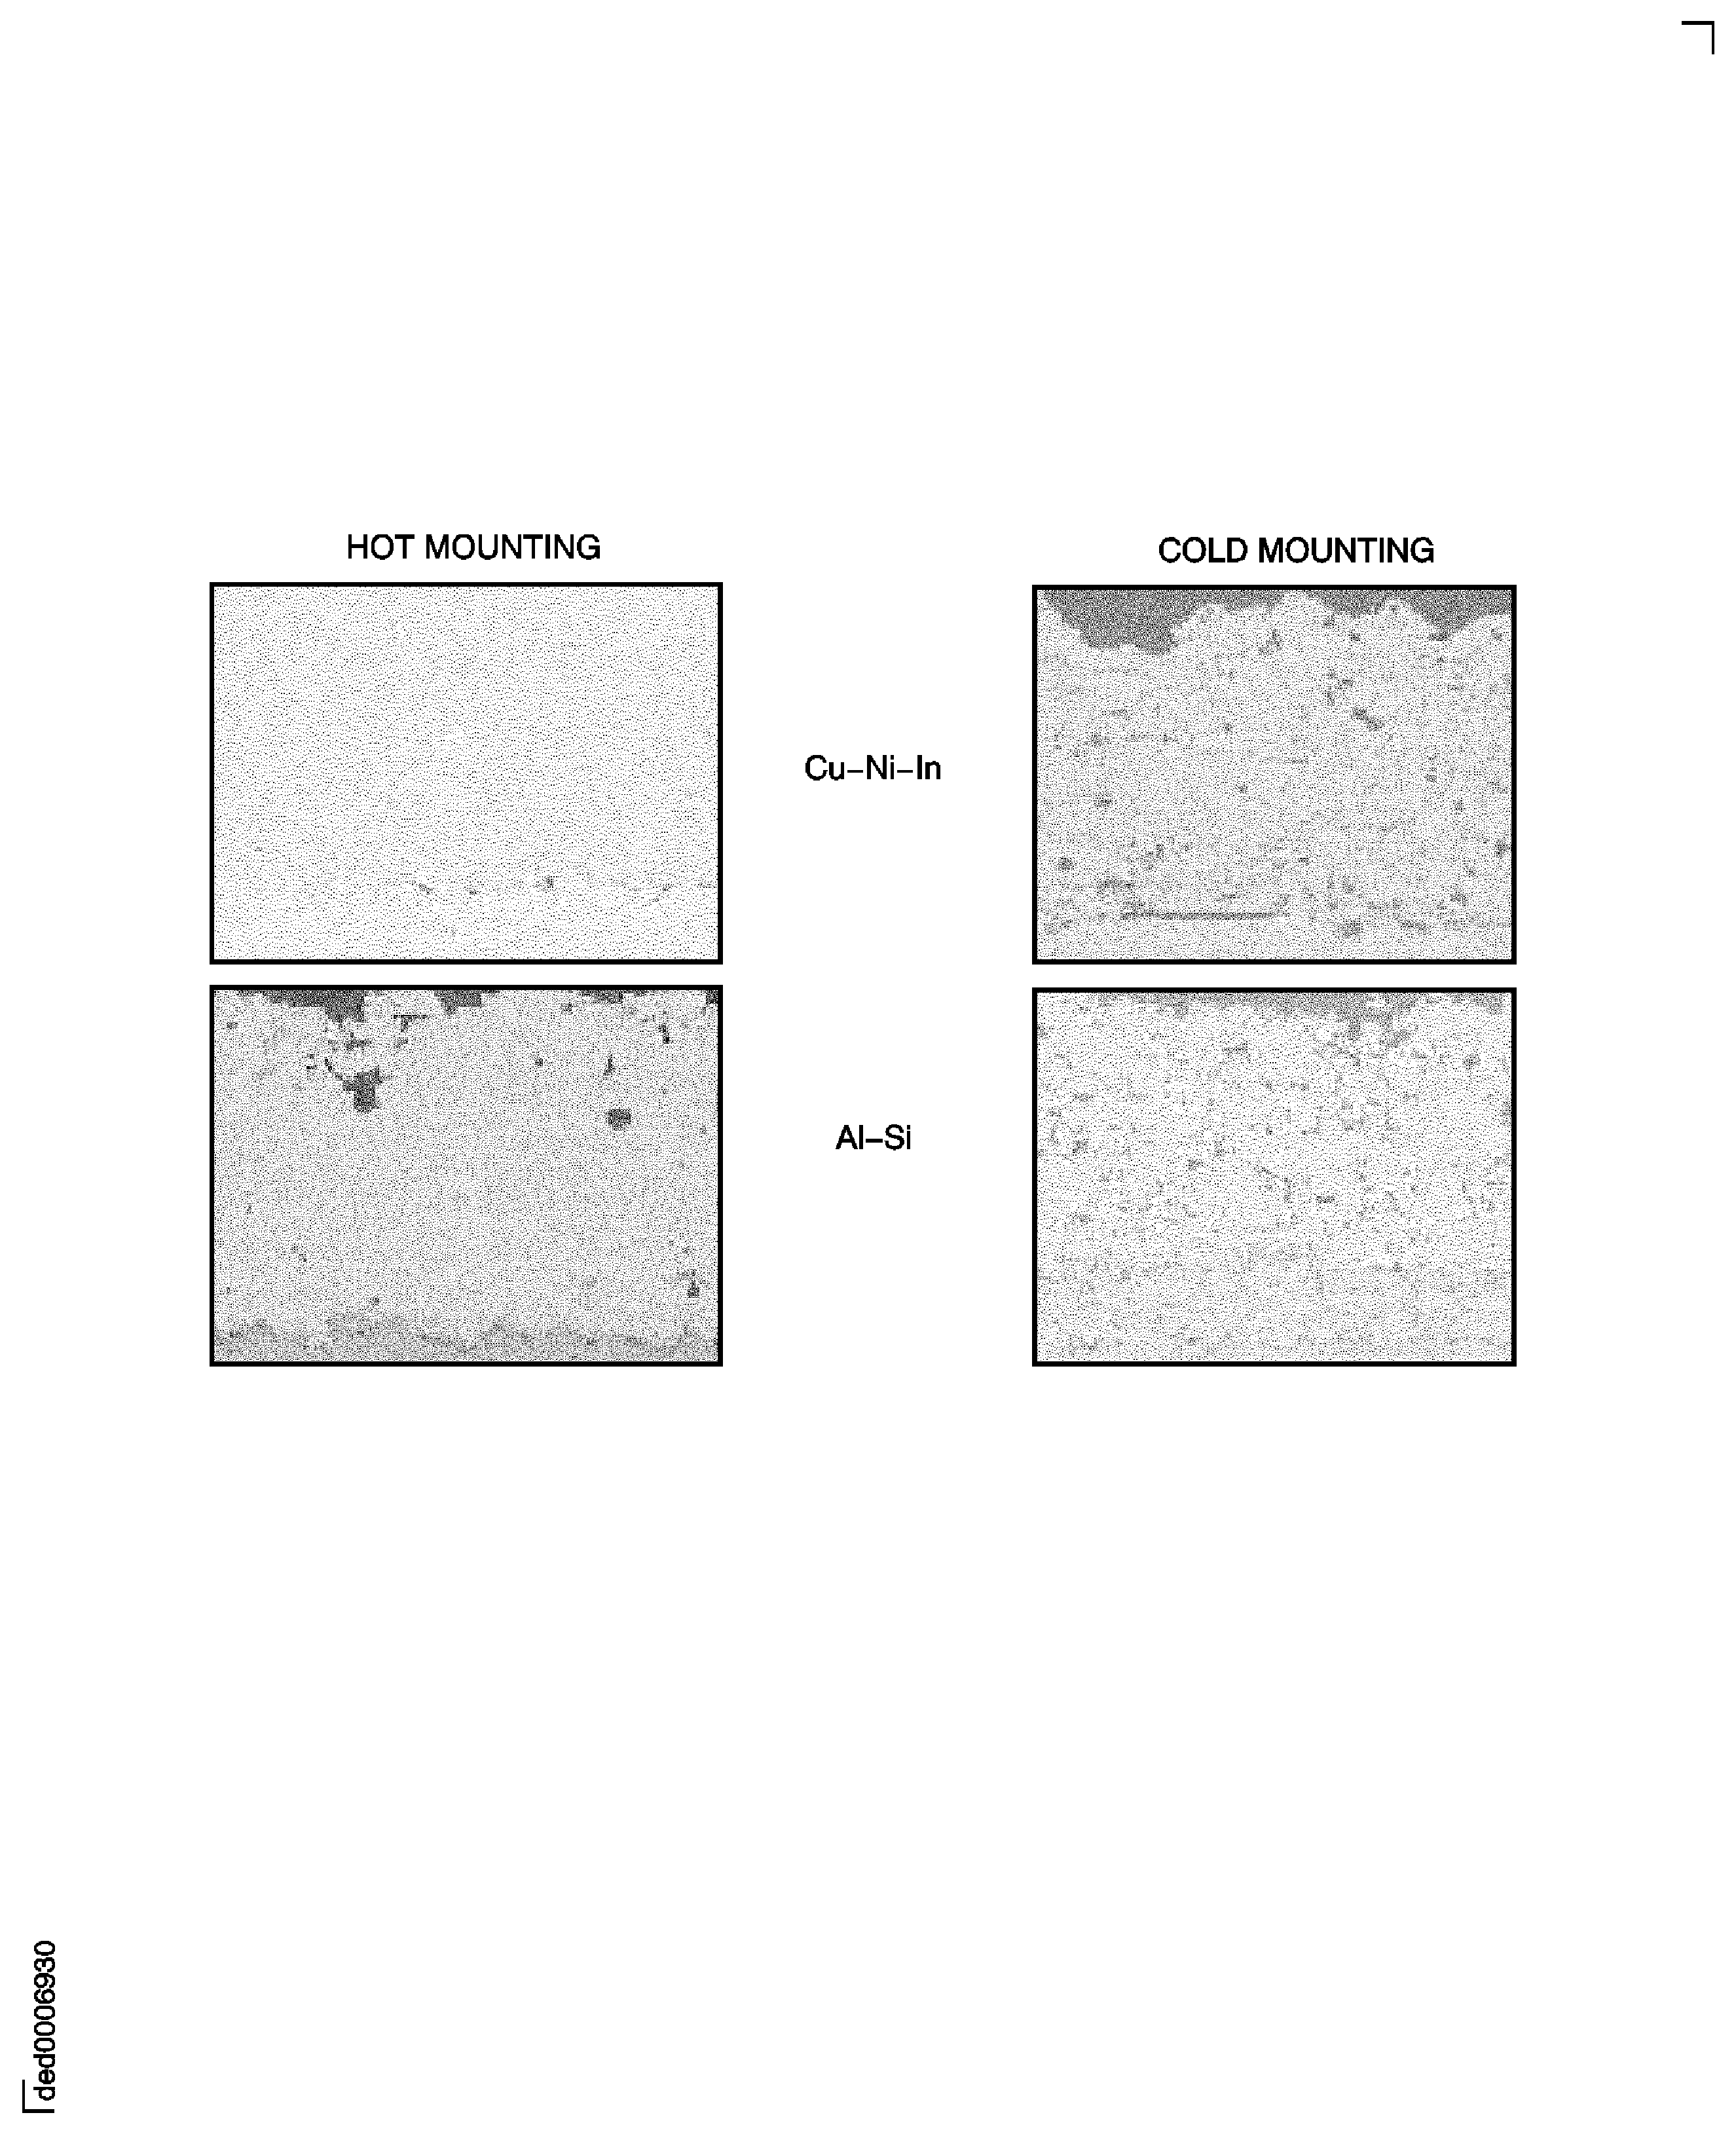
Figure: Examples of Coating Contamination
Examples of Coating Contamination
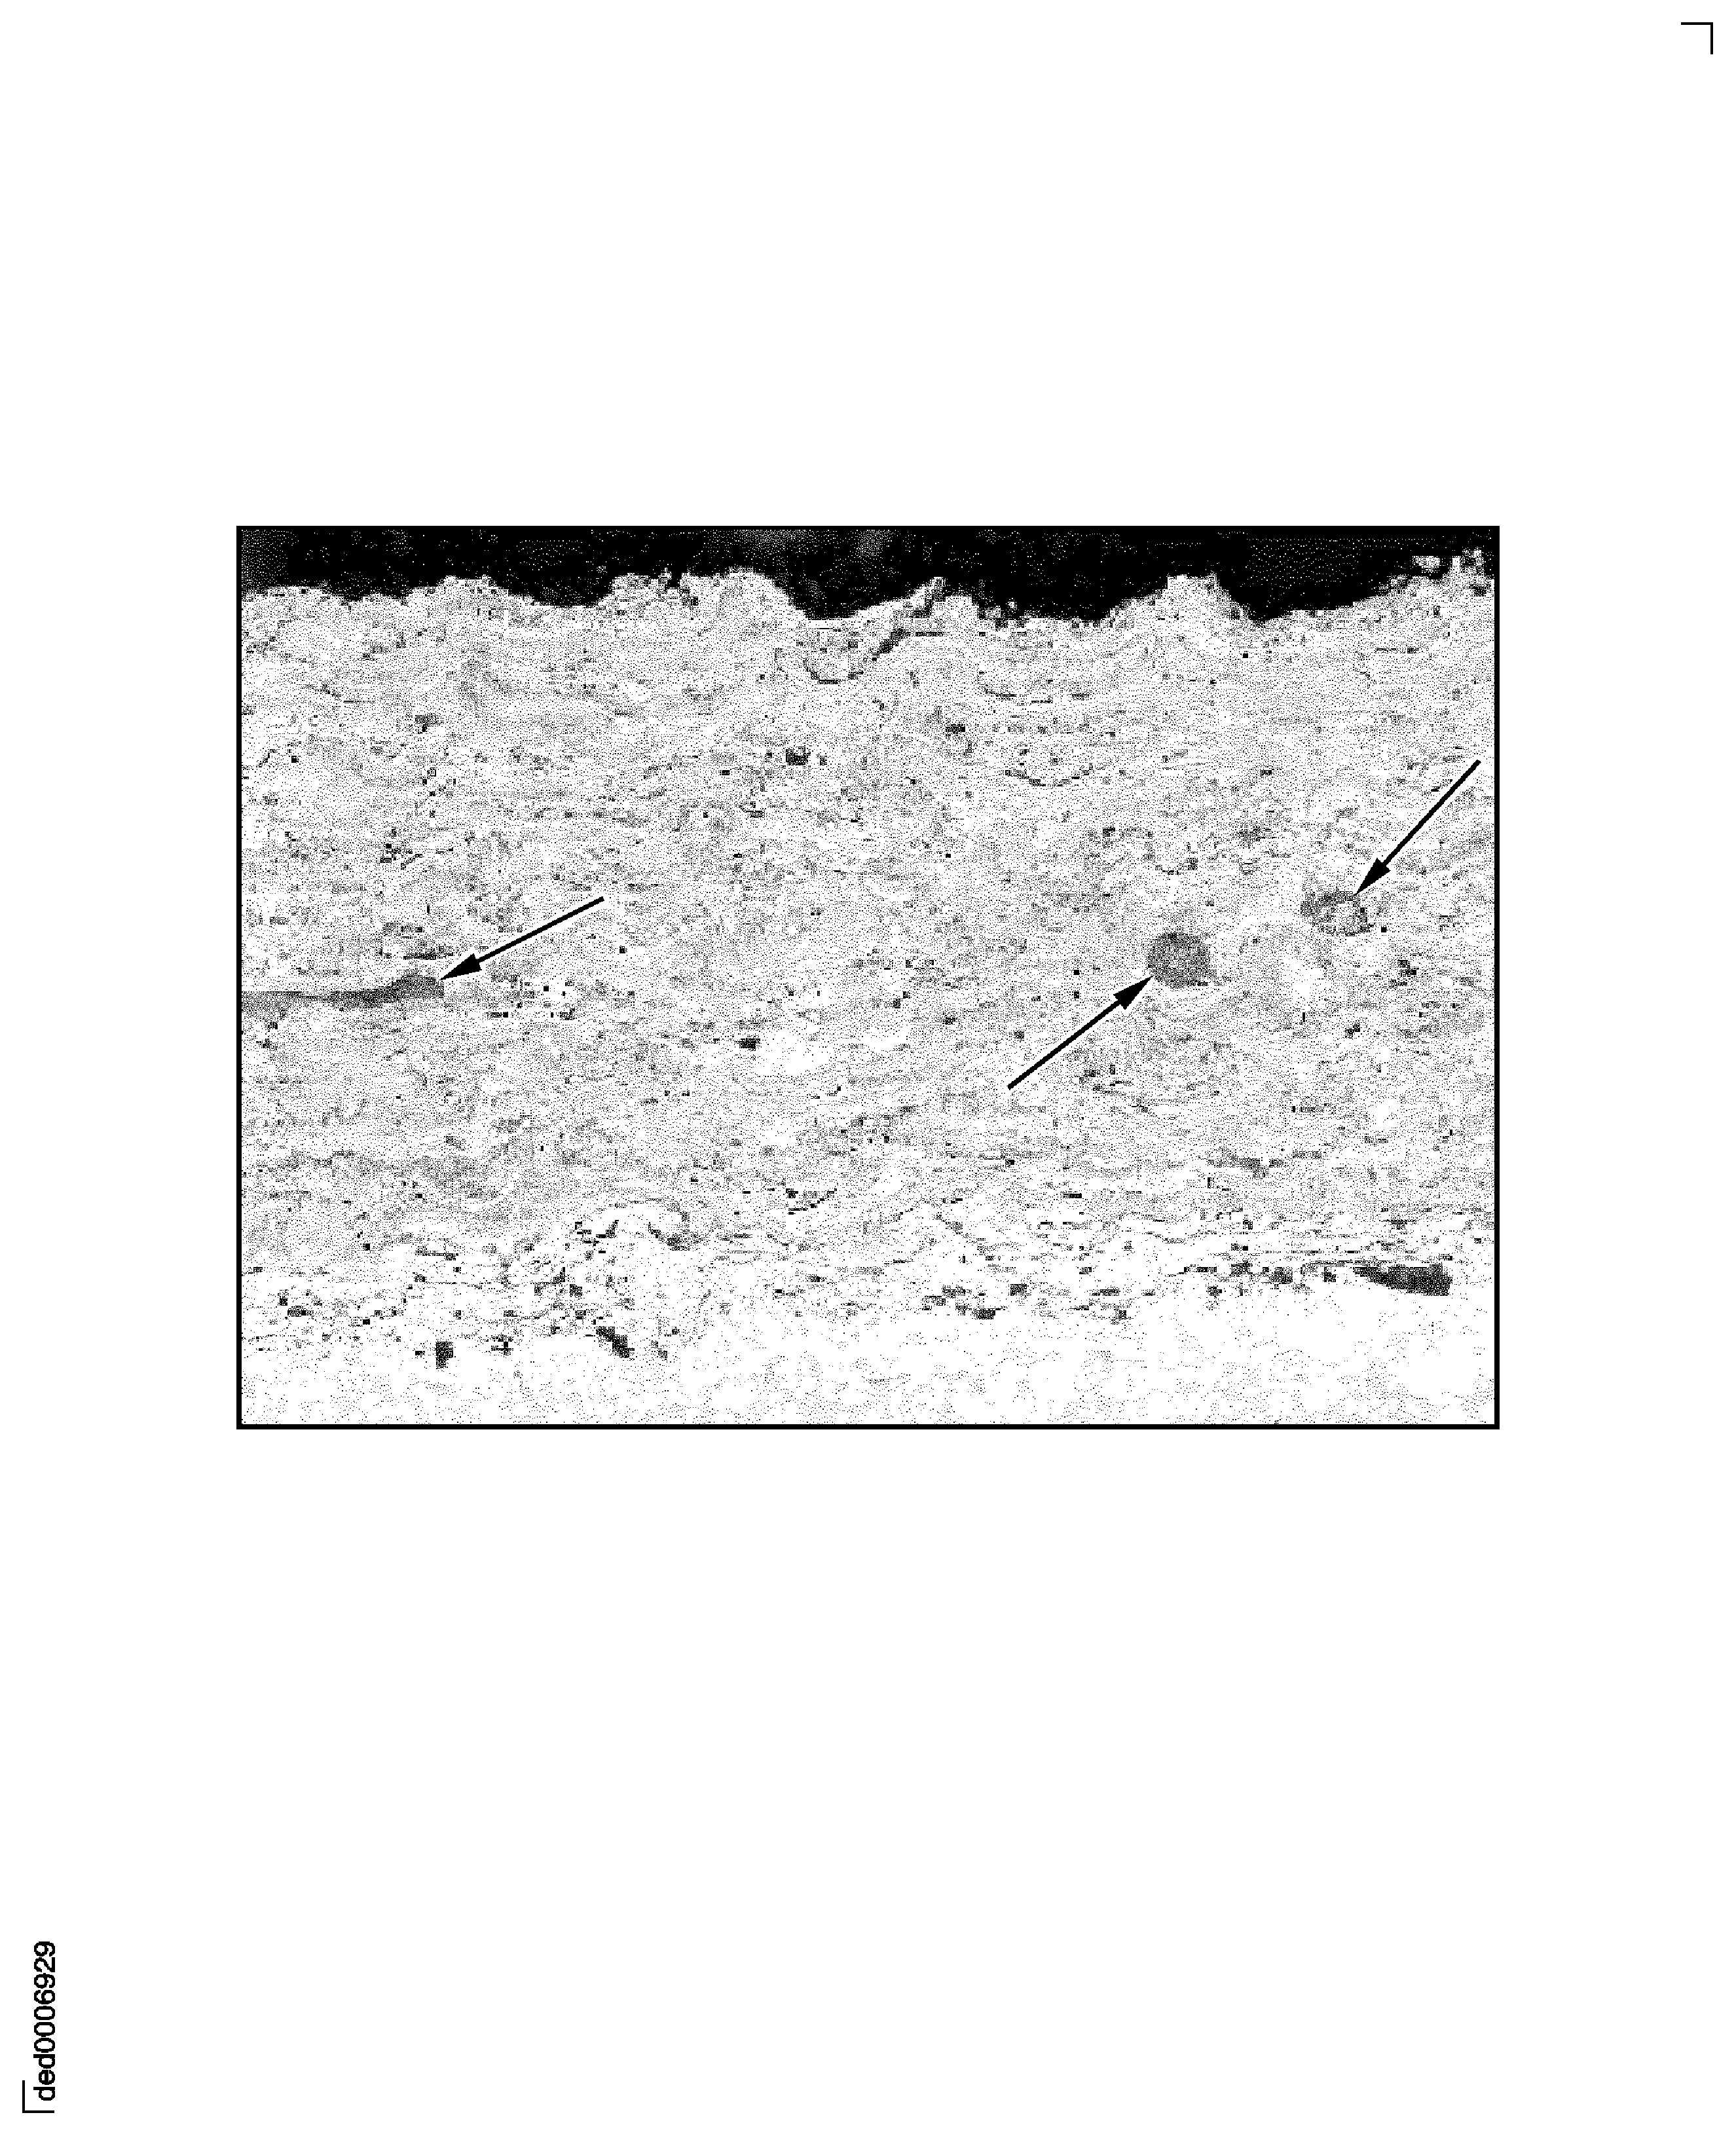
Figure: Example of Crack
Example of Crack
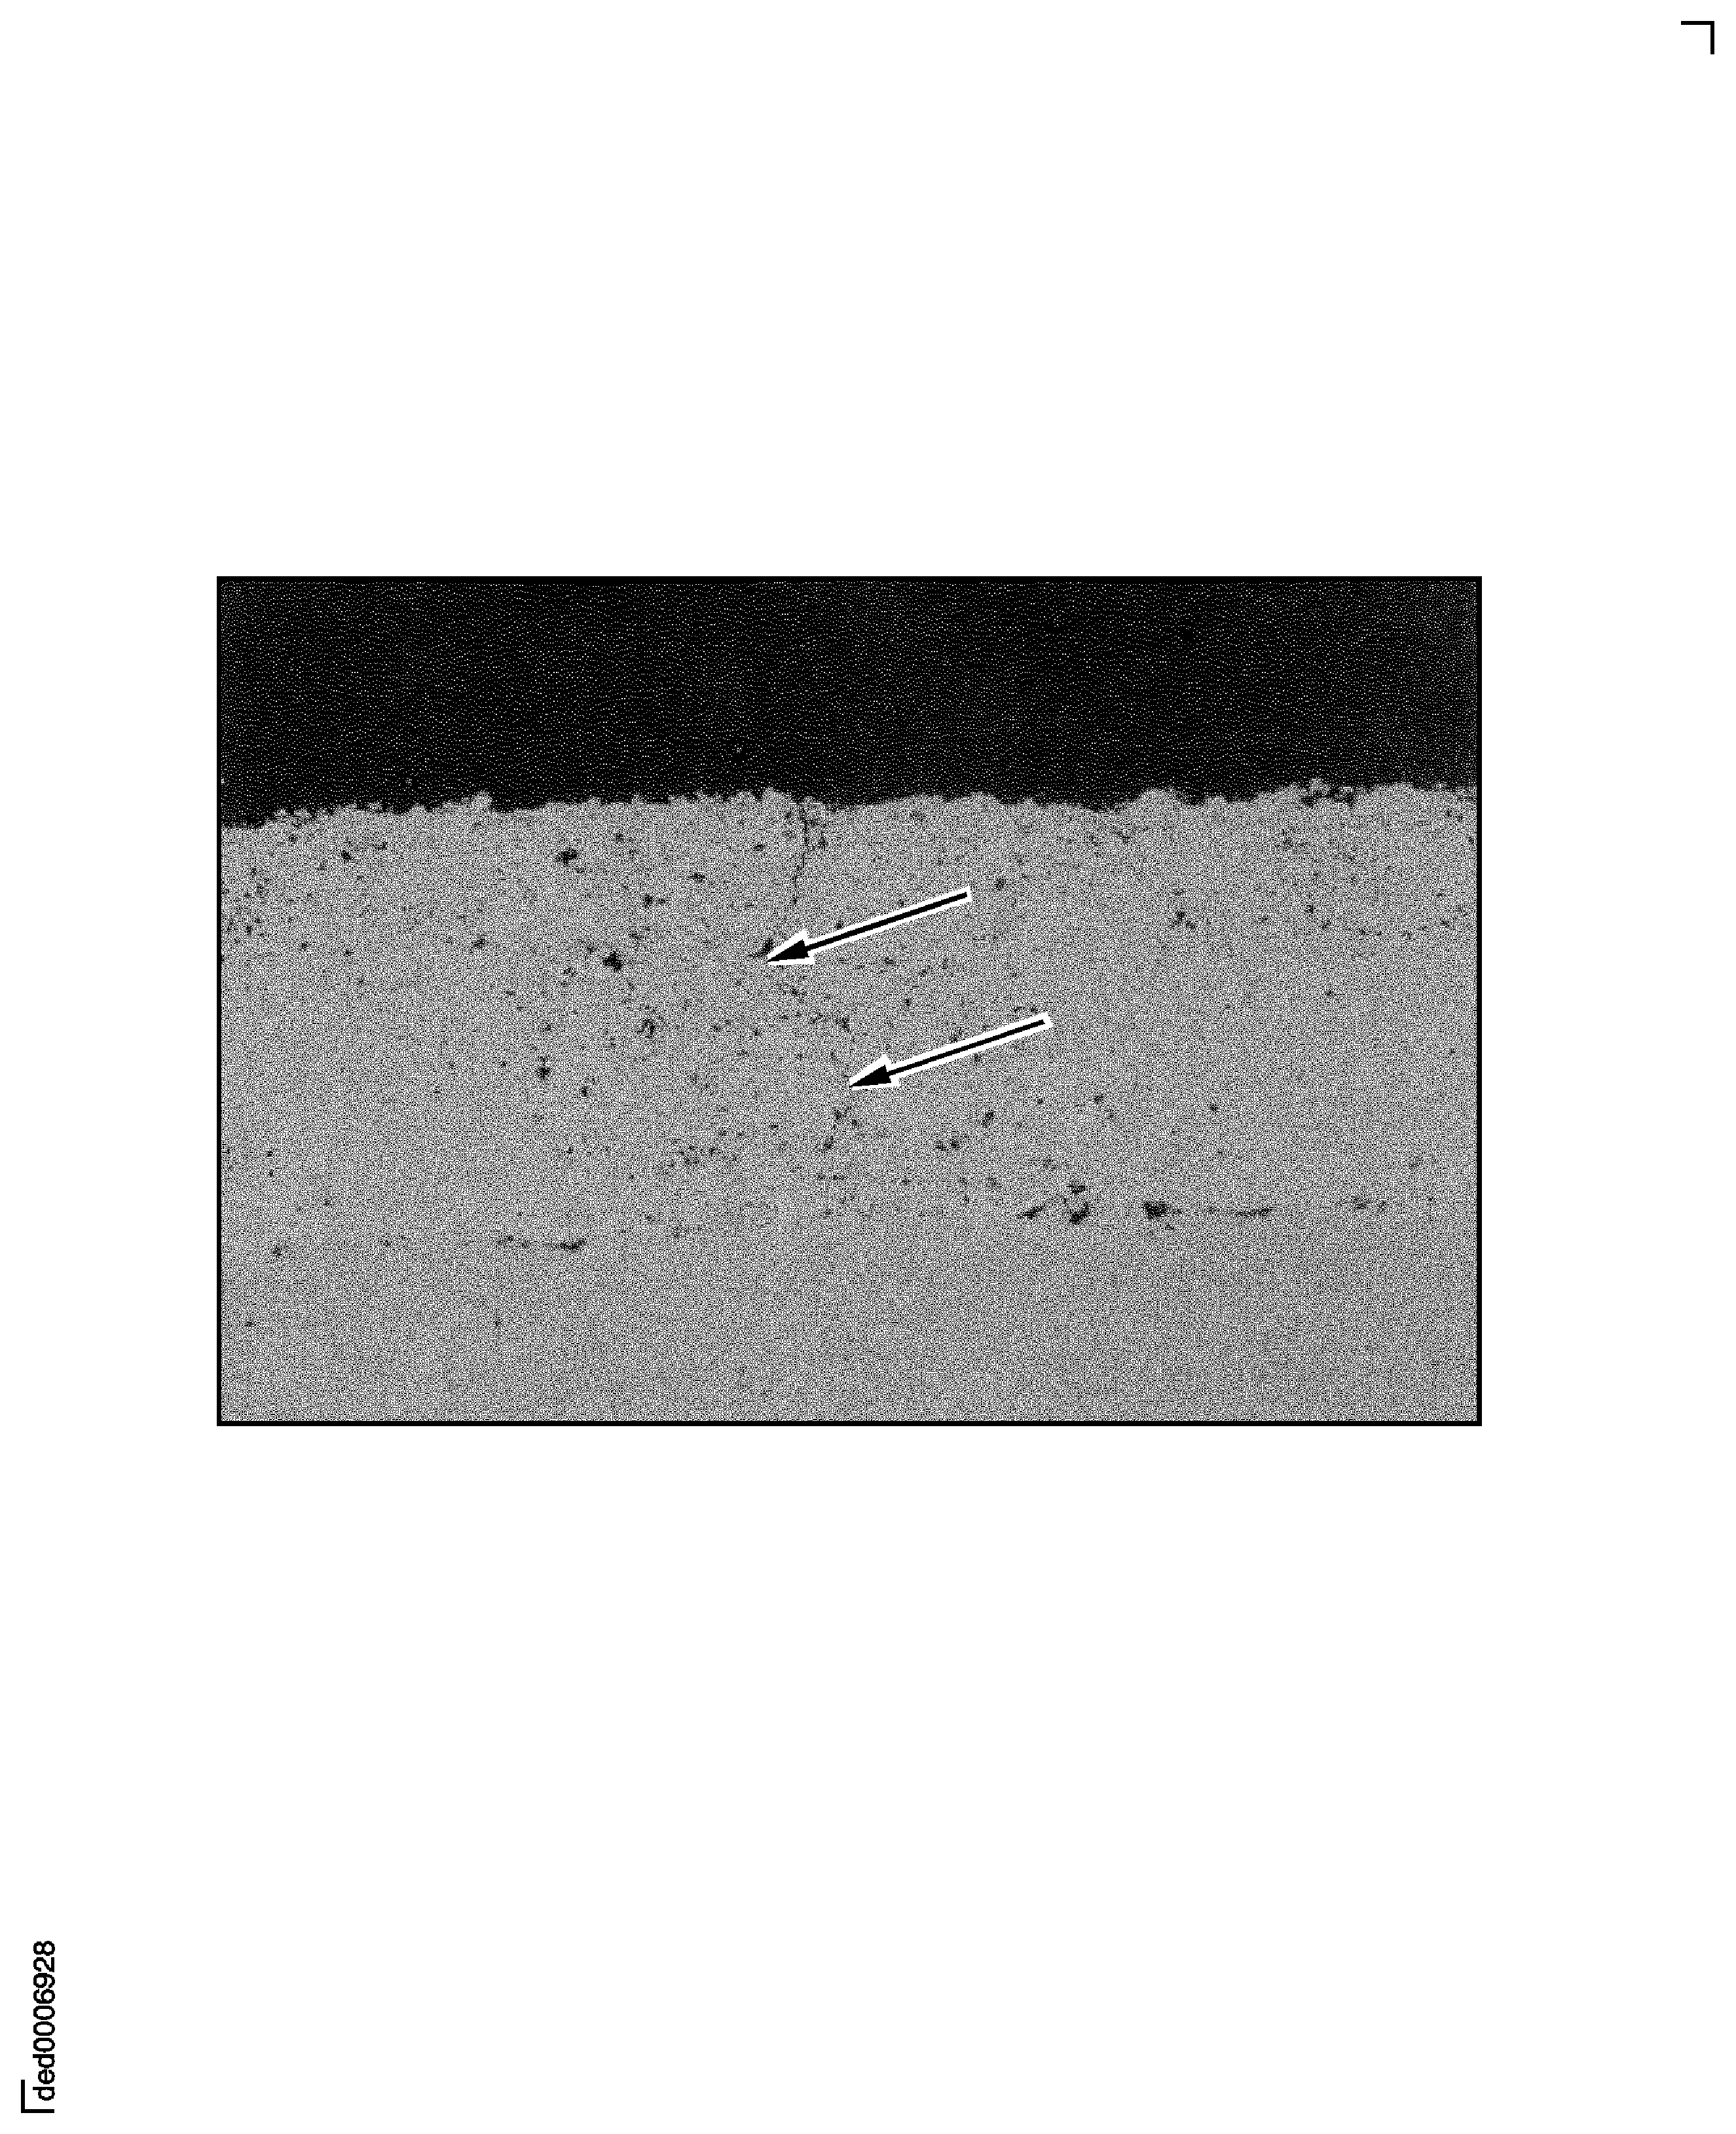
Figure: Examples of Delamination
Examples of Delamination
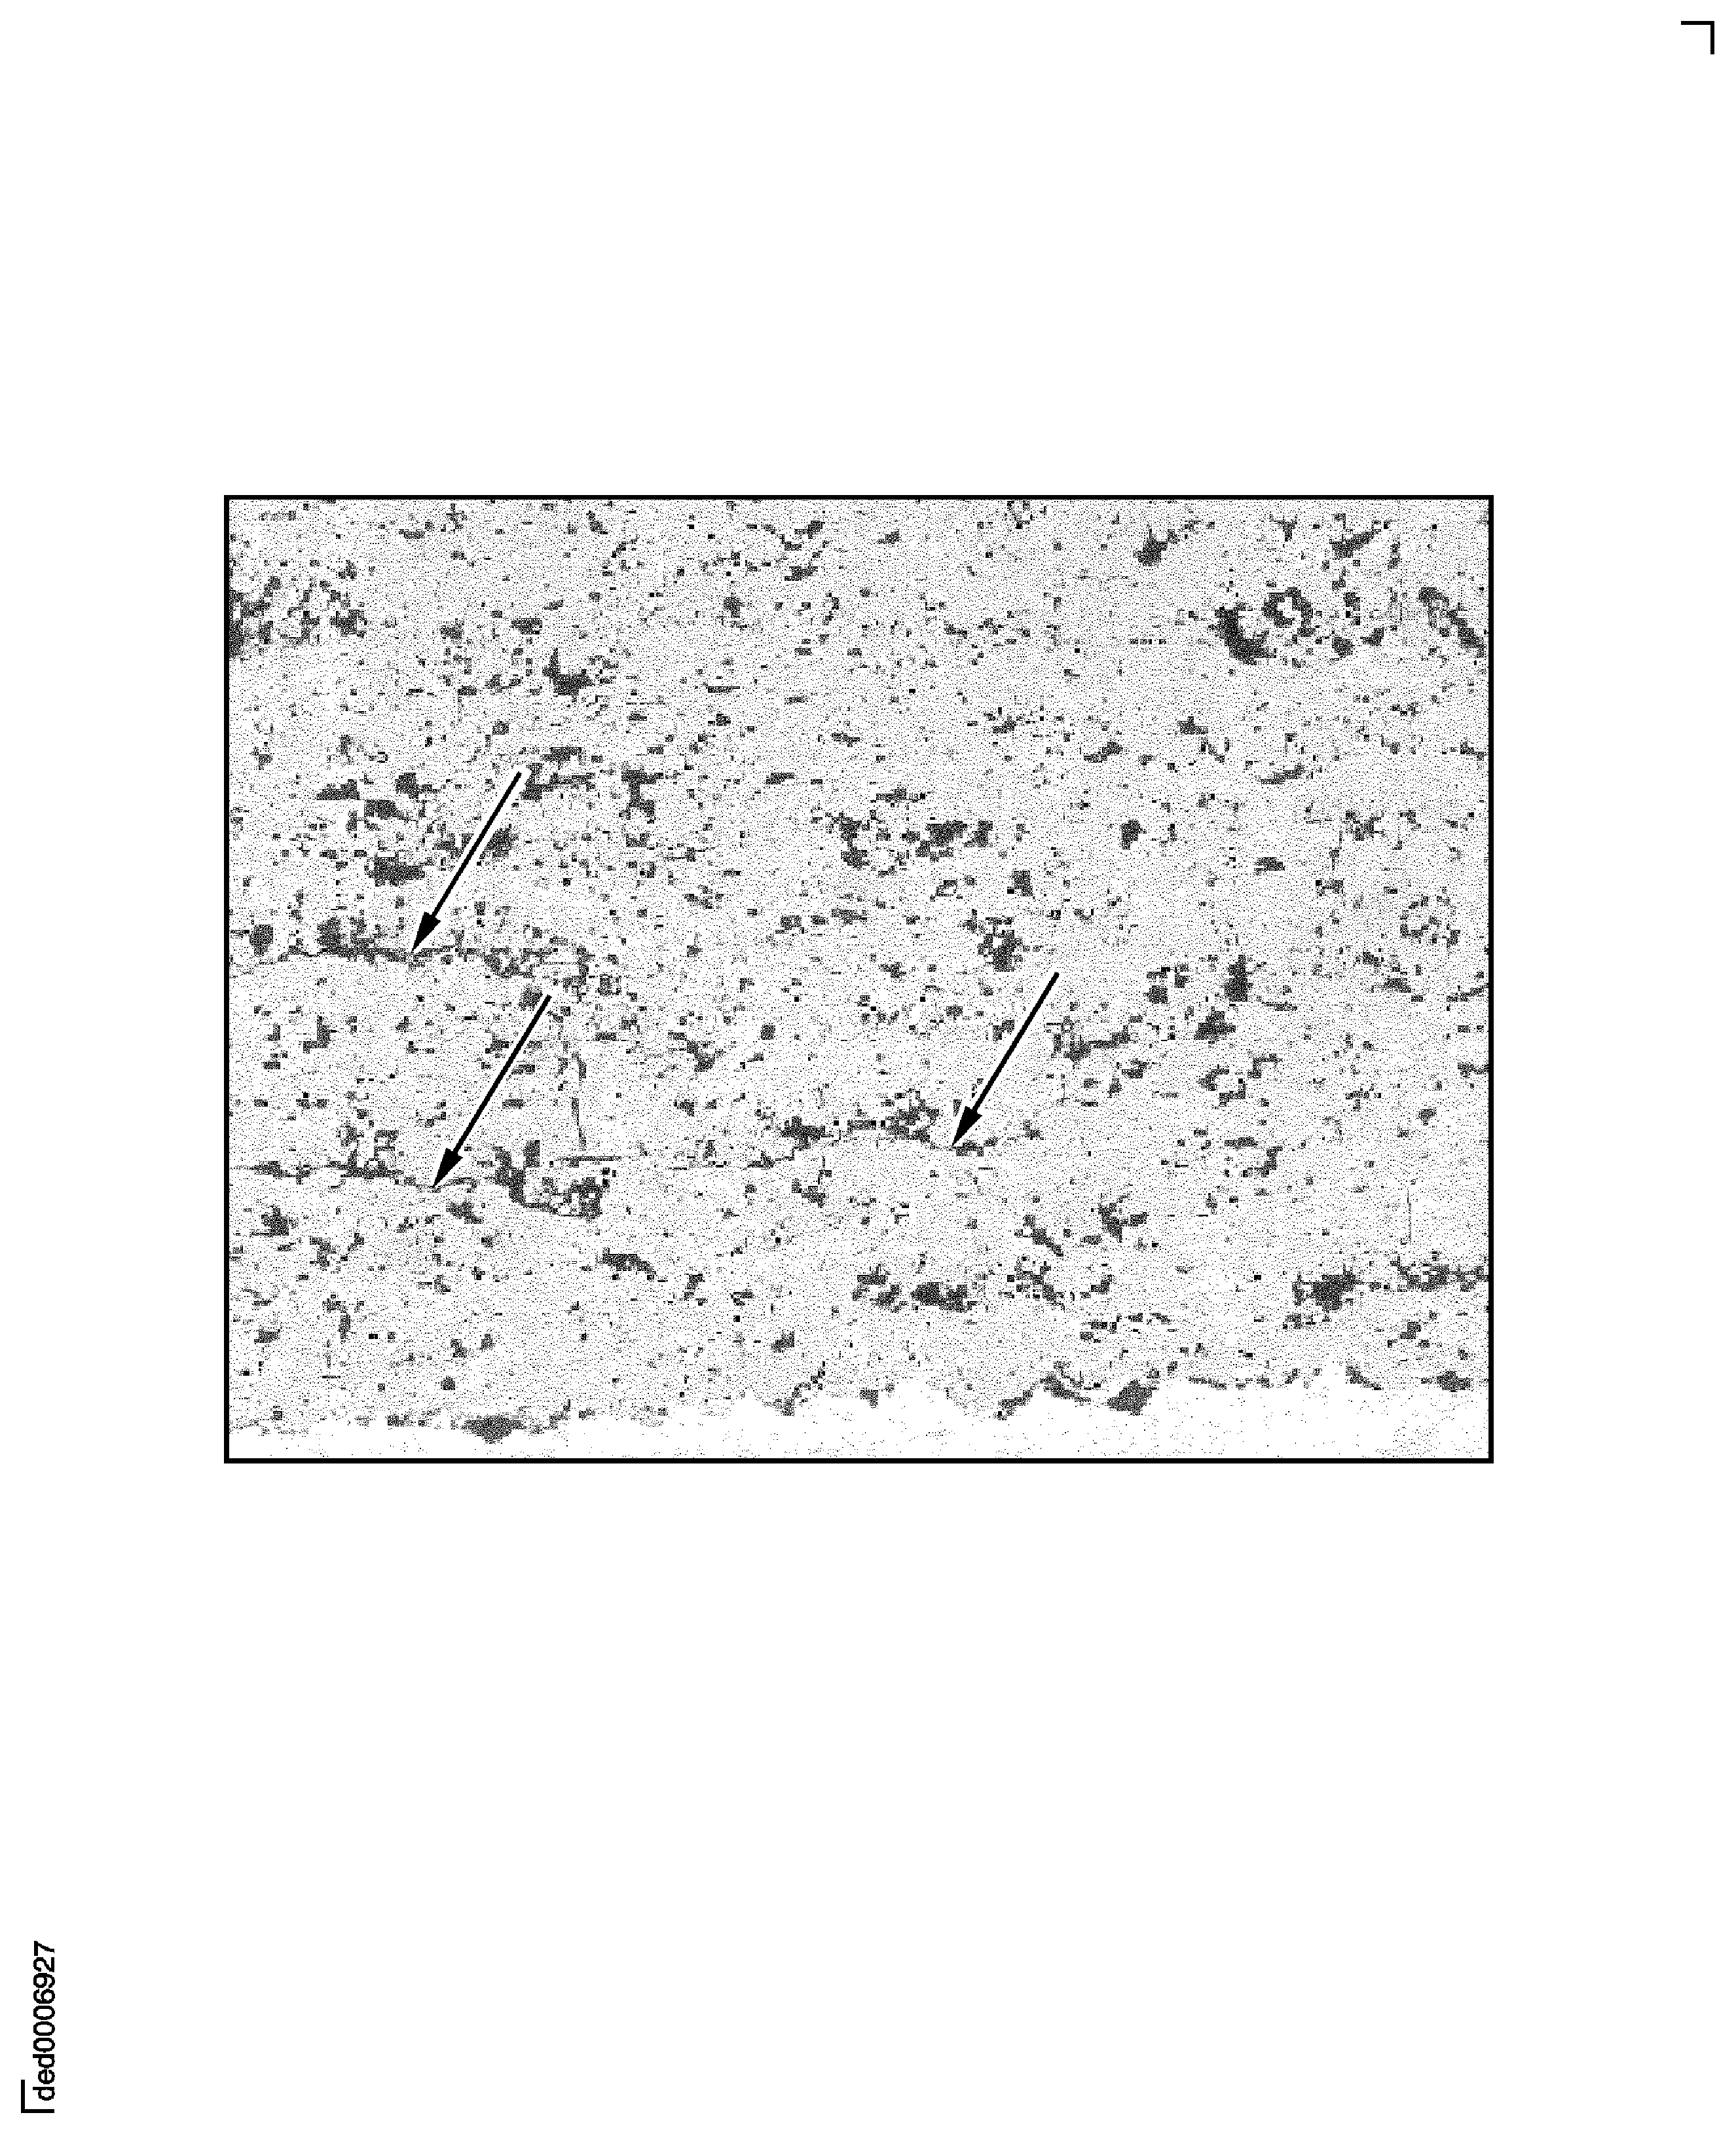
Figure: Examples of Poor Integrity
Examples of Poor Integrity
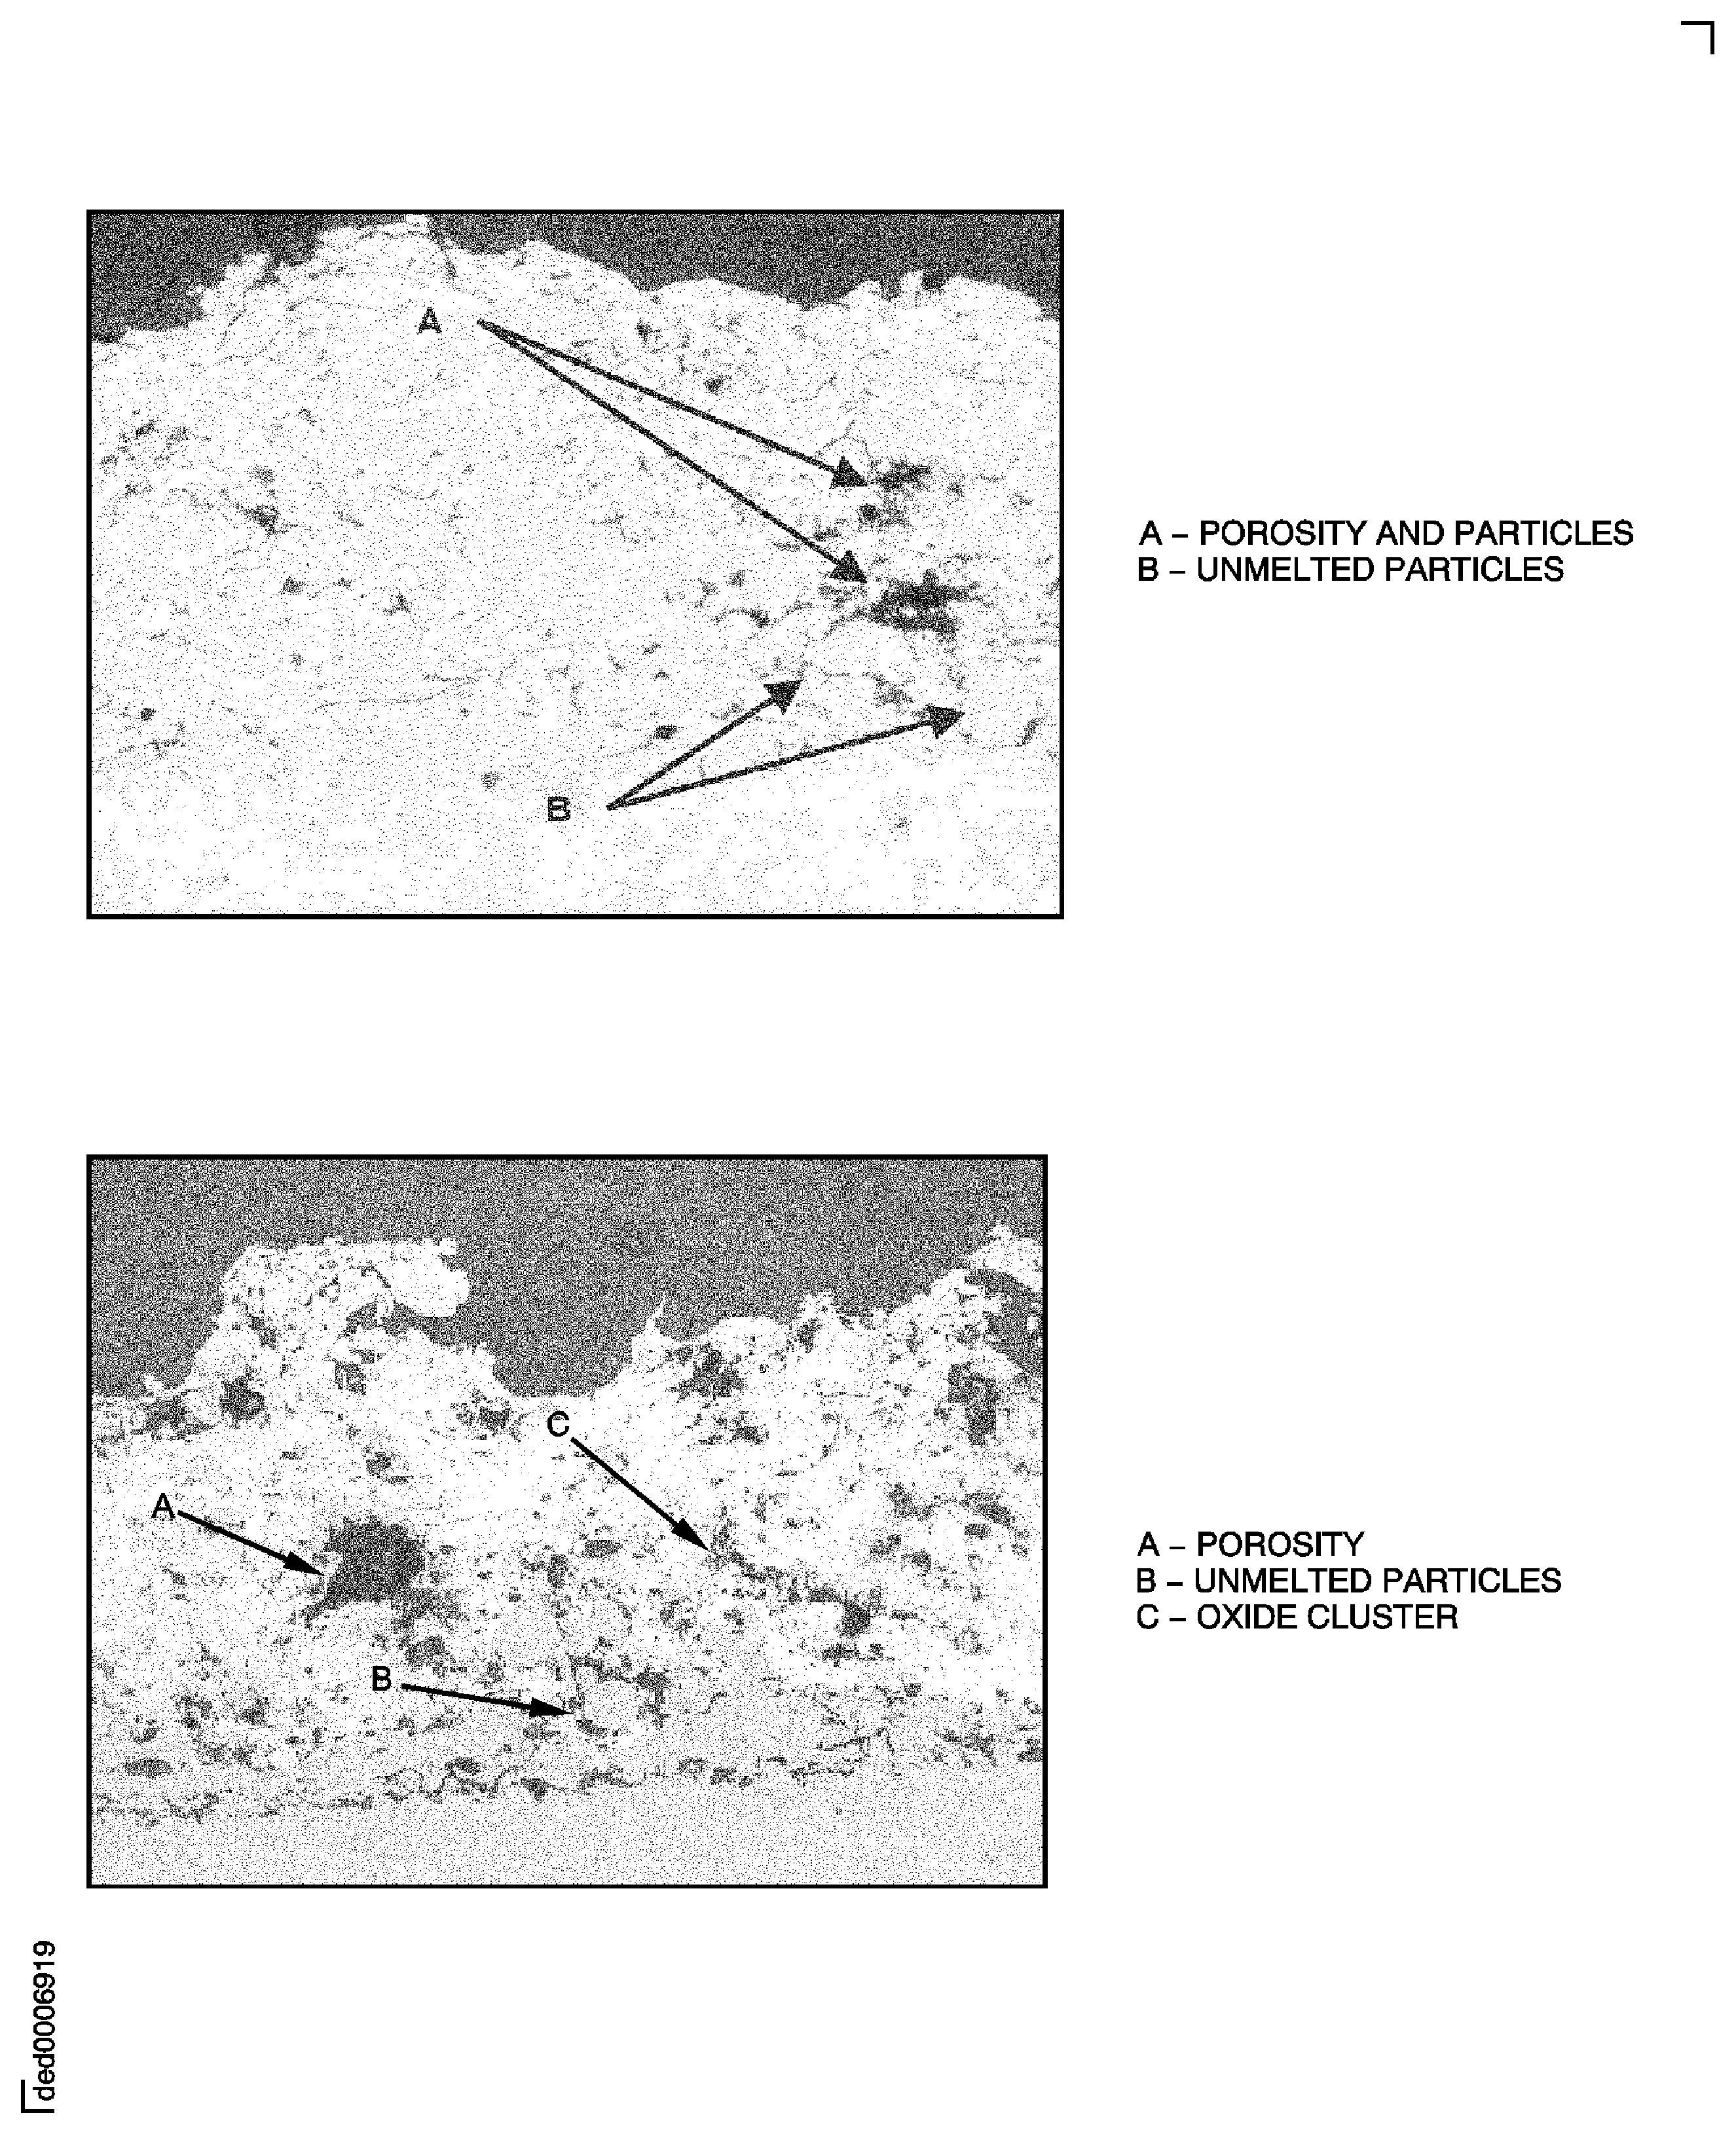
Figure: Examples of Interface Contamination
Examples of Interface Contamination
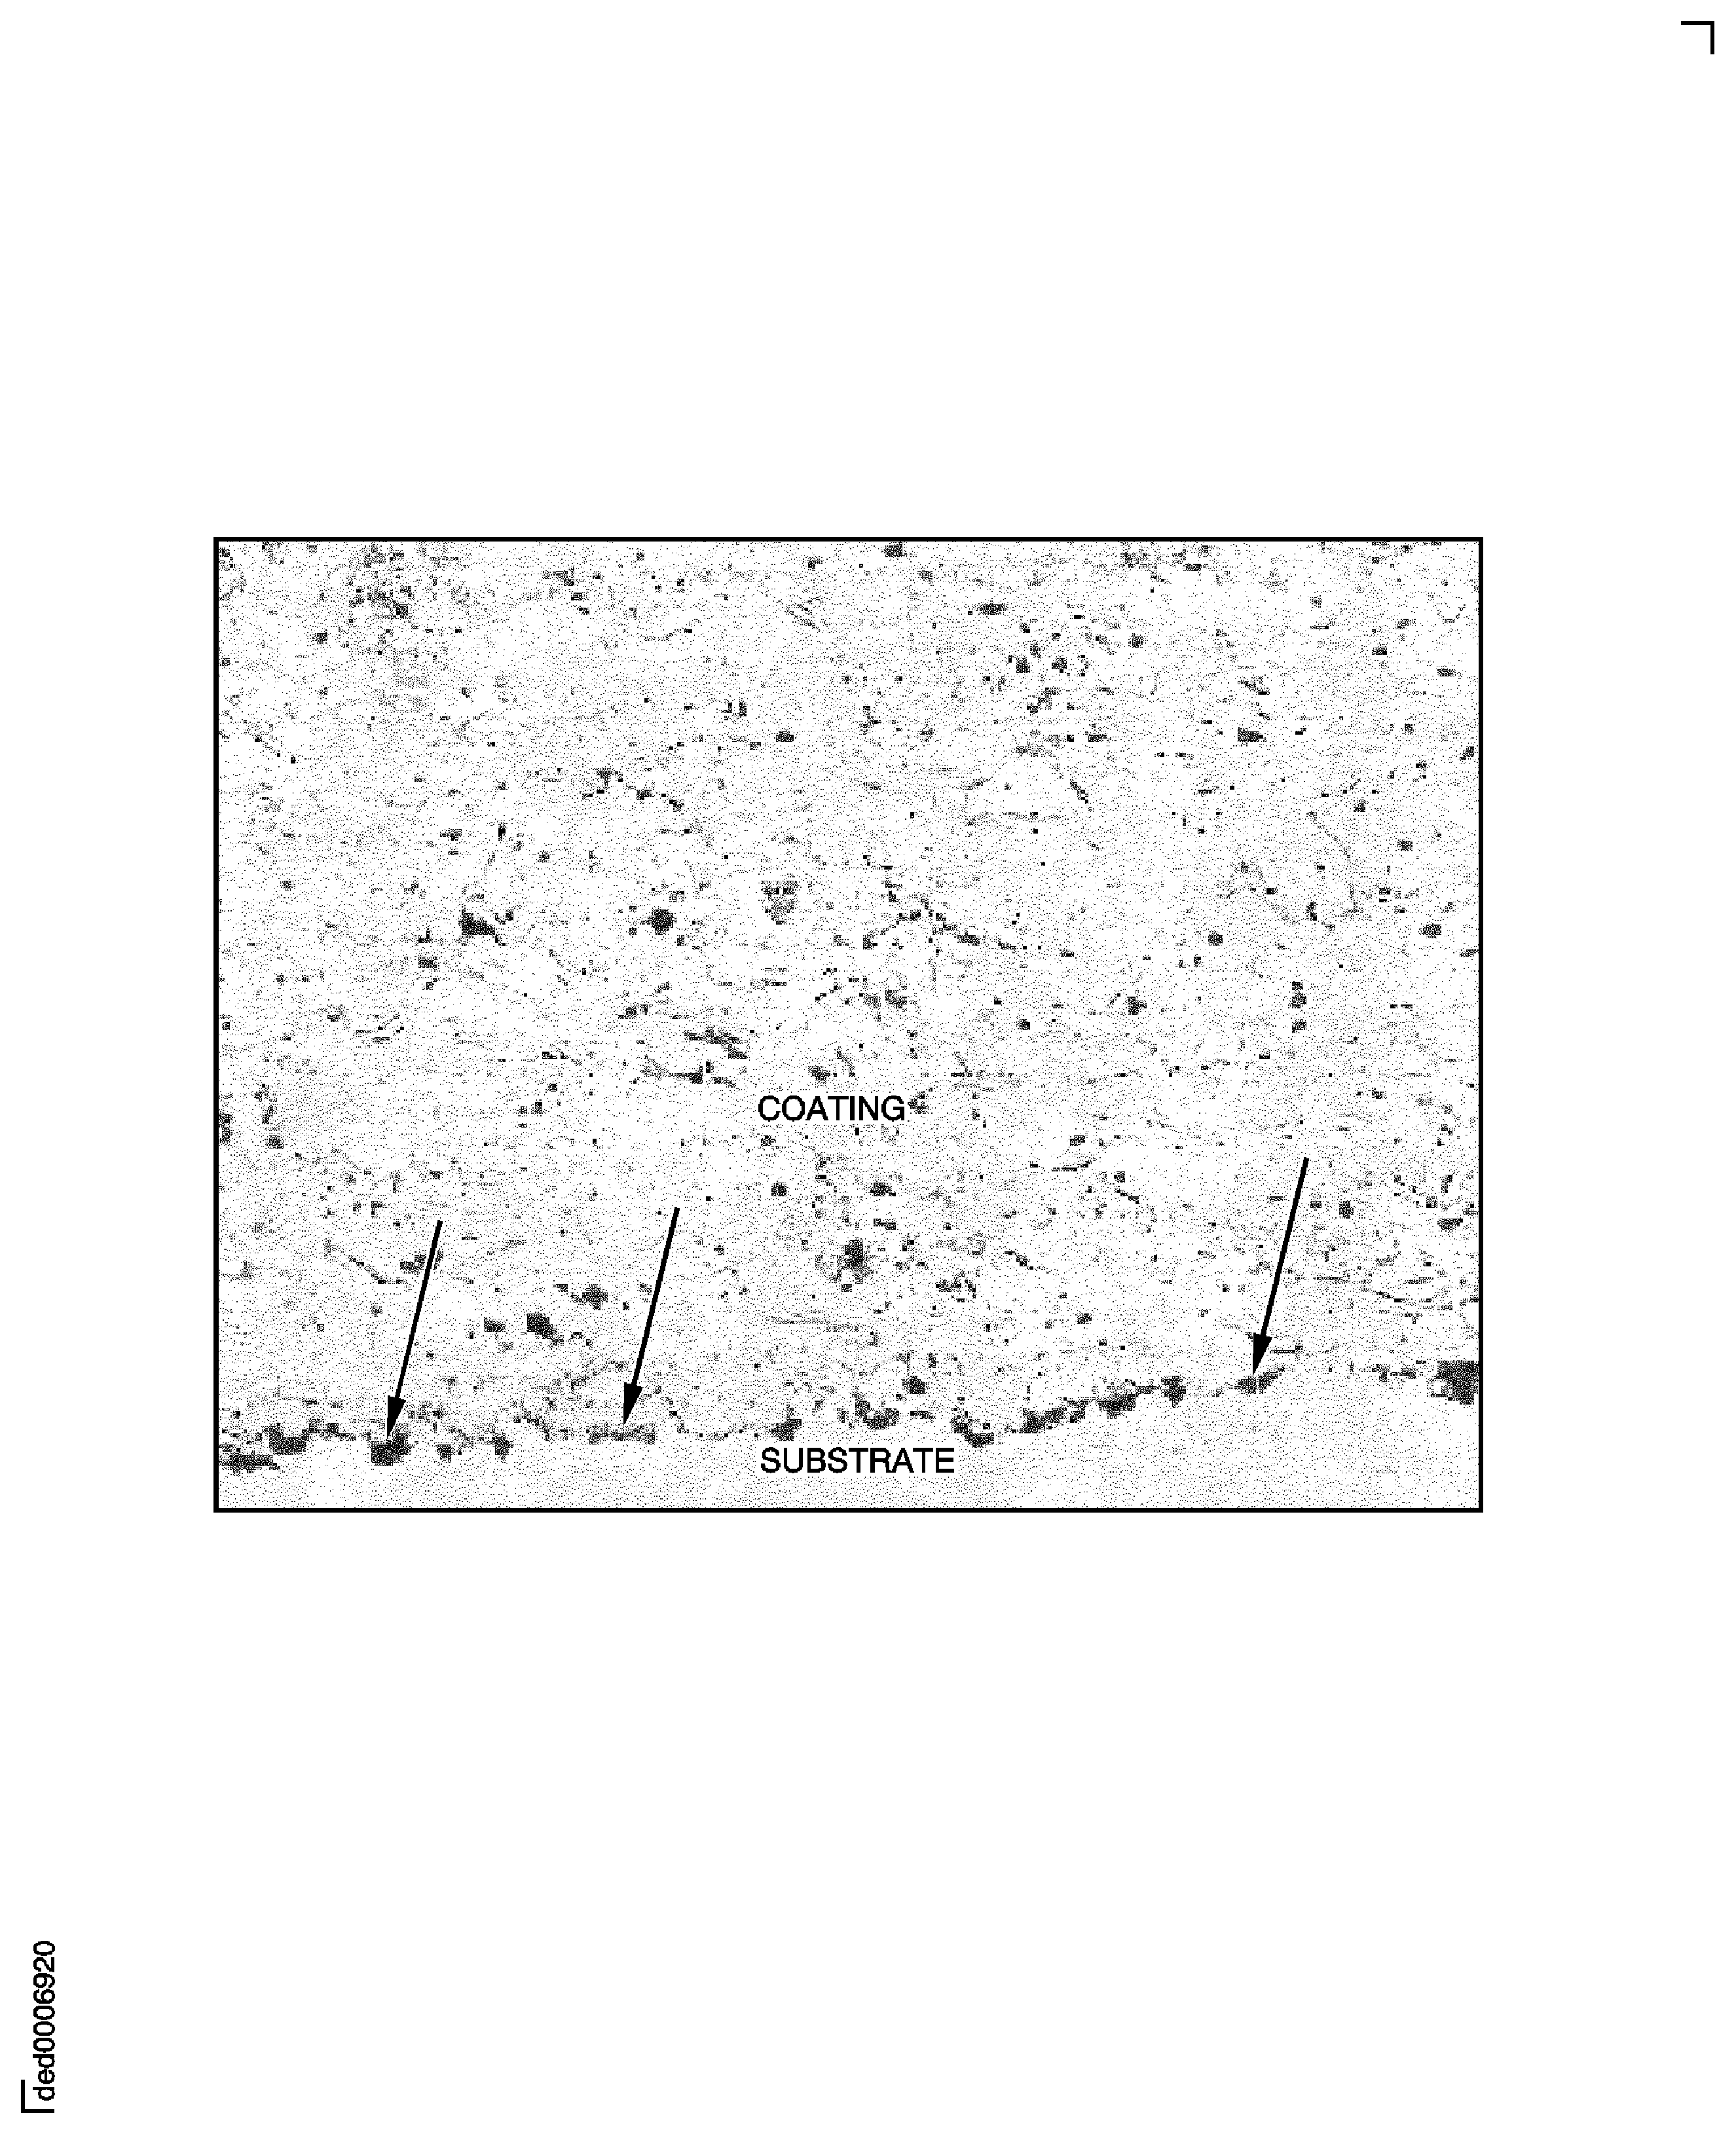
Figure: Example of Layering
Example of Layering
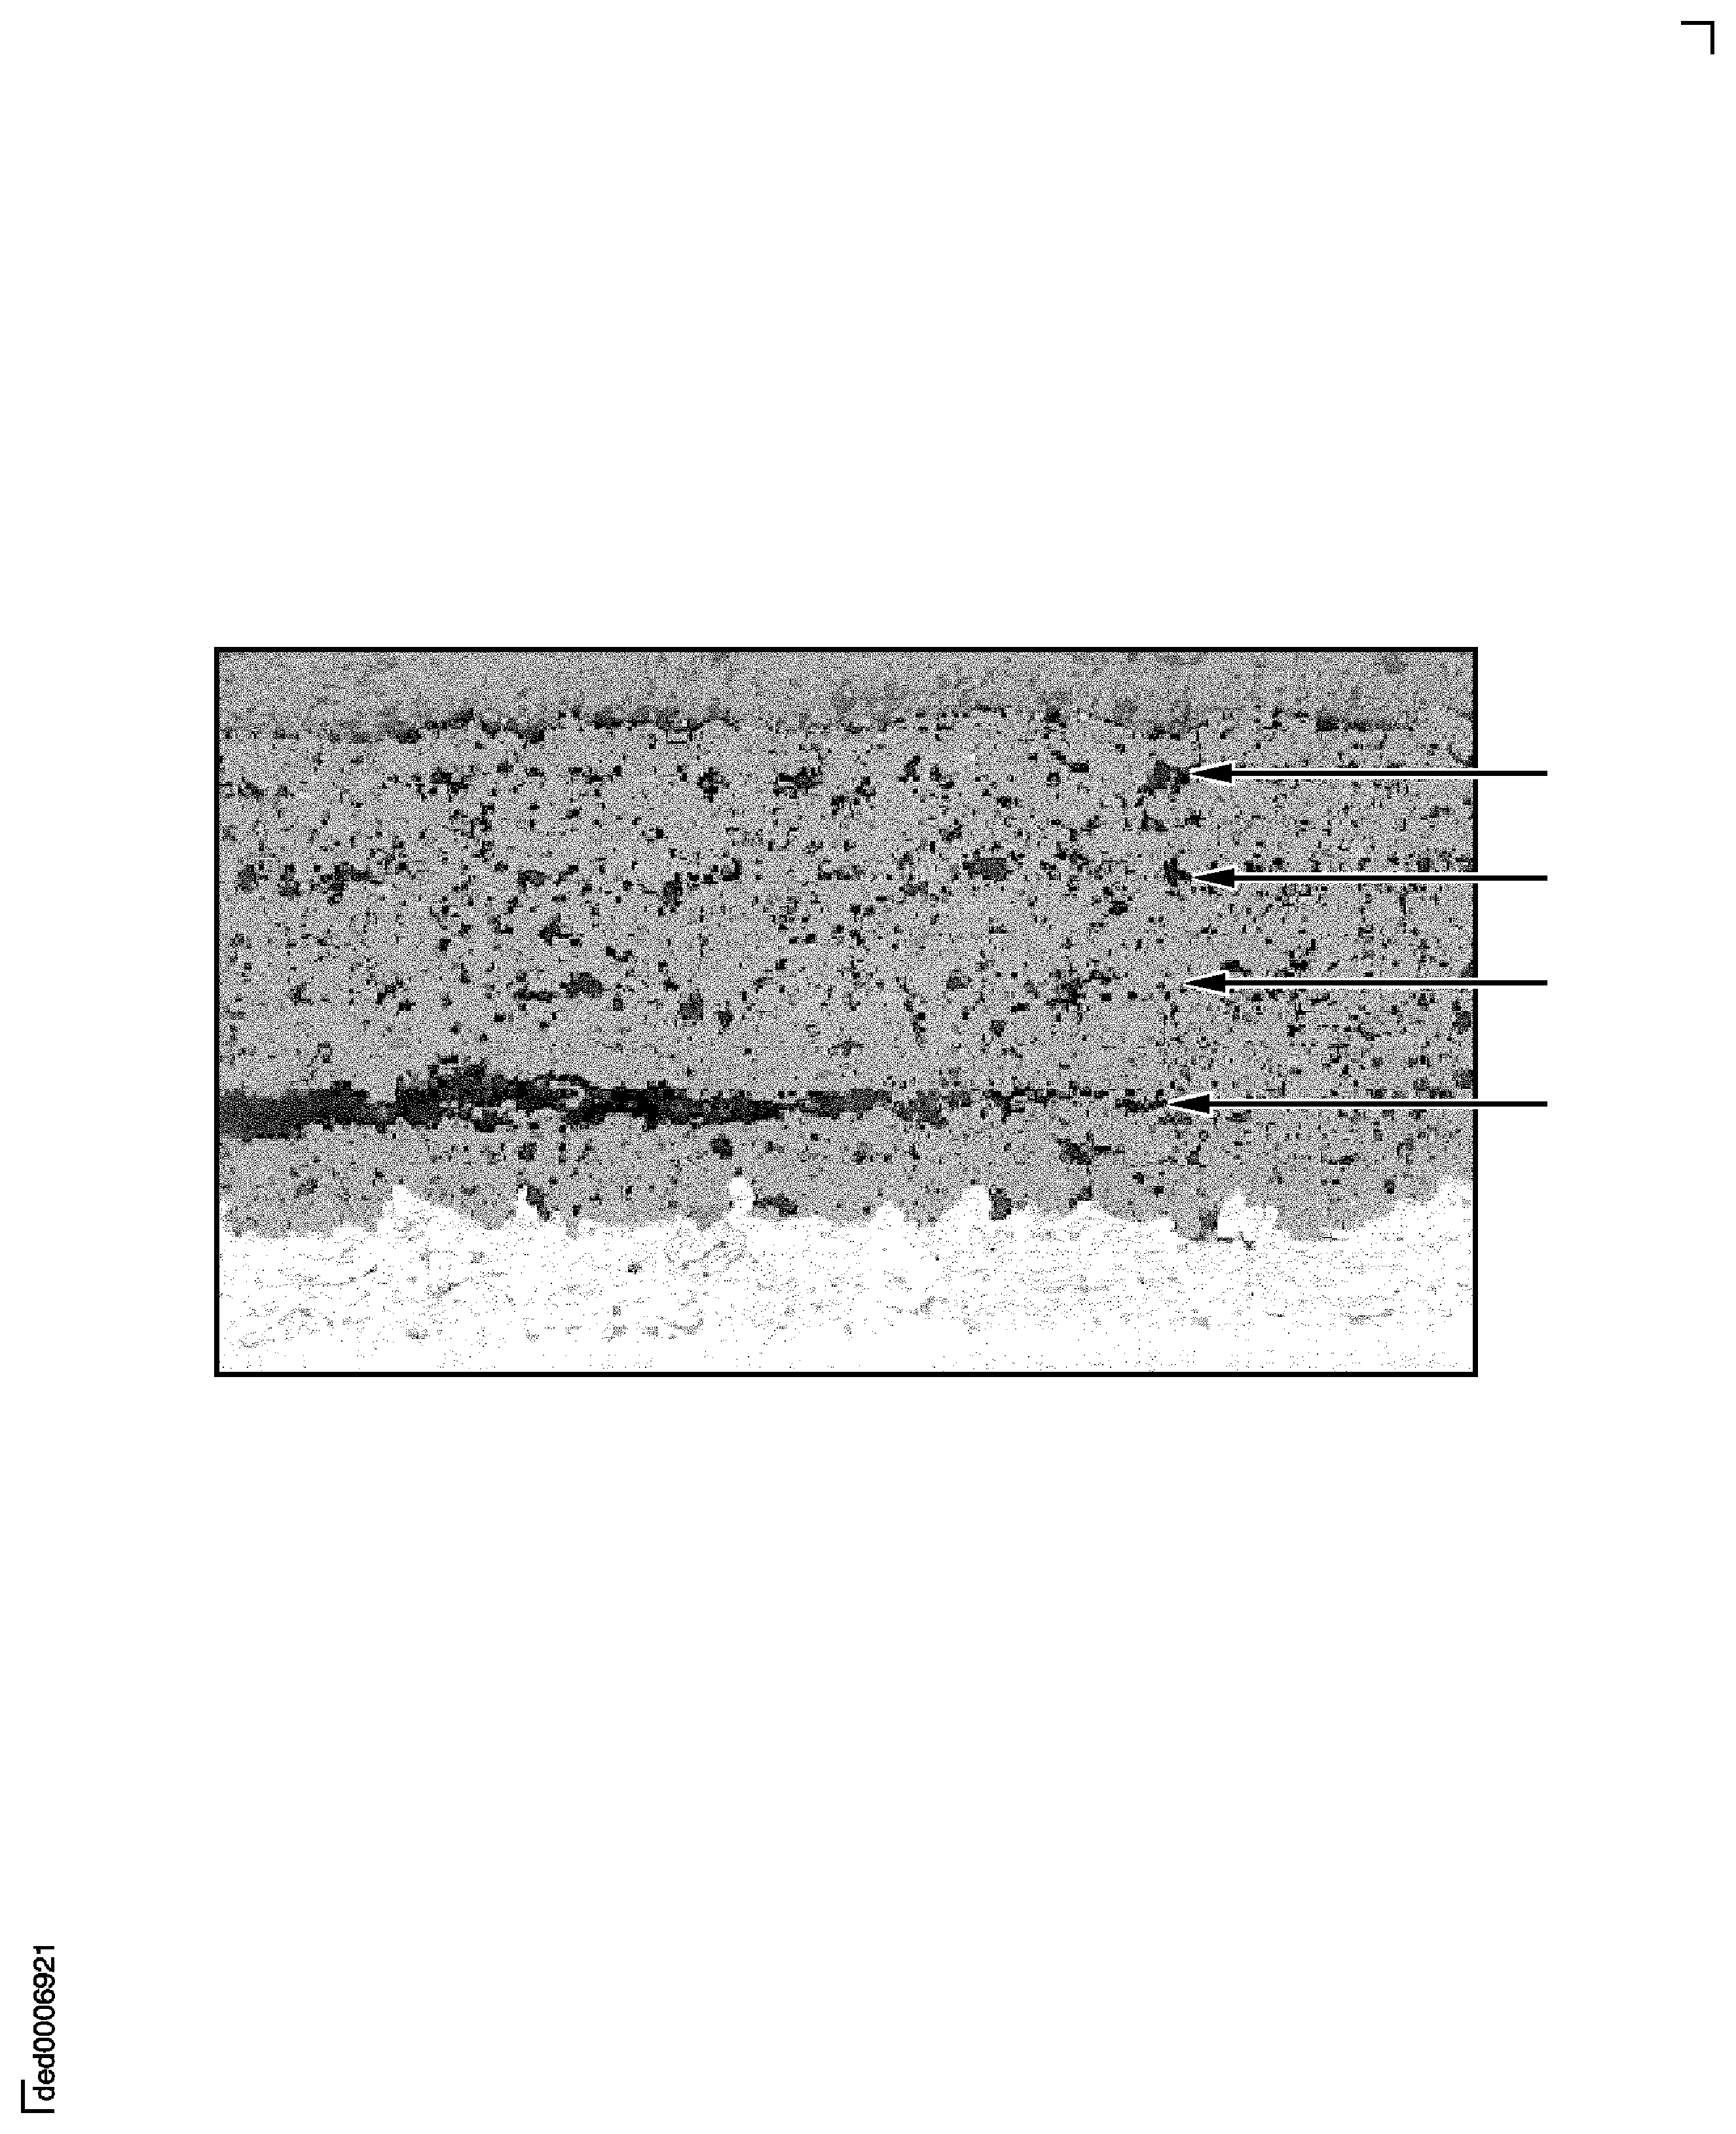
Figure: Example of Massive Porosity
Example of Massive Porosity
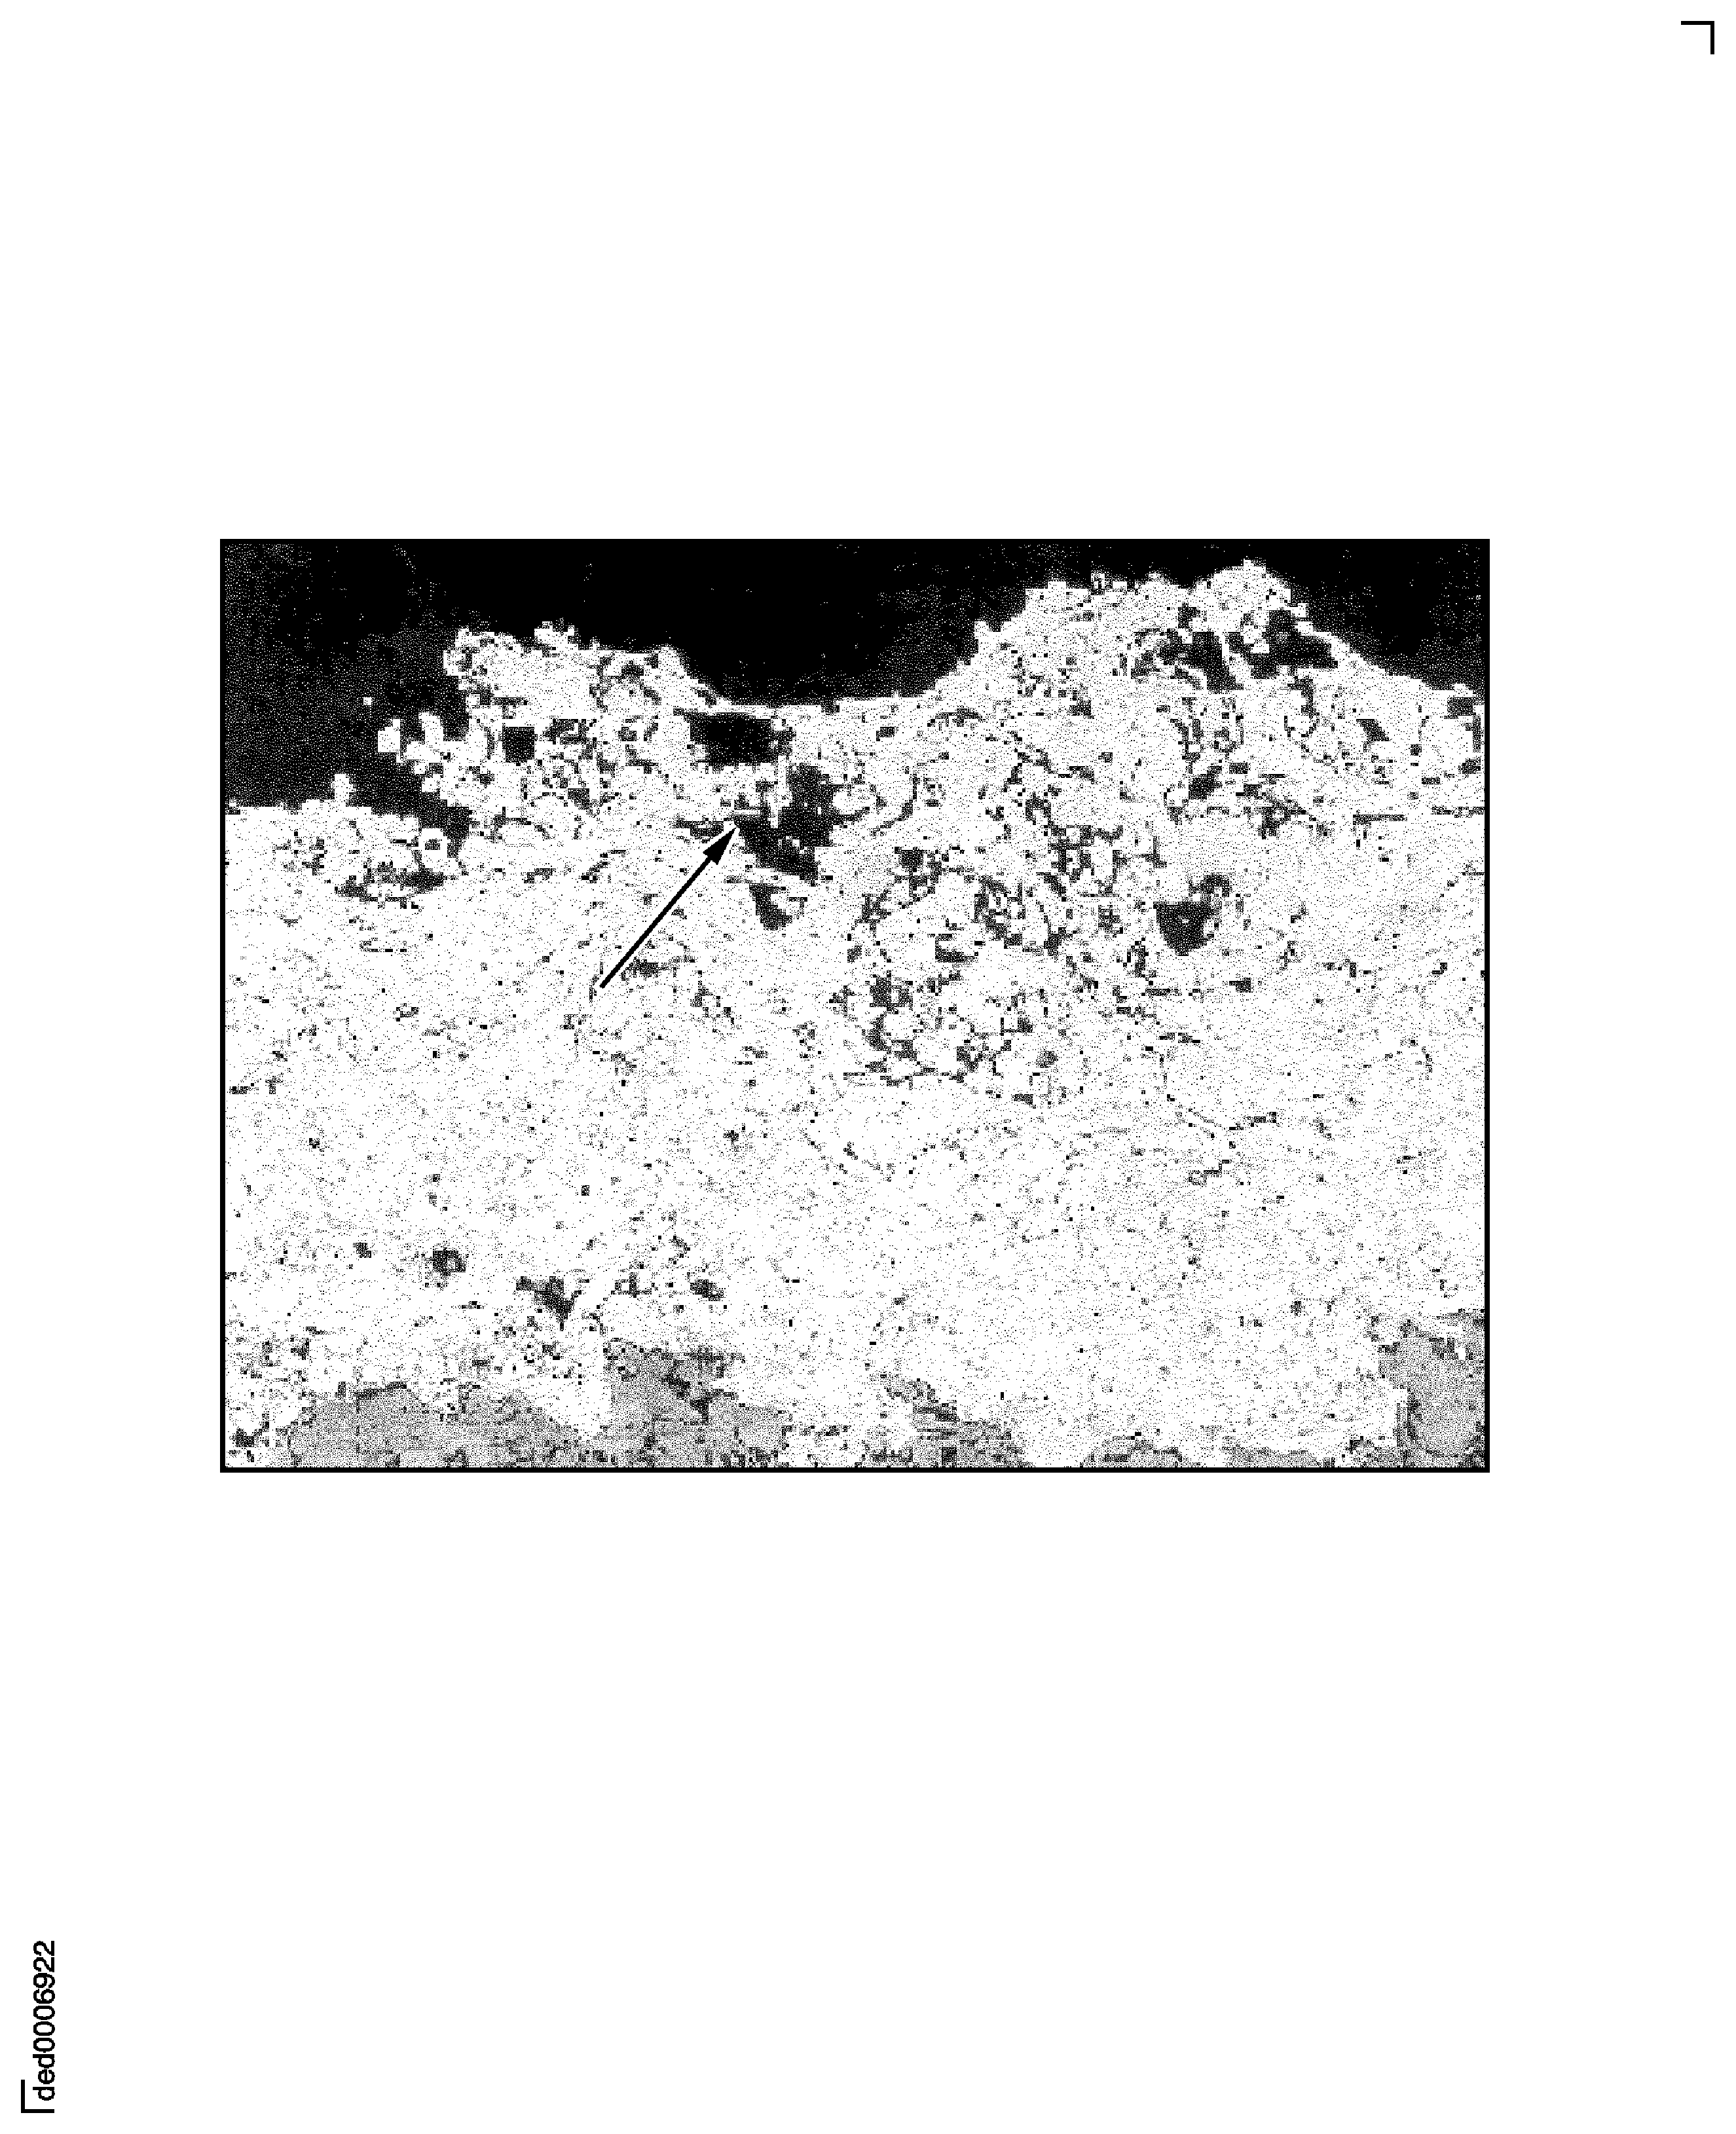
Figure: Examples of Oxide Clusters
Examples of Oxide Clusters
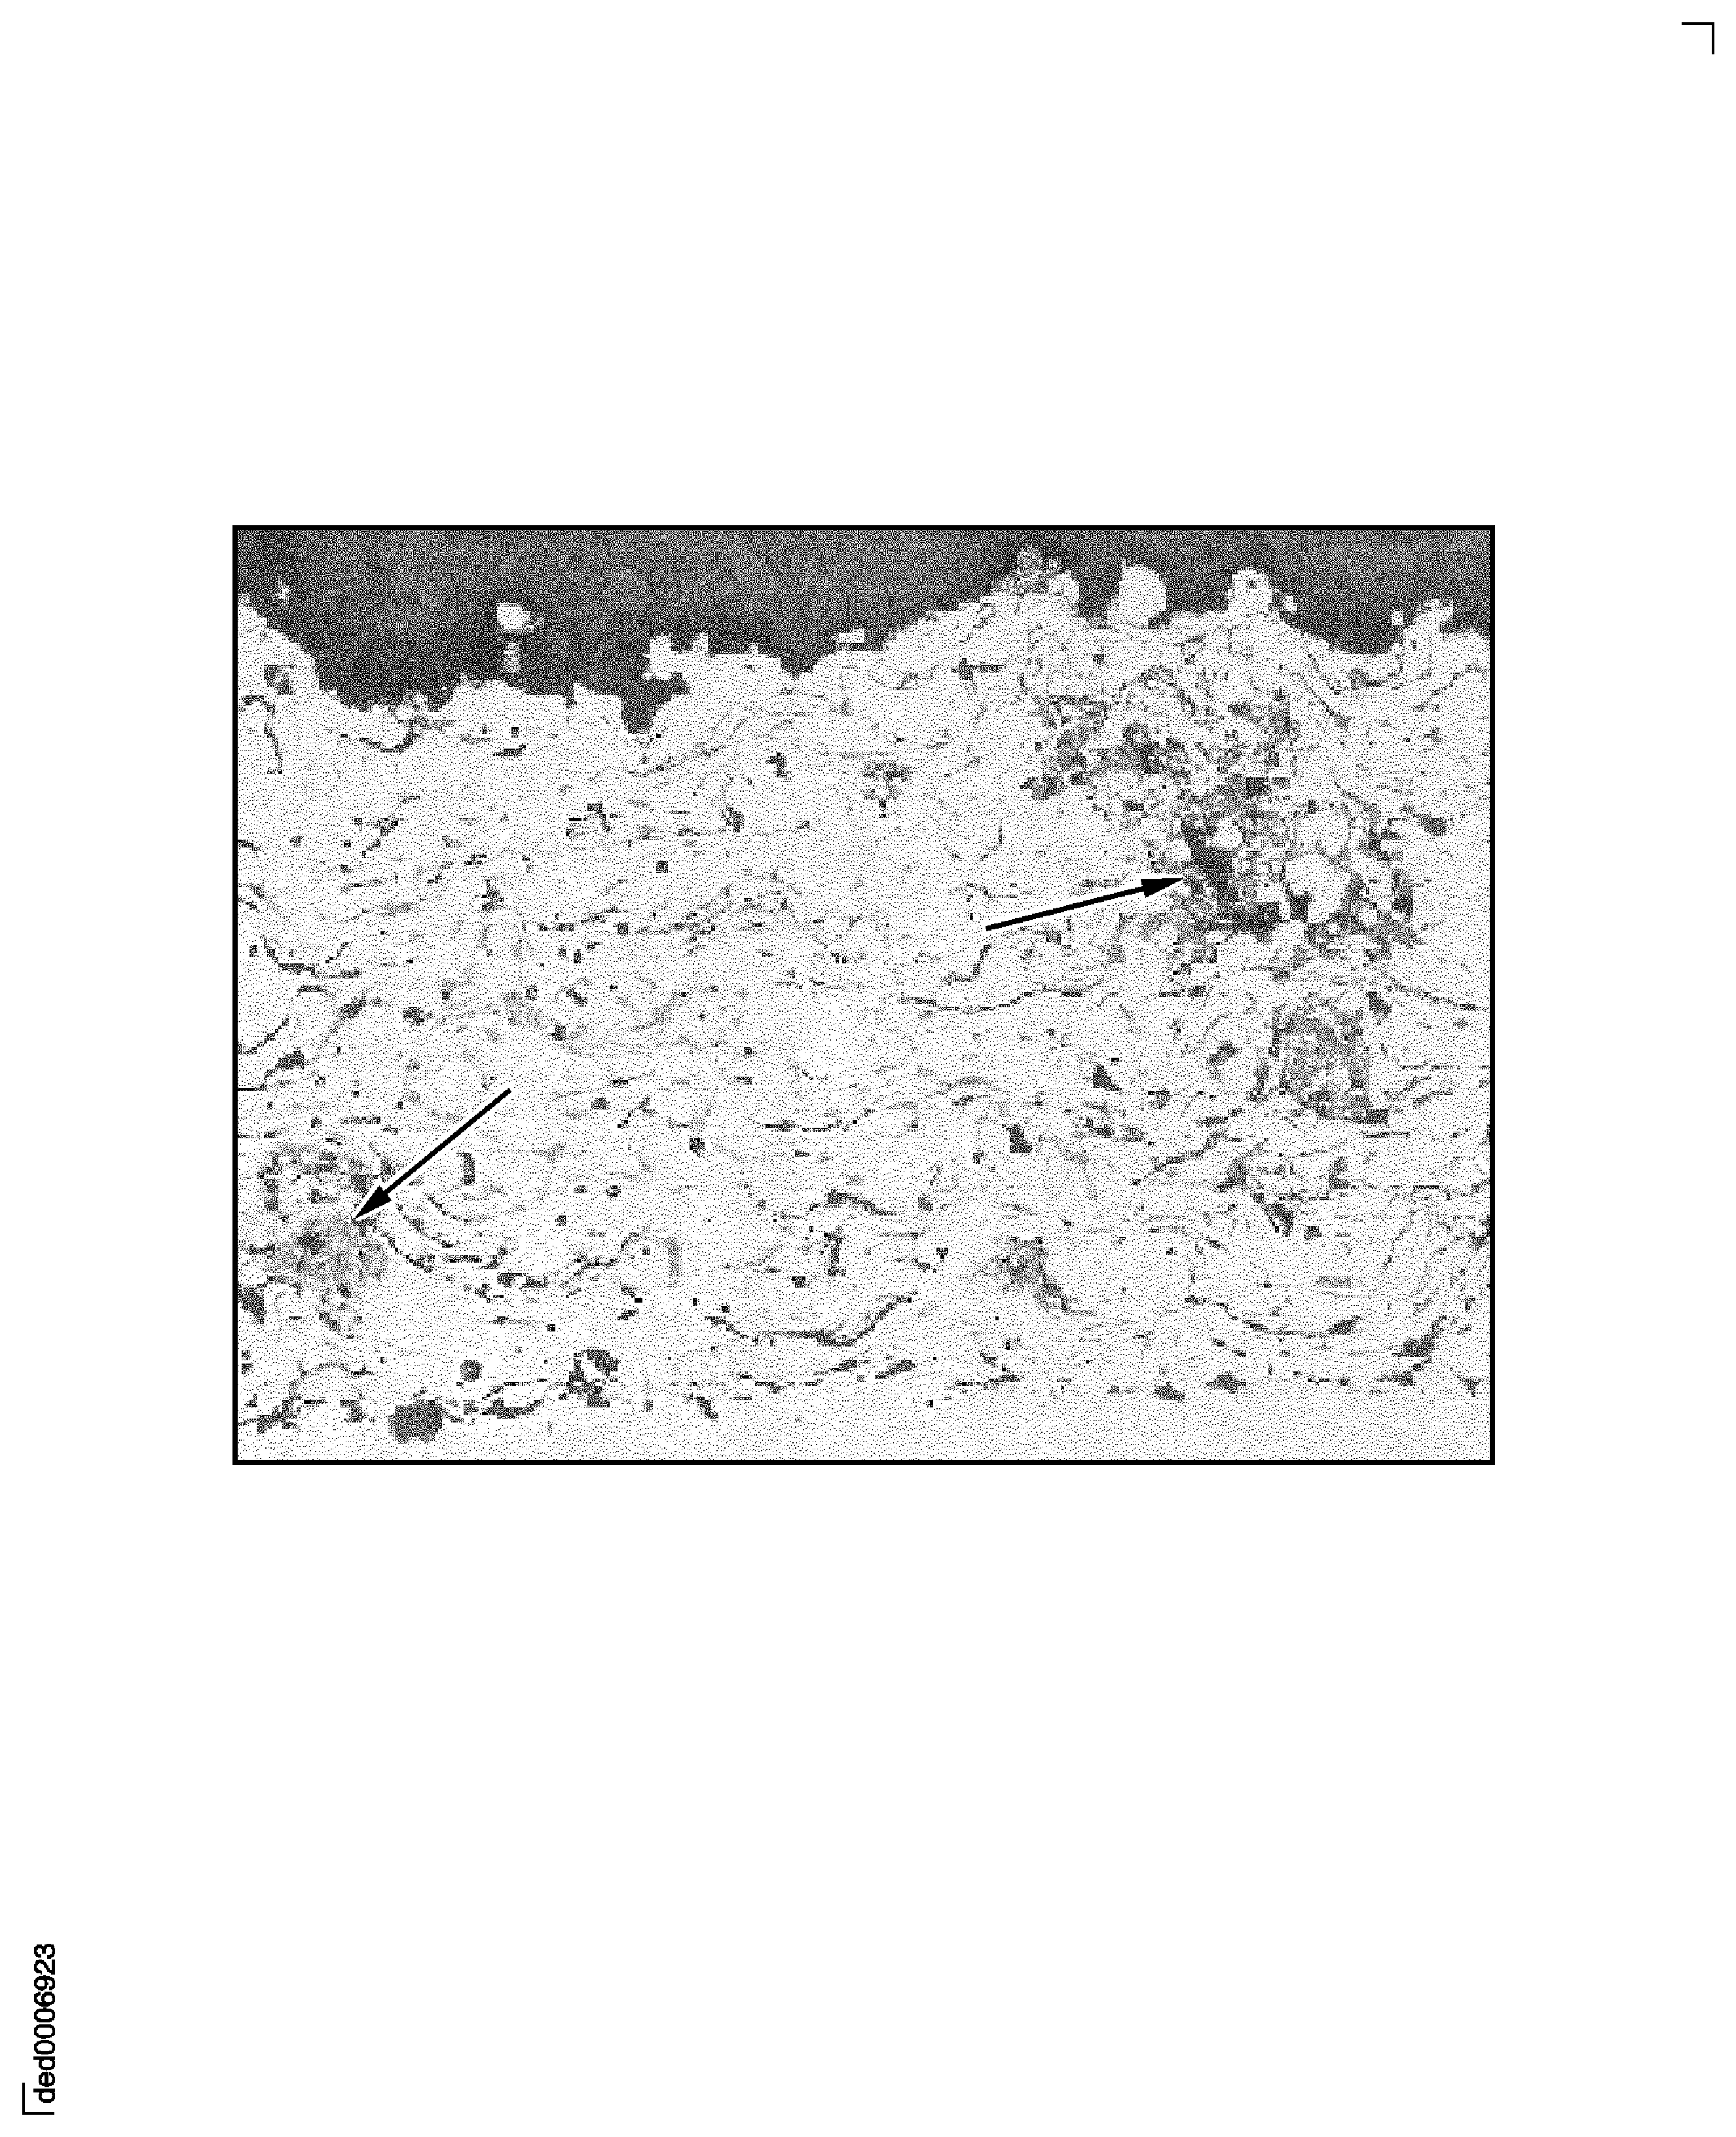
Figure: Examples of Oxide Stringers
Examples of Oxide Stringers
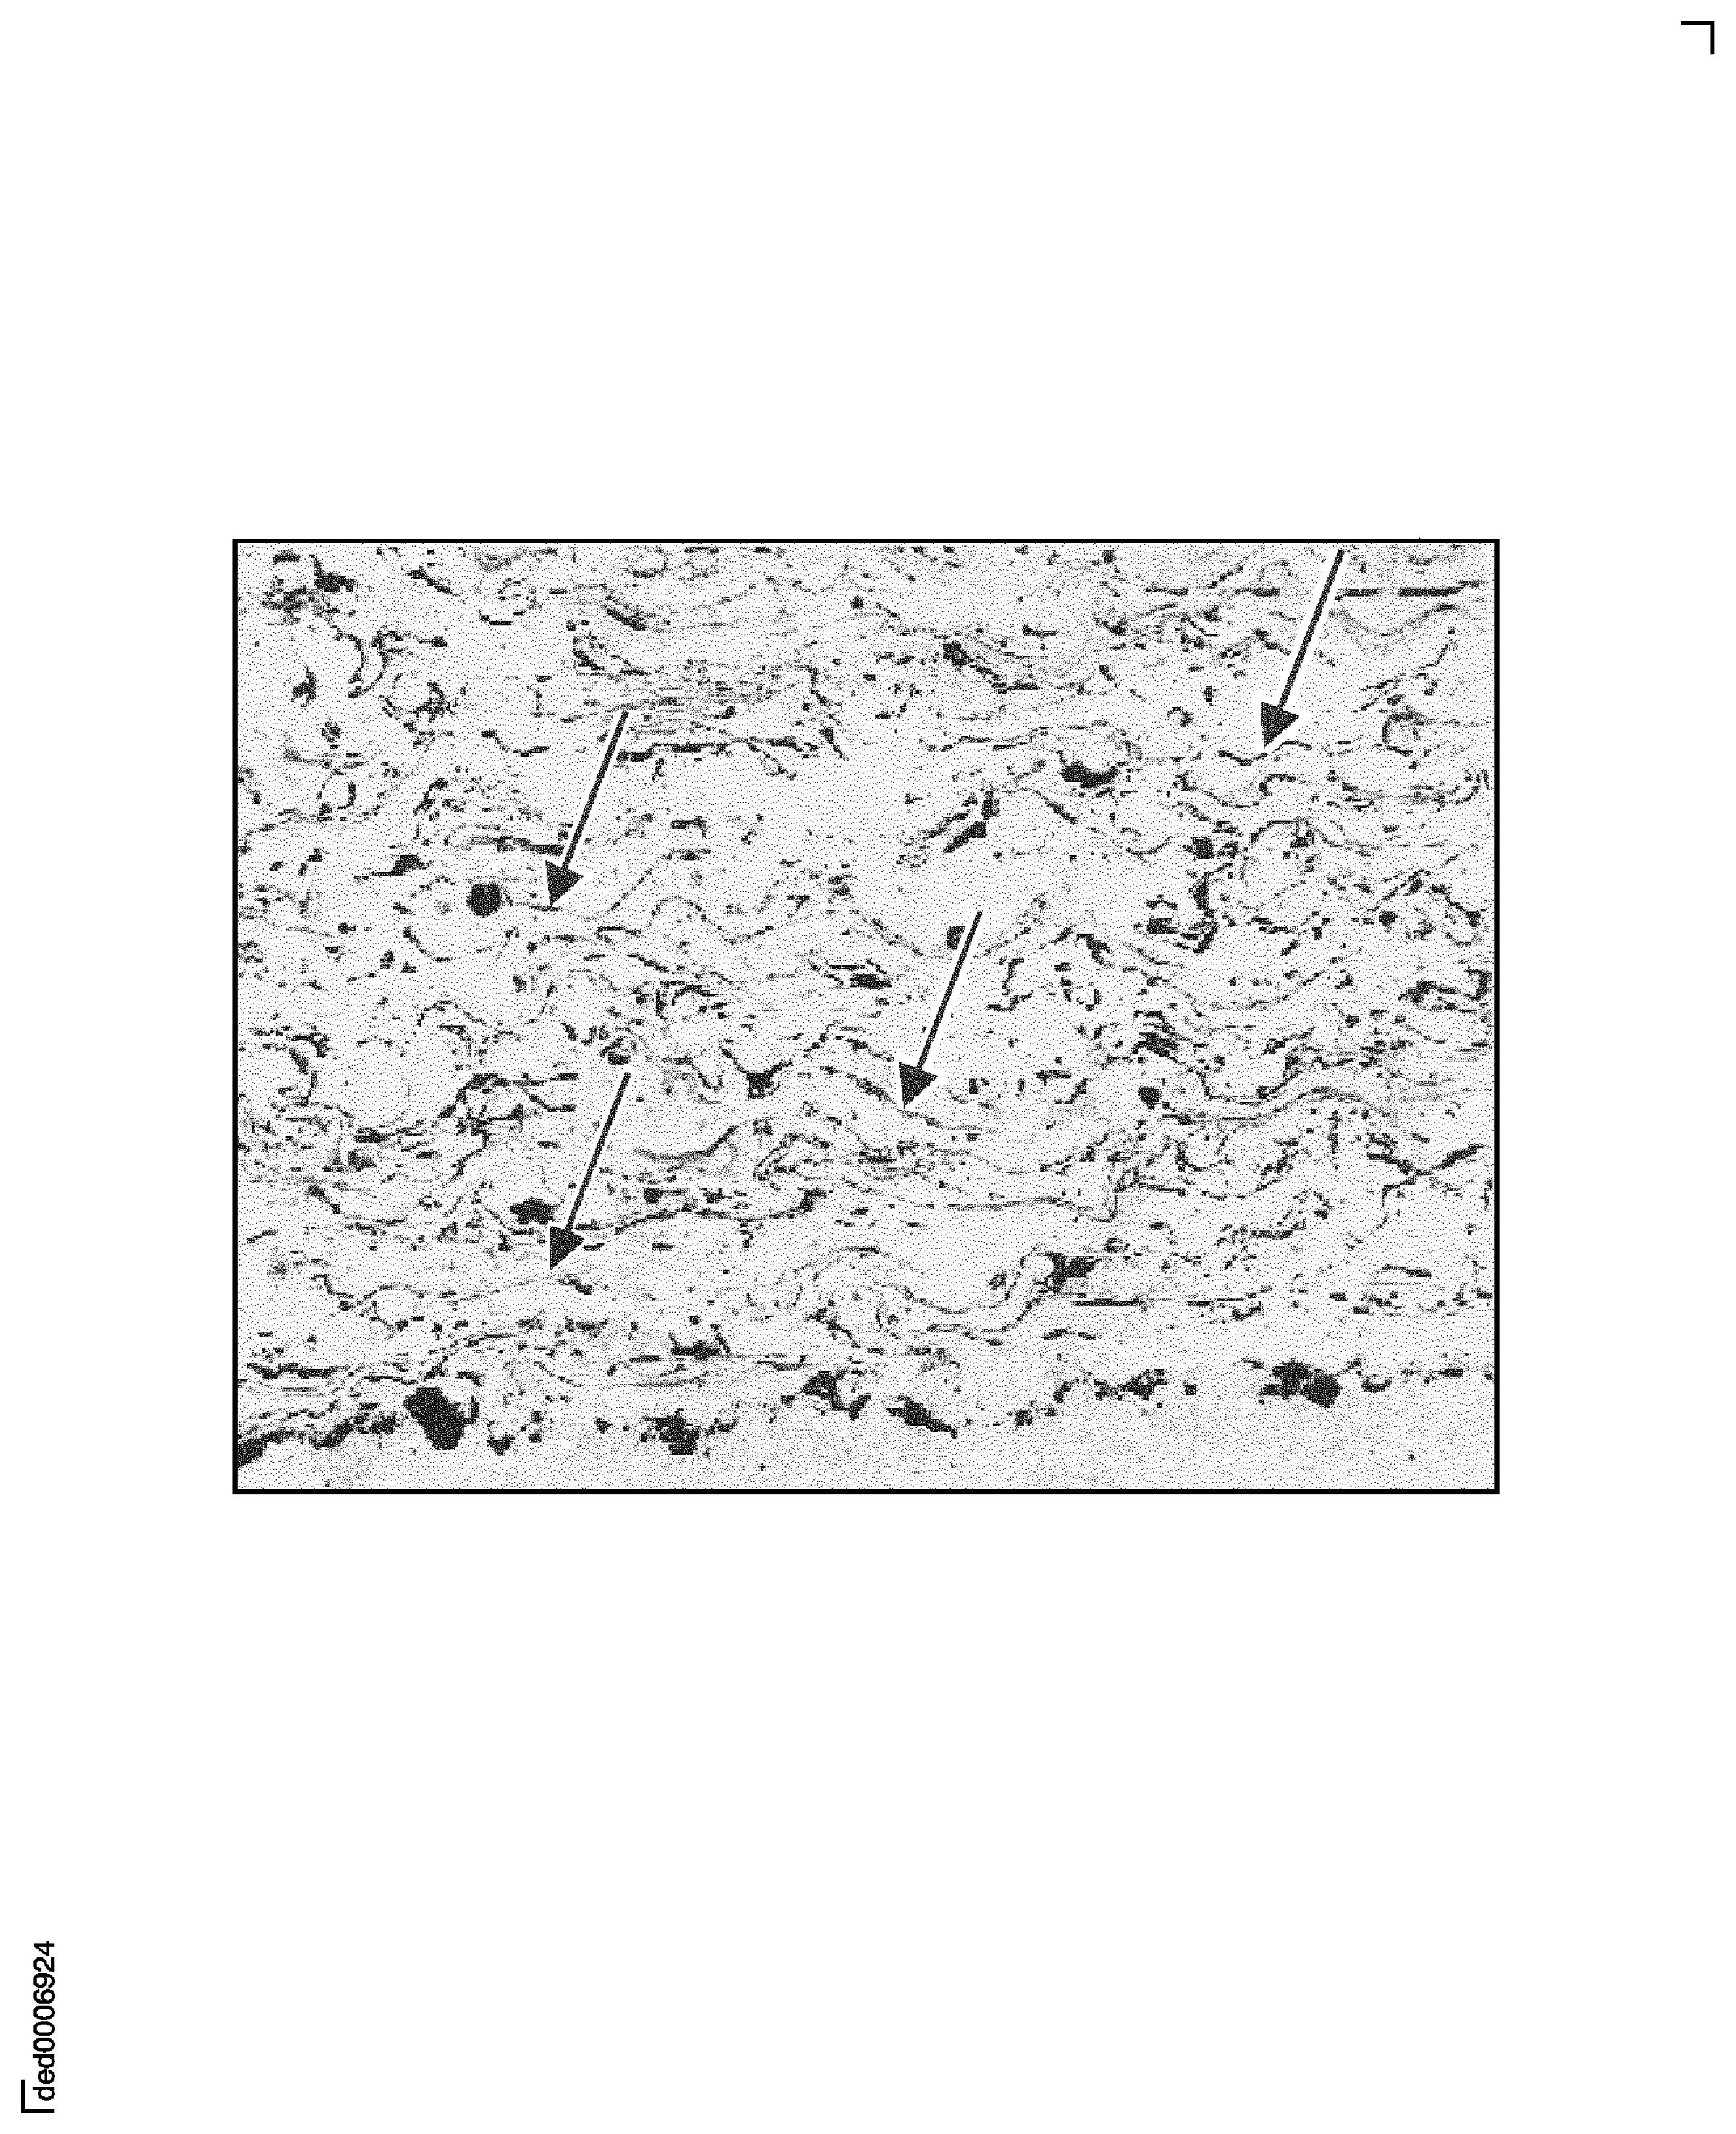
Figure: Examples of Separation
Examples of Separation
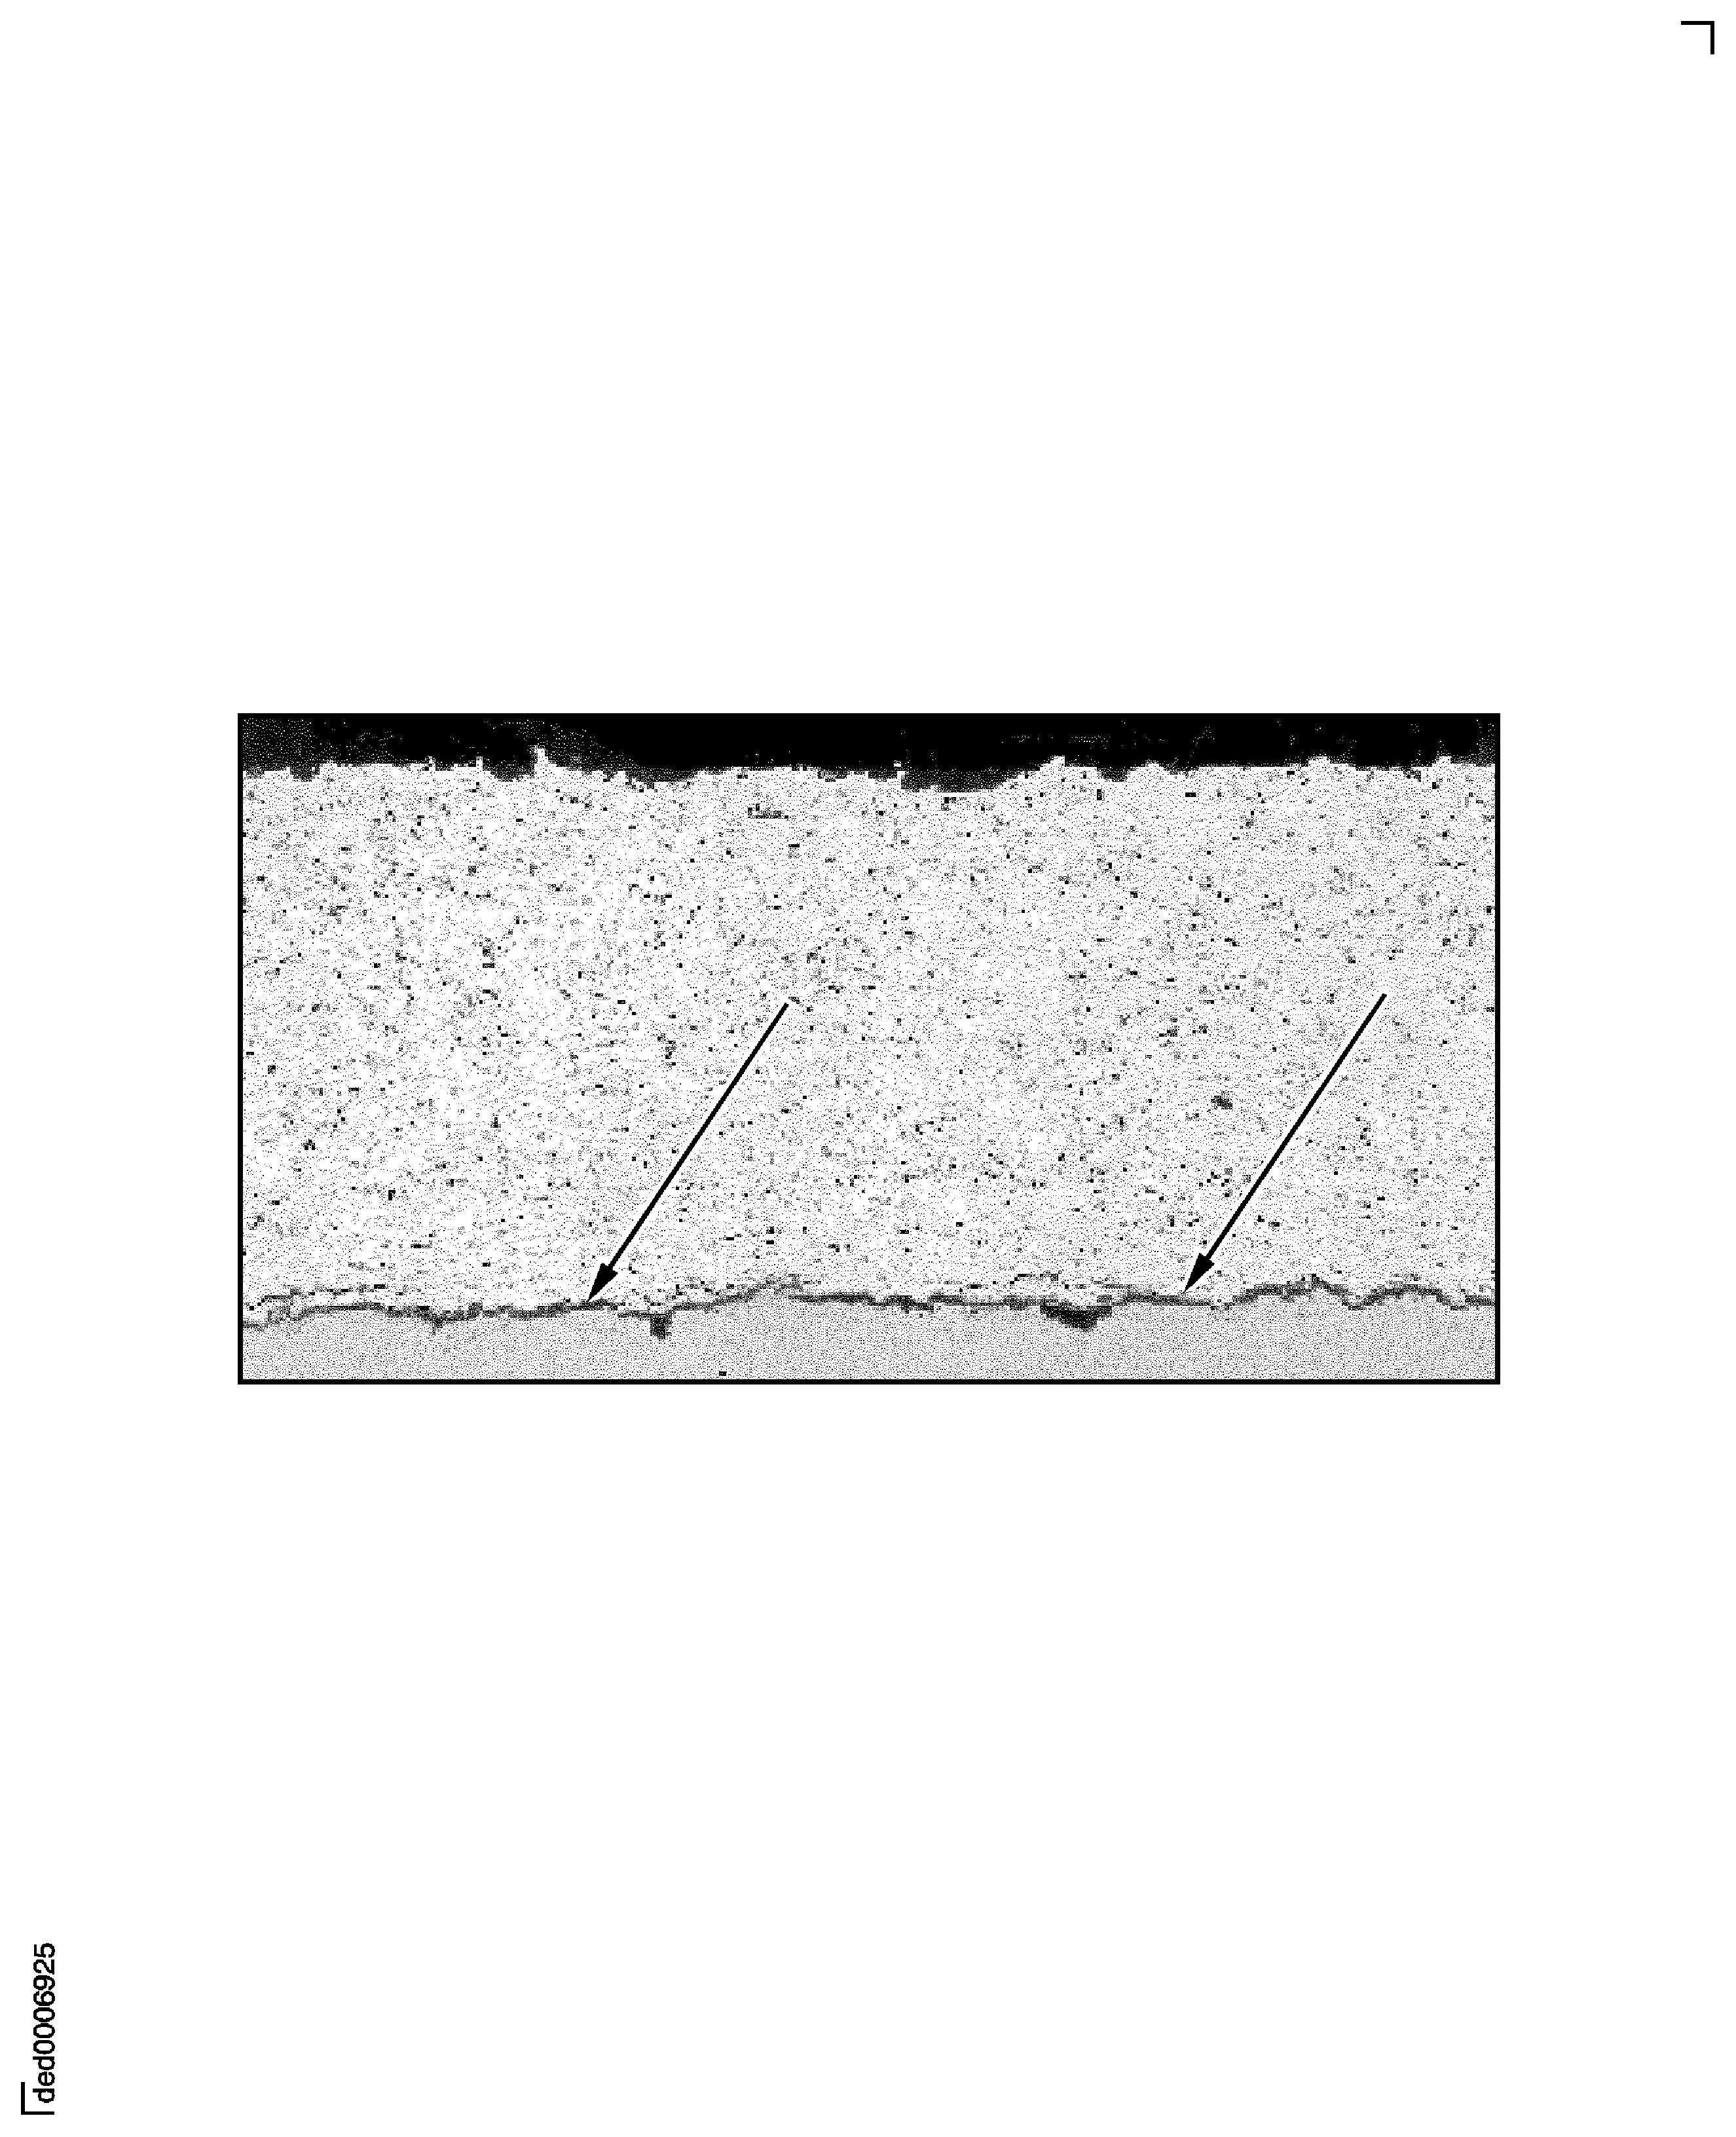
Figure: Examples of Uniformity
Examples of Uniformity
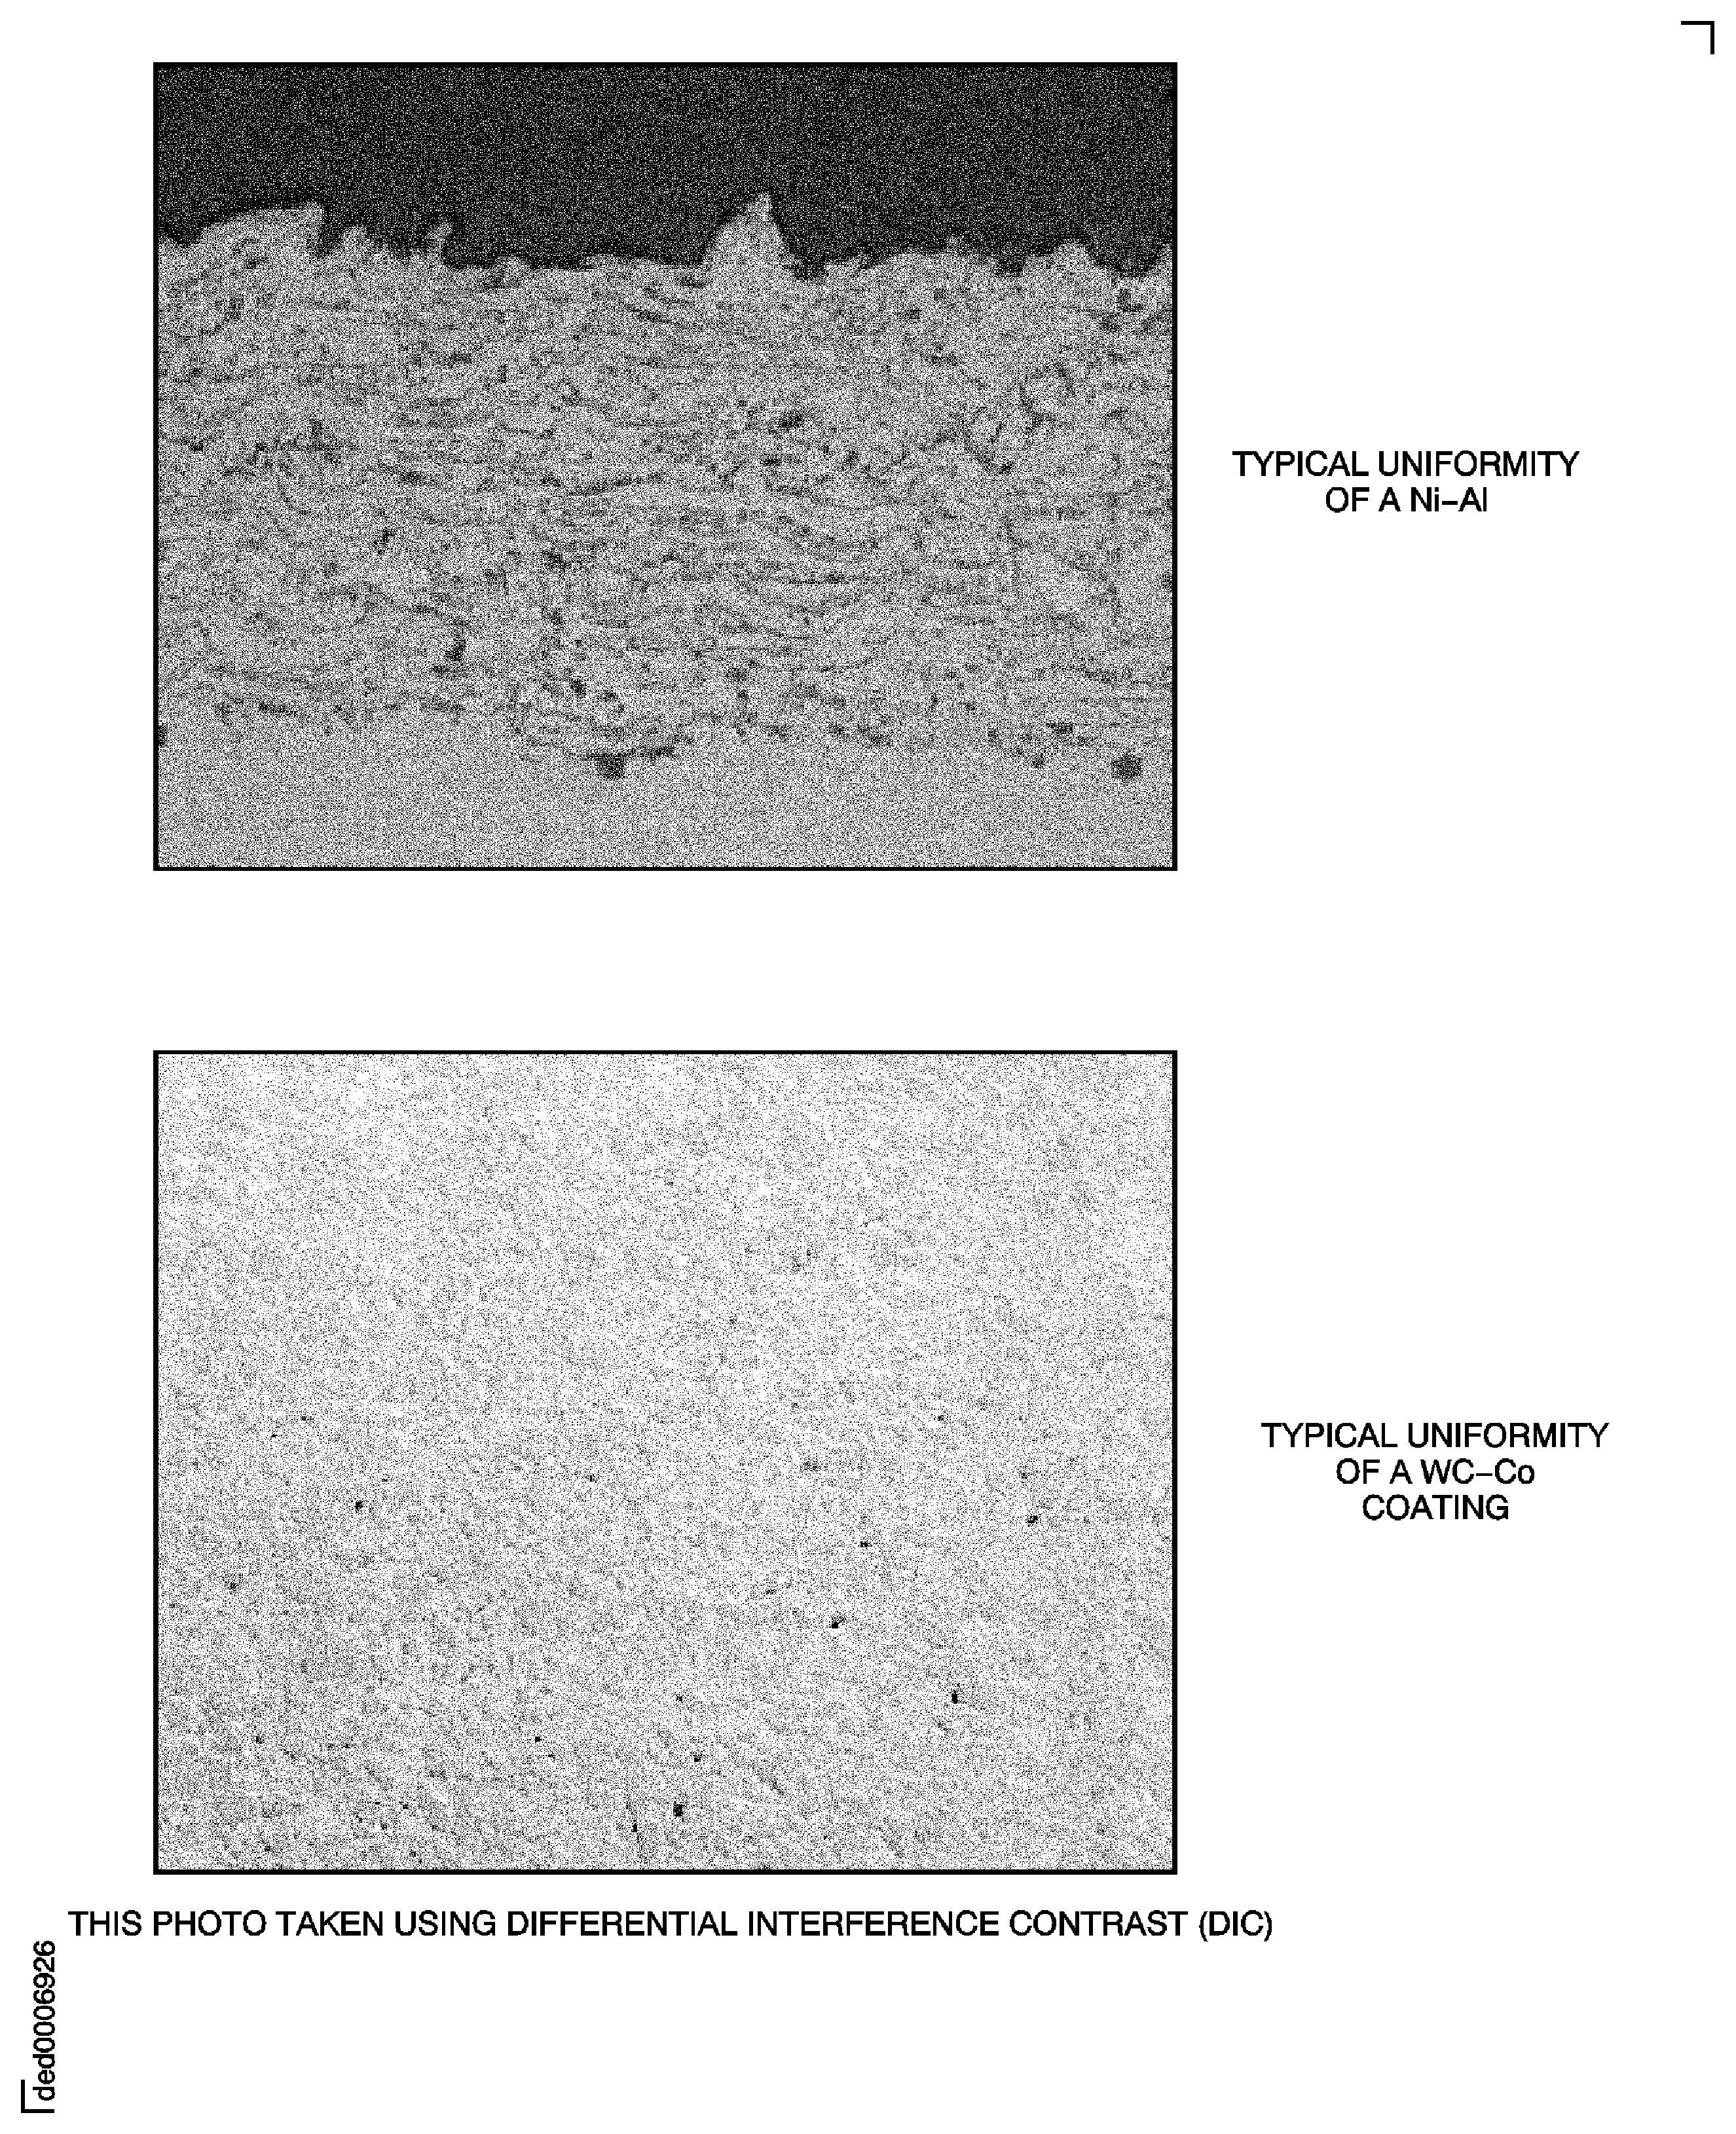
Figure: Examples of Unmelted Particles
Examples of Unmelted Particles
