Export Control
EAR Export Classification: Not subject to the EAR per 15 C.F.R. Chapter 1, Part 734.3(b)(3), except for the following Service Bulletins which are currently published as EAR Export Classification 9E991: SBE70-0992, SBE72-0483, SBE72-0580, SBE72-0588, SBE72-0640, SBE73-0209, SBE80-0024 and SBE80-0025.Copyright
© IAE International Aero Engines AG (2001, 2014 - 2021) The information contained in this document is the property of © IAE International Aero Engines AG and may not be copied or used for any purpose other than that for which it is supplied without the express written authority of © IAE International Aero Engines AG. (This does not preclude use by engine and aircraft operators for normal instructional, maintenance or overhaul purposes.).Applicability
All
Description
TASK 70-34-03-340-501-002 Thermal Spray Coating Application - Acceptance Standards
Introduction
This Task gives the acceptance standards for the IAE coatings given in SPM TASK 70-34-03-340-501, SUBTASK 70-34-03-340-001 and referenced figure. The cross reference between the CoMat number and the IAE coating number is given in SPM TASK 70-34-03-340-501, SUBTASK 70-34-03-340-001.
For definitions of the frequency of occurrence terms “negligible”, “isolated”, “occasional”, “intermittent”, “predominant”, and “continuous”, refer to SPM TASK 70-34-03-340-501-001, SUBTASK 70-34-03-860-106.
Permitted Test Limits for IAE 53, IAE 271 and IAE 36206 Coatings
Bond Strength
NOTE
Refer to TASK 70-34-03-340-501-001 for bond strength test procedures.The bond strength limits which can be permitted for specified coatings are given in the table below.
NOTE
When no IAE 271 suffix is specified by a repair, use IAE 271-37 limits.Coating
Bond Strength (minimum)
IAE 53-1
6500 psi (44.8 MPa) (refer to NOTE: 1.)
IAE 53-2
6500 psi (44.8 MPa) (refer to NOTE: 1.)
IAE 53-5
5000 psi (34.5 MPa)
IAE 53-7
5000 psi (34.5 MPa)
IAE 53-10
6500 psi (44.8 MPa)
IAE 53-12
6500 psi (44.8 MPa)
IAE 53-13
6000 psi (41.4 MPa)
IAE 53-14
4000 psi (27.6 MPa)
IAE 53-15
4500 psi (31.0 MPa)
IAE 53-16
4700 psi (32.4 MPa) (refer to NOTE: 4.)
IAE 53-17
4500 psi (31.0 MPa)
IAE 53-18
6000 psi (41.4 MPa) (refer to NOTE: 4.)
IAE 53-20
3000 psi (20.7 MPa)
IAE 53-21
5000 psi (34.5 MPa)
IAE 53-22
6000 psi (41.4 MPa)
IAE 53-33
2500 psi (17.2 MPa)
IAE 53-35
3000 psi (20.7 MPa)
IAE 53-37
5000 psi (34.5 MPa)
IAE 53-38
6000 psi (41.4 MPa)
IAE 53-47
4500 psi (31.0 MPa)
IAE 53-69
5500 psi (37.9 MPa) (refer to NOTE: 3.)
IAE 53-78
5000 psi (34.5 MPa)
IAE 271-13
6000 psi (41.4 MPa)
IAE 271-35
3000 psi (20.7 MPa) (includes bond coat) (refer to NOTE: 6.)
IAE 271-37
5000 psi (34.5 MPa) (refer to NOTE: 7.)
IAE 271-47
4500 psi (31.0 MPa)
IAE 271-48
5000 psi (34.5 MPa)
IAE 36206-4
9000 psi (62.1 MPa)
IAE 36206-5
9000 psi (62.1 MPa)
IAE 36206-6
8000 psi (55.2 MPa)
IAE 36206-7
9000 psi ( 62.1 MPa)
IAE 36206-8
8000 psi ( 55.2 MPa)
NOTE
1. The bond strength of IAE 53-1 and IAE 53-2 can be as low as 4400 psi (30.3 MPa) on aluminum alloys.2. Deleted.3. This bond strength applies to AMS 4928 specimens only. Bond strength on AMS 5613 must not be less than 2500 psi (17.2 MPa).4. When IAE 53-16 is specified, IAE 53-18 can be used as an alternative.5. Deleted.6. Bond strength applies to CoMat 07-122 dual wire electric arc coating applied over 0.003 to 0.005 inch (0.077 to 0.127 mm) of IAE 271-37 bond coat.7. Use IAE 271-37 when no IAE 271 suffix is specified.
Metallographic Examination Limits for IAE 53-XX Coatings
NOTE
Coating must essentially have no inclusions or contamination at the coating-base metal interface and be without cracks, massive porosity, and excessive oxides. Specific characteristics for the various suffix numbers follow.The evaluation criteria for permitted and not permitted conditions are based on a 1/2 to 3/4 inch (12.7 to 19.0 mm) length of coating cross-section if the part or test piece configuration permits.The minimum magnification to examine coating thickness is 100X. If coating is level to within 0.0005 inch (0.013 mm), it is only necessary to report the predominant thickness. If coating tapers or varies more than 0.0005 inch (0.013 mm), it is necessary to report the range, or minimum, maximum, and predominant thickness. Thickness on test panels that do not represent actual parts is optional.Condition of Interface Between Coating and Base Metal (All Coatings)
Examine the interface at 500X for contamination in the form of base metal oxides, grit, or coating remaining from other stripping operations. Do not include coating oxides as interface contamination.
Record the percent of interface contamination. Refer to Interface Contamination microstructure photographs in SPM TASK 70-34-03-340-501.
A maximum of 35 percent interface contamination and intermittent areas of straight line interface is permitted. For separation acceptance criteria, refer to RULE 17 in the SPM
Do a check for straight-line interface and separation.
NOTE
Separation occurs when a well bonded coating has pulled away from the substrate (base metal). Surface roughness that is not sufficient and poor quality coating integrity can cause separation.Intermittent areas of straight-line interface are permitted. Refer to SPM TASK 70-34-03-340-501-001 for the definition of Frequency of Occurrence.
Refer to RULE 17 in SPM TASK 70-34-03-340-501-001 for a rule for the metallographic examination of separation.
Porosity
All IAE 53 coatings
Use 100X to 500X magnification, as necessary, to examine the microstructure for porosity. Estimate visually, quantify by image analysis or grid count, or compare with porosity comparison charts.
Porosity which would usually be rejected is permitted if found in the areas of corners, grooves, or slots, or inside diameter (ID) of hole. Refer to SPM TASK 70-34-03-340-501 for the illustration that shows typical corners, grooves, or slots where greater amounts of porosity or oxides are permitted.
Examine for the presence of any massive porosity.
NOTE
Massive porosity is individual voids greater than 0.0004 inch (0.010 mm) average diameter in fine coatings or greater than 0.001 inch (0.025 mm) average diameter in coarse coatings.
IAE 53-2, coating only
Porosity of 15 percent or less of total micro area is permitted.
Porosity of more than 15 percent of total micro area is not permitted.
IAE 53-5, coating only
Porosity of five percent or less of total micro area and 0.0005 inch (0.013 mm) average diameter is permitted.
Porosity more than five percent of total micro area or more than 0.0005 inch (0.013 mm) average diameter is not permitted.
NOTE
For IAE 53-5, isolated porosity that is greater than 0.0005 inch (0.013 mm) up thru 0.0015 inch (0.038 mm) average diameter is permitted.
IAE 53-7, IAE 53-10, IAE 53-12, IAE 53-13, IAE 53-14, IAE 53-15, IAE 53-18, IAE 53-20, IAE 53-21, IAE 53-22, IAE 53-33, IAE 53-35, IAE 53-47, and IAE 53-78 coatings only
Porosity of 15 percent or less of total micro area and only occasional areas of massive porosity is permitted. Refer to SPM TASK 70-34-03-340-501-001 SUBTASK 70-34-03-860-106 for the definition of “occasional”.
Porosity of more than 15 percent of total micro area is not permitted.
Massive porosity that is more than occasional is not permitted. Refer to SPM TASK 70-34-03-340-501-001 SUBTASK 70-34-03-860-106 for the definition of “occasional”.
IAE 53-37 coating only
orosity of 15 percent or less of total micro area is permitted.
Porosity of more than 15 percent of total micro area is not permitted.
IAE 53-69 Coating Only
Percent of coating and size must be reported.
Massive porosity is not permitted.
Cracks and/or shrinkage
See Figure.
IAE 53 Coatings (All)
NOTE
It is important to know the difference between cracks that are a result of mechanical damage and those that are normal or usual (intrinsic) to the coating structure.Examine the coating at 100 - 500X magnification, as necessary. Cracks can be the result of:
Damage during preparation for coating
Mechanical damage cracks.
NOTE
These cracks propagate along, or are parallel to, the base metal.
Damage during the coating process
Base metal flex cracks
Heat stress cracks
NOTE
Both of these types of cracks are perpendicular to the base metal. Be sure to record these cracks.
The normal or usual (intrinsic) coating structure
Microcracks
Shrink cracks
Oxides and oxide stringers
IAE 53 Coatings (All)
Examine at 500X magnification with no etchant.
Note the presence of oxides which can be in either stringer or globular form and if oxides are in the area of a corner, groove, or slot.
NOTE
Be sure not to include porosity as part of the oxide content. Porosity (stringer or globular form) will appear black if not filled or very dark blue-gray if filled with mounting medium.Oxides and oxide stringers that are not permitted are permitted if located in the area of corners, grooves, or the slots, or inside diameter of a hole. Refer to SPM TASK 70-34-03-340-501 for the illustration that shows typical corners, grooves, or slots where greater amounts of porosity or oxides are permitted.
IAE 53-1 coating only
See Figure.
Oxides similar to Inset 1 Figure are permitted.
Oxides worse than Inset 1 (See Figure) are not permitted. Refer to Paragraph for areas where oxides can be permitted. Refer to SPM TASK 70-34-03-340-501 for the illustration that shows typical corners, grooves, or slots where greater amounts of porosity or oxides are permitted.
IAE 53-2 coating only
Oxides similar to Inset 2 (See Figure) are permitted.
Oxides worse than Inset 2 (See Figure) are not permitted. Refer to Paragraph for areas where oxides can be permitted. Refer to SPM TASK 70-34-03-340-501 for the illustration that shows typical corners, grooves, or slots where greater amounts of porosity or oxides are permitted.
IAE 53-5 coating only
Oxides similar to Inset 4 and 5 (See Figure) with occasional areas similar to Inset 6 (See Figure) are permitted. Occasional oxide clusters in any location are permitted. Refer to TASK 70-34-03-340-501 for the illustration that shows typical corners, grooves, or slots where greater amounts of porosity or oxides are permitted.
IAE 53-7 Coating only
IAE 53-13 Coating Only
Oxides similar to Inset 10 (seeFigure) are permitted.
Oxides worse than Inset 10 (seeFigure) are not permitted. Refer to Paragraph for areas where oxides can be permitted. Refer to TASK 70-34-03-340-501 for the illustration that shows typical corners, grooves, or slots where greater amounts of porosity or oxides are permitted.
IAE 53-14 Coating Only
Oxides worse than Paragraph are not permitted. Refer to Paragraph for areas where oxides can be permitted. Refer to TASK 70-34-03-340-501 for the illustration that shows typical corners, grooves, or slots where greater amounts of porosity or oxides are permitted.
IAE 53-15 Coating Only
Oxides worse than Paragraph are not permitted. Refer to Paragraph for areas where oxides can be permitted. Refer to TASK 70-34-03-340-501 for the illustration that shows typical corners, grooves, or slots where greater amounts of porosity or oxides are permitted.
IAE 53-16 Coating Only
Oxides worse thanParagraph are not permitted. Refer to Paragraph for areas where oxides can be permitted. Refer to TASK 70-34-03-340-501 for the illustration that shows typical corners, grooves, or slots where greater amounts of porosity or oxides are permitted.
IAE 53-17 Coating Only
Oxides worse than Paragraph are not permitted. Refer to Paragraph for areas where oxides can be permitted. Refer to TASK 70-34-03-340-501 for the illustration that shows typical corners, grooves, or slots where greater amounts of porosity or oxides are permitted.
IAE 53-18 Coating Only
Oxides worse than Paragraph are not permitted. Refer to Paragraph for areas where oxides can be permitted. Refer to TASK 70-34-03-340-501 for the illustration that shows typical corners, grooves, or slots where greater amounts of porosity or oxides are permitted.
IAE 53-20 Coating Only
Oxides similar to Inset 26 (see Figure) are permitted.
Oxides worse than Inset 26 (see Figure) are not permitted. Refer to Paragraph for areas where oxides can be permitted. Refer to TASK 70-34-03-340-501 for the illustration that shows typical corners, grooves, or slots where greater amounts of porosity or oxides are permitted.
IAE 53-21 Coating Only
Oxides worse than Paragraph are not permitted. Refer to Paragraph for areas where oxides can be permitted. Refer to TASK 70-34-03-340-501 for the illustration that shows typical corners, grooves, or slots where greater amounts of porosity or oxides are permitted.
IAE 53-22 Coating Only
Oxides worse than Paragraph are not permitted. Refer to Paragraph for areas where oxides can be permitted. Refer to TASK 70-34-03-340-501 for the illustration that shows typical corners, grooves, or slots where greater amounts of porosity or oxides are permitted.
IAE 53-35 Coating Only
Oxides similar to Inset 33 (see Figure) are permitted.
Oxides worse than Insert 33 (see Figure) are not permitted. Refer to Paragraph for areas where oxides can be permitted. Refer to TASK 70-34-03-340-501 for the illustration that shows typical corners, grooves, or slots where greater amounts of porosity or oxides are permitted.
IAE 53-37 Coating Only
Oxide worse than Paragraph are not permitted. Refer to Paragraph for areas where oxides can be permitted. Refer to TASK 70-34-03-340-501 for the illustration that shows typical corners, grooves, or slots where greater amounts of porosity or oxides are permitted.
IAE 53-38 Coating Only
Oxides similar to Inset 34 (seeFigure) are permitted.
Oxide worse than Inset 34 are not permitted. Refer to Paragraph for areas where oxides can be permitted. Refer to TASK 70-34-03-340-501 for the illustration that shows typical corners, grooves, or slots where greater amounts of porosity or oxides are permitted.
IAE 53-47 Coating Only
Oxides worse than Paragraph are not permitted. Refer to Paragraph for areas where oxides can be permitted. Refer to TASK 70-34-03-340-501 for the illustration that shows typical corners, grooves, or slots where greater amounts of porosity or oxides are permitted.
IAE 53-69 Coating Only
Oxides worse than Paragraph are not permitted. Refer to Paragraph for areas where oxides can be permitted. Refer to TASK 70-34-03-340-501 for the illustration that shows typical corners, grooves, or slots where greater amounts of porosity or oxides are permitted.
IAE 53-78 Coating Only
Oxides similar to Inset 41 and 42 (see Figure) are permitted.
Oxide worse than Inset 42 (see Figure) are not permitted. Refer to Paragraph for areas where oxides can be permitted. Refer to TASK 70-34-03-340-501 for the illustration that shows typical corners, grooves, or slots where greater amounts of porosity or oxides are permitted.
IAE 53-80 Coating Only
Oxides worse than Paragraph are not permitted. Refer to Paragraph for areas where oxides can be permitted. Refer to TASK 70-34-03-340-501 for the illustration that shows typical corners, grooves, or slots where greater amounts of porosity or oxides are permitted.
Unmelted Particles
See Figure.
NOTE
Unmelted particles: Unreacted powder particles contained within the coating matrix. These particles have a globular or angular appearance, are not adhered to the adjacent coating matrix, and are not part of a cohesive microstructure. Refer to the illustration that shows Examples of Unmelted Particles in TASK 70-34-03-340-501-001.IAE 53 Coatings (Except IAE 53-10 thru IAE 53-12, and IAE 53 -69)
Examine the coating with 500X magnification.
Estimate the total percent of ratable globular particles in the coating.
Integrity (Bonding Between Particles/Constituents)
See Figure.
Examine overall coating soundness and quality at 500X magnification.
Note areas of loosely bonded coating, which is usually related to globules or porosity (or both).
Bond Between Coatings
See Figure
Examine the interface between layers.
Note poorly bonded areas that are not the result of mechanical damage. Multi-layered coatings can be:
Metallic/metallic
Metallic/ceramic
Metallic/cermet
Metallographic examination limits for IAE 271-XX coatings
NOTE
1. The usual magnification which is used to examine the coatings is 500X with approximate thickness of coating of 0.020 inch (0.508 mm).NOTE
2. The coating thickness must be constant and have no inclusions at the coating to base metal interface to the level necessary with IAE 53 coatings. Refer to ParagraphCondition of interface between coating and base metal
NOTE
IAE 271 coatings can be machined with a single-point tool or by grinding. The speeds and feeds must not be too fast or tearing of the coating with subsequent flaking, and breakup will occur.The coating must be bonded to the base metal.
The coating must be constant and have no spalling, chipping, flaking, or other unwanted defects.
Porosity
IAE 271-37 and IAE 271-48: 2.5 percent maximum
IAE 271-47: 10 percent maximum
IAE 271-13 and IAE 271-35: Refer to Paragraph for the limits for the equivalent IAE 53 suffixes.
Cracks and/or shrinkage
Refer to Paragraph for the requirements for the equivalent IAE 53 suffixes.
Laminar features
These features are caused by the deposition process and are permitted unless separation can be seen.
Metallographic examination limits for IAE 36206- XX coatings.
Examine and measure the coating unetched for thickness and distribution at a minimum of 100X magnification. Measure the thickness to the nearest 0.0005 inch (0.013mm).
IGNORE:
Mechanical damage
Isolated valleys
Humps
Pits
Examine the coating properties for these conditions:
Quality of Coating/Base Material Interface.
Examine the interface between the coating and base material at 200X to 500X magnification. Contamination can be in the form of:
Grit
Oxides
Coating remaining from other stripping operation
Also do a check for coating/base metal separation.
Cracks:
Examine at 100X to 500X magnification for cracks in the required area. It is important to know the difference between cracks caused by mechanical preparation and those that are not.
Cracks that propagate along or parallel to the base metal are most commonly caused by mechanical damage.
Cracks perpendicular to the base metal can be caused by flexion of the substrate or by thermal stresses, and should be recorded.
Cracks are not permitted.
Porosity:
Examine for porosity at 100X to 500X magnification, as necessary.
Acceptable (Satisfactory): Up to 3%
Rejectable (Unsatisfactory): Greater than 3%
For examples of porosity, refer to General data.
Interface Contamination
Examine for contamination at 100X to 500X magnification as necessary.
Acceptable (Satisfactory): Up to 25% of the interface with no separation
Rejectable (Unsatisfactory): Greater than 25% of the interface with no separation
For examples of interface contamination, refer to General Data.
Oxides and Oxide Stringers. Refer to Table.
Examine for oxides at 100X to 500X magnification
Oxides will appear as dark gray stringers.
The quantity of oxides can be measured by: visual estimate, image analysis, or grid count.
Hardness test (IAE 53-1, IAE 53-5, IAE 53-10, IAE 53-16, IAE 53-38 and IAE 53-69 coatings, and IAE 36206-7 and IAE 36206-8 coatings only).
The average hardness which must be indicated for the test on a cross-section of each coating is given below. If cracks occur with a 10.6 oz (300 g) load, do the test again with a 3.5 oz (100 g) load, or less.
IAE 53-1: Minimum hardness of 700 DPH
IAE 53-5: Hardness of 450 to 850 DPH
IAE 53-10: Minimum hardness of 650 DPH
IAE 53-16: Minimum hardness of 300 DPH
IAE 53-38: Minimum hardness of 400 DPH
IAE 53-69: Hardness of 130 to 300 DPH.
IAE 36206-7: Minimum hardness of 550 DPH.
IAE 36206-8: Minimum hardness of 550 DPH.
Tables
Table 2. Area of Coating Occupied by Rateable Globules
IAE 53 Coating Suffix
Rateable Globule Minimum Size in. (mm)
Permitted Up thru 5 percent
Not Permitted Greater than 5 percent
Permitted Up thru 10 percent
Not Permitted Greater than 10 percent
-1
None permitted
-2
0.006
(0.152)
X
X
-5
0.002
(0.051)
X
X
-7
0.0035
(0.089)
X
X
-13
0.003
(0.076)
X
X
-14
0.003
(0.076)
X
X
-15
0.004
(0.102)
X
X
-16
0.0015
(0.038
X
X
-17
0.0025
(0.064)
X
X
-18
0.003
(0.076)
X
X
-20
0.004
(0.102)
X
X
-21
0.0035
(0.089)
X
X
-22
0.0025
(0.064)
X
X
-33
0.005
(0.127)
X
X
-35
0.0035
(0.089)
X
X
-37
0.0035
(0.089)
X
X
-38
0.002
(0.051)
X
X
-47
0.005
(0.127)
X
X
-78
0.003
(0.076)
X
X
-80
0.0035
(0.089)
X
X
Table 3. Acceptable
Rejectable
HVOF Coating
(Satisfactory)
(Unsatisfactory)
IAE 36206-4 Fig. 70-34-03-990-040
Less than or equal to Fig. 70-34-03-990-040
Greater than Fig. 70-34-03-990-040
IAE 36206-5, IAE 36206-6 Fig. 70-34-03-990-041
Less than or equal to Figure
Greater than Figure
IAE 36206-7 Figure
Less than or equal to Figure
Greater than Figure
IAE 36206-8 Figure
Less than or equal to Fig. 7034-03-990-043
Greater than Figure
Deleted figures
Fig 70-34-03-990-008-001: Example of the interface between coating and base metal
Fig 70-34-03-990-008-002: Example of the interface between coating and base metal
Fig 70-34-03-990-008-003: Example of the interface between coating and base metal
Fig 70-34-03-990-009-001: Porosity in coatings
Fig 70-34-03-990-009-002: Porosity in coatings
Fig 70-34-03-990-009-003: Porosity in coatings
Fig 70-34-03-990-010: Corners, grooves or slots where large amounts of porosity or oxides are permitted
NOTE
Fig 70-34-03-990-012-002: Oxides in coatings is relocated to TASK 70-34-03-340-501.
Figure: Cracks and/or shrinkage in coatings
Cracks and/or shrinkage in coatings
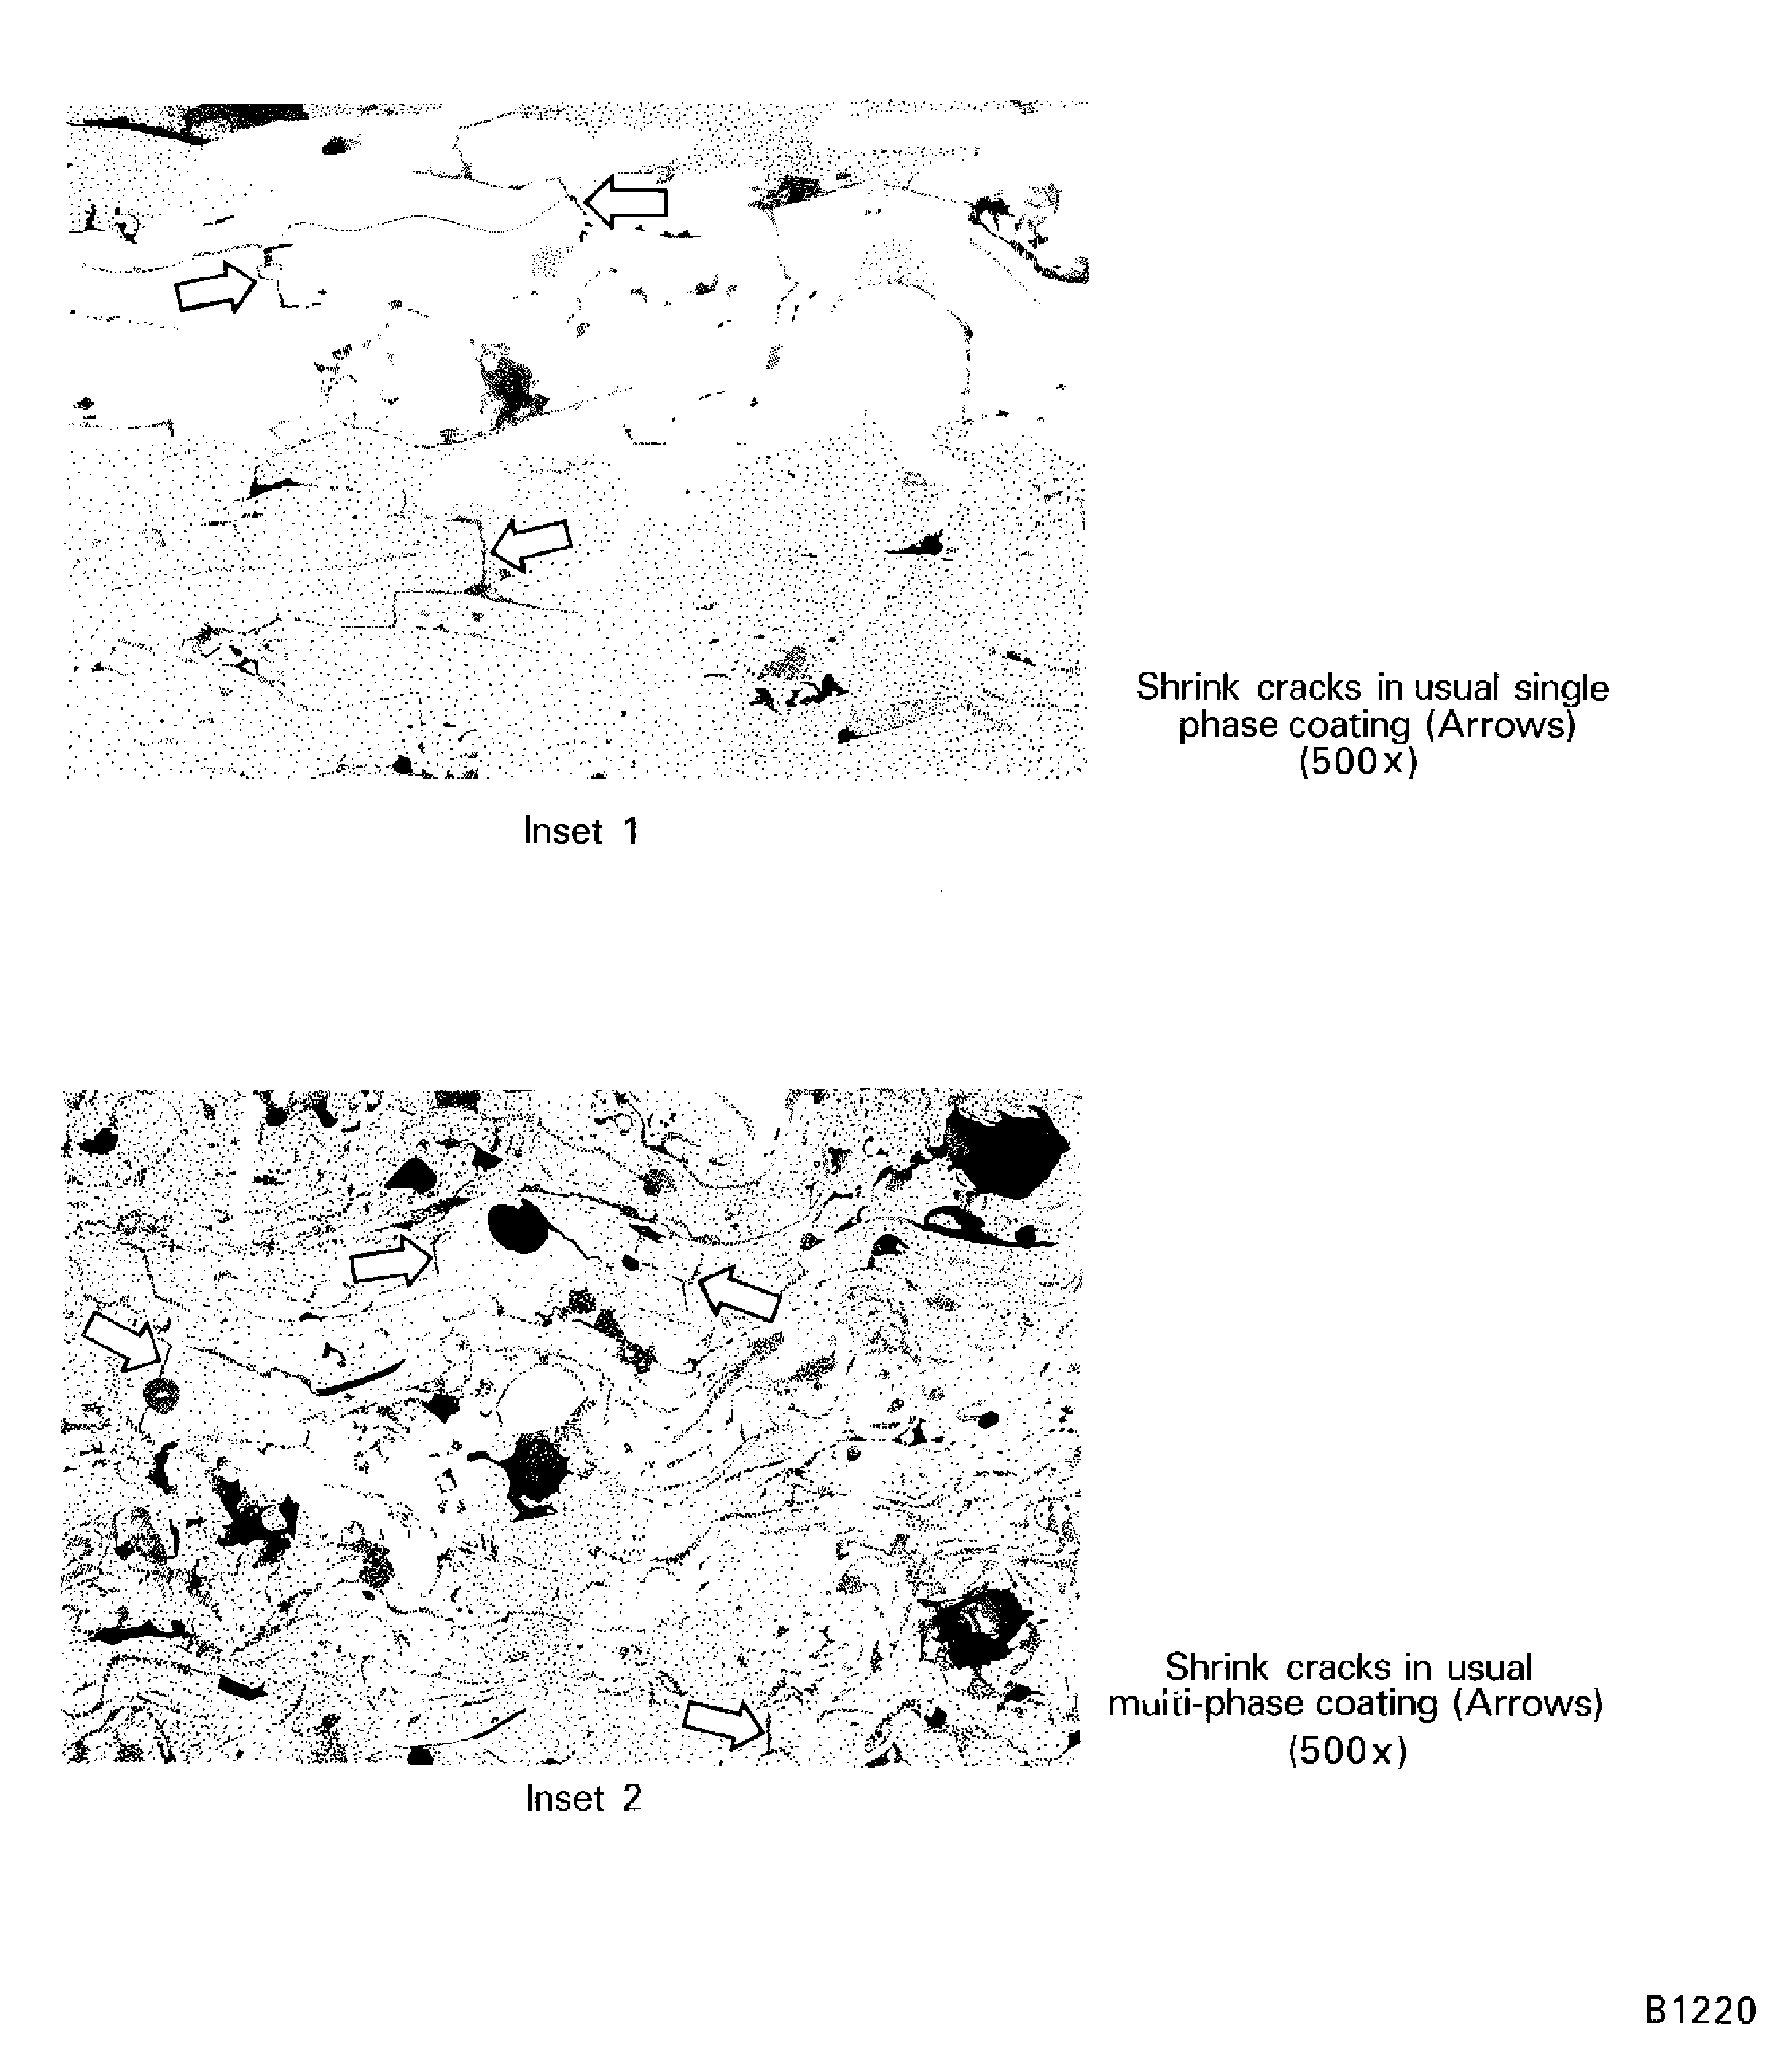
Figure: Cracks and/or shrinkage in coatings
Cracks and/or shrinkage in coatings
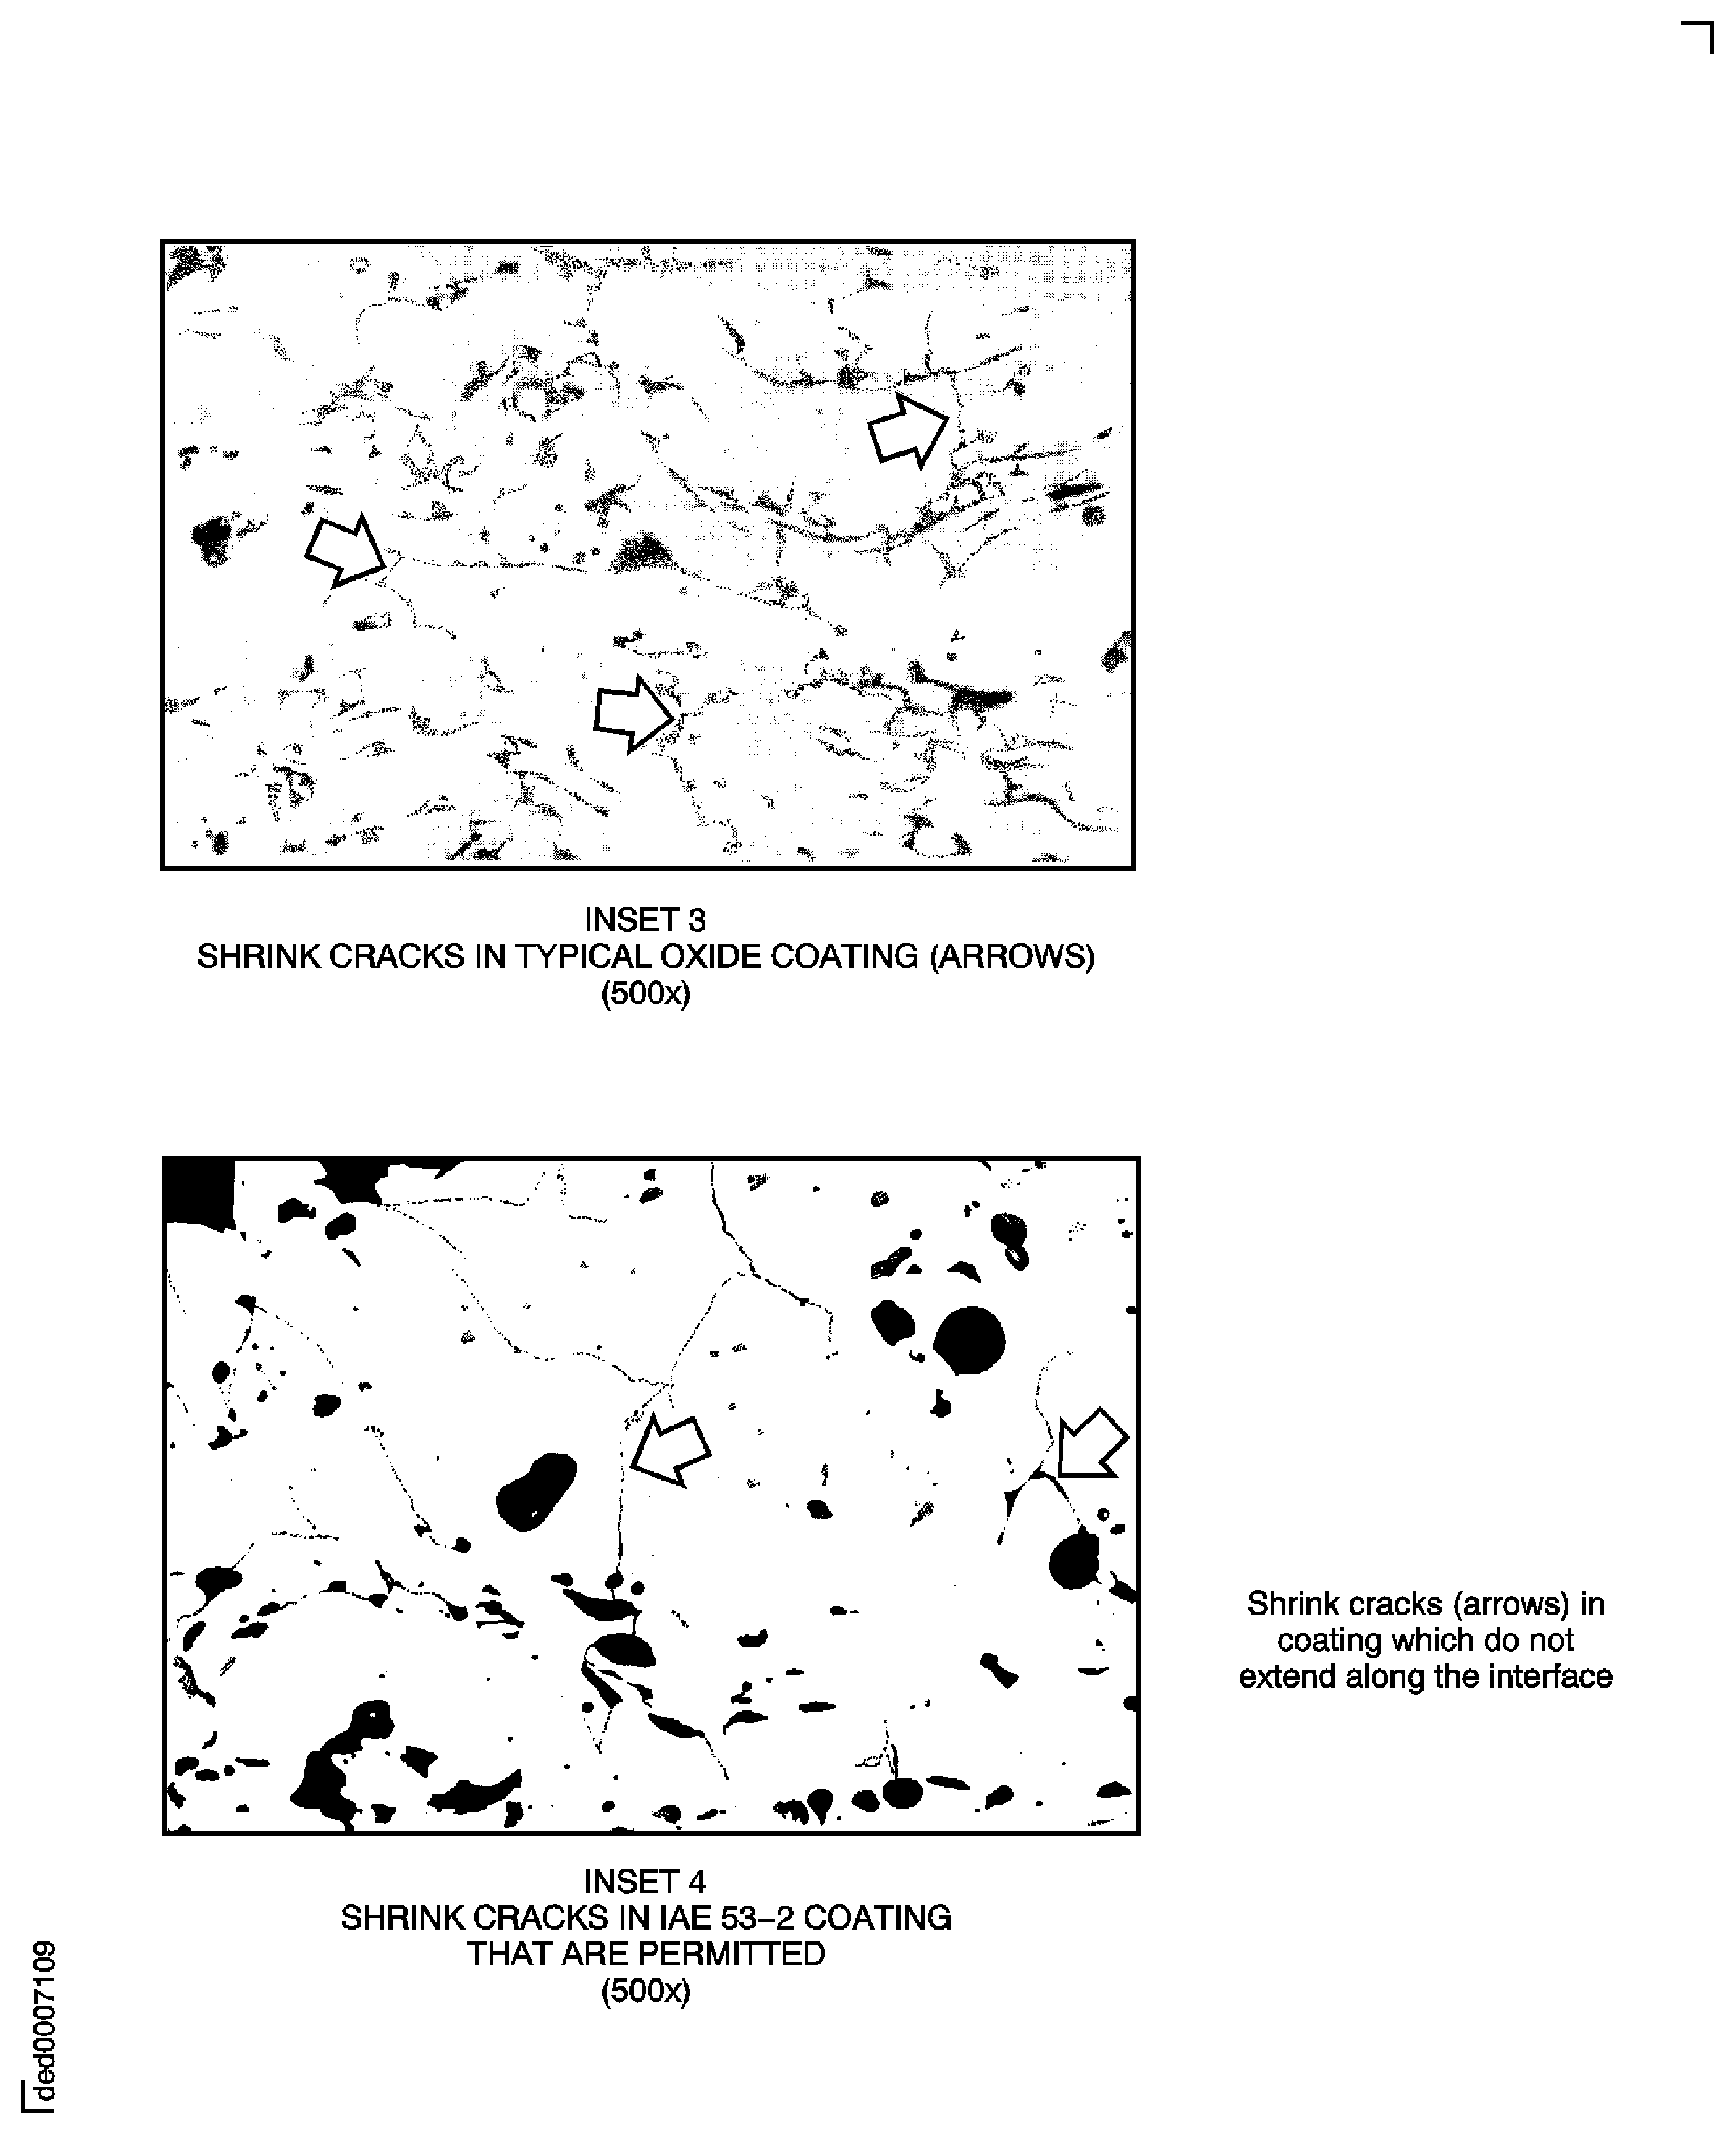
Figure: Cracks and/or shrinkage in coatings
Cracks and/or shrinkage in coatings
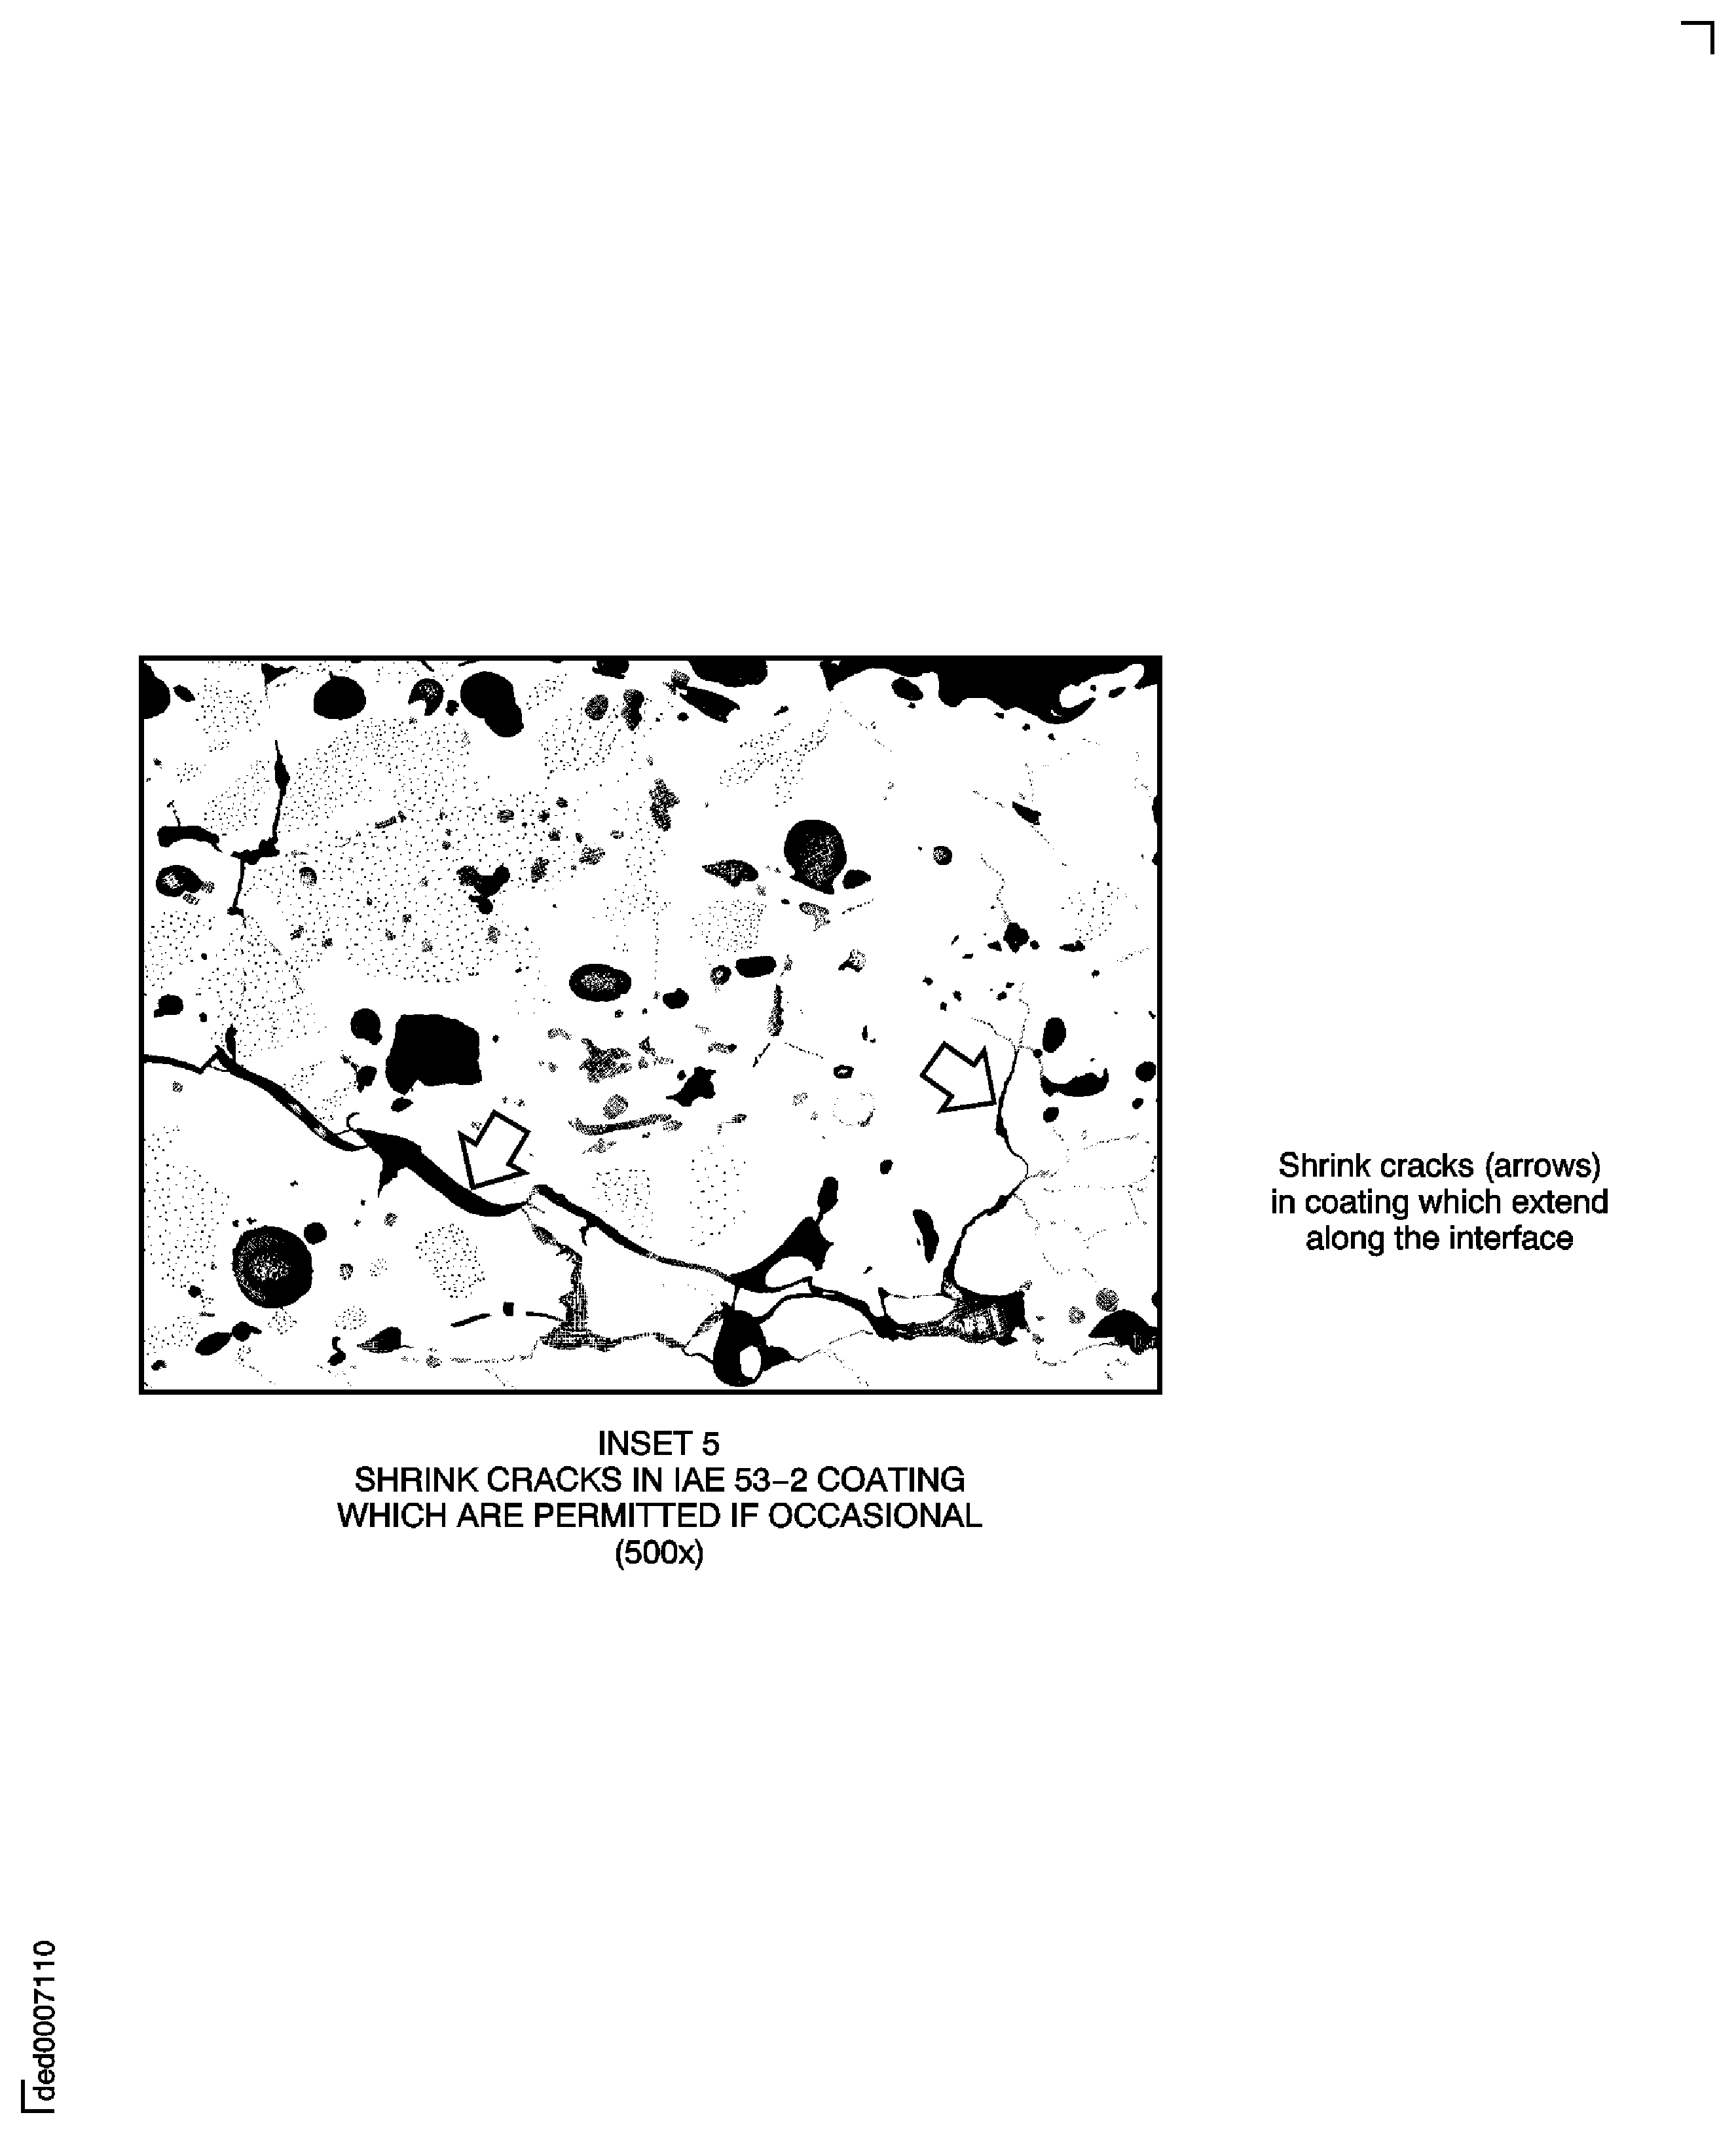
Figure: Oxides in coatings
Oxides in coatings
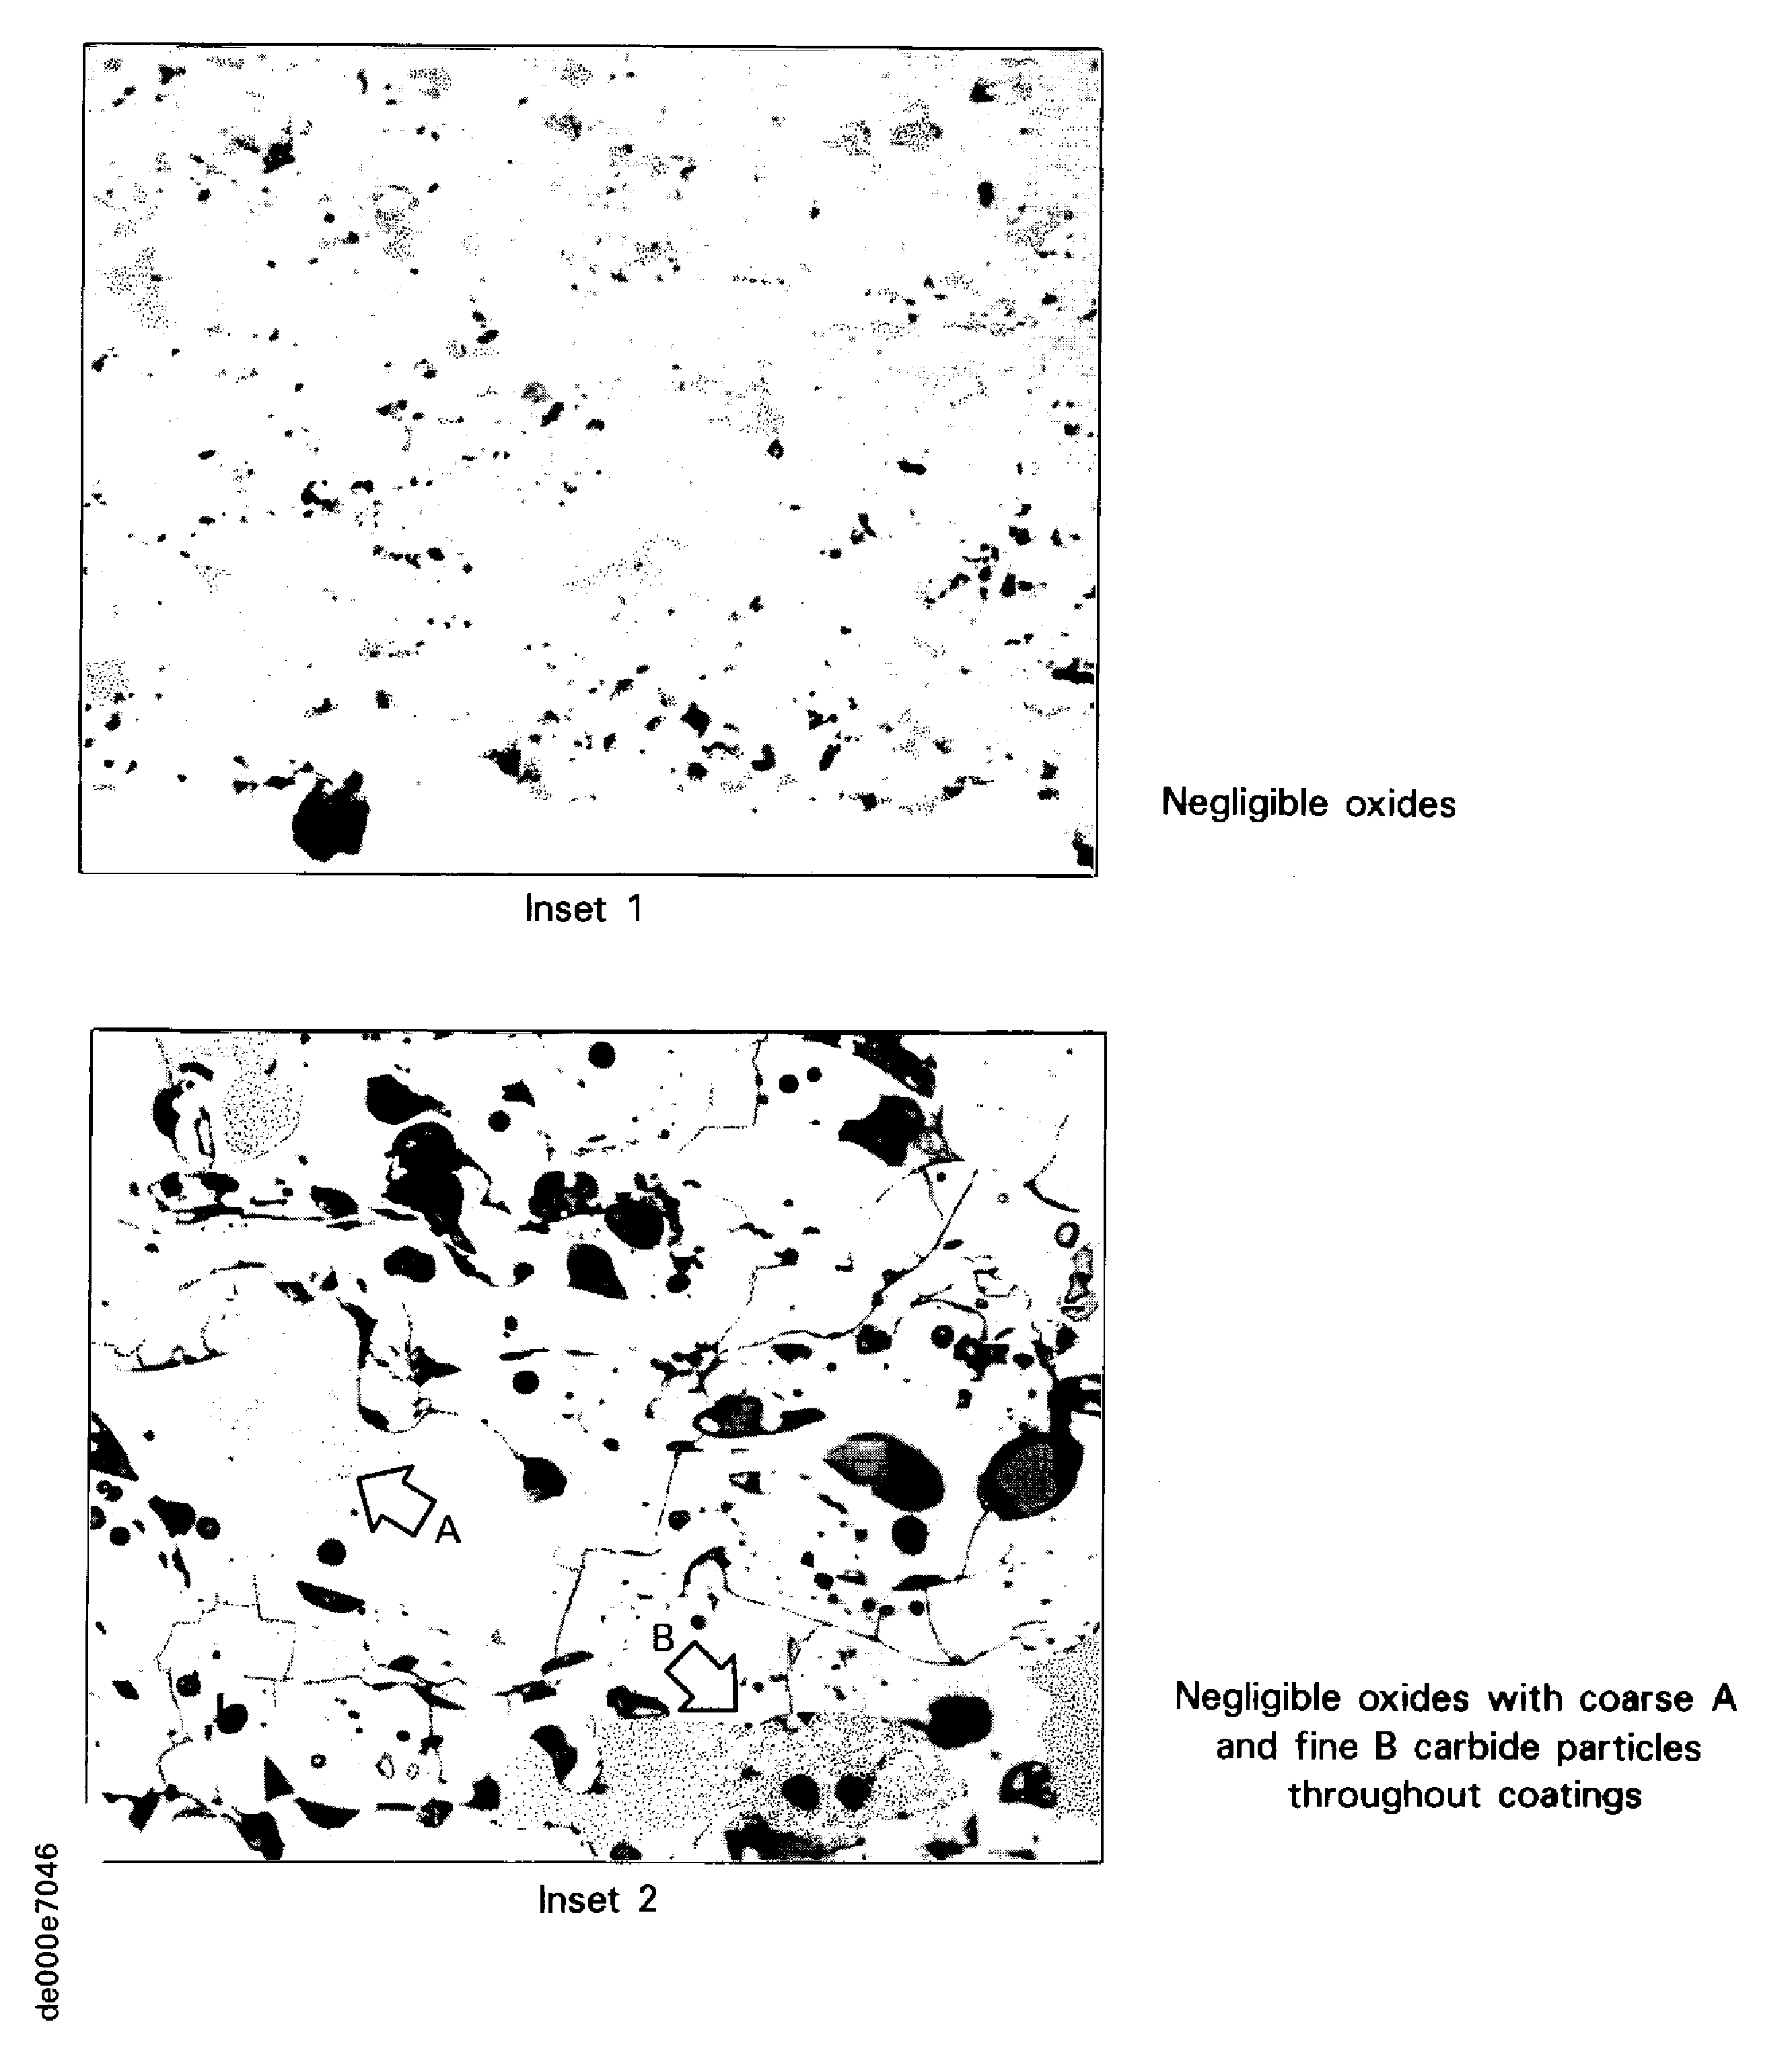
Figure: Oxides in coatings
Oxides in coatings
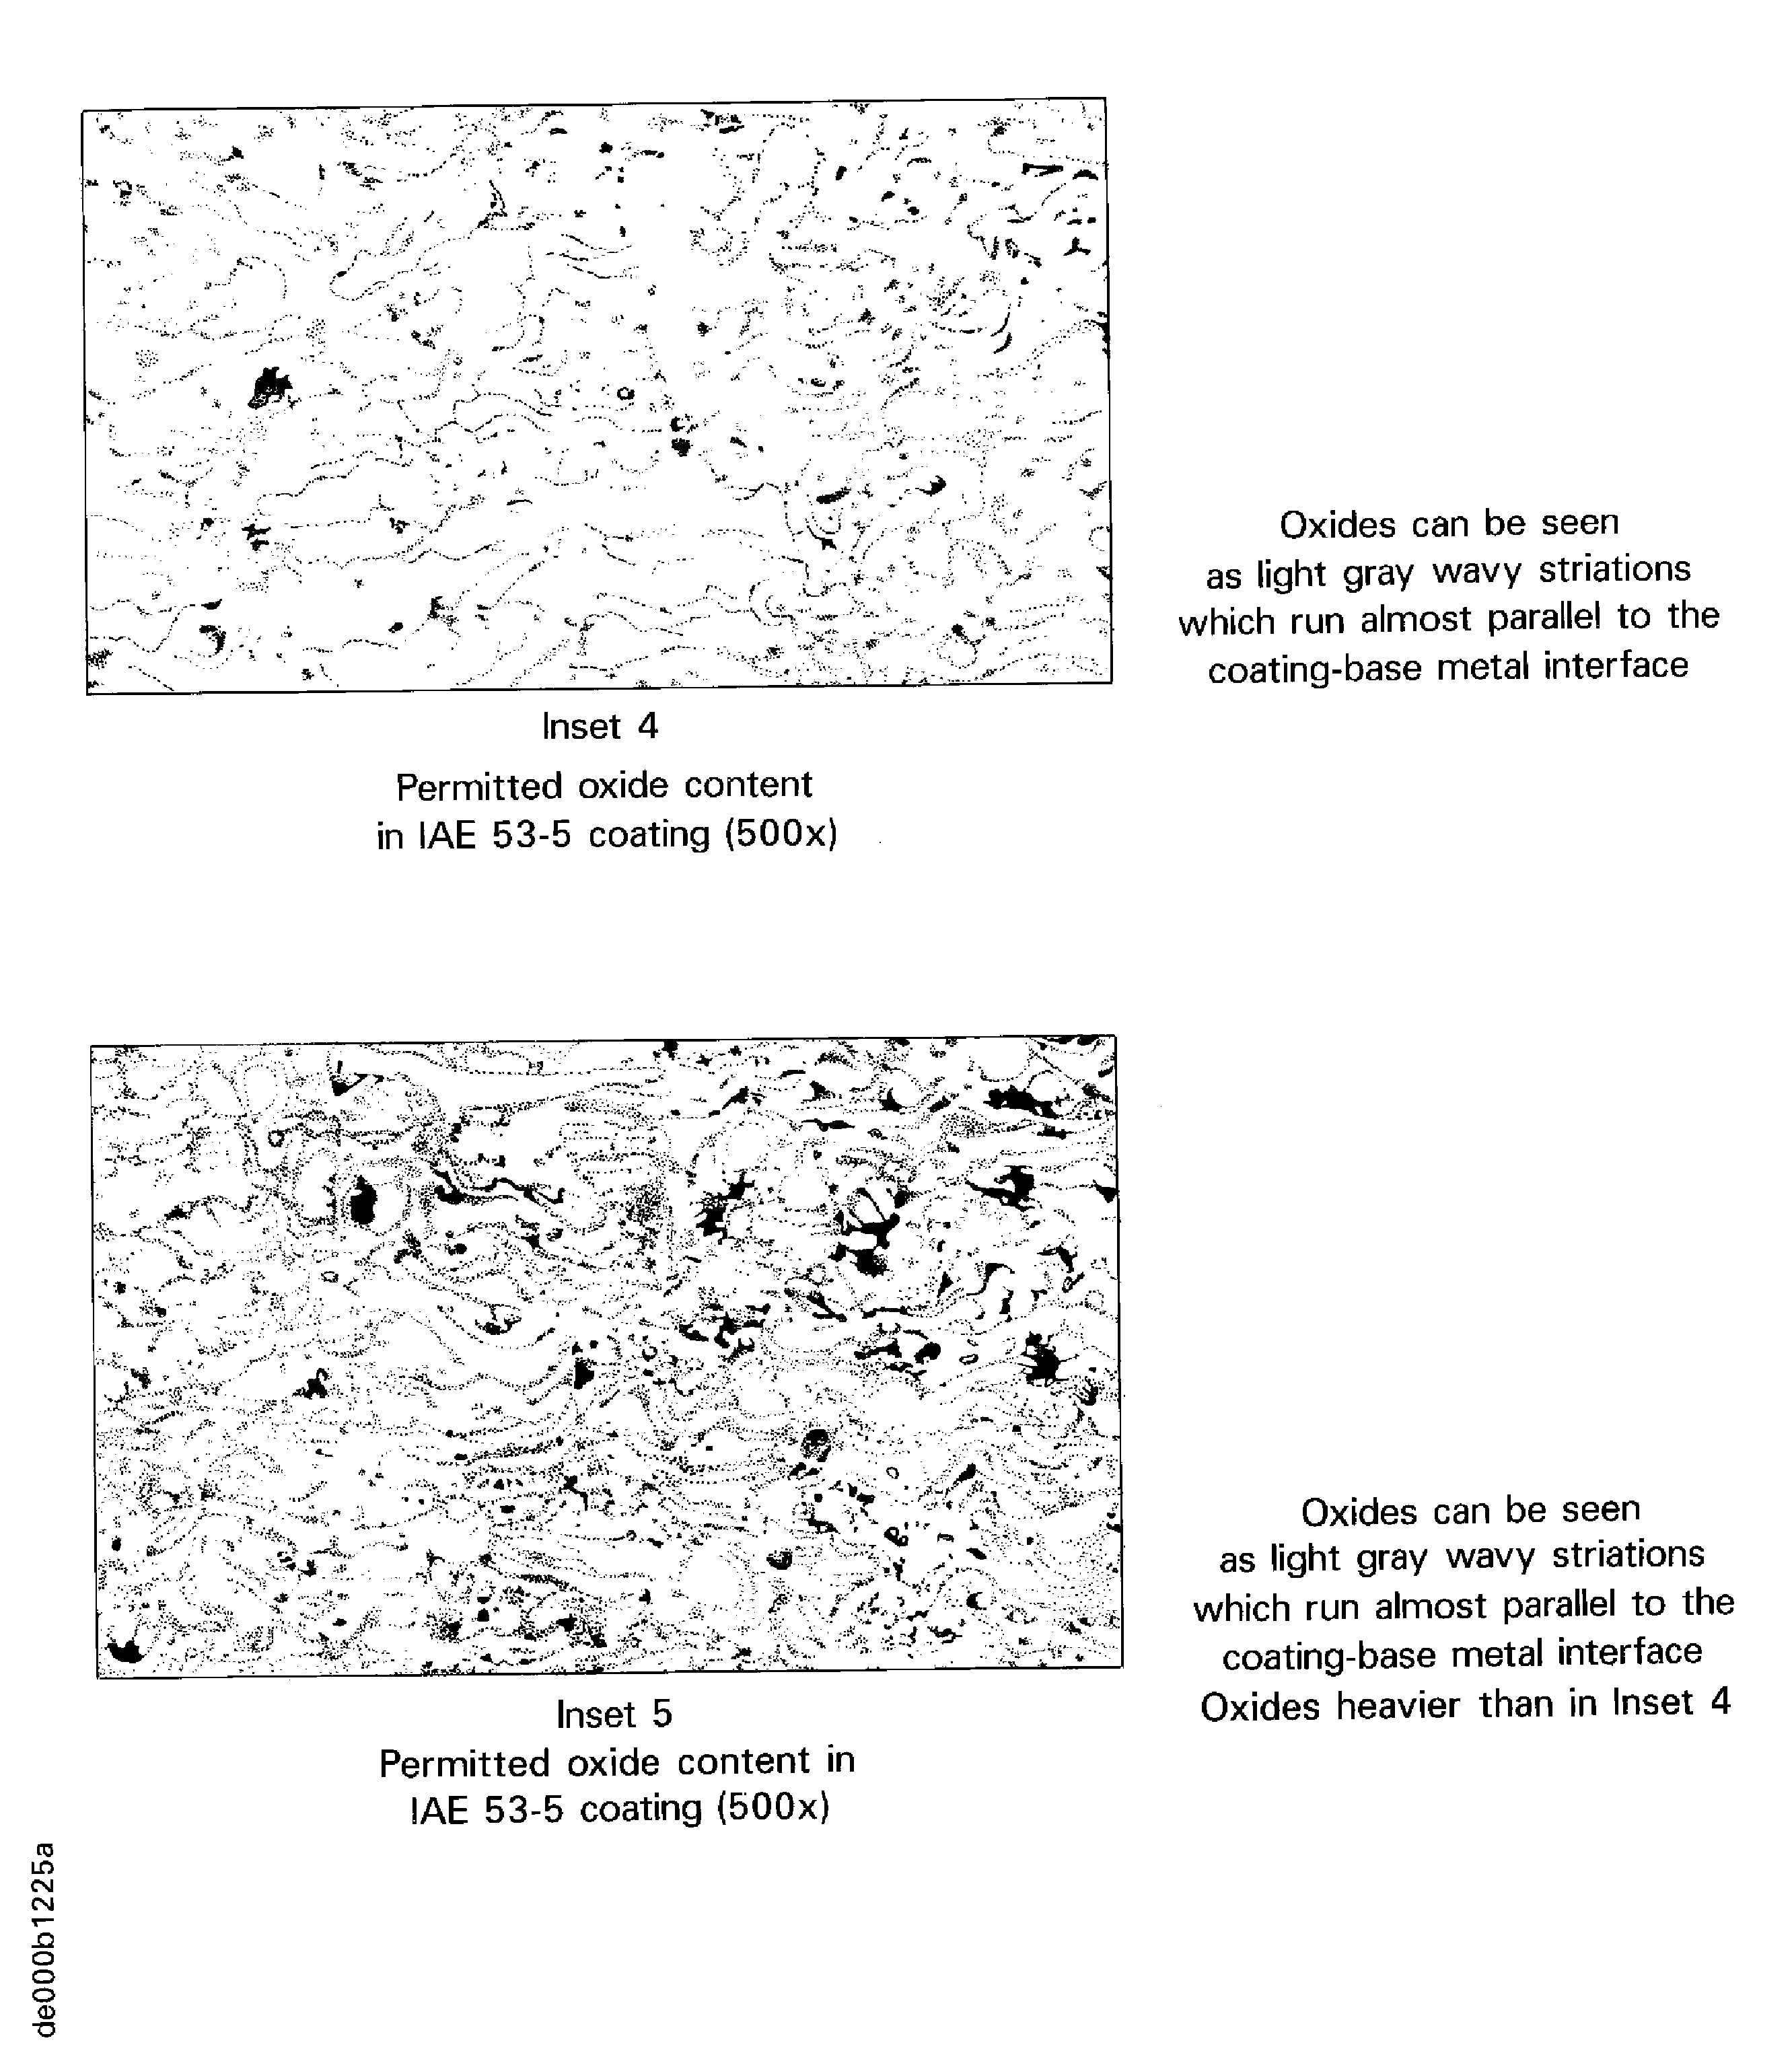
Figure: Oxides in coatings
Oxides in coatings
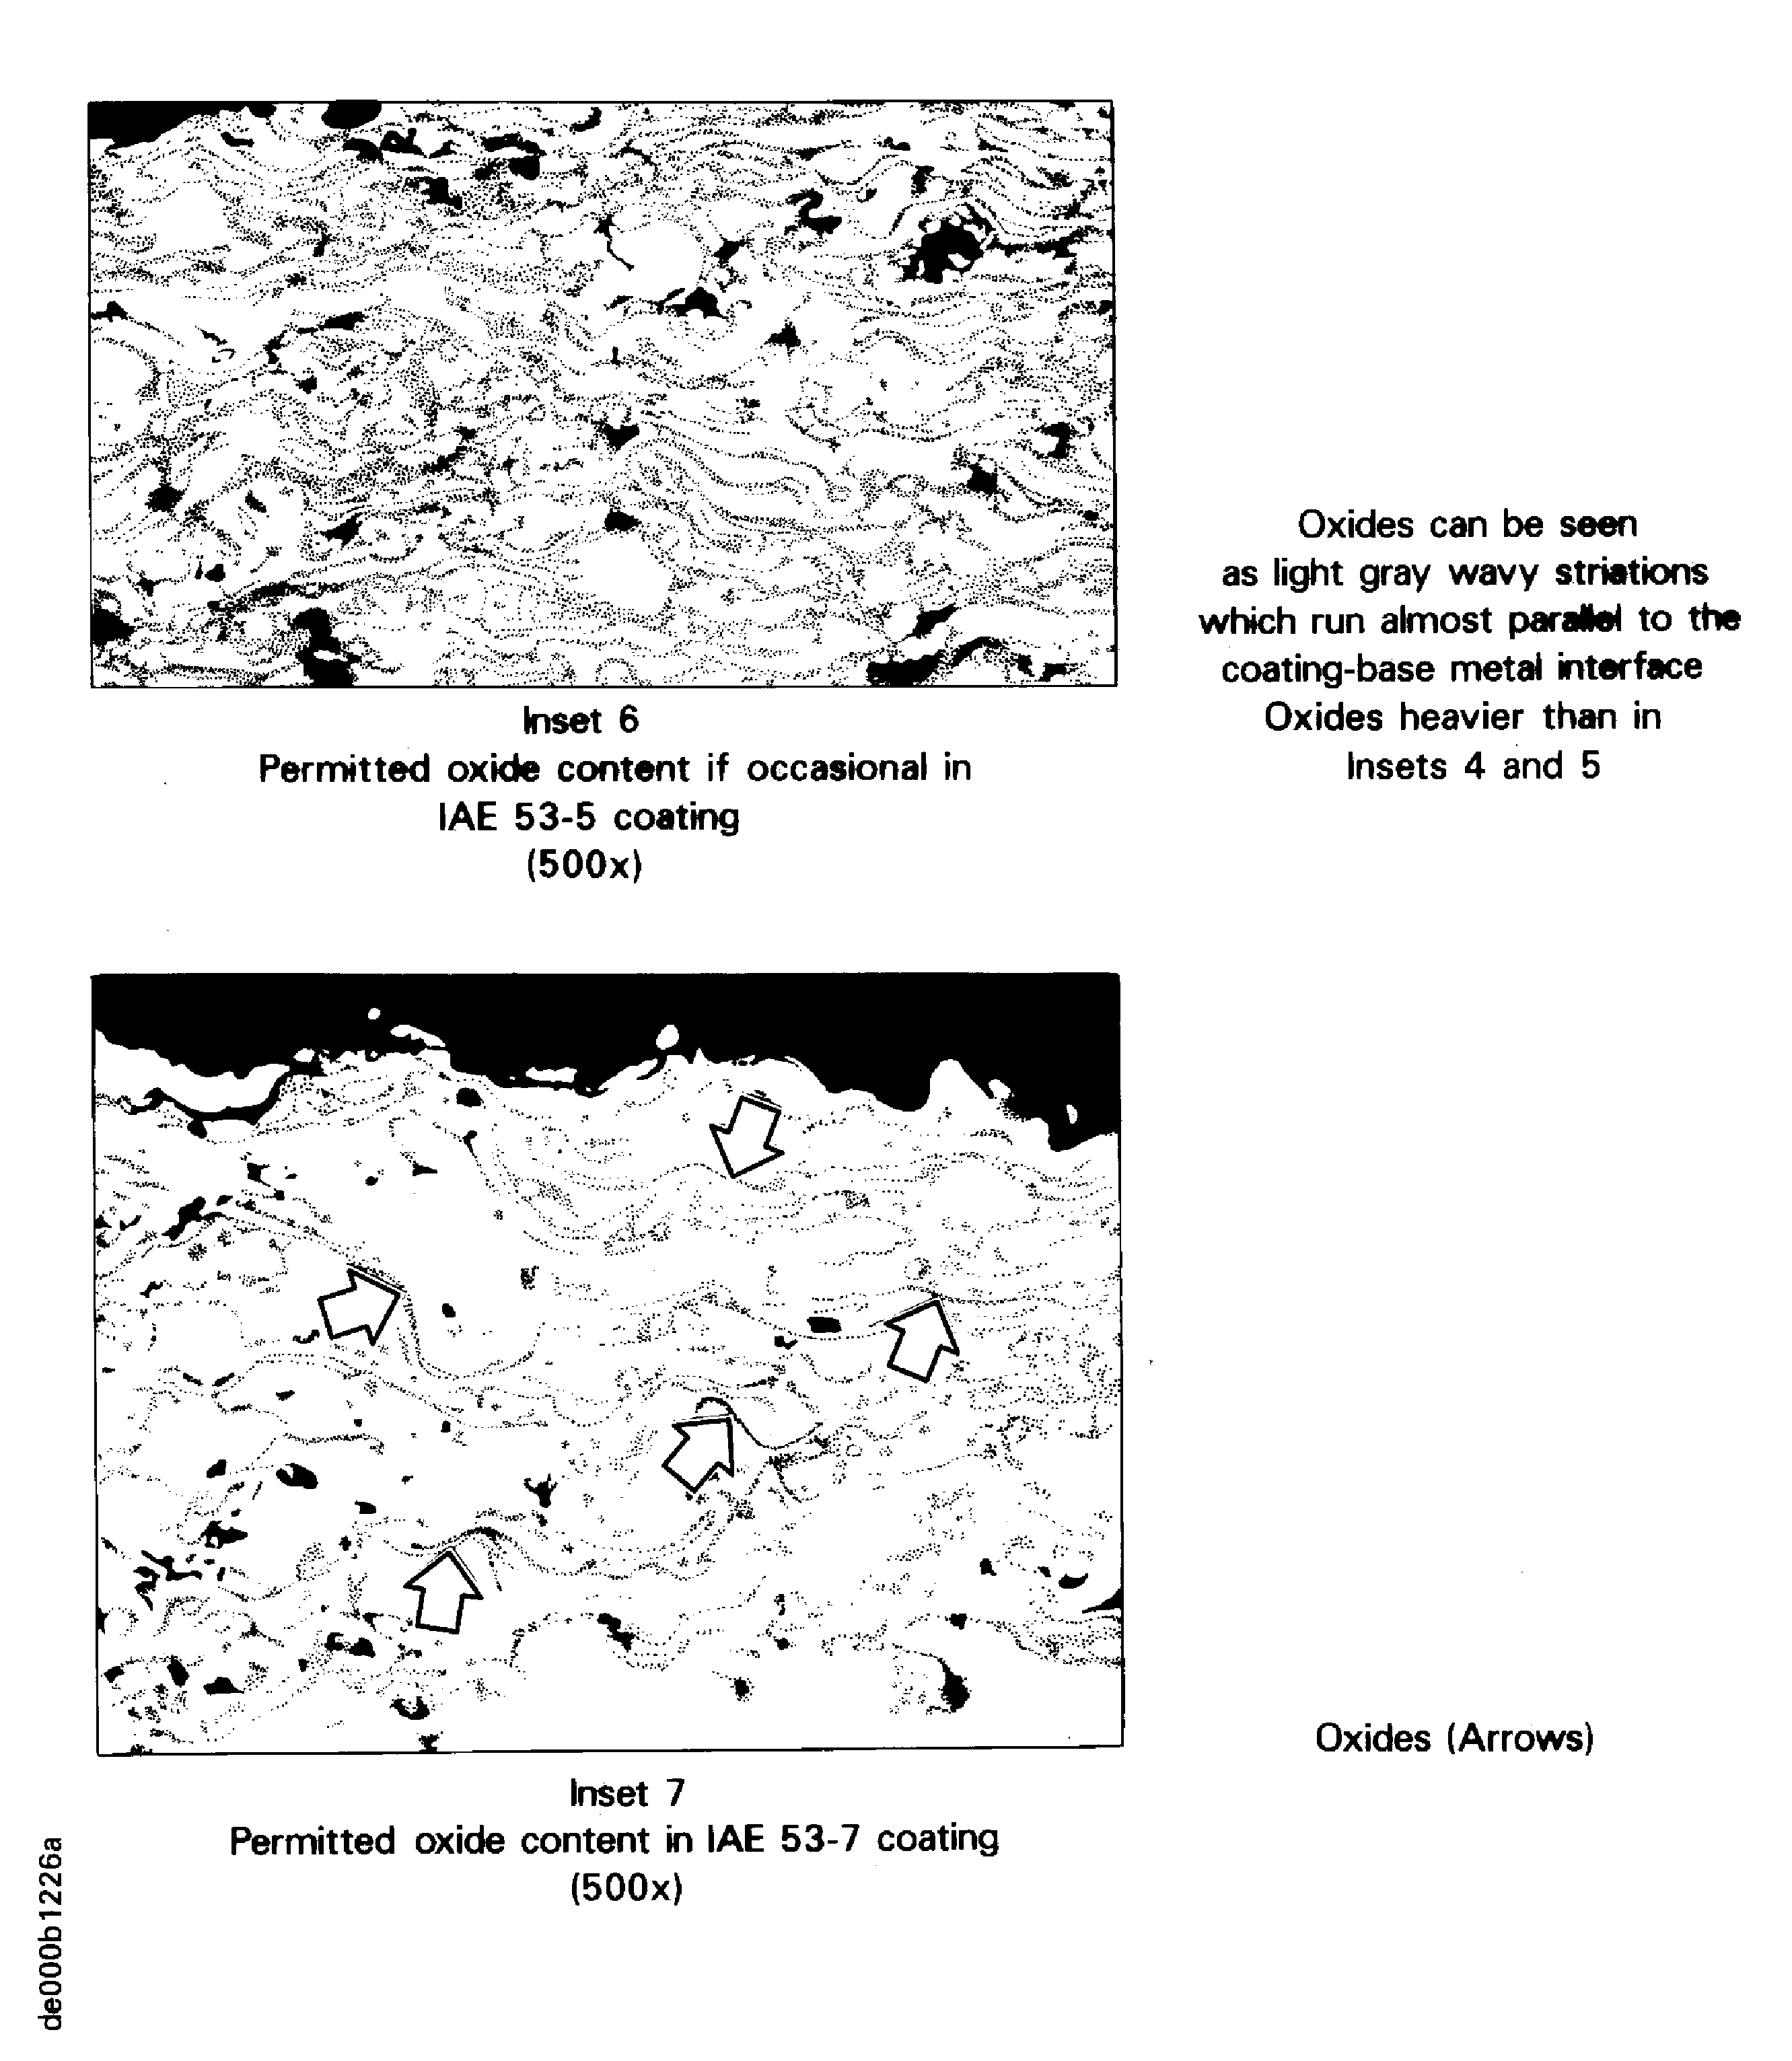
Figure: Oxides in coatings
Oxides in coatings
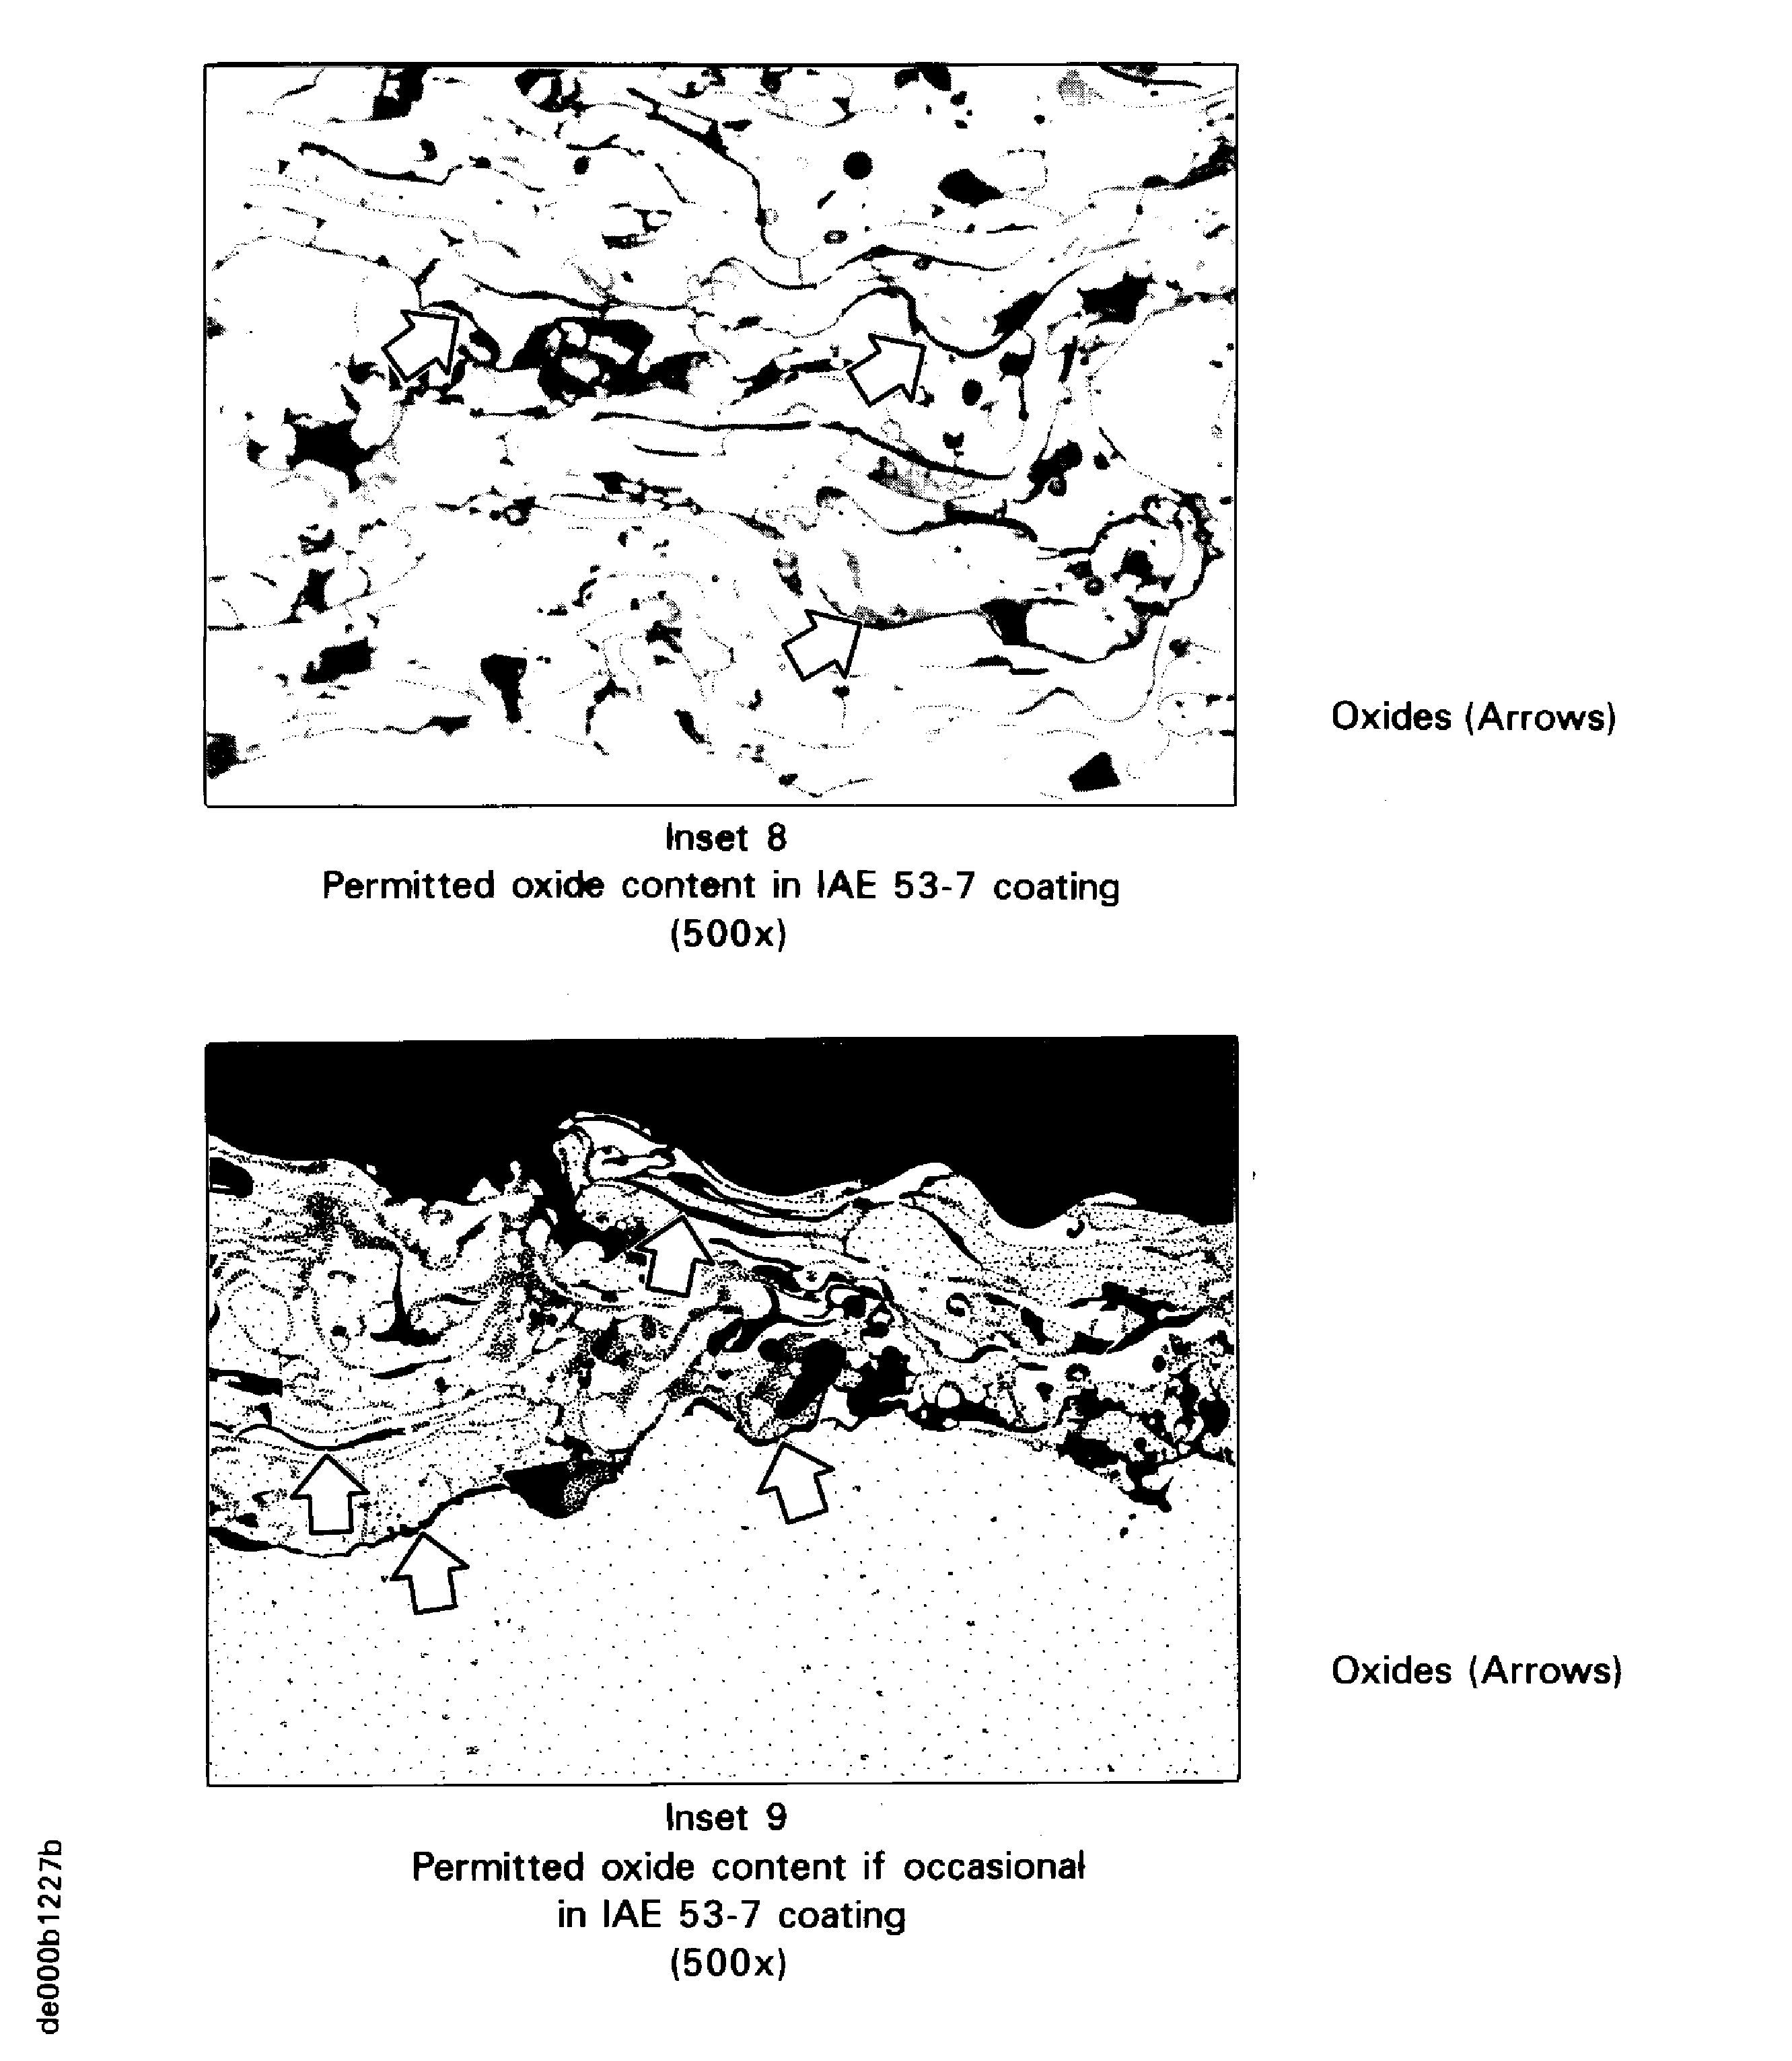
Figure: Oxides in coatings
Oxides in coatings
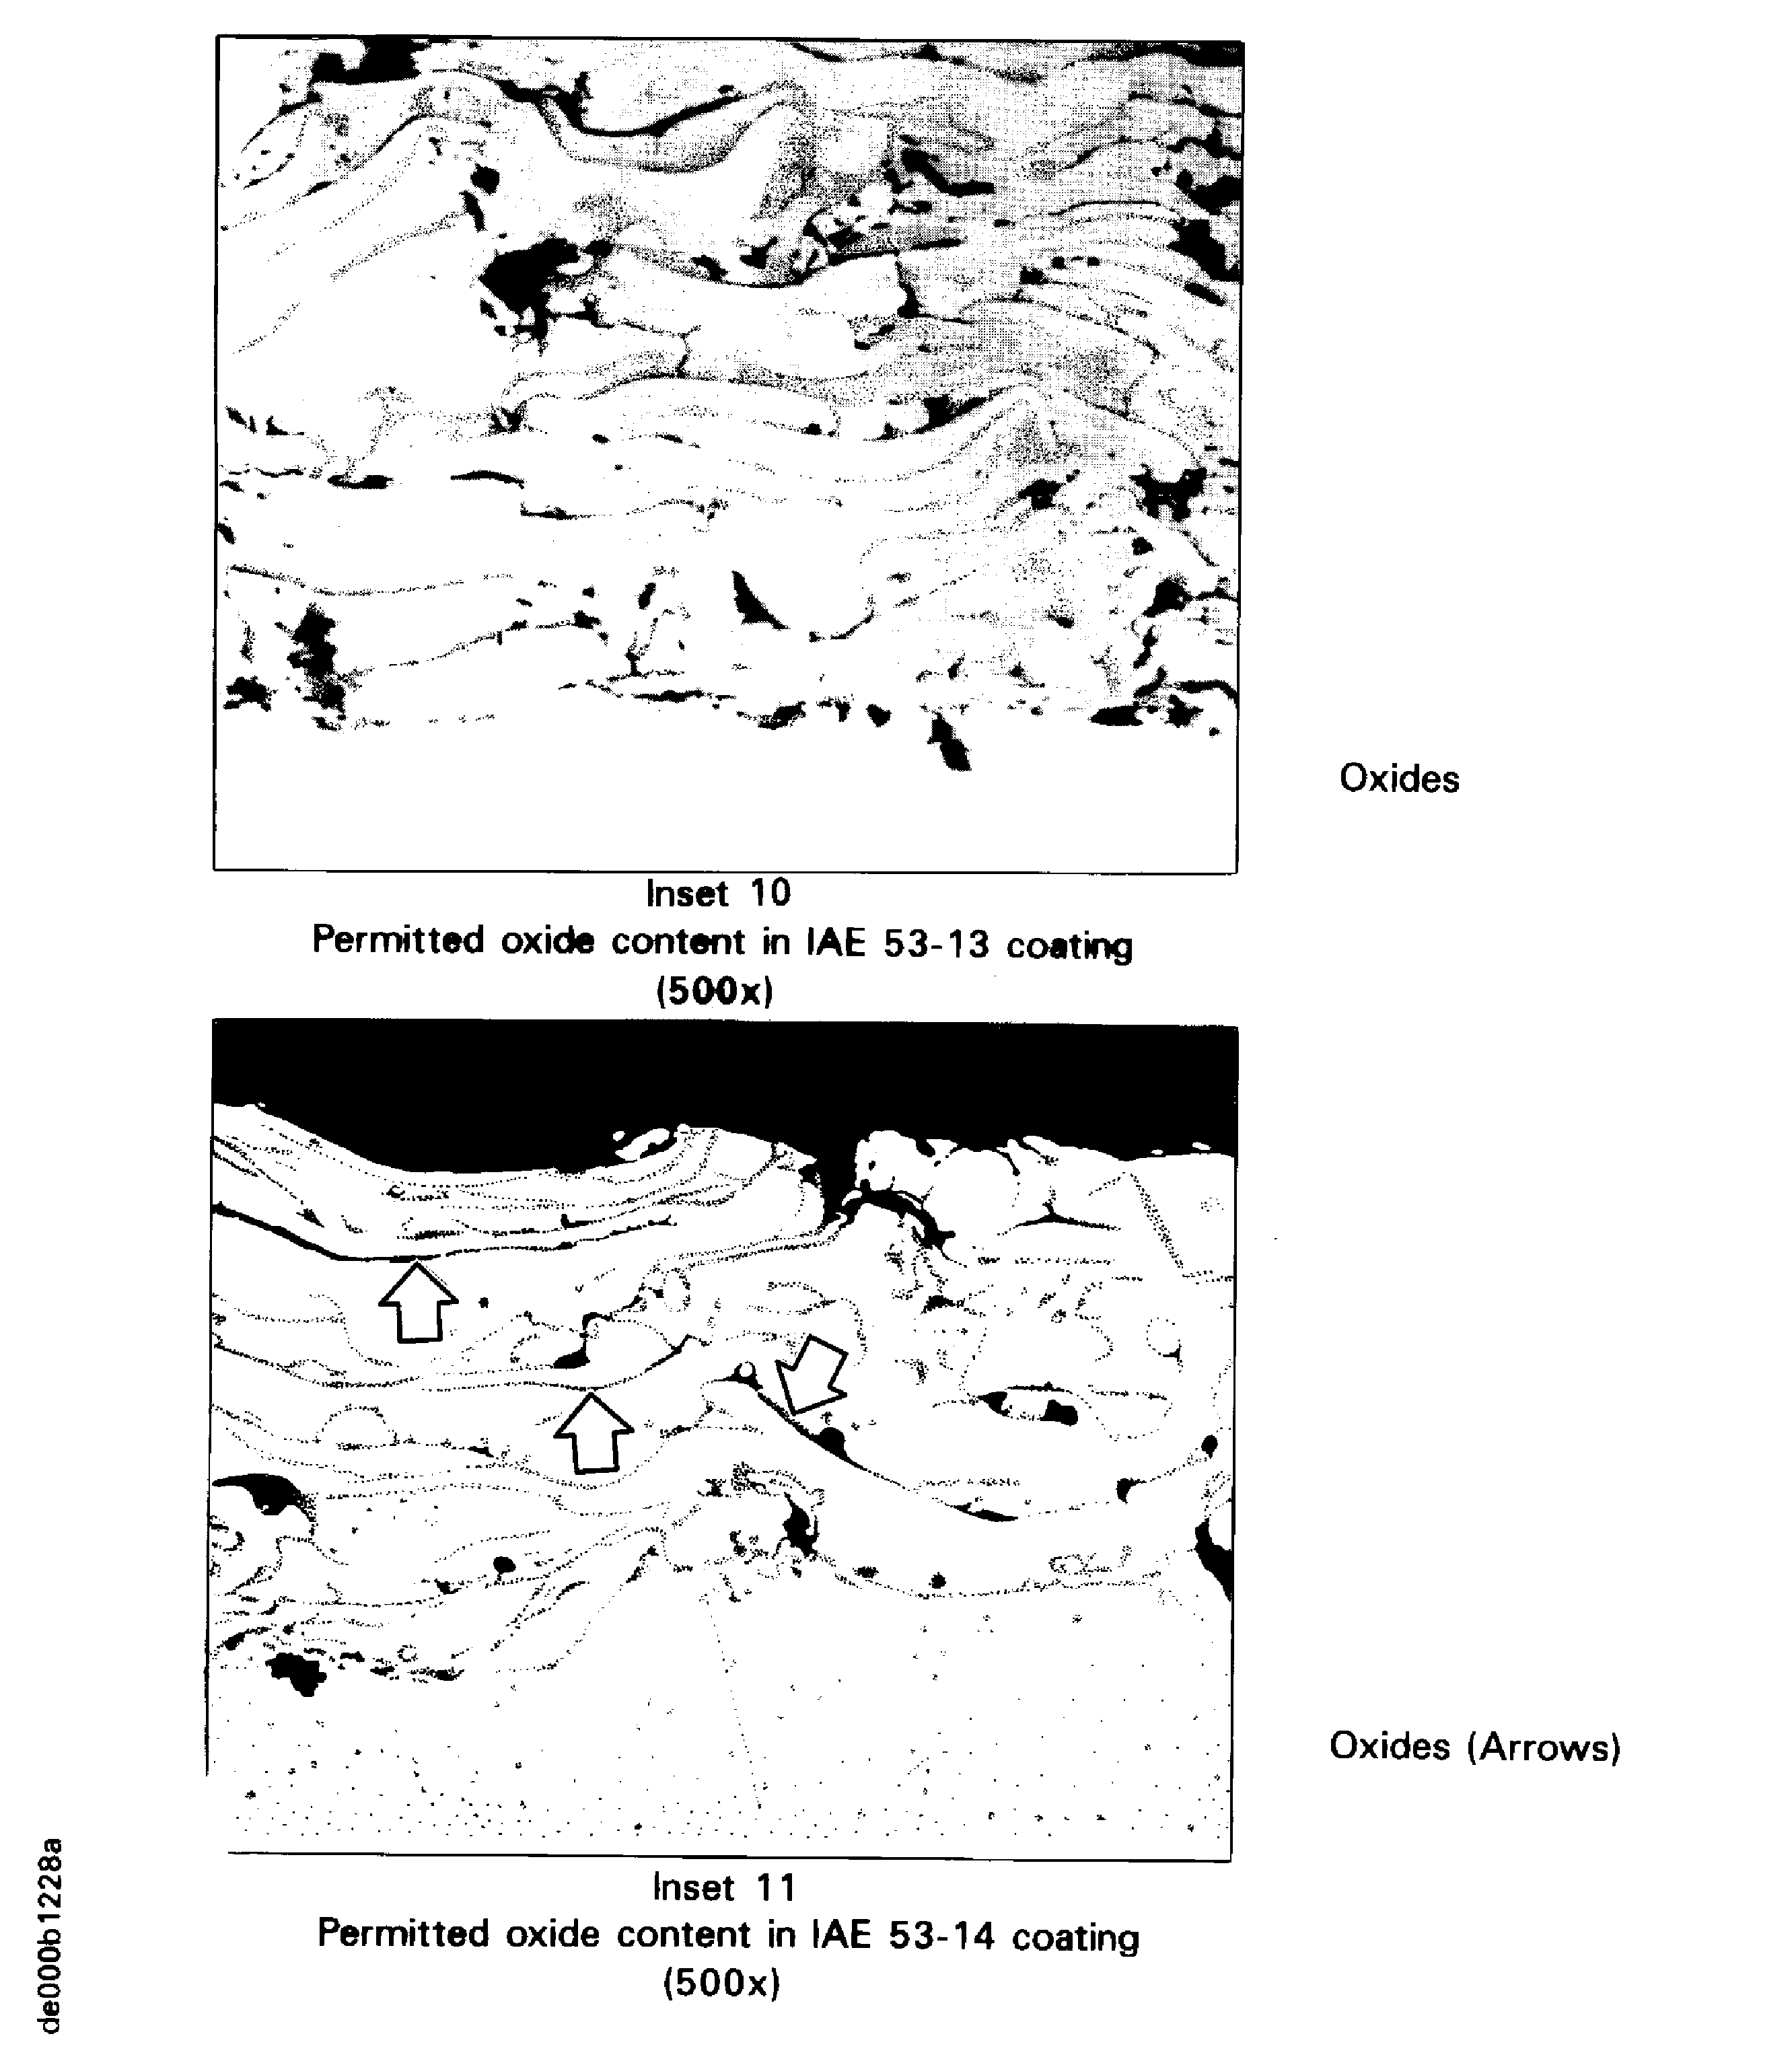
Figure: Oxides in coatings
Oxides in coatings
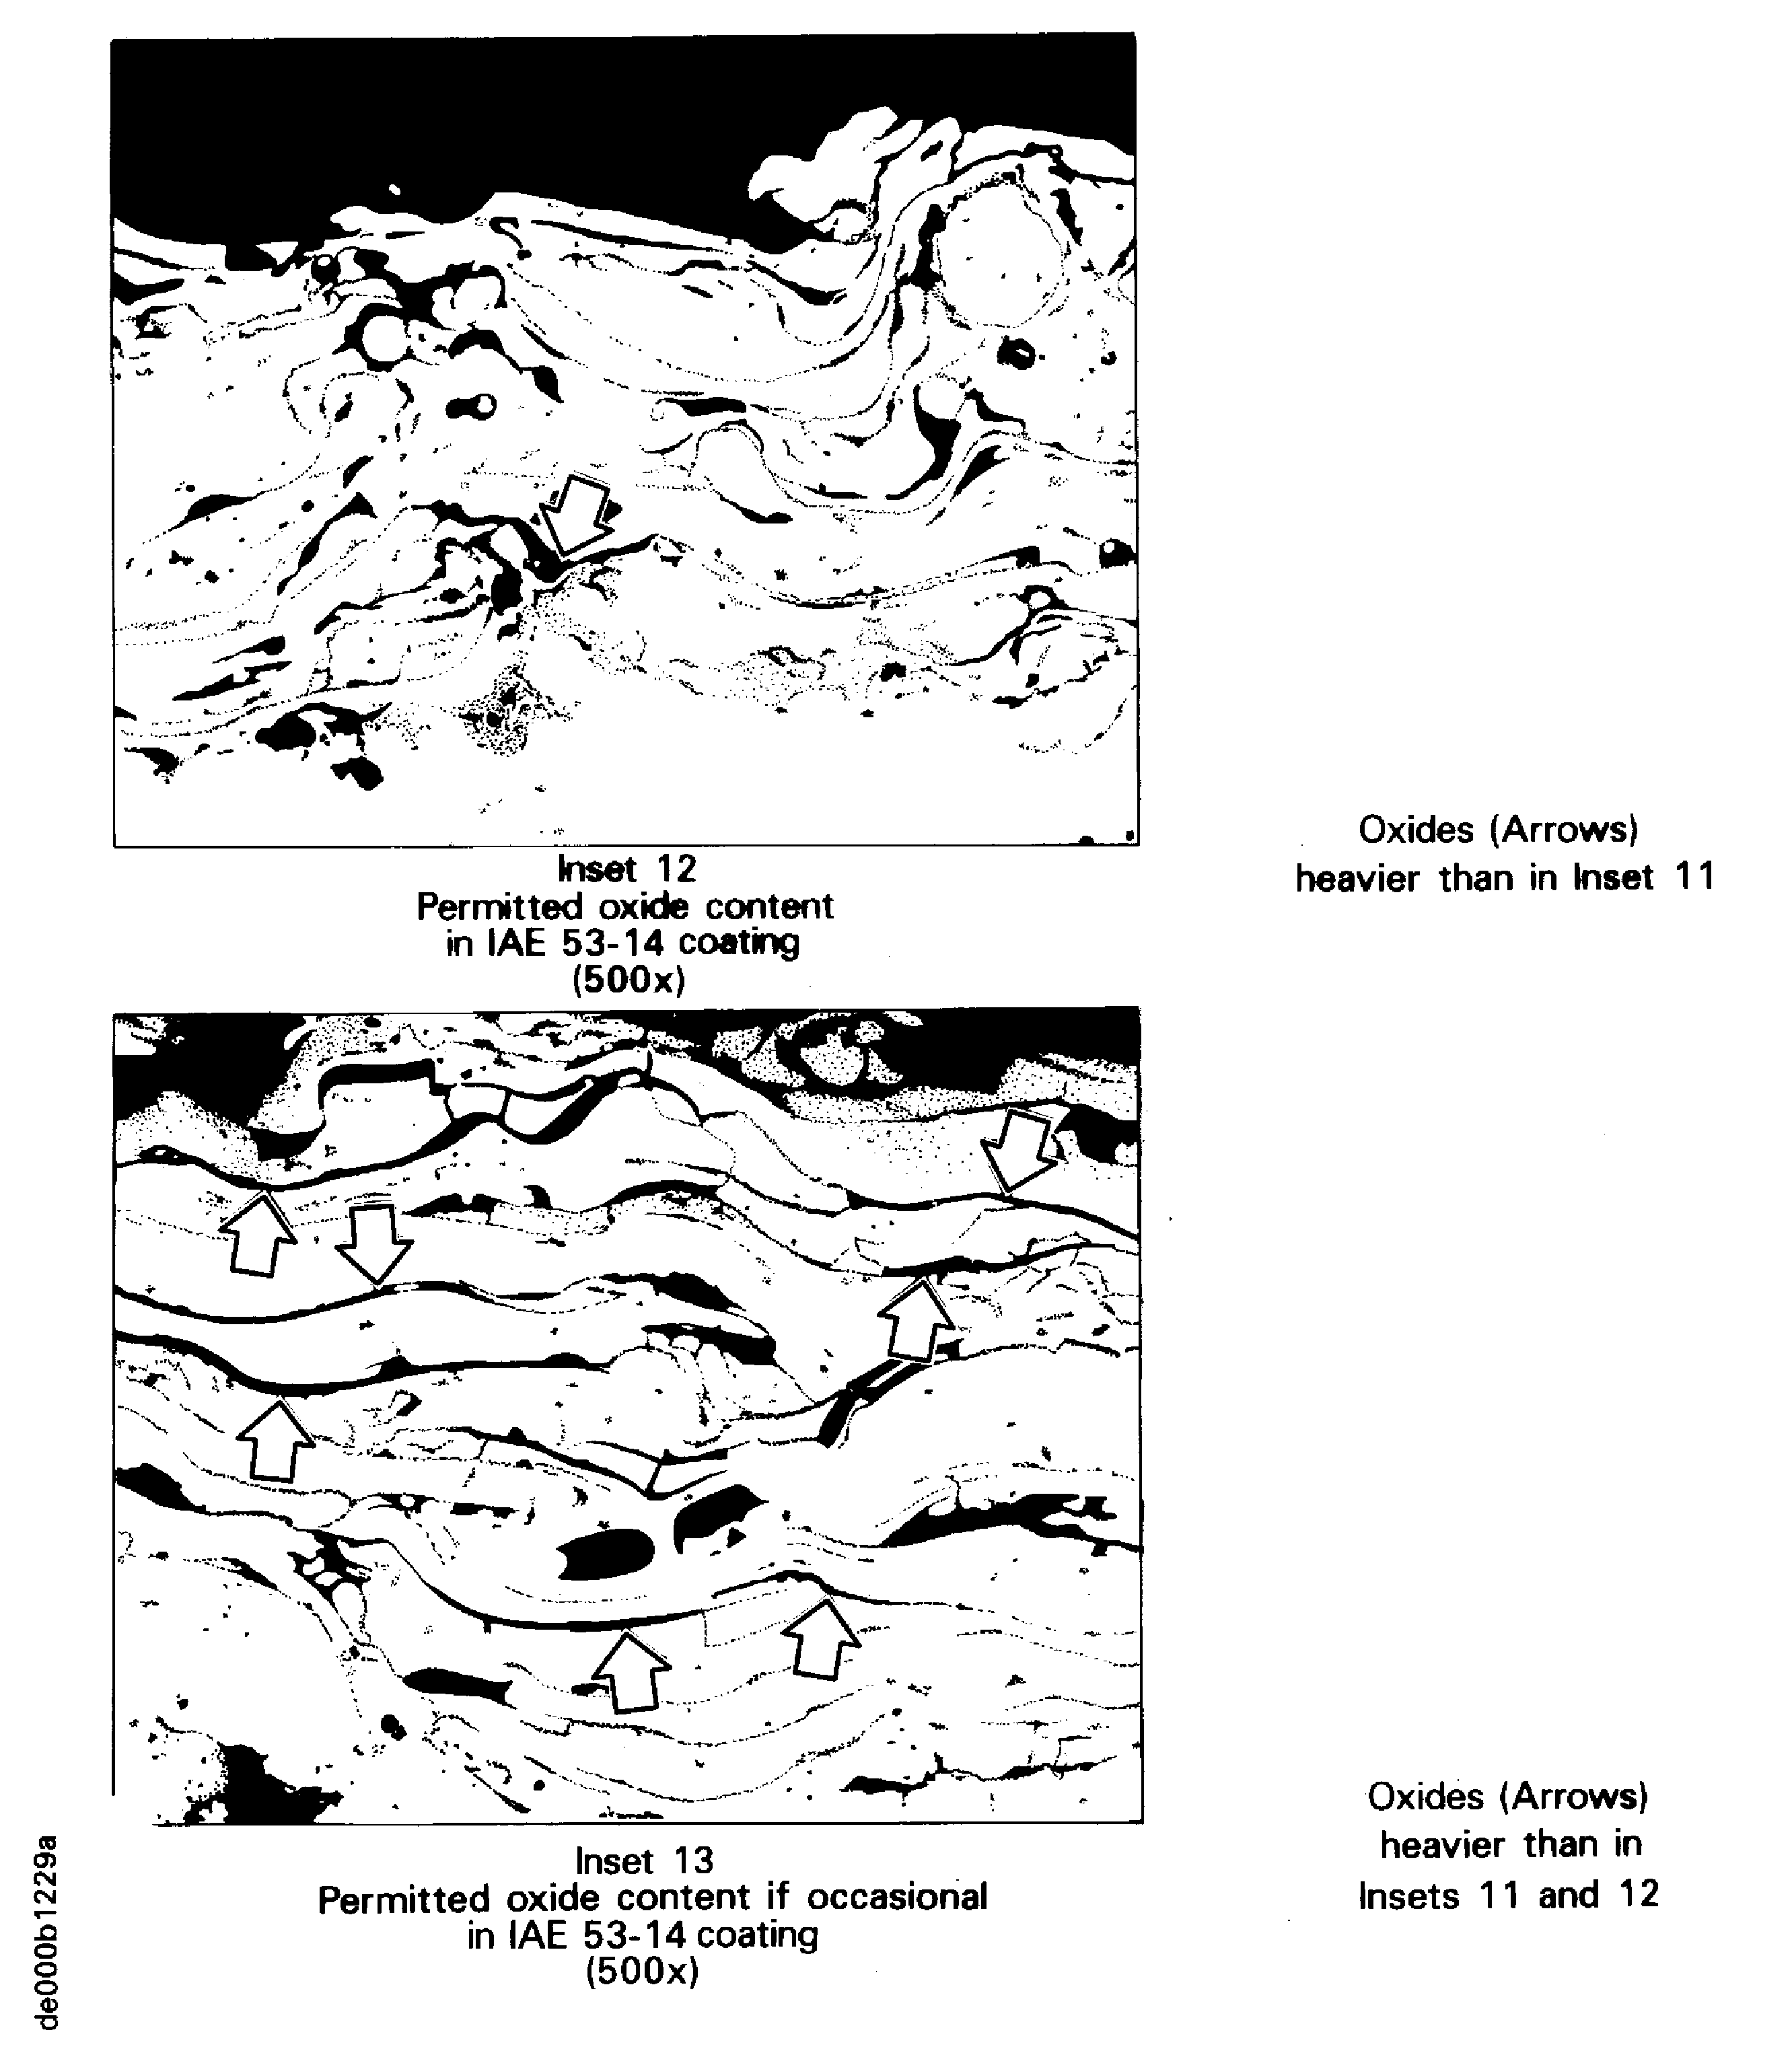
Figure: Oxides in coatings
Oxides in coatings
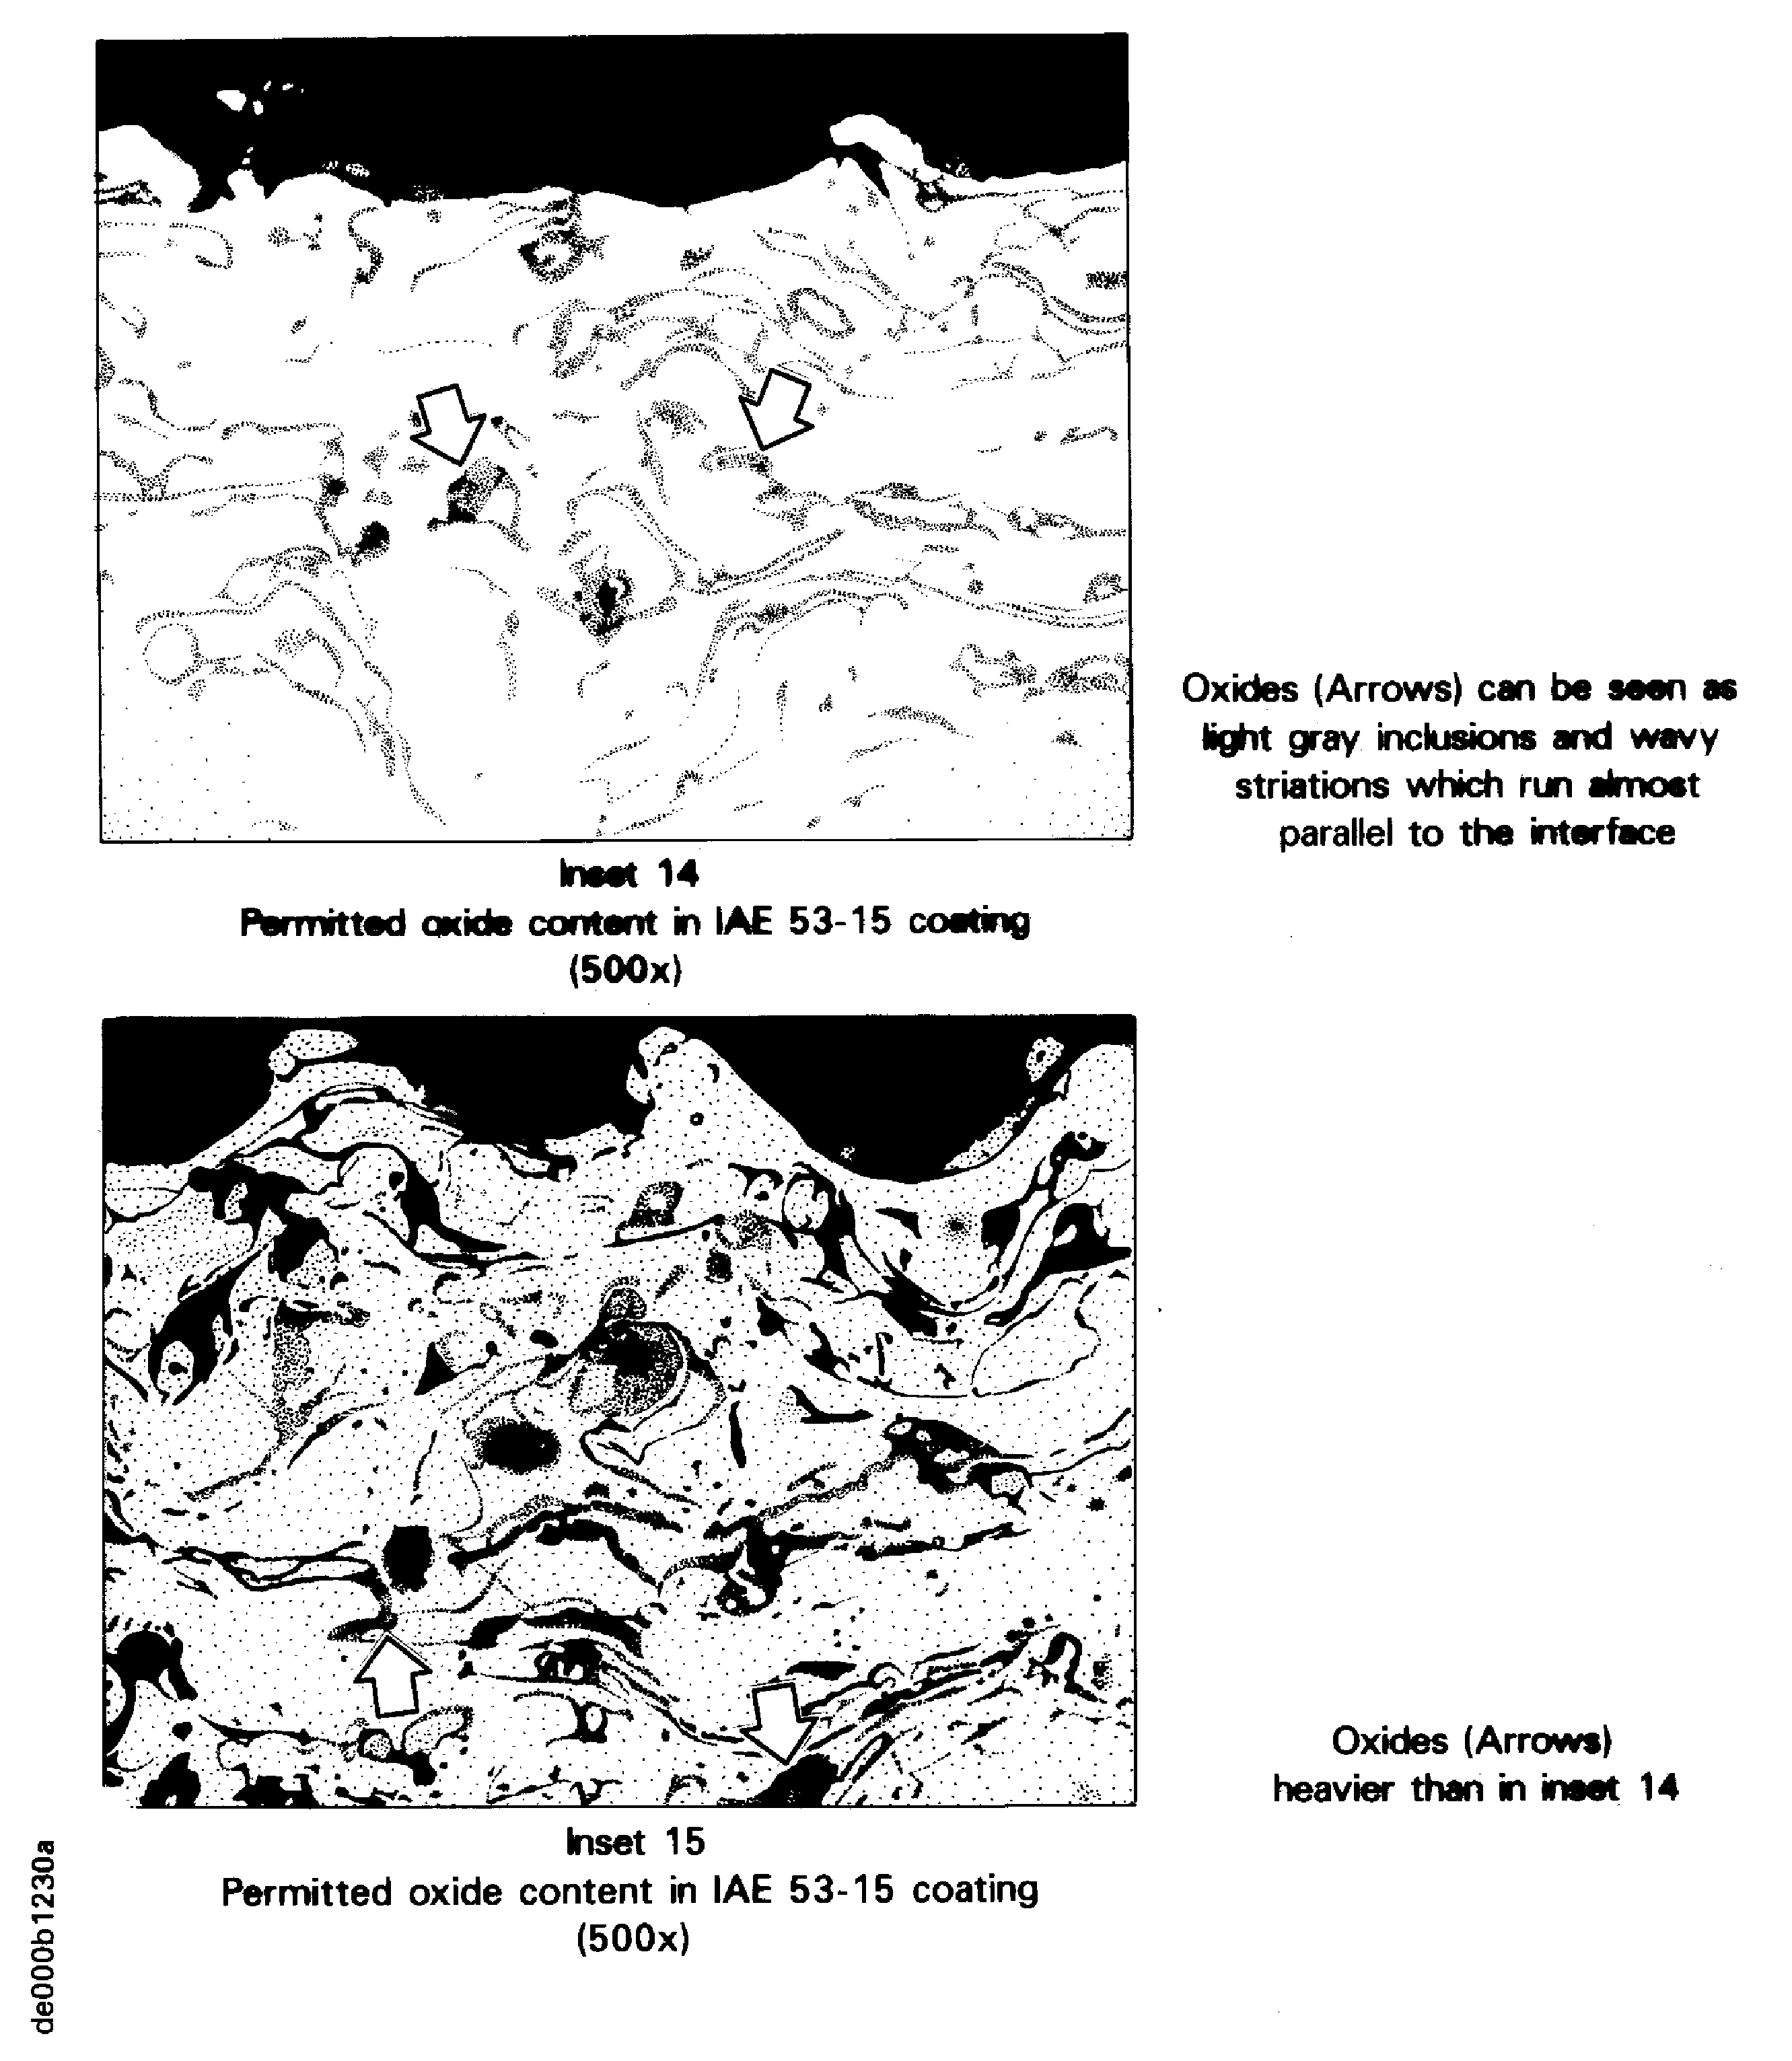
Figure: Oxides in coatings
Oxides in coatings
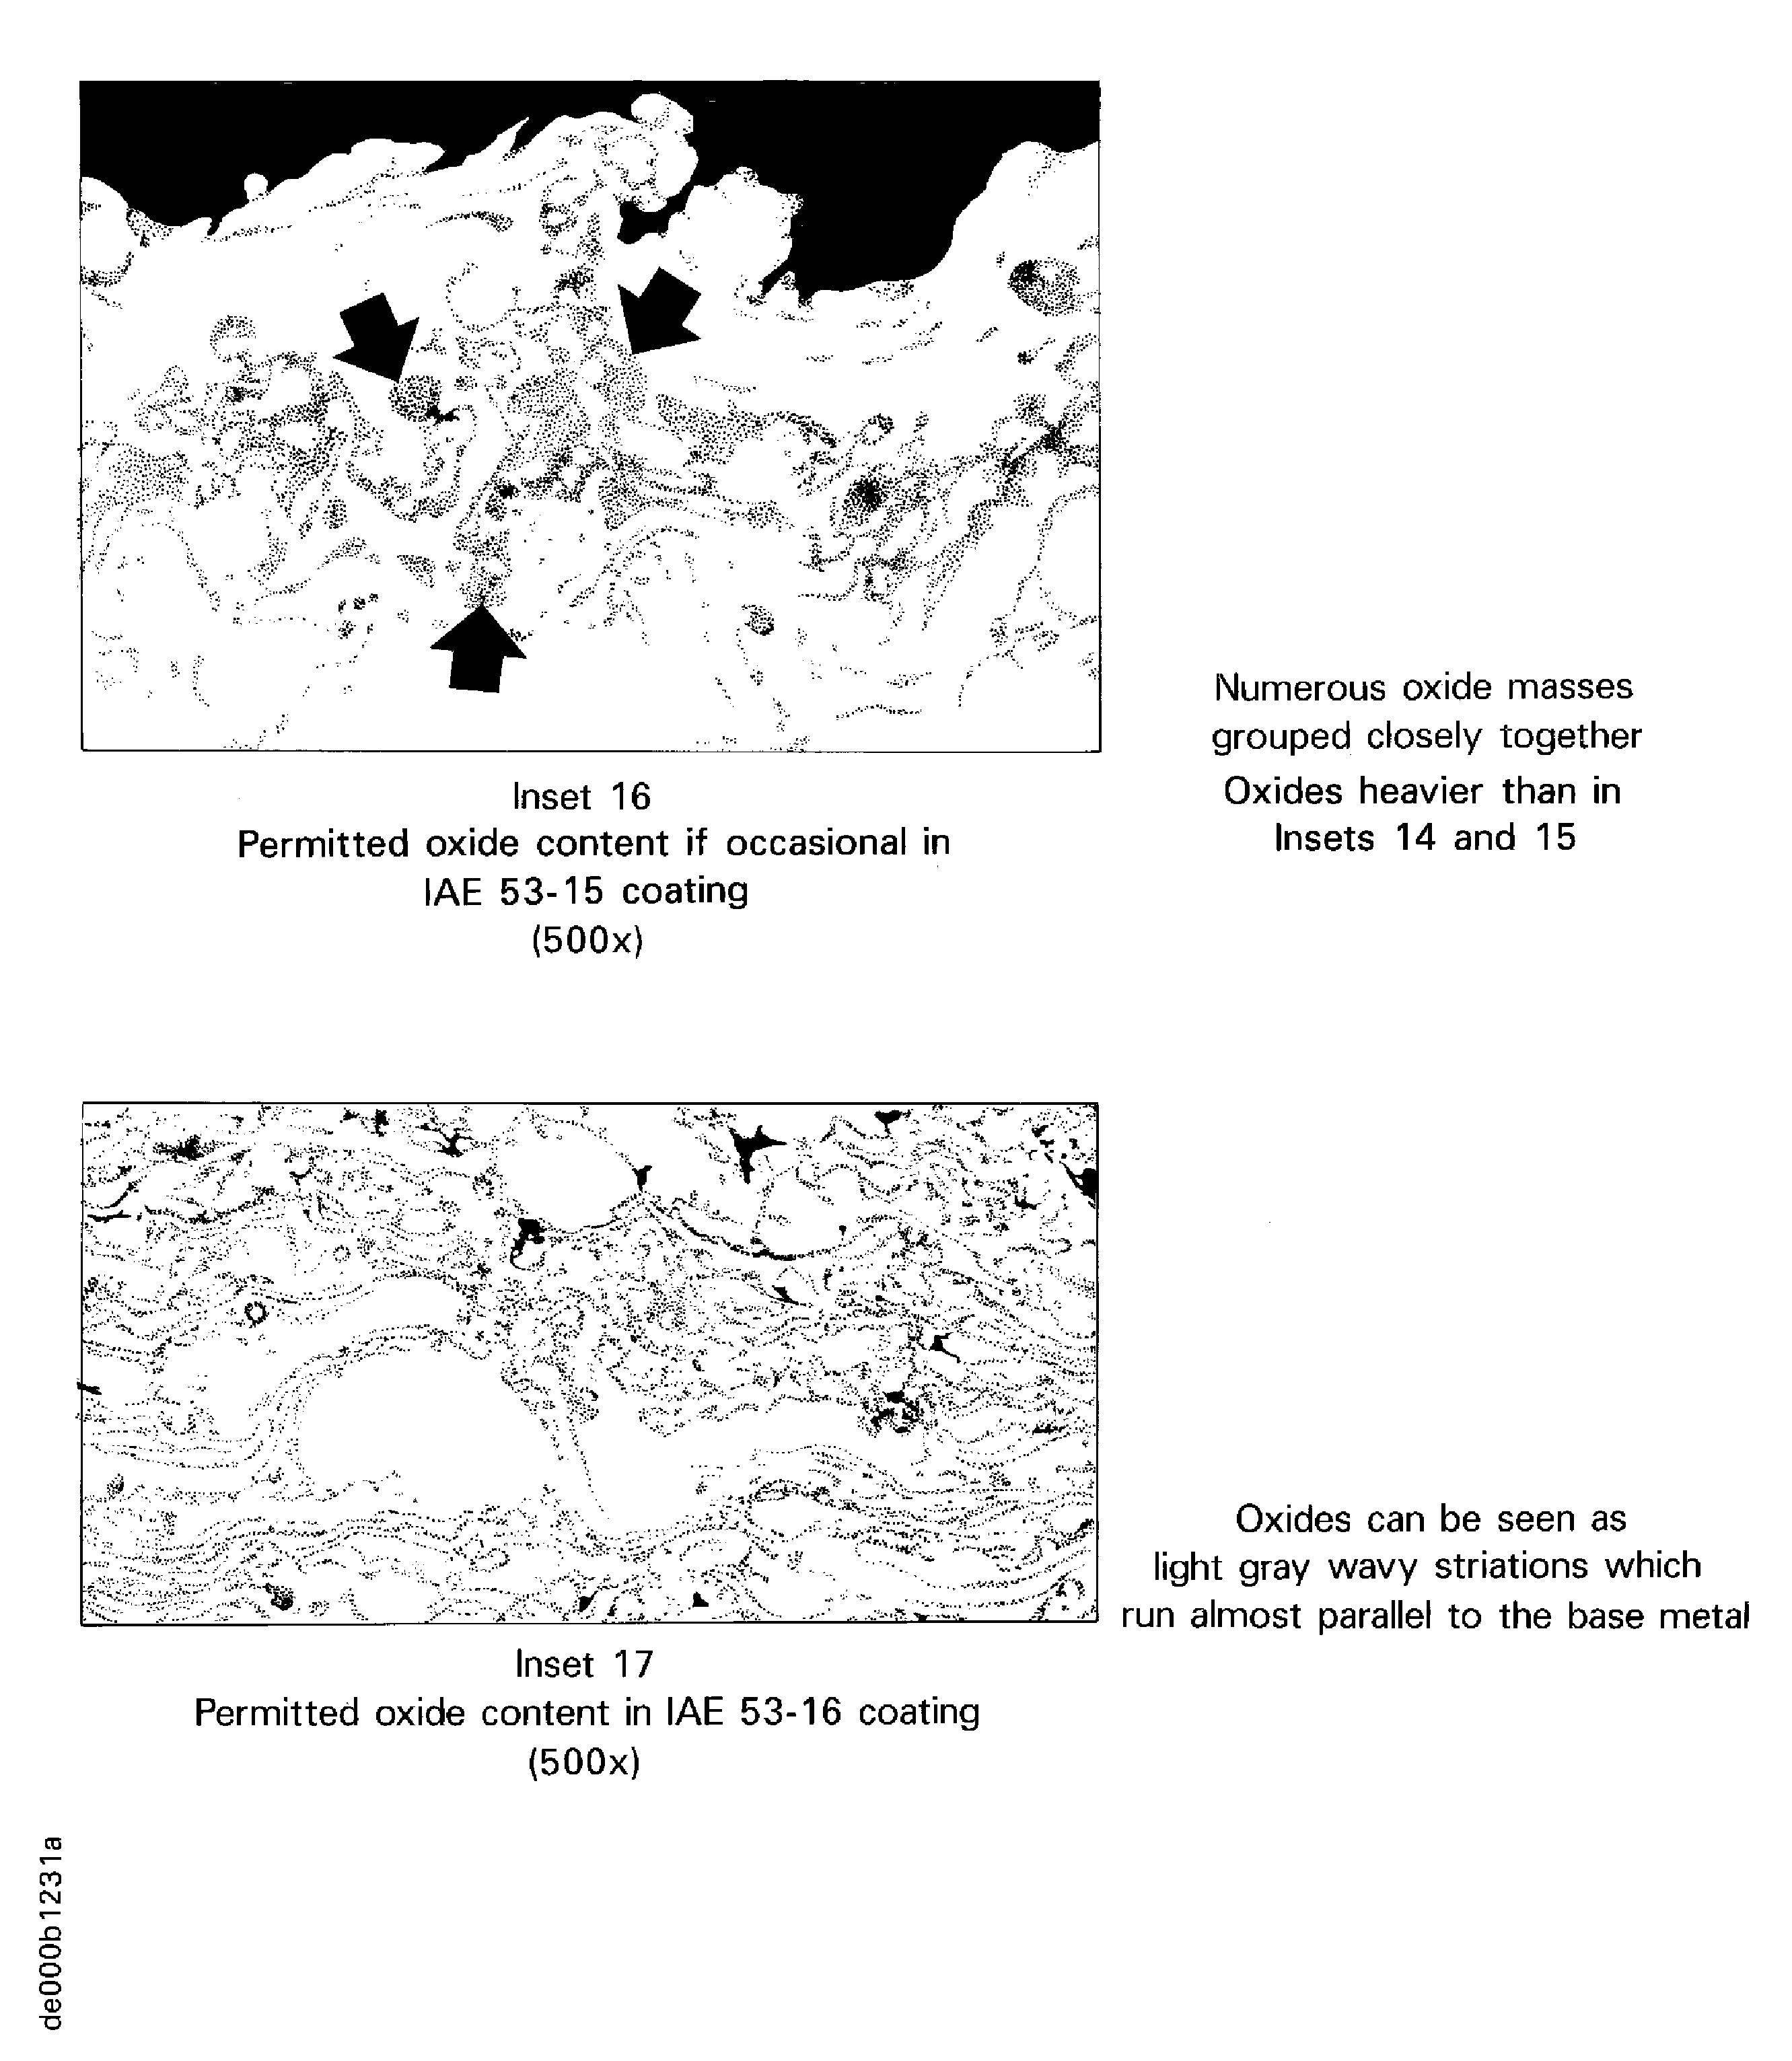
Figure: Oxides in coatings
Oxides in coatings
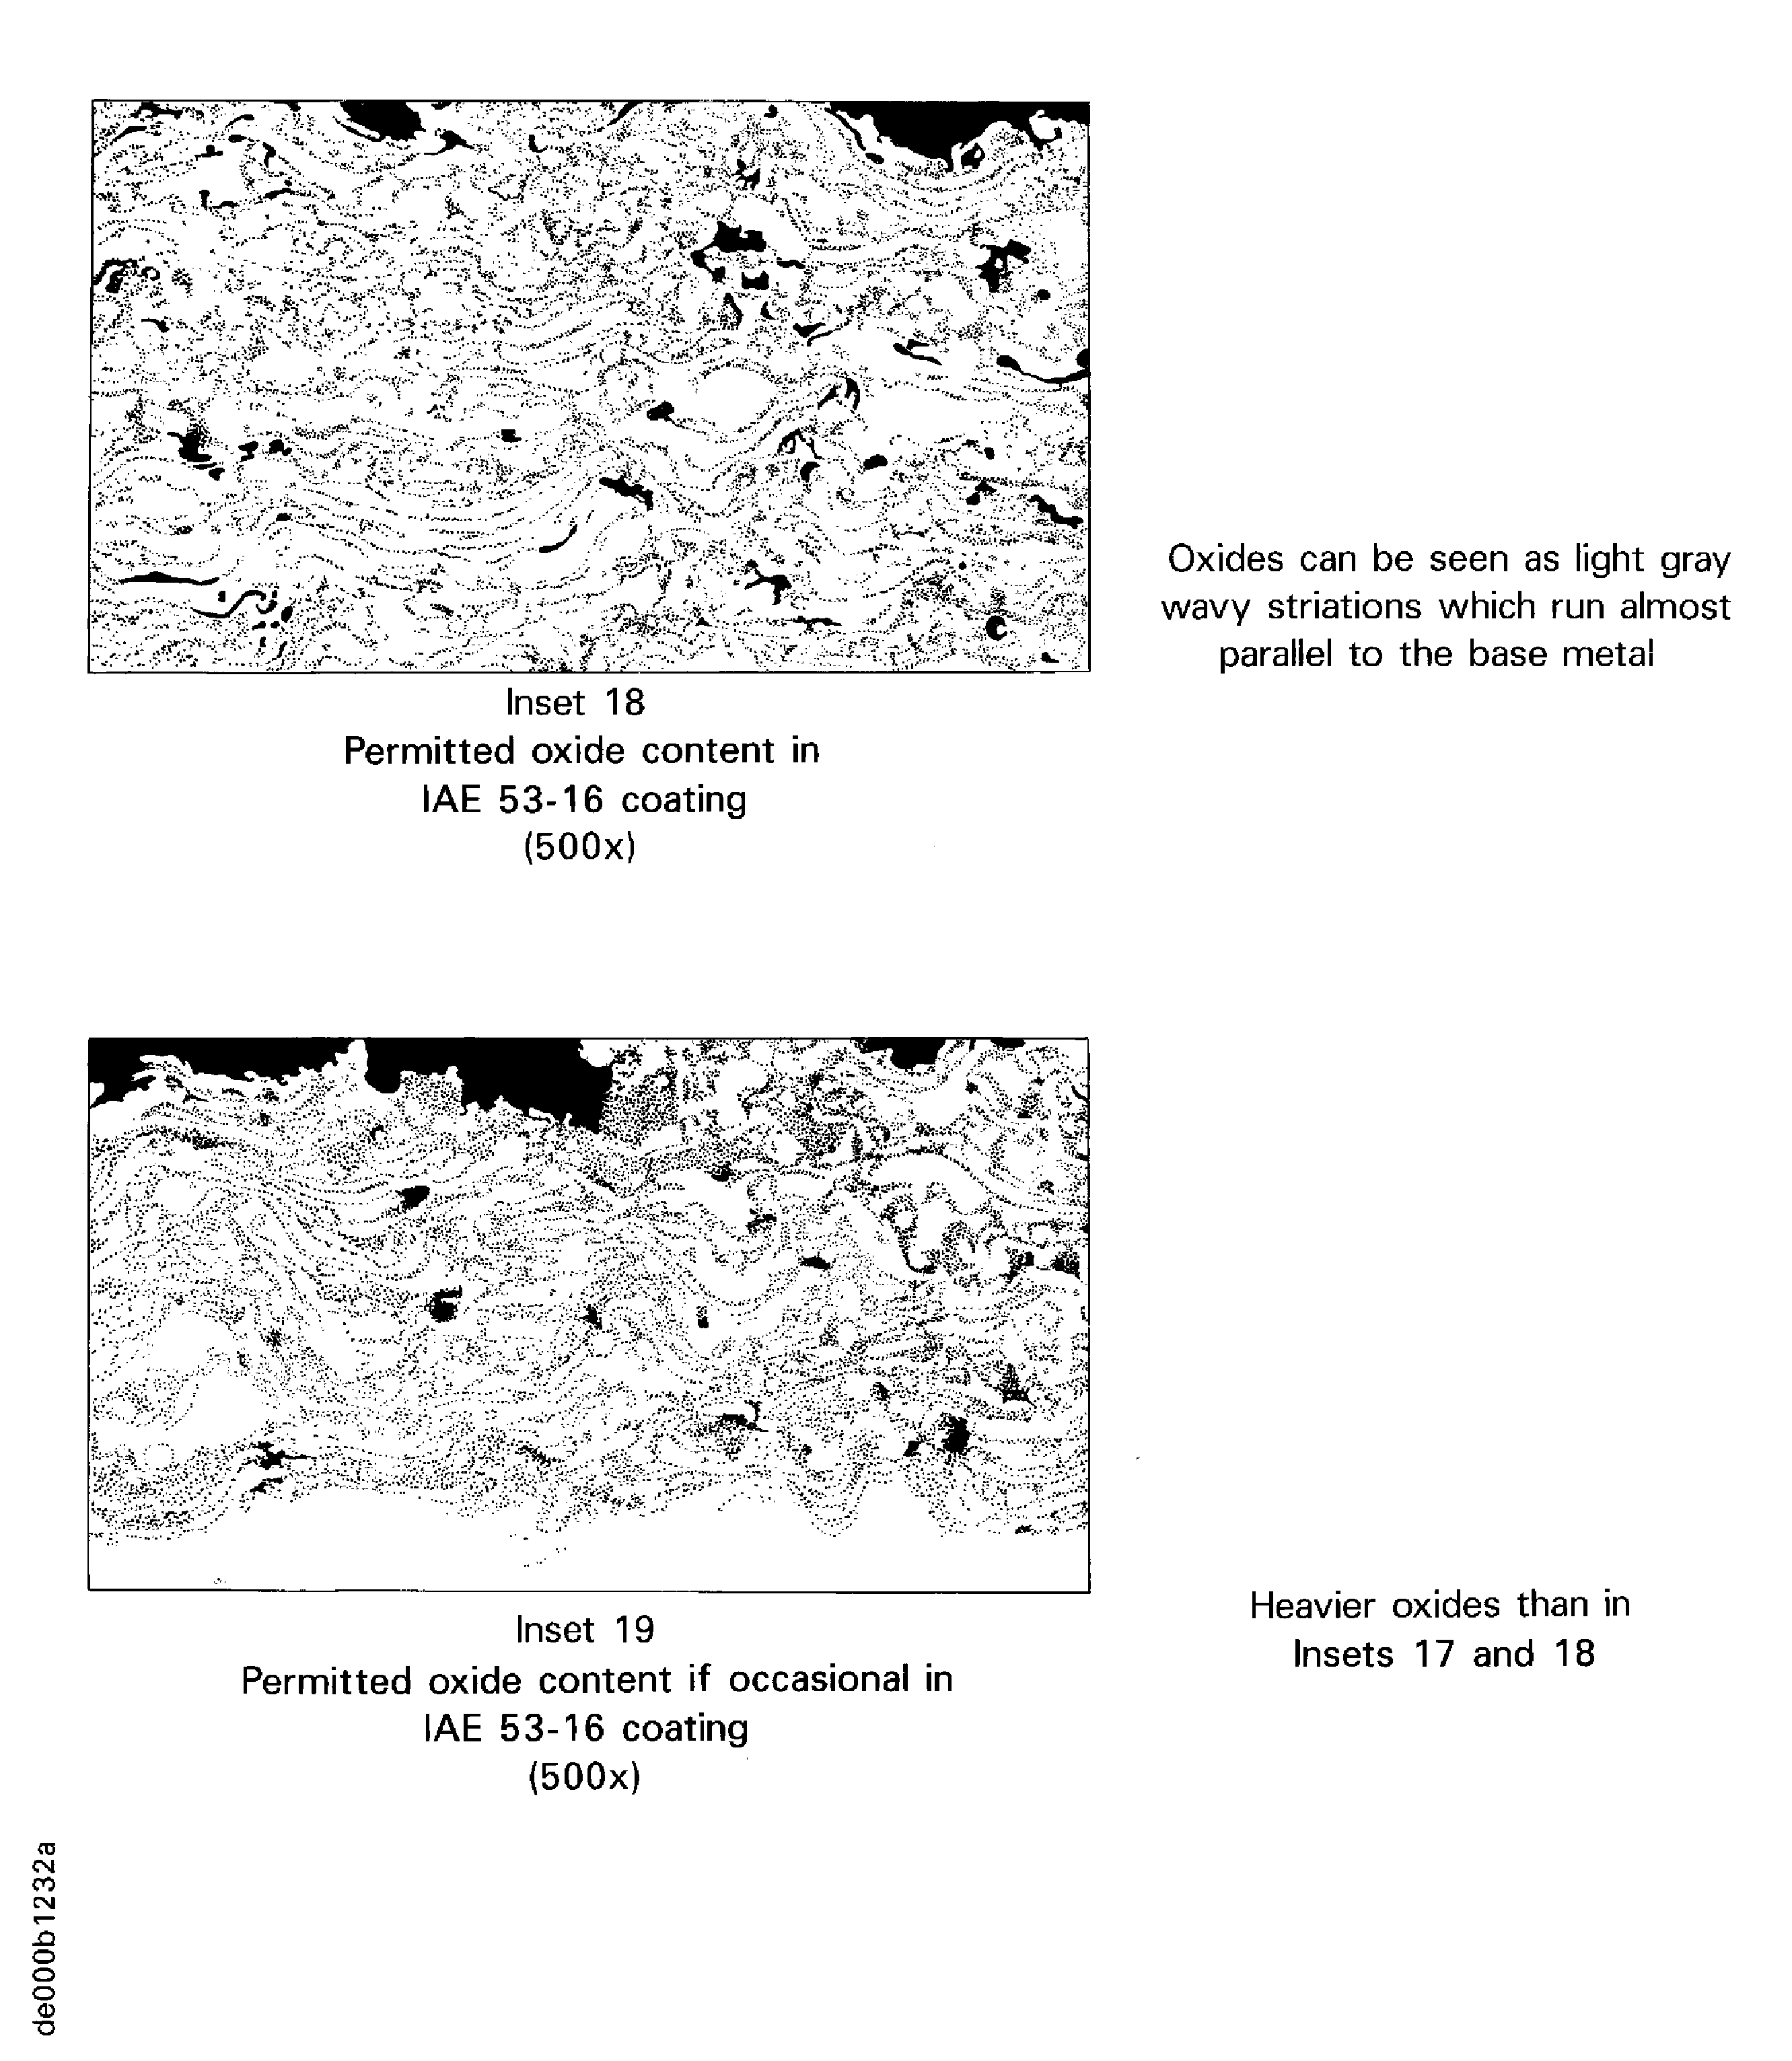
Figure: Oxides in coatings
Oxides in coatings
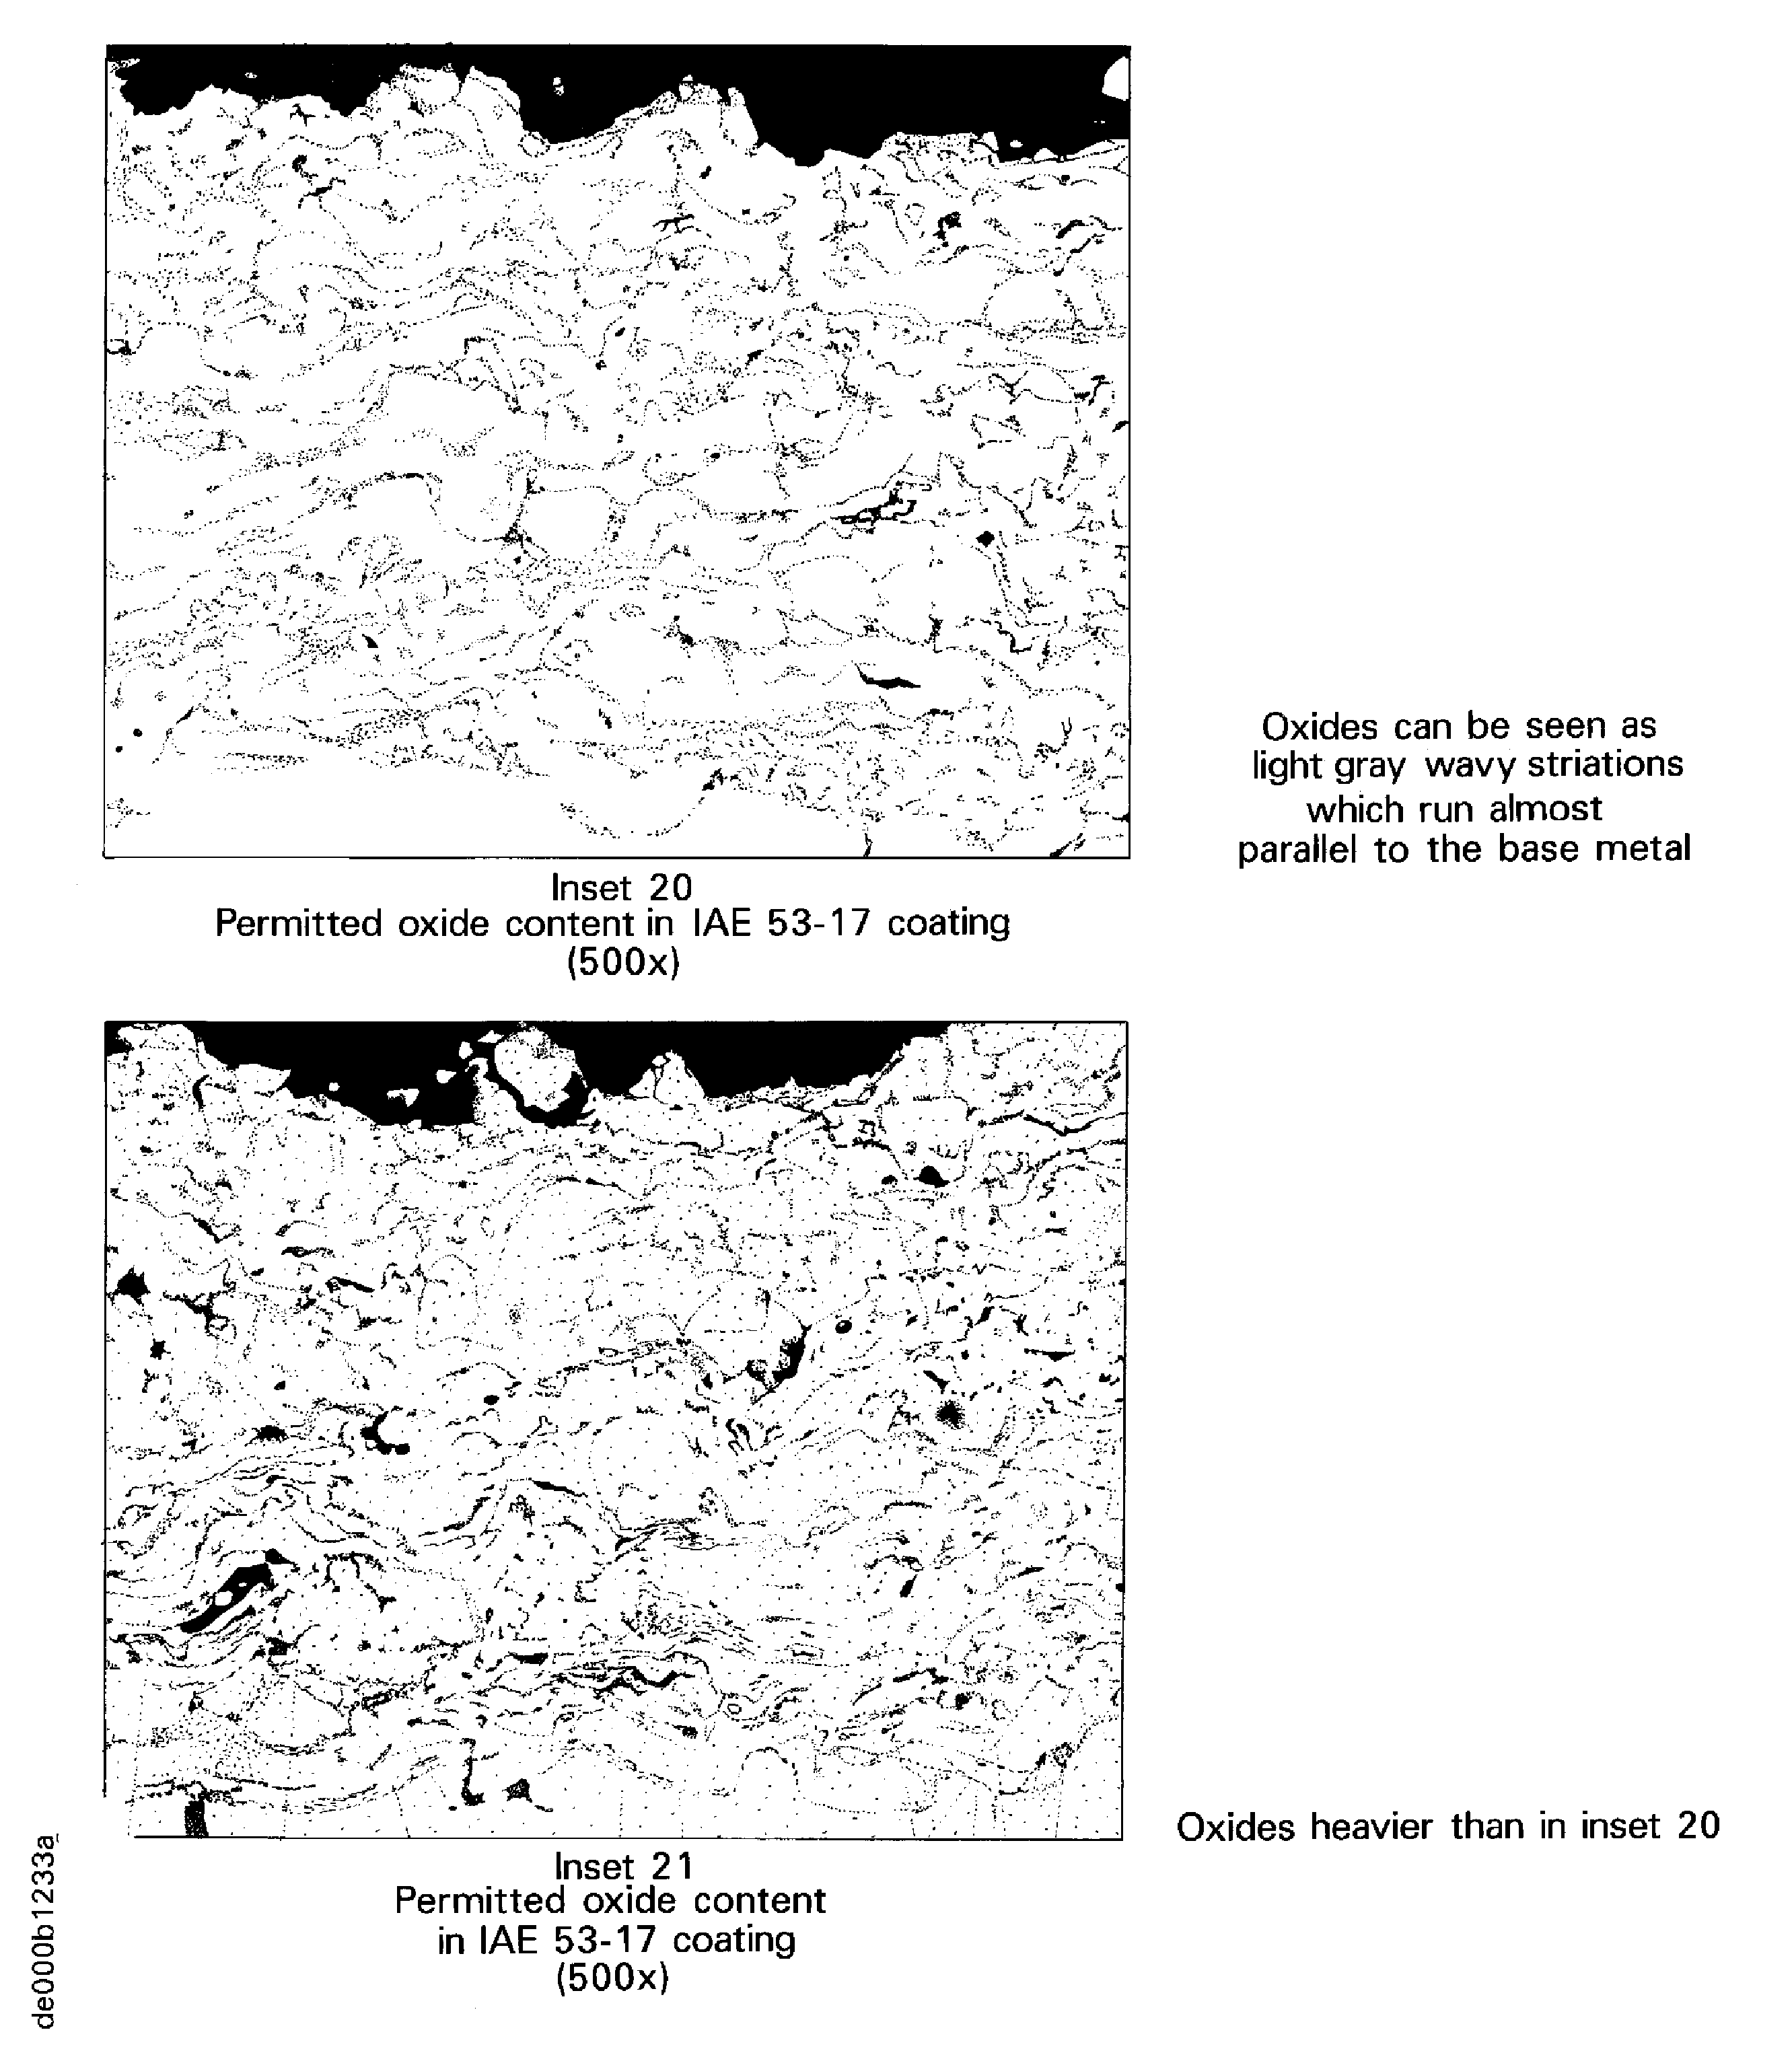
Figure: Oxides in coatings
Oxides in coatings
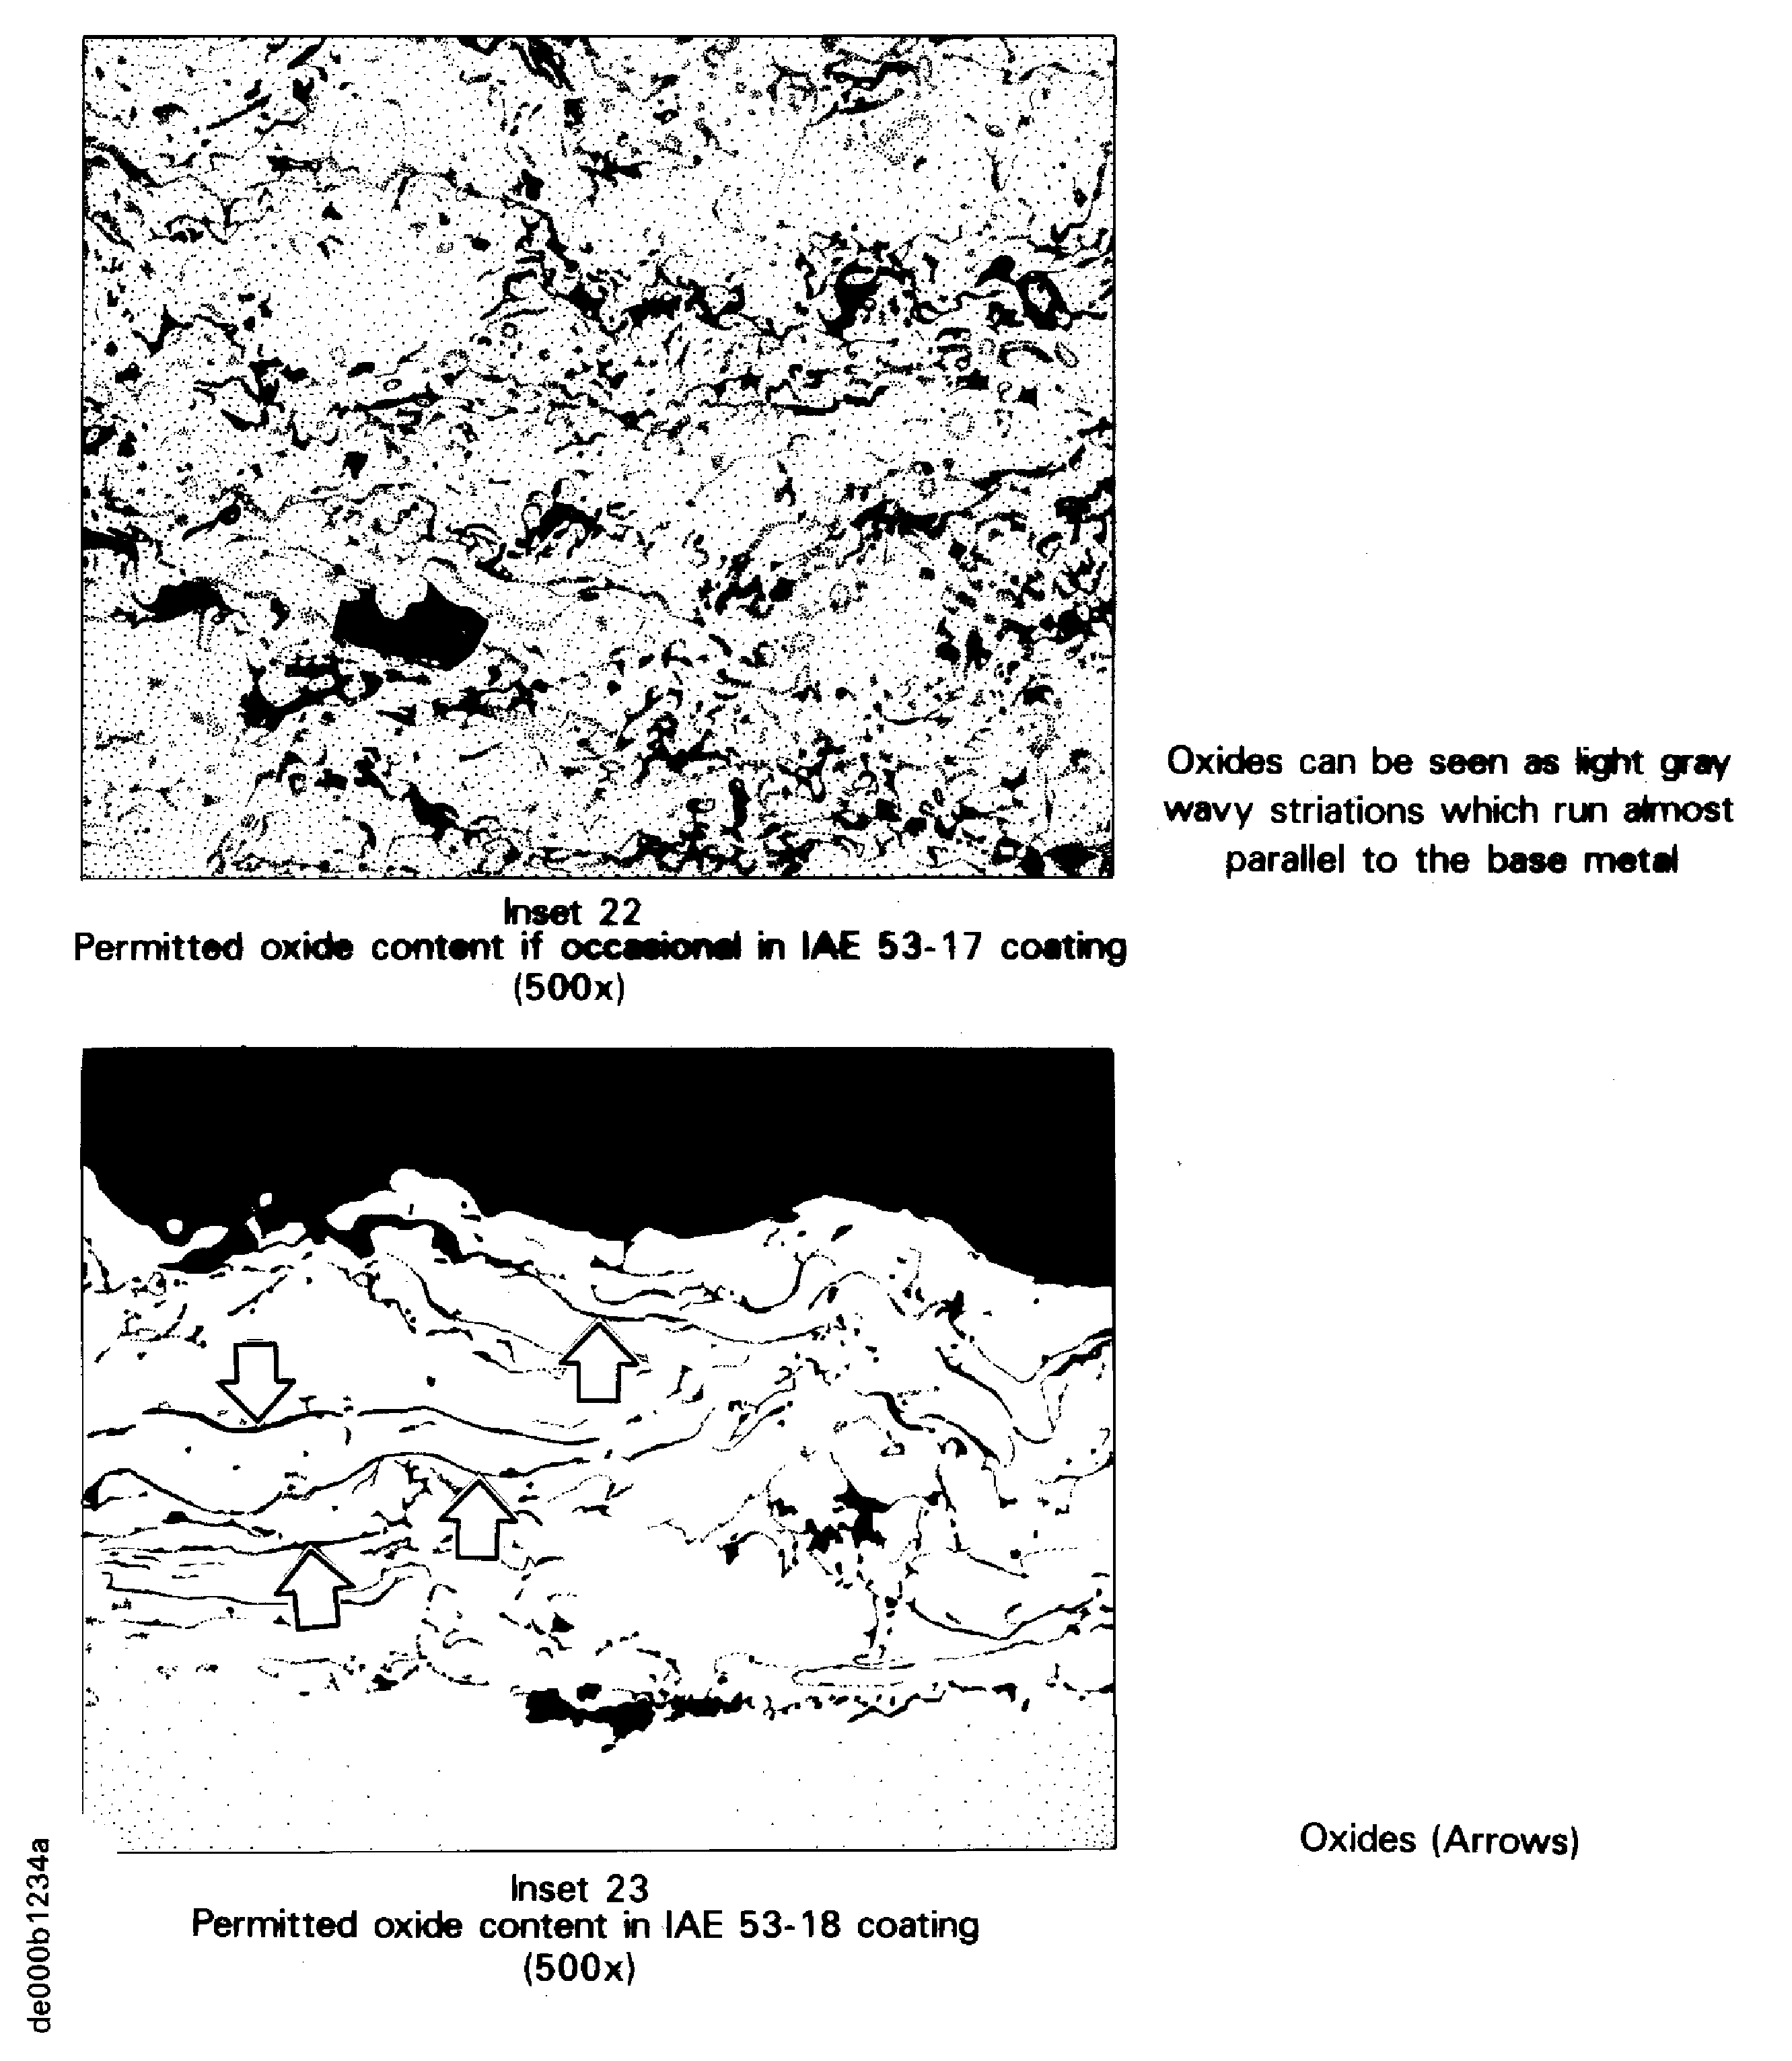
Figure: Oxides in coatings
Oxides in coatings
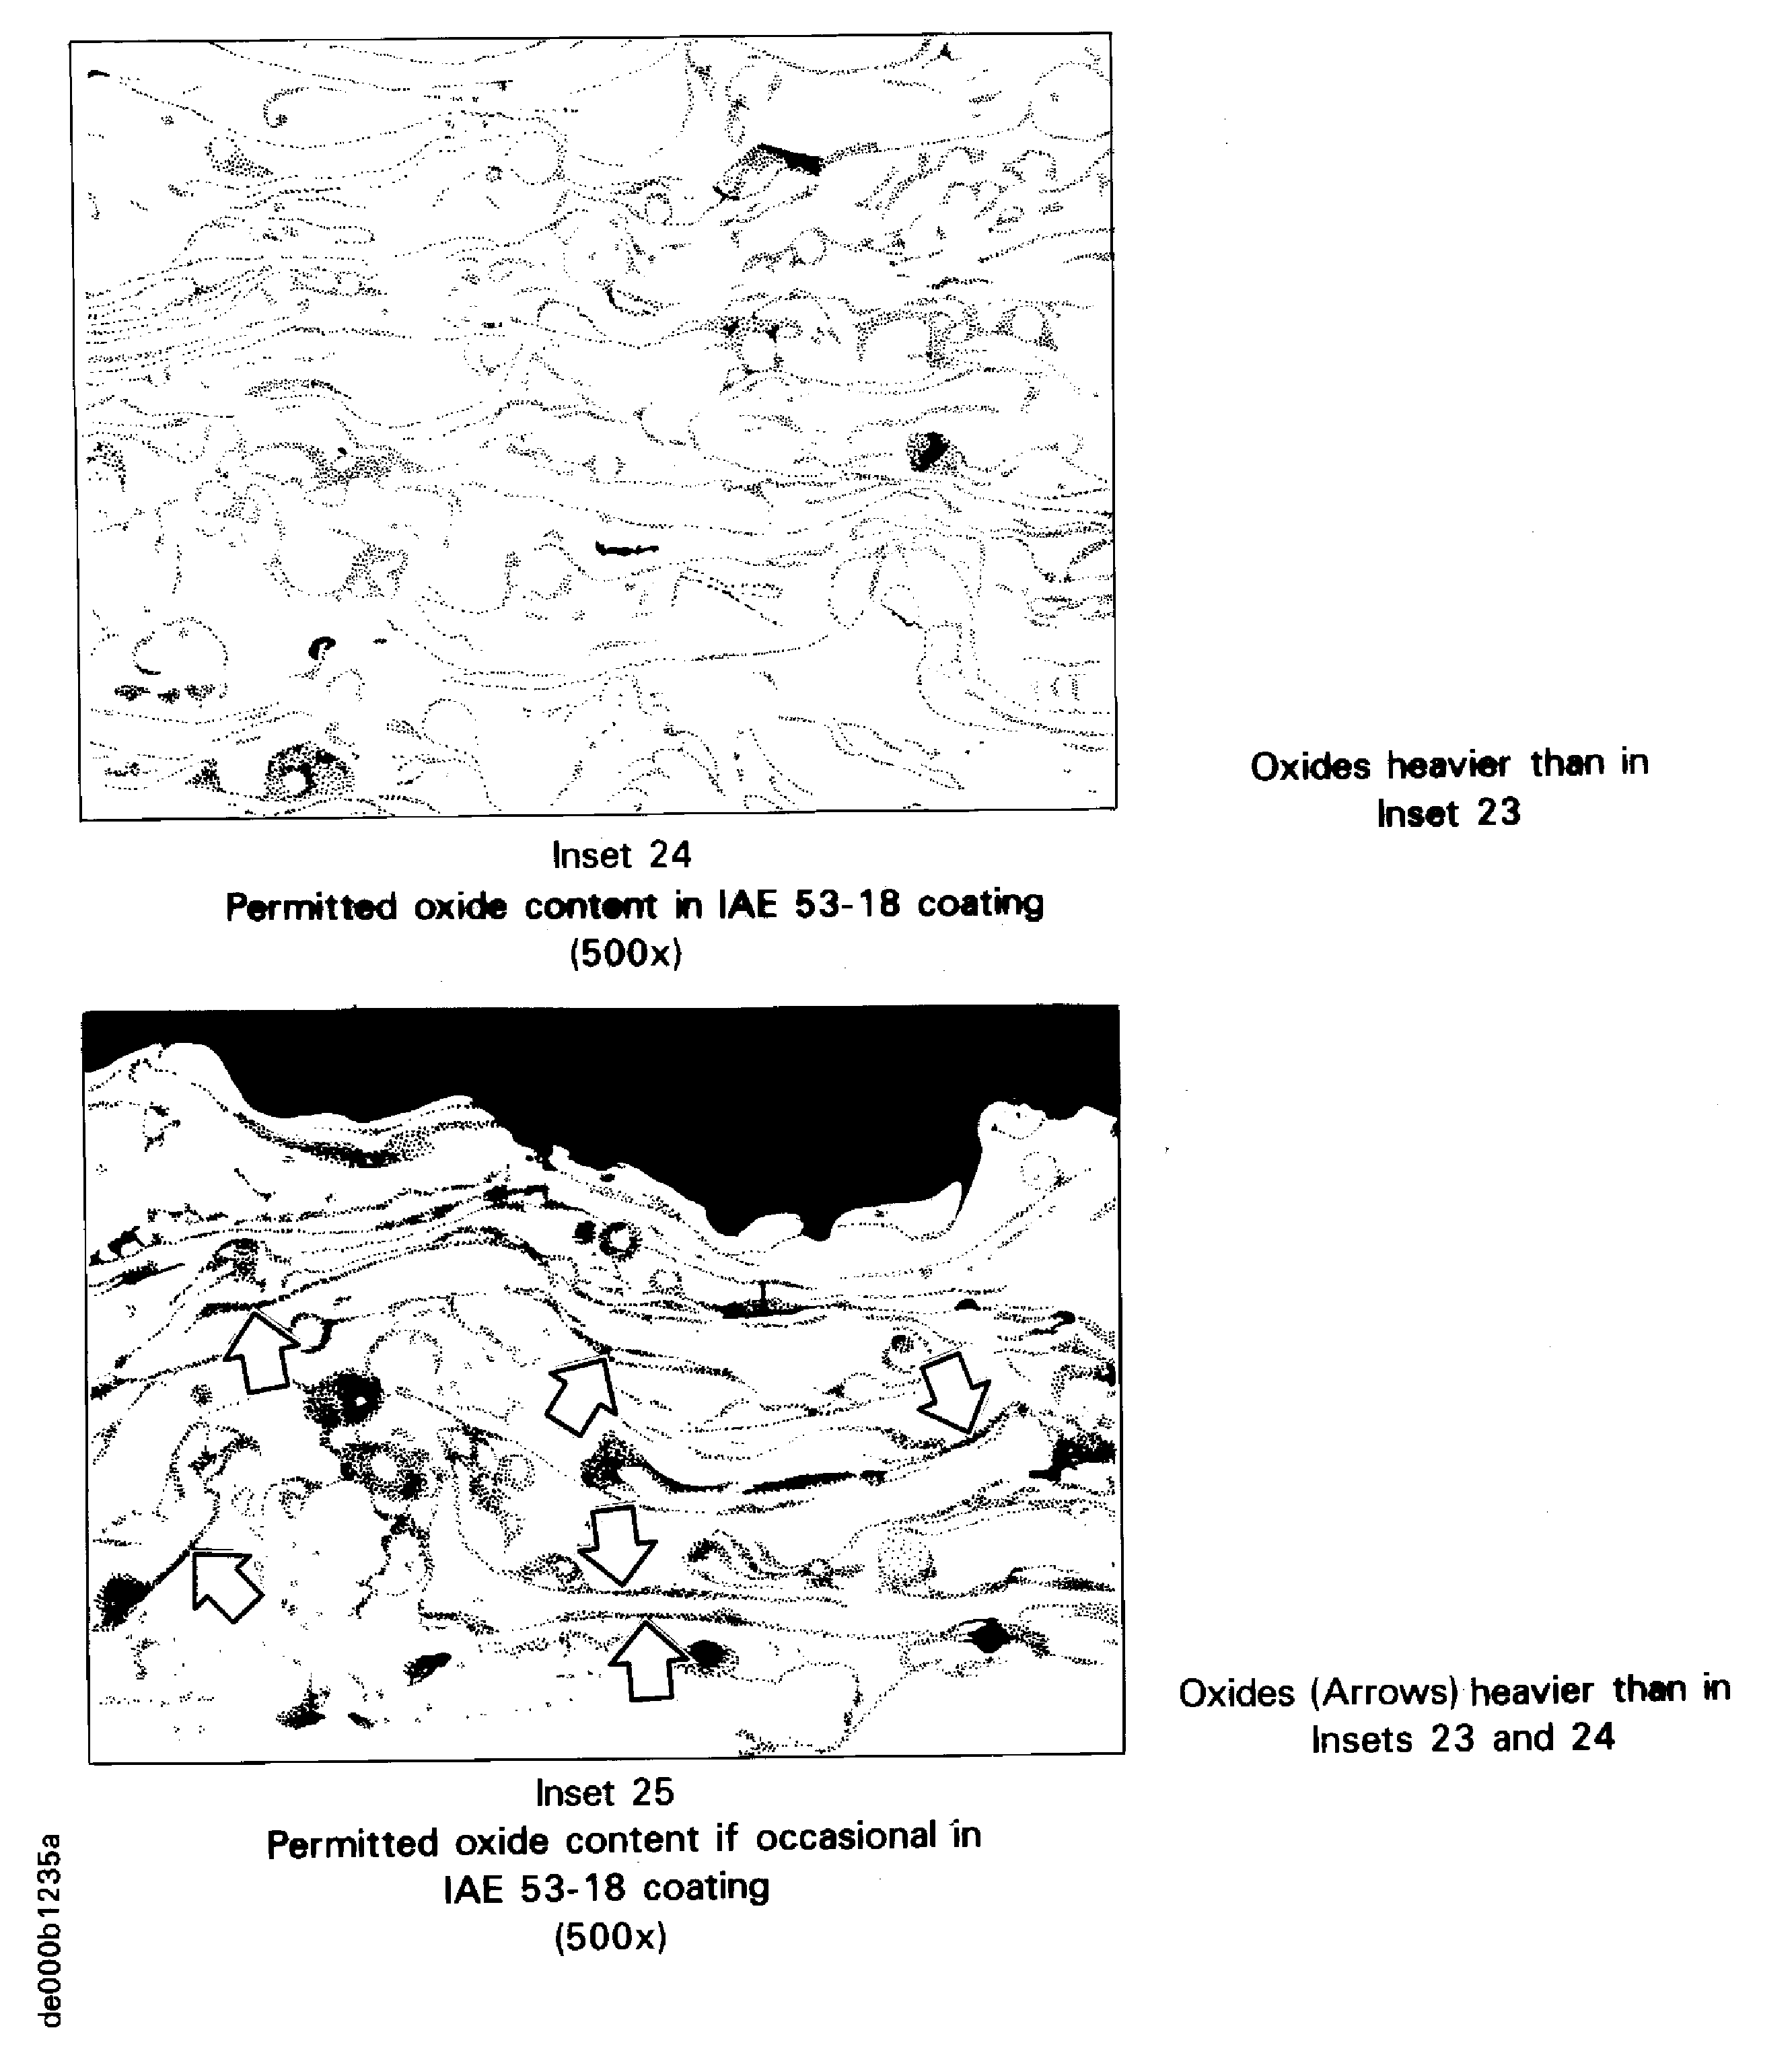
Figure: Oxides in coatings
Oxides in coatings
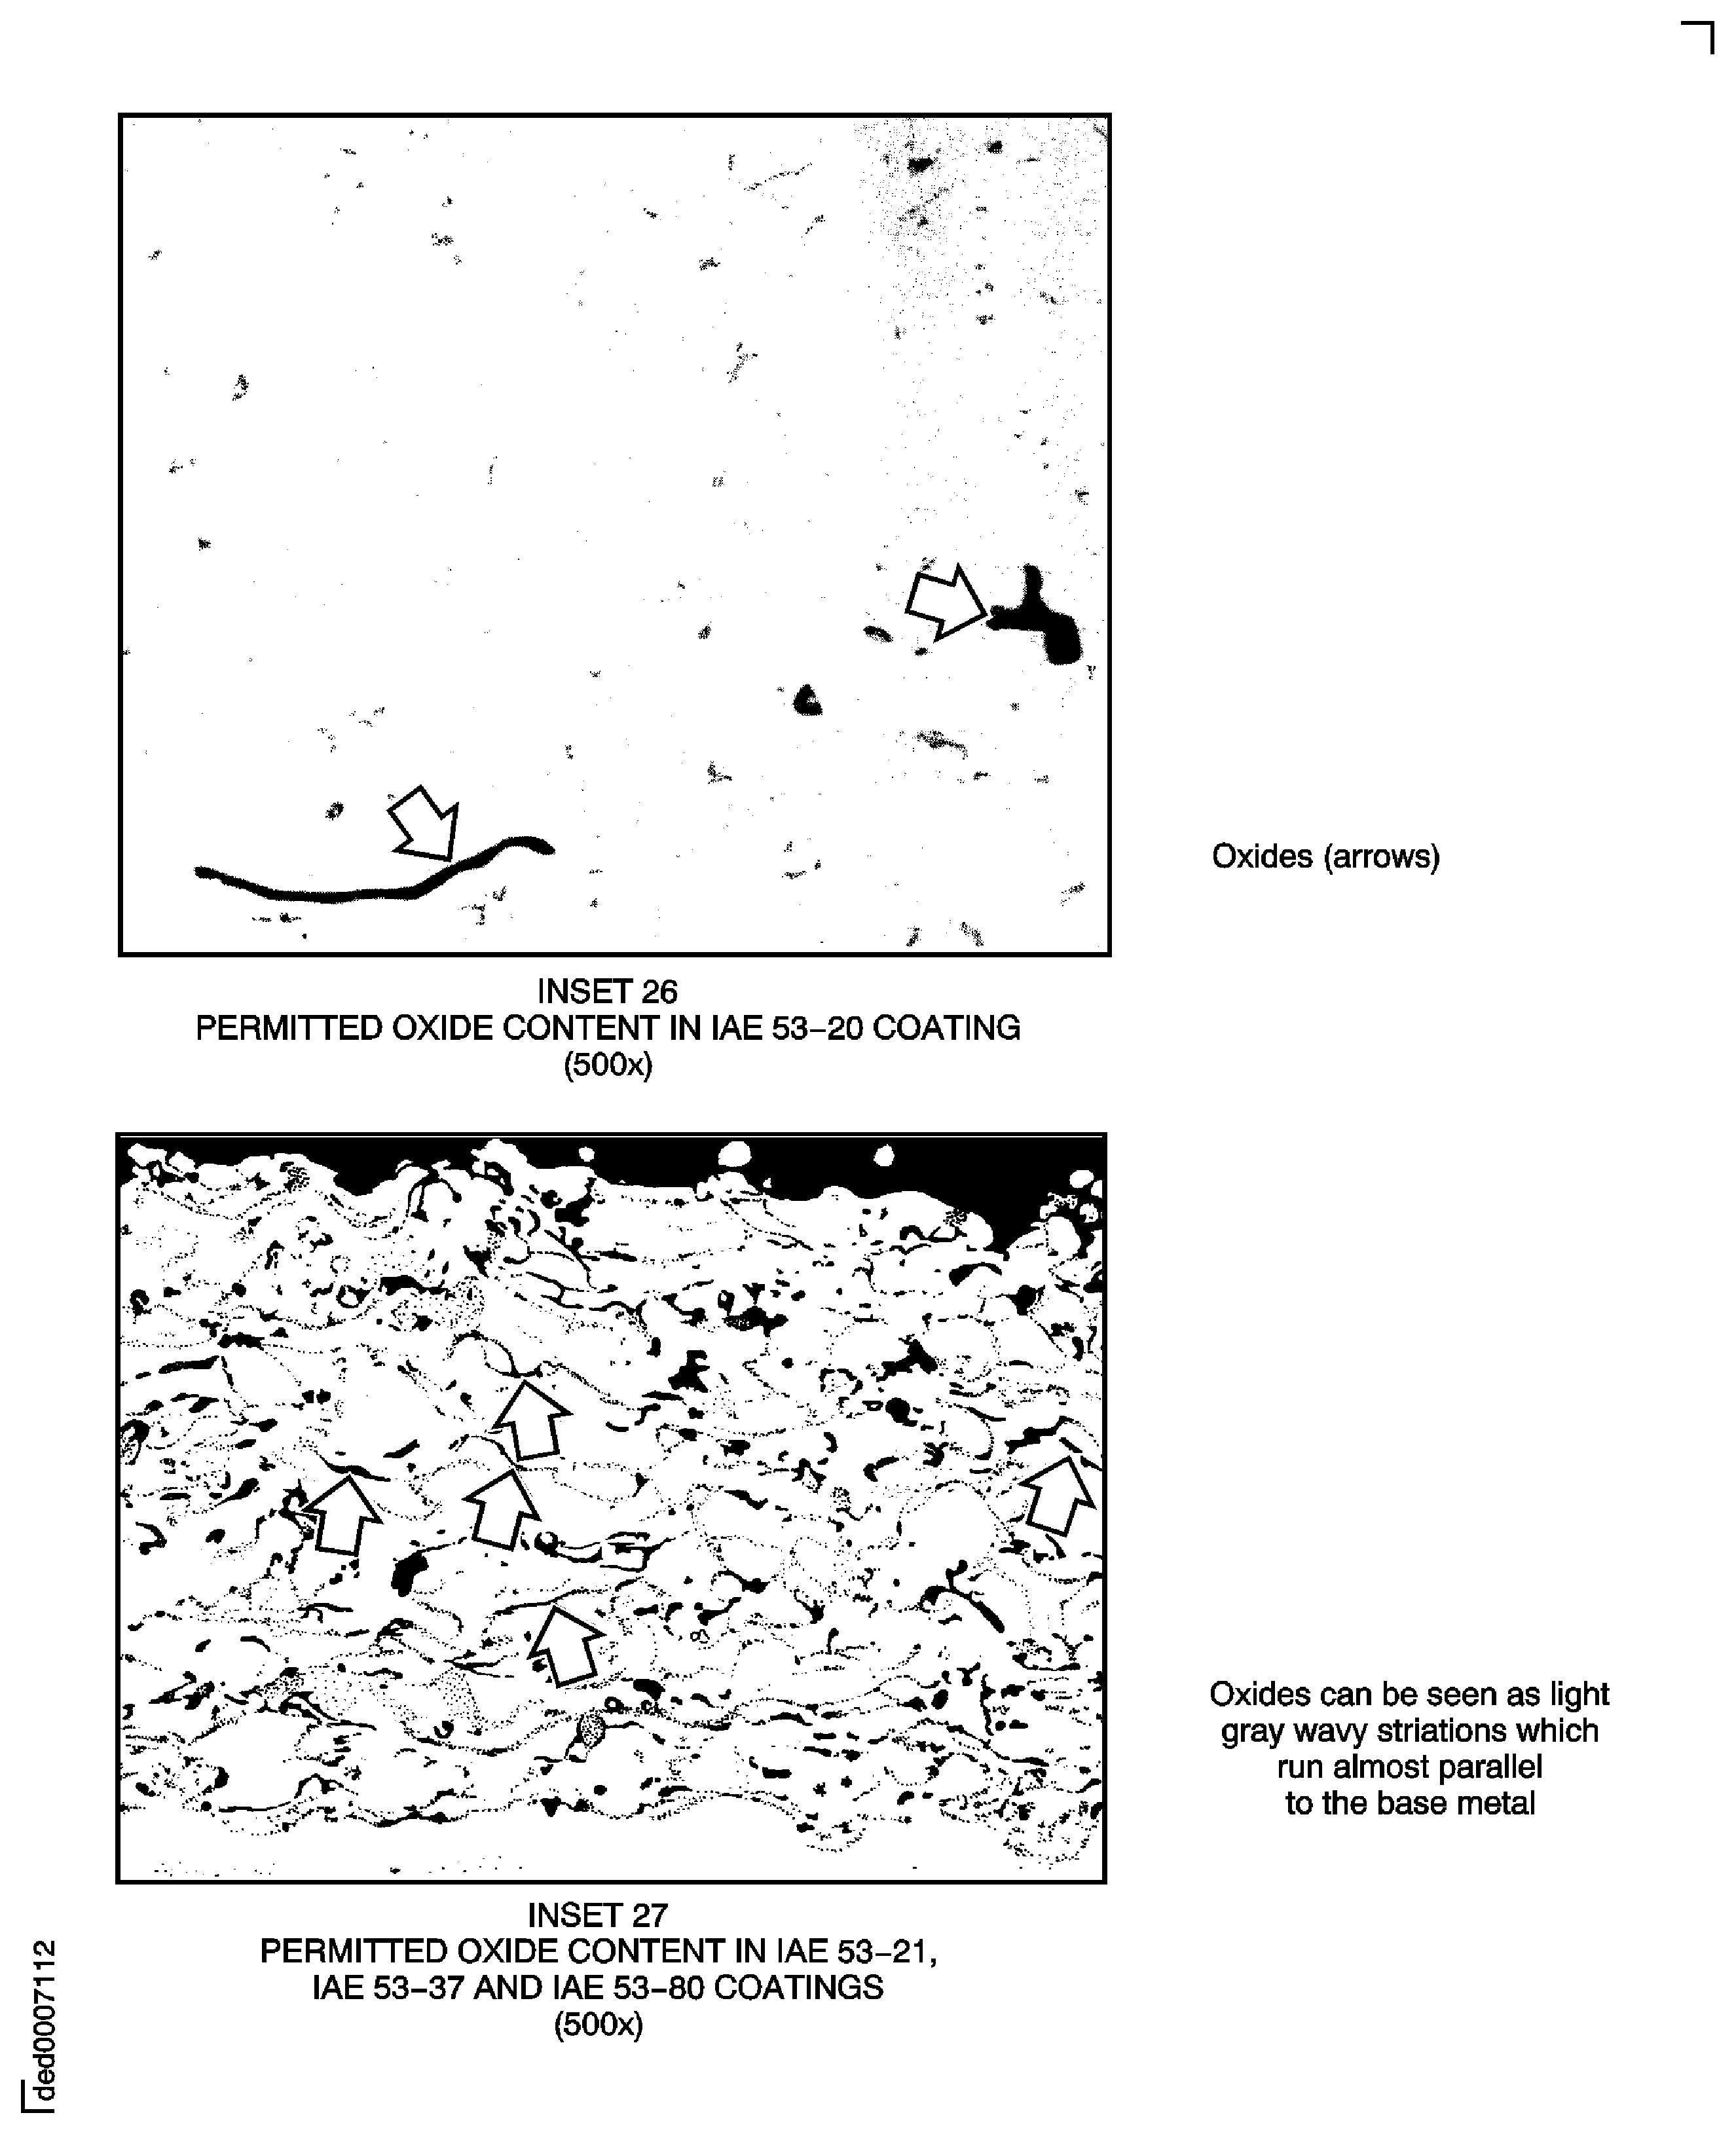
Figure: Oxides in coatings
Oxides in coatings
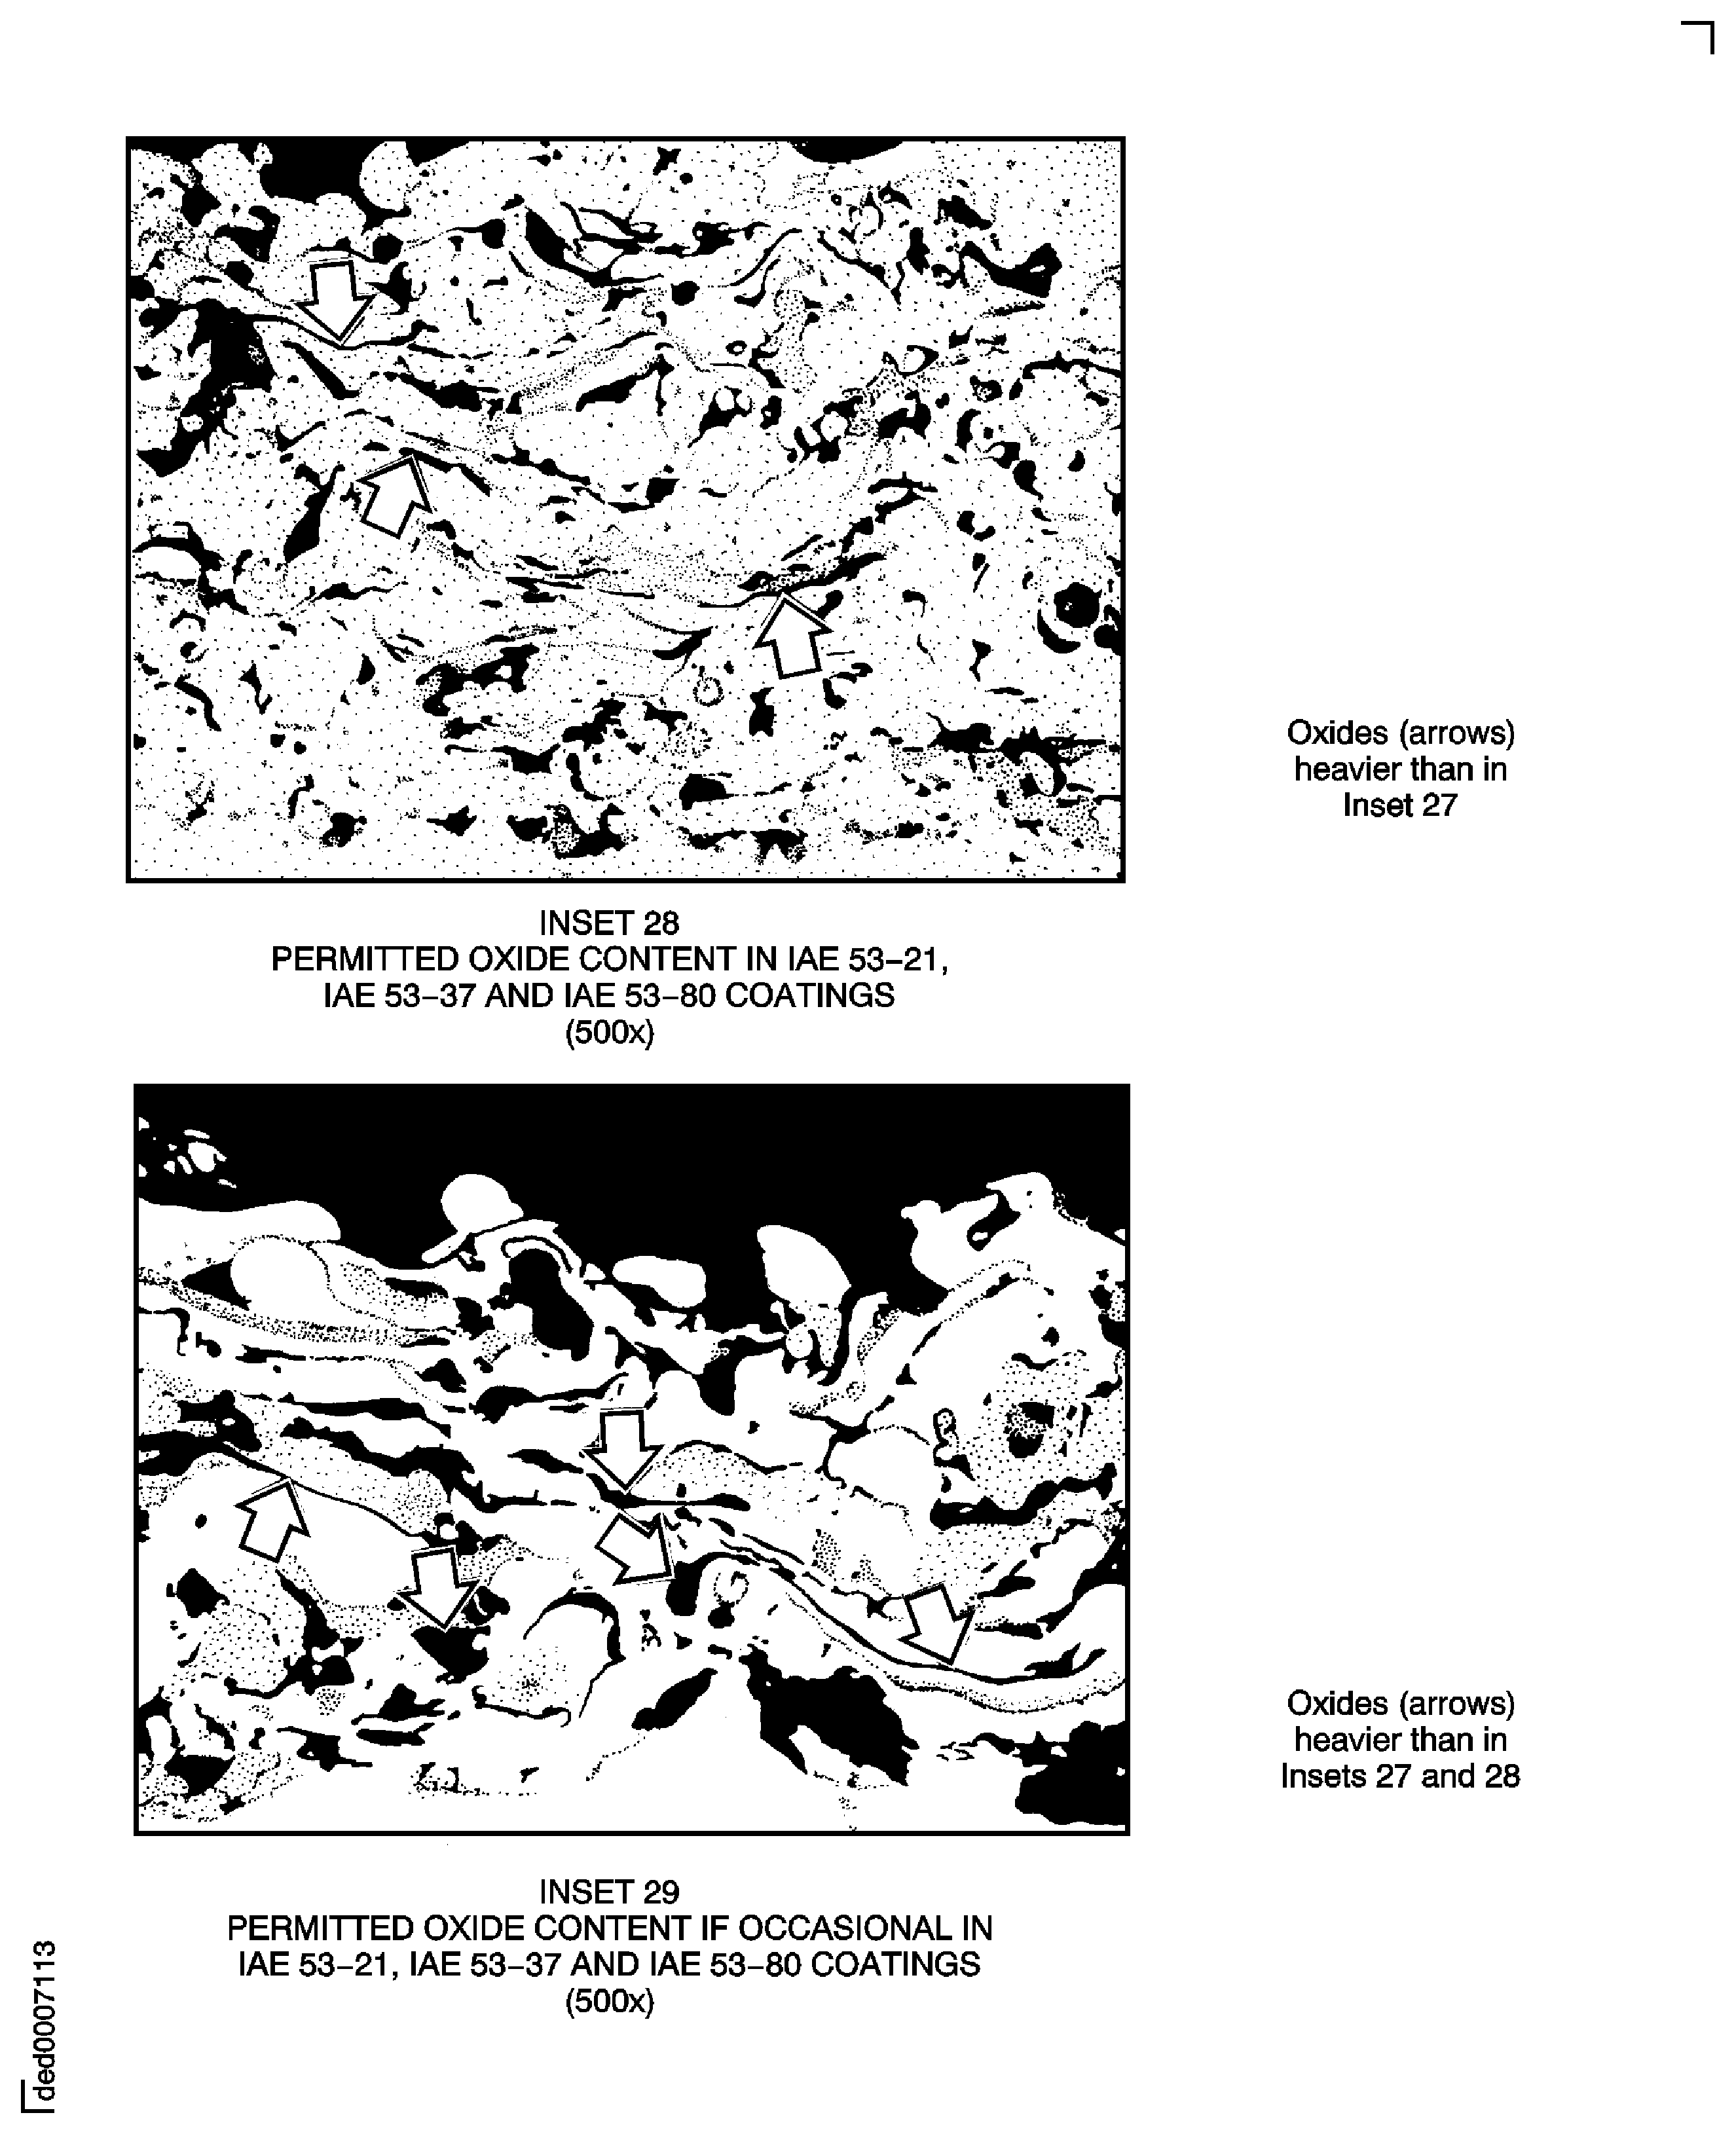
Figure: Oxides in coatings
Oxides in coatings
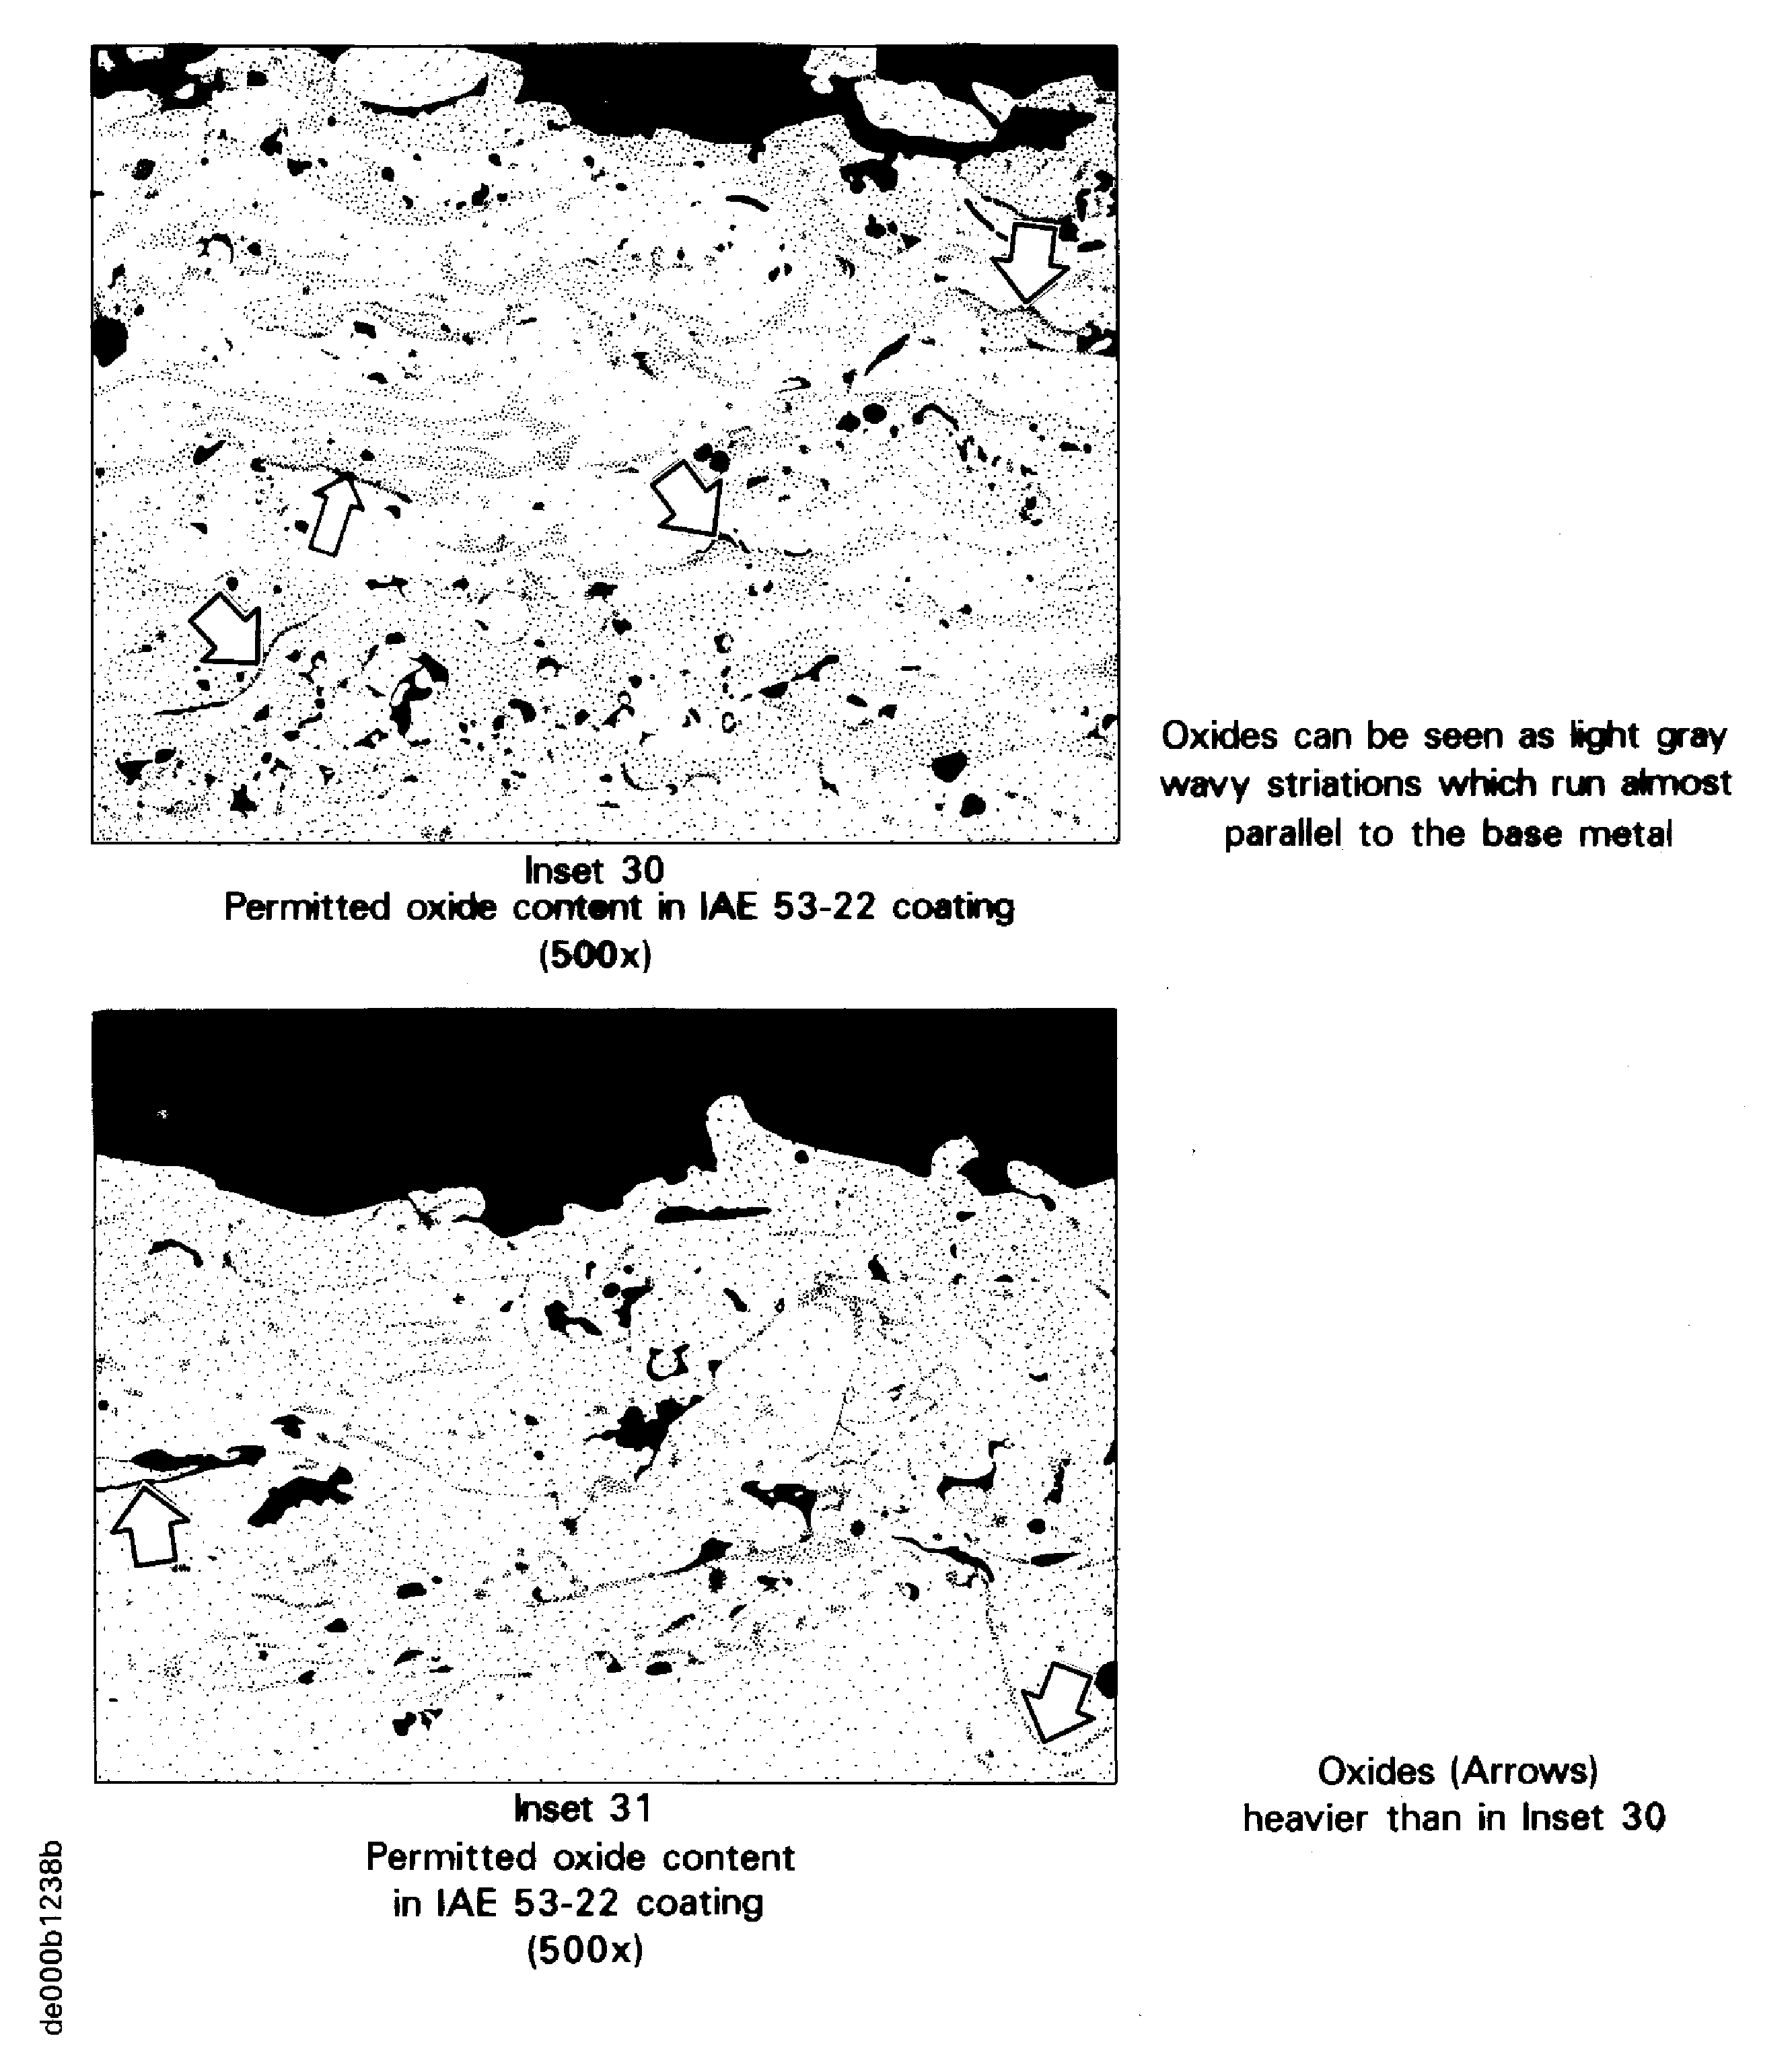
Figure: Oxides in coatings
Oxides in coatings
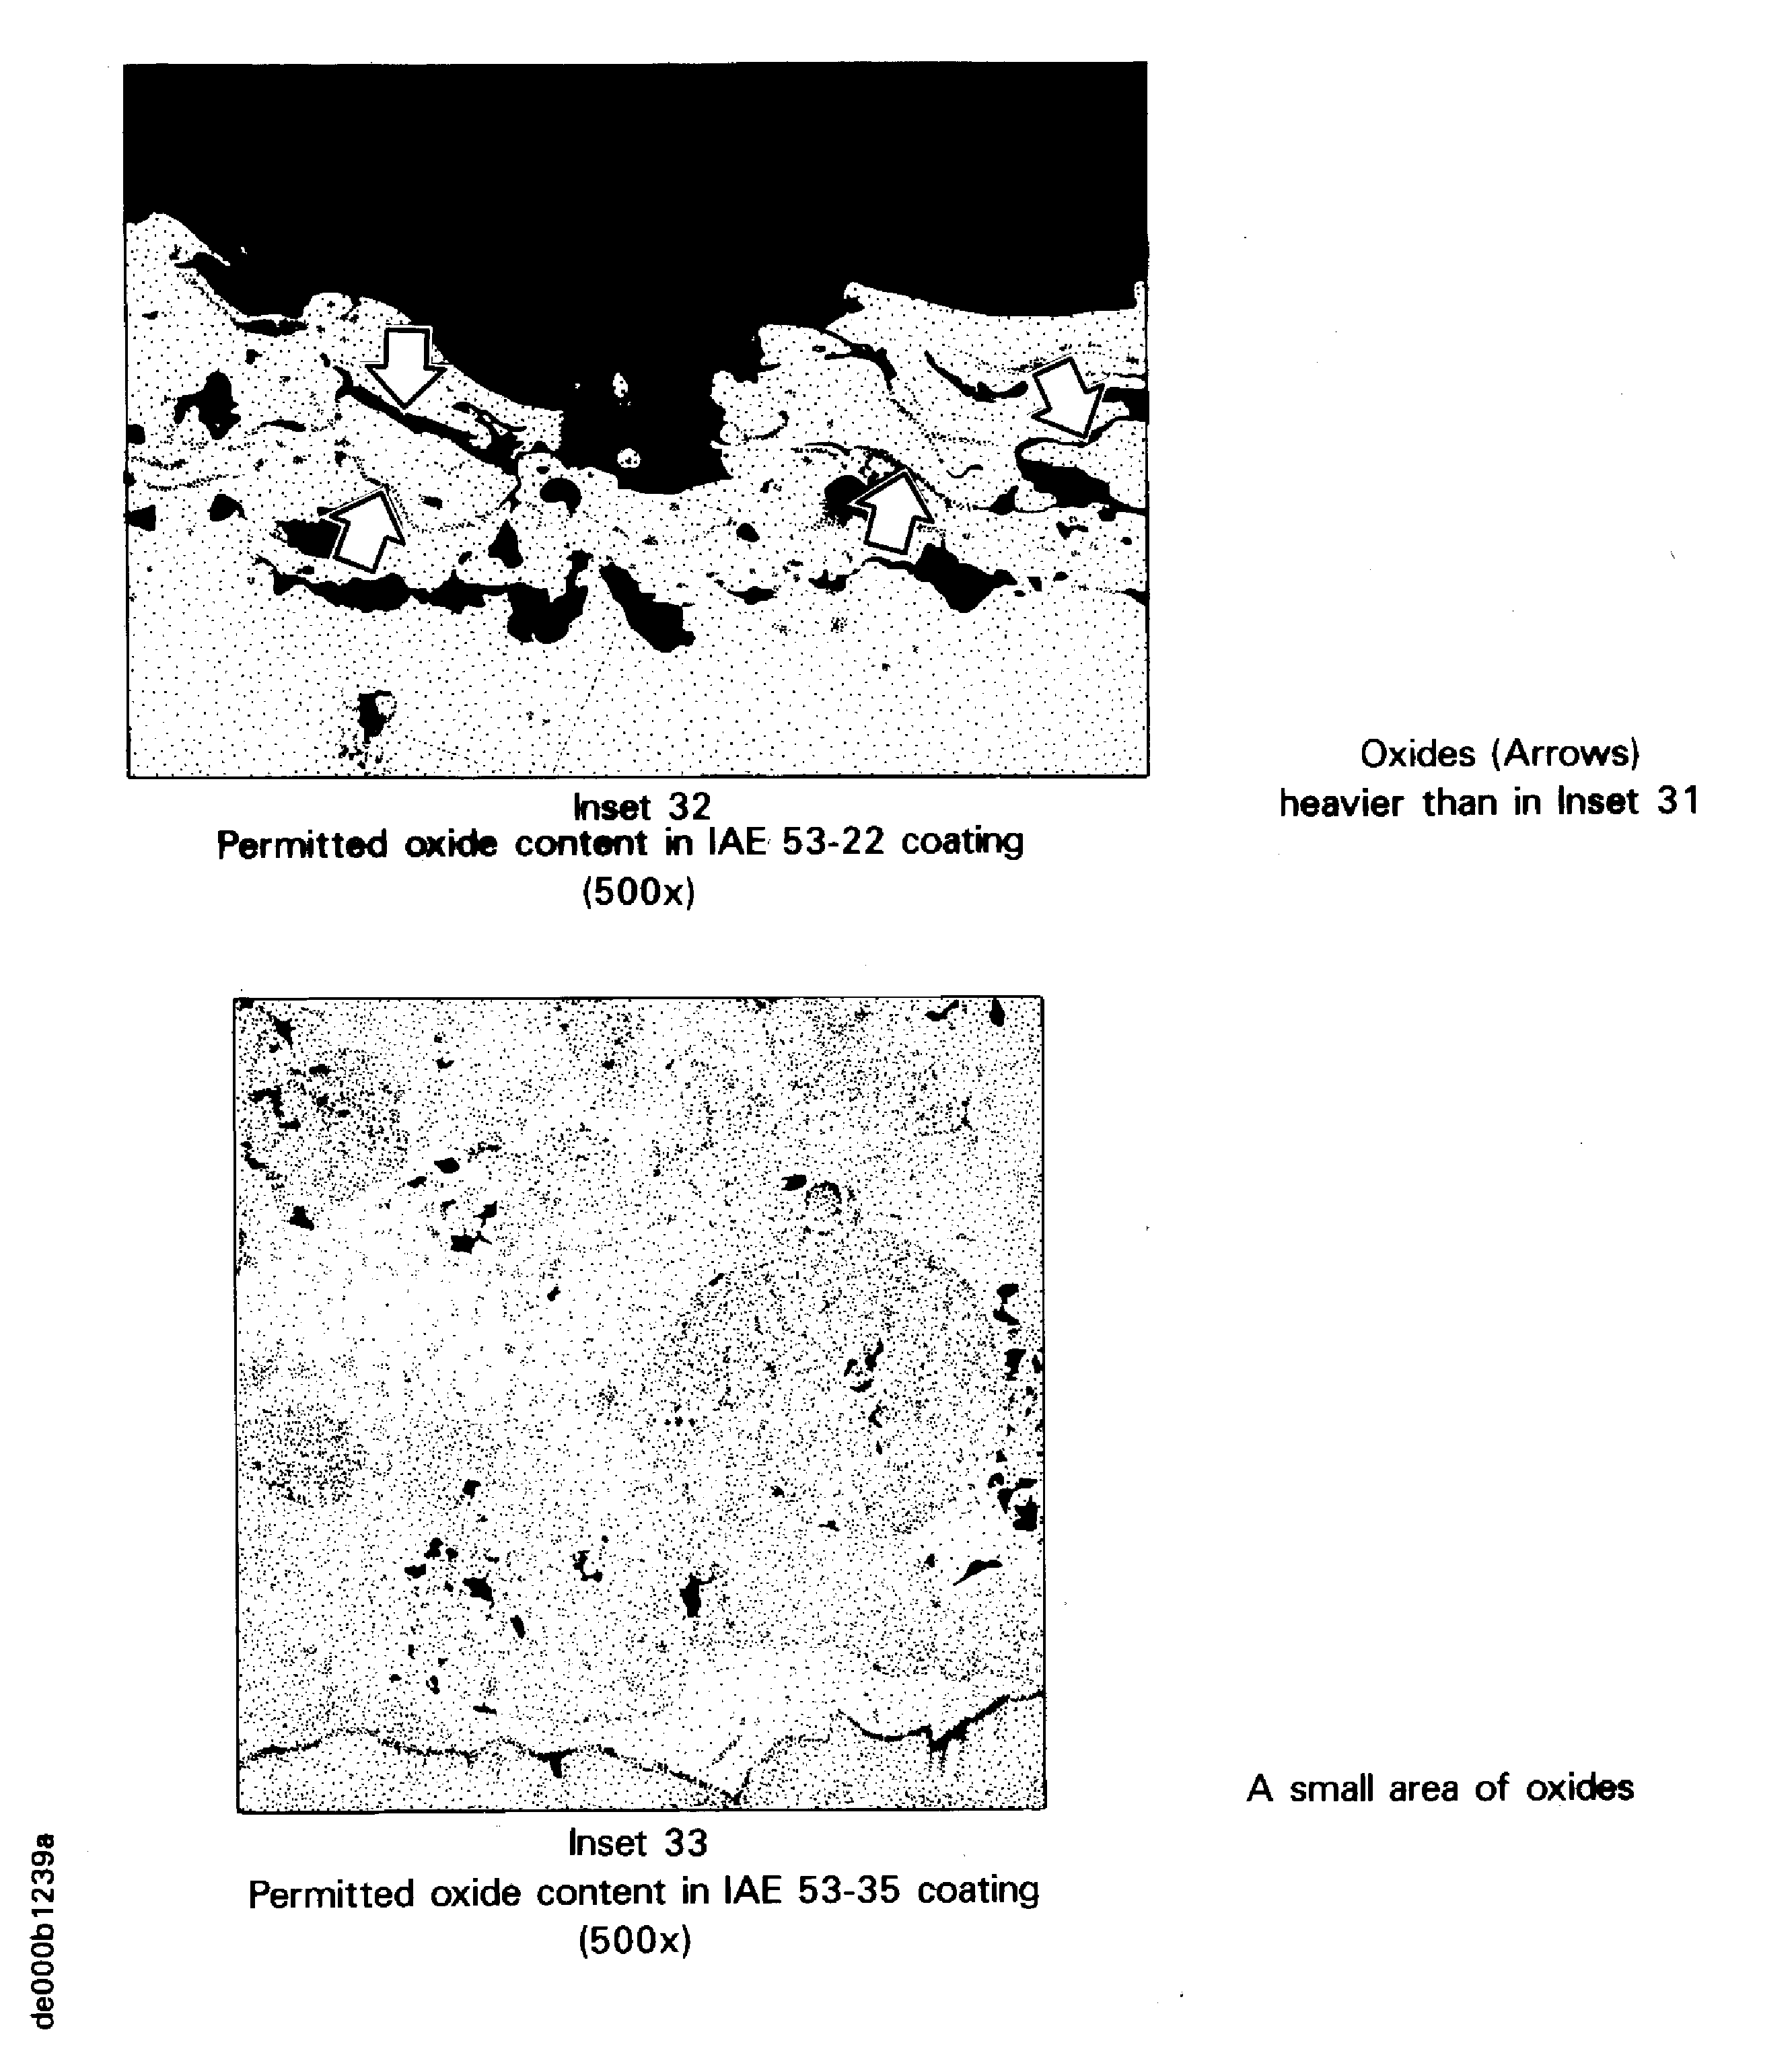
Figure: Oxides in coatings
Oxides in coatings
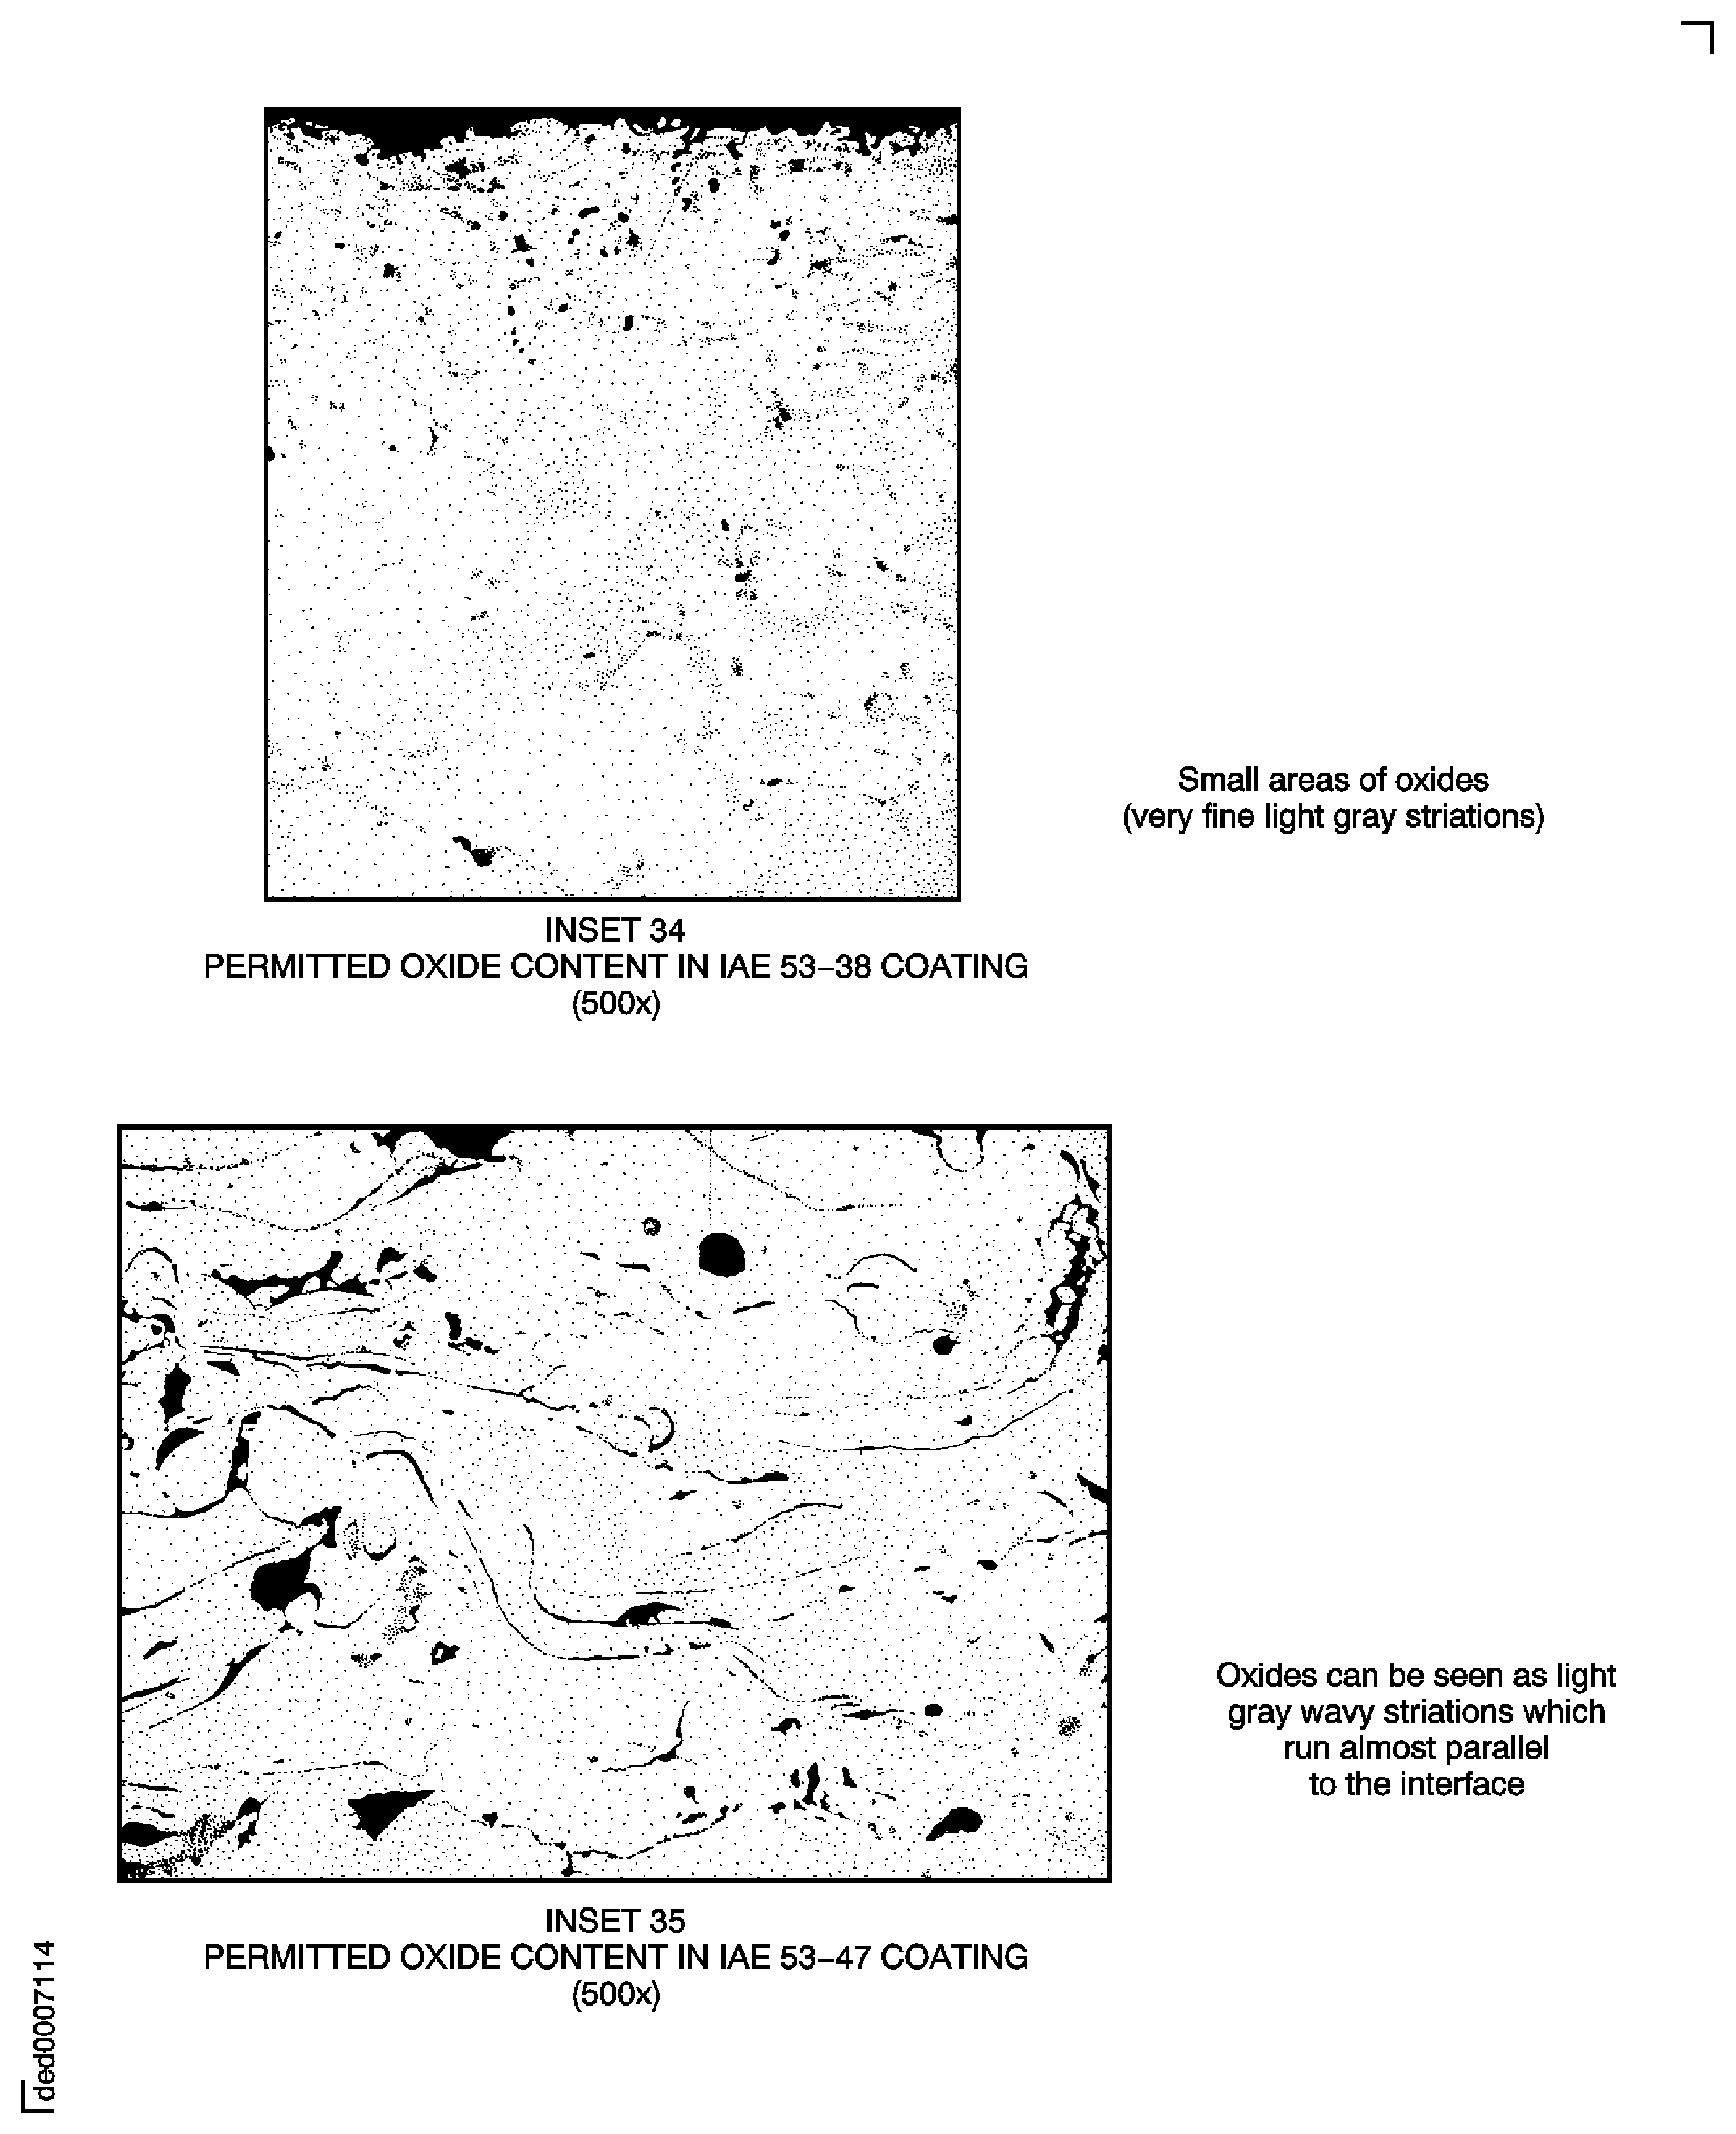
Figure: Oxides in coatings
Oxides in coatings
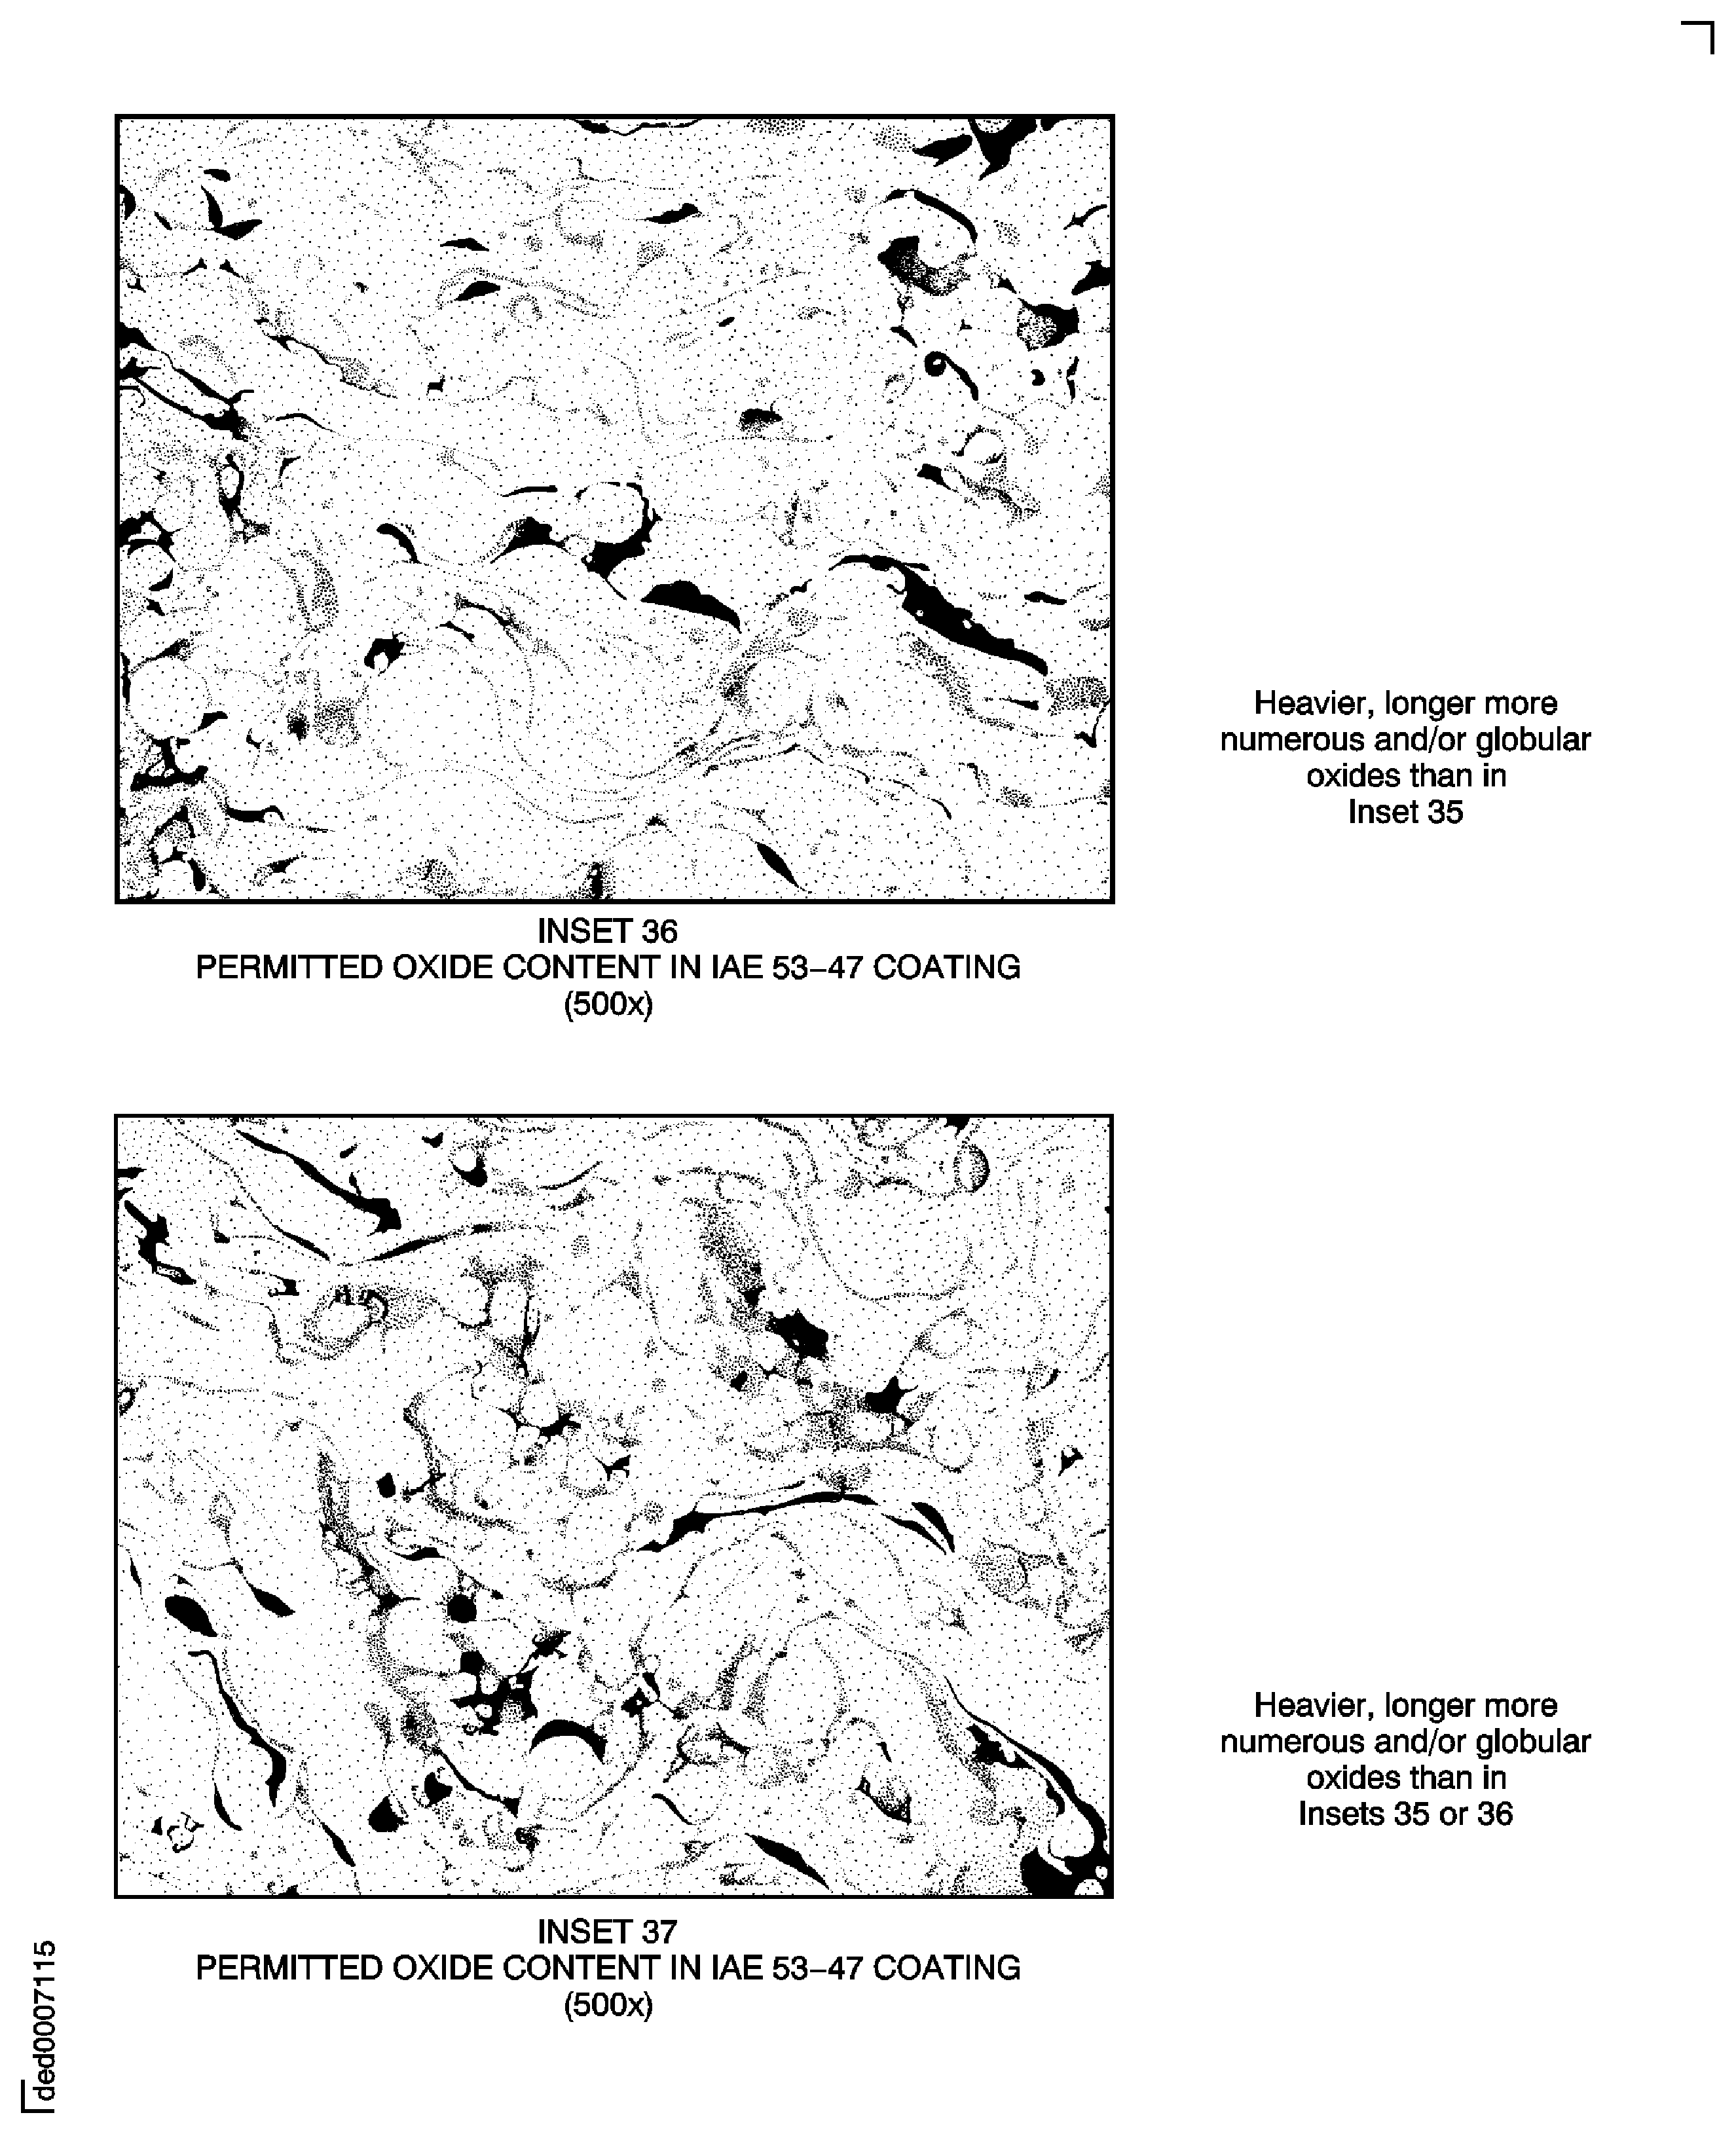
Figure: Oxides in coatings
Oxides in coatings
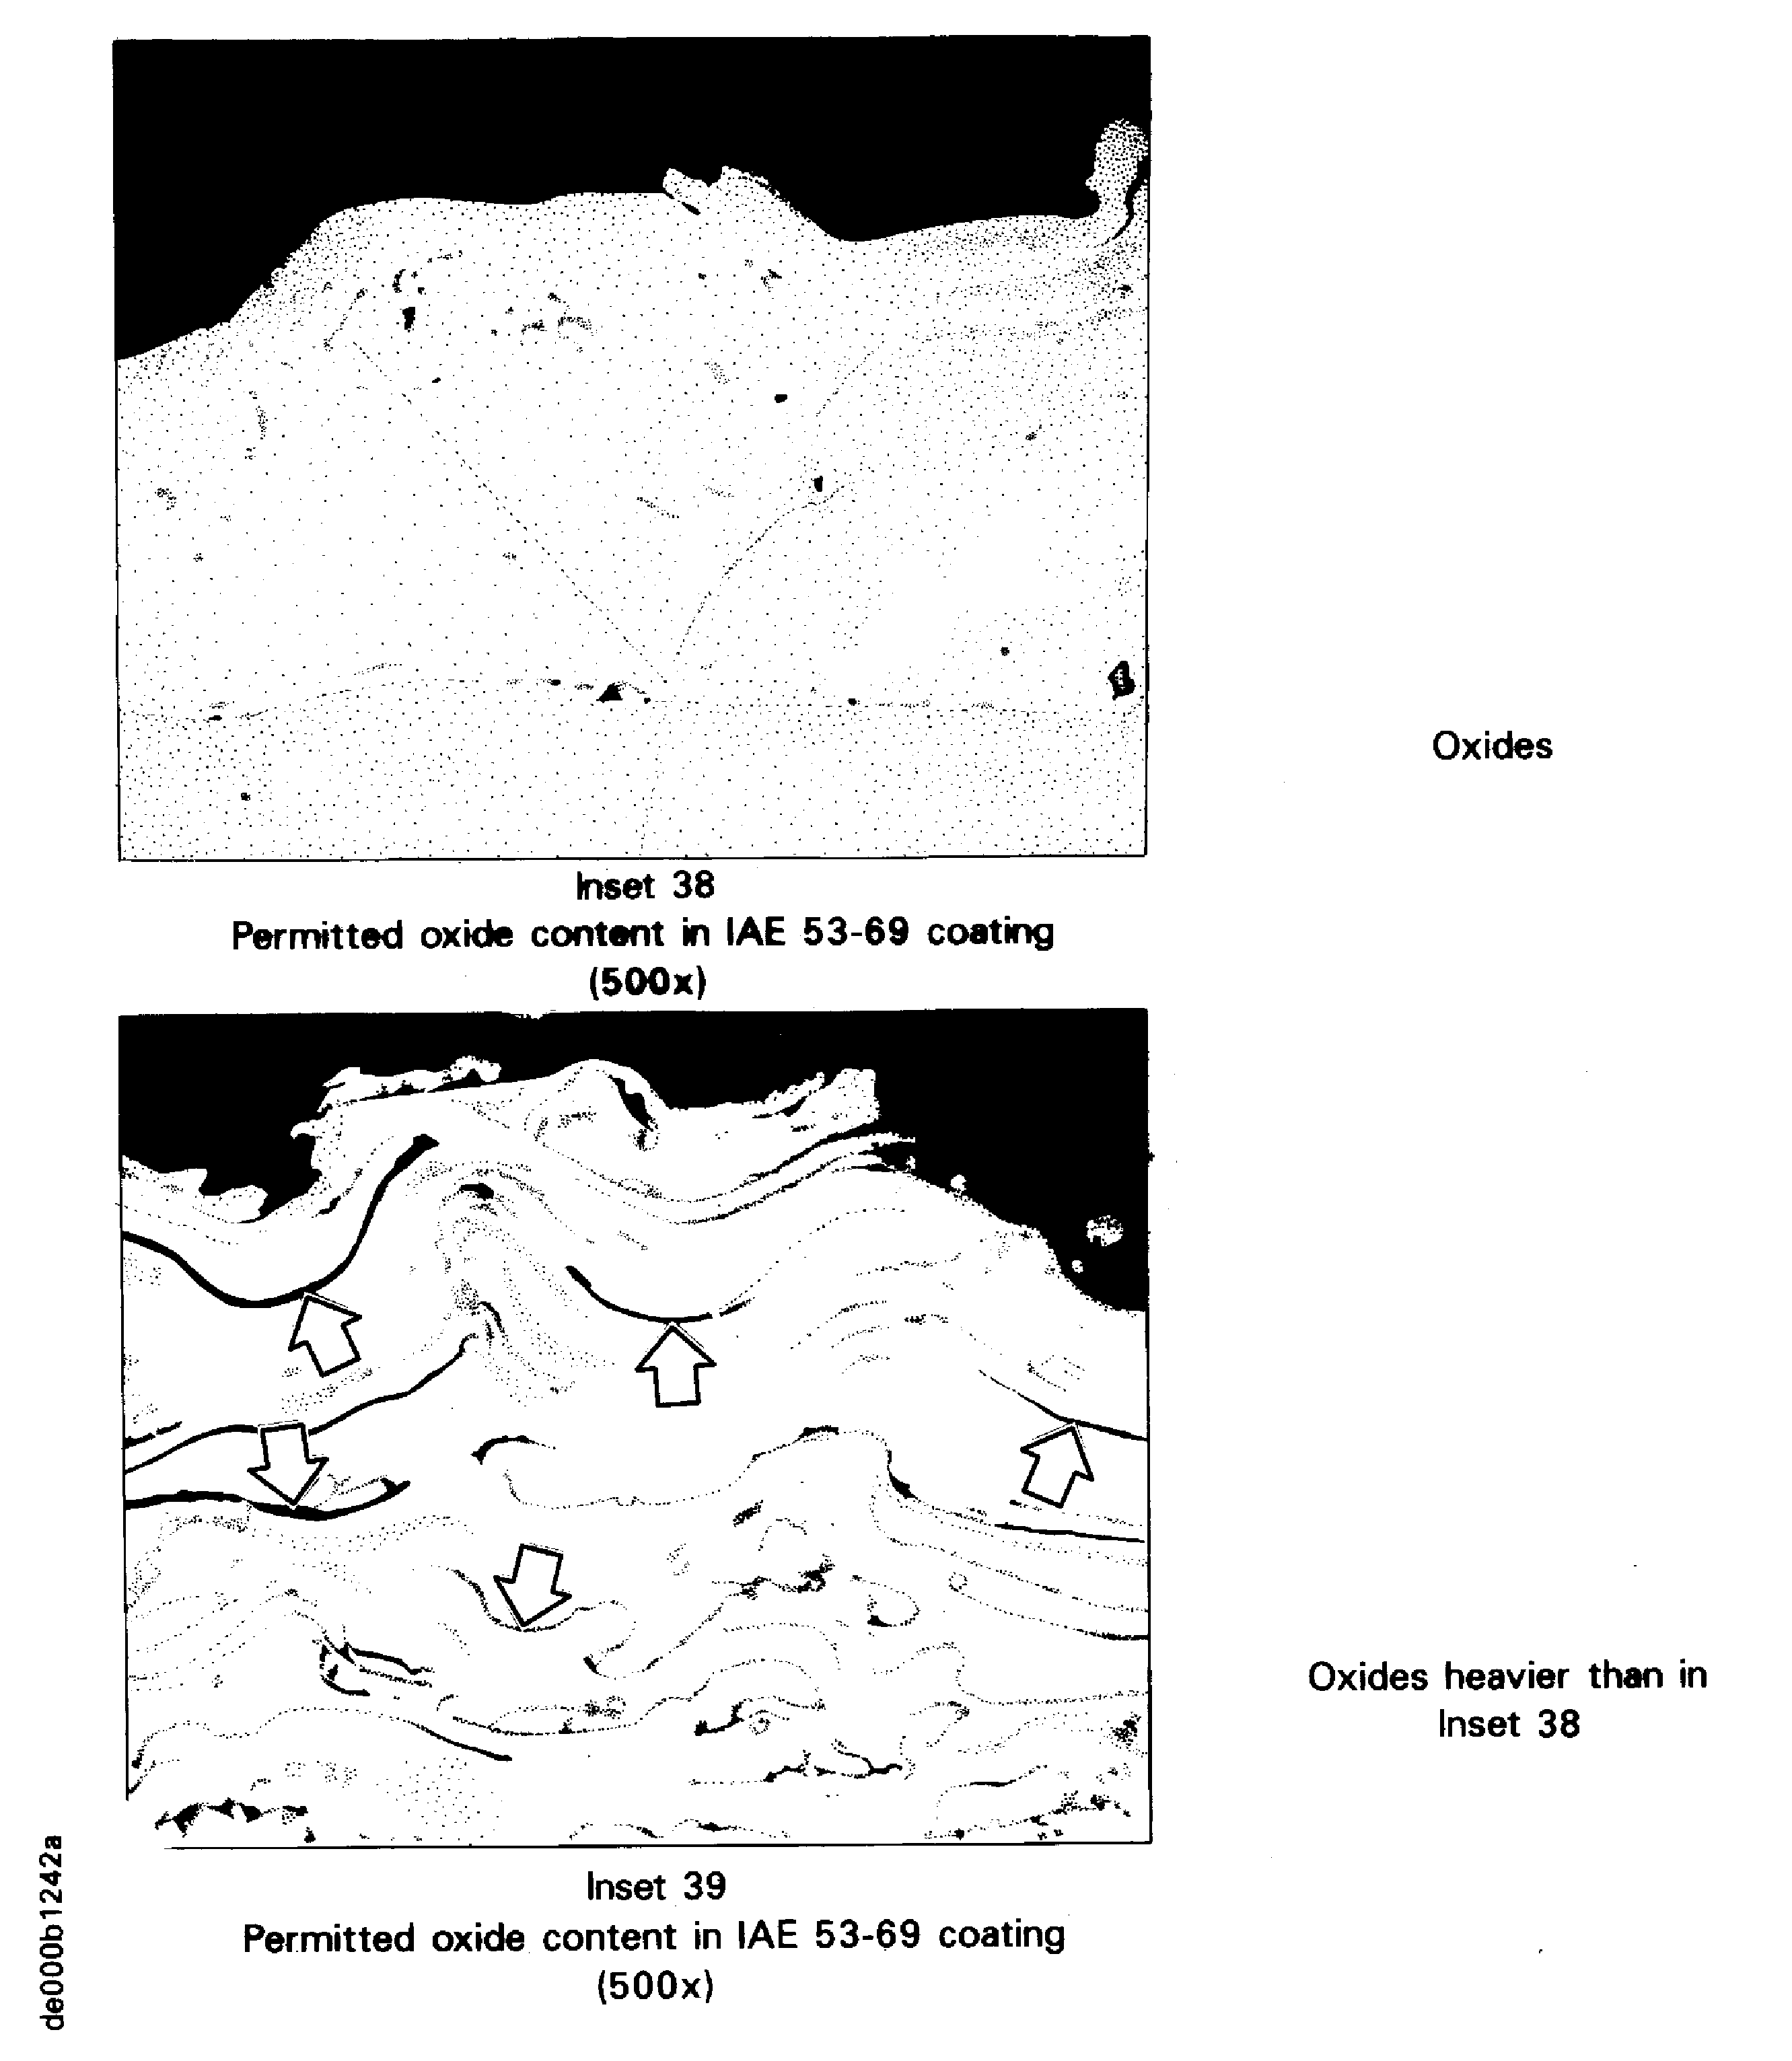
Figure: Oxides in coatings
Oxides in coatings
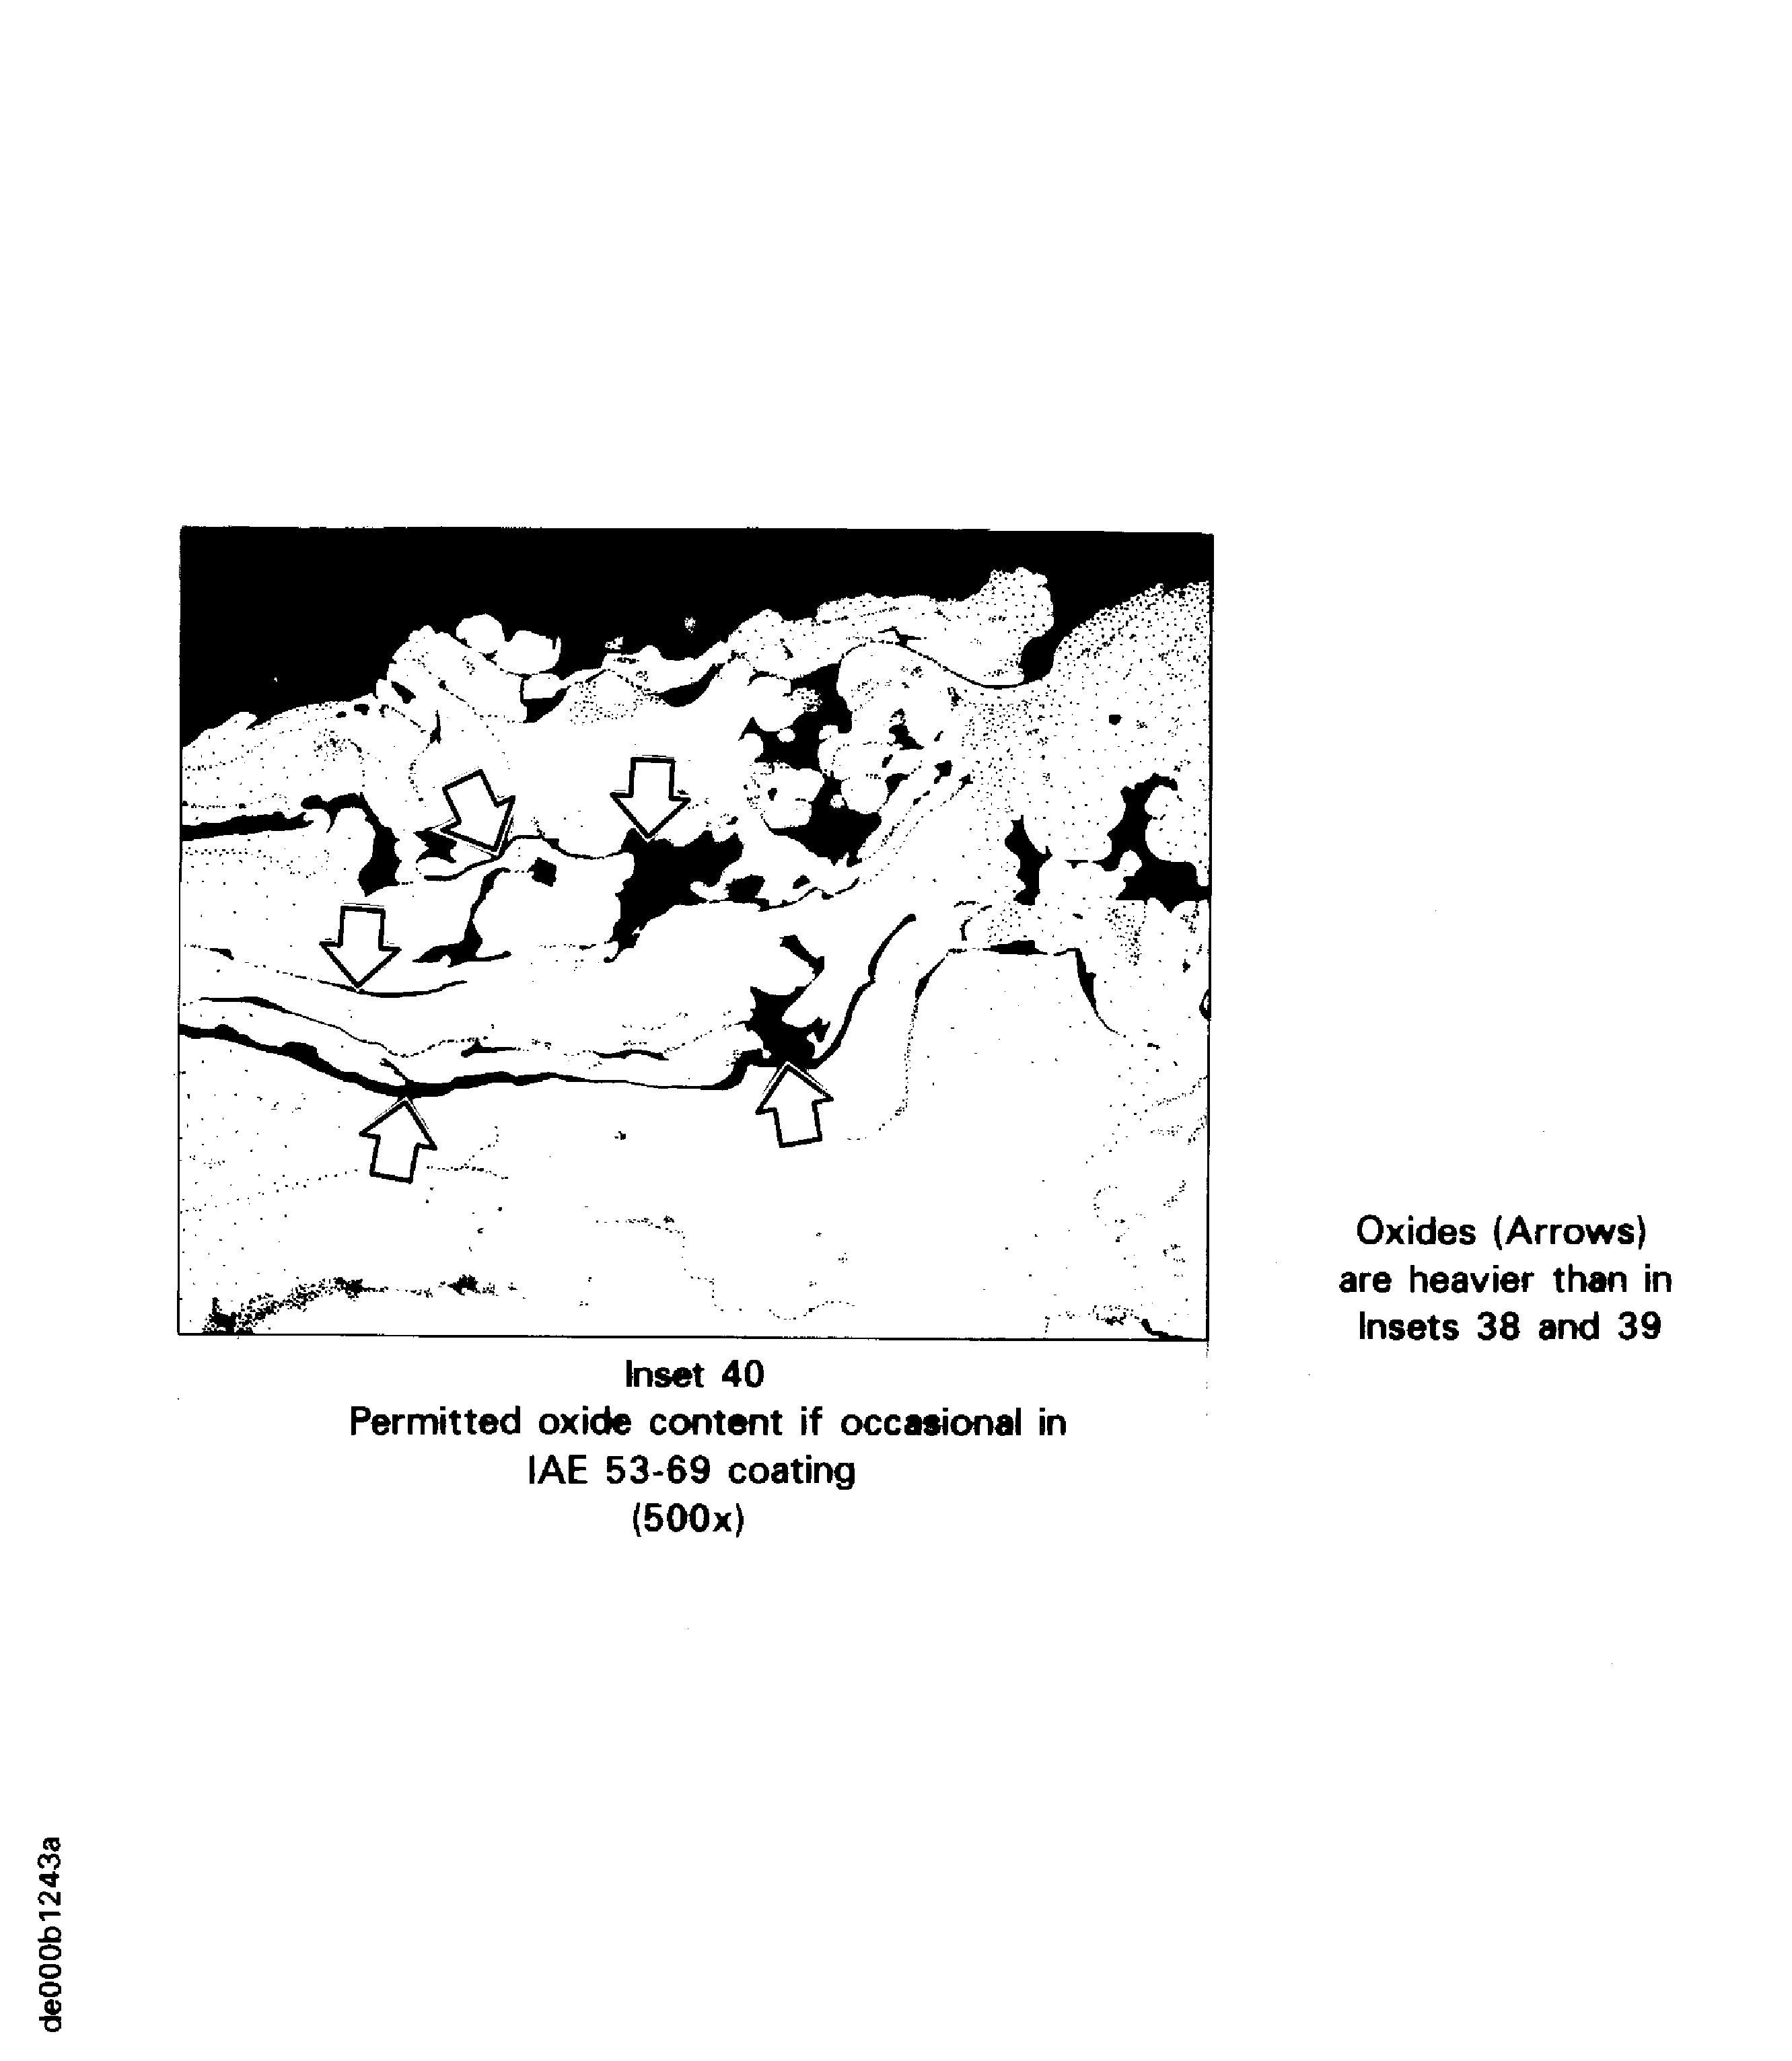
Figure: Oxides in coatings
Oxides in coatings
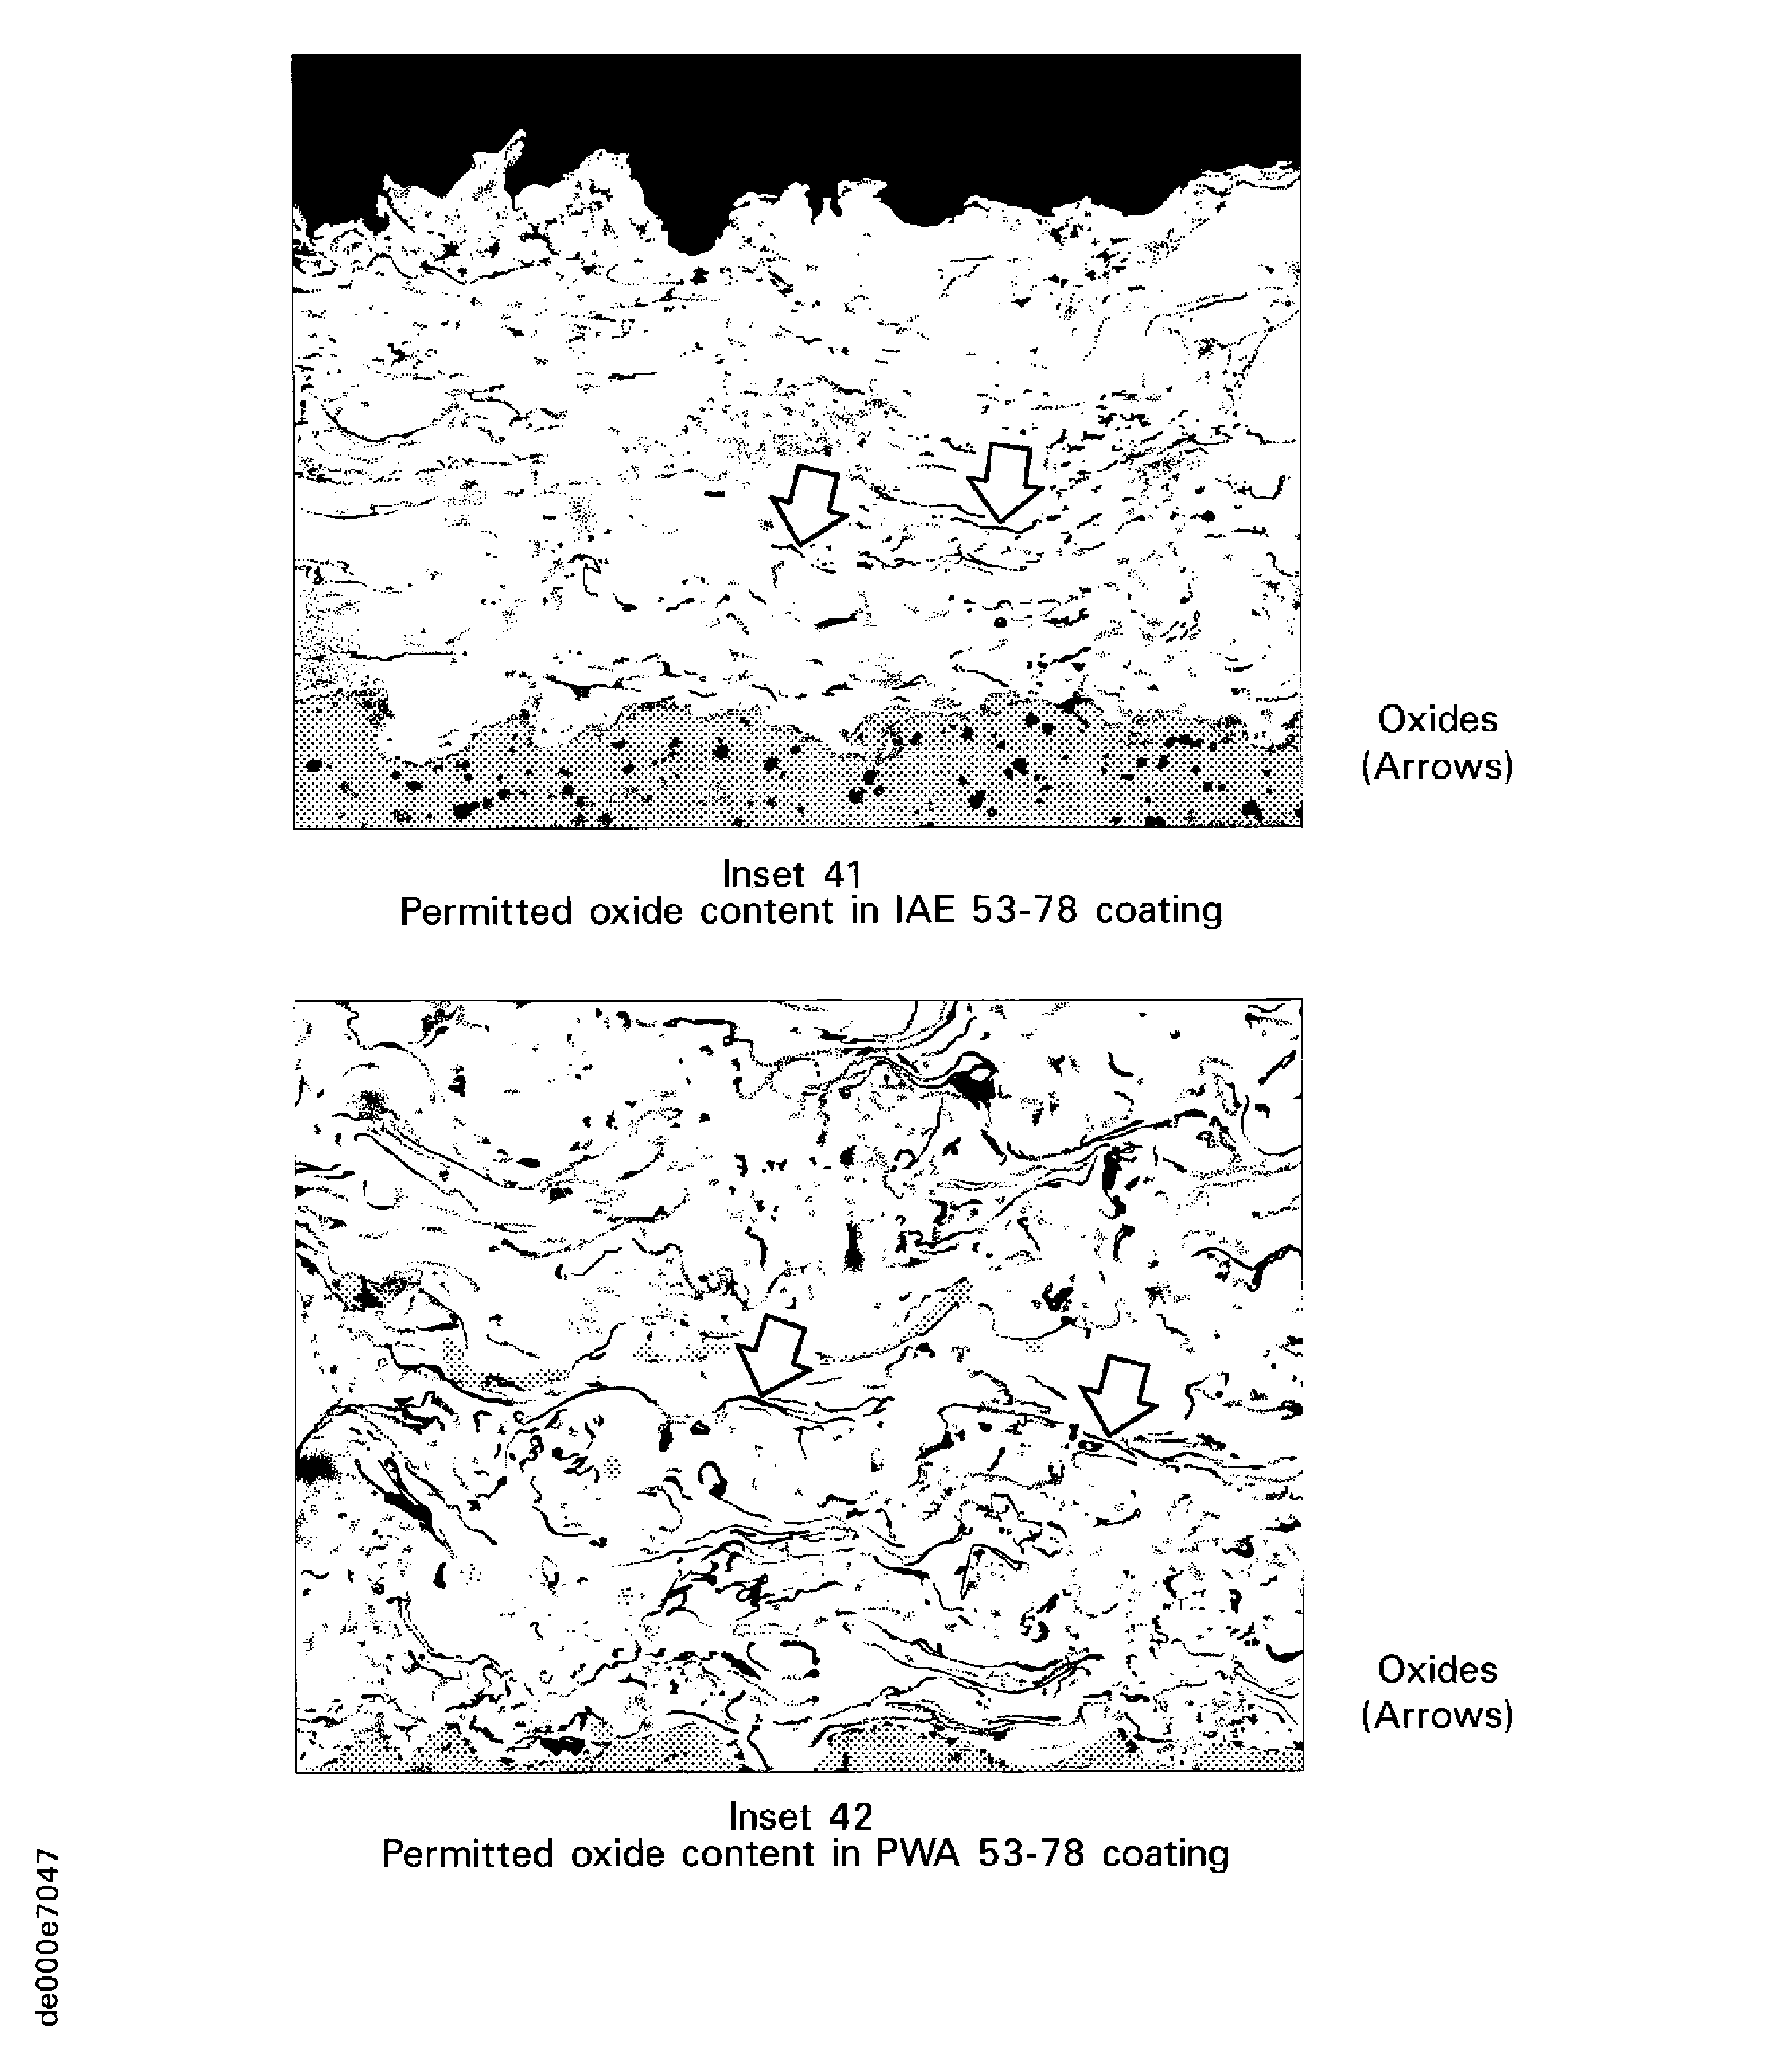
Figure: Deleted
Deleted

Figure: Unmelted particles in coatings
Unmelted particles in coatings
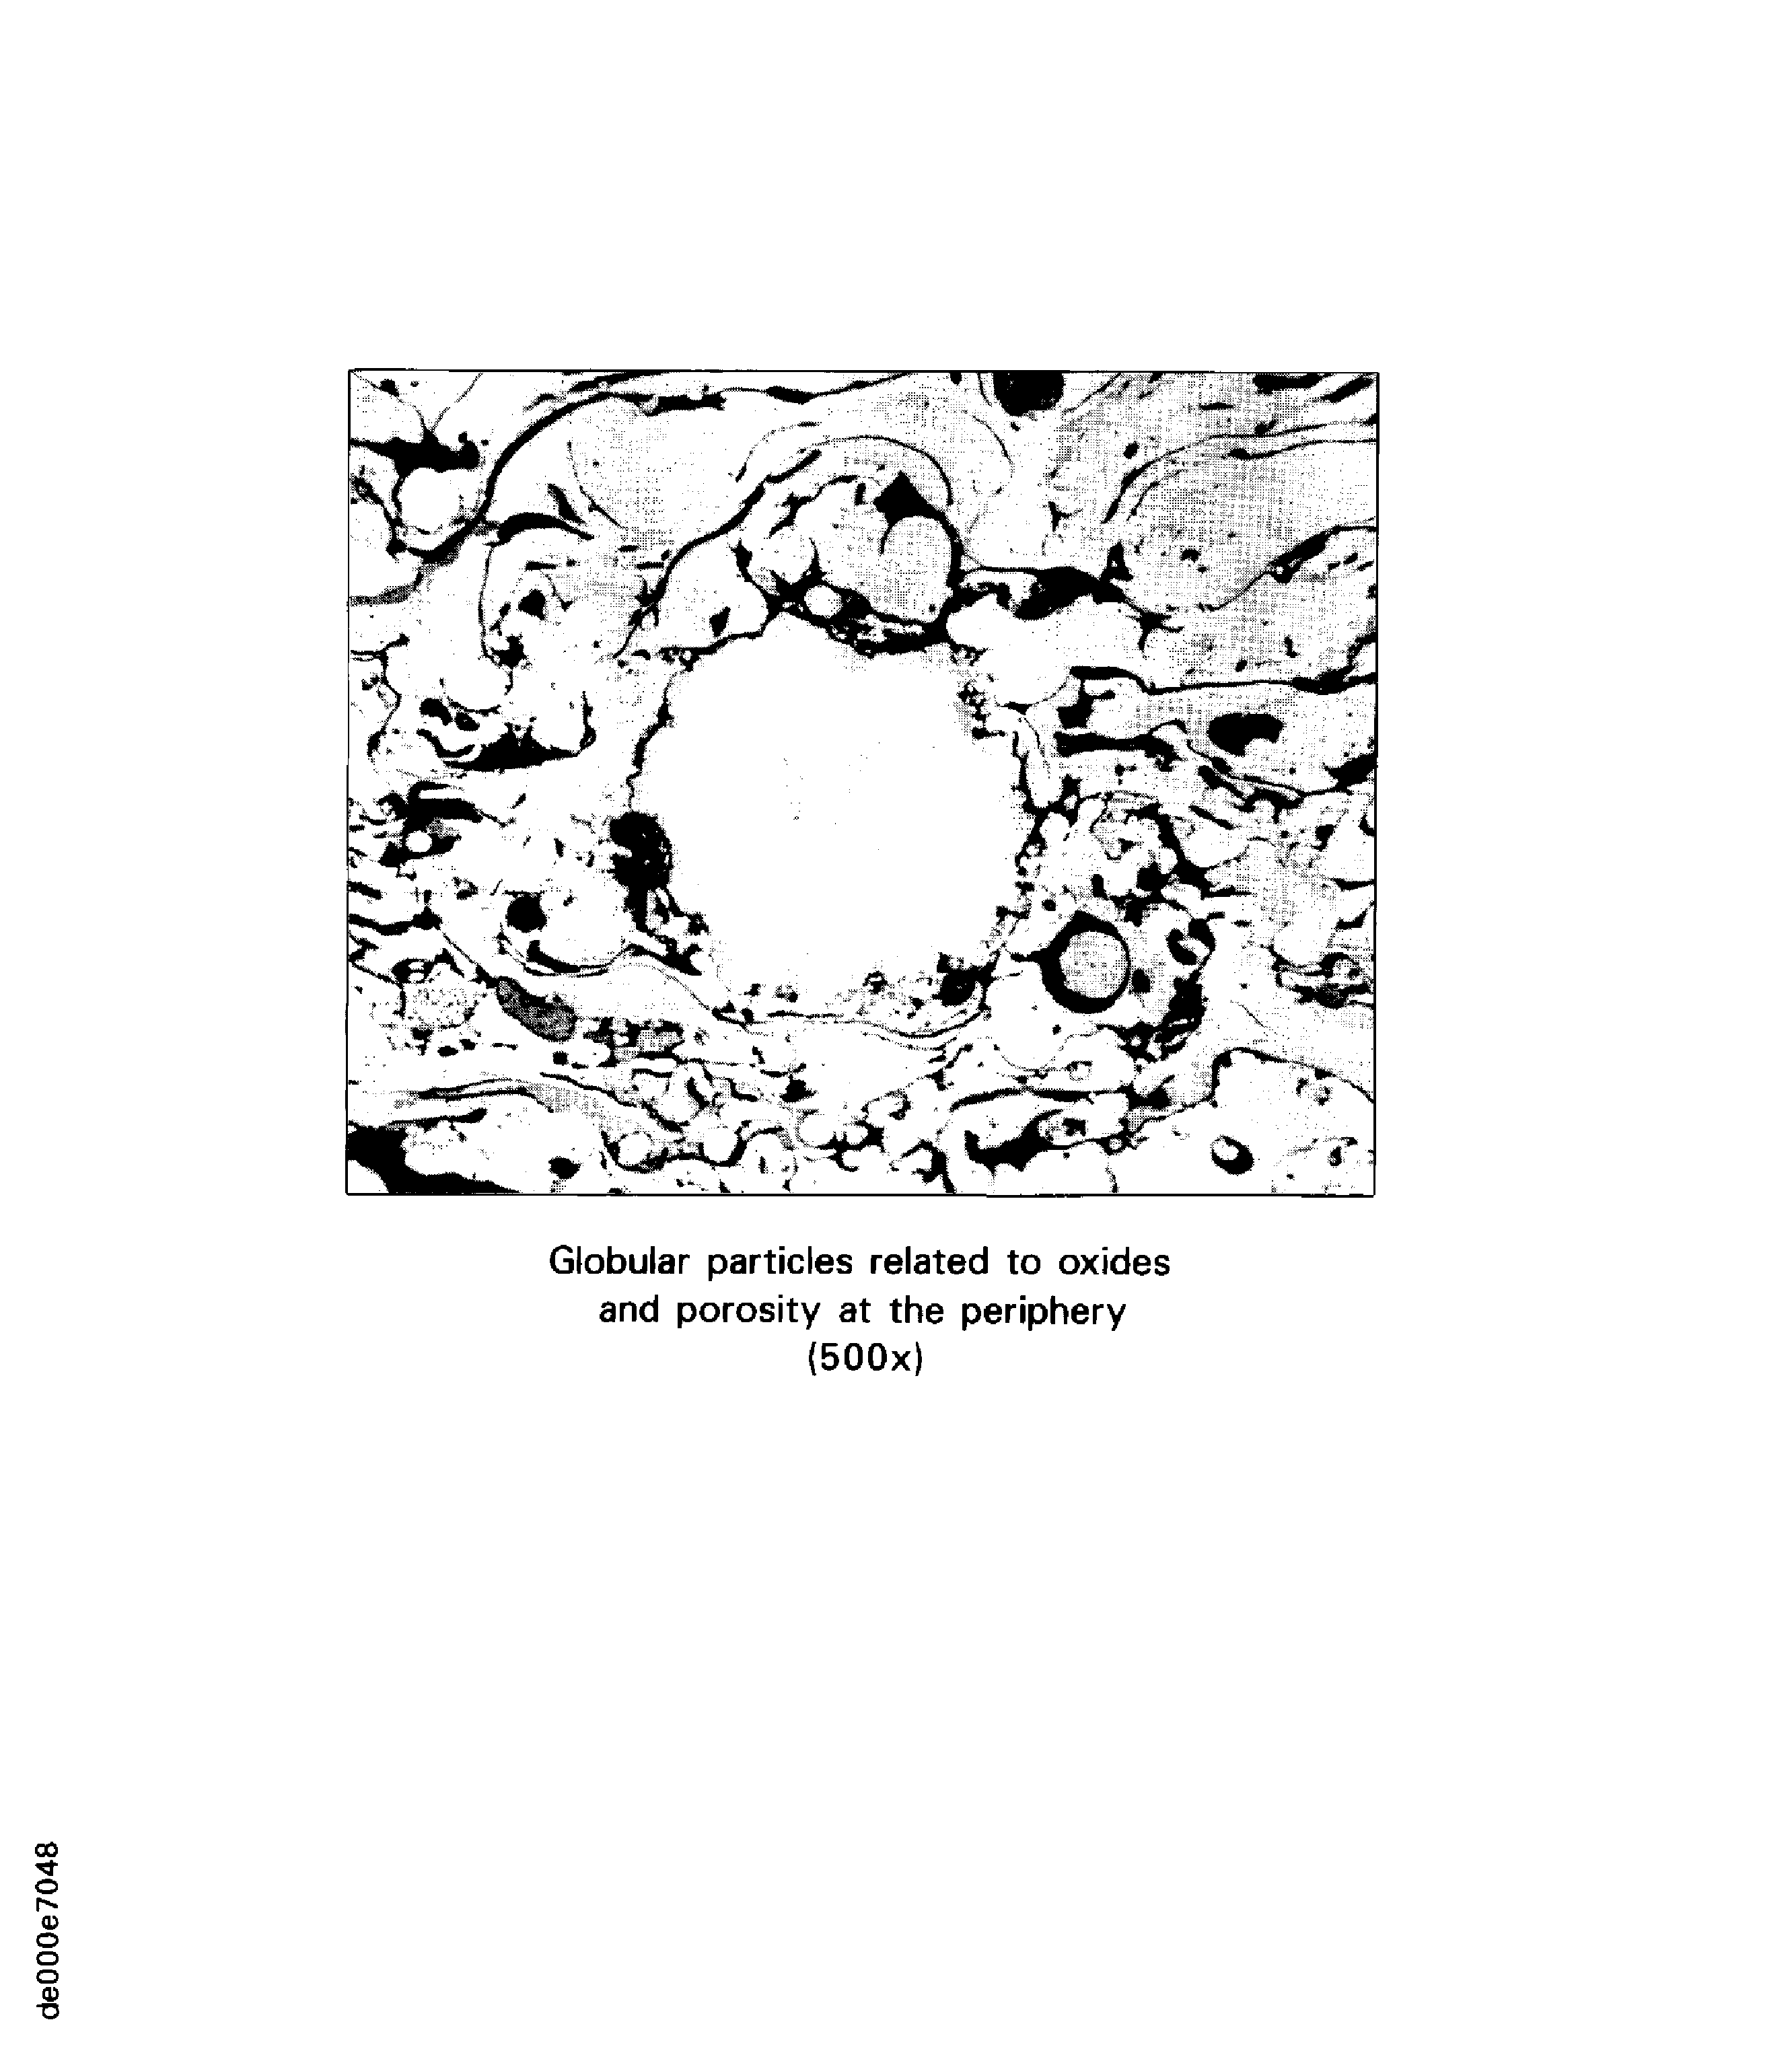
Figure: Unreacted nickel - aluminum particles in coatings
Unreacted nickel - aluminum particles in coatings

Figure: Integrity in coatings
Integrity in coatings
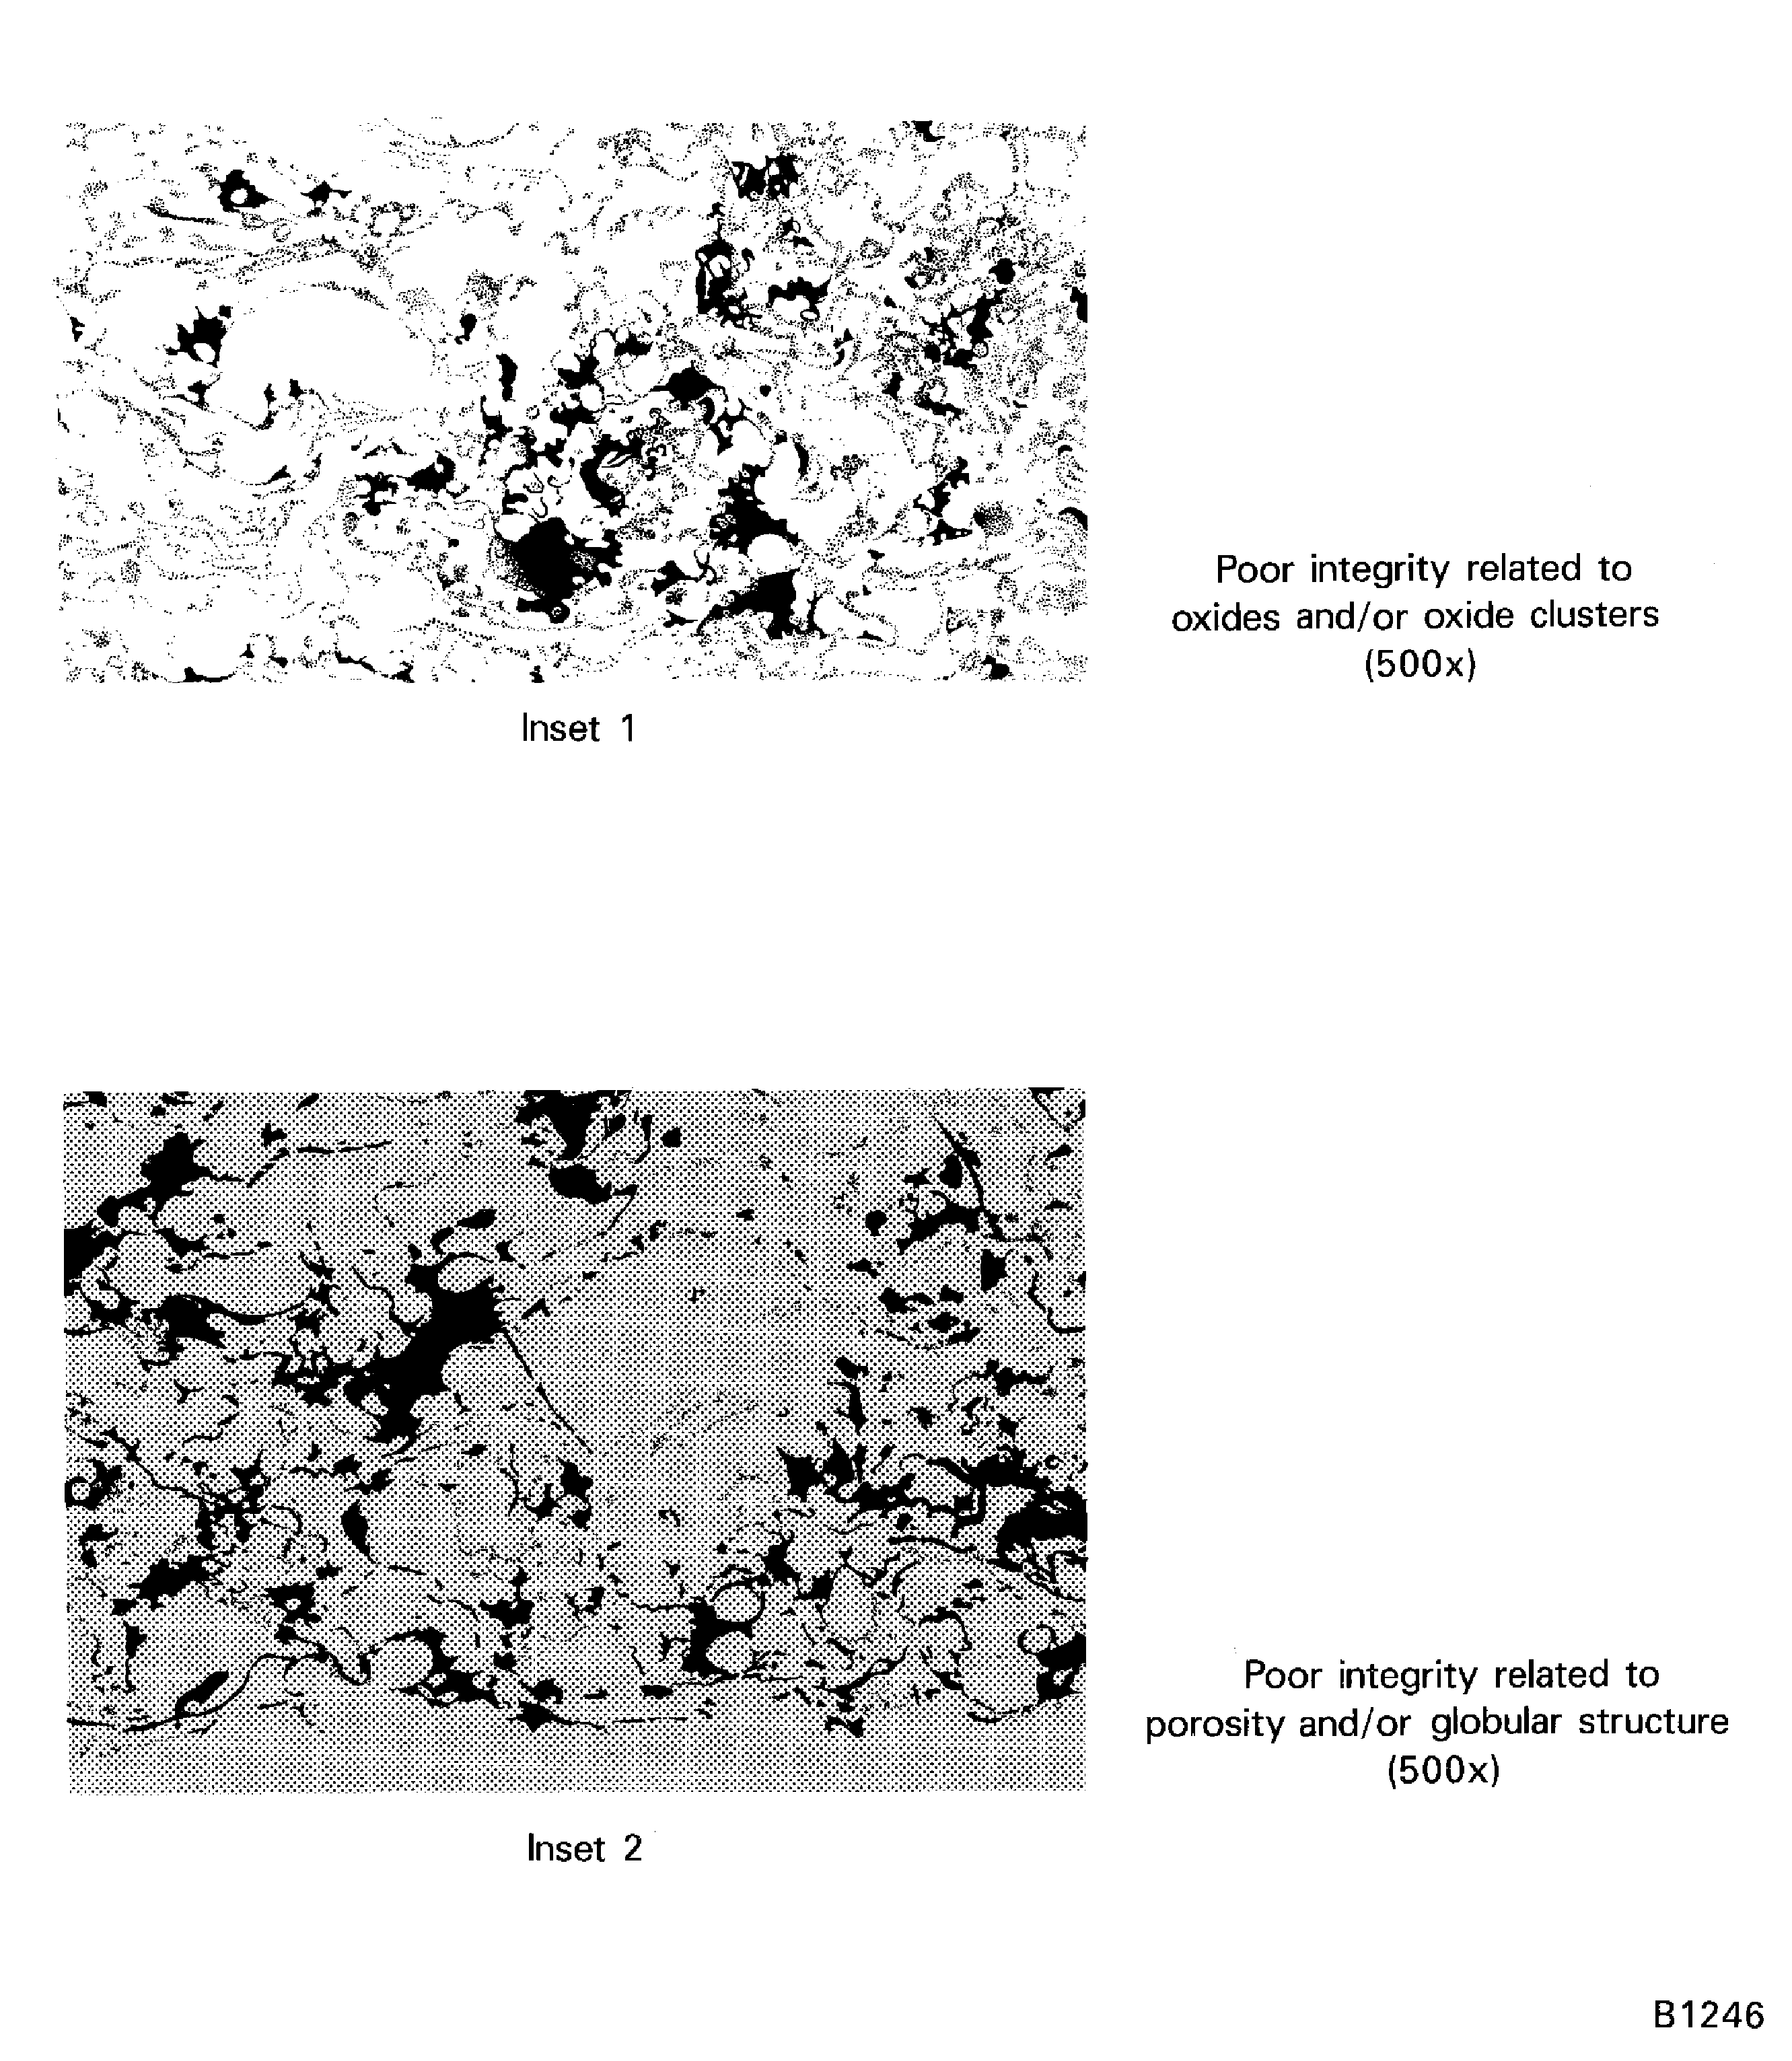
Figure: Bond between coatings
Bond between coatings
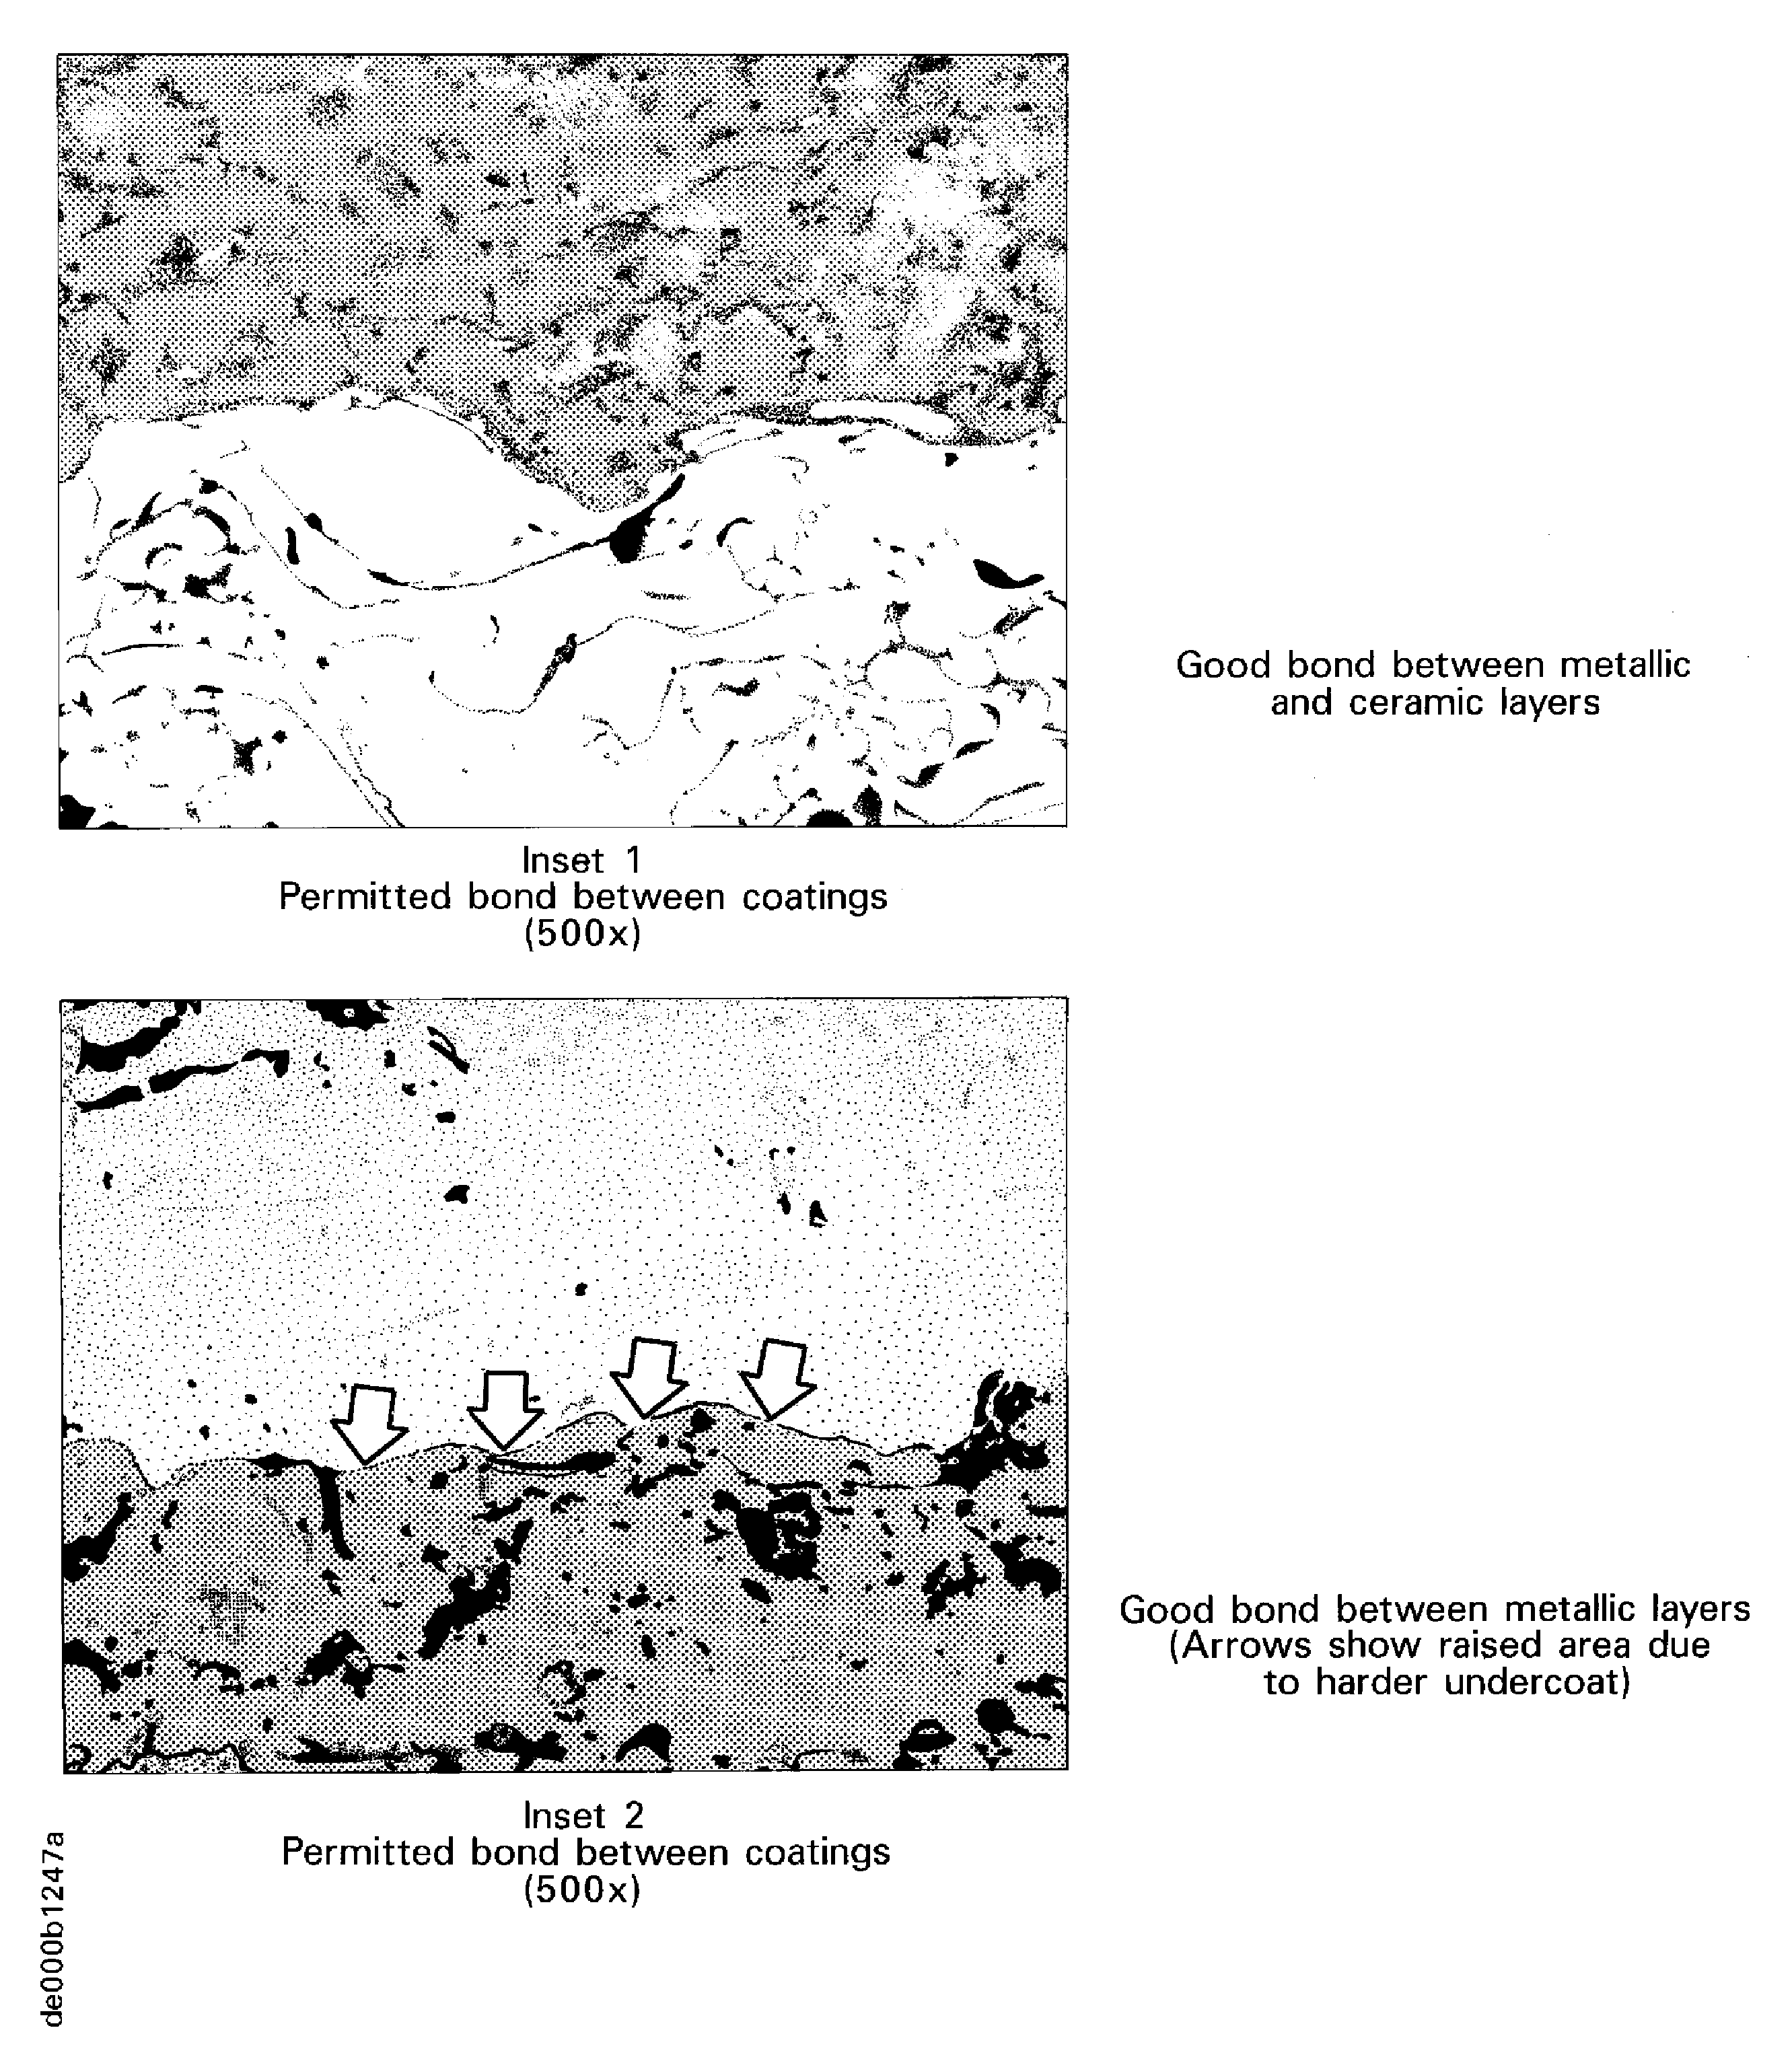
Figure: Usual appearance of IAE 53-10 and IAE 53-12 (500X)
Usual appearance of IAE 53-10 and IAE 53-12 (500X)
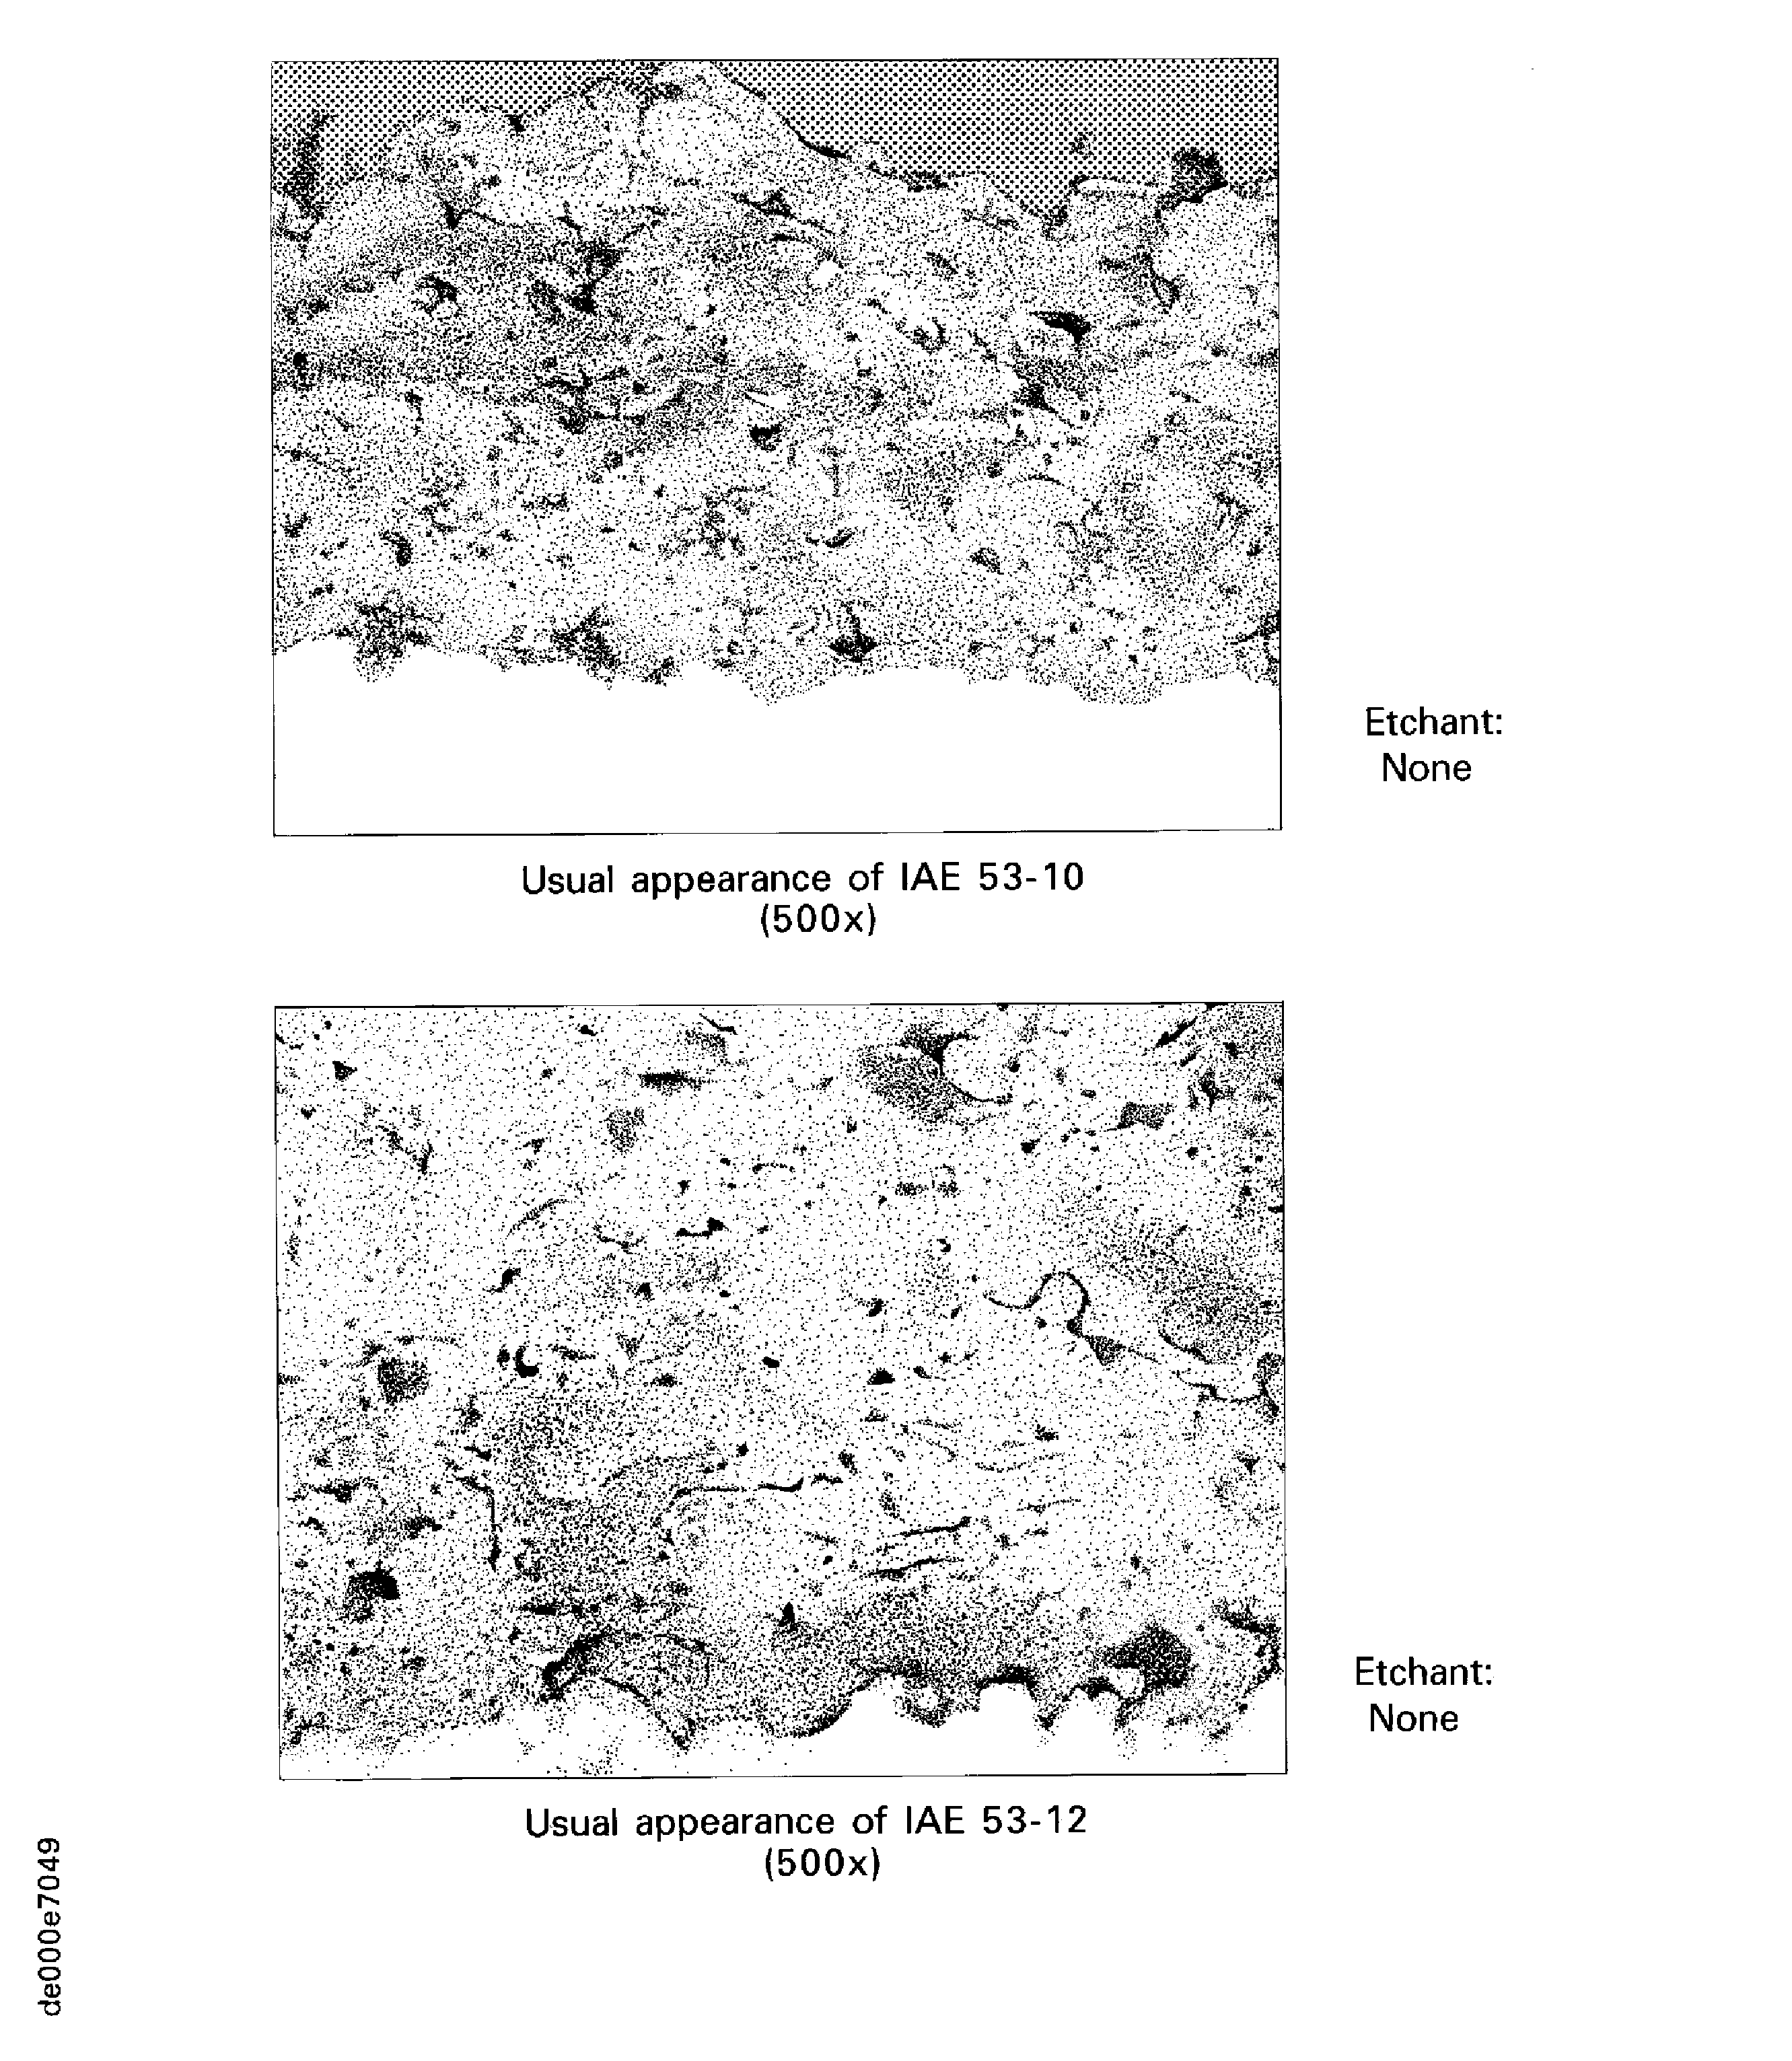
Figure: IAE 271 Coating thickness requirements for aluminum posts
IAE 271 Coating thickness requirements for aluminum posts
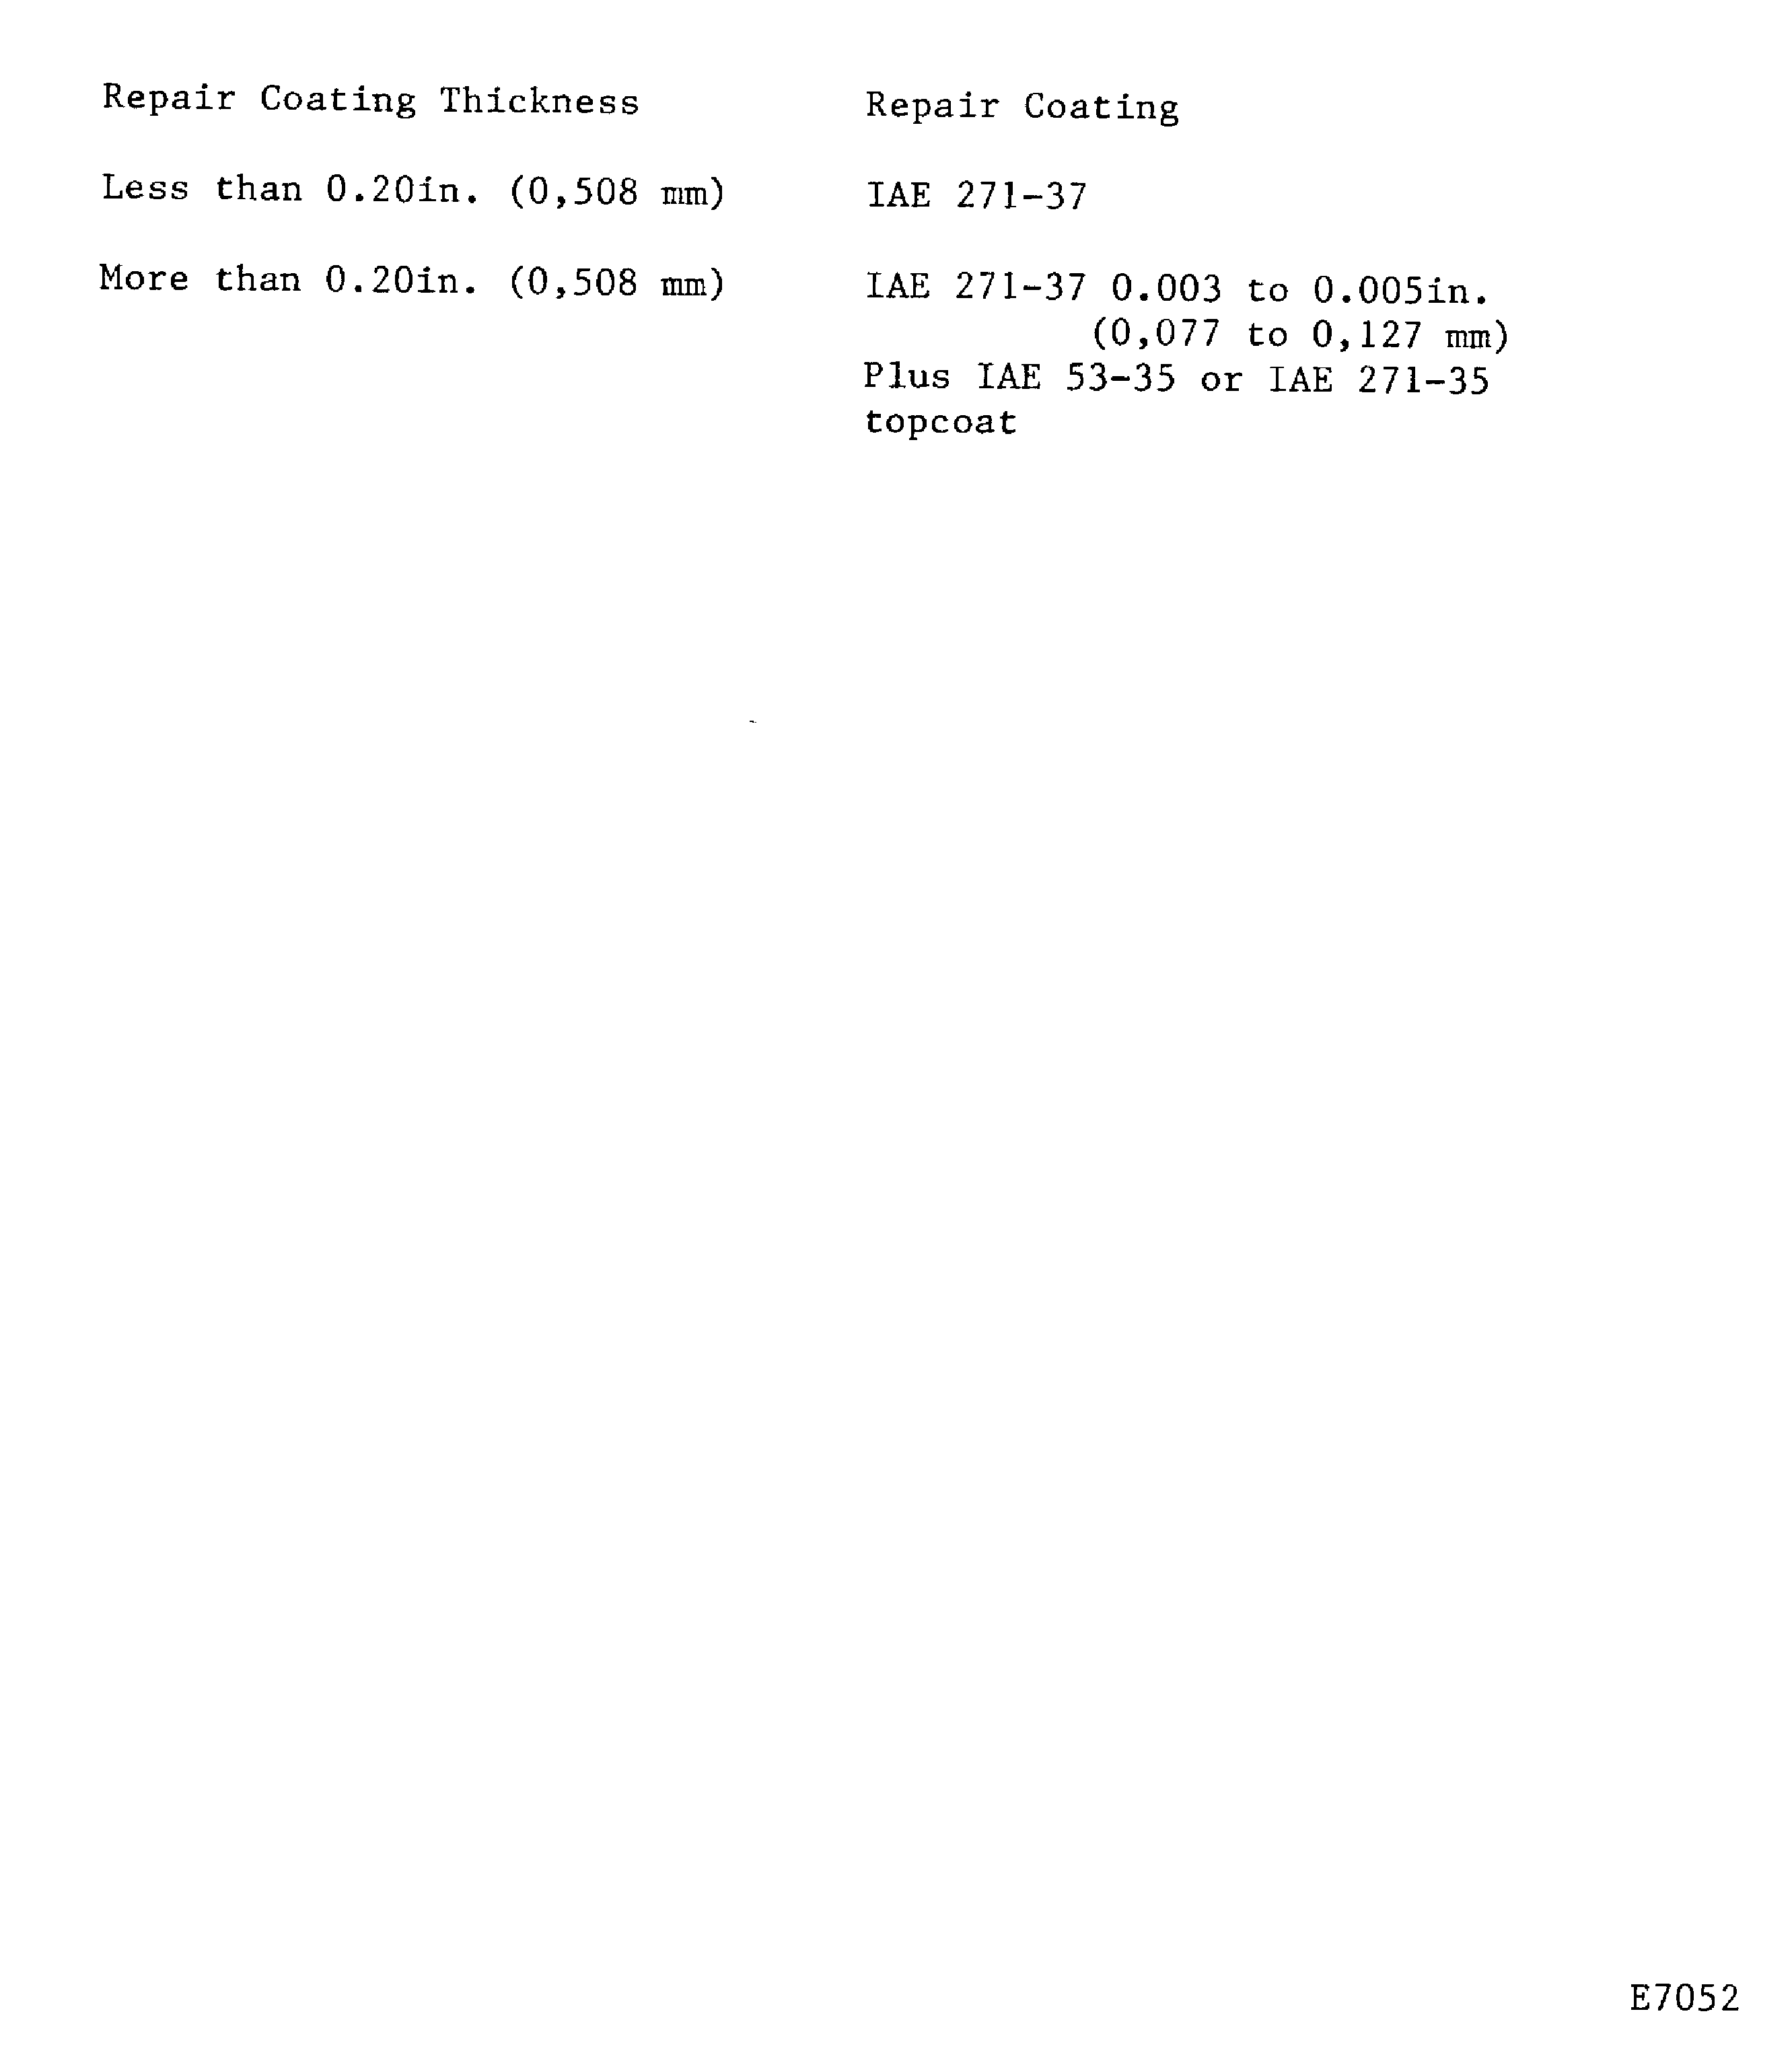
Figure: IAE 36206-4 (typical) At 500X
IAE 36206-4 (typical) At 500X
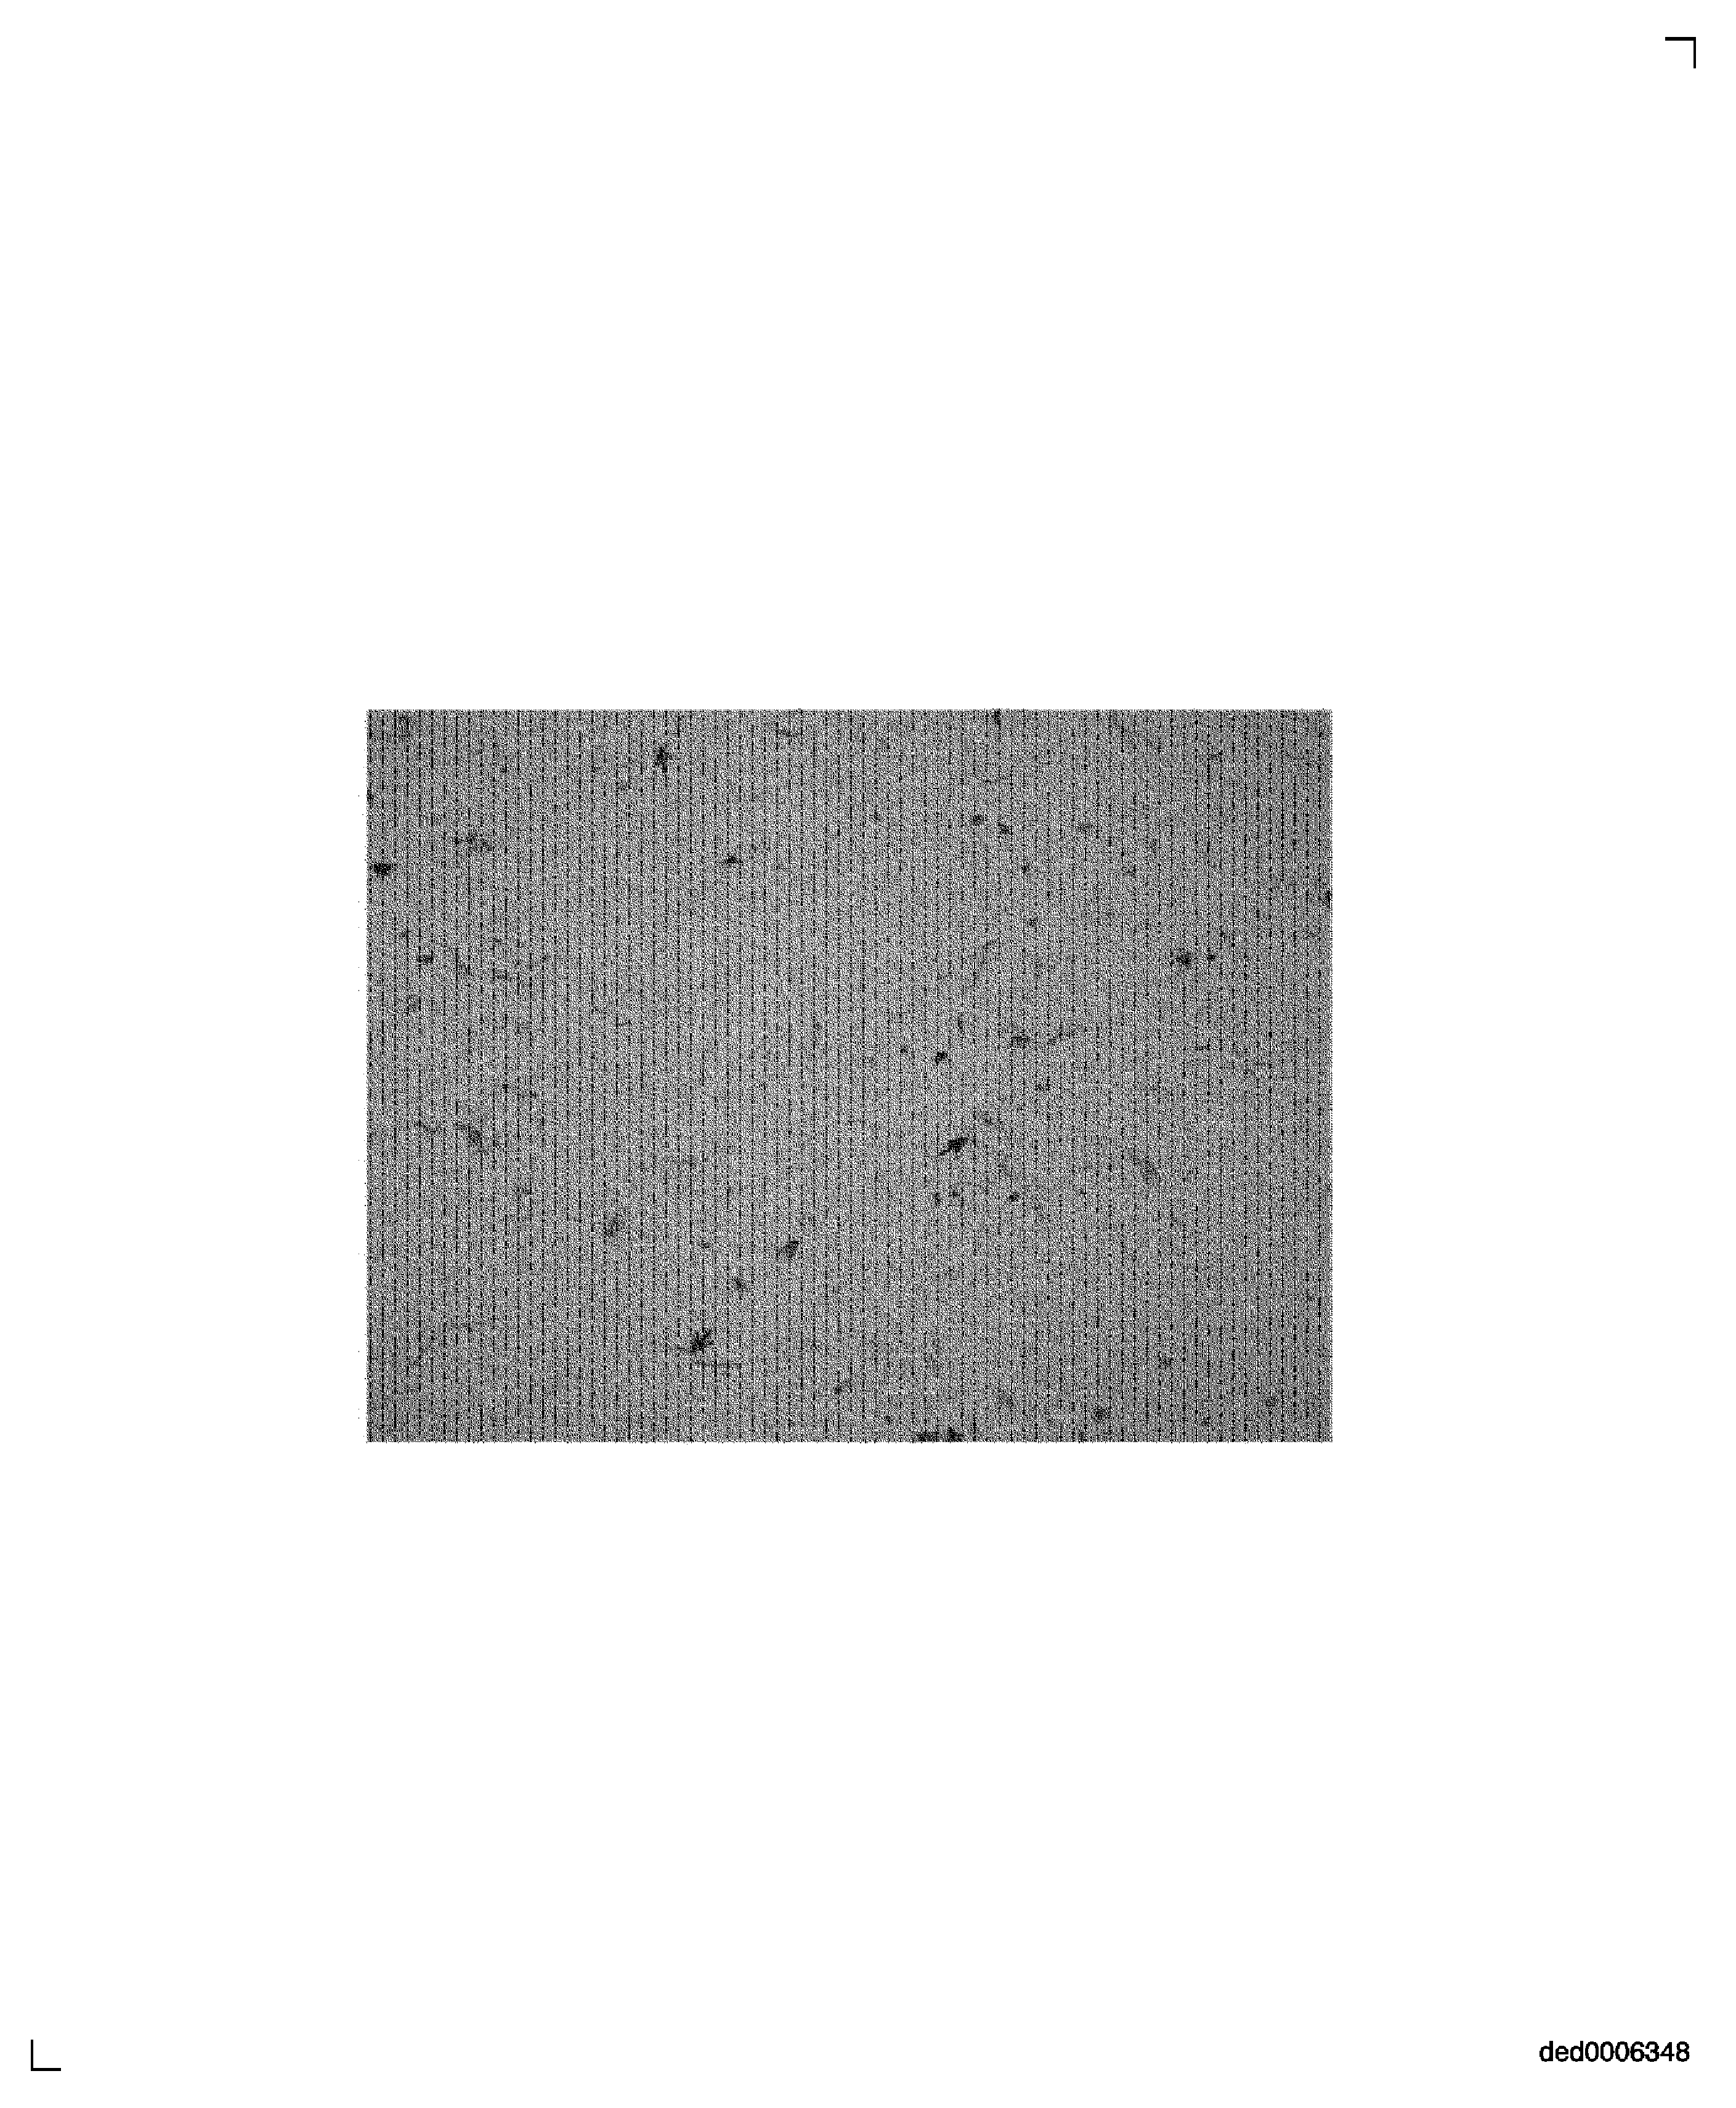
Figure: IAE 36206-5 and IAE 36206-6 (Typical) At 500X - Approximately 18% Oxides
IAE 36206-5 and IAE 36206-6 (Typical) At 500X - Approximately 18% Oxides
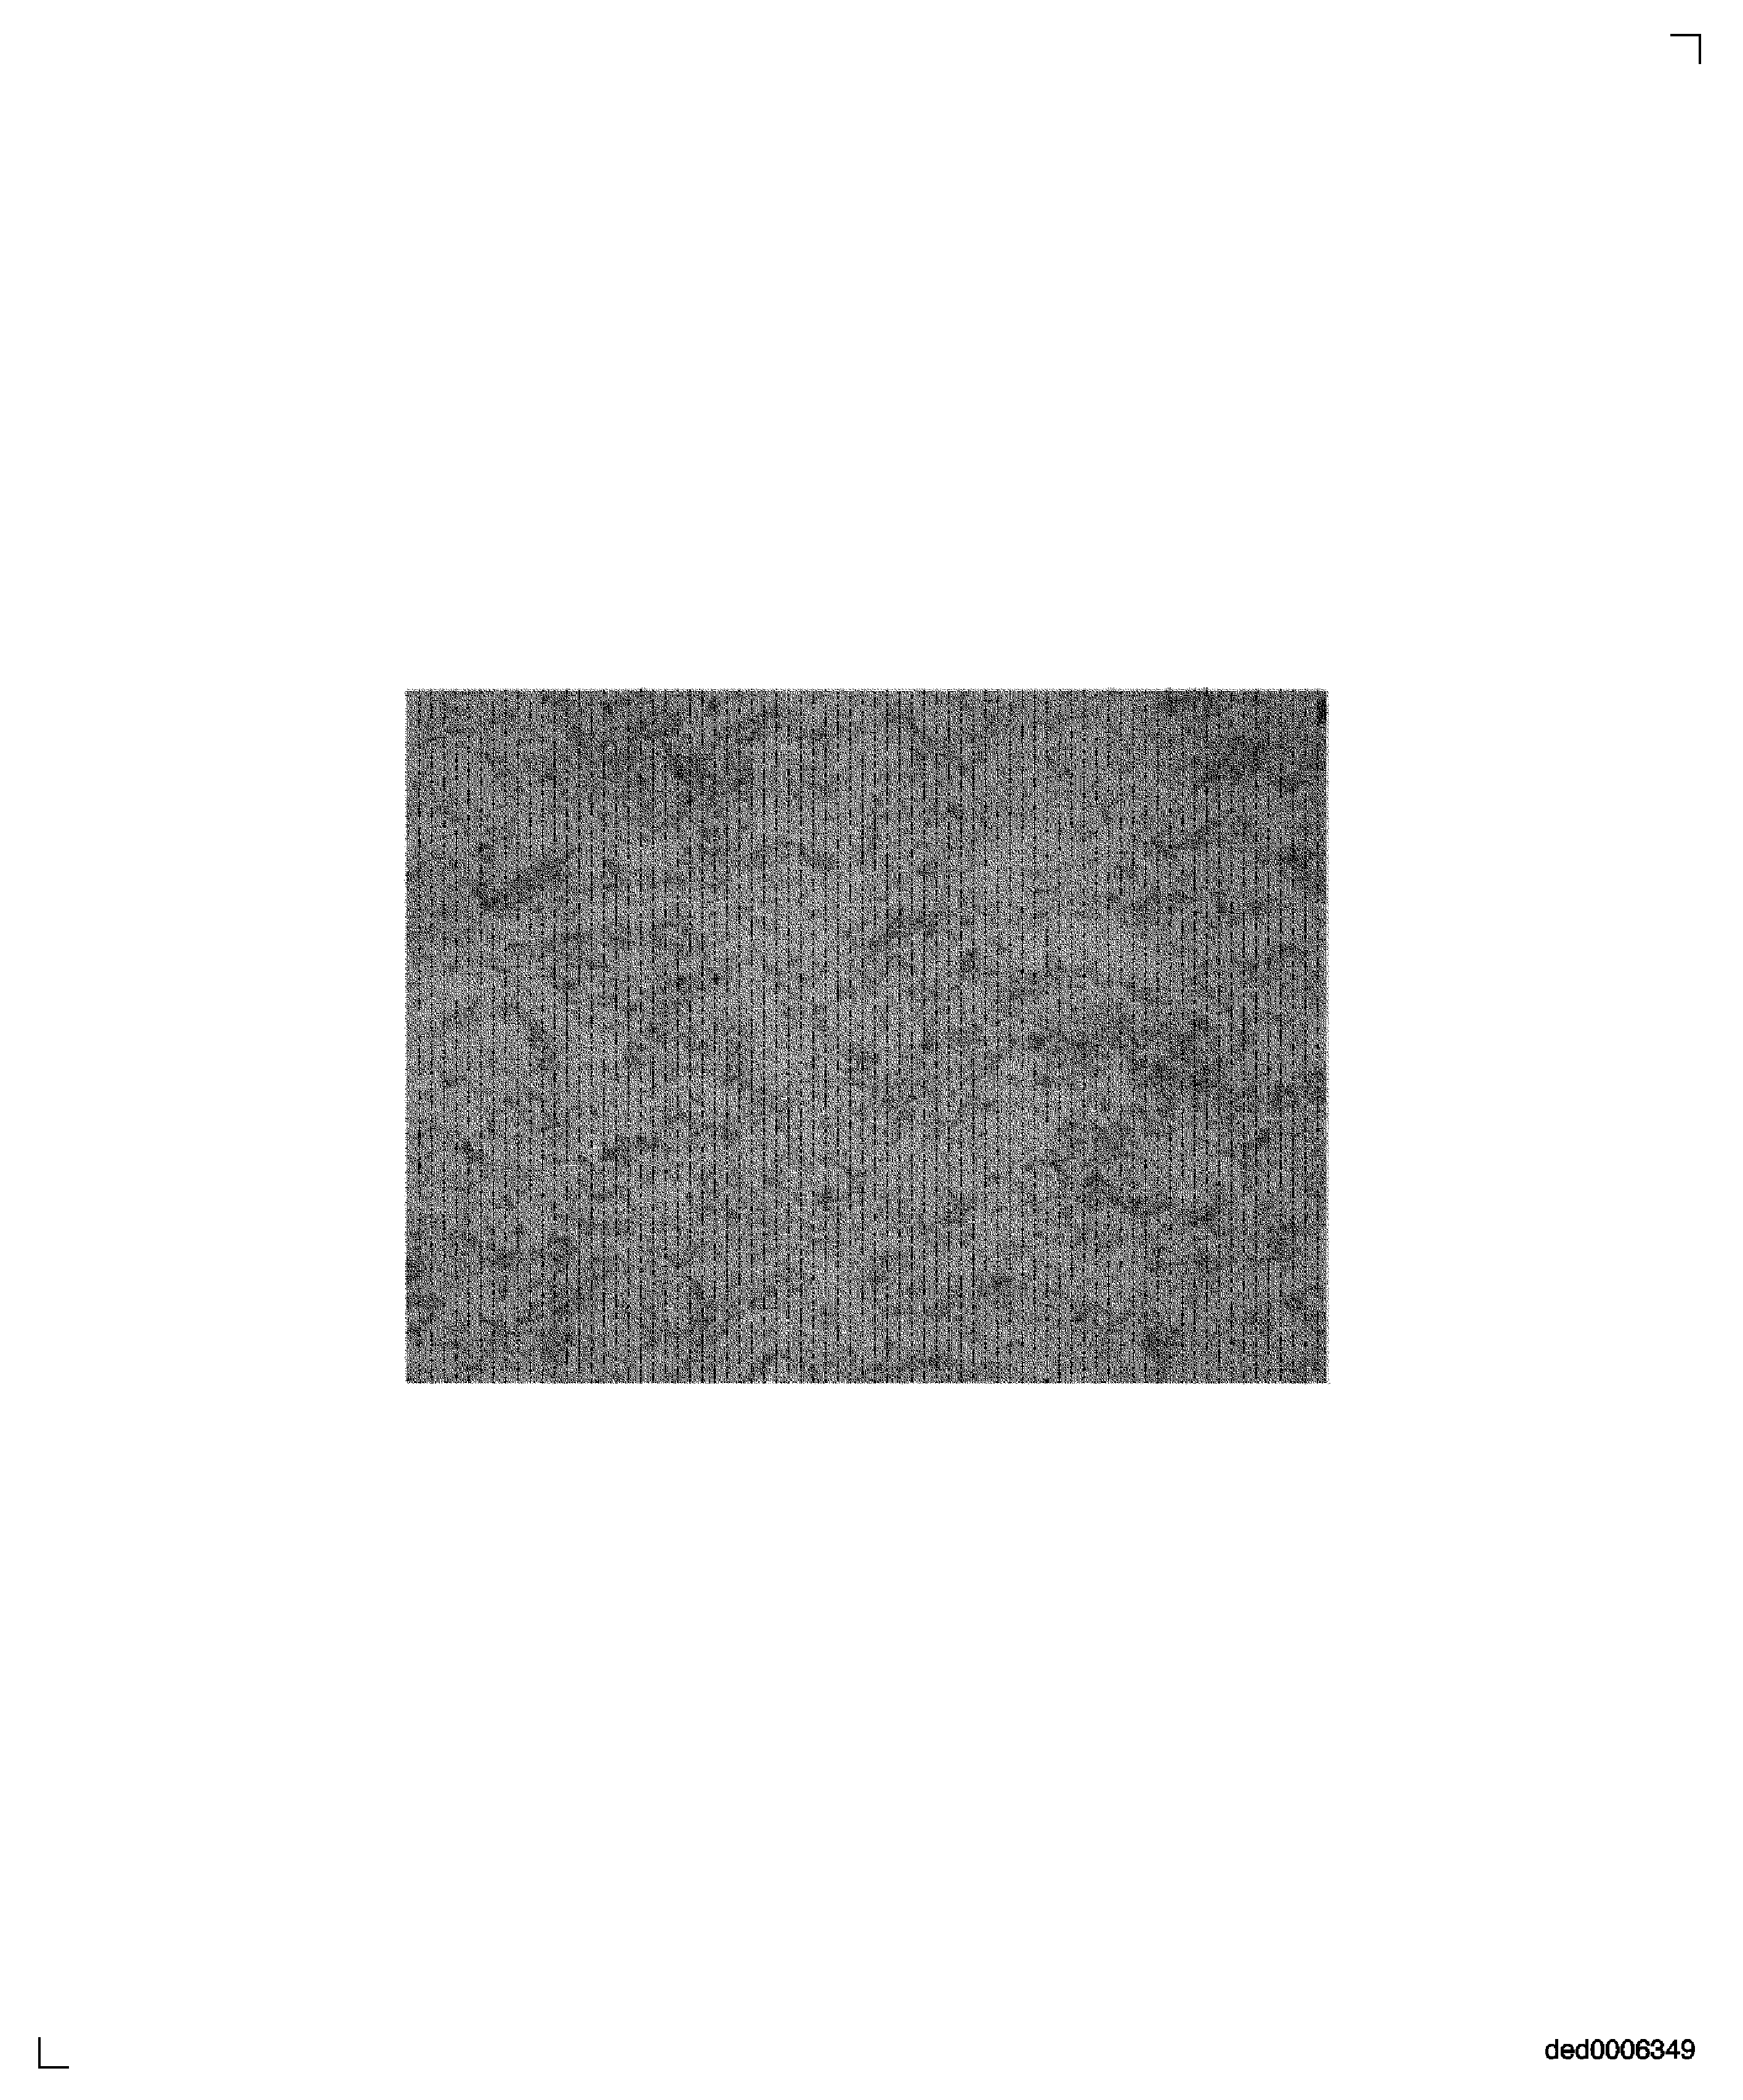
Figure: IAE 36206-7 (Typical) At 500X - Approximately 5% Oxides
IAE 36206-7 (Typical) At 500X - Approximately 5% Oxides
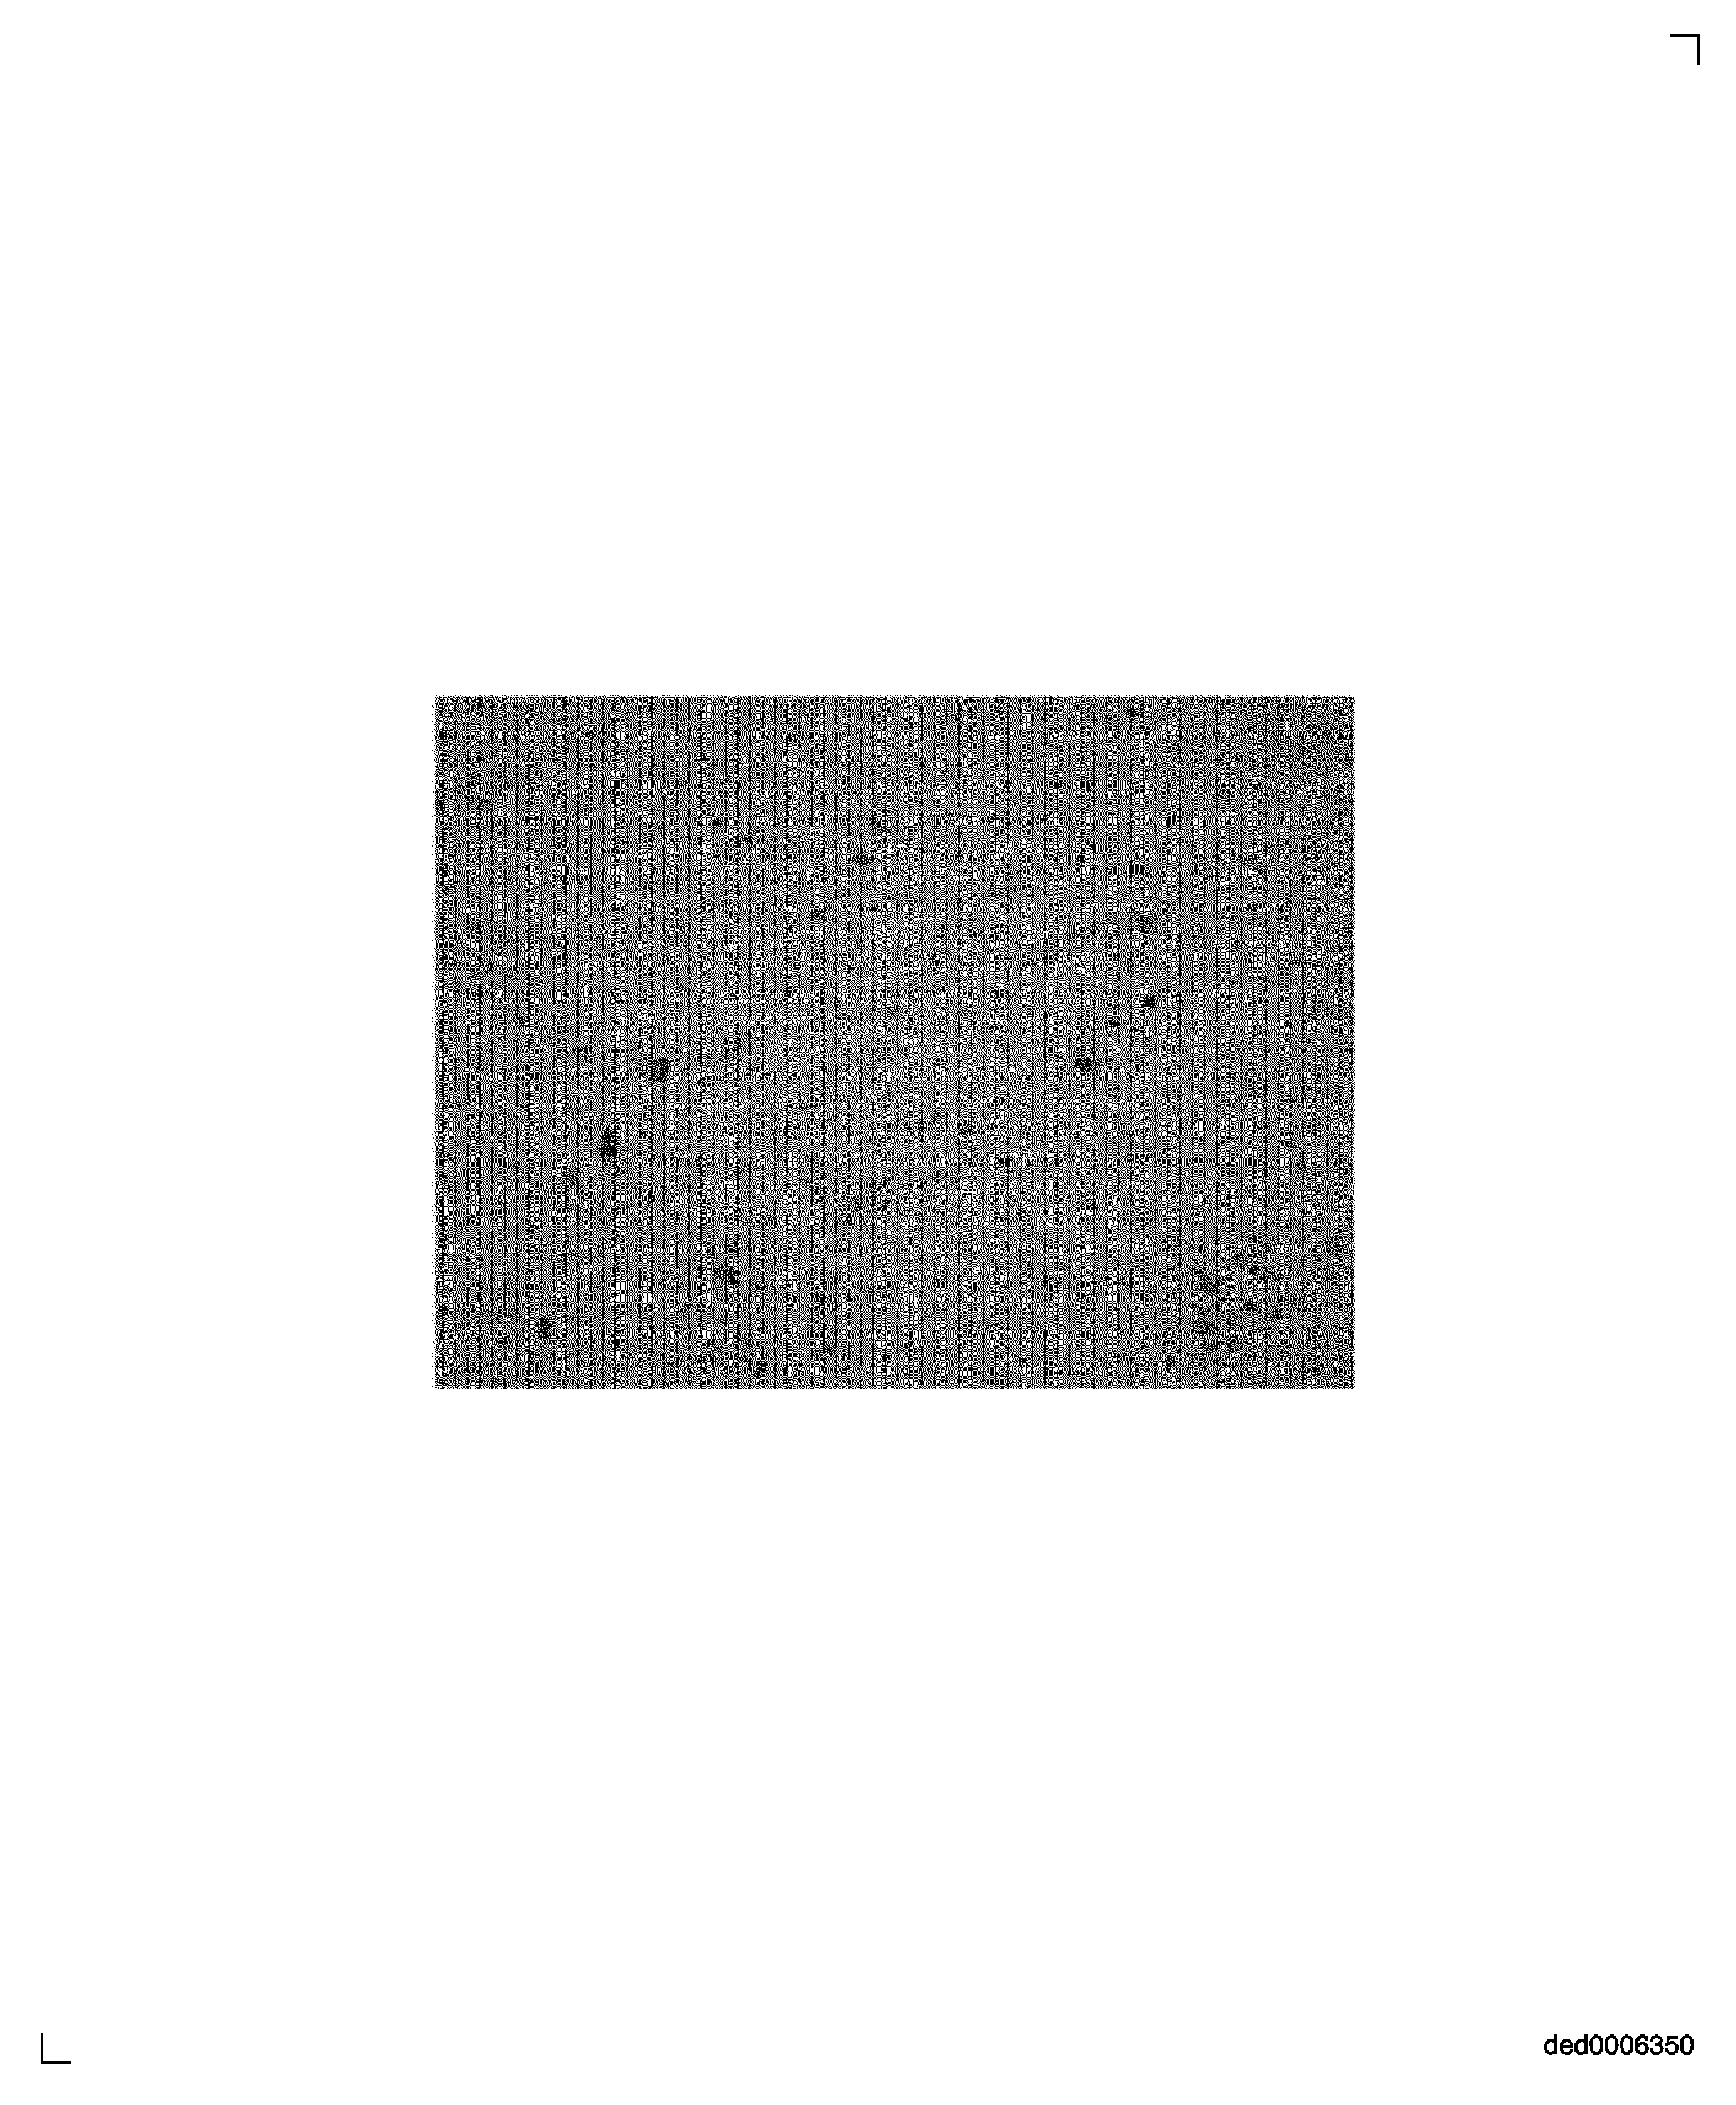
Figure: IAE 36206-8 (Typical) At 500X - Approximately 5% Oxides
IAE 36206-8 (Typical) At 500X - Approximately 5% Oxides
