Export Control
EAR Export Classification: Not subject to the EAR per 15 C.F.R. Chapter 1, Part 734.3(b)(3), except for the following Service Bulletins which are currently published as EAR Export Classification 9E991: SBE70-0992, SBE72-0483, SBE72-0580, SBE72-0588, SBE72-0640, SBE73-0209, SBE80-0024 and SBE80-0025.Copyright
© IAE International Aero Engines AG (2001, 2014 - 2021) The information contained in this document is the property of © IAE International Aero Engines AG and may not be copied or used for any purpose other than that for which it is supplied without the express written authority of © IAE International Aero Engines AG. (This does not preclude use by engine and aircraft operators for normal instructional, maintenance or overhaul purposes.).Applicability
All
Common Information
TASK 72-44-20-300-018 HPT Stage 1 Vane - Outer Diameter Rear Foot Plasma Spray Repair, Repair-018 (VRS3158)
Effectivity
FIG/ITEM | PART NO. |
|---|---|
01-240 | 2A0561 |
01-250 | 2A0091CL21 |
01-250 | 2A2591CL21 |
01-251 | 2A0091CL22 |
01-251 | 2A2591CL22 |
01-252 | 2A0091CL23 |
01-252 | 2A2591CL23 |
01-253 | 2A0091CL24 |
01-253 | 2A2591CL24 |
01-254 | 2A0091CL25 |
01-254 | 2A2591CL25 |
01-255 | 2A0091CL26 |
01-255 | 2A2591CL26 |
01-256 | 2A0091CL27 |
01-256 | 2A2591CL27 |
01-257 | 2A0091CL28 |
01-257 | 2A2591CL28 |
01-258 | 2A0091CL29 |
01-258 | 2A2591CL29 |
01-259 | 2A0091CL30 |
01-259 | 2A2591CL30 |
01-260 | 2A0091CL31 |
01-250 | 2A2591CL31 |
01-261 | 2A0091CL32 |
01-261 | 2A2591CL32 |
01-262 | 2A0091CL33 |
01-262 | 2A2591CL33 |
01-263 | 2A0091CL34 |
01-263 | 2A2591CL34 |
01-264 | 2A0091CL35 |
01-264 | 2A2591CL35 |
01-265 | 2A0091CL36 |
01-265 | 2A2591CL36 |
01-266 | 2A0091CL37 |
01-266 | 2A2591CL37 |
01-267 | 2A0091CL38 |
01-267 | 2A2591CL38 |
01-268 | 2A0091CL39 |
01-268 | 2A2591CL39 |
01-269 | 2A0091CL40 |
01-269 | 2A2591CL40 |
01-270 | 2A0091CL41 |
01-270 | 2A2591CL41 |
01-271 | 2A0091CL42 |
01-271 | 2A2591CL42 |
01-272 | 2A0091CL43 |
01-272 | 2A2591CL43 |
01-273 | 2A0091CL44 |
01-273 | 2A2591CL44 |
01-274 | 2A0091CL45 |
01-274 | 2A2591CL45 |
01-275 | 2A0091CL46 |
01-275 | 2A2591CL46 |
01-276 | 2A0091CL47 |
01-276 | 2A2591CL47 |
01-277 | 2A0091CL48 |
01-277 | 2A2591CL48 |
01-278 | 2A0091CL48-5 |
01-279 | 2A0091CL49 |
01-279 | 2A2591CL49 |
01-280 | 2A0091CL49-5 |
01-284 | 2A2591CL50 |
01-286 | 2A2591CL51 |
Material of component
RR | ||
|---|---|---|
DESCRIPTION | SYMBOL | MATERIAL |
Stage 1 HPT vane cluster assembly - | Nickel alloy | |
Stage 1 HPT vane assembly - | Nickel alloy | |
General
Price and availability - refer to IAE
The practices and processes referred to in the procedure by the TASK numbers are in the SPM.
NOTE
Preliminary Requirements
Pre-Conditions
NONESupport Equipment
| Name | Manufacturer | Part Number / Identification | Quantity | Remark |
|---|---|---|---|---|
| Workshop inspection equipment | LOCAL | Workshop inspection equipment | ||
| Portablegrinding equipment | LOCAL | Portable grinding equipment |
Consumables, Materials and Expendables
| Name | Manufacturer | Part Number / Identification | Quantity | Remark |
|---|---|---|---|---|
| CoMat 03-243 WELDING FILLER WIRE | LOCAL | CoMat 03-243 |
Spares
NONESafety Requirements
NONEProcedure
Refer to Figure.
Remove the coating so the foot thickness is 0.182 to 0.188 in. (4.623 to 4.775 mm).

CAUTION
KEEP THE CAVITIES OF THE LEADING AND TRAILING EDGES AND THE AIRFOIL SURFACE CLEAN OF GRINDING DEBRIS.Grind the rear face of the foot to remove the coating.
SUBTASK 72-44-20-320-051-A00 Remove the Coating from the Rear Foot of the Stage 1 HPT Vane Cluster Assembly (PN 2A0091 or 2A2591)
Refer to Figure.
Remove the coating so the foot thickness is 0.190 to 0.196 in. (4.826 to 4.978 mm).

CAUTION
KEEP THE CAVITIES OF THE LEADING AND TRAILING EDGES AND THE AIRFOIL SURFACE CLEAN OF GRINDING DEBRIS.Grind the rear face of the foot to remove the coating.
SUBTASK 72-44-20-320-051-B00 Remove the Coating from the Rear Foot of the Stage 1 HPT Vane Assembly (PN 2A0561)
Refer to Figure and the SPM TASK 70-34-03-340-501, IAE 53-18 or IAE 271-47.
Apply coating to a thickness of 0.003 to 0.015 in. (0.08 to 0.38 mm).
NOTE
Do this procedure if the thickness of the rear foot is less than 0.182in. (4.623 mm).Plasma spray the repair area of the rear foot.
Refer to Figure and the SPM TASK 70-34-03-340-501, IAE 53-15.
Apply coating to a thickness of 0.015 in. (0.381 mm) maximum.
NOTE
Build up the flange thickess to the upper end of the tolerance so that the thickess of IAE 53-15 will not be more than the maximum limit of 0.015 in. (0.381 mm).Plasma spray the repair area of the rear foot.
SUBTASK 72-44-20-340-052-A01 Plasma Spray the Rear Foot of the Stage 1 HPT Vane Cluster Assembly (PN 2A0091 or 2A2591)
Refer to Figure.
Build up the foot to a sufficient thickness so that the thickness of the foot after machining will be a minimum of 0.182 in. (4.623 mm).
Use the gas tungsten arc or plasma weld method and CoMat 03-243 WELDING FILLER WIRE.
NOTE
You can do this procedure if the thickness of the rear foot is between 0.164in. (4.166 mm) and 0.182in. (4.623 mm).Weld the rear foot to build up the thickness.
Refer to Figure.
Machine the weld area to 0.182 in. (4.623 mm) minimum.
Refer to the SPM TASK 70-37-14-370-501.
Stress-relieve the vane.
Refer to the SPM TASK 70-23-03-230-501, 70-23-08-230-501 or 70-23-05-230-501.
No cracks are permitted.
Fluorescent penetrant inspect the vane.
Refer to Figure and the SPM TASK 70-34-03-340-501, IAE 53-15.
Apply coating to a thickness of 0.015 in. (0.381 mm) maximum.
Plasma spray the repair area of the rear foot.
SUBTASK 72-44-20-340-052-A02 Weld Build-Up and Plasma Spray the Rear Foot of the Stage 1 HPT Vane Cluster Assembly (PN 2A0091 or 2A2591)
Refer to Figure and the SPM TASK 70-34-03-340-501, IAE 53-15.
Apply coating to a thickness of 0.020 in. (0.508 mm) maximum.
Plasma spray the repair area of the rear foot.
SUBTASK 72-44-20-340-053-A00 Plasma Spray the Rear Foot of the Stage 1 HPT Vane Cluster Assembly (PN 2A0091 or 2A2591)
NOTE
Do this procedure if the thickness of the rear foot is a minimum of 0.182 in. (4.623 mm).Refer to Figure and the SPM TASK 70-34-03-340-501, IAE 53-18 or IAE 271-47.
Apply coating to a thickness of 0.003 to 0.015 in. (0.08 to 0.38 mm).
NOTE
Do this procedure if the thickness of the rear foot is less than 0.190 in. (4.826 mm).Plasma spray the repair area of the rear foot.
Refer to Figure and the SPM TASK 70-34-03-340-501, IAE 53-15.
Apply coating to a thickness of 0.015 in. (0.381 mm) maximum.
NOTE
Build up the flange thickness to the upper end of the tolerance so that the thickness of IAE 53-15 will not be more than the maximum limit of 0.015 in. (0.381 mm).Plasma spray the repair area of the rear foot.
SUBTASK 72-44-20-340-054-B01 Plasma Spray the Rear Foot of the Stage 1 HPT Vane Assembly (PN 2A0561)
Refer to Figure.
Build up the foot to a sufficient thickness so that the thickness of the foot after machining will be a minimum of 0.190 in. (4.826 mm).
Use the gas tungsten arc or plasma weld method and CoMat 03-243 WELDING FILLER WIRE.
Weld the rear foot to build up the thickness.
Refer to Figure.
Machine the weld area to 0.190 in. (4.826 mm) minimum.
Refer to the SPM TASK 70-37-14-370-501.
Stress-relieve the vane.
Refer to the SPM TASK 70-23-03-230-501, SPM TASK 70-23-08-230-501 or SPM TASK 70-23-05-230-501.
No cracks are permitted.
Fluorescent penetrant inspect the vane.
Refer to Figure and the SPM TASK 70-34-03-340-501, IAE 53-15.
Apply coating to a thickness of 0.015 in. (0.381 mm) maximum.
Plasma spray the repair area of the rear foot.
SUBTASK 72-44-20-340-054-B02 Weld Build-Up and Plasma Spray the Rear Foot of the Stage 1 HPT Vane Assembly (PN 2A0561)
NOTE
You can do this procedure if the thickness of the rear foot is between 0.172 in. (4.369 mm) and 0.190 in. (4.826 mm).Refer to Figure and the SPM TASK 70-34-03-340-501, IAE 53-15.
Apply coating to a thickness of 0.020 in. (0.508 mm) maximum.
NOTE
Do this procedure if the thickness of the rear foot is a minimum of 0.190 in. (4.826 mm).Plasma spray the repair area of the rear foot.
SUBTASK 72-44-20-340-053-B00 Plasma Spray the Rear Foot of the Stage 1 HPT Vane Assembly (PN 2A0561)
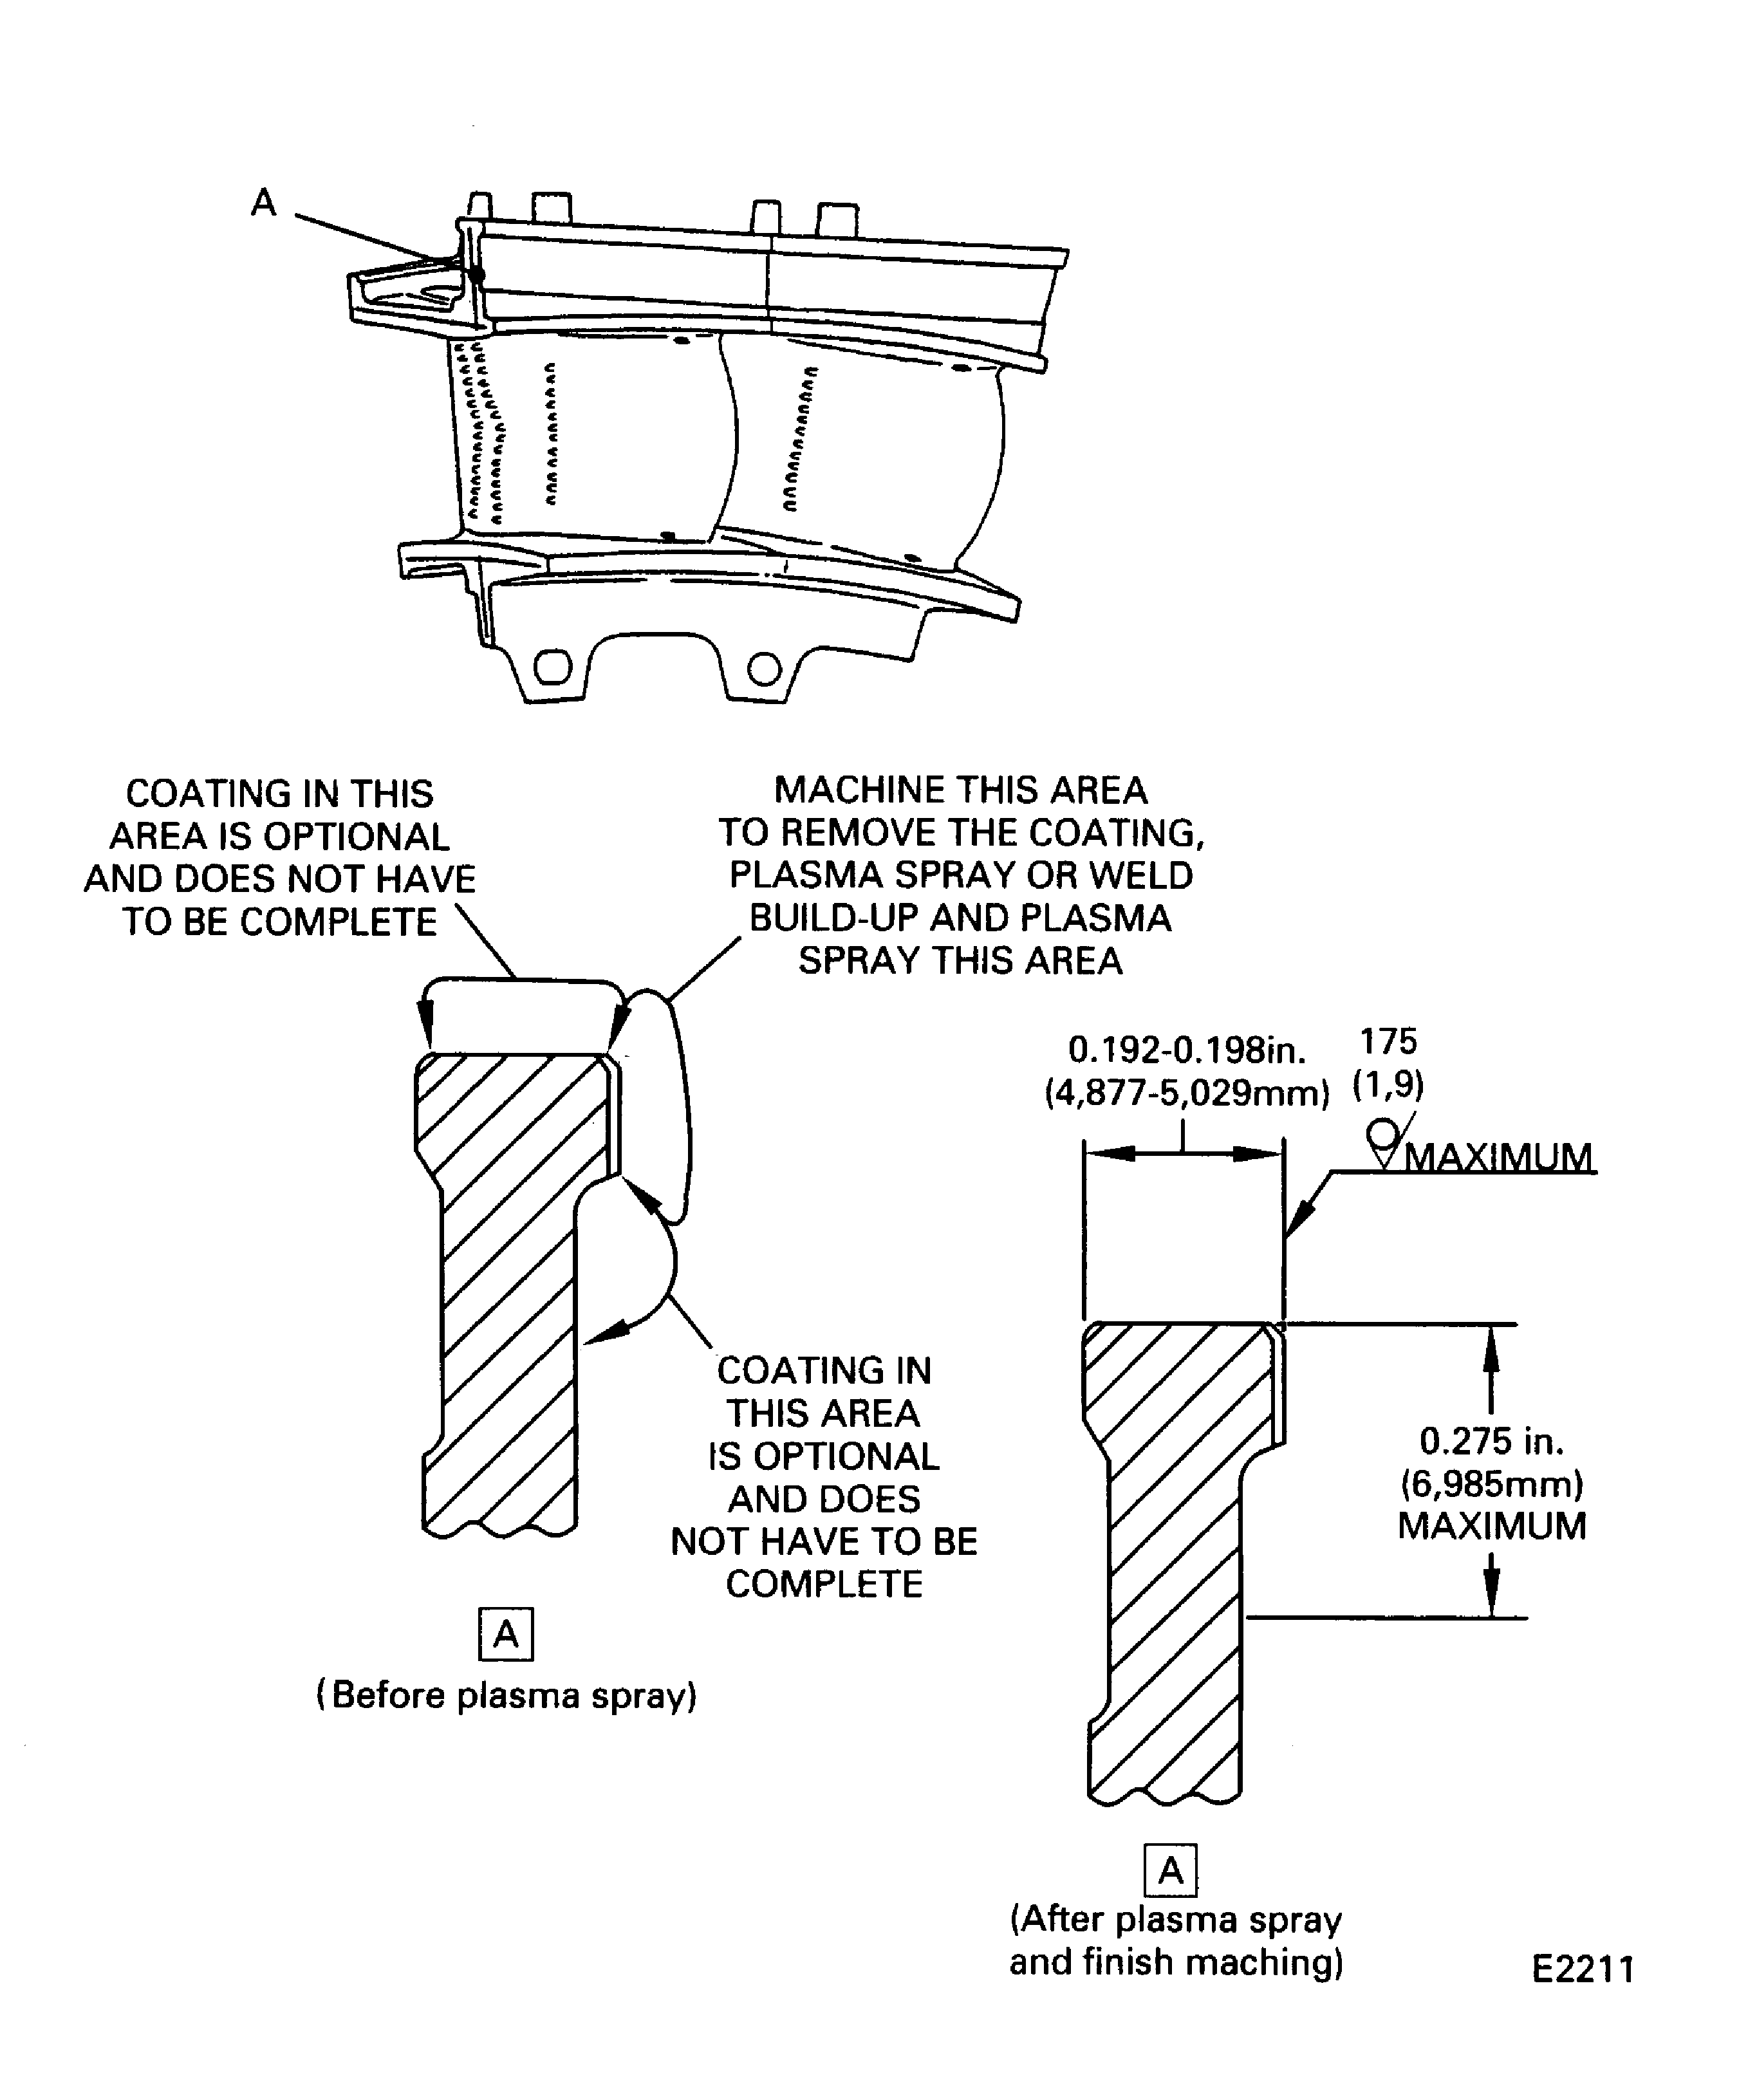
Refer to Figure.
Machine the foot to a thickness of 0.192 to 01.98 in. (4.877 to 5.029 mm).
The minimum thickness of the coating after machining is 0.003 in. (0.076 mm).
Break the edges 0.015 to 0.025 in. (0.38 to 0.64 mm).
Set up and finish machine the rear foot after plasma spray.
SUBTASK 72-44-20-320-052-A00 Machine the Rear Foot of the Stage 2 HPT Vane Cluster Assembly after Plasma Spray (PN 2A0091 and 2A2591)
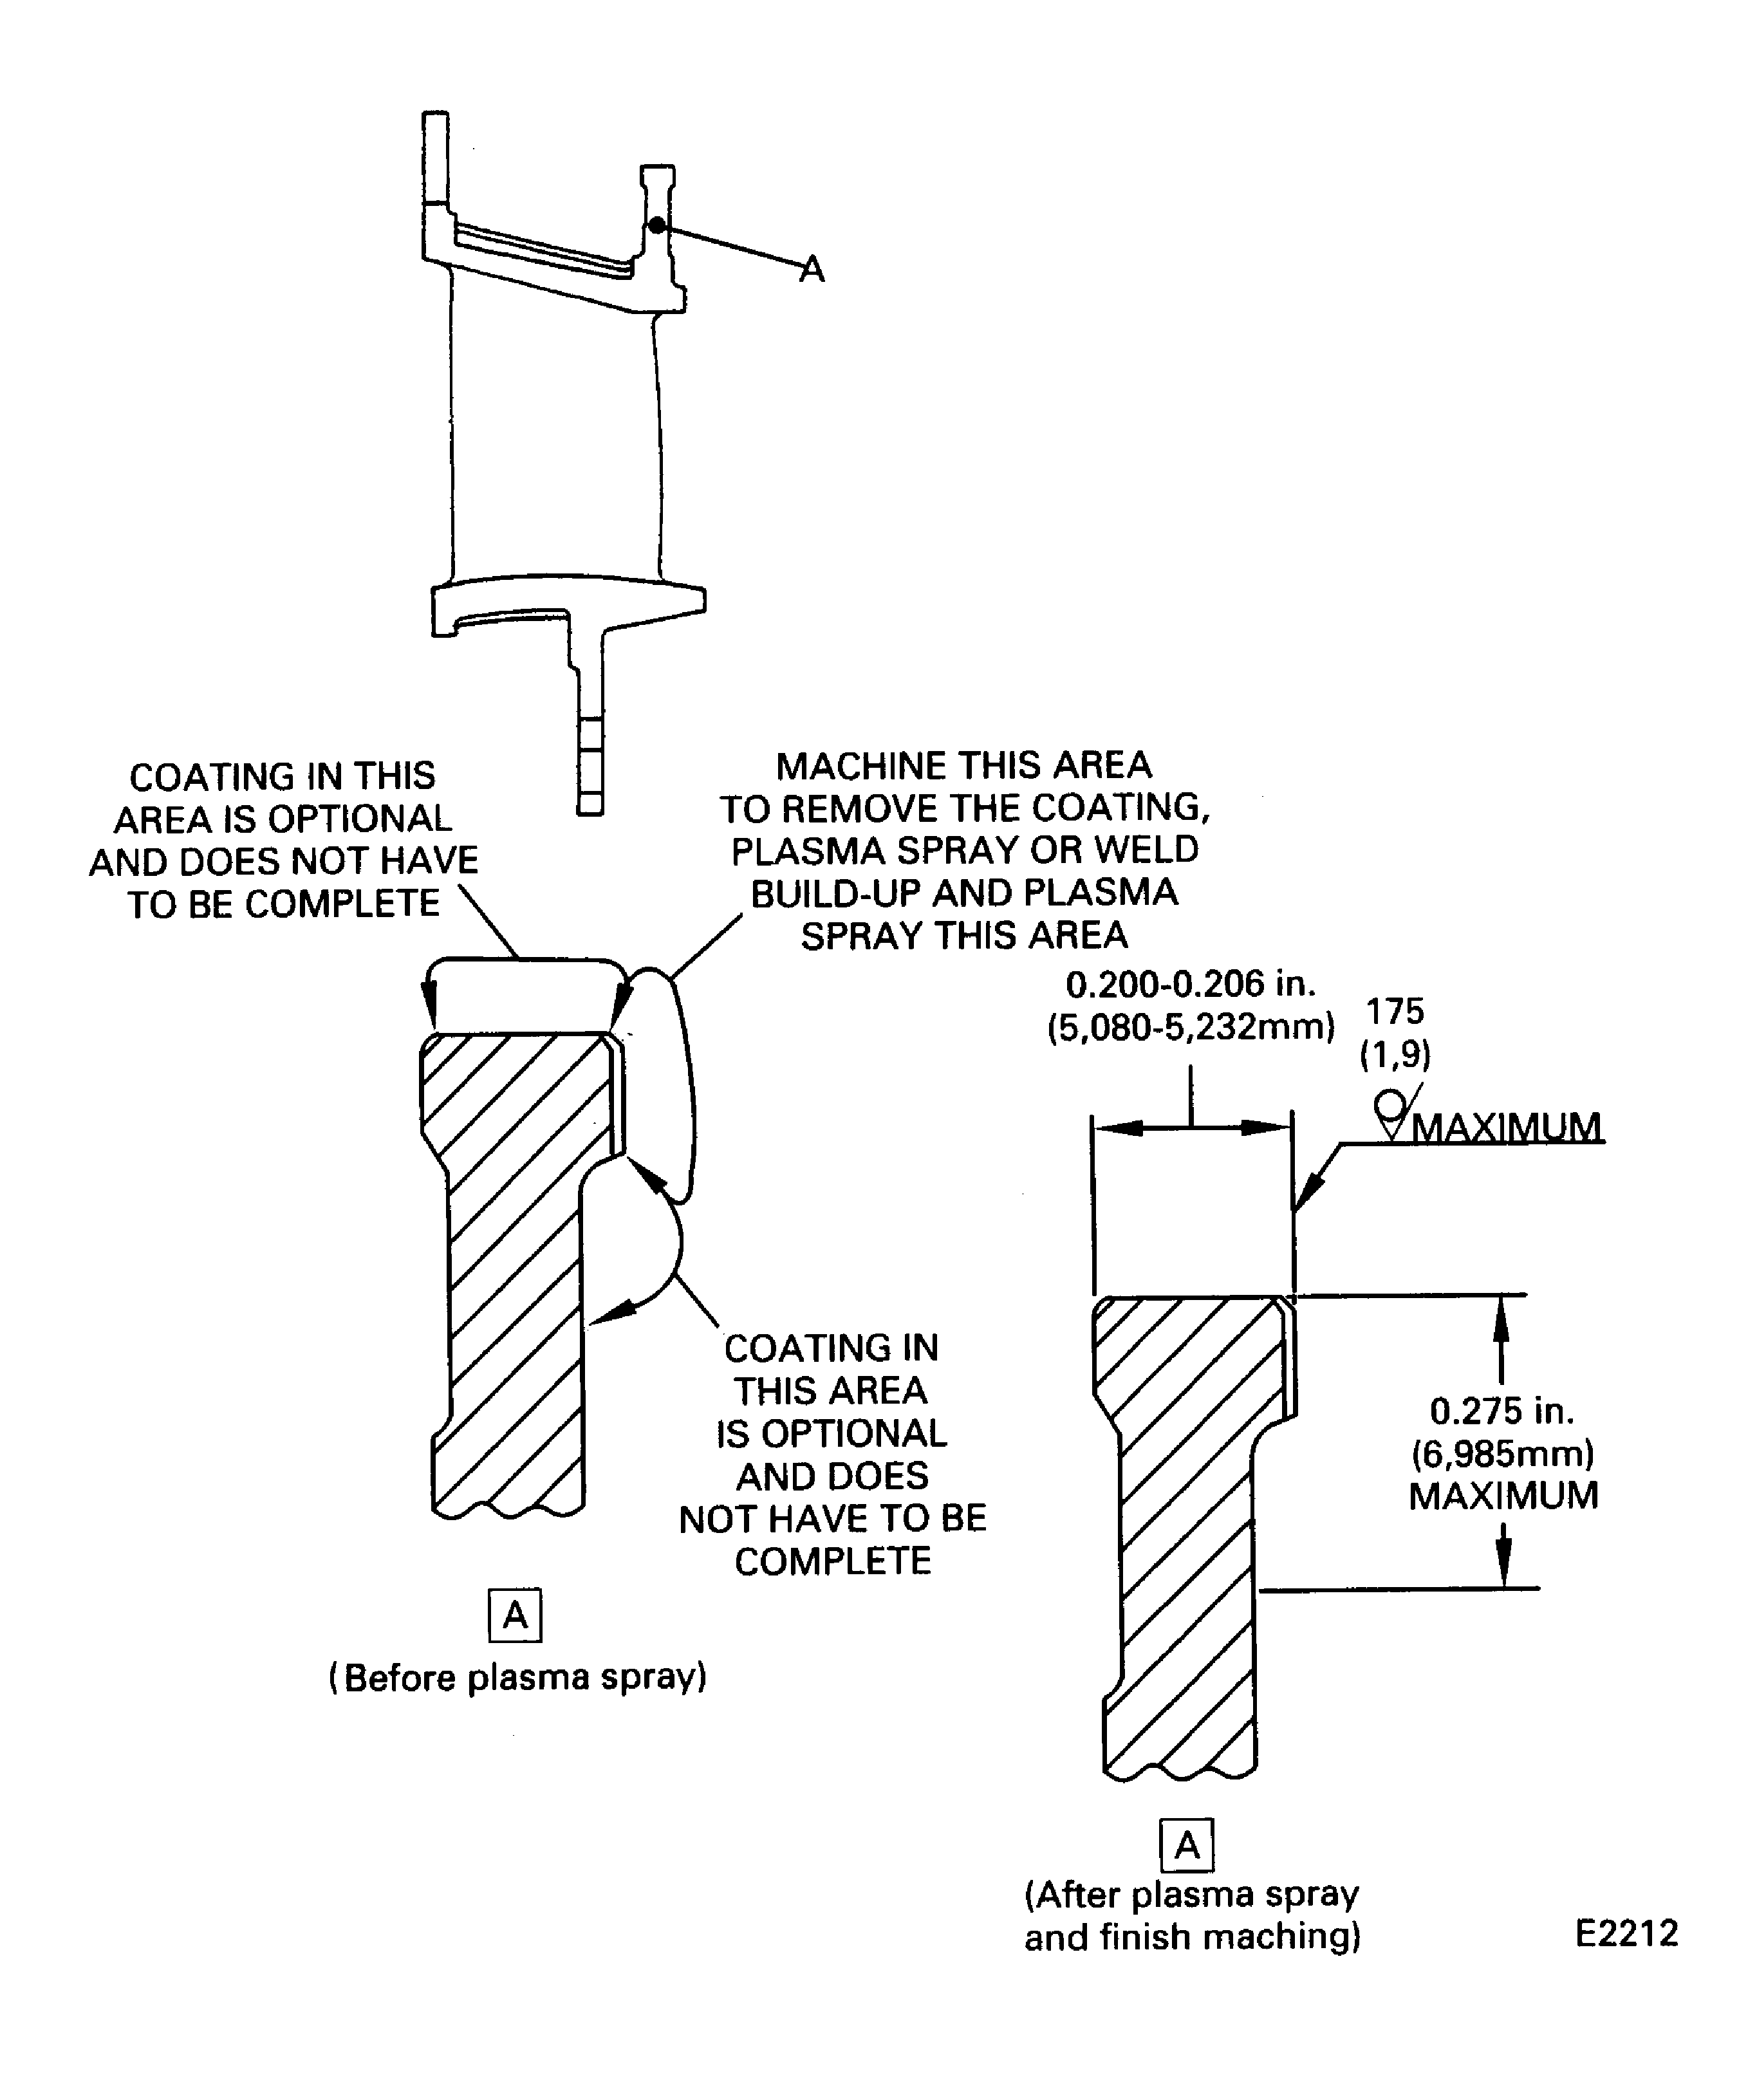
Refer to Figure.
Machine the foot to a thickness of 0.200 to 0.206 in. (5.080 to 5.232 mm).
The minimum thickness of the coating after machining is 0.003 in. (0.076 mm).
Break the edges 0.015 to 0.025 in. (0.38 to 0.64 mm).
Set up and finish machine the rear foot after plasma spray.
SUBTASK 72-44-20-320-052-B00 Machine the Rear Foot of the Stage 1 HPT Vane Assembly after Plasma Spray (PN 2A0561)
Refer to TASK 72-44-20-200-000 (INSPECTION-000).
Examine the repair.
SUBTASK 72-44-20-220-087 Examine the Repair
Figure: Stage 1 HPT vane cluster assembly (PN 2A0091 and 2A2591) outer diameter rear foot plasma spray repair
Stage 1 HPT vane cluster assembly (PN 2A0091 and 2A2591) outer diameter rear foot plasma spray repair

Figure: Stage 1 HPT vane assembly (PN 2A0561) outer diameter rear foot plasma spray repair
Stage 1 HPT vane assembly (PN 2A0561) outer diameter rear foot plasma spray repair

