Export Control
EAR Export Classification: Not subject to the EAR per 15 C.F.R. Chapter 1, Part 734.3(b)(3), except for the following Service Bulletins which are currently published as EAR Export Classification 9E991: SBE70-0992, SBE72-0483, SBE72-0580, SBE72-0588, SBE72-0640, SBE73-0209, SBE80-0024 and SBE80-0025.Copyright
© IAE International Aero Engines AG (2001, 2014 - 2021) The information contained in this document is the property of © IAE International Aero Engines AG and may not be copied or used for any purpose other than that for which it is supplied without the express written authority of © IAE International Aero Engines AG. (This does not preclude use by engine and aircraft operators for normal instructional, maintenance or overhaul purposes.).Applicability
All
Common Information
TASK 72-45-00-300-002 HPT Stage 2 Air Seal - Blend Repair, Repair-002 (VRS3208)
Preliminary Requirements
Pre-Conditions
| Action/Condition | Data Module/Technical Publication |
|---|---|
| Make sure that the cleaning and inspection procedures are done before this repair. | |
| Refer to Cleaning-000 | TASK 72-45-00-100-000 |
| Refer to Inspection-000 | TASK 72-45-00-200-000 |
Support Equipment
NONEConsumables, Materials and Expendables
NONESpares
NONESafety Requirements
CAUTION
Procedure
The Source Demonstration requirements of this repair means that any facility not authorized to accomplish this repair either utilize the Authorized Repair Vendors listed below or contact IAE Manager Maintenance Operations to determine if a qualification program can be initiated at their facility.
IAE International Aero Engines AG
400 Main Street
M/S 121-10
East Hartford CT 06118
U.S.A.
Attn: Manager Technical Services
Authorized Repair Vendors for the Shotpeen section of Repair VRS3208 are listed below:
Pratt and Whitney Global Service Partners
East Hartford Repair Operations (GSP-EHRO)
400 Main Street, Well No.14 - Mail Stop 117-62
East Hartford, CT 06108
USA
Tel: (860) 557-2646
Fax: (860) 557-2647
Metal Improvements Company Inc. (MIC)
145 Addison Road
P. O. Box 487
Windsor, CT 06095
USA
Tel: (860) 688-6201
Fax: (860) 285-8809
MTU Maintenance Gmbh
Airport Hannover
Muenchner Strasse 31
D-30855 Langenhagen
Germany
Tel: 49 511 7806 0
Fax: 49 511 7806 111
IHI Corporation
229 Tonogaya,
Mizuho-Machi Nishitama-Gun
Tokyo 190-1297
Japan
Tel: 81-42-568-7362
Fax: 81-42-568-7566
ATTN: Program Manager, V2500
PRATT AND WHITNEY AIR NEW ZEALAND SERVICES
PO Box 14005
634 Memorial Avenue
Christchurch International Airport
Christchurch 8053
NEW ZEALAND
The designation by IAE of an authorized repair vendor indicates that the repair vendor has demonstrated the necessary capability to enable it to carry out the listed repair work. However, IAE makes no warranties of representations concerning the qualifications or quality standards of the repair vendors to carry out the repair work, and accepts no responsibility whatsoever for any work that may be carried out by a repair vendor, other than when IAE is listed as the repair vendor. Authorized repair vendors do not act as agents or representatives of IAE.
Repair Facilities
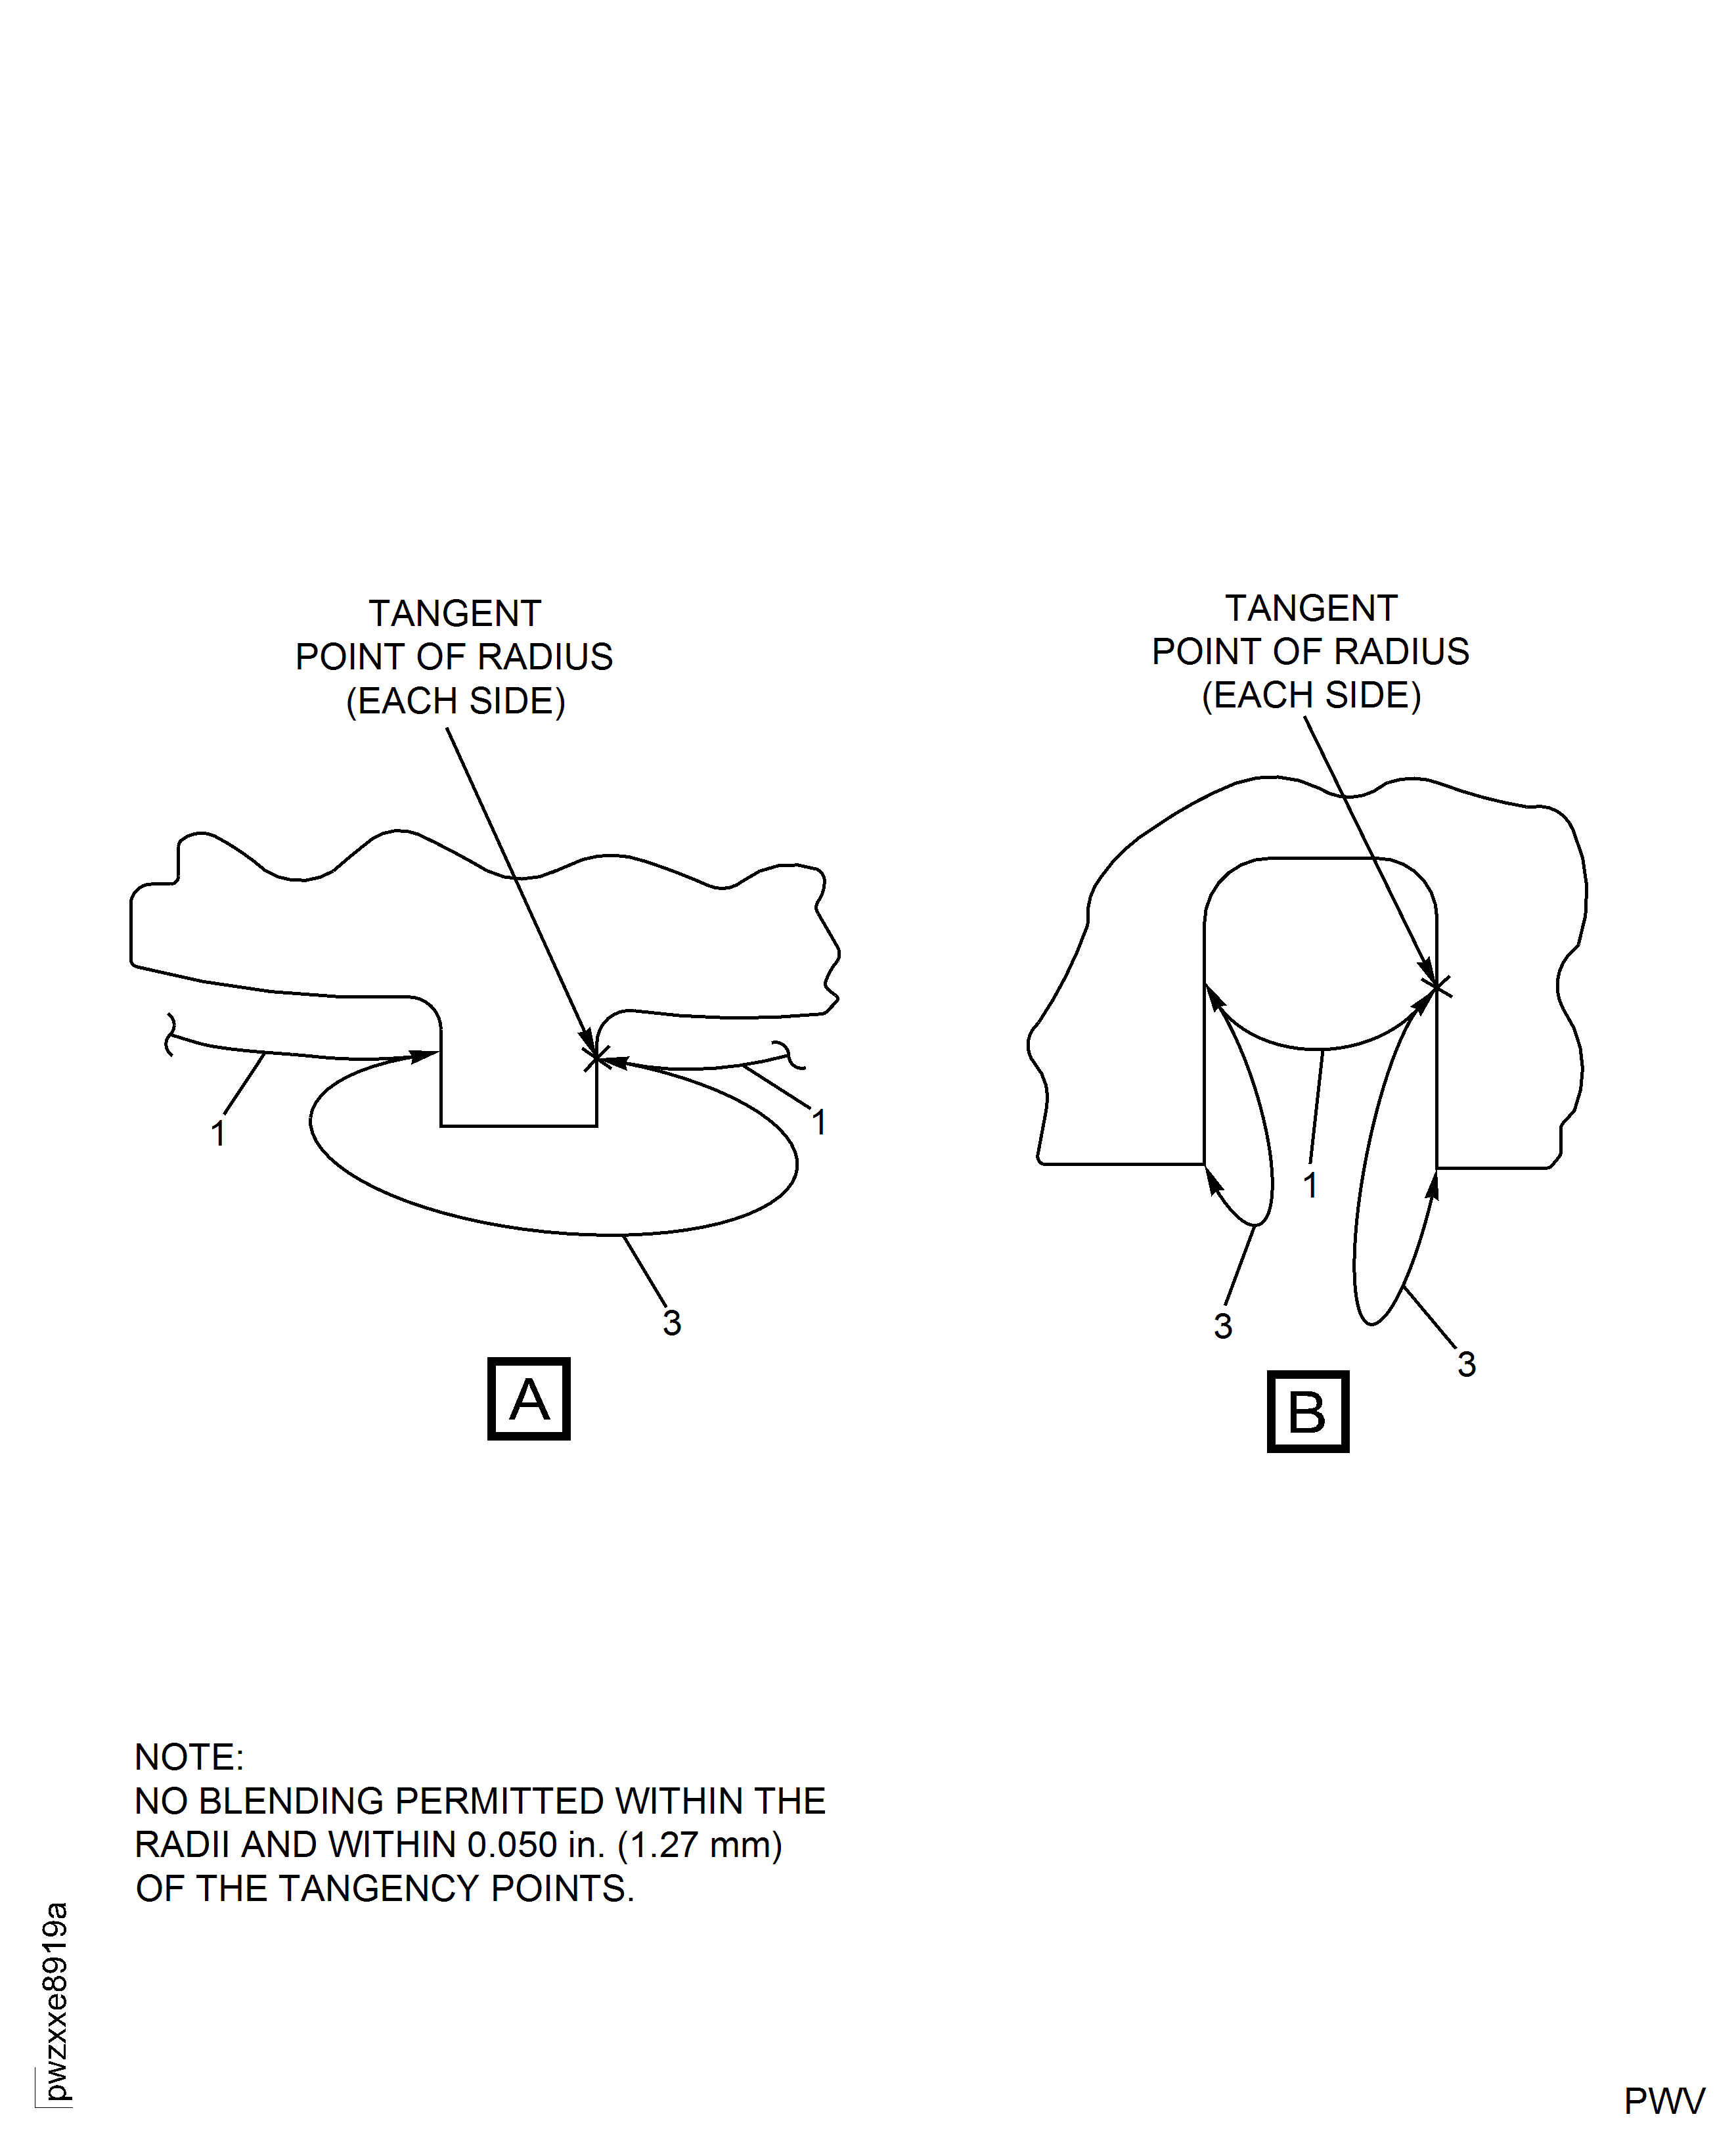
Blend the damage at Locations 2 and 3 by SPM TASK 70-35-03-300-501.
Blend to a sufficient depth to remove damage plus more 0.002 in. to 0.003 in. (0.05 mm to 0.08 mm) of material. Blend to a maximum depth of 0.005 in. (0.13 mm). The minimum blend length at Location 4 must not be more than 0.500 in. (12.7 mm) in a circumferential direction. There must be a minimum of 2.000 in. (50.8 mm) between blended areas. Break the edges 0.003 in. to 0.015 in. (0.08 mm to 0.38 mm).
Blend the damage at Location 4 by SPM TASK 70-35-03-300-501.
Damage depth at Location 5 must be no more than 0.002 in. (0.05 mm). Blending at Location 5 is not permitted.
Inspect the damage at Location 5.
Damage depth at Location 6 must be no more than 0.002 in. (0.05 mm). Blending at Location 6 is not permitted.
Inspect the damage at Location 6.
SUBTASK 72-45-00-350-052-001 Blend the Stage 2 HPT Air Seal (Rotary Method)

WARNING
PUT ON EYE PROTECTION WHEN YOU OPERATE THE ROTARY EQUIPMENT. DISCHARGE AIR WILL BLOW LOOSE GRIT AND MATERIALS WHICH CAN CAUSE INJURY.Blend the damage at Locations 2 and 3 by SPM TASK 70-35-03-300-501.
Blend to a sufficient depth to remove damage plus more 0.002 in. to 0.003 in. (0.05 mm to 0.08 mm) of material. Blend to a maximum depth of 0.005 in. (0.13 mm). The minimum blend length at Location 4 must not be more than 0.500 in. (12.7 mm) in a circumferential direction. There must be a minimum of 2.000 in. (50.8 mm) between blended areas. Break the edges 0.003 in. to 0.015 in. (0.08 mm to 0.38 mm).
Blend the damage at Location 4 by SPM TASK 70-35-03-300-501.
Damage depth at Location 5 must be no more than 0.002 in. (0.05 mm). Blending at Location 5 is not permitted.
Inspect the damage at Location 5.
Damage depth at Location 6 must be no more than 0.002 in. (0.05 mm). Blending at Location 6 is not permitted.
Inspect the damage at Location 6.
SUBTASK 72-45-00-350-052-002 Blend the Stage 2 HPT Air Seal (Manual Method)
Refer to TASK 72-45-00-200-000 (Inspection-000) and select the appropriate Inspection-002 by the applicable part number.
Fluorescent penetrant inspect the blend repaired surfaces.
SUBTASK 72-45-24-230-201 Examine the Blended Repair Areas
Shotpeen with intensity of 4A, use S-170 shot or CW-20 cut wire shot of HDNS 45 HRC minimum or equivalent. You must shotpeen the full blend repaired areas.
Refer to SPM TASK 70-38-13-380-501.
Shotpeen the blend repaired areas at Location 3.
SUBTASK 72-45-00-380-054 Shotpeen the Blend Repaired Areas (Local)

CAUTION
THE SOURCE DEMONSTRATION VENDOR IS NECESSARY TO DO THE SHOTPEEN AT LOCATIONS 2 AND 4 OR DAMAGE TO THE PART CAN OCCUR.For part number 2A4196, refer to TASK 72-45-00-200-002-G00 (Inspection-002), SUBTASK 72-45-00-220-186.
For part number 2A4157, refer to TASK 72-45-00-200-002-I00 (Inspection-002), SUBTASK 72-45-00-220-203.
SUBTASK 72-45-00-230-190 Examine the Stage 2 HPT Air Seal for the Axial Length
Figure: Repair Locations And Details For PN 2A4157
Repair Locations And Details For PN 2A4157
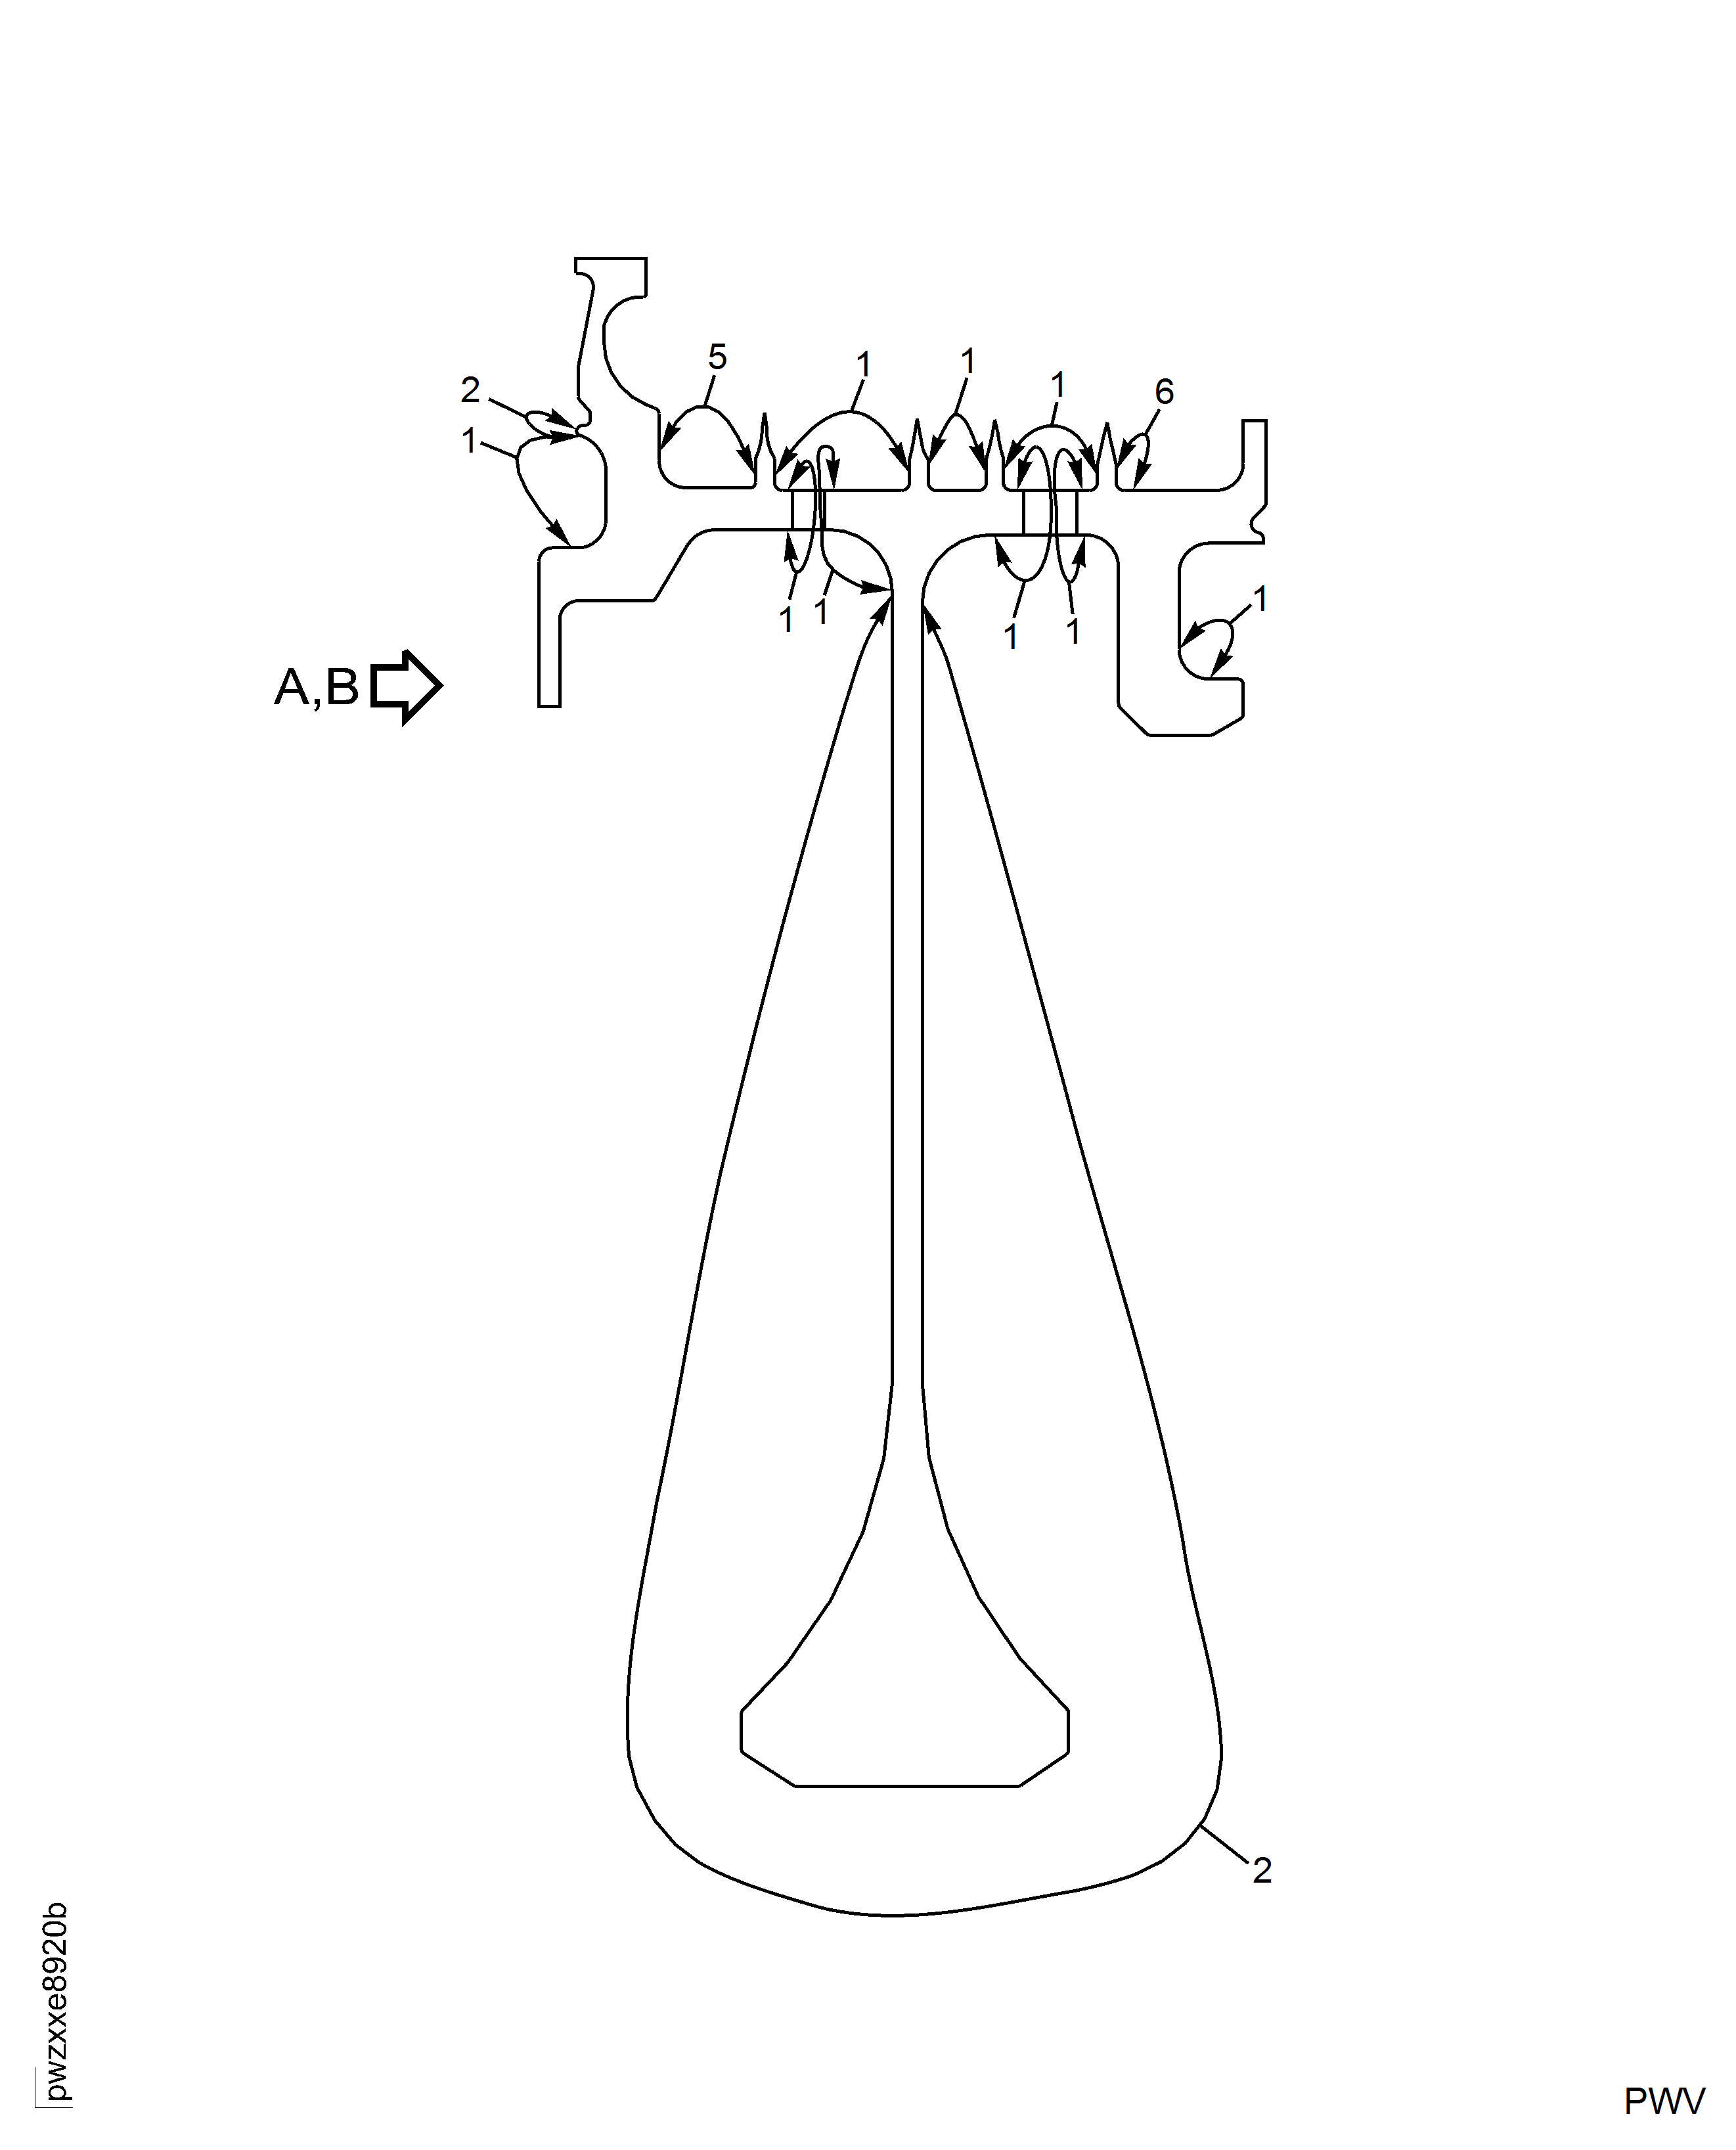
Figure: Repair Locations and Details for PN 2A4157
Repair Locations and Details for PN 2A4157
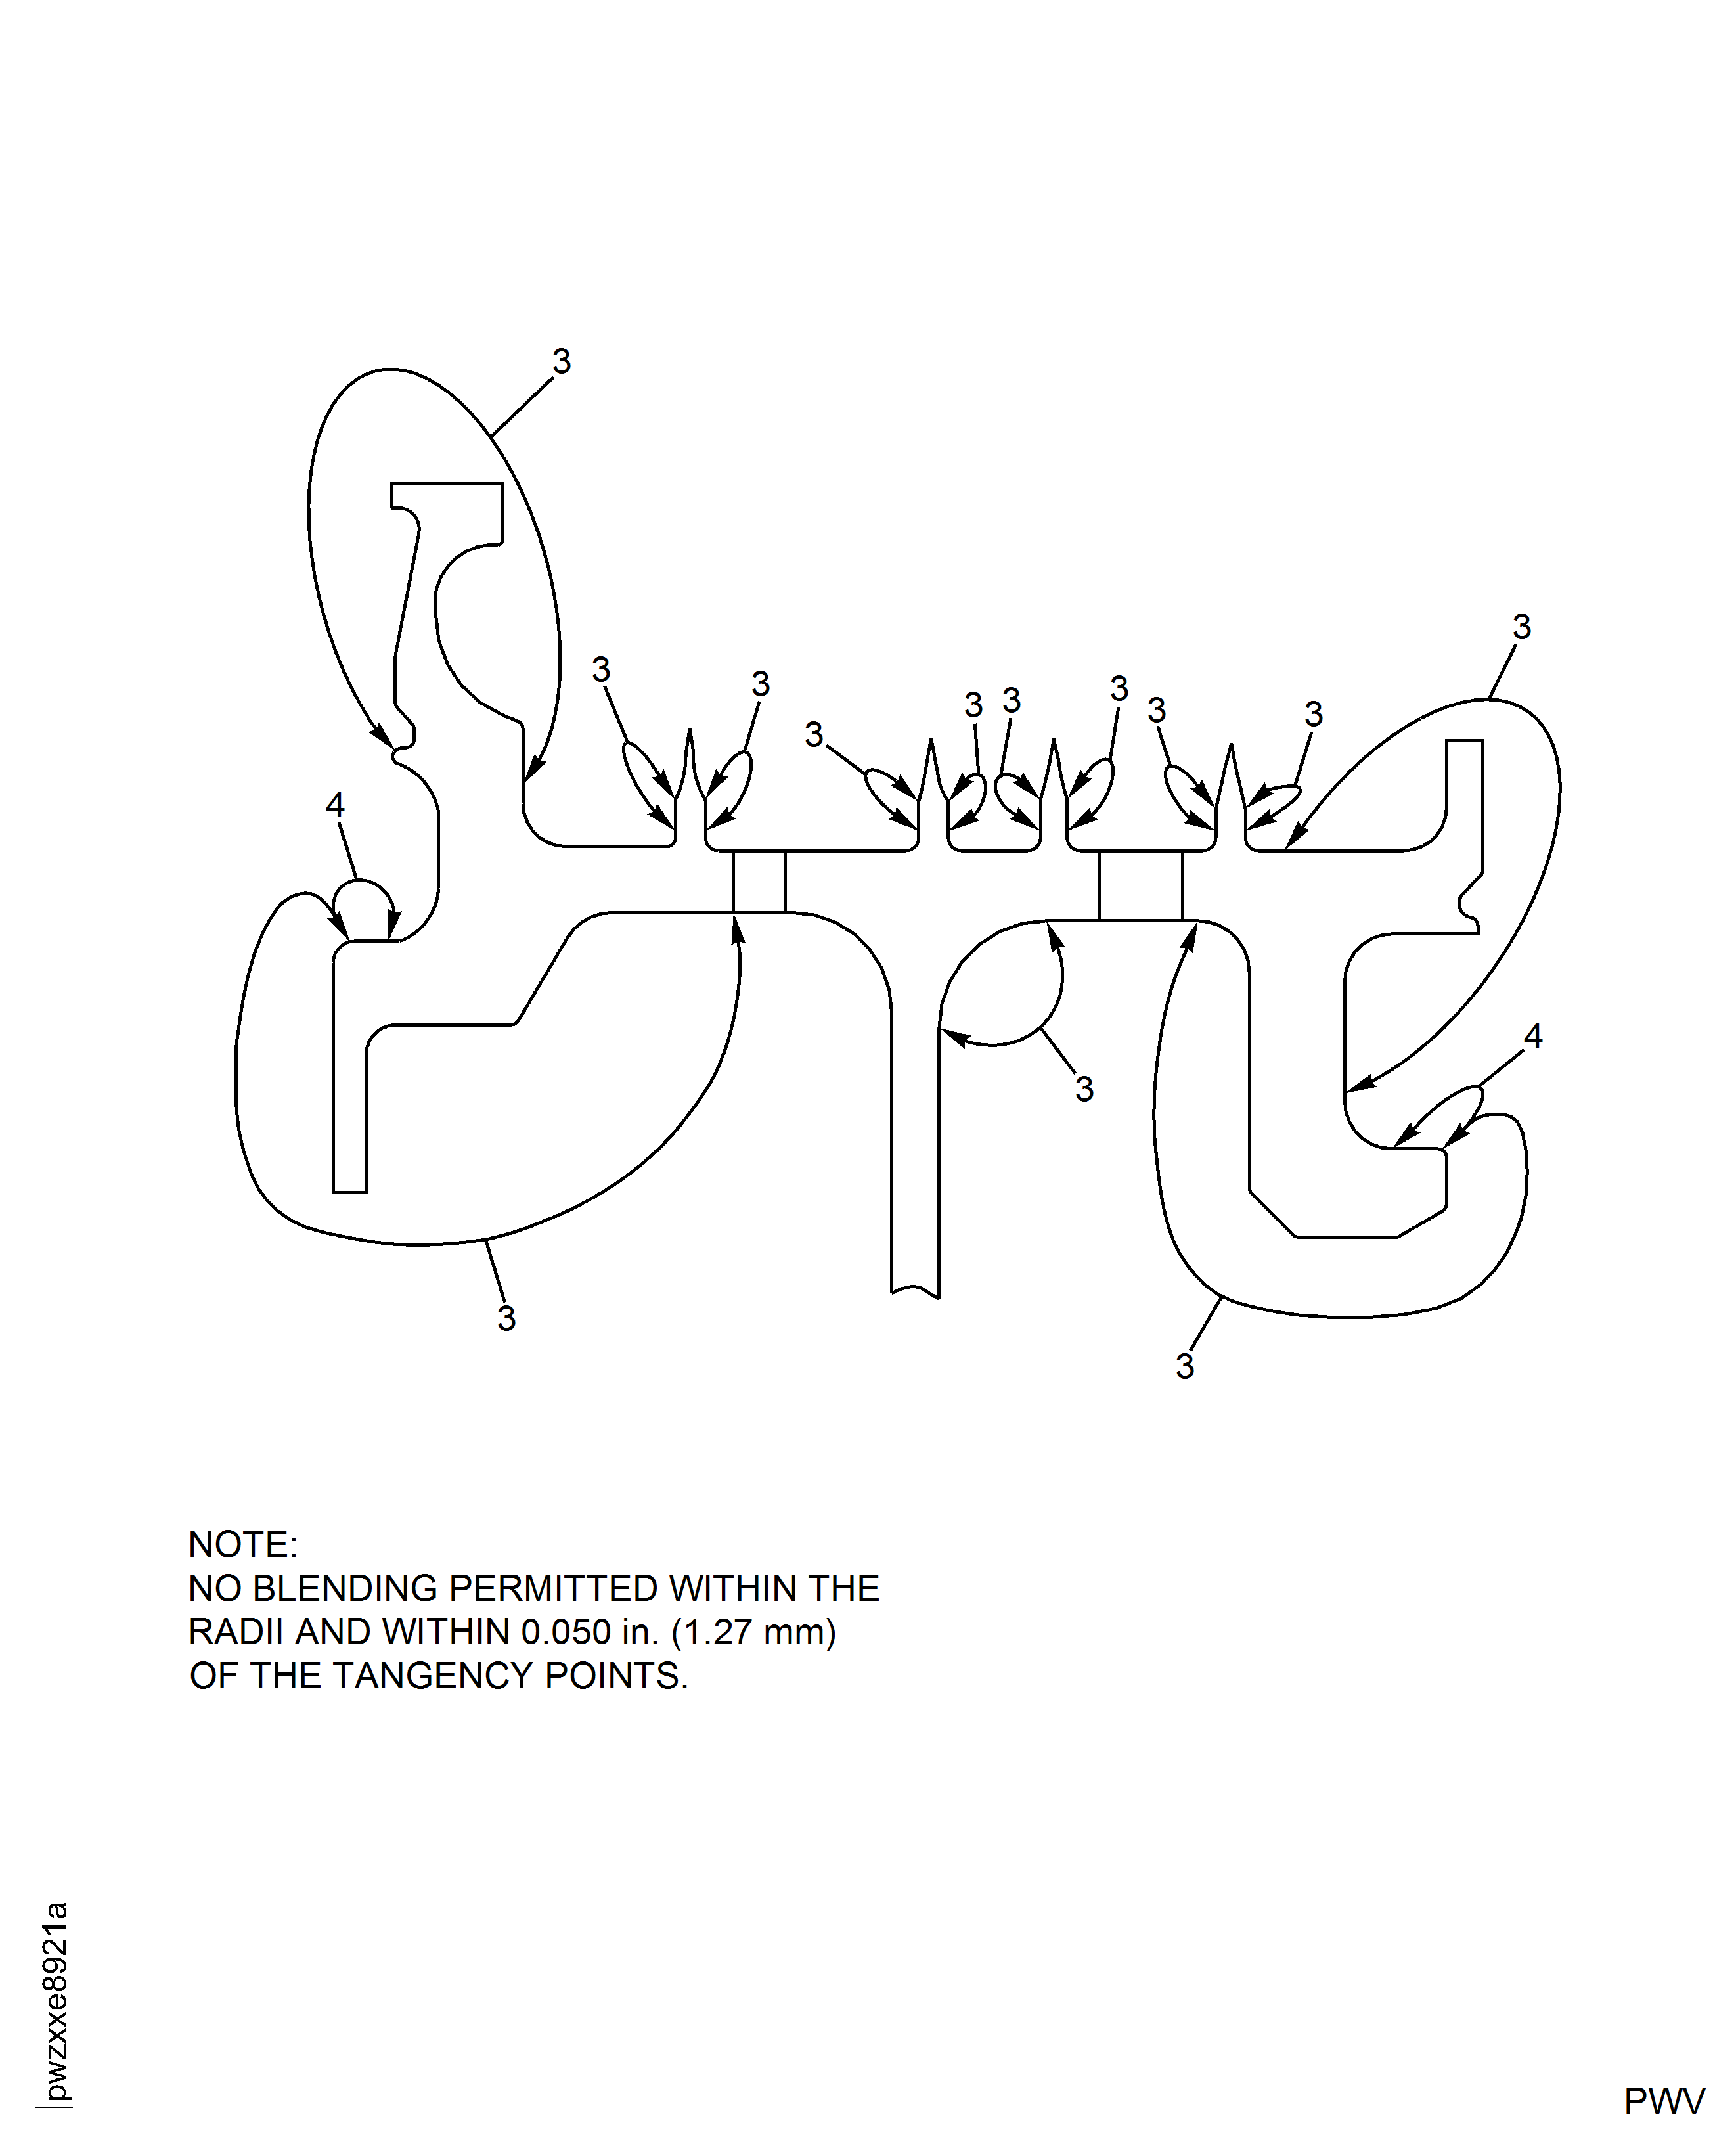
Figure: Repair Locations and Details for PN 2A4157
Repair Locations and Details for PN 2A4157

Figure: Repair Locations And Details For PN 2A4196
Repair Locations And Details For PN 2A4196
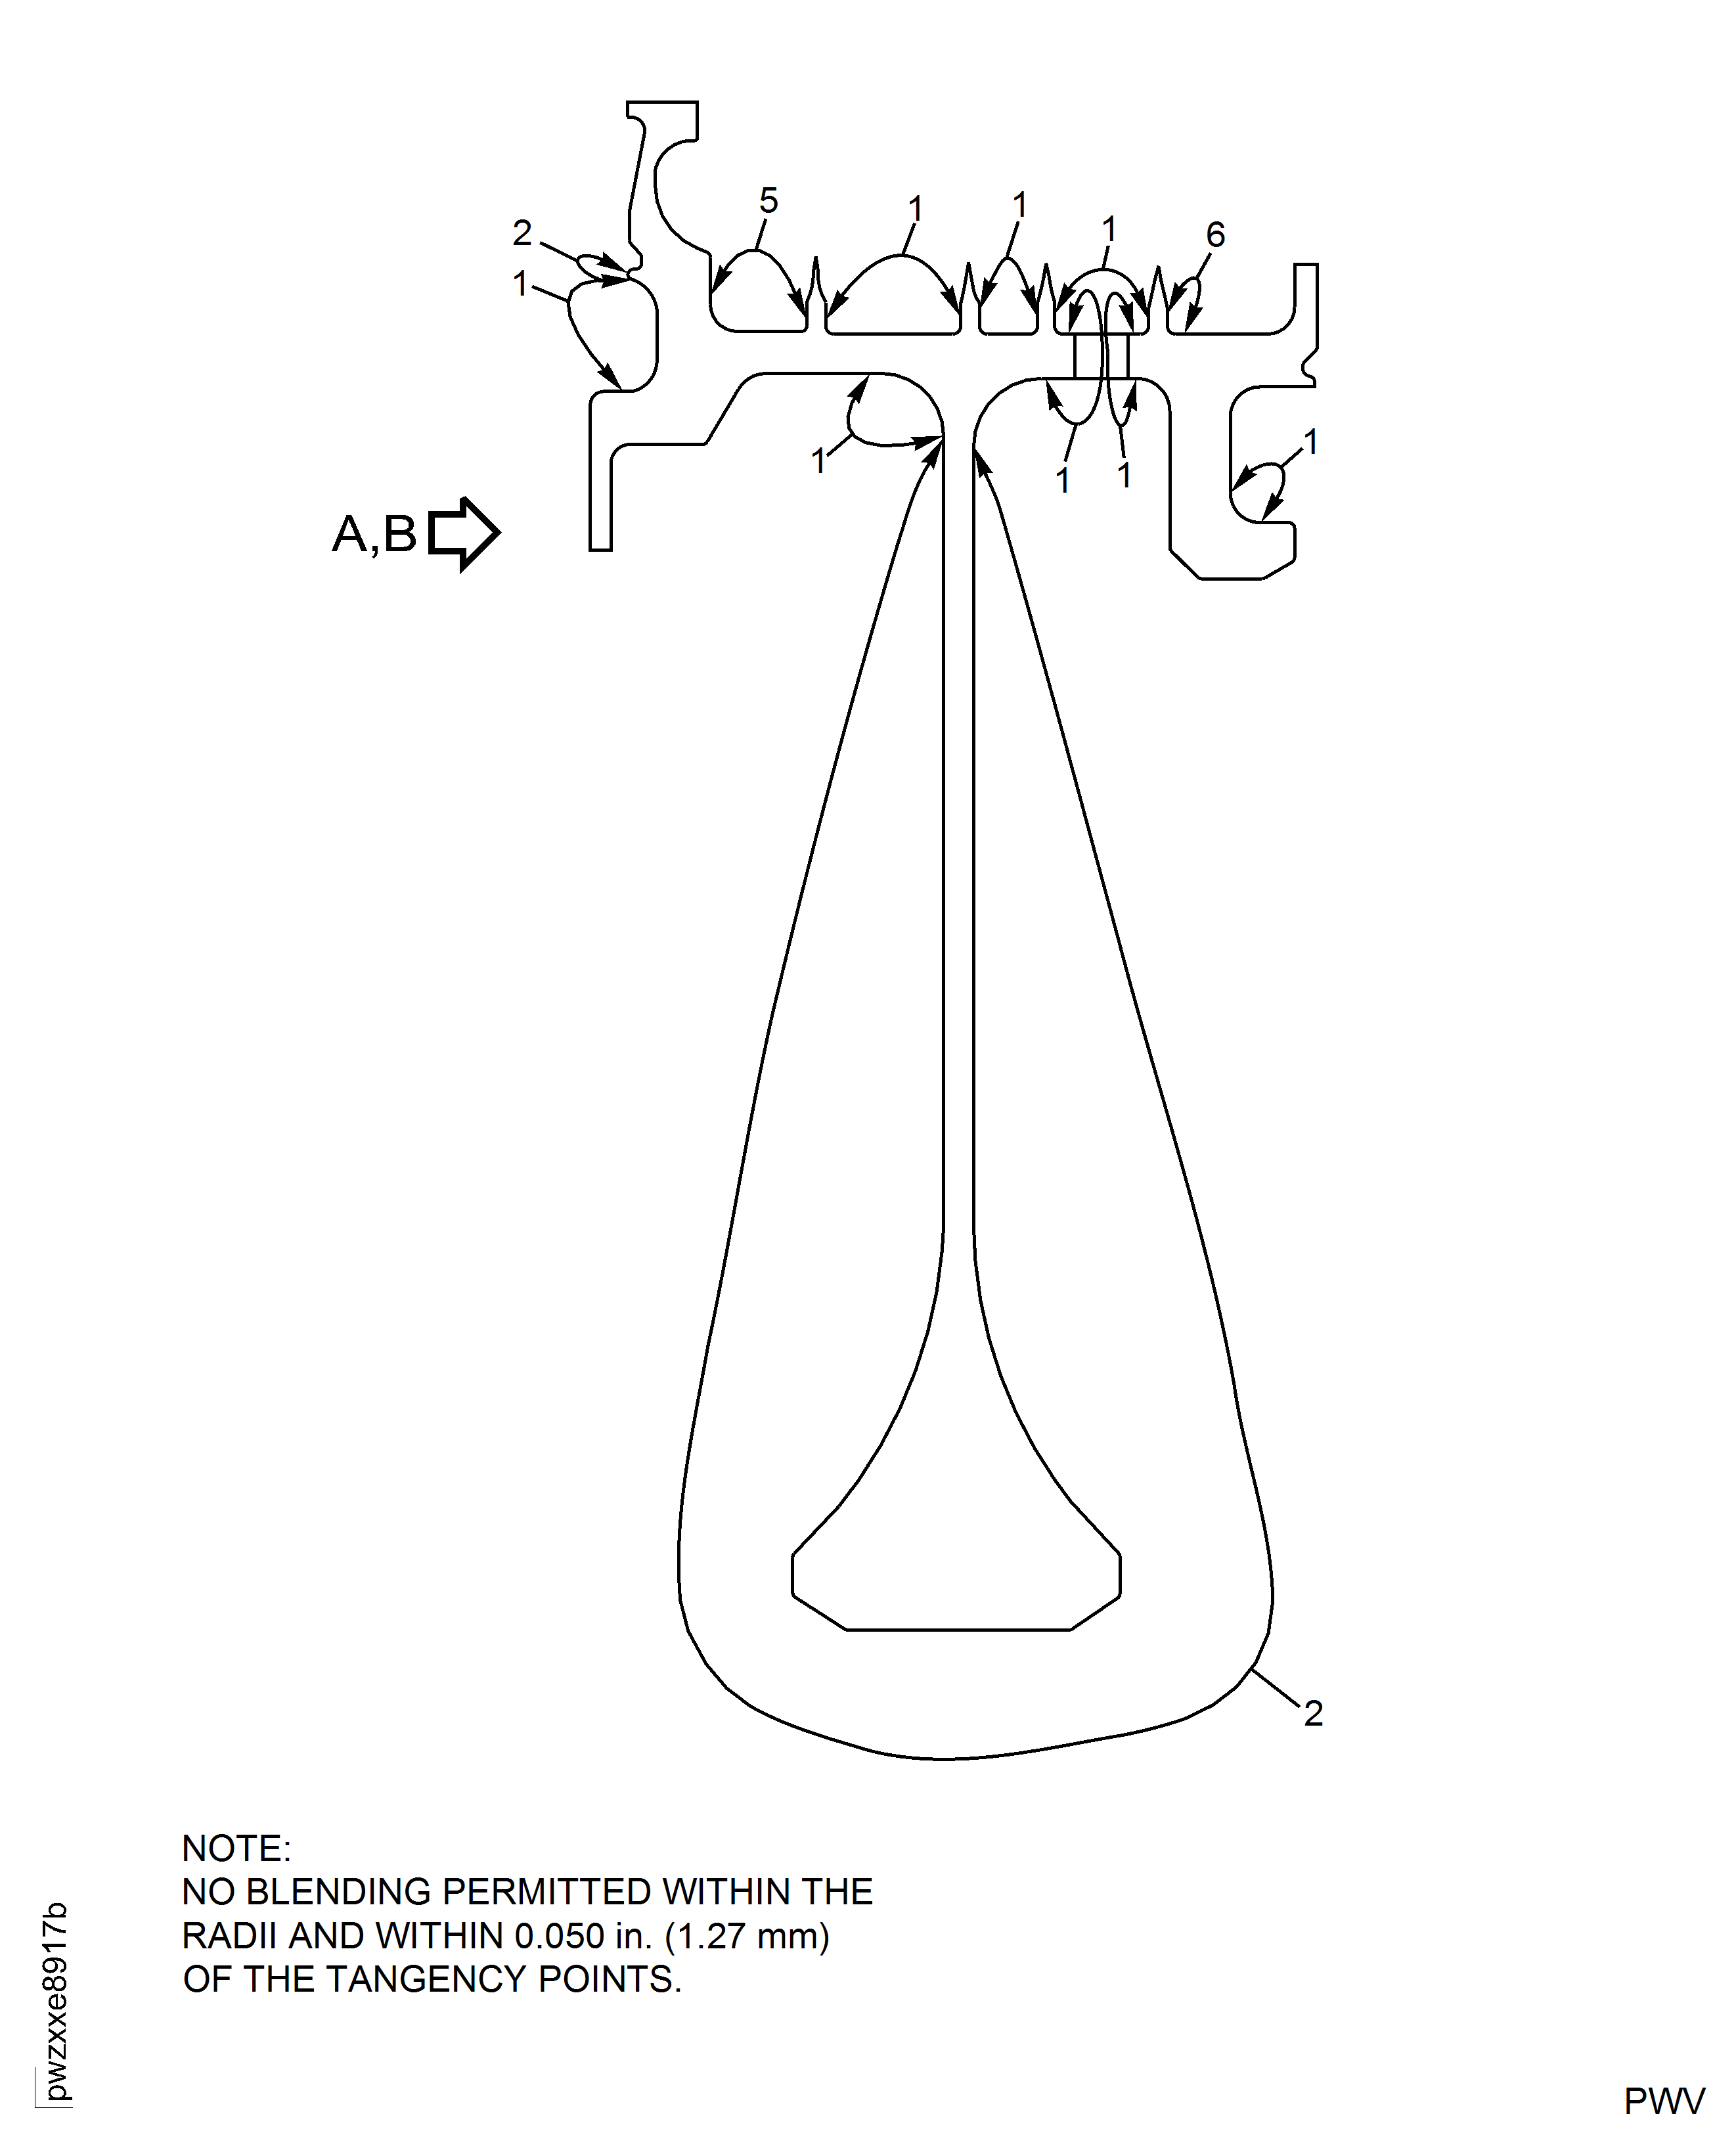
Figure: Repair Locations and Details for PN 2A4196
Repair Locations and Details for PN 2A4196

Figure: Repair Locations and Details for PN 2A4196
Repair Locations and Details for PN 2A4196
