Export Control
EAR Export Classification: Not subject to the EAR per 15 C.F.R. Chapter 1, Part 734.3(b)(3), except for the following Service Bulletins which are currently published as EAR Export Classification 9E991: SBE70-0992, SBE72-0483, SBE72-0580, SBE72-0588, SBE72-0640, SBE73-0209, SBE80-0024 and SBE80-0025.Copyright
© IAE International Aero Engines AG (2001, 2014 - 2021) The information contained in this document is the property of © IAE International Aero Engines AG and may not be copied or used for any purpose other than that for which it is supplied without the express written authority of © IAE International Aero Engines AG. (This does not preclude use by engine and aircraft operators for normal instructional, maintenance or overhaul purposes.).Applicability
All
Common Information
TASK 72-45-13-300-001 HPT Stage 1 Rotating Inner Air Seal - Blend Repair, Repair-001 (VRS3199)
Preliminary Requirements
Pre-Conditions
| Action/Condition | Data Module/Technical Publication |
|---|---|
| Make sure that all the cleaning and inspection procedures are done before this repair. |
Support Equipment
NONEConsumables, Materials and Expendables
NONESpares
NONESafety Requirements
CAUTION
Procedure
All blends must be smooth and made in the shape of the initial contour. The minimum blend length to depth is 15 to 1.
The maximum total blended away area on each knife-edge is 0.200 sqin. (129.0 sqmm).
The maximum total blended away area on all knife-edges is 0.300 sqin. (194.0 sqmm).
Blend to a sufficient depth to remove damage plus an additional 0.002 in. to 0.003 in. (0.05 mm to 0.08 mm) of material.
Blend the dents, nicks, scratches and corrosion on the knife-edges by SPM TASK 70-35-03-300-501.
SUBTASK 72-45-13-350-051 Blend the Dents, Nicks, Scratches and Corrosion on the Knife-Edges
All blends must be smooth and made in the shape of the initial contour.
The minimum blend length to depth is 15 to 1.
All the finish marks must follow the lay of the initial tool marks.
The maximum local blending permitted on each side of the front diameter is 0.005 in. (0.13 mm).
Blend to a sufficient depth to remove damage plus an additional 0.002 in. to 0.003 in. (0.05 mm to 0.08 mm) of a material.
All dimensions apply when Surface K is flat by 0.002 in. (0.05 mm) and Diameter J maintains a clearance envelope of 8.636 in. (219.35 mm) diameter in free or held condition. Hold the seal only on Surfaces G and K and Diameter J.
NOTE
You can blend on each side of the front diameter if the flange thickness is not decreased to less than 0.074 in. (1.88 mm).
You can machine each side of the front diameter to remove a large quantity of damage if the flange thickness is not decreased to less than 0.074 in. (1.88 mm).
Blend the dents, nicks, scratches and corrosion on each side of the front diameters by SPM TASK 70-35-03-300-501.
All blends must be smooth and made in the shape of the initial contour.
All the finish marks must follow the lay of the initial tool marks.
The minimum blend length to depth is 15 to 1.
The maximum blend depth is 0.007 in. (0.18 mm).
The maximum blend length is 0.500 in. (12.70 mm) in a circumferential direction.
The minimum distance between blended areas is 2.00 in. (50.8 mm).
Blend to a sufficient depth to remove damage plus an additional 0.002 in. to 0.003 in. (0.05 mm to 0.08 mm) of material.
Blend the dents, nicks, scratches and corrosion on the rear diameter by SPM TASK 70-35-03-300-501.
For PN 2A1352, no blending of holes is permitted.
Damage up to 0.001 in. (0.03 mm) in depth is permitted.
All blends must be smooth and made to the initial contour in all directions.
All the finish marks must follow the lay of the initial tool marks.
The minimum blend length to depth is 15 to 1.
The maximum blend depth is 0.005 in. (0.13 mm).
Blend to a sufficient depth to remove damage plus an additional 0.002 in to 0.003 in. (0.05 mm to 0.08 mm) of material.
If the damage or blend goes through the hole edge, repair the hole edge radius by the procedure given in SPM TASK 70-33-19-350-501.
Blend the dents, nicks, scratches and corrosion on the large holes by SPM TASK 70-35-03-300-501.
All blends must be smooth and made to the initial contour in all directions.
All the finish marks must follow the lay of the initial tool marks.
The minimum blend length to depth is 15 to 1.
The maximum blend depth is 0.007 in. (0.18 mm).
Blend to a sufficient depth to remove damage plus an additional 0.002 in. to 0.003 in. (0.05 mm to 0.08 mm) of material.
Blend the dents, nicks and scratches on all other surfaces by SPM TASK 70-35-03-300-501.
SUBTASK 72-45-13-350-052 Blend the Dents, Nicks, Scratches and Corrosion Pits on the Air Seal Surfaces Except the Knife-Edges
Install the HPT Stage 1 Rotating Inner Air Seal into the fixture. Use appropriate fixture.
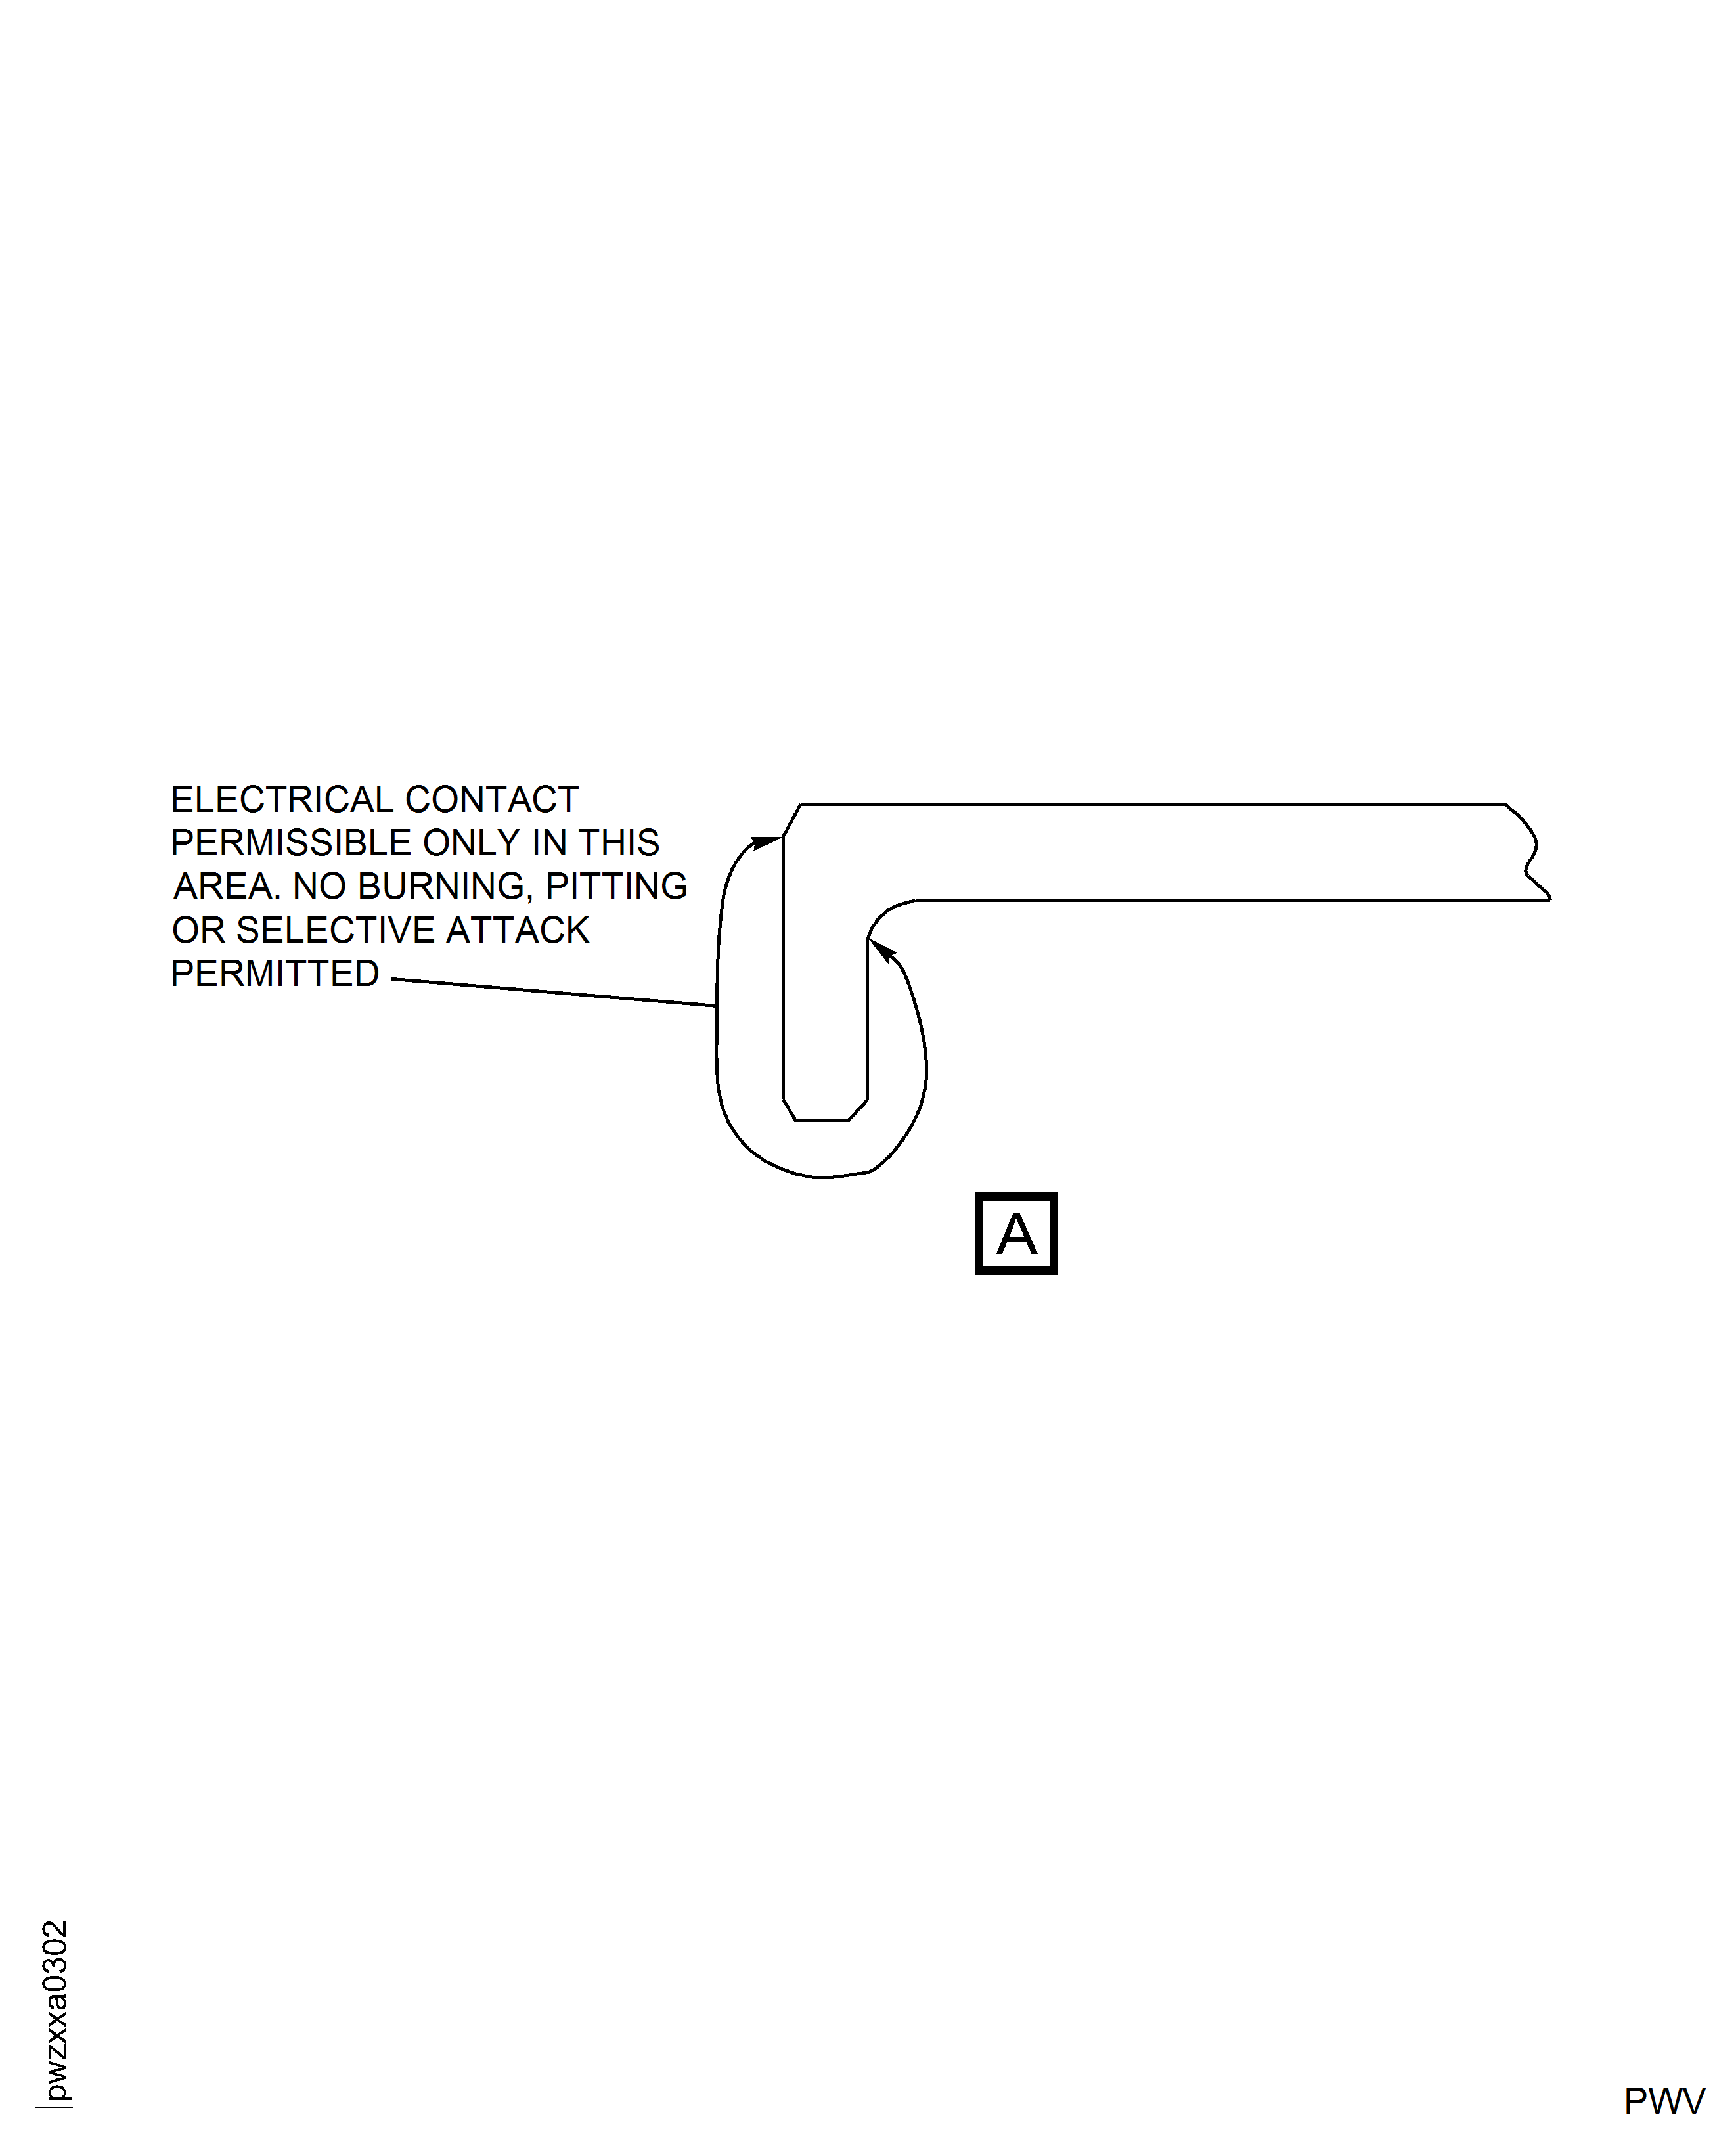
Constraint contact permitted only on Surface G, Surface K and Diameter J.
Turn the HPT Stage 1 Rotating Inner Air Seal at 900 rpm.
Record amount of unbalance in oz-in.
Remove prior unbalance marking. Make a mark for amount and location of unbalance per TASK 70-09-00-400-501, procedures to make permanent identification and location marks. Use shallow electrolytic etch.
SUBTASK 72-45-13-440-001 Balance Check the HPT Stage 1 Rotating Inner Air Seal
Figure: Repair Details and Dimensions
Repair Details and Dimensions
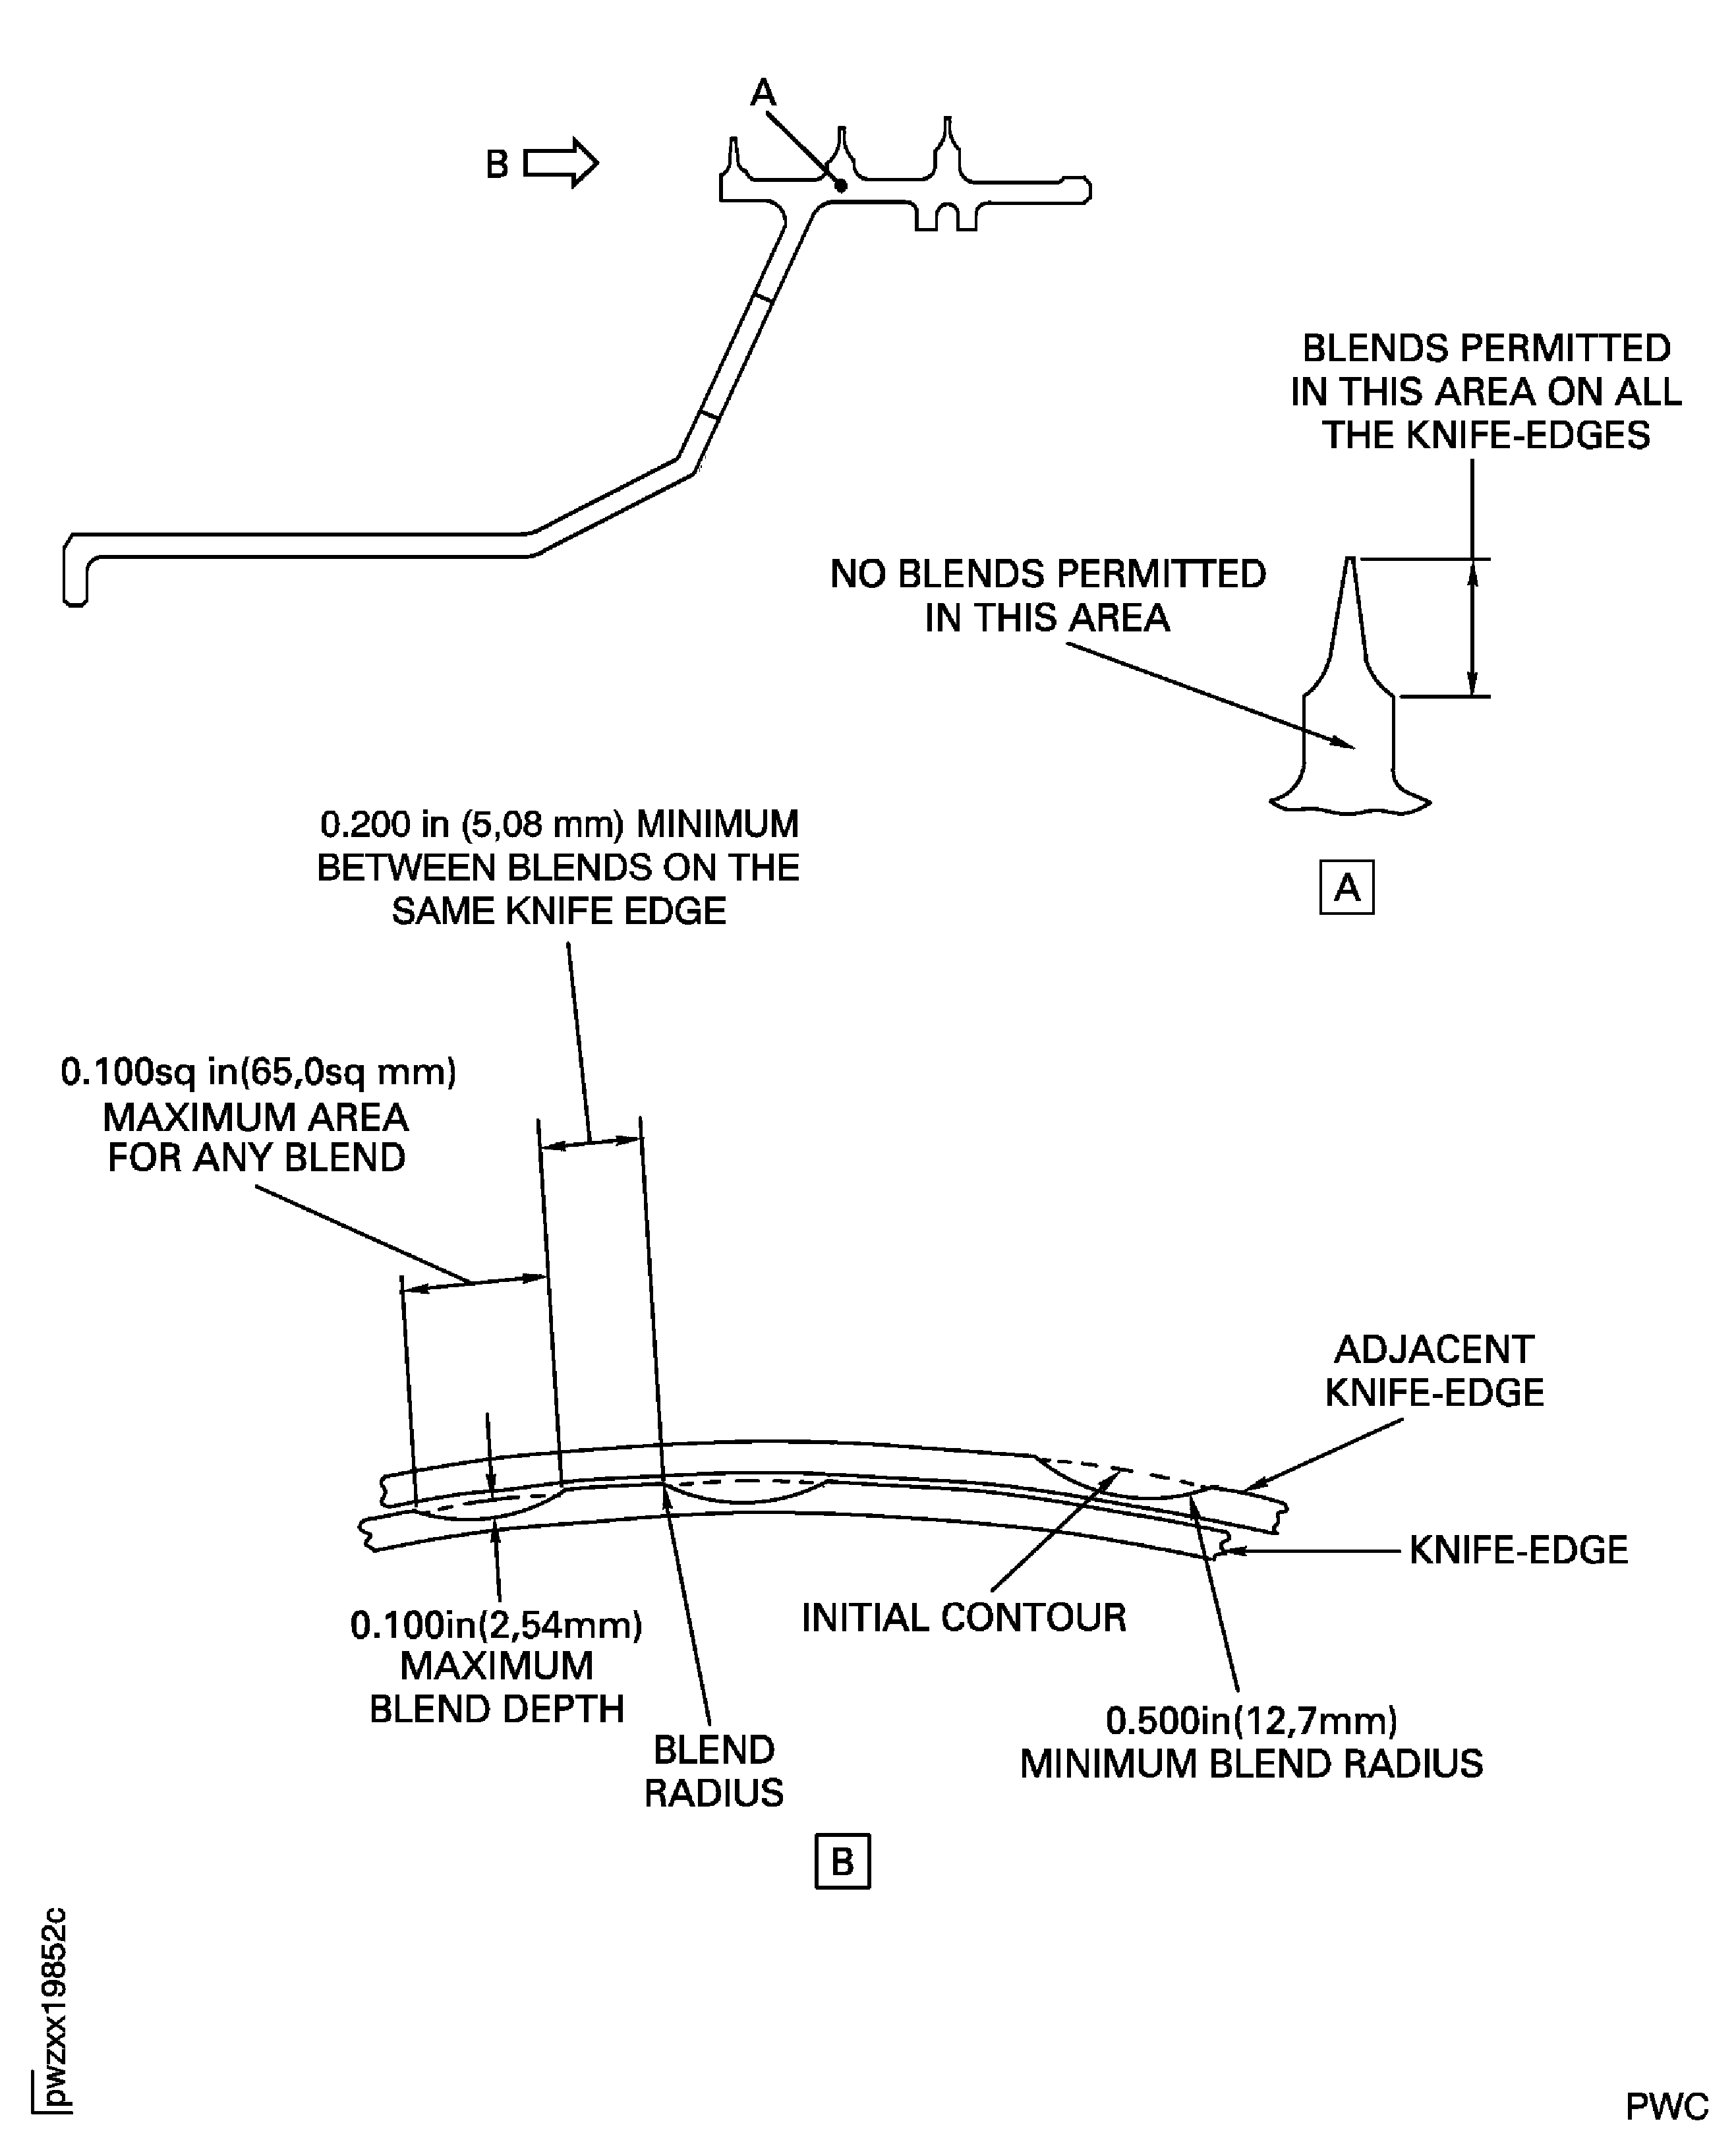
Figure: Repair Details and Dimensions
Repair Details and Dimensions
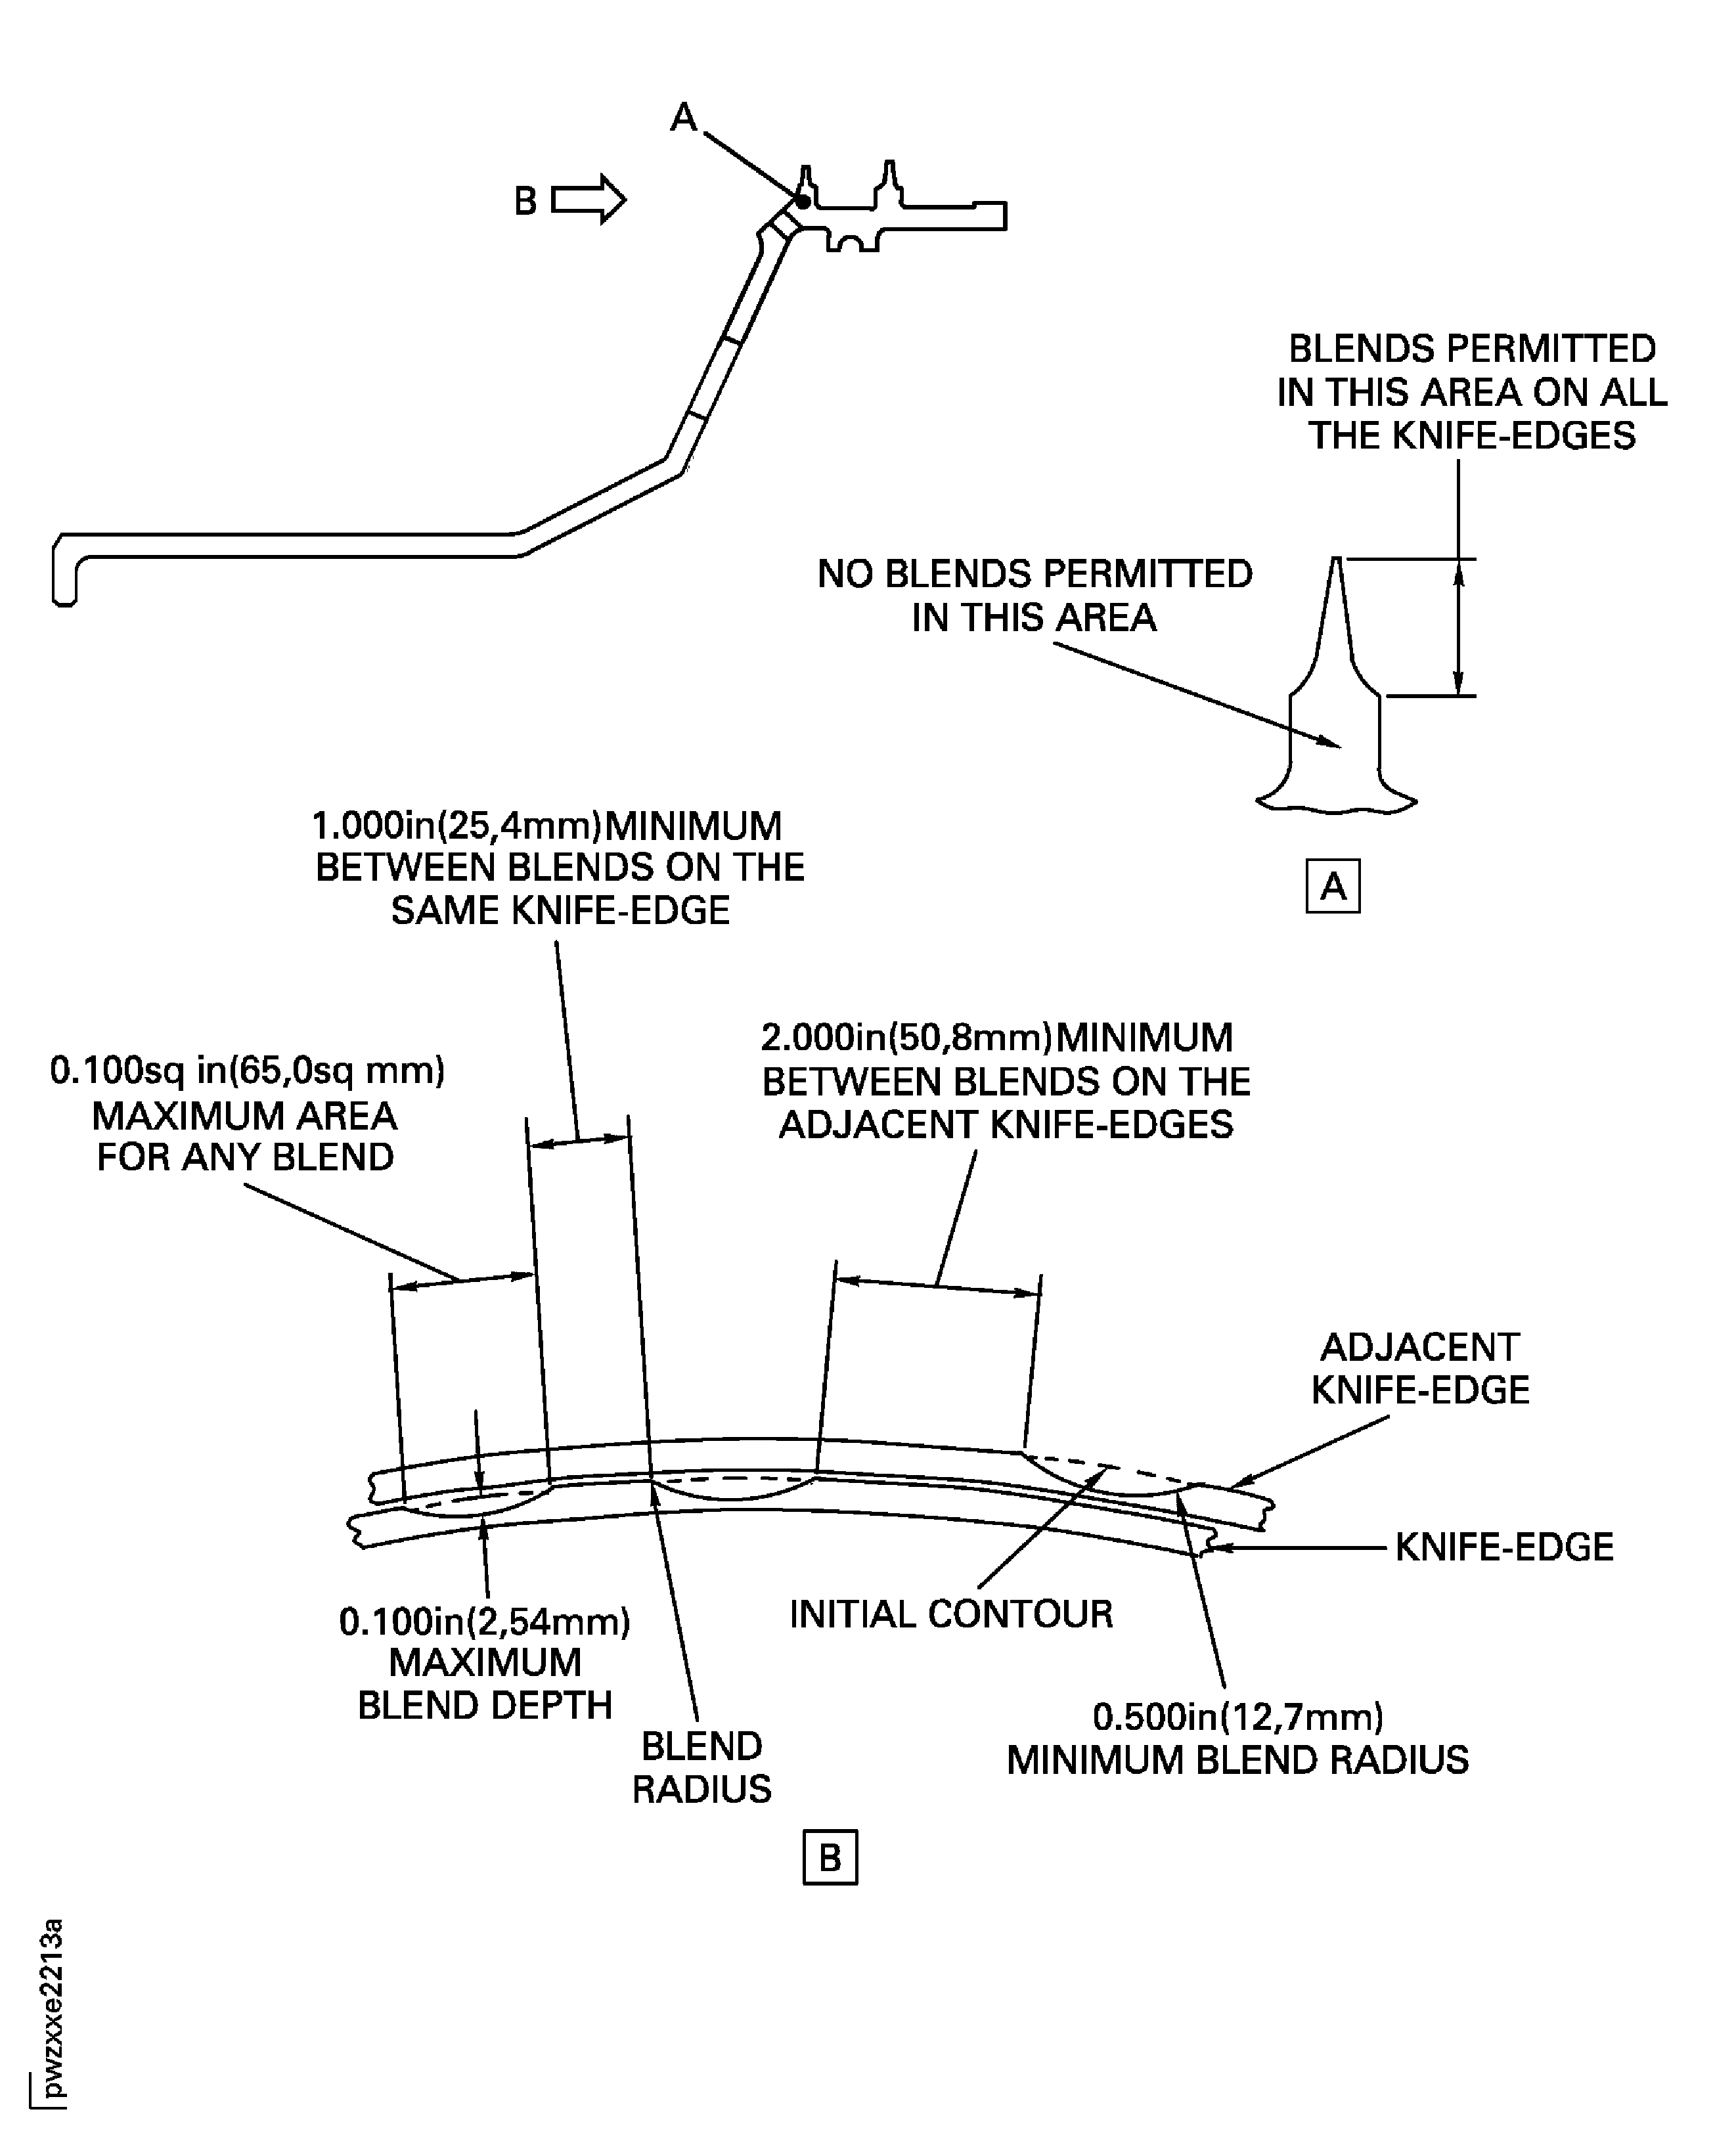
Figure: Repair Details and Dimensions (For PNs 2A0884 and 2A0884-001)
Repair Details and Dimensions (For PNs 2A0884 and 2A0884-001)
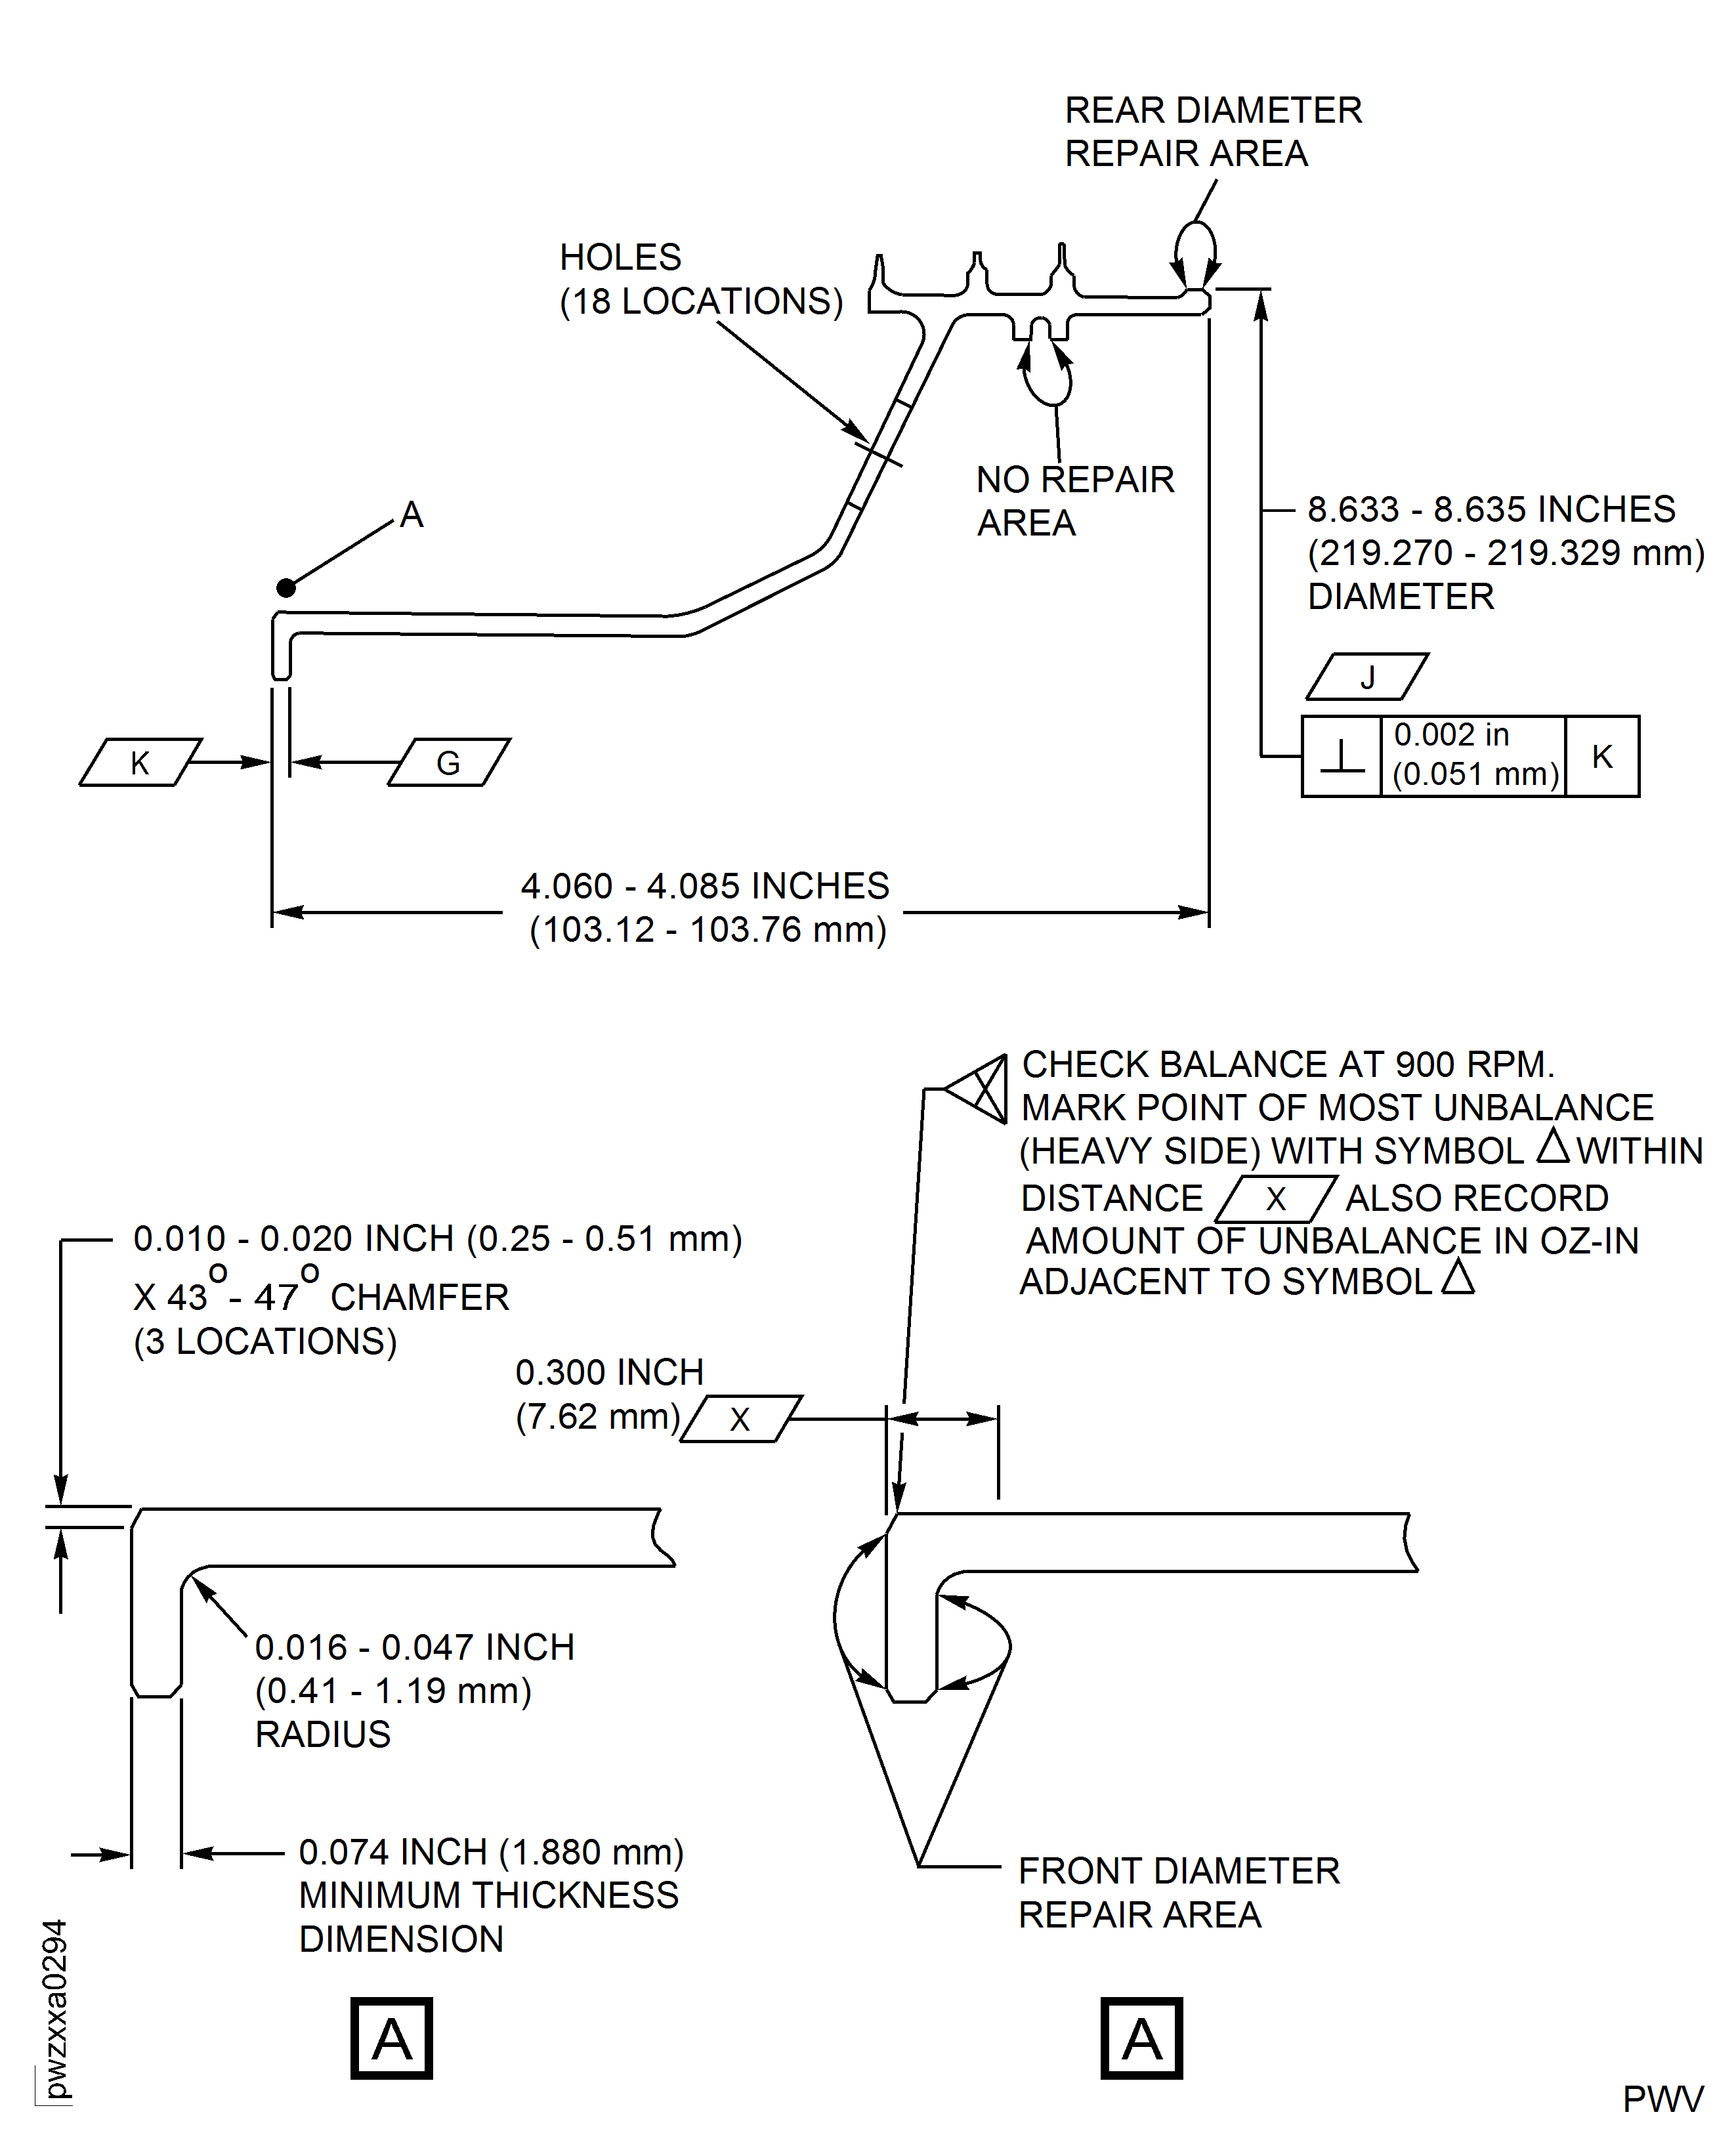
Figure: Repair Details and Dimensions (For PN 2A1203)
Repair Details and Dimensions (For PN 2A1203)
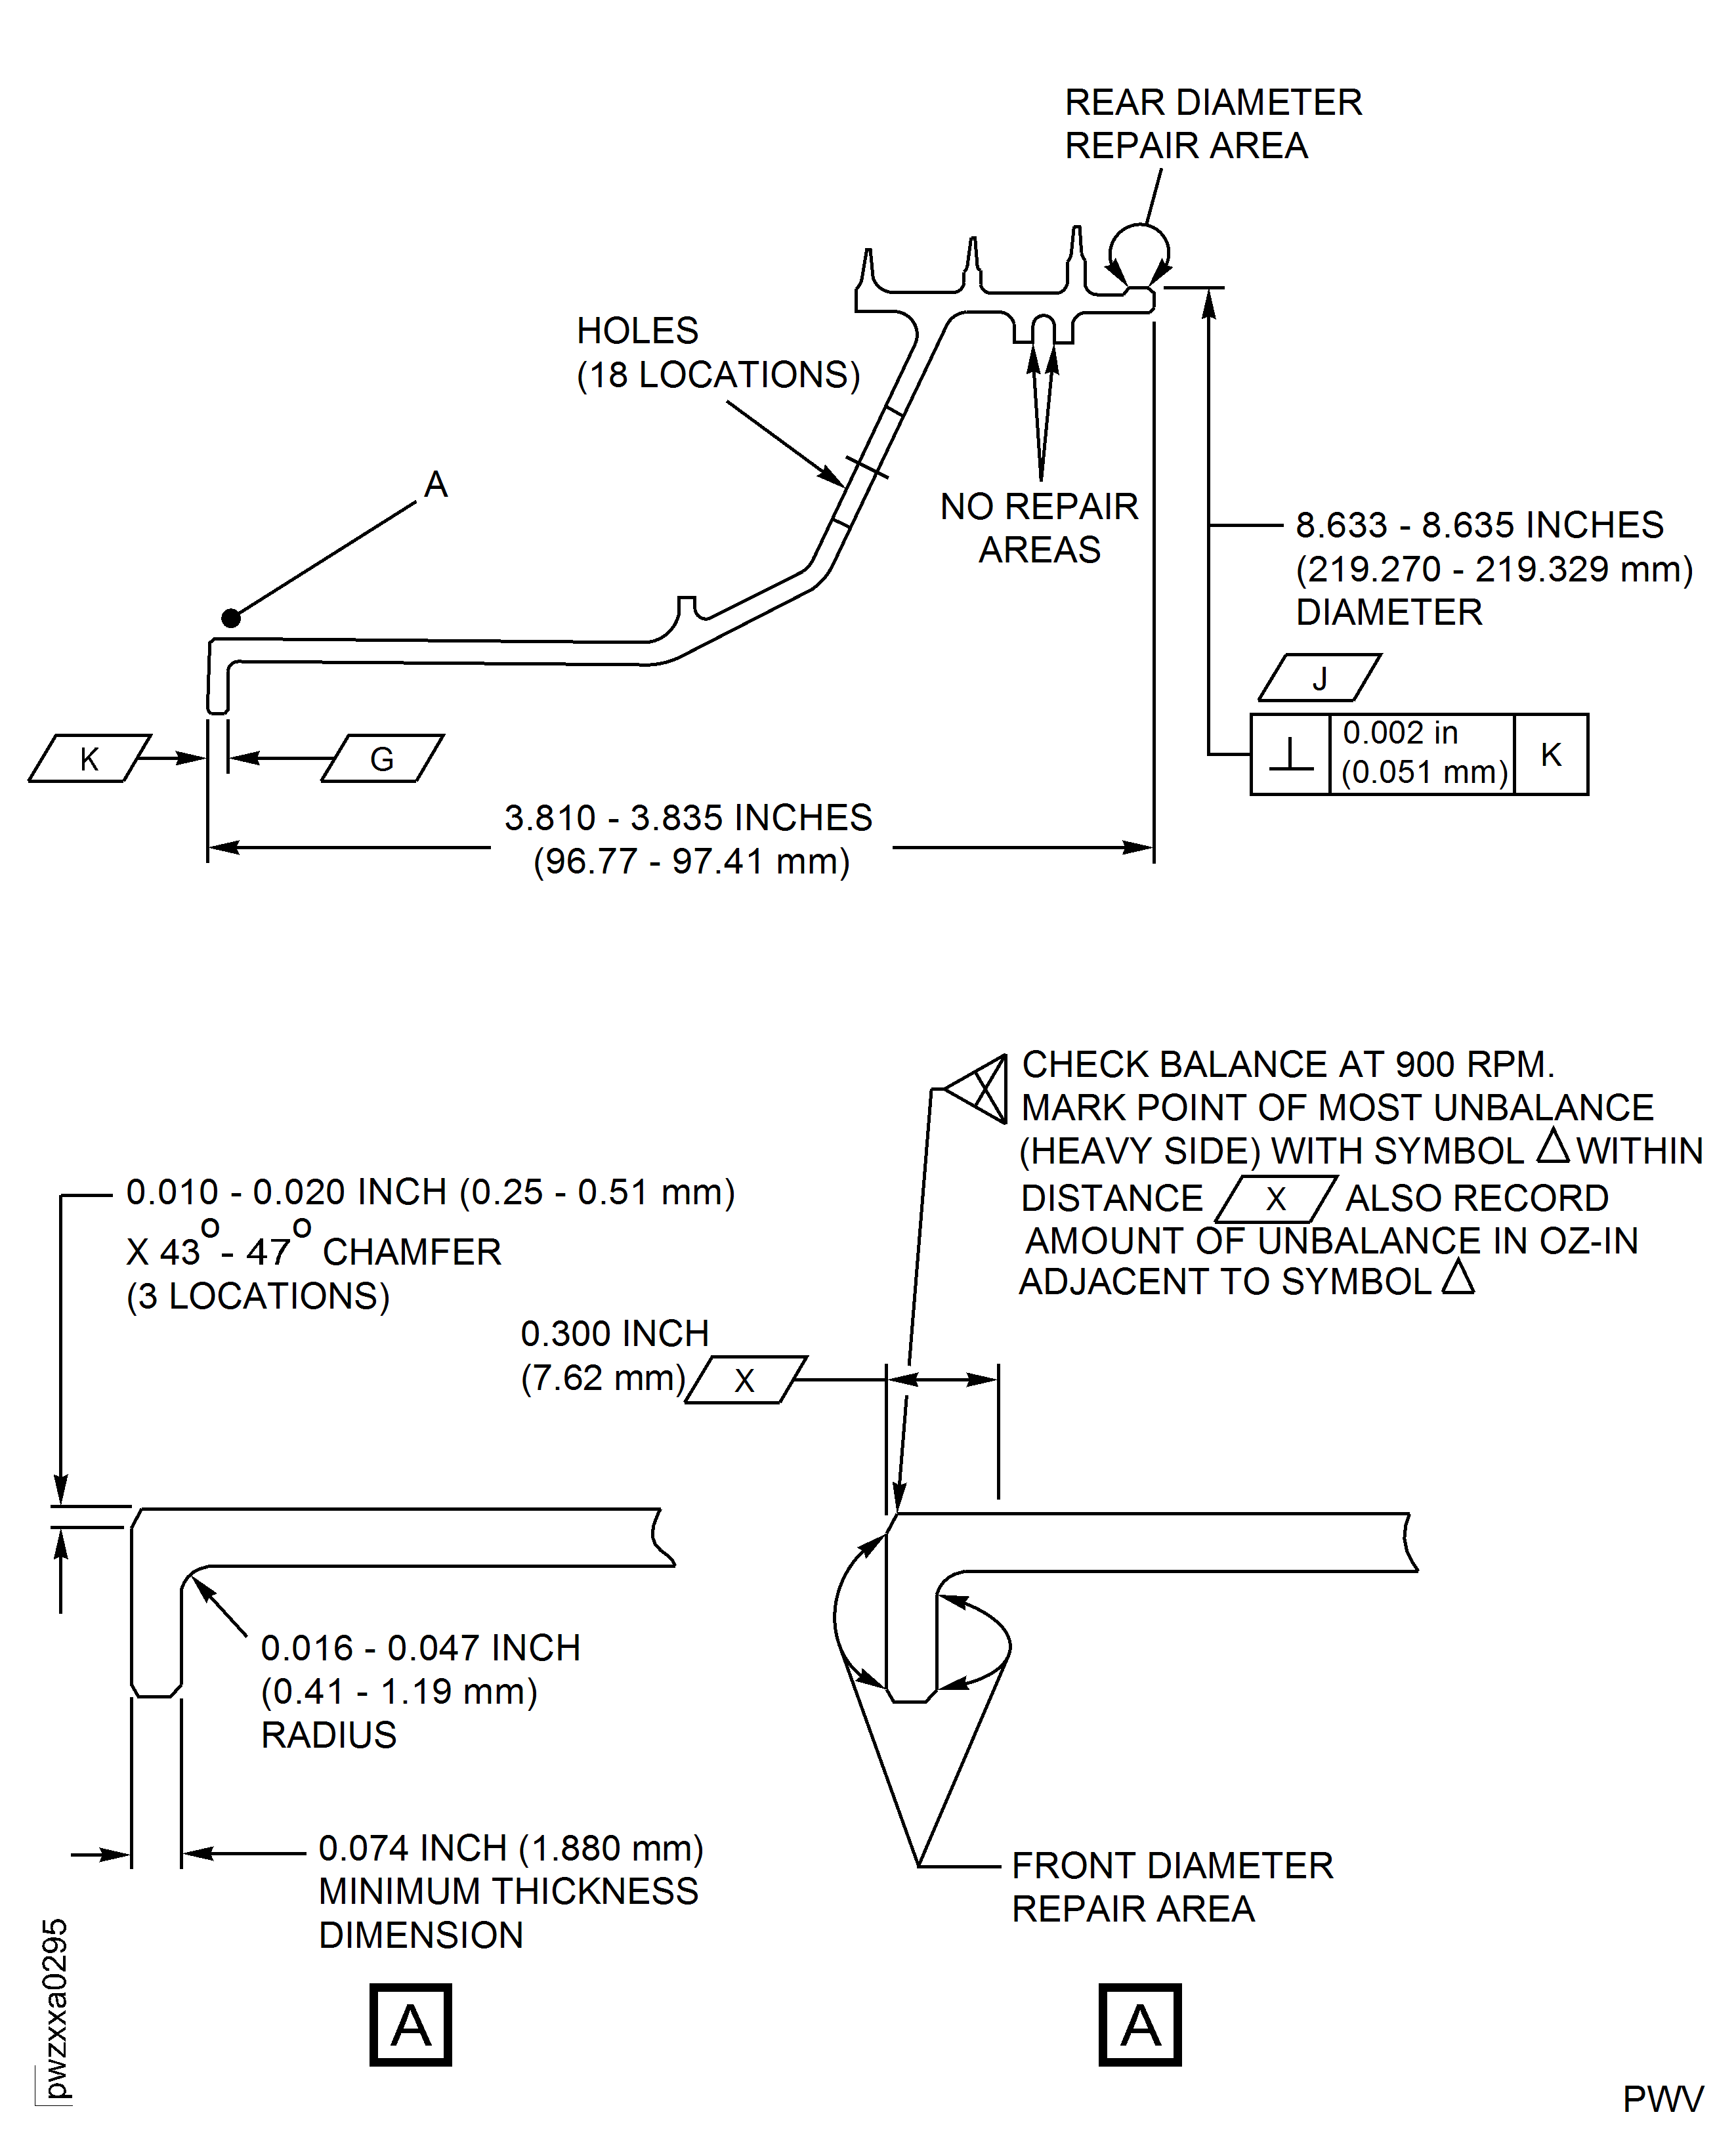
Figure: Repair Details and Dimensions (For PN 2A3032)
Repair Details and Dimensions (For PN 2A3032)
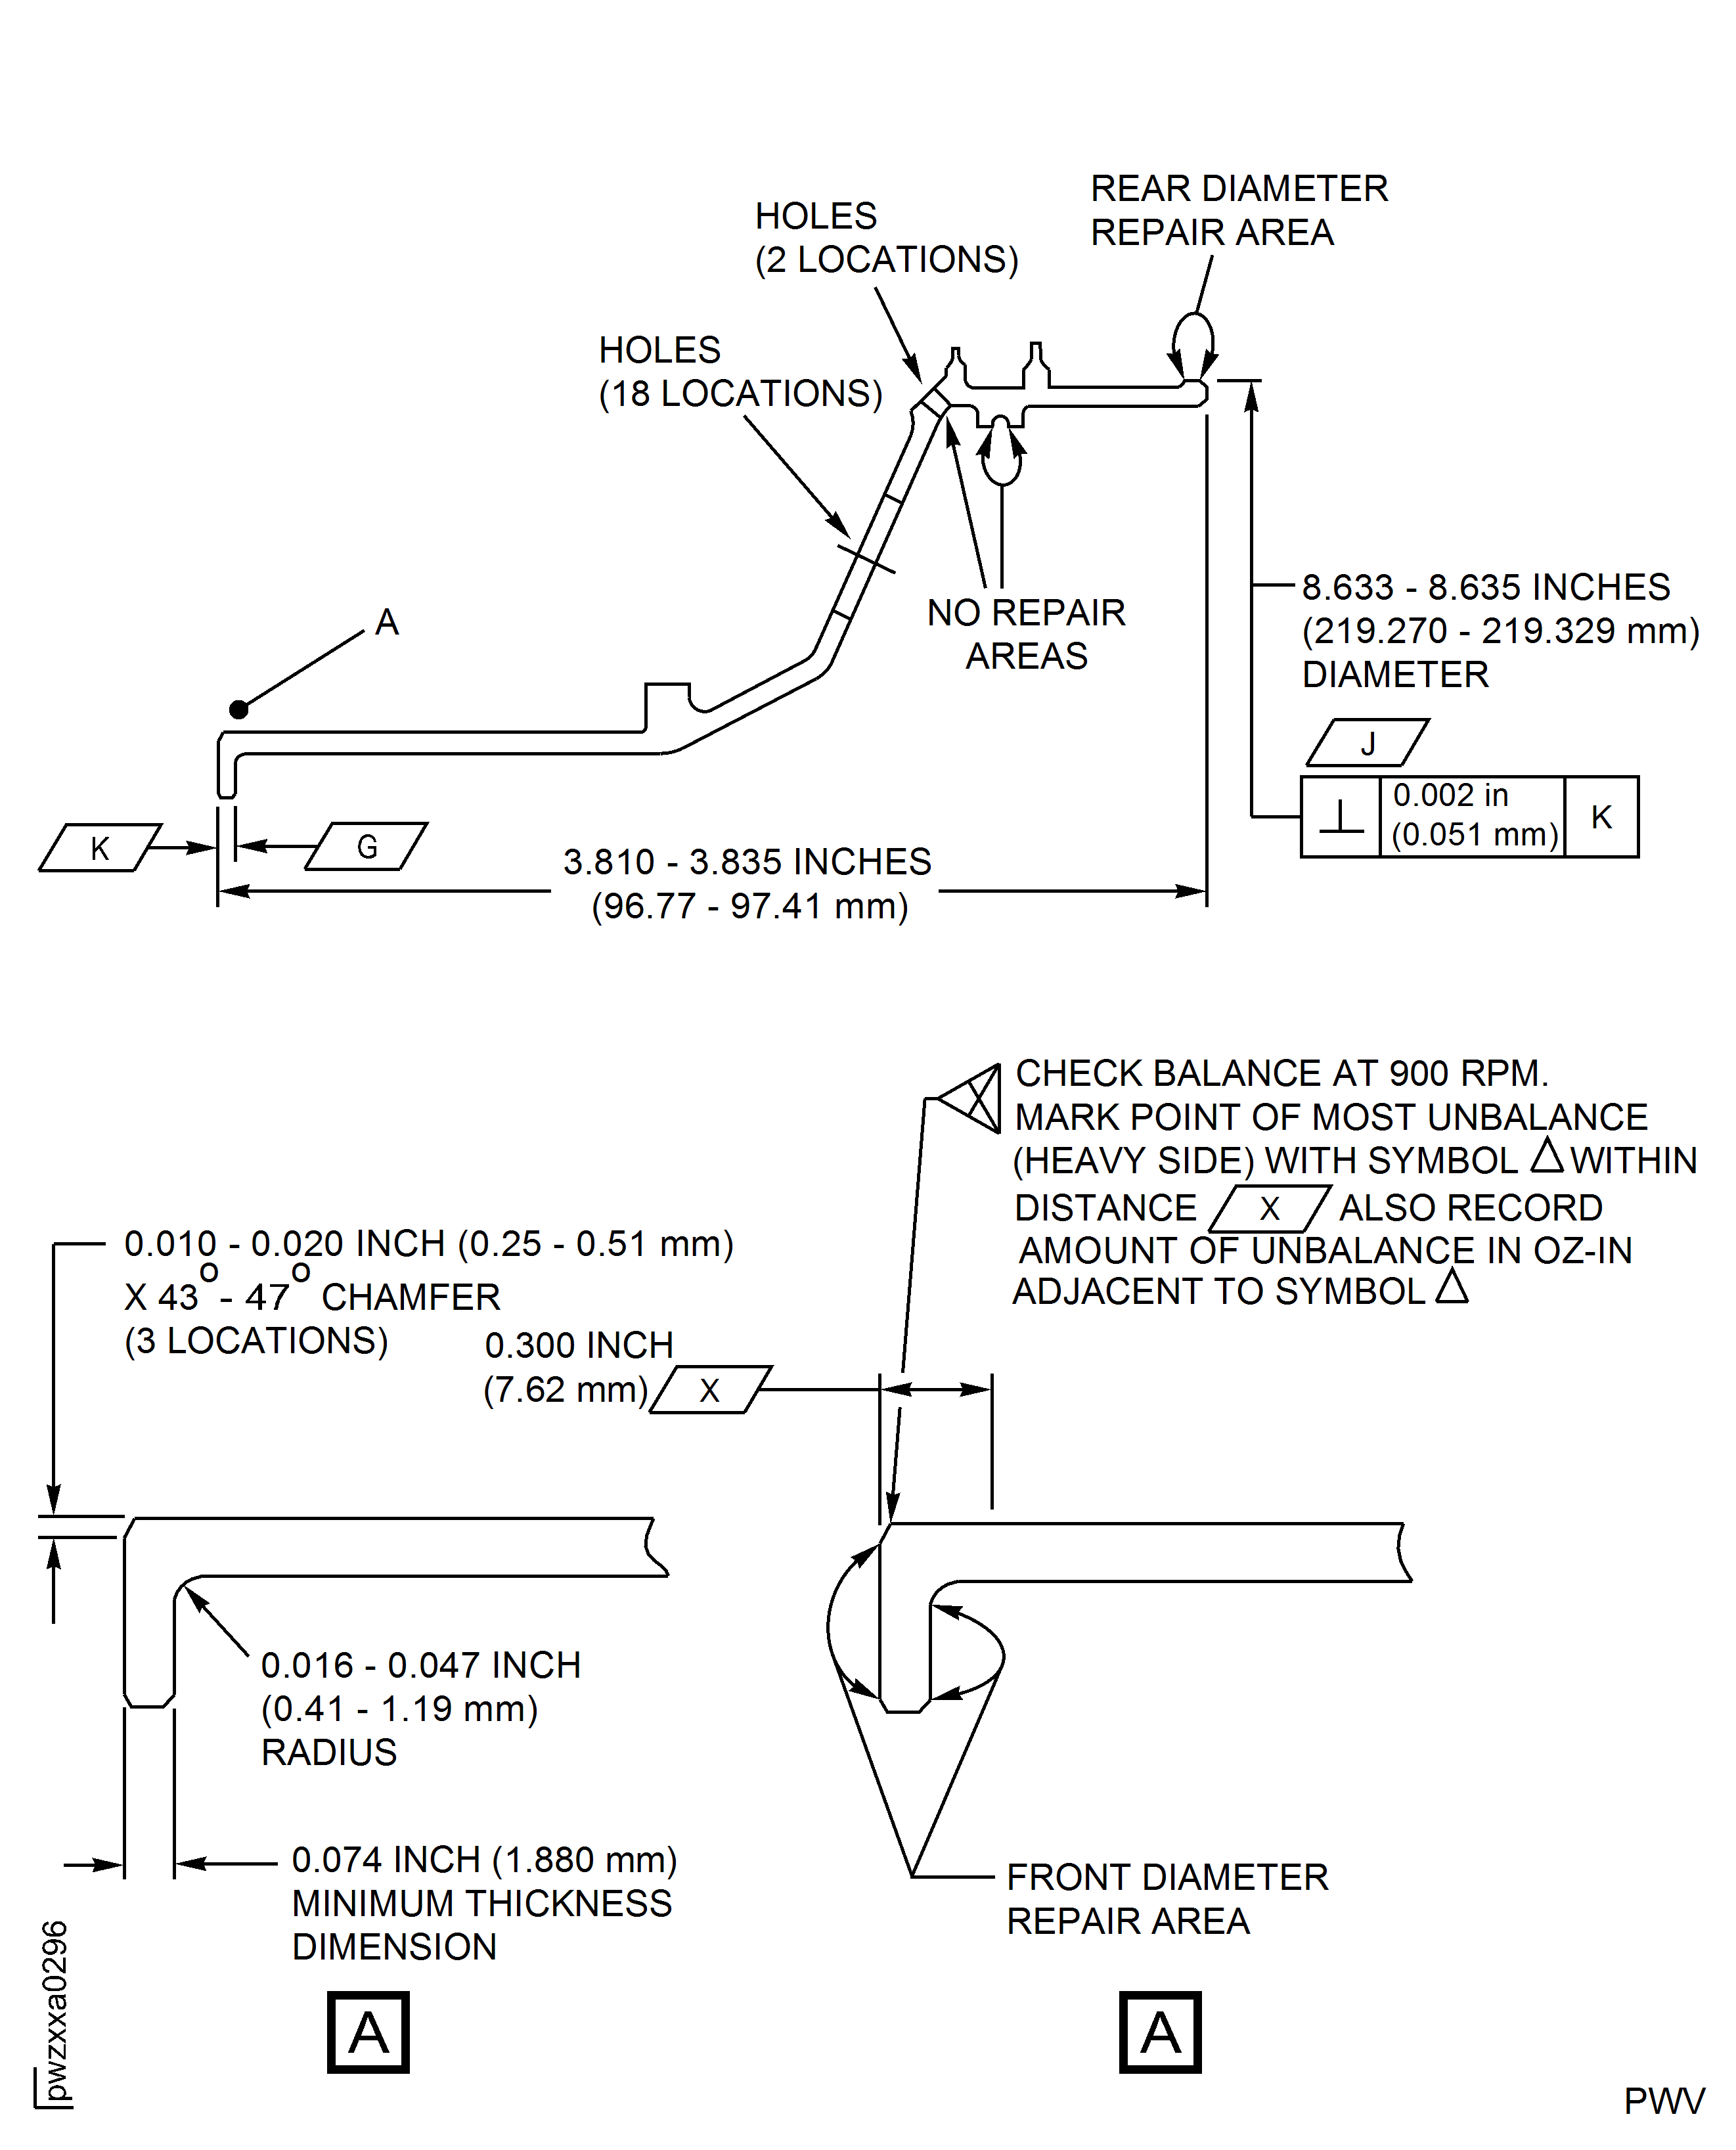
Figure: Repair Details and Dimensions (For PN 2A3069
Repair Details and Dimensions (For PN 2A3069
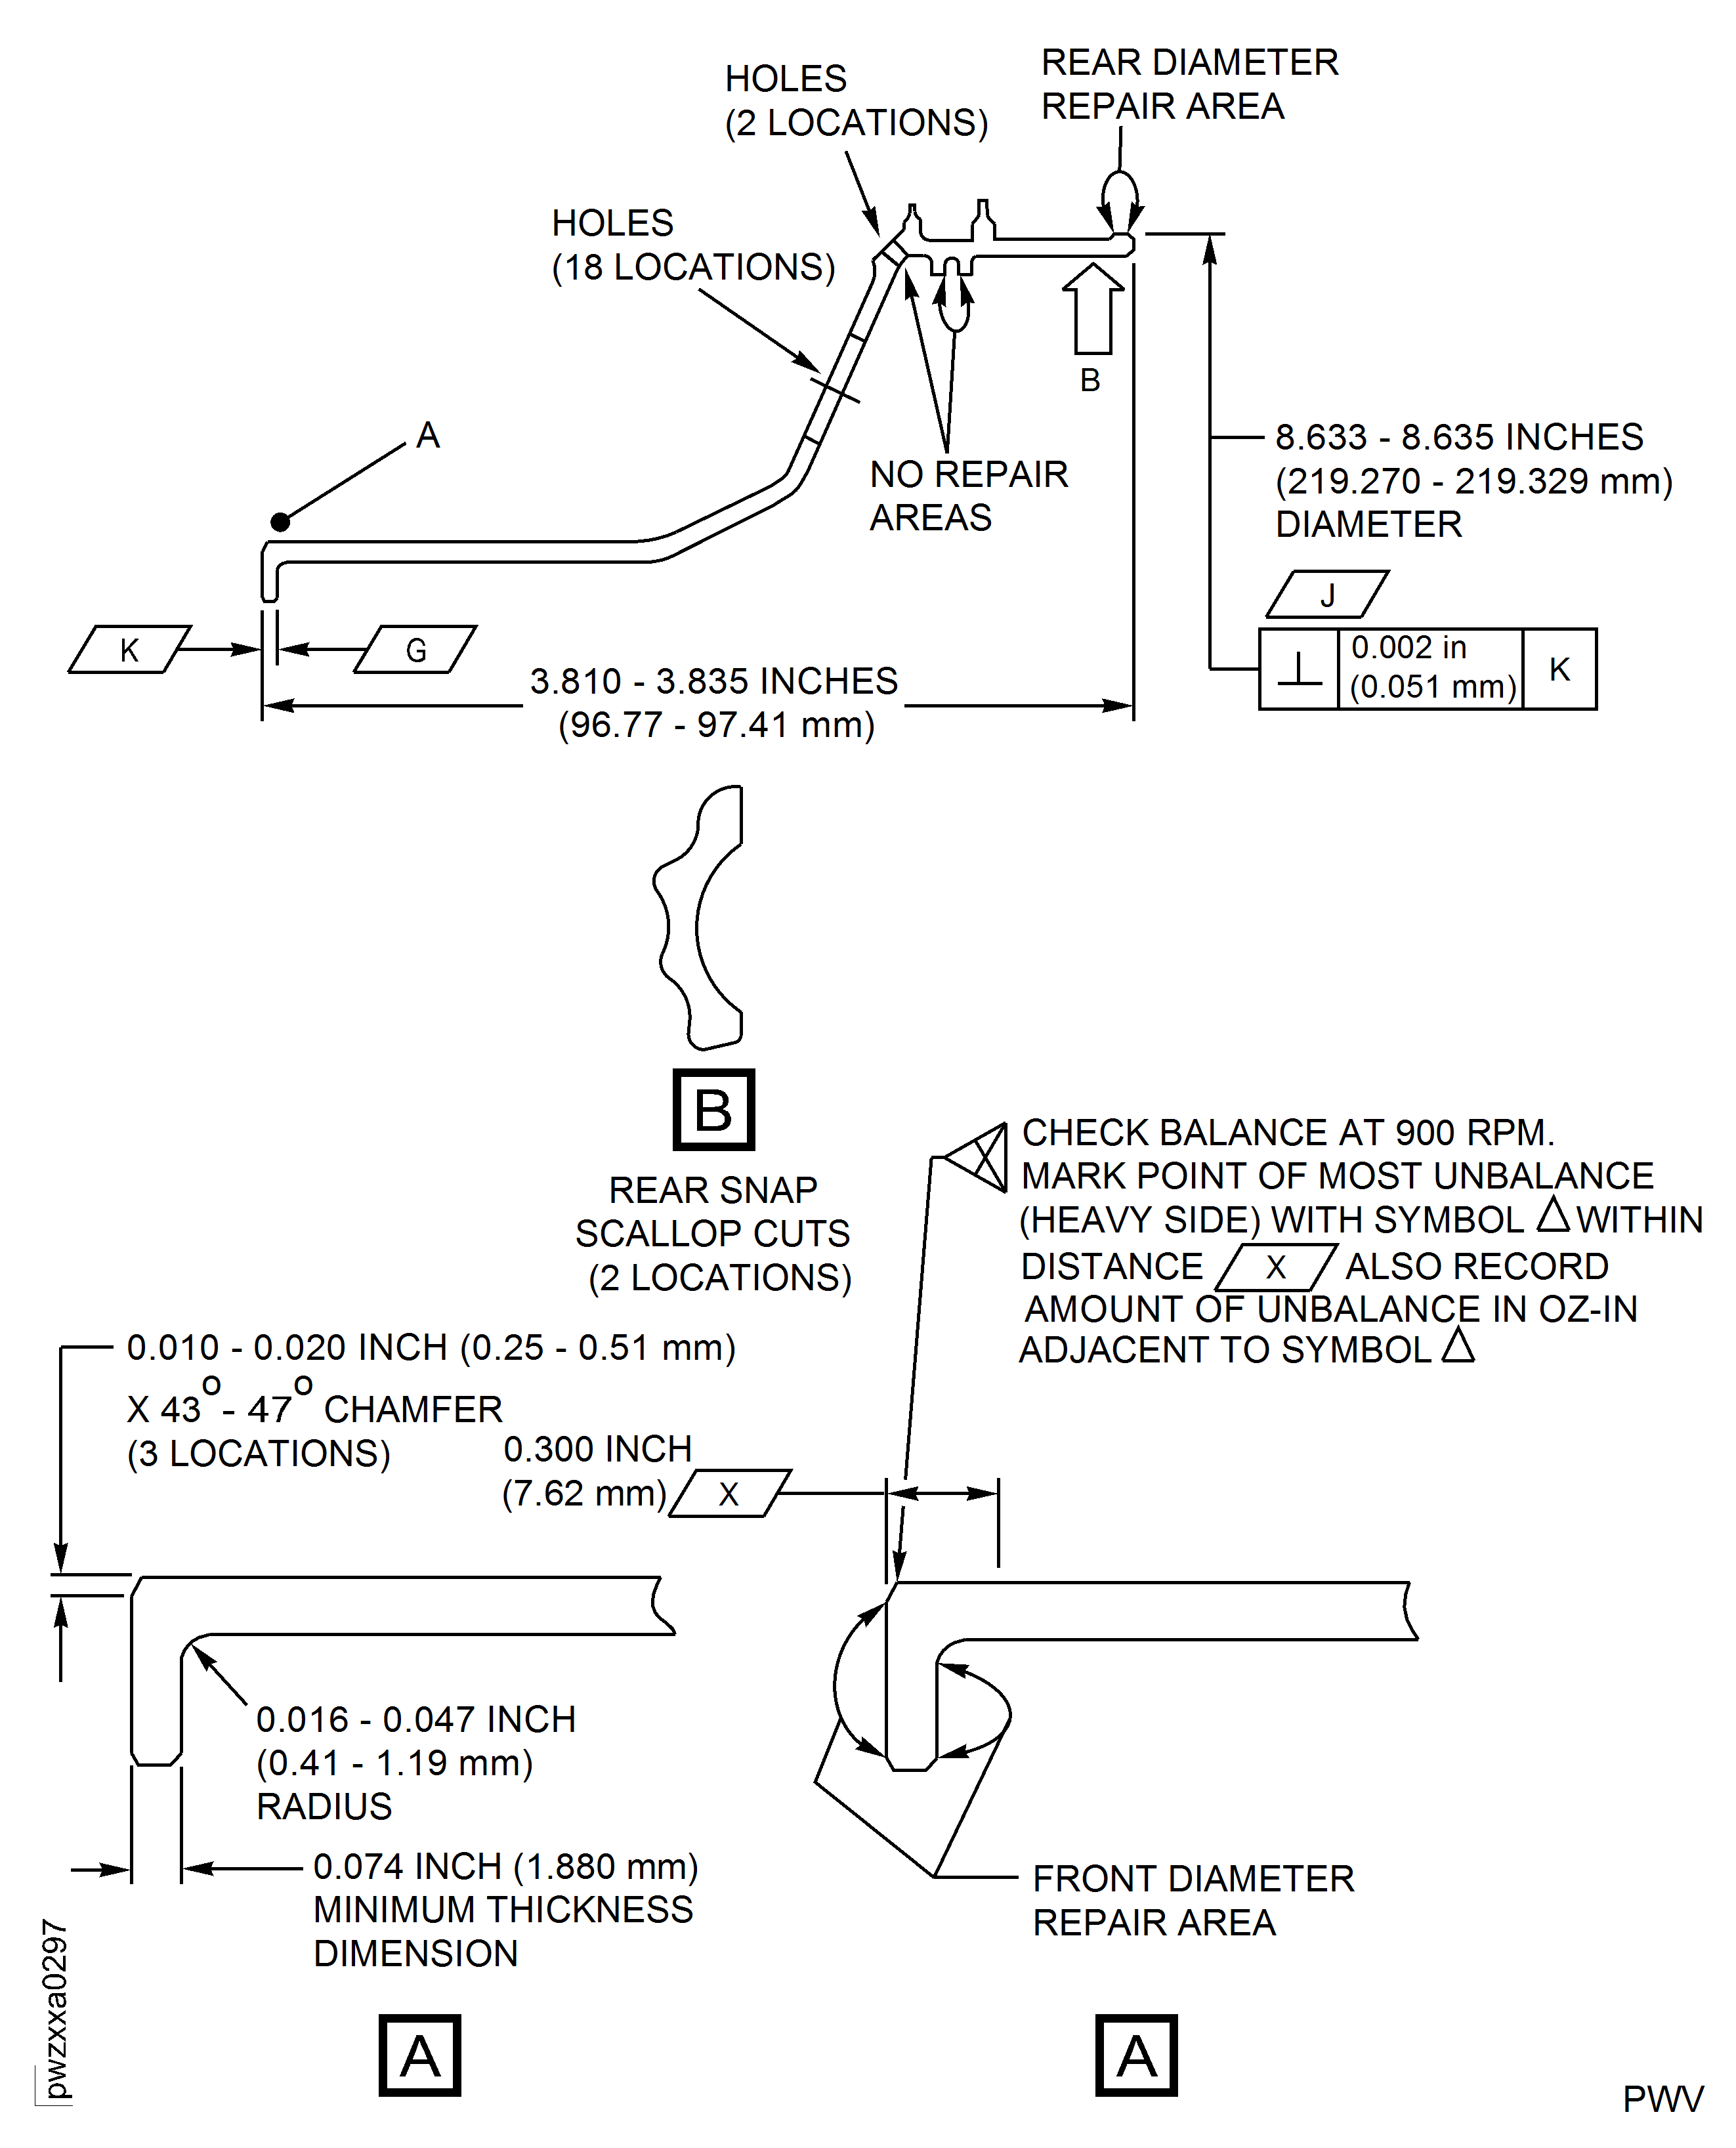
Figure: Repair Details and Dimensions (For PNs 2A3086 and 2A3424)
Repair Details and Dimensions (For PNs 2A3086 and 2A3424)
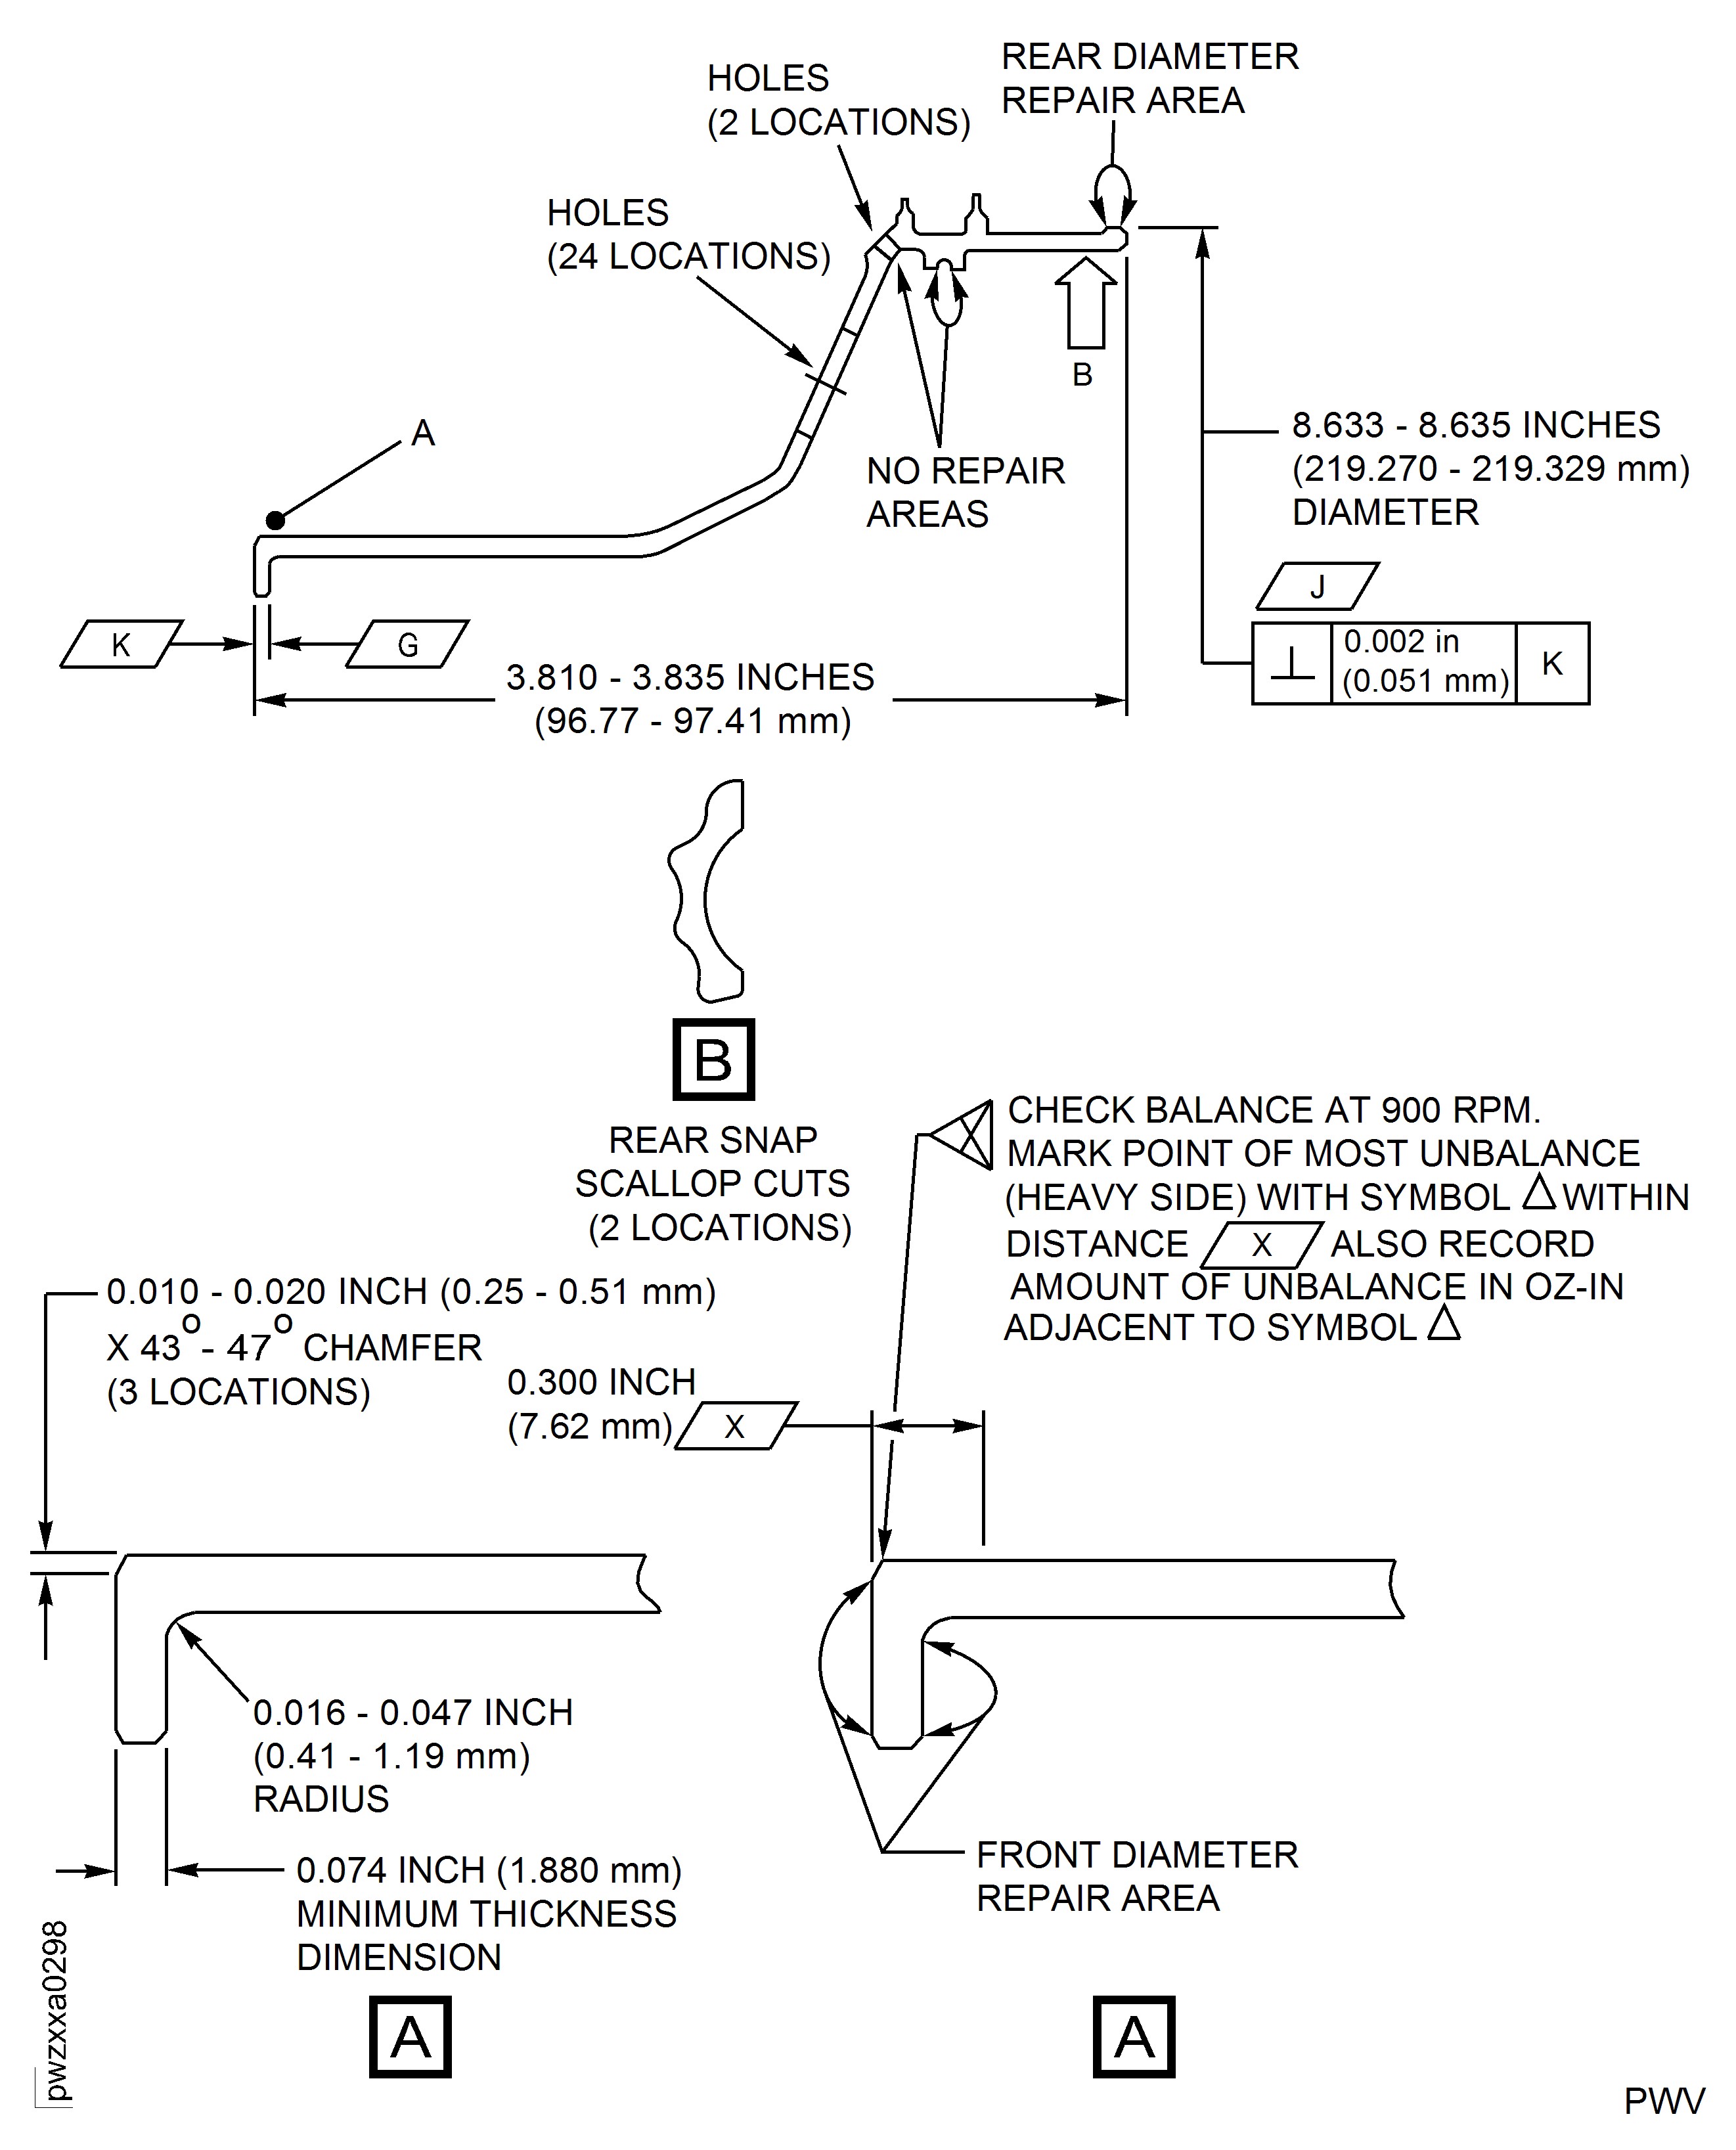
Figure: Repair Details and Dimensions (For PN 2A1352)
Repair Details and Dimensions (For PN 2A1352)

Figure: Repair Details and Dimensions (For PN 2A3923)
Repair Details and Dimensions (For PN 2A3923)
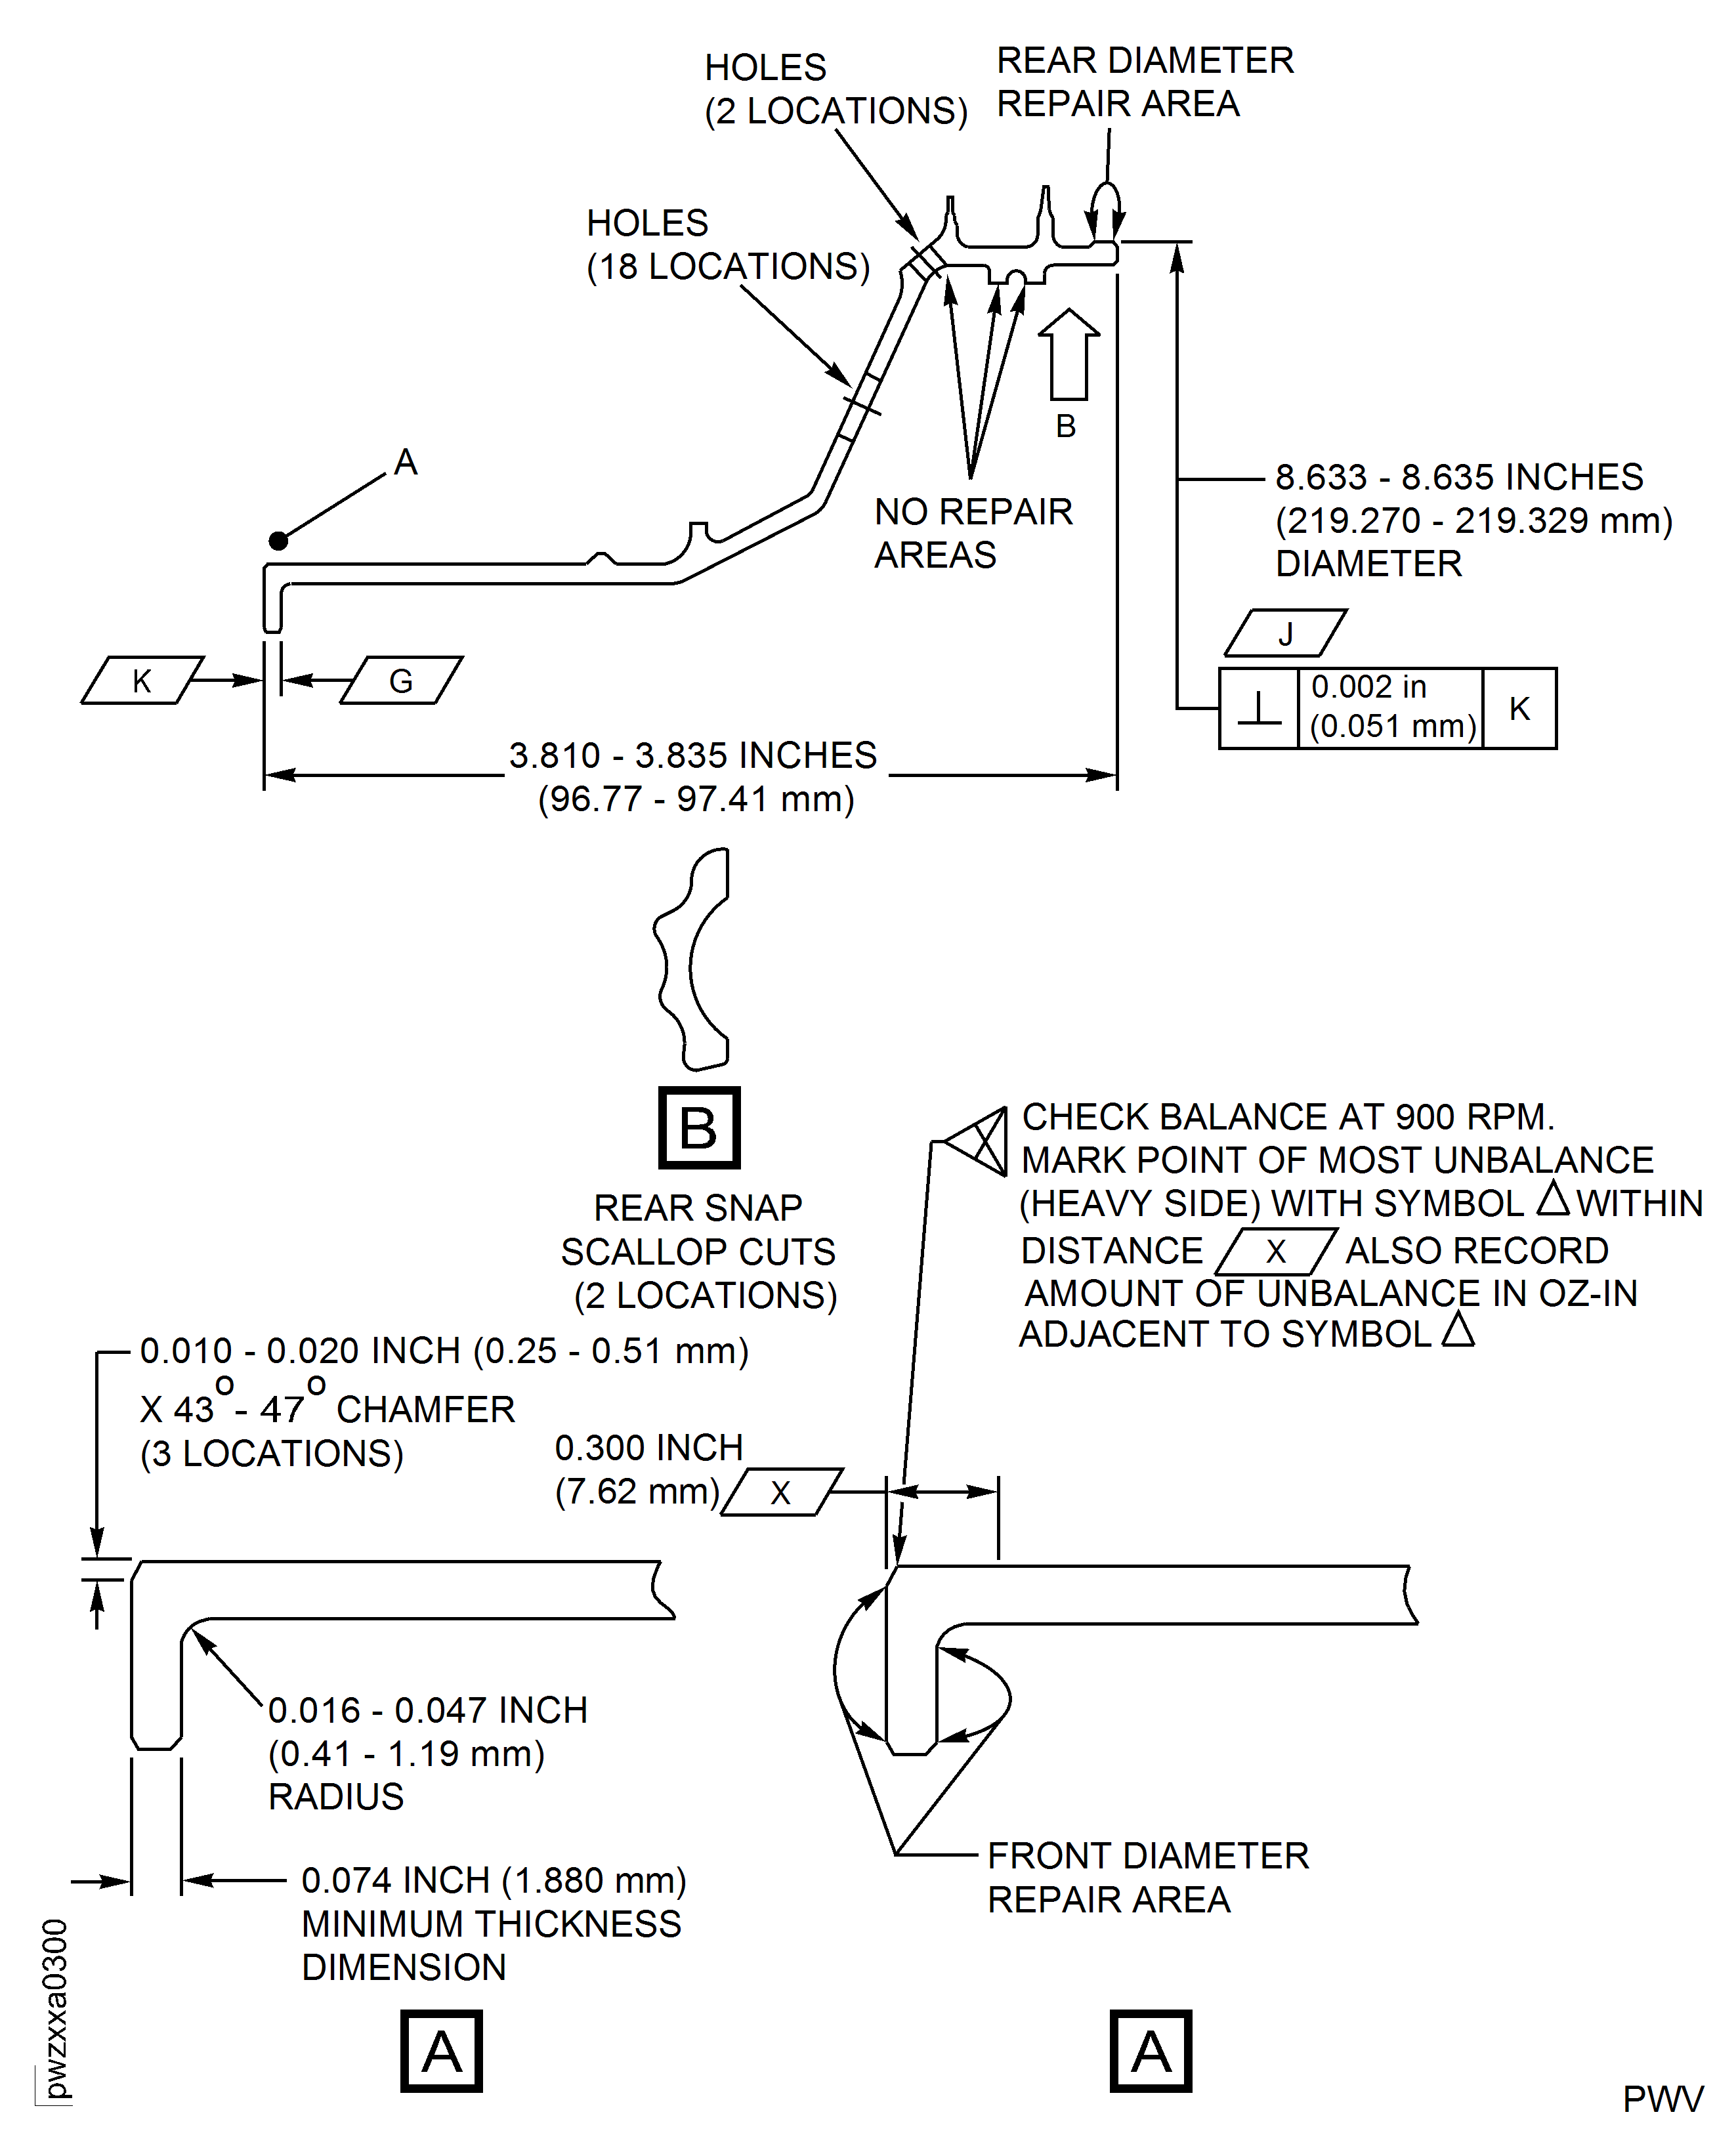
Figure: Repair Details and Dimensions (For PN 2A3109)
Repair Details and Dimensions (For PN 2A3109)

Figure: Electrical Contact Area (Typical)
Electrical Contact Area (Typical)
