Export Control
EAR Export Classification: Not subject to the EAR per 15 C.F.R. Chapter 1, Part 734.3(b)(3), except for the following Service Bulletins which are currently published as EAR Export Classification 9E991: SBE70-0992, SBE72-0483, SBE72-0580, SBE72-0588, SBE72-0640, SBE73-0209, SBE80-0024 and SBE80-0025.Copyright
© IAE International Aero Engines AG (2001, 2014 - 2021) The information contained in this document is the property of © IAE International Aero Engines AG and may not be copied or used for any purpose other than that for which it is supplied without the express written authority of © IAE International Aero Engines AG. (This does not preclude use by engine and aircraft operators for normal instructional, maintenance or overhaul purposes.).Applicability
All
Common Information
TASK 72-50-00-300-006 LPT Stage 6 Inner Air Seal - Rebalance, Repair-006 (VRS4027)
General
Price and availability - none
The practices and processes referred to in the procedure by the TASK numbers are in the SPM.
NOTE
NOTE
Preliminary Requirements
Pre-Conditions
NONESupport Equipment
| Name | Manufacturer | Part Number / Identification | Quantity | Remark |
|---|---|---|---|---|
| Crack detection kit (fluorescent) | LOCAL | Crack detection kit (fluorescent) | ||
| Depth gage | LOCAL | Depth gage | ||
| Dial caliper | LOCAL | Dial caliper | ||
| Hand held pneumatic grinder | LOCAL | Hand held pneumatic grinder | ||
| Illuminated magnifier (portable) | LOCAL | Illuminated magnifier (portable) | ||
| One plane vertical balancing machine | LOCAL | One plane vertical balancing machine | ||
| Radius gauge | LOCAL | Radius gauge | ||
| Rotary files | LOCAL | Rotary files | ||
| Roughness microtester | LOCAL | Roughness microtester | ||
| Vernier caliper | LOCAL | Vernier caliper | ||
| Unltraviolet lamp | LOCAL | Ultraviolet lamp | ||
| IAE 1M14236 Balancing fixture | 0AM53 | IAE 1M14236 | 1 |
Consumables, Materials and Expendables
| Name | Manufacturer | Part Number / Identification | Quantity | Remark |
|---|---|---|---|---|
| CoMat 05-113 EMERY POLISHING PAPER | LOCAL | CoMat 05-113 |
Spares
NONESafety Requirements
NONEProcedure
Keep material removal to the minimum to get balance within limits.
Do not remove material from a small area. Apply material removal over a larger amount, with less removal to permit further rebalancing.
Crack test after machining is optional. If used do the crack test before butterfly polishing to get optimal results. Refer to the SPM TASK 70-35-19-350-501.
Machine grind the inner air seal.
Use controlled machining technique (CMT) in a circumferential direction.
For small material removal use files.
Edges must be rounded 0.008 to 0.020in. (0.20 to 0.50 mm).
Use butterfly polishing.
Refer to the SPM TASK 70-35-19-350-501.
Remove material to get balance within limits.
Use fine stones and CoMat 05-113 EMERY POLISHING PAPER to make the worked surface as smooth as the original surface if necessary.
Edges are not permitted.
Polish the worked areas.
SUBTASK 72-50-00-350-056 General Instructions for the Rebalancing of the Stage 6 Inner Air Seal (01-240) after Repair
NOTE
Refer to: Figure
SUBTASK 72-50-00-350-057 Rebalancing the Stage 6 Turbine Inner Air Seal (01-240)
Refer to: Figure
Do the crack test after material removal but before butterfly polishing to get optimal results, refer to TASK 70-23-05-230-501.
Use crack detection kit (fluorescent) and ultraviolet lamp.
Do the test for cracks after material removal with machine and files.
SUBTASK 72-50-00-230-055 Do the Post Repair Inspection for Crack Test Areas
NOTE
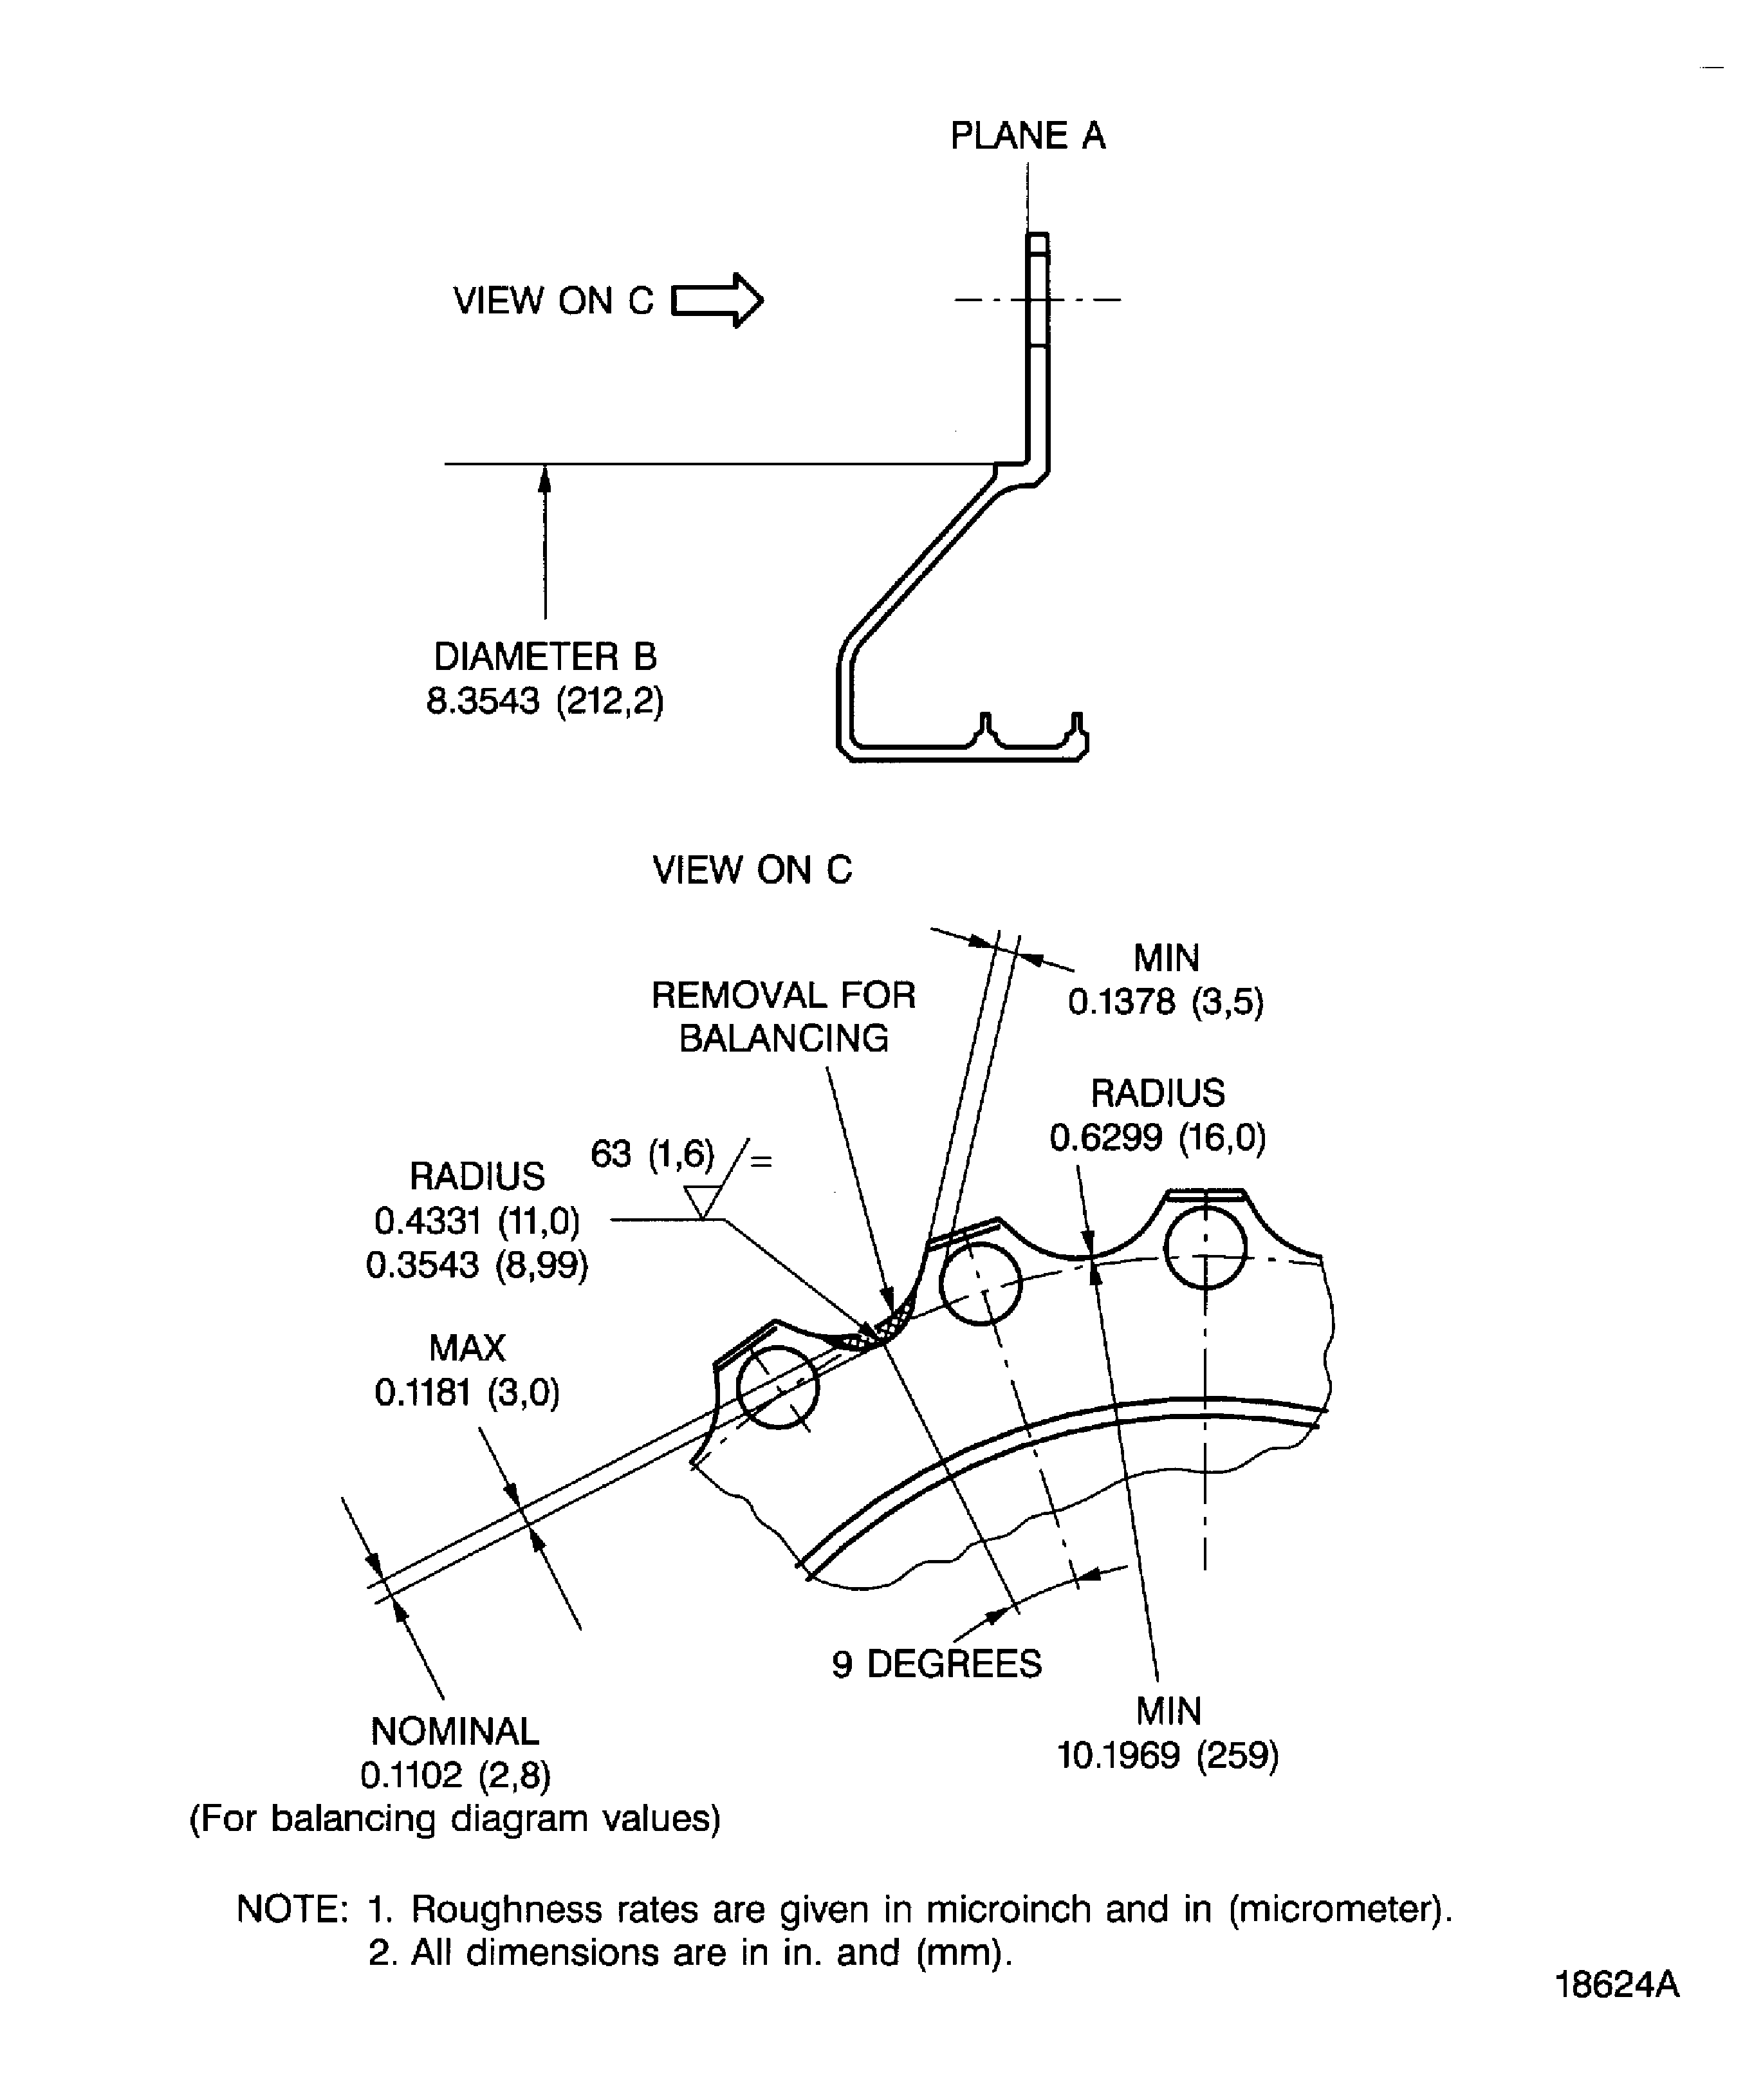
This is an optional procedure.Make sure that dimensions are not more than maximum, refer to Figure.
Use vernier caliperdial caliperradius gage set, radius gage set and roughness microtester.
Examine the reworked areas dimensionally.
SUBTASK 72-50-00-220-065 Do the Post Repair Inspection
Figure: Rebalance the stage 6 turbine inner air seal
Rebalance the stage 6 turbine inner air seal

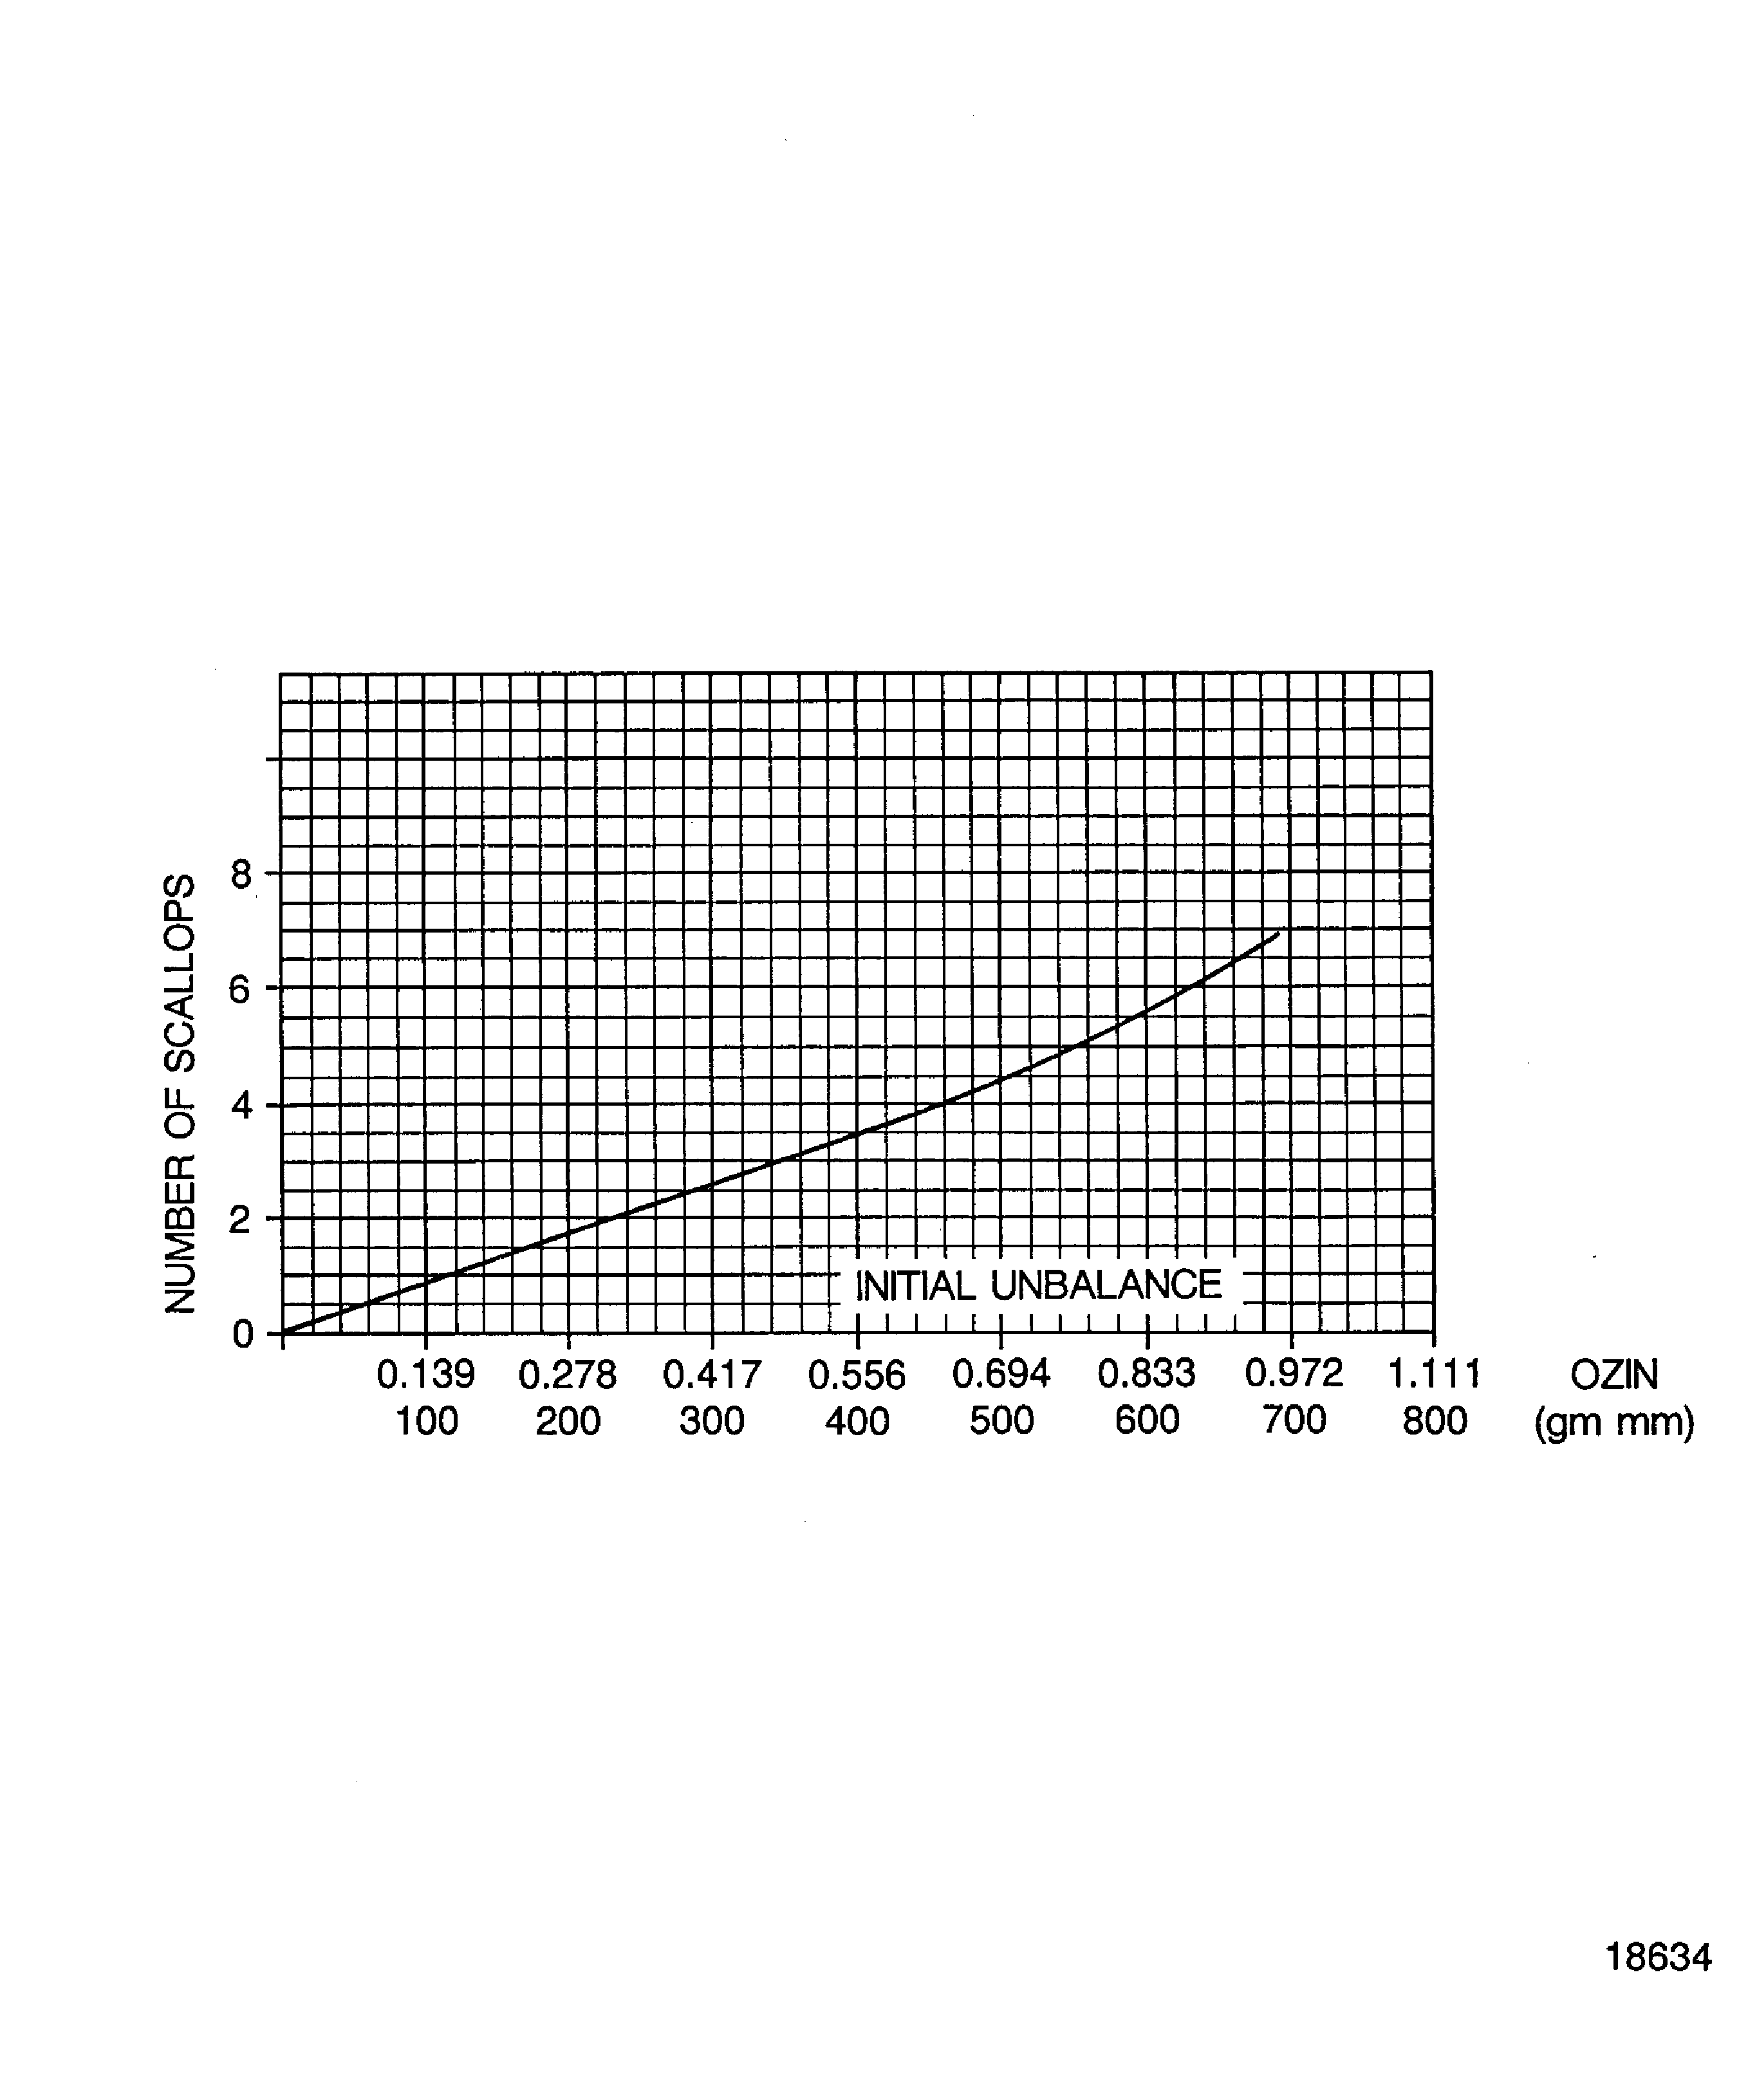
Figure: Balancing diagram of stage 6 turbine inner air seal
Balancing diagram of stage 6 turbine inner air seal

