Export Control
EAR Export Classification: Not subject to the EAR per 15 C.F.R. Chapter 1, Part 734.3(b)(3), except for the following Service Bulletins which are currently published as EAR Export Classification 9E991: SBE70-0992, SBE72-0483, SBE72-0580, SBE72-0588, SBE72-0640, SBE73-0209, SBE80-0024 and SBE80-0025.Copyright
© IAE International Aero Engines AG (2001, 2014 - 2021) The information contained in this document is the property of © IAE International Aero Engines AG and may not be copied or used for any purpose other than that for which it is supplied without the express written authority of © IAE International Aero Engines AG. (This does not preclude use by engine and aircraft operators for normal instructional, maintenance or overhaul purposes.).Applicability
All
Common Information
TASK 70-35-19-350-501 Hole Radius Blending
Safety Precautions
General
Unless differently specified, this procedure must only be used for increasing the operational life of certain disks, shafts, rotor spacers, hubs, and other parts necessary for improved surface finish and contour of holes, such as tiebolt, counterweight, and lightening holes. This procedure prevents the sharp corners on edges at the ends of holes which were made oversize then restored to the necessary dimensions by platting and machining. This procedure can also be used when specified to repair radius at end of holes after machining the face of a part.
Equipment
Get or make the following tools
An applicable steel spindle (rod) made to dimensions shown in Figure
Steel masks to protect face and snap diameter of parts as shown in Figure. Make mask of stainless steel 0.015 to 0.030 in. (0.381 to 0.762 mm) thick or of mild steel with chromium flash to resist abrasion. Hole size must be approximately 0.250 in. (6.35 mm) (diameter) larger than hole being reworked. Height of lip protecting snap diameter must not interfere with cutting action of abrasive and cause blend to be off center or leave an area at end of hole which is not reworked.
CoMat 05-104 ALUMINUM OXIDE ABRASIVECLOTH, No. 120 grit, 1.5in. wide, abrasive cloth. Stiffness and cutting qualities of abrasive cloth will affect contour of reworked radius and amount and speed of material removal.
Power tool with unloaded speed of 18000 rpm such as:
CLECO air gun, model GLF-180 which can be obtained from:
CLECO Air Tools,
Box 2541,
Houston,
Texas 77001
USA
Du-More, model 8-011 which can be obtained from:
Du-More Company,
1300 Seventeenth Street,
Racine,
Wisconsin 53403
USA
NOTE
NOTE
Preliminary Requirements
Pre-Conditions
NONESupport Equipment
NONEConsumables, Materials and Expendables
| Name | Manufacturer | Part Number / Identification | Quantity | Remark |
|---|---|---|---|---|
| CoMat 05-104 ALUMINUM OXIDE ABRASIVECLOTH | 06565 | CoMat 05-104 |
Spares
NONESafety Requirements
WARNING
CAUTION
Procedure
Use equipment specified and the applicable drill press configuration as shown in Figure. Remove sharp corners and edges of reworked holes after machining and before plating. Remove unwanted plate and make constant radius after plating.
Secure air gun to spindle of drill press using on applicable adapter as shown in Figure.
NOTE
Use tape to protect vertical surface of adjacent areas. Refer to SPM TASK 70-34-18-380-501.Install mask on face of part and secure in place with tape or soft jaw (nonmetallic) clamps.
Adjust drill press stop or applicable stop plate so abrasive holding spindle will penetrate hole to applicable depth from top surface of part as shown in Figure.
NOTE
Size of abrasive cloth must be held to within 0.0625in. of specified size and must be pushed to the bottom of the slot. Abrasive cloth must be held satisfactorily in slot in spindle. It is permitted to bend points of spindle together to improve the grip on the abrasive cloth.Cut abrasive cloth to size of 1.250 inches as indicated in Figure. Fold, insert in spindle with abrasive side open, and twist firmly in direction indicated (opposite direction of spindle rotation).
NOTE
Automatic timers and limit switches can be used to start and stop air gun if necessary.Start air gun and lower spindle into hole the necessary depth of penetration. Raise and lower spindle in reciprocating stroke of about 0.0625 in. at rate of two strokes a second. Time necessary will be approximately 6 to 12 seconds (or as necessary) to produce a blended radius for each hole.
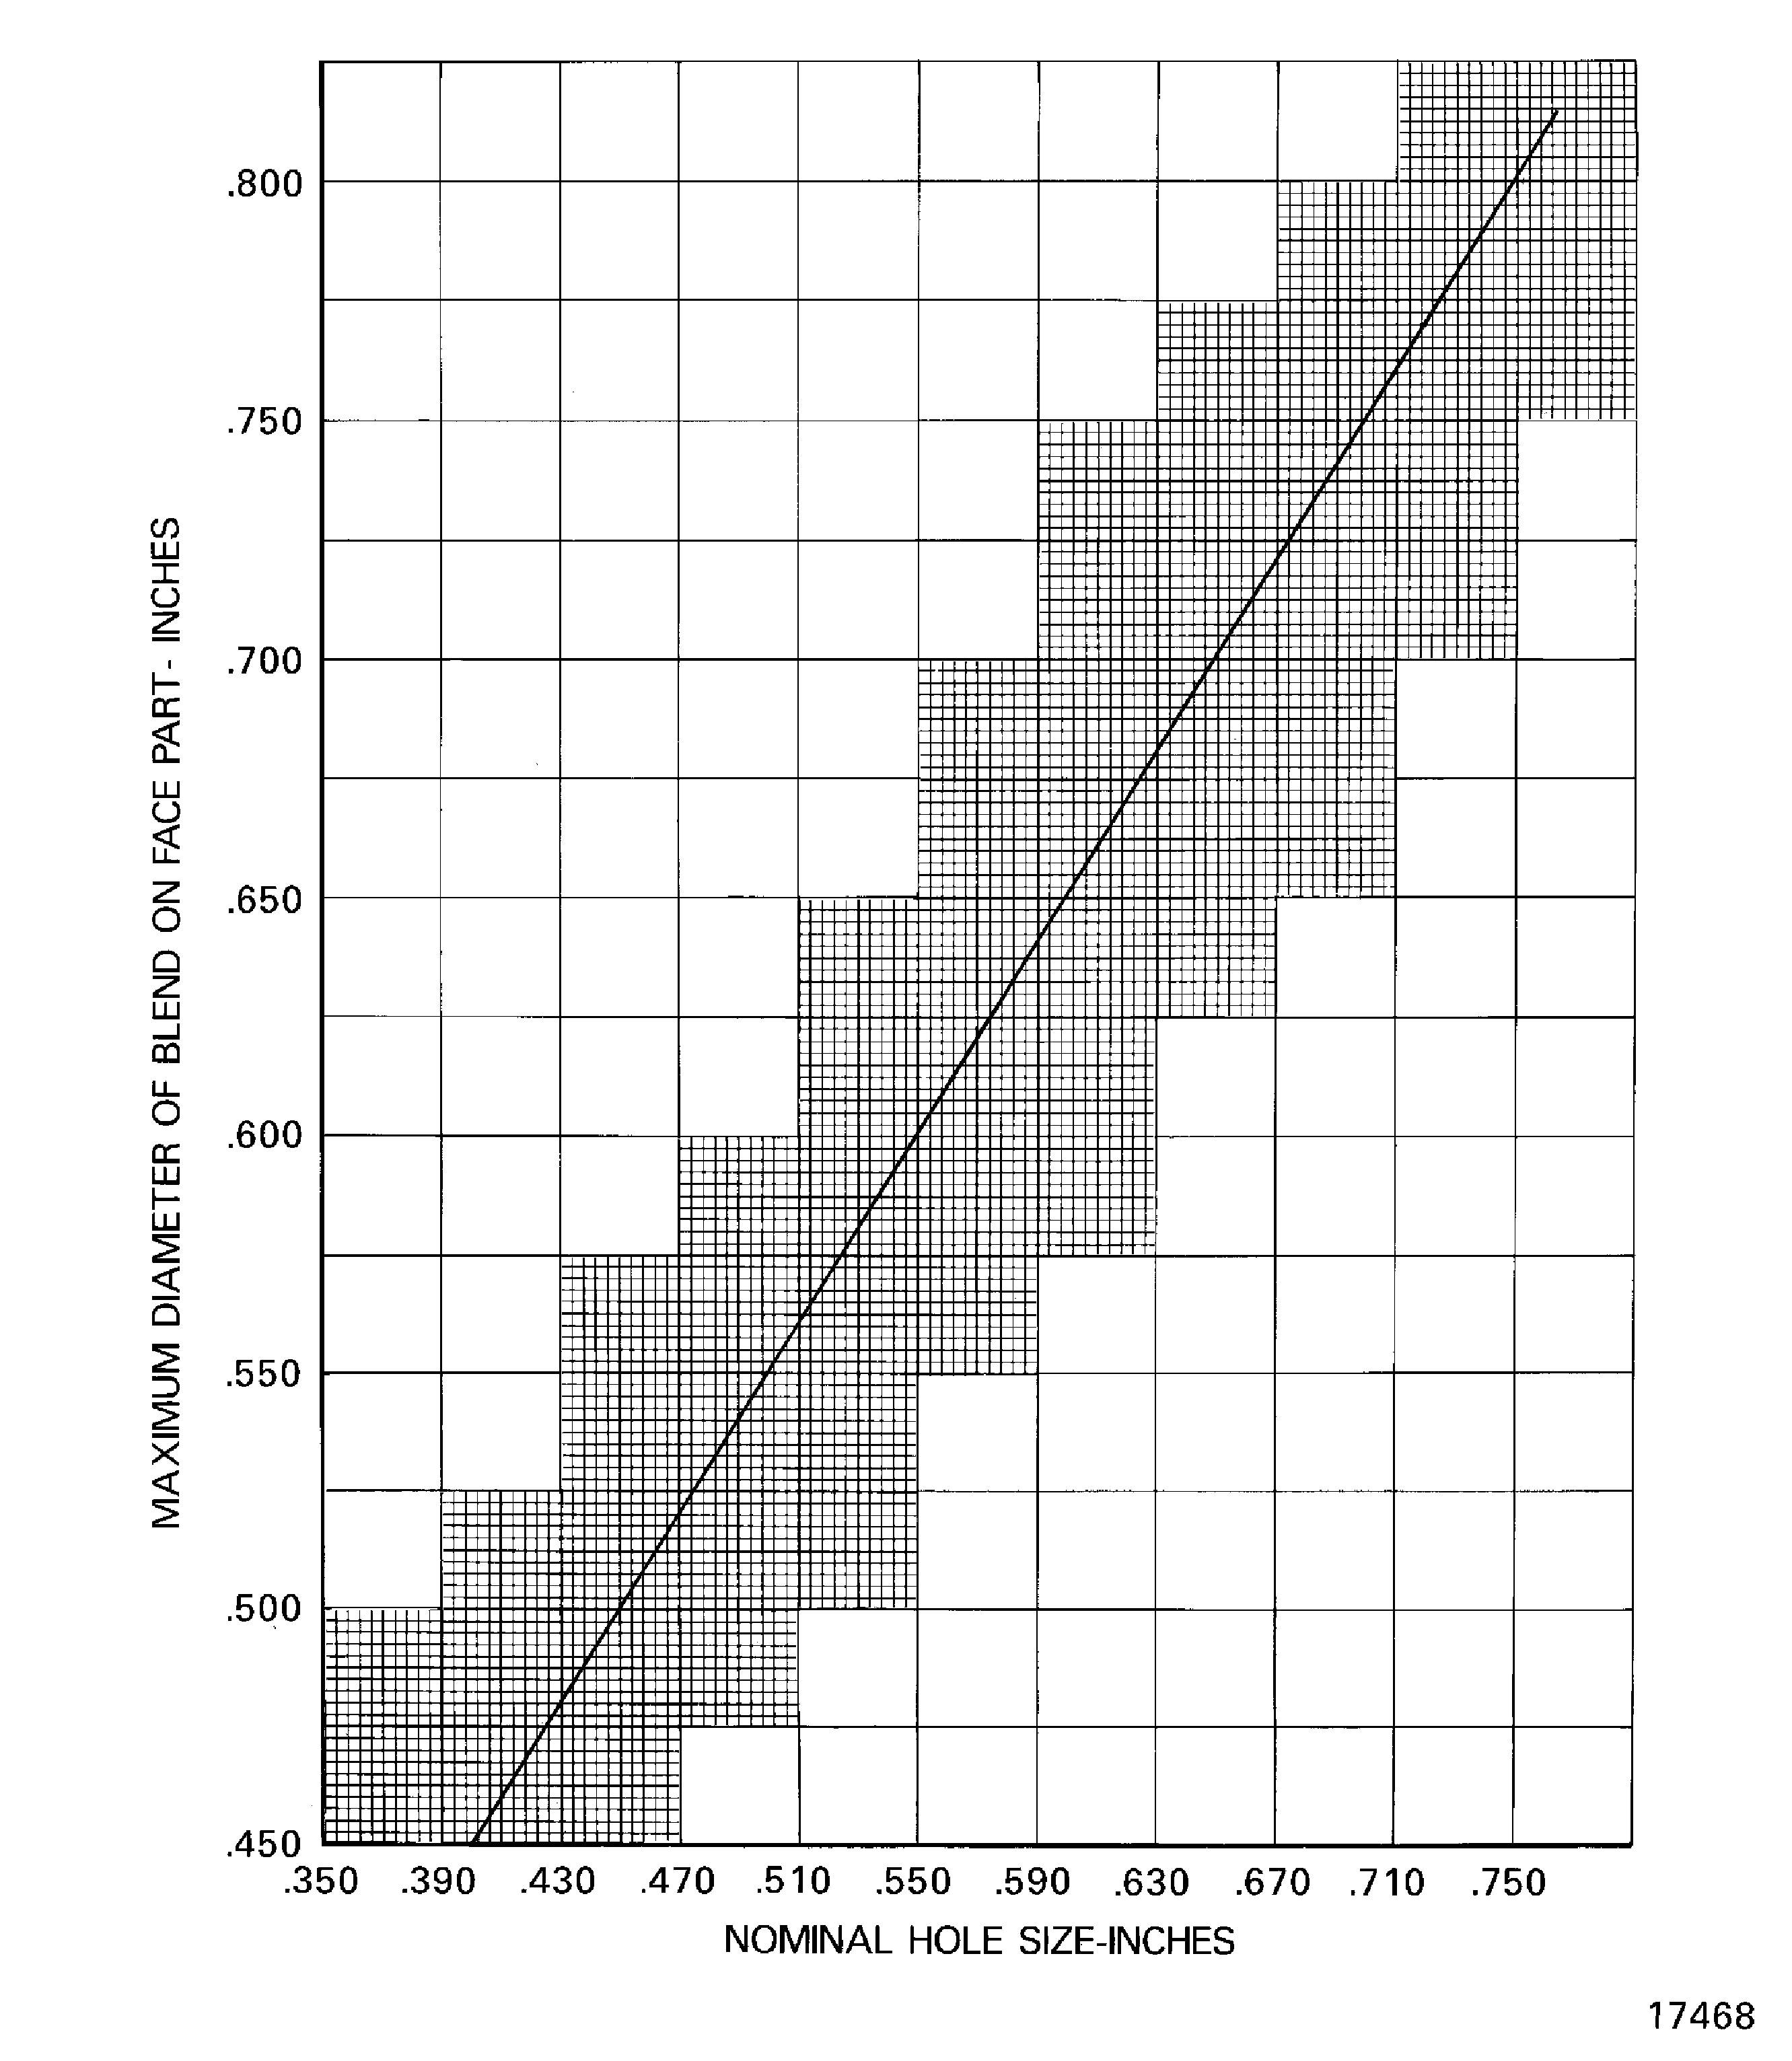
Contour of intersection of holes with face of part can range from a radius through a smoothly faired curve to a blended chamfer-like condition as shown in Figure.
All surface finish specifications as the SPM TASK 70-35-09-350-501 apply, as applicable.
Circular scratches in bolting face caused by the SPM TASK 70-35-19-350-501 (butterfly) finishing are permitted provided each scratch depth is not more than that of the normal machining feed lines.
Figure shows permitted and reject conditions of butterfly finished holes.
Inspect radius area for necessary contour blending into adjacent surfaces with no sharp ridges, edges or indentations.
SUBTASK 70-35-19-350-004 Procedure
Figure: Rod and Abrasive cloth (Butterfly) for Hole Radius Rework
Rod and Abrasive cloth (Butterfly) for Hole Radius Rework
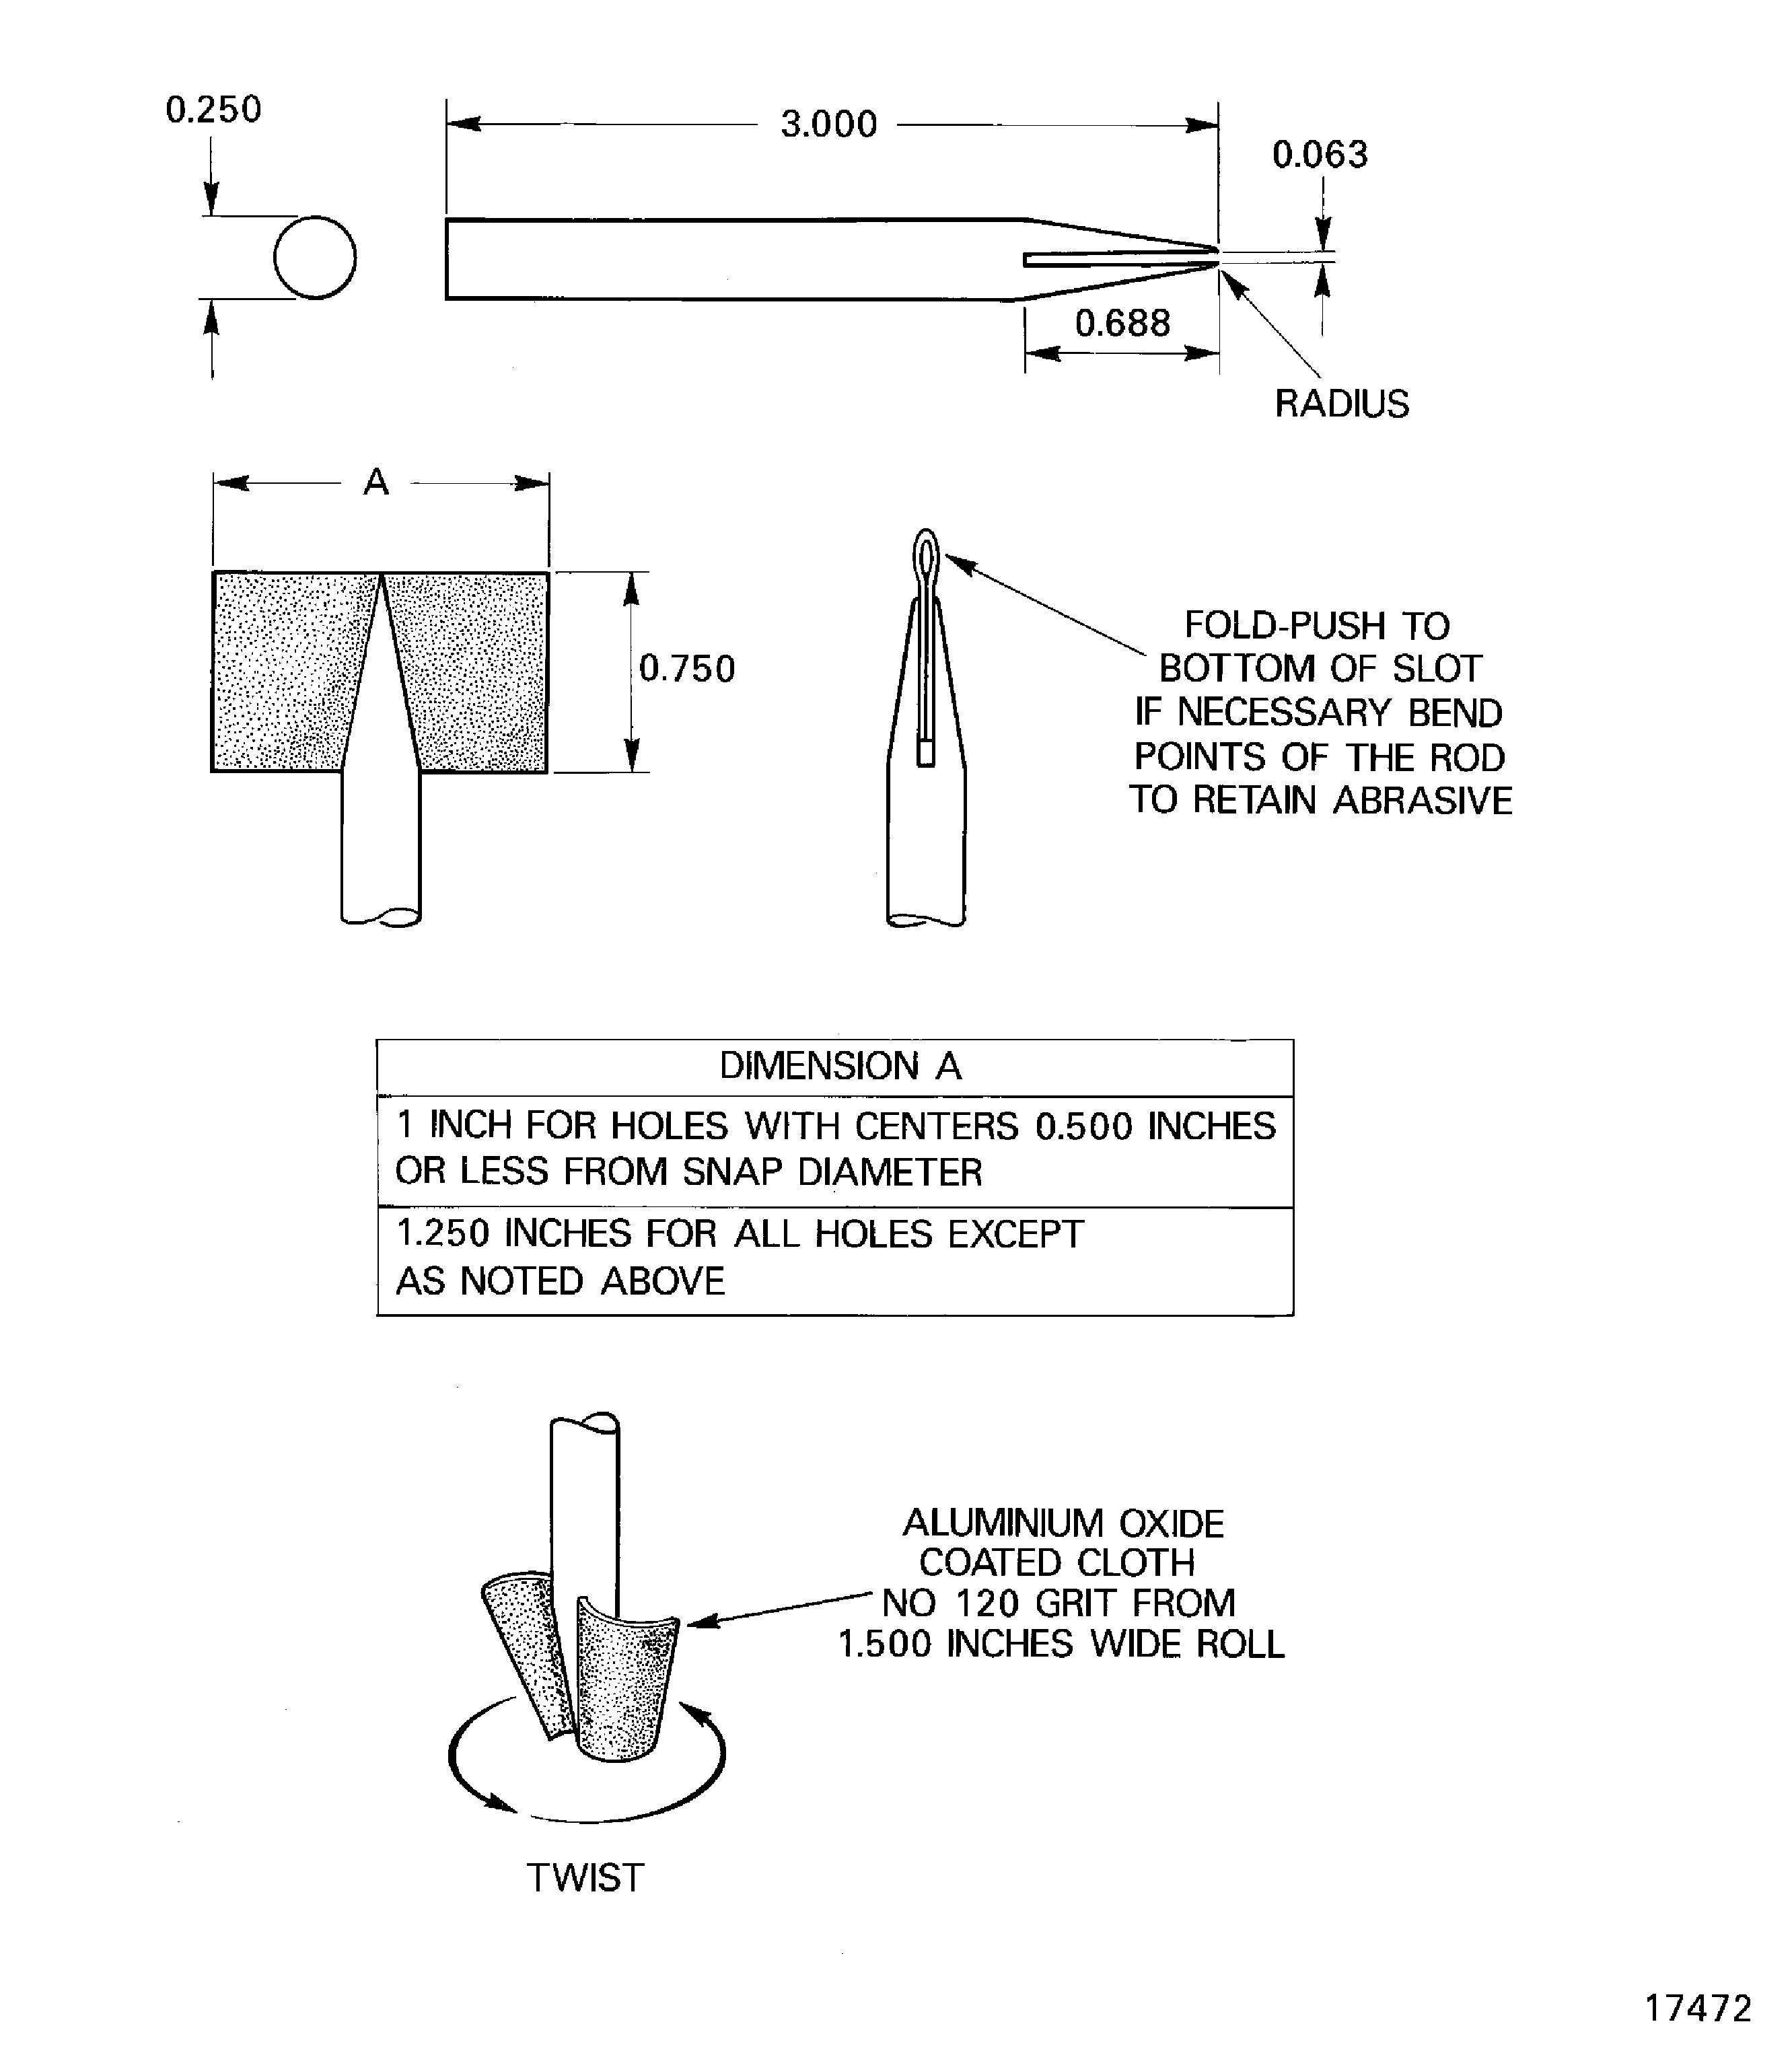
Figure: Typical stop plate setup and holding fixture for compressor disk rework
Typical stop plate setup and holding fixture for compressor disk rework
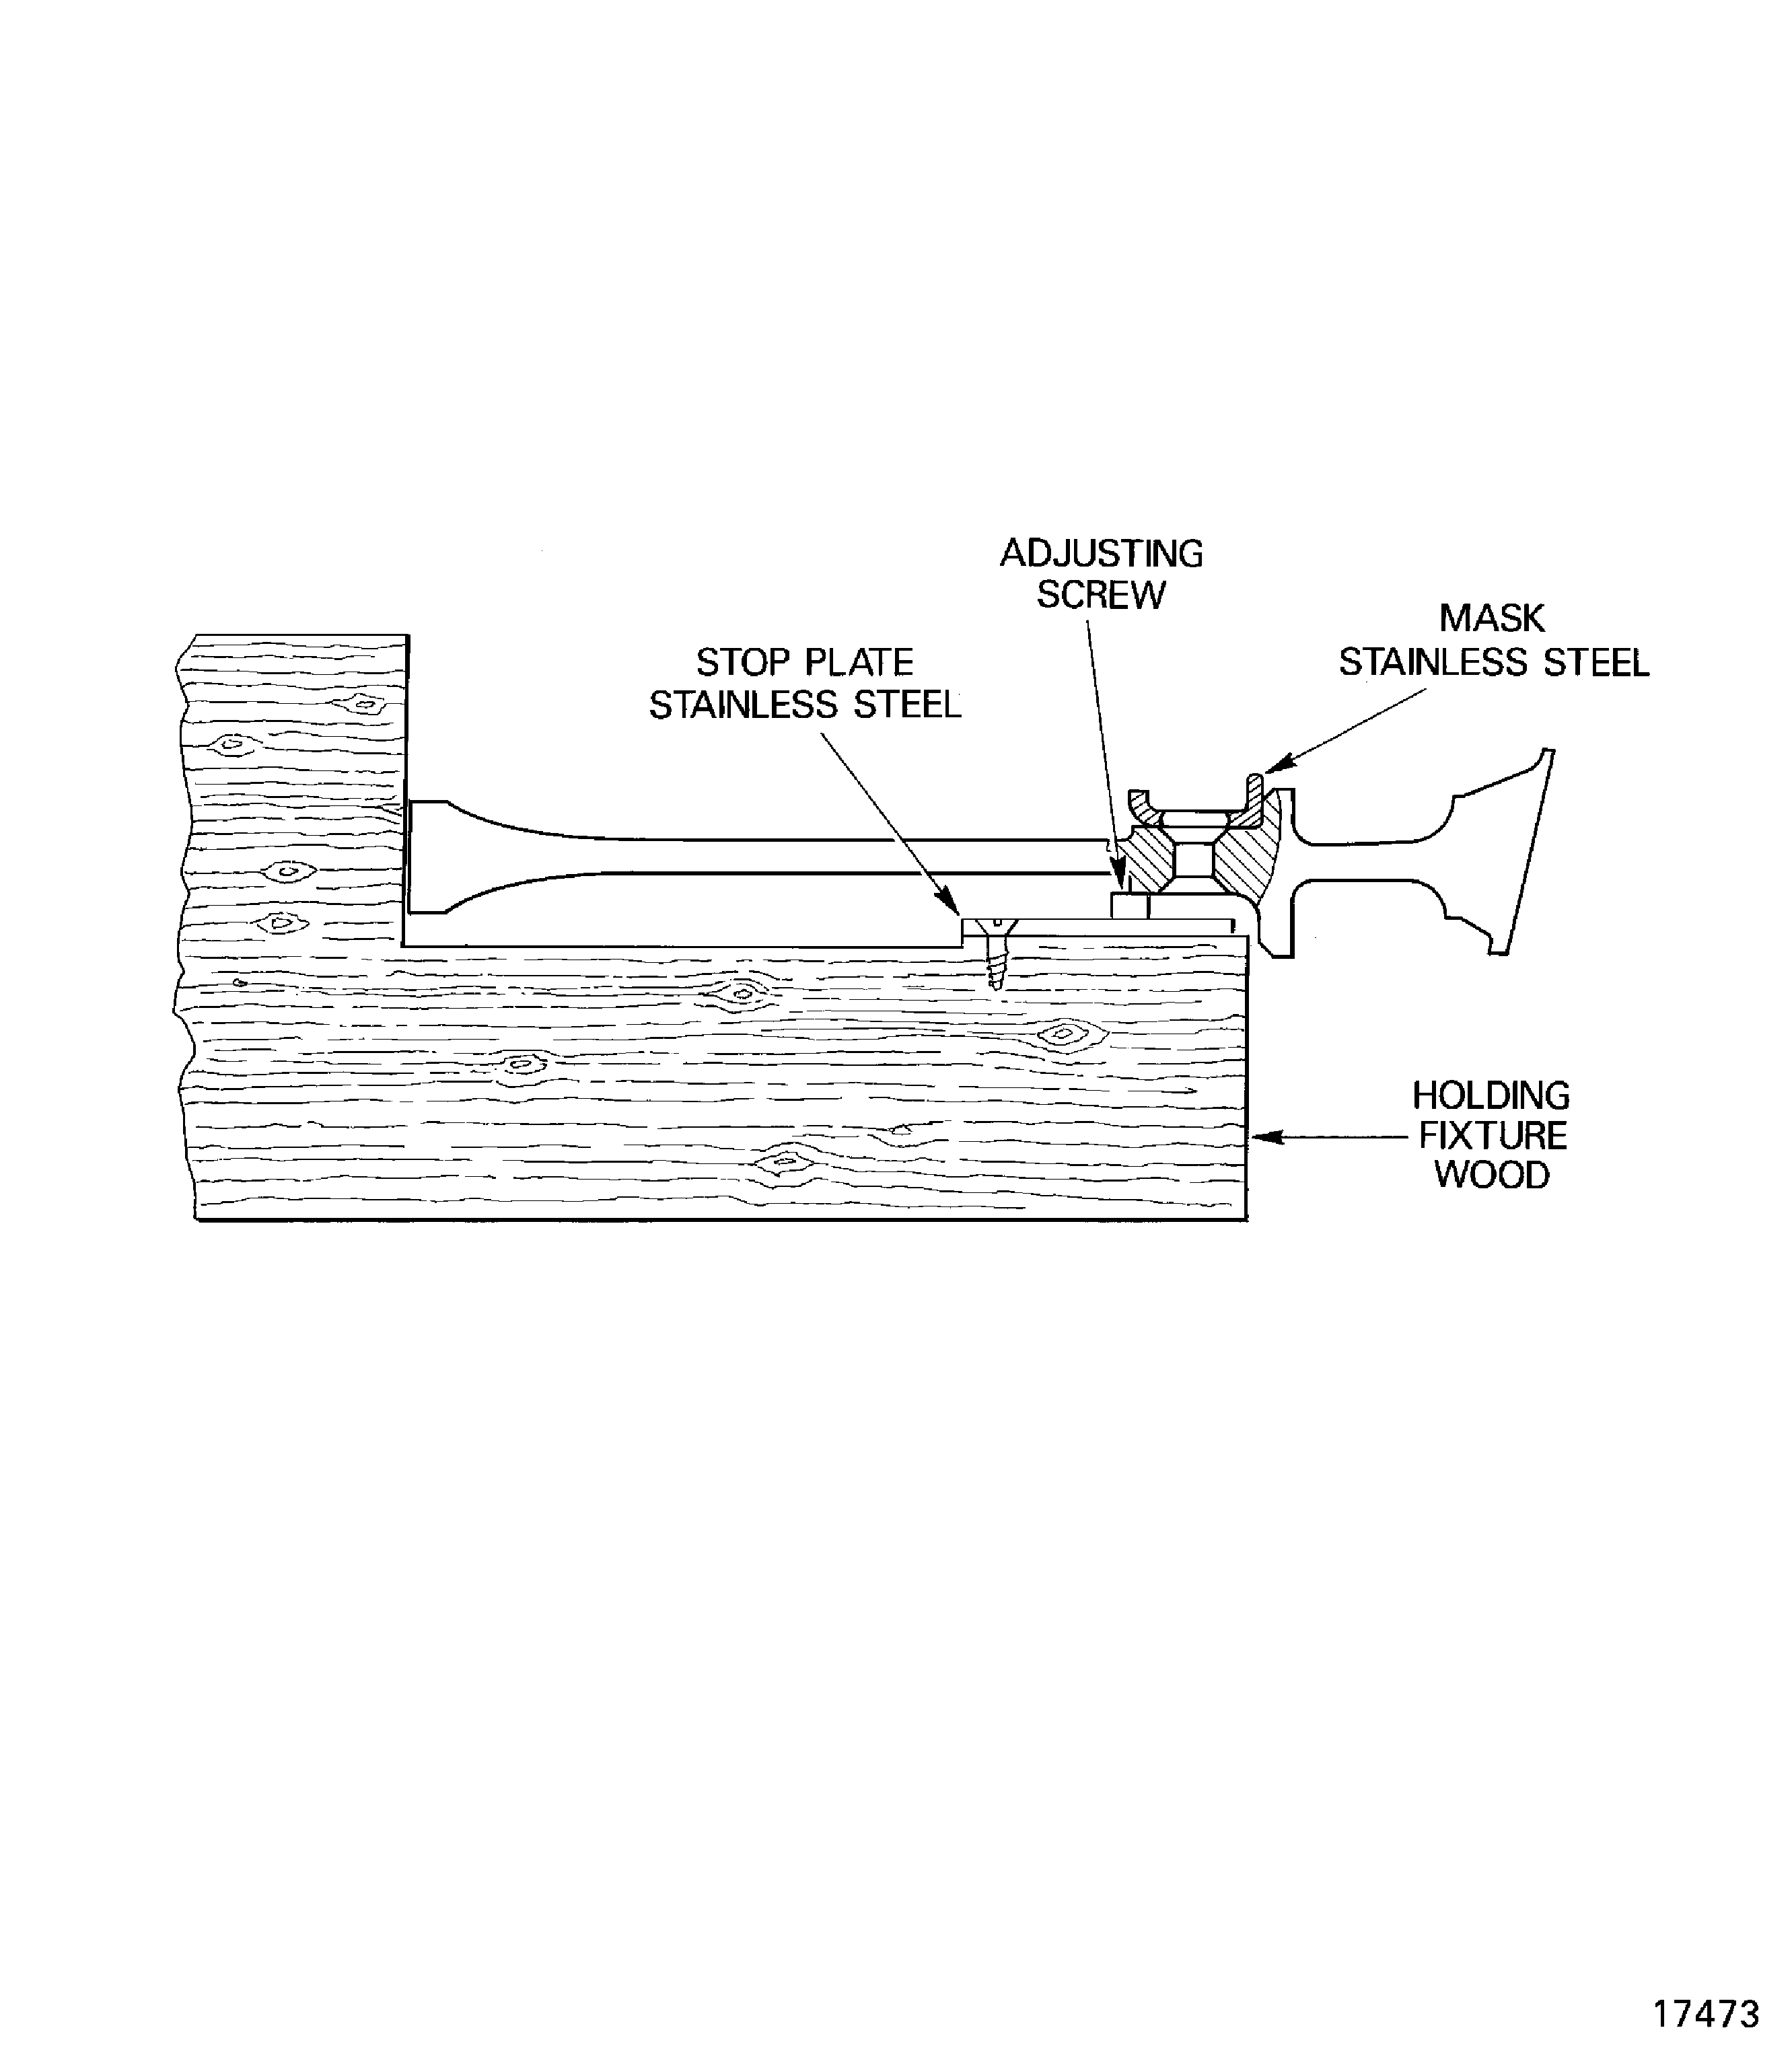
Figure: Semi-automatic tool setup
Semi-automatic tool setup
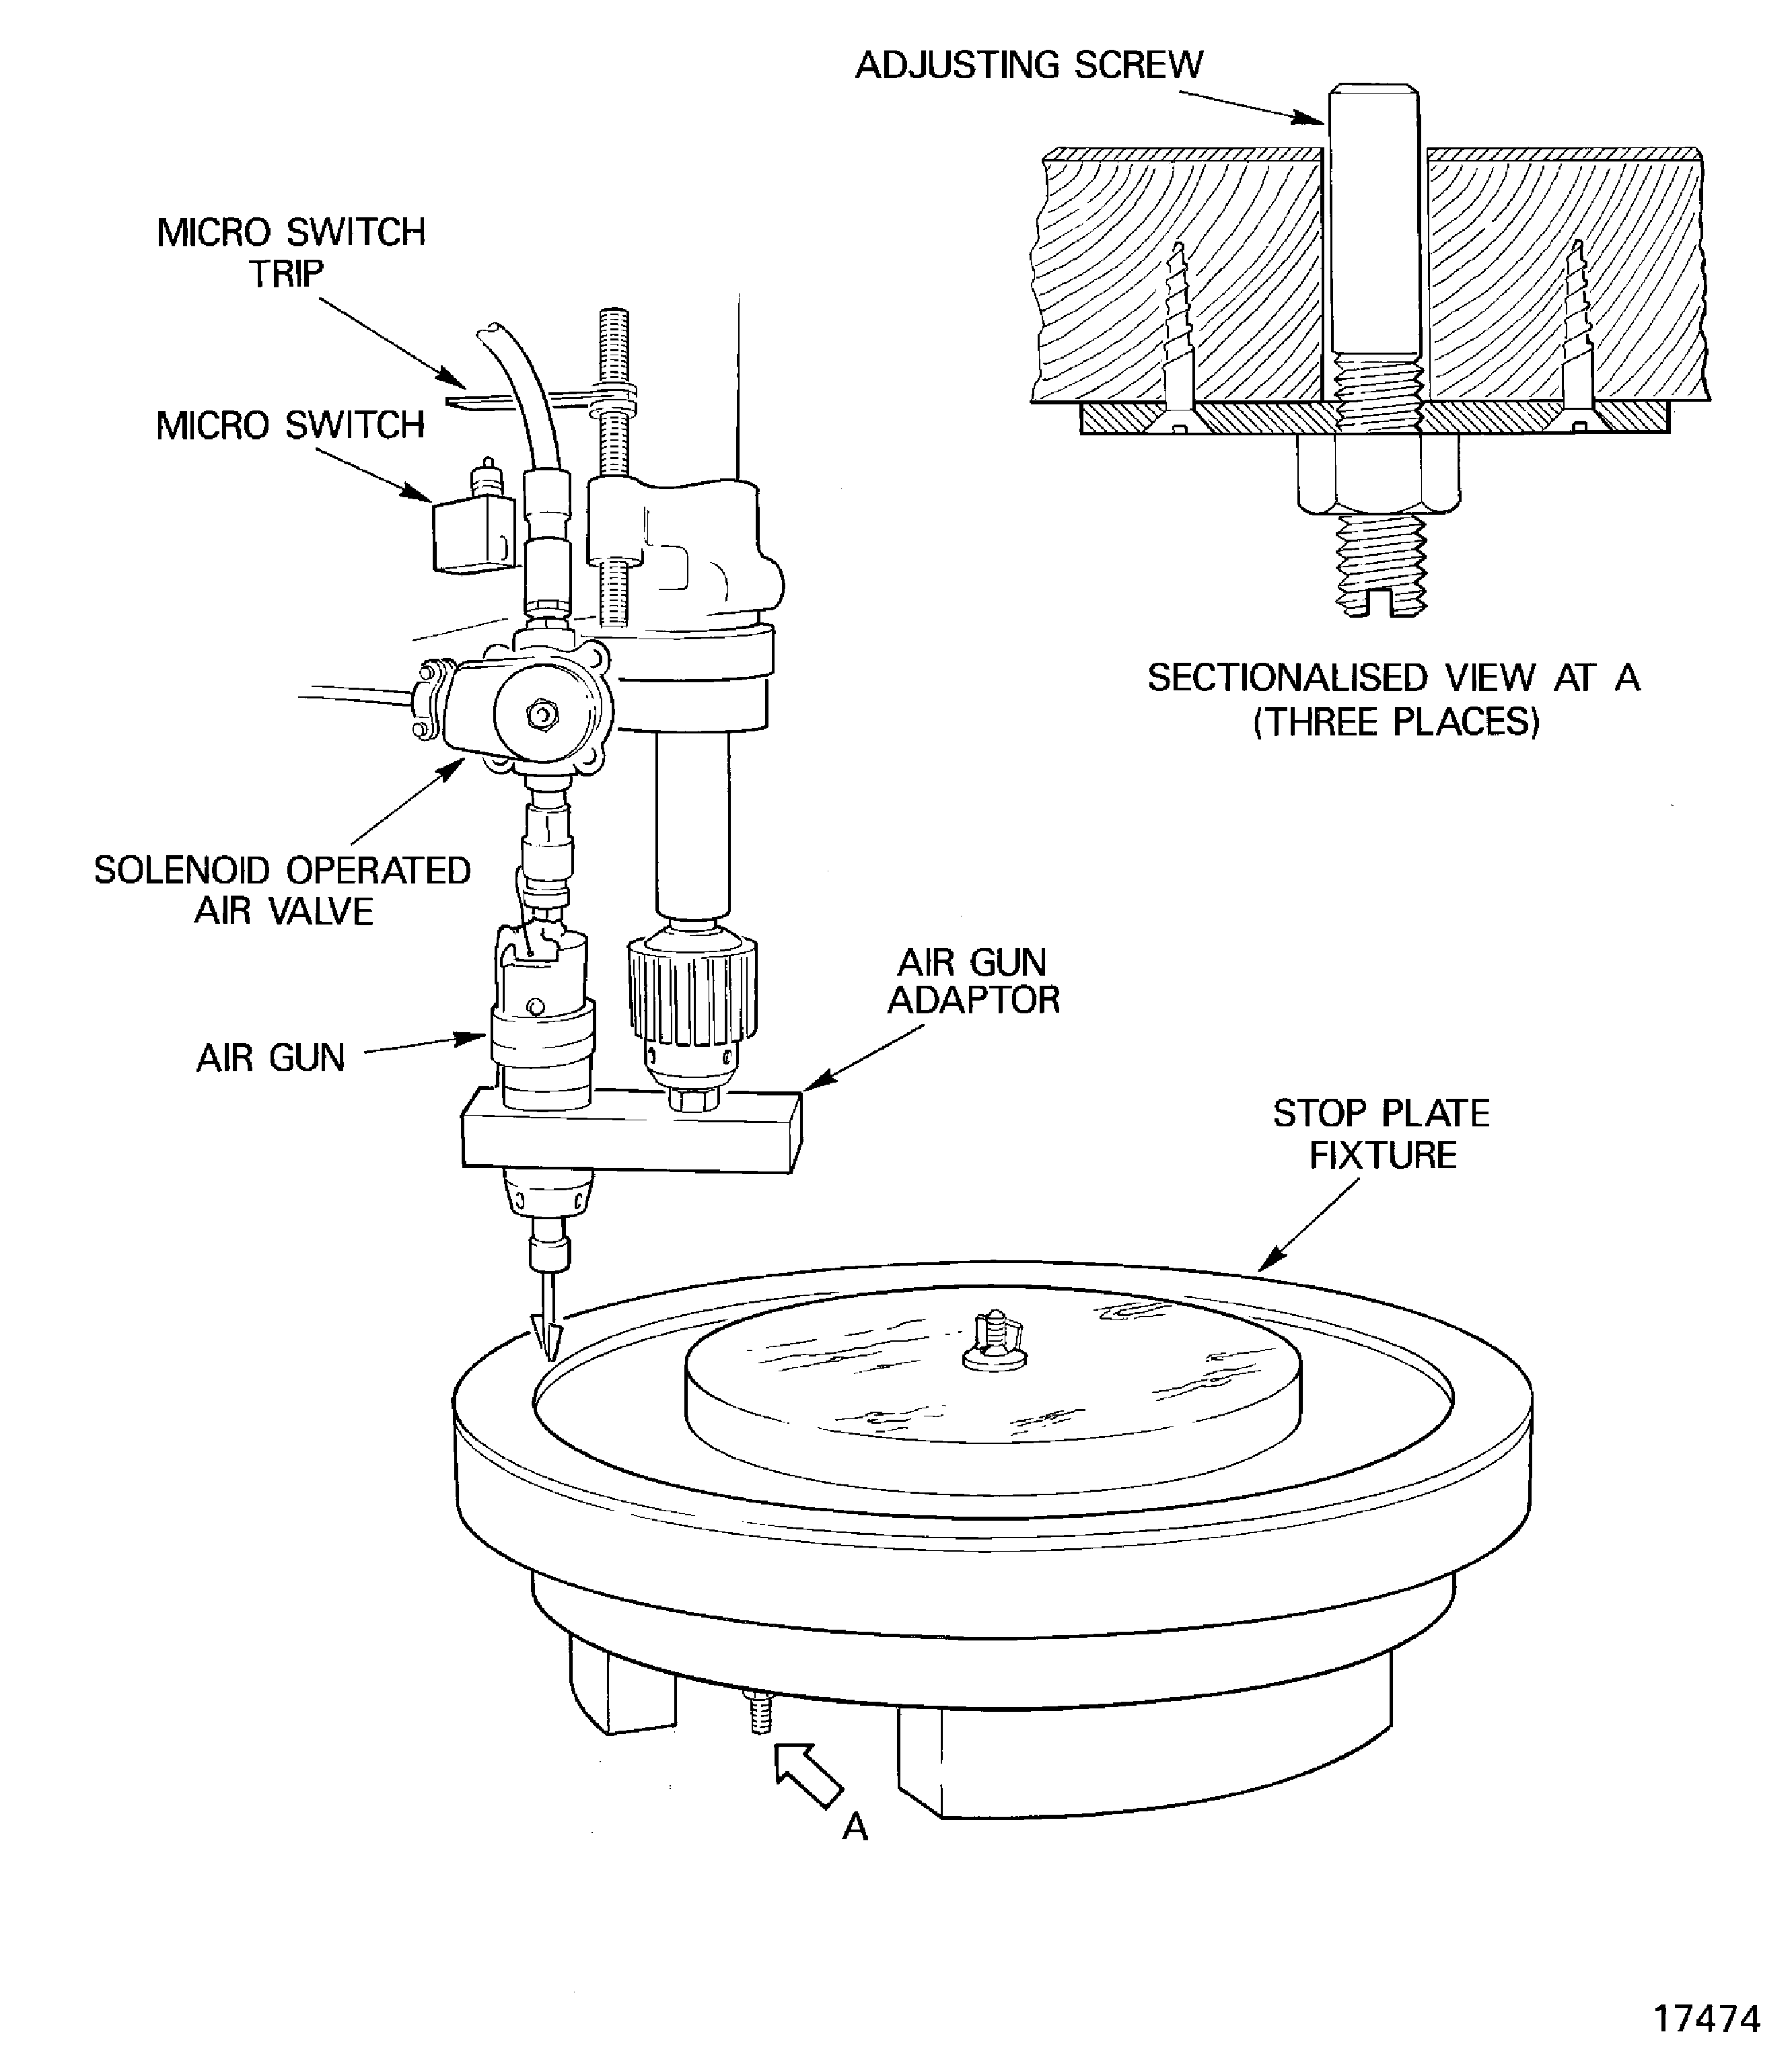
Figure: Abrasive penetration depth
Abrasive penetration depth
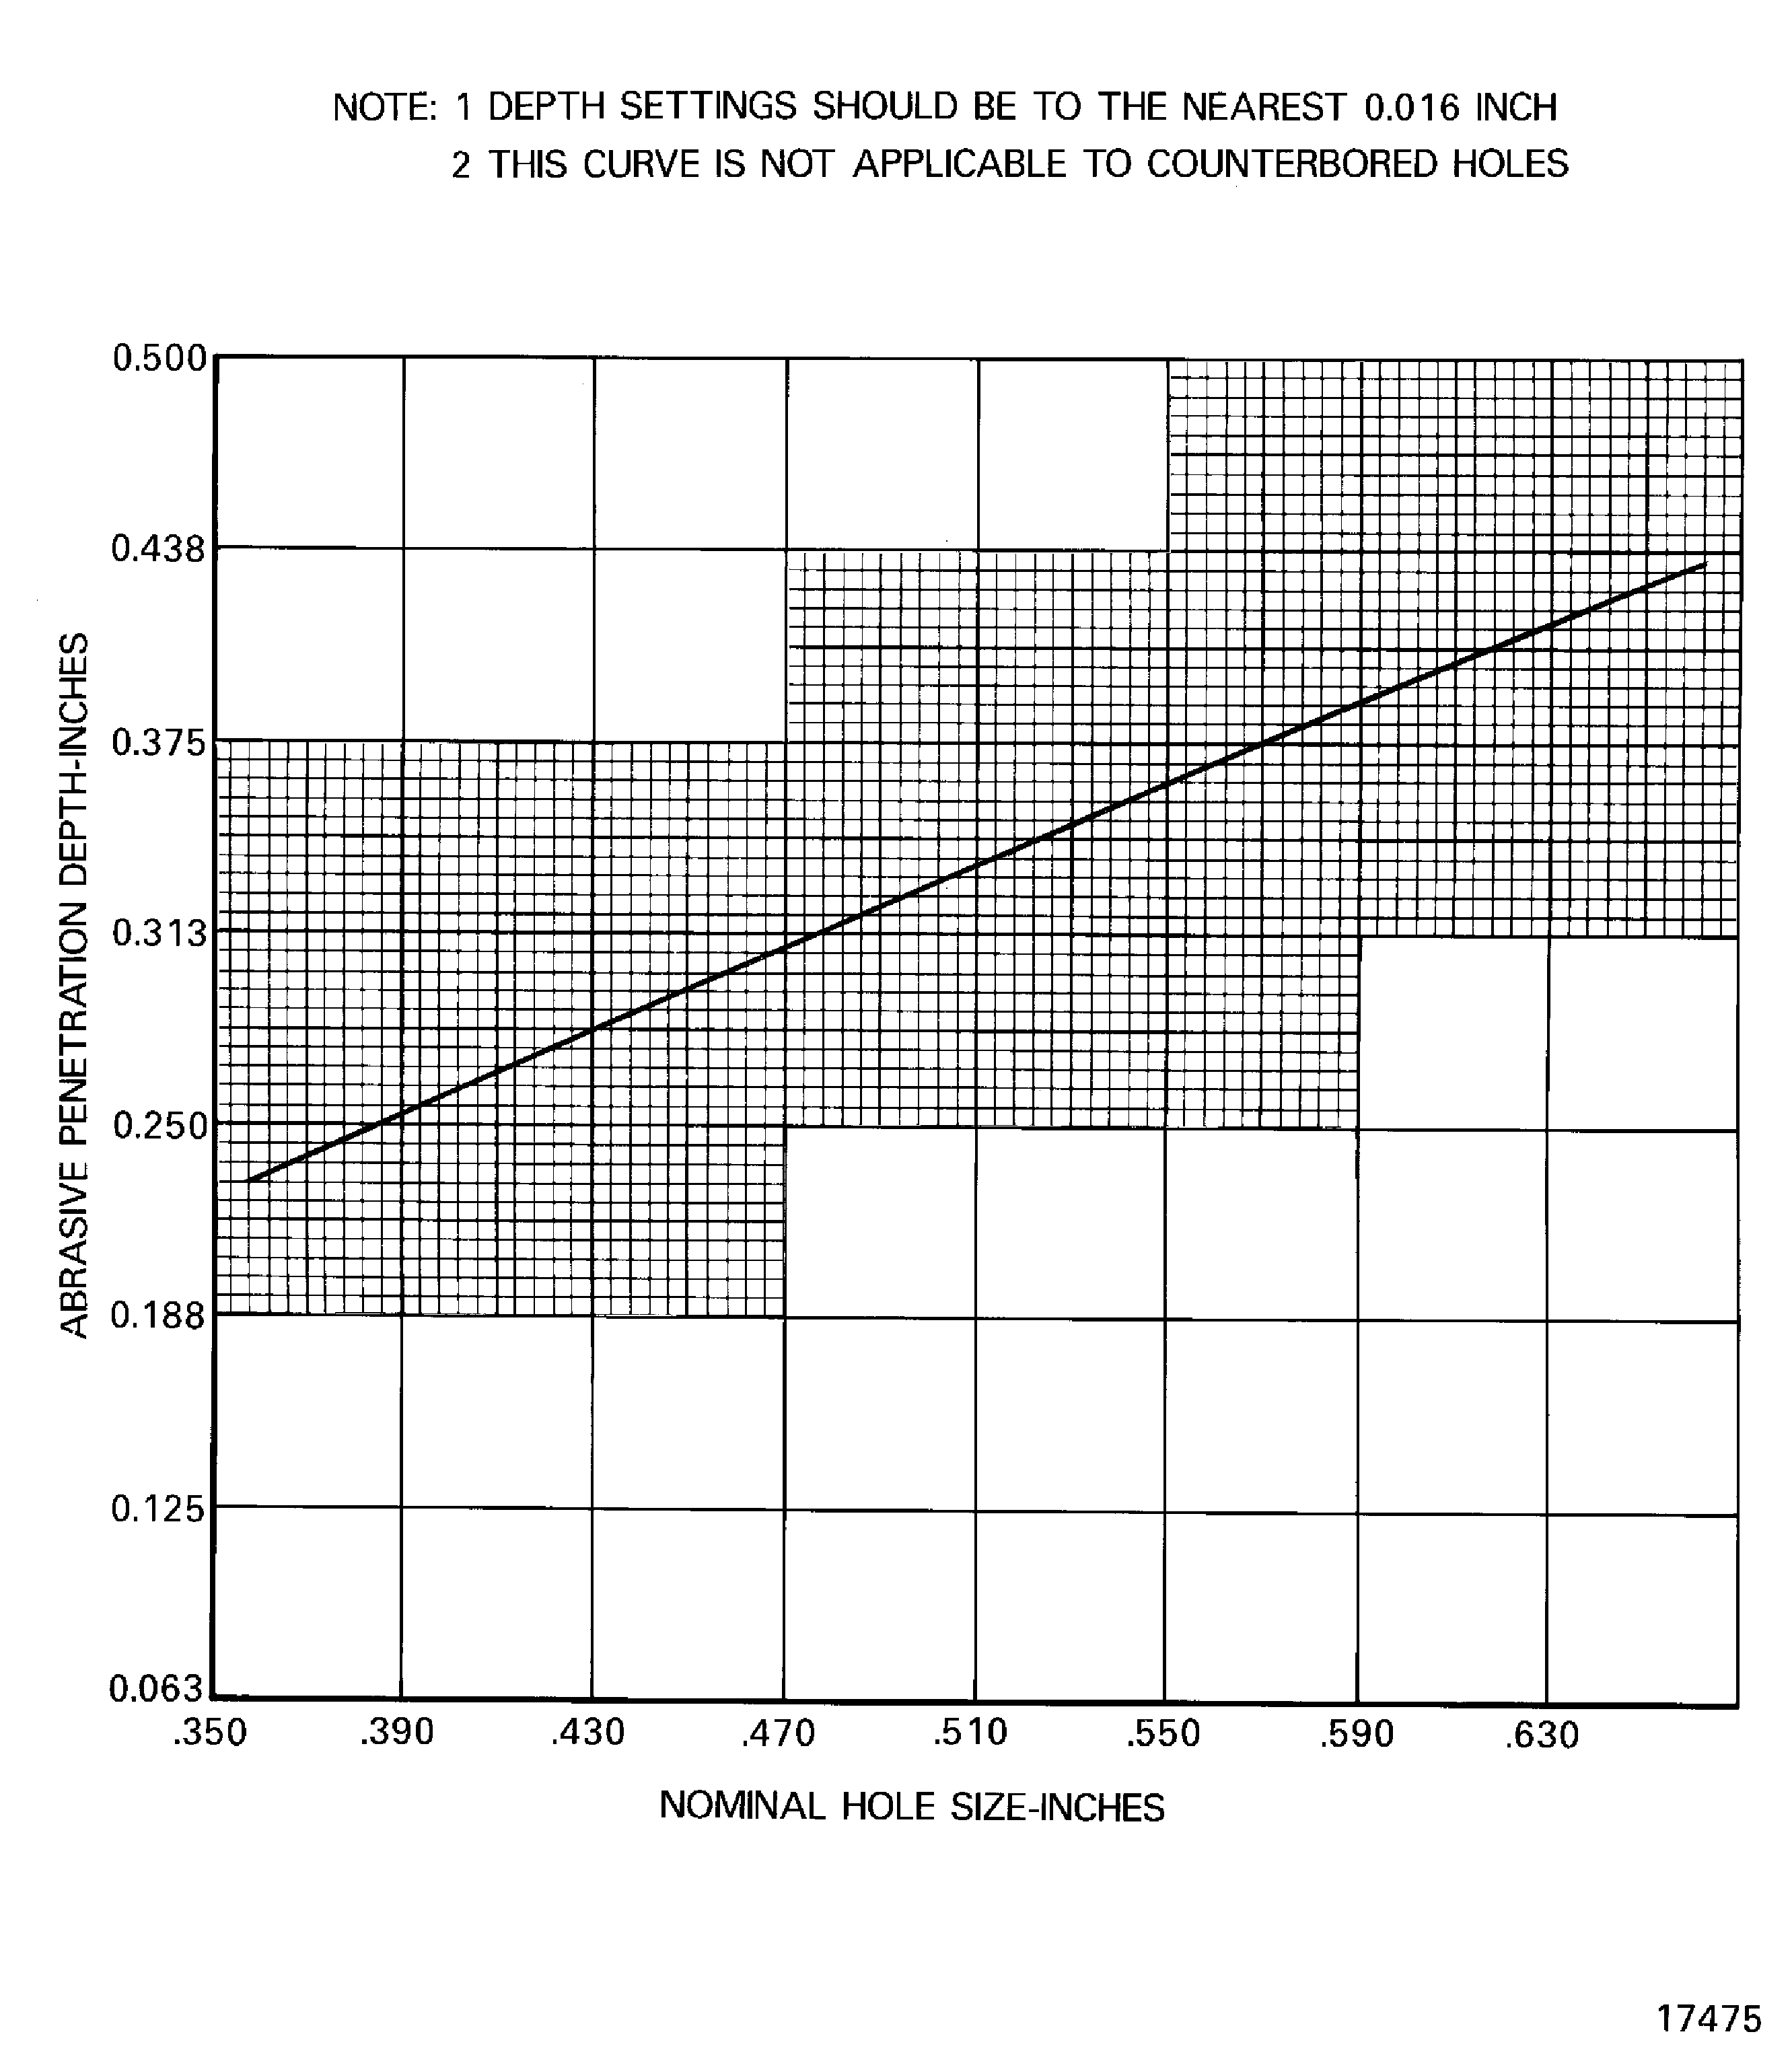
Figure: Hole radius blend contour and acceptable and rejectable conditions of butterfly finished holes
Hole radius blend contour and acceptable and rejectable conditions of butterfly finished holes
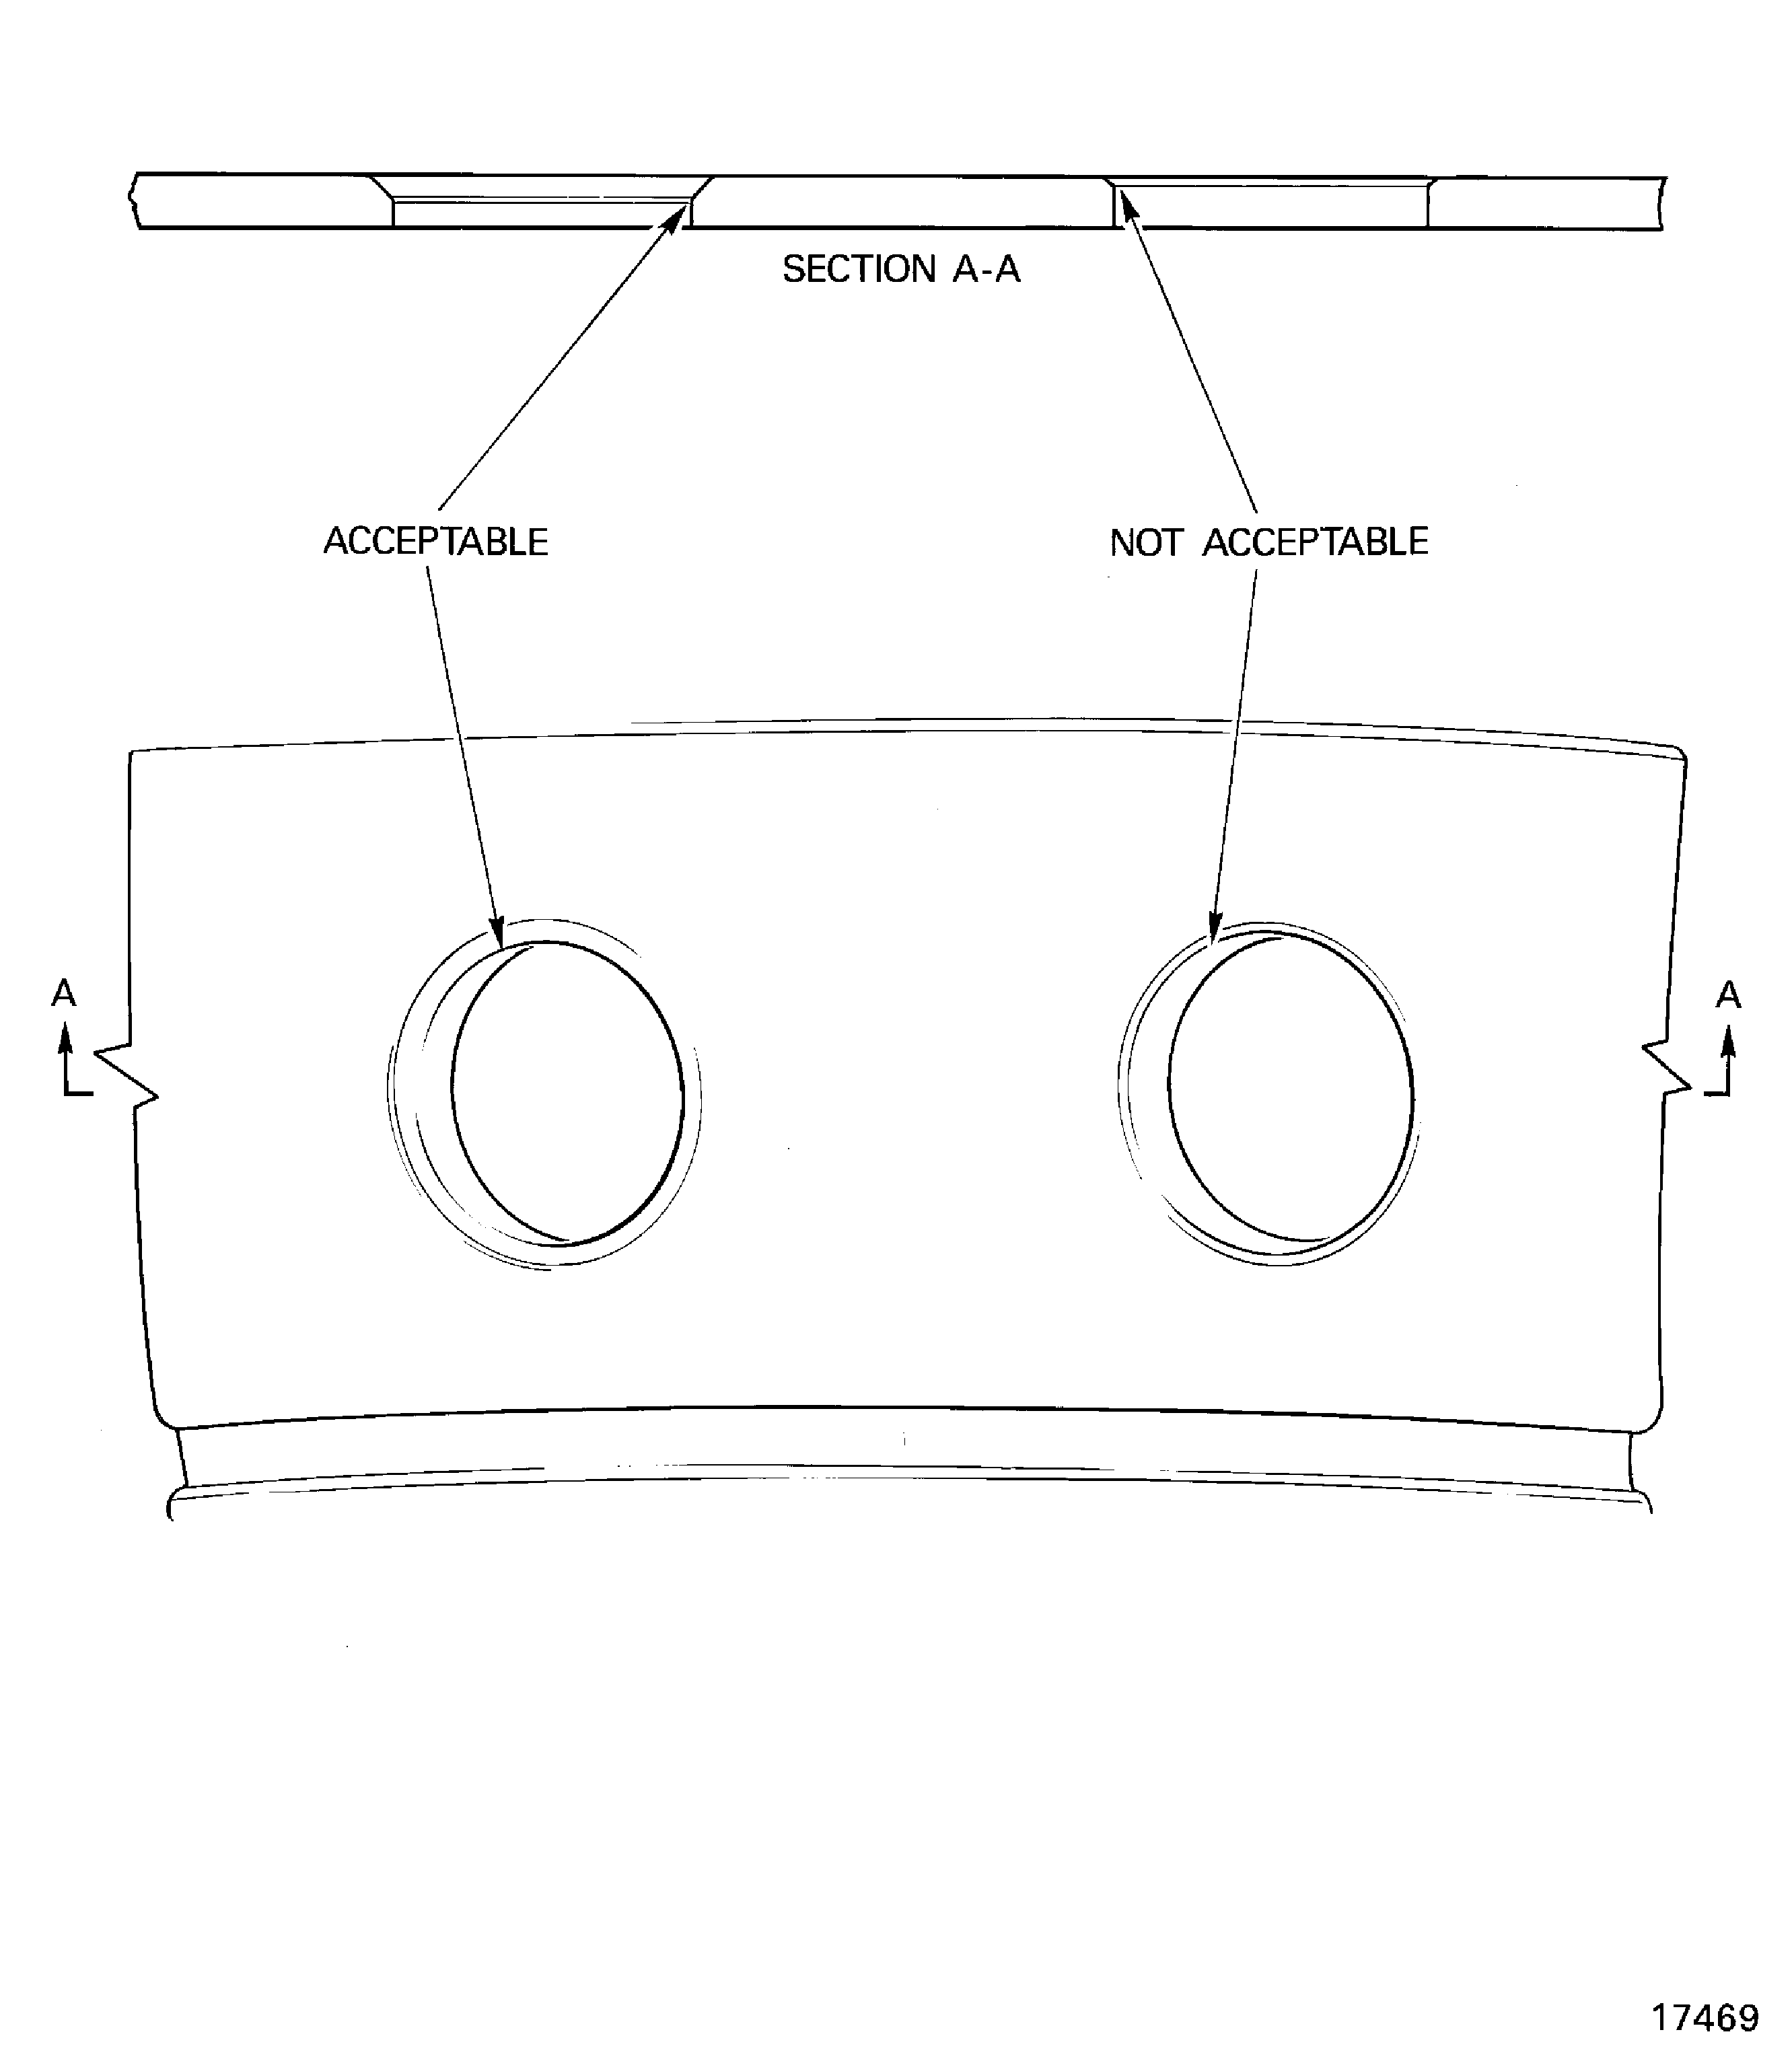
Figure: Typical plug gage
Typical plug gage
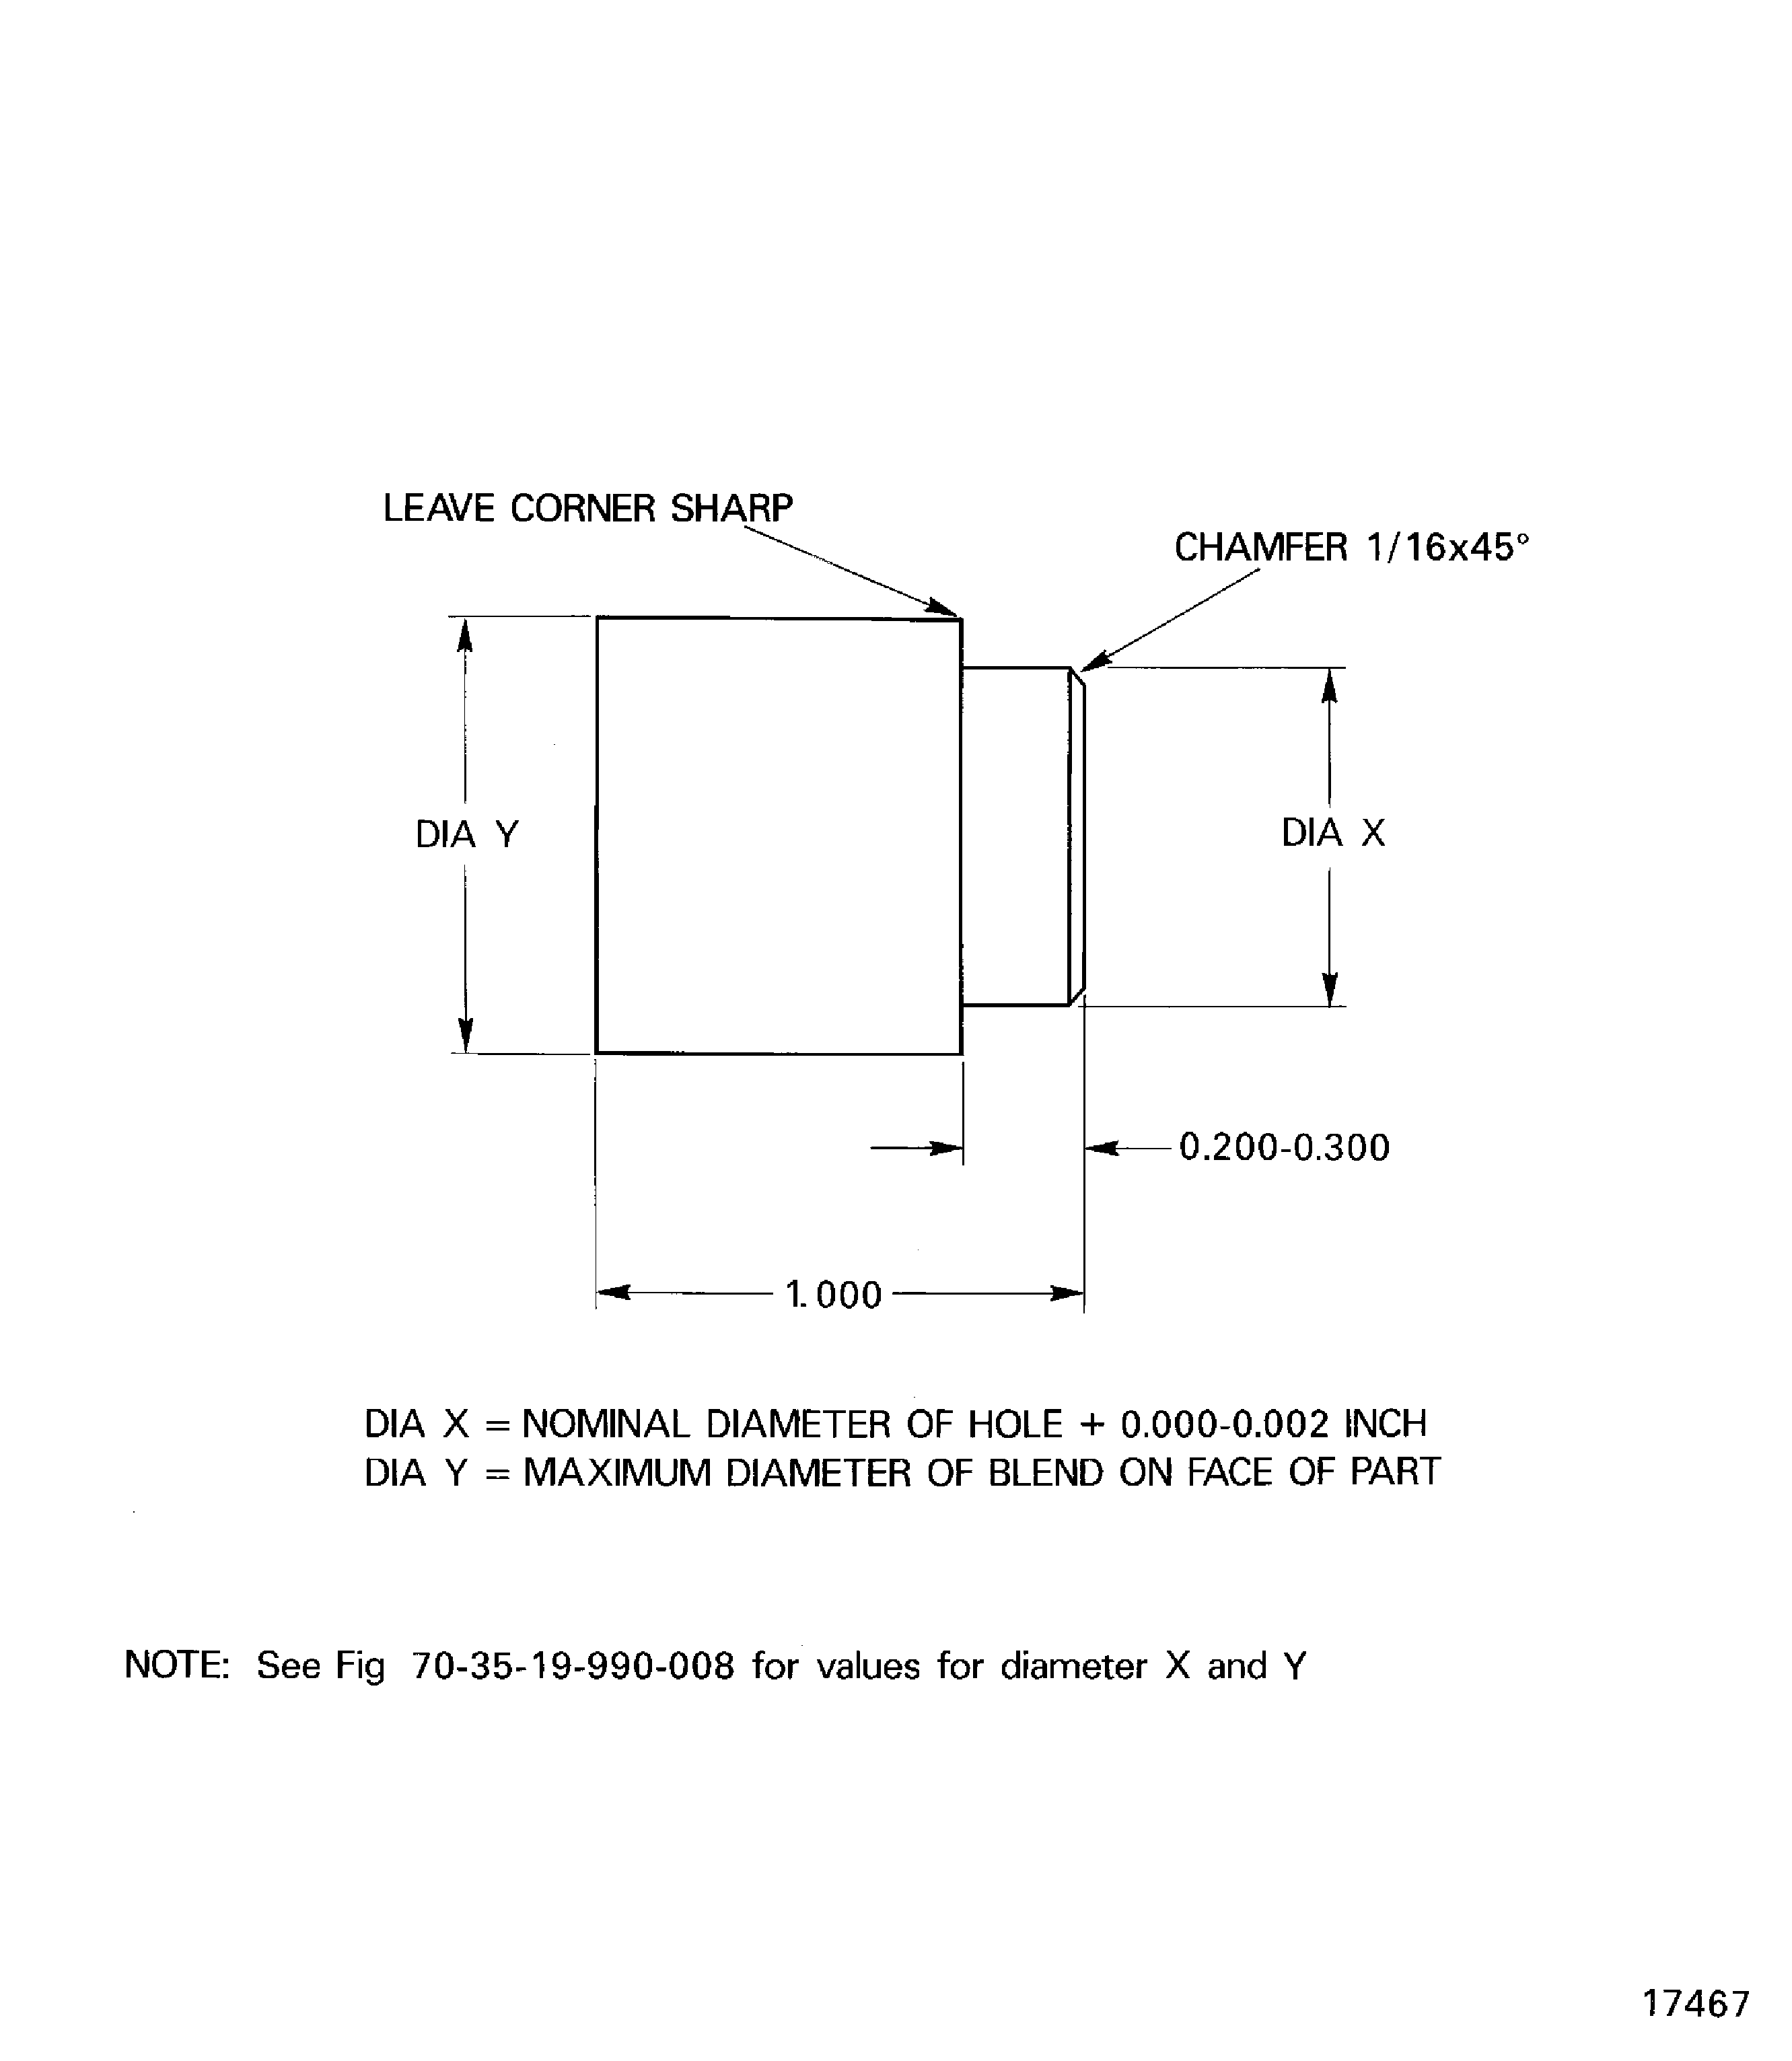
Figure: Maximum diameter of blend on face of part
Maximum diameter of blend on face of part
