Export Control
EAR Export Classification: Not subject to the EAR per 15 C.F.R. Chapter 1, Part 734.3(b)(3), except for the following Service Bulletins which are currently published as EAR Export Classification 9E991: SBE70-0992, SBE72-0483, SBE72-0580, SBE72-0588, SBE72-0640, SBE73-0209, SBE80-0024 and SBE80-0025.Copyright
© IAE International Aero Engines AG (2001, 2014 - 2021) The information contained in this document is the property of © IAE International Aero Engines AG and may not be copied or used for any purpose other than that for which it is supplied without the express written authority of © IAE International Aero Engines AG. (This does not preclude use by engine and aircraft operators for normal instructional, maintenance or overhaul purposes.).Applicability
All
Common Information
TASK 72-50-10-300-007 LPT Stage 6 (Bladed) Rotor Assembly - Blend Repair, Repair-007 (VRS4352)
Material of Component
PART IDENT | IAE SYMBOL | MATERIAL |
Stage 6 turbine blade | Inconel 713C | |
Stage 6 turbine disk | Inconel 718 | |
Stage 6 turbine airseal | Waspaloy |
General
Price and availability - none
The practices and processes referred to in the procedure by the TASK numbers are in the SPM.
Make sure that the necessary cleaning and inspection procedures are done before this repair.
Be careful that no particles or dirt get into or stay in the assembled turbine rotor.
After repair remaining unbalance of stage 6 turbine rotor must be in the limits, refer to TASK 72-50-30-440-000.
NOTE
Preliminary Requirements
Pre-Conditions
NONESupport Equipment
NONEConsumables, Materials and Expendables
NONESpares
NONESafety Requirements
NONEProcedure
NOTE
Refer to SPM TASK 70-35-03-300-501 for blending surface damage.
For local blending use a length to depth ratio of 100:1 minimum. Refer to Figure.
If there is a number of damage marks together blend the whole area to the specified depth. No more than 25 blends are permitted. Tell IAE if more than 25 blends are necessary.
Area A1.1 must not be blended by this repair.
For direction of blend repair, where specified, refer to Figure.
Maximum permitted blend depth is 0.010 in. (0.25 mm).
Minimum distance between blends is 0.500 in. (12.70 mm).
Blend repair in area A1.2
No blends permitted.
Blend repair in area A1.3
Maximum permitted blend depth for nicks and dents is 0.004 in. (0.10 mm).
Maximum permitted blend depth for scratches and scores is 0.002 in. (0.05 mm).
Blend repair in area A1.4 (without areas A1.4.1 and A1.4.2)
Maximum permitted blend depth is 0.002 in. (0.05 mm).
The total area of blend repair must not be more than 30 percent of the whole area A1.4.1.
Blend repair in area A1.4.1
Maximum permitted blend depth is 0.002 in. (0.05 mm).
The total area of blend repair must not be more than 50 percent of the whole area A1.4.2.
Blend repair in area A1.4.2
Maximum permitted blend depth is 0.005 in. (0.13 mm).
Maximum permitted length of blends for scratches and scores is 0.752 in. (19.10 mm).
Minimum distance between blends is 0.500 in. (12.50 mm).
For damage outside the spacing limit maximum depth of blend repair is 0.003 in. (0.08 mm).
Maximum blend area is 0.25 sqin. (160.00 sqmm).
Blend repair in area A1.5
SUBTASK 72-50-10-350-004 Blend Repair the Air Seal of the Stage 6 Turbine Rotor
NOTE
Refer to SPM TASK 70-35-03-300-501 for blending surface damage.
For local blending use a length to depth ratio of 10:1 minimum. Refer to Figure.
The minimum distance between the blends is 0.200 in. (5.08 mm).
Do not blend repair dents except on leading edge and trailing edge.
Nicks within permitted limits do not require blend repair. If present, remove raised material only.
Repeated blending in one place is permitted to the specified maximum depth, measured from the initial unblended surface.
Area A2.1 must not be blended by this repair.
Polish the airfoil in spanwise direction only.
Maximum permitted blend depth from initial surface is 0.020 in. (0.51 mm).
Minimum material thickness after blending is 0.040 in. (1.02 mm).
The blended area must not be more than 20 percent of area A2.2.
Blend the surface in area A2.2.
Maximum permitted blend depth from initial surface is 0.010 in. (0.25 mm).
Minimum material thickness after blending is 0.040 in. (1.02 mm).
The blended area must not be more than 20 percent of area A2.3.
Blend the surface in area A2.3.
Maximum permitted blend depth from initial surface is 0.010 in. (0.25 mm).
The blended area must not be more than 20 percent of area A2.4.
Blend the surface in area A2.4.
Maximum permitted blend depth from initial surface is 0.021 in. (0.53 mm).
The maximum permitted total depth of opposite blends on leading and trailing edge is 0.021 in. (0.53 mm).
The total length of all blends on leading edge must not be more than 10 percent of the span.
The minimum transition radius to the outer shroud is 0.080 in. (2.03 mm).
Use a length to depth ratio of 5:1 minimum.
Blend the surface in area A2.5.1.
Maximum permitted blend depth from initial surface is 0.021 in. (0.53 mm).
The maximum permitted total depth of opposite blends on leading and trailing edge is 0.021 in. (0.53 mm).
The total length of all blends on leading edge must not be more than 10 percent of the span.
Use a length to depth ratio of 6:1 minimum.
Blend the surface in area A2.5.2.
Maximum permitted blend depth from initial surface is 0.021 in. (0.53 mm).
The maximum permitted total depth of opposite blends on leading and trailing edge is 0.021 in. (0.53 mm).
The total length of all blends on leading edge must not be more than 10 percent of the span.
Use a length to depth ratio of 6:1 minimum.
Blend the surface in area A2.5.3.
Maximum permitted blend depth from initial surface is 0.021 in. (0.53 mm).
The maximum permitted total depth of opposite blends on leading and trailing edge is 0.021 in. (0.53 mm).
The total length of all blends on trailing edge must not be more than 10 percent of the span.
Use a length to depth ratio of 5:1 minimum.
Blend the surface in area A2.6.1.
Maximum permitted blend depth from initial surface is 0.021 in. (0.53 mm).
The maximum permitted total depth of opposite blends on leading and trailing edge is 0.021 in. (0.53 mm).
The total length of all blends on trailing edge must not be more than 10 percent of the span.
Use a length to depth ratio of 5:1 minimum.
Blend the surface in area A2.6.2.
Maximum permitted blend depth from initial surface is 0.010 in. (0.25 mm).
The blended area must not be more than 40 percent of area A2.7.
Blend the surface in area A2.7.
Maximum permitted blend depth from initial surface is 0.014 in. (0.36 mm).
The blend area must not be more than 40 percent of area A2.8.
Blend the surface in area A2.8.
Maximum permitted blend depth from initial surface is 0.014 in. (0.36 mm).
The blended area must not be more than 20 percent of area A2.9.
Blend the surface in area A2.9.
No blends permitted.
Blend the surface in area A2.10.
No blends permitted.
Blend the surface in area A2.11.
No blends permitted.
Blend the surface in area A2.12.
SUBTASK 72-50-10-350-005 Blend Repair the Blades of the Stage 6 Turbine Rotor
NOTE
Refer to SPM TASK 70-35-03-300-501 for blending surface damage.
For local blending the length to depth ratio must be a minimum of 100:1. Refer to Figure.
If there is a number of damage marks together blend the whole area to the specified depth. No more than 25 blends are permitted.
No blends permitted.
Blend repair in area A3.1
Maximum permitted blend depth is 0.006 in. (0.15 mm), if not specified differently in other areas.
Blend repair in area A3.2
No blends permitted.
Blend repair in area A3.3 (slots and holes)
Maximum permitted local blend repair depth is 0.004 in. (0.10 mm).
For blend areas 0.0625 sqin. (40.30 sqmm) or more damage not more than 0.002 in. (0.05 mm) maximum depth to be blended to a 0.003 in. (0.076 mm) maximum depth.
Blend to sufficient depth to remove damage plus an additional 0.001 in. (0.025 mm).
Use a length to depth ratio of 50:1 minimum.
Blend repair in area A3.4 (without areas A3.4.1, A3.4.2, and A3.4.3)
Damage not more than 0.002 in. (0.05 mm) maximum depth to be blended to a 0.003 in. (0.076 mm) maximum depth.
Blend to sufficient depth to remove damage plus an additional 0.001 in. (0.025 mm).
The total area of blend repair must not be more than 30 percent of the whole area A3.4.1.
Use a length to depth ratio of 30:1 minimum.
Blend repair in area A3.4.1
Damage not more than 0.002 in. (0.05 mm) maximum depth to be blended to a 0.003 in. (0.076 mm) maximum depth.
Blend to sufficient depth to remove damage plus an additional 0.001 in. (0.025 mm).
The total area of blend repair must not be more than 30 percent of the whole area A3.4.2.
Use a length to depth ratio of 50:1 minimum.
Blend repair in area A3.4.2
Damage not more than 0.002 in. (0.05 mm) maximum depth to be blended to a 0.003 in. (0.076 mm) maximum depth.
Blend to sufficient depth to remove damage plus an additional 0.001 in. (0.025 mm).
The total area of blend repair must not be more than 50 percent of the whole area A3.4.3.
Use a length to depth ratio of 30:1 minimum.
Blend repair in area A3.4.3
No blends permitted.
Blend repair in area A3.5
Maximum permitted blend repair depth is 0.006 in. (0.15 mm).
Use a length to depth ratio of 15:1 minimum.
Blend repair in area A3.6 (without corner radius)
Maximum permitted diameter of the holes is 0.520 in. (13.21 mm).
Round bottom dents to a maximum depth of 0.005 in. (0.127 mm) are permitted in the lead-in radii without blendings, if any raised material is removed.
Refer to SPM TASK 70-35-19-350-501.
Blend repair in area A3.7 (shaft holes)
SUBTASK 72-50-10-350-006 Blend Repair the Disk of the Stage 6 Turbine Rotor
Do the test for cracks.
SUBTASK 72-50-10-230-001 Examine the Blended Areas of Disk and Airseal for Cracks
Refer to SPM TASK 70-35-19-350-501.
Butterfly polish all repaired holes and chamfers.
SUBTASK 72-50-10-350-010 Polish the Repaired Areas of Disk
The surface finish of all repairs must be 32 microinch RMS (0.8 micrometer Ra).
Examine the surface finish.
The blend ratio must be in the limits.
Examine the blended areas dimensionally.
SUBTASK 72-50-10-220-001 Do the Post Repair Inspection of the Stage 6 Turbine Rotor Disk and Airseal
The blended surface must be as smooth as the initial surface.
Edges and corners are not permitted.
Examine the surface of the blended areas visually.
The blend ratio must be in the limits.
Examine the blended areas dimensionally.
SUBTASK 72-50-10-220-002 Do the Post Repair Inspection of the Stage 6 Turbine Rotor Blades
Figure: Repair Details and Dimensions
Repair Details and Dimensions
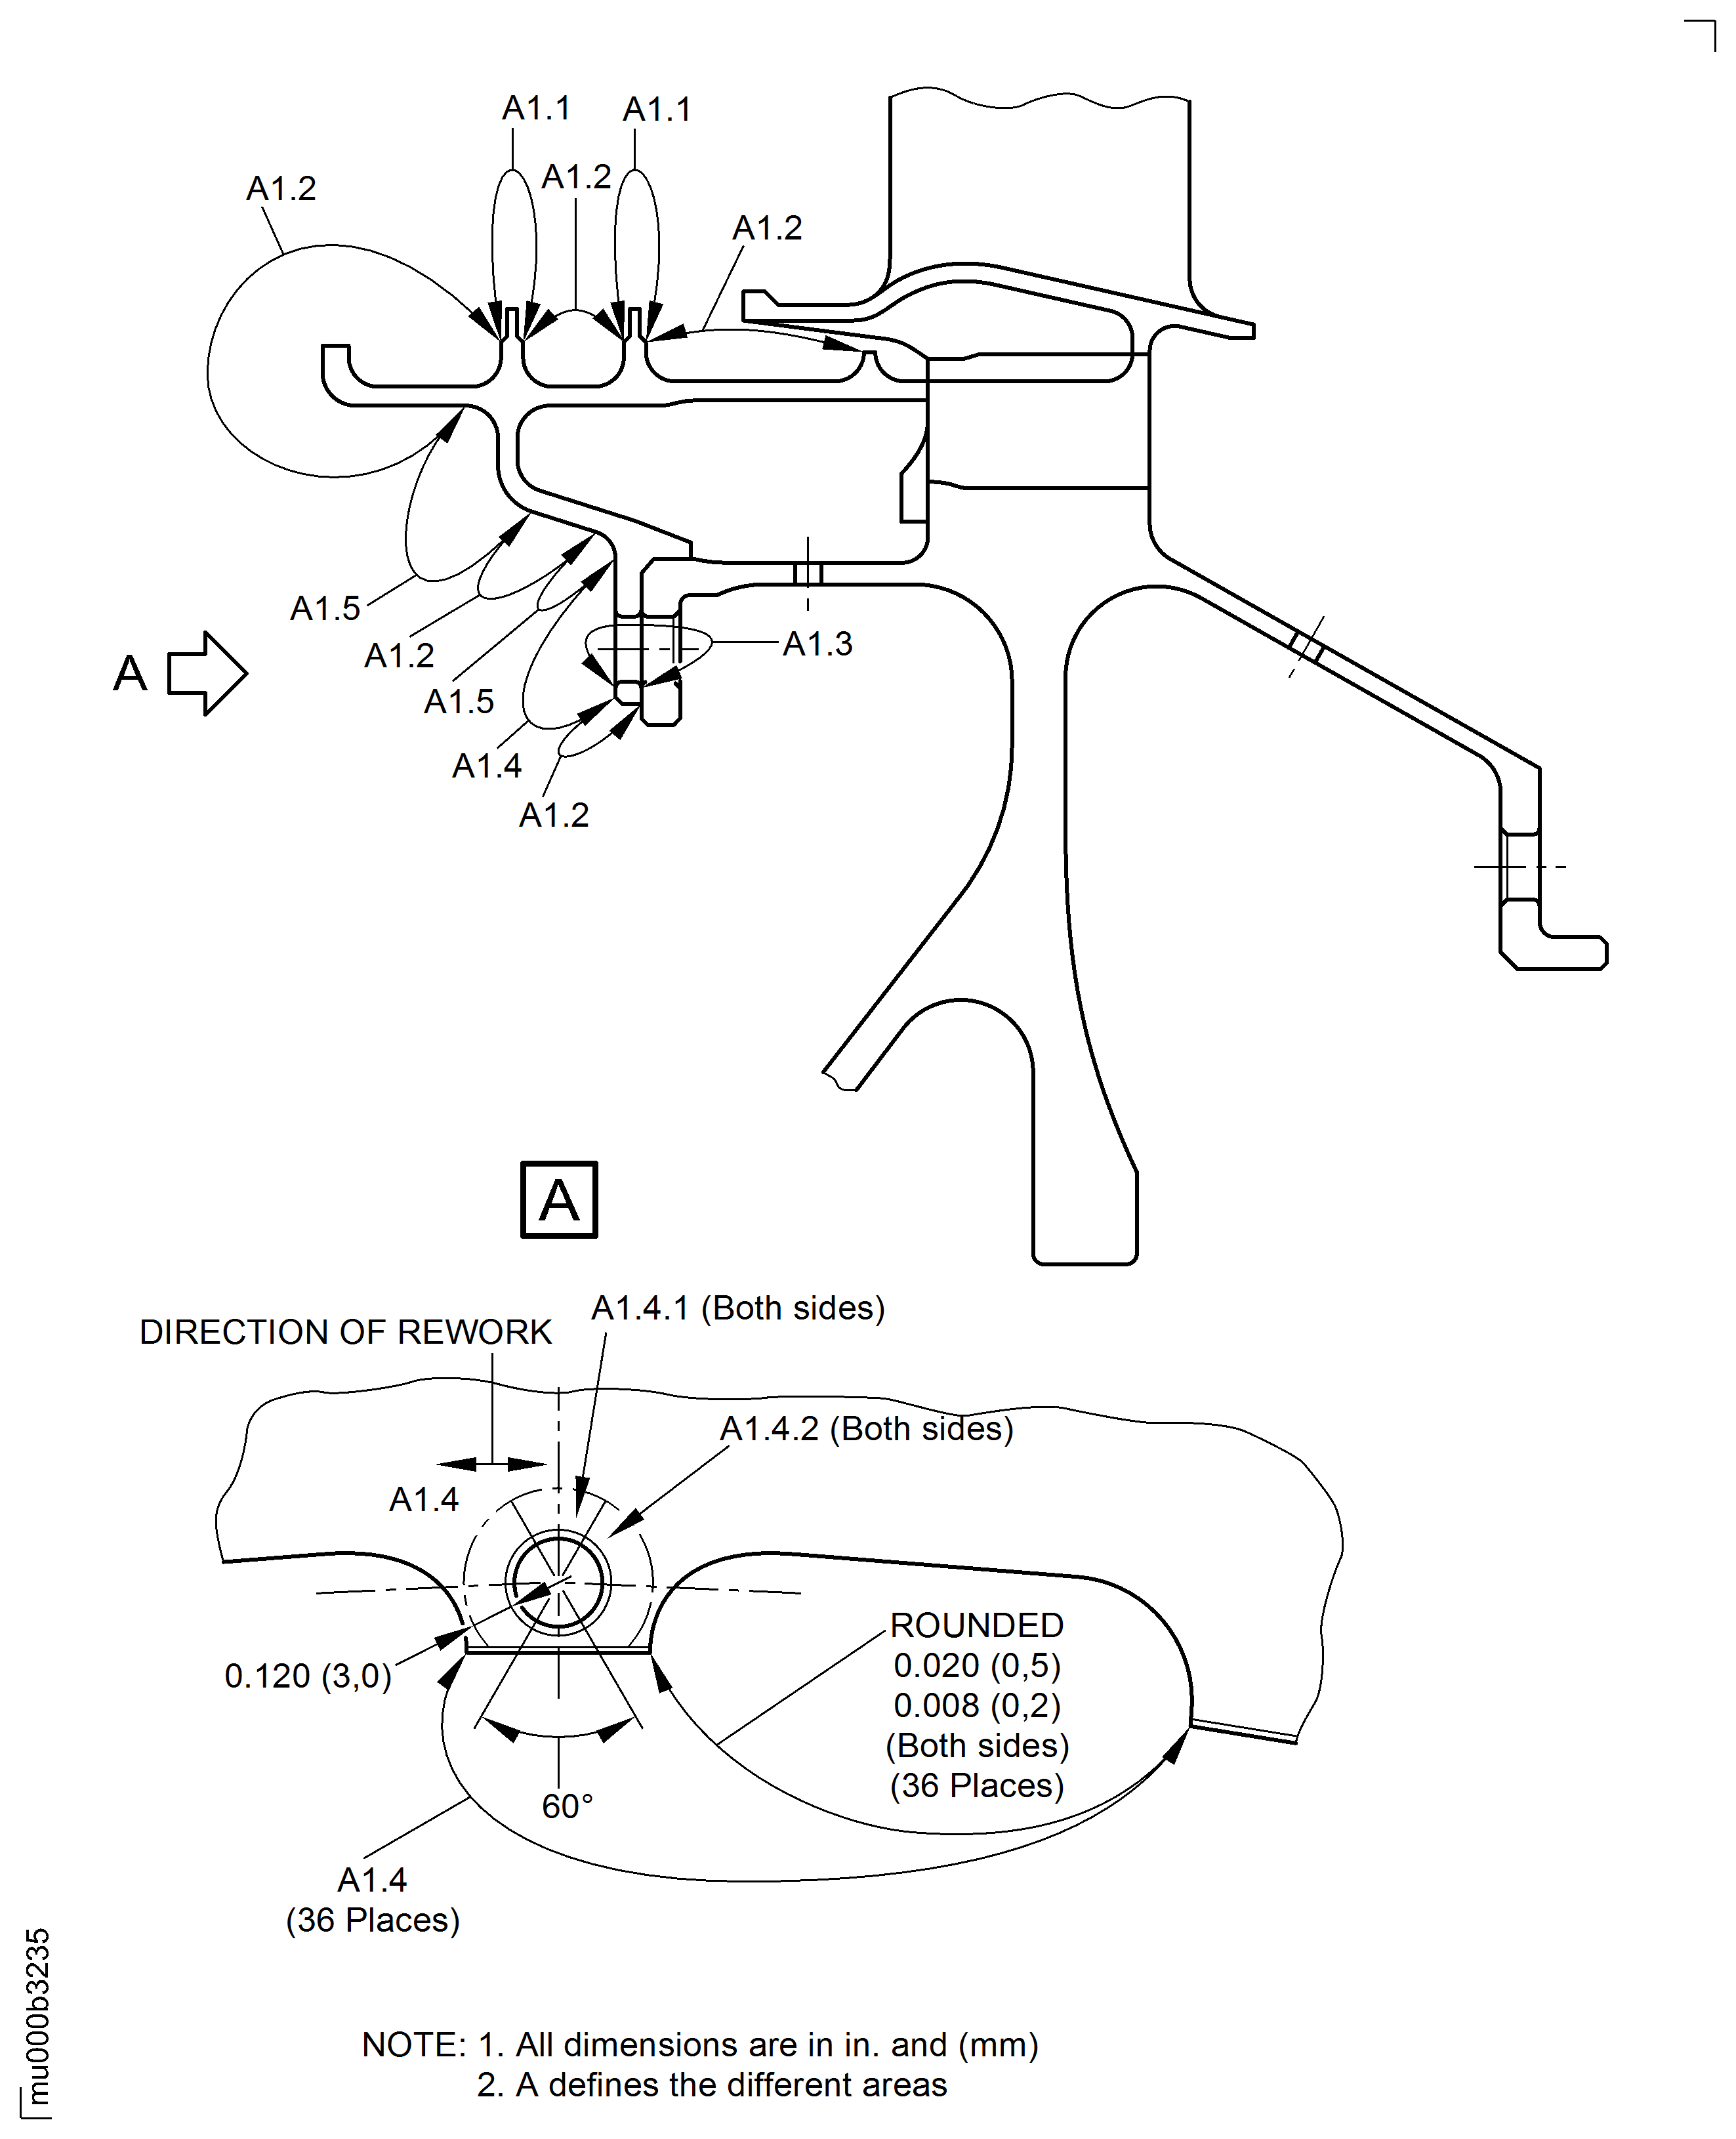
Figure: Repair Details and Dimensions
Repair Details and Dimensions
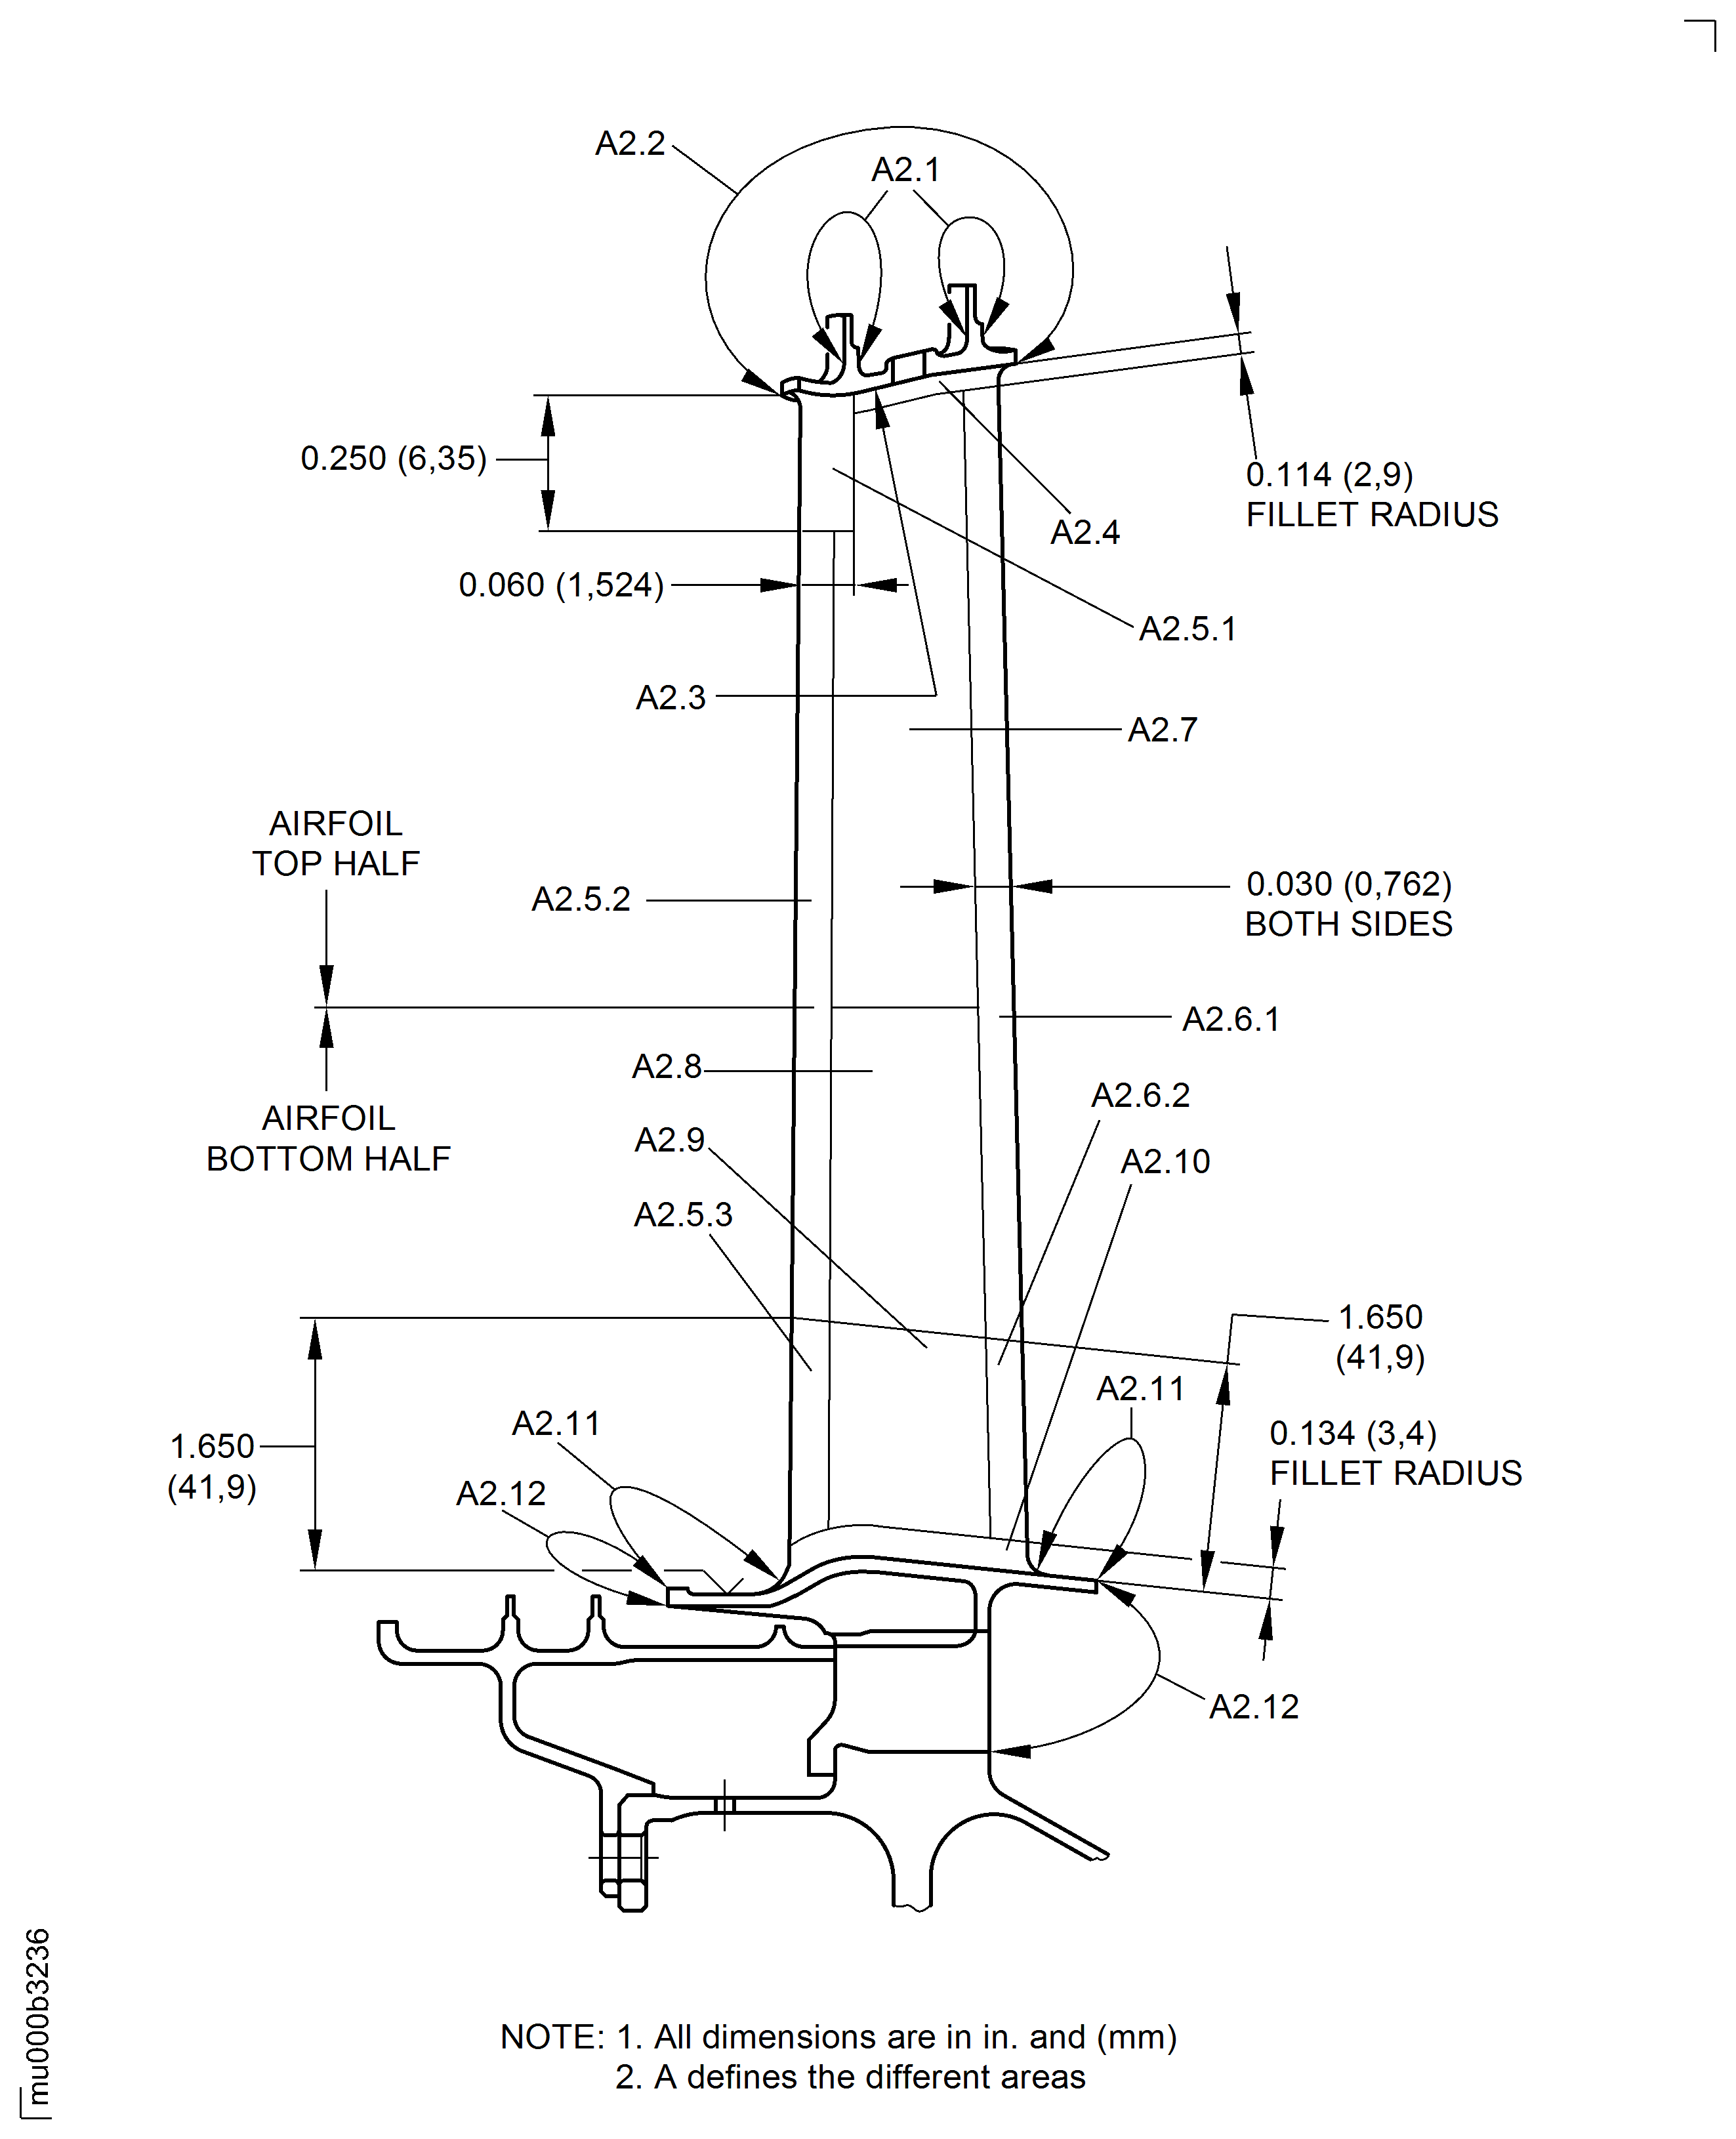
Figure: Repair Details and Dimensions
Repair Details and Dimensions
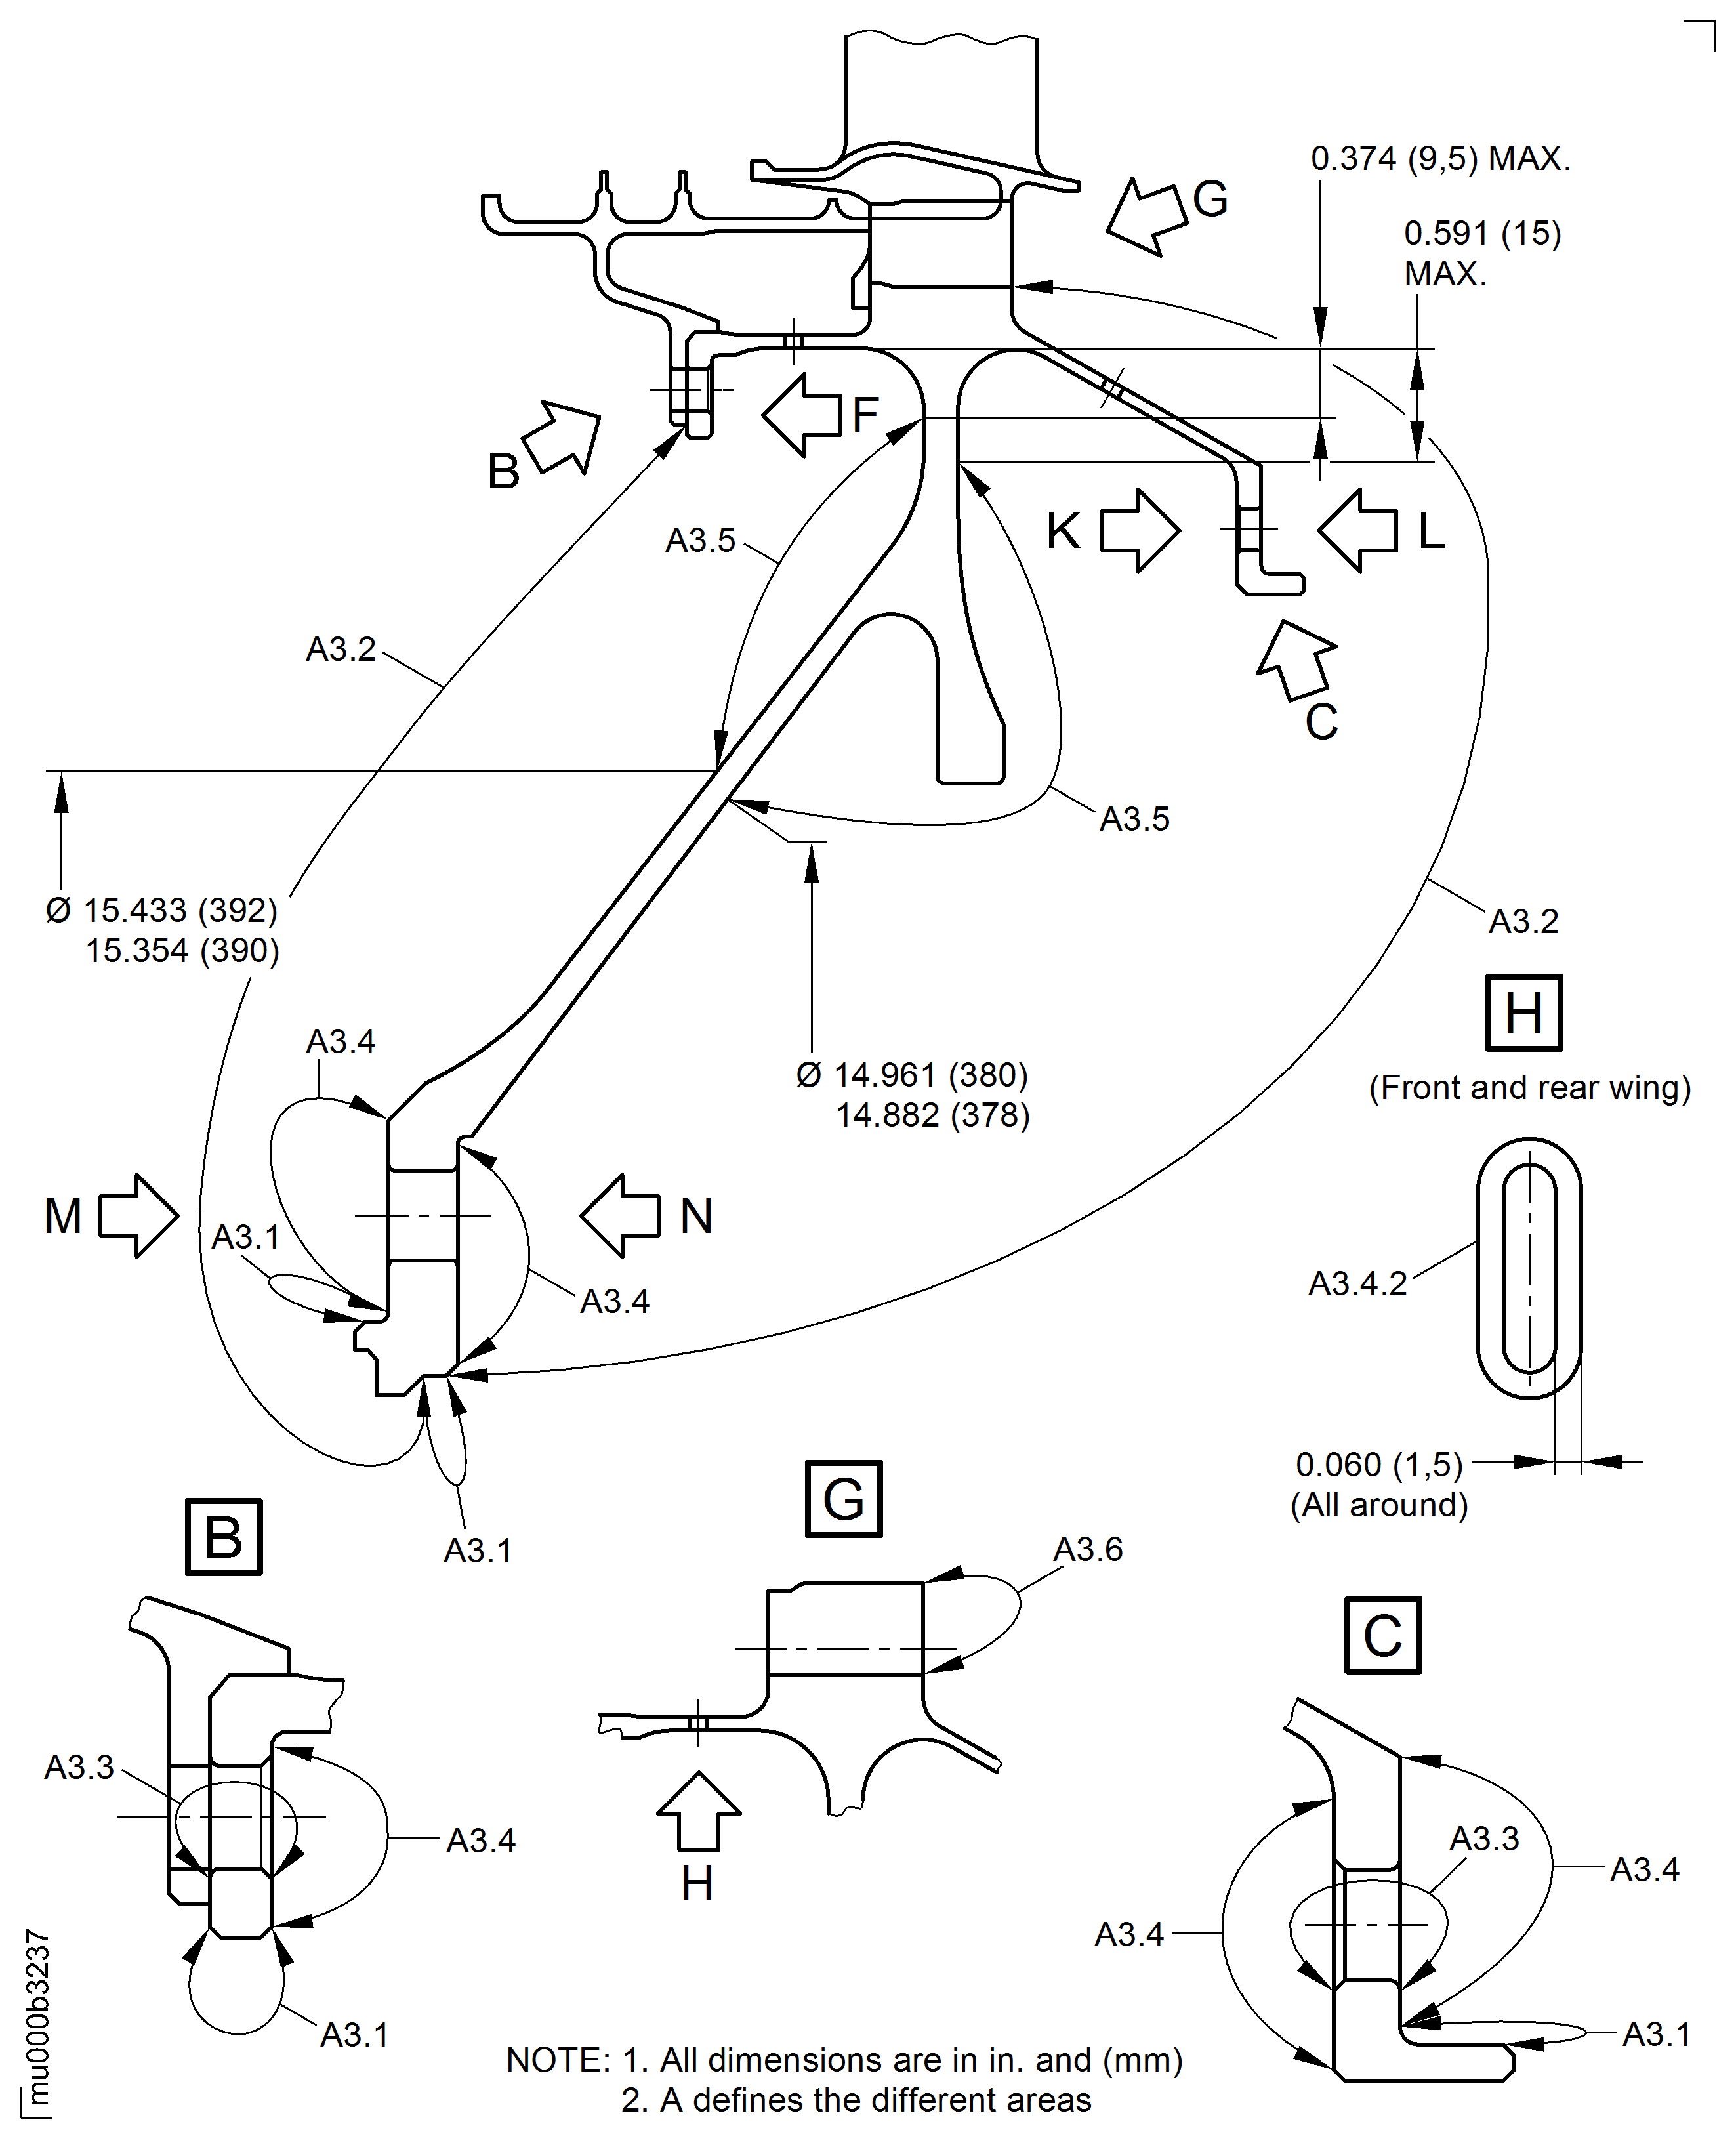
Figure: Repair Details and Dimensions
Repair Details and Dimensions
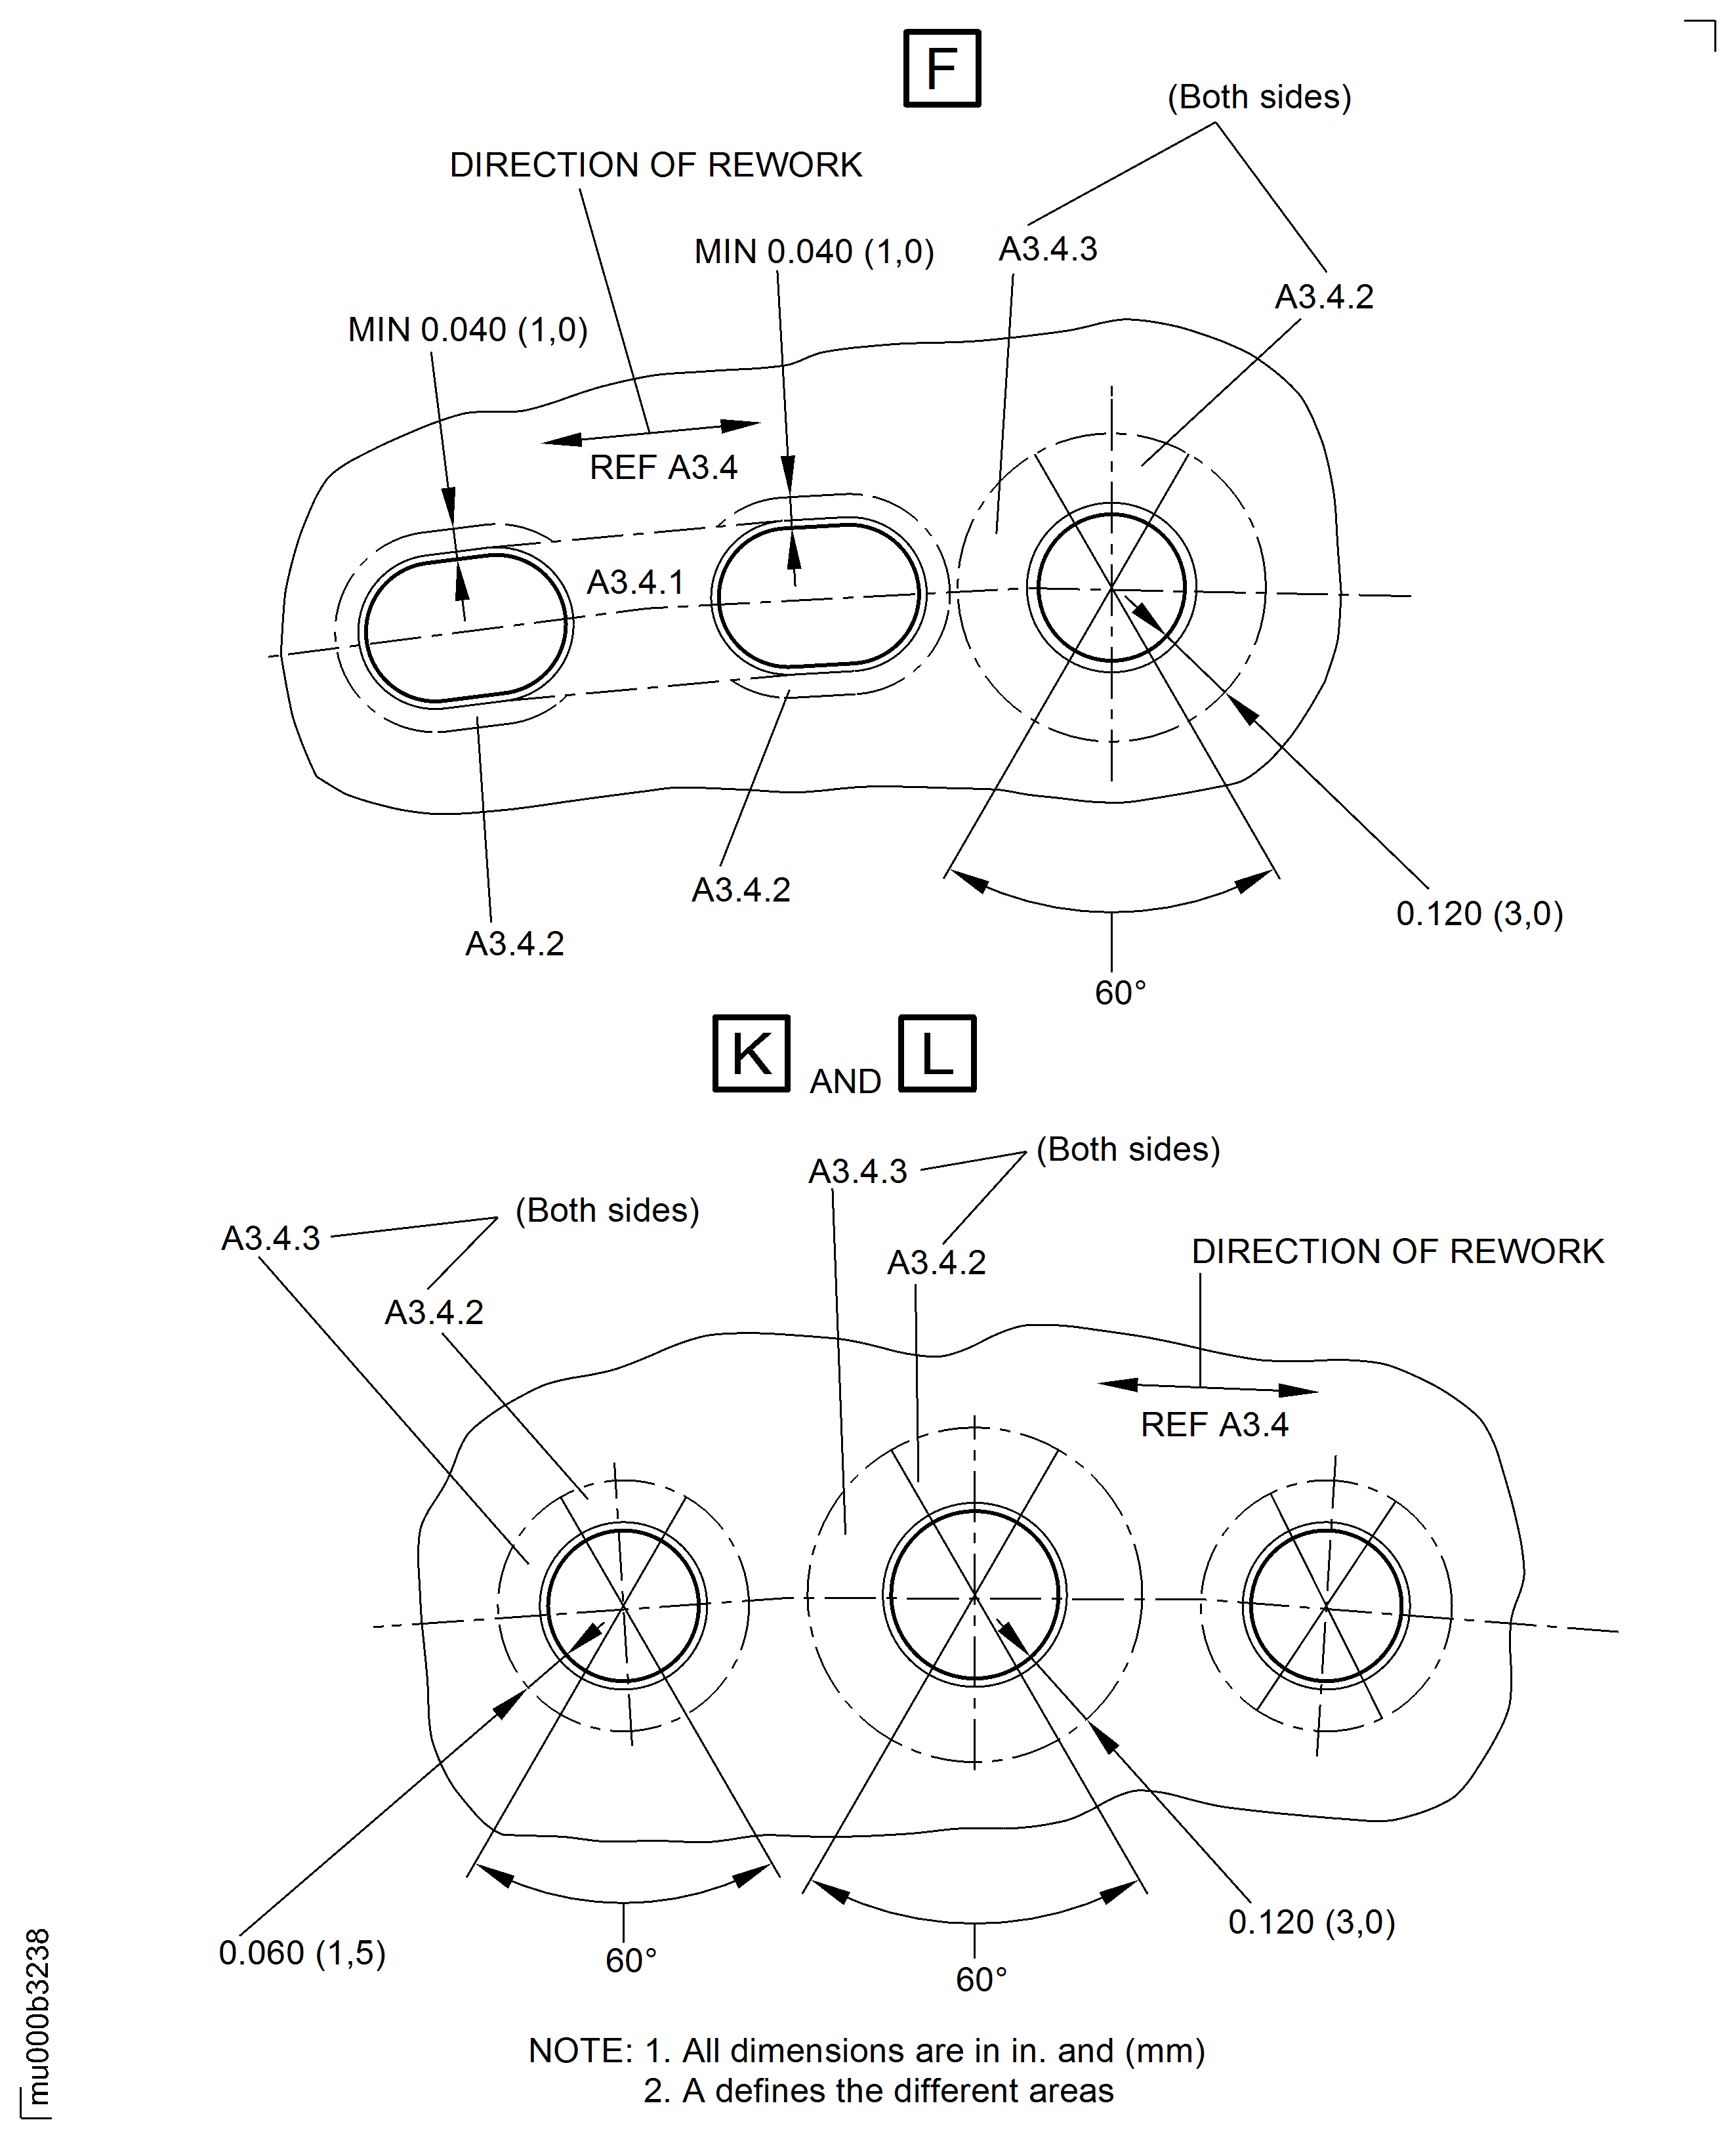
Figure: Repair Details and Dimensions
Repair Details and Dimensions
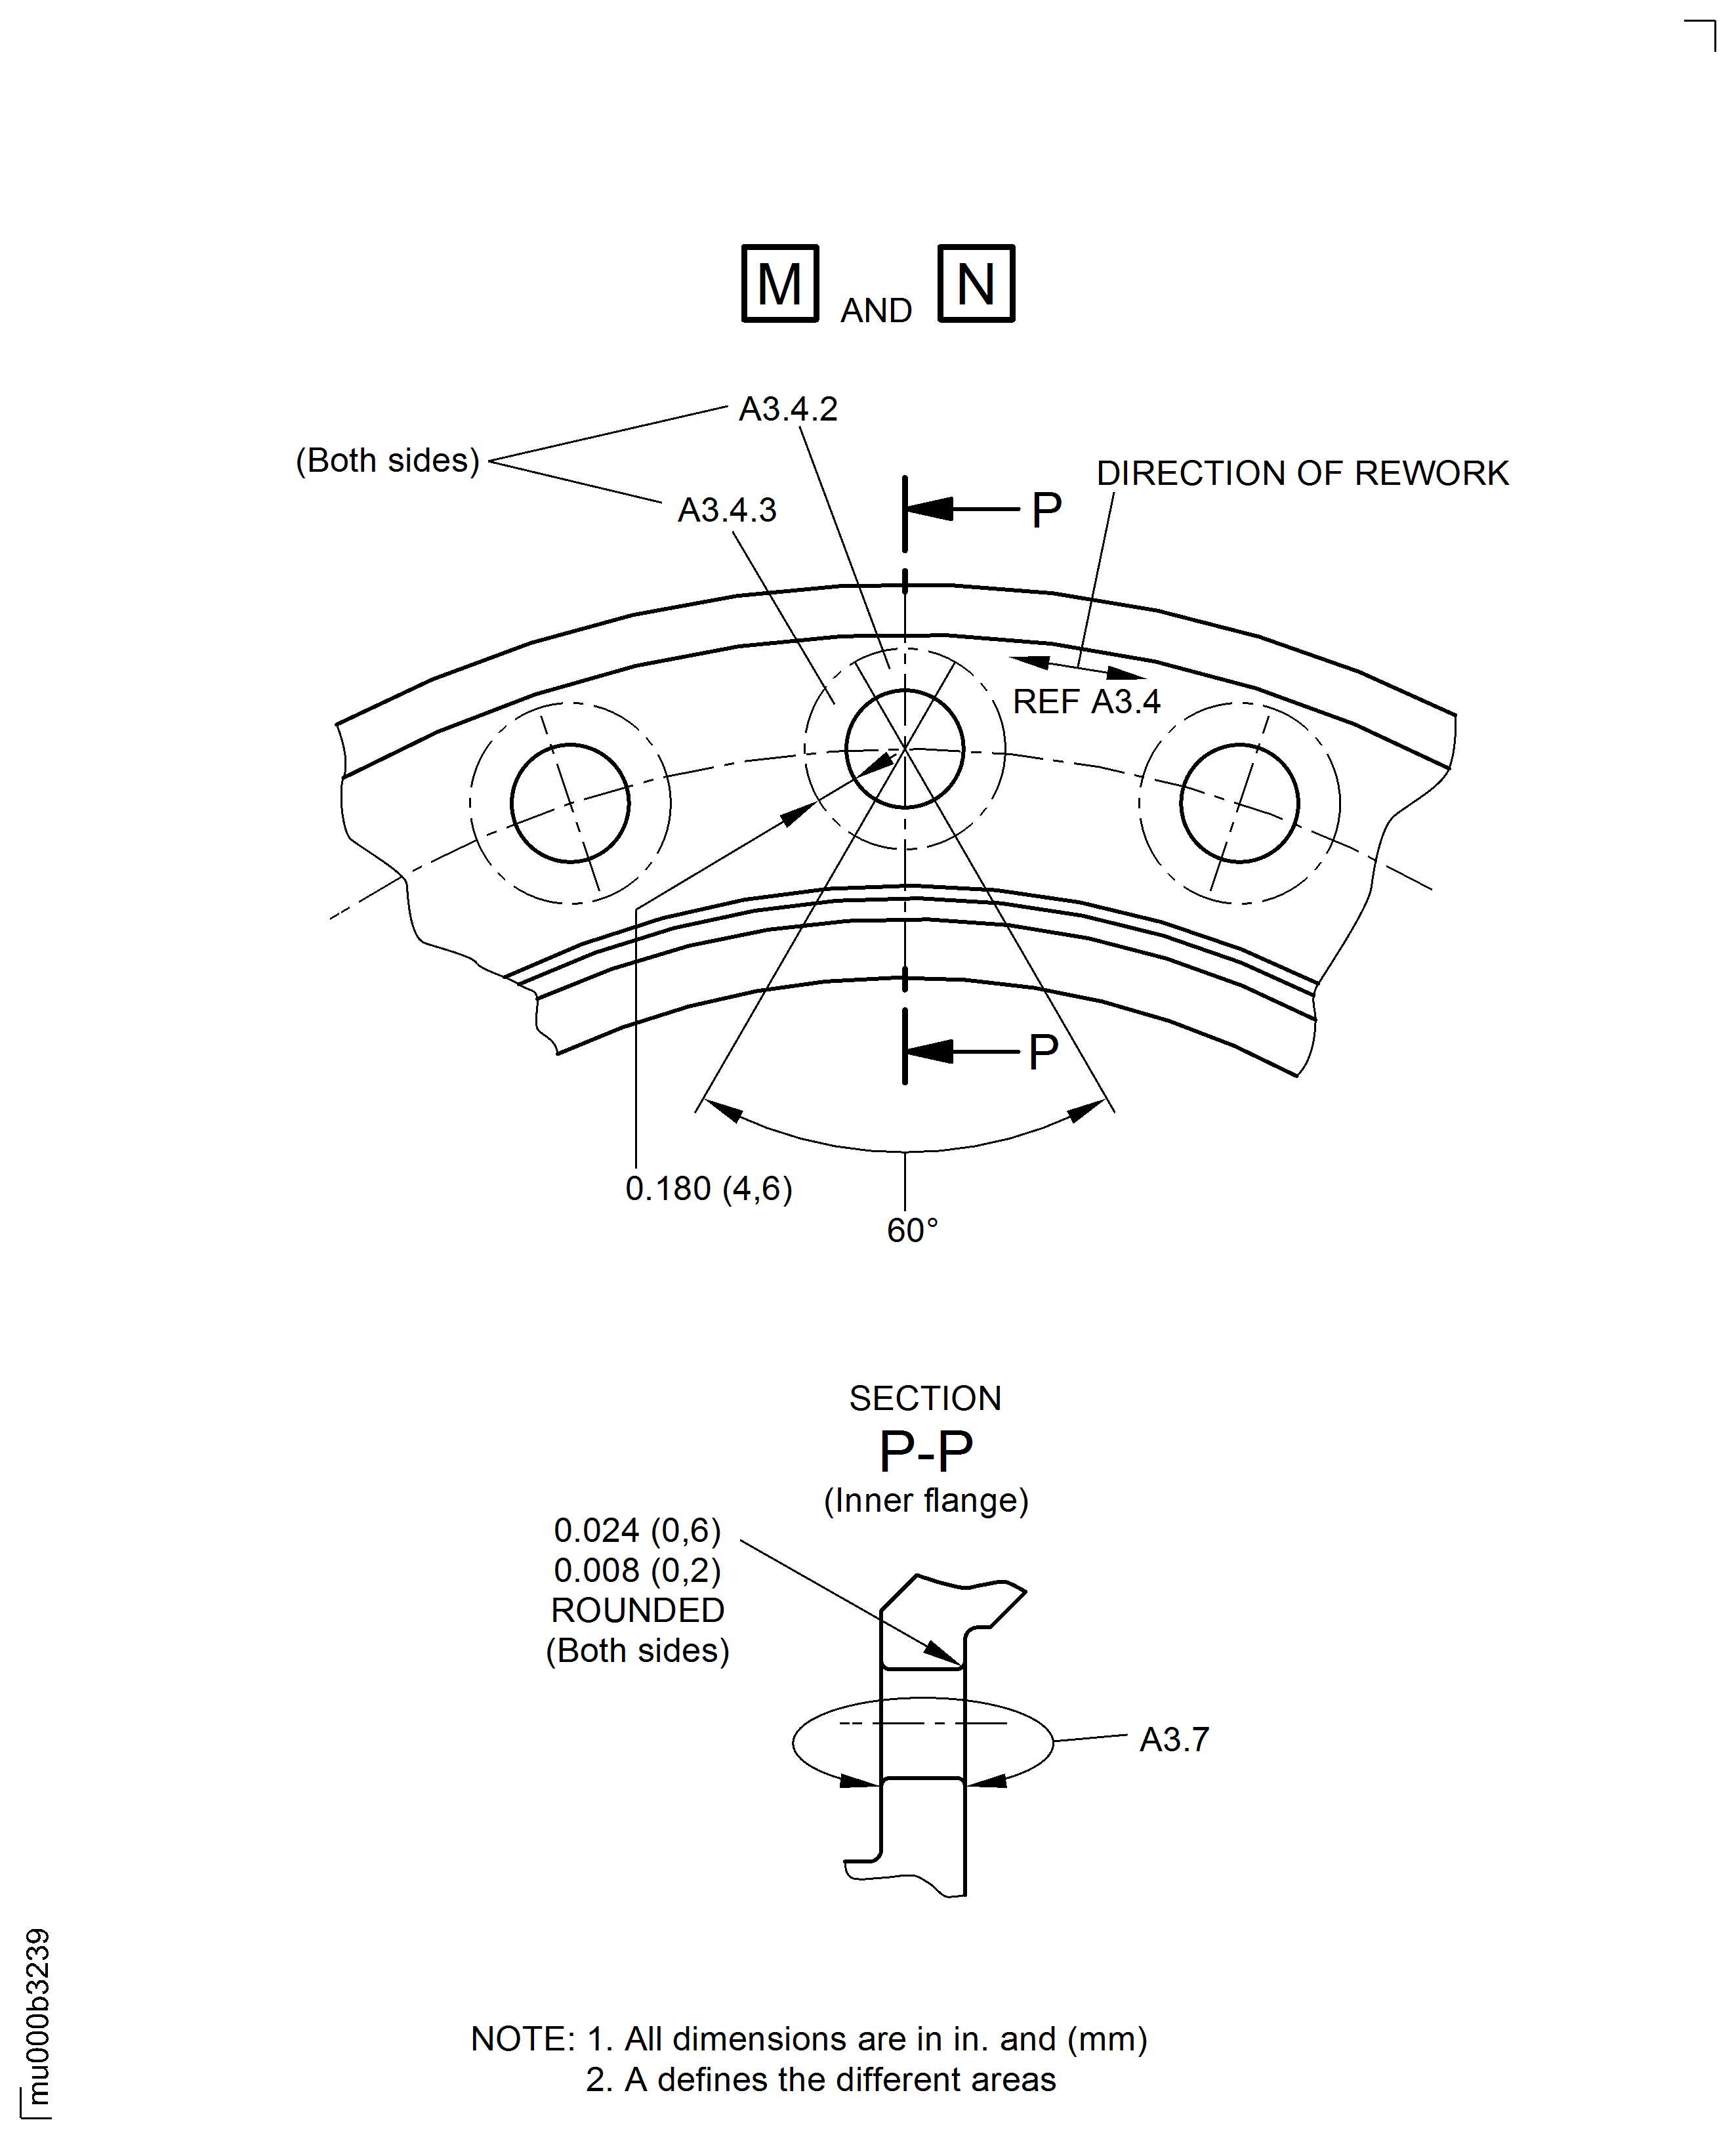
Figure: Repair Details and Dimensions
Repair Details and Dimensions
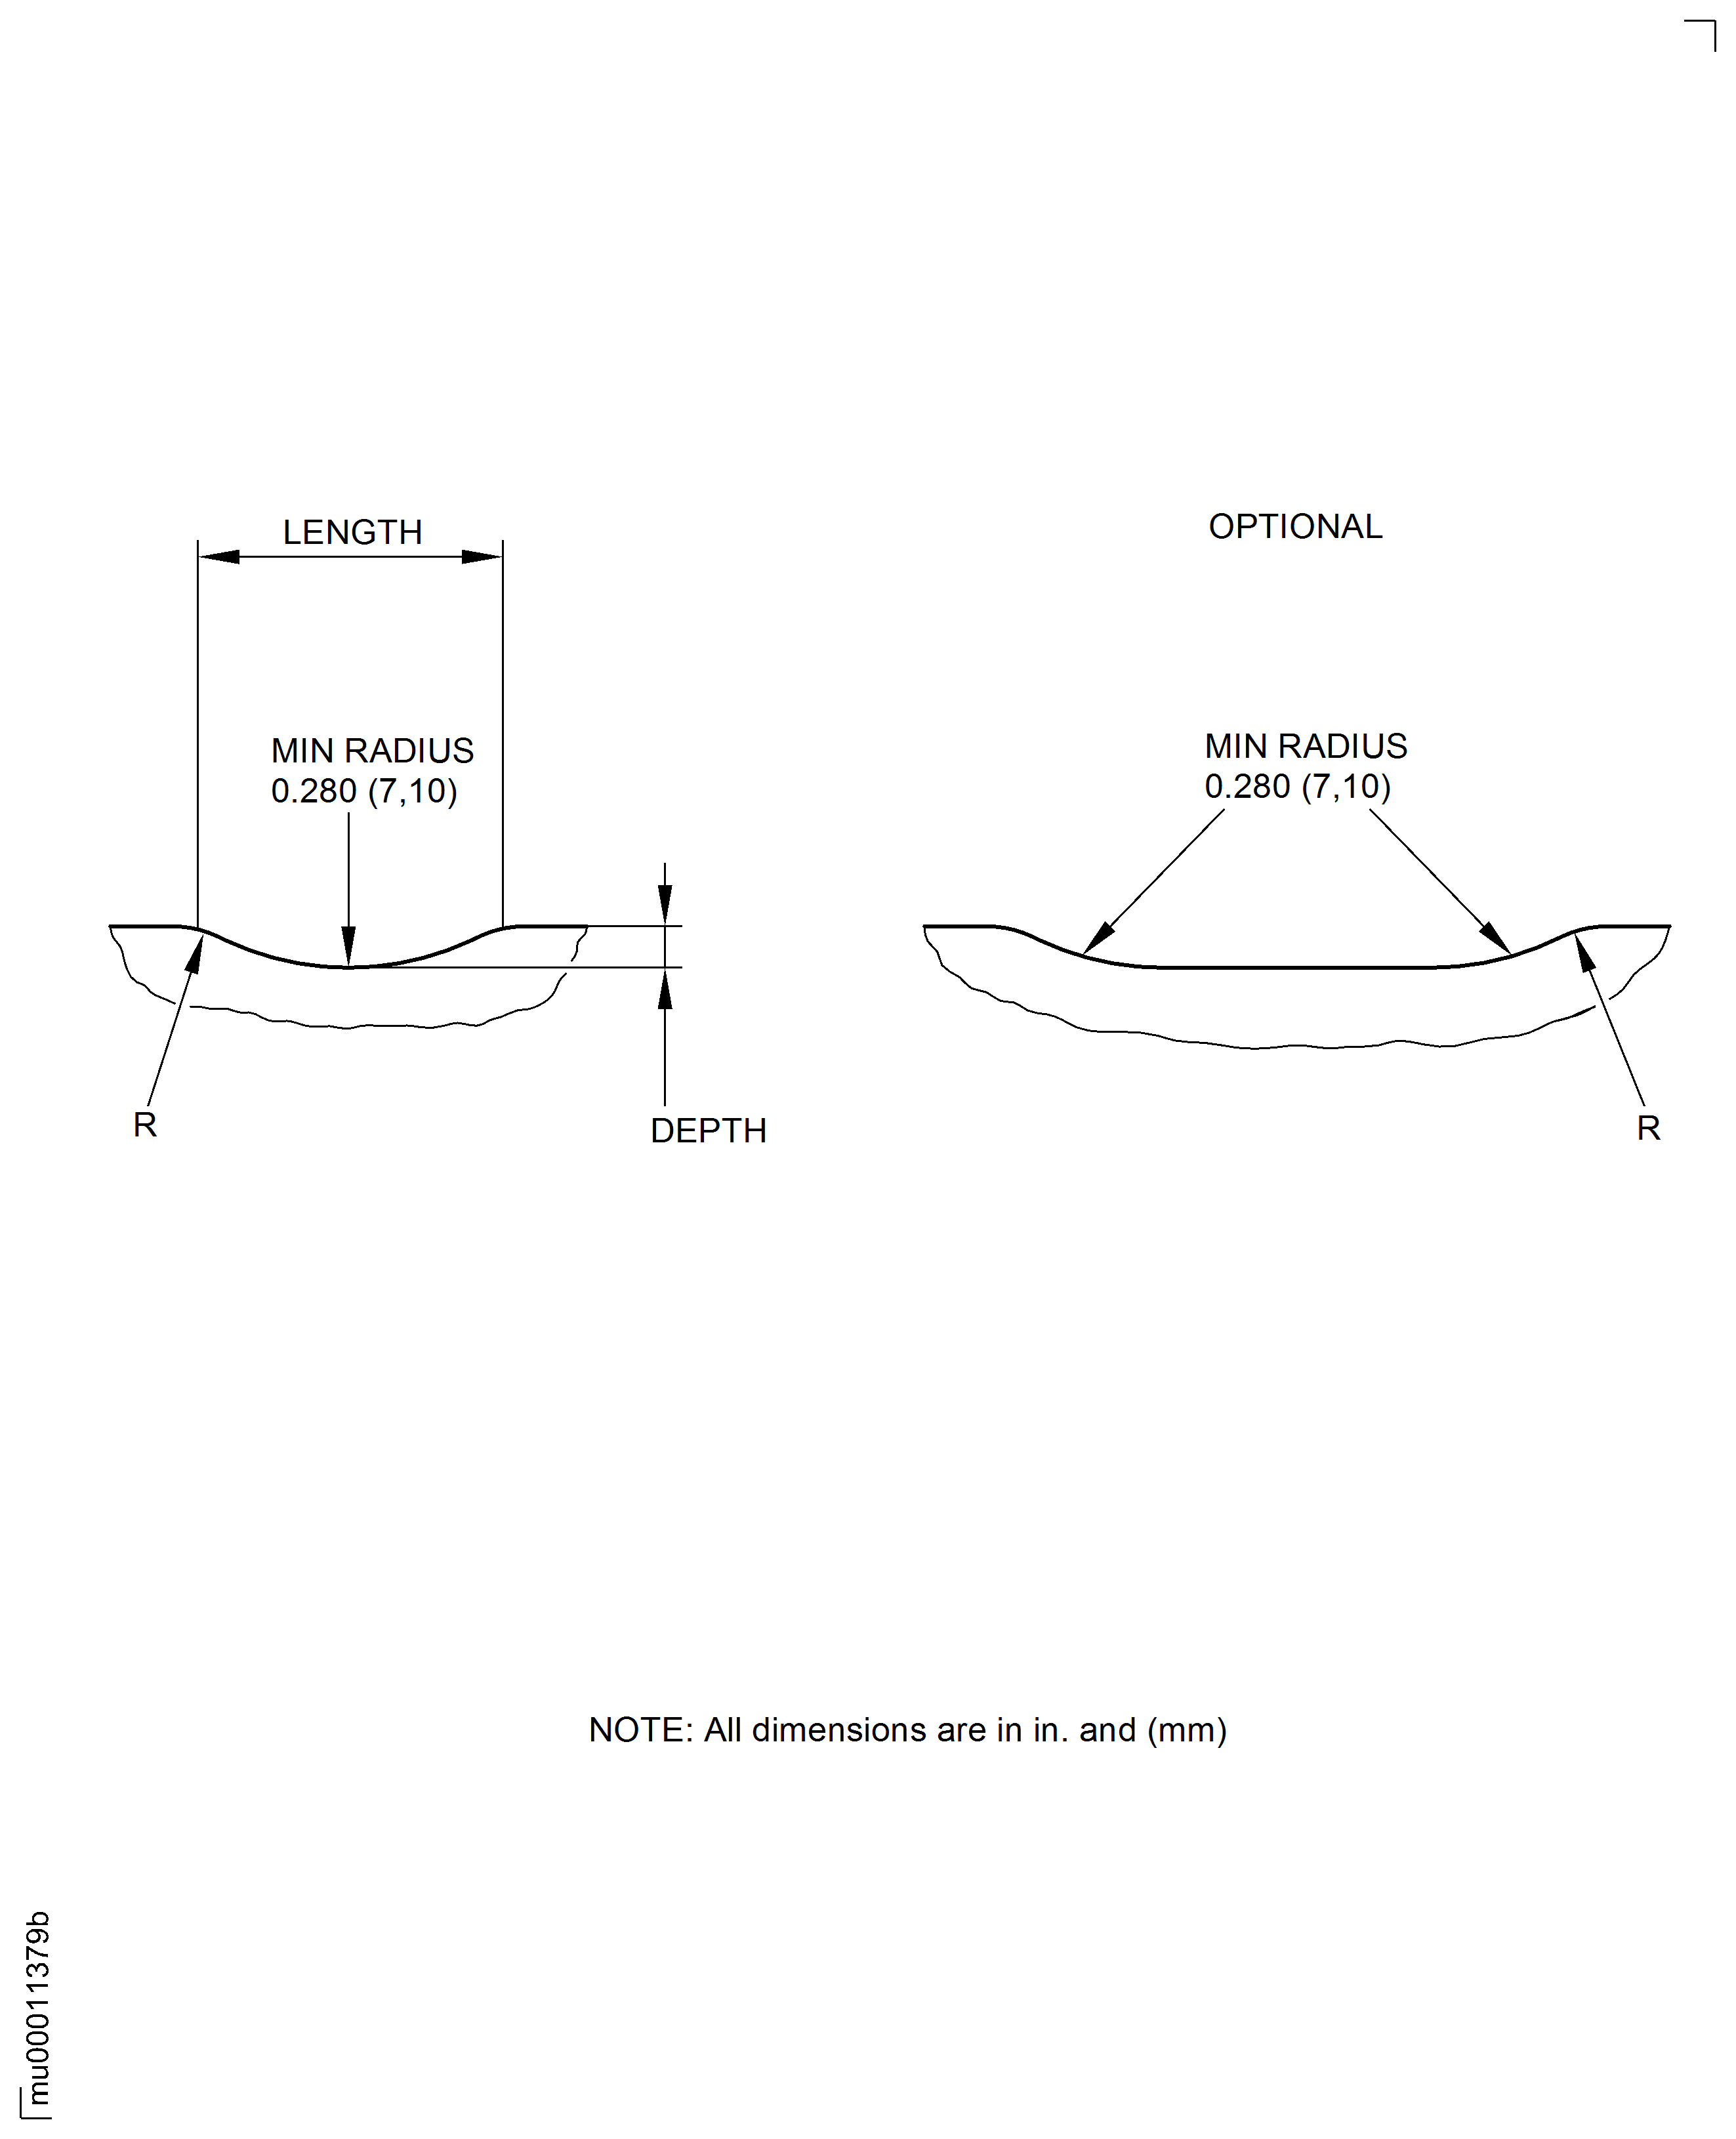
Figure: Repair Details and Dimensions
Repair Details and Dimensions

