Export Control
EAR Export Classification: Not subject to the EAR per 15 C.F.R. Chapter 1, Part 734.3(b)(3), except for the following Service Bulletins which are currently published as EAR Export Classification 9E991: SBE70-0992, SBE72-0483, SBE72-0580, SBE72-0588, SBE72-0640, SBE73-0209, SBE80-0024 and SBE80-0025.Copyright
© IAE International Aero Engines AG (2001, 2014 - 2021) The information contained in this document is the property of © IAE International Aero Engines AG and may not be copied or used for any purpose other than that for which it is supplied without the express written authority of © IAE International Aero Engines AG. (This does not preclude use by engine and aircraft operators for normal instructional, maintenance or overhaul purposes.).Applicability
All
Common Information
TASK 72-50-21-300-023 LPT Case - Nickel Plate The Location Pin Holes At The Front And/or Rear Flange, Repair-023 (VRS4034)
Effectivity
FIG/ITEM | PART NO. |
|---|---|
01-010 | 3A0807 |
01-010 | 3A0990 |
01-010 | 3A0991 |
01-010 | 3A1908 |
01-010 | 3A2183 |
01-010 | 3A2265 |
01-010 | 3A2447 |
01-010 | 3A2533 |
General
Price and availability - none
The practices and processes referred to in the procedure by the TASK number are in the SPM.
NOTE
For equipment and materials necessary to do this repair refer to SPM TASKS given below:
70-09-00-400-501
70-11-03-300-503
70-23-05-230-501
70-33-06-300-503
70-38-24-380-501.
Equivalent equipment may be used.
NOTE
Preliminary Requirements
Pre-Conditions
NONESupport Equipment
| Name | Manufacturer | Part Number / Identification | Quantity | Remark |
|---|---|---|---|---|
| Crack detection kit (fluorescent) | LOCAL | Crack detection kit (fluorescent) | ||
| Dial bore gage | LOCAL | Dial bore gage | ||
| Oven | LOCAL | Oven | Electric | |
| Roughness microtester | LOCAL | Roughness microtester | ||
| Unltraviolet lamp | LOCAL | Ultraviolet lamp | ||
| Vapor degreaser | LOCAL | Vapor degreaser | ||
| Vibrating marking pencil | LOCAL | Vibrating marking pencil |
Consumables, Materials and Expendables
NONESpares
NONESafety Requirements
NONEProcedure
Refer to the SPM TASK 70-23-05-230-501.
Use medium sensitivity level.
No cracks are permitted.
Use ultraviolet lamp and crack detection kit (fluorescent).
Do the test for cracks.
SUBTASK 72-50-21-230-061 Examine the Machined Surfaces for Cracks
Refer to the SPM TASK 70-11-03-300-503.
Aqueous degrease.
SUBTASK 72-50-21-110-058 Clean the LP Turbine Case
Make sure that all surfaces not to be plated have full protection.
Refer to the SPM TASK 70-38-24-300-503.
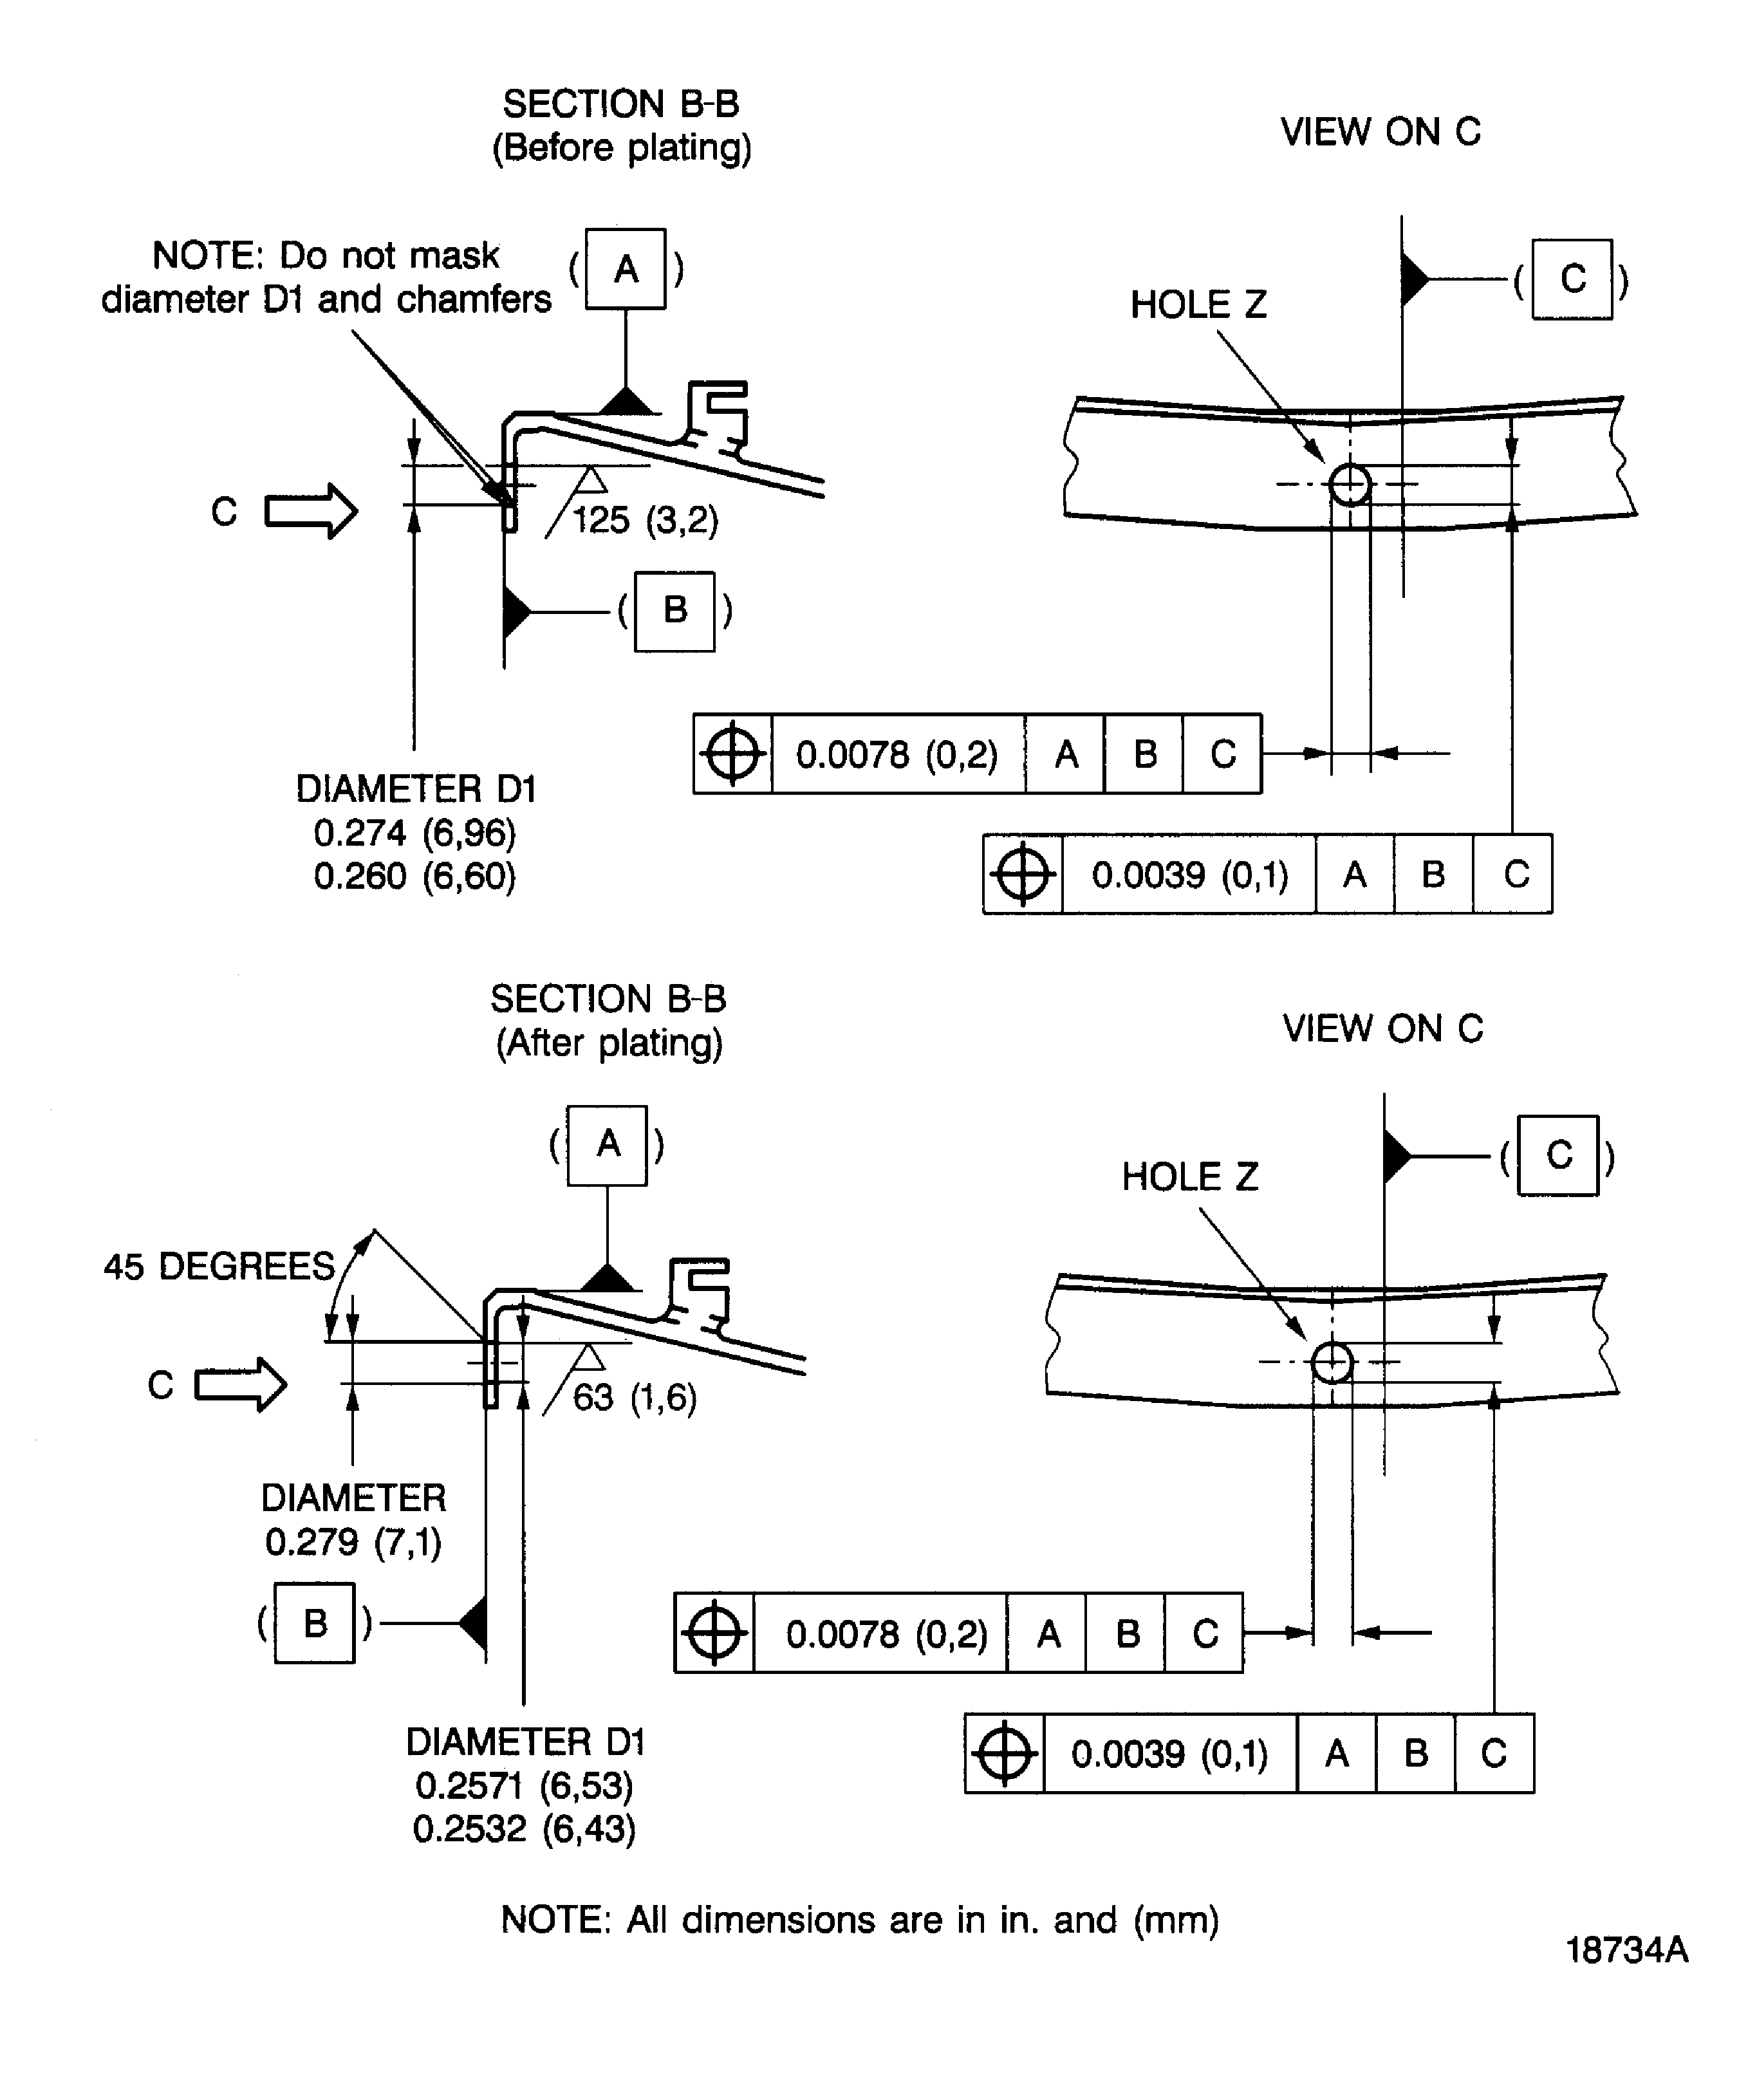
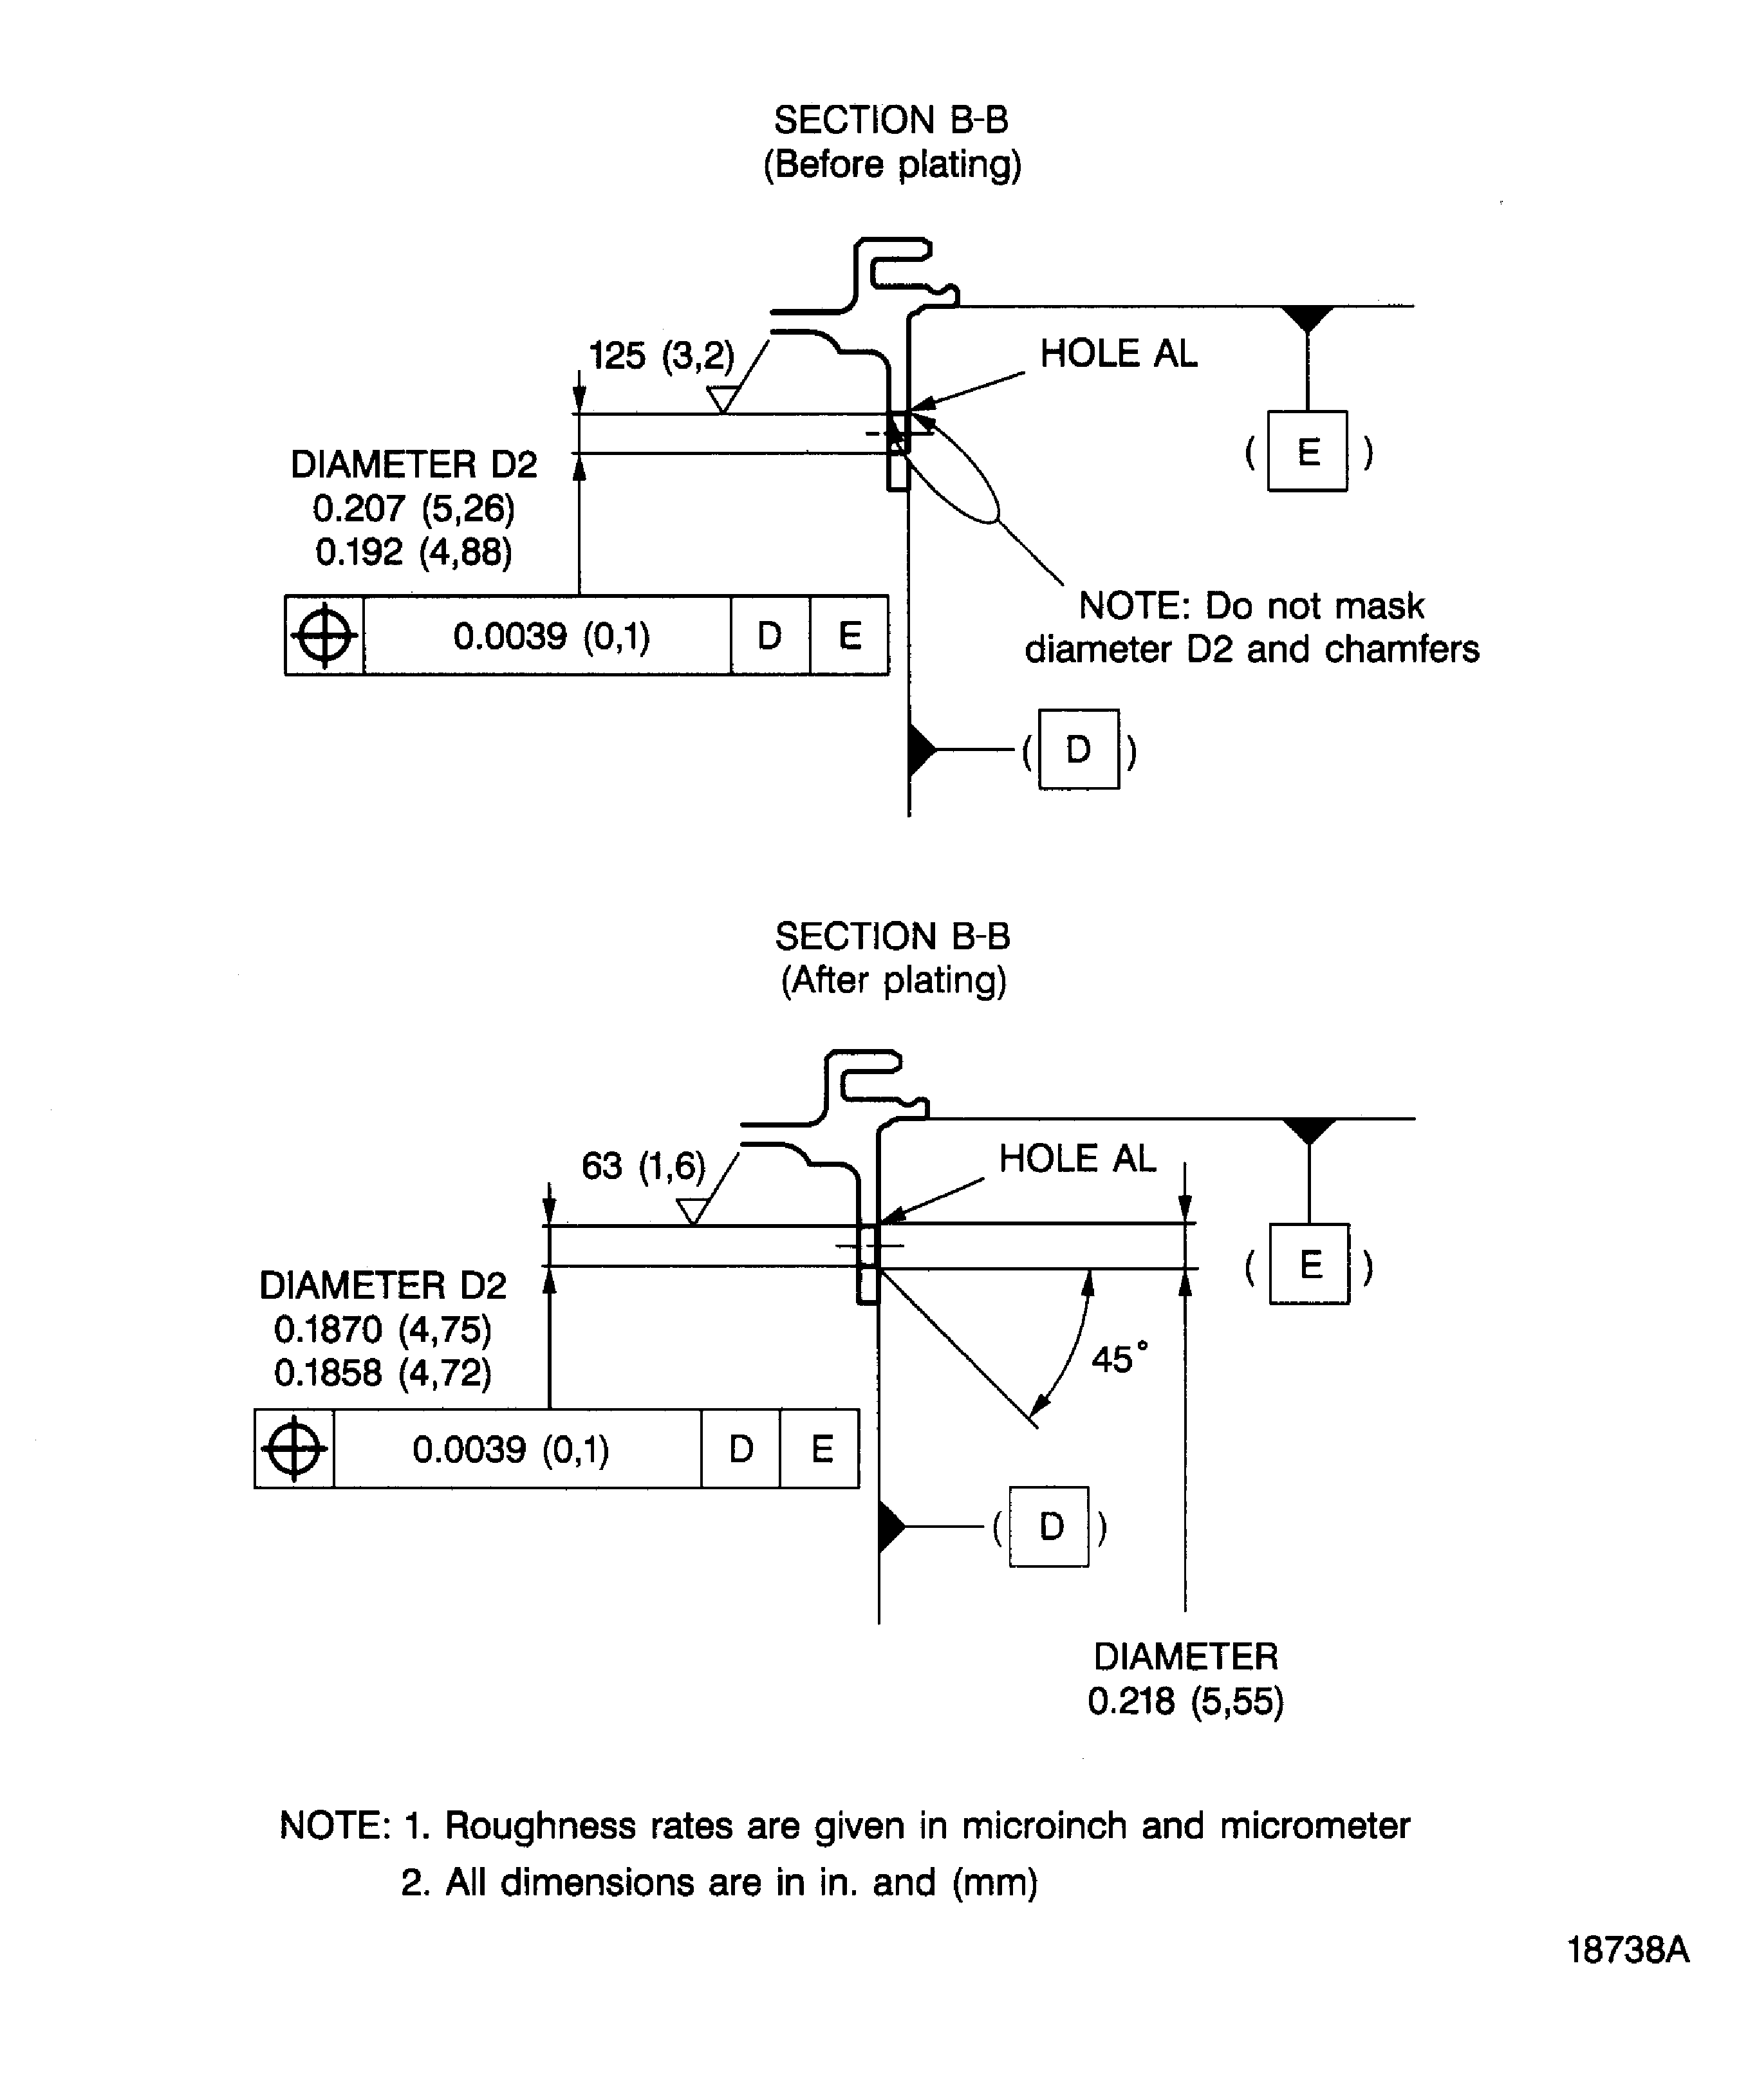
Mask all areas without surfaces of diameter D1 and/or D2 and bore chamfers.
SUBTASK 72-50-21-330-051 Prepare the Surfaces for the Nickel Plate Procedure
Refer to the SPM TASK 70-33-06-300-503.
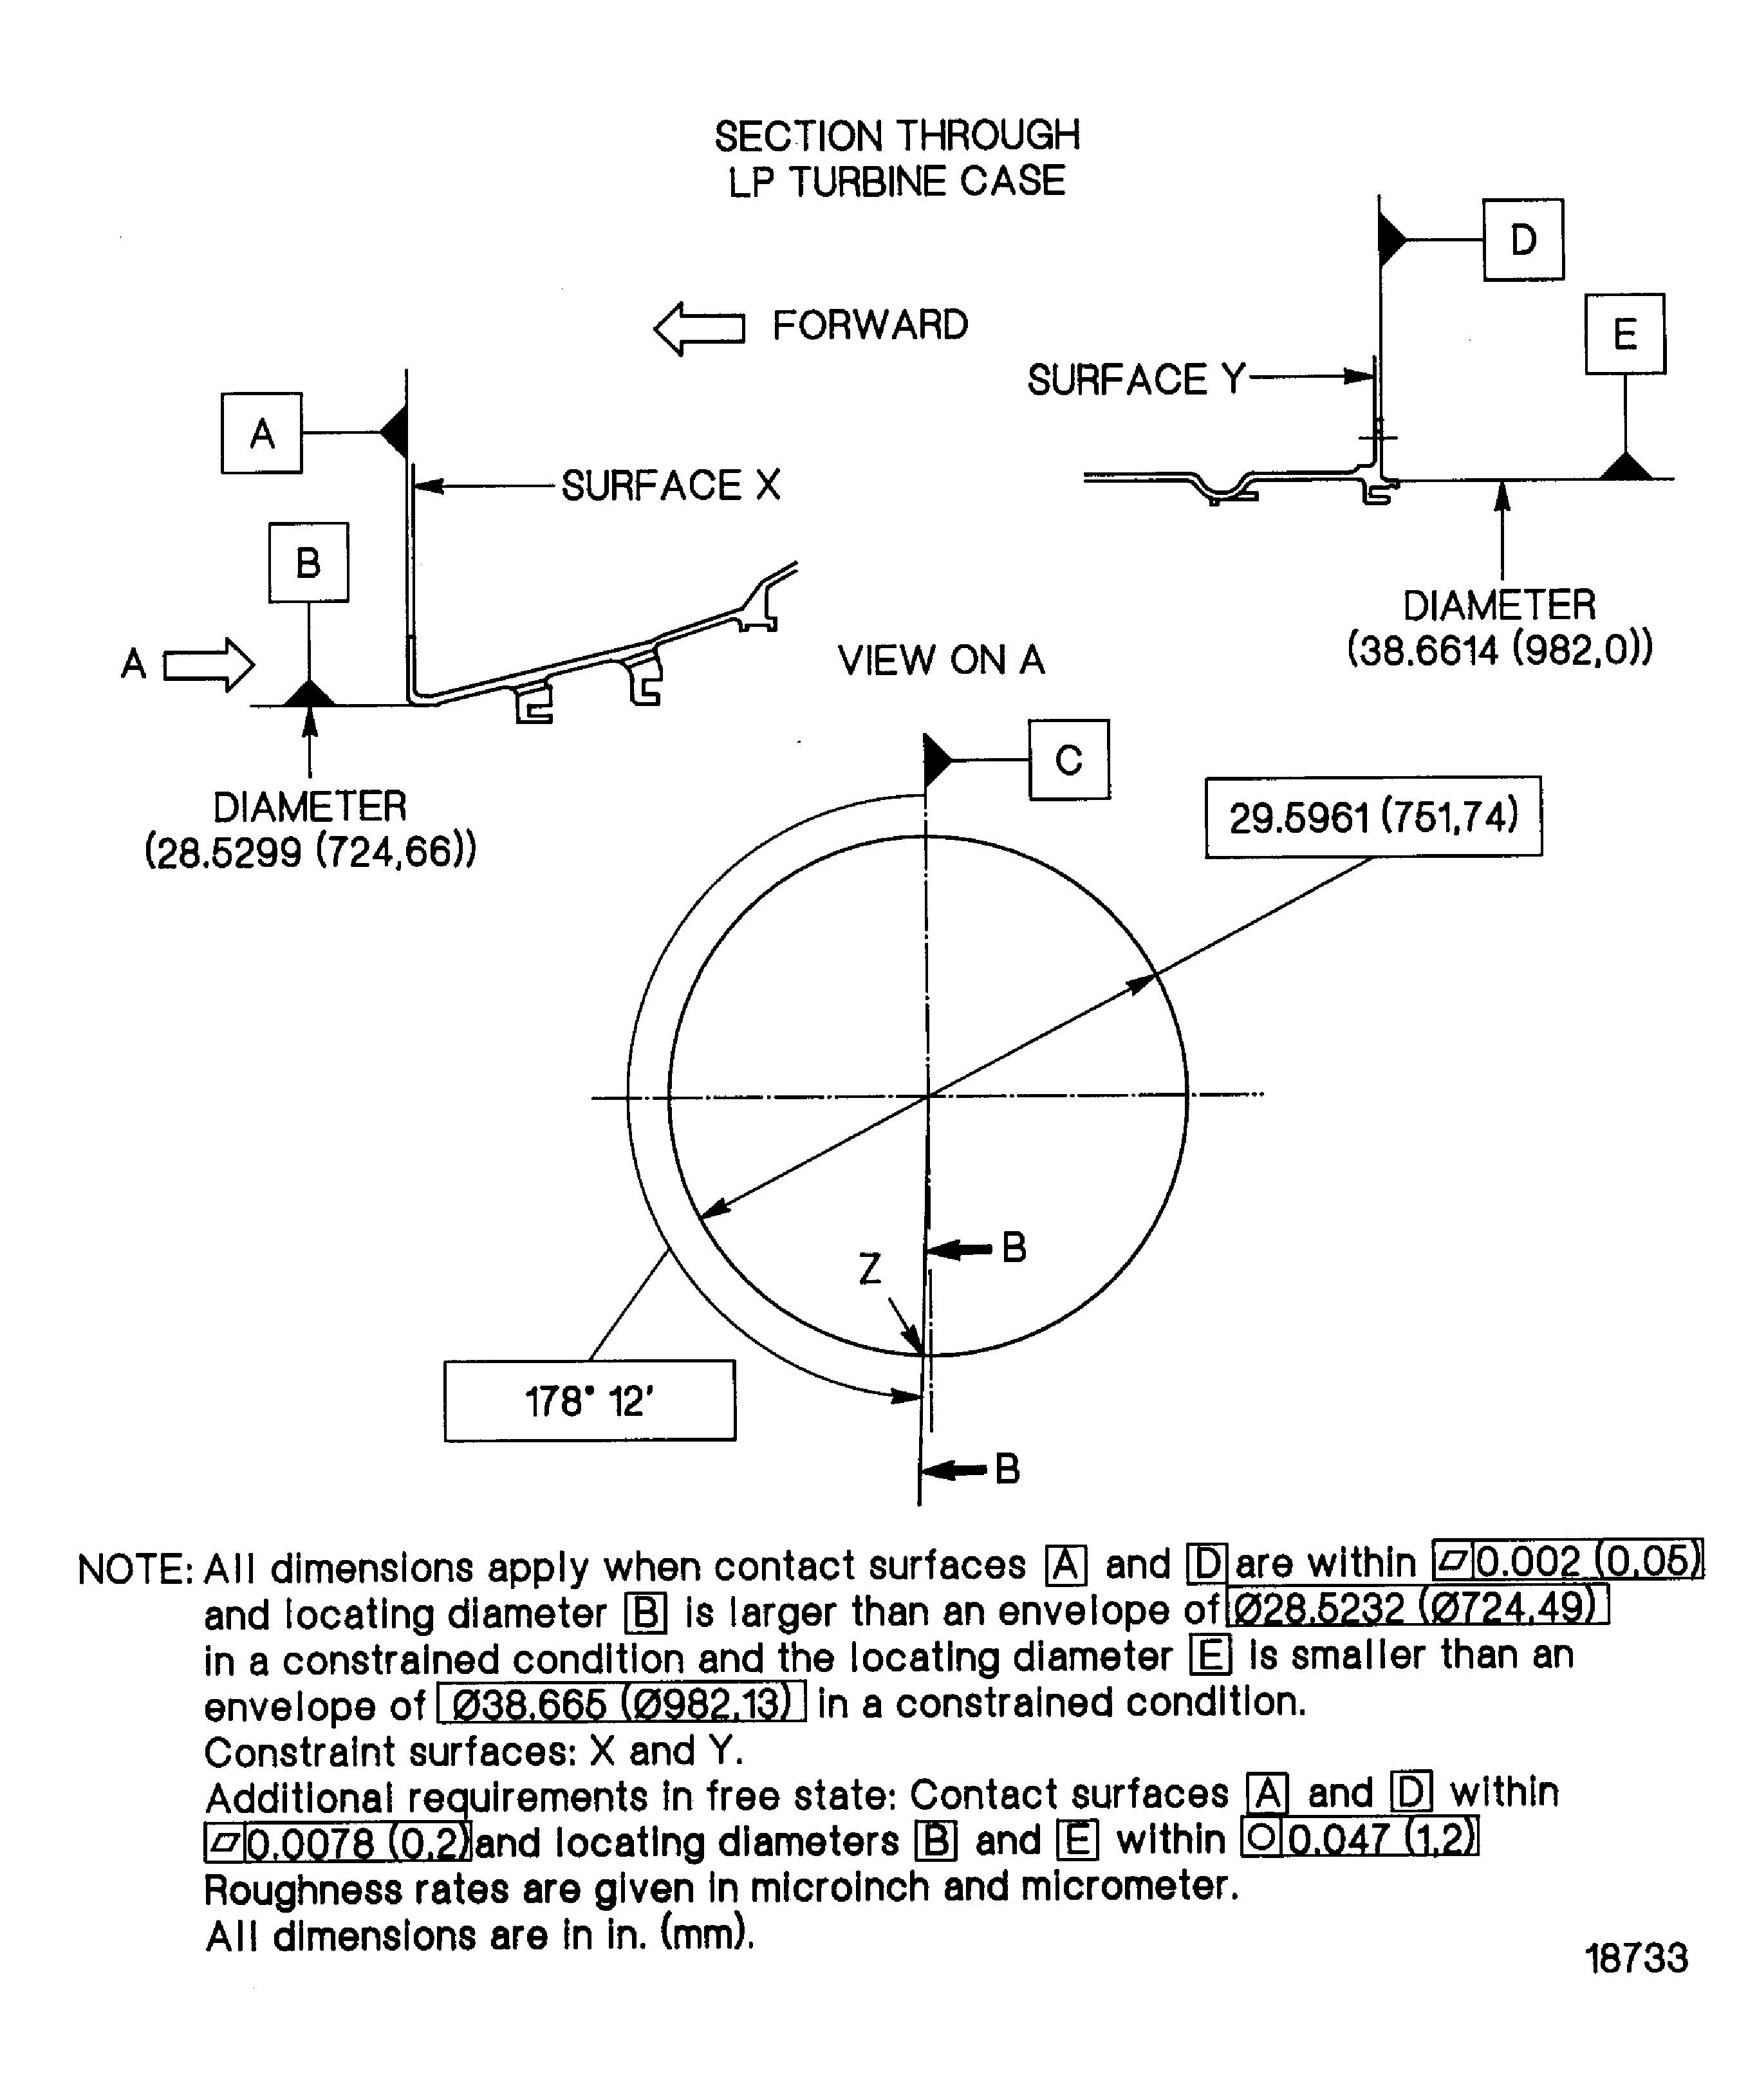
The maximum diameter D1 (nickel plated) is 0.243in. (6.17 mm), refer to Figure.
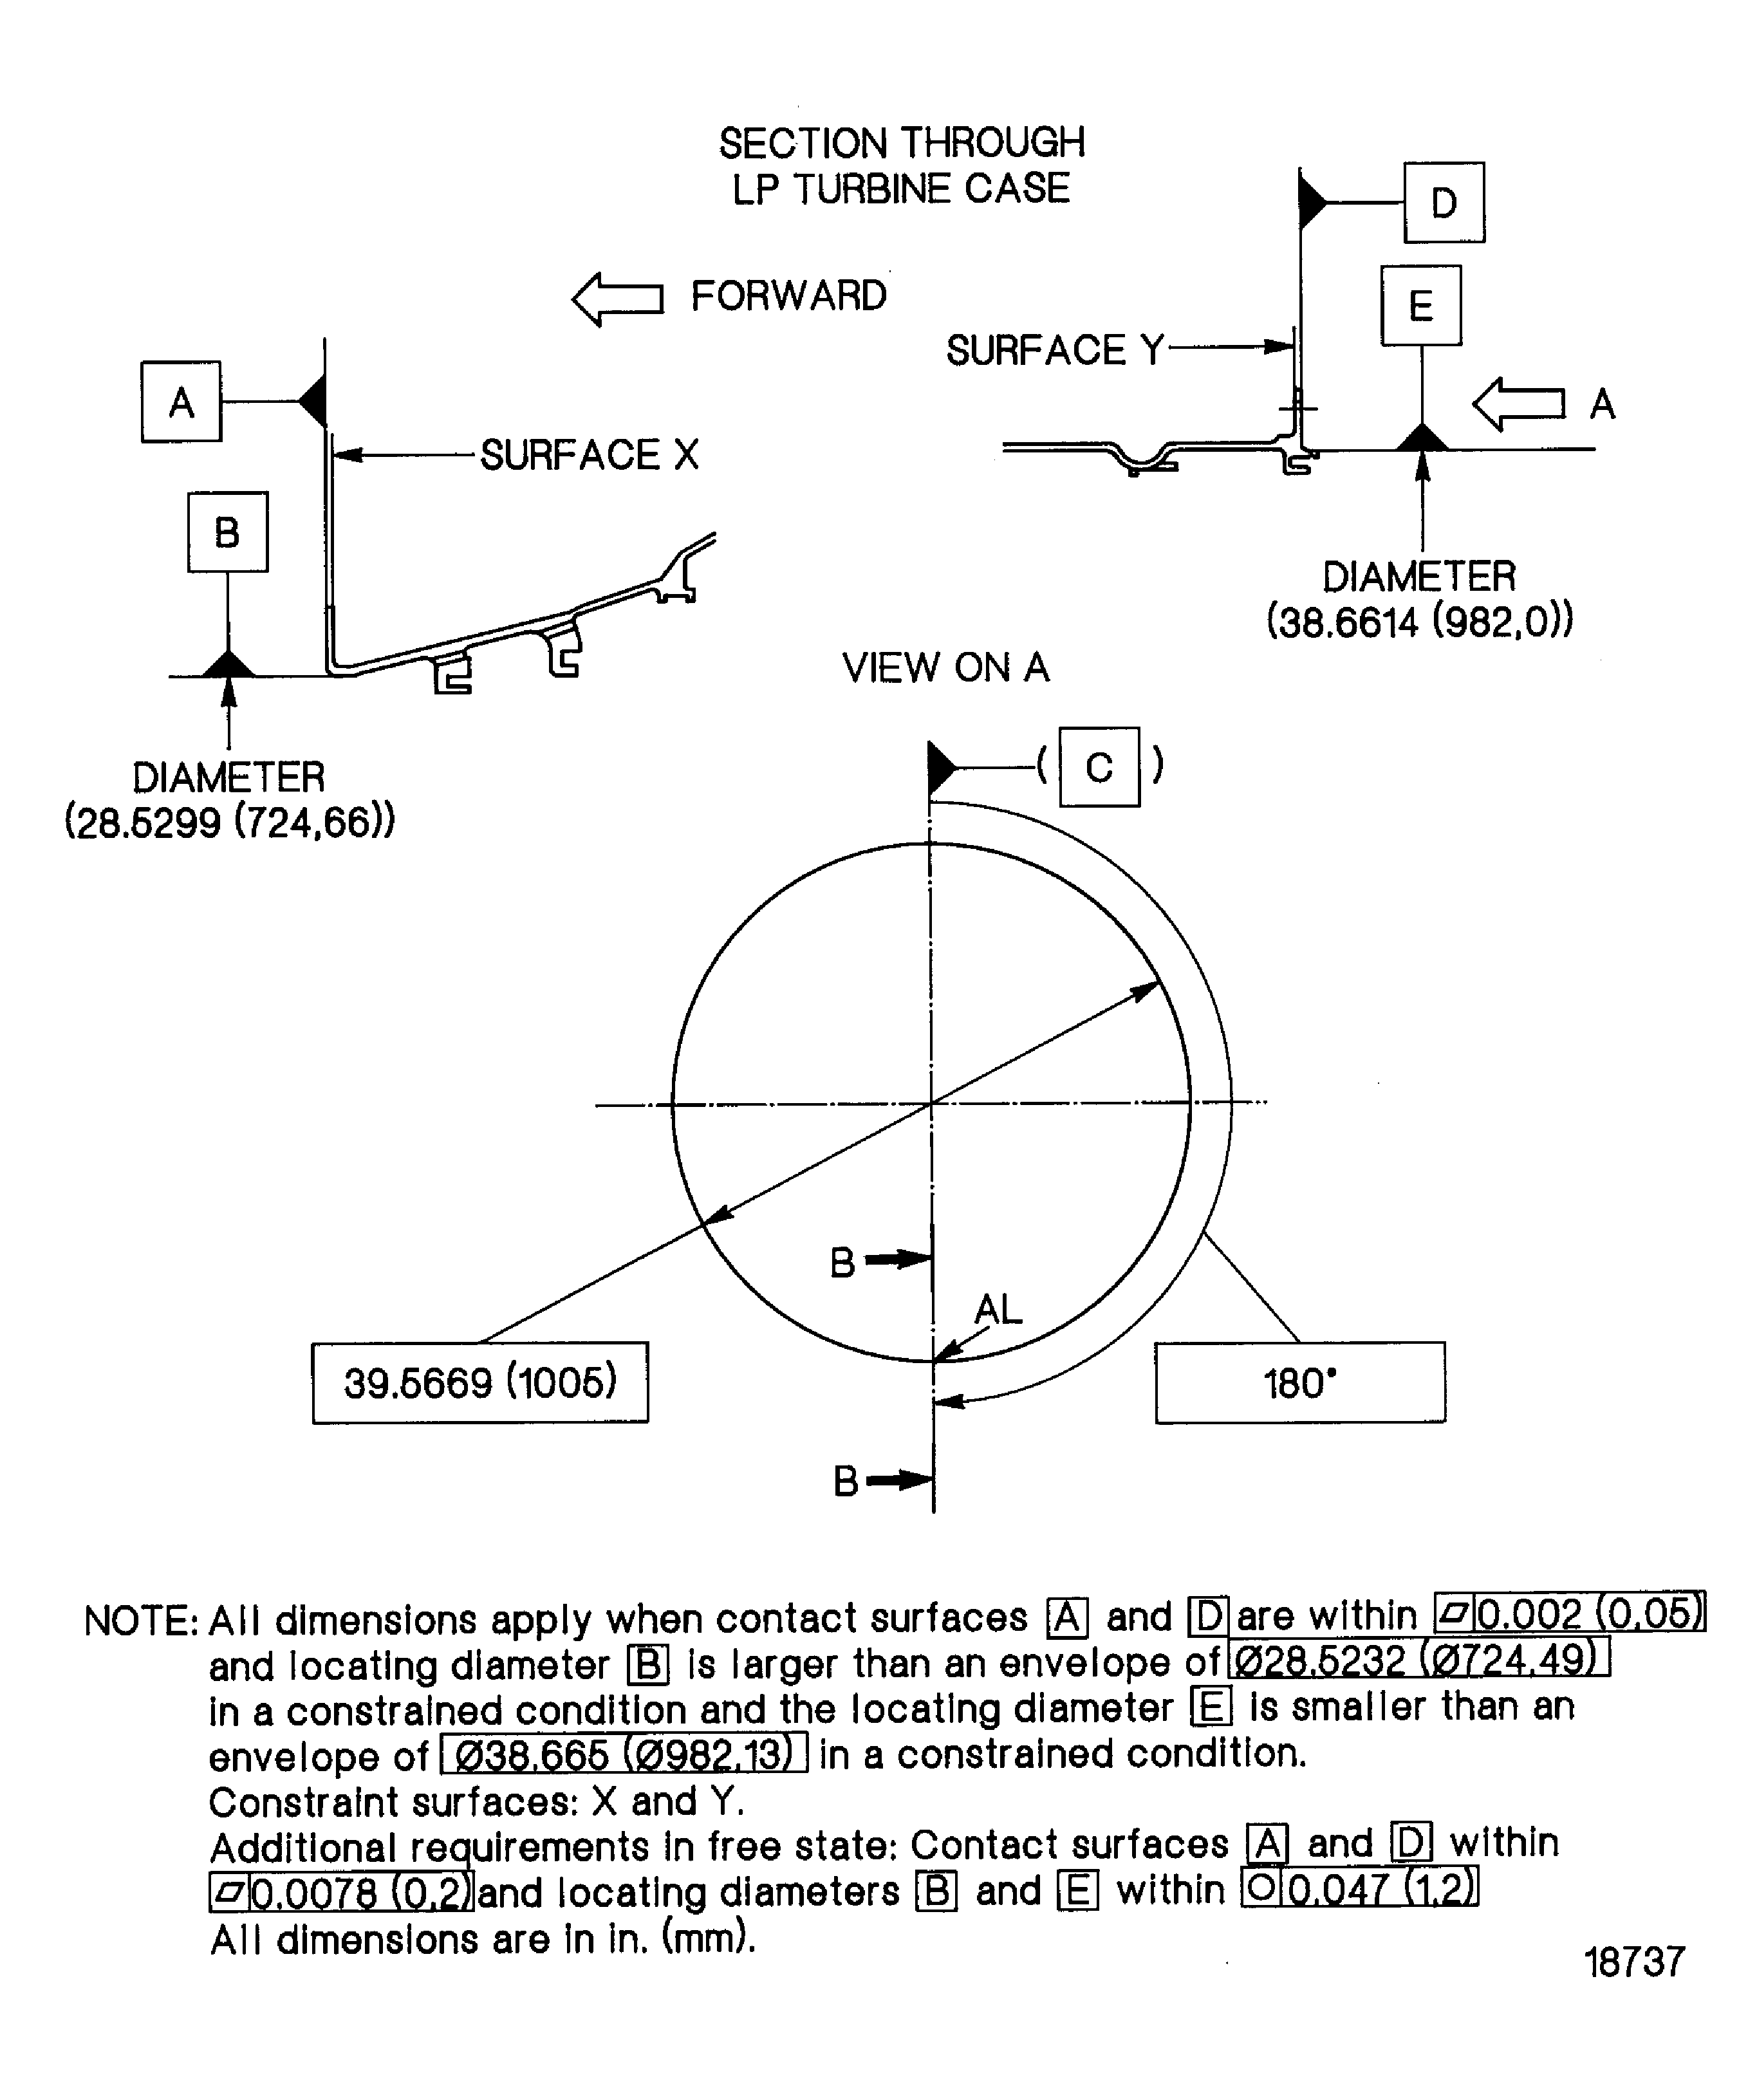
The maximum diameter D2 (nickel plated) is 0.176in. (4.47 mm), refer to Figure.
Nickel plate the surfaces and bore chamfers of diameter D1 and/or D2.
SUBTASK 72-50-21-330-052 Nickel Plate the Prepared Surfaces
Refer to the SPM TASK 70-11-03-300-503.
Aqueous degrease.
SUBTASK 72-50-21-110-059 Clean the LP Turbine Case
Refer to the SPM TASK 70-11-03-300-503.
Aqueous degrease.
SUBTASK 72-50-21-110-060 Clean the LP Turbine Case
Refer to VRS4002 TASK 72-50-21-300-002 (REPAIR-002).
Install the flared-over locating pin.
SUBTASK 72-50-21-350-063 Install the Flared-over Location Pin on to the Rear Flange of the LP Turbine Rear Case
NOTE
When the rear flange location pin bore has been repaired install the rear flange location pin again.
Figure: Dimensions for the repair of the locating pin hole at the front flange of the LP turbine case
Sheet 1

Figure: Dimensions for the repair of the locating pin hole at the front flange of the LP turbine case
Sheet 2

Figure: Dimensions for the repair of the locating pin hole at the rear flange of the LP turbine case
Sheet 1

Figure: Dimensions for the repair of the locating pin hole at the rear flange of the LP turbine case
Sheet 2

