Export Control
EAR Export Classification: Not subject to the EAR per 15 C.F.R. Chapter 1, Part 734.3(b)(3), except for the following Service Bulletins which are currently published as EAR Export Classification 9E991: SBE70-0992, SBE72-0483, SBE72-0580, SBE72-0588, SBE72-0640, SBE73-0209, SBE80-0024 and SBE80-0025.Copyright
© IAE International Aero Engines AG (2001, 2014 - 2021) The information contained in this document is the property of © IAE International Aero Engines AG and may not be copied or used for any purpose other than that for which it is supplied without the express written authority of © IAE International Aero Engines AG. (This does not preclude use by engine and aircraft operators for normal instructional, maintenance or overhaul purposes.).Applicability
All
Common Information
TASK 72-50-21-300-031 LPT Case - Weld Repair Cracks At The Outer Duct Support Hook By Stop Drill And Plug, Repair-031 (VRS4343)
Effectivity
FIG/ITEM | PART NO. |
|---|---|
01-010 | 3A0807 |
01-010 | 3A0990 |
01-010 | 3A0991 |
01-010 | 3A1908 |
01-010 | 3A2183 |
01-010 | 3A2265 |
01-010 | 3A2447 |
01-010 | 3A2533 |
General
Price and availability - none
The practices and processes referred to in the procedure by the TASK numbers are in the SPM.
This repair can be done at module level and at piece part level.
NOTE
NOTE
Preliminary Requirements
Pre-Conditions
NONESupport Equipment
| Name | Manufacturer | Part Number / Identification | Quantity | Remark |
|---|---|---|---|---|
| Electric hand drill | LOCAL | Electric hand drill | ||
| Hand held grinder | LOCAL | Hand held grinder |
Consumables, Materials and Expendables
| Name | Manufacturer | Part Number / Identification | Quantity | Remark |
|---|---|---|---|---|
| CoMat 03-284 WELDING FILLER WIRE, NiBASE | LOCAL | CoMat 03-284 |
Spares
NONESafety Requirements
NONEProcedure
Refer to: Figure
Refer to the SPM TASK 70-23-05-230-501.
Use Medium sensitivity level.
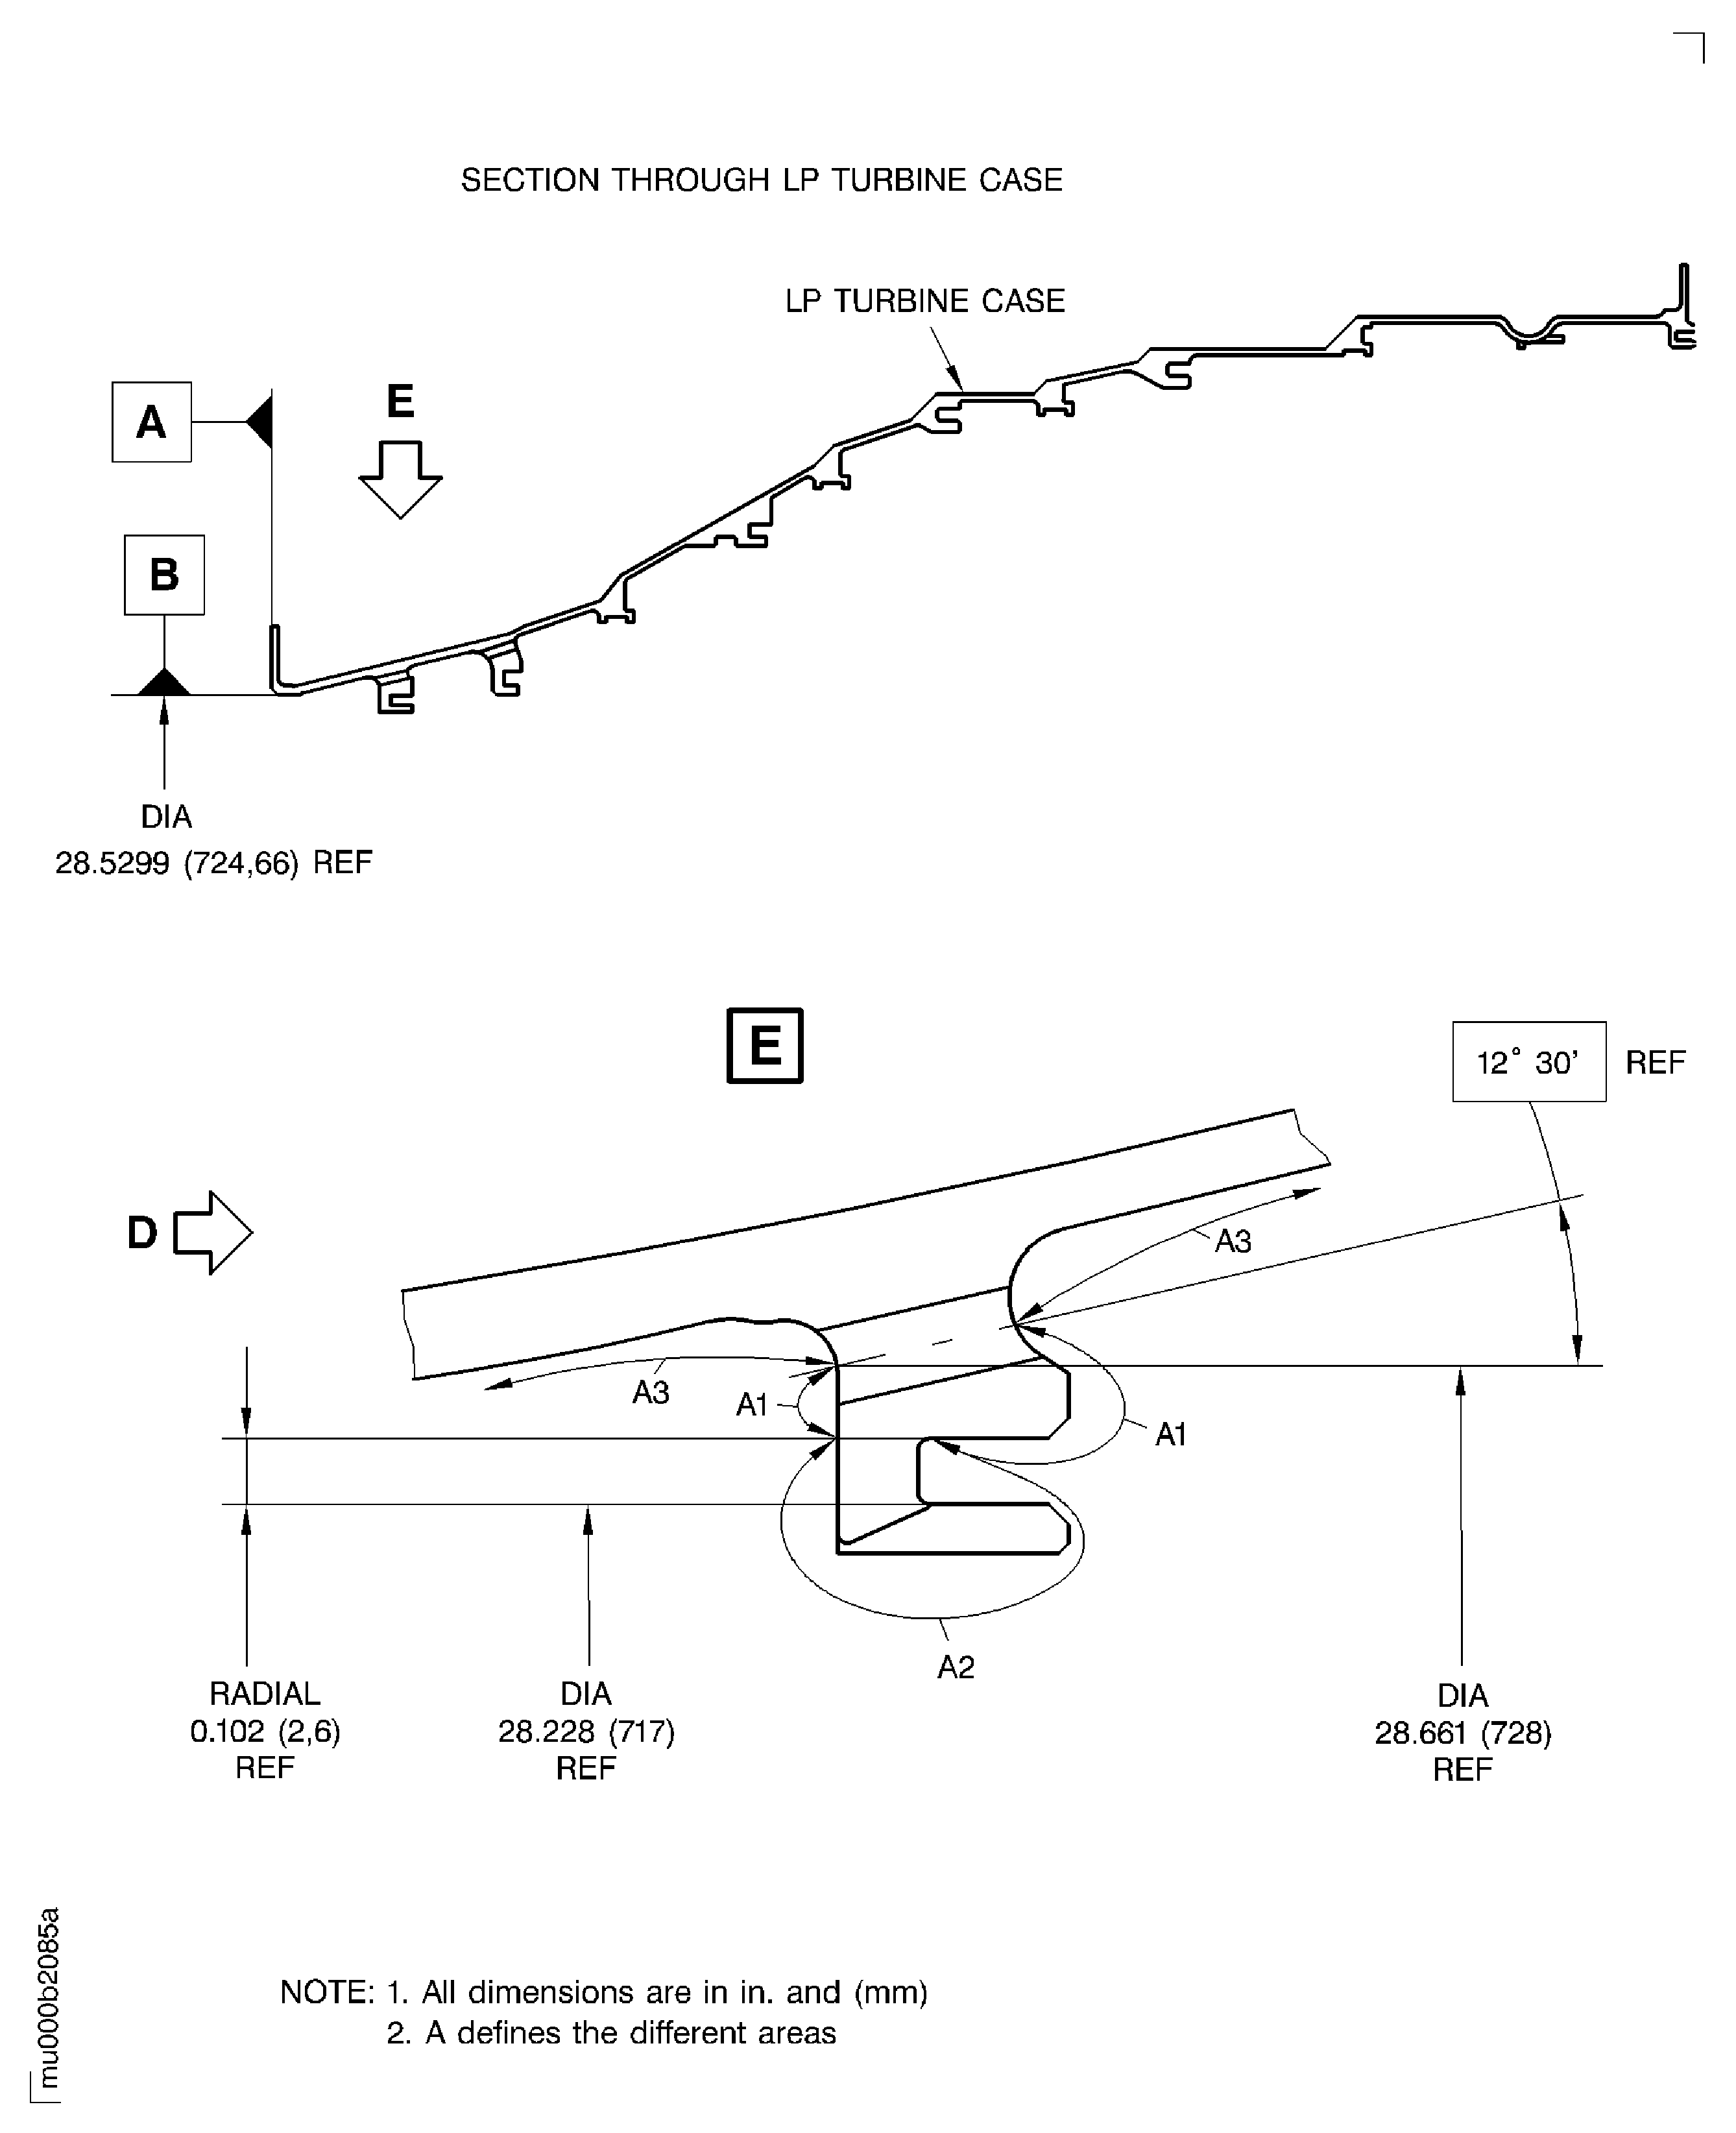
Repair the cracks if they go across in area A1.
Cracks in area A2 must not be repaired.
Cracks in area A3 cannot be repaired by this procedure.
Do the test for cracks.
SUBTASK 72-50-21-230-054 Examine the Area A1, A2 and A3 of the LP Turbine Case for Cracks
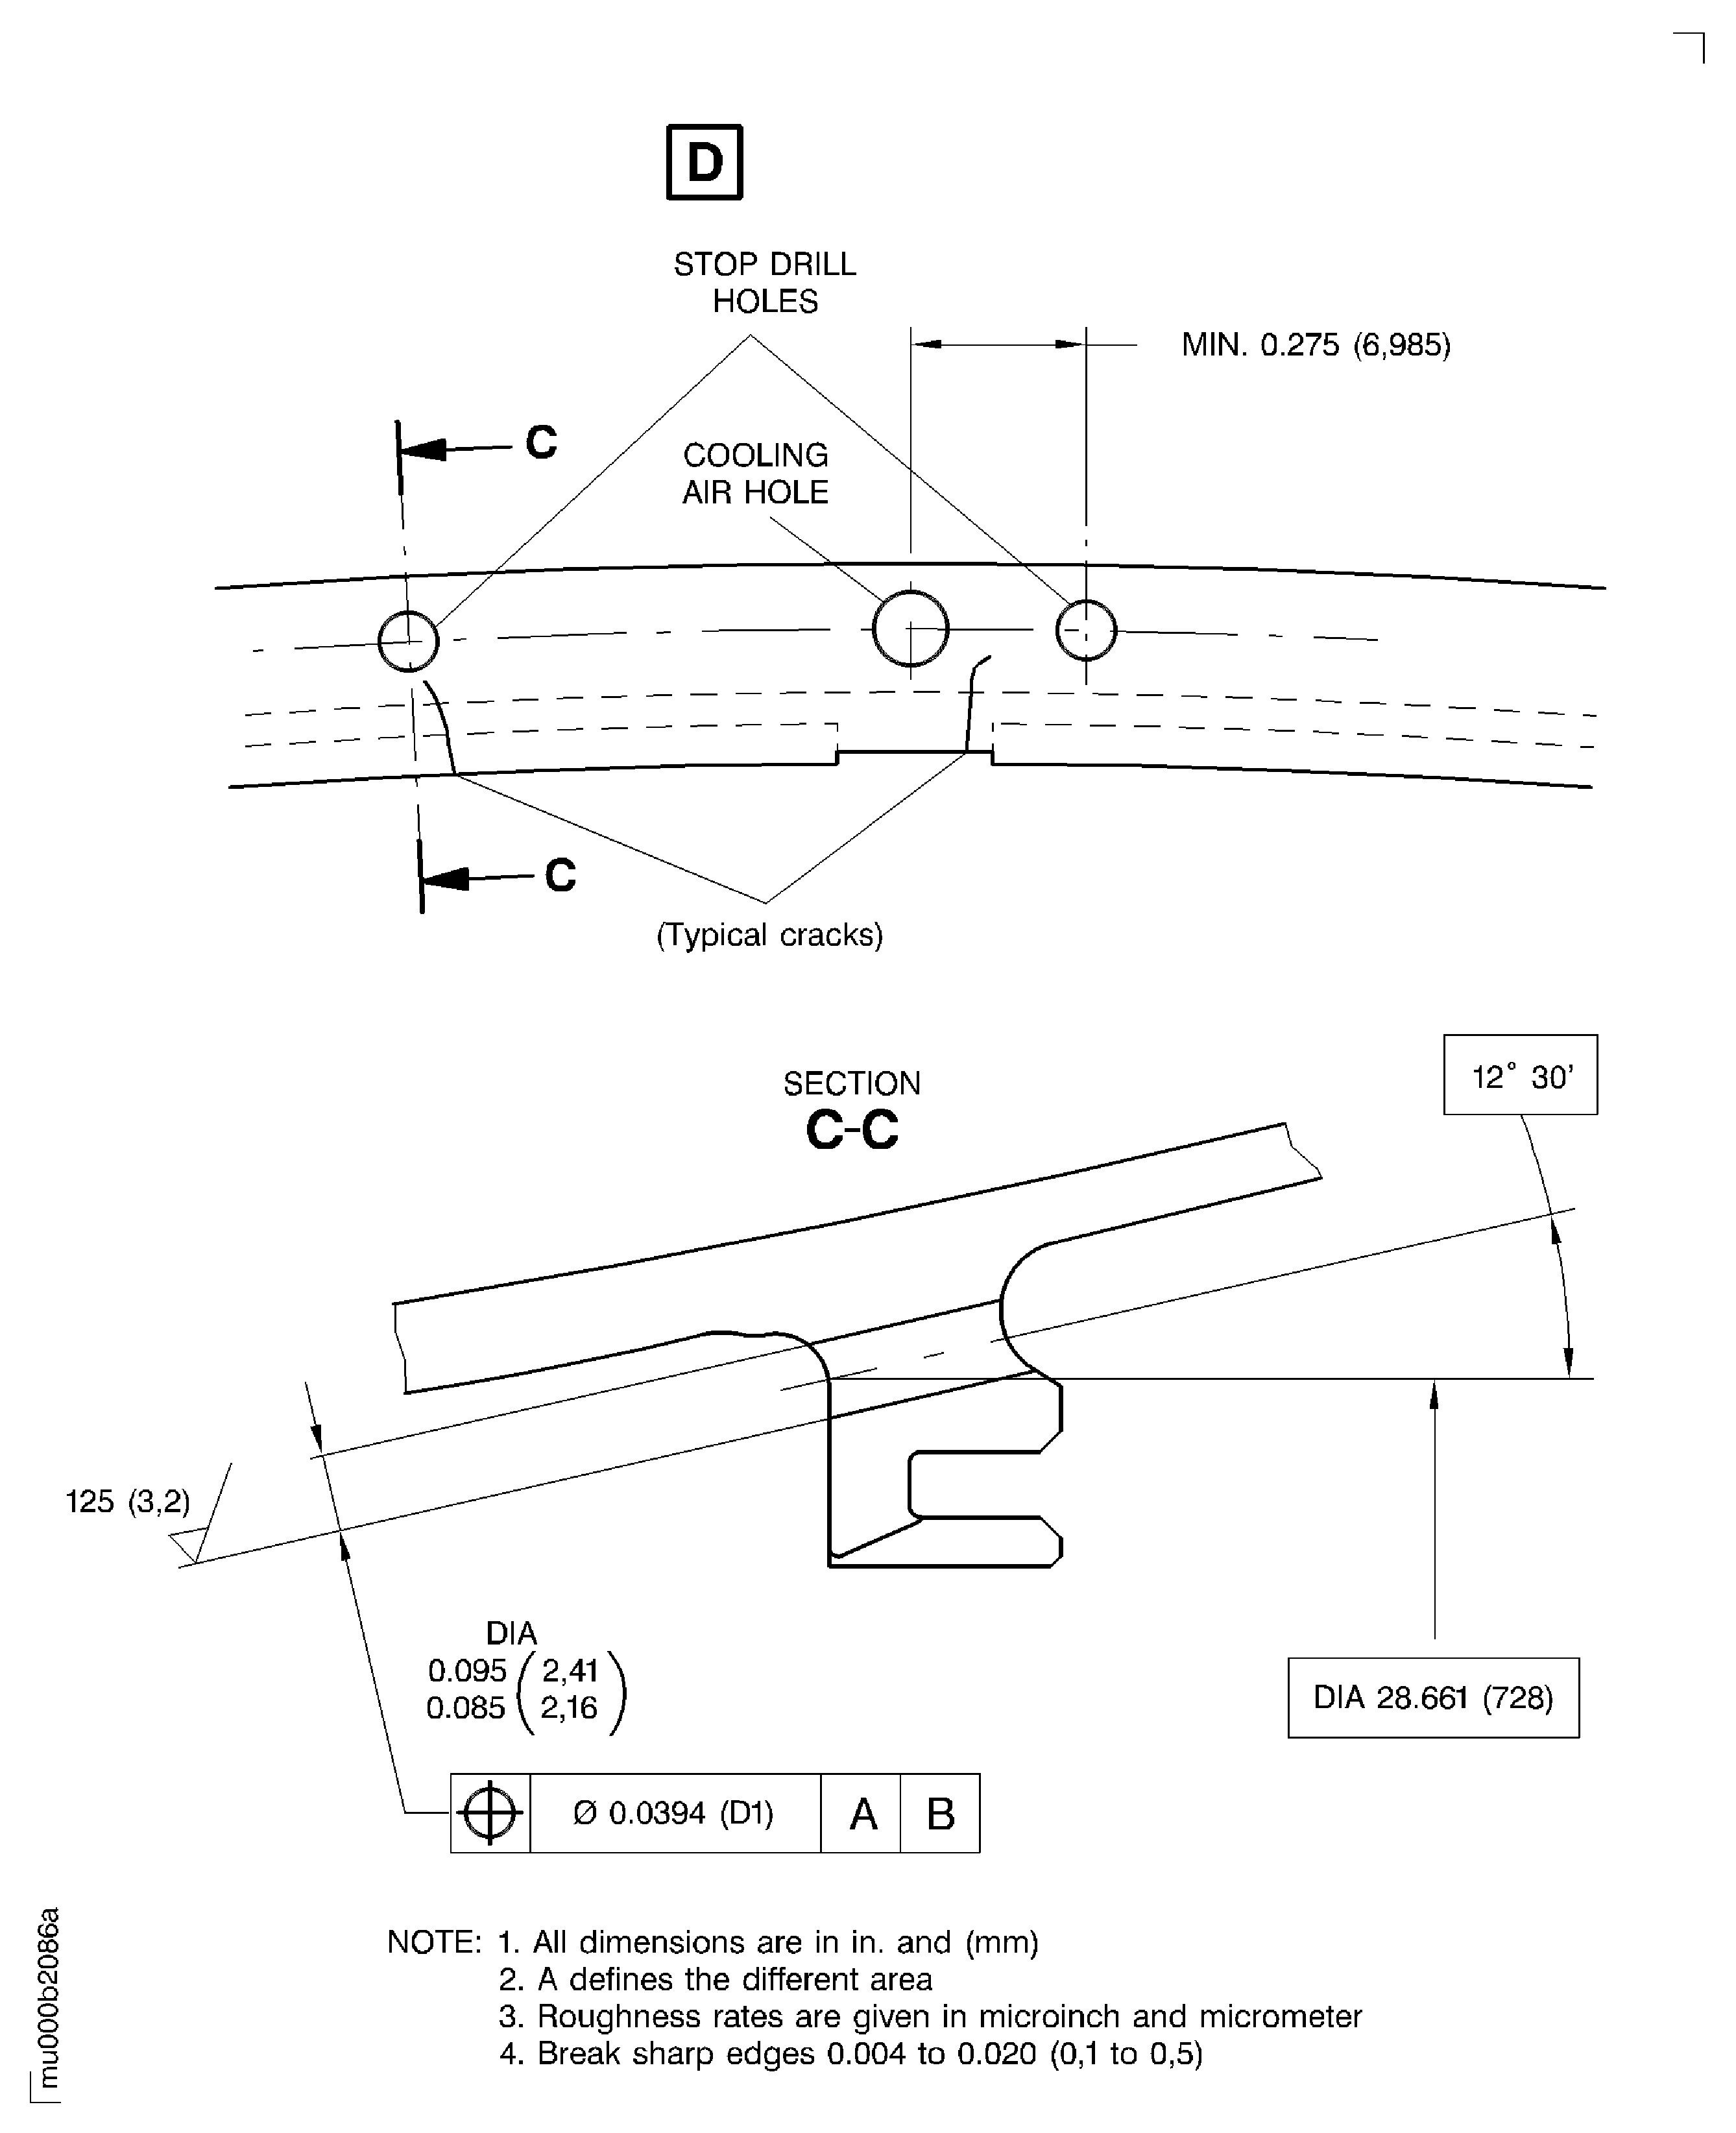
For dimensions refer to Figure.
Every stop hole have to be radially in line with the crack.
Maintain minimum distance between the holes.
If projected radial growth of a crack does not align to an existing air hole but is within permitted minimum distance of two holes, the stop hole must be as near as possible to existing cooling air hole.
Use electric hand drill with a drill.
For drill diameter refer to stop bore diameter tolerance in Figure.
Drill stop holes.
SUBTASK 72-50-21-350-067 Machine the Cracks at the LP Turbine Case

CAUTION
IF THE MODULE IS NOT DISASSEMBLED, DRILL THE HOLE IN SOME STEPS. BEFORE THE DRILL FINALLY BREAKS THROUGH, CLEAN OUT THE HOLE REGULARLY WITH A COMPRESSED AIR GUN. THIS WILL KEEP SWARF PRODUCTION IN THE BACK END OF THE HOLE TO A MINIMUM.NOTE
All stop holes are to be at the same radial location as the cooling air holes.NOTE
If the module is not disassembled, you must not deburr the stop holes on the rear side.Refer to the SPM TASK 70-23-05-230-501.
Use medium sensitivity level.
Cracks ending in a stop hole are permitted.
Cracks starting in a stop hole radially outside of the stop hole centerline are not permitted.
Do the test for cracks at the stop holes.
SUBTASK 72-50-21-220-067 Examine the Repaired Areas for Cracks
Cut a pin with applicable diameter 0.062 to 0.094 in. (1.60 to 2.40 mm) to a length of 0.220 to 0.230 in. (5.60 to 6.80 mm).
Make sure that the pin diameter is smaller than the stop hole diameter.
Refer to Figure.
Lightly peen or melt one end of the pin to make it oval shaped.
Prepare the plug-pin.
Install the end of the plug that is not deformed into the stop hole from the side of the outer duct support hook to be welded.
Use a drift or punch to make the plug flush with the weld surface.
Refer to Figure.

CAUTION
PLUG ALL STOP HOLES. DO NOT PLUG THE AIR COOLING HOLES.NOTE
This gives an interference fit between the plug and the stop hole to be plugged.NOTE
After plugging, a total of 10 air cooling holes that are 0.114 - 0.125 in. (2.90 - 3.20 mm) diameter must be open.Install the plug in the stop hole.
SUBTASK 72-50-21-310-059 Prepare the Plug-Pin
Refer to the SPM TASK 70-31-13-310-501.
Use gas tungsten arc weld technique and CoMat 03-284 WELDING FILLER WIRE, NiBASE.
Keep heat input to a minimum.
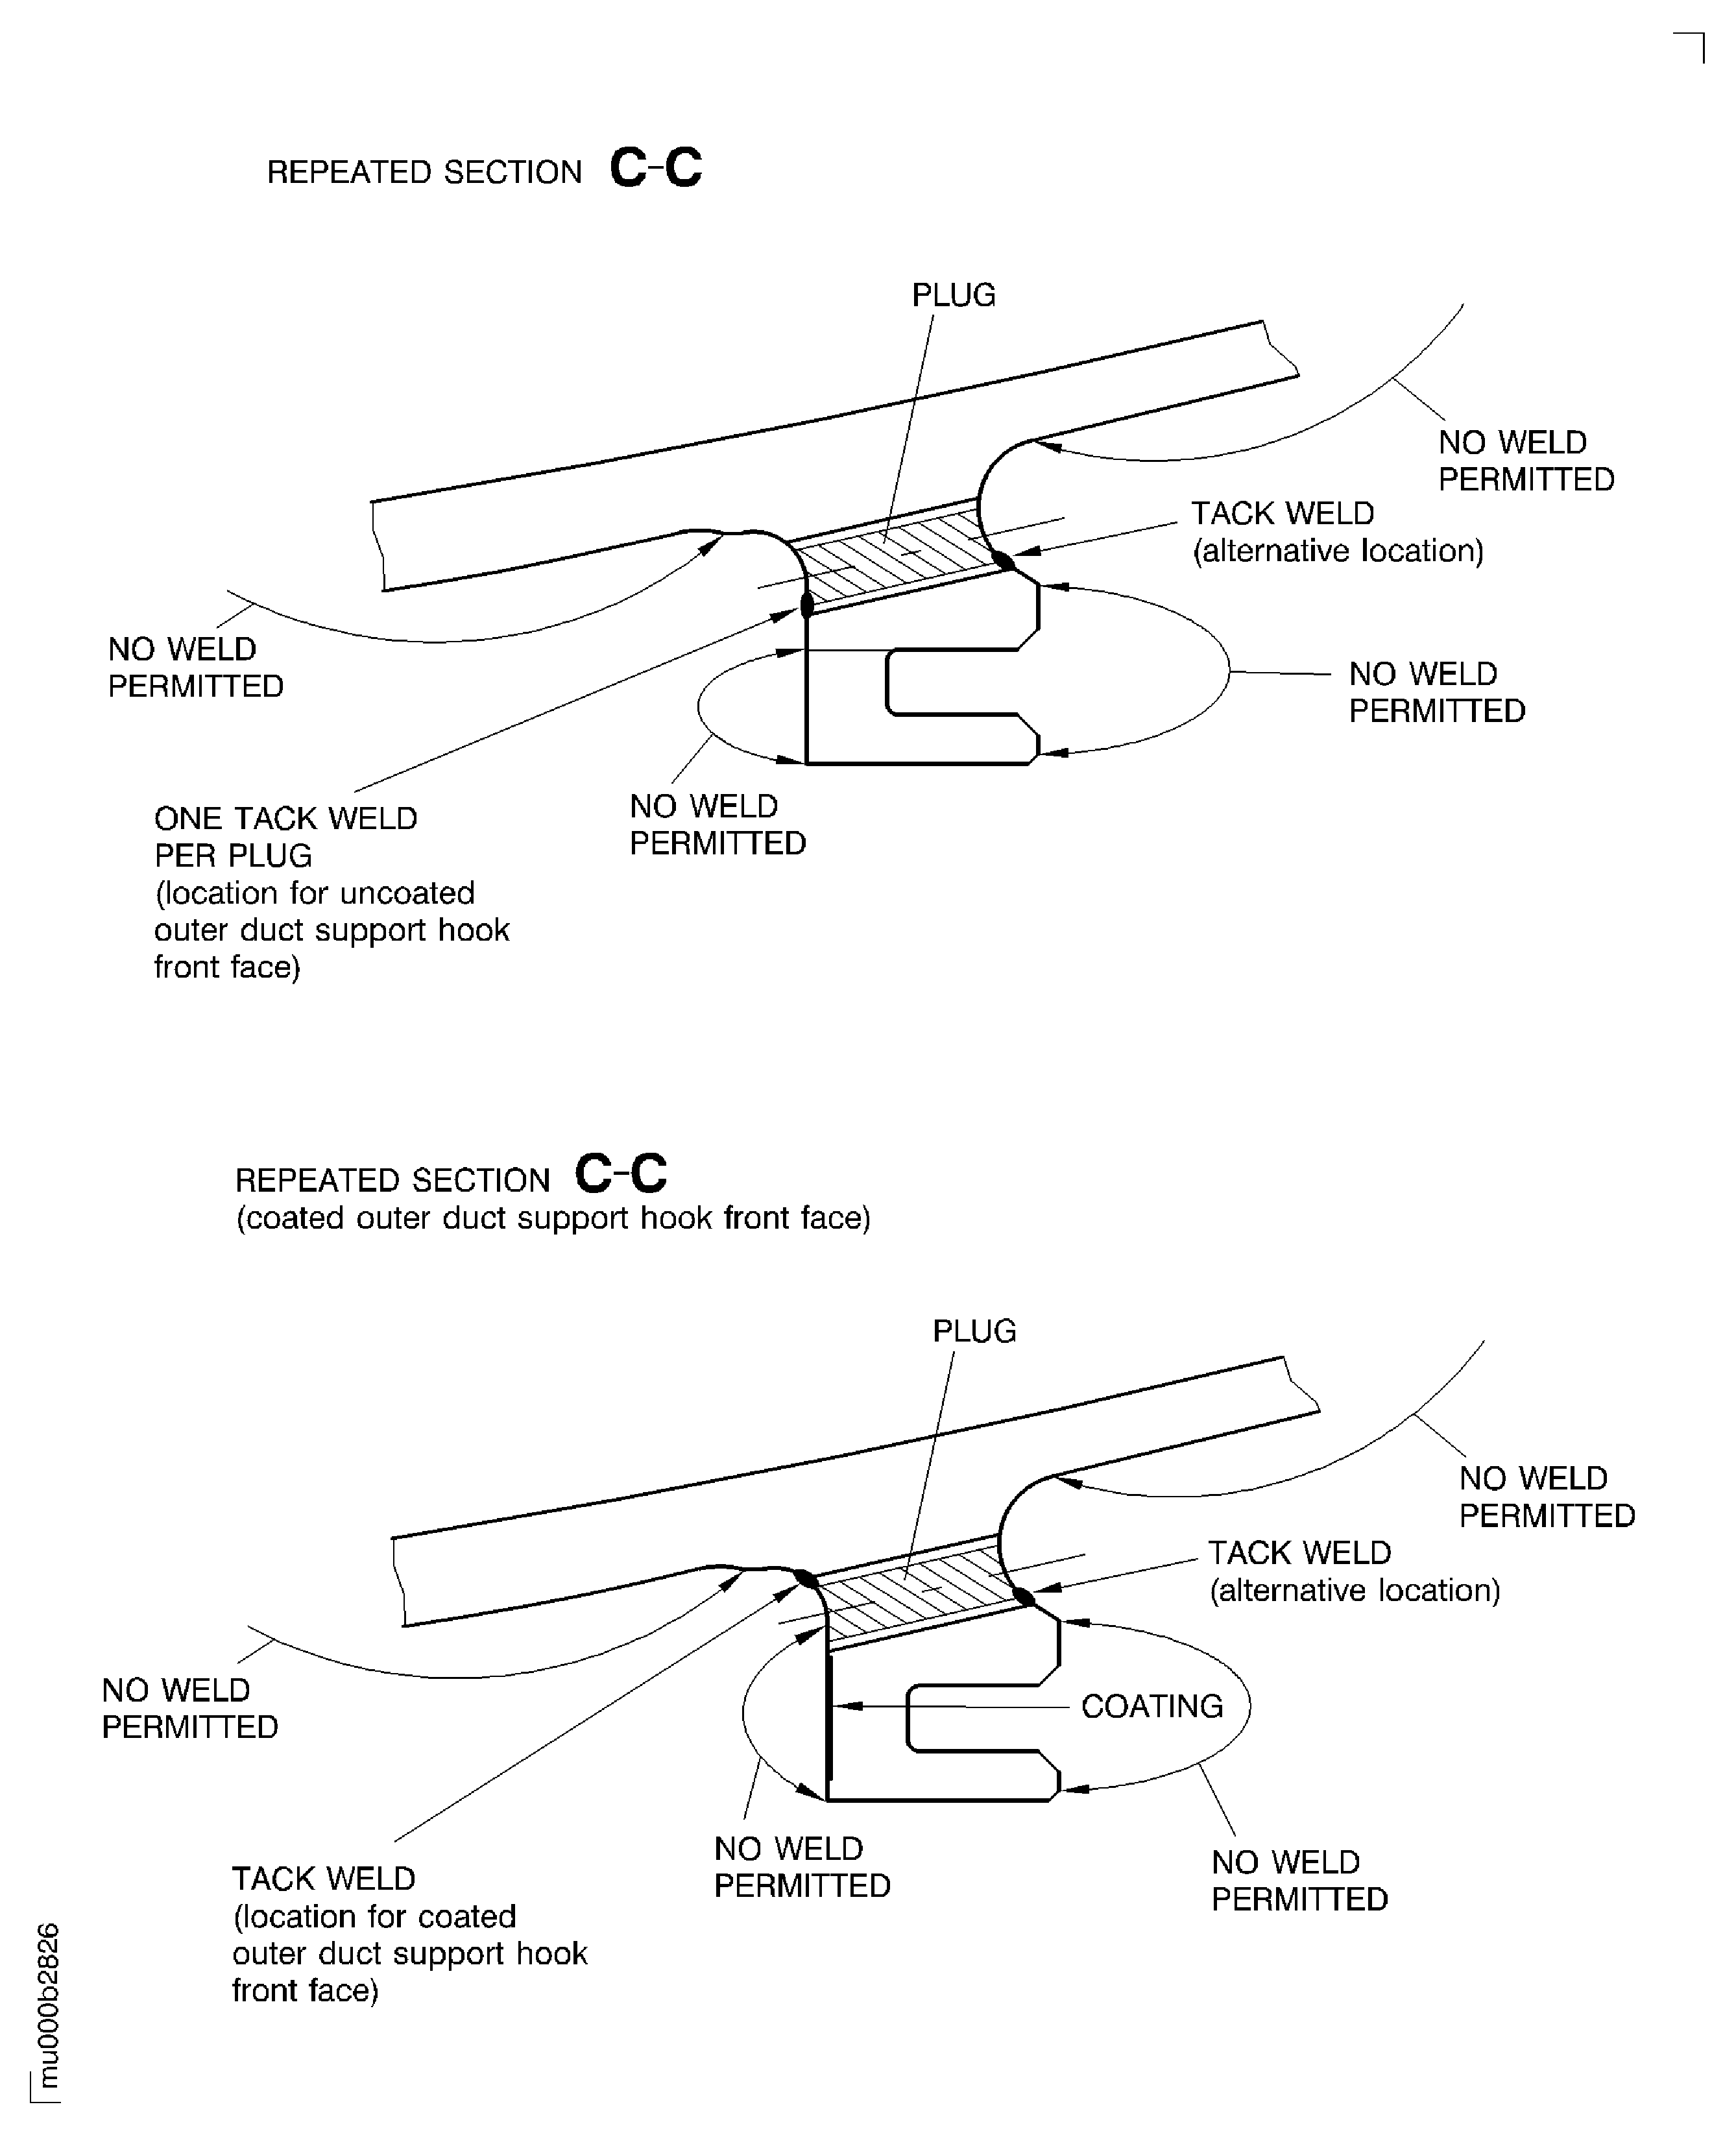
Refer to Figure.
Stress relief after welding is not necessary.
Tack weld the plug.
SUBTASK 72-50-21-310-060 Tack Weld the Plug
Figure: Stop drilling of cracks at the outer duct support of the LP turbine case
Sheet 1

Figure: Stop drilling of cracks at the outer duct support of the LP turbine case
Sheet 2

Figure: Tack weld the plug at the outer duct support of the LP turbine case
Tack weld the plug at the outer duct support of the LP turbine case

