Export Control
EAR Export Classification: Not subject to the EAR per 15 C.F.R. Chapter 1, Part 734.3(b)(3), except for the following Service Bulletins which are currently published as EAR Export Classification 9E991: SBE70-0992, SBE72-0483, SBE72-0580, SBE72-0588, SBE72-0640, SBE73-0209, SBE80-0024 and SBE80-0025.Copyright
© IAE International Aero Engines AG (2001, 2014 - 2021) The information contained in this document is the property of © IAE International Aero Engines AG and may not be copied or used for any purpose other than that for which it is supplied without the express written authority of © IAE International Aero Engines AG. (This does not preclude use by engine and aircraft operators for normal instructional, maintenance or overhaul purposes.).Applicability
All
Common Information
TASK 70-31-13-310-501 The Different Procedures Of Fusion Welding
General
This TASK gives the necessary data for the different fusion weld repairs to the engine components as follows:
The definition of fusion welding | |
Weld preparation data | |
Material group definition | |
Process definition | |
Filler metal data | |
Shielding gas | |
Fusion/penetration data | |
Dimensions and tolerances | |
Inert gas fusion welding | |
Plasma arc welding | |
Electron beam welding | |
Powder feed weld surfacing | |
Stress-relief after welding | |
Welding of titanium | |
Application of fusion weld type hardfacing | |
Patch-type weld repairs | |
Skip welding | |
Welding near flanges | |
Rewelding | |
Post-treatment | |
Inspection of Welds |
Safety Precautions
NOTE
Preliminary Requirements
Pre-Conditions
NONESupport Equipment
NONEConsumables, Materials and Expendables
| Name | Manufacturer | Part Number / Identification | Quantity | Remark |
|---|---|---|---|---|
| CoMat 02-128 LOCKWIRE | LOCAL | CoMat 02-128 | ||
| CoMat 03-109 WELDING WIRE | 80710 | CoMat 03-109 | ||
| CoMat 03-111 WELDING WIRE | 0AM53 | CoMat 03-111 | ||
| CoMat 03-133 WELDING WIRE | 57965 | CoMat 03-133 | ||
| CoMat 03-185 WELDING FILLER WIRE | LOCAL | CoMat 03-185 | ||
| CoMat 03-186 WELDING FILLER WIRE, COBALTBASE | LOCAL | CoMat 03-186 | ||
| CoMat 03-187 WELDING WIRE, Co BASE | LOCAL | CoMat 03-187 | ||
| CoMat 03-192 WELDING WIRE | LOCAL | CoMat 03-192 | ||
| CoMat 03-195 WELDING WIRE TITANIUM | LOCAL | CoMat 03-195 | ||
| CoMat 03-197 WELDING FILLER WIRE | LOCAL | CoMat 03-197 | ||
| CoMat 03-199 WELDING FILLER WIRE | LOCAL | CoMat 03-199 | ||
| CoMat 03-203 WELDING FILLER WIRE, 80%Ni, 20% Cr | 2R602 | CoMat 03-203 | ||
| CoMat 03-206 WELDING FILLER WIRE | LOCAL | CoMat 03-206 | ||
| CoMat 03-209 WELDING FILLER WIRE, NiBASE 5% Cr | LOCAL | CoMat 03-209 | ||
| CoMat 03-214 WELDING FILLER WIRE, TiC.G. PURE | LOCAL | CoMat 03-214 | ||
| CoMat 03-243 WELDING FILLER WIRE | LOCAL | CoMat 03-243 | ||
| CoMat 03-244 WELDING FILLER WIRE | LOCAL | CoMat 03-244 | ||
| CoMat 03-245 WELDING FILLER WIRE | LOCAL | CoMat 03-245 | ||
| CoMat 03-284 WELDING FILLER WIRE, NiBASE | LOCAL | CoMat 03-284 | ||
| CoMat 03-286 WELDING WIRE | LOCAL | CoMat 03-286 | ||
| CoMat 03-287 WELDING FILLER WIRE | LOCAL | CoMat 03-287 | ||
| CoMat 03-348 WELDING WIRE | LOCAL | CoMat 03-348 | ||
| CoMat 03-364 WELDING FILLER WIRE | LOCAL | CoMat 03-364 | ||
| CoMat 03-365 WELDING WIRE | LOCAL | CoMat 03-365 | ||
| CoMat 03-366 WELDING FILLER WIRE | LOCAL | CoMat 03-366 | ||
| CoMat 03-367 WELDING FILLER WIRE | 58401 | CoMat 03-367 | ||
| CoMat 03-368 WELDING WIRE | LOCAL | CoMat 03-368 | ||
| CoMat 03-369 WELDING FILLER WIRE | LOCAL | CoMat 03-369 | ||
| CoMat 03-370 WELDING WIRE | LOCAL | CoMat 03-370 | ||
| CoMat 03-371 WELDING WIRE | LOCAL | CoMat 03-371 | ||
| CoMat 03-372 WELDING FILLER WIRE | LOCAL | CoMat 03-372 | ||
| CoMat 03-375 WELDING FILLER WIRE | LOCAL | CoMat 03-375 | ||
| CoMat 03-376 WELDING FILLER WIRE | LOCAL | CoMat 03-376 | ||
| CoMat 03-378 WELDING WIRE | LOCAL | CoMat 03-378 | ||
| CoMat 03-379 WELDING FILLER WIRE | 58401 | CoMat 03-379 | ||
| CoMat 03-380 WELDING WIRE | LOCAL | CoMat 03-380 | ||
| CoMat 03-381 WELDING FILLER WIRE | LOCAL | CoMat 03-381 | ||
| CoMat 03-382 WELDING FILLER WIRE | LOCAL | CoMat 03-382 | ||
| CoMat 03-383 WELDING FILLER WIRE | LOCAL | CoMat 03-383 | ||
| CoMat 03-384 WELDING FILLER WIRE | LOCAL | CoMat 03-384 | ||
| CoMat 03-385 WELDING FILLER WIRE | LOCAL | CoMat 03-385 | ||
| CoMat 03-386 WELDING FILLER WIRE | LOCAL | CoMat 03-386 | ||
| CoMat 03-387 WELDING FILLER WIRE | LOCAL | CoMat 03-387 | ||
| CoMat 03-389 WELDING WIRE | 58401 | CoMat 03-389 | ||
| CoMat 03-390 WELDING FILLER WIRE | 28553 | CoMat 03-390 | ||
| CoMat 03-391 WELDING FILLER WIRE | 2R602 | CoMat 03-391 | ||
| CoMat 03-392 WELDING WIRE | LOCAL | CoMat 03-392 | ||
| CoMat 03-393 WELDING WIRE | LOCAL | CoMat 03-393 | ||
| CoMat 03-394 WELDING WIRE, TITANIUM | LOCAL | CoMat 03-394 | ||
| CoMat 03-395 WELDING FILLER METAL | 1B843 | CoMat 03-395 | ||
| CoMat 03-463 WIRE, WELDING | LOCAL | CoMat 03-463 | ||
| CoMat 03-464 WIRE, WELDING | LOCAL | CoMat 03-464 | ||
| CoMat 03-483 WIRE - WELDING, TITANIUMALLOY | LOCAL | CoMat 03-483 |
Spares
NONESafety Requirements
WARNING
Procedure
The fusion welding procedure used in the repair of the engine parts is the fusion of metals to attach the adjacent areas of the parts. This can be done with or without filler metal and without the use of pressure. Also included in fusion welding is 'surfacing'. This is when more material is fused on the surface to 'build-up' or 'hard surface' the base metal.
SUBTASK 70-31-13-310-001 The Definition of Fusion Welding
Refer to: Figure
Prepare the joint (prepared groove welds).
Prepare the material joint root face, bevel angle, radius and depth of penetration for the prepared groove welds and plug or slot welds. Refer to Figure.
Make sure the root opening is made as small as possible. It must not be more than the value given, as follows:
Weld type/Maximum root opening.
Groove (Arc and Gas processes) /0.060in. (1.52 mm).
Groove (Electron beam process) /0.003in. (0.08 mm).
Arc spot and Arc-seam (All processes) /0.000in. (0.00 mm).
Fillet/0.100in. T(0.254 mm T)*.
*Maximum sheet separation as determined by the thickness of the thinner sheet (T).
SUBTASK 70-31-13-310-002 Weld Preparation Data, .
Refer to: Figure
IAE will specify the type of material to be welded. This is shown with the IAE specification number, then a dash and a suffix number, this identifies the material group, as follows:
Weldment Material Suffix (Group)
Material Type
-1
Carbon and low alloy steels
-2
Corrosion resistant, non-precipitation hardenable steels
-3
Nickel and non-precipitation hardenable nickel alloys
-4
Aluminum alloys
-5
Magnesium alloys (not used)
-6
Commercially pure titanium
-7
Cobalt alloys
-8
Copper and copper alloys
-9
Refractory metals, refractory alloys (columbium, tantalum, tungsten, molybdenum and associated alloys) and oxide dispersion strengthened metals
-11
Maraging steels
-22
Corrosion resistant, precipitation hardenable steels
-33
Precipitation hardenable nickel alloys
-66
Titanium alloys
When a Repair includes material from two weldment groups, the suffix number has two or more numbers (these are the applicable group numbers). The lower number is shown before the higher, as in the IAE 16 material code examples, as follows:
Materials to be Welded
Weld Code
Group 1 to Group 1
IAE 16-1
Group 1 to Group 11
IAE 16-111
Group 2 to Group 2
IAE 16-2
Group 2 to Group 3
IAE 16-23
Group 2 to Group 22
IAE 16-222
Group 2 to Group 33
IAE 16-233
Group 3 to Group 7
IAE 16-37
Group 3 to Group 22
IAE 16-322
Group 7 to Group 33
IAE 16-733
Group 66 to Group 66
IAE 16-66
For the given filler metal tables, refer to the material groups. This will help during the selection of the correct filler metal. Each suffix group has the specific metal types in it, for example, material Groups 2 and 22, Groups 3 and 33, Groups 7 and 9. Refer to Step for the necessary data for the selection of the filler metal.
SUBTASK 70-31-13-310-003 Material Group Definition
Fusion weld process letter designations.
IAE 16 letter/Fusion weld process/AWS letter:
A/Manual gas tungsten arc /GTAW-MA.
J/Machine gas tungsten arc /GTAW-ME.
K/Manual gas metal arc /GMAW-MA.
L/Machine gas metal arc /GMAW-ME.
M/Electron beam/EBW.
N/Machine plasma-arc (Transferred-arc)/PAW-ME.
P/Manual plasma-arc (Transferred-arc)/PAW-MA.
For bevel, U, V and J groove welds, where incomplete penetration is permitted, the minimum acceptable penetration can be specified as the sum of two dimensions located to the left of the weld symbol. The first dimension specifies the minimum depth of weld preparation, and the sum of the two dimensions specifies the total minimum depth of penetration.
Weld symbols agree with those specified by the American Welding Society (AWS) publication A2.4, except as follows.
American Welding Society
550 NW LeJeune Road
P.O. BOX 351040
Miami, FL 33135-7040 USA
Tel: 1-305-443-9353
Fax: 1-305-443-7559
Weld symbols.
NOTE
AWS publications, AWS A2.4 Symbols for Welding and Nondestructive Testing and AWS A3.0 Welding Terms and Definitions, are available from:For more information on finishing, refer to Step.
Finish definition.
SUBTASK 70-31-13-310-004 Process Definition
It is not always necessary to use filler metal when you weld with the electron beam procedure. If filler metal is used, it must be as specified in Step. The filler metal is attached to the joint with resistance-tack or fusion-tack welds before the electron beam weld is made.
Unless it is specified in Repair text and/or illustration, you must use filler metal in all weld repairs. Although, these do not include the procedures which follow:
General.
When different alloys are to be welded, the filler metal used must be as specified for one of the two alloys. This is not applicable if there is a specified metal given in Step thru 027 or the Repair.
Loose strips of base metal can be used as an alternative to the specified filler metal. This is not applicable if there is a specified metal given in Step thru 027 or the Repair.
Welding Filler Metal for Carbon and Low Alloy Steels (Group 1) and Maraging Steels (Group 11)
Welding filler metal for corrosion resistant steels - non-precipitation hardenable (Group 2) and precipitation hardenable (Group 22)
Welding Filler Metal for Nickel and Non-precipitation Hardenable Nickel Alloys (Group 3) and Precipitation Hardenable Nickel Alloys (Group 33)
Welding Filler Metal for Aluminium Alloys (Group 4)
Welding Filler Metal for Commercially Pure Titanium (Group 6) and Titanium alloys (Group 66) and (Group 66X)
Welding Filler Metal for Cobalt Alloys (Group 7)
Welding Filler Metal for Refractory Metals and Refractory Alloys and Oxide Dispersion - Strengthened Metals (Group 9)
This use of the filler metal does not include the procedures which follow:
Carbon and low alloy steels (Group 1) and maraging steels (Group 11). The filler metal must be as given in Step.
Corrosion resistant steels - non-precipitation hardenable (Group 2) and precipitation hardenable (Group 22). The filler metal must be as given in Step.
Nickel and non-precipitation hardenable nickel alloys (Group 3) and precipitation hardenable nickel alloys (Group 33). The filler metal must be as given in Step.
Aluminum alloys (Group 4). The filler metal must be as given in Step.
Commercially pure titanium (Group 6) and titanium alloys (Group 66 and Group 66X). The filler metal must be given in Step.
Cobalt alloys (Group 7). The filler metal must be as given in Step.
The necessary filler metal data.
SUBTASK 70-31-13-310-005 Filler Metal Data

CAUTION
THE NECESSARY WELD FILLER WIRE DATA GIVEN DOES NOT PERMIT ITS USE FOR A REPAIR WITHOUT CORRECT APPROVAL OF THE PROCESS TO BE USED.YOU MUST NOT USE FLUX WHEN YOU WELD TITANIUM, TITANIUM ALLOYS, REFRACTORY METALS AND REFRACTORY ALLOYS. YOU CAN USE FLUX WHEN YOU WELD OTHER METALS AND METAL ALLOYS BY ALL PROCESSES BUT THESE DO NOT INCLUDE ELECTRON BEAM, LASER BEAM, PLASMA-ARC, GAS TUNGSTEN-ARC, GAS METAL-ARC AND INERTIA-FRICTION PROCEDURES.THE FLUX USED MUST NOT BE HARMFUL TO THE COMPOSITION OR PHYSICAL PROPERTIES OF THE WELDED JOINT.SUBTASK 70-31-13-310-021 Welding Filler Metal for Carbon and Low Alloy Steels (Group 1) and Maraging Steels (Group 11)
PARENT METAL
FILLER METAL NECESSARY
CATEGORY No. (2)
SPEC.
AMS
(IAE)
TRADE NAME OR TYPE
CoMat NUMBER (NOTES)
TRADE NAME OR TYPE (1)
1.1
5040
5042
5050
5053
5060
5062
5069
5070
5075
5080
5082
1006 thru 1035
03-133
03-385
AWS70S-2
502 bare
1.2
5335
5336
6280
6281
6355*
8630
03-385
502 bare
1.3
6350
6360
6370
6371
6373
4130
03-385
502 bare
1.4
6437
6485
6487
6488
H-11
03-383
6130
1.5
6265
9310
03-385
502 bare
11.1
6512
6520
250 Maraging
03-386
250 Maraging
11.2
6514
6521
300 Maraging
03-384
300 Maraging
Notes for Material Group 1 and Group 11:
* Superseded by AMS 6350. Refer to Category No. 1.3.
(1) This is general data only. The filler metal must be as in the given specifications.
(2) The category number has the material group number, refer to Step. This number is followed by a decimal number, to make it easier to add subsequent notes.
SUBTASK 70-31-13-310-022 Welding Filler Metal for Corrosion Resistant Steels - Non-Precipitation Hardenable (Group 2) and Precipitation Hardenable (Group 22)
PARENT METAL
FILLER METAL NECESSARY
CATEGORY No. (2)
SPEC.
AMS
(IAE)
TRADE NAME OR TYPE
CoMat NUMBER (NOTES)
TRADE NAME OR TYPE (1)
2.1
5350
5351
5504
5591
5613
410
03-392 (3)(7)
410
2.2
5354
5508
5616
(1464)
Greek Ascoloy
03-378 (3)(7)
Greek Ascoloy
2.3
5503
5627
430
03-286 (3)
347
2.4
5548
5554
5745
AM-350
03-371 (3)
AM-350
2.5
5547
5743
AM-355
03-372 (3)
AM-355
2.6
5510
5557
5559
5570
5576
5645
321
03-286 (3)(7)
03-463 (3)(7)
347
321
2.7
5362
5363
5512
5556
5558
5571
5575
5646
5654
(767)
(770)
347
03-286 (3)(7)
347
2.8
5360
5361
5524
5573
5648
316
03-369 (3)(7)
316
2.9
5365
5366
5521
5572
5577
5651
310
03-370 (7)
310
2.10
(798)
(1079)
AM-363
03-109
AM-363
2.11
(1091)
(1478)
(36170)
H-46
03-181
M190
22.1
5525
5731
5858
5895
A-286
03-209 (6)
03-376
Hastelloy W
A286 (Premium)
22.2
5528
5529
5568
17-7PH
03-286 (5)
03-380 (4)
347
17-7PH
22.3
5342
5343
5344
5355
5398
5604
5622
5643
17-4PH
03-381
03-375
17-4PH
17-4PH
22.4
5357
5659
5862
15-5PH
03-381
17-4PH
Notes for Material Group 2 and Group 22:
(1) This is general data only. The filler metal must be as in the given specifications.
(2) The category number has the material group number, refer to Step. This number is followed by a decimal number, to make it easier to add subsequent notes.
(3) CoMat 03-209 WELDING FILLER WIRE, NiBASE 5% Cr can be used to weld category 2.1 thru 2.8 to category 3.1 and 3.2.
(4) Must be used where no other catagory is included.
(5) Must be used for welding this category to other categories.
(6) Must be used for all welding of this category, unless specified differently.
(7) CoMat 03-209 WELDING FILLER WIRE, NiBASE 5% Cr or CoMat 03-287 WELDING FILLER WIRE can be used for welding categories 2.1 or 2.2 to categories 2.6, 2.7, 2.8, or 2.9.
SUBTASK 70-31-13-310-023 Welding Filler Metal for Nickel and Non-precipitation Hardenable Nickel Alloys (Group 3) and Precipitation Hardenable Nickel Alloys (Group 33)
PARENT METAL
FILLER METAL NECESSARY
CATEGORY No. (2)
SPEC.
AMS
(IAE)
TRADE NAME OR TYPE
CoMat NUMBER (NOTES)
TRADE NAME OR TYPE (1)
3.1
5540
5580
5665
(661)
(1060)*
(1062)**
(1070)*
Inconel 600
03-245 (3)(5)
Inconel 62
3.2
(673)
Nimonic 75
03-203 (3)
03-245 (3)(5)
Nichrome V
Inconel 62
3.3
5390
5536
5587
5588
5754
(1038)
Hastelloy X
03-197
Hastelloy X
3.4
5388
5389
5530
Hastelloy C
03-367
Hastelloy C
3.5
5553
(6000)
(6005)
(6015)
Nickel 200
03-111
Nickels 200
3.6
5607
5771
Hastelloy N
03-209 (4)(7)
Hastelloy W
3.7
5401
5581***
5599
5666
(1468)
5879
(1069)
(1072)
Inconel 625
03-287 (6)
Inconel 625
3.8
5887
5889
(1128)
(1165)
Inconel 617
03-390
Inconel 617
3.9
5711
5873
Hastelloy S
03-382
Hastelloy S
3.10
5878
(1163)
(1127)
Haynes 230
03-464
Haynes 230
33.1
5660
5661
(1003)
Incoloy 901
03-209 (4)(7)
Hastelloy W
33.2
5542
5582
5598
5667
5670
5671
Inconel X-750
03-199 (8)
Inconel 69
33.3
5544
5586
5706
(625)
(1471)
Waspaloy
03-244
03-389
Waspaloy
33.4
5383
5589
5596
5662
(649)
(1009)
(1065)
(1469)
(1477)
Inconel 718
03-284
Inconel 718
33.5
5391
(655)
Inconel 713
03-245 (5)(6)(9)
03-287 (6)
Inconel 62
Inconel 625
33.6
5606
5702
5703
(1025)
(1026)
Inconel 706
03-284
Inconel 718
33.7
(659)
MAR M 002
03-287 (6)
Inconel 625
33.8
(1422)
(1426)
MAR M 200 +Hf
03-287 (6)
Inconel 625
33.9
(663)
(1445)
B1900
B1900 +Hf
03-287 (6)
Inconel 625
33.10
(1451)
IN-738
03-287 (6)
Inconel 625
33.11
(1456)
(1467)
IN-792
03-287 (6)
Inconel 625
33.12
(1447)
MAR M-247
03-287 (6)
Inconel 625
33.13
(1480)
(1484)
454
03-287 (6)
Inconel 625
33.14
5872
C-263
03-387
C-263
33.15
(1198)
Haynes 242
03-209
Hastelloy W
Notes for Material Group 3 and Group 33:
* Superseded by AMS 5580.
** Superseded by AMS 5581, Type 1.
*** AMS 5581, Type 1 is for tubing with diameters less than 1.00 inch (25.4 mm). AMS 5581, Type 2 is for tubing with diameters 1.00 inch (25.4 mm) or greater.
(1) This is general data only. The filler metal must be as in the given specifications.
(2) The category number has the material group number, refer to Step. This number is followed by a decimal number, to make it easier to add subsequent notes.
(3) CoMat 03-209 WELDING FILLER WIRE, NiBASE 5% Cr can be used to weld category 2.1 thru 2.8 to category 3.1 and 3.2.
(4) Must be used for all welding of this category, unless specified differently.
(5) Must be used for welding by gas metal-arc (GMAW-MA and GMAW-ME), gas tungsten-arc (GTAW-MA and GTAW-ME), plasma-arc, electron beam or laser beam process only.
(6) Must not be used for welding the airfoils of blades and vanes.
(7) You must not use parent metal (from all the types available) as filler metal.
(8) CoMat 03-284 WELDING FILLER WIRE, NiBASE can be used as an alternative to CoMat 03-199 WELDING FILLER WIRE.
(9) This filler must not be used on parts that will be coated with IAE 73 or other diffused aluminide coatings.
SUBTASK 70-31-13-310-024 Welding Filler Metal for Aluminium Alloys (Group 4)
PARENT METAL
FILLER METAL NECESSARY
CATEGORY No. (2)
SPEC.
AMS
(IAE)
TRADE NAME OR TYPE
CoMat NUMBER (NOTES)
TRADE NAME OR TYPE (1)
4.1
4031
4143
4313
2219
03-393
2319
4.2
4225
203.OP
03-393
2319
4.3
All alloys which are welded; this does not include those above.
03-206
4043
Notes for Material Group 4:
(1) This is general data only. The filler metal must be as in the given specifications.
(2) The category number has the material group number, refer to Step. This number is followed by a decimal number, to make it easier to add subsequent notes.
SUBTASK 70-31-13-310-025 Welding Filler Metal for Commercially Pure Titanium (Group 6) and Titanium alloys (Group 66) and (Group 66X)
PARENT METAL
FILLER METAL NECESSARY
CATEGORY No. (2)
SPEC.
AMS
(IAE)
TRADE NAME OR TYPE
CoMat NUMBER (NOTES)
TRADE NAME OR TYPE (1)
6.1
4900
4901
4902
4921
4941
4942
Comm. Pure Ti
03-214
Comm. Pure Ti
66.1
4943
4944
3Al-2.5V
03-214
Comm. Pure Ti
66.2
4909
4910
4924
4926
4966
5Al-2.5Sn
03-483 (3)
5Al-2.5Sn
66.3
4915
4916
4972
4973
(1202)
(1217-2)
8Al-1Mo-1V
03-365
8Al-1Mo-1V
66.4
4919
4975
4976
(1209)
(1214)
(1223)
(1224)
(1225)
(1231)
(1265)
(1267)
6Al-2Sn- 4Zr-2Mo
03-348
6Al-2Sn- 4Zr-2Mo
66.5
4911
4928
4935
(1217-1)
(1232)
(1264)
6Al-4V
03-214
03-364 (4)
03-366 (4)
Comm.Pure Ti
6Al-4V
6Al-4V (ELI)
66.6
4914
15V-3Cr- 3Sn-3Al
03-391
15V-3Cr- 3Sn-3Al
66.7
(1272)
(1274)
(1276)
35V-15Cr
(Alloy C)
03-394
35V-15Cr
(Alloy C)
66X.1
4911
4928
4935
(1217-1)
(1232)
(1262)
(1264)
6Al-4V
03-195
03-364 (4)
03-366 (4)
6Al-4V
6Al-4V
6Al-4V (ELI)
66X.2
4943
(1260)
3Al-2.5V
03-195
03-364 (4)
03-366 (4)
6Al-4V
6Al-4V
6Al-4V (ELI)
Notes for Material Group 6 and Group 66:
(1) This is general data only. The filler metal must be as in the given specifications.
(2) The category number has the material group number, refer to Step. This number is followed by a decimal number, to make it easier to add subsequent notes.
(3) CoMat 03-214 WELDING FILLER WIRE, TiC.G. PURE can be used as an alternative to CoMat 03-483 WIRE - WELDING, TITANIUMALLOY.
(4) When a repair specifies CoMat 03-364 WELDING FILLER WIRE, it is always permitted to use CoMat 03-366 WELDING FILLER WIRE, which is a better grade of titanium weld wire. But it is not permitted to use CoMat 03-364 WELDING FILLER WIRE when CoMat 03-366 WELDING FILLER WIRE is specified.
SUBTASK 70-31-13-310-026 Welding Filler Metal for Cobalt Alloys (Group 7)
PARENT METAL
FILLER METAL NECESSARY
CATEGORY No. (2)
SPEC.
AMS
(IAE)
TRADE NAME OR TYPE
CoMat NUMBER (NOTES)
TRADE NAME OR TYPE (1)
7.1
5382
Stellite 31 (X-40)
03-186
03-187
Stellite 31 (X-40)
7.2
(653)
WI-52
03-243 (3)
Haynes 188
7.3
5537
5759
(1064)
Haynes 25 (L-605)
03-243 (3)
Haynes 188
7.4
(657)
MAR M-302
03-243 (3)
Haynes 188
7.5
5608
5772
(1042)
(1088)
Haynes 188
03-243 (3)
Haynes 188
7.6
(647)
MAR M-509
03-243 (3)
Haynes 188
Notes for Material Group 7:
(1) This is general data only. The filler metal must be as in the given specifications.
(2) The category number has the material group number, refer to Step. This number is followed by a decimal number, to make it easier to add subsequent notes.
(3) Any parts that had used CoMat 03-185 WELDING FILLER WIRE (L-605) before June 15, 1993 can continue, but the use of CoMat 03-243 WELDING FILLER WIRE is recommended.
SUBTASK 70-31-13-310-027 Welding Filler Metal for Refractory Metals and Refractory Alloys and Oxide Dispersion - Strengthened Metals (Group 9)
PARENT METAL
FILLER METAL NECESSARY
CATEGORY No. (2)
SPEC.
AMS
(IAE)
TRADE NAME OR TYPE
CoMat NUMBER (NOTES)
TRADE NAME OR TYPE (1)
9.1
5865
5890
DS Nickel
03-203 (3)
03-368 (3)
03-197 (5)
03-244 (4)
03-389 (4)
03-287 (3)
03-192
Nichrome V
Nichrome V
Hastelloy X
Waspalloy
Waspalloy
Inconel 625
Waspalloy
9.2
(1095)
C-103
03-395
C-103
Notes for Material Group 9:
(1) This is general data only. The filler metal must be as in the given specifications.
(2) The category number has the material group number, refer to Step. This number is followed by a decimal number, to make it easier to add subsequent notes.
(3) Must be used where no other category is included.
(4) Must be used for welding category 9.1 to category 2.6, 2.7 and 7.1.
(5) Must be used for welding category 9.1 to 3.3.
The shielding gas must meet the conditions specified in Step as delivered. Monitors are an important aid and must be available to measure the shielding gas oxygen and moisture content.
SUBTASK 70-31-13-310-017 Shielding Gas
Groove and flange welds must have the penetration completed through the joint and to the point of tangency in flange-groove welds. Refer to Figure and step G.
Fillet welds must have fusion of the component parts at the root of the joint and along each leg of the weld. There is no limit to the depth of penetration. Although, the weld metal build-up must be kept at a minimum on a base metal surface opposite the weld deposit side.
EXCEPTIONS.
For aluminum and for other alloys when the included angle between the pieces joined is less than 80 degrees, the fusion of the component parts at the root of the joint is not necessary.
For aluminum alloys, the maximum dimension of any unfused area, measured from the root, must not be more than 20 percent of the actual weld throat.
For titanium and titanium alloys, the fusion of the component parts at the root of the joint is not necessary for fillet welds that are less than 0.5 inch (12.7 mm) in length.
Numbers in parentheses in Figure.
SUBTASK 70-31-13-310-006 Fusion/Penetration Data
Some welding symbols have no contour or finish symbol in them. For these, in hand welding, the weld height (above the base metal) must not be more than 100 percent of the base metal thickness. Although, in machine welding it must not be more than 50 percent of base metal thickness. For both types of welding, the undercut or underfill below the surface must not be more than five percent of the base metal thickness. Refer to Figure, View A.
Other welding symbols have a convex contour but no finish symbol. For these, in hand welding, the maximum weld height (above the base metal) must not be more than 100 percent of the base metal thickness. In machine welding it must not be more than 50 percent of base metal thickness. For both types of welding, the maximum weld height must not be less than ten percent. Refer to Figure, View C.
A weld can have a flush contour symbol with no finish symbol. For these, the maximum and minimum weld height above the base metal must be as given in the illustration or the applicable text. Refer to Figure, View E.
A weld symbol can include both the flush contour and finish symbols. For these, the weld height above the base metal must be not more than 0.010in. (0.25 mm) after the weld is finished. The welded joint thickness (this does not include melt-through) after the weld is finished must be not less than the minimum thickness specified for the base metal. Refer to Figure, View G.
When a groove weld is made at one face of the base metal and a back or backing weld at the opposite face, the requirements of step (1) must apply to the groove weld. The requirements of paragraph D. must apply to the back or backing weld when no finishing is specified. The requirements of step (d) will apply to the back or backing weld when finishing is specified.
NOTE
Melt-through is a condition that must be kept to a minimum.
The height of the weld above the base metal face for groove welds (when the weld is made from one side only) and flange welds (where full penetration is necessary) must agree with the instructions in steps (a) thru (f). Also, refer to these instructions for plug, slot, arc-spot and arc-seam welds for the weld height. When no finish element appears in the welding symbol, these requirements must apply to the metal as welded, but when a finish element appears in the welding symbol, the requirements of step (d) apply. When the surfaces adjacent to the weld bead contain surface alignment variations, the weld metal height measurement must be set from the uppermost surface. Underfill or undercut measurement must be set at each adjacent surface. Refer to Figure.
When no contour or finish symbol is shown in the welding symbol for melt-through, the underfill or undercut must not be more than 5 percent and the height of the melt-through must be not more than 50 percent of the base metal thickness. Refer to Figure, View B.
However, the maximum melt-through thickness of 75 percent of the base metal thickness is permitted as follows:
* For hand welding of aluminum.
* For hand welding of all materials with a maximum thickness of 0.040in. (1.016 mm).
For a welding symbol with a convex contour element (but no finish symbol given for melt-through) the height of the melt-through must not be more than 50 percent of the base metal thickness. The melt-through must have a convex contour. Refer to Figure, View D.
For a welding symbol with a flush contour symbol (but no finish symbol given for melt through) the minimum and maximum melt-through height must be as given in an illustration or text. Refer to Figure, View F.
When the weld symbol has flush contour and finish symbols given for melt-through, the height of the melt-through must be not more than 0.010in. (0.25 mm) after it is finished. The welded joint thickness (this does not include the weld from the welded side) must be not less than the minimum thickness of the base metal after the finish procedure is completed.
Melt-through is the weld metal on the rear side of the base metal (the opposite side to where the weld is made). The requirements that follow apply to the melt-through for groove welds (this does not include flare groove welds) and flange welds (this does not include welds where complete penetration is not necessary). When no finish is specified for melt-through, these requirements will apply to the metal as welded. The data is also applicable after the weld is finished (if this is necessary).
Corner joint welds. Refer to Figure, View I.
Total thickness of welds. Refer to Figure, View J.
Dissimilar thickness. Refer to Figure, View K.
For the thickness of weld metal in groove, flange, plug, slot, arc-spot and arc-seam welds, refer to Figure and Figure. Views show square groove welds but apply to all groove flange, plug, slot, arc-spot and arc-seam welds. Views show only that part of the weld involved.
Specified size for all other alloys:
0.030 in. (0.76 mm) maximum - a factor of 5 (for Lap Joint Fillets).
0.063in. (1.60 mm) maximum - a factor of 3.
More than 0.063in. (1.60 mm) but less than 0.188in. (4.78 mm) - a factor of 2. (A factor of 3 for Lap Joint Fillets).
0.188in. (4.78 mm) minimum - a factor of 1.5.
The length of the fillet weld legs must not be less than the size given on Figure. It must not be more than the factor multiplied by the specified size, as follows:
The throat (theoretical) of fillet welds for titanium and titanium alloys must not be less than half the fillet leg size specified on Figure. For other materials it must not be less than 0.7, multiplied by the fillet leg dimension given. If the fillet leg dimensions given are of not equal lengths, always use the shorter leg dimension, to find the throat dimension.
The convexity in a lap joint fillet weld must not extend above the base metal surface more than 25 percent of base metal thickness. This is necessary for thicknesses of more than 0.050in. (1.27 mm). If the base metal thickness is 0.050in. (1.27 mm) or less, then the convexity must not extend more than 40 percent. Refer to Figure.
The size of fillets in fillet welds.
The weld centers must be in the center on the overlap or in the correct position given on the Repair illustration. The tolerance must not be more than 0.040in. (1.02 mm) or less than 0.040in. (1.02 mm) from the given position. The weld center must be one half the weld width from the edge of the weld.
The distance from edge(s) or piece(s) which are at a 90 degree angle to the end of the welding line is as follows. It must be not more than or less than 0.040in. (1.02 mm) of the distance necessary on the Repair illustration.
NOTE
In welding, the term "alignment variation" replaces the term "mismatch" because:- Alignment variation assumes a post-weld condition.- Mismatch assumes a pre-weld condition.
The position of fusion arc-spot and arc-seam welds and electron beam spot and seam welds.
Alignment variation limits must be Class 2, except for diffuser and combustion case welds and unless specified differently on the illustration or in the text to be Class 1. (Refer to Step.).
SUBTASK 70-31-13-310-007 Dimensions and Tolerances
One type of fusion welding is gas metal arc welding (GMAW), formerly called MIG (metallic inert gas) welding. In this type of welding the electrode is consumed, this then becomes the filler material. The electrode wire is usually made of the same material which is to be welded. GMAW welding must only be used when specified in the Repair instructions.
Another type of welding is gas tungsten arc welding (GTAW), formerly called TIG (tungsten inert gas) welding. In GTAW welding, the filler metal is supplied into the weld area. The torch electrode is not used up (non-consumable) and it is made of tungsten. Pure tungsten is used with alternating or direct current to weld aluminum. Thoriated tungsten (tungsten with two percent thorium oxide) is used with direct current for all other alloys.
General.
Refer to Step.
For titanium and titanium alloys:
The high temperatures necessary for fusion welding and the subsequent air cooling give higher hardness and lower ductility in many materials. This can cause cracks in the weld zone. If correct stress-relief is done after welding (this is usually necessary for most materials), it can cause a large decrease in cracks.
GTAW welding is usually used for repair of cracks in jet engine parts. Electron beam welding can be used, usually when a part is replaced or when it is necessary to add a piece of material.
NOTE
Welding machines must control the speed and direction of feed of the work in relation to the welding head of the machine and must control the rate of feed of the filler metal used.
Welding atmospheres.
GMAW welding.
Airco DC Aircomatic welder or equivalent.
Aircomatic AH20 or AH35 gun or equivalent.
Airco wire feeder or equivalent.
ESAB ST-12 or equivalent machine GMAW torch.
NOTE
ESAB bought out Praxair's welding equipment line. Welding equipment specified (or use units with equivalent features and safeguards) is available from the sources that follow:40608.6S493.96073.Refer to the OPCI for names and addresses of these sources.GTAW welding.
Miller SR-200 DC or AC/DC welder or Airco DC or AC/DC 200 ampere Bumblebee welder or equivalent.
ESAB HW-9 (pencil type) or equivalent manual GTAW gas-cooled torch.
ESAB HW-20, with water circulating equipment and ceramic cups with a range from No. 5 to No. 8 or equivalent manual GTAW water-cooled torch.
ESAB HW-13 or equivalent GTAW water-cooled torch.

WARNING
IF AN OXYGEN REGULATOR IS USED WITH ARGON GAS, IT MUST NOT BE USED AGAIN WITH AN OXYGEN CYLINDER. ARGON GAS CAN HAVE OIL IN IT WHICH CAN CAUSE AN EXPLOSION BECAUSE OF OIL IN THE OXYGEN REGULATOR.
CAUTION
TO PREVENT CONTAMINATION, ALL WELD TOOLING MADE OF COPPER (BACKUP BARS, EXPANDABLE BACKUP SHOES AND HOLD-DOWN CLAMPS) USED FOR THE WELDING OF COBALT, COBALT ALLOYS AND REFRACTORY ALLOYS MUST BE CHROMIUM OR NICKEL PLATED. THE PLATING MUST BE ON ALL AREAS OF THE TOOL THAT CAN TOUCH THE PART DURING ASSEMBLY OR WELDING.Inert gas enclosure fixtures, in some cases , a durable clear plastic envelope can be used.
Fixtures and chills
Applicable gas regulators and flowmeters
Ventilation equipment, as necessary
NOTE
ESAB bought out Praxair's welding equipment line. Welding equipment specified (or use units with equivalent features and safeguards) is available from the sources that follow:6S493.96073.Refer to the OPCI for names and addresses of these sources.Clean the part to remove the grease. Refer to the SPM TASK 70-11-03-300-503.

CAUTION
WIRE BRUSHES WHICH ARE USED TO CLEAN CORROSION AND HEAT RESISTANT STEELS AND ALLOYS MUST HAVE THEIR BRISTLES MADE OF AUSTENITIC CORROSION RESISTANT STEEL. WHEN YOU USE THE WIRE BRUSHES, MAKE SURE ALL THE UNWANTED MATERIAL IS REMOVED FROM THE SURFACE; IT IS NOT SATISFACTORY TO ONLY POLISH THE SURFACE.Use wire brushes or silicon carbide abrasives for rough removal of the protective coatings, unwanted material and surface scale.

CAUTION
DO NOT USE CHLORINATED SOLVENTS ON TITANIUM OR TITANIUM ALLOYS.Clean areas to be welded. Refer to the SPM TASK 70-11-26-300-503.

CAUTION
UNWANTED MATERIAL/CONTAMINATION WILL MAKE THE WELDS WEAK.
Prepare the part for inert gas fusion welding.
In manual GTAW welding with high frequency controls, it is not necessary to hit the electrode on the surface to start the arc. Hold the torch in a vertical position to the workpiece so the shielding gas gives protection on all sides of the weld area. It is better to have the area to be welded in a horizontal (flat) position.
If a particular weld Repair tells you to put wet asbestos in the weld area (to keep it cool), the recommended alternative is bulk ceramic fiber. Bulk ceramic fiber (Fiberfrax) can be supplied from:
Unifrax Corp.
(Was The Carborundum Company,Fibers Division,)
2351 Whirlpool Street
Niagara Falls,
New York 14305, USA
Tel: 1-716-278-3800
Fax: 1-716-278-3904

WARNING
DURING ALL THESE PROCEDURES YOU MUST OBEY THE SAFETY PRECAUTIONS AND USE APPROVED WELDING PROCEDURES. THERE MUST BE SUFFICIENT VENTILATION AND YOU MUST USE THE NECESSARY PROTECTIVE EQUIPMENT. DO NOT WELD IN CLOSED AREAS UNLESS THERE IS SUFFICIENT EXHAUST VENTILATION.
CAUTION
DURING GTAW WELDING OF ENGINE PARTS, IT IS MOST IMPORTANT THAT THE WELDING EQUIPMENT GROUND CONNECTION IS ATTACHED DIRECTLY TO THE PART. THE GROUND CONNECTION MUST NOT BE ATTACHED SO CURRENT FLOWS THROUGH THE ENGINE FROM A PART TO A DIFFERENT PART.General inert gas fusion welding procedures.
NOTE
In GTAW welding, if a sealed welding chamber is used (this can be rigid or flexible), it is not necessary to use cups around the electrode. Also backup fixtures are not necessary. This is only applicable if the air atmosphere is removed from the chamber and it contains only inert gas.
SUBTASK 70-31-13-310-008 Inert Gas Fusion Welding
Plasma arc welding (PAW) is a process similar to GTAW. The arc is changed because, as it goes through a constricted orifice, it tightens the arc. This makes a gas stream of straight, highly energized gas or plasma. It is this columnar arc which makes the type of bead related to this process. This bead is of small width and the penetration of more depth.
When plasma arc welding is used in the 'keyhole' configuration, the intense heat of the high velocity gas goes through the workpiece. As the 'keyhole' is moved along the joint, surface tension of the melted material causes the hole to close. The hole becomes solid (with material) behind the direction of travel.
The advantages of plasma arc welding compared with GTAW welding include:
Much better penetration.
Smaller width of weld bead.
Decreased shrinkage.
Decreased joint preparation.
Decreased amount of filler wire.
Single pass in machine operation.
Decrease in passes in manual operation, thus, better weld quality, decreased surface/subsurface defects.
Decrease width of zone of composition gradient in the weld metal (this can be applicable when the filler wire is not the same as the base metal composition).
Plasma arc welding is not an interchangeable alternative to GTAW welding. Use only when specified by the Engine Manual.
NOTE
ESAB bought out Praxair's welding equipment line. Welding equipment specified (or use units with equivalent features and safeguards) is available from the sources that follow:17514.40608.96073.Refer to the OPCI for names and addresses of these sources.The maximum thickness of most alloys for machine operation is 0.375 inch (9.53 mm), although the maximum limit for titanium is nearer to 0.500 inch (12.70 mm). For manual operation, the maximum limit is approximately 0.250 inch (6.35 mm). The primary properties which usually limit a particular procedure are the density of the material and surface tension of the molten puddle.
The specific things necessary for each process and plasma torch size must be included in the schedule when you make fixtures. For machine operation, sufficient clearance must be given at the weld joint. This clearance is for the shielding cup and trailing shield with more space to prevent double arcing.
Technical data necessary.

CAUTION
CONTAMINATION AND UNWANTED MATERIAL WILL MAKE THE WELDS WEAK.Clean the part to remove the grease. Refer to the SPM TASK 70-11-03-300-503. The surfaces to be welded must not have protective coatings on them which can cause weakness in the weld. Make sure the surfaces have no dirt, grease, oil or other unwanted materials on them, and keep oxides from the part, as much as possible.

CAUTION
WIRE BRUSHES WHICH ARE USED TO CLEAN CORROSION AND HEAT RESISTANT STEELS AND ALLOYS MUST HAVE THEIR BRISTLES MADE OF AUSTENITIC CORROSION RESISTANT STEEL. WHEN YOU USE THE WIRE BRUSHES, MAKE SURE ALL THE UNWANTED MATERIAL IS REMOVED FROM THE SURFACE. IT IS NOT SATISFACTORY TO ONLY POLISH THE SURFACE.Use wire brushes or silicon carbide abrasives for rough removal of the protective coatings, unwanted material and surface scale.

CAUTION
DO NOT USE CHLORINATED SOLVENTS ON TITANIUM OR TITANIUM ALLOYS.Clean the areas to be welded. Refer to the SPM TASK 70-11-26-300-503.
Preparation of plasma arc welding.
If the assemblies have one more surface below and near to the weld joint, they must be fully examined. This must be done before a decision is made to use the plasma arc welding process. The plasma jet has a large quantity of energy, which could melt or cut the adjacent surface (unless a heat shield is used to give protection).
The gas groove below the joint must have a minimum depth of 0.500 inch (12.70 mm). The width must be sufficient to clear the width of the underbead, refer to Figure.
Gas protection of the weld puddle and the heat-affected zone is very important with the plasma arc process.
Initially the welding current will slope up from a set position on the starting slope current dial to the current value on the welder current dial. This occurs in the length of time set on the starting slope time dial. During this time, travel or wire feed can be started or can be started immediately after the main welding phase occurs. The gas slope system is also started (and stays stable from this time) when the welding arc becomes stable. The 'keyhole' is removed at the end of the finished joint by the gas slope automatic sequence programmer.
Frequently the secondary arc will make burns in the torch components and the workpiece. There are a number of possible causes for this (these are easy to correct) as follows:
Insufficient space between torch components and other parts of the work or fixture at ground potential.
Too high a current for the orifice diameter.
Too low a gas flow.
Insufficient torch stand off.
Incorrect tungsten electrode setback.
Double arcing is usually related to plasma arc, although it is possible on a GTAW torch with a metal gas cup.
Plasma arc welding procedures (machine).
In welding titanium, use argon or helium for the torch shielding gas, which flows out around the plasma orifice. Refer to Step paragraph 17.A.
Plasma arc welding procedures (manual).
SUBTASK 70-31-13-310-009 Plasma Arc Welding
In an electron beam welding machine, the speed of the electrons is increased in an electron gun (to that greater than half the speed of light). The electron flow made is then formed, focused and bent by electrostatic and electromagnetic fields into a beam of small width. This beam hits the material to be welded, as a very small spot. When this occurs, the kinetic energy of the high speed electrons is changed into heat. This melts the material to make a fusion weld.
The process is usually done in a high vacuum because gas molecules (such as air or a gas blanket) make the electron beam go in all directions.
At this time there are two basic types of electron beam welders: The high voltage machines which use acceleration voltages of 70,000 to 150,000 volts and the low voltage machines which use from 15,000 to 30,000 volts. High voltage beams can give a beam of better focus with deeper penetration.
Low total energy (heat) input.
This results in minimum distortion, minimum weld area, and minimum heat affected zone. Low heat input is possible because beam penetration is possible without the usual thermal conductivity effects of the weld material (for example in GTAW welding). The accurately focused beam results in a fusion zone with a cross section of small width.
Good control.
Beam voltage, beam current, spot size and position are all adjustable with precision. This gives control to a high degree of the weld heat input. Also beam deflection in one of two (or both) directions or in the shape of a variable diameter circle can change bead shape and height on some materials.
There are three important conditions which give good results with electron beam welding (as compared to the GTAW process).
The standards for electron beam welding are the same as for GTAW welding. Although, in electron beam welding, the most usual type of joint is the butt joint. The butt joint must have a close fit with no separation, to give a satisfactory joint. The maximum gap must not be more than 0.003 inch (0.076 mm). Plug welds can be made with this process.
General data.
Clean the part to remove the grease. Refer to the SPM TASK 70-11-03-300-503. The surfaces to be welded must not have protective coatings on the them which can cause weakness in the weld. Make sure the surfaces have no plasma spray, flame plate, plating, dirt, grease, oil or unwanted materials on them. Keep oxides from the part, as much as possible.

CAUTION
WIRE BRUSHES WHICH ARE USED TO CLEAN CORROSION AND HEAT RESISTANT STEELS AND ALLOYS MUST HAVE THEIR BRISTLES MADE OF AUSTENITIC CORROSION RESISTANT STEEL. WHEN YOU USE THE WIRE BRUSHES, MAKE SURE ALL THE UNWANTED MATERIAL IS REMOVED FROM THE SURFACE, IT IS NOT SATISFACTORY TO ONLY POLISH THE SURFACE.DO NOT USE SOLVENTS WHICH CONTAIN CHLORIDE ON PARTS.Use wire brushes or silicon carbide abrasives for the rough removal of the protective coatings, unwanted material and surface scale.
Clean the area to be welded. Refer to the SPM TASK 70-11-26-300-503, no unwanted or remaining material must be on the part after it is cleaned.

CAUTION
SPECIAL PREPARATION PROCEDURES WHICH USE ACID CLEANING FOR TITANIUM AND TITANIUM ALLOYS OR THE USE OF CHEMICAL PROCEDURES WHICH REMOVE MATERIAL ARE ONLY PERMITTED IN PARTICULAR WELDING REPAIRS. THESE PREPARATION PROCEDURES MUST NOT BE USED UNLESS SPECIFIED IN THE APPLICABLE REPAIR PROCEDURES.CONTAMINATION AND UNWANTED MATERIAL WILL MAKE THE WELDS WEAK.Preparation for electron beam welding.
Install the parts in fixtures or clamp them together as necessary, with filler material if it is to be used. Parts can be carefully tack welded together with inert gas fusion welding with the correct filler wire. These tack welds must not cause defects in the electron beam weld, or base metal. Also the tack welds must be fully contained in the final weld, unless specified differently.
Remove the part from the vacuum chamber then make an inspection of the weld. Finish the weld surface as specified for the particular part. You must be careful to make sure that weld beads on parts in the engine's gas path are of minimum height. They must be correctly flared and if necessary made smooth to prevent an incorrect engine airflow. If these things are not done, it can cause problems in engine operation.
Stress-relieve the part as specified in the applicable procedure, refer to Step. Stress-relief is necessary because of high temperatures used in the fusion zone of electron beam welding and the subsequent procedure to make the part cool. These procedures can result in an increased material hardness and a decrease in ductility. Although a low total heat is used (in this process), parts can crack unless correctly stress-relieved.
Electron beam welding procedures.
SUBTASK 70-31-13-310-010 Electron Beam Welding
Powder Feed Weld Surfacing is a welding process used to fuse powder filler metal onto a surface. The filler material is in powder form and the energy source can be either a laser beam or plasma arc which melts the powder and substrate material to produce a correct metallurgical bond.
The process is performed with an inert gas shield such as argon and/or helium. The nozzle can be either a coaxial or side-feed configuration.
The advantage of this process over the usual welding process is that the heat input to the base material is kept to a minimum. The result is a very small fusion zone with a minimal heat-affected zone and minimal part distortion.

CAUTION
WIRE BRUSHES USED FOR CLEANING CORROSION AND HEAT RESISTANT STEELS AND ALLOYS MUST HAVE BRISTLES OF AUSTENITIC CORROSION RESISTANT STEEL. WHEN YOU USE WIRE BRUSHES, BE SURE TO REMOVE ALL THE UNWANTED SURFACE MATERIAL; DO NOT JUST POLISH OVER THEM.DO NOT USE SOLVENTS THAT CONTAIN CHLORIDES.To remove protective coatings, refer to the repair methods specified in the Engine Manual; then, remove any remaining surface scale by wire brush or silicon carbide abrasives.
Clean the part, refer to the SPM TASK 70-11-26-300-503 solvent wipe method, before you weld.
Surface Preparation.
You can ignore small pores of less than 0.002in. (0.051 mm) when the material thickness is less than 0.063in. (1.60 mm).
If there is no Engine Manual requirement, the maximum permitted size of pores is 0.020in. (0.51 mm) with 2/linear inch (25.4 mm) and the minimum distance of the indications is 0.080in. (2.03 mm). When applied to castings, the maximum pore size must be as specified in the applicable casting quality documents.
Guidelines for quality standards as follows:
Quality Control.
SUBTASK 70-31-13-310-018 Powder Feed Weld Surfacing
Usually it is necessary to stress-relieve parts repaired by fusion welding. The cycles of stress-relief operations done in an oven with an air atmosphere are also applicable to local stress-relief operations. Refer to the SPM TASK 70-37-00-370-501.
For some parts, stress-relief is not necessary. This is known from the satisfactory result of processes done before. The Engine Manual Repair will give the procedure for stress-relief, as necessary.

CAUTION
THE NECESSARY STRESS-RELIEF (IAE CONTROL NO. 70-37-06, SPM TASK 70-37-06-370-501 AND IAE CONTROL NO. 70-37-07, SPM TASK 70-37-07-370-501) AFTER WELDING OR BRAZING TYPE 410 OR GREEK ASCOLOY MATERIALS REMOVES THE BRITTLENESS IN THE JOINT AREAS. YOU MUST BE CAREFUL WITH THE PARTS DURING THE STRESS-RELIEF PROCEDURE AND UNTIL IT IS COMPLETED. THIS IS TO PREVENT CRACKS IN THE PARTS.The stress-relief cycles given in below are for general information. The applicable Engine Manual, Repair or Service Bulletin will instruct the use of a particular stress-relief cycle (these will be identified by the cycle number). If a different stress-relief cycle is necessary (to those given in this procedure) it will be included in the particular procedure.
Cycle No.
Materials
TASK
1,
1A
Type 410, Greek Ascoloy, Titanium (Blades) Low Alloy Steels
4*,
4A*
Inconel X
5,
5A
B-1900/ IAE 633/IAE 1455, STELLITE 31/AMS 5382, Inconel 713/IAE 655, WI-52/IAE653, MAR-M-509/IAE 647, MAR-M-200/IAE 1422/IAE 1480
6,
6A
Greek Ascoloy
7,
7A
WASPALOY, Udimet 700
9
Inconel 600, Nimonic 75/IAE 673
10**
HASTELLOY X, W, N, S Haynes 188/IAE 1042, Inconel 625, Types 310/316
11
Titanium and Titanium Alloys
12,
12A
Inconel 718 Short Cycle Precipitation Heat Treatment
13
17-7PH Austenite Conditioning, Types 410/430 welded with 430 Rod
14
Type 430 with AMS 5776 or AMS 5680 Rod
15,***
15A***
A-286 Tinidur Stress-Relief/Age
16
Inconel 706 or 718 Simple Stress-Relief
17
Incoloy 901 (Structural Welds)
18
Cast Nickel and Cobalt Alloy Airfoil Materials
-
Martensitic Corrosion Resistant Steels
-
Types 321/347 (Partial Stress-Relief)
* Cycles 12, 12A and 16 can be used as alternatives to Cycle 4 and 4A.
** Cycle 22 (Refer to the SPM TASK 70-37-24-370-501) can be used as an alternative to Cycle 10 for Hastelloy X. Refer to the SPM TASK 70-37-24-370-501.
*** Cycle 16 can be used as an alternative to Cycles 15 and 15A.
SUBTASK 70-31-13-370-001 Stress-Relief After Welding
For good quality GTAW welding on titanium and titanium alloys, it is necessary that no contamination occurs in the weld area, during welding. The inert gas used must be argon and/or helium of not less than 99.995 percent purity. It must not contain more than 5.0 ppm free oxygen and not more than 10 ppm moisture.
Titanium can make oxides and nitrides quickly because it absorbs atmospheric gases/surface contamination at temperatures of 1500 deg F (816 deg C) or more. The result of this is a permanent decrease in fatigue life, tensile strength and ductility. Because the molten weld puddle temperature is approximately 2600 deg F (1427 deg C), the weld bead and some of the heat affected zone can get this contamination. Thus, it is most important that a satisfactory inert atmosphere gives protection on the front and back of the weld. As much as possible, no oxides, dirt, oil, contamination or unwanted material must be on the front or back surfaces (this includes fingerprints on the cleaned metal surface; fingerprints can cause weld contamination which can cause cracks).
After the part is cleaned (in the specified procedure), make sure all the weld area is fully dry with no remaining solution on it. If not, when weld heat is applied, contamination of the gas shield occurs, as the solution changes to a vapor. Put the part in an oven at a temperature of 285 to 315 deg F (141 to 157 deg C) for one hour to dry the internal parts of case assemblies.
Silcon carbide abrasives must only be used for the last surface clean procedure and to remove oxides. This must be followed with a solvent flush. Refer to the SPM TASK 70-11-26-300-503.
It could be necessary to rout the defective area to be welded to make the smallest possible hole. This could be necessary if you cannot gain access to the back of the weld area to clean it. It is then possible to use a mechanical procedure to clean the bottom of the adjacent area. The access hole is then included in the area to be repaired. You can weld a small patch to fill the hole.
It is recommended that the welding of titanium is done in a sealed chamber, pressurized with inert gas. Let a flow of the inert gas go through the hollow parts (such as inlet guide vane assemblies) so the atmosphere is removed. Refer to Step, Inert Gas Fusion Welding. Sufficient time must be given for the inert gas to replace all the air inside each part. You can use a vacuum pump to remove the existing atmosphere in the sealed chamber before the inert gas goes into the chamber. Use this procedure until the atmosphere is of the necessary purity in the chamber.
If a sealed chamber is not available, you can seal the component case holes with plugs. Then, let a flow of inert gas go into the component so the flow goes through or out of the weld area. If necessary, put the gas in one side of the repair and make a small vent on the other side to do this. Always give sufficient time for the air to be replaced.
NOTE
The different shades of blue you can see on the welds and the case after this stress-relief are not important. They are caused by the heat of the stress-relief. The colors are not an indication of, pre-weld contamination.The inert gas purity level can be seen from the color made when the spot welds are made on titanium test pieces (in the sealed chamber). Put the test piece adjacent to the area to be welded so its sides are open to the inert atmosphere. You can bend the test pieces or use clamps or other applicable procedures to do this. The tack welds change in color as the oxygen content decreases and the inert atmosphere becomes more pure (slowly and continuously) as follows: blue, light blue, yellowish blue, yellow, straw, light straw and silver.
These colors are only applicable to the center of the tack weld. The blue band of small width, which is usually in the heat affected zone, is to be ignored. It is important to get tack welds of a silver color, these must be made on the test piece, before the welding repair is started. You can have the color limit of light straw, refer to IAE 3P16233 and the permitted visual inspection limits. These limits are applicable before the post-weld stress-relief.
When titanium welding with a local inert gas shield, make sure the weld area on both sides has protection. This is applicable until the temperature decreases to approximately 1100 deg F (593 deg C). This is below the temperature when impurities and oxygen becomes absorbed. When a sealed chamber is not used, let the torch gas flow over the weld area for five to ten seconds after the arc is stopped. This will give the necessary gas shield while the weld area becomes cool.
Stress-relieve the parts after welding with cycle No. 11 Figure unless specified differently (Refer to the SPM TASK 70-37-17-370-501).
SUBTASK 70-31-13-310-012 Welding of Titanium
To keep distortion to a minimum for patch-type weld repairs, use a close fit between the patch and the cut-out in the part. Also, use a small diameter weld wire (as less heat is necessary, this gives less distortion). It is satisfactory that more than one pass is necessary when a small weld wire is used.
Correct use of these procedures is important when an adjacent flange or surface has a critical tolerance (for example, flatness, squareness, parallelism, concentricity or a smaller tolerance). The nearer a patch repair is to a critical area the more important step A. becomes. If patches are not as near to such areas and areas with greater tolerances it is not as applicable.
SUBTASK 70-31-13-310-014 Patch-type Weld Repairs
In general, skip welding is welding a short distance in a location (for this example, weld A) then welding in a location 180 degrees away (weld B). One more weld is then made (weld C) 90 degrees from the initial weld (weld A). This is followed by one more weld (weld D) made at 180 degrees from weld C.
There are limits in the use of skip welding. For example, when welding projections on a circle, where there is a space between each projection. The use of skip welding has shown that this type of welding can result in more distortion. Because heat is decreased to zero very quickly and the part heats and cools quickly, warpage results. In such a repair, it is better to weld these type of projections one after the other. This permits the subsequent area to become warm gradually. Also at the same time (in the welded area) there is a decrease in the rate the part cools.
SUBTASK 70-31-13-310-015 Skip Welding
When the part is installed in the fixture, it is permissible to use shims between the fixture and flange. This is to put stress on the flange with a sufficient quantity and in the opposite direction, to keep distortion to a minimum. On completion of welding, the part is released (so there are no stresses on the part). The flange area near the weld will go back to its correct plane.
SUBTASK 70-31-13-310-016 Welding Near Flanges
Rewelding of manual or machine gas metal-arc, gas tungsten-arc, plasma-arc or shielded metal-arc welds can be made by the initial procedure or the manual gas tungsten-arc or plasma-arc procedure. For class 1 welds, a maximum of three rewelds is permitted for each rejectable indication. Such indications, separated by less than 1.0in. (25.4 mm) must be considered a single rejectable indication.
One manual reweld of up to 100 percent of weld length of electron beam welds with gas tungsten-arc or plasma-arc procedure, which uses filler metals specified in Figure, is permitted for filling surface defects, (this does not include drum rotor and rotating knife-edge airseals).
SUBTASK 70-31-13-310-019 Rewelding
NOTE
The operations that follow can be done in or adjacent to the fusion zone if all the heat treat requirements are fulfilled once no more welding is to be done. Refer to Figure.To clean oxides and discoloration from welded parts, refer to Step or Step or Step, as applicable. Refer to the SPM TASK 70-11-06-300-503 for the cleaning of titanium and titanium alloy parts and heat treating refer to the SPM TASK 70-37-00-370-501.
SUBTASK 70-31-13-310-020 Post-Treatment
The welder must physically examine the weld for quality, uniformity, undercutting, and cracking. Use 10X magnification, unless specified differently by the Engine Manual.
NOTE
Be careful to make sure that the weld beads on gaspath parts are held to specific repair requirements and that they are correctly faired by blending to prevent flow disturbance. Failure to follow this precaution can cause engine operation problems.Welds must blend into adjacent metal in gradual smooth curves. Under no conditions must the operator reduce the thickness of the base metal.
NOTE
During welding near a hole, the metal between the edge of the hole and weld area can melt. This causes "Melt Back", which is the result of lack of metal to absorb the heat of welding and can cause a V-shaped area at the edge of the hole. When this occurs, add weld material and repair the hole and the adjacent area to the initial configuration.Do a fluorescent penetrant inspection of the welded area. Refer to the SPM TASK 70-23-00-230-501. You can also use radiographic inspection to do a check for stress cracks and other defects in the weld or in the metal adjacent to the weld.
General.
SUBTASK 70-31-13-310-030 Inspection of Welds
Figure: Depth of penetration and bevel angles of prepared welds
Depth of penetration and bevel angles of prepared welds
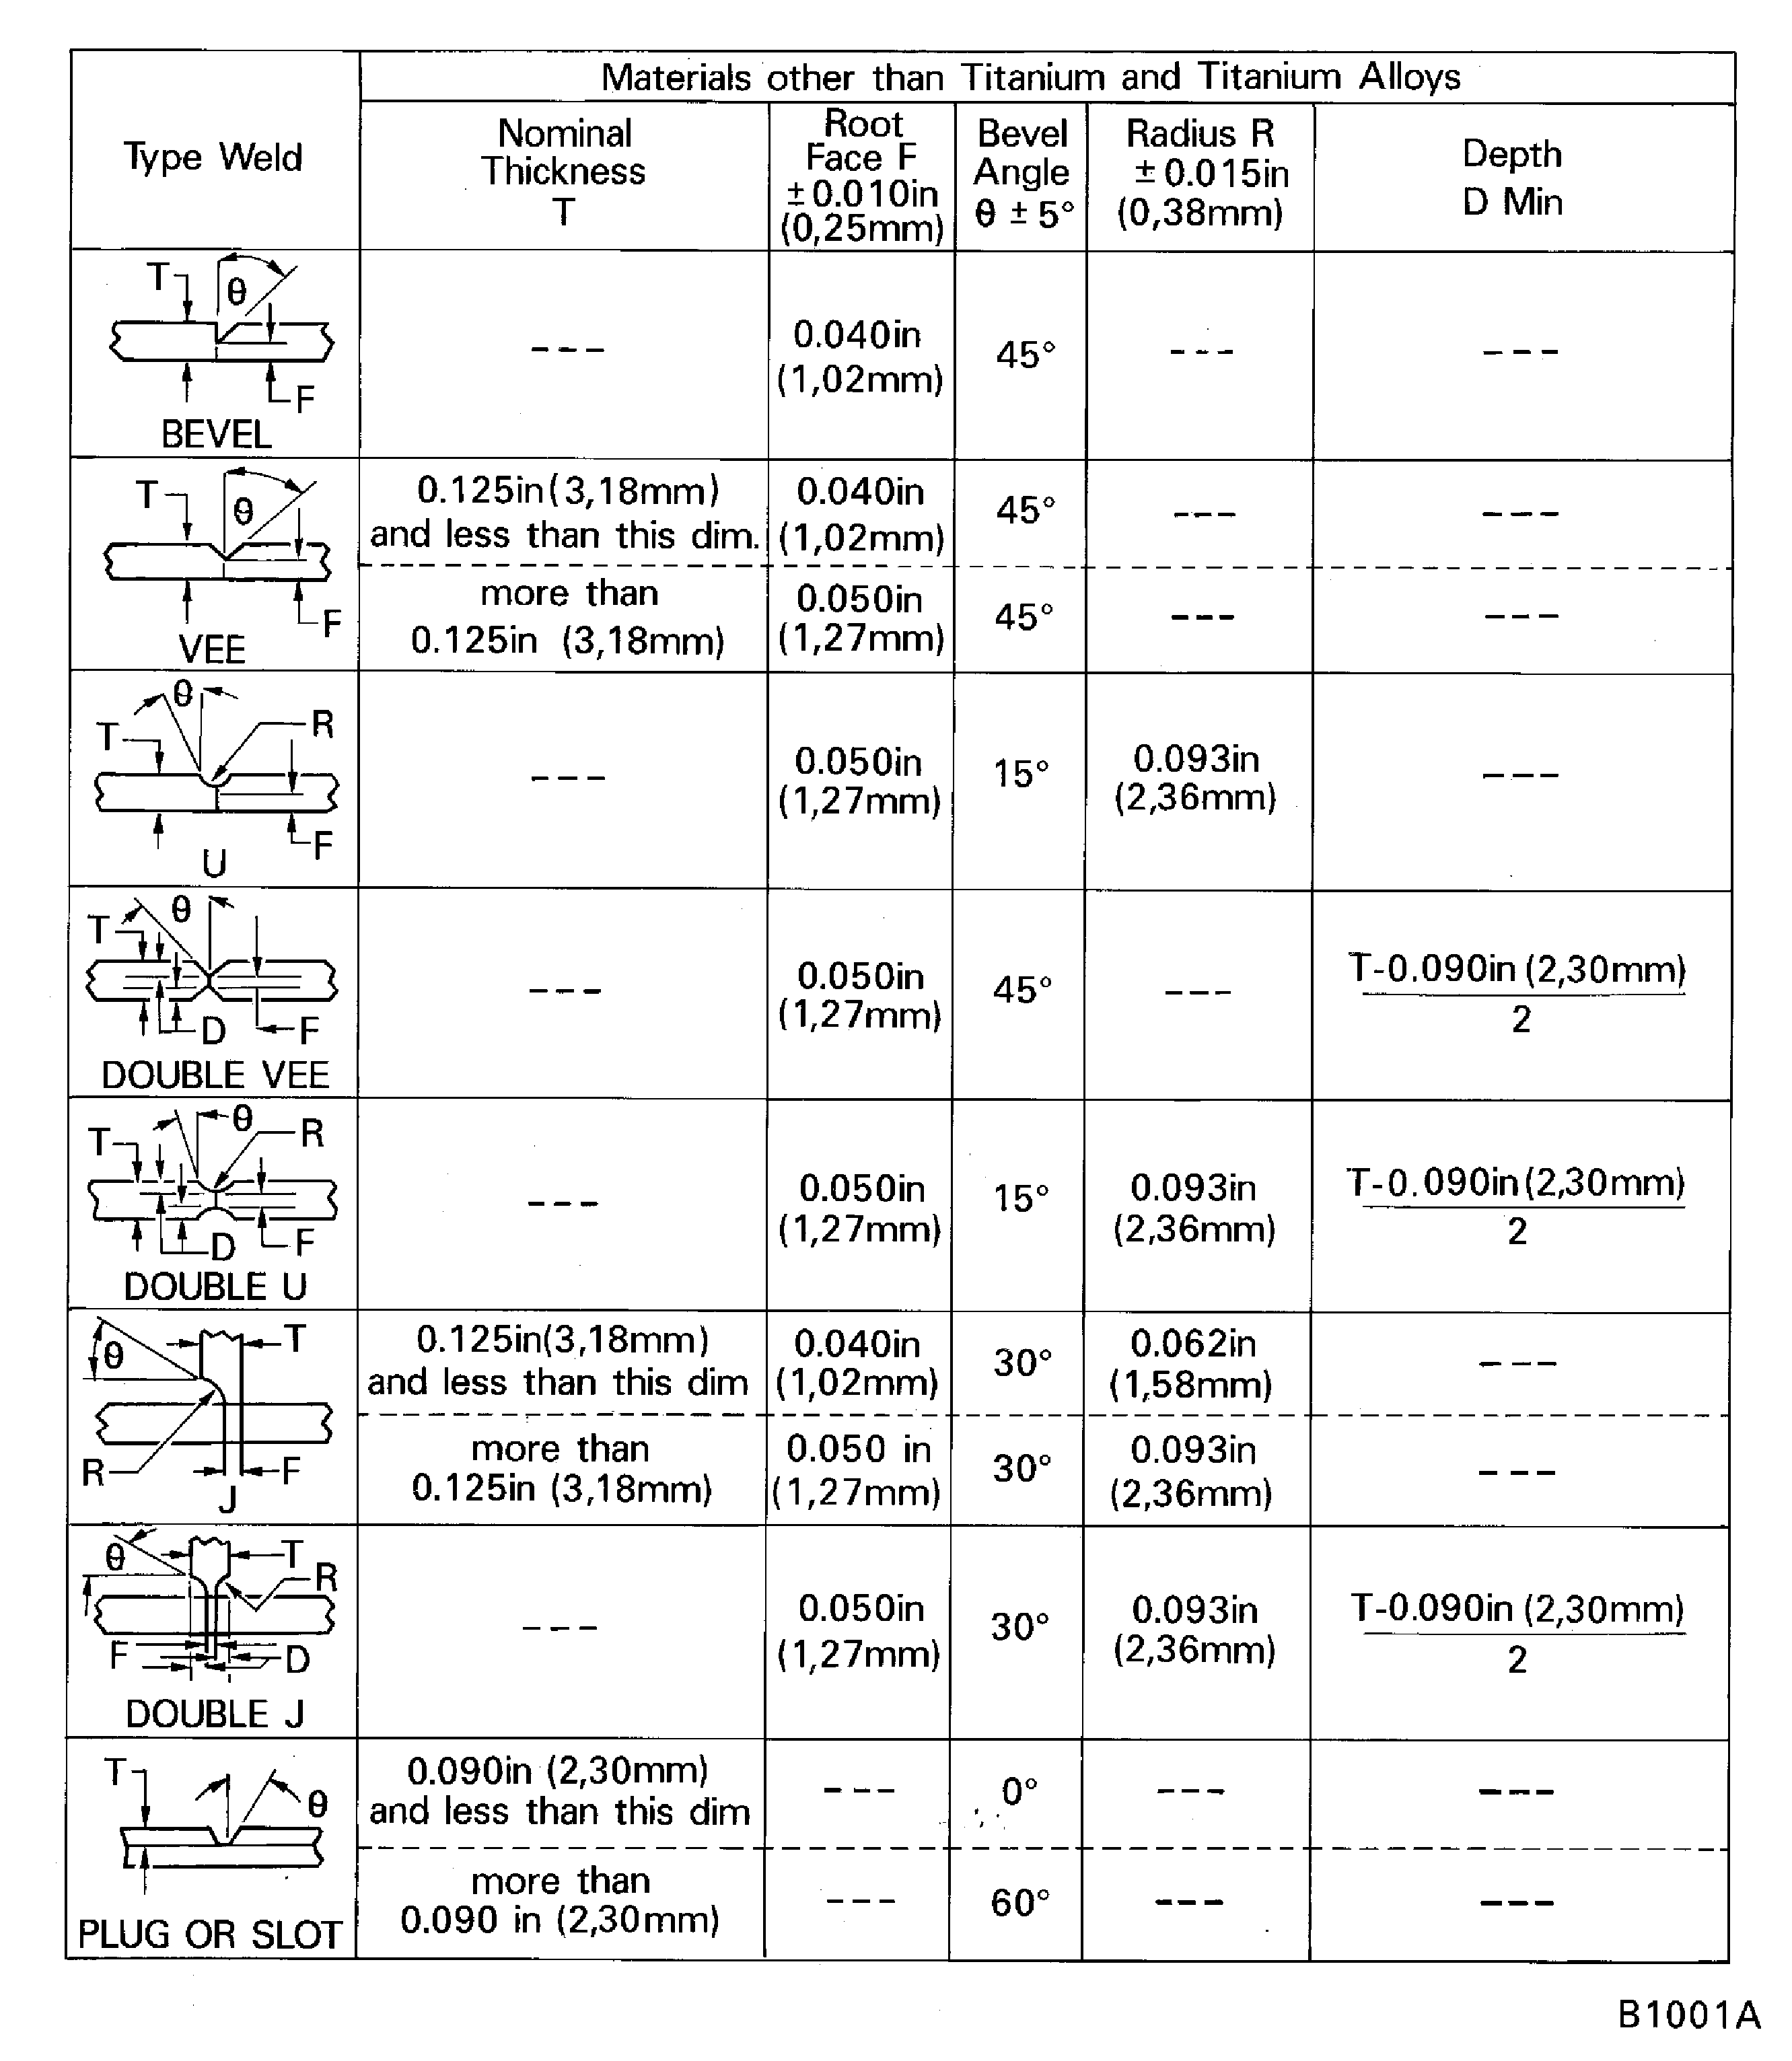
Figure: Depth of penetration and bevel angles of prepared welds
Depth of penetration and bevel angles of prepared welds
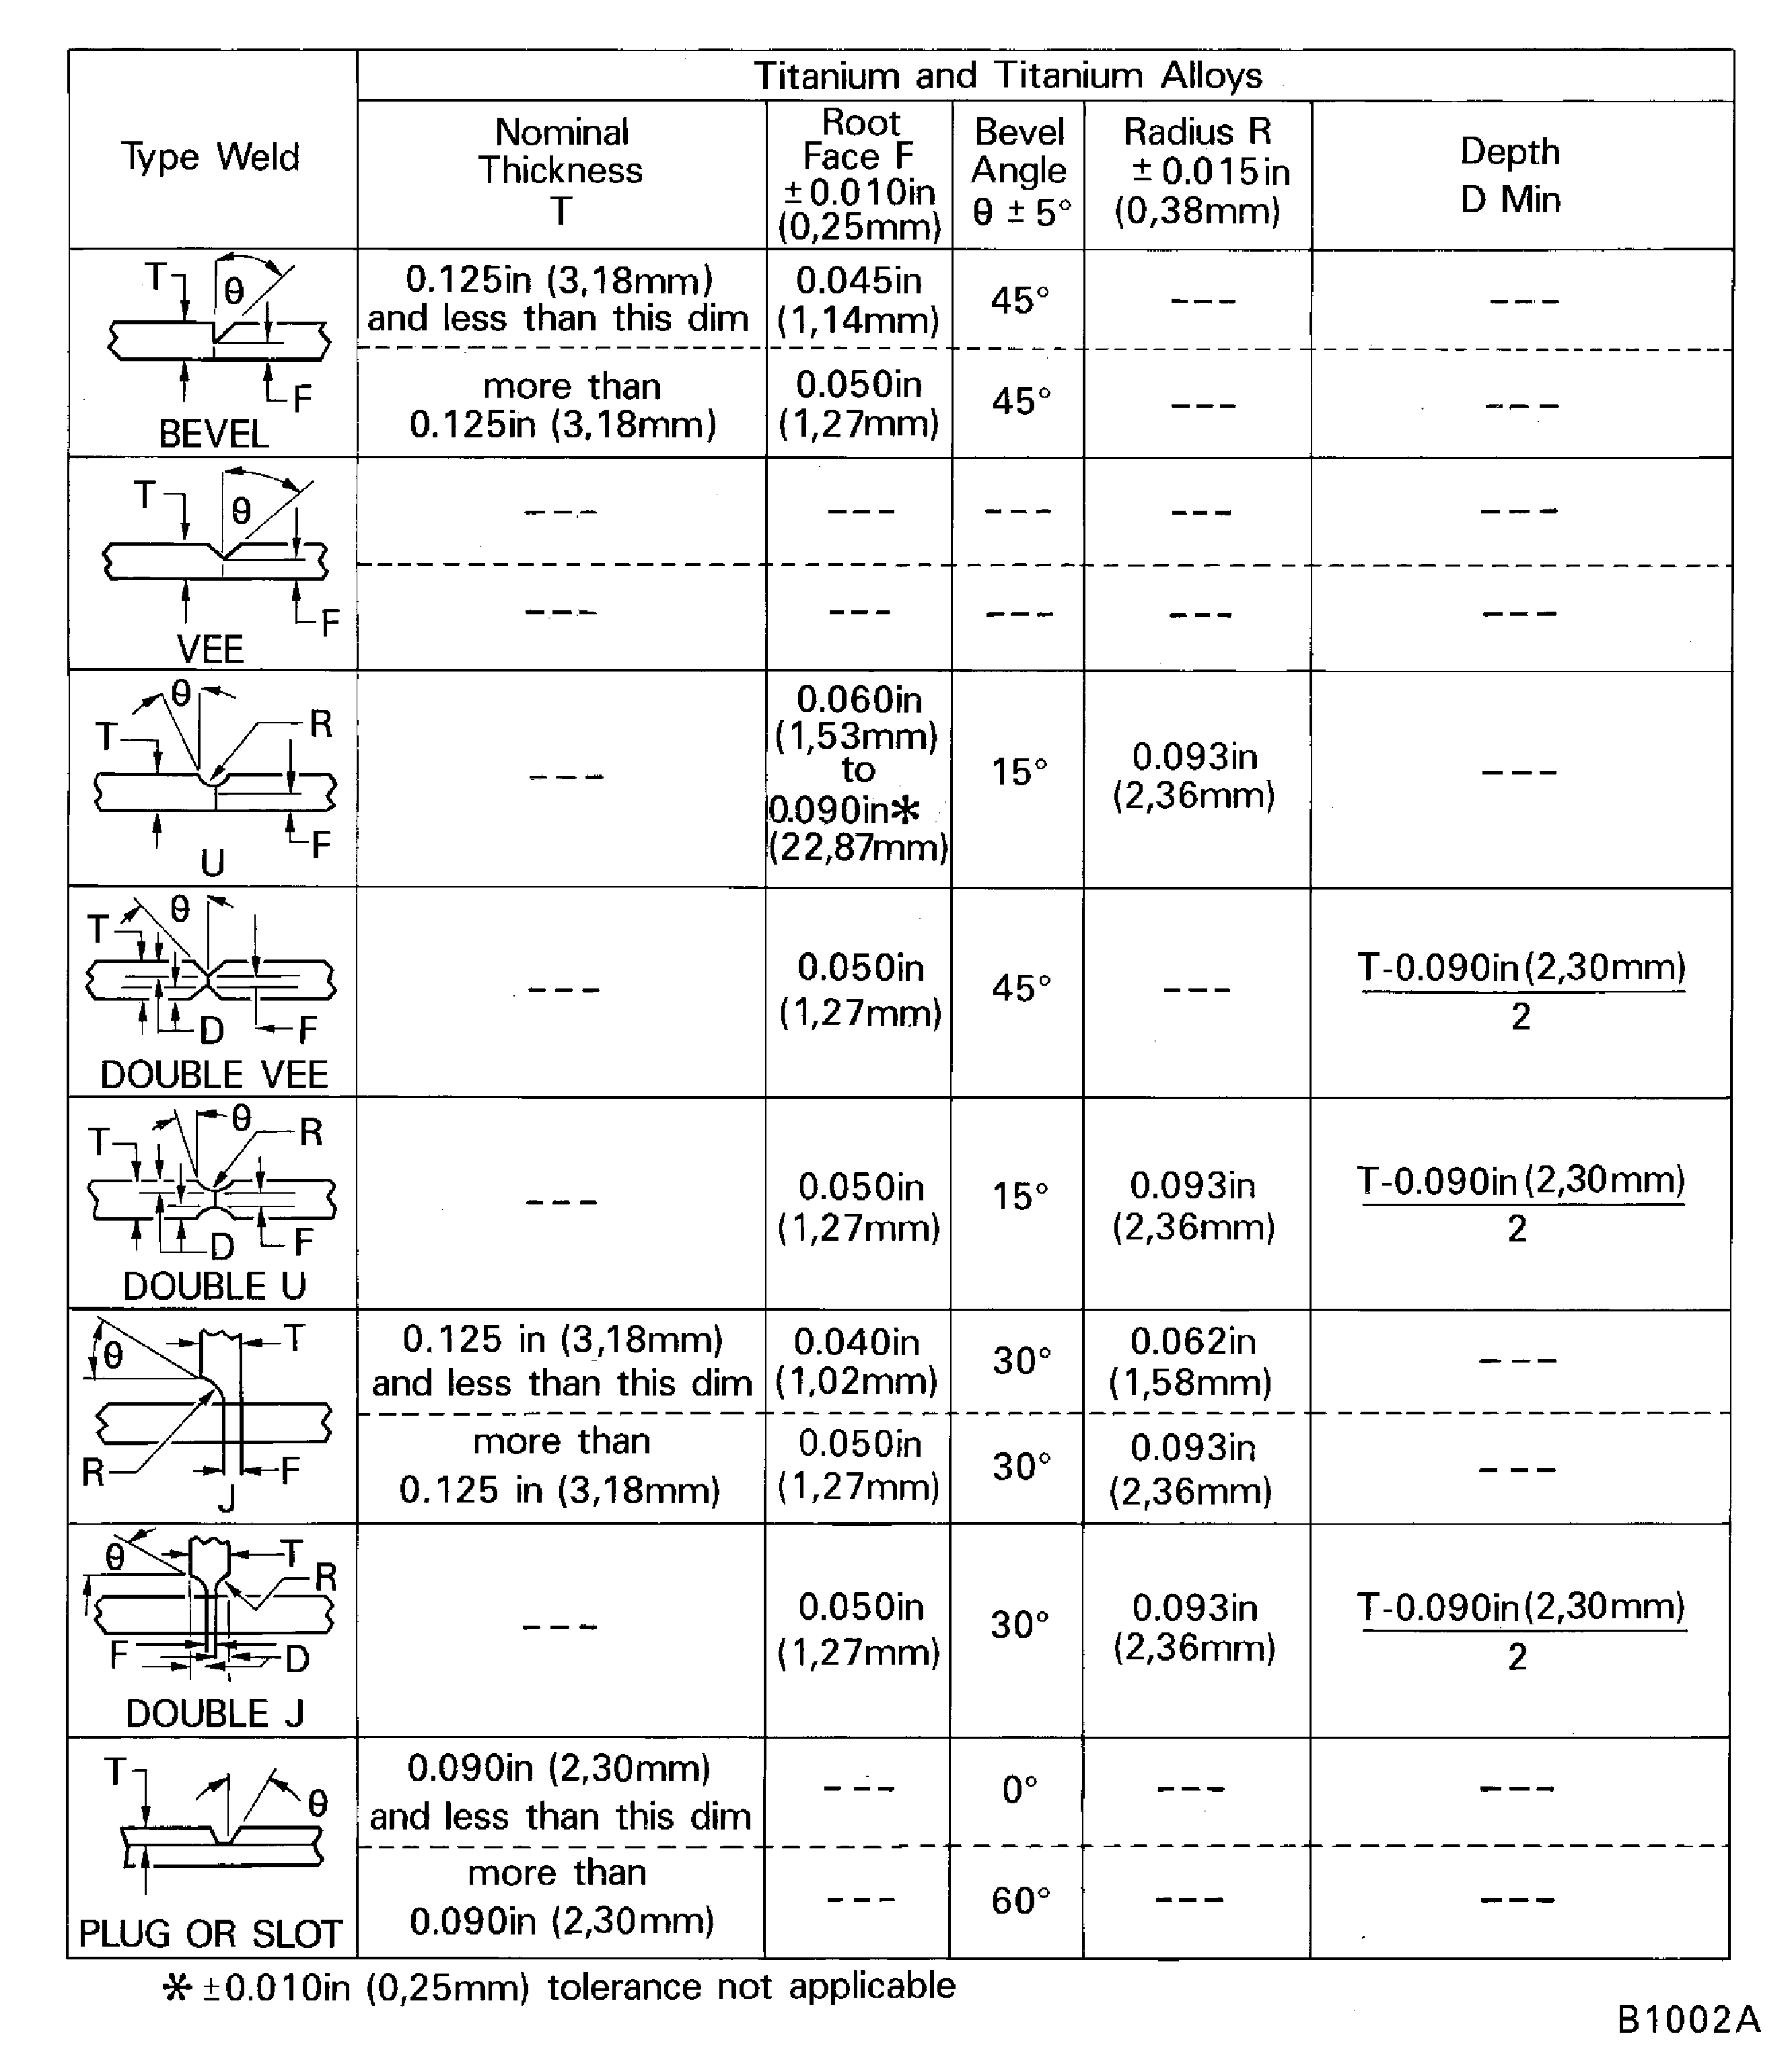
Figure: Welding filler metal data
Welding filler metal data

Figure: Weld symbols
Weld symbols
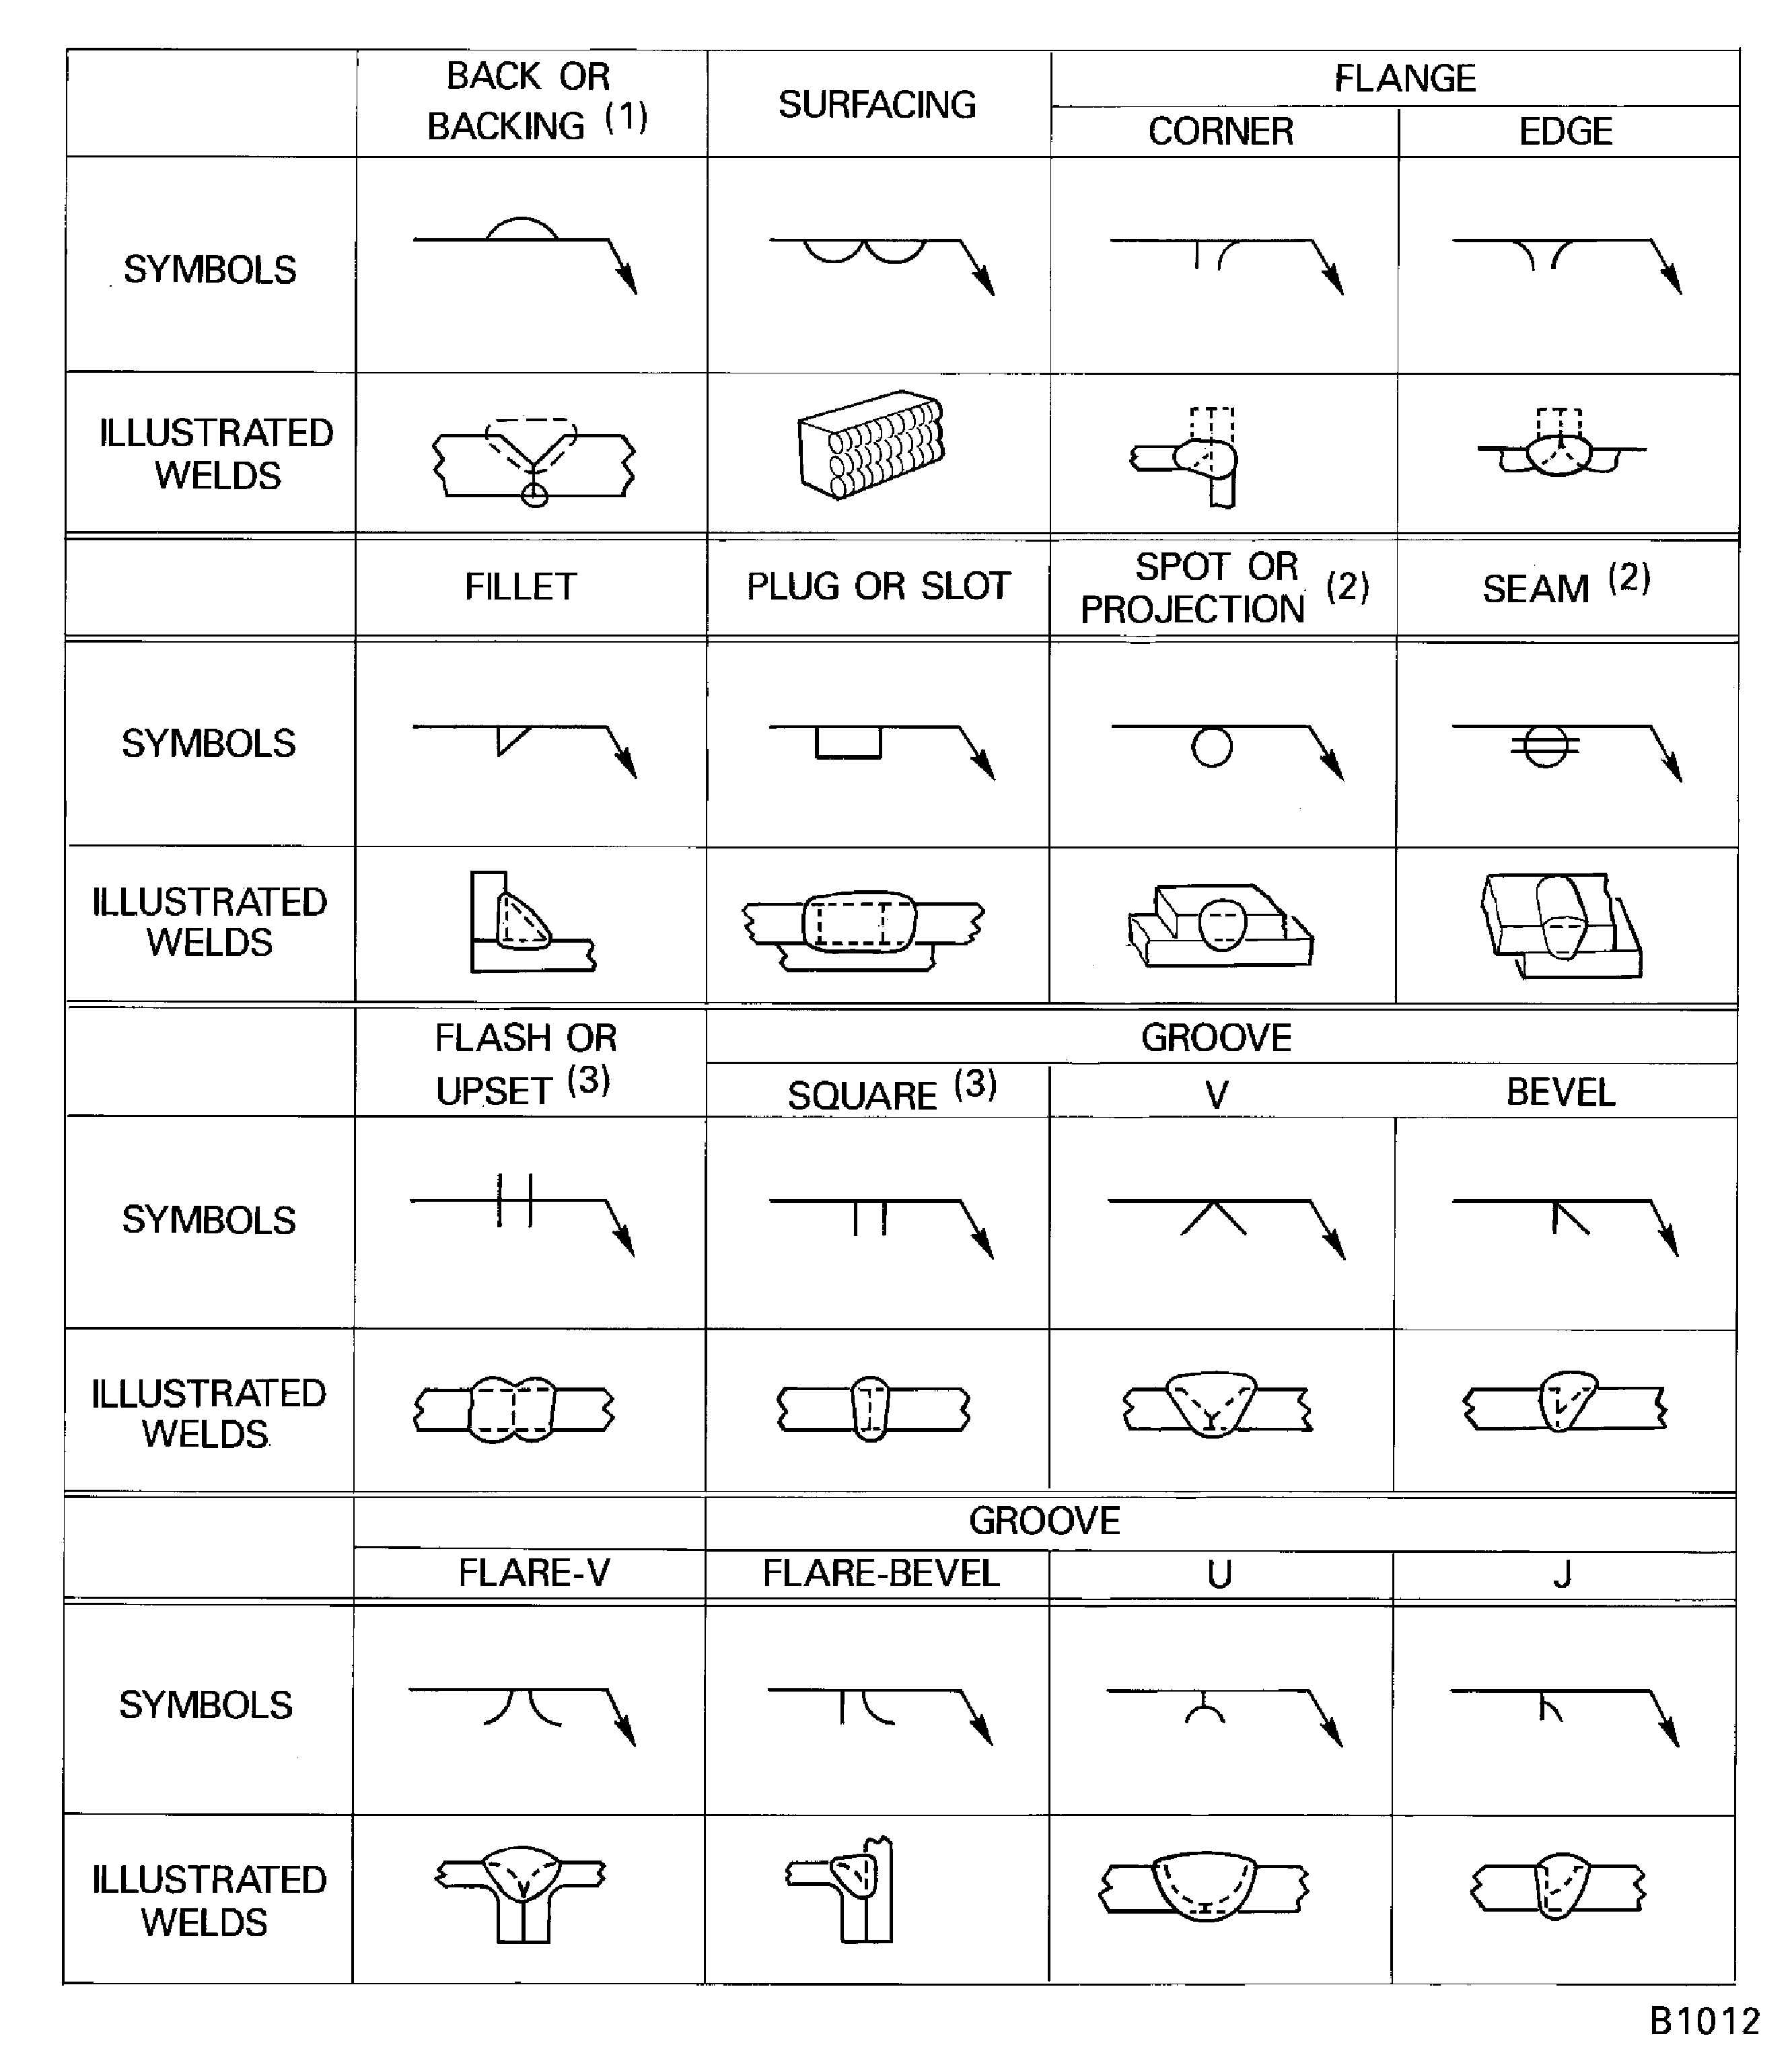
Figure: Groove weld height control symbols
Groove weld height control symbols
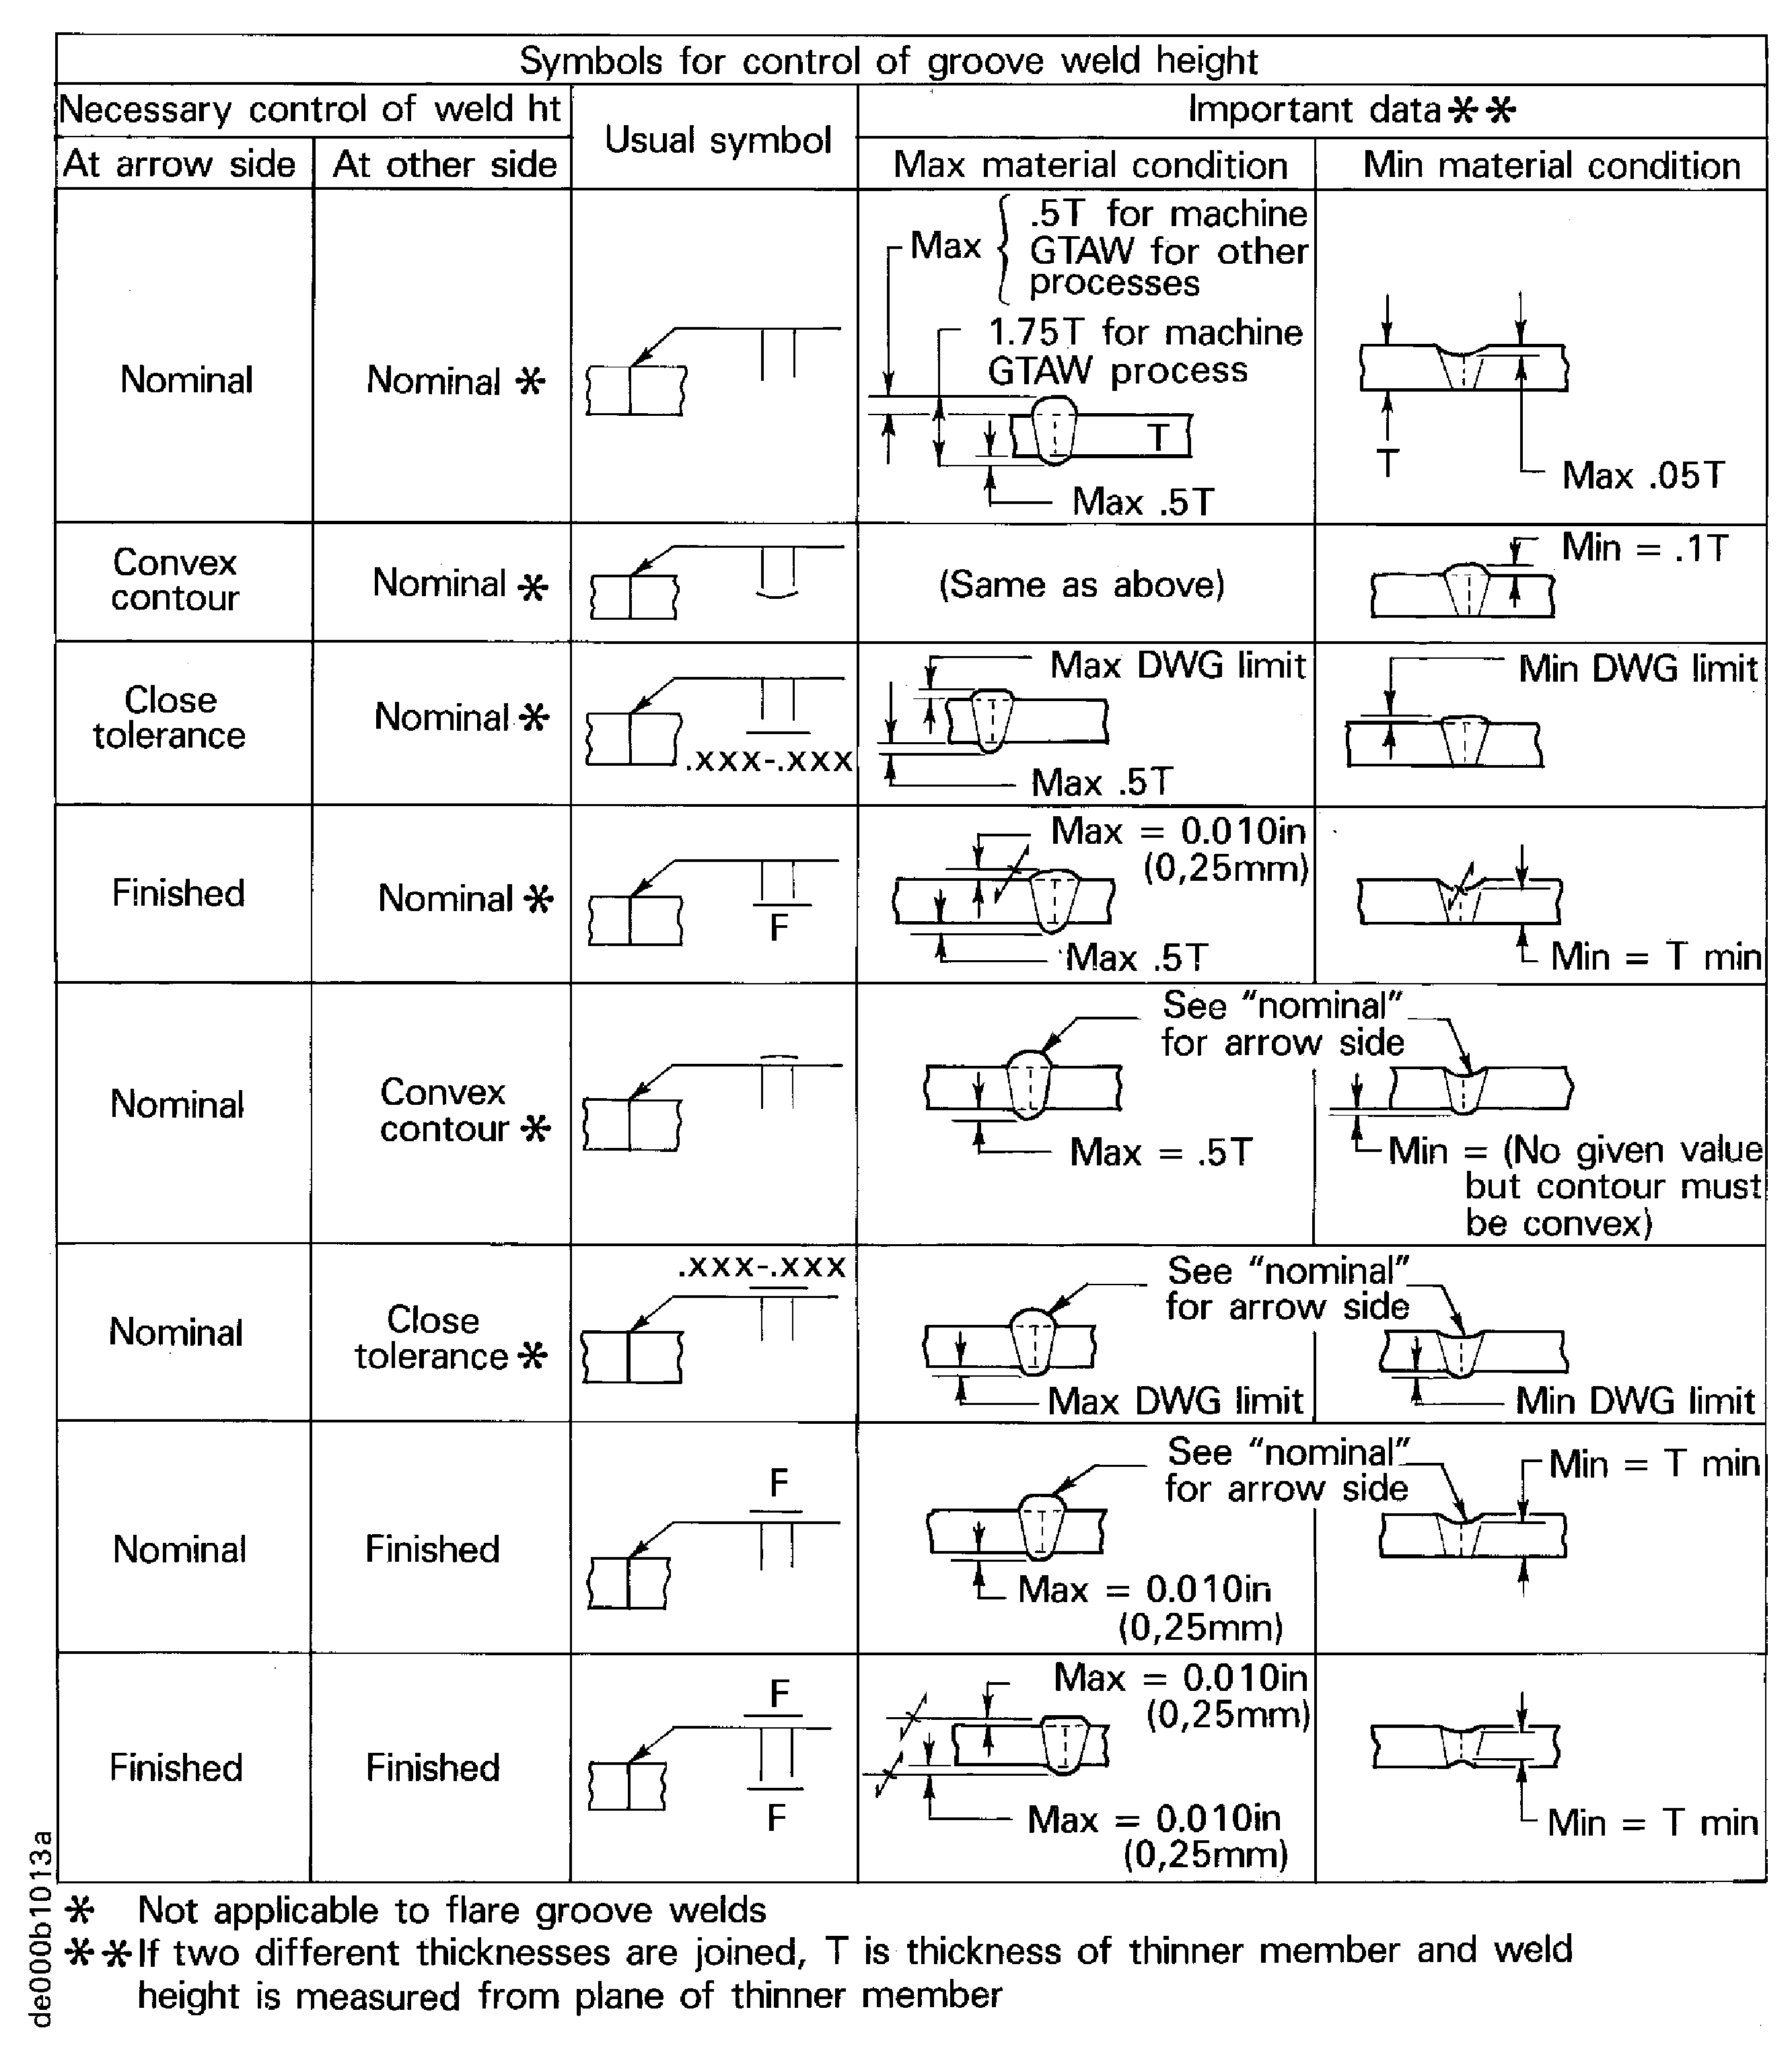
Figure: Fillet dimensions in fillet welds
Fillet dimensions in fillet welds
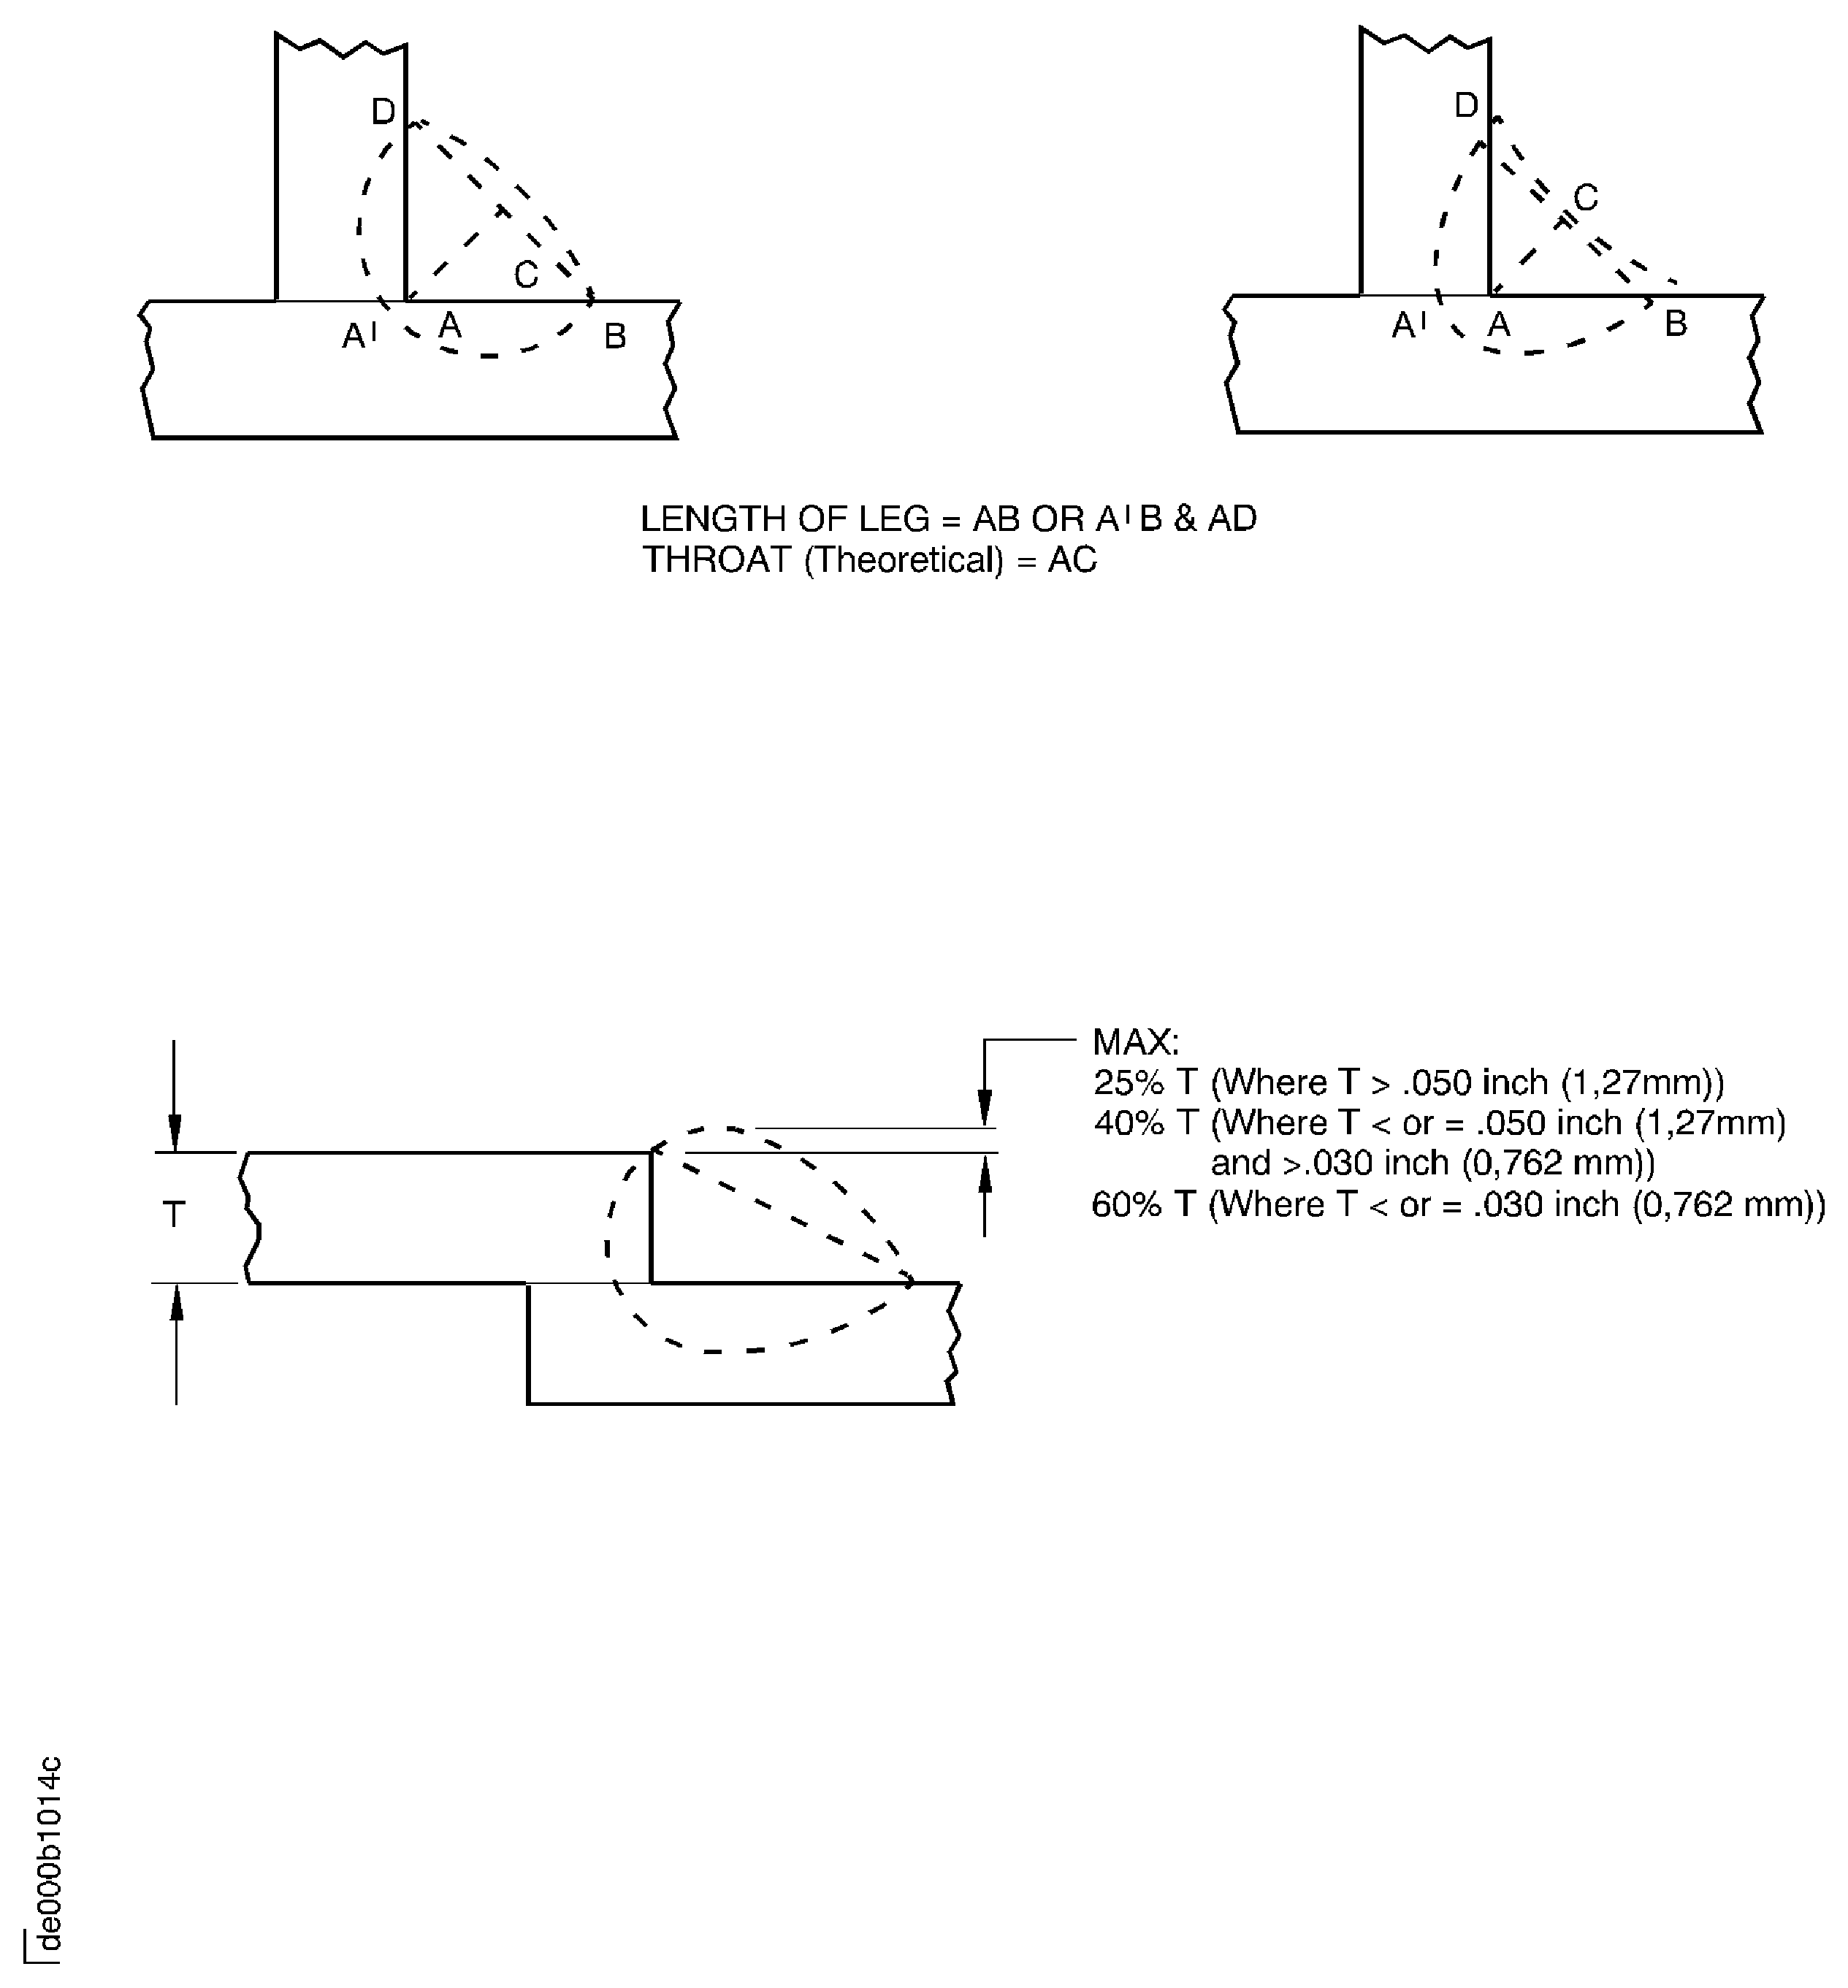
Figure: Alignment variation limits
Alignment variation limits
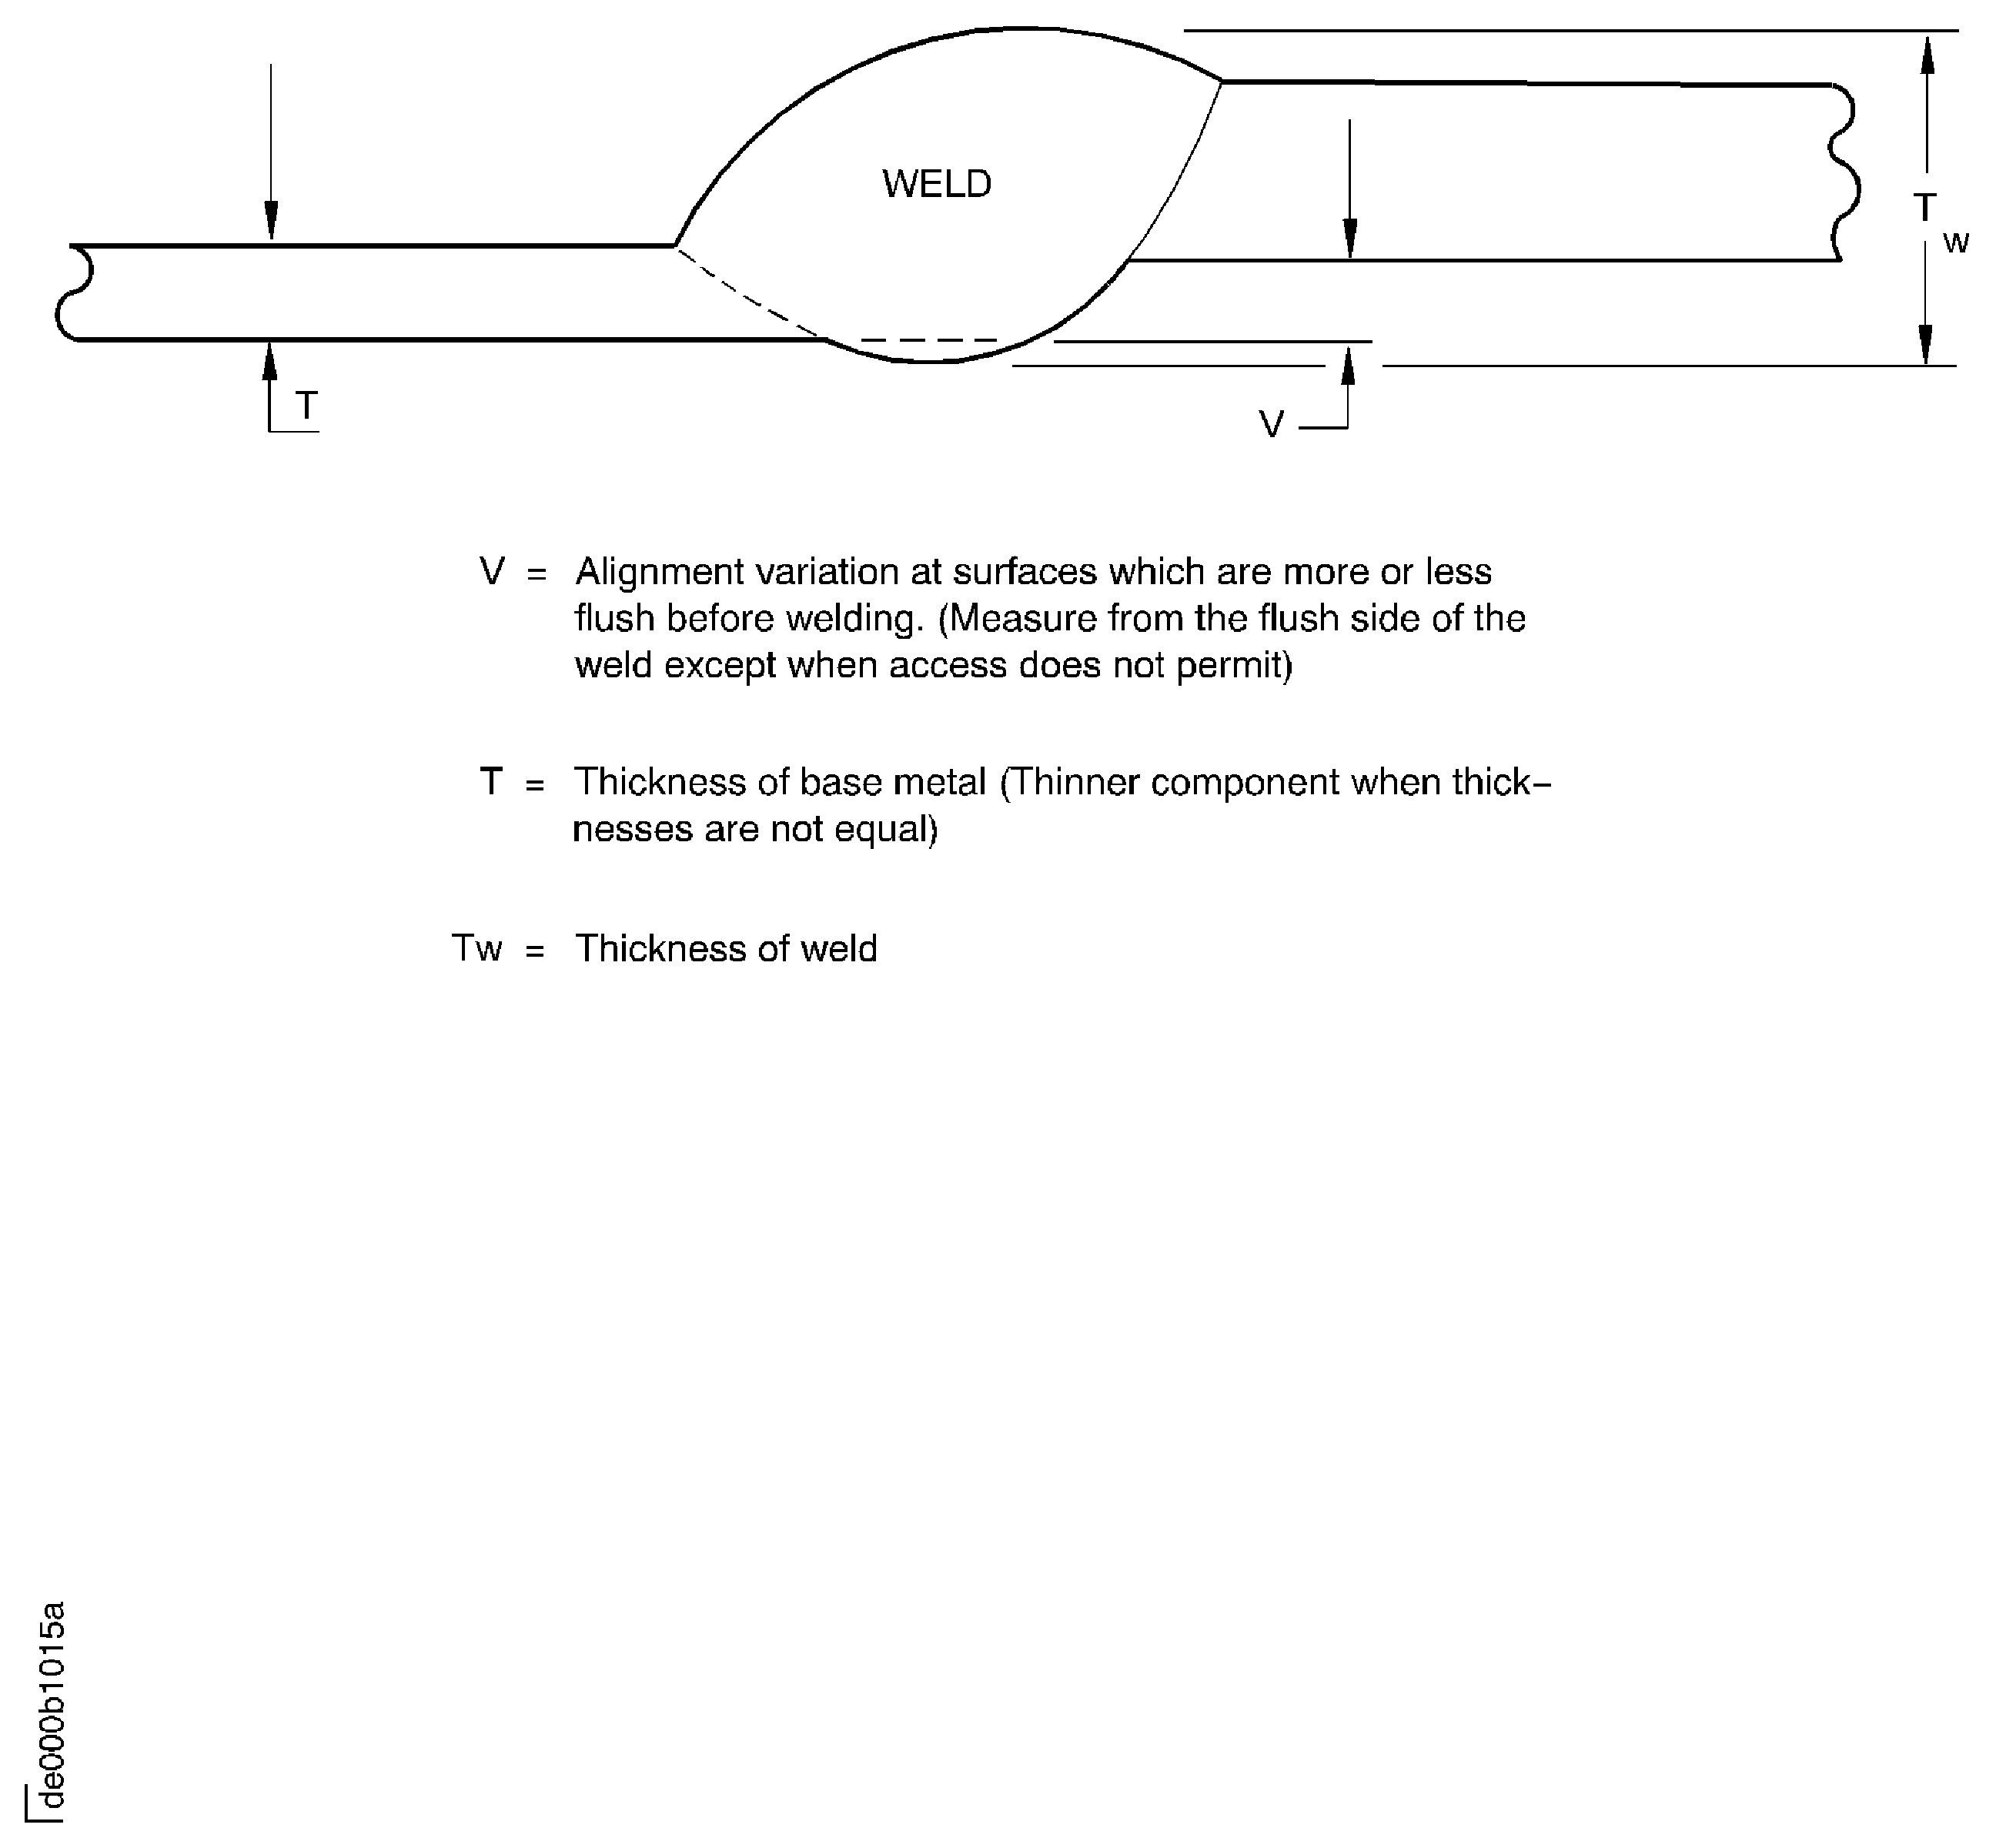
Figure: Alignment variation Limits - Percentage of nominal material thickness
Alignment variation Limits - Percentage of nominal material thickness
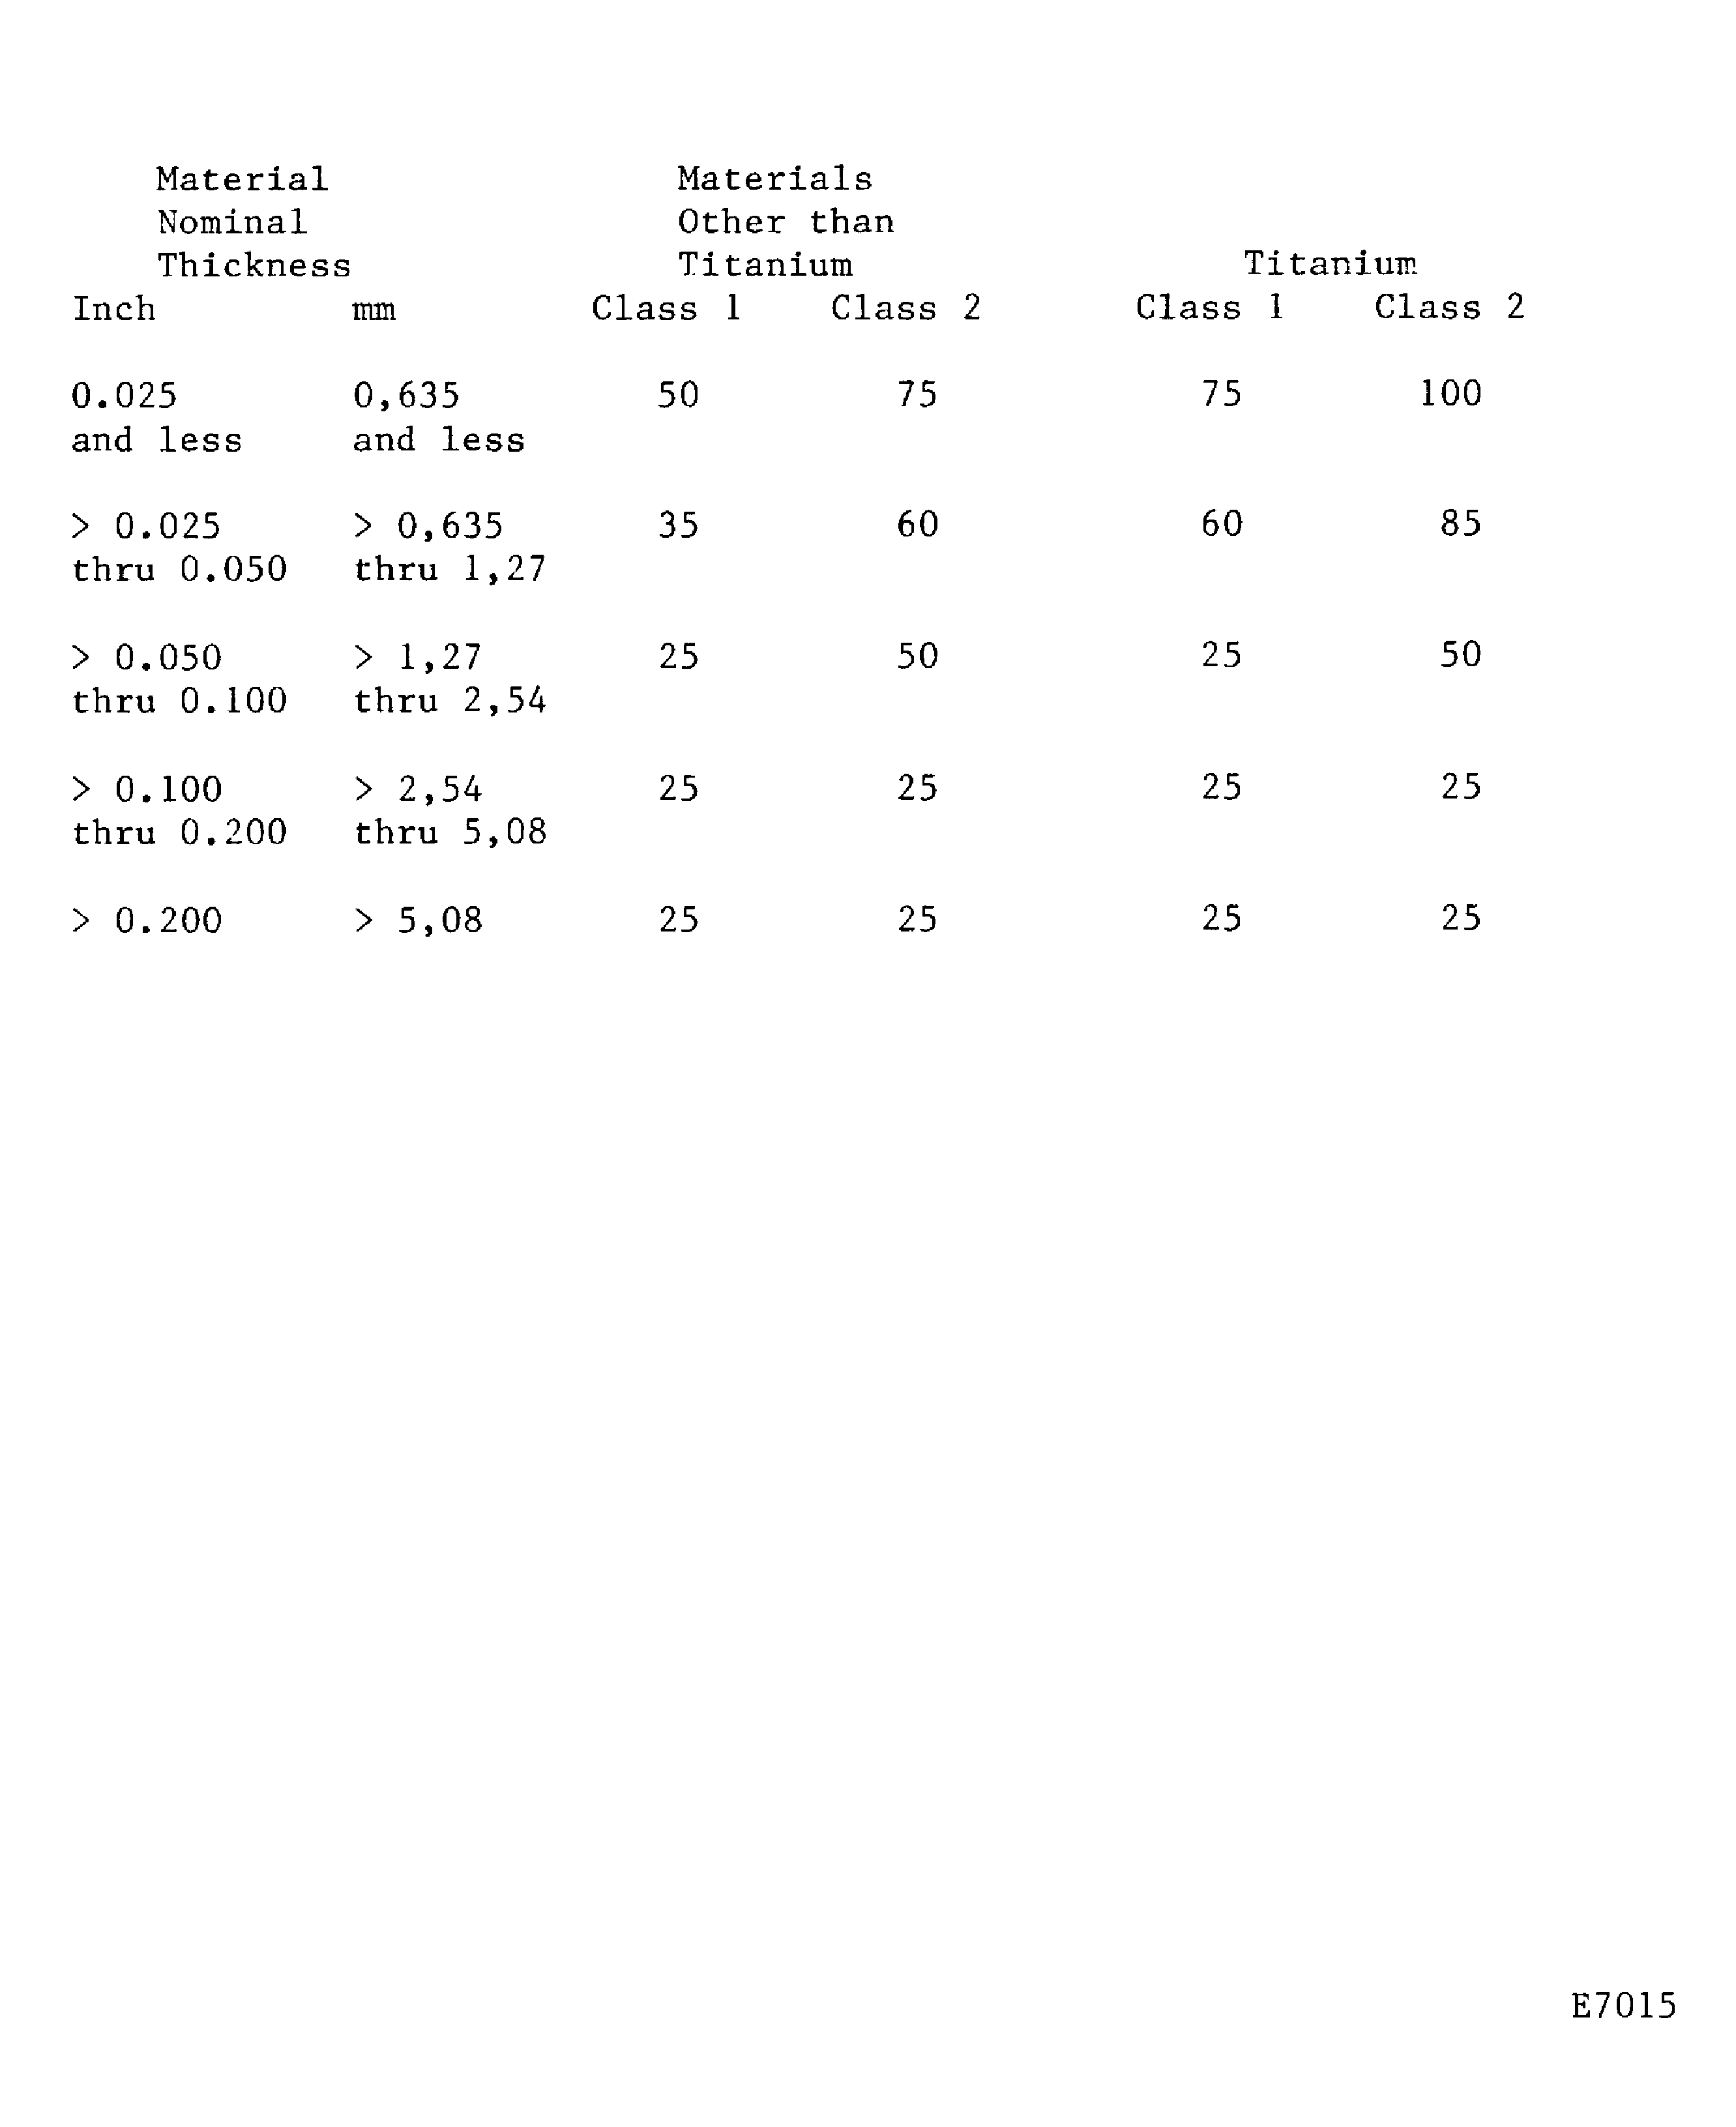
Figure: Plasma arc welding backup fixture
Plasma arc welding backup fixture
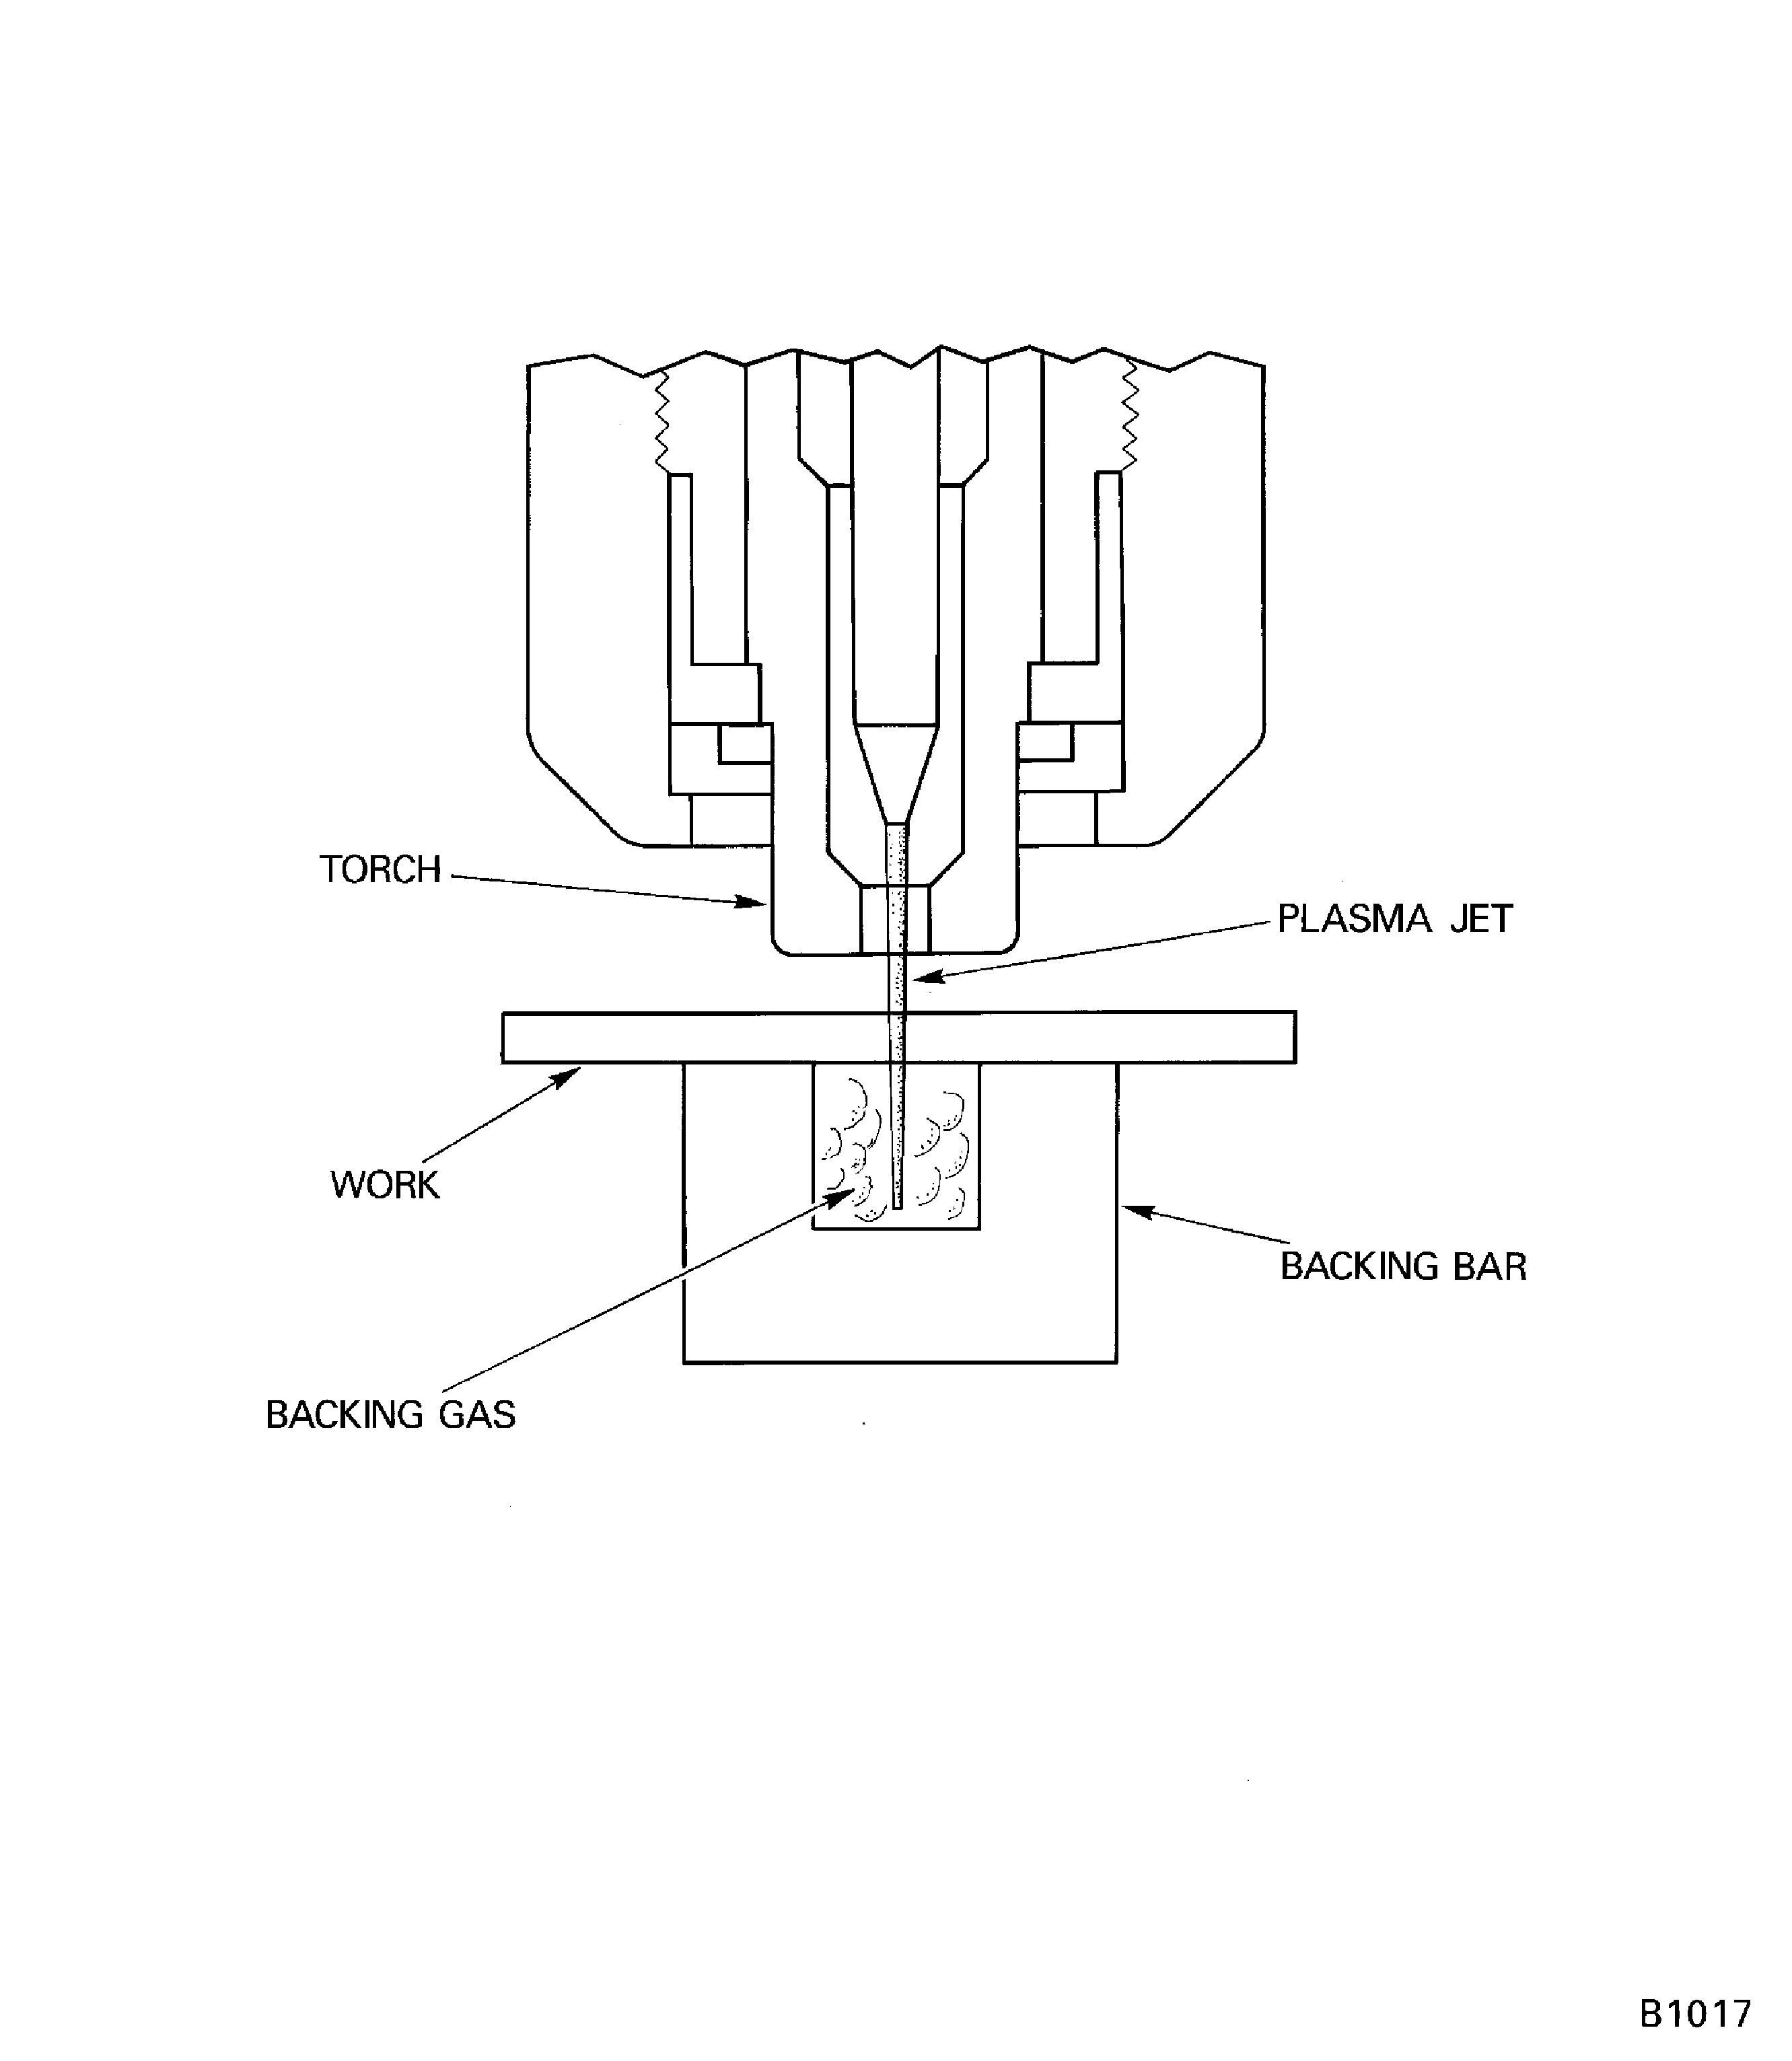
Figure: Stress-relief cycle data
Stress-relief cycle data

Figure: Patch type weld repair
Patch type weld repair
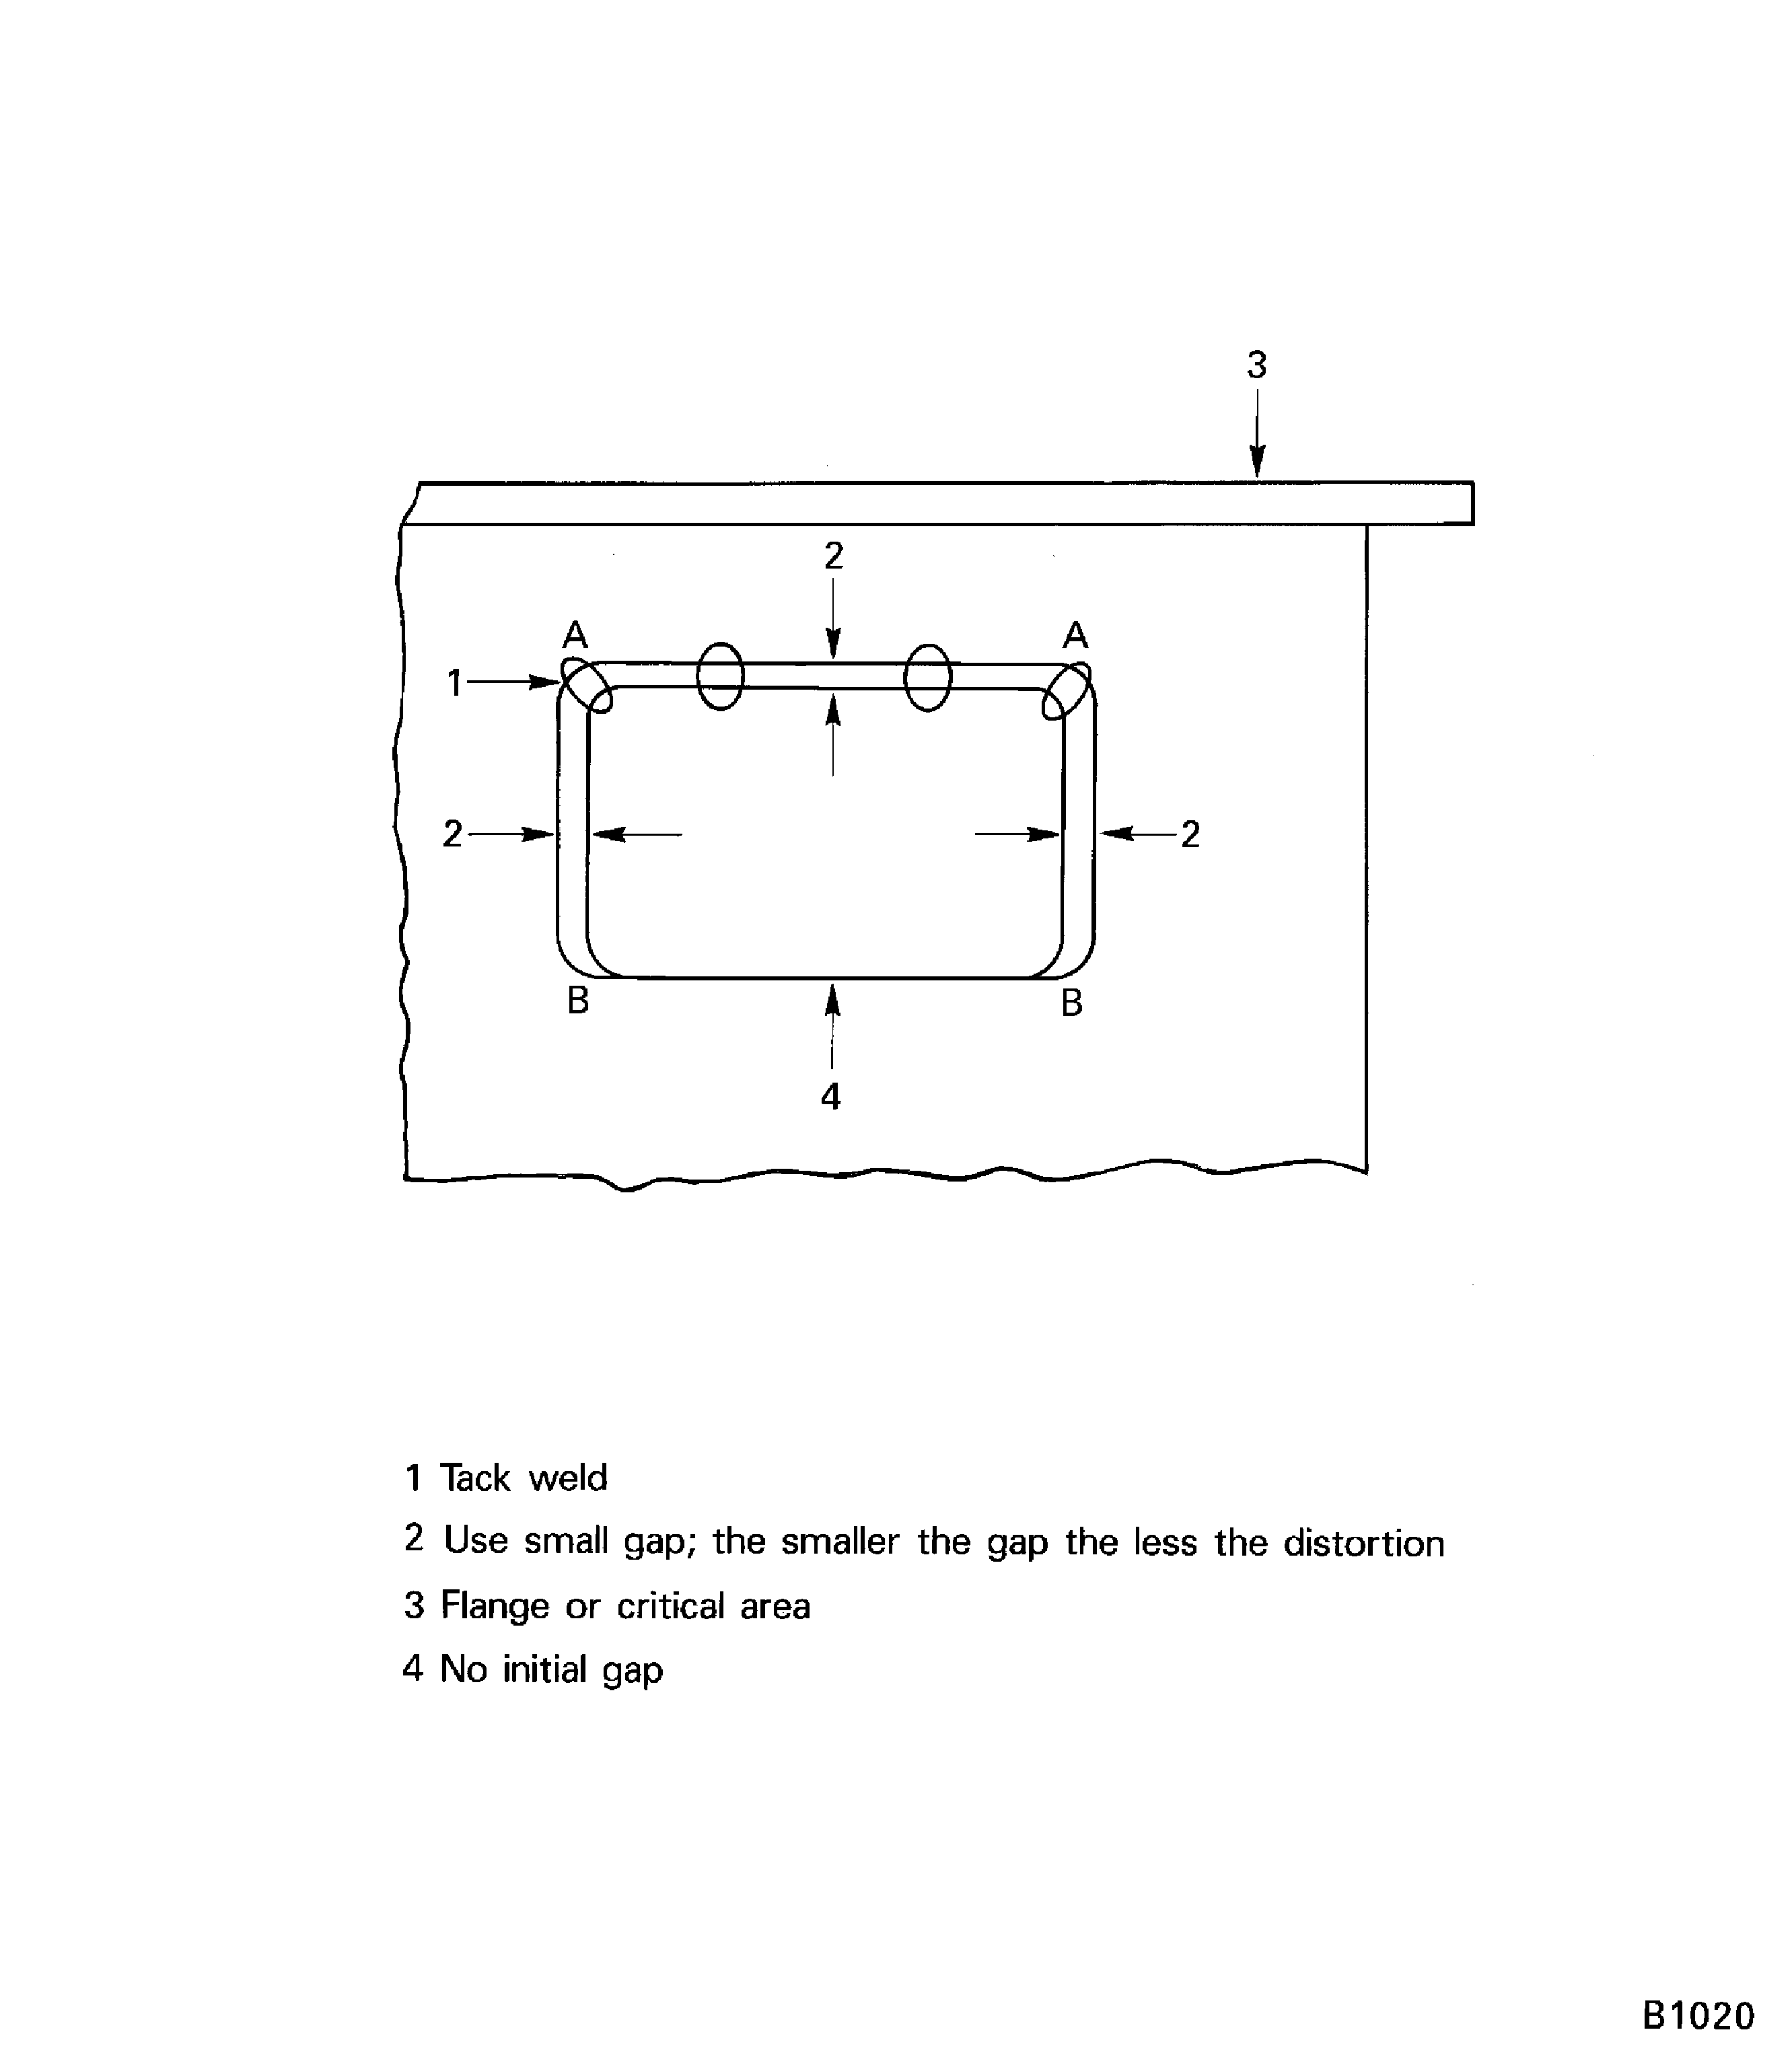
Figure: Illustration of dimensions and tolerances
Illustration of dimensions and tolerances
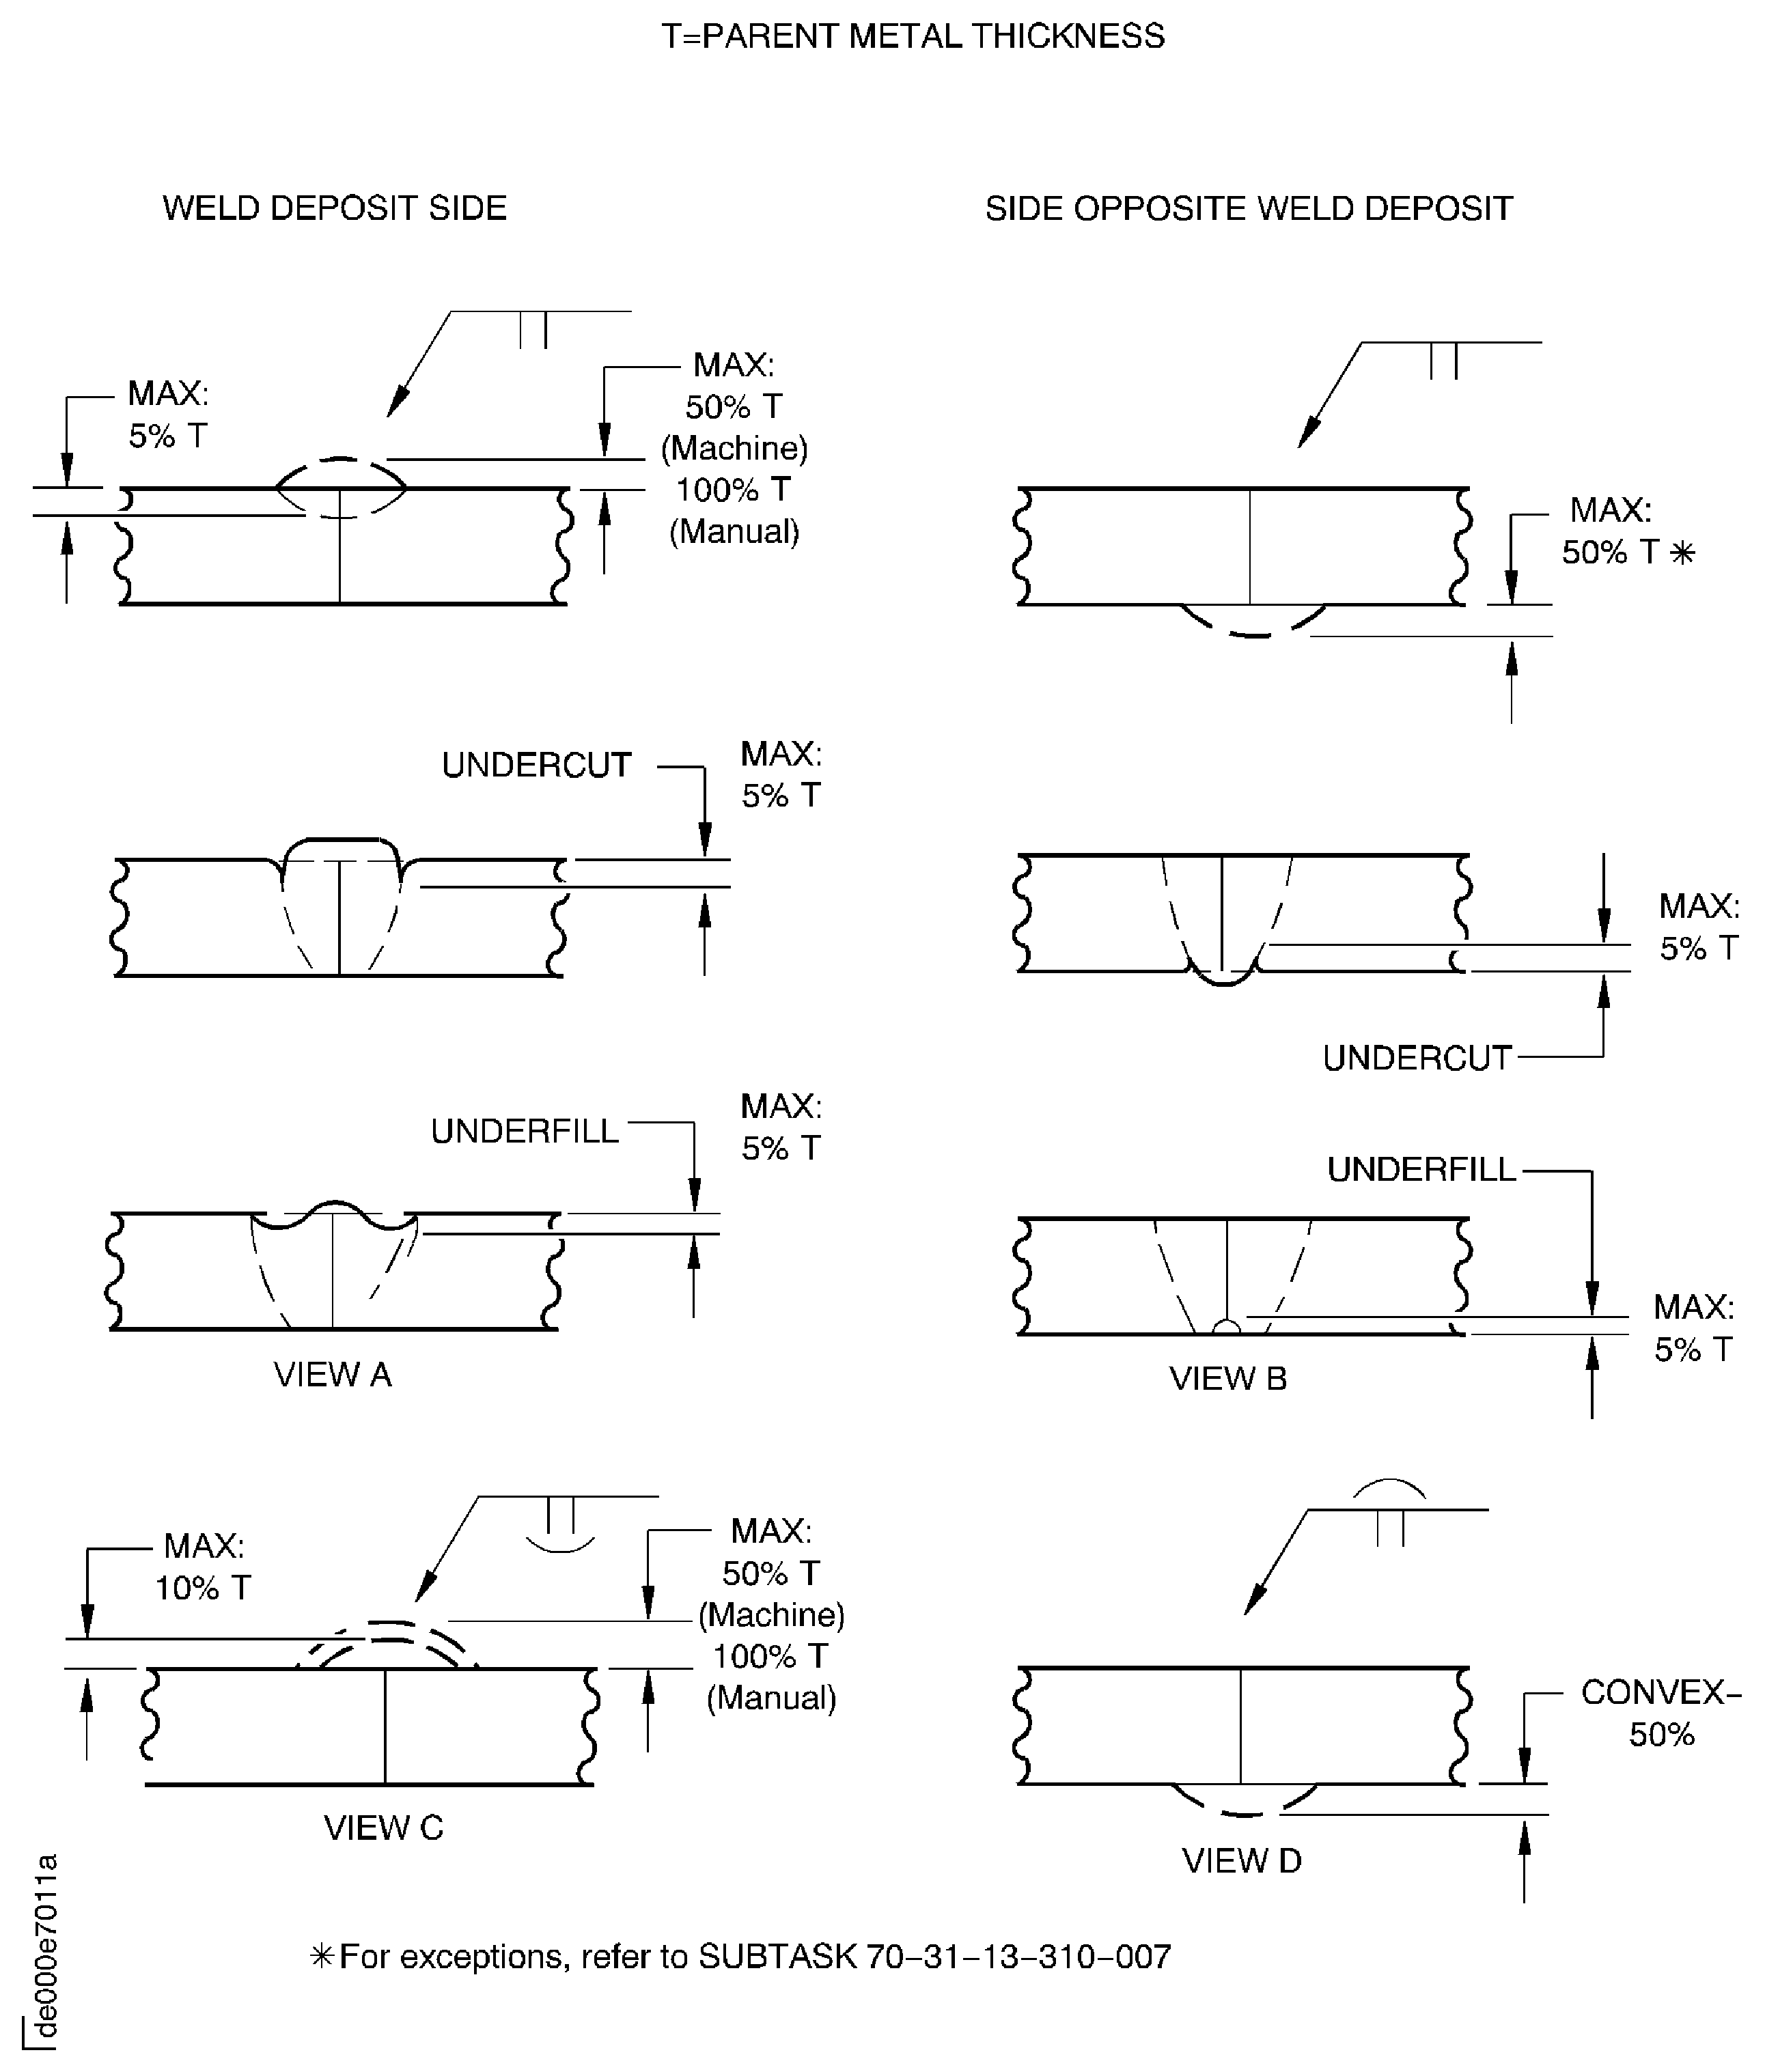
Figure: Illustration of dimensions and tolerances
Illustration of dimensions and tolerances
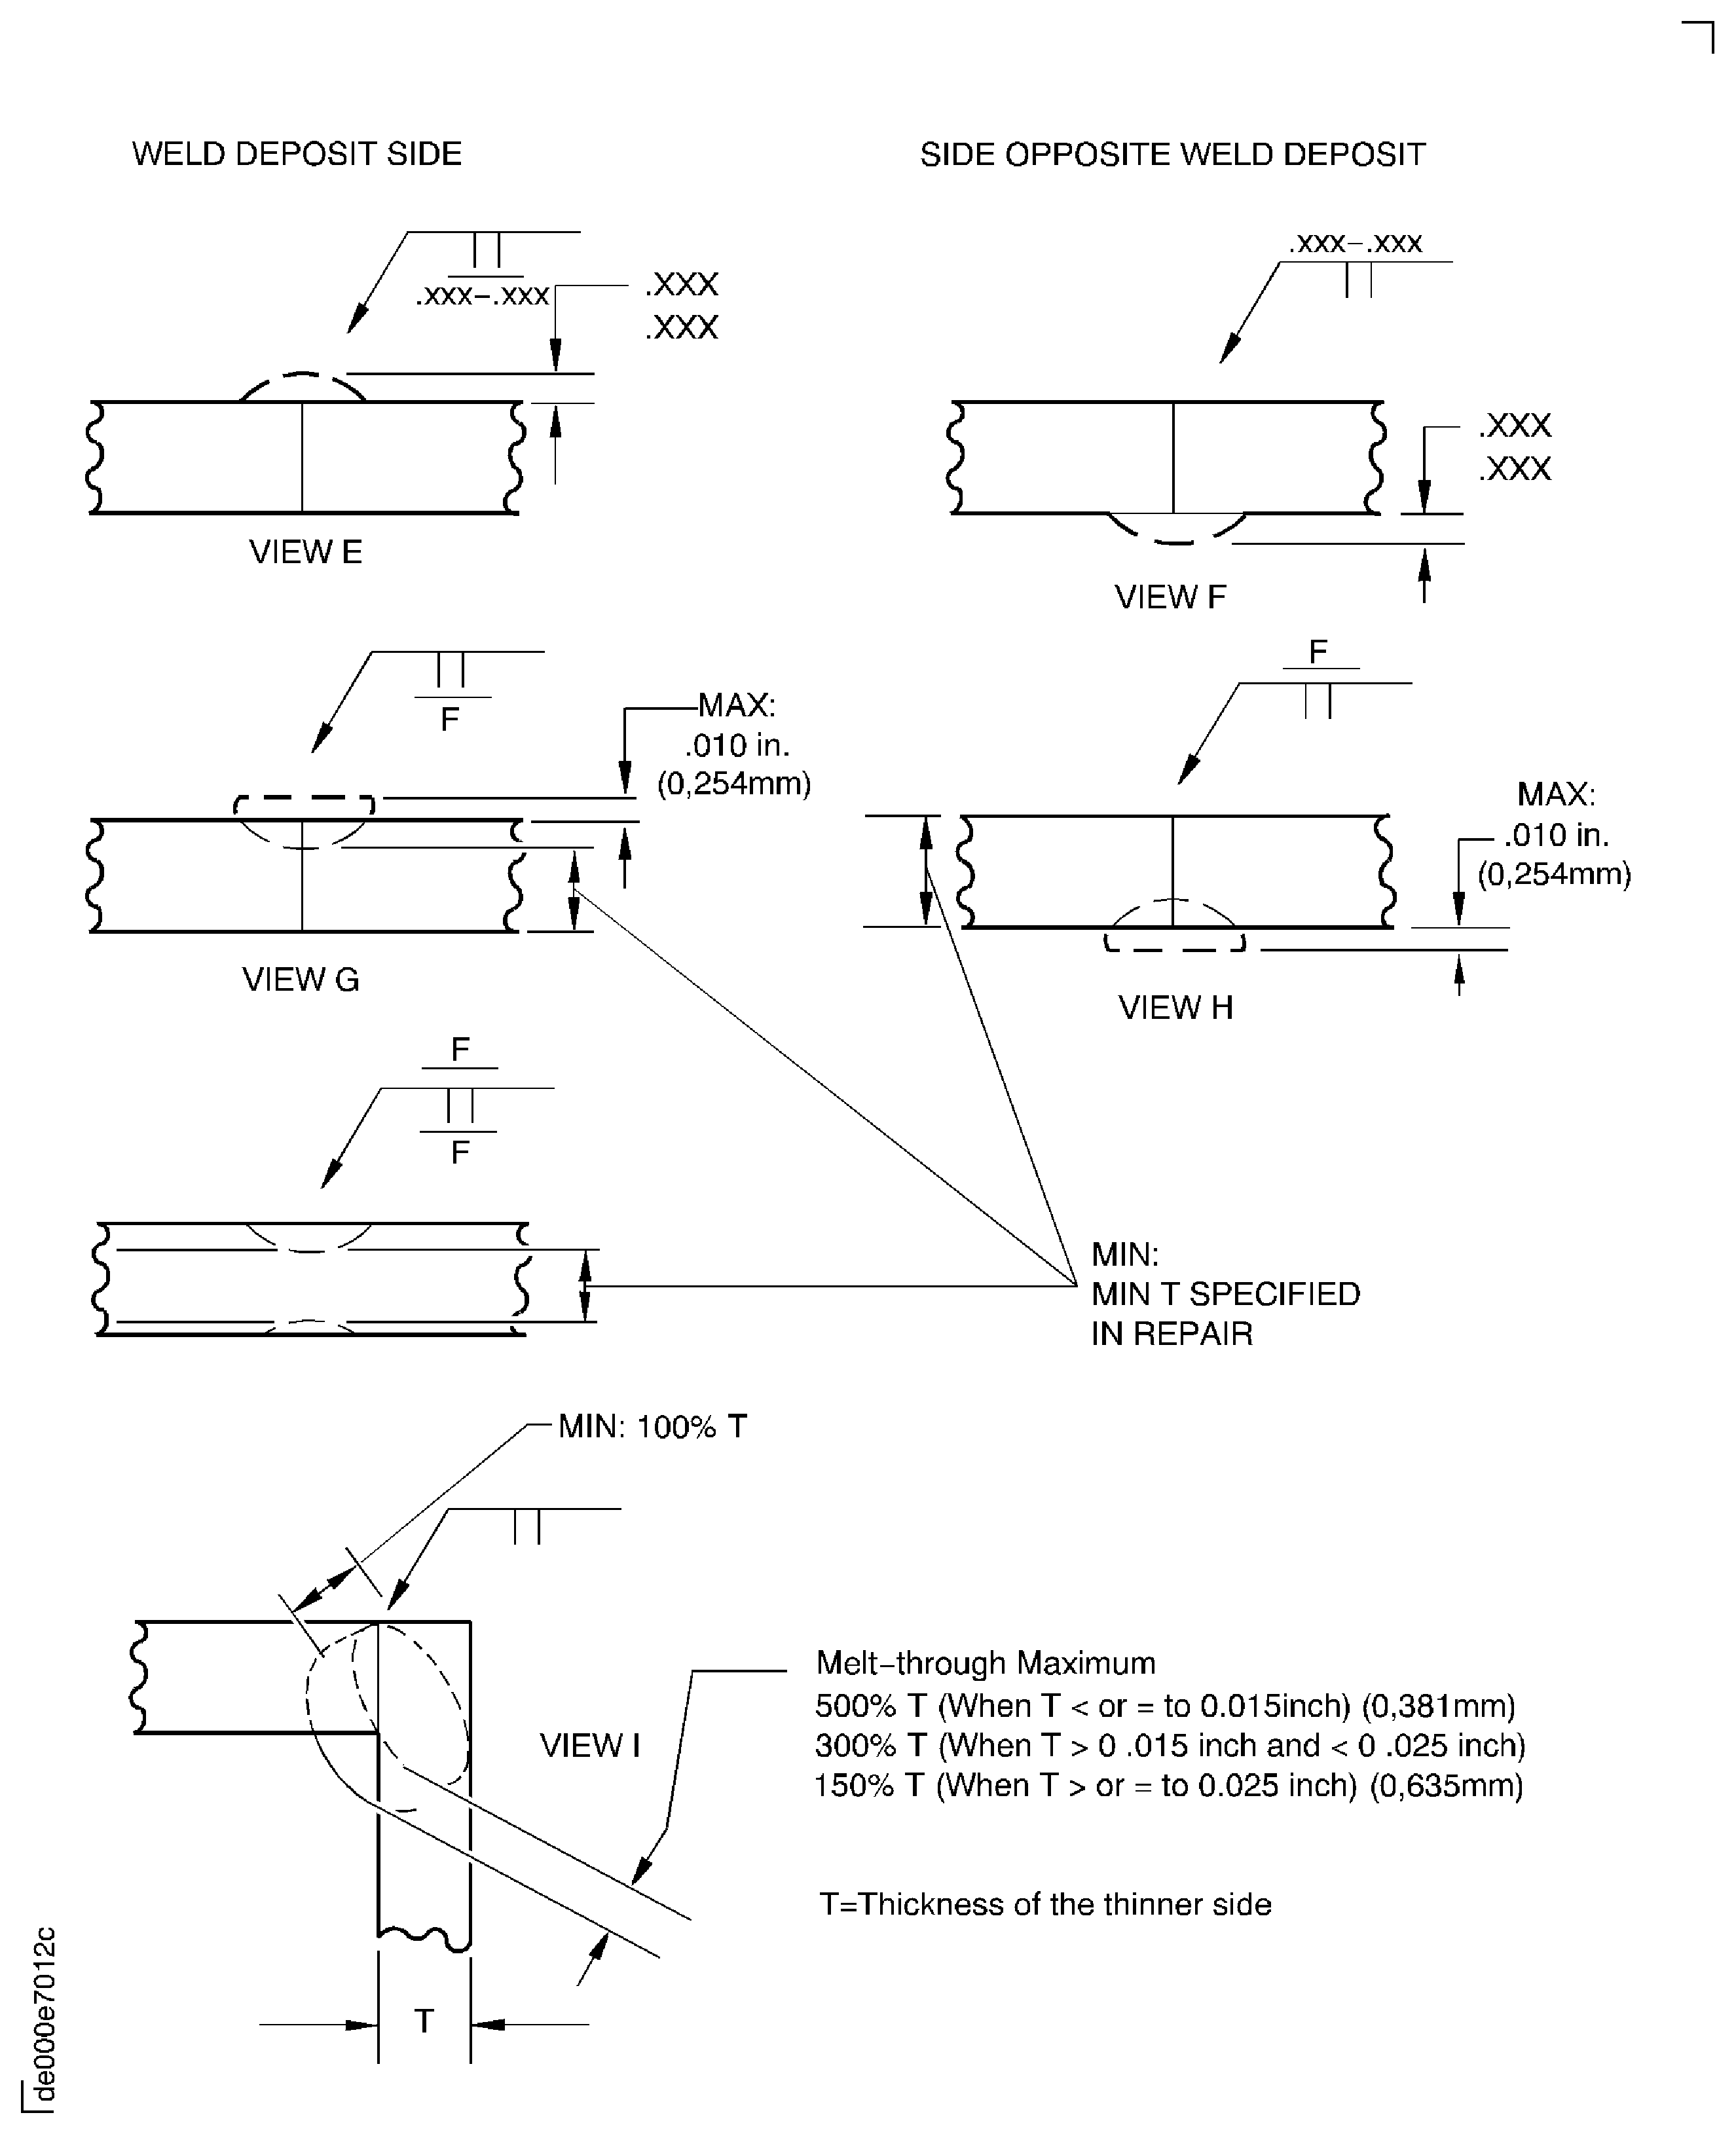
Figure: Illustration of dimensions and tolerances
Illustration of dimensions and tolerances
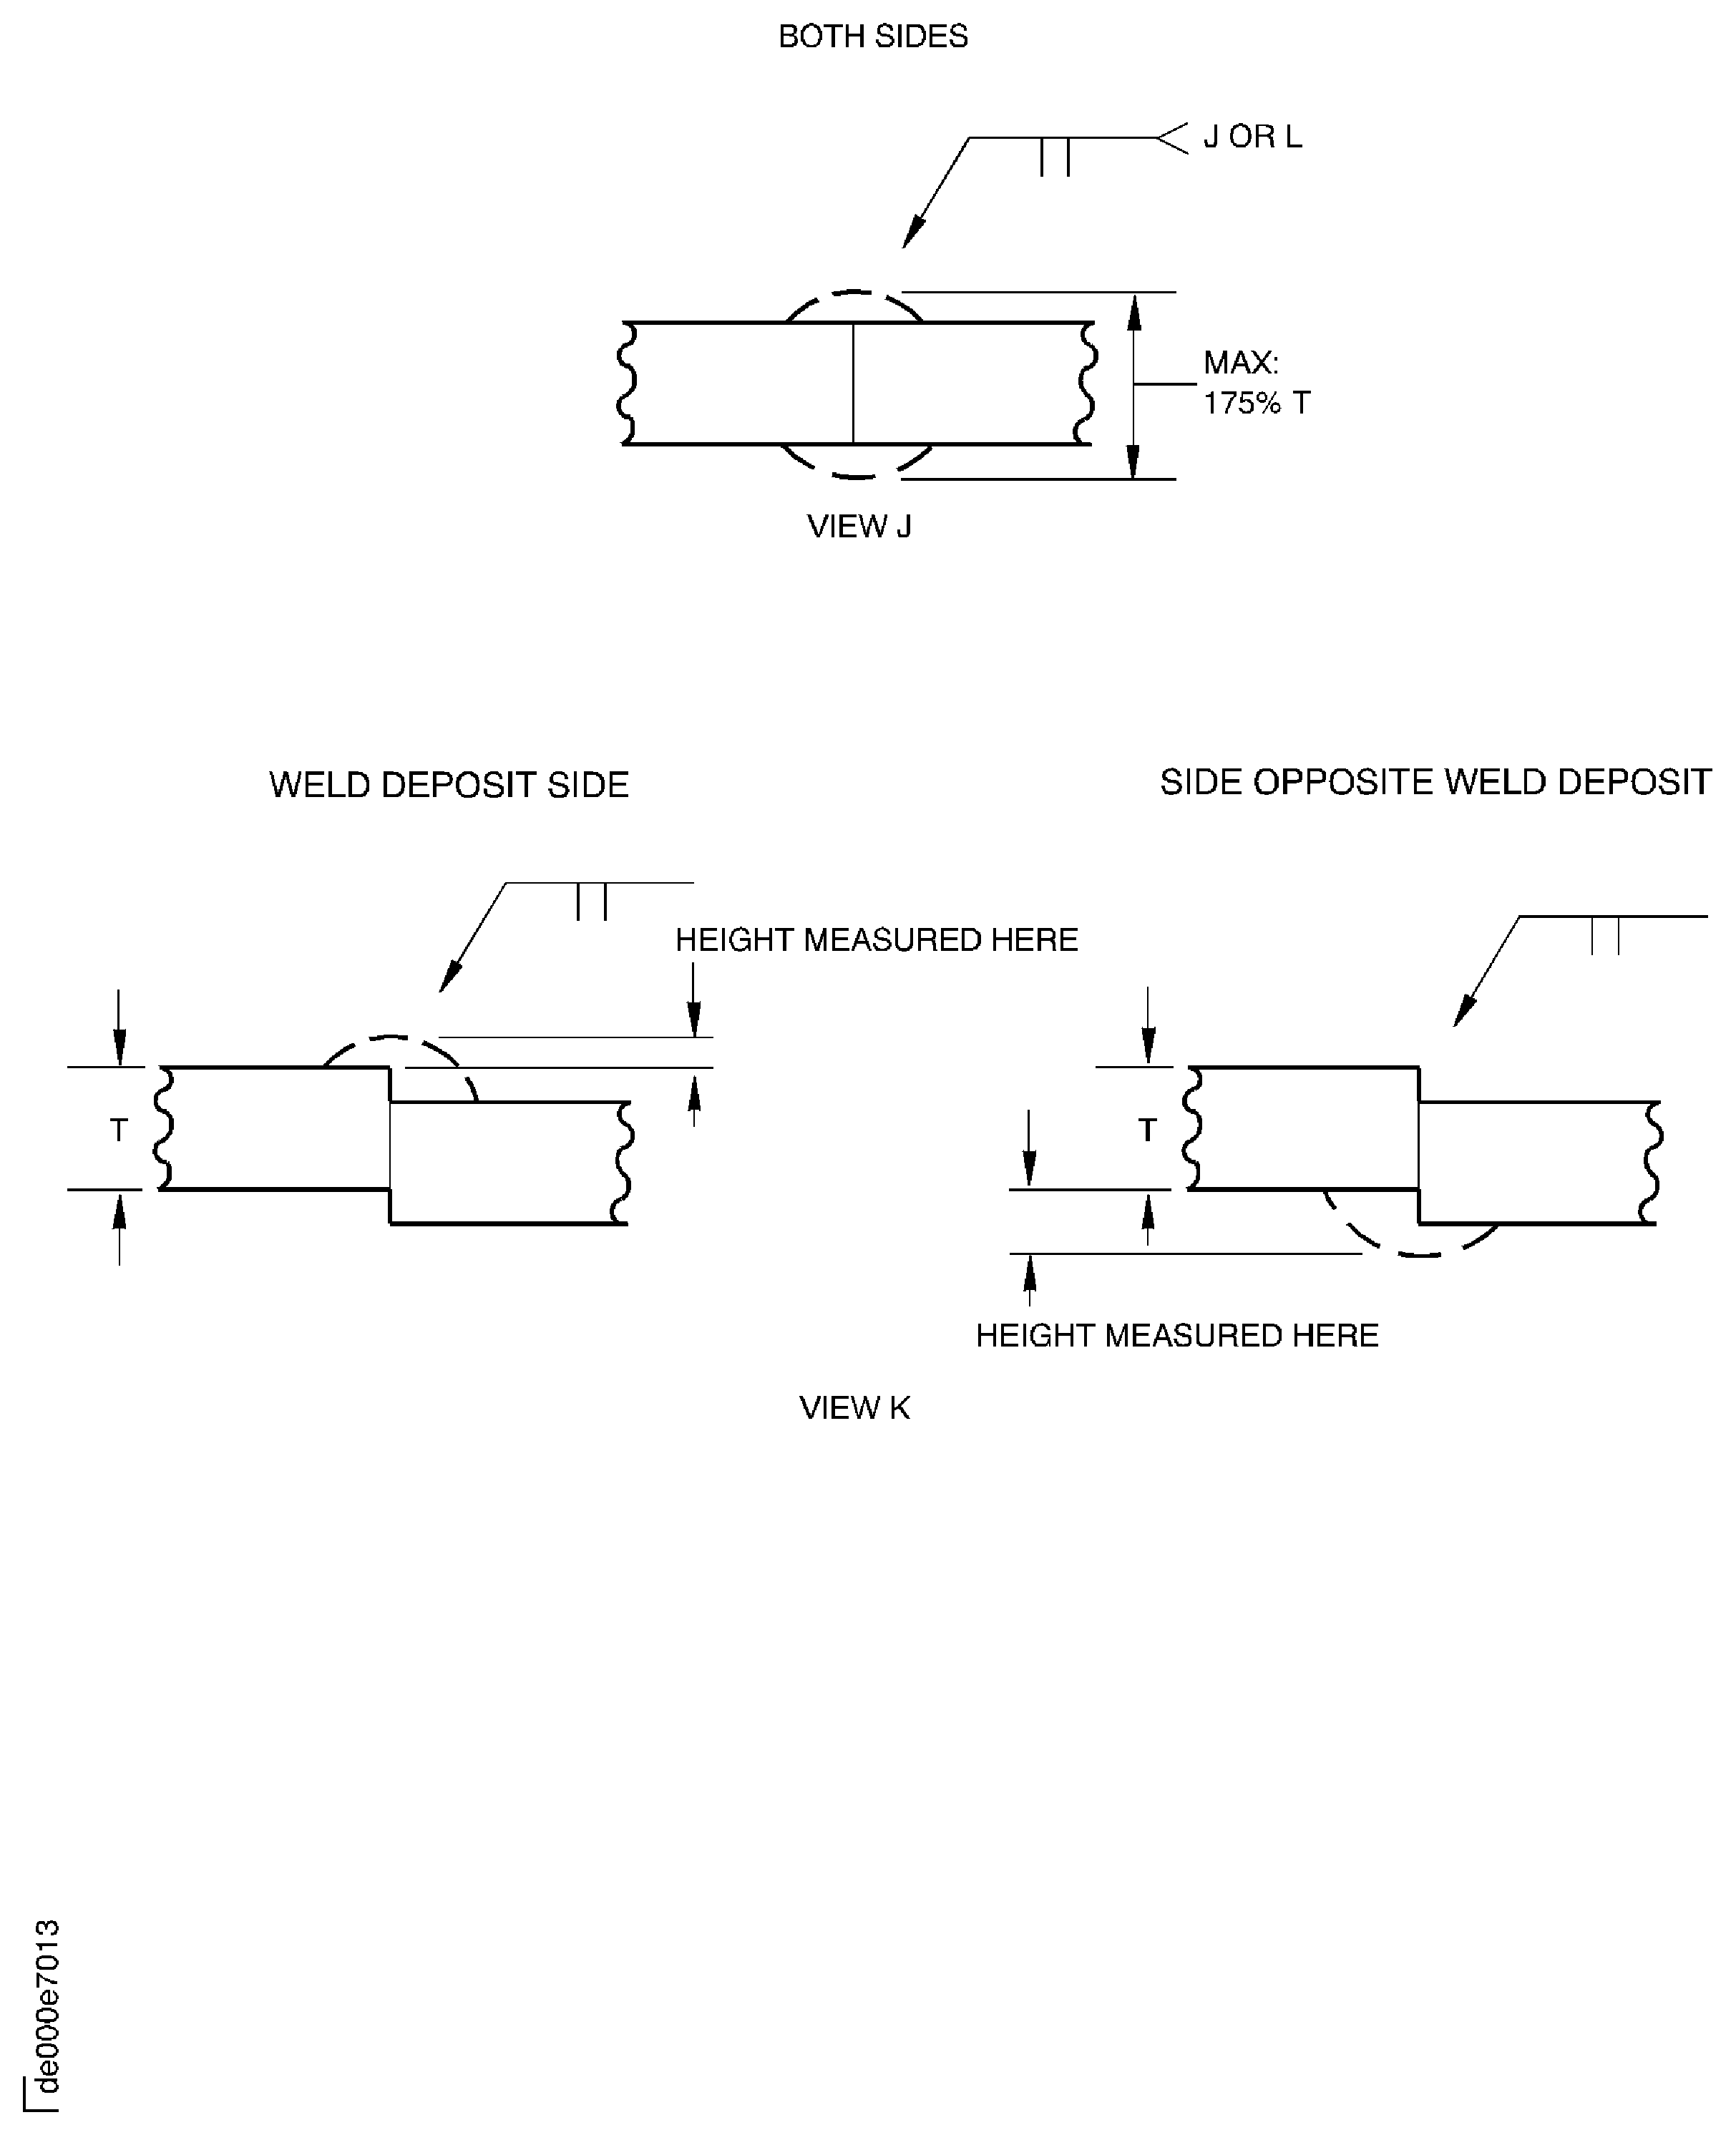
Figure: Brush seal weld
Brush seal weld

