TASK 72-50-33-300-015 LPT Stage 5 Rotating Airseal - Blend Repair , Repair-015 VRS4226)

DMC:V2500-A0-72-50-3305-00A-649A-C|Issue No:002.00|Issue Date:2013-11-01

Export Control

EAR Export Classification: Not subject to the EAR per 15 C.F.R. Chapter 1, Part 734.3(b)(3), except for the following Service Bulletins which are currently published as EAR Export Classification 9E991: SBE70-0992, SBE72-0483, SBE72-0580, SBE72-0588, SBE72-0640, SBE73-0209, SBE80-0024 and SBE80-0025.

Copyright

© IAE International Aero Engines AG (2001, 2014 - 2021) The information contained in this document is the property of © IAE International Aero Engines AG and may not be copied or used for any purpose other than that for which it is supplied without the express written authority of © IAE International Aero Engines AG. (This does not preclude use by engine and aircraft operators for normal instructional, maintenance or overhaul purposes.).

Applicability

All

Common Information

TASK 72-50-33-300-015 LPT Stage 5 Rotating Airseal - Blend Repair , Repair-015 VRS4226)

Effectivity

FIG/ITEM

PART NO.

01-100

3A0793

01-100

3A1985

Material of component

PART IDENT

SYMBOL

MATERIAL

Stage 5 turbine air seal

Waspaloy

General

Price and availability - none

The practices and processes referred to in the procedure by the TASK numbers are in the SPM.

NOTE

For equipment and materials necessary to do this repair, refer to the SPM TASK 70-23-05-230-501 and SPM TASK 70-35-19-350-501.
Equivalent materials or equipment may be used.

Preliminary Requirements

Pre-Conditions

NONE

Support Equipment

NameManufacturerPart Number / IdentificationQuantityRemark
Dial caliperLOCALDial caliper
Horizontal rotating tableLOCALHorizontal rotating table
Illuminated comparator magnifierLOCALIlluminated comparator magnifier
Radius gage setLOCALRadius gage set
CountersinkLOCALCountersink

90 degrees

Special depth micrometerLOCALSpecial depth micrometer
Special bore gageLOCALSpecial bore gage
Silicon impression materialLOCALSilicon impression material
Carbide tipped reamerLOCALCarbide tipped reamer
Roughness microtesterLOCALRoughness microtester

Consumables, Materials and Expendables

NONE

Spares

NONE

Safety Requirements

NONE

Procedure

    1. SUBTASK 72-50-33-350-061 General Instructions for the Blend Repair of the Stage 5 Turbine Air Seal

      1. Blend the nicks, dents and pits of the stage 5 turbine air seal.

      2. Use files and stones to remove the nicks, dents and pits.

      1. Polish the blended areas.

      2. Use fine stones to make the blended surface as smooth as the initial surface. Edges and corners are not permitted.

    1. SUBTASK 72-50-33-350-062 Blend Repair of the Stage 5 Turbine Air Seal

      NOTE

      1. Refer to SUBTASK 72-50-33-350-061 before you do the blend repairs.

      2. Keep material removal to the minimum to remove damage.

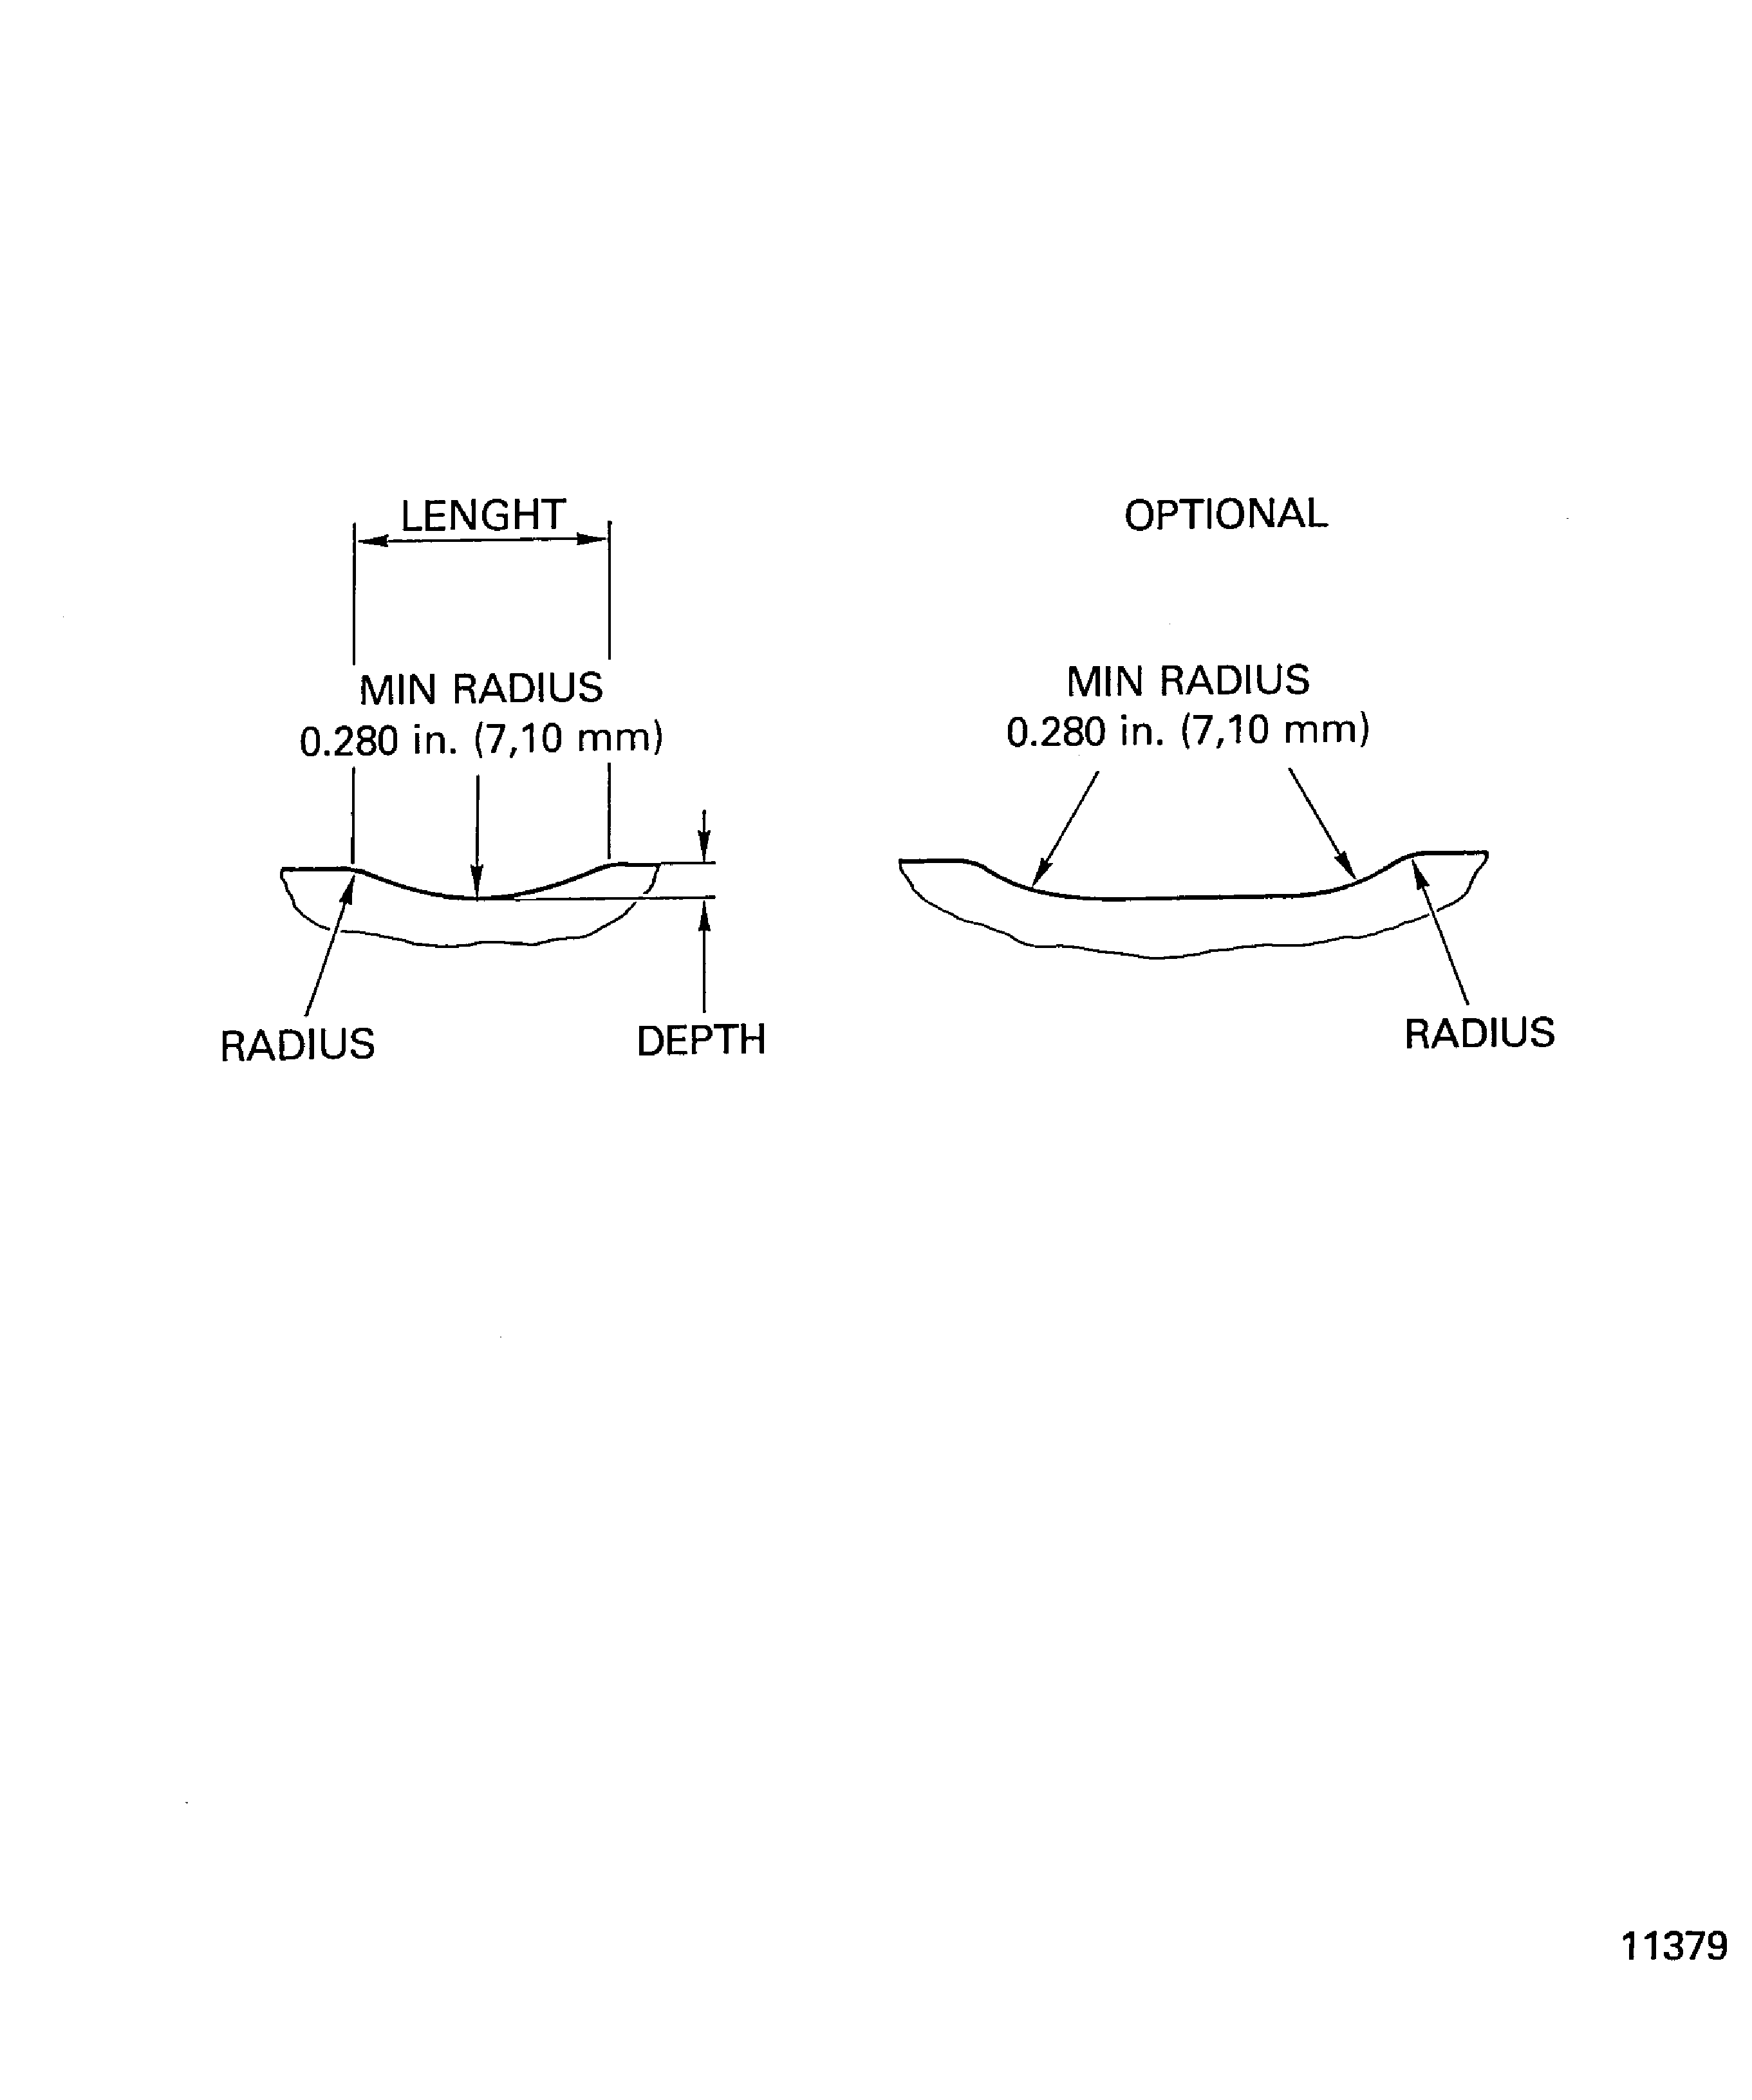
      3. For local blending, use a length to depth ratio of 15:1 minimum unless otherwise specified, Figure.

      4. Unless stated differently, there is no limit for the number of blends. If there is a number of damage marks together blend the whole area to the specified depth.

      5. Do not blend the coated knife edge seals using this repair.

      6. For direction of blend repair, where specified, refer to Figure.

      1. Blend repair in area A1.

      2. Maximum permitted depth of blend repair is 0.010in. (0.25 mm).

        Length to depth blend ratio is 5:1. Minimum distance between blends is 0.500in. (12.70 mm).

      1. Blend repair in area A2.

      2. Use carbide tipped reamer.

        Maximum permitted diameter of the holes is 0.2717in. (6.90 mm).

        Remove only minimum material to achieve surface finish.

        Round bottom dents to a maximum depth of 0.005in. (0.127 mm) are permitted in the lead-in radii without blendings provided any raised material is removed.

      1. Blend repair in area A3.

      2. Maximum permitted depth of local blends (nicks and dents) is 0.004in. (0.10 mm).

        Maximum permitted depth of blends for scratches and scores is 0.002in. (0.05 mm) without the areas given in steps D. and E.

      1. Blend repair in area A3.1.

      2. Maximum permitted depth of blend repair is 0.002in. (0.05 mm).

        The total area of blend repair must not be more than 30 percent of the whole area A3.1.

      1. Blend repair in area A3.2.

      2. Maximum permitted depth of blend repair is 0.002in. (0.05 mm).

        The total area of blend repair must not be more than 50 percent of the whole area A3.2.

      1. Blend repair in area A4.

      2. Maximum permitted depth of blend repair is 0.002in. (0.05 mm).

        Maximum permitted length of individual blends is 1.65in. (42.00 mm).

        No more than four blends are permitted, spaced one per quadrant.

      1. Blend repair in area A5.

      2. Remove raised material only.

      1. Blend repair in area A6.

      2. Maximum permitted depth of blend repair is 0.005in. (0.13 mm).

        Maximum permitted length of blends for scratches and scores is 0.75in. (19.10 mm).

        Minimum distance between blends is 0.500in. (12.50 mm).

        For damage outside the spacing limit maximum depth of blend repair is 0.003in. (0.08 mm).

        Maximum blend area is 0.25 sqin (160.00 sqmm).

    1. SUBTASK 72-50-33-230-063 Do the Post Repair Inspection for Cracks

      1. Do the test for cracks.

      2. Examine all blended areas in accordance with the SPM TASK 70-23-05-230-501.

        No cracks are permitted.

    1. SUBTASK 72-50-33-320-077 Polish the Repair Holes of the Stage 5

    2. Refer to: Figure

      1. Butterfly polish all the repaired holes.

      2. Refer to the SPM TASK 70-35-19-350-501.

    1. SUBTASK 72-50-33-220-094 Do the Post Repair Inspection

      1. Examine the surface finish.

      2. The surface finish of all repairs must be 32 microinch RMS (0.8 micrometer ra).

        Use horizontal rotating table, illuminated comparator magnifier and roughness microtester.

      1. Examine the blended areas dimensionally.

      2. Measure the dimensions of the blended areas, Figure and Figure.

        The blend ratio must be in the limits, refer to Step.

        Use the horizontal rotating table, dial caliper, radius gage set, countersink 90 degrees, special depth micrometer and special bore gage.

        NOTE

        If necessary use silicon impression material to measure the areas A3.1 and A3.2.
    1. SUBTASK 72-50-33-350-063 Do the Post Repair

      1. Rebalance the air seal.

      2. Refer to Repair, VRS4230 TASK 72-50-33-300-019.

  1. Figure: Blend repair of the stage 5 turbine air seal

    Sheet 1
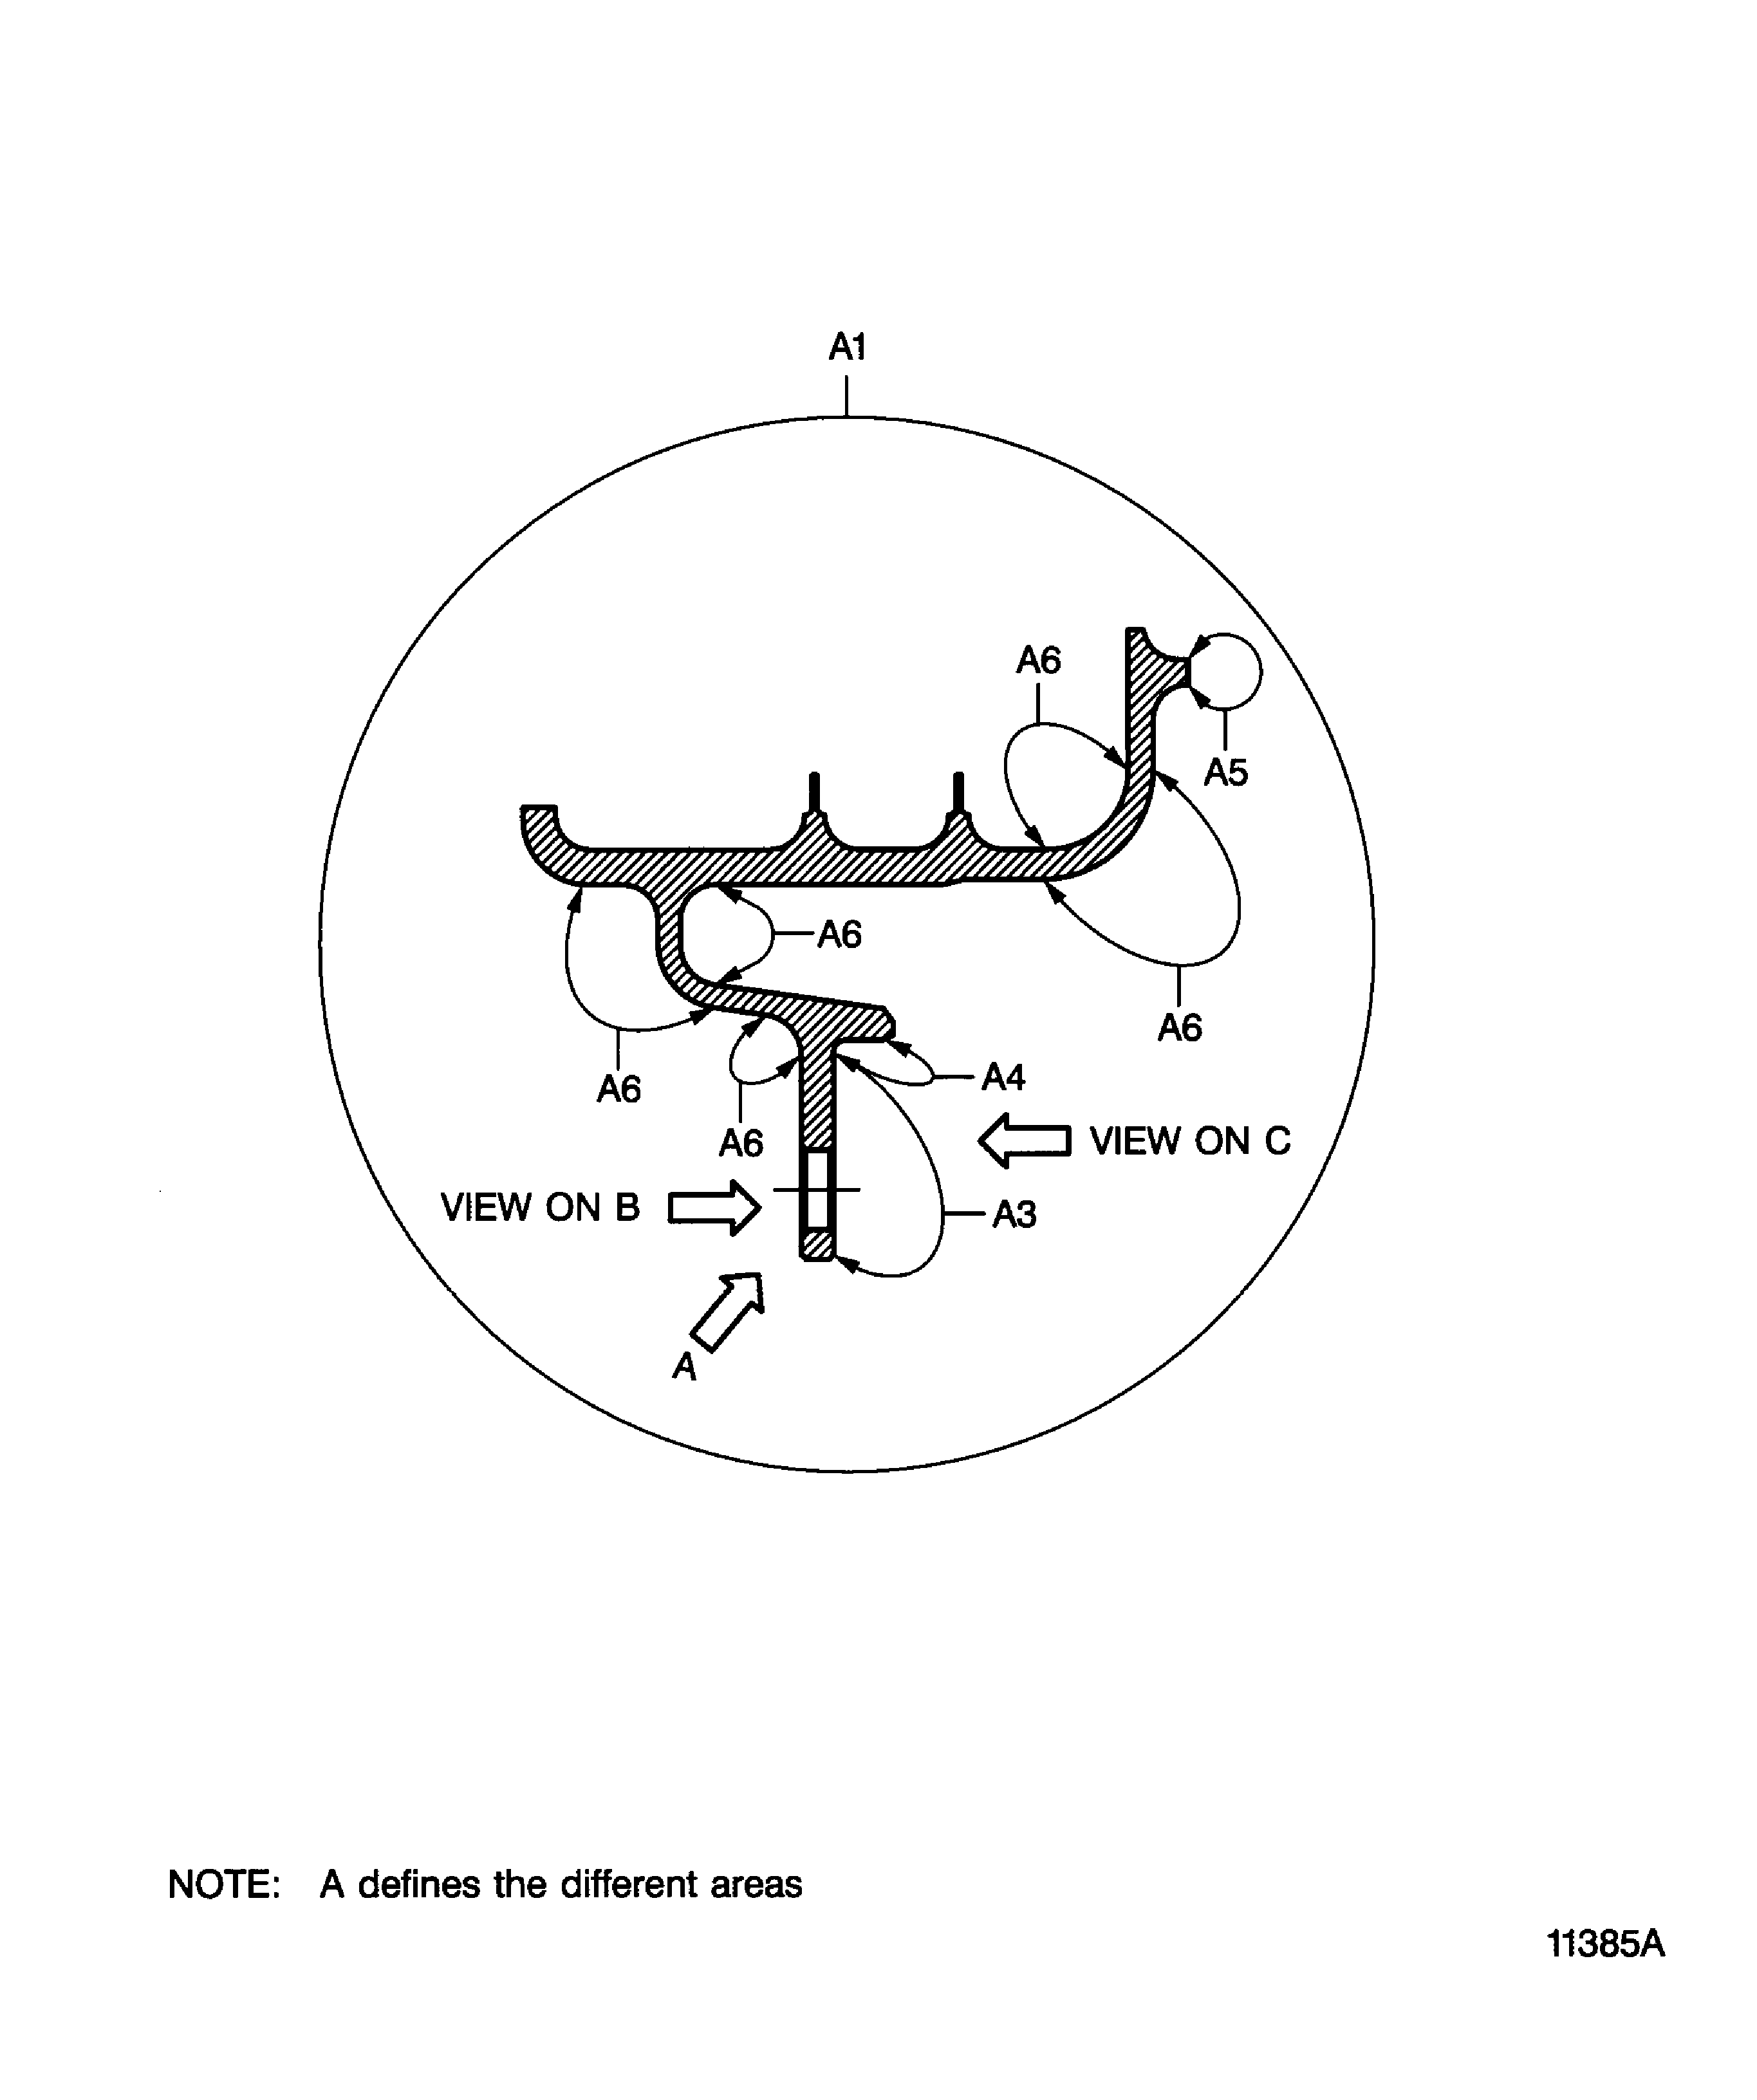
    Legend
    Blend repair of the stage 5 turbine air seal

    Sheet 1

    Close

    Figure: Blend repair of the stage 5 turbine air seal

    Sheet 2

    Legend
    Blend repair of the stage 5 turbine air seal

    Sheet 2

    Close

    Figure: Local blending length to depth ratio

    Local blending length to depth ratio
Requirements After Job Completion

Follow-On Conditions

NONE
Change Type:

Editorial correction due to conversion

Manufacturer Code:LOCAL
Enterprise Name:LOCALLY SUPPLIED
Manufacturer Code:LOCAL
Tool Number:Carbide tipped reamer
Tool Name:Carbide tipped reamer
Manufacturer Code:LOCAL
Tool Number:Countersink
Tool Name:Countersink
Manufacturer Code:LOCAL
Tool Number:Dial caliper
Tool Name:Dial caliper
Manufacturer Code:LOCAL
Tool Number:Horizontal rotating table
Tool Name:Horizontal rotating table
Manufacturer Code:LOCAL
Tool Number:Illuminated comparator magnifier
Tool Name:Illuminated comparator magnifier
Manufacturer Code:LOCAL
Tool Number:Radius gage set
Tool Name:Radius gage set
Manufacturer Code:LOCAL
Tool Number:Roughness microtester
Tool Name:Roughness microtester
Manufacturer Code:LOCAL
Tool Number:Silicon impression material
Tool Name:Silicon impression material
Manufacturer Code:LOCAL
Tool Number:Special bore gage
Tool Name:Special bore gage
Manufacturer Code:LOCAL
Tool Number:Special depth micrometer
Tool Name:Special depth micrometer