Export Control
EAR Export Classification: Not subject to the EAR per 15 C.F.R. Chapter 1, Part 734.3(b)(3), except for the following Service Bulletins which are currently published as EAR Export Classification 9E991: SBE70-0992, SBE72-0483, SBE72-0580, SBE72-0588, SBE72-0640, SBE73-0209, SBE80-0024 and SBE80-0025.Copyright
© IAE International Aero Engines AG (2001, 2014 - 2021) The information contained in this document is the property of © IAE International Aero Engines AG and may not be copied or used for any purpose other than that for which it is supplied without the express written authority of © IAE International Aero Engines AG. (This does not preclude use by engine and aircraft operators for normal instructional, maintenance or overhaul purposes.).Applicability
All
Common Information
TASK 72-60-21-300-025 Main Gearbox Casing - Repair The Oil Tank Bore By Bushing, Repair-025 (VRS5258)
Effectivity
FIG/ITEM | PART NO. |
|---|---|
02-050 | 4B0053 |
02-050 | 4B0054 |
02-050 | 4B0055 |
02-050 | 4B0057 |
02-050 | 4B0400 |
02-050 | 4B0402 |
02-050 | 4B0423 |
Material of component
DESCRIPTION | RR SYMBOL | MATERIAL |
|---|---|---|
Accessory gearbox casing | A357/T61 (AMS4219) | Aluminium alloy |
Bushing | AMS4152 AA2024-T3 | Wrought aluminum base alloy |
General
NOTE
Preliminary Requirements
Pre-Conditions
NONESupport Equipment
| Name | Manufacturer | Part Number / Identification | Quantity | Remark |
|---|---|---|---|---|
| Arbor Press | LOCAL | Arbor press | ||
| Freezer | LOCAL | Freezer | ||
| IAE 3F10349 Drift, bushing (dia 178) | 0AM53 | IAE 3F10349 | 1 | |
| Magnifying Glass | LOCAL | Magnifying Glass | ||
| Oven | LOCAL | Oven | ||
| Vibrating Marking Pencil | LOCAL | Vibrating Marking Pencil | ||
| Workshop inspection equipment | LOCAL | Workshop inspection equipment |
Consumables, Materials and Expendables
NONESafety Requirements
NONEProcedure
SUBTASK 72-60-21-320-079 Machine the Oil Tank Bore in the Gearbox Casing
Refer to the SPM TASK 70-38-02-300-503.
Apply the chromate conversion coating to the machined surfaces.
SUBTASK 72-60-21-330-074 Apply the Chromate Conversion Coating
Refer to Figure.
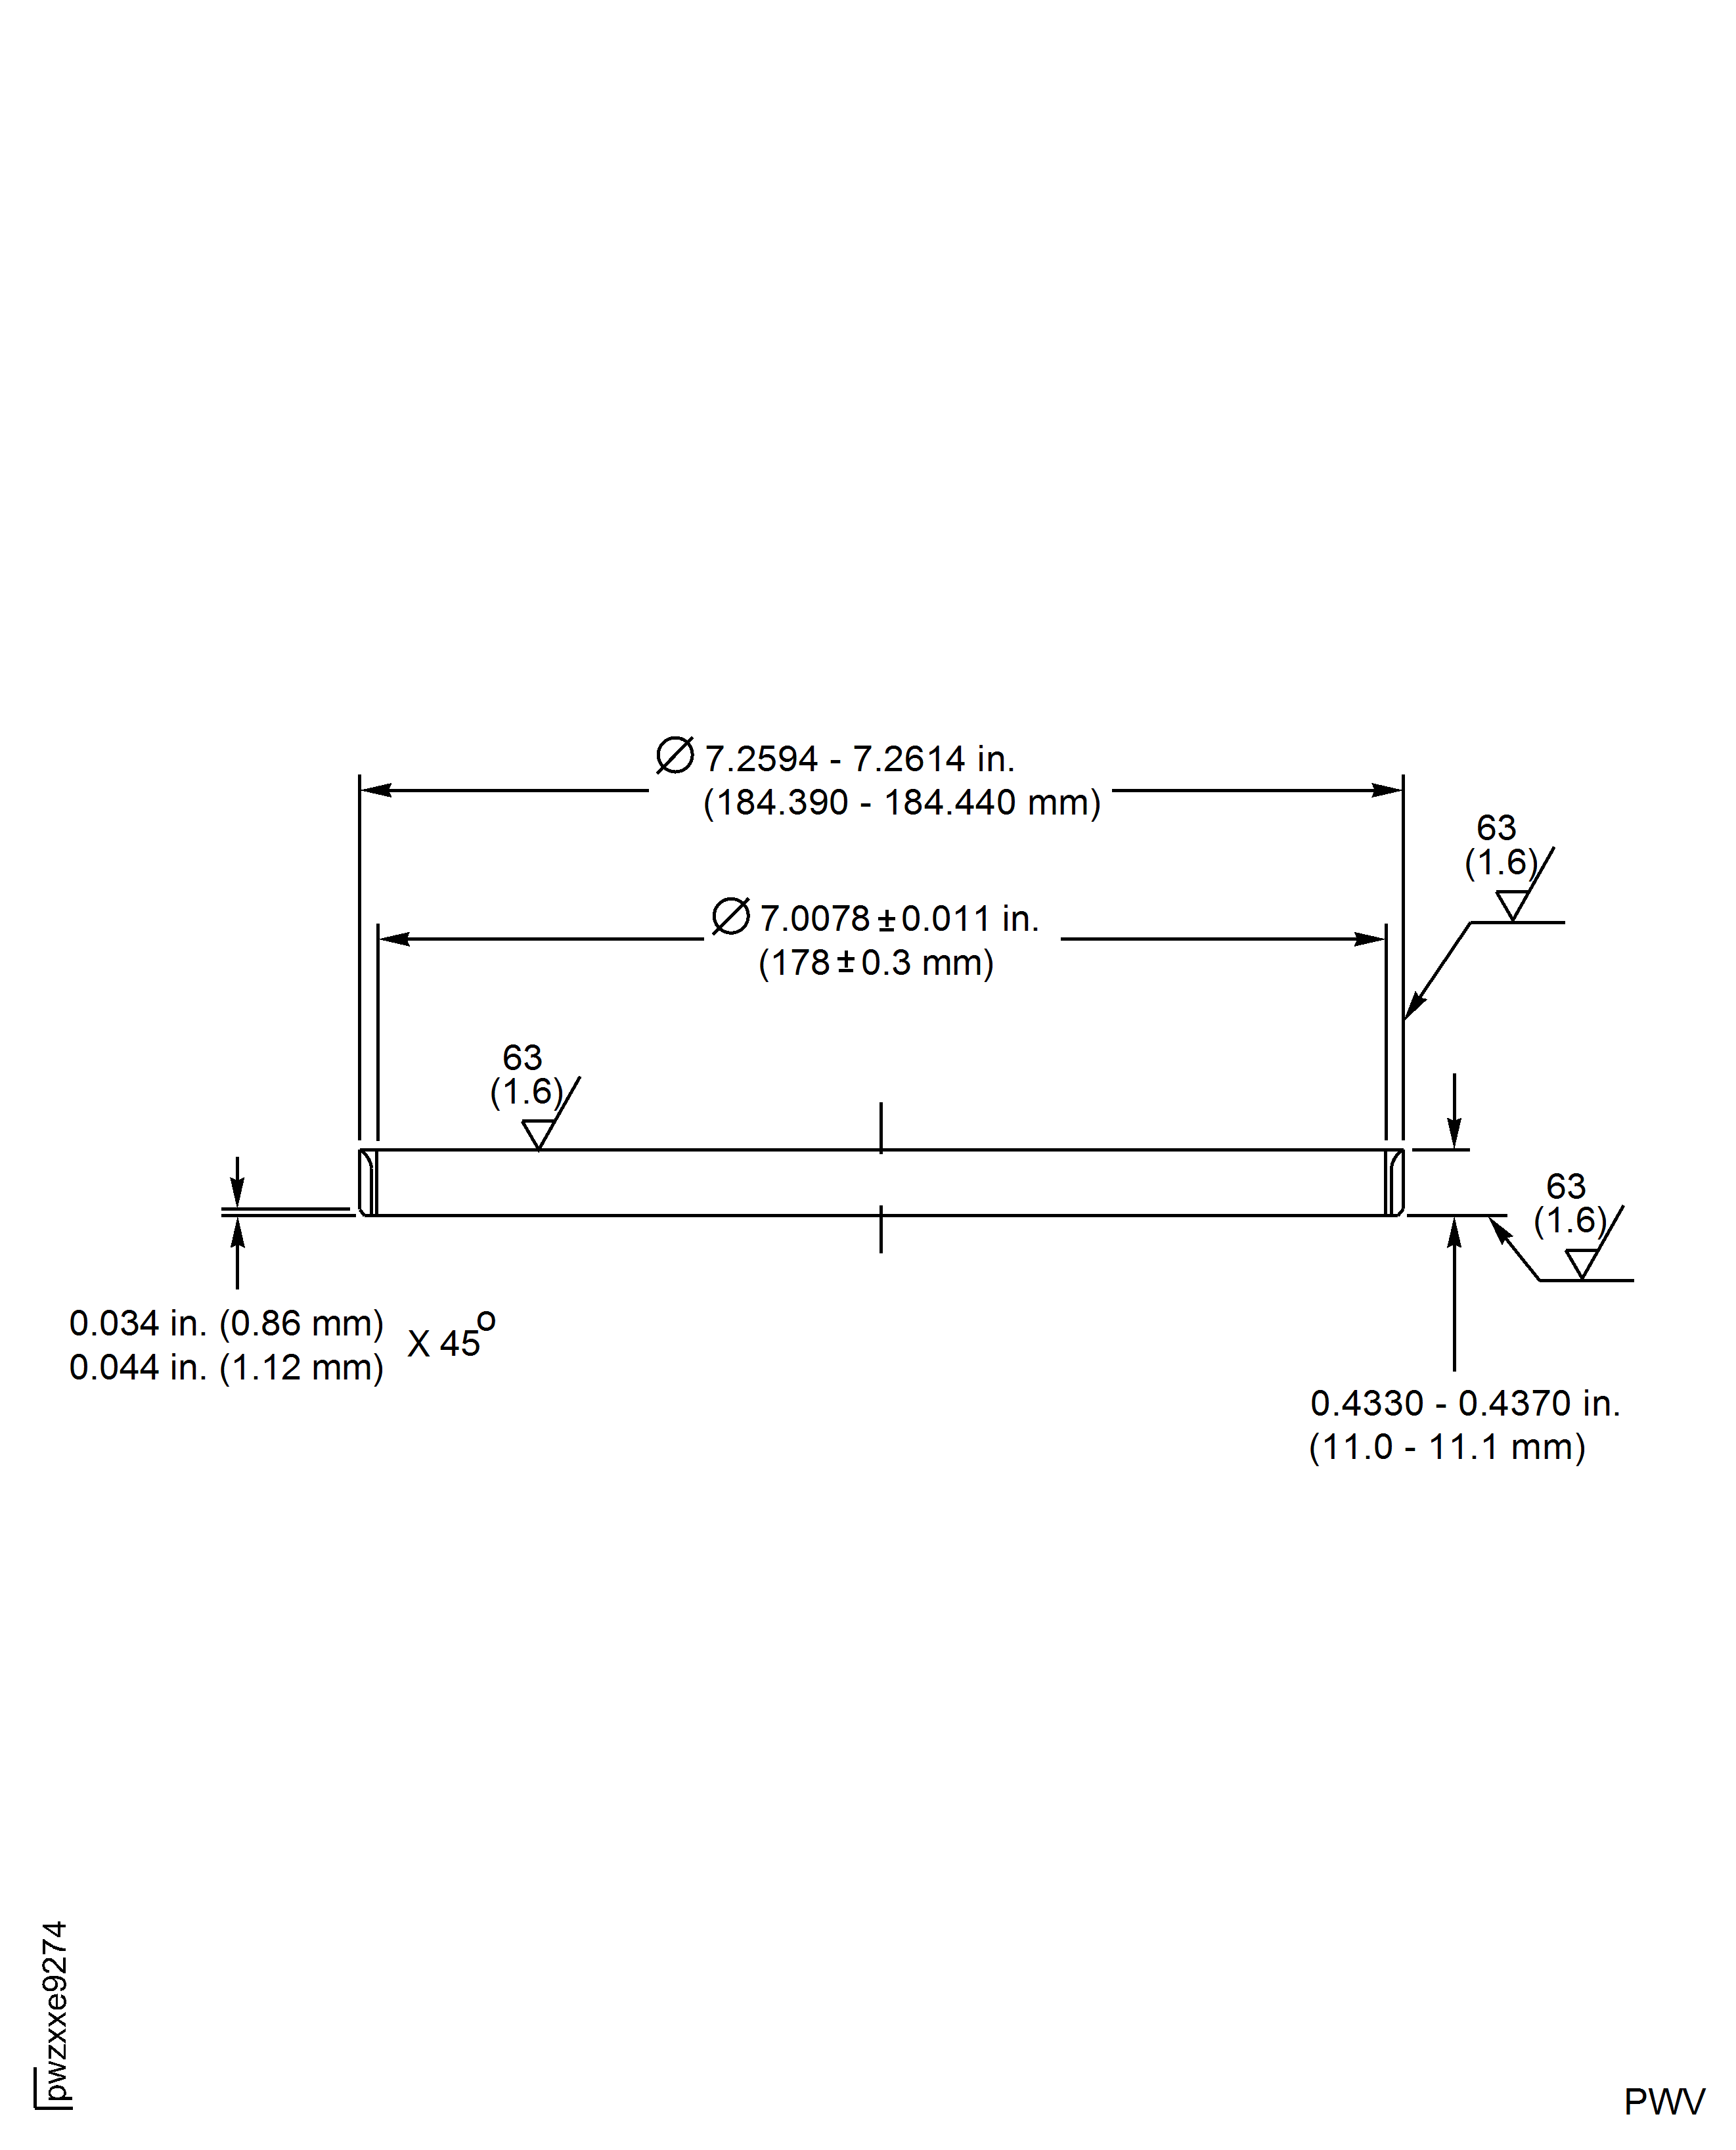
Outside diameter must be between 7.2594 in. - 7.2614 in (184.390 mm - 184.440 mm).
Deleted.
Produce a bushing.
SUBTASK 72-60-21-320-081 Optional produce a Bushing
Refer to SPM TASK 70-23-03-230-501.
Cracks, markings appearing like cracks or through porosity are not allowed.
SUBTASK 72-60-21-230-001 Do a Fluorescent Penetrant Inspection for Cracks
Refer to SPM TASK 70-38-02-300-503.
SUBTASK 72-60-21-310-001 Apply the Chromate Conversion Coating
Dimension to be checked as average of 6 equally spaced readings on 360 deg.
0.011 in (0.3 mm) out of roundness allowed on unconstrained part.
SUBTASK 72-60-21-220-117 Do a Dimensional Inspection of the Outside Diameter

CAUTION
MAKE SURE THAT THE LEAD IN CHAMFER OF THE BUSHING POINTS AWAY FROM THE DRIFT.Install the bushing on the IAE 3F10349 Drift, bushing (dia 178) 1 off.

WARNING
DO NOT TOUCH THE HOT PARTS WITHOUT PROTECTIVE GLOVES.HOT PARTS CAN CAUSE REDDENING AND BLISTERING OF THE SKIN IF THE HANDS ARE NOT PROTECTED.IMMERSE THE CONTACTED AREA IN COLD WATER FOR 10 MINUTES IF THE SKIN IS BURNED. IMMEDIATELY GET THE MEDICAL ATTENTION IF PAIN OR BLISTERING PERSIST.Use an oven and/or a freezer to increase the temperature of the casing and/or decrease the temperature of the assembled drift and bushing.
Give sufficient back-up support at bushing bore area to prevent casing distortion when you install the bushing.
Use IAE 3F10349 Drift, bushing (dia 178) 1 off and an arbor press.

CAUTION
INSTALL BUSHING IN MACHINED BORE IMMEDIATELY AFTER REMOVAL FROM FREEZER OTHERWISE BUSHING CANNOT BE CORRECTLY INSTALLED.Install the bushing into machined bore.
SUBTASK 72-60-21-350-090 Install the Bushing
Chamfer where necessary.
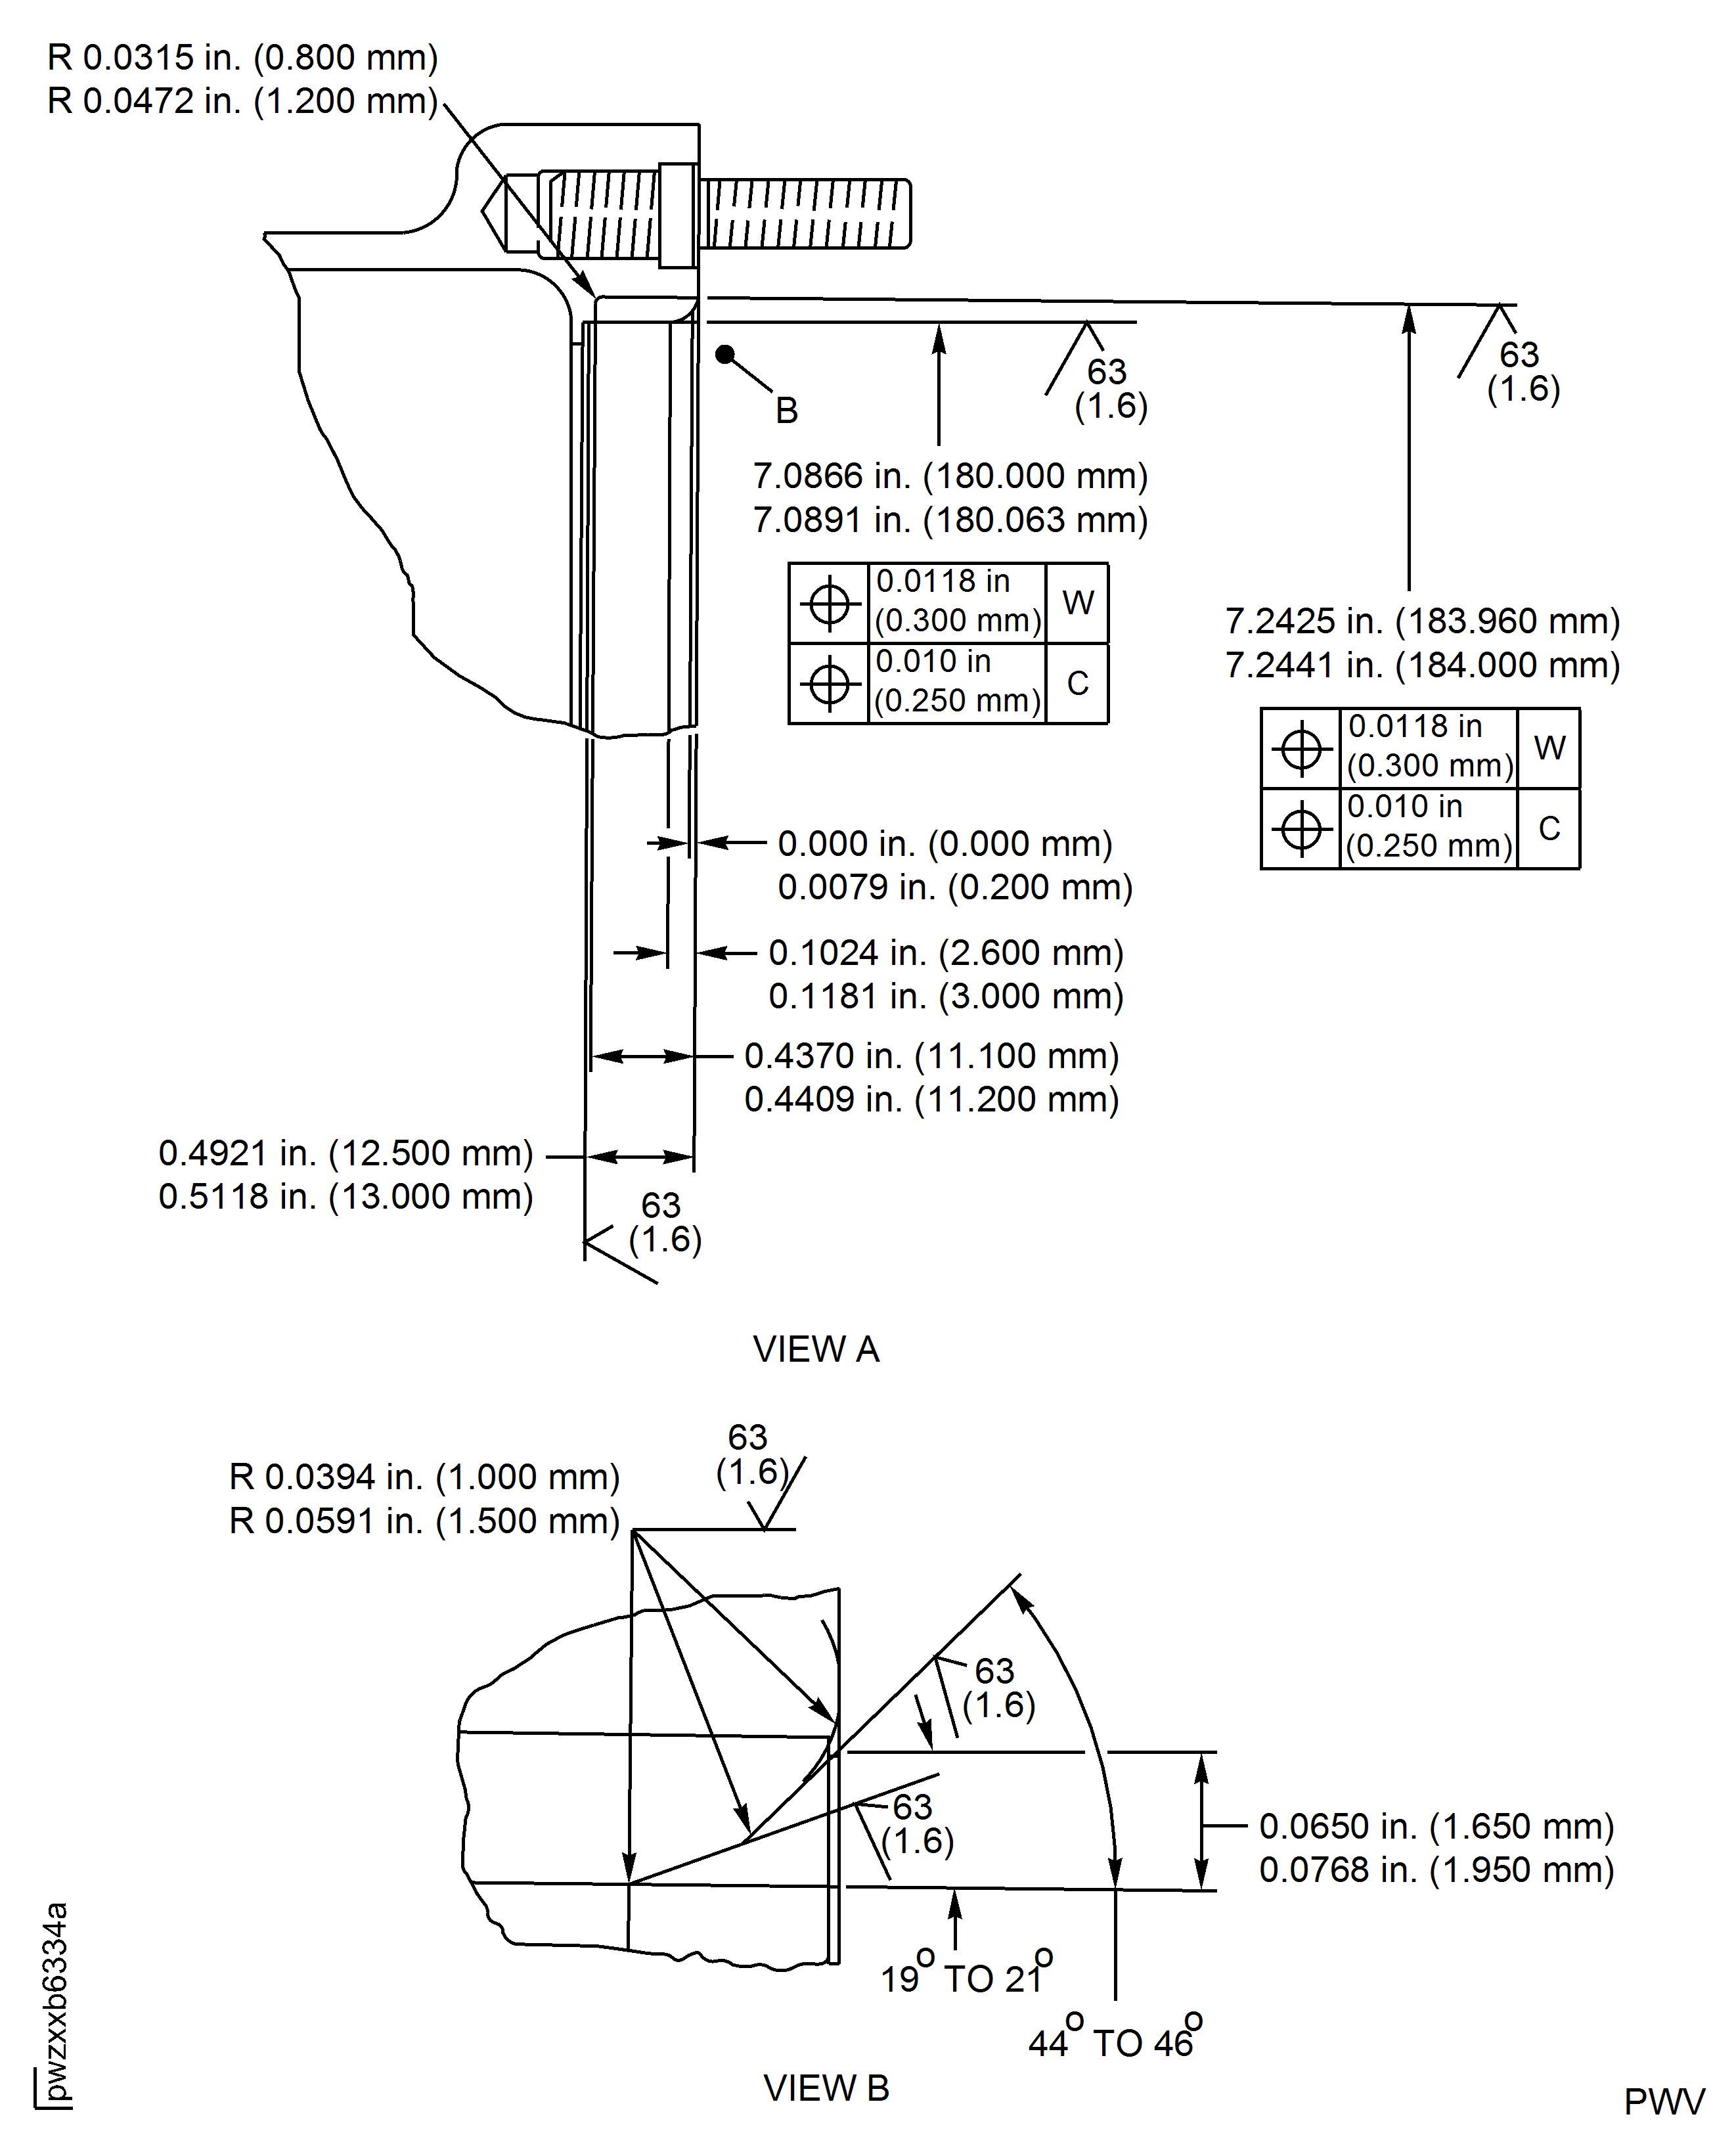
The true position of the diameter must be within 0.0118 in. (0.300 mm) FIR in relation to W system and within 0.010 in. (0.250 mm) in relation to diameter 8.0315 in (204.000 mm).
Bore surface rough must be 63 micro inch (1.6 micron).
The dimension must be between 7.0866 in. and 7.0891 in. (180.000 mm and 180.063 mm).
Machine the inner diameter of the bushing.
SUBTASK 72-60-21-320-080 Machine the Inner Diameter of the Bushing
Refer to the SPM TASK 70-38-02-300-503.
Apply the chromate conversion coating to the machined surfaces of the bushing.
SUBTASK 72-60-21-330-075 Apply the Chromate Conversion Coating
Refer to the SPM TASK 70-09-00-400-501, SUBTASK 70-09-00-400-001.
Make a mark VRS5258 adjacent to the part number.
SUBTASK 72-60-21-350-091 Identify the Repair
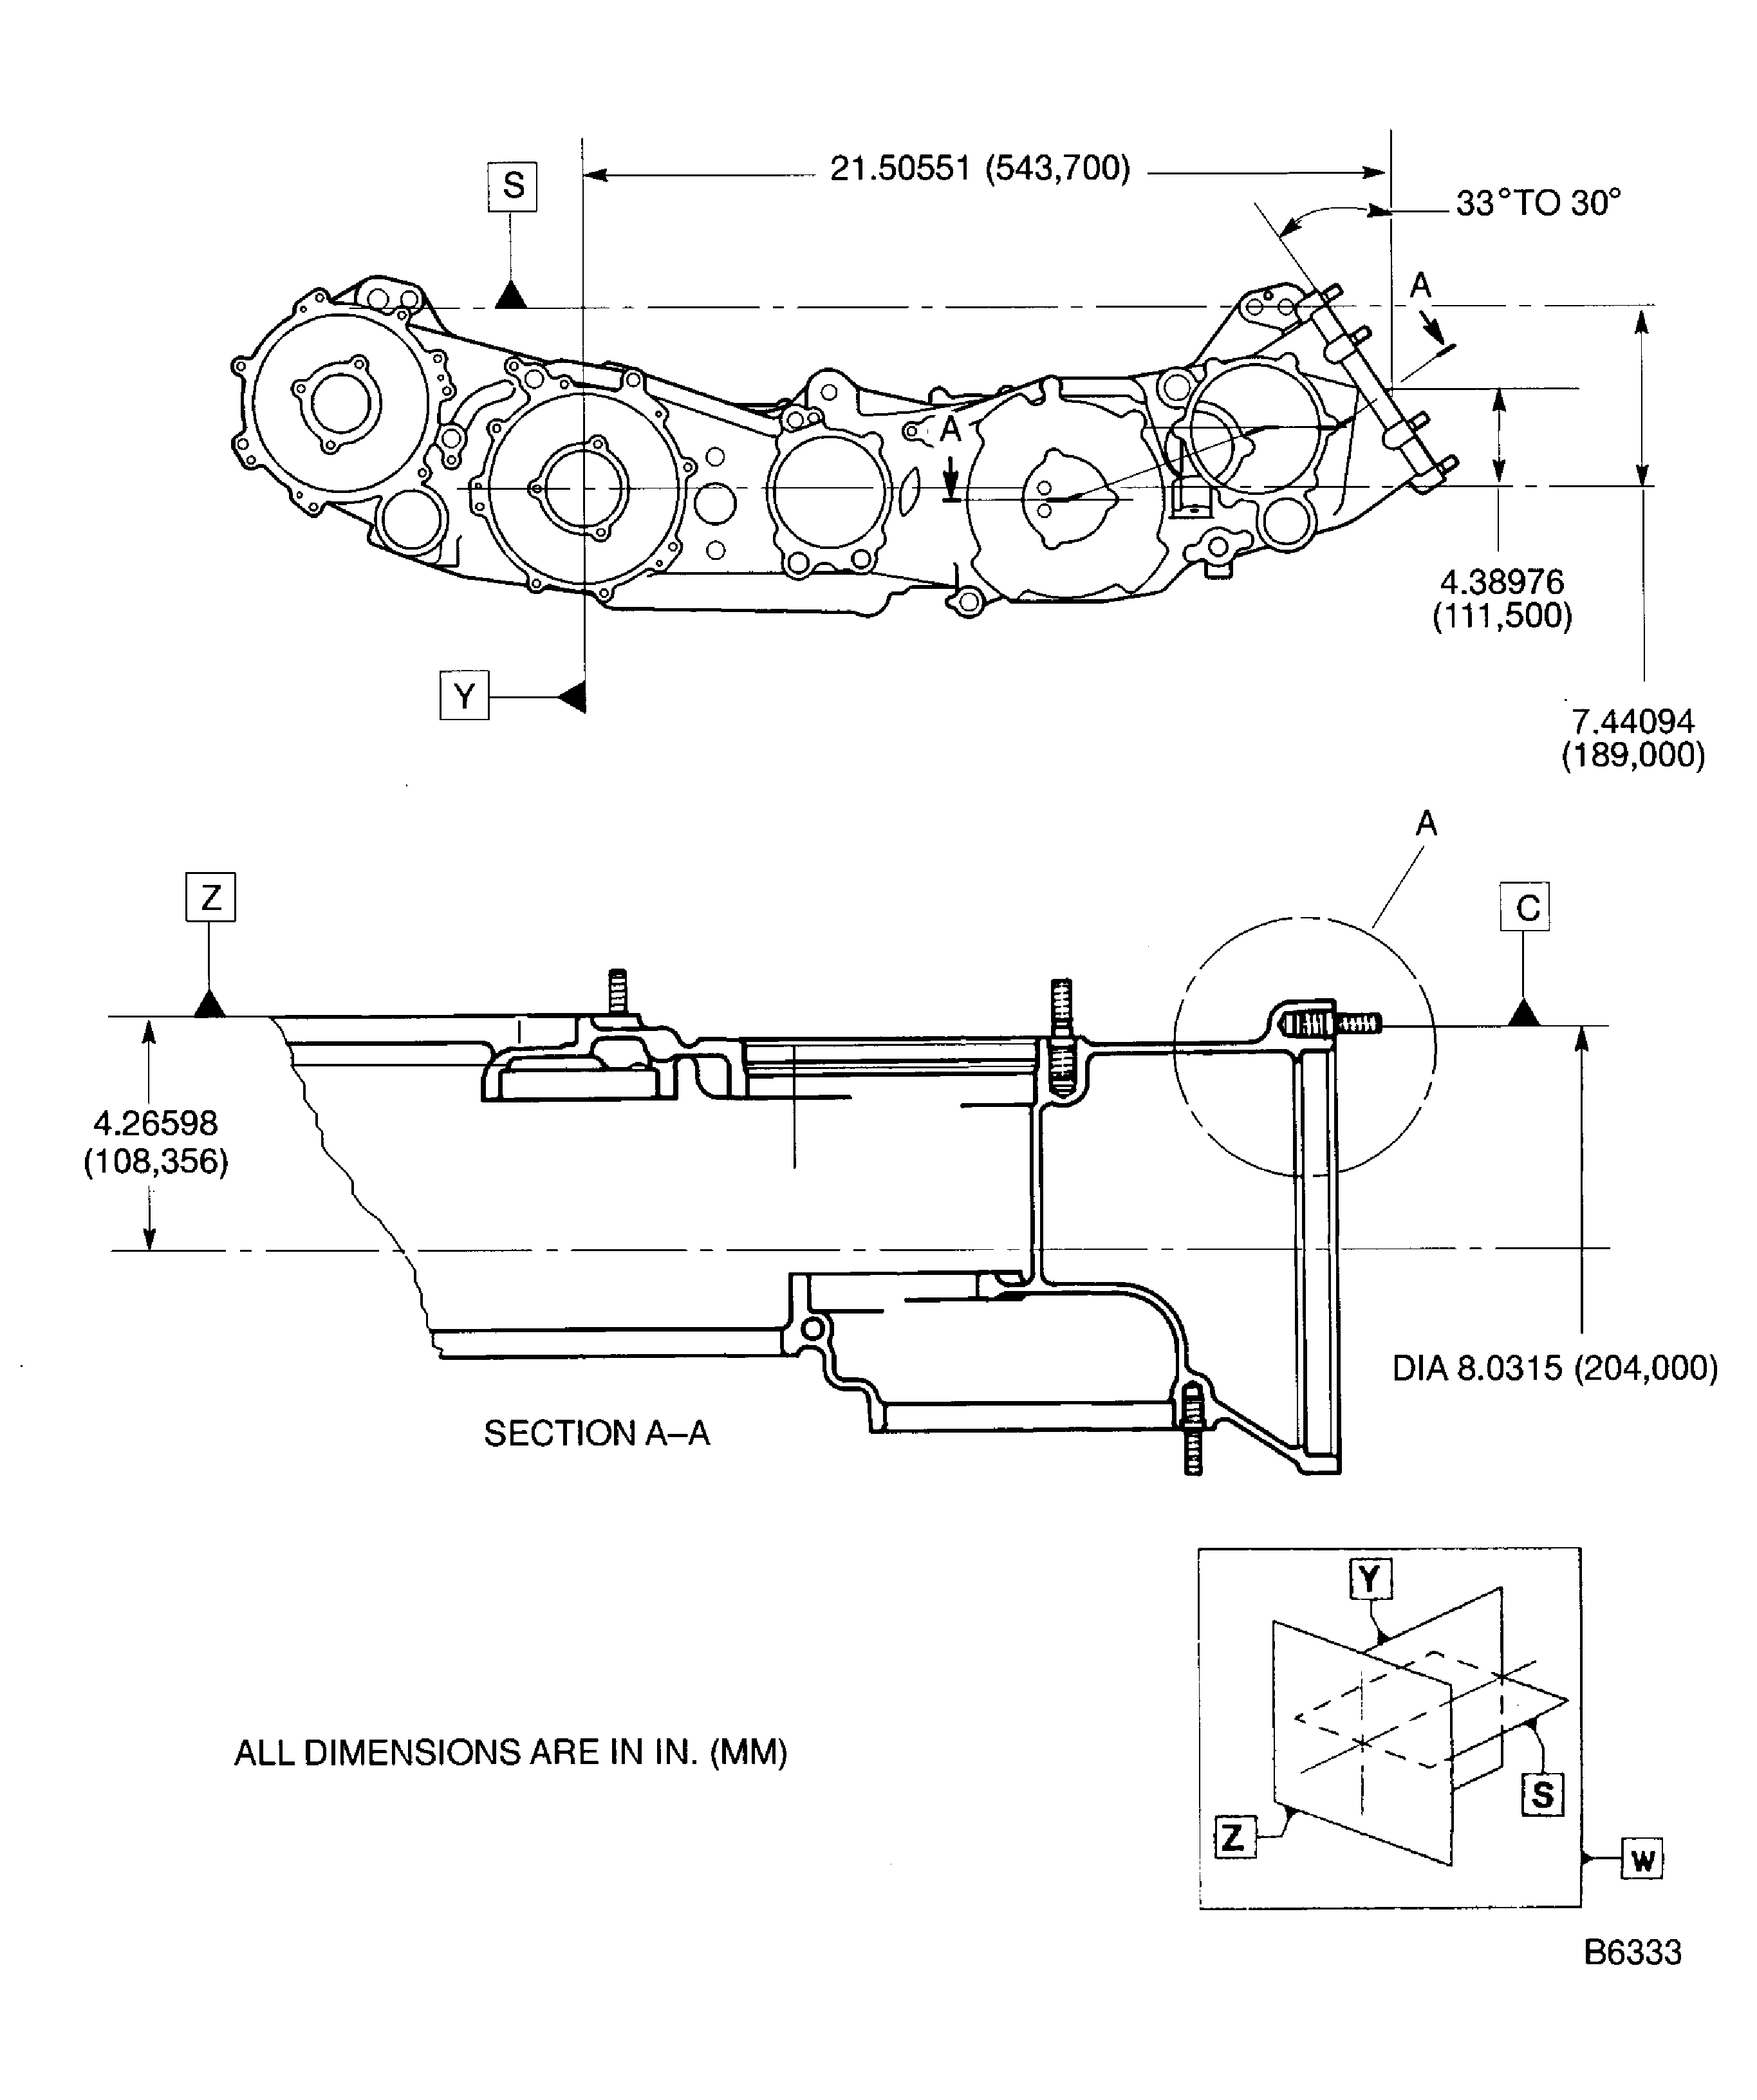
Figure: Repair All Details And Dimensions
Repair All Details And Dimensions

Figure: Repair All Details And Dimensions
Repair All Details And Dimensions

Figure: Dimensions Of The Bush
Dimensions Of The Bush

