Export Control
EAR Export Classification: Not subject to the EAR per 15 C.F.R. Chapter 1, Part 734.3(b)(3), except for the following Service Bulletins which are currently published as EAR Export Classification 9E991: SBE70-0992, SBE72-0483, SBE72-0580, SBE72-0588, SBE72-0640, SBE73-0209, SBE80-0024 and SBE80-0025.Copyright
© IAE International Aero Engines AG (2001, 2014 - 2021) The information contained in this document is the property of © IAE International Aero Engines AG and may not be copied or used for any purpose other than that for which it is supplied without the express written authority of © IAE International Aero Engines AG. (This does not preclude use by engine and aircraft operators for normal instructional, maintenance or overhaul purposes.).Applicability
All
Common Information
TASK 72-50-22-300-139 LPT Stage 4 Vane - Blend Repair Of Surface Damage - REPAIR 139 (VRS4609)
General
Price and availability - none
The practices and processes referred to in the procedure by the TASK numbers are in the SPP.
NOTE
A ** following any repair referenced in this inspection indicates that the repair is not yet published in the current revision of this manual and the part must be rejected. Contact IAE for additional information concerning FAA approved data.
Preliminary Requirements
Pre-Conditions
NONESupport Equipment
NONEConsumables, Materials and Expendables
NONESpares
NONESafety Requirements
NONEProcedure
NOTE
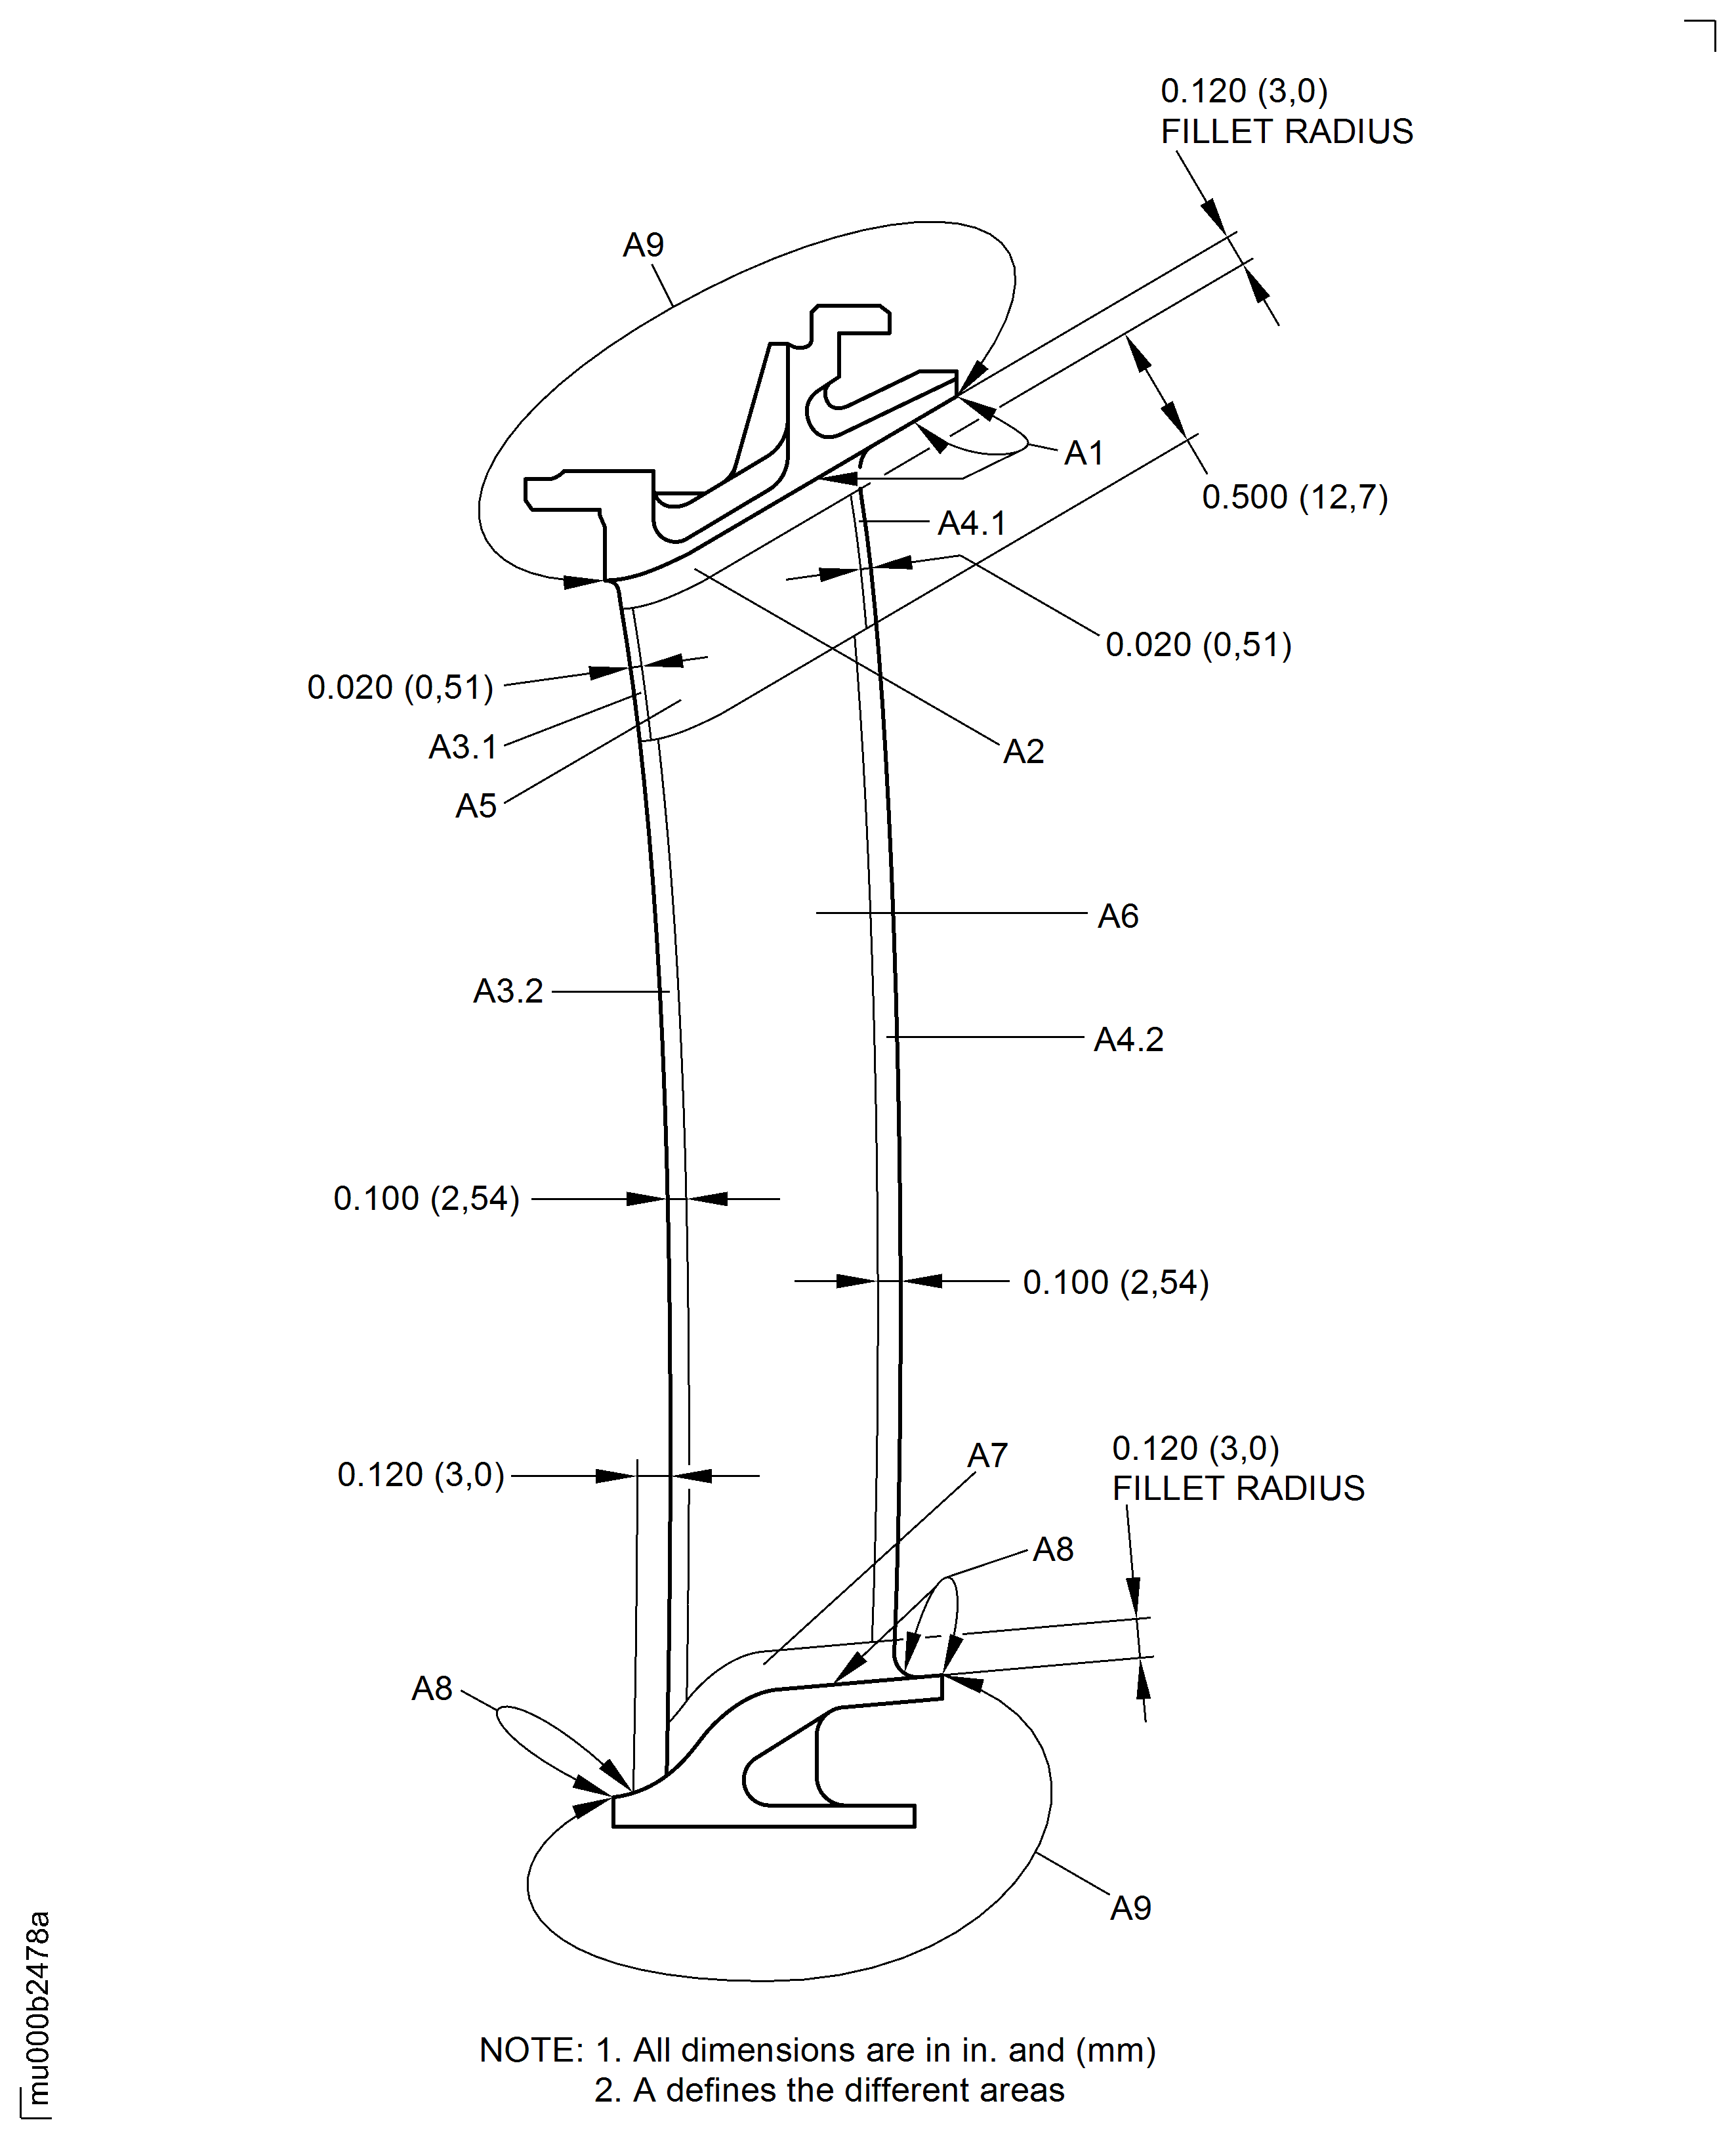
1. Refer to SPM TASK 70-35-21-350-501 for blending surface damage.2. Do not blend repair dents except on leading edge and trailing edge.3. For local blending use a length to depth ratio of 5:1 minimum, refer to Figure.4. The minimum distance between the blends at leading and trailing edge is 0.500 in. (12.7 mm).5. Nicks within acceptable limits do not require blend repair. If present, remove raised material only.6. Repeated blending in one place is acceptable to the specified maximum depth, measured from the initial unblended surface.Maximum permitted blend depth from initial surface is 0.010 in. (0.25 mm).
The blended area must not be more than 10 percent of Area A1.
Blend the surface in Area A1.
No blends permitted.
Blend the surface in Area A2 .
Maximum permitted blend depth from initial surface is 0.020 in. (0.51 mm).
The maximum permitted total depth of opposite blends on leading and trailing edge is 0.020 in. (0.51 mm).
The total length of all blends on leading edge must not be more than 0.700 in. (17.78 mm).
Blend the surface in Area A3.1
Maximum permitted blend depth from initial surface is 0.100 in. (2.54 mm).
The maximum permitted total depth of opposite blends on leading and trailing edge is 0.100 in. (2.54 mm).
The total length of all blends on leading edge must not be more than 0.700 in. (17.78 mm).
Blend the surface in Area A3.2
Maximum permitted blend depth from initial surface is 0.020 in. (0.51 mm).
The maximum permitted total depth of opposite blends on leading and trailing edge is 0.020 in. (0.51 mm).
The total length of all blends on trailing edge must not be more than 0.700 in. (17.78 mm).
Blend the surface in Area A4.1
Maximum permitted blend depth from initial surface is 0.100 in. (2.54 mm).
The maximum permitted total depth of opposite blends on leading and trailing edge is 0.100 in. (2.54 mm).
The total length of all blends on trailing edge must not be more than 0.700 in. (17.78 mm).
Blend the surface in Area A4.2
Maximum permitted blend depth from initial surface is 0.010 in. (0.25 mm).
The blended area must not be more than 10 percent of Area A5
Blend the surface in Area A5
Maximum permitted blend depth from initial surface is 0.010 in. (0.25 mm).
The blended area must not be more than 10 percent of Area A6.
Blend the surface in Area A6
No blends permitted.
Blend the surface in Area A7
Maximum permitted blend depth from initial surface is 0.010 in. (0.25 mm).
The blended area must not be more than 10 percent of Area A8.
Blend the surface in Area A8
Maximum permitted blend depth from initial surface is 0.010 in. (0.25 mm).
Blend cracks only.
Blending of nicks, dents and pits is not permitted.
Remove the raised material.
Blend the surface in Area A9
SUBTASK 72-50-22-350-001 Blend Repair the Stage 4 Turbine Vane
Refer to TASK 70-23-05-230-501.
Use high sensitivity level.
No cracks are permitted.
Do the test for cracks.
SUBTASK 72-50-22-230-001 Examine the Blended Areas for Cracks
Refer to Figure.
The blended surface must be as smooth as the initial surface.
Edges and corners are not permitted.
Examine the surface of the blended areas visually.
The blend ratio must be in the limits.
Examine the blended areas dimensionally.
SUBTASK 72-50-22-220-001 Do the Post Repair Inspection
Refer to VRS4607 (TASK 72-50-22-300-XXX)**.
Refer to VRS4608 TASK 72-50-22-300-138.
Restore the coating of the Stage 4 turbine vane.
SUBTASK 72-50-22-350-002 Do the Post Repair
Figure: Repair Details and Dimensions
Repair Details and Dimensions

Figure: Repair Details and Dimensions
Repair Details and Dimensions

