Export Control
EAR Export Classification: Not subject to the EAR per 15 C.F.R. Chapter 1, Part 734.3(b)(3), except for the following Service Bulletins which are currently published as EAR Export Classification 9E991: SBE70-0992, SBE72-0483, SBE72-0580, SBE72-0588, SBE72-0640, SBE73-0209, SBE80-0024 and SBE80-0025.Copyright
© IAE International Aero Engines AG (2001, 2014 - 2021) The information contained in this document is the property of © IAE International Aero Engines AG and may not be copied or used for any purpose other than that for which it is supplied without the express written authority of © IAE International Aero Engines AG. (This does not preclude use by engine and aircraft operators for normal instructional, maintenance or overhaul purposes.).Applicability
V2500-A5
Common Information
TASK 72-45-25-200-004-C00 HPT Stage 2 Duct Segment - Examine, Inspection-004
General
This TASK gives the procedure for the inspection of the stage 2 HPT duct segment.
The policy that is necessary for inspection is given in SPM TASK 70-20-00-200-501.
All the parts must be cleaned before any is examined. Refer to TASK 72-45-25-100-000 (CLEANING-000).
All parts must be visually examined for damage, corrosion and wear. Any defects that are not identified in the procedure must be referred to IAE.
The procedure for those parts which must have a crack test is given in SUBTASK 72-45-25-230-059. Do the test before the part is visually inspected.
A ** following repair in this inspection indicates that the repair is not yet published in the current revision of the manual and the part must be rejected. Contact IAE for additional information concerning FAA approved repair date.
Do not discard any part until you are sure there are no repairs available. Refer to the instructions in Repair before a discarded part is used again or oversize parts are installed.
Parts which should be discarded can be held although no repair is available. The repair of a discarded part could be shown to be necessary at a later date.
All parts must be examined to make sure that all the repairs have been completed satisfactorily.
The practices and processes referred to in the procedure by the TASK numbers are in SPM.
References
Refer to SPM for data on these items.
Definitions of Damage, SPM TASK 70-02-02-350-501.
Inspection of Parts, SPM TASK 70-20-00-200-501.
Some data on these items is contained in this TASK. For more data on these items refer to SPM.
Method of Testing for Crack Indications.
Chemical Processes.
Surface Protection.
Preliminary Requirements
Pre-Conditions
NONESupport Equipment
NONEConsumables, Materials and Expendables
NONESpares
NONESafety Requirements
NONEProcedure
Clean the part. Refer to the TASK 72-45-25-100-000 (CLEANING-000).
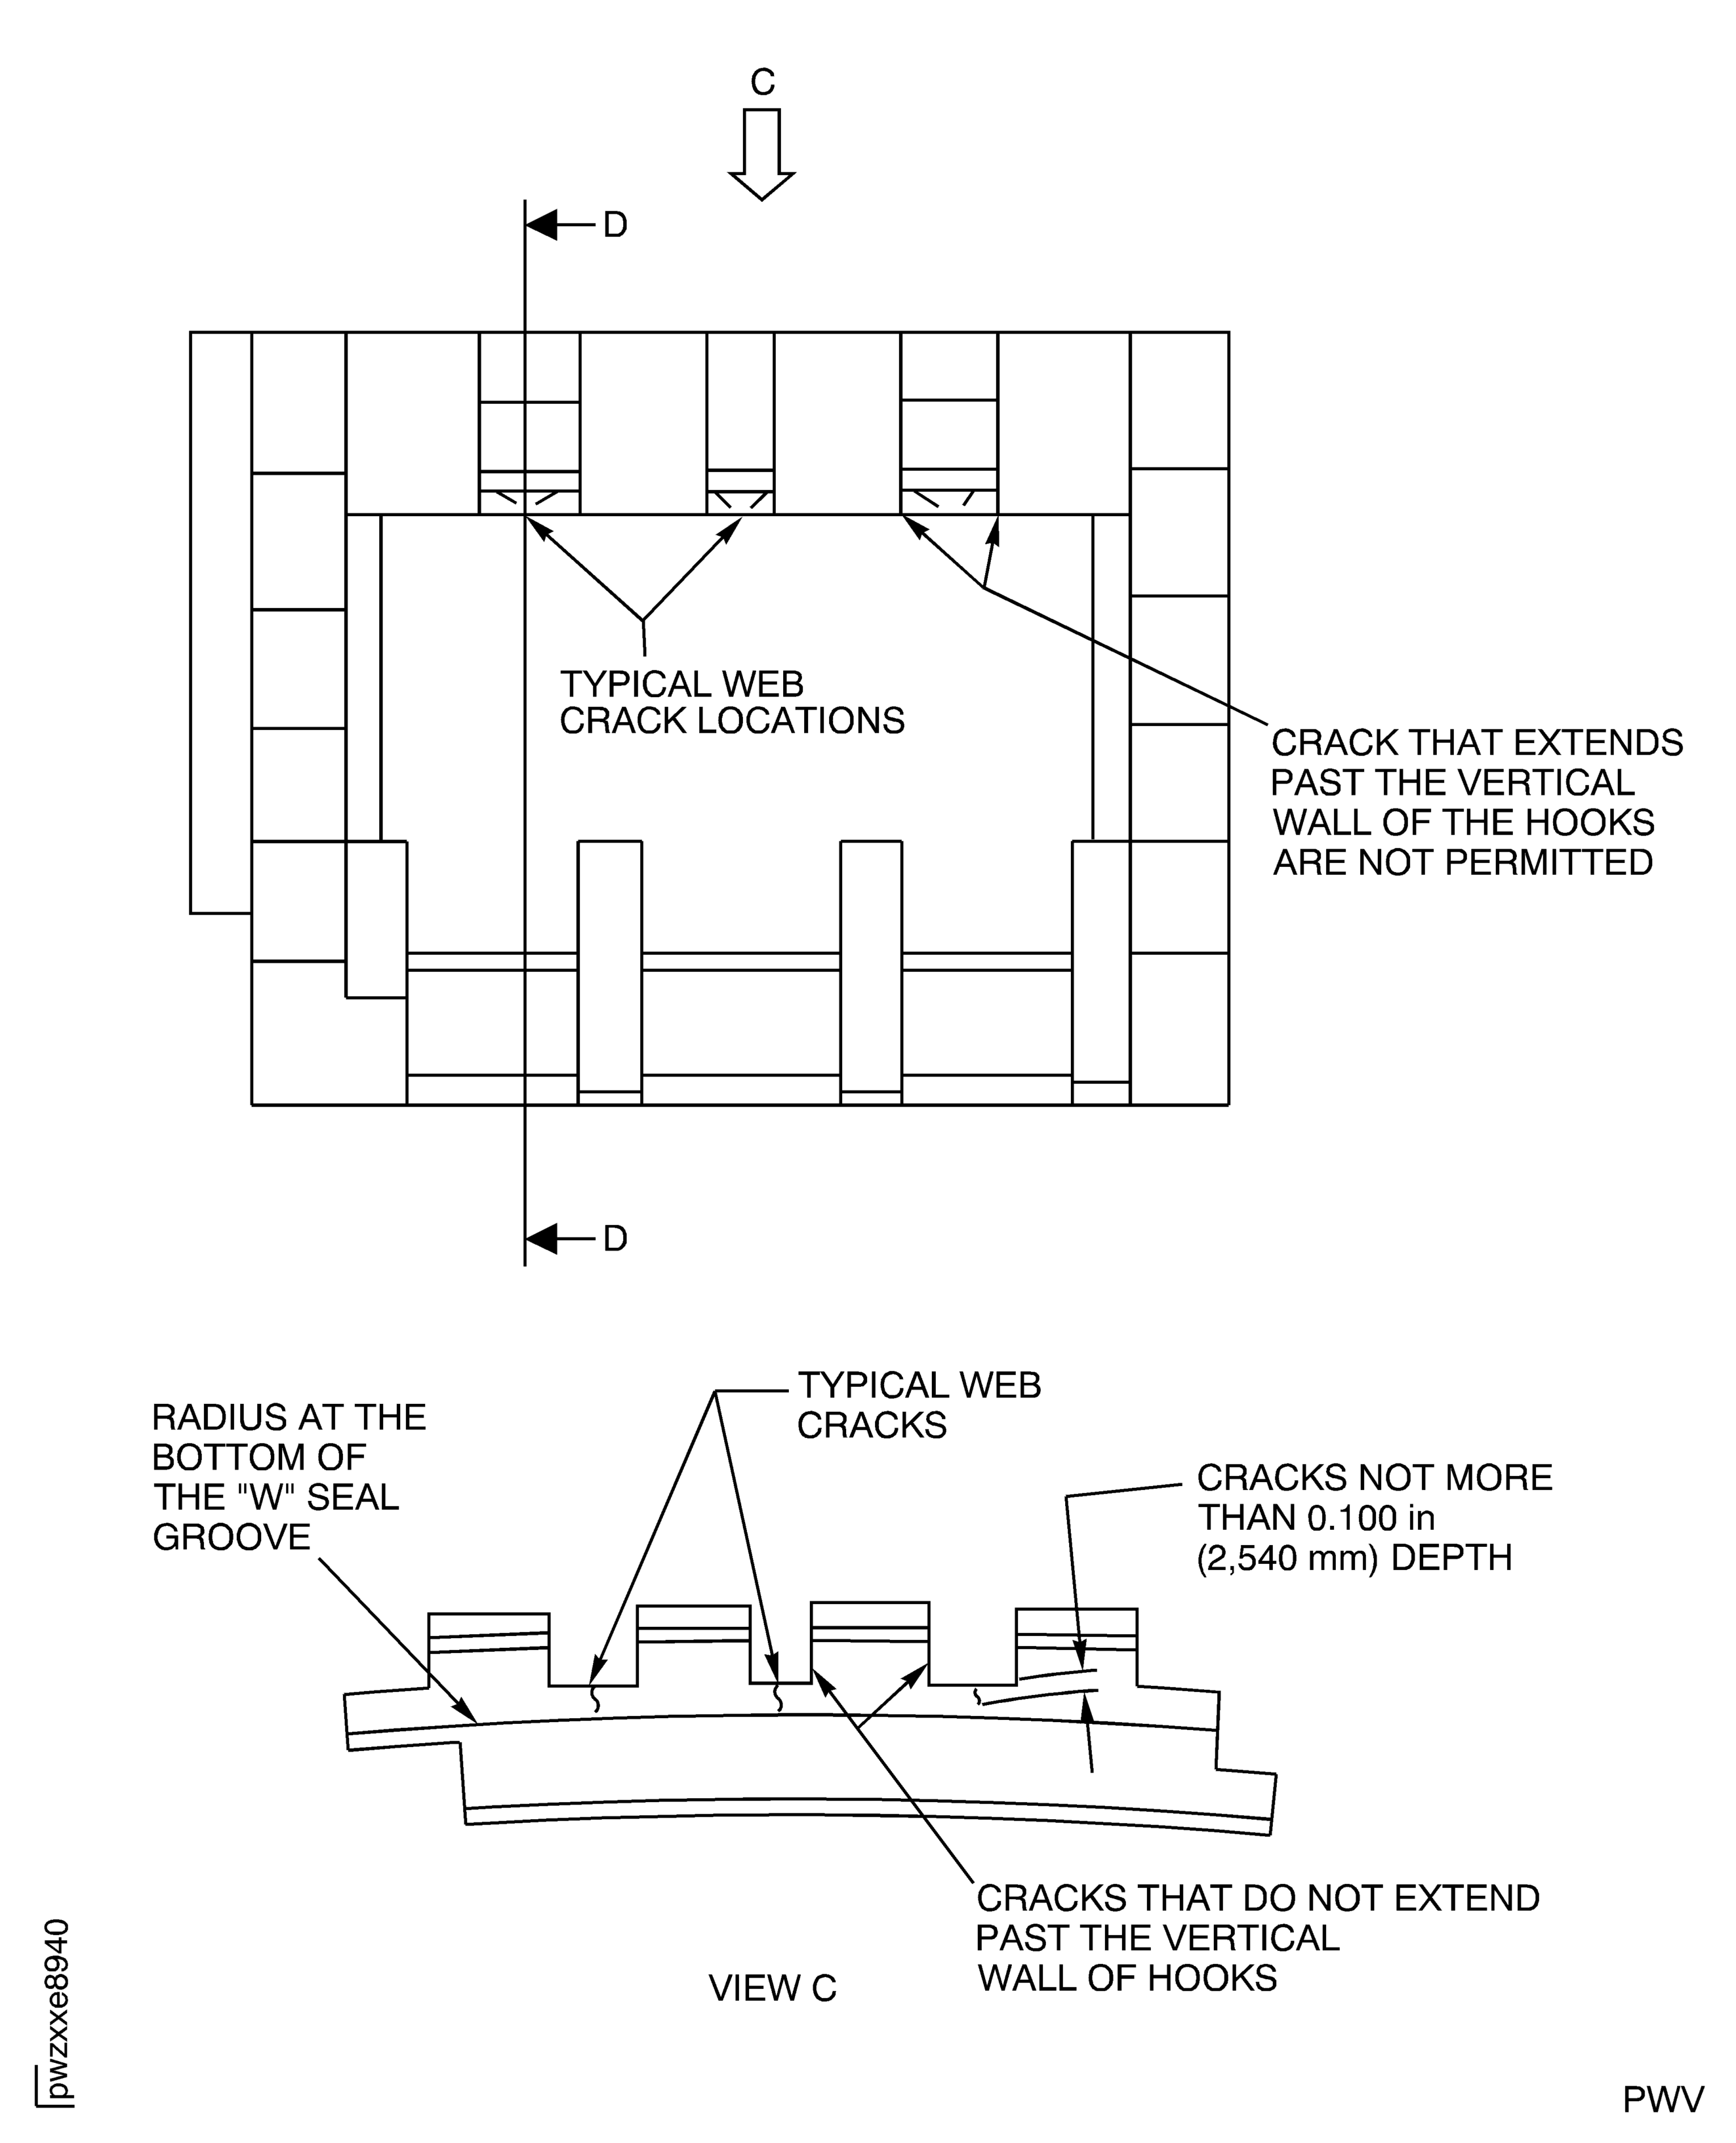
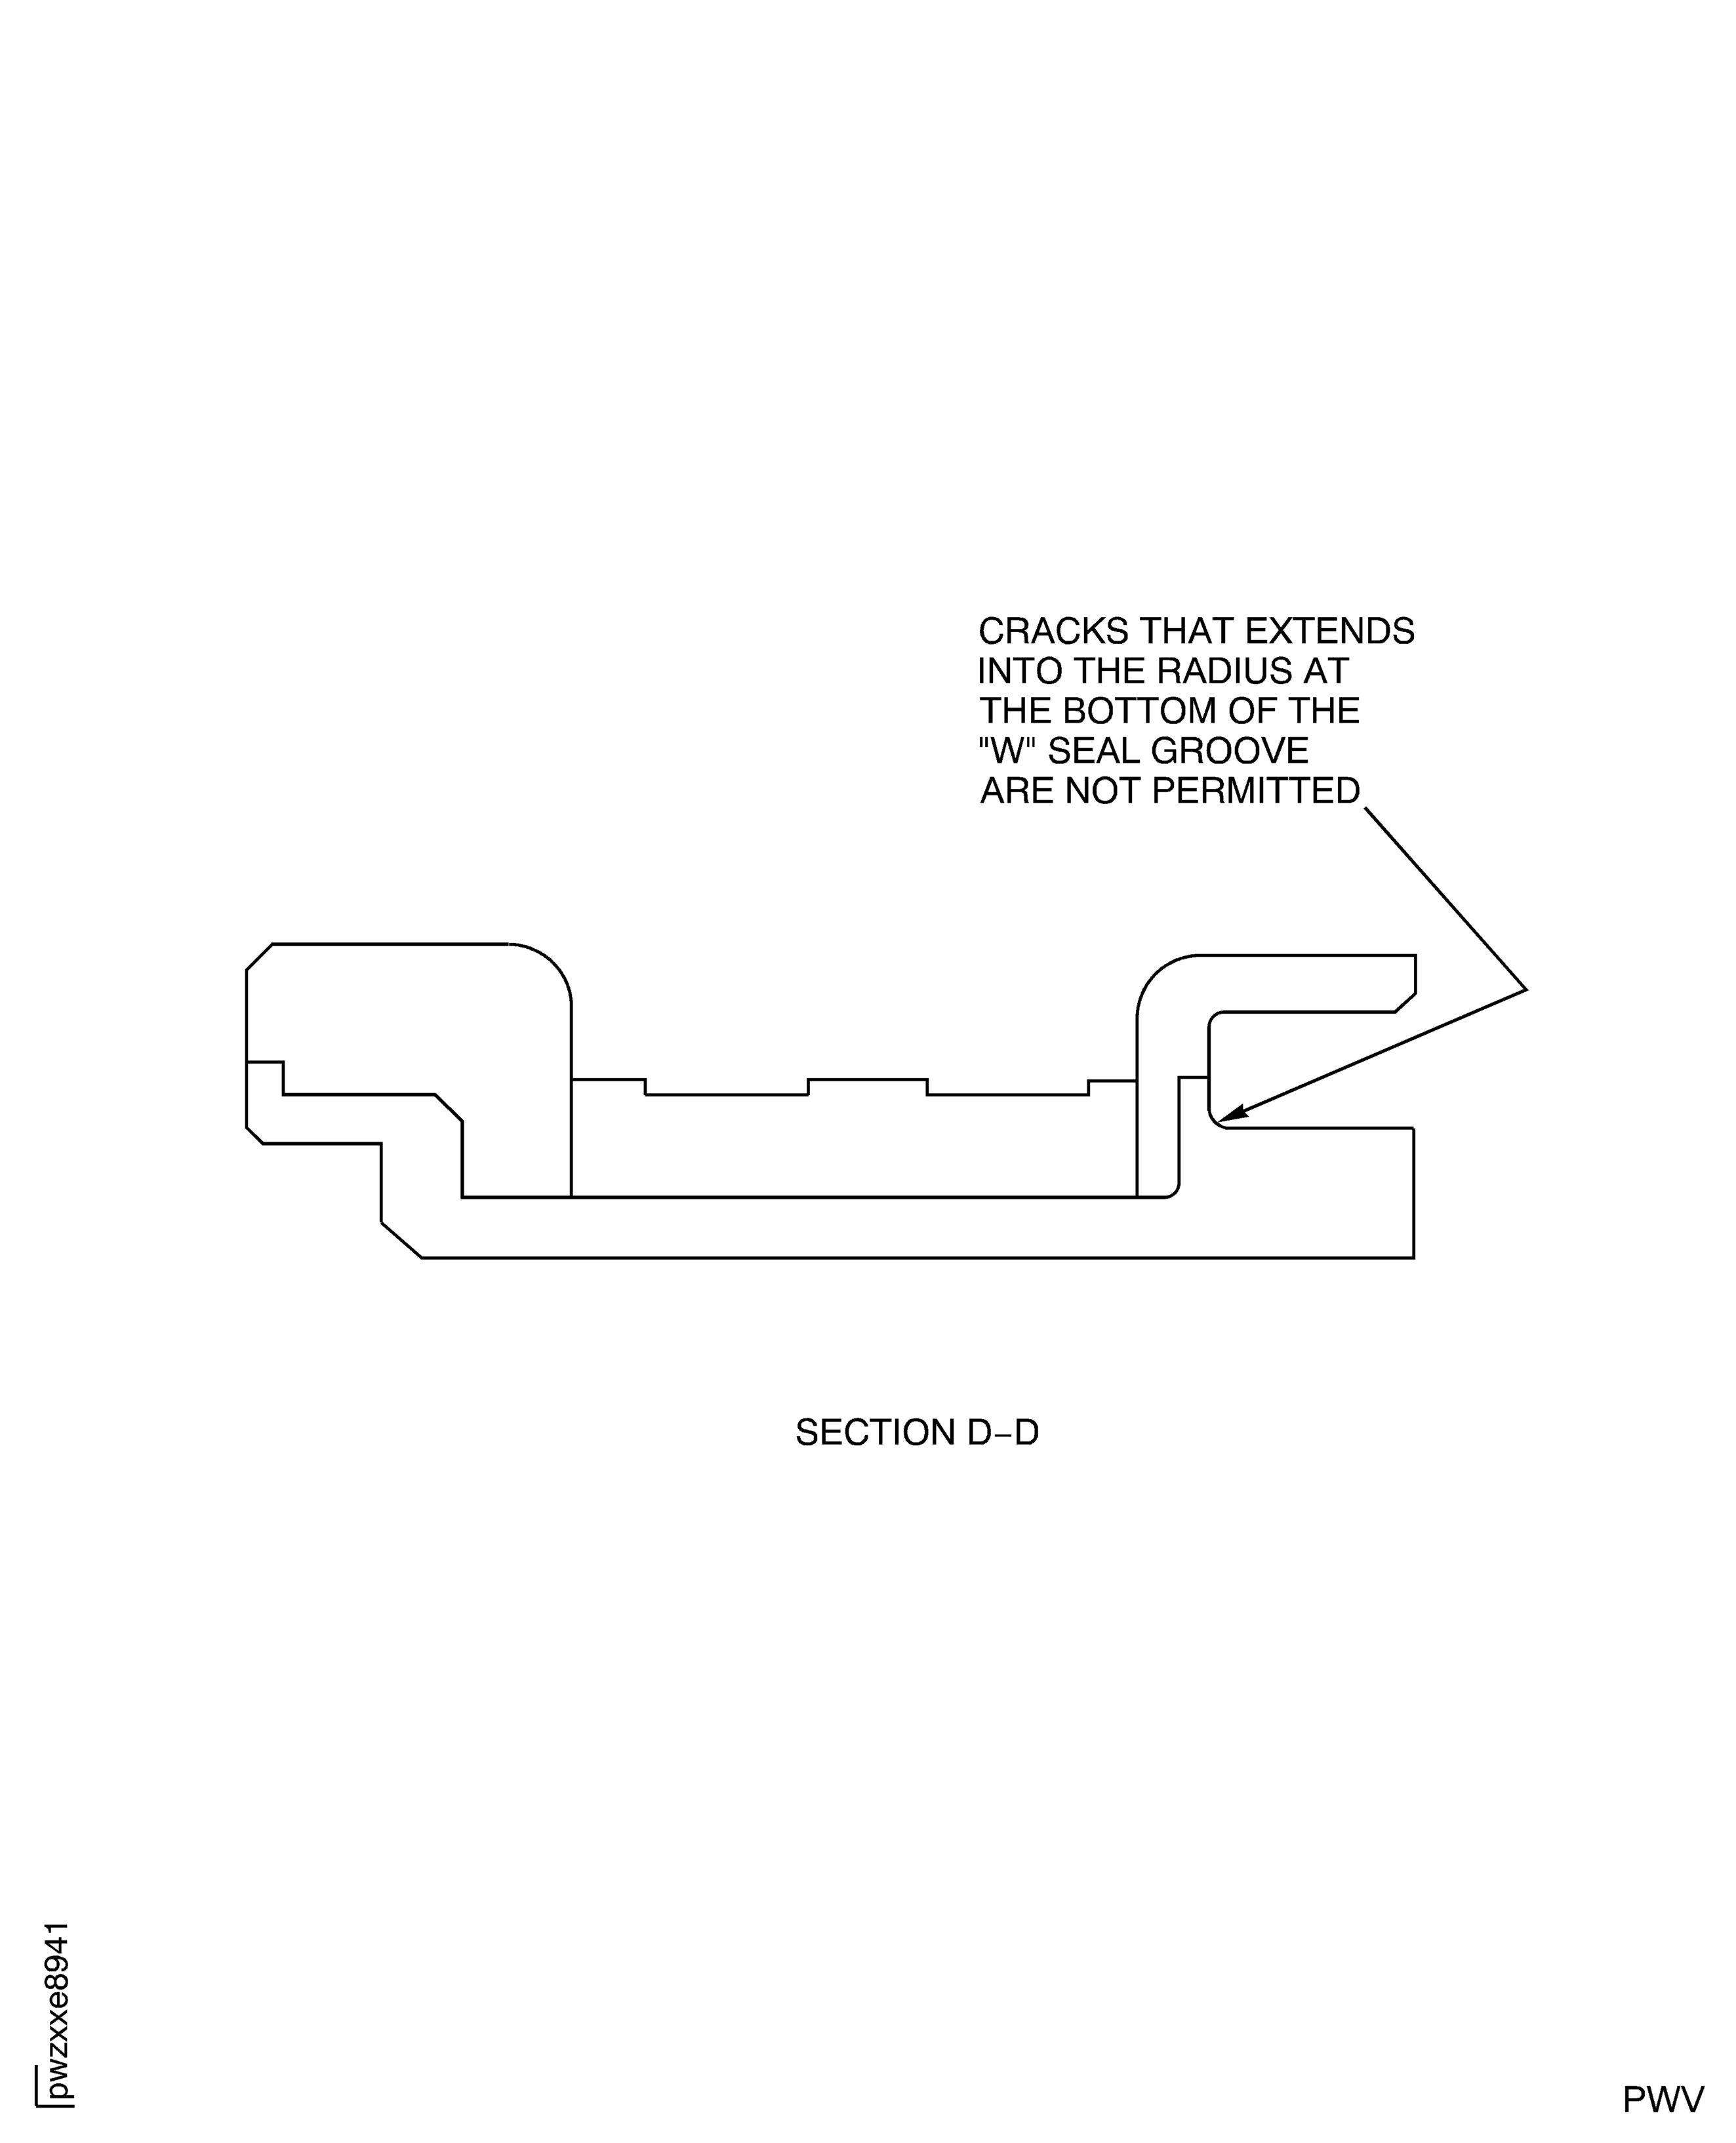
Axial cracks less than 0.005 in. (0.13 mm) width and less than 0.100 in. (2.54 mm) depth in the material between hooks are permitted. Cracks are permitted to a maximum of the vertical wall of the hook or the radius of the W seal groove. Refer to Figure and Figure. No more than one crack is permitted between each hook.
Cracks in the hook web material.
Repair, VRS3615 TASK 72-45-25-300-009 (REPAIR-009).
All other base material cracks.
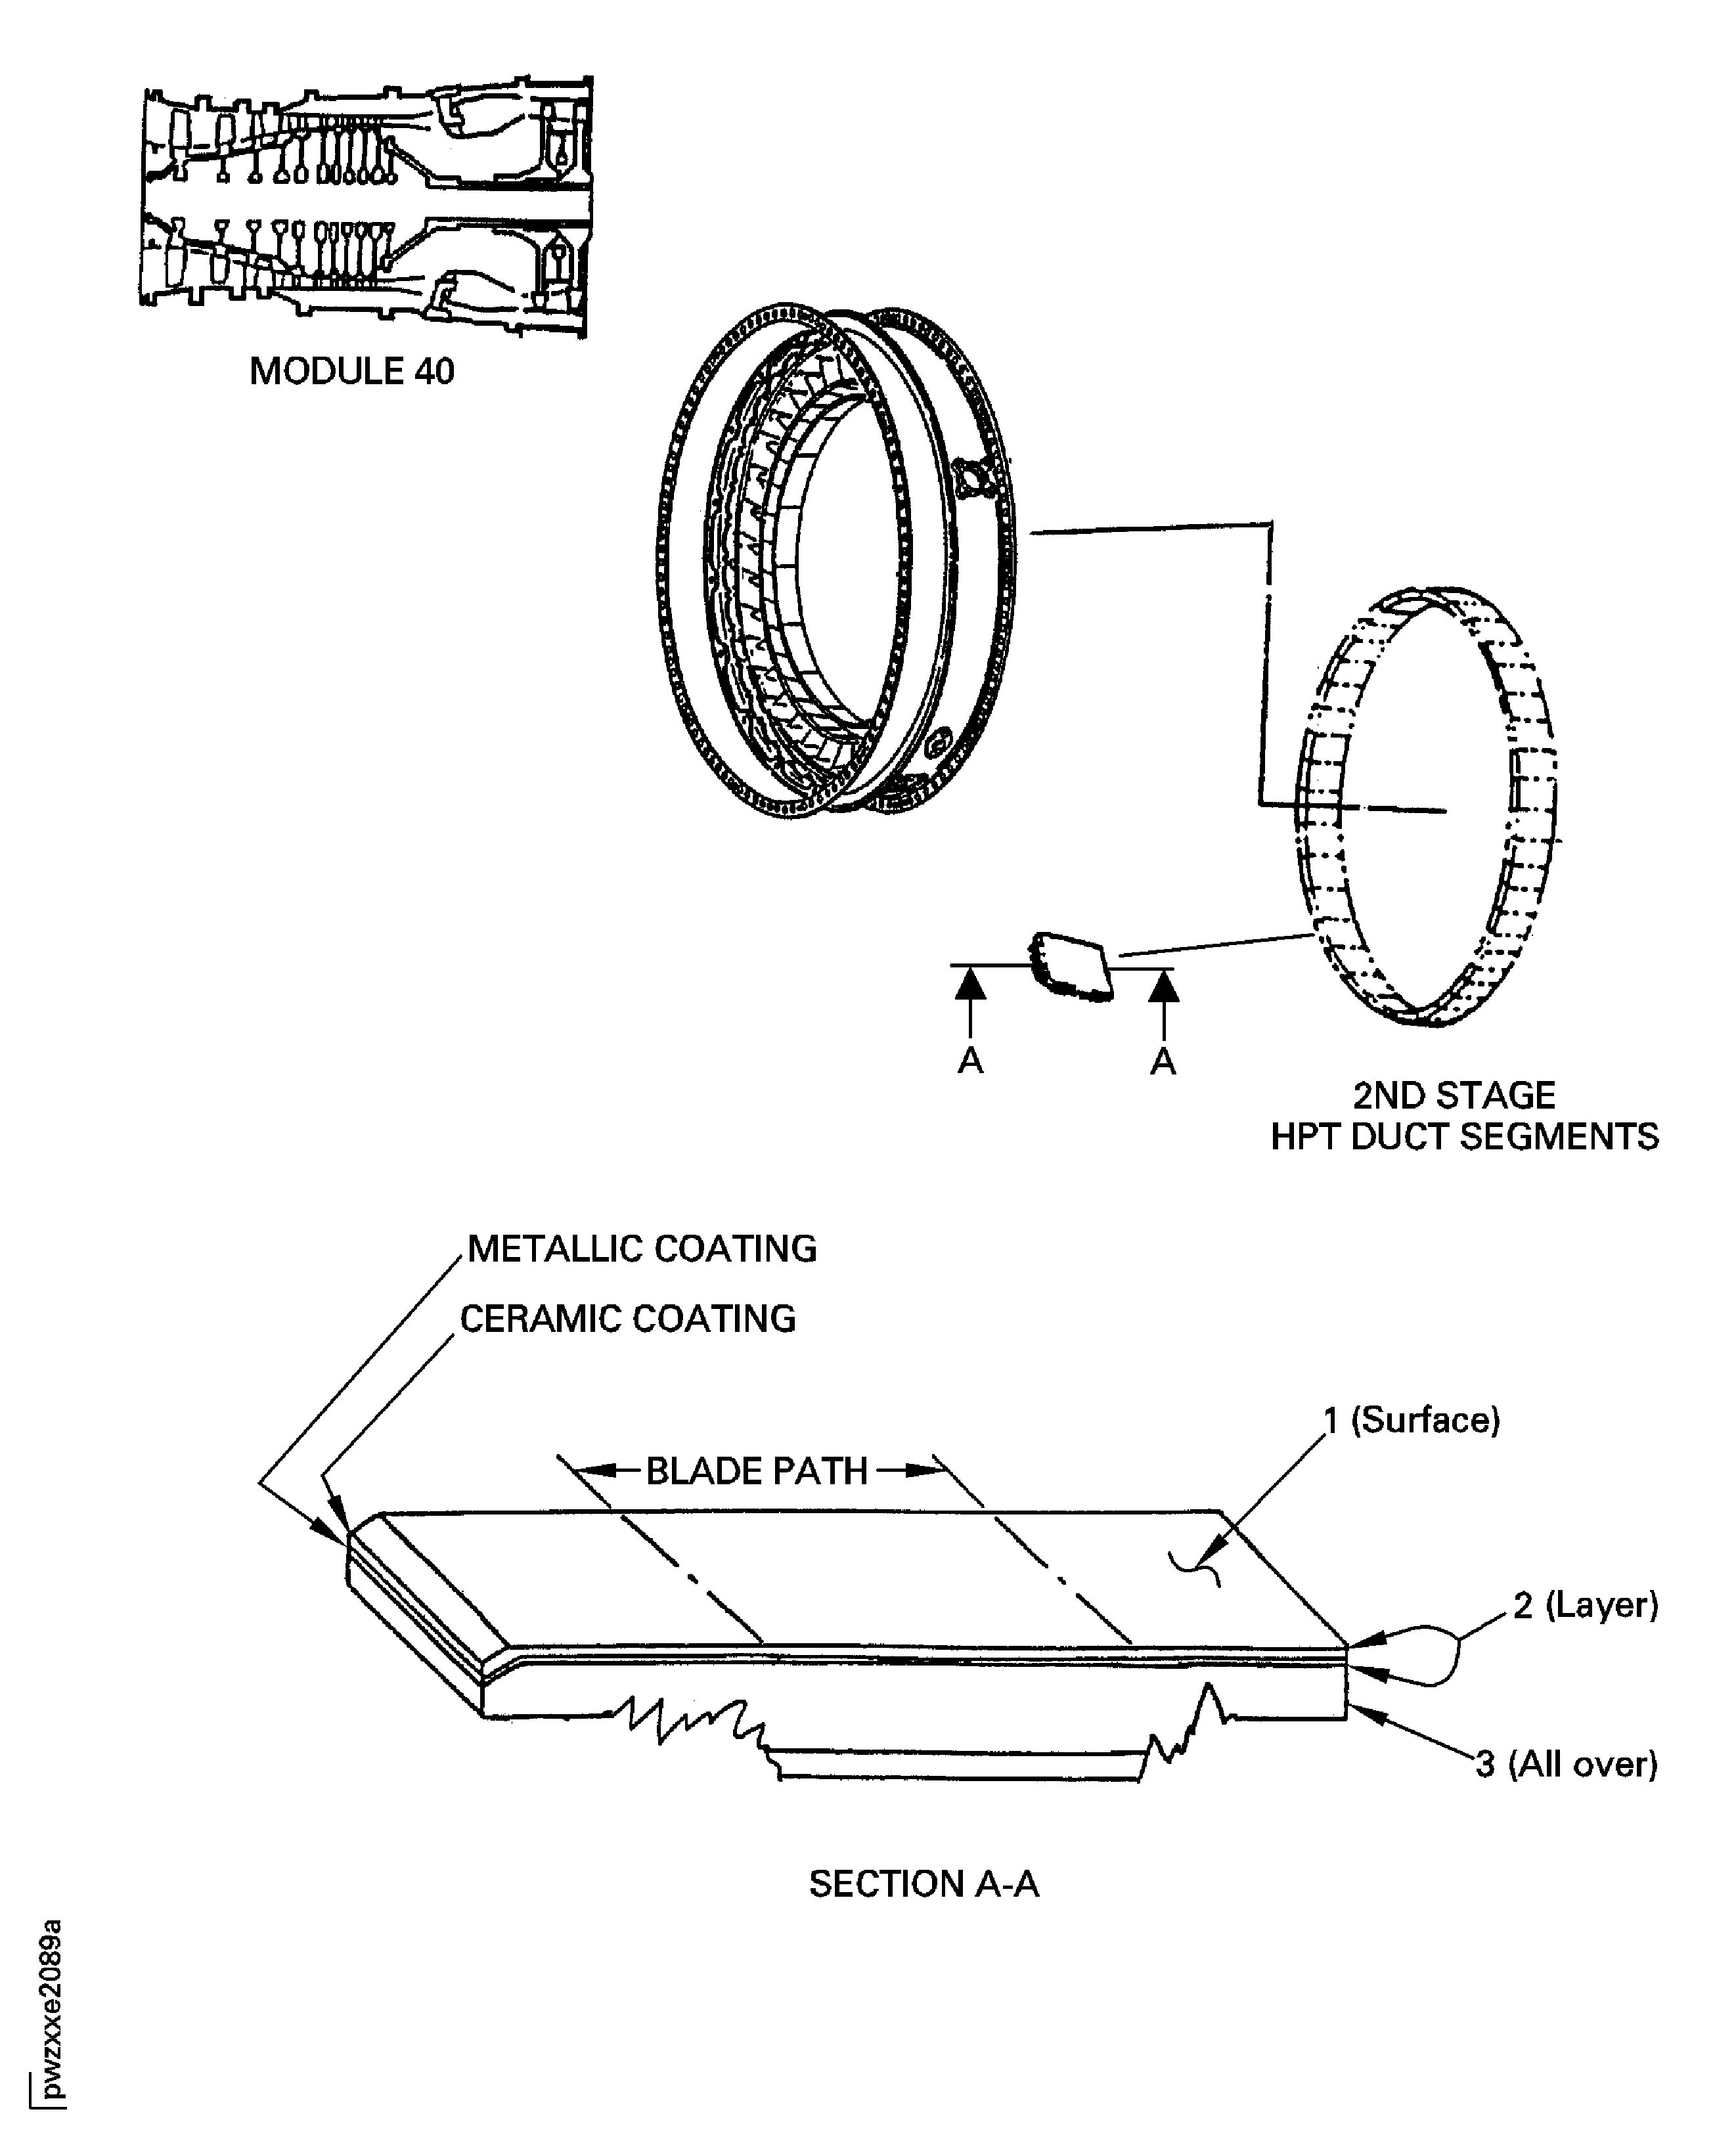
Do the test for cracks on the part that is given below. Examine the metal surfaces. Do not examine the ceramic and metallic coated areas at Location 1. Use the applicable penetrant procedure.
PART IDENT
TASK/SUBTASK
Stage 2 HPT duct segment
SPM TASK 70-23-01-230-501 or
SUBTASK 72-45-25-230-059-001 Examine the Stage 2 HPT Duct Segments (01-060) for Cracks
Refer to Figure.
NOTE
Erosion is the condition of the top porous layer of ceramic when it becomes rough or is missing from wear.Repair, VRS3615 TASK 72-45-25-300-009 (REPAIR-009).
Spalling is in the blade path. Damage is down to the metallic layer.
Spalling.
Repair, VRS3615 TASK 72-45-25-300-009 (REPAIR-009).
Not more than 0.005 in. (0.13 mm) in depth.
Burns.
Examine the duct segment surface at Location 1 for spalling, erosion, cracking, crazing and burning.
Repair, VRS3615 TASK 72-45-25-300-009 (REPAIR-009).
Separation is in the bondline or cermet layer.
Separation.
Remove blade material or Repair, VRS3615 TASK 72-45-25-300-009 (REPAIR-009).
Not more than 0.500 in. (12.7 mm) axially if the blades are to be replaced.
Blade tip material transfer.
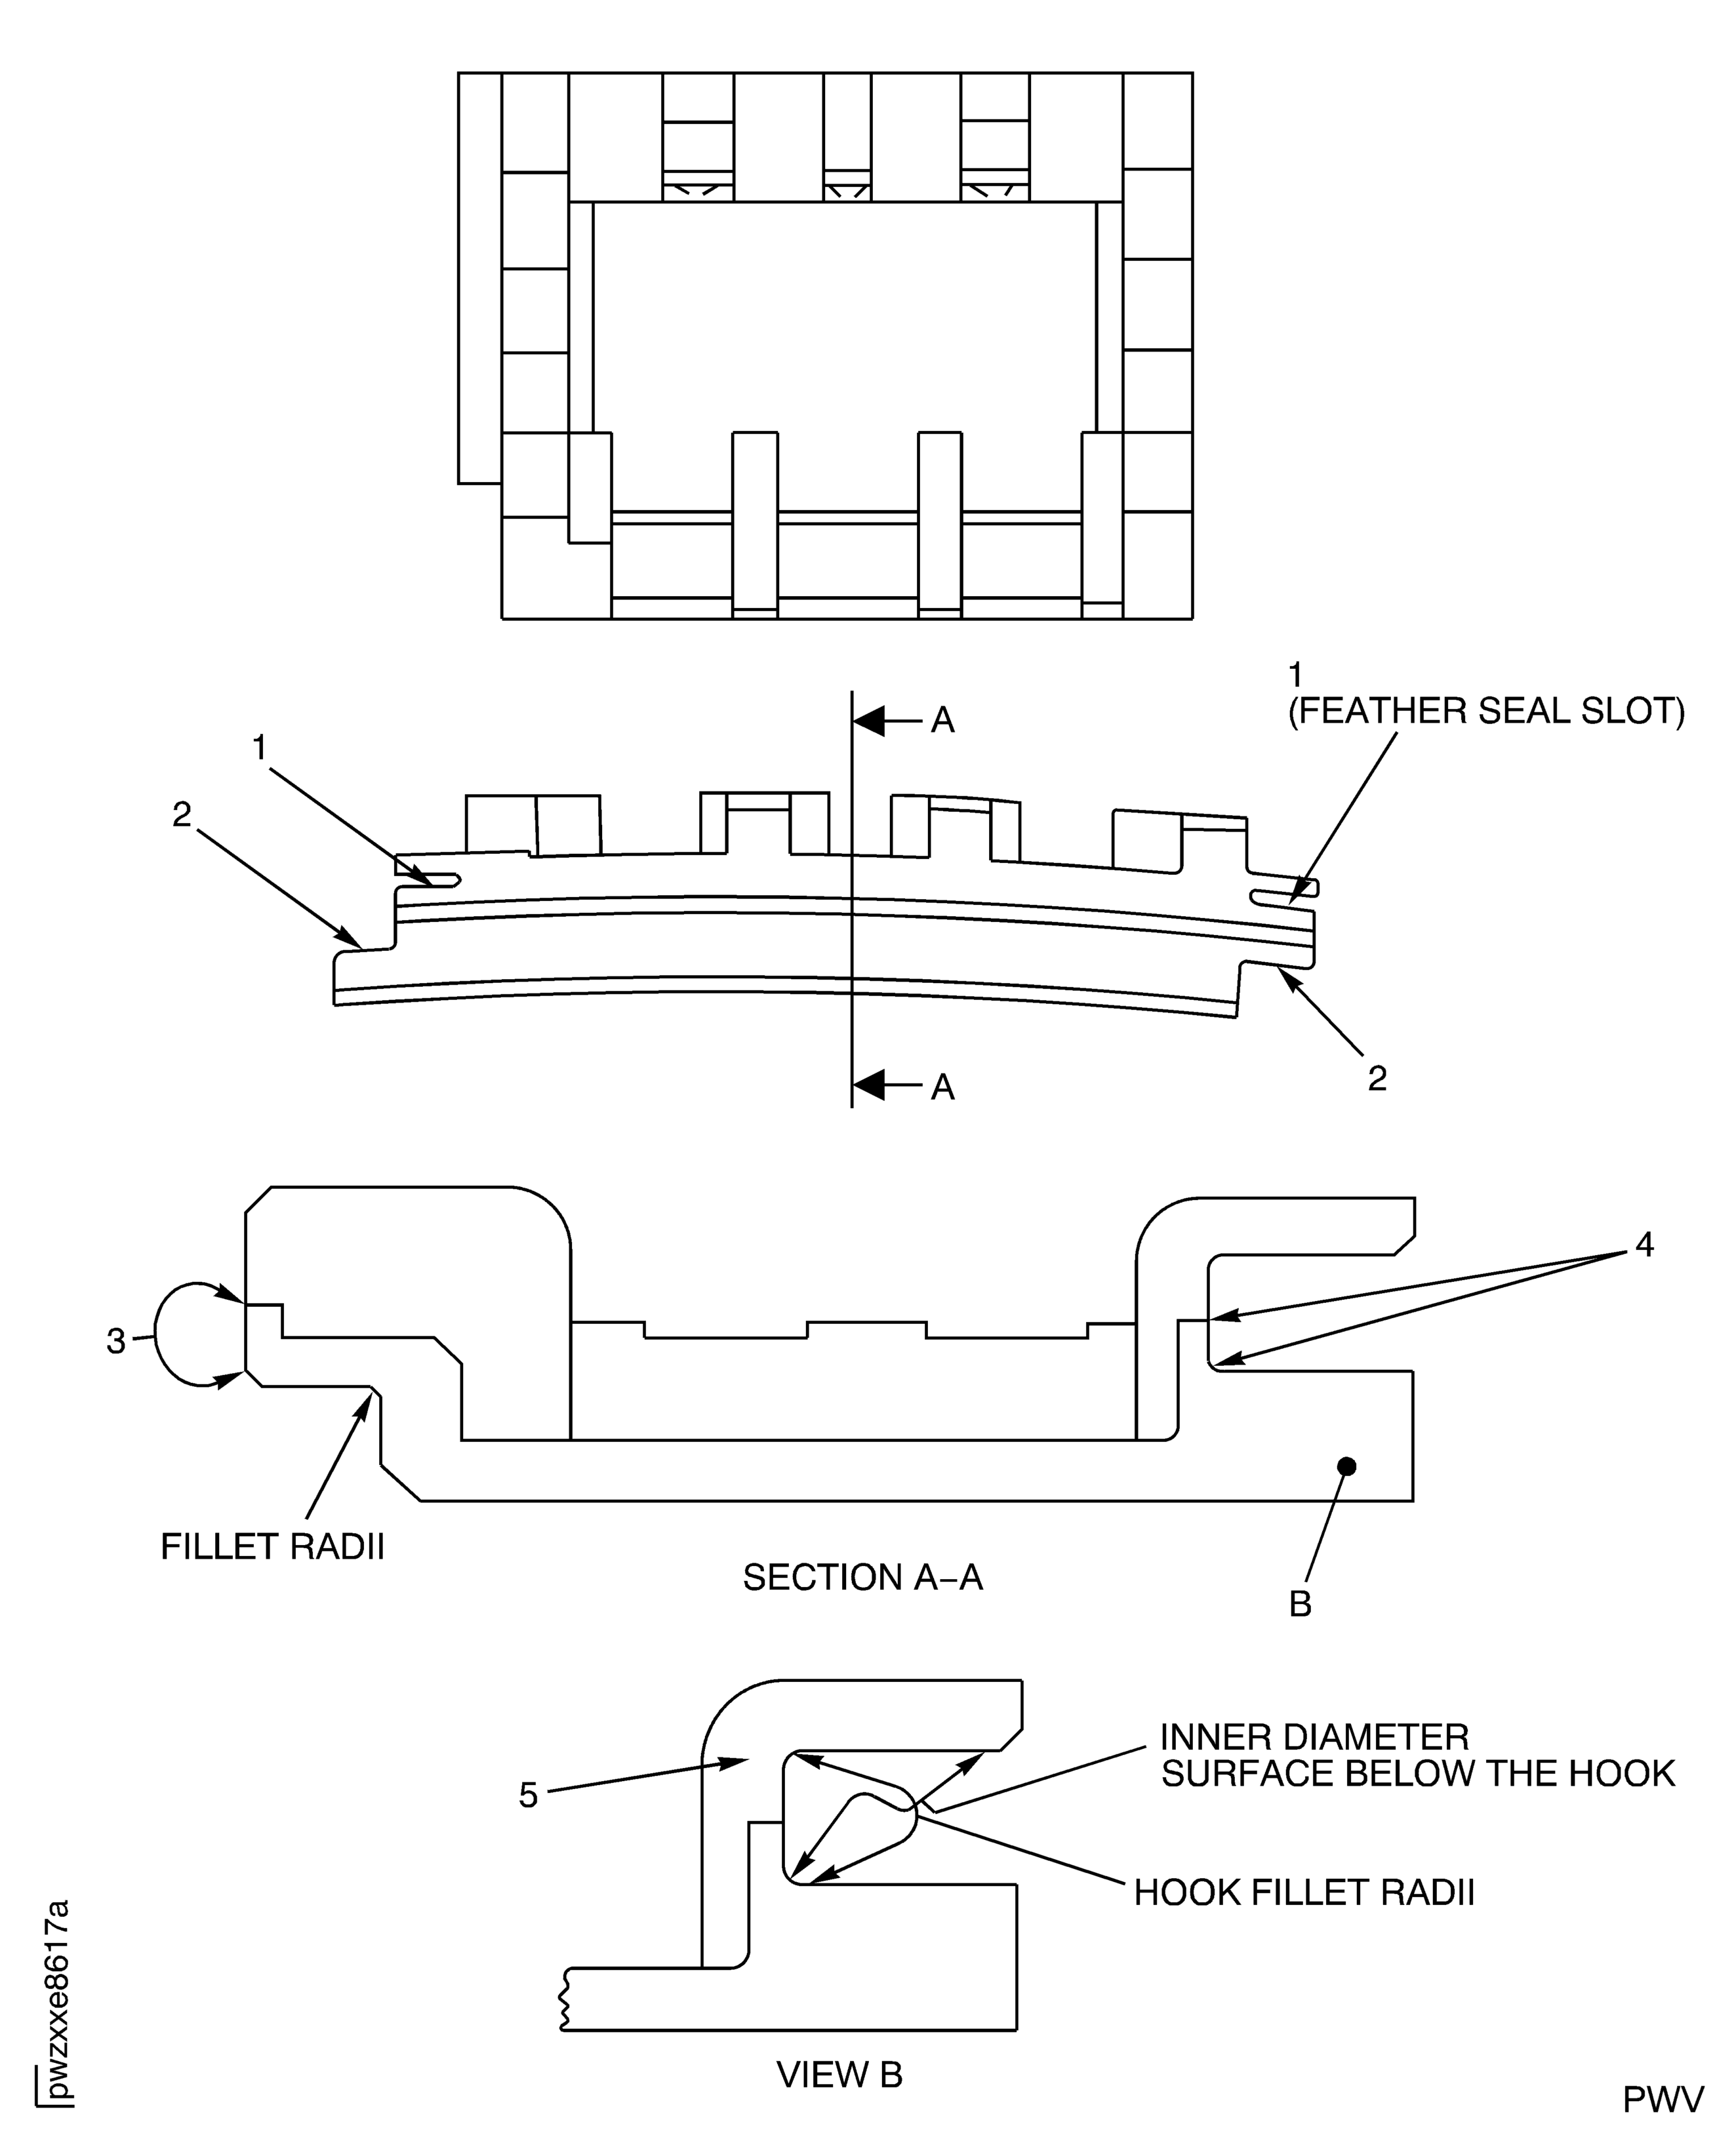
Examine the duct segment layers at Location 2 for separation, material transfer and deformation.
Repair, VRS3615 TASK 72-45-25-300-009 (REPAIR-009).
Areas other than in (a).
Melted base material.
Bent or missing tabs.
Repair, VRS3615 TASK 72-45-25-300-009 (REPAIR-009).
Coating that is damaged or missing.
Examine the duct segment all over at Location 3 for bent or missing tabs, erosion or damaged or missing coating.
SUBTASK 72-45-25-220-080 Examine the Stage 2 HPT Duct Segments (01-060)
Refer to Figure.
Hooks - Location 5 - nicks, dents, gouges and similar surface imperfections are permitted to 0.005 in. (0.13 mm) depth, if they are smooth-bottomed and not in the fillet radii. Outside of the fillet radii and ID surfaces, isolated surface imperfections are permitted to 0.040 in. (1.02 mm) depth if they are smooth-bottomed and no two adjacent hooks are affected. The total affected area on each hook is less than 0.016 sq in. (10.32 sq mm) and no imperfection spans more than 0.100 in. (2.54 mm) circumferentially. For hooks with multiple surface imperfections only one may be greater than 0.005 in. (0.13 mm) deep.
Shiplap surfaces - Location 2 - nicks, dents, gouges, and similar surface imperfections are permitted to 0.005 in. (0.13 mm) depth, if they are smooth-bottomed and not in the fillet radii, isolated surface imperfections are permitted to 0.040 in. (1.02 mm) depth, if they are smooth-bottomed, the total affected area is less than 0.016 in. (0.41 mm) and no imperfection spans more than 0.100 in. (2.54 mm) axially. For multiple surface imperfections, only one may be greater than 0.005 in. (0.13 mm) deep.
All other surfaces - nicks, dents, gouges and similar surface imperfections are permitted to 0.005 in. (0.13 mm) depth, if they are smooth-bottomed. Isolated surface imperfections are permitted to 0.040 in. (1.02 mm) depth if fillet radii, cooling holes and hook web are not affected, the imperfection is smooth-bottomed, and the total affected area is less than 0.050 sq in. (32.26 sq mm). All imperfections greater than 0.005 in. (0.13 mm) in depth must be separated by 0.010 in. (0.25 mm) minimum. Imperfections on axial and circumferential faces spanning more than half of the face width are not permitted.
Repair, VRS3722 TASK 72-45-25-300-011 (REPAIR-011) or Repair, VRS3615 TASK 72-45-25-300-009 (REPAIR-009).
Other than (a), (b), (c), (d).
Corrosion, dents, erosion, nicks and pits.
Examine the duct segment at Locations 1, 2, 3, 4, 5 for corrosion, dents, erosion, nicks and pits on all base metal surfaces.
SUBTASK 72-45-25-220-100 Examine the Stage 2 HPT Duct Segments (01-060) for Corrosion, Dents, Erosion, Nicks and Pits on the Base Metal Surfaces
Figure: Stage 2 HPT Duct Segment Inspection Locations
Stage 2 HPT Duct Segment Inspection Locations

Figure: Stage 2 HPT Duct Segment Inspection Locations
Stage 2 HPT Duct Segment Inspection Locations

Figure: Stage 2 HPT Duct Segment Inspection Locations
Stage 2 HPT Duct Segment Inspection Locations

Figure: Stage 2 HPT Duct Segment Inspection Locations
Stage 2 HPT Duct Segment Inspection Locations

