Export Control
EAR Export Classification: Not subject to the EAR per 15 C.F.R. Chapter 1, Part 734.3(b)(3), except for the following Service Bulletins which are currently published as EAR Export Classification 9E991: SBE70-0992, SBE72-0483, SBE72-0580, SBE72-0588, SBE72-0640, SBE73-0209, SBE80-0024 and SBE80-0025.Copyright
© IAE International Aero Engines AG (2001, 2014 - 2021) The information contained in this document is the property of © IAE International Aero Engines AG and may not be copied or used for any purpose other than that for which it is supplied without the express written authority of © IAE International Aero Engines AG. (This does not preclude use by engine and aircraft operators for normal instructional, maintenance or overhaul purposes.).Applicability
All
Common Information
TASK 70-22-06-220-501 MAGNETIC PERMEABILITY INSPECTION
This task contains four Subtasks:
Subtask 70-22-06-220-001: General - Magnetic Permeability Inspection
Subtask 70-22-06-220-001: Equipment - Magnetic Permeability Inspection
Subtask 70-22-06-220-001: Calibration of Magnetoscop Models
Subtask 70-22-06-220-001: Magnetic Permeability Inspecting Of The Engine Parts
Preliminary Requirements
Pre-Conditions
NONESupport Equipment
| Name | Manufacturer | Part Number / Identification | Quantity | Remark |
|---|---|---|---|---|
| Magnetoscope(R) Meter, Model 1.069 or equivalent, Model 1.067, or 1.068 | LOCAL | Magnetoscop(R), Meter, Model 1.069 or equivalent, Model 1.067, or 1.068 |
Consumables, Materials and Expendables
NONESpares
NONESafety Requirements
WARNING
WARNING
WARNING
Procedure
Magnetic permeability inspection is a non-destructive technique that is used to understand the corroded condition of metallic super alloys. The inspection uses the correlation between relative magnetic permeability and magnetic flux distortion to determine the amount of corrosion present. Magnetic permeability inspection equipment typically uses a permanent magnet and fluxgates to determine the magnetic permeability of another material. Typical inspection, however are not true permeability measurements due to geometry and volume differences. They are simply a comparison between a standard and a part in a certain condition.
A permanent magnet has its own magnetic flux and when the permanent magnet comes into contact with another material, if the material has any magnetic behavior, the magnetic flux deflects or distorts. The amount that it distorts from original can be measured by fluxgates and correlated to a voltage difference. The voltage difference and correlation can then be used to determine the permeability of the material the permanent magnet is contacting.
Each material has a specific magnetic permeability value and the value can increase or decrease when tested, depending on the products of the electrochemical reaction of the corrosion process. When a material is not magnetic, its magnetic permeability value is approximately 1.000 like air.
Definition
Corroded - See TASK 70-02-02-350-501 Specified Types of Damage for definition.
Corrosion - the process of destroying a material by chemical reaction.
Calibration Reference Standard - a highly controlled block or material used to calibrate magnetic permeability inspection equipment that has an assigned relative magnetic permeability value.
Calibration Block Adapter - a fitting that goes onto a calibration reference standard to make sure proper inspection probe alignment and position.
Electrochemical Reaction - a process involving the transfer of electrons between two substances, usually a solid and a liquid.
Ferromagnetic - having a high susceptibility to magnetization or exhibiting attraction to magnets.
Fluxgates - simple electromagnetic devices that employs two or more small coils of wire around a core of highly permeable magnetic material, to directly sense the direction of the horizontal component of the Earth's magnetic field.
Magnetic Flux - total magnetic induction crossing a surface or the strength of a magnetic field over a given area perpendicular to the magnetic field lines.
Magnetic Field - region around a magnetic material or a moving electric charge in which the force of magnetism acts.
Magnetic Permeability - the ability of a magnetic material to support its own magnetic field.
Oxidized - when a substance or element is converted into an oxide, meaning it is combined with oxygen, or when a substance loses electrons during a reaction.
Permeability - the ability of a substance to allow gases or liquids to go through it.
Terminology
SUBTASK 70-22-06-220-001 General - Magnetic Permeability Inspection
Use only FOERSTER equipment for all permeability inspection procedures. See Support Equipment Table for Source Codes. Refer to Source Codes. See Vendor List - Organizations Technical Information Repository, V2500-00-00-00-00-00A-00KA-D.
There are four models used for magnetic permeability inspection. See Table.
Unless otherwise specified in the part specific repair or inspection, the inspection units are not interchangeable. Each unit can have different features and upgrades which make the relative permeability value readings differ from one unit to another.
Inspection Units
The probes used in magnetic permeability inspections are permeability probes. Each inspection unit has specific permeability probes that are compatible with that unit. See Table for the probes and compatible units.
Table 1. Magnetic Permeability Inspection Equipment FOERSTER Magnetoscop Model
Permeability Probe
Permeability High Sensitivity Probe
Permeability Probe, (90 degree probe)
Source code
1.070
PP-2-5, PN 2061392
PP-2-2-R, PN 2069652
D0438
63473
1.069 without Probe Adapter PN 9064001
PN 1668145
PN 1668170
PN 1806416
D0438
63473
1.069 with Probe Adapter PN 9064001
PN 1.005.01-1522
PN 1.069-3001
PN 1.00501-1532
PN 1.005.01-1526
(for bladed rotor/Module)
D0438
63473
1.068
PN 1.005.01-1522
PN 1.005.01-1532
PN 1.005.01-1526
(for bladed rotor/Module)
D0438
63473
1.067
PN 1.005.01-1522
PN 1.005.01-1532
PN 1.005.01-1526
(for bladed rotor/Module)
D0438
63473
Inspection Probes
The calibration or reference standard block's permeability value should be a value close to the acceptable limit in the repair or inspection. There are three potential calibration standards for each inspection unit:
Table 2. Calibration or Reference Standards Calibration Standard Permeability Value
Part Number for FOERSTER Magnetoscop Model 1.070
Part number for FOERSTER MAGNETOSCOP Model 1.069/1.068/1.067
1.050 µr
2075296
1362364
1.025 µr
2093200
1362356
1.005 µr
2093219
1362348
A probe-to-calibration standard adapter must be used with the FOERSTER Magnetoscop Model 1.070. Only the Adapter PP-2-5 PN 2075270 from FOERSTER can be used.
Use only FOERSTER equipment for all calibration or reference standards.
Calibration or Reference Standards
Inspect probes, adapters, cords, inspection units, and calibration standards daily for damage. Replace or repair as necessary.
Inspection units, probes, and calibration standards must be inspected and calibrated regularly as instructed in the inspection unit's operation manual. Refer to Step for the calibration of Magnetoscop 1.067, 1.068, 1.069, and 1.070 models.
Clean the inspection unit, inspection probes, and calibration standards after each inspection with a soft, clean, lint-free cloth dampened with clean water. Do not use solvents such as acetone. Equipment must be free from metal or magnetic dust particles. Dry equipment with a clean, lint-free cloth after cleaning.
Maintenance
SUBTASK 70-22-06-220-002 Equipment - Magnetic Permeability Inspection
Put the Magnetoscop on a suitable work bench with a non-magnetic work surface.
NOTE
The inspection area must be free from magnetic materials, permanent magnets and strong alternating current fields such as electric motors which will influence the meter needle deflection.
General
Remove the lid from instrument.
With mode selector switch in 'OFF' position, zero the needle in the MAGNETOSCOP meter using the mechanical screw adjustment located at the bottom center of the meter.
Set the mode selector switch to 'BATT TEST' position. Replace the batteries if meter needle is outside the green band.
Set the mode selector switch to '0' position. Zero the meter needle electrically using the adjusting screw adjacent to the '0' position.
The '100' position on the mode selector switch is not used.

CAUTION
DO NOT ALLOW PERMANENT MAGNET OF THE PROBE TO BECOME DE-MAGNETIZED BY BEING EXPOSED TO PERMANENT MAGNETS OR TO STRONG ALTERNATING CURRENT FIELDS SUCH AS ELECTRIC MOTORS. LEAVE PROTECTIVE CAP ON PROBE EXCEPT WHEN PROBE IS ACTUALLY IN CONTACT WITH ENGINE PARTS BEING INSPECTED.Connect the permeability probe to the instrument. See Figure.
The measuring range is always set to the value that is indicated on the Mu = 1 + scale for the permeability inspection. Do not use the MuTesla scale.
The measuring range selected selects which scale is on the meter is to be read.
Table 3. Measuring Range For Permeability Probe PN 1.005 - 1526(1X) Mu = 1 +
Measuring Range
Meter Scale
Range Of Values
Permeability Range
0.03
30-0-30 (Red)
0.000 - 0.030
1.000 - 1.030
0.1
100-0-100 (Black)
0.000 - 0.100
1.000 - 1.100
0.3
30-0-30 (Red)
0.000 - 0.300
1.000 - 1.300
1.0
100-0-100 (Black)
0.000 - 1.000
1.000 - 2.000
Set the measuring range to the 0.03 scale. See Figure and Table for the applicable permeability probe measuring ranges.
Set the mode selector switch to 'OPERATION'.

CAUTION
THE SYMMETRY ADJUSTMENT SCREW ON THE 1.005-1526 PROBE SHOULD ONLY BE ADJUSTED USING THE BRASS ADJUSTMENT SCREWDRIVER. USE OF ANY OTHER DEVICE CAN PREVENT PROPER ADJUSTMENT AND CALIBRATION.Check that the meter needle is still on zero. If necessary, zero the meter needle using the symmetry adjustment control in the center of the probe. See Figure.
Remove the protective cap from the probe and zero the meter needle. Use the symmetry adjustment wheel on the probe. See Figure.
For the 1X permeability probe, 1.0 must be subtracted from the permeability (Mu) value of the reference standard.
NOTE
For the 1X permeability probe 1.005 - 1526 and a reference standard with Mu - 1.46, the meter value is 0.46.NOTE
Example: Meter Value = Mu - 1 = 1.46 - 1.0 = 0.46.
Calculate the meter value for the permeability of the reference standard. See Figure.
NOTE
The meter displays Mu - 1.For the 1X permeability probe 1.005 - 1526 and a value of 0.46, the measuring range would be set to 1.0 and the maximum needle deflection to 46 divisions on the 100-0-100 (black) scale to get the correct calibration. See Figure.
Set the measuring range to the sensitivity necessary by the meter value found in Step.
Place the probe tip on the reference standard with the probe body perpendicular to the contact surface of the standard. See Figure.
The permeability standard must be checked at the start and end of each inspection sequence or if you have stopped the inspection for any reason.
Keep a perpendicular orientation and traverse the probe tip vertically on the reference standard to maximize the meter needle deflection. Adjust the sensitivity control to get the value found in Step.

CAUTION
DO NOT PERMIT THE PERMANENT MAGNET OF THE PROBE TO BECOME DEMAGNETIZED BY BEING EXPOSED TO MAGNETIC MATERIALS, PERMANENT MAGNETS, OR STRONG ALTERNATING CURRENTS.
CAUTION
REMOVE THE PROTECTIVE CAP ON THE PROBE END ONLY DURING THE CALIBRATION PROCEDURE AND WHEN MEASUREMENTS ARE TO BE TAKEN DURING THE INSPECTION TO PREVENT DAMAGE TO THE PROBE.Calibration of FOERSTER Magnetoscop Model 1.067 or Model 1.068:
Connect the probe to the meter. Turn on the Magnetoscop 1.069 and warm up for 10 minutes. See Figure.
Make sure Magnetoscop is in "Permeability Comparison" Mode. To set the Mode, press the MODE button until the instrument displays that it is in the "Permeability Comparison" Mode.
Make sure the Range is set to R2: 2.000µr (output should be 3 decimals on the digital display) midas. To set the Range, press the RANGE button on the instrument until the instrument displays "R2: 2.000µr".
Press the MENU button and select "Calibration" from the Main Menu.
From the "Calibration" Menu, scroll down using the F2 button and select "Offset Adjust" by pressing the F3 button. The instrument will then adjust the offset of the system automatically. This can take a minute to complete. The calibration menu will let you make another selection once the offset is completed. See Figure.
If the probe does not 1.000 (+/-0.001), then select "Perm Probe Zero Adjust" from the "Calibration Menu" and adjust the inspection probe thumb-wheel adjustment or screw adjustment until the displayed value is as close to 1.000 as possible (+/-0.001).
NOTE
Probes with a screw adjustment should have a special screwdriver that was provided with the probe at the time of purchase. Probes with a thumb-wheel adjustment are adjusted by hand. See Figure.
Check that the probe reads 1.000 (+/-0.001) when not contacting objects and away from magnetic fields.
If the probe does not read +/- 0.005 of the reading on the calibration standard block, do the calibration process again.
From the "Calibration" Menu, select "Permeability Calibration". Enter the calibration standard block's permeability value. Check calibration block by contacting the center of the calibration block with the probe, holding the probe perpendicular to block center with the thumb-wheel pointed towards the label of the block. Press the ENTER button and hold the probe steady until the display shows completion of calibration, then press EXIT from the calibration menu. Make sure reading on the block is +/-0.005 of the reading on the calibration standard block. Refer to Table for calibration standards. See Figure and Figure.
If the probe does not read 1.000 (+/-0.001), disconnect the probe from the meter, turn off the Magnetoscop 1.069, and start the Calibration of FOERSTER Magnetoscop Model 1.069 again. Do not continue to use the probe without proper calibration.
Pull the probe away from the calibration standard block and check that the probe reads 1.000 (+/- 0.001) when not contacting objects and away from magnetic fields.
Connect the probe to the inspection unit. Turn on the Magnetoscop 1.070 and allow machine to display relative permeability/start-up. See Figure.
Compensate the probe to 1.0000 (+/-0.0005), (0.9995 - 1.0005), when not contacting objects and away from magnetic fields by pressing the zero button. After probe compensation is done, the inspection unit should display 1.0000. See Figure.
Connect the probe to the inspection unit. Turn on the Magnetoscop 1.070 and allow machine to display relative permeability/measuring mode screen. See Figure.
Press the F button to enter the "Main Menu".
From the "Main Menu", press the down button until "Calibration" is highlighted. Press the F button to select "Calibration".
Press the down button until "Set Reference" is highlighted. Press the F button to select "Set Reference".
Press the down button until "With Adapter" is highlighted. Press the F button to select "With Adapter".
Enter the permeability value on the calibration standard. Refer to Table for calibration standards.
Press the down button until "OK" is highlighted. Press the F button to select "OK".
Follow the instructions displayed on the inspection unit. The marking on Adapter PP-2-5 must align with the line marking on the calibration standard. Press the F1 button to start the measurement. Wait until the next prompt on the inspection unit is displayed.
Follow the instructions displayed on the inspection unit. It should ask for the inspection probe to be placed on one side of the calibration standard with Adapter PP-2-5. Press the F1 button to start the measurement again. Wait until the next prompt on the inspection unit is displayed.
Follow the instructions displayed on the inspection unit. It should now ask for the inspection probe to be removed. Press the F1 button again after removing the probe. Wait unit the next prompt on the inspection unit is displayed.
Now turn the calibration standard and place Adapter PP-2-5 on the opposite side. The marking on Adapter PP-2-5 must match the marking on the calibration standard. Follow the instructions displayed on the inspection unit. It should ask for the inspection probe to be placed on the second side of the calibration standard with Adapter PP-2-5. Press the F1 button to start the measurement again. Wait until the next prompt on the inspection unit is displayed.
Follow the instructions displayed on the inspection unit. It should now ask for the inspection probe to be removed. Press the F1 button again after removing the probe. Wait until the inspection unit automatically returns to the relative permeability/measuring mode screen.
If the probe does not read +/- 0.005 of the reading on the calibration standard block, disconnect the probe from the inspection unit, turn off the Magnetoscop 1.070 and do the following calibration procedure.
Check the calibration standard block on both sides by placing Adapter PP-2-5 on each side of the block and inserting the probe into Adapter PP-2-5 until it is contacting the center of the calibration block. Hold the probe steady for at least 3 seconds on each side. Make sure the average reading of both sides of the block is +/- 0.005 of the reading on the calibration standard block. See Figure. Refer to Table for calibration standards.
If probe does not read 1.000 (+/-0.0005), disconnect the probe from the inspection unit, turn off the Magnetoscop 1.070, and start the Calibration of FOERSTER Magnetoscop Model 1.070 again. Do not continue to use the probe without proper calibration.
Pull the probe away from the calibration standard block and check that the probe reads 1.000 (+/-0.0005) when not contacting objects and away from magnetic fields.
Calibration of FOERSTER Magnetoscop Model 1.070:
SUBTASK 70-22-06-220-003 Calibration of Magnetoscop Models
If inspecting with the FOERSTER Magnetoscop Model 1.069, make sure the thumb-wheel side of the probe is always upright.
If inspecting with the FOERSTER Magnetoscop Model 1.070, make sure the side of the probe with the arrows is always upright.
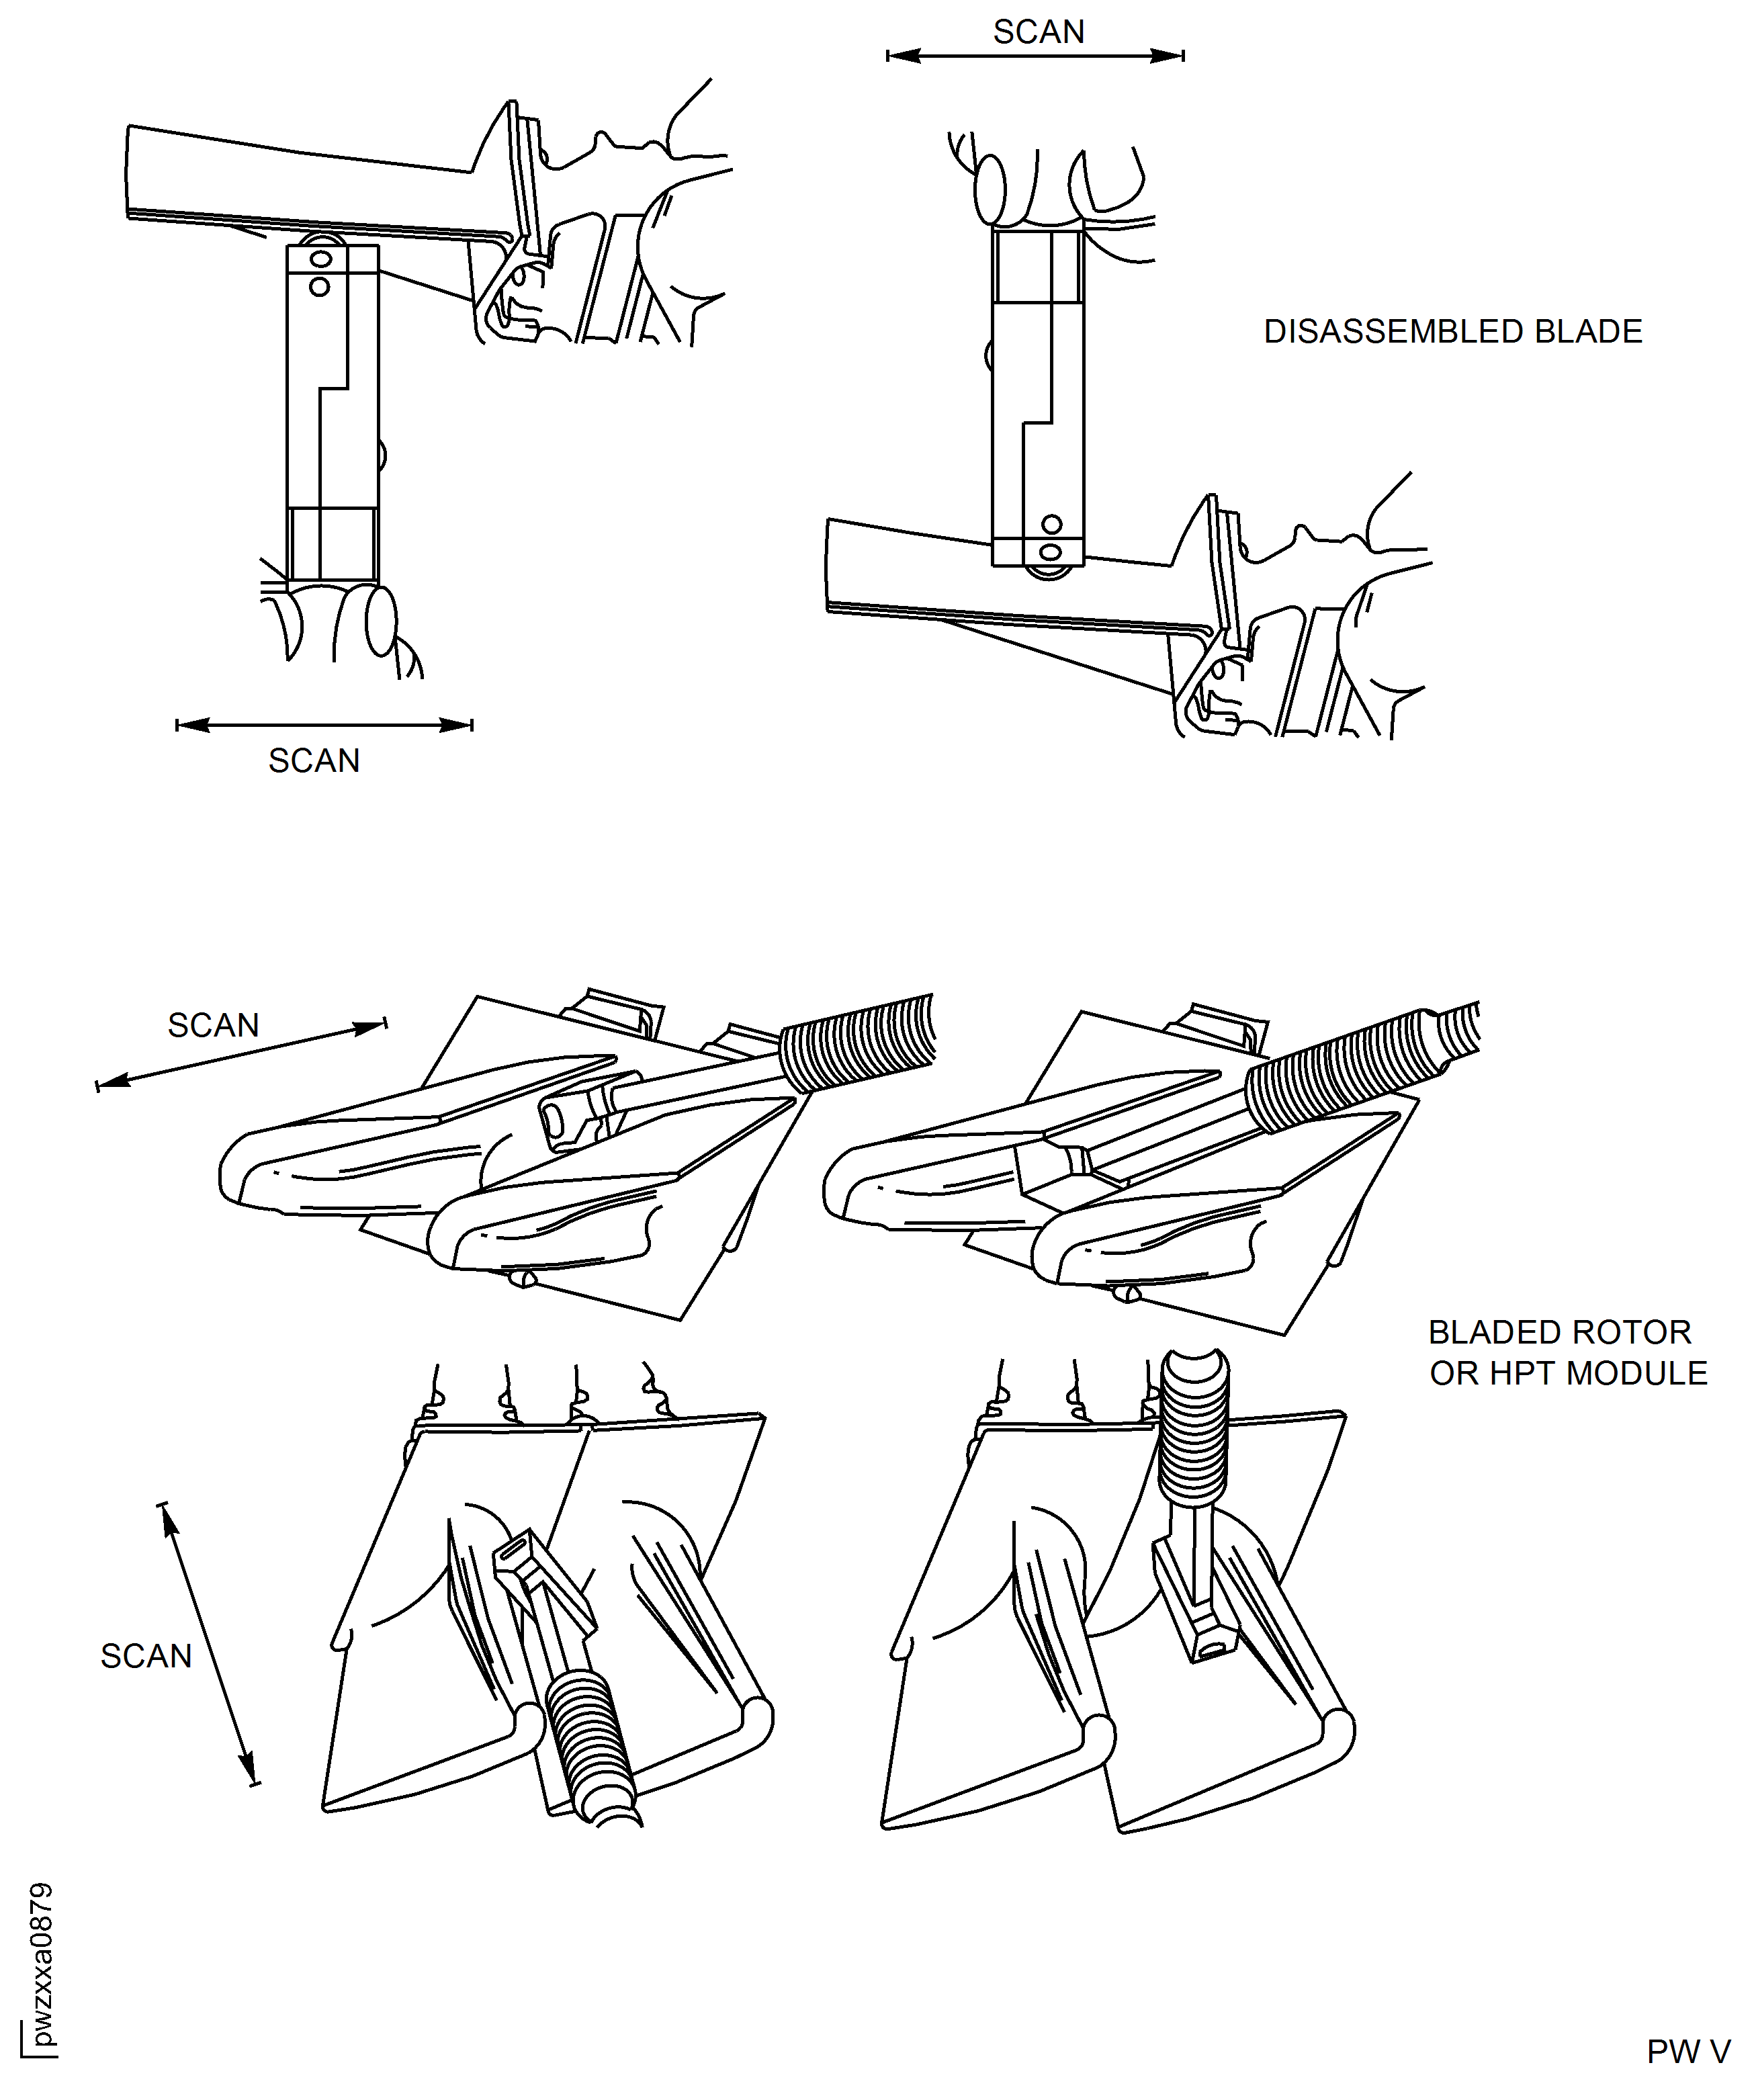
Make sure probe makes good contact with the part's surface during the inspection and that the probe is perpendicular to the surface. Permeability measurements are based solely on the location on the part and the probe's orientation. Improper orientation of the probe to the part will give inaccurate readings. See Figure.
If a pre-designed inspection guide is not available, it is permissible to design an inspection guide. An inspection guide is not necessary though unless referenced by the repair or inspection.
If designing an inspection guide, it is recommended that the guide thickness be 0.080 Inch (2.032 mm) for the Magnetoscop 1.069 Model and 0.050 Inch (1.270 mm) for the Magnetoscop 1.070 Model. However the probe must contact the part's surface during inspection. Therefore in some radii and tight spaces, the thickness of the guide can be smaller or non-existent.
It is recommended to use an inspection guide when possible. Inspection guides allow for accurate probe placement in regards to the areas of interest for the part specific inspection or repair and guides also aid in proper probe orientation. Some part specific repairs or inspections can reference a specific tool or guide.
Part or inspection area external surface is dirty. Too much dirt or foreign material will affect the detected permeability value reading and give a misleading value.
Part or inspection area has ceramic thermal barrier coating. Thermal barrier coatings tend to retain oxidized or corroded material that will influence permeability value readings.
Part or inspection area is not at same temperature as inspection equipment. Difference in temperature cause relative permeability values to drift. Inspection equipment and parts should be at the same temperature and that temperature should not vary during the inspection process.
Part is assembled in the engine or a higher level assembly. The part needs to be disassembled from higher level assemblies to permit the best inspection probe-to-part orientation for inspection.
Different part conditions can influence the accuracy of the permeability inspection values. Do not do a magnetic permeability inspection on a part in these conditions, unless otherwise specified:
Inspection probe tip should not be placed against or near (1 foot) ferrous items such as a steel table or any other magnetic material such as pure nickel or pure cobalt. Contact with aluminum is acceptable.
Do not expose the permanent magnet of the inspection probe to other permanent magnets or strong alternating currents or direct current magnetic fields or physical shock. Contact will cause the probe to become demagnetized.
Do not have magnetic sensitive items such as data storage devices or magnetic read devices such as personal badges and credit cards in proximity to the inspection probe. The probe could corrupt and destroy these devices.
Wear insulating gloves or use an insulating sleeve with the inspection probe to prevent the probe from warming up due to extended skin or hand contact. If the probe warms up from prolonged skin contact, the readings will be affected.
Make sure the inspection probe tip is protected and covered by a protection cover when not in use. See Figure.
Keep inspection station clear of ferromagnetic materials. Ferromagnetic tables or nearby objects will affect the relative permeability measurement.
Check inspection probes prior to inspecting parts. Inspection probes must be free of metal or magnetic dust particles. Metal or magnetic dust particles will affect the relative permeability measurement. Refer to Step for cleaning and maintenance of inspection probes.
Keep inspection equipment at ambient temperature between 32°-105°F (0.° - 41.° C).
The only suggested cleaning is to remove all the loose dirt and other particles from the external surface of the part with a soft bristle brush. Loose dirt and other particles from the external surface of the part with a soft bristle brush. Loose dirt and other unwanted material can cause the meter needle to deflect. This to be followed unless otherwise specified in the applicable P/N permeability inspection or repair.
CIR or Engine Manual assigned piece part cleaning. These cleaning processes are to remove all debris, deposits, and corrosion from a part.
Do not stress-relieve, precipitation heat threat or heat tint part(s).
Do not do any function checks like air of water flow before, unless otherwise specified in the applicable P/N permeability inspection or repair.
Do not complete the following piece part CIR or Engine Manual tasks before the completion of the permeability inspection unless Engine Manual publication repair or inspection directs otherwise. Completion of these tasks will affect the permeability value.
During inspection use only a CoMat 06-120 Metal Marking Pencil (Hard) to mark blades. Refer to SPM TASK 70-09-01-400-501 for the procedure to temporary mark the parts.
General Guidelines

WARNING
DO NOT DO THIS OPERATION IF YOU HAVE A CARDIAC PACEMAKER OR SIMILAR NECESSARY PERSONAL MEDICAL DEVICE. THE MAGNETIC FIELDS COULD DISRUPT THE NORMAL OPERATION OF MEDICAL DEVICES.
CAUTION
PROLONGED DIRECT SKIN CONTACT WITH THE INSPECTION PROBE HOUSING WILL HEAT THE PROBE CAUSING FALSE READINGS.
CAUTION
DO NOT PERMIT THE PERMANENT MAGNET OF THE PROBE TO BECOME DEMAGNETIZED BY BEING EXPOSED TO MAGNETIC MATERIALS, PERMANENT MAGNETS OR STRONG ALTERNATING CURRENTS.
CAUTION
REMOVE THE PROTECTIVE CAP ON THE PROBE END ONLY DURING THE CALIBRATION PROCEDURE AND WHEN MEASUREMENTS ARE TO BE TAKEN DURING THE INSPECTION TO PREVENT DAMAGE TO THE PROBE.Put the Magnetoscop on a suitable work bench with a non-magnetic work surface.
NOTE
The inspection area must be free from magnetic materials, permanent magnets and strong alternating current fields such as electric motors which will influence the meter needle deflection.Make sure the inspection probe is insulated from direct skin contact by either wearing insulating gloves or using an insulating sleeve over the inspection probe's housing.
Remove the inspection probe tip protection cover. See Figure.
Make sure inspection probe are properly calibrated. Refer to Step.
Attach the inspection guide to the part in order to make inspection consistent. Make sure the inspection guide is snug and contacts the part properly.
If gliding along a specified inspection path, glide the probe at a consistent speed not exceeding 0.5 inch per second (1.270 mm per second).
If inspecting discreet points on the part, hold the probe for at least 3 seconds at each point.
Inspect the specific path/points outlined in the part specific repair or inspection by gliding or placing the inspection probe along or on the areas of interest with part of the probe's housing contacting the inspection guide. Make sure proper contact and orientation of the probe is maintained. Refer to the General Guidelines in Step.
If gliding along a specified inspection path, glide the probe at a consistent speed not more than 0.5 inch per second (2.540 mm per second).
If inspecting discreet points on the part, hold the probe for at least 3 seconds at each point.
Inspect the specific path or points outlined in the part specific repair or inspection by gliding or placing the inspection probe along or on the areas of interest. Make sure proper contact and orientation of the probe is maintained. Refer to the General Guidelines in Step.
If not using an inspection guide or tool, do the following steps. See Figure.
If the part's relative permeability values more than the acceptable limits provided in the part specific inspection or repair, remove the part from service.
If using FOERSTER Magnetoscop Model 1.067 or FOERSTER Magnetoscop Model 1.068, the permeability standard must be checked at the start and end of each inspection sequence or if you have stopped the inspection for any reason. See Step, for calibrating the FOERSTER Magnetoscop Model 1.067 or Model 1.068.
Check the inspection probe's calibration by holding the probe up in the air. The probe should be away from magnetic fields and not contacting any objects. The inspection probe's display should read 1.000 (+/-0.001) if using the FOERSTER Magnetoscop Model 1.069 or 1.000(+/-0.0005) if using the FOERSTER Magnetoscop Model 1.070.
If using the FOERSTER Magnetoscop Model 1.070, zero the inspection probe after inspecting each part by pressing the zero button on the unit.
Turn off the Magnetoscop Model if it will be idle for more than 30 minutes. Put the probe tip protection cap back on. See Figure.
Procedure
SUBTASK 70-22-06-220-004 Magnetic Permeability Inspecting Of The Engine Parts
Figure: Inspection Equipment FOERSTER Magnetoscop Model 1.067 or 1.068
Inspection Equipment FOERSTER Magnetoscop Model 1.067 or 1.068
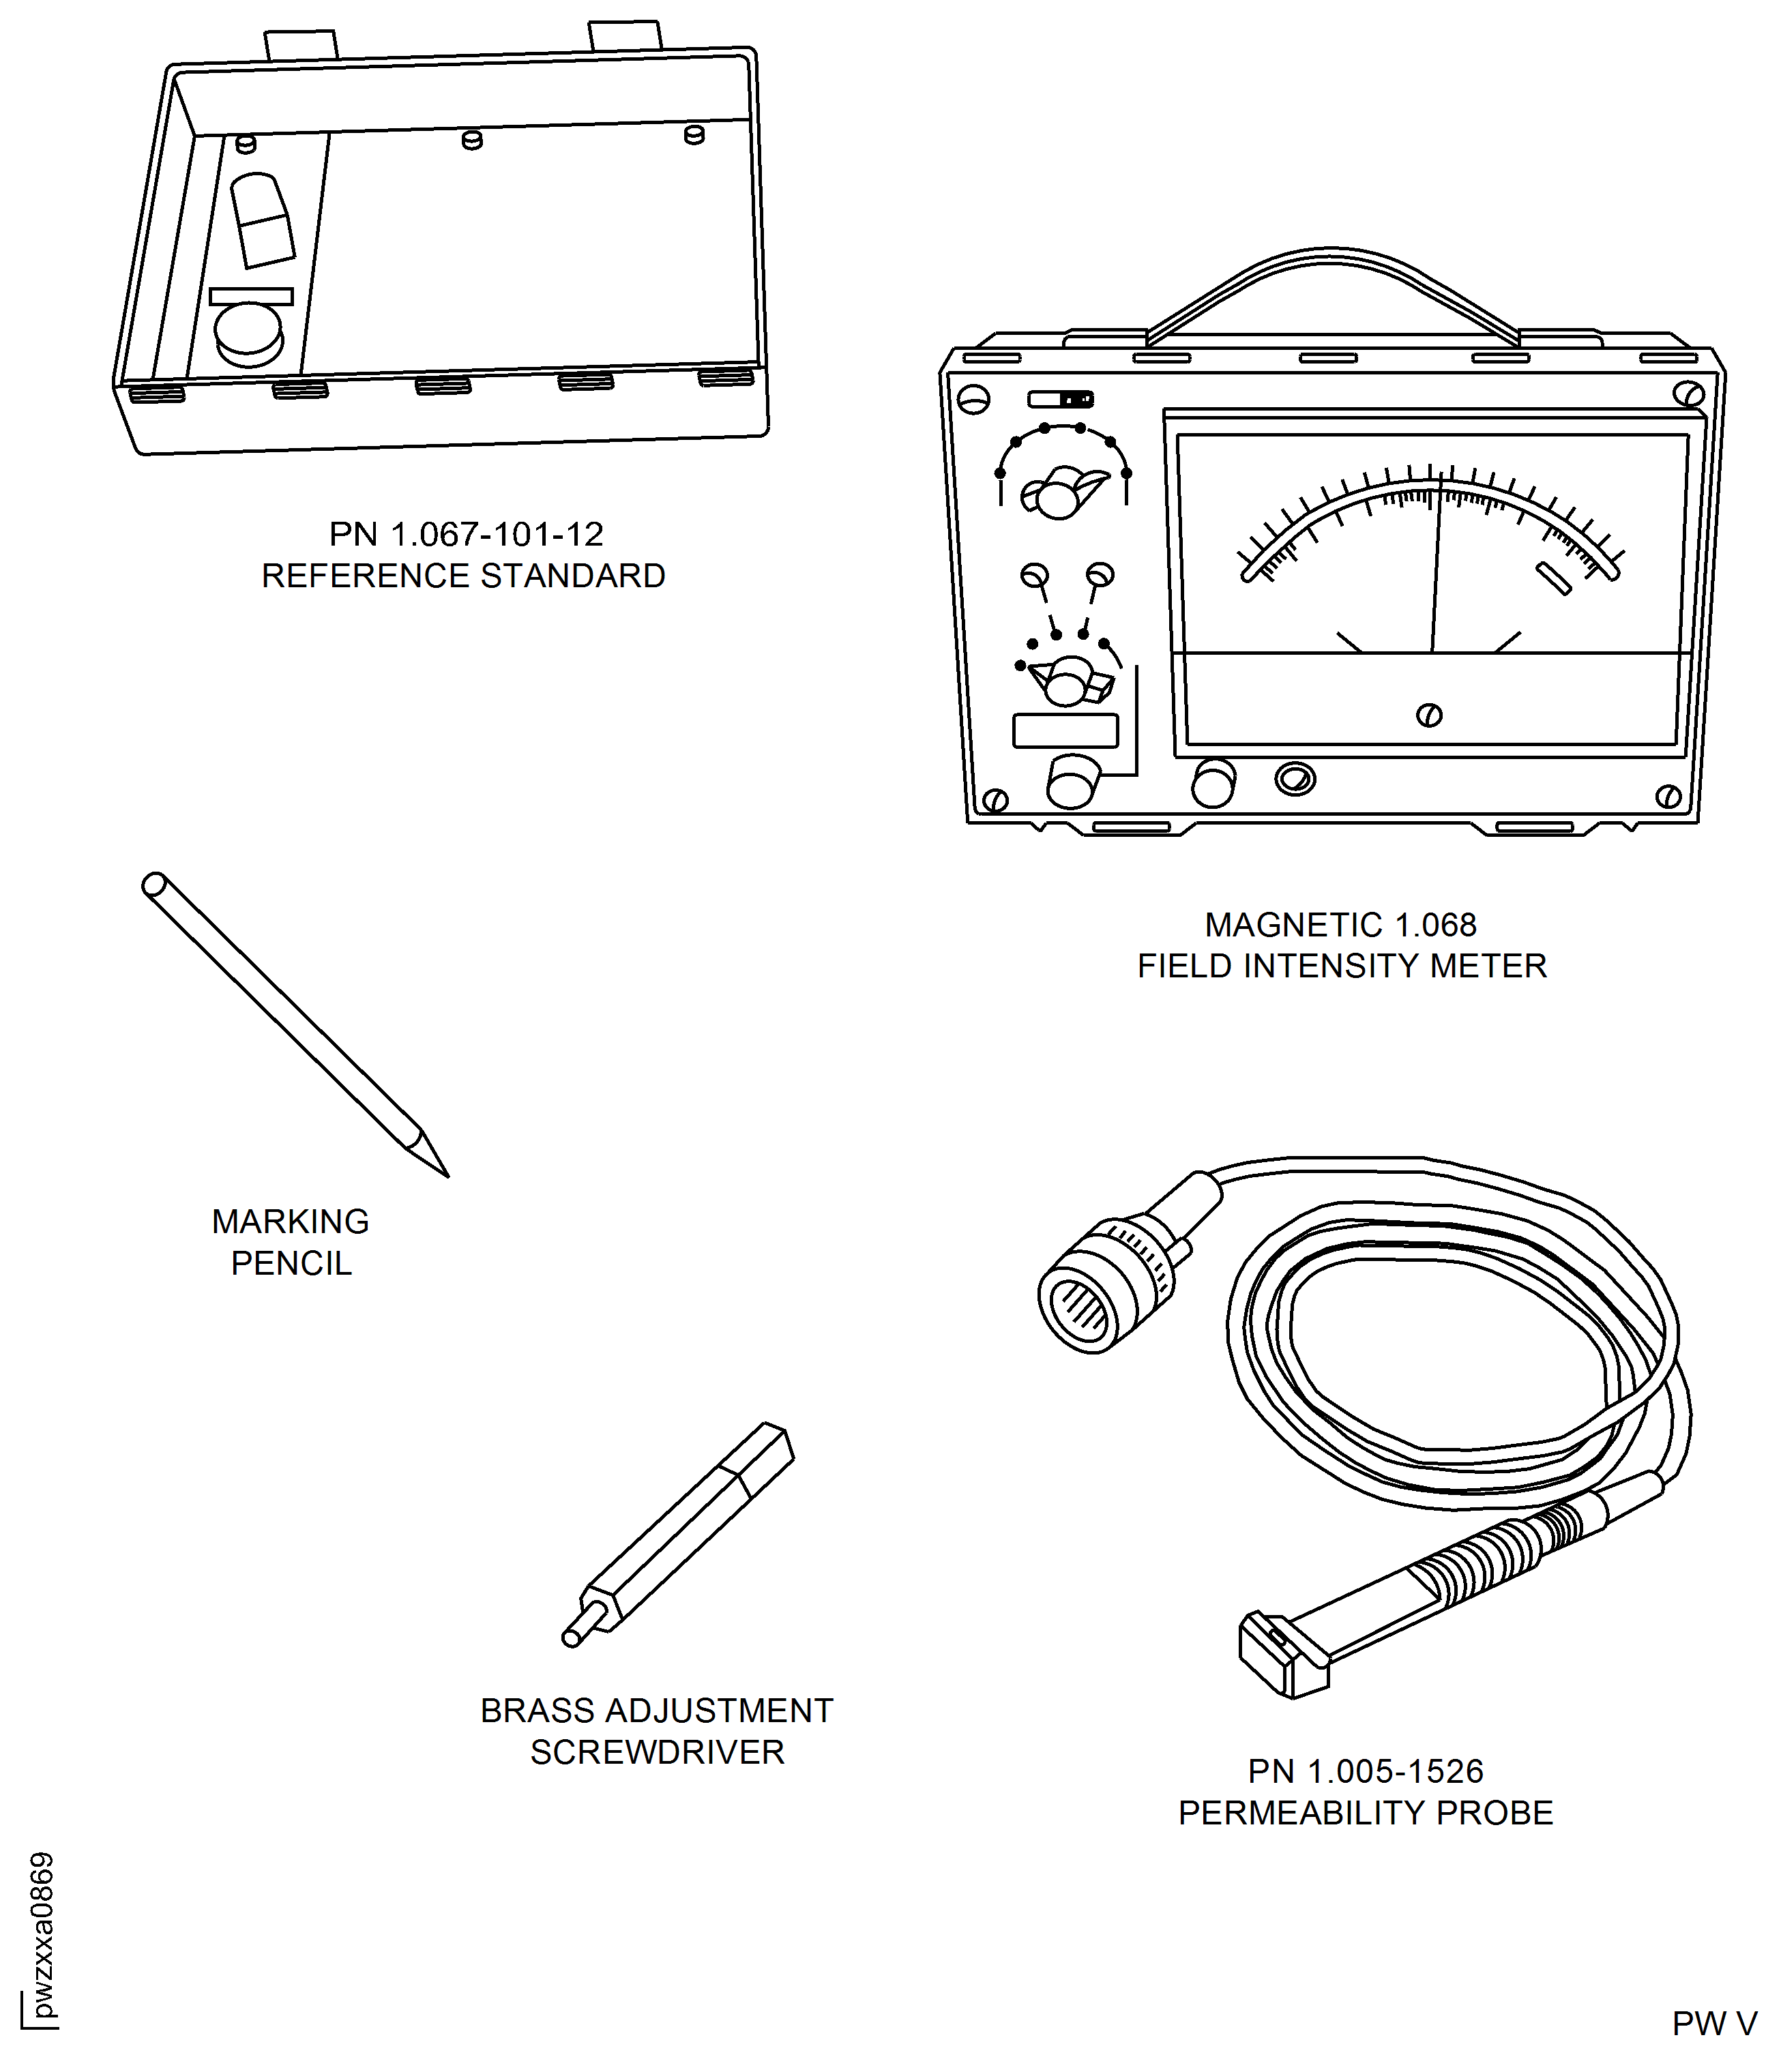
Inspection Equipment FOERSTER Magnetoscop Model 1.067 or 1.068
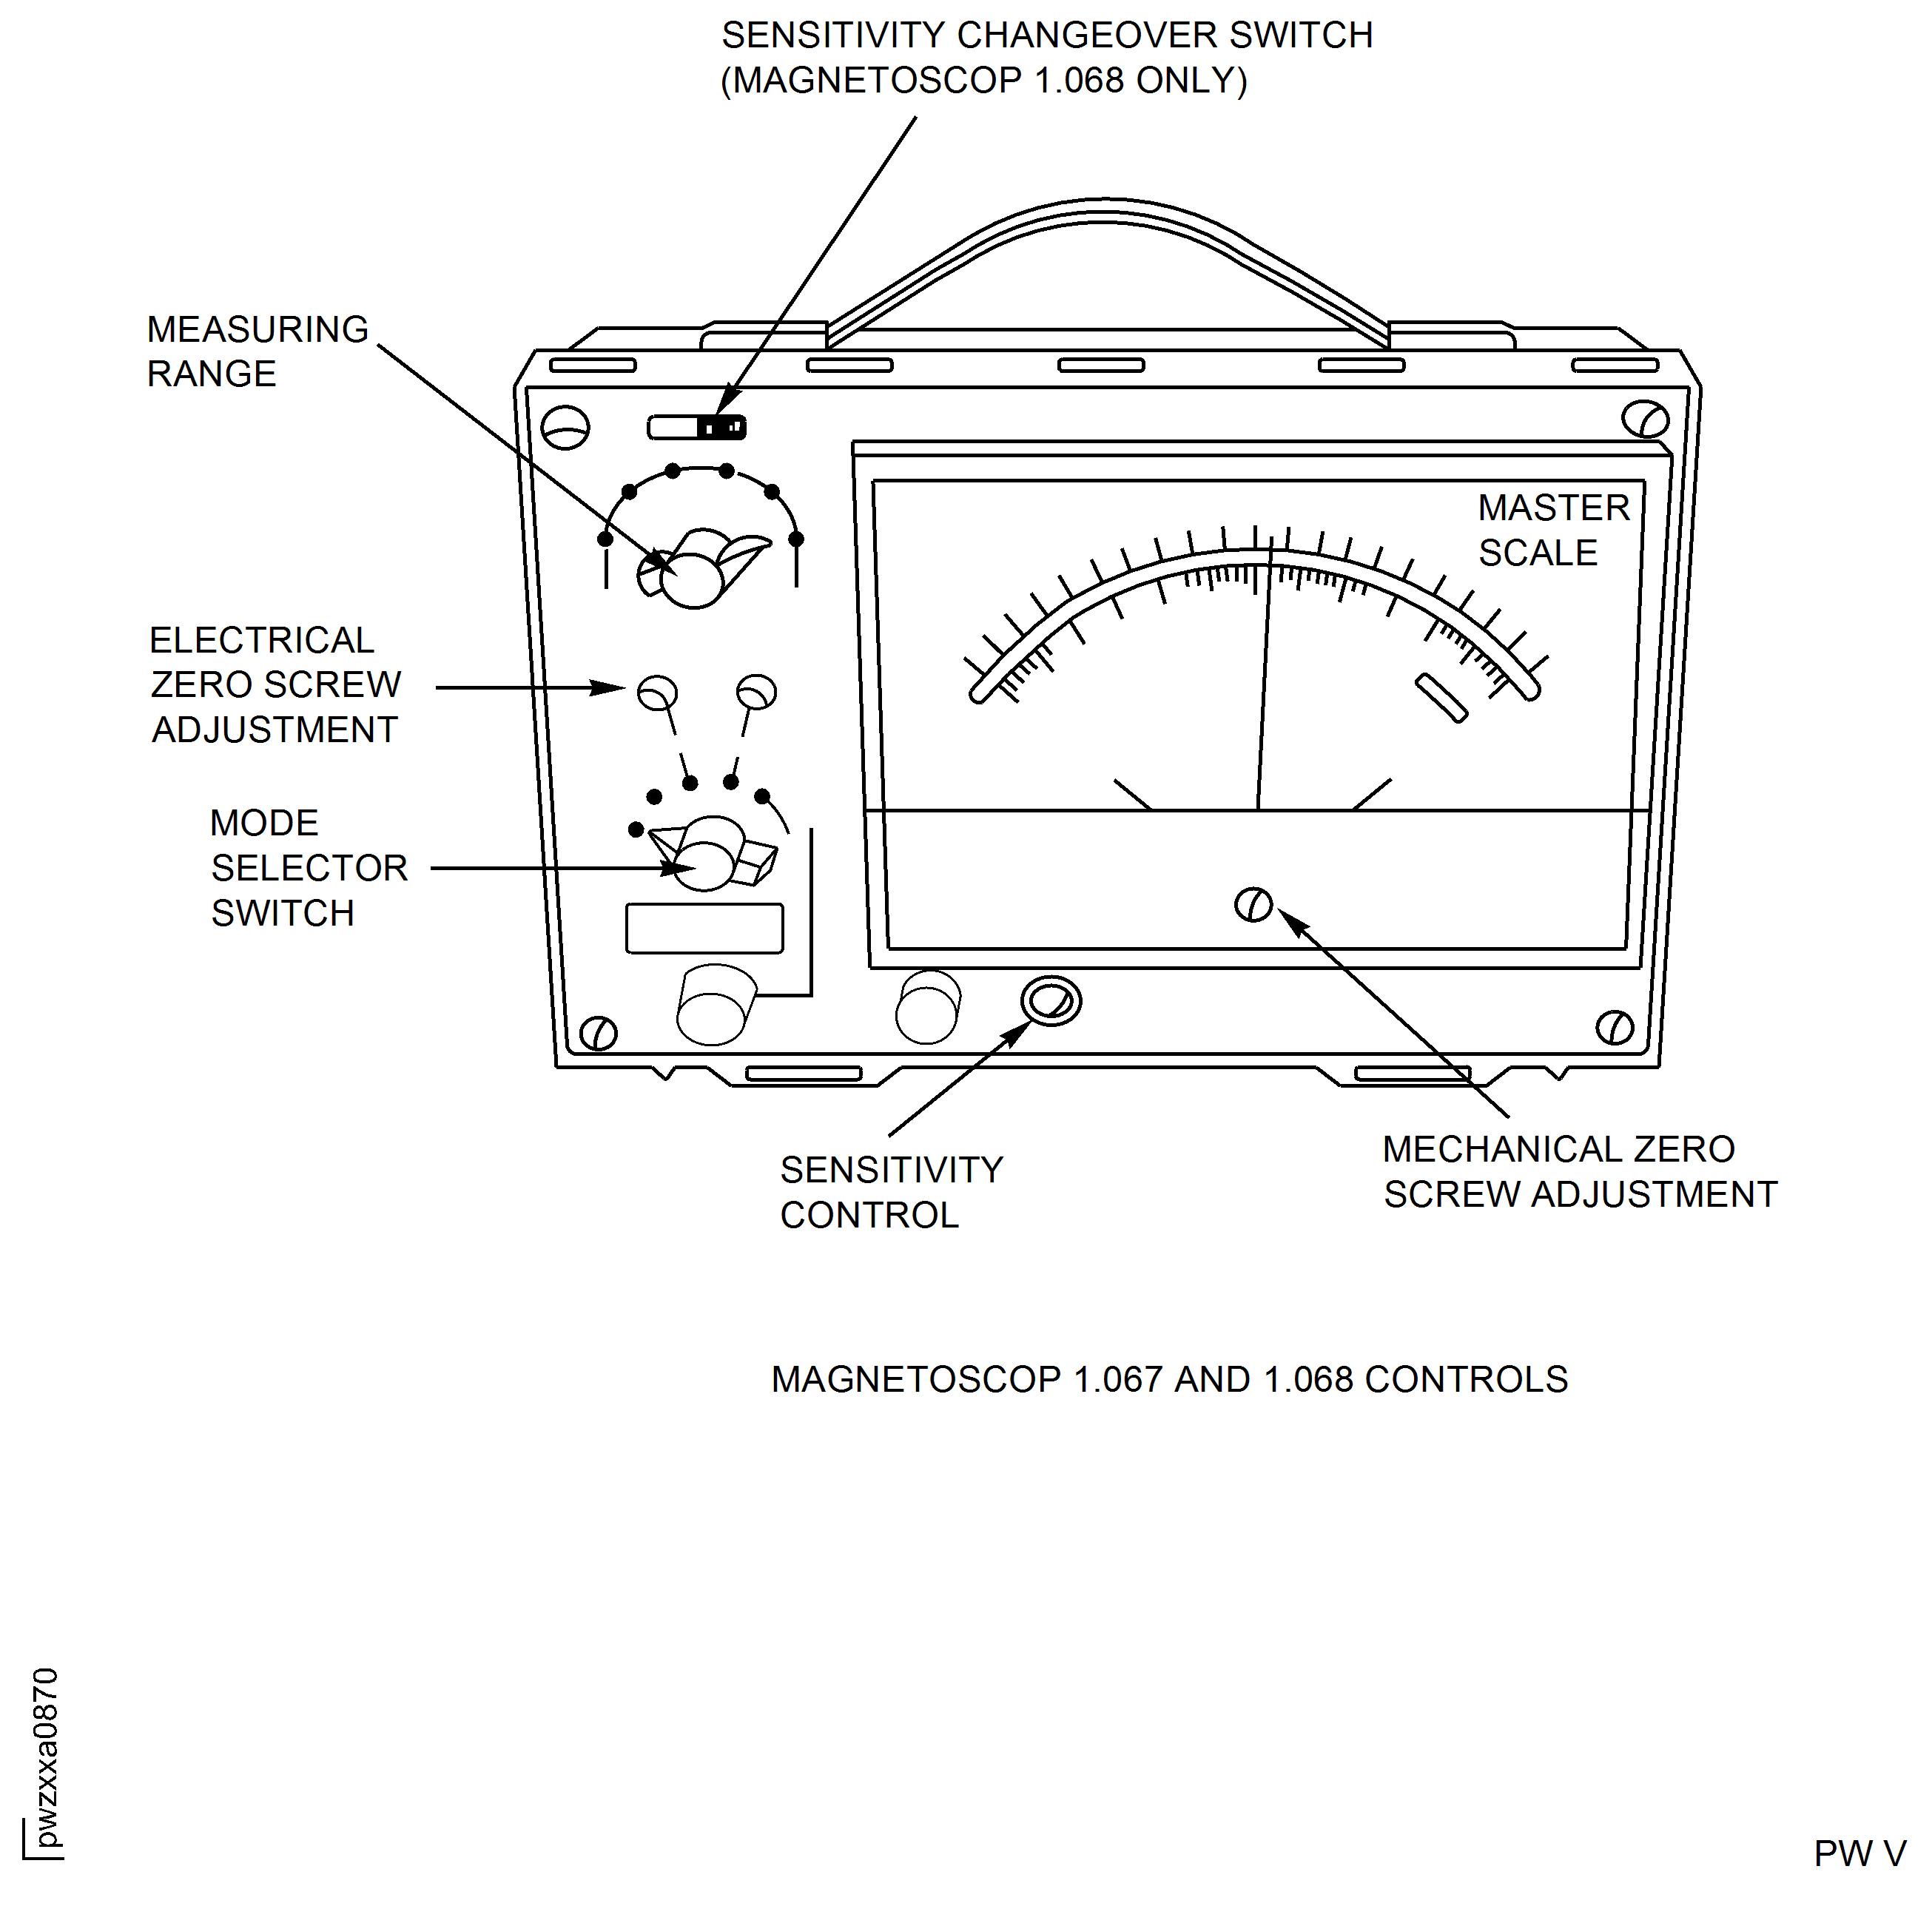
Inspection Equipment FOERSTER Magnetoscop Model 1.067 or 1.068
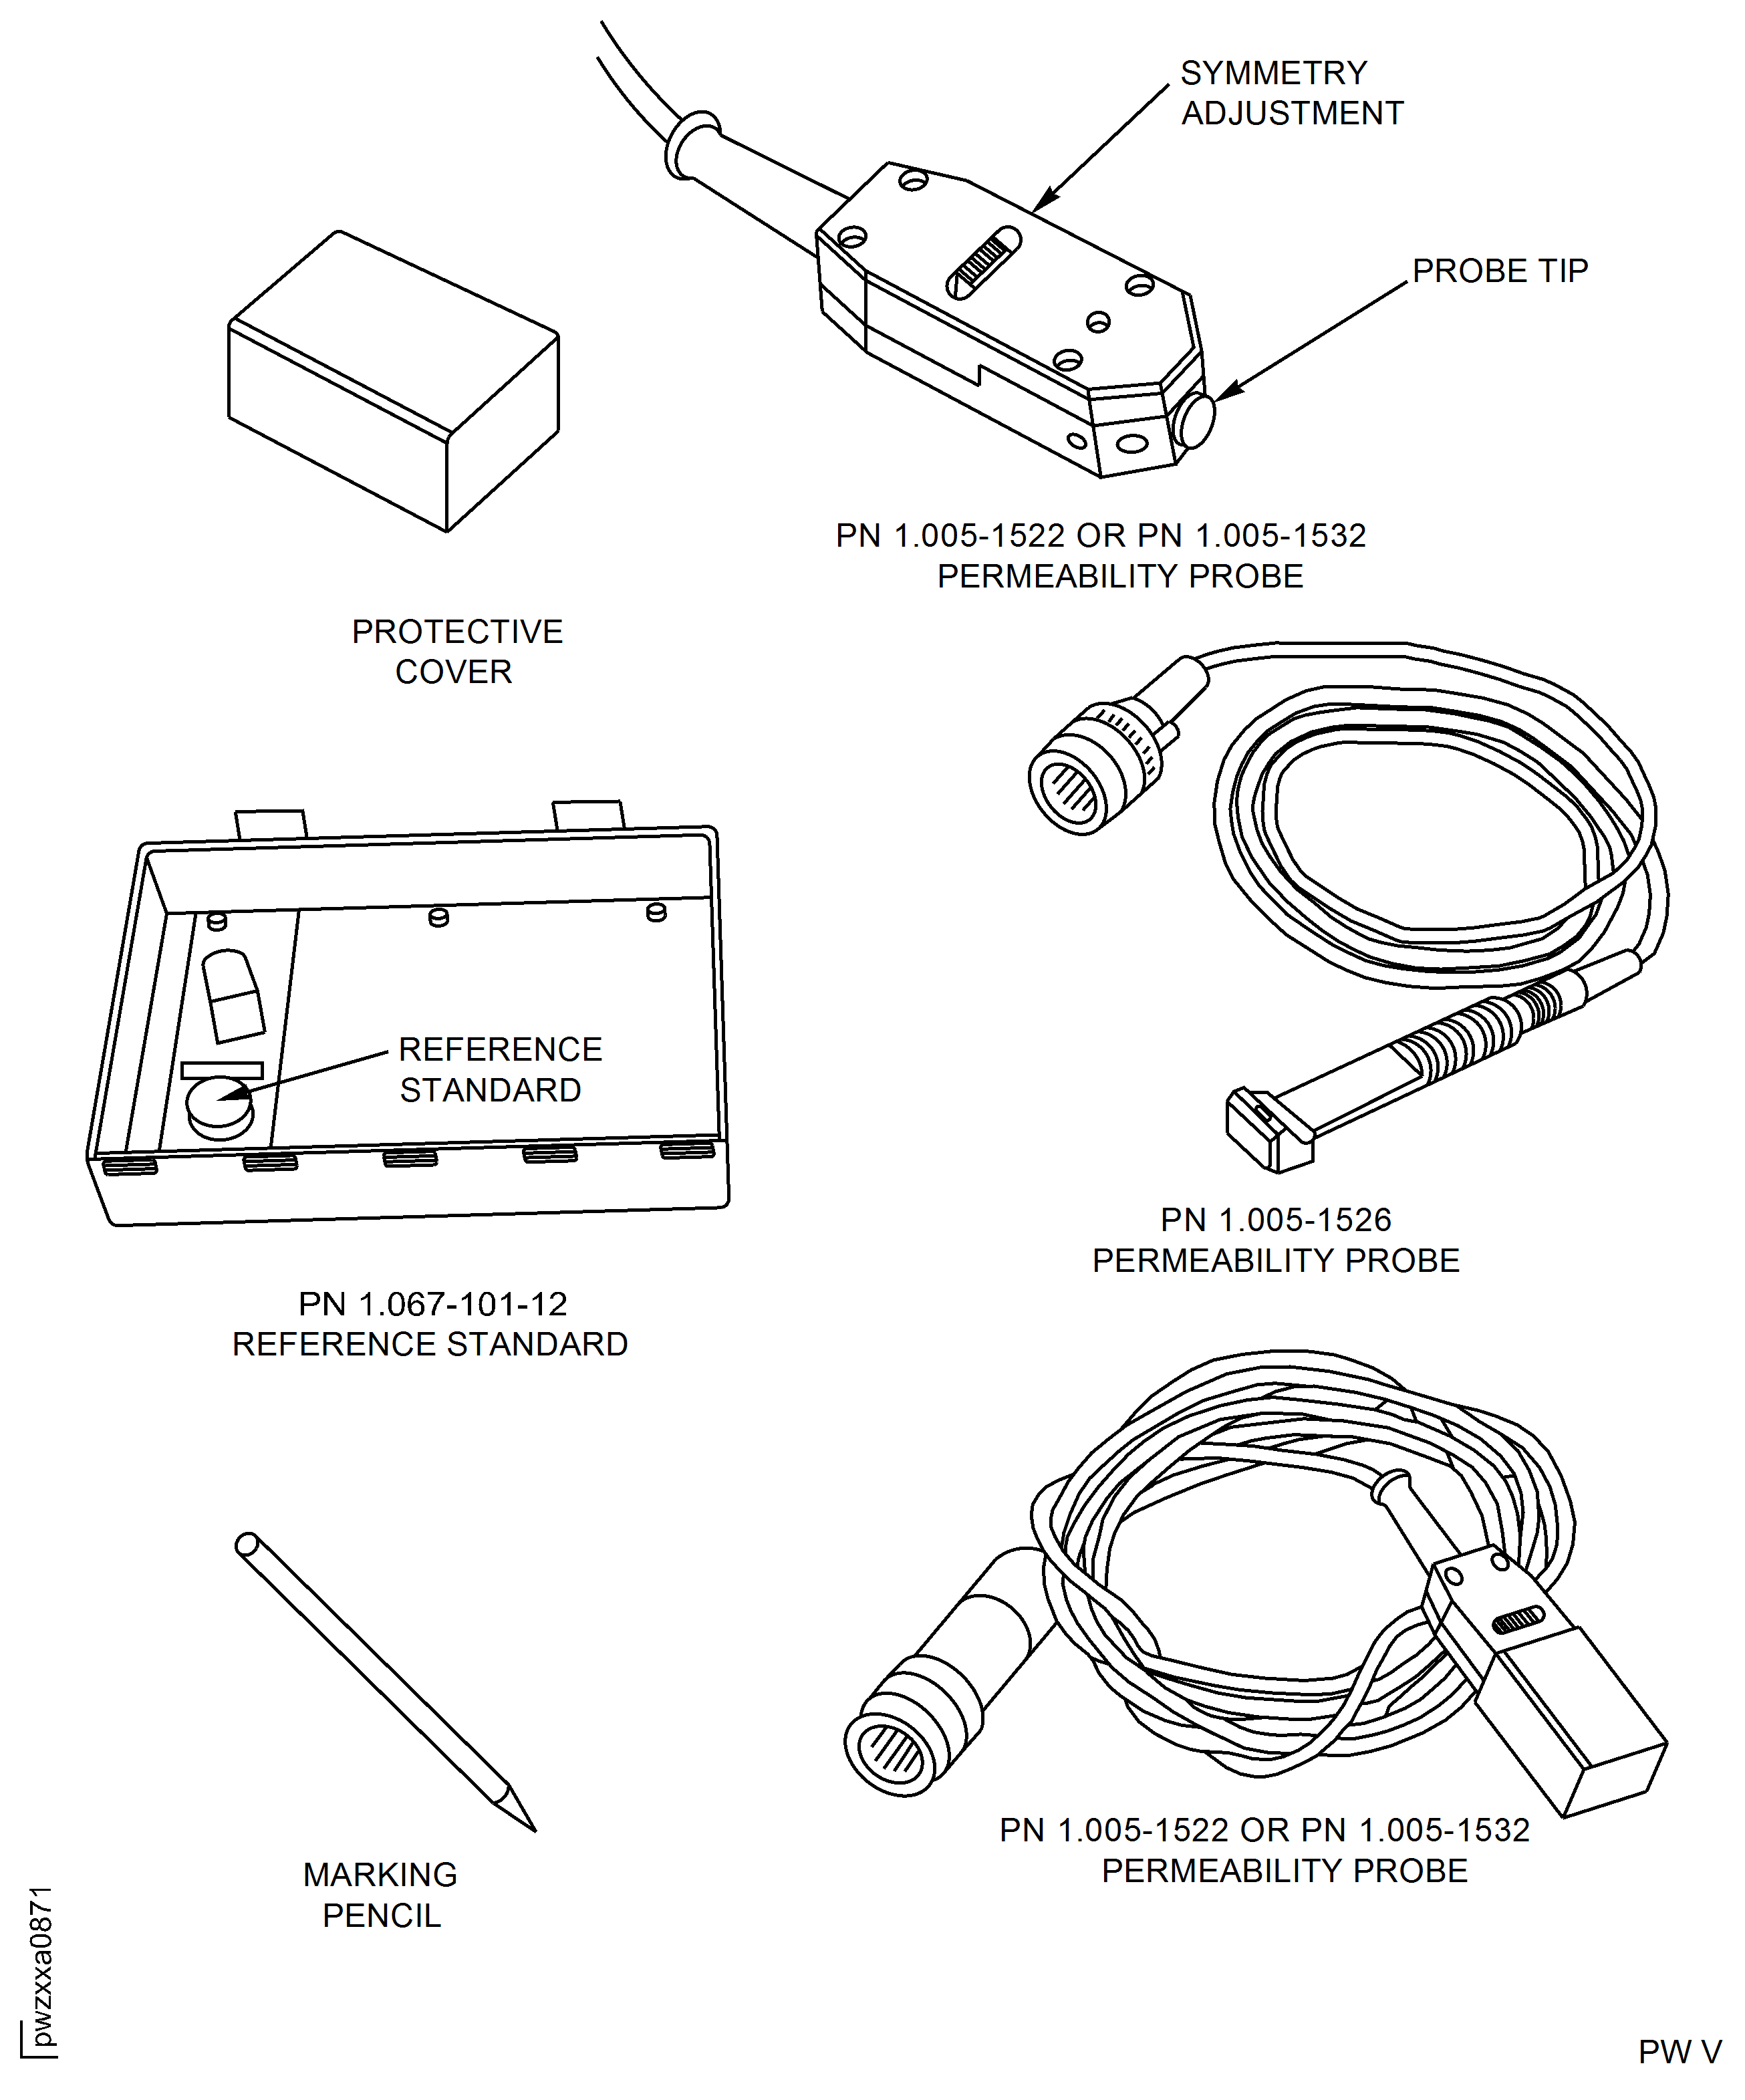
Inspection Equipment FOERSTER Magnetoscop Model 1.067 or 1.068
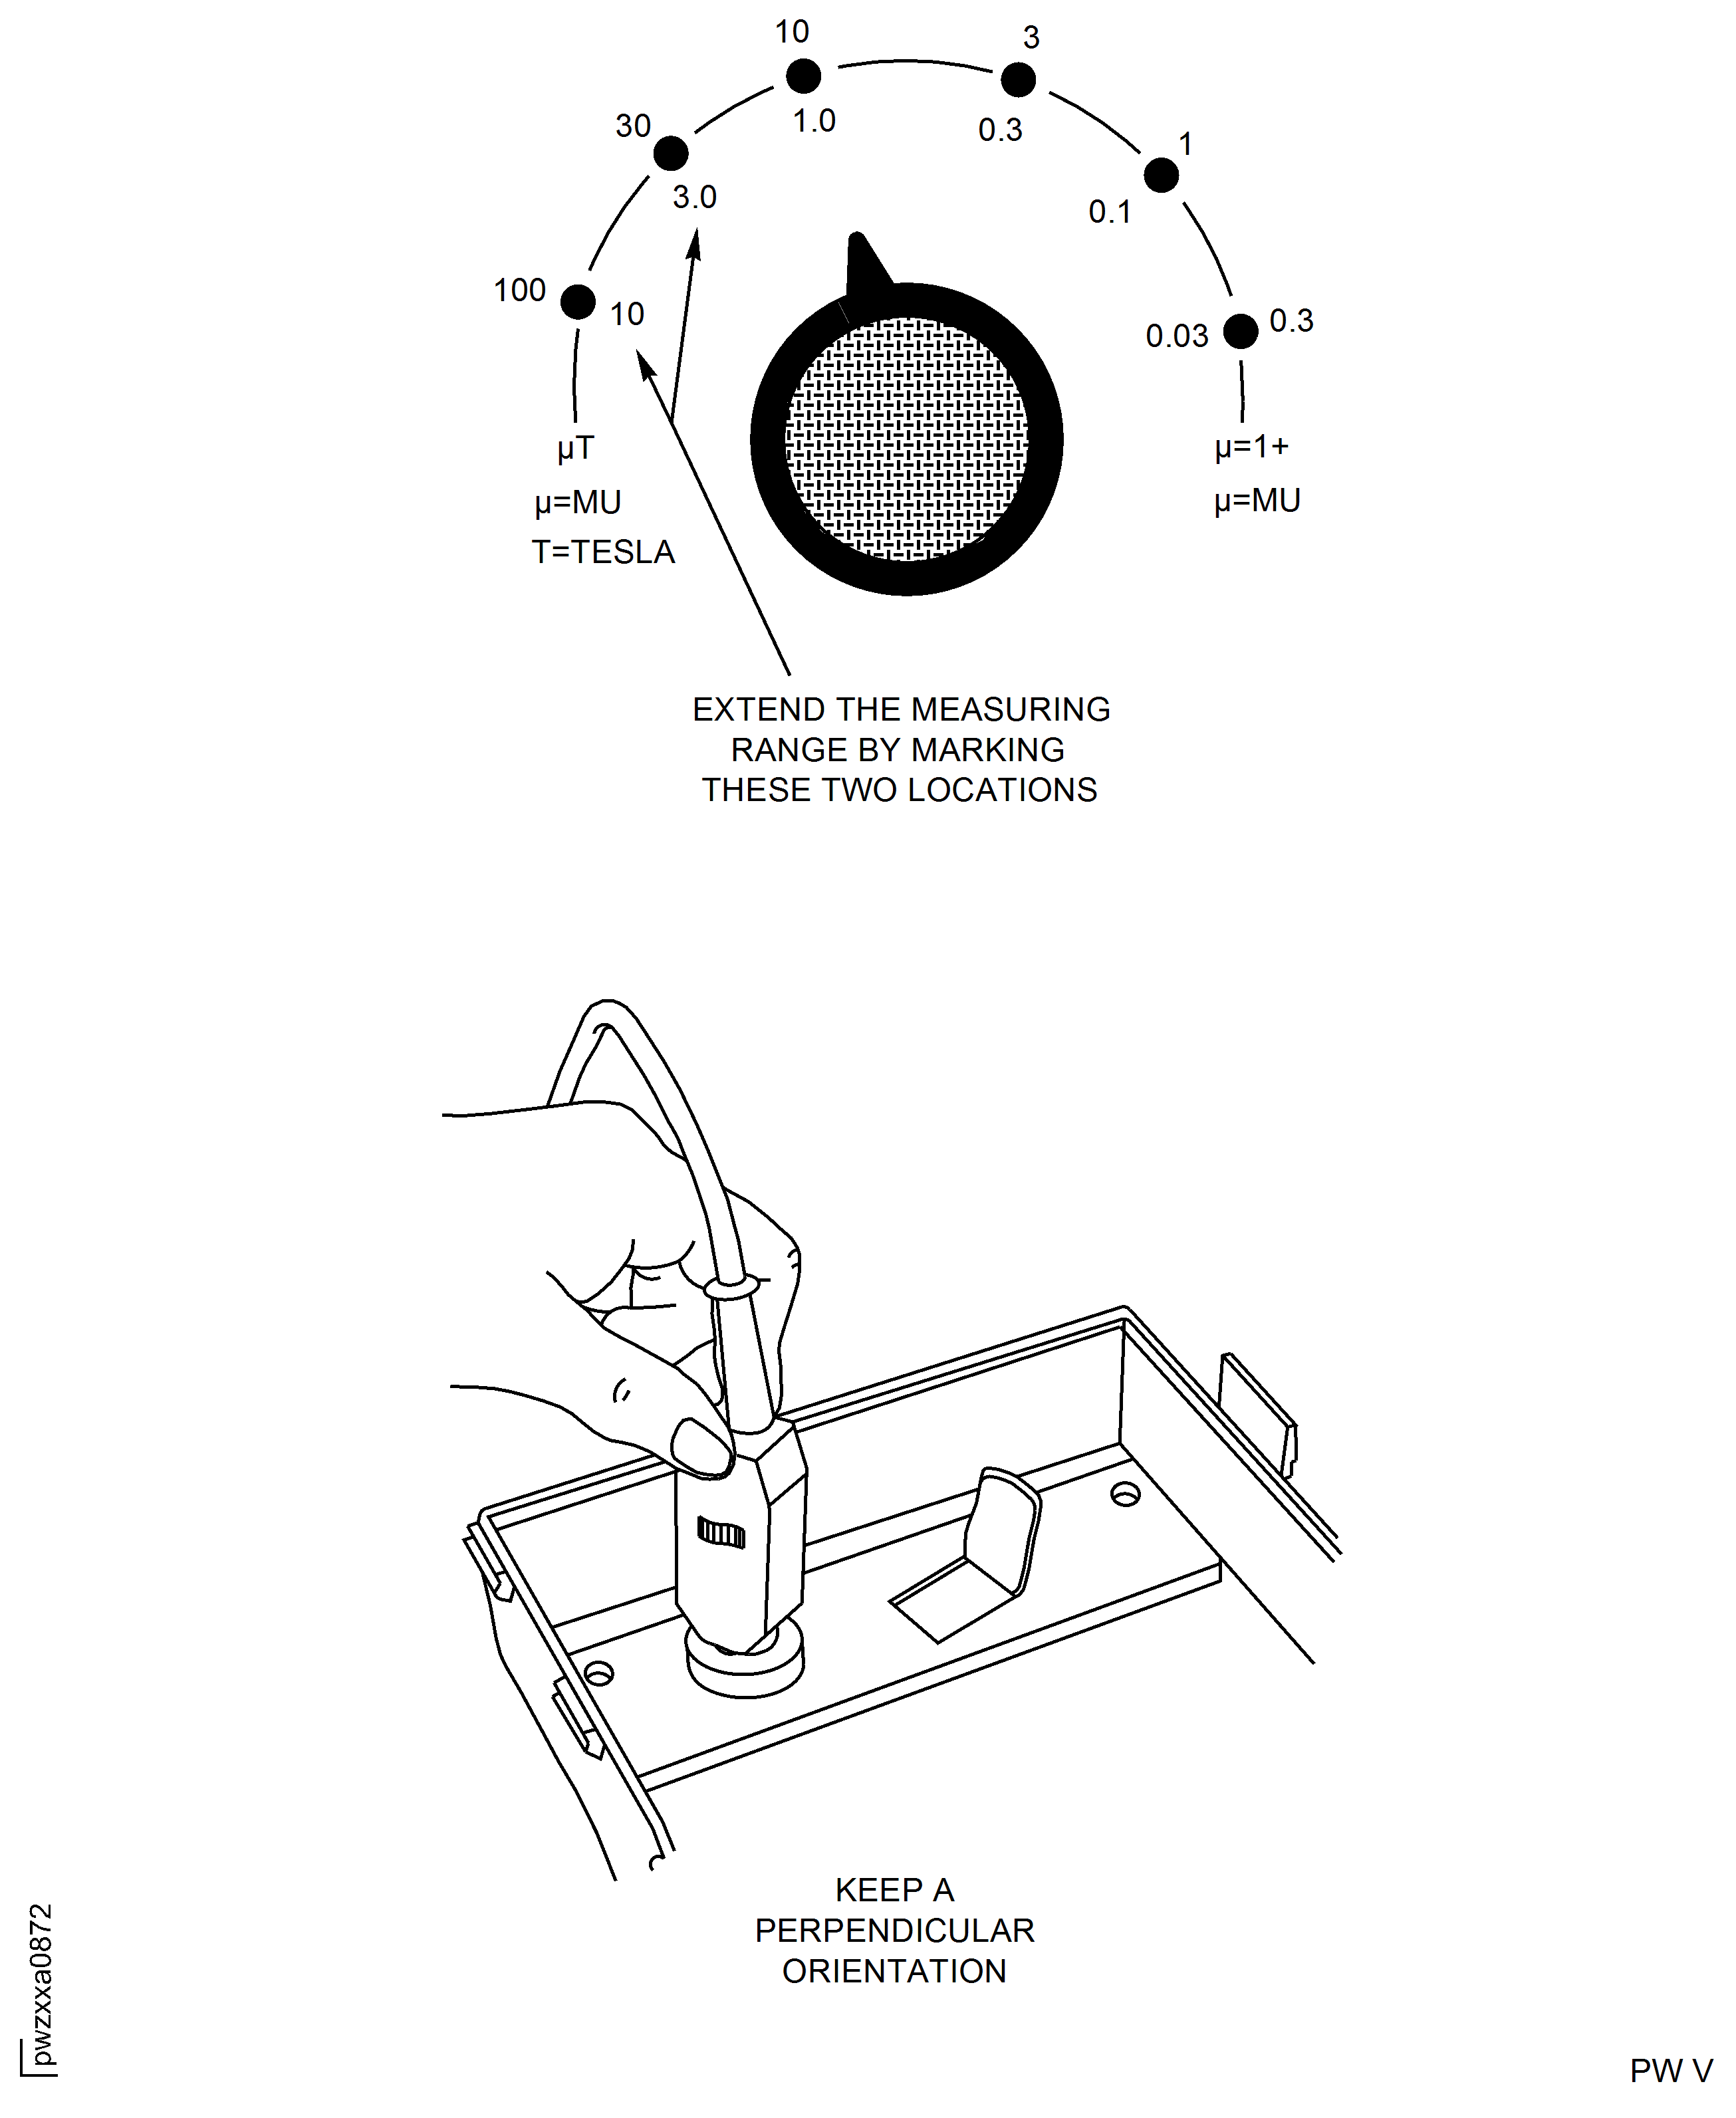
Figure: Inspection Equipment FOERSTER Magnetoscop Model 1.069
Inspection Equipment FOERSTER Magnetoscop Model 1.069
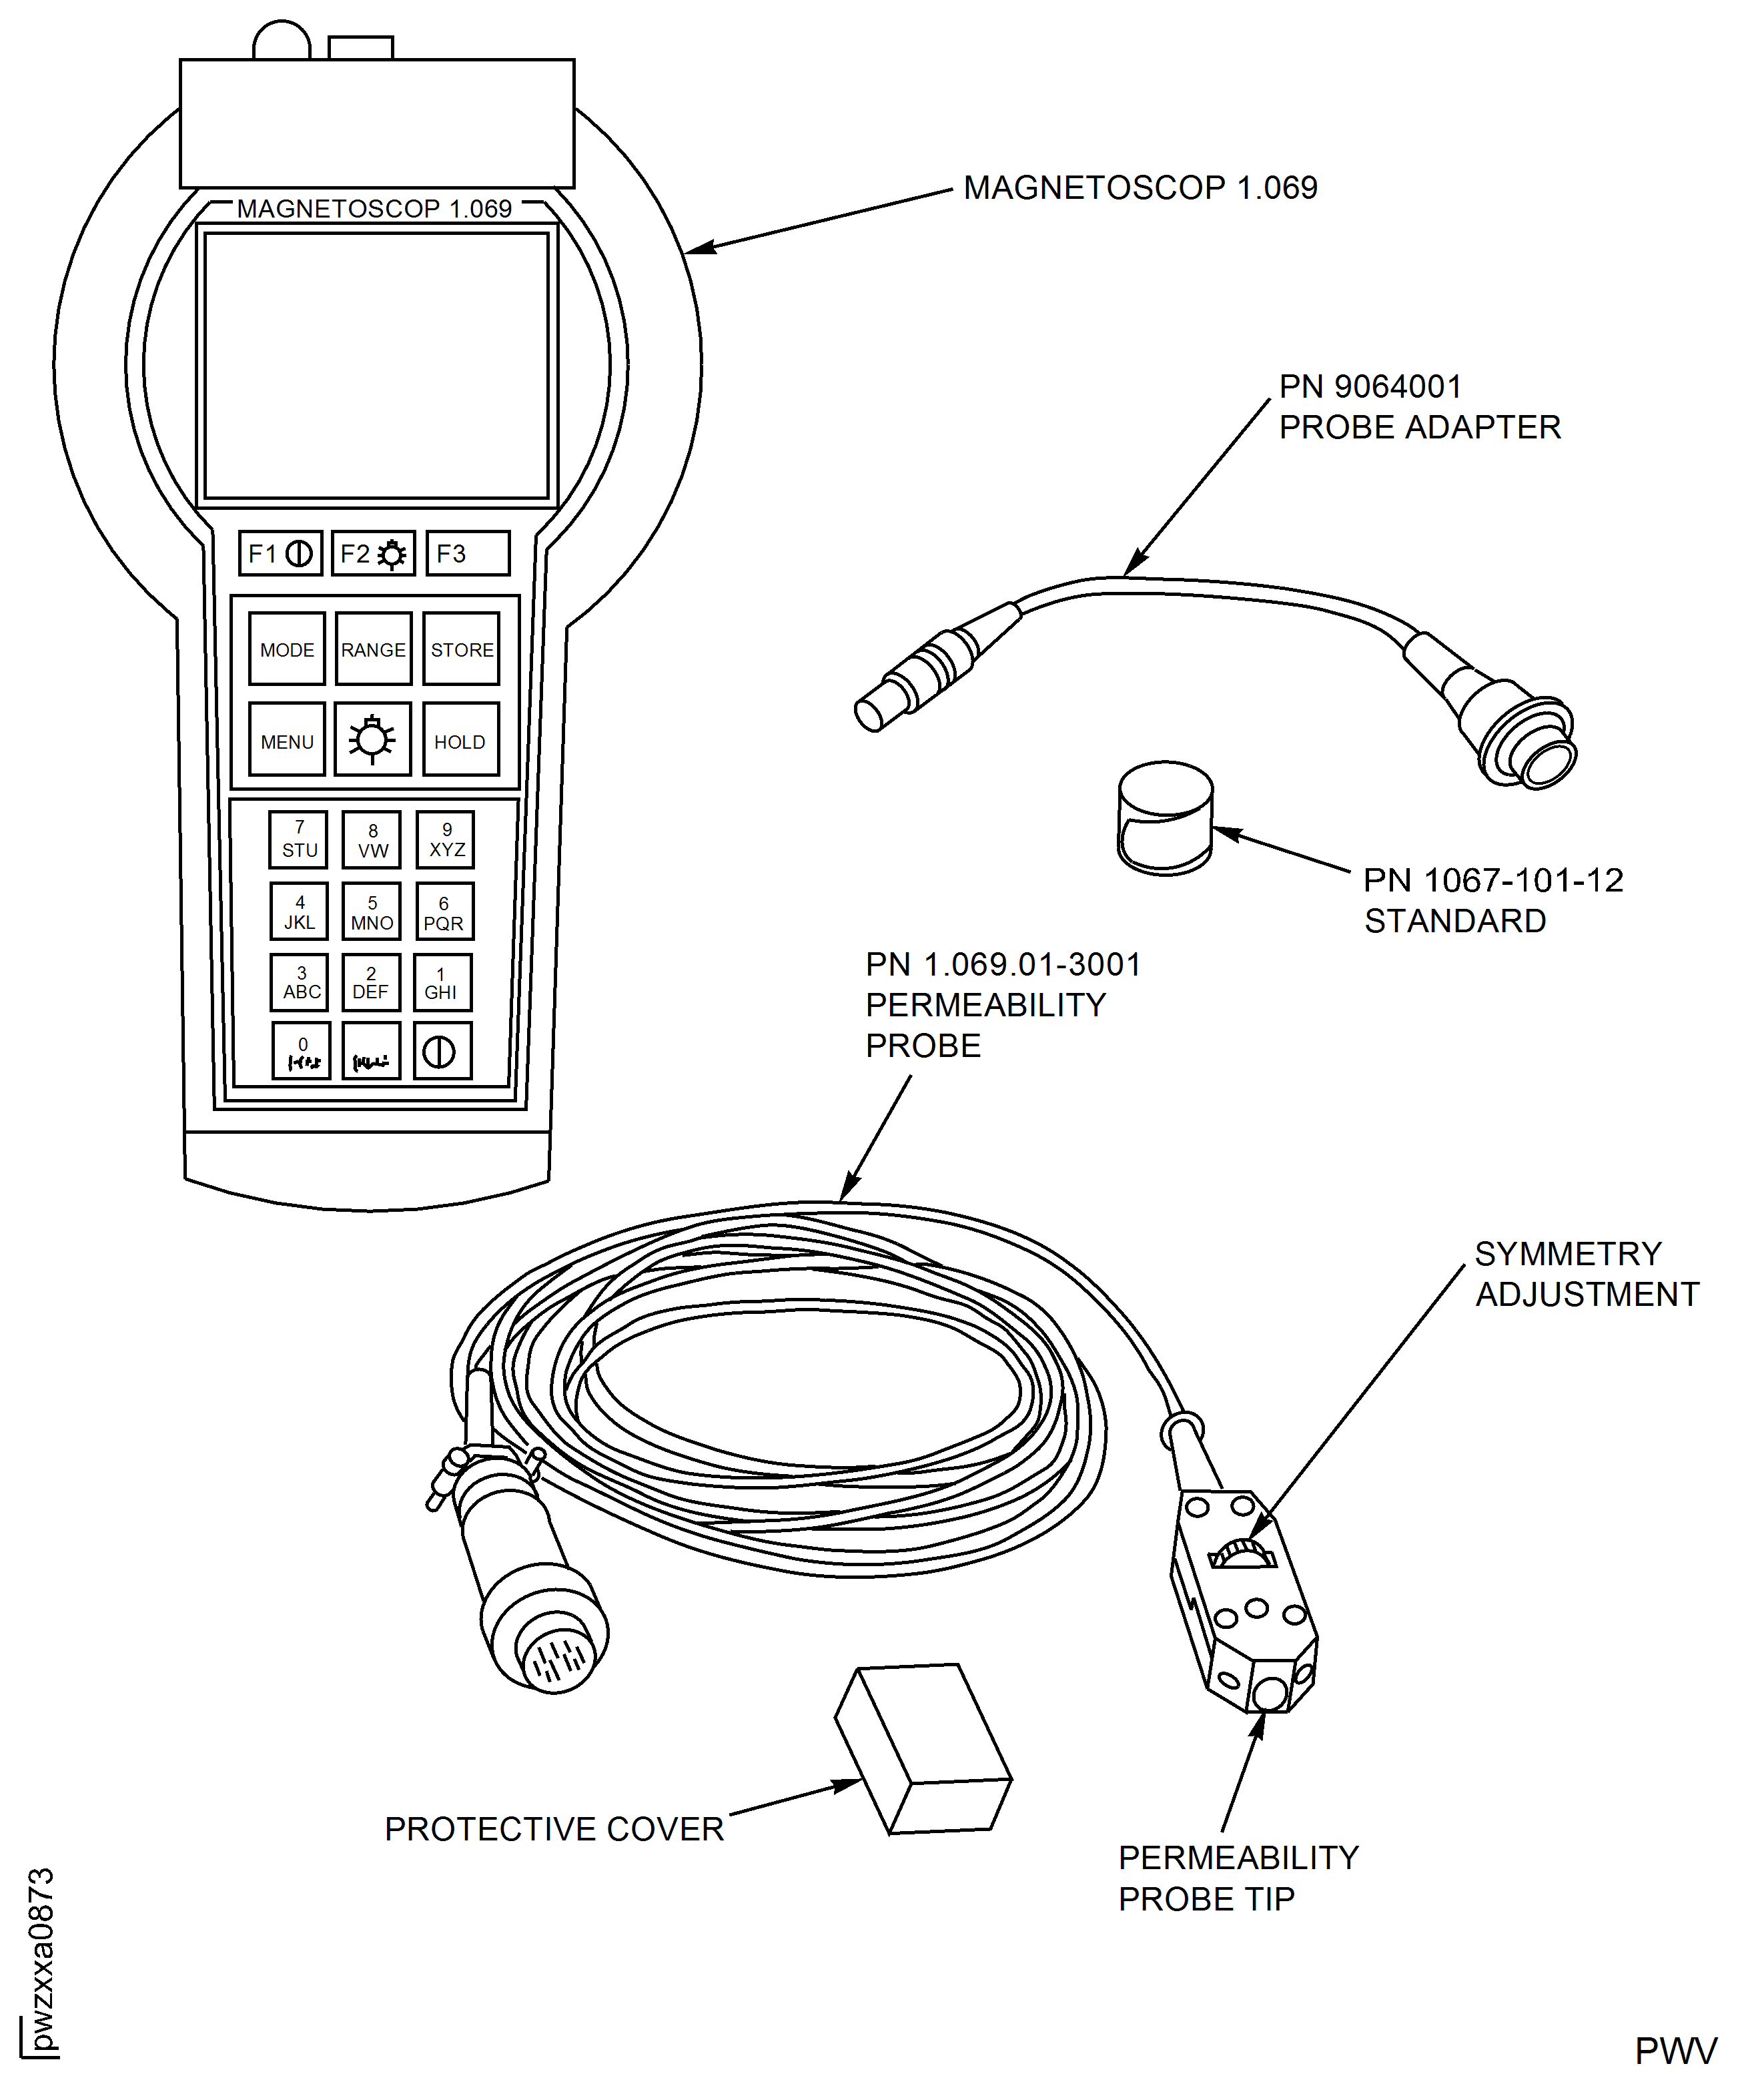
Inspection Equipment FOERSTER Magnetoscop Model 1.069
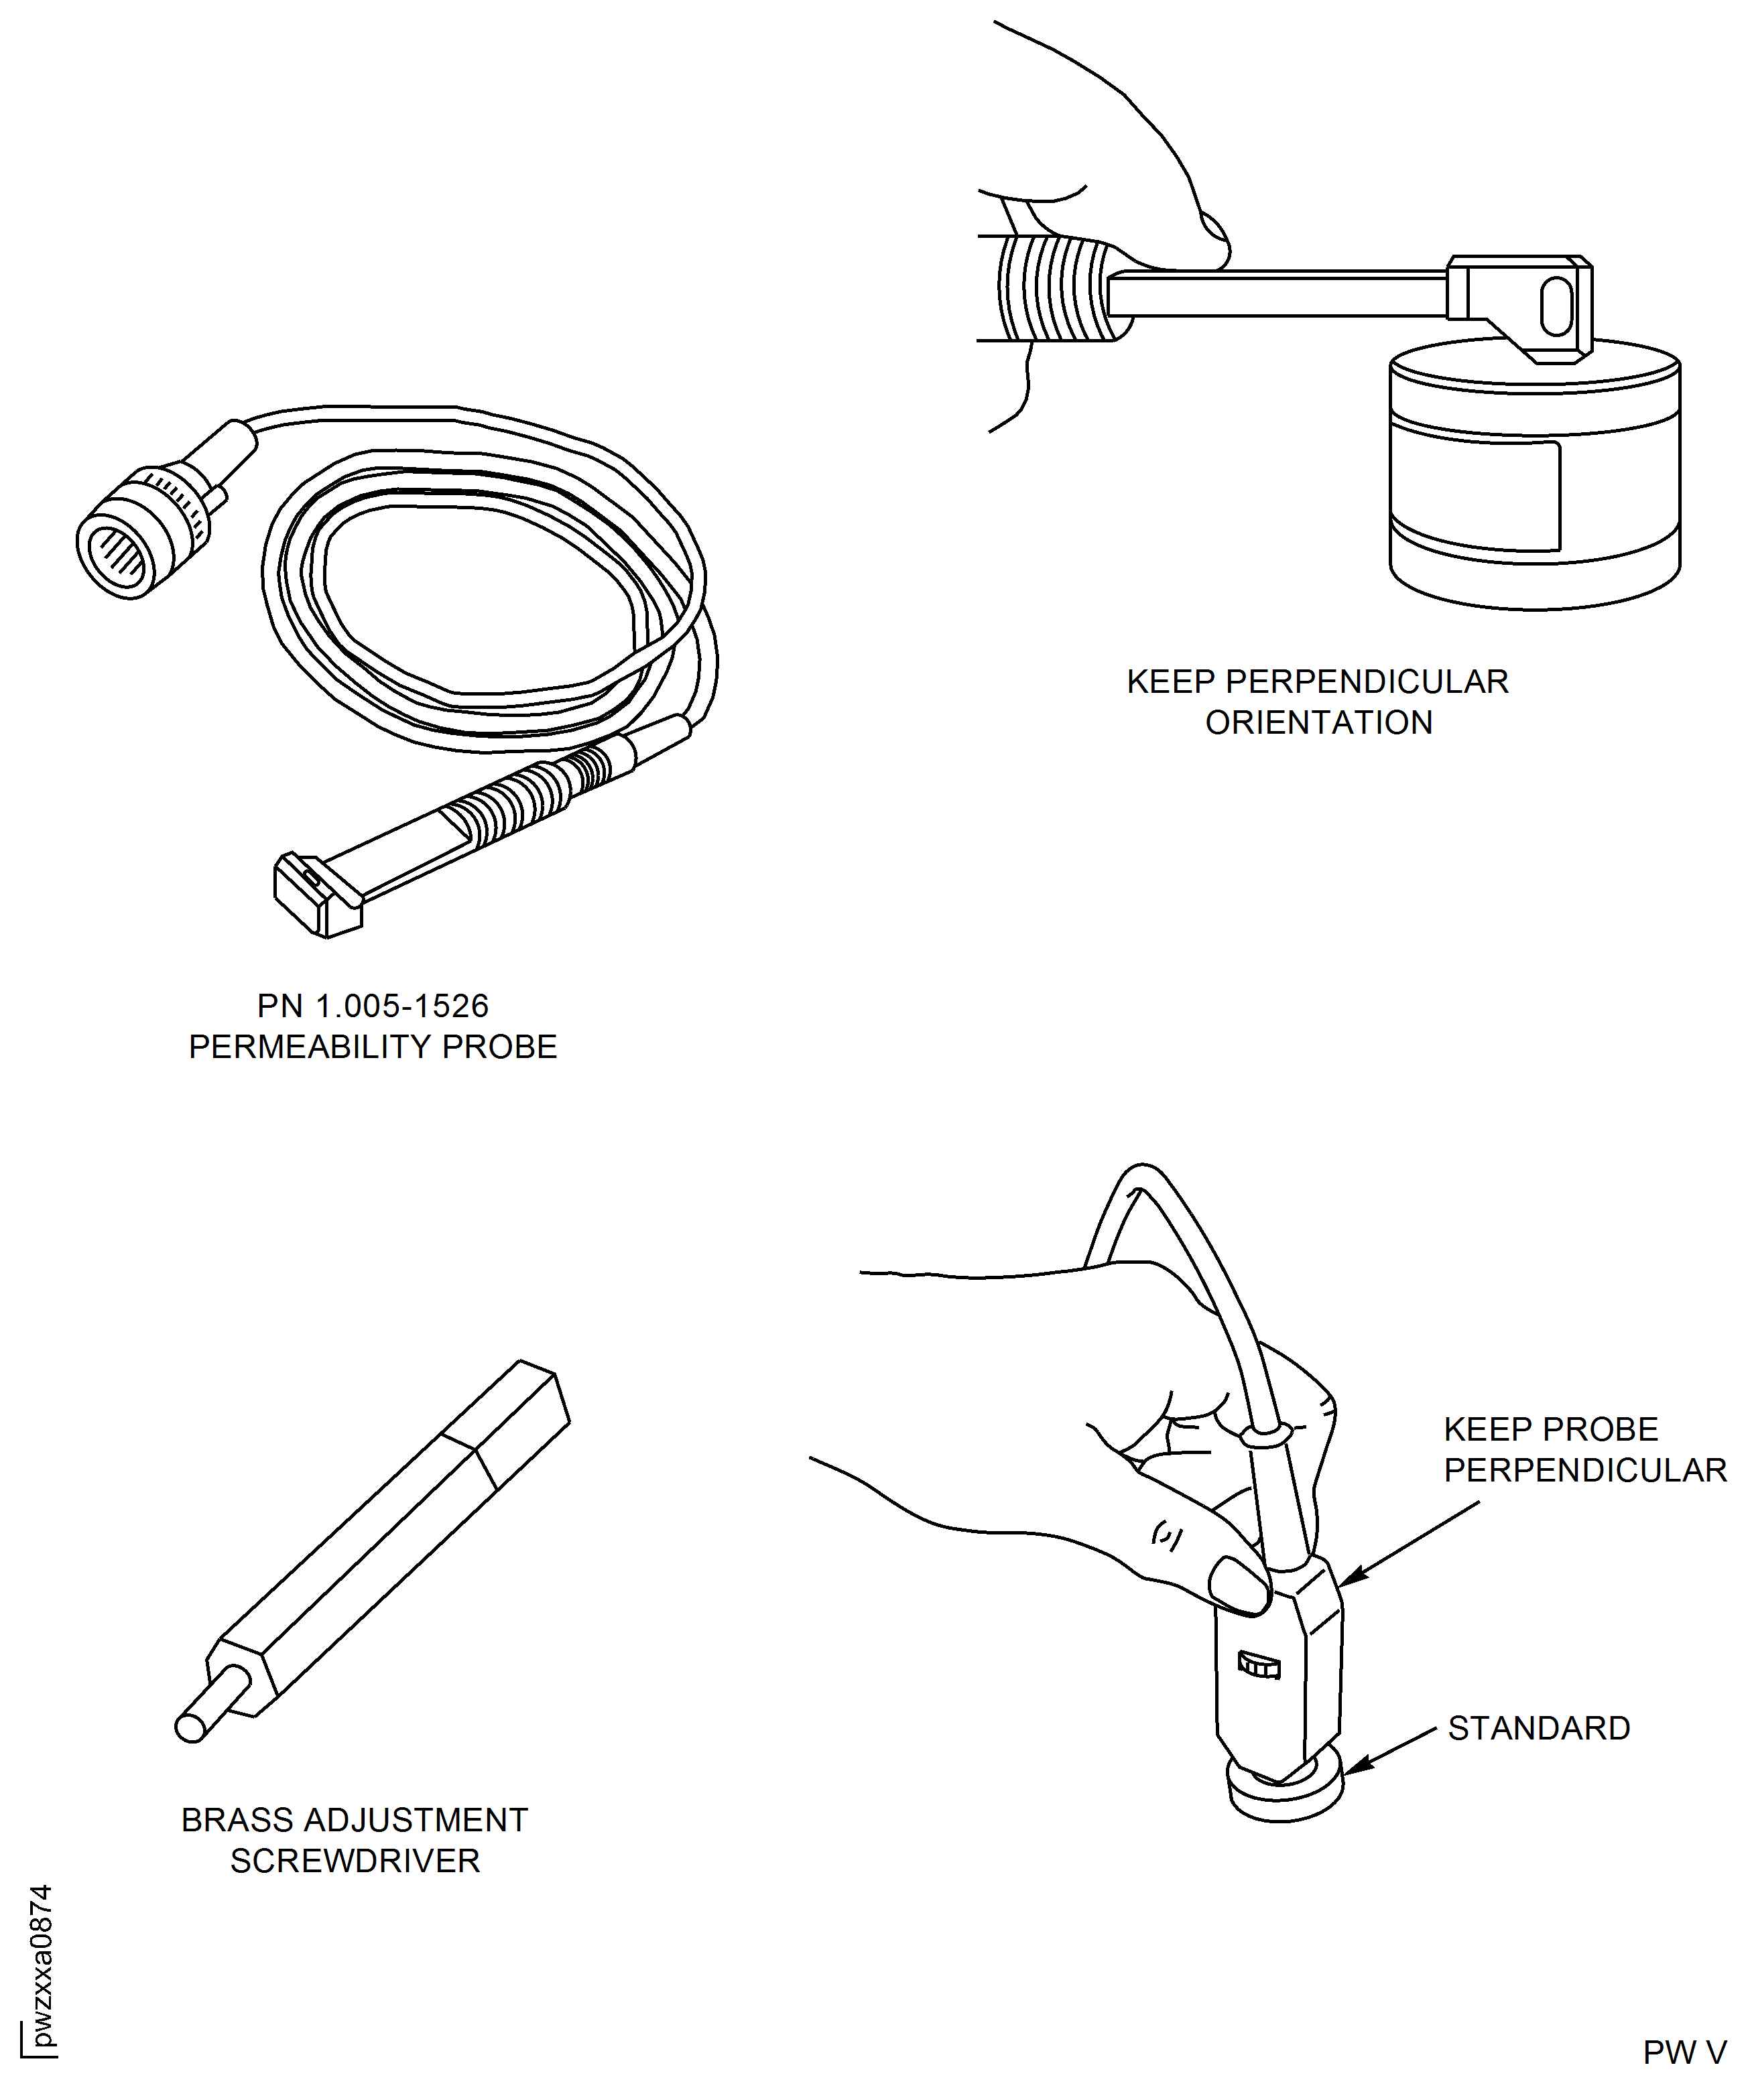
Figure: Inspection Equipment FOERSTER Magnetoscop Model 1.070
Inspection Equipment FOERSTER Magnetoscop Model 1.070
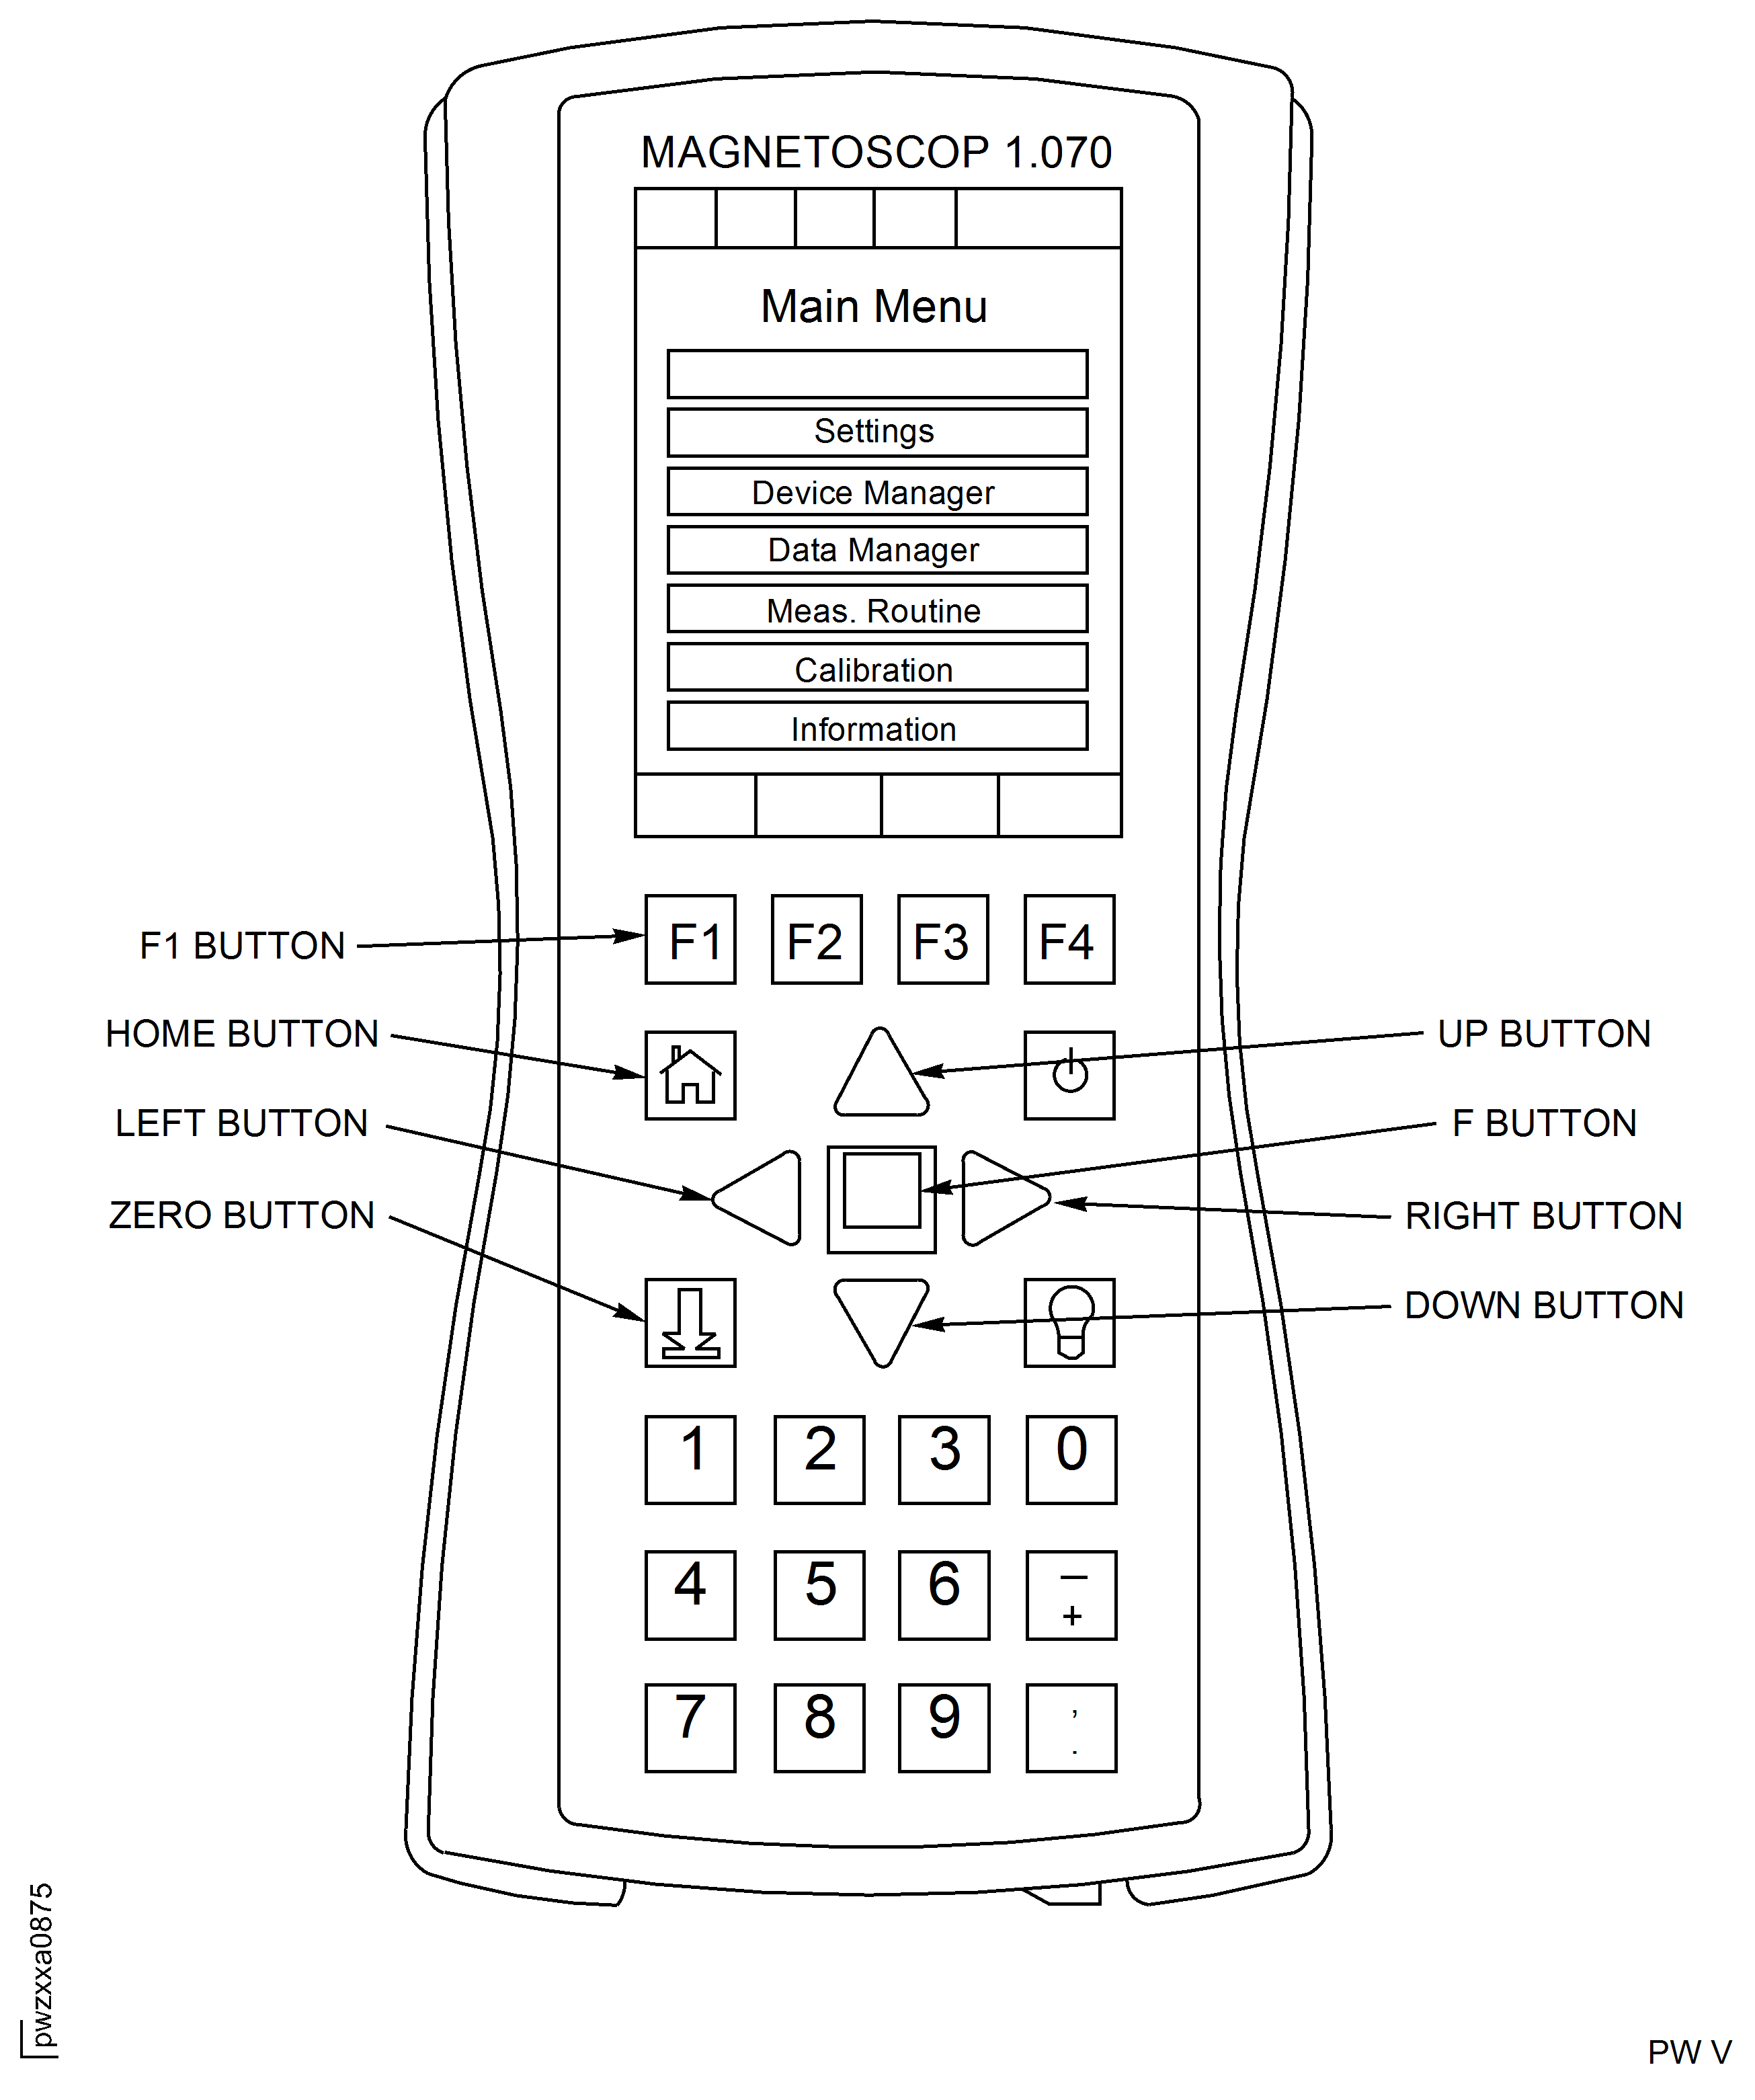
Inspection Equipment FOERSTER Magnetoscop Model 1.070
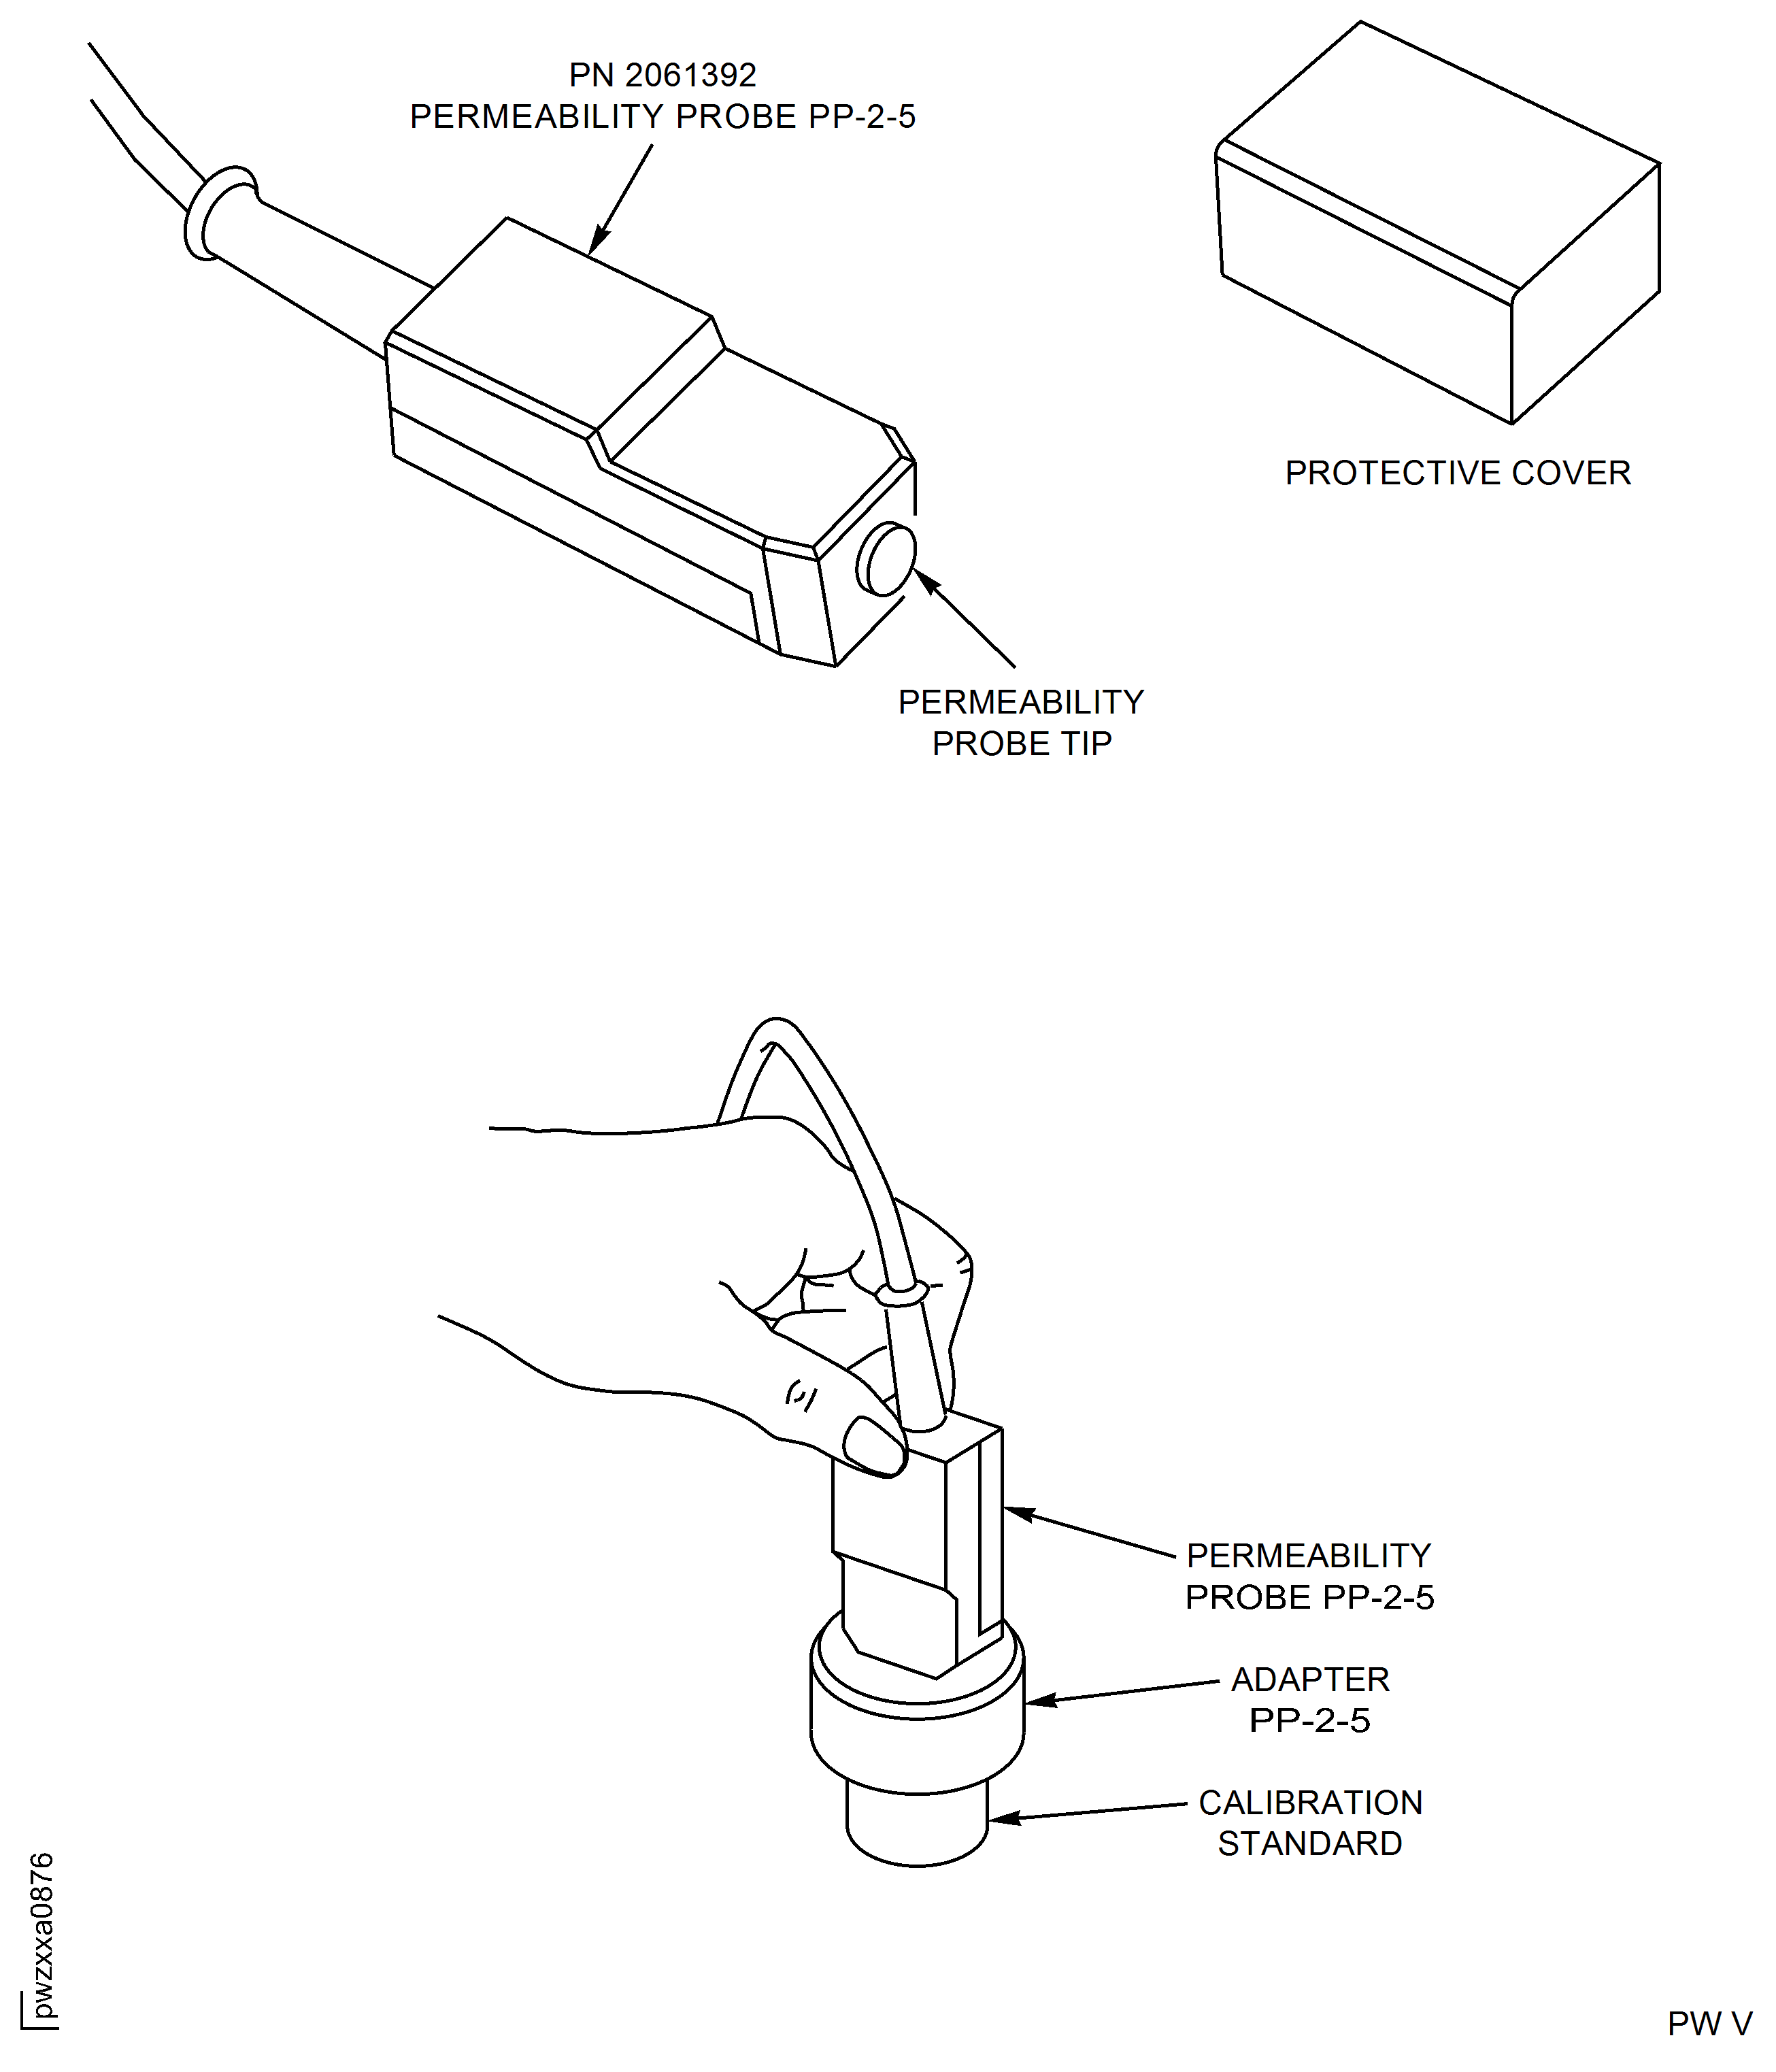
Figure: Magnetic Permeability Inspection
Magnetic Permeability Inspection
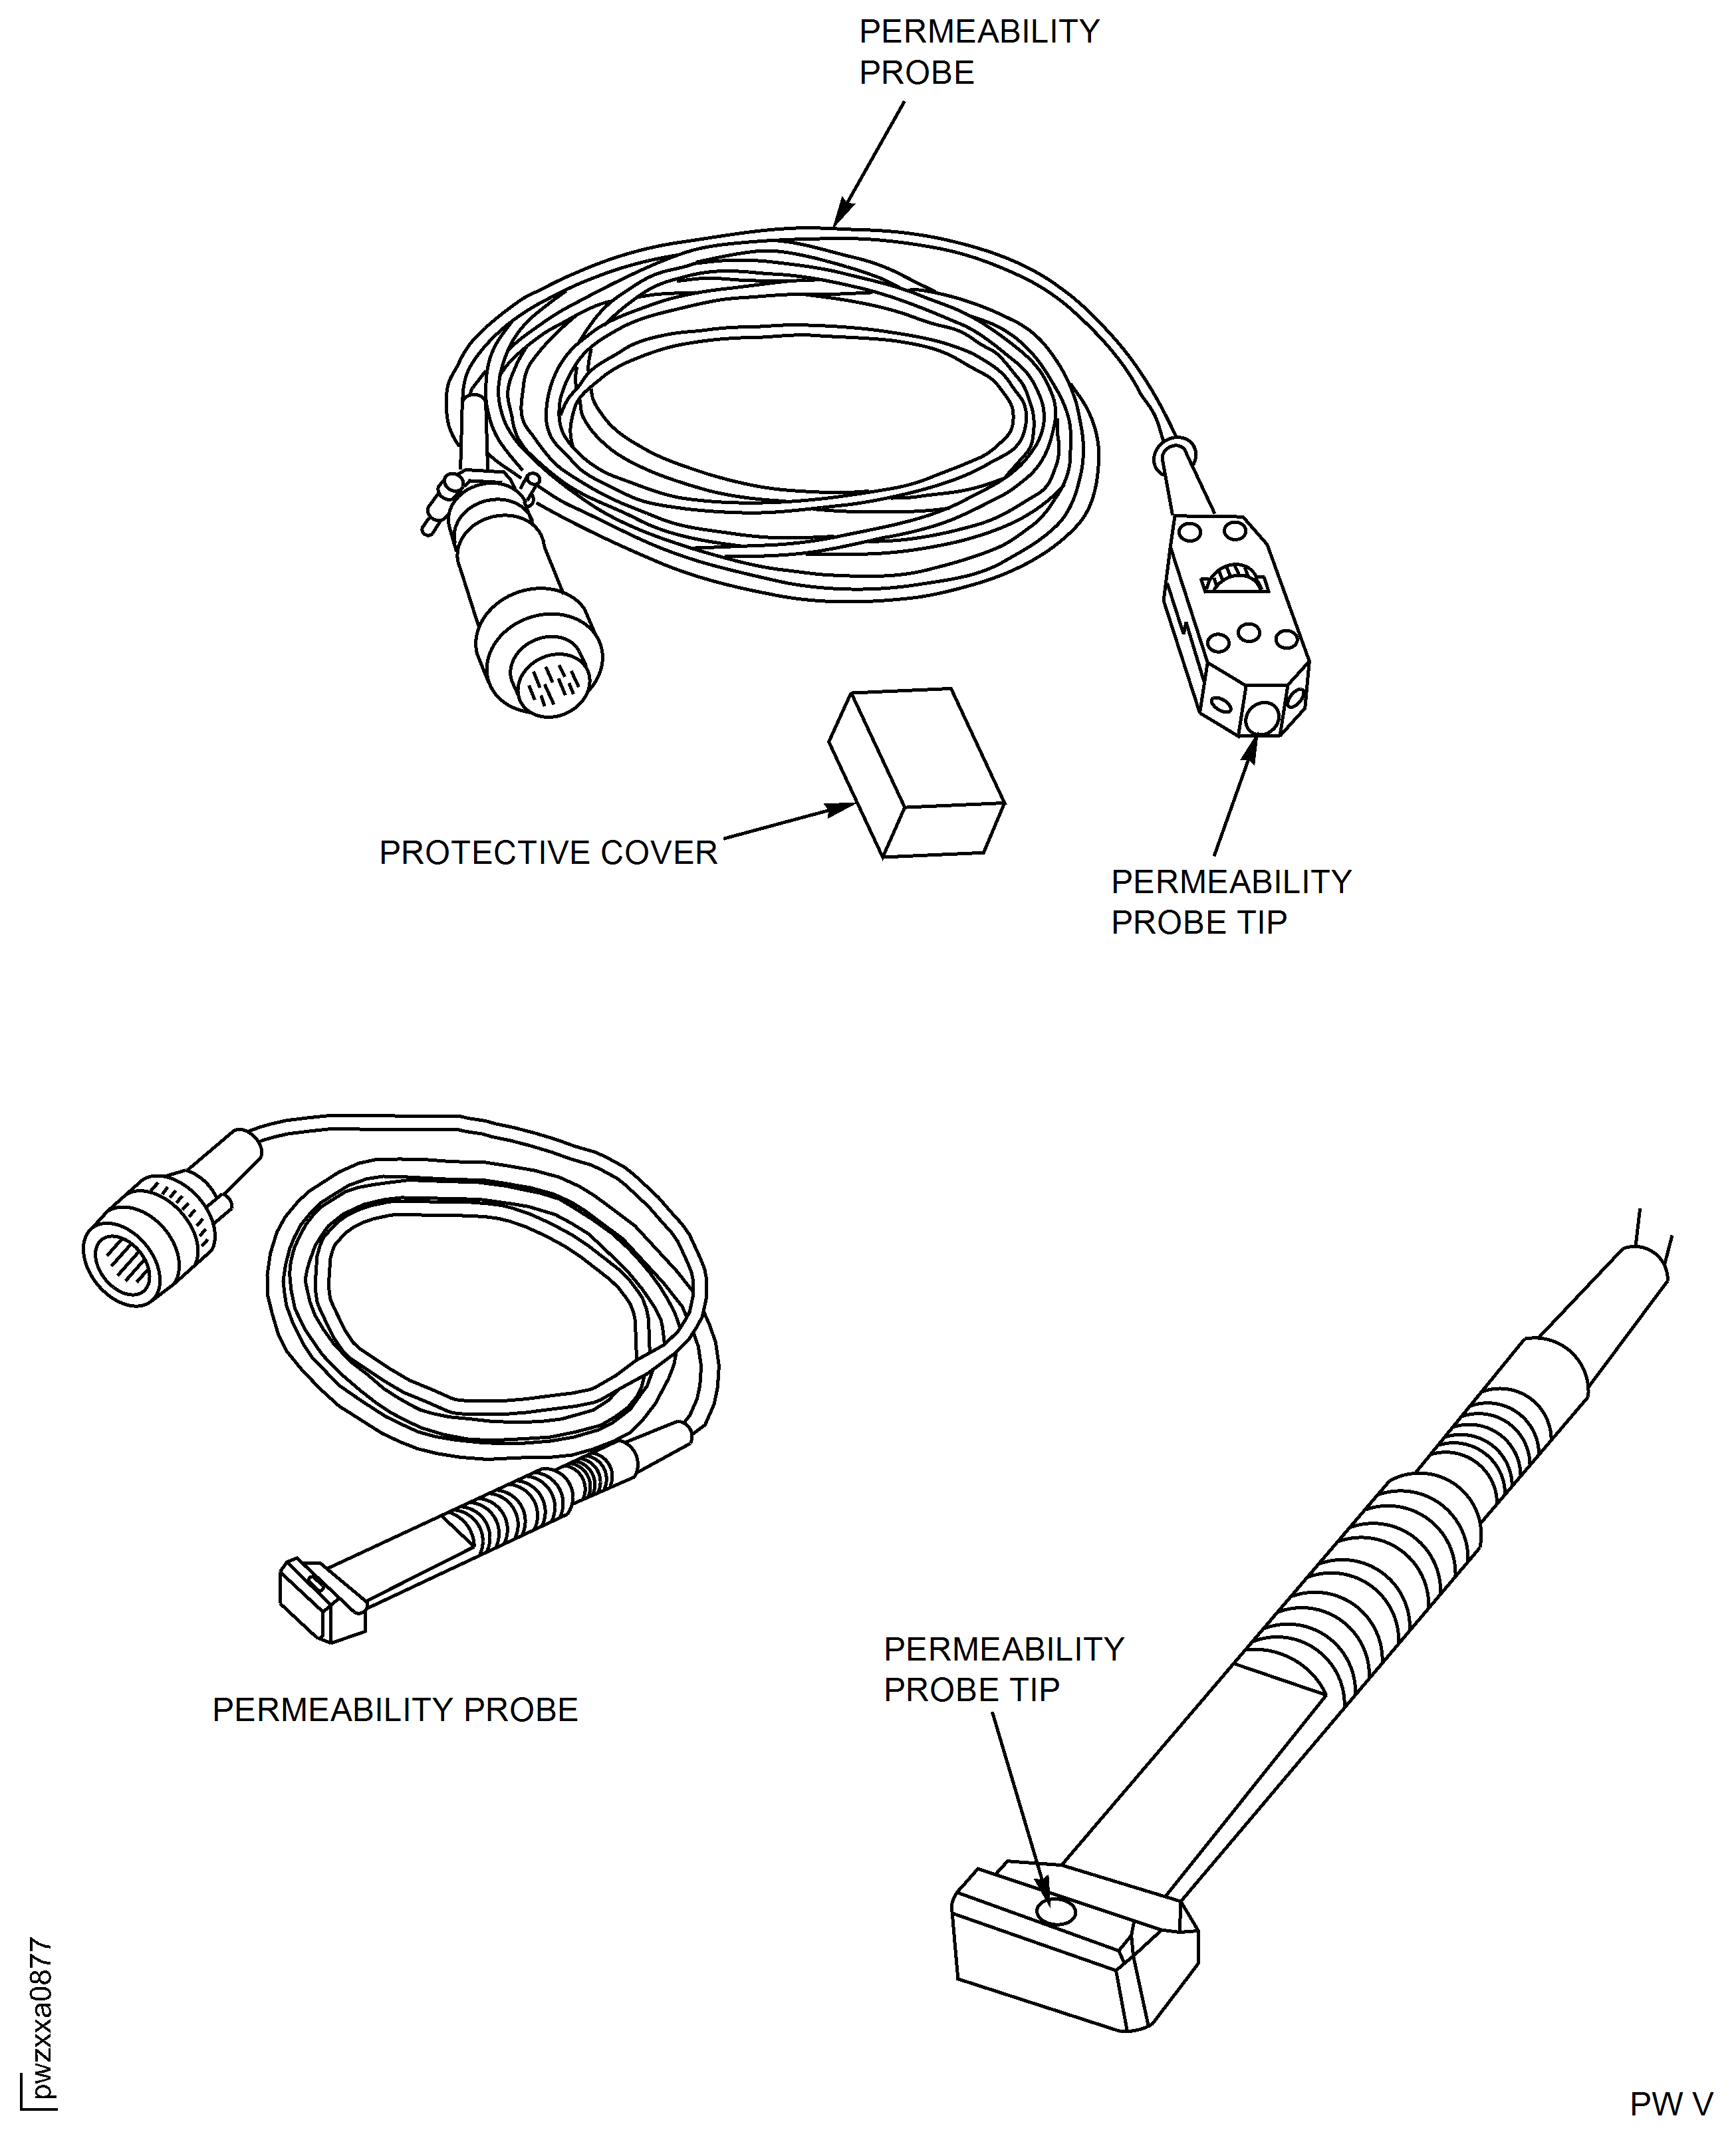
Magnetic Permeability Inspection
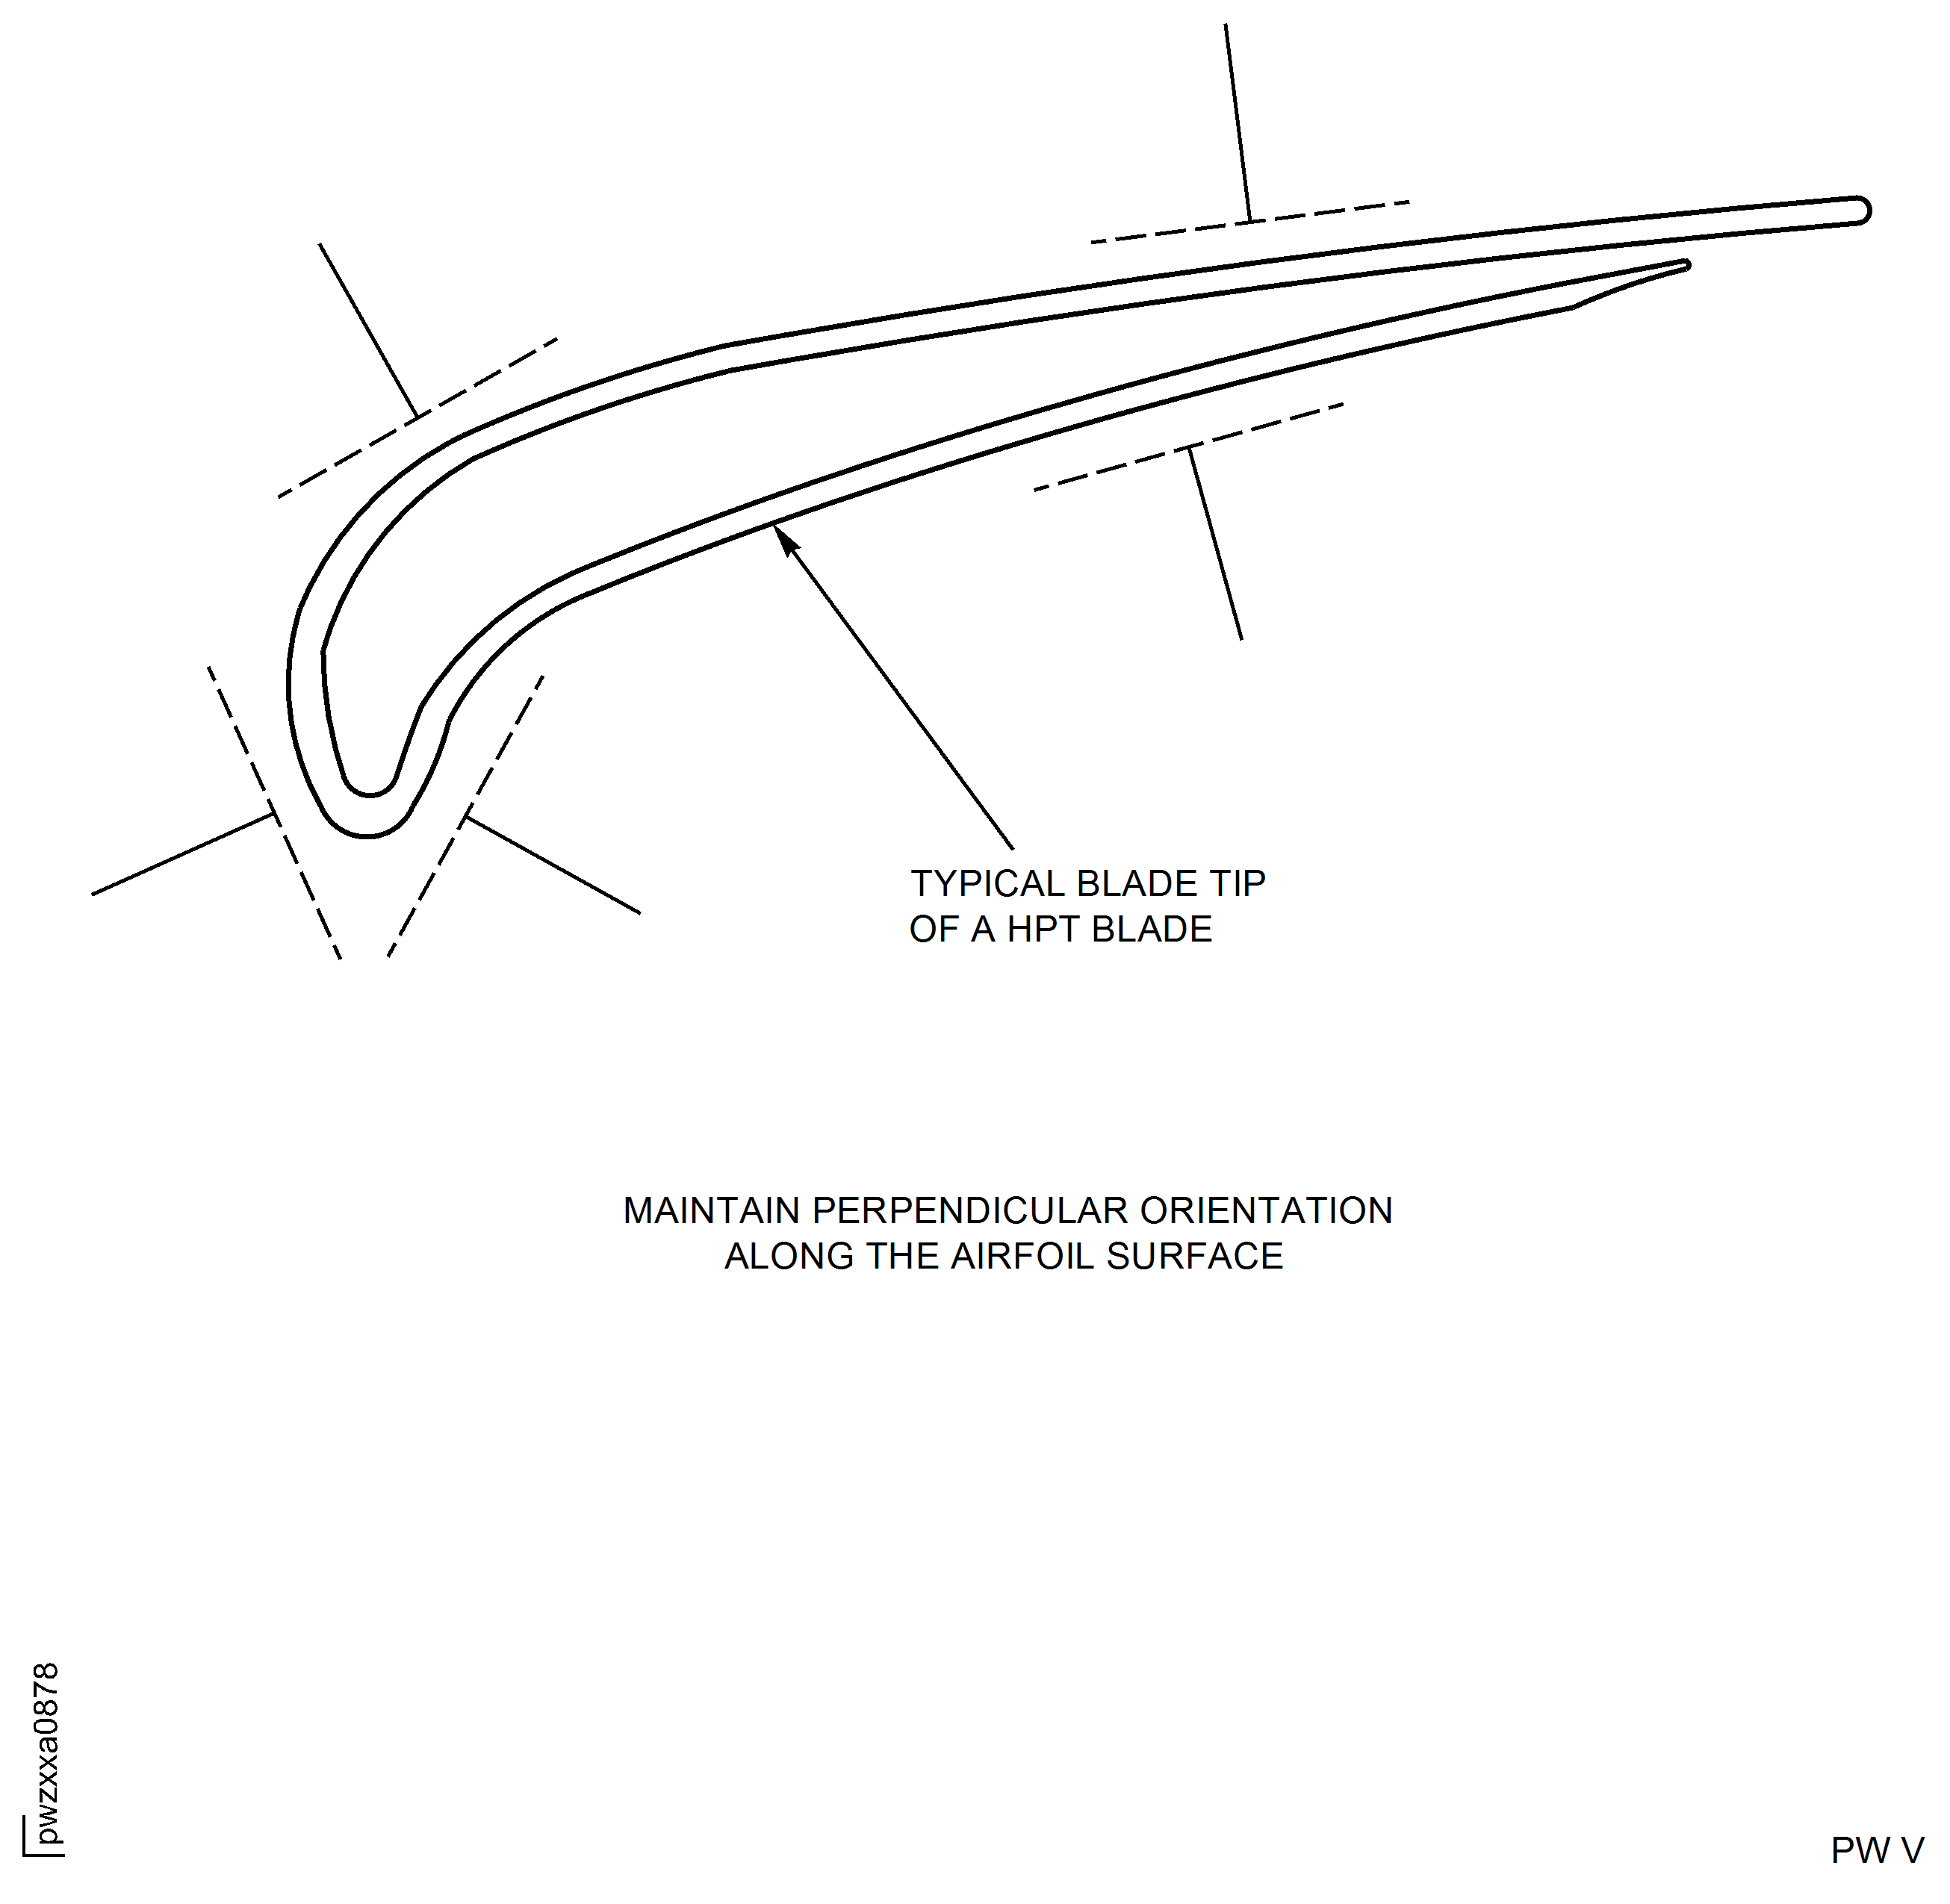
Magnetic Permeability Inspection
