Export Control
EAR Export Classification: Not subject to the EAR per 15 C.F.R. Chapter 1, Part 734.3(b)(3), except for the following Service Bulletins which are currently published as EAR Export Classification 9E991: SBE70-0992, SBE72-0483, SBE72-0580, SBE72-0588, SBE72-0640, SBE73-0209, SBE80-0024 and SBE80-0025.Copyright
© IAE International Aero Engines AG (2001, 2014 - 2021) The information contained in this document is the property of © IAE International Aero Engines AG and may not be copied or used for any purpose other than that for which it is supplied without the express written authority of © IAE International Aero Engines AG. (This does not preclude use by engine and aircraft operators for normal instructional, maintenance or overhaul purposes.).Applicability
All
Common Information
TASK 70-29-01-290-501 Inspection Of Ball And Roller Bearings
Equipment and Materials | ||
General | ||
Properties and Causes of Defects | ||
Material Fatigue | ||
Wear | ||
Corrosion Damage | ||
Plastic Deformation | ||
Visual Inspection and Identification of Defects to Anti-Friction Bearings | ||
Feel Test | ||
Dimensional Checks | ||
Bearing Corrosion Protection and Preparation for Storage After Cleaning or Inspection | ||
Table 1 Overhaul Limits | ||
Figures |
Preliminary Requirements
Pre-Conditions
NONESupport Equipment
| Name | Manufacturer | Part Number / Identification | Quantity | Remark |
|---|---|---|---|---|
| IAE 2J12621 Plug gage | 0AM53 | IAE 2J12621 | 1 off |
Consumables, Materials and Expendables
| Name | Manufacturer | Part Number / Identification | Quantity | Remark |
|---|---|---|---|---|
| CoMat 01-224 FLEXIBLE GREASE PROOFPAPER | 0AM53 | CoMat 01-224 | ||
| CoMat 01-233 BARRIER MATERIAL | 0AM53 | CoMat 01-233 | ||
| CoMat 02-069 DISPOSABLE CLEANING TISSUES | 33591 | CoMat 02-069 | ||
| CoMat 02-093 BARRIER MATERIAL | 76209 | CoMat 02-093 | ||
| CoMat 02-095 POLYETHYLENE PREFORMEDBAGS | LOCAL | CoMat 02-095 | ||
| CoMat 02-099 LINT-FREE CLOTH | LOCAL | CoMat 02-099 | ||
| CoMat 06-085 CORD, Nonwicking | 0H1N6 | CoMat 06-085 | ||
| CoMat 06-086 TIES | 18992 | CoMat 06-086 | ||
| CoMat 10-039 ENGINE OIL | LOCAL | CoMat 10-039 | ||
| CoMat 10-040 LUBRICANT (ENGINE OIL) | 0AM53 | CoMat 10-040 | ||
| CoMat 10-061 STODDARD SOLVENT | LOCAL | CoMat 10-061 | ||
| CoMat 10-125 LUBRICATING AND PRESERVATION OIL | LOCAL | CoMat 10-125 | ||
| CoMat 12-027C CORROSION PREVENTIVE COMPOUND | LOCAL | CoMat 12-027C |
Spares
NONESafety Requirements
NONEProcedure
Consumable materials.
Flexible greaseproof paper
Barrier material
Disposable cleaning tissues
Barrier material
Polyethylene bag
Lint free cloth
Cord
Ties
Lubricant (engine oil)
Lubricant (engine oil)
Stoddard solvent
Lubricating and preservation oil
Corrosion preventive compound
NOTE
To identify the consumable materials refer to the PCI.
SUBTASK 70-29-01-290-010 Equipment and Material
Bearing components.
The names given to the bearing components, shown in Figure have been agreed with the Anti-friction Bearing Manufacturers Association (AFBMA). Always use these names in all inspection reports.
Only use CoMat 02-099 LINT-FREE CLOTH or CoMat 02-069 DISPOSABLE CLEANING TISSUES to remove unwanted oil from bearings. Do not vapor degrease.
Obey all the precautions that follow:
Handling precautions.

CAUTION
YOU MUST WEAR CLEAN COTTON GLOVES WHEN YOU TOUCH BEARINGS.If the bearing has preservative grease on it, pressure flush the bearings with CoMat 10-125 LUBRICATING AND PRESERVATION OIL. The oil temperature must be 150 to 170 deg F (66 to 77 deg C) at a pressure of 15 to 25 psi (104 to 173 kPa). Continue to flush until all the preservative is removed. Replace the mineral oil when it is contaminated.

CAUTION
DO NOT USE PETROLEUM BASED OIL ON A BEARING WHICH WILL BE USED IN AN ENGINE THAT USES SYNTHETIC OIL IN THE LUBRICATING SYSTEM. THIS WILL PREVENT SLUDGE AND CONTAMINATION OF THE ENGINE OIL.Remove the lubricating and preservation oil with CoMat 10-061 STODDARD SOLVENT. If pressure flush is available, use 25 to 35 psi (173 to 242 kPa) for a minimum of one minute, then, immediately preserve the bearing. Refer to Step.
Unpack new bearings from the shipping container and remove the preservative as follows:
Unpacking new bearings.
NOTE
Do not remove the bands that hold the bearing together.New bearings need not be fully depreserved for an initial inspection of the ID and OD fits only. Preservative can be wiped from the ID and OD and applied again after inspection.When the use of a ball-end or radius-tip scriber is necessary lightly hold the scriber perpendicular to the base of the area. Only the weight of the scriber must be used on the surface.
Standard scribers can be made with AISI-01 or AISI-W1 (Grade 4) steel. The tolerance on the highly polished nose radii must be plus or minus 0.001in. (0.025 mm). The hardness must be Rockwell C55 to 60. Scriber kits can be purchased from some bearing suppliers.
SUBTASK 70-29-01-290-011 General
There are differences between the damage caused by material fatigue, wear, corrosion, plastic deformation, service conditions, incorrect installation or bad maintenance. Damage can be caused when anti-friction bearings do not turn freely. Damage can also be caused by unwanted materials, material defects and manufacturing defects. But these differences are not always clear.
A bearing with the correct load applied and correctly lubricated can become defective after a given time, because of material fatigue. A bearing with too much load applied will also become defective, but in a lesser time. The same theory also applies to wear. Some wear is usual and can be accepted for most bearings. Too much wear, which frequently occurs as a result of unwanted material in the bearing area, must be carefully monitored to prevent more damage.
SUBTASK 70-29-01-290-001 Properties and Causes of Defects
Material fatigue is not unusual and can occur in all anti-friction bearings. All bearings that turn, with a load applied, have a specified life. This life is related to the number of turns and the load applied. A bearing becomes unserviceable when its raceways and/or parts that turn become damaged, because of material fatigue. Fatigue damage usually starts as small cracks below the surface. As the load increases the cracks become larger until they get to the surface where the material becomes peeled.
Damage to the material continues as the peeled particles get into the bearing raceways which then becomes very hot. The condition of the bearing then becomes worse, it runs rough and makes a noise. If the bearing continues to run, all the components will become badly damaged. Raceways can then become ruptured because there is no internal radial clearance.
SUBTASK 70-29-01-290-002 Material Fatigue
Wear usually occurs when particles of unwanted material get into the bearing. Abrasive particles such as dust, sand or broken pieces of a seal can make the roller surfaces rough and give them a matt silver effect. When there is too much wear, the clearances become larger and the shape of the raceways change.
SUBTASK 70-29-01-290-003 Wear
When roller surfaces have corrosion damage, the bearing runs rough and makes a noise. The corrosion that comes off the roller parts is abrasive and causes wear. Corrosion not only starts when water, acid or alkaline solution gets in to the bearing, but also when acid lubricants are used. Condensation because of high humidity can also cause corrosion.
SUBTASK 70-29-01-290-004 Corrosion Damage
The raceways of anti-friction bearings can be found to have small irregular contours which usually look almost the same as the adjacent area. Usually they are only seen because of the light reflections caused by changes to the surface. Bearings with such damage usually run rough and make a noise. In general, there are two possible causes for such damage.
SUBTASK 70-29-01-290-005 Plastic Deformation
Definition and description - Failure of the rolling surfaces that touch. Usually irregular, sharp edged, deep holes with edge conditions that show the hole will get larger.
Cause - Fatigue of the rolling surfaces that touch. This condition can also be caused by inclusions (not metal) below the surface.
Overhaul limits - Reject.

CAUTION
ALWAYS MAKE SURE THAT THE SYMPTOMS ARE CORRECT BECAUSE FATIGUE AND PITTED SYMPTOMS ARE ALMOST THE SAME. INITIAL FATIGUE SYMPTOMS HAVE AN IRREGULAR SHAPE, WHILE PITTED SYMPTOMS USUALLY HAVE A CIRCULAR SHAPE.Fatigue break-up (or spalling), refer to Figure.
Definition and description - Too much slipping between balls or rollers and raceways. Skidding is seen on rollers as a burnished or frosted ring around the rollers and/or raceways. On ball bearings it is seen as a speckled pattern or a burnished or frosted ring on the balls and as burnished, irregular frosted or smeared areas on the inner race. Heavy cage pocket wear is frequently a symptom of skidding.
Cause - Incorrect lubrication and/or light or no load between the balls or rollers and the raceway.
Overhaul limits - Reject.
Skidding, refer to Figure.
Definition and description - Smooth shallow dents on balls, rollers or raceways that usually look shiny at the bottom of the dent. The contour of the dent in the raceway is the same as the ball or roller radius.
Cause - Heavy shock load or too much static loads which makes impressions of the balls or rollers in the bearing race. True brinelling occurs when there is no movement of the bearing.
Overhaul limits - True brinelling is acceptable if it can not be felt with the specified scriber for the applicable diameter bearing. If it can be felt it must not be more than the limits given in Figure.
True Brinelling, refer to Figure.
Definition and description - Surface marks on balls, rollers or raceways that usually look polished or have a satin finish. These marks will be seen as lines on the raceway at each roller position or as dots at each ball position. Because false brinelling is a type of fretting corrosion, red iron oxide can be found where false brinelling has occurred.
Cause - Continuous vibrations when the bearing is topped which make ball or roller marks on the raceway surfaces. False brinelling only occurs when the engine is stopped and frequently results from vibration when the engine is being moved.
Overhaul limits - False brinelling is acceptable on functional and non-functional surfaces.
False Brinelling, refer to Figure.
Definition and description - A linear opening which can cause the material to break.
Cause - Too much stress because of sudden loads that are too large, extension of a nick or scratch or from too much heat.
Overhaul limits - Reject.
Cracked, refer to Figure.
Definition and description - A sequence of small light scratches usually found on the ball, roller or raceway surfaces.
Cause - The surfaces that touch, slide with unwanted material between them or a local failure of the lubricant film.
Overhaul limits - Scuffing on balls, rollers and raceway surfaces is acceptable if it can not be felt with the specified scriber for the applicable diameter bearing, refer to Step Table 1.
Scuffing, refer to Figure.
Definition and description - Roller bearings: A line of dots on rollers and raceway with signs of material transfer and local heat discoloration. Ball bearings: A dot on the ball and the raceway where they touch with signs of material transfer and local heat discoloration.
Cause - Heavy electrical discharge through the parts of a bearing.
Overahul limits - Reject.
Heavy electrical discharge, refer to Figure.
Definition and description - Color change of bearing surfaces that range from light straw (low temperature) to purple (high temperature). Bearings from the hot section of the engine will usually show some color change.
Cause - Bearing surfaces that are in a hot air environment, that do not have sufficient lubrication, are a tight fit or have heat transferred from other components.
Overhaul limits - Heat color change is acceptable unless the surfaces show unsatisfactory colors (dark blue to purple). If it is possible that the bearing hardness is not correct a hardness check must be done on non-functional surfaces. Use a Rockwell A tester so you do not go into the hardened surface.
High temperature color change, Refer to Figure.
Definition and description - Wear on the roller ends and guide faces that range from circles of light scratches to very bad scoring and galling.
Cause - The inner or outer raceway is not square or not correctly aligned, rollers not balanced or cage pockets too large. It can also be caused by axial loads on the bearing.
Overhaul limits - Wear is acceptable unless there is a step of 0.0005in. (0.0127 mm) or more, rough sharp edges or eccentric burnishing of the roller end faces.
Worn roller ends and guide faces, refer to Figure.
Definition and description - Small holes, of irregular shape, in a surface from which material has been removed.
Cause - Corrosion, chemical or electrolytic damage, oxidation and/or mechanical damage such as chipping or grain breakout or removal of imbedded particles.
Overhaul limits.
Functional surfaces - Pits are acceptable if they can not be felt with the specified scriber for the applicable diameter bearing or are not more than the maximum dimension given in Figure. Groups of pits are acceptable if three or more pits in a given circular area can not be felt with the specified scriber for the applicable diameter bearing. If it can be felt it must not be more than the maximum dimension given in Figure.
Pits are acceptable if they do not extend on to a functional surface and are not larger than 0.062in. (1.588 mm) across the largest dimension.
Groups of pits are acceptable if three or more pits are in a 0.250in. (6.35 mm) diameter circle and each is no larger than 0.031in. (0.794 mm) across the largest dimension.
Bearings with bores of 5.9055in. (150 mm) or smaller:
Pits are acceptable if they do not extend on to a functional surface and are not larger than 0.125in. (3.175 mm) across the largest dimension.
Groups of pits are acceptable if three or more pits are in a 0.50 in. (1.27 mm) diameter circle and each is no larger than 0.062 in. (1.588 mm) across the largest dimension.
Bearings with bores of more than 5.9055in. (150 mm):
Non-functional surfaces (not corner radii or chamfers that connect two non-functional surfaces) -.
Pits are acceptable if they do not extend onto a functional surface and are no larger than 0.062 in. (1.588 mm) across the largest dimension or if there are no more than seven which are from 0.062 in. (1.588 mm) to 0.125 in. (3.175 mm) across the largest dimension.
Groups of pits are acceptable if three or more pits are in a 0.250 in. (6.35 mm) diameter circle and each is no larger than 0.031 in. (0.794 mm) across the largest dimension.
Bearings with bores of 5.9055in. (150 mm) or smaller:
Pits are acceptable if they do not extend onto a functional surface and are no larger than 0.125 in. (3.175 mm) across the largest dimension or if there are no more than seven which are from 0.125 in. (3.175 mm) to 0.187 in. (4.763 mm) across the largest dimension.
Groups of pits are acceptable if three or more pits are in a 0.50 in. (12.7 mm) diameter circle and each is no larger than 0.062 in. (1.588 mm) across the largest dimension.
Bearings with bores of more than 5.9055 in. (150 mm):
Corner radii and chamfers that connect non-functional surfaces -.
Pitted, refer to Figure.
Definition and description - Small irregular dents in the raceways, balls or rollers that can possibly be seen as a pattern.
Cause - Unwanted material such as sand, metal chips or abrasive media in the bearing. The unwanted material can be the result of bad maintenance or a problem in the engine which causes loose material to get in to the bearing.
Overhaul limits - The damage caused by unwanted material is acceptable if the marks can not be felt by the specified scriber for the applicable diameter bearing. If it can be felt it must not be more than the maximum dimension given in Figure.
Marks caused by unwanted materials, refer to Figure.
Definition and description - Narrow, shallow abrasions in the surface of bearing components.
Cause - Movement of a sharp object or particle across a surface.
Overhaul limits.
Scratches on balls are acceptable if they cannot be felt with the specified scriber for the applicable diameter bearing or, if felt, single scratches do not extend more than halfway around the surface, or if multiple scratches do not cross or extend more than one quarter way around the surface or the maximum scratch width is not more than 0.010in. (0.254 mm).
Scratches on rollers are acceptable if they cannot be felt with the specified scriber for the applicable diameter bearing or, if felt, single scratches do not extend more than halfway around the circumference, or if multiple scratches do not cross or extend more than one quarter way around the circumference or the maximum scratch width is not more than 0.010in. (0.254 mm).
Scratches on ball or roller raceways are acceptable if they can not be felt with the specified scriber for the applicable diameter bearing or, if felt, the maximum length of each circumferential scratch is less than 0.50in. (12.7 mm) and each transverse scratch is less than one half the width of the raceway, the maximum scratch width is 0.010in. (0.254 mm) or the scratches do not cross.
Functional surfaces.
Scratches, refer to Figure.
Definition and description - Deep scratches found on the ball, roller and raceway surfaces. Scores can also occur on bearing ID and OD surfaces. It will frequently be seen as parallel or concentric scratches on these surfaces.
Cause - Unwanted material between the surfaces that touch, continued movement of balls or rollers on a surface with sharp edges or incorrect installation.
Overhaul limits.
Functional surfaces: Scores are acceptable if they can not be felt with the specified scriber for the applicable diameter bearing, refer to Step Table 1.
Scored, refer to Figure.
Definition and description - Dents: shallow smooth indentations. Nicks: sharp, clearly defined cuts. On functional surfaces there will frequently be a shiny area around the indentation. On non-functional surfaces there will be an edge of lifted material.
Cause - Unwanted material has got between the balls or rollers. Or they have been hit by a hard, sharp object.
Overhaul limits.
Functional surfaces: Nicks and dents are acceptable if they can not be felt with the specified scriber for the applicable bearing diameter. If they can be felt they must not be more than the dimension given in Figure.
Non-functional surfaces: Nicks and dents are acceptable if they do not extend on to a functional surface or are not more than the maximums given in Figure. The high material around nicks or dents can be stoned level with the surface.
Definition and description - The surface area is broken, pitted or discolored with groups of shallow small pits. The surface will usually show an orange peel effect.
Cause - Bad bearing protection during handling or storage or failure of lubrication which causes chemical action or, in humid conditions, condensation.
Overhaul limits.
Corrosion on functional surfaces is acceptable if it can not be felt with the specified scriber for the applicable bearing diameter, refer to Step Table 1.
Corrosion, refer to Figure.
Definition and description - Surface oxidation between parts that are a close fit, more frequently on bearing raceways and mounting surfaces. It can range from black to a shiny effect.
Cause - Small related movement between surfaces.
Overhaul limits - Fretting of non-functional surfaces is acceptable. Fretting can be removed by light polishing.
Fretting, refer to Figure.
Definition and description - A more severe type of fretting where material moves between surfaces.
Cause - Relative movement between two surfaces that are not lubricated and have a load on them.
Overhaul limits.
Galling, refer to Figure.
Definition and description - A surface discoloration, that is not dangerous, that ranges from light brown to black which can occur as stripes or patches. The surface will be smooth and not broken.
Cause - Corrosive attack or failure of the lubricant because of high temperature.
Overhaul limits - Staining or varnishing is acceptable on all surfaces.
Definition and description - Peeled particles of the surface layer in thin irregular pieces.
Cause - Very high temperatures or loads, lubrication is not sufficient or defects below the surface of the material.
Overhaul limits - Peeling on functional surfaces is cause for rejection.
Peeling, refer to Figure.
Definition and description.
The load path witness mark for the inner race will usually be on one side and not near the shoulder. There will usually be no well defined load path on the half of the inner race that has no load. The load path witness mark for the outer race will be near the center in the direction of the applied load. Inner and outer paths must be a constant distance from the shoulder through 360 degrees.
Ball bearings.
NOTE
The center of the bedding band must not wander from side to side (i.e. axially) around the track.On the outer race the bedding band (load path) witness mark will usually be a constant circumferential path and not on either edge. The path must be a constant distance from the shoulder through 360 degrees. The inner race will show a light bedding band (load path) which may be indistinct.
Non or Lightly Loaded Roller bearings.
The bedding band (load path) on the outer race will not necessarily be constant, but may vary in width and intensity around the track. But, intensity of the bedding band (load path) must be constant across its width.
The inner race bedding band (load path) will be the same as for a non or lightly loaded roller bearing but more distinct.
Cause - The continuous movement of the balls or rollers, that have a load on them, on the raceway surface.
Loaded roller bearings.
Load path indications.
Definition and description - Seen as different wear patterns, refer to paragraph W.
Cause - Movement of the cages on the land-riding area.
Overhaul limits - Any rub pattern which extends across an arc of more than 30 degrees is acceptable, if the edge cannot be felt with a 0.030 in. (0.762 mm) radius scriber.
Cage defects - Rubbing and local wear.
Definitions and description - Cage defects , see (1) thru (7).
Cause - The bearing is not aligned, the cage is not correctly balanced or there is not sufficient lubrication. Nicks and dents can occur from bad handling.
Overhaul limits - Damage or wear as given is cause for rejection.
Cage defects - Damage and wear.
SUBTASK 70-29-01-290-006 Visual Inspection and Identification of Defects to Anti-Friction Bearings
Clean the bearing before inspection, refer to the SPM TASK 70-11-22-300-503 or TASK 70-11-17-300-503.

CAUTION
DO NOT SPIN THE BEARING WITHOUT A LOAD APPLIED. THIS CAN CAUSE THE BALLS OR ROLLERS TO GROUP TOGETHER AND NOT MOVE FREELY IN THE CAGE. THIS WILL GIVE AN INCORRECT INDICATION OF ROUGH RUNNING.Make sure the bearing is clean and lubricated. Apply a light axial force to the outer race and turn it slowly by hand, while you hold the inner race to make sure the raceway and the balls or rollers touch. Turn the bearing the opposite way up and do the inspection again. Any rough bearings must be cleaned and examined again. Reject the bearing if it still feels rough after inspection.
SUBTASK 70-29-01-290-007 Feel Test
Push the outer race against and away from the dial gage. The total movement of the dial gage is the internal radial clearance. To make allowances for eccentricity of the inner ring this check must be done at more than one radial location and take an average result. This procedure is accurate to 0.0005 in. (0.0127 mm) and must be considered before you reject a bearing.
NOTE
This check is also applicable to both details of a duplex bearing.Measure the radial clearance as follows:
Measure the radial clearance, refer to Figure.
Apply a thin layer of CoMat 10-125 LUBRICATING AND PRESERVATION OIL to the load bearing elements of the bearing. See Figure.
Place graduated adapter ring (determined from Table of Bearing Limits) over outer ring of bearing as shown in Figure.
Use any one of the approved temporary marking methods and combination square with center head to scribe a line on rear face of ball cage opposite zero mark on graduate ring. See Figure. Refer to the SPM TASK 70-09-01-400-501 for temporary marking of parts.
Place gage (Figure) over inner ring of bearing. Align gage pointer with zero degree position on graduated ring and scribe mark on cage.
Place weight (Figure) on top of gage.
Aligning pointer of gage with zero mark of graduated ring and previously applied mark on cage, rotate weight clockwise exactly ten revolutions. See Figure.
NOTE
The direction of the inner ring thrust loading can be determined from the Table of Bearing Limits. The rear ring of a forward loaded bearing is the loaded ring.Measure the contact angle of a single-row ball bearing with a split inner ring, as follows:
Ball bearing contact angle.
Install the correct bearing IAE 2J12621 Plug gage inspection plug gage on to the holding plate.
To measure the diameter below the rollers, the rollers are pushed against the outer raceway.
Measure the diameter below the rollers, refer to Figure.
NOTE
When the outer diameter 'D' is examined for differences in dimensions and shape, the reject limits do not apply for distances of less than 2r (When r is the corner radius), from the side faces of the race.Measure the outer diameter, refer to Figure, Detail A.
Measure the inner race outer diameter of roller bearings that come apart, refer to Figure, Detail B.
NOTE
When the bore diameter 'd' is examined for differences in dimensions and shape, the reject limits do not apply for distances of less than 2r (Where r is the corner radius), from the side faces of the race.Measure the bore diameter (ID), refer to Figure, Detail C.
Measure the cage guide clearance, refer to Figure, Detail A.
Bearing Bore: Plus or minus 0.0001 in. (0.0025 mm) beyond limit.
Bearing OD: Plus or minus 0.0001 in. (0.0025 mm) beyond limit.
Contact Angle: Plus or minus 0.5 degree beyond limit.
Internal Radial Clearance: Plus or minus 0.0003 in. (0.0076 mm) beyond limit.

CAUTION
THE FOLLOWING LIMITS APPLY IF FITS WITH THE MATING SHAFTS OR HOUSINGS ARE NOT EXCEEDED. ANY INDICATION OF A SPUN RACE OR INDICATIONS OF HOT RUNNING WOULD NEGATE THESE LIMITS.These service limits are for main bearing inspection at the overhaul level and are beyond the basic limits shown in the Table of Limits in the Engine Manual.
Bearing Bore: Plus or minus 0.0003 in. (0.0076 mm) beyond limit.
Bearing OD: Plus or minus 0.0003 in. (0.0076 mm) beyond limit.
Internal Radial Clearance: Plus or minus 0.0003 in. (0.0076 mm) beyond limit.

CAUTION
THE FOLLOWING LIMITS APPLY IF FITS WITH THE MATING SHAFTS OR HOUSINGS ARE NOT EXCEEDED. ANY INDICATION OF A SPUN RACE OR INDICATIONS OF HOT RUNNING WOULD NEGATE THESE LIMITS.These service limits are for accessory bearing inspection at the overhaul level and are beyond the basic limits shown in the Table of Limits in the Engine Manual.
Measure the axial free movement, refer to Figure, Detail B.
SUBTASK 70-29-01-290-008 Dimensional Checks
For preservation of bearing after cleaning or inspection refer to TASK 70-53-01-620-501, SUBTASK 70-53-01-620-002.
SUBTASK 70-29-01-290-009 Bearing Corrosion Protection and Preparation for Storage After Cleaning or Inspection
Figure: The names of the bearing components
The names of the bearing components
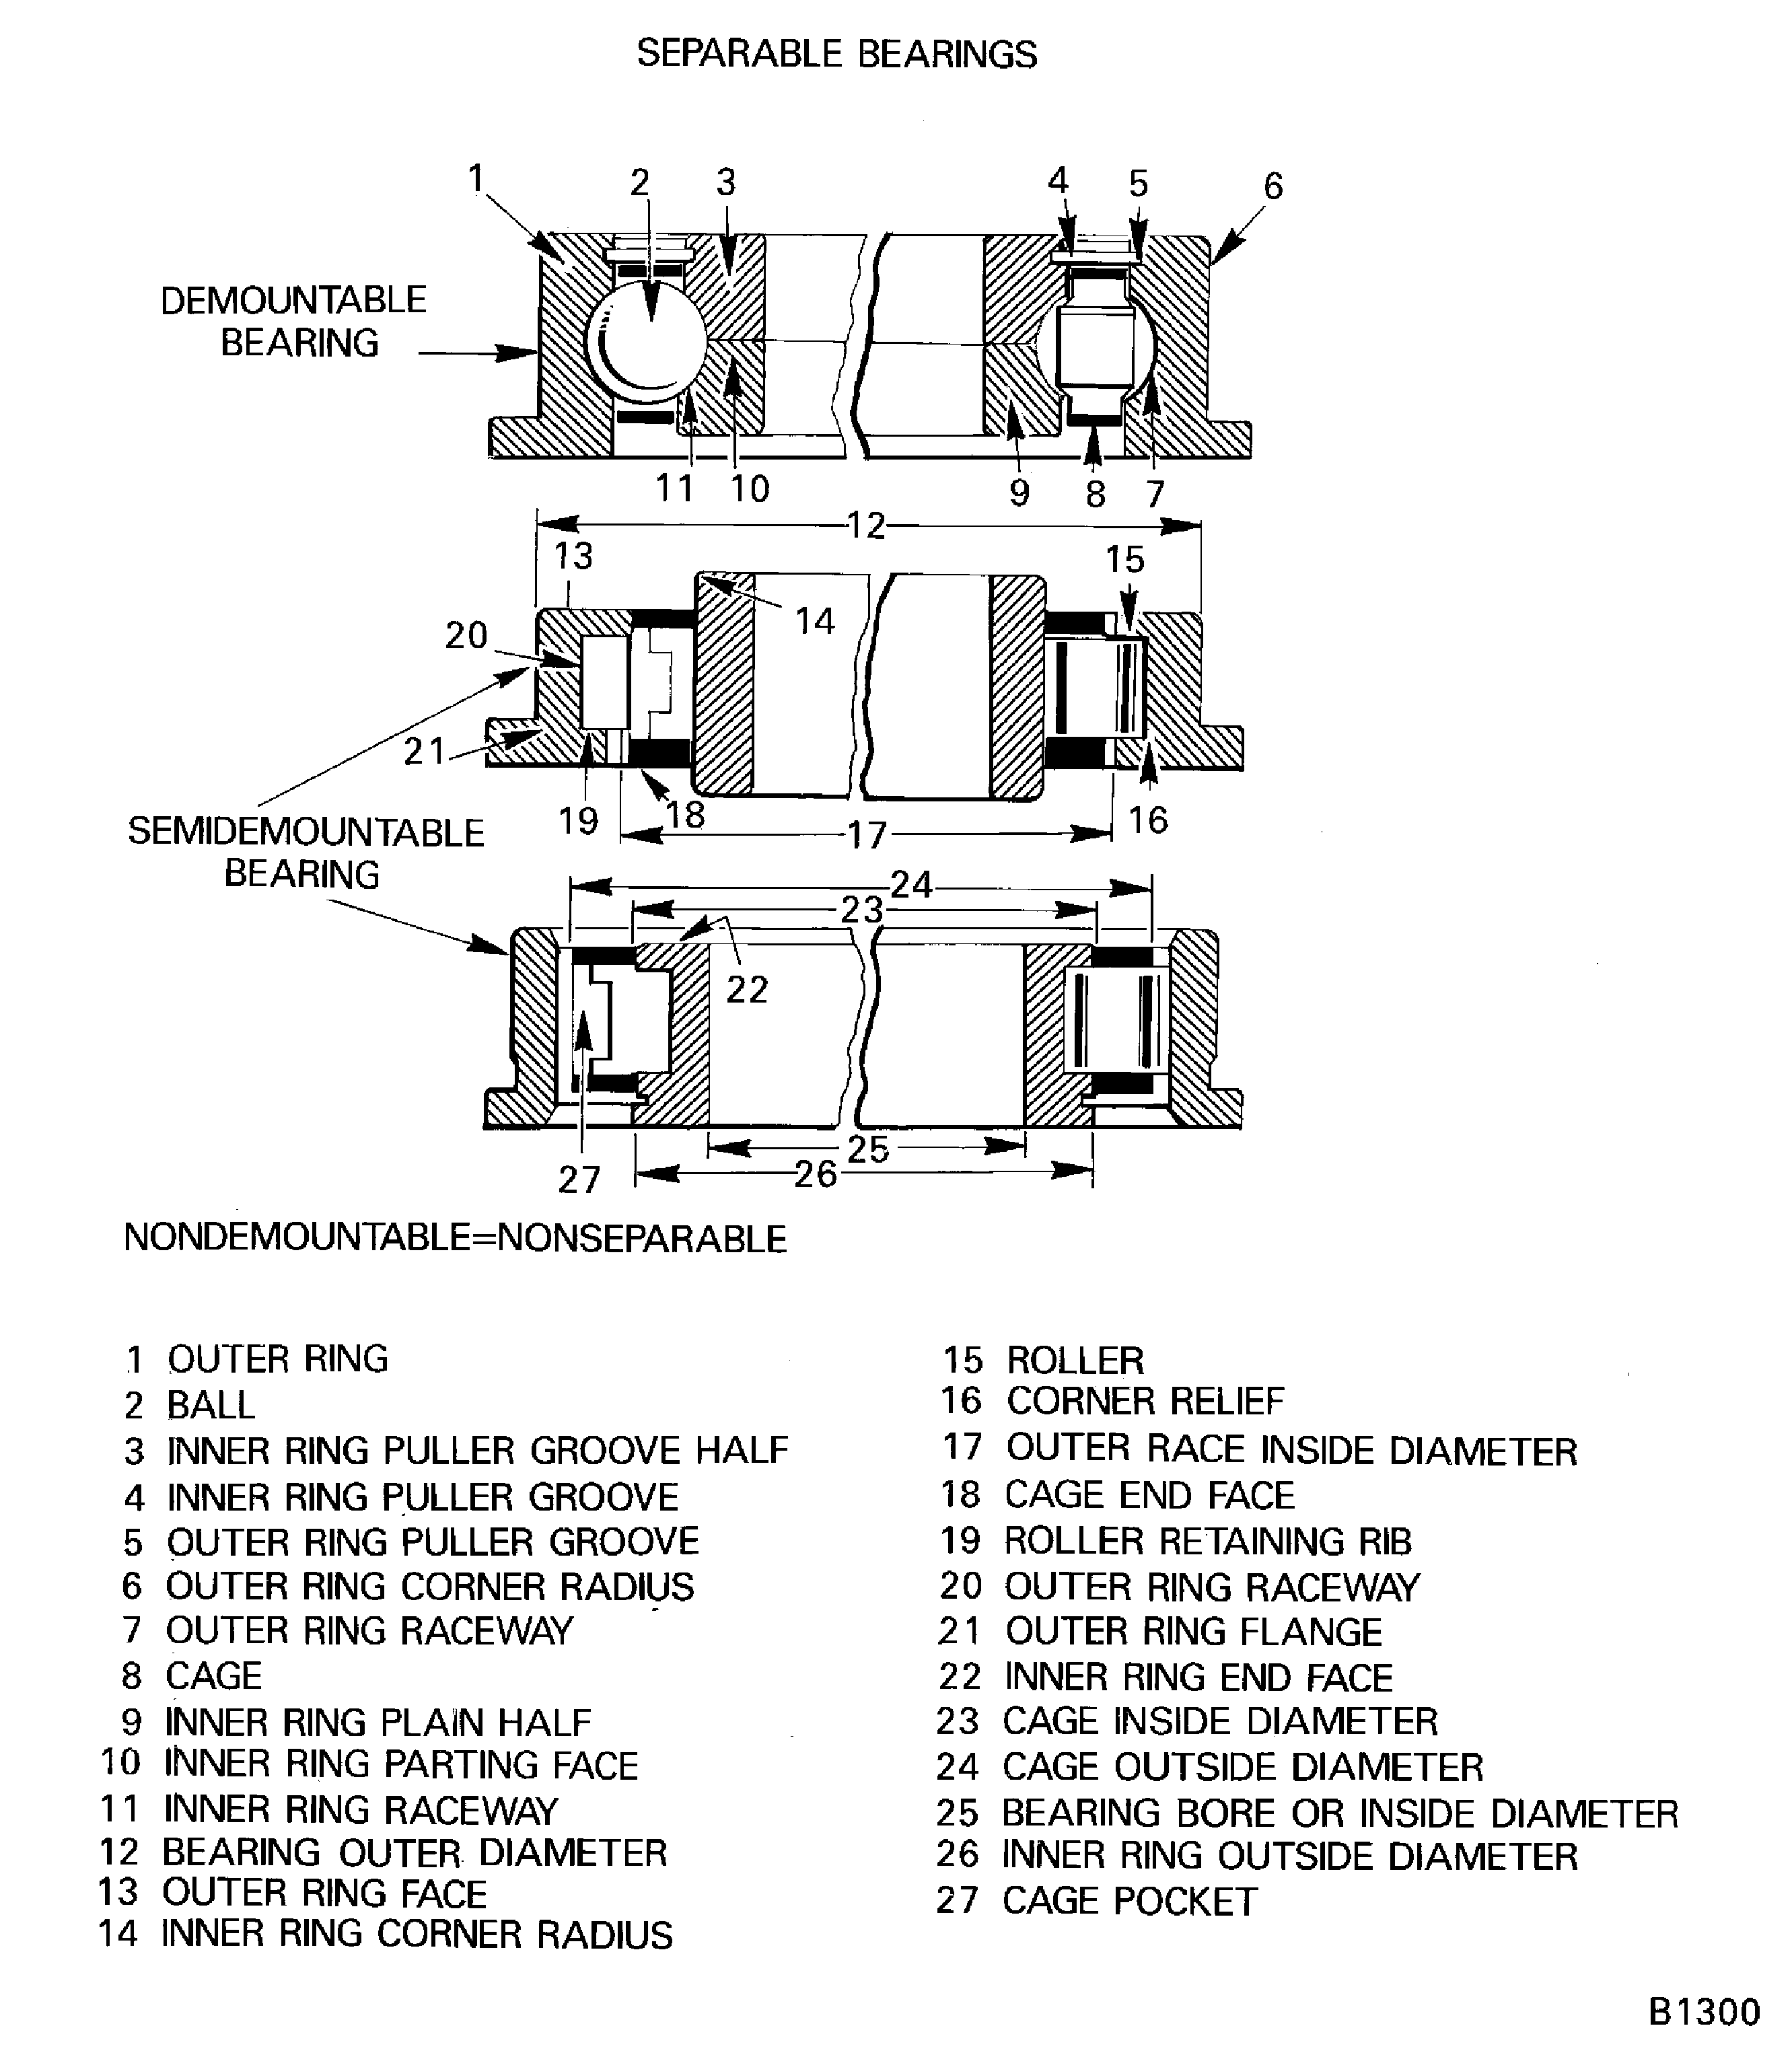
Figure: Examples of fatigue break-up (Spalled)
Examples of fatigue break-up (Spalled)
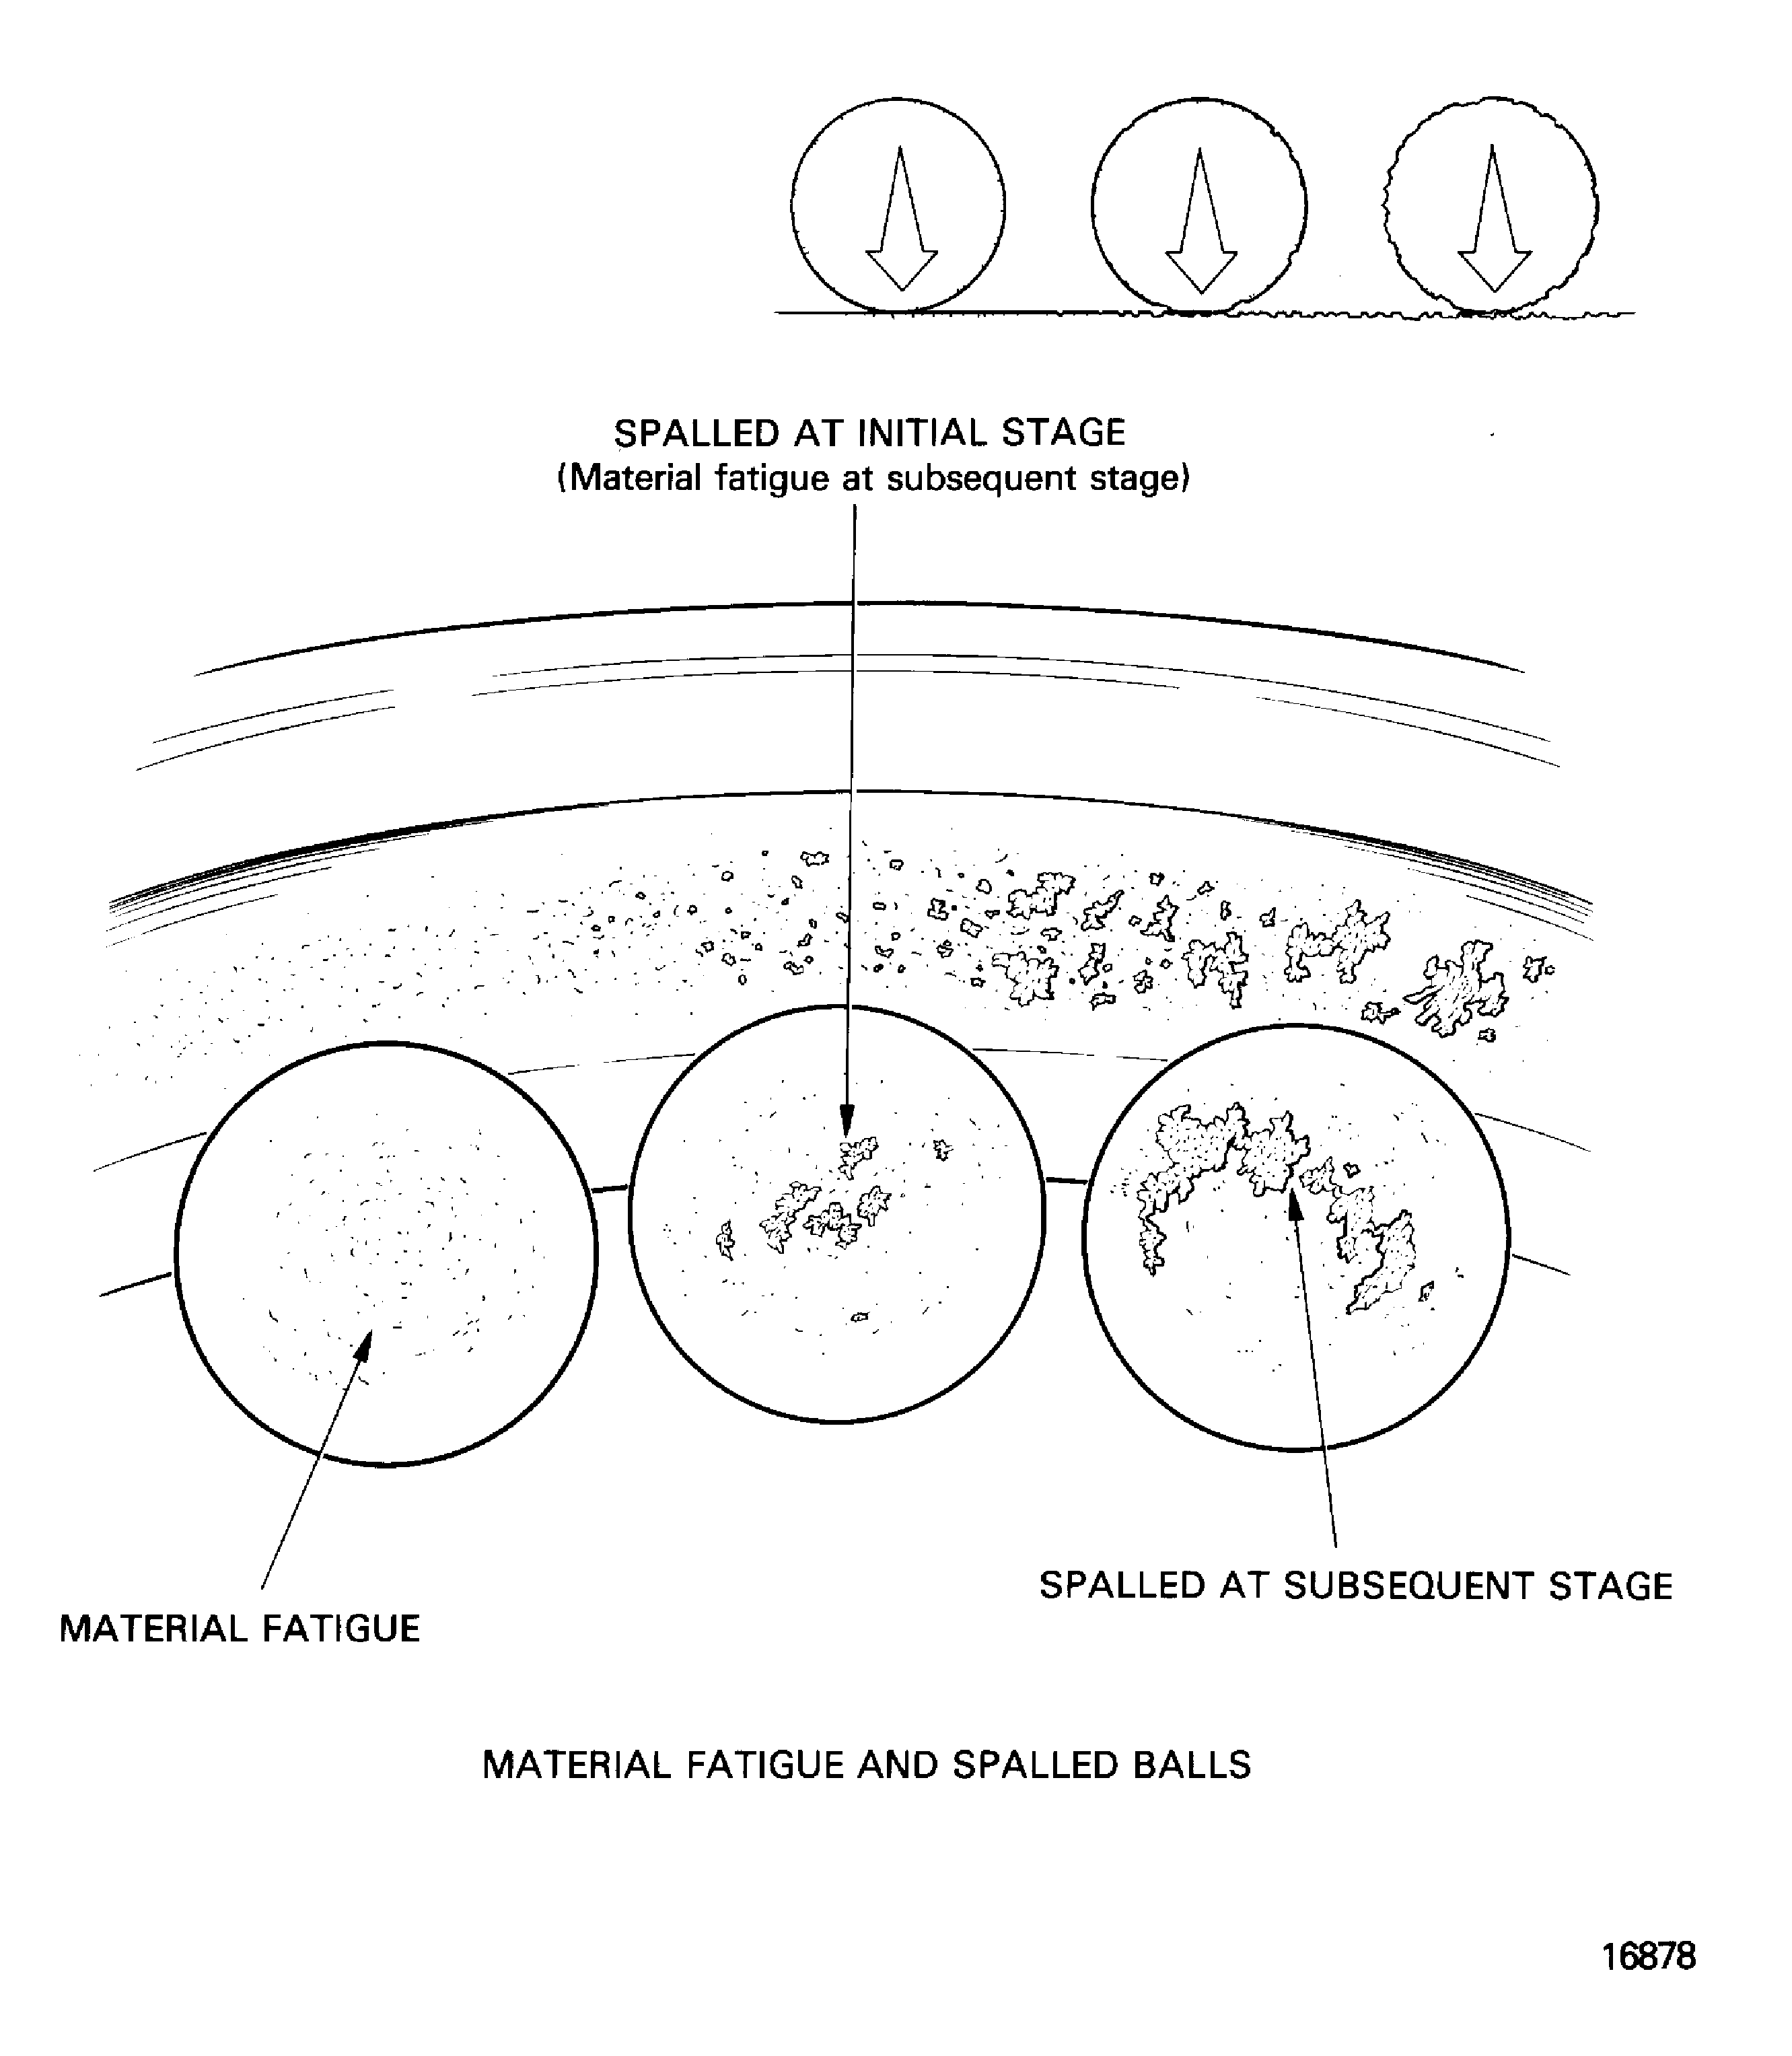
Figure: Examples of skidding
Examples of skidding
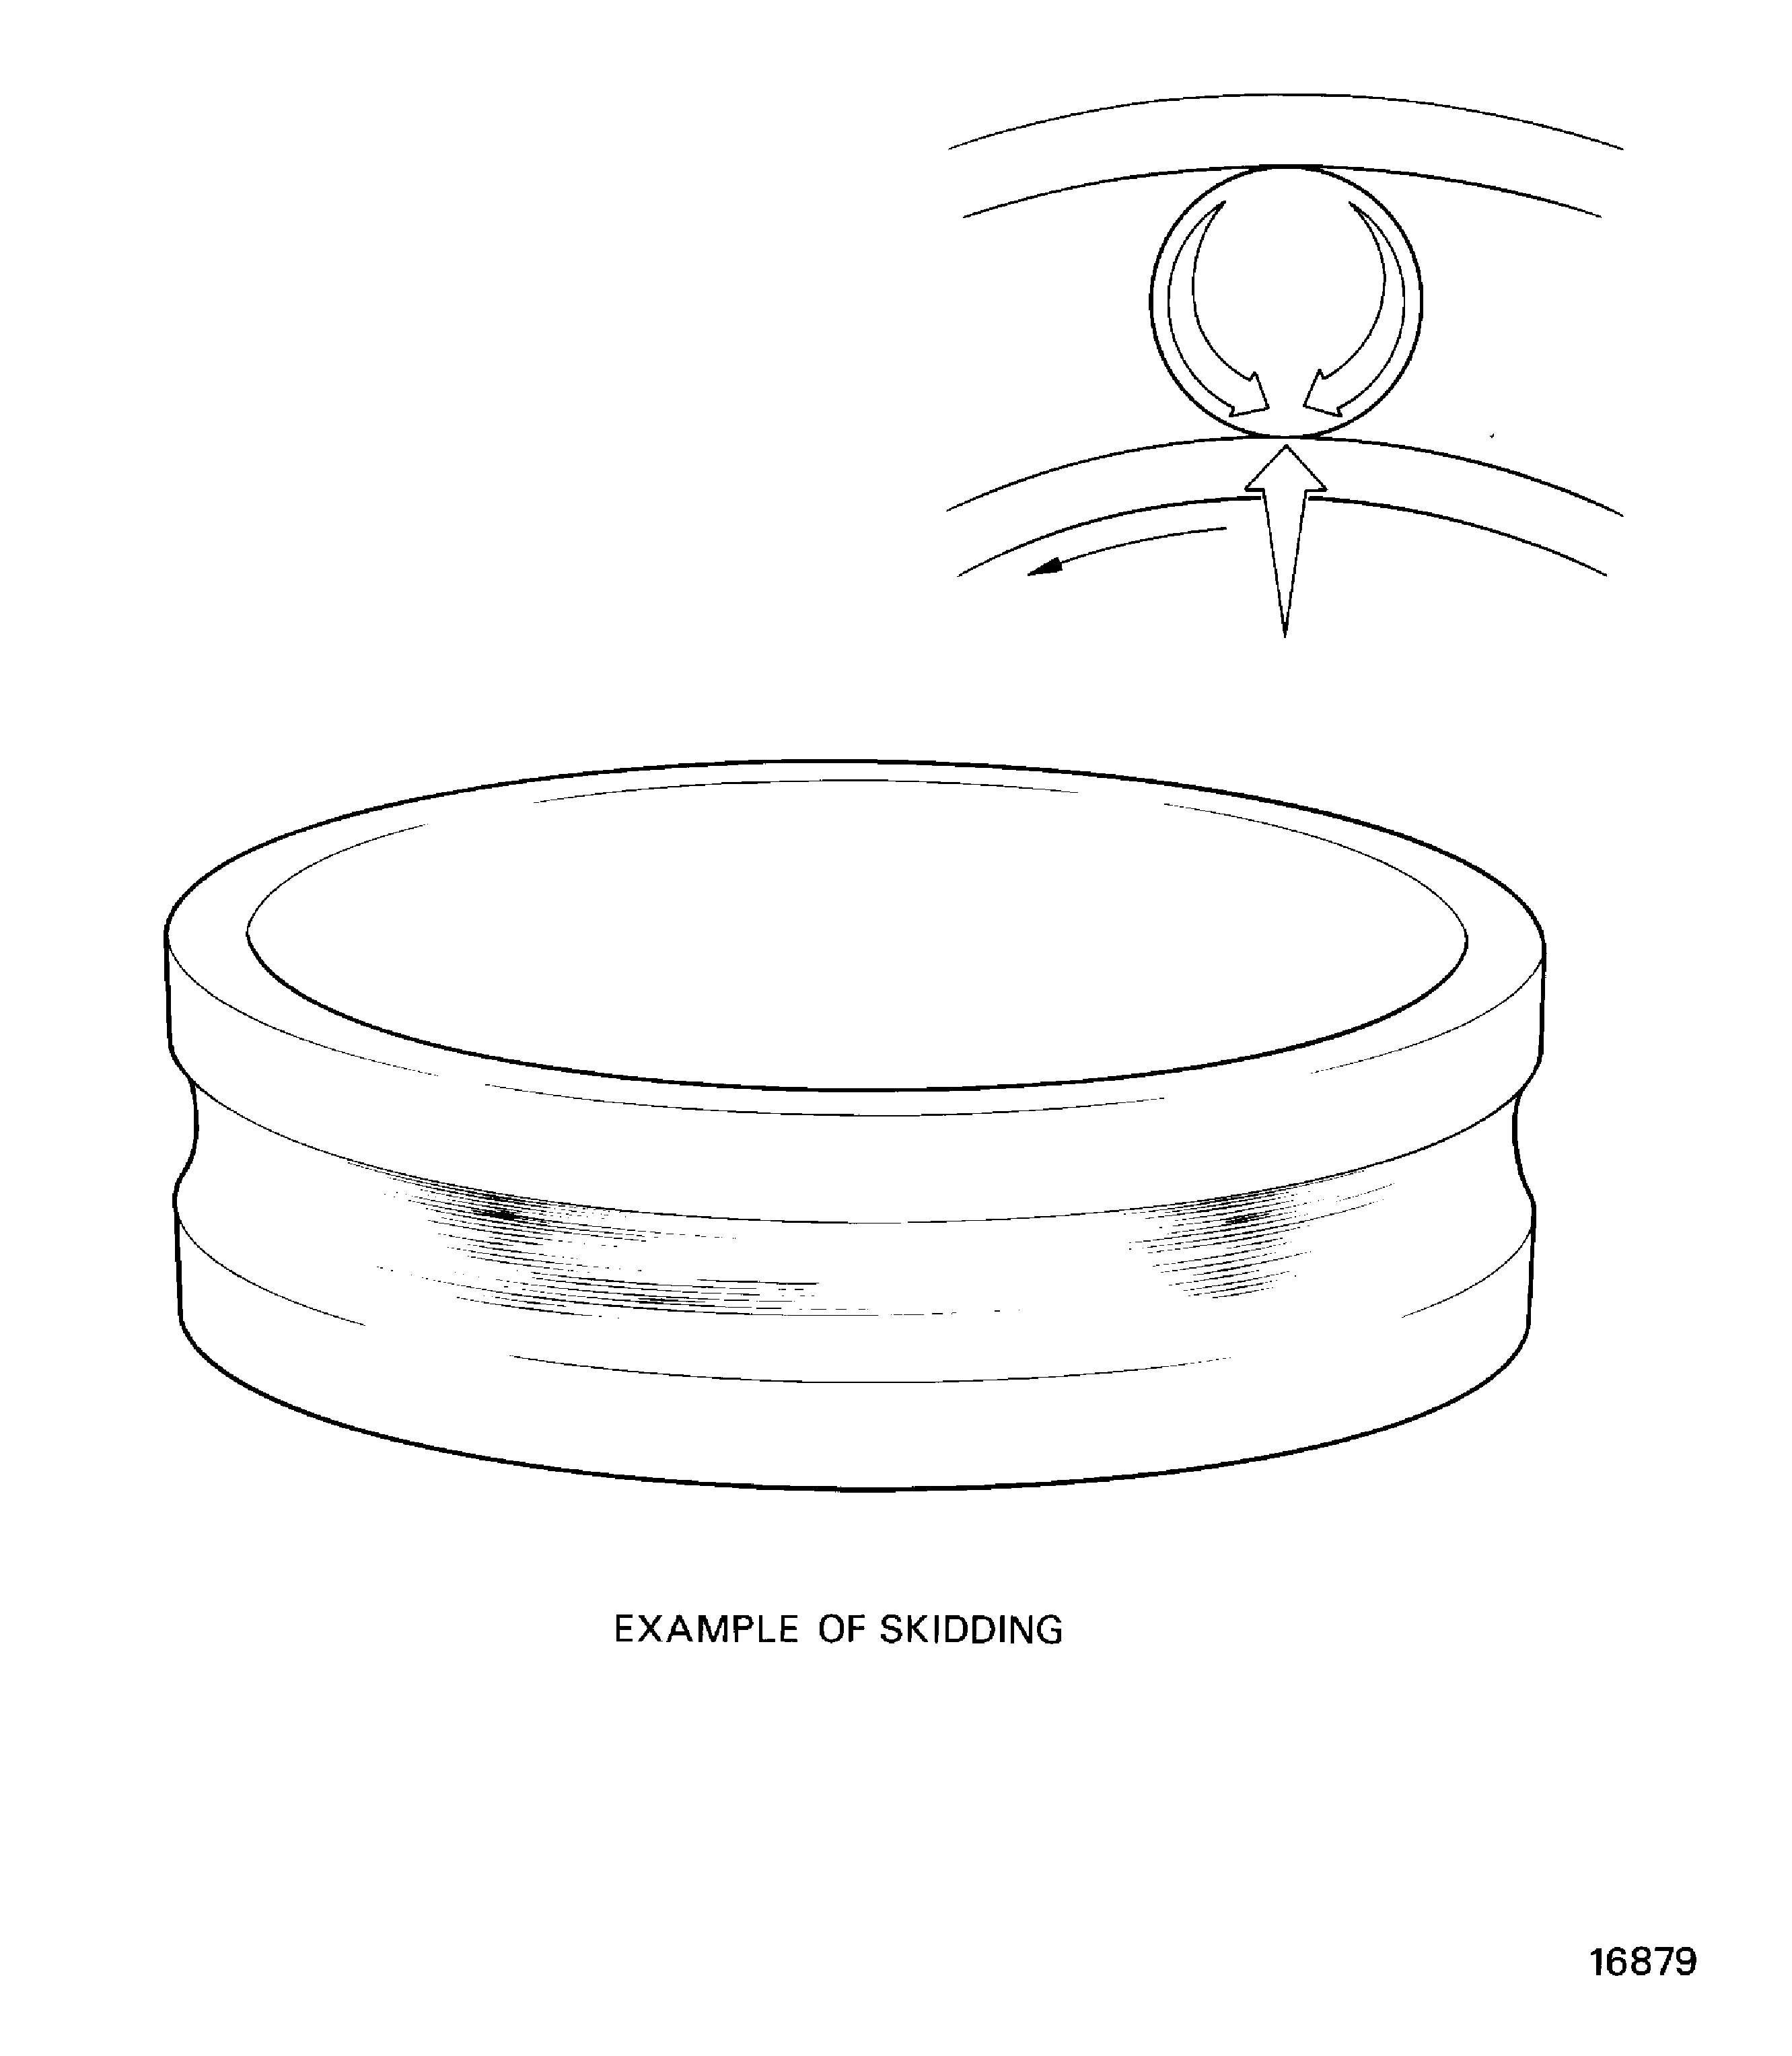
Figure: True brinelling
True brinelling
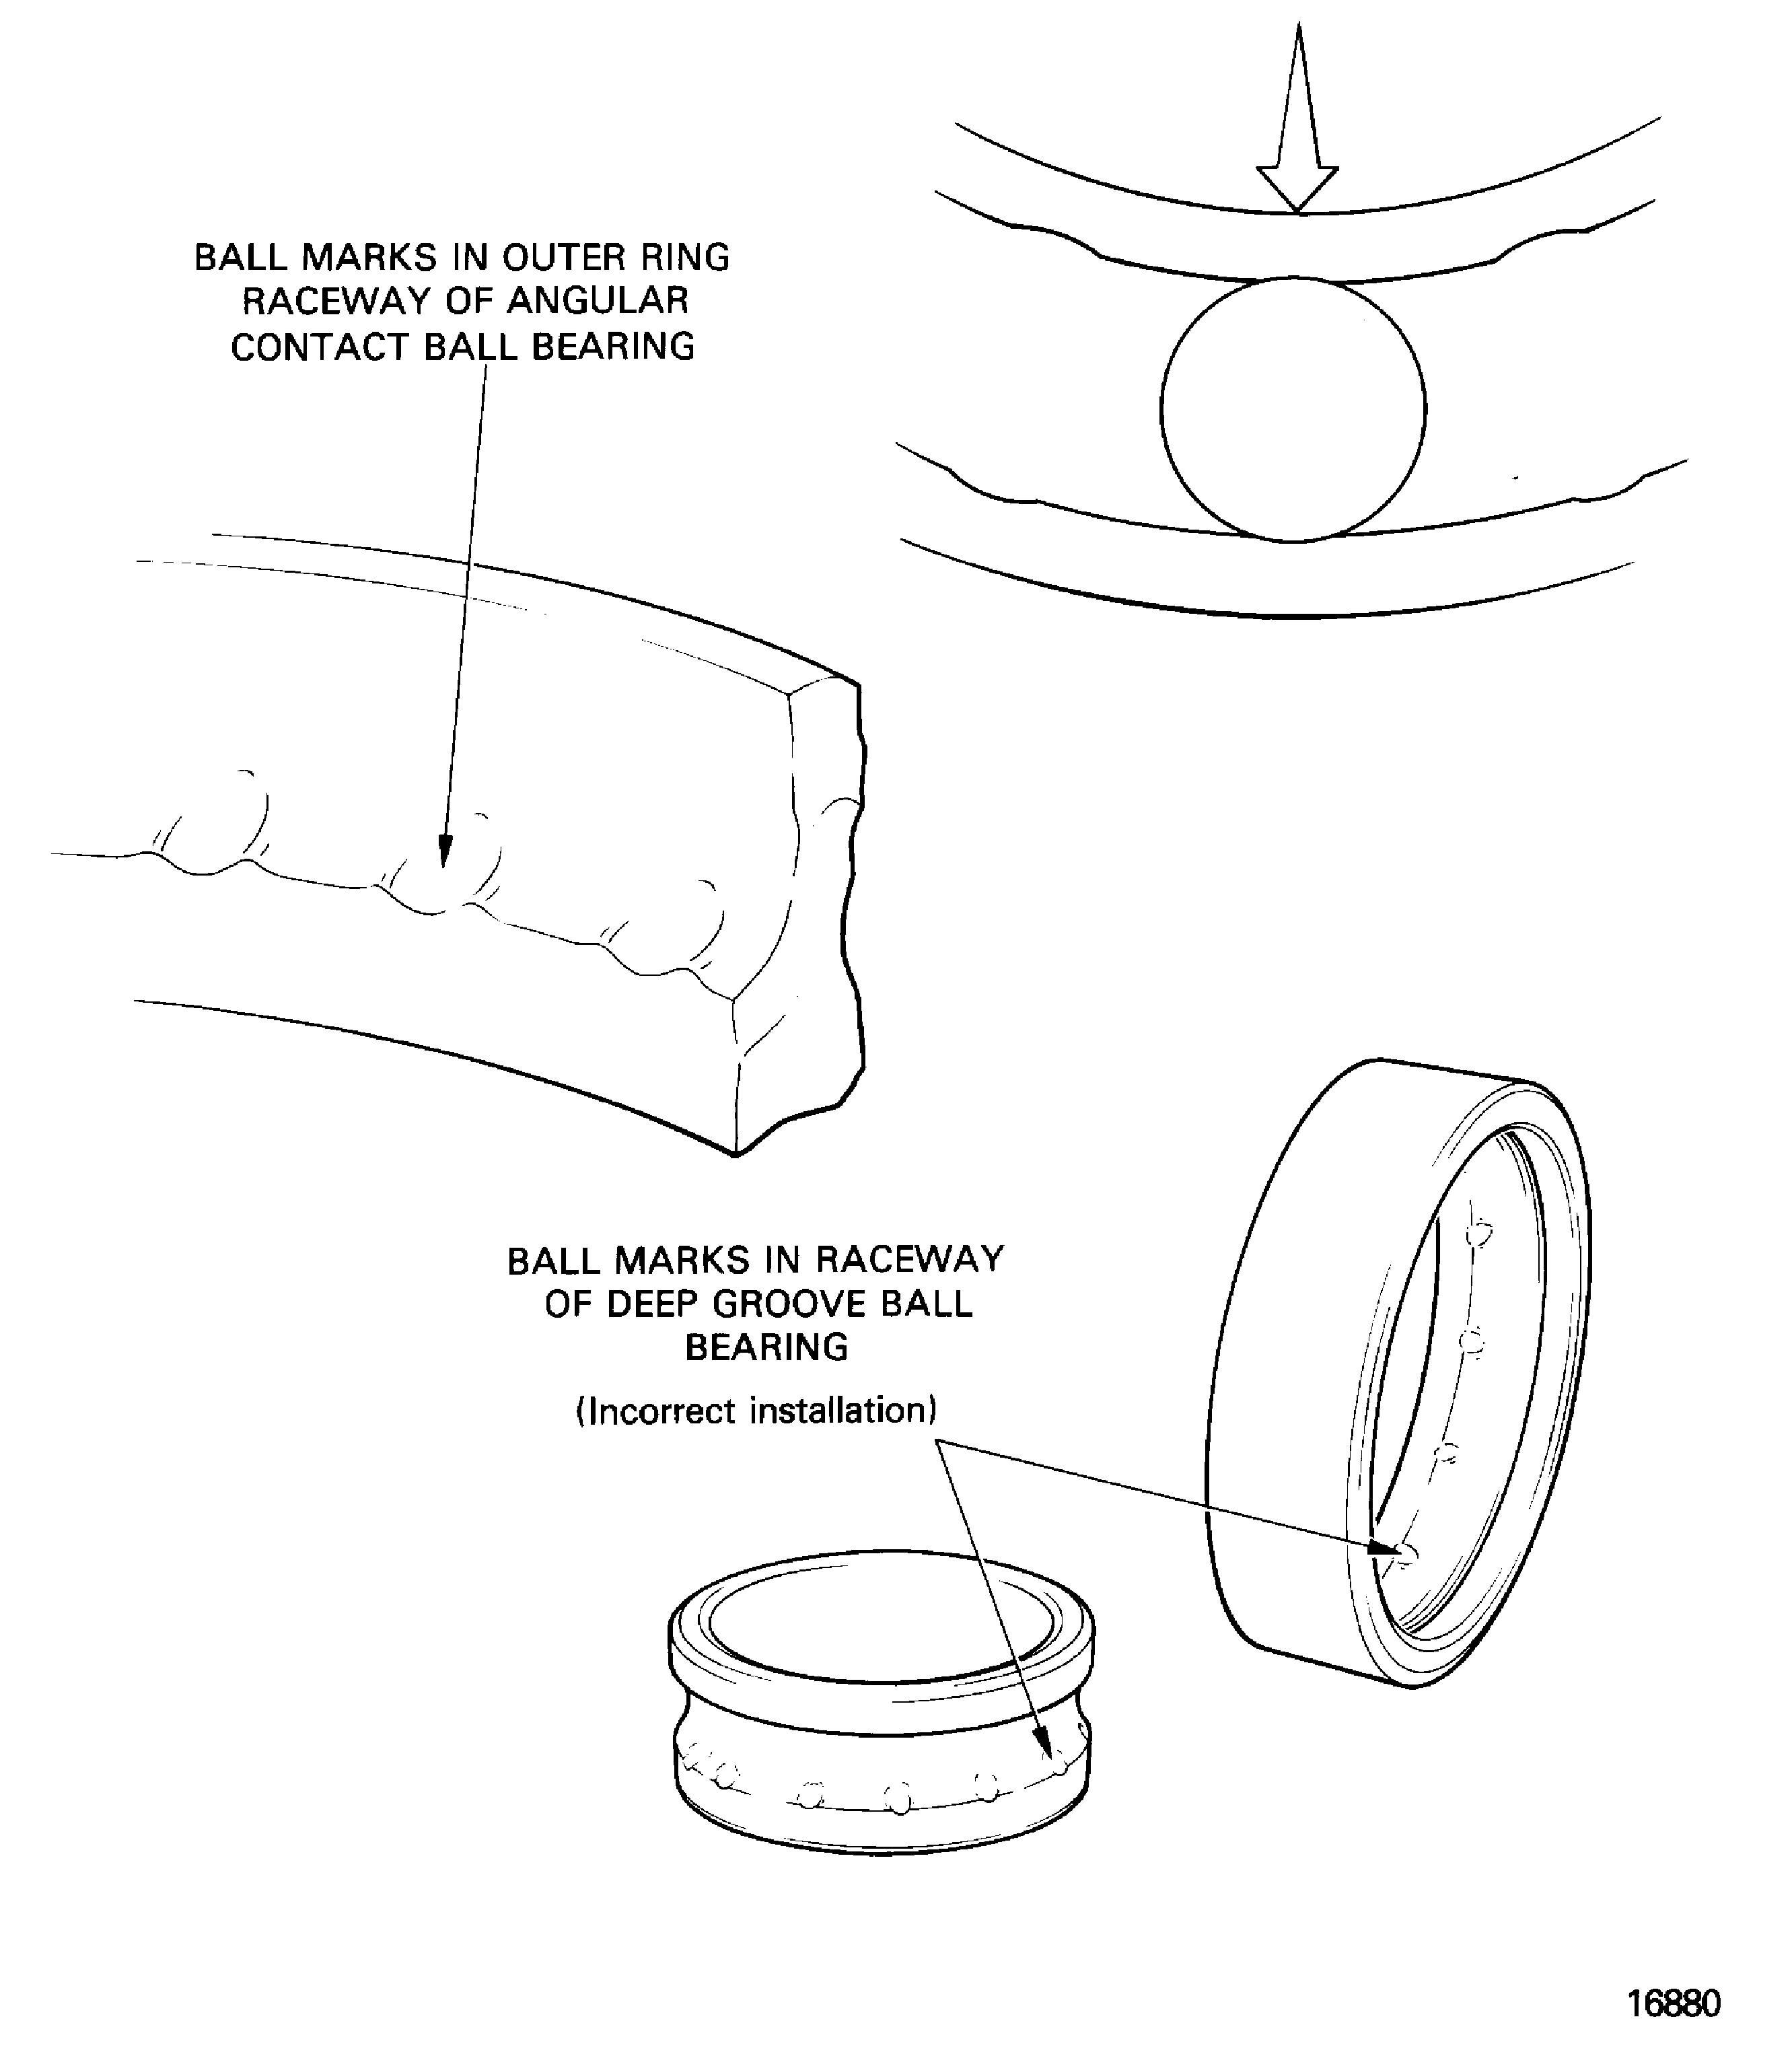
Figure: False brinelling
False brinelling
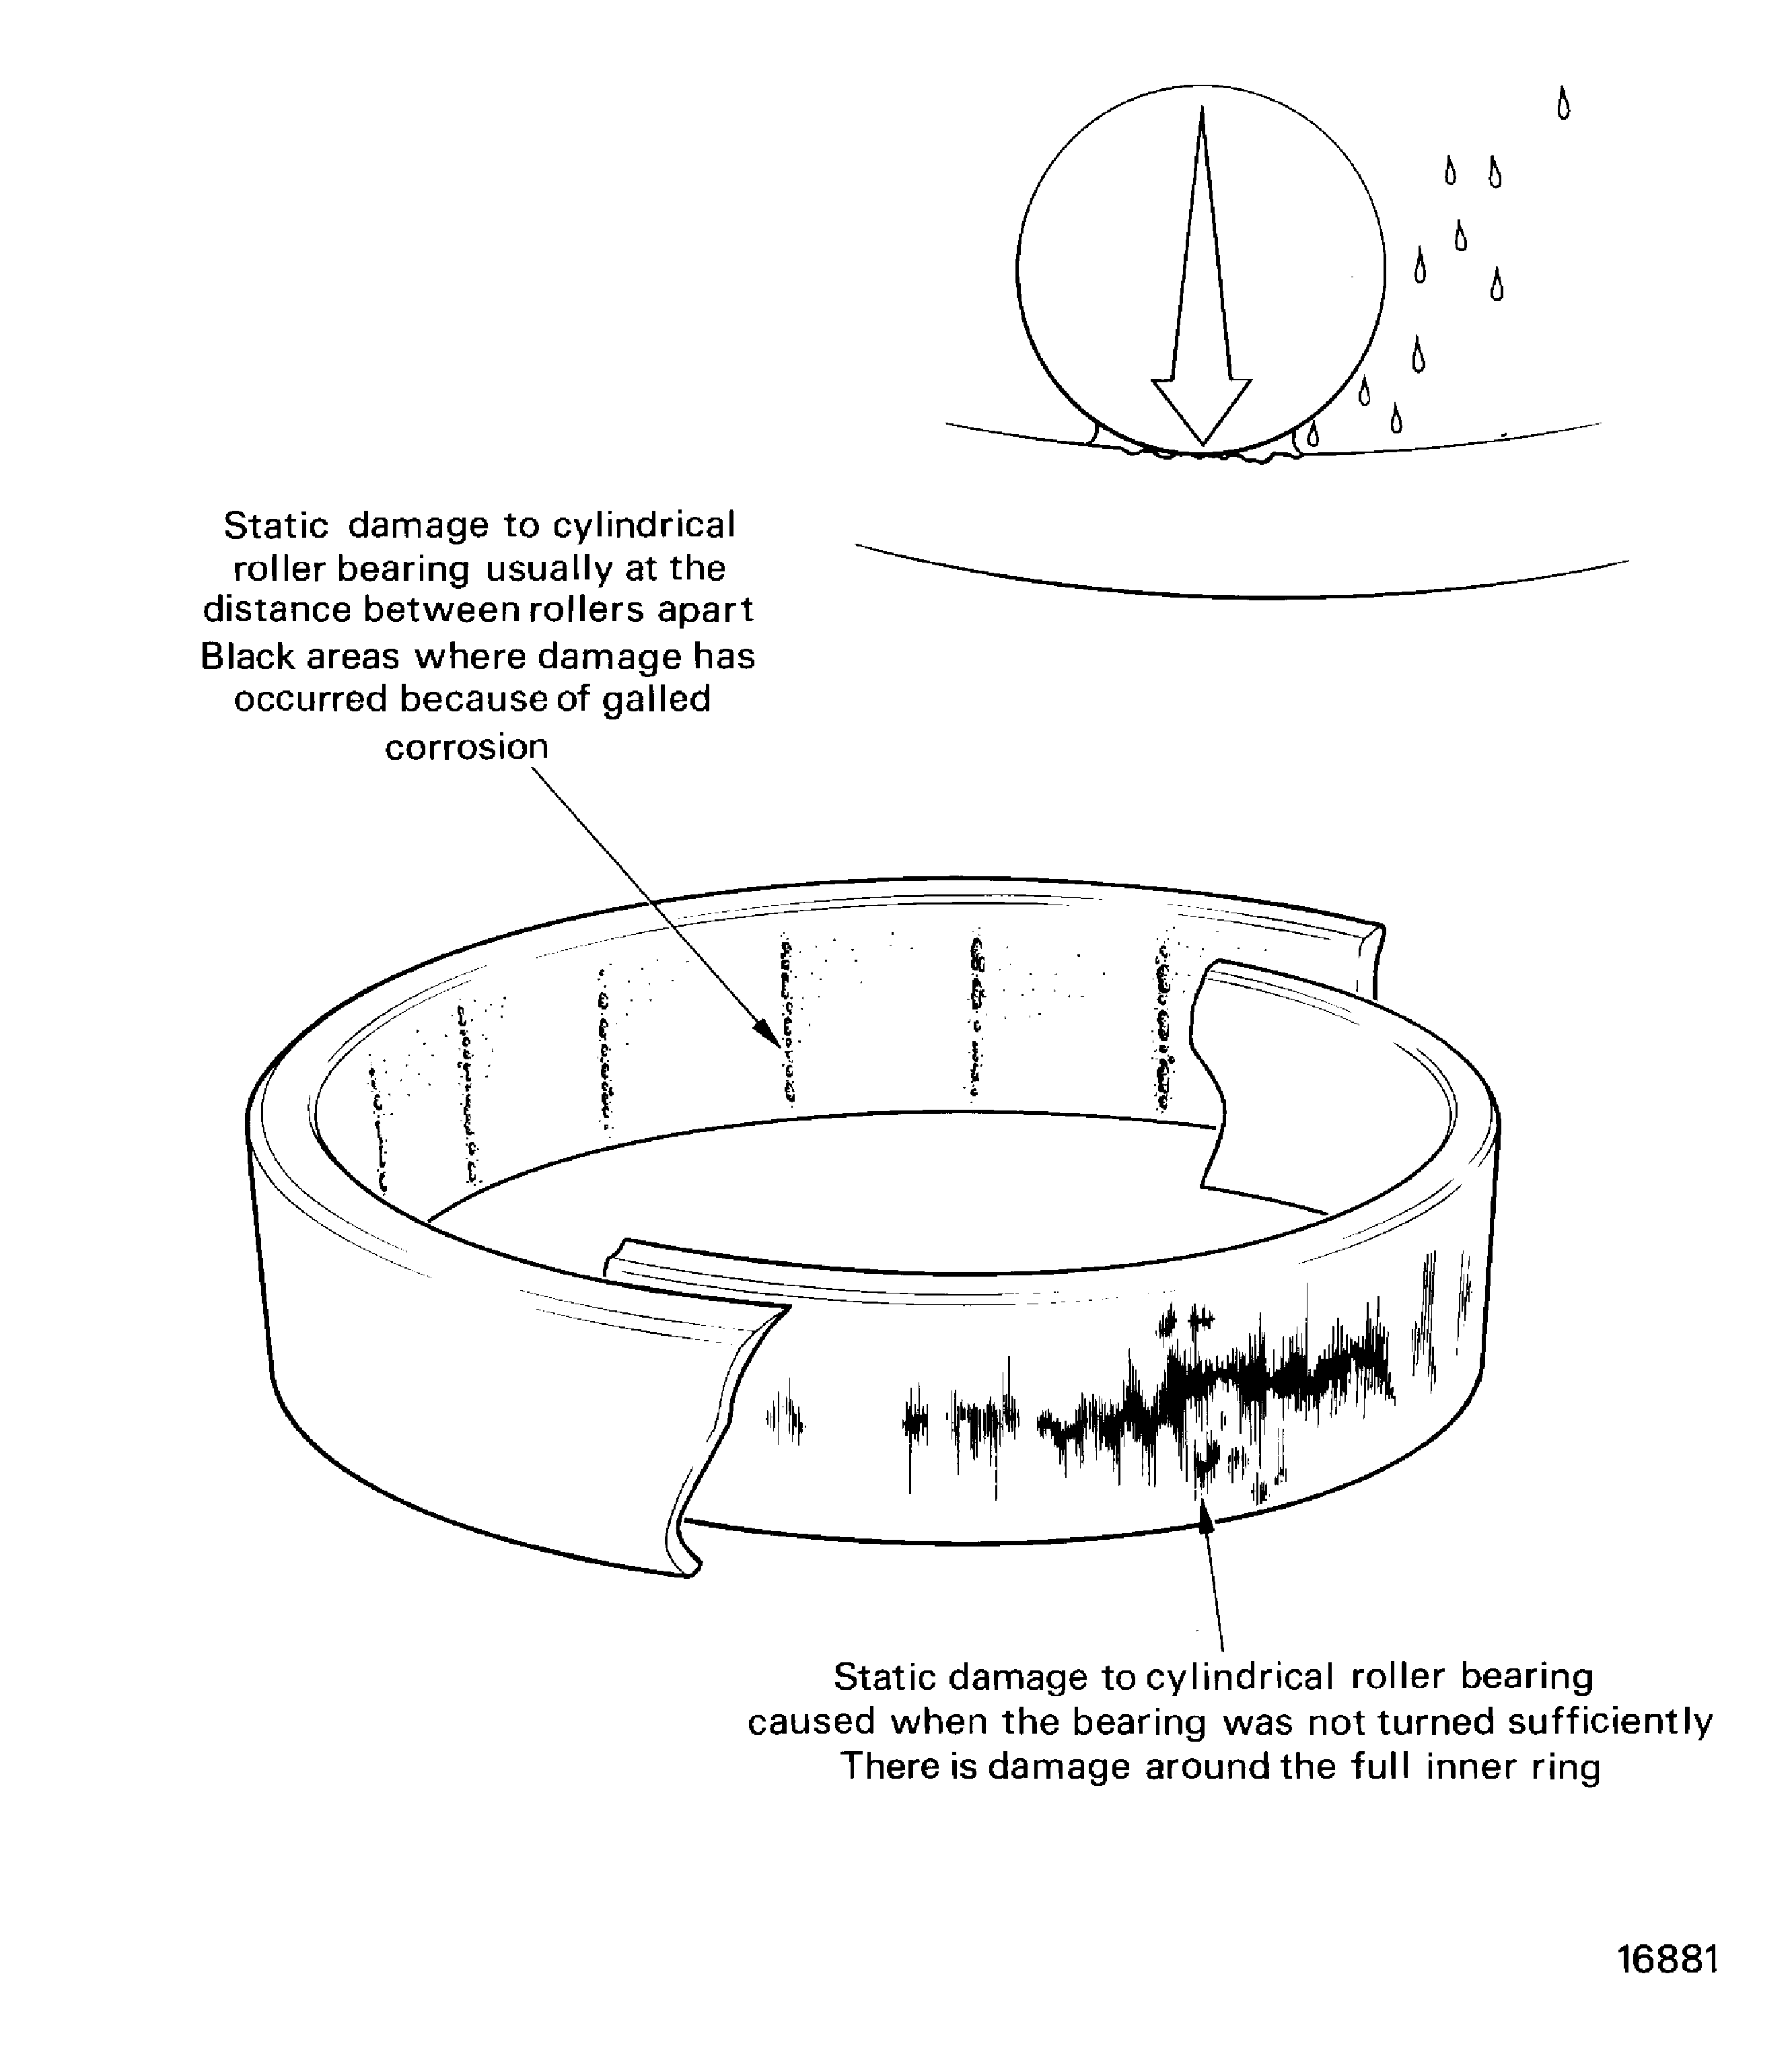
Figure: Examples of cracks
Examples of cracks
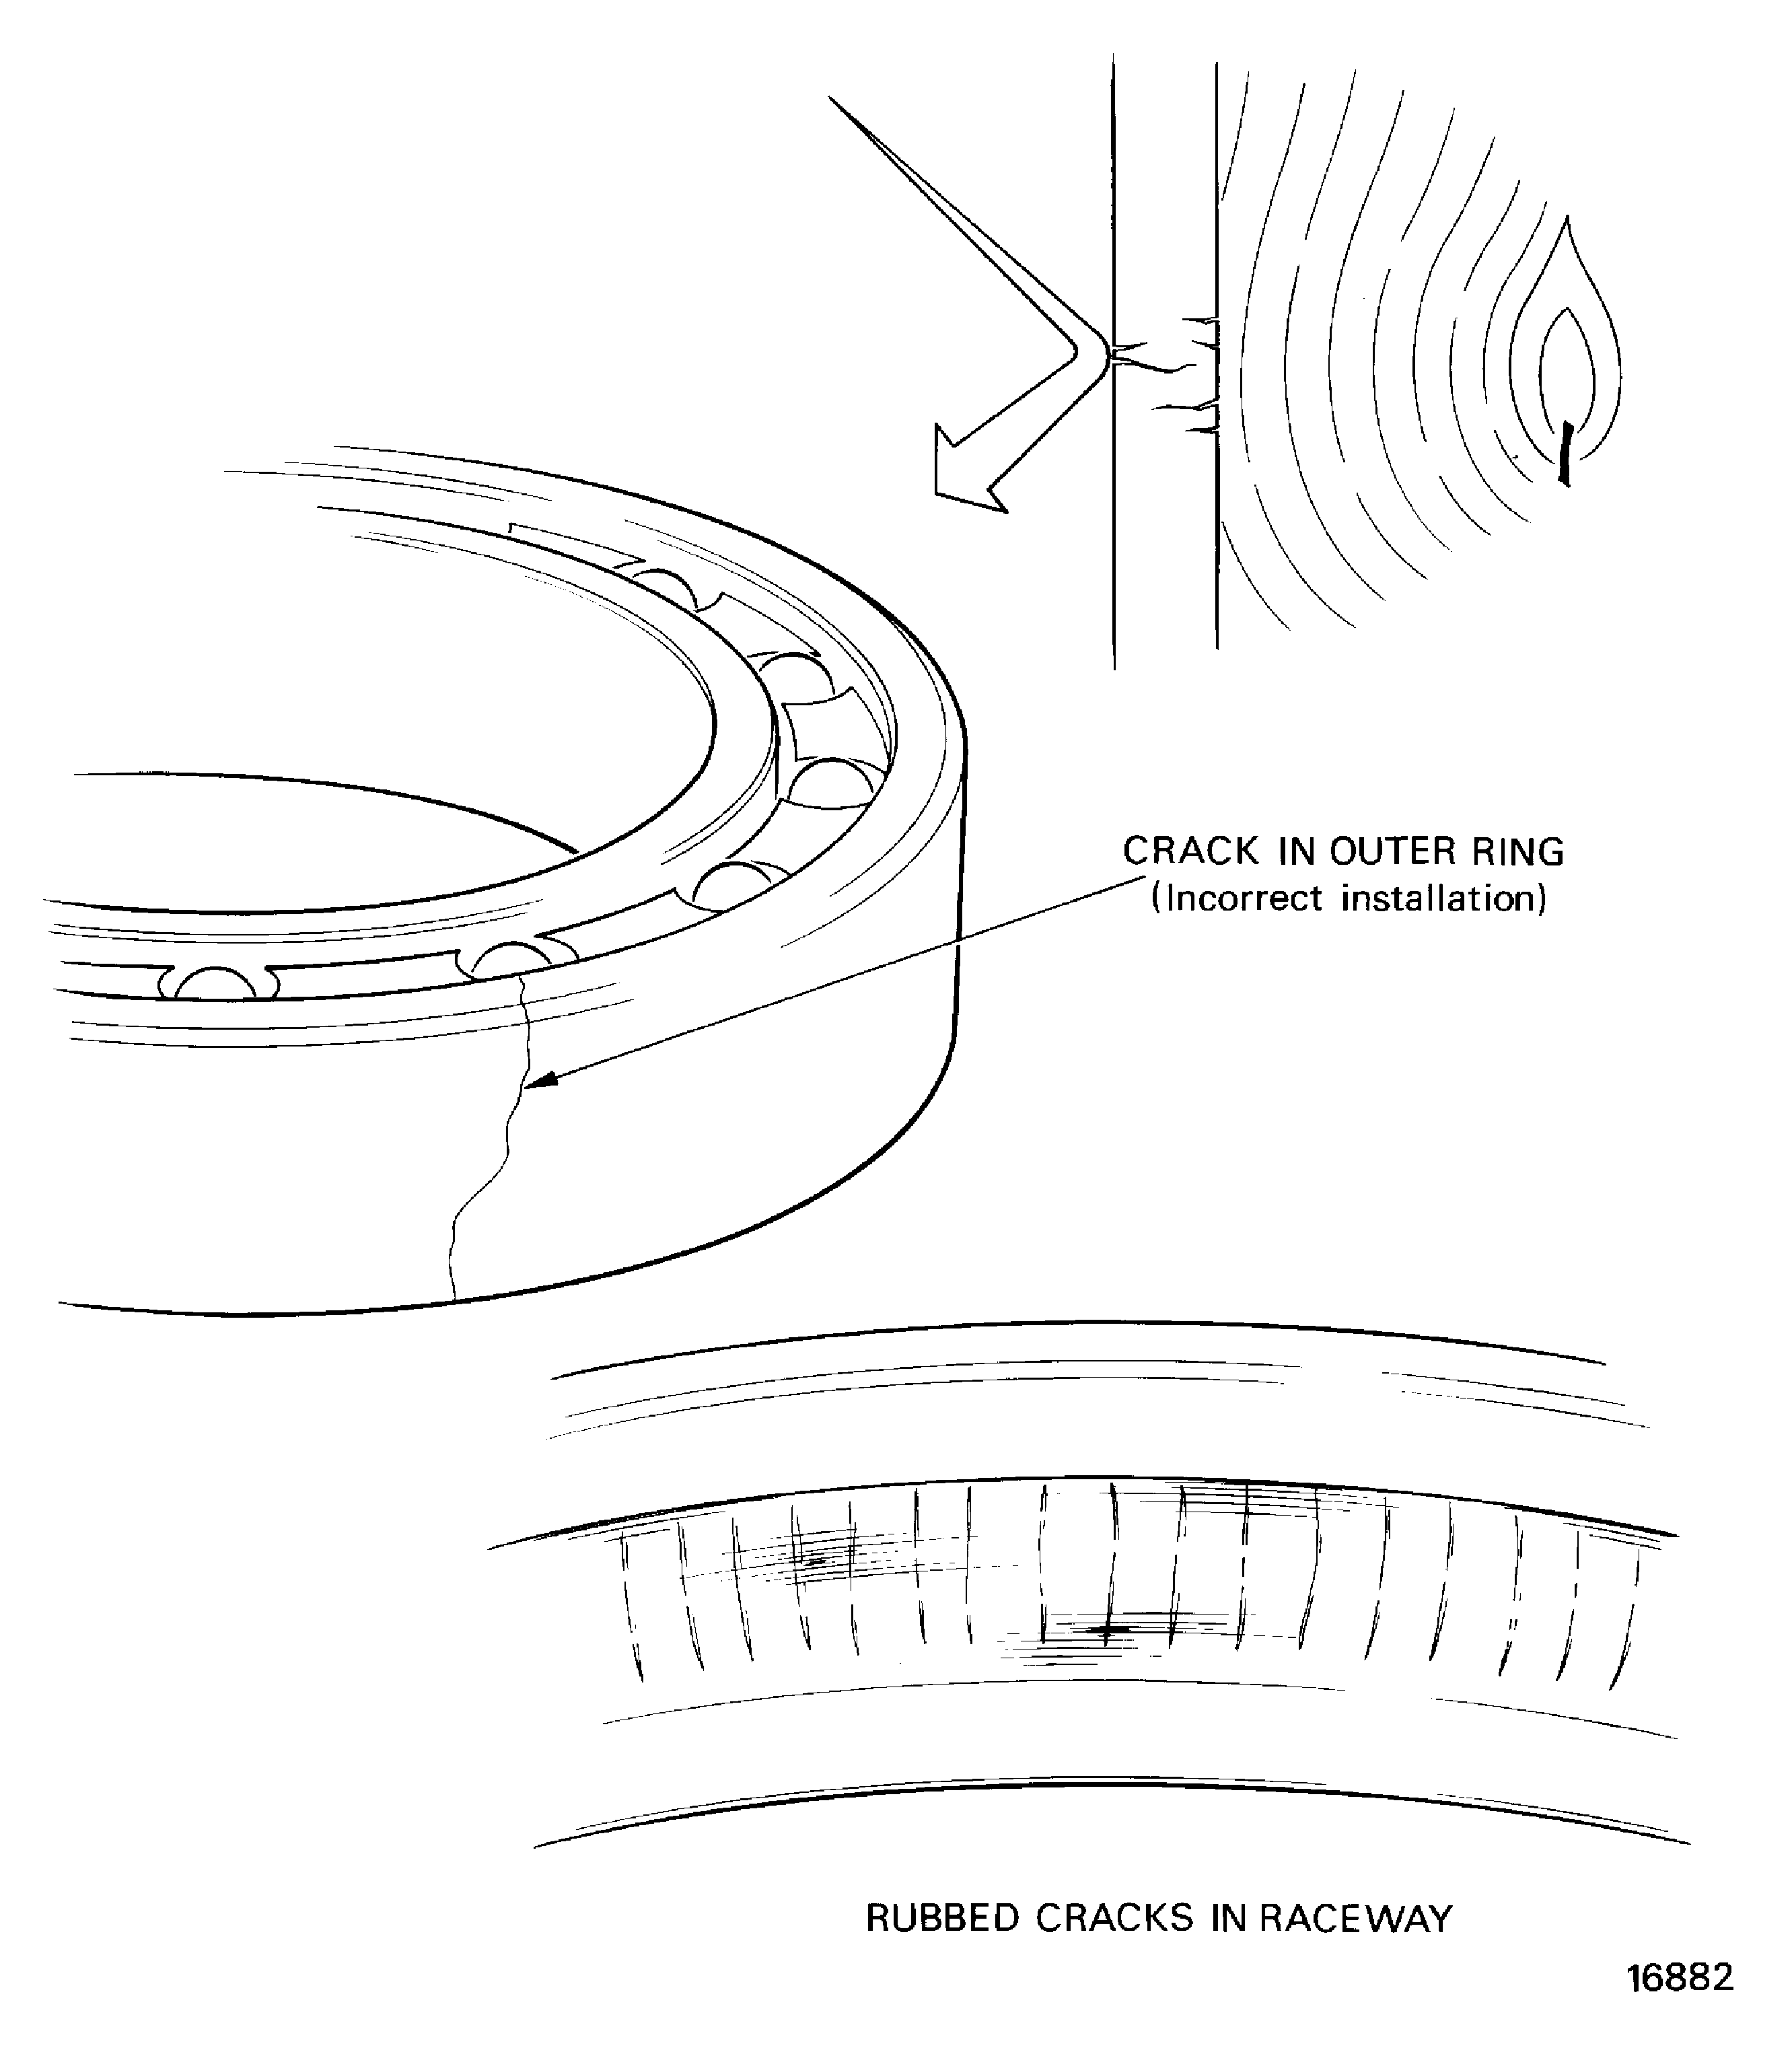
Figure: Examples of scuffing marks
Examples of scuffing marks
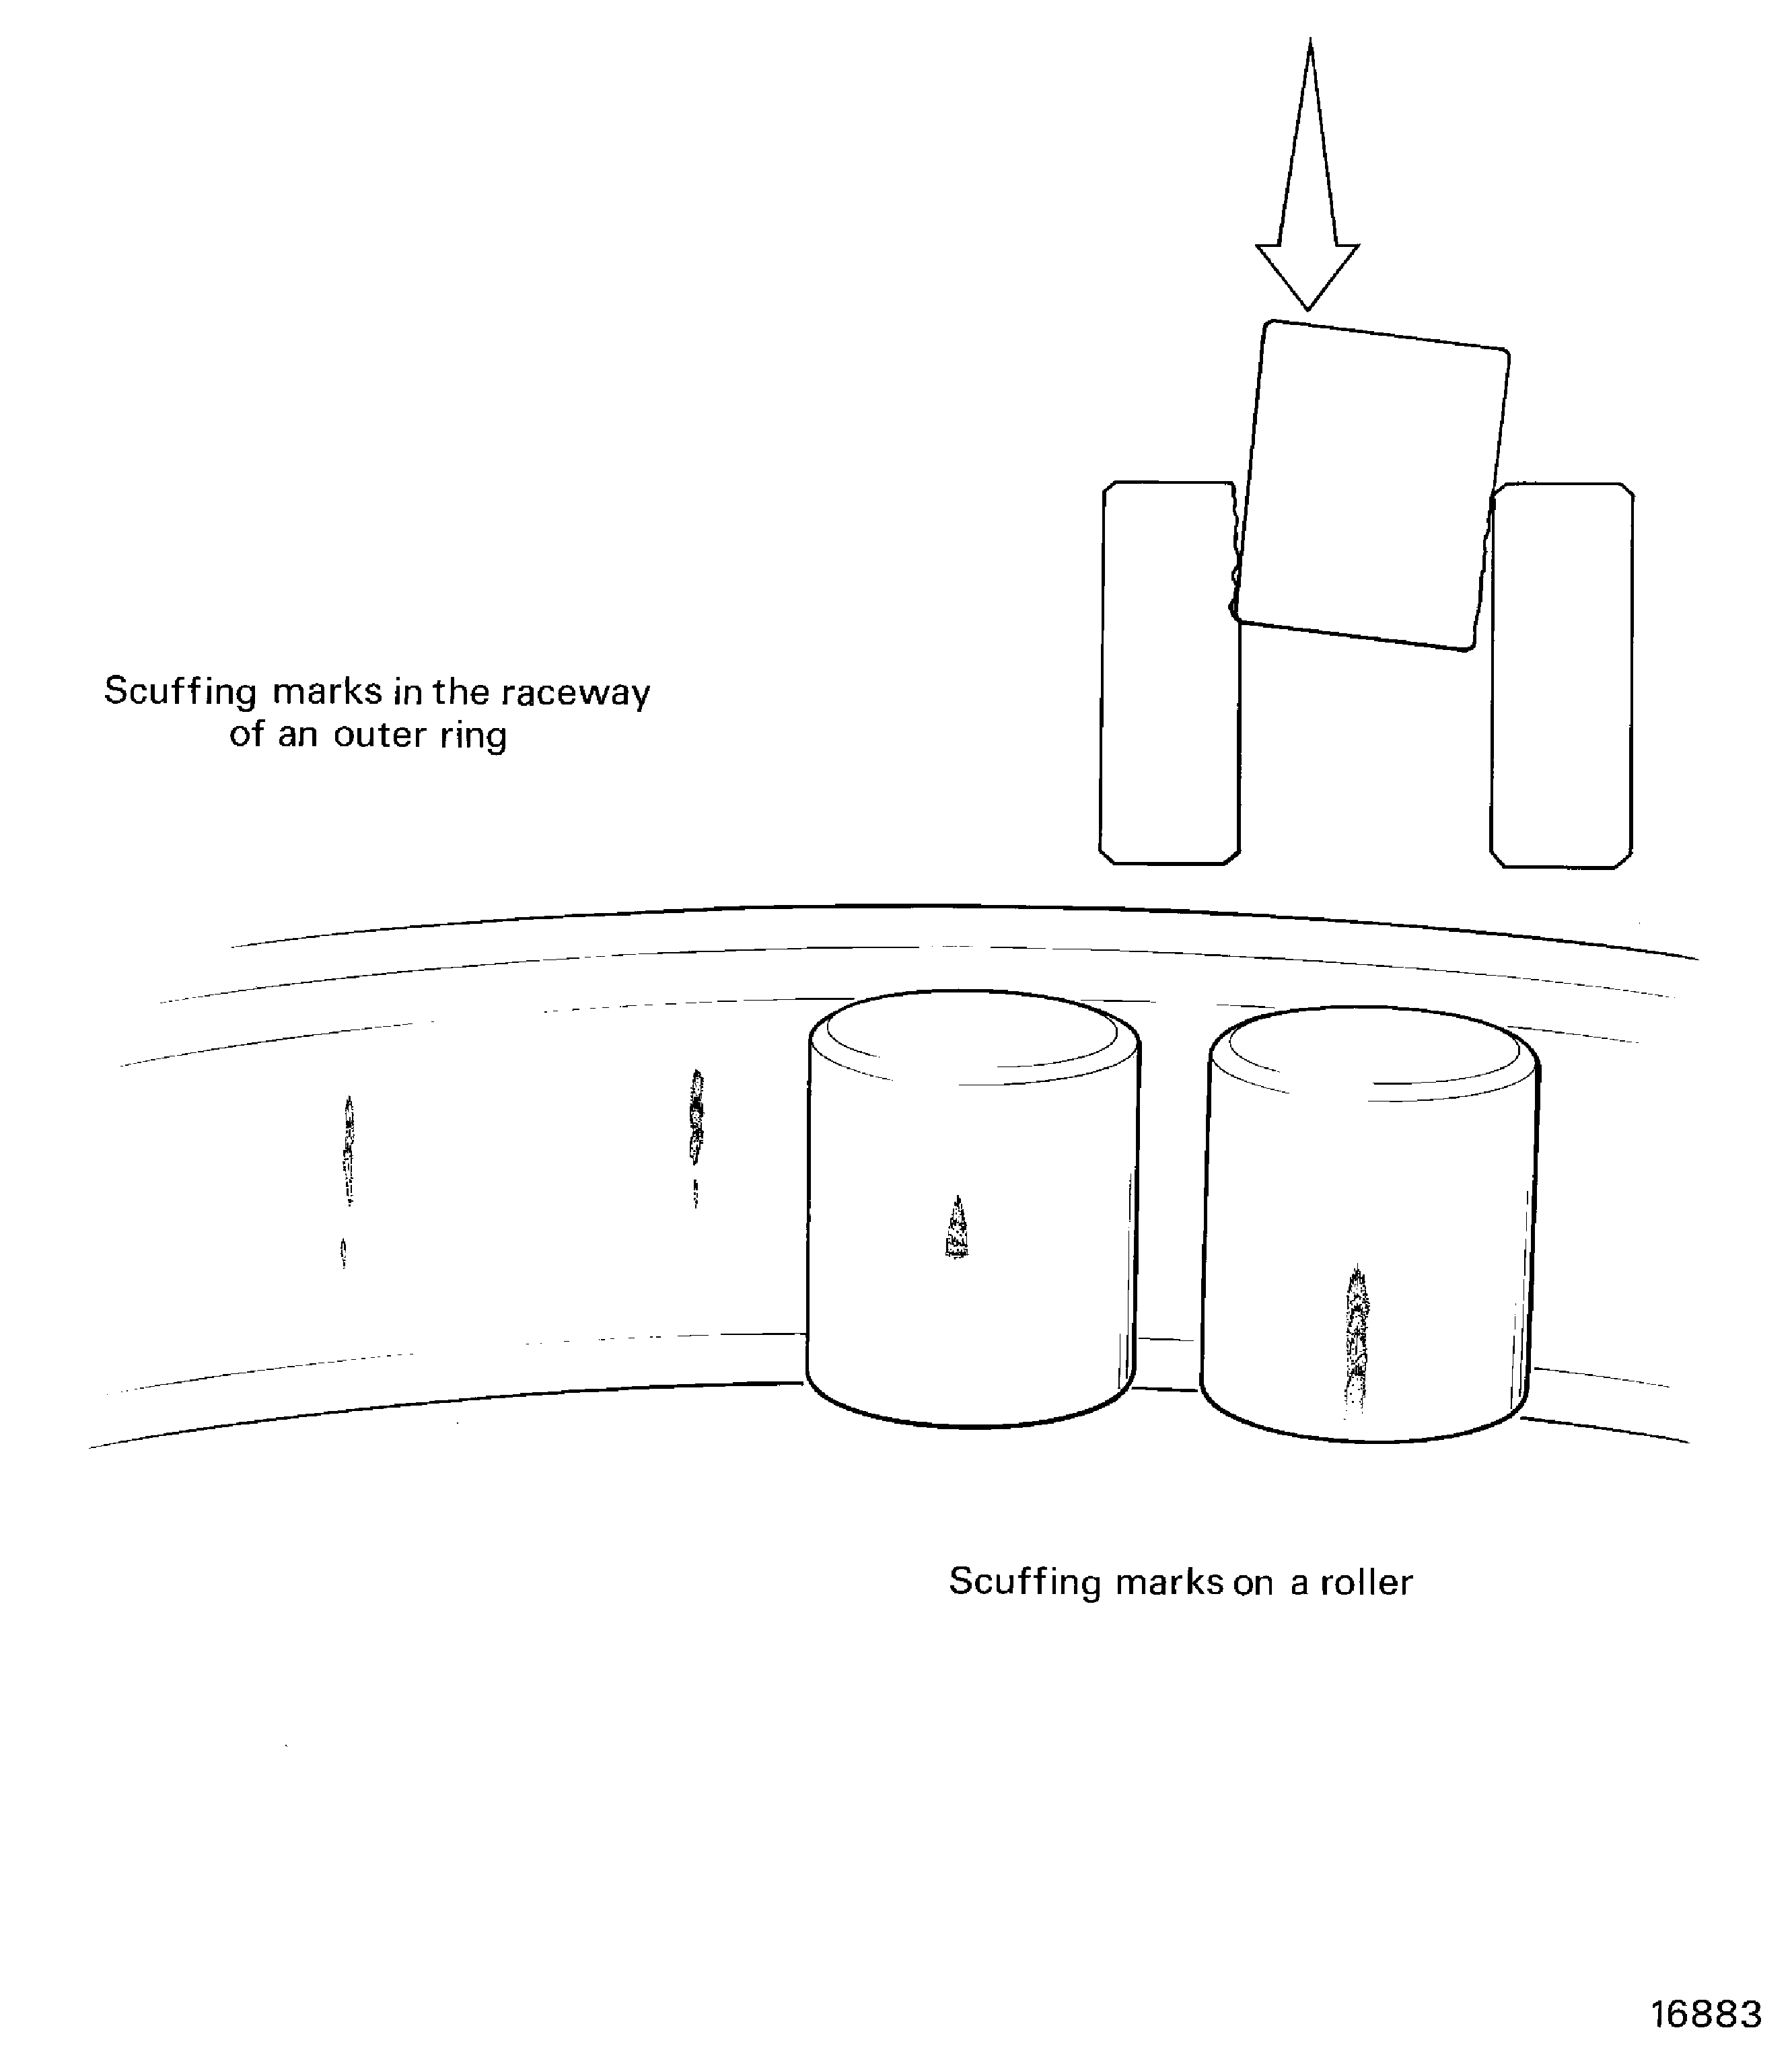
Figure: Examples of heavy electrical discharges
Examples of heavy electrical discharges
Figure: Examples of high temperature color changes
Examples of high temperature color changes
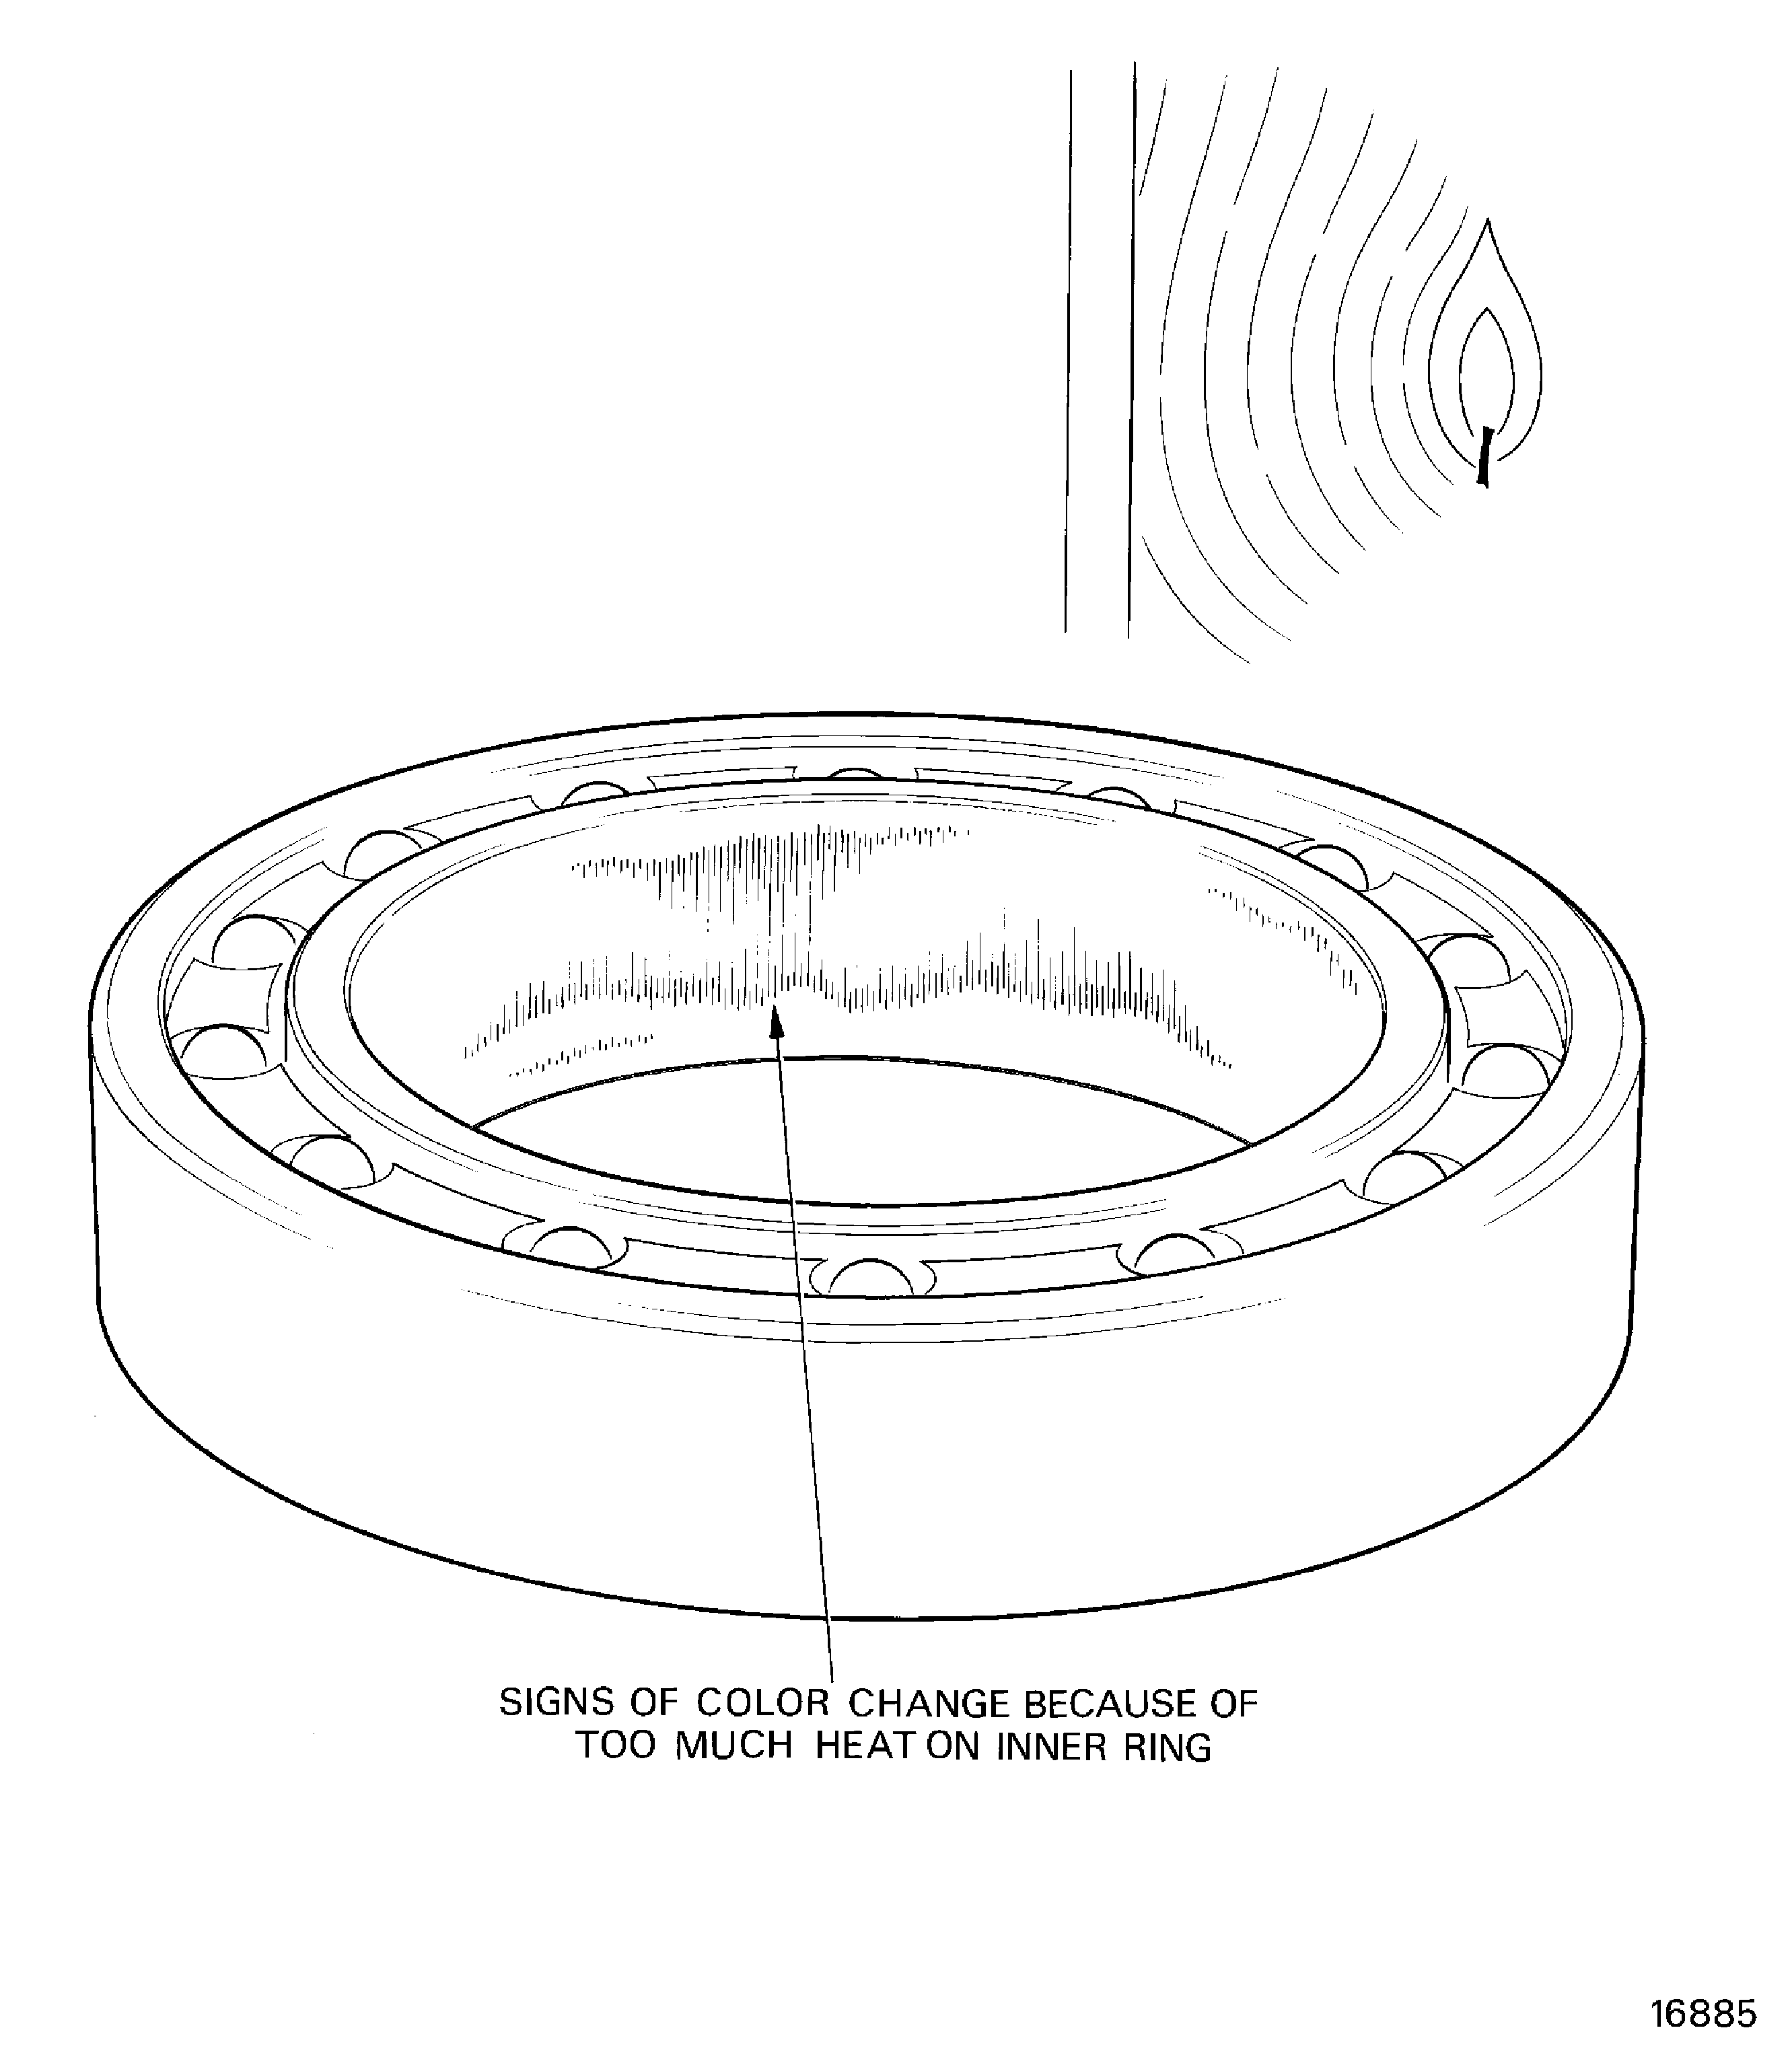
Figure: Examples of worn roller ends and guide faces
Examples of worn roller ends and guide faces
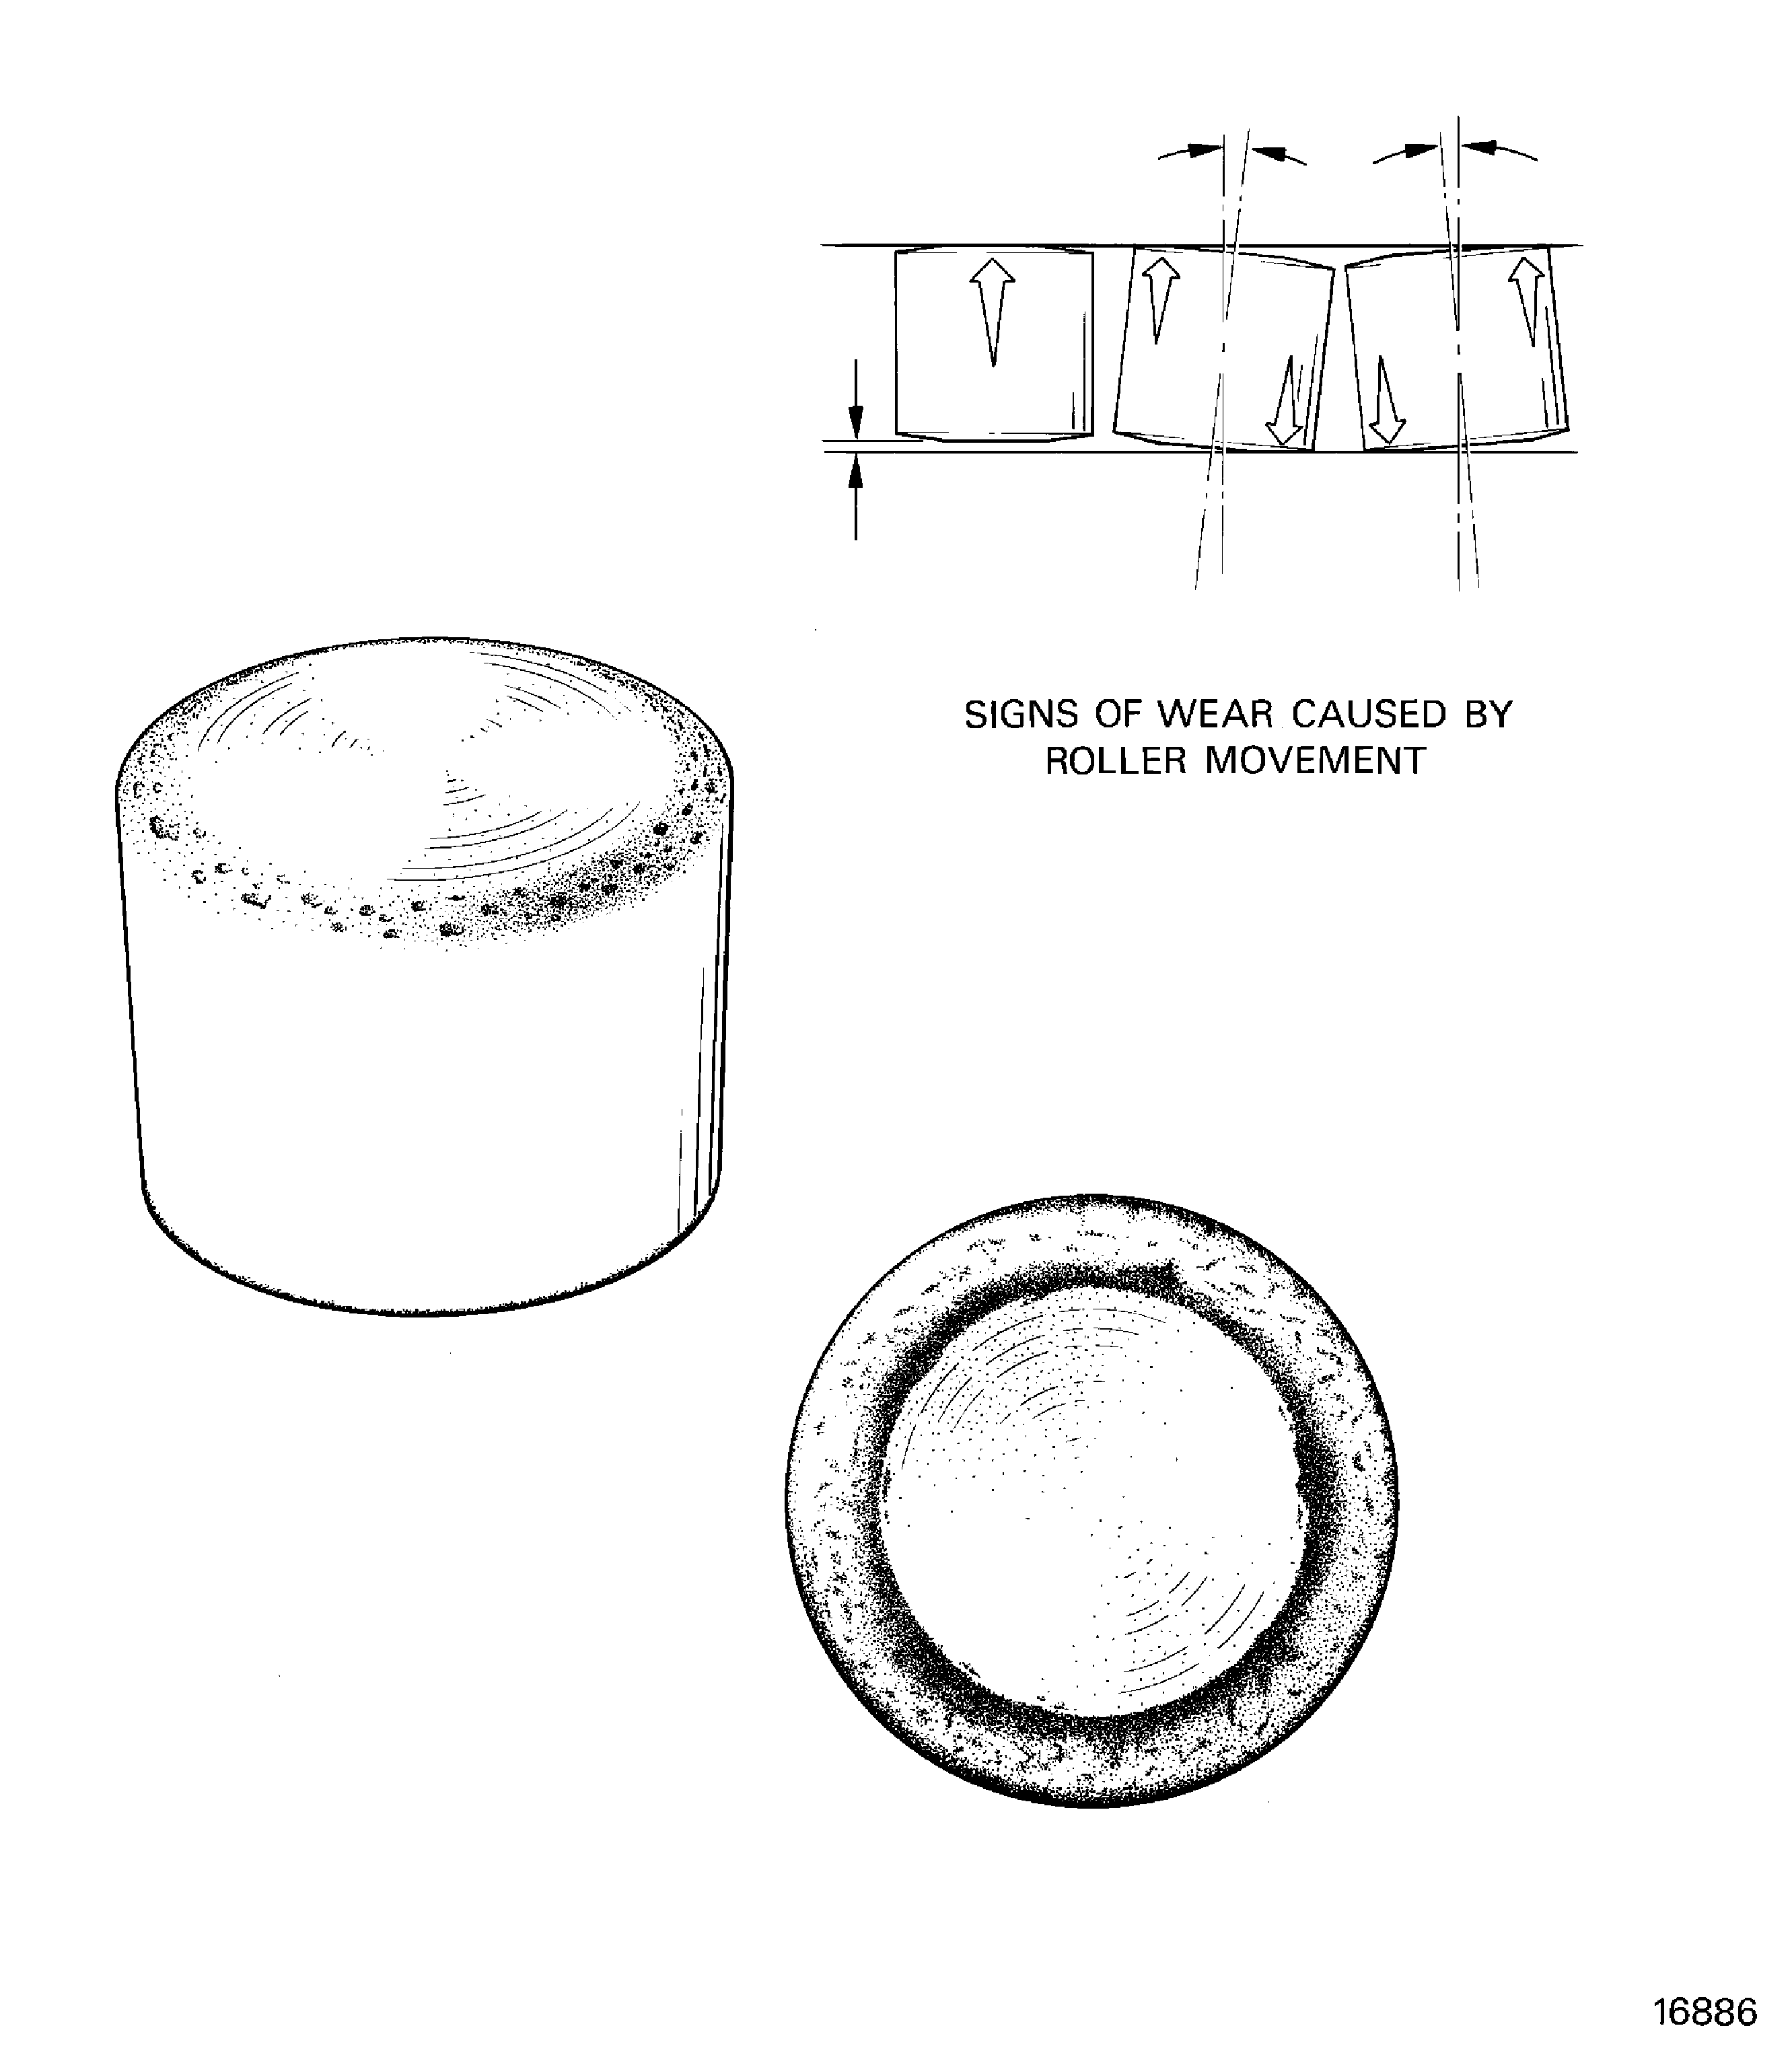
Figure: Examples of pitted surfaces
Examples of pitted surfaces
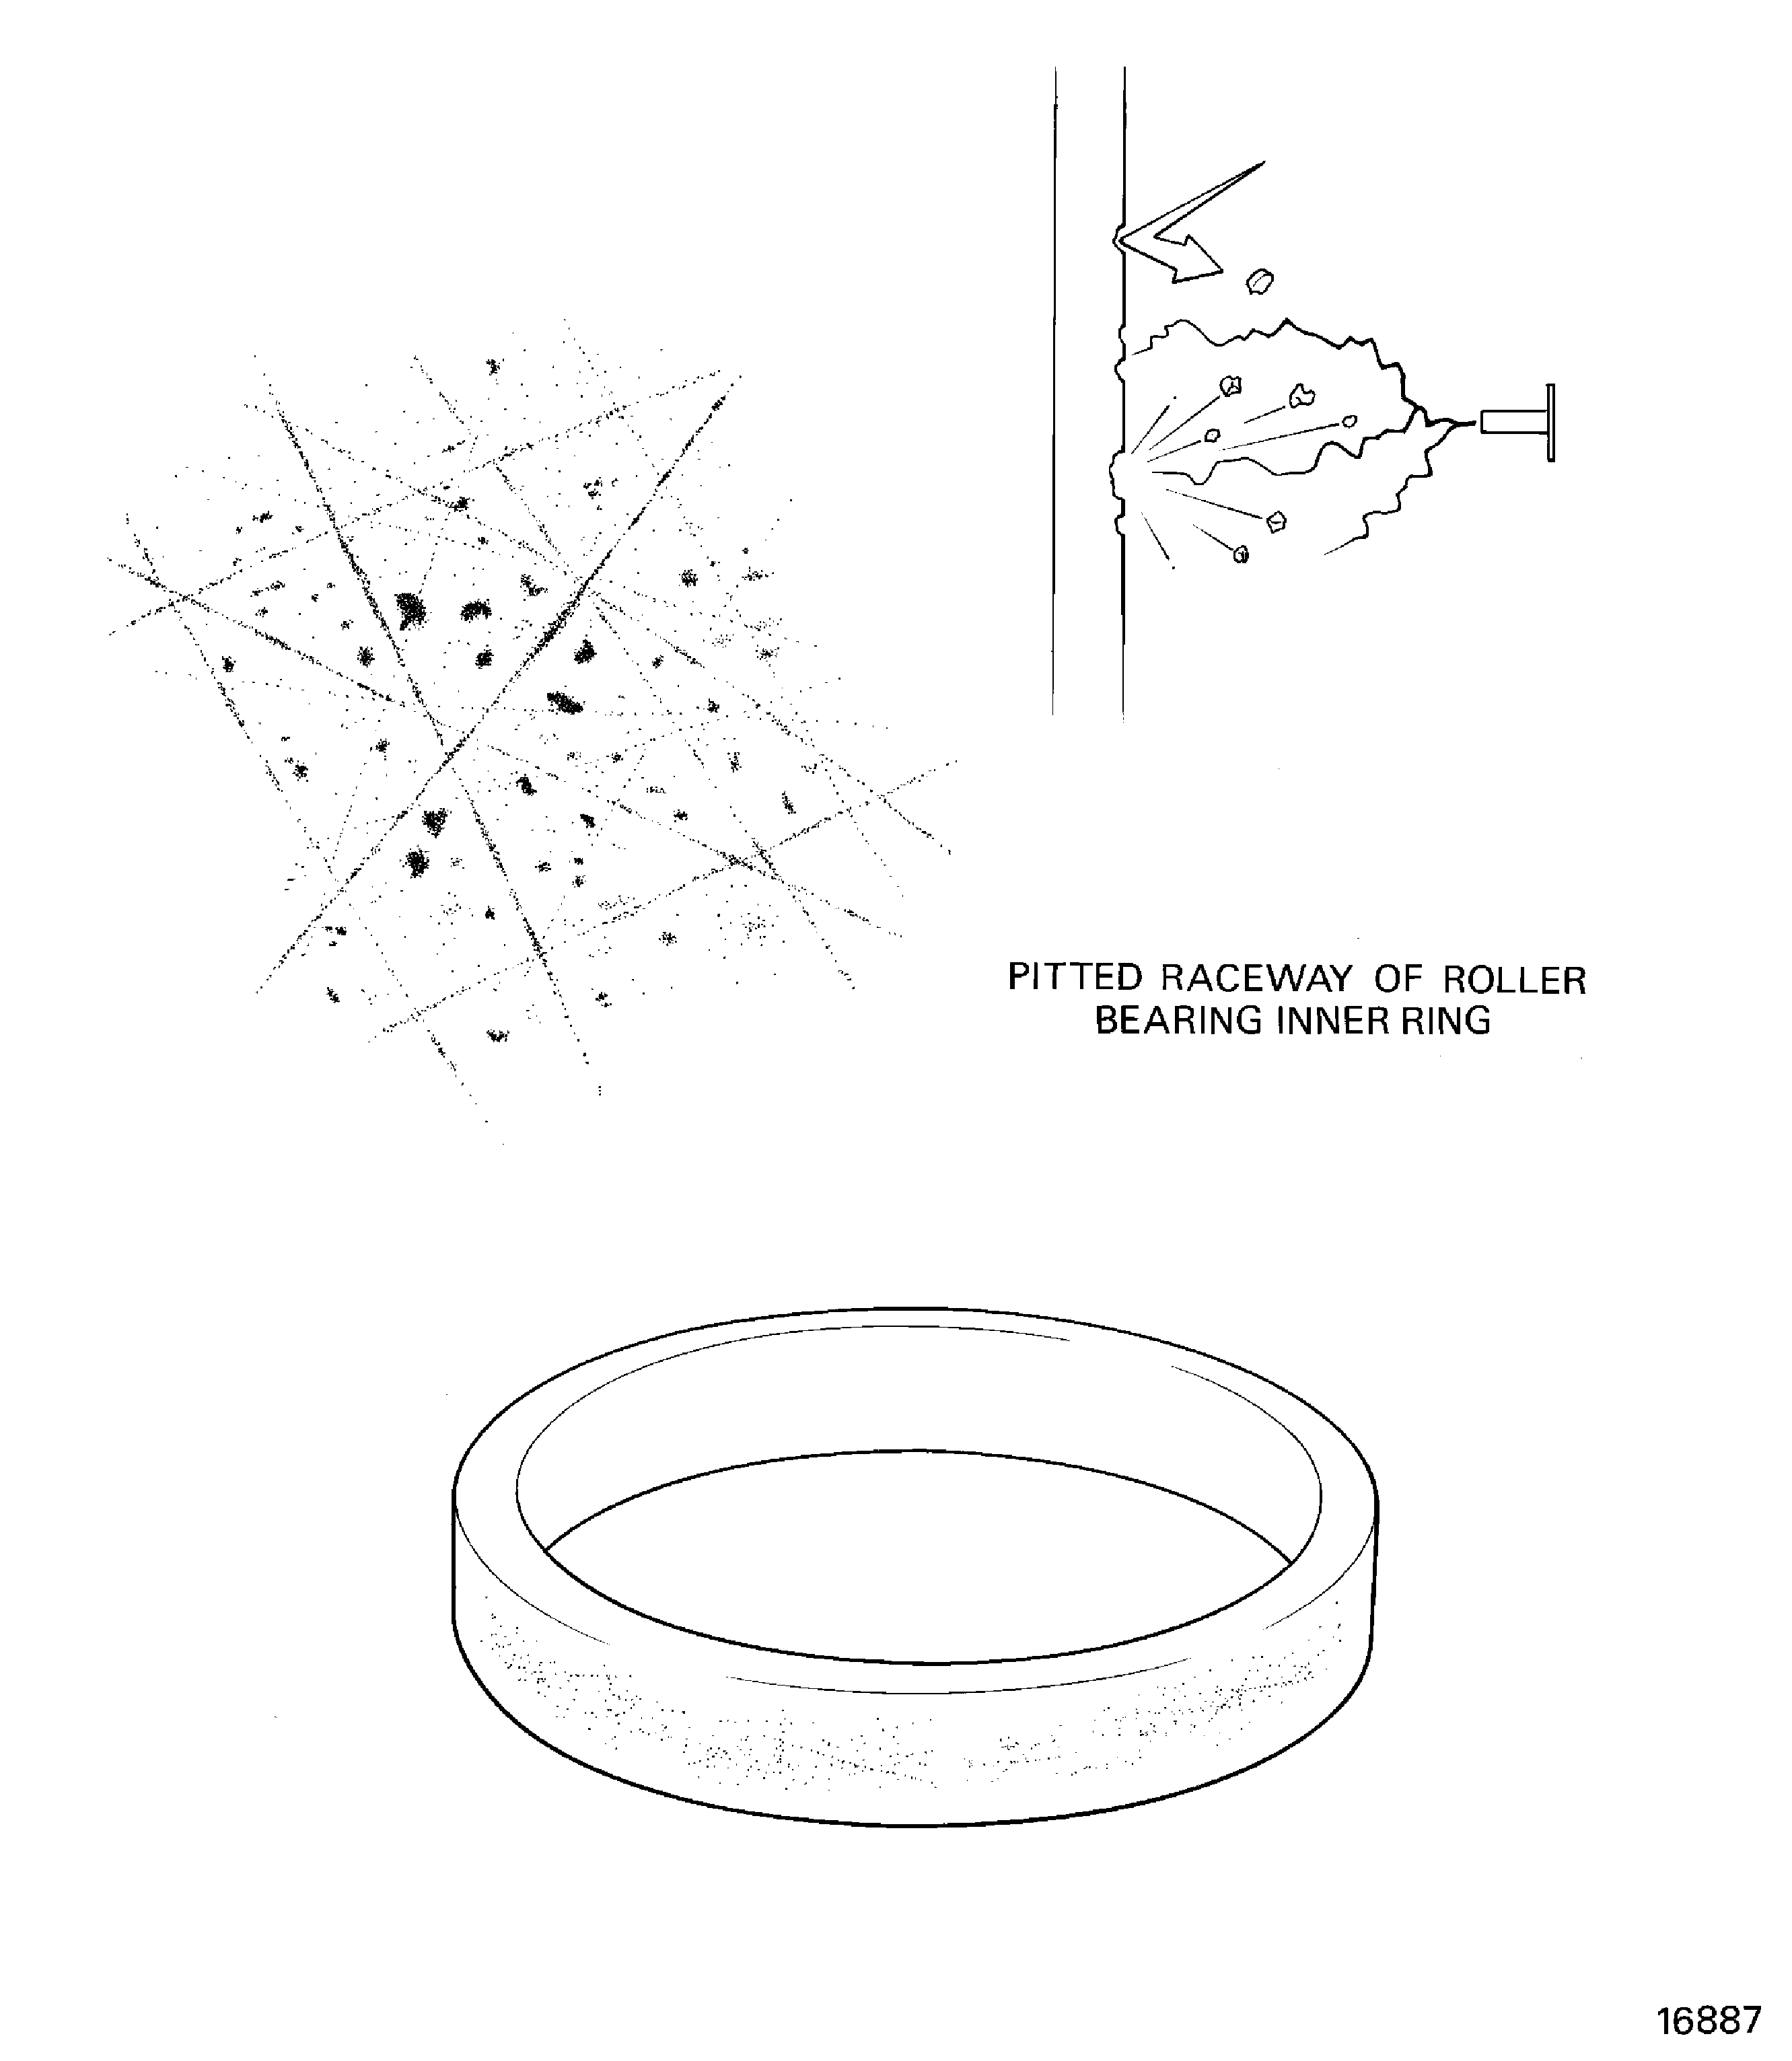
Figure: Examples of marks caused by unwanted materials
Examples of marks caused by unwanted materials
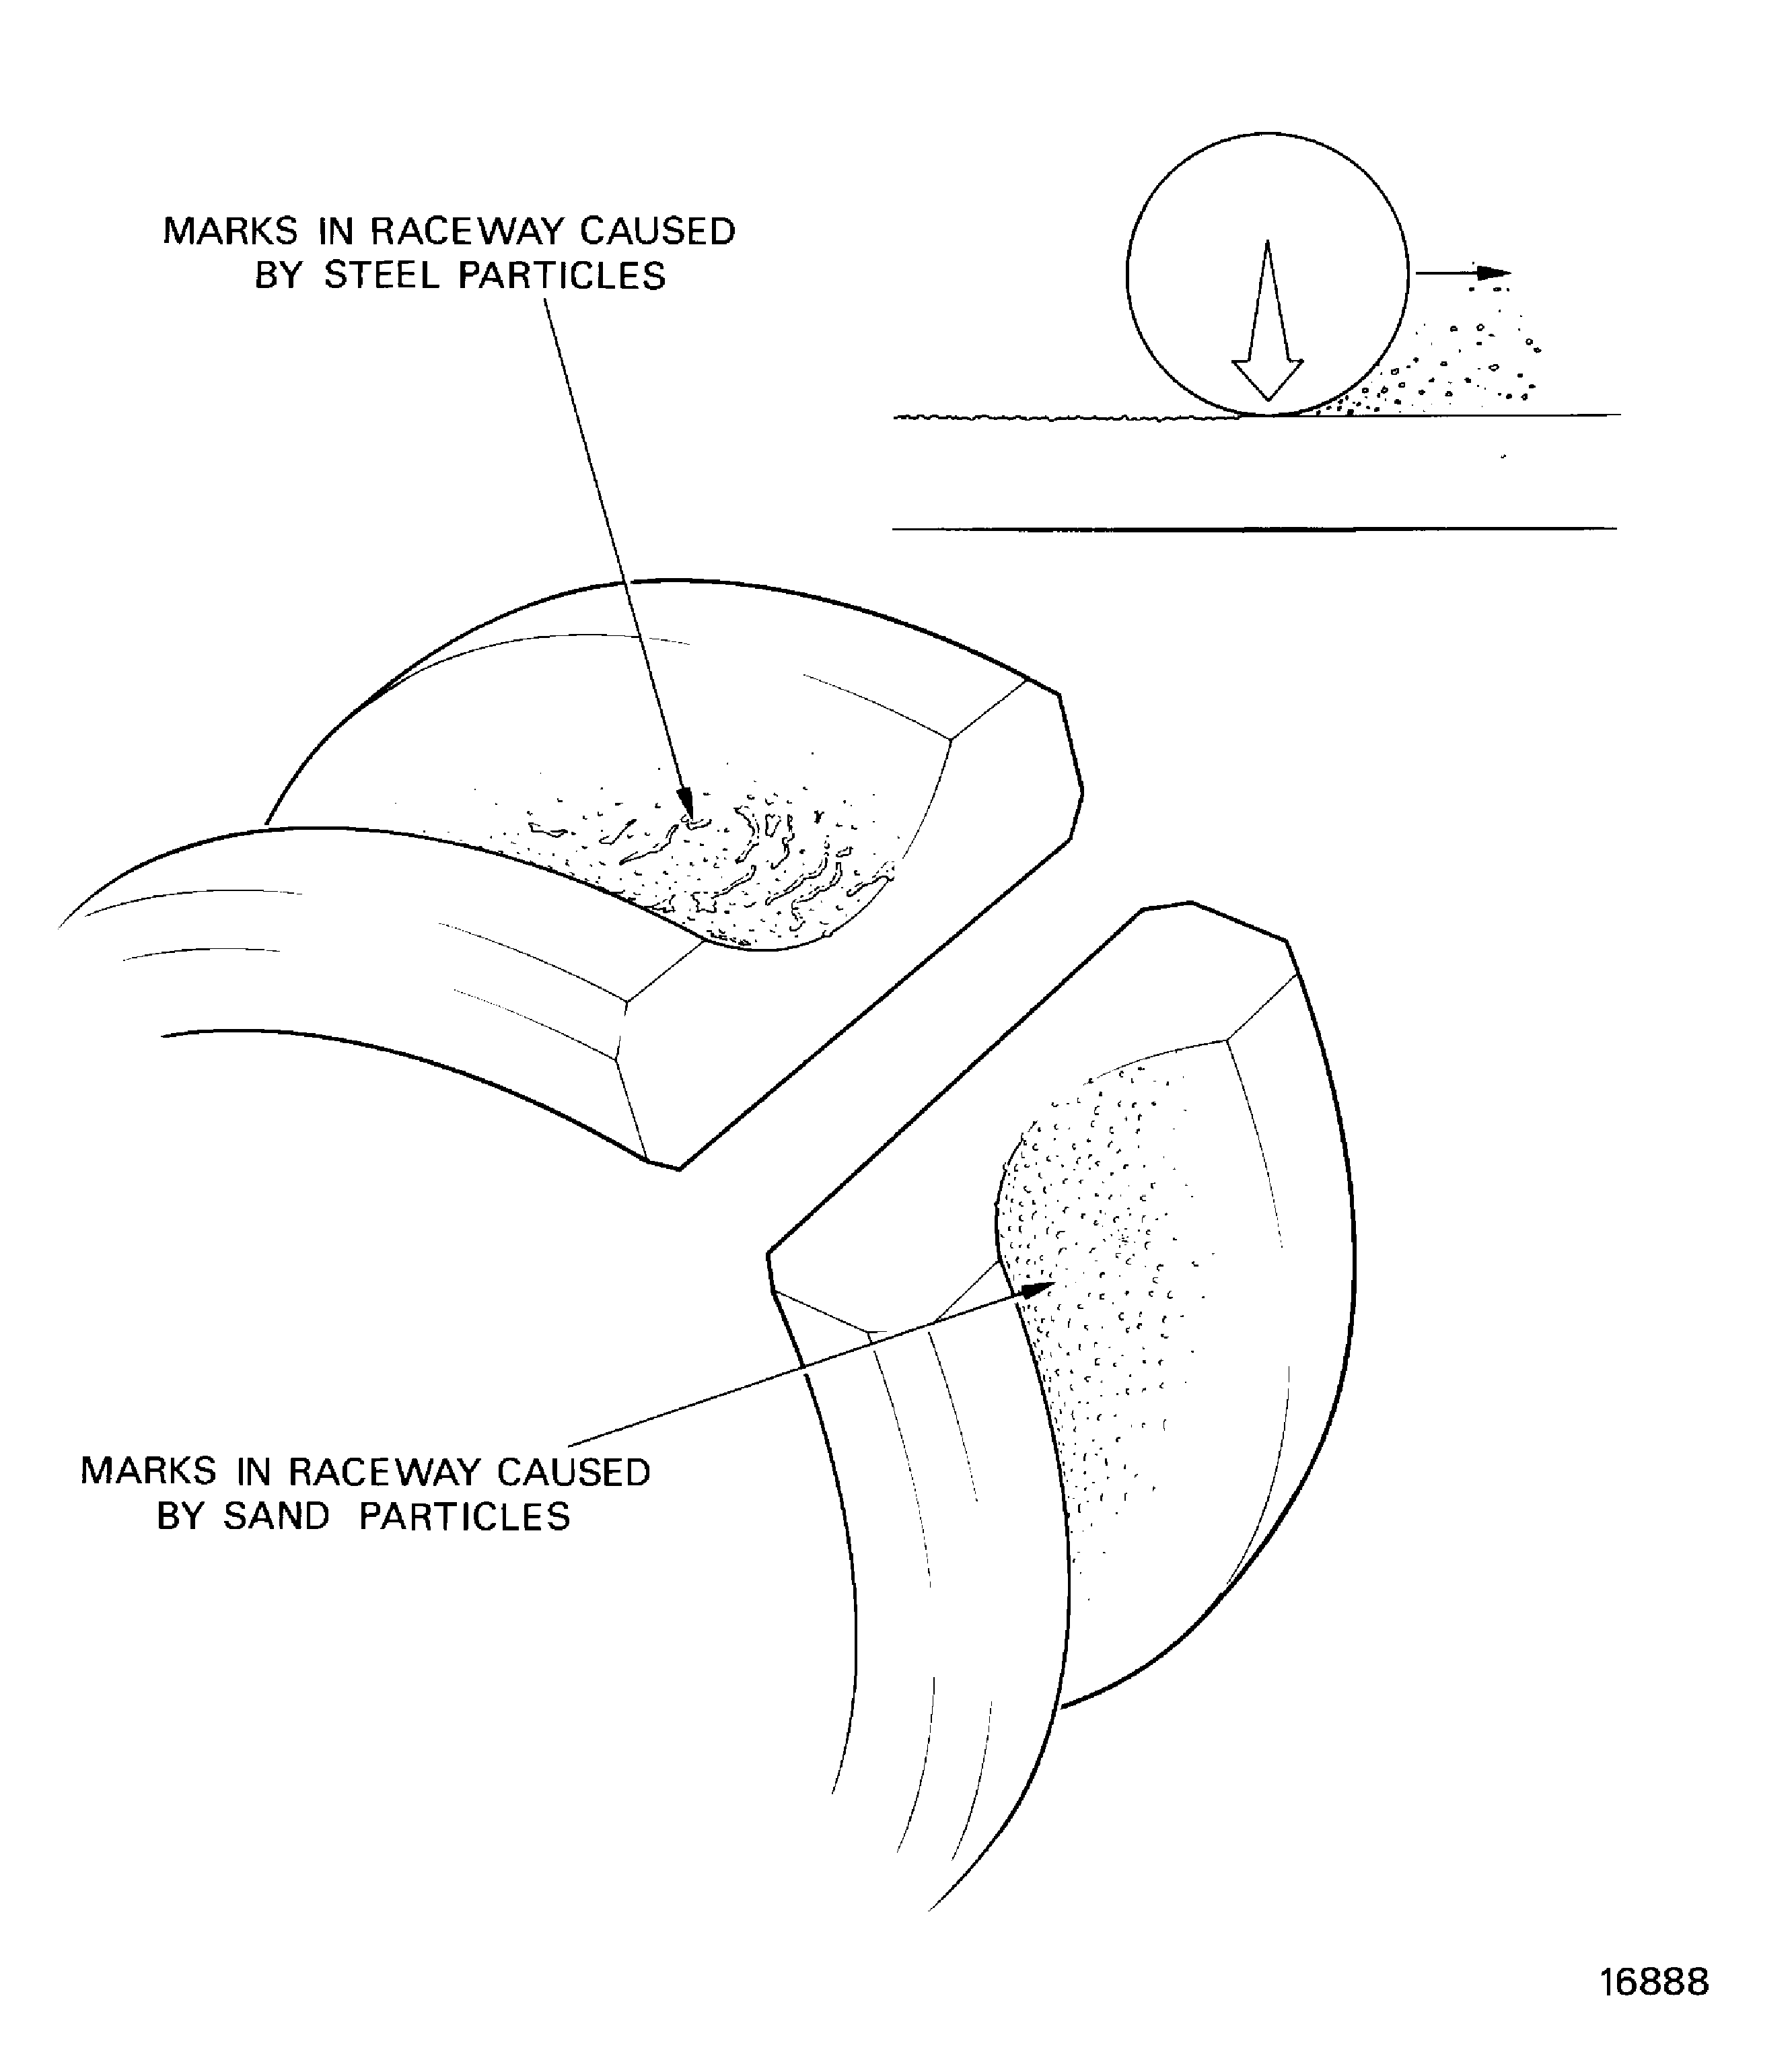
Figure: Examples of scratches
Examples of scratches
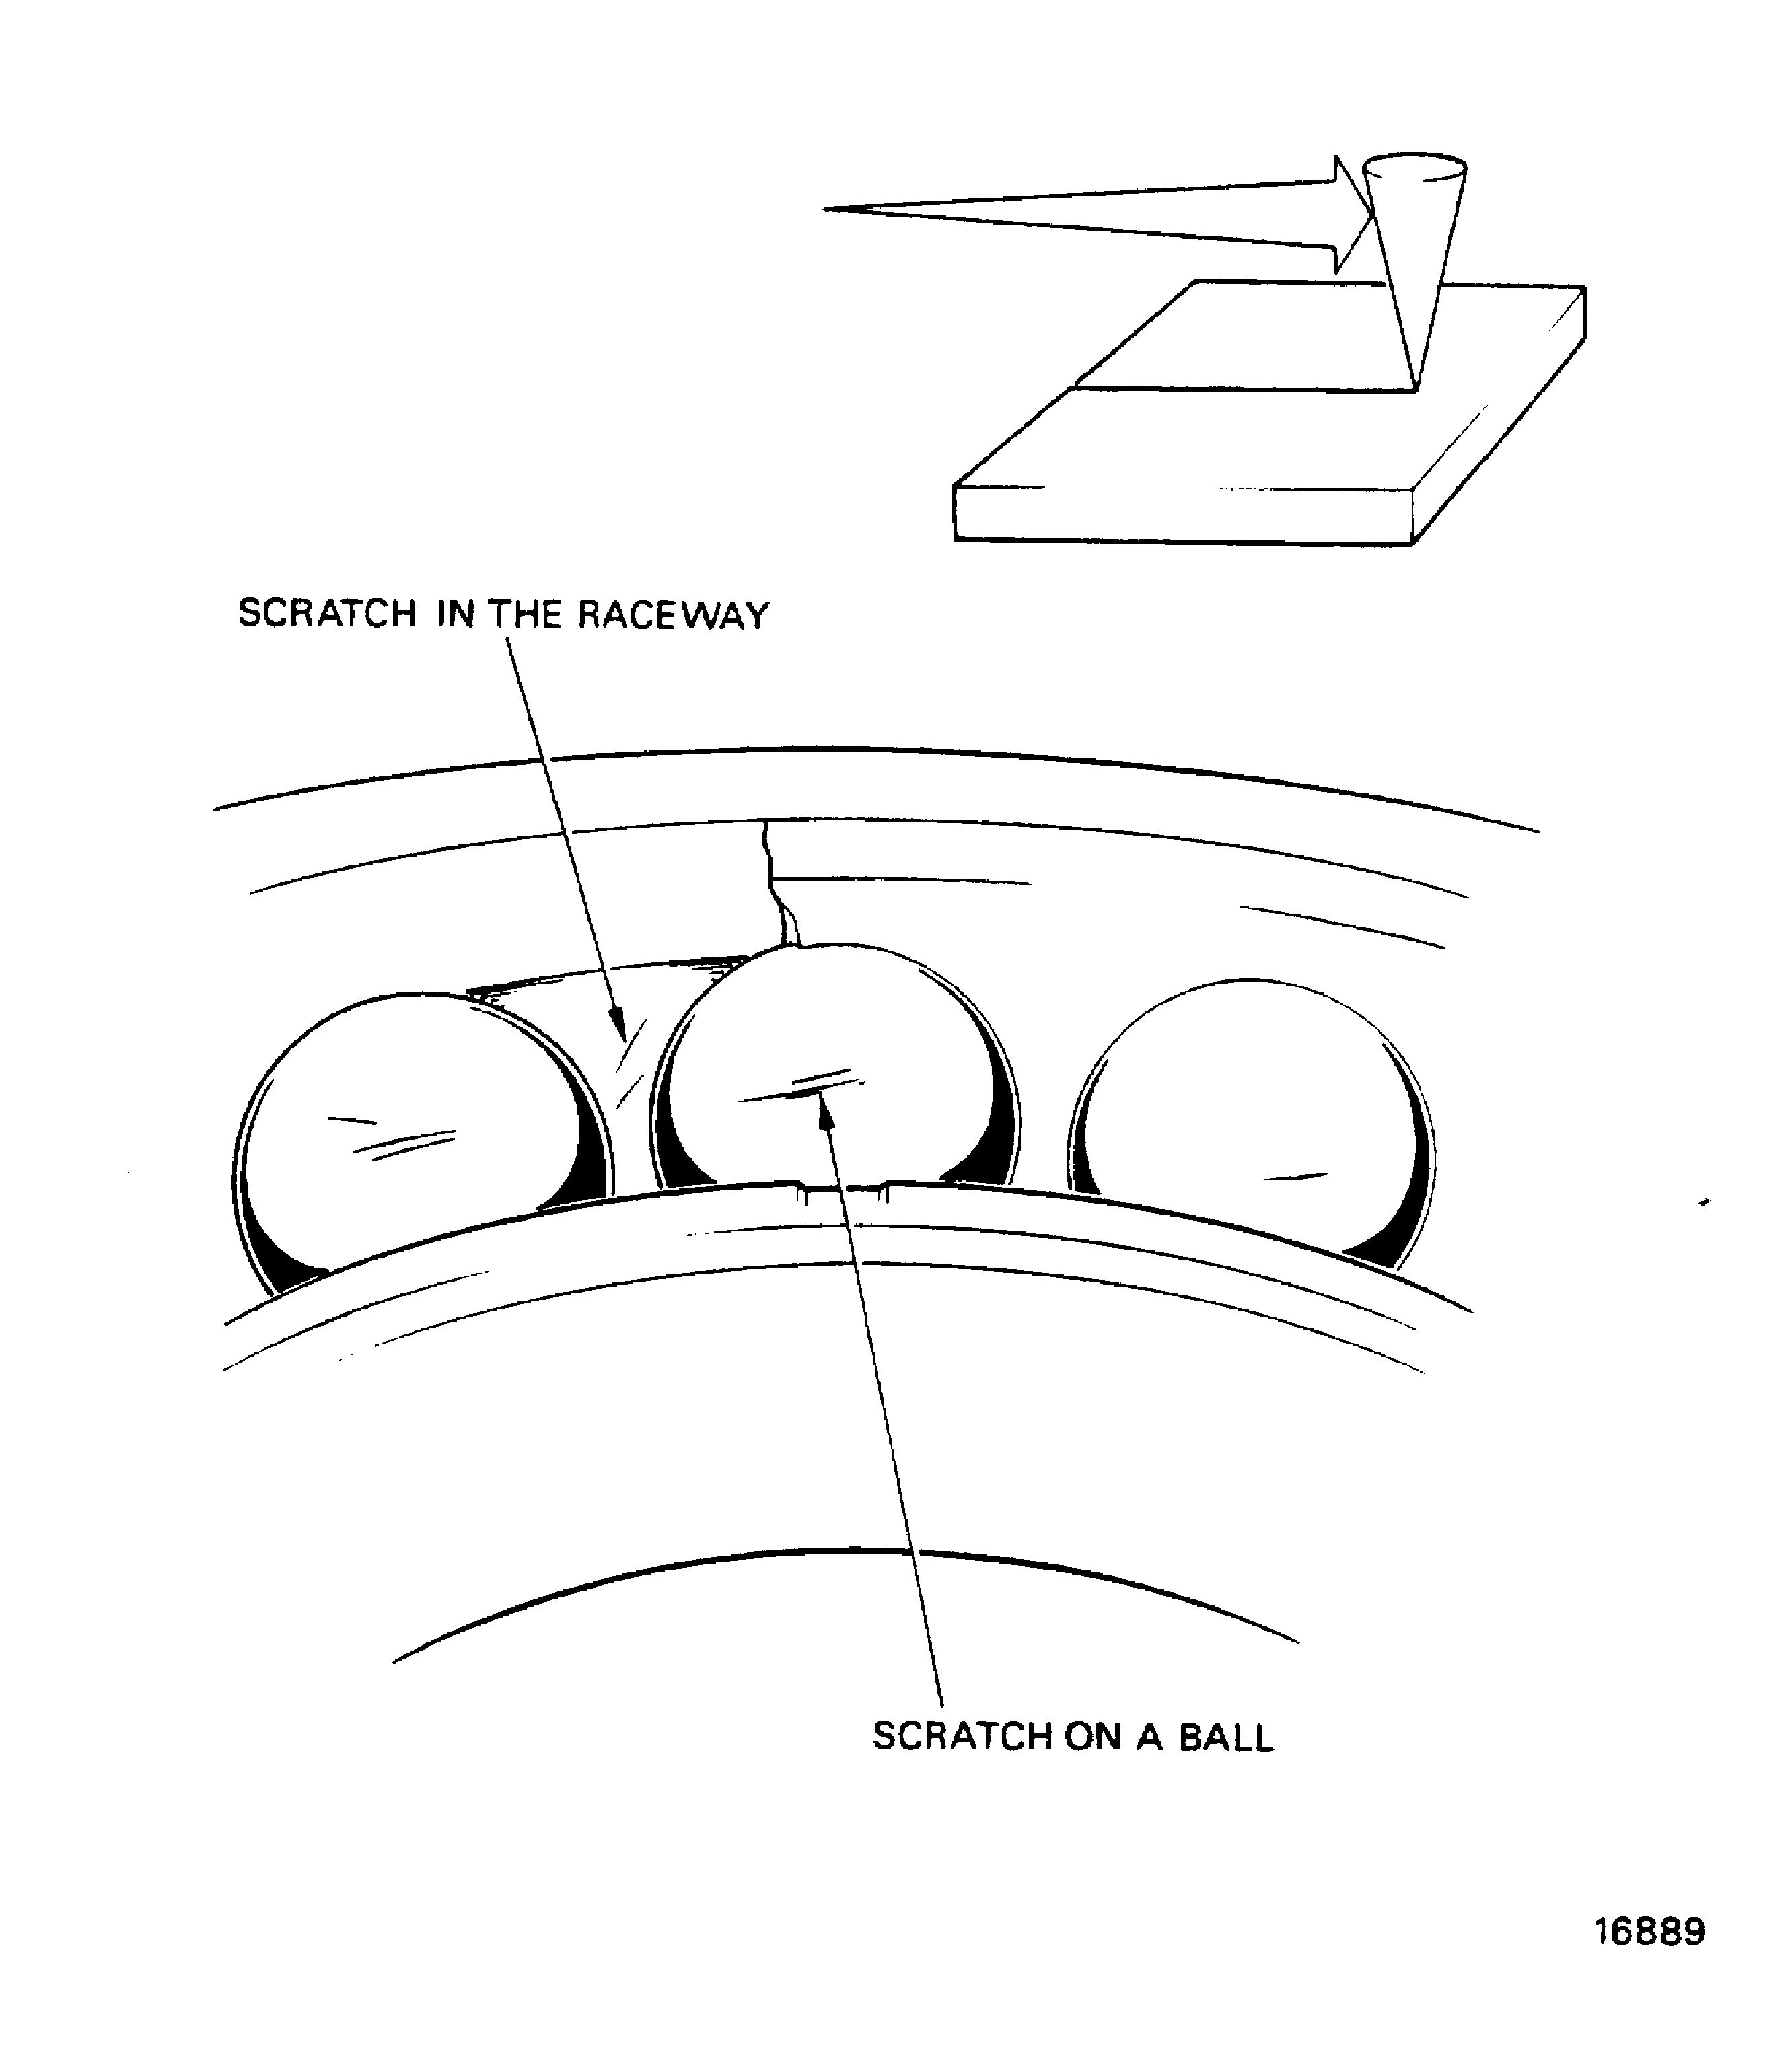
Figure: Examples of scores
Examples of scores
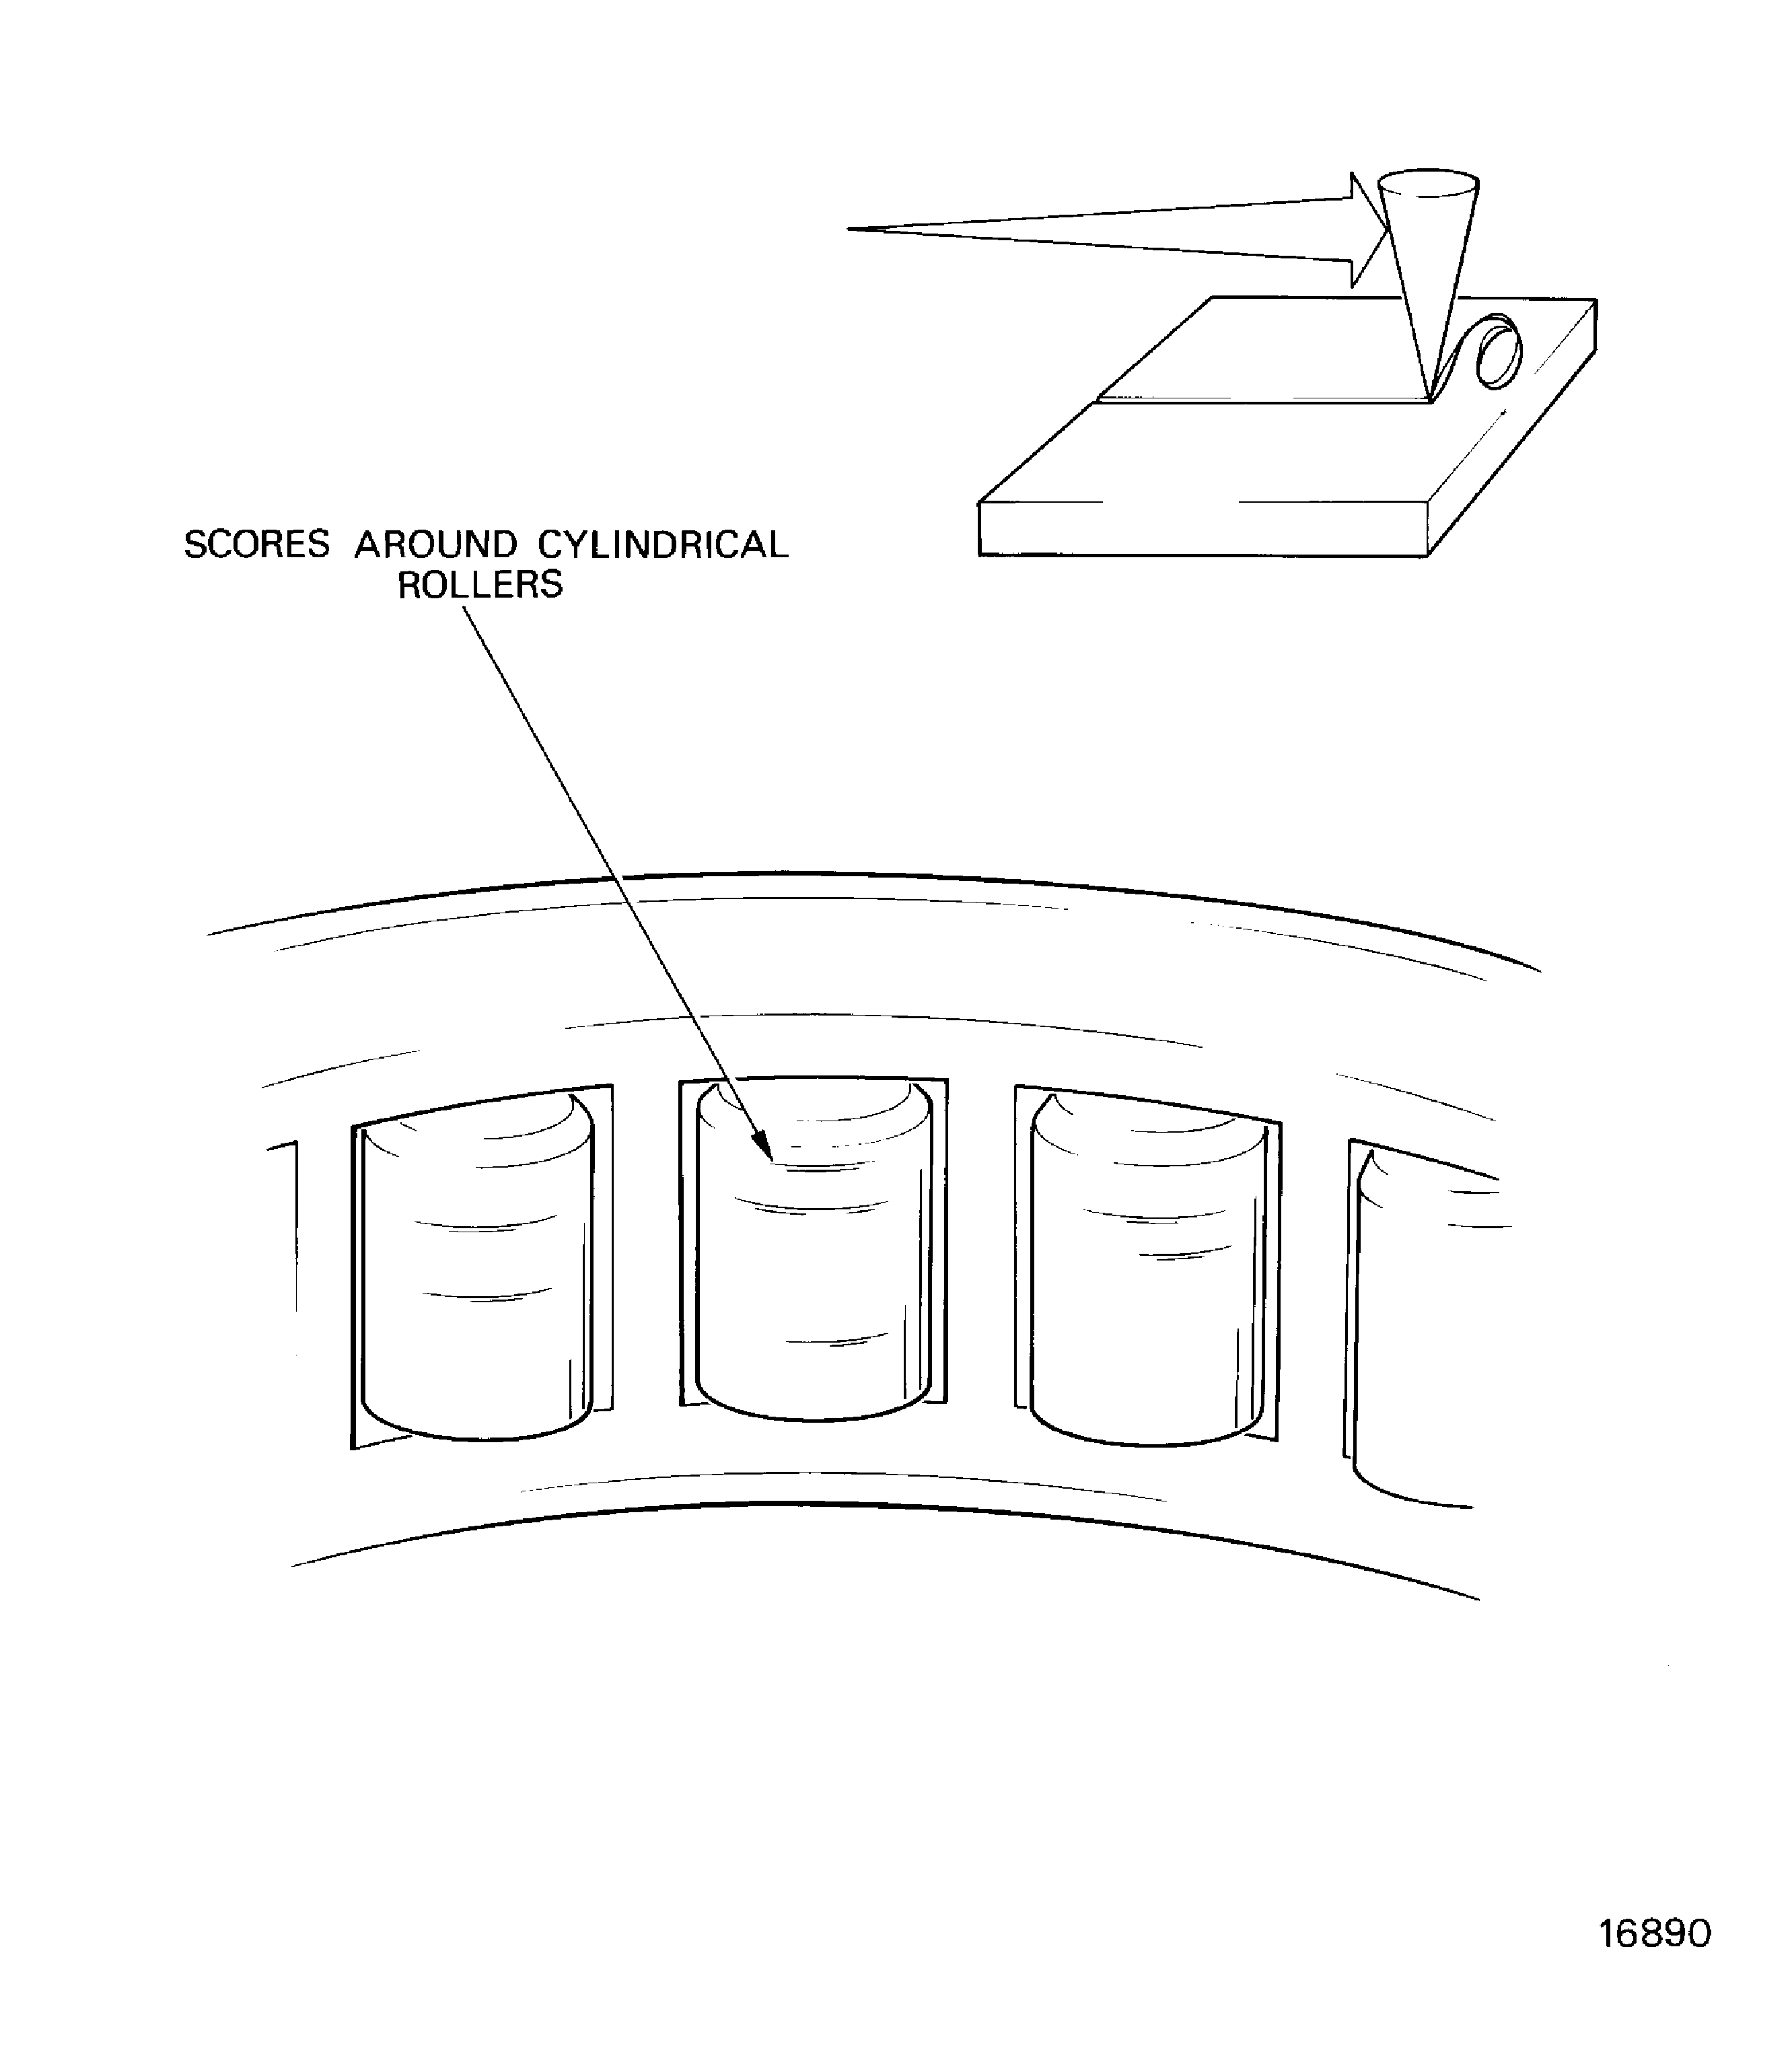
Figure: Examples of nicked surfaces
Examples of nicked surfaces
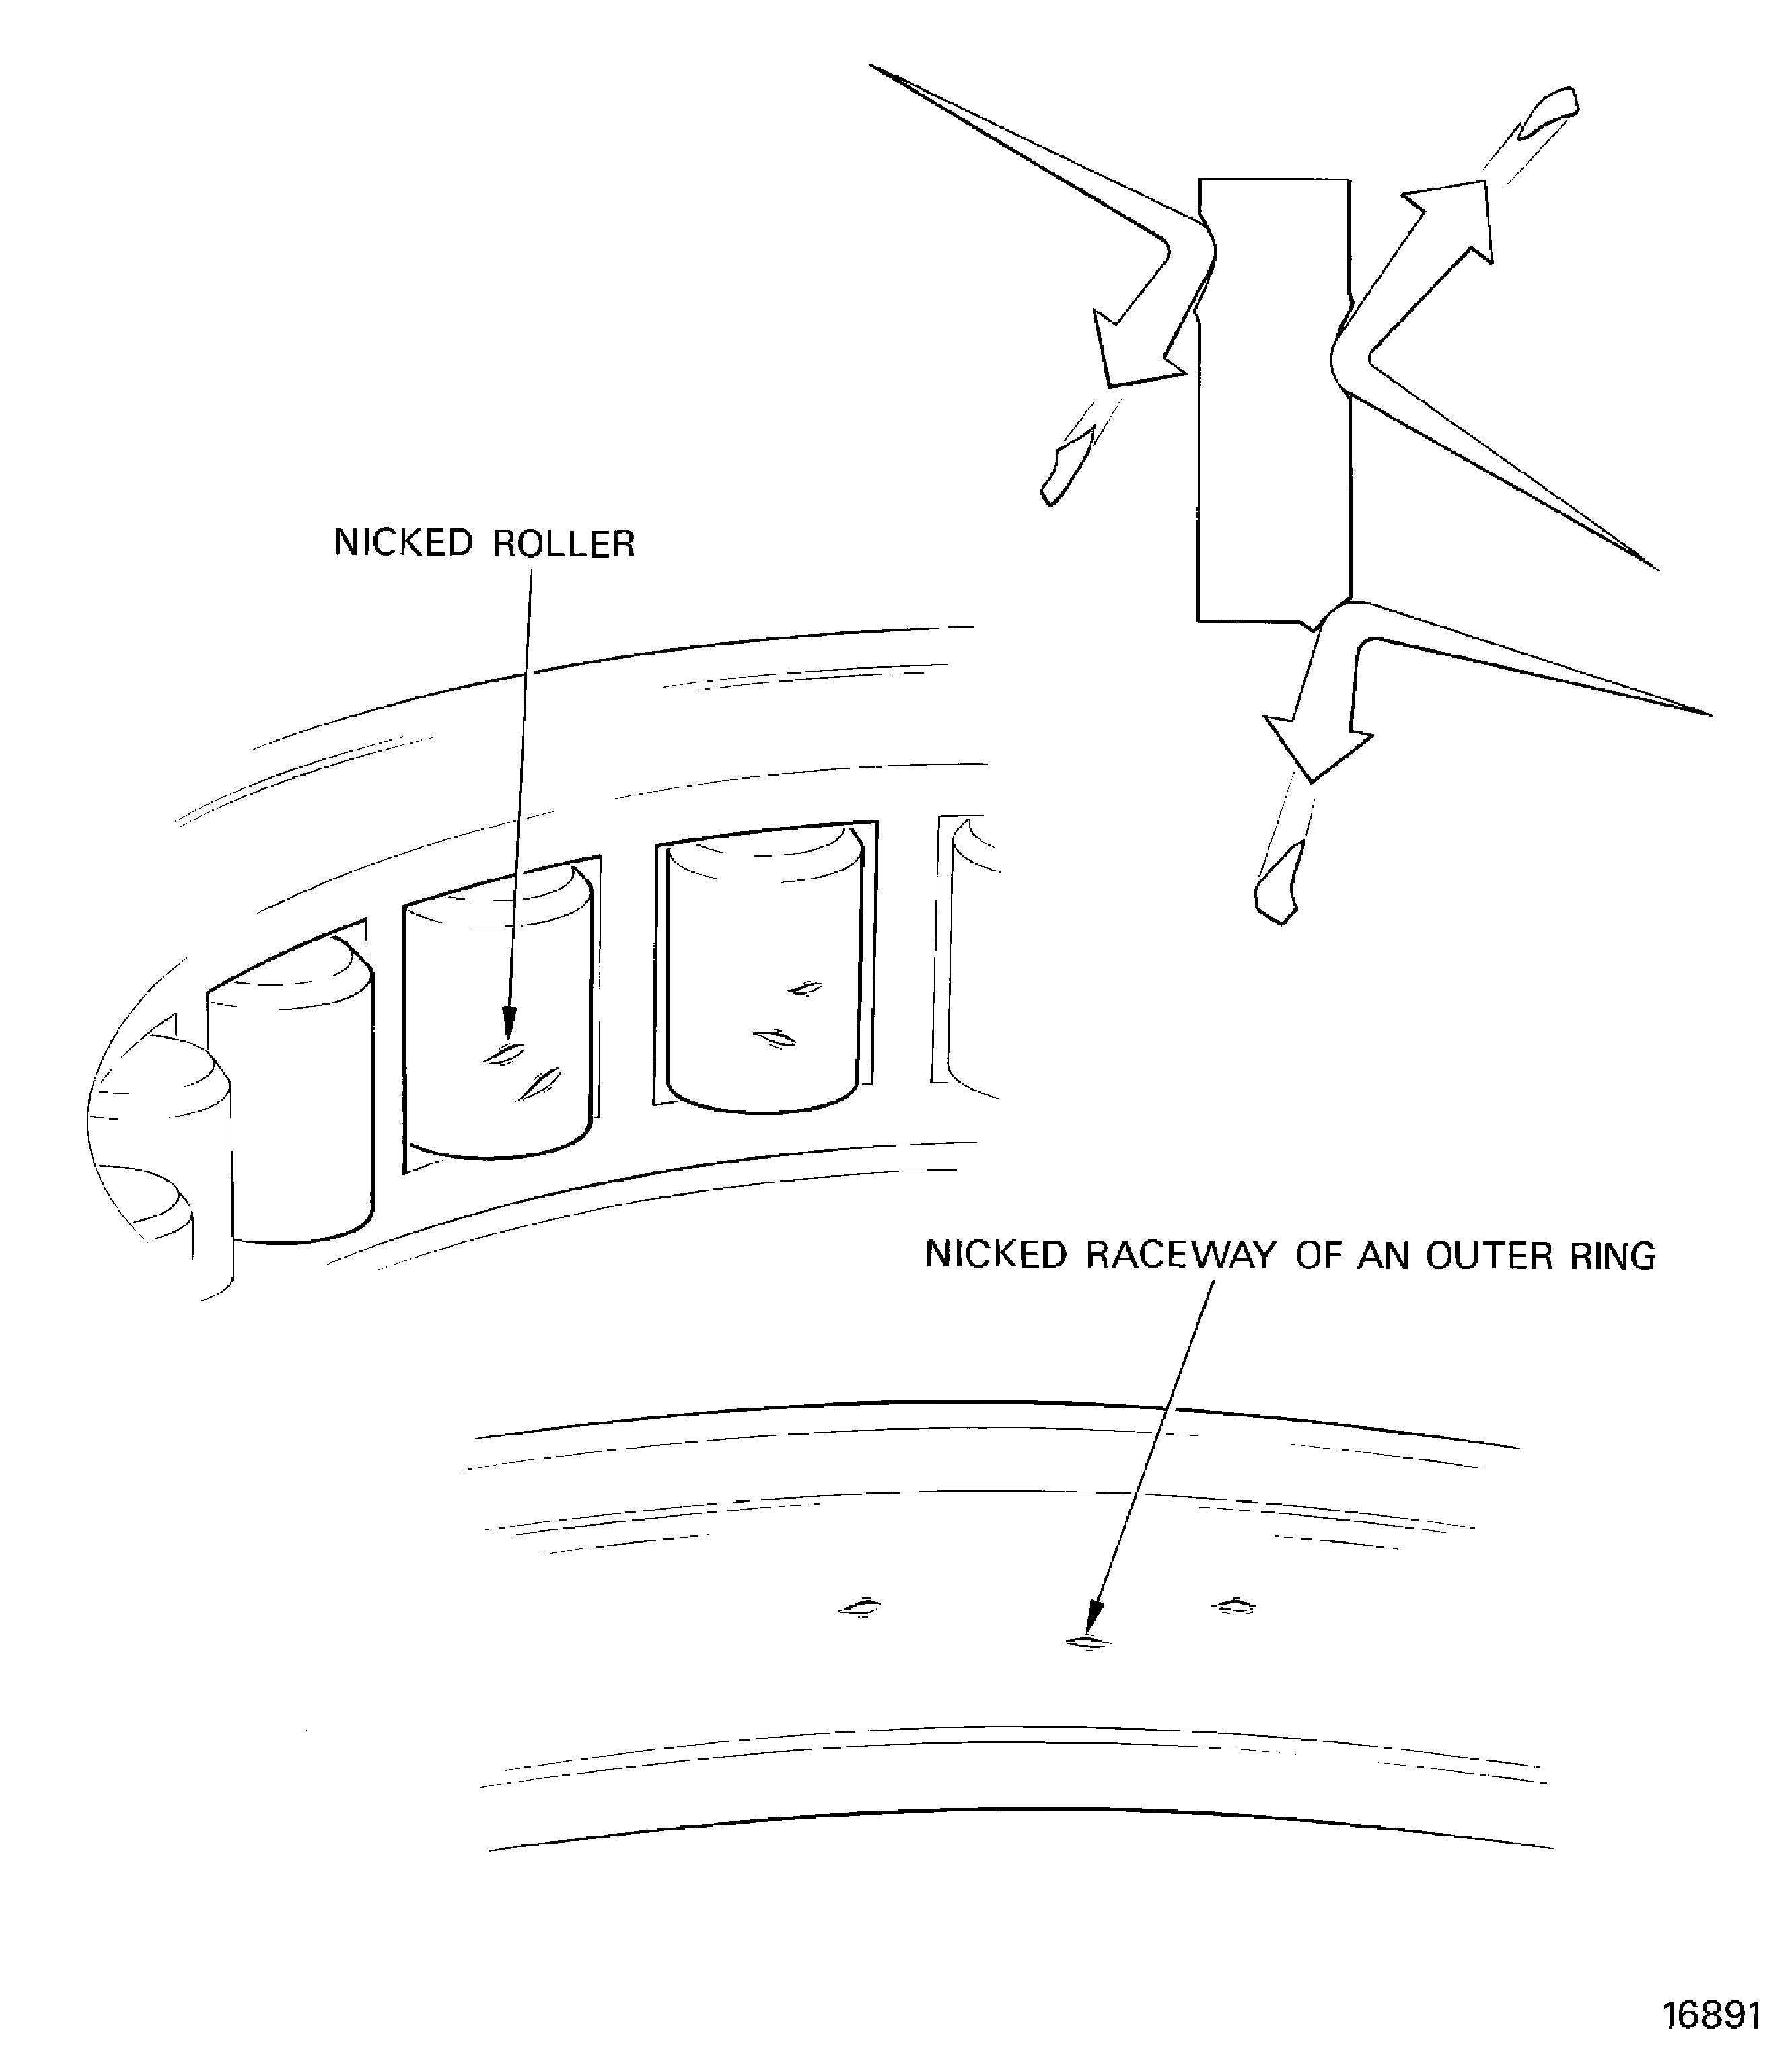
Figure: Examples of dented surfaces
Examples of dented surfaces
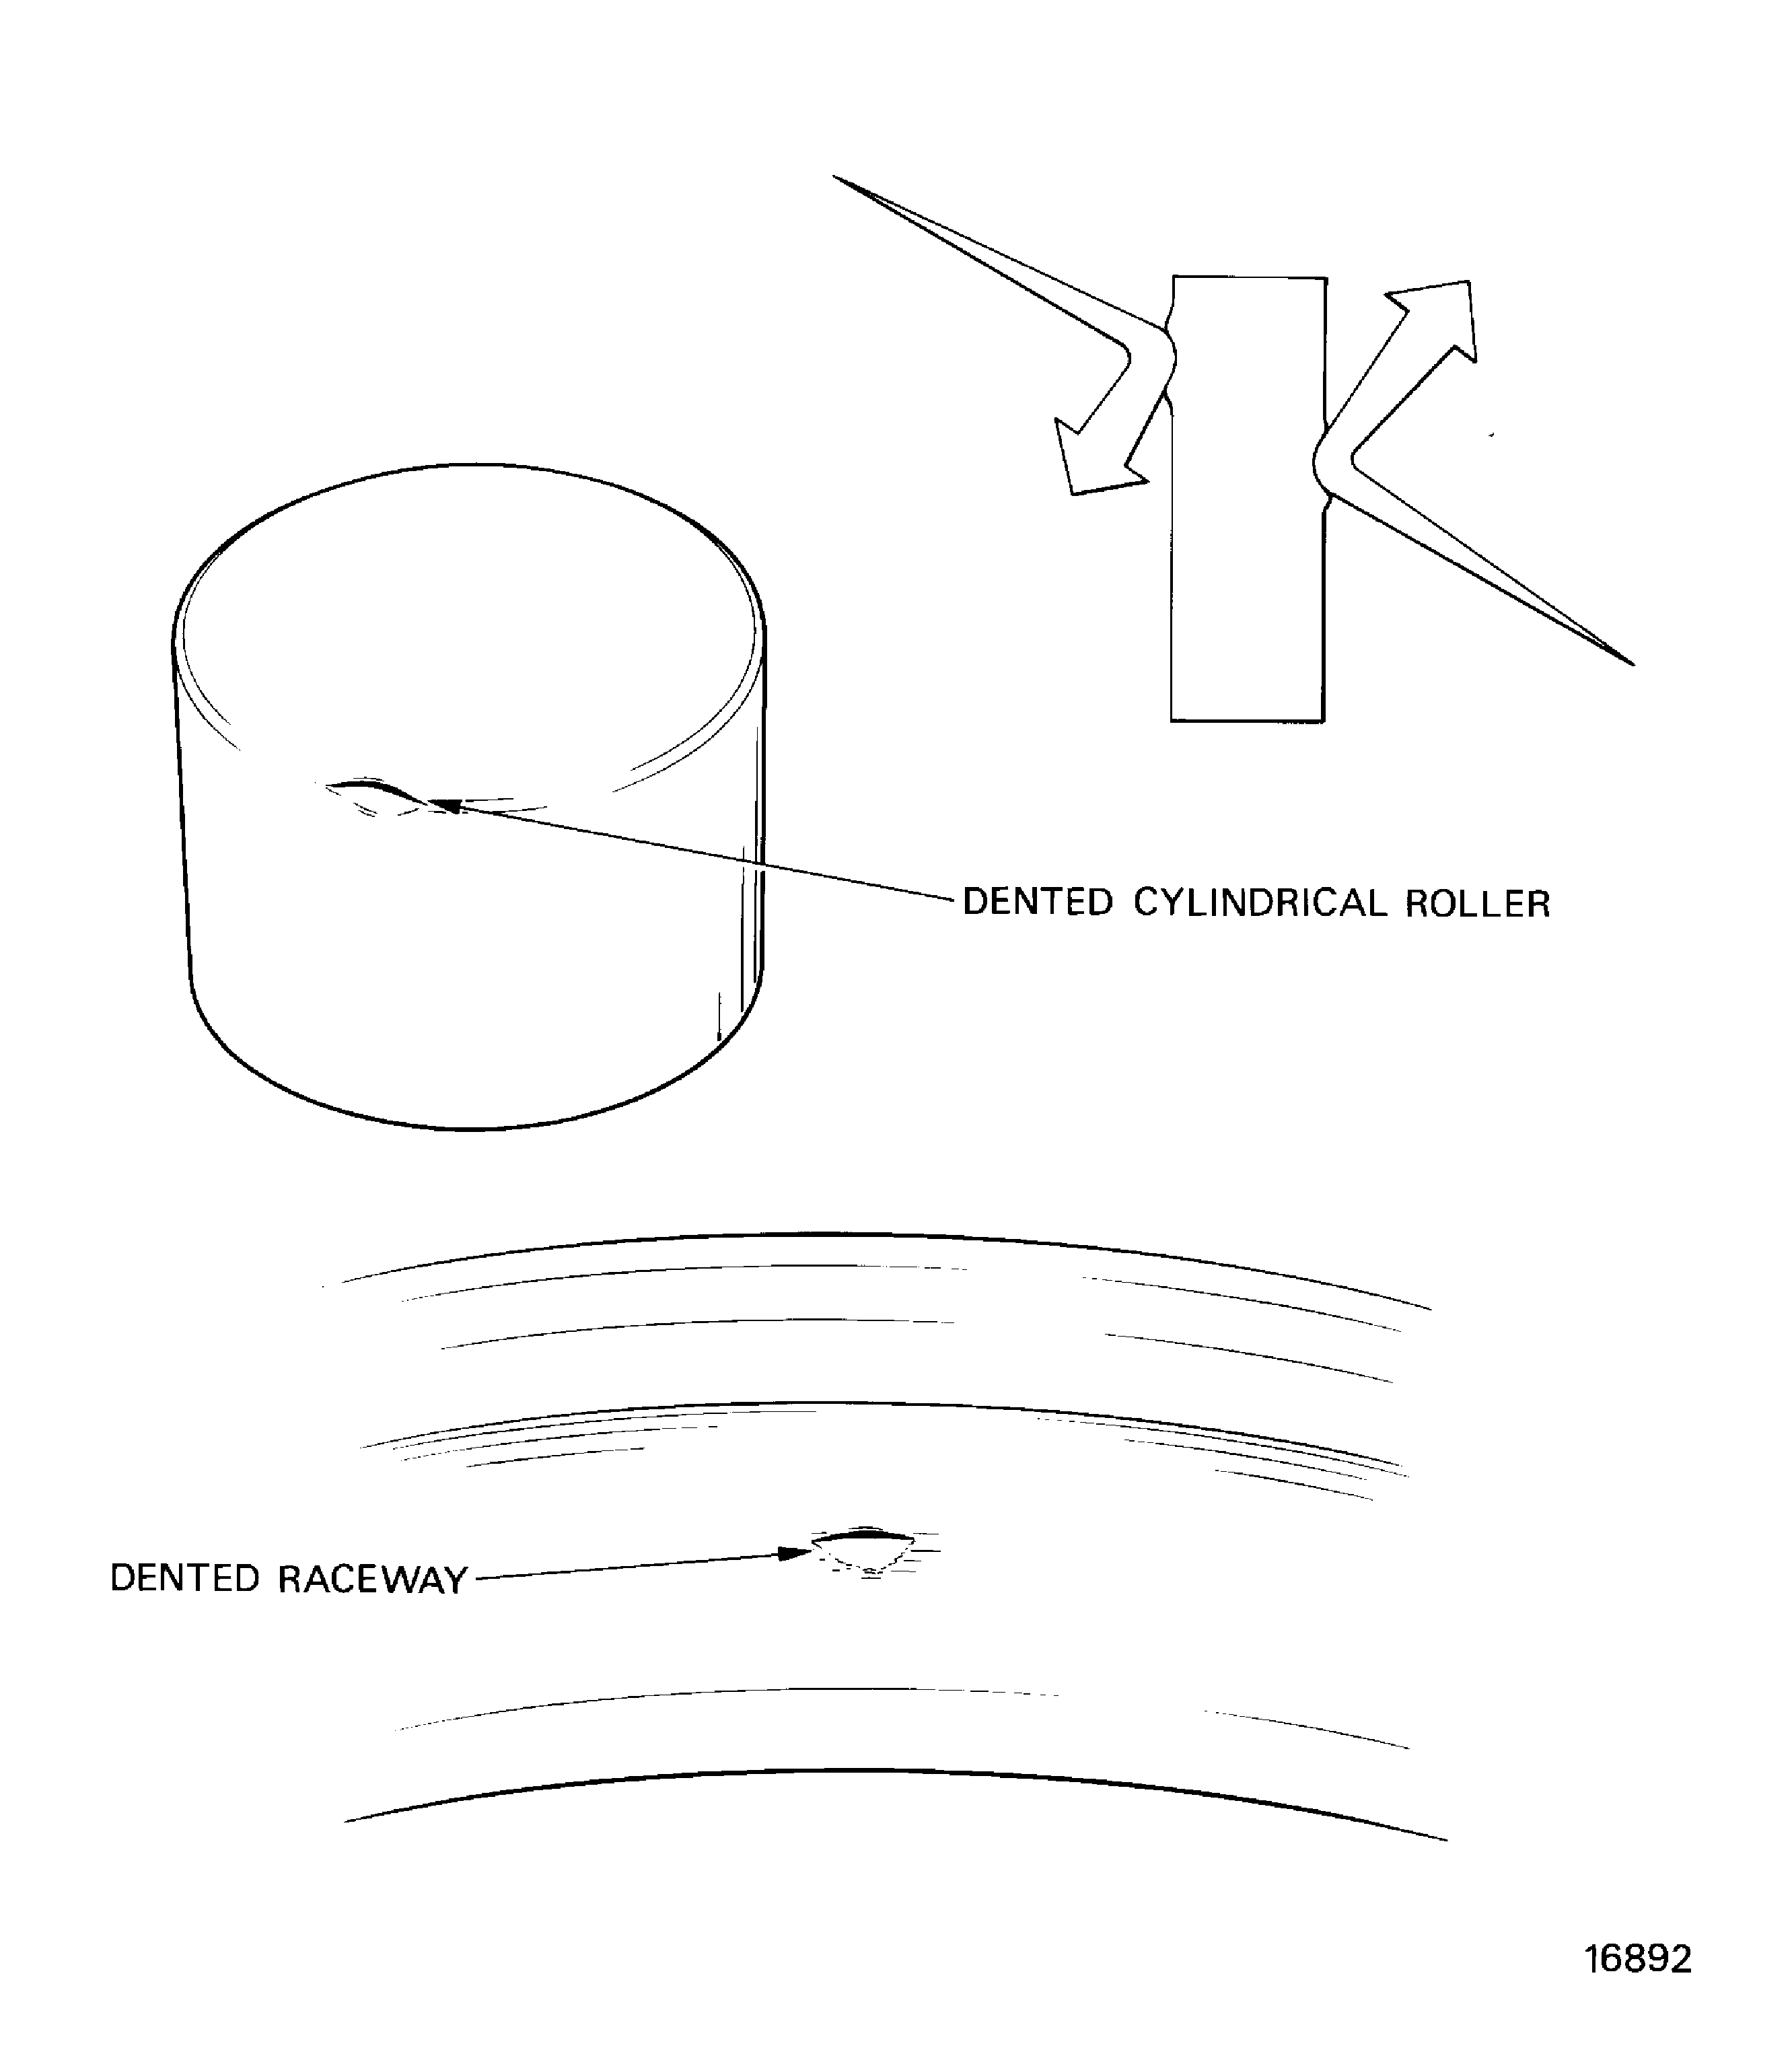
Figure: Examples of corroded surfaces
Examples of corroded surfaces
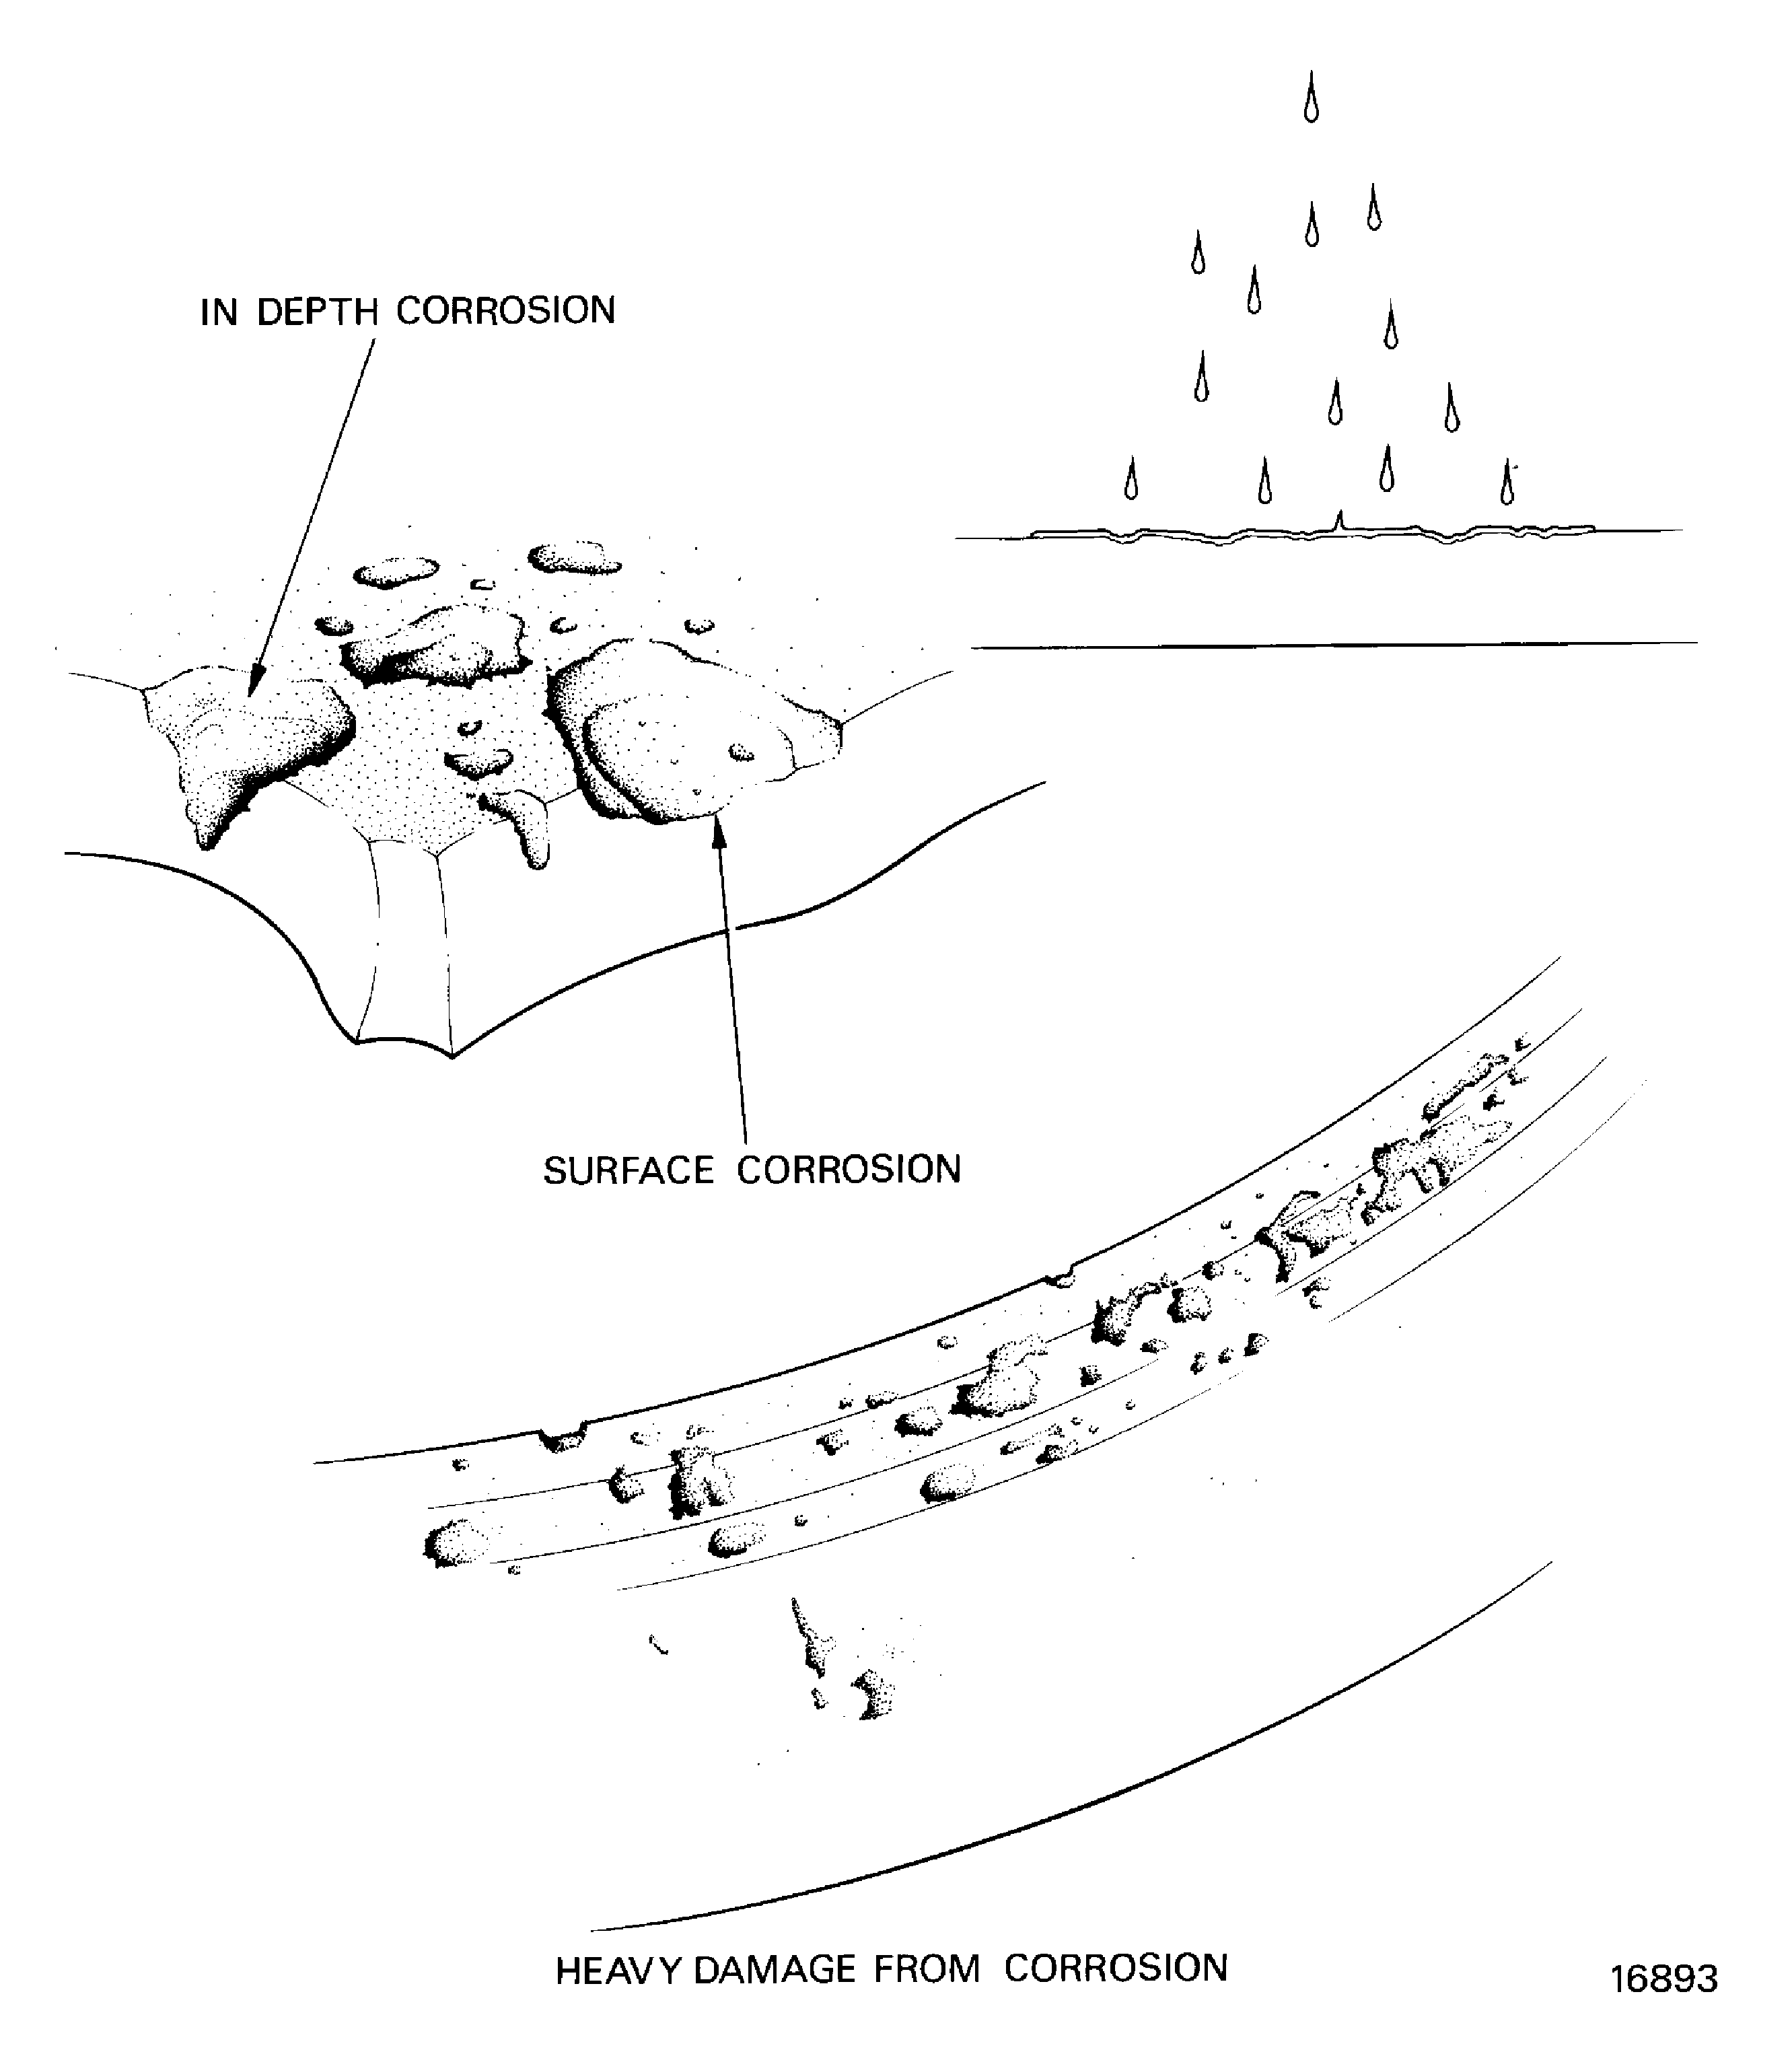
Figure: Examples of galled surfaces
Examples of galled surfaces
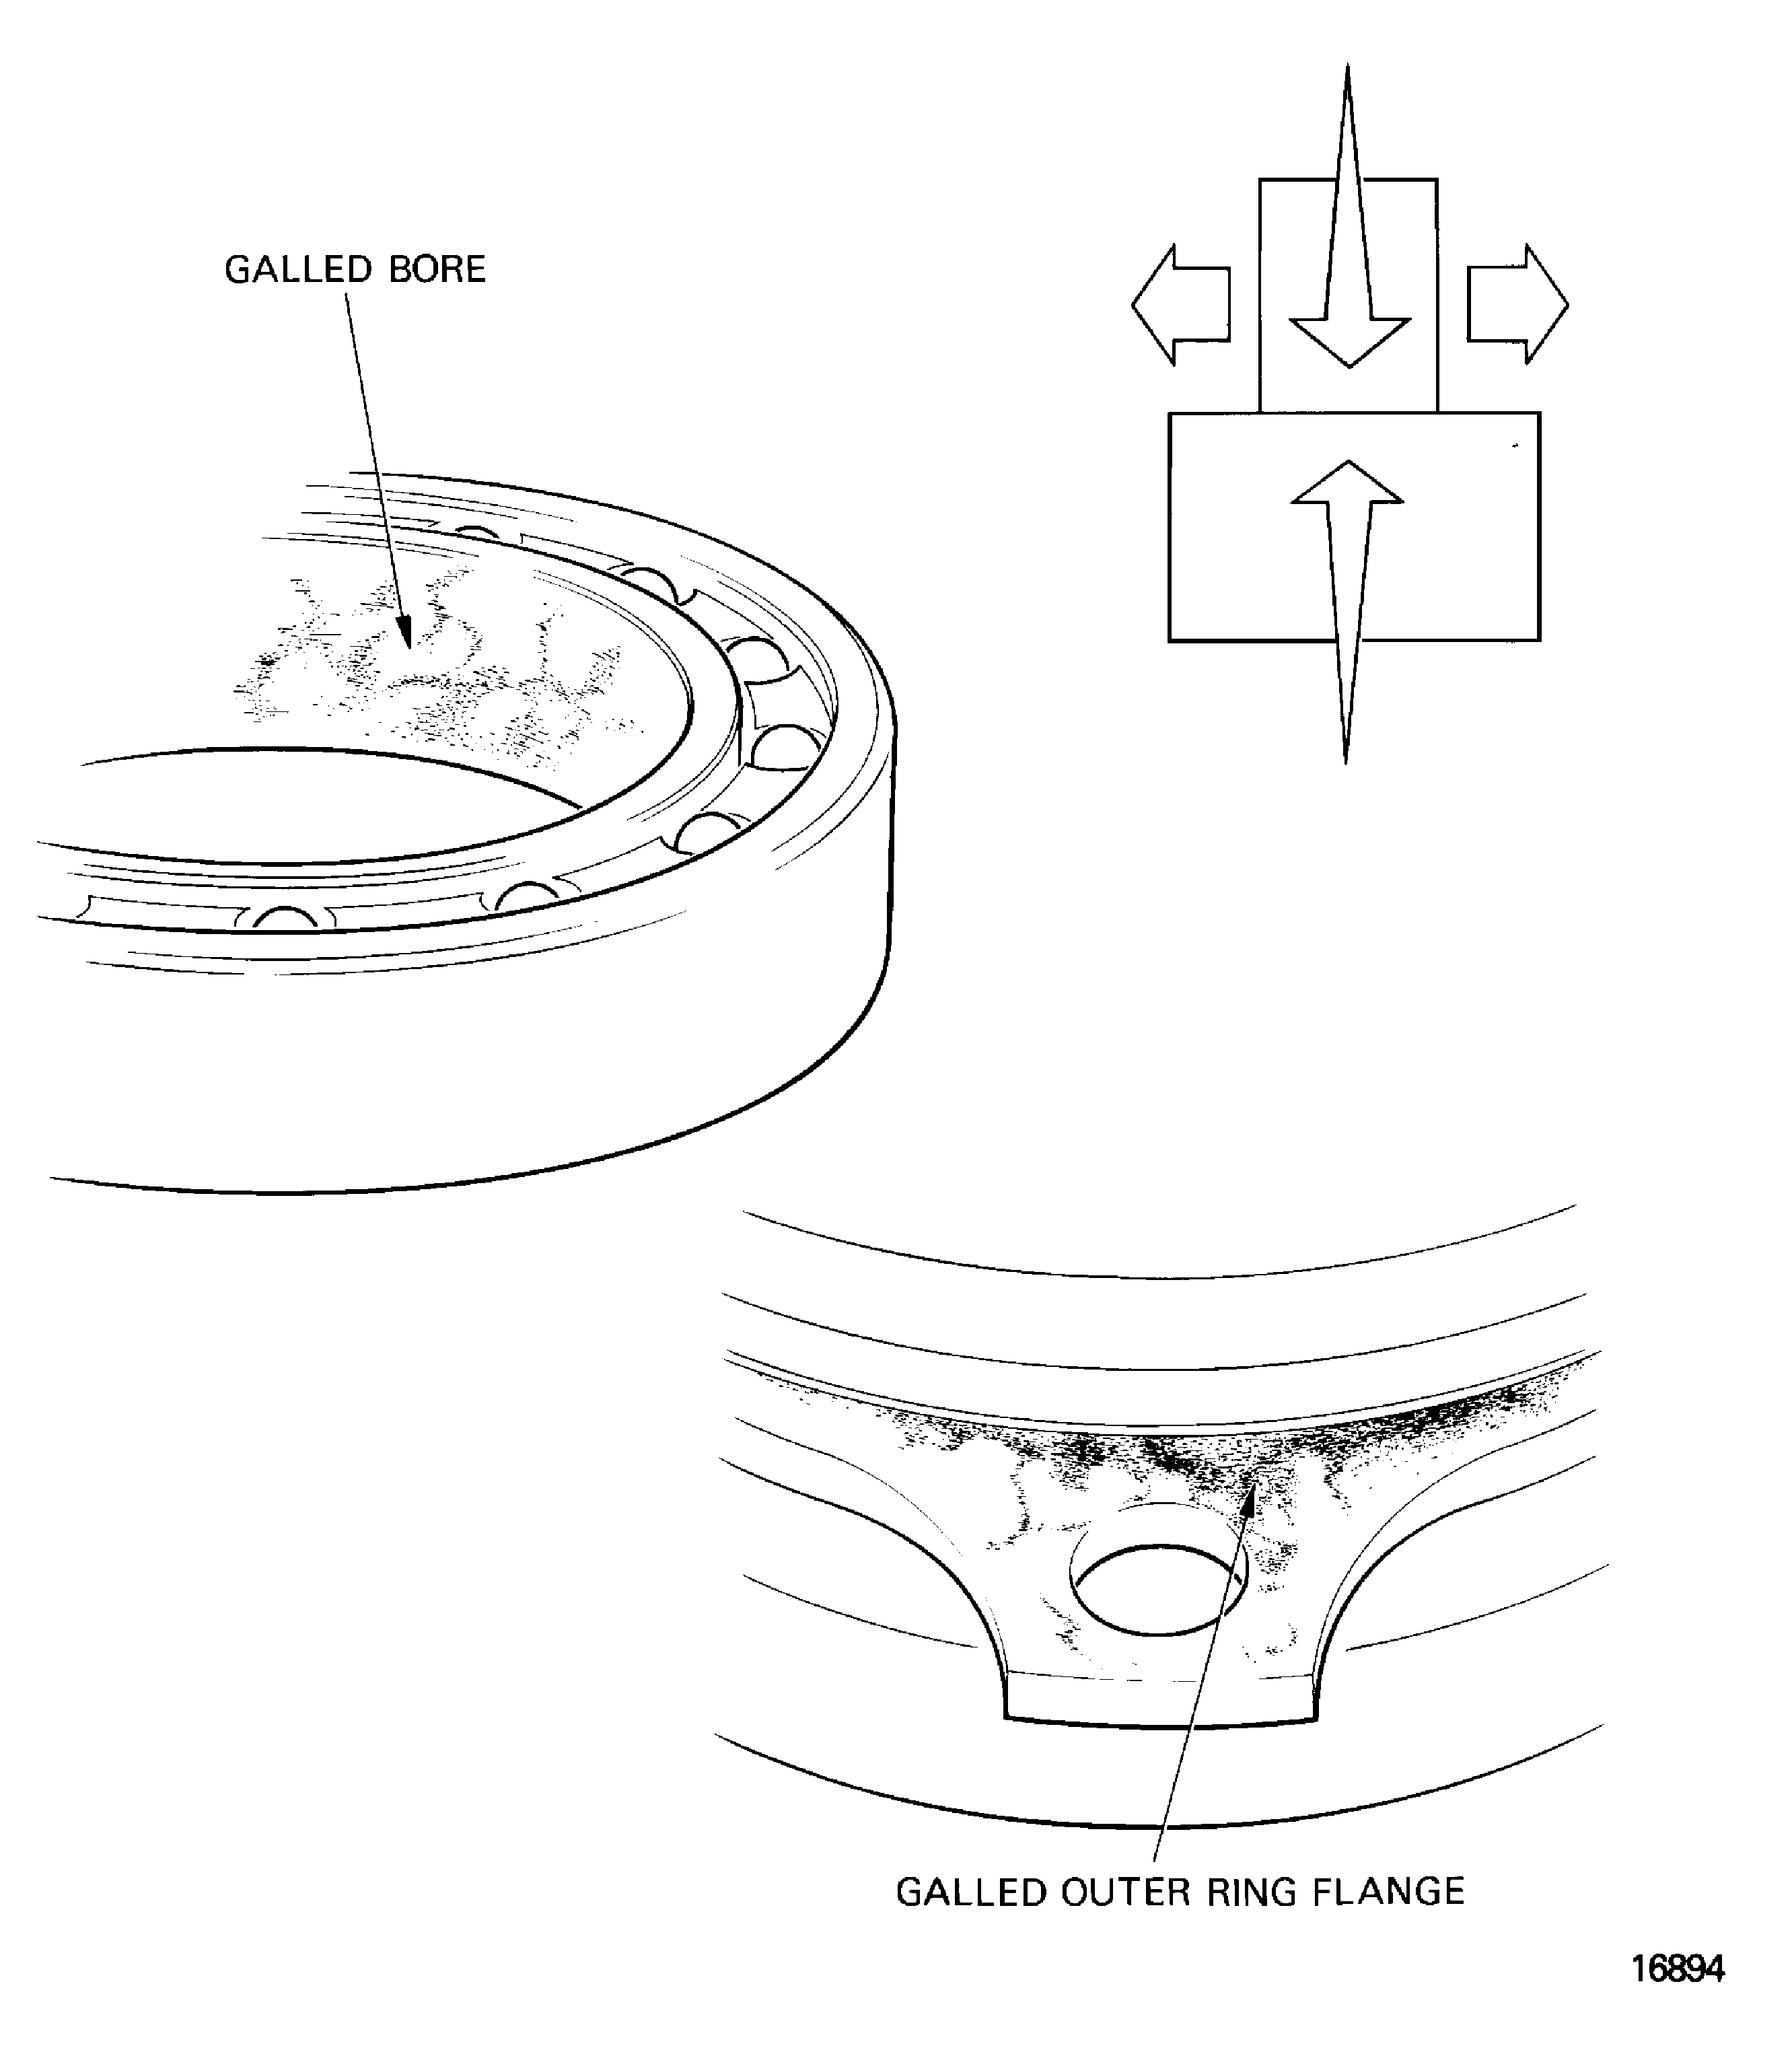
Figure: Examples of stains
Examples of stains
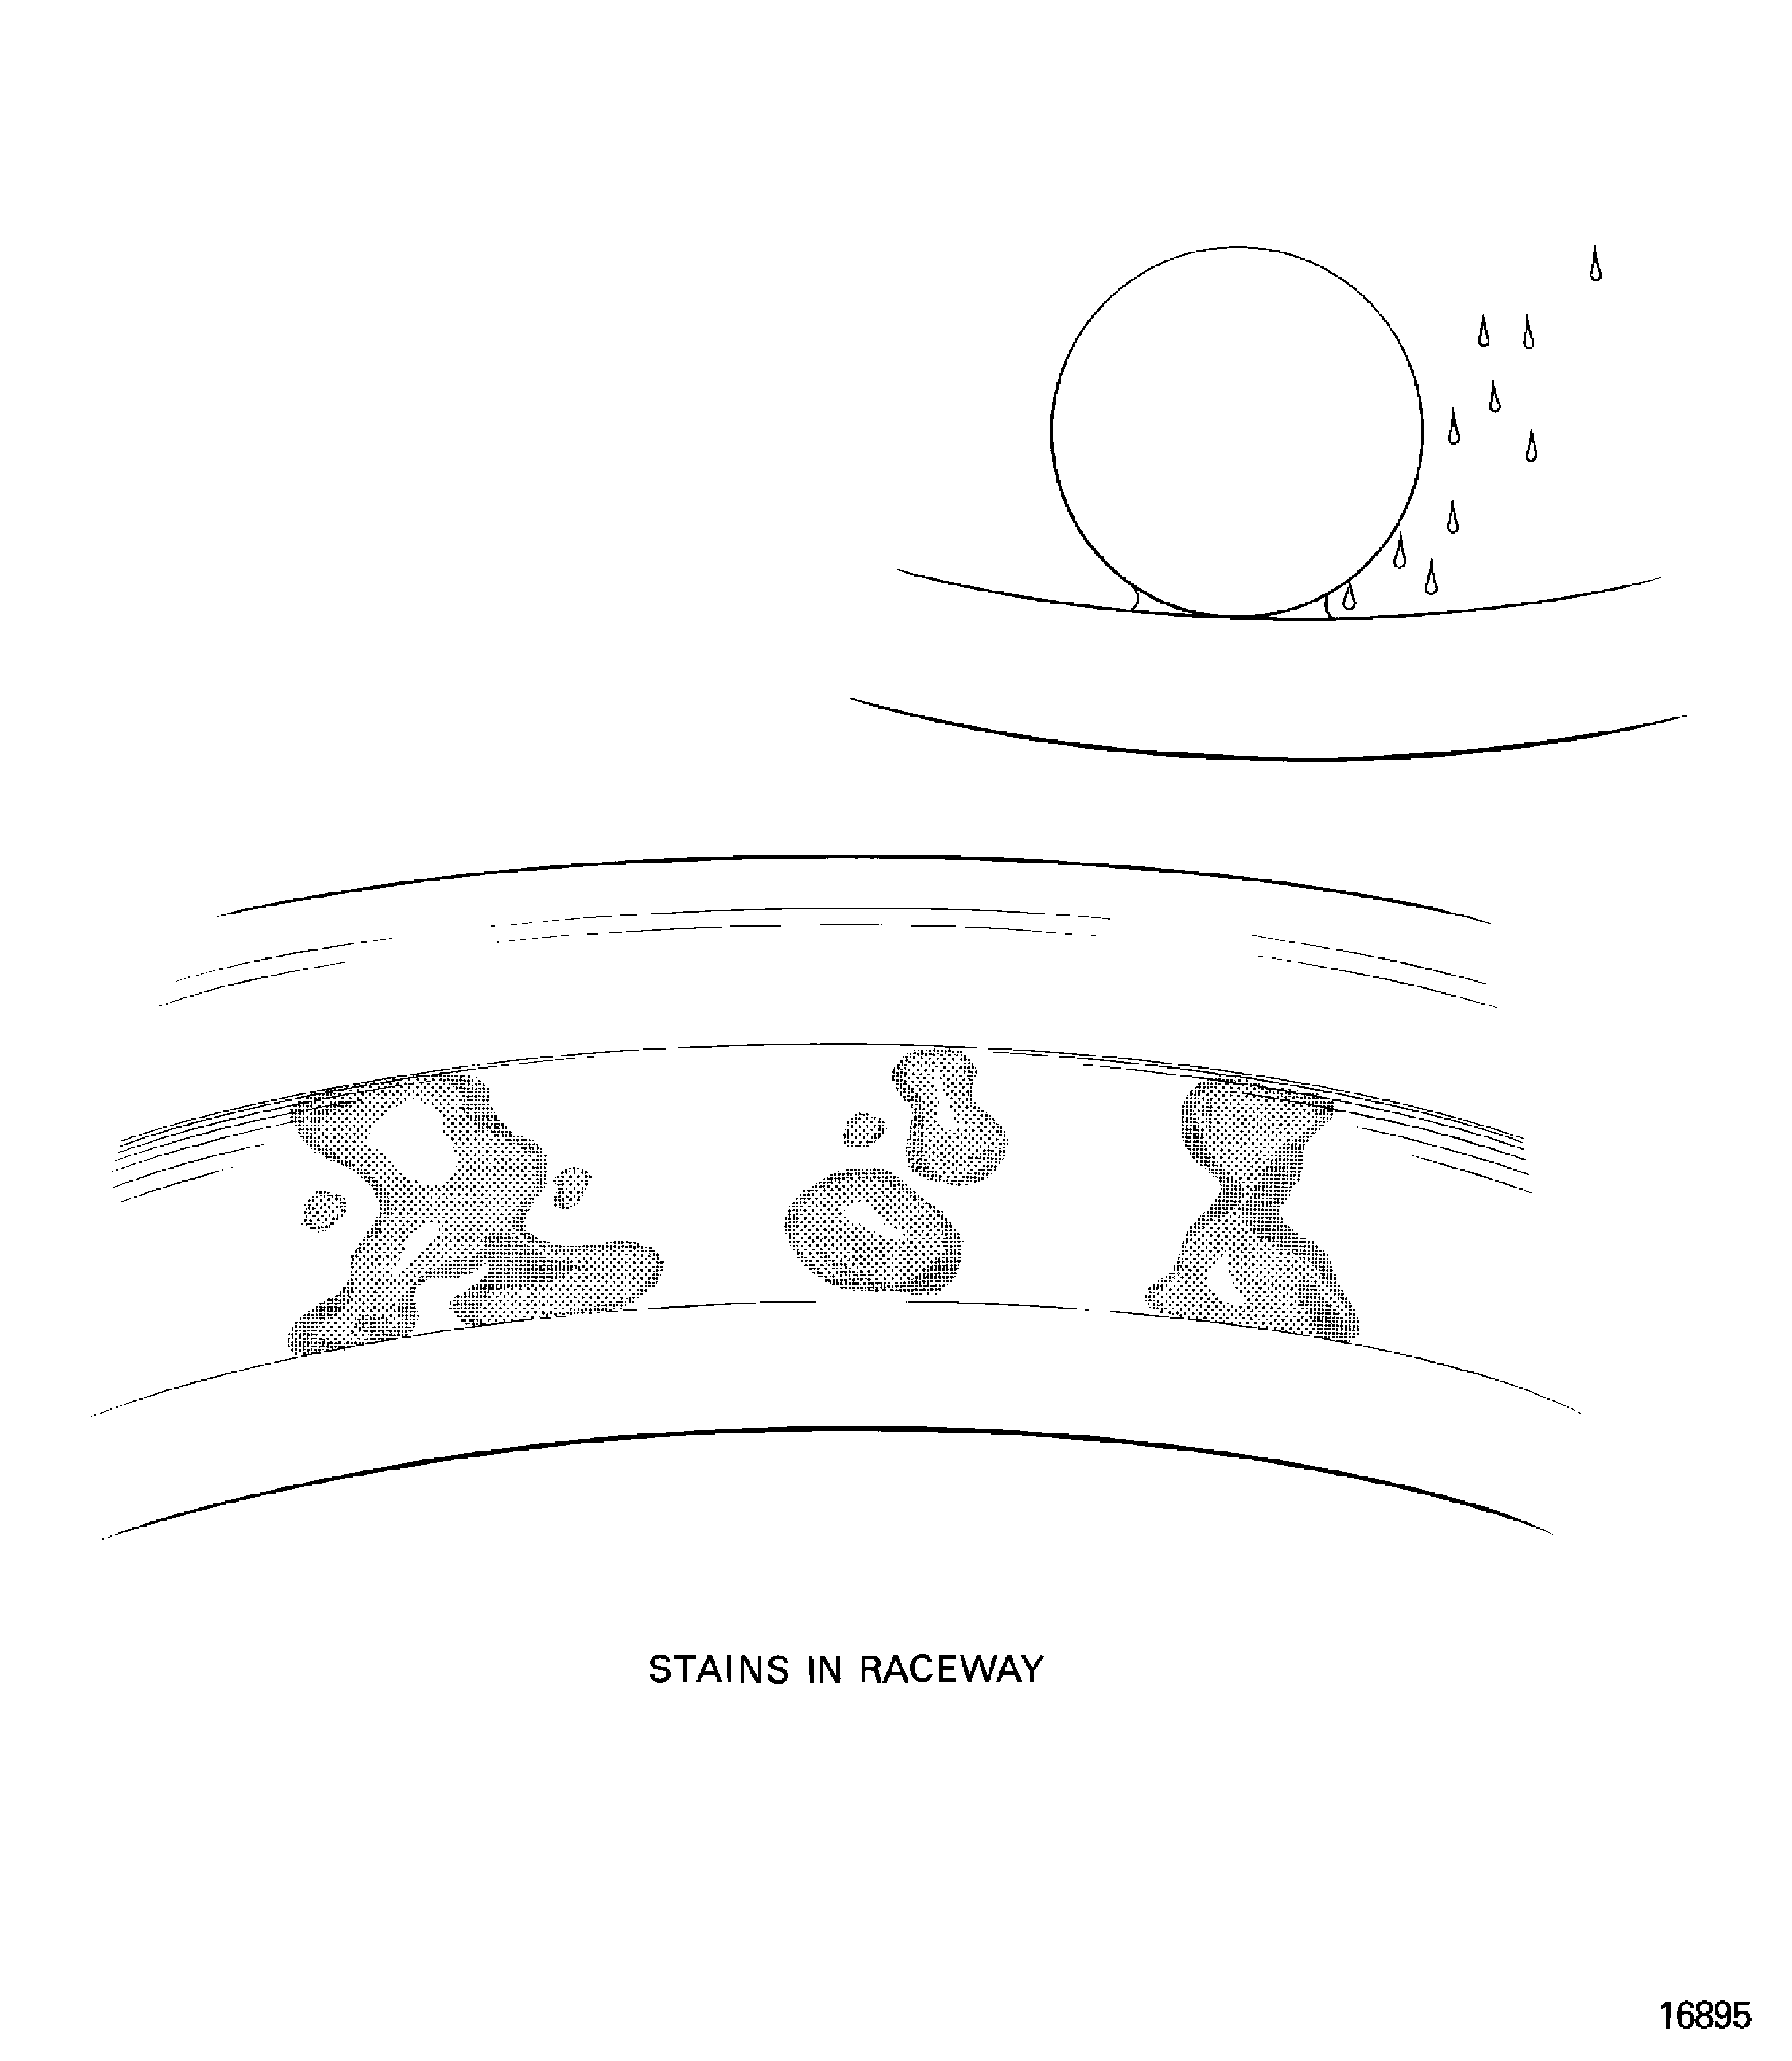
Figure: Examples of carbon particles
Examples of carbon particles
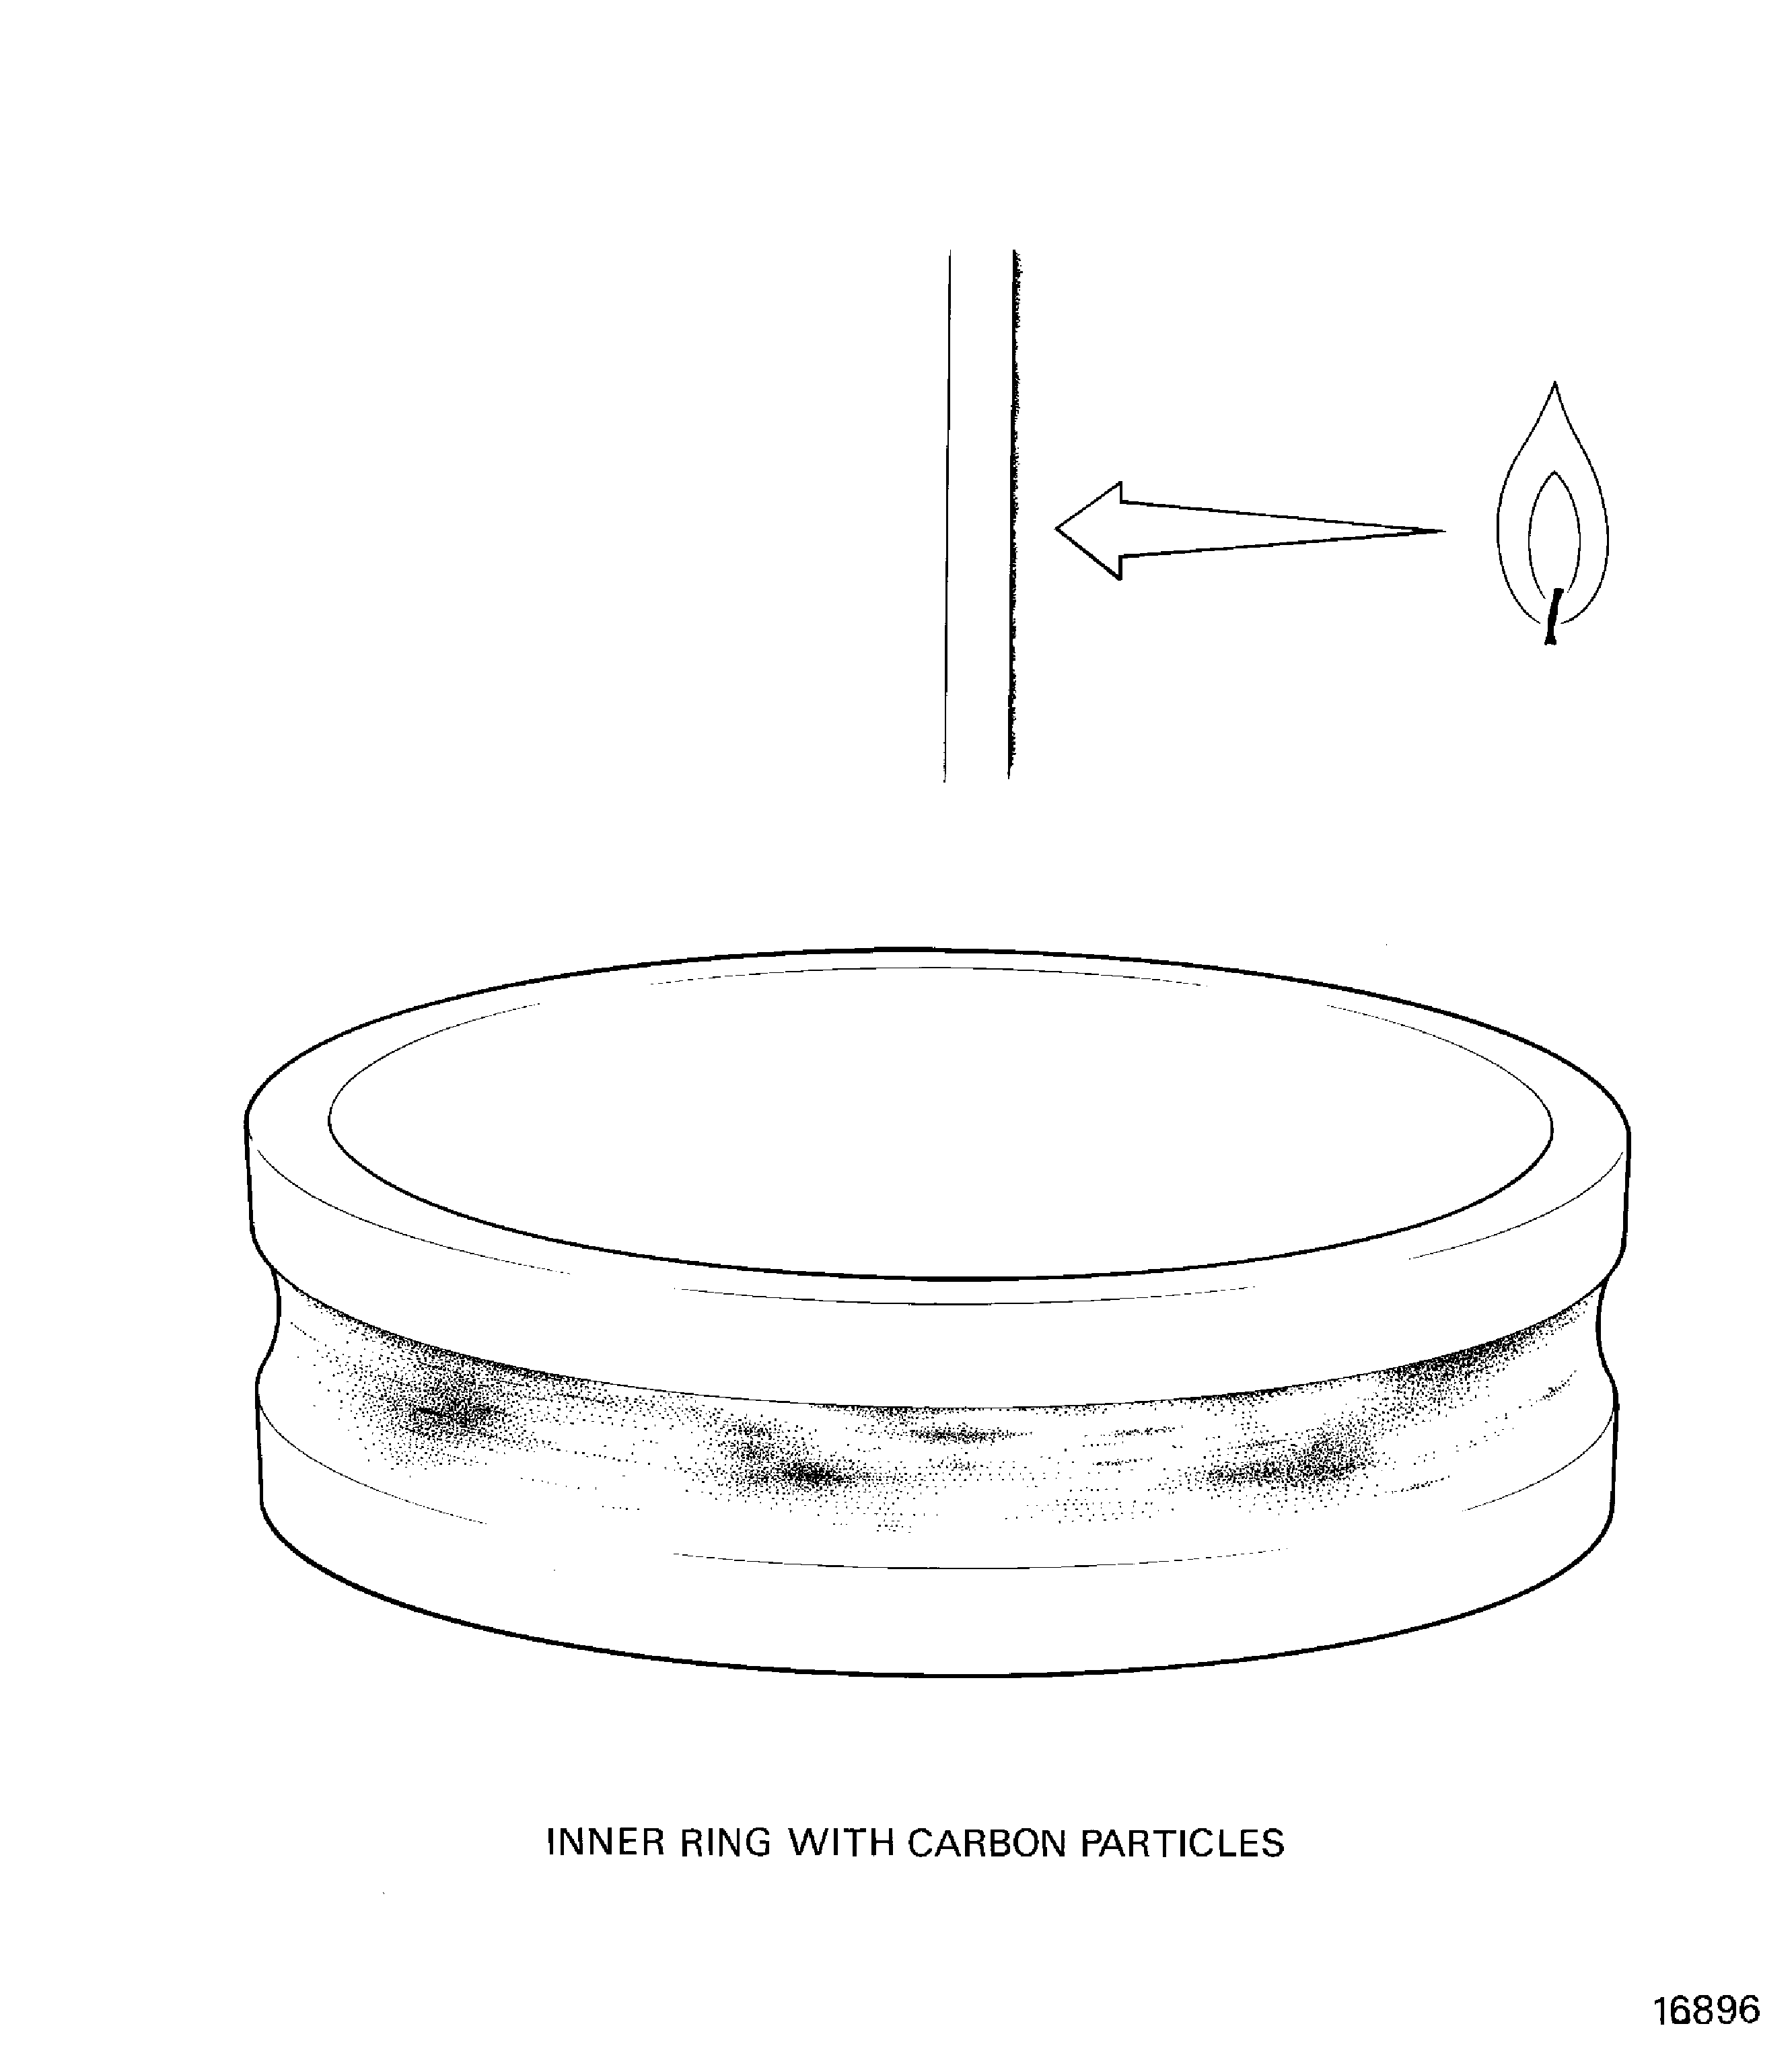
Figure: Examples of peeled surfaces
Examples of peeled surfaces
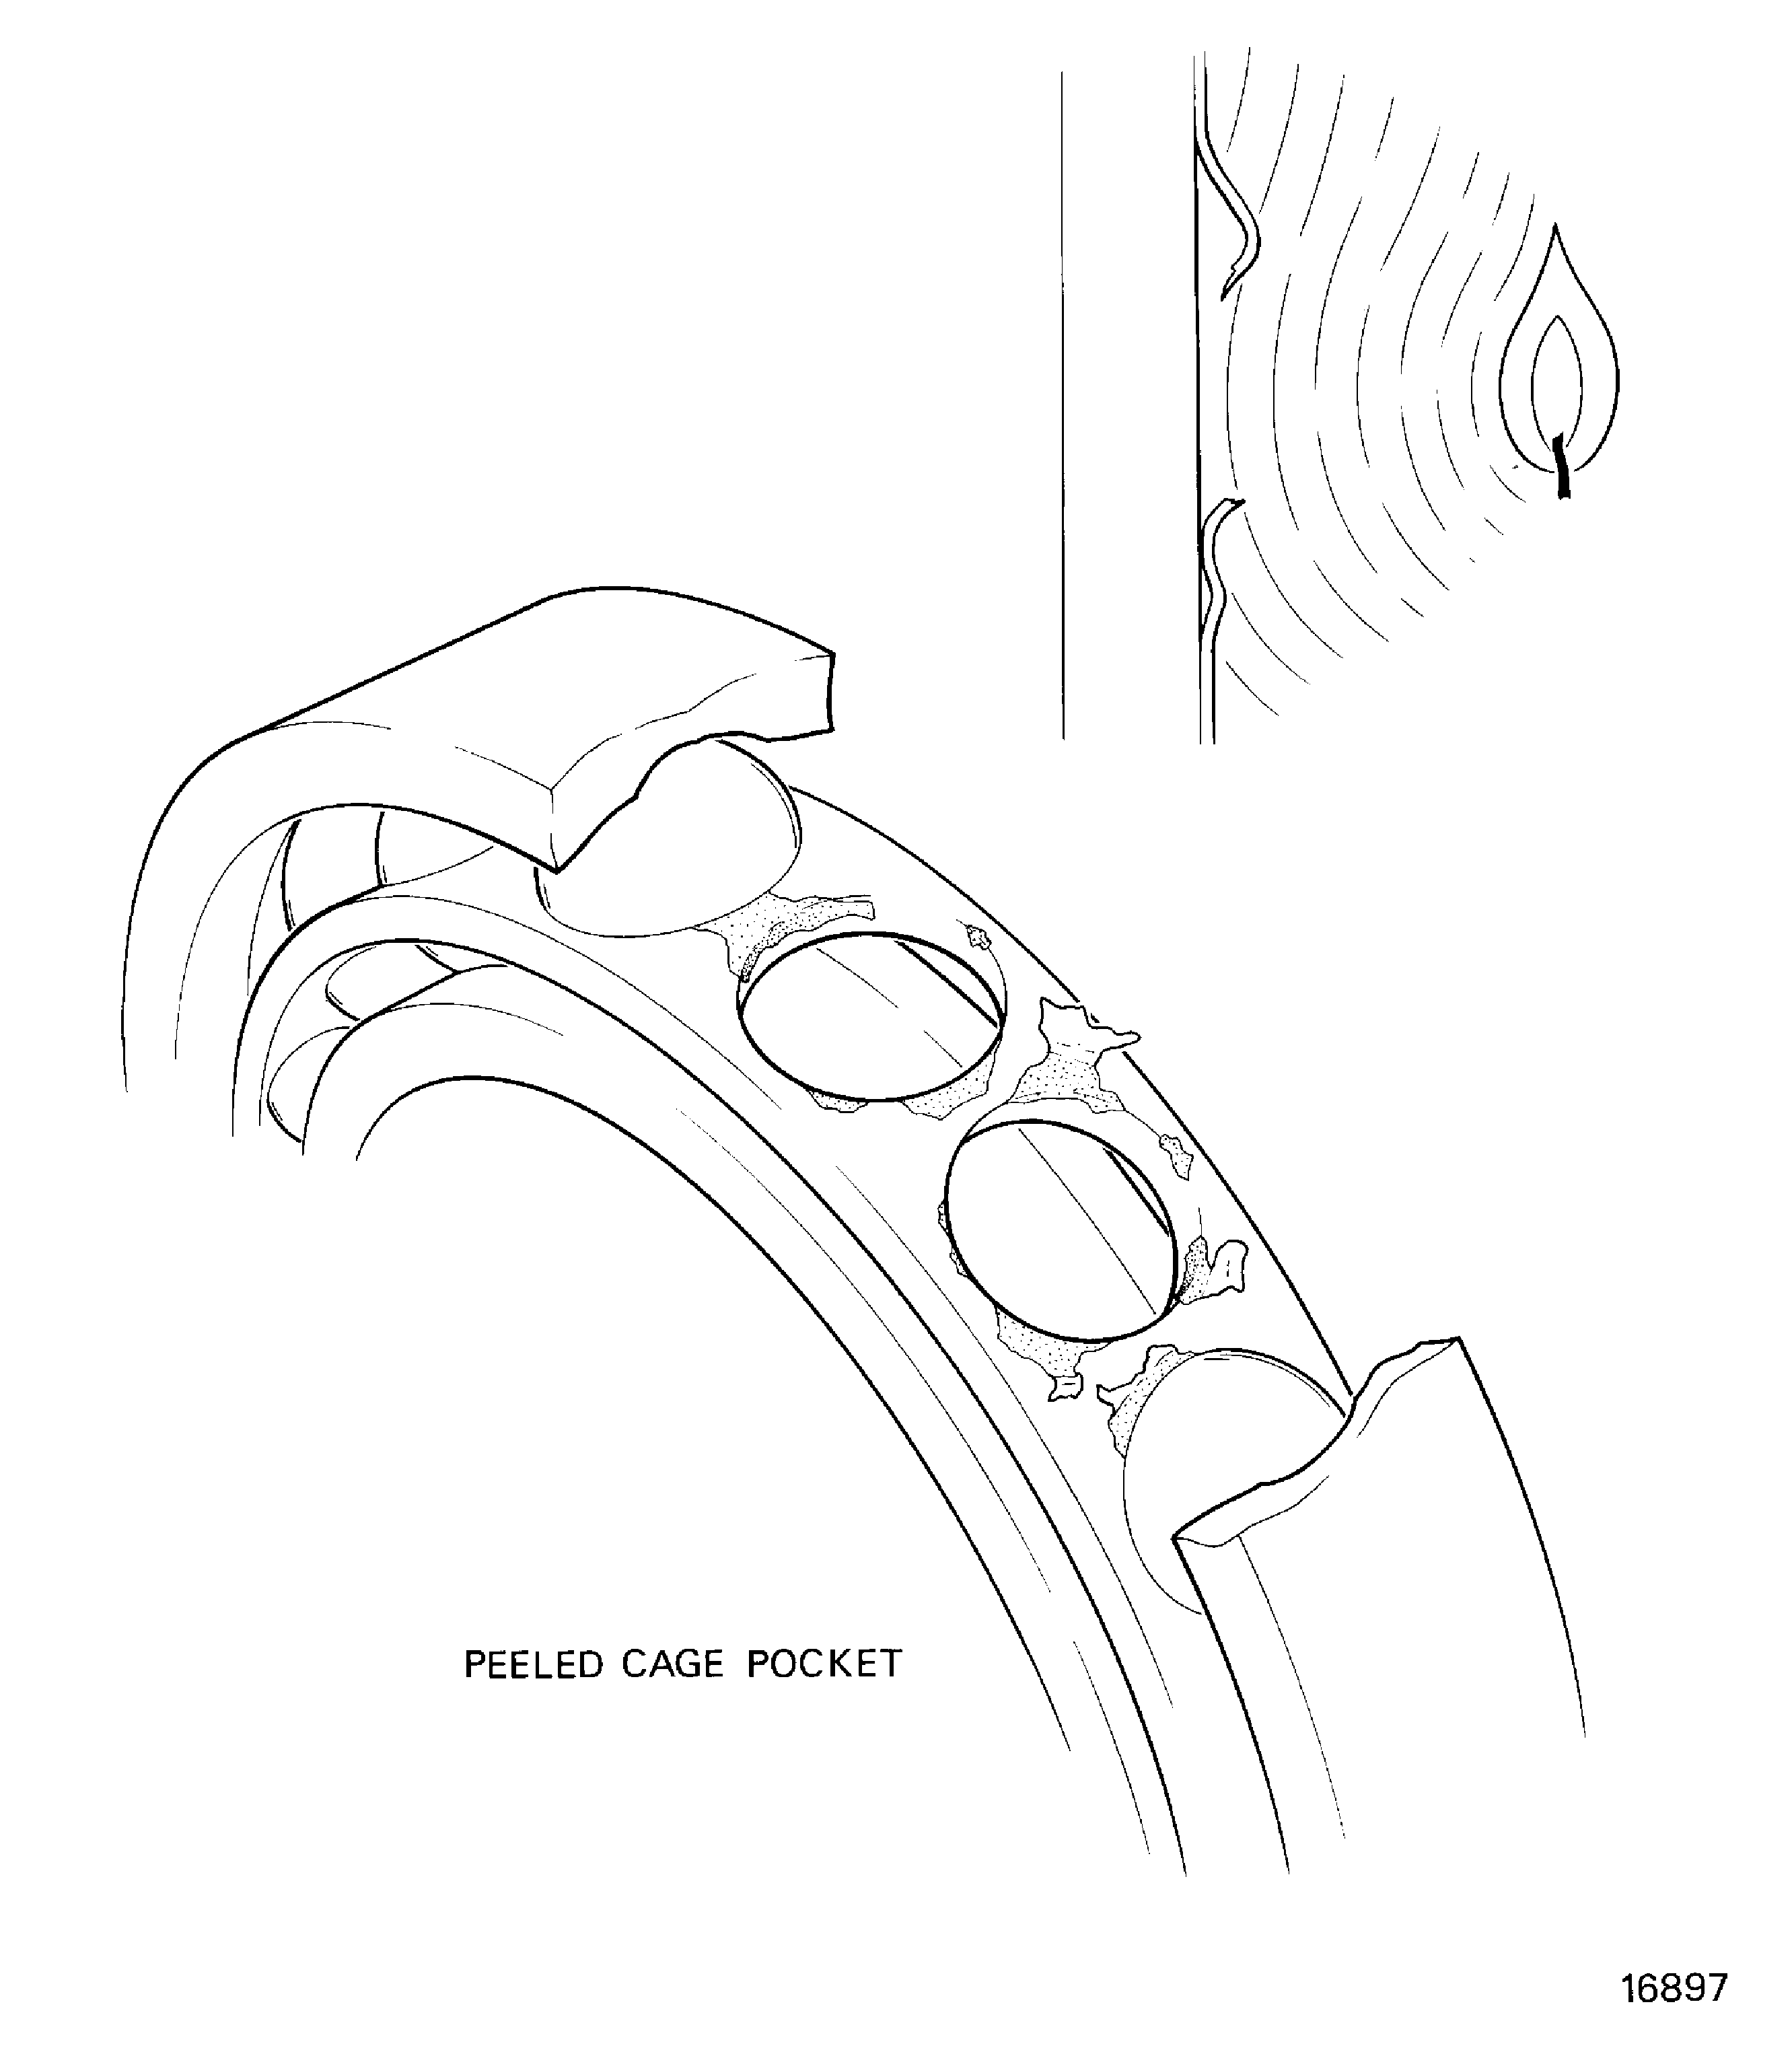
Figure: Measure the internal radial clearance
Measure the internal radial clearance
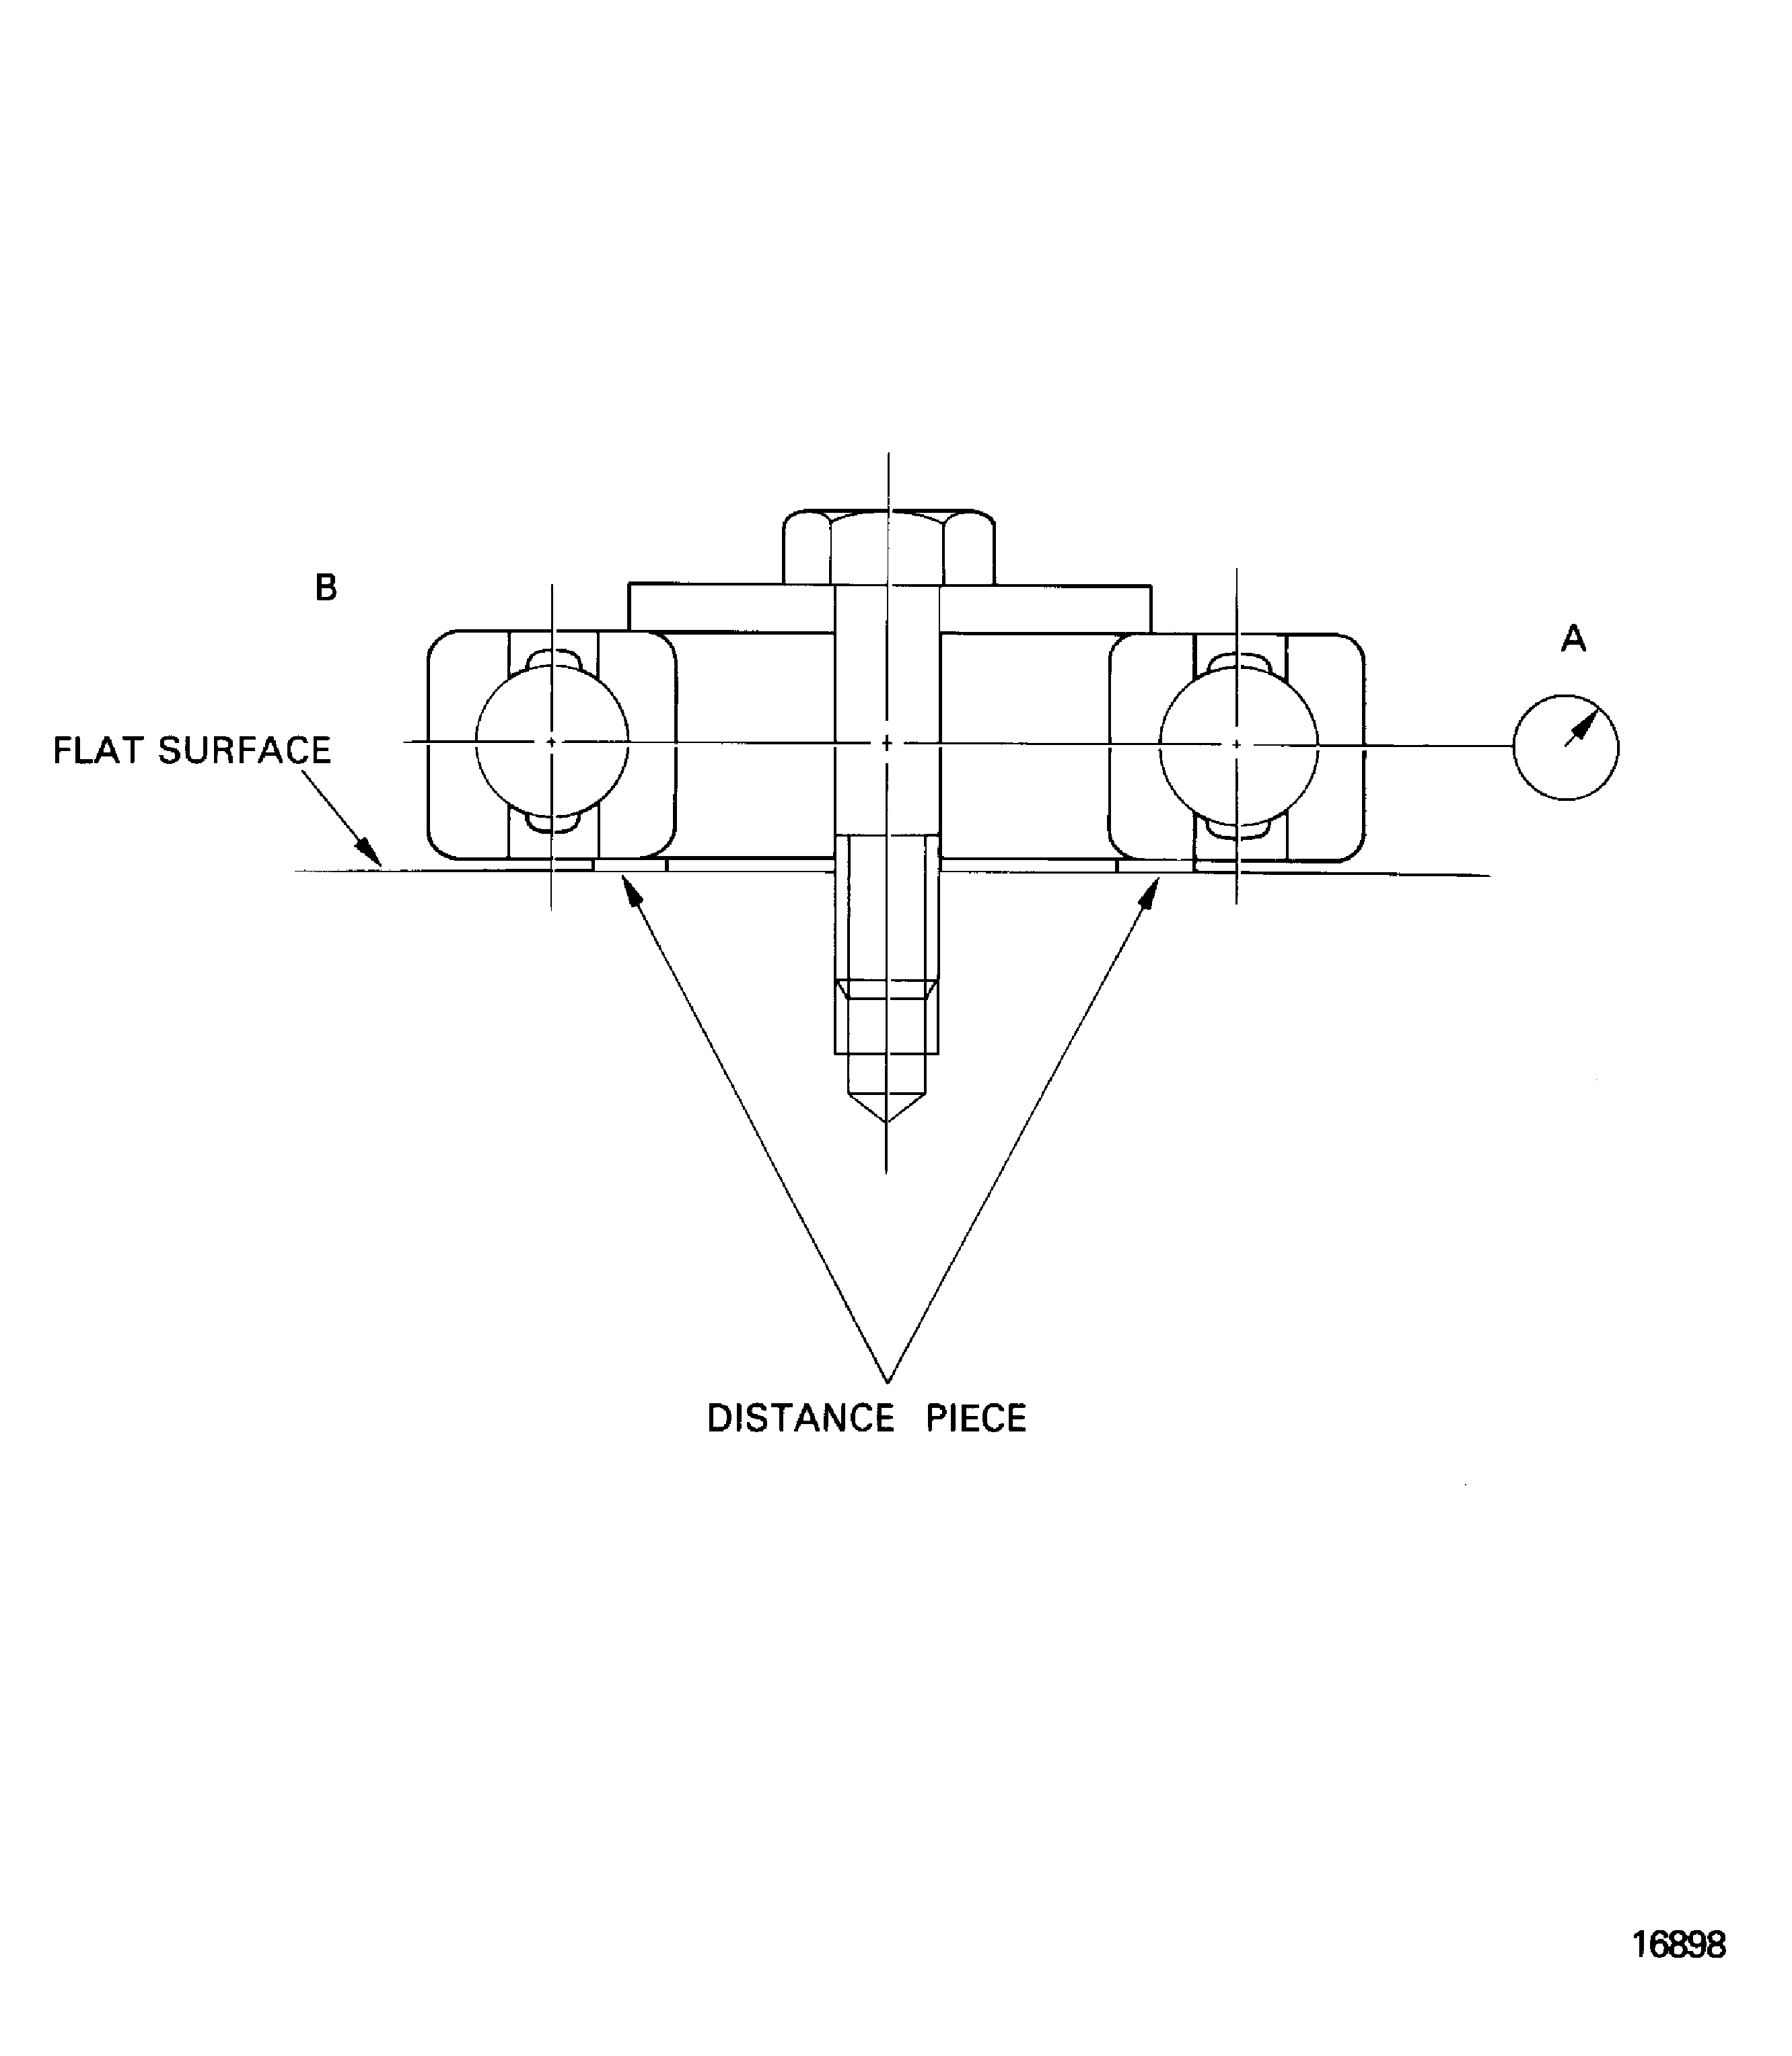
Figure: Lubricating the bearing
Lubricating the bearing
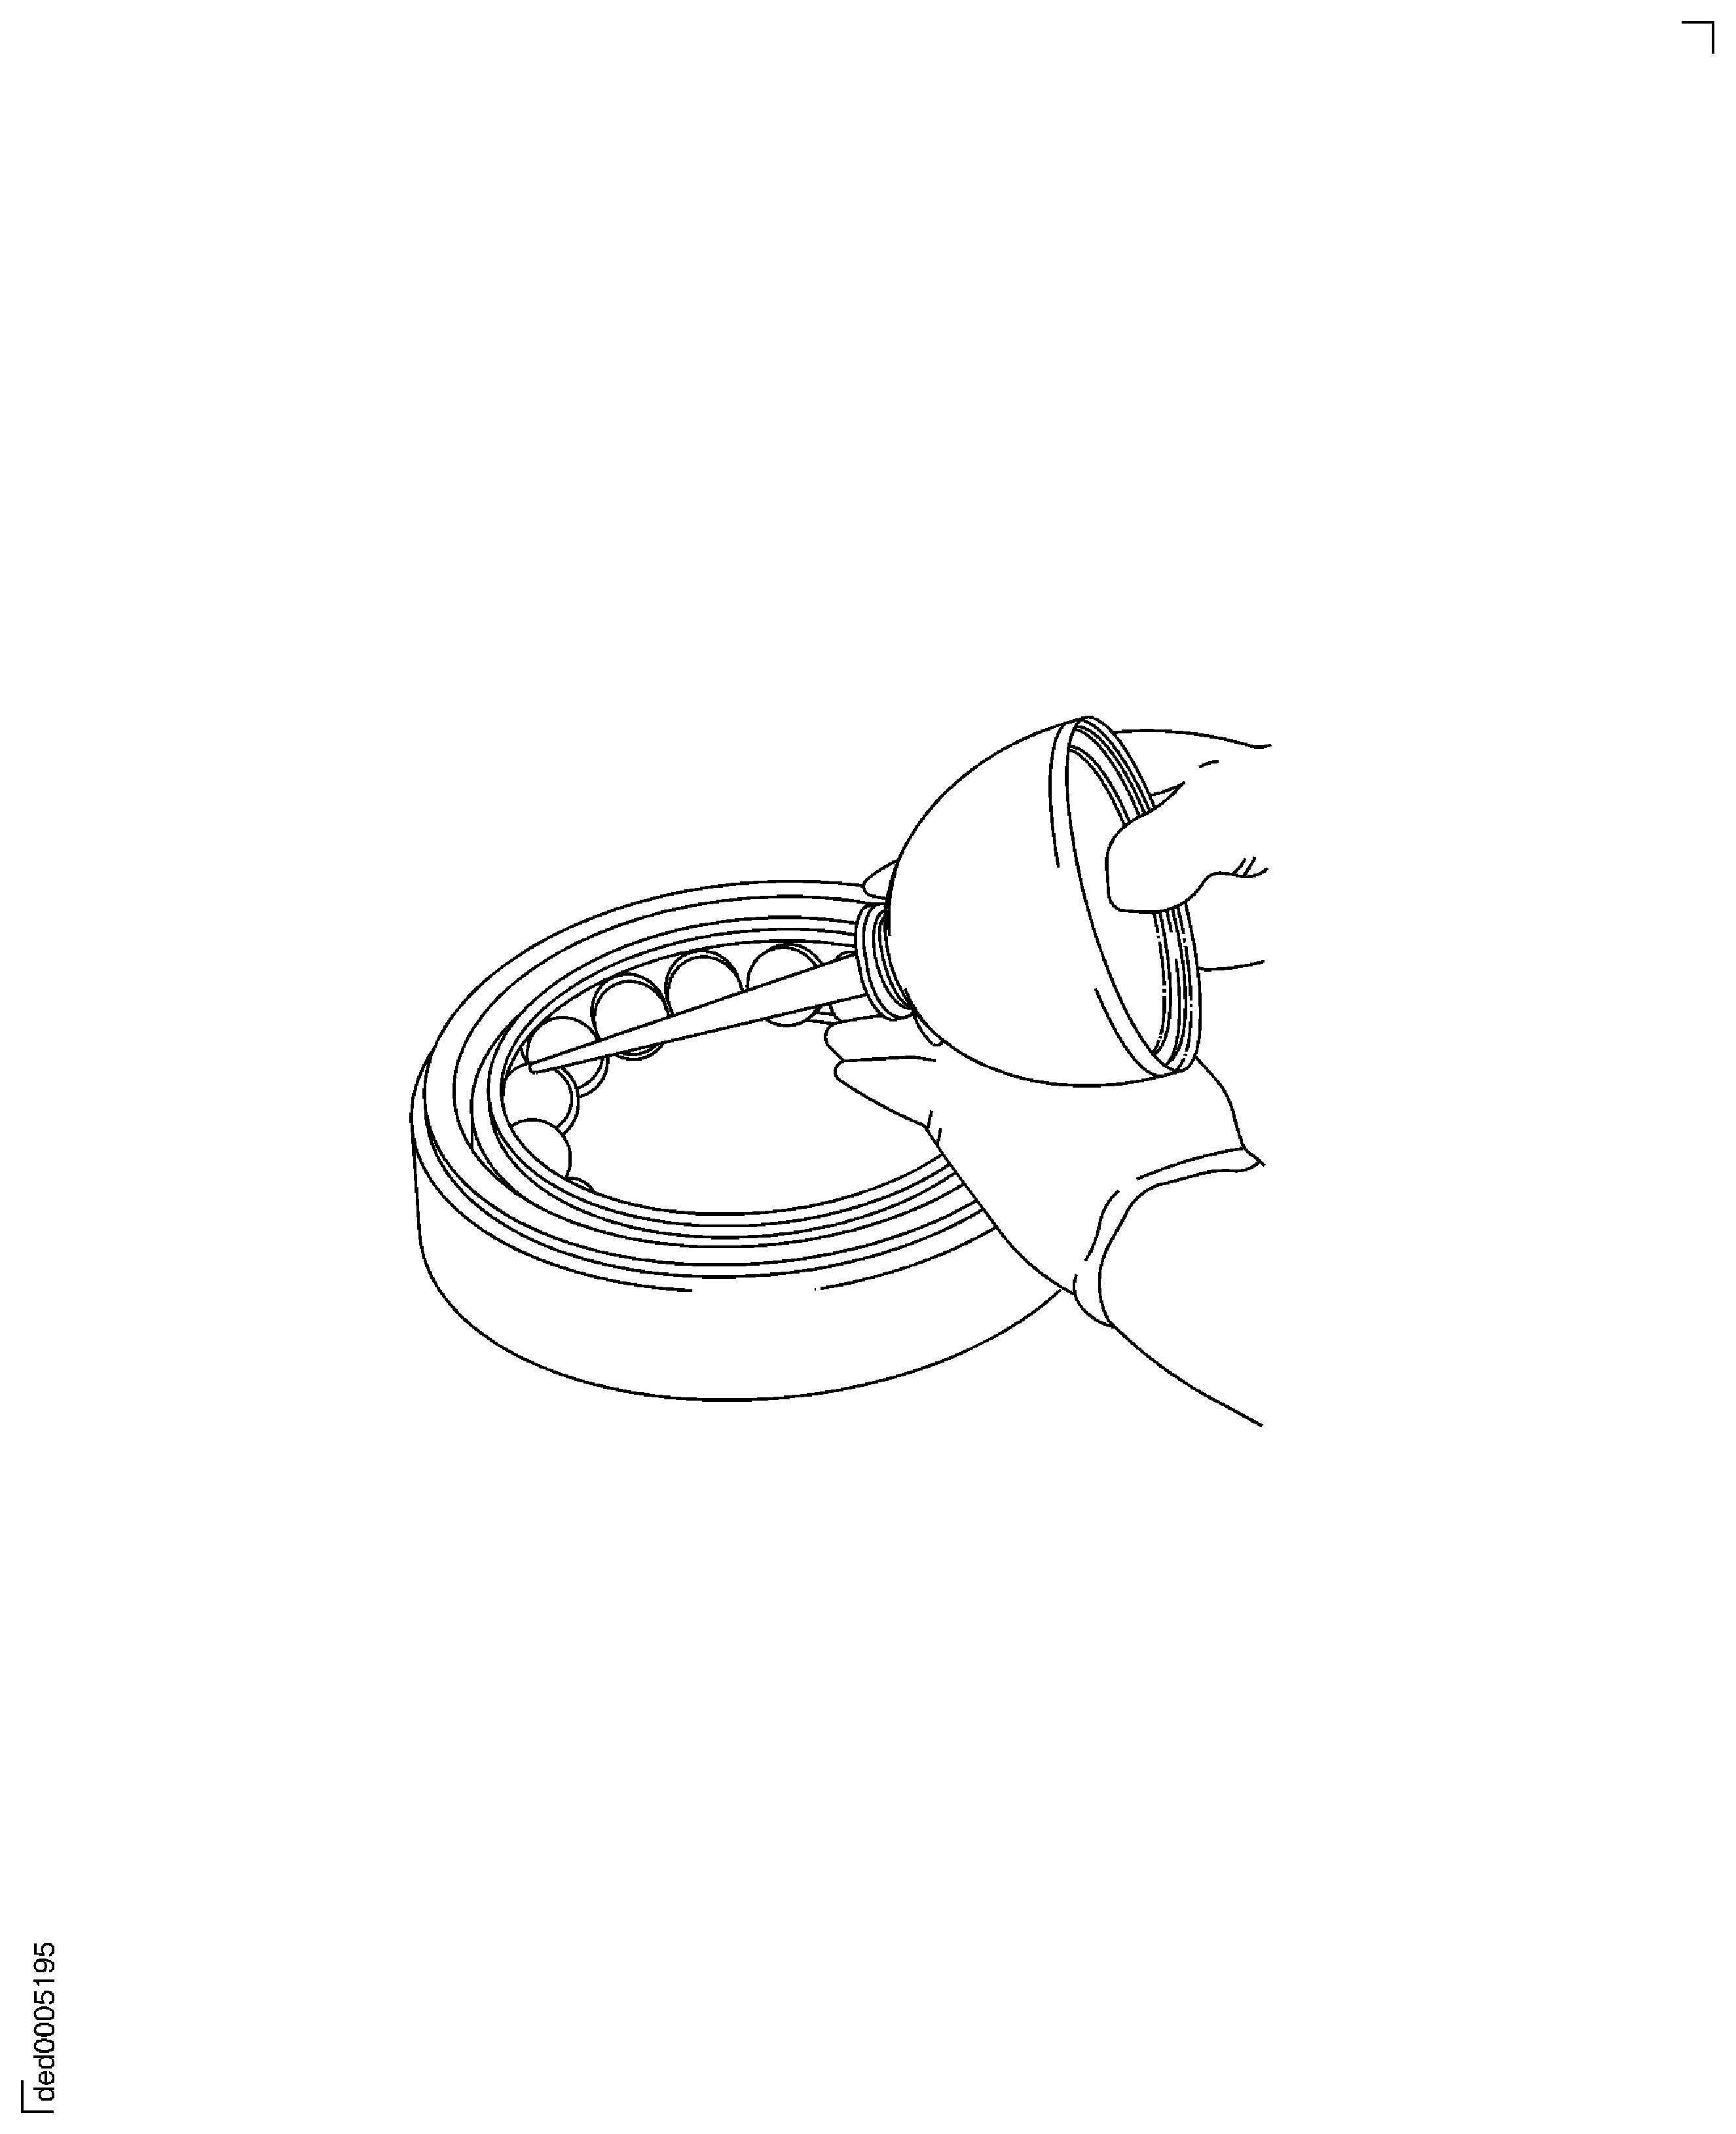
Figure: Installing Graduated Ring
Installing Graduated Ring
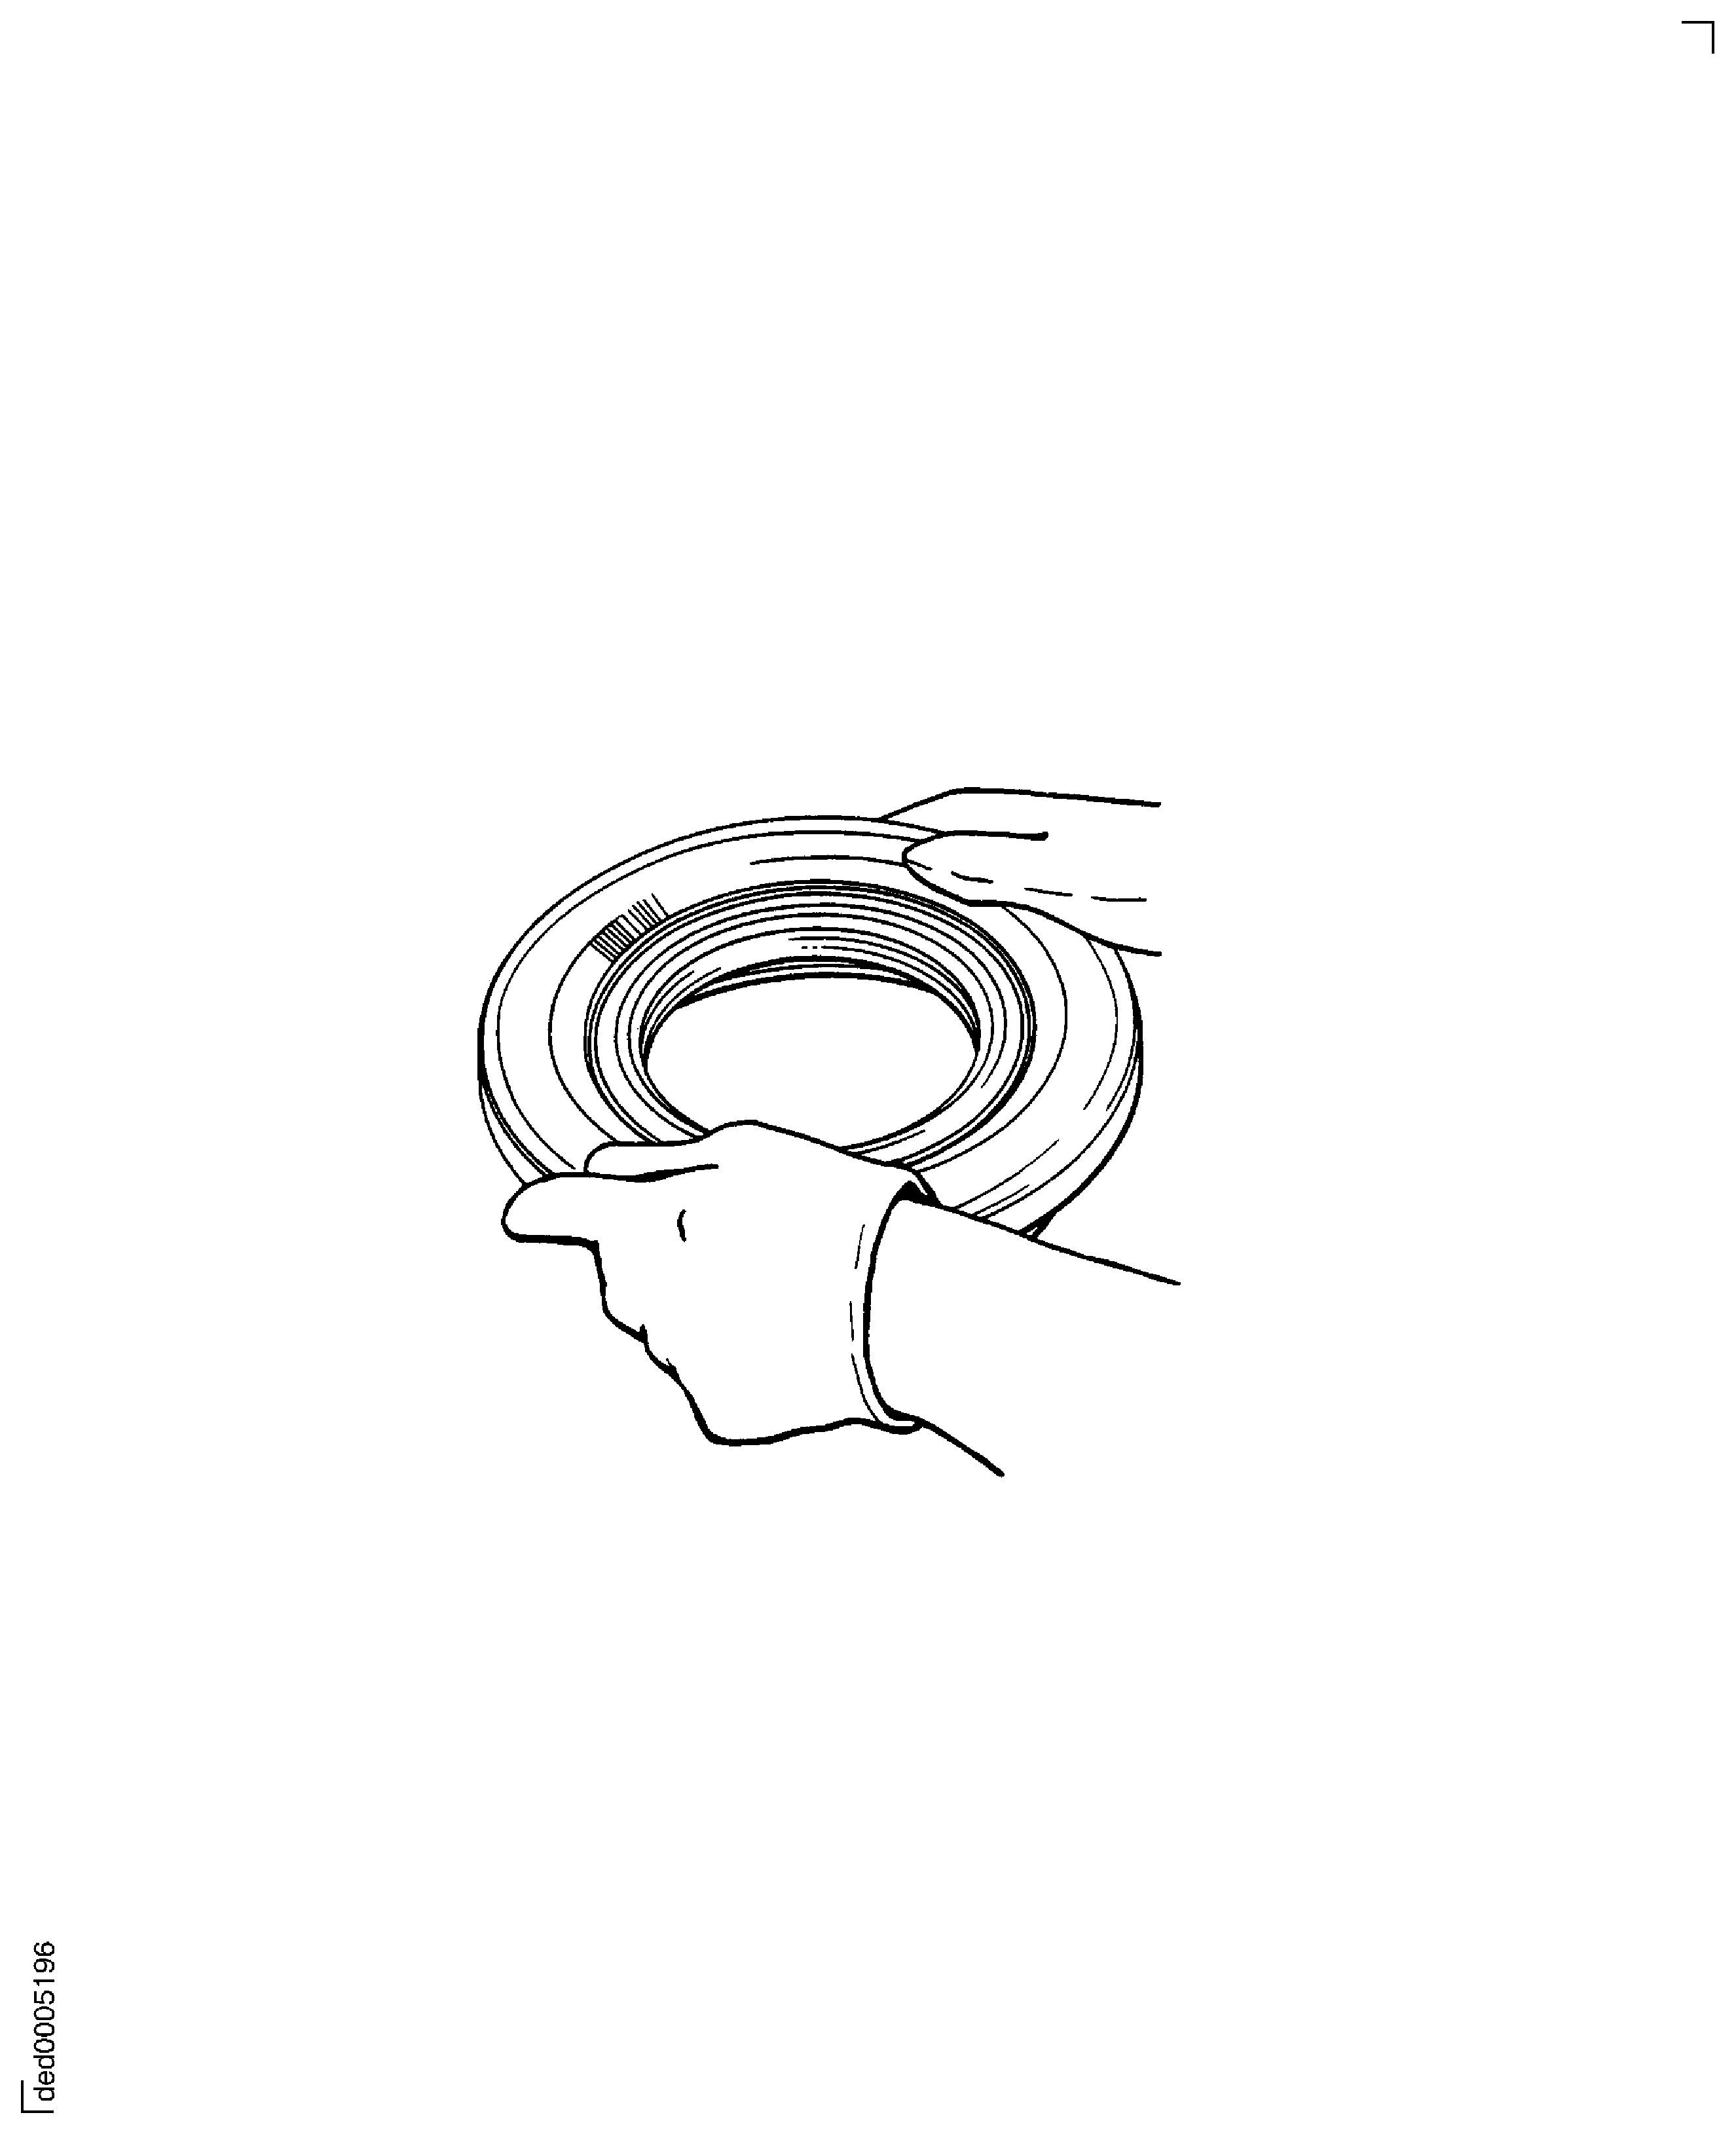
Figure: Marking Ball Cage
Marking Ball Cage
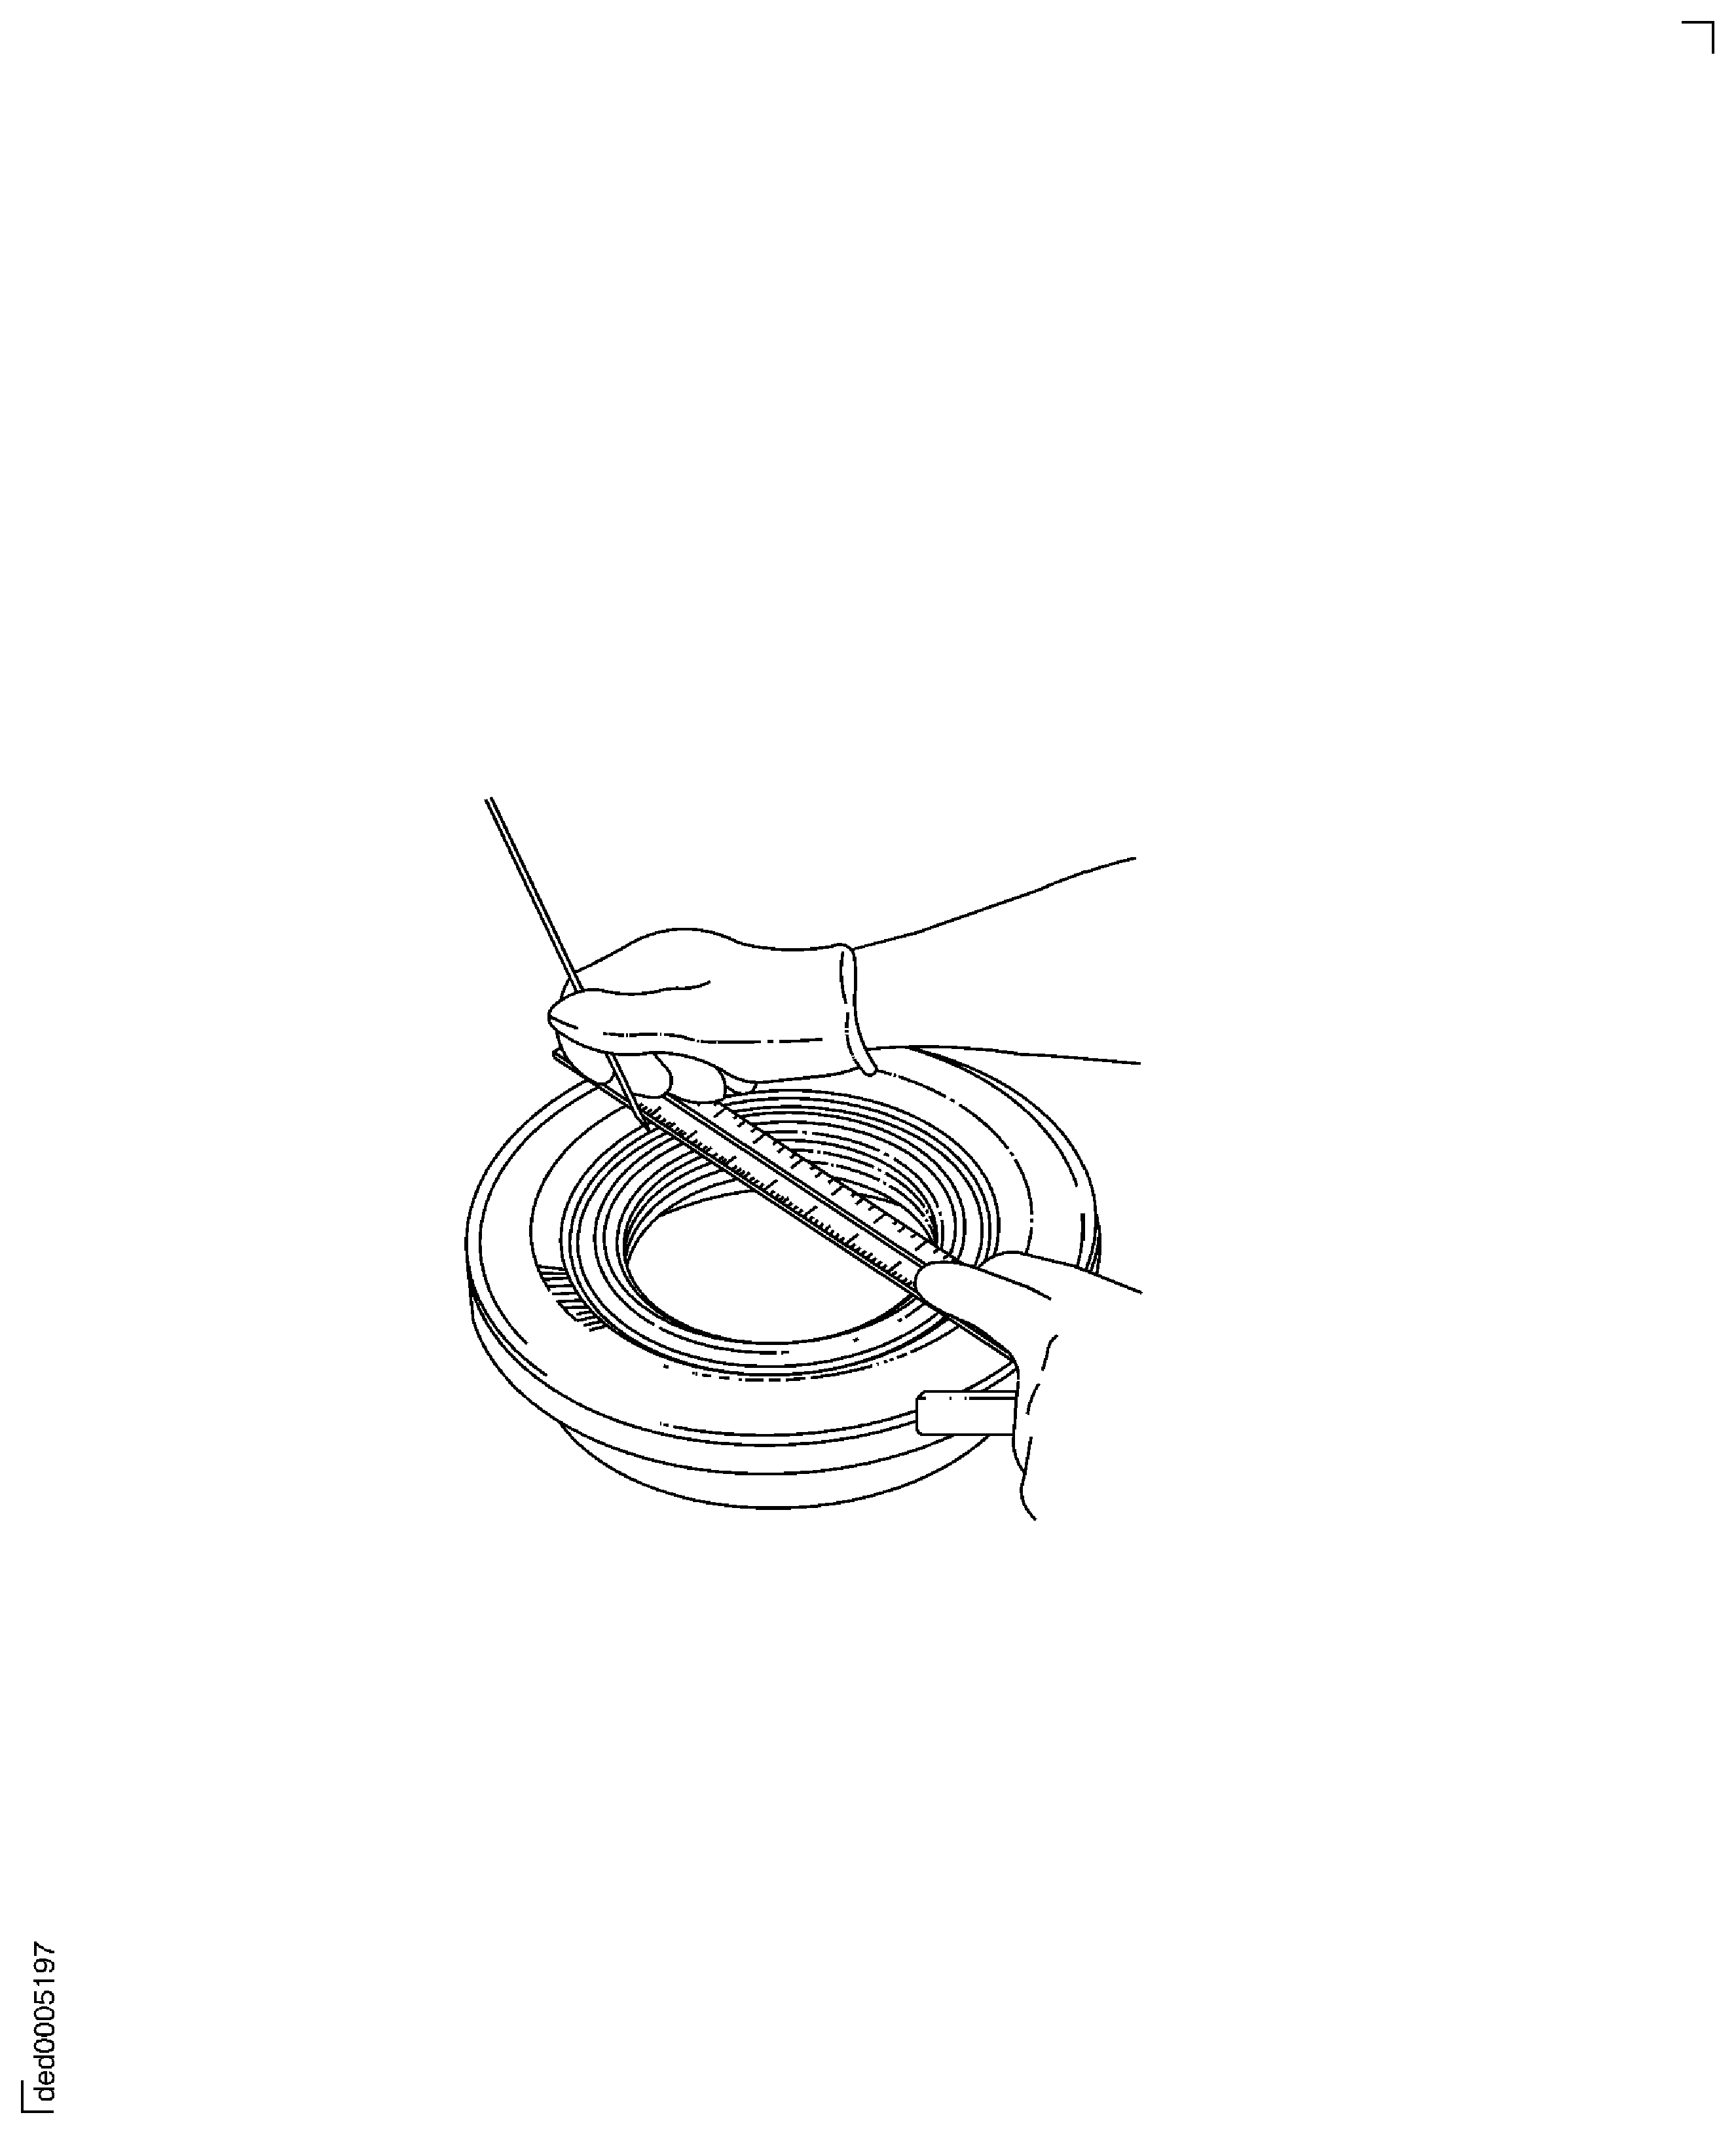
Figure: Bearing and Contact Angle Measurement Equipment
Bearing and Contact Angle Measurement Equipment
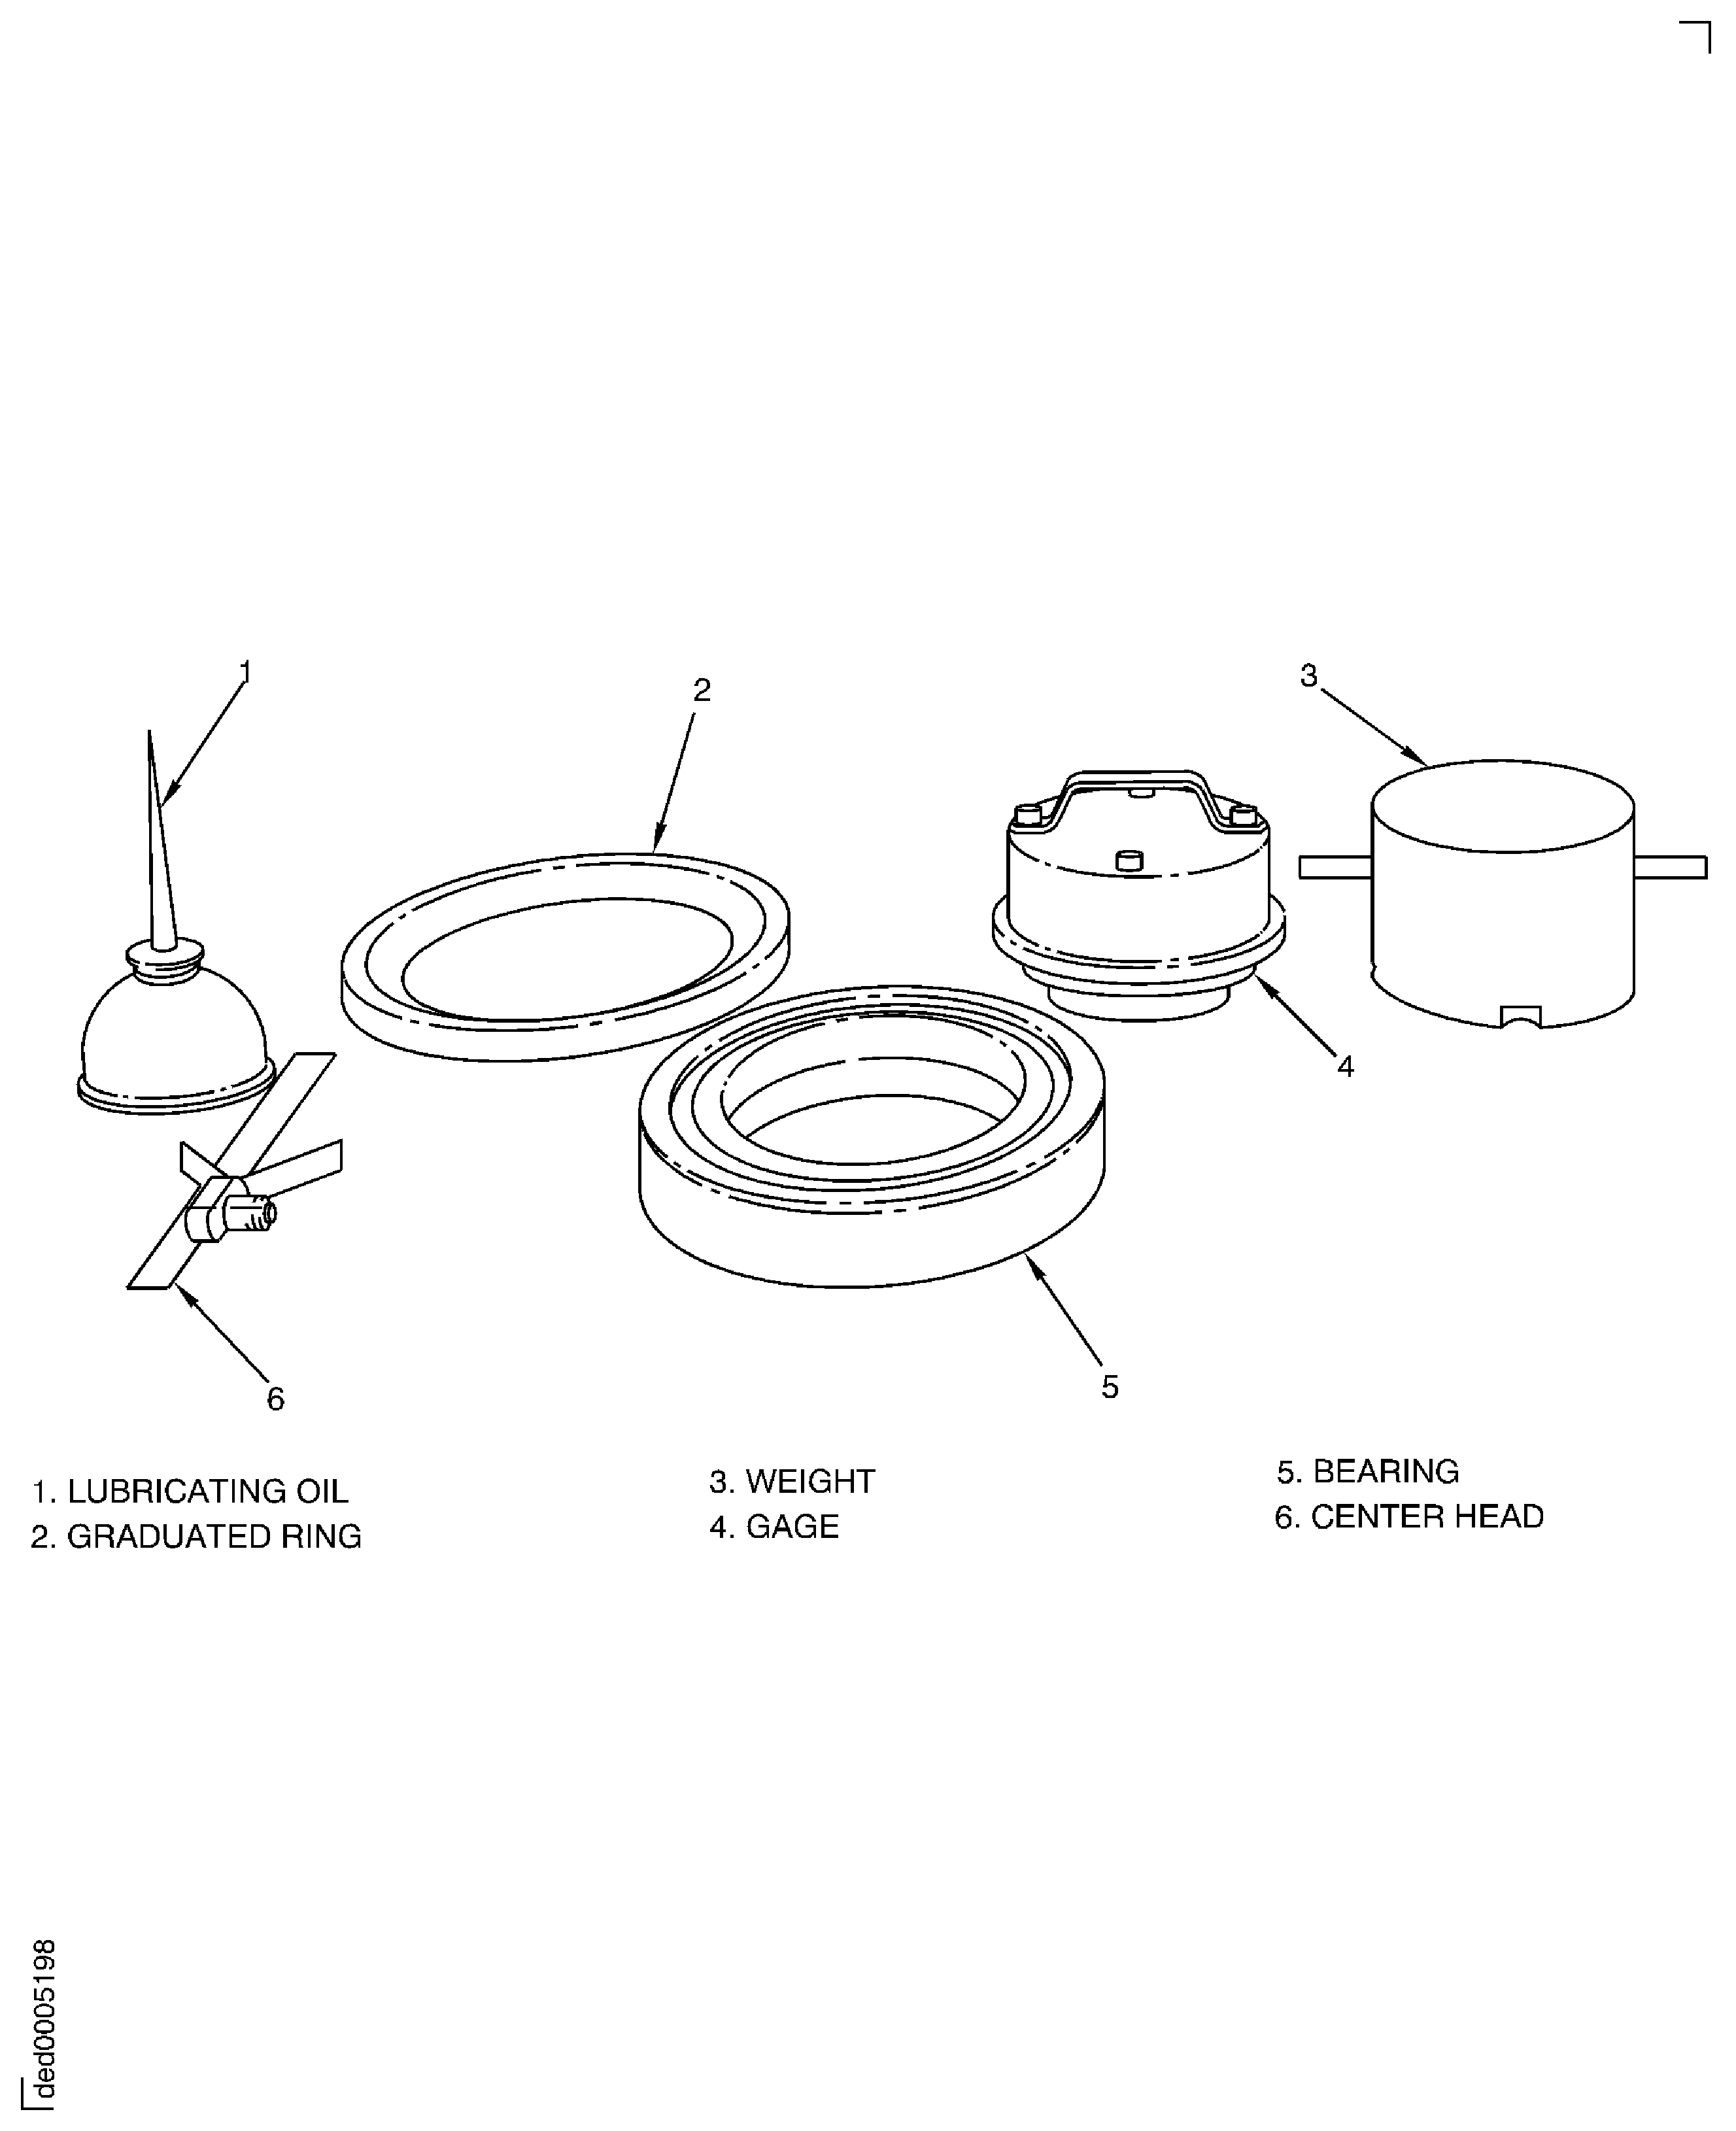
Figure: Rotating the Load
Rotating the Load
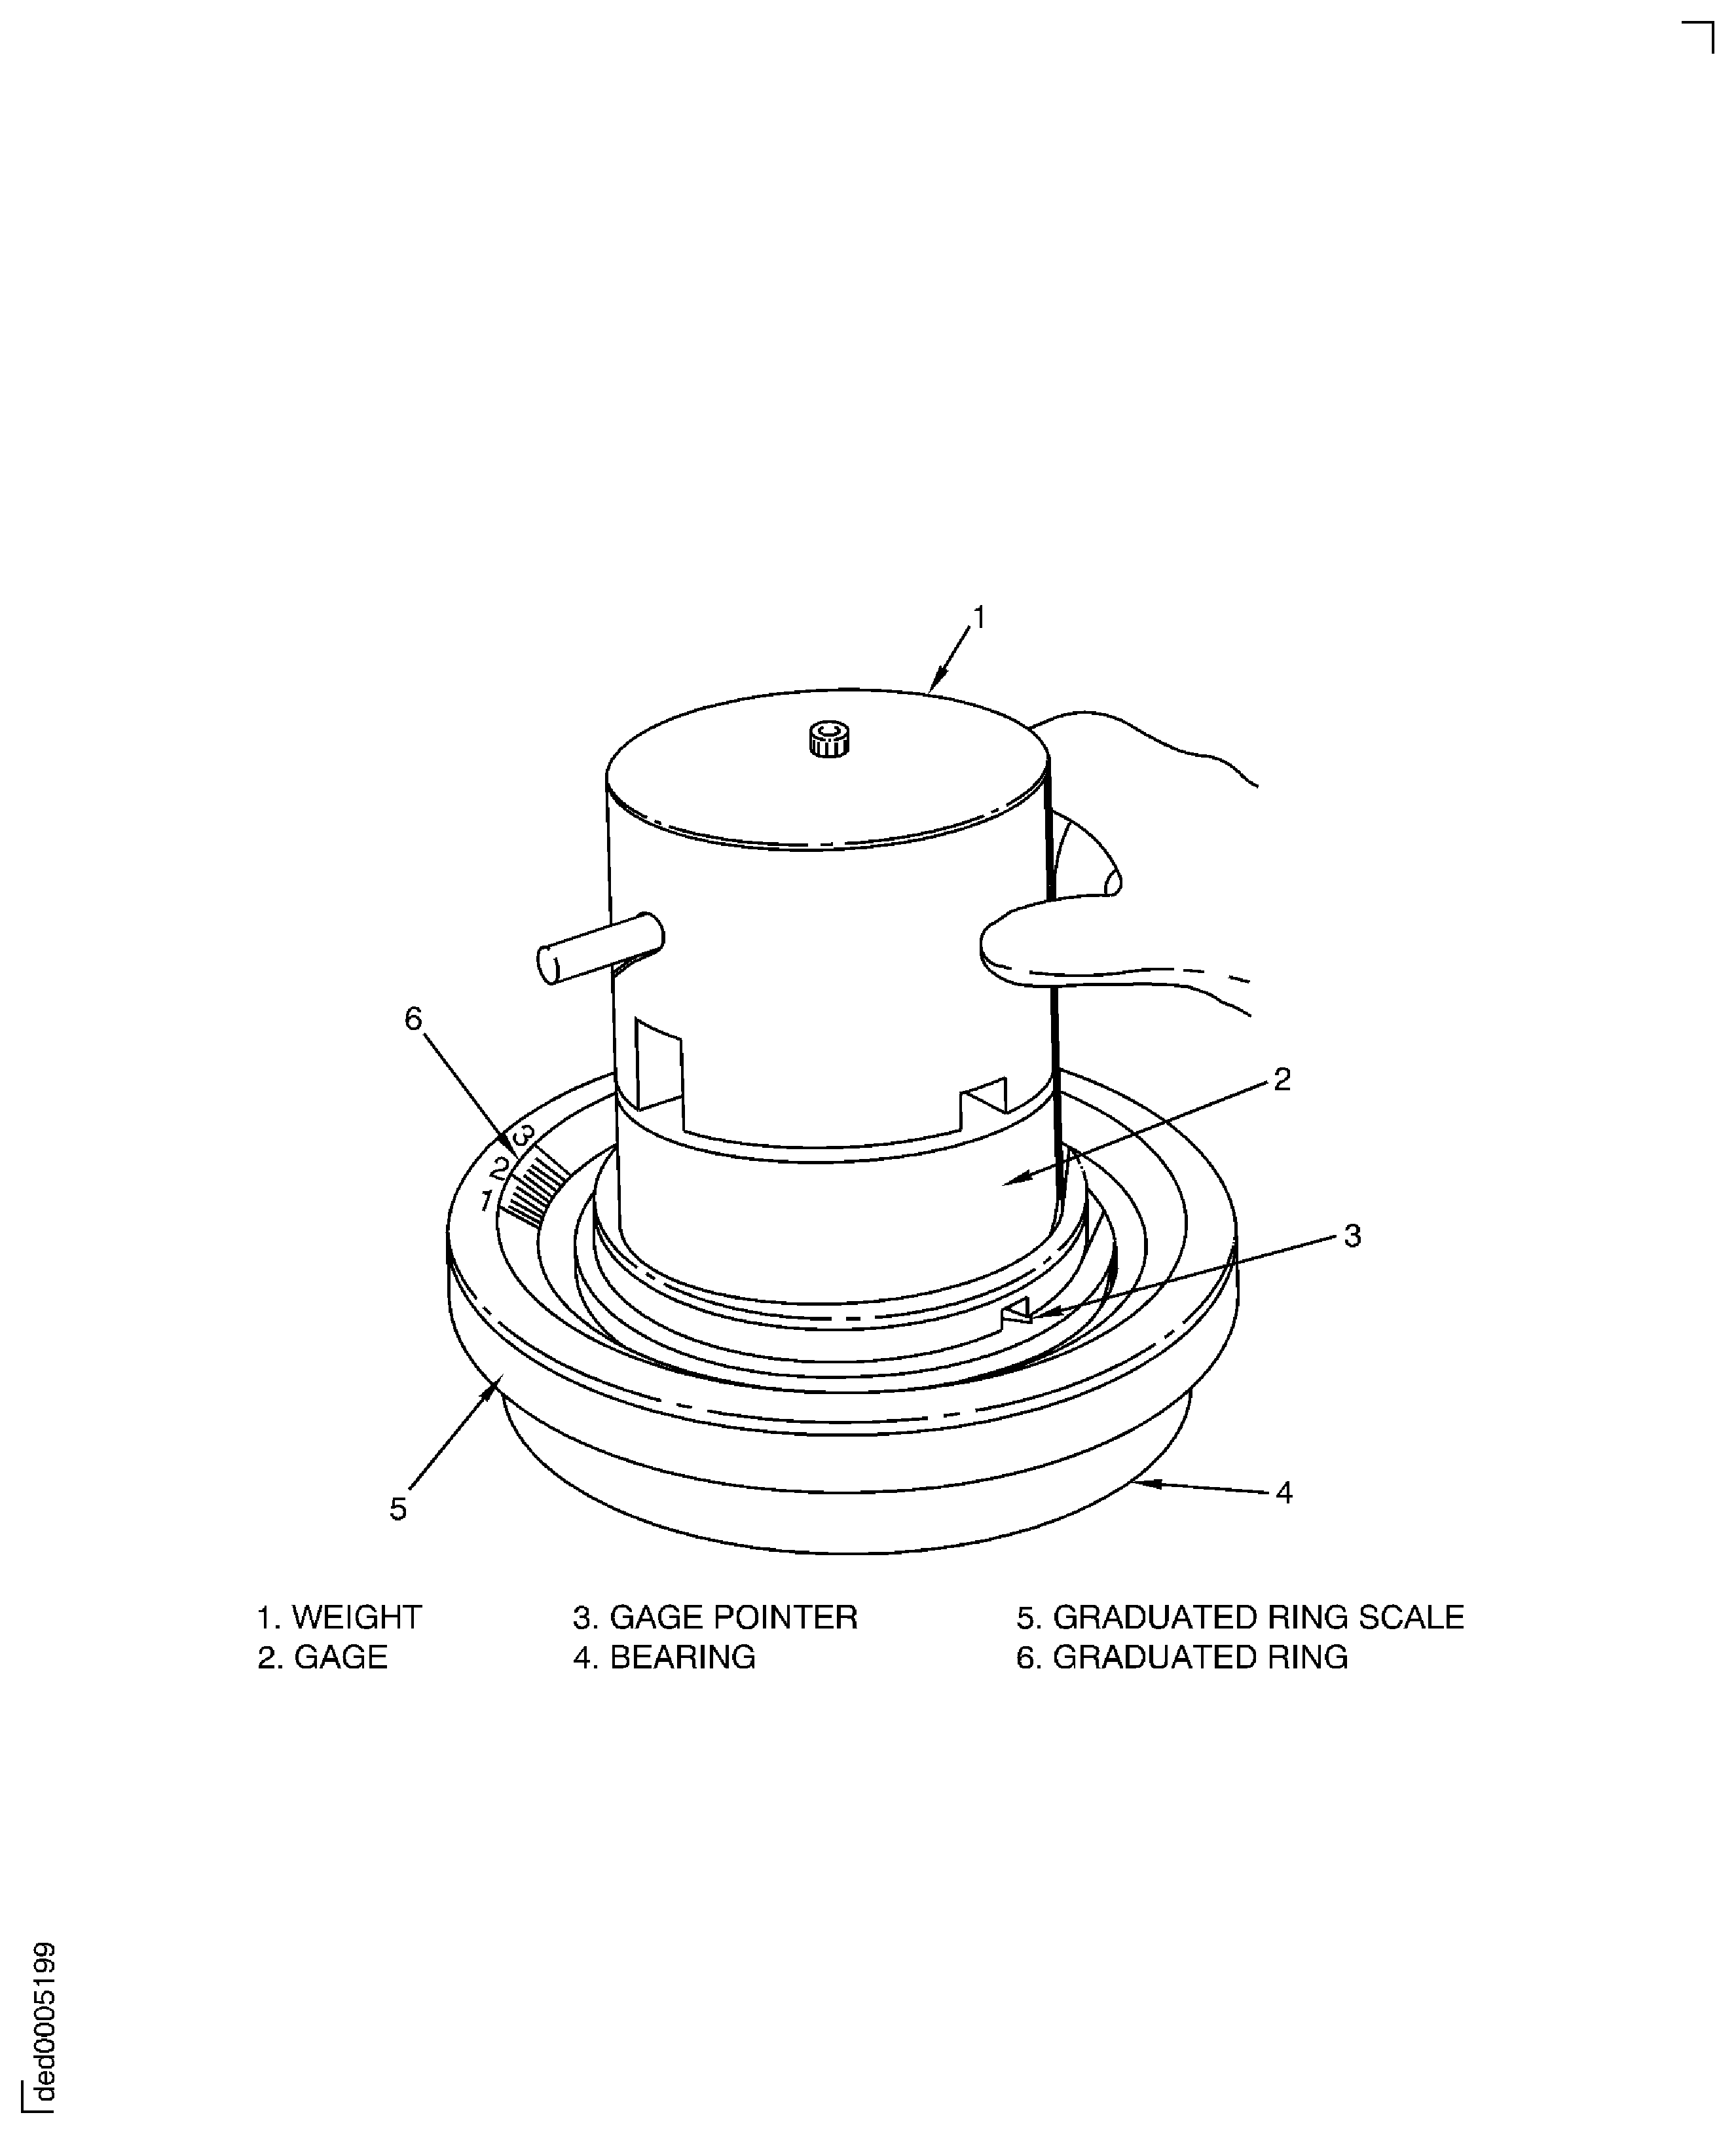
Figure: Measure the diameter below the rollers
Measure the diameter below the rollers
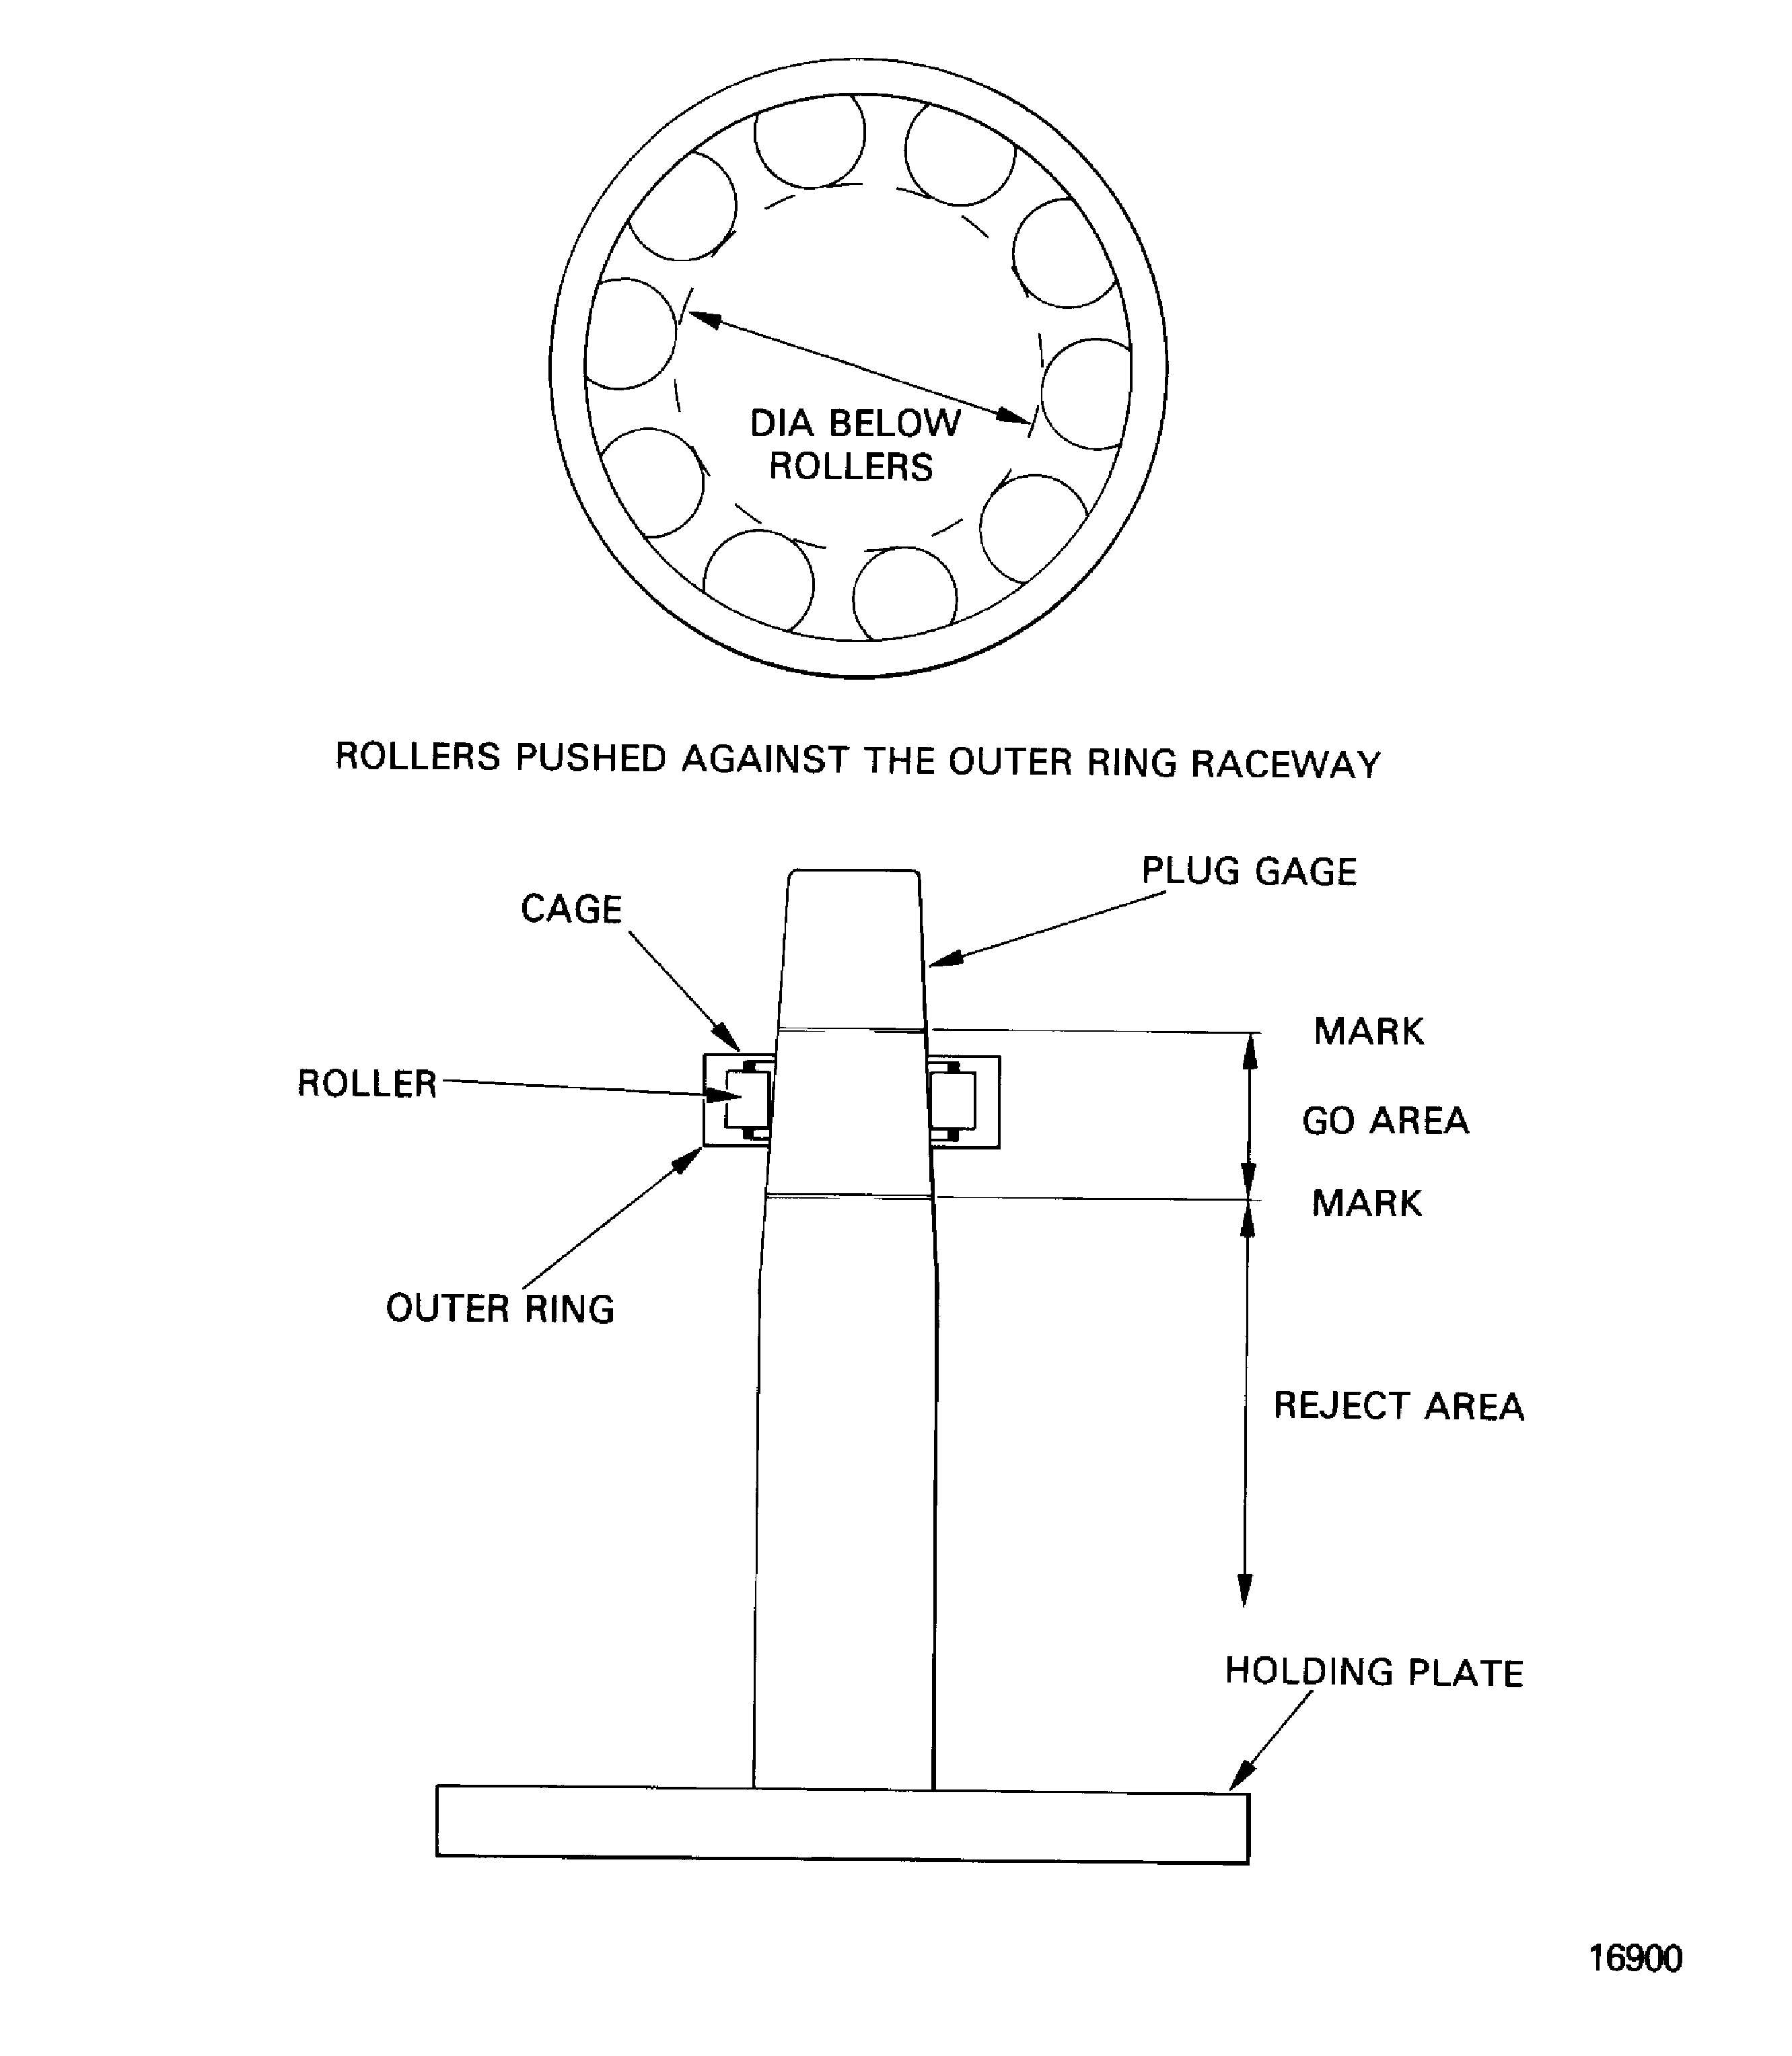
Figure: Bearing dimension checks
Bearing dimension checks
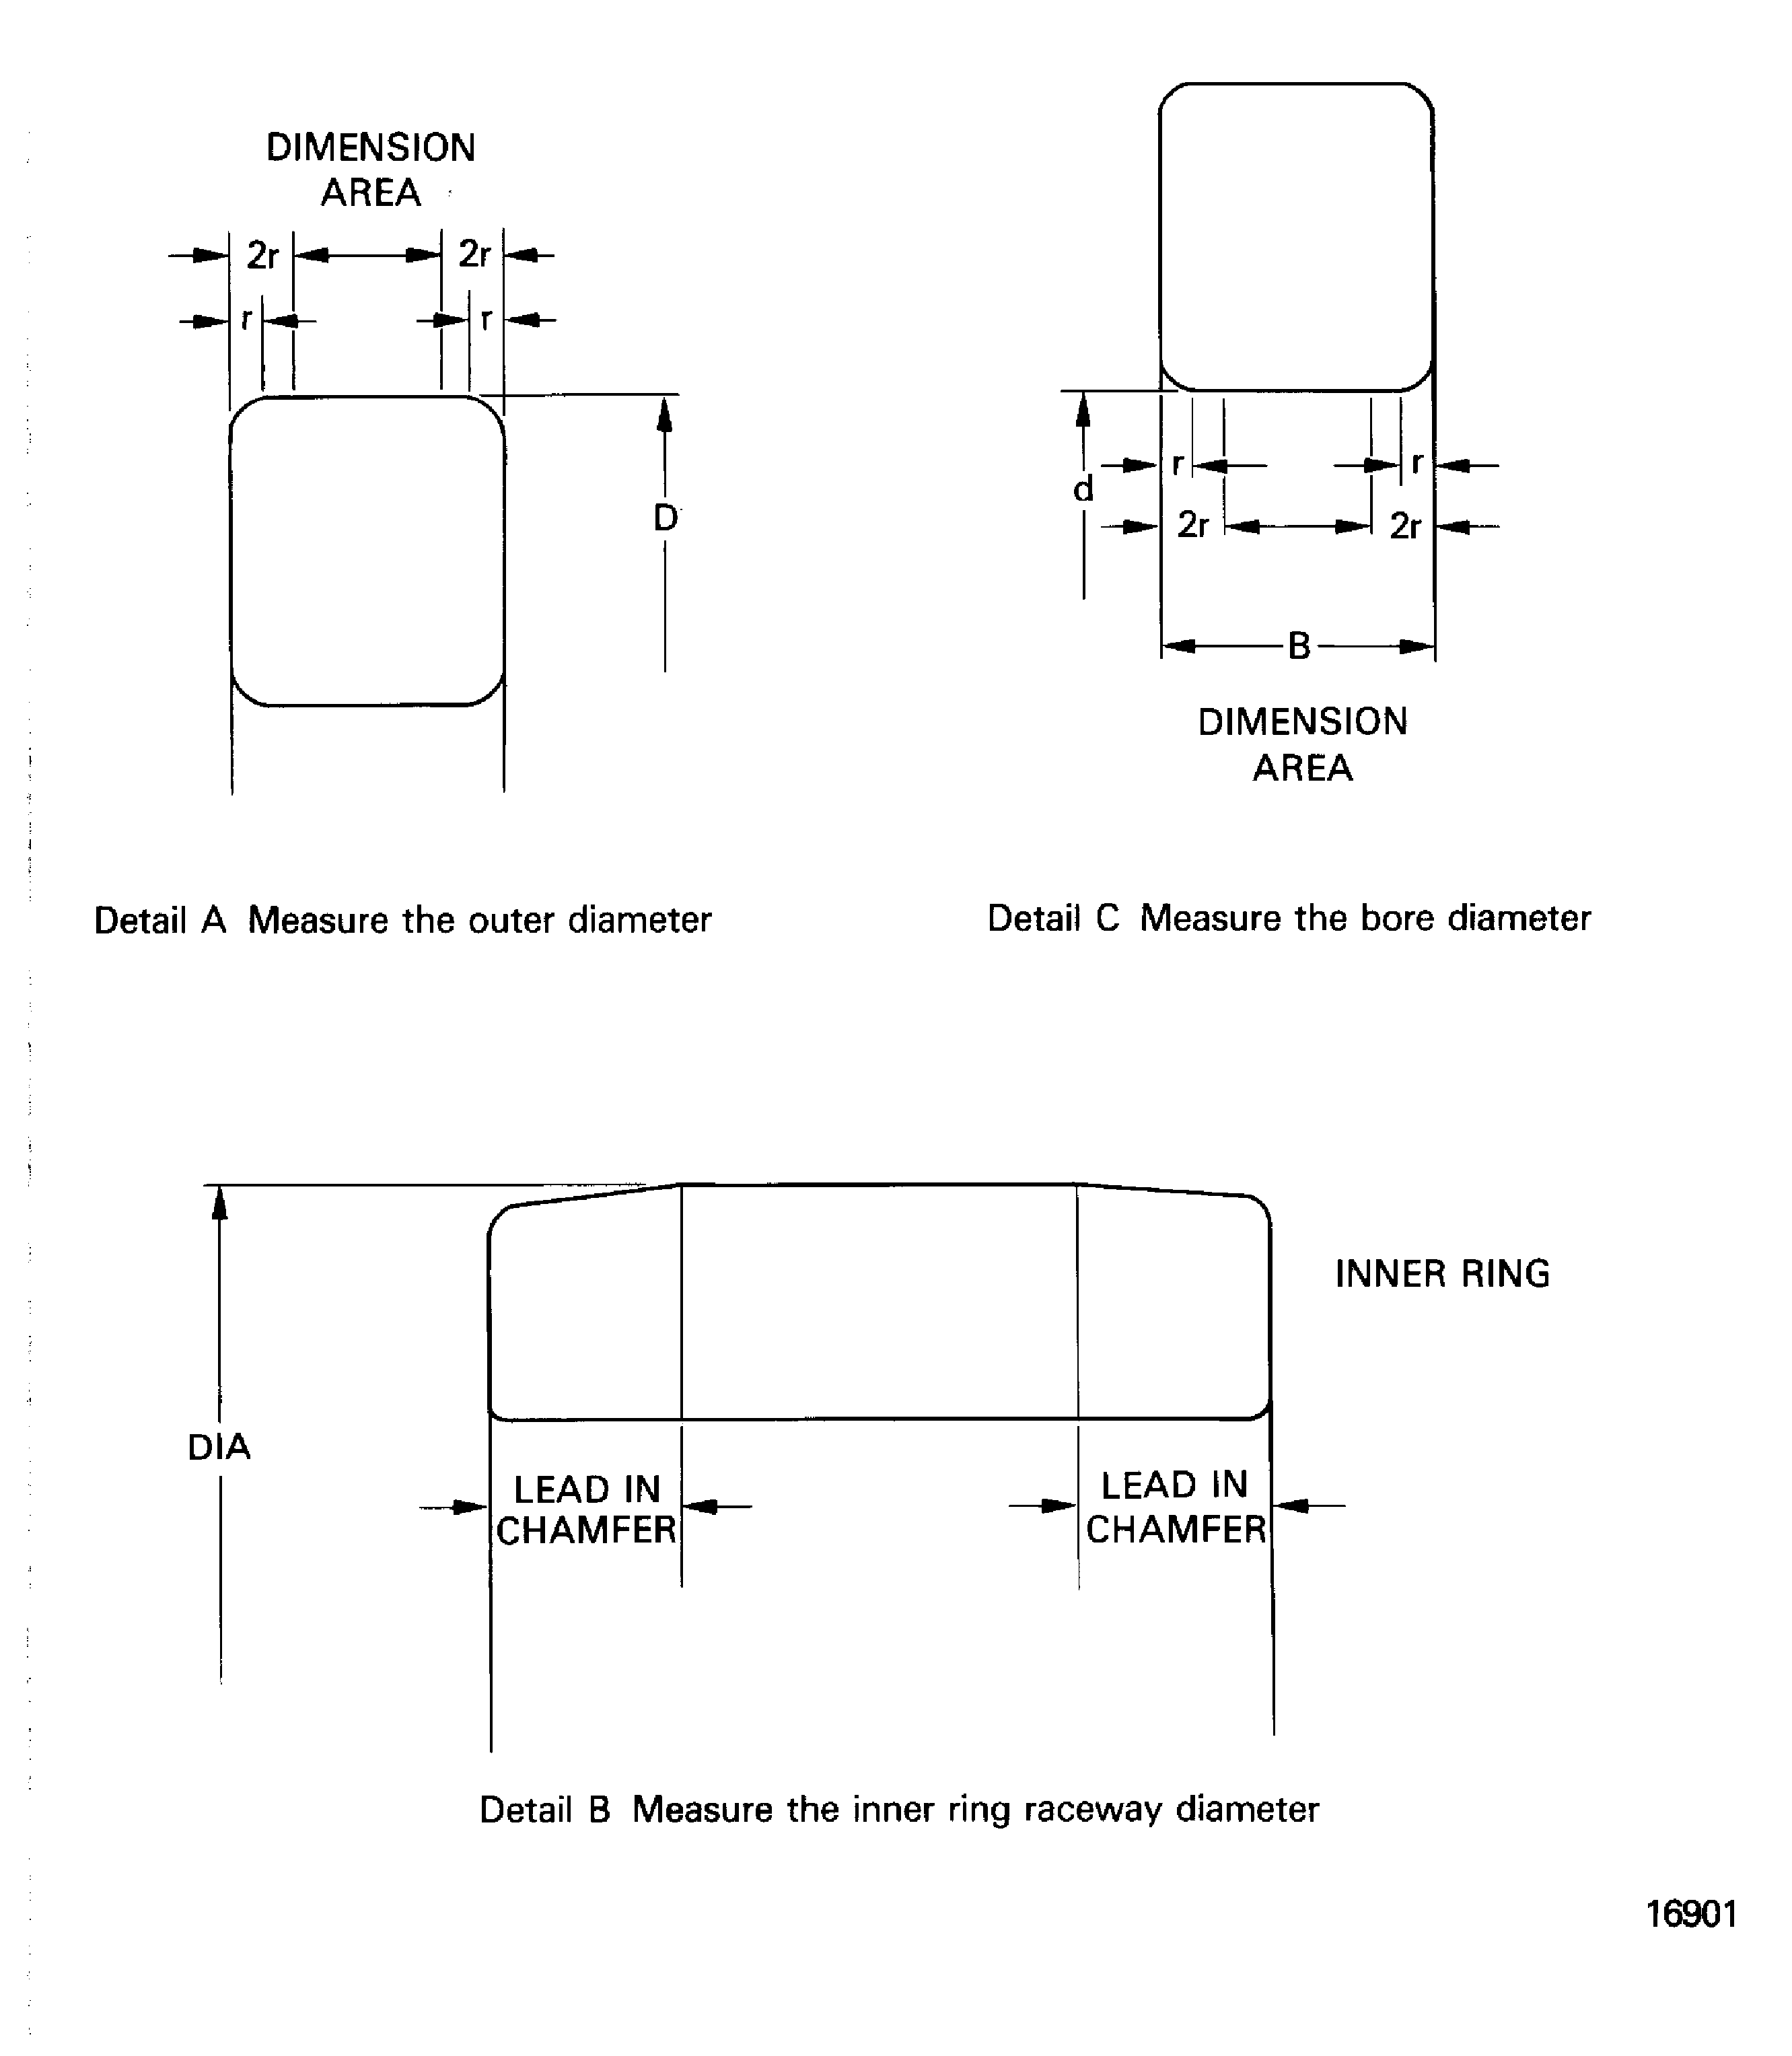
Figure: Bearing dimension checks
Bearing dimension checks
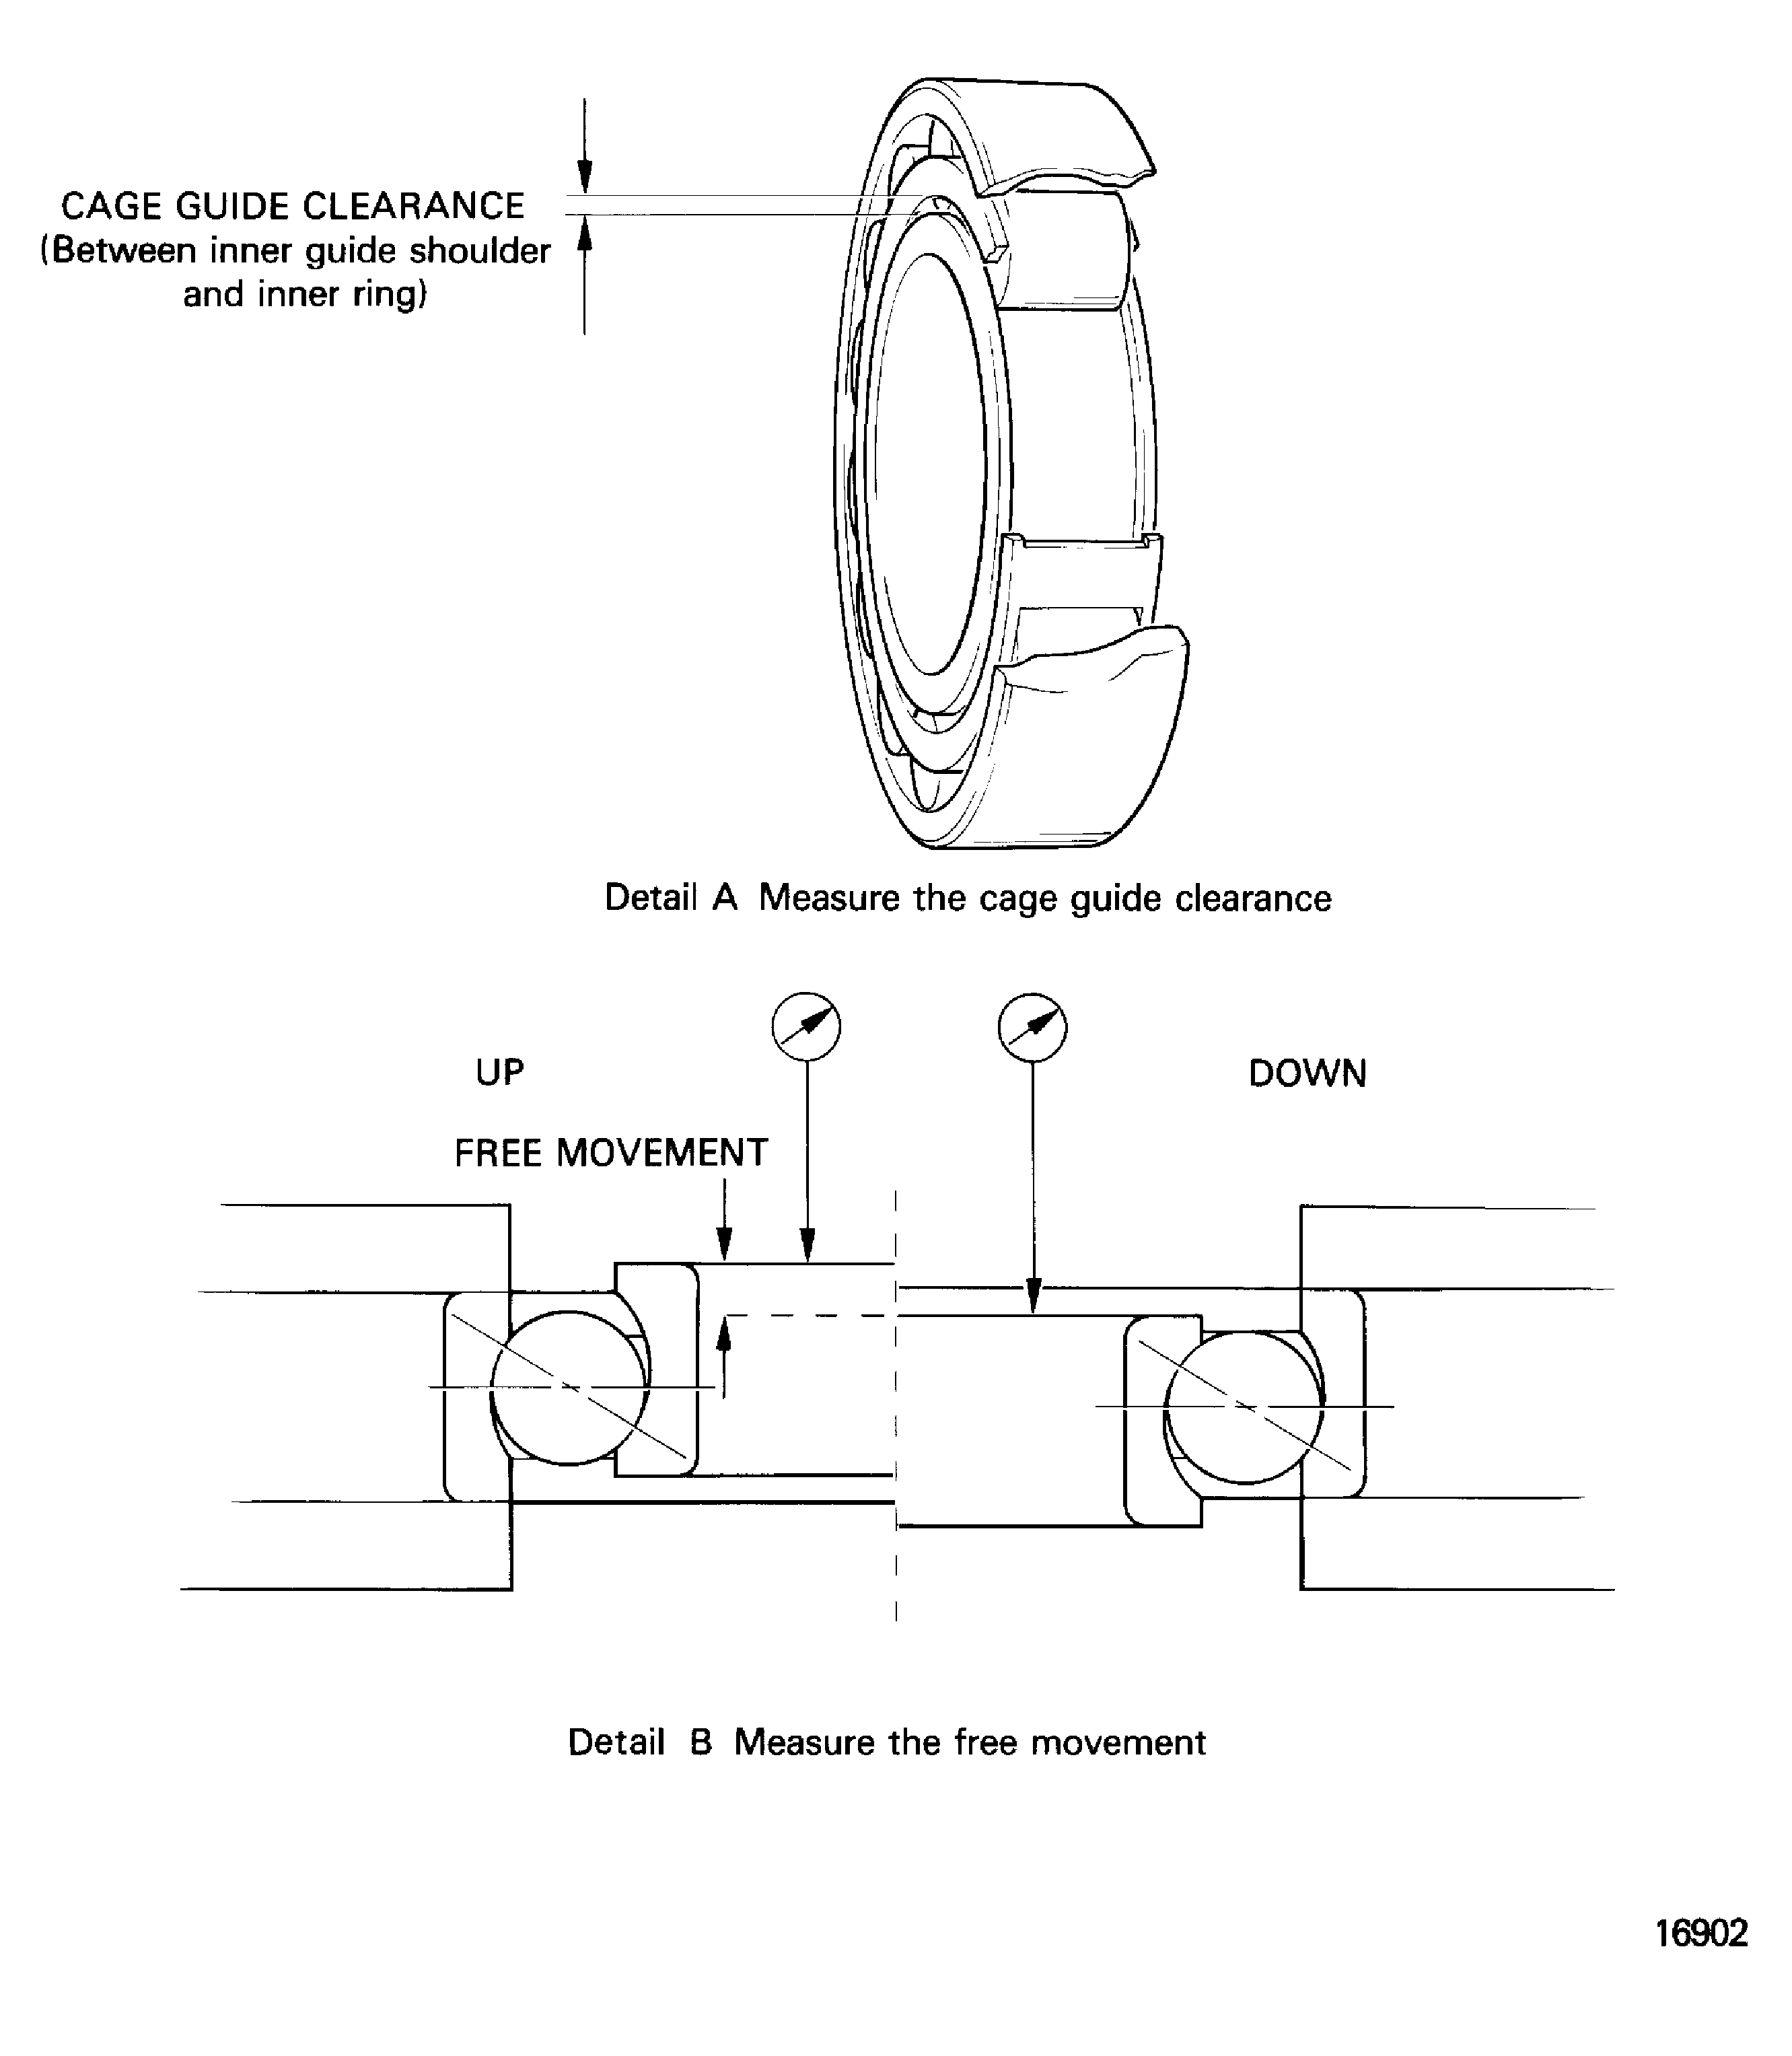
Figure: Overhaul limits
Overhaul limits
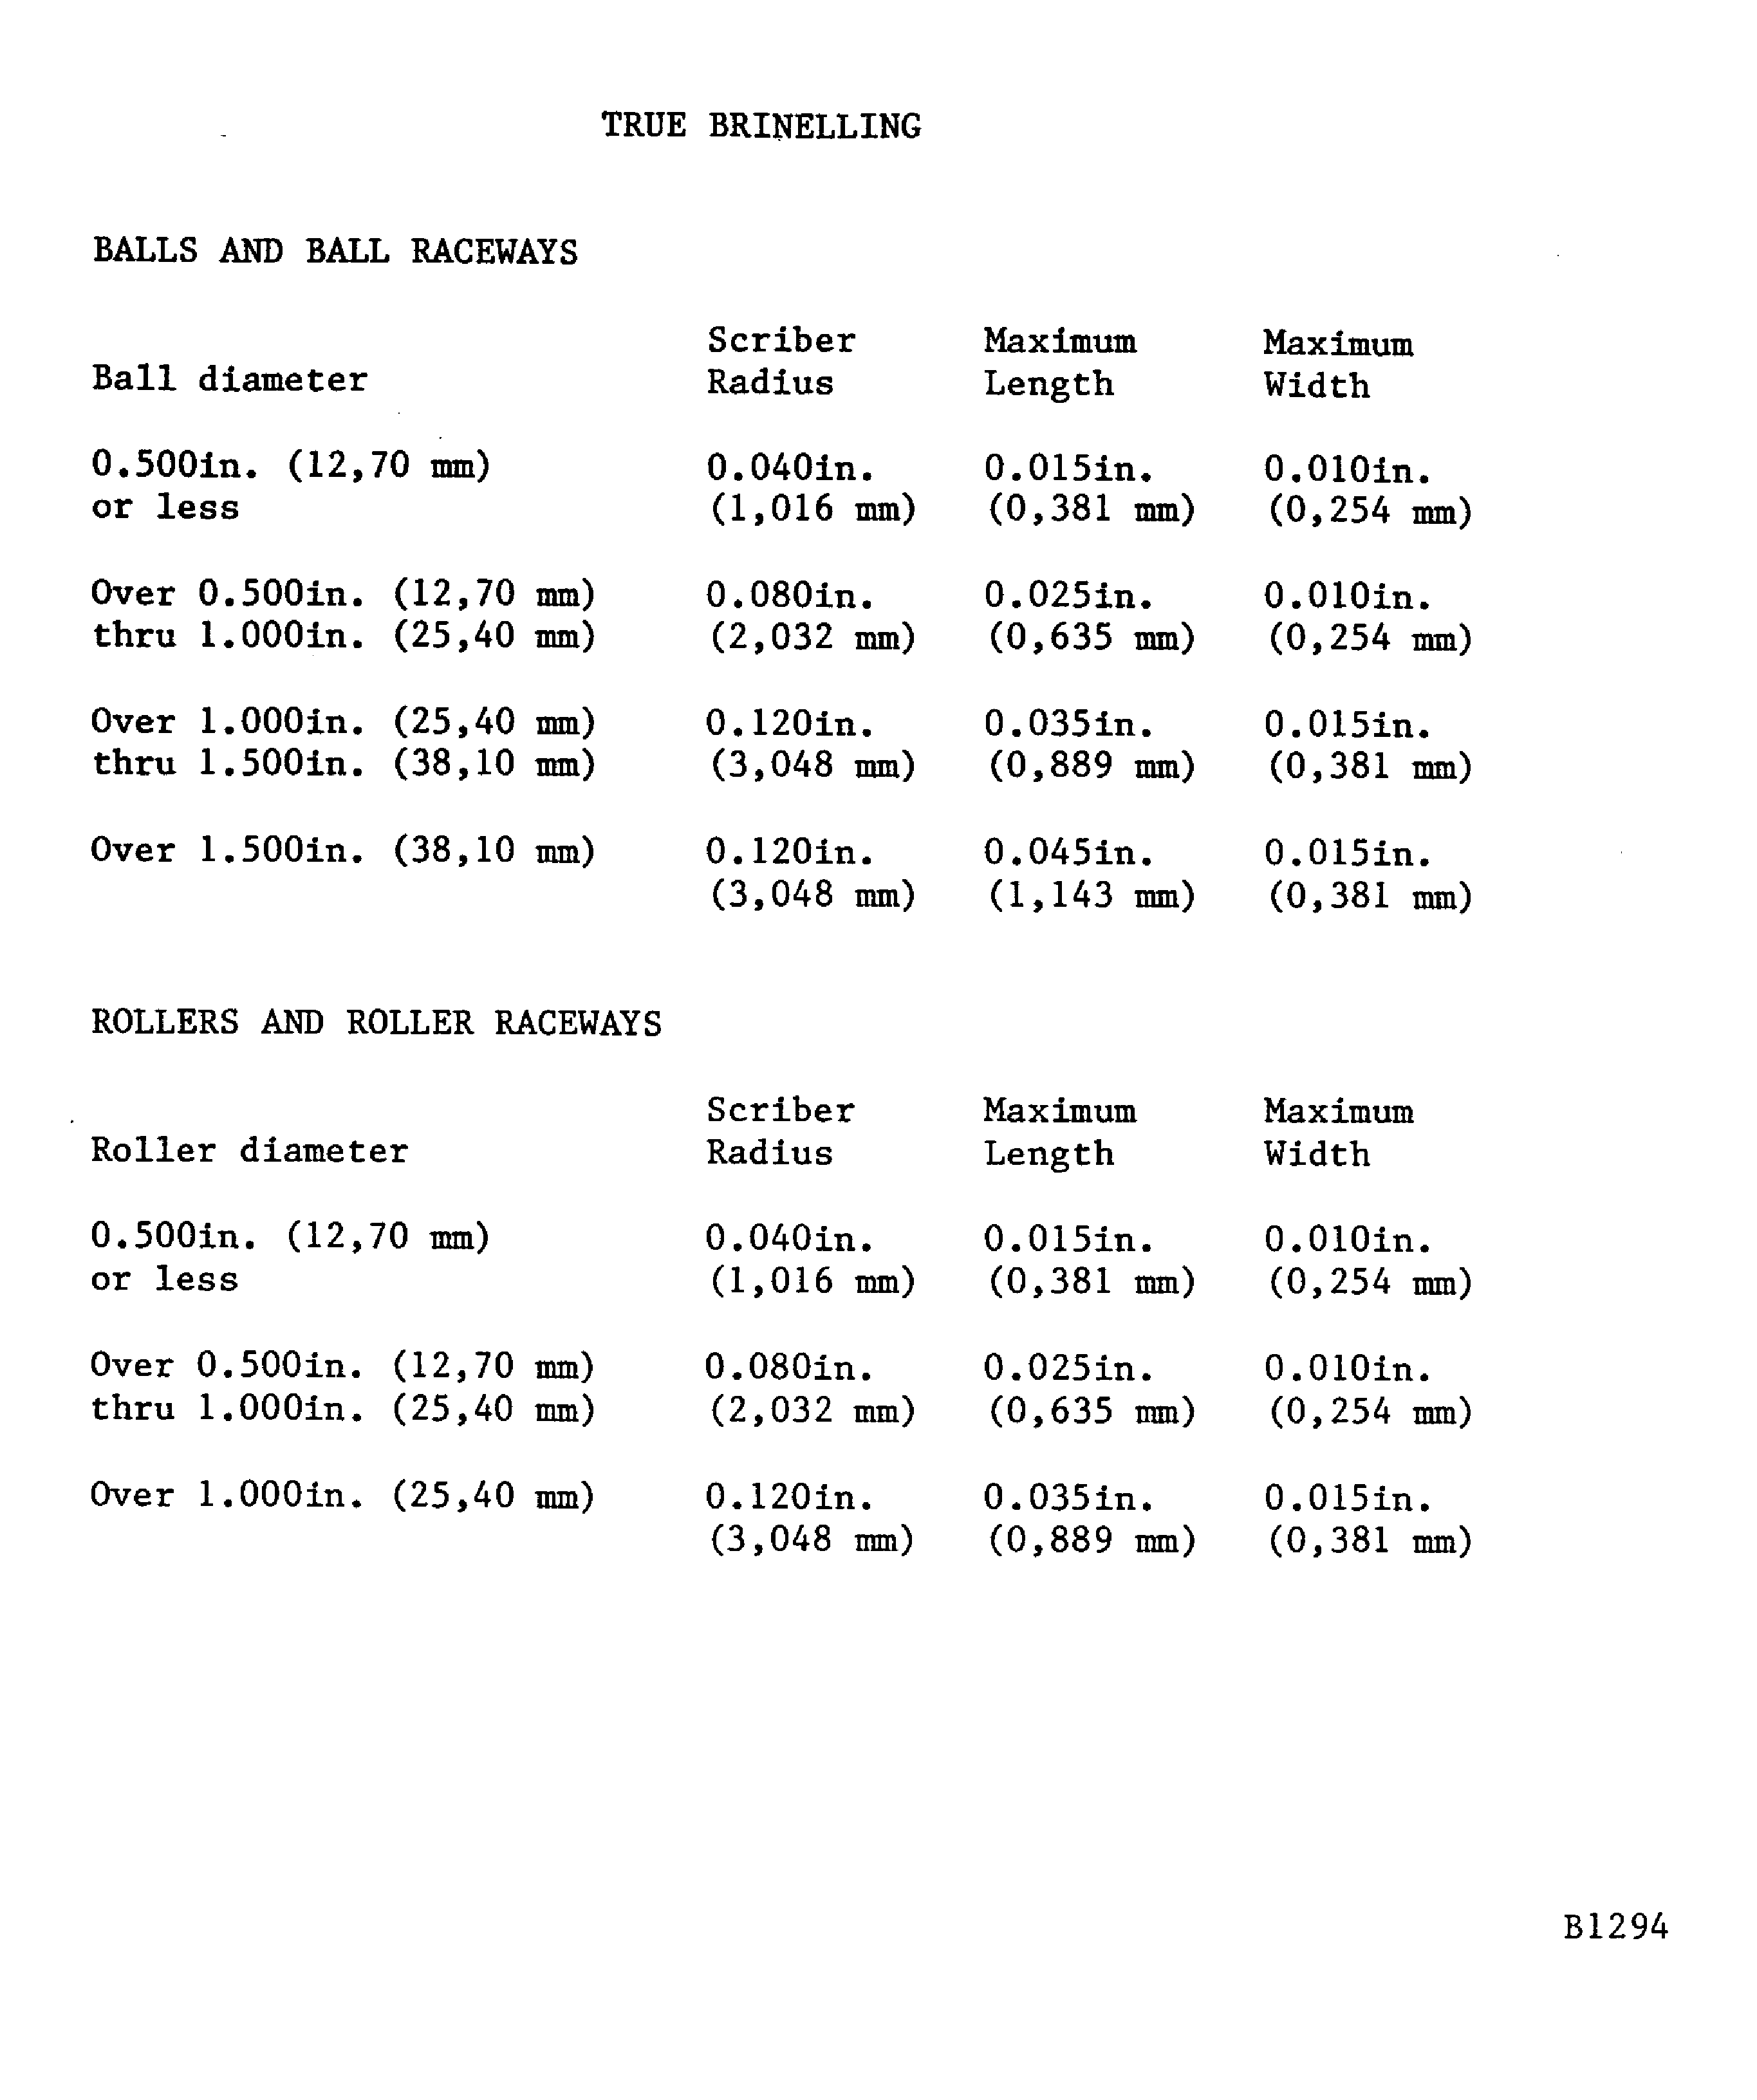
Figure: Overhaul limits
Overhaul limits
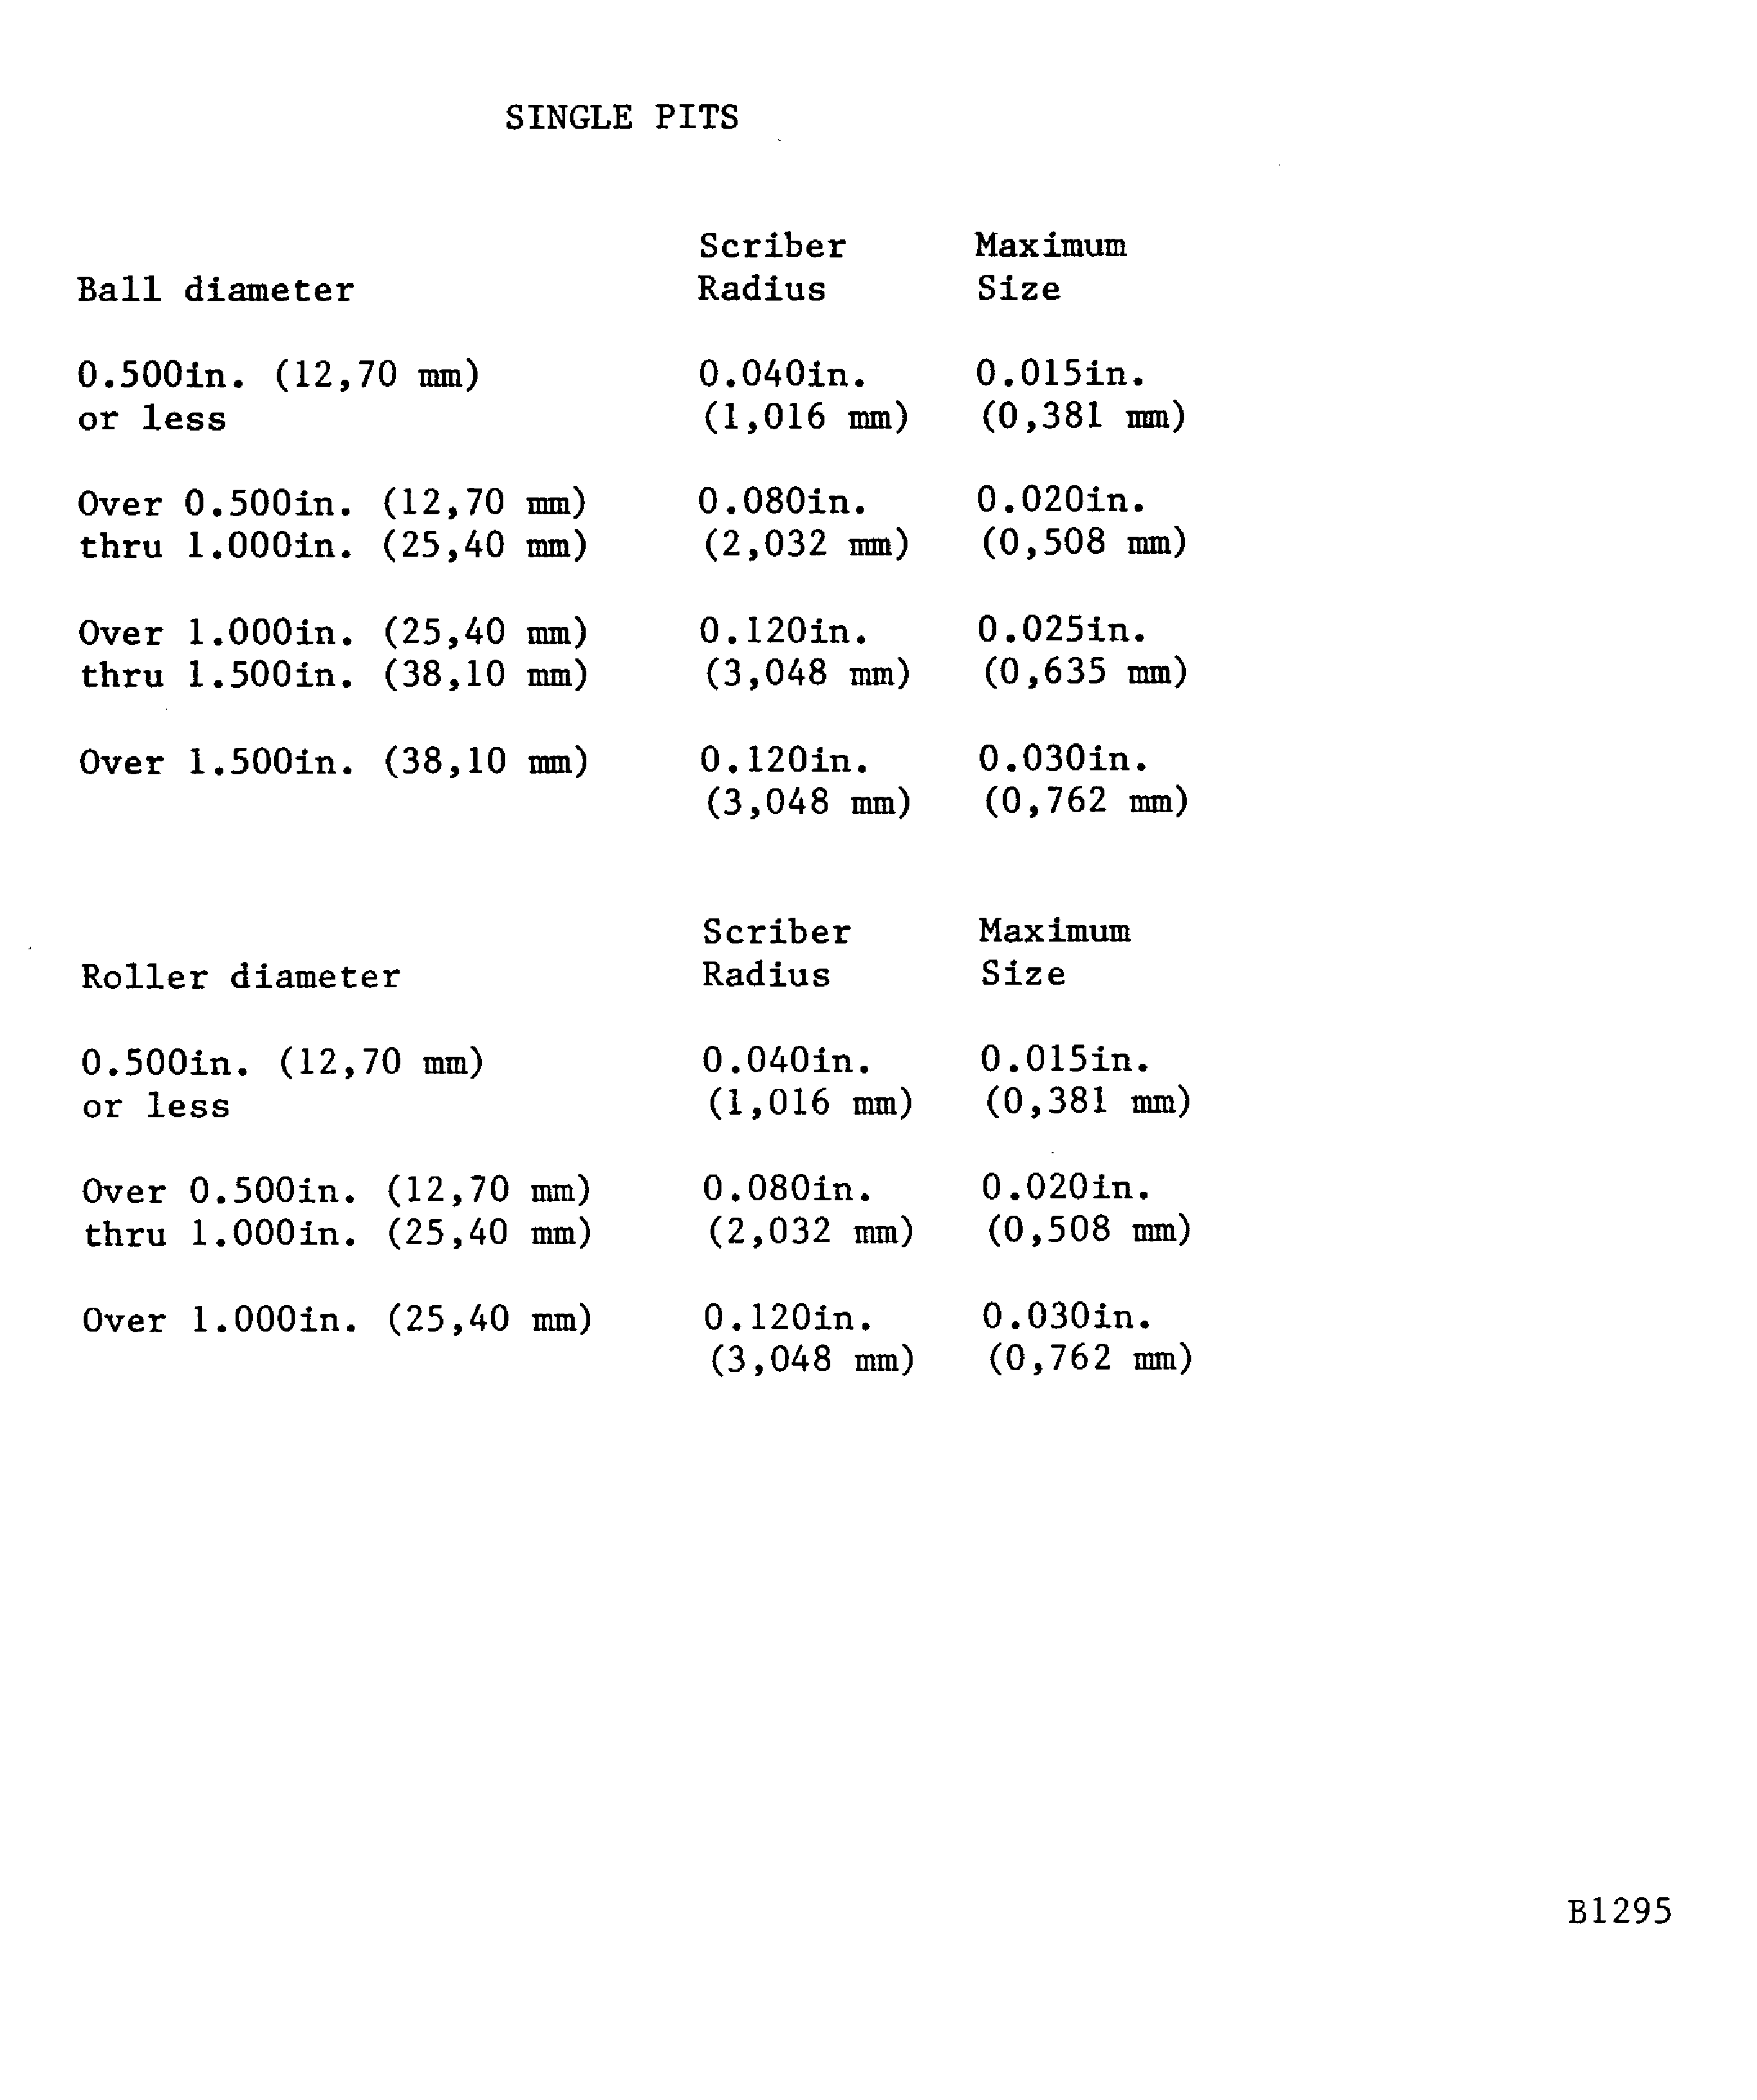
Figure: Overhaul limits
Overhaul limits
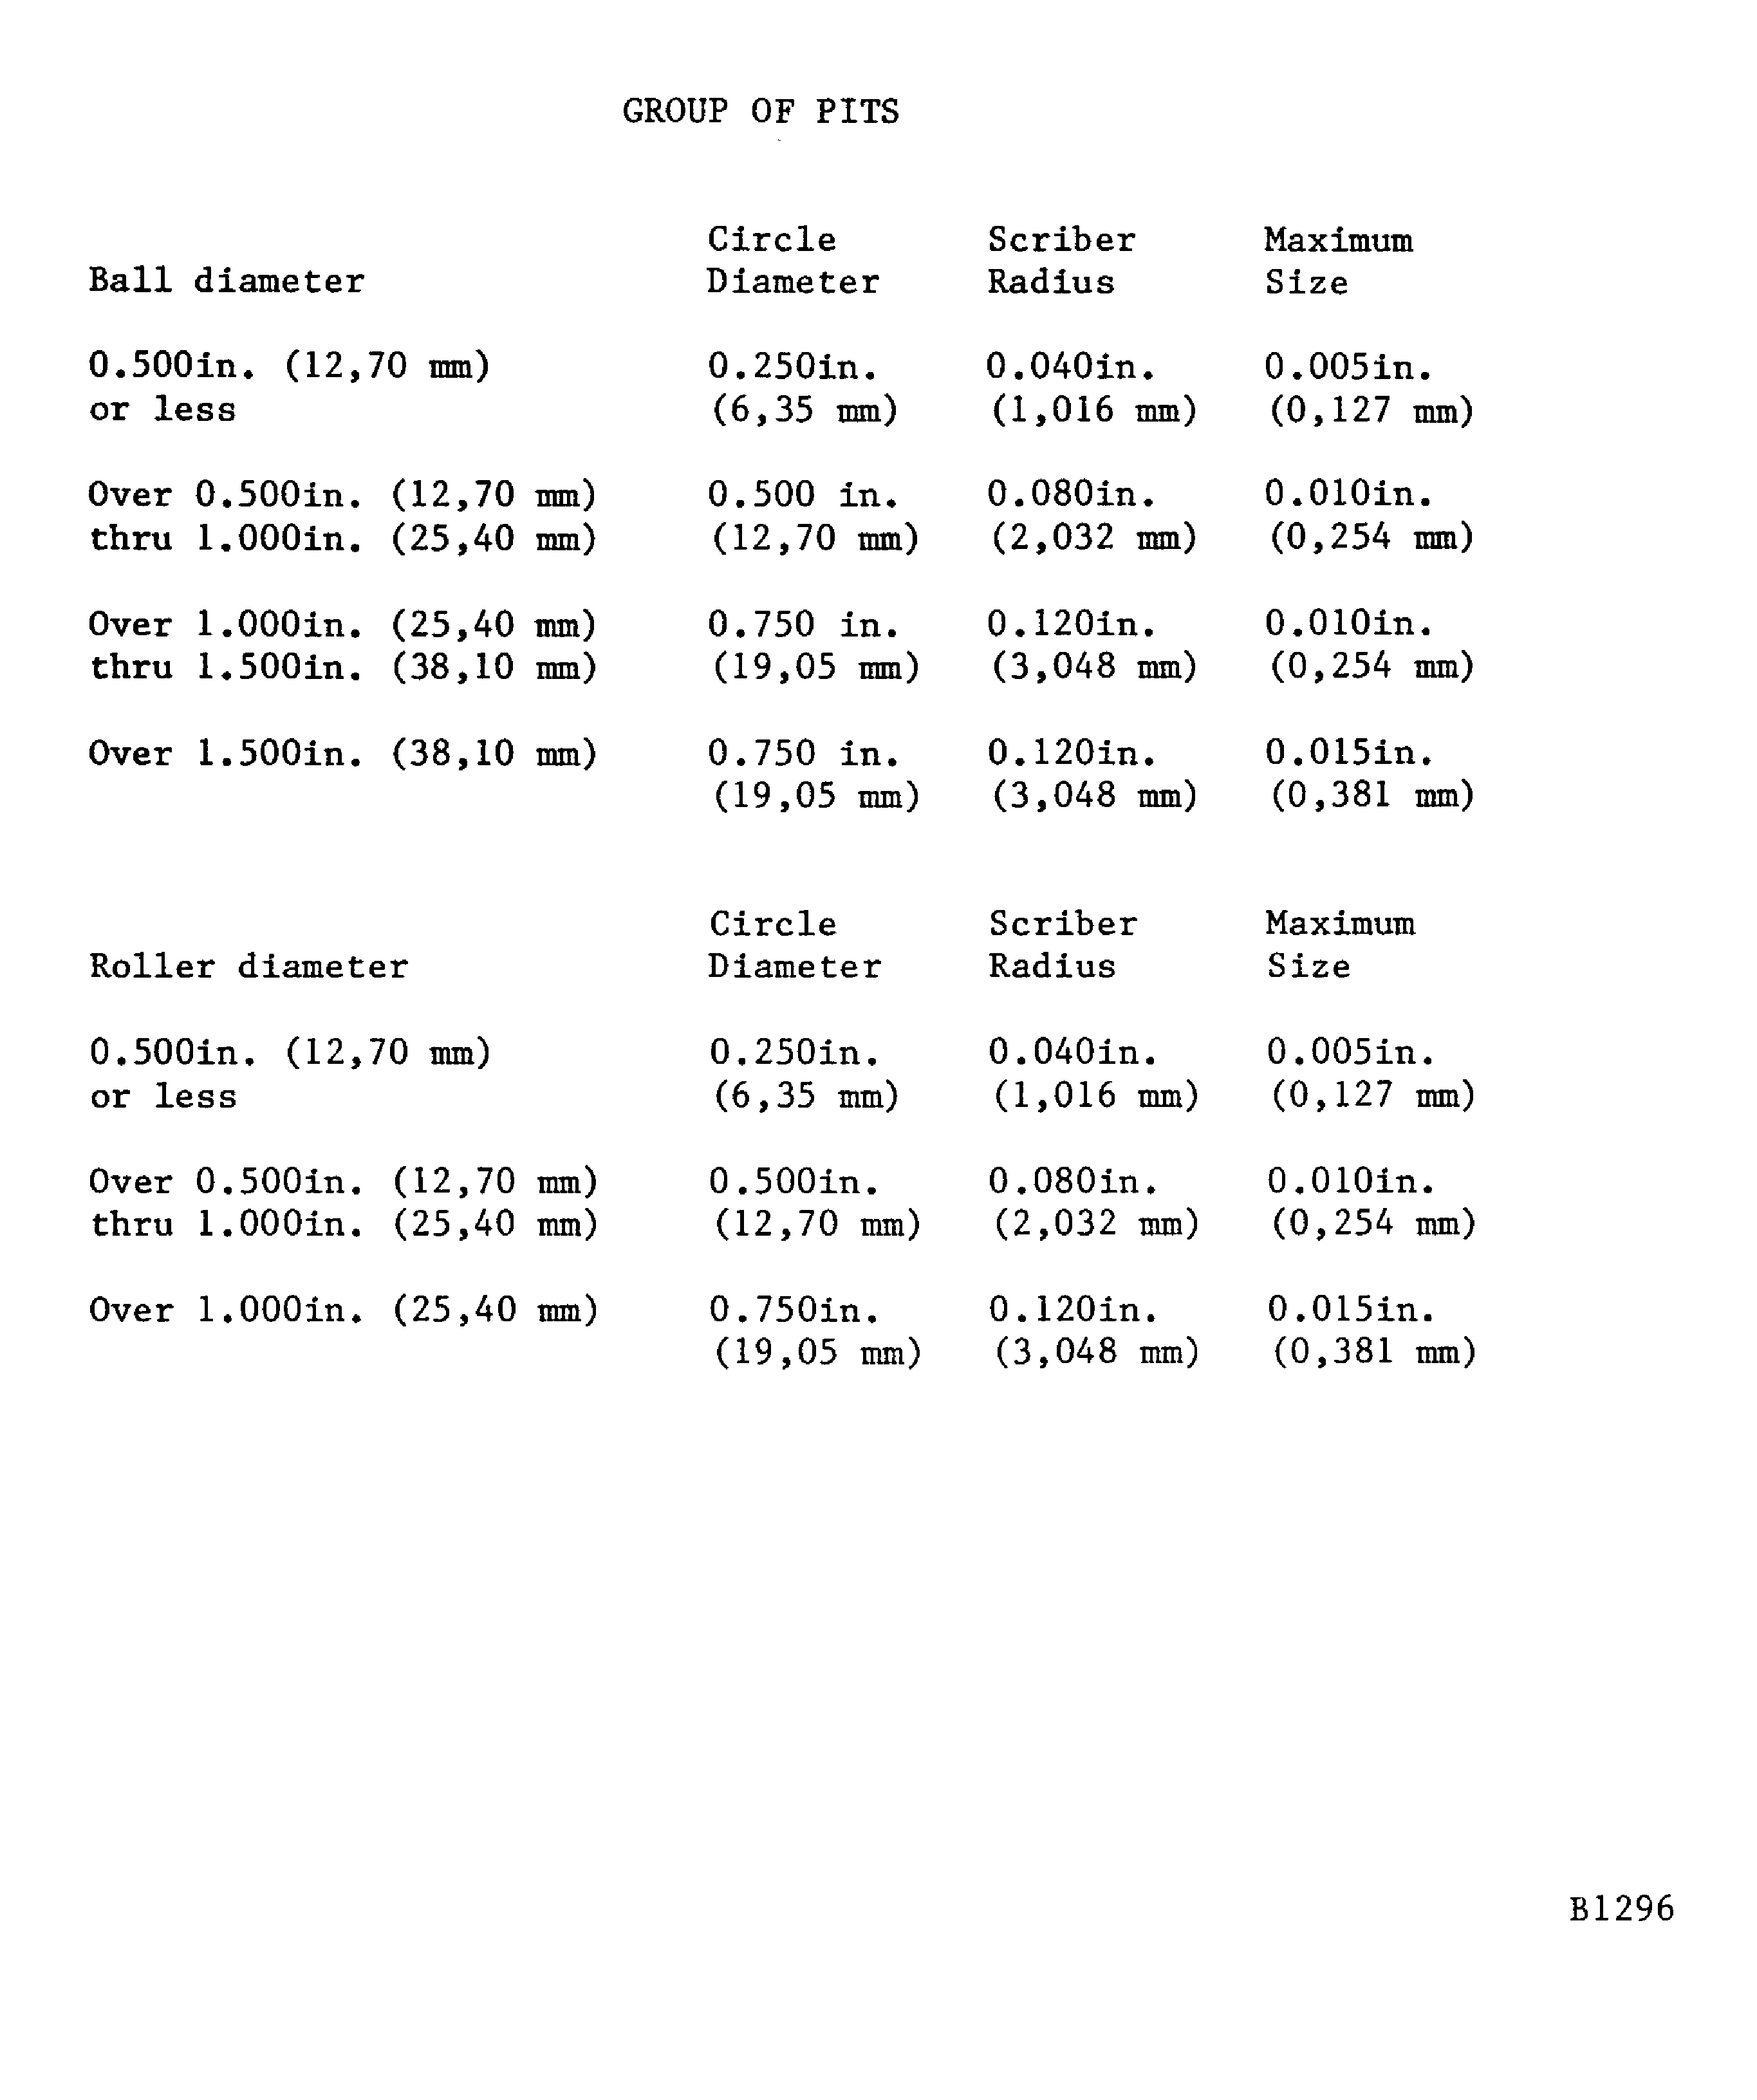
Figure: Overhaul limits
Overhaul limits
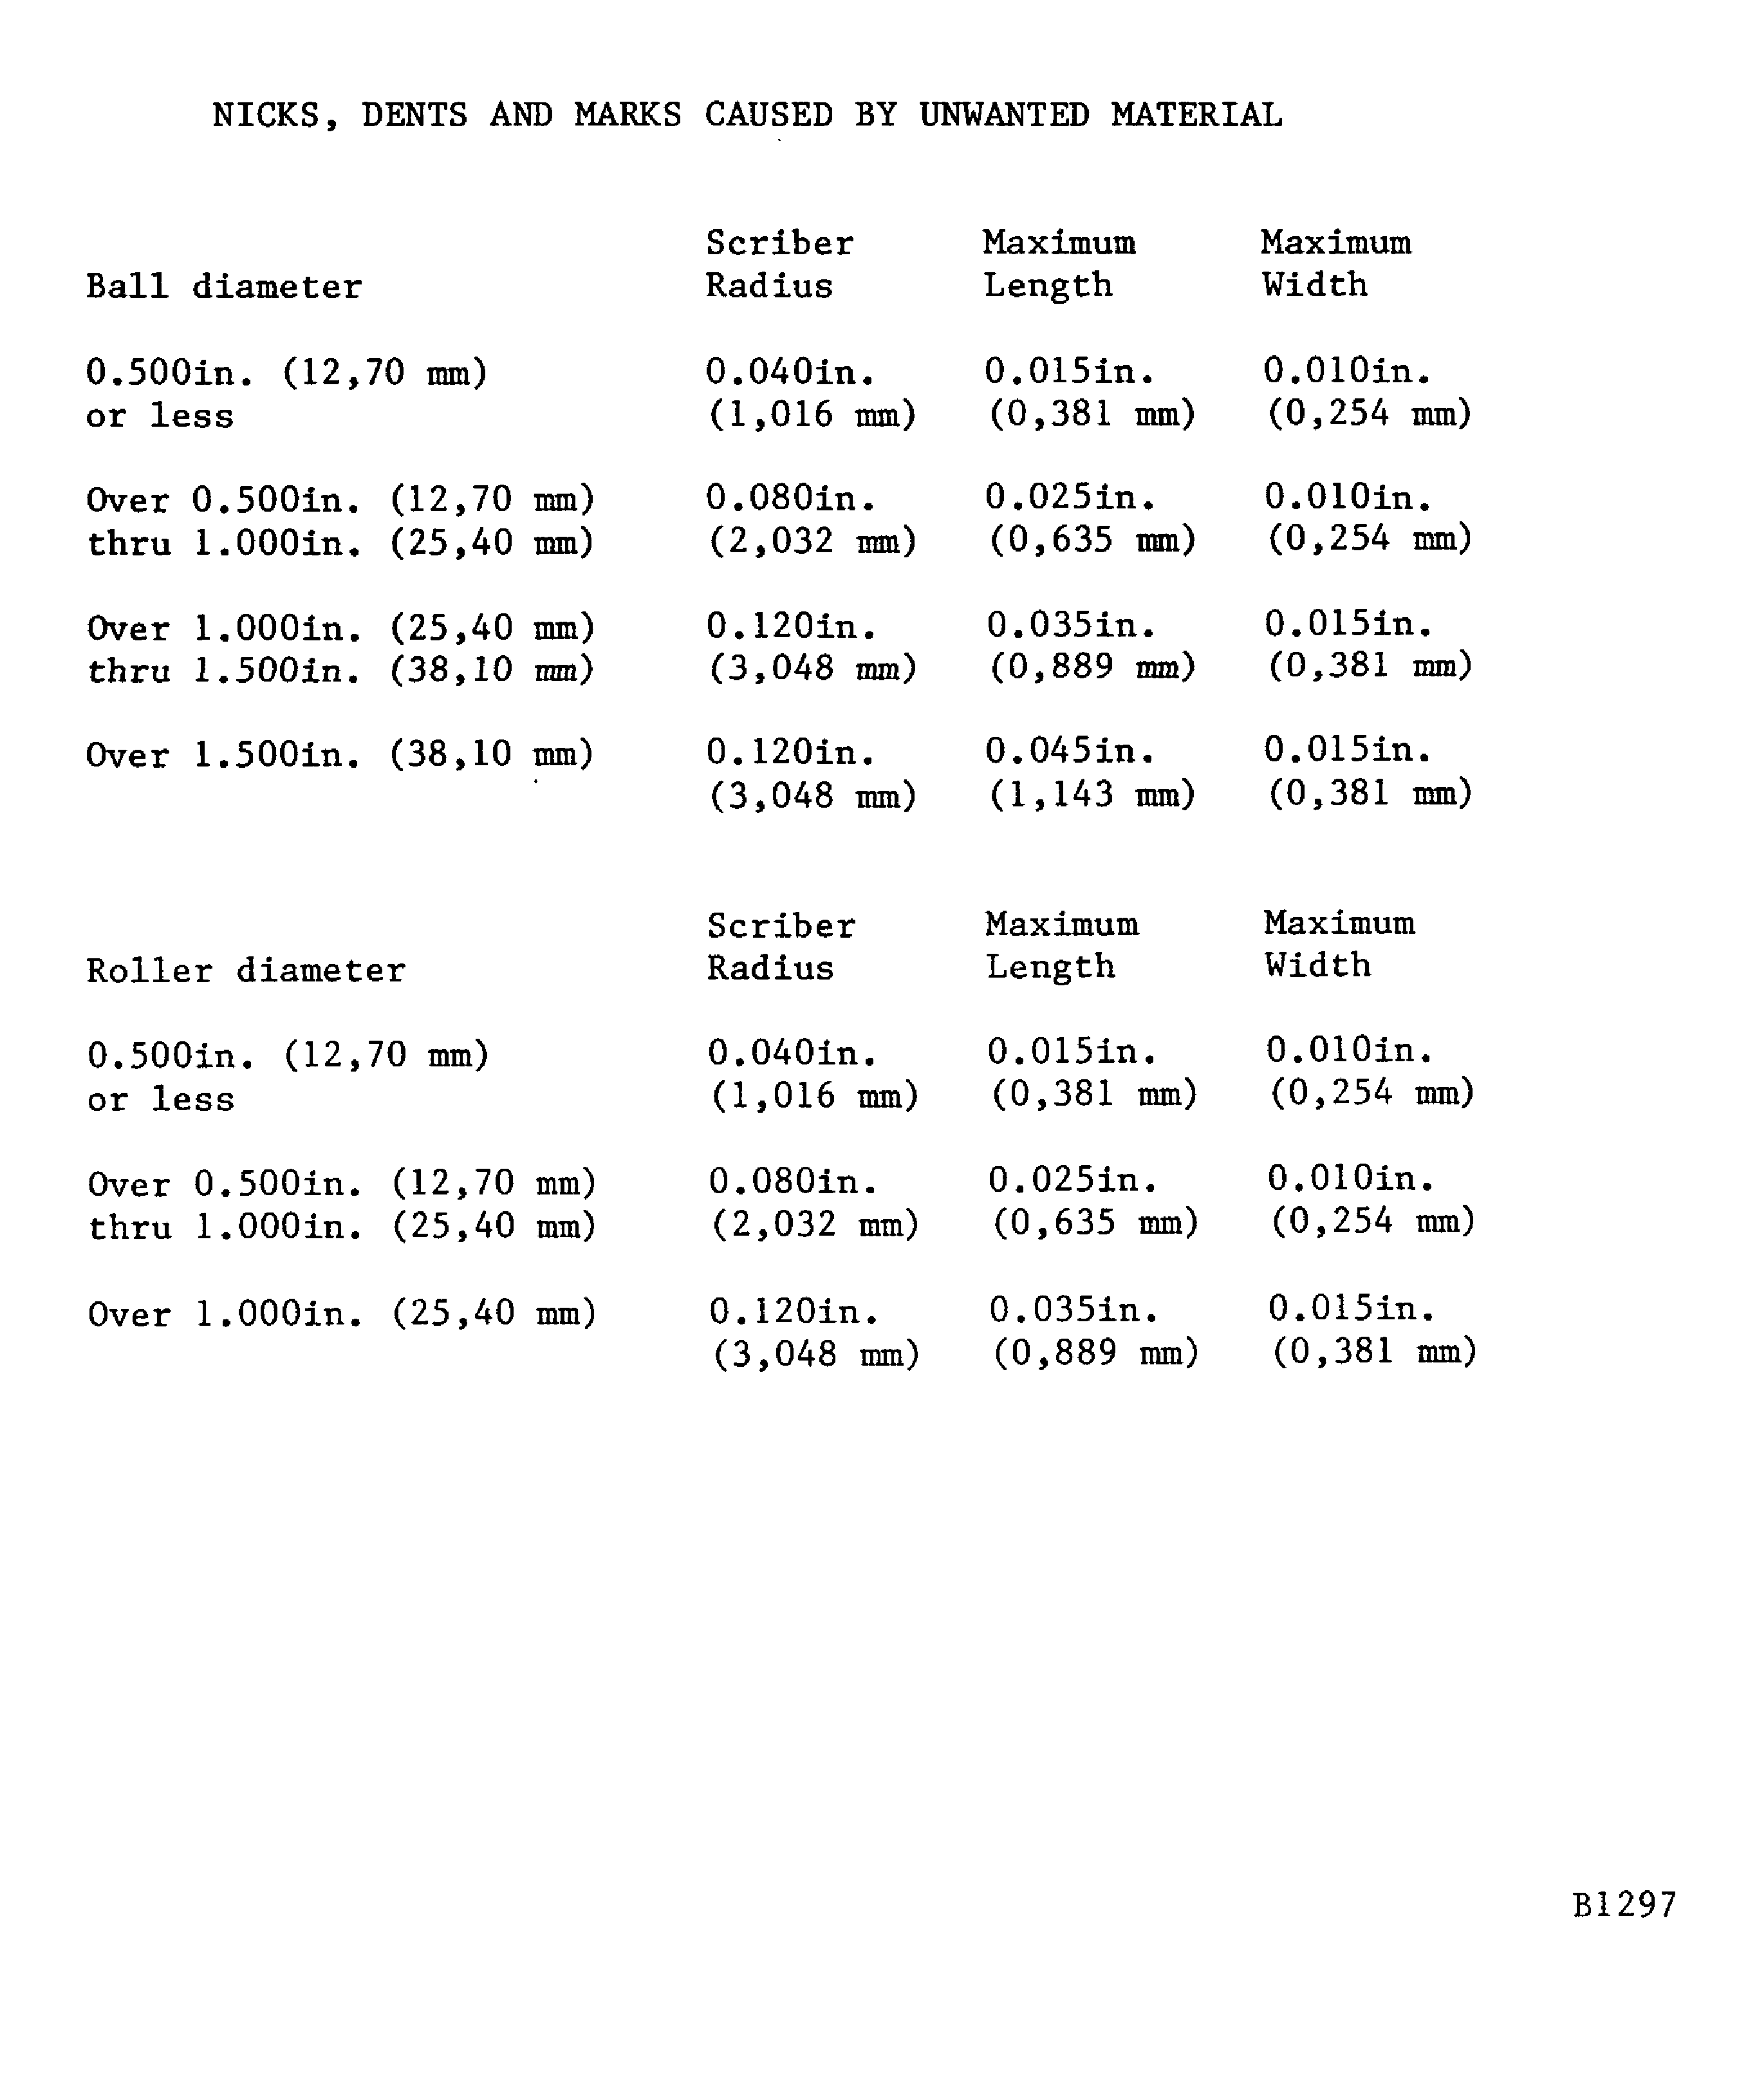
Figure: Overhaul limits
Overhaul limits
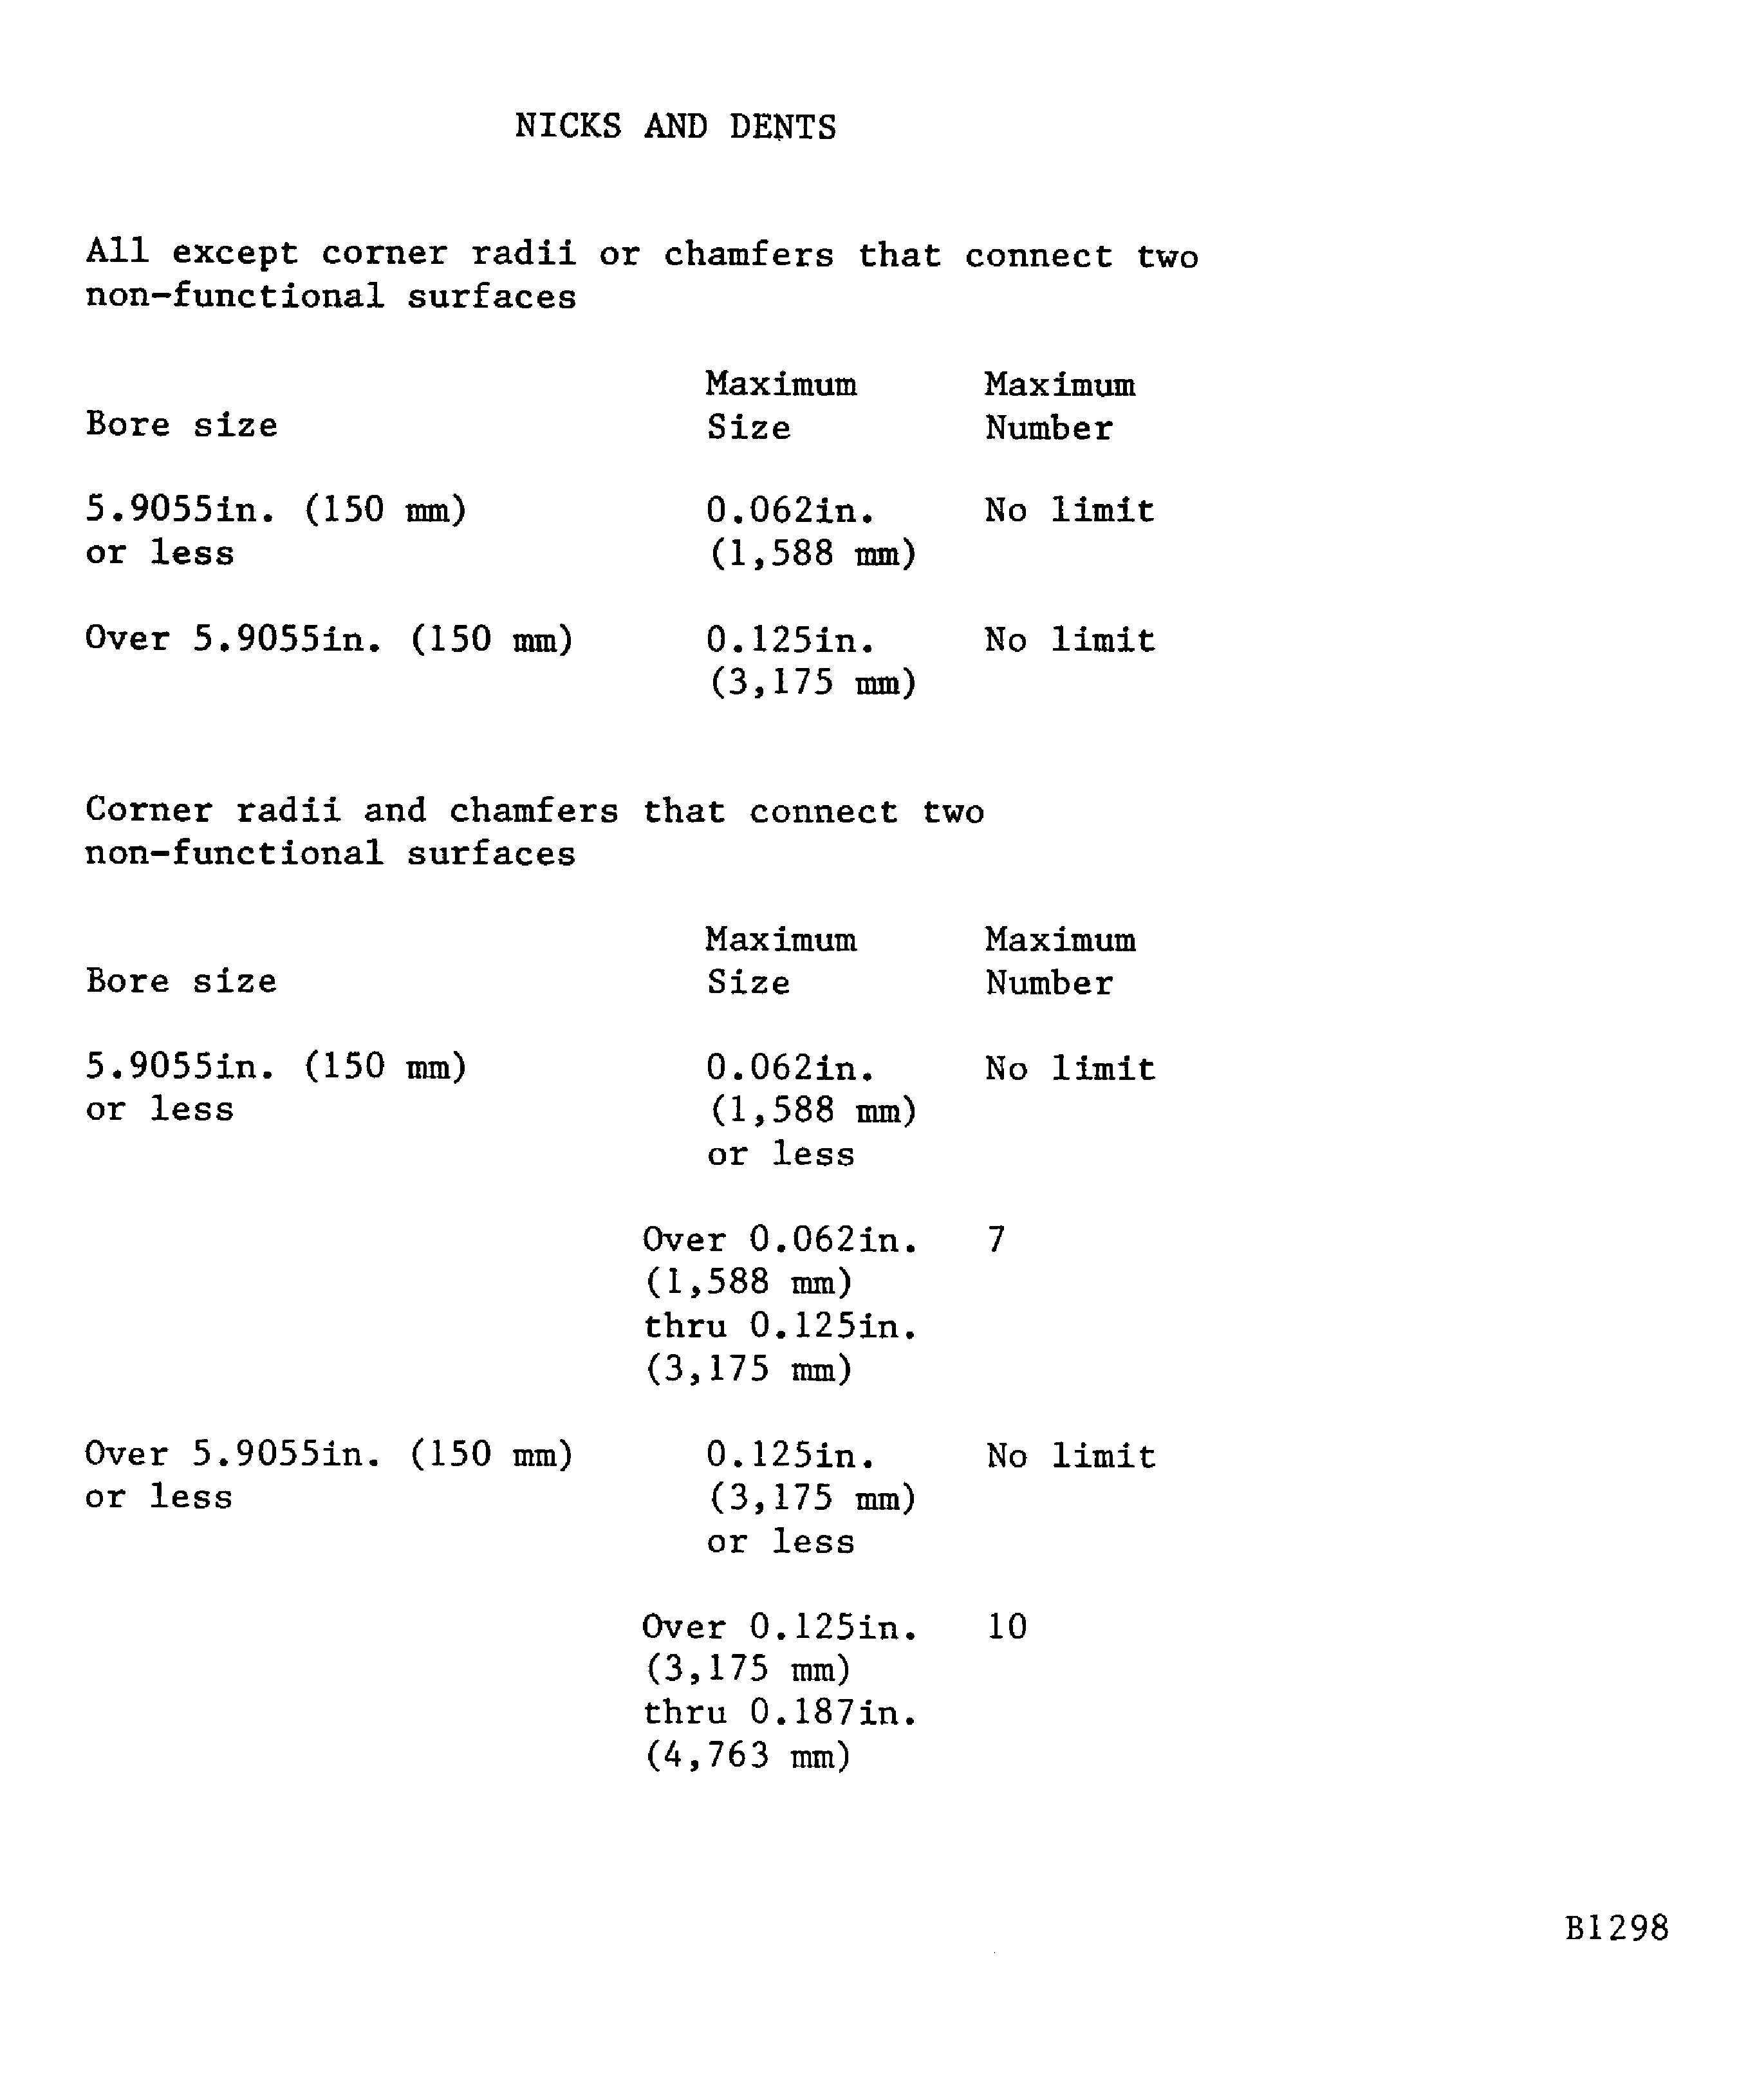
Figure: Overhaul limits Deleted see SUBTASK 70-29-01-220-001
Overhaul limits Deleted see SUBTASK 70-29-01-220-001

Figure: Measure the contact angle
Measure the contact angle

