TASK 70-34-10-340-501 Flame spray coating - Nickel graphite

DMC:V2500-00-70-34-10-00A-609A-D|Issue No:003.00|Issue Date:2019-08-01

Export Control

EAR Export Classification: Not subject to the EAR per 15 C.F.R. Chapter 1, Part 734.3(b)(3), except for the following Service Bulletins which are currently published as EAR Export Classification 9E991: SBE70-0992, SBE72-0483, SBE72-0580, SBE72-0588, SBE72-0640, SBE73-0209, SBE80-0024 and SBE80-0025.

Copyright

© IAE International Aero Engines AG (2001, 2014 - 2021) The information contained in this document is the property of © IAE International Aero Engines AG and may not be copied or used for any purpose other than that for which it is supplied without the express written authority of © IAE International Aero Engines AG. (This does not preclude use by engine and aircraft operators for normal instructional, maintenance or overhaul purposes.).

Applicability

All

Common Information

TASK 70-34-10-340-501 Flame spray coating - Nickel graphite

General

Abradable coating PWA 75-1 which is applied to airseal surfaces consists of flame sprayed nickel-coated graphite in the proportion of 75 percent nickel to 25 percent graphite.

NOTE

A coating that is almost the same as PWA 75, but has a plasma-sprayed undercoat, is designated PWA 74 (Refer to SPM TASK 70-34-15-340-501).

Preliminary Requirements

Pre-Conditions

NONE

Support Equipment

NameManufacturerPart Number / IdentificationQuantityRemark
Powder flame spray gunLOCALPowder flame spray gun

special 0.046 in. (1.168 mm) diameter nozzle

Gas control unitLOCALGas control unit

To supply oxygen gas, hydrogen gas, acetylene gas, and argon gas with applicable regulators and flowmeters.

Powder feederLOCALPowder feeder

Additional feeder to supply flame torch

Flame spray equipmentLOCALFlame spray equipment

Consumables, Materials and Expendables

NameManufacturerPart Number / IdentificationQuantityRemark
CoMat 03-010 ARGON GAS0B434CoMat 03-010
CoMat 03-097 FLAME SPRAY POWDERIAE15CoMat 03-097
DELETEDLOCALDELETED

(Deleted CoMat 03-117 and CoMat 03-118)

CoMat 03-138 HYDROGEN GAS (PROTECTIVE ATMOSPHERE)0B434CoMat 03-138
CoMat 03-289 OXYGEN GASLOCALCoMat 03-289
CoMat 03-347 ACETYLENE GASX222XCoMat 03-347
CoMat 05-019 WATERPROOF SILICON CARBIDE1E1X8CoMat 05-019
CoMat 05-020 WATERPROOF SILICON CARBIDELOCALCoMat 05-020
CoMat 05-021 WATERPROOF SILICON CARBIDE44197CoMat 05-021
CoMat 05-064 WATERPROOF SILICON CARBIDE1E1X8CoMat 05-064
CoMat 05-076 WATERPROOF SILICON CARBIDE1E1X8CoMat 05-076
CoMat 05-077 WATERPROOF SILICON CARBIDE1E1X8CoMat 05-077
CoMat 05-078 WATERPROOF SILICON CARBIDE1E1X8CoMat 05-078
CoMat 05-079 WATERPROOF SILICON CARBIDE1E1X8CoMat 05-079
CoMat 05-080 WATERPROOF SILICON CARBIDE1E1X8CoMat 05-080
CoMat 05-081 WATERPROOF SILICON CARBIDE1E1X8CoMat 05-081
CoMat 05-082 WATERPROOF SILICON CARBIDE1E1X8CoMat 05-082
CoMat 05-090 DIAMOND PASTE09410CoMat 05-090

Spares

NONE

Safety Requirements

WARNING

IT IS THE RESPONSIBILITY OF THE OPERATOR TO OBTAIN AND OBSERVE THE MANUFACTURERS MATERIAL SAFETY DATA SHEETS FOR CONSUMABLE MATERIALS INFORMATION (SUCH AS HAZARDOUS INGREDIENTS; PHYSICAL/CHEMICAL CHARACTERISTICS; FIRE, EXPLOSION, REACTIVITY, AND HEALTH HAZARD DATA; PRECAUTIONS FOR SAFE HANDLING; AND USE AND CONTROL MEASURES), AND ALSO TO TAKE LOCAL REGULATIONS INTO CONSIDERATION.

Procedure

    1. SUBTASK 70-34-10-340-001 Apply the Plasma Coating

      1. NOTE

        For sequence of repair operations, masking and surface preparation, refer to SPM TASK 70-34-03-340-501.

        Application.

      2. Install the flame spray gun at a distance of 6.5 in. to 10.125 in. (165.100 mm to 257.175 mm) from work, depending upon equipment used, and pre-heat as necessary.

      3. Apply CoMat 03-097 FLAME SPRAY POWDER to an additional thickness of 0.040 in. (1.016 mm), unless otherwise specified to produce the PWA 75-1 coating.

      4. During application, clean the spray nozzle frequently by brushing the tip with a stiff wire brush.

    1. SUBTASK 70-34-10-110-001 Removal of Masking Tape

    2. After the plasma coating has been applied and the part has cooled, remove all masking materials and clean off remaining masking adhesives. Standard workshop procedures and solvents must be used.

    1. SUBTASK 70-34-10-320-001 Finishing the PWA 75-1 Coating

    2. PWA 75-1 coating can be finished by approved milling methods.

    3. Thoroughly check the first piece in each batch of parts that are almost the same, to make sure the procedure is producing the correct results. There-after, check additional pieces as frequently as necessary to keep the correct result. Also, check the results whenever a change in procedure is made.

    1. SUBTASK 70-34-10-220-001 Quality Control and Acceptance Standards

    2. The test piece must be coated periodically as required.

      1. Metallurgical mounting procedure.

      2. Vacuum mount the specimen in epoxy, or equivalent. If pre-grinding of specimen is necessary before mounting, grind directionally from coating into base metal.

      3. Polish using CoMat 05-090 DIAMOND PASTE on cellulose cotton cloth or equivalent.

      4. Condition the polished surface with a slurry of 0.3 micron (or finer) alumina polishing powder and water on a micro-cloth or equivalent.

      5. Examine the unetched coating at the specified magnifications for the conditions in the applicable metallographic examination limits below.

      1. NOTE

        Specimens must be given a metallographic polish before the inspection that follows.

        PWA 75-1 Metallographic Examination Limits, On Surfaces Other Than Blade Roots.

        1. Porosity at 100X or higher magnification.

        2. Satisfactory conditions, refer to Figure and Figure.

        3. Conditions shown in Figure, when adjacent to chamfered edges, and no greater than 20 percent of total coated area are satisfactory refer to Figure.

        4. Conditions less porous than Figure but more porous than Figure must be re-evaluated.

        5. Conditions less porous than Figure but more porous than Figure must be re-evaluated.

        6. Conditions shown in Figure when adjacent to chamfered edges, and more than 20 percent of total coated area must be re-evaluated, refer to Figure.

        7. Conditions shown in Figure (too porous) and in Figure (too dense) are unsatisfactory and must be rejected.

        1. Dispersal of nickel/graphite constituents at 100X magnification.

        2. Satisfactory conditions, refer to Figure and Figure.

        3. Conditions better than in Figure but worse than in Figure or Figure must be re-evaluated.

        4. Conditions shown in Figure (insufficient graphite) are unsatisfactory and must be rejected.

        1. Cracks at 100X or higher magnification.

        2. Any cracks in total micro area must be rejected.

        1. Bond at coating interface at 500X magnification.

        2. Conditions shown in Figure up through 15 percent of total micro distance are satisfactory.

        3. Conditions shown in Figure over 15 percent through 25 percent of total micro distance must be re-evaluated.

        4. Conditions shown in Figure more than 25 percent of total micro distance must be rejected.

        5. Separation between coating and base metal is unsatisfactory and must be rejected.

        1. Oxides at 500X magnification.

        2. Conditions shown in Figure and Figure are satisfactory.

        3. Conditions better than in Figure but worse than in Figure must be re-evaluated.

        4. Conditions shown in Figure or worse are unsatisfactory and must be rejected.

      1. PWA 75-1 Metallographic Examination Limits, On Blade Roots.

        1. Porosity at 100X magnification.

        2. Conditions shown in Figure and Figure are satisfactory.

        3. Conditions less porous than in Figure must be re-evaluated.

        4. Conditions more porous than in Figure but less porous than in Figure must be re-evaluated.

        5. Conditions almost the same or worse than in Figure are unsatisfactory and must be rejected.

        1. Dispersion of coating constituents at 100X magnification.

        2. Conditions shown in Figure and Figure are satisfactory.

        3. Conditions better than in Figure but worse than in Figure or Figure must be re-evaluated.

        4. Conditions nearly the same as or worse than in Figure are unsatisfactory and must be rejected.

        1. Cracks at 100X or higher magnification.

        2. Cracks in total micro area are unsatisfactory and must be rejected.

        1. Bond at coating interface at 100X magnification.

        2. Conditions nearly the same as or better than Figure are satisfactory.

        3. Conditions worse than Figure but better than Figure must be re-evaluated.

        4. Conditions nearly the same as in Figure, inside root radii must be re-evaluated.

        5. Conditions nearly the same as in Figure outside root radii are unsatisfactory and must be rejected.

        1. Oxides at 500X magnification.

        2. Conditions shown in Figure and Figure are satisfactory.

        3. Conditions better than in Figure but worse than Figure must be re-evaluated.

        4. Conditions nearly the same as or worse than in Figure are unsatisfactory and must be rejected.

    1. SUBTASK 70-34-10-280-001 Thermal Shock Test for Adhesion (PWA 75-1 coating)

      1. Specimen preparation.

      2. Cut specimen approximately 0.75 in. to 1.00 in. (19.05 mm to 25.4 mm) long and full width using a band saw with HSS 10-14 teeth/inch blade at approximately 30 SFPM feeding by hand. Refer to Figure.

      3. Unless otherwise specified, rough polish all edges of coating, break corners, and grind coating surface to a thickness of approximately 0.040 in. (1.016 mm) then rough polish through 600 grit silicon carbide paper or equivalent.

      4. Examine specimen at 7X magnification for mechanical damage to coating at interface. Evidence of bond separation can be cause for preparing another specimen.

      1. Procedure.

      2. Heat treat specimen in air at 1000 degrees for five to ten minutes.

      3. Quench in water.

      4. Examine at 3.5 X magnification for bond separation, cracks, flaking, spalling or other defects.

      1. Test standards.

      2. Conditions shown in Figure and Figure are satisfactory.

      3. Conditions shown in Figure must be re-evaluated.

      4. Conditions shown in Figure are unsatisfactory and must be rejected.

    1. SUBTASK 70-34-10-280-002 Scratch Hardness Test

      1. Scratch hardness tester.

        1. Scratch hardness tester may be fabricated locally to the design shown in Figure.

        2. This tester has a traverse table with stops to hold the test block during the test. The traverse table must have a motor drive that can move the table in the traverse direction at approximately 1 foot/minute (0.3 m/minute), and the range of travel must be more than 0.75 in. (19 mm).

        3. This tester also has a weight holder that applies a total load (the weight of the weight holder plus the weight of the added weight(s)) of 8.5 lbs (3.9 kg) to the cutter. The cutter is a nominal 120 degrees edge angle, 0.215 in. (5.46 mm) outer diameter, tungsten carbide wheel with an inner diameter of 0.090 in. - 0.095 in. (2.29 mm - 2.41 mm) in a wheel insert with a tungsten carbide axle, or a nominal 120 degrees edge angle, 0.215 in. (5.46 mm) outer diameter, quick change tungsten carbide wheel unit. The scratch hardness tester keeps the rolling axis of the tungsten carbide cutter wheel parallel to the plane of the traverse table, and perpendicular to the traverse direction of the traverse table.

        4. The tungsten carbide cutter wheels, axles, wheel inserts, and quick change tungsten carbide wheel units are available from:

          The Fletcher - Terry Company, LLC

          65 SPRING LANE

          FARMINGTON CT 06032

          UNITED STATES OF AMERICA

      1. Specimen preparation.

      2. Cut Y section specimen of suitable size using band saw with HSS 10-14 teeth/inch blade at approximately 30 SFPM, feeding by hand. Refer to Figure and Figure.

      3. Grind flat the surface of the base metal opposite the coated side.

      4. Using sufficient coolant to prevent work hardening rough polish the coated side with CoMat 05-082 WATERPROOF SILICON CARBIDE through CoMat 05-064 WATERPROOF SILICON CARBIDE to a thickness of 0.040 in. to 0.050 in. (1.016 mm to 1.270 mm) coating.

      1. Hardness tester calibration.

      2. Set table traverse rate at one ft/min.

      3. Place test block on table against stops. Test block is a specimen of relatively soft non-ferrous metal such as AMS 4040 aluminum alloy, selected to have a SHN (Scratch Hardness Number) in the range same as that specified for the coating being tested.

      4. Set the unloaded scratch wheel on the test block, near the edge, and a minimum of 0.125 in. (3.175 mm) from other scratches.

      5. Place a 7.5 lb (3.4 Kg) load on the scratch wheel to total 8.5 lb (3.85 Kg) including tare.

      6. Traverse the specimen to make three scratches, each approximately 0.75 in. (19.05 mm) long.

      7. Examine each scratch at approximately 20X magnification. If gouged, or shows any unusual irregularity, perform a new traverse.

      8. Measure width of scratch to nearest 0.0005 in. (0.0127 mm) in several places, using a magnification of at least 100X. The average of these measurements in inches is called the Scratch Hardness Number (SHN).

      9. NOTE

        "Limits of the test block" refers to maximum deviation (plus or minus) from the SHN established for initial satisfactory operating performance, using a standard block.

        If SHN exceeds limits of the test block by more than 0.0005 in. (0.0127 mm) it is possible the testing machine is defective.

      1. Hardness testing procedure.

      2. Calibrate the scratch hardness tester, refer to subparagraph (b) above and Figure.

      3. Set traverse rate of tester at one ft/min.

      4. Place specimen on the table against stops.

      5. Set unloaded scratch wheel on the specimen near edge.

      6. Load the scratch wheel with 7.5 lb (3.4 Kg) (Total of 8.5 lb (3.85 Kg including tare weight).

      7. Traverse the specimen to make a scratch approximately 0.75 in. (19.05 mm) long in circumferential direction. Refer to Figure.

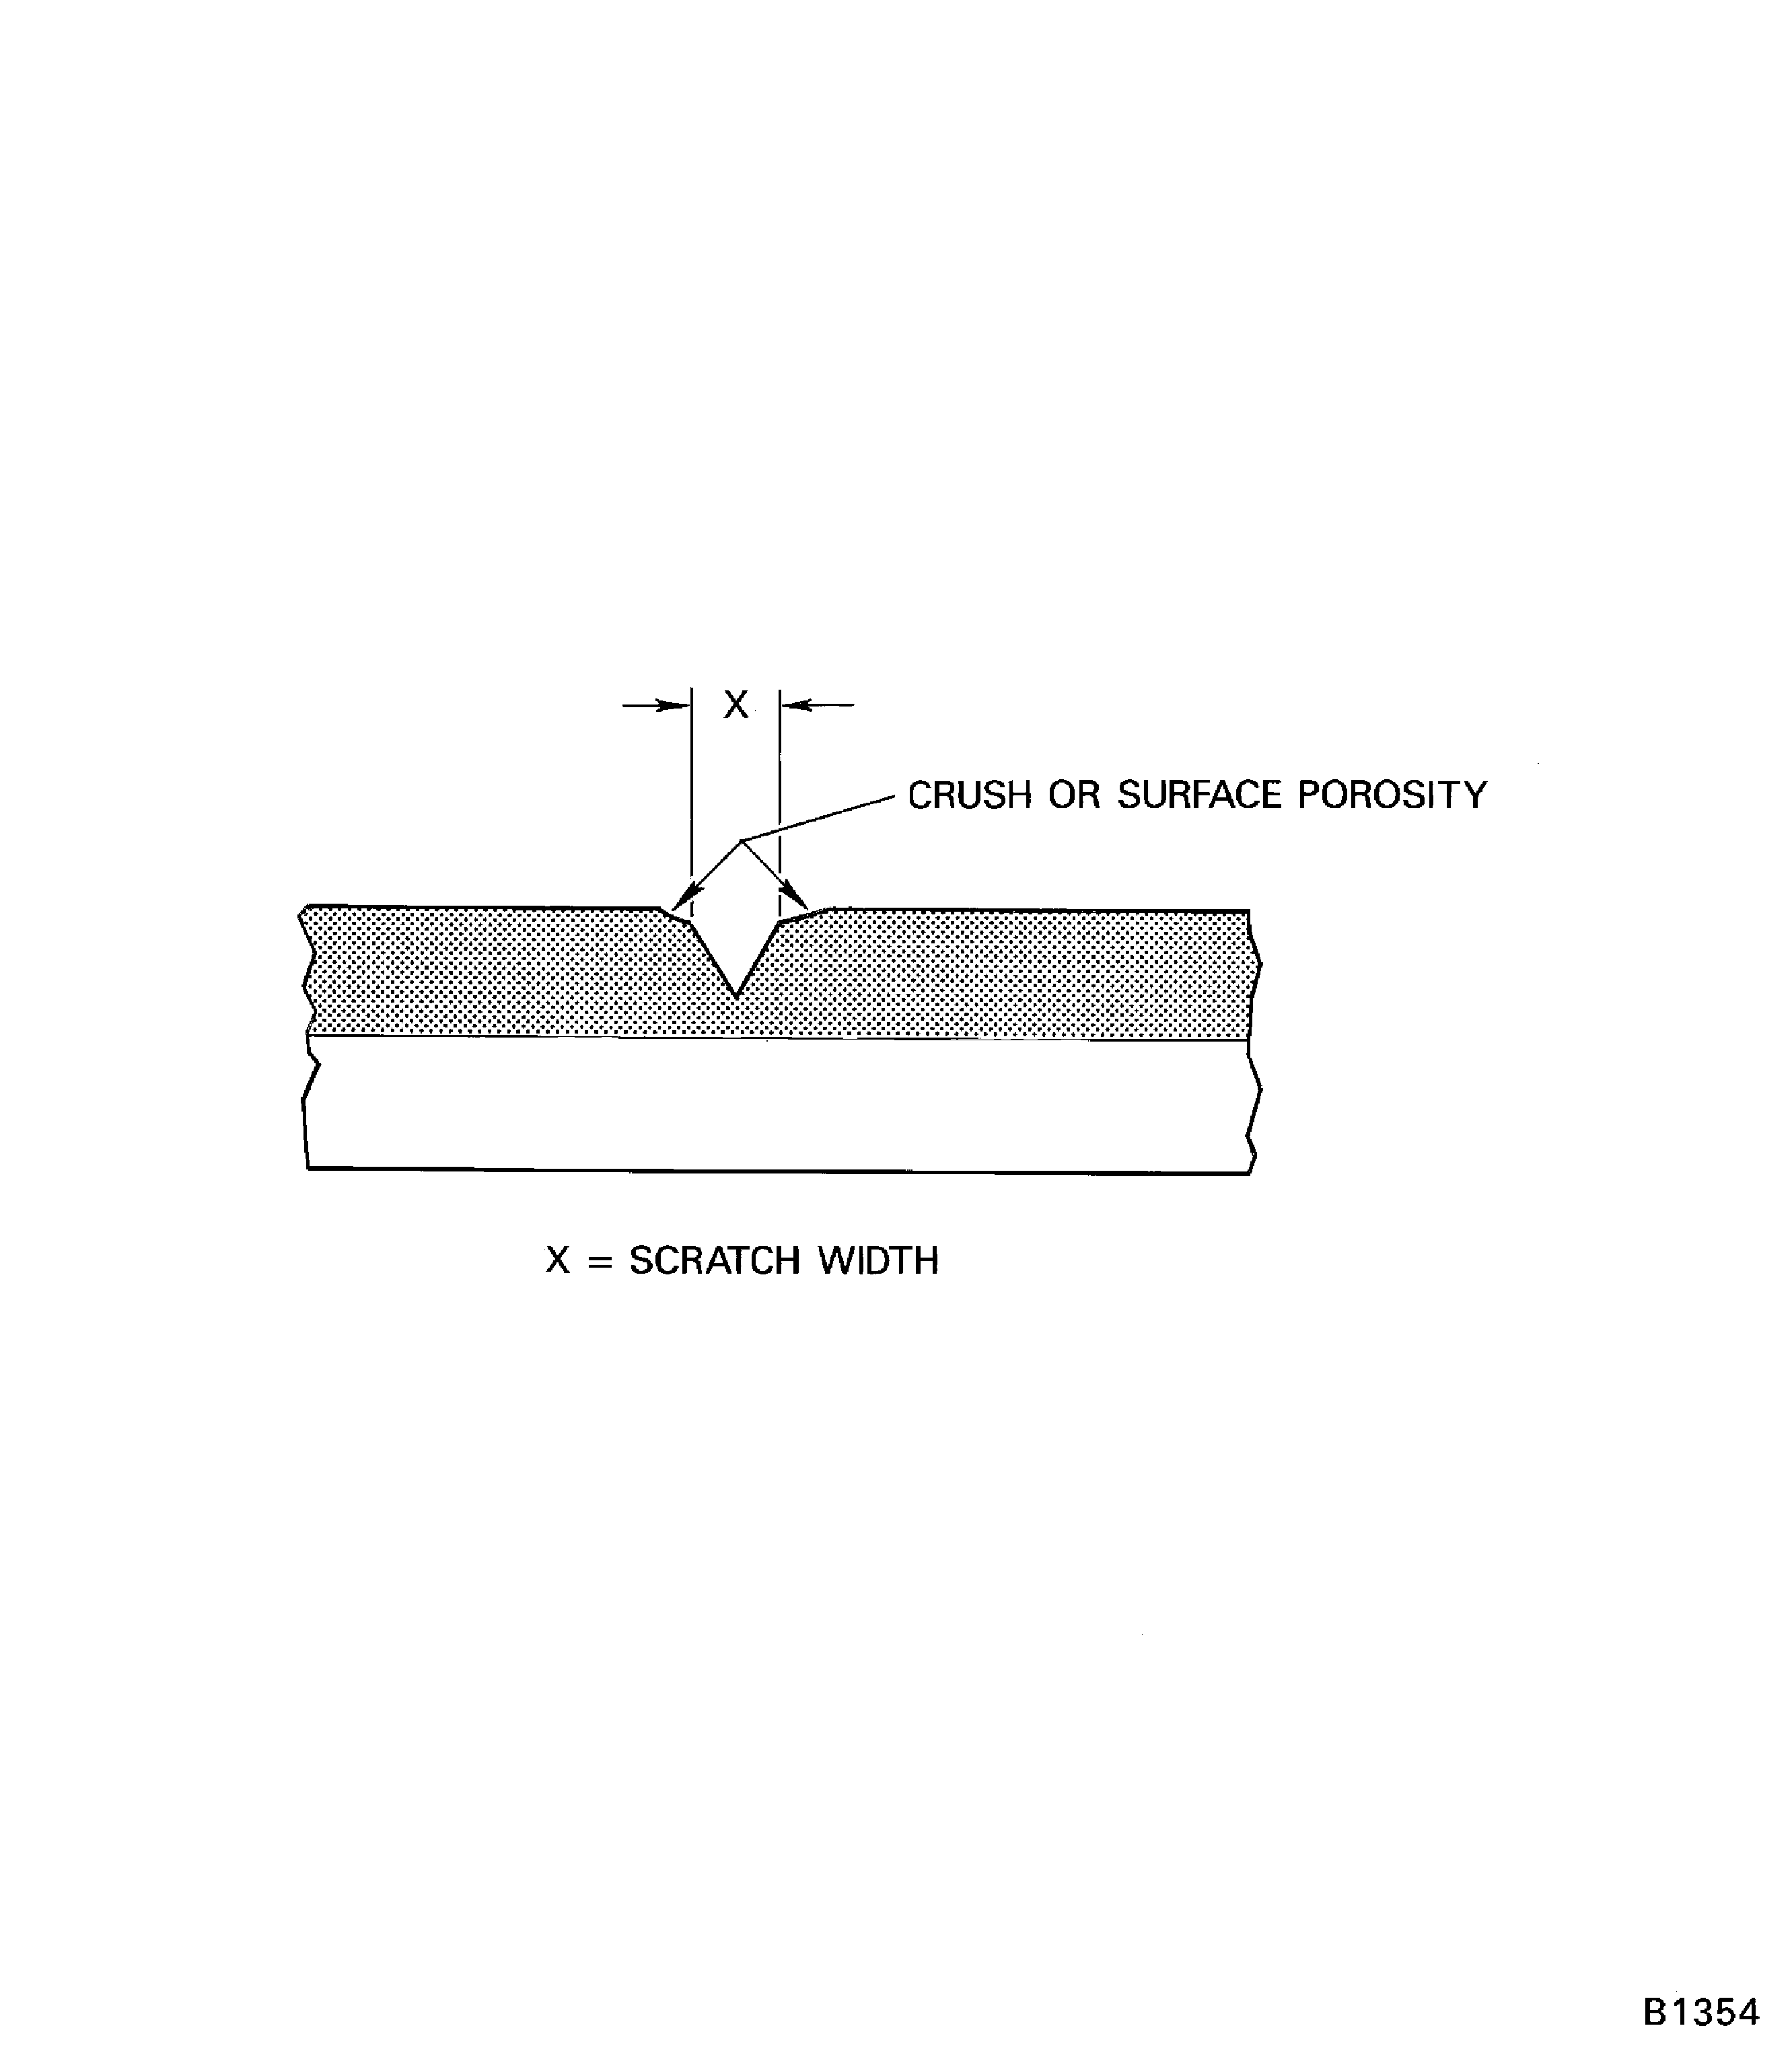
      8. Measure width (x) of scratch to nearest 0.002 in. (0.051 mm) in several places with Brinell microscope, refer to Figure. Do not include area of crush, surface porosity, or area within 2.5 scratch widths of any specimen containing vertical supports.

      1. Hardness Requirements.

      2. PWA 75-1 must show an average indentation width of 0.016 in. to 0.24 in. (0.406 mm to 0.610 mm) when traversed at a rate of approximately one ft/min under a rotating tungsten carbide wheel which is under a 8.5 lb (3.85 Kg) total load.

  1. Figure: Satisfactory porosity in PWA 75-1 coating (100X)

    Satisfactory porosity in PWA 75-1 coating (100X)
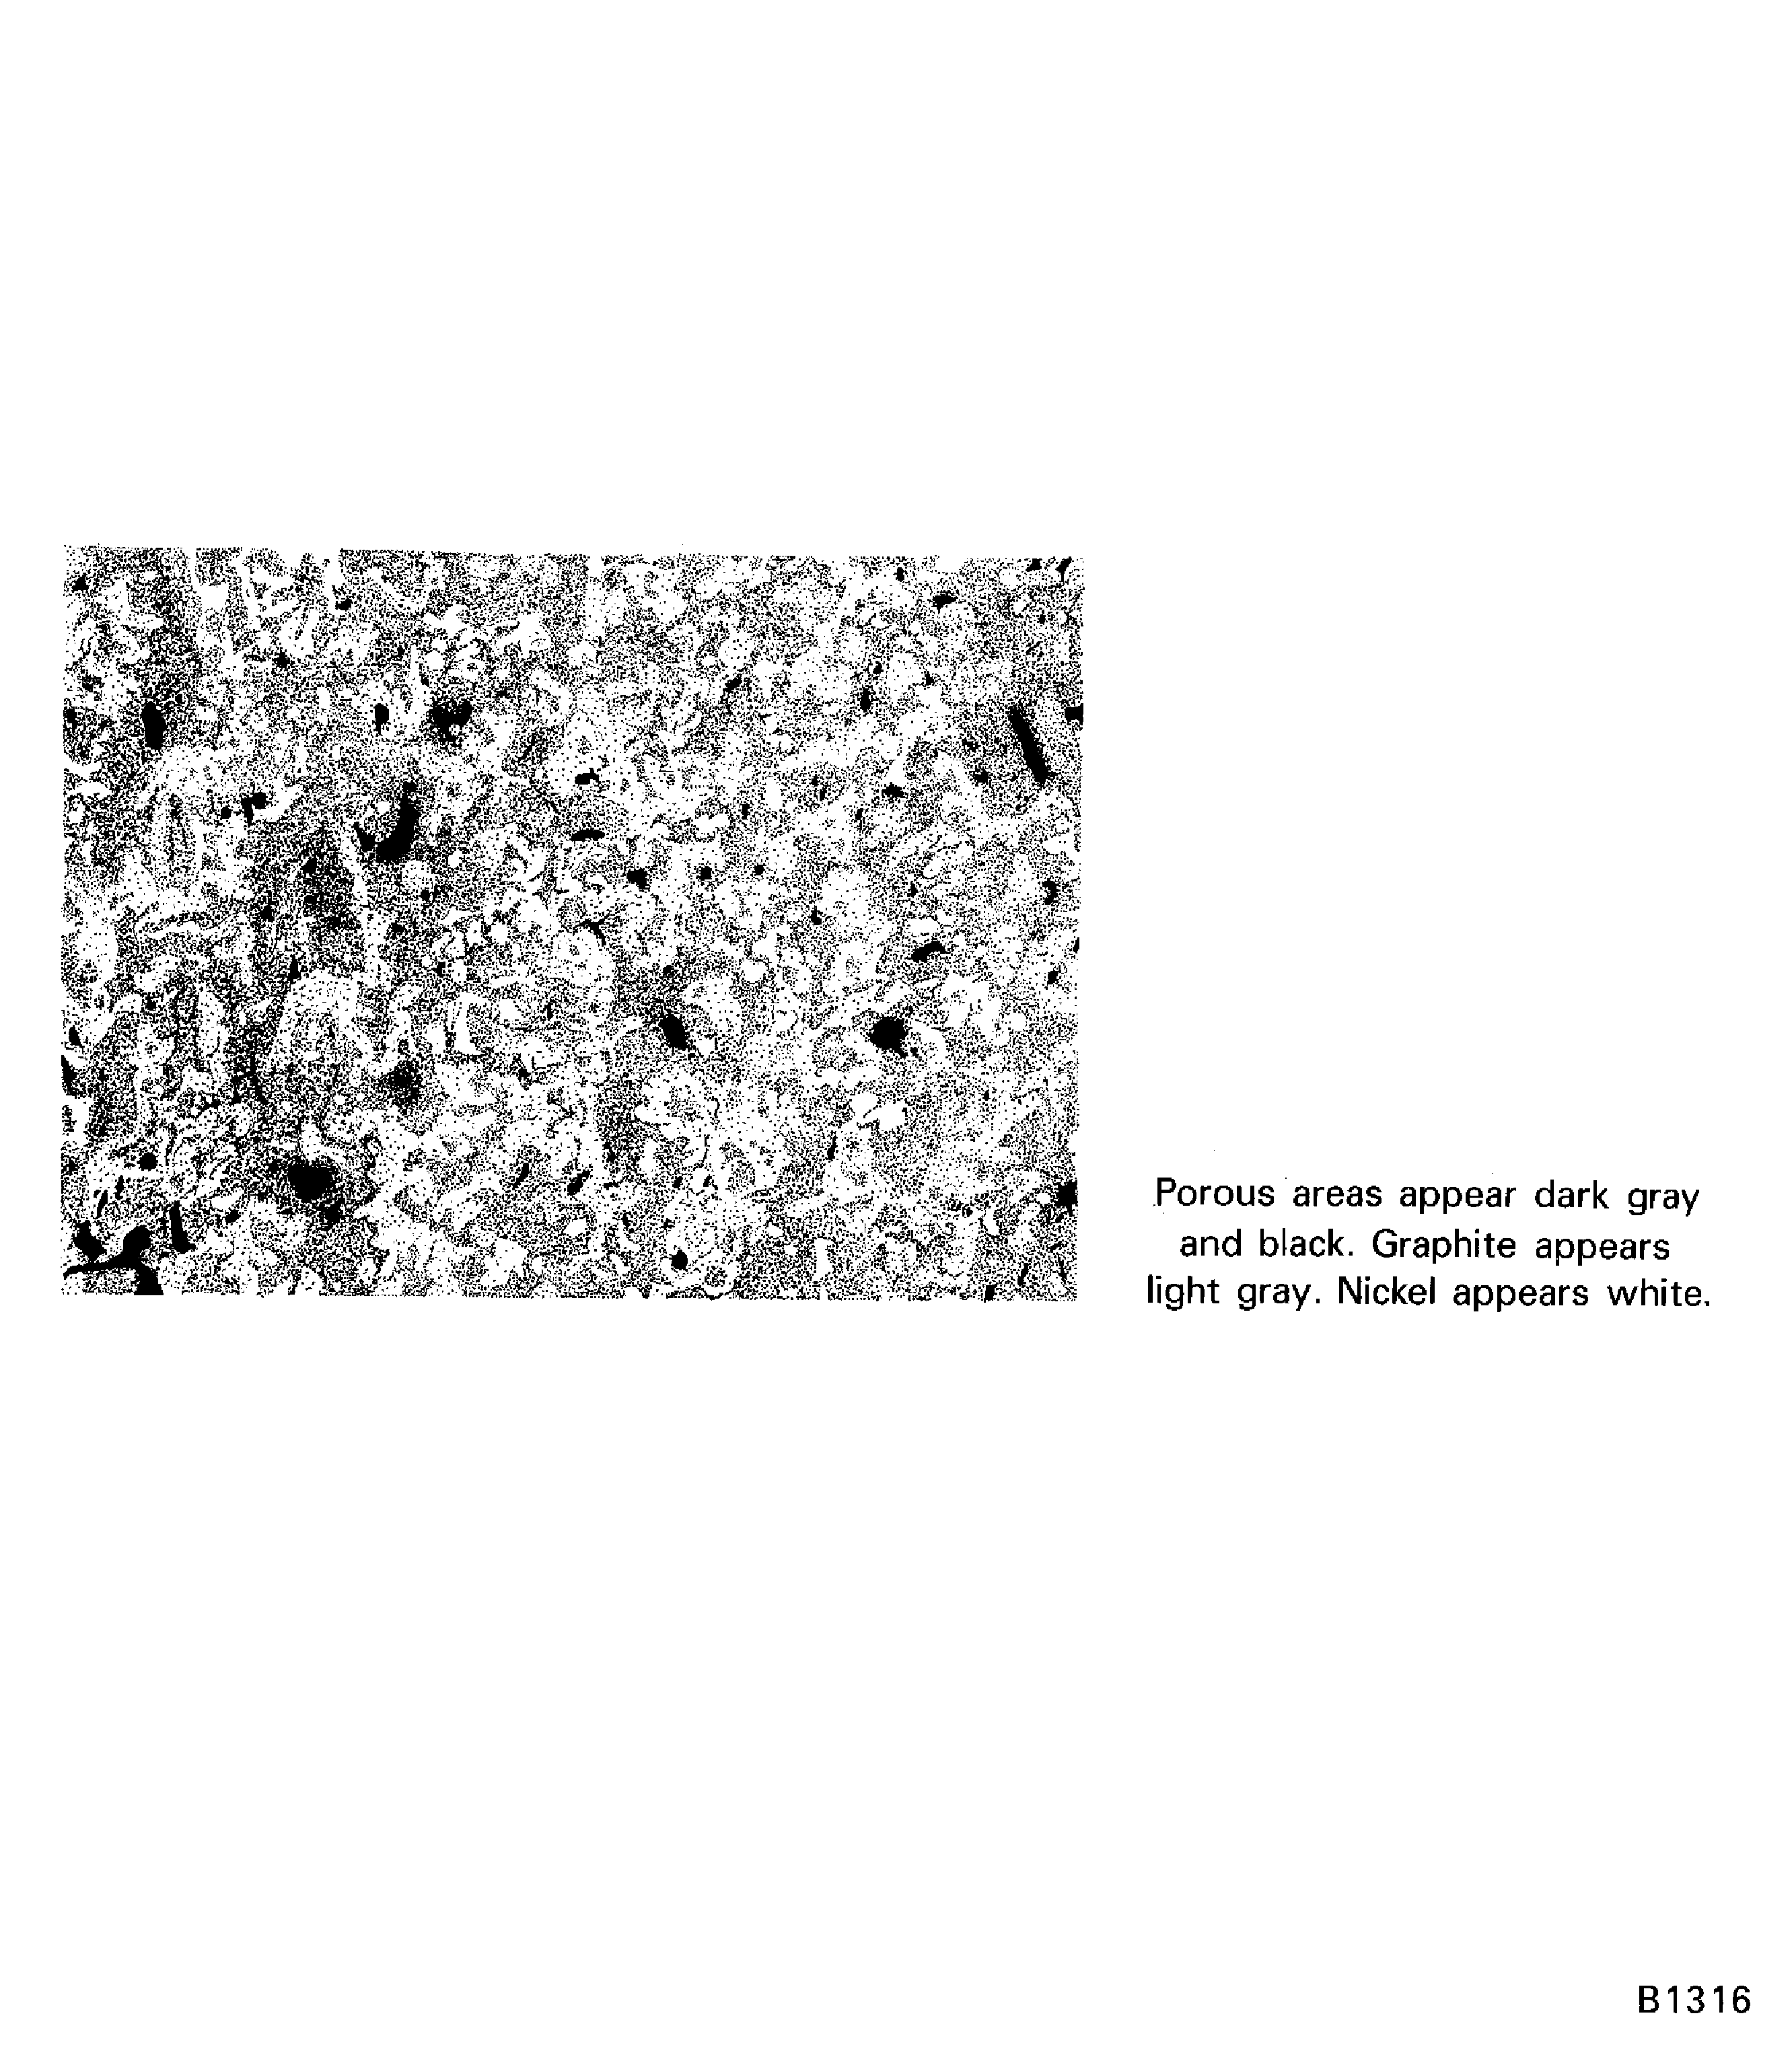
    Figure: Satisfactory porosity in PWA 75-1 coating (100X)

    Satisfactory porosity in PWA 75-1 coating (100X)
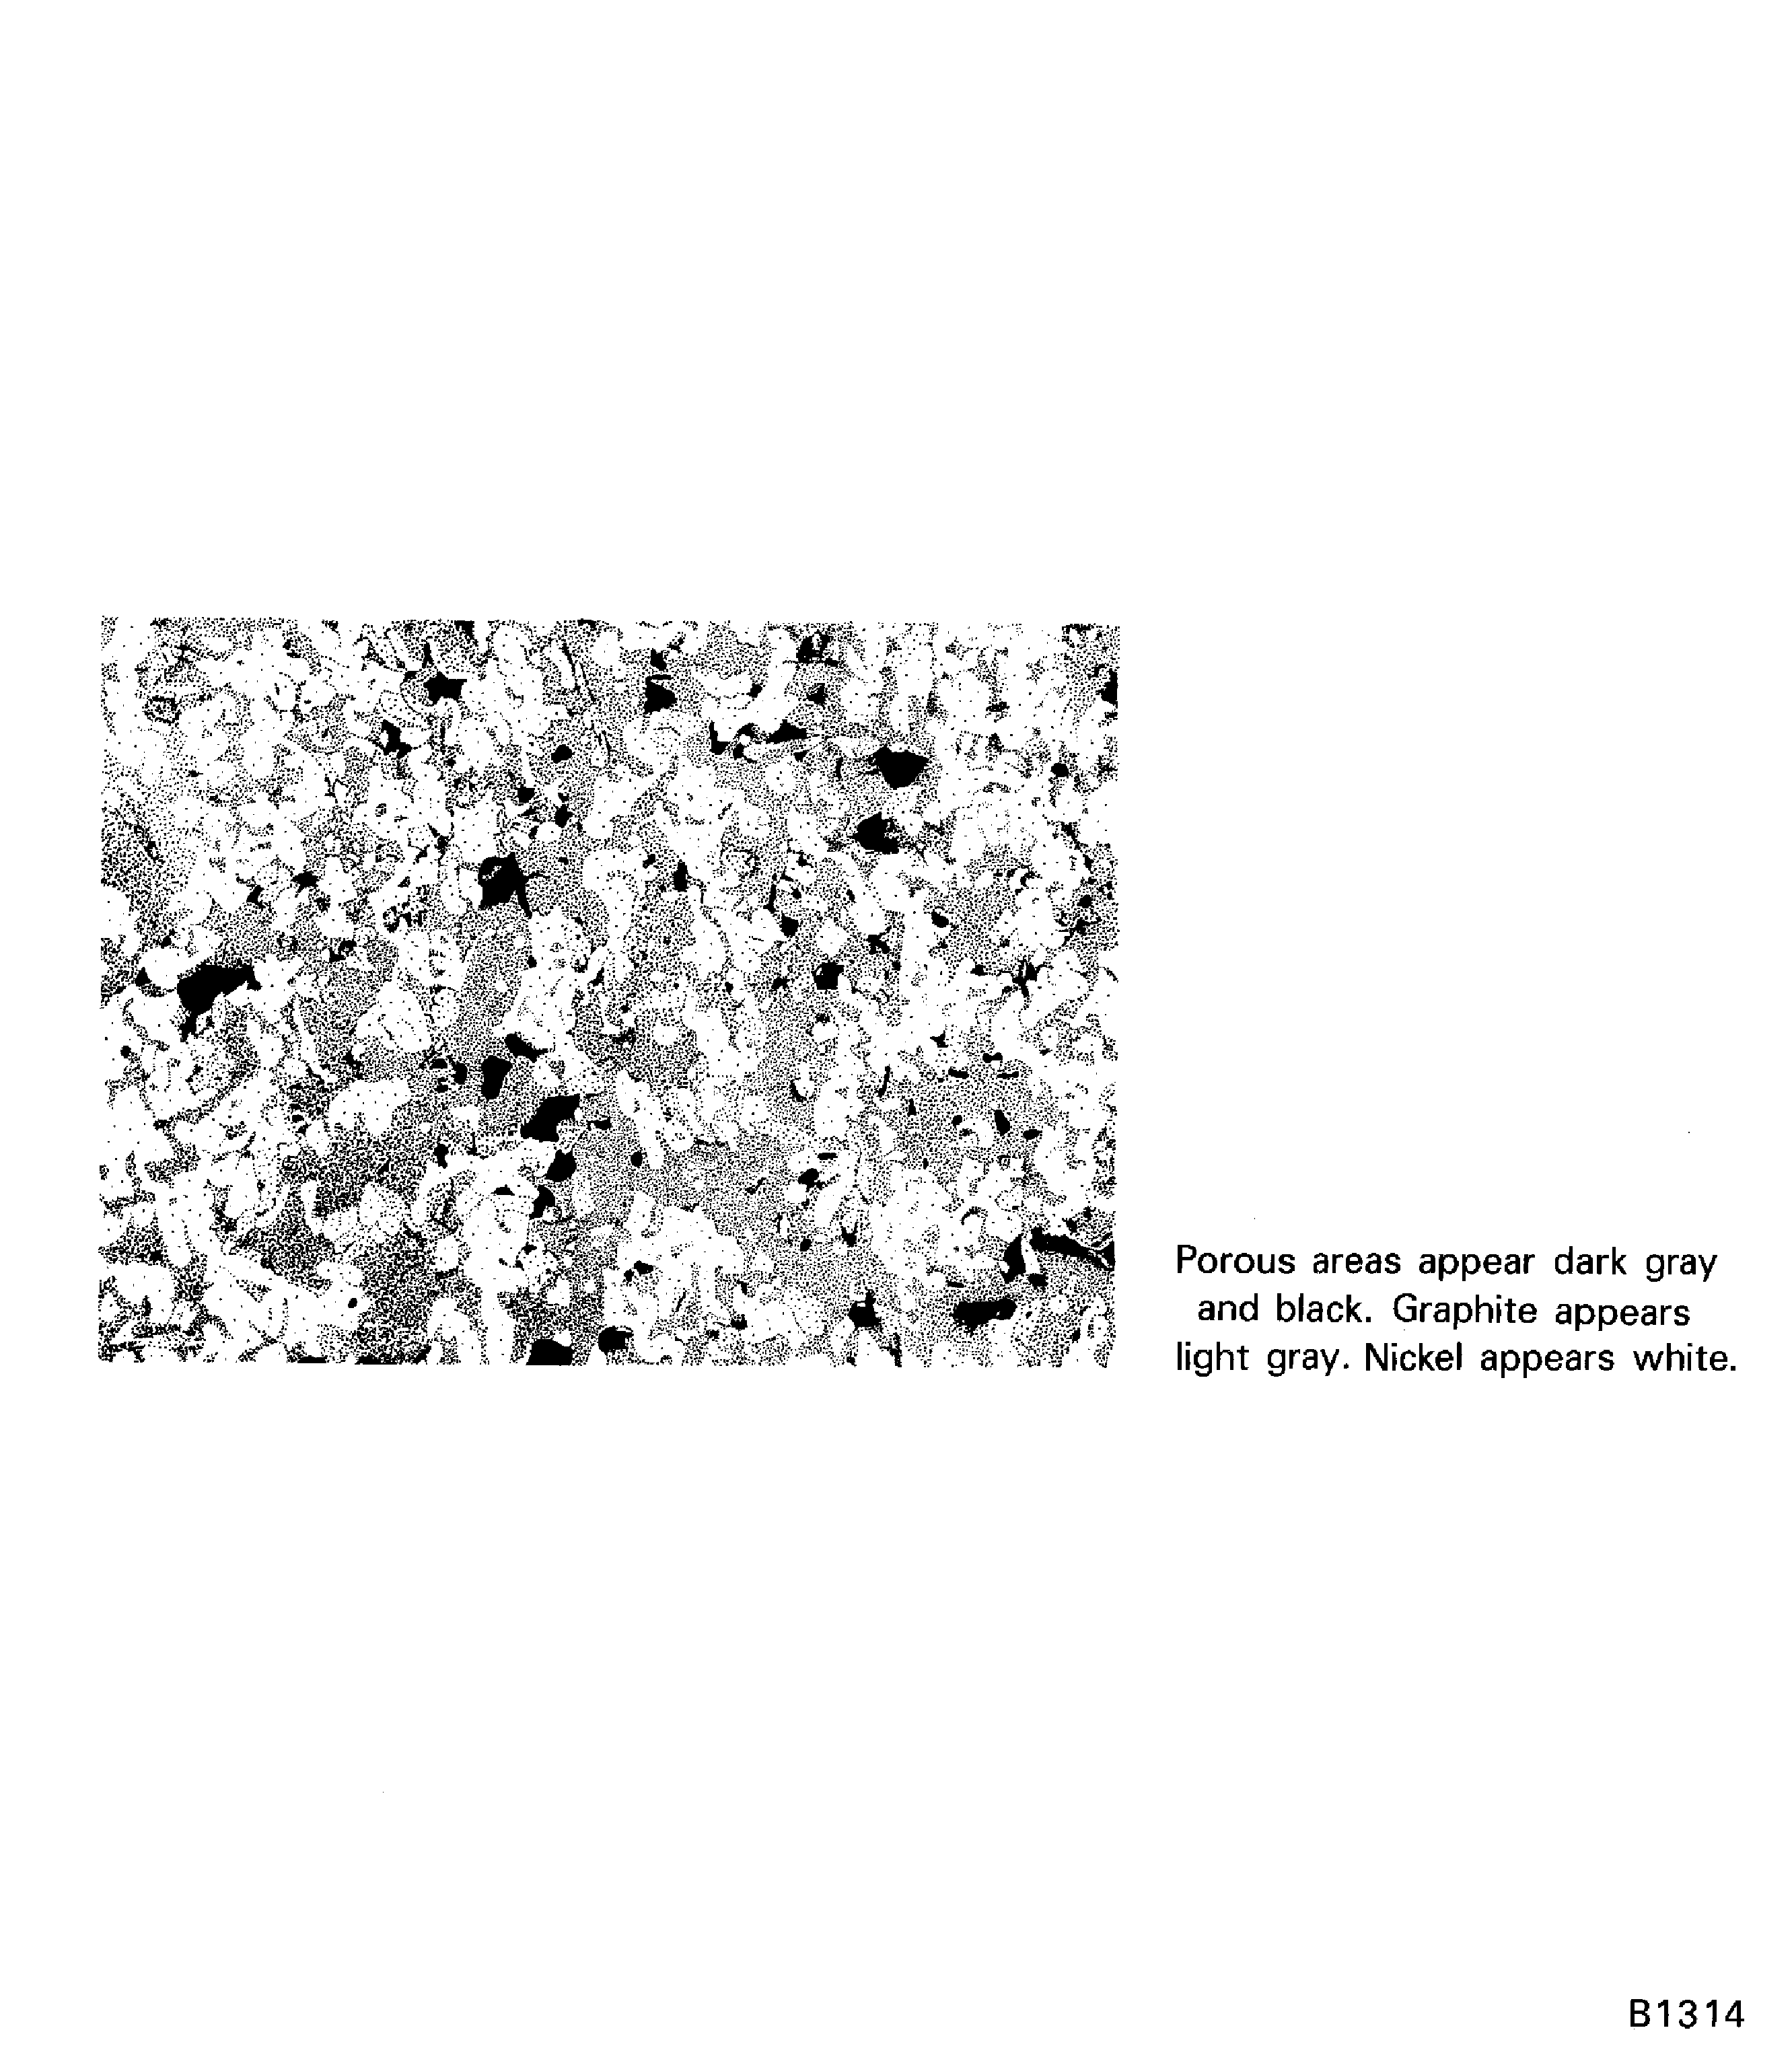
    Figure: Excessive porosity in PWA 75-1 coating (100X)

    Excessive porosity in PWA 75-1 coating (100X)
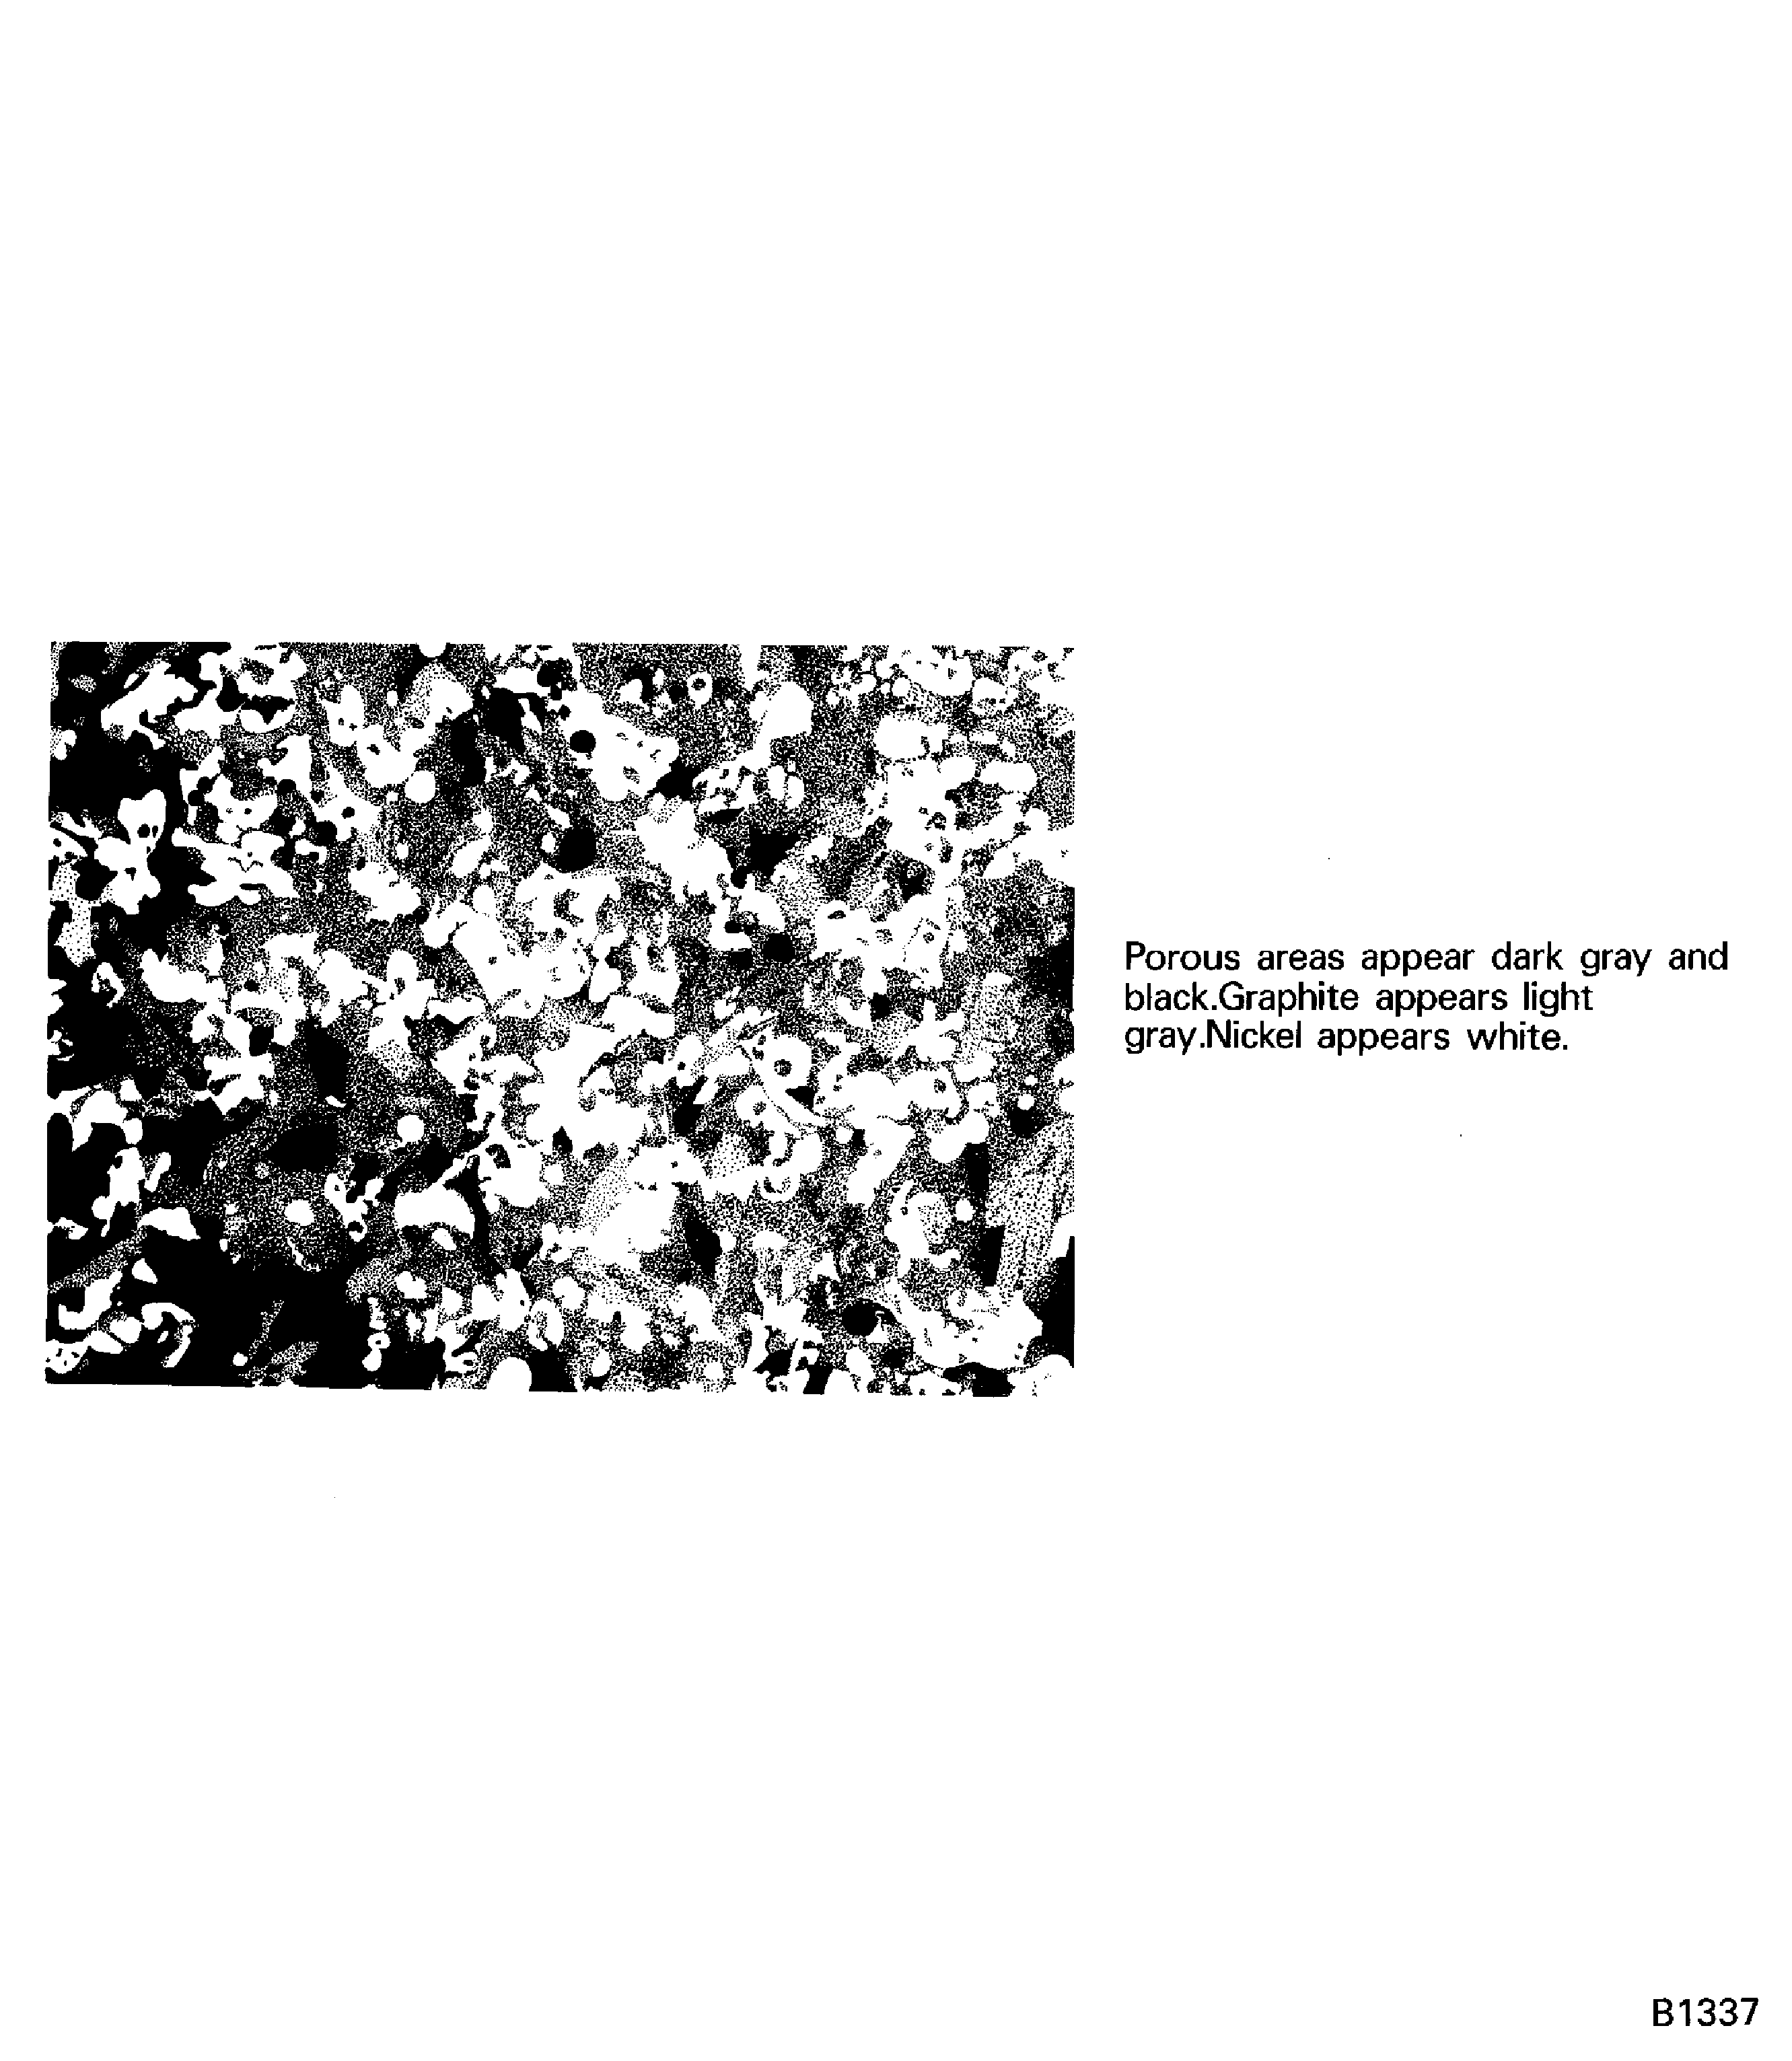
    Figure: Diagram showing porosity criteria for PWA 75-1 coating adjacent to chamfers

    Diagram showing porosity criteria for PWA 75-1 coating adjacent to chamfers
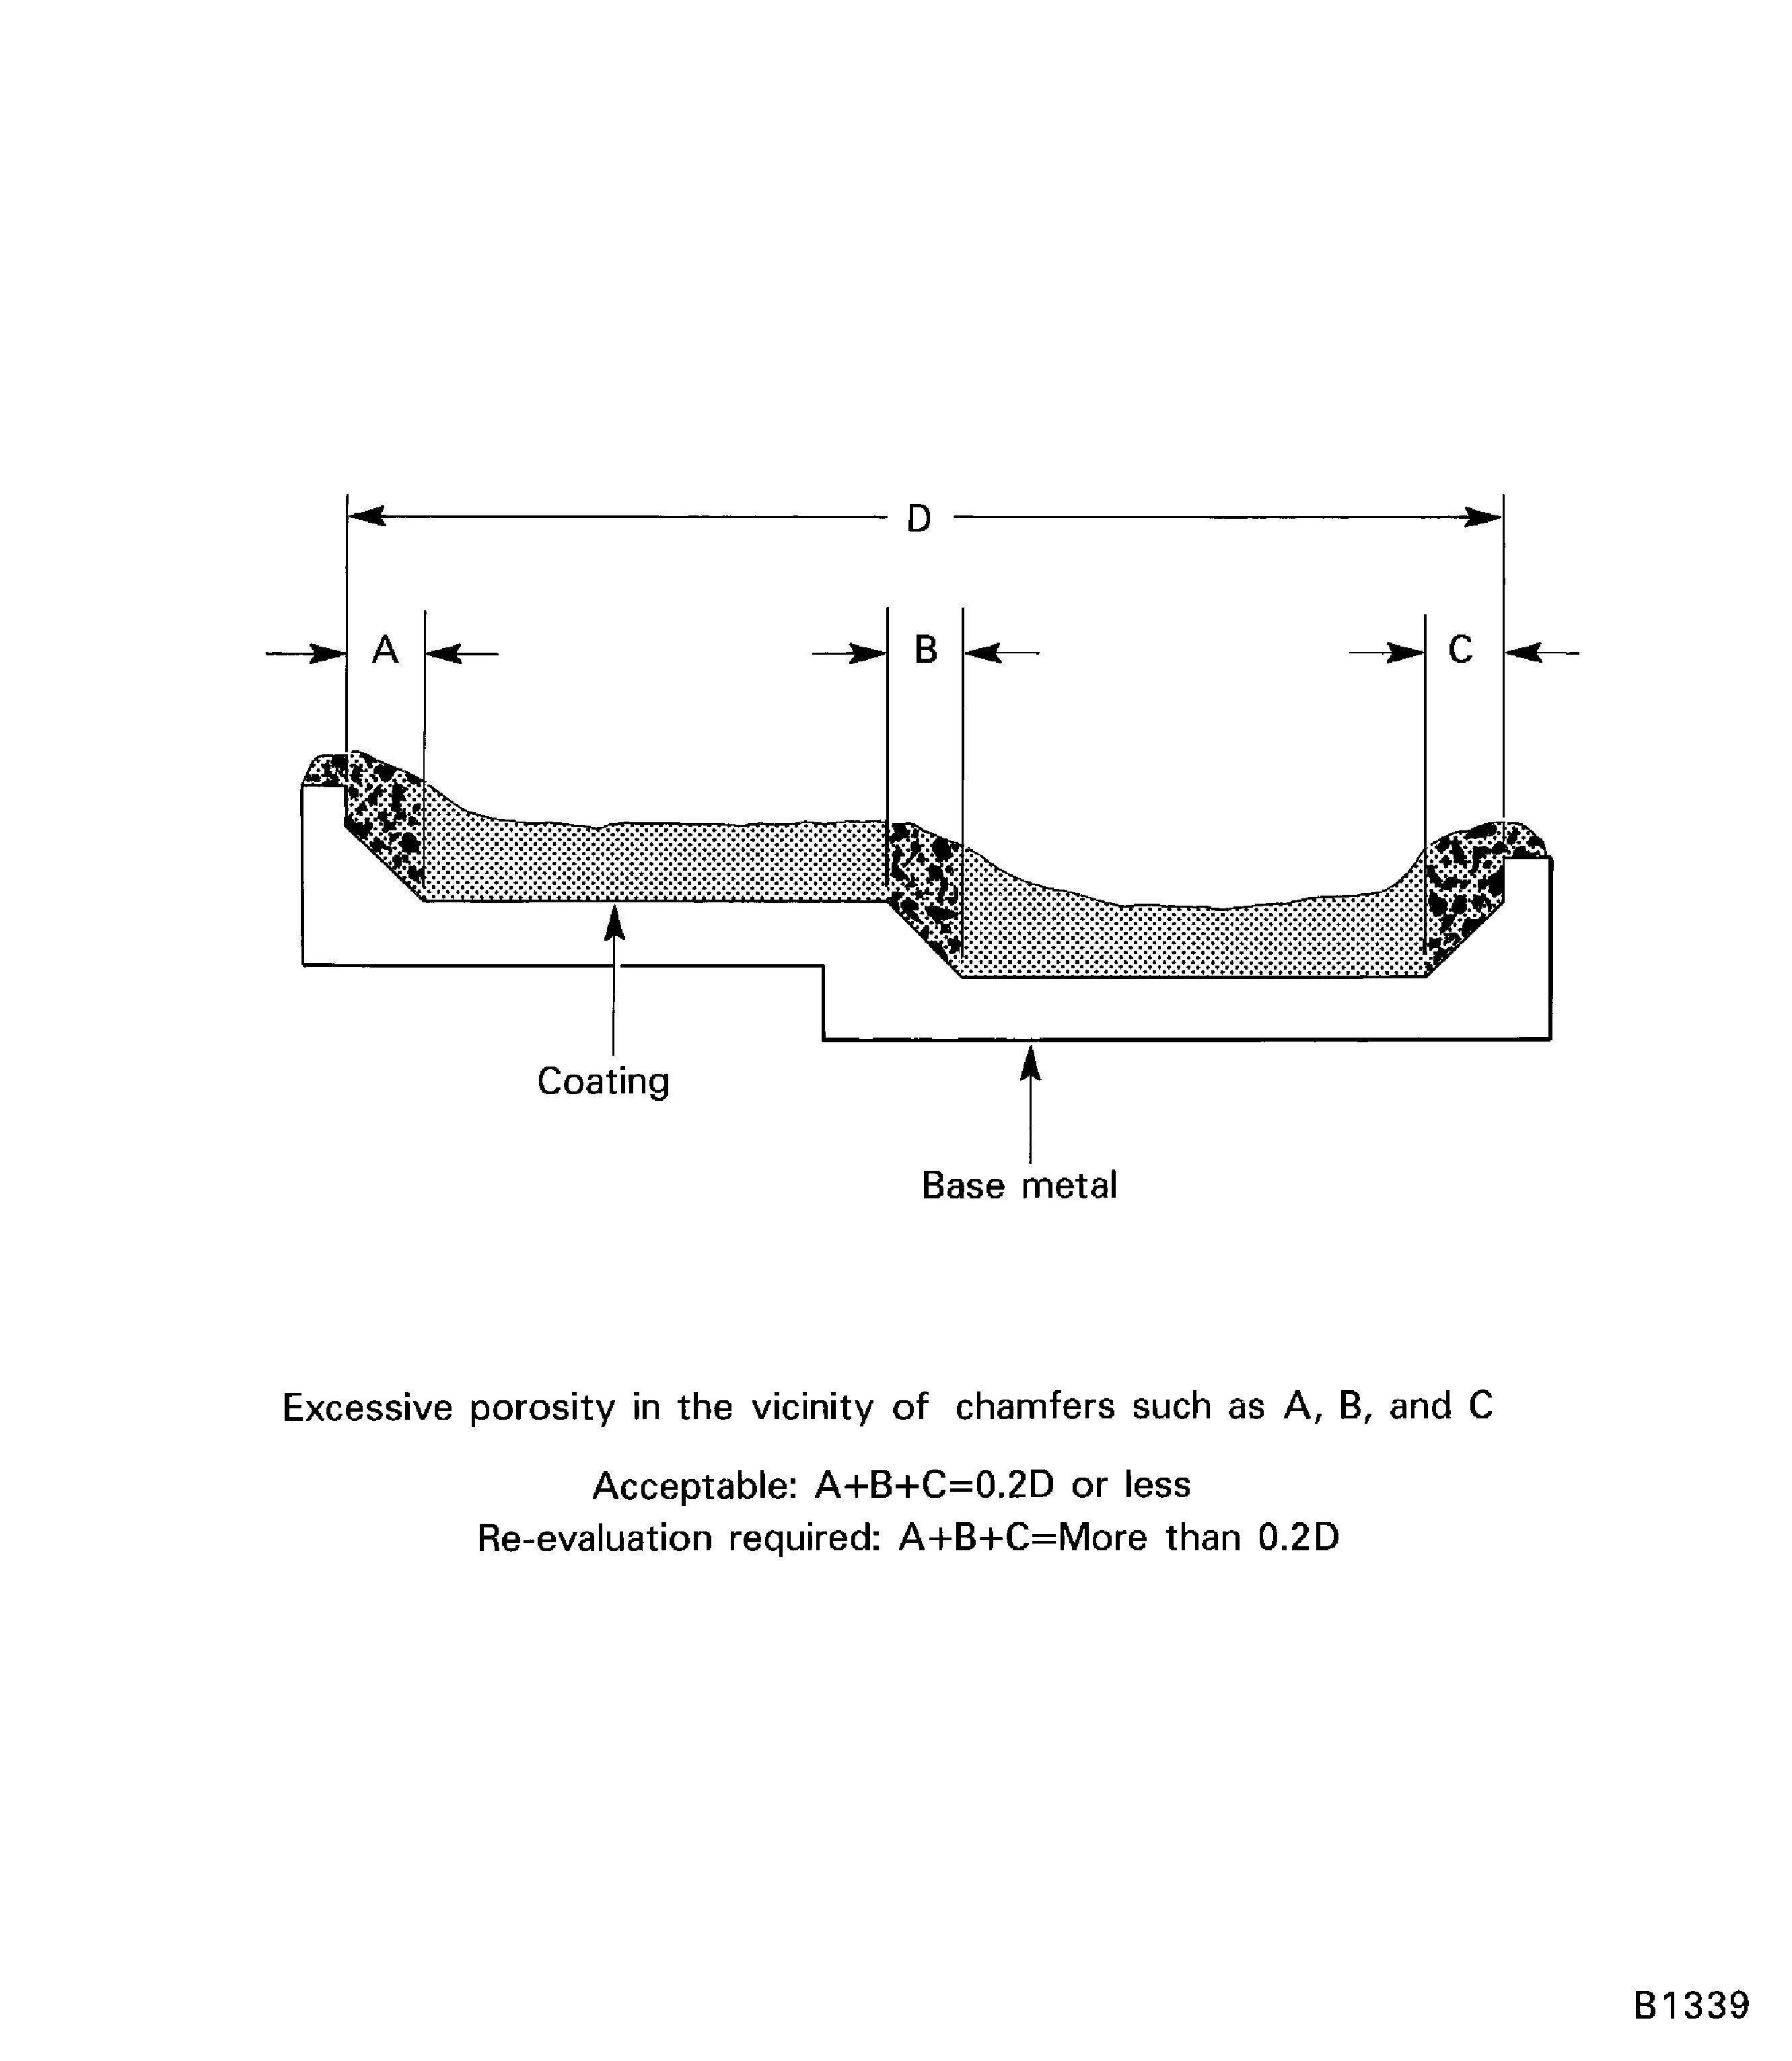
    Figure: Inadequate porosity in PWA 75-1 coating (100X)

    Inadequate porosity in PWA 75-1 coating (100X)
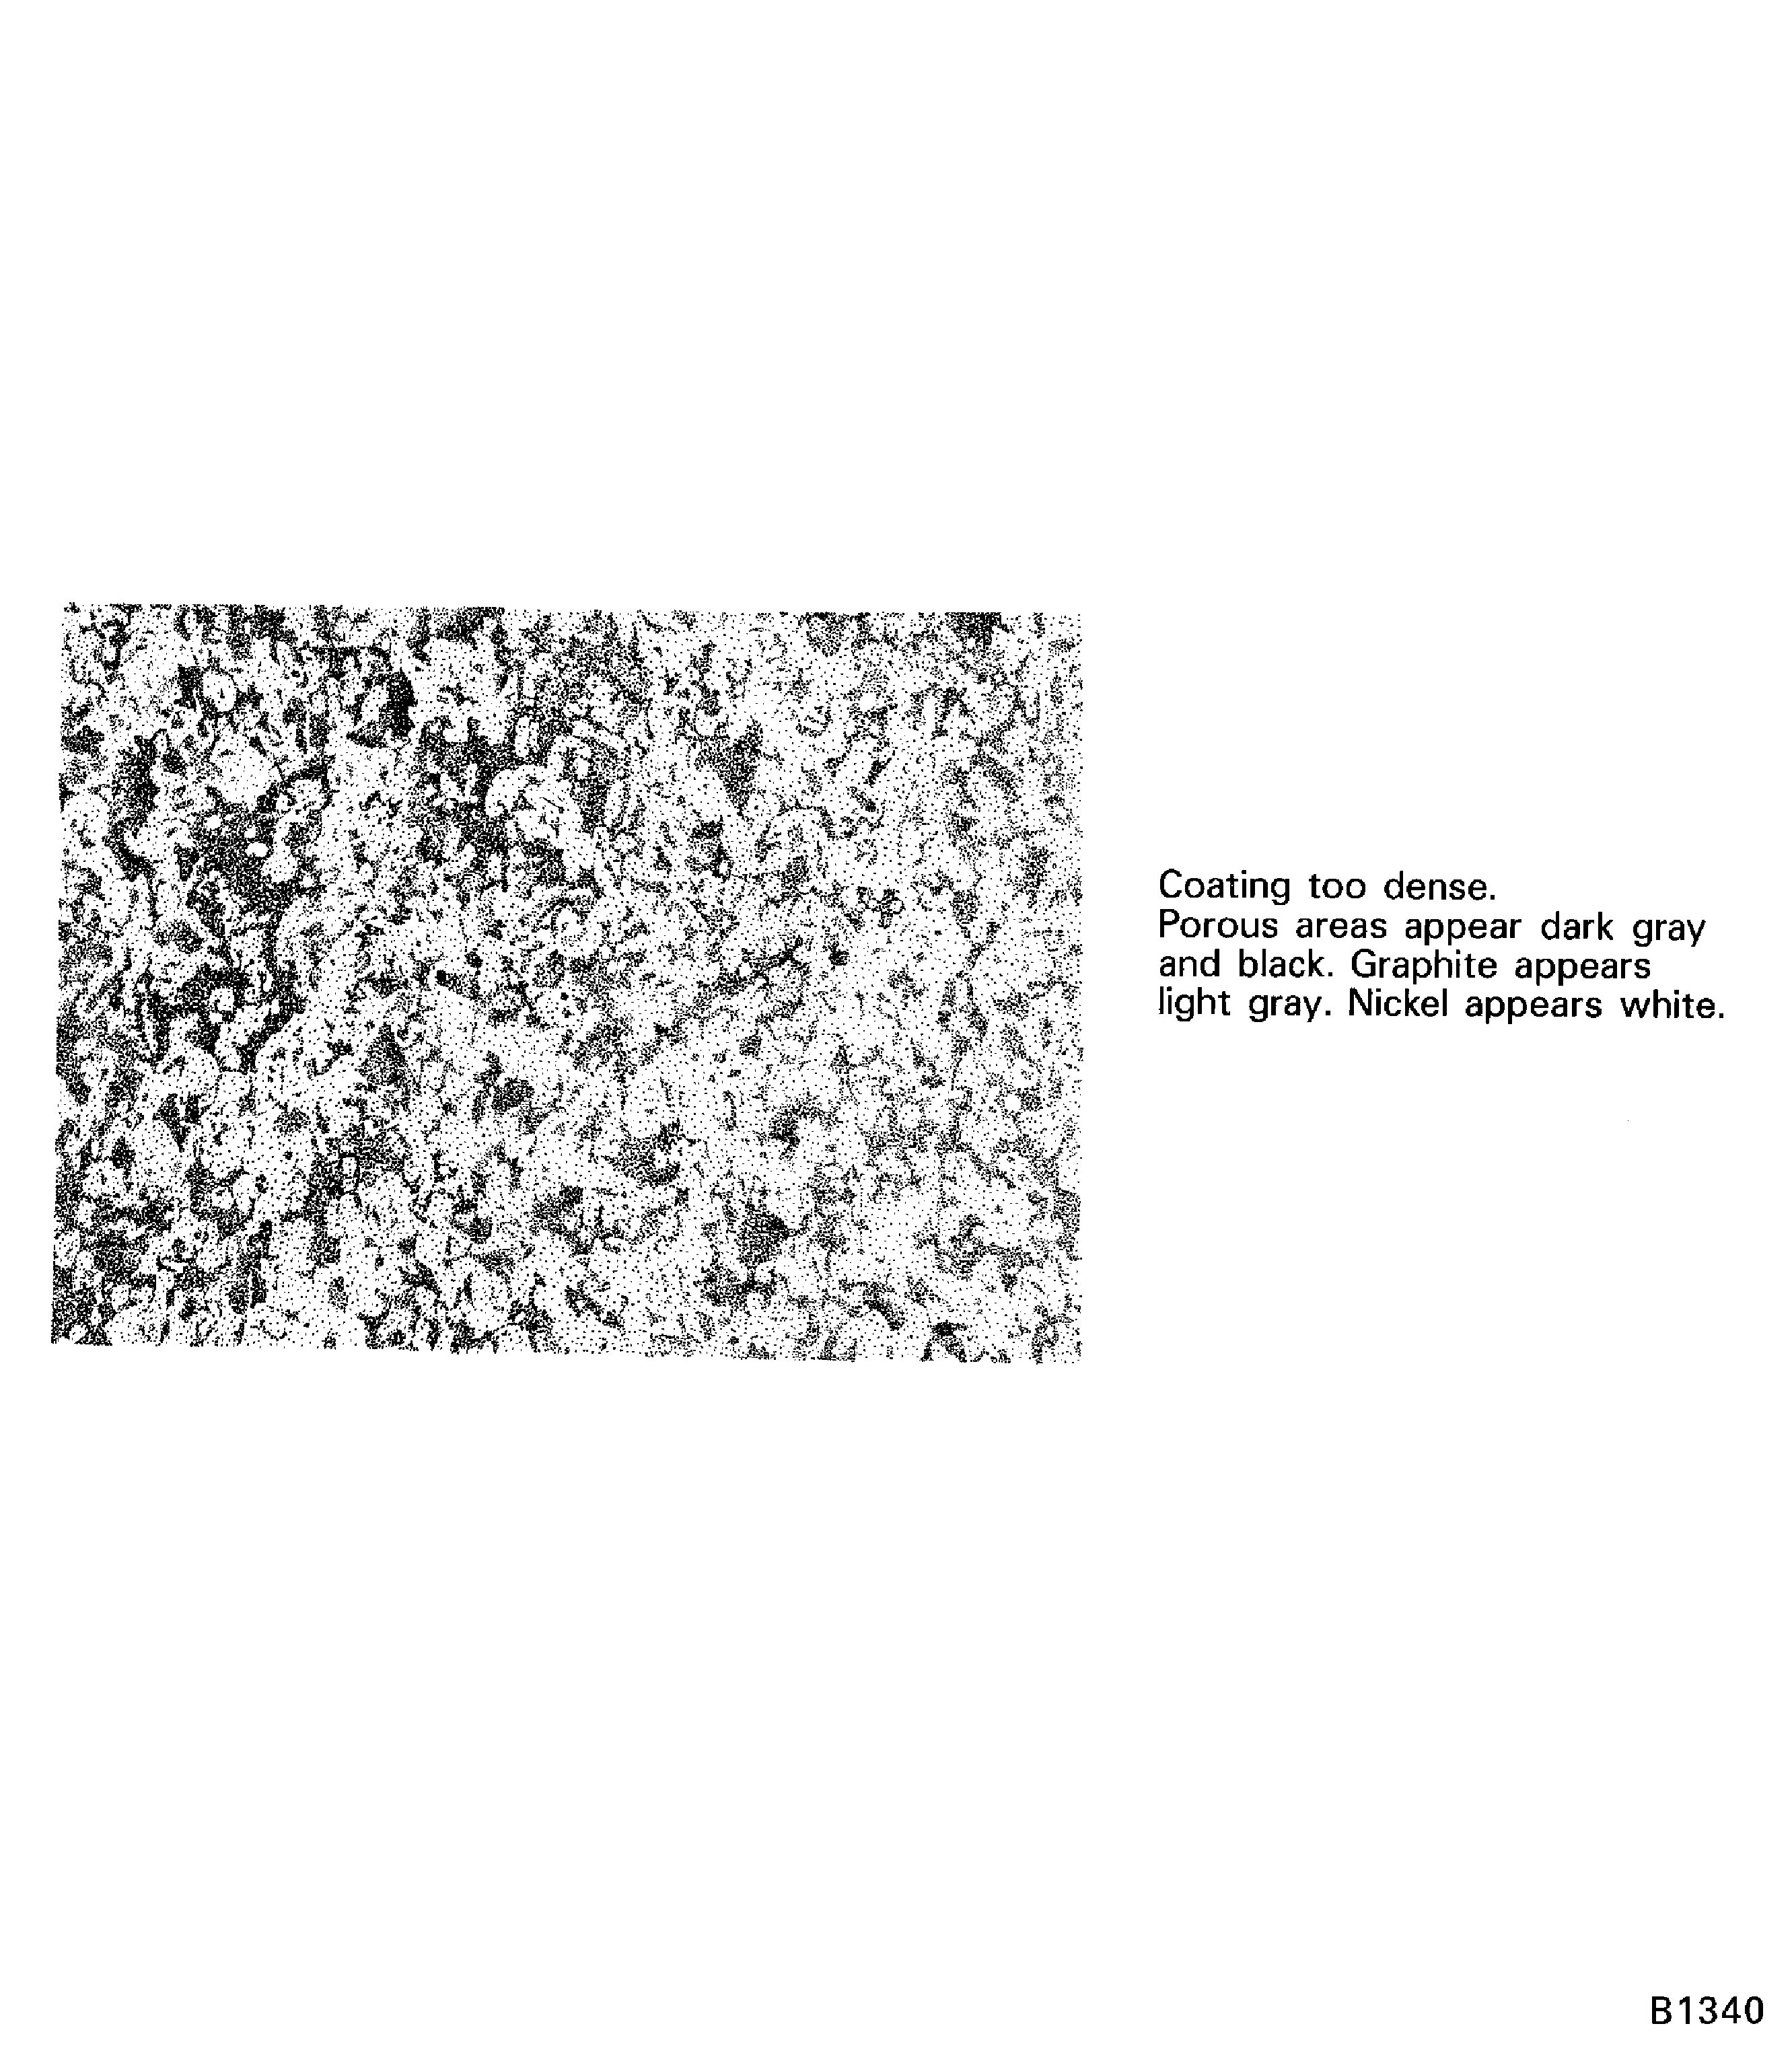
    Figure: Dispersal of nickel/graphite constituents in PWA 75-1 coating

    Dispersal of nickel/graphite constituents in PWA 75-1 coating
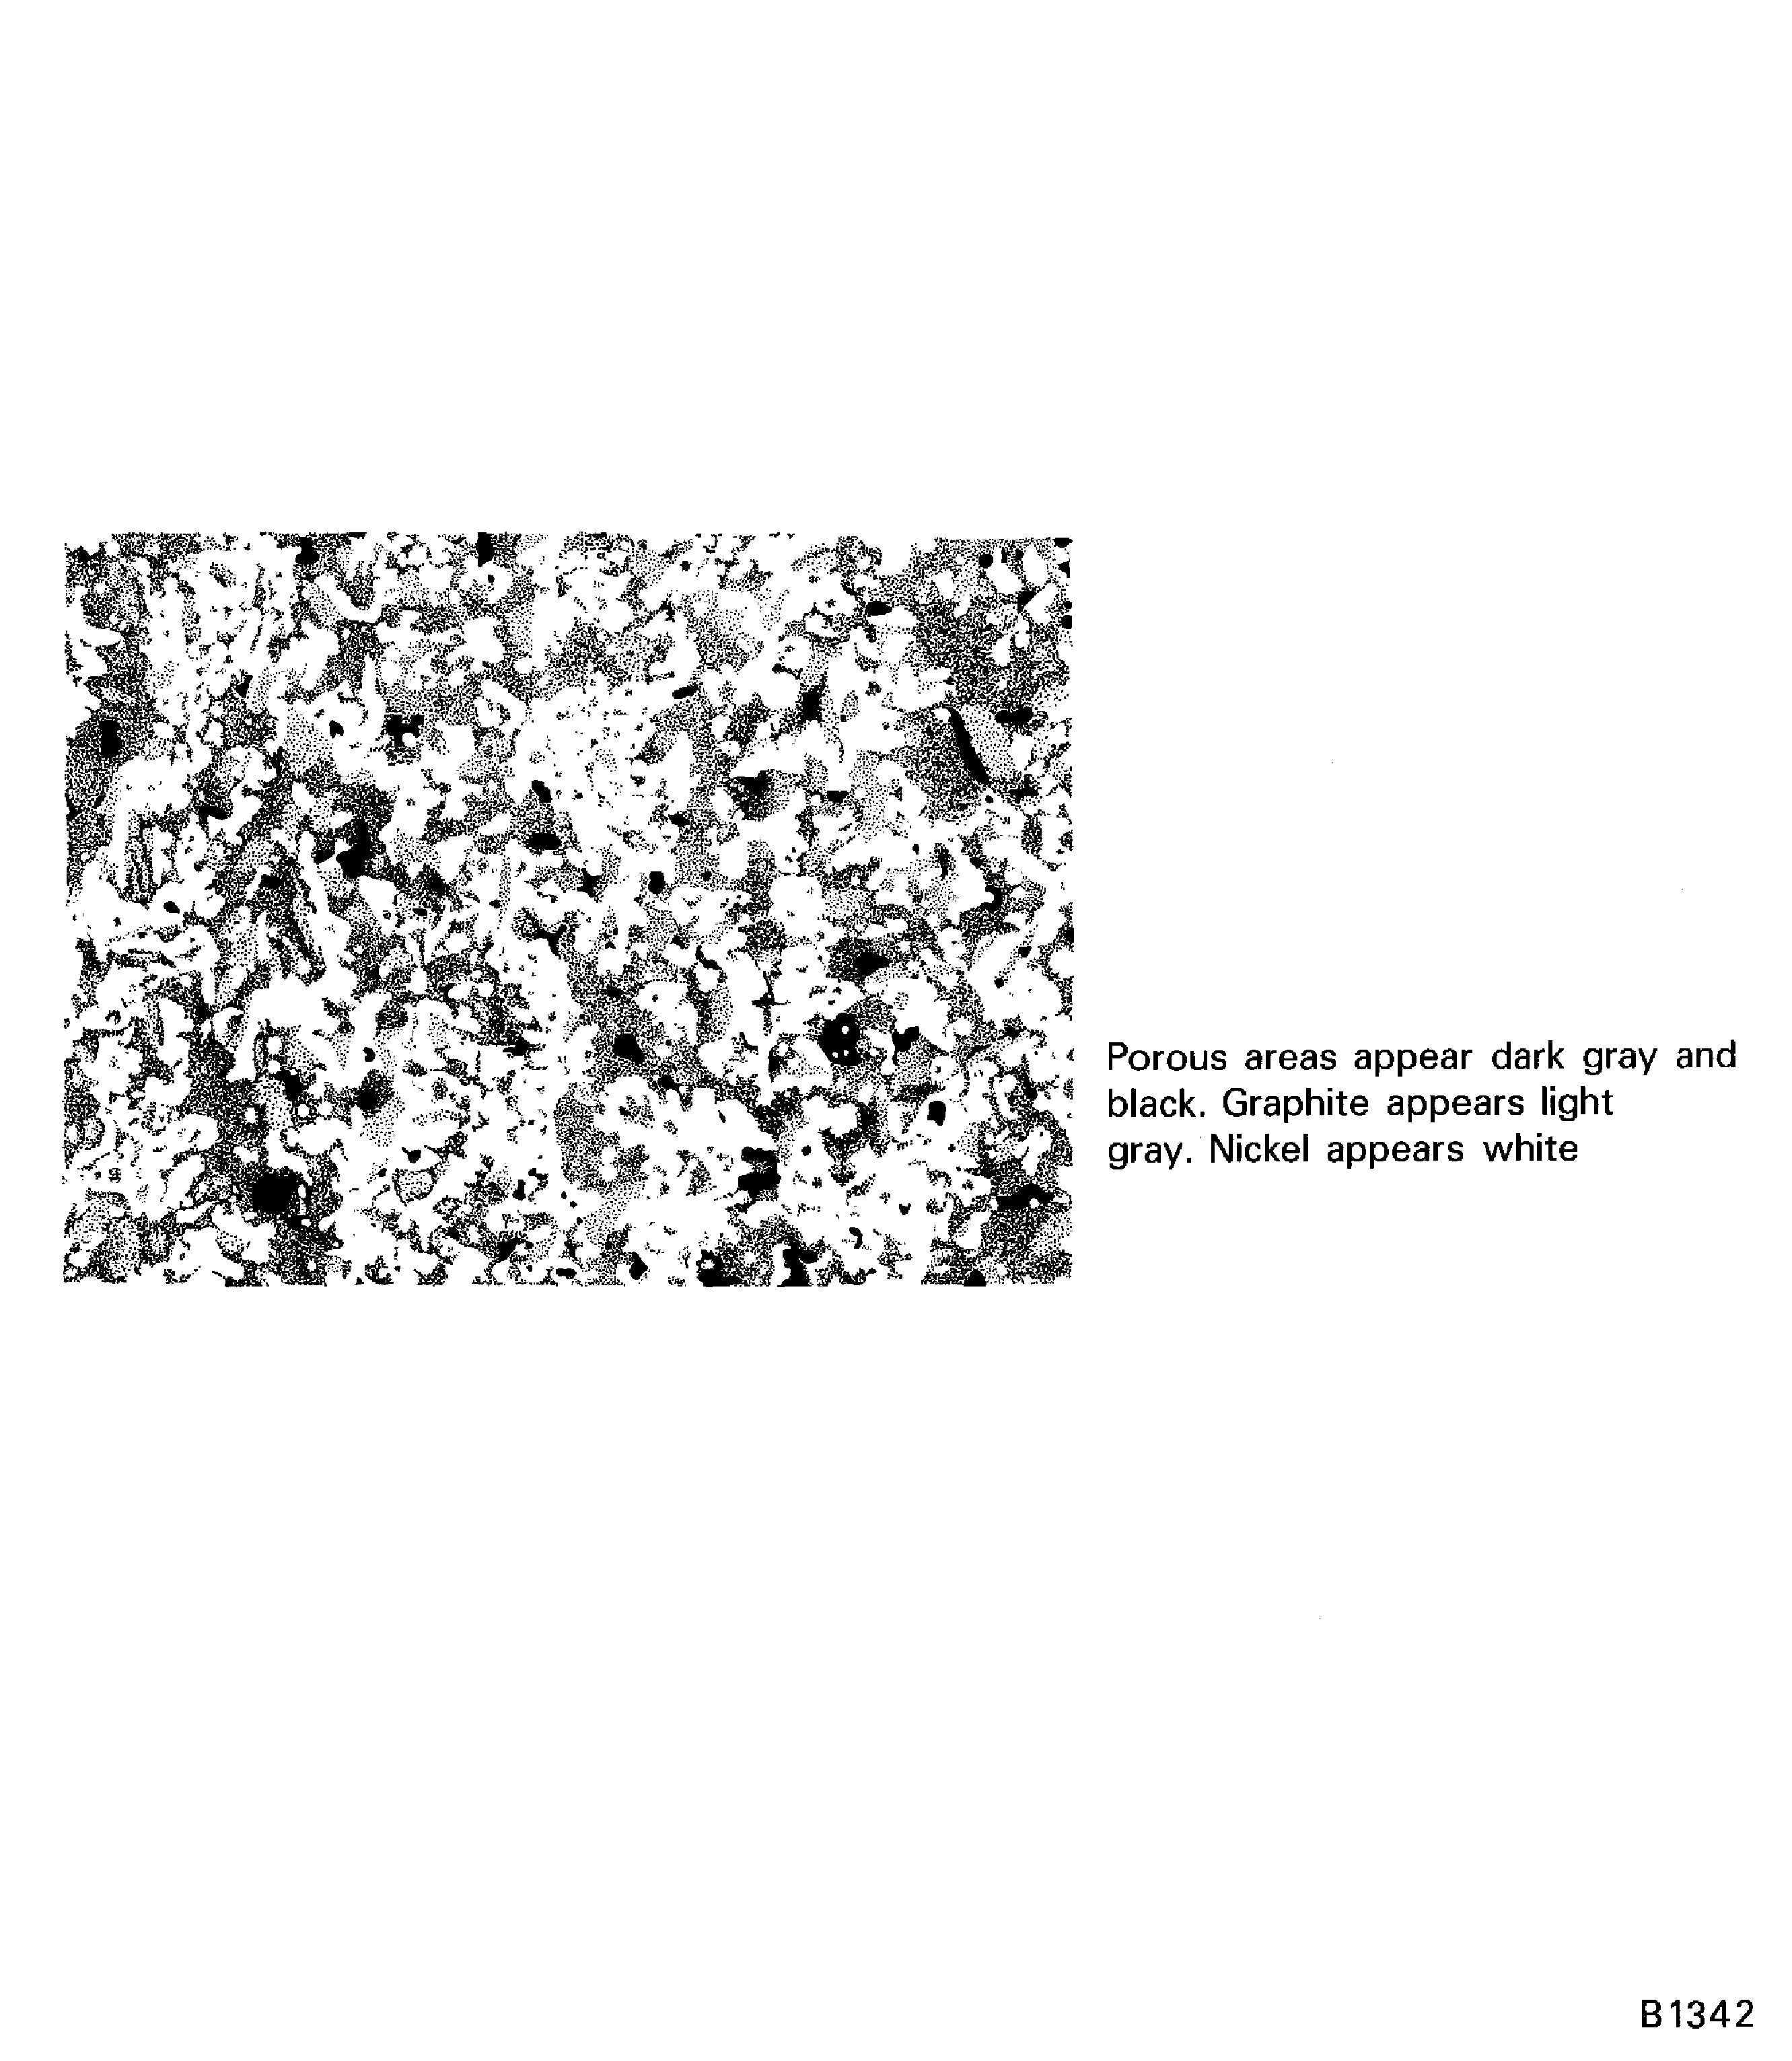
    Figure: Satisfactory dispersal of nickel/graphite constituents in PWA 75-1 coating (100X)

    Satisfactory dispersal of nickel/graphite constituents in PWA 75-1 coating (100X)
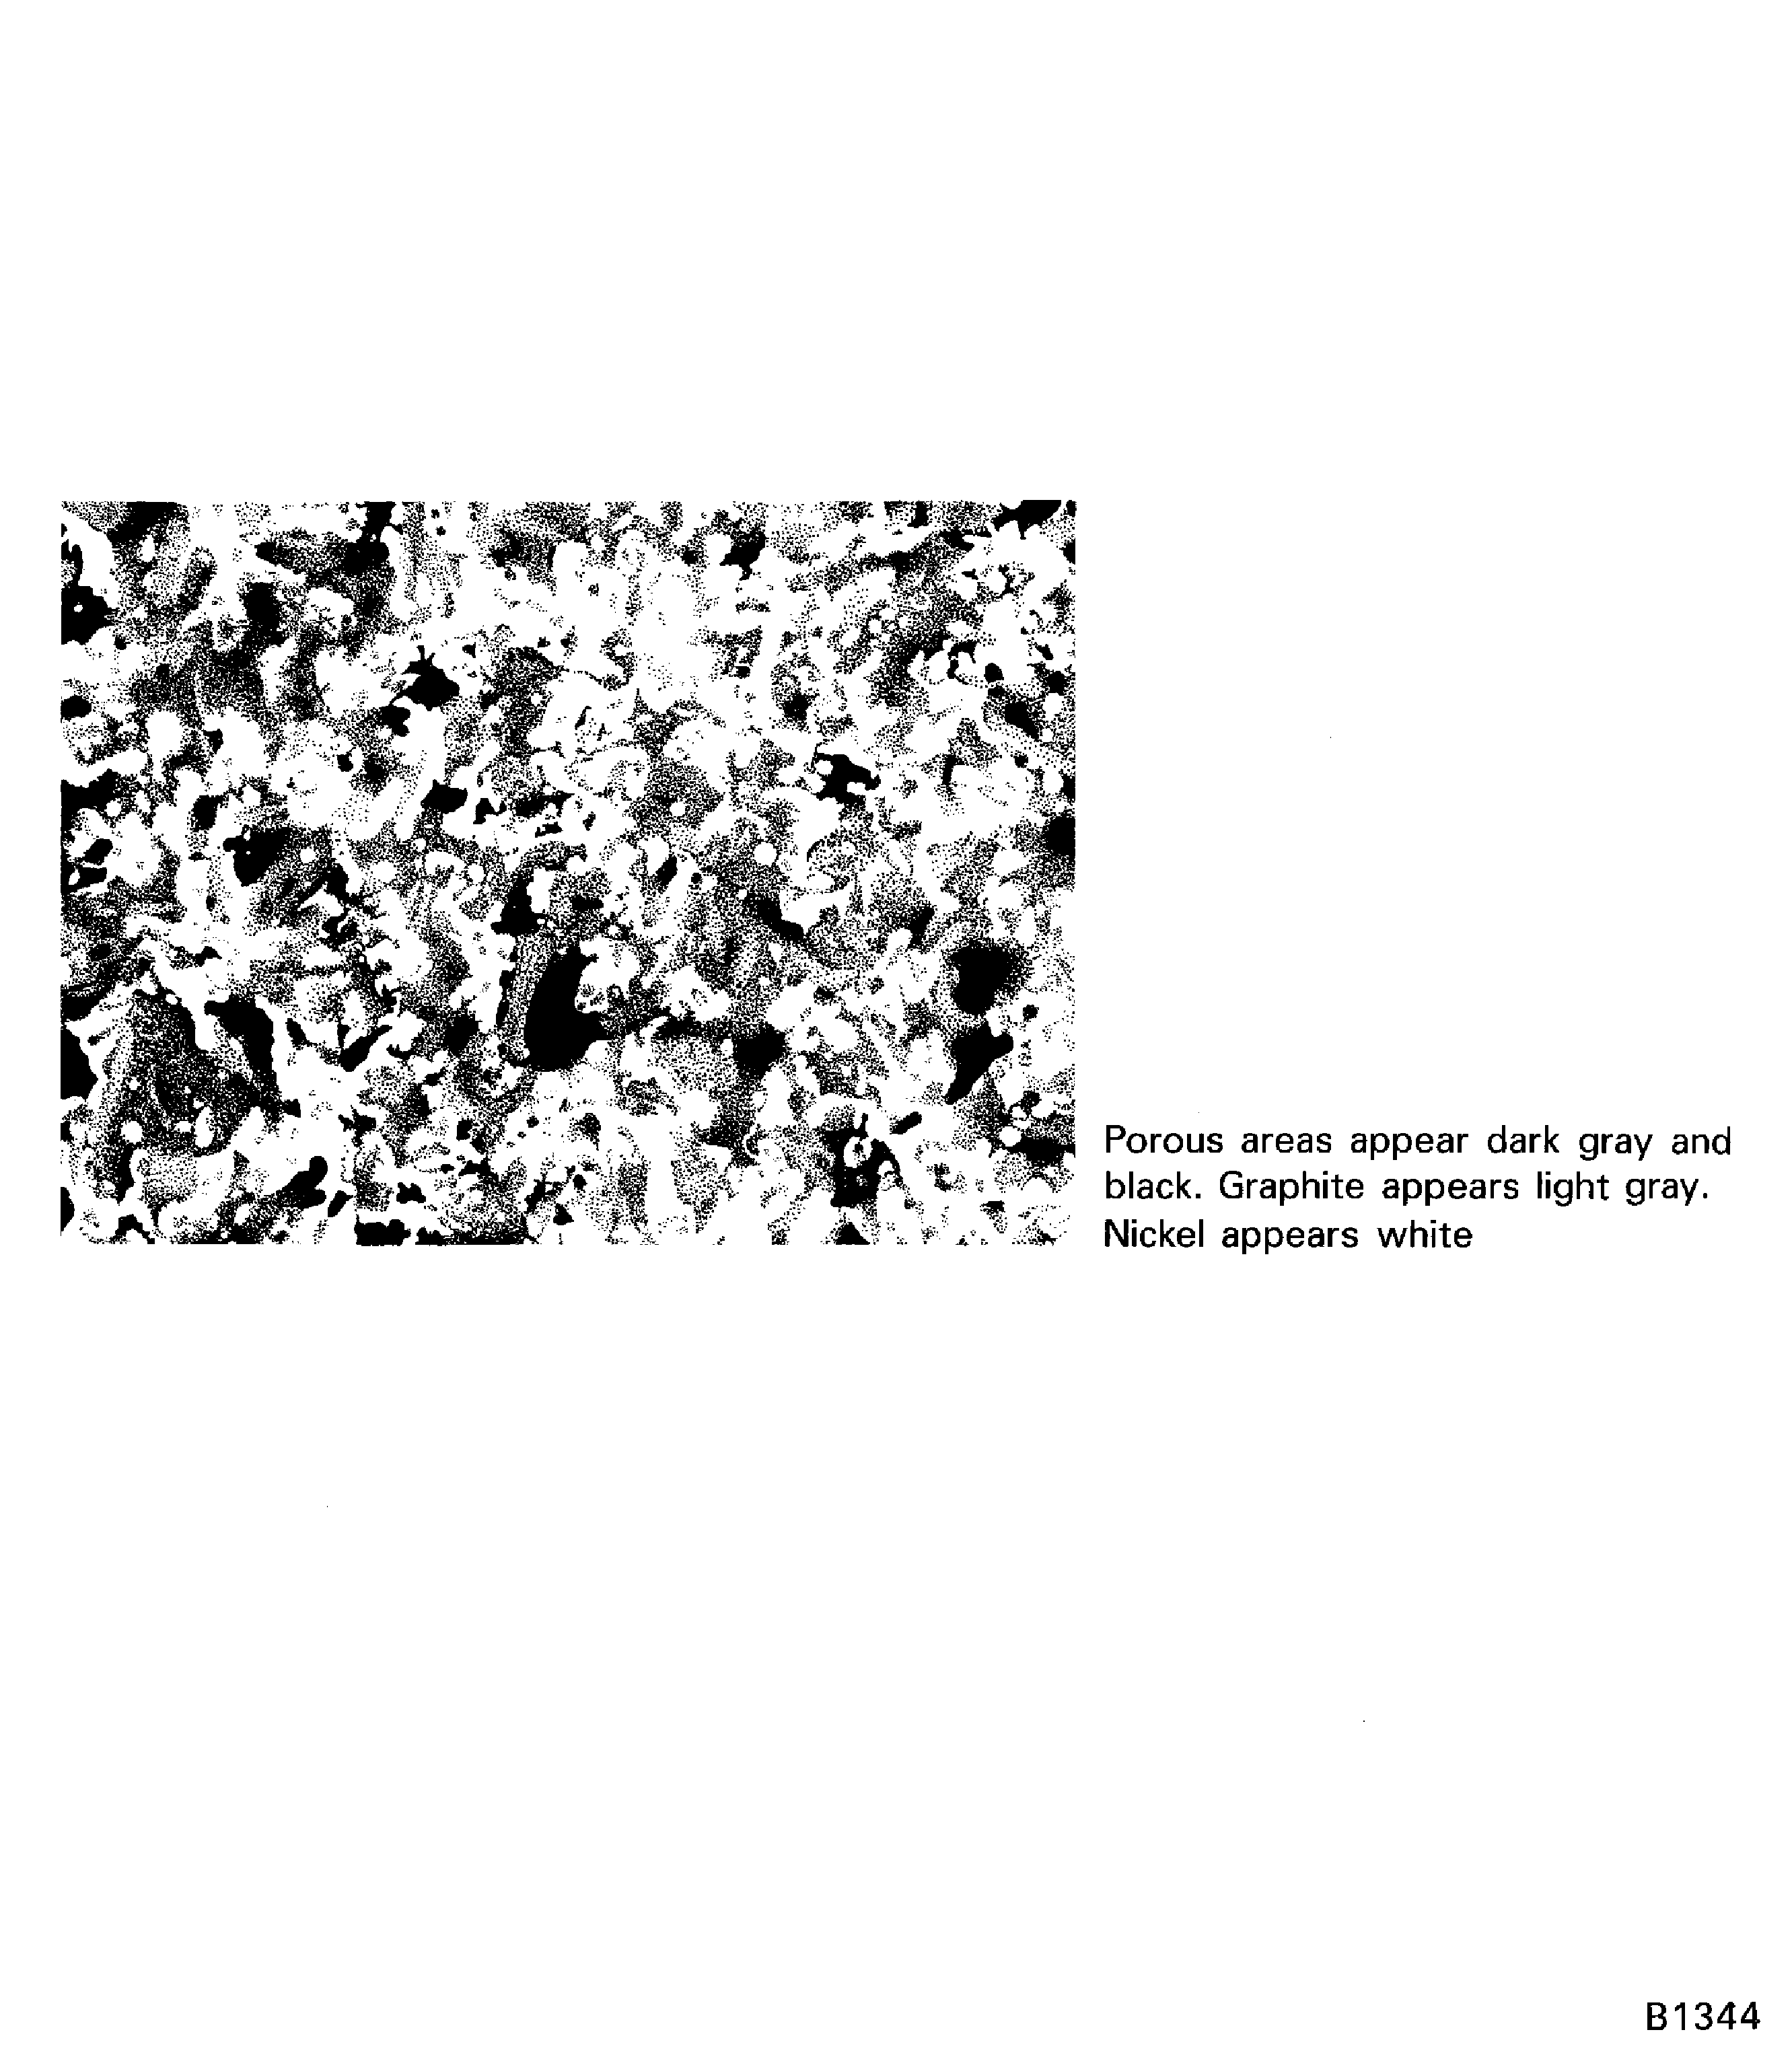
    Figure: Unsatisfactory dispersal of nickel/graphite constituents in PWA 75-1 coating (100X) insufficient graphite
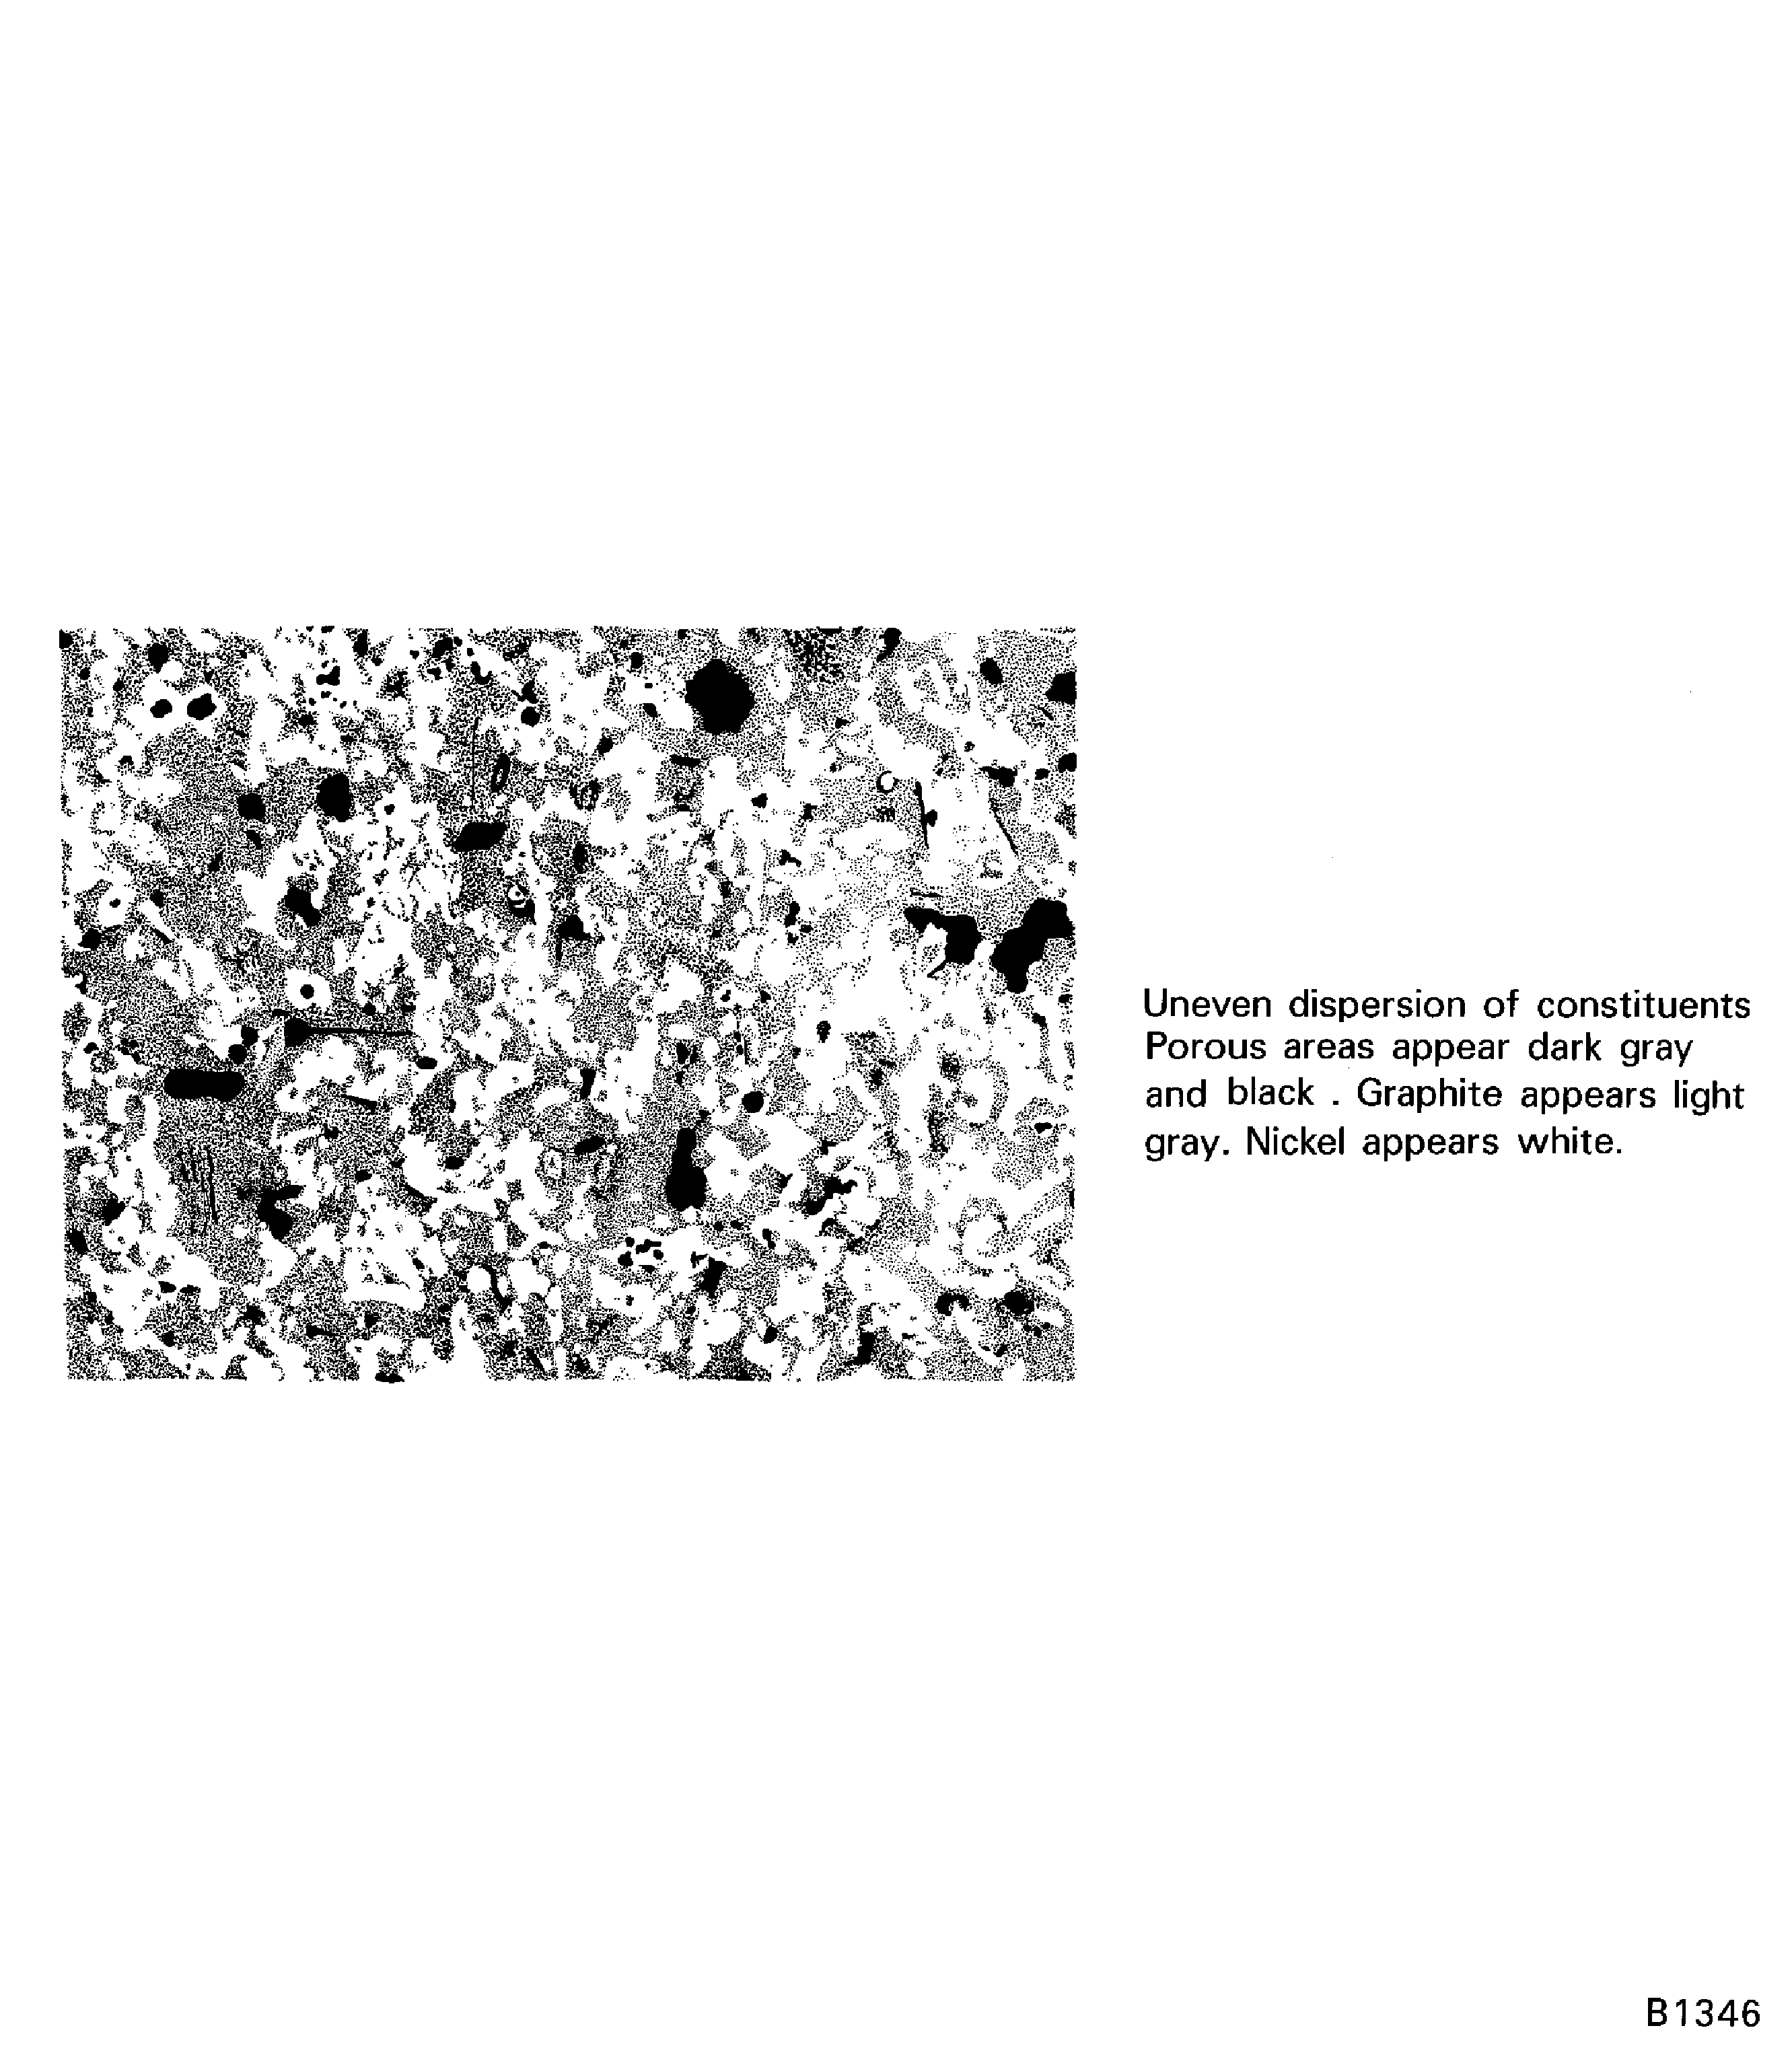
    Unsatisfactory dispersal of nickel/graphite constituents in PWA 75-1 coating (100X) insufficient graphite

    Figure: Unsatisfactory bond at coating interface in PWA 75-1 coating (500X)

    Unsatisfactory bond at coating interface in PWA 75-1 coating (500X)
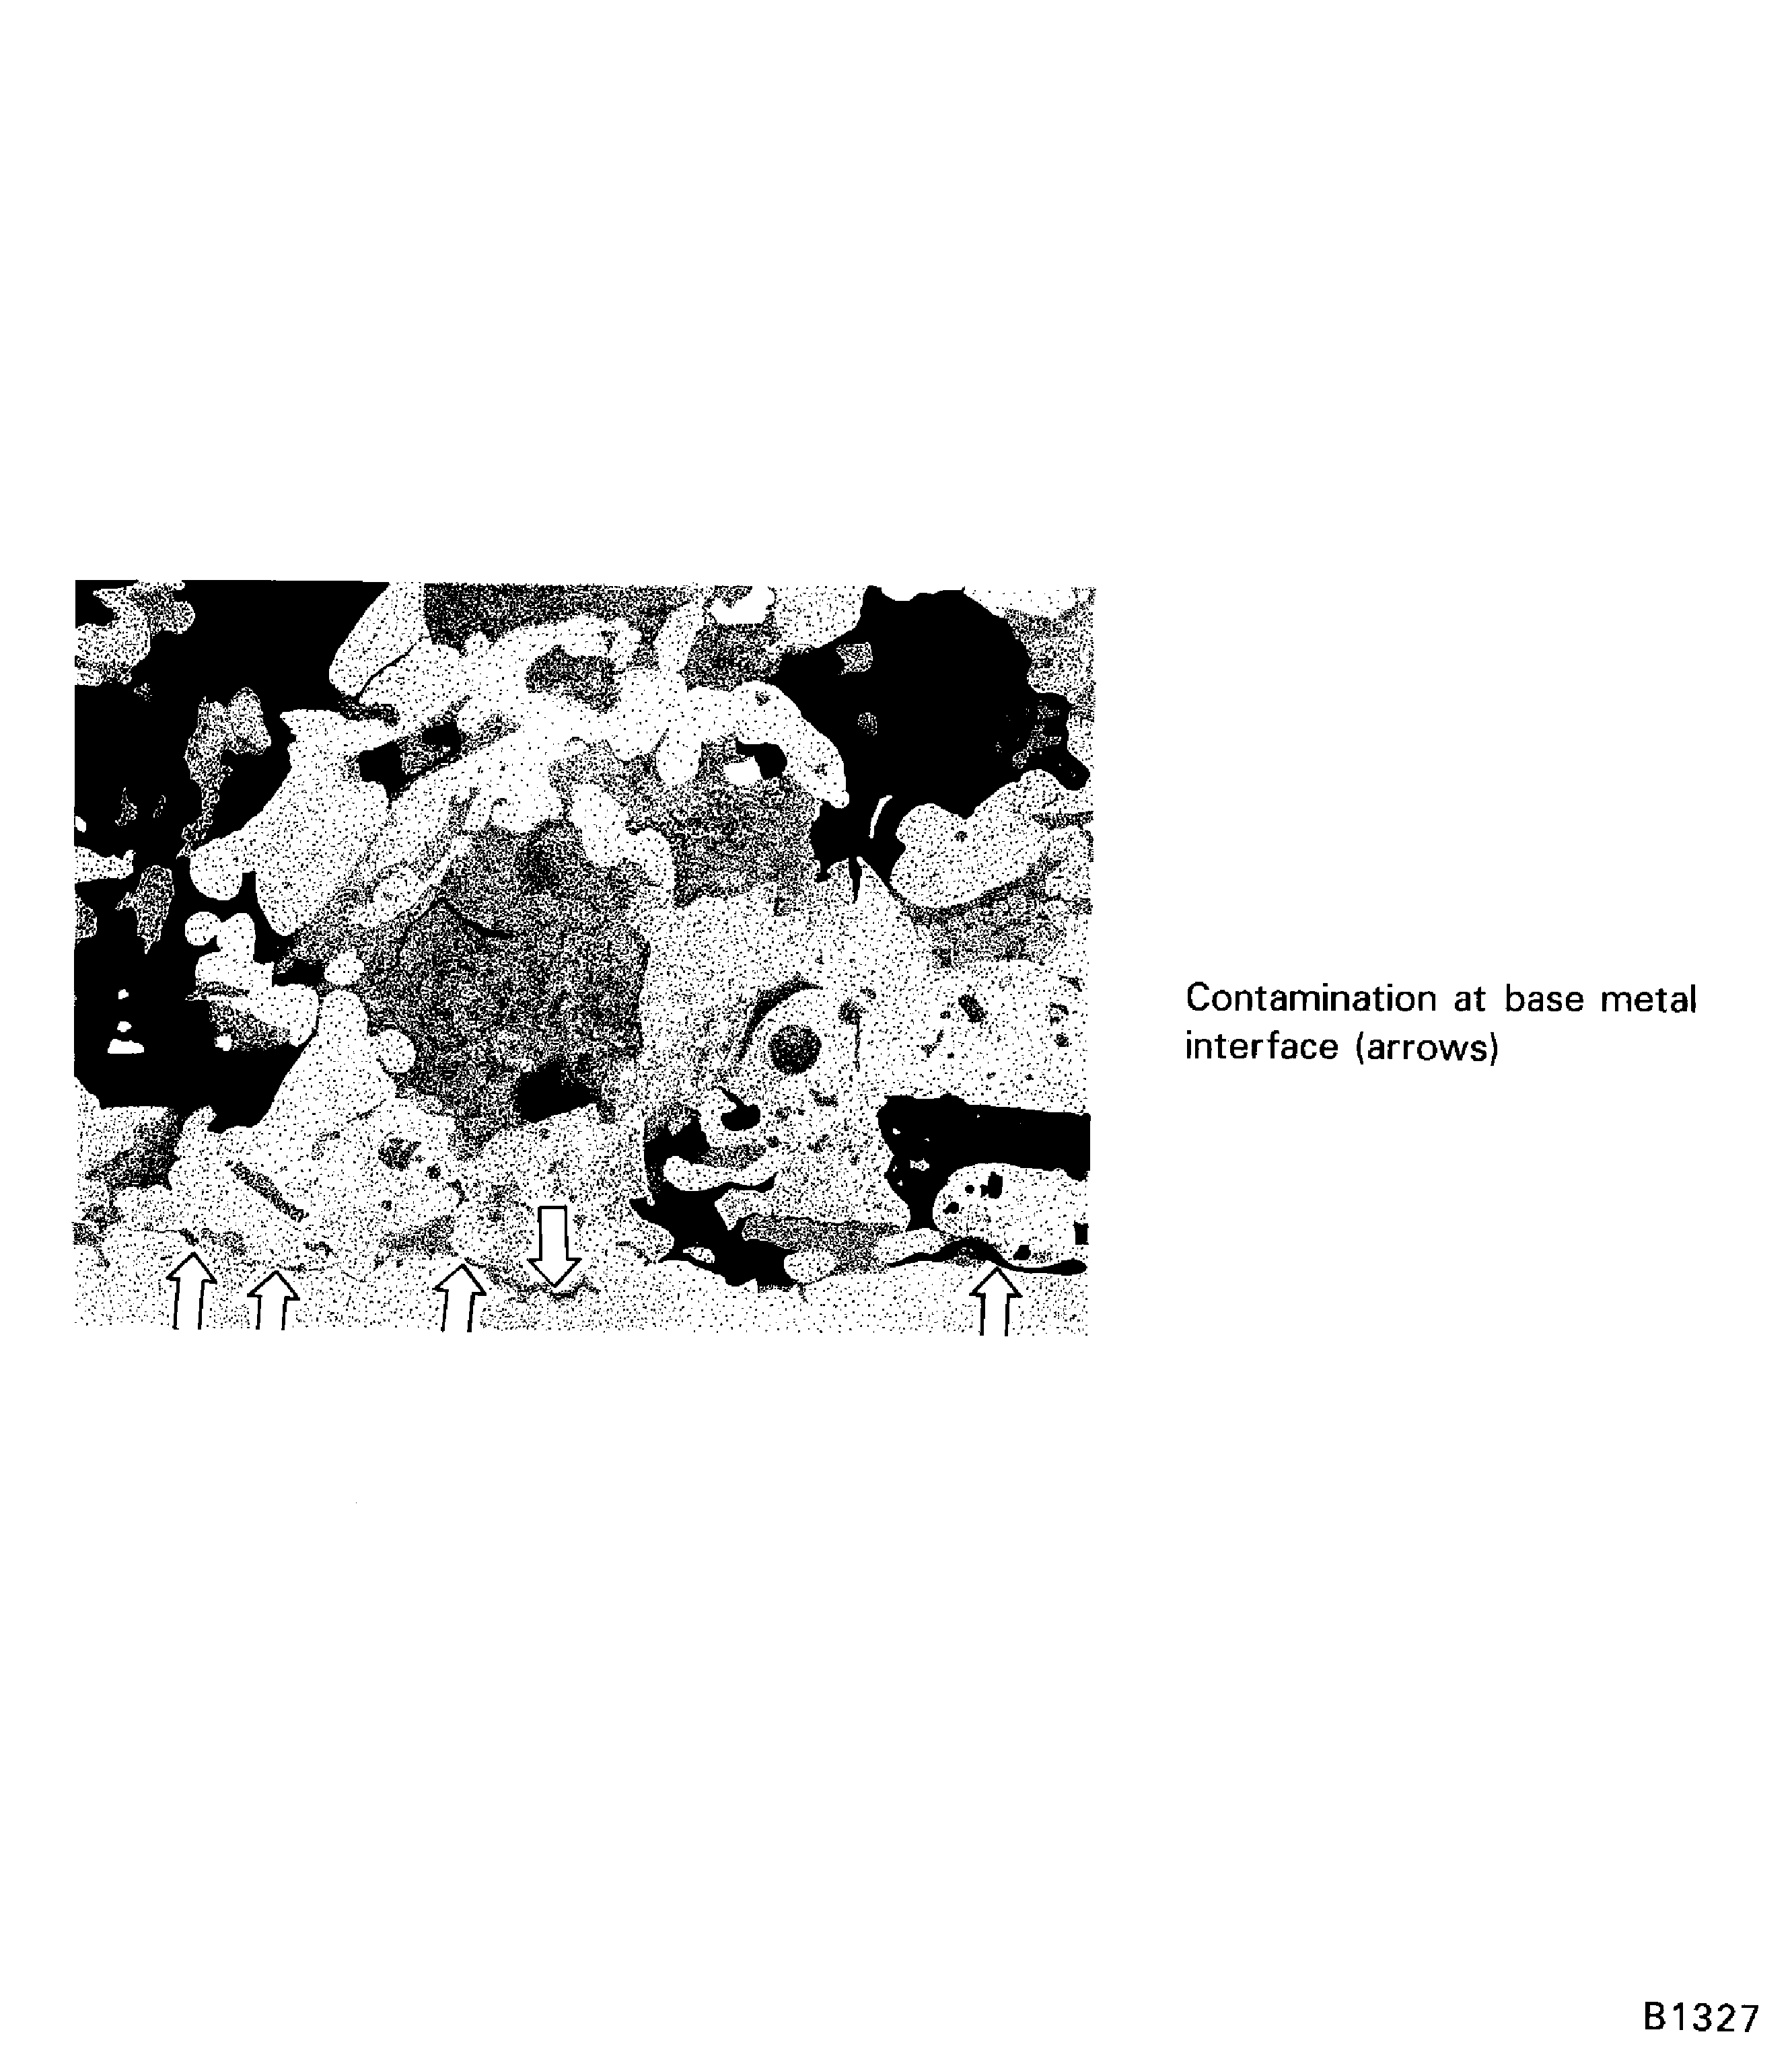
    Figure: Satisfactory oxides in PWA 75-1 coating (500X)

    Satisfactory oxides in PWA 75-1 coating (500X)
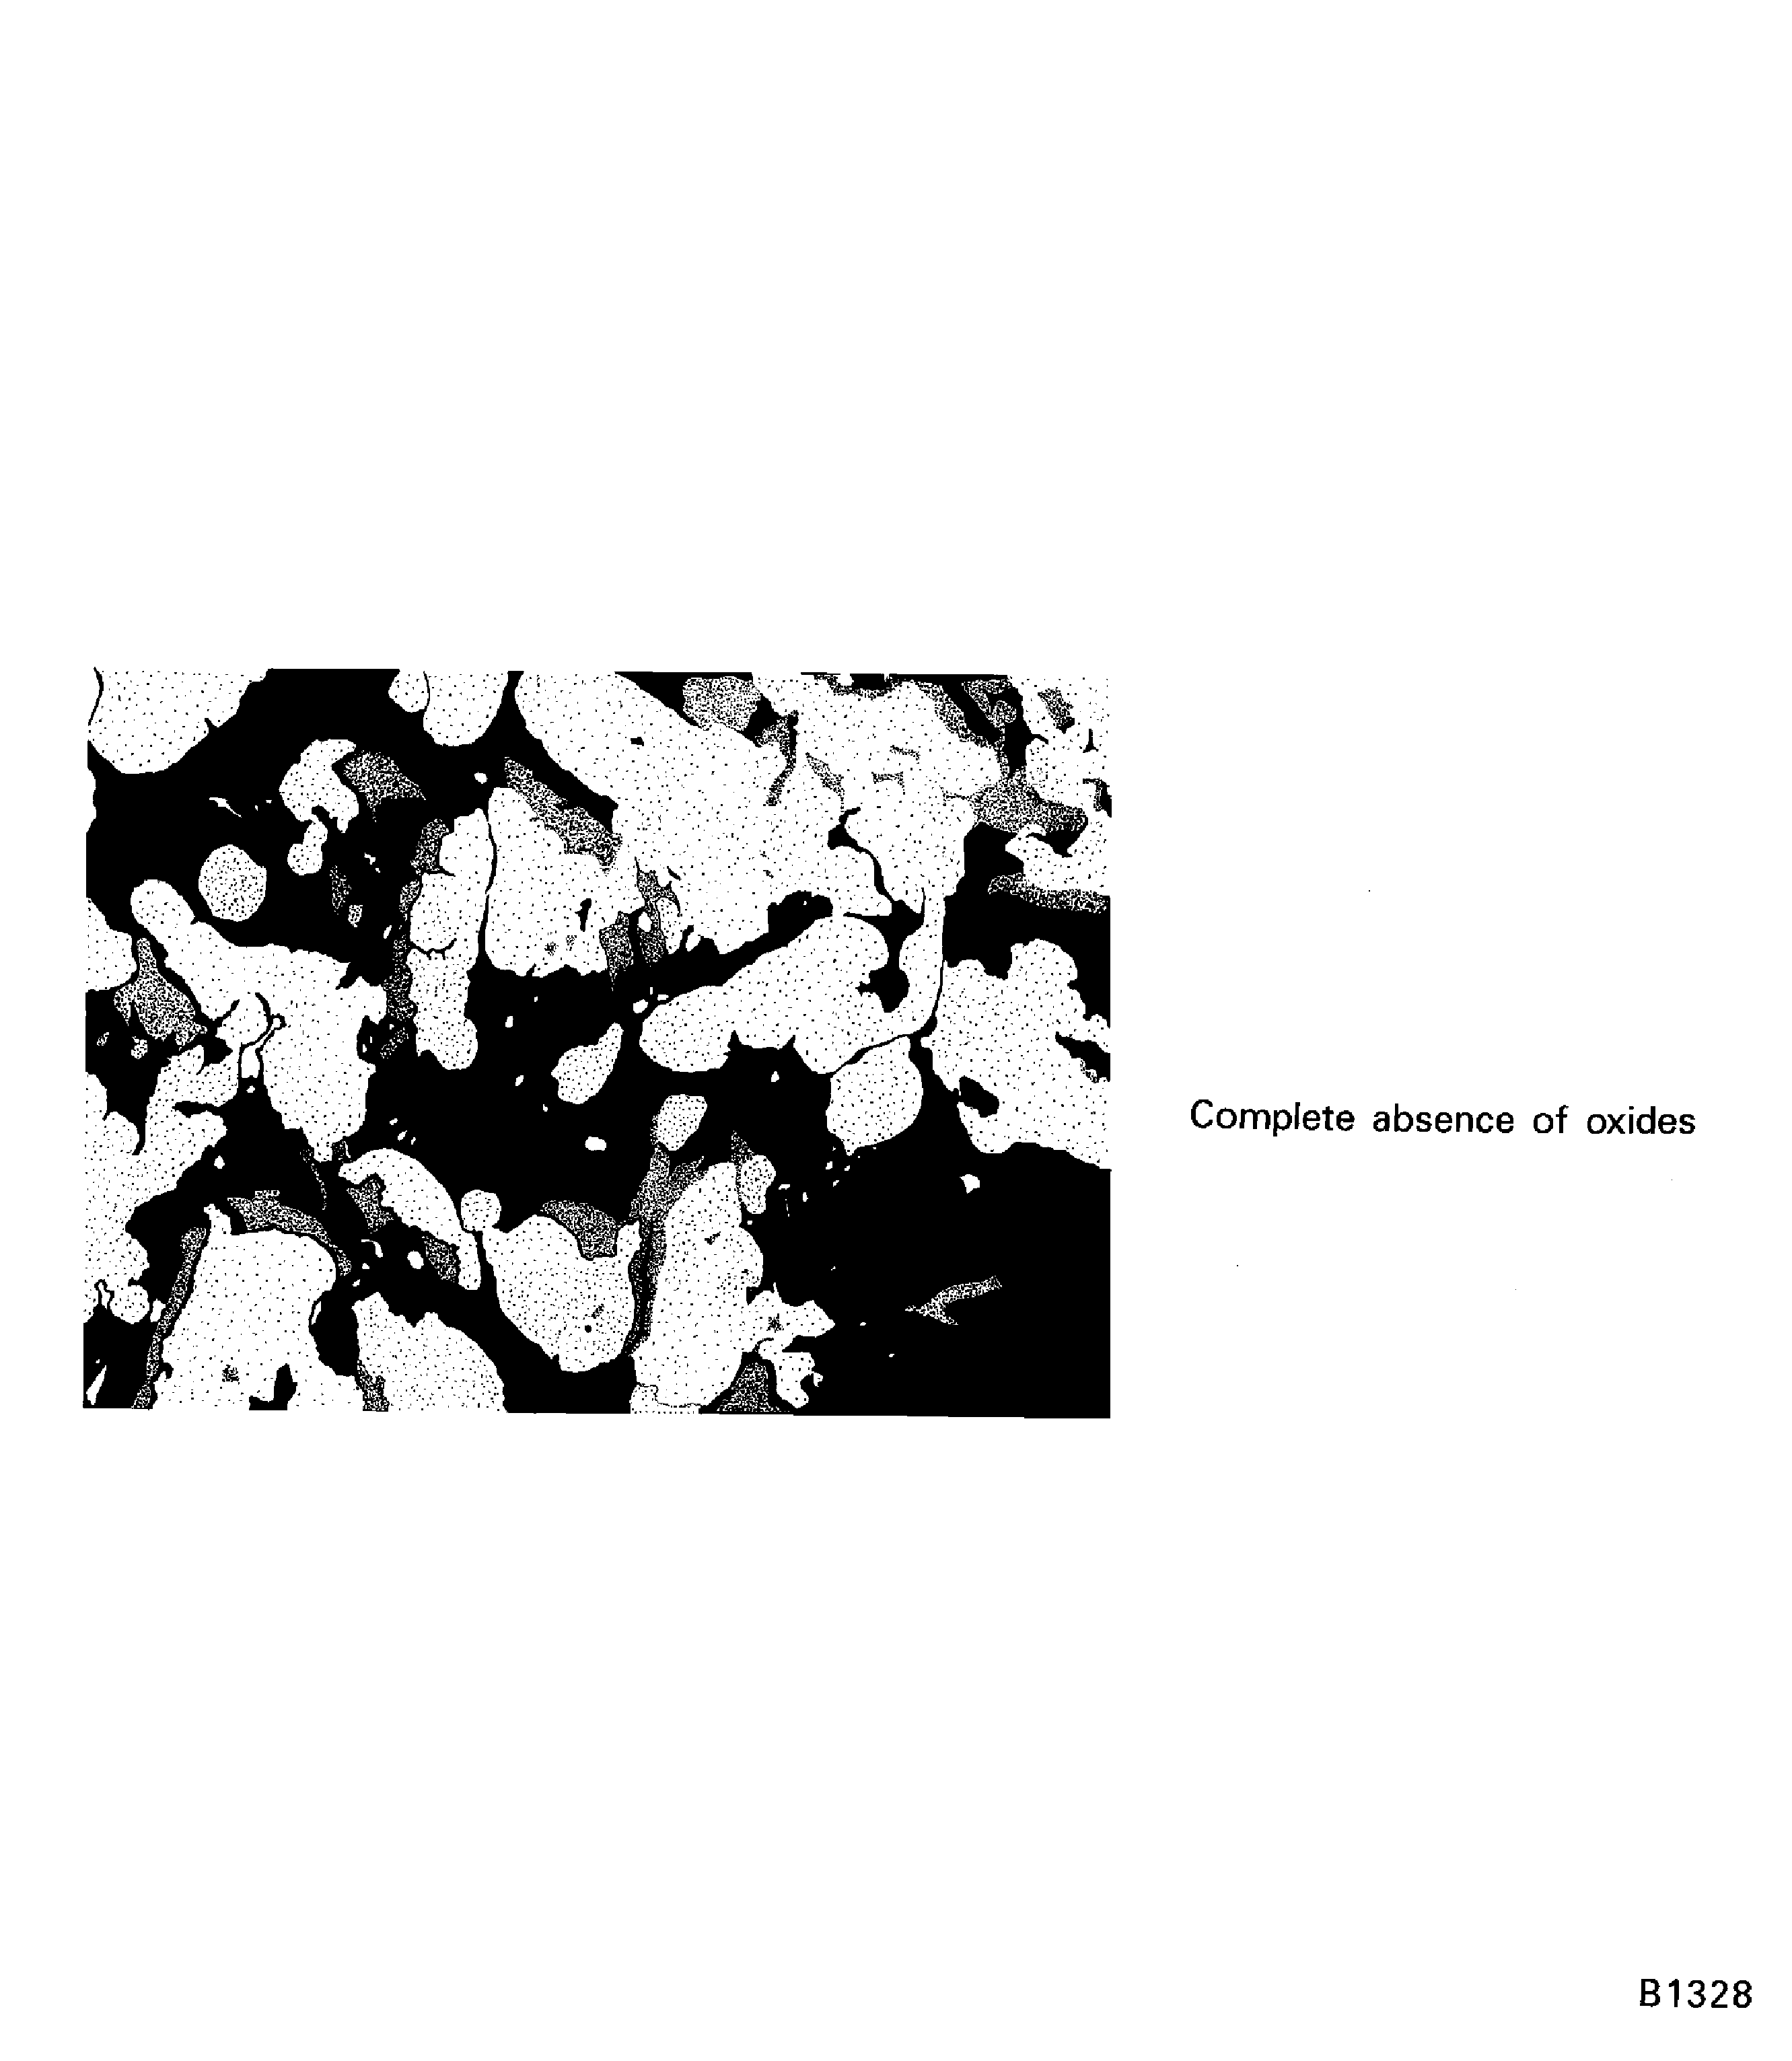
    Figure: Satisfactory oxides in PWA 75-1 coating (500X)

    Satisfactory oxides in PWA 75-1 coating (500X)
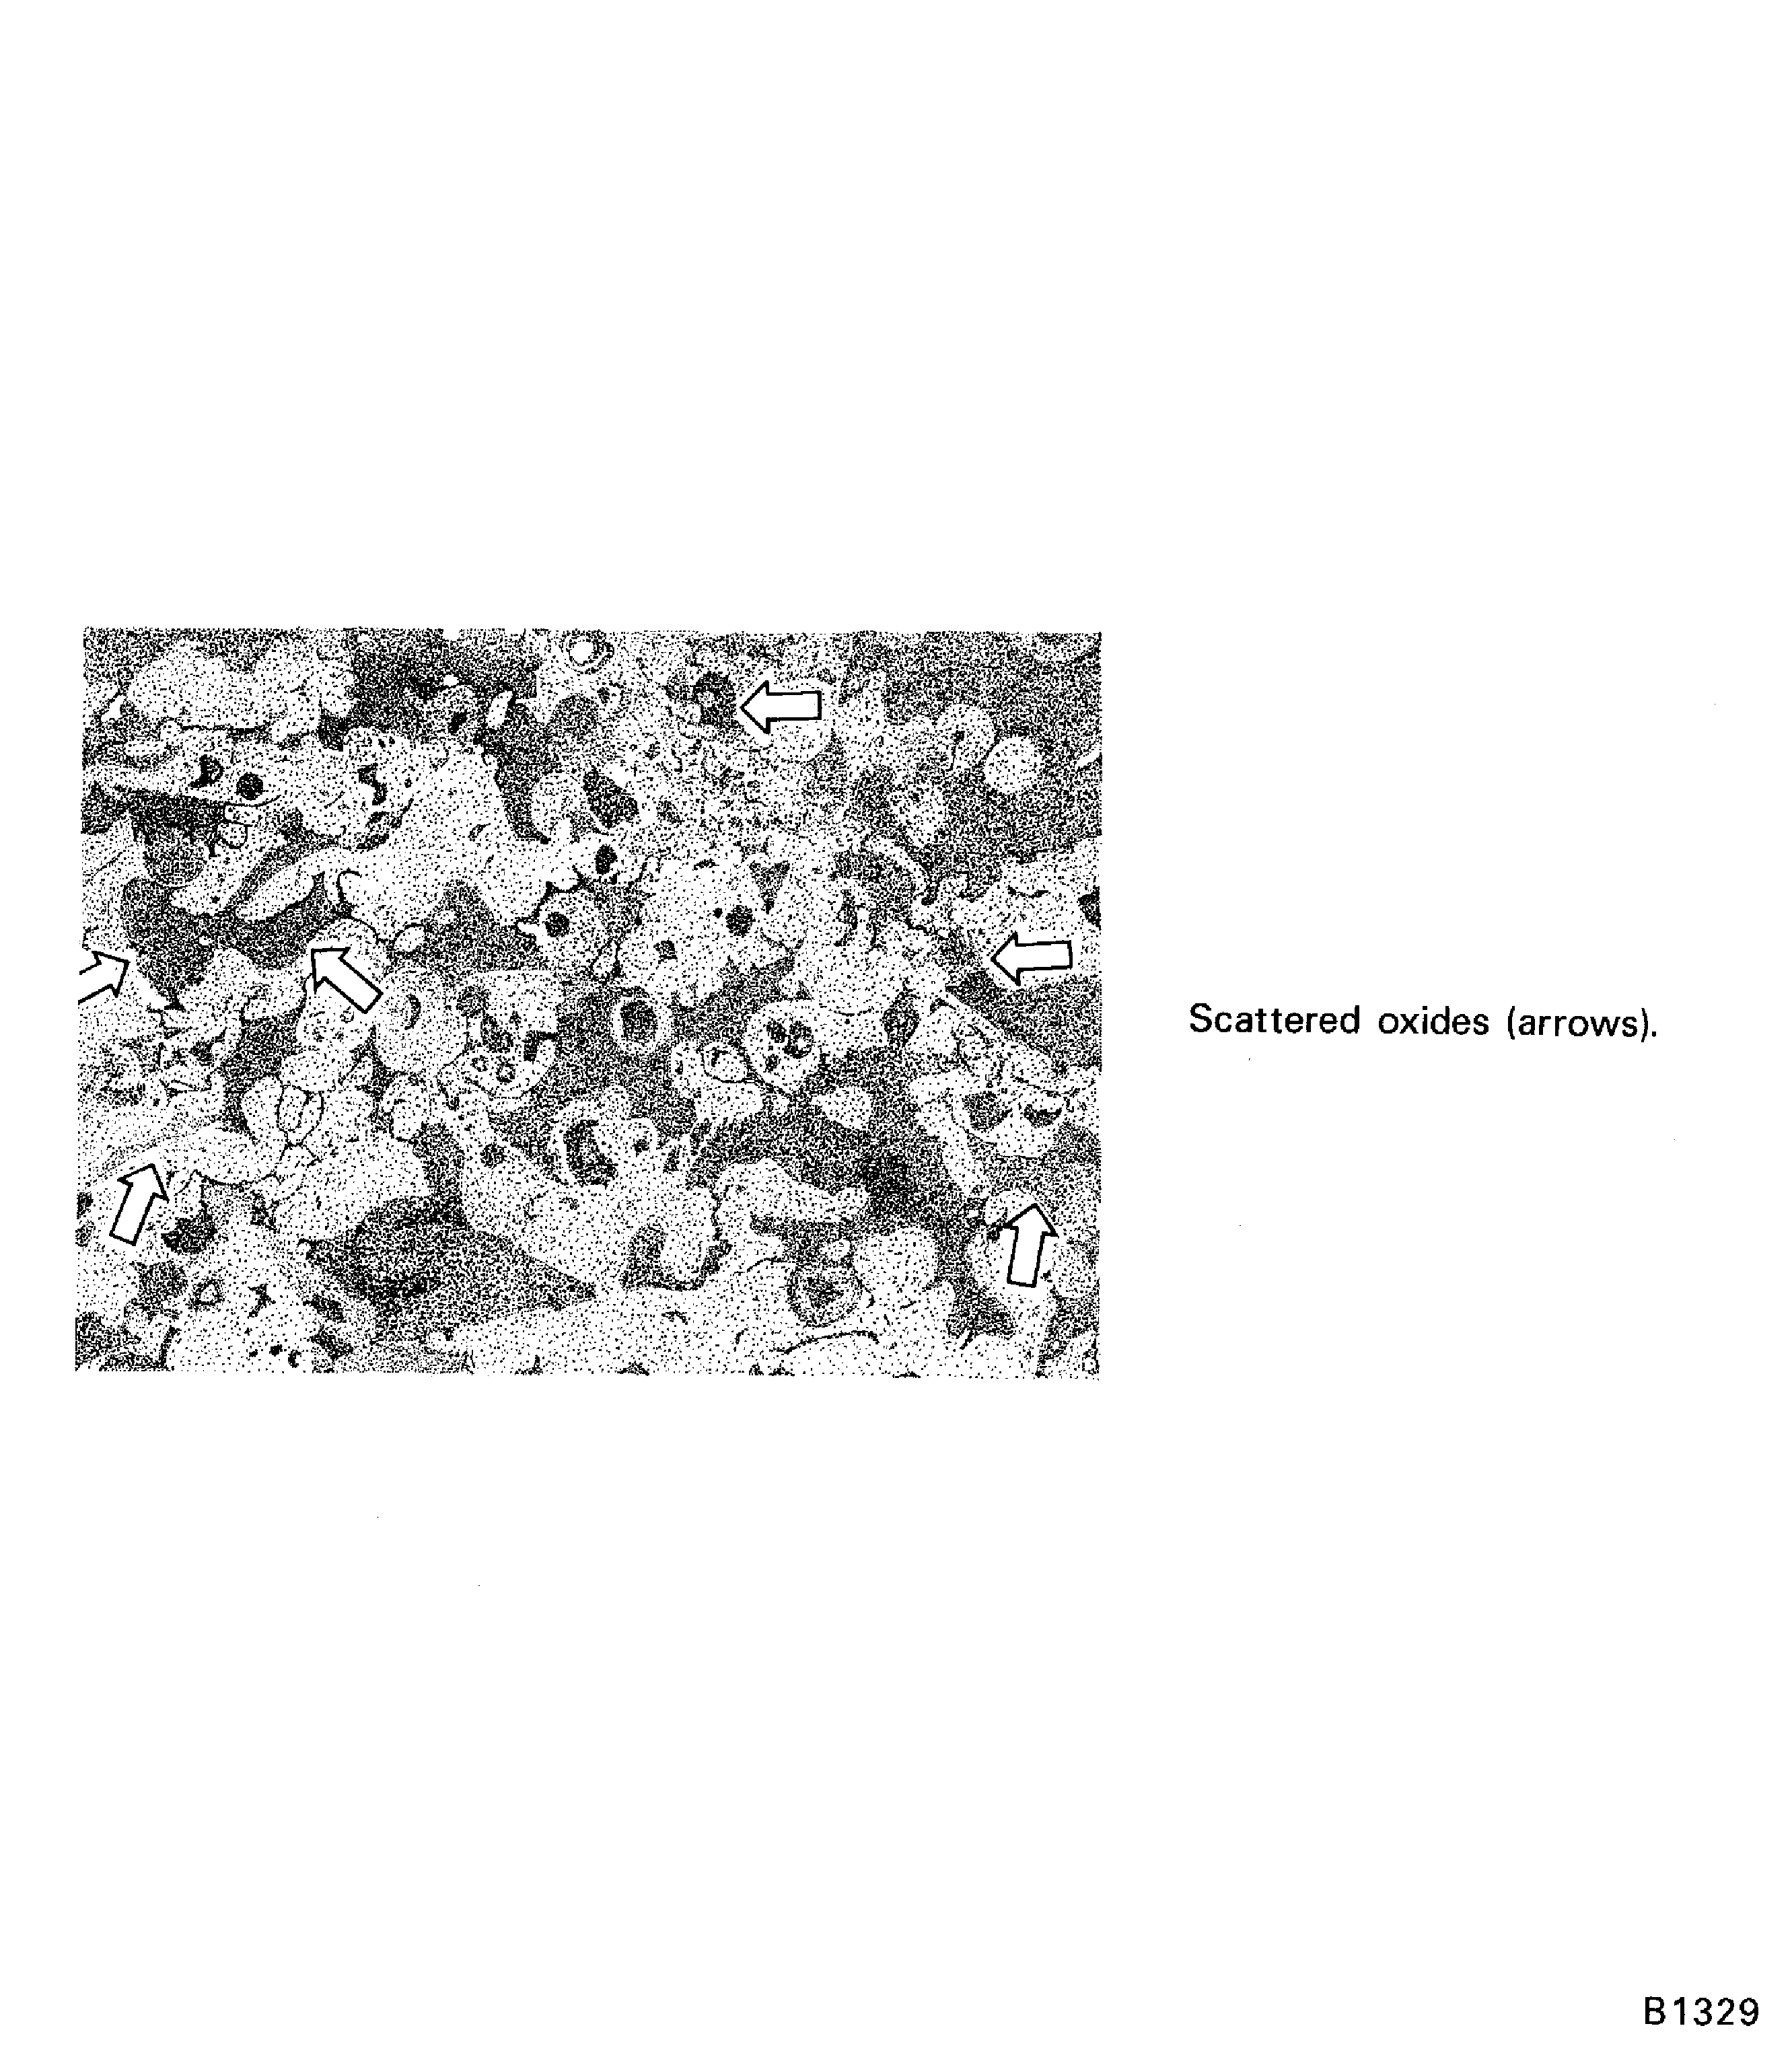
    Figure: Unsatisfactory oxides in PWA 75-1 coating (500X)

    Unsatisfactory oxides in PWA 75-1 coating (500X)
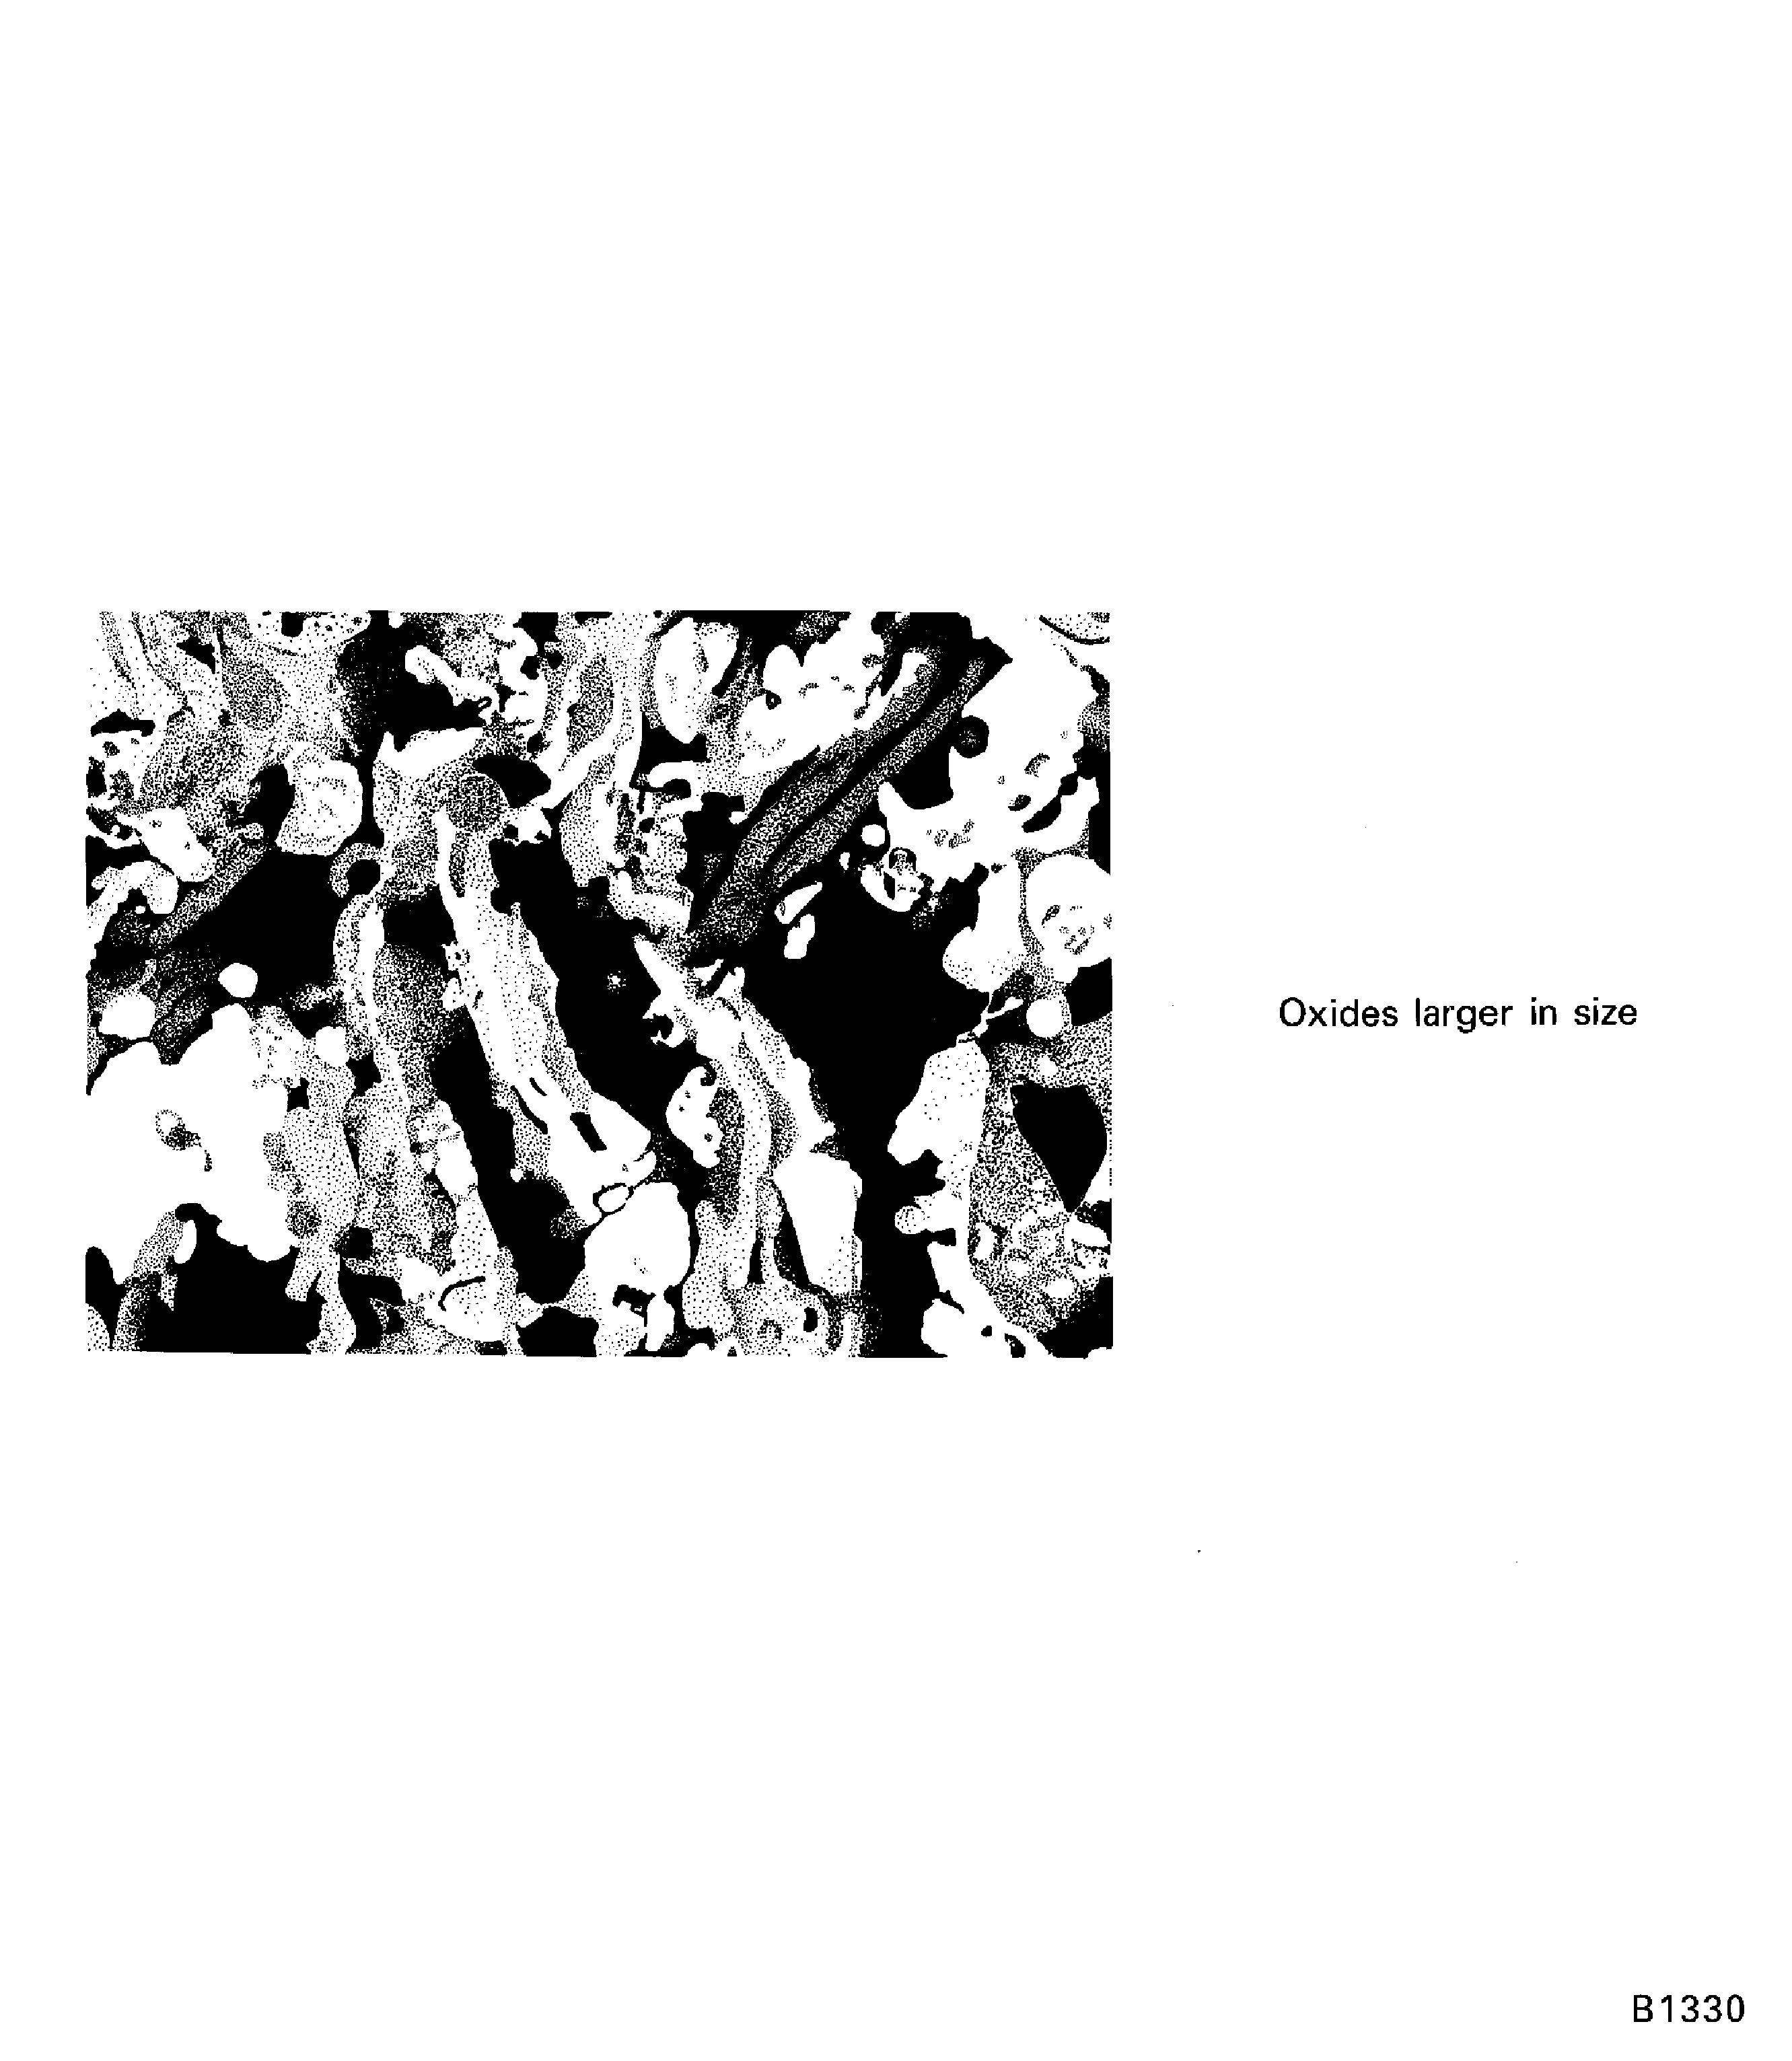
    Figure: Satisfactory porosity in PWA 75-1 coating on blade roots (100X)

    Satisfactory porosity in PWA 75-1 coating on blade roots (100X)
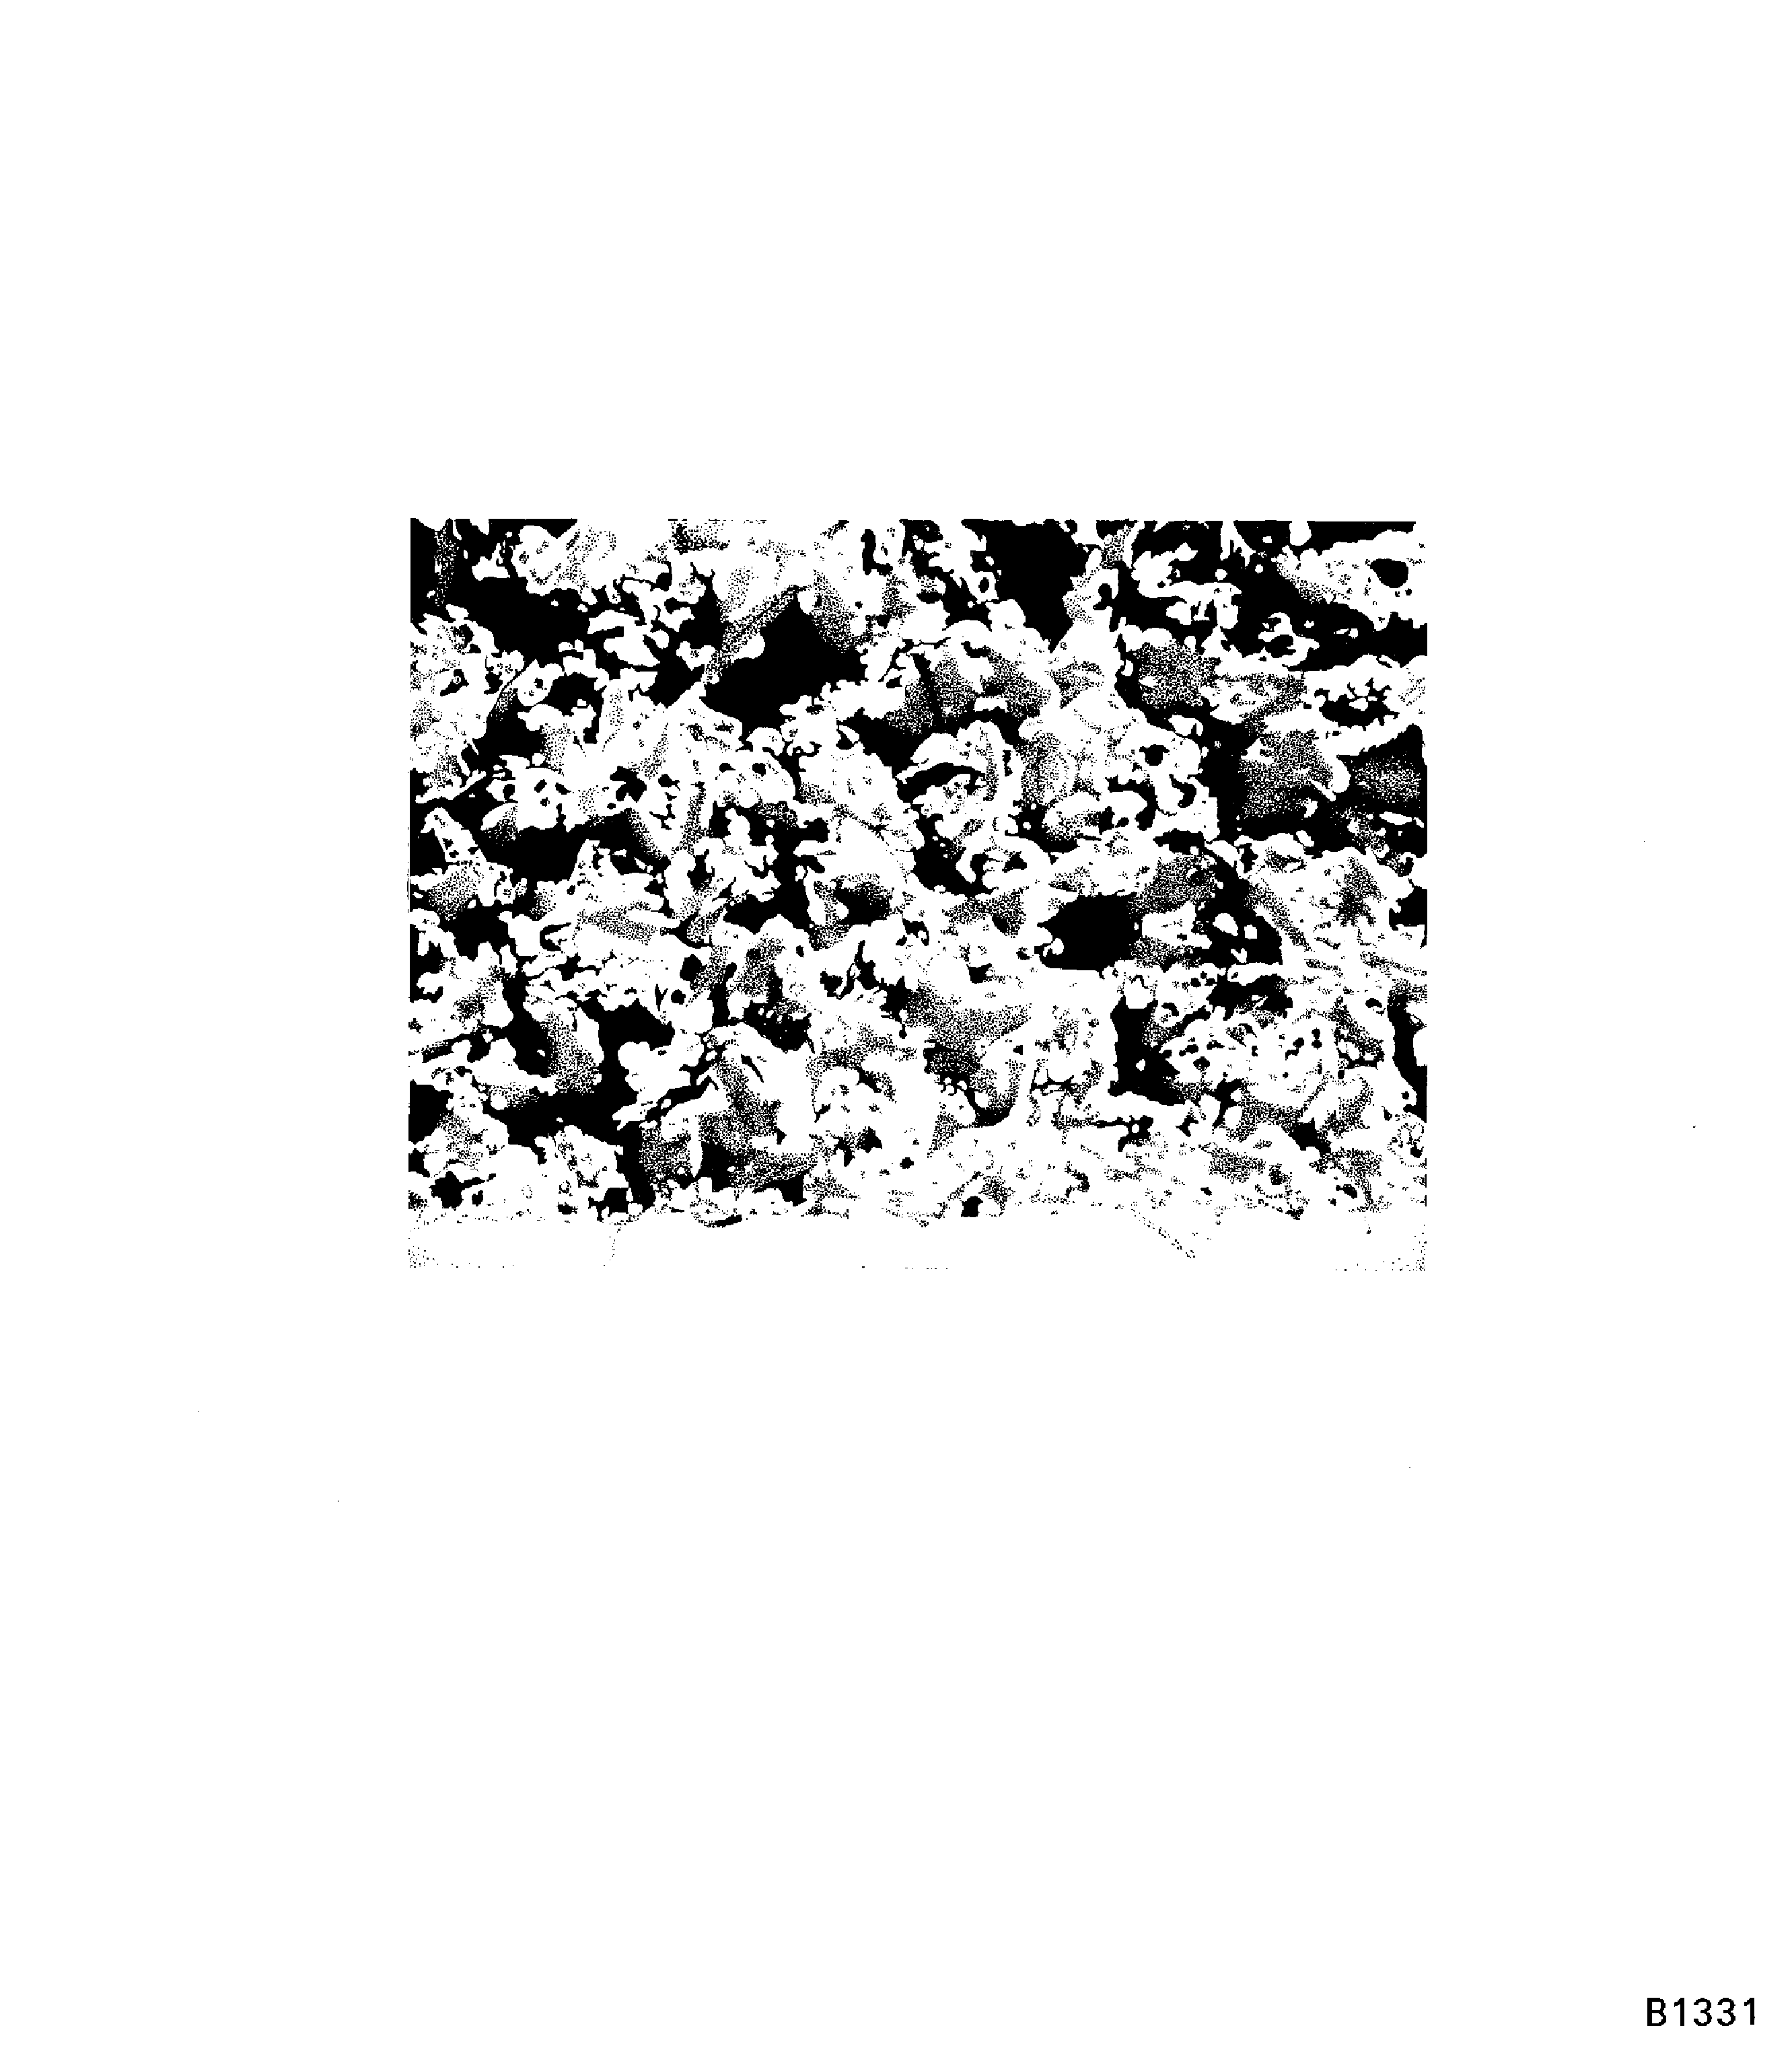
    Figure: Satisfactory porosity in PWA 75-1 coating on blade roots (100X)

    Satisfactory porosity in PWA 75-1 coating on blade roots (100X)
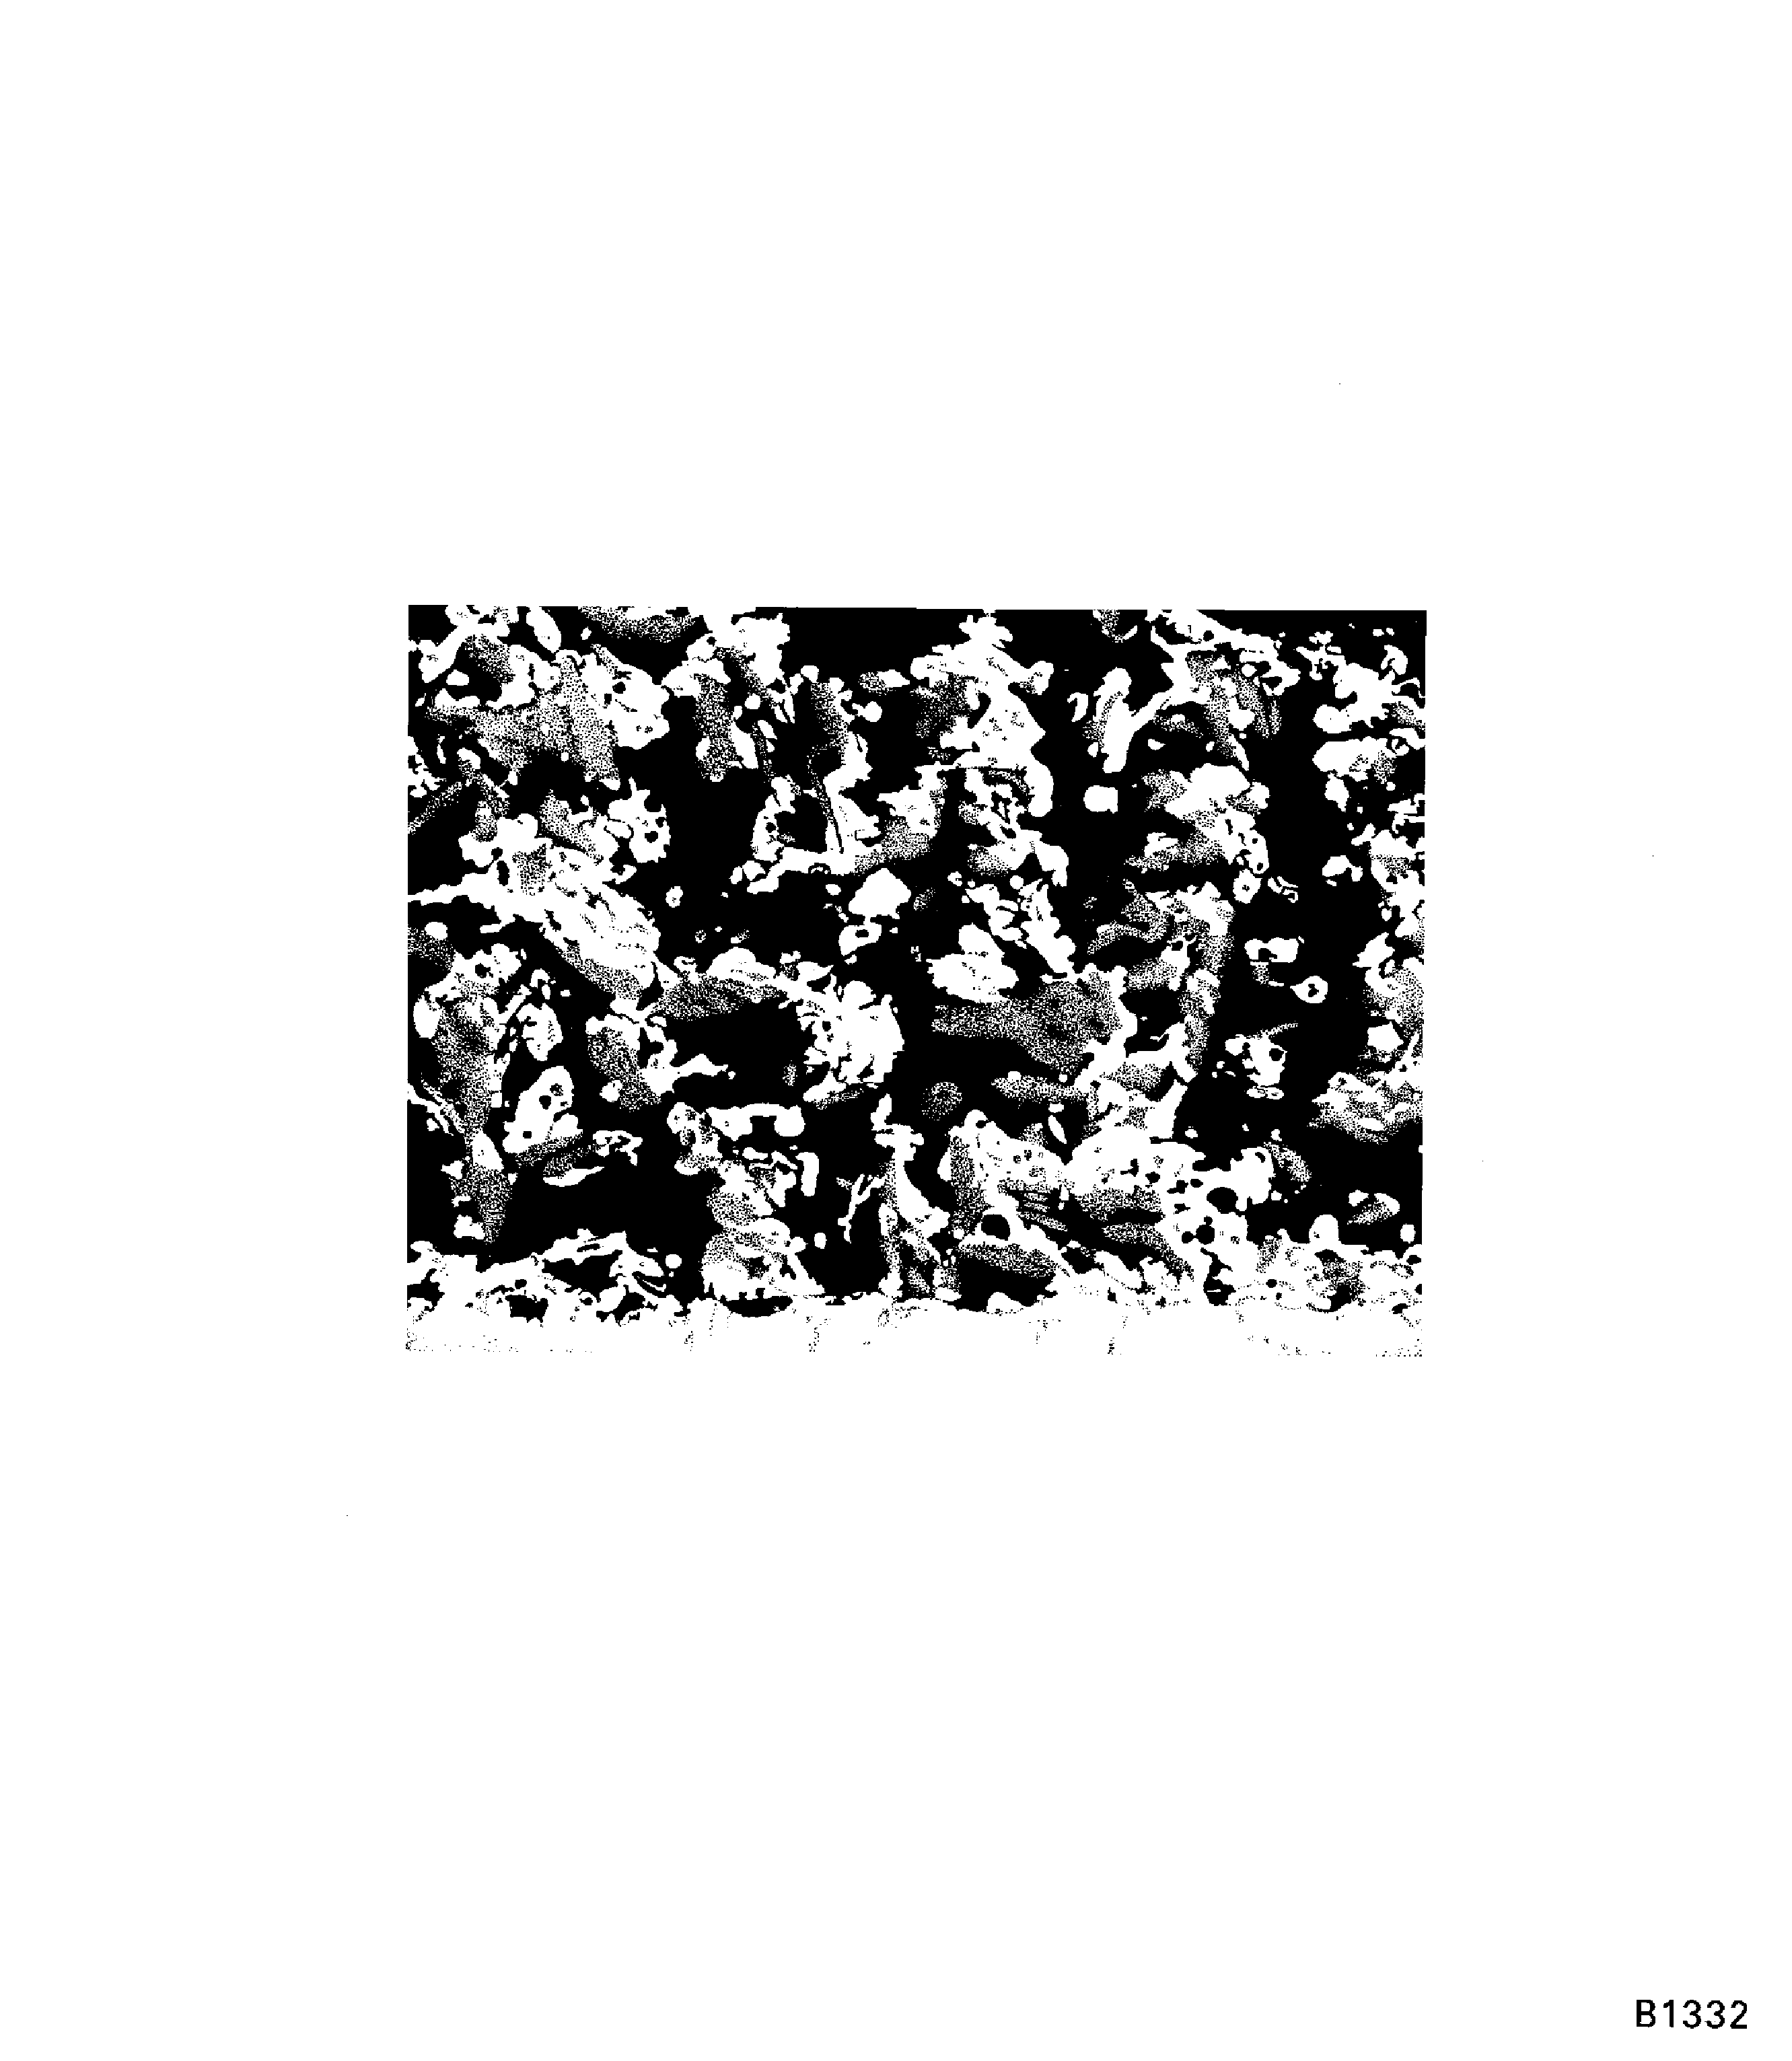
    Figure: Unsatisfactory porosity in PWA 75-1 coating on blade roots (100X)

    Unsatisfactory porosity in PWA 75-1 coating on blade roots (100X)
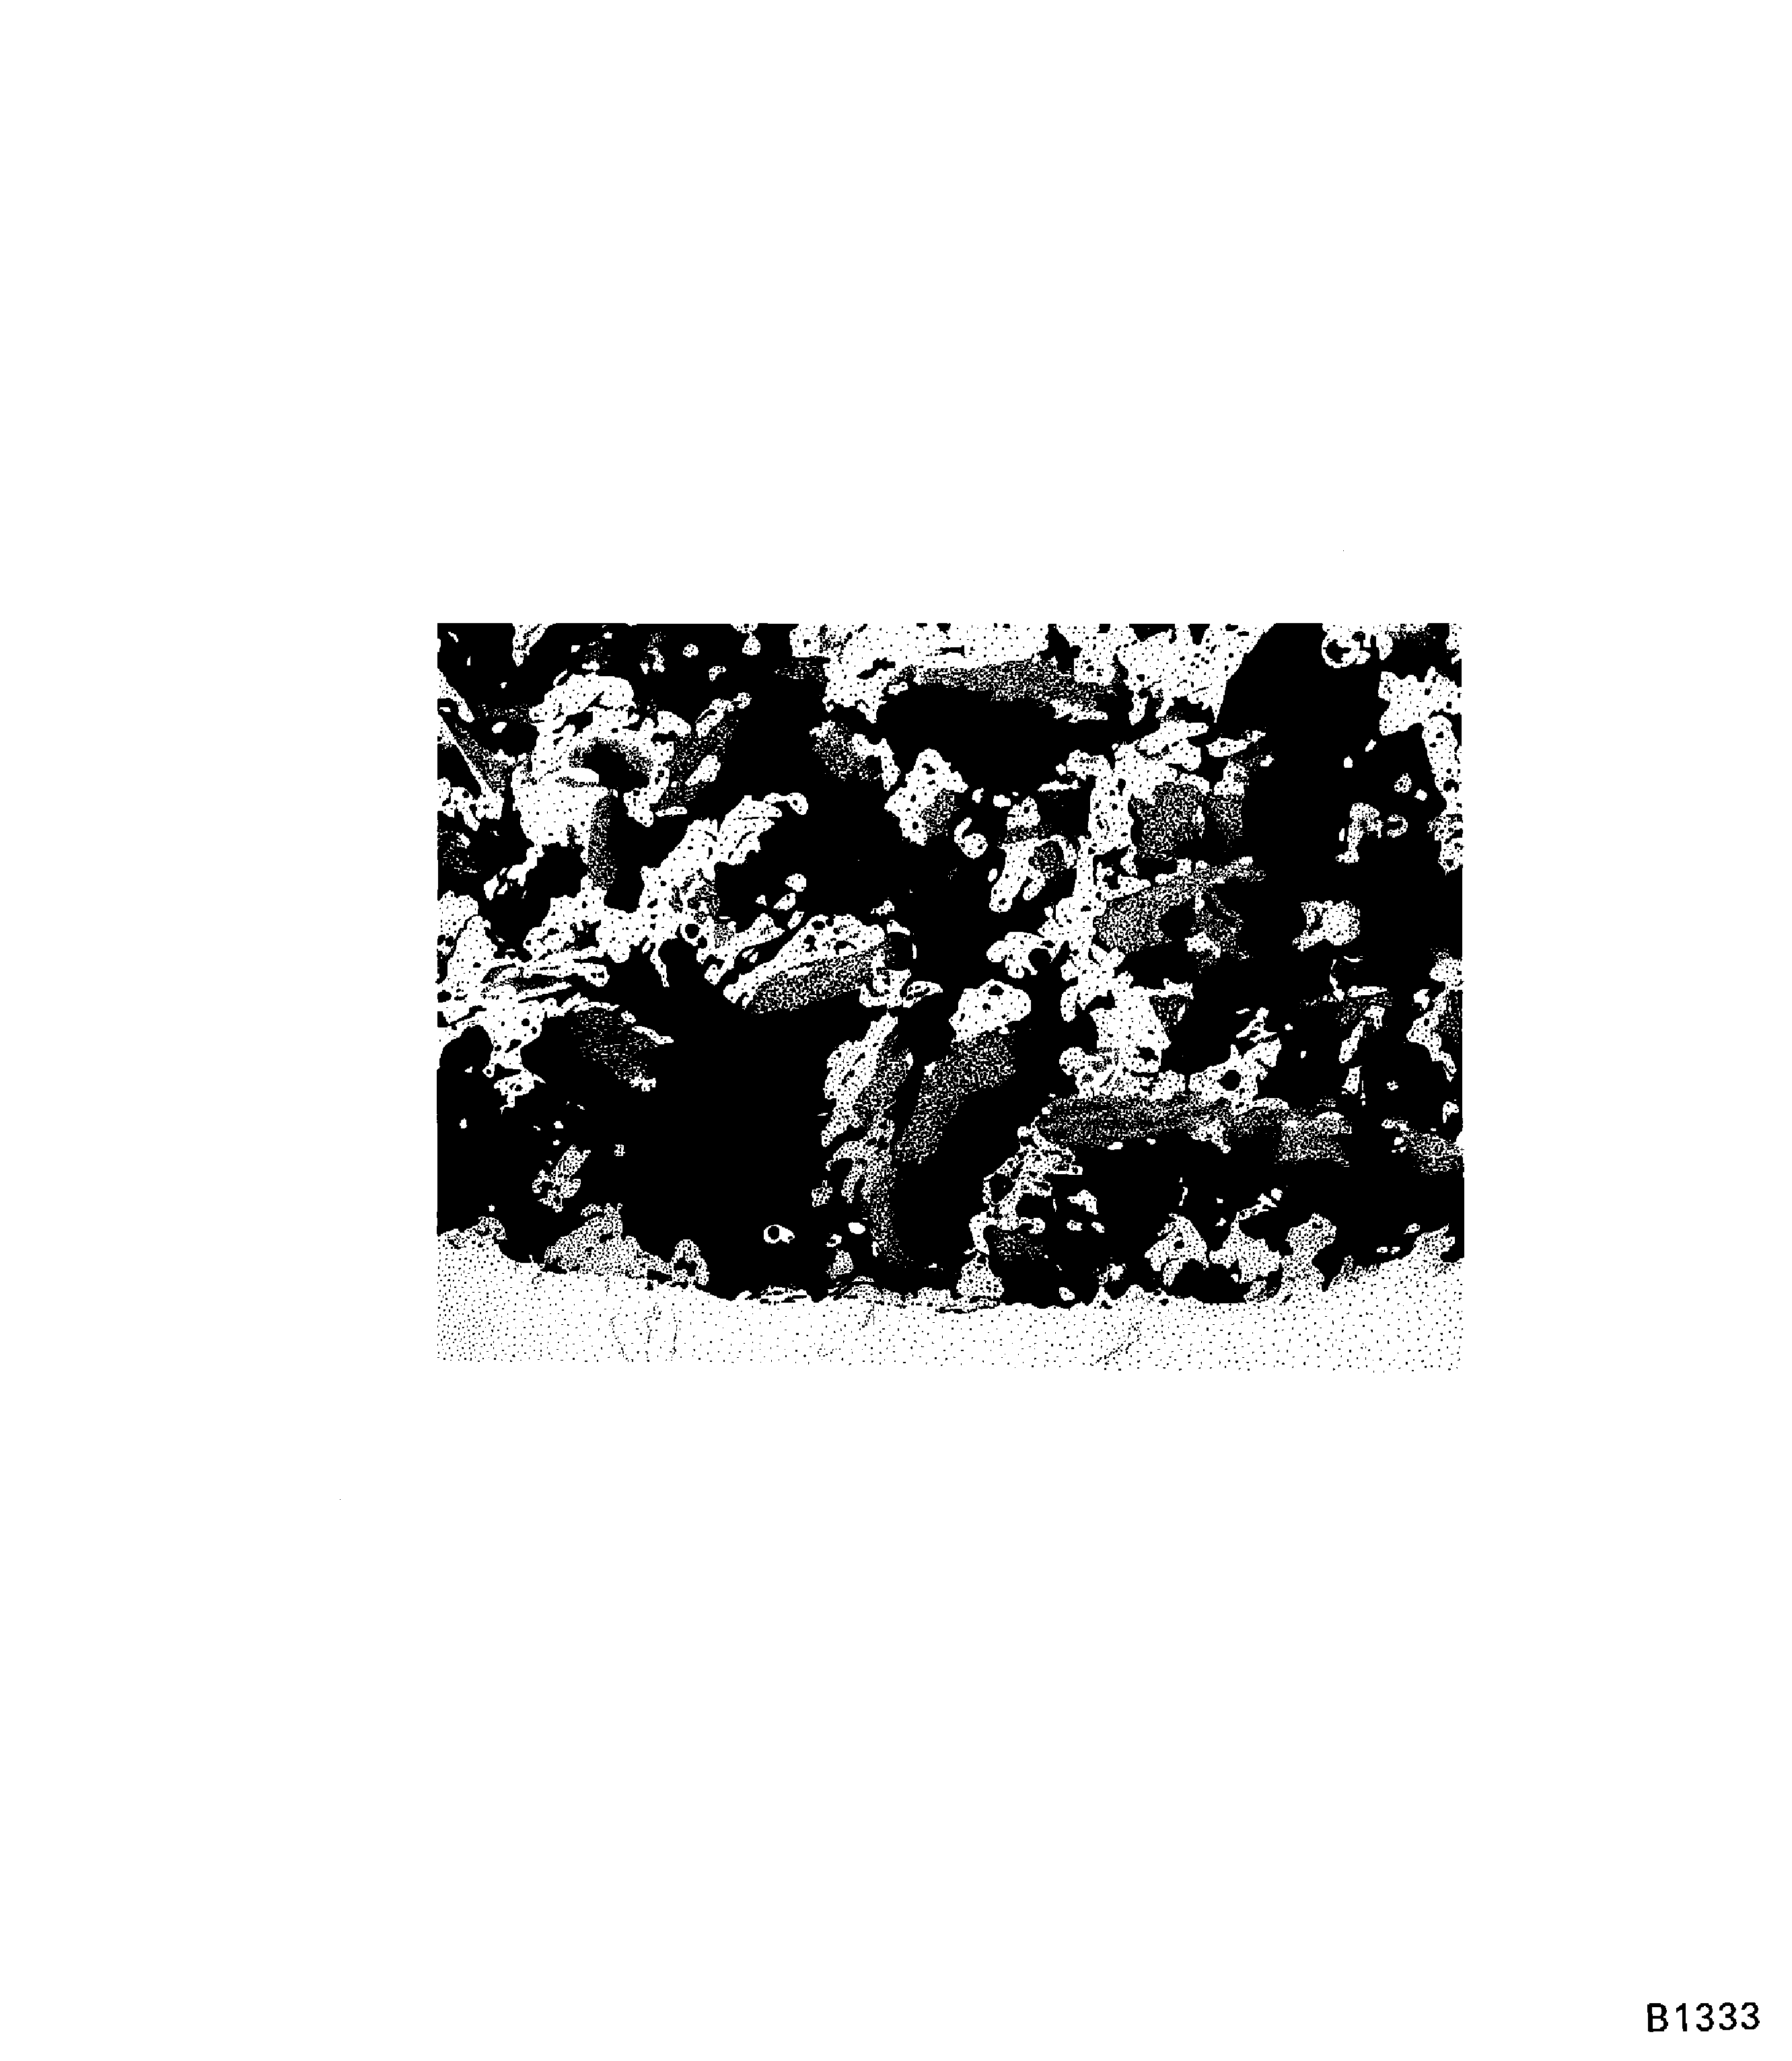
    Figure: Interface condition of PWA 75-1 on blade roots (100X)

    Interface condition of PWA 75-1 on blade roots (100X)
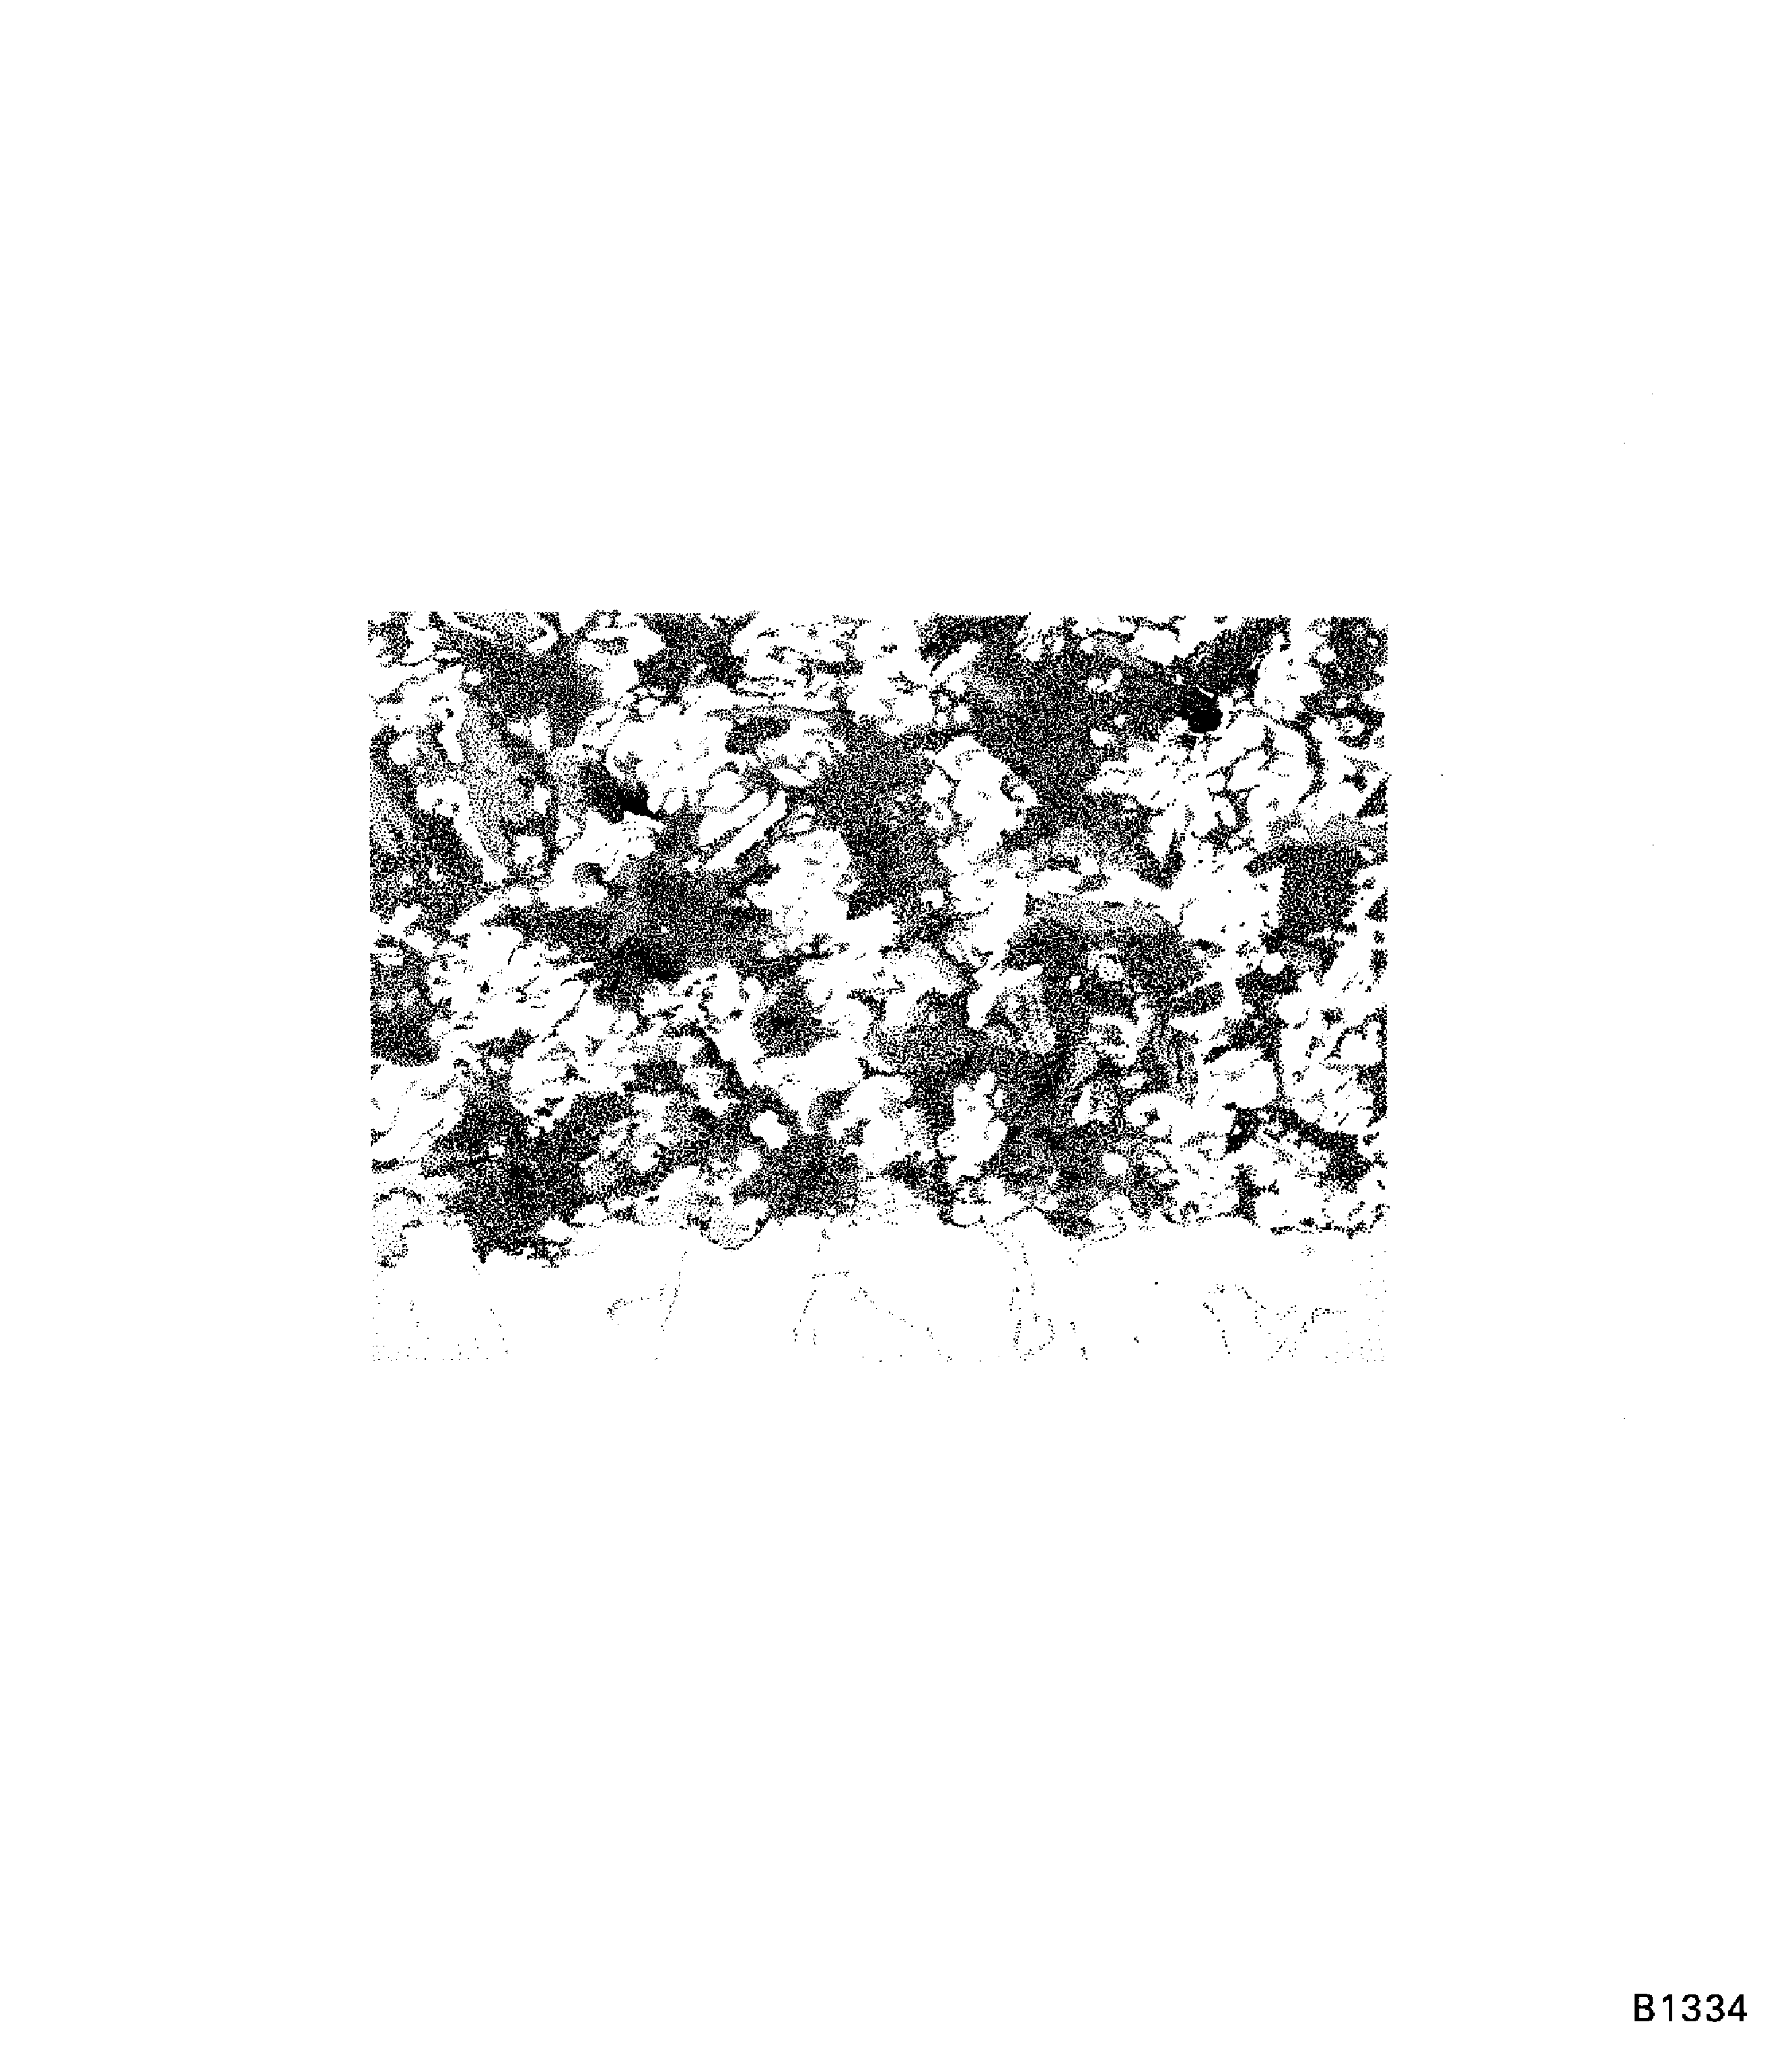
    Figure: Interface condition of PWA 75-1 coating on blade roots (100X)

    Interface condition of PWA 75-1 coating on blade roots (100X)
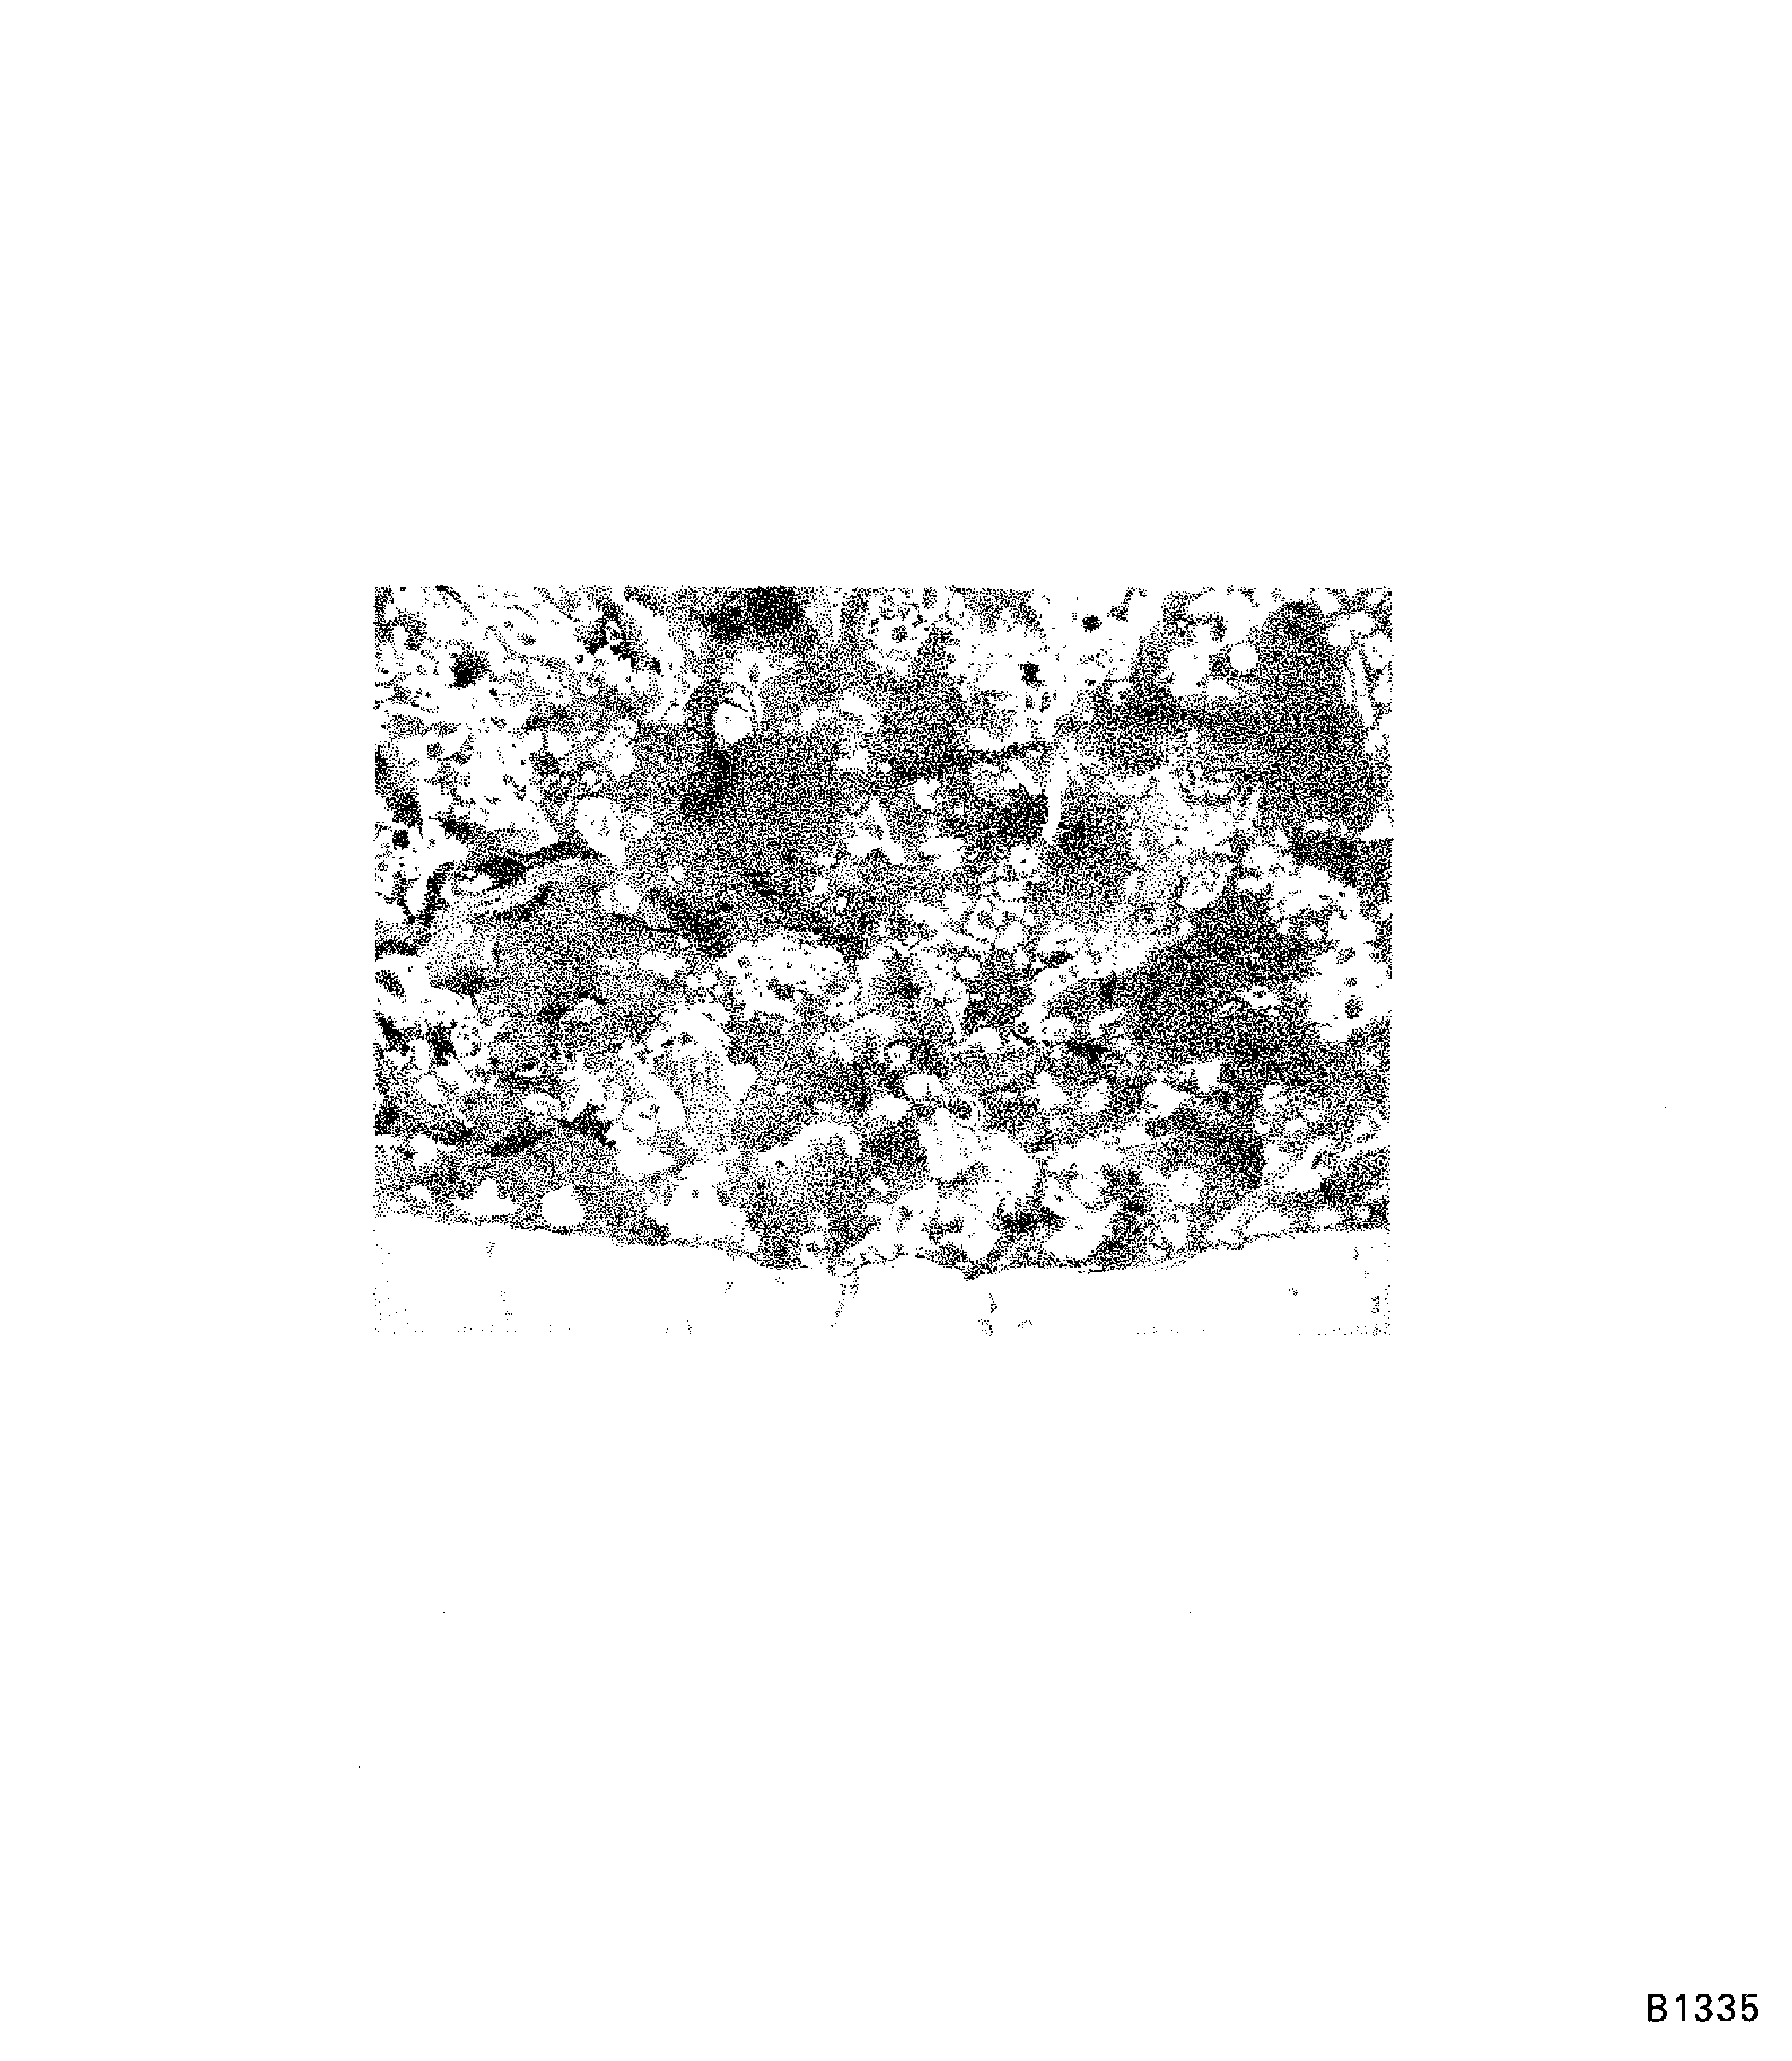
    Figure: Band saw set-up

    Band saw set-up
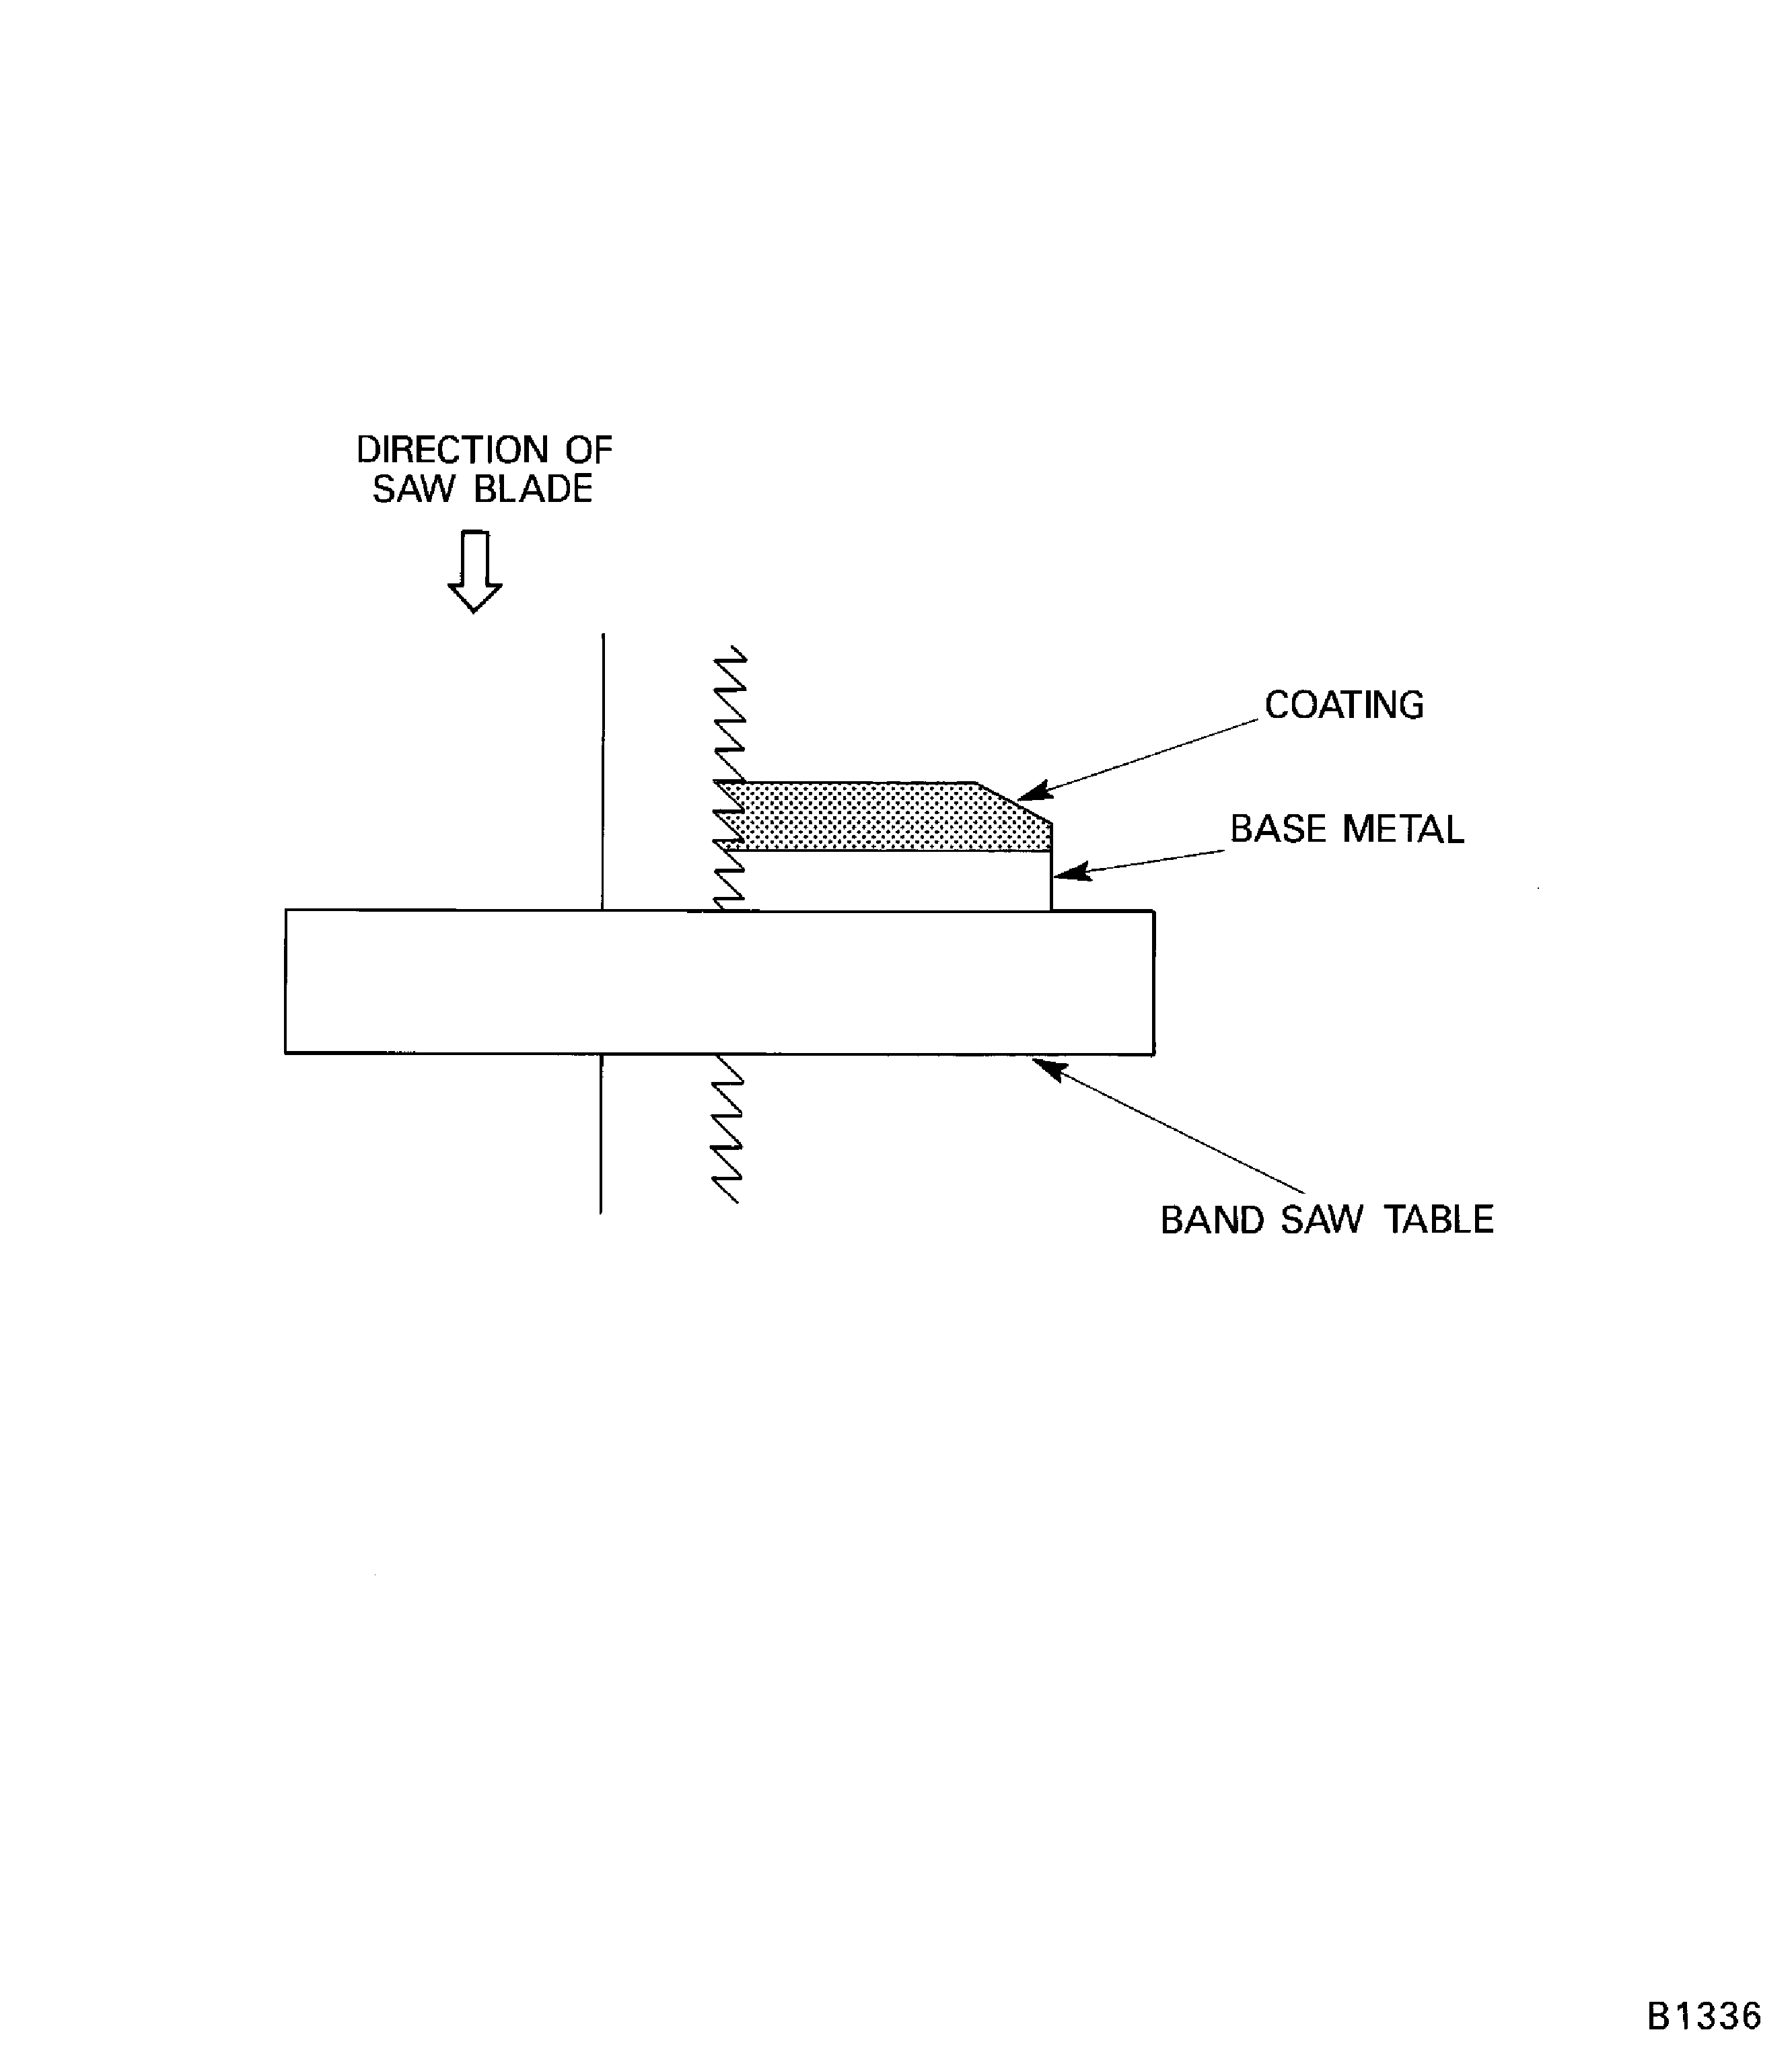
    Figure: Satisfactory thermal shock test conditions in PWA 75-1 coating (3.5X)

    Satisfactory thermal shock test conditions in PWA 75-1 coating (3.5X)
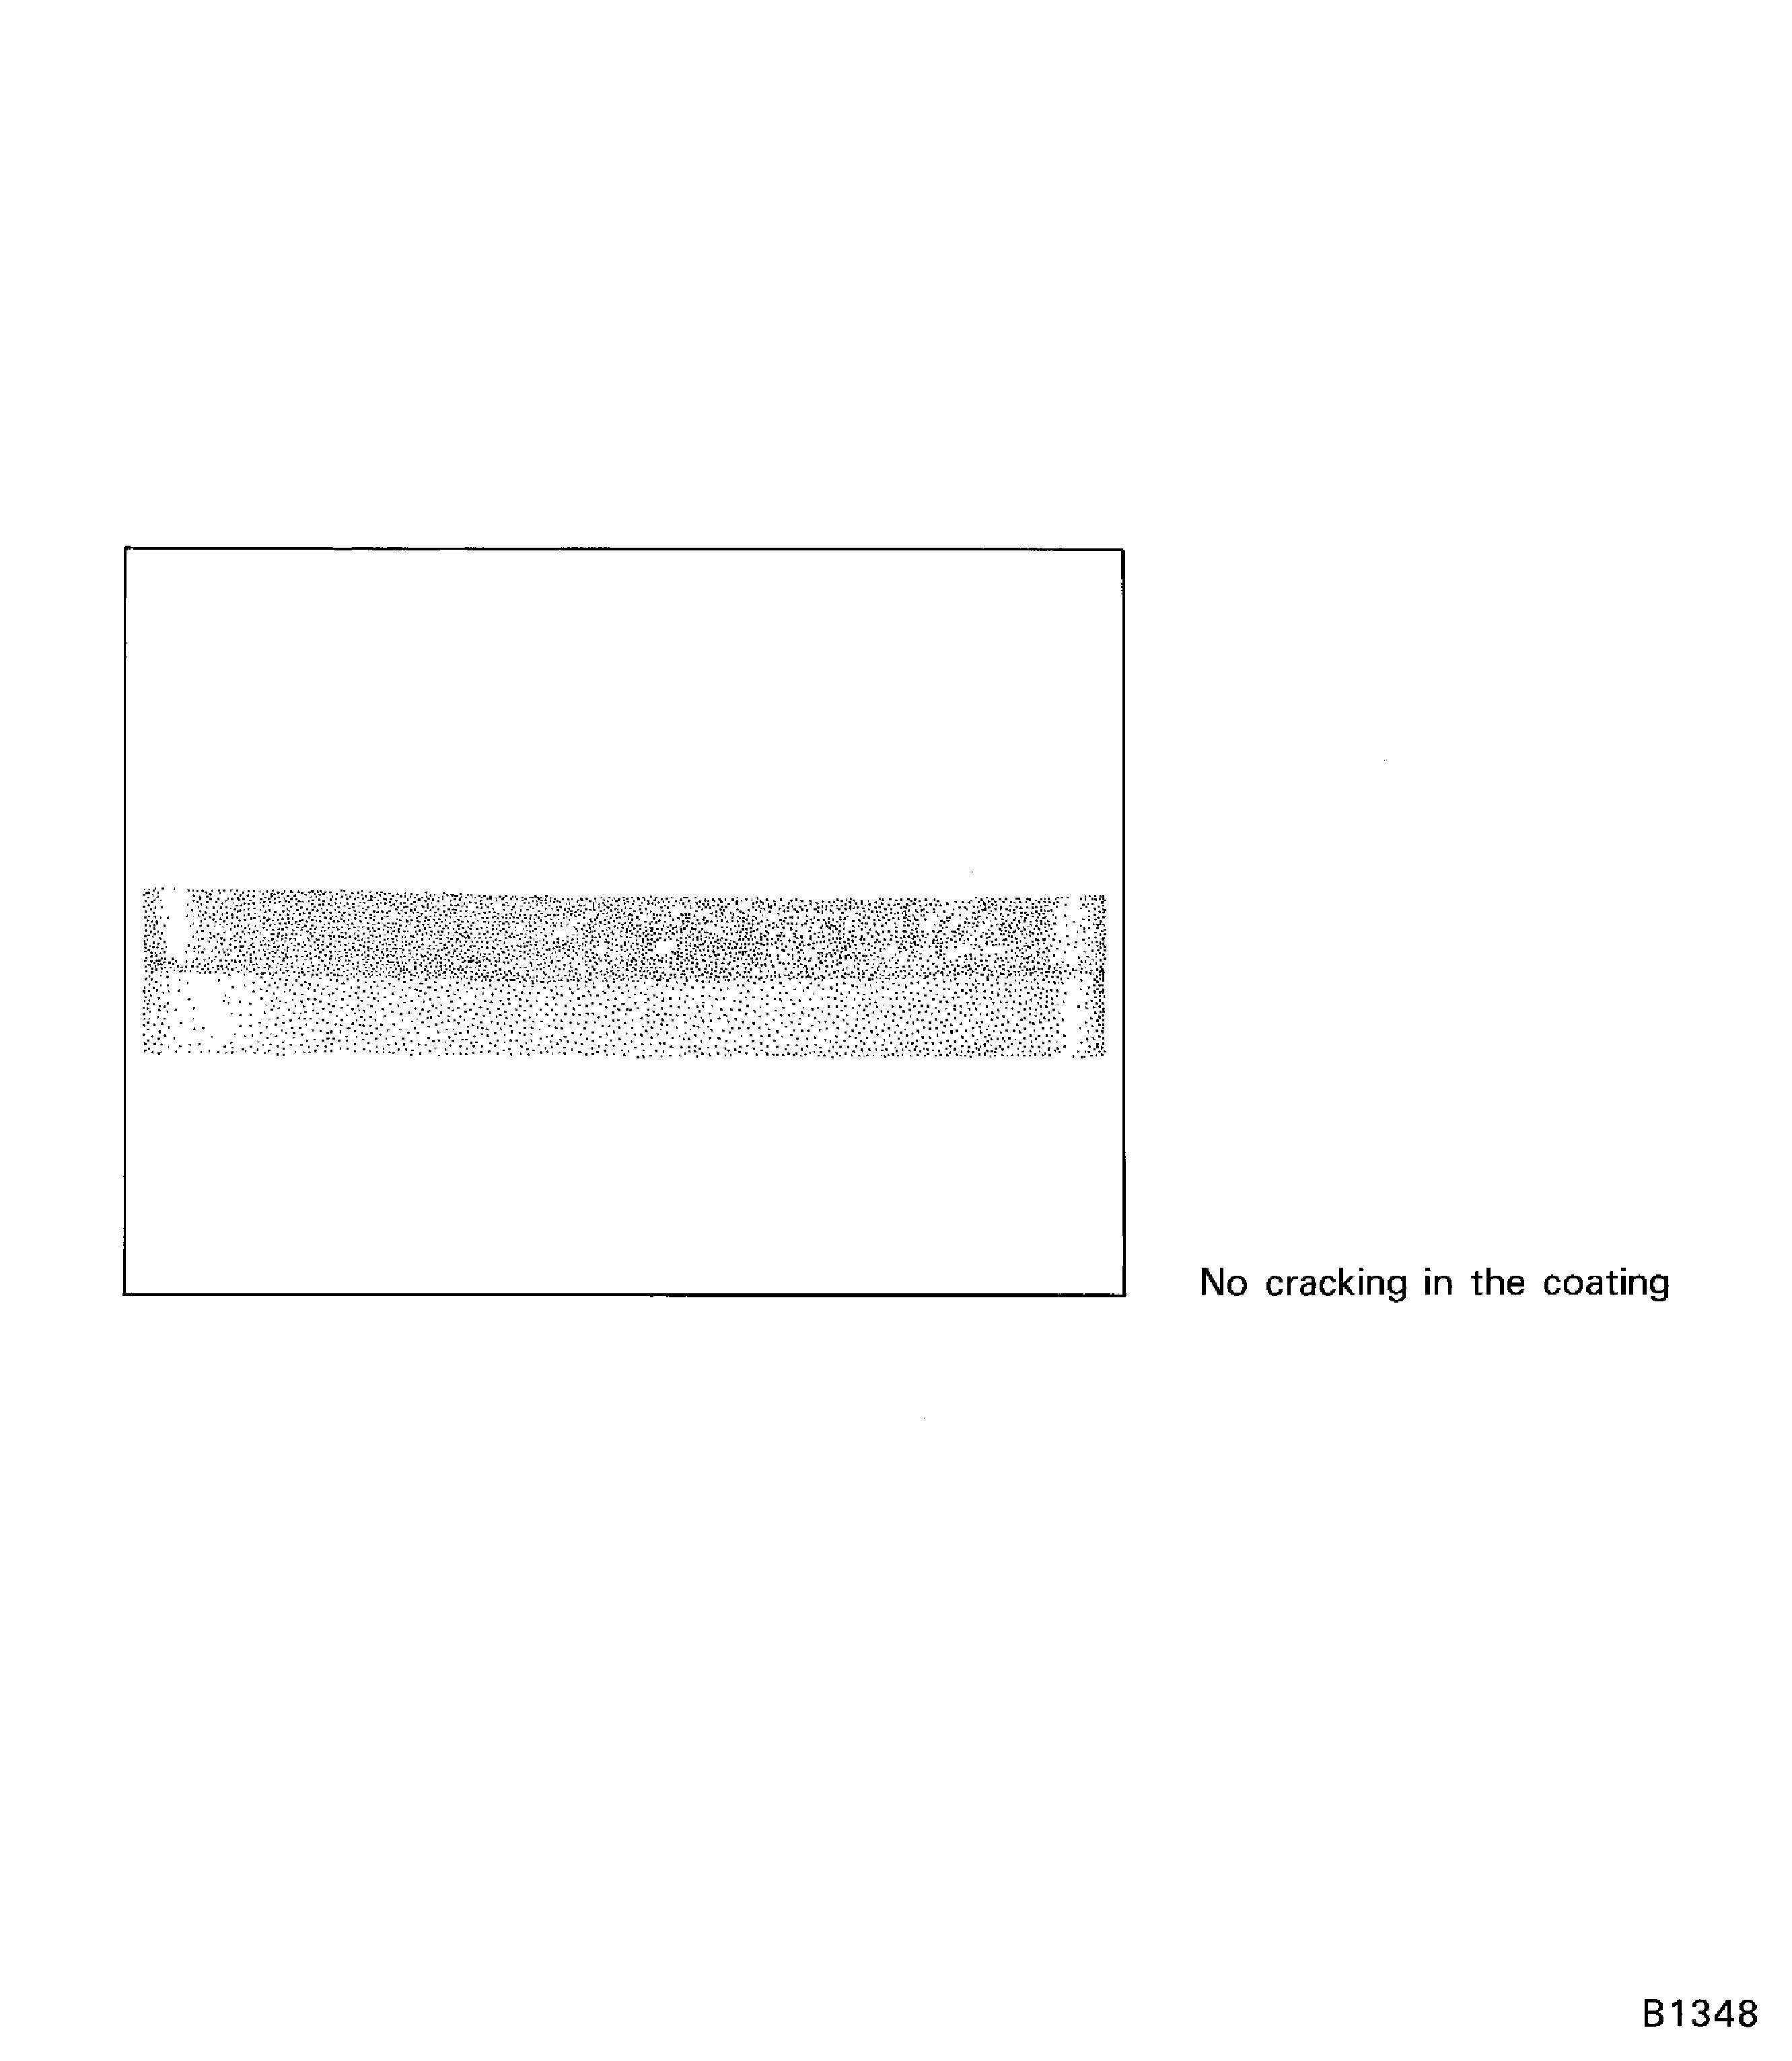
    Figure: Satisfactory thermal shock test conditions (Slight cracks) in PWA 75-1 coating (3.5X)

    Satisfactory thermal shock test conditions (Slight cracks) in PWA 75-1 coating (3.5X)
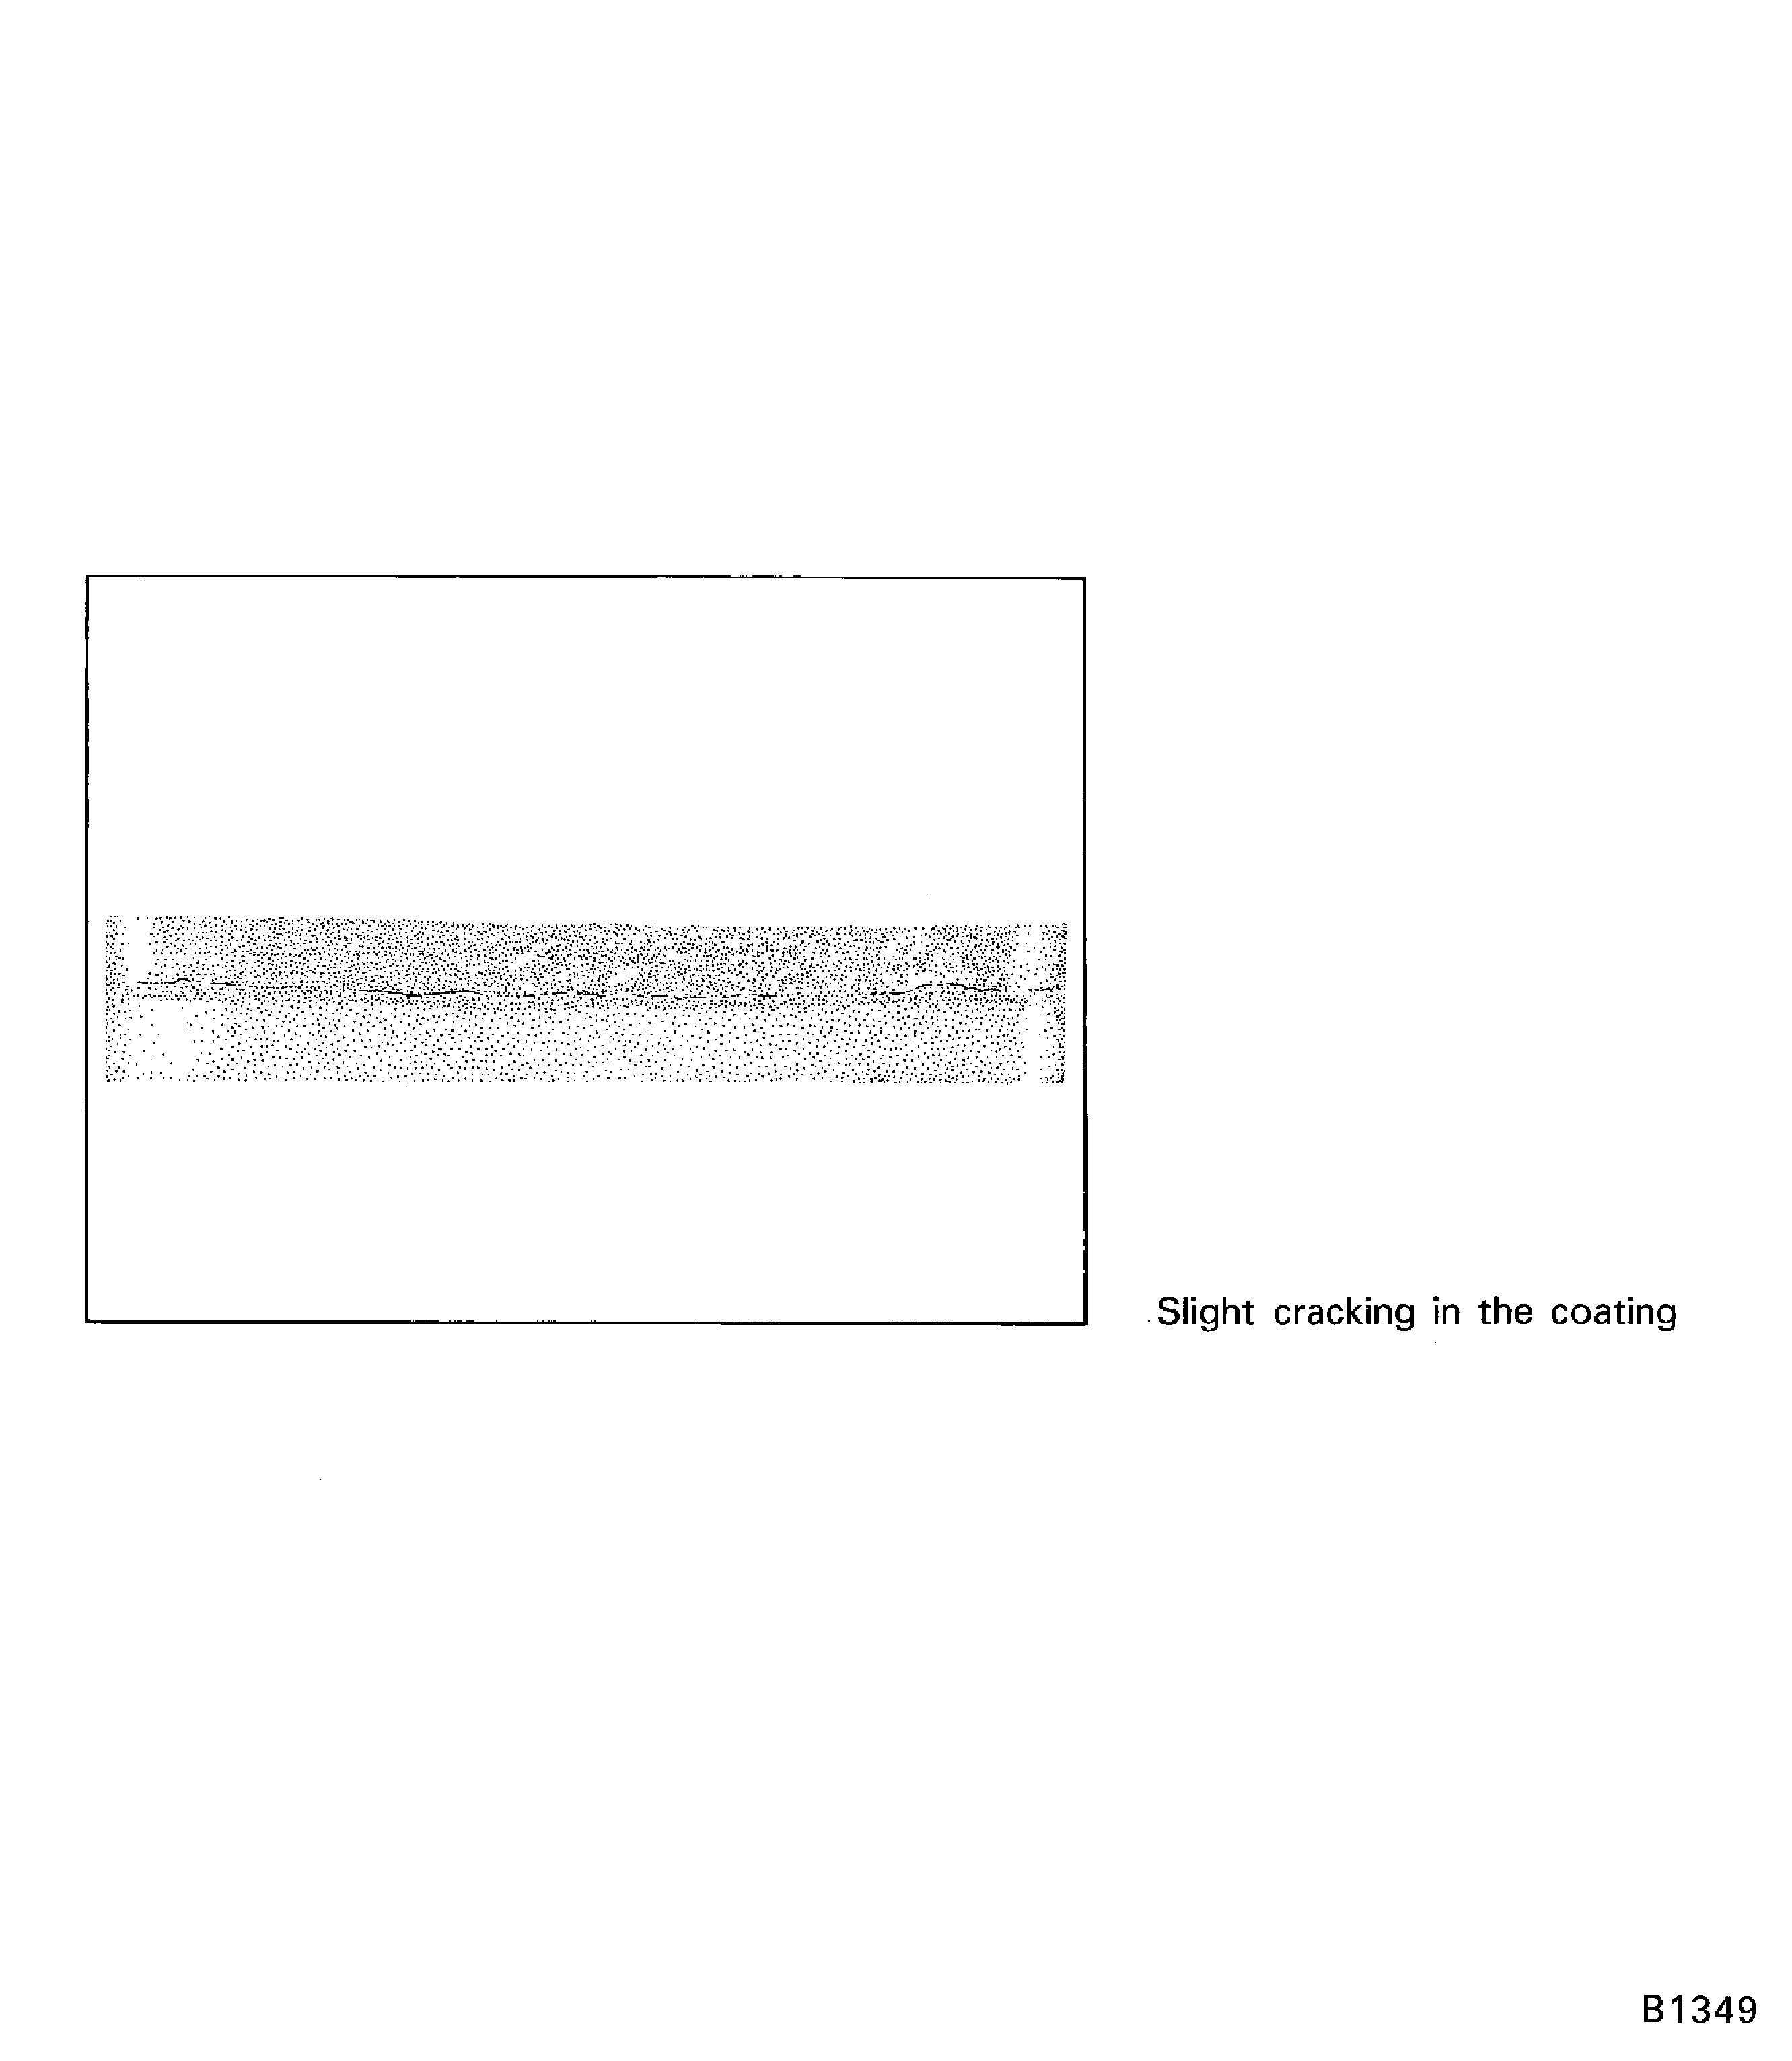
    Figure: Thermal shock test conditions (Moderate cracks) in PWA 75-1 coating (3.5X) to be re-evaluated

    Thermal shock test conditions (Moderate cracks) in PWA 75-1 coating (3.5X) to be re-evaluated
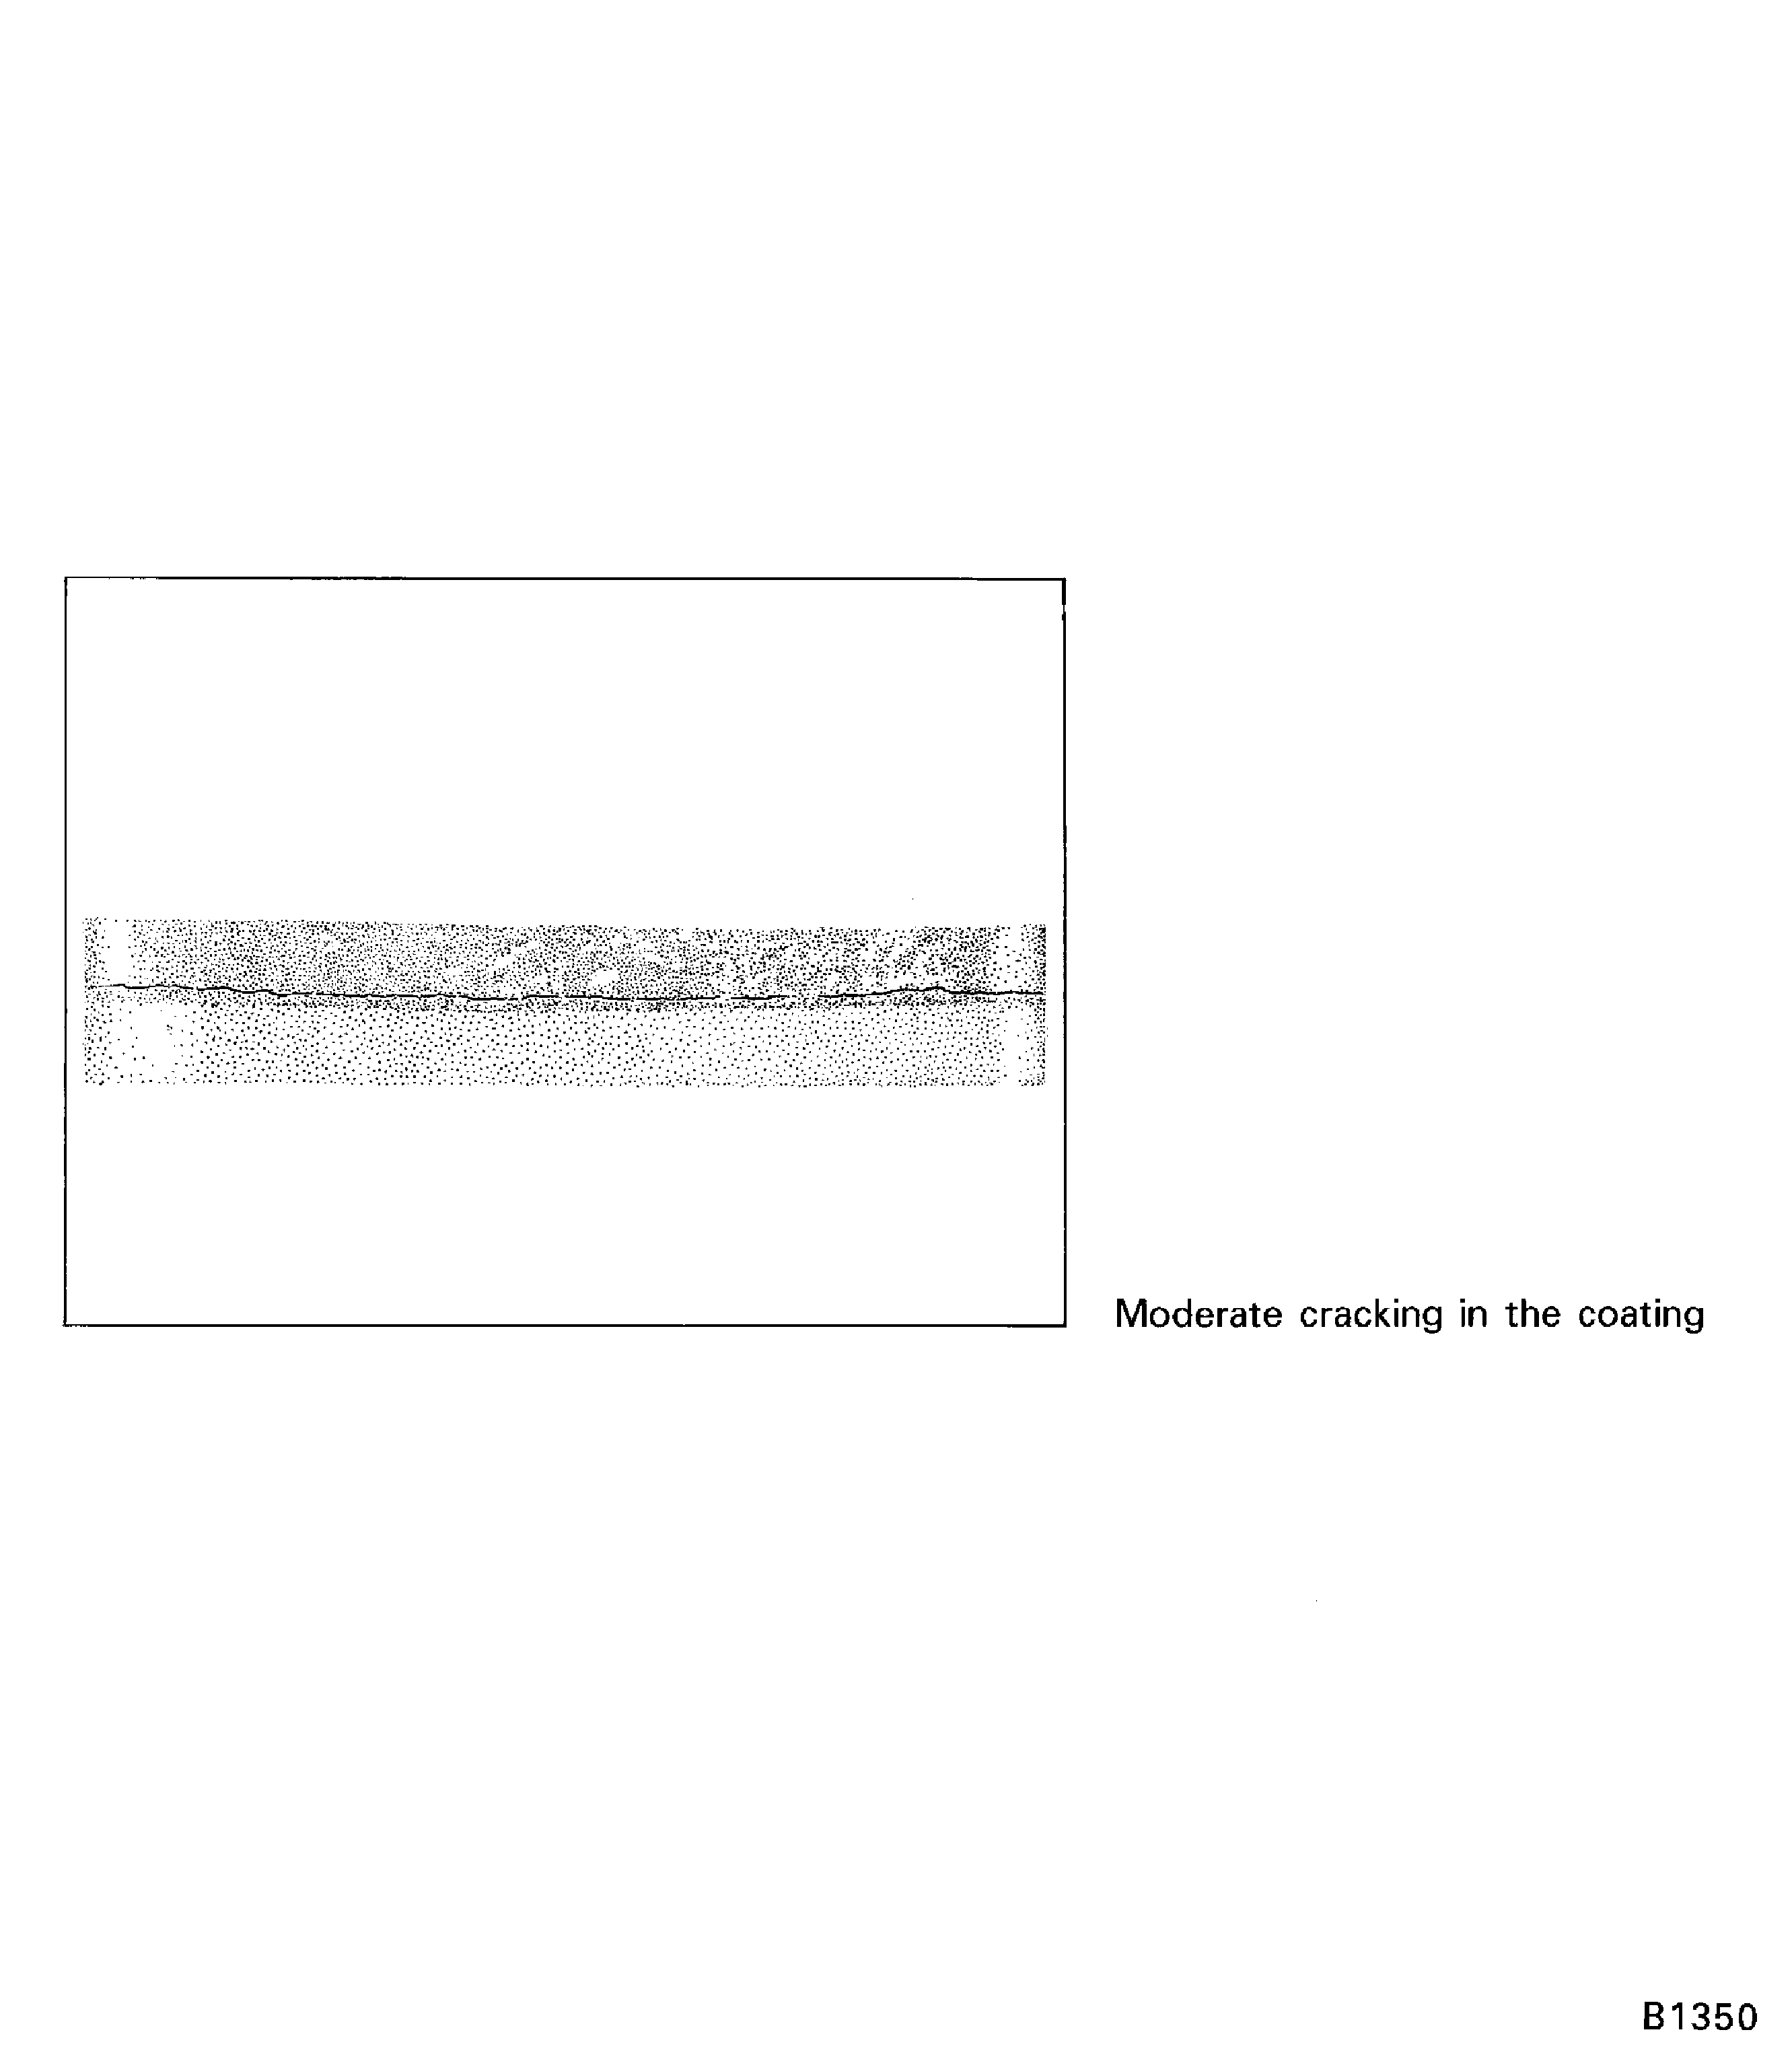
    Figure: Unsatisfactory thermal shock test conditions (Severe cracks) in PWA 75-1 coating (3.5X)

    Unsatisfactory thermal shock test conditions (Severe cracks) in PWA 75-1 coating (3.5X)
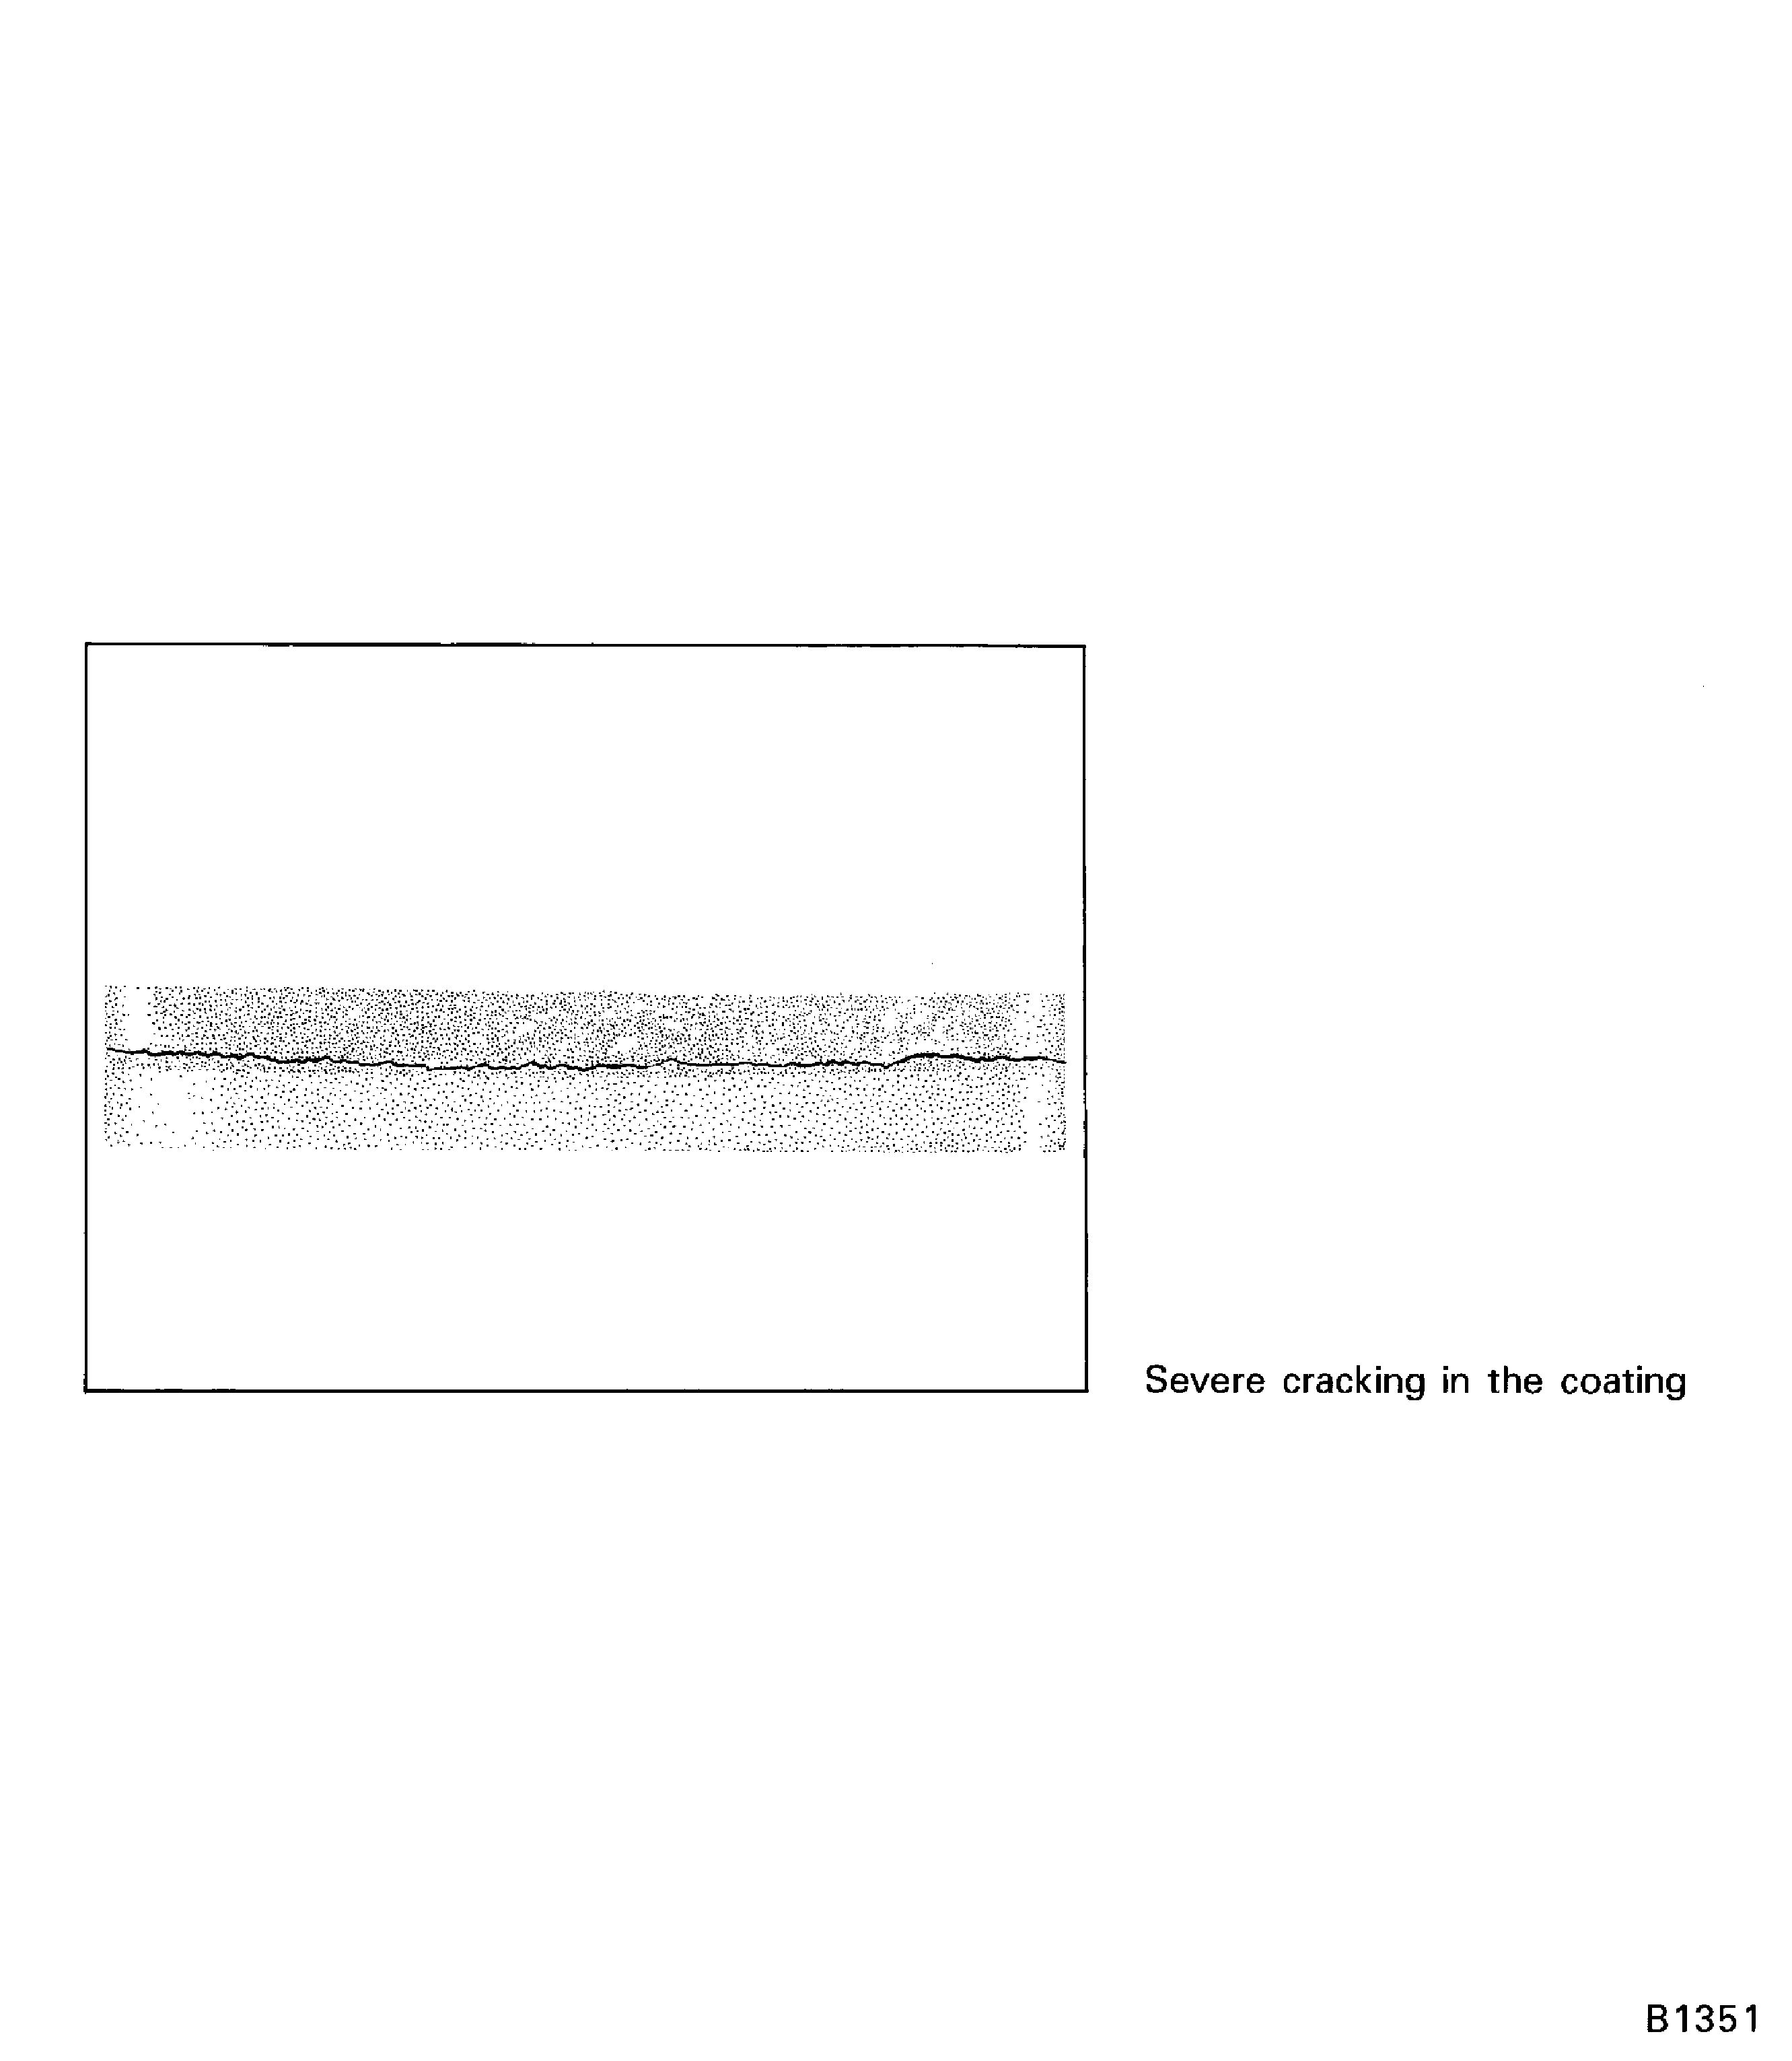
    Figure: Scratch hardness tester

    Scratch hardness tester
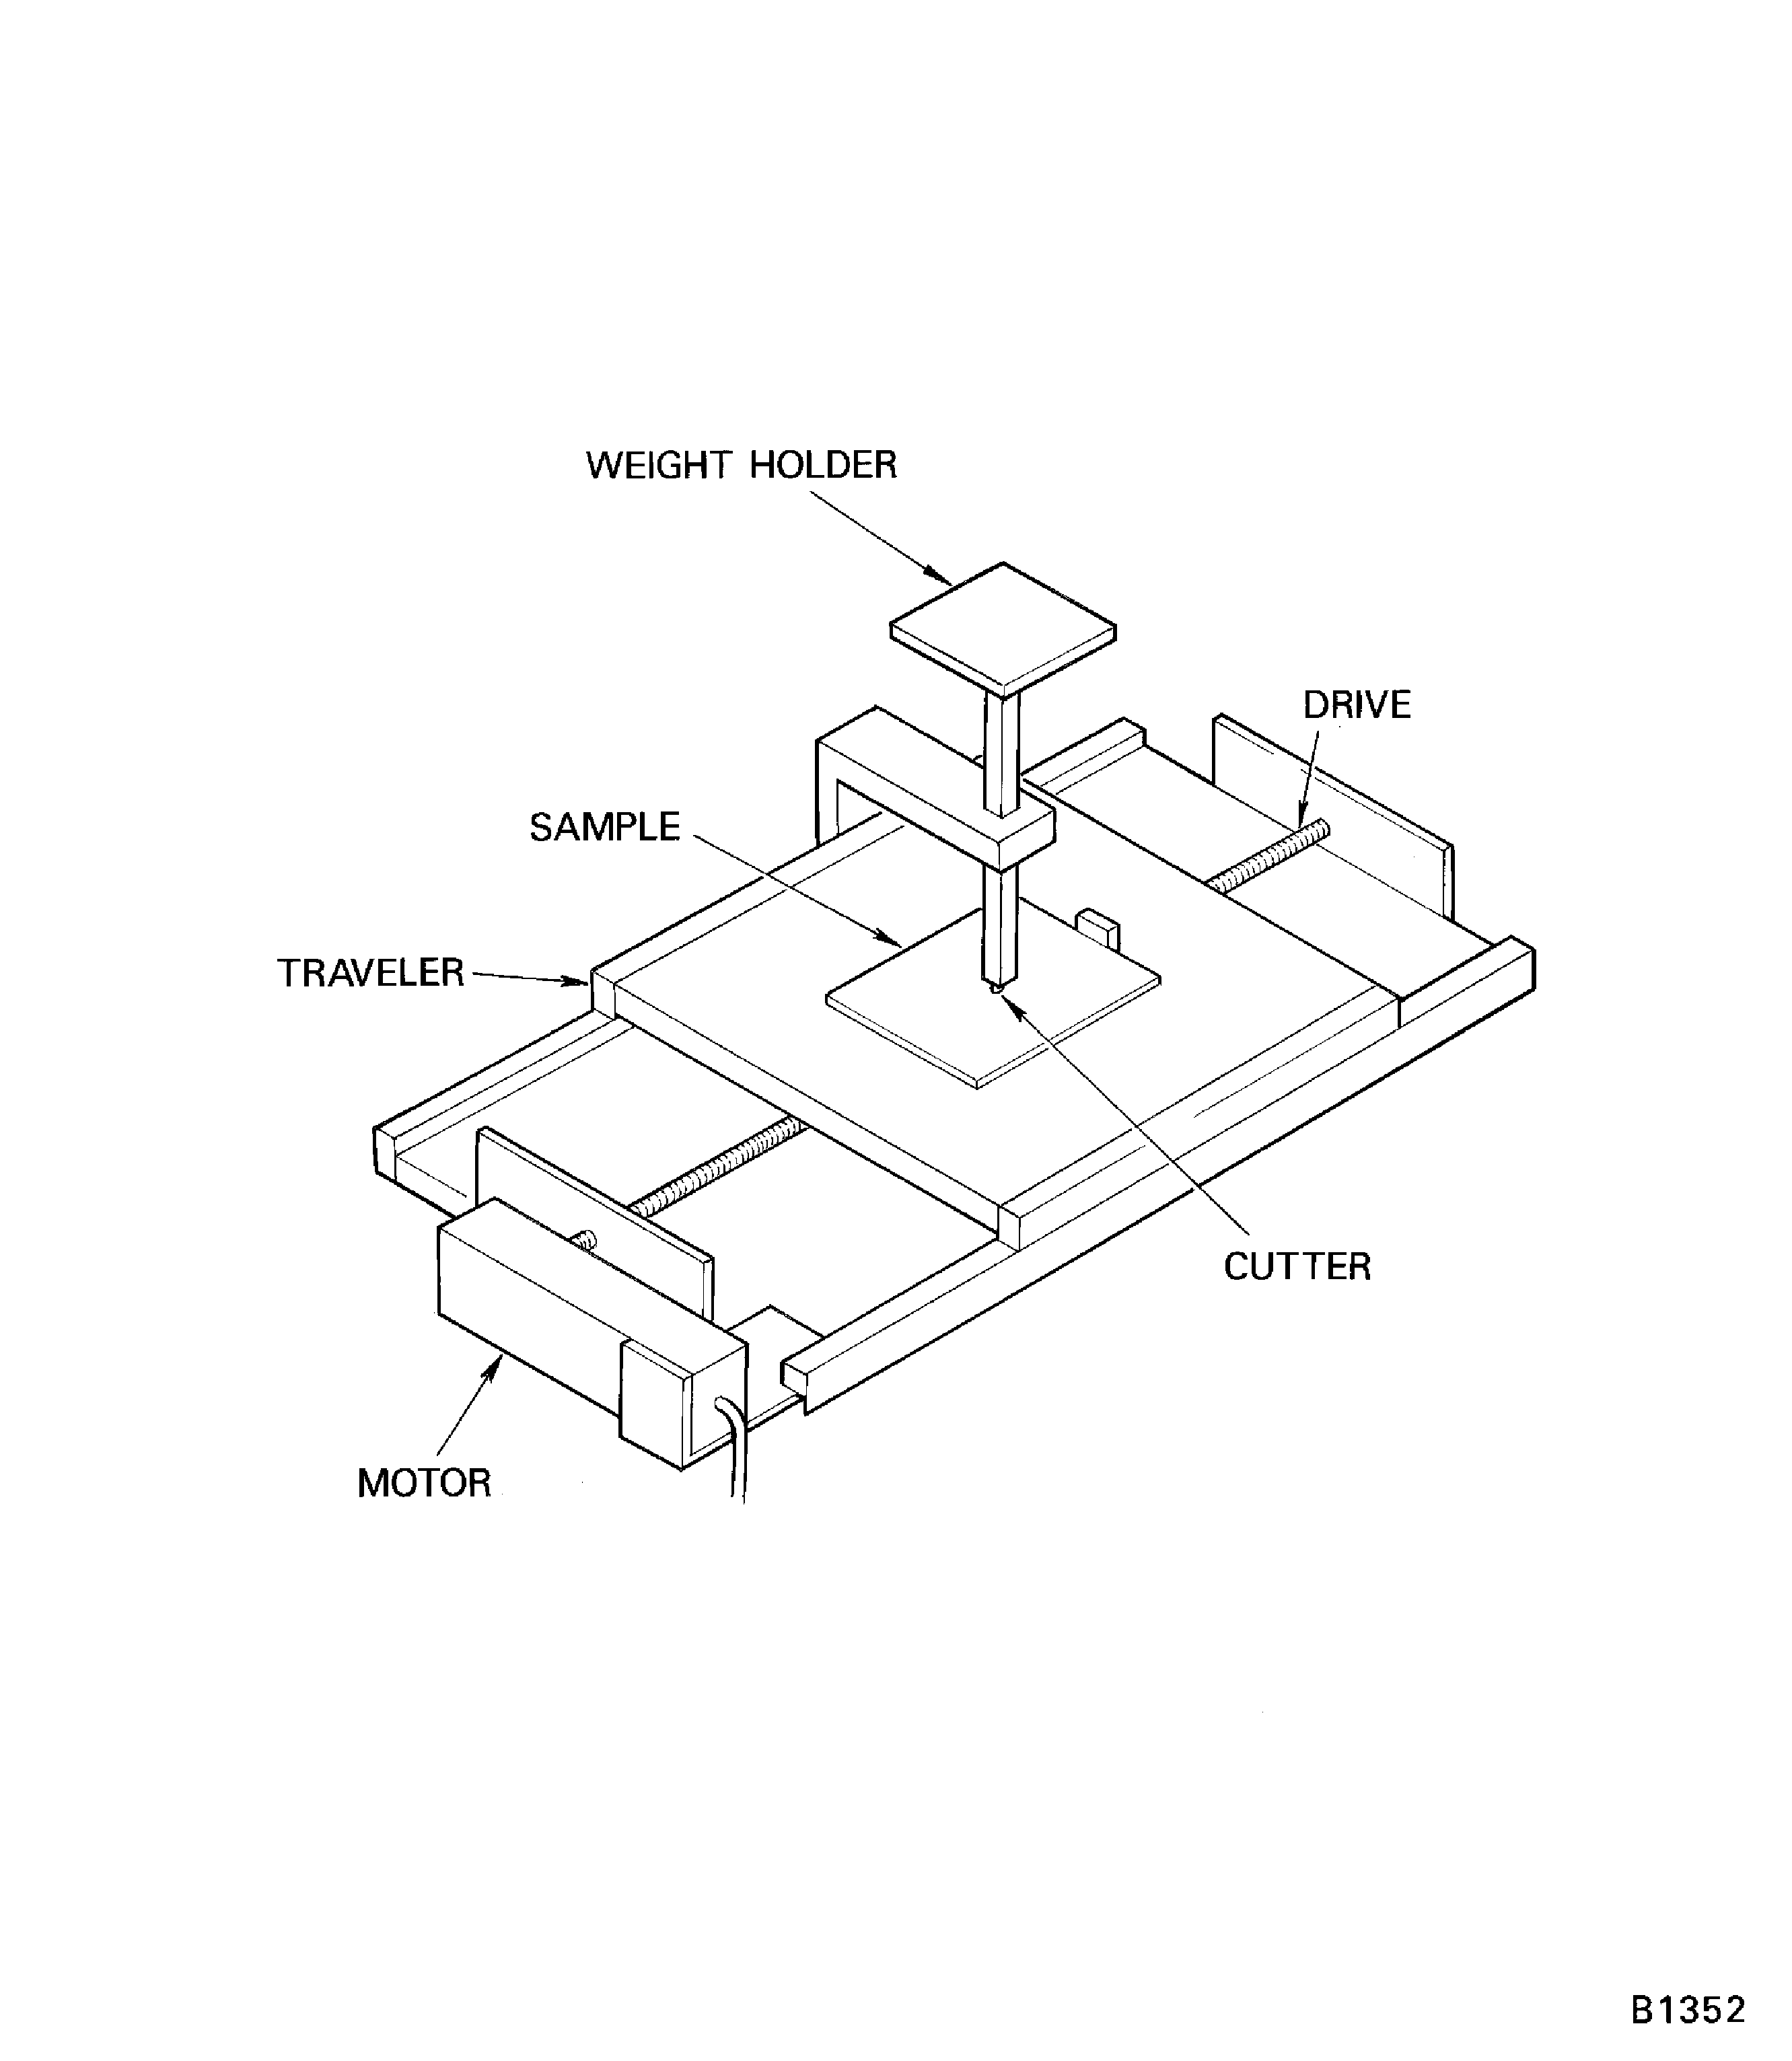
    Figure: Typical specimen selection

    Typical specimen selection
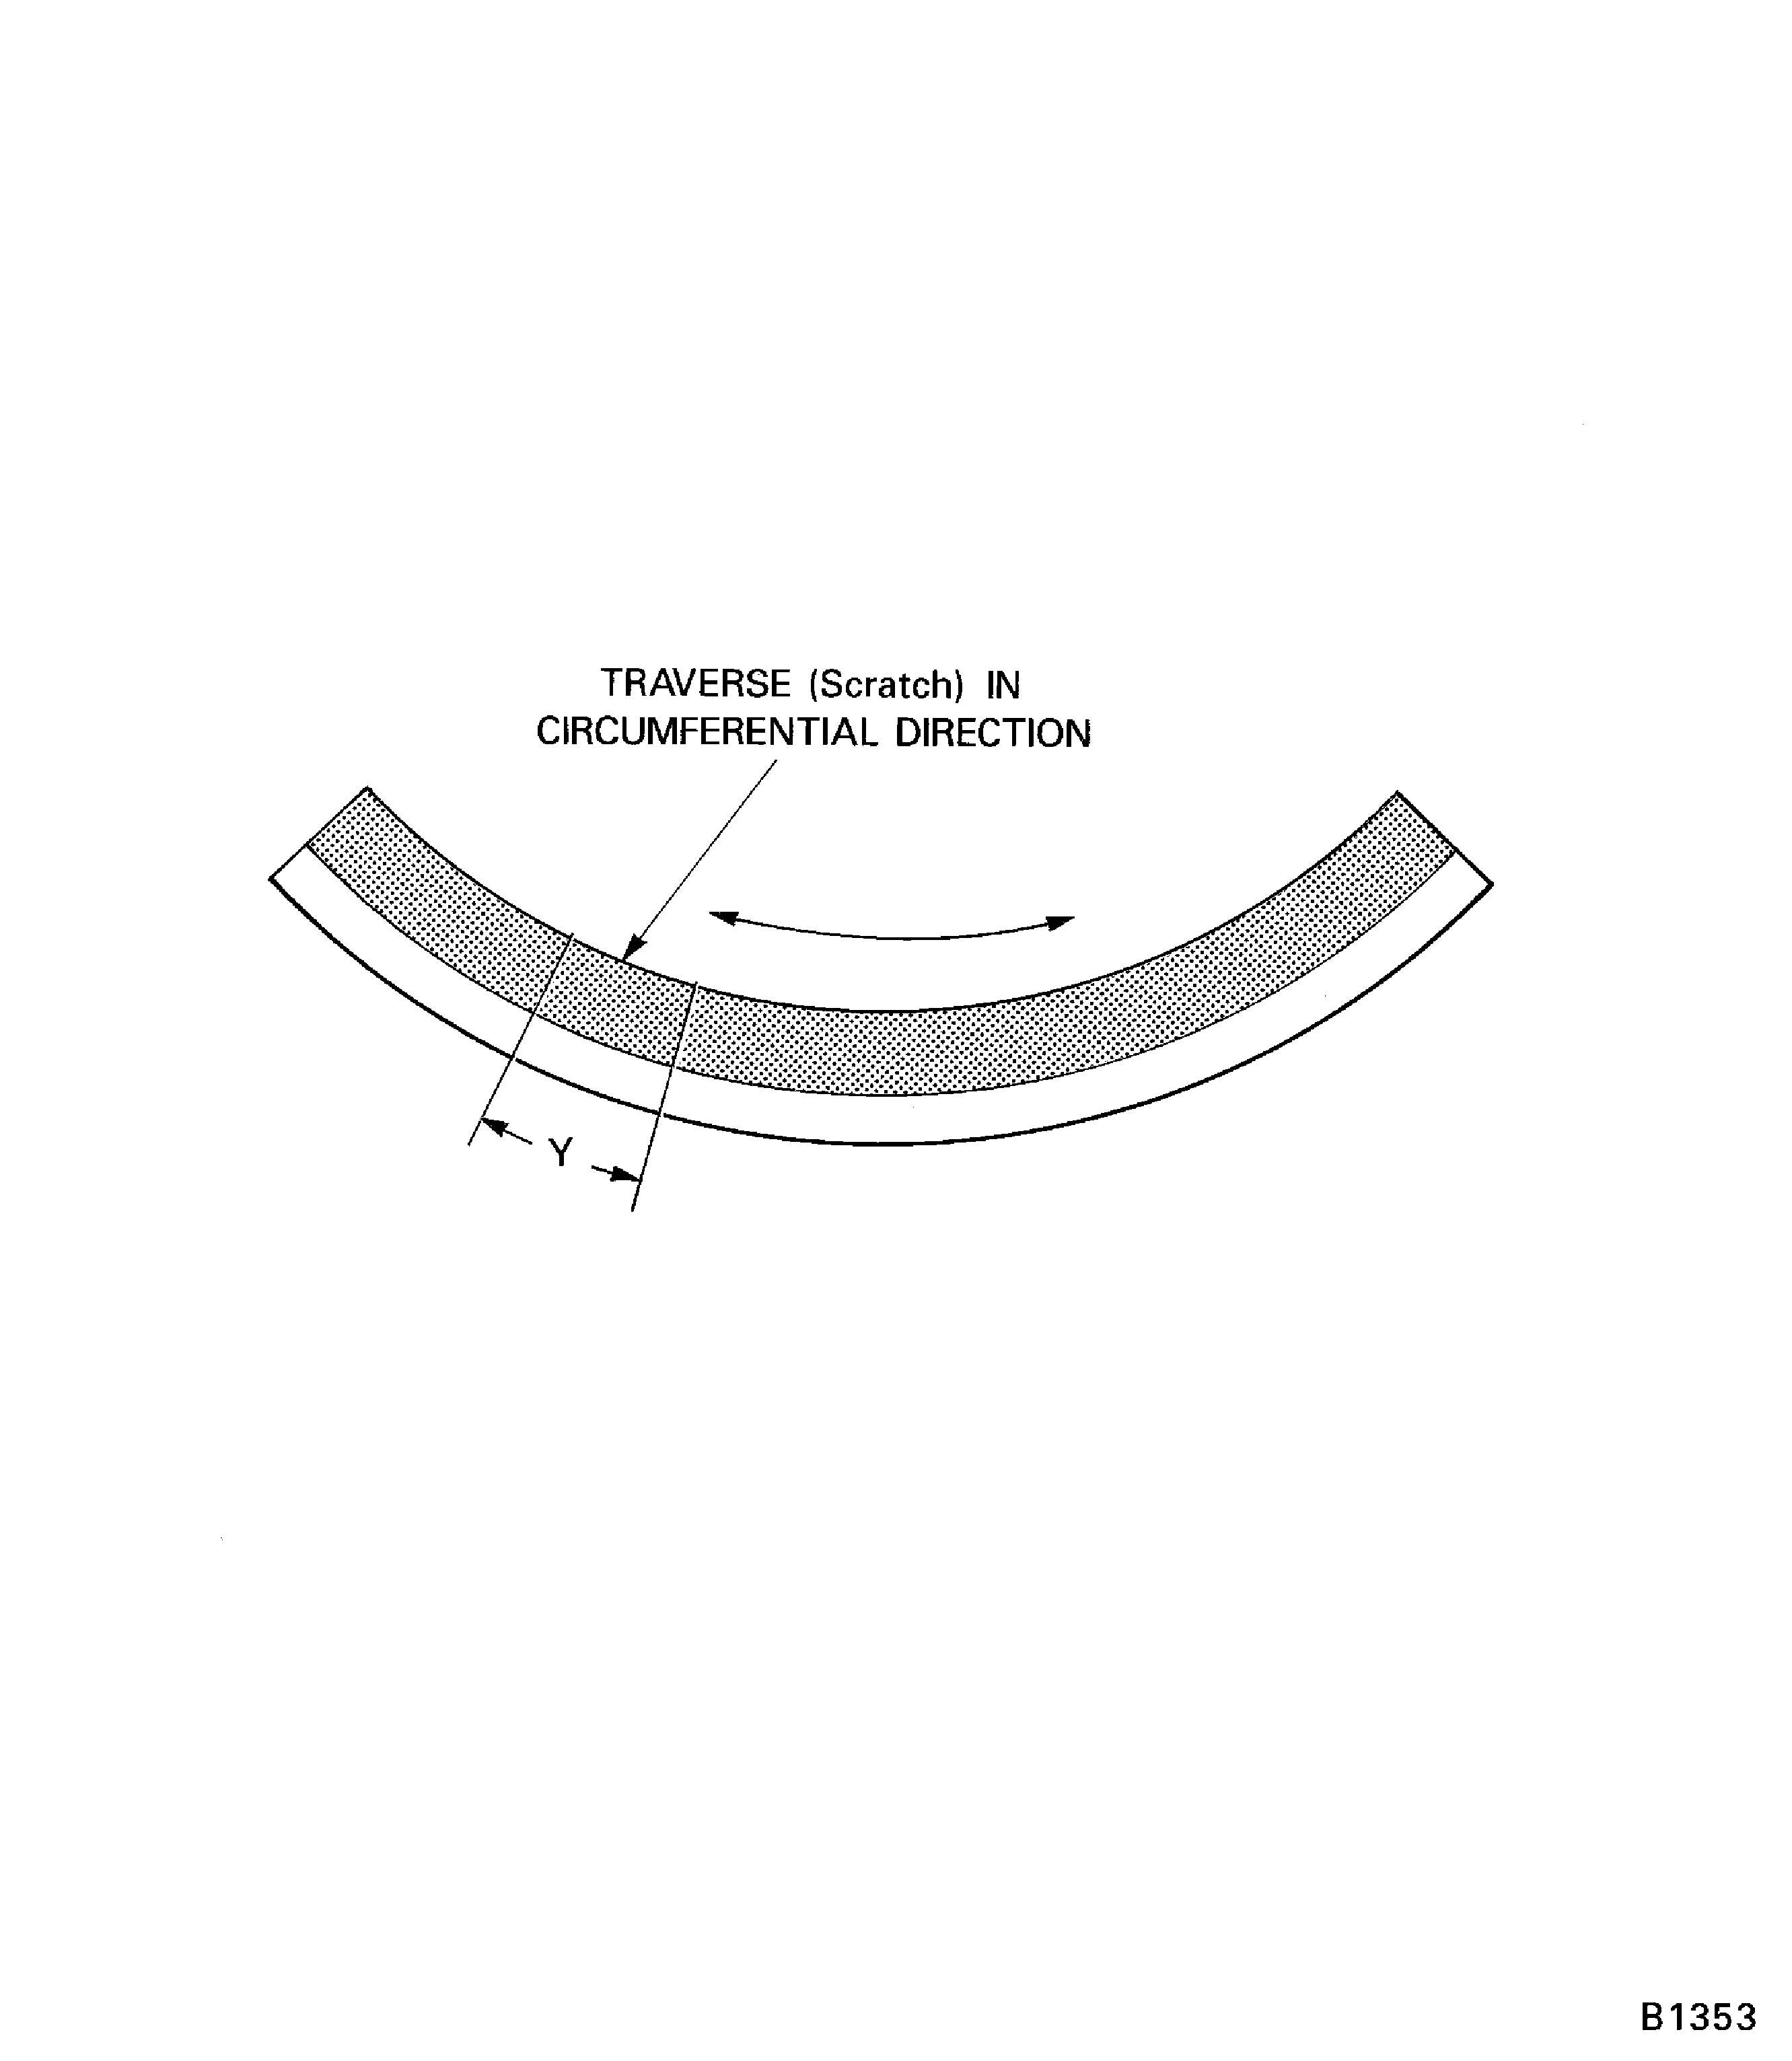
    Figure: Scratch width measurement

    Scratch width measurement
Requirements After Job Completion

Follow-On Conditions

NONE
Change Type:

Revise CoMat to update the gas control unit (REA19VC251)

Manufacturer Code:09410
Enterprise Name:BUEHLER LTD
BU Name:BUEHLER LTD
Street:41 WAUKEGAN RD
P.O. Box:1
City:LAKE BLUFF
State:IL
Zip Code:60044-1699
Country:USA
Phone Number:1-847-295-6500
Fax Number:1-847-295-7979
Internet:www.buehler.com
Manufacturer Code:0B434
Enterprise Name:MATHESON TRI-GAS INC
BU Name:MATHESON TRI-GAS INC
Street:150 ALLEN RD STE 302
City:BASKING RIDGE
Zip Code:NJ 07920
Country:USA
Phone Number:1-800-828-43130
Fax Number:1-215-619-0458
Internet:www.mathesongas.com
Manufacturer Code:1E1X8
Enterprise Name:SAINT-GOBAIN CERAMICS AND PLASTICS, INC
BU Name:SAINT-GOBAIN CERAMICS AND PLASTICS, INC
Street:1 NEW BOND ST
City:WORCESTER
State:MA
Zip Code:01606
Country:UNITED STATES OF AMERICA
Phone Number:1-508-795-5000, 1-800-243-0028
Fax Number:1-508-795-2380
Internet:www.saint-gobain-northamerica.com
Manufacturer Code:44197
Enterprise Name:SAINT-GOBAIN INDUSTRIAL CERAMICS INC.
BU Name:SAINT-GOBAIN ABRASIVES, INC
Street:ONE NEW BOND STREET
P.O. Box:PO BOX 15008
City:WORCESTER
State:MA
Zip Code:01615-0008
Country:USA
Phone Number:1-508-795-5000
Fax Number:1-508-795-2828
Internet:www.saint-gobain-northamerica.com
Manufacturer Code:IAE15
Enterprise Name:DELETED
BU Name:DELETED
City:SEE CAGE CODE DK026
Country:SEE CAGE CODE DK026
Manufacturer Code:LOCAL
Enterprise Name:LOCALLY SUPPLIED
Manufacturer Code:X222X
Enterprise Name:N/A – REFER TO APPLICABLE COMAT SUFFIX
Manufacturer Code:0B434
Supply Number:CoMat 03-010
Type:sp01
Supply Short Name:CoMat 03-010 ARGON GAS
Supply Name:CoMat 03-010 ARGON GAS
Specification Groups:
Doc NumberType
ARGON GAS:MINIMUM PURITY 99.998% MOISTURE 6 PPM MAX. OXYGEN 5 PPM MAX. HYDROCARBONS + CO2 3 PPM MAX. NITROGEN 20 PPM MAX. HYDROGEN 1 PPM MAX. APPROXIMATE DEW POINT -84 degF
Suppliers:
ManufacturerRemarks
0B434
0KPC9
4YRR6
46AN7
649M0
Manufacturer Code:IAE15
Supply Number:CoMat 03-097
Type:sp01
Supply Short Name:CoMat 03-097 FLAME SPRAY POWDER
Supply Name:CoMat 03-097 FLAME SPRAY POWDER
Specification Groups:
Doc NumberType
AMPERIT 202.415
Suppliers:
ManufacturerRemarks
IAE15
IE252
Manufacturer Code:0B434
Supply Number:CoMat 03-138
Type:sp01
Supply Short Name:CoMat 03-138 HYDROGEN GAS (PROTECTIVE ATMOSPHERE)
Supply Name:CoMat 03-138 HYDROGEN GAS (PROTECTIVE ATMOSPHERE)
Specification Groups:
Doc NumberType
HYDROGEN GAS: HYDROGEN 99.95% MIN. BY VOL. NITROGEN 300 PPM MAX. HYDROCARBONS 10 PPM MAX. CARBON DIOXIDE 10 PPM MAX. CARBON MONOXIDE 10 PPM MAX. OXYGEN 10 PPM MAX. MOISTURE CONTENT 10 PPM MAX.
Suppliers:
ManufacturerRemarks
0B434
0KPC9
46AN7
4YRR6
649M0
Manufacturer Code:LOCAL
Supply Number:CoMat 03-289
Type:sp01
Supply Short Name:CoMat 03-289 OXYGEN GAS
Supply Name:CoMat 03-289 OXYGEN GAS
Specification Groups:
Doc NumberType
PMC2218 (PW REF)OXYGEN 99.5% MINIMUM BY VOL., DEW POINT 0 °F MAXIMUM
Suppliers:
ManufacturerRemarks
LOCAL
0B434
0LV01
4YRR6
46AN7
Manufacturer Code:X222X
Supply Number:CoMat 03-347
Type:sp01
Supply Short Name:CoMat 03-347 ACETYLENE GAS
Supply Name:CoMat 03-347 ACETYLENE GAS
Specification Groups:
Doc NumberType
Where CoMat 03-347 is specified with no suffix, use one of the CoMat 03-347 letter suffix alternative materials.
Suppliers:
ManufacturerRemarks
X222X
Manufacturer Code:1E1X8
Supply Number:CoMat 05-019
Type:sp01
Supply Short Name:CoMat 05-019 WATERPROOF SILICON CARBIDE
Supply Name:CoMat 05-019 WATERPROOF SILICON CARBIDE
Specification Groups:
Doc NumberType
OMAT: 5/31 (RR REF)WATERPROOF SILICON CARBIDE ABRASIVE PAPER, CAMI GRIT DESIGNATION 400 (ANSI B74.18)
JCR-184 (JAEC REF)
Suppliers:
ManufacturerRemarks
1E1X8
LOCAL
K6835
Manufacturer Code:1E1X8
Supply Number:CoMat 05-020
Type:sp01
Supply Short Name:CoMat 05-020 WATERPROOF SILICON CARBIDE
Supply Name:CoMat 05-020 WATERPROOF SILICON CARBIDE
Specification Groups:
Doc NumberType
OMAT: 5/33 (RR REF)WATERPROOF SILICON CARBIDE ABRASIVE PAPER, CAMI GRIT DESIGNATION 320 (ANSI B74.18)
JCR-027 (JAEC REF)
JCR-186 (JAEC REF)
Suppliers:
ManufacturerRemarks
1E1X8
LOCAL
K6835
Manufacturer Code:1E1X8
Supply Number:CoMat 05-021
Type:sp01
Supply Short Name:CoMat 05-021 WATERPROOF SILICON CARBIDE
Supply Name:CoMat 05-021 WATERPROOF SILICON CARBIDE
Specification Groups:
Doc NumberType
OMAT: 5/35 (RR REF)WATERPROOF SILICON CARBIDE ABRASIVE PAPER, CAMI GRIT DESIGNATION 240 (ANSI B74.18 )
JCR-188 (JAEC REF)
Suppliers:
ManufacturerRemarks
1E1X8
K6835
LOCAL
Manufacturer Code:1E1X8
Supply Number:CoMat 05-064
Type:sp01
Supply Short Name:CoMat 05-064 WATERPROOF SILICON CARBIDE
Supply Name:CoMat 05-064 WATERPROOF SILICON CARBIDE
Specification Groups:
Doc NumberType
OMAT: 5/29 (RR REF)WATERPROOF SILICON CARBIDE ABRASIVE PAPER, CAMI GRIT DESIGNATION 600 (ANSI B74.18)
JCR-182 (JAEC REF)
Suppliers:
ManufacturerRemarks
1E1X8
K6835
LOCAL
Manufacturer Code:1E1X8
Supply Number:CoMat 05-076
Type:sp01
Supply Short Name:CoMat 05-076 WATERPROOF SILICON CARBIDE
Supply Name:CoMat 05-076 WATERPROOF SILICON CARBIDE
Specification Groups:
Doc NumberType
OMAT: 5/30 (RR REF)WATERPROOF SILICON CARBIDE ABRASIVE PAPER, CAMI GRIT DESIGNATION 500
JCR-183 (JAEC REF)
Suppliers:
ManufacturerRemarks
1E1X8
K6835
LOCAL
Manufacturer Code:1E1X8
Supply Number:CoMat 05-077
Type:sp01
Supply Short Name:CoMat 05-077 WATERPROOF SILICON CARBIDE
Supply Name:CoMat 05-077 WATERPROOF SILICON CARBIDE
Specification Groups:
Doc NumberType
OMAT: 5/32 (RR REF)WATERPROOF SILICON CARBIDE ABRASIVE PAPER, CAMI GRIT DESIGNATION 360
JCR-185 (JAEC REF)
Suppliers:
ManufacturerRemarks
1E1X8
K6835
LOCAL
Manufacturer Code:1E1X8
Supply Number:CoMat 05-078
Type:sp01
Supply Short Name:CoMat 05-078 WATERPROOF SILICON CARBIDE
Supply Name:CoMat 05-078 WATERPROOF SILICON CARBIDE
Specification Groups:
Doc NumberType
OMAT: 5/34 (RR REF)WATERPROOF SILICON CARBIDE ABRASIVE PAPER, CAMI GRIT DESIGNATION 280 (ANSI B74.18)
JCR-187 (JAEC REF)
Suppliers:
ManufacturerRemarks
1E1X8
K6835
LOCAL
Manufacturer Code:1E1X8
Supply Number:CoMat 05-079
Type:sp01
Supply Short Name:CoMat 05-079 WATERPROOF SILICON CARBIDE
Supply Name:CoMat 05-079 WATERPROOF SILICON CARBIDE
Specification Groups:
Doc NumberType
OMAT: 5/36 (RR REF)WATERPROOF SILICON CARBIDE ABRASIVE PAPER, CAMI GRIT DESIGNATION 220 (ANSI B74.18)
JCR-189 (JAEC REF)
Suppliers:
ManufacturerRemarks
1E1X8
K6835
LOCAL
Manufacturer Code:1E1X8
Supply Number:CoMat 05-080
Type:sp01
Supply Short Name:CoMat 05-080 WATERPROOF SILICON CARBIDE
Supply Name:CoMat 05-080 WATERPROOF SILICON CARBIDE
Specification Groups:
Doc NumberType
OMAT: 5/37 (RR REF)WATERPROOF SILICON CARBIDE ABRASIVE PAPER, CAMI GRIT DESIGNATION 180 (ANSI B74.18)
JCR-190 (JAEC REF)
Suppliers:
ManufacturerRemarks
1E1X8
K6835
LOCAL
Manufacturer Code:1E1X8
Supply Number:CoMat 05-081
Type:sp01
Supply Short Name:CoMat 05-081 WATERPROOF SILICON CARBIDE
Supply Name:CoMat 05-081 WATERPROOF SILICON CARBIDE
Specification Groups:
Doc NumberType
OMAT: 5/38GRIT SIZE 150 A-A-1047
JCR-191GRIT SIZE 150 A-A-1047
Suppliers:
ManufacturerRemarks
1E1X8
K6835
LOCAL
Manufacturer Code:1E1X8
Supply Number:CoMat 05-082
Type:sp01
Supply Short Name:CoMat 05-082 WATERPROOF SILICON CARBIDE
Supply Name:CoMat 05-082 WATERPROOF SILICON CARBIDE
Specification Groups:
Doc NumberType
OMAT: 5/39 (RR REF)WATERPROOF SILICON CARBIDE ABRASIVE PAPER, CAMI GRIT DESIGNATION 120 (ANSI B74.18)
JCR-192 (JAEC REF)
Suppliers:
ManufacturerRemarks
1E1X8
K6835
LOCAL
Manufacturer Code:09410
Supply Number:CoMat 05-090
Type:sp01
Supply Short Name:CoMat 05-090 DIAMOND PASTE
Supply Name:CoMat 05-090 DIAMOND PASTE
Specification Groups:
Doc NumberType
PASTE DIAMOND (1 MICRON)
Suppliers:
ManufacturerRemarks
09410
Manufacturer Code:LOCAL
Supply Number:DELETED
Type:sp01
Supply Short Name:DELETED
Supply Name:DELETED
Specification Groups:
Doc NumberType
DELETED
Suppliers:
ManufacturerRemarks
LOCAL
Manufacturer Code:LOCAL
Tool Number:Flame spray equipment
Tool Name:Flame spray equipment
Manufacturer Code:LOCAL
Tool Number:Gas control unit
Tool Name:Gas control unit
Manufacturer Code:LOCAL
Tool Number:Powder feeder
Tool Name:Powder feeder
Manufacturer Code:LOCAL
Tool Number:Powder flame spray gun
Tool Name:Powder flame spray gun