Export Control
EAR Export Classification: Not subject to the EAR per 15 C.F.R. Chapter 1, Part 734.3(b)(3), except for the following Service Bulletins which are currently published as EAR Export Classification 9E991: SBE70-0992, SBE72-0483, SBE72-0580, SBE72-0588, SBE72-0640, SBE73-0209, SBE80-0024 and SBE80-0025.Copyright
© IAE International Aero Engines AG (2001, 2014 - 2021) The information contained in this document is the property of © IAE International Aero Engines AG and may not be copied or used for any purpose other than that for which it is supplied without the express written authority of © IAE International Aero Engines AG. (This does not preclude use by engine and aircraft operators for normal instructional, maintenance or overhaul purposes.).Applicability
All
Common Information
TASK 70-38-40-380-501 Flap Peen
General
It is permitted to use this SPM procedure only when it is specified by the repair.
For all parts, it is not permitted to use this SPM procedure as an alternative to TASK 70-38-13-380-501 shotpeening.
Do not use this SPM procedure on rotating parts.
You must repair and blend the part to remove burrs and sharp corners from the area to be peened before you peen the part.
Do all necessary FPI, FMPI, or other NDT inspections before you peen the part.
To make sure there is no change in set-up, it is necessary to peen a new Almen Test Strip after each 30 minutes of operation and then measure the arc height of the test strip.
Use AC/DC universal motor with speed control or operated motor with pressure regulator and speed controller.
NOTE
Definitions
ROTARY FLAP PEENING: A manual peening operation that uses tungsten carbide balls bonded to a flexible polymeric flap.
PEENING INTENSITY: A measure of the energy indicated by the arc height of a peened Almen Test Strip at the saturation curve.
COVERAGE: The percentage of the specified part surface that has been peened so that a visual inspection at 10X minimum magnification shows a continuous pattern of dimples that overlap, and that is the same in all areas and removes the top layer of finish.
FULL COVERAGE: One hundred percent of the specified part surface shows a continuous pattern of dimples that overlap. That condition is the same in all areas and removes the top layer of finish as seen by a visual inspection at a minimum of 10X magnification.
MULTIPLE COVERAGE: The minimum peening time to get full coverage is multiplied to get coverage greater than full coverage. For example, the time necessary to get 125 percent coverage is 1.25 times the minimum time necessary for full coverage, and the time necessary to get 200 percent coverage is two times the minimum time necessary for full coverage.
SATURATION CURVE: A plot of the arc height on the Almen Test Strip will increase by not more than 10 percent at two times the peening time.
SATURATION POINT: The point on the saturation curve at the minimum peening time for which a 100 percent increase in the peening time will increase the arc height on the Almen Test Strip by not more than 10 percent.
Preliminary Requirements
Pre-Conditions
NONESupport Equipment
| Name | Manufacturer | Part Number / Identification | Quantity | Remark |
|---|---|---|---|---|
| Tachometer | LOCAL | Tachometer | ||
| Timing Device | LOCAL | Timing Device | ||
| Flap Assembly | 76381 | TC330 Flap Assembly | ||
| Roto Peen Mandrel | 76381 | No. 7210 Roto Peen Mandrel | ||
| Magnetic Almen Strip Holder | 76381 | Magnetic Almen Strip Holder | ||
| Flexible Shaft Grinder Series 6-14 (Low Speed) | 18797 | Flexible Shaft Grinder | ||
| AC/DC Universal Motor With Speed Control | LOCAL | AC/DC Universal Motor With Speed Control | ||
| Operated Motor With Pressure Regulator And Speed Controller | LOCAL | Operated Motor With Pressure Regulator And Speed Control |
Consumables, Materials and Expendables
| Name | Manufacturer | Part Number / Identification | Quantity | Remark |
|---|---|---|---|---|
| CoMat 02-062 MASKING TAPE | 0AM53 | CoMat 02-062 | ||
| CoMat 02-228 MASKING TAPE (HEAVY DUTY) | 52152 | CoMat 02-228 | ||
| CoMat 02-232 MASKING TAPE | 52152 | CoMat 02-232 | ||
| CoMat 02-369 MASKING TAPE (HEAVY) | 0AM53 | CoMat 02-369 |
Spares
NONESafety Requirements
WARNING
Procedure
Flap rotation speed
Peening time or duration
Mandrel height
The three factors in the subsequent list dictate how you perform the procedure and the quantity of peening necessary.
Change in operator
Change in equipment or in flap rotation speed
A different type or group of parts
It is necessary to construct a saturation curve each time one or more of the changes in the subsequent list occurs:
Install the Almen Test Strip in a Magnetic Almen Strip Holder. Make sure the indicator pointer pushes against the surface of the test strip that is not being peened.
The Almen Test Strip must be flat in 0.000 +/- 0.001 in. (0.000 +/- 0.025 mm) when measured on an Almen Gage. When you measure the flatness of the specimen, you must make an adjustment for the effect of the gage magnet. Measure the flatness from both faces of the specimen, and then get an average of the results.
Install the mandrel in the middle of the Flap Assembly. Lock the mandrel in the chuck of the Flexible Shaft Grinder Series 6-14 (Low Speed).
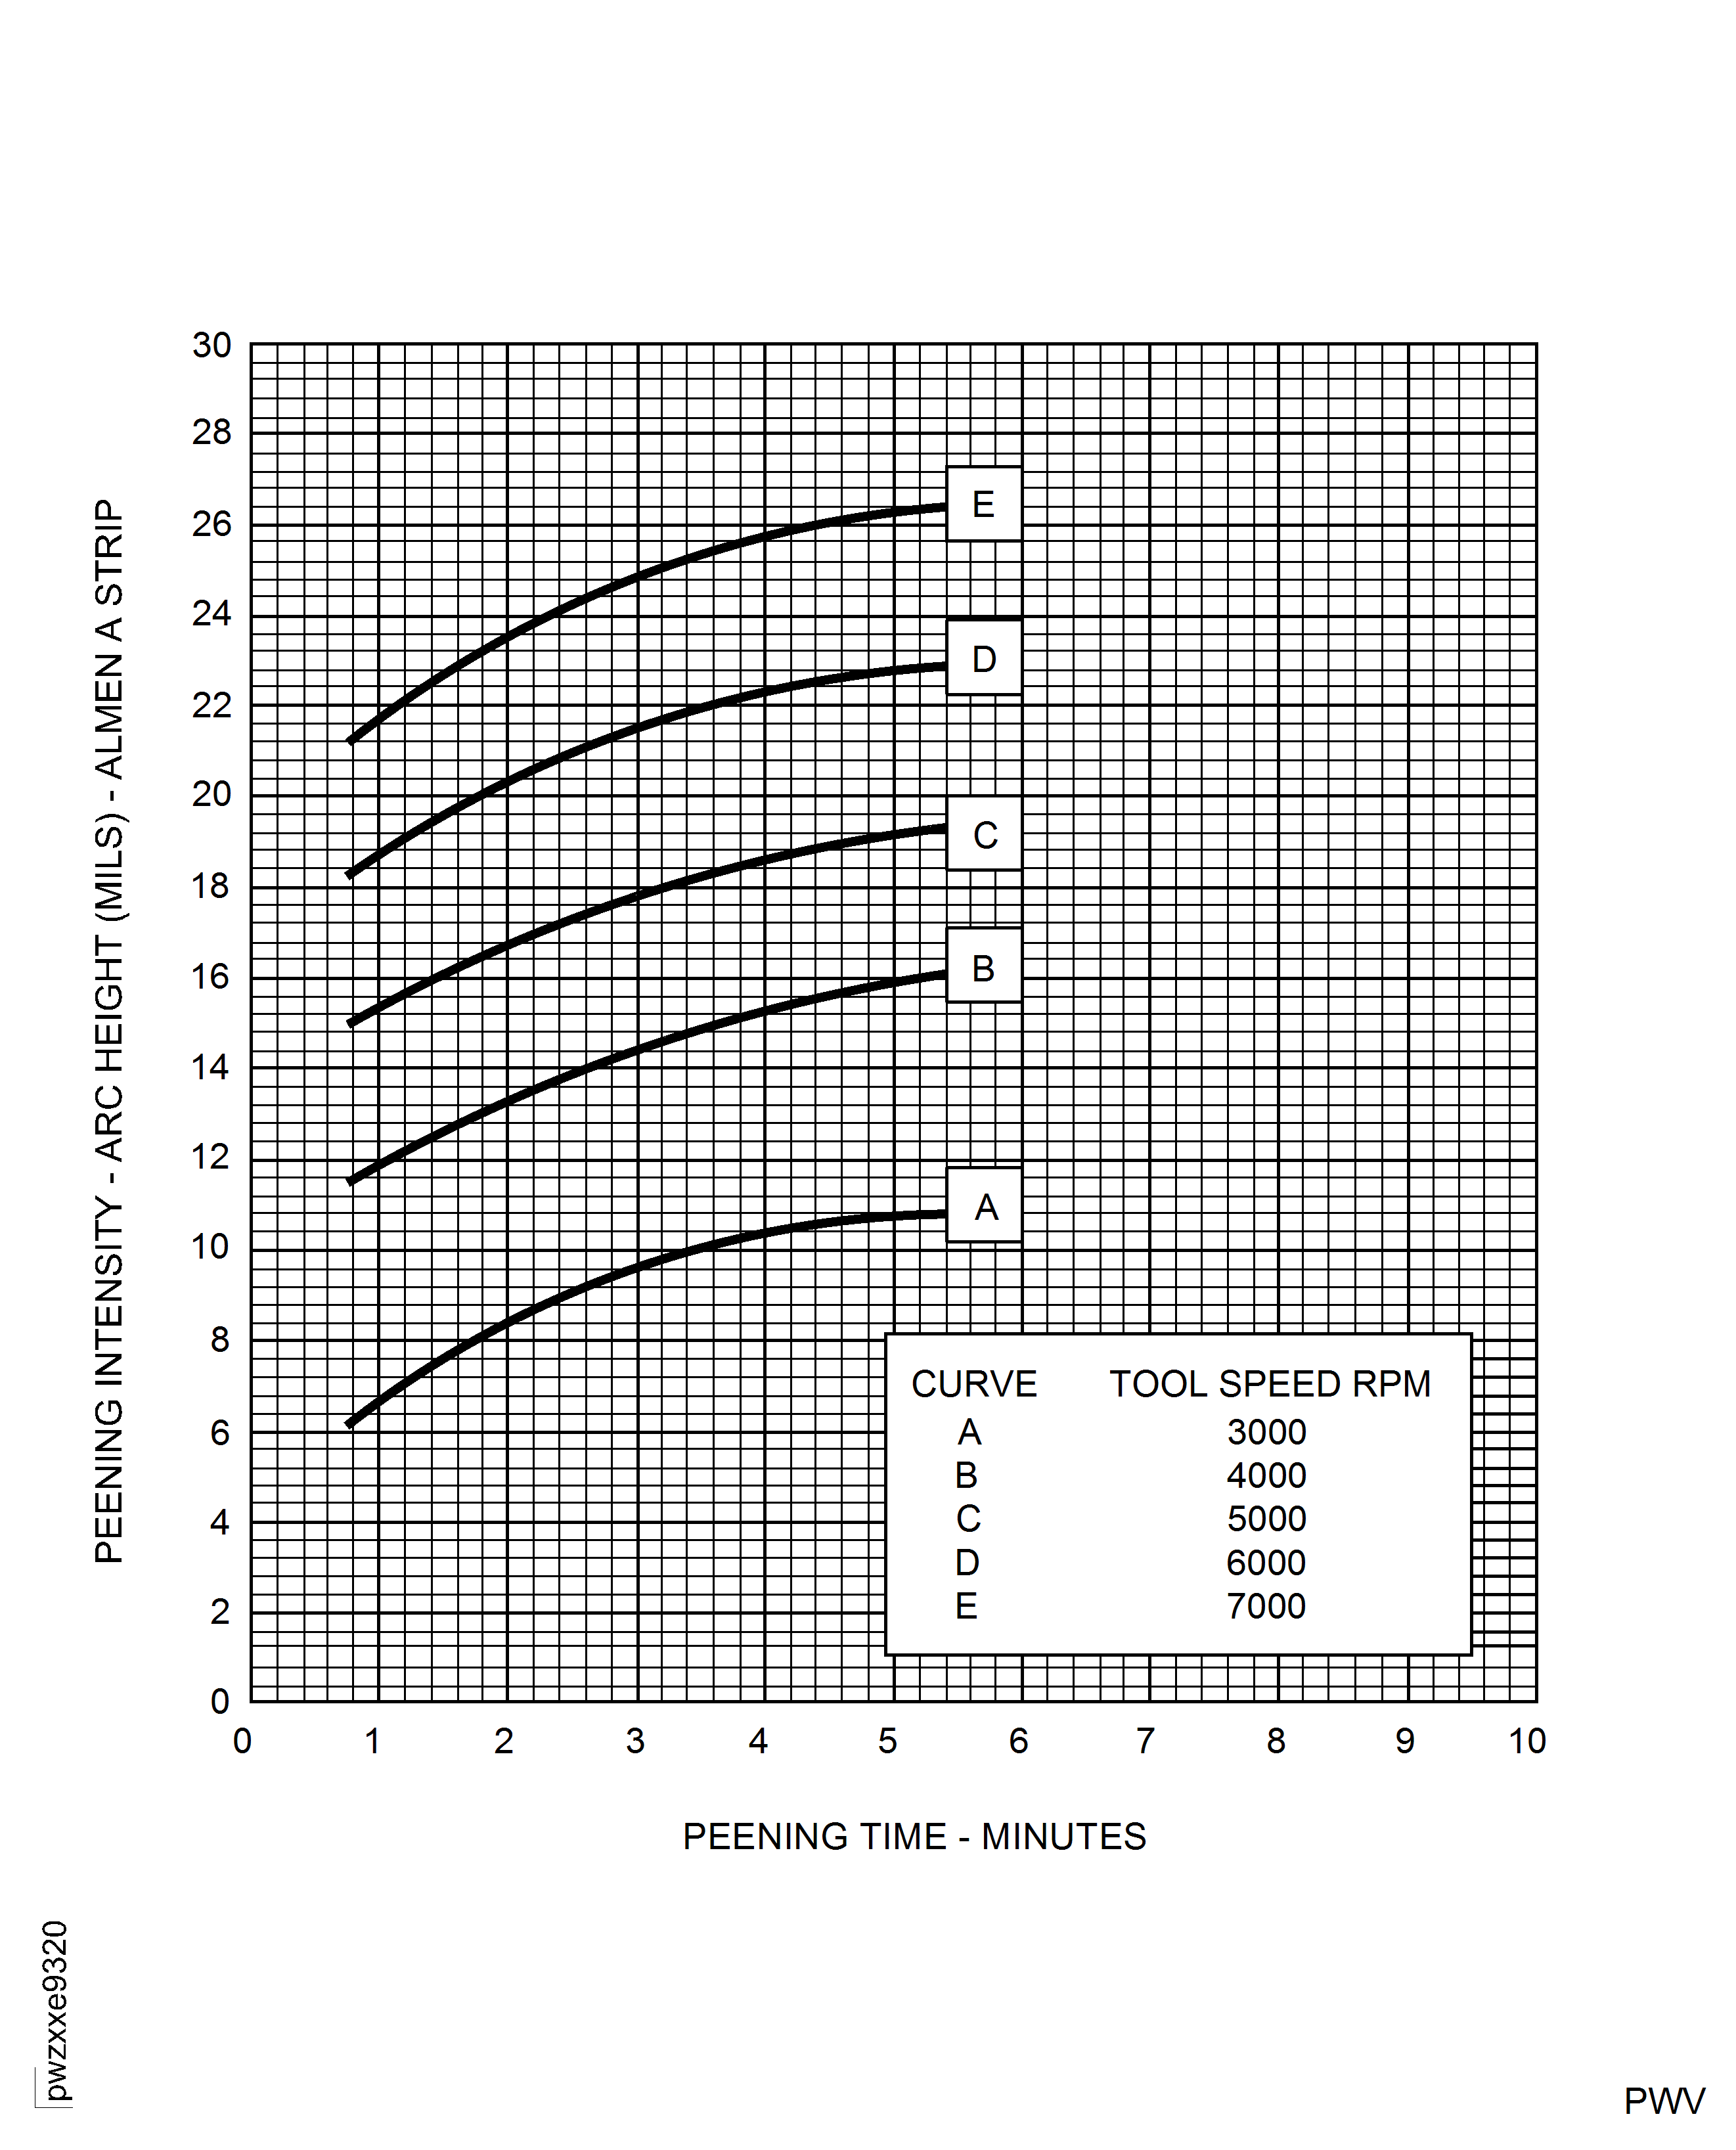
Use the graph of the intensity/speed curve in Figure to select the initial tool speed.
Set the parallel position of the mandrel and move it in a continuous motion at a distance of 0.100 - 0.125 in. (2.54 - 3.18 mm) the test strip surface. See Figure. If the mandrel is set too high, it will vibrate too much and the tool will bounce.
Set the speed of the flapper to create the correct pressure. Keep the correct pressure as indicated by individual peen marks. Too much pressure will cause the shot metal to drag, which will score the surface and will cause the wheel to break. See Figure.
To make sure that peening coverage is the same on all sides, use a circular or oscillating motion over the full area. Use continuous motion while you move the mandrel in rows across the full length of the test strip. Make an overlap of each row. See Figure.
Peen the Almen Test Strip along its full length for two minutes.
Set the Almen Test Strip on the Almen Gage and measure the height of the curve.
Plot the peening time and the measured arc height on a graph as shown in Figure.
Do the above steps in this procedure to peen the Almen Test Strip on another test strip using the same limits and set points, but increase the peening time by two minutes. Peen additional test strips for different peening times in two-minute increments until you have a sufficient number of points on the graph to make a curve (saturation curve). See Figure.
Use this curve to find the saturation point. The saturation point is the point on the curve at the minimum peening time for which a 100 percent increase in the peening time increases the arc height by no more than 10 percent. See Figure.
Do a test with a different tool speed (increase the speed to increase the intensity or decrease the speed to decrease the intensity). The curves in Figure show peening time and intensities at different tool speeds. These curves are approximate because results can change when you use manually-controlled equipment.
Run a new group of Almen Test Strips to find a new saturation curve. Compare the new curve with the necessary intensity.
Compare the saturation point on the curve to the peening intensity specified in the manual. If the test setup does not give the specified intensity, follow the subsequent steps.
Multiply the saturation time (T in Figure) by 1.25 (125 percent) to get the correct peening time.
Peen the Almen Test Strip as follows:
SUBTASK 70-38-40-380-001 Construct Saturation Curve to Determine Correct Peening Parameters
When necessary, mask areas of the part not to be peened with either a mechanical mask or sufficient layers of suitable tape, such as CoMat 02-062 MASKING TAPE, CoMat 02-228 MASKING TAPE (HEAVY DUTY), CoMat 02-232 MASKING TAPE, or CoMat 02-369 MASKING TAPE (HEAVY) .
Make sure that the edges of the tape bond tightly to the part.
If area to be peened is flat, position this area in a horizontal plane.
If area is on a curved surface, position with approximate center of area up for maximum access.
Peen designated area with the same parameters (tool speed, time and distance) and procedure that was used to find the saturation curve.
NOTE
The operator performing the repair operation must be the same operator who peened the test strips to find the saturation curve.Examine rotary flap at intervals for missing balls. Replace flap if more than 2 balls are missing from one of the sides.
If you applied maskant, remove it and clean all remaining maskant material from the part by SPM TASK 70-11-26-300-503 solvent wipe method.
SUBTASK 70-38-40-380-002 Peen Areas 2 sq in. (1290 sq. mm) or Smaller
Repair area must be divided into sections, less than 2 sq. in. (1290 sq. mm.)
Each section must be completely peened before you continue to the next section.
When necessary, mask areas of the part not to be peened with either a mechanical mask or sufficient layers of suitable tape, such as CoMat 02-062 MASKING TAPE, CoMat 02-228 MASKING TAPE (HEAVY DUTY), CoMat 02-232 MASKING TAPE, or CoMat 02-369 MASKING TAPE (HEAVY).
Make sure that the edges of the tape bond tightly to the part.
If area to be peened is flat, position this area in a horizontal plane.
If area is on a curved surface, position with approximate center of area up for maximum access.
Peen designated area with the same parameters (tool speed, time and distance) and procedure that was used to find the saturation curve.
NOTE
The operator performing the repair operation must be the same operator who peened the test strips to find the saturation curve.Examine rotary flap at intervals for missing balls. Replace flap if more than 2 balls are missing from one of the sides.
You must have overlap at section boundaries.
Prevent a sharp transition from full peening intensity to zero peening intensity. Zones in which peening is optional or zones in which peening is not required to be complete, should exhibit a decreasing density of marks from full peening intensity to zero peening intensity. See Figure.
If you applied maskant, remove it and clean all remaining maskant material from the part by SPM TASK 70-11-26-300-503 solvent wipe method.
SUBTASK 70-38-40-380-003 Peen Areas Larger Than 2 sq in. (1290 sq. mm)
Coverage must be the same on all surfaces and complete across the full length and width of the strip.
Run the Almen Test Strip and compare it to the test strip you used to calculate the saturation curve. If there is a difference, find the cause (change in speed, time, or distance).
Peen the area again to get the correct coverage.
If you see that the area is not fully peened, or if the area does not have the correct overlap, follow the subsequent steps.
Examine the coverage area at 10x magnification.
SUBTASK 70-38-40-380-004 Check for Peening Coverage
Preserve the part as necessary by SPM TASK 70-38-37-300-503.
SUBTASK 70-38-40-380-005 Corrosion Prevention
Figure: Intensity/Time Determination
Intensity/Time Determination
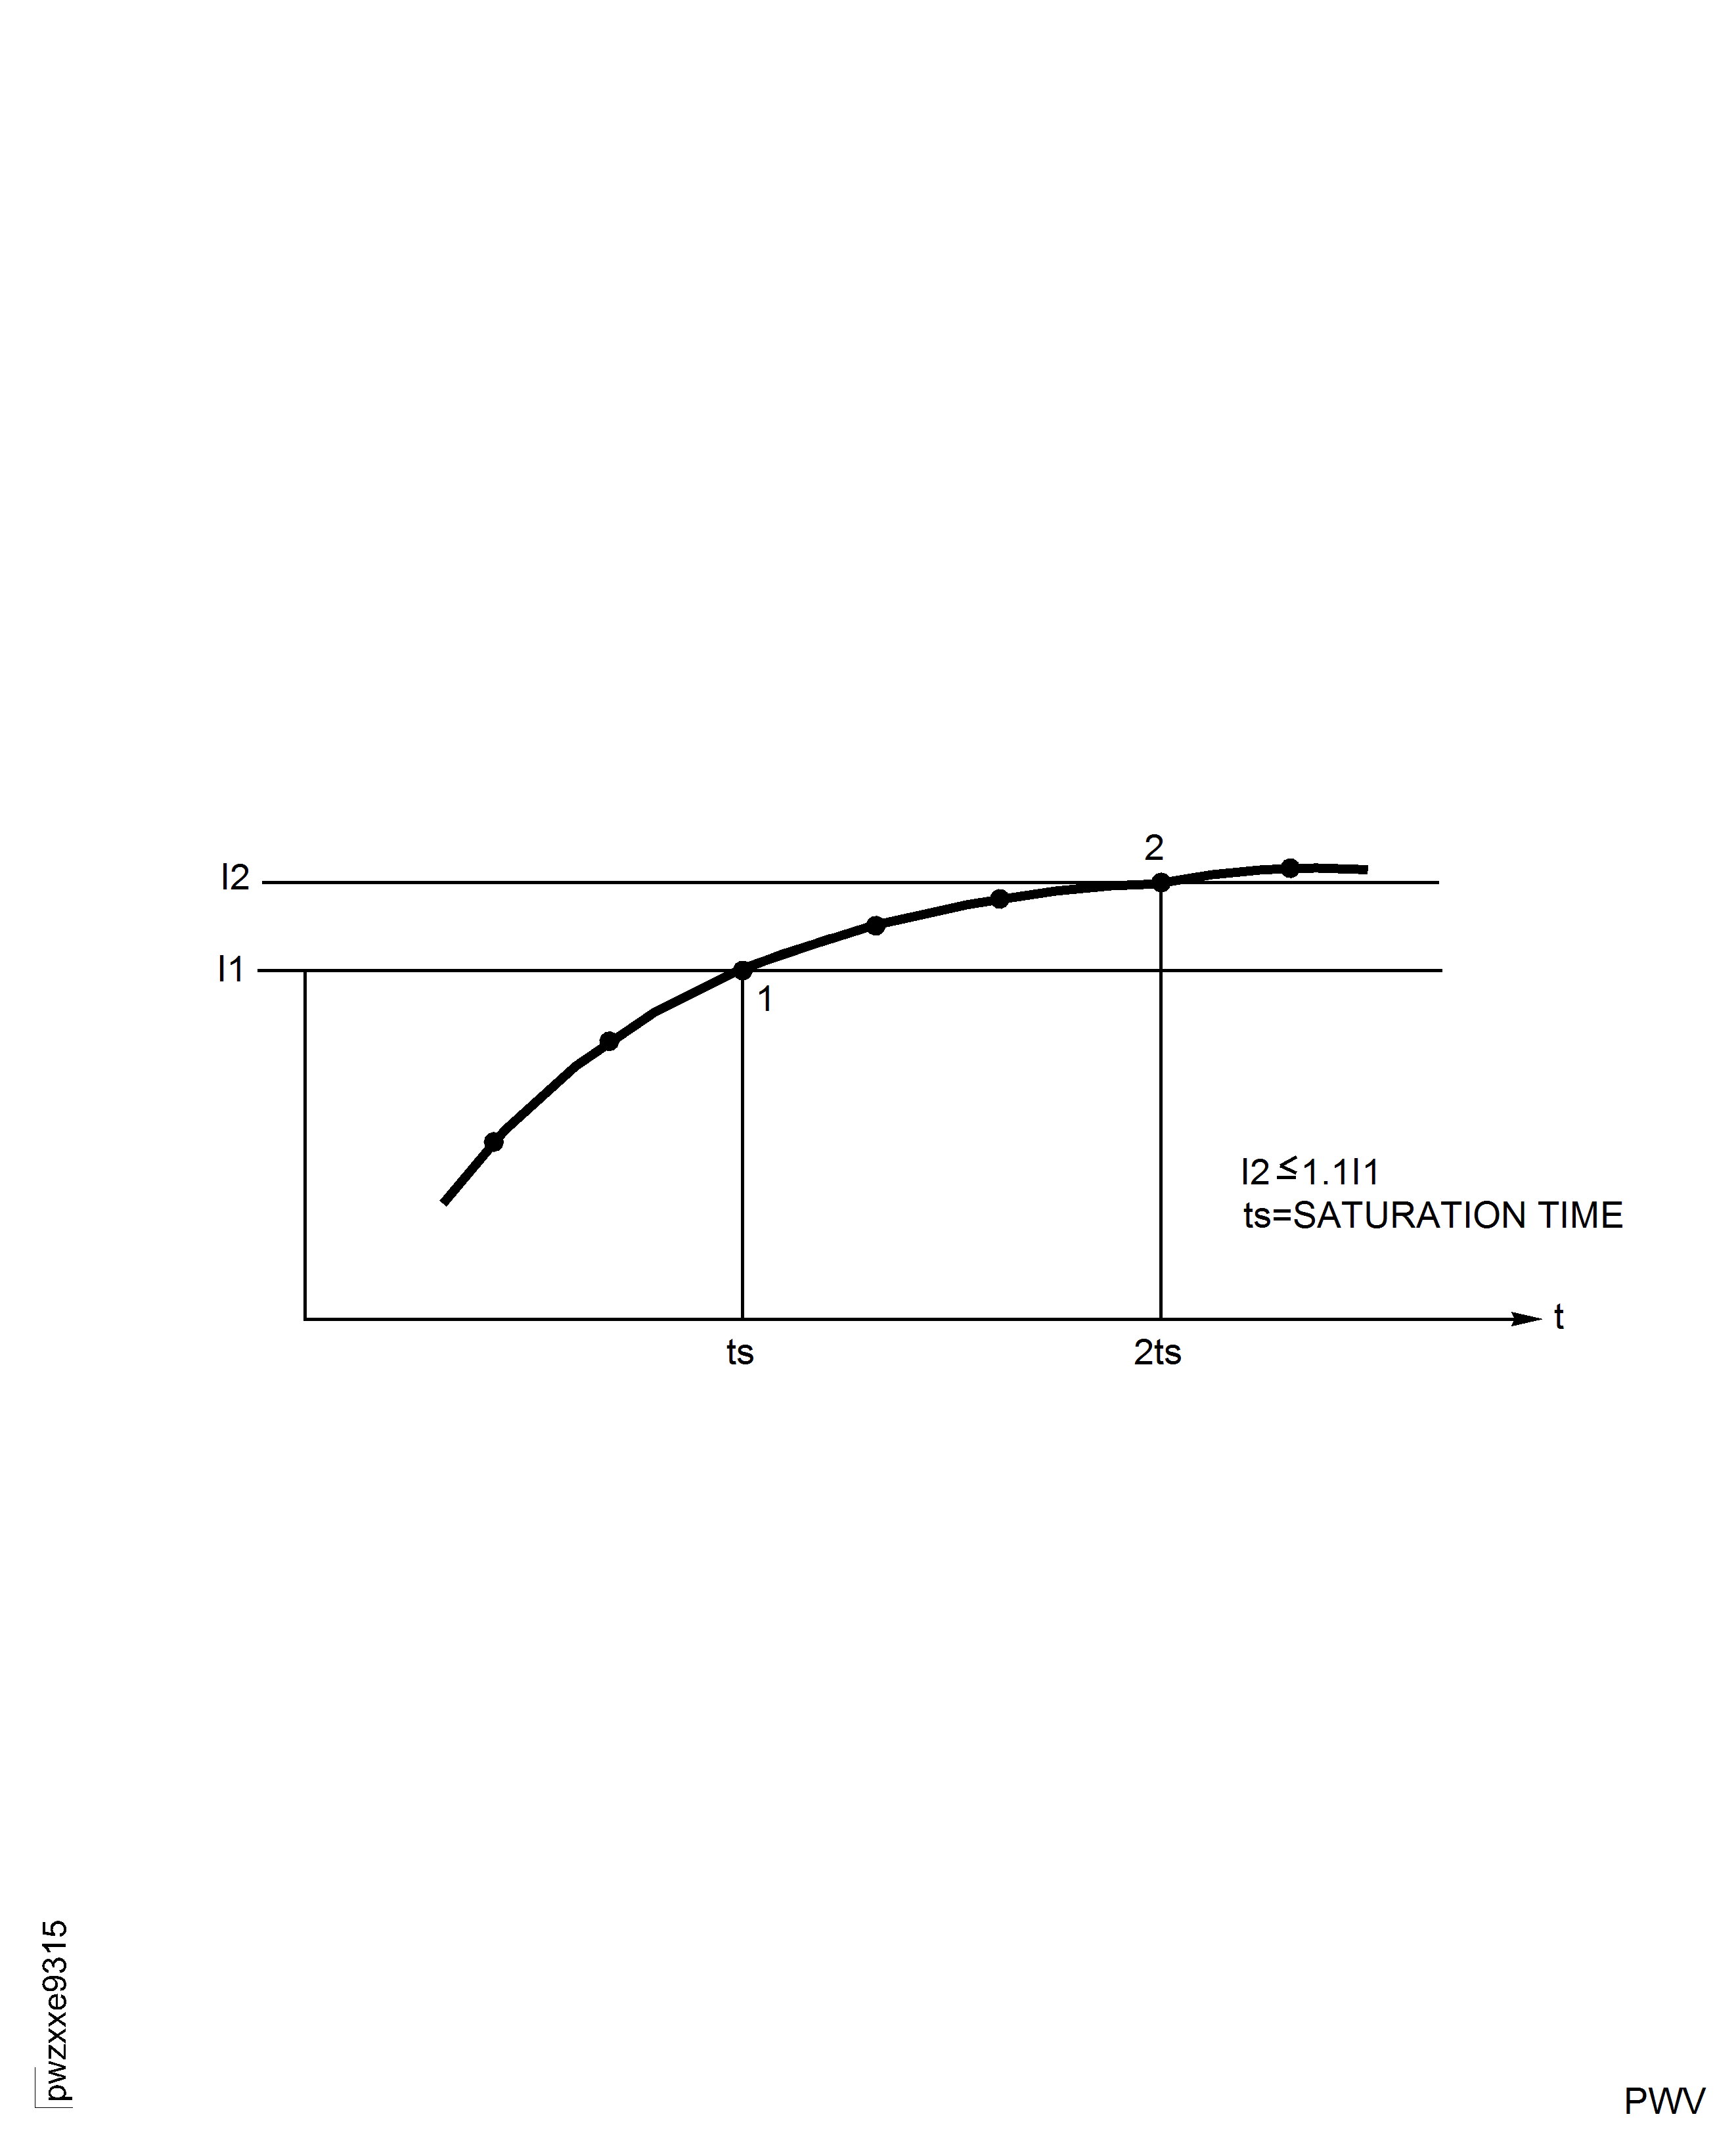
Figure: Effects Of Correct Flap Pressure And Excessive Flap Pressure
Effects Of Correct Flap Pressure And Excessive Flap Pressure
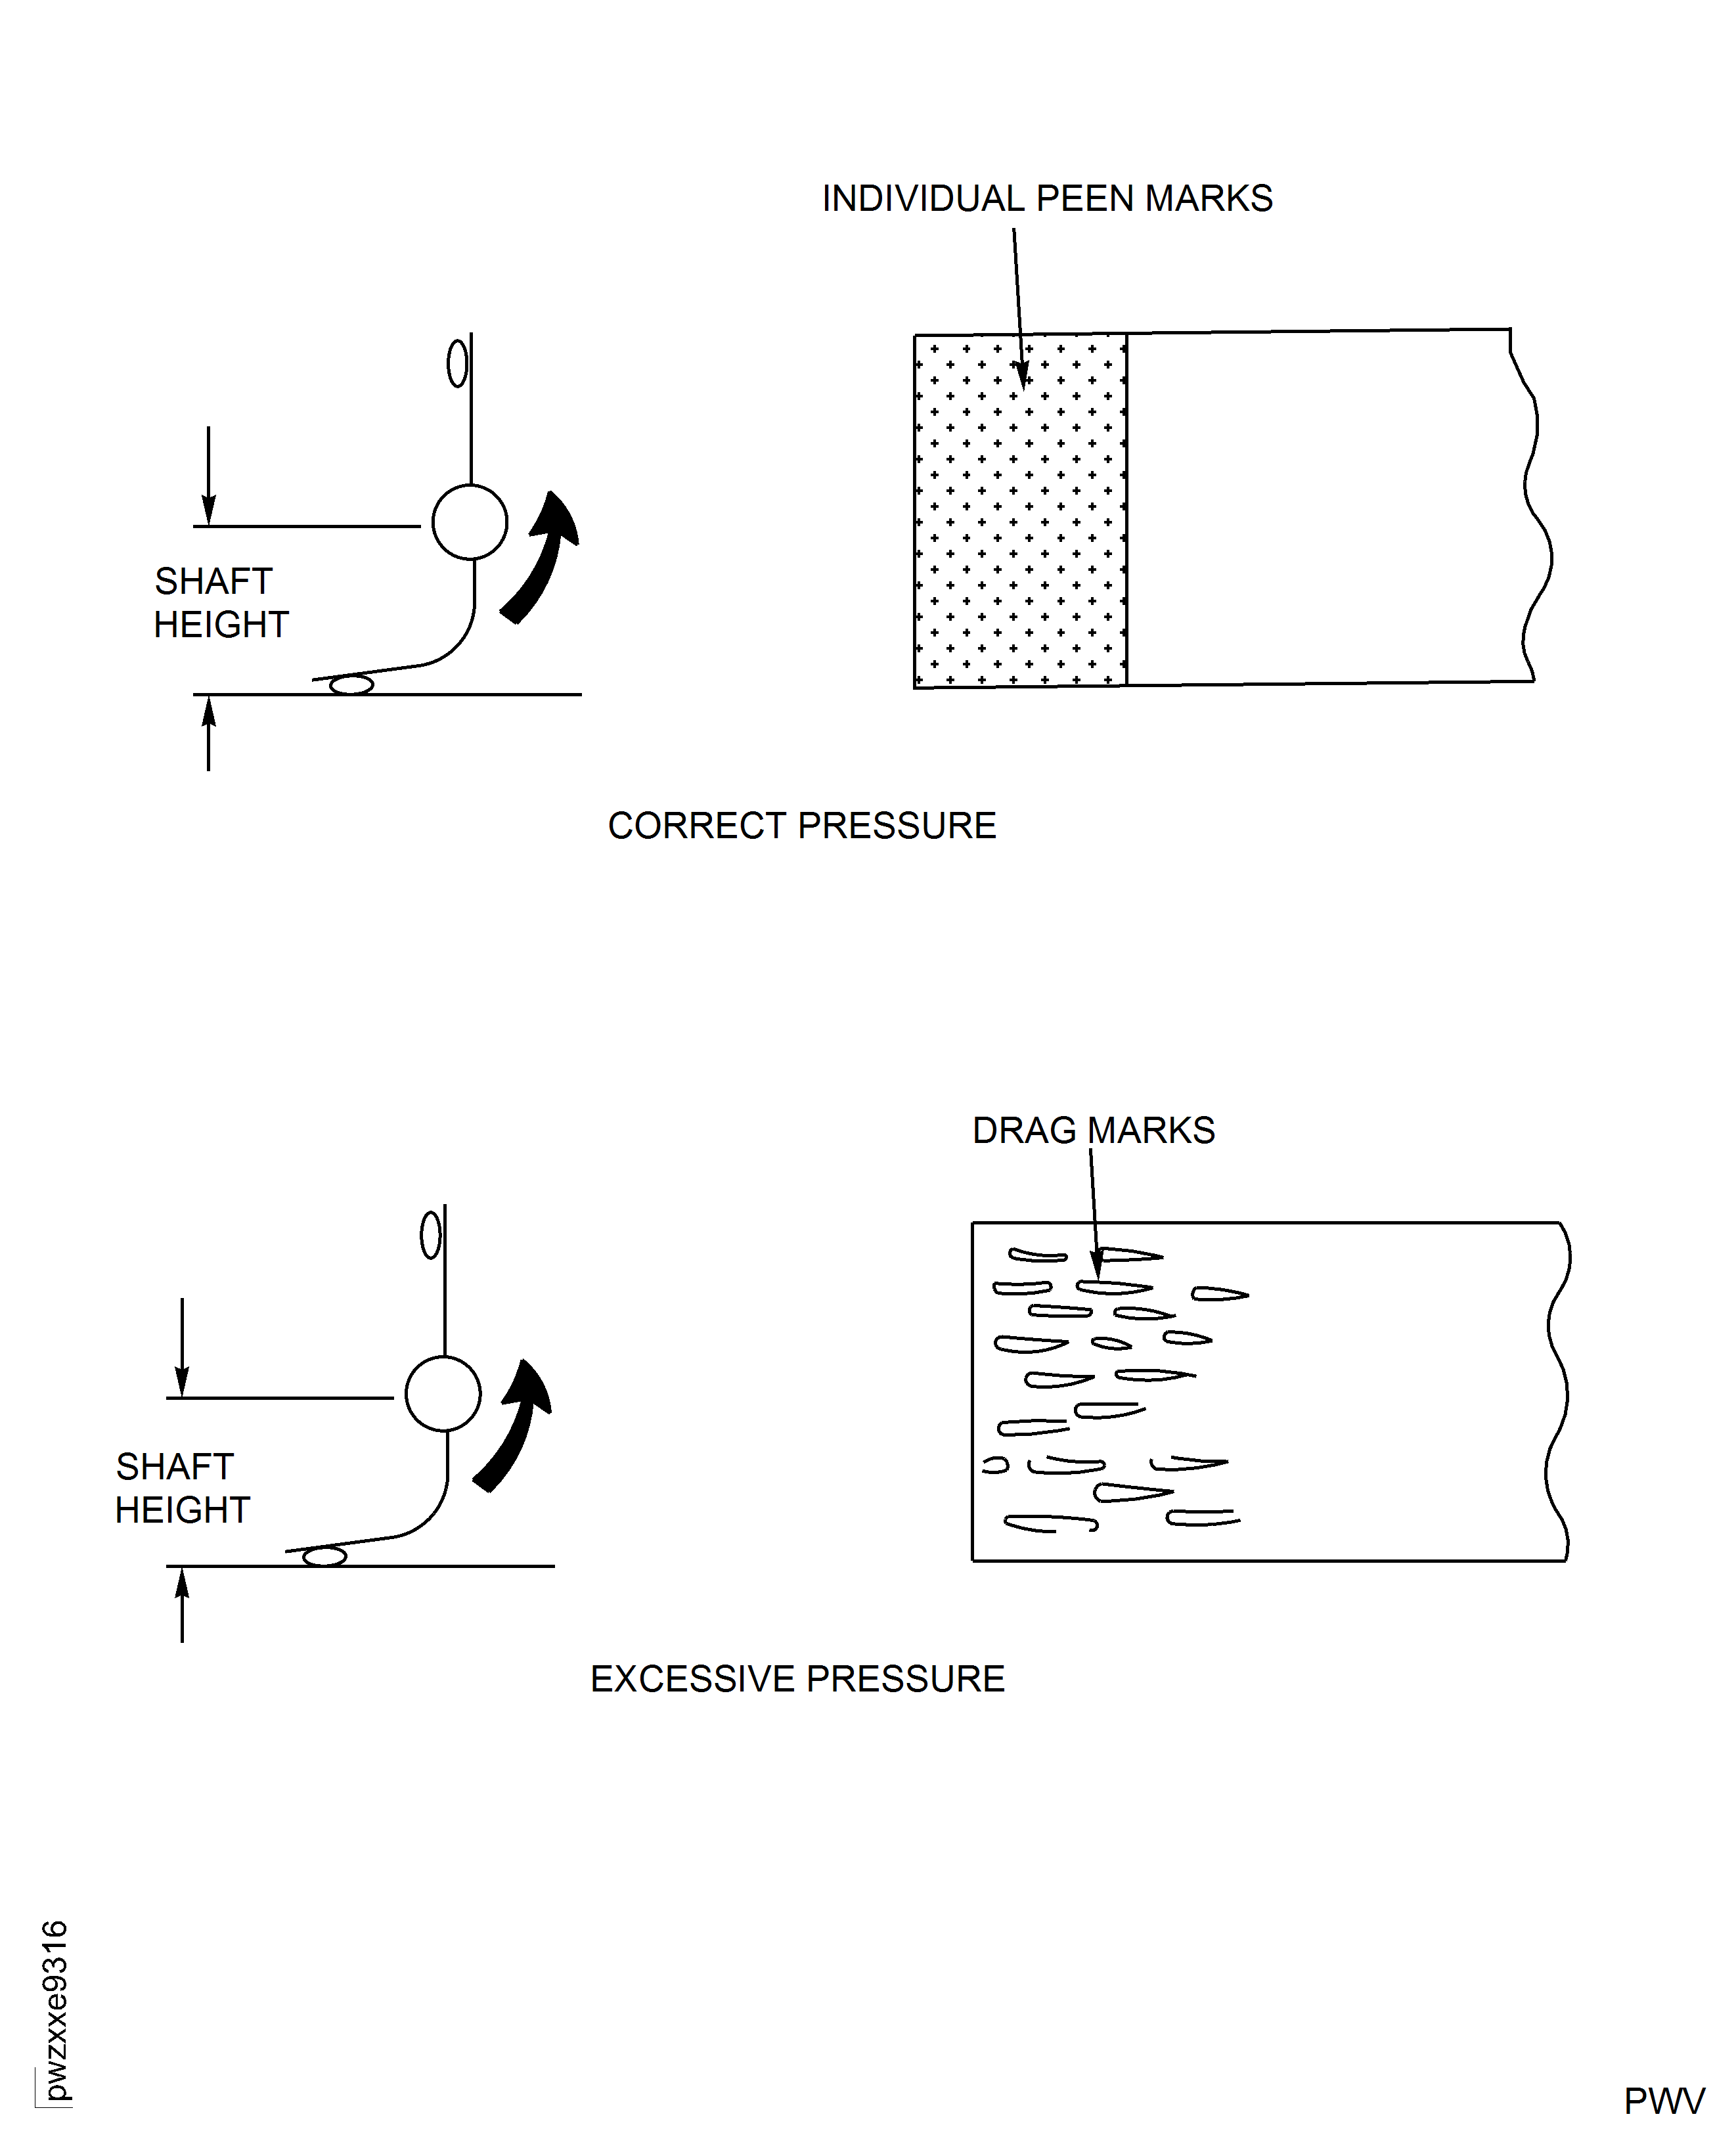
Figure: Mandrel Position
Mandrel Position
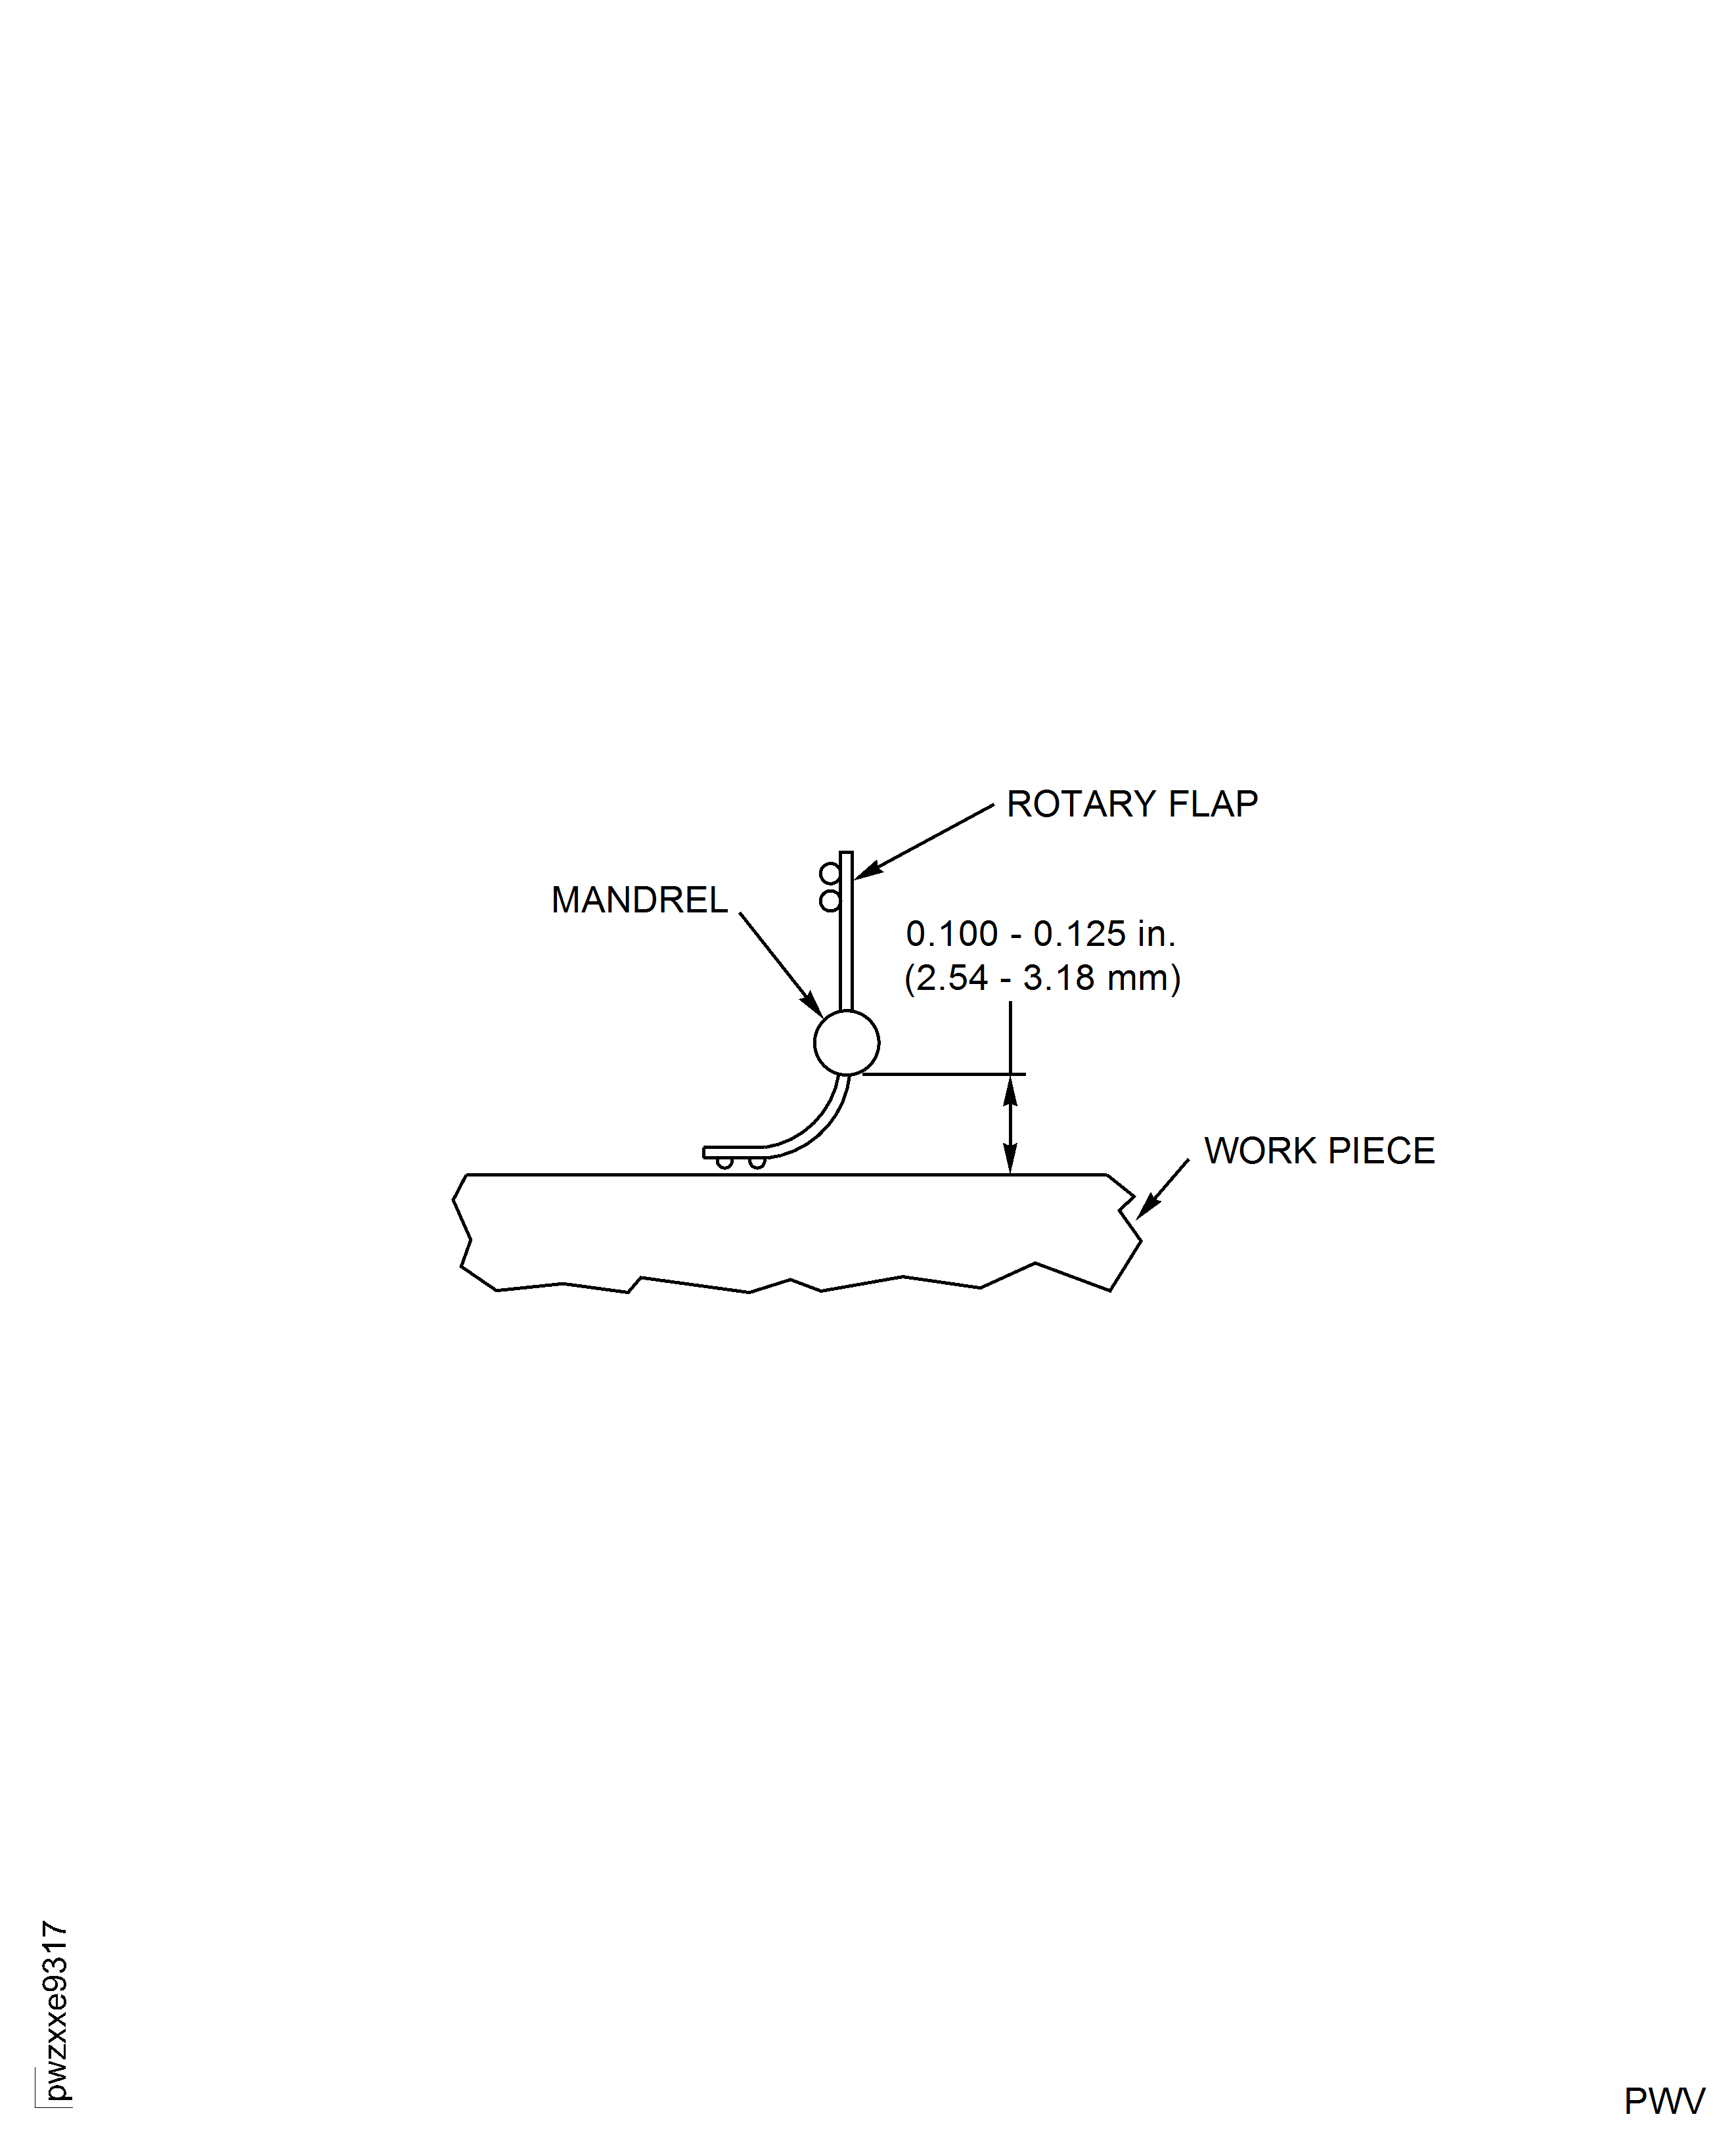
Figure: Typical Overlapping - Circular Motion Pattern For Flap Peening
Typical Overlapping - Circular Motion Pattern For Flap Peening
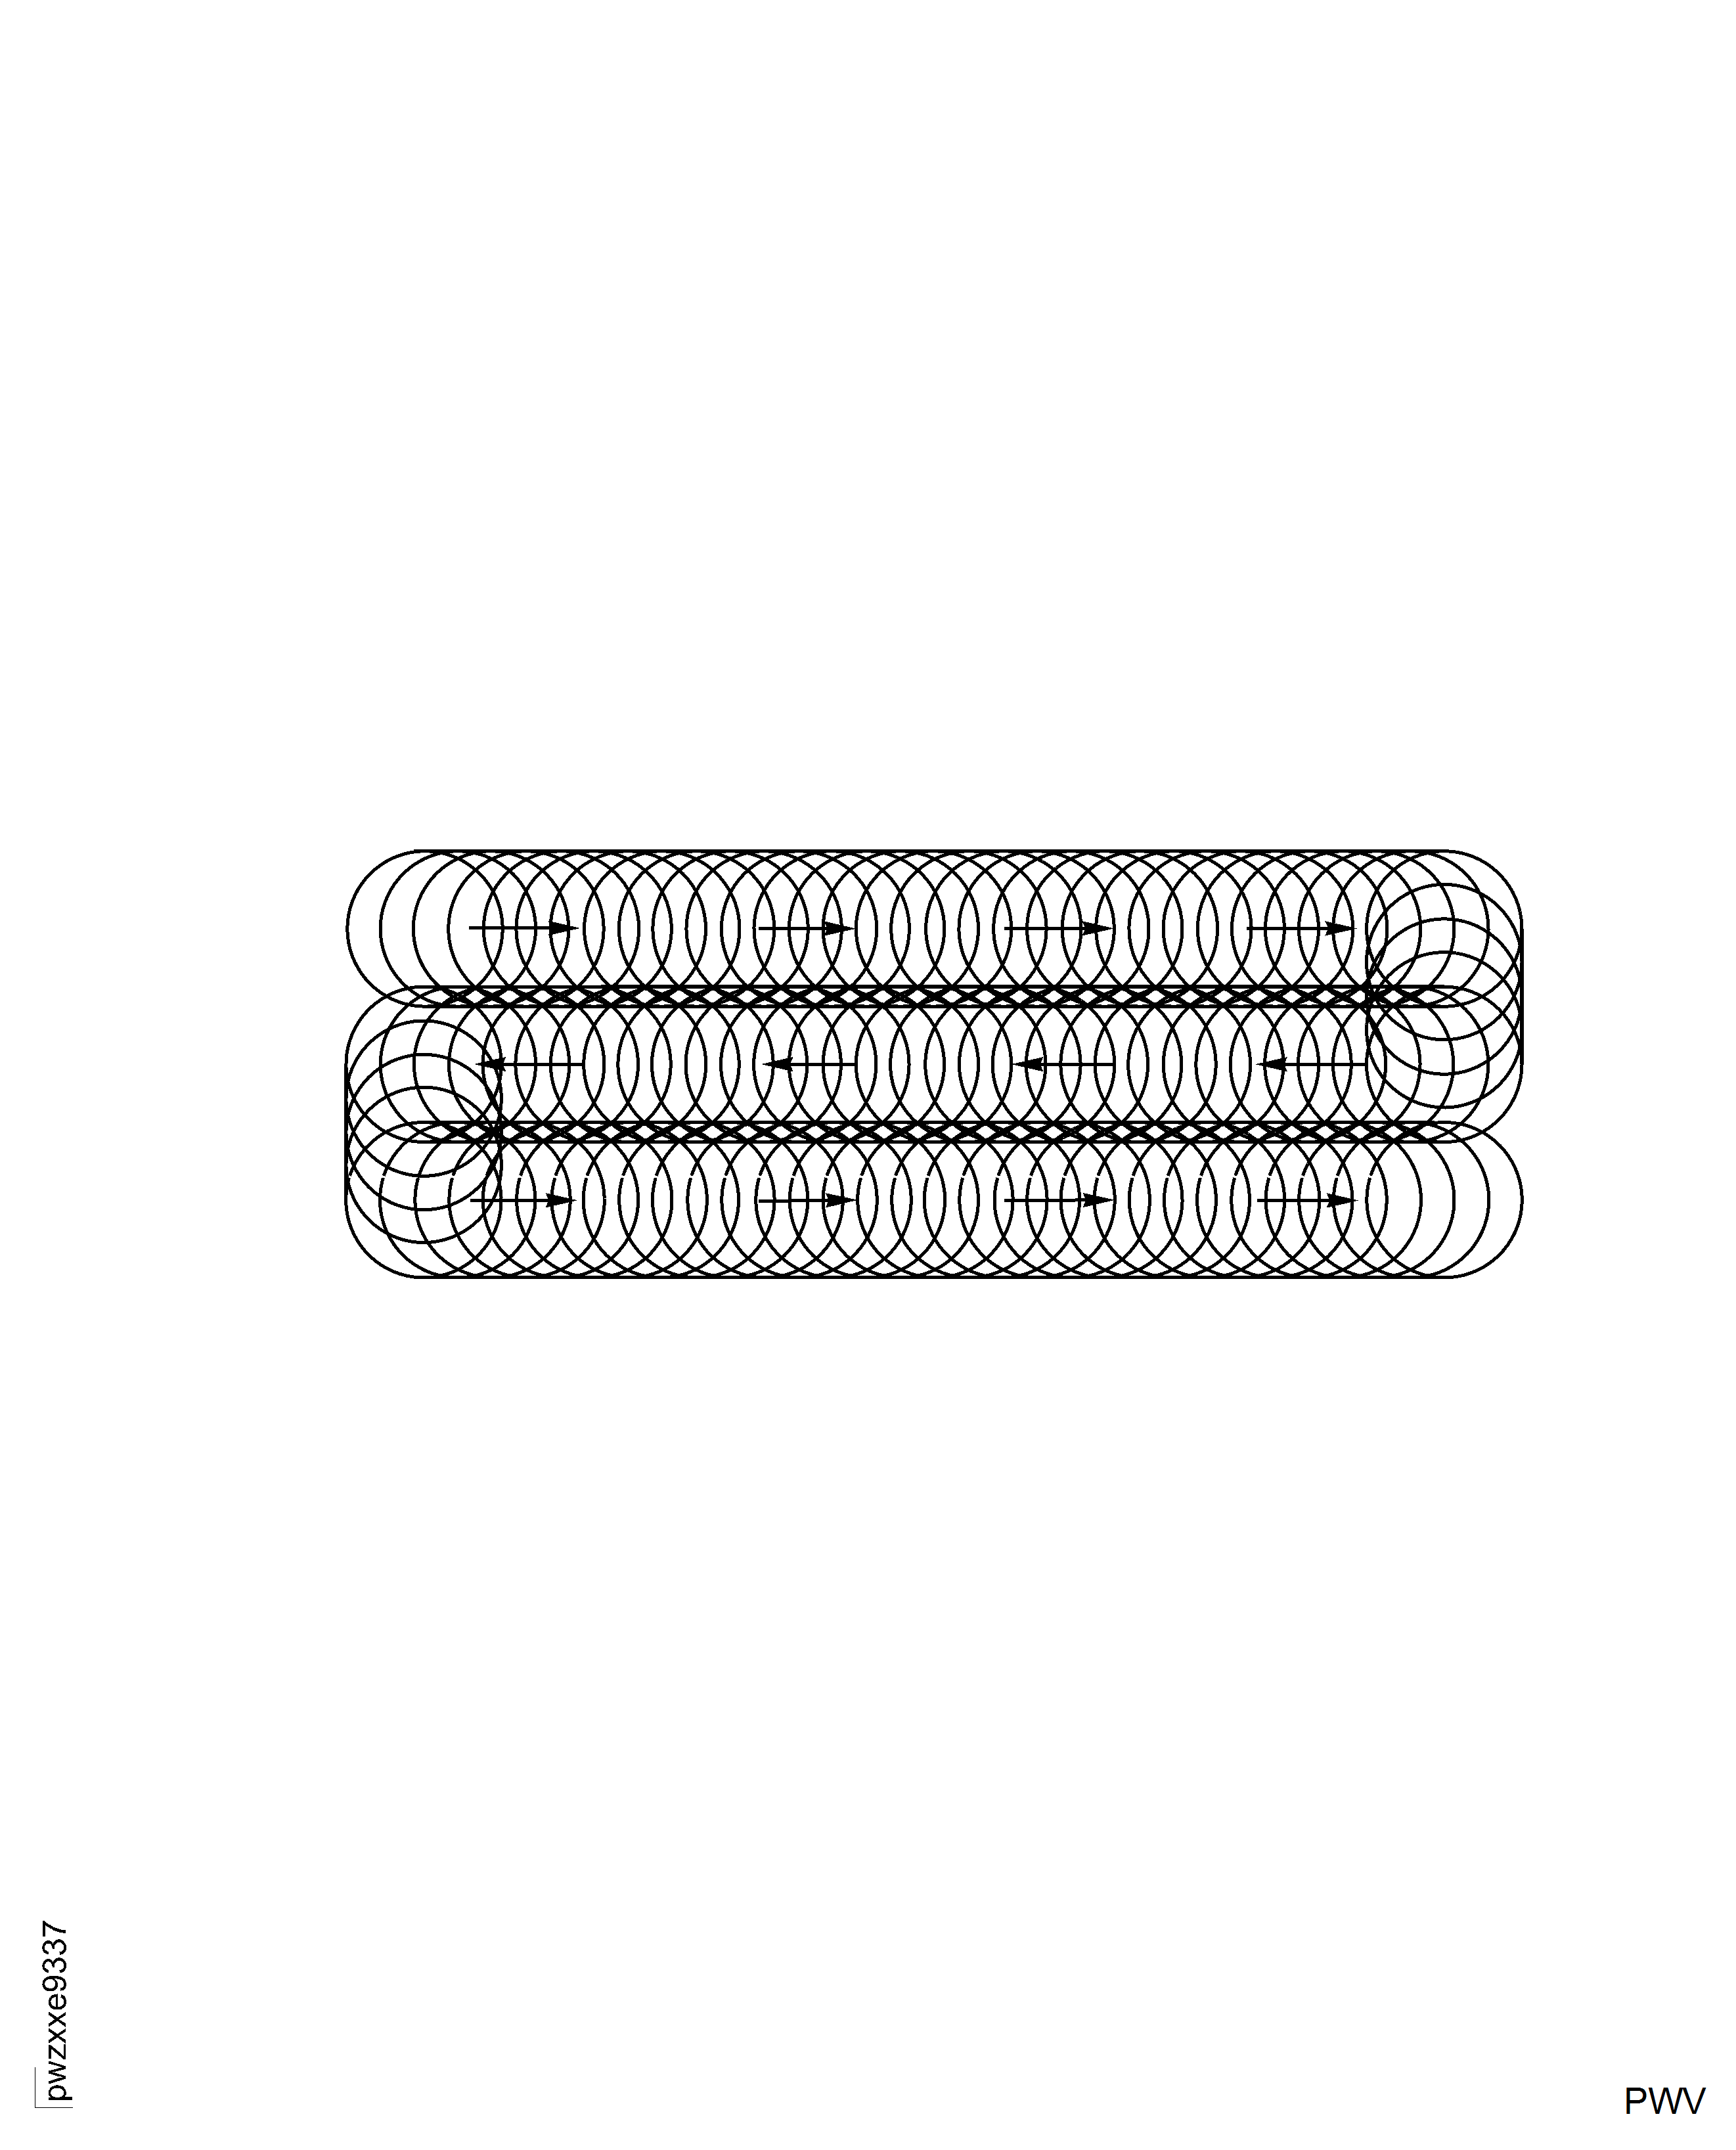
Figure: Peen Intensity/Tool Speed
Peen Intensity/Tool Speed
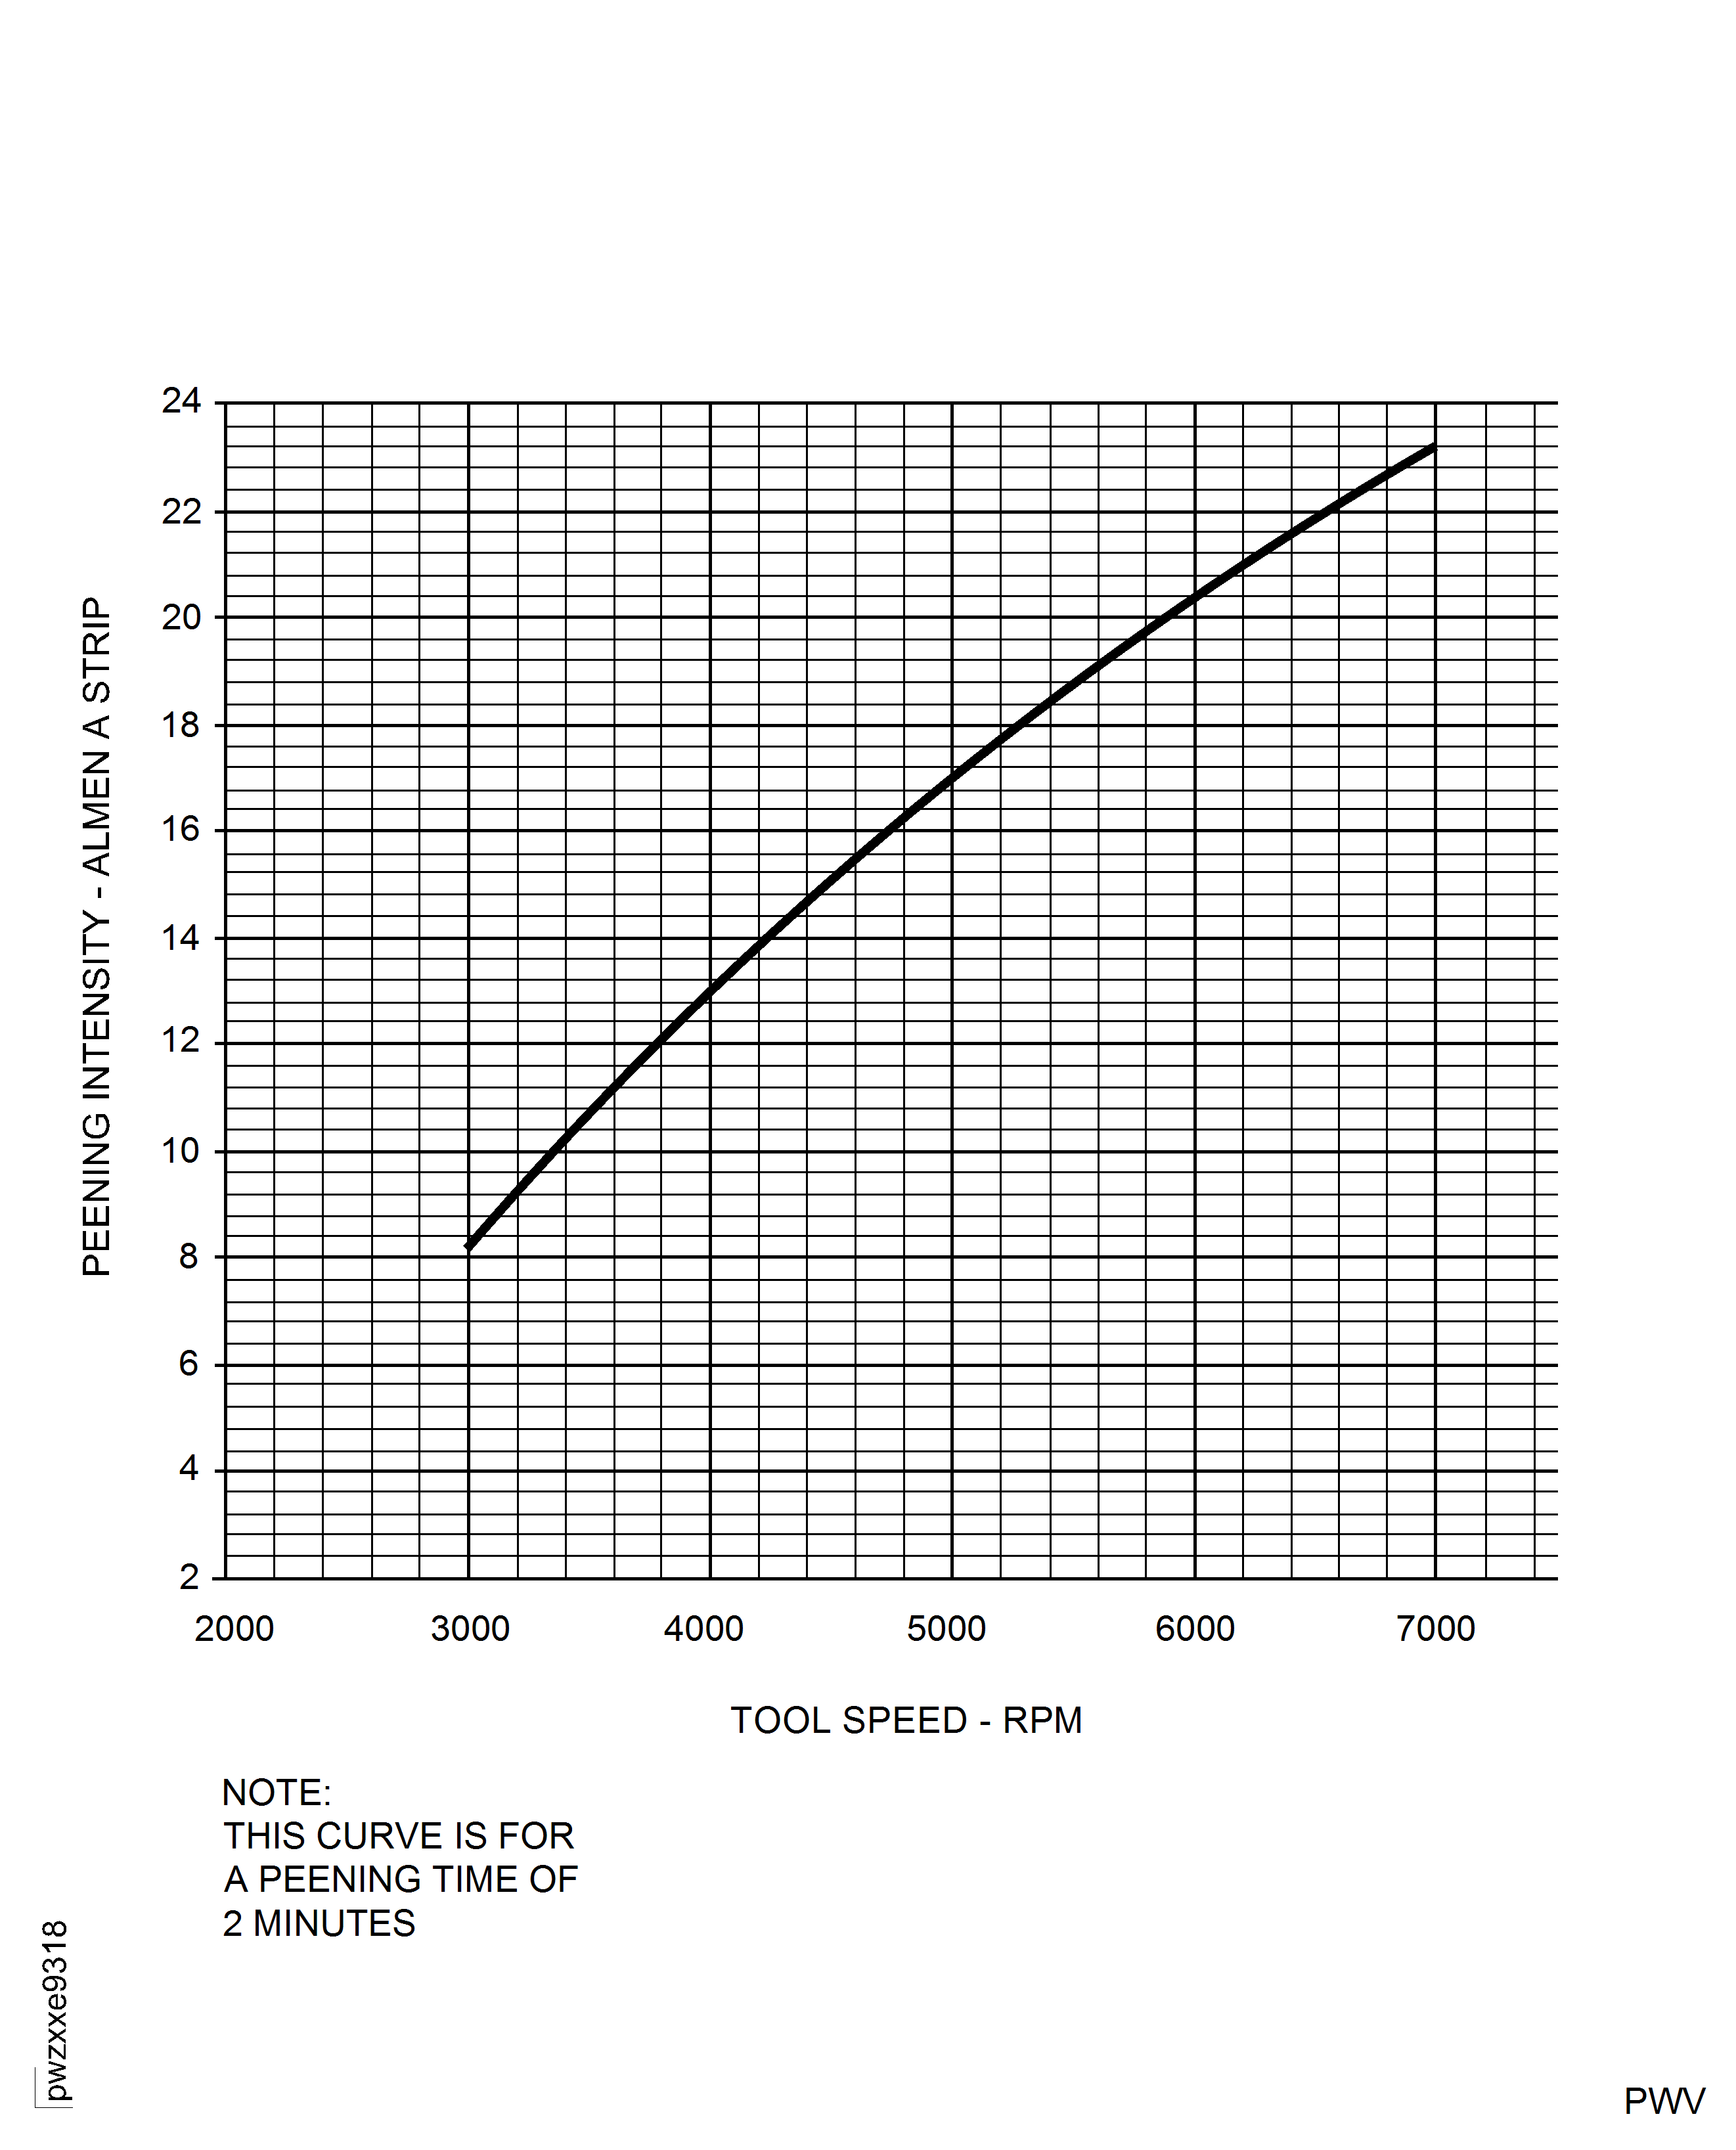
Figure: Transition From Full Intensity To Zero Intensity
Transition From Full Intensity To Zero Intensity
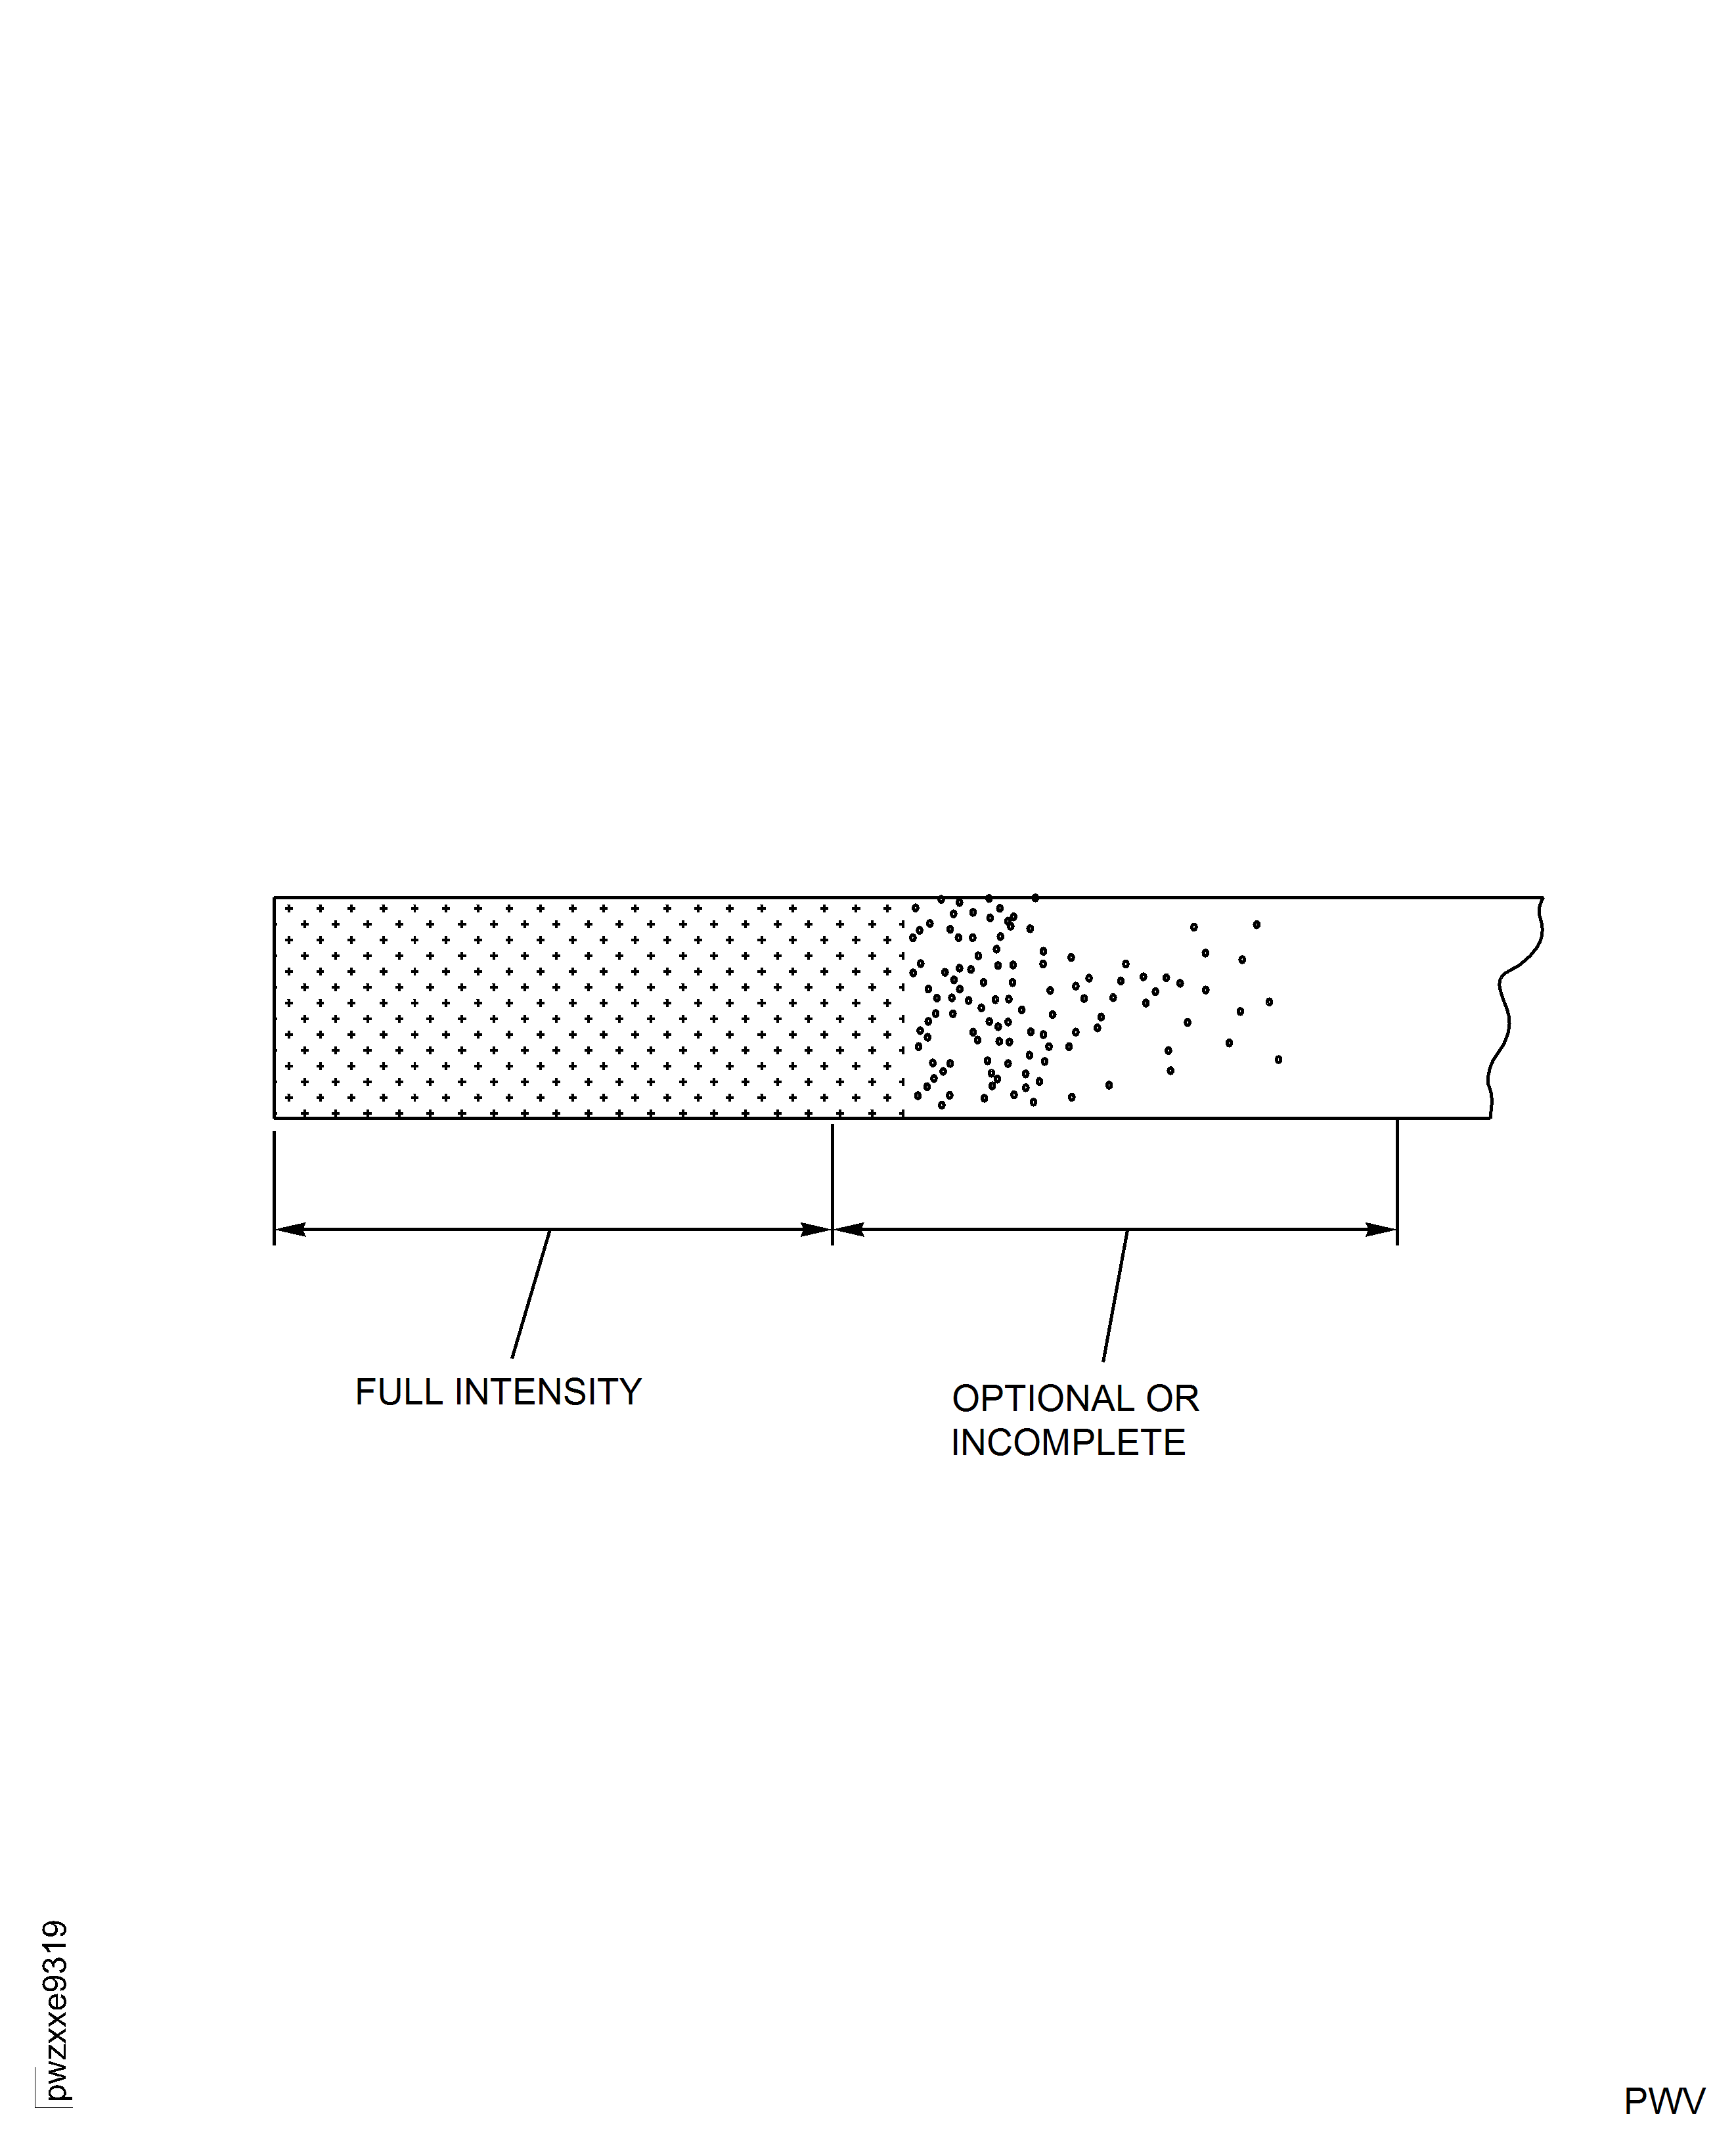
Figure: Saturation Curve
Saturation Curve
