Export Control
EAR Export Classification: Not subject to the EAR per 15 C.F.R. Chapter 1, Part 734.3(b)(3), except for the following Service Bulletins which are currently published as EAR Export Classification 9E991: SBE70-0992, SBE72-0483, SBE72-0580, SBE72-0588, SBE72-0640, SBE73-0209, SBE80-0024 and SBE80-0025.Copyright
© IAE International Aero Engines AG (2001, 2014 - 2021) The information contained in this document is the property of © IAE International Aero Engines AG and may not be copied or used for any purpose other than that for which it is supplied without the express written authority of © IAE International Aero Engines AG. (This does not preclude use by engine and aircraft operators for normal instructional, maintenance or overhaul purposes.).Applicability
All
Common Information
TASK 30-21-49-200-101 Anti-Ice Ducts - Examine, Inspection-001
General
This TASK gives the procedure for the inspection of the anti-ice duct.
Fig/item numbers in parentheses in the procedure agree with those used in the IPC.
The policy that is necessary for inspection is given in the SPM TASK 70-20-00-200-501.
All the parts must be cleaned before any part is examined. Refer to Cleaning-000 TASK 30-21-49-100-100.
All parts must be visually examined for damage, corrosion and wear. Any defects that are not identified in the procedure must be referred to IAE.
The procedure for those parts which must have a crack test is given in SUBTASK 30-21-49-230-051. Do the test before the part is visually examined.
A ** following repair referenced in this inspection indicates that the repair is not yet published in the current revision of the manual and the part must be rejected. Contact IAE for additional information concerning FAA approved repair date.
Do not discard any part until you are sure there are no repairs available. Refer to the instructions in Repair before a discarded part is used again or oversize parts are installed.
Parts which should be discarded can be held although no repair is available. The repair of a discarded part could be shown to be necessary at a later date.
All parts must be examined to make sure that all the repairs have been completed satisfactorily.
The practices and processes referred to in the procedure by the TASK numbers are in the SPM.
References
Refer to the SPM for data on these items.
Definitions of Damage, Refer to SPM TASK 70-02-02-350-501.
Record and Control of the Lives of Parts, Refer to SPM TASK 70-05-00-220-501.
Inspection of Parts, Refer to SPM TASK 70-20-00-200-501.
Some data on these items is contained in this TASK. For more data on these items refer to the SPM.
Method of Testing for Crack Indications.
Chemical Processes.
Surface Protection.
Preliminary Requirements
Pre-Conditions
NONESupport Equipment
NONEConsumables, Materials and Expendables
NONESpares
NONESafety Requirements
NONEProcedure
Reject.
Cracks other than in Step.
Cracked.
Repair, VRS2708 30-21-49-300-002**.
Defective weld.
Fluorescent penetrant examine for cracks. Refer to the SPM TASK 70-23-01-230-501.
SUBTASK 30-21-49-230-051 Examine the Anti-Ice Duct (01-010) and All Welds for Cracks
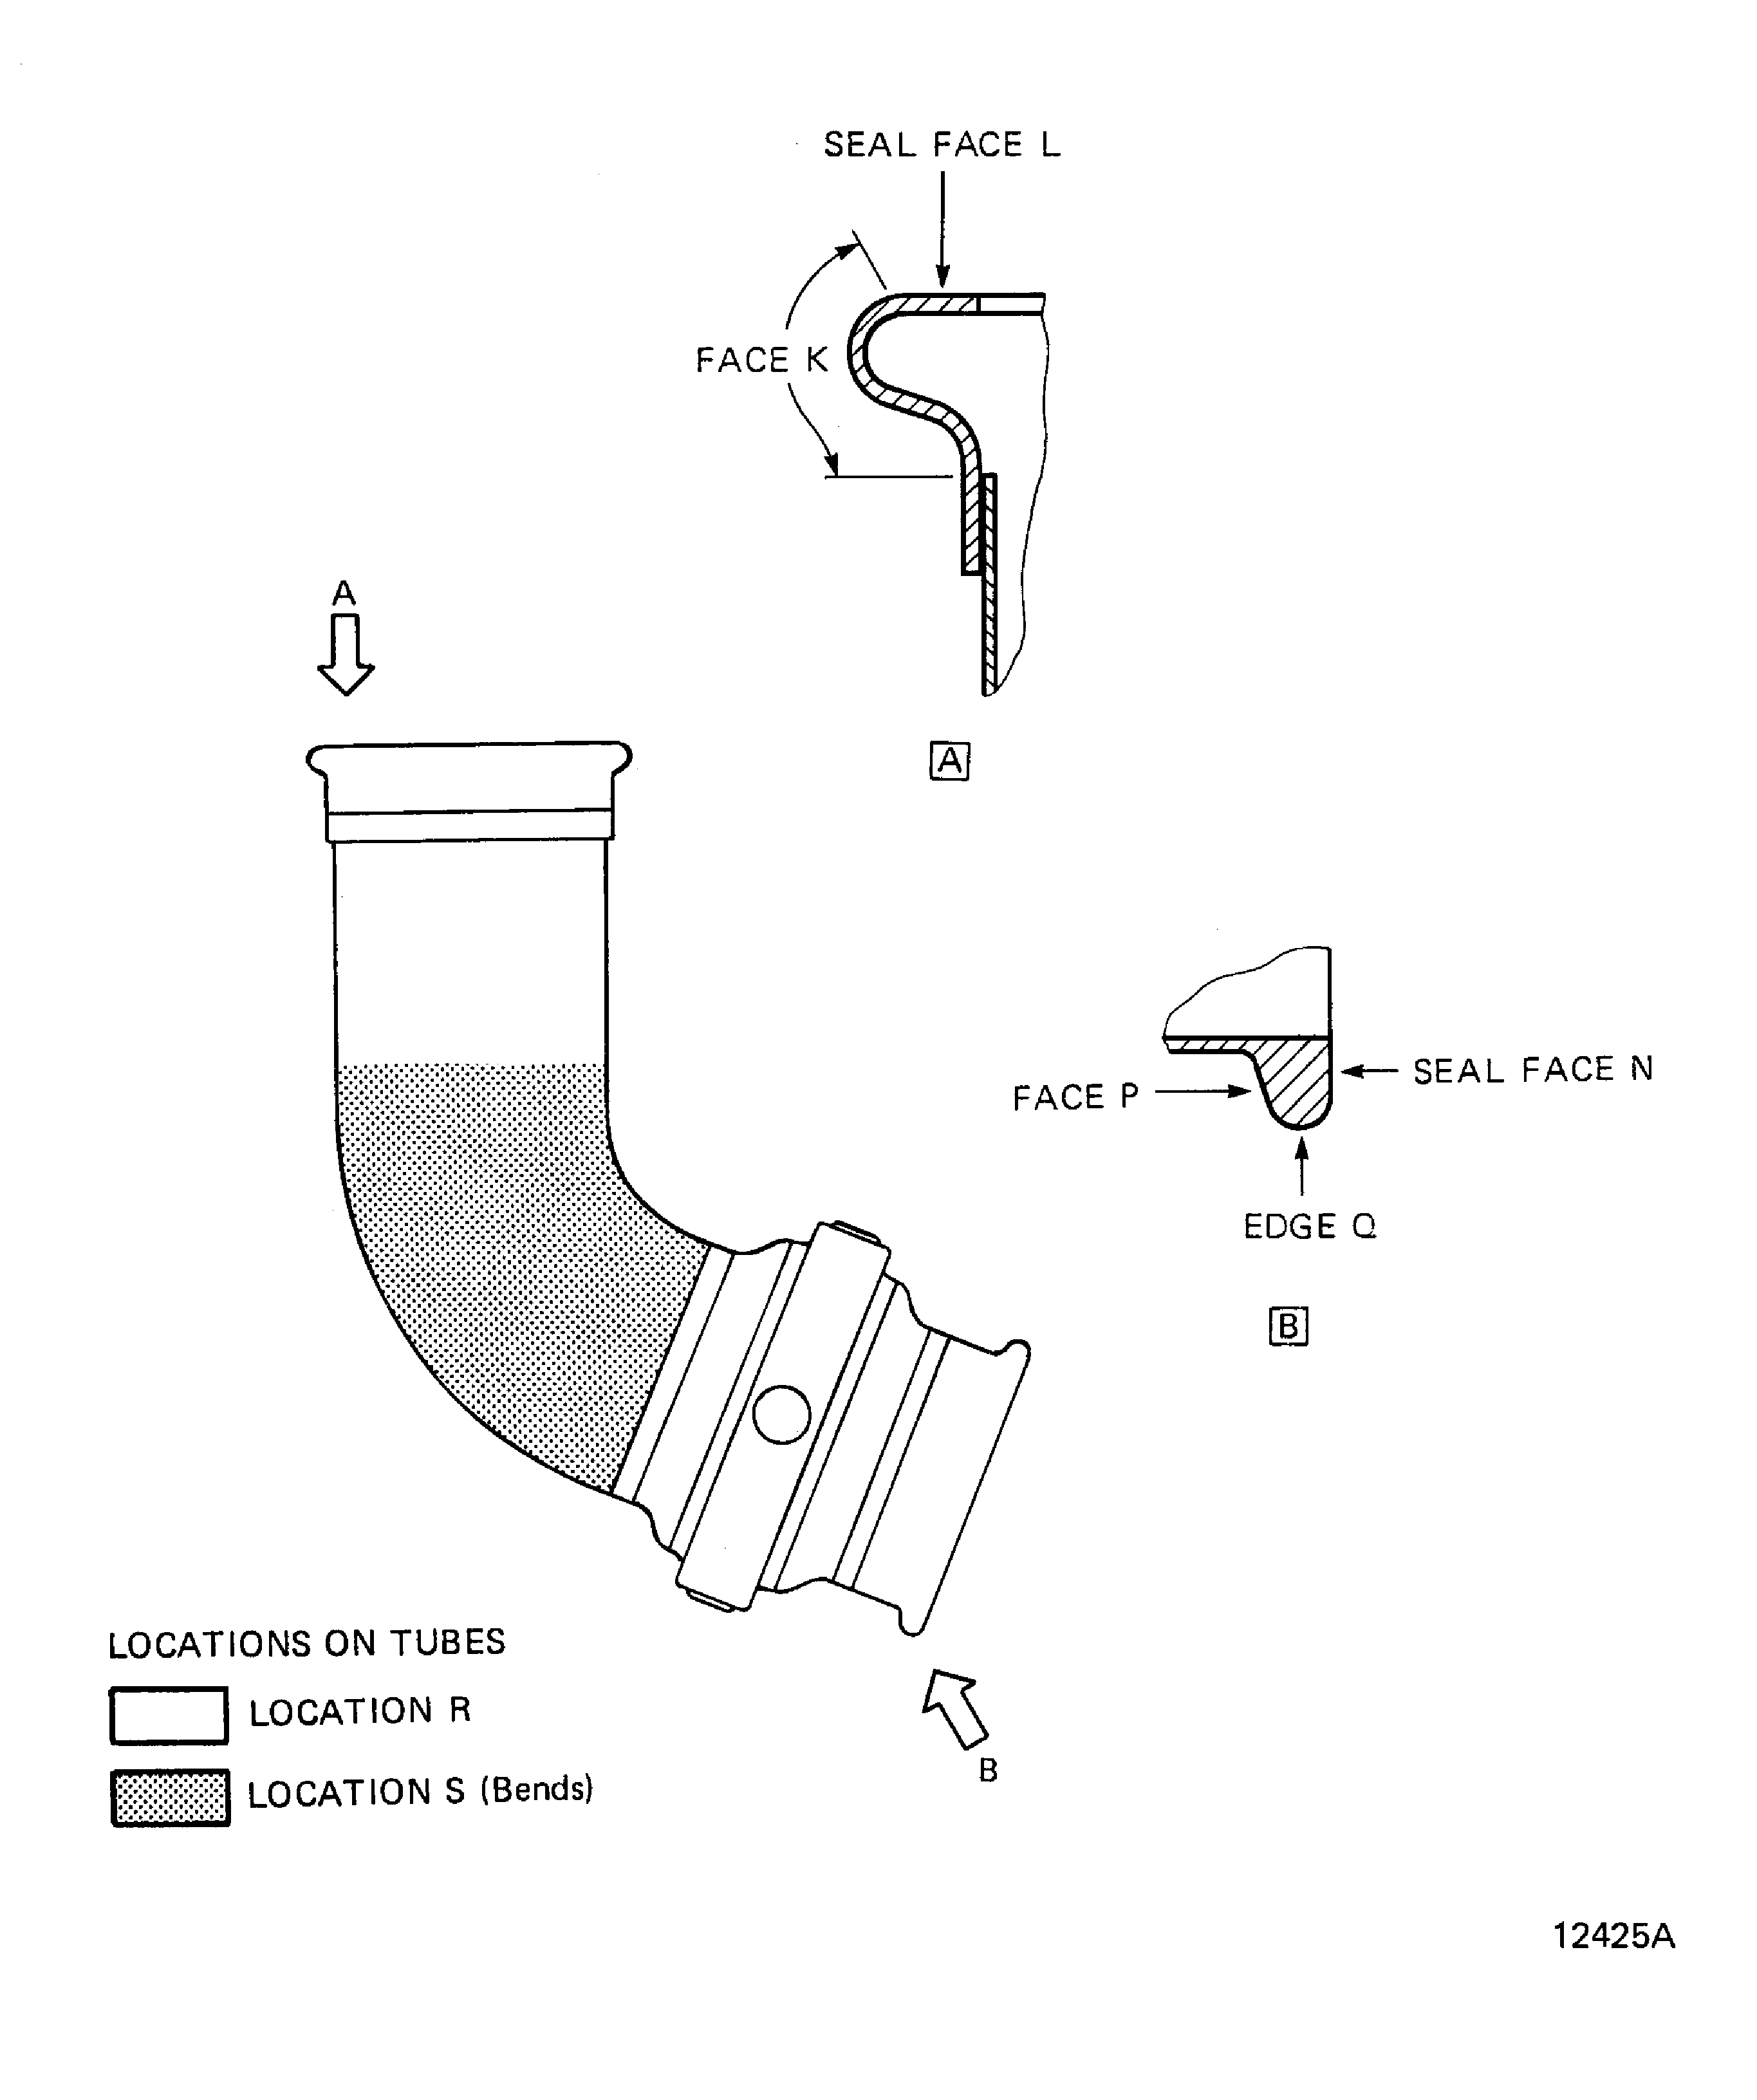
Refer to Figure.
Repair, VRS2858 (Repair-003) TASK 30-21-49-300-003.
Up to 0.004 in. (0.10 mm) deep.
Repair, VRS2857 30-21-49-300-001**
More than in Step.
Nicked.
Repair, VRS2858 (Repair-003) TASK 30-21-49-300-003.
Up to 0.004 in. (0.10 mm) deep.
Repair, VRS2857 30-21-49-300-001**
More than in Step.
Scratched.
Repair, VRS2858 (Repair-003) TASK 30-21-49-300-003.
Up to 0.004 in. (0.10 mm) deep.
Repair, VRS2857 30-21-49-300-001**
More than in Step.
Rubbed.
Repair, VRS2857 30-21-49-300-001**
Other than in Step.
One or more dents, with more than 1.000 in. (25.4 mm) between the edges of each of the dents.
Repair, VRS2857 30-21-49-300-001**
More than one dent, with less than 1.000 in. (25.4 mm) between the edges of each of the dents.
Dented.
SUBTASK 30-21-49-220-051 Examine the Anti-Ice Duct (01-010) at Location R
Refer to Figure.
Repair, VRS2858 (Repair-003) TASK 30-21-49-300-003.
Nicked.
Repair, VRS2858 (Repair-003) TASK 30-21-49-300-003.
Scratched.
Repair, VRS2858 (Repair-003) TASK 30-21-49-300-003.
Rubbed.
Repair, VRS2858 (Repair-003) TASK 30-21-49-300-003.
Up to 0.250 in. (6.35 mm) deep with any radius of the dent not less than 0.080 in. (2.03 mm)
Reject.
More than in Step.
Reject.
More than one dent, with less than 1.000 in. (25.4 mm) between the edges of each of the dents.
One or more dents, with more than 1.000 in. (25.4 mm) between the edges of each of the dents.
Dented.
SUBTASK 30-21-49-220-052 Examine the Anti-Ice Duct (01-010) at Location S
Refer to Figure.
Repair, VRS2858 (Repair-003) TASK 30-21-49-300-003.
Up to 0.010 in. (0.25 mm) deep.
Reject.
More than in Step.
On the edge Q and the faces K and P.
Repair, VRS2858 (Repair-003) TASK 30-21-49-300-003.
Circumferential scratches up to 0.010 in. (0.25 mm) deep.
Reject.
Other than in Step.
On the seal faces L and N.
Scratched.
Repair, VRS2858 (Repair-003) TASK 30-21-49-300-003.
Burred.
Repair, VRS2858 (Repair-003) TASK 30-21-49-300-003.
Up to 0.010 in. (0.25 mm) deep.
Reject.
More than in Step.
On the edge Q and the faces K and P.
Nicked.
Reject.
Distortion of the end fittings.
Distorted.
Reject.
Damage to the seal faces K and P.
Damaged.
SUBTASK 30-21-49-220-053 Examine the Anti-Ice Duct (01-010) End-Fittings
Figure: Locations on the Anti-Ice Duct (01-010)
Locations on the Anti-Ice Duct (01-010)

