Export Control
EAR Export Classification: Not subject to the EAR per 15 C.F.R. Chapter 1, Part 734.3(b)(3), except for the following Service Bulletins which are currently published as EAR Export Classification 9E991: SBE70-0992, SBE72-0483, SBE72-0580, SBE72-0588, SBE72-0640, SBE73-0209, SBE80-0024 and SBE80-0025.Copyright
© IAE International Aero Engines AG (2001, 2014 - 2021) The information contained in this document is the property of © IAE International Aero Engines AG and may not be copied or used for any purpose other than that for which it is supplied without the express written authority of © IAE International Aero Engines AG. (This does not preclude use by engine and aircraft operators for normal instructional, maintenance or overhaul purposes.).Applicability
All
Common Information
TASK 36-21-49-300-001 Bleed Air Pressure Indicating Air Tubes - Repair The End Fittings, Repair-001 (VRS2930)
Effectivity
FIG/ITEM | PART NO. |
|---|---|
01-100 | 740-5089-501 |
01-100 | 740-5089-503 |
01-100 | 740-5089-505 |
01-100 | 740-5645-505 |
01-100 | 745-5645-503 |
01-100 | 745-5645-505 |
01-500 | 740-5644-503 |
01-500 | 740-5644-505 |
01-500 | 745-5644-501 |
01-500 | 745-5644-503 |
01-500 | 745-5644-505 |
02-100 | 740-5086-501 |
02-100 | 740-5074-507 |
02-110 | 740-5092-501 |
02-500 | 740-5093-501 |
02-500 | 740-5093-503 |
02-500 | 745-5093-501 |
02-725 | 745-5097-501 |
02-725 | 745-5097-503 |
General
This repair can be done on the end fittings of the tube during overhaul.
The practices and processes referred to in the procedure by the TASK numbers are in SPM.
NOTE
Preliminary Requirements
Pre-Conditions
NONESupport Equipment
| Name | Manufacturer | Part Number / Identification | Quantity | Remark |
|---|---|---|---|---|
| Die | LOCAL | 0.5000-20 UNJF-3A | ||
| Die | LOCAL | 0.4375-20 UNJF-3A | ||
| Drill | LOCAL | 0.0625 in. (1.59 mm) | ||
| Smooth flat file | LOCAL | |||
| Thread gage | LOCAL | (A GO - NO GO gage to test the size of thread on the thread taps/dies listed above) | ||
| Thread tap | LOCAL | 0.4375-20 UNJF-3B |
Consumables, Materials and Expendables
| Name | Manufacturer | Part Number / Identification | Quantity | Remark |
|---|---|---|---|---|
| CoMat 01-076 METHYL ETHYL KETONE | LOCAL | CoMat 01-076 | ||
| CoMat 02-099 LINT-FREE CLOTH | LOCAL | CoMat 02-099 | ||
| CoMat 02-102 BRUSH, PAINT | LOCAL | CoMat 02-102 | ||
| CoMat 10-035 COMPOUND, METAL CUTTING,WATER-TYPE | LOCAL | CoMat 10-035 |
Spares
NONESafety Requirements
NONEProcedure
Refer to Cleaning-000 TASK 36-21-49-100-101.
Clean the end fittings
SUBTASK 36-21-49-110-052 Clean the End Fittings
If more than three turns of the screw threads are damaged, then discard the tube assembly.
Visually examine the screw threads.
Use the applicable thread tap/die and the CoMat 10-035 COMPOUND, METAL CUTTING,WATER-TYPE metal cutting compound. If the thread tap does not turn easily, discard the tube assembly.
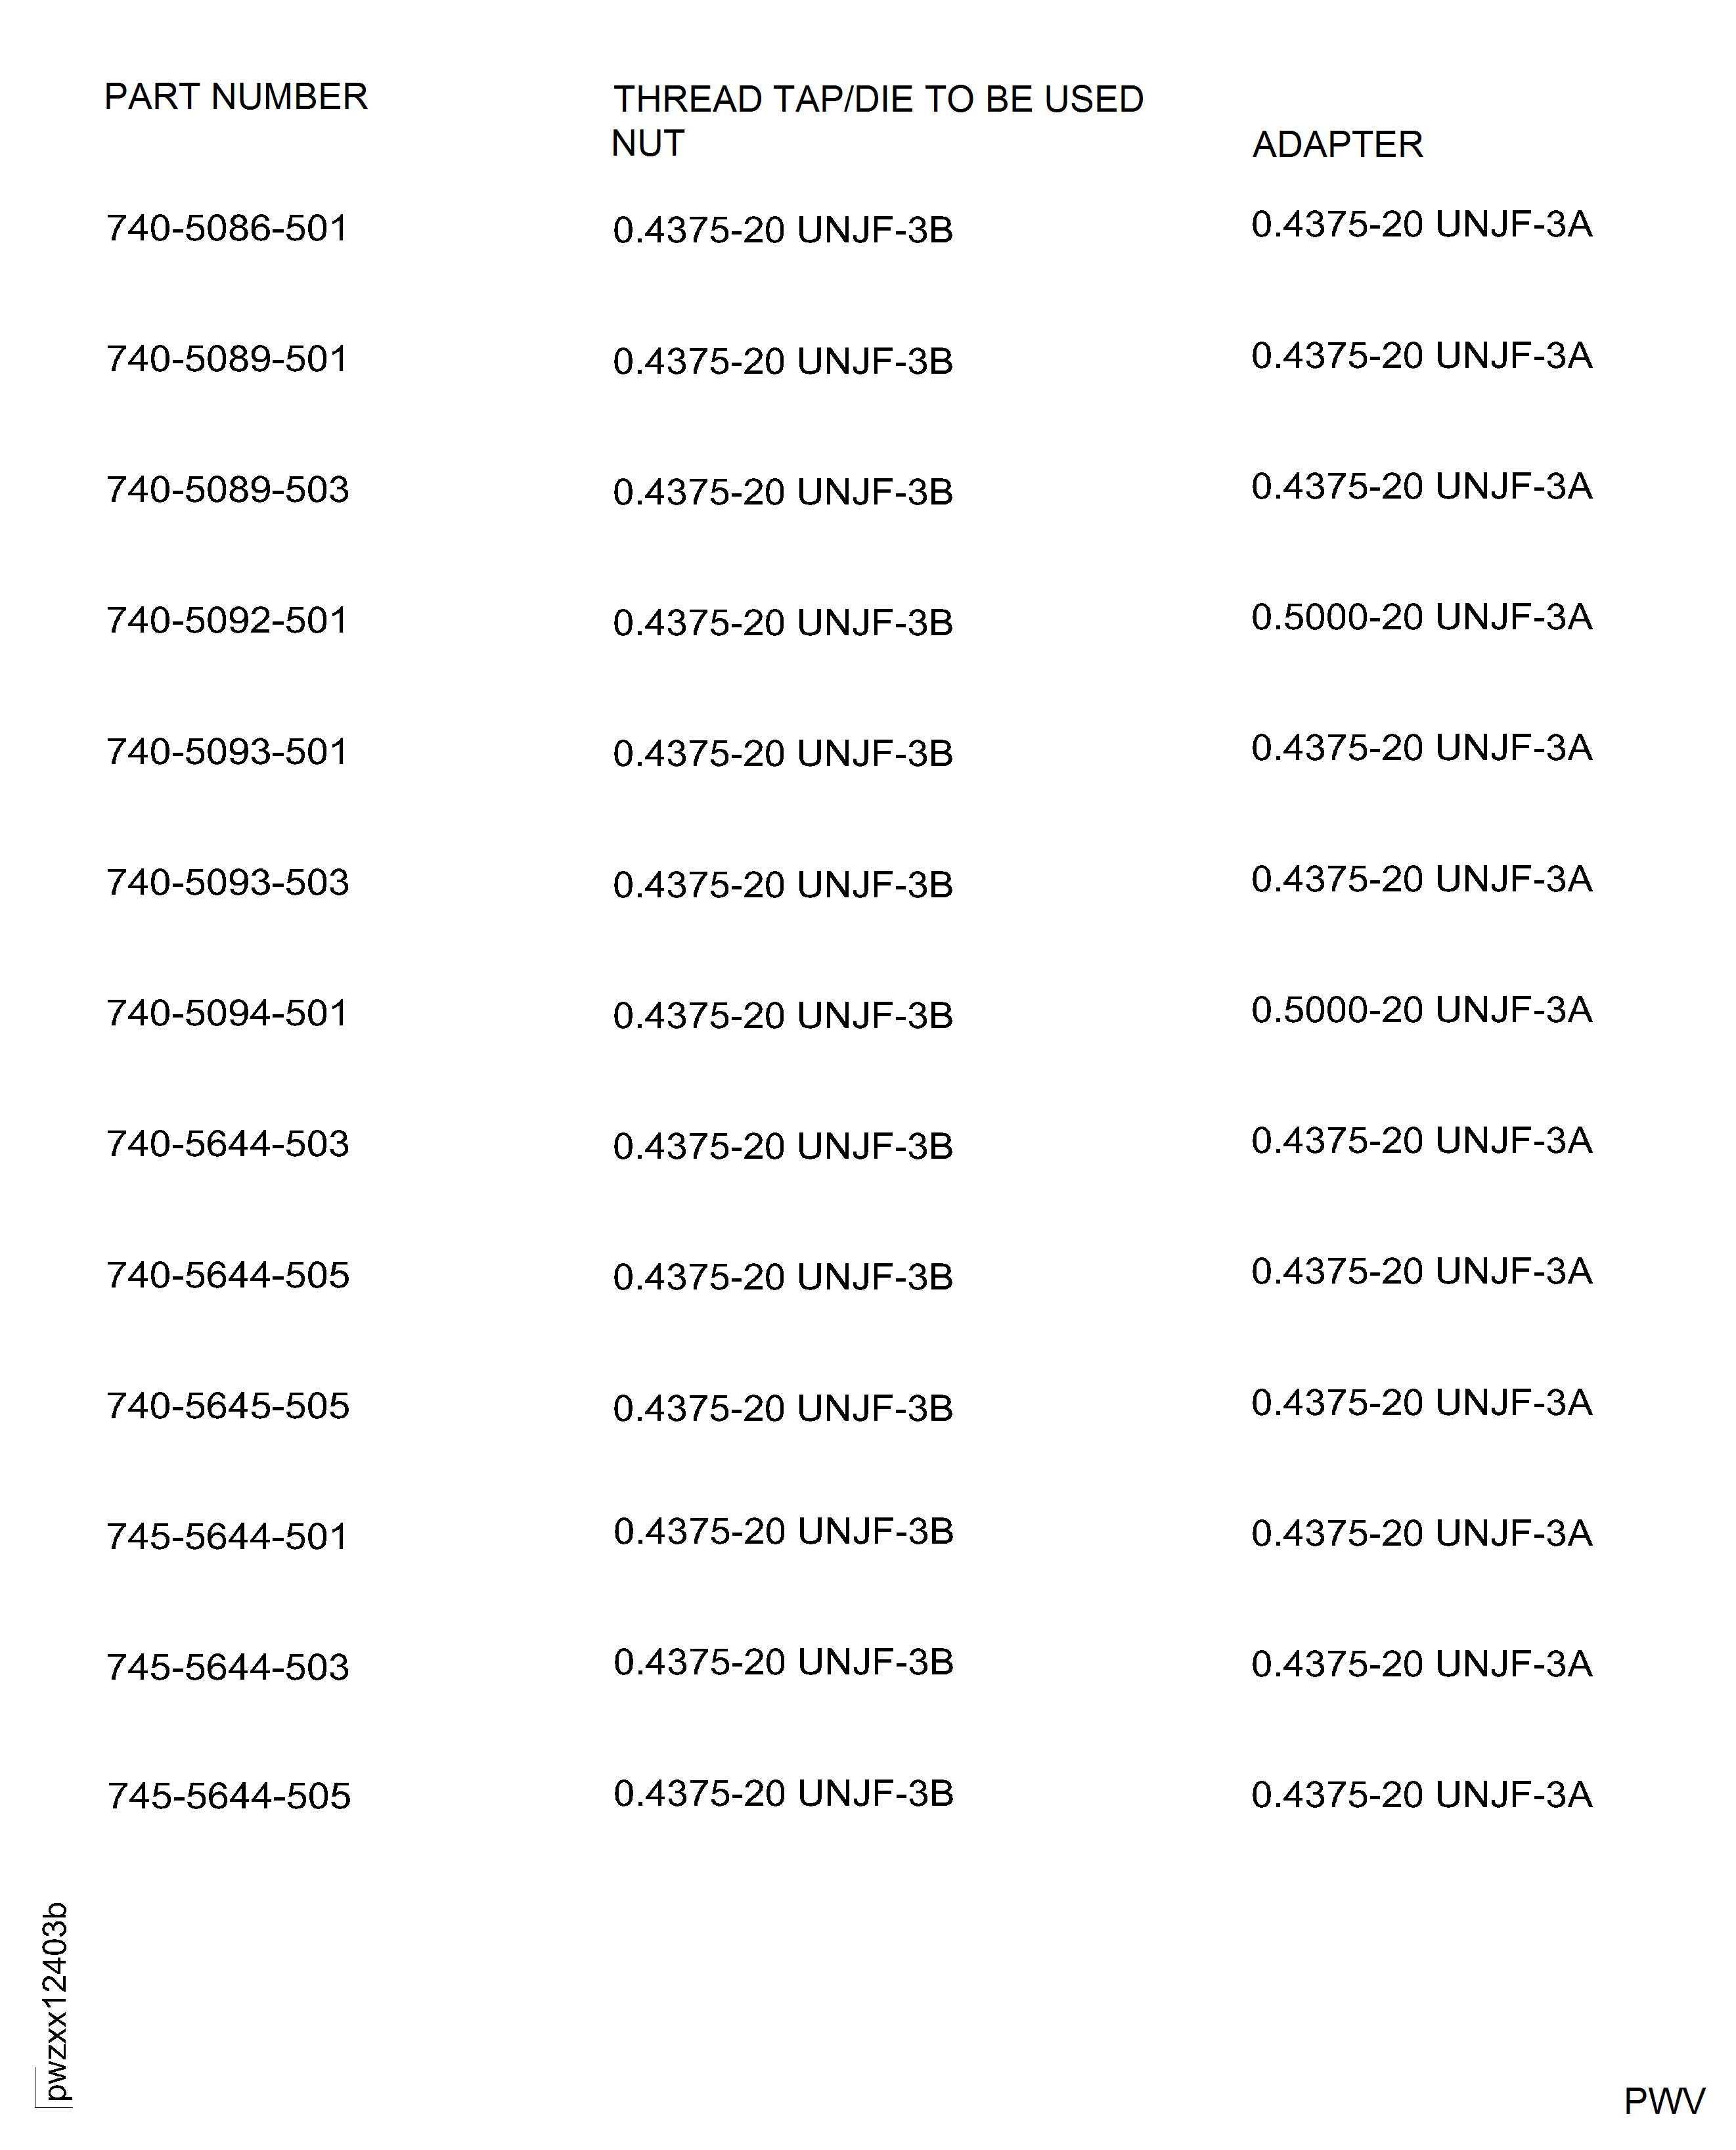
Refer toFigure for the thread taps/dies to be used on each part number.
Repair the screw threads.
Use the applicable thread gage to measure the size of the threads. The GO end of the gage must go in the end fitting. The NO-GO end of the gage must not go in the end fitting. If the NO-GO end goes in, discard the tube assembly.
Make sure that the dimensions of the screw threads are correct.
SUBTASK 36-21-49-350-051 Repair the Screw Threads

CAUTION
DO NOT DAMAGE THE SEALING FACES OF THE END FITTINGS. IT CAN MAKE THE TUBE UNSERVICEABLE.Use the smooth flat file to remove all burrs and scratches.
Make the wrench flats flat and smooth.
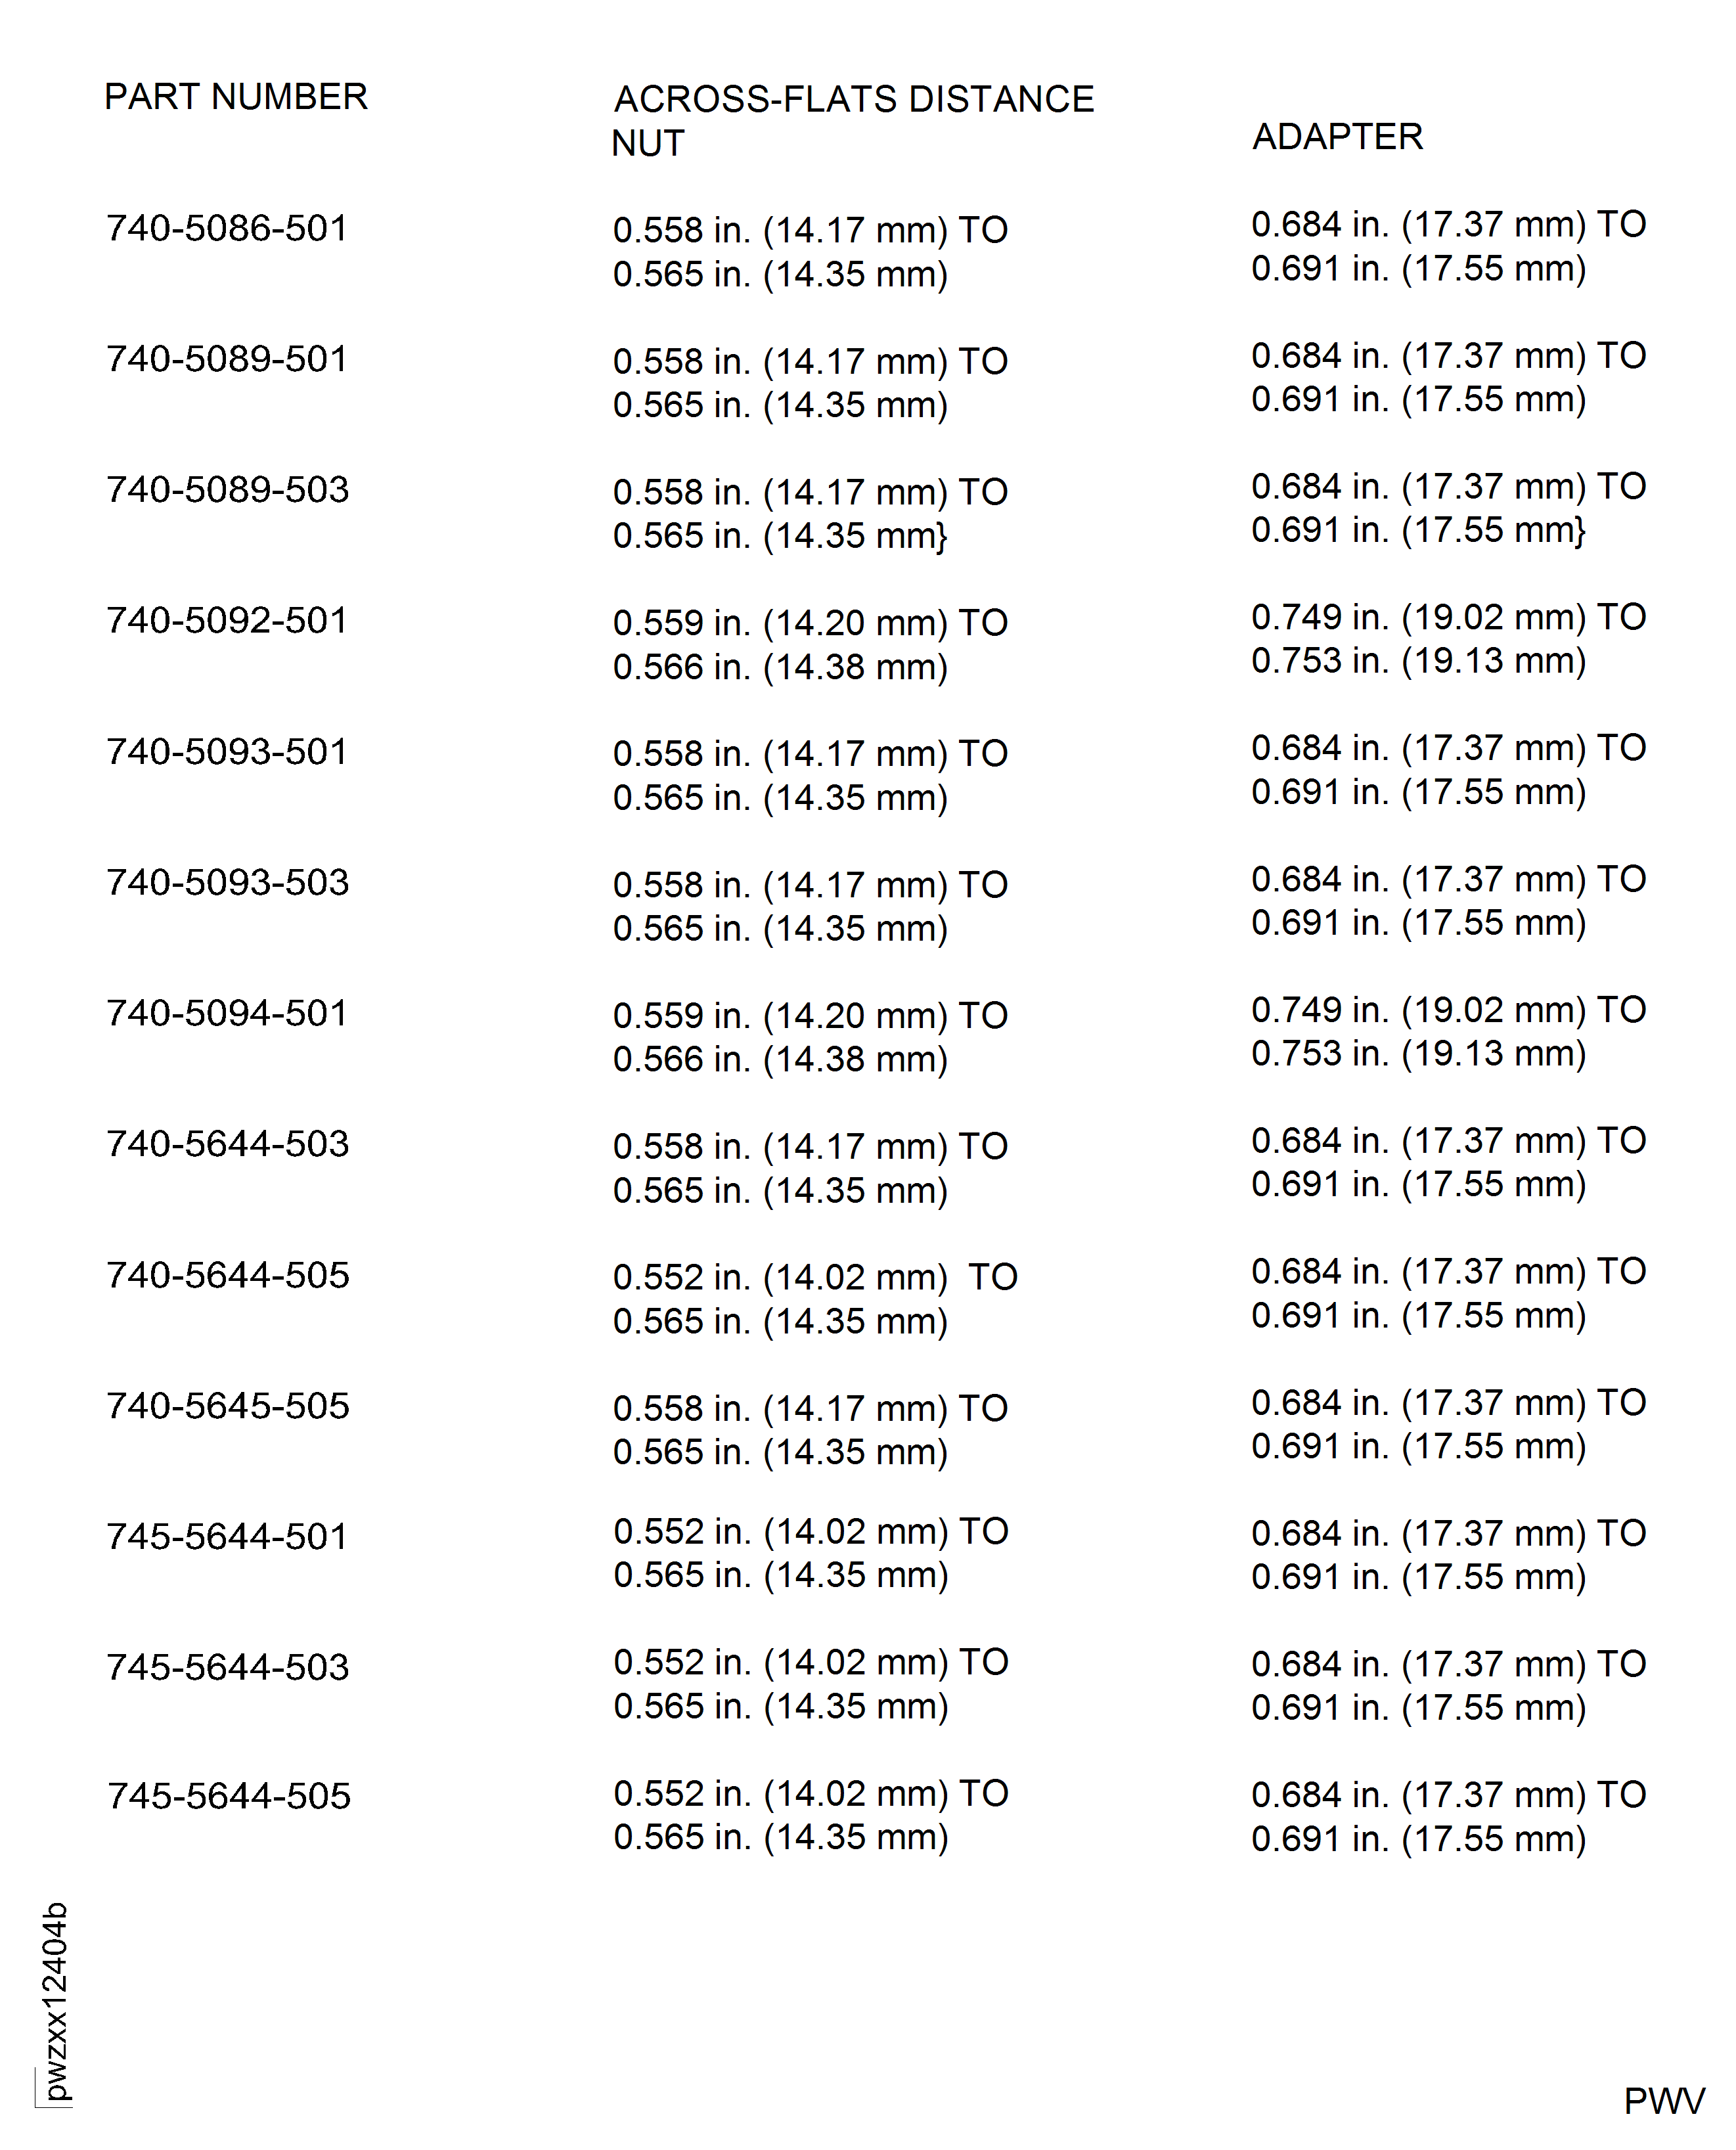
Each pair of flats must be parallel to each other. If the distance is not correct or the flats are not parallel, discard the tube assembly. Refer to Figure for the across-flats distance for each part number.
Measure the distance across the flats at each of three positions.
Do again Step.
Clean the end fitting
SUBTASK 36-21-49-350-052 Repair the Wrench Flats
Refer to Inspection-000 TASK 36-21-49-200-100.
Visually examine the end fitting
SUBTASK 36-21-49-220-067 Examine the End Fitting
Do again Step.
Make the edges of the damaged hole smooth
Drill a new hole through the two wrench flats at the next position away from the damaged hole. Use a 0.0625 in. (1.59 mm) diameter drill. Make sure the angle between the nut and lock-wire is correct.
Drill a new lock-wire hole
SUBTASK 36-21-49-350-054 Repair a Lock-wire Hole
Refer to TASK 70-23-05-230-501.
Do a dye-penetrant test on the end fitting.
SUBTASK 36-21-49-230-055 Examine the End Fitting
Refer to TASK 36-21-49-700-101.
Do a pressure test on the tube.
SUBTASK 36-21-49-780-054 Pressure Test the Tube
Refer to TASK 70-09-00-400-501.
Mark the repair scheme number VRS2930 on the tube adjacent to the part number with the electro-etch method.
SUBTASK 36-21-49-850-051 Put the Repair Scheme Number on the Tube
Figure: Repair Details And Dimensions
Repair Details And Dimensions

Figure: Repair Details And Dimensions
Repair Details And Dimensions

