TASK 72-00-44-220-001 Stage 1 Turbine Nozzle Assembly - Examine The Stage 1 Turbine Nozzle Assembly Front Face At Interface L-44, Inspection-001

DMC:V2500-A0-72-00-4400-00A-310A-B|Issue No:003.00|Issue Date:2020-05-01

Export Control

EAR Export Classification: Not subject to the EAR per 15 C.F.R. Chapter 1, Part 734.3(b)(3), except for the following Service Bulletins which are currently published as EAR Export Classification 9E991: SBE70-0992, SBE72-0483, SBE72-0580, SBE72-0588, SBE72-0640, SBE73-0209, SBE80-0024 and SBE80-0025.

Copyright

© IAE International Aero Engines AG (2001, 2014 - 2021) The information contained in this document is the property of © IAE International Aero Engines AG and may not be copied or used for any purpose other than that for which it is supplied without the express written authority of © IAE International Aero Engines AG. (This does not preclude use by engine and aircraft operators for normal instructional, maintenance or overhaul purposes.).

Applicability

All

Common Information

TASK 72-00-44-220-001 Stage 1 Turbine Nozzle Assembly - Examine The Stage 1 Turbine Nozzle Assembly Front Face At Interface L-44, Inspection-001

General

The word "Reject" after an interface inspection statement requires that further detailed inspection or repair as applicable, of the affected area be accomplished using data in the applicable ATA section of the part in question. Contact IAE for FAA approved data if the referenced TASK is not in the manual.

Refer to TASK 72-00-00-200-001 (examine the modular/non-modular interfaces) before you do this TASK.

The policy that is necessary for inspection is given in the SPM TASK 70-20-01-200-501.

You can do the inspections that follow if the stage 1 turbine nozzle assembly is removed (Refer to TASK 72-00-44-020-001-001).

Installation of modules that are near the maximum interface limits can result in decreased module run times.

Use a bright light and a 3X magnifying glass to find surface cracks.

Preliminary Requirements

Pre-Conditions

NONE

Support Equipment

NONE

Consumables, Materials and Expendables

NONE

Spares

NONE

Safety Requirements

NONE

Procedure

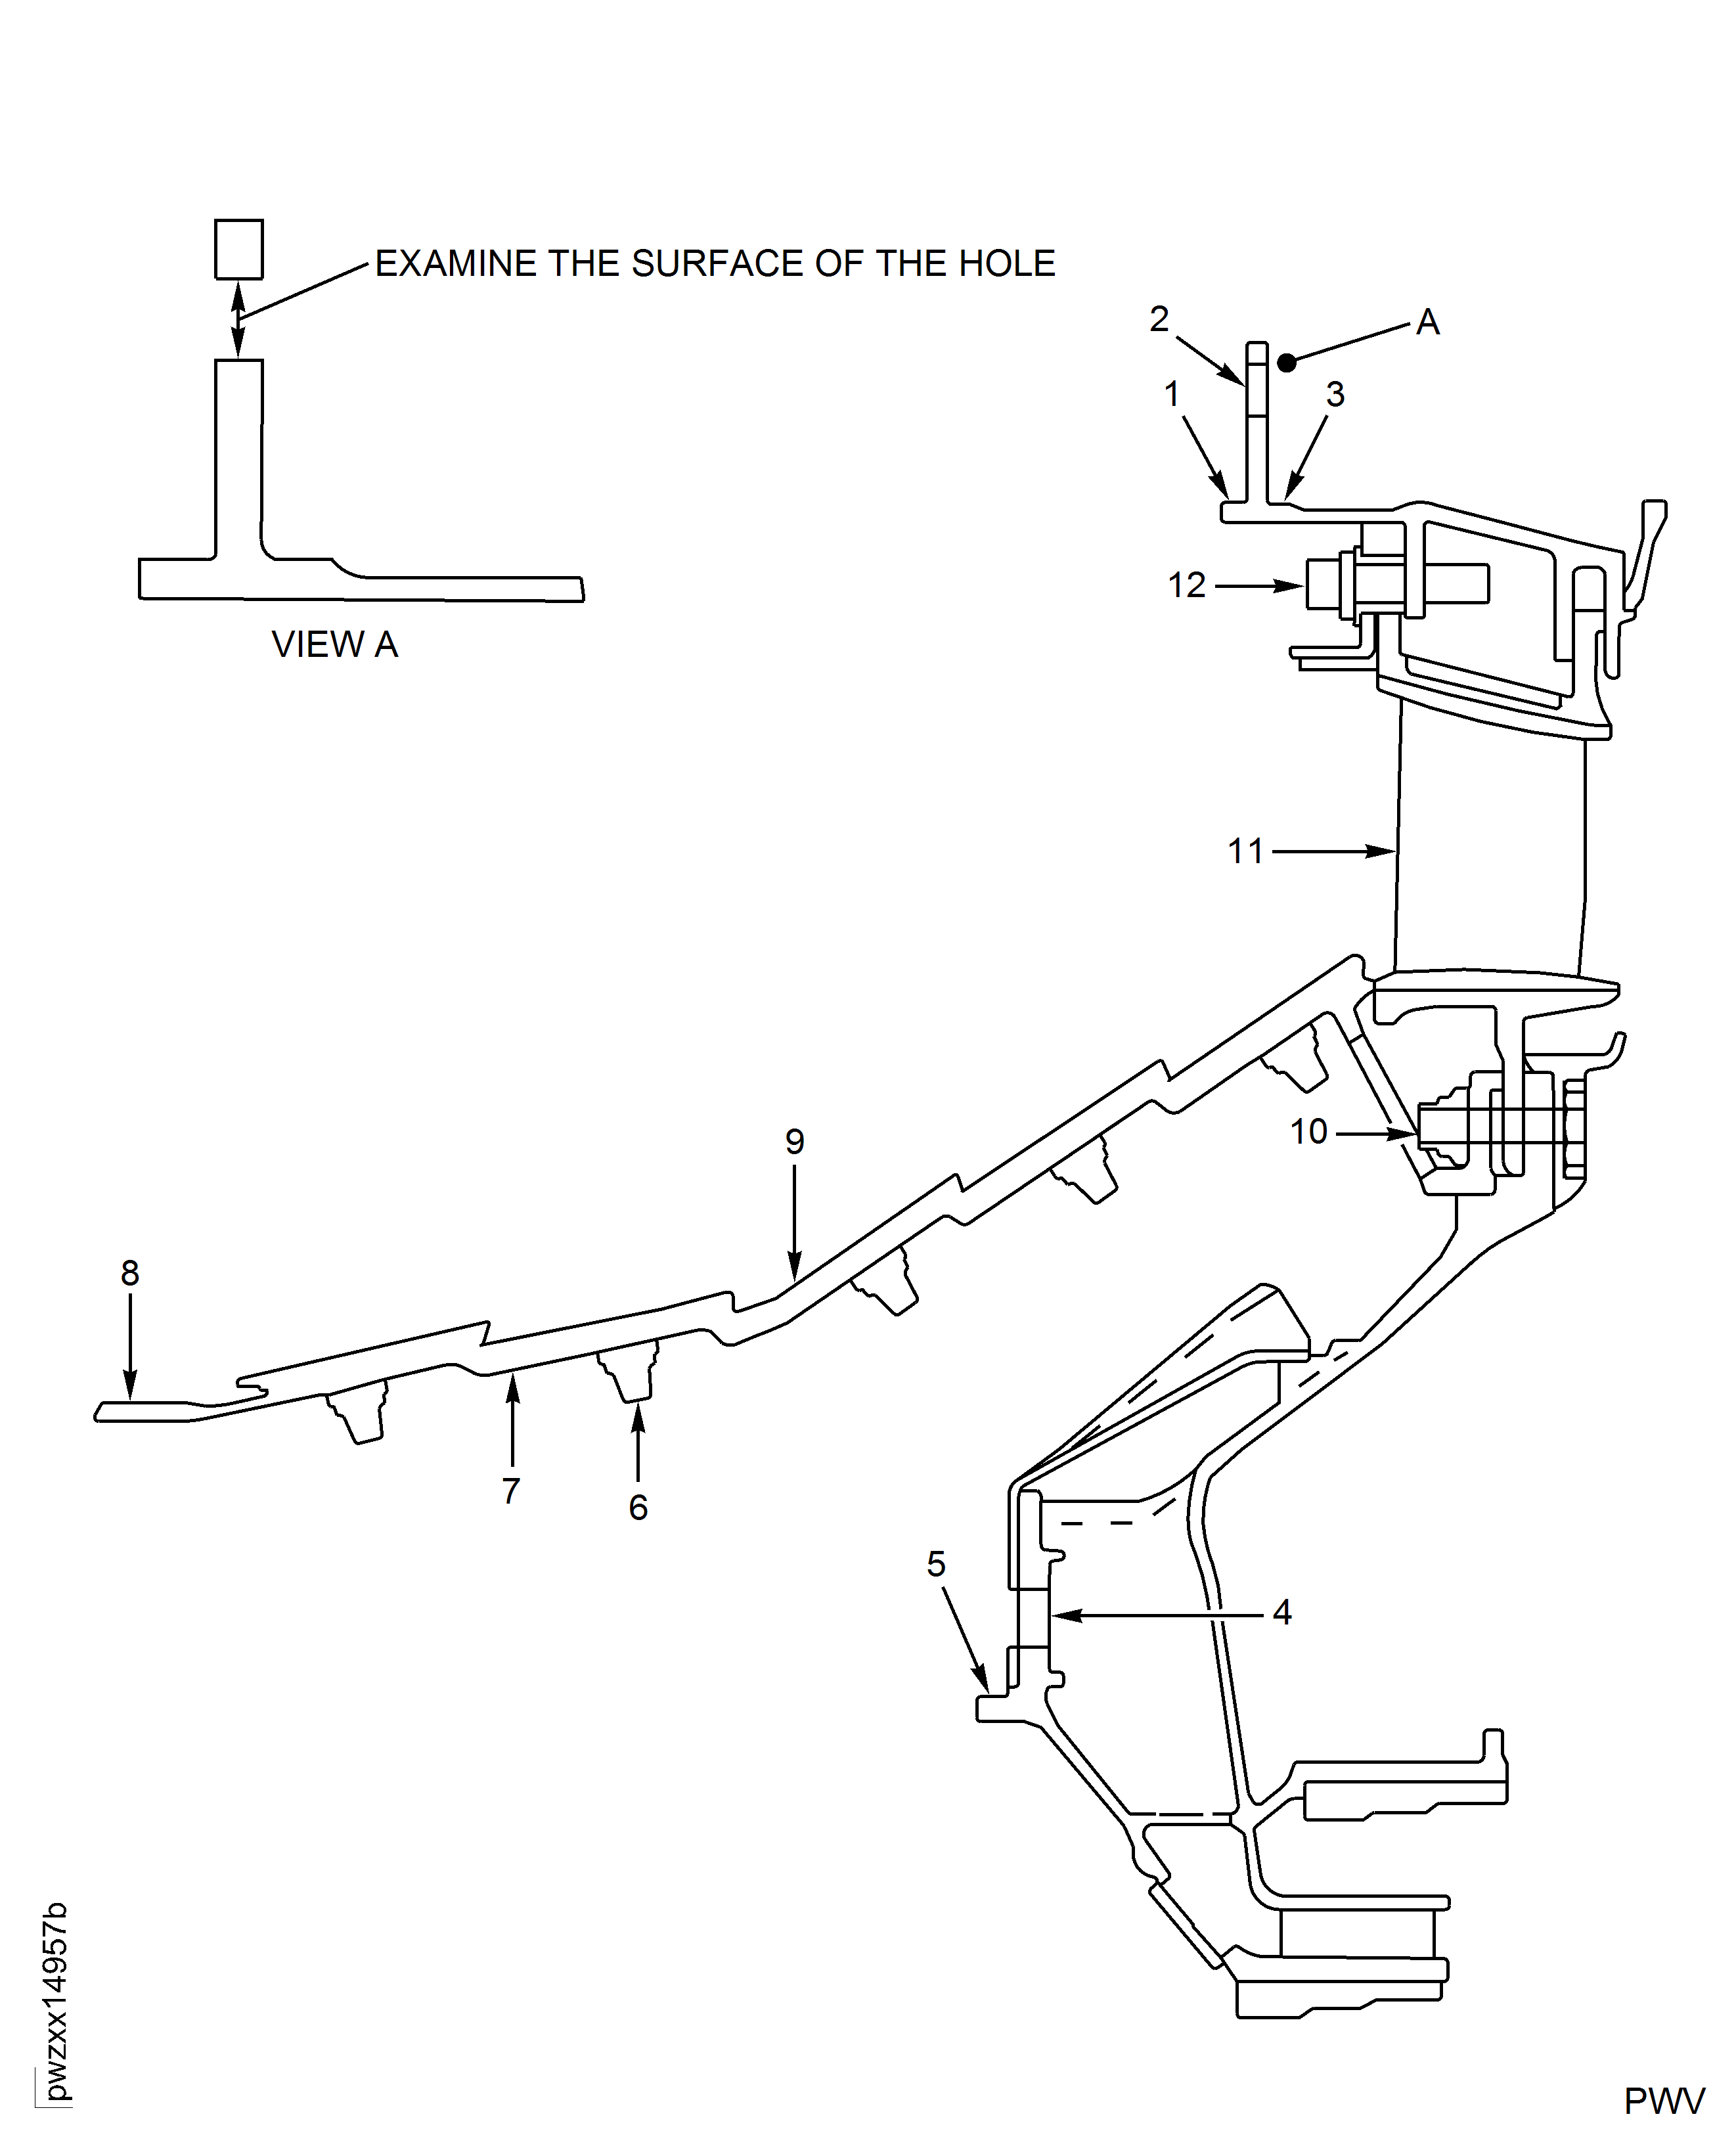
    1. SUBTASK 72-00-44-220-055 Visually Examine the Support Assembly Outer Flange Area at Locations 1 and 3

    2. Refer to Figure.

      1. Round bottom dents up to 0.250 in. (6.350 mm) in diameter and 0.010 in. (0.254 mm) deep

      2. Accept

      1. Wear up to 25 percent of the contact surface

      2. Accept

      1. Other than Step or Step

      2. Reject

    1. SUBTASK 72-00-44-220-056 Visually Examine the Support Assembly Outer Flange Bolt Holes at Location 2

    2. Refer to Figure.

      1. Cracks

      2. Reject

    1. SUBTASK 72-00-44-220-083 Examine the Support Assembly Outer Flange at Location 2

    2. Refer to Figure.

    3. Clean the bolt holes per SPM TASK 70-11-26-300-503 (PW equivalent SPOP 208).

    4. Perform local FPI per SPM TASK 70-23-05-230-501 (high sensitivity) (or equivalent PW SPOP 70).

    5. Examine the flange bolt holes carefully.

      1. If you find any indication.

      2. Reject.

    1. SUBTASK 72-00-44-220-058 Visually Examine the Duct Assembly Contact Surface at Location 5

    2. Refer to Figure.

      1. Wear and/or galled up to 0.005 in. (0.127 mm) deep and up to 20 percent of the contact surface area

      2. Accept

      1. Other than Step

      2. Reject

    1. SUBTASK 72-00-44-220-059 Visually Examine the Duct Assembly Bolt Holes at Location 4

    2. Refer to Figure.

      1. Cracks

      2. Reject

    1. SUBTASK 72-00-44-220-060 Visually Examine the Inner Combustion Chamber at Location 6

    2. Refer to Figure.

      1. Nuts that are not there or loose washers

      2. Reject

    1. SUBTASK 72-00-44-220-061 Visually Examine the Shell of the Inner Combustion Chamber Assembly at Location 7

    2. Refer to Figure.

      1. Dents less than 0.010 in. (0.254 mm) deep and 1.000 sq.in. (645.000 sq.mm) in area

      2. Accept

      1. Burn holes, cracks or blocked cooling holes

      2. Reject

    1. SUBTASK 72-00-44-220-062 Visually Examine the Front Seal of the Inner Combustion Chamber Assembly at Location 8

    2. Refer to Figure.

      1. Local wear if the base metal does not show. If base metal does show, it must be less than 20 percent of the total coated area and less than 20 percent of the axial width of the coated area

      2. Accept

      1. Chipped or spalled hardface is less than 20 percent of the total coated area. Chipped or spalled hardface must be less than 20 percent of the width of the coated area

      2. Accept

      1. Other than Step or Step

      2. Reject

    1. SUBTASK 72-00-44-220-063 Visually Examine the Liner Segments at Location 9

    2. Refer to Figure.

      1. There are segment cracks less than 1.000 in. (25.400 mm). All cracks must be more than 0.700 in. (17.780 mm) from a circumferential edge.

      2. Accept

      1. There is edge burnback less than 0.200 in. (5.080 mm) in rows 1, 2, 3, 4 or 5 and no attachment post can be seen

      2. Accept

      1. There are surface burns

      2. Accept

      1. There are up to three burn holes on inner combustion chamber liner assembly that are less than 0.200 in. (5.080 mm) long. There can be only one burn hole on a segment or no attachment post can be seen

      2. Accept

      1. There is spalled, chipped or cracked ceramic coating

      2. Accept

      1. There is a combustion chamber segment that has cracks and/or burns that can possibly cause a piece of segment metal more than 0.500 in. (12.700 mm) long to break off

      2. Reject

      1. Other than Step, Step, Step, Step or Step

      2. Reject

    1. SUBTASK 72-00-44-220-078 Examine the Combustion Chamber Inner Liner Nut Channel at Location 10

    2. Refer to Figure.

      1. Nuts that are not there or pieces that are broken away

      2. Reject

    1. SUBTASK 72-00-44-220-064 Visually Examine the Stage 1 Vanes at Location 11

    2. Refer to Figure.

      1. Concave or convex side axial cracks not more than 1.500 in. (38.10 mm) long and/or concave or convex side radial cracks not more than 1.500 in. (38.10 mm) long. All cracks must be less than 0.050 in. (1.27 mm) wide and must not have connected loop cracks more than 0.400 in. (10.16 mm) long or look like this will occur

      2. Accept

      1. No limit to tight leading edge cracks. All cracks must be less than 0.050 in. (1.27 mm) wide

      2. Accept

      1. One inner and/or outer platform crack less than 0.500 in. (12.70 mm) long. No platform radius cracks parallel to the fillet are permitted. A maximum of one crack on each vane is permitted that extends from the airfoil concave or convex surface to a platform

      2. Accept

      1. No limit to surface burns. No burn holes are permitted

      2. Accept

      1. No limit to platform burns. No burn holes are permitted

      2. Accept

      1. Trailing edge burns less than 25 percent of chord length from the trailing edge and less than 0.500 in. (12.70 mm) (five cooling slots) in width except as given in step H

      2. Accept

      1. Trailing edge burns in the inner three cooling slots

      2. Reject

      1. No limit to chipped or spalled ceramic coat

      2. Accept

      1. No limit to round bottom dents not more than 0.010 in. (0.25 mm) deep

      2. Accept

      1. Other than Step thru Step

      2. Reject

    1. SUBTASK 72-00-44-220-066 Visually Examine the Turbine Vane Retaining Bolts at Location 12

    2. Refer to Figure.

      1. Missing or loose

      2. Reject

  1. Figure: Locations at Interface L-44

    Locations at Interface L-44
Requirements After Job Completion

Follow-On Conditions

NONE
Change Type:

Added new subtask and revised figure. (19VC115)