Export Control
EAR Export Classification: Not subject to the EAR per 15 C.F.R. Chapter 1, Part 734.3(b)(3), except for the following Service Bulletins which are currently published as EAR Export Classification 9E991: SBE70-0992, SBE72-0483, SBE72-0580, SBE72-0588, SBE72-0640, SBE73-0209, SBE80-0024 and SBE80-0025.Copyright
© IAE International Aero Engines AG (2001, 2014 - 2021) The information contained in this document is the property of © IAE International Aero Engines AG and may not be copied or used for any purpose other than that for which it is supplied without the express written authority of © IAE International Aero Engines AG. (This does not preclude use by engine and aircraft operators for normal instructional, maintenance or overhaul purposes.).Applicability
All
Common Information
TASK 72-32-85-300-005 Fan Case - Blend Repair, Repair-005 (VRS1405)
Effectivity
FIG/ITEM | PART NO. |
|---|---|
01-100 | 5W0069 |
01-100 | 5W0072 |
01-100 | 5W0081 |
01-100 | 5W0093 |
01-100 | 5W0094 |
01-100 | 5W0100 |
01-100 | 5W0184 |
01-100 | 5W0186 |
01-100 | 5W0187 |
01-100 | 5W0188 |
01-100 | 5W0189 |
01-100 | 5W0190 |
01-100 | 5W0199 |
01-100 | 5W0200 |
01-100 | 5W0201 |
01-100 | 5W0202 |
01-100 | 5W0203 |
01-100 | 5W0204 |
01-100 | 5W0205 |
01-100 | 5W0209 |
01-100 | 5W0210 |
01-100 | 5W0211 |
01-100 | 5W0212 |
01-100 | 5W0213 |
General
This Repair scheme gives the procedure for blending the Fan Case.
Price and Availability - refer to IAE
The practices and processes referred to in the procedure by the TASK number are in the SPM.
NOTE
Preliminary Requirements
Pre-Conditions
NONESupport Equipment
| Name | Manufacturer | Part Number / Identification | Quantity | Remark |
|---|---|---|---|---|
| Portable blending equipment | LOCAL | Portable blending equipment | ||
| Rotary files | LOCAL | Rotary files | ||
| Ultrasonic wall thickness measuring equipment | LOCAL | Ultrasonic wall thickness measuring equipment | ||
| Dimensional inspection equipment | LOCAL | Dimensional inspection equipment | ||
| Vibrating marking pencil | LOCAL | Vibrating marking pencil |
Consumables, Materials and Expendables
| Name | Manufacturer | Part Number / Identification | Quantity | Remark |
|---|---|---|---|---|
| CoMat 05-020 WATERPROOF SILICON CARBIDE | LOCAL | CoMat 05-020 | ||
| CoMat 05-021 WATERPROOF SILICON CARBIDE | 44197 | CoMat 05-021 | ||
| CoMat 08-133 SURFACE REPLICATING MATERIAL | LOCAL | CoMat 08-133 |
Spares
NONESafety Requirements
NONEProcedure
Refer to the SPM TASK 70-11-26-300-503.
Use cleaning equipment.
Clean the repaired area.
SUBTASK 72-32-85-110-083 Clean the Damaged Area
If the damage is within locations 6 and/or 7 it is recommended that the damage depth and the wall thickness of the area adjacent to the damage is noted.
The thickness can be measured with ultrasonic wall thickness measuring equipment.
The depth of damage can be measured with dimensional inspection equipment and CoMat 08-133 SURFACE REPLICATING MATERIAL.
NOTE
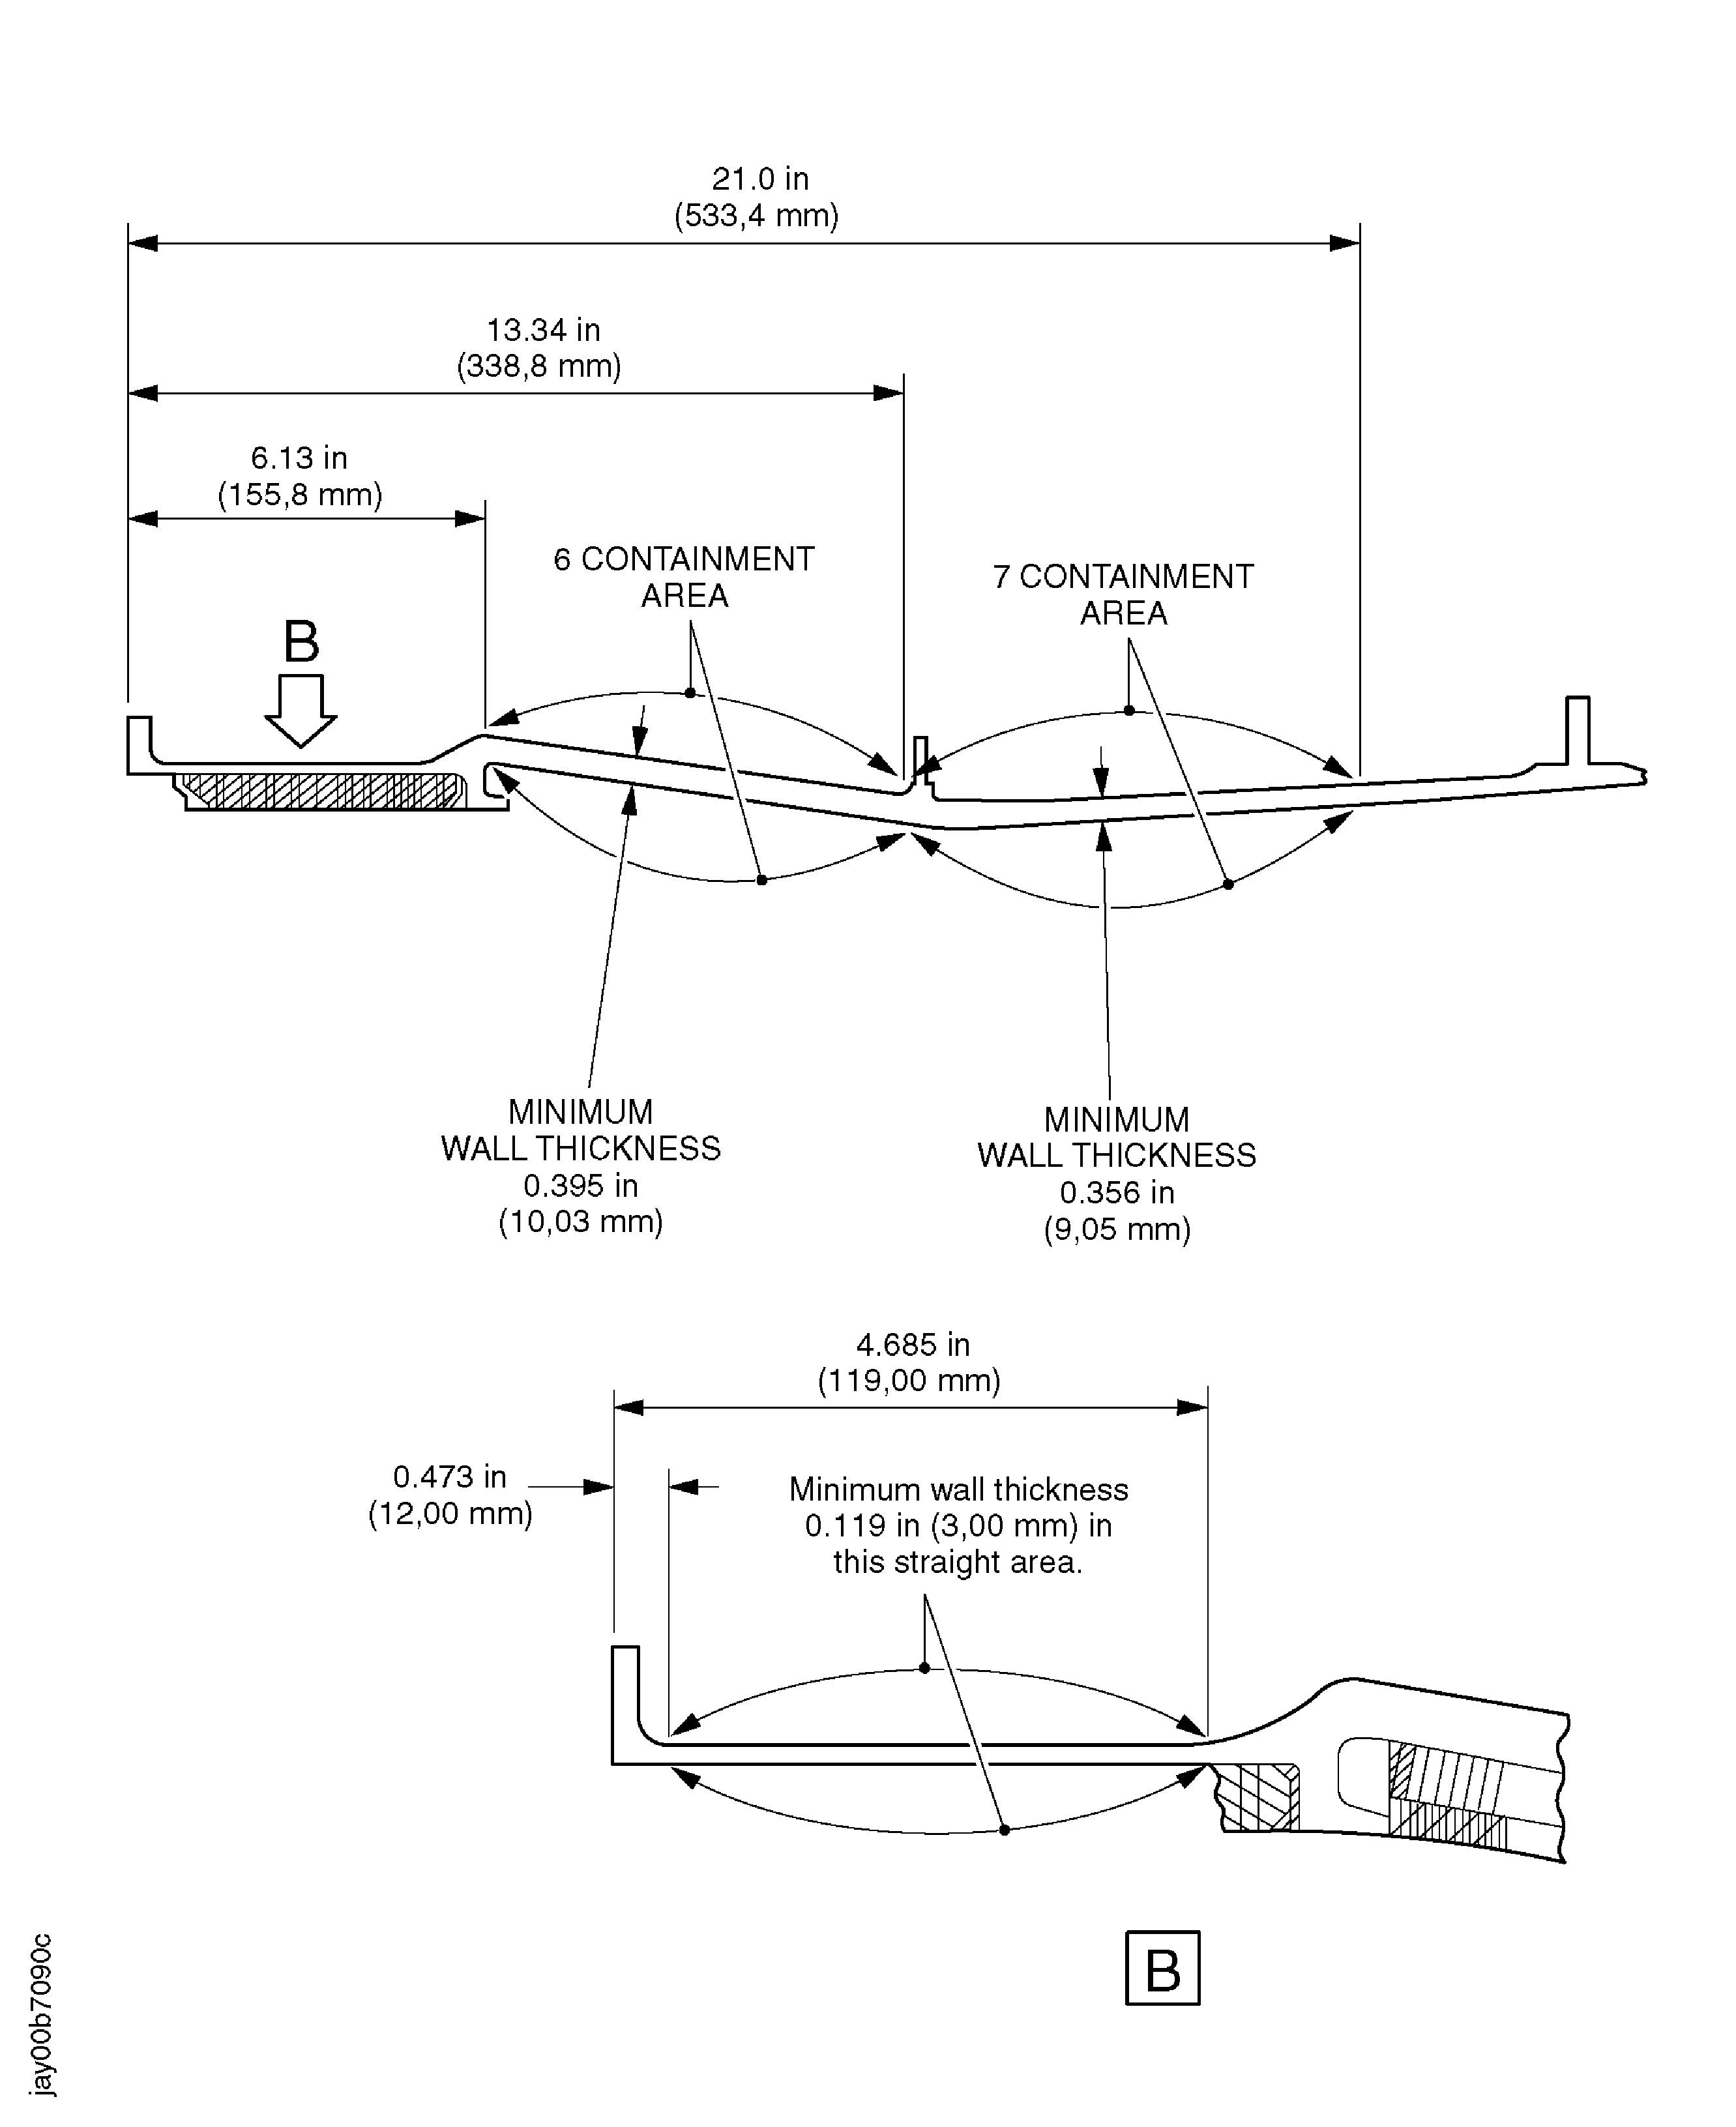
Make sure that ultrasonic wall thickness measuring equipment was calibrated by the necessary procedures given in operation manuals of the measuring equipment or local regulations. Calibration piece to be made from the same material (Ti-6A1-4V) or a material with the same acoustic velocity as the part to be tested. The calibration piece thickness must be within the thickness limits of the part to be measured, refer to Figure.A replica produed by filling a mold with a casting compound, such as elastomer or plastic and letting it harden inside the impression, taking on the damaged shape and surface details of the original specimen.Visually examine and measure the dimensions of the damaged area.
SUBTASK 72-32-85-220-195 Examine the Damaged Area of the Fan Case (01-100)
NOTE
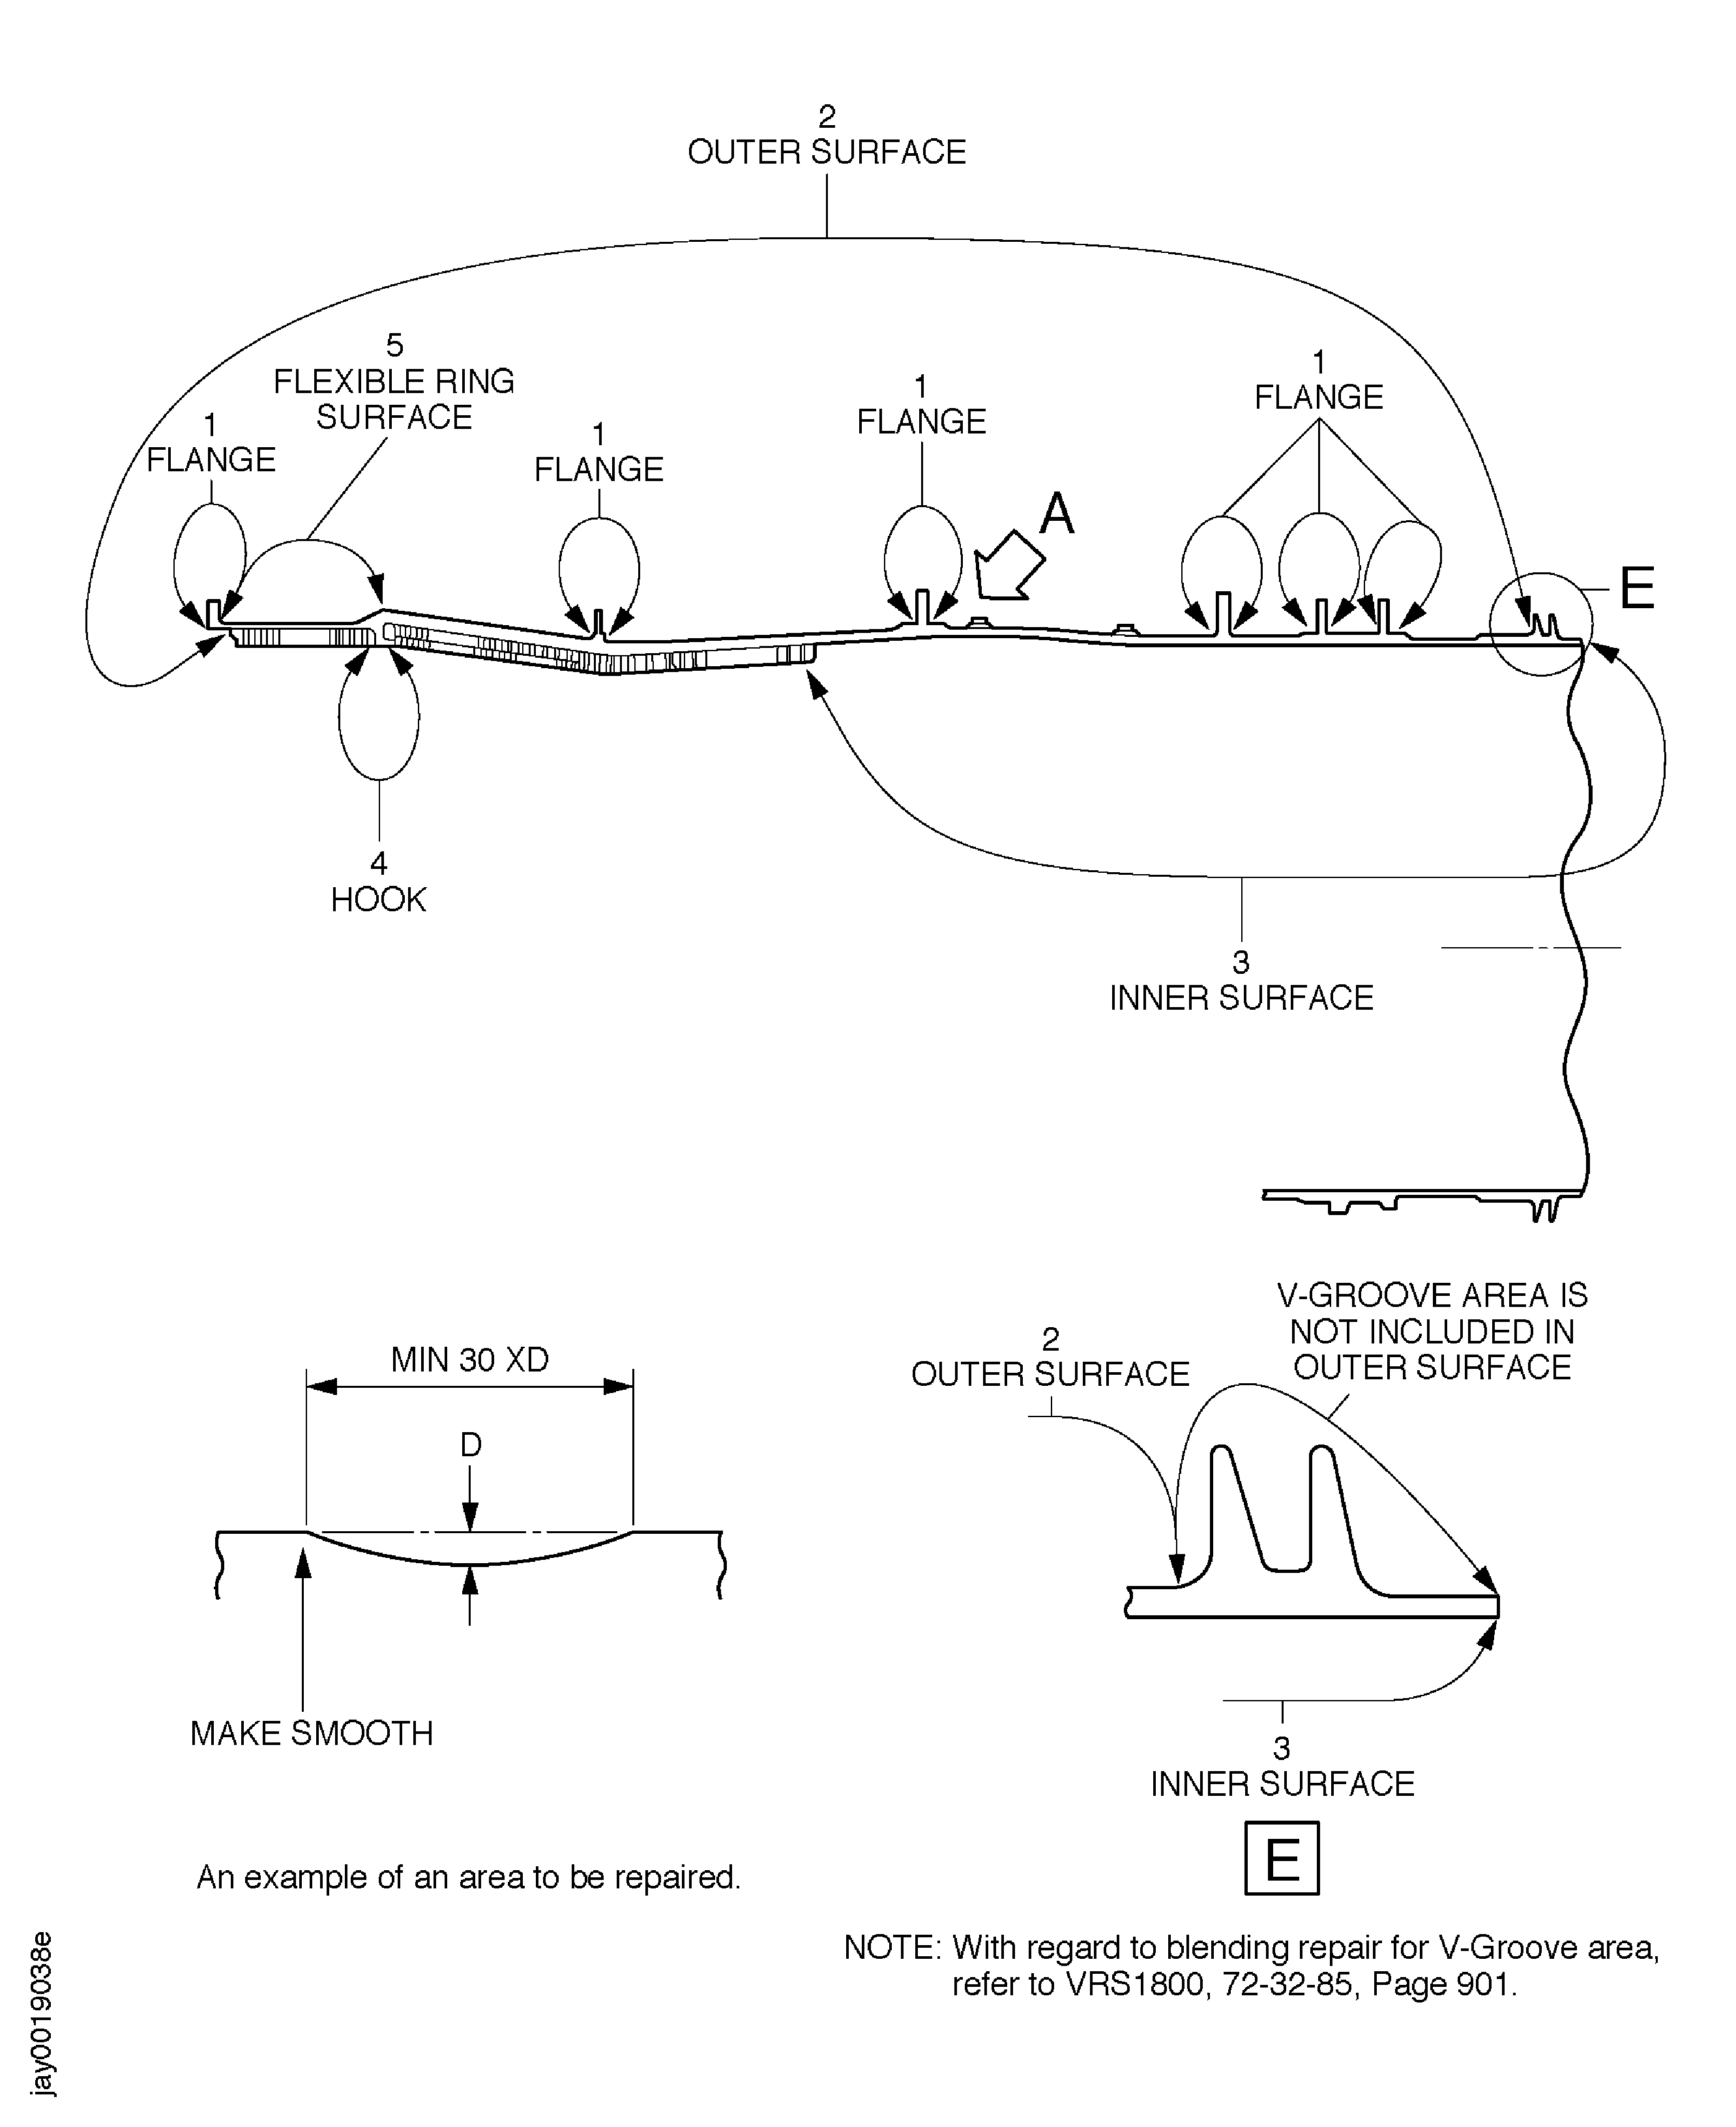
Dull tools and worn or loaded abrasive equipments generate heat rapidly and sould be checked frequently and replaced when necessary.The blend ratio, length to depth, must be a minimum of 30:1. Refer to Figure.Remove the minimum quantity of material necessary to remove the damage. All blends must be smooth and continuous.The surface finish of all the repaired surfaces must have the same or better quality to that of the adjacent, not damaged, areas.Use portable blending equipment, CoMat 05-020 WATERPROOF SILICON CARBIDE and CoMat 05-021 WATERPROOF SILICON CARBIDE.
Continue to remove material until all the damage is removed.
The blend must be smooth and continuous into the original contour in all directions.
The surface finish of all blended areas must be as smooth as the original finish.
Refer to the SPM TASK 70-35-03-300-501.

CAUTION
TITANIUM COMPONENT - YOU MUST USE SILICON CARBIDE TYPE ABRASIVE WHEELS, STONES AND PAPERS TO DRESS, BLEND AND POLISH THIS COMPONENT. IF MECHANICAL CUTTERS ARE USED, ONLY LIGHT CUTS MUST BE MADE TO AVOID OVERHEATING THE MATERIAL.
CAUTION
TITANIUM COMPONENT - AVOID BUILD UP HEAT BY APPLYING ONLY GENTLE PRESSURE AND KEEPING THE TOOL SPEED AS LOW AS POSSIBLE. USE TECHNIQUES WHICH ALLOW FOR PROGRESSIVE WEAR OF THE DRESSING MEDIA TO PRESENT A CONTINUALLY FRESH CUTTING SURFACE TO THE WORK PIECE. DO NOT DWELL ON ONE AREA OF THE COMPONENT. DRESS, WHERE POSSIBLE, IN A CIRCULARY MOTION, TAKING LIGHT CUTS TO AVOID OVERHEATING.
CAUTION
TITANIUM COMPONENT - YOU MUST MAKE SURE THAT WHEN YOU REMOVE MATERIAL, BLEND AND POLISH, TO MAKE SMOOTH, THAT NO SPARKS ARE PRODUCED AND THE ADJACENT AREA IS MASKED OFF.
CAUTION
TITANIUM COMPONENT - IF THE MATERIAL SHOWS A CHANGE IN COLOUR DURING DRESSING, TO DARKER THAN A LIGHT STRAW COLOUR, THE COMPONENT IS TO BE REJECTED.
CAUTION
POWER BLENDING TOOLS MAY BE USED IF DAMAGED TITANIUM PART IS PERIODICALLY CHECKED FOR HEAT BUILD-UP BY TOUCHING OCCASIONALLY WITH UNGLOVED HAND. IF TITANIUM PART BECOMES TOO HOT TO TOUCH, ALLOW MATERIAL TO COOL BEFORE CONTINUING REPAIR.
CAUTION
THE FAN CASE IS MADE FROM TITANIUM ALLOY AND IS THIN IN SOME AREAS. IF YOU BLEND TOO MUCH. THE PART CANNOT BE SERVICEABLE AND WILL HAVE TO BE REPLACED.
CAUTION
DO NOT OPERATE WITHOUT SAFETY GOGGLES AND OTHER GUARDS EQUIPMENT. FLYING PARTICLES CAN CAUSE INJURY.Blend the fan case surface damage such as dents, nicks, scratches, wear, fretting, galling distorsion.
SUBTASK 72-32-85-350-061 Blend Repair the Fan Case (01-100)
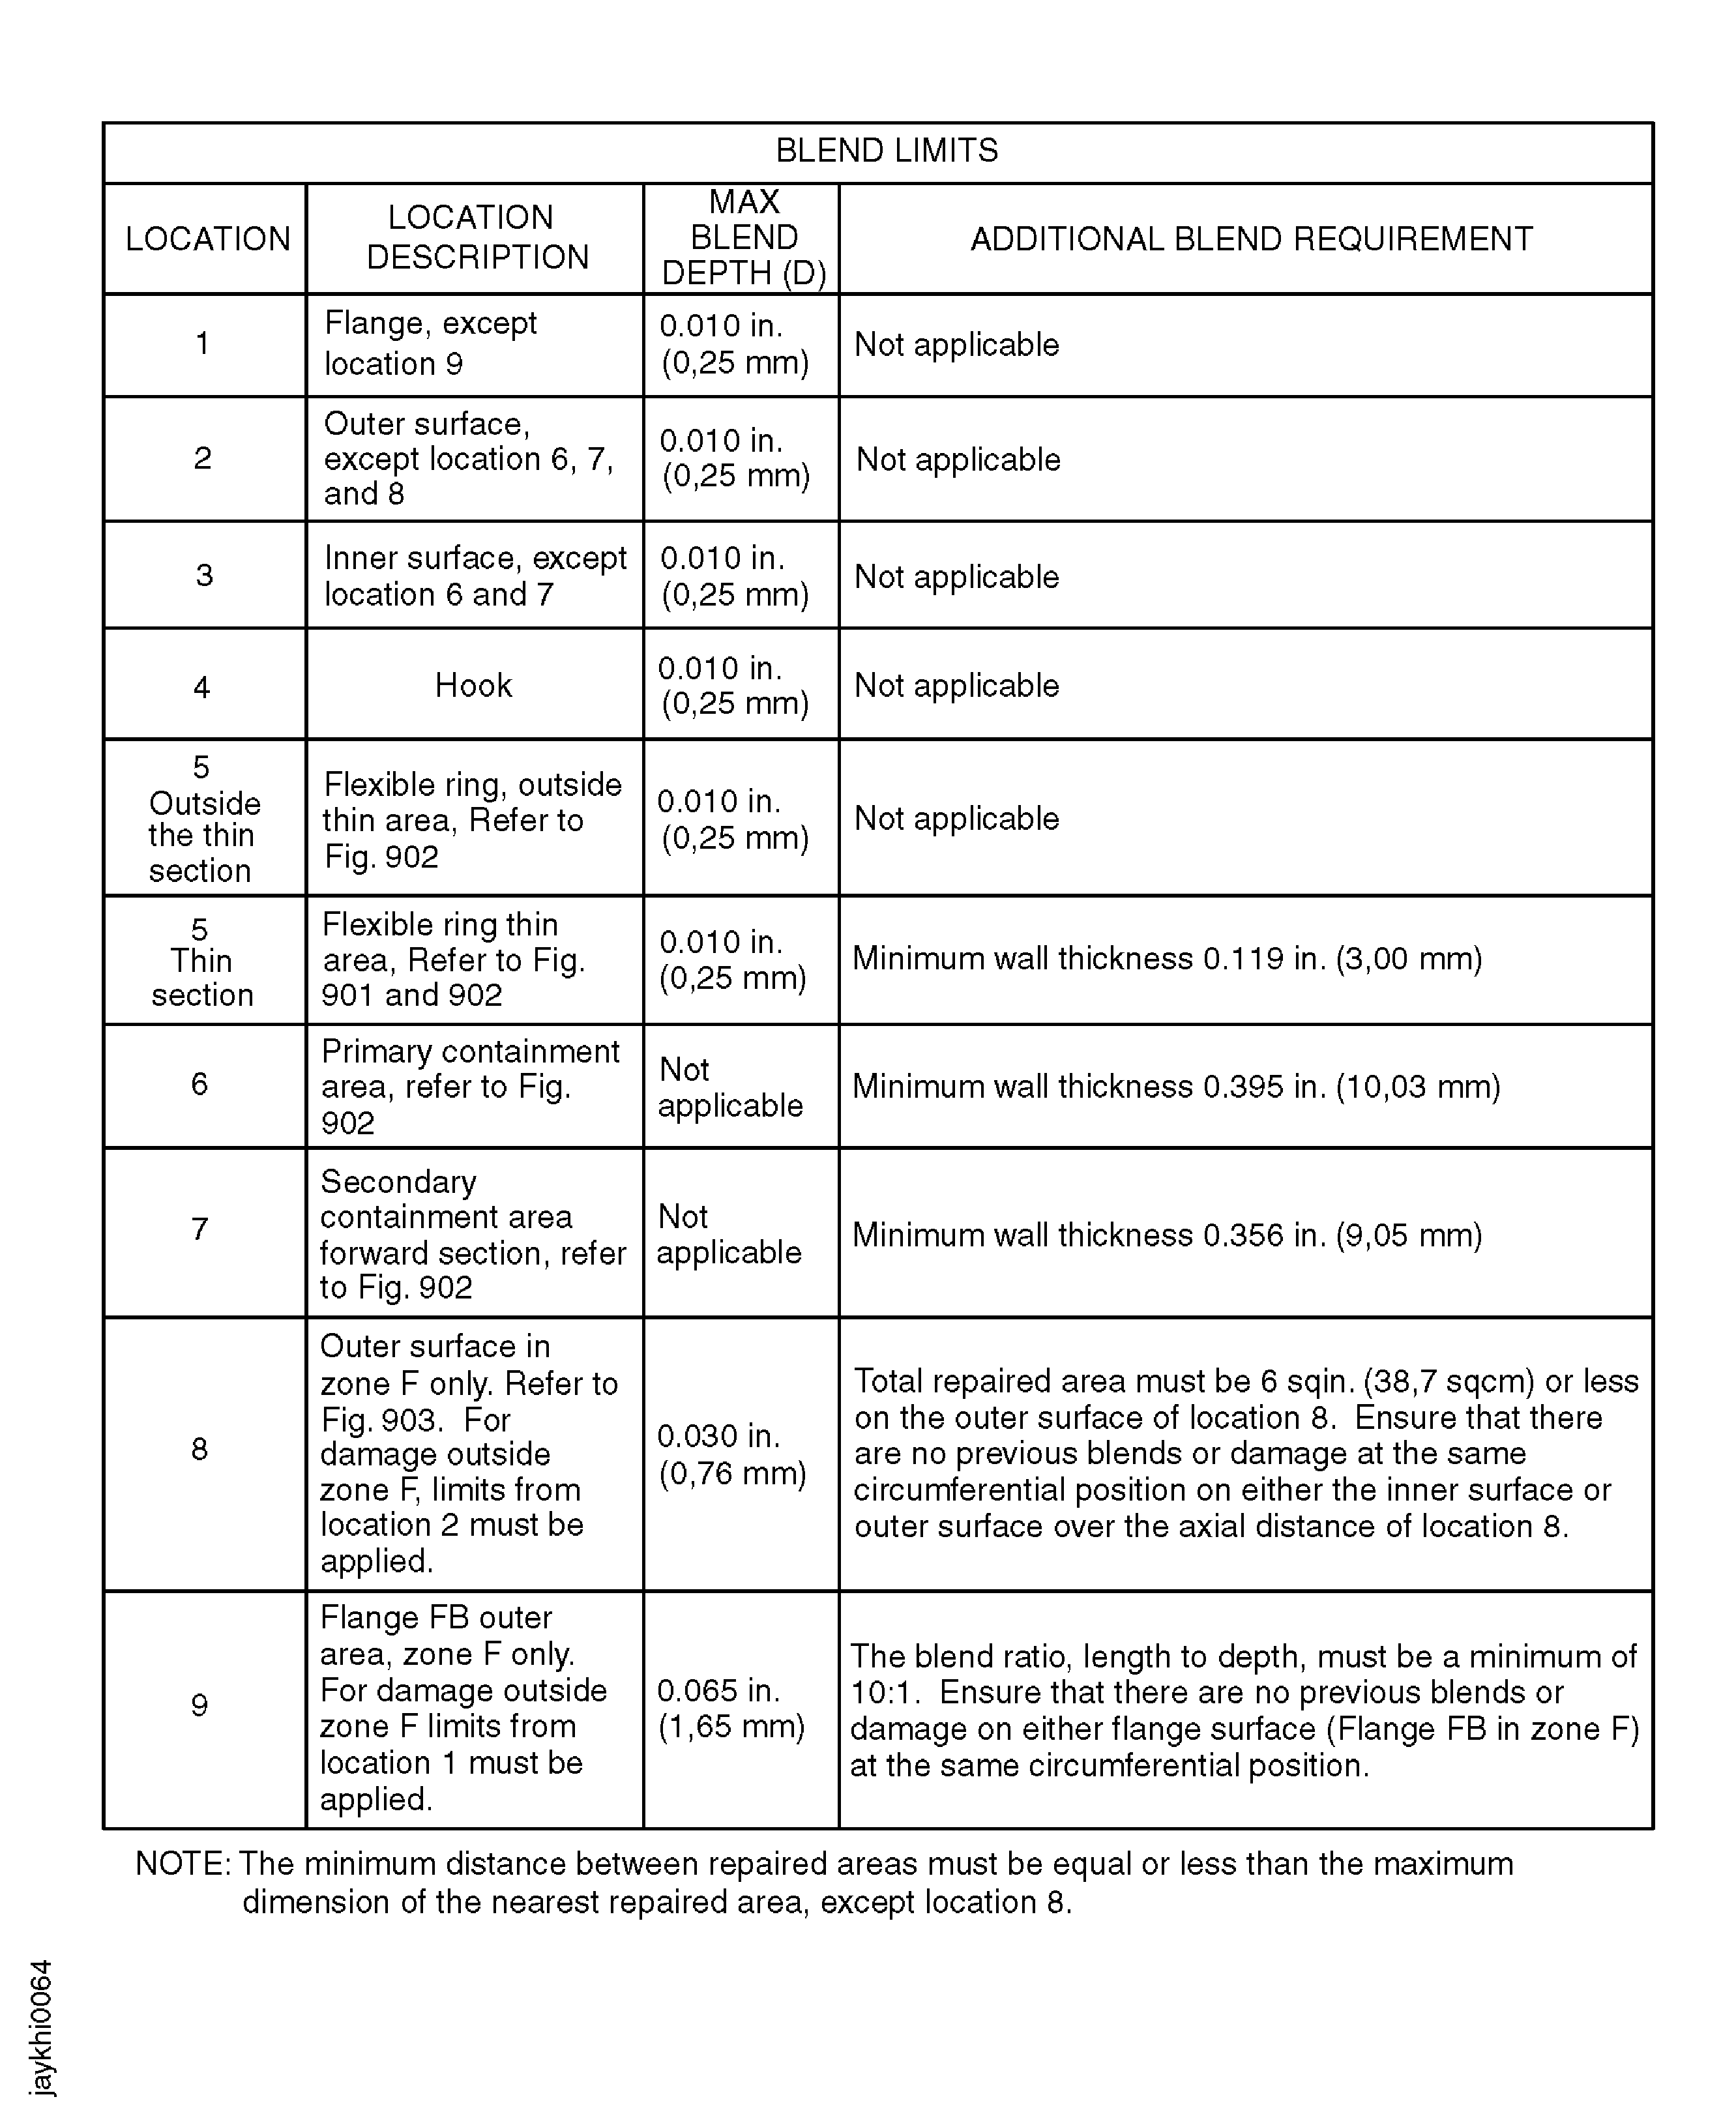
Make sure the dimensions are within the specified limits.
If the repair is within locations 6 and/or 7.
The minimum wall thickness must be measured.
The thickness can be measured with ultrasonic wall thickness measuring equipment.
NOTE
Make sure that ultrasonic wall thickness measuring equipment was calibrated by the necessary procedures given in operation manuals of the measuring equipment or local regulations.Calibration piece to be made from the same material (Ti-6A1-4V) or a material with the same acoustic velocity as the part to be tested.The calibration piece thickness must be within the thickness limits of the part to be measured, refer to Figure.Visually examine and measure the dimensions of the repaired area.
Refer to Figure.
Measure the dimensions of the blended areas.
The blend area must have a minimum ratio, length to depth, of 30:1.
Examine the ratio of the blended area dimensionally.
SUBTASK 72-31-85-220-064 Examine the Blend Repaired Area of the Fan Case (01-100)
Refer to the SPM TASK 70-11-26-300-503.
Clean the repair area.
Refer to the SPM TASK 70-11-08-300-503, SUBTASK 70-11-08-300-002.
Use chemical etching equipment.
Swab etch the repaired area(s).
SUBTASK 72-32-85-110-085 Do a Swab Etch
Refer to the SPM TASK 70-23-05-230-501.
No cracks are permitted.
Do the test for cracks.
SUBTASK 72-32-85-230-067 Do a Crack Test
Refer to the SPM TASK 70-09-00-400-501.
Use vibro-engraving equipment.
If the repair has been performed in location 6 make a mark VRS1405-6 and in location 7 make a mark VRS1405-7.
Make a mark VRS1405 adjacent to the part number.
SUBTASK 72-32-85-350-143 Identify the Repair
Figure: Fan Case Assembly
Fan Case Assembly

Figure: Containment Area of the Fan Case Assembly
Containment Area of the Fan Case Assembly

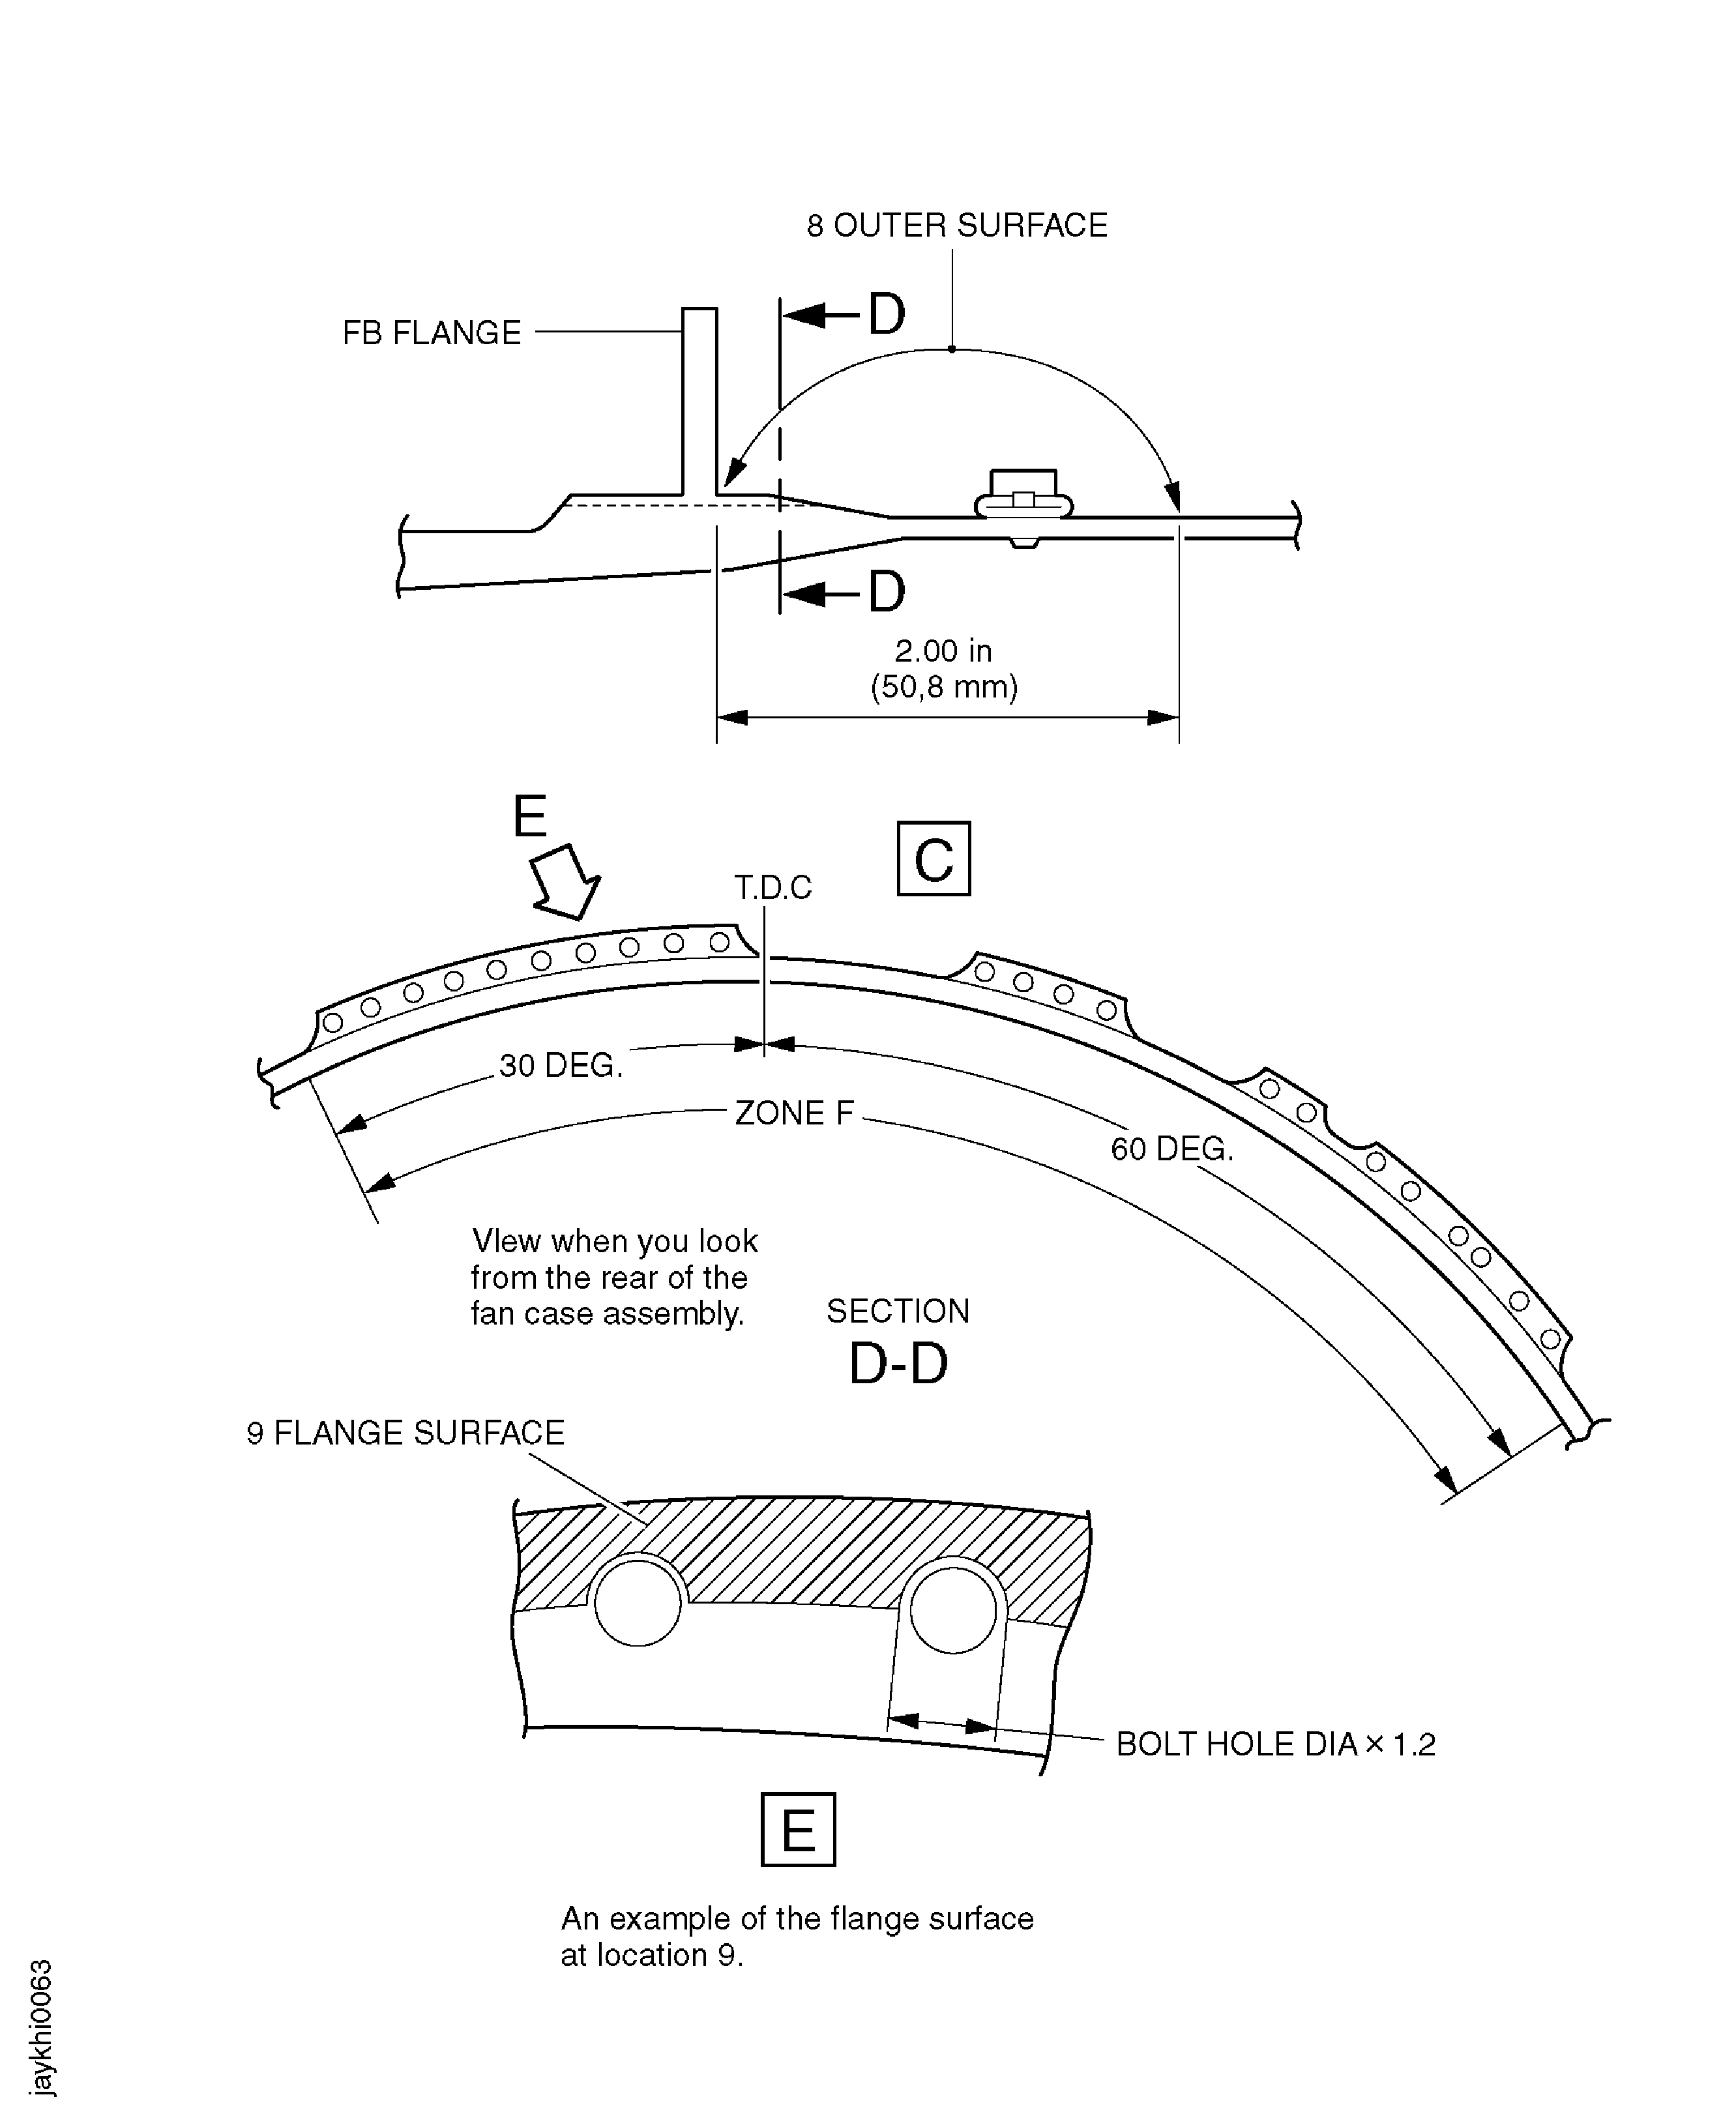
Figure: FB Flange of the Fan Case Assembly
FB Flange of the Fan Case Assembly

Figure: Fan Case Assembly Blending Limits
Fan Case Assembly Blending Limits

